

Page 1

Gaggenau Instruction manual
VG 295 AU
Gas cooktop
Page 2

Table of contents
Instruction manual
Safety information 3
General notes 3
Safety during operation 3
Safety during cleaning 3
Safety during maintenance and repairs 4
WHAT TO DO IF YOU SMELL GAS 4
Your new appliance 4
Gas cooktop 4
Control knob 5
Special accessories 5
Burner assembly 5
Operating principle 6
Operation 6
Switching on 6
Operation indicator 7
Electronic flame detection and automatic re-ignition 7
Switching off 7
Settings table and tips 7
Tips for cooking and roasting 7
Cooking in the wok 7
Additional information on products, accessories,
replacement parts and services can be found at
www.gaggenau.com
Cookware recommendations 8
Suitable cooking vessels 8
Precautions for use 8
Care and cleaning 8
Cleaning 8
Cleaning the electrode 9
Burnt-in residues 9
Burner discolouration 10
Do not use these cleaners 10
Trouble shooting 10
After-sales service 11
Packaging and old appliances 11
Environmental protection 11
2
Page 3

m Safety information
PLEASE READ THIS MANUAL BEFORE INSTALLING AND USING THIS COOKTOP.
This cooker is approved for use with Natural and Propane gases. Leave instructions with the owner.
General notes
Check the appliance after unpacking it. Do not
connect the appliance if it has been damaged during
transport.
This appliance is intended for use in the private
household and the home environment only. Use the
appliance only for preparing food, not for heating
rooms.
Adults and children must not operate the appliance
without supervision, if they are physically or mentally
incapable of doing so, or if they lack the knowledge
and experience required to operate the appliance
correctly and safely. Do not let children play with the
appliance or the packaging material.
This appliance is not intended for operation with an
external timer or an external remote control.
The manufacturer accepts no responsibility for
damage which arises as a result of disregarding the
instruction manual.
Do not spray aerosols in the vicinity of this appliance
while it is in operation.
Where this appliance is installed in a marine craft or
in a caravan, for safety reasons it shall not be used as
a space heater.
Unsuitable for use in a marine craft, caravan or mobile
home, unless each burner is fitted with a flame guard.
Risk of burns! Empty cookware becomes extremely hot if placed on gas burners when they are in operation. If touched, hot cookware could cause burns. Under no circumstances heat empty cookware.
Risk of fire! Overheated fat or oil is highly inflammable. Only prepare food cooked in fat or oil when cooking can be fully supervised. Under no circumstances attempt to extinguish burning fat or oil with water. Choke the fire using a lid or fire blanket.
Risk of fire! Flammable materials may catch fire from an open gas flame or from heat. Do not store or use flammable materials (e.g. spray cans, cleaning agents) underneath or in the immediate vicinity of the hob. Under no circumstances place flammable objects on the hob.
Risk of injury! Unsuitable pan sizes, damaged or incorrectly positioned pans can cause serious injury. Observe the instructions which accompany the cookware.
Risk of short circuit! The cable insulation of electrical appliances can melt. Under no cirumstances place the mains cable on the burners when they are still hot.
Caution! Heat damage to adjacent appliances or kitchen units: Heat and moisture are produced if the
appliance is operated over a prolonged period.
Additional ventilation is required. Open windows and
switch on an extraction hood which conducts into the
open air.
Caution! Heat damage to the extractor hood: Always switch on the extractor hood while the gas cooktop is in use. When using several cooking positions select a higher fan level on the extractor hood. Make sure there is a sufficient ventilation of the room.
Caution! Appliance damage caused by heat accumulation: Do not heat roasting dishes, pans or
grill stones on more than one burner at the same time.
Caution! Malfunction: Always turn control knobs to the off position when the appliance is not in operation.
Do not modify this appliance.
Safety during operation
Risk of burns! The appliance becomes hot during
operation. Keep children away from the appliance.
Risk of fire! Overheated food can cause fires. Only operate the appliance when its use can be supervised.
Risk of fire! Gas burners operated without cookware in position produce a great amount of heat. The appliance or an extractor hood fitted above it may be damaged or set on fire. Only operate gas burners with cookware in position.
Safety during cleaning
Risk of burns! The appliance becomes hot during
operation. Allow the appliance to cool down before
cleaning.
Risk of electric shock! Do not use high pressure washers or steam cleaners to clean the appliance.
Caution! Damage to the appliance: Do not pull off the control knobs to clean them.
3
Page 4
Safety during maintenance and repairs
For conversion to another type of gas, please call the
after-sales service.
Risk of injury! In the event of a malfunction or if the appliance is damaged, unscrew the fuses (or switch off the circuit breakers). Shut off the gas supply. Contact the after-sales service.
Risk of injury! Considerable injuries may be caused by faulty repairs. Repairs to the appliance must only be carried out by a trained technician. If a repair is required, please call the after-sales service.
Risk of injury! A damaged electricity cable or gas hose must be replaced as soon as possible by the manufacturer, sales subsidiary, after-sales service or a trained technician.
Your new appliance
Your new appliance and its accessories are described
in this section.
WHAT TO DO IF YOU SMELL GAS
▯ Do not light any appliance.
▯ Do not touch any electrical switch; do not use any
phone in the building.
▯ Immediately call your gas supplier from a
neighbour's phone. Follow the gas supplier's
instructions.
▯ If you cannot reach your gas supplier, call the fire
department.
Installation and service must be performed by an
authorised person.
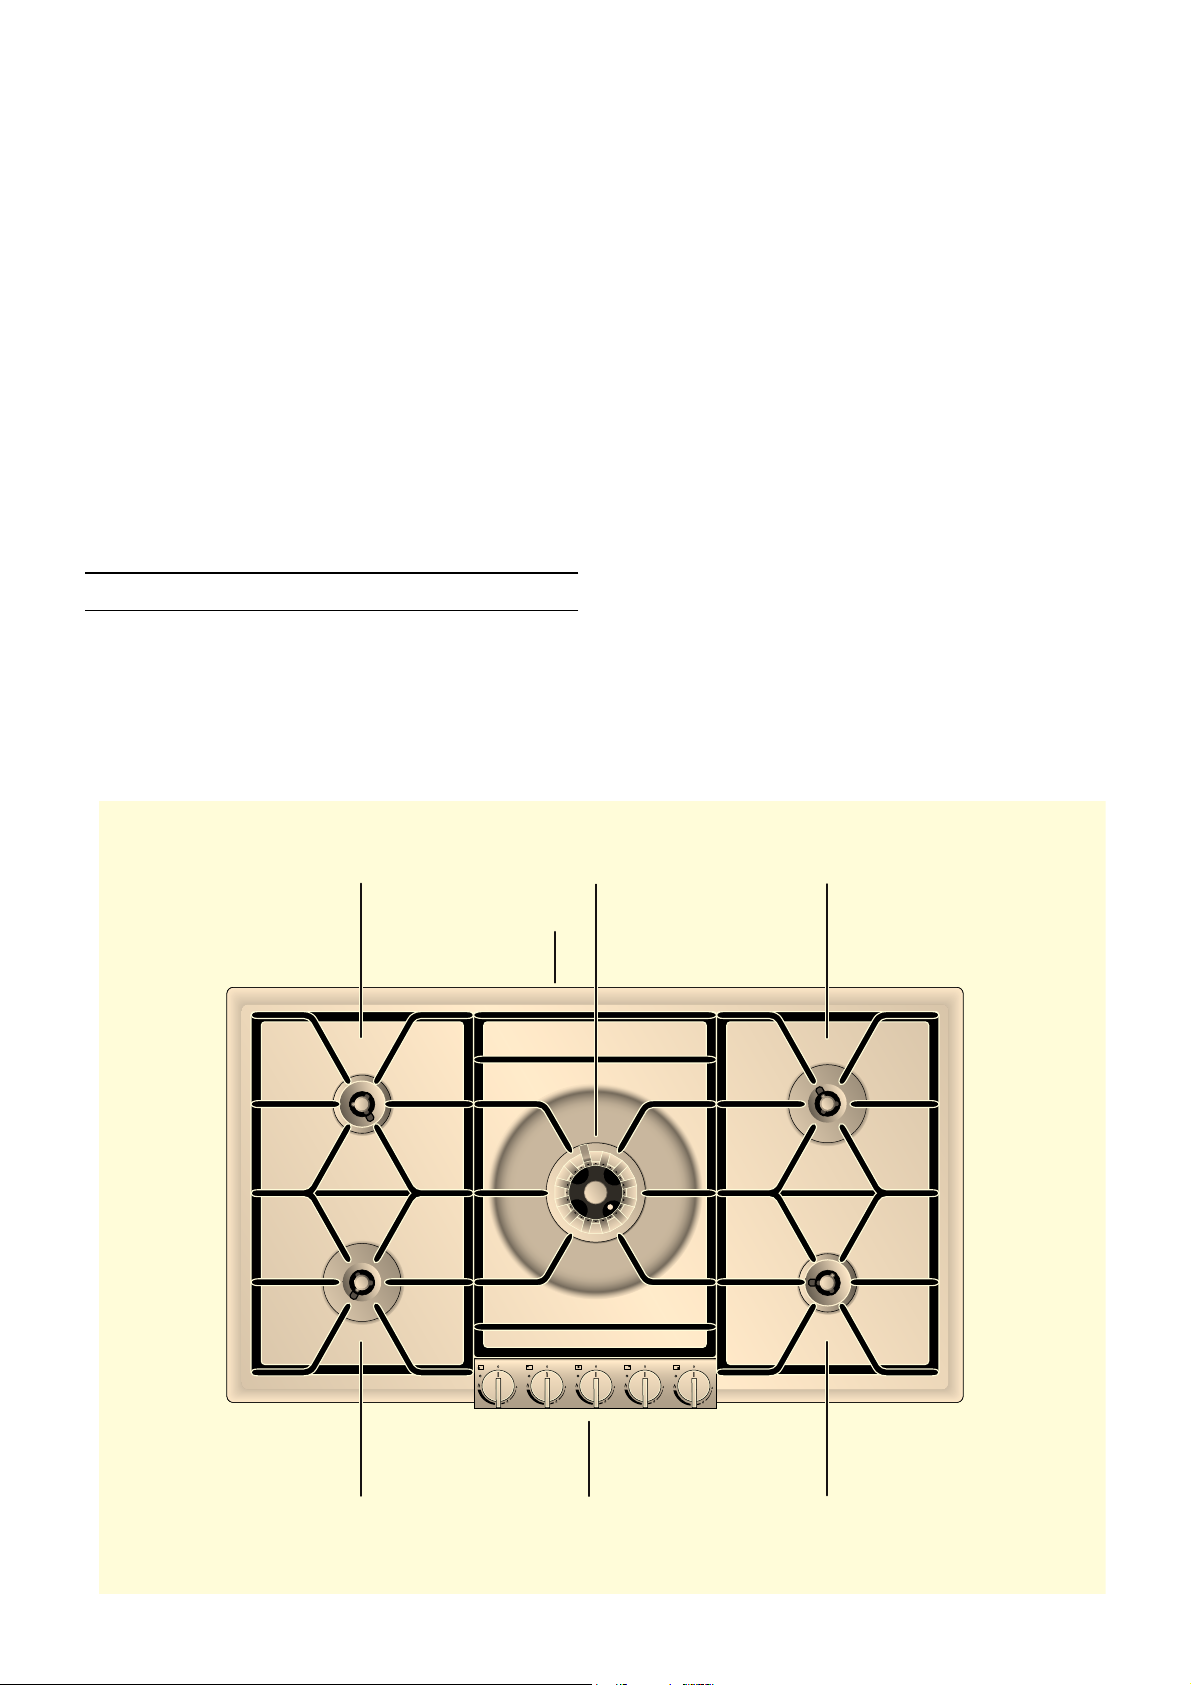
Gas cooktop
QRUPDOEXUQHUN:
KLJKRXWSXWEXUQHUN:ZRNEXUQHUN:
DLULQOHW
KLJKRXWSXWEXUQHUN:
4
QRUPDOEXUQHUN:FRQWURONQREV
Page 5

Control knob Burner assembly
The markings show the
position of the corresponding
burner and the setting
between high and low heat.
The flame setting is infinitely
variable between high and
low.
Always assemble the burner parts correctly and evenly
to avoid faults during ignition or during use. The
catching pins must fit in the corresponding grooves.
Normal burner / high output burner assembly
EXUQHUOLG
EXUQHUULQJ
EXUQHUKHDG
HOHFWURGH
Wok burner assembly
EXUQHUOLG
EXUQHUULQJ
EXUQHUKHDG
HOHFWURGH
5
Page 6

Operating principle
The gas cooktop features teo normal burners (two
flame rings), two high output burners (two flame rings)
and a wok burner (three flame rings).
The appliance features one-hand operation, automatic
fast ignition, electronic flame detection and automatic
re-ignition.
The ignition is activated when the control knob is
turned. The flame size can be set continuously
between high and low.
2))
KLJKKHDW
Operation
The markings show the position of the corresponding
burner and the setting between high and low heat. The
flame setting is infinitely variable between high and
low heat.
Notes
‒ Only light a burner if all pan supports and burner
parts are properly assembled.
‒ Make sure the burners and electrodes are clean
and dry.
‒ Only use the recommended accessories. Do not
cover the stainless steel cooktop base (e.g. with
aluminium foil).
‒ Do not cover the air inlet at the back of the
cooktop.
Abnormal operation
Flames are usually blue and sharply defined. If the
flames are yellowish or noisy or if the gas does not
ignite within the period specified under "switching on"
abnormal operation is indicated. Refer to chapter
"After-sales service" of this manual for service contact
details.
ORZKHDW
Caution! Heat damage to the extractor hood: Always switch on the extractor hood while the gas cooktop is in use. When using several cooking positions select a higher fan level on the extractor hood. Make sure there is a sufficient ventilation of the room.
Switching on
Your cooktop features automatic fast ignition.
1 Place a suitable pot or pan on the corresponding
cooking position.
2 Press down the corresponding control knob and
turn it anticlockwise to the required position. The
burner lights automatically.
The flame size can be set continuously between high
and low by slowly turning the control knob.
Notes
‒ When using large pots or pans you should ignite
the burner in the low position.
‒ Every time the gas hob is switched on, the
electronics run an auto test. All electrodes fire
and the required burner ignites after a few
seconds. When switching on further burners, only
the corresponding electrode fires.
6
Page 7

‒ When being switched on, a short sound may be
heard when the electronic of the gas hob opens
the gas supply valve. This is a normal condition.
‒ The cooktop cannot be used during a power
failure.
Operation indicator
The operation indicator next to the control knob
comes on, if the burner is switched on and the flame
burns correctly. If a malfunction occurs the operation
indicator will flash.
Electronic flame detection and automatic re-ignition
For your safety the cooktop features electronic flame
monitoring. Should the flame go out during operation
(e.g. because of a draught), the appliance will
automatically re-ignite the burner.
Should the re-ignition be unsuccessful (e.g. burner is
soiled by spilled over food or liquid), all burners are
switched off, the indicator lights of the burners that
were switched on flash.
Turn all control knobs to the OFF position. The
flashing indicator lights will go out except for the
affected burner. This indicator will continue to flash
for a few seconds.
Settings table and tips
Cooking level Cooking
method
High heat ‘ Boiling Water
Searing Meat
Heating Fat, liquids
Boiling Soup, sauce
Blanching Vegetables
From ‘ to ’ Roasting Meat, fish, potatoes
Baking Pancakes, egg dishes
Simmering in
open pot
Simmering Sweet sauces,
Boiling with
closed lid
Steaming Vegetables, fish
Stewing Vegetables, fruit, fish
Braising Goulash, roasts,
Low heat ’ Thawing Frozen foods
Slow cooking Rice, pulses
Reheating Soup, casserole,
Examples
Dumplings, sausages,
beef for making soup
sauces
Soup, potatoes
vegetables
vegetables in a sauce
Tips for cooking and roasting
After the appliance has cooled down sufficiently,
check this burner to see if all the burner parts have
been assembled correctly. Check if the burner or the
electrode has been soiled (see trouble shooting
guide).
Note: If a malfunction occurs on one burner, you can
continue using the remaining burners, however, you
must turn all control knobs to the off-position first,
before recommencing.
Please note when switching on the cold appliance
on the HIGH setting:
Depending on the gas type and pressure, it is
possible that the electrode continues to fire, although
there is a flame visible, and then switches off. Turn all
control knobs to the OFF position. Then turn the
control knob for the required cooking position to any
setting except the high position and leave to warm up
for 30 to 60 seconds. Then you can continue to use
your appliance as usual.
Switching off
Turn the corresponding control knob clockwise to the
OFF position.
The electronics of the appliance will switch the gas
supply off, if all control knobs are in the off position.
The values given in the settings table must be looked
upon as recommended values. The heat required
depends not only on the type and condition of the
food, but also the size and contents of the pot.
Due to the high performance of the cooktop, fat and
oil will heat up quickly. Never leave the cooktop
unattended, fat can ignite, food can burn.
Preferably use the rear cooking zones to prepare
meals, that need longer to cook.
Preferably use the high output burners or the wok
burner for brief cooking, deep fat frying and searing of
large quantities.
Cooking in the wok
We recommend using a round-bottom wok.
Only use oil that is suitable for frying at high
temperatures, for example peanut oil.
Fry the food quickly on a high heat while stirring
continuosly. Vegetables should stay crispy.
Use a heat resistant, flat ladle with a long handle to
stir the food and take it out of the wok pan.
7
Page 8

Cookware recommendations
The following tips can help you save energy and avoid
damage to your cookware.
Suitable cooking vessels
Burner Pot base, recom-
mended diameter
Standard burner 200 - 240 mm 90 mm
High output burner 240 - 280 mm 90 mm
Wok burner 240 - 320 mm 160 mm
Pots with a diameter of less than 90 mm or more
than 280 mm (320 mm for the Wok burner) should
not be used. When using large pots, pay attention to
keeping to a minimum distance of 50 mm between the
cooking vessel and combustible surroundings. A
minimum distance of 50 mm must be observed
between the control knob / control panel and the pot
or pan. The pot or pan should not touch the control
panel.
Pot base, minimum diameter
Place the pots or pans on
the pan support, never
directly on the burner.
Make sure that the pan
supports and burner caps
are correctly positioned
before using the appliance.
Pots or pans should be
placed on the cooktop
carefully.
Do not strike the cooktop
and do not place excessive
weight on it.
Do not heat a cooking
vessel (e.g. roaster, pan,
grill stone) on more than
one burner at the same
time. The resulting heat
accumulation will damage
the appliance.
Precautions for use
Use pots or pans which are
the right size for each
burner.
Do not use small pots or
pans on large burners. The
flame should not touch the
sides of the pot.
Do not use damaged pots
or pans, which do not sit
evenly on the cooktoop,
they may tip over.
Only use pots or pans with
a thick, flat base.
Do not cook without using
a lid and make sure the lid
is properly fitted. This
wastes energy.
Always centre the pot or
pan over the burner,
otherwise it could tip over.
Do not place large pots on
the burners near the
control knobs. These may
get damaged by the high
temperatures.
Care and cleaning
In this chapter you will find tips on how to maintain
and clean your cooktop correctly.
m Risk of burns!
The appliance becomes hot during operation. Allow
the appliance to cool down before cleaning.
m Risk of electric shock!
Do not use high pressure washers or steam cleaners
to clean the appliance.
Cleaning
Clean the appliance after every use once it has cooled
down. Remove spills immediately. Burnt in residues
may be difficult to remove.
Keep the air inlets at the back of the cooktop clean.
Do not cover the air inlets.
The burners (burner lid, burner ring and burner head)
will change their color during operation and become
darker. This change in color will not influence the usevalue.
Cleaning the gas cooktop:
1 First lift one of the pot grids on the side with both
hands. Then remove the remaining two pot grids.
Caution! Be careful not to scratch the stainless steel base.
2 Remove the burner lids, burner rings and burner
heads. Only clean the burner parts when cold!
8
Page 9

3 Soak burnt-in remainders in a little water and
detergent. This loosens even the most stubborn
of soiling. Do not use any abrasive agents and
abrasive sponges.
4 Only use very little water to clean your cooktop.
Be careful that no water enters the burner base.
5 As the result of heat development, slight
discoloration can appear on the stainless steel
surface. Do not attempt to scrape away such
discoloration. This damages the surface.
Distribute stainless steel care agents uniformly
and thinly on the cooktop (not on the control
panel!). This will ensure an even surface and will
keep your cooktop in a good condition for a long
period of time.
6 Make sure the burner parts are dry before
assembly. Only operate the appliance with all
parts dry. Damp burner parts will cause
malfunctions when igniting or unstable flames.
7 When assembling the burner parts, make sure
that the burner ring and burner head are placed in
such a way that the catching pin fits in the
corresponding groove. Make sure all burner parts
are properly fitted and lie evenly flat.
8 Important: Fit the middle pot support first (be
careful to center it over the burner) and then the
pot supports on the side. The rounded corners of
the pot supports on the side must face out to the
side. (see picture).
Part/surface Recommended cleaning method
Burner lid,
burner ring,
burner head
(brass)
Wok burner
head (enamel
on cast iron)
Control panel Clean with a soft, moist cloth and some
Control knobs Clean with a soft, moist cloth and some
Take burner parts off for cleaning. Clean
in soapy water with a cloth and detergent. Use brass polish to retain the original shiny surface of the burner ring and
the burner lid.
Port openings of the burner ring must be
kept free. Be careful not to loose the
small parts.
Do not clean in a dishwasher!
Clean with detergent and brush. Dry
thoroughly before assembly.
Do not clean in a dishwasher!
soapy water; do not use too much water.
Dry with a soft cloth.
soapy water; do not use too much water.
Caution! Damage to the appliance: Do not pull off the control knobs to clean them.
Cleaning the electrode
Soiled electrodes may cause malfunctions when
igniting or flame monitor disturbance.
If necessary clean with the included brush. Be careful
when cleaning electrodes, they are fragile, do not
twist or damage. Do not switch on the cooktop while
cleaning.
Part/surface Recommended cleaning method
Stainless steel
surfaces
Pan support Carefully take off pan supports for clean-
Clean with a soft cloth and some soapy
water; polish dry with a soft cloth. Do not
use too much water to avoid water entering the appliance.
ing. Soak in soapy water. Clean with a
brush and some detergent.
Be careful when cleaning around the
rubber rests to ensure they do not come
loose.
Rinse with clear water. Carefully dry pan
support before assembly.
Do not clean in a dishwasher!
Burnt-in residues
To remove stubborn, burnt-in residues you can order
the grill cleaning gel (order number 00311761) from
your specialist retailer or from our after-sales service.
You can use it to clean the pan supports, the burner
parts and the stainless steel cooktop base. If
necessary apply the gel and leave overnight. Please
observe the manufacturer’s instructions.
9
Page 10

Burner discolouration
Do not use these cleaners
After extended use, the brass burner parts take on a
darker colour as a result of the oxidation process that
occurs naturally. The discolouration does not affect
their serviceability.
▯ Scouring or chemically aggressive cleaners
▯ Don't allow acidic cleaners (e.g. vinegar, citric
acid, etc.) to get on the frame or panel.
▯ Cleaners containing chlorine or with a high
content of alcohol
▯ Oven cleaner
▯ Hard and scratchy sponges, brushes or scouring
pads
▯ Thoroughly wash out new sponge cloths before
using them.
Trouble shooting
Malfunctions often have simple explanations. Please
read the following notes before calling the after-sales
service.
Fault Possible cause Solution
Burner does not ignite when
switched on, operation indicators are off.
Burner does not ignite when
switched on, operation indicator
of the switched on burner is flashing.
Burner goes off during operation,
operation indicators go off, only
the operation indicator of the
affected burner continues to
flash for a few seconds.
Burners go off during operation,
operation indicators go off.
Burners go off during operation,
all operation indicators are flashing.
The kitchen smells of gas. There may be a leak in the gas cylin-
No electrical power. Turn control knob to 0. Check the fuse box if the
fuse has tripped.
Malfunction of the burner or the gas
supply.
Turn control knob to 0.
Check:
▯ Are all burner parts correctly assembled?
▯ Is the gas shut-off valve open?
▯ Is the burner dry and clean?
▯ Is there an air pocket in the gas supply line after
first installation or changing the LP (propane)
gas tank?
▯ LP (propane) gas: is the gas tank empty?
Malfunction of the burner or the gas
supply.
Turn all control knobs to 0. Wait, until the appliance
has cooled!
Check affected burner:
▯ Are all burner parts correctly assembled?
▯ Is the electrode soiled (food remains) or wet?
▯ Is the burner soiled by boiled over food?
▯ Check for strong draughts (for example open
window behind the cooktop)?
▯ LP (propane) gas: is the gas tank empty?
Power cut Turn all control knobs to 0. Check the power supply.
There will be no automatic re-ignition after a power
cut.
Overheating protection Turn all control knobs to 0. Wait, until operation indi-
cators go off.
Check that the coupling is sound.
der coupling.
10
Page 11

After-sales service
Packaging and old appliances
In the event of repairs please contact our after-sales
sevice. We are committed fo find the best solution
also in order to avoid an unnecessary call-out.
Please quote the E number (product number) and the
FD number (production number) of your appliance
when contacting the after-sales service. The rating
plate bearing these numbers can be found on the
bottom of the appliance. A duplicate rating plate is
supplied for adhesion to accessible location near to
the cooktop. For future reference you can note the
data of your appliance below.
E-Nr. FD-Nr.
Please note that calling out an after-sales service
technician is not free of charge, even within the
warranty period, should the problem result from an
operating error.
Please find the contact data of all countries in the
enclosed customer service list.
For service to this appliance or spare parts contact
the Gaggenau distributor:
Both the packaging of new appliances and the old
appliances themselves contain valuable raw materials
and recyclable materials.
Please dispose of the individual parts separated
according to type.
Please ask your dealer or inquire at your local
authority about current means of disposal.
Environmental protection
This appliance is labelled in accordance with
the European Directive 2002/96/EU
concerning used electrical and electronic
appliances (WEEE – waste electrical and
electronic equipment). The guideline
determines the framework for the return and
recycling of used appliances as applicable.
Sampford IXL
Phone: 1300 727 421
Fax: 1300 727 425
email: service@sampfordixl.com.au
Service and maintenance must only be carried out
by an authorised person.
Warning: disconnect power and gas supply before
servicing this appliance.
11
Page 12

Gaggenau Hausgeräte GmbH
Carl-Wery-Straße 34
D-81739 München
www.gaggenau.com
9000576972 en (950910)
 Loading...