


en User manual
RF463304
RF463305
RF463505
Freezer
en
en Table of contents
en
User manual
(
Safety instructions 4
About these instructions 4
Risk of explosion 4
Risk of electric shock 4
Risk of cold burns 4
Risk of injury 4
Fire hazard/Danger due to refrigerants 5
Fire hazard 5
Avoiding placing children and vulnerable people
at risk 5
Damage to property 5
Weight 5
8
Intended use 6
7
Green living 6
Packaging 6
Old appliances 6
5
Installation and connection 7
Scope of supply 7
Technical specifications 7
Installing the appliance 7
Built-in cut-out 7
Side-by-side installation 7
Tips for saving energy 8
Before using the appliance for the first time 9
Water connection 9
Electrical connection 9
*
Getting to know your appliance 10
Appliance 10
Controls 10
Ice and water dispenser 11
Features 12
1
Operating the appliance 15
Switching on the appliance 15
Switching off and disconnecting the appliance 15
Setting the temperature 15
Fast freezing 15
Display lock for cleaning 15
Switching ice cube production on or off 16
Eco mode 16
Reset water filter counter 16
Self-test 16
Setting the brightness of the control panel 16
Setting up the display screen 16
Setting the touch field colour 17
Setting the touch field tone type 17
Setting the touch field tone volume 17
Setting the signal tone volume 17
Switching the water filter counter on and off 17
Dimming when door is opened and closed 17
Ice and water dispenser light 18
Ice and water dispenser proximity sensor 18
Setting the temperature unit 18
Setting the language 18
Resetting to factory settings 18
Switching demo mode on or off 18
Rest mode 19
Automatic door opening 19
Home network 20
Automatic display lock for cleaning 20
M
Alarm 20
Door alarm 20
Temperature alarm 20
o
Home Connect 21
Setting up Home Connect 21
Connecting the refrigerator to the Home
Connect app 22
Installing updates for the Home Connect
software 22
Customer Service access 22
Delete network settings 23
Information on data protection 23
Declaration of Conformity 23
W
Freezer compartment 24
Freezing capacity 24
Fully utilising the freezer volume 24
Purchasing frozen food 24
When loading products, please note: 24
Freezing fresh food 25
Defrosting frozen food 25
;
Ice and water dispenser 26
Before using the appliance for the first time 26
Observing drinking water quality 26
Information on operation of the ice maker 26
Dispensing ice and water 26
=
Defrosting 27
Freezer compartment 27
D
Cleaning 27
Care instructions for stainless steel surfaces 27
Cleaning the display 27
Cleaning the equipment 28
>
Noises 29
Normal noises 29
Preventing noises 29
9
Lighting 29
3
What to do in the event of a fault 30
Appliance 30
Ice and water dispenser 31
2

4
Customer Service 33
Appliance self-test 33
Obtaining advice and ordering repairs if a fault
occurs 33
en
3

en Safety instructions
m (Safety instructions
Safety instructions
This appliance complies with the relevant
safety regulations for electrical appliances and
is fitted with noise suppression.
The refrigeration circuit has been checked for
leaks.
About these instructions
▯ Read and follow the instructions for
installation and use.They contain important
information on how to install, use and
maintain the appliance.
▯ The manufacturer is not liable if you
disregard the notifications and warnings in
the operating and installation instructions.
▯ Retain all documents for subsequent use or
for the next owner.
Risk of electric shock
Improper installations and repairs may put the
user at considerable risk.
▯ When installing the appliance, ensure that
the mains cable is not trapped or damaged.
▯ If the mains cable is damaged: immediately
disconnect the appliance from the
electricity supply.
▯ Do not use multi-outlet power strips,
extension leads or adapters.
▯ Have the appliance repaired by the
manufacturer, Customer Service or a
similarly qualified person only.
▯ Use original parts supplied by the
manufacturer only.
The manufacturer guarantees that these
parts satisfy the safety requirements.
Risk of explosion
▯ If the appliance's ventilation openings are
sealed, a leak in the refrigeration circuit
may result in a flammable mixture of gas
and air.
Do not obstruct ventilation openings in the
appliance enclosure or the built-in
structure.
▯ Never use electric devices inside the
appliance (e.g. heaters or electric ice
makers).
▯ Do not store products which contain
flammable propellant (e.g. spray cans) or
explosive substances in the appliance.
▯ Keep high-percentage alcohol tightly
sealed and store in an upright position.
Risk of cold burns
▯ Never put frozen food straight from the
freezer compartment into your mouth.
▯ Avoid prolonged contact between your skin
and frozen food, ice or the tubes in the
freezer compartment.
Risk of injury
Containers which contain carbonated
beverages may burst.
Do not store containers which contain
carbonated beverages in the freezer
compartment.
▯ Do not use additional means to accelerate
the defrosting process other than those
recommended by the manufacturer.
4
Safety instructions
en
Fire hazard/Danger due to refrigerants
The tubes of the refrigeration circuit
convey a small quantity of an environmentally
friendly but flammable refrigerant (R600a). It
does not damage the ozone layer and does not
contribute to the greenhouse effect. If
refrigerant escapes, it may injure your eyes or
ignite.
▯ Do not damage the tubes.
If the tubes are damaged:
▯ Keep naked flames and ignition sources
away from the appliance.
▯ Ventilate the room.
▯ Switch off the appliance and pull out the
mains plug.
▯ Please contact Customer Service.
Measures:
▯ Ensure that children and vulnerable people
have understood the hazards.
▯ A person responsible for safety must
supervise or instruct children and
vulnerable people who are using the
appliance.
▯ Only children aged 8 years and above may
use the appliance.
▯ Supervise children who are cleaning and
maintaining the appliance.
▯ Never allow children to play with the
appliance.
Risk of suffocation
▯ If the appliance features a lock: keep the
key out of the reach of children.
Fire hazard
Portable multi-outlet power strips or
power supplies may overheat, causing a fire.
Never leave portable multi-outlet power strips
or portable power supplies behind the
appliance.
Avoiding placing children and vulnerable
people at risk
At risk here are:
▯ Children,
▯ People with limited physical, mental or
sensory abilities,
▯ People who have inadequate knowledge
concerning safe operation of the appliance.
▯ Keep children away from the packaging
and its parts.
Damage to property
To prevent damage to property:
▯ Do not stand or support yourself on the
base, runners or doors.
▯ Keep plastic parts and door seals free of oil
and grease.
▯ Pull on the mains plug – not the power
cord.
Weight
The appliance is very heavy. The appliance
should always be transported and set up by at
least 2 persons.
"Installation and connection" on page 7
~
5

en Intended use
8
Intended use
Intended use
Use this appliance
▯ only for freezing food, making ice and dispensing
drinking water.
▯ Only in the home and in the home environment.
▯ Only according to this user manual.
This appliance is intended for use up to a maximum
height of 2000 metres above sea level.
7
Green living
Green living
Packaging
All materials are environmentally safe and recyclable:
▯ Dispose of packaging in an environmentally friendly
manner.
▯ Please ask your dealer or inquire at your local
authority about current means of disposal.
Old appliances
Valuable raw materials can be reclaimed by recycling
old appliances.
m Warning – Children may become locked in the
appliance and suffocate!
▯ Leave shelves and containers in the appliance to prevent
children from climbing in.
▯ Keep children away from the redundant appliance.
Caution!
Refrigerant and harmful gases may escape.
Do not damage the tubes of the refrigerant circuit or the
insulation.
1 Pull out the mains plug.
2 Cut through the power cable.
3 Have the appliance disposed of properly.
This appliance is labelled in accordance with
European Directive 2012/19/EU on waste
electrical and electronic equipment (WEEE).
This Directive provides an EU-wide framework for
returning and recycling old appliances.
6

Installation and connection
en
5
Installation and connection
Installation and connection
Scope of supply
After unpacking all parts, check for any damage in
transit.
If you have any complaints, contact the dealer from
whom you purchased the appliance or our Customer
Service.
~ "Customer Service" on page 33
The delivery consists of the following parts:
▯ Built-in appliance
▯ Interior fittings (depending on model)
▯ Installation material
▯ User manual
▯ Installation instructions
▯ Customer service booklet
▯ Warranty enclosure
▯ Information on the energy consumption and noises
Technical specifications
Refrigerant, cubic capacity and further technical
specifications can be found on the rating plate.
~ "Getting to know your appliance" on page 10
Installing the appliance
Permitted room temperature
The permitted room temperature depends on the climate
class of the appliance.
Information on the climate class can be found on the
rating plate.
~ "Getting to know your appliance" on page 10
Climate class Permitted room temperature
SN +10°C ... 32°C
N +16°C ... 32°C
ST +16°C ... 38°C
T +16°C ... 43°C
The appliance is fully functional within the permitted
room temperature.
If an appliance with climate class SN is operated at
colder room temperatures, the appliance will not be
damaged up to a room temperature of +5°C.
Built-in cut-out
The cut-out must fulfil these criteria:
▯ Anti-tilt bracket fitted
▯ Cut-out depth min. 610 mm, for flush installation
635 mm
▯ Rectangular
▯ Sturdy – the side panels and the top must be min.
16 mm thick and securely attached to the floor or
wall
▯ Depth of shortened side panels: min. 100 mm
Installation location
The more refrigerant an appliance contains, the larger
the room in which the appliance is situated must be. In
rooms which are too small, leaking refrigerant can form
a flammable gas-air mixture.
At least 1 m³ of room space is required per 8 g of
refrigerant. The amount of refrigerant in your appliance
is indicated on the rating plate inside the appliance.
~ "Getting to know your appliance" on page 10
The weight of the appliance may be up to 460 kg
depending on the model. The base must be sufficiently
stable, and should not give. If necessary, reinforce the
floor.
Side-by-side installation
Observe the specifications in the installation
instructions for a side-by-side installation.
If a partition wall is required between the appliances, it
must be at least 16 mm wide.
7
en Installation and connection
Tips for saving energy
If you follow the instructions below, your appliance will use less power.
Note: The arrangement of the features does not affect the energy consumption of the appliance.
Installing the appliance
Keep the appliance out of direct sunlight. The appliance needs to cool less frequently at low ambient
Install the appliance as far away as possible from heating ele-
ments, cookers and other heat sources:
At least 1¼" (3 cm) from electric or gas cookers.
At least 11¾" (30 cm) from oil or solid-fuel cookers.
Select an installation location with a room temperature of
approx. 20°C.
Do not cover or block the ventilation openings. If the warm air can escape, the appliance needs to cool less
Ventilate the room daily.
Using the appliance
Open the appliance door only briefly. The air in the appliance will not warm up as much. The appliTransport purchased food in a cool bag and place in the
appliance quickly.
Allow warm food and beverages to cool down before placing
in the appliance.
Defrost frozen food in the refrigerator compartment to utilise
the low temperature of the frozen food.
Always leave a space between the food and the back wall. The air can then circulate and the humidity will remain conPack food airtight.
Do not cover or block the ventilation openings. The appliance consumes less power if warm air can escape.
Vacuum the ventilation openings once a year.
temperatures and therefore consumes less power.
frequently and therefore consumes less power.
ance will need to cool less frequently, and therefore consume
less power.
stant.The appliance will need to cool less frequently, and
therefore consume less power.
--------
8

Installation and connection
en
Before using the appliance for the
first time
1 Remove information material, adhesive tape and
protective film.
2 Clean the appliance.
~
"Cleaning" on page 27
Water connection
Caution!
– Installation and connection of the appliance must
be carried out by qualified technicians according to
the installation instructions supplied.
– To avoid damage to the appliance and to ensure its
proper functioning, it should only be connected to a
drinking water system.
– To avoid water damage, a shut-off valve must be
installed.
Water pressure of drinking water system
Caution!
If the water pressure exceeds the maximum value, a
pressure relief valve must be installed between the
drinking water connection and the hose set to avoid
damage to the appliance.
Note: If the water pressure is too low, this will impair
the appliance functions.
▯ Min. 0.2 Mpa (2 bar/29 psi)
▯ Max. 0.8 Mpa (8 bar/116 psi)
Electrical connection
Caution!
Do not connect the appliance to electronic energy saver
plugs.
Note: You can connect the appliance to mainscontrolled and sine-controlled inverters.
Mains-controlled inverters are used for photovoltaic
systems which are directly connected to the national
grid. Sine-controlled inverters must be used for isolated
applications.Isolated applications, e.g. on ships or in
mountain lodges, which are not directly connected to
the national grid.
1 After installing the appliance, wait at least 1 hour
before connecting it to avoid damaging the
compressor.
2 Connect the appliance to a correctly installed
socket.
The socket must comply with the following data:
Socket with 220 V ... 240 V
Protective
conductor
Fuse 10 A ... 16 A
Outside Europe: Check whether the indicated
current type of the appliance corresponds with the
values of your power supply. The appliance
specifications are specified on the rating plate.
~ "Getting to know your appliance" on page 10
3 Connect the appliance to a socket near the
appliance.
The socket must also be freely accessible after
installation of the appliance.
50 Hz
m Warning – Risk of electric shock!
If the length of the mains cable is insufficient, do
NOT use multi-outlet power strips or extension
leads.Instead, please contact Customer Service for
alternative solutions.
9
en Getting to know your appliance
*
Getting to know your appliance
Getti ng to know your appliance
Controls
)J 1*
H
P
X
`
h
)"
)*
)2
):
)B
j
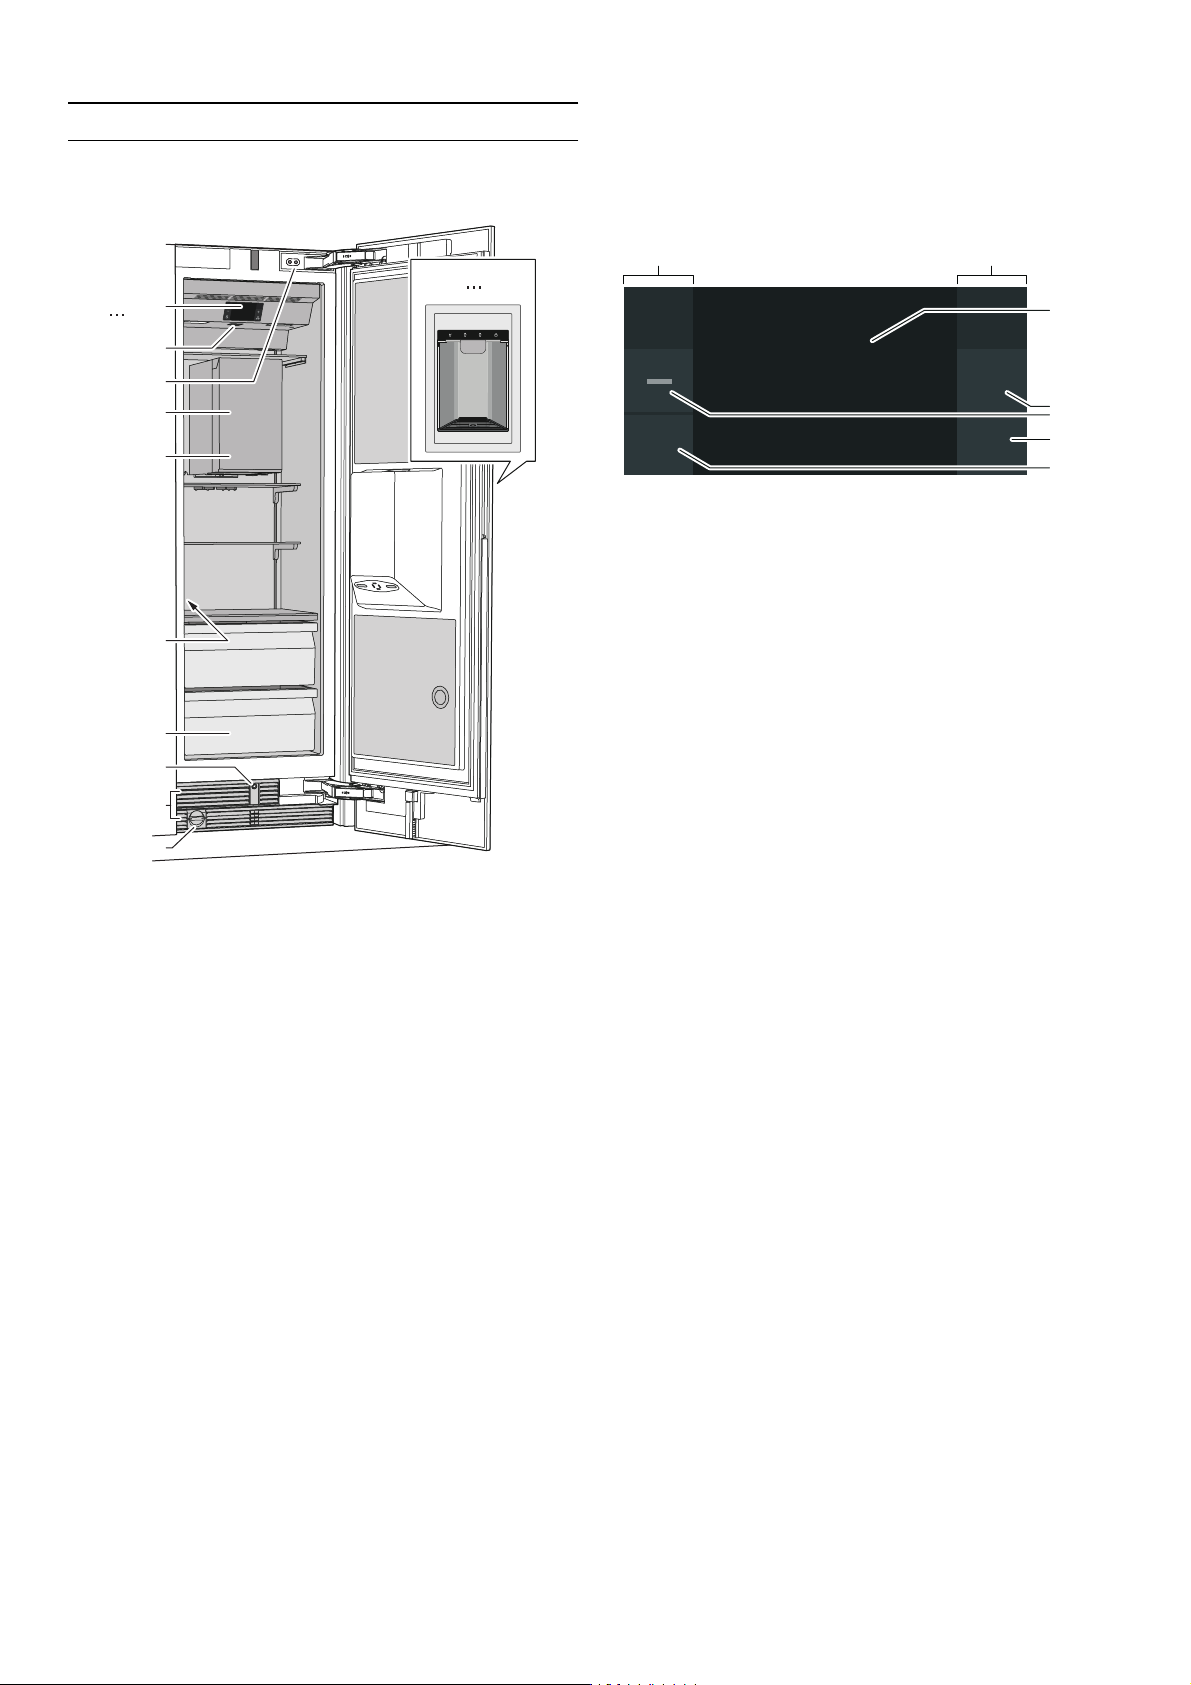
( Touch fields
There are sensors under the touch fields.
Touching the symbol calls up the respective
function.
0 Freezer compartment temperature display
Indicates the set temperature in °C/°F.
8 A/@ buttons
Used to change the temperature.
@ h/â button
Switches super freezing on or off.
H à button
Opens main menu.
&
u
#
+
Appliance
(...H Controls
P Main switch on/off
X Door damper
` Ice maker
h Ice cube container
)" Rating plate
)* Frozen food container
)2 Automatic door opening
): Ventilation opening
)B Particle filter
)J...1* Ice and water dispenser
Main menu
Press à button to open the main menu.
In the main menu you can find:
▯ Basic settings
▯ Display lock for cleaning
▯ Ice cube production
▯ Eco mode
▯ Reset water filter counter
▯ Self-test
▯ Rest mode (when active)
~ "Operating the appliance" on page 15
10
Getting to know your appliance
en
Basic settings menu
To access the Basic settings menu:
1 Press the à button.
2 Press the B button to move to the menu item Basic
settings.
3 Open the menu using the ™ button.
In the Basic settings menu, you will find the following
sub-menus and setting options:
▯ Brightness
▯ Display screen
▯ Touch field colour
▯ Touch field tone
▯ Touch field tone volume
▯ Signal tone volume
▯ Water filter counter
▯ Dimming when door is opened and closed
▯ Ice and water dispenser light
▯ Ice and water dispenser proximity sensor
▯ Temperature unit
▯ Language
▯ Factory settings
▯ Demo mode
▯ Rest mode
▯ Automatic door opening
▯ Home network
▯ Automatic display lock for cleaning
~ "Operating the appliance" on page 15
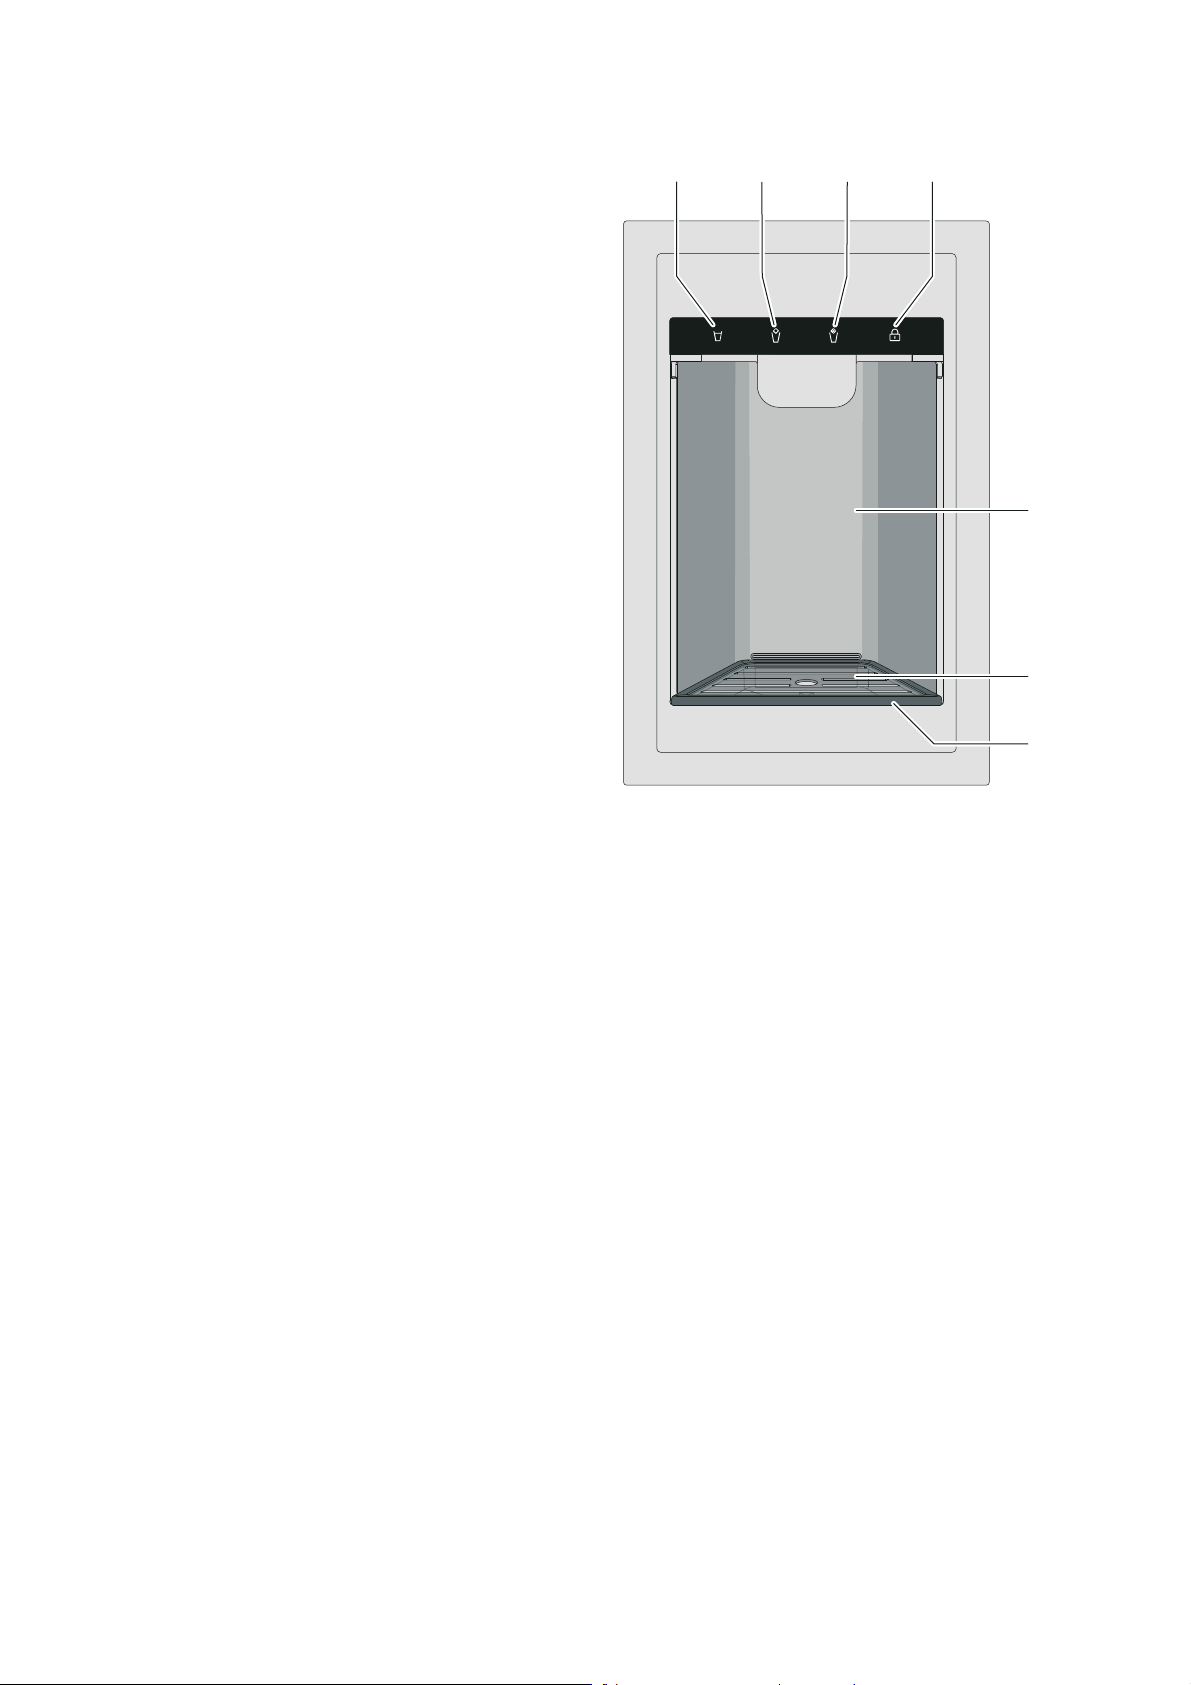
Ice and water dispenser
=
)J WATER button
Starts water dispensing.
)R CUBED button
Starts ice cube dispensing.
)Z CRUSHED button
Starts dispensing crushed ice.
E- 5
M
)b LOCK button
Locks controls for ice and water dispenser
(child lock).To switch on or off, hold down
for 3 seconds.
)j Ice and water dispenser cover
1" Drip grate
1* Drip tray
11
 Loading...