

Page 1

Gaggenau
Instruction manual
EB 388
Oven
Page 2

Table of contents
Instruction manual
Important safety information 3
Causes of damage 5
Environmental protection 5
Environmentally-friendly disposal 5
Tips for saving energy 5
Getting to know the appliance 6
Oven 6
Displays and controls 6
Operating modes 7
Cooling fan 7
Your accessories 8
Inserting accessories 8
Accessories 8
Special accessories 8
Before using for the first time 9
Setting the time 9
Heating up the oven 9
Cleaning accessories 9
Operating the appliance 9
Switching on 9
Switching off 9
Eco hot air 10
Settings table 11
Basic settings 19
Cleaning and maintenance 19
Cleaning agents 19
Drying the cooking compartment 20
Replacing the oven lamp 20
Glass cover 20
Self-cleaning (pyrolytic system) 21
Preparing self-cleaning 21
Adjusting self-cleaning 21
Self-cleaning ended 21
Trouble shooting 22
Aftersales service 23
: Additional information on products, accessories,
replacement parts and services can be found at
www.gaggenau.com and in the online shop
www.gaggenau-eshop.com
Timer functions 13
Cooking time 13
End of cooking time 14
Timer 14
Alarm clock function 14
Stopwatch 14
Core temperature probe 15
Inserting the core temperature probe in the food to be
cooked 15
Setting the core temperature 15
Core temperature guidelines 16
Rotisserie spit (special accessory) 17
Fitting and securing a roast 17
Inserting the rotisserie spit 17
Baking stone (special accessory) 18
Using the baking stone 18
Cleaning the baking stone 18
Child lock 18
Activating the child lock 18
Deactivating the child lock 18
2
Page 3

m Important safety information
Read these instructions carefully. Only then will you be able to operate your appliance safely and correctly. Retain the instruction manual and installation instructions for future use or for subsequent owners.
This appliance is only intended to be fully fitted in a kitchen. Observe the special installation instructions.
Check the appliance for damage after unpacking it. Do not connect the appliance if it has been damaged in transport.
Only a licensed professional may connect appliances without plugs. Damage caused by incorrect connection is not covered under warranty.
This appliance is intended for domestic use only. The appliance must only be used for the preparation of food and drink. The appliance must be supervised during operation. Only use this appliance indoors.
This appliance is intended for use up to a maximum height of 2000 metres above sea level.
This appliance may be used by children over
the age of 8 years old and by persons with
reduced physical, sensory or mental
capabilities or by persons with a lack of
experience or knowledge if they are
supervised or are instructed by a person
responsible for their safety how to use the
appliance safely and have understood the
associated hazards.
Children must not play with, on, or around the appliance. Children must not clean the appliance or carry out general maintenance unless they are at least 8 years old and are being supervised.
Keep children below the age of 8 years old at a safe distance from the appliance and power cable.
Always slide accessories into the cooking compartment correctly. See description of accessories in the instruction manual.
Risk of fire!
▯ Combustible items stored in the cooking
compartment may catch fire. Never store
combustible items in the cooking
compartment. Never open the appliance
door if there is smoke inside. Switch off
the appliance and unplug it from the mains
or switch off the circuit breaker in the fuse
box.
Risk of fire!
▯ A draught is created when the appliance
door is opened. Greaseproof paper may
come into contact with the heating element
and catch fire. Do not place greaseproof
paper loosely over accessories during
preheating. Always weight down the
greaseproof paper with a dish or a baking
tin. Only cover the surface required with
greaseproof paper. Greaseproof paper
must not protrude over the accessories.
Risk of burns!
▯ The appliance becomes very hot. Never
touch the interior surfaces of the cooking
compartment or the heating elements.
Always allow the appliance to cool down.
Keep children at a safe distance.
Risk of serious burns!
▯ Accessories and ovenware become very
hot. Always use oven gloves to remove
accessories or ovenware from the cooking
compartment.
Risk of burns!
▯ Alcoholic vapours may catch fire in the hot
cooking compartment. Never prepare food
containing large quantities of drinks with a
high alcohol content. Only use small
quantities of drinks with a high alcohol
content. Open the appliance door with
care.
Risk of scalding!
▯ The accessible parts become hot during
operation. Never touch the hot parts. Keep
children at a safe distance.
Risk of scalding!
▯ When you open the appliance door, hot
steam may escape. Open the appliance
door with care. Keep children at a safe
distance.
Risk of scalding!
3
Page 4

▯ Water in a hot cooking compartment may
create hot steam. Never pour water into the
hot cooking compartment.
Risk of injury!
Scratched glass in the appliance door may develop into a crack. Do not use a glass scraper, sharp or abrasive cleaning aids or detergents.
Risk of electric shock!
▯ Incorrect repairs are dangerous. Repairs
may only be carried out and damaged
power cables replaced by one of our
trained after-sales technicians. If the
appliance is defective, unplug the
appliance from the mains or switch off the
circuit breaker in the fuse box. Contact the
after-sales service.
Risk of electric shock and serious injury!
▯ The cable insulation on electrical
appliances may melt when touching hot
parts of the appliance. Never bring
electrical appliance cables into contact
with hot parts of the appliance.
Risk of electric shock!
▯ Do not use any high-pressure cleaners or
steam cleaners, which can result in an
electric shock.
Risk of electric shock!
▯ When replacing the cooking compartment
bulb, the bulb socket contacts are live.
Before replacing the bulb, unplug the
appliance from the mains or switch off the
circuit breaker in the fuse box.
Risk of electric shock!
▯ A defective appliance may cause electric
shock. Never switch on a defective
appliance. Unplug the appliance from the
mains or switch off the circuit breaker in
the fuse box. Contact the after-sales
service.
Risk of electric shock!
▯ The insulation of an incompatible meat
probe may be damaged. Only use the meat
probe which is recommended for this
appliance.
Risk of fire!
▯ Loose food residues, grease and meat
juices may catch fire during pyrolytic
cleaning. Remove coarse dirt from the
cooking compartment and from the
accessories before every pyrolytic cleaning
cycle.
Risk of fire!
▯ The appliance will become very hot on the
outside during the pyrolytic cleaning cycle.
Never hang combustible objects, e.g. tea
towels, on the door handle. Do not place
anything against the front of the oven.
Keep children at a safe distance.
Risk of burns!
▯ The cooking compartment will become
very hot during the pyrolytic cleaning cycle.
Never open the appliance door or move
the locking latch by hand. Allow the
appliance to cool down. Keep children at a
safe distance.
Risk of burns!
▯ ; The appliance will become very hot on
the outside during the Self-cleaning cycle.
Never touch the appliance door. Allow the
appliance to cool down. Keep children at a
safe distance.
Risk of serious damage to health!
The appliance will become very hot during the
pyrolytic cleaning cycle. The non-stick coating
on baking trays and tins is destroyed and
noxious gases are released. Never let non-stick
baking trays and tins go through the pyrolytic
cleaning cycle. Only enamelled accessories
may be cleaned at the same time.
4
Page 5

Causes of damage
Caution!
– Accessories, foil, greaseproof paper or ovenware
on the cooking compartment floor: do not place
accessories on the cooking compartment floor.
Do not cover the cooking compartment floor with
any sort of foil or greaseproof paper. Do not place
ovenware on the cooking compartment floor if a
temperature of over 50 ºC has been set. This will
cause heat to accumulate. The baking and
roasting times will no longer be correct and the
enamel will be damaged.
– Water in a hot cooking compartment: do not pour
water into the cooking compartment when it is
hot. This will cause steam. The temperature
change can cause damage to the enamel.
– Moist food: do not store moist food in the cooking
compartment when it is closed for prolonged
periods This will damage the enamel.
– Fruit juice: when baking particularly juicy fruit
pies, do not pack the baking tray too generously.
Fruit juice dripping from the baking tray leaves
stains that cannot be removed. If possible, use
the deeper universal pan.
– Cooling with the appliance door open: only allow
the cooking compartment to cool when it is
closed. Even if the appliance door is only open a
little, front panels of adjacent units could be
damaged over time.
– Very dirty door seal: If the door seal is very dirty,
the appliance door will no longer close properly
when the appliance is in use. The fronts of
adjacent units could be damaged.Always keep the
door seal clean.
– Appliance door as a seat, shelf or worktop: Do not
sit on the appliance door, or place or hang
anything on it. Do not place any cookware or
accessories on the appliance door.
– Inserting accessories: depending on the
appliance model, accessories can scratch the
door panel when closing the appliance door.
Always insert the accessories into the cooking
compartment as far as they will go.
– Carrying the appliance: do not carry or hold the
appliance by the door handle. The door handle
cannot support the weight of the appliance and
could break.
Environmental protection
Environmentally-friendly disposal
Dispose of packaging in an environmentally-friendly
manner.
This appliance is labelled in accordance with
European Directive 2012/19/EU concerning
used electrical and electronic appliances
(waste electrical and electronic equipment WEEE). The guideline determines the
framework for the return and recycling of used
appliances as applicable throughout the EU.
Tips for saving energy
▯ Open the appliance door as little as possible
while cooking, baking or roasting.
▯ Use dark, black lacquered or enamelled baking
tins for baking. They absorb the heat particularly
well.
▯ It is best to bake several cakes one after the
other. The oven will still be hot. This reduces the
baking time for the second cake. You can also
place two loaf tins next to each other.
▯ In the hot air mode, you can bake on several levels
at the same time.
▯ If the cooking time is relatively long, you can
switch off the oven 10 minutes before the end of
the cooking time and use the oven's residual heat
to complete the cooking process.
5
Page 6
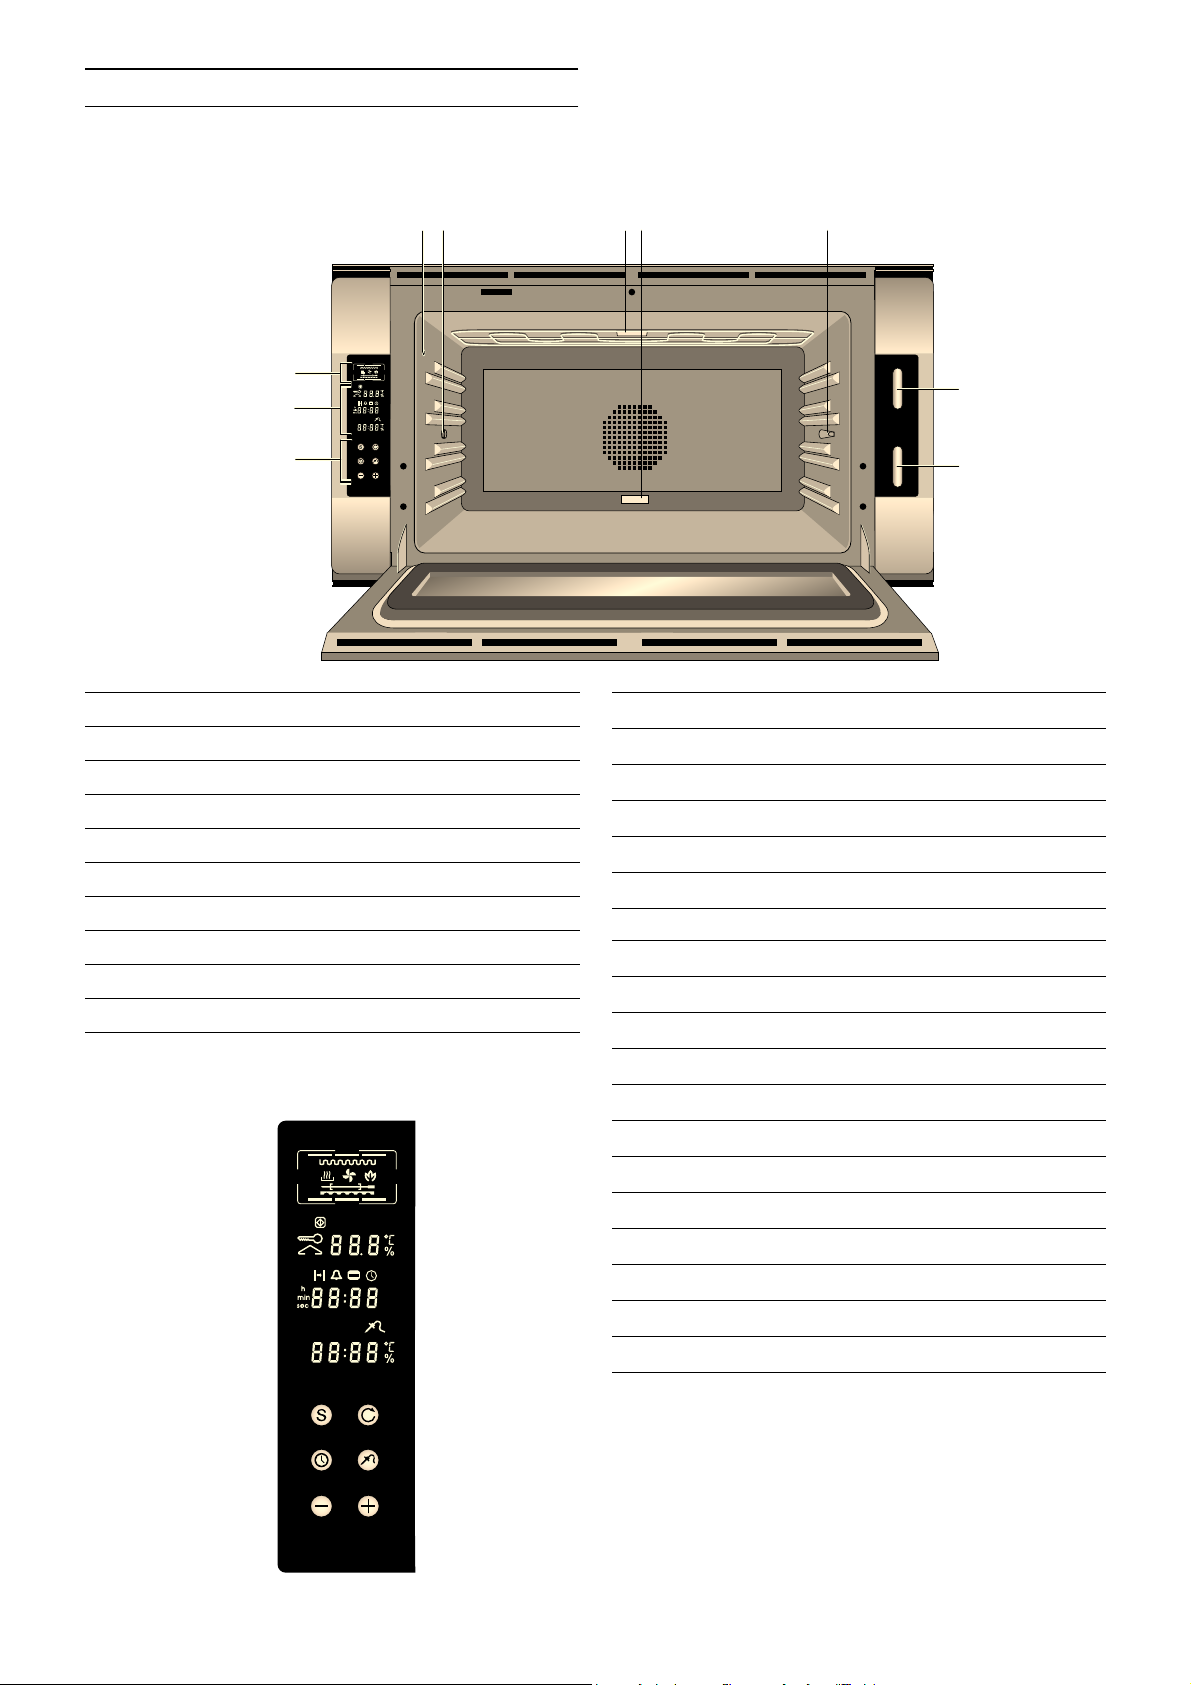
Getting to know the appliance
Oven
1 Temperature selector
2 Mode selector
3 Function keys
4 Display functions
5 Display mode
6 Socket for core temperature probe
7 Holder for rotisserie spit
8 Oven lighting
9 Socket for baking stone
10 Locking element for rotisserie spit
Key Function
~
Ó
M
Ø
A @
Symbol Meaning
Ð
Ï
Start/status
ON/OFF Rotisserie spit
Timer functions
Core temperature probe
Increase value/reduce value
Child lock
Door locking
Displays and controls
6
[
×
V
Ò
M
Ø
‹‹.‹Ö
Õ‹:‹‹
‹‹:‹‹Ö
Heating
Duration, end
Timer/alarm time
Cooking time
Clock
Core temperature probe
Set temperature/power
Time display
Current temperature/power
Page 7

Operating modes
The following operating modes are available. To select
the operating mode, turn the operating mode selector
until the required function is shown in the operating
mode display.
Display Temperature Operating mode Use
Ã
Æ
Ä
Å
à “’‹
Ç
É
Ê
Ë
Ì
Í
Î
50 - 300 °C Hot air Baking, roasting, defrosting, drying, drying out, steri-
lising
50 - 300 °C Hot air + bottom heat Baking, roasting
50 - 300 °C Grilling + Hot air Temperature-controlled grilling with Hot air, intensive
grilling with Hot air
50 - 300 °C Grilling* Power-controlled grilling
50 - 300 °C Eco hot air** Energy-saving hot air mode
The oven lighting remains off
50 - 300 °C Bottom heat Browning or continued cooking from below
50 - 300 °C
50 - 300 °C Top + bottom heat Baking and roasting
50 - 300 °C
50 - 300 °C Top heat Browning or continued cooking
50 - 300 °C Baking stone
485 °C Pyrolytic self-cleaning Self-cleaning of the oven cooking compartment
Bottom + Y top heat
Top + Y bottom heat
(only available as an
optional accessory)
Browning or continued cooking from below and,
partly, from above
Browning or continued cooking from above and,
partly, from below
Baking stone for baking bread and pizza
*50% ~ 150 °C
60% ~ 180 °C
**Type of heating that was used to determine the energy efficiency class in accordance with EN 50304.
70% ~ 210 °C
80% ~ 240 °C
90% ~ 270 °C
100% ~ 300 °C
Cooling fan
The cooling fan switches on and off as required. The
hot air escapes above the door. Caution: do not cover
the ventilation slots. Otherwise the oven will overheat.
So that the cooking compartment cools down more
quickly after operation, the cooling fan continues to
run for a certain period afterwards.
7
Page 8

Your accessories
The accessories supplied with your appliance are
suitable for making many dishes. Ensure that you
always insert the accessories into the cooking
compartment the right way round.
Special accessories
You can order the following special accessories from
your specialist dealer:
BS 020 002 Pizza paddle, set of 2
DS 070 062 Rotisserie spit
Only use the accessories as specified. The
manufacturer accepts no liability if these accessories
are used incorrectly.
Inserting accessories
The gridiron features a latching function. The latching
function prevents tilting of the gridiron when pulling it
out. You must insert the gridiron in the cooking
interior correctly so that tilt protection will work.
When pushing in the gridiron, make sure that the
latching lugs at the side point up.
Accessories
As standard, your appliance comes with the following
accessories:
2 baking trays
1 grill tray with grille
1 gridiron
GP 032 062 Grill tray, enamelled
39 mm deep
GR 030 062 Gridiron, chrome-plated.
Angled, without opening
GR 035 062 Gridiron, chrome-plated
With opening and feet
KB 032 062 Baking tray, enamelled
18 mm deep
KB 036 062 Baking tray, enamelled
20 mm deep
PS 075 001 Baking stone
Including heating element,
baking stone support and pizza
paddle
1 plug-in core temperature probe
8
Page 9

Before using for the first time
Operating the appliance
Here, you will find out what you have to do before
preparing food with your oven for the first time. Read
the Safety information section beforehand.
Setting the time
When a new appliance is connected, or after a
prolonged power failure, the time
the time display.
Proceed as follows to set the time:
1 Press the
flashes in the display.
2 Set the time with the @ and A keys.
3 Press the ~ key. The time display lights up in the
display.
You can also set the time anytime later. Proceed in the
same way to do this.
Note: when the oven is switched off, the time display
is hidden to ensure compliance with the EU regulation
on electricity consumption in the standby mode.
Refer to the section entitled "Basic settings" to find
out how to permanently display the time anyway.
M key four times. The M symbol
‹‰:‹‹ appears in
Heating up the oven
Make sure there are no packaging remainders left in
the interior.
Heat up the empty, closed oven to dispel the 'new'
smell. An hour of hot air at 200°C is ideal.
Switching on
1 Set the temperature selector to the required
value. The temperature and the mode are
displayed.
2 Set the required mode with the mode selector.
The warming up symbol [ appears in the display until
the set temperature has been reached. It appears
again during post-heating.
Displaying the current temperature:
You can query the current temperature in the cooking
interior at any time. To do this, press the ~ key. The
current temperature is shown briefly in the bottom
part of the display.
Note: during continuous operation of the oven,
system-related temperature fluctuations of up to 5° C
above or below the set temperature are within the
normal range.
Then allow the oven to cool down and wipe the
surfaces with a moist cloth.
Cleaning accessories
Before using the accessories for the first time, clean
them thoroughly using hot detergent solution and a
soft cloth.
Note: do not clean the baking stone with water and
detergent. Cracks can appear in the material if a moist
baking stone is heated up. If the baking stone should
ever become moist, it must dry out completely before
the next time it is heated up. This can take several
days.
Switching off
To switch off the oven, set the temperature selector to
0. The oven lighting goes out and the oven is in standby mode.
Note: The clock display goes out in stand-by mode.
Press any button to display the time again. The "Basic
settings" section provides information on how to
display the time permanently.
Caution!
To prevent the enamel from being damaged, do not
leave food to cool down or be stored in the appliance.
If condensation has formed in the cooking
compartment, heat up the appliance for 5 minutes with
hot air at 50 °C and then open the door so that the
moisture can evaporate.
9
Page 10

Eco hot air
Your new appliance is particularly energy-efficient.
You will find information here about the energyoptimised "Eco hot air" operating mode.
With the energy-efficient "Eco hot air" operating
mode, you can prepare many dishes on one level. The
fan distributes the energy-optimised heat from the ring
heating element in the back wall evenly around the
cooking compartment.
The oven lighting remains off. When opening the oven
door or pressing the ~ button, the oven lighting
comes on briefly.
Displaying the current temperature:
You can request the current temperature in the
cooking compartment at any time. To do this, press
the ~ button. The current temperature is displayed
briefly in the lower section of the display. The oven
lighting comes on for a short time.
Notes
‒ Only open the oven during cooking if this is
absolutely necessary.
‒ The core temperature sensor cannot be used with
the Eco hot air operating mode.
The table contains a selection of dishes best suited to
Eco hot air.
Dishes Eco hot air
(temp. °C)
Cakes/pastries
Biscuits 165 2nd from the
Ring cake 165 1st from the bot-
Plaited loaf (750 g dough) 165 2nd from the
Apple tart 190 2nd from the
Biscuits 165 2nd from the
Piped cookies
(in accordance with
EN 60350)
Muffins 160 2nd from the
Small cakes
(in accordance with
EN 60350)
Cream puffs 200 2nd from the
Meat
Pork joint (1.7 kg) 220 2nd from the
140 2nd from the
150 2nd from the
Slide-in shelf Recommended cooking
bottom
tom
bottom
bottom
bottom
bottom
bottom
bottom
bottom
bottom
The values in the settings table refer to a preheated
appliance. They are only intended as a guideline
because more or less heat will be required depending
on the type and condition of the meal.
Own comments
time (approx. h:min)
00:30-00:35
00:40-00:50
00:30-00:35
00:40-00:50
00:25-00:30
00:35-00:45
00:25
00:40-00:50
00:55
01:40
10
Page 11

Dishes Eco hot air
(temp. °C)
Side dishes and meals
Pizza (baking tray) 180 2nd from the
Potato gratin 180 2nd from the
Slide-in shelf Recommended cooking
bottom
bottom
Settings table
The values given are for a preheated appliance. The
values must be looked upon as a guideline. The heat
required depends on the type and condition of the
food.
Own comments
time (approx. h:min)
00:35-00:45
00:50
Dishes Hot air
(temp. °C)
Cakes/pastries
Biscuit roll 180 180-190 2nd from the
Biscuit base 165 165-175 2nd from the
Yeast cake 165 165-175 2nd from the
Cheesecake (thick) 165 165-175 2nd from the
Cheese slices 165 165-175 2nd from the
Small baked items 165 1st/2nd/3rd
Ring cake (yeast dough) 165 165-175 1st from the bot-
Fruit flan 165 165-175 2nd from the
Choux pastry (cream puff) 180 180-190 2nd from the
Sponge cake 165 165-175 2nd from the
Meat
Pork joint (1.5 kg) 220/180* 2nd from the
Sirloin, rare 275/200* 2nd from the
Medium rare 275/200* 2nd from the
Well-done 275/200* 2nd from the
Joint of veal 175 2nd from the
Lamb 220/180* 2nd from the
Top and bottom heat
(temp. °C)
165-175 2nd from the
Slide-in shelf Recommended cooking
bottom
bottom
bottom
bottom
bottom
from the bottom
bottom
tom
bottom
bottom
bottom
bottom
bottom
bottom
bottom
bottom
bottom
Own
time (approx. h:min)
(core temperature)
00:19-00:20
00:30-00:35
00:30
01:20-01:35
01:00-01:10
00:15-00:20
00:15-00:20
00:45-00:50
00:45-00:50
00:25-00:30
00:55-01:00
01:30 (80 °C)
00:30-00:35 (40-50 °C)
00:45-00:50 (55-65 °C)
01:00-01:10 (65-75 °C)
01:10-01:20
01:10 (75 °C)
11
Page 12

Dishes Hot air
(temp. °C)
Top and bottom heat
Slide-in shelf Recommended cooking
(temp. °C)
Game
Leg of roe venison 175-200 2nd from the
bottom
Wild boar 175-200 2nd from the
bottom
Poultry
Own
time (approx. h:min)
(core temperature)
01:30-01:40 (80-85 °C)
01:30 -01:40 (80-85 °C)
Poultry 180 2nd from the
01:00 (90 °C)
bottom
Fish
Fish fillet 200-225 2nd from the
00:30-00:50
bottom
Fish (1.5-2 kg) 200 2nd from the
00:30-00:50
bottom
* We recommend that you reduce the temperature to the value shown here after approx. 20 minutes.
12
Page 13

Timer functions
You can set the following timer functions:
▯ Cooking time
▯ Cooking time end
Cooking time
If you set a cooking time for your meal, the appliance
switches off heating automatically after this time has
elapsed.
You can set a cooking time from 1 minute to 23 hours
59 minutes.
▯ Timer
▯ Stopwatch
▯ Alarm clock function
Use the operator control keys to operate the timer
functions. Visual and audible signals assist you with
operation:
Short deep
tone
Short high
tone
Deep tone
sequence
Flashing
display symbol
Dashes in the
display
Note: when you press the
displayed for 10 seconds.
Correcting an input:
Selection is being made
Input completed
Programmed value reached, awaiting
confirmation
Awaiting input or confirmation
No value programmed
M key, set times are
Place your meal in the oven and set the temperature
and mode you require with the temperature and mode
selectors.
Programming the cooking time:
1 Press the M key once. The × and Ò symbols
flash. The time display shows ¬¬:¬¬ or the
current duration.
2 Set the required duration with the aid of the @
and A keys.
3 Press the start key ~. The × symbol goes off and
the Ò lights up continuously.
After expiry of the duration:
The Ò flashes. An audible signal is sounded. The
appliance ends heating. Press any key. Ò goes off,
the signal tone goes off and heating is started again.
Now set the temperature control to 0° C.
Press the M key. Within 10 seconds, correct the time
value with the @ and A keys. Confirm input with the ~
key. To clear an input, press the @ and A keys at the
same time.
Correcting an input:
Press the M key. Within 10 seconds, correct the time
value with the @ and A keys. Confirm input with the ~
key. To clear an input, press the @ and A keys at the
same time.
13
Page 14

End of cooking time
Alarm clock function
With this function you can move the end of the set
cooking time to a later point in time.
To do this, enter the cooking time and program the
required time for the end of the cooking time. The
electronic circuitry calculated the corresponding
starting time and starts cooking automatically.
Note: note that easily perishable foodstuffs must not
be left in the oven for too long.
Proceed as follows:
1 Set a cooking time (see section entitled "Cooking
time")
2 Press the M key twice. The × and Ò symbols
flash. The time display shows ¬¬:¬¬ or the
current duration.
3 Set the required time with the aid of the @ and A
keys.
4 Press the start key ~. The × symbol goes off and
the Ò lights up continuously.
After expiry of the duration:
The Ò flashes. An audible signal is sounded. The
appliance ends heating. Press any key. The Ò symbol
goes off, the signal tone goes off and heating is
started again. Now set the temperature control to
0° C.
Note: you can even program the switch-off time if you
have not set a cooking time. Simply begin at point 2.
Timer
You can use the timer to program a period of time,
e.g. as an egg timer. You can enter values between
00:01 seconds and 23:50 hours.
1 Press the @ key. The y and V symbols flash.
The time display shows ¬¬:¬¬ or the current
duration.
A signal tone can be triggered at any time of the day.
The alarm clock function is independent of the other
appliance functions.
Note: the alarm clock function does not switch off
your appliance.
1 Press the M key three times. The y and U
symbols flash. The time display shows ¬¬:¬¬ or
the current duration.
2 Set the required time with the aid of the @ and A
keys.
3 Press the start key ~. The y symbol goes off and
the U lights up continuously.
After expiry of the duration:
The U symbol flashes. An audible signal is sounded.
Press any key. U goes off and the signal tone is
ended.
Stopwatch
You can use the stopwatch to monitor the cooking
time of dishes without programming automatic
deactivation, for example.
The time is displayed beginning at 00:00 and
extending up to a maximum of 12 hours.
Switching the stopwatch on and off:
You start or switch off the stopwatch by pressing the
A key.
2 Set the required duration with @ and A. 3 Press the ~ key. The V symbol and the elapsing
timer are shown in the display.
The timer starts, even without pressing the ~ key,
if you do not enter anything for 5 seconds.
After expiry of the duration:
the V flashes. An audible signal is sounded. Press
any key to end the timer.
Note: while the set timer is running, you can view the
time of the day by pressing the ~ key.
14
Page 15

Core temperature probe
Inserting the core temperature probe in the food to be cooked
Risk of electric shock!
m
The insulation of an incompatible meat probe may be
damaged. Only use the meat probe which is
recommended for this appliance.
m Risk of burns!
The cooking interior and the core temperature probe
become very hot. Use oven mitts to plug and unplug
the core temperature probe.
The core temperature probe allows you to cook exactly
to the precise level you require. It measures the
temperature inside the meat between 30 °C and
99 °C.
Only use the core temperature probe supplied. You
can also purchase it as a spare part from the aftersales service (order no. 156 838, also available online
in the eShop).
The core temperature probe may be damaged at
temperatures above 250 °C. You must therefore use it
only in your electric oven (max. 230 °C).
Suitable types of heating:
▯ Ã Hot air
▯ Æ Hot air + bottom heat
▯ Ç Bottom heat
▯ É Bottom + Y top heat
▯ Ê Top + bottom heat
▯ Ë Top + Y bottom heat
▯ Ì Top heat
Insert the core temperature probe in the food to be
cooked before you place it in the cooking interior.
Insert the metal tip at the thickest point in the food to
be cooked. Make sure that the end of the tip is
approximately in the centre. It must not be placed in
the fat and must not touch any cookware or bones.
If there are several pieces, insert the core temperature
probe in the middle of the thickest piece.
Insert the core temperature probe completely, if
possible.
In the case of poultry, make sure that the tip of the
core temperature probe is not in the cavity in the
centre, but in the meat between the belly and upper
leg.
Place the food to be cooked in the middle of the
gridiron.
Note: The core temperature probe cannot be used in
the following operating modes: Grilling and hot air,
Grilling, Eco hot air and Baking stone.
The set cooking compartment temperature must be at
least 10 °C higher than the set core temperature.
After use, always remove the core temperature probe
from the cooking compartment. Never store it inside
the cooking compartment.
After each use, clean the core temperature probe with
a damp cloth. Do not clean it in the dishwasher.
Caution!
Do not use the temperature probe in combination with
the rotisserie spit.
Setting the core temperature
m
Risk of burns!
If you only insert the core temperature probe after the
appliance was already in operation, the cooking
interior surface and accessories can be very hot. Use
oven cloths!
1 Insert the core temperature probe in the socket
on the top right of the cooking interior and close
the appliance door.
Do not jam the core temperature probe's cable!
Ø appear in the display. The core temperature
appears in the core temperature display. The core
temperature display flashes at a core temperature
below 30° C and above 99° C.
2 Set the heating mode and the cooking
temperature with the rotary selectors.
15
Page 16

3 Press the
Ø key.
Food Core tempera-
ture guideline
Beef
Sirloin, tenderloin, entrecôte
Ø symbol flashes. The suggested
The
temperatur of 60° C or a higher measured core
temperature appears in the core temperature
display.
4 Set the required core temperature (30 - 99° C)
with the @ and A keys.
5 Press the ~ key to start the cooking mode.
Once the food you are cooking has reached a
core temperature of 30 °C, the current core
temperature appears in the display under the Ø
symbol.
You can change the set core temperatur at any
time.
Once the set core temperature is reached, a signal
sounds and the Ø symbol flashes. The cooking mode
is ended automatically.
Heating is started again by pressing any key.
6 Turn the temperature selector to 0° to end
heating.
m Risk of burns!
The core temperature probe and cooking interior are
hot. Allow the cooking interior to cool down before
you pull out the core temperature probe or use oven
cloths.
Note: if you leave the cooked food in the cooking
interior for some time after the cooking mode has
ended, the core temperature will rise slightly due to
the residual heat in the cooking interior.
very rare
rare
medium
well-done
Joint of beef 80 – 85 °C
Pork
Joint of pork 72 – 80 °C
Loin of pork
medium
well-done
Meat loaf 85 °C
Fillet of pork 65 – 70 °C
Veal
Joint of veal, well-done 75 – 80 °C
Breast of veal, stuffed 75 – 80 °C
Saddle of veal
medium
well-done
Fillet of veal
rare
medium
well-done
45 – 47 °C
50 – 52 °C
58 – 60 °C
70 – 75 °C
65 – 70 °C
75 °C
58 – 60 °C
65 – 70 °C
50 – 52 °C
58 – 60 °C
70 – 75 °C
Cancelling cooking with a core temperature
Use an oven cloth to pull the core temperature probe
out of the socket. The appliance continues to heat in
the normal cooking mode.
Core temperature guidelines
Use chilled food only, not frozen food. The details
given in the table are guidelines. Results depend on
the quality and composition of the food.
For hygiene reasons, critical foodstuffs such as fish
and game should reach a core temperature of 62 – 70
°C; for poultry and minced meat this should be as
high as 80 – 85 °C.
16
Game
Saddle of venison 60 – 70 °C
Leg of roe venison 70 – 75 °C
Venison loin steaks 65 – 70 °C
Saddle of hare or rabbit 65 – 70 °C
Poultry
Chicken 85 °C
Guinea fowl 75 – 80 °C
Goose, turkey, duck 80 – 85 °C
Duck breast
medium
well-done
Ostrich steak 60 – 65 °C
55 – 60 °C
70 – 80 °C
Page 17

Food Core tempera-
ture guideline
Rotisserie spit (special accessory)
Lamb
Leg of lamb
medium
well-done
Saddle of lamb
medium
well-done
Mutton
Leg of mutton
medium
well-done
Saddle of mutton
medium
well-done
Fish
Fillet 62 – 65 °C
60 – 65 °C
70 – 80 °C
55 – 60 °C
65 – 75 °C
70 – 75 °C
80 – 85 °C
70 – 75 °C
80 °C
You can use the "rotisserie spit" function with all
operating modes.
Caution!
Do not use the temperature probe in combination with
the rotisserie spit.
Fitting and securing a roast
Whole 65 °C
Terrine 62 – 65 °C
Miscellaneous
Bread 90 °C
Paté 72 – 75 °C
Terrine 60 – 70 °C
Foie gras 45 °C
As far as possible, place the roast in the centre of the
rotisserie spit.
Fasten the roast at both ends with the retaining clips.
You can also tie down the roast with kitchen thread. In
the case of poultry, tie the wing ends under the back
and the legs on the rump. Then, they will not get too
dark. Pierce the skin under the wings so the fat can
drain off.
Choose the oven temperature according to the data in
the table. If the temperature is too high, the meat or
poultry becomes too dark on the outside. It stays
largely raw on the inside.
Inserting the rotisserie spit
1 Insert the left and right support brackets in the
holes on the grill pan.
2 Place the rotisserie spit on the grill frame and
push it into the cooking interior.
3 Insert and hook the right side of the rotisserie
spit into the locking element in the cooking
interior.
4 Turn the drive on and off with the Ó key. The
Ô symbol appears in the mode display
when the rotisserie spit is activated.
17
Page 18

Baking stone (special accessory)
Child lock
With the baking stone you achieve baking results that
are comparable to those of a solid stone oven.
Using the baking stone
1 Plug the heating element into the baking stone
socket on the rear wall of the oven.
2 Insert the oven rack with the baking stone in the
oven in the first level from below.
Note: use the included wooden paddle to push in
your items for baking.
3 Set the mode selector to the baking stone
function Í, and set the temperature selector to
the required temperature.
The child lock prevents children from inadvertently
switching on the appliance.
Activating the child lock
Requirement: temperature selector is not set to 0.
1 Keep the ~ key pressed.
2 Switch off the oven with the temperature selector.
The child lock is active and the Ð symbol flashes.
The selector switches can now be operated without
triggering a heating cycle.
Deactivating the child lock
1 Hold down the ~ key.
2 Switch on the oven with the temperature selector.
The Ð symbol in the display goes off.
The child lock has been cancelled. You can once
again switch on the appliance in the usual manner.
Cleaning the baking stone
Use a soft brush to remove soiling and dough
remainders.
Notes
‒ Do not clean the baking stone with water and
detergent.
‒ Lasting stains can remain on the baking stone
despite cleaning. These do not have a detrimental
effect on the taste of baked items, though.
18
Page 19

Basic settings
Cleaning and maintenance
You can adapt the following basic settings:
▯ Temperature display: °C/°F
▯ Time display: 12h (am/pm)/24h
▯ Time display on standby: ON/OFF
Note: when the time display is activated, the
electricity consumed by the appliance exceeds the
electricity consumption in the standby mode that is
legally prescribed in the EU.
How to operate the options menu:
1 Set the temperature and mode selector to 0.
2 Press the ~ and keep it pressed.
3 Turn the mode selector to the right.
4 Release the ~ key.
5 You can now select the various functions by
turning the mode selector:
‒ Position 1: temperature display °C/°F
‒ Position 2: time display 12h/24h
‒ Position 3: time display ON/OFF
6 Set the required values with @ and A.
7 Press the ~ key to confirm.
To quit the options menu, set the mode selector to 0
or turn the temperature selector to any position.
Risk of burns!
m
The appliance becomes very hot. Never touch the
interior surfaces of the cooking compartment or the
heating elements. Always allow the appliance to cool
down. Keep children at a safe distance.
m Risk of electric shock!
Do not use any high-pressure cleaners or steam
cleaners, which can result in an electric shock.
Cleaning agents
Pay attention to the information in the table to ensure
that the various surfaces are not damaged by incorrect
cleaning agents. Do not use any
▯ sharp or abrasive cleaning agents
▯ highly alcoholic cleaning agents
▯ hard abrasive pads or cleaning sponges
▯ high-pressure or steam cleaners
Thoroughly rinse out new sponge cloths before use.
Area Cleaning agent
Oven front Hot soapy water:
Clean with a dish cloth and dry with a
soft cloth. Do not use any glass cleaner
or scrapers.
Stainless steel Hot soapy water:
Clean with a dish cloth and dry with a
soft cloth. Remove scale, grease, starch
and protein stains immediately. Corrosion can form under such stains.
Stainless care products that are suitable
for warm surfaces are obtainable from
after-sales service or trade dealers. Apply
a wafer-thin coat of care product with a
soft cloth.
Door panes Glass cleaner:
Clean with a a soft cloth. Do not use any
glass scrapers.
Cooking interior Hot soapy water:
Clean with a dish cloth.
Use oven cleaner for extreme soiling. Use
in the cold cooking interior only.
Glass cover of the
oven lamp
Seal
Do not remove!
Racks Hot soapy water:
Hot soapy water:
Clean with a dish cloth.
Hot soapy water:
Clean with a dish cloth. Do not scour.
Soak and clean with a dish cloth or a
brush.
19
Page 20

Area Cleaning agent
Telescopic pull-out
racks
Accessories Hot soapy water:
Hot soapy water:
Clean with a dish cloth or a brush. Do not
soak or clean in a dishwasher.
Soak and clean with a dish cloth or a
brush.
Drying the cooking compartment
To prevent the enamel from being damaged, carefully
dry the cooking compartment after cleaning. After
cleaning, leave the appliance door ajar in the stop
position (approx. 30°) for approx. 1 hour to allow the
enamel surfaces in the cooking compartment to dry
thoroughly.
Replacing the oven lamp
The lamp belonging to the oven lighting must be
replaced if it has failed. You can obtain replacement
lamps (article number 157 312) from Gaggenau aftersales service or from trade dealers. Use these lamps
only.
m Risk of electric shock !
Disconnect the appliance from the power supply.
Switch off the circuit breaker or remove the fuse from
the household fuse box.
m Risk of burns!
The appliance becomes very hot. Never touch the
interior surfaces of the cooking compartment or the
heating elements. Always allow the appliance to cool
down. Keep children at a safe distance.
Proceed as follows:
1 Undo the two screws with a Phillips screwdriver.
2 Remove the frame with the window pointing down.
3 You can tilt the lamp down and remove it by
pressing on the contact spring.
Proceed in reverse order to insert the new lamp.
Glass cover
You must replace a damaged glass cover. Suitable
glass covers may be obtained from the after-sales
service. Please specify the E number and FD number
of your appliance.
20
Page 21

Self-cleaning (pyrolytic system)
During self-cleaning, the oven heats up to 485° C.
Thus, remainders from roasting, grilling or baking are
burnt up and all you have to do is wipe the ash out of
the interior.
A duration from one to three hours is at your disposal
for this mode of operation. The more extreme and the
older soiling is, the longer the cleaning time should
be.
It suffices for you to clean the interior every two to
three months. If required, cleaning more often is also
possible.
m Risk of fire!
Loose food residues, grease and meat juices may
catch fire during pyrolytic cleaning. Remove coarse
dirt from the cooking compartment and from the
accessories before every pyrolytic cleaning cycle.
m Risk of fire!
The appliance will become very hot on the outside
during the pyrolytic cleaning cycle. Never hang
combustible objects, e.g. tea towels, on the door
handle. Do not place anything against the front of the
oven. Keep children at a safe distance.
Adjusting self-cleaning
1 Set the temperature selector to 485° C.
2 Set the mode selector to the Pyrolytic self
cleaning setting.
Timer programming is activated. Suggested time
2:00 h.
3 Depending on soiling, adjust the time by means of
the @ and A keys (adjustment range 1:00 - 3:00
h).
4 Press the ~ key. Self-cleaning begins.
The current time remaining for self-cleaning can be
queried at any time by pressing the M key and can be
modified with the @ and A keys. Complete input with
the ~ key.
Notes
‒ For your safety, the oven door is locked at
temperatures in excess of 300° C. The locking
and unlocking process takes about 30 seconds.
The F flashes during this time. Do not try to
open the oven door during this process.
‒ You can program a switch-off time if you would
like to run self-cleaning at night, for instance
(section entitled "Timer functions - switch-off
time"). The program then starts automatically.
m Risk of serious damage to health!
The appliance will become very hot during the
pyrolytic cleaning cycle. The non-stick coating on
baking trays and tins is destroyed and noxious gases
are released. Never let non-stick baking trays and tins
go through the pyrolytic cleaning cycle. Only
enamelled accessories may be cleaned at the same
time.
Preparing self-cleaning
Caution!
Fire risk! Loose food remainders, fat and roast juice
can ignite. Wipe out the cooking interior with a moist
cloth.
▯ Remove coarse soiling and food remainders from
the oven.
▯ Clean the door seals manually, the inside of the
door and the glass pane because the pyrolysis
cleaning process does not clean these parts.
▯ Remove all loose interior parts from the cooking
interior. Refer to the section entitled "Cleaning
and care" for details of how to remove the
gridirons. There must be no objects left in the
interior.
▯ Close the oven door.
Self-cleaning ended
The Ò symbol flashes after the pyrolysis cleaning
operation has ended. The timer switches off heating
automatically.
The flashing stops as soon as any button is pressed or
if the temperature selector is set to 0.
Note: When the press the ~ button, the suggested
value 2:00 h appears again. Press the ~ button again
to start the self-cleaning process again.
Once the cooking interior has cooled down, wipe the
remaining ash out of the interior with a moist cloth.
21
Page 22

Trouble shooting
Malfunctions often have simple explanations. Please
read the following notes before calling the after-sales
service.
Disruption Possible cause Solution
Appliance not working, no display Plug not inserted Connect the appliance to the electricity
Power failure Check whether other kitchen appliances
Fuse defective Check in the fuse box whether the fuse
Operating error Switch off the fuse for the appliance in
Appliance cannot be started Appliance door is not quite closed Close appliance door
Display of current temperature shows
Power supply was interrupted Move the temperature selector to the 0
¬¬.¬
Continuous signal tone
Appliance switches off on its own. Safety shut-off: the appliance has not
been operated for longer than 12 hours
Oven lighting is on, the F symbol is lit
and the appliance is not heating.
No time display when the appliance is
switched off
Your appliance is in the demo mode 1 Disconnect the appliance from the
Your appliance is in the energy-saving
standby mode
m Risk of electric shock!
Incorrect repairs are dangerous. Repairs may only be
carried out by one of our trained after-sales engineers.
If the appliance is faulty, unplug the mains plug or
switch off the fuse in the fuse box. Contact the aftersales service.
mains
are working
for the appliance is in working order
the fuse box and switch it on again after
about 60 seconds
position and adjust the oven again.
Switch off the appliance and set it again.
mains for a few seconds (switch off
the fuse)
2 Switch on the fuse again, keep the @
key pressed and set the temperature
switch to any position (not light!).
Changing the basic setting for the time
display: See section entitled "Basic settings".
--------
22
Page 23

Aftersales service
In the event of repairs please contact our after-sales
service. We are committed fo find the best solution
also in order to avoid an unnecessary call-out.
Please quote the E number (product number) and the
FD number (production number) of your appliance
when contacting the after-sales service. The rating
plate bearing these numbers can be found on the front
side when you open the appliance door.
For future reference you can note the data of your
appliance and the telephone number of our after-sales
service below.
E-Nr. FD-Nr.
After-sales service
Please note that calling out an after-sales service
technician is not free of charge, even within the
warranty period, should the problem result from an
operating error.
Please find the contact data of all countries in the
enclosed customer service list.
To book an engineer visit and product advice
GB 0844 892 8988
Calls from a BT landline will be charged at up to
3 pence per minute. A call set-up fee of up to
6 pence may apply.
IE 01450 2655
0.03 € per minute at peak.
Off peak 0.0088 € per minute.
AU 1300 368 339
NZ 09 477 0492
Trust the expertise of the manufacturer, and rest
assured that the repair will be carried out by trained
service technicians using original spare parts for your
domestic appliance.
O
23
Page 24

Gaggenau Hausgeräte GmbH
Carl-Wery-Straße 34
D-81739 München
www.gaggenau.com
9000959426 en (950610)
*9000959426*
 Loading...