


Operating and assembly instructions
ED 220/221
Built-in steam oven

ED 220/221 |
Preface |
|
|||
1. |
Important notes |
Page 3-4 |
|||
|
|||||
|
1.1 |
For your safety |
Page 3 |
||
|
1.2 |
About use |
Page 4 |
||
|
2. |
Appliance and accessories |
Page 5-6 |
||
|
2.1 |
Appliance description |
Page 5 |
||
|
2.2 |
Display |
Page 5 |
||
|
2.3 |
Accessories / special accessories |
Page 6 |
||
|
3. |
Operating for the first time |
Page 7-10 |
||
|
3.1 |
Important notes |
Page 7 |
||
|
3.2 |
Calibration |
Page 7-8 |
||
|
3.3 |
What to do, when ... |
Page 8 |
||
|
3.4 |
Determining water hardness |
Page 9 |
||
|
3.5 |
Entering the water hardness |
Page 10 |
||
|
4. |
Operation |
Page 11-17 |
||
|
4.1 |
Switching on and off |
Page 11 |
||
|
4.2 |
Control knobs |
Page 11 |
||
|
4.3 |
Operating modes |
Page 12 |
||
|
4.4 |
Operating the timer |
Page 13-17 |
||
|
5. |
Special functions |
Page 18-23 |
||
|
5.1 |
Child lock |
Page 18 |
||
|
5.2 |
Options menu |
Page 19 |
||
|
5.3 |
Core temperature sensor |
Page 20-21 |
||
|
5.4 |
Steaming |
Page 22 |
||
|
5.5 |
Condensing |
Page 22 |
||
|
5.6 |
Display of the current cooking compartment |
|
||
|
|
|
temperature |
Page 23 |
|
|
5.7 |
Power failure protection |
Page 23 |
||
|
5.8 |
Holiday protection |
Page 23 |
||
|
5.9 |
Cleaning aid |
Page 23 |
||
|
6. |
Further uses |
Page 24-25 |
||
|
|
|
|
||
|
7. |
Cooking table, Baking table |
Page 26-30 |
||
|
8. |
Tips and tricks |
Page 31 |
||
|
|
|
|
||
|
9. |
Cleaning and care |
Page 32-35 |
||
|
9.1 |
Manual cleaning |
Page 32 |
||
|
9.2 |
Cleaning the side plate |
Page 33 |
||
|
9.3 |
Cleaning aid |
Page 34-35 |
||
|
10. |
Maintenance |
Page 36-39 |
||
|
10.1 General |
Page 36 |
|||
|
10.2 Lamp replacement |
Page 36 |
|||
|
10.3 Descaling |
Page 37 |
|||
|
10.4 Dismantling the front window |
Page 38 |
|||
|
10.5 Remedying small malfunctions yourself |
Page 39 |
|||
1
Preface
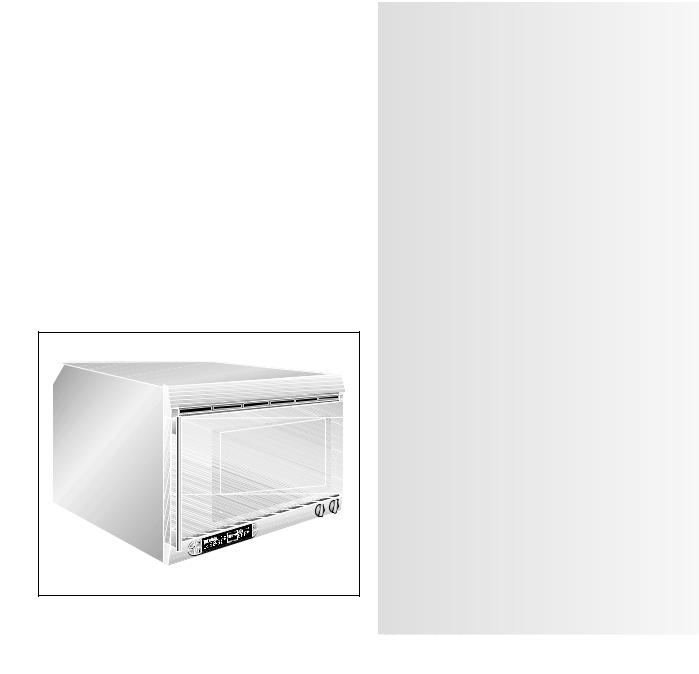
Fig. 1 |
2 |
With your steam oven you can experience modern professional cooking technology in your own household.
The steam oven offers the following advantages:
–Cooking with steam allows gentle preparation. The valuable substances contained in the foodstuffs you prepare are retained almost completely.
–Diverse meals can be prepared without any transfer of taste.
–Thanks to a special combined steaming method, foodstuffs are neither dried out nor drained of their goodness.
–Gently re-heating up food is possible, and prepared meals retain their natural appearance.
To ensure that you will be able to use this appliance in all its diversity, read through the operating and assembly instructions
conscientiously before operating it for the first time. The instructions contain important notes on use, installation and maintenance of
the appliance.
On the following pages you will find important notes on safety and operation. These notes will serve to ensure your personal safety and the lasting value of your appliance.
The chapters entitled “Structure and operating principle” and “Operation” tell you all about what your appliance can do and how you operate it.
The chapter entitled “Cleaning and care” will make sure that your appliance will stay operable and beautiful for a long time.
We have also compiled some “Tips and tricks” for your.
And now we wish you lots of fun with your steam oven.

1. Important notes
1.1 For your safety
You must not operate the appliance if it is damaged.
The appliance must only be connected by an authorised specialist, paying attention to the relevant regulations of the power supply companies and the regional construction regulations.
Observe the assembly instructions!
Caution: Fire risk! Do not store any combustible objects in your appliance. When operating the appliance, only ever leave the inner parts inside the cooking compartment that you actually need.
As the user, you yourself are responsible for maintenance and proper use in the household.
Only ever operate the appliance under supervision. Disconnect the unit from the water mains when it is not in operation.
Caution! The appliance gets hot during operation. Keep children away!
Caution! There is a risk of injuries if the door is not closed properly. You could jam and crush your fingers and hands.
Caution! Steam may billow out when you open the door. If there is steam in the oven, do not reach in with your hands! Risk of burns!
Caution! When removing the cooking insert hot water may drip from the oven top. Risk of scalding! Be careful when removing the cooking insert as hot liquid might spill. Use heat resistant oven gloves.
Leads of other electrical appliances that are used in the proximity of the cooker must not be jammed in by the hot oven door.
Do not clean the appliance with a steam cleaning apparatus or with water pressure – risk of shortcircuits!
Disconnect the appliance from the water and electricity mains. Switch off the corresponding fuse and turn off the tap.
Caution! For technical reasons the lamp cover cannot be removed. Lamp must only be replaced by Gaggenau after-sales service.
Repairs may only be carried out by authorised electricians.
Note: The appliance must not be connected to the hot water supply.
No warranty claims can be lodged for any damage resulting from failure to observe these instructions.
Technical modifications reserved.
3

1.2 About use
The appliance is intended solely for use in the household and must not be put to any other uses.
Use the appliance to prepare meals only. It must not be used to heat up the room in which it is installed.
Only ever use the included cooking inserts or order the special accessories.
Do not place any items in the oven compartment that might rust. Rusty accessories will lead to further rusting in the oven compartment!
Do not use any silver tableware in the cooking compartment.
The cooking compartment may become discoloured during prolonged operation. This does not have a detrimental influence on operability of the appliance.
Operation is only possible when the door is closed, otherwise there is a risk that water will spray out of the appliance or that hot steam will come out.
The steam oven uses unpressurized steam, therefore the door can be opened at any time during cooking. To prevent extreme steam from escaping when you open the door, you can condense beforehand. Water may drip when opening the door.
Steam may escape during operation and when opening the door.
The  (Heating) symbol in the control panel goes off as soon as the required temperature has been reached.
Turn the “Temperature” control knob (right control knob) to the 0 position after use.
In the event of malfunctions, first of all check the household fuses. If the problem has nothing to do with the power or water supply, please contact your specialist dealer or your local Gaggenau aftersales service.
The door window may fog up at all moisture levels (above all at the 100 % moisture level).
Operating noise may occur in all operating modes. Opening and closing of the air flap causes clicking noise.
The appliance rinses automatically when switched on if it has not been in operation for a prolonged period of time or after a prolonged power failure (several hours). This removes water that is left over in the pipes.
The food being cooked must not come into contact with the sides or the grease filter.
At set temperatures below 65°C, the light is switched off after a few seconds to ensure that the halogen lamp will not additionally heat
up the oven compartment. This ensures more precise temperature coordination. The light in the oven compartment is switched on again for a few seconds if you turn one of the two control knobs or if you press a key.
Calibration
(automatic boiling point-adjustment):
The boiling point of water depends on the barometric pressure. The barometric pressure changes with the altitude of the place where the appliance is installed. During self-adjustment, the appliance adapts itself to the pressure conditions prevailing at the appliance’s location.
The appliance cannot be operated if it has not been calibrated!
The appliance features a descaling display. When it flashes, this is an indication that the appliance must be descaled. Before commencing operation, you must enter the water hardness in your household on the appliance.
4

2. Appliance and accessories |
|
|
||||||||||
2.1 Appliance description |
|
|
|
|
|
|||||||
|
|
1 |
|
2 |
|
3 |
|
|
|
|
1 |
Grease filter |
|
|
|
|
|
|
|
|
|
|
|
2 |
Air flap |
|
|
|
|
|
|
|
|
|
|
|
3 |
Slide-in grills |
|
|
|
|
|
|
|
|
|
|
|
4 |
“Temperature” control knob |
|
|
|
|
|
|
|
|
|
|
|
5 |
“Moisture level” control knob |
|
|
|
|
|
|
|
|
|
|
|
6 |
Core temperature sensor |
|
|
|
|
|
|
|
|
|
|
|
7 |
Base strainer with siphon trap |
|
|
|
|
|
|
|
|
|
|
|
8 |
Side plate |
|
|
|
|
|
|
|
|
|
|
|
9 |
Display |
Fig. 2 |
9 |
8 |
|
7 |
6 |
5 |
4 |
|
|
|
|
|
2.2 Display |
|
|
|
|
|
|
|
|
|
|
||
|
|
|
|
|
|
|
|
|
|
|
10 |
Timer key |
10 |
11 |
|
|
|
|
|
|
|
|
12 |
11 |
Core temperature sensor key |
|
|
|
|
|
|
|
|
|
|
|
12 |
Plus key |
|
|
|
|
|
|
|
|
|
|
|
13 |
Minus key |
|
|
|
|
|
|
|
|
|
|
|
14 |
Temperature / Moisture level display |
|
|
|
|
|
|
|
|
|
|
|
15 |
Time display |
|
|
|
|
|
|
|
|
|
|
|
16 |
Steaming / condensing key |
17 |
16 |
|
|
15 |
|
|
|
14 |
|
13 |
17 |
Confirmation key |
|
|
|
|
|
|
|
|
|||||
Fig. 3 |
|
|
|
|
|
|
|
|
|
|
|
|
|
|
|
|
|
|
|
|
|
|
|
18 |
“Child lock" symbol (symbol flashes) |
18 |
19 |
20 |
21 22 23 |
|
24 |
25 |
26 27 |
19 |
“Show room mode" symbol (symbol lights constantly) |
|||
|
“Duration, end" symbol |
|||||||||||
|
|
|
|
|
|
|
|
|
|
|
20 |
“Short timer" symbol |
|
|
|
|
|
|
|
|
|
|
|
21 |
“Cooking time" symbol |
|
|
|
|
|
|
|
|
|
|
|
22 |
“Core temperature sensor" symbol |
|
|
|
|
|
|
|
|
|
|
|
23 |
“Water connection" symbol |
|
|
|
|
|
|
|
|
|
|
|
24 |
“Heating" symbol |
|
|
|
|
|
|
|
|
|
|
|
25 |
“Steaming / condensing" symbol |
Fig. 4 |
28 |
|
|
|
|
29 |
30 |
31 |
|
|
26 |
“Descaling" symbol |
|
|
|
|
|
|
27 |
“Door lock" symbol |
|||||
|
|
|
|
|
|
|
|
|
|
|
||
|
|
|
|
|
|
|
|
|
|
|
28 |
“Start calibration" symbol |
|
|
|
|
|
|
|
|
|
|
|
29 |
“Steaming" symbol |
|
|
|
|
|
|
|
|
|
|
|
30 |
“Hot air" symbol |
|
|
|
|
|
|
|
|
|
|
|
31 |
“Cleaning aid" symbol |
5
2.3 Accessories / special accessories
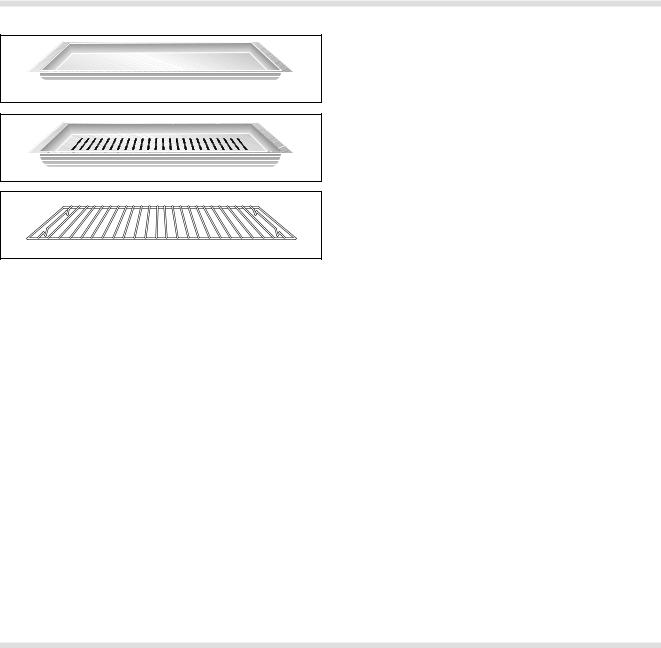
Fig. 5 |
Fig. 6 |
Fig. 7 |
As standard, the appliance comes with the following accessories:
–Stainless steel cooking insert GN 2/3, unperforated, 40 mm deep (Fig. 5)
–Stainless steel cooking insert GN 2/3, perforated, 40 mm deep (Fig. 6)
–Wire grill (Fig. 7)
–Water connection pipe (3 m)
–Waste water pipe (3 m)
You can order the following special accessories:
– DR 220-010: Pressure reducer, connection accessory for water pressure 6-10 bar
– GZ 010-011: Extension pipes for water connections
– WF 040-020: Brita descaling system (filter head and filter cartridge). If the hardness of the water exceeds 9 ° (English water hardness), you must install a descaling system before the appliance.
–WF 040-021: Set of 3 filter cartridges
–KB 220-114: Stainless steel cooking insert
GN 1/3, unperforated, 40 mm deep
– KB 220-124: Stainless steel cooking insert GN 1/3, perforated, 40 mm deep
6

3. Operating for the first time
3.1 Important notes
Before operating the appliance for the first time, please pay attention to the following notes:
Read through these instructions attentively before operating the appliance for the first time.
Remove the packaging from the appliance and dispose of it properly.
Pay attention to the fact that there are accessories in the base of the packaging.
Keep packaging elements away from children.
Thoroughly clean the appliance and accessories before using them for the first time. This will eliminate any “newness” smells and soiling (see Chapter 9).
3.2 Calibration
The boiling point of water depends on the barometric pressure at mean sea level.
During calibration, the appliance is adjusted to the pressure conditions prevailing at the altitude where the appliance is installed.
Recalibrate the appliance manually if you should move home to a different altitude (see chapter entitled “Options menu” on Page 19).
Every appliance is subjected to a thorough check before it arrives in your home. It is therefore possible that there is still water in the appliance.
Before operating the appliance for the first time, make sure that the water connection is properly secured.
When you operate the appliance for the first time, the suggested time 8:00 appears on the display. You can now choose the required time of day by pressing the + and – keys. Press the
 (Confirmation) key to confirm the entered value.
Important:
The calibration process cannot be interrupted.
Should the calibration process be interrupted by opening the door or switching off the appliance, the steam oven will not function. The appliance will automatically start calibration until the operation has been completed.
Recalibration is not necessary after a power failure.
7
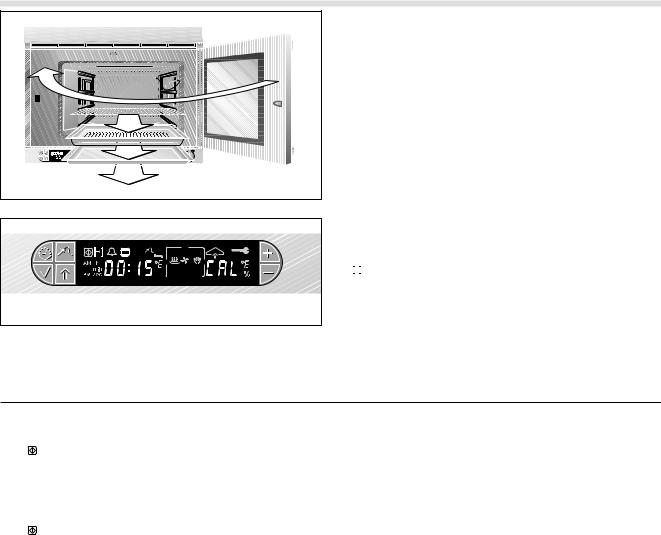
Fig. 8 |
Fig. 9 |
3.3 What to do, when ...
Proceed as follows:
–Install the appliance at the required location (see assembly instructions).
–Remove all loose parts from the oven compartment (baking tray etc.).
–Close the appliance door.
–Open the water tap.
–Self-adjustment starts automatically as soon as you turn the “Temperature” control knob to any temperature. This takes around 15 minutes. The elapsing time appears in the display. The “CAL” symbol for calibration appears in the display.
–An audible signal sounds after completion of calibration. The appliance is now ready for operation. “--:--” appears on the display. The

 (Duration) and
  (Cooking time) symbols flash on the display.
–Turn the “Temperature” control knob back to the 0 position. The appliance is now ready for operation.
The display repeatedly flashes the symbol  (water connection).
The appliance receives no water. Turn the water connection on. Check that the pipe is correctly connected and free from bends. Turn the “Temperature” control knob to 0 and then to the required temperature.
The R symbol appears on the display. The appliance has not been calibrated. Switch the appliance on,
|
|
|
the calibration process starts automatically. |
The |
|
symbol appears on the display. The appliance is in show room mode without heating function. |
|
The appliance does not calibrate or |
Disconnect the appliance from power supply for a few seconds |
||
heat up, although the heating symbol |
(by switching off the fuse), then within 3 minutes press + key |
||
appears on the display. |
and keep pressed and turn “Temperature” control knob to any |
||
|
|
|
temperature (not light!). |
The |
|
symbol flashes on the display. |
The child lock is operating (see page 18). |
|
|||
|
|
|
|
The CAL and 40 °C symbol flash |
The temperature in the oven is above 40 °C. Therefore the calibration |
||
alternating on the display. |
cannot take place. The actual temperature appears on the left of |
||
|
|
|
the display. The appliance automatically cools the oven below |
|
|
|
40 °C and re-starts the calibration. |
F 61 or F 62 lights on the display. |
Check the power and water supply. If these are functioning |
||
|
|
|
correctly call the Gaggenau after-sales service. |
|
|
|
|
|
|
|
|
8 |
|
|
|

3.4 Determining water hardness
Water hardness range 4 has been pre-entered on the appliance. If the hardness of the water in your household should deviate from this value, the correct water hardness range (between 1
and 4) must be entered before commencing operation of the appliance. You can find out the hardness of the water in your household either by consulting your waterworks or by using the included test strip.
–Run water from the tap for about 20 seconds to drain off stale water.
–Fill a glass with tap water and briefly (no more than 1 second) dip the test strip into the water, making sure that all test points are wetted.
–Remove the strip from the water and shake off any surplus water drops.
–You can read off the result after one minute.
–If your water contains lime, one or more of the test areas is/are of a reddish colour and the others stay light or greenish. The number of light (green) areas defines the right water hardness range setting on the appliance.
The test set must be used even if a water descaling system is already installed in your household because, depending on the descaling method, not all scale-forming ions are removed.
Number of light |
Water hardness |
Water |
(green) areas on |
(German hardness) |
hardness |
the test strip |
|
range |
3 or more |
1-7° |
1 |
2 |
7-14° |
2 |
1 |
14-21° |
3 |
None |
>21° |
4 |
|
|
|
Please also note that different designations are used outside Germany to describe the hardness of water.
Water hardness range |
1 |
2 |
3 |
4 |
|
|
|
|
|
American hardness |
1-7° |
7-14° |
14-21° |
>21° |
French hardness |
1-12° |
12-25° |
25-37° |
>37° |
British hardness |
1-9° |
9-18° |
18-26° |
>26° |
Russian hardness |
1-50° |
50-100° |
100-150° |
>150° |
|
|
|
|
|
9
3.5 Entering the water hardness |
|
|
|||
|
End |
|
If the hardness of the water in your household |
||
|
|
deviates from the value that is set at the works |
|||
|
Options menu |
|
|||
|
|
|
(water hardness range 4), you must enter the |
||
|
Temperature |
0 |
right water hardness in the options menu for |
||
Descaling |
commencing operation of the appliance. |
||||
display in |
|
||||
|
° C / ° F |
|
Proceed as follows: |
||
|
|
|
|||
|
|
|
– Turn the two control knobs to the topmost |
||
|
|
|
position. |
|
|
Start |
Time display |
|
– Press the |
(Confirmation) key and keep it |
|
Calibration |
24h / 12h (AM/PM) |
|
pressed. |
|
|
|
|
|
|||
|
|
|
– Turn the “Moisture level” knob to the right. |
Fig. 10 |
Time display |
– Release the (Confirmation) key. |
|
ON/OFF |
|
||
(only if appliance is switched off) |
– The various options appear on the display. Turn |
|
|
||
|
the “Moisture level” control knob to the right to |
|
|
the descaling position. |
|
|
– With the + and – keys, set the water hardness |
|
|
(between 1 and 4) (Fig. 11). |
|
|
– Press the |
(Confirmation) key. |
|
– To quit the options menu, turn the “Moisture” |
|
|
control knob back up or turn the “Temperature” |
|
|
control knob. |
|
Fig. 11 |
|
|
10

4. Operation
4.1 Switching on and off
Switching on |
Fig. 12 |
The appliance rinses automatically when switched on, if it has not been in operation for some days. This removes water that is left over in the pipes and will take no longer than 1 minute.
Switching off |
Fig. 13 |
4.2 Control knobs |
|
|
Off |
Cleaning assistance |
Suggested |
temperature |
|
Moisture |
Temperature |
control knob |
control knob |
Fig. 14 |
|
Switching on
–Turn the “Temperature” control knob by one latching position to the right (Fig. 12).
The lighting goes on:
–Turn the “Moisture level” control knob to the moisture level you require.
–Turn the “Temperature” knob to the temperature you require.
When you turn the “Temperature” knob one latching position to the left, the suggested temperature for the chosen moisture level appears on the display.
100 % – 100 °C
80 % – 120 °C
60 % – 120 °C
30 % – 165 °C
0 % – 165 °C
When the “Moisture” control knob is turned, the moisture is displayed for a few seconds.
Switching off:
To switch off, turn the “Temperature” knob to the 0 position (Fig. 13).
The steam oven lighting goes off.
“Temperature” control knob:
The temperature can be set between 30 and 230 °C.
“Moisture” control knob:
You can select the following moisture levels: 100 %, 80 %, 60 %, 30 % und 0 %
11
4.3 Operating modes
Moisture |
Temperature |
|
Display |
Particularly |
|
Principle |
Remarks |
||||
|
|
|
|
|
|
|
|
suitable for... |
|
|
|
100% |
150 - 230°C |
|
|
|
|
|
|
Bread |
|
Steam baking: |
|
|
|
|
|
|
|
|
|
||||
|
|
|
|
|
|
|
|
poultry, |
|
The high moisture prevents the food from drying out. |
|
|
|
|
|
|
|
|
|
puff pastry |
|
Thanks to the high temperature, the surface become |
|
|
|
|
|
|
|
|
|
|
|
crispy brown all-round. |
|
100% |
100°C |
|
|
|
|
|
|
Vegetables, |
|
Steaming: |
You can use several |
|
|
|
|
|
|
|
|
side dishes, |
|
The food is completely surrounded by steam. |
cooking inserts at |
|
|
|
|
|
|
|
|
blanching, |
|
Steaming is a very gently method with which the food |
the same time. |
|
|
|
|
|
|
|
|
sterilising, |
|
is not deprived of its goodness and retains its natural |
|
|
|
|
|
|
|
|
|
juice extraction |
|
colour. |
|
100% |
120°C |
|
|
|
|
|
|
Potatoes, |
|
Fast steaming: |
|
|
|
|
|
|
|
|
|
pulses and beans |
|
The higher temperature accelerates steaming. |
|
|
|
|
|
|
|
|
|
|
|
Not suitable for sensitive foodstuffs. |
|
100% |
80 - 90°C |
|
|
|
|
|
|
Fish |
|
Low-temperature steaming: |
|
|
|
|
|
|
|
|
|
|
|
The air in the cooking compartment is saturated with |
|
|
|
|
|
|
|
|
|
|
|
steam. The heat is transferred without any drying out |
|
|
|
|
|
|
|
|
|
|
|
whatever. Protein leaking is avoided by the lower |
|
|
|
|
|
|
|
|
|
|
|
temperature. |
|
80% |
30 - 45°C |
|
|
|
|
|
|
Yeast dough, |
|
Fermenting, rising: |
Light goes off after |
|
|
|
|
|
|
|
|||||
60% |
|
|
|
|
|
|
|
sour dough mixture, |
|
Thanks to the moisture, the heat is distributed |
a few seconds. |
|
|
|
|
|
|
|
|
Yoghurt |
|
particularly evenly. The surfaces of doughs do not |
|
|
|
|
|
|
|
|
|
|
|
dry out so much. |
|
80% |
150 - 230°C |
|
|
|
|
|
|
Casserole dishes, |
|
Combined steaming: |
|
60% |
|
|
|
|
|
|
|
gratin, |
|
the middle way between steam baking and hot air |
|
|
|
|
|
|
|
|
|
roast |
|
operation makes it possible to achieve the optimum |
|
|
|
|
|
|
|
|
|
|
|
cooking climate for every food. |
|
60% |
120°C |
|
|
|
|
|
|
Plated dishes |
|
Reheating: |
Meals can be heated |
|
|
|
|
|
|
|
|||||
|
160°C |
|
|
|
|
|
|
|
|
cooked food can be reheated gently. Thanks to the |
directly on the plate. |
|
|
|
|
|
|
|
|
|
|
supply of steam, the food is not dried out. |
|
|
|
|
|
|
|
|
|
|
|
Reheat food served on plates at 120 °C and baked |
|
|
|
|
|
|
|
|
|
|
|
items at 160 °C. |
|
30% |
150 - 230°C |
|
|
|
|
|
|
Yeast pastry |
|
In this mode of operation, the cooking compartment |
|
|
|
|
|
|
|
|
|
|
|
is sealed hermetically. The remaining moisture |
|
|
|
|
|
|
|
|
|
|
|
prevents the drying effect of conventional hot air. |
|
30% |
70 - 80°C |
|
|
|
|
|
|
Roast beef, |
|
Low-temperature cooking: |
|
|
|
|
|
|
|
|
|
leg of lamb |
|
briefly seared meat can mature slowly and gently |
|
|
|
|
|
|
|
|
|
|
|
over a long cooking time. |
|
0% |
150 - 230°C |
|
|
|
|
|
|
Fruit cake |
|
Hot air: |
|
|
|
|
|
|
|
|
|
|
|
the cooking compartment is ventilated and vented |
|
|
|
|
|
|
|
|
|
|
|
through an opening so that the moisture produced |
|
|
|
|
|
|
|
|
|
|
|
can be dissipated. This is particularly advantageous |
|
|
|
|
|
|
|
|
|
|
|
for baked items that have to give off moisture during |
|
|
|
|
|
|
|
|
|
|
|
the baking process. |
|
100% |
60°C |
|
|
|
|
|
|
|
|
Cleaning aid |
|
|
|
|
|
|
|
|
|
|
|
The cleaning aid makes it possible to loosen |
|
|
|
|
|
|
|
|
|
|
|
soiling with steam. |
|
|
|
|
|
|
|
|
|
|
|
|
|
12

4.4 Operating the timer
The required moisture level and temperature can be set before and after time programming by turning the “Temperature” or “moisture level” knob.
As long as one or several symbol(s) in the display flash(es), no input is possible and no value is programmed or an invalid value has been programmed.
All time values are entered by means of the 

 (timer), +, – and
  (confirmation) keys. Every
input triggers an audible and a visible signal.
If you select a program (e.g. end), but you do not enter a value, the current time will appear on the display after 20 seconds.
An entered value (e.g. duration programming) must be confirmed within 20 seconds  (Confirm) key. Entered values are not stored if they are not confirmed.
Press the  (Confirm) key if you wish to confirm a value during programming.
If you press any other key instead, the entered value will not be stored and will disappear.
You can query set values by pressing the 

 (timer) key. The value appears on the display for around 10 seconds. During this time, you can
modify the value by pressing the + or – key and you can confirm it by pressing the  (Confirm) key.
Press the + and – keys at the same time if you wish to clear a value.
If you have already programmed a time value once (e.g. a duration) on the appliance, this previously programmed value will be proposed to you when programming a value again.
The longer you press the + or – key when programming a time, the faster the time elapses on the display.
After completion of time programming, the corresponding symbol flashes on the display. For example, if you have programmed an end time, the 
 (end time) symbol will flash. An audible signal is also sounded. Heating is deactivated and the oven lighting goes off. You can restart the previously selected mode by pressing any key on the display. You end the baking process by turning the “Temperature" knob to 0.
During a time programming it is possible at any time to turn the “Temperature” control knob back to 0. The steam oven will then no longer heat. The previously programmed value is retained. An audible signal sounds after the entered time has elapsed.
Every alarm goes off after 3 minutes.
Note: all time programming functions can be programmed simultaneously.
Note: If the time is not displayed exactly on the timer, this may not be due to a technical defect. The mains frequency of the public power supply is the time base for the timers. In Europe, this is a standard frequency of 50 Hz (Hertz). As far as this point is concerned, power supply networks that are fed from power stations in eastern Europe fluctuate. This is why an incorrect time may be displayed. This discrepancy has no influence on the functions and program sequences of the appliance.
13
 Loading...