

Gaggenau BO 280/281-6, BO 250 Series, BO 251-6 Series, BO 280-6 Series, BO 281-6 Series Use And Care Manual

Oven
BO 280/281-6..
Gaggenau Use and Care Manual


Important Safety Instructions 4
Fire Safety 4
Burn Prevention 4
Child Safety 4
Cleaning Safety 4
Cookware Safety 5
Proper Installation and Maintenance 5
Operating for the First Time 6
Avoiding Damage to the Appliance and the
Cabinet 6
Oven 6
Cabinet Fronts near the Oven 6
Features of your New Oven 7
Oven 7
Display and Controls 8
Keys 8
Accessories 9
Heating Modes 10
First Settings after Installation 11
Note 11
Setting the Language 11
Choosing the Time Format 11
Setting the Clock 11
Setting the Date 12
Temperature Unit °C or °F 12
Exiting Menu and Saving Settings 12
Activating the Oven 13
Standby 13
Activating the Oven 13
Setting the Oven 14
Setting the Temperature and Cooking Mode 14
Current Oven Temperature Display 14
Meat Probe 15
Programming the Meat Probe 15
Note 16
Cleaning 16
Recommended Temperature Values 16
Rotary Spit 17
Preparation 17
Switching on the Rotary Spit 17
Switching off the Rotary Spit 18
Note 18
Baking Table 19
Roasting Table 20
Grilling Table 22
Tips and Tricks 23
Baking 23
Further Tips for Baking 24
Rising Dough (Fermenting) 24
Tips for Roasting and Grilling 24
Defrosting 24
Timer 25
Calling up the Timer Menu 25
Timer 25
Stopwatch 26
Cooking Time Duration 27
Cooking Time End 28
Sabbath Mode 29
Setting the Program 29
Note 29
Memory Recipes 30
Calling up the Memory Menu 30
Storing the Settings 30
Note 30
Starting a Memory Recipe 31
Note 31
Child Lock 32
Activating the Child Lock 32
Deactivating the Child Lock 32
Note 32
Additional Functions 33
Safety Deactivation 33
Fast Heating up 33
Changing the Basic Settings 34
Note 34
Example: Changing the Standby Screen 34
The Following Settings Can Be Changed 35
Care and Manual Cleaning 37
Pyrolysis 38
Before Starting Pyrolysis 38
Setting the Program 38
Delaying the Switch-off Time 39
Note 39
Cleaning Accessories with Pyrolysis 40
Trouble Shooting 41
Error Messages 41
Exhibition Mode 41
Power Cut 42
Replacing the Oven Lights 42
Replacing the Ceiling Light 42
Replacing the Side Light 43
Table of Contents
3

Fire Safety
Read and save these instructions.
Do not use aluminum foil or protective liners to line
any part of an appliance, especially surface unit
drip bowls or oven bottom. Installation of these
liners may result in a risk of electric shock or fire.
If materials inside an oven or warming drawer
should ignite, keep door closed. Turn off the
appliance and disconnect the circuit at the circuit
breaker box.
Use this appliance only for its intended use as
described in this manual. For example, never use
the appliance for warming or heating the room.
Never use the appliance for storage.
Always have a working smoke detector near the
kitchen.
In the event that personal clothing or hair catches
fire, drop and roll immediately to extinguish flames.
Smother flames from food fires other than grease
fires with baking soda. Never use water on cooking
fires.
Have an appropriate fire extinguisher available,
nearby, highly visible and easily accessible near the
oven.
Burn Prevention
DO NOT TOUCH HEATING ELEMENTS OR
INTERIOR SURFACES OF OVEN – Heating
elements may be hot even though they are dark in
color. Interior surfaces of an oven become hot
enough to cause burns. During and after use, do
not touch, or let clothing, potholders, or other
flammable materials contact heating elements or
interior surfaces of oven until they have had
sufficient time to cool. Other surfaces of the
appliance may become hot enough to cause burns.
Among these surfaces are oven vent openings,
surfaces near these openings and oven doors.
Exercise caution when opening the appliance.
Standing to the side, open the door (or drawer)
slowly and slightly to let hot air and/or steam
escape. Keep your face clear of the opening and
make sure there are no children or pets near the
unit. After the release of hot air and/or steam,
proceed with your cooking. Keep doors shut unless
necessary for cooking or cleaning purposes. Do not
leave open doors unattended.
Do not heat or warm unopened food containers.
Build-up of pressure may cause the container to
burst and cause injury.
Always place oven racks in desired location while
oven is cool. If a rack must be moved while oven is
hot, do not let potholder contact the heating
elements.
Always use dry potholders. Moist or damp
potholders on hot surfaces may result in burns from
steam. Do not let potholder touch hot heating
elements. Do not use a towel or other bulky cloth.
Child Safety
When children become old enough to use the
appliance, it is the legal responsibility of the
parents or legal guardians to ensure that they are
instructed in safe practices by qualified persons.
Do not allow anyone to climb, stand, lean, sit, or
hang on any part of an appliance, especially a door,
warming drawer, or storage drawer. This can
damage the appliance, and the unit may tip over,
potentially causing severe injury.
Do not allow children to use this appliance unless
closely supervised by an adult. Children and pets
should not be left alone or unattended in the area
where the appliance is in use. They should never be
allowed to play in its vicinity, whether or not the
appliance is in use.
CAUTION – Items of interest to children should not
be stored in an appliance, in cabinets above an
appliance or on the backsplash. Children climbing
on an appliance to reach items could be seriously
injured.
Cleaning Safety
IMPORTANT SAFETY NOTICE: The California Safe
Drinking and Toxic Enforcement Act requires the
Governor of California to publish a list of
substances known to the state to cause cancer,
birth defects or other reproductive harm, and
requires businesses to warn customers of potential
exposure to such substances.
The burning of gas cooking fuel and the elimination
of soil during self-cleaning can generate small
amounts of Carbon Monoxide.
4
Important Safety Instructions
!

The fiberglass insulation in self-clean ovens gives
off very small amounts of formaldehyde during the
first several cleaning cycles.
California lists formaldehyde as a potential cause of
cancer. Carbon Monoxide is a potential cause of
reproductive toxicity.
Exposure to these substances can be minimized by:
1. Providing good ventilation when cooking with
gas.
2. Providing good ventilation during and
immediately after self cleaning the oven.
3. Operating the unit according to the instructions
in this manual.
When self-cleaning, confirm that the door locks and
will not open. If the door does not lock, do not run
Self-Clean. Contact service.
Wipe out excessive spillage before self-cleaning the
oven.
Birds have very sensitive respiratory systems. Keep
pet birds out of the kitchen or other rooms where
kitchen fumes could reach them. During self clean,
fumes are released that may be harmful to birds.
Other kitchen fumes such as overheating
margarines and cooking oils may also be harmful.
Keep oven free from grease build up.
Cookware Safety
Do not place food directly on oven bottom.
Follow the manufacturer’s directions when using
cooking or roasting bags.
Proper Installation and Maintenance
WARNING: When properly cared for, your new
appliance has been designed to be safe and
reliable. Read all instructions carefully before use.
These precautions will reduce the risk of burns,
electric shock, fire, and injury to persons. When
using kitchen appliances, basic safety precautions
must be followed, including those in the following
pages.
Have the installer show you the location of the
circuit breaker or fuse. Mark it for easy reference.
This appliance must be properly installed and
grounded by a qualified technician. Connect only to
properly grounded outlet. Refer to Installation
Instructions for details.
This appliance is intended for normal family
household use only. It is not approved for outdoor
use. See the Warranty. If you have any questions,
contact the manufacturer.
Do not store or use corrosive chemicals, vapors,
flammables or nonfood products in or near this
appliance. It is specifically designed for use when
heating or cooking food. The use of corrosive
chemicals in heating or cleaning will damage the
appliance and could result in injury.
Do not operate this appliance if it is not working
properly, or if it has been damaged. Contact an
authorized servicer.
Do not obstruct oven vents.
Do not repair or replace any part of the appliance
unless specifically recommended in this manual.
Refer all servicing to a factory authorized service
center.
In the event of an error the display flashes. If this
happens during self-clean, disconnect appliance
from the power supply and call a qualified
technician.
In the event of an error the display flashes.
Disconnect appliance from the power supply and
call a qualified technician.
5
Important Safety Instructions
!

6
Remove the packaging from the appliance and
dispose of it according to local regulations.
Be careful to remove all accessories from the
packaging. Keep packaging elements and plastic
bags away from children.
Check the appliance for transport damage after
unpacking it. Do not connect the appliance if it has
been damaged.
The appliance must be connected by an authorised
specialist. No warranty claims can be lodged for
any damage resulting from incorrect connection.
Observe the installation instructions.
Thoroughly clean the appliance before using it for
the first time. This will eliminate any ‘newness’
smells and soiling.
This appliance is labelled in accordance
with the European Directive 2002/96/EG
concerning used electrical and electronic
appliances (waste electrical and electronic
equipment – WEEE). The guideline
determines the framework for the return and
recycling of used appliances as applicable.
Oven
Remove fruit acids such as the juice of lemons or
plums etc. after every baking operation. The acid
can cause spots on the oven’s enamel.
Never splash water into a hot oven. This could
damage the enamel.
Do not place the baking tray directly onto the
bottom of the oven. Do not place utensils (for
example a roaster) directly onto the bottom of the
oven. Do not line the bottom of the oven with
aluminium foil. This will cause a build-up of heat
which can damage the enamel.
Do not cover the ventilation openings of the oven.
Do not take off the door seal. A damaged door seal
must be changed immediately.
The socket for the separate heating element for the
roaster and the baking stone (special accessory)
can be found in the middle of the back panel at the
bottom. During normal operation, please leave the
cover in the socket.
Cabinet Fronts near the Oven
After taking the food out of the oven, allow the oven
to cool down with the door closed. Do not leave the
oven door half open, the hot air can cause damage
to adjacent cabinets. The cooling fan will continue
to run for a while and will then switch off
automatically.
Operating for the First Time Avoiding Damage to the Appliance
and the Cabinet

7
Features of your New Oven
Display and controls
Ventilation openings – Do not obstruct oven vents
Oven
Door seal
Socket for meat probe
Socket for heating element
BA 056/058
Rotary spit
connector
8
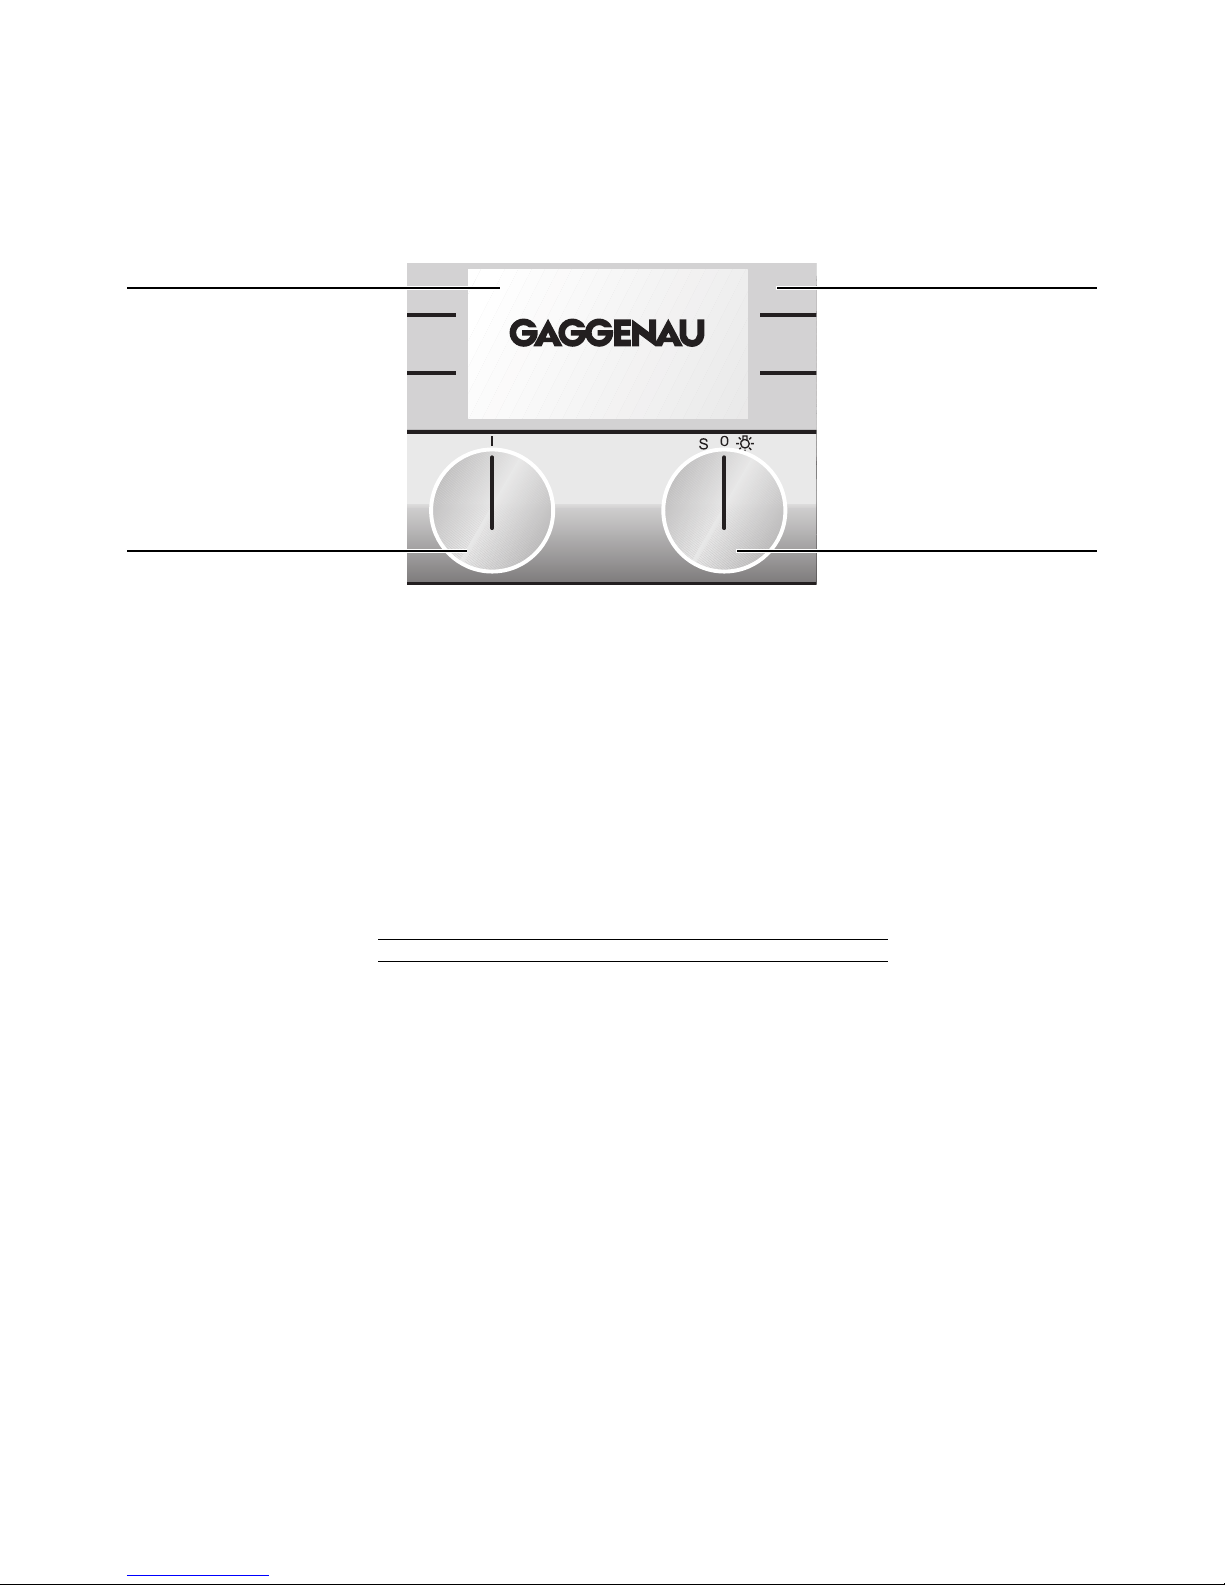
Display and Controls
Temperature selector
You can set a temperature
between 120 and 550°F or
pyrolysis. You can turn the
knob to the right or left. To
switch on the light in the
oven, turn the temperature
selector one position to
the right.
The light in the oven
remains off if the
temperature is set below
140°F.
Function selector
Use the left knob to select
the cooking mode you will
use to prepare your meal
or the pyrolysis function.
You can turn the knob to
the right or left.
Display
In the top part of the display
is the status bar or a call up
menu. The lower part shows
the different settings.
Tou ch keys
The keys on the left and
right beside the display
are touch sensitive. The
function of the keys
depends on the chosen
setting. The icon beside
the key shows the function
of the key.
Keys
Symbol Function
g move right
f move left
b save selected values / start
j cancel
d increase values
e decrease values
q timer menu
c basic settings menu
I rotary spit
a call up additional info
o child lock activate
p child lock deactivate
V extended timer
l timer stop
m timer start
k store memory recipe
9
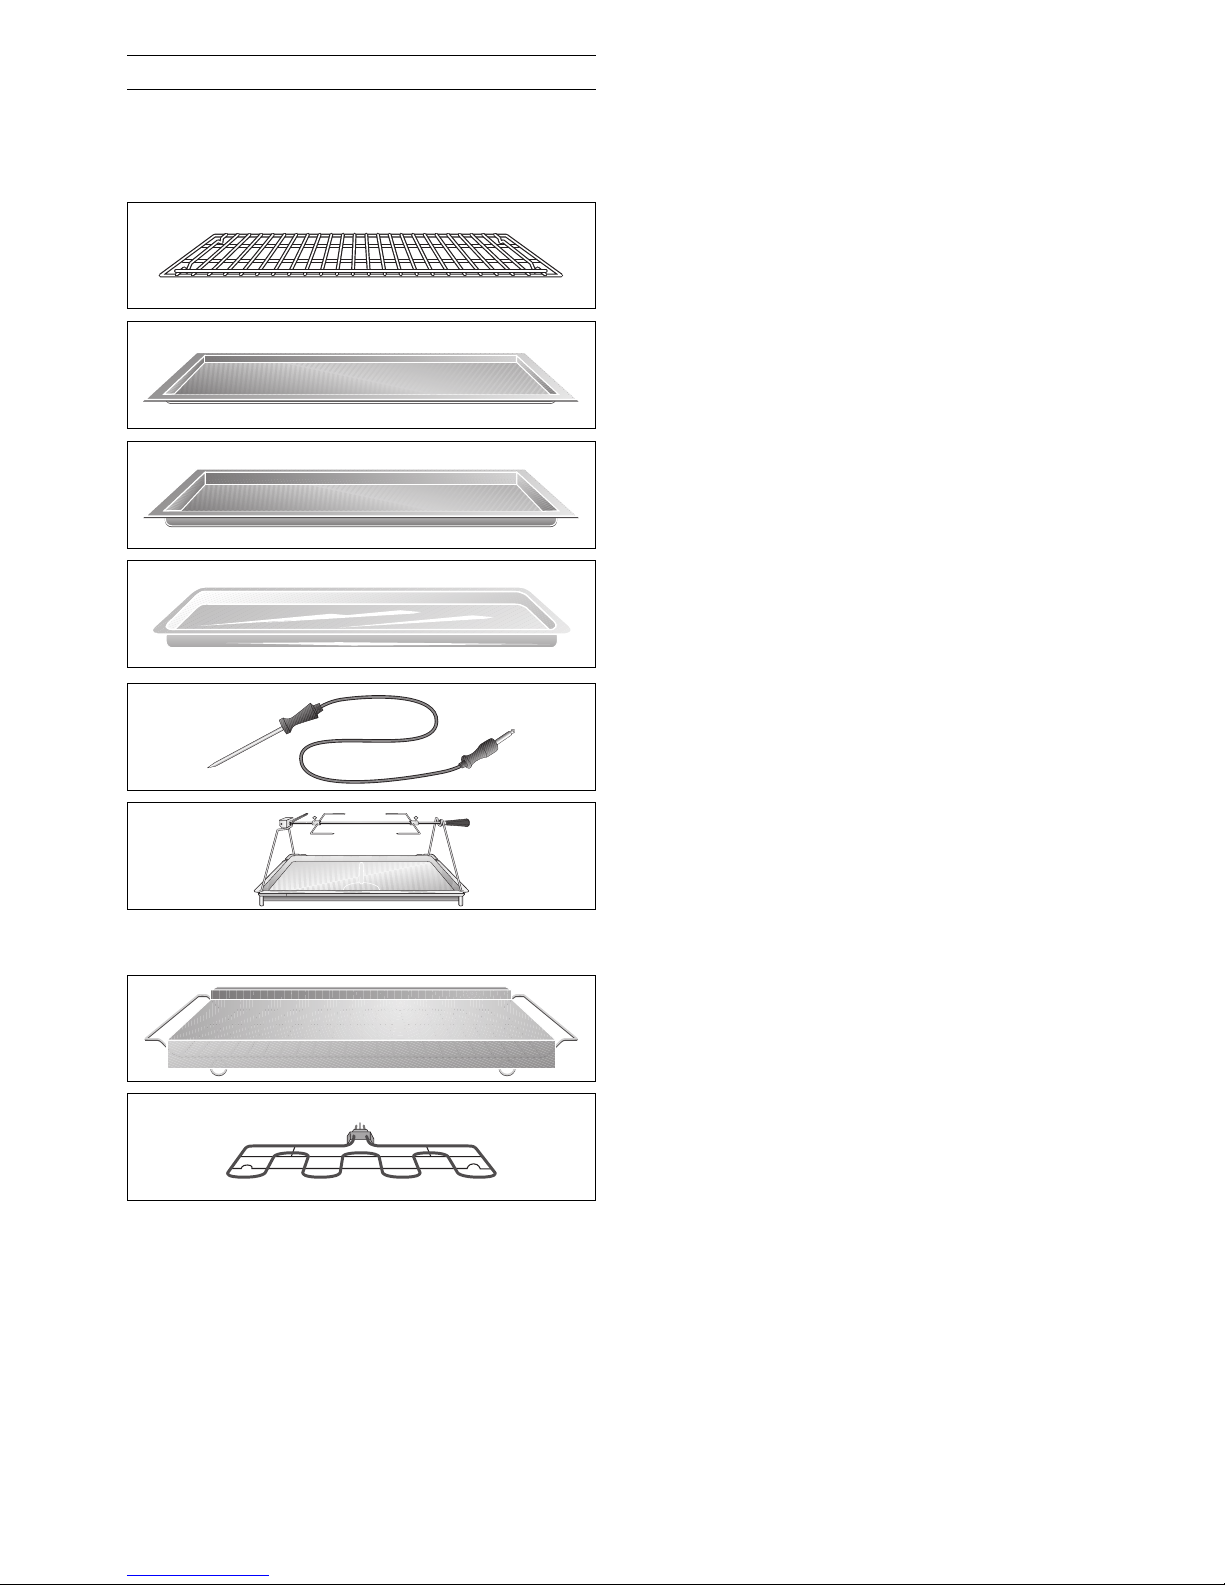
Accessories
As standard, your appliance comes with the
following accessories:
•
Wire rack for cake tins, roasts, broiled pieces
and crockery
Always insert the wire rack with the double
crossbrace to the front.
•
Baking tray for cakes, biscuits and pastries
•
Broiling tray for roasts or as a grease collecting
tray
•
Models BO 270/271 only:
glass tray for gratins and fruit cake
•
Meat probe
•
Rotary spit with support frame
You can order the following special accessories:
•
Baking stone with wire rack and wooden pizza
spatula for pizza and bread
Additionally you will require the heating element
•
Heating element for baking stone
! WARNING: Do not use aluminum foil or
protective liners to line any part of an appliance,
especially surface unit drip bowls or oven bottom.
Installation of these liners may result in a risk of
electric shock or fire.
Do not place food directly on oven bottom.
10
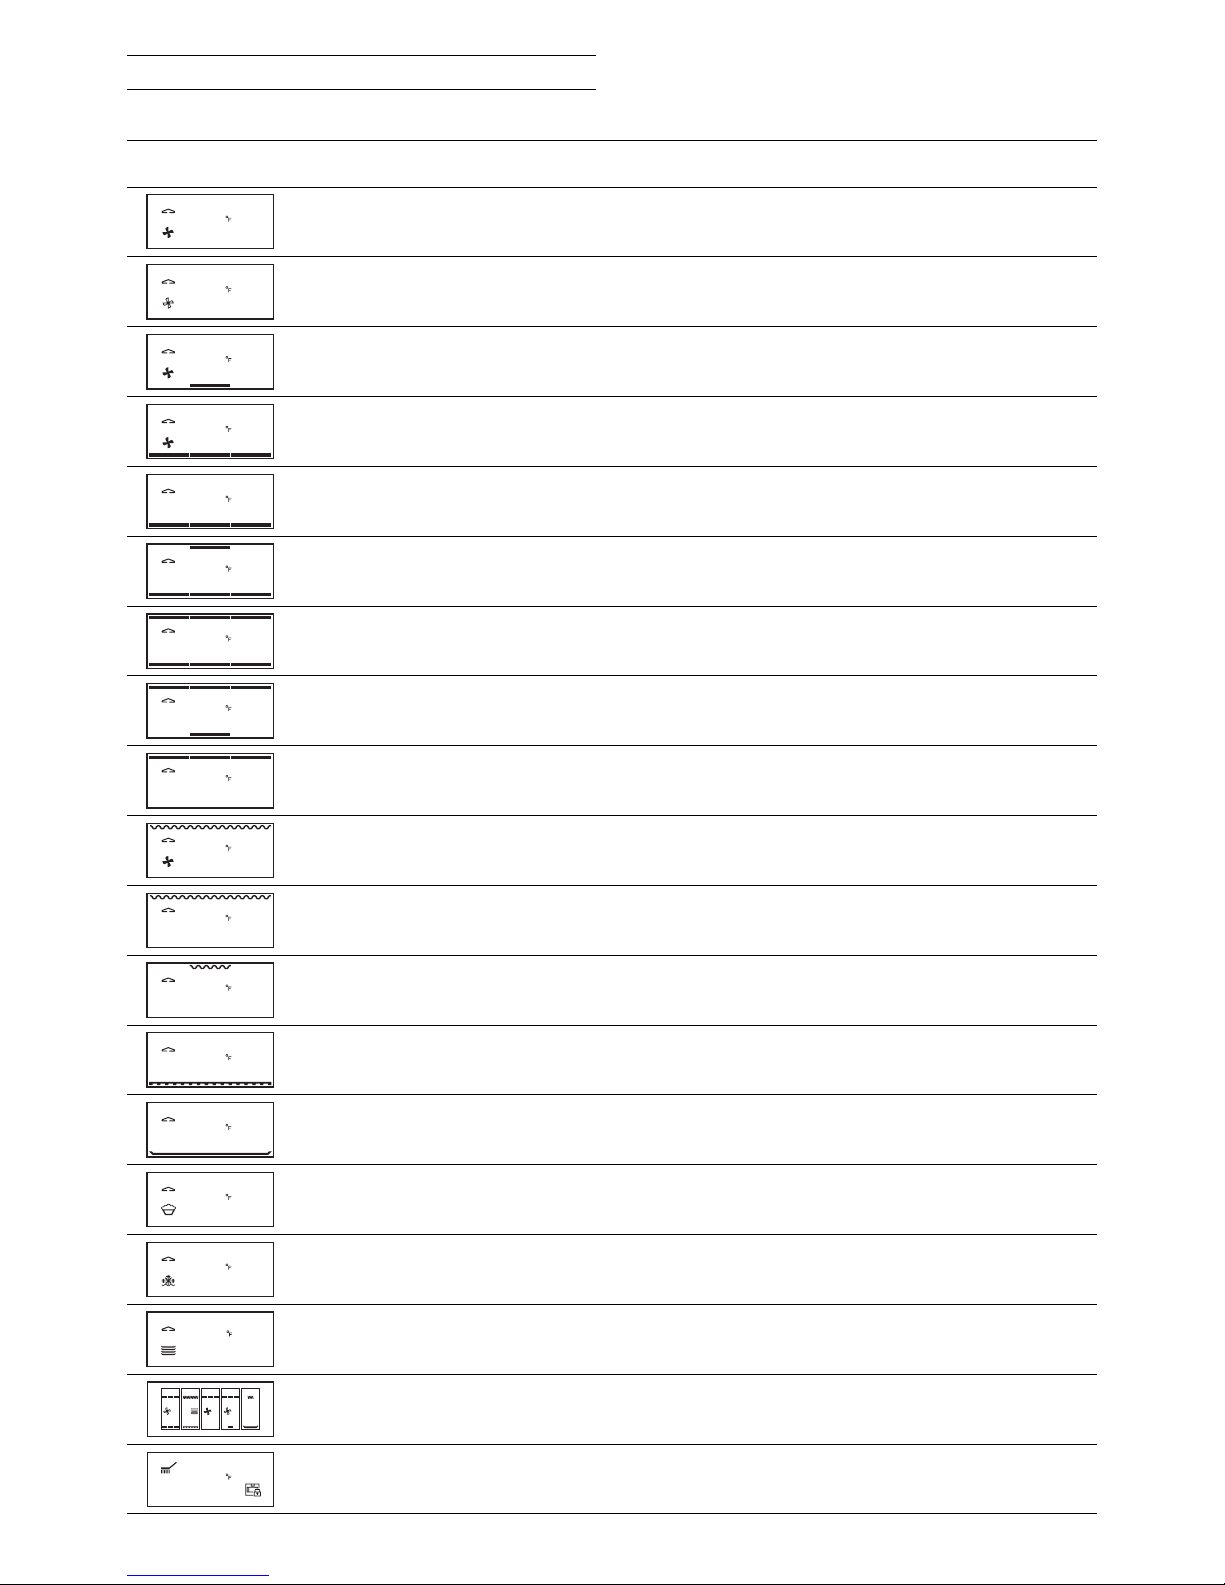
Heating Modes
Display Heating mode Use
Convection For cakes, biscuits and puff pastry on several
levels
Economy Energy saving convection mode for cakes,
(the oven light is off) small pastries or gratins
Convection and 1/3 bottom heat Additional reduced heat from beneath.
Convection and bottom heat Additional heat from beneath for moist cakes,
for example fruit cakes
Bottom heat Further baking, for example for fruit cakes,
for preserving or for food in a bain-marie
1/3 Top and bottom heat Bottom heat with reduced top heat
Top and bottom heat For cakes in tins or on trays, gratins or roasts
Top and 1/3 bottom heat Top heat with reduced bottom heat
Top heat Direct heat from the top, for example to brown
meringue on a fruit cake
Convection broiling Evenly distributed heat for meat, poultry or
whole fish
Broiling Broiling flat pieces of meat, sausages or fish fillets
melting cheese, gratins
Economy broiling Only the middle part of the heating element is on.
Energy saving grilling for small amounts of food
Baking stone operation Heated baking stone for crispy pizza, bread
(only with special accessories) or bread rolls like from a solid stone oven
Roaster operation Heated cast roaster for large quantities of meat,
(only with special accessories) gratin or the Christmas turkey
Dough proofing Raising yeast dough, the perfect temperature
setting is 100°F
Defrosting Even and gentle defrosting between
100 - 140°F depending on the food
Keeping warm Keep meals warm, warm porcellain dishes
Memory recipes Store and recall the settings for meals that
you often prepare
Pyrolysis Automatic self cleaning
355
355
355
355
360
360
360
360
360
380
390
390
550
430
100
110
175
905
02:30 00:30 00:30 02:30 00:30
390
F
175 F
360 F 320 F 175 F
11
First Settings after Installation
When your new oven has been connected, the first
settings menu appears on the display.
You can set the
•
time format,
•
language,
•
clock,
•
date,
•
temperature unit.
Note
The first settings menu appears only after the
appliance has been connected or if the appliance is
without electricity for several days.
Refer to the chapter basic settings if you wish to
change these parameters at any time.
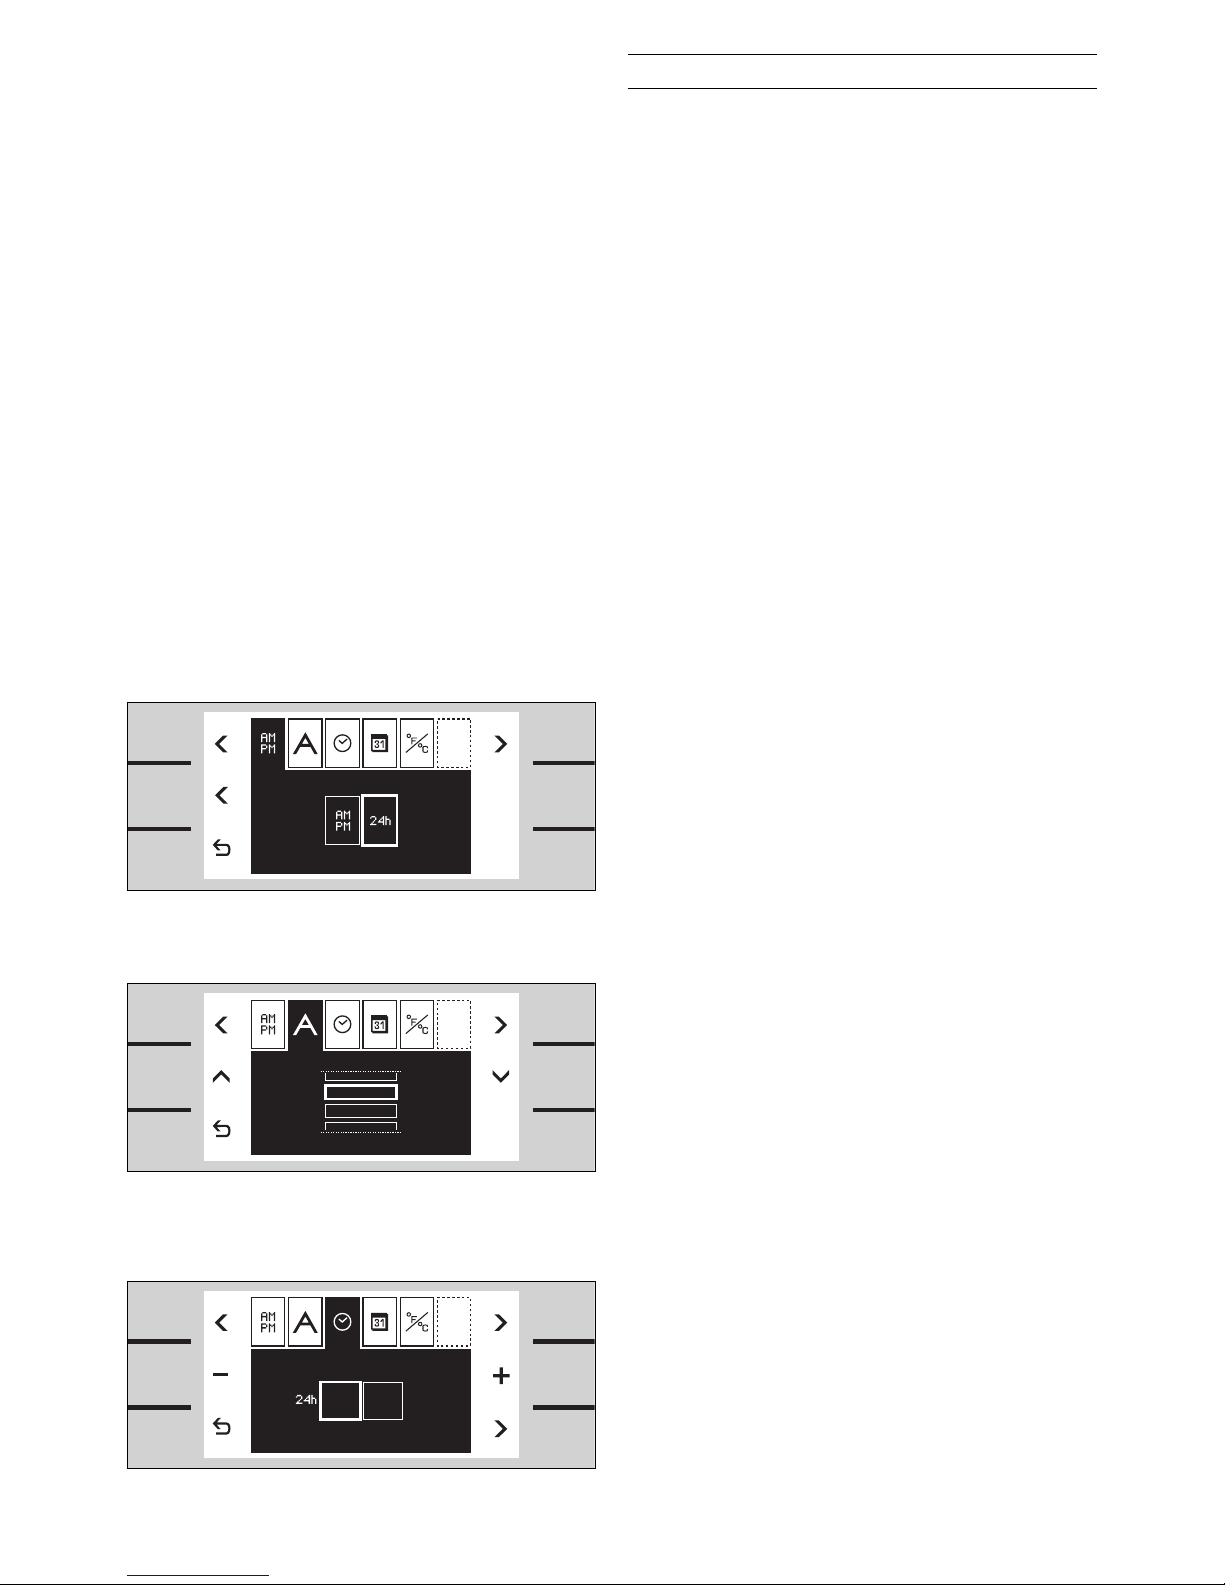
Choosing the Time Format
1 The time fomat setup menu appears on the
screen.
The time fomat can be either 12 hour format
(AM/PM) or 24 hour format. The 24 hour format
is pre-selected.
2 You can change the time format using the
centre f key.
Setting the Language
1 Using the menu key g select the language
setup menu. The available languages for the
display messages appear on the screen.
German is pre-selected.
2 You can change the language using the
h or i
keys or switch the display messages off.
Setting the Clock
1 Using the menu key g select the clock
function
Q.
08:30 appears on the screen.
2 Using the
d / e keys set the correct time.
Use the arrow key
g bottom right to change from
hours to minutes.
English
Deutsch
Francais
Italiano
3008
12
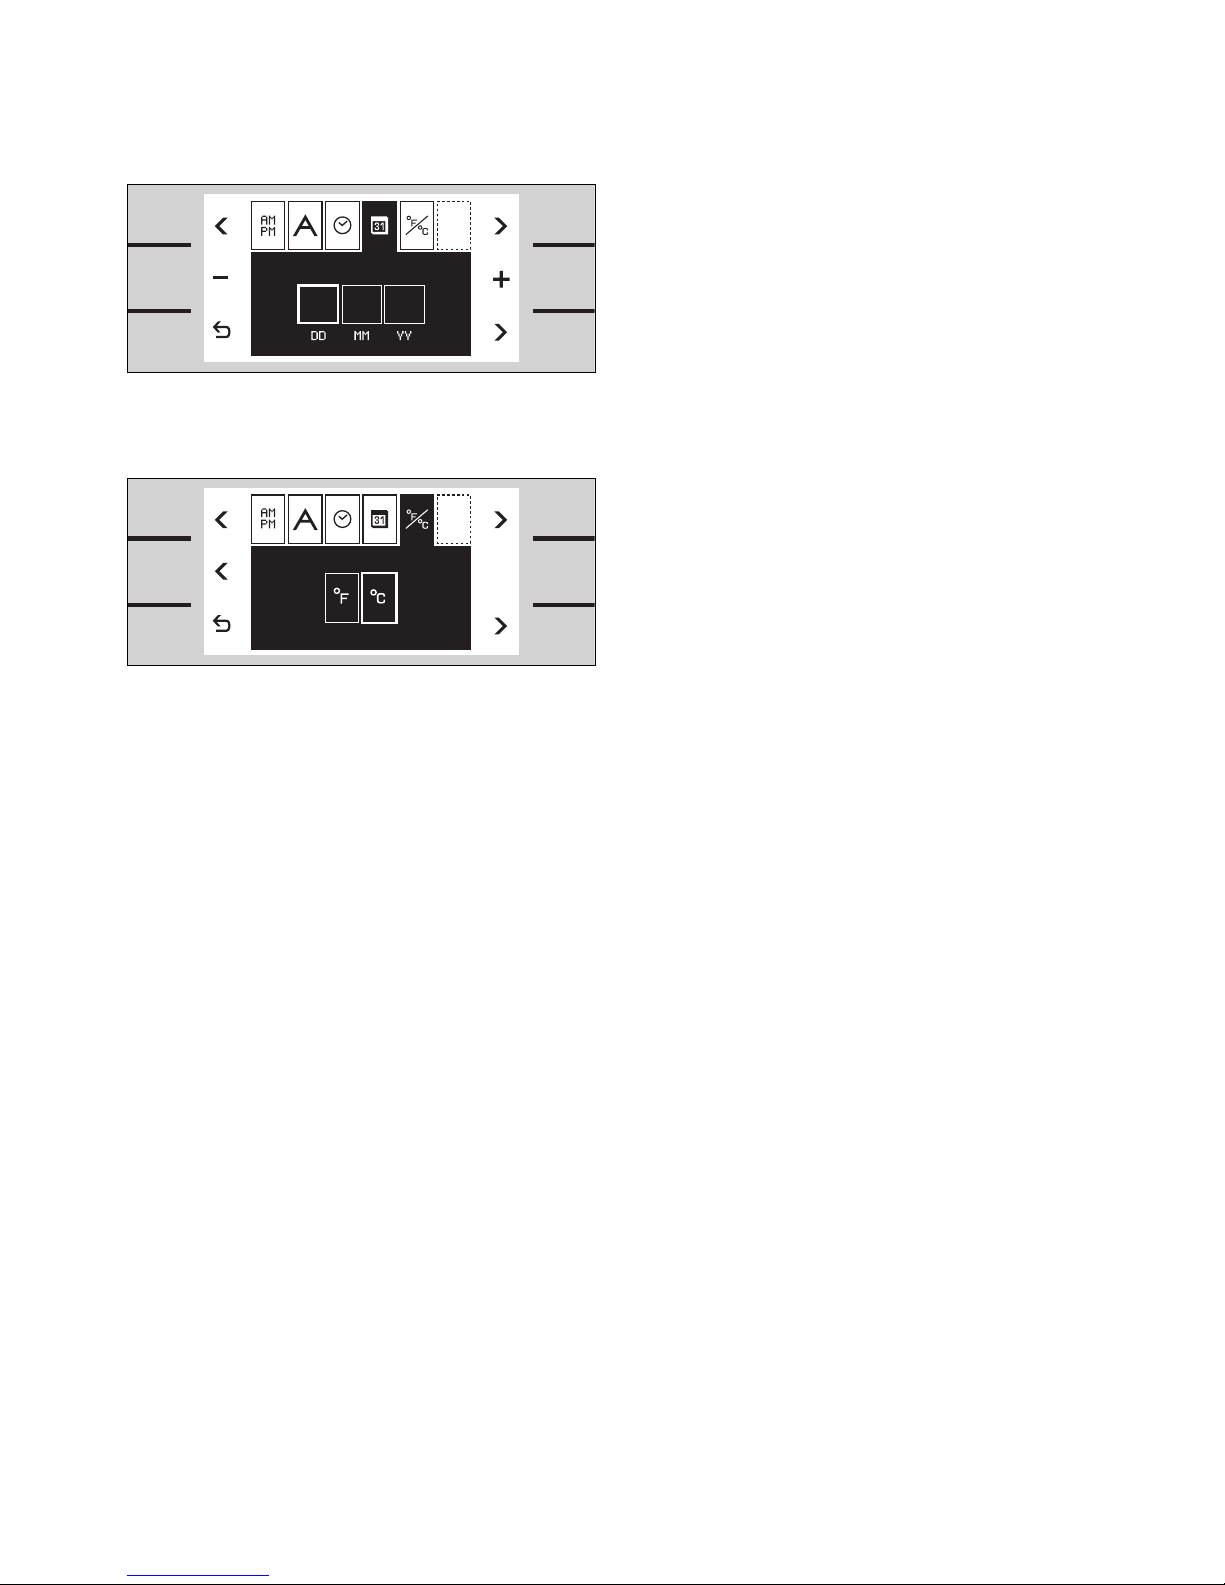
Setting the Date
1 Using the menu key g select the date
function a.
26.10.07 appears on the screen.
2 Using the
d / e keys enter day, month, year.
Use the arrow key
g bottom right to change from
day/month/year.
Temperature Unit °C or °F
1 Using the menu key g select the temperature
unit function l. °C is pre-selected.
2 You can change the temperature unit using the
middle
f key.
Exiting Menu and Saving Settings
Touch the b key to exit the menu. All settings are
saved.
The oven is on standby. The standby screen
appears.
10 0726
13
13:30
Standby
The oven remains on standby when no operating
mode is selected or the child lock is activated.
The keys are not activated. The display is not lit.
Note:
You can choose between different standby screens.
GAGGENAU and the clock is pre-selected. Refer to
the chapter basic settings if you want to change the
standby screen.
Note:
The display contrast depends on the vertical
viewing angle. You can adjust the contrast of the
display in the basic settings.
Activating the Oven
To leave standby do one of the following:
•
touch a key
•
open or close the oven door
•
turn the temperature knob
•
turn the function knob
Now you are able to set the required function. Read
the relevant chapter on how to activate the required
function.
Note:
The standby screen reappears after one minute if
no further function is chosen. The display light goes
off.
Activating the Oven
14
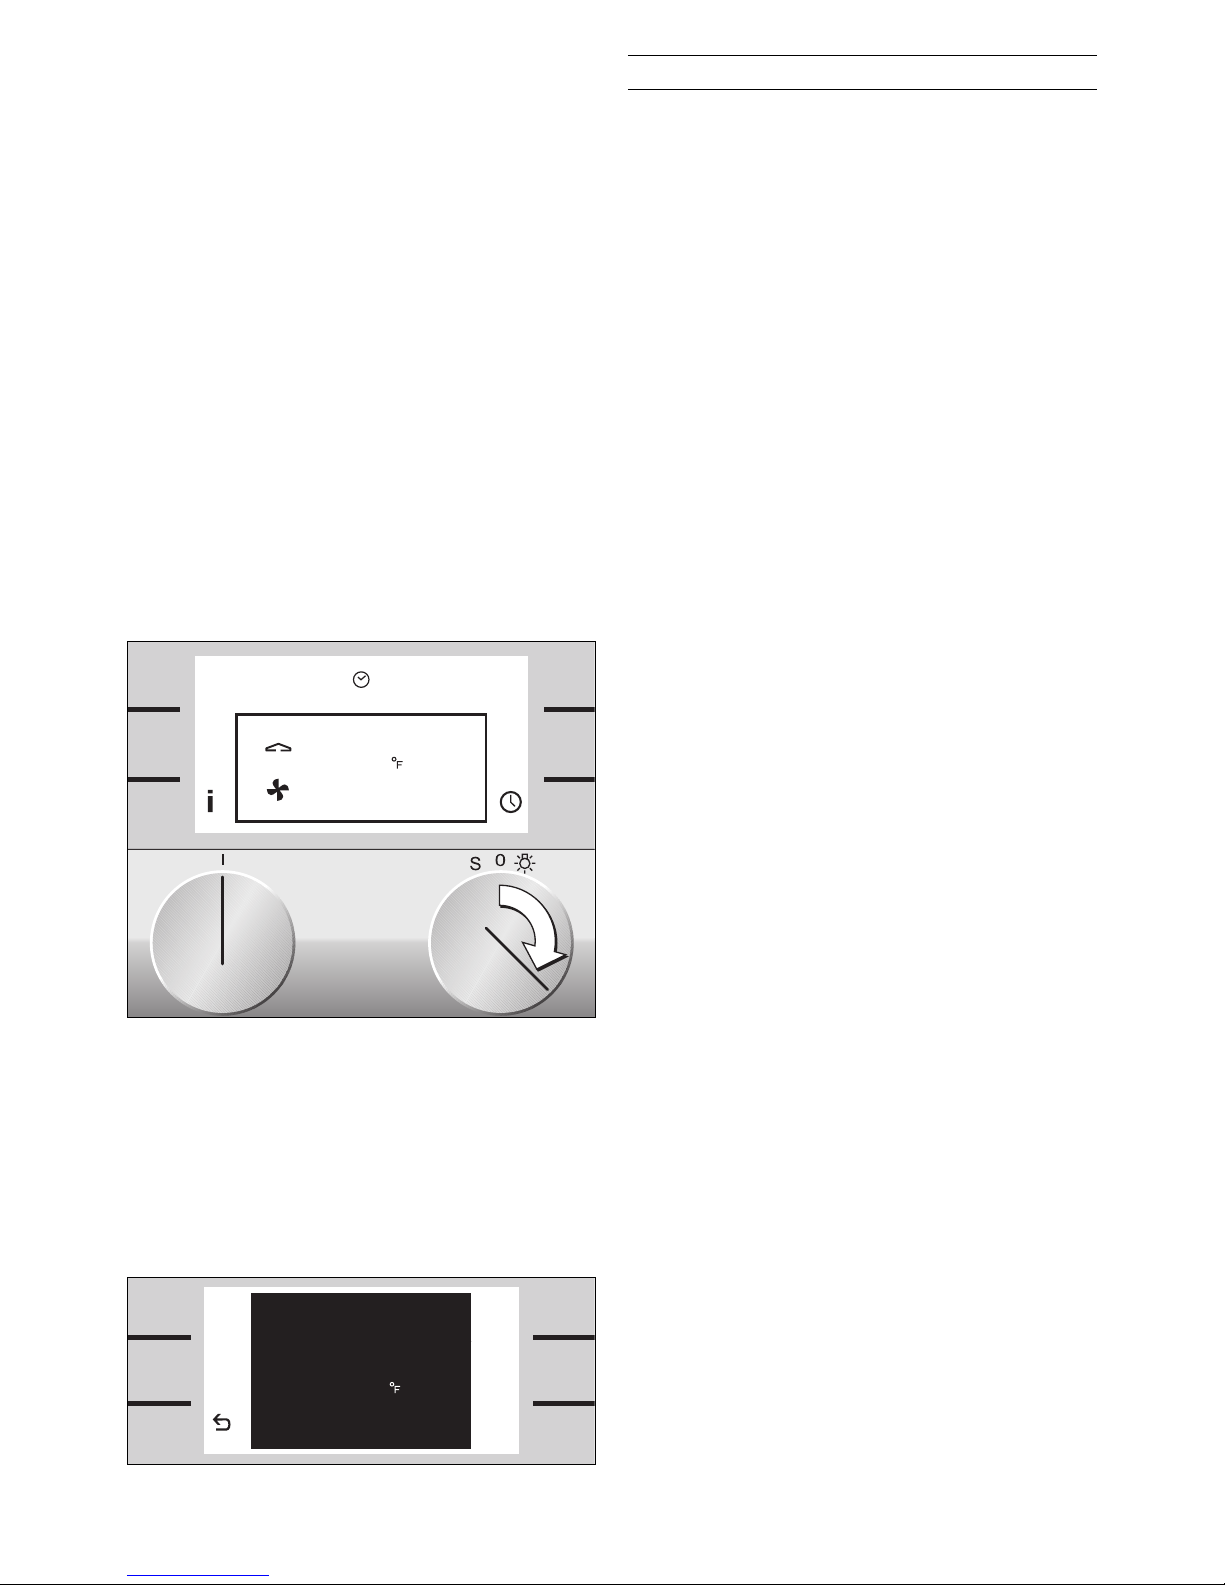
The main operations of your oven are easily set
using the knobs.
Using the right knob you can set the temperature.
To switch on the light in the oven, turn the
temperature knob one position to the right.
The temperature range is 120 - 550°F.
Exception:
Fermenting 85 - 120°F
Defrosting 100 - 140°F
Keeping warm 120 - 250°F
Roaster operation 120 - 430°F
Using the left knob you can set the cooking mode.
The top position is hot air.
Setting the Temperature and
Cooking Mode
1 Set the temperature knob to the required
temperature.
Temperature and cooking mode symbol appear
on the display. The light in the oven goes on.
To select another cooking mode:
2 Turn the function knob until the required
cooking mode appears on the screen.
The heating up symbol
f appears until the required
temperature is reached. The symbol appears again
when the oven heats during operation.
A signal sounds when the selected temperature is
reached. Press any key to switch off the signal.
Note: You can deactivate the heating up signal in
the basic settings.
The temperature and cooking mode can be changed
at any time.
When the meal is ready switch the oven off using
the temperature knob. The oven light goes off. The
standby screen appears.
Current Oven Temperature Display
The current oven temperature is briefly shown when
you press the a info key. Using the b key you can
return to the standard screen.
Note:
Depending on the heating mode, a slight temperature
variation after heating up during use is normal.
Setting the Oven
355
13.30
357
 Loading...