

Page 1

HAND
DRYER
EN
RAPID, RAPID SMALL
DE
CZ
SK
HU
PL
Page 2

Page 3

EN
Thank you for purchasing our product.
Before using this unit, please read this manual in order to avoid improper handling and use
ofthedevice.
• Do not attemt to install the unit yourself unless you are a trained service technician. Otherwise,
this may affect the safety and proper functioning of the unit.
• Read this manual thoroughly and carefully before beginning to use the unit, ensuring safety and
proper function. Please keep it well for later reference.
Warning: If you don’t use this unit properly or follow the safety quidelines carefully, it would lead
to serious personal injury or property damage.
Do not open the front panel. Otherwise, this may get an electric shock.
Do not allow the unit get wet. Otherwise, this may cause electric shock.
Do not use in a wet enviroment, for example, near bathroom where it may get the direct water and
the places where the condensation may form. Otherwise, this may cause electric shock and unit
malfunction.
Do not modify and disassemble the unit unnecessarily. Otherwise, this may cause fire, electric
shock, or personal injury.
Use a single-phase AC220-240 V, 50/60 Hz power supply.
Use separate line. Using any other electric appliance with same line, may cause the branch socket
to become very hot and cause fire.
Turn off the power switch before inspecting and cleaning the unit. Otherwise, this may cause
electric shock.
Do not let children hang from the unit. Otherwise, this may cause the unit to drop.
Always use the unit with the drain tank and air filter attached.
If the unit does not start, or works abnormally, turn off the power switch and ground-fault breaker
and contact your dealer for inspection and repair. Otherwise, this may cause electric shock or fire
due to short circuit.
Safety precautions before installing the unit
• Do not attemt to install the unit with the power on (power cord). Otherwise, this may cause
electric shock.
• The installation location should be strong enough to support the unit, and the unit should be
installed firmly on the surface. Otherwise, this may cause personal injury due to unit falling.
• Wear gloves when installing the unit. Otherwise, this may cause injury.
Features
• No touch hand drying ensures complete hygiene.
• A tamper-proof timer built is to prevent overuse.
• No need paper towels, ease of maintenance.
• No pollution, with antibacterial coating.
• To prevent overusing the unit, the built-in timer will stop unit after 30 seconds. To continuos use,
draw back your hands and put them in again.
Page 4

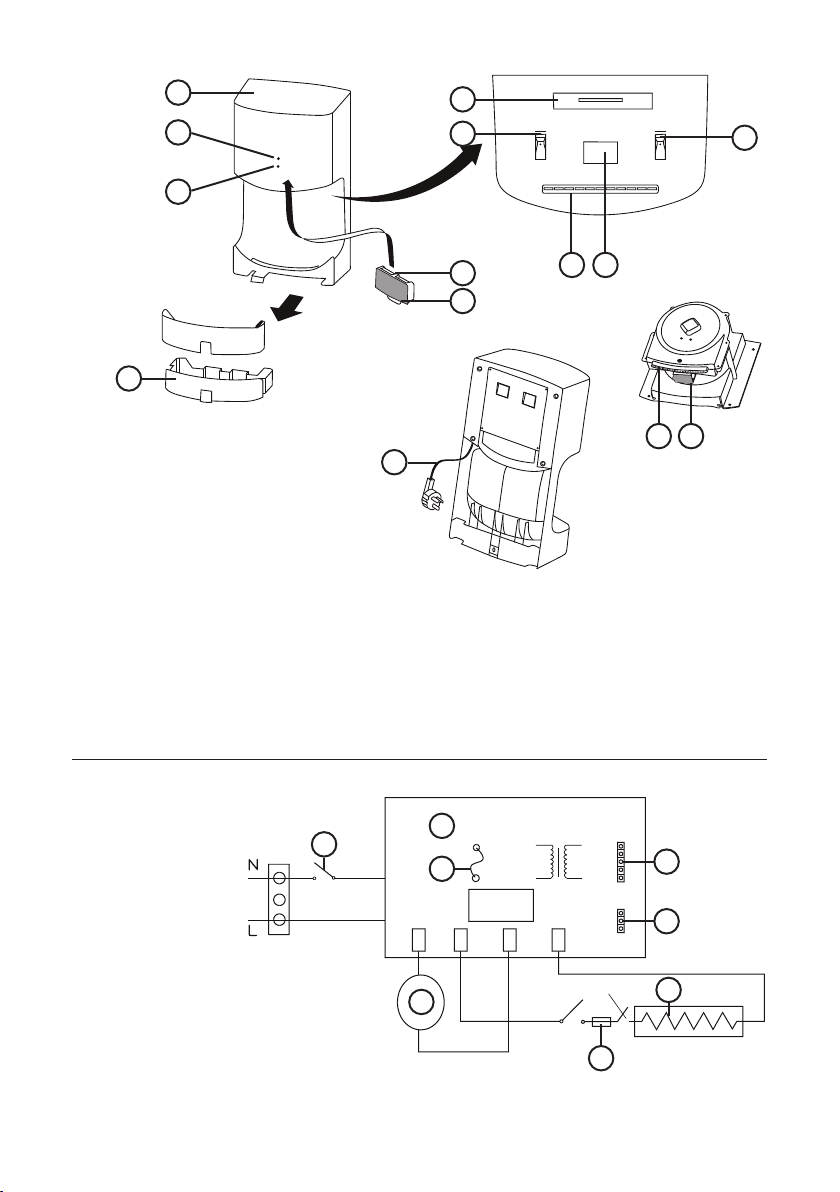
Parts:
1
2
3
5
6
7
4
1. Shell
2. Power
3. Check
4. Water reception device
5. Filter box
6. Power switch
7. Hot switch
8. Air outlet
9. Induction device
10. Filter
11. Power line
Wiring diagram
5
10
11
2
1
1
8 9
98
4
1. Switch
2. Control board
3. Motor
4. Sensor operating board
5. Indicator light
6. Heater
7. Temperature control
5
3
7
6
Page 5

Safety precautions before installing the unit
Do not install in the following types of location, otherwise this may cause malfunction:
• Locations where the temperature can exceed -10°C or 40°C.
• Locations where the unit may come into direct contact with water.
• Locations where the unit is under direct or strong sunlight.
• Locations where there is a lot of condensation.
• Locations where corosive, neutral, or reductive gases are present.
• Places lower than 0m or heigher than 2000m above sea level.
Installation location
• Install somewhere the unit will be easy to use, as shown in the figure. If the unit is installed too
low, water may get on it when the floor is being cleaned. The bottom of the unit must be at least
150 mm higher than the floor or any objects under it.
• The left side of the unit must be at least 150 mm away from any walls, because the power switch
is located on the left.
• Ensure there are no mirrors or walls near te right side, as drops of water may splatter to the right
when drying hands. Recommended distance is at least 100 mm.
• Avoid locations where people or doors might bump into the unit.
• For installation choose absolutely smooth surface on the wall.
1a
2
5
3 3
1. Fixed screws
2. Installed terminal box
3. Ground
4. Installation pannel
5. Safety srew
• Use a single-phase alternating current 220-240 V power supply.
• Use a power cord which is between 1,5-2 mm thick. (Cords other than 1,5-2 mm single-core
can not be used).
• Fixed screw (1b) is not need to install when installing appliance without water reception device.
4
1b
Page 6
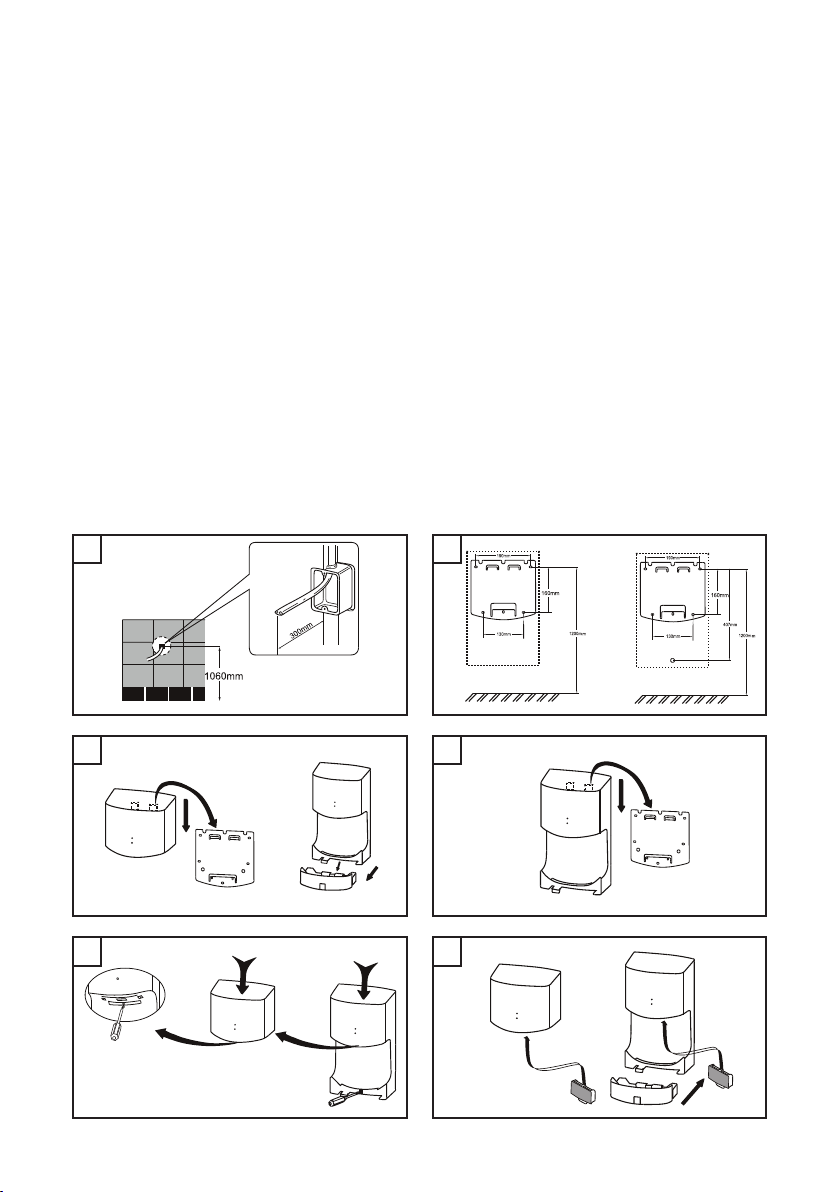
Instalation
Wire the unit.
1. Embed the switch box in the installation location (1 switchbox no cover) and wire the power
cord (with the green and yellow combined is ground line).
• If no switchbox is used, the power cord will be pushed out, and prevent the unit from being
installed firmly against the wall.
2. Attach the installation panel to the wall using the 4 installation screws.
• If the wall is concrete, use commercially available metal screw plugs (curl plugs).
• If the wall is not concrete, reinforce it before installation.
3. Remove the drain tank.
• Use one hand to draw the lock and use the both to draw the drain tank.
4. Hang the hand dryer on the installation pannel.
5. Fasten the hand dryer.
• Take out the filter box, push the hand dryer down and fasten the safety screw as show in the
picture.
6. Attach the draink tank.
• Make sure the air filter is all the way in.
1 2
3 4
5 6
Page 7

The instruction picture of drying the hand ensure that pappliance is turned on
1. Letting the palm of the
hand close to the air outlet
slowly.
Usage and attention:
1. After washing hands, place hands under wind outlet about 12 cm. The hands dryer will be
automatically activated and sent warm wind.
2. Before using, you should do the best to get rid of water droplets. When drying hands, you
should rub hands, which reduces the time of drying hands and saving electricity.
3. The machine is not fitted to dry wet clothes and handkerchief atc.
4. Place retreat the hands when the hand are dried, then it automatically stop working after 3 s.
5. When mentally handicapped persons and children use the machine, the guardian must be their
side, or it could be dangerous.
6. Do not pull the power lines or cover it with clothing items, in order to avoid fires or other
accidents.
7. Please do not use wet hands to plug on or plug off switch and power lines, avoiding electrical
shock.
2. Letting back of the
hand close to the air out
let slowly.
-
3. Rub both hands one
another.
Maintenance
1. For shell marks, please cut off power first and use soft cloth dipped neutral detergent to smear
clean. The acid or alkaline detergent in bathroom like benzene, lacquer thinner and abrasives, are
absolutely not applied. Moreover, you must not use nylon brush broom to smear the apparatus, in
order to avoid scratches and lacerations.
2. During the cleaning, you should prevent the water drop into machines, in order to avoid electric
shock or short circuit.
3. The machine should pull out or shut down power at off duty time, which can long the service
life for the machine.
4. It is forbidden to decompose, repair and transform the aircraft without professional persons, or
else it might causes electric shock, fire and other accidents.
5. If the machine breaks down, please, contact qualified person to repair the appliance.
6. If the machine breaks down, please replace it with special soft line or special components
purchased from its manufacturers or repair department.
Page 8

Take out the filter
box.
Take out the filter
pack off the filter
box.
Flick away the
dust in the filter
pack, if the dirt
Note: No washing
filter with water.
is too much,
please replace
the filter pack.
Term of guarantee:
1. The product warranty period is two year.
2. The service within warranty period for products, which came into effect from the date of buying
the machine.
3. Within two years after purchasing, consumers find the machine failure caused by the product
itself reason, then they can go to the purchasing place to maintenance and replace the machine
for free with original invoices and completed and the quality assurance card stampeyed by dealers.
4. Over warranty period or it is not free maintained products, while our company remains
committed to serving you.
Technical specifications:
Rapid Rapid small
Voltage: AC 220-240 V
Frequency: 50/60 Hz
Power: 1400 W
Heat power: 800 W
Motor: brush motor
Drying time: 10-15 s
Sensing distance: 9-15 cm
Size: mm 250/166/468 250/166/230
Weight: kg 4,7 3,7
The English version of the manual is an exact translation of the original manufacturer‘s instructions.
Images used in this manual are for illustrational purposes only and may differ from the actual product.
Page 9

DE
Vielen Dank, dass Sie sich für unser Produkt entschieden haben.
Bevor Sie das Gerät benutzen, lesen Sie bitte die Bedienungsanleitung sorgfältig durch, um sich
mit allen Sicherheitshinweisen vertraut zu machen.
• Versuchen Sie nicht dieses Gerät selbst zu installieren, wenn Sie kein ausgebildeter
Servicetechniker sind. Es kann die Sicherheit und die Funktion des Gerätes beeinträchtigen.
• Bevor Sie dieses Gerät in Betrieb nehmen, lesen Sie bitte diese Bedienungsanleitung sorgfältig
durch bewahren Sie diese Anleitung für den späteren Gebrauch. Weiterhin stellen Sie sicher, dass
das Gerät ordnungsgemäß funktioniert.
Warnung: Die Nichteinhaltung dieser Sicherheitshinweise kann zu ernsthaften Verletzungen oder
Schäden am Gerät führen.
• Öffnen Sie nicht die Frontplatte, dies könnte einen Stromschlag verursachen.
• Das Gerät darf nicht nass sein, dies könnte einen Stromschlag verursachen.
• Das Gerät nicht im Bad, in der Nähe von Badewanne und Dusche, oder an Orten verwenden,
an denen das Gerät in direkten Kontakt mit Wasser kommt dies kann zu Verletzungen durch
Stromschlag oder zum Kurzschluss im Gerät führen.
• Falls nicht erforderlich, nehmen Sie das Gerät nicht auseinander. Dies kann zu Brand,
Verletzungen durch Stromschlag oder schweren Verletzungen führen.
• Verwenden Sie nur Einphasen-Netzspannung AC220-240 V, 50/60 Hz.
• Verwenden Sie keine weiteren elektrischen Geräte für die gleiche Steckdose.
• Vor jeder Reinigung oder Wartung schalten Sie das Gerät mit dem Hauptschalter aus. Ansonsten
kann dies zu Verletzungen durch Stromschlag führen.
• Sorgen Sie dafür, dass sich Kinder nicht an das Gerät hängen, da dieses sonst herunterfallen
kann.
• Wenn das Gerät nicht ordnungsgemäß oder seltsam arbeitet, schalten Sie den Hauptschalter aus
und kontaktieren Sie Ihren Händler oder eine Servicestelle. Ansonsten kann dies zu Verletzungen
durch Stromschlag, zu Brand und Kurzschluss führen.
Sicherheitsmaßnahmen vor der Installation des Gerätes
• Installieren Sie das Gerät nicht, wenn es unter Spannung steht.
• Die Oberfläche, auf der das Gerät installiert werden soll, muss ausreichend stabil sein, um das
Gerät tragen zu können. Ansonsten kann das Gerät herunterfallen und Verletzungen verursachen.
• Verwenden Sie bei der Installation Handschuhe, um Verletzungen zu vermeiden.
Funktionen
• Automatischer und hygienischer Händetrockner mit Sensor.
• Timer gegen unberechtigte Handhabung verhindert einen übermäßigen Gebrauch.
• Einfache Wartung, es sind keine Papiertücher erforderlich.
• Keine Verunreinigung dank der antibakteriellen Beschichtung.
• Um einen übermäßen Gebrauch zu vermeiden, ist im Gerät ein Timer eingebaut, der alle 30
Sekunden das Gerät abschaltet. Wenn Sie die Hände unter dem Gerät halten, startet das Gerät
automatisch.
Page 10
Geräteteile
1
2
3
5
6
7
4
1. Abdeckung
2. Stromanschluss
3. Kontrollanzeige
4. Wasserablauftank
5. Filterhalter
6. Hauptschalter
7. Heizschalter
8. Luftauslass
9. Sensor
10. Filter
11. Netzkabel
Elektroschema
5
10
11
2
1
1
8 9
98
4
1. Ausschalter
2. Bedienfeld
3. Motor
4. Steckverbinder der Betriebsplatte
5. Steckverbinder für Kontrollanzeige
6. Heizkörper
7. Thermischer Überlastschutz
5
3
7
6
Page 11

Sicherheitsmaßnahmen vor der Installation des Gerätes
Nicht an folgenden Orten installieren, um Störungen zu vermeiden.
• Orte, deren Temperaturen -10°C und 40°C überschreiten.
• Orte, an denen das Gerät in direkten Kontakt mit Wasser kommt.
• Orte mit direkter Sonneneinstrahlung.
• Orte mit hoher Kondensation (Wasserdampf).
• Orte mit hoher Konzentration von Gasen korrosiver, neutraler und zersetzender Art.
• Orte, die niedriger als 0 m oder höher als 2000 m liegen.
Installationsort
• Das Gerät so installieren, um es leicht verwenden zu können, wie auf der Abbildung. Wird
das Gerät zu tief installiert, kann in ihn Wasser gelangen, z.B. bei Bodenreinigung. Der Abstand
der Unterseite des Gerätes zum Boden oder anderen Gegenständen muss mindestens 150 mm
betragen.
• Die linke Seite des Gerätes sollte mindestens 150 mm von jeder Wand entfernt sein, da sich dort
der Hauptschalter befindet.
• Die rechte Seite sollte mindestens 100 mm von einer Wand oder einem Spiegel entfernt sein,
um Spritzwasser zu vermeiden.
• Vermeiden Sie Orte, wo Türen gegen den Händetrockner schlagen können.
• Wählen Sie eine Wand mit einer flachen Oberfläche, um das Gerät anzubringen.
1a
2
5
3 3
1. Befestigungsschraube
2. Installierte Klemmenleiste
3. Erdung
4. Befestigungsplatte
5. Sicherheitsschraube
• Verwenden Sie Einphasen-Netzspannung 220-240 V.
• Verwenden Sie ein 1,5-2 mm starkes Kabel.
• Für die Installation ohne Wasserablauftank ist keine Befestigungsschraube erforderlich (1b).
4
1b
Page 12

Montageanleitung
Anschluss
1. Legen Sie die Schaltbox an den Bestimmungsort und verlegen Sie die Stromleitung (Kombination von grün-gelb ist Erdungskabel).
• Wenn Sie die Schaltbox nicht verwenden, wird das Kabel nach außen gedrückt und verhindert,
dass das Gerät fest an der Wand sitzt.
2. Die Befestigungsplatte bringen Sie mit Hilfe von 4 Schrauben an die Wand.
• Ist die Wand stabil, verwenden Sie normale Schrauben.
• Ist die Wand nicht stabil, muss sie vor der Montage bearbeitet werden.
3. Entfernen Sie den Wasserablauftank
• Mit einer Hand ziehen Sie am Schloss und dann nehmen Sie den Tank heraus.
4. Hängen Sie den Trockner in die Befestigungsplatte.
5. Befestigen Sie den Händetrockner
• Entnehmen Sie die Filterhalterung, drücken Sie das Gerät nach unten und befestigen Sie das
Gerät mit Sicherheitsschrauben wie auf der Abbildung.
6. Befestigen Sie den Wasserablauftank.
• Stellen Sie sicher, dass der Filter richtig befestigt ist.
1 2
3 4
5 6
Page 13

Verwendung (stellen Sie sicher, dass das Gerät eingeschaltet ist)
1. Halten Sie die Hände
mit den Handflächen nach
unten unter das Gebläse.
Anwendung und Hinweise
1. Nach dem Händewaschen halten Sie die Hände ca. 12 cm unter dem Gebläse. Das Gerät
startet automatisch.
2. Falls die Hände zu nass waren, wiederholen Sie den Vorgang. Beim Trocknen die Hände
drehen, so werden sie schneller trocken und es wird Strom gespart.
3. Das Gerät ist nicht zum Trocknen von Kleidung, Taschentüchern u.ä. bestimmt.
4. Bitte wenn Ihre Hände trocken sind, nehmen Sie sie heraus, das Gerät schaltet nach 3 Sekunden
automatisch ab.
5. Wird das Gerät durch Personen mit eingeschränkten physischen, sensorischen oder geistigen
Fähigkeiten einschließlich Kinder benutzt, müssen diese beaufsichtigt werden, um Gefahren zu
vermeiden.
6. Ziehen Sie nicht an den Kabeln des Gerätes, decken Sie diese nicht ab, ansonsten kann dies
zu Brand oder Unfällen führen.
7. Schalten Sie das Gerät nicht ein oder berühren Sie nicht den Netzstecker, wenn Sie nasse
Hände haben, dies kann zu einem Stromschlag führen.
2. Drehen Sie die Hände
mit den Handflächen
nach oben.
3. Reiben Sie die Hände aneinander.
Wartung
1. Vor der Reinigung schalten Sie das Gerät zuerst aus und reinigen Sie das Gehäuse mit einem
weichen, leicht angefeuchteten Tuch. Benutzen Sie niemals scheuernde Reinigungsmittel, Benzol,
Lacke oder alkalische Mittel. Zur Fleckenentfernung verwenden Sie keine Bürsten, um Kratzer am
Gerät zu vermeiden.
2. Vermeiden Sie, dass Wasser in das Innere des Gerätes gelangt, dies kann Stromschlag oder
Kurzschluss verursachen.
3. Um die Lebensdauer des Gerätes zu verlängern, schalten Sie das Gerät aus oder ziehen Sie
den Netzstecker aus der Steckdose, wenn Sie das Gerät nicht verwenden.
4. Jegliche Änderungen am Gerät oder Reparaturen sind durch entsprechend qualifizierte
Personen durchzuführen.
5. Ist das Gerät defekt, wenden Sie sich an entsprechend qualifizierte Personen, um es reparieren
zu lassen.
6. Ist die Stromleitung defekt, ist diese durch eine spezielle Stromleitung oder spezielle
Komponente zu ersetzen, die Sie beim Händler oder in einer Servicestelle erhalten.
Page 14

Entnehmen Sie
die Filterhalterung.
Entnehmen Sie
den Filter.
Entfernen Sie
Staub vom Filter.
Ist der Filter sehr
Hinweis: Filter
nicht mit Wasser
abspülen.
verunreinigt,
ersetzen Sie ihn.
Garantie:
1. Die Garantie auf das Gerät beträgt 2 Jahre.
2. Die Servicegarantie beginnt mit dem Kauftag des Gerätes zu laufen.
3. Ist das Gerät defekt, kann es innerhalb von 2 Jahren nach dem Kauf kostenlos ausgetauscht
oder repariert werden.
4. Nach Ablauf der Garantiezeit kann das Gerät nicht mehr kostenlos ausgetauscht oder repariert
werden.
Technische Daten:
Rapid Rapid small
Netzspannung: AC 220-240 V
Frequenz: 50/60 Hz
Antriebsleistung: 1400 W
Heizleistung: 800 W
Motor: Bürsten-Motor
Trocknungszeit: 10-15 s
Sensorbereich: 9-15 cm
Maße: mm 250/166/468 250/166/230
Gewicht: kg 4,7 3,7
Die deutsche Version der Anleitung ist eine genaue Übersetzung der Anleitung des Herstellers.
Die in diesem Handbuch verwendeten Bilder dienen nur zur Illustration und können nicht genau
das Produkt entsprechen.
Page 15

CZ
Děkujeme za nákup našeho výrobku.
Před použitím přístroje si prosím přečtěte tento návod, vyhnete se tak neodborné manipulaci
azacházení s přístrojem.
• Nepokoušejte se sami instalovat tento přístroj, pokud nejste vyškolený servisní technik. Může to
mít vliv na bezpečnost a správné fungování přístroje.
• Předtím, než začnete používat toto zařízení, si důkladně přečtěte návod k použití a ujistěte se, že
je přístroj bezpečně používán a správně funguje. Prosíme, ponechejte si tento manuál pro pozdější
potřebu.
Varování: Pokud nebudete správně používat toto zařízení a dodržovat bezpečnostní instrukce,
může to vést k vážnému zranění, nebo poškození majetku.
• Neotvírejte přední panel, jinak můžete dostat zásah elektrickým proudem.
• Zařízení nesmí být mokré, jinak můžete dostat zásah elektrickým proudem.
• Přístroj nepoužívejte v koupelně, v blízkosti vany a sprchy, nebo tam, kde může přístroj přijít
do přímého kontaktu s vodou, nebo na místech kde dochází ke srážení vody. Jinak může dojít k
zásahu elektrickým proudem, nebo ke zkratu přístroje.
• Přístroj neupravujte a nerozebírejte, pokud to není nutné. Jinak může dojít k požáru, zásahu
elektrickým proudem, nebo vážnému zranění.
• Použijte pouze jednofázové AC220-240 V, 50/60 Hz napětí.
• Použití jakéhokoliv jiného elektrického zařízení na stejné zásuvce se nedoporučuje.
• Před čistěním nebo kontrolou přístroje vždy vypněte hlavní vypínač. Jinak může dojít k zásahu
elektrickým proudem.
• Nedovolte dětem, aby se za přístroji zavěšovali. Nebo může přístroj spadnout.
• Pokud přístroj nefunguje, nebo abnormálně pracuje, vypněte hlavní vypínač a zemní jistič a
kontaktujte Vašeho prodejce nebo opraváře. Jinak může dojít k zásahu elektrickým proudem, nebo
požáru a zkratu.
Bezpečnostní opatření před instalací přístroje
• Nepokoušejte se instalovat zařízení, pokud je zapnuté napětí (kabel přístroje).
• Povrch, na který bude přístroj instalován, musí být dostatečně pevný, aby přístroj udržel, a
přístroj musí být na povrch pevně připevněn. Jinak může přístroj spadnout a způsobit zranění.
• Při instalaci použijte rukavice. Jinak může dojít ke zranění.
Funkce
• ‘‘Bezdotykový‘‘ vysoušeč rukou zajišťuje kompletní hygienu.
• Časovač proti neoprávněné manipulaci zabraňuje nadměrnému užívání.
• Jednodušší údržba díky tomu, že nejsou potřeba papírové ručníky.
• Žádné znečištění díky antibakteriální vrstvě.
• Abychom předcházeli nadměrnému užívání, v přístroje je zabudovaný časovač, který přístroj
vypne každých 30 sekund. Když vložíte ruce zpět pod vysoušeč, bude znovu spuštěn.
Page 16

Díly
1
2
3
5
6
7
4
1. Kryt
2. Napájení
3. Kontrolka
4. Nádržka na vodu
5. Pouzdro na filtr
6. Hlavní vypínač
7. Vypínač tepla
8. Odvod vzduchu
9. Indukční zařízení
10. Filtr
11. Napájecí kabel
Elektrické schéma
5
10
11
2
1
1
8 9
98
4
1. Vypínač
2. Řídící panel
3. Motor
4. Konektor provozní desky
5. Konektor pro indikátor světelný
6. Topné těleso
7. Tepelná pojistka
5
3
7
6
Page 17

Bezpečnostní opatření před instalací
Vyhněte se instalaci na následující místa, jinak může dojít k poruše.
• kde teplota přesahuje rozmezí -10°C/+ 40°C.
• kde přístroj může přijít do přímého kontaktu s vodou.
• kde je přístroj vystaven přímému slunečnímu záření.
• kde je hodně vodních srážek, pára.
• kde jsou korozivní, neutrální, nebo reduktivní plyny.
• která jsou níže než 0 m nebo výše než 2000 m nad mořskou výškou.
Místo instalace
• Přístroj naistalujte někam, kde jej bude snadné používat, jako je vyobrazeno na obrázku. Pokud
je přístroj naistalován příliš nízko, může se do přístroje dostat voda, například při čištění podlahy.
Spodek přístroje musí být nainstalován nejméně 150 mm od země a jiných objektů, které jsou pod
nimi.
• Levá strana přístroje musí být nainstalována minimálně 150 mm od stěny, protože hlavní vypínač
se nachází na levé straně.
• Ujistěte se, že práva strana přístroje není příliš blízko zrcadlům nebo stěnám, protože při sušení
rukou může cákat voda. Doporučená vzdálenost je nejméně 100 mm.
• Vyhněte se místům, kde do přístroje mohou narážet dveře.
• K instalaci si vyberte místo, kde je absolutně hladký povrch na zdi.
1a
2
5
3 3
1. Připevňovací šrouby
2. Instalovaná svorkovnice
3. Zem
4. Instalační panel
5. Bezpečnostní šroub
• Použijte běžné jednofázové 220-240 V napájení.
• Použijte kabel, který je silný 1,5-2 mm. Nemohou být použity silnější kabely.
• K instalaci bez nádržky na vodu, není potřeba připevňovací šroub (1b).
4
1b
Page 18

Návod k instalaci
Zapojení přístroje
1. Vložte spínací skříňku na místo instalace a položte elektrické vedení (kombinace zeleného a
žlutého drátu je uzemňovací).
• Pokud nepoužijete spínací skříňku, napájecí kabel bude vytlačen ven a bude zabraňovat, aby
přístroj byl těsně připevněn ke zdi.
2. Ke zdi připevněte instalační panel za použití 4 šroubů.
• Pokud je zeď pevná, betonová, použijte běžně dostupné šrouby.
• Pokud zeď není pevná, betonová, před instalací ji zpevněte.
3. Vyjměte vypouštěcí nádržku.
• Jednou rukou přitáhněte zámek a poté vytáhněte vypouštěcí nádržku.
4. Vysoušeč rukou zavěste na instalační panel.
5. Upevněte vysoušeč rukou.
• Vyjměte pouzdro na filtr, přístroj zatlačte dolů a upevněte jej bezpečnostními šrouby tak jako je
na obrázku.
6. Připevněte vypouštěcí nádržku.
• Ujistěte se, že vzduchový filtr je těsně připevněn.
1 2
3 4
5 6
Page 19

Návod k vysoušení rukou (ujistěte se, že je přístroj zapnutý)
1. Pomalu vložte ruce
dlaněmi dolů do vysoušeče
k fukaru.
Použití a upozornění
1. Po umytí rukou, umístěte ruce asi 12 cm pod fukar. Přístroj se automaticky zapne a začne
foukat teplý vzduch.
2. Před použitím vysoušeče by jste si měli co nejlépe oklepat ruce od vody. Při vysoušení, by jste
měli otáčet dlaněmi, protože ruce tak budou rychleji vysušeny a šetříme tím elektřinu.
3. Přístroj není určen k sušení oblečení, či kapesníků atd.
4. Prosíme, pokud máte ruce suché, vyndejte je z vysoušeče a odstupte od něj, po 3 sekundách
se přístroj automaticky vypne.
5. Pokud je přístroj používán hendikepovanými osobami nebo dětmi, musí jim být při používání
poskytnut dohled, jinak může hrozit nebezpečí.
6. Netahejte za kabely přístroje, ani jej ničím nepřikrývejte, jinak může dojít k požáru nebo nehodě.
7. Prosíme, pokud máte mokré ruce tak přístroj nezapojujte ani nevypojujte ze zásuvky, jinak
může dojít k zásahu elektrickým proudem.
2. Ruce pomalu otočte
dlaněmi vzhůru.
3. Otřete si o sebe obě
ruce.
Údržba
1. Pro čištění vnějších částí přístroje nejdříve vypněte napájení a použijte měkký hadřík namočený
v čisticím prostředku. Nesmí být použity abrazivní přípravky, benzol, laky ani žádné jiné alkalické
přípravky. Kromě toho, k odstranění skvrn nesmí být použity nylonové kartáče, jinak by se přístroj
poškrábal.
2. Zamezte, aby se během čistění dostala voda dovnitř přístroje, jinak může dojít k zásahu
elektrickým proudem nebo ke zkratu.
3. Abychom prodloužili životnost přístroje, musí být vypojen ze zásuvky nebo musí být vypnuté
napájení, když přístroj není v provozu.
4. Jakékoliv úpravy, demontáž či opravy přístroje, které neprovádí kvalifikovaná osoba, jsou
zakázány.
5. Pokud je přístroj rozbitý, prosíme, pro opravení přístroje kontaktujte kvalifikovanou osobu.
6. Pokud je rozbité elektrické vedení, nahraďte jej speciálním vedením, nebo speciálními
komponenty, které si obstarejte u dodavatele nebo v servisu.
Page 20

Vyjměte pouzdro
na filtr.
Filtr vyjměte z
pouzdra na filtr.
Odstraňte z filtru
prach. Pokud je
Poznámka: Filtr
nemyjte vodou.
filtr hodně zanesený, nahraďte
jej.
Záruka:
1. Záruční doba přístroje je 2 roky.
2. Servisní záruka přístroje začíná ode dne, kdy byl přístroj zakoupen.
3. Pokud je přístroj nefunkční, může být zákazníkům zdarma poskytnuta výměna či oprava
přístroje, do dvou let od zakoupení přístroje.
4. Po skončení záruční lhůty již není možno poskytnout opravu, či výměnu zdarma.
Technické parametry:
Rapid Rapid small
Napětí: AC 220-240 V
Frekvence: 50/60 Hz
Výkon: 1400 W
Výkon topení: 800 W
Motor: kartáčový motor
Čas sušení: 10-15 s
Rozsah snímání: 9-15 cm
Rozměry: mm 250/166/468 250/166/230
Hmotnost: kg 4,7 3,7
Česká verze návodu je přesným překladem originálního návodu výrobce.
Fotografie použité v manuálu jsou pouze ilustrační a nemusí se přesně shodovat s výrobkem.
Page 21

SK
Ďakujeme za nákup nášho výrobku.
Pred použitím prístroja si prosím prečítajte tento návod, vyhnete sa tak neodbornej manipulácii
azaobchádzaniu s prístrojom.
• Nepokúšajte sa sami inštalovať tento prístroj, ak nie ste vyškolený servisný technik. Môže to mať
vplyv na bezpečnosť a správne fungovanie prístroja.
• Predtým, než začnete používať toto zariadenie, si dôkladne prečítajte návod na použitie a uistite
sa, že je prístroj bezpečne používaný a správne funguje. Prosíme, ponechajte si tento manuál pre
neskoršiu potrebu.
Varovanie: Ak nebudete správne používať toto zariadenie a dodržiavať bezpečnostné inštrukcie,
môže to viesť k vážnemu zraneniu, alebo poškodeniu majetku.
• Neotvárajte predný panel, inak môžete dostať zásah elektrickým prúdom.
• Zariadenie nesmie byť mokré, inak môžete dostať zásah elektrickým prúdom.
• Prístroj nepoužívajte v kúpeľni, v blízkosti vane a sprchy, alebo tam, kde môže prístroj prísť do
priameho kontaktu s vodou, alebo na miestach kde dochádza k zrážaniu vody. Inak môže dôjsť k
zásahu elektrickým prúdom, alebo ku skratu prístroja.
• Prístroj neupravujte a nerozoberajte, pokiaľ to nie je nutné. Inak môže dôjsť k požiaru, zásahu
elektrickým prúdom, alebo vážnemu zraneniu.
• Použite iba jednofázové AC220-240 V, 50/60 Hz napätie.
• Použitie akéhokoľvek iného elektrického zariadenia na rovnakej zásuvke sa neodporúča.
• Pred čistením alebo kontrolou prístroja vždy vypnite hlavný vypínač. Inak môže dôjsť k zásahu
elektrickým prúdom.
• Nedovoľte deťom, aby sa za prístrojmi vešali. Alebo môže prístroj spadnúť.
• Pokiaľ prístroj nefunguje, alebo abnormálne pracuje, vypnite hlavný vypínač a zemný istič a
kontaktujte Vášho predajcu alebo opravára. Inak môže dôjsť k zásahu elektrickým prúdom, alebo
požiaru a skratu.
Bezpečnostné opatrenia pred inštaláciou prístroja
• Nepokúšajte sa inštalovať zariadenie, ak je zapnuté napätia (kábel prístroja).
• Povrch, na ktorý bude prístroj inštalovaný, musí byť dostatočne pevný, aby prístroj udržal, a
prístroj musí byť na povrch pevne pripevnený. Inak môže prístroj spadnúť a spôsobiť zranenie.
• Pri inštalácii použite rukavice. Inak môže dôjsť k zraneniu.
Funkcia
• „Bezdotykový“ sušič rúk zabezpečuje kompletnú hygienu.
• Časovač proti neoprávnenej manipulácii zabraňuje nadmernému užívaniu.
• Jednoduchšie údržba vďaka tomu, že nie sú potrebné papierové uteráky.
• Žiadne znečistenie vďaka antibakteriálnej vrstve.
• Aby sme predchádzali nadmernému užívaniu, v prístroja je zabudovaný časovač, ktorý prístroj
vypne každých 30 sekúnd. Keď vložíte ruky späť pod sušič, bude znovu spustený.
Page 22

Diely
1
2
3
5
6
7
4
1. Kryt
2. Napájenie
3. Kontrolka
4. Nádržka na vodu
5. Púzdro na filter
6. Hlavný vypínač
7. Vypínač tepla
8. Odvod vzduchu
9. Indukčné zariadenie
10. Filter
11. Napájací kabel
Elektrické schéma
5
10
11
2
1
1
8 9
98
4
1. Vypínač
2. Riadiaci panel
3. Motor
4. Konektor prevádzkovj dosky
5. Konektor pre indikátor svetelný
6. Výhrevné teleso
7. Tepelná poistka
5
3
7
6
Page 23

Bezpečnostné opatrenia pred inštaláciou
Vyhnite sa inštalácii na nasledujúce miesta, inak môže dôjsť k poruche.
• Miesta, kde je teplota presahuje -10 °C a nad 40 °C.
• Miestam, kde prístroj môže prísť do priameho kontaktu s vodou.
• Miestam, kde je prístroj vystavený priamemu slnečnému žiareniu.
• Miestam, kde je veľa vodných zrážok, para.
• Miestam, kde sú korozívne, neutrálne, alebo reduktívnou plyny.
• Miestam, ktoré sú nižšie ako 0 m alebo vyššie ako 2000 m nad morskou výškou.
Miesto inštalácie
• Prístroj nainštalujte niekam, kde ho bude ľahké používať, ako je vyobrazené na obrázku. Pokiaľ
je prístroj nainštalovaný príliš nízko, môže sa do prístroja dostať voda, napríklad pri čistení podlahy.
Spodok prístroja musí byť nainštalovaný najmenej 150 mm od zeme a iných objektov, ktoré sú
pod nimi.
• Ľavá strana prístroja musí byť nainštalovaná minimálne 150 mm od steny, pretože hlavný
vypínač sa nachádza na ľavej strane.
• Uistite sa, že práva strana prístroja nie je príliš blízko zrkadlám alebo stenám, pretože pri sušení
rúk môže cakat voda. Odporúčaná vzdialenosť je najmenej 100 mm.
• Vyhnite sa miestam, kde do prístroja môžu narážať dvere.
• K inštalácii si vyberte miesto, kde je absolútne hladký povrch na stene.
1a
2
5
3 3
1. Pripevňovacia skrutka
2. Inštalačné svorkovnice
3. Uzemnenieý
4. Instalační panel
5. Bezpečnostná skrutka
• Použite bežné jednofázové 220-240 V napájanie.
• Použite kábel, ktorý je silný 1,5-2 mm. Nemôžu byť použité silnejšie káble.
• Na inštaláciu bez nádržky na vodu, nie je potreba pripevňovaciú skrutku (1b).
4
1b
Page 24

Návod na inštaláciu
Zapojenie prístroja
1. Vložte spínaciu skrinku na miesto inštalácie a položte elektrické vedenie (kombinácia zeleného
a žltého drôtu je uzemňovací).
• Ak nepoužijete spínaciu skrinku, napájací kábel bude vytlačený von a bude zabraňovať, aby
prístroj bol tesne pripevnený k stene.
2. K stene pripevnite inštalačnú panel za použitia 4 skrutiek.
• Ak je múr pevná, betónová, použite bežne dostupné skrutky.
• Ak múr nie je pevná, betónová, pred inštaláciou ju spevnite.
3. Vyberte vypúšťaciu nádržku
• Jednou rukou pritiahnite zámok a potom vytiahnite vypúšťaciu nádržku.
4. Sušič rúk zaveste na inštalačný panel.
5. Upevnite sušič rúk
• Vyberte puzdro na filter, prístroj zatlačte dolu a upevnite ho bezpečnostnými skrutkami tak ako
je na obrázku.
6. Pripevnite vypúšťaciu nádržku.
• Uistite sa, že vzduchový filter je tesne pripevnený.
1 2
3 4
5 6
Page 25

Návod na vysúšanie rúk (uistite sa, že je prístroj zapnutý)
1. Pomaly vložte ruky dlaňami nadol do sušiča k vyfukovania.
Použitie a upozornenia
1. Po umytí rúk, umiestnite ruky asi 12 cm pod fukár. Prístroj sa automaticky zapne a začne fúkať
teplý vzduch.
2. Pred použitím sušiča by ste si mali čo najlepšie otriasť ruky od vody. Pri vysúšanie, by ste mali
otáčať dlaňami, pretože ruky tak budú rýchlejšie vysušené a šetríme tým elektrinu.
3. Prístroj nie je určený na sušenie oblečenia, či vreckoviek atď.
4. Prosíme, ak máte ruky suché, vyberte ich zo sušiča a odstúpte od neho, po 3 sekundách sa
prístroj automatiky vypne.
5. Ak je prístroj používaný hendikepovanými osobami alebo deťmi, musí im byť pri používaní
poskytnutý dohľad, inak môže hroziť nebezpečenstvo.
6. Neťahajte za káble prístroja, ani ho ničím neprikrývajte, inak môže dôjsť k požiaru alebo nehode.
7. Prosíme, ak máte mokré ruky tak prístroj nezapájajte ani neodpájajte zo zásuvky, inak môže
dôjsť k zásahu elektrickým prúdom.
2. Ruky pomaly otočte
dlaňami nahor.
3. Utrite si o seba obe
ruky.
Údržba
1. Na čistenie vonkajších častí prístroja najskôr vypnite napájanie a použite mäkkú handričku
namočenú v čistiacom prostriedku. Nesmie byť použité abrazívne prípravky, benzol, laky ani
žiadne iné alkalické prípravky. Okrem toho, na odstránenie škvŕn nesmie byť použité nylonové
kefy, inak by sa prístroj poškrabal.
2. Zabráňte, aby sa počas čistenia dostala voda dovnútra prístroja, inak môže dôjsť k zásahu
elektrickým prúdom alebo ku skratu.
3. Aby sme predĺžili životnosť prístroja, musí byť vypojený zo zásuvky alebo musia byť vypnuté
napájanie, keď prístroj nie je v prevádzke.
4. Akékoľvek úpravy, demontáž či opravy prístroja, ktoré nevykonáva kvalifikovaná osoba, sú
zakázané.
5. Ak je prístroj rozbitý, prosíme, pre opravenie prístroje kontaktujte kvalifikovanú osobu.
6. Ak je rozbité elektrické vedenie, nahraďte ho špeciálnym vedením, alebo špeciálnymi
komponenty, ktoré sa oboznámte u dodávateľa alebo v servise.
Page 26

Vyberte púdro na
filter.
Filter vyberte z
púzdra na filter.
Odstráňte z filtra
prach. Ak je filter
veľa zanesený,
Poznámka: Filter
neumývajte vo-
dou.
nahraďte ho.
Záruka:
1. Záručná doba prístroja je 2 roky.
2. Servisný záruka prístroja začína odo dňa, keď bol prístroj zakúpený.
3. Ak je prístroj nefunkčný, môže byť zákazníkom bezplatne poskytnutá výmena či oprava prístroja,
do dvoch rokov od zakúpenia prístroja.
4. Po skončení záručnej lehoty už nie je možné poskytnúť opravu, či výmenu zadarmo.
Technické parametre:
Rapid Rapid small
Napätie: AC 220-240 V
Frekvencia: 50/60 Hz
Výkon: 1400 W
Výkon kúrenia: 800 W
Motor: kefy motor
Čas sušenia: 10-15 s
Rozsah snímania: 9-15 cm
Rozmery: mm 250/166/468 250/166/230
Váha: kg 4,7 3,7
Slovenská verzia návodu je presným prekladom originálneho návodu výrobcu.
Fotografie použité v návode sú len ilustračné a nemusia sa presne zhodovat s výrobkom.
Page 27

HU
Köszönjük, hogy megvásárolta termékünket.
Használat előtt kérjük olvassa el a használati útmutatót, így megelőzheti az eszköz helytelen
használatát.
• Ne telepítse a készüléket egyedül, ha nem egy szakképzett szakember. Ez hatással lehet a
biztonságra és a készülék megfelelő működésére.
• Mielőtt elkezdené alkalmazni ezt a készüléket, figyelmesen olvassa el a használati utasítást és
győződjön meg róla, hogy a készülék biztonságos és megfelelően működik. Kérjük, őrizze meg ezt
az útmutatót későbbi használatra.
Figyelmeztetés: Ha nem megfelelően működteti a berendezést és nem tartja be a biztonsági
utasításokat az súlyos sérülést vagy anyagi kárt okozhat.
• utasításokat az súlyos sérülést vagy anyagi kárt okozhat..
• Ne nyissa ki az előlapot, különben fennáll az áramütés veszélye.
• A készüléket nem lehet nedves helyre tenni, különben fennáll az áramütés veszélye.
• Ne használja a fürdőszobában, közel fürdőkádhoz, illetve zuhanyzó, illetve ahl a készülék
közvetlenül érintkezésbe lépnek a vízzel, vagy egyéb helyeken, ahol van víz kondenzáció. Ez
áramütést okozhat vagy rövidzárlatot a készülékben.
• Ne módosítsa és ne szedje szét, hacsak nem szükséges. Egyébként tüzet, áramütést vagy
súlyos sérülést okozhat.
• Csak egyenáramú AC220-240 V, 50/60 Hz feszültséghez csatlakoztatható.
• Bármilyen más elektromos berendezéseket ugyanabba az aljzatba nem ajánlott.
• Tisztítás előtt mindig kapcsolja ki a főkapcsolót. Ellenkező esetben ez áramütést okozhat.
• Ne engedje, hogy gyerekek felmásszanak a műszerre. Vagy ráüljenek.
• Ha a készülék nem működik, vagy nem működik megfelelően, kapcsolja ki a főkapcsolót, húzza
ki, és lépjen kapcsolatba a kereskedővel vagy technikussal. Különben áramütést vagy tüzet vagy
rövidzárlatot okozhat.
Óvintézkedések a készülék instalációja előtt
• Ne telepítse a készüléket, ha a feszültség be van kapcsolva (kábel eszköz).
• A felület, amelyen a készülék beszerelése erősnek kell lennie ahhoz, hogy megtartsa a készüléket,
és a készüléket szilárdan kell rögzíteni a felszínre. A készülék leeshet, és sérülést okozhat.
• Amikor telepíti, használjon védőkesztyűt. Ellenkező esetben sérülést okozhat.
Funkciók
• „érintés nélküli“ kézszárító biztosítja a teljes higiéniát.
• Az időzítő nem megfelelő használatkor megakadályozza a túlzott használatot.
• Könnyebb karbantartás mivel nincs szükség a papírtörlőre.
• Nincs szennyeződés miatt bakteriális bevonat.
• A túlzott használat elkerülése érdekében, a készülék tartalmaz egy időzítőt, amely kikapcsolja a
készüléket minden 30 másodpercben. Amikor fel majd vissza helyezi a kezét a készülék újra indul.
Page 28

Részek
1
2
3
5
6
7
4
1. Keret
2. Csatlakozó
3. Fényjelző
4. Víztartály
5. Filter tartó
6. Főkapcsoló
7. Melegítő kapcsoló
8. Légáramlás
9. Indukciós készülék
10. Filter
11. Csatlakozó kábel
Elektromos tervezet
5
10
11
2
1
1
8 9
98
4
1. Kapcsoló
2. Irányító panel
3. Motor
4. Csatlakozó lemez
5. Fényjelző indikátor
6. Melegítő
7. Tőlmelegedési biztosíték
5
3
7
6
Page 29

Óvintézkedések a telepítés előtt
Ne telepítse a következő helyeken, mert ez hibás működést okozhat.
• az a hely, ahol a hőmérséklet meghaladja a -10 ° C és 40 ° C-ot
• az a hely, ahol az egység közvetlen érintkezésbe kerül a vízzel
• az a hely, ahol a készülék közvetlen napsugárzásnak van kitéve.
• az a hely, ahol sok a csapadék, pára.
• az a hely, ahol maró, semleges vagy reduktív gázok vannak.
• a helyeket, amelyek kevesebb, mint 0 m vagy nagyobb mint 2000 m tengerszint feletti
magasságban vannak.
A telepítés helye
• Telepítse a készüléket olyan helyre, ahol könnyű használni, ahogy az ábrán látható. Ha a
berendezést túl alacsonyra helyezi, akkor lehetővé teheti a víz bejutását a készülékbe, például a
padló tisztításakor. Az alján a készüléket úgy kell felszerelni, legalább 150 mm-re legyen a föld és
más tárgyaktól, amelyek alattuk vannak.
• A bal oldalon a készüléket úgy kell felszerelni, legalább 150 mm-re legyen a faltól, mivel a
főkapcsoló található a bal oldalon.
• Ellenőrizze, hogy a jobb oldalon a készülék nincs túl közel egy tükör vagy egy fal ahonnan a
kézszárító vizet kaphat. Az ajánlott távolság legkevesebb 100 mm.
• Kerülje az olyan helyeket, ahol a készülékhez ajtó érhet.
• A telepítéshez olyan helyet válasszon, amely teljesen sima.
1a
2
5
3 3
1. Rögzítő csavar
2. Telepítő terminál
3. Alap
4. Instalációs panel
5. Biztonsági csavar
• Használjon általános egyenáramot 220-240 V.
• Használjon kábelt amely 1,5-2 mm vastag. Ne használjon vastagabb kábeleket.
• A telepítéshez a víztartály nélkül nem szükséges a rögzítő csavar (1b).
4
1b
Page 30

Használati útmutató telepítéshez
A készülék csatlakoztatása
1. Helyezze a kapcsolószekrényt a telepítés helyére, és feküdt távvezetékek (a kombinációja a
zöld és a sárga vezetéket a földre).
• Ha nem használja a gyújtás tápkábelt megakadályozza, hogy a készülék szorosan kapcsolódjon
a falra.
2. Csatlakoztassa a falhoz telepítési 4 csavarral.
• Ha a fal rögzített, beton, a kereskedelemben kapható csavarral csatlakoztassa.
• Ha a fal nem tömör, konkrét telepítés előtt kell erősíteni.
3. Vegye ki a leeresztő tartályt
• Egy kézzel húzza ki a zárat, majd húzza ki a leeresztő tartály.
4. Kézszárítót akassza fel az installációs panelre
5. Csatlakoztassa a kézszárítót
• Vegye ki a filtert, a készüléket nyomja le és rögzítse a biztonsági csavarral mint a képen.
6. Csatlakoztassa a leeresztő tartályt.
• Ellenőrizze, hogy a levegőszűrő szorosan rögzítve van e.
1 2
3 4
5 6
Page 31

Útmutató a kézszárítóhoz (ellenőrizze, hogy a készülék be van kapcsolva)
1. Tegye a kezét tenyérrel
lefelé a kézszárítóba.
Használat és figyelmeztetés
1. Kézmosás után helyezze kezét körülbelül 12 cm-rel a ventillátor alá. A készülék automatikusan
bekapcsol, és elkezdi fújni a meleg levegőt.
2. Használat előtt a lehető legjobban le kéne ráznia a vizet a kezéről. Kézszárítás közben mozgassa
a tenyereit és a kezét így gyorsabban száradnak és energiát spórol.
3. A készülék nem alkalmas ruhák szárítására.
4. Kérjük, ha megszáradt a keze, vegye el a készüléktől, 3 másodperc után a készülék kikapcsol
automatikusan.
5. Ha a készüléket fogyatékos személyek használják, felügyelet szükséges a használathoz, hogy
ne történjen baleset.
6. Ne húzza az eszköz kábeleit, mert ez tüzet okozhat vagy balesetet.
7. Kérjük, ha nedves a keze, így ne csatlakoztassa vagy húzza ki a készüléket a konnektorból,
mert ez áramütést okozhat.
2. Lassan forgassa el a
kezét tenyérrel felfelé.
3. Törölje egymáshoz
mindkét kezét.
Karbantartás
1. Tisztítsa meg a készülék külsejét, kapcsolja ki a készüléket először, és puha ruhával mosószerrel
tisztítsa. E használjon maró anyagokat, benzolt, festék vagy bármely más lúgos termékeket.
Továbbá a ne használjon nylon kefét, egyébként a készülék karcolódhat.
2. Ne, hogy a víz tisztítása során a készülék belsejébe, mert ellenkező esetben áramütést vagy
rövidzárlatot.
3. Ki kell húzni a csatlakozóból a készüléket vagy ki kell kapcsolni, ha a készülék nincs
használatban.
4. Minden változás, eltávolítása vagy javítása az eszköznek, nem szakképzett személynek tilos.
5. Ha a készülék sérült, forduljon szervizhez vagy egy szakképzett személyhez.
6. Ha megtört a vezeték, telepítsen egy speciális vezetőt vagy speciális alkatrészt, ismertesse
szállítójával vagy a szervizben.
Page 32

Vegye ki a filter
tartóját.
Távolítsa el a
tartóból a szűrőt.
Távolítsa el a
port a szűrőről.
Ha a szűrő
Megjegyzés: Ne
mossuk a szűrőt
vízzel.
piszkos cserélje
ki.
Garancia:
1. A garancia időtartama a készülékre 2 év.
2. A garancia kezdete a készülék megvásárlásakor kezdődik.
3. Ha a készülék sérült, akkor az ügyfeleknek ingyenes cserére vagy javításra van lehetősége két
éven belül a készülék vásárlásától.
4. A garancia lejárta után nincs lehetőség ingyenes javításra vagy cserére.
Műszaki adatok:
Rapid Rapid small
Feszültség: AC 220-240 V
Frekvencia: 50/60 Hz
Teljesítmény: 1400 W
Fűtés teljesítménye: 800 W
Motor: motor kefy
Szárítás ideje: 10-15 s
Érzékelés tartama: 9-15 cm
Méretek: 250/166/468 250/166/230
Súly: kg 4,7 3,7
A magyar használati utasítás a gyártótól kapott verzió pontos fordítása.
A kézikönyvben használt fényképek csak illusztrációk, nem egyeznek meg pontosan a termékkel.
Page 33

PL
Dziękujemy za zakup naszego produktu.
Przed użyciem prosimy starannie przeczytać tę instrukcję.
• Nie podejmować samodzielnych prób instalowania tego urządzenia, jeżeli nie jesteś przeszkolonym technikiem serwisu. Może wpłynąć to na bezpieczeństwo i prawidłowe działanie urządzenia.
• Przed rozpoczęciem użytkowania urządzenia, należy dokładnie zapoznać się z instrukcją obsługi i upewnić się czy, urządzenie jest użytkowane w sposób bezpieczny i czy działa prawidłowo.
Instrukcje obsługi należy przechować.
Ostrzeżenie: Jeżeli urządzenie nie będzie użytkowane właściwie i nie będą zachowane zalecenia
dotyczące bezpieczeństwa, może skutkować to wypadkiem lub szkodą materialną.
• Nie otwierać czołowej części obudowy, może to skutkować porażeniem prądem elektrycznym.
• Urządzenie nie może być mokre, może to skutkować porażeniem prądem elektrycznym.
• Urządzenia nie użytkować w łazience, w pobliżu wanny i prysznica lub w miejscu, w którym
urządzenie może mieć kontakt z wodą lub w miejscach, w których dochodzi do skraplania się
wody na urządzeniu. Może to skutkować porażeniem prądem elektrycznym lub spowodować
zwarcie w urządzeniu.
• Urządzenia nie należy poddawać modyfikacji, ani nie rozbierać, jeżeli nie jest to konieczne.
W przeciwnym przypadku może to skutkować spowodowaniem pożaru, porażeniem prądem
elektrycznym lub poważnym wypadkiem.
• Użyć tylko napięcia jednofazowego AC220-240 V, 50/60 Hz.
• Nie zaleca się podłączania do tego samego gniazda wtykowego innego urządzenia elektrycznego.
• Przed przystąpieniem do czyszczenia lub przeglądu urządzenia należy zawsze wyłączyć
wyłącznik główny. W przypadku przeciwnym może dojść do porażenia prądem elektrycznym.
• Nie pozwalać dzieciom na wieszanie się na urządzeniu. Urządzenie może spaść.
• Jeżeli urządzenie nie działa lub pracuje w sposób odmienny niż normalnie należy wyłączyć
wyłącznik główny oraz bezpiecznik nadprądowy i skontaktować się ze sprzedawcą lub zakładem
naprawczym. W przeciwnym przypadku może to skutkować spowodowaniem pożaru, porażeniem
prądem elektrycznym lub zwarciem.
Środki bezpieczeństwa podejmowane przed przystąpieniem do instalowania urządzenia
• Nie przystępować do instalowania urządzenia, jeżeli podłączone jest zasilanie (przewód
zasilający).
• Powierzchnia, na której urządzenie będzie instalowane, musi wytrzymać ciężar urządzenia a
urządzenie musi być do powierzchni w sposób odpowiedni zamocowane. W przeciwnym wypadku
urządzenie może spaść i spowodować wypadek.
• Podczas prac instalacyjnych używać rękawic. Nie używanie rękawic może być przyczyną
wypadku.
Działanie
• ‘‘Bezdotykowa‘‘ suszarka do rąk zapewnia prawidłowe warunki higieniczne.
• Regulator czasowy zabraniający nieuprawnionej manipulacji przeciwdziała nadmiernemu użytkowaniu.
• Uproszczone użytkowanie, brak konieczności używania ręczników papierowych.
• Zastosowana powłoka antybakteryjna minimalizuje występowanie zabrudzeń.
• Aby zapobiec nadmiernemu użytkowaniu, w urządzeniu zabudowany jest regulator czasowy,
który wyłącza urządzenie po 30 sekundach pracy. Ponowne podstawienie rąk pod suszarkę
powoduje ponowne uruchomienie urządzenia.
Page 34

Części
1
2
3
5
6
7
4
1. Osłona
2. Zasilanie
3. Kontrolka
4. Zbiorniczek na wodę
5. Obudowa filtra
6. Wyłącznik główny
7. Wyłącznik grzałki
8. Odprowadzenie powietrza
9. Urządzenie indukcyjne
10. Filtr
11. Przewód zasilający
Schemat instalacji elektrycznej
5
10
11
2
1
1
8 9
98
4
1. Wyłącznik
2. Panel sterowniczy
3. Motor
4. Złączka płyty głównej
5. Złączka dla kontrolki
6. Grzałka
7. Bezpiecznik termiczny
5
3
7
6
Page 35

Środki bezpieczeństwa podejmowane przed przystąpieniem do instalowania urządzenia
Unikać instalowania w poniższych miejscach, w przeciwnym wypadku może skutkować to
uszkodzeniem urządzenia.
• Miejsce, gdzie temperatura jest poniżej -10°C i powyżej 40°C.
• Miejsce, gdzie może dojść do bezpośredniego kontaktu urządzenia z wodą.
• Miejsce, gdzie urządzenie wystawione jest na bezpośrednie nasłonecznienie.
• Miejsce, w którym występuje skraplanie się wody, para.
• Miejsce, gdzie występują gazy wywołujące korozję, neutralne lub o działaniu redukcyjnym.
• Miejsce, znajdujące się poniżej 0 m lub powyżej 2000 m nad poziomem morza.
Miejsce instalowania
• Urządzenie instalować w miejscu umożliwiającym łatwy dostęp, jak przedstawiono na ilustracji.
Jeżeli urządzenie zostanie zainstalowane zbyt nisko, do urządzenia może przedostać się woda, np.
przy myciu posadzki. Spód urządzenia powinien znajdować się co najmniej 150 mm od podłoża i
innych obiektów znajdujących się pod urządzeniem.
• Lewy bok urządzenia musi znajdować się minimum 150 mm od ściany, ponieważ wyłącznik
główny jest zainstalowany na lewym boku urządzenia.
• Upewnić się, że bok prawy urządzenia nie znajduje się zbyt blisko luster lub ścian, ponieważ
podczas osuszania dłoni może pryskać woda. Zalecana odległość to minimum 100 mm.
• Nie instalować w miejscu, gdzie w urządzenie mogą uderzać drzwi.
• Dla potrzeb zainstalowania wybrać miejsce, w którym ściana ma gładką i równą powierzchnię.
1a
2
5
3 3
1. Śruba mocująca
2. Wbudowana listwa zaciskowa
3. Uziemienie
4. Płyta instalacyjna
5. Śruba zabezpieczająca
• Użyć normalne napięcie jednofazowe 220-240 V.
• Użyć przewodu o przekroju 1,5-2 mm. Nie należy używać przewodów o większym przekroju.
• Przy instalacji bez zbiorniczka na wodę, nie potrzeba śruby mocującej (1b).
4
1b
Page 36

Instrukcja instalowania
Podłączenie urządzenia
1. Umieścić przełącznik wieloobrotowy w miejscu instalacji i ułożyć instalację przewodową (kombinacja przewodu zielonego i żółtego to uziemienie).
• Jeżeli nie zostanie użyty przełącznik wieloobrotowy, przewód zasilania będzie wyprowadzony
na zewnątrz i będzie przeszkadzał w szczelnym przymocowaniu urządzenia do ściany.
2. Do ściany przymocować płytę instalacyjną używając 4 śrub.
• Jeżeli ściana ma właściwe cechy wytrzymałościowe, jest wykonana np. z betonu, użyć zwykle
dostępnych śrub.
• Jeżeli ściana nie ma właściwych cech wytrzymałościowych, nie jest np. wykonana z betonu,
przed instalowaniem należy ją wzmocnić.
3. Wyjąć zbiorniczek ściekowy
• Jedną ręką odciągnąć zamek i następnie wyjąć zbiorniczek ściekowy.
4. Suszarkę do rąk zawiesić na płycie instalacyjnej.
5. Przymocować suszarkę do rąk
• Wyjąć obudowę filtra, urządzenie nacisnąć w dół i i zamocować używając śrub zabezpieczających w sposób przedstawiony na ilustracji.
6. Przymocować zbiorniczek ściekowy.
• Upewnić się, że filtr powietrza jest szczelnie zamocowany.
1 2
3 4
5 6
Page 37

Sposób osuszania rąk (sprawdzić, czy urządzenie jest włączone)
1. Wolno podłożyć ręce
skierowane dłońmi w dół
do suszarki pod dmucha
wę.
Sposób użytkowania i ostrzeżenia
1. Po umyciu rąk, umieścić ręce około 12 cm pod dmuchawą. Urządzenie automatycznie włączy
się i zacznie wydmuchiwać ciepłe powietrze.
2. Przed przystąpieniem do osuszania należy pozbyć się nadmiaru wody z rąk. Podczas osuszania
należy obracać dłonie. Osuszanie przebiegnie szybciej i oszczędza to zużycie energii elektrycznej.
3. Urządzenie nie jest przeznaczone do suszenia odzieży, chusteczek do nosa itp.
4. Po osuszeniu rąk, należy wyjąć je z suszarki i odejść od suszarki, po 3 sekundach urządzenie
wyłączy się automatycznie.
5. Jeżeli z urządzenia korzystają osoby o ograniczonych zdolnościach psychofizycznych lub
dzieci, w czasie korzystania przez nich z urządzenia należy zapewnić im nadzór, w przeciwnym
wypadku stanowi to zagrożenie.
6. Nie pociągać za przewody urządzenia, urządzenia nie przykrywać, może spowodować to pożar
lub być przyczyną wypadku.
7. Mokrymi rękoma nie podłączać ani nie wyłączać urządzenia z gniazda instalacji elektrycznej,
może dojść do porażenia prądem elektrycznym.
2. Ręce wolno obrócić
dłońmi w górę.
-
3. Ocierać o siebie obie
dłonie.
Konserwacja
1. Do czyszczenia zewnętrznych elementów urządzenia użyć miękkiej ścierki nasączonej środkiem
do czyszczenie. Nie wolno stosować preparatów o właściwościach ściernych, benzolu, lakierów
ani innych preparatów alkalicznych. Do usuwania plam nie wolno używać np. szczotek nylonowych,
powoduje to uszkodzenie powierzchni urządzenia. Przed czyszczeniem należy wyłączyć zasilanie.
2. Uważać, aby w trakcie czyszczenia do wnętrza urządzenia nie przedostała się woda, może
spowodować to porażenie prądem elektrycznym lub spowodować zwarcie.
3. W celu wydłużenia żywotności urządzenia, w czasie kiedy urządzenie nie jest przez dłuższy
okres użytkowane należy odłączyć je od zasilania.
4. Samowolne adaptacje, demontaż lub naprawy urządzenia są zabronione, jeżeli nie są
wykonywane przez osobę wykwalifikowaną.
5. Jeżeli urządzenie jest uszkodzone, w celu wykonania naprawy należy skontaktować się z osoba
posiadającą właściwe kwalifikacje.
6. Jeżeli uszkodzona jest instalacja elektryczna, należy zastąpić ją instalacją specjalną lub
składnikami specjalnymi, które można nabyć u dostawcy lub w serwisie.
Page 38

Wyjąć obudowę
filtra.
Wyjąć filtr z obudowy.
Filtr oczyścić z
pyłu. Jeżeli fil-
Uwaga: Nie myć
filtr wodą.
tr jest bardzo
anieczyszczony,
należy go wymienić.
Gwarancja:
1. Okres objęty gwarancją wynosi 2 lata.
2. Gwarancja obejmuje okres od daty zakupu urządzenia.
3. Jeżeli urządzenie nie działa, klientom może być umożliwiona bezpłatna wymiana lub naprawa
urządzenia, w okresie dwóch lat od daty zakupu urządzenia.
4. Po upływie okresu objętego gwarancją, nie można świadczyć bezpłatnej wymiany lub naprawy
urządzenia.
Parametry techniczne:
Rapid Rapid small
Napięcie: AC 220-240 V
Częstotliwość: 50/60 Hz
Moc: 1400 W
Moc grzałki: 800 W
Silnik: silnik szczotkowy
Czas osuszania: 10-15 s
Zakres wykrywania: 9-15 cm
Wymiary: mm 250/166/468 250/166/230
Waga: kg 4,7 3,7
Polska wersja językowa instrukcji jest dokładnym tłumaczeniem oryginalnej instrukcji producenta.
Zdjęcia wykorzystane w tym podręczniku są jedynie ilustracją i nie może dokładnie dopasować produkt.
Page 39

Page 40

Hand dryer
more products G21
Automatic soap dispenserAutomatic hand disinfection
 Loading...