


Oklahoma

EN
DE
CZ
SK
HU
PL


EN
ASSEMBLY AND OPERATION INSTRUCTIONS
Model: Oklahoma BBQ
USE ONLY THE HOSE AND HOSE CONNECTOR PROVIDED! IF A REPLACEMENT IS
NECESSARY, PLEASE CONTACT EITHER OUR CUSTOMER SERVICE DEPARTMENT OR
YOUR LOCAL DEALER. THE USE OF UNAUTHORISED PARTS CAN BE DANGEROUS.
0359/16
FOR OUTDOOR USE ONLY
PLEASE READ INSTRUCTIONS CAREFULLY BEFORE ASSEMBLY
RETAIN THIS MANUAL FOR FUTURE REFERENCE

WARNING
Hazardous fire or explosion may result if instructions are not followed.
It is the consumer’s responsibility to see that the barbecue is properly assembled, installed, and
taken care of. Failure to follow instructions in this manual could result in bodily injury and/or
property damage.
FOR YOUR SAFETY IF YOU SMELL GAS:
1. Turn off gas supply at bottle.
2. Extinguish all naked flames; do not operate any electrical appliances.
3. Ventilate the area.
4. Check for leaks as detailed in this manual.
5. If odour persists, contact your dealer or gas supplier immediately.
SAFETY PRECAUTIONS:
1. Perform impermeability check after each tank refill.
2. Never perform impermeability check with a match or open flame.
3. Do not store gasoline or other flammable vapours and liquids in the vicinity of this or any other
appliance.
4. Any LP cylinder not connected for use shall not be stored in the vicinity of this or any other
appliance.
Assembly:
WARNING: Whilst every effort has made in manufacture of your barbecue to remove any sharp
edge, you should handle all components with care to avoid accidental injury.
Tools required: Either a crosshead screwdriver or flat-bladed screwdriver and either a spanner
(we have supplied a multifunction spanner) or a pair pliers.
ASSEMBLY:
Please read all instructions thoroughly before proceeding. Find a large, clean area to assemble
your barbecue. Please refer to the parts list and assembly diagram as necessary. Assembly of the
barbecue involves many large components, it is advisable to have two people to assemble the unit.
NOTICE: Rip off all the plastic protection before assembling!
WARNING: Do not move the appliance during use.
Turn off gas supply at the gas cylinder when appliance is not in use.
Do not modify the appliance.
Minimum distance from sides and back of unit to combustible construction is 3 m
from side and 3 m from back.

2
1
3
2
A
8
4
5
5
11
9
10
14
12
12
22
6
4
5
5
7
13
18
19
17
1
5
16
20
23
19
13
21
20
The English version of the manual is an exact translation of the original manufacturer‘s instructions.
Images used in this manual are for illustrational purposes only and may differ from the actual product.

Part List: Oklahoma BBQ
Ref Description Quantity
1 Cooking rack (sheet) 1
2 Grill plate 1
2A Hot plate 1
3 Flame tamer 3
4 Side table 2
5 Grill bracket 4
6 Grill body assembly 1
7 Control knob 3
8 Drip tray 1
9 Trolley left front leg 1
10 Trolley side sheet 2
11 Trolley left rear leg 1
12 Castor 2
13 Trolley bracket-front 1
14 Left door 1
15 Door handle 2
16 Right door 1
17 Trolley right front leg 1
18 Trolley right rear leg 1
19 Wheel cover 2
20 Wheel 2
21 Wheel axle 1
22 Trolley bottom plate 1
23 Door baffle-bottom 1

Hard Wares List: Oklahoma BBQ
Ref Description Quantity
A
B
C
D
E
F
G
H
ASSEMBLY:
M4×4 Screw 4
M6×12 Screw 26
M6×65 Screw 4
M6×70 Screw 8
Axis pad 8
Pad (8mm) 8
R Clip 2
ø 13 Flat Washer 2
11
10
9
B 4x

18
17
10
B 4x
9, 10, 11
10, 17, 18
22
C 4x

B 4x
13
19
G
20
H
21
19
H
20
G
G 2x
H 2x
12

14
23
B 2x
15
15
16
A 4x

14, 15
15, 16
5
B 4x

10
6
F
F
D 8x
F 8x
4
4
E
B 8x
E 8x
E

1
3
2
8
2A

Technical Information:
0359/16
BRAND: G21
APPLIANCE CODE: Oklahoma BBQ
THERMAL POWER 10.5 kW (764 g/h) The grill burner is dimensioned to 3.5 kW
GAS CATEGORY: I3+(28-30/37) I3B/P(30)
GAS TYPES: Butane Propane Butane, Propane or their mixture
GAS PRESSURE: 28 - 30 mbar 37 mbar 30 mbar
INJECTION JET SIZE: Grill: 0.90 mm
IDENTIFICATION CODE: 0359CQ00453
ONLY FOR OUTDOOR USE.
WARNING: PARTS OF THE GRILL CAN BE VERY HOT. KEEP OUT OF REACH OF
CHILDREN.
BEFORE USE, PLEASE READ THE INSTRUCTION MANUAL CAREFULLY.
Note:
Diameter dimension of pan used for side burner, must be between 140-240mm
Digits on the injector indicates its size, For example, ”0.85”on the injector means injector size is ”0.85mm”.
WARNING INFORMATION
IMPORTANT:
• Read the following instructions carefully and be sure your barbecue is properly installed,
assembled and cared for. Not following these instructions may result in serious injury and/or
property damage.
• If you have any questions concerning assembly or operation, contact your dealer or LPG Gas
Company.
• Prior to use please make sure the appliance and cylinder are placed on a flat level ground.
• Never light the GRILL OR REAR BURNERS with the HOOD in the closed position.
• Never light the SIDE BURNER with the lid in the closed position.
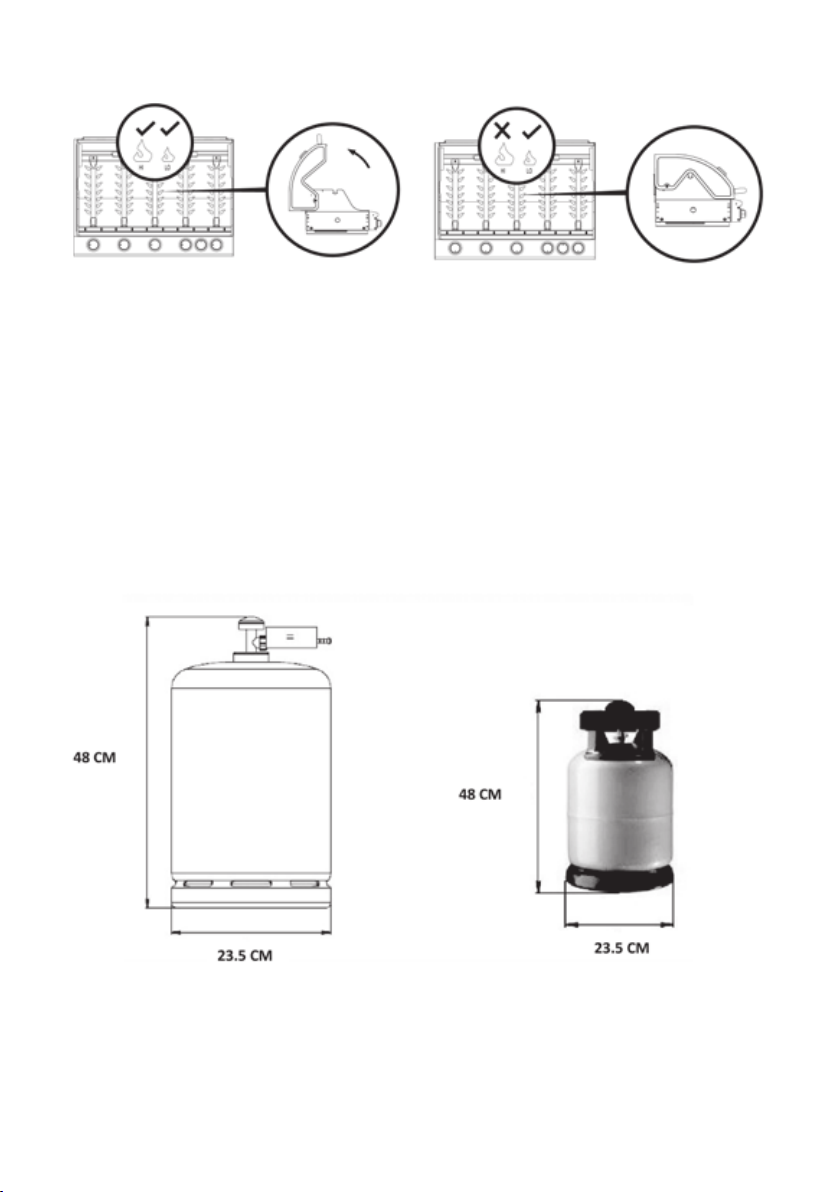
• Your barbecue can be used with gas cylinders with weight between 11 kg and 15 kg, and
diameter maximum 23.5 cm; height (regulator included)maximum 48 cm.

NOTE FOR CONSUMER: Retain for future Reference
CONNECTING THE GAS CYLINDER TO THE GRILL
This appliance is only suitable for use with low-pressure butane or propane gas or LPG mixtures,
fitted with the appropriate low-pressure regulator via a flexible hose. The hose should be secured
to the regulator and the appliance with hose clips. For barbecue which is set to I3B/P(30), I3+(2830/37) use a regulator which operates butane gas at 30 mbar and propane gas at 37 mbar. For
I3B/P(50), a regulator operates the butane, propane gas mixture at 50mbar. Ensure the regulator
was certified by standard EN16129. Never store gas cylinder inside the grill.
Regulator and Hose
Use only regulators and hose approved for LP Gas at the above pressures. The life expectancy of
the regulator is estimated as 2 years. It is recommended that regulator is changed within 2 years of
the date of manufacture. The use of the wrong regulator or hose is unsafe; always check that you
have the correct items before operating the barbecue. The hose used must conform to the relevant
standard for the country of use. The length of the hose must be 1.5 metres (maximum). Worn or
damaged hose must be replaced. Ensure that the hose is not obstructed, kinked, or in contact
with any part of the barbecue other than at its connection.
Storage of Appliance
Storage of an appliance indoors is only permissible if the cylinder is disconnected and removed
from the appliance. When the appliance is not to be used for a period of time it should be stored
in its original packaging and stored in a dry dust free area.
Gas Cylinder
The gas cylinder should not be dropped or handled roughly! Always keep the cylinder in upright
position, during operation. Make sure the cylinder is from any source of flame before you change
the cylinder. If the appliance is not in use, the cylinder must be disconnected. Replace the
protective cap on the cylinder after disconnecting the cylinder from the appliance. The gas cylinder
must be sited outside the body of the appliance.
Cylinders must be stored outdoors in an upright position and out of the reach of children. The
cylinder must never be stored where temperatures can reach over 50°C. Do not store the cylinder
near flames, pilot lights or other sources of ignition. DO NOT SMOKE.
This barbecue is designed for use outdoors, away from any flammable materials. It is important
that there are no overhead obstructions and that there is a minimum distance of 3 m from the
side or rear of the appliance. It is important that the ventilation openings of the appliance are
not obstructed. The barbecue must be used on a level, stable surface. The appliance should be
protected from direct draughts and shall be positioned or protected against direct penetration by
any trickling water (e.g. rain).
Parts sealed by the manufacturer or his agent must not be altered by the user. No modifications
should be made to any part of this barbecue and repairs and maintenance should only be carried
out by a registered service engineer.
Since this barbecue has no restriction in the Emission of unburned gas, this barbecue must be
installed and/or used outdoors or in an amply ventilated area.

Appliance connection
Before connection, ensure that there is no debris caught in the head of the gas cylinder, regulator,
burner and burner ports. Spiders and insects can nest within and clog the burner/venturi tube at
the orifice. A clogged burner can lead to a fire beneath the appliance.
Fit the hose to the appliance using a spanner to tighten it onto the connection thread. If the hose is
replaced it must be secured to the appliance and regulator connections with hose clips. Disco-
nnect the regulator from the cylinder (according to the directions supplied with the regulator) when
the barbecue is not in use.
The Barbecue must be used in a well ventilated area. Do not obstruct the flow of combustion air
to the burner when the barbecue is in use. GRILL CAN ONLY BE USED OUTDOOR.
BEFORE USE CHECK FOR LEAKS.
NEVER CHECK FOR LEAKS WITH A NAKED FLAME, ALWAYS USE A SOAPY WATER
SOLUTION.
TO CHECK FOR LEAKS
• Make 2-3 fluid ounces of leak detecting solution by mixing one part washing up liquid with 3
parts water.
• Ensure the control valve is “OFF”.
• Connect the regulator to the cylinder and ON/OFF valve to the burner, ensure the connections
are secured then turn ON the gas.
• Brush the soapy solution onto the hose and all joints. If bubbles appear you have a leak, which
must be rectified before use.
• Retest after fixing the fault.
• Turn OFF the gas at the cylinder after testing.
• If leakage is detected and cannot be rectified. Do not attempt to cure leakage but contact your
gas dealer.

Lighting Instructions
1. Open the hood of the barbecue before attempting to light the burners.
2. Turn all the control knobs clockwise to “OFF” position.
3. Connect the regulator to the gas bottle. Turn the gas supply “ON” at the regulator. Check with
the use of soapy water for any gas leakage between the bottle and the regulator.
4. Push down the front left control knob and keep pressing whilst turning anti-clockwise to the
“HIGH” position (a clicking sound is heard), this will light the left hand burner. Observe if the burner
has lit. If not repeat this process.
5. If the burner has not lit after retrying wait 5 minutes and repeat step 4.
6. Adjust the heat by turning the knob to the High/Low position.
7. If the burner does not light. Light the appliance with a match using the lighting hole in the side
of the appliance. Consult your gas dealer to rectify the ignition.
8. To light the remaining burners in sequence from left to right, repeat step 4 above. The
crosslighting channel between the burners will light the burner adjacent to it. Never attempt to light
other burners except left hand burner first.
9. To turn the barbecue ‘OFF’ turn the cylinder valve or regulator switch to the ‘OFF’ position and
then turn the control knob on the appliance clockwise to the ‘OFF’ position.

CLEANING AND MAINTENANCE
CAUTION: All cleaning and maintenance should be carried out when the barbecue is cold and with
the fuel supply turned OFF at the gas cylinder.
CLEANING
“Burning off” the barbecue after every use (for approx 15 minutes) will keep excessive food residue
to a minimum.
OUTER SURFACE
Use mild detergent or baking soda and hot water solution. Non-abrasive scouring powder can be
used on stubborn stains, then rinse with water.
INTERIOR OF BARBECUE BOTTOM
Remove residue using brush, scraper and/or cleaning pad then wash with a soapy water solution.
Rinse with water and allow to dry.
WOODEN SURFACE
Wash with a soft cloth and hot soapy water solution. Rinse with water. Do not use abrasive
cleaners, degreasers or a concentrated barbecue cleaner on wooden parts.
COOKING GRID
Use a mild soapy water solution. Non-abrasive scouring powder can be used on stubborn stains
then rinse with water.
BURNER CLEANING
• Turn the gas OFF at the control knob and disconnect the cylinder.
• Remove grate.
• Clean the burner with a soft brush or blow clean with compressed air and wipe with a cloth.
• Clean any clogged ports with a pipe cleaner or stiff wire (such as an opened paper clip).
• Inspect burner for any damage (cracks or holes). If damage is found, replace with a new burner.
Reinstall the burner, check to ensure that the Gas valve orifices are correctly positioned and
secured inside the burner inlet (venturi).

SERVICE
Your gas barbecue should be serviced annually by a competent registered person.
TROUBLESHOOTING
PROBLEM POSSIBLE CAUSE SOLUTION
The burner does
not ignite using
the ignition
system
The burner
cannot be ignited
even with the
use of matches
Low flame or
flashback (fire
in burner tube-a
hissing or roaring
noise may be
heard)
1.LP gas cylinder is empty
2.Faulty regulator
3.Obstructions in burner
4.Obstructions in gas jets or gas hose
5. Electrode wire loose or disconnected
on electrode or ignition unit
6.Electrode or wire is damaged faulty
pushbutton igniter
1.LG gas cylinder is empty
2.Faulty regulator
3.Obstructions in burner
4.Obstructions in gas jets or gas hose
1.LP gas cylinder is too small
2.Obstructions in burner
3.Obstructions in gas jets or gas hose
4.Windy conditions
1.Replace with full cylinder
2.Have regulator checked or
replace
3.Clean burner
4.Clean jets and gas hose
5.Reconnect wire
6.Change electrode and wire
change igniter
1.Replace with full cylinder
2.Have regulator checked or
replace
3.Clean burner
4.Clean jets and gas hose
1.Use larger cylinder
2.Clean burner
3.Clean jets and gas hose
4.Use BBQ in a more sheltered
place

Optional accessories (not included)
Motor kit
Ref # Description Qty
1 Motor 1
2 Motor mounting bracket 1
3 Rotisserie bracket 1
4 M6 screw 4
5 M6X12 screw 4

Rotisserie shaft kit
Ref # Description Qty
6 Meat prong (including locking screw) 2
7 Lock ring (including locking screw) 1
8 Rolling ring 1
9 Rotisserie shaft tail 1
10 Handle 1
11 Rotisserie needle 1
CARE AND PROTECTION OF STAINLESS STEEL SURFACES
Your BBQ features Stainless Steel components, using moderate grade Stainless Steels. All Stainless Steel grades require a level of care and protection to retain their appearance. Stainless Steels
are not immune to corrosion and neither are they maintenance-free, contrary to popular
public perception. Even the highest marine grades of Stainless Steel require frequent cleaning
with fresh water to avoid oxidation and other corrosive issues.
After assembly, we recommend that owners apply a thin layer of Olive Oil with a clean rag,
to all exposed Stainless Steel areas. This should then be polished in and buffed off with another
clean rag to a non-oily finish. This process will aid protection against dirt and other corrosive contaminants, by providing a temporary food-safe shield. The Olive Oil layer also makes later polishing
and removal of fingerprints easier. This process should be repeated frequently when cleaning your
grill.
You may have bought a protective cover for your BBQ. It is recommended that a BBQ cover
should be used at all times when the BBQ is not in use to protect your investment. However it is
vital to understand that unless the BBQ is cool, clean and dry when the cover is fitted, use of
a cover can in fact be detrimental. A cover placed on a warm, wet or unclean BBQ (or any mix
of these factors) can in fact be a very effective corrosion breeder!
For this reason, the BBQ should always be cool, cleaned of any surface contaminants or dirt
and be thoroughly dry before a protective cover is fitted. This is especially important before a
BBQ is stored for any length of time i.e. if the BBQ doesn’t get frequent use, or when the BBQ is
stored away over winter months.
Look after your investment carefully and it will serve you well for many years to come.

DE
MONTAGE- UND BETRIEBSANWEISUNGEN
Model: Oklahoma BBQ
VERWENDEN SIE NUR DEN BEIGELEGTEN SCHLAUCH UND SCHLAUCHANSCHLUSS!
WENN EIN ERSATZ ERFORDERLICH SEIN SOLLTE, WENDEN SIE SICH AN UNSEREN
KUNDENDIENST ODER IHREN LOKALEN HÄNDLER.
DIE VERWENDUNG VON NICHT FREIGEGEBENEN TEILEN KANN ZU UNSICHEREN
BETRIEBSBEDINGUNGEN FÜHREN UND DIE UMWELT GEFÄHRDEN.
0359/16
NUR ZUR VERWENDUNG IM FREIEN
BITTE LESEN SIE DIESE ANWEISUNGEN SORGFÄLTIG VOR DER MONTAGE DURCH
BEWAHREN SIE DIESES HANDBUCH ZUM SPÄTEREN NACHSCHLAGEN AUF

WARNUNG
Das Ignorieren dieser Anweisungen kann zu gefährlichen Bränden
oder Explosion führen
Es obliegt der Verantwortung des Verbrauchers, dass der Grill richtig montiert, installiert und
gewartet wird. Die Nichtbeachtung der Anweisungen in diesem Handbuch kann zu Verletzungen
und / oder Sachschäden führen.
SICHERHEITSANWEISUNGEN FÜR DEN FALL, DASS SIE GASGERUCH WAHRNEHMEN:
1. Schließen Sie die Gasversorgung an der Flasche.
2. Löschen Sie alle offenen Flammen; betreiben Sie keine elektrischen Geräte.
3. Lüften Sie den Bereich.
4. Überprüfen Sie die Dichtheit, wie in diesem Handbuch beschrieben.
5. Wenn der Gasgeruch weiterhin bestehen, wenden Sie sich sofort an Ihren Händler oder
Gaslieferanten.
VORSICHTSMASSNAHMEN:
1. Überprüfen Sie die Dichtheit aller Verbindungen nach jedem Befüllen der Gasflasche.
2. Suchen Sie NIE nach Lecks mit einem Streichholz oder offenem Feuer.
3. Lagern Sie keine Benzin oder andere entflammbare Dämpfe und Flüssigkeiten in der Nähe
dieses oder anderer ähnlicher Geräte.
4. Jede LPG Flasche, die nicht mit dem Grill verbunden ist, darf nicht in der Nähe dieses oder eines
anderen ähnlichen Geräts gelagert werden.
ZUSAMMENBAU:
WARNHINWEIS: Trotz aller Bemühungen bei der Herstellung sämtliche scharfen Kanten an Ihrem
Grill zu entfernen, sollten Sie alle Teile vorsichtig handhaben, um versehentliche Verletzungen zu
vermeiden.
Benötigtes Werkzeug: Entweder ein Kreuzschlitz- oder Schlitzschraubendreher und einen
Schlüssel (haben wir ein Multifunktionsschlüssel im Lieferumfang enthalten) oder ein Paar Zangen.
ZUSAMMENBAU:
Bitte lesen Sie alle Anweisungen gründlich durch, bevor Sie fortfahren. Suchen Sie einen großen,
sauberen Bereich, in dem Sie Ihren Grillwagen zusammenbauen. Bei Bedarf verweisen wir auf die
Stückliste und den Montageplan. Die Montage des Grills beinhaltet viele große Bauteile, daher ist
es ratsam, den Zusammenbau zu zweit durchzuführen.
HINWEIS: Stellen Sie sicher, dass alle Kunststoffschutzfolien vor der Montage entfernt werden!
ACHTUNG: Bewegen Sie das Gerät während des Betriebs nicht.
Schließen Sie die Gaszufuhr an der Gasflasche, wenn das Gerät nicht in Gebrauch ist
Ändern Sie nichts am Gerät.
Mindestabstand an den Seiten und der Rückseite des Gerätes zu brennbaren
Konstruktionen jeweils 3 m.

2
1
3
2
A
8
4
5
5
11
9
10
14
12
12
22
6
4
5
5
7
13
18
19
17
1
5
16
20
23
19
13
21
20
Die deutsche Version der Anleitung ist eine genaue Übersetzung der Anleitung des Herstellers.
Die in diesem Handbuch verwendeten Bilder dienen nur zur Illustration und können nicht genau
das Produkt entsprechen.

Teileliste: Oklahoma BBQ
Ref # Beschreibung Mng
1 Warmhalterost 1
2 Grillrost 1
2A Grillplatte 1
3 Flammenregulierung 3
4 Seitliche Ablage 2
5 Grillhalter 4
6 Grilldeckel 1
7 Bedienknopf 3
8 Tropfwanne 1
9 Vordere linke Rahmenstrebe zur Radbefestigung 1
10 Seitenwand 2
11 Vordere linke Rahmenstrebe zur Radbefestigung 1
12 Rad 2
13 Stütze 1
14 Tür links 1
15 Türgriff 2
16 Tür rechts 1
17 Vordere rechte Rahmenstrebe zur Radbefestigung 1
18 Hintere rechte Rahmenstrebe zur Radbefestigung 1
19 Radkappe 2
20 Rad 2
21 Radachse 1
22 Unteres Fach 1
23 Türanschlag 1

Liste Montagematerial: Oklahoma BBQ
Ref # Beschreibung Mng
A
B
C
D
E
F
G
H
MONTAGE:
M4×4 schraube 4
M6×12 schraube 26
M6×65 schraube 4
M6×70 schraube 8
Achse-unterlegscheibe 8
Unterlegscheibe (8mm) 8
R clip 2
Ø 13 flache unterlegscheibe 2
11
10
9
B 4x

18
17
10
B 4x
9, 10, 11
10, 17, 18
22
C 4x

B 4x
13
19
G
20
H
21
19
H
20
G
G 2x
H 2x
12

14
23
B 2x
15
15
16
A 4x
 Loading...