

MOBILE AIR
CONDITIONER
Envi 12H
Thank you for purchasing our product.
Before using this unit, please read this manual in order to avoid improper handling and use
ofthedevice.
• Follow local grid interconnection rules while installing the air conditioning and ensure that it is
properly grounded. If you have any question on electrical installation, follow the instructions of the
manufacturer, and if necessary, ask a professional electrician to install it.
• Place the machine in a flat and dry place and keep a distance of above 50cm between the machine and the surrounding objects or walls.
• After the air conditioning is installed, ensure that the power plug is intact and firmly plugged into
the power outlet, and place the power cord orderly to prevent someone from being tripped or pulling
out the plug.
• Do not put any object into the air inlet and outlet of the air conditioning. Keep the air inlet and
outlet free from obstructions.
• When drainage pipes are installed, ensure that the drainage pipes are properly connected, and
are not distorted or bended.
• While adjusting the upper and lower wind-guide strips of the air outlet, pluck it with hands gently
to avoid damaging wind-guide strips.
• When moving the machine, make sure that it is in an upright position.
• The machine should stay away from gasoline, flammable gas, stoves and other heat sources.
• Don‘t disassemble, overhaul and modify the machine arbitrarily, otherwise it will cause a machine malfunction or even bring harm to persons and properties. To avoid danger, if a machine failure
occurs, ask the manufacturer or professionals to repair it.
• Do not install and use the air conditioning in the bathroom or other humid environments.
• Do not pull the plug to turn off the machine.
• Do not place cups or other objects on the body to prevent water or other liquids from spilling
into the air conditioning.
• Do not use insecticide sprays or other flammable substances near the air conditioning.
• Do not wipe or wash the air conditioning with chemical solvents such as gasoline and alcohol.
When you need to clean the air conditioning, you must disconnect the power supply, and clean it
with a half-wet soft cloth. If the machine is really dirty, scrub with a mild detergent.
• The appliance can be used by children aged from 8 years and above and persons with reduced
physical, sensory or mental capabilities if they have been given supervision or instruction concerning use of the appliance in a safe way and understand the hazards involved.
• Children shall not play with the appliance.
Features
• With cooling, heating, dehumidification and air supply function.
• Automatic swing leaf in the outlet has automatic air swing function. If the air swing function is in
operation, you can press the SWING button to stop the swing leaf at the desired angle.
• LCD displays the control panel. High-quality LCD remote control is equipped to facilitate operation. The remote control can be placed on the back of the body.
• Handles on both sides adopt dividing point design, so that it is easer to carry it.
• The handles on the rear of the air conditioner allow the power cord to be securely stored to
prevent damage when carrying the air conditioner.
• Air filtration capability.
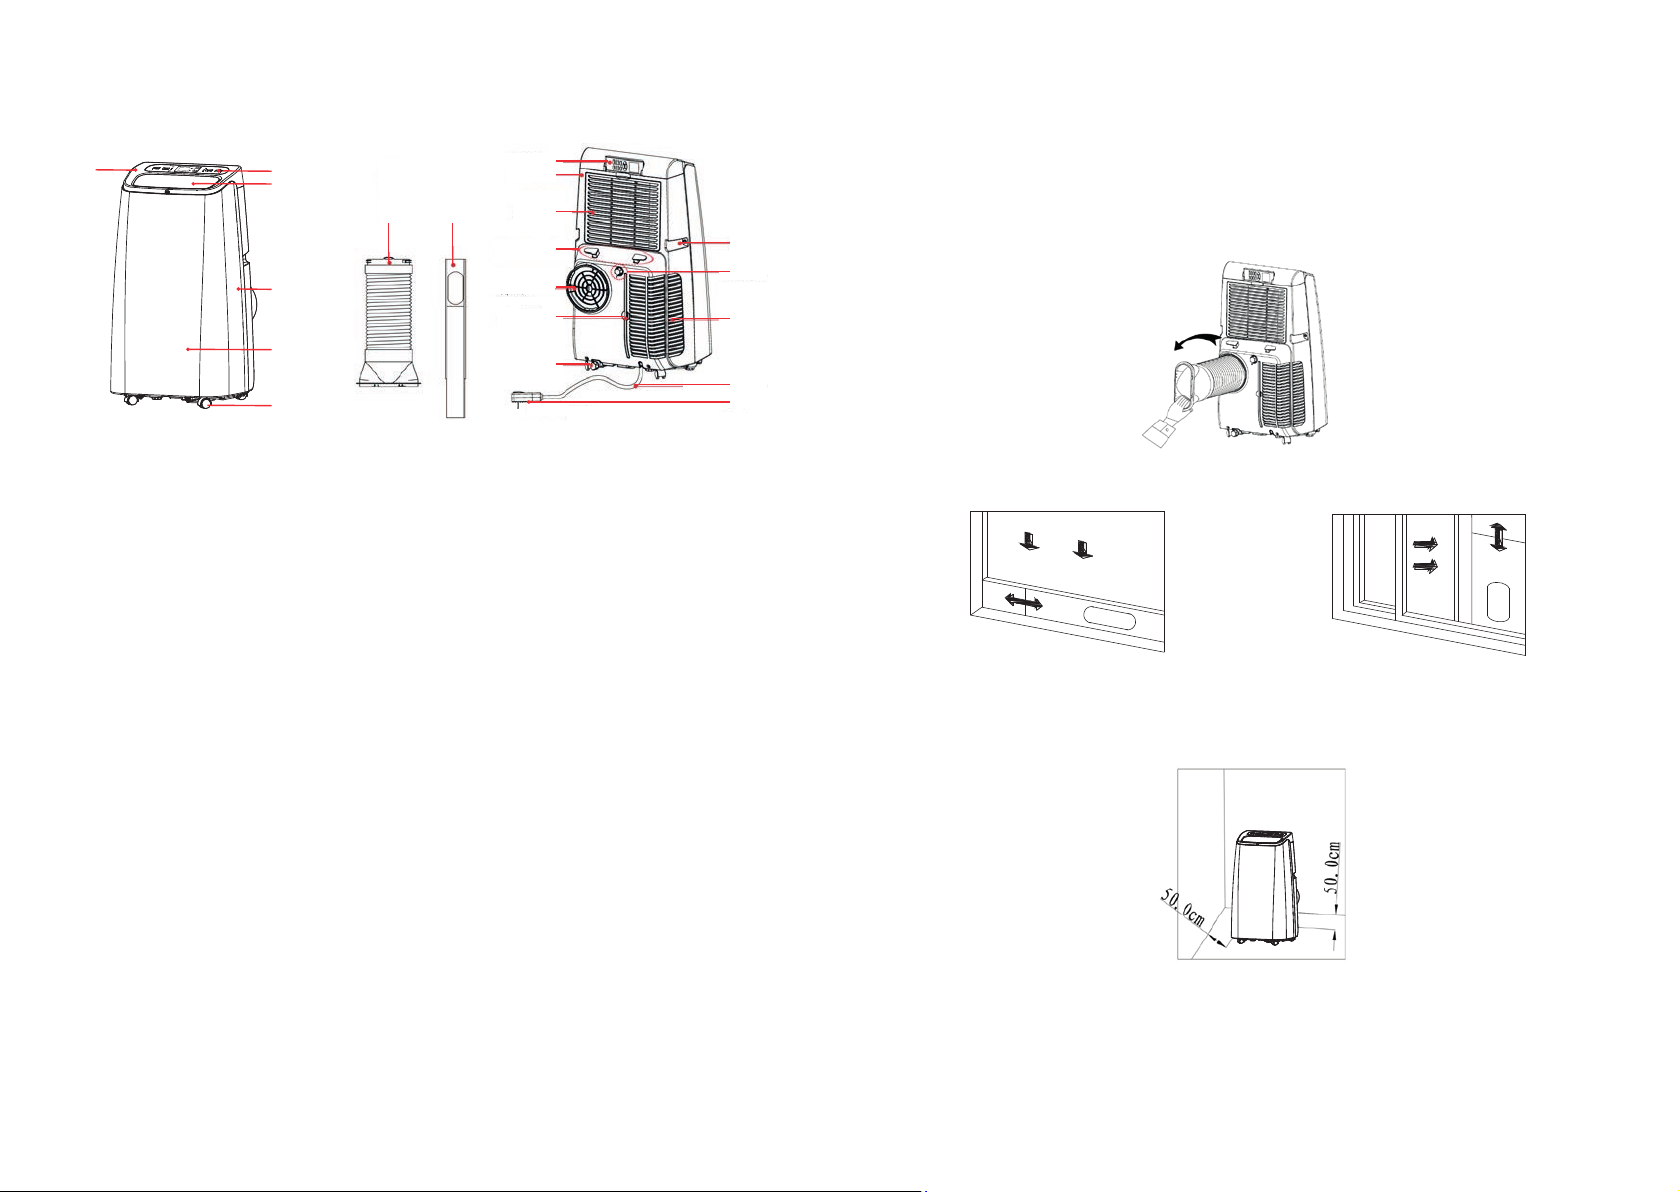
Components
Instalation
WARNING
Before using the mobile air conditioner, keep it upright for at least 2 hours.
12
3
7 8
4
5
6
10
11
12
14
16
18
9
13
15
17
19
20
The air conditioner can be easily moved in the room. In the moving process, ensure that the air
container is in the upright position and the air conditioner shoul be placed on a flat surface. Do not
install and use the air conditioner in the bathroom or other humid environments.
1. Install the heat pipe assembly, screw the heat pipe assembly into the exhaust port on the rear
panel (counterclockwise).
2. Install the window sealing plate assembly (Air Block - optional accessories).
1. Mask
2. Top cover
3. Swing leaf
4. Rear housing
5. Front housing
6. Omni-directional wheel
7. Exhuast pipe assembly
8. Window sealing plate assembly
9. Remote control
10. Rear housing
11. EVA filter housing
12. Power cord hook
13. Handle
14. Air vent
15. Continuos drainage hole
16. CON filter screen
17. Air inlet grille
18. Drainage hole
19. Power cord
20. Power cord plug
3. Pull the pipe towards the window and insert in into the hole in Air Block seal.
4. Install the body
Move the machine with installed heat pipe and place it in front of the window. The distance
between the body and walls or other objects should be at least 50 cm.
NOTICE
• The pipe cannot be distorted nor has substantial turning (greater than 45 °). Keep the ventilation
of the heat pipe unobstructed.
IMPORTANT NOTICE
The length of the exhaust hose shall be 280-1,500mm, and this length is based on the specifications
of the air conditioning. Do not use extension tubes or replace it with other different hoses, or this
may cause a malfunction.
Operation instruction
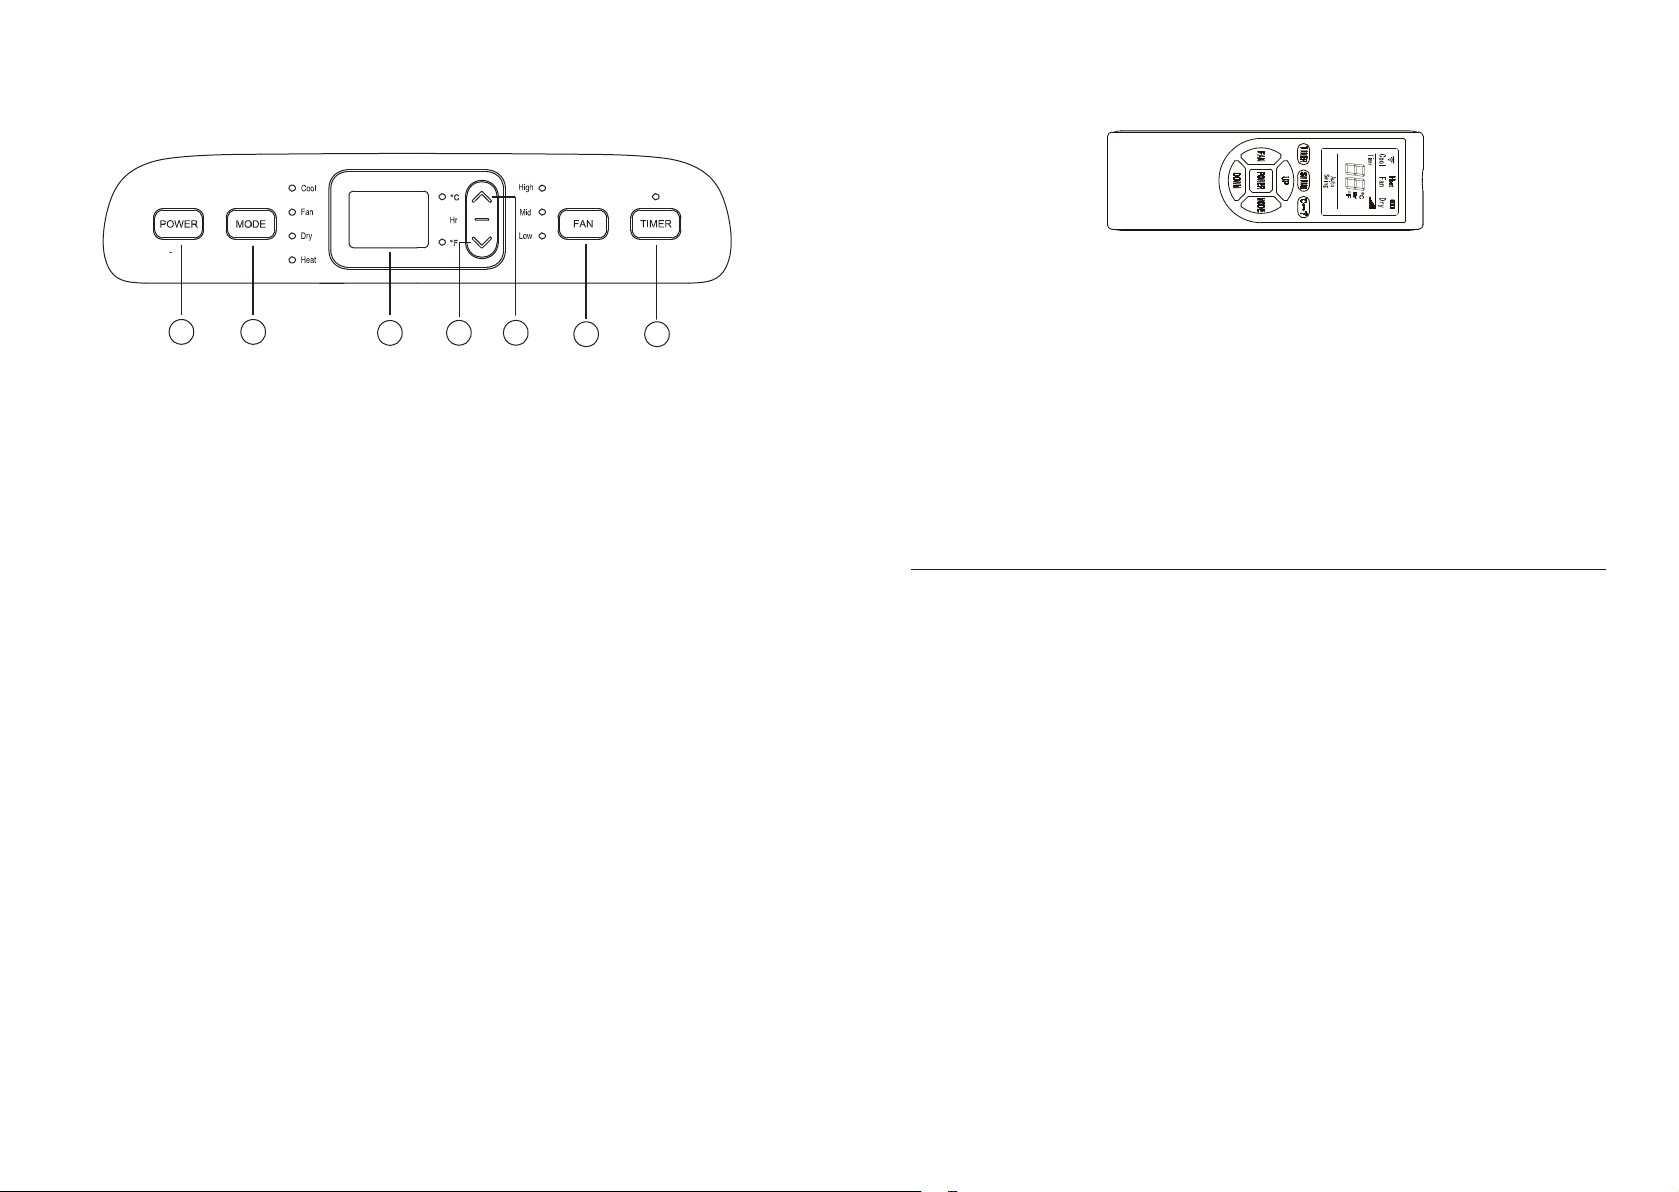
Instruction for operating
67
1. Timing key
2. Wind speed selection key
3. Up key
4. Down key
When the machine is powered on for the first time, the buzzer will play power-on music and then
the machine will get into standby status.
Power key: press the key to turn on or turn off the machine.
Mode selection key: in the case of power on, press the key to switch between cooling, air supply,
dehumidification and heating mode.
Up and Down key: press the two keys to change the set temperature or timing setting value,
operate as follows:
While setting temperature, press up key or down key to select the required temperature (not
available in air supply or dehumidification mode).
Simultaneously press both keys to switch between Celsius °C and Fahrenheit °F.
Wind Speed Selection key
In cooling and air supply mode, press the key to select high, medium or low wind speed operation.
In heating mode, press the key to select high, medium or low wind speed operation.
In dehumidification mode, pressing the key is invalid, and the fan will forcibly choose low wind
speed operation
Timing key:
If the machine is powered on, press the key to turn or on turn off the timer.
Press the key, when the timing symbol flashes, press up and down key to select the required
timing value.
Timing values can be set within 1-24 hours and the timing value is adjusted upwards or
downwards by one hour.
5
5. Display window
6. Mode selection key
7. Power key
34
12
Remote Control
Instruction for operating remote control:
Power: Press the key to tum on or turn off the machine.
Mode: press the key to switch between cooling, air supply, dehumidification and heating mode.
Up: press the key to increase temperature and timing set value.
Down: press the key to reduce temperature and timing set value.
Fan: press the key to select high, medium and low wind speed output circularly.
Timer: press the key to set timing value.
Swing: press the key to open or close swing style. Air flow of the air outlet can blow at different
angles.
°C-°F: press the key to switch between Celsius and Fahrenheit.
A Variety of Protection Functions
Frost Protection Function:
In cooling, dehumidification or economic power saving mode, if the temperature of the exhaust
pipe is too low, the machine will automatically enter protection status. If the temperature of the
exhaust pipe rises to a certain temperature, it can automatically revert to normal operation.
Overflow Protection Function:
When water in the water pan exceeds the warning level, the machine will automatically sound an
alarm, and the LDC temperature display area will show „FL“. At this point, you need to move the
drainage pipe connecting the machine or the water outlet to sewer or other drainage area to empty
the water.
After the water is emptied, the machine will automatically return to the original state.
Automatic Defrosting (heating and cooling models have this function):
The machine has automatic defrosting function, heating symbol on the display screen will flash.
Automatic Thermal Protection:
To protect the service life of the machine, the machine has automatic thermal protection in heating
mode. During the protection period, the compressor and the lower motor will stop operation and
will automatically return to normal heating state after the temperature of the machine recovers.
To increase the service life of the compressor, it has a 3-minute delay booting protection function
after the compressor is turned off.
Drainage Instruction
Maintenance
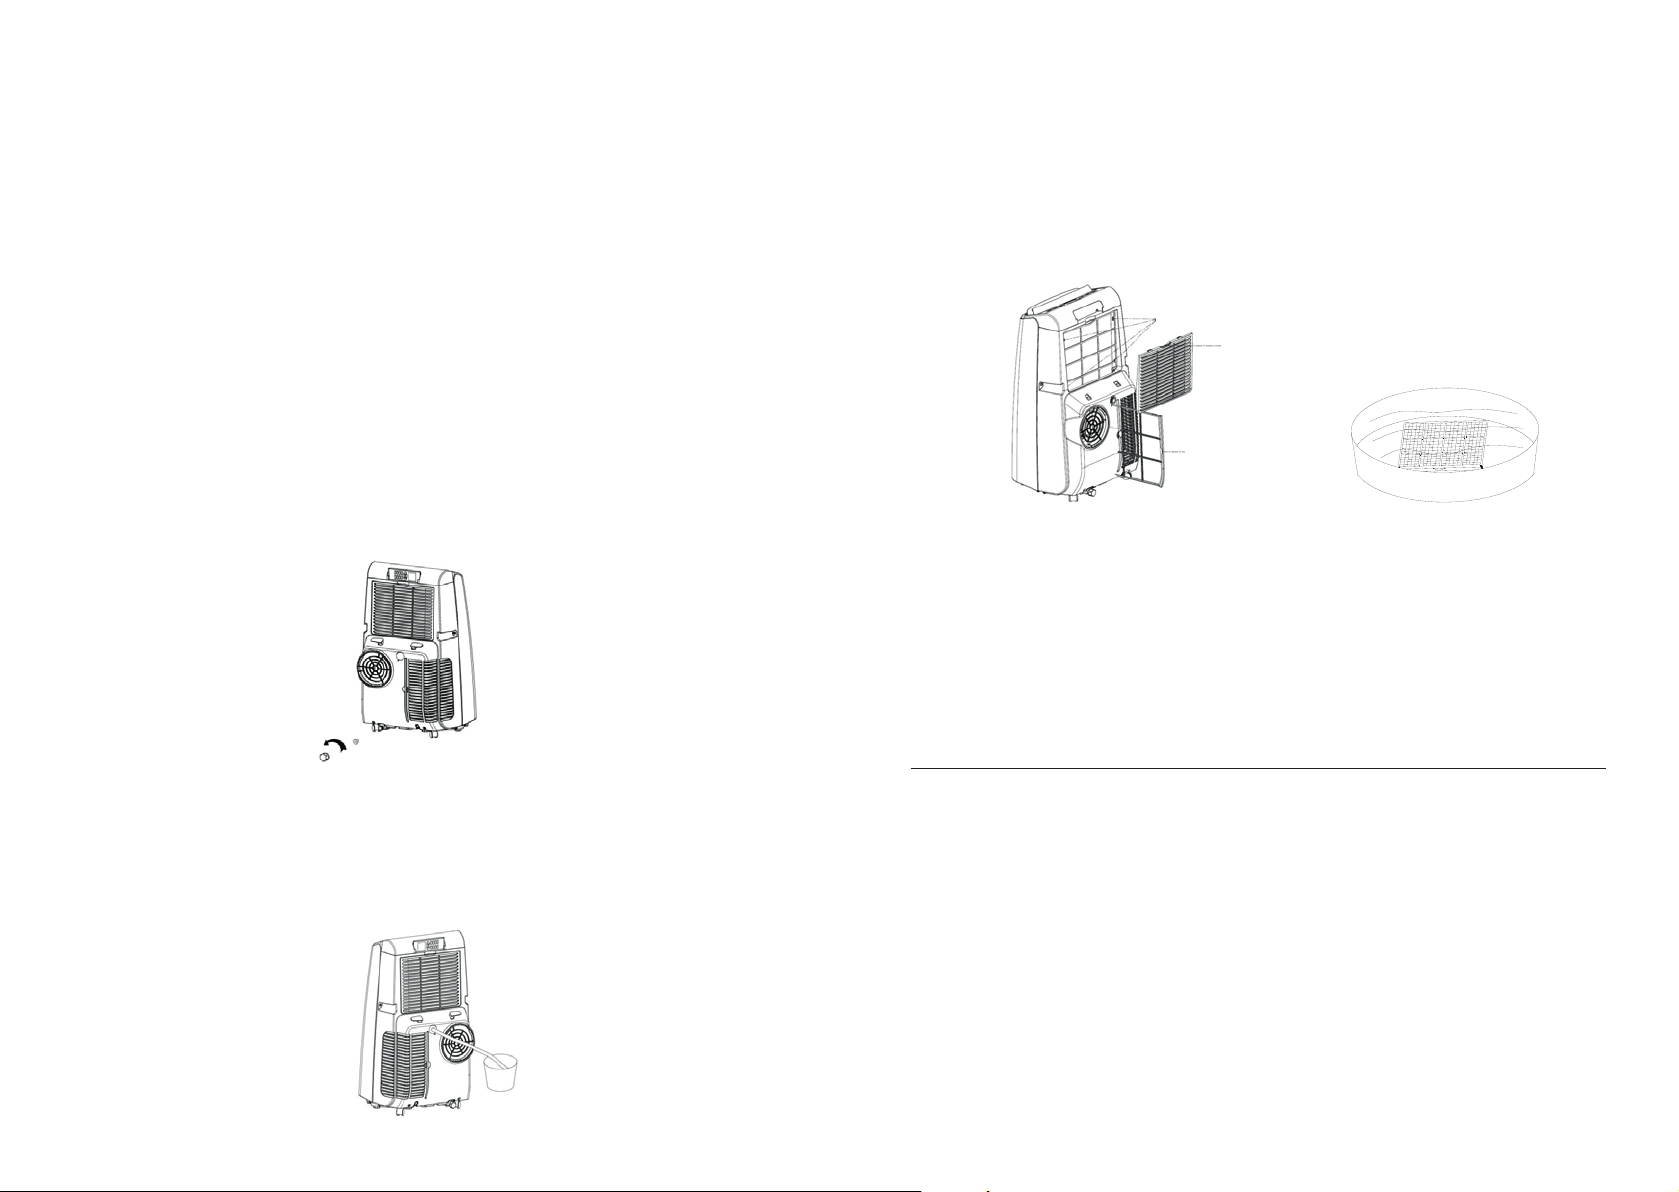
Manual drainage:
When the machine stops after the water is full, turn off the machine power and unplug the power
plug.
Notice
Please move the machine carefully, so as not to spill the water in the water pan at the bottom of
the body.
• Place the water container below the side water outlet behind the body.
• Unscrew the drainage cover, the water will automatically flow into the water container.
Notice
Keep the drainage cover properly.
During drainage, the body can be tilted slightly backwards.
If the water container cannot hold all the water and the water is still flowing, you can stop it to
prevent water from flowing to the floor or the carpet.
When the water is discharged, tighten the drainage cover properly.
Notice
Restart the machine after the drainage cover is installed, otherwise condensate water of the
machine will flow to the floor or the carpet.
Cleaning: Before cleaning and maintenance, turn off the machine amd unplug the plug.
Clean the surface
Clean the surface of the machine with a wet soft cloth. Do not use chemicals, such as benzene,
alcohol, gasoline etc. Otherwise, the surface or even the whole machine will be damaged.
Clean the filter screen
If the filter screen is clogged with dust, the effectiveness of the machine is reduced. Clean the filter
screen once every 2 weeks.
1
2
2
1. Retaining screw
2. Wedging block
Cleaning the upper filter screen frame
Clasp the wedging block with hands. Force down from the outside to remove the filter screen
frame. Unscrew 4 screws from the rear housing.
Put the filter into warm water with neutral detergent (about 40°C/104°F) and then dry it.
Cleaning the lower filter screen frame
Hold the filter screen frame and pull it outward gently to remove it.
Put the filter into warm water with neutral detergent (about 40°C/104°F) and then dry it.
Continuous drainage (only applicable in cooling and dehumidification mode)
• Unscrew the drainage cover.
• Set the drainage pipe into the water outlet.
• Connect the drainage pipe to the bucket or to the outlet (in case of drain, the condensate will
drain spontaneously)
Postseason storage
Unscrew the drainage cover and discharge the water into the water container. You can slightly tilt
the body to dischrage the water.
Turn on the machine, adjust it to low-wind ventilation mode and wait until the drainage pipes
become dry, so as to storage the machine dry and prevent it from mildewing.
Turn off the machine, unplug the power plug and wrap the power cord around handles in the back
side of the machine and install the drainage cover.
Remove the exhaust pipe and keep it properly.
Cover the air conditioner with a plastic bag so as not to be dusty and place it into dry place and
keep it out of reach of children.
Remove the batteries from the remote control.
Notice
Ensure that the body is placed in a dry place and keep all components properly.
Troubleshooting
1
3
4
2
Do not repair or disassemble the air conditioning by yourself. Unqualified repairs will lead to failure
of the warranty and may cause injury of persons or damage their properties.
Problems Reasons Solutions
The air conditioning
does not work.
The cooling or heating
effect is not good.
Big Noise The air conditioning is not placed
The compressor
does not work.
The remote control
does not work.
Displays ‚E1‘. The pipe temperature sensor is
Displays ‚E2‘ The room temperature sensor is
There is no electricity. Turn it on after connecting it to a
The overflow indicator displays
„FL“.
The ambient temperature is too
low or too high?
In cooling mode, the room
temperature is lower than the set
temperature; in heating mode,
the room temperature is higher
than the set temperature.
In dehumidification mode, the
ambient temperature is low.
There is direct sunlight. Pull the Curtain.
Doors or windows are open;
there are a lot of people; or in
cooling mode, there are other
sources of heat.
The filter screen is dirty. Clean or replace the filter screen.
The air inlet or outlet is blocked. Clear obstructions.
on a flat surface.
Overheat protection starts. Wait for 3 minutes until the
The distance between the
machine and the remote control
is too far.
The remote control is not aligned
with the direction of the remote
control receiver.
Batteries are dead.
abnormal.
abnormal.
socket with electricity.
Discharge the water inside.
Recommend to use the machine
in at the temperature of 7-35 °C
(44-95 °F).
Change the set temperature.
The machine is placed in a room
with an ambient temperature of
greater than 17 °C (62 °F).
Close the doors and windows.
Put the air conditioning on a flat
and hard place (to reduce the
noise).
temperature is lowered and then
restart the machine.
Let the remote control get close
to the air conditioning, and make
sure that the remote control
directly faces to the direction of
the remote control receiver.
Check the room temperature
sensor and related circuitry.
Check the room temperature
sensor and related circuitry.
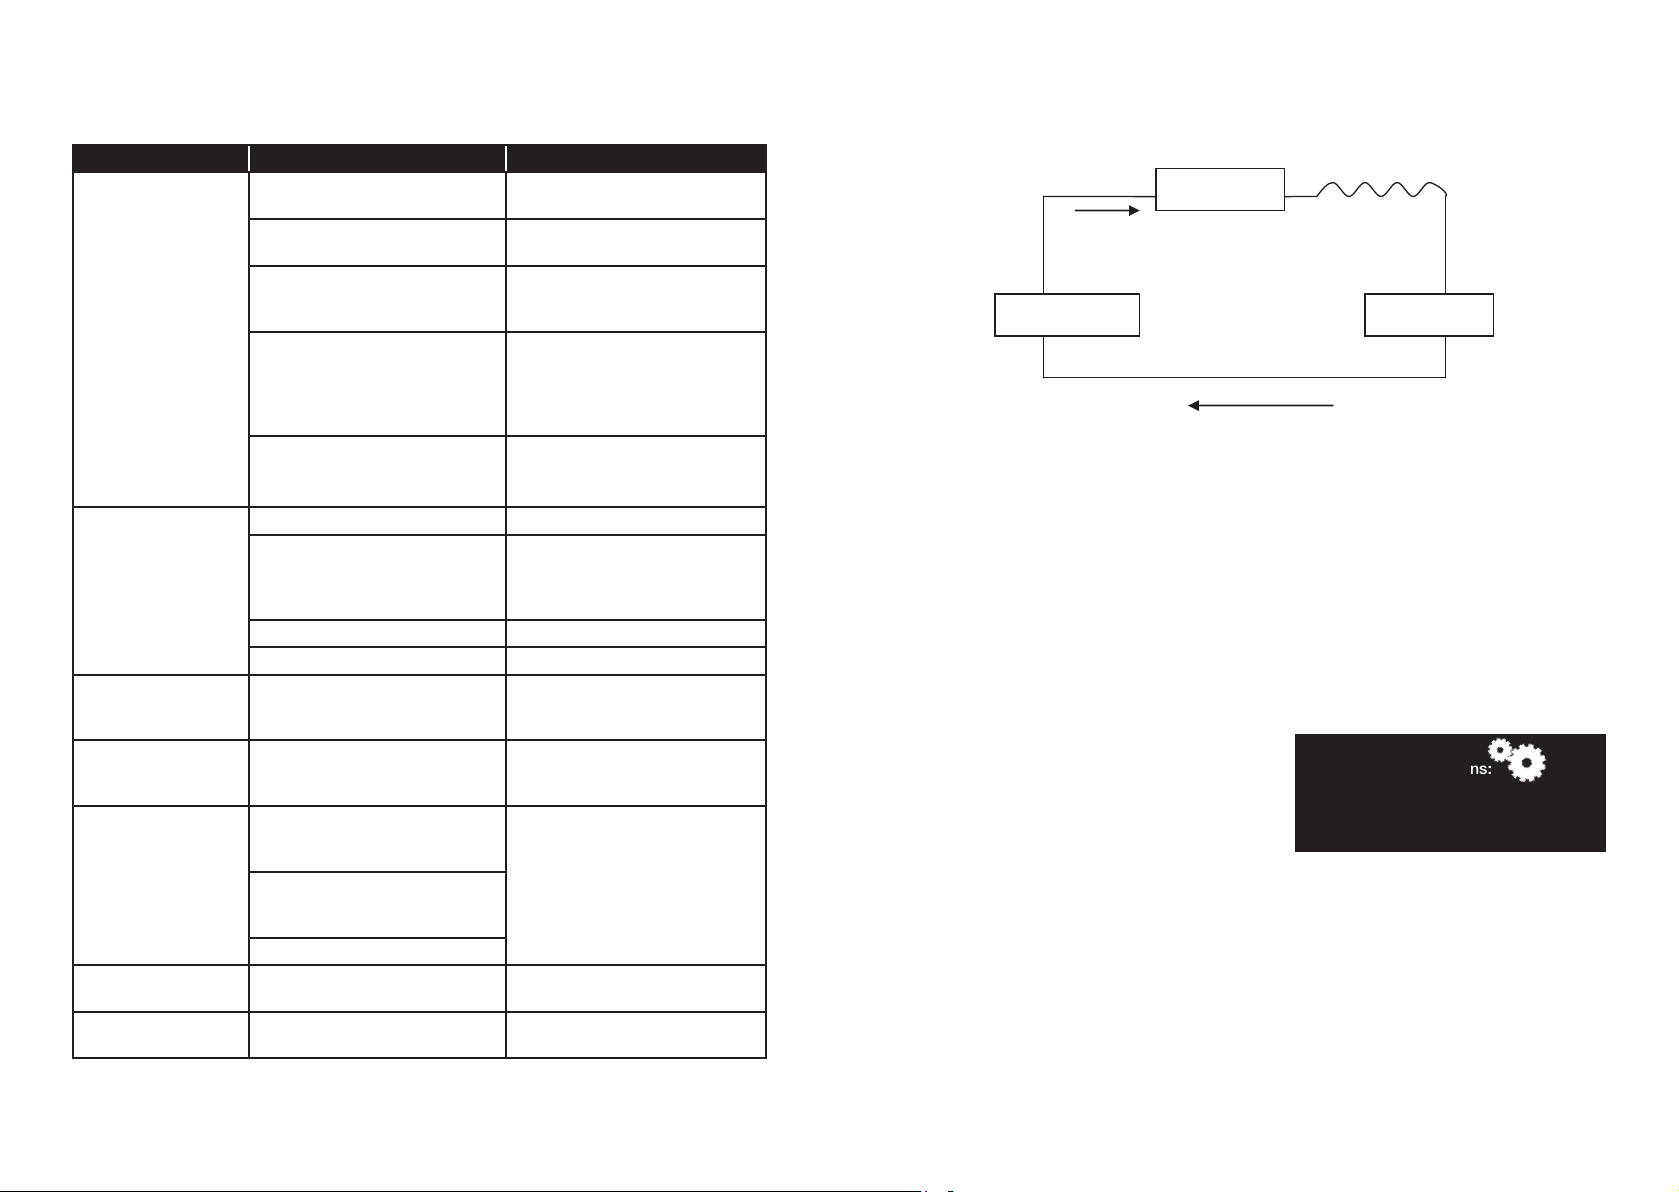
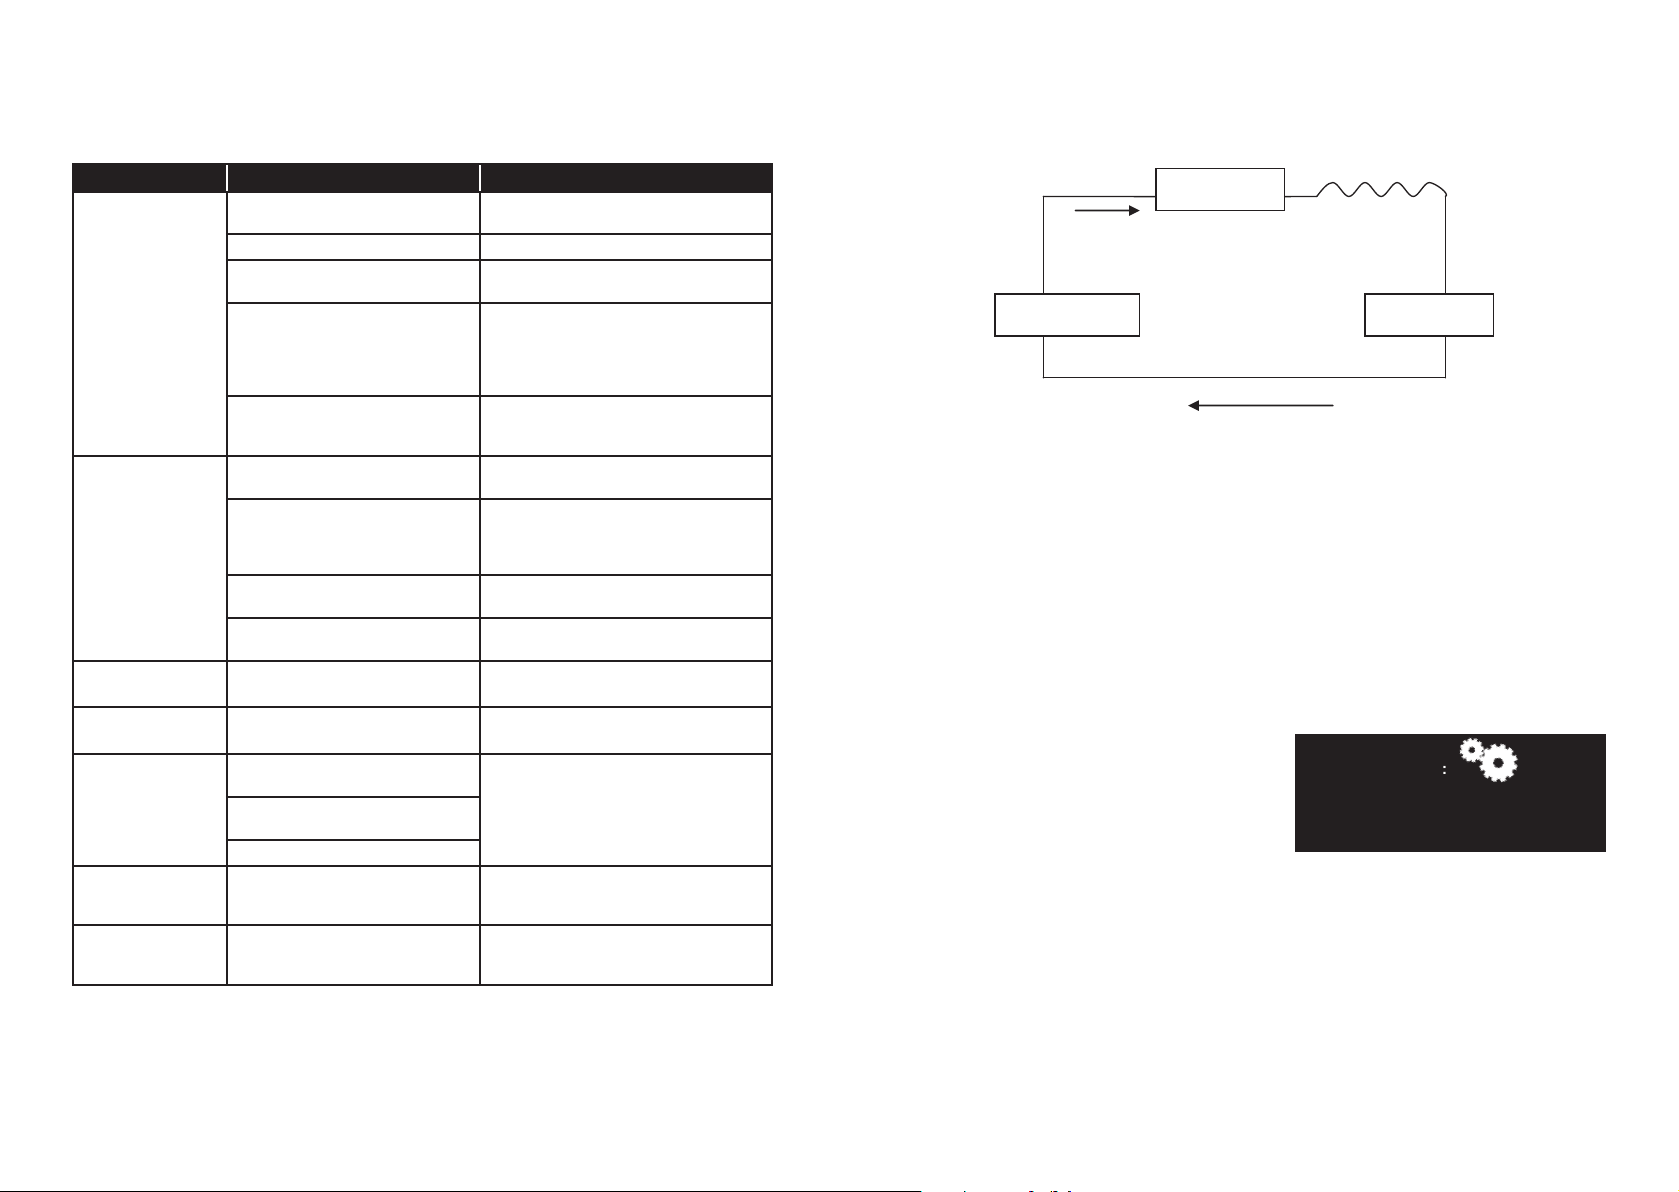
Schematic diagram
1. Condenser
2. Capillary
3. Compressor
4. Evaporator
Technical specifications:
Voltage
: 220-240 V~
Frequency
: 50 Hz
If problems not listed in the table occur or recommended solutions do not work, please contact the
professional service organization.
The English version of the manual is an exact translation of the original manufacturer‘s instructions.
Images used in this manual are for illustrational purposes only and may differ from the actual product.
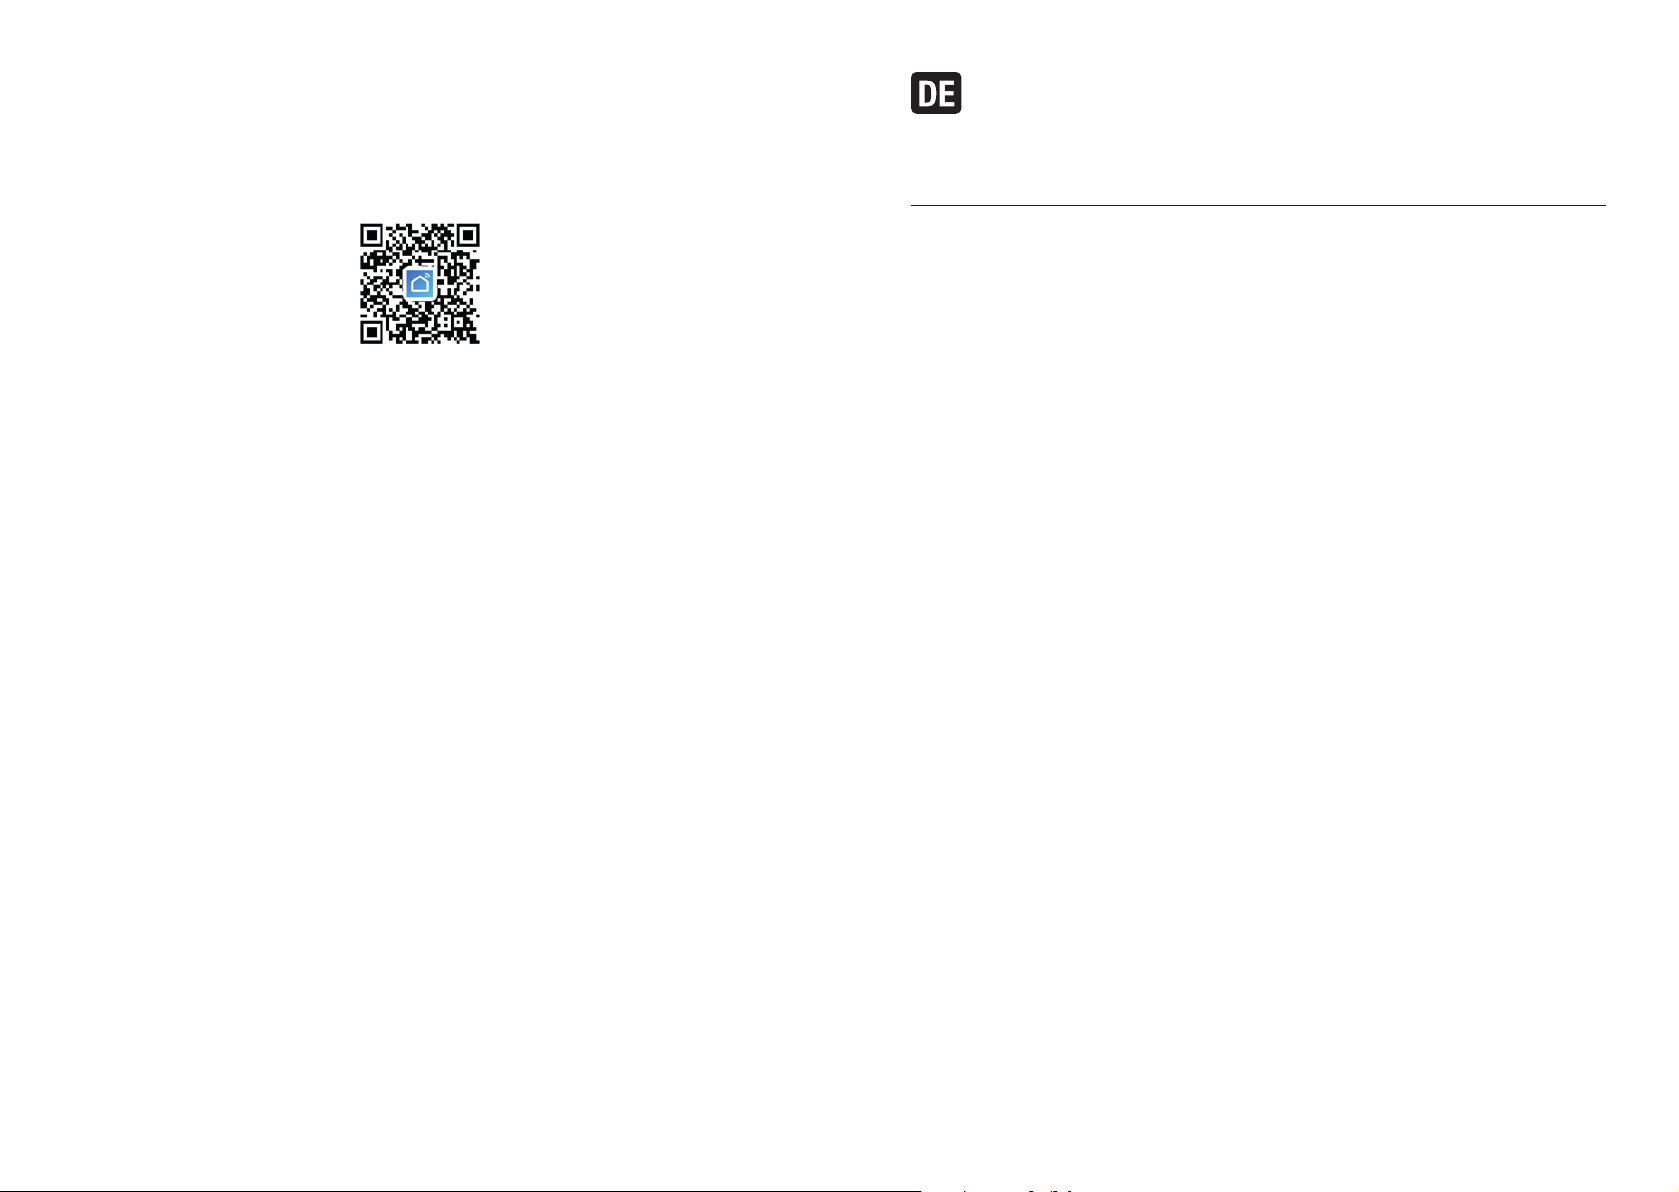
WiFi Connection Guide
Install App
Download the ‘’Smart Life’’ app from the Play Store (android) or App Store (iOS).
Register
If you do not have a Smart Home account, register or sign in with a verification code sent by SMS.
To register:
1. Tap to enter registration page.
2. The system automatically recognises your country/area. You can also select your country
code manually. Enter your mobile phone number/email address and tap ‘’Next’’.
3. If you choose the mobile phone number option, then enter the verification code in the message
sent to you by SMS. Set a password as prompted and press ‘’Confirm’’ to finish your registration.
Add Device Through Network
1. Power air conditioner on, when air conditioner under standby mode, press the ‘’SPEED’’
button for 5 seconds to enter WiFi-connect mode.
2. Open Smart Home app and tap ‘’+’’ in the upper right to add new device through the network.
3. Ensure th device’s indicator light rapidly flashes (2times per second) and tap ‘’Confirm light is
rapidly flashing’’.
4. Select WiFi network (note: network must be 2.4Ghz band) and enter the password.
The device will commence the pairing process and connect to the app.
5. After successfully configuring the devices, the smart AC will be shown on the home page. Tap
to enter its control page.
Note:
• When device is online, it can be controlled.
• When device is offline, it displays ‘’Offline’’ and can be remotely powered on.
Vielen Dank, dass Sie sich für unser Produkt entschieden haben.
Bevor Sie das Gerät benutzen, lesen Sie bitte die Bedienungsanleitung sorgfältig durch, um sich
mit allen Sicherheitshinweisen vertraut zu machen.
• Beachten Sie bei der Installation der Klimaanlage die örtlichen Vorschriften für den Netzwerkanschluss und stellen Sie sicher, dass diese ordnungsgemäß geerdet ist. Wenn Sie Fragen zur
elektrischen Installation haben, befolgen Sie die Anweisungen des Herstellers und bitten Sie gegebenenfalls einen Elektriker um die Installation.
• Stellen Sie das Gerät auf eine ebene und trockene Oberfläche und platzieren Sie es mindestens
50 cm von umgebenden Objekten und Wänden entfernt.
• Vergewissern Sie sich nach der Installation der Klimaanlage, dass der Netzstecker intakt und
fest in die Steckdose eingesteckt ist, und dass das Netzkabel so platziert ist, dass ein Herausziehen oder Auslösen der Steckdose verhindert wird.
• Führen Sie keine Gegenstände in den Lufteinlass und -auslass der Klimaanlage ein. Der Lufteinlass und -auslass darf nicht mit etwas verdeckt werden.
• Stellen Sie beim Installieren von Abflussrohren sicher, dass die Abflussrohre ordnungsgemäß
angeschlossen sind und keine Verformung oder Biegung auftritt.
• Behandeln Sie die Lufteinlasslamellen vorsichtig, um Beschädigungen zu vermeiden.
• Stellen Sie beim Umgang mit der Klimaanlage sicher, dass sich die Klimaanlage in aufrechter
Position befindet.
• Das Gerät muss von Benzin, brennbarem Gas, Herd und anderen Wärmequellen ferngehalten werden.
• Zerlegen, reparieren oder modifizieren Sie das Gerät nicht, da dies zu Fehlfunktionen oder
Schäden am Gerät oder sogar zu Verletzungen führen kann. Reparaturarbeiten müssen immer von
einem autorisierten Servicecenter ausgeführt werden.
• Installieren oder stellen Sie das Gerät nicht in einem Badezimmer oder einer anderen feuchten
Umgebung auf.
• Um das Gerät auszuschalten, verwenden Sie den Netzschalter und ziehen Sie nicht am Kabel.
• Legen Sie keine Getränke oder andere Flüssigkeiten auf das Gerät, die auf das Gerät gelangen könnten.
• Verwenden Sie keine insektiziden Sprays oder andere brennbare Substanzen in der Nähe der
Klimaanlage.
• Wischen Sie die Klimaanlage nicht mit chemischen Lösungsmitteln wie Benzin oder Alkohol ab.
Um die Klimaanlage zu reinigen, trennen Sie sie von der Stromquelle und reinigen Sie sie mit einem
feuchten Tuch. Wenn das Gerät stark verschmutzt ist, verwenden Sie ein mildes Reinigungsmittel.
• Dieses Gerät kann von Kindern über 8 Jahren und Personen mit eingeschränkten körperlichen,
sensorischen oder geistigen Fähigkeiten verwendet werden, sofern sie von einer verantwortlichen
Person für die sichere Verwendung des Geräts überwacht werden und das Risiko verstehen.
• Stellen Sie sicher, dass Kinder nicht mit dem Gerät spielen.
Gerätefunktionen
• Kühl-, Heizungs-, Entfeuchtungs- und Lüftungsfunktionen.
• Die Swing-Funktion löst eine automatische Drehfunktion aus. Wenn die automatische Drehfunktion in Betrieb ist, können Sie die SWING-Taste drücken, um die Gebläse-Lamellen im gewünschten Winkel anzuhalten.
• Die Klimaanlage ist mit einer Fernbedienung mit LCD-Display ausgestattet, die auf der Rückseite der Klimaanlage sicher aufbewahrt werden kann.
• Die Griffe auf beiden Seiten der Klimaanlage erleichtern das Handling mit der Klimaanlage.

• Clips an der Rückseite der Klimaanlage ermöglichen ein sicheres Verstauen des Netzkabels, um
Beschädigungen beim Tragen der Klimaanlage zu vermeiden.
• Möglichkeit der Luftfiltration.
Komponenten:
12
3
7 8
4
5
6
10
11
12
14
16
18
9
13
15
17
19
20
Installation
WARNUNG
Lassen Sie die Klimaanlage vor der Verwendung mindestens 2 Stunden aufrecht stehen.
Sie können die Klimaanlage in Ihrem Raum frei bewegen. Stellen Sie jedoch sicher, dass sich
die Klimaanlage in einer aufrechten Position befindet und sich auf einer ebenen Fläche befindet.
Installieren oder stellen Sie das Gerät nicht in einem Badezimmer oder anderen feuchten
Umgebungen auf.
1. Bringen Sie das Auspuffrohr an. Schrauben Sie das Rohr in die Auslassöffnung an der Rückseite (gegen den Uhrzeigersinn).
2. Installieren Sie die Fensterdichtung (Air Block - kaufbares Zubehör)
1. Maske
2. Obere Abdeckung des Geräts
3. Verstellbare Lamellen
4. Hintere Abdeckung des Geräts
5. Frontabdeckung
6. Lenkrollen
7. Abluftschlauch
8. Fensterdichtungen
9. Fernbedienungsfach
10. Rückseite
11. Eva-Filter
12. Kabelklemmen
13. Griffe
14. Belüftung
15. Entleeren Sie den Wasserentzug für einen
kontinuierlichen Wasserablauf
16. CON-Filter
17. Lufteinlassgitter
18. Abfluss ablassen
19. Kabel
20. Netzstecker
3. Führen Sie das Rohr zum Fenster und setzen Sie die Luftblockdichtung in das Loch ein.
4. Installation des Gerätekörpers
Stellen Sie die Klimaanlage mit dem installierten Rohr vor dem Fenster so auf, dass sie mindestens
50 cm von der Wand und den umgebenden Objekten entfernt ist.
Hinweis
Das Rohr darf nicht verdreht oder gedreht werden (mehr als 45 °). Das Rohr darf nicht verstopft
sein.
Wichtiger Hinweis
Das Abgasrohr sollte eine Länge von 280-1500 mm haben. Die Länge hängt von der Art der
Klimaanlage ab. Verwenden Sie keine Verlängerungsrohre oder andere Rohre, da dies das Gerät
beschädigen kann.

Steuerung des Geräts
Bedienungsanleitung:
67
1. Timer
2. Einstellen der Lüftergeschwindigkeit
3. UP-Taste
4. DOWN-Taste
Wenn das Gerät zum ersten Mal eingeschaltet wird, ertönt ein Summer und der Ton wird abgespielt.
Anschließend wechselt das Gerät in den Standby-Modus.
Ein / Aus-Taste: Drücken Sie diese Taste, um das Gerät ein- oder auszuschalten.
Moduseinstellungstaste: Wenn das Gerät eingeschaltet ist, drücken Sie diese Taste, um den
Betriebsmodus des Geräts auszuwählen. Bei jedem Tastendruck wechselt der Modus wie folgt:
Kühlung, Belüftung, Entfeuchtung, Heizung.
5
5. Anzeige
6. Moduseinstellung
7. Ein / Aus-Taste
34
12
Fernbedienung
Anweisungen zur Verwendung der Fernbedienung:
Power-Taste - Drücken Sie die Taste, um das Gerät ein- oder auszuschalten.
Mode-Taste - Drücken Sie diese Modustaste, um in den Kühl-, Lüftungs-, Entfeuchtungs- oder
Heizmodus zu wechseln.
UP-Taste - Drücken Sie diese Taste, um die Temperatur oder die Zeit zu erhöhen.
Down-Taste - Zum Verringern der Temperatur oder Zeit drücken.
Fan-Taste- Mit dieser Taste können Sie die Lüftergeschwindigkeit auf hoch, mittel und niedrig
einstellen.
Timer-Taste - drücken und die Blaszeit einstellen.
Swing-Taste - löst die automatische Schwenkfunktion aus. Wenn die automatische Drehfunktion
in Betrieb ist, können Sie die Gebläse-Lamellen im gewünschten Winkel mit der Taste SWING
anhalten.
°C- °F - mit dieser Schaltfläche wird die Anzeige in ° C oder ° F Grad eingestellt.
UP- und DOWN-Tasten: Diese Tasten dienen zum Erhöhen und Verringern der Temperatur- und
Timereinstellungen. Verwenden Sie diese wie folgt:
Drücken Sie beim Einstellen der Temperatur auf UP oder DOWN, um die gewünschte Temperatur
einzustellen.
Sie können zwischen Celsius ° C und Fahrenheit ° F wechseln, wenn Sie beide Tasten gleichzeitig
drücken.
Einstellung der Lüftergeschwindigkeit
Drücken Sie im Kühl- und Lüftungsmodus die Taste, um die Lüftergeschwindigkeit auszuwählen
- hoch, mittel, niedrig.
Drücken Sie im Heizmodus und wählen Sie die Gebläsedrehzahl - hoch, mittel, niedrig. Im
Entfeuchtungsmodus ist die Taste nicht funktionsfähig, die Gebläsedrehzahl ist auf niedrige
Drehzahl eingestellt.
Timer
Wenn das Gerät eingeschaltet ist, drücken Sie diese Taste, um den Timer ein- oder auszuschalten.
Drücken Sie die Taste, das Timer-Symbol blinkt und drücken Sie die UP- oder DOWN-Taste, um
die gewünschte Kühlzeit einzustellen.
Die Abkühlzeit kann jede Stunde zwischen 1-24 Stunden eingestellt werden.
Verschiedene Schutzfunktionen
Frostschutz:
Beim Kühlen, Entfeuchten oder im Standby-Modus ist die Temperatur im Abgasrohr möglicherweise
zu niedrig und das Gerät startet automatisch den Schutzstatus. Wenn die Temperatur im Abgasrohr
auf eine bestimmte Temperatur steigt, kehrt das Gerät in den Normalmodus zurück.
Schutz vor Überlauf:
Wenn das Wasser im Wassertank den sicheren Stand überschreitet, löst das Gerät automatisch
einen Alarm aus und auf dem LCD wird „FL“ angezeigt. In diesem Fall muss das überschüssige
Kondensat durch die Ablassöffnungen abgelassen werden.
Wenn das Wasser entfernt wird, kehrt das Gerät in den Normalmodus zurück.
Automatische Abtaufunktion (diese Funktion kann zum Heizen und Kühlen verwendet werden):
Während des Abtauens blinkt das Heizsymbol im Display.
Automatischer thermischer Schutz:
Im Heizmodus verwendet das Gerät einen automatischen Wärmeschutz, um die Lebensdauer
des Geräts zu erhöhen. Wenn der thermische Schutz ausgelöst wird, wird der Kompressor
ausgeschaltet und der Motor kehrt nach dem Abkühlen in den Normalmodus zurück.
Warten Sie 3 Minuten, bevor Sie das Gerät erneut starten:
Wenn das Gerät ausgeschaltet wurde, es kann nicht innerhalb der nächsten 3 Minuten wieder in
Betrieb genommen werden. Diese Funktion schützt das Gerät. Das Gerät beginnt nach 3 Minuten
automatisch zu arbeiten.
Anweisungen zum Entwässern
Wartung
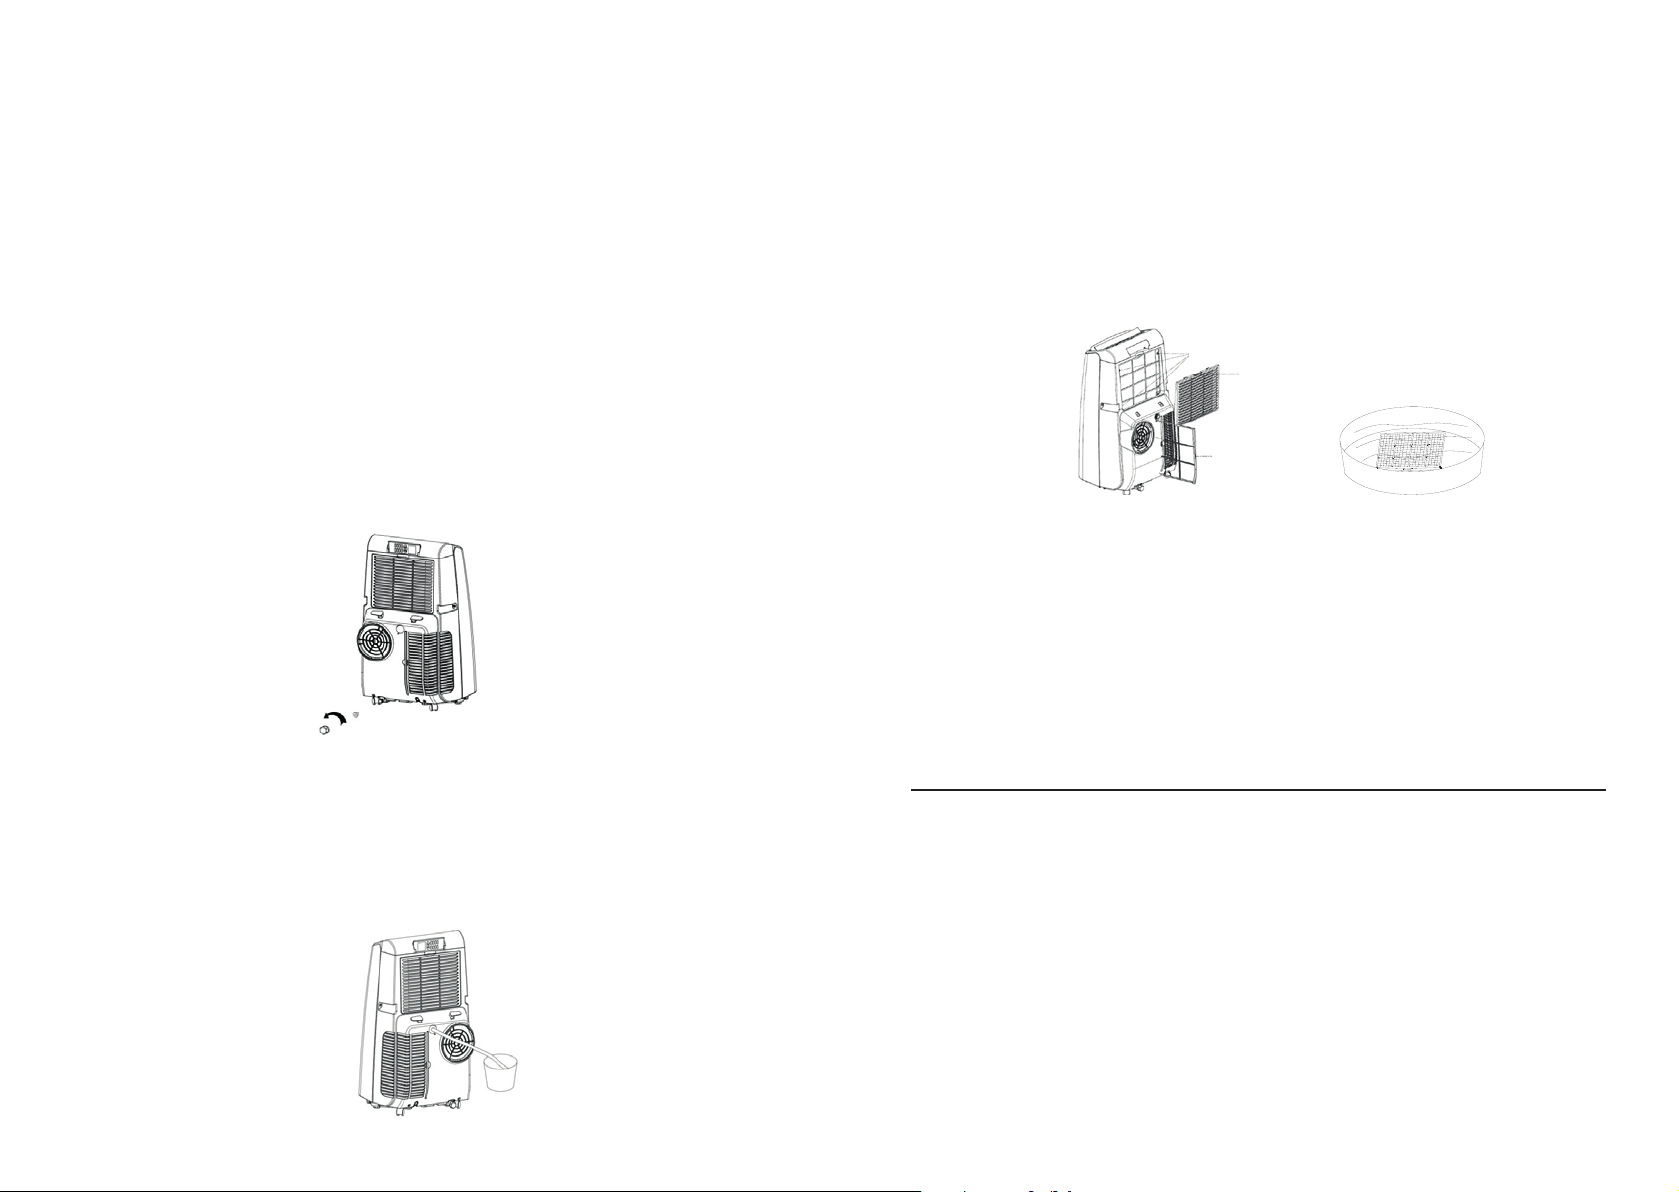
Manuelle Entwässerung
Wenn das Gerät nicht mehr funktioniert und das Wasser im Gerät über dem zulässigen Wert liegt,
schalten Sie das Gerät aus und ziehen Sie den Netzstecker.
Hinweis
Gehen Sie mit dem Gerät sehr vorsichtig um, damit kein Wasser in den Geräteboden gelangt.
• Stellen Sie den Wasserbehälter auf die Rückseite des Geräts.
• Schrauben Sie den Ablassdeckel ab, damit Wasser in den vorbereiteten Behälter ablaufen kann.
Hinweis
Dann befestigen Sie den Ablassdeckel richtig.
Sie können die Klimaanlage leicht kippen, während das Wasser abläuft.
Wenn der Behälter mit Wasser gefüllt ist und das Wasser immer noch fließt, können Sie verhindern,
dass es auf den Boden oder den Teppich läuft.
Wenn das Wasser abgelaufen ist, verschließen Sie vorsichtig den Abfluss.
Hinweis
Starten Sie das Gerät nach dem Schließen des Ablassauslasses erneut, da sonst Kondenswasser
in den Boden oder auf den Teppich gelangen kann.
Kontinuierlicher Ablauf der Abflussleitung
(Es kann nur im Kühl- und Entfeuchtungsmo-
dus verwendet werden)
• Schrauben Sie den Ablaufdeckel ab.
• Platzieren Sie das Abflussrohr in der Bohrung für einen kontinuierlichen Kondensatabfluss.
• Legen Sie das Abflussrohr in einen Abflussbehälter oder führen Sie es in den Abfall (im Fall der
Schwerkraft fließt das Kondensat spontan ab).
Reinigung: Schalten Sie das Gerät aus und ziehen Sie den Netzstecker, bevor Sie es reinigen und
warten.
Oberflächenreinigung
Wischen Sie die Geräteoberfläche mit einem feuchten Tuch ab. Verwenden Sie keine Chemikalien
wie Benzin, Alkohol, Kerosin usw. ansonsten kann die Oberfläche des Geräts oder das gesamte
Gerät beschädigt werden.
Reinigung des Filters
Wenn der Filter staubig ist, verringert sich die Effizienz der Klimaanlage. Reinigen Sie den Filter
alle 2 Wochen.
1
2
2
1. Befestigungsschraube
2. Gitter
Reinigung des Oberfilters
Nehmen Sie das Filtergitter in die Hand. Schieben Sie es nach unten und entfernen Sie es aus dem
Filterrahmen. Lösen Sie 4 Schrauben vom Gerät.
Legen Sie den Filter in warmes Wasser mit einem neutralen Reinigungsmittel (ca. 40 ° C) und
trocknen Sie ihn.
Reinigung des Bodenfilters
Nehmen Sie den Filter in die Hand und ziehen Sie ihn vorsichtig heraus.
Setzen Sie den Filter in warmes Wasser mit neutralem Reinigungsmittel (ca. 40 ° C) und trocknen
Sie ihn dann.
Lagerung nach der Saison
Lösen Sie die Abflussöffnungen und füllen Sie das Restwasser in einen vorbereiteten Behälter. Sie
können das Gerät beim Entleeren leicht neigen.
Schalten Sie das Gerät ein, stellen Sie den Lüftermodus auf niedrige Gebläsedrehzahl und warten Sie, bis
die Abflussrohre trocken sind, um das Gerät trocken zu lagern, sodass sich kein Schwamm im Gerät bildet.
Schalten Sie das Gerät aus, ziehen Sie den Netzstecker heraus und wickeln Sie das Gerätekabel
auf die Klemmen an der Rückseite des Geräts. Schließen Sie dann die Abflussöffnung.
Entfernen Sie das Abgasrohr und lagern Sie es.
Decken Sie die Klimaanlage mit Plastik ab, um Staub zu vermeiden, und lagern Sie sie an einem
trockenen Ort außerhalb der Reichweite von Kindern.
Nehmen Sie die Batterien aus der Fernbedienung heraus.
Hinweis:
Stellen Sie sicher, dass sich der Gerätekörper an einem trockenen Ort befindet und alle
Komponenten der Klimaanlage ordnungsgemäß gelagert werden.
Problembehebung
1
3
4
2
Reparieren oder zerlegen Sie die Klimaanlage nicht selbst. Reparaturen, die von einer nicht
qualifizierten Person ausgeführt werden, führen zum Erlöschen der Garantie und können zu
Verletzungen oder Sachschäden führen.
Problem Mögliche Ursache Lösung
Klimaanlage
funktioniert nicht.
Die Wirkung
von Heizen oder
Kühlen ist nicht gut
genug.
Gerät macht viel
Lärm
Der Kompressor
funktioniert nicht.
Die Fernbedienung
funktioniert nicht.
Das Display zeigt
„E1“.
Das Display zeigt
„E2“.
Es gibt keine Stromversorgung. Schließen Sie das Gerät an die Steckdose
Die Displayanzeigen zeigen „FL“ an. Gießen Sie das Wasser aus dem Gerät aus.
Die Umgebungstemperatur ist zu
niedrig oder zu hoch.
Im Kühlmodus ist die
Raumtemperatur niedriger als die
eingestellte Temperatur und im
Heizmodus ist die Raumtemperatur
höher als die eingestellte Temperatur.
Im Entfeuchtungsmodus ist die
Umgebungstemperatur zu niedrig.
Die Klimaanlage steht unter direktem
Sonnenlicht.
Es gibt offene Türen oder Fenster,
oder es sind viele Personen im
Raum oder es gibt eine andere
Wärmequelle.
Der Filter ist schmutzig. Reinigen Sie den Filter oder ersetzen Sie
Die Luftein- oder -auslässe sind
verstopft.
Gerät ist nicht auf einer ebenen
Fläche aufgestellt.
Die Überhitzungsfunktion hat
begonnen
Die Entfernung der Fernbedienung
und des Geräts ist sehr groß.
Die Fernbedienung zeigt nicht auf
den Geräteempfänger.
Die Batterien sind erschöpft.
Die Temperatur am Rohrsensor ist
nicht normal.
Die Temperatur am Rohrsensor ist
nicht normal.
an und schalten Sie es ein.
Die empfohlene Temperatur für die
Klimaanlage beträgt 7 - 35 ° C (44 - 95 ° F).
Stellen Sie die eingestellte Temperatur ein.
Stellen Sie das Gerät an einem Ort auf, an
dem die Temperatur über 17 ° C (62 ° F)
liegt.
Ziehe die Vorhänge hoch.
Schließen Sie die Tür und das Fenster.
ihn.
Reinigen Sie sie so, dass sie nicht verstopft
sind.
Stellen Sie das Gerät an anderer Stelle auf
eine flache und schwere Oberfläche.
Warten Sie 3 Minuten, bis die Temperatur
abfällt, und starten Sie das Gerät erneut.
Richten Sie die Fernbedienung näher an
das Gerät und vergewissern Sie sich, dass
sie auf den Empfänger am Gerät zeigt.
Überprüfen Sie die Temperatur am
Röhrensensor und die zugehörigen
Stromkreise.
Überprüfen Sie die Temperatur am
Röhrensensor und die zugehörigen
Stromkreise.
Schema
1. Kondensator
2. Kapillare
3. Kompressor
4. Verdampfer
Technische Daten:
Spannung: 220-240 V~
Frequenz: 50 Hz
Wenn Probleme auftreten, die nicht in dieser Tabelle aufgeführt sind, oder wenn die Fehlerbehebung
nicht hilft, wenden Sie sich an einen professionellen Service.
Die deutsche Version des Handbuchs ist eine genaue Übersetzung der Anweisungen des
Originalherstellers.
Die in diesem Handbuch verwendeten Bilder dienen nur zur Illustration und stimmen möglicherweise
nicht genau mit dem Produkt überein.

Děkujeme za nákup našeho výrobku.
Před použitím přístroje si prosím přečtěte tento návod, vyhnete se tak neodborné manipulaci
azacházení s přístrojem.
• Při instalaci klimatizace dodržujte místní předpisy pro propojení sítě a ujistěte se, že je řádně
uzemněna. Pokud máte jakékoliv dotazy ohledně elektrické instalace, postupujte podle pokynů
výrobce a v případě potřeby požádejte profesionálního elektrikáře, aby jej nainstaloval.
• Přístroj umístěte na rovný a suchý povrch a umístěte jej minimálně 50cm od okolních objektů
a zdí.
• Po nainstalování klimatizace se ujistěte se, že napájecí zástrčka je neporušená a pevně zasunutá do elektrické zásuvky, a napájecí kabel umístěte tak, abyste zabránili zakopnutí či vytažení
ze zásuvky.
• Nevkládejte žádné předměty ke vstupu a výstupu vzduchu klimatizace. Vstup a výstup vzduchu
nesmí nic zakrývat.
• Při instalaci drenážních trubek zajistěte, aby drenážní trubky byly správně připojeny a aby nedošlo k deformaci nebo ohnutí.
• Při nastavování lamel vzduchového vstupu s nimi manipulujte jemně, aby nedošlo k poškození.
• Při manipulaci s klimatizací se ujistěte, že klimatizace je ve vzpřímené pozici.
• Přístroj musí být z dosahu benzínu, hořlavého plynu, sporáku a jiných zdrojů tepla.
• Přístroj nerozebírejte, neopravujte a neupravujte, jinak může dojít k poruše či poškození přístroje
nebo dokonce k újmě na zdraví. Opravu zařízení musí vždy provádět autorizovaný servis.
• Přístroj neinstalujte ani neumisťujte do koupelny, nebo jiných vlhkých prostředí.
• Když chcete přístroj vypnout, použijte vypínač, netahejte za kabel.
• Na přístroj neumisťujte pití ani jiné tekutiny, aby se nevylily do přístroje.
• V blízkosti klimatizace nepoužívejte insekticidní spreje nebo jiné hořlavé látky.
• Neotírejte ani neumývejte klimatizace chemickými rozpouštědly, jako je benzín a alkohol. Když
chcete klimatizace vyčistit, vypojte ji ze zdroje napájení a vyčistěte ji vlhkým hadříkem. Pokud je
přístroj hodně špinavý, použijte jemný čisticí prostředek.
• Tento přístroj může být používán dětmi od 8 let a osobami se sníženými fyzickými, smyslovými
nebo duševními schopnostmi, pokud jim byl poskytnut dohled osobou za ně zodpovědnou ohledně používání spotřebiče bezpečným způsobem a porozuměl riziku, které hrozí.
• Zajistěte, aby si děti s přístrojem nehrály.
Komponenty:
12
3
4
5
6
1. Maska
2. Horní kryt přístroje
3. Nastavitelné lamely
4. Zadní kryt přístroje
5. Přední kryt přístroje
6. Otočná kolečka
7. Trubice pro odvod vzduchu
8. Těsnění do oken
9. Přihrádka pro dálkové ovládání
10. Zadní kryt přístroje
9
10
7 8
11
12
14
16
18
11. Eva filter
12. Úchyty na kabel
13. Rukojeti
14. Výduch vzduchu
15. Odvod pro kontinuální odvod vody
16. CON filter
17. Mřížka přívodu vzduchu
18. Drenážní výpusť
19. Kabel
20. Elektrická zástrčka
13
15
17
19
20
Vlastnosti přístroje
• Funkce chlazení, topení, odvlhčování a ventilace.
• Funkce Swing, spouští automatickou otočnou funkci. Pokud je automatická otočná funkce v
provozu, můžete stisknutím tlačítka SWING zastavit vyfukovací lamely v požadovaném úhlu.
• Klimatizace je vybavena dálkovým ovládáním s LCD displejem, které lze bezpečně uložit na
zadní stranu klimatizace.
• Rukojeti po obou stranách klimatizace jsou navrženy tak, aby usnadnily manipulaci s klimatizací
• Úchytky na zadní straně klimatizace umožnují bezpečné uložení napájecího kabelu čímž zamezují jeho poškození při přenášení klimatizace.
• Možnost filtrace vzduchu.

Instalace
Ovládání přístroje
VAROVÁNÍ
Před použitím klimatizace ji nechte minimálně 2h ve vzpřímené pozici.
Klimatizaci můžete libovolně přesouvat po pokoji. Při přesouvání se však ujistěte, že klimatizace
je ve vzpřímené pozici a klimatizace je umístěna na rovném povrchu. Přístroj neinstalujte ani
neumisťujte do koupelny, nebo jiných vlhkých prostředí.
1. Připevněte výduchovou trubku. Trubici zašroubujte do výfukového otvoru na zadní straně (protisměru hodinových ručiček).
2. Nainstalujte těsnění okna (Air Block – dokoupitelné příslušentsví)
3. Trubici natáhněte k oknu a vložte do otvoru těsnění Air Block.
4. Instalace těla přístroje
Klimatizaci s nainstalovanou trubicí umístěte před okno, tak aby byla minimálně 50 cm od zdi a
okolních předmětů.
Instrukce k provozu:
67
1. Časovač
2. Nastavení rychlosti ventilátoru
3. Tlačítko UP
4. Tlačítko DOWN
Když je přístroj poprvé zapnut, rozezní se bzučák a zahraje znělka a poté se přístroj přepne do
pohotovostního stavu.
Tlačítko zapnutí/vypnutí: stiskněte toto tlačítko a přístroj se zapne/vypne.
Tlačítko nastavení režimu: když je přístroj zapnutý, stisknutím tohoto tlačítka zvolíte provozní
režim přístroje. Po každém stisku tlačítka se přepne režim následovně chlazení, ventilace,
odvlhčování, topení.
Tlačítka UP a DOWN: tato tlačítka slouží ke zvyšování a snižování hodnoty pro nastavení teploty a
časovače, používejte je následovně:
Při nastavování teploty stiskněte opakovaně tlačítko UP nebo DOWN a nastavte požadovanou
teplotu (nastavení teploty není možné v režimu ventilace a odvlhčování).
Při stisknutí obou tlačítek najednou si můžete přepnout mezi stupni Celsia °C a Fahrenheita °F.
Nastavení rychlosti ventilátoru
V režimu chlazení a ventilace, stiskněte tlačítko a vyberte rychlost ventilátoru – vysoká, střední,
nízká.
V režimu topení stiskněte tlačítko a vyberte rychlost ventilátoru – vysoká, střední, nízká. V režimu
odvlhčování tlačítko není funkční, rychlost ventilátoru je nastavena na nízkou rychlost.
5
5. Displej
6. Nastavení režimu
7. Tlačítko zapnutí/vypnutí
34
12
Poznámka
• Trubice nesmí být zkřivená nebo být přetočená (více než 45°). Trubice nesmí být ničím ucpaná.
Důležité upozornění
Výfuková trubice by měla být dlouhá 280-1500 mm. Délka záleží na typu klimatizace. Nepoužívejte
prodlužující trubice nebo jiné trubice, může dojít k poškození přístroje.
Časovač/Timer
Když je přístroj zapnutý, stisknutím tlačítka zapnete/vypnete časovač.
Stiskněte tlačítko, symbol časovače bude blikat a stisknutím tlačítka UP nebo DOWN nastavíte
požadovanou dobu chlazení.
Doba chlazení může být nastavena v rozmezí 1-24h vždy po jedné hodině.

Dálkové ovládání
Instrukce k odvodňování
Manuální odvodňování
Když se přístroj přestane pracovat a voda v přístroji je nad povolenou úroveň, přístroj vypněte a
vypojte ze zásuvky.
Poznámka
S přístrojem zacházejte velmi opatrně, aby se nevylila voda do spodní části přístroje.
• Nádobku na vodu umístěte k zadní straně přístroje.
• Odšroubujte drenážní krytku, aby voda mohla odtéct do připravené nádobky.
Instrukce k používání dálkového ovládání:
Tlačítko Power – pro zapnutí/vypnutí přístroje stiskněte tlačítko.
Tlačítko Mode – tlačítko režimu stiskněte pro přepnutí na režim chlazení, ventilace, odvlhčování,
nebo topení.
Tlačítko UP – stiskněte pro zvýšení teploty nebo času.
Tlačítko Down – stiskněte pro snížení teploty nebo času.
Tlačítko Fan – tímto tlačítkem můžete nastavit rychlost ventilátoru na vysokou, střední a nízkou.
Tlačítko Timer – stiskněte tlačítko a nastavte dobu foukání.
Tlačítko Swing – spouští automatickou otočnou funkci. Pokud je automatická otočná funkce v
provozu, můžete stisknutím tlačítka SWING zastavit vyfukovací lamely v požadovaném úhlu.
°C-°F – tímto tlačítkem nastavíte zobrazování v °C nebo °F stupních.
Různé funkce ochrany
Protinámrazová ochrana:
Při chlazení, odvlhčování nebo v úsporném režimu může být teplota ve výfukové trubici příliš nízká
a přístroj automaticky spustí ochranný status. Pokud teplota ve výfukové trubici stoupne na určitou
teplotu, přístroj se vrátí do normálního režimu.
Ochrana proti přetékání:
Když voda v nádržce na vodu přesáhne bezpečnou úroveň, přístroj automaticky spustí alarm a na
LCD displeji se zobrazí ‘‘FL‘‘. V tomto případě je potřeba drenážním otvorem vypustit přebytečný
kondenzát.
Když je voda odstraněna, přístroj se vrátí do normálního režimu.
Automatická funkce odmrazení (tuto funkci můžete použít při topení a chlazení):
Během odmrazování bude na displeji blikat symbol topení.
Automatická tepelná ochrana:
Při režimu topení přístroj používá automatickou tepelnou ochranu aby, byla zvýšena životnost
přístroje. Při spuštění tepelné ochrany se vypne kompresor a motor se po zchladnutí vrátí do
normálního režimu.
Poznámka
Drenážní krytku poté správně připevněte.
Během odtékání vody můžete klimatizaci trochu naklonit.
Když je nádobka už plná vody a odtékající voda z klimatizace pořád teče, můžete ji zastavit, aby
se nerozlila na zem nebo koberec.
Když voda odtekla, pečlivě uzavřete drenážní výpusť.
Poznámka
Po uzavření drenážní výpustě přístroj restartujte, jinak zkondenzovaná voda může vytéct na zem
nebo na koberec.
Kontinuální odvod drenážní trubicí (může být použito pouze v režimu chlazení a odvlhčování)
• Odšroubujte drenážní krytku.
• Drenážní trubici nasaďte do otvoru pro kontinuální odvod kondenzátu.
• Drenážní trubici dejte do nádobky na odtékající vodu nebo vyveďte do odpadu (v případě samospádu bude kondenzát odtékat samovolně).
Počkejte před opětovným uvedením do provozu 3 minuty:
Pokud byl přístroj vypnutý, nemůže se během následujících 3 minut uvést opětovně do provozu.
Tato funkce slouží k ochraně přístroje. Přístroj se spustí automaticky po 3 minutách.

Údržba
Čištění: Před čištěním a údržbou přístroj vypněte a odpojte jej od elektrické sítě.
Čištění povrchu
Povrch přístroje otřete vlhkým hadříkem. Nepoužívejte chemikálie, jako je benzín, alkohol, petrolej
atd. Jinak bude povrch přístroje nebo dokonce celý přístroj poškozen.
Čištění filtru
Když je filtr zaprášený, efektivita klimatizace je snížena. Čistěte filtr každé 2 týdny.
1
2
2
1. Upevňovací šroub
2. Mřížka
Čištění horního filtru
Mřížku filtru vezměte do rukou. Zatlačte ji dolů a vyndejte ji z rámu filtru. Odšroubujte 4 šrouby z
těla přístroje.
Filtr vložte do teplé vody s neutrálním čisticím prostředkem (okolo 40°C/104°F), poté jej usušte.
Čištění dolního filtru
Vezměte filtr do rukou a jemně jej vytáhněte.
Filtr vložte do teplé vody s neutrálním čisticím prostředkem (okolo 40°C/104°F), poté jej usušte.
Posezónní skladování
Odšroubujte drenážní výpustě a vylijte zbytkovou vodu do předem připravené nádoby. Přístroj
můžete při vypouštění mírně naklonit.
Přístroj zapněte, nastavte režim ventilace s nízkou rychlostí ventilátoru a počkejte, dokud nebudou
drenážní trubice suché, abyste mohli přístroj uskladnit suchý a nevytvořila se v přístroji plíseň.
Přístroj vypněte, vypojte jej ze zásuvky a kabel přístroje namotejte na úchyty zezadu přístroje a
poté uzavřete drenážní výpusť.
Sundejte výfukovou trubici a uskladněte ji.
Klimatizaci přikryjte igelitem tak, aby se na ni neprášilo a umístěte ji na suché místo, z dosahu dětí.
Z dálkového ovládání vyjměte baterie.
Poznámka:
Ujistěte se, že tělo přístroje je umístěno na suché místo a všechny komponenty klimatizace jsou
správně uskladněny.
Řešení potíží
Klimatizaci neopravujte ani sami nerozebírejte. Opravy provedené nekvalifikovanou osobou můžou
vést ke zrušení záruky a mohou způsobit zranění uživateli nebo poškození jejich majetku.
Problém Možná příčina Řešení
Klimatizace nepracuje Není žádný přívod elektřiny. Přístroj připojte do zásuvky a
Ukazatelé na displeji zobrazují
‘‘FL‘‘.
Okolní teplota je příliš nízká nebo
příliš vysoká.
V režimu chlazení je pokojová
teplota nižší než nastavená
teplota a v režimu topení je
pokojová teplota vyšší než
nastavená teplota.
V režimu odvlhčování je okolní
teplota příliš nízká.
Efekt topení nebo
chlazení není
dostatečně dobrý
Přístroj vydává velký
hluk
Kompresor nefunguje Započala funkce proti přehřátí Počkejte 3 minuty dokud teplota
Nefunguje dálkové
ovládání
Na displeji se
zobrazuje ‘‘E1‘‘
Na displeji se
zobrazuje ‘‘E2‘‘
Pokud se dostaví problémy, které nejsou uvedeny v této tabulce, nebo řešení potíží nepomáhá,
prosíme, kontaktujte profesionální servis.
Klimatizace je pod přímým
slunečním zářením.
Jsou otevřené dveře nebo okno,
nebo je v místnosti moc lidí, nebo
tam je jiný zdroj tepla
Filtr je špinavý. Filtr vyčistěte, nebo jej nahraďte.
Vzduchové vstupy nebo výstupy
jsou ucpány.
Přístroj není umístěný na rovném
povrchu.
Vzdálenost dálkového ovládání a
přístroje je moc velká.
Dálkové ovládání není
nasměrováno k přijímači na
přístroji.
Baterie jsou vybité.
Teplota na senzoru trubice je
abnormální.
Teplota na senzoru trubice je
abnormální.
zapněte jej.
Vylijte vodu, která je uvnitř
přístroje.
Doporučená teplota pro používání
klimatizace je 7 – 35°C (44 –
95°F).
Upravte nastavenou teplotu.
Přístroj umístěte na místo, kde je
teplota vyšší než 17°C (62°F).
Zatáhněte závěsy.
Zavřete dveře a okno.
Vyčistěte je, aby nebyli ucpány.
Přístroj umístěte jinam, na rovný a
těžký povrch.
neklesne, poté přístroj restartujte.
Dálkové ovládání namiřte blíže k
přístroji a ujistěte se, že směřuje k
přijímači na přístroji.
Zkontrolujte teplotu na senzoru
trubice a související obvody.
Zkontrolujte teplotu na senzoru
trubice a související obvody.

Schéma
1
3
4
2
WiFi připojení
Nainstalujte aplikaci
Stáhněte si aplikaci ‘‘Smart Life‘‘ z Play Store (Android) nebo z App Store (iOS).
1. Kondenzátor
2. Kapilár
3. Kompresor
4. Výparník
Technické parametry:
Napětí: 220-240 V~
Frekvence: 50 Hz
Registrace
Pokud nemáte účet Smart Home, zaregistrujte se nebo se přihlašte pomocí ověřovací kódu
zaslaného SMS zprávou.
Jak na registraci:
1. Stiskněte enter pro vstup na registrační stránku.
2. Systém automaticky rozpozná zemi/místo kde se nacházíte. Také můžete kód vaší země vybrat ručně. Vložte vaše telefonní číslo/emailovou adresu a pokračujte dál.
3. Pokud jste si zvolili přihlášení pomocí SMS ověřovacího kódu, vložte potvrzující kód, který vám
byl zaslán SMS zprávou. Nastavte heslo a potvrďte vaši registraci.
Synchronizujte zařízení
1. Klimatizaci zapněte a když je v pohotovostním režimu, stiskněte tlačítko ‘‘SPEED‘‘ na 5 s a
dostanete se do režimu nastavení WiFi připojení.
2. Otevřete aplikaci Smart Home a stiskněte tlačítko ‘‘+‘‘ v pravém horním rohu a prostřednictvím
sítě přidejte nové zařízení.
3. Ujistěte se, že světelné indikátory na zařízení rychle blikají (2x za vteřinu) a stisknutím tlačítka
potvrďte, že světelné indikátory rychle blikají.
4. Zvolte síťové připojení WiFi (síť musí být v pásmu 2,4Ghz) a vložte heslo.
Zařízení zahájí proces párování a spáruje se s aplikací.
5. Po úspěšné konfiguraci zařízení se na domovské stránce zobrazí chytrá aplikace. Pokračujte
dále na stránku ovládání.
Poznámka:
• Zařízení lze ovládat, když je přístroj online.
• Když je zařízení offline, zobrazí se ‘‘Offline‘‘ a můžete jej na dálku zapnout.
Česká verze návodu je přesným překladem originálního návodu výrobce.
Fotografie použité v manuálu jsou pouze ilustrační a nemusí se přesně shodovat s výrobkem.

Bezpečnostní instrukce pro instalaci přístroje používající chladící plyn
R290
Aby nedošlo k poškození, před zahájením provozu přístroj umístěte alespoň na 24h do vzpřímené
polohy.
Ujistěte se, že přívod a vývod vzduchu není nikdy ucpán.
Přístroj provozujte vždy pouze na horizontálním povrchu, aby nedocházelo k úniku vody z přístroje.
VAROVÁNÍ
• Nepřekračujte vyšší impedanci než 0,236 ohm v napájení, ke kterému je spotřebič připojen.
• Každá osoba, která se zabývá opravami klimatizace, nebo prací s chladící kapalinou, by měla
být držitelem platného certifikátu pro tyto práce podle předpisů v dané zemi.
• Při likvidaci obalu nebo přístroje, nezapomeňte na životní prostředí a zlikvidujte jej do příslušného odpadu.
• Přístroj by měl být skladován v dobře ventilovaném prostředí, kde velikost prostoru pokoje odpovídá požadavkům na provoz.
• Přístroj by měl být skladován tak, aby nedošlo k mechanickému poškození.
• Informace o místech, kde je povolená instalace potrubí pro chladící plyn, zahrnují tato prohlášení:
» instalace potrubí musí být omezena na minimum
» potrubí musí být chráněno před fyzickým poškozením a v případě používání hořlavých chla-
div, nesmí být instalován v nevětraném prostoru
» je třeba dodržovat vnitrostátní předpisy o plynárenství
» mechanické přípojky musí být přístupné pro účel údržby
» na zařízení obsahující hořlavá chladiva, by měla být uvedena minimální plocha místnosti, ve
které bude přístroj používán
• Požadované ventilační otvory musí být vždy čisté a neucpané.
• Servis musí být prováděn pouze certifikovaným servisním střediskem podle doporučení výrobce.
• Po zapnutí přenosné klimatizace nebo odvlhčovače může ventilátor pracovat v normálních podmínkách nepřetržitě tak, aby byl zajištěn minimální objem vzduchu 100 m3 / h, i když je kompresor
uzavřen kvůli regulátoru teploty.
• Pro odmrazování nebo čištění použijte nástroje a prostředky doporučené výrobcem.
• Neperforujte žádný z komponentů chladícího obvodu. Chladící plyn může být bez zápachu.
• Údržbu a opravy, které vyžadují pomoc jiného kvalifikovaného personálu, musí být prováděny
pod dohledem specialistů na používání hořlavých chladiv.
Hrozí nebezpečí požáru
Před použitím přístroje si pečlivě přečtěte návod k použití.
Chladicí plyn R290 splňuje evropské směrnice o životním prostředí.
Toto zařízení obsahuje přibližně 12,7g chladícího plynu R290.
Přístroj by měl být nainstalován, provozován a uskladňován v dobře větrané místnosti o ploše
minimálně 12,7 m2.
Instrukce a opravy zařízení používající plyn R290
1. Zkontrolujte prostor
Před zahájením provozu přístrojů obsahujících hořlavé chladivo je nezbytné provést bezpečnostní
kontrolu, aby se minimalizovalo riziko vzniku požáru a je třeba provést následující opatření.
2. Postup práce
Veškeré práce se provádějí podle nařízeného postupu, aby se minimalizovalo nebezpečí přítomnosti
hořlavého plynu nebo výparů v průběhu práce.
3. Pracovní prostor
Všichni zaměstnanci údržby a ostatní pracovníci musí být poučeni o správném provádění práce. Je
třeba se vyvarovat práci ve stísněném prostoru.
4. Kontrola přítomnosti chladiva
Prostor musí být zkontrolován příslušným detektorem chladícího plynu, aby techničtí pracovníci
byli ujištěni, že během práce nedošlo k úniku chladiva. Všichni pracovníci si musí být vědomi, že
se nachází v potencionálně toxickém a hořlavém prostoru. Ujistěte se, že zařízení pro detekci úniku
plynu je vhodné pro použití se všemi použitelnými chladivy.
5. Přítomnost hasicího přístroje
Pokud mají být na chladicím zařízení prováděny jakékoliv práce, musí být k dispozici vhodné
zařízení pro hašení požáru. Hasicí přístroj se suchým práškem nebo CO2 mějte blízko po ruce.
6. Žádné zdroje vznícení
Žádná osoba, která provádí práci s chladicím systémem, nesmí jakkoliv používat zdroje, které
mohou způsobit vznícení, jelikož to může vést k nebezpečí požáru nebo výbuchu. Všechny možné
zdroje vznícení, jako jsou cigarety, zapalovače atd. by měli být umístěny dostatečně daleko od
místa instalace, opravy, odstraňování a likvidace, neboť může dojít k uvolnění chladiva do okolního
prostoru. Před prováděním práce je třeba prověřit oblast kolem zařízení a ujistit se, že nehrozí
nebezpečí požáru nebo nebezpečí vznícení.
7. Ventilovaný prostor
Před prováděním prací nebo rozebíráním přístroje se ujistěte, že prostor je otevřený nebo
dostatečně ventilovaný. Prostor by měl být ventilovaný po celou dobu jakékoliv práce.
8. Kontrola chladícího zařízení
Pokud jsou elektrické součástky vyměňovány, musí být vhodné pro daný účel a správnou
specifikaci. Celou dobu se řiďte pokyny pro údržbu a servis od výrobce. Pokud jste na pochybách,
obraťte se na servisního technika výrobce.
Při instalacích s použitím hořlavých chladiv se musí provést následující kontroly:
• náplň chladiva je v souladu s velikostí prostoru, ve kterém jsou části s obsahem chladiva instalovány
• větrací zařízení a vývody vzduchu fungují přiměřeně a nejsou ničím zablokovány
• značky na zařízení musí být stále viditelné a čitelné. Značky, které nejsou čitelné by měly být
opraveny.
• chladicí potrubí a jeho součásti musí být odolné vůči korozi nebo být proti korozi vhodně chráněny a nesmí být vystaveny jakékoliv látce, která může chladicí potrubí a jeho součásti korodovat.
9. Kontrola elektrických zařízení
Opravy a údržby elektrických komponentů by měly zahrnovat počáteční bezpečnostní kontroly.
Pokud dojde k poruše, která by mohla ohrozit bezpečnost, nesmí být k obvodu připojen žádný
elektrický zdroj, dokud nebude provedena oprava.
Počáteční kontrola:
• Zjistěte, jestli kondenzátory nejsou vybité. Kontrola by měla být provedena bezpečným způsobem, aby se zabránilo možnosti vzplanutí.

• Při nabíjení, obnovování nebo čištění systému musí být izolovány všechny elektrické součástky
a elektrické vedení.
• Vše musí být správně uzemněno.
10. Opravy uzavřených součástek
Během opravy uzavřených součástek by měly být všechny elektrické zdroje odpojeny. Pokud je
naprosto nezbytné používat při servisu elektrické napájení, pak musí být v nejkritičtějším bodě
umístěna trvale fungující detekce úniků plynu, která upozorňuje na potenciálně nebezpečnou
situaci.
Zvláštní pozornost je třeba věnovat následujícím skutečnostem, aby se při práci na elektrických
součástech nepoškodil plášť tak, že by byla snížena úroveň ochrany. Snížená úroveň ochrany
zahrnuje poškození kabelů, nadměrný počet připojení, svorky, které nebyly připevněny podle
původních specifikací, poškození těsnění, nesprávná montáž atd.
Zajistěte, aby těsnění nebo těsnící materiály nebyly degradovány až do okamžiku, kdy už nebudou
sloužit k zabránění pronikání hořlavých látek do ovzduší. Používejte pouze originální náhradní díly.
11. Opravy komponentů s jiskrovou bezpečností
Nepoužívejte žádné trvalé induktivní nebo kapacitní zatížení na odvodu, aniž byste se ujistili, že to
nepřekročí povolené napětí a proud.
Komponenty s jiskrovou bezpečností jsou jedinými typy, na kterých lze pracovat, zatímco jste v
přítomnosti hořlavého ovzduší.
Výměna komponentů musí být specifikována výrobcem. Nesprávné komponenty mohou způsobit
únik chladiva a následné vznícení.
12. Kabeláž
Zkontrolujte, zda kabely nejsou vystaveny opotřebení, korozi, nadměrnému tlaku, vibracím, ostrým
hranám nebo jiným nepříznivým vlivům na životní prostředí. Také zkontrolujte stáří nebo neustálé
vibrace ze zdrojů, jako jsou kompresory nebo ventilátory.
13. Detekce hořlavé chladicí kapaliny
Za žádných okolností nesmí být pro hledání případného úniku chladicí kapaliny použity
potencionální hořlaviny. Nesmí být použit halogenový hořák (nebo jakýkoli jiný detektor využívající
otevřený plamen).
14. Odstranění a vyprázdnění
Při otevírání chladícího obvodu kvůli opravám nebo jakémukoliv jinému účelu, by měly být užívány
konvenční postupy. Nicméně u hořlavých chladicích kapalin je důležité používat jen ty nejvhodnější
postupy, protože musí být brána v úvahu hořlavost materiálu. Měl by být dodržován následující
postup:
• odstranit chladicí kapalinu;
• vyčistit okruh od inertního plynu;
• vyprázdnit;
• vyčistit inertním plynem;
• otevřít okruh rozříznutím nebo pájením.
Náplň chladicího okruhu by měla být vrácena do správných okruhů. U zařízení, které obsahují
hořlavé chladivo, by měl být systém vyčištěn bezkyslíkovým dusíkem, aby bylo zařízení bezpečné
pro hořlavé chladivo. Někdy může být potřebné tuto proceduru několikrát zopakovat. Pro čištění
chladícího systému by neměl být používán stlačený vzduch nebo kyslík.
U zařízení obsahujících hořlavé chladivo, by mělo být čištění chladící kapaliny provedeno dosažením
podtlaku prostřednictvím bezkyslíkového dusíku dokud není dosaženo hodnoty pracovního tlaku,
potom navrácením atmosférického tlaku a znovudosažením podtlaku. Tento proces by měl být
opakován tak dlouho, dokud v systému není žádné chladivo. Ve chvíli, kdy je použita poslední
várka bezkyslíkového dusíku, mělo by dojít k navrácení atmosférického tlaku, aby byla umožněna
práce v systému. Tato procedura je absolutně zásadní, pokud se má na potrubí provádět pájení.
Zajistěte, aby vývod vakuové pumpy nebyl v blízkosti jakéhokoliv potencionálního zdroje požáru a
že je toto místo dostatečně odvětrané.
15. Proces plnění
Kromě konvenčních postupů by měly být dodržovány následující požadavky.
• Zajistěte, aby při plnění nedošlo ke kontaminaci jinými chladivy. Hadičky a vedení by měly být
co nejkratší, aby v nich byl minimalizován obsah chladiva.
• Válce by měly být uchovávány ve správných polohách podle instrukcí.
• Zajistěte, aby byl chladicí okruh uzemněn před plněním chladivem.
• Oštítkujte systém, jakmile je plnění dokončené (pokud to již není hotové).
• Věnujte zvýšenou pozornost tomu, abyste systém nepřeplnili.
Před znovunaplněním systému zkontrolujte tlak vhodným čistícím plynem. Systém by měl být
zkontrolován z hlediska možného úniku chladiva po jeho doplnění, ale před uvedením do provozu.
Následný test úniku chladiva by měl být proveden před opuštěním místa.
16. Vyřazení z provozu
Před provedením toho kroku je zásadní, aby měl technik úplné znalosti ohledně tohoto zařízení a
všech jeho detailů. Je doporučeno, aby bylo chladivo bezpečně zakryto. Před prováděním úkonu
by měl být odebrán vzorek oleje a chladiva pro případ, že by před opětovným použitím tohoto
chladiva bylo třeba provést analýzu. Před zahájením úkolu je nezbytné mít k dispozici elektrickou
energii.
a) Seznamte se se zařízením a jeho provozem.
b) Izolujte systém od elektřiny.
c) Před provedením úkonu zajistěte, že:
• Pokud je potřeba, je dostupné mechanické manipulační zařízení pro manipulaci s nádobou;
• Jsou dostupné osobní ochranné prostředky a jsou správně používány;
• Je zajištěn dohled kompetentní osoby nad celou procedurou;
• Vybavení a nádoby vyhovují příslušným normám;
d) Pokud je to možné, vypumpujte chladicí systém.
e) Pokud není možné dosáhnout vakua, vytvořte rozdělovač, aby mohlo být chladivo odstraněno
z různých částí systému.
f) Spusťte výměnné zařízení a postupujte podle instrukcí.
g) Nepřeplňujte nádobu (ne více než 80 % objemu kapaliny).
h) Nepřekračujte maximální možný pracovní tlak v nádobě, ani dočasně.
i) Před odpojením potrubí se ujistěte, že než jej odpojíte, jsou všechny ventily na zařízení uza-
vřené.
j) Výměnné chladivo nesmí být naplněno do jiného chladicího systému, pokud nebylo vyčištěno
a zkontrolováno.
17. Štítkování
Zařízení by mělo být oštítkováno tak, aby bylo jasné, že bylo vyřazeno z provozu a bylo z něj
odstraněno chladivo. Štítek by měl být označen datem a podepsán. U zařízení, které obsahují
hořlavé chladivo, se ujistěte, že štítek obsahuje informaci o tom, že obsahuje hořlavé chladivo.
18. Výměna
Při odstraňování chladiva ze systému za účelem vyřazení z provozu nebo servisu, je doporučováno,
aby bylo chladivo odstraněno bezpečně.
Při přesunu chladiva do nádoby se ujistěte, že používáte dostatečně velikou nádobu. Zajistěte,
abyste měli k dispozici dostatečný prostor pro uchování celé náplně chladicího systému. Všechny

používané nádoby musí být určeny pro dané chladivo a označeny daným typem chladiva (např.
speciální nádoby pro obnovu chladiva). Nádoby by měly být opatřeny tlakovým odvzdušňovacím
ventilem a uzavíracími ventily v dobrém provozním stavu. Prázdné nádoby by měli být vyprázdněny
a pokud možno vyčištěny před dalším použitím.
Zařízení na výměnu by mělo být v dobrém provozním stavu a měly by být k dispozici instrukce
k zařízení vhodné k obnově všech vhodných chladiv, včetně hořlavých. Navíc by měly být k
dispozici kalibrované váhy v dobrém provozním stavu. Hadičky musí být v pořádku a neporušené
s odpouštěcími spojkami. Před použitím výměnného zařízení zkontrolujte, zda je v uspokojivém
stavu, zda je správně udržováno a zda jsou všechny elektrické součásti utěsněny tak, aby se
zabránilo vznícení v případě uvolnění chladiva. Pokud máte pochybnosti, obraťte se na výrobce.
Výměnné chladivo by mělo být vráceno dodavateli chladiva ve správném výměnném válci s
připojenou poznámkou pro správnou recyklaci. Nemíchejte chladiva ve výměnných jednotkách a
zvláště ne ve válcích.
Pokud má být odstraněn kompresor nebo kompresní olej, zajistěte, aby byly vyprázdněny na
dostatečnou úroveň, aby nezůstalo hořlavé chladivo v mazivu. Proces vyprázdnění se musí provést
před vrácením kompresoru dodavateli. Pro urychlení tohoto procesu může být použit pouze
elektrický ohřev těla kompresoru. Při vypouštění oleje ze systému je nutné postupovat bezpečně.
Ďakujeme za nákup nášho výrobku.
Pred použitím prístroja si prosím prečítajte tento návod, vyhnete sa tak neodbornej manipulácii
azaobchádzaniu s prístrojom.
• Pri inštalácii klimatizácie dodržujte miestne predpisy pre prepojenie siete a uistite sa, že je riadne uzemnená. Ak máte akékoľvek otázky ohľadom elektrickej inštalácie, postupujte podľa pokynov
výrobcu a v prípade potreby požiadajte profesionálneho elektrikára, aby ho nainštaloval.
• Prístroj umiestnite na rovný a suchý povrch a umiestnite ho minimálne 50 cm od okolitých objektov a múrov.
• Po nainštalovaní klimatizácie sa uistite, že napájacia zástrčka je neporušená a pevne zasunutá
do elektrickej zásuvky, a napájací kábel umiestnite tak, aby ste zabránili zakopnutiu či vytiahnutiu
zo zásuvky.
• Nevkladajte žiadne predmety k vstupu a výstupu vzduchu klimatizácie. Vstup a výstup vzduchu
nesmie nič zakrývať.
• Pri inštalácii drenážnych rúrok zaistite, aby drenážne rúrky boli správne pripojené a aby nedošlo
k deformácii alebo ohnutiu.
• Pri nastavovaní lamiel vzduchového vstupu s nimi manipulujte jemne, aby nedošlo k poškodeniu.
• Pri manipulácii s klimatizáciou sa uistite, že klimatizácia je vo vzpriamenej polohe.
• Prístroj musí byť z dosahu benzínu, horľavého plynu, sporáka a iných zdrojov tepla.
• Prístroj nerozoberajte, neopravujte a neupravujte, inak môže dôjsť k poruche či poškodeniu
prístroja alebo dokonca k ujme na zdraví. Opravu zariadenie musí vždy vykonávať autorizovaný
servis.
• Prístroj neinštalujte ani neumiestňujte do kúpeľne, alebo iných vlhkých prostredí.
• Keď chcete prístroj vypnúť, použite vypínač, neťahajte za kábel.
• Na prístroj neumiestňujte pitie ani iné tekutiny, aby sa nevyliala do prístroja.
• V blízkosti klimatizácie nepoužívajte insekticídne spreje alebo iné horľavé látky.
• Neutierajte ani neumývajte klimatizáciu chemickými rozpúšťadlami, ako je benzín a alkohol. Keď
chcete klimatizáciu vyčistiť, odpojte ju zo zdroja napájania a vyčistite ju vlhkou handričkou. Pokiaľ
je prístroj veľmi špinavý, použite jemný čistiaci prostriedok.
• Tento prístroj môže byť používaný deťmi od 8 rokov a osobami so zníženými fyzickými, zmyslovými alebo duševnými schopnosťami, pokiaľ im bol za nich poskytnutý dohľad zodpovednou
osobou pokiaľ ide o používanie spotrebiča bezpečným spôsobom a porozumel riziku, ktoré hrozí.
• Zaistite, aby sa deti s prístrojom nehrali.
Vlastnosti prístroja
• Funkcia chladenia, kúrenia, odvlhčovania a ventilácie.
• Funkcia Swing spúšťa automatickú otočnú funkciu. Ak je automatická otočná funkcia v prevádzke, môžete stlačením tlačidla SWING zastaviť vyfukovacie lamely v požadovanom uhle.
• Klimatizácia je vybavená diaľkovým ovládaním s LCD displejom, ktoré možno bezpečne uložiť
na zadnú stranu klimatizácie.
• Rukoväte po oboch stranách klimatizácie sú navrhnuté tak, aby uľahčili manipuláciu s klimatizáciou
• Úchytky na zadnej strane klimatizácie umožňujú bezpečné uloženie napájacieho kábla čím zamedzujú jeho poškodenie pri prenášaní klimatizácie.
• Možnosť filtrácie vzduchu.

Komponenty:
Inštalácia
VAROVANIE
Pred použitím klimatizácie ju nechajte minimálne 2 h vo vzpriamenej polohe.
12
3
7 8
4
5
6
10
11
12
14
16
18
9
13
15
17
19
20
Klimatizáciu môžete ľubovoľne presúvať po izbe. Pri presúvaní sa však uistite, že klimatizácia je
vo vzpriamenej polohe a klimatizácia je umiestnená na rovnom povrchu. Prístroj neinštalujte ani
neumiestňujte do kúpeľne, alebo iných vlhkých prostredí.
1. Pripevnite výfukovú rúru. Rúru zaskrutkujte do výfukového otvoru na zadnej strane (v protismere hodinových ručičiek).
2. Nainštalujte tesnenie okna (Air Block - dokúpiteľné príslušenstvo)
1. Maska
2. Horný kryt prístroja
3. Nastaviteľné lamely
4. Zadný kryt prístroja
5. Predný kryt prístroja
6. Otočné kolieska
7. Trubica pre odvod vzduchu
8. Tesnenie do okien
9. Priehradka pre diaľkové ovládanie
10. Zadný kryt prístroja
11. Eva filter
12. Úchyty na kábel
13. Rukoväte
14. Výduch vzduchu
15. Odvod pre kontinuálny odvod vody
16. CON filter
17. Mriežka prívodu vzduchu
18. Drenážny výpust
19. Kábel
20. Elektrická zástrčka
3. Rúru natiahnite k oknu a vložte do otvoru tesnenia Air Block.
4. Inštalácia tela prístroja
Klimatizáciu s nainštalovanou trubicou umiestnite pred okno, tak aby bola minimálne 50 cm od
steny a okolitých predmetov.
Poznámka
Rúra nesmie byť skrivená alebo byť pretočená (viac ako 45 °). Trubica nesmie byť ničím upchaná.
Dôležité upozornenie
Výfuková rúra by mala byť dlhá 280-1500 mm. Dĺžka záleží na type klimatizácie. Nepoužívajte
predlžovaciu rúru alebo iné rúry, môže dôjsť k poškodeniu prístroja.

Ovládanie prístroja
Inštrukcie k prevádzke:
67
1. Časovač
2. Nastavenie rýchlosti ventilátora
3. Tlačidlo UP
4. Tlačidlo DOWN
Keď je prístroj prvýkrát zapnutý, rozoznie sa bzučiak a zahrá zvučku a potom sa prístroj prepne do
pohotovostného stavu.
Tlačidlo zapnutia / vypnutia: stlačte toto tlačidlo a prístroj sa zapne / vypne.
Tlačidlo nastavenia režimu: keď je prístroj zapnutý, stlačením tohto tlačidla zvolíte prevádzkový
režim prístroja. Po každom stlačení tlačidla sa prepne režim nasledovne: chladenie, ventilácia,
odvlhčovanie, kúrenie.
Tlačidlá UP a DOWN: tieto tlačidlá slúžia na zvyšovanie a znižovanie hodnoty pre nastavenie
teploty a časovača, používajte ich nasledovne:
Pri nastavovaní teploty stláčajte UP alebo DOWN a nastavte požadovanú teplotu (nastavenie
teploty nie je možné v režime ventilácie a odvlhčovania).
Pri stlačení oboch tlačidiel naraz si môžete prepnúť medzi stupňami Celzia °C a Fahrenheita °F.
Nastavenie rýchlosti ventilátora
V režime chladenia a ventilácie, stlačte tlačidlo a vyberte rýchlosť ventilátora - vysoká, stredná,
nízka.
V režime kúrenia stlačte tlačidlo a vyberte rýchlosť ventilátora - vysoká, stredná, nízka. V režime
odvlhčovania tlačidlo nie je funkčné, rýchlosť ventilátora je nastavená na nízku rýchlosť.
5
5. Displej
6. Nastavenie režimu
7. Tlačidlo zapnutia / vypnutia
34
12
Diaľkové ovládanie
Inštrukcie na používanie diaľkového ovládania:
Tlačidlo Power - pre zapnutie / vypnutie prístroja stlačte tlačidlo.
Tlačidlo Mode - tlačidlo režimu stlačte pre prepnutie na režim chladenia, ventilácie, odvlhčovania,
alebo kúrenia.
Tlačidlo UP - stlačte pre zvýšenie teploty alebo času.
Tlačidlo Down - stlačte pre zníženie teploty alebo času.
Tlačidlo Fan - týmto tlačidlom môžete nastaviť rýchlosť ventilátora na vysokú, strednú a nízku.
Tlačidlo Timer - stlačte tlačidlo a nastavte čas fúkania.
Tlačidlo Swing - spúšťa automatickú otočnú funkciu. Ak je automatická otočná funkcia v
prevádzke, môžete stlačením tlačidla SWING zastaviť vyfukovacie lamely v požadovanom uhle.
°C- °F - týmto tlačidlom nastavíte zobrazovanie v °C alebo °F stupňoch.
Rôzne funkcie ochrany
Protinámrazová ochrana:
Pri chladení, odvlhčovaní alebo v úspornom režime môže byť teplota vo výfukovej trubici príliš
nízka a prístroj automaticky spustí ochranný štatút. Pokiaľ teplota vo výfukovej trubici stúpne na
určitú teplotu, prístroj sa vráti do normálneho režimu.
Ochrana proti pretekaniu:
Keď voda v nádržke na vodu presiahne bezpečnú úroveň, prístroj automaticky spustí alarm a
na LCD displeji sa zobrazí ‚‘ FL ‚‘. V tomto prípade je potrebné drenážnym otvorom vypustiť
prebytočný kondenzát.
Keď je voda odstránená, prístroj sa vráti do normálneho režimu.
Automatická funkcia odmrazenia (túto funkciu môžete použiť pri kúrení a chladení):
Počas odmrazovania bude na displeji blikať symbol kúrenia.
Časovač/Timer
Keď je prístroj zapnutý, stlačením tlačidla zapnete / vypnete časovač.
Stlačte tlačidlo, symbol časovača bude blikať a stlačením tlačidla UP alebo DOWN nastavíte
požadovanú dobu chladenia.
Doba chladenia môže byť nastavená v rozmedzí 1-24 h vždy po jednej hodine.
Automatická tepelná ochrana:
Pri režime kúrenia prístroj používa automatickú tepelnú ochranu aby, bola zvýšená životnosť
prístroja. Pri spustení tepelnej ochrany sa vypne kompresor a motor sa po vychladnutí vráti do
normálneho režimu.
Počkajte pred opätovným uvedením do prevádzky 3 minúty:
Ak bol prístroj vypnutý, nemôže sa počas nasledujúcich 3 minút uviesť opätovne do prevádzky.
Táto funkcia slúži na ochranu prístroja. Prístroj sa spustí automaticky po 3 minútach.

Inštrukcie na odvodňovanie
Údržba
Manuálne odvodňovanie
Keď prístroj prestane pracovať a voda v prístroji je nad povolenú úroveň, prístroj vypnite a odpojte
zo zásuvky.
Poznámka
S prístrojom zaobchádzajte veľmi opatrne, aby sa nevyliala voda do spodnej časti prístroja.
• Nádobku na vodu umiestnite k zadnej strane prístroja.
• Odskrutkujte drenážnu krytku, aby voda mohla odtiecť do pripravenej nádobky.
Poznámka
Drenážnu krytku potom správne pripevnite.
Počas odtekania vody môžete klimatizáciu trochu nakloniť.
Keď je nádobka už plná vody a odtekajúca voda z klimatizácie stále tečie, môžete ju zastaviť, aby
sa nerozliala na zem alebo koberec.
Keď voda odtiekla, starostlivo uzavrite drenážnu výpust.
Poznámka
Po uzavretí drenážnej výpuste prístroj reštartujte, inak skondenzovaná voda môže vytiecť na zem
alebo na koberec.
Čistenie: Pred čistením a údržbou prístroj vypnite a odpojte ho od elektrickej siete.
Čistenie povrchu
Povrch prístroja utrite vlhkou handričkou. Nepoužívajte chemikálie, ako je benzín, alkohol, petrolej
atď. Inak bude povrch prístroja alebo dokonca celý prístroj poškodený.
Čistenie filtra
Keď je filter zaprášený, efektivita klimatizácie je znížená. Čistite filter každé 2 týždne.
1
2
2
1. Upevňovacia skrutka
2. Mriežka
Čistenie horného filtra
Mriežku filtra vezmite do rúk. Zatlačte ju nadol a vyberte ju z rámu filtra. Odskrutkujte 4 skrutky z
tela prístroja.
Filter vložte do teplej vody s neutrálnym čistiacim prostriedkom (okolo 40 ° C / 104 ° F), potom ho
usušte.
Kontinuálny odvod drenážnej trubice (môže byť použité len v režime chladenia a
odvlhčovania)
• Odskrutkujte drenážnu krytku.
• Drenážnu trubicu nasaďte do otvoru pre kontinuálny odvod kondenzátu.
• Drenážnu trubicu dajte do nádobky na odtekajúcu vodu alebo ju vyveďte do odpadu (v prípade
samospádu bude kondenzát odtekať samovoľne).
Čistenie dolného filtra
Vezmite filter do rúk a jemne ho vytiahnite.
Filter vložte do teplej vody s neutrálnym čistiacim prostriedkom (okolo 40 ° C / 104 ° F), potom ho
osušte.
Posezónne skladovanie
Odskrutkujte drenážne výpuste a vylejte zvyškovú vodu do vopred pripravenej nádoby. Prístroj
môžete pri vypúšťaní mierne nakloniť.
Prístroj zapnite, nastavte režim ventilácie s nízkou rýchlosťou ventilátora a počkajte, kým nebudú
drenážne trubice suché, aby ste mohli prístroj uskladniť suchý a nevytvorila sa v prístroji pleseň.
Prístroj vypnite, odpojte ho zo zásuvky a kábel prístroja namotajte na úchytky zozadu prístroja a
potom uzavrite drenážnu výpust.
Zložte výfukovú trubicu a uskladnite ju.
Klimatizáciu prikryte igelitom tak, aby sa na ňu neprášilo a umiestnite ju na suché miesto, z dosahu
detí.
Z diaľkového ovládania vyberte batérie.
Poznámka:
Uistite sa, že telo prístroja je umiestnené na suché miesto a všetky komponenty klimatizácie sú
správne uskladnené.

Riešenie problémov
1
3
4
2
Klimatizáciu neopravujte ani sami nerozoberajte. Opravy vykonané nekvalifikovanou osobou môžu
viesť k zrušeniu záruky a môžu spôsobiť zranenie užívateľovi alebo poškodenie majetku.
Problém Možná príčina Riešenie
Klimatizácia
nepracuje.
Efekt kúrenia alebo
chladenia nie je
dostatočne dobrý.
Prístroj vydáva veľký
hluk
Kompresor nefunguje. Započala funkcia proti prehriatiu Počkajte 3 minúty kým teplota
Nefunguje diaľkové
ovládanie.
Na displeji sa
zobrazuje ‘‘E1‘‘.
Na displeji sa
zobrazuje ‘‘E2‘‘.
Nie je žiadny prívod elektriny. Prístroj pripojte do zásuvky a
Ukazovatele na displeji zobrazujú
‘‘FL‘‘.
Okolní teplota je příliš nízká nebo
příliš vysoká.
V režime chladenia je izbová
teplota nižšia ako nastavená
teplota a v režime kúrenie
je izbová teplota vyššia ako
nastavená teplota.
V režime odvlhčovania je okolitá
teplota príliš nízka.
Klimatizácia je pod priamym
slnečným žiarením.
Sú otvorené dvere alebo okno,
alebo je v miestnosti veľa ľudí,
alebo tam je iný zdroj tepla.
Filter je špinavý. Filter vyčistite alebo ho nahraďte.
Vzduchové vstupy alebo výstupy
sú upchaté.
Prístroj nie je umiestnený na
rovnom povrchu.
Vzdialenosť diaľkového ovládania
a prístroja je veľmi veľká.
Diaľkové ovládanie nie je
nasmerované k prijímaču na
prístroji.
Batérie sú vybité.
Teplota na senzore trubice je
abnormálna.
Teplota na senzore trubice je
abnormálna.
zapnite ho.
Vylejte vodu, ktorá je vo vnútri
prístroja.
Doporučená teplota pro používání
klimatizace je 7 – 35°C (44 –
95°F).
Upravte nastavenú teplotu.
Prístroj umiestnite na miesto, kde
je teplota vyššia ako 17°C (62°F).
Zatiahnite závesy.
Zatvorte dvere a okno.
Vyčistite ich, aby neboli upchaté.
Prístroj umiestnite inam, na rovný
a ťažký povrch.
neklesne, potom prístroj
reštartujte.
Diaľkové ovládanie namierte
bližšie k prístroju a uistite sa, že
smeruje k prijímaču na prístroji.
Skontrolujte teplotu na senzore
trubice a súvisiace obvody.
Skontrolujte teplotu na senzore
trubice a súvisiace obvody.
Schéma
1. Kondenzátor
2. Kapilár
3. Kompresor
4. Výparník
Technické parametre:
Napätie: 220-240 V~
Frekvencia: 50 Hz
Ak sa dostavia problémy, ktoré nie sú uvedené v tejto tabuľke, alebo riešenie problémov nepomáha,
prosíme, kontaktujte profesionálny servis.
Slovenská verzia návodu je presným prekladom originálneho návodu výrobcu.
Fotografie použité v návode sú len ilustračné a nemusia sa presne zhodovat s výrobkom.

Köszönjük, hogy megvásárolta termékünket.
Használat előtt kérjük olvassa el a használati útmutatót, így megelőzheti az eszköz helytelen
használatát.
• A légkondicionáló telepítésekor vegye figyelembe a helyi hálózati csatlakozási szabályokat, és gondoskodjon róla, hogy megfelelően földelt. Ha bármilyen kérdése van az elektromos szereléssel kapcsolatban,
kövesse a gyártó utasításait, és ha szükséges, kérje meg egy szakképzet villanyszerelőt, hogy telepítse.
• Helyezze a készüléket sík és száraz felületre, és tegye azt legalább 50 cm-re a környező tárgyaktól és falaktól.
• A klímaberendezés telepítése után győződjen meg arról, hogy a tápkábel sértetlen és szilárdan
be van-e dugva a hálózati konnektor aljzatba, és a tápkábelt úgy helyezze el, hogy megakadályozza a kioldását vagy a kihúzódását.
• Ne helyezzen semmilyen tárgyat a légkondicionáló levegő be- és kimenetébe. A levegő be- és
kimenetét nem szabad semmivel sem letakarni.
• Vízelvezető csövek telepítésekor ügyeljen arra, hogy a vízelvezető csövek megfelelően csatlakozzanak, és hogy ne deformálódjanak vagy hajoljanak meg.
• A levegőbevezető lamellák beállításakor, óvatosan járjon el a megrongálódás elkerülése érdekében.
• A légkondicionáló kezelése során ügyeljen arra, hogy a légkondicionáló függőleges helyzetben legyen.
• A készüléket benzintől, gyúlékony gáztól, tűzhelytől és egyéb hőforrásoktól távol kell tartani.
• Ne szerelje szét, javítsa vagy módosítsa a készüléket, mivel ez meghibásodást vagy a készülék károsodását, vagy akár sérülést okozhat. A javítási munkákat mindig hivatalos szervizközpontnak kell elvégeznie.
• Ne telepítse vagy helyezze a készüléket fürdőszobába vagy más nedves környezetbe.
• A készülék kikapcsolásához használja a távkapcsolót, ne húzza ki a kábelt.
• Ne helyezzen semmilyen más folyadékot vagy italt a készülékre, hogy elkerülje a készülékbe
való kiömlést.
• A légkondicionáló közelében ne használjon rovarirtó spray-t vagy egyéb gyúlékony anyagokat.
• Ne törölje vagy mossa a légkondicionálót kémiai oldószerekkel, például benzinnel és alkohollal.
A klímaberendezés tisztításához húzza ki a tápegységet és tisztítsa meg nedves törlővel. Ha a gép
nagyon piszkos, használjon enyhe mosószert.
• A készüléket 8 évesnél idősebb gyermekek és csökkent fizikai, érzékszervi vagy mentális képességgel rendelkező személyek használhatják, feltéve, hogy a felelős személy felügyeli őket, ha a
készülék biztonságos használatáról van szó és ha megértették a kockázat veszélyét.
• Győződjen meg arról, hogy a gyermekek nem játszanak a készülékkel.
Alkatrészek:
1. Maszk
2. A készülék felső fedele
3. Állítható lamellák
4. A készülék hátsó fedele
5. A készülék elülső fedele
6. Görgők
7. Levegő kimeneti cső
8. Ablaktömítések
9. Távirányító rekesz
10. A készülék hátsó fedele
12
3
7 8
4
5
6
10
11
12
14
16
18
9
13
15
17
19
20
11. Eva filter
12. Kábel fogantyúk
13. Fogantyúk
14. Levegő kilépő
15. Kivezető a víz folyamatos kivezetéséhez
16. CON filter
17. Levegőbemeneti rács
18. Vízelvezető
19. Kábel
20. Elektromos csatlakozó
A készülék funkciói
• Hűtés, fűtés, párátlanítás és szellőztetés.
• A Swing funkció automatikus forgó funkciót indít. Ha az automatikus forgó funkció működik, a
SWING gomb megnyomásával leállíthatja a levegőkimeneti lamellákat a kívánt szögben.
• A légkondicionáló távirányítóval irányítható LCD kijelzővel rendelkezik, amely biztonságosan tárolható a légkondicionáló hátoldalán.
• A légkondicionáló két oldalán található fogantyúk a légkondicionáló kezelés megkönnyítésére
szolgálnak.
• A klímaberendezés hátsó részén található fogantyúk lehetővé teszik a tápkábel biztonságos
elhelyezését megakadályozva a károsodást a légkondicionáló szállítása során.
• Légszűrés lehetősége

Telepítés
Készülék kezelése
FIGYELMEZTETÉS
A légkondicionáló használata előtt hagyja legalább 2 órán át függőleges helyzetben.
A klímaberendezést a kívánt helyiségben mozgathatja. Mozgáskor azonban győződjen meg arról,
hogy a légkondicionáló függőleges helyzetben van, és a légkondicionáló síkfelületen van. Ne
telepítse vagy helyezze a készüléket fürdőszobába vagy más nedves környezetbe.
1. Csatlakoztassa a levegőkimeneti csövet. A csövet a levegőkimeneti nyílásba illessze a készülék hátsó részében (óramutató járásával ellentétes irányban).
2. Telepítse az ablaktömítést (Air Block – megvásárolható tartozék)
3. A csövet húzza az ablakhoz és illessze az Air Block tömítés nyílásába.
4. Az eszköz testének telepítése
Helyezze a légkondicionálót a beépített csővel az ablak elé, hogy legalább 50 cm-re legyen a faltól
és a környező tárgyaktól.
Üzemeltetési utasítások:
67
1. Időzítő
2. Ventilátor gyorsaságának beállítása
3. UP gomb
4. DOWN gomb
Amikor a készülék első alkalommal be van kapcsolva, hangjelzést add ki és egy hangot jászik le,
majd készenléti üzemmódba kapcsol.
Bekapcsolés / kikapcsolás gomb: nyomja meg ezt a gombot a készülék be- és kikapcsolásához.
Mód beállítása gomb: ha a készülék be van kapcsolva, nyomja meg ezt a gombot, hogy kiválassza
a készülék üzemmódját. Minden alkalommal, amikor megnyomja a gombot, az üzemmód a
következőképpen vált: hűtés, szellőzés, párátlanítás, fűtés.
UP a DOWN gomb: ezek a gombok a hőmérséklet és az időzítő beállításának növelésére és
csökkentésére szolgálnak, az alábbiak szerint:
A hőmérséklet beállításakor nyomja meg az UP vagy a DOWN gombot a kívánt hőmérséklet
beállításához (a hőmérséklet beállítása nem lehetséges a szellőzés és a párátlanítás
üzemmódokban).
A két gomb egyidejű megnyomásával választhat Celsius ° C és Fahrenheit ° F beállítása között.
Ventilátor gyorsaságának beállítása
Hűtés és szellőzés üzemmódban nyomja meg a gombot a ventilátor sebességének kiválasztásához
- magas, közepes, alacsony.
Fűtés üzemmódban nyomja meg a gombot és válassza ki a ventilátor sebességét - magas,
közepes, alacsony.
Párátlanítás módban a gomb nem működik, a ventilátor sebessége alacsony sebességre van
állítva.
5
5. Kijelző
6. Mód beállítása
7. Bekapcsolás / kikapcsolás gomb
34
12
Megjegyzés
A cső nem lehet görbítve vagy csavarva (több mint 45 °). A cső nem lehet eltömített.
Fontos figyelmeztetés
A légkivezető csőnek legalább 250-1500mm hosszúnak kell lennie. A hosszúság a légkondicionáló
típusától függ. Ne használjon hosszabbító csövet vagy más csövet, a készülék károsodását
okozhatja.
Időzítő/Timer
Ha a készülék be van kapcsolva, nyomja meg a gombot az időzítő be- és kikapcsolásához.
Nyomja meg a gombot, az időzítő szimbólum villogni kezd, ezután nyomja meg a UP vagy DOWN
gombot a kívánt hűtési idő beállításához.
A hűtési idő 1 óránként 1-24 óra között állítható be.

Távirányítás
Vízelvezetési utasítások
Kézi vízelvezetés
Amikor a gép leáll, és a készülékben lévő víz meghaladja a megengedett szintet, kapcsolja ki a
készüléket, és húzza ki a csatlakozót.
Megjegyzés
Nagyon óvatosan kezelje a készüléket, hogy a víz ne kerüljön a készülék alsó részébe.
• Helyezze a víztartályt a készülék hátoldalához.
• Csavarja le a vízelvezető fedelet, hogy a víz az előkészített tartályba folyon.
A távirányító használatára vonatkozó utasítások:
Power gomb – a készülék bekapcsolásához / kikapcsolásához nyomja meg ezt a gombot.
Mode gomb - nyomja meg az üzemmód gombot a hűtés, szellőzés, páramentesítés vagy fűtés
üzemmódok való váltásához.
UP gomb - nyomja meg a gombot a hőmérséklet vagy az idő növeléséhez.
Down gomb - nyomja meg a gombot a hőmérséklet vagy az idő csökkentéséhez.
Fan gomb - ezzel a gombbal beállíthatja a ventilátor sebességét magas, közepes és alacsony
értékre.
Timer gomb - nyomja meg a gombot a fújási idő beállításához.
Swing gomb - automatikus forgó funkciót indít. Ha az automatikus forgó funkció működik, a
SWING gomb - megnyomásával leállíthatja a levegőkimeneti lamellákat a kívánt szögben.
°C- °F - ez a gomb a hőmérsékletet ° C vagy ° F fokokban mutatja majd.
Különböző védelmi funkciók
Fagyvédelem:
Hűtés, páramentesítés vagy készenléti állapotban a légkivezetőcső hőmérséklete túl alacsony
lehet, és a készülék automatikusan elindítja a védelmi állapotot. Ha a légkivezetőcső hőmérséklete
bizonyos hőmérsékletre emelkedik, a készülék visszatér normál üzemmódba.
Túlfolyási védelem
Amikor a víz a víztartályban meghaladja a biztonságos szintet, a készülék automatikusan riasztást
indít, és az ‚‘ FL ‚‘ felirat jelenik meg az LCD kijelzőn. Ebben az esetben a fölösleges kondenzátumot
le kell üríteni a vízelvezetőn.
A víz elvezetése után a készülék visszatér normál üzemmódba.
Automatikus leolvasztási funkció (ez a funkció fűtésnél és hűtésnél használható):
A leolvasztás során a fűtési szimbólum villogni fog a kijelzőn.
Automatikus hővédelem:
Fűtés üzemmódban a készülék automatikus hővédelmet alkalmaz a készülék élettartamának
növelése érdekében. A hővédelem elindításakor a kompresszor és kikapcsol, a motor visszatér a
normál üzemmódba, ha már lehűlt.
Megjegyzés
A vízelvezető fedelet erősítse vissza helyesen.
A vízleeresztés közben kissé megdöntheti a légkondicionálót.
Amikor a palack tele van vízzel, és a víz még mindig folyik, akkor megállíthatja, hogy ne kerüljön a
földre vagy a szőnyegre.
Amikor a víz lefolyt, óvatosan zárja le a vízelvezetőcsövet.
Megjegyzés
A vízleeresztő lezárása után indítsa újra a készüléket, ellenkező esetben a kondenzált víz a földre
vagy a szőnyegre folyhat.
Folyamatos vízelvezetés a vízelvezetőcső segítségével (csak hűtési és páramentesítési módban használható)
• Csavarja le a vízelvezető fedelet.
• A vízelvezetőcsövet helyezze a nyílásba a kondenzvíz folyamatos elvezetéséért.
• A vízelvezető csövet helyezze a vízelvezető tartályba vagy a lefolyóba (Szabad esés esetében a
kondenzátum magától folyik el).
Várjon 3 percet az újraindítás előtt:
Ha a készülék ki volt kapcsolva, akkor a következő 3 perc alatt nem kapcsolható vissza. Ez a
funkció védi az eszközt. A készülék 3 perc után automatikusan elindul.

Karbantartás
Tisztítás: Tisztítás és karbantartás előtt kapcsolja ki és húzza ki a készüléket.
Felület tisztítása
Törölje le a felületet nedves törlővel. Ne használjon olyan vegyszereket, mint benzin, alkohol,
petróleum stb. Ellenkező esetben a készülék felülete vagy akár az egész készülék sérülhet meg.
Szűrő tisztítása
Amikor a szűrő poros, a légkondicionáló hatékonysága csökken. Tisztítsa a szűrőt 2 hetente.
1
2
2
1. Rögzítőcsavar
2. Rács
Felső szűrő tisztítása
Vegye a rácsot a kezébe. Nyomja le és távolítsa el a szűrő keretéről. Csavarja ki a négy csavart a
testből.
Helyezze a szűrőt semleges mosószerrel ellátott meleg vízbe (kb. 40 ° C / 104 ° F), majd szárítsa meg.
Alsó szűrő tisztítása
Vegye a rácsot a kezébe és enyhén húzza ki.
Helyezze a szűrőt semleges mosószerrel ellátott meleg vízbe (kb. 40 ° C / 104 ° F), majd szárítsa meg.
Szezon kívüli tárolás
Csavarja ki a vízelvezetőket és öntse egy előkészített tartályba a maradék vizet. A leeresztés során
kissé megdöntheti az eszközt.
Kapcsolja be a készüléket, állítsa a ventilátor üzemmódot alacsony ventilátorsebességre, és várja
meg, amíg a vízelvezető csövek szárazok lesznek, hogy a készüléket szárazon tudja tárolni a
penész kialakulását megelőzve.
Csatlakoztassa le a konnektorból, húzza ki a tápkábelt, és tekerje a készülék hátoldalán található
fogantyúkra, majd csukja le a leeresztő nyílást.
A légkimeneti csövet rakja össze és tárolja.
Fedje le a légkondicionálót fóliával, hogy elkerülje a porosodását, és helyezze száraz helyre,
gyermekektől elzárva.
Távolítsa el az elemeket a távirányítóból.
Megjegyzés:
Győződjen meg arról, hogy a készülék teste száraz helyen van, és hogy az összes légkondicionáló
alkatrész megfelelően van tárolva.
Hibák eltávolítása
Ne javítsa és ne szedje szét a legkondicionálót. A képzetlen személy által végzett javítások
érvényteleníthetik a garanciát, és személyi sérülést vagy anyagi kárt okozhatnak.
Hiba Lehetséges ok Megoldás
A légkondicionáló nem
működik.
A fűtés vagy hűtés
hatása nem elég jó.
A készülék sok zajt
ad ki.
A kompresszor nem
működik.
A távirányító nem
működik.
“E1” felirat jelenik meg
a kijelzőn.
“E2” felirat jelenik meg
a kijelzőn.
Ha olyan problémák merülnek fel, amelyek nem szerepelnek ebben a táblázatban, vagy ha a
hibaelhárítás nem segít, kérjük, forduljon szakszerviz segítségéhez.
Nincs áramellátás. Csatlakoztassa a készüléket a
A kijelzőn az ‘‘FL‘‘ felirat jelenik
meg.
A környezeti hőmérséklet túl
alacsony vagy túl magas.
Hűtés üzemmódban a helyiség
hőmérséklete alacsonyabb, mint
a beállított hőmérséklet, és fűtés
üzemmódban a szobahőmérséklet
magasabb, mint a beállított
hőmérséklet.
A páramentesítési módban
a környezeti hőmérséklet túl
alacsony.
A légkondicionáló közvetlen
napfényben van.
Nyitott ajtók vagy ablakok vagy
sok ember egy szobában, ami egy
másik hőforrás lehet.
A szűrő piszkos. Tisztítsa vagy cserélje ki a szűrőt.
A lég bemenetelek és lég
kimentelek elvannak zárva.
A készülék nincs síkfelületre
helyeze.
Megkezdődött a túlmelegedés
védelmi funkció.
A távirányító és a készülék közötti
távolság túl nagy.
A távirányító nem a készülék
vevőegység mutat.
Az elemek lemerültek.
A hőmérséklet a csőérzékelőn
rendellenes.
A hőmérséklet a csőérzékelőn
rendellenes.
konnektorba, és kapcsolja be.
Öntse ki a vizet a készülékből.
A légkondicionálás javasolt
hőmérséklete 7 - 35 ° C (44 - 95
° F).
Állítsa be a beállított
hőmérsékletet.
Helyezze a készüléket olyan
helyre, ahol a hőmérséklet 17 ° C
felett van.
Húzza be a függönyöket.
Zárja be az ajtót és az ablakot.
Tisztítsa meg őket, hogy ne
legyenek eltömődve.
Helyezze a készüléket egy sík,
nehéz felületre.
Várjon 3 percet, amíg a
hőmérséklet csökken, majd indítsa
újra a készüléket.
Irányítsa a távirányítót közelebb
a készülékhez, és győződjen
meg róla, hogy a készülék a
vevőegység felé mutat.
Ellenőrizze a csőérzékelő
és a kapcsolódó áramkörök
hőmérsékletét.
Ellenőrizze a csőérzékelő
és a kapcsolódó áramkörök
hőmérsékletét.

Szakrajz
1
3
4
2
1. Kondenzátor
2. Kapilláris
3. Kompresszor
4. Elpárologtató
Műszaki adatok:
Feszültség: 220-240 V~
Frekvencia: 50 Hz
A magyar használati utasítás a gyártótól kapott verzió pontos fordítása.
A kézikönyvben használt fényképek csak illusztrációk, nem egyeznek meg pontosan a termékkel.
Dziękujemy za zakup naszego produktu.
Przed użyciem prosimy starannie przeczytać tę instrukcję.
• Podczas instalacji klimatyzacji należy przestrzegać lokalnych przepisów dotyczących połączeń sieciowych i upewnić się, że jest ona prawidłowo uziemiona. Jeśli masz jakiekolwiek pytania dotyczące instalacji
elektrycznej, postępuj zgodnie z instrukcjami producenta i, jeśli to konieczne, poproś o to profesjonalnego
elektryka.
• Umieść urządzenie na płaskiej i suchej powierzchni i umieść je w odległości co najmniej 50 cm od
otaczających obiektów i ścian.
• Po zainstalowaniu klimatyzacji upewnij się, że wtyczka zasilania jest nienaruszona i solidnie podłączo
na do gniazdka elektrycznego, a przewód zasilający jest umieszczony, aby zapobiec potknięciu się lub
odłączeniu.
• Nie wkładaj żadnych przedmiotów do wlotu i wylotu powietrza klimatyzacji. Wlot i wylot powietrza nie
mogą być zasłonięte niczym.
• Podczas instalowania rur drenażowych należy upewnić się, że rury drenażowe są prawidłowo podłąc
zone i nie występuje odkształcenie lub zgięcie.
• Podczas regulacji płytek wlotu powietrza, należy je ostrożnie obchodzić, aby uniknąć uszkodzeń.
• Podczas obsługi klimatyzacji upewnij się, że klimatyzacja jest w pozycji pionowej.
• Urządzenie należy trzymać z dala od benzyny, łatwopalnego gazu, kuchenki i innych źródeł ciepła.
• Nie należy demontować, naprawiać ani modyfikować urządzenia, ponieważ może to spowodować
nieprawidłowe działanie lub uszkodzenie urządzenia lub nawet obrażenia. Prace naprawcze muszą być
zawsze wykonywane przez autoryzowane centrum serwisowe.
• Nie instaluj ani nie umieszczaj urządzenia w łazience lub w innym wilgotnym środowisku.
• Aby wyłączyć urządzenie, użyj przełącznika zasilania, nie ciągnij za kabel.
• Nie umieszczaj na urządzeniu żadnych napojów ani innych płynów, które mogłyby wylać się na urządzenie.
• Nie używaj środków owadobójczych ani innych substancji łatwopalnych w pobliżu klimatyzacja.
• Nie wycierać ani nie myć klimatyzacji rozpuszczalnikami chemicznymi, takimi jak benzyna i alkohol. Aby
wyczyścić klimatyzację, odłącz ją od źródła zasilania i wyczyść ją wilgotną szmatką. Jeśli maszyna jest
bardzo brudna, użyj łagodnego detergentu.
• Z tego urządzenia mogą korzystać dzieci w wieku powyżej 8 lat i osoby o obniżonych zdolnościach
fizycznych, sensorycznych lub umysłowych, pod warunkiem, że są nadzorowane przez osobę odpowie
dzialną za bezpieczne korzystanie z urządzenia i rozumieją ryzyko.
• Upewnij się, że dzieci nie bawią się urządzeniem.
• Funkcje urządzenia
• Funkcje chłodzenia, ogrzewania, osuszania i wentylacji.
• Funkcja Swing uruchamia automatyczną funkcję obrotową. Jeśli działa funkcja automatycznego obra
cania, można nacisnąć przycisk SWING, aby zatrzymać łopatki dmuchawy pod żądanym kątem.
• Klimatyzacja jest wyposażona w sterowania zdalnego sterowania z wyświetlaczem LCD, który można
bezpiecznie przechowywać z tyłu klimatyzacja.
• Uchwyty po obu stronach klimatyzacji zostały zaprojektowane tak, aby ułatwić obsługę z klimatyzacją.
• Zaciski z tyłu klimatyzator a umożliwiają bezpieczne schowanie przewodu zasilającego, aby zapobiec
uszkodzeniu podczas przenoszenia klimatyzacji.
• Możliwość filtracji powietrza.
-
-
-
-

Komponenty:
Instalacja
UWAGA
Przed skorzystaniem z klimatyzacja pozostaw go w pozycji pionowej przez co najmniej 2 godziny.
12
3
7 8
4
5
6
10
11
12
14
16
18
9
13
15
17
19
20
Możesz swobodnie przenosić klimatyzację w swoim pokoju. Jednak podczas przenoszenia upewnij
się, że klimatyzacja znajduje się w pozycji pionowej i że znajduje się na płaskiej powierzchni. Nie
instaluj ani nie umieszczaj urządzenia w łazience lub w innym wilgotnym otoczeniu.
1. Zamocuj rurę wydechową. Wkręć rurę do otworu wylotowego z tyłu (w lewo).
2. Zainstaluj uszczelkę okna (Air Block - akcesorium do kupienia)
1. Maska
2. Górna pokrywa urządzenia
3. Regulowane lamele
4. Tylna pokrywa urządzenia
5. Pokrywa przednia
6. Kółka obrotowe
7. Rura powietrza wywiewanego
8. Uszczelki okienne
9. Komora sterowania
10. Tylna okładka
11. Filtr Eva
12. Zaciski kablowe
13. Uchwyty
14. Wentylacja
15. Opróżnij w celu ciągłego odprowadzania
wody
16. Filtr CON
17. Siatka wlotu powietrza
18. Spustowy wylot
19. Kabel
20. Wtyczka elektryczna
3. Poprowadź rurę do okna i włóż uszczelkę Air Block do otworu.
4. Instalowanie korpusu urządzenia
Umieść klimatyzację z zainstalowaną rurą przed oknem, tak aby znajdowała się w odległości co
najmniej 50 cm od ściany i otaczających obiektów.
Uwaga
Rury nie wolno skręcać ani obracać (więcej niż 45 °). Rura nie może być zatkana.
Ważna uwaga
Rura wydechowa powinna mieć długość 280-1500 mm. Długość zależy od rodzaju klimatyzacji.
Nie używaj przedłużacza ani innych rur, ponieważ może to spowodować uszkodzenie urządzenia.

Sterowanie urządzeniem
Instrukcje obsługi:
67
1. Zegar
2. Ustawianie prędkości wentylatora
3. Przycisk UP (W GÓRĘ)
4. Przycisk DOWN (W DÓŁ)
Po pierwszym włączeniu urządzenia rozlega się sygnał dźwiękowy i odtwarzana jest melodia, a
następnie urządzenie przełącza się w tryb gotowości.
Przycisk włączania / wyłączania: naciśnij ten przycisk, aby włączyć / wyłączyć urządzenie.
Przycisk ustawiania trybu: gdy urządzenie jest włączone, naciśnij ten przycisk, aby wybrać tryb
pracy urządzenia. Każde naciśnięcie przycisku powoduje zmianę trybu w następujący sposób:
chłodzenie, wentylacja, osuszanie, ogrzewanie.
Przyciski UP i DOWN: te przyciski służą do zwiększania i zmniejszania ustawień temperatury i
ustawień zegara, użyj ich w następujący sposób:
Podczas regulacji temperatury naciśnij UP lub DOWN, aby ustawić żądaną temperaturę (ustawienie
temperatury nie jest możliwe w trybach wentylacji i osuszania).
Naciskając oba przyciski w tym samym czasie, można przełączać się między stopniami Celsjusza
° C i Fahrenheita ° F.
Ustawienie prędkości wentylatora
W trybie chłodzenia i wentylacji naciśnij przycisk, aby wybrać prędkość wentylatora - wysoką,
średnią, niską.
W trybie ogrzewania naciśnij i wybierz prędkość wentylatora - wysoką, średnią, niską. W trybie
osuszania przycisk nie działa, prędkość wentylatora jest ustawiona na niską prędkość.
Timer / Zegar
Gdy urządzenie jest włączone, naciśnij ten przycisk, aby włączyć / wyłączyć zegar.
Naciśnij przycisk, symbol zegara zacznie migać i naciśnij przycisk UP lub DOWN, aby ustawić
żądany czas chłodzenia.
Czas chłodzenia można ustawić w zakresie od 1 do 24 godzin co godzinę.
5
5. Wyświetlacz
6. Ustawienie trybu
7. Przycisk włączania / wyłączania
34
12
Zdalne sterowanie
Instrukcje korzystania z sterowania:
Przycisk Power - Naciśnij przycisk, aby włączyć / wyłączyć urządzenie.
Przycisk Mode - Przycisk trybu, naciśnij, aby przełączyć na tryb chłodzenia, wentylacji, osuszania
lub ogrzewania.
Przycisk UP - Naciśnij, aby zwiększyć temperaturę lub czas.
Przycisk Down - Naciśnij, aby zmniejszyć temperaturę lub czas.
Przycisk Fan - Użyj tego przycisku, aby ustawić prędkość wentylatora na wysoką, średnią i niską.
Przycisk Timer - Naciśnij i ustaw czas nadmuchu.
Przycisk Swing - Uruchamia automatyczną funkcję obrotu. Jeśli działa funkcja automatycznego
obracania, można nacisnąć przycisk SWING, aby zatrzymać lamele dmuchawy pod żądanym
kątem.
°C- °F - ten przycisk ustawia wyświetlanie w stopniach C lub °F.
Różne funkcje ochrony
Ochrona przed mrozem:
Podczas chłodzenia, osuszania lub w trybie gotowości temperatura w rurze wydechowej może
być zbyt niska, a urządzenie automatycznie uruchamia status ochronny. Jeśli temperatura w rurze
wydechowej wzrośnie do określonej temperatury, urządzenie powróci do trybu normalnego.
Ochrona przed przelaniem:
Gdy woda w zbiorniku wody przekroczy bezpieczny poziom, urządzenie automatycznie uruchomi
alarm i na wyświetlaczu pojawi się „FL”. W takim przypadku konieczne jest odprowadzenie
nadmiaru kondensatu przez otwory spustowe.
Po usunięciu wody urządzenie powraca do trybu normalnego.
Funkcja automatycznego odszraniania (tej funkcji można używać do ogrzewania i chłodzenia):
Podczas odszraniania na wyświetlaczu zacznie migać symbol ogrzewania.
Automatyczna ochrona termiczna:
W trybie ogrzewania urządzenie wykorzystuje automatyczną ochronę termiczną, aby zwiększyć
żywotność urządzenia. Po uruchomieniu zabezpieczenia termicznego sprężarka jest wyłączana i
silnik po ochłodzeniu powraca do trybu normalnego.
Odczekaj 3 minuty przed ponownym uruchomieniem urządzenia:
Jeśli urządzenie zostało wyłączone, nie można go ponownie uruchomić w ciągu 3 minut. Ta funkcja
chroni urządzenie. Urządzenie zacznie działać automatycznie po 3 minutach.

Instrukcje odwadniania
Konserwacja
Ręczny drenaż
Gdy urządzenie przestaje działać, a woda w urządzeniu znajduje się powyżej dozwolonego
poziomu, wyłącz urządzenie i odłącz je od zasilania.
Uwaga
Z urządzeniem należy obchodzić się bardzo ostrożnie, aby woda nie wylała się na dno urządzenia.
• Umieść pojemnik na wodę z tyłu urządzenia.
• Odkręć korek spustowy, aby woda spłynęła do przygotowanego pojemnika.
Uwaga
Następnie prawidłowo załóż korek spustowy.
Możesz lekko pochylić klimatyzację, gdy woda się opróżnia.
Gdy pojemnik jest pełen wody, a bieżąca woda nadal płynie, możesz powstrzymać ją przed
rozlaniem na ziemię lub dywan.
Po spuszczeniu wody ostrożnie zamknij otwór spustowy.
Uwaga
Po zamknięciu otworu spustowego należy ponownie uruchomić urządzenie, w przeciwnym razie
skroplona woda może wyciekać na ziemię lub na dywan.
Czyszczenie: Wyłącz urządzenie i odłącz je od gniazdka przed czyszczeniem i konserwacją.
Czyszczenie powierzchni
Wytrzyj powierzchnię urządzenia wilgotną szmatką. Nie używaj środków chemicznych, takich jak
benzyna, alkohol, nafta itp. W przeciwnym razie uszkodzona zostanie powierzchnia urządzenia lub
nawet całe urządzenie.
Czyszczenie filtra
Gdy filtr jest zakurzony, skuteczność klimatyzacji jest zmniejszona. Czyść filtr co 2 tygodnie.
1
2
2
1. Śruba mocująca
2. Siatka
Czyszczenie górnego filtra
Weź siatkę filtra w swoje ręce. Naciśnij go i wyjmij z ramki filtra. Odkręć 4 śruby z urządzenia.
Umieść filtr w ciepłej wodzie z neutralnym detergentem (około 40 ° C / 104 ° F), a następnie
wysusz.
Czyszczenie dolnego filtra
Weź filtr do rąk i delikatnie go wyciągnij.
Umieść filtr w ciepłej wodzie z neutralnym detergentem (około 40 ° C / 104 ° F), a następnie
wysusz go.
Ciągły wylot rury odpływowej (może być używany tylko w trybie chłodzenia i osuszania)
• Odkręć pokrywę spustu.
• Umieść rurę spustową w otworze, aby zapewnić ciągły odpływ kondensatu.
• Umieść rurę odpływową w zbiorniku odpływowym lub poprowadź ją do odpadów (w przypadku
grawitacji kondensat spontanicznie spłynie).
Przechowywanie po sezonie
Odkręć otwory odpływowe i wlej resztki wody do wcześniej przygotowanego pojemnika. Możesz
lekko przechylić urządzenie podczas opróżniania.
Włącz urządzenie, ustaw tryb wentylatora na niską prędkość wentylatora i poczekaj, aż rury
drenażowe będą suche, aby przechowywać urządzenie w stanie suchym, aby w urządzeniu nie
powstawała pleśń.
Wyłącz urządzenie, odłącz je od gniazda i przewiń kabel urządzenia do zacisków z tyłu urządzenia,
a następnie zamknij otwór spustowy.
Wyjmij rurę wydechową i przechowuj ją.
Pokryj klimatyzacja plastikiem, aby uniknąć kurzu i umieść ją w suchym miejscu, niedostępnym
dla dzieci.
Wyjmij baterie z sterowania.
Uwaga:
Upewnij się, że korpus urządzenia jest umieszczony w suchym miejscu, a wszystkie elementy
klimatyzacji są prawidłowo przechowywane.

Rozwiązywanie problemów
1
3
4
2
Nie naprawiaj ani nie demontuj klimatyzacja samodzielnie. Naprawy wykonywane przez
niewykwalifikowaną osobę mogą unieważnić gwarancję i mogą spowodować obrażenia ciała lub
uszkodzenie mienia.
Problem Możliwa przyczyna Rozwiązanie
Klimatyzacja nie działa. Brak zasilania. Podłącz urządzenie do gniazda
Wskaźniki wyświetlacza pokazują
„FL”.
Temperatura otoczenia jest zbyt
niska lub zbyt wysoka.
W trybie chłodzenia temperatura
w pomieszczeniu jest niższa
niż ustawiona temperatura, a w
trybie ogrzewania temperatura
pomieszczenia jest wyższa niż
ustawiona temperatura.
W trybie osuszania temperatura
otoczenia jest zbyt niska.
Efekt ogrzewania lub
chłodzenia nie jest
wystarczająco dobry.
Urządzenie robi dużo
hałasu
Sprężarka nie działa. Rozpoczęła się funkcja przegrzania Odczekaj 3 minuty, aż temperatura
Sterowanie nie działa. Odległość sterowania i urządzenia
Wyświetlacz pokazuje
„E1”.
Wyświetlacz pokazuje
„E2”.
Klimatyzacja jest bezpośrednio
nasłoneczniona.
Są otwarte drzwi lub okna lub w
pomieszczeniu jest wiele osób, lub
jest inne źródło ciepła.
Filtr jest brudny. Wyczyść filtr lub wymień go.
Wloty lub wyloty powietrza są
zatkane.
Urządzenie nie jest umieszczone na
płaskiej powierzchni.
jest bardzo duża.
Sterowanie nie wskazuje odbiornika
urządzenia.
Baterie są wyczerpane.
Temperatura na czujniku rury jest
nieprawidłowa.
Temperatura na czujniku rury jest
nieprawidłowa.
zasilania i włącz je.
Wylej wodę z urządzenia.
Zalecana temperatura dla
klimatyzacji wynosi 7 - 35 ° C (44 95 ° F).
Dostosuj ustawioną temperaturę.
Umieść urządzenie w temperaturze
powyżej 17 ° C (62 ° F).
Pociągnij zasłony.
Zamknij drzwi i okno.
Wyczyść je, aby nie były zatkane.
Umieść urządzenie w innym miejscu
na płaskiej i ciężkiej powierzchni.
spadnie, a następnie uruchom
ponownie urządzenie.
Skieruj sterowania bliżej urządzenia
i upewnij się, że jest skierowany w
stronę odbiornika na urządzeniu.
Sprawdź temperaturę czujnika
rurowego i powiązanych obwodów.
Sprawdź temperaturę czujnika
rurowego i powiązanych obwodów.
Schemat
1. Skraplacz
2. Kapilara
3. Sprężarka
4. Parownik
Parametry techniczne:
Napetost: 220-240 V~
Frekvenca: 50 Hz
Jeśli pojawią się problemy, które nie są wymienione w tej tabeli lub jeśli rozwiązywanie problemów
nie pomoże, skontaktuj się z profesjonalnym serwisem.
Polska wersja instrukcji to dokładne tłumaczenie oryginalnych instrukcji producenta.
Zdjęcia użyte w instrukcji służą wyłącznie do celów ilustracyjnych i mogą nie być dokładnie zgodne
z produktem.


 Loading...