

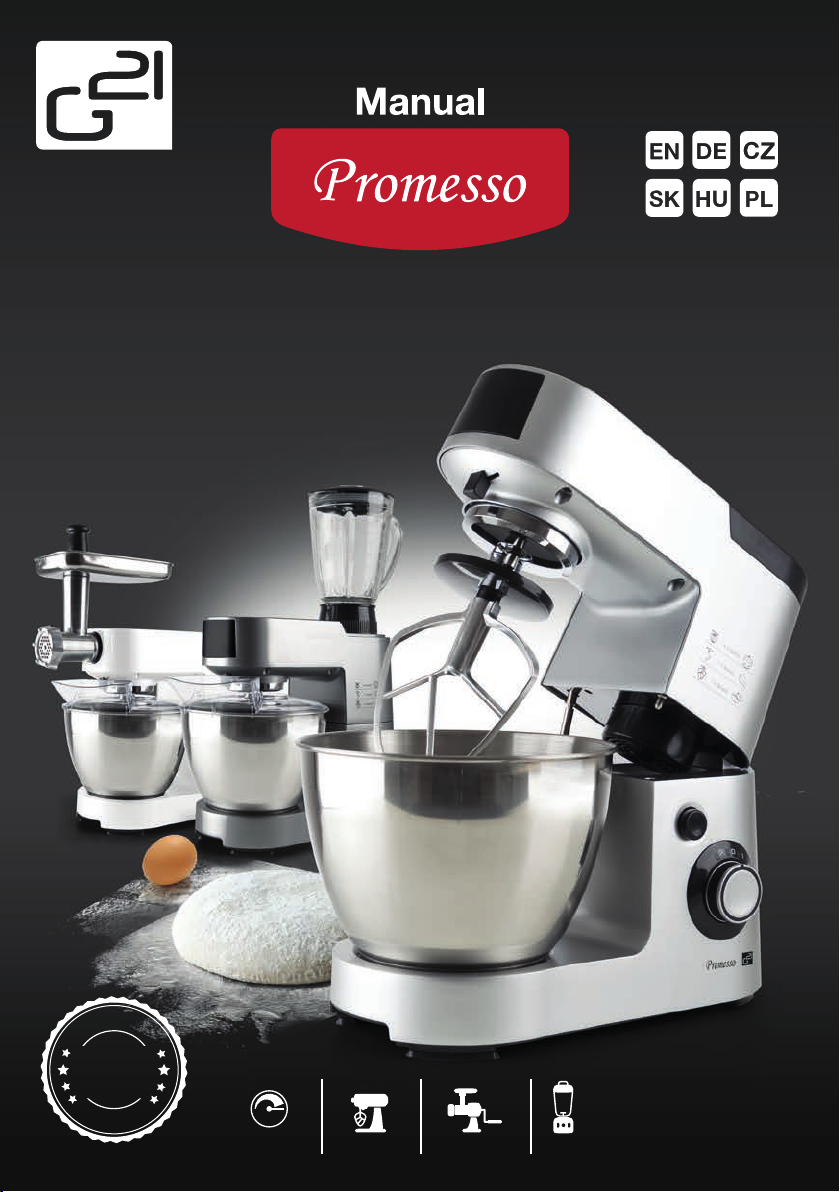
Page 1
A
R
N
R
T
A
W
Y
4
Y
S
E
R
A
1 500 W MixerMeat grinderKneading
Page 2

Page 3

EN
G
A
R
A
N
T
I
E
4
J
A
H
R
E
WARRANTY
4 years extended warranty registration on product.
Extended warranty registration is carried out by filling out application form on the following address:
www.g21-vitality.cz/warrantyregistration
Within two months from the purchase of the appliance.
Extended warranty does not apply to accessories.
A
R
N
W
A
R
T
Y
Y
4
E
A
R
S
Page 4

EN
Thank you for purchasing our product.
Before using this unit, please read this manual in order to avoid improper handling and use
ofthedevice.
This device has been tested according to all relevant current CE guidelines, such as electromagnetic compatibility and low voltage directives, and has been constructed in accordance with the
latest safety regulations.
Subject to technical changes without prior notice!
General Safety Instructions
Read the operating instructions carefully before putting the appliance into operation and keep the
instructions including the warranty, the receipt and, if possible, the box with the internal packing. If
you give this device to other people, please also pass on the operating instructions.
• The appliance is designed exclusively for private use and for the envisaged purpose. This appliance is not fit for commercial use. Do not use it outdoors (except if it is designed to be used outdoors).
Keep it away from sources of heat, direct sunlight, humidity (never dip it into any liquid) and sharp edges. Do not use the appliance with wet hands. If the appliance is humid or wet, unplug it immediately.
• When cleaning or putting it away, switch off the appliance and always pull out the plug from the socket
(pull on the plug, not the cable) if the appliance is not being used and remove the attached accessories.
• Do not operate the machine without supervision. If you should leave the workplace, always
switch the machine off or remove the plug from the socket (pull the plug itself, not the lead).
• Check the appliance and the cable for damage on a regular basis. Do not use the appliance if
it is damaged.
• Do not try to repair the appliance on your own. Always contact an authorized technician. To
avoid the exposure to danger, always have a faulty cable be replaced only by the manufacturer, by
our customer service or by a qualified person and with a cable of the same type.
• Use only original spare parts.
• Pay careful attention to the following “Special Safety Instructions”.
Children and Frail Individuals
In order to ensure your children‘s safety, please keep all packaging (plastic bags, boxes, polystyrene etc.) out of their reach.
Caution! Do not allow small children to play with the foil as there is a danger of suffocation!
In order to protect children or frail individuals from the hazards of electrical equipment, please
ensure that this device is only used under supervision. This device is not a toy. Do not allow small
children to play with it.
Special safety Instructions for this Machine
• Only operate this machine under supervision.
• Do not insert anything into the rotating hooks while the machine is working.
• Place the machine on a smooth, flat and stable working surface.
• Do not insert the mains plug of the machine into the power socket without having installed all
the necessary accessories.
• Only the pusher should be used for refilling the mincer.
• Danger of overloading! Please use the device either as a mincer or mixer, but never both
functions at the same time.
Page 5
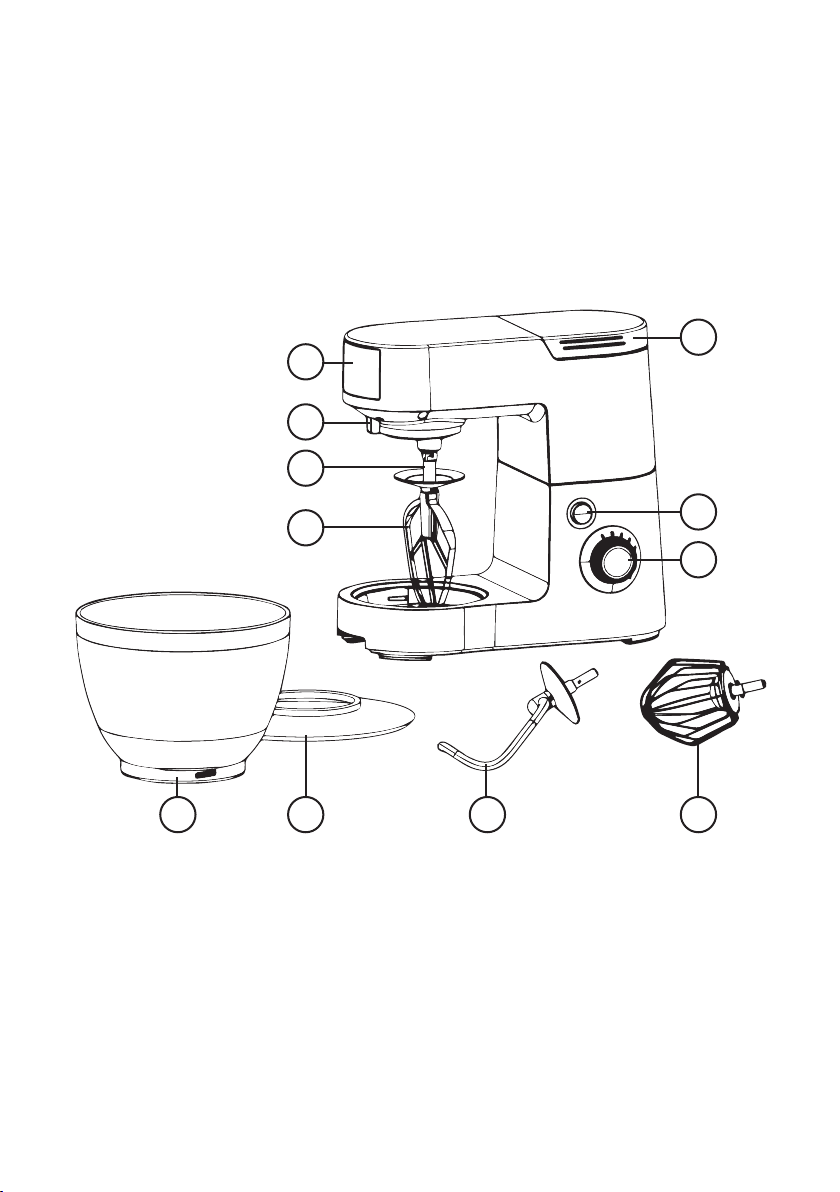
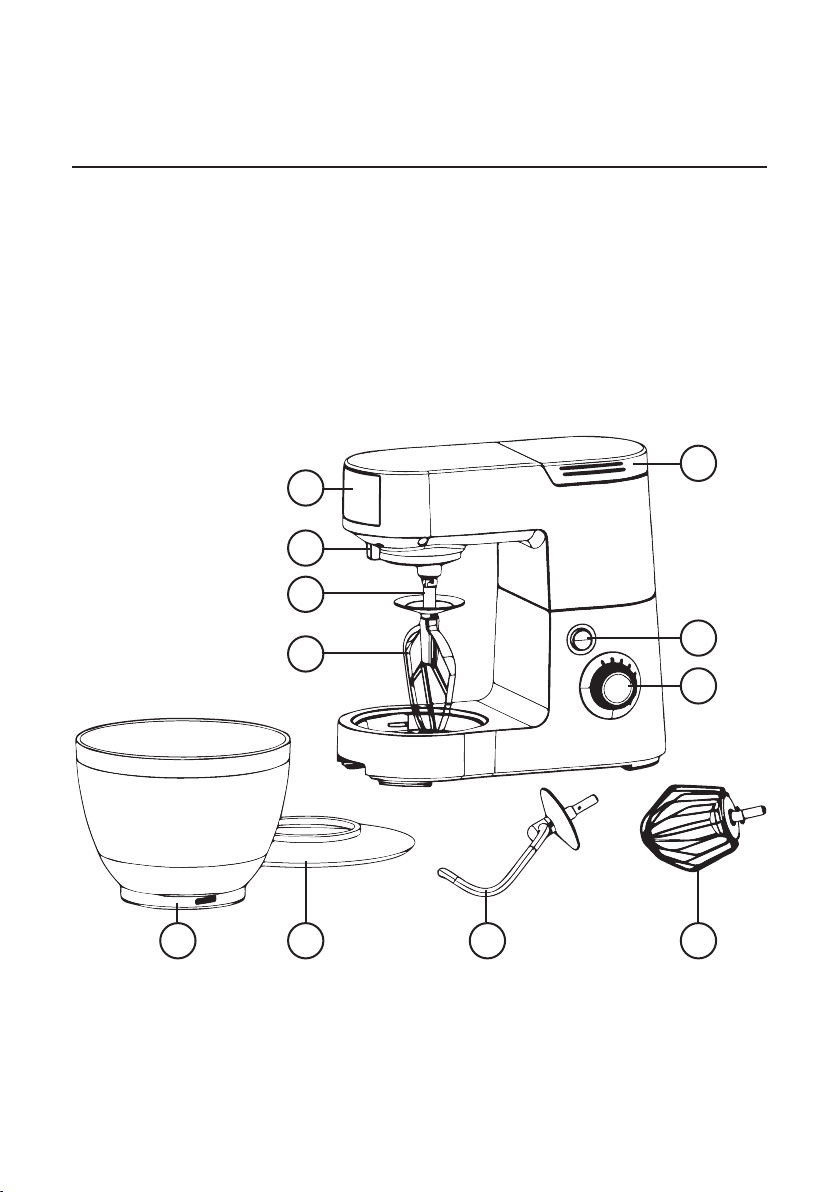
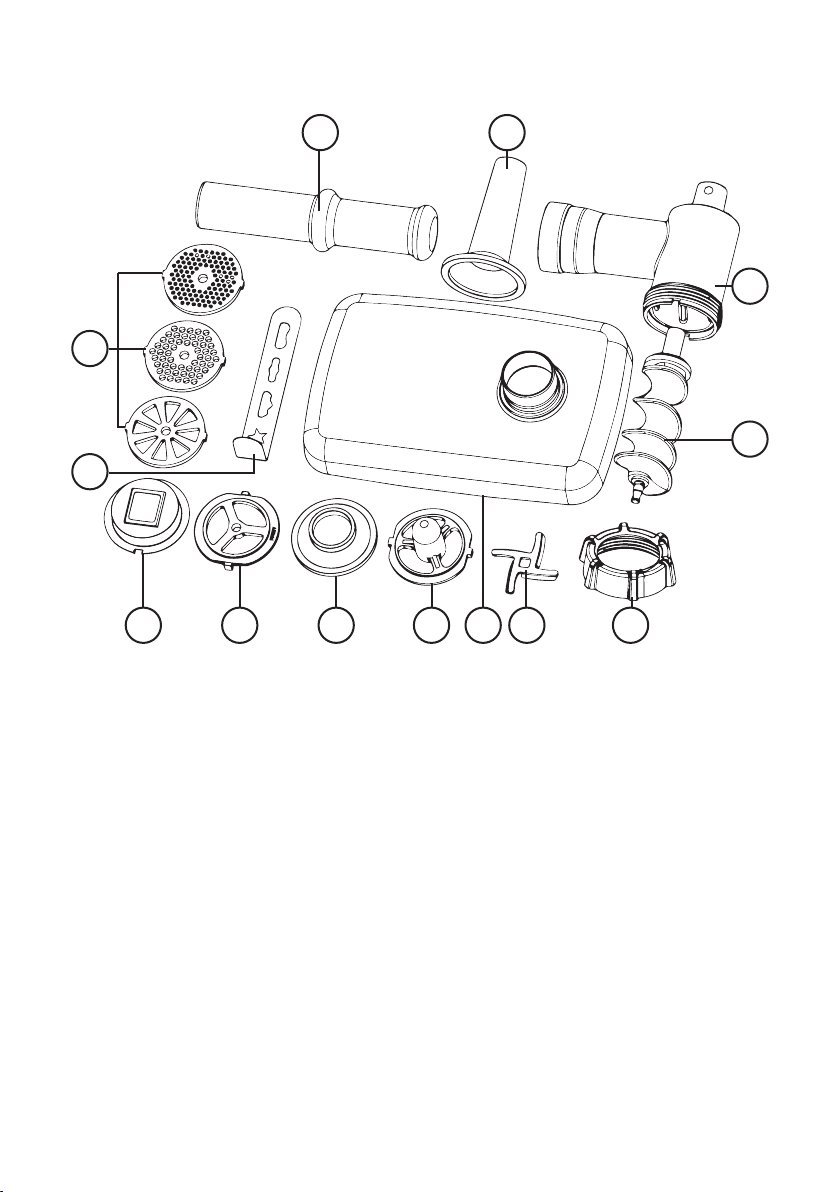
Overview of the Components
Main Components and Standard Accessories:
1. Drive shaft
2. A. Front cover
B. Back cover
3. Sus bowl
4. Safety lever
5. Lever for raising and lowering the arm
6. Switch
7. Bowl Cover
8. A. Kneading hook
B. Whisk
C. Stirrer
2A
4
1
2B
8B
3 7 8A 8C
5
6
Page 6

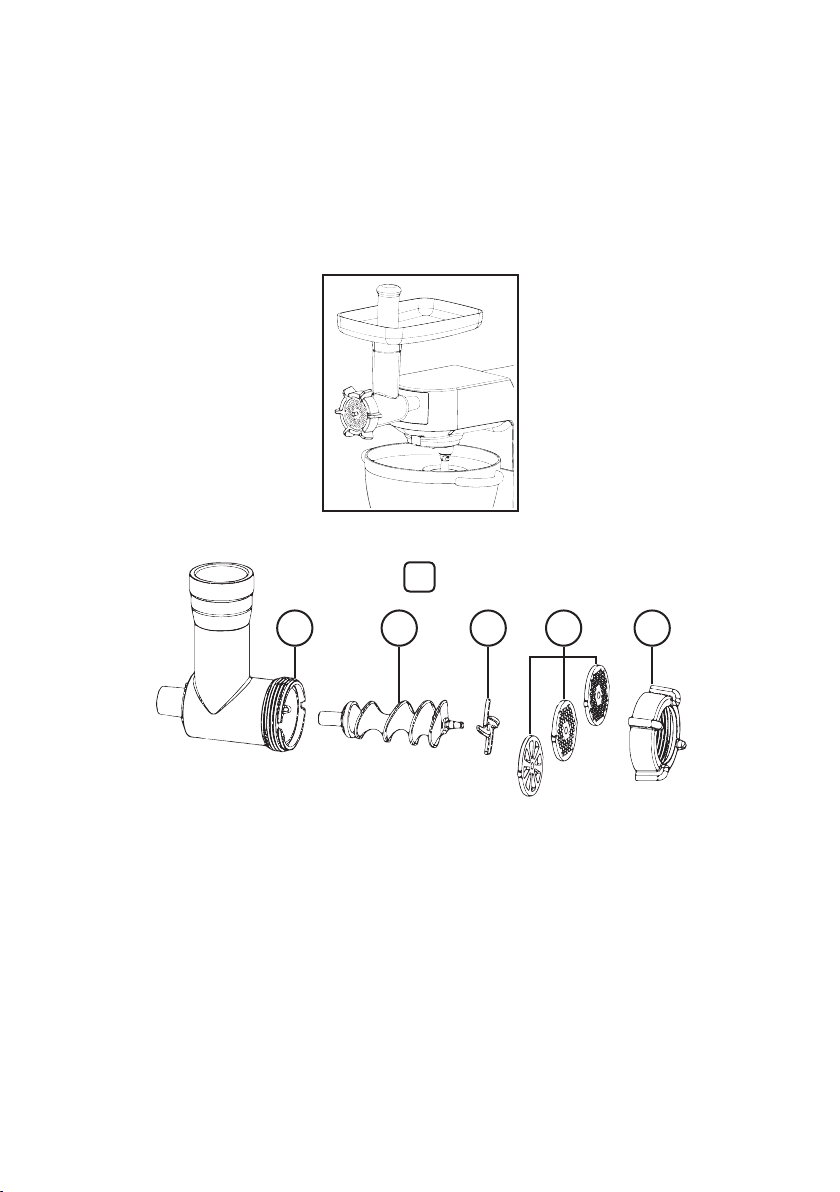
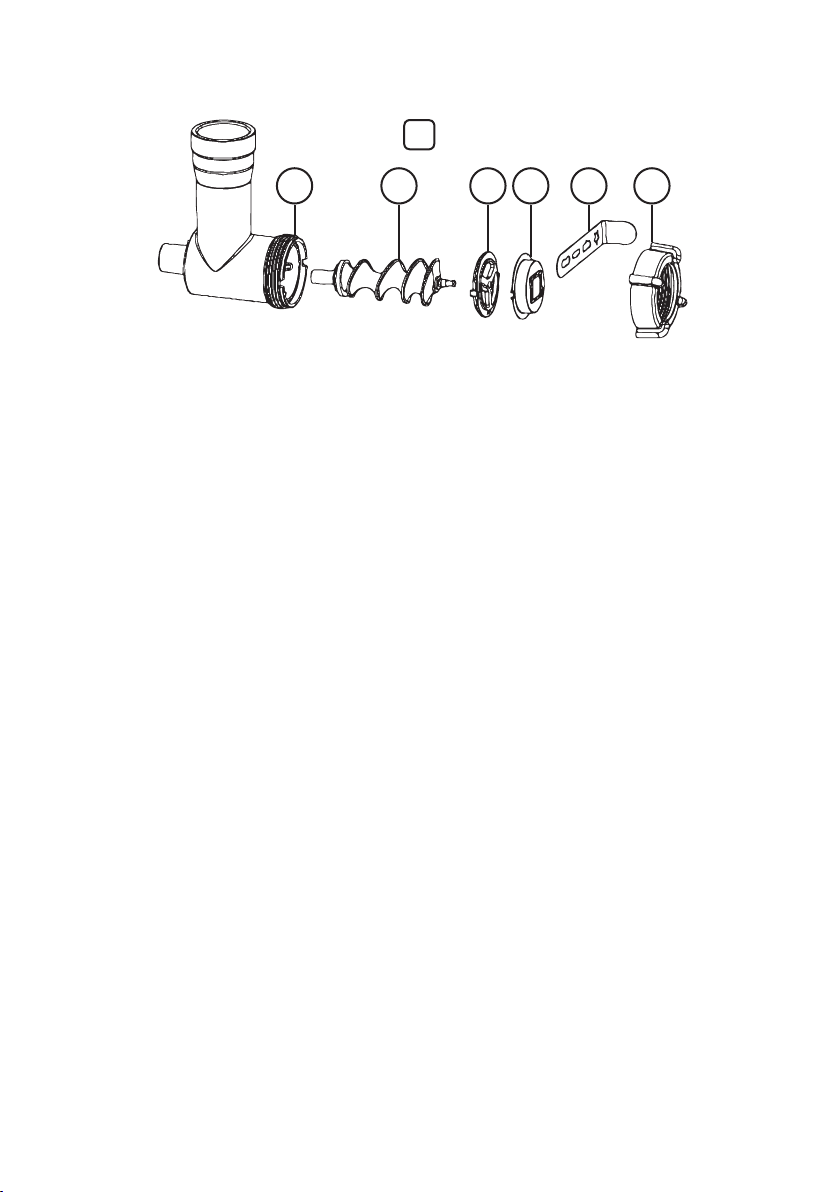
Optional Accessories - Meat Grinder:
13
9
20 19
Slide
9.
Spiral Housing
10.
Spiral
11.
Blades
12.
Sieve
13.
Lock
14.
A. Sausage attachment, large
15.
B. Sausage attachment, small
C. Adapter for 15
Presser Meat Mincer
17.
Presser
18.
Biscuit Attachment
19.
Biscuit Attachment
20.
18
15A 15C
15B
10
11
1217 14
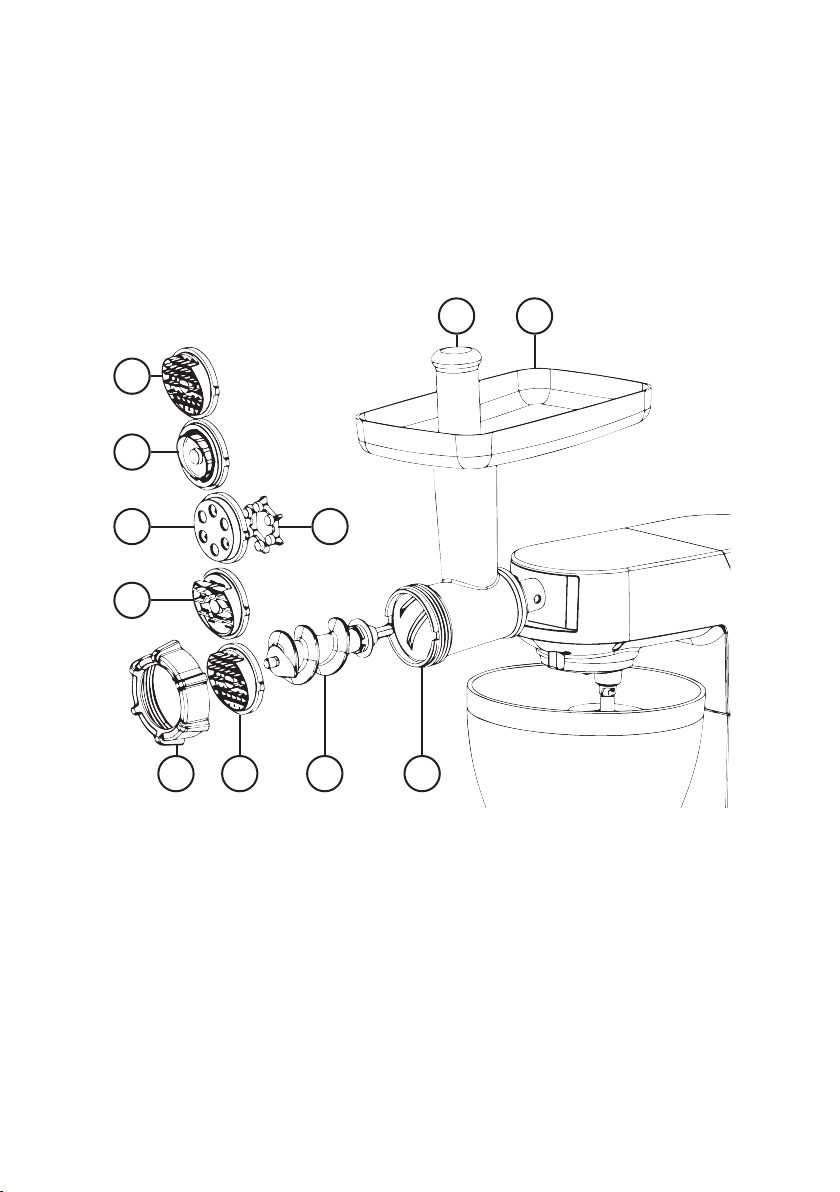
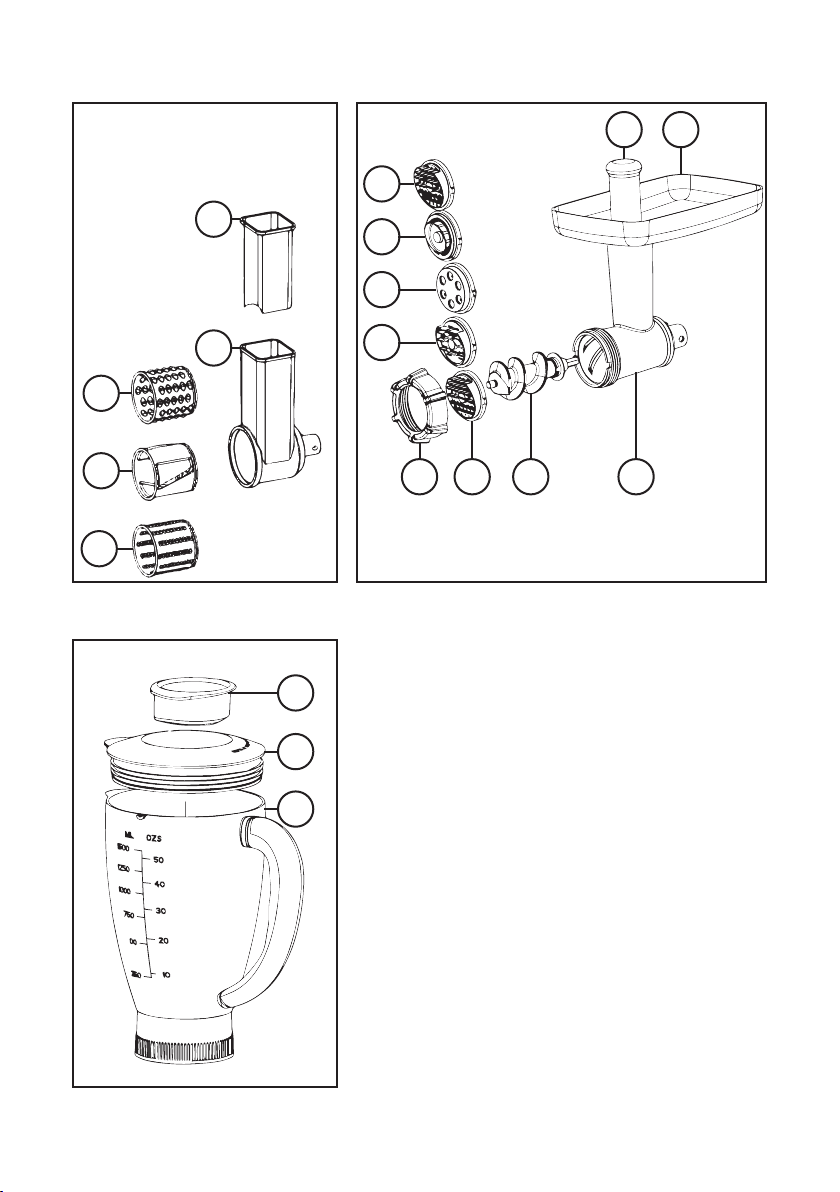
Page 7

Salad Express: Pasta Maker
24D
22
24B
24C
18 17
23C
23B
23A
21
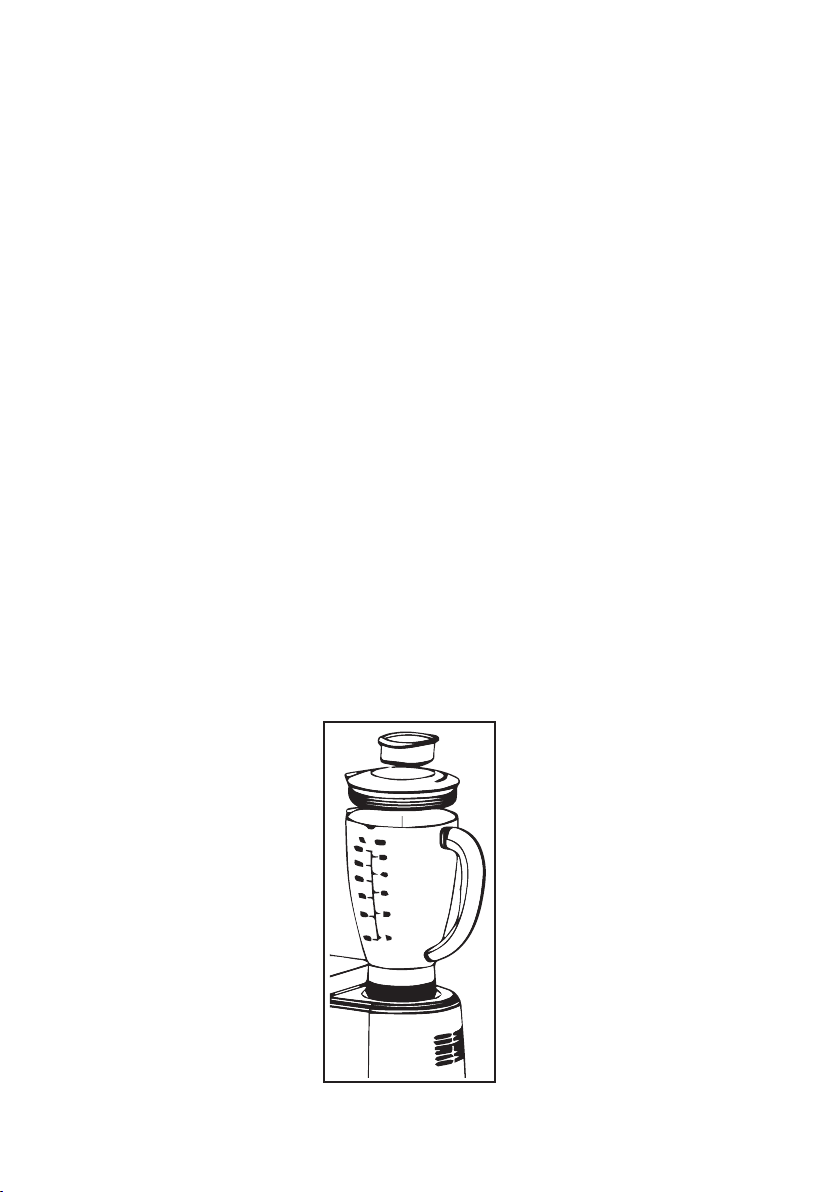
Blender
28
29
30
24E
14
24A
21.
Salad Express Housing
22.
Salad Express Pusher
23.
A. Fine Rasping
B. Slice Cutter
C. Coarse Rasping
10.
Spiral Housing
11.
Spiral
24.
A. Spaghetti Disk
B. Pappardelle Disk
C. Macaroni Disk
D. Spaghetti Disk
E. Fettuccine Disk
14.
Lock
28.
Lock Lid
29.
Lid Cover
30.
Blender glass Jar
11 10
Page 8

Using the Mixing Bowl
1. Place the mixing dish into its holding device and turn the dish in the direction of LOCK until it
locks into place.
2. In order to lift the arm, press the lever (5) downwards in the direction of the arrow. The arm will
now move upwards.
3. Mount the required utensil by inserting the top into the drive shaft and locking the cotter pin in
the shaft by turning to the right.
4. Now fill in your ingredients. Do not overfill the machine - the maximum quantity of ingredients
is 2 kg.
5. Lower the arm using the lever (5).
6. Insert the mains plug into a properly installed 230 V/50 Hz safety power socket.
7. Switch the machine using the level regulator to a speed between 1 and 6 (corresponding to
the mixture).
8. For pulse operation (kneading at short intervals), turn the switch to the “PULSE” position. The
switch has to be held in this position according to the desired interval length. When the switch is
released it returns automatically to the “0” position.
Adjusting the Levels and Using the Hook for not more than 2 kg of Mixture
Levels Use Type of Mixture
1-2 Kneading hook Heavy mixturese.g. bread or short pastry)
3-4 Stirrer Medium-heavy mixturese.g. crepes or sponge mixture)
5-6 Whisk Light mixtures (e.g. cream, egg white, blancmange)
Pulse Whisk Interval (e.g. for mixing under sponge, egg white)
NOTE:
• Short operation time: With heavy mixtures, do not operate the machine for more than ten mi-
nutes, and then allow it to cool down for a further ten minutes.
• Use the splash guard to protect against liquid mixtures.
9. After kneading/stirring turn the switch (6) back to the “0” position as soon as the mixture has
formed a ball. Then remove the mains plug.
10. Press the lever (5) downwards and the arm will be raised.
11. The mixture can now be released with the help of a spatula and removed from the mixing bowl.
12. The mixing bowl can now be removed by turning to the left.
13. Clean the parts as described under “Cleaning”.
Page 9

Suggested Recipes
Sponge Mixture (Basic Recipe), Level 3-4
Ingredients:
250grams soft butter or margarine, 250grams sugar, 1 packet vanilla sugar, 1 pinch of salt, 4 eggs, 500grams
wheat flour, 1 packet baking powder, approx. 1/8 liter milk.
Preparation:
Transfer the wheat flour and the remaining ingredients to the mixing bowl, stir with the stirrer for 30 seconds on
level 1, then for approximately 3 minutes on level 3. Grease a tin or cover with baking paper. Fill in the mixture
and bake. Before the cake is removed from the oven, test to see if it is done. With a sharp wooden stick pierce
the centre of the cake. If no mixture sticks to it, the cake is cooked. Turn the cake on to a cake grid and allow
to cool.
Heating: electric oven, top and bottom heat 175-200° Celsius
Gas oven: level 2-3
Baking time: 50-60 minutes
Depending on taste, this recipe can be changed, for example with 100g raisins or 100g nuts or 100g grated
chocolate. In fact, the possibilities are endless.
Linseed Bread Rolls, Level 1-2
Ingredients:
500-550g wheat flour, 50g linseed, 3/8 liter water, 1 cube of yeast (40g), 100g low-fat curds, well drained, 1 tsp
salt. For coating: 2 tbsp of water.
Preparation:
Soak the linseed in 1/8 liter of lukewarm water. Transfer the remaining lukewarm water (1/4 liter) into the mixing
bowl, crumble in the yeast, add the curds and mix with the kneading hook on level 2. The yeast must be completely dissolved. Put the flour with the soaked linseed, curds and the salt into the mixing bowl. Knead thoroughly
on level 1, then switch to level 2 and continue kneading for 3-5 minutes. Cover the mixture and allow to rise in
a warm place for 45-60 minutes. Knead thoroughly once more, remove from the bowl and form sixteen rolls.
Cover the baking tin with wet baking paper. Place the rolls on this and allow to rise for 15 minutes. Coat with
lukewarm water and bake.
Heating: electric oven: top and bottom heat 200-220°C (preheated for 5 minutes)
Gas oven level 2-3
Baking time: 30-40 minutes
Chocolate Cream, Level 5-6
Ingredients:
200ml sweet cream, 150g semi-bitter chocolate coating, 3 eggs, 50-60g sugar, 1 pinch of salt, 1 packet of vanilla
sugar, 1 tablespoon cognac or rum, chocolate flakes.
Preparation:
Beat the cream in the mixing bowl with the whisk until stiff. Remove from the bowl and place somewhere to
cool. Melt the chocolate coating in accordance with the instructions on the packet or in the microwave at 600W
for 3 minutes. In the meantime, beat the eggs, sugar, vanilla sugar, cognac or rum and salt in the mixing bowl
with the whisk on level 3 to form a foam. Add the melted chocolate and stir in evenly on level 5-6. Leave a little
of the cream for decoration. Add the remaining cream to the creamy mixture and stir in briefly using the pulse
function. Serve well cooled.
Page 10
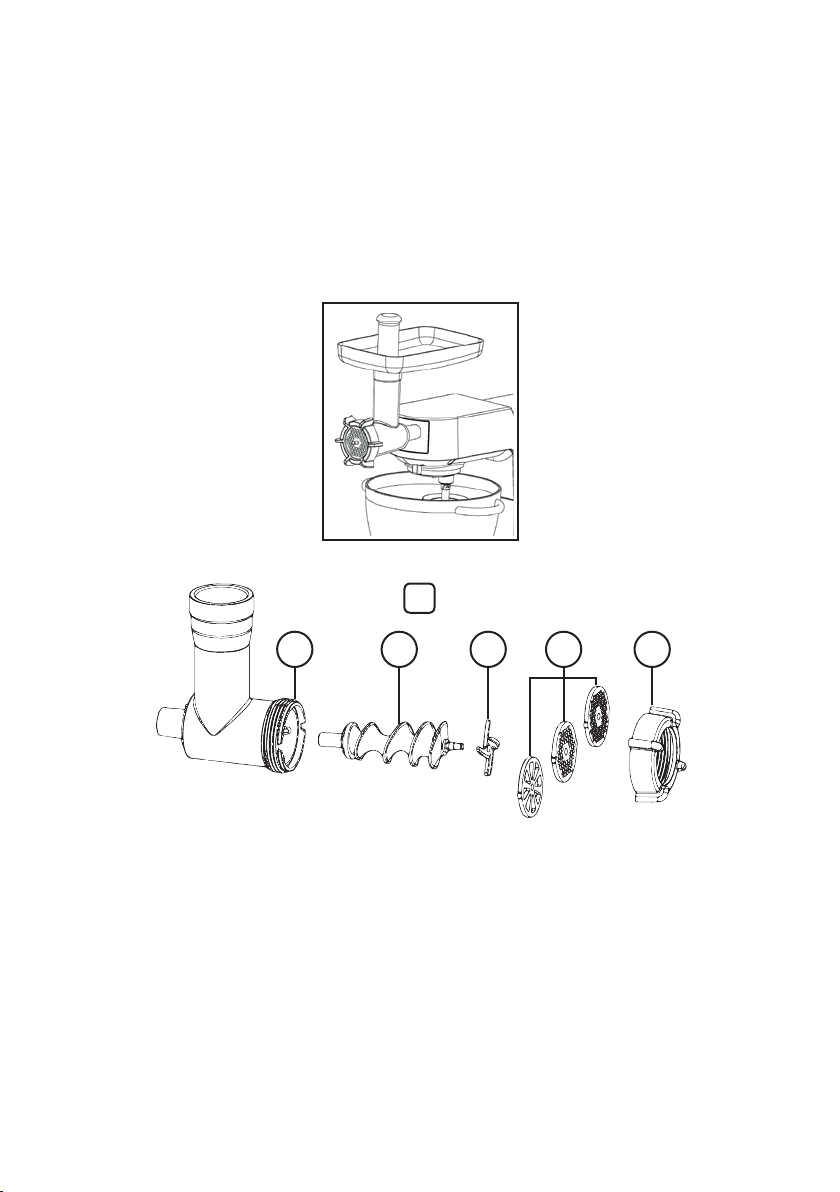
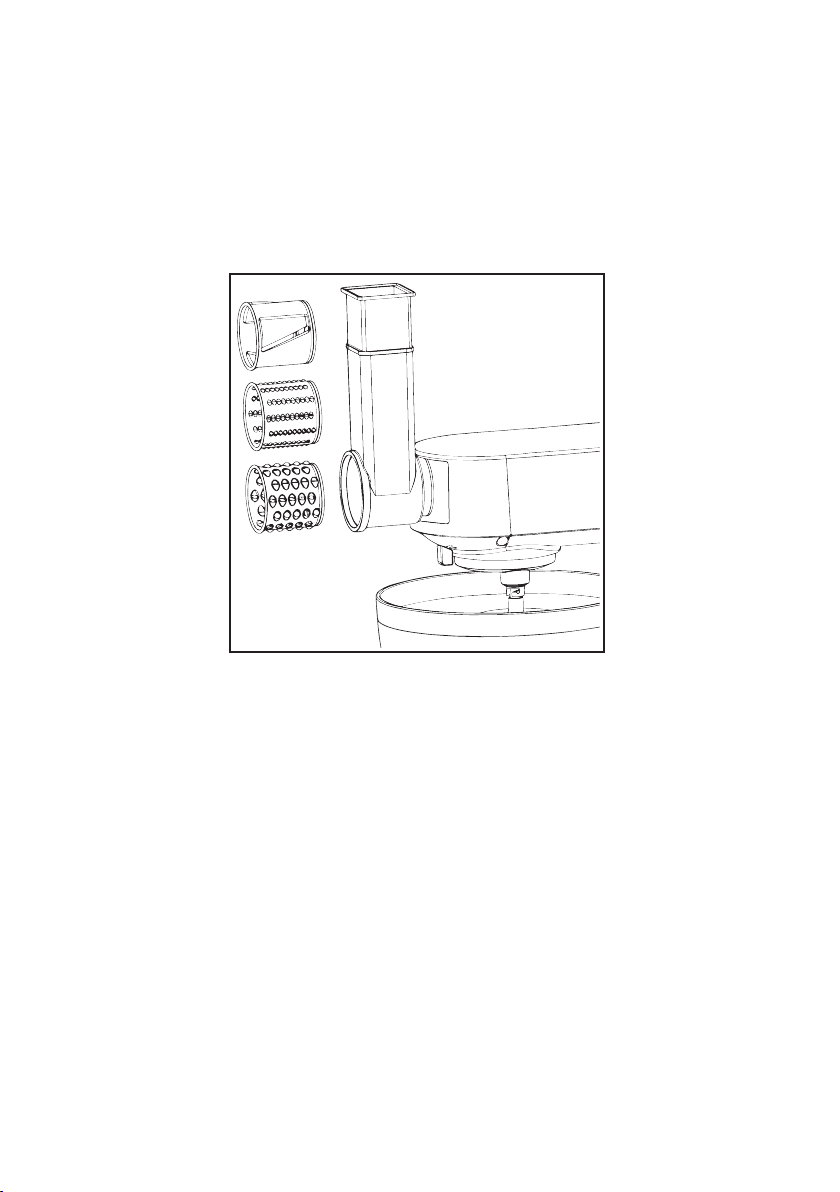
Meat Mincer
Initial Operation - General
1. Remove the cover (2a) from the helix drive and take out the screw.
2. Place the spiral housing (10) with the filler neck facing upwards into the spiral drive and turn the
screw clockwise until it is closed.
3. Place the filling tray on the filler neck in such a way that the receptacle of the tray is positioned
under the arm.
4. Push the spiral into the horizontal section of the spiral housing until the axle locks in place.
Please see the sections on “Operating the Mincer” and “Sausage Attachment”.
Operation Meat Mincer (see illustration A)
A
10
1. First place the blade on the end of the helix and then a screen of your choice. Please pay
attention to the screen and the recesses on the helix housing. Screw the lock (14) on until it is
“hand tight”.
2. Put the pieces of meat on to the filling tray (17) and into the filler neck.
3. Place a vessel under the exit.
4. Please ensure that the function switch (6) is turned to “Off”.
5. Connect the device to a 230 V, 50 Hz safety contact power socket.
6. Turn the mincer on by the switch (6).
7. If necessary push the meat with the presser (18). Please do not follow this up with your fingers.
NOTE:
• Cut the meat into pieces of about 2.5 cm. Please take care that the meat does not contain any
bones or sinews.
11 12 13 14
Page 11
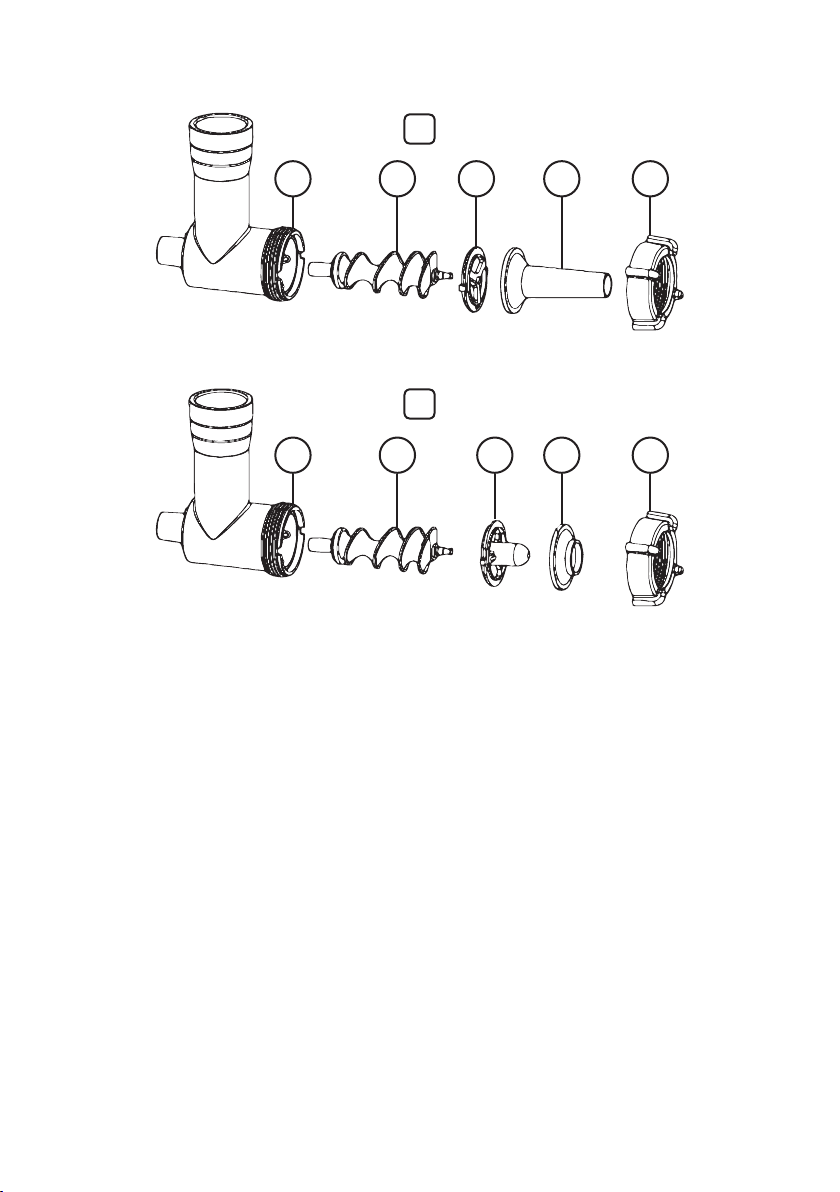
Operation Sausage Attachment (see illustration B/C)
B
10
11
19
15B
14
C
10
1. Place the adapter (15c) on the axle of the spiral auger.
2. Insert a sausage attachment (15a or b) into the lock. Attachment 15a is for thick sausages,
attachment 15b for thin sausages.
3. Turn the lock “hand tight” on to the spiral housing.
4. Push the sausage skin (using either real or synthetic skin) over the sausage skin and knot the
end.
5. Fill the sausage paste on to the filling tray and into the filler neck.
6. Repeat steps 4 to 7 as described in “Operation Meat Mincer”.
7. The sausage mixture is pressed through the sausage attachment and filled into the sausage
skin.
8. When the first sausage has reached the desired length, squeeze it together with your fingers at
the end of the sausage top. Turn the sausage around its own axis once or twice.
NOTE:
• Cut Levels 1 to 4 are suitable for mincer operation.
• Do not operate the device for more than 10 minutes and then allow it to cool down for a further
10 minutes.
• You can turn off the device after each single sausage length until you are more experienced.
• Carry out step 8 as described. Then turn on the meat mincer again.
• If you decide to use real skin, let it soak in water for a while before use.
• Take care that the sausage skin is filled „loosely“, as during boiling or frying the sausage ex-
pands and the skin might tear.
11
15C
15A
14
Page 12
Operation with Biscuit Attachment (see illustration D)
D
10
1. Please follow points 1 to 4 as described under “Initial Operation”.
2. Unscrew the biscuit attachment and select the desired biscuit cutter.
3. Put the mixture on to the filling tray and the filler neck.
4. Please ensure that the function switch (6) is turned to “Off”.
5. Connect the device to a 230 V, 50 Hz safety contact power socket.
6. Turn the mincer on by the switch (6).
7. If necessary, push the mixture further down with the pusher (18). Do not touch with your fingers.
8. Hold the elongated mixture at the exit and cut it off at the desired length.
11 19 920 14
Page 13

Salad Express
Initial Operation - General
1. Remove the cover (2a) from the helix drive and take out the screw.
2. Place the salad express housing (21) with the filler neck facing upwards into the spiral drive and
turn the screw clockwise until it is closed.
3. Choose a cylinder cutter [Fine Rasping (23a) / Coarse Rasping (23c) or Slice Cutter (23b)] Place
the cylinder cutter into the salad express housing with opening facing to the front.
Operation with Salad Express
1. Please ensure that the function switch (6) is turned to “Off”.
2. Connect the device to a 230 V, 50 Hz safety contact power socket.
3. Turn the salad express on and adjusting the levels at 5-6 by the switch (6).
4. Push the food further down with the pusher (22). Do not touch with your fingers.
Page 14
Pasta Maker
Initial Operation - General
1. Prepare dough with flour and water in 5:2 rates. (e.g. 500g flour and 200g water, or 500g flour,
2 eggs and 100g water. Mixing with beater (8c) at 1-4 levels for 2-3minutes). Details see the section
on “using the mixing bowl”
2. Remove the cover (2a) from the helix drive and take out the screw.
3. To choose a pasta disk (24a/ 24b/ 24c/ 24d or 24e) that what you wish.
4. Place the spiral driver (25) and chosen pasta disk into the pasta maker housing. See “illustration”.
Screw the pasta lock (14) on until it is “hand tight”.
5. Place the pasta maker housing with the filler neck facing upwards into the spiral drive and turn
the screw clockwise until it is closed.
24D
24B
24C 24C
24E
18
17
14
24A
Operation Meat Mincer (see illustration A)
1. Please ensure that the function switch (6) is turned to “Off”.
2. Connect the device to a 230 V, 50 Hz safety contact power socket.
3. Turn the pasta maker on and adjusting the levels at 5-6 by the switch (6).
4. Push the dough further down with the pusher (18). Do not touch with your fingers.
11 10
Page 15
Blender
Initial Operation - General
1. Remove the back cover (2b).
2. Place the food stuff you wish to process into the blender jar (30).
3. Press the lid cover into place and it is firmly fixed.
4. Place the lock lid (28) into the hole in the lid cover (29) and turn clockwise to lock.
5. Mount the blender jar (30) onto the attaching hole and turn it clockwise until it is firmly fixed.
6. Assemble the mixing bowl with splash guard (3).
Operation Blender
Please ensure that the function switch (6) is turned to “Off”.
Connect the device to a 230 V, 50 Hz safety contact power socket.
Turn the blender on and adjusting the suitable speed levels the switch (6).
• Level 5 for light usage with liquids
• Level 6 for a firmer consistency – for the mixing of liquids and solid foods.
• Moment Level for use in short, powerful bursts. (The switch does not stay in the “Pulse” position.
Hold the switch down in the “Pulse” position or turn it repeatedly to the “Pulse” position.)
Useful Tips:
Danger of burns! Be careful with hot liquids.
It may be necessary to switch off the appliance from time to time to remove pieces of food slicking
to the inside of the blender jar.
• Switch off the appliance and unplug it.
• Remove the lock lid (28) and lid cover(29).
• Remove pieces slicking to the inside of the blender jar (30) with a soft spatula.
• Keep the spatula at a safe distance from the knives.
Page 16

Cleaning
• Before cleaning remove the mains lead from the socket.
• Never immerse the housing with motor in water!
• Do not use any sharp or abrasive detergents.
Motor Housing
• Only a damp rinsing cloth should be used to clean the outside of the housing.
CAUTION:
• The components are not suitable for cleaning in a dishwasher. If exposed to heat or caustic
cleaners they might become misshapen or discolored.
• Components that have come into contact with food can be cleaned in soapy water.
WARNING:
• The blade of the mincer is very sharp!
• Danger of injury!
• Allow the parts to dry thoroughly before reassembling the device.
• Please apply a small quantity of vegetable oil likely to the screens after they have dried.
Salad Express, Pasta Maker, Blender,
• Components that have come into contact with food can be cleaned in soapy water.
• Allow the parts to dry thoroughly before reassembling the device.
• Please apply a small quantity of vegetable oil likely to the screens after they have dried.
• If the paste can not remove from the discs easily. Just wait until the paste dry thoroughly, then
tap it slightly to let the paste get off.
WARNING:
• The blade of the cylinder cutters is very sharp!
• Danger of injury!
Technical Information:
Rated voltage: 220-240 V~
Frequency:
Power consumption: 1 500 W
Protection class: I
Short operation time: 10 min.
50 Hz - 60 Hz
The English version of the manual is an exact translation of the original manufacturer‘s instructions.
Images used in this manual are for illustrational purposes only and may differ from the actual product.
Page 17

DE
GARANTIE
4 Jahre Garantie Verlängerung bei Produktregistrierung.
Erweiterte Garantieregistrierung erfolgt durch Ausfüllen des Antragsformulars unter folgender Adresse :
www.g21-vitality.cz/warrantyregistration
innerhalb von zwei Monaten nach dem Kauf des Gerätes.
Die erweiterte Garantie gilt nicht für Zubehör
N
A
T
I
E
G
A
R
J
4
A
H
R
E
Page 18

DE
Vielen Dank, dass Sie sich für unser Produkt entschieden haben.
Bevor Sie das Gerät benutzen, lesen Sie bitte die Bedienungsanleitung sorgfältig durch, um sich
mit allen Sicherheitshinweisen vertraut zu machen.
Dieses Gerät wurde gemäß allen relevanten aktuellen CE-Richtlinien geprüft, wie die elektromagnetische Verträglichkeit und Niederspannungsrichtlinie und wurde in Übereinstimmung mit den
neuesten Sicherheitsbestimmungen konstruiert.
Technische Änderungen vorbehalten ohne vorherige Ankündigung!
Allgemeine Sicherheitshinweise
• Lesen Sie die Bedienungsanleitung sorgfältig durch, bevor Sie das Gerät in Betrieb nehmen und
bewahren Sie diese Bedienungsanleitung, den Garantieschein, einschließlich der Rechnung und,
wenn möglich, den Karton mit der Innenverpackung auf. Wenn Sie das Gerät an andere Personen
weitergeben, dann übergeben Sie Ihnen auch diese Bedienungsanleitung.
• Das Gerät ist ausschließlich für den privaten Gebrauch und nur für den dargestellten Zweck
vorgesehenen. Dieses Gerät ist für den gewerblichen Gebrauch nicht ausgelegt. Verwenden Sie
das Gerät nicht im Freien (außer wenn es für die Verwendung im Freien entworfen wurde). Halten
Sie es von Wärmequellen, direkter Sonneneinstrahlung, Feuchtigkeit (niemals in Flüssigkeiten
tauchen () und scharfen Kanten fern. Verwenden Sie das Gerät nicht mit nassen Händen. Wenn
das Gerät feucht oder nass ist, ziehen Sie sofort den Stecker aus der Steckdose.
• Während der Reinigung oder wenn Sie das Gerät für längere Zeit nicht benutzen, schalten Sie
das Gerät aus und ziehen Sie den Stecker aus der Steckdose (ziehen Sie dabei immer am Stecker,
nicht am Kabel), und entfernen Sie das angebaute Zubehör.
• Betreiben Sie das Gerät nicht ohne Aufsicht. Wenn Sie den Arbeitsplatz verlassen sollten,
schalten Sie das Gerät immer aus oder ziehen den Stecker aus der Steckdose (ziehen Sie am
Stecker, nicht am Kabel).
• Überprüfen Sie das Gerät und das Kabel regelmäßig auf Schäden. Verwenden Sie das Gerät
nicht, wenn es beschädigt ist.
• Versuchen Sie nicht, das Gerät selbst zu reparieren. Wenden Sie sich immer einen autorisierten Techniker.
Um sich keiner Gefahren auszusetzen, lassen Sie ein defektes Netzkabel nur vom Hersteller, durch unseren
Kundendienst oder von einer qualifizierten Person und nur mit einem Kabel des gleichen Typs ersetzen.
• Verwenden Sie nur Original - Ersatzteile.
• Achten Sie besonders auf die folgenden „Besondere Sicherheitshinweise“.
Kinder und gebrechliche Personen
Um die Sicherheit ihrer Kinder zu gewährleisten, halten Sie bitte das Verpackungsmaterial (Plastiktüten, Kartons, Styropor usw.) außerhalb deren Reichweite.
VORSICHT! Lassen Sie kleine Kinder nicht mit der Folie spielen, da Erstickungsgefahr besteht!
Um Kinder oder gebrechliche Personen vor den Gefahren elektrischer Geräte zu schützen, stellen
Sie sicher, dass dieses Gerät nur unter Aufsicht verwendet wird. Dieses Gerät ist kein Spielzeug.
Lassen Sie kleine Kinder nicht damit spielen.
Besondere Sicherheitshinweise für dieses Gerät
• Betreiben Sie dieses Gerät nur unter Aufsicht.
• Stecken Sie keine Gegenstände in die rotierenden Messer, während das Gerät in Betrieb ist.
• Stellen Sie das Gerät auf eine glatte, ebene und stabile Arbeitsfläche.
• Stecken Sie den Netzstecker des Geräts nicht in die Steckdose, bevor alle benötigten Anbauteile
Page 19
installiert haben.
• Es sollte nur der mitgelieferte Stopfer zum Nachfüllen des Fleischwolfs verwendet werden.
• Überlastungsgefahr! Bitte benutzen Sie das Gerät entweder als Fleischwolf oder Mixer, aber nie
beide Funktionen gleichzeitig.
Übersicht der Komponenten
Hauptkomponenten und Standardzubehör:
1. Die Antriebsbuchse
2. A. Abdeckung vorne
B. Abdeckung hinten
3. Rührschüssel
4. Sicherungshebel
5. Hebel zum Anheben und Absenken des Armes
6. Schalter
7. Schüsselabdeckung
8. A. Knethaken
B. Schneebesen
C. Rührbesen
2A
4
1
2B
8B
3 7 8A 8C
5
6
Page 20
Optionales Zubehör - Fleischwolf:
13
9
20 19
Spritzgebäckvorsatz
9.
Schneckengehäuse
10.
Schnecke
11.
Messer
12.
Lochscheiben
13.
Verschluss
14.
A. Wurstfüller, groß
15.
B. Wurstfüller, klein
C. Zwischenstück für 15
Einfüllablage
17.
Stopfer
18.
Spritzgebäck Zwischenstück
19.
Spritzgebäck Formhalter
20.
18
15A 15C
15B
10
11
1217 14
Page 21
Gemüseschneider: Nudelmaschine
24D
22
24B
24C
18 17
23C
23B
23A
21
Mixer
28
29
30
24E
14
24A
21.
22.
23.
10.
11.
24.
14.
28.
29.
30.
11 10
Gemüseschneider Gehäuse
Gemüseschneider Stopfer
A. Feine Reibe
B. Scheibenreibe
C. Grobe Reibe
Schneckengehäuse
Schnecke
A.Spaghetti Scheibe
B. Pappardelle Scheibe
C. Makkaroni Scheibe
D. Spaghetti Scheibe
E. Fettucine Scheibe
Verschluss
Deckelverschluss
Behälterdeckel
Mixerbehälter
Page 22

Benutzung der Rührschüssel
1. Legen Sie die Rührschüssel in die Haltevorrichtung und drehen Sie die Schüssel in Richtung
LOCK, bis sie einrastet.
2. Um den Arm zu anzuheben, drücken Sie den Hebel (5) nach unten in Richtung des Pfeils. Der
Arm bewegt sich nun nach oben.
3. Montieren Sie das gewünschte Zubehör, in dem Sie es in die Antriebsbuchse einsetzen und
durch Drehen nach rechts festziehen.
4. Nun können Sie Ihre Zutaten einfüllen. Das Gerät nicht überfüllen - die Höchstmenge an Zuta-
ten beträgt 2 kg.
5. Senken Sie den Arm mit dem Hebel (5) ab.
6. Stecken Sie den Netzstecker in eine ordnungsgemäß installierte Steckdose 230 V / 50 Hz.
7. Schalten Sie das Gerät mit dem Stufenschalter auf eine Geschwindigkeit zwischen 1 und 6
(entsprechend den Zutaten) ein.
8. Für Pulsbetrieb (Kneten in kurzen Abständen), drehen Sie den Schalter auf die Position „PUL-
SE“ Der Schalter muss in diese Position entsprechend der gewünschten Intervalllänge gehalten
zu werden. Wenn der Schalter losgelassen wird, kehrt er automatisch in die Position „0“ zurück.
Einstellung der Stufen und Verwendung des Knethakens für nicht mehr als 2 kg Zutaten
Stufen Verwendung Art der Mischung
1-2 Knethaken Zähe Mischungen (z.B. Brot oder Mürbeteig)
3-4 Rührbesen Mittelzähe Mischungen (z.B. Crêpes oder Biskuitteig)
5-6 Schneebesen Weiche Mischungen (z.B. Sahne, Eiweiß, Pudding)
Pulse Schneebesen Intervall (z.B. fürs Unterrühren, Eiweißschlagen)
BEMERKUNG
• Kurzbetriebszeit: Bei zähen Mischungen sollten Sie die Maschine nicht für mehr als zehn Mi-
nuten in Betrieb nehmen, , ohne dass Sie die Maschine anschließend für weitere zehn Minuten
abkühlen lassen.
• Verwenden Sie den Spritzschutz bei flüssigen Zutaten.
9. Stellen Sie nach dem Kneten / Rühren den Schalter (6) in die Position „0“ zurück, sobald die
Mischung eine Kugel gebildet hat. Ziehen Sie dann den Netzstecker.
10. Drücken Sie den Hebel (5) nach unten um den Arm anzuheben.
11. Die Mischung kann nun mit Hilfe eines Spatels aus der Rührschüssel entnommen werden.
12. Die Rührschüssel kann nun durch Drehen nach links zunächst entriegelt und dann entfernt
werden.
13. Reinigen Sie die Teile wie im Abschnitt „Reinigen“ beschrieben ist.
Page 23

Empfohlene Rezepte
Biskuitteig (Grundrezept), Stufe 3-4
Zutaten:
250 g weiche Butter oder Margarine, 250 g Zucker, 1 Päckchen Vanillezucker, 1 Prise Salz, 4 Eier, 500 g Weizenmehl, 1 Päckchen Backpulver, ca. 1/8 Liter Milch.
Zubereitung:
Geben Sie das Weizenmehl und die restlichen Zutaten in die Rührschüssel und rühren mit dem Rührbesen für etwa 30
Sekunden auf Stufe 1, dann ca. 3 Minuten lang auf Stufe 3.Fetten Sie eine Form ein oder legen Sie sie mit Backpapier aus.
Füllen Sie das Gemisch in die Form und lassen es backen. Bevor Sie den Kuchen aus dem Ofen nehmen, vergewissern
Sie sich, dass der Kuchen, fertig ist. Nehmen Sie dazu ein Holzstäbchen und stecken es in die Mitte des Kuchens. Wenn
kein Teig an dem Stäbchen mehr haftet, ist der Kuchen durchgebacken. Drehen Sie den Kuchen auf ein Kuchengitter
um und lassen ihn abkühlen.
Traditioneller Backofen
Einschubhöhe: 2
Heizstufe: Elektro - Backofen, Ober- und Unterhitze 175-200 ° Celsius; Gasofen: Stufe 2-3
Backzeit: 50-60 Minuten
Je nach Geschmack kann dieses Rezept abgeändert werden, zum Beispiel mit 100 g Rosinen oder 100 g Nüssen
oder 100 g geriebener Schokolade. In der Wirklichkeit sind die Möglichkeiten unbegrenzt.
Leinsamen Brötchen, Stufe 1-2
Zutaten:
500-550 g Weizenmehl, 50 g Leinsamen, 3/8 Liter Wasser, 1 Würfel Hefe (40 g), 100 g Magerquark, gut abgetropft, 1 TL Salz. Zum Bestreichen: 2 EL Wasser.
Zubereitung:
Weichen Sie die Leinsamen in 1/8 Liter lauwarmes Wasser. Ein. Das restliche lauwarme Wasser (1/4 Liter) in die Rührschüssel geben und die zerbröselte Hefe und den Quark hinzufügen, danach mit dem Knethaken auf Stufe 2 rühren.
Die Hefe muss vollständig aufgelöst sein. Geben Sie dann das Mehl mit den eingeweichten Leinsamen und dem Salz
in die Schüssel. Kurz durchkneten auf Stufe 1, dann auf Stufe 2 wechseln und für weitere 3-5 Minuten kneten. Decken
Sie danach den Teig ab und lassen ihn an einem warmen Ort für 45 bis 60 Minuten gehen. Lassen den Teig noch einmal
kurz durchkneten und nehmen Sie ihn anschließend aus der Schüssel und bilden sechzehn Röllchen. Legen Sie das
Backblech mit nassem Backpapier aus. Legen Sie die Brötchen auf das Backblech und lassen Sie sie für weitere 15
Minuten gehen. Bestreichen Sie sie mit lauwarmem Wasser und schieben Sie sie in den Ofen.
Traditioneller Backofen:
Einschubhöhe: 2
Heizstufe: Elektro - Backofen: Ober- und Unterhitze 200-220 ° C (vorgeheizt für 5 Minuten), Gasherd Stufe 2-3
Backzeit: 30-40 Minuten
Schokoladencreme, Stufe 5-6
Zutaten:
200 ml süße Sahne, 150 g Halbbitterschokoladen-Kuvertüre, 3 Eier, 50-60 g Zucker, 1 Prise Salz, 1 Päckchen
Vanillezucker, 1 EL Cognac oder Rum, Schokoladenflocken.
Zubereitung:
Schlagen Sie die Sahne in der Rührschüssel mit dem Schneebesen steif. Entnehmen Sie die Sahne aus der
Schüssel und stellen Sie sie irgendwohin zum Kühlen ab. Schmelzen Sie die Kuvertüre in Übereinstimmung
mit den Anweisungen auf der Packung oder in der Mikrowelle bei 600 Watt für 3 Minuten. In der Zwischenzeit
schlagen Sie die Eier zusammen mit dem Zucker, Vanillezucker, Cognac oder Rum und Salz in die Rührschüssel
und dann das Ganze mit dem Schneebesen auf Stufe 3 zu einem Schaum. Fügen Sie die geschmolzene Schokolade hinzu und rühren auf Stufe 5-6 bis alles gleichmäßig verrührt wurde. Lassen ein wenig von der Creme für
die Dekoration. Fügen Sie dann die restliche Sahne zur der cremigen Mischung hinzu und rühren diese mit der
Pulsfunktion vorsichtig unter. Dekorieren Sie die Schokoladencreme und servieren diese gut gekühlt.
Page 24
Fleischwolf
Inbetriebnahme - Allgemein
1. Entfernen Sie die vordere Abdeckung (2a) vom Schnecken-Antrieb und nehmen Sie die
Schnecke heraus.
2. Stecken Sie das Schneckengehäuse (10) mit dem Einfüllstutzen nach oben in den Schnecke-
nantrieb und drehen Sie den Verschluss im Uhrzeigersinn, bis es eingerastet ist.
3. Stecken Sie die Einfüllablage auf den Einfüllstutzen so, dass die Schale der Ablage sich über
dem Arm befindet.
4. Schieben Sie die Schnecke in den horizontal ausgerichteten Teil des Schneckengehäuses, bis
die Achse einrastet. Bitte beachten Sie die Abschnitte zur „Bedienung des Fleischwolfes“ und zum
„Wurstfülleraufsatz“.
Der Fleischwolf (siehe Abbildung A)
A
10 11 12 13 14
1. Stecken Sie zuerst das Messer ans Ende der Schnecke und dann eine Lochscheibe Ihrer Wahl.
Bitte beachten Sie die Aussparungen auf der Lochscheibe und dem Schneckengehäuse. Schrauben Sie den Verschluss (14) auf das Gehäuse, und ziehen ihn „handfest“ zu.
2. Legen Sie die Fleischstücke auf die Einfüllablage (17) und in den Einfüllstutzen.
3. Stellen Sie ein Gefäß unter die Auslassöffnung.
4. Bitte stellen Sie sicher, dass der Funktionsschalter (6) in der Position „Off“ steht.
5. Schließen Sie das Gerät an eine abgesicherte 230 V, 50 Hz Steckdose.
6. Schalten Sie den Fleischwolf mit dem Schalter (6) ein.
7. Bei Bedarf drücken Sie das Fleisch mit dem Stopfer (18) in den Einfüllstutzen. Bitte tuen Sie
dies nicht mit den Fingern.
BEMERKUNG
• Schneiden Sie das Fleisch in etwa 2,5 cm große Stücke. Bitte achten Sie darauf, dass das Fle-
isch keine Knochen oder Sehnen enthält.
Page 25
Der Wurstfüller (siehe Abbildung B / C)
B
10
11
19
15B
14
C
10
1. Stecken Sie den Adapter (15c) auf die Achse der spiralförmigen Schnecke.
2. Stecken Sie den Wurstfüller (15a oder b) in den Verschluss. Der Füller 15a ist für dicke Würste,
der Füller 15b für dünne Würstchen.
3. Schrauben Sie den Verschluss „handfest“ auf das Schneckengehäuse.
4. Schieben Sie die Wurstpelle über den Füller (Sie können entweder Natur- oder Kunstdärme
verwenden) und machen am Ende einen Knoten.
5. Geben Sie das Wurstbrät auf die Einfüllablage und füllen es in den Einfüllstutzen.
6. Wiederholen Sie die Schritte 4 bis 7, wie unter „Fleischwolf“ beschrieben.
7. Die Wurstmasse wird durch den Wurstfüller gedrückt und in die Wurstpelle gefüllt.
8. Wenn die erste Wurst die gewünschte Länge erreicht hat, drücken Sie mit den Fingern das
Ende der Wurst zusammen. Drehen Sie die Wurst um die eigene Achse ein- oder zweimal.
BEMERKUNG
• Stufen 1 bis 4 sind für den Fleischwolfbetrieb geeignet.
• Lassen Sie das Gerät nicht länger als 10 Minuten laufen und lassen Sie es dann für weitere 10
Minuten abkühlen.
• Sie können das Gerät nach jeder einzelnen Wurstlänge ausschalten, bis Sie mehr Erfahrung
bekommen.
• Führen Sie Schritt 8 wie beschrieben aus. Dann schalten Sie den Fleischwolf wieder ein.
• Wenn Sie sich entscheiden, Naturdarm zu verwenden, lassen Sie es für eine Weile vor dem
Gebrauch in Wasser einweichen.
• Achten Sie darauf, dass die Wurstpelle nicht zu „fest“ gefüllt ist, da beim Kochen oder Braten
die Wurstmasse aufgeht und somit die Haut platzen könnte.
11
15C
15A
14
Page 26

Der Betrieb mit Spritzgebäckvorsatz (siehe Abbildung D)
D
10
1. Bitte beachten Sie die Punkte 1 bis 4 wie unter „Inbetriebnahme“ beschrieben sind.
2. Schrauben Sie den Spritzgebäckvorsatz auseinander und wählen Sie die gewünschte Press-
form aus.
3. Geben Sie den Teig auf die Einfüllablage und in dem Einfüllstutzen.
4. Bitte stellen Sie sicher, dass der Funktionsschalter (6) in der Position „Off“ steht.
5. Schließen Sie das Gerät an eine abgesicherte 230 V, 50 Hz Steckdose.
6. Schalten Sie den Fleischwolf mit dem Schalter (6) ein.
7. Falls erforderlich, drücken Sie den Teig weiter nach unten mit dem Stopfer (18). Nicht mit den
Fingern nachschieben.
8. Entnehmen Sie den in die Länge gepressten Teig am Ausgang und schneiden es in kleinere
Stücke.
11 19 920 14
Page 27
Gemüseschneider
Inbetriebnahme - Allgemein
1. Entfernen Sie die vordere Abdeckung (2a) vom Schnecken-Antrieb und nehmen Sie die
Schnecke heraus.
2. Setzen Sie den Gemüseschneider (21) mit dem Einfüllstutzen nach oben in den Schneckenan-
trieb und drehen Sie im Uhrzeigersinn bis er eingerastet ist.
3. Wählen Sie einen Schneidzylinder [Feine Raspel (23a) / Grobe Raspel (23c) oder Scheibe-
nraspel (23b)]. Setzen Sie den Schneidzylinder in das Gehäuse des Gemüseschneiders mit der
Öffnung nach vorne ein.
Gemüseschneider
1. Bitte stellen Sie sicher, dass der Funktionsschalter (6) in der Position „Off“ steht.
2. Schließen Sie das Gerät an eine abgesicherte 230 V, 50 Hz Steckdose.
3. Schalten Sie den Gemüseschneider ein und passen die Stufe 5-6 mit dem Schalter (6) an.
4. Schieben Sie das Gemüse mit dem Stopfer weiter nach unten (22). Nicht mit den Fingern na-
chschieben.
Page 28

Nudelmaschine
Inbetriebnahme - Allgemein
1. Bereiten Sie einen Teig aus Mehl und Wasser im Verhältnis 5:2 vor. (z.B. 500 g Mehl und 200 g
Wasser, oder 500 g Mehl, 2 Eier und 100 g Wasser. Den Teig mit dem mit Rührbesen (8c) auf Stufe
1-4 für 2-3Minuten rühren). Einzelheiten finden Sie im Abschnitt „Benutzung der Rührschüssel“
2. Entfernen Sie die vordere Abdeckung (2a) vom Schnecken-Antrieb und nehmen Sie die
Schnecke heraus.
3. Wählen Sie eine Nudelplatte (24a / 24b / 24c / 24d oder 24e) aus, die Sie wollen.
4. Setzen Sie die Schneckentreiber (25) und die gewählte Nudelscheibe in das Gehäuse der
Nudelmaschine ein. Siehe „Abbildung“ Schrauben Sie den Verschluss (14) „handfest“ auf.
5. Setzen Sie die Nudelmaschine mit dem Einfüllstutzen nach oben in den Schneckenantrieb und
drehen Sie im Uhrzeigersinn bis sie eingerastet ist.
18
24D
24B
24C 24C
24E
14
24A
Der Fleischwolf (siehe Abbildung A)
1. Bitte stellen Sie sicher, dass der Funktionsschalter (6) in der Position „Off“ steht.
2. Schließen Sie das Gerät an eine abgesicherte 230 V, 50 Hz Steckdose.
3. Schalten Sie die Nudelmaschine ein und passen die Stufe 5-6 mit dem Schalter (6) ein.
4. Schieben Sie den Teig mit dem Stopfer weiter nach unten (18). Nicht mit den Fingern nach-
schieben.
11 10
17
Page 29

Mixer
Inbetriebnahme - Allgemein
1. Entfernen Sie die hintere Abdeckung (2b)
2. Geben Sie die Lebensmittel, die Sie verarbeiten möchten, in den Mixbehälter (30)
3. Drücken Sie den Behälterdeckel fest auf den Mixbehälter).
4. Setzen Sie den Deckelverschluss (28) in das Loch des Behälterdeckels (29) und drehen diesen
im Uhrzeigersinn bis er fest verschlossen ist.
5. Setzen Sie den Mixbehälter (30) auf die Befestigung und drehen im Uhrzeigersinn bis er eingerastet ist.
6. Setzen Sie die Rührschüssel mit Spritzschutz (3) ein.
Der Mixer
Bitte stellen Sie sicher, dass der Funktionsschalter (6) in der Position „Off“ steht.
Schließen Sie das Gerät an eine abgesicherte 230 V, 50 Hz Steckdose.
Schalten Sie den Mixer einstellen die geeigneten Geschwindigkeitsstufen mit dem Schalter (6) ein.
• Stufe 5 für die leichte Verwendung mit Flüssigkeiten
• Stufe 6 für das Mixen von Flüssigkeiten und festen Nahrungsmitteln.
• Pulsbetrieb für den Einsatz mit kurzen, kräftigen Mixstößen. (Der Schalter bleibt nicht in der
„Pulse“ Position stehen. Halten Sie den Schalter nach unten in der „Pulse“ Position oder schalten
Sie ihn immer wieder in die „Pulse“ Position.)
Nützliche Tipps:
Verbrennungsgefahr! Seien Sie vorsichtig, wenn Sie heißen Flüssigkeiten arbeiten.
Die Öffnung im Behälterdeckel (28) kann dazu verwendet werden, um Zutaten hinzufügen, während
der Mixer läuft. Entfernen Sie dazu den Deckelverschluss aus dem Behälterdeckel (29).
Es kann notwendig sein, das Gerät von Zeit zu Zeit auszuschalten, um die Lebensmittel Innere des
Mixbehälters durchzumischen und Lebensmittelstücke von außen nach innen zu bewegen.
• Schalten Sie das Gerät aus und ziehen den Stecker aus der Steckdose.
• Entfernen Sie die Behälterdeckel (28) und Deckelverschluss (29)
• Entfernen Sie die Lebensmittelstücke, die an der Außenwand des Mixbehälters (30) haften, mit
einem weichen Spatel.
• Halten Sie den Spatel in einem sicheren Abstand von den Messern.
Page 30

Reinigung
• Ziehen Sie vor der Reinigung den Netzstecker aus der Steckdose.
• Tauchen Sie nie das Gehäuse mit Motor ins Wasser!
• Verwenden Sie keine scharfen oder scheuernden Reinigungsmittel.
Motorgehäuse
• Verwenden Sie zur Reinigung der Außenseite des Gehäuses nur ein feuchtes Spültuch.
• Rührschüssel, Mischgeräte und Komponenten des Fleischwolfs
VORSICHT!
• Die Komponenten sind für die Reinigung in einer Spülmaschine nicht geeignet .Wenn Hitze oder
Ätzmitteln ausgesetzt werden, könnten sie sich verformen oder verfärben.
• Teile, die mit Lebensmitteln in Berührung gekommen sind, können in Seifenwasser gereinigt
werden.
WARNUNG!
• Die Klingen des Fleischwolfs sind sehr scharf!
• Verletzungsgefahr!
• Lassen Sie die Teile vor dem Zusammenbau des Geräts gründlich trocknen.
• Bitte benetzen Sie alle Metallteile mit einer kleinen Menge von Pflanzenöl, nachdem sie get-
rocknet sind.
Gemüseschneider, Nudelmaschine, Mixer,
• Teile, die mit Lebensmitteln in Berührung gekommen sind, können in Seifenwasser gereinigt
werden.
• Lassen Sie die Teile vor dem Zusammenbau des Geräts gründlich trocknen.
• Bitte benetzen Sie alle Metallteile mit einer kleinen Menge von Pflanzenöl, nachdem sie get-
rocknet sind.
• Wenn sich Teigreste aus den Scheiben nicht leicht entfernen lassen. Warten Sie, bis die Teigres-
te gründlich getrocknet sind, dann können Sie mit leichtem Klopfen die Reste entfernen.
WARNUNG!
• Die Klingen der Zylinderschneider sind sehr scharf!
• Verletzungsgefahr!
Technische Daten:
Spannung: 220-240 V ~
Frequenz: 50 Hz - 60 Hz
Leistungsaufnahme: 1500 W
Schutzklasse: I
Kurzbetriebszeit: 10 Min.
Die deutsche Version der Anleitung ist eine genaue Übersetzung der Anleitung des Herstellers.
Die in diesem Handbuch verwendeten Bilder dienen nur zur Illustration und können nicht genau
das Produkt entsprechen.
Page 31

CZ
W
A
R
R
A
N
T
Y
4
Y
E
A
R
S
Z
Á
R
U
K
A
4
R
O
K
Y
G
A
R
A
N
T
I
E
4
J
A
H
R
E
ZÁRUKA
Registrace prodloužené záruky 4 roky na tělo přístroje.
Registrace prodloužené záruky se provádí vyplněním formuláře na adrese:
www.g21-vitality.cz/registracezaruky
Do 2 měsíců od zakoupení přístroje.
Prodloužená záruka se nevztahuje na příslušenství.
U
R
K
A
Z
Á
4
R
O
K
Y
Page 32

CZ
Děkujeme za nákup našeho výrobku.
Před použitím přístroje si prosím přečtěte tento návod, vyhnete se tak neodborné manipulaci
azacházení s přístrojem.
Toto zařízení bylo testováno podle všech příslušných pokynů CE, jako je elektromagnetická kompatibilita a směrnice nízkého napětí, a bylo vyrobeno v souladu s bezpečnostními předpisy.
Technické změny vyhrazeny bez předchozího upozornění.
Bezpečnostní instrukce
Před uvedením přístroje do provozu si pozorně přečtěte provozní instrukce, uschovejte si manuál
včetně záručního listu či účtenky. Pokud budete přístroj dávat jiné osobě, předejte mu také manuál
na použití.
• Nepoužívejte jej ve venkovních prostorách. Zařízení nepokládejte na horké povrchy, přímé
slunce, na vlhká místa (nikdy jej neponořujte do žádné kapaliny) a vyhněte se místům s ostrými
okraji. Přístroj nepoužívejte, když máte mokré ruce. Pokud je přístroj vlhký nebo mokrý, ihned ho
vypojte ze zásuvky.
• Pokud budete zařízení čistit nebo dávat na jiné místo, nebo ho nebudete používat, vypněte jej a
vždy vypojte kabel ze zásuvky a vyndejte přiložené příslušenství.
• Nepoužívejte přístroj bez dozoru. Pokud budete opouštět místo, kde zařízení pracuje, vždy ho
vypněte a vyndejte kabel ze zásuvky.
• Zařízení a kabel zkontrolujte, jestli nejsou poškozené. Nepoužívejte je, pokud jsou poškozené.
• Nepokoušejte se sami opravovat zařízení. Vždy kontaktujte autorizovaný servis. Aby, jste se
vyhnuli nebezpečí, vadný kabel musí být vyměněn pouze odborným servisem nebo kvalifikovanou
osobou a musí být nahrazen kabelem stejného typu.
• Používejte pouze originální náhradní díly.
• Dávejte pozor na následující ‘‘Speciální bezpečnostní instrukce‘‘.
Bezpečnost dětí
Abychom zajistili bezpečnost dětí, prosíme, nenechávejte všechno balení (plastové sáčky, krabice,
polystyren atd.) v jejich dosahu.
Pozor! Nenechejte si malé děti hrát s fóliemi, hrozí nebezpečí udušení!
Aby nedošlo k úrazu dětí, nebo postižených jedinců elektrickým proudem, prosíme, ujistěte se,
že přístroj je používán pod dohledem. Přístroj není hračka. Nedovolte malým dětem hrát si s
přístrojem.
Speciální bezpečnostní instrukce
• Přístroj nenechávejte pracovat bez dozoru.
• Nic nevkládejte do otáčejících se háků, když přístroj pracuje.
• Přístroj umístěte na hladký, rovný a stabilní povrch.
• Zařízení nezapojujte do zásuvky, dokud není nainstalované všechno potřebné příslušenství.
• Na doplňování surovin do mlýnku musí být použito pěchovadlo.
• Nebezpečí přetížení! Prosíme, přístroj použijte buď jako mlýnek nebo jako mixér, ale nikdy
nepoužívejte obě funkce najednou.
Page 33

Popis produktu
Hlavní součástky a standartní příslušenství:
1. Hnací hřídel
2. A. Přední krytka
B. Zadní krytka
3. Miska
4. Pojistná páka
5. Tlačítko pro zvedání a spouštění ramene
6. Hlavní vypínač
7. Krytka na mísu
8. A. Hnětací hák
B. Míchací metla
C. Šlehací metla
2A
4
1
2B
8B
3 7 8A 8C
5
6
Page 34

Volitelné příslušenství – Mlýnek na maso
18
13
9
20 19
Podložka
9.
Tělo šneku
10.
Šnek
11.
Nože
12.
Sítko
13.
Uzávěr
14.
A. Příslušenství na výrobu klobás, velké
15.
B. Příslušenství na výrobu klobás, malé
C. Nástavec
Plnící tác
17.
Pěchovadlo
18.
Příslušenství na výrobu sušenek
19.
Příslušenství na výrobu sušenek
20.
15A 15C
15B
10
11
1217 14
Page 35

Krájení/strouhání Výroba těstovin
24D
22
24B
24C
18 17
23C
23B
23A
21
Mixér
28
29
30
24E
14
24A
21.
22.
23.
10.
11.
24.
14.
28.
29.
30.
11 10
Tělo kráječe/struhadla
Pěchovadlo na krájení
A. Struhadlo
B. Kráječ plátků
C. Hrubé struhadlo
Tělo šneku
Šnek
A. Disk na špagety
B. Disk na pappardelle
C. Disk na macaroni
D. Disk na špagety
E. Disk na fettuccine
Uzávěr
Uzávěr víka
Víko
Skleněná mixovací nádoba
Page 36

Používání míchací mísy
1. Míchací mísu umístěte do držáku a otočte jí ke směru LOCK (zámek), dokud nezapadne na
své místo.
2. Abychom zvedli rameno, zmáčkněte tlačítko (5). Rameno se nyní zvedne nahoru.
3. Zasaďte požadovaný nástroj vložením nahoru do hnací hřídele a uzamkněte závlačku v hřídeli
otočením doprava.
4. Nyní vložte vaše suroviny. Nádobu nepřeplňujte – maximální množství surovin je 2 Kg.
5. Sklopte rameno pomocí tlačítka (5).
6. Zapojte hlavní zástrčku do 230 V/50 Hz bezpečnostní zásuvky.
7. Zapněte přístroj, použijte rychlostní úrovně mezi 1-6 (záleží na směsi).
8. Pro provoz přerušujícího míchání (hnětení v krátkých intervalech), zapněte knoflík do pozice
“PULSE“. Knoflík musí být držen v této pozici podle požadované délky hnětení. Když je knoflík
uvolněn, vrátí se automaticky do pozice “0“.
Nastavení rychlostí a použití hnětacího háku na méně než 2 Kg směsi
Rychlost Použití Druh směsi
1-2 Hnětací hák Těžká směs (např. chléb, pečivo)
3-4 Míchací metla Středně těžká směs (např. těsto na palačinky, pečivo)
5-6 Šlehací metla Lehká směs (např. krémy, sníh, šodó)
Pulzování Šlehací metla Interval (např. míchání sněhu, těsta na pečivo)
Poznámka:
• Maximální provozní čas: Těžké směsi, nemíchejte déle než 10 minut, poté přístroj nechejte
vychladnout dalších 10 minut.
• Na tekuté směsi použijte víko, aby nestříkaly ven.
9. Po uhnětení/míchání otočte knoflík (6) zpátky do pozice “0“, jakmile se směs zformovala do
koule. Poté vyndejte hlavní zástrčku ze zásuvky.
10. Zmáčkněte tlačítko (5) a rameno se zvedne.
11. Nyní můžete špachtlí nebo stěrkou vyndat směs z mísy.
12. Míchací mísu můžete vyndat otočením doleva.
13. Umyjte příslušenství tak, jak je popsáno v části “Čištění“.
Page 37

Recepty
Piškot (základní recept), rychlost 3-4
Ingredience:
250 g změklého másla nebo margarínu, 250 g cukru, 1 balíček vanilkového cukru, 1 špetka soli, 4 vejce, 500 g
polohrubé mouky, 1 balíček kypřícího prášku, cca 1/8 litru mléka.
Postup:
Mouku a zbývající ingredience dejte do míchací mísy, směs míchejte míchačem po 30 sekund na úroveň 1, poté
přibližně 3 minuty na úroveň 3. Vymažte pečící formu nebo do ní dejte pečící papír. Naplňte směsí a dejte péct.
Předtím než těsto vyndáte z trouby, vyzkoušejte, jestli je hotové. Píchněte do středu těsta ostrou jehlicí. Pokud se
na jehlici nepřilepila žádná směs, těsto je upečené. Těsto vyklopte na tác a nechejte jej vychladnout.
Pečení: elektrická trouba - horní a spodní ohřev 175-200°C
plynová trouba – úroveň 2-3
Čas pečení: 50-60 minut
Záleží na chuti, tento recept se může pozměnit, například můžete přidat 100 g rozinek, oříšků, nebo strouhané
čokolády. Ve skutečnosti, je možností mnohem více.
Pečivo se lněným semínkem, rychlost 1-2
Ingredience:
500-550 g mouky, 50 g lněných semínek, 3/8 litru mléka, 1 kostka droždí (40 g), 100 g nízko tučného tvarohu, 1
čajovou lžičku soli, 2 čajové lžičky vody na potření.
Postup:
Lněná semínka namočte v 1/8 litru mléka nebo ve vlažné vodě. Zbývající vlažnou vodu (1/4 litru) nalijte do míchací mísy, rozdrolte droždí a dejte jej do vody a zamíchejte hnětacím hákem na úroveň 2. Droždí musí být úplně
rozpuštěné. Do míchací mísy nasypte mouku, lněná semínka, sůl a tvaroh. Důkladně míchejte na úroveň 1, poté
přepněte na úroveň 2 a pokračujte v míchání dalších 3-5 minut. Směs přikryjte a nechejte kynout na teplém místě
45-60 minut. Poté směs ještě jednou důkladně promíchejte a vyndejte z mísy a z těsta vytvořte 16 rohlíků. Pečící
plech vyložte vlhkým pečícím papírem. Rohlíky vložte na plech a nechejte vykynout 15 minut. Potřete je vlažnou
vodou a dejte péct.
Pečení: elektrická trouba - horní a spodní ohřev 200-220°C (předehřejte na 5 minut),
plynová trouba – úroveň 2-3
Čas pečení: 30-40 minut
Čokoládový krém, rychlost 5-6
Ingredience:
200 ml smetany, 150 g polo hořké čokoládové polevy, 3 vejce, 50-60 g cukru, 1 špetka soli, 1 balíček vanilkového
cukru, 1 polévková lžíce koňaku nebo rumu, nastrouhaná čokoláda nebo čokoládové vločky.
Postup:
V míchací míse ušlehejte pomocí metly smetanu, dokud nebude tuhá. Smetanu vyndejte z mísy a nechejte ji
vychladnout. Rozehřejte čokoládovou polevu podle instrukcí na balíčku nebo v mikrovlnné troubě 3 minuty na
600 W. Mezitím v míchací míse ušlehejte vejce s cukrem, vanilkových cukrem, rumem a solí, pomocí metly šlehejte na úroveň 3 do pěny. Přidejte rozpuštěnou čokoládu a míchejte na úroveň 5-6. Trochu ušlehané smetany
si nechejte na ozdobu. Přidejte zbývající smetanový krém do směsi a krátce míchejte pomocí pulzního míchání.
Servírujte dobře vychlazené.
Page 38

Mlýnek na maso
Před prvním spuštěním:
1. Zatáhněte pojistnou páku (4) a sundejte krytku (2a) z motoru.
2. Nandejte kryt na šnek (10) plnícím hrdlem nahoru do pohonu a otočte šroubem po směru
hodinových ručiček, dokud se nezavře.
3. Plnící misku dejte na plnící hrdlo takovým způsobem, že nádoba zásobníku bude umístěna
pod hrdlem.
4. Šnek vložte do horizontální části těla šneku, dokud se šnek neuzamkne na správném místě.
Prosíme, přečtěte si část “Výroba mletého masa“ a “Výroba klobás“.
Výroba mletého masa (obrázek A)
A
10 11 12 13 14
1. Nejdříve připevněte nože na konec šneku a poté přiložte jeden ze tří disků dle vašeho výběru.
Prosíme, buďte opatrní při upevňování sítka na krytku šneku. Přišroubujte uzávěr (14) na těsno.
2. Vkládejte kousky masa na plnící tác (17) a do plnícího hrdla.
3. Pod konec mlýnku umístěte nádobu.
4. Prosíme, ujistěte se, že knoflík (6) je vypnutý.
5. Přístroj zapojte do 230 V, 50 Hz bezpečnostní zásuvky.
6. Knoflíkem (6) zapněte přístroj.
7. Pokud je to potřebné, maso zatlačte pěchovadlem (18). V žádném případě maso nezatlačujte
do plnícího hrdla svými prsty.
Poznámka:
• Maso nakrájejte asi na 2,5 cm velké kousky. Prosíme, dávejte si pozor, aby maso neobsahovalo
žádné kosti a šlachy.
Page 39

Výroba klobás (obrázek B/C)
B
10
11
19
15B
14
C
10
1. Umístěte nástavec (15c) na hřídel šneku.
2. Vložte nástavce na výrobu klobás (15a nebo 15b) do uzávěru. Nástavec 15a je na tlustější
klobásy a nástavec 15b je na tenčí klobásy.
3. Uzávěr utěsněte na krytku šneku.
4. Vezměte si střívko a na konci udělejte uzel.
5. Plnící tác a plnící hrdlo naplňte masem.
6. Zopakujte kroky 4-7 tak, jako je popsáno v části “ Výroba mletého masa“.
7. Rozemletou masovou směsí můžete plnit střívka klobás.
8. Až první klobása dosáhne požadované délky, pomocí prstů stlačte maso a zavažte konec
střívka. Jednou nebo dvakrát klobásou otočte kolem její osy.
Poznámka:
• Na mletí masa jsou vhodné rychlosti 1-4.
• Přístroj by neměl pracovat déle než 10 minut. Po 10 minutách práce jej nechejte 10 minut
vychladnout.
• Dokud nemáte dost zkušeností, přístroj můžete pokaždé vypnout po naplnění každé klobásy.
Proveďte krok 8. Potom mlýnek znovu zapněte.
• Pokud jste se rozhodli použít pravé střívko, před použitím jej nechejte na chvilku namočit ve
vodě.
• Dávejte si pozor, střívko by mělo být naplněné “volně“, aby se při vaření či smažení neprotrhlo.
11
15C
15A
14
Page 40

Výroba sušenek (obrázek D)
D
10
1. Prosíme, řiďte se kroky 1-4 tak, jak je popsáno v části “Před prvním spuštěním“.
2. Odšroubujte uzávěr a vyberte si požadovaný kráječ.
3. Směs vložte na plnící tác a do plnícího hrdla.
4. Prosíme, ujistěte se, že hlavní knoflík (6) je vypnutý.
5. Přístroj zapojte do 230 V, 50 Hz bezpečnostní zásuvky.
6. Knoflíkem (6) zapněte přístroj.
7. Pokud je to potřebné, směs zatlačte pěchovadlem (18). V žádném případě směs nezatlačujte
do plnícího hrdla svými prsty.
8. Podlouhlé těsto držte na konci a nakrájejte na požadovanou délku.
11 19 920 14
Page 41

Kráječ/struhadlo
Před prvním spuštěním:
1. Zatáhněte pojistnou páku (4) a sundejte krytku (2a) z motoru.
2. Zatáhněte pojistnou páku (4), tělo kráječe (21) umístěte plnícím hrdlem nahoru do pohonu, poté
pojistnou páku uvolněte. Ujistěte se, že je tělo kráječe přichyceno.
3. Vyberte si válcový kráječ (struhadlo 23a, hrubé struhadlo 23c, nebo kráječ plátku 23b). Struha-
dlo nebo kráječ umístěte do těla kráječe otvorem dopředu.
Obsluha kráječe
1. Prosíme, ujistěte se, že hlavní knoflík (6) je vypnutý.
2. Přístroj zapojte do 230 V, 50 Hz bezpečnostní zásuvky.
3. Kráječ zapněte knoflíkem (6) a nastavte rychlost 5-6.
4. Suroviny zatlačte dolu pěchovadlem na krájení (22). Suroviny nezatlačujte do plnícího hrdla
svými prsty.
Page 42

Výroba těstovin
Před prvním spuštěním:
1. Připravte těsto smícháním mouky s vodou v poměru 5:2 (například 500 g mouky a 200 ml vody,
nebo 500 g mouky, 2 vejce a 100 ml vody, zamíchejte šlehačem (8c) na úroveň 1-4 na 2-3 minuty).
Detaily si přečtěte v části “Použití míchací mísy“.
2. Zatáhněte pojistnou páku (4) a sundejte krytku (2a) z motoru.
3. Vyberte si disk na těstoviny (24a,24b,24c,24d, nebo 24e).
4. Spirálu a vybraný disk na těstoviny umístěte do výrobníku těstovin. Podívejte se na obrázek.
Zašroubujte uzávěr (14) na těsno.
5. Tělo šneku (10) umístěte plnícím hrdlem nahoru do pohonu, tak, že zatáhnete pojistnou páku,
nasadíte výrobník, dokud se nezacvakne.
24D
24B
24C 24C
24E
18
17
14
24A
Obsluha mlýnku
1. Prosíme, ujistěte se, že hlavní knoflík (6) je vypnutý.
2. Přístroj zapojte do 230 V, 50 Hz bezpečnostní zásuvky.
3. Mlýnek zapněte knoflíkem (6) a nastavte rychlost 5-6.
4. Suroviny zatlačte dolu pěchovadlem (18). Suroviny nezatlačujte do plnícího hrdla svými prsty.
11 10
Page 43

Mixér
Před prvním spuštěním:
1. Sundejte zadní krytku (2b).
2. Suroviny, které chcete rozmixovat, dejte do mixovací nádoby (30).
3. Nasaďte krycí víko, aby pevně drželo.
4. Do otvoru ve víku vložte uzávěr (28) a po směru hodinových ručiček ho zavřete.
5. Mixovací nádobu (30) nasaďte do příslušného otvoru a otočte s ní ve směru hodinových ruči-
ček, dokud se nezacvakne.
6. Nasaďte mixovací mísu s víkem (3).
Používání mixéru
Prosíme, ujistěte se, že hlavní knoflík (6) je vypnutý.
Přístroj zapojte do 230 V, 50 Hz bezpečnostní zásuvky.
Zapněte mixér a knoflíkem (6) nastavte vhodnou rychlostní úroveň.
• Rychlost 5 pro lehké používání na tekutiny.
• Rychlost 6 na pevnější konzistence – na mixování tekutých a pevných surovin.
• Pulzní chod – pro použití v krátkých, nárazových intervalech. (Tlačítko nezůstává v pulzní pozici.
Tlačítko vždy zmáčkněte a držte, poté opakujte).
Užitečné tipy
Hrozí popálení! Buďte opatrní při používání horkých tekutin.
Čas od času může být nezbytné mixér vypnout a promíchat suroviny, které ulpívají na stěnách
mixéru.
• Přístroj vypněte a vypojte ho.
• Sundejte uzávěr z víka (28) a víko (29).
• Ulpívající suroviny na stěnách mixovací nádoby (30) setřete špachtlí.
• Špachtli držte v bezpečné vzdálenosti od nožů.
Page 44

Čištění
• Před čistěním vypojte kabel ze zásuvky.
• Nikdy neponořujte tělo přístroje s motorem do vody!
• Nepoužívejte ostré předměty a abrazivní čističe.
Čištění těla přístroje
• Přístroj pouze omyjte vlhkým hadříkem z venku.
POZOR:
• Míchací mísa, míchací vybavení a komponenty mlýnku nejsou vhodné na mytí v myčce. Pokud
budou vystaveny teplu nebo žíravým látkám, mohou se poškodit nebo zbarvit.
• Komponenty, které přijdou do styku s potravinami, umyjte vodou s jarem.
VAROVÁNÍ:
• Čepele mlýnku jsou velmi ostré!
• Nebezpečí zranění!
• Před smontováním nechejte části přístroje důkladně uschnout.
• Části, které se o sebe třou, doporučujeme občas promazat rostlinným olejem.
Kráječ, struhadlo, výrobník těstovin a mixér
• Komponenty, které přijdou do styku s potravinami, umyjte vodou s jarem.
• Před smontováním nechejte části přístroje důkladně uschnout.
• Části, které se o sebe třou, doporučujeme občas promazat rostlinným olejem.
• Když těsto nemůžete snadno umýt z disků, počkejte, až těsto úplně uschne a poté ho odstraňte.
VAROVÁNÍ:
• Čepele kráječe jsou velmi ostré!
• Nebezpečí zranění!
Technické parametry:
Napětí: 220-240 V~
Frekvence: 50 Hz - 60 Hz
Výkon: 1 500 W
Třída: I
Maximální provozní čas: 10 min.
Česká verze návodu je přesným překladem originálního návodu výrobce.
Fotografie použité v manuálu jsou pouze ilustrační a nemusí se přesně shodovat s výrobkem.
Page 45

SK
W
A
R
R
A
N
T
Y
4
Y
E
A
R
S
Z
Á
R
U
K
A
4
R
O
K
Y
G
A
R
A
N
T
I
E
4
J
A
H
R
E
ZÁRUKA
Registrácia predĺženej záruky 4 roky na telo prístroja.
Registrácia predĺženej záruky sa uskutočňuje vyplnením formulára na adrese:
www.g21-vitality.cz/registracezaruky
Do 2 mesiacov od zakúpenia prístroja.
Predĺžená záruka sa nevzťahuje na príslušenstvo.
U
R
K
A
Z
Á
4
R
O
K
Y
Page 46

SK
Ďakujeme za nákup nášho výrobku.
Pred použitím prístroja si prosím prečítajte tento návod, vyhnete sa tak neodbornej manipulácii
azaobchádzaniu s prístrojom.
Toto zariadenie bolo testované podľa všetkých príslušných pokynov CE, ako je elektromagnetická
kompatibilita a smernice nízkeho napätia, a bolo vyrobené v súlade s bezpečnostnými predpismi.
Technické zmeny vyhradené bez predchádzajúceho upozornenia.
Bezpečnostné instrukcie
Pred uvedením prístroja do prevádzky si pozorne prečítajte prevádzkové inštrukcie, uschovajte
si manuál vrátane záručného listu či účtenky. Ak budete prístroj dávať inej osobe, predajte mu aj
manuál na použitie.
• Nepoužívajte ho vo vonkajších priestoroch. Zariadenie neukladajte na horúce povrchy, priame
slnko, na vlhké miesta (nikdy ho neponárajte do žiadnej kvapaliny) a vyhnite sa miestam s ostrými
okrajmi. Prístroj nepoužívajte, keď máte mokré ruky. Ak je prístroj vlhký alebo mokrý, ihneď ho
odpojte zo zásuvky.
• Ak budete zariadenie čistiť alebo dávať na iné miesto, alebo ho nebudete používať, vypnite ho a
vždy vypojte kábel zo zásuvky a vyberte priložené príslušenstvo.
• Nepožívajte prístroj bez dozoru. Ak budete opúšťať miesto, kde zariadenie pracuje, vždy ho
vypnite a vyberte kábel zo zásuvky (zatiahnite za zástrčku, nikdy nie za kábel).
• Zariadenie a kábel skontrolujte, či nie sú poškodené. Nepoužívajte ich, ak sú poškodené.
• Nepokúšajte sa sami opravovať zariadenie. Vždy kontaktujte autorizovaný servis. Aby,
ste sa vyhli nebezpečenstvu, chybný kábel musí byť vymenený iba odborným servisom alebo
kvalifikovanou osobou a musí byť nahradený káblom rovnakého typu.
• Používajte len originálne náhradné diely.
• Dávajte pozor na nasledujúce ‚‘ Špeciálne bezpečnostné inštrukcie ‚‘.
Bezpečnosť detí
Aby sme zaistili bezpečnosť detí, prosíme, nenechávajte všetko balenie (plastové vrecká, krabice,
polystyrén atď.) v ich dosahu.
Pozor! Nenechajte si malé deti hrať s fóliami, hrozí nebezpečenstvo udusenia!
Aby nedošlo k úrazu detí, alebo postihnutých jedincov elektrickým prúdom, prosíme, uistite sa,
že prístroj je používaný pod dohľadom. Prístroj nie je hračka. Nedovoľte malým deťom hrať sa s
prístrojom.
Špeciálne bezpečnostné inštrukcie
• Prístroj nenechávajte pracovať bez dozoru.
• Nič nevkladajte do otáčajúcich sa hákov, keď prístroj pracuje.
• Prístroj umiestnite na hladký, rovný a stabilný povrch.
• Zariadenie nezapájajte do zásuvky, dokiaľ nie je nainštalované všetko potrebné príslušenstvo.
• Na doplňovanie surovín do mlynčeka musí byť použité vtláčadlo.
• Nebezpečenstvo preťaženia! Prosíme, prístroj použite buď ako mlynček alebo ako mixér, ale
nikdy nepoužívajte obe funkcie naraz.
Page 47

Prehľad súčiastok
Hlavné súčiastky a štandardné príslušenstvo:
1. Hnací hriadeľ
2. A. Predný kryt
B. Zadný kryt
3. Miska
4. Poistná páka
5. Tlačidlo pre zdvíhanie a spúšťanie ramena
6. Hlavný vypínač
7. Kryt na misku
8. A. Hák na miesenie
B. Mmiešacia metla
C. Šľahacia metla
2A
4
1
2B
8B
3 7 8A 8C
5
6
Page 48

Voliteľné príslušenstvo - Mlynček na mäso
18
13
9
20 19
Podložka
9.
Telo šneku
10.
Šnek
11.
Nože
12.
Sitko
13.
Uzáver
14.
A. Príslušenstvo na výrobu klobás, veľké
15.
B. Príslušenstvo na výrobu klobás, malé
C. Nástavec
Plniaca tácka
17.
Natláčacie viečko
18.
Príslušenstvo na výrobu sušienok
19.
Príslušenstvo na výrobu sušienok
20.
15A 15C
15B
10
11
1217 14
Page 49

Krájanie / strúhanie Výroba cestovín
24D
22
24B
24C
18 17
23C
23B
23A
21
Mixér
28
29
30
24E
14
24A
21.
22.
23.
10.
11.
24.
14.
28.
29.
30.
11 10
Telo krájača / strúhadla
Vtláčadlo na krájanie
A. Strúhadlo
B. krájač plátkov
C. Hrubé strúhadlo
Kryt na šnek
Šnek
A. Disk na špagety
B. Disk na pappardelle
C. Disk na macaroni
D. Disk na špagety
E. Disk na fettucine
Uzáver
uzáver veka
Veko
Sklenená mixovacia nádoba
Page 50

Používanie miešacej misy
1. Miešaciu misu umiestnite do držiaka a otočte ju k smeru LOCK (zámok), kým nezapadne na
svoje miesto.
2. Aby sme zdvihli rameno, stlačte tlačidlo (5). Rameno sa teraz zdvihne nahor.
3. Zasaďte požadovaný nástroj vložením hore do hnacie hriadele a uzamknite závlačku v hriadeli
otočením doprava.
4. Teraz vložte vaše suroviny. Nádobu neprepĺňajte - maximálne množstvo surovín je 2 Kg.
5. Sklopte rameno pomocou tlačidla (5).
6. Zapojte hlavný zástrčku do 230 V / 50 Hz bezpečnostné zásuvky.
7. Zapnite prístroj, použite rýchlostné úrovne medzi 1-6 (záleží na zmesi).
8. Pre prevádzku prerušovaného miešania (miesenie v krátkych intervaloch), zapnite gombík do
pozície „PULSE“. Gombík musí byť držaný v tejto pozícii podľa požadovanej dĺžky miesenie. Keď
je gombík uvoľnený, vráti sa automaticky do pozície „0“.
Nastavenie rychlostí a použitie hnetacieho háku na menej ako 2 Kg zmesi
Rýchlosť Použitie Druh zmesi
1-2 Hnetací hák Ťažká zmes (napr. chlieb, pečivo)
3-4 Miešacia
metla
5-6 Šlahacia metla Ľahká zmes (napr. krémy, sneh, šodó)
Pulzovanie Šlahacia metla Interval (napr. miešanie snehu, cesta na pečivo)
Poznámka:
• Maximálny prevádzkový čas: Ťažké zmesi nemiešajte dlhšie ako 10 minút, potom ich nechajte
vychladnúť ďalších 10 minút.
• Na tekuté zmesi použite veko, aby nestriekali von.
9. Po miešania otočte gombík (6) späť do pozície „0“, akonáhle sa zmes sformovala do gule.
Potom vyberte hlavnú zástrčku zo zásuvky.
10. Stlačte tlačidlo (5) dole a rameno sa zdvihne.
11. Teraz môžete špachtľou alebo stierkou vybrať zmes z misy.
12. Miešacia misu môžete vybrať otočením doľava.
13. Umyte príslušenstvo tak, ako je popísané v časti „Čistenie“.
Stredne ťažká zmes (napr. cesto na palacinky, pečivo)
Page 51

Recepty
Piškótové cesto (základný recept), rýchlosť 3-4
Ingrediencie:
250 g zmäknutého masla alebo margarínu, 250 g cukru, 1 balíček vanilkového cukru, 1 štipka soli, 4 vajcia, 500
g polohrubej múky, 1 balíček kypriaceho prášku, cca 1/8 litra mlieka.
Príprava:
Múku a zvyšné ingrediencie dajte do miešacej misy, zmes miešajte miešačkou po 30 sekúnd na úroveň 1, potom
približne 3 minúty na úroveň 3. Vymažte formu na pečenie alebo do nej dajte papier na pečenie. Naplňte zmesou
a dajte piecť. Predtým než cesto vyberiete z rúry, vyskúšajte, či je hotové. Pichnite do stredu cesta ostrú ihlicou.
Ak sa na ihlicu neprilepila žiadna zmes, cesto je upečené.
Vyklopte piškótovécesto na tácku nechajte ho vychladnúť.
Pečenie: elektrická rúra - horný a spodný ohrev 175-200 ° C
plynová rúra - úroveň 2-3
Čas pečenia: 50-60 minút
Záleží na chuti, tento recept sa môže pozmeniť, napríklad môžete pridať 100 g hrozienok, orieškov, alebo strúha-
nej čokolády. V skutočnosti, je možnosťou oveľa viac.
Pečivo sa ľanovým semienkom, rýchlosť 1-2
Ingrediencie:
500-550 g múky, 50 g ľanových semienok, 3/8 litra mlieka, 1 kocka droždia (40 g), 100 g nízko tučného tvarohu,
1 čajovú lyžičku soli, 2 čajové lyžičky vody na potretie.
Príprava:
Ľanové semienka namočte v 1/8 litra mlieka alebo vo vlažnej vode. Zostávajúce vlažnú vodu (1/4 litra) nalejte do
miešacej misy, rozdrolte droždie a dajte ho do vody a zamiešajte hákom na miesenie na úroveň 2. Droždie musí
byť úplne rozpustené. Do miešacej misy nasypte múku, ľanové semienka, soľ a tvaroh. Dôkladne miešajte na
úroveň 1, potom prepnite na úroveň 2 a pokračujte v miešaní ďalších 3-5 minút. Zmes prikryte a nechajte kysnúť
na teplom mieste 46-60 minút. Potom zmes ešte raz dôkladne premiešajte a vyberte z misy a z cesta vytvorte
16 rožkov. Plech na pečenie vyložte vlhkým papierom na pečenie. Rožky vložte na plech a nechajte vykysnúť 15
minút. Potrite ich vlažnou vodou a dajte piecť.
Pečenie: elektrická rúra - horný a spodný ohrev 200-220 ° C (predhrejte na 5 minút),
plynová rúra - úroveň 2-3
Čas pečenia: 30-40 minút
Čokoládový krém, rýchlosť 5-6
Ingrediencie:
200 ml smotany, 150 g polo horkej čokoládovej polevy, 3 vajcia, 50-60 g cukru, 1 štipka soli, 1 balíček vanilkového cukru, 1 polievková lyžica koňaku alebo rumu, nastrúhaná čokoláda alebo čokoládové vločky.
Príprava:
V miešacej mise ušľahajte pomocou metly smotanu, kým nebude tuhá. Smotanu vyberte z misy a nechajte ju
vychladnúť. Rozohrejte čokoládovú polevu podľa inštrukcií na balíčku alebo v mikrovlnnej rúre 3 minúty na 600
W. Medzitým v miešacej mise ušľahajte vajcia s cukrom, vanilkových cukrom, rumom a soľou, pomocou metly,
šľahajte na úroveň 3 do peny. Pridajte rozpustenú čokoládu a miešajte na úroveň 5-6. Trochu ušľahanej smotany
si nechajte na ozdobu. Pridajte zostávajúce smotanový krém do zmesi a krátko miešajte pomocou pulzného
miešania. Servírujte dobre vychladené.
Page 52

Mlynček na mäso
Pred prvým spustením:
1. Zatiahnite poistnú páku (4) a zložte krytku (2a) z motora.
2. Dať kryt na šnek (10) plniacim hrdlom hore do pohonu a otočte skrutkou v smere hodinových
ručičiek, kým sa nezavrie.
3. Plniace misku dajte na plniace hrdlo takým spôsobom, že nádoba zásobníka bude umiestnená
pod hrdlom.
4. Šnek zatlačte do horizontálnej časti krytu na šnek, kým sa šnek uzamkne na správnom mieste.
Prosíme, prečítajte si časť „Výroba mletého mäsa“ a „Výroba klobás“.
Výroba mletého mäsa (obrázok A)
A
10 11 12 13 14
1. Najskôr pripevnite nože na koniec závitovky a potom priložte jedno z troch diskov podľa vášho
výberu. Prosíme, buďte opatrní pri upevňovaní sitka na krytku závitovky. Priskrutkujte uzáver (14)
na tesno.
2. Vkladajte kúsky mäsa na plniaci tácku (17) a do plniaceho hrdla.
3. Pod koniec mlynčeka umiestnite nádobu.
4. Prosíme, uistite sa, že tlačidlo (6) je vypnuté.
5. Prístroj zapojte do 230 V, 50 Hz bezpečnostné zásuvky.
6. Tlačidlom (6) zapnite prístroj.
7. Ak je to potrebné, mäso zatlačte zatláčadlom (18). V žiadnom prípade mäso nezatláčajte do
plniaceho hrdla svojimi prstami.
Poznámka:
• Mäso nakrájajte asi na 2,5 cm veľké kúsky. Prosíme, dávajte si pozor, aby mäso neobsahovalo
žiadne kosti a šľachy.
Page 53

Výroba klobás (obrázok B / C)
B
10
11
19
15B
14
C
10
1. Umiestnite nástavec (15c) na hriadeľ závitovky.
2. Vložte nástavce na výrobu klobás (15a alebo 15b) do uzáveru. Nástavec 15a je na hrubšie
klobásy a nástavec 15b je na tenšie klobásy.
3. Uzáver utesnite na krytku závitovky.
4. Vezmite si črievko a na konci urobte uzol.
5. Plniacu tácku a plniace hrdlo naplňte mäsom.
6. Zopakujte kroku 4-7 tak, ako je popísané v časti „Výroba mletého mäsa“.
7. Rozomletou mäsovou zmesou môžete plniť črievka klobás.
8. Až prvý klobása dosiahne požadovanú dĺžku, pomocou prstov stlačte mäso a zaviažte koniec
črievka. Raz alebo dvakrát klobásou otočte okolo jej osi.
Poznámka:
• Na mletie mäsa sú vhodné rýchlosti 1-4.
• Prístroj by nemal pracovať dlhšie ako 10 minút. Po 10 minútach práce ho nechajte 10 minút
vychladnúť.
• Kým nemáte dosť skúseností, prístroj môžete zakaždým vypnúť po naplnení každej klobásy.
Vykonajte krok 8. Potom mlynček znova zapnite.
• Urobte krok 8 tak, ako je popísané. Potom mlynček znova zapnite.
• Ak ste sa rozhodli použiť pravé črievko, pred použitím ju nechajte na chvíľku namočiť vo vode.
• Dávajte si pozor, črievko by malo byť naplnené „voľne“, aby sa pri varení či smažení črievko
nepotrhalo.
11
15C
15A
14
Page 54

Výroba sušienok (obrázok D)
D
10
1. Prosíme, riaďte sa krokmi 1-4 tak, ako je popísané v časti „Pred prvým spustením“.
2. Odskrutkujte uzáver a vyberte si požadovaný krájač.
3. Zmes vložte na plniacu tácku a do plniaceho hrdla.
4. Prosíme, uistite sa, že hlavné tlačidlo (6) je vypnuté.
5. Prístroj zapojte do 230 V, 50 Hz bezpečnostné zásuvky.
6. Tlačidlom (6) zapnite prístroj.
7. Ak je to potrebné, zmes zatlačte zatláčadlom (18). V žiadnom prípade zmes nezatláčajte do
plniaceho hrdla svojimi prstami.
8. Podlhovasté cesto držte na konci a nakrájajte na požadovanú dĺžku.
11 19 920 14
Page 55

Krájač / strúhadlo
Pred prvým spustením:
1. Zatiahnite poistnú páku (4) a zložte krytku (2a) z motora.
2. Zatiahnite poistnú páku (4), telo krájača (21) umiestnite plniacim hrdlom hore do pohonu, po-
tom poistnú páku uvoľnite. Uistite sa, že je telo krájača prichytené.
3. Vyberte si valcový krájač (strúhadlo 23a, hrubé strúhadlo 23c, alebo krájač plátku 23b). Str-
úhadlo alebo krájač umiestnite do tela krájača otvorom dopredu.
Obsluha krájača
1. Prosíme, uistite sa, že hlavné tlačidlo (6) je vypnuté.
2. Prístroj zapojte do 230 V, 50 Hz bezpečnostné zásuvky.
3. Krájač zapnite tlačidlom (6) a nastavte úroveň 5-6.
4. Suroviny zatlačte bane zatláčadlom na krájanie (22). Suroviny nezatláčajte do plniaceho hrdla
svojimi prstami.
Page 56

Výroba cestovín
Pred prvým spustením:
1. Pripravte cesto zmiešaním múky s vodou v pomere 5: 2 (napríklad 500 g múky a 200 ml vody,
alebo 500 g múky, 2 vajcia a 100 ml vody, zamiešajte šľahačom (8c) na úroveň 1-4 na 2-3 minúty
). Detaily si prečítajte v časti „Použitie miešacej misy“.
2. Zatiahnite poistnú páku (4) a zložte krytku (2a) z motora.
3. Vyberte si disk na cestoviny (24a, 24b, 24c, 24d, alebo 24e).
4. Špirálu a vybraný disk na cestoviny umiestnite výrobník cestovín. Pozrite sa na obrázok.
Zaskrutkujte uzáver (14) na tesno.
5. Telo závitovky (10) umiestnite plniacim hrdlom hore do pohonu, tak, že zatiahnete poistnú
páku, nasadíte výrobník, kým sa nezacvakne.
24D
24B
24C 24C
24E
18
17
14
24A
Obsluha mlynčeka (obrázok A)
1. Prosíme, uistite sa, že hlavné tlačidlo (6) je vypnuté.
2. Prístroj zapojte do 230 V, 50 Hz bezpečnostné zásuvky.
3. Mlynček zapnite tlačidlom (6) a nastavte úroveň 5-6.
4. Suroviny zatlačte bane zatláčadlom (18). Suroviny nezatláčajte do plniaceho hrdla svojimi
prstami.
11 10
Page 57

Mixér
Pred prvým spustením:
1. Zložte zadný kryt (2b).
2. Suroviny, ktoré chcete rozmixovať, dajte do nádoby na mixovanie (30).
3. Nasaďte krycie veko, aby pevne držalo.
4. Do otvoru vo veku vložte uzáver (28) a po smere hodinových ručičiek ho zatvorte.
5. Nádobu na mixovanie (30) nasaďte do príslušného otvoru a otočte s ňou v smere hodinových
ručičiek, kým sa nezacvakne.
6. Nasaďte nádobu s vekom (3).
Používanie mixéra
Prosíme, uistite sa, že hlavné tlačidlo (6) je vypnuté.
Prístroj zapojte do 230 V, 50 Hz bezpečnostné zásuvky.
Zapnite mixér s gombíkom (6) nastavte vhodnú rýchlostú úroveň.
• Rýchlosť 5 pre ľahké používanie - na tekutiny.
• Rýchlosť 6 na pevnejšie konzistencie - na mixovanie tekutých a pevných surovín.
• Pulzná chod - pre použitie v krátkych, nárazových intervaloch. (Tlačidlo nezostáva v pulznej
pozícii. Tlačidlo vždy stlačte a držte, potom zopakujte)
Užitočné tipy
Hrozí popálenie! Buďte opatrní pri používaní horúcich tekutín.
Čas od času môže byť potrebné mixér vypnúť a premiešať suroviny, ktoré zostávajú na stenách
mixéra.
• Prístroj vypnite a vypojte ho.
• Zložte uzáver z veka (28) a veko (29).
• Úponok suroviny na stenách mixovacej nádoby (30) zotrite špachtľou.
• Špachtľu držte v bezpečnej vzdialenosti od nožov.
Page 58

Čistenie
• Pred čistením vypojte kábel zo zásuvky.
• Nikdy neponárajte telo prístroja s motorom do vody!
• Nepoužívajte ostré predmety a abrazívne čističe.
Čistenie tela prístroja
• Prístroj iba umyte vlhkou handričkou z vonku.
POZOR:
• Miešacia misa, miešacie vybavenie a komponenty mlynčeka nie sú vhodné na umývanie v umý-
vačke.
• Pokiaľ budú vystavené teplu alebo žieravým látkam, môžu sa poškodiť alebo sfarbiť.
• Komponenty, ktoré prídu do styku s potravinami, umyte vodou s jarou.
VAROVANIE:
• Čepele mlynčeka sú veľmi ostré!
• Nebezpečenstvo zranenia!
• Pred zmontovaním nechajte časti prístroja dôkladne uschnúť.
• Časti, ktoré sa o seba trú, odporúčame občas premazať rastlinným olejom.
Krájač, strúhadlo, výrobník cestovín a mixér
• Komponenty, ktoré prídu do styku s potravinami, umyte vodou s jarou.
• Pred zmontovaním nechajte časti prístroja dôkladne uschnúť.
• Časti, ktoré sa o seba trú, odporúčame občas premazať rastlinným olejom.
• Keď cesto nemôžete ľahko umyť z diskov, počkajte, až cesto úplne uschne a potom ho od-
stráňte.
VAROVANIE:
• Čepele krájača sú veľmi ostré!
• Nebezpečenstvo zranenia!
Technické parametre:
Napätie: 220-240 V~
Frekvencia: 50 Hz - 60 Hz
Spotreba energie: 1 500 W
Trieda: I
Maximálna prevádzková doba: 10 min.
Slovenská verzia návodu je presným prekladom originálneho návodu výrobcu.
Fotografie použité v návode sú len ilustračné a nemusia sa presne zhodovat s výrobkom.
Page 59

HU
W
A
R
R
A
N
T
Y
4
Y
E
A
R
S
Z
Á
R
U
K
A
4
R
O
K
Y
Z
Á
R
U
K
A
4
R
O
K
Y
G
A
R
A
N
T
I
E
4
J
A
H
R
E
G
W
A
R
A
N
C
J
A
4
L
A
T
A
GARANCIA
Regisztráció kiterjesztett garanciára 4 év a gép testre.
Regisztrációhoz a kiterjesztett garanciához töltse ki az űrlapot:
2 hónapon belül a készülék vásárlásakor.
A kiterjesztett garancia nem terjed a kiegészítőkre.
www.g21-vitality.cz/garanciaregisztracio
G
R
A
4
É
A
V
N
C
I
A
Page 60

HU
Köszönjük, hogy megvásárolta termékünket.
Használat előtt kérjük olvassa el a használati útmutatót, így megelőzheti az eszköz helytelen
használatát.
Ez a készülék minden idevágó CE utasítás alapján volt tesztelve, mint az elektromágneses kompatibilitás és alacsony feszültség irányelv , valamint minden biztonsági előírást betartva.
A műszaki változtatások jogát fenntartjuk.
Biztonsági utasítások
Mielőtt használni kezdené a készüléket, kérjük, hogy figyelmesen olvassa el a használati útmutatót,
valamint őrizze meg a garancialevéllel és nyugtával együtt. Amennyiben más személynek adná a
terméket, a használati útmutatóval együtt adja át.
• Ne használja a készüléket a szabadban. Ne helyezze forró felületre, ne tegye ki közvetlen
napfénynek, nedvességnek (semmilyen folyadékba ne merítse) és kerülje el az éles felületeket.
Vizes kézzel nem szabad a készüléket használni. Ha nedvesség kerül a készülékre azonnal húzza
ki az áramkörből.
• Ha a készüléket tisztítja, vagy egy másik helyre helyezi, vagy nem használja, kapcsolja ki, és
mindig húzza ki a kábelt az aljzatból és távolítsa el a mellékelt tartozékokat.
• Ne használja a készüléket felügyelet nélkül. Ha elhagyta a helyet, ahol a gép dolgozik, mindig
kapcsolja ki és húzza ki a kábelt a konnektorból (húzza ki a dugót, ne a kábelt).
• Ellenőrizze a készülék és a vezeték épségét. Ne használja, ha azok sérültek.
• Ne próbálja megjavítani a készüléket. Keressen fel egy márkaszervizt. Tehát, hogy elkerülje a
veszélyt, a hibás kábelt ki kell cserélni, ezt azonban csak egy képesített személy végezheti el és ki
kell cserélni egy kábellel, amely azonos típusú.
• Csak eredeti alkatrészeket használjon.
• Ügyeljen a következő „Speciális biztonsági utasítások ‚‘-ra.
Gyermekek biztonsága
Annak érdekében, hogy a gyermekek biztonsága meg legyen, ne hagyja az összes csomagolóanyagot (műanyag zacskók, dobozok, polisztirol, stb) elérhető közelségben.
Vigyázat! Ne engedje, hogy gyermekek játszanak a műanyag csomagolással, fennáll a fulladás
veszélye!
Az áramütés veszélyének elkerülése érdekében a gyermekek és fogyatékkal élő személyek közelében ellenőrizze, hogy az eszközt csak felügyelet mellett használják. A készülék nem játékszer. Ne
engedje, hogy gyermekek játsszanak a készülékkel.
Különleges biztonsági utasítások
• A készüléket csak felügyelet mellett használja.
• Ne helyezzen semmit a forgó horoghoz, keverőhöz, ha a készülék működik.
• Helyezze sík, egyenletes és stabil felületre.
• Ne csatlakoztassa a berendezést, amíg nem telepítette a szükséges felszerelést.
• A nyersanyagok hozzáadásához mindig a bedugó kart használja.
• Túlterhelés kockázata! Kérjük, használja a készüléket, mint egy darálót, vagy turmixgépet, de
soha ne használja mindkét funkciót egyszerre.
Page 61

Alkatrészek áttekintése
Fő alkotóelemek és a mellékelt tartozékok:
1. Meghajtó
2. A. Elülső fedél
B. Hátsó fedél
3. Edény
4. Biztonsági kar
5. Gomb a kar kioldásához
6. Fő kapcsoló
7. Edény fedele
8. A. Dagasztókar
B. Habverő
C. Gömbhabverő
2A
4
1
2B
8B
3 7 8A 8C
5
6
Page 62

Választható tartozék - húsdaráláshoz
13
9
20 19
Alátét
9.
Csavar teste
10.
Csavar
11.
Kések
12.
Szita
13.
Zár
14.
A. Kolbász készítő tartozék, nagy
15.
B. Kolbász készítő tartozék, kicsi
C. Tartozék
Töltő tálca
17.
Betoló kar
18.
Sütemény készítő tartozék
19.
Sütemény készítő tartozék
20.
18
15A 15C
15B
10
11
1217 14
Page 63

Szeletelés / aprítás Tésztakészítés
24D
22
24B
24C
18 17
23C
23B
23A
21
Turmixgép
28
29
30
24E
14
24A
A szeletelő / aprító teste
21.
Aprító kar
22.
A. Reszelő
23.
B. Szeletelő
C. Durva reszelő
Csavar kupakja
10.
Csavar
11.
A. Lemez spagettihez
24.
B. Pappardelle lemez
C. Macaroni lemez
D. Spagetti lemez
E. Fettucine lemez
Zár
14.
Fedő zárja
28.
Fedél
29.
Üveg keverő edény
30.
11 10
Page 64

A keverő tál használata
1. A keverő tálat belehelyezzük a tartóba, és kapcsolja be LOCK (zár) irányába, amíg a helyére
nem pattan.
2. Ha emelni szeretné a kart, nyomja meg a (5). Majd emelje fel a kart.
3. Helyezze a kívánt eszközt behelyezéssel a meghajtóba és rögzítse csapot a tengely elfordításával jobbra.
4. Most adja hozzá a nyersanyagokat. Ne töltse túl a tartályt - maximális nyersanyagok mennyisége 2 kg.
5. Engedje le a kart a gombbal (5).
6. Csatlakoztassa a hálózati csatlakozót egy 230 V / 50 Hz biztonsági aljzatba.
7. Kapcsolja be a készüléket, válogasson a sebesség-szinteket között 1-6 (attól függően milyen
az összetétel).
8. Ahhoz, hogy a pulzáló keverést használja (keverő rövid időközönként), fordítsa el a gombot
„PULSE“ állásba. A gombot kell tartani ebben a helyzetben a kívánt ideig. A gomb elengedésekor
automatikusan visszatér „0“ állásba.
A sebesség beállítása dagasztóhoz kevesebb mint 2 kg keverék esetében
Sebesség Használat Keverék
1-2 Dagasztókar Súlyos keverék (pl. kenyér, sütemények)
3-4 Keverő lapát Közepes keverék (pl. palacsinta tészta, keksz)
5-6 Habaró lapát Könnyen keverhető (pl. krémek, hab, sodó)
Pulzálás Habaró lapát Intervallum (pl. keverés, hab, sütemény tészta)
Megjegyzés:
• Maximális munkaidő: nehéz keveréket, ne keverjük tovább mint 10 percig, majd hagyjuk kihűlni további 10 percig.
• A folyékony keveréknél használja a fedelet
9. Miután dagasztott / kevert, forgassa (6) vissza „0“ állásba, amint összeállt a keverék. Ezután
távolítsa el a hálózati csatlakozót az aljzatból.
10. Nyomja meg a gombot (5) le, és a kar felemelkedik.
11. Most kanállal vagy lapáttal kiszedheti a keveréket.
12. A keverőtálat leveheti ha elfordítja balra.
13. Tisztítsa meg a tartozékokat, lásd „Tisztítás“.
Page 65

Receptek
Piskóta tészta (alaprecept), a sebesség 4/3
Összetevők:
250 g puha vaj vagy margarin, 250 g cukor, 1 csomag vaníliás cukor, 1 csipet só 4 tojás, 500 g közepes durva
liszt, 1 csomag sütőpor, körülbelül 8,1 liter tejet.
Elkészítés:
A lisztet és a többi összetevőt a keverő edénybe helyezzük, keverővel keverjük 30 másodpercig 1-es fokozaton,
majd kötülbelül 3 percig 3-as fokozaton. Kenje ki a sütőformát vagy helyezzen sütőpapírt a sütőeszközbe. Töltse
bele a keveréket és süsse meg. Mielőtt kivenné a tésztát a sütőből, győződjön meg róla, hogy az teljsen megsült.
Szúrjon éles tűt a tészta közepébe. Ha nem ragadt rá a keverék, akkor a tészta megsült.
Fordítsa ki a sütőformából és hagyja kihűlni.
Sütés: elektromos sütő - felső és alsó fűtés 175-200 ° C
gázsütő – fokozat 2-3
Sütési idő: 50-60 perc
Csak az ízlésétől függ, hogyan módosítja a receptet, kiegészítheti 100 g mazsolával, diófélékkel vagy reszelt
csokoládéval. Valójában sokkal több lehetőség van variálni a receptet.
Lenmagos sütemény, sebesség 02/01
Összetevők:
500-550 g liszt, 50 g lenmag, 3/8 liter tej 1 kocka élesztő (40 g), 100 g zsírszegény túró, 1 teáskanál só, 2 teáskanál víz a harmadik alkalommal.
Elkészítés:
A lenmagokat beáztatjuk 1/8 liter langyos vízbe vagy tejbe. A maradék langyos vizet (1/4 liter) beleöntjük egy
tálba, szétmorzsoljuk az élesztőt és hozzádjuk a vízhez és összekeverjük 2-es fokozaton. Az élesztőnek teljesen
szét kell olvadnia. A keverő edénybe beletesszük a lisztet, a lenmagokat, sót és túrót. Jól összekeverjük 1-es
fokozaton, majd átkapcsoljuk 2-es fokozatba és folytatjuk a keverést még 3-5 percig. A keveréket letakarjuk és
hagyjuk kelni meleg helyen 46-60 percig. Aztan akeveréket még egyszer alaposan összekeverjük, kivesszük
a tálból és 16 adagra felosztjuk. A tálcára sütőpapírt helyezünk. A kiformázott kifliket ráhelyezzük a tálcára és
hagyjuk kelni 15 percig. Megkenjük őket langyos vízzel és megsütjük.
Sütés: elektromos sütő - felső és alsó fűtés 200-220 ° C (előfűtés, 5 perc)
gázsütő - Level 2-3
Sütési idő: 30-40 perc
Csokoládékrém, sebesség 5-6
Hozzávalók:
200 ml tejszín, 150 g félig sötét csokoládé bevonat, 3 tojás, 50-60 dkg cukor, 1 csipet só, 1 csomag vaníliás
cukor, 1 evőkanál konyak vagy rum, reszelt csokoládé vagy csokoládé chips.
Elkészítés:
A keverő edényben keverje ki a tejszínt keverő lapáttal, amíg az kemény nem lesz. Vegye ki a tejszínt az edényből
és hagyja kihűlni. Melegítse fel a csoki öntetet a csomagoláson lévő útmutató szerint, vagy tegye mikrohullámú
sütőbe 3 percre 600 W-on. Ezalatt a keverő edényben keverje ki a tojást a cukorral. Vaníliás cukorral, rummal
és sóval, amíg habot nem képeznek. Adja hozzá a megolvasztot csokoládé öntetet és keverje 5-6-os fokozaton.
Egy kevés tejszínt hagyjon a díszítésre is. Adja hozzá a tejszínt és röviden a pulzáló funkció segítségével keverje.
Tálalja amikor teljesen kihűlt.
Page 66

Húsdaráló
Az üzembe helyezés előtt:
1. Húzza ki a rögzítő kart (4) és vegye le a fedelet (2) a motorról.
2. Tegye vissza a fedelet a csavarra (10) töltőnyílással felfele a meghajtásba, majd fordítsa el a
csavart az óramutató járásával megegyezően, amíg zárva nem lesz.
3. A töltő edényt helyezze a töltőnyílásra oly módon, hogy a tartály alá helyezik a tartály nyakát.
4. A csavart nyomja a vízszintes részbe a csavar tartályába, amíg a csavar lezáródik a megfelelő
helyen. Kérjük, olvassa el a „Darált hús készítés“ és „Kolbász készítés“ részt.
Darált hús készítés (kép A)
A
10 11 12 13 14
1. Először csatlakoztassa a pengéket a csavar végére, majd alkalmazza a három tárcsa közül az
egyiket, amelyiket választott. Kérjük, legyen óvatos, amikor szereli a szitát a csavarhoz. Csavarja
a kupakot (14), hogy lezárja.
2. Tegyen daráló végéhez helyezzen egy edényt.
3. Kérjük, ellenőrizze, hogy a gomb (6) ki van kapcsolva.
4. Csatlakoztassa az eszközt a 230 V, 50 Hz biztonsági aljzatba.
5. Nyomja meg a (6) és kapcsolja be a készüléket.
6. Ha szükséges, nyomja a húst nyomókarral (18). Semmi esetre se ne erőltesse a húst a töltőcsőbe az ujjaival.
Megjegyzés:
• A húst szeletelje fel 2,5 cm-es nagyságú darabokra. Kérjük, legyen óvatos, hogy a húsok nem
tartalmaznak csontokat és inakat.
Page 67

Kolbász készítés (kép B / C)
B
10
11
19
15B
14
C
10
1. Helyezze a tartozékot (15c) a csavar tengelyre.
2. Helyezze be a kolbász készítéshez szükséges kiegészítőt (15a vagy 15b) a kupakba. A 15a
vastagabb kolbászhoz és a 15b vékonyabb kolbászhoz ajánlott.
3. A zárat erősítse a csavar testéhez.
4. Vegyen egy kolbászbelet és kössön csomót a végére.
5. A töltő tálcát és a töltő nyakat töltse meg hússal.
6. Ismételje meg a 4-7 lépéseket a fentiekből.
7. Az aprított húskeverékkel meg tudja tölteni a kolbász beleket.
8. Ha az első kolbász eléri a kívánt méretet, használja az ujjait nyomásra és kössön csomót a
kolbász végére. Egyszer vagy kétszer fordítsa meg a kolbászt a tengelye körül.
Megjegyzés:
• Húsdaráláshoz alkalmas sebességek 1-4.
• A készüléknek nem szabad tovább működnie, mint 10 perc. 10 perc után hagyja hűlni 10 percig.
• Amíg nincs elég tapasztalata, minden alkalommal, amikor megtölt egy kolbászt kapcsolja ki a
készüléket töltés után. Járjon el a 8. Pont szerint. Ezután tölthet kolbászokat újra.
• 8. lépésben leírtak szerint tegyen. Ezután tölthet kolbászokat újra.
• Ha úgy dönt, hogy jobb friss belet használni, használat előtt hagyjuk egy ideig ázni a vízben.
• Legyen óvatos, a kolbászt „szabadra“ kell tölteni, hogy az ne szakadjon szét.
11
15C
15A
14
Page 68

Keksz gyártása (kép D)
D
10
1. Kérjük, kövesse az 1-4 pontot, ahogyan a“ Az üzembe helyezés előtt” részben van írva.
2. Csavarja le a kupakot, és válassza ki a szeletelőt.
3. Tedd a keveréket a töltő tálcára majd a töltő nyakba.
4. Kérjük, ellenőrizze, hogy a főkapcsoló (6) ki van kapcsolva.
5. Csatlakoztassa az eszközt a 230 V, 50 Hz biztonsági aljzatba.
6. Nyomja meg a (6) gombot kapcsolja be a készüléket.
7. Ha szükséges, a keverék nyomja meg a nyomógombbal (18 Semmi esetre se ne erőltesse a
húst a töltőcsőbe az ujjaival.
8. A hosszúkás tésztát fogja a végén, és vágja a kívánt hosszra.
11 19 920 14
Page 69

Szeletelő / Reszelő
Az üzembe helyezés előtt:
1. Húzza ki a rögzítő kart (4) és vegye le a fedelet (2) a motorról.
2. Húzza ki a rögzítő kart (4), a szeletelő testet (21), helyezze a töltőcső fel a meghajtót, a biztonsági kar kiadás. Győződjön meg arról, hogy a szervezet csatlakozik szeletelő.
3. Válassza ki a hengeres vágót (23a reszelő, durva reszelő 23c, vagy szeletelő szeletekre 23b). A
reszelőt vagy szeletelőt helyezze a testbe nyílással előre.
Szeletelő működtetése
1. Győződjön meg róla, hogy a főkapcsoló (6) ki van kapcsolva.
2. Csatlakoztassa a készüléket 230 V, 50 Hz biztonsági aljzatba.
3. Kapcsolja be a szeletelőt (6) 5-6 fokozaton.
4. A nyersanyagokat nyomja a nyomókarral az enyémbe a vágásához (22). Nyersanyagokat ne az
ujjaival töltse a betöltő nyakba.
Page 70

Tészta készítés
Az üzembe helyezés előtt:
1. Készítsen tésztát víz és liszt összekeverésével 5: 2 arányban (például500 g liszt és 200 ml víz,
vagy 500 g liszt, 2 tojás és 100 ml víz, keverje össze habaróval (8c) 1-4 fokozatón 2-3 percig ). A
részletekért olvassa el a „Keverő edény használata“ részt.
2. Húzza be a biztosító kart (4) és tegye fel a tartót (2a) a motorról.
3. Válassza ki a tésztíkészítő lemezt (24a, 24b, 24c, 24d, vagy 24e).
4. A spirált a kiválasztott lemezre helyezze a tészta készítőre. Nézze meg a képet. Csavarja be a
zárat (14) szorosan.
5. Ezeket a csigákat (10) helyezze a töltő nyakbkal felfelé úgy, hogy behúzza a biztosíték karját,
felhelyezi a készítőt, amíg az be nem illesazkedik a helyére.
18
24D
24B
24C 24C
24E
14
24A
A daráló használata (kép A)
1. Kérjük, bizonyosodjon meg, hogy a főkapcsoló (6) ki van kapcsolva.
2. Csatlakoztassa a készüléket 230 V, 50 Hz biztonsági aljzatba.
3. Kapcsolja be a készüléket (6) 5-6 fokozaton.
4. A nyersanyagokat az adagoló karral adagolja (18). Nyersanyagokat ne az ujjaival töltse a betöltő nyakba.
11 10
17
Page 71

Turmixgép
Az üzembe helyezés előtt:
1. Helyezze fel a hátsó tartót (2b).
2. A nyersanyagokat, amelyeket turmixolni szeretné helyezze a turmixoló edénybe (30).
3. Helyezze fel a fedőt, hogy az erősen tartson.
4. A fedő nyílásán lévő lyukba helyezze be a zárat (28) az óra járásával megegyező irányba.
5. Turmixoláshoz szükséges edényt (30) helyezze a megfelelő nyílásba és fordítsa el az óra mutató járásával megegyező irányba amíg az a helyére nem pattan.
6. Helyezze fel az edényt a fedővel (3).
A turmixgép használata
Kérjük, bizonyosodjon meg, hogy a főkapcsoló (6) ki van kapcsolva.
Csatlakoztassa a készüléket 230 V, 50 Hz biztonsági aljzatba.
Kapcsolja be a turmixgépet (6) állítsa be a kellő fokozatot.
• Fokozat 5 könnyű keverékekhez, folyadékokhoz.
• Rýchlosť 6 szilárdabb keverékekhez – folyékony és szilárd nyersanyagokho
• Pulzálás – rövid, nyomás szerű keverésekhez. (A gomb nem marad a pulzáló pozícióban. A
gombot mindig nyomja meg majd engedje el)
Hasznos tippek
• Gyulladásveszély! Legyen óvatos, ha forró folyadékot használ.
• Időről időre ki kell a turmixgépet kapcsolni és össze kell keverni a nyersanyagokat, ami a turmixgép falán maradhat.
• A készüléket kapcsolja ki és húzza ki.
• Távolítsa el a zárat a fedélről (28) és a fedelet (29).
• Az edény oldaláról a keveréket (30) törölje le splatulával.
• A splatulát tartsa kellő távolságban a késektől.
Page 72

Tisztítás
• Tisztítás előtt húzza ki a kábelt.
• Soha ne merítse a készülék testét a motorral a vízbe!
• Ne használjon éles tárgyakat és súroló tisztítószert.
A készülék testének tisztítása
• A készüléket csak kívülről törölje át nedves anyaggal.
FIGYELEM:
• A keverő tál, keverési eszközök és malom alkatrészei nem alkalmasak a mosogatógépben való
tisztításhoz.
• Ha hőnek vagy maró anyagoknak vannak kitéve károsodhat az anyag vagy elszíneződhet.
• A részeket, amelyek kapcsolatba kerülnek élelmiszerekkel mossa vízzel és egy kevés jarral.
FIGYELEM:
• A szeletelő kések nagyon élesek!
• Sérülés veszély!
• Összeszerelés előtt hagyja a gépet teljesen megszáradni.
• A részeket amelyek érintkeznek egymással érdemes időnként növényi olajjal bekenni.
Szeletelő, reszelő, tészta készítő és turmixgép
• A részeket, amelyek kapcsolatba kerülnek élelmiszerekkel mossa es vízzel és egy kevés jarral.
• Összeszerelés előtt hagyja a gépet teljesen megszáradni
• A részeket amelyek érintkeznek egymással érdemes időnként növényi olajjal bekenni.
• Ha nem sikerül leszedni a tésztát a tárcsákról, hagyja azokat teljesen megszáradni és csak
ezután próbálja eltávolítani.
FIGYELEM:
• A szeletelő kések nagyon élesek!
• Sérülés veszély!
Műszaki adatok:
Feszültség: 220-240 V~
Frekvencia: 50 Hz - 60 Hz
Energia használat: 1 500 W
Osztály: I
Maximális működési időtartam: 10 min.
A magyar használati utasítás a gyártótól kapott verzió pontos fordítása.
A kézikönyvben használt fényképek csak illusztrációk, nem egyeznek meg pontosan a termékkel.
Page 73

PL
Z
Á
R
U
K
A
4
R
O
K
Y
G
A
R
A
N
T
I
E
4
J
A
H
R
E
GWARANCJA
Rejestracja przedłużonej gwarancji 4 lata na korpus urządzenia.
Rejestrację przedłużonej gwarancji przeprowadza się poprzez wypełnienie formularza dostępn ego na adresie:
Do 2 miesięcy od zakupu urządzenia.
Przedłużona gwarancja nie dotyczy wyposażenia (akcesoriów).
www.g21-vitality.cz/warrantyregistration
G
W
L
R
A
4
A
A
T
N
C
A
J
A
Page 74

PL
Dziękujemy za zakup naszego produktu.
Przed użyciem prosimy starannie przeczytać tę instrukcję.
To urządzenie zostało poddane testom według wszystkich odpowiednich wytycznych CE, takich
jak kompatybilność elektromagnetyczna, dyrektywa niskiego napięcia, i zostało wykonane zgodnie z przepisami bezpieczeństwa.
Techniczne zmiany przewidywane bez uprzedniego ostrzeżenia.
Instrukcja bezpieczeństwa
Przed uruchomieniem urządzenia należy uważnie przeczytać instrukcję obsługi, zachować instrukcję wraz z kartą gwarancyjną lub rachunkiem. Jeśli będziecie Państwo przekazywać urządzenie
innej osobie, przekażcie jej także instrukcję obsługi.
• Nie należy używać urządzenia na wolnym powietrzu, poza budynkiem. Nie należy kłaść
urządzenia na gorące powierzchnie, powierzchnie wystawione na bezpośrednie działanie
promieni słonecznych, w wilgotnych miejscach (nie zanurzać w płynach) i unikać miejsc z ostrymi
krawędziami. Nie należy używać urządzenia, gdy ma się mokre ręce. Jeśli urządzenie jest wilgotne
lub mokre, należy niezwłocznie wyjąć z gniazda przewód zasilający.
• Podczas czyszczenia urządzenia lub przenoszenia na inne miejsce, należy je wyłączyć i zawsze
wyjmować kabel zasilający z gniazda oraz zdjąć przystawki i akcesoria.
• Nie należy używać urządzenia bez nadzoru. Podczas opuszczania miejsca pracy urządzenia, należy
je za każdym razem wyłączyć i wyjąć kabel zasilający z gniazda (pociągnąć za wtyczkę, nigdy za kabel).
• Należy sprawdzić urządzenie i kabel, czy nie są uszkodzone. Nie należy ich używać, jeśli są
uszkodzone.
• Nie należy próbować samemu naprawiać urządzenia. Zawsze należy kontaktować się z
autoryzowanym serwisem. W celu uniknięcia niebezpieczeństwa, uszkodzony kabel powinien
zostać wymieniony tylko przez profesjonalną obsługę lub wykwalifikowaną osobę i musi być
zastąpiony kablem tego samego typu.
• Należy używać tylko oryginalnych części zamiennych.
• Należy zwrócić uwagę na następujące ‘‘Specjalna instrukcja bezpieczeństwa‘‘.
Bezpieczeństwo dzieci
W celu zapewnienia bezpieczeństwa dzieci prosimy nie zostawiać całego opakowania (plastikowe
woreczki, polistyren itd.) w ich zasięgu.
Uwaga! Nie pozwalać dzieciom na zabawę foliami, istnieje ryzyko uduszenia!
W celu uniknięcia ryzyka porażenia prądem elektrycznym dzieci lub osób o ograniczonej spra-
wności psychomotorycznej należy się upewnić, że urządzenie jest używane pod nadzorem. Urządzenie nie jest zabawką. Dzieci nie powinny bawić się urządzeniem.
Specjalna instrukcja bezpieczeństwa
• Urządzenia nie należy zostawiać bez nadzoru.
• Nie należy wkładać przedmiotów w obracające się mieszadła, haki podczas pracy urządzenia.
• Urządzenie należy umieścić na gładkiej, równej i stabilnej powierzchni.
• Urządzenia nie należy podłączać do gniazda zasilającego, dopóki nie zostaną zainstalowane
wszystkie niezbędne akcesoria.
• W celu dodawania składników do młynka należy użyć popychacza.
• Niebezpieczeństwo przeciążenia! Prosimy używać urządzenia jako młynka bądź jako miksera,
nie należy używać obu funkcji jednocześnie.
Page 75

Spis elementów urządzenia
Główne elementy i standardowe akcesoria:
1. Wałek napędu
2. A. Osłona przednia
B. Osłona tylna
3. Miska
4. Dźwignia bezpieczeństwa
5. Przycisk do podnoszenia i opuszczania ramienia
6. Główny wyłącznik
7. Pokrywa na misę
8. A. Mieszadło hakowe do ugniatania
B. Mieszadło
C. Ubijak
2A
4
1
2B
8B
3 7 8A 8C
5
6
Page 76

Akcesoria opcjonalne – Młynek do mięsa
13
9
20 19
Podkładka
9.
Korpus ślimaka
10.
Ślimak
11.
Noże
12.
Sitko
13.
Nakrętka
14.
A. Akcesoria do wyrobu kiełbas, duże
15.
B. Akcesoria do wyrobu kiełbas, małe
C. Nakładka
Tacka do napełniania
17.
Popychacz
18.
Akcesoria do wyboru ciastek
19.
Akcesoria do wyrobu ciastek
20.
18
15A 15C
15B
10
11
1217 14
Page 77

Szatkowanie/ścieranie Akcesoria do wyrobu makaronu
18 17
24D
22
24B
24C
23C
23B
23A
21
Mikser
28
29
30
24E
14
24A
Korpus szatkownicy/tarki
21.
Popychacz do szatkownicy
22.
A. Tarka
23.
B. Tarka do plastrów
C. Tarka grubo trąca
Obudowa ślimaka
10.
Ślimak
11.
A. Tarcza do wyrobu makaronu spaghetti
24.
B. Tarcza do wyrobu makaronu pappardelle
C. Tarcza do wyrobu makaronu macaroni
D. Tarcza do wyrobu makaronu spaghetti
E. Tarcza do wyrobu makaronu fettucine
Nakrętka
14.
Zaślepka pokrywy
28.
Pokrywa
29.
Szklane naczynie do miksowania
30.
11 10
Page 78

Sposób używania miski do mieszania
1. Miskę należy umieścić w uchwycie i obrócić ją w kierunku LOCK (zamknięcie), aż do zatrzaśnięcia się zaczepów.
2. W celu podniesienia ramienia należy przycisnąć przycisk (5). Ramię od razu podniesie się do
góry.
3. Należy osadzić odpowiednie narzędzie poprzez umieszczenie od góry na wałku napędu i zamknąć zawleczkę w wałku poprzez przekręcenie w prawo.
4. Teraz można włożyć składniki. Nie należy przepełniać pojemnika – Maksymalna ilość składników wynosi 2 Kg.
5. Opuścić ramię za pomocą przycisku (5).
6. Należy włożyć główną wtyczkę do gniazda bezpieczeństwa 230 V/50 Hz.
7. Włączyć urządzenie, należy używać poziomów prędkości między 1-6 (w zależności od konsystencji składników).
8. W celu uruchomienia przerywanego mieszania (ugniatanie w krótkich interwałach), należy ustawić pokrętło w pozycji “PULSE“. Pokrętło należy trzymać w tej pozycji w zależności od pożądanej
długości ugniatania. Gdy pokrętło zostanie zwolnione, automatycznie powróci do pozycji “0“.
Ustawienie prędkości i użycie mieszadła hakowego dla składników poniżej 2 Kg
Prędkość Użycie Rodzaj masy
1-2 Mieszak hakowy do
wyrabiania ciasta
3-4 Końcówka do mies-
zania
5-6 Końcówka do ubijania Lekka masa (np. kremy, bita śmietana, budyń)
Pulsowanie Końcówka do ubijania Interwał (np. mieszanie bitej śmietany, ciasta na wypieki)
Uwaga:
• Maksymalny czas pracy: Cięższe masy, nie mieszać dłużej niż 10 minut, następnie należy
odstawić urządzenie do ostygnięcia na następnych 10 minut.
• W przypadku składników płynnych należy użyć pokrywki, aby mieszanka się nie rozpryskiwała.
9. Po wyrobieniu/wymieszaniu należy ustawić pokrętło (6) z powrotem do pozycji “0“, jak tylko
mieszanka uformuje się w kulę. Następnie należy wyciągnąć główną wtyczkę z gniazda.
10. W celu podniesienia ramienia należy przycisnąć przycisk (5).
11. Teraz można za pomocą łopatki lub łyżki wyjąć masę z miski.
12. Miskę można zdjąć poprzez przekręcenie jej w lewo.
13. Należy umyć akcesoria w taki sposób, jaki opisano w części „Czyszczenie”.
Masa cięższa (np. chleb, wypieki)
Średnio ciężka masa (np. ciasto na naleśniki, wypieki)
Page 79

Przepisy
Biszkopt (podstawowy przepis), prędkość 3-4
Składniki:
250 g masła lub margaryny, 250 g cukru, 1 opakowanie cukru wanilinowego, 1 szczypta soli, 4 jajka, 500 g krupczatki, 1 opakowanie proszku do pieczenia, ok. 1/8 litra mleka.
Przygotowanie:
Mąkę i pozostałe składniki umieścić w misce do mieszania, mieszankę mieszać mieszadełkiem po 30 sekund
na poziomie 1, następnie około 3 minut na poziomie 3. Następnie posmarować formę do pieczenia lub wyłożyć
papierem do pieczenia. Wlać ciasto do formy i piec w piekarniku. Przed wyjęciem ciasta z piekarnika należy
sprawdzić, czy jest gotowe. W tym celu należy wbić w środek ciasta drewniany patyczek. Jeśli patyczek jest
suchy, to znaczy, że ciasto jest już upieczone. Wyjąć ciasto na tacę i odstawić do wystudzenia.
Pieczenie: piekarnik elektryczny – grzałka dolna i górna 175-200°C
Piekarnik gazowy – poziom 2-3
Czas pieczenia: 50-60 minut
W zależności od gustu, przepis ten może się zmieniać, na przykład można dodać 100 g rodzynków, orzeszków,
lub startej czekolady. W rzeczywistości, możliwości jest o wiele więcej.
Rogaliki z siemieniem lnianym, prędkość 1-2
Składniki:
500-550 g mąki, 50 g siemienia lnianego, 3/8 litra mleka, 1 kostka drożdży (40 g), 100 g chudego twarogu, 1
łyżeczka soli, 2 łyżeczki wody do posmarowania ciasta.
Przygotowanie:
Siemię lniane namoczyć w 1/8 litra mleka lub w letniej wodzie. Resztę letniej wody (1/4 litra) wlać do misy do
mieszania, rozdrobnić drożdże i umieścić je w wodzie, następnie wymieszać hakiem do wyrabiania ciasta ustawionym na poziom 2. Drożdże muszą być całkowicie rozpuszczone. Do miski wsypać mąkę, siemię lniane, sól
oraz twaróg. Dokładnie mieszać na poziomie 1, następnie przełączyć na poziom 2 i kontynuować mieszanie od
3-5 minut. Ciasto przykryć i odstawić do wyrośnięcia w ciepłe miejsce na około 46-60 minut. Następnie masę
jeszcze raz dokładnie wymieszać i wyjąć z miski, z ciasta uformować 16 rogalików. Blaszkę wyłożyć wilgotnym
papierem do pieczenia. Rogaliki umieścić na blasze i odstawić do wyrośnięcia na 15 minut. Posmarować je letnią
wodą, a następnie wstawić do piekarnika.
Pieczenie: piekarnik elektryczny – grzałka górna i dolna 200-220°C (podgrzać na 5 minut),
Piekarnik gazowy – poziom 2-3
Czas pieczenia: 30-40 minut
Krem czekoladowy, prędkość 5-6
Składniki:
200 ml śmietany, 150 g polewy czekoladowej gorzkiej, 3 jajka, 50-60 g cukru, 1 szczypta soli, 1 opakowanie
cukru wanilinowego, 1 łyżka stołowa koniaku lub rumu, starta czekolada lub płatki, wiórki czekoladowe.
Przygotowanie:
W misce do mieszania ubić za pomocą końcówki do ubijania śmietanę na sztywną pianę. Śmietanę wyjąć z miski
i odstawić do wystudzenia. Podgrzać polewę czekoladową według instrukcji na opakowaniu lub w kuchence mikrofalowej 3 minuty na 600 W. W tym samym czasie w misce ubić jajka z cukrem, cukrem wanilinowym, rumem
i solą za pomocą ubijaka ubijać na poziomie 3 na pianę. Dodać rozpuszczoną czekoladę i mieszać na poziomie
5-6. Odrobinę ubitej śmietany odstawić dla celów dekoracyjnych. Dodać resztę kremu śmietanowego do masy i
krótko mieszać za pomocą mieszania pulsacyjnego. Podawać dobrze wystudzony.
Page 80

Młynek do mięsa
Przed pierwszym uruchomieniem:
1. Należy przesunąć dźwignię mocującą (4) i zdjąć pokrywę (2a) z silnika.
2. Umieścić obudowę ślimaka (10) otworem do napełniania od góry w napędzie i obracać śrubę
w kierunku wskazówek zegara, do czasu jej zablokowania.
3. Miskę należy nałożyć na otwór do napełniania w taki sposób, że pojemnik będzie umieszczony
pod otworem.
4. Ślimak należy włożyć do poziomej części pokrywy obudowy ślimaka, dopóki ślimak nie znajdzie się na odpowiednim miejscu. Prosimy przeczytać część „Wyrób mięsa mielonego” oraz
„Wyrób kiełbas”.
Wyrób mięsa mielonego (obrazek A)
A
10 11 12 13 14
1. Najpierw należy przymocować noże na końcu ślimaka, a następnie dodać jedną z trzech tarczy
według uznania. Należy zachować ostrożność podczas mocowania sitka na pokrywie ślimaka.
Zaślepkę szczelnie przykręcić (14).
2. Umieścić kawałki mięsa na tacy (17) i wkładać do otworu do napełniania.
3. Przy końcu młynka umieścić naczynie.
4. Należy się upewnić, że przycisk (6) jest wyłączony.
5. Urządzenie podłączyć do gniazda bezpieczeństwa 230 V, 50 Hz.
6. Za pomocą przycisku (6) włączyć urządzenie.
7. Jeśli zajdzie potrzeba, mięso można popchnąć popychaczem (18). W żadnym wypadku nie
używać do tego celu palców.
Uwagi:
• Mięso należy pokroić na około 2,5 cm kawałki. Trzeba zwrócić uwagę, aby mięso nie zawierało
kości i ścięgien.
Page 81

Wyrób kiełbasy (obrazek B/C)
B
10
11
19
15B
14
C
10
1. Nakładkę umieścić (15c) w wale ślimaka.
2. Włożyć nakładki do wyrobu kiełbasy (15a lub 15b) do nakrętki. Nakładka 15a służy do wyrobu
grubszej kiełbasy, natomiast nakładka 15b służy do wyrobu cieńszej kiełbasy.
3. Zaślepkę uszczelnić na obudowie ślimaka.
4. Następnie wziąć jelito i na końcu zawiązać węzełek.
5. Tacę i otwór do napełniania napełnić mięsem.
6. Powtórzyć krok 4-7 w sposób, który został opisany w części „Wyrób mięsa mielonego”.
7. Zmieloną mieszanką mięsną można napełniać jelita na kiełbasy.
8. Kiedy pierwsza kiełbasa osiągnie odpowiednią długość, za pomocą palców należy docisnąć
mięso i związać koniec jelita. Raz lub dwa obrócić kiełbasę wokół jej własnej osi.
Uwagi:
• Do mielenia mięsa są odpowiednie prędkości 1-4.
• Urządzenie nie powinno pracować dłużej niż 10 minut. Po 10 minutach pracy należy odstawić
je do ostygnięcia na 10 minut.
• Jeśli nie posiadacie Państwo doświadczenia w pracy z tym urządzeniem, można je po każdym
napełnieniu kiełbasy wyłączać. Wykonać krok 8. Następnie ponownie włączyć młynek.
• Jeśli do produkcji kiełbasy używamy prawdziwego jelita, przed użyciem jelita należy je na chwilę
odstawić do wody w celu namoczenia.
• Jelito powinno być wypełnione „luźno”, aby się nie przerwało podczas gotowania czy smażenia.
11
15C
15A
14
Page 82

Wyrób ciastek (obrazek D)
D
10
1. Prosimy postępować zgodnie z krokami 1-4 w sposób, który jest opisany w części „Przed
pierwszym uruchomieniem”.
2. Odkręcić zaślepkę i wybrać odpowiednią nakładkę do szatkowania.
3. Masę umieścić na tacy i wkładać do otworu do napełniania.
4. Należy się upewnić, że główny przycisk (6) jest wyłączony.
5. Urządzenie podłączyć do gniazda bezpieczeństwa 230 V, 50 Hz.
6. Za pomocą przycisku (6) włączyć urządzenie.
7. Jeśli zajdzie potrzeba, masę można popchnąć popychaczem (18). W żadnym wypadku nie
używać do tego celu palców.
8. Podłużne ciasto należy trzymać przy końcu i kroić według uznania.
11 19 920 14
Page 83

Szatkownica/tarka
Przed pierwszym uruchomieniem:
1. Pociągnąć dźwignię bezpieczeństwa (4) i zdjąć osłonę (2a) z silnika.
2. Przesunąć dźwignię bezpieczeństwa (4), korpus szatkownicy (21) umieścić otworem do napełniania od góry w napędzie, a następnie zwolnić dźwignię bezpieczeństwa.
3. Wybrać tarczę (tarcza 23a, tarcza grubo trąca 23c, lub do plastrów 23b). Odpowiednią tarczę
należy umieścić w korpusie szatkownicy otworem do przodu.
Obsługa szatkownicy
1. Należy się upewnić, że główny przycisk (6) jest wyłączony.
2. Urządzenie podłączyć do gniazda bezpieczeństwa 230 V, 50 Hz.
3. Szatkownicę włączyć za pomocą przycisku (6) i ustawić poziom 5-6.
4. Składniki należy umieszczać w kierunku do dołu za pomocą popychacza do szatkownicy (22).
Składników nie należy wpychać do otworu do napełniania palcami.
Page 84

Wyrób makaronów
Przed pierwszym uruchomieniem:
1. Należy przygotować ciasto, mieszając mąkę z wodą w stosunku 5:2 (na przykład 500 g mąki
i 200 ml wody lub 500 g mąki, 2 jajka i 100 ml wody, zamieszać trzepaczką (8c) na poziomie 1-4
przez ok. 2-3 minuty). Szczegóły można przeczytać w części “Sposób użycia miski do mieszania“.
2. Pociągnąć dźwignię bezpieczeństwa (4) i zdjąć osłonę (2a) z silnika.
3. Wybrać tarczę do wyrobu makaronu (24a,24b,24c,24d, lub 24e).
4. Spiralę i wybraną tarczę do wyrobu makaronu umieścić w pojemniku do wyrobu makaronu.
Patrz obrazek. Zaślepkę szczelnie przykręcić (14).
5. Obudowę ślimaka (10) umieścić otworem do napełniania od góry w napędzie w następujący
sposób, najpierw należy przesunąć dźwignię bezpieczeństwa, nasadzić pojemnik do wyrobu
makaronu aż do momentu jego odpowiedniego osadzenia.
18
24D
24B
24C 24C
24E
14
24A
Obsługa młynka
1. Należy się upewnić, że główny przycisk (6) jest wyłączony.
2. Urządzenie podłączyć do gniazda bezpieczeństwa 230 V, 50 Hz.
3. Młynek włączyć za pomocą przycisku (6) i ustawić poziom 5-6.
4. Składniki należy umieszczać w kierunku do dołu za pomocą popychacza (18). W żadnym wypadku nie wykonywać tej czynności za pomocą palców.
11 10
17
Page 85

Mikser
Przed pierwszym uruchomieniem:
1. Zdjąć tylną osłonę (2b).
2. Składniki do zmiksowania umieścić w naczyniu do miksowania (30).
3. Nasadzić pokrywę, aby mocno się trzymała.
4. Do otworu w pokrywie włożyć zaślepkę (28) i przykręcić ją w kierunku wskazówek zegara.
5. Naczynie do miksowania (30) nasadzić na odpowiedni otwór i obrócić je w kierunku wskazówek zegara aż do zatrzaśnięcia zaczepów mocujących.
6. Umieścić naczynie do mieszania z pokrywką (3).
Sposób używania miksera
Należy się upewnić, że główny przycisk (6) jest wyłączony.
Urządzenie podłączyć do gniazda bezpieczeństwa 230 V, 50 Hz.
Włączyć mikser i za pomocą pokrętła (6) ustawić odpowiedni poziom prędkości.
• Prędkość 5 dla delikatnego użycia dla płynnych składników.
• Prędkość 6 dla bardziej spójnej konsystencji – do miksowania płynnych i stałych składników.
• Miksowanie pulsacyjne – dla użycia w krótkich, przerywanych interwałach. (Przycisk nie pozostaje w pozycji pulsacyjnej. Przycisk zawsze należy przycisnąć i trzymać, następnie powtarzać
czynność).
Przydatne wskazówki
Ryzyko poparzenia! Ostrożnie podczas pracy z gorącymi płynami.
Od czasu do czasu nieuniknione może być wyłączenie miksera i wymieszanie składników, które
przylegają do ścian miksera.
• Urządzenie należy wyłączyć i odłączyć od zasilania.
• Zdjąć zaślepkę z pokrywy (28) i pokrywę (29).
• Przylegające do ścian naczynia do miksowania składniki (30) należy zdjąć za pomocą łopatki.
• Łopatkę trzymać w bezpiecznej odległości od noży.
Page 86

Czyszczenie
• Przed przystąpieniem do czyszczenia należy odłączyć kabel z gniazda.
• Nie zanurzać korpusu urządzenia z silnikiem w wodzie i innych płynach!
• Nie używać ostrych przedmiotów oraz abrazyjnych środków czyszczących.
Czyszczenie korpusu urządzenia
• Urządzenie tylko obmyć wilgotną szmatką z zewnątrz.
UWAGA:
• Miska do mieszania, akcesoria do mieszania i elementy młynka nie są odpowiednie do mycia
w zmywarce. Jeśli zostaną wystawione na działanie ciepła lub substancji żrących, mogą ulec uszkodzeniu lub się odbarwić.
• Elementy, które miały kontakt z produktami spożywczymi należy umyć wodą z jarem (płyn do
mycia naczyń).
OSTRZEŻENIE:
• Ostrza młynka są bardzo ostre!
• Ryzyko zranienia!
• Przed montażem należy odstawić części urządzenia do całkowitego wyschnięcia.
• Części, które się o siebie ocierają, polecamy od czasu do czasu posmarować olejem roślinnym.
Szatkownica, tarka, urządzenie do wyrobu makaronu i mikser
• Elementy, które miały kontakt z produktami spożywczymi należy umyć wodą z jarem (płyn do
mycia naczyń).
• Przed montażem należy odstawić części urządzenia do całkowitego wyschnięcia.
• Części, które się o siebie ocierają, polecamy od czasu do czasu posmarować olejem roślinnym.
• Jeśli występują trudności z usunięciem ciasta z tarczy, należy poczekać, aż ciasto zupełnie
wyschnie, a następnie je usunąć.
OSTRZEŻENIE:
• Ostrza młynka są bardzo ostre!
• Ryzyko zranienia!
Parametry techniczne:
Napięcie: 220-240 V~
Częstotliwość: 50 Hz - 60 Hz
Zużycie energii: 1 500 W
Klasa: I
Maksymalny czas pracy: 10 min.
Polska wersja językowa instrukcji jest dokładnym tłumaczeniem oryginalnej instrukcji producenta.
Zdjęcia wykorzystane w tym podręczniku są jedynie ilustracją i nie może dokładnie dopasować produkt.
Page 87

Page 88

powerful blenders “Smoothie”Food processor “Promesso“
vertical juicers “Emotion” horizontal juicers “Chamber” and “Gourmet”
food dehydrators “Harmony”
more products G21
 Loading...