

Page 1
Page 2

Page 3

EN
Thank you for purchasing our product.
Before use, please read these instructions carefully. After reading the manual you will be sure that
you use the juicer safely, comfortably and efficiently and also that you are preventing improper
handling.
IMPORTANT SAFETY INSTRUCTIONS
When using electrical appliances, basic safety precautions should always be followed including
the following:
1. Read all instructions before using.
2. To protect against risk of electrical shock, do not put main body (motor) in water or any liquid.
3. Children should be supervised to ensure that they to do not play with the appliance.
4. Do not operate any appliance with damaged cord or plug or after the appliance malfunctions,
or is dropped or damaged in any manner. Return the appliance to the nearest authorized service
centre for examination, repair or electrical or mechanical adjustment.
5. If the supply cord is damaged, it must be replaced by the manufacturer or its service agent.
6. Unplug from outlet when not in use, before assembling or taking off parts and before cleaning.
7. Avoid contact with moving parts.
8. Do not use attachments not recommended or sold by the manufacturer as it may lead tofire,
electric shock or injury. Do not customize or upgrade machine without professional supervision.
Doing so will void the warranty of the appliance.
9. Always ensure you switch the juicer to the OFF position and the motor has stopped completely
before you disassemble the juicer.
10. Do not put your fingers or other objects into the juicer while it is in operation. If food becomes
lodged in the inlet, use the plunger to push it down, or use the reverse button on the machine
todislodge. If this is not possible turn juicer off and wait for motor to completely stop before disassembling juicer to remove food.
11. Do not use outdoors.
12. Do not use appliance for other than the intended purpose.
13. Lift appliance with the handle only.
14. Do not put any parts into the dishwasher.
15. Do not use appliance for more than 20 minutes continuously as the motor may overheat
andstop working; use it after the appliance has cooled and the motor will work again.
16. Do not use the appliance to juice hard materials, including pits, ice, frozen fruit, large or hard
seeds (eg peach, plum, persimmon, rambutan, durian seeds).
17. This appliance is not intended for use by persons (including children) with reduced physical,
sensory or mental capabilities, or lack of experience and knowledge, unless they have been given
supervision or instruction concerning use of the appliance by person(s) responsible for their safety.
18. Switch off the appliance and disconnect from power supply before changing accessories
ortouching any moving parts.
Page 4
Installation and operating instructions
A. Component identification and content check list
Main Components
A Hopper
B Squeezing Screw
C Strainer-less pulp
D Strainer-more pulp
E Spinning Brush
F Bowl
G Base
H Cleaning Brush
I Pusher
J Container
Pulp
outlet
Juice
outlet
Fig 1
Note: Do not turn the appliance on before the ingredients are inserted and do not operate
withanempty bowl.
Important: The hopper edge must point to close sign on the base in order for the machine tooperate properly. (Fig 1)
Page 5

B. Assembly Instructions
Important: Prior to assembling the juicer please check this point: At the base of the bowl there
isarubber stopper. When in place the stopper ensures all of the juice only exits via the juice outlet.
Before juicing always ensure that the rubber stopper is firmly in place. (Fig 2)
Fig 2
1. Assemble the bowl on the base. (Fig3)
A. Make sure the bowl is placed all the way into the shaft of the base.
2. Choose which strainer you need to use. The Yellow Strainer is a fine strainer and will reduce theamount of pulp in your juice. The Orange Strainer is a coarse strainer and will increase
the amount of pulp in your juice. Insert the strainer into the spinning brush. Align the red dot
onthestrainer with the red dot on the bowl and insert strainer + spinning brush into the bowl.
When the dots are correctly aligned the strainer + spinning brush will lock in place. (Fig 4)
3. Insert the squeezing screw into the strainer and turn until it drops into position. (Fig 5)
4. Assemble the hopper onto the bowl. (Fig 6)
A. Align the small arrow on the hopper with the red dot on the bowl.
B. Twist the hopper so that the plastic tab with the arrow on it points to the closed sign
onthebase. (Fig 7)
Note: The small arrow from part 4. A will no longer be aligned with the red dot once the hopper
islocked to the close position. (Fig 7)
bowl
base
Fig 3 Fig 4
Fig 5 Fig 6
Fig 7
Page 6

C. Operating Instructions
Warning:
• Do not operate the juicer with wet hands as it may cause an electric shock.
• Do not operate the juicer untill the juice ingredients are inserted.
• Do not operate for more than 20 minutes at one time.
Important: The Juicer has an auto shut down feature to protect the motor and hence providing you
with a long lasting machine. If the components are not aligned or installed correctly; or the motor
overheats due to extended juicing; or the strainer becomes clogged, the juicer will automatically
shut down. This is normal and prevents permanent damage to your slow juicer.
Switch the machine off if this happens. Check components are correctly installed and there is no
food clogged in the strainer. Wait 5 minutes for the motor to cool then resume normal operation.
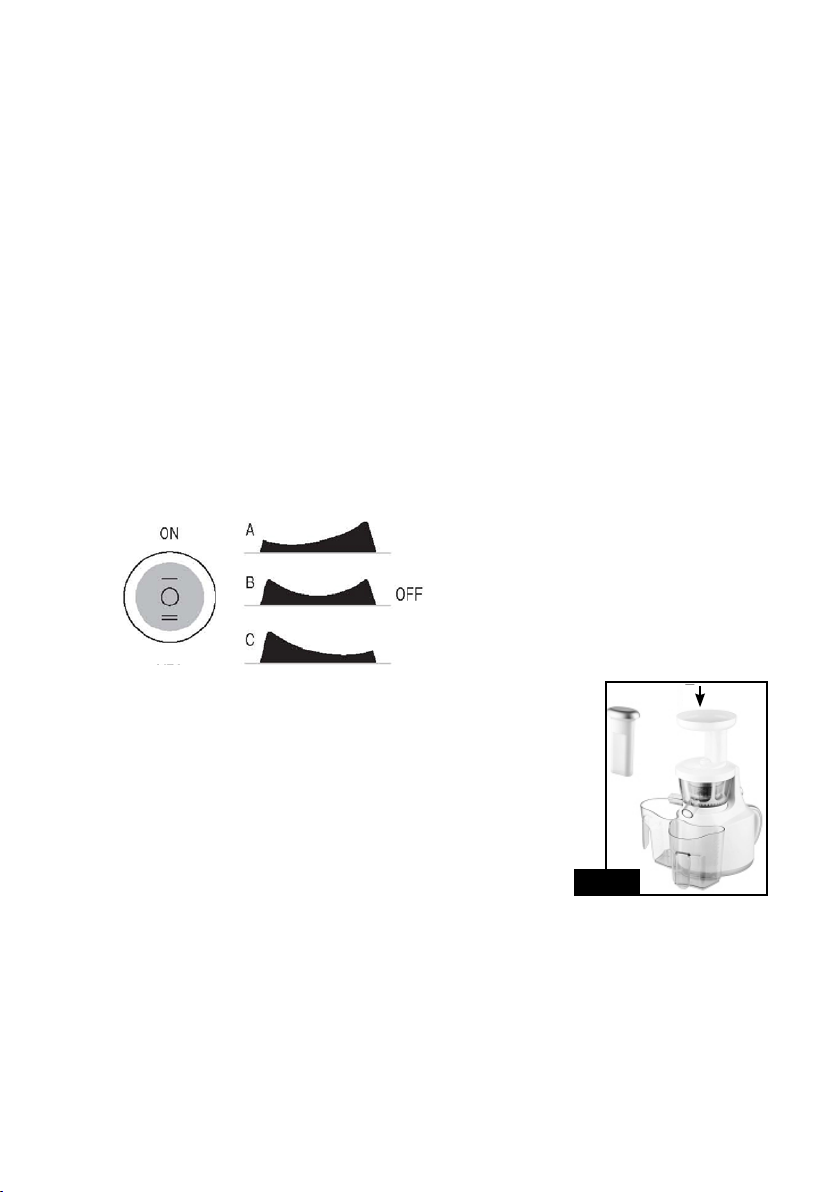
1. Plug in the juicer.
2. Place a container below the juicer outlet and a container below the pulp outlet.
3. The juicer power button (located at the top of the handle) has 3 positions.
A. ON-This starts the motor and juicing process
B. OFF-This is the central position of the button. It switches off the appliance.
C. REV-Reverse. Only use this function when something is stuck in the juicer and it needs
tobe unclogged.
REVERSE
4. Prepare the material you wish to juice and insert into the hopper
Ensure pieces are not larger than 4cm for optimal juicer extraction.
Remove any large pits or seeds.
Always pre-wash food before juicing.
Do not overstuff the hopper or force food in. Insert food slowly
toallow the juicer time to work. The pusher is only be used if food
becomes stuck. (Fig 8)
5. Switch the power button to “ON”.
Feed material into the hopper, a segment at a time. Allow juicer time
to work and process the material before adding more.
Do not overstuff the hopper or force food in. The pusher is only to be
used if food becomes stuck.
6. When you are finished switch the power button to ‘OFF’.
Note: If you are making different juices in one session and want to
avoid mixing of flavors, pour water into the hopper and let the machine run fora minute to clean the unit. Discard the rinsing water.
Fig 8
Page 7
D. If the machine becomes clogged and inoperable
1. Turn the machine off and press the reverse button for a few seconds then try operating again.
Note: The reverse button works with a ‘pulse’ motion.
2. If the reverse button does not work turn off the machine and switch off at the power point. Disassemble the unit to dislodge any material then reassemble as per the instructions and try again.
E. How to disassemble and clean the unit
1. Switch off the unit.
2. Twist the bowl and hopper as one piece
tothe right so that the arrow on the hopper moves away from the close position. Lift off. (Fig 9)
3. Disassemble the parts in the order shown
by the diagram. (Fig 10)
4. Use the brush to clean all of these parts
thoroughly in warm soapy water then dry thoroughly. Ensure the pulp outlet of the bowl
Fig 9
isclear. (Use the flat end of the cleaning brush
to clear trapped material from the pulp outlet).
Unplug the rubber stopper for easier access
tothe pulp outlet.
5. Use a damp cloth or dry towel to wipe
down the base of the unit. Do not rinse
thebase withwater.
Fig 10
Cleaning Tips:
Periodically remove the silicone brushes from the spinning brush and clean thoroughly before reassembling. Clean thoroughly immediately after each use to minimize staining. Pull out the rubber
stopper on the base of the bowl to clean bowl effectively. Always ensure the rubber stopper isre-
-inserted prior to juicing otherwise it may cause a leak. Do not use harsh abrasives or chemicals
toclean the juicer. Do not clean in the dish washer.
Technical data
Product Name- Slow Juicer
Input Voltage- AC 220 - 240V
Frequency- 50 Hz
Power- 150 W
Speed- 80 rpm
Images used in this manual are for illustrational
purposes only and may differ from the actual
Motor- Single Phase Induction
Maximum Usage time- 20 min
product.
Page 8
Frequently Asked Questions
What are the things I should not put into Juicer?
?
Any produce with large or hard seeds (eg persimmon, peach, plum, durian, rambutan, etc).
Iceandfrozen fruit/vegetables are also not recommended.
? Can the juicer be used as a food grinder or mill?
No, this is not designed to grind or mill (eg rice, grains, peppercorns etc). You may use thejuicer
toextract milk from grains etc AFTER it has been soaked for at least 6 hours.
? Must I disassemble and clean after using Juicer?
Yes, simple cleaning by pouring water into the feeding chute is not enough. You need to disassemble all attachments and clean thoroughly with warm water.
? If the juicer gets stuck and the cover cannot be opened after juicing, is this a defect? Should
I contact customer service?
When juicing fibrous vegetables, the fibres may tend to get clogged or stuck at the pulp outletandthis may cause the juicer to stop working. Another reason may be inserting the produce
toofast into the feeding chute too fast. Press the REVERSE button for 1 minute and then press ON
for 2-3minutes, this process will unclog stuck fibres. You can also pour water through thechute
todo simple cleaning that will help to unclog fibres. If you still have problems with disassembling
themachine, contact our customer service.
Troubleshooting
Before you call for service, review these troubleshooting tips:
Problem Possible Causes What To Do
No power to juicer Juicer is not plugged in.
Incorrect assembly.
Check the juicer is plugged in.
Reassemble the juicer according
to the instructions.
Motor has stopped Bowl has been overfilled
Leaking from beneath
the bowl
Stain on the bowl, Strainer, Spinning brush
Squeaking noise during
operation
Damage to the strainer Frozen foods, ice, pits, seeds,
withmaterial.
Overuse has caused the motor
to shut down as a precaution
tooverheating.
Rubber plug on base of bowl is
not correctly inserted.
Natural color from juicing
materials.
Juicing noise from squeezing
screw.
unknown substance or too
much material in the bowl.
Press the reverse power button
to try to clear the clog. You may
need to repeat this a few times.
Switch off and let the motor cool
before using again.
Ensure the rubber plug on base
of bowl is completely inserted.
This is perfectly normal. Toreduce discoloration ensure you
rinse and clean the appliance
immediately after use.
This is perfectly normal. Ensure
you do not overload the juicer.
Ensure you read the instructions carefully on the correct
use ofthejuicer. Do not overfill
thejuicer.
Page 9
RECIPES
Apple natural ice cream
Ingredients:
• 600 grams of apples
• 4 spoons of milk powder
• 2 spoons of condensed milk
Process:
Wash the apples and cut them into small pieces.
Put prepared apples into juicer.
Milk powder does not dissolve easily, so use
asmaller amount of prepared apple juice to which
mix condensed milk. ( preferably use blender G21
Perfect Smoothie)
Mix the juice with mixture of milk.
Put into the large bowl.
Put into the freezer for at least 1-2 hours.
Juice to cleanse your body
Ingredience:
• 300 grams of carrot
• 200 grams of spinach
• 250 grams of carrot
• 150 grams of lettuce
• 100 grams of spinach
• 300 grams of carrot
• 100 grams of beetroot
• 100 grams of cucumber
Pineapple ice cream
Ingredients:
• 500 grams of pineapples
• 1 white yoghurt
• 3 spoons of condensed milk
Process:
Remove the rind of pineapple, cut it into small pieces and put it into blender.
Mix the juice with yoghurt and condensed milk.
Put mixture into the freezer for 1-2 hours.
Juice against headaches and migraines
Ingredients:
• 300 grams of carrot
• 100 grams of dandelion
• 144 grams of spinach
• 300 grams of carrot
• 200 grams of celery (if you use celery
stick, change shares to 350 grams of carrot
and150grams of celery)
Juice against colds
Ingredients:
• 250 grams of carrot
• 150 grams of celery
• 100 grams of radish
• 300 grams of carrot
• 75 grams of beetrot
• 125 grams of pomegranate
• 200 grams of grapefruit
• 10 grams of lemon
• 200 grams of orange
The recipes were developed in cooparation with www.centrumzdravibrno.cz, unique and com-
prehensive measurement of the overall state of organism, consulting, health information andse-
minars, courses and RAW food school.
Page 10

EN
Warranty card
To be filled in by the sales representative
Productname:
Product type............................................................
Serial number............................................................
Warranty period......................24..............................
The above specified product was handed to the customer free of any defects including all accessories and trade
andtechnical documentation. Customer was properly familiarized with the principles of safe use, operation andtechnical maintenance of the product.
Customer name ...................................................Customer address ...................................
Dealer signature ...................................................Date of sale .............................................
Stamp seller
WARRANTY TERMS
Object of warranty:
Warranty applies to the product itself including all supplied accessories.
Warranty period:
Warranty period is 24 months from date of sale to the customer. The period between applying of the warranty claim
until the date of customer’s duty to pick the product up upon the warranty repair does not count into the warranty
period.
Dealer is obliged to provide the customer with the confirmation of the warranty claim date and also warranty repair
and repair duration. If the product is replaced under warranty, a new warranty period starts from the date when customer receives the new product.
Warranty coverage and importer duties:
Importer is responsible for the product having the characteristics typical for this goods category and given product
parameters during the whole warranty period.
Importer is not responsible for any defects caused by usual wear or improper use of the product.
Warranty expiration:
The right for warranty claim is cancelled in following cases:
a. If the product was not used and maintained according to the user manual or if it was damaged by unqualified
action of the user.
b. If the product was used in inappropriate conditions or for different purposes than the ones applicable to this
product category.
c. If the user can not present the warranty card.
d. If any data in the original manufacturer, dealer or service documentation was intentionally modified.
e. If any part of the product was replaced by an unoriginal part.
f. If the product was damaged or excessively worn because of insufficient maintenance.
g. If the product was damaged by force majeure
h. If the product was modified without the manufacturer consent.
i. If the defect was caused by improper storage of the product.
j. If the damage was caused by natural and regular wear of the product.
k. If the product was connected or used with another device which was not approved by the importer or manufacturer.
Warranty claims:
Warranty claims should be filed at the dealer. The user is obliged to present a filled in warranty card or proof of purchase. Warranty repairs are carried out by the dealer / importer or approved service centers.
Legal:
Other relationships between the seller (dealer / importer) and buyer (customer) are regulated by the applicable civil
or commercial code.
Distributor for CZ: PENTA CZ s.r.o Distributor for SK: PENTA SK s.r.o. Distributor for other countries Penta CZ s.r.o.
Page 11

DE
Vielen Dank, dass Sie sich für unser Produkt entschieden haben.
Lesen Sie bitte vor dem Gebrauch diese Gebrauchsanweisung sorgfältig durch. Nach der Lektüre
des Handbuchs werden Sie in der Lage sein, den Saftpresse sicher, bequem und effizient zu benutzen und auch dessen unsachgemäße Handhabung vermeiden können.
BEI DER VERWENDUNG VON ELEKTRISCHEN GERÄTEN SOLLTEN IMMER GRUNDLEGENDE
Sicherheitsvorkehrungen befolgt werden, einschließlich der folgenden:
1. Lesen Sie vor Gebrauch alle Anleitungen durch.
2. Um sich gegen die Gefahr von Stromschlägen zu schützen, tauchen Sie das Basisgehäuse
(Motor) nie in Wasser oder andere Flüssigkeiten.
3. Kinder sollten beaufsichtigt werden, um sicherzustellen, dass sie nicht mit dem Gerät spielen.
4. Ein Gerät mit beschädigtem Kabel oder Stecker oder ein Gerät das Störungen während
desBetriebs aufweist, oder das fallengelassen oder in irgendeiner Art und Weise beschädigt wurde, darf nicht in Betrieb genommen werden. Bringen Sie das Gerät zum nächsten autorisierten
Kundendienst zur Überprüfung, Reparatur oder zum Richten der elektrischen bzw. mechanischen
Komponenten.
5. Wenn das Netzkabel beschädigt ist, darf dieses nur vom Hersteller oder von dessen Kundendienst ersetzt werden.
6. Ziehen Sie das Gerät aus der Steckdose, wenn es nicht in Gebrauch ist, vor dem Zusammenbau oder dem Entfernen von Teilen oder vor dem Reinigen.
7. Vermeiden Sie Kontakt mit beweglichen Teilen.
8. Verwenden Sie kein Zubehör, das nicht vom Hersteller empfohlen oder verkauft wurde,daes sonst zu Bränden, Stromschlag oder Verletzungen kommen kann. Keine Änderungen
amGerät ohne professionelle Aufsicht, andernfalls erlischt die Garantie des Gerätes.
9. Vergewissern Sie sich, dass die Saftpresse ausgeschaltet und der Motor vollständig angehalten hat, bevor Sie den Entsafter zerlegen.
10. Halten Sie nicht Ihre Finger oder Fremdkörper in die Saftpresse, solange sie in Betrieb ist. Wenn
die Lebensmittel in der Einlass gezogen werden, verwenden Sie den Presskolben, umsienach
unten zu drücken, oder verwenden Sie die Rücklauftaste am Gerät um sie zu entfernen. Wenn
dies nicht möglich ist, schalten Sie den Entsafter aus und warten Sie bis der Motor zum Stillstand
gekommen ist, bevor Sie die Saftpresse demontieren um die Lebensmittel zu entfernen.
11. Nicht im Freien verwenden.
12. Gerät nicht für andere als den vorgesehenen Zweck verwenden.
13. Gerät nur am Griff haltend anheben.
14. Geben Sie keine Teile in die Spülmaschine.
15. Gerät nicht länger als 20 Minuten ununterbrochen laufen lassen, da sonst sich der Motor
überhitzen kann und das Gerät somit aufhören kann zu funktionieren; ist dies mal der Fall, lassen
Sie das Gerät abkühlen bis der Motor wieder läuft.
16. Verwenden Sie das Gerät nicht zum Entsaften von harten Lebensmitteln, einschließlich Kerne,
Eis, Tiefkühlobst, großen oder harten Samen bzw. Kernen (z.B. Pfirsich, Pflaume, Kaki, Rambutan,
Durian Samen).
17. Dieses Gerät ist nicht geeignet zur Verwendung durch Personen (einschließlich Kindern)
miteingeschränkten physischen, sensorischen oder geistigen Fähigkeiten oder mangels Erfahrung
und Wissen, es sei denn, sie werden angemessen beaufsichtigt oder sie erhielten eine ausführliche
Anleitung zur Benutzung des Geräts von Personen, die für ihre Sicherheit verantwortlich sind.
18. Trennen Sie das Gerät vom Netz , bevor Sie Zubehörteile tauschen oder bewegliche Teile
berühren.
Page 12

Installation und bedienungsanleitung
A. Identifikation der Bestandteile und Lieferumfang
Hauptkomponenten
A Trichter
B Förderschnecke
C Sieb weniger Fruchtfleisch
D Sieb mehr Fruchtfleisch
E Rotierender Pinsel
F Schüssel
G Basis
H Reinigungsbürste
I Stößel
J Behälter
Zellstoffauslaß
Saftaustritt
Abb. 1
Hinweis: Betreiben Sie das Gerät erst nach Einfüllen der Lebensmittel und nicht mit einer leeren
Schüssel.
Wichtig: Der Trichterrand muss auf die Geschlossen-Markierung auf der Basis zeigen, damit
dieMaschine richtig funktionieren kann (Abb. 1).
Page 13

B. Montageanleitung
Wichtig: Vor der Montage der Saftpresse überprüfen Sie bitte folgenden Punkt: An der Basis
derSchüssel befindet sich ein Gummistopfen. Der Stopfen sorgt dafür, dass sämtlicher Saft nur
über den Saftablauf austritt. Vor dem Entsaften muss immer darauf geachtet werden, dass derGummistopfen fest angebracht ist (Abb. 2).
Abb. 2
1. Montieren Sie die Schüssel auf die Basis (Abb 3).
A. Stellen Sie sicher, dass die Schale vollständig im Schacht der Basis eingeschoben ist.
2. Wählen Sie das Sieb aus, das Sie verwenden möchten. Bei dem gelb Sieb handelt es sich
umein feines Sieb und es reduziert die Fruchtfleischmenge im Saft. Das orangene Sieb ist grober und eserhöht die Fruchtfleischmenge im Saft. Legen Sie das Sieb in die Drehbürste. Richten Sie den roten Punkt auf dem Sieb mit dem roten Punkt auf der Schüssel aus und schieben Sieb + Drehbürste in die Schüssel. Wenn die Punkte richtig ausgerichtet sind, rastet
dasSieb+Drehbürste ein (Abb. 4).
3. Legen Sie die Pressschnecke in das Sieb und drehen sie so lange bis sie an der richtigen Stelle
einrastet (siehe Abb. 5).
4. Montieren Sie den Trichter auf die Schüssel (Abb. 6).
A. Richten Sie den kleinen Pfeil auf den Trichter auf den roten Punkt auf der Schüssel aus.
B. Drehen Sie den Trichter, so dass die Kunststofflasche mit dem Pfeil auf das „geschlossen“
Zeichen auf der Basis zeigt (Abb. 7).
Hinweis: Die kleinen Pfeil aus Teil 4.A ist nicht mehr mit dem roten Punkt ausgerichtet, wenn
derTrichter in die geschlossene Position (Abb. 7) eingerastet ist.
schüssel
basis
Abb. 3 Abb. 4
Abb. 5 Abb. 6
Abb. 7
Page 14
C. Betriebsanleitung
Warnung:
• Bedienen Sie die Saftpresse nicht mit feuchten Händen, da sonst die Gefahr eines elektrischen Schlags besteht.
• Schalten Sie die Saftpresse erst nach Einfüllen von Lebensmitteln ein.
• Lassen Sie das Gerät nicht länger als 20 Minuten am Stück laufen.
Achtung: Der Entsafter hat eine automatischer Abschaltfunktion, um den Motor zu schützen
undum Ihnen eine langlebige Maschine anzubieten. Wenn die Komponenten nicht richtig ausgerichtet oder zusammengesetzt sind; oder der Motor überhitzt wegen langer Laufzeit; oder wenn
das Sieb verstopft ist, wird die Saftpresse automatisch abgeschaltet. Das ist normal und verhindert bleibende Schäden an Ihrer langsamen Saftpresse.
Wenn dies geschieht, schalten Sie das Gerät aus. Überprüfen Sie die Komponenten ob sie richtig
zusammengebaut sind und ob keine Lebensmittel das Sieb verstopfen. Warten Sie 5 Minuten,
bisder Motor abkühlt ist und nehmen dann den normalen Betrieb wieder auf.
1. Stecken Sie den Entsafter in die Steckdose.
2. Stellen Sie ein Gefäß unter den Saftablauf der Saftpresse und einen Behälter unter den Austritt
des Fruchtfleisches.
3. Der Netzschalter des Entsafters (oben am Griff) hat 3 Positionen.
A. ON/AN- Dies startet den Motor
unddenEntsaftungsvorgan
B. OFF/AUS- Das ist die mittlere Position
des Schalters. Dies schaltet das Gerät aus.
D. REV- Reverse. Verwenden Sie diese
Funktion, wenn etwas in der Saftpresse stec-
REVERSE
ken bleibt, und es herausgeholt werden muss.
4. Bereiten Sie die Lebensmittel vor, die Sie entsaften möchten
und geben Sie sie in den Trichter
Stellen Sie sicher, dass die Stücke nicht größer als 4 cm sind, damit
die optimale Extraktion des Saftes sichergestellt wird.
Entfernen Sie große Kerne oder Samen.
Waschen Sie die Lebensmittel vor dem Entsaften ab.
Überfüllen Sie den Trichter nicht oder stopfen die Lebensmittel
mitKraft in die Maschine. Füllen Sie die Lebensmittel langsam ein,
damit die Saftpresse Zeit zum Verarbeiten hat. Der Stößel wird nur
verwendet, wenn Lebensmittel im Trichter stecken bleiben (Abb. 8).
5. Schalten Sie den Netzschalter auf „ON“.
Füllen Sie die Lebensmittel Stück für Stück in den Trichter ein. Geben Sie dem Entsafter Zeit um die zugeführten Stücke zu verarbeiten,
bevor Sie mehr einfüllen.
Überfüllen Sie den Trichter nicht oder stopfen die Lebensmittel
mitKraft in die Maschine. Der Stößel wird nur verwendet, wenn Lebensmittel im Trichter stecken bleiben.
6. Wenn Sie fertig sind schalten Sie den Netzschalter auf „OFF“.
Hinweis: Wenn Sie verschiedene Säfte in einer Sitzung herstellen
und dabei vermeiden möchten, dass sich die Aromen vermischen,
gießen Wasser in den Trichter und schalten das Gerät für eine Minute an, um es zu reinigen. Entsorgen Sie das Spülwasser.
Abb. 8
Page 15

D. Wenn die Maschine verstopft und somit nicht mehr arbeitet
1. Schalten Sie das Gerät aus und drücken danach für ein paar Sekunden die Rücklauftaste,
versuchen Sie es anschließend erneut.
Hinweis: Die Rücklauftaste arbeitet mit einer „Puls“ Bewegung.
2. Wenn der Rückwärtsgang nicht funktioniert hat, schalten Sie das Gerät aus und ziehen esaus
der Steckdose. Nehmen Sie das Gerät auseinander und entfernen jegliche Lebensmittelreste, bauen Sie es dann gemäß Anweisungen wieder zusammen und versuchen es erneut.
E. Anweisungen zum Zerlegen und Reinigen
des Geräts
1. Schalten Sie das Gerät aus.
2. Drehen Sie die Schüssel und Trichter
am Stück nach rechts, so dass der Pfeil auf
dem Trichter sich von der geschlossenen Position wegbewegt. Heben Sie es ab (Abb. 9).
3. Zerlegen Sie die Teile in der Reihenfolge
wie im Diagramm dargestellt (Abb. 10).
4. Verwenden Sie den Pinsel, um alle Teile
Abb. 9
gründlich im warmen Seifenwasser zu reinigen;
trocknen Sie die Teile anschließend ab. Stellen
Sie sicher, dass der Fruchtfleisch Ausgang der
Schüssel frei ist. (Verwenden Sie das flache
Ende der Reinigungsbürste, um verstopftes
Material aus dem Fruchtfleischaustritt zu lösen). Entfernen Sie den Gummistopfen für einen
leichteren Zugang zum Fruchtfleischaustritt.
5. Wischen Sie mit einem feuchten Tuch
oder trockenem Handtuch die Basiseinheit
des Geräts ab. Spülen Sie die Basiseinheit
nicht mit Wasser.
Abb. 10
Reinigungstipps:
Entfernen Sie regelmäßig die Silikon-Pinsel der Drehbürste und reinigen Sie sie gründlich vor dem
Zusammenbau. Reinigen Sie das Gerät sofort und gründlich nach jedem Gebrauch, um das antrocknen von Verschmutzungen zu minimieren. Entfernen Sie den Gummistopfen vom Schüsselboden um die Schüssel effektiv reinigen zu können. Stellen Sie sicher, dass der Gummistopfen
vor der Saftherstellung wieder eingefügt wird, da es sonst zu Undichtigkeiten kommen kann. Verwenden Sie keine scharfen Scheuermittel oder Chemikalien, um die Saftpresse zu reinigen. Nicht
inder Geschirrspülmaschine reinigen.
Technische daten
Produkt Name- Perfect Juicer
Eingangsspannung- AC220 - 240V
Frequenz- 50 Hz
Geschwindigkeit- 80 U/min
Die in diesem Handbuch verwendeten Bilder dienen nur zur Illustration und können nicht genau
dasProdukt entsprechen.
Motor- einphasig induktiv
Maximale Verwendungsdauer20 min
Page 16

Häufig gestellte Fragen
? Was sollte man nicht in den Juicer geben?
Alles was große oder harte Samen hat ( z.B. Persimonen, Pfirsiche, Pflaumen, Durian, Rambutan,
etc). Eis & gefrorenes Obst / Gemüse sind ebenfalls nicht zu empfehlen.
? Kann die Saftpresse wie ein Fleischwolf oder Mühle verwendet werden?
Nein, das Gerät ist nicht als Mahlwerk oder Mühle ausgelegt (z.B. Reis, Getreide, Pfefferkörner
usw.) Sie können die Saftpresse verwenden, um Milch aus Getreide o.ä. zu extrahieren, nachdem
es für mindestens 6 Stunden eingeweicht worden ist.
? Muss ich das Gerät nach Gebrauch zerlegen und reinigen?
Ja, die einfache Reinigung durch Wassereingießen in den Trichter ist nicht genug. Sie müssen
alleAnbauteile demontieren und gründlich mit warmem Wasser reinigen.
? Wenn die Saftpresse stehen bleibt und sich die Abdeckung nach dem Entsaften nicht öffnen
lässt, ist dies ein Fehler? Soll ich mich an den Kundendienst wenden?
Beim Entsaften von Gemüse, neigen die Fasern dazu, den Fruchtfleischaustritt zu verstopfen oder
darin stecken zu bleiben und dies kann bewirken, dass die Saftpresse nicht mehr funktioniert. Ein
weiterer Grund kann die zu schnelle Zufuhr der Lebensmittel in das Presswerk. Drücken Sie dieREVERSE-Taste für 1 Minute und schalten Sie dann für ca. 2-3 Minuten das Gerät ein, diessollte
diesteckengebliebenen Fasern lösen. Sie können auch mit Wasser eine einfache Reinigung durchführen, dies sollte helfen, die Fasern zu entfernen. Wenn Sie dann immer noch Probleme haben,
die Maschine auseinander zu nehmen, kontaktieren Sie unseren Kundendienst.
Fehlerbehebung
Bevor sie sich an den kundendienst wenden, lesen sie zuerst folgende tipps zur fehlerbehebung:
Problem Mögliche Ursachen Was ist zu tun
Entsafter bekommt
keinen Strom
Motor ist stehen
geblieben
Undichte an der Unterseite der Schüssel
Flecken auf der
Schüssel, Sieb,
Drehbürste
Quietschende
Geräusche während
des Betriebs
Beschädigung des
Siebes
Entsafter ist nicht eingesteckt.
Falscher Zusammenbau.
Schüssel wurde mit Lebensmitteln überfüllt.
Aufgrund von Überlastung
wurde der Motor als Vorsichtsmaßnahme, um eine
Überhitzung zu vermeiden,
abgeschaltet.
Gummistopfen an der Unterseite der Schüssel wurde nicht
richtig eingesetzt.
Natürliche Verfärbungen
aufGrund der Saftherstellung.
Geräusche von der Zuführungsschnecke und vom
Presswerk.
Tiefkühlkost, Eis, Kerne,
Samen, unbekannte Substanzen oder zu viel Material
inderSchüssel.
Überprüfen Sie ob die Saftpresse
eingesteckt ist.
Bauen Sie die Saftpresse anhand
derAnleitung zum Zusammenbau
erneut zusammen.
Drücken Sie die REVERSE Taste,
um zu versuchen, die Verstopfung
zu lösen. Es kann nötig sein, dies
einpaarmal zu wiederholen.
Schalten Sie das Gerät aus
undlassen Sie den Motor abkühlen,
bevor Sie weiter arbeiten.
Achten Sie darauf, dass der Gummistopfen an der Unterseite derSchüssel vollständig eingesteckt ist.
Das ist völlig normal. Um Verfärbungen zu reduzieren stellen Sie sicher,
dass Sie sofort nach Gebrauch
dasGerät abspülen und reinigen.
Das ist völlig normal. Achten Siedarauf, den Entsafter nicht zuüberlasten.
Lesen Sie die Gebrauchsanweisung sorgfältig durch und achten
sie auf die korrekte Verwendung
der Saftpresse .Den Entsafter nicht
überfüllen.
Page 17

REZEPTE
Apfel-Natur Eis
Zutaten:
• 600 g Äpfel
• 4 Löffel Milchpulver
• 2 EL Kondensmilch
Zubereitung:
Waschen Sie die Äpfel und schneiden sie in kleine
Stücke.
Geben Sie die vorbereiteten Apfelstücke in Saftpresse.
Milchpulver lässt sich nicht leicht auflösen, also
nehmen Sie zunächst etwas vom frisch gepressten Apfelsaft zusammen mit der Kondensmilch
und mixen es mit dem Milchpulver. (Verwenden
Sie dazu vorzugsweise den Mixer G21 Perfect
Smoothie)
Mixen Sie den restlichen Saft mit der Milchmischung.
Geben Sie die Mischung in eine große Schüssel.
Stellen Sie sie für mindestens 1-2 Stunden
indenGefrierschrank.
Saft zum Entschlacken Ihres Körpers
Zutaten:
• 300 g Karotten
• 200 g Spinat
• 250 g Karotten
• 150 g Kopfsalat
• 100 g Spinat
• 300 g Karotten
• 100 g Rote Beete
• 100 g Gurke
• 300 g Karotten
• 75 g Rote Beete
• 125 g Granatapfel
Ananas-Eis
Zutaten:
• 500 g Ananas
• 1 weißer Joghurt
• 3 EL Kondensmilch
Zubereitung:
Entfernen Sie die Schale der Ananas, schneiden
Sie sie in kleine Stücke und legen sie in den Mixer.
Mixen Sie den Saft mit dem Joghurt und der Kondensmilch.
Stellen Sie die Mischung für 1-2 Stunden
indenGefrierschrank.
Saft gegen Kopfschmerzen und Migräne
Zutaten:
• 300 g Karotten
• 100 g Löwenzahn
• 144 g Spinat
• 300 g Karotten
• 200 g Sellerie (wenn Sie lieber Stangensellerie
verwenden möchten, dann ändern Sie die Angaben zu 350 g Karotten und 150 g Sellerie)
Saft gegen Erkältungen
Zutaten:
• 250 g Karotten
• 150 g Sellerie
• 100 g Rettich/Radieschen
• 200 g Grapefruit
• 100 g Zitrone
• 200 g Orangen
Die Rezepte wurden in Zusammenarbeit mit www.centrumzdravibrno.cz, einem Zentrum für
individuelle und umfassende Bestimmung des Gesamtzustands des Organismus, für Beratung,
Gesundheitsinformationen und -seminare, -kurse und Rohkost Schule, entwickelt.
Page 18

Garantieschein
DE
Es wird von Verkäufer ausgefüllt
Name des Produkts:
Typ des Produkts....................................................
Fertigungsnummer..................................................
Gewährleistungfrist.....................24.........................
Dieser Produkt wurde einwandfrei dem Käufer übergeben, inklusive geschäfts-technische Dokumentation und Zubehör. Käufer wurde richtig über Prinzipen richtige Bedienung und technische Instandhaltung informiert.
Name des Käufers ..........................................................Adresse des Käufers .....................................
Unterstrift des Käufers ...................................................Datum des Verkaufs .......................................
Stempel des Verkäufers
GARANTIEBEDIENUNGEN
Garantiegegestand:
Garantie streckt auf den Grundprodukt mit geliefertem Zubehör aus.
Gewährleistungsfrist:
Garantiezeit beträgt 24 Monaten nach dem Verkauf. Die Ganantiezeit enthält nicht die Zeit, die von Anwendung
derGarantierecht für Mangel des Produkts bis der Zeit, wenn der Kunde verantwortlich ist, das Produkt zu übernehmen.
Verkäufer muss eine Bestätigung erstellen, wann er Garantierecht gefördet wurde, Info über die Reparatur und Reperatursdauer anbringen. Wenn zu einem Umtausch kam, wird neue Garantiezeit nach Abname neues Produkts laufen.
Garantiebereich und Verantwortung der Lieferer:
Der Lieferer trägt die Verantwortung, dass das Produkt die gewählichen Eigenschaften für betreffenden Typ des Produkts und angeführte Parameter während der Gewährleistungsfrist hat Lieferer ist nicht verantwortlich für die Mangel,
die bei gewählichler Abnutzung oder Anwendung des Produkts für andere Zwecke entstehen.
Verfall der Garantie:
a. Das Erzeugnis wurde verwendet und instandhaltet nicht nach der Bedienanleitung oder wurde Beschädigt durch
unqualifizierten Zugriff des Anwenders.
b. Das Erzeugnis wurde bei anderen Bedienungen oder für anderen Zwecken verwendet, als die festgelegte.
c. Wenn man den Garantieschein nicht vorlegen kann.
d. Wenn die Angaben von Hersteller, Verkäufer oder Service-Organisation in Garantieschein wissentlich überschreiben wurden.
e. Wenn ein Element des Produkt durch ein nicht originalen Teil ersetzt wurde
f. Wenn das Erzeugnis beschädigt oder übermässig abgenützt durch ungenügende Instandhaltung wurde.
g. Wenn das Produkt durch höhere Macht beschädigt wurde.
h. Wenn eine Änderung des Produkt ohne Zustimmung des Herstellts durchgeführt wurde.
i. Wenn Mangel durch laienhafte Lagerung passiert wurde.
j. Wenn Mangel bei natürlichen und gewöhnlichen Anwendung entstehen.
k. Wenn Produkt mit einem anderen verbundet oder eingeschaltet wurde, wenn das der Herstellet nicht erlaubt.
Anspruch der Garantie:
Anspruch muss beim Verkäufert durchsetzen werden. Der Käufer muss richtig ausgefüllter Garantieschein vorlegen
oder Einkaufzettel. Garantiereparaturem durchführt Verkäufer oder von ihm beauftragte Personen.
Distributor pro ČR: PENTA CZ s.r.o. Distributor pre SR: PENTA SK s.r.o. Distributor for other countries Penta CZ s.r.o.
Page 19

CZ
Děkujeme za nákup našeho výrobku.
Před použitím si prosím pečlivě přečtěte tento návod. Po přečtení návodu budete mít jistotu, že odšťavňovač budete používat bezpečně, pohodlně a efektivně, a také zabráníte tomu,
žesodšťavňovačem budete neodborně manipulovat.
DŮLEŽITÁ BEZPEČNOSTNÍ UPOZORNĚNÍ
Během používání elektrického zařízení dodržujte preventivní opatření zahrnující:
1. Před prvním použitím si pozorně přečtěte všechna upozornění.
2. Neponořujte hlavní motor do vody ani žádné jiné kapaliny, abyste se vyvarovali úrazu elektric-
kým proudem.
3. Zajistěte, aby se děti nedostaly do kontaktu s elektrospotřebičem.
4. Nepoužívejte přístroj s poničeným kabelem nebo zásuvkou, v případě závady na přístroji,
nebo pokud je poškozený jakýmkoliv jiným způsobem. V případě poruchy kontaktujte autorizovaný servis.
5. Pokud je napájecí kabel poničen, musí být nahrazen výrobcem nebo v odborném servisu.
6. Před čistěním, rozebráním, nebo před vyjímáním jednotlivých částí odpojte přístroj ze zásuvky.
7. Vyhněte se kontaktu s pohyblivými částmi.
8. Nepoužívejte příslušenství, které není doporučeno nebo prodáváno výrobcem, neboť by moh-
lo dojít k požáru, k úrazu elektrickým proudem, nebo zranění. Neupravujte ani nevylepšujte přístroj.
Pokud tak učiníte, bude zrušena záruka na spotřebič.
9. Vždy se ujistěte, že jste vypínač spotřebiče uvedly do pozice OFF a motor se kompletně za-
stavil před rozmontováním přístroje.
10. Nesahejte do vnitřní části přístroje, ani nevkládejte jiné předměty, zatímco je zapnutý. Po-
kud se jídlo zasekne v přívodu, použijte pěchovadlo, abyste jídlo stlačili dolů nebo použijte tlačítko zpětného chodu na přístroji k uvolnění šneku. Pokud není možné přístroj vypnout, počkejte,
nežsemotor kompletně zastaví předtím, než rozmontujete přístroj k odstranění jídla.
11. Nepoužívejte venku.
12. Nepoužívejte přístroj pro jiné, než doporučené účely.
13. Zvedejte přístroj pouze za rukojeť.
14. Nemyjte žádné části přístroje v myčce nádobí.
15. Nepoužívejte přístroj na více než 20 minut v kuse, motor se může přehřát a přestat pracovat,
nechejte motor vychladnout a přístroj bude opět pracovat.
16. Nevkládejte do zařízení k výrobě nápoje tvrdé materiály jako například pecky, led, zmrzlé ovo-
ce, velká nebo tvrdá jádra (jako například broskve, švestky, kaki a další).
17. Tento přístroj není určen pro užití lidmi (zahrnující děti) se sníženou psychickou, smyslovou
nebo mentální způsobilostí nebo s nedostatkem zkušeností a znalostí, ledaže by byli obeznámeni
s instrukcemi zahrnujícími použití přístroje člověkem odpovědným za jejich bezpečnost.
18. Vypněte přístroj a odpojte ze zdroje před výměnou doplňků.
Page 20

Instalace a provozní instrukce
A. Popis částí a obsah kontrolního seznamu
Hlavní části
A Zásobník
B Šnek
C Sítko- méně dužnaté
D Sítko- více dužnaté
E Rotující kartáč
F Mísa
G Podstavec
H Čistící kartáč
I Pěchovadlo
J Nádobka
Výpust
dužiny
Výpust
šťávy
Obr. 1
Poznámka: Nezapínejte přístroj před vložením materiálu na přípravu nápoje.
Důležité: Aby přístroj správně pracoval, musí hrana zásobníku směřovat na značku na podstavci.
(Obr. 1)
Page 21

B. Sestavení přístroje
Důležité: Před sestavením přístroje si prosím zkontrolujte tento bod: Na dně mísy je gumová
zátka. Zátka zajišťuje, že veškerý nápoj vychází pouze nápojovou výpustí. Před přípravou nápoje
sevždy ujistěte, že gumová zátka je napevno na svém místě. (Obr. 2)
Obr. 2
1. Vložte mísu na spodní část (Obr. 3)
A. Ujistěte se, že mísa je správně umístěna.
2. Vyberte si sítko, které chcete použít. Žluté sítko je jemné sítko, které bude redukovat množství
dužiny ve vašem nápoji. Oranžové sítko je hrubé sítko a bude zvyšovat množství dužiny ve vašem
nápoji. Vložte sítko do rotujícího kartáče. Spojte červený bod na sítku s červeným bodem na míse
a vložte sítko + rotující kartáč do mísy. Pokud jsou body správně spojeny, sítko + rotující kartáč
dosebe zapadnou. (Obr. 4)
3. Vložte šnek do sítka a otáčejte do doby, než zapadne do správné pozice. (Obr. 5)
4. Vložte zásobník na mísu. (Obr. 6)
A. Spojte malou šipku na zásobníku s červeným bodem na míse.
B. Otočte zásobník tak, že plastický štítek se šípkou na zásobníku ukazuje na znak na spodní
části.
Poznámka: Jakmile je zásobník ve správné poloze, šipka z části 4. A není nadále spojena s červe-
ným bodem na míse. (Obr. 7)
mísa
základna
Obr. 3 Obr. 4
Obr. 5 Obr. 6
Obr. 7
Page 22

C. Návod k obsluze
Varování:
• Nepoužívejte přístroj, pokud máte mokré ruce.
• Nepoužívejte přístroj před vložením materiálu na přípravu nápoje.
• Nepoužívejte více, než 20 minut vkuse.
Důležité: Dojde-li k nějaké závadě, přístroj se automaticky vypne, díky tomu je motor chráněn
adéle vydrží. Pokud části nejsou spojeny nebo nainstalovány správně, popřípadě se motor přehřívá při delším procesu výroby nápojů nebo je sítko ucpané, přístroj se automaticky vypne. Toto
jenormální a chrání váš přístroj před zničením. Pokud dojde k této situaci, vypněte přístroj. Zkontrolujte správnou instalaci jednotlivých částí a to, zda v sítku není zaseklý nějaký materiál. Vyčkejte
5 minut na vychladnutí motoru, poté začněte opět pracovat.
1. Zapojte přístroj
2. Umístěte nádobu pod nápojovou výpusť a nádobu pod dužinovou výpusť.
3. Spínací tlačítko (umístěné na horní části rukojeti) má 3 pozice:
A. Zapnuto (ON)- Spíná motor a proces výroby džusu.
B. Vypnuto (OFF)- Centrální pozice tlačítka. Vypíná přístroj.
C. REV- zpětný chod. Tuto funkci používejte pouze tehdy, pokud se nějaký materiál zasekne
v přístroji a je potřeba jej z přístroje vyndat.
REVERSE
4. Připravte si materiál na přípravu nápoje a vložte jej do zásobníku.
Ujistěte se, že kousky nejsou delší než 4 cm pro optimální výtažek
šťávy.
Odstraňte všechna větší jadérka a pecky.
Před vložením do přístroje jídlo řádně umyjte.
Nedávejte do zásobníku příliš jídla a netlačte ho dovnitř. Vkládejte
jídlo pomalu, aby měl přístroj čas na zpracování. Pěchovadlo může
být použito pouze v případě, že se jídlo zasekne. (Obr. 8)
5. Zapněte tlačítko napájení do pozice ON
Vložte materiál do zásobníku. Nechte přístroji čas pracovat a zpracovat materiál před dalším přidáním materiálu.
Nedávejte do zásobníku příliš jídla a netlačte ho dovnitř. Pěchovadlo
se použije pouze tehdy, pokud se jídlo zasekne.
6. Když jste hotovi, uveďte tlačítko do pozice OFF.
Poznámka: Pokud připravujete různé druhy nápojů najednou a chcete se vyvarovat smíšení chutí, nalejte vodu do zásobníku a nechejte
přístroj běžet několik minut pro vyčištění.
Obr. 8
Page 23

D. Pokud je přístroj zanesen a nepracuje
1. Vypněte přístroj a na několik sekund zmáčkněte tlačítko zpětného chodu, poté zkuste praco-
vat znovu.
Poznámka: tlačítko zpětného chodu vydává pulzující pohyb.
2. Pokud tlačítko zpětného chodu nefunguje, vypněte přístroj a vytáhněte ho z napájení. Roze-
berte jednotku k uvolnění materiálu, poté znovu smontujte dle instrukcí a zkuste to znovu.
E. Jak rozebrat a vyčistit přístroj
1. Vypněte přístroj
2. Otočte mísou a zásobníkem doprava
tak, že šipka na zásobníku se dostane pryč
zuzamčené pozice. (Obr. 9)
3. Rozeberte části v pořadí, jaké je ukázáno
na diagramu. (Obr. 10)
4. Použijte kartáč na důkladné vyčistění
všech těchto částí v teplé jarové vodě, poté
důkladně osušte. Ujistěte se, že výpusť dužiny
Obr. 9
je čistá. (Použijte plochý konec čistícího kartáče k vyčištění materiálu v dužinové výpusti)
Vyjměte gumovou zátku pro lepší přístup k dužinové výpusti.
5. Použijte vlhký hadřík nebo suchý ručník
k umytí spodní části přístroje. Neoplachujte
spodní část vodou.
Obr. 10
Typy na čistění:
Pravidelně čistěte silikonové kartáče na rotujícím kartáči. Po každém použití přístroje je třeba jej
důkladně vyčistit. Vytáhněte gumovou zátku na spodní části mísy, abyste ji mohli vyčistit. Vždy
seujistěte, že gumová zátka je znovu vložena před výrobou nápoje, v opačném případě může
dojít k úniku nápoje z přístroje. Nepoužívejte drsné materiály nebo chemikálie k vyčistění přístroje.
Nemyjte v myčce na nádobí.
Technická data
Jméno produktu- Perfect Juicer
Vstupní napětí- AC 220 - 240V
Frekvence- 50 Hz
Rychlost- 80 ot/min
Motor- jednofázový indukční
Fotografie použité v manuálu jsou pouze ilustrační
Maximální čas užití- 20 min
a nemusí se přesně shodovat s výrobkem.
Page 24

Často kladené otázky
Jaké materiály bych neměl vkládat do přístroje?
?
Jakékoliv produkty s velkými nebo tvrdými jádry, peckami (broskve, švestky,…). Nedoporučujeme
ani led a zmrzlé ovoce/zeleninu.
? Může být přístroj použit jako drtič nebo mlýnek?
Ne, tento přístroj není uzpůsoben k mletí (například rýže, zrníček, zrnek pepře,…). Přístroj můžete
použít na získání výtažku ze zrníček poté, co předtím byla namočena na nejméně 6 hodin dopředu.
? Musím přístroj rozebrat a vyčistit po jeho použití?
Ano, jednoduché vyčistění napájecího žlabu tekoucí vodou nestačí. Potřebujete rozebrat všechna
příslušenství a vyčistit důkladně teplou vodou.
? Pokud se odšťavňovač zasekne a kryt po procesu výroby nápoje nelze otevřít, je to závada?
Měl bych kontaktovat zákaznický servis?
Pokud vytváříte nápoj z vláknité zeleniny, vlákna mohou vést k zanesení nebo zaseknutí ve výpusti
dužiny a toto může zapříčinit, že přístroj přestane pracovat. Dalším důvodem může být příliš rychlé
vkládání do žlabu. Zmáčkněte tlačítko zpětného chodu na jednu minutu a poté zmáčkněte tlačítko
ON na 2-3 minuty, tento proces zajistí odstranění zaseknutých vláken. Také můžete lít vodu skrz
žlab pro jednoduché vyčištění, které pomůže odstranit vlákna. Pokud nadále problémy přetrvávají
apřístroj stále nelze otevřít, kontaktujte náš zákaznický servis.
Řešení problémů
Předtím, než zavoláte do servisu, prostudujte si tyto typy na řešení problémů:
Problém Možné příčiny Co dělat
Přístroj nepracuje Odšťavňovač není zapojen
Motor se zastavil Mísa je přeplněna materiálem.
Prosakování z vnitřku
mísy
Znečistění částí přístroje Přírodní barva z materiálů pou-
Zvuk skřípění během
procesu
Zničené sítko Zmrzlé jídlo, led, jadérka,
doelektrické sítě.
Nesprávné sestavení přístroje.
Nadměrné používání způsobilo
zastavení motoru jako prevence
před přehřátím.
Gumová zátka na spodní části
mísy není správně upevněna.
žitých k výrobě nápoje.
Zvuk ze šneku. Toto je zcela normální. Ujistěte
semínka, neznámá hmota nebo
příliš mnoho materiálu v míse.
Zjistěte, jestli je přístroj zapojen
do elektrické sítě.
Znovu sestavte přístroj dle
instrukcí.
Stiskněte tlačítko opačného
chodu a vyčistěte zanesení.
Je možné, že bude třeba toto
vyzkoušet několikrát.
Vypněte a nechejte motor vychladnout před dalším použitím.
Ujistěte se, že gumová zátka
na spodní části mísy je správně
vložena.
Toto je zcela normální. Ujistěte
se, že jste vypláchli a vyčistili
přístroj okamžitě po užití.
se, že jste přístroj příliš nezahltili
materiálem k výrobě džusu.
Ujistěte se, že jste si pečlivě pročetli instrukce na správné použití
přístroje. Nevkládejte do přístroje
příliš mnoho materiál.
Page 25

RECEPTY
Jablečná přírodní zmrzlina
Ingredience:
• 600g jablek
• 4 lžičky sušeného mléka
• 2 lžičky kondenzovaného mléka
Postup:
Umyjte jablka a nakrájejte jej na menší kousky.
Vložte připravené jablka do odšťavňovače
Sušené mléko se nerozpouští snadno, proto po-
užijte menší množství připravené jablečné šťávy,
dokteré rozmíchejte sušené i kondenzované mléko (nejlépe za pomocí mixeru G21 Perfect Smoothie).
Smíchejte šťávu se směsí mlék.
Vložte do široké mísy. Vložte do mrazáku na mini-
málně 1-2 hodiny.
Juice pro očištění organismu
Ingredience:
• 300 g karotky
• 200 g špenátu
• 250 g karotky
• 150 g hlávkového salátu
• 100 g špenátu
• 300 g karotky
• 100 g červené řepy
• 100 g okurky
• 300 g karotky
• 75 g červené řepy
• 125 g granátového jablka
Ananasová zmrzlina
Ingredience:
• 500 g ananasu
• 1 bílý jogurt
• 3 lžičky kondenzovaného mléka
Postup:
Odstraňte kůru z ananasu a nakrájejte jej na menší
kousky a vložte do odšťavňovače.
Smíchejte šťávu s jogurtem a kondenzovaným
mlékem.
Směs vložte do mrazáku na 1-2 hodiny.
Juice proti bolesti hlavy a migrénám
Ingredience:
• 300 g karotky
• 100 g pampelišky
• 144 g špenátu
• 300 g karotky
• 200 g celeru (použijete-li celerovou nať, změň-
te podíly na 350 g karotky a 150 g celeru)
Juice proti nachlazení
Ingredience:
• 250 g karotky
• 150 g celeru
• 100 g ředkviček
• 200 g grapefruitu
• 100 g citrónu
• 200 g pomeranče
Recepty byly připraveny ve spolupráci s www.centrumzdravibrno.cz: unikátní a komplexní měření
celkového stavu organismu, poradenství, informace z oblasti zdraví a semináře, kurzy aškolu
RAWfood.
Page 26

CZ
Záruční list
Vyplní prodejce
Název výrobku:
Typ výrobku..............................................................
Výrobní číslo..............................................................
Záruční doba...........................24.............................
Výše uvedený výrobek byl bez závad předán kupujícímu včetně příslušné obchodně-technické dokumentace a příslušenství. Kupující byl řádně poučen o zásadách správné obsluhy a technické údržby výrobku.
Jméno kupujícího ..................................................Adresa kupujícího ...................................
Podpis prodejce ...................................................Datum prodeje ........................................
Razítko prodávajícího
ZÁRUČNÍ PODMÍNKY
Předmět záruky:
Záruka se stahuje na základní výrobek dodávaný včetně příslušenství.
Záruční doba:
Záruční doba na výrobek je 24 měsíců od data prodeje kupujícímu. Doba od uplatnění práva z odpovědnosti za vady
až do doby, kdy uživatel po skončení opravy byl povinen věc převzít, se do záruční doby nepočítá.
Prodávající je povinen vydat kupujícím potvrzení o tom, kdy právo uplatnil, jakož i o provedení opravy a o době jejího
trvání. Dojde-li k výměně výrobku, začne běžet záruční doba znovu od převzetí nového výrobku.
Rozsah záruky a odpovědnosti dovozce:
Dovozce nese odpovědnost za to, že výrobek bude mít po celou záruční dobu vlastnosti obvyklé pro dotyčný druh
výrobku a uvedené parametry. Dovozce neodpovídá za vady výrobku způsobené běžným opotřebením nebo použitím
výrobku k jiným účelům, než ke kterým byl určen.
Zánik záruky:
Záruční nárok zaniká jestliže:
a. výrobek nebyl používán a udržován podle návodu k použití nebo byl poškozen jakýmkoli neodborným zásahem
uživatele
b. výrobek byl používán v jiných podmínkách nebo k jiným účelům než ke kterým byl určen
c. nelze předložit záruční list výrobku
d. došlo k úmyslnému přepisování údajů uvedeným výrobcem, prodejcem nebo servisní organizací v původní dokumentaci výrobku
e. byla některá část výrobku nahrazena neoriginální součástí
f. k poškození výrobku nebo k nadměrnému opotřebení došlo vinou nedostatečné údržby
g. výrobek havaroval nebo byl poškozen vyšší mocí
h. byla provedena změna výrobku bez souhlasu výrobce
i. vady byly způsobené neodborným skladováním výrobku
j. vady vznikly přirozeným a běžným provozním opotřebováním výrobku
k. výrobek byl spojen nebo provozován se zařízením, které nebylo odsouhlaseno dovozcem
Uplatnění reklamace:
Reklamaci uplatňuje kupující u prodávajícího. Při reklamaci je kupující povinen předložit řádně vyplněný záruční list
nebo nákupní doklad.
Záruční opravy provádí prodávající nebo jím pověřené opravny.
Právo:
Ostatní vztahy mezi kupujícím a prodávajícím se řídí příslušnými ustanoveními Občanského zákoníku č. 47/1992 sb.,
případně obchodního zákoníku č. 513/1991 sb. ve znění pozdějších změn a doplňků.
Distributor pro ČR: PENTA CZ s.r.o. Distributor pre SR: PENTA SK s.r.o. Distributor for other countries Penta CZ s.r.o.
Page 27

SK
Ďakujeme za nákup nášho výrobku.
Pred použitím si pozorne prečítajte tento návod. Po prečítaní návodu budete mať istotu, že odšťavovač budete používať bezpečne, pohodlne, efektívne a zabránite neodbornej manipulácii.
DÔLEŽITÉ BEZPEČNOSTNÉ UPOZORNENIA
Počas používania elektrického zariadenia dodržiavajte preventívne opatrenia:
1. Pred použitím si pozorne prečítajte všetky upozornenia.
2. Neponárajte hlavný motor do vody ani do žiadnych iných tekutín, aby ste sa vyvarovali elek-
trickému šoku.
3. Deti by mali mať dozor dospelej osoby, aby ste sa uistili, že sa nedostanú do kontaktu sospo-
trebičom.
4. Nepoužívajte prístroj s poškodeným káblom alebo zásuvkou, v prípade poruchy prístroja, ale-
bo ak je poškodený akýmkoľvek iným spôsobom. V prípade poruchy sa obráťte na najbližšie autorizované servisné stredisko na prehliadku alebo opravu.
5. Ak je dodávka poškodená, musí byť nahradená výrobcom alebo servisným strediskom.
6. Pred čistením, rozobratím alebo pred vyberaním jednotlivých častí odpojte prístroj zo zásuvky.
7. Vyhnite sa kontaktu s pohyblivými časťami.
8. Nepoužívajte príslušenstvo, ktoré nie je doporučené alebo predávané výrobcom, pretože
bymohlo dôjsť k požiaru, elektrickému šoku, alebo zraneniu. Neupravujte ani nevylepšujte prístroj
bez profesionálneho dohľadu. Ak tak urobíte, bude zrušená záruka na spotrebič.
9. Pred rozmontovaním prístroja sa vždy uistite, že ste spotrebič uviedli do pozície OFF a motor
sa kompletne zastavil.
10. Nesiahajte do vnútornej časti prístroja ani nevkladajte iné predmety, kým je zapnutý. Ak sajed-
lo zasekne v prívode, použite zvon na čistenie odtoku, aby ste jedlo stlačili nadol alebo použite
tlačidlo spätného chodu na prístroji k uvoľneniu. Ak nie je možné prístroj vypnúť, počkajte, než
samotor kompletne zastaví predtým, ako rozoberiete prístroj pre odstránenie jedla.
11. Nepoužívajte vo vonkajšom prostredí.
12. Nepoužívajte prístroj na iné, než odporúčané účely.
13. Zdvíhajte prístroj iba za rukoväť.
14. Neumývajte žiadne časti prístroja v umývačke riadu.
15. Nepoužívajte prístroj na dlhšie ako 20 minút v kuse, motor sa môže prehriať a prestať praco-
vať. V tomto prípade nechajte motor vychladnúť a prístroj bude opäť pracovať.
16. Nepoužívajte na výrobu nápoja tvrdé materiály ako napríklad kôstky, ľad, zmrznuté ovocie,
veľké alebo tvrdé jadrá (ako napríklad broskyne, slivky, a ďalšie).
17. Tento prístroj nie je určený ľudom (zahŕňajúc deti) so zníženou psychickou, zmyslovou alebo
mentálnou spôsobilosťou alebo s nedostatkom skúseností a znalostí, iba ak by boli oboznámení
sinštrukciami o používaní prístroja človekom zodpovedným za ich bezpečnosť.
18. Vypnite prístroj a odpojte zo zdroja pred výmenou doplnkov alebo pred dotýkaním sa pohyb-
livých častí.
Page 28

Inštalácia a prevádzkové inštrukcie
A. Opis častí a obsah kontrolného zoznamu
Hlavné časti
A Zásobník
B Šnek
C Sitko-menej dužinaté
D Sitko-viac dužinaté
E Rotujúca kefa
F Misa
G Podstavec
H Čistiaca kefa
I Posuňovač
J Nádobka
Výpust
dužiny
Výpust
šťavy
Obr. 1
Poznámka: Nezapínajte prístroj pred vložením materiálu na prípravu nápoja.
Dôležité: Aby prístroj správne pracoval, musí hrana zásobníku smerovať na značku na podstavci.
(Obr. 1)
Page 29

B. Zostavenie prístroja
Dôležité: Pred zostavením prístroja si prosím skontrolujte tento bod: Na dne misy je gumová zát-
ka. Zátka zabezpečuje, že nápoj vychádza iba nápojovou výpusťou. Pred prípravou nápoja sa vždy
presvedčte, že gumová zátka je napevno na svojom mieste. (Obr. 2)
Obr. 2
1. Vložte misu na spodnú časť. (Obr. 3)
A. Presvedčte sa, či je misa na správnom mieste.
2. Vyberte si sitko, ktoré chcete použiť. Žlté sitko je jemné sitko, ktoré bude redukovať množstvo
dužiny vo vašom nápoji. Oranžové sitko je hrubé sitko a bude zvyšovať množstvo dužiny vovašom
nápoji. Vložte sitko do rotujúcej kefy. Spojte červený bod na sitku s červeným bodom na mise
avložte sitko + rotujúcu kefu do misy. Ak sú body správne spojené, sitko + rotujúca kefa do seba
zapadnú. (Obr. 4)
3. Vložte stláčaciu skrutku do sitka a otáčajte dovtedy, než zapadne do správnej pozície. (Obr. 5)
4. Vložte zásobník na misu (Obr. 6)
A. Spojte malú šípku na zásobníku s červeným bodom na mise.
B. Otočte zásobník tak, že plastický štítok, šipkou na zásobníku ukazuje na znak na spodnej
časti.
Poznámka: Akonáhle je zásobník v správnej polohe, šipka z časti 4. nie je naďalej spojená s čer-
veným bodom na mise. (Obr. 7)
misa
základňa
Obr. 3 Obr. 4
Obr. 5 Obr. 6
Obr. 7
Page 30

C. Návod na obsluhu
Varovanie:
• Nepoužívajte prístroj s mokrými rukami, mohlo by to zapríčiniť elektrický šok.
• Nepoužívajte prístroj pred vložením materiálu na prípravu nápoja.
• Nepoužívajte viac, než 20 minút v kuse.
Dôležité: Ak dôjde k nejakej poruche, prístroj sa automaticky vypne, vďaka tomu je motor chránený a predlžuje sa jeho životnosť. Ak časti nie sú spojené alebo nainštalované správne, prípadne
samotor prehrieva pri dlhšom procese výroby džúsu alebo je sitko upchaté, prístroj sa automaticky vypne. Toto je normálne a chráni váš prístroj pred zničením. Pokiaľ dôjde k tejto situácii, vypnite
prístroj. Skontrolujte správnu inštaláciu jednotlivých částí a to, či v sitku nie je zaseknutý nejaký
materiál. Počkajte 5 minút na vychladnutie motora, potom začnite opäť pracovať.
1. Zapojte prístroj
2. Umiestnite nádobu pod nápojovú výpusť a nádobu pod dužinovú výpusť.
3. Spínacie tlačidlo (umiestnené na hornej časti rukoväte) má 3 pozície:
A. Zapnuté (ON) - Spína motor a proces výroby džúsu.
B. Vypnuté (OFF) - Centrálna pozícia tlačidla. Vypína prístroj.
C. REV-spätný chod. Túto funkciu používajte iba vtedy, ak sa nejaký materiál zasekne vprístro-
ji a je potrebné ho z prístroja vybrať.
REVERSE
4. Pripravte si materiál na prípravu nápoja a vložte ho do zásobníka
Uistite sa, že kúsky nie sú dlhšie ako 4 cm pre optimálny výťažok
Odstráňte všetky väčšie jadierka a kôstky
Pred vložením do prístroja jedlo poriadne umyte
Nedávajte do zásobníka väčšie množstvo jedla a netlačte ho dovnút-
ra. Vkladajte jedlo pomaly, aby mal prístroj čas na spracovanie. Posunovač môže byť použitý iba v prípade, že sa jedlo zasekne. (Obr. 8)
5. Zapnite tlačidlo napájania do pozície ON
Vložte materiál do zásobníka. Nechajte prístroju dostatok času
naspracovanie vloženého materiálu pred ďalším pridaním materiálu.
Nedávajte do zásobníka väčšie množstvo jedla a netlačte ho dovnútra. Posunovač sa uplatňuje iba vtedy, ak sa jedlo zasekne.
6. Po skončení uveďte tlačidlo do pozície OFF.
Poznámka: Ak pripravujete rôzne druhy nápojov naraz a chcete
savyvarovať zmiešaniu chutí, nalejte vodu do zásobníka a nechajte
prístroj bežať niekoľko minút, aby sa vyčistil.
Obr. 8
Page 31

D. Ak je prístroj zanesený a nepracuje
1. Vypnite prístroj a na niekoľko sekúnd stlačte spätné tlačidlo, potom skúste pracovať znova.
Poznámka: tlačidlo spätného chodu vydáva pulzujúci pohyb
2. Ak tlačidlo spätného chodu nefunguje, vypnite prístroj a vytiahnite ho z napájania. Rozoberte
jednotku k uvoľneniu materiálu, potom znovu zmontujte podľa inštrukcií a skúste to znova.
E. Ako rozobrať a vyčistiť prístroj
1. Vypnite prístroj
2. Otočte misou a zásobníkom doprava tak,
že šípka na zásobníku sa dostane preč z uzatvorenej pozície.
3. Rozoberte časti v poradí, aké je ukázané
na diagrame
4. Použite kefu na dôkladné vyčistenie všet-
kých týchto častí v teplej saponátovej vode,
potom dôkladne osušte. Uistite sa, že výpust
Obr. 9
dužiny je čistý. (Použite plochý koniec čistiacej
kefy k vyčisteniu materiálu v dužinovom výpuste) Vyberte gumovú zátku pre lepší prístup
kdužinovému výpustu.
5. Použite vlhkú handričku alebo suchú utier-
ku na umytie spodnej časti prístroja. Neoplachujte spodnů časť vodou.
Obr. 10
Typy na čistenie:
Pravidelne čistite silikónové kefy na rotujúcej kefe. Po každom použití prístroja je potrebné hodôkladne vyčistiť. Vytiahnite gumovú zátku na spodnej časti misy, aby ste ju mohli vyčistiť. Vždy
sauistite, že gumová zátka je znovu vložená pred výrobou nápoja, v opačnom prípade môže dôjsť
k úniku nápoja z prístroja. Nepoužívajte drsné materiály alebo chemikálie na vyčistenie prístroja.
Neumývajte v umývačke riadu.
Technické dáta
Meno produktu- Perfect Juicer
Vstupné napätie- AC 220 - 240V
Frekvencia- 50 Hz
Rýchlosť- 80 rpm
Motor- jednofázový indukčný
Fotografie použité v návode sú len ilustračné a ne-
Maximálny čas použitia- 20 min
musia sa presne zhodovat s výrobkom.
Page 32

Často kladené otázky
Aké materiály by som nemal vkladať do prístroja?
?
Akékoľvek produkty s veľkými alebo tvrdými jadierkami, semenami (broskyne, slivky, ...). Neodporúčame ani ľad a zmrznuté ovocie / zeleninu.
? Môže byť prístroj použitý ako drvič alebo mlynček?
Nie, tento prístroj nie je prispôsobený na mletie (napríklad ryže, zrniečok, zrniek čierneho korenia,...). Prístroj môžete použiť na získanie výťažku zo zrniečok potom, čo boli namočené po dobu
najmenej 6 hodín.
? Musím prístroj rozobrať a vyčistiť po jeho použití?
Áno, jednoduché vyčistenie napájacieho žľabu tečúcou vodou nestačí. Potrebujete rozobrať všetky
doplnky a vyčistiť dôkladne teplou vodou.
? Ak sa odšťavovač zasekne a kryt po procese výroby nápoja nedá otvoriť, je to závada? Mal by
som kontaktovať zákaznícky servis?
Ak vytvárate nápoj z vláknitej zeleniny, vlákna môžu viesť k zaneseniu alebo zaseknutiu vo výpuste dužiny a toto môže zapríčiniť, že prístroj prestane pracovať. Ďalším dôvodom môže byť príliš
rýchle vkladanie do žľabu. Stlačte tlačidlo spätného chodu na jednu minútu a potom stlačte tlačidlo
ON na2-3 minúty, tento proces zaistí odstránenie zaseknutých vlákien. Tiež môžete liať vodu cez
žľab pre jednoduché vyčistenie, ktoré pomôže odstrániť vlákna. Ak naďalej problémy pretrvávajú
aprístroj stále nemožno otvoriť, kontaktujte náš zákaznícky servis.
Riešenie problémov
Predtým, než zavoláte do servisu, preštudujte si tieto typy na riešenie problémov:
Problém Možné príčiny Čo robiť
Prístroj nepracuje Odšťavovač nie je zapojený
Motor sa zastavil Misa je preplnená materiálom.
Presakovanie zvnútra
misy
Znečistenia častí
prístroja
Škrípanie počas procesu
Zničené sitko Zmrznuté jedlo, ľad, jadierka,
doelektriky.
Nesprávne zostavenie prístroja.
Nadmerné používanie spôsobilo zastavenie motora ako
prevencia pred prehriatím.
Gumová zátka na spodnej časti
misy nie je správne upevnená.
Prírodná farba z materiálov
použitých na výrobu nápoja.
Zvuk zo závitovky. Toto je úplne normálne. Uistite
semienka, neznáma hmota alebo príliš veľa materiálu v mise.
Zistite, či je prístroj zapojený
doelektriky.
Znovu zostavte prístroj podľa
inštrukcií.
Stlačte tlačidlo opačného chodu
a vyčistite zanesenia. Je možné,
že bude potrebné toto vyskúšať
niekoľkokrát.
Vypnite a nechajte motor vychladnúť pred ďalším použitím.
Uistite sa, že gumová zátka
naspodnej časti misy je správne
vložená.
Toto je úplne normálne. Uistite
sa, že ste vypláchli a vyčistili
prístroj okamžite po užití.
sa, že ste prístroj príliš nezahltili
materiálom na výrobu džúsu.
Uistite sa, že ste si starostlivo
prečítali inštrukcie na správne
použitie prístroja. Nevkladajte
doprístroja príliš veľa materiálu.
Page 33

RECEPTY
Jablčná prírodná zmrzlina
Ingrediencie:
• 600g jabĺk
• 4 lyžičky sušeného mlieka
• 2 lyžičky kondenzovaného mlieka
Postup:
Umyte jablká a nakrájajte ich na menšie kúsky.
Vložte pripravené jablká do odšťavovača
Sušené mlieko sa nerozpúšťa ľahko, preto pou-
žite menšie množstvo pripravenej jablčnej šťavy,
do ktorej rozmiešajte sušené aj kondenzované
mlieko (najlepšie za pomocou mixéra G21 Perfect
Smoothie).
Zmiešajte šťavu so zmesou mliek.
Vložte do širokej misy.
Vložte do mrazničky na minimálne 1-2 hodiny
Džús na očistenie organizmu
Ingredience:
• 300 g karotky
• 200 g špenátu
• 250 g karotky
• 150 g hlávkového šalátu
• 100 g špenátu
• 300 g karotky
• 100 g červenej repy
• 100 g uhorky
• 300 g karotky
• 75 g červenej repy
• 125 g granátového jablka
Ananásová zmrzlina
Ingrediencie:
• 500 g ananásu
• 1 biely jogurt
• 3 lyžičky kondenzovaného mlieka
Postup:
Odstráňte kôru z ananásu, nakrájajte ho na menšie
kúsky a vložte do odšťavovača.
Zmiešajte šťavu s jogurtom a kondenzovaným
mliekom.
Zmes vložte do mrazničky na 1-2 hodiny.
Džús proti bolesti hlavy a migrénam
Ingredience:
• 300 g karotky
• 100 g púpavy
• 144 g špenátu
• 300 g karotky
• 200 g zeleru (ak použijete zelerovú vňať, zmeň-
te podiely na 350 g karotky a 150 g zeleru)
Džús proti nachladnutiu
Ingredience:
• 250 g karotky
• 150 g zeleru
• 100 g reďkoviek
• 200 g grapefruitu
• 100 g citrónu
• 200 g pomarančov
Recepty boli pripravené v spolupráci s www.centrumzdravibrno.cz: unikátne a komplexné
meranie celkového stavu organizmu, poradenstvo, informácie z oblasti zdravia a semináre, kurzy
aškola RAW food.
Page 34

SK
Záručný list
Vyplní predajca
Názov výrobku:
Typ výrobku..............................................................
Výrobné číslo............................................................
Záručná doba..........................24.............................
Vyššie uvedený výrobok bol bez závad predaný kupujúcemu vrátane príslušnej obchodno-technickej dokumentácie a príslušenstva. Kupujúci bol riadne poučený o zásadách správnej obsluhy a technickej údržby výrobku.
Meno kupujúceho .................................................Adresa kupujúceho ...................................
Podpis predajcu ...................................................Dátum predaja ...........................................
Razítko prodávajícího
ZÁRUČNÉ PODMIENKY
Predmet záruky:
Záruka sa vzťahuje na základný výrobok dodávaný vrátane príslušenstva.
Záručná doba:
Záručná doba na výrobok je 24 mesiacov od dátumu predaja kupujúcemu. Doba od uplatnenia práva zodpovednosti
za vady až do doby, kedy užívateľ po skončení opravy bol povinný vec prevziať, sa do záručnej doby nepočíta.
Predávajúci je povinný vydať kupujúcemu potvrdenie o tom, kedy právo uplatnil, ako i o vykonaní opravy a o dobe
jej trvania. Ak dôjde k výmene výrobku, začne plynúť záručná doba znova od momentu prevzatia nového výrobku.
Rozsah záruky a povinnosti dovozcu:
Dovozca nesie zodpovednosť za to, že výrobok bude mať po celú záručnú dobu vlastnosti obvyklé pre daný druh
výrobku a uvedené parametre.
Dovozca nezodpovedá za vady výrobku spôsobené bežným opotrebením alebo použitím výrobku na iné účely,
nežna aké je určený.
Zánik záruky:
Nárok na záruku zaniká v nasledujúcich prípadoch:
a. ak výrobok nebol používaný a udržovaný podľa návodu na použitie alebo bol poškodený neodborným zásahom
užívateľa
b. ak výrobok bol používaný v iných podmienkach alebo na iné účely než na aké bol určený
c. ak nie je možné predložiť záručný list výrobku
d. ak došlo k úmyselnému prepisovaniu údajov uvedeným výrobcom, predajcom alebo servisnou organizáciou vpôvodnej dokumentácii výrobku
e. ak bola niektorá časť výrobku nahradená neoriginálnou súčasťou
f. ak došlo k poškodeniu výrobku alebo k nadmernému opotrebeniu vinou nedostatočnej údržby
g. ak výrobok havaroval alebo bol poškodený vyššou mocou
h. ak bola vykonaná zmena výrobku bez súhlasu výrobcu
i. ak závada bola spôsobená neodborným skladovaním výrobku
j. k vada vznikla prirodzeným a bežným opotrebovaním výrobku
k. ak bol výrobok spojený alebo používaný so zariadením, ktoré nebolo odsúhlasené dovozcom
Uplatnenie reklamácie:
Reklamáciu uplatňuje kupujúci u predávajúceho. Pri reklamácii je kupujúci povinný predložiť riadne vyplnený záručný
list alebo nákupný doklad. Záručné opravy vykonáva predávajúci alebo ním poverené opravne.
Právo:
Ostatné vzťahy medzi kupujúcim a predávajúcim sa riadia príslušnými ustanoveniami občianskeho, prípadne obchodného zákonníka.Ostatní vztahy mezi kupujícím a prodávajícím se řídí příslušnými ustanoveními Občanského zákoníku
č. 47/1992 sb., případně obchodního zákoníku č. 513/1991 sb. ve znění pozdějších změn a doplňků.
Distribútor pre ČR: PENTA CZ s.r.o. Distribútor pre SR: PENTA SK s.r.o. Distributor for other countries Penta CZ s.r.o.
Page 35

HU
Köszönjük, hogy megvásárolta termékünket.
Használat előtt olvassa el a használati útmutatót. Az áttanulmányozása után biztos lehet benne,
hogy a turmixgepet szakszerűen, biztonságosan, kényelmesen és hatékonyan fogja használni.
FONTOS BIZTONSÁGI ELŐÍRÁSOK
Az elektromos berendezés használata közben tartsa be az alábbi óvintézkedéseket:
1. Használat előtt olvassa el az összes figyelmeztetést.
2. Ne merítse a motort vízbe vagy más folyadékba, hogy elkerülje az áramütés.
3. Gyermekek nem használhatják a terméket, így a termék közelében legyenek felnőtt felügyelete
alatt.
4. Ne használja a terméket sérült kábellel vagy a csatlakozóval, ill. ha a termék meghibásodott,
vagy ha bármilyen más módon megsérült. Hiba esetén forduljon a legközelebbi hivatalos szervizhez.
5. Ha a termék szállítás közben megsérült igényeljen csereterméket az eladónál vagy a gyártónál.
6. Tisztítás, szétszerelés vagy az egyes részek eltávolítása előtt húzza ki a készüléket a konne-
ktorból.
7. Kerülje az érintkezést a mozgó részekkel.
8. Ne használjon olyan tartozékokat, melyeket a gyártó nem forgalmaz vagy ajánl, az ellenkező
eset tűzhöz, áramütéshez vagy sérüléshez vezethet. Ne módosítsa vagy szerelje a terméket szakember felügyelete nélkül. Ellenkező esetben a garancia érvényét veszti.
9. Szétszerelés előtt győződjön meg arról, hogy a termék teljesen kikapcsolt és a kapcsológomb
az OFF pozícióban van, illetve, hogy a motor teljesen leállt.
10. Ne nyúljon a készülék belsejébe és ne is rakjon bele élelmiszert, míg a készülék be van kapc-
solva. Ha az élelmiszer beragad a csőb, használja a pumpát vagy állítsa a gépet ellentétes menetirányba. Ha a készüléket nem lehet teljesen kikapcsolni, várja meg, míg a motor leáll, majd szedje
ki a beragadt ételt.
11. Ne használja a szabadban.
12. Csak az ajánlott célokra használja a gépet.
13. Csak a fogantyú segítségével emelje meg.
14. Ne mossa semmilyen részét mosogatógépben.
15. Ne használja a készüléket 20 percnél tovább, a motor túlmelegedhet és leállhat. Ebben az
esetben, hagyja, hogy a motor kihűljön, majd kezdjen el vele ismét dolgozni.
16. Ne használjon kemény anyagokat az italok készítéséhez, mint pl. a kő, jég, fagyasztott gy-
ümölcs, nagy vagy kemény mag (például őszibarack, szilva, stb.)
17. A készülék használata nem alkalmas csökkent fizikai, érzékszervi vagy mentális képességű
emberek (beleértve a gyermekeket is) számára, illetve kevés tapasztalattal vagy ismerettel rendelkezőknek, kivéve ha azok ismertetve lettek egy értük felelős személy által a termék használatáról.
18. Kapcsolja ki a készüléket, és húzza ki a konnektorból, mielőtt tartozékokat cserél vagy megé-
rinti a mozgó alkatrészeket.
Page 36

Szerelési és üzemeltetési utasítás
A. Az alkatrészek listája és használata
Fő alkatrészek
A Tálca
B Csiga
C Szűrő-finom
D Szűrő-durva
E Forgó kefe
F Tál
G Alapzat
H Tisztító kefe
I Tolókészülékek
J Edény
Drain a cellulóz
Drain gyümölcslé
Ábra 1
Megjegyzés: Előbb helyezze be az élelmiszert, majd csak utána kapcsolja be a készüléket.
Fontos: A megfelelő működéshez a tálca élének az alapzaton feltünetett jelnél kell lennie. (1. ábra)
Page 37

B. A készülék összeszerelése
Fontos: Mielőtt összeszerelné az eszközt, kérjük ellenőrizze a következő pontokat: a tál alján van
egy gumidugó. Ez biztosítja, hogy az ital kizárólag a kivezető nyíláson keresztül távozzon. Az ital
elkészítése előtt győződjön meg arról, hogy a dugó stabilan és szilárdan a helyén van. (2. ábra)
Ábra. 2
1. Helyezze a tálat az aljára. (3. ábra)
A. Ellenőrizze, hogy a tál a megfelelő helyen van e.
2. Válassza ki, melyik a szűrőt akarja használni. A sárga egy finomabb szűrő, amely kevésbé en-
gedi át a rostokat. A narancssárga durvább, és növeli a rosttartalmat az italokban. Rakja a szűrőt
a forgó kefébe. Csatlakoztassa a piros pontot a szitán és a piros pontot a tálon, és tegye a szitát
a forgó kefével együtt a tálba. Ha a pontok megfelelően vannak csatlakoztatva, a szűrő és a forgó
kefe egymásba illik. (4. ábra)
3. Helyezze a tömörítési csavart a szitába, és csavarja addig, míg be nem ül a helyére. (5. ábra)
4. Helyezze a tálcát a tálra (6. ábra)
A. Illessze össze a tálcán levő nyilat a tálon levő piros ponttal.
B. Forgassa el a tálcát úgy, hogy a tálca műanyag lemeze a nyillal a lenti rész jelére mutat.
Ha a tálca a megfelelő helyzetben van, a nyíl a 4. szakaszból már nincs összeillesztve a tálon levő
piros ponttal (7. ábra)
tál
alap
Ábra 3 Ábra 4
Ábra 5 Ábra 6
Ábra 7
Page 38

C. Használati utasítás
Figyelem:
• Ne működtesse nedves kézzel, ez áramütést okozhat.
• Ne kapcsolja be a gépet, mielőtt betenné az élelmiszert.
• Ne használja több, mint 20 percig egyhuzamban.
Fontos: Ha hiba lép fel, a készülék automatikusan kikapcsol. Ez megvédi a motort és meghosszabbítja az életettartamot. Abban az esetben ha az alkatrészek nincsenek megfelelően csatlakozatva,
vagy ha a motor túlmelegszik vagy ha a szűrő eltömődik, a készülék automatikusan kikapcsol. Ez
teljesen normális folyamat, mely megvédi a készüléket a sérülésektől. Ha veszély áll fent, kapcsolja
ki a készüléket. Ellenőrizze, hogy az egyes részek helyesen vannak e csatlakozatva, illetve hogy a
szűrő nincs e eltömődve. Várjon 5 percet, míg a motor lehűlik, ezután a gépet újra működtetheti.
1. Csatlakoztassa az eszközt
2. Tegyen egy edényt az italt kibocsátó, és egyet a rostot kibocsátó nyílás alá.
3. A bekapcsoló gombnak (a fogantyú felső felén) 3 állása van:
A. Be (ON) - Beindítja a motort, ezáltal a gyümölcslé készítését.
B. Off (KI) – Középső állás. Kikapcsolja a készüléket.
C. REV-vissza. Ezt a funkciót csak akkor használja, ha valamilyen anyag beragadt a készülé-
kbe.
REVERSE
4. Készítse elő a hozzávalókat és rakja a tálcára
Győződjön meg róla, hogy a darabok 4cm-nél nem nagyobbak
Távolítson el minden kisebb és nagyobb magot
Felhasználás előtt a gyümölcsöt alaposan mossa meg
Ne rakjon túl sok élelmiszert a gépbe és ne nomja a gépbe erővel. Az
ételt lassan adagolja, hogy a gépnek legyen elég ideje a feldolgozásra. A tolattyú csak akkor használatos, ha az étel beragad. (8. ábra)
5. Kapcsolja be a bekapcsoló gombot ON
Rakja az élelmiszert a tálcára. Az ételt lassan adagolja, hogy a gépnek
legyen elég ideje a feldolgozásra.
Ne rakjon túl sok élelmiszert a gépbe és ne tolja be erővel. A tolattyú
csak akkor használatos, ha az étel beragad.
6. A munka befejeztével kapcsola ki az OFF pozícióba való állítással
Megjegyzés: ha több féle gyümölcslevet készít és nem szeretné, hogy
az ízek összekeveredjenek, öntsön vizet a tartályba, pár percre kapcsolja be a gépet, majd a vizet öntse ki.
Ábra 8
Page 39

D. Ha a készülék eltömődött és nem működik
1. Kapcsolja ki a gépet, néhány másodpercre kapcsolja be a vissza gombot, majd indítsa újra.
Megjegyzés: a vissza gomb pulzáló mozgást ad ki.
2. Ha a vissza gomb nem működik, kapcsolja ki a készüléket és kapcsolja le az áramkörről.
Szerelje szét a készüléket, hogy felszabadítsa a beragadt anyagot, majd szerelje újra össze és
indítsa újra.
E. Hogyan szedje szét és tisztítsa meg a készüléketj
1. Kapcsolja ki a készüléket
2. Fordítsa el a tálat és a tálcát jobbra úgy,
hogy a nyíl a tálcán megszűnik zárt helyzetben
lenni.
3. Szerelje szét az alkatrészeket abban a so-
rrendben, ahogy az az ábrán látható
4. Használat után kefével alaposan tisztítsa
meg a részeket langyos, szappanos vízzel,
Ábra 9
5. majd törölje teljesen szárazra. Ellenőrizze,
hogy a kivezető nyílás nincs e eltömődve. Vegye ki a gumidugót, hogy a rostok könnyebben
távozhassanak.
6. Használjon nedves vagy száraz törlőken-
dőt készülék aljának tisztításához. Az alsó részt
soha ne öblítse le vízzel.
Ábra 10
Tippek a tisztításhoz:
A forgó kefe szilikon ecseteit rendszeresen tisztítsa. Minden használat után alaposan tisztítsa meg
a készüléket. Vegye ki a gumidugót, így könnyebben tisztítható az alj. Mindig győződjön meg arról,
hogy a gumidugót visszadugta, mert így nem szivároghat gyümölcslé a készülék belsejébe. Ne
használjon súroló anyagokat vagy vegyszereket a készülék tisztításához. Ne mossa mosogatógépben.
Műszaki adatok
Termék neve- Perfect Juicer
Feszültség- AC 220 - 240V
Frekvencia- 50 Hz
Sebesség- 80 rpm
Motor- egyfázisú indukciós
A használati útmutatóban felhasznált fényképek
Maximális idő használata- 20 perc
csupán illusztrációk, esetenként eltérhetnek a
valós terméktől.
Page 40

Gyakran ismételt kérdések
Milyen anyagokat nem szabad a készülékbe tenni?
?
Semmilyen terméket nagy vagy kemény magokkal (barack, szilva, ...). Nem ajánljuk a jeget és a
fagyasztott gyümölcsöt / zöldséget.
? Lehet használni a készüléket aprítóként vagy darálóként?
Nem, ez a készülék nem alkalmas az élelmiszer a darálásra (például rizs, gabonafélék, magvak fekete bors, ...). Az eszközzel kivonatot nyerhetünk viszont bizonyos magvakból, ám azoknak ehhez a
feldolgozás előtt legalább 6 órán át ázniuk kell.
? Muszáj szétszedni és megtisztítani használat után?
Igen, a gyors tisztítás folyó víz alatt nem elég. Szét kell szedni az összes tartozékot és meleg vízzel
megtisztítani.
? Ha a facsaró megakad és fedelet nem lehet felnyitni az baj? Vegyem fel a kapcsolatot az
ügyfélszolgálattal?
Ha rostos gyümölcsből készít italt, könnyen megtörténhet, hogy a rostok eldugítják vagy eltömítik
a kivezető nyílást, mely esetben a készülék leáll. Ennek a másik oka lehet a túl gyors adagolás a
tartályba. Nyomja meg a vissza gombot úgy kb egy percig, majd kapcsolja vissza az ON gombbal
2-3percre. Ez a folyamat megakadályozza a rostok beszorulását. Víz segítségével is megpróbálhajta kitisztítani az eltömődött rostokat. Ha a problémák továbbra is fennállnak, és még mindig nem
tudja felnyitni a fedelet, forduljon ügyfélszolgálatunkhoz.
Hibaelhárítás
Mielőtt a szervizhez fordulna, tekintse át az alábbi hibaelhárítási tippeket:
Probléma Lehetséges okok Mit csináljak
A készülék nem
működik
Megállt a motor A tál tele van anyaggal.
Szivárgás az edényben A gumidugó az alján nincs
Csikorgás működés
közben
Tönkrement szita Fagyasztott élelmiszer, jég, ma-
A készülék alkatrészeinek szennyeződése
A facsaró nincs bedugva a
konnektorba.
A készülék helytelenül van
összeszerelve.
A motor túlmelegedés miatt
bizonsági okokból leállt.
megfelelően rögzítve.
Hang a csigából. Ez teljesen normális. Győződjön
gok, magvak, ismeretlen vagy
túl sok anyag van a tálban.
A felhasznált anyagok lehetnek
az elszíneződés okai.
Nézze meg, hogy az eszköz
csatlakoztatva van-e az áramkörbe.
A készüléket rakja újra össze az
utasításoknak megfelelően.
Nyomja meg a vissza gombot és
tisztítsa ki a gépet. Lehetséges,
hogy többször kell majd próbálkoznia.
Kapcsolja ki a készüléket és
hagyja kihűlni a motort.
Ellenőrizze, hogy a gumidugó az
alján a megfelelő helyen van.
meg arról, hogy a készülék nincs
e eltömődve a gyümölcstől.
Figyelmesen olvassa el a használati utasítást. Kérjük, ne tegyen túl
sok anyagota gépbe.
Ez teljesen normális. Őblítse le,
és tisztítsa meg a készüléket
használat után.
Page 41

RECEPTEK
Almából készült természetes fagylalt
Hozzávalók:
• 600 gramm alma
• 4 teáskanál tejpor
• 2 teáskanál sűrített te
Az eljárás:
Mossuk meg az almákat, és vágjuk kisebb darabokra.
Helyezzük az előkészített almát a facsaróba.
A tejpor nem oldódik fel könnyen, így ajánljuk öss-
zekeverni kisebb mennyiségű előkészített almalével, amelybe sűrített tejet öntünk (lehetőleg a G21
Perfect Smoothie turmixgéppel). A levet keverjük
össze a tejjel.
Tegyük egy nagy tálba.
Rakjuk a fagyasztóba legalább 1-2 órára.
Dzsúsz a szervezet tisztítására
Hozzávalók:
• 300g sárgarépa
• 200 gramm spenót
• 250 g sárgarépa
• 150 g saláta
• 100 gramm spenót
• 300g sárgarépa
• 100 g cékla
• 100 g uborka
• 300g sárgarépa
• 75 g cékla
• 125g gránátalma
Ananász fagylalt
Hozzávalók:
• •500gananász
• •1simajoghurt
• •3teáskanálsűrítetttej
Az eljárás:
Hámozza meg az ananászt, a húsát szeletelje apró
darabokra, majd tegye be a facsaróba.
Keverjük össze joghurttal és sűrített tejjel.
Keverék a fagyasztóba 1-2 órán keresztül.
Dzsúsz fejfájás és migrén ellen
Hozzávalók:
• 300g sárgarépa
• 100g pitypang
• 144 g spenót
• 300g sárgarépa
• 200 g zeller (Ha hozzáadja a zeller zöldjét is,
az arányokat változtassa: 350 g sárgarépa, 150
g zeller)
Dzsúsz megfázás ellen
Hozzávalók:
• 250 g sárgarépa
• 150 g zeller
• 100 g retek
• 200 g grapefruit
• 100 g citrom
• 200g narancs
Receptek a www.centrumzdravibrno.cz közreműködésével készültek: a szervezet egyedi és
teljeskörű kivizsgálása, tanácsadás, egészségügyi tájékoztatás és szemináriumok, tanfolyamok
és iskolázás a RAW (nyers) étrendről.
Page 42

Garancialevél
HU
Az eladó tölti ki
A termék neve:
Termék típusa...............................................................
Sorszám........................................................................
A jótállási idő...............................24.............................
A fent említett termék a vásárlóhoz hibamentesen, a szükséges üzleti és műszaki dokumentációval és kiegészítőkkel együtt került. A vásárló érdemben értesült a termék helyes használatáról és karbantartásáról.
A vevő neve...........................................................A vevő címe.............................................................
Az eladó aláírása ...................................................Az értékesítés időpontja..........................................
Az eladó pecsétje
GARANCIÁLIS FELTÉTELEK
A garancia tárgya:
A garancia az alaptermékre és a kiegészítőkre egyaránt vonatkozik.
A jótállási idő a termékre vonatkozóan 24 hónap értékesítés időpontjától számítva. Az idő, melyben még a
garanciális idő alatt levő termék javítása folyik, az időpontig amíg azt a vevő át nem veszi, nem számít bele a
garanciális időbe. Az eladó köteles a vevőnek elismervényt adni annak a garanciális jogával való élésének időpontjáról, a javításról , és a javítás időtartamáról. Ha a termék cseréjére kerül sor, a garanciális idő a cseretermék
átvételétől számítódik.
A garancia vonatkozása és a forgalmazó kötelességei:
A forgalmazó vállal felelősséget azért, hogy a termék az egész garanciális időszak alatt megőrizze jellemző tulajdonságait és paramétereit. A forgalmazó nem felel a normál elhasználódás során vagy a helytelen használat
következtében keletkezett hibákért.
A garancia megszűnése:
A garancia nem vonatkozik az alábbi esetekben:
a. ha a terméket nem utasításokat betartva használták vagy tartották karban, illetve ha a termék a felhasználó gondatlanságából adódóan megsérült
b. ha a terméket nem rendeltetészerűen, nem a megfelelő körülmények között, nem a megfelelő célra használták
c. ha nincs felmutatva a garancialevél
d. ha szándékos átírás történt a gyártó, a forgalmazó vagy az eladó által a termék eredeti dokumentációjában
e. amennyiben a termék egy része nem eredetivel lett pótolva
f. ha a termék sérüléséhez vagy az elhasználódásához a nem megfelelő karbantartás vezetett
g. ha a termék baleset következtében vagy nagyobb erő hatására sérült meg
h. ha a termék meg lett változtatva a gyártó engedélye nélkül
i. ha a meghibásodást a nem megfelelő tárolás okozta
j. ha a hiba a természetes kopás és elhasználódás során keletkezett
k. ha a termék használva vagy csatlakoztatva lett olyan szerkezethez, amit a gyártó nem engedélyezett
A reklamáció benyújtása:
A reklamációt a vevő az eladónak nyújtja be. A reklamációnál a vevő kötelessége benyújtani a pontosan kitöltött
garancialevelet és a vásárlási bizonylatot. A garanciális javítást az eladó vagy az eladó által megbízott szervisz
végzi.
Jogok:
A vevő és az eladó közti egyéb kapcsolatot a polgári és kereskedelmi törvénykönyv szabályozza.
Az eladó pecsétje:
Distributor pro ČR: PENTA CZ s.r.o. Distributor pre SR: PENTA SK s.r.o. Distributor for other countries Penta CZ s.r.o.
Page 43

Page 44

 Loading...