

Page 1
digital
SaFE
EN
CZ
SK
HU
Page 2

Page 3

EN
Thank you for purchasing our product.
Before using this unit, please read this manual in order to avoid improper handling and use
ofthedevice.
You have just made an important step to protect your property. Each of our safes is professionally
produced and ensures the greatest possible security. Before using read carefully the instructions
on the following pages of this manual.
PLEASE KEEP THE KEY IN A SAFE PLACE.
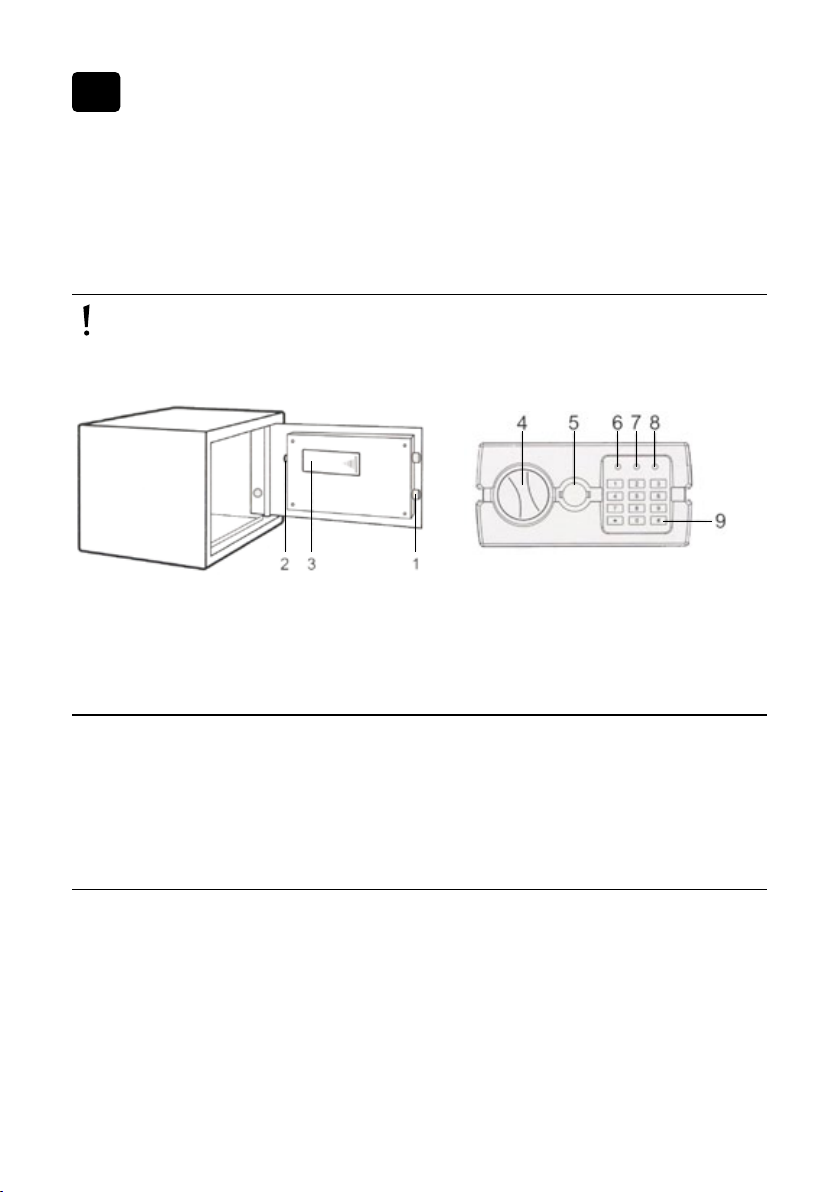
Schematic drawing of the safe Scheme of control panel
1. Safety pins 2. The reset button 3. Place for batteries
4. Handle for the lock operating 5. Cover of the emergency lock 6. Green LED
7. Red Led 8. Yellow LED 9. Confirmation button
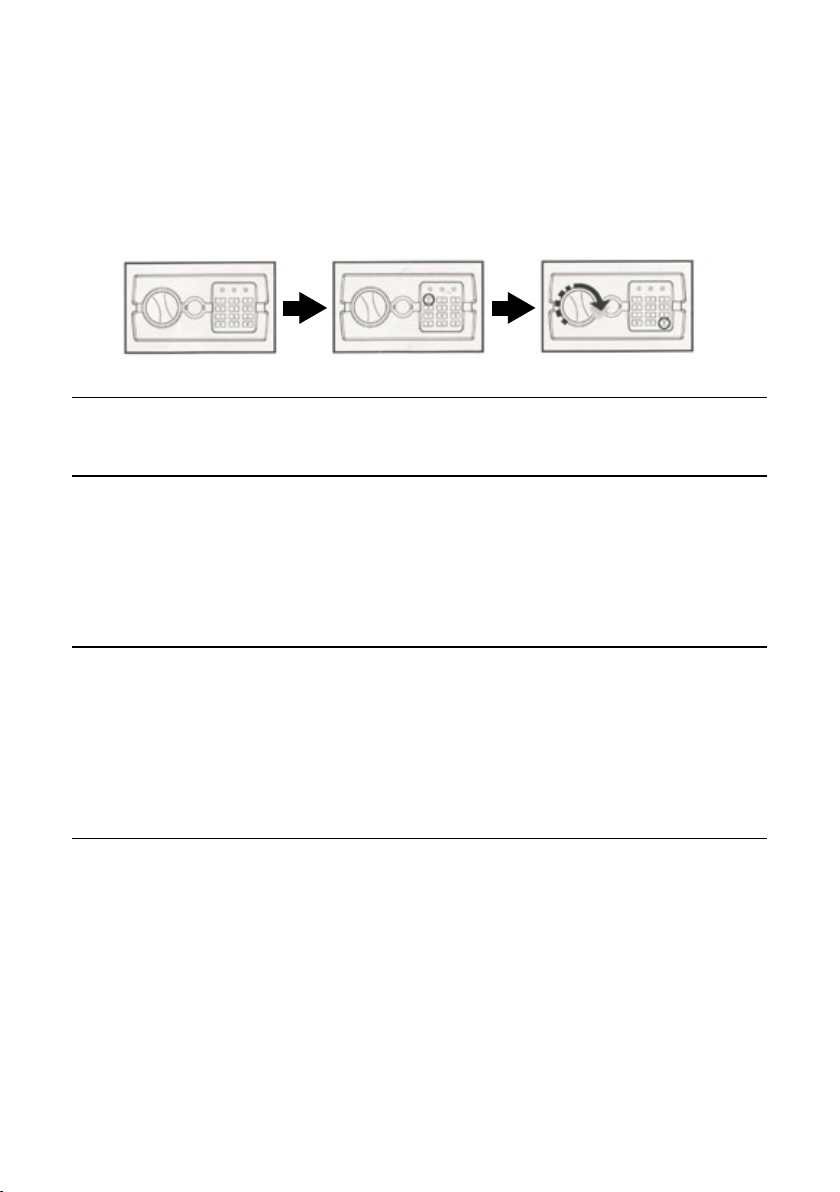
First use
Remove the opening cover for emergency key next to the keyboard.
Remove the cover of emergency lock and insert emergency key. Then turn the key countercloc-
kwise.
Turn the handle clockwise.
Warning: After opening pull the safety key out and store in a safe place.
Inserting the batteries
Open the door of the safe. Insert four AA batteries into the batteries holder.
If the green and the red led on the front side of the door light at the same time it is necessary
tochange the batteries.
Warning: take care about the right polarity of inserted batteries. If there is a failure of the voltage
supply longer than 3 minutes the safe will be reseted and it isnecessary to proceed as during the
first use.
Page 4
Opening the door
Enter your security number (3-8 numbers). Each press will be signalized by a beep and by flashing
yellow light.
Pressing A (C/#) or B (E/*) will light up green light.
Turn the handle clockwise and pull out. Door will be opened.
Warning: The preset code is 159. If you enter the wrong code, yellow LED flashes and the safe
beeps three times. Please enter the code again.
Closing the door
Turn the handle counterclockwise.
Automatic locking
If you enter the wrong code three times, safe will be locked and will run the warning beeps
for20seconds.
3 more bad entering will lock the safe and the safe will run the beeps for 5 minutes.
Warning: The keyboard is inactive during beeping. If you want to stop beeping, you have to open
the door using the emergency key and remove the batteries.
Entering the security code
Open the safe and press the RESET button on the inner side of the safe door. You will hear a beep
and on the keyboard will flash the yellow LED.
Enter the new code (3-8 numbers). By pressing A (C/#) or B (E/*) confirm the setting. The lock signalizes by a short beep that the new code is setted. The yellow LED goes out.
If you enter the wrong code the yellow LED flashes and you will hear 3 beeps. It is necessary
toenter the code again.
Entering the main security code
Open the safe and press the key O two times, then press the RESET button on the inner side
ofthedoor. The yellow LED lights up. Start to set up the code.
Enter the new code (3-8 numbers). By pressing A or B confirm the setting. Safe beeps two times
and also the yellow LED blinks two times. The code is setted successfully.
When the yellow LED blinks three times, it means invalid setting of the code and it is necessary
torepeat the process again.
Page 5
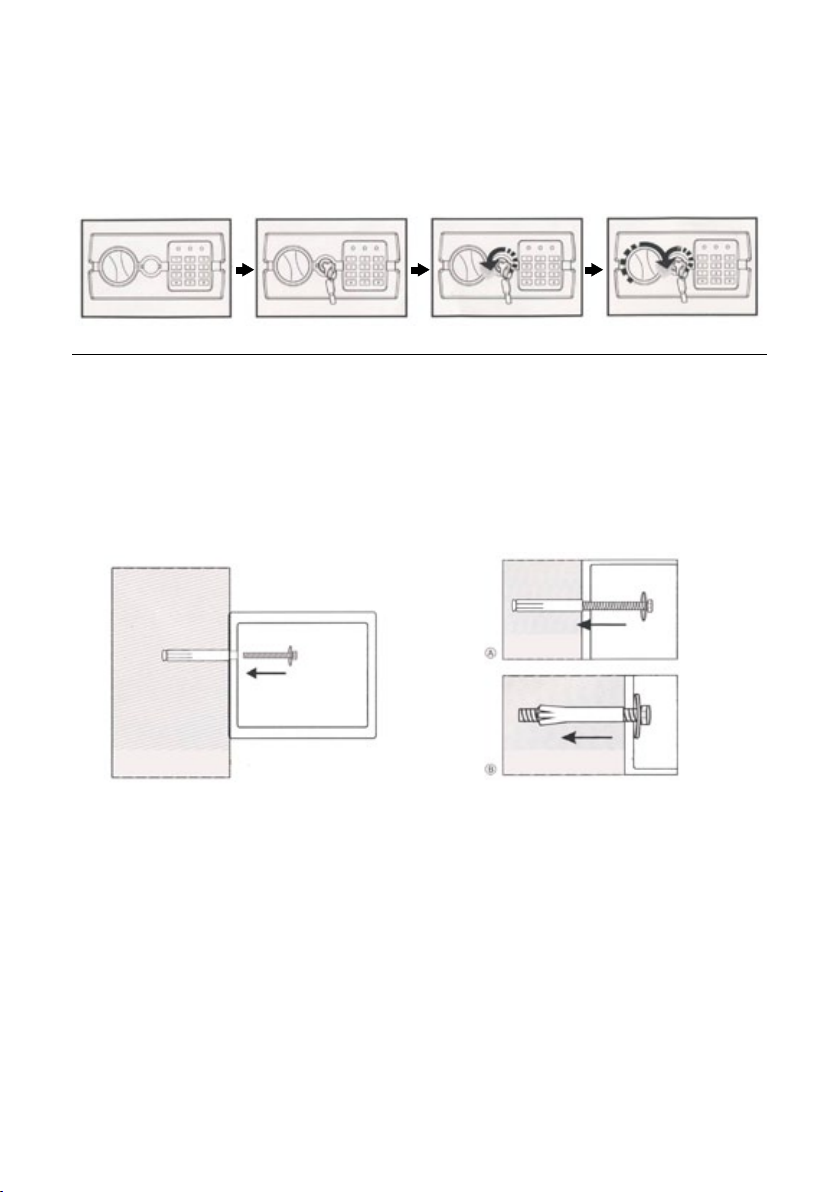
Opening the safe using the emergency key
In the case of forgotten code or when there is a technical problem of electronic lock it is possible
to open the safe with using emergency key.
Remove the cover next to the keyboard.
Insert the key into the lock for emergency opening and turn counterclockwise. Then turn the han-
dle clockwise.
Mounting process
Put the safe to the place that can not be easily manipulated.
Drill the holes for the dowels.
Turn expansion screws counterclockwise.
Fix the safe on the wall with using expansion screws (or clamping screws).
Make sure the safe is correctly attached to the dowels and tighten.
Warning: use expansion screws to the concrete wall. Clamping screws use on the wooden walls.
Wall
Wall
Images used in this manual are for illustrational purposes only and may differ
from the actual product.
Wall
Page 6
EN
Warranty card
To be filled in by the sales representative
Productname:
Product type.............................................................
Serial number............................................................
Warranty period......................24...............................
The above specified product was handed to the customer free of any defects including all accessories and trade
and technical documentation. Customer was properly familiarized with the principles of safe use, operation
andtechnical maintenance of the product.
Customer name ...................................................Customer address ...................................
Dealer signature ...................................................Date of sale .............................................
Stamp seller
WARRANTY TERMS
Object of warranty:
Warranty applies to the product itself including all supplied accessories.
Warranty period:
Warranty period is 24 months from date of sale to the customer. The period between applying of the warranty
claim until the date of customer’s duty to pick the product up upon the warranty repair does not count into the
warranty period.
Dealer is obliged to provide the customer with the confirmation of the warranty claim date and also warranty
repair and repair duration. If the product is replaced under warranty, a new warranty period starts from the date
when customer receives the new product.
Warranty coverage and importer duties:
Importer is responsible for the product having the characteristics typical for this goods category and given product parameters during the whole warranty period.
Importer is not responsible for any defects caused by usual wear or improper use of the product.
Warranty expiration:
The right for warranty claim is cancelled in following cases:
a. If the product was not used and maintained according to the user manual or if it was damaged by unqualified
action of the user.
b. If the product was used in inappropriate conditions or for different purposes than the ones applicable to this
product category.
c. If the user can not present the warranty card.
d. If any data in the original manufacturer, dealer or service documentation was intentionally modified.
e. If any part of the product was replaced by an unoriginal part.
f. If the product was damaged or excessively worn because of insufficient maintenance.
g. If the product was damaged by force majeure
h. If the product was modified without the manufacturer consent.
i. If the defect was caused by improper storage of the product.
j. If the damage was caused by natural and regular wear of the product.
k. If the product was connected or used with another device which was not approved by the importer or manufacturer.
Warranty claims:
Warranty claims should be filed at the dealer. The user is obliged to present a filled in warranty card or proof of
purchase. Warranty repairs are carried out by the dealer / importer or approved service centers.
Legal:
Other relationships between the seller (dealer / importer) and buyer (customer) are regulated by the applicable
civil or commercial code.
Distributor for CZ: PENTA CZ s.r.o Distributor for SK: PENTA SK s.r.o. Distributor for other countries Penta CZ s.r.o.
Page 7

CZ
Děkujeme za nákup našeho výrobku.
Před použitím přístroje si prosím přečtěte tento návod, vyhnete se tak neodborné manipulaci azacházení s přístrojem.
Právě jste učinili důležitý krok k ochraně Vašeho nejcennějšího majetku. Každý z našich trezorů
jeprofesionálně vyráběn a zajišťuje co největší bezpečnost. Než začnete trezor používat, přečtěte
si pozorně návod k obsluze na následujících stranách tohoto manuálu.
PROSÍM USCHOVEJTE KLÍČ OD TREZORU NA BEZPEČNÉ MÍSTO.
Schématický nákres trezoru Schéma ovládacího panelu
1. Bezpečnostní čepy 2. Tlačítko reset 3. Místo pro baterie
4. Madlo ovládání zámku 5. Kryt nouzového zámku 6. Zelené LED
7. Červená LED 8. Žlutá LED 9. Potvrzovací tlačítko
První použití
Při prvním otevření odstraňte kryt otvoru pro nouzový klíč vedle klávesnice.
Vyjměte kryt nouzového zámku a vložte nouzový klíč. Poté otočte klíčem proti směru hodinových
ručiček.
Otočte otvíracím madlem až na doraz po směru hodinových ručiček.
Upozornění: Po otevření vytáhněte bezpečnostní klíč a uložte jej na bezpečné místo.
Vložení baterií
Otevřete dveře trezoru.
Vložte 4xAA baterie do bateriového držáku.
Pokud svítí současně zelená a červená dioda na přední straně dveří, je zapotřebí baterie z důvodu
nízkého napětí vyměnit.
Upozornění: Dejte pozor na správnou polaritu vkládaných baterií. Pokud dojde k výpadku napětí
delšímu jak 3 minuty, trezor bude resetován a je zapotřebí postupovat jako při prvním použití.
Page 8

Otevření dveří
Zadejte své bezpečnostní číslo (3-8 číslic). Každé stisknutí bude signalizováno pípnutím a rozsvícením žlutého světla.
Stisknutím tlačítka “A“ (C/#) nebo “B“ (E/*) se rozsvítí zelená kontrolka.
Otočte otvíracím madlem zámku ve směru hodinových ručiček a zatáhněte směrem ven. Dojde
kotevření dveří.
Upozornění: Přednastavený kód je “159“. Při špatném zadání kódu žlutá LED bliká a trezor 3xpíp-
ne. Zadejte kód znovu.
Uzavření dveří
Otočte otvíracím madlem zámku proti směru hodinových ručiček.
Automatické uzamčení
3 špatná zadání kódu zablokují trezor a spustí varovné pípání po dobu 20 vteřin.
Další 3 špatná zadání kódu zablokují trezor a spustí varovné pípání po dobu 5 minut.
Upozornění: Během pípání je klávesnice neaktivní. Pokud chcete zastavit zvukový signálm, musíte
otevřít dveře nouzovým klíčem a vyjmout baterie.
Zadání bezpečnostního kódu
Otevřete trezor a stiskněte tlačítko RESET na vnitřní straně trezorových dveří. Ozve se pípnutí
anaklávesnici se rozsvítí žlutá LED.
Zadejte nový 3 až 8 místný kód. Stiskem klávesy “A“ (C/#) nebo “B“ (E/*) potvrďte nastavení, zámek pípnutím signalizuje, že je nastaven nový kód. Žlutá LED zhasne.
Při špatném zadání kódu žlutá LED bliká a ozvou se 3 pípnutí. Je zapotřebí zadat kód znovu.
Zadání hlavního bezpečnostního kódu
Otevřete trezor a stiskněte 2x klávesu “0“, poté stiskněte tlačítko RESET na vnitřní straně dveří.
Rozsvítí se žlutá LED. Začněte nastavovat kód.
Zadejte nový 3 až 8 místný kód. Stiskem klávesy “A“ (C/#) nebo “B“ (E/*) potvrďte nastavení. Trezor
2x pípne a 2x blikne žluté LED. Kód je úspěšně nastaven.
Pokud žlutá LED 3x zabliká, znamená to neplatné nastavení kódu a je zapotřebí proces znovu
opakovat.
Page 9

Otevření pomocí nouzového klíče
V případě zapomenutí kódu nebo při technické závadě elektronického zámku je možno otevřít
trezor pomocí nouzového klíče.
Odstraňte kryt vedle klávesnice.
Vložte klíč pro nouzové otevření do zámku a otočte proti směru hodinových ručiček až na doraz.
Nyní otočte otvíracím madlem ve směru hodinových ručiček.
Montážní postup
Trezor umístěte na místo, se kterým nelze jednoduše manipulovat.
Vyvrtejte díry pro hmoždinky.
Otočte expanzní šrouby proti směru hodinových ručiček.
Pomocí expanzních šroubů (nebo upínacích šroubů) připevněte trezor na stěnu.
Ujistěte se, že je trezor správně přichycen do hmoždinek a dotáhněte.
Upozornění: Expanzní šrouby použijte do betonové stěny. Upínací šrouby použijte na dřevěné
stěny.
Zeď
Zeď
Fotografie použité v manuálu jsou pouze ilustrační a nemusí se přesně shodovat s výrobkem.
Zeď
Page 10

CZ
Záruční list
Vyplní prodejce
Název výrobku:
Typ výrobku..............................................................
Výrobní číslo..............................................................
Záruční doba...........................24.............................
Výše uvedený výrobek byl bez závad předán kupujícímu včetně příslušné obchodně-technické dokumentace
apříslušenství. Kupující byl řádně poučen o zásadách správné obsluhy a technické údržby výrobku.
Jméno kupujícího ..................................................Adresa kupujícího ...................................
Podpis prodejce ...................................................Datum prodeje ........................................
Razítko prodávajícího
ZÁRUČNÍ PODMÍNKY
Předmět záruky:
Záruka se stahuje na základní výrobek dodávaný včetně příslušenství.
Záruční doba:
Záruční doba na výrobek je 24 měsíců od data prodeje kupujícímu. Doba od uplatnění práva z odpovědnosti
zavady až do doby, kdy uživatel po skončení opravy byl povinen věc převzít, se do záruční doby nepočítá.
Prodávající je povinen vydat kupujícím potvrzení o tom, kdy právo uplatnil, jakož i o provedení opravy a o době
jejího trvání. Dojde-li k výměně výrobku, začne běžet záruční doba znovu od převzetí nového výrobku.
Rozsah záruky a odpovědnosti dovozce:
Dovozce nese odpovědnost za to, že výrobek bude mít po celou záruční dobu vlastnosti obvyklé pro dotyčný
druh výrobku a uvedené parametry. Dovozce neodpovídá za vady výrobku způsobené běžným opotřebením
nebo použitím výrobku k jiným účelům, než ke kterým byl určen.
Zánik záruky:
Záruční nárok zaniká jestliže:
a. výrobek nebyl používán a udržován podle návodu k použití nebo byl poškozen jakýmkoli neodborným zásahem
uživatele
b. výrobek byl používán v jiných podmínkách nebo k jiným účelům než ke kterým byl určen
c. nelze předložit záruční list výrobku
d. došlo k úmyslnému přepisování údajů uvedeným výrobcem, prodejcem nebo servisní organizací v původní dokumentaci výrobku
e. byla některá část výrobku nahrazena neoriginální součástí
f. k poškození výrobku nebo k nadměrnému opotřebení došlo vinou nedostatečné údržby
g. výrobek havaroval nebo byl poškozen vyšší mocí
h. byla provedena změna výrobku bez souhlasu výrobce
i. vady byly způsobené neodborným skladováním výrobku
j. vady vznikly přirozeným a běžným provozním opotřebováním výrobku
k. výrobek byl spojen nebo provozován se zařízením, které nebylo odsouhlaseno dovozcem
Uplatnění reklamace:
Reklamaci uplatňuje kupující u prodávajícího. Při reklamaci je kupující povinen předložit řádně vyplněný záruční
list nebo nákupní doklad.
Záruční opravy provádí prodávající nebo jím pověřené opravny.
Právo:
Ostatní vztahy mezi kupujícím a prodávajícím se řídí příslušnými ustanoveními Občanského zákoníku č. 47/1992
sb., případně obchodního zákoníku č. 513/1991 sb. ve znění pozdějších změn a doplňků.
Distributor pro ČR: PENTA CZ s.r.o. Distributor pre SR: PENTA SK s.r.o. Distributor for other countries Penta CZ s.r.o.
Page 11
SK
Ďakujeme za nákup nášho výrobku.
Pred použitím prístroja si prosím prečítajte tento návod, vyhnete sa tak neodbornej manipulácii
azaobchádzaniu s prístrojom.
Práve ste urobili dôležitý krok k ochrane Vášho najcennejšieho majetku. Každá z našich trezorov
jeprofesionálne vyrábaný a zaisťuje čo najväčšiu bezpečnosť. Predtým než začnete trezor používať, prečítajte si pozorne návod na obsluhu na nasledujúcich stranách tohto manuálu.
PROSÍM USCHOVAJTE KĽÚČ OD TREZORU NA BEZPEČNÉ MIESTO.
Schematický nákres trezoru Schéma ovládacieho panela
1. Bezpečnostné čapy 2. Tlačidlo Reset 3. Miesto pre batérie
4. Držadlo ovládania zámku 5. Kryt núdzového zámku 6. Zelený LED
7. Červený LED 8. Žltý LED 9. Potvrdzovacie tlačidlo
Prvé použitie
Pri prvom otvorení odstráňte kryt otvoru pre núdzový kľúč vedľa klávesnice.
Vyberte kryt núdzového zámku a vložte núdzový kľúč. Potom otočte kľúčom proti smeru hodino-
vých ručičiek.
Otočte otváracím držadlom až na doraz v smere hodinových ručičiek.
Upozornenie: Po otvorení vytiahnite bezpečnostný kľúč a uložte ho na bezpečné miesto.
Vloženie batérií
Otvorte dvere trezoru.
Vložte 4xAA batérie do batériového držiaka.
Ak svieti súčasne zelená a červená dióda na prednej strane dverí, je potrebné batérie z dôvodu
nízkeho napätia vymeniť.
Upozornenie: Dajte pozor na správnu polaritu vkladaných batérií. Pokiaľ dôjde k výpadku napätia
dlhšiemu ako 3 minúty, trezor sa vynuluje a je potrebné postupovať ako pri prvom použití.
Page 12

Otvorenie dverí
Zadajte svoje bezpečnostné číslo (3-8 číslic). Každé stlačenie bude signalizované pípnutím a rozsvietením žltého svetla.
Stlačením tlačidla „A“ (C / #) alebo „B“ (E / *) sa rozsvieti zelená kontrolka.
Otočte otváracím držadlom zámku v smere hodinových ručičiek a potiahnite smerom von. Dôjde
k otvoreniu dverí.
Upozornenie: Prednastavený kód je „159“. Pri zlom zadaní kódu žltá LED bliká a trezor 3x pípne.
Zadajte kód znova.
Uzavretie dverí
Otočte otvíracím madlem zámku proti směru hodinových ručiček.
Automatické uzamknutie
3 zlé zadanie kódu zablokuje trezor a spustí varovné pípanie po dobu 20 sekúnd.
Ďalšie 3 zlá zadanie kódu zablokuje trezor a spustí varovné pípanie po dobu 5 minút.
Upozornenie: Počas pípanie je klávesnica neaktívny. Ak chcete zastaviť zvukový signál musíte
otvoriť dvere núdzovým kľúčom a vybrať batérie.
Zadanie bezpečnostného kódu
Otvorte trezor a stlačte tlačidlo RESET na vnútornej strane trezorových dverí. Ozve sa pípnutie ana
klávesnici sa rozsvieti žltý LED.
Zadajte nový 3 až 8 miestny kód. Stlačením klávesy „A“ (C / #) alebo „B“ (E / *) potvrďte nastavenie,
zámok pípnutím signalizuje, že je nastavený nový kód. Žltý LED zhasne.
Pri zlom zadaní kódu žltá LED bliká a ozvú sa 3 pípnutie. Je potrebné zadať kód znova.
Zadanie hlavného bezpečnostného kódu
Otvorte trezor a stlačte 2x kláves „0“, potom stlačte tlačidlo RESET na vnútornej strane dverí.
Rozsvieti sa žltý LED. Začnite nastavovať kód.
Zadajte nový 3 až 8 miestny kód. Stlačením klávesy „A“ (C / #) alebo „B“ (E / *) potvrďte nastavenie.
Trezor 2x pípne a 2x blikne žltý LED. Kód je úspešne nastavený.
Ak žltý LED zabliká 3x, znamená to neplatné nastavenie kódu a potrebu proces znovu opakovať.
Page 13

Otvorenie pomocou núdzového kľúča
V prípade zabudnutia kódu alebo pri technickej poruche elektronického zámku je možné otvoriť
trezor pomocou núdzového kľúča.
Odstráňte kryt vedľa klávesnice.
Vložte kľúč pre núdzové otvorenie do zámku a otočte proti smeru hodinových ručičiek až na doraz.
Teraz otočte otváracím držadlom v smere hodinových ručičiek.
Montážny postup
Trezor umiestnite tak, aby s ním nebolo možné jednoducho manipulovať.
Vyvŕtajte diery pre rozperky (hmoždinky).
Otočte expanzné skrutky proti smeru hodinových ručičiek.
Pomocou expanzných skrutiek (alebo upínacích skrutiek) pripevnite trezor na stenu.
Uistite sa, že trezor je správne prichytený do hmoždiniek a dotiahnite.
Upozornenie: Expanzné skrutky použite do betónovej steny. Upínacie skrutky použite na drevené
steny.
Múr
Múr
Fotografie použité v návode sú len ilustračné a nemusia sa presne zhodovat s výrobkom.
Múr
Page 14

SK
Záručný list
Vyplní predajca
Názov výrobku:
Typ výrobku..............................................................
Výrobné číslo............................................................
Záručná doba..........................24.............................
Vyššie uvedený výrobok bol bez závad predaný kupujúcemu vrátane príslušnej obchodno-technickej dokumentácie a príslušenstva. Kupujúci bol riadne poučený o zásadách správnej obsluhy a technickej údržby výrobku.
Meno kupujúceho .................................................Adresa kupujúceho ...................................
Podpis predajcu ...................................................Dátum predaja ...........................................
Razítko prodávajícího
ZÁRUČNÉ PODMIENKY
Predmet záruky:
Záruka sa vzťahuje na základný výrobok dodávaný vrátane príslušenstva.
Záručná doba:
Záručná doba na výrobok je 24 mesiacov od dátumu predaja kupujúcemu. Doba od uplatnenia práva zodpovednosti za vady až do doby, kedy užívateľ po skončení opravy bol povinný vec prevziať, sa do záručnej doby
nepočíta.
Predávajúci je povinný vydať kupujúcemu potvrdenie o tom, kedy právo uplatnil, ako i o vykonaní opravy
aodobe jej trvania. Ak dôjde k výmene výrobku, začne plynúť záručná doba znova od momentu prevzatia
nového výrobku.
Rozsah záruky a povinnosti dovozcu:
Dovozca nesie zodpovednosť za to, že výrobok bude mať po celú záručnú dobu vlastnosti obvyklé pre daný druh
výrobku a uvedené parametre.
Dovozca nezodpovedá za vady výrobku spôsobené bežným opotrebením alebo použitím výrobku na iné účely,
nežna aké je určený.
Zánik záruky:
Nárok na záruku zaniká v nasledujúcich prípadoch:
a. ak výrobok nebol používaný a udržovaný podľa návodu na použitie alebo bol poškodený neodborným zásahom
užívateľa
b. ak výrobok bol používaný v iných podmienkach alebo na iné účely než na aké bol určený
c. ak nie je možné predložiť záručný list výrobku
d. ak došlo k úmyselnému prepisovaniu údajov uvedeným výrobcom, predajcom alebo servisnou organizáciou vpôvodnej dokumentácii výrobku
e. ak bola niektorá časť výrobku nahradená neoriginálnou súčasťou
f. ak došlo k poškodeniu výrobku alebo k nadmernému opotrebeniu vinou nedostatočnej údržby
g. ak výrobok havaroval alebo bol poškodený vyššou mocou
h. ak bola vykonaná zmena výrobku bez súhlasu výrobcu
i. ak závada bola spôsobená neodborným skladovaním výrobku
j. k vada vznikla prirodzeným a bežným opotrebovaním výrobku
k. ak bol výrobok spojený alebo používaný so zariadením, ktoré nebolo odsúhlasené dovozcom
Uplatnenie reklamácie:
Reklamáciu uplatňuje kupujúci u predávajúceho. Pri reklamácii je kupujúci povinný predložiť riadne vyplnený
záručný list alebo nákupný doklad. Záručné opravy vykonáva predávajúci alebo ním poverené opravne.
Právo:
Ostatné vzťahy medzi kupujúcim a predávajúcim sa riadia príslušnými ustanoveniami občianskeho, prípadne obchodného zákonníka.Ostatní vztahy mezi kupujícím a prodávajícím se řídí příslušnými ustanoveními Občanského
zákoníku č. 47/1992 sb., případně obchodního zákoníku č. 513/1991 sb. ve znění pozdějších změn a doplňků.
Distribútor pre ČR: PENTA CZ s.r.o. Distribútor pre SR: PENTA SK s.r.o. Distributor for other countries Penta CZ s.r.o.
Page 15

HU
Köszönjük, hogy megvásárolta termékünket.
Használat előtt kérjük olvassa el a használati útmutatót, így megelőzheti az eszköz helytelen
használatát.
Ön most egy nagyon fontos lépést tett affelé, hogy megvédje legértékesebb vagyontárgyait.
Azösszes széfünk szakmailag tökéletesen kivitelezett, hogy a lehető legnagyobb biztonságot nyújtsa. Mielőtt elkezdené a széf használatát, kérjük olvassa el a használati utasításokat a következő
oldalakon.
KÉRJÜK, A SZÉF KULCSÁT TEGYE EGY BIZTONSÁGOS HELYRE.
A széf sematikus rajza A vezérlő panel szerkezete
1. Biztonsági trezorzár 2. Reset gomb 3. Az elemek helye
4. Azárszerkezetet vezérlő fogantyú 5. A vesznyitó zár borítása 6. Zöld LED
7. Piros LED 8. Sárga LED 9. Megerősítés gomb
Első használat
Az első nyitás alkalmával távolítsa el a vésznyitó kulcs borítását a billentyűzet mellett.
Vegye le a vésznyitó zár borítását és helyezze be a biztonsági kulcsot. Majd fordítsa el a kulcsot
azóramutató járásával ellentétesen.
Fordítsa el a zárzserkezetet vezérlő fogantyút teljesen a kattanásig az óramutató járásával mege-
gyezően.
Figyelmeztetés: Miután a széf kinyílt, vegye ki a biztonsági kulcsot, és tárolja egy biztonságos
helyen.
Az elemek behelyezése
Nyissa ki a széf ajtaját.
Helyezzen be 4 db AA elemet az erre kijelölt helyre.
Ha egyszerre világít a zöld és a piros LED az ajtó elülső oldalán, az elemek feszültsége alacsony,
így azokat mihamarabb ki kell cserélni.
Megjegyzés: Ellenőrizze, hogy a helyes polaritással helyezze be az elemeket. 3 percnél hosszabb
áramszünet esetén a széf újraindul, így meg kell ismételni az eljárást, amit az első használatkor
alkalmazott.
Page 16

Az ajtó kinyitása
Adjon meg egy biztonsági kódot (3-8 számjegy). Minden gombnyomást egy hangjelzés és egy
sárga felvillanó fény kísér.
Az „A“ (C / #) vagy a „B“ (E / *) gomb megnyomásakor felvillan a zöld fény.
Fordítsa a zárszerkezetet vezérlő fogantyút óramutató járásával megegyező irányba, és húzza ki-
felé. Így az ajtó kinyílik.
Megjegyzés: A gyárilag beállított kód „159“. Ha rossz kódot ad meg, a sárga LED elkezd villogni
és a széf 3x sípol. Ebben az esetben adja meg a kódot még egyszer.
Az ajtó zárása
Fordítsa el a fogantyút az óramutató járásával ellentétes irányban.
Automatikus zárás
3 hibás kód beírása zárolja a széfet és 20 másodpercen keresztül figyelmeztető hangjelzést ad ki.
További 3 helytelen kód leblokkolja a széfet, míg az 3 percen keresztül figyelmeztető hangjelzést
ad ki.
Figyelmeztetés: A sípolás alatt a billentyűzet inaktív. A figyelmeztető hangjelzés leállításához ki kell
nyitni a széfet a vesznyitó kulccsal és ki kell venni az elemeket.
A biztonsági kód megadása
Nyissa ki a széfet, majd nyomja meg a RESET gombot a biztonsági ajtó belső oldalán. Eközben
hangjelzés hallatszik és a sárga LED világít a billentyűzeten.
Adjon meg egy új, 3-8 számjegyből álló kódot. Nyomja meg a „A“ (C / #) vagy a „B“ (E / *) gombot
és hagyja jóvá a beállítást. A sípszó jelzi, hogy az új kód el lett fogadva. A sárga LED kialszik.
Ha rossz kódot sárga LED villog, és hallani 3 sípolás. Meg kell majd próbáljuk újra.
A fő biztonsági kód megadása
Nyissa ki a széfet, nyomja meg 2x a „0“ billentyűt, majd nyomja meg a RESET gombot az ajtó
beljsejében. A sárga LED felvillan, ezután megkezdheti a kód beírását.
Adjon meg egy új, 3-8 számjegyből álló kódot. Nyomja meg a „A“ (C / #) vagy a „B“ (E / *) gombot,
ezután a kód aktiválódik. A széf kétszer sípol, és kétszer felvillan a sárga LED. A kód sikeresen be
lett állítva.
Ha a sárga LED háromszor villan fel, az azt jelenti, hogy a kódot nem sikerült beállítani, így meg
kell ismételni a folyamatot.
Page 17

Nyitás a biztonsági kulccsal
Abban az esetben, ha elfelejti a kódot, vagy a széfnél műszaki hiba lép fel, a széfet a vésznyitó
kulcs segítségével lehet kinyitni.
Vegye le a billentyűzet melletti fedelet.
Helyezze a kulcsot a vésznyitó zárba és fordítsa el az óramutató járásával ellentétesen. Ezután
fordítsa a zárszerkezetet vezérlő foganytút az óramutató járásával megegyező irányba.
Felszerelési útmutató
A széfet rakja egy biztonságos helyre, ahonnan nem mozdítható el könnyen.
Falra szereléskor először fúrja ki a helyet a tiplik számára.
Forgassa el a tipliket az óramutató járásával ellentétesen.
A tiplik, ill. dubelek segítségével rögzítse a széfet a falhoz.
Ellenőrizze, hogy a széf megfelelően rögzült a tiplikhez, majd ezután húzza be.
Figyelem: dubelek a betonfalba valóak. A tipliket a fából készült falhoz ajánljuk.
Fal
Fal
A kézikönyvben használt fényképek csak illusztrációk, nem egyeznek meg pontosan a termékkel.
Fal
Page 18

Garancialevél
HU
Az eladó tölti ki
A termék neve:
Termék típusa...............................................................
Sorszám........................................................................
A jótállási idő...............................24.............................
A fent említett termék a vásárlóhoz hibamentesen, a szükséges üzleti és műszaki dokumentációval és kiegészítőkkel együtt került. A vásárló érdemben értesült a termék helyes használatáról és karbantartásáról.
A vevő neve...........................................................A vevő címe.............................................................
Az eladó aláírása ...................................................Az értékesítés időpontja..........................................
Az eladó pecsétje
GARANCIÁLIS FELTÉTELEK
A garancia tárgya:
A garancia az alaptermékre és a kiegészítőkre egyaránt vonatkozik.
A jótállási idő a termékre vonatkozóan 24 hónap értékesítés időpontjától számítva. Az idő, melyben még a
garanciális idő alatt levő termék javítása folyik, az időpontig amíg azt a vevő át nem veszi, nem számít bele a
garanciális időbe. Az eladó köteles a vevőnek elismervényt adni annak a garanciális jogával való élésének időpontjáról, a javításról , és a javítás időtartamáról. Ha a termék cseréjére kerül sor, a garanciális idő a cseretermék
átvételétől számítódik.
A garancia vonatkozása és a forgalmazó kötelességei:
A forgalmazó vállal felelősséget azért, hogy a termék az egész garanciális időszak alatt megőrizze jellemző tulajdonságait és paramétereit. A forgalmazó nem felel a normál elhasználódás során vagy a helytelen használat
következtében keletkezett hibákért.
A garancia megszűnése:
A garancia nem vonatkozik az alábbi esetekben:
a. ha a terméket nem utasításokat betartva használták vagy tartották karban, illetve ha a termék a felhasználó gondatlanságából adódóan megsérült
b. ha a terméket nem rendeltetészerűen, nem a megfelelő körülmények között, nem a megfelelő célra használták
c. ha nincs felmutatva a garancialevél
d. ha szándékos átírás történt a gyártó, a forgalmazó vagy az eladó által a termék eredeti dokumentációjában
e. amennyiben a termék egy része nem eredetivel lett pótolva
f. ha a termék sérüléséhez vagy az elhasználódásához a nem megfelelő karbantartás vezetett
g. ha a termék baleset következtében vagy nagyobb erő hatására sérült meg
h. ha a termék meg lett változtatva a gyártó engedélye nélkül
i. ha a meghibásodást a nem megfelelő tárolás okozta
j. ha a hiba a természetes kopás és elhasználódás során keletkezett
k. ha a termék használva vagy csatlakoztatva lett olyan szerkezethez, amit a gyártó nem engedélyezett
A reklamáció benyújtása:
A reklamációt a vevő az eladónak nyújtja be. A reklamációnál a vevő kötelessége benyújtani a pontosan kitöltött
garancialevelet és a vásárlási bizonylatot. A garanciális javítást az eladó vagy az eladó által megbízott szervisz
végzi.
Jogok:
A vevő és az eladó közti egyéb kapcsolatot a polgári és kereskedelmi törvénykönyv szabályozza.
Az eladó pecsétje:
Distributor pro ČR: PENTA CZ s.r.o. Distributor pre SR: PENTA SK s.r.o. Distributor for other countries Penta CZ s.r.o.
Page 19

Page 20

 Loading...