

Page 1
Notes: Always read this manual before using the charger.
Store this manual where it can be used at any time.
•Copying of part or all of the contents of this manual without
Multi Charger
CR-2000
Instruction Manual
prior permission is prohibited.
•The contents of this manual are subject to change without
prior notice.
•The contents of this manual should be complete, but if you
find any errors or omission, please contact us.
•Futaba is not responsible for the results of use of this
product by the customer.
Thank you for purchasing a CR-2000.
The CR-2000 is a quick charger for the nickel cadmium and nickel metal hydride battery used
in radio control transmitters, receivers, and glow boosters. Since this charger can charge the
battery faster than ordinary chargers for home use, that much more care is required.
To fully display the performance of the charger and to use the charger safely, please read this
instruction manual thoroughly before use.
Do not leave the side of the CR-2000 during charging. If you sense an abnormality at
the charger or battery during charging, immediately stop charging. If the temperature of
the battery rises to 60。C or higher, it is extremely dangerous. If the battery suddenly
becomes hot, immediately stop charging.
•When a nickel cadmium or nickel metal hydride battery is new or has not been used for a long time,
the delta peak, which is the criteria for the end of charging, will be difficult to obtain and may not be
detected. If charging is continued, the battery will be overcharged and become abnormally hot and is
extremely dangerous.
Features of CR-2000
•Nickel cadmium and nickel metal hydride batteries for transmitter, receiver, and glow booster
can be charged.
•Auto cut by peak voltage detection
•Transmitter and receiver batteries or transmitter and glow booster batteries can be charged
simultaneously.
•The charging current can be changed. Transmitter: 0.5A~2.0A (0.1A steps), receiver:
0.05A~2.0A (0.05A steps), glow booster: 1A~2.5A (0.5A steps)
•The input voltage, output voltage, charging current, peak voltage, charging time, and
charging amount can be monitored on an LCD display.
Input power supply (parent power supply)
Use a 12V car battery or a power supply having an output capacity of 6A or more at
DC11~15V as the input power supply.
CR-2000 Ratings
•Input voltage:
DC11V~15V (low battery display at 10.5V)
•Corresponding batteries:
TX: 500~2,000mAh (6~8 cells)
RX: 50~2,000mAh (4~6 cells)
GLOW: 1,000~2,500mAh (1 cell)
(Specifications and ratings are subject to change without notice accompanying technical developments.)
•Charging current range:
TX: 0.5~2A, RX: 0.05~2A, GLOW: 1~2.5A
•Case size: 151x85x35mm
(Excluding projecting parts and cord compartment.)
•Weight: 355g
1M23N11702
Usage precautions
Do not use the charger near materials that may ignite.
•There is the danger of ignition by sparking when the battery is connected or disconnected.
Never charge a battery other than a nickel cadmium or nickel metal hydride battery.
•Charging a noncompliance battery will cause the battery to overheat or give off sparks and is
extremely dangerous.
Never connect the battery in reverse.
•Reverse connection will cause the battery to overheat or will damage the inside of the charger.
Do not add an additional charge after charging.
•Auto cut will not function and the battery will overcharge and overheat and is extremely dangerous.
Never get the charger wet.
•The interior of the charger is a precision electronic circuit and the entry of water will cause erroneous
operation. If the charger gets wet, always have it repaired.
Do not charge a warm battery.
•The specified charging amount cannot be obtained and the battery performance will not be amply
displayed. Charge the battery after it has cooled.
Never charge a battery over its nominal capacity (1C).
•If a battery is charged with a current exceeding 1C, the battery will overheat and deteriorate.
Do not connect two or more battery packs to one output terminal.
•It is extremely dangerous because the battery will short circuit and auto cut will not function normally.
When power is taken from a car, do not operate the car ignition switch during charging.
Also, do not charge the battery while the car is in motion.
•It will cause input voltage changes and erroneous operation due to vibration, etc. When an
abnormality occurs while running, it cannot be coped with and is associated with serious accidents.
Do not perform charging with the charger sitting on vinyl, plastic, or other materials that
melt easily or on a car seat or other flammable article.
•The charger will heat up during charging. Also, the battery may also overheat for some reason.
Do not contact the metal parts of a glow booster into other live parts during charging.
•Shorting is extremely dangerous.
Avoid places where the charger will be exposed to direct sunlight. Perform charging
within the 5~40°C range.
•Normal charging will be impossible and will cause abnormal heating.
When charging a new battery or a battery that has not been used for a long time, auto
cut may not function. If the battery becomes abnormally hot, stop charging.
•When a nickel cadmium or nickel metal hydride battery is new or has not been used for a long time,
the delta peak, which is the criteria for the end of charging, will be difficult to obtain and may not be
detected. If charging is continued, the battery will be overcharged and become abnormally hot and is
extremely dangerous. When the delta peak is not detected and auto cut does not function, it may be
possible to detect the delta peak by discharging and charging the battery 2~3 times using a standard
charging current charger.
Charge a battery that has been appropriately discharged.
•If a battery is repeatedly charged with a charge remaining, it may not return to its original
performance. The criteria for the charge remaining after discharge are 0.9V/cell.
Be careful that the cord is not pinched or shorted.
•If the cord is shorted, the battery may heat up and give off sparks.
During charging, check the charging amount at the data display screen. When the
charging amount becomes extremely large, stop charging.
•Auto cut may not function for some reason.
After the end of charging, disconnect the battery from the charger.
Meaning of Special Markings
Pay special attention to safety where indicated by the following marks:
Procedures which may lead to dangerous conditions and cause death/serious injury
if not carried out properly.
Procedures which may lead to a dangerous condition or cause death or serious
injury to the user if not carried out properly, or procedures where the probability of
superficial injury or physical damage is high.
Procedures where the possibility of serious injury to the user is small, but there is a
danger of injury, or physical damage, if not carried out properly.
: Prohibited : Mandatory
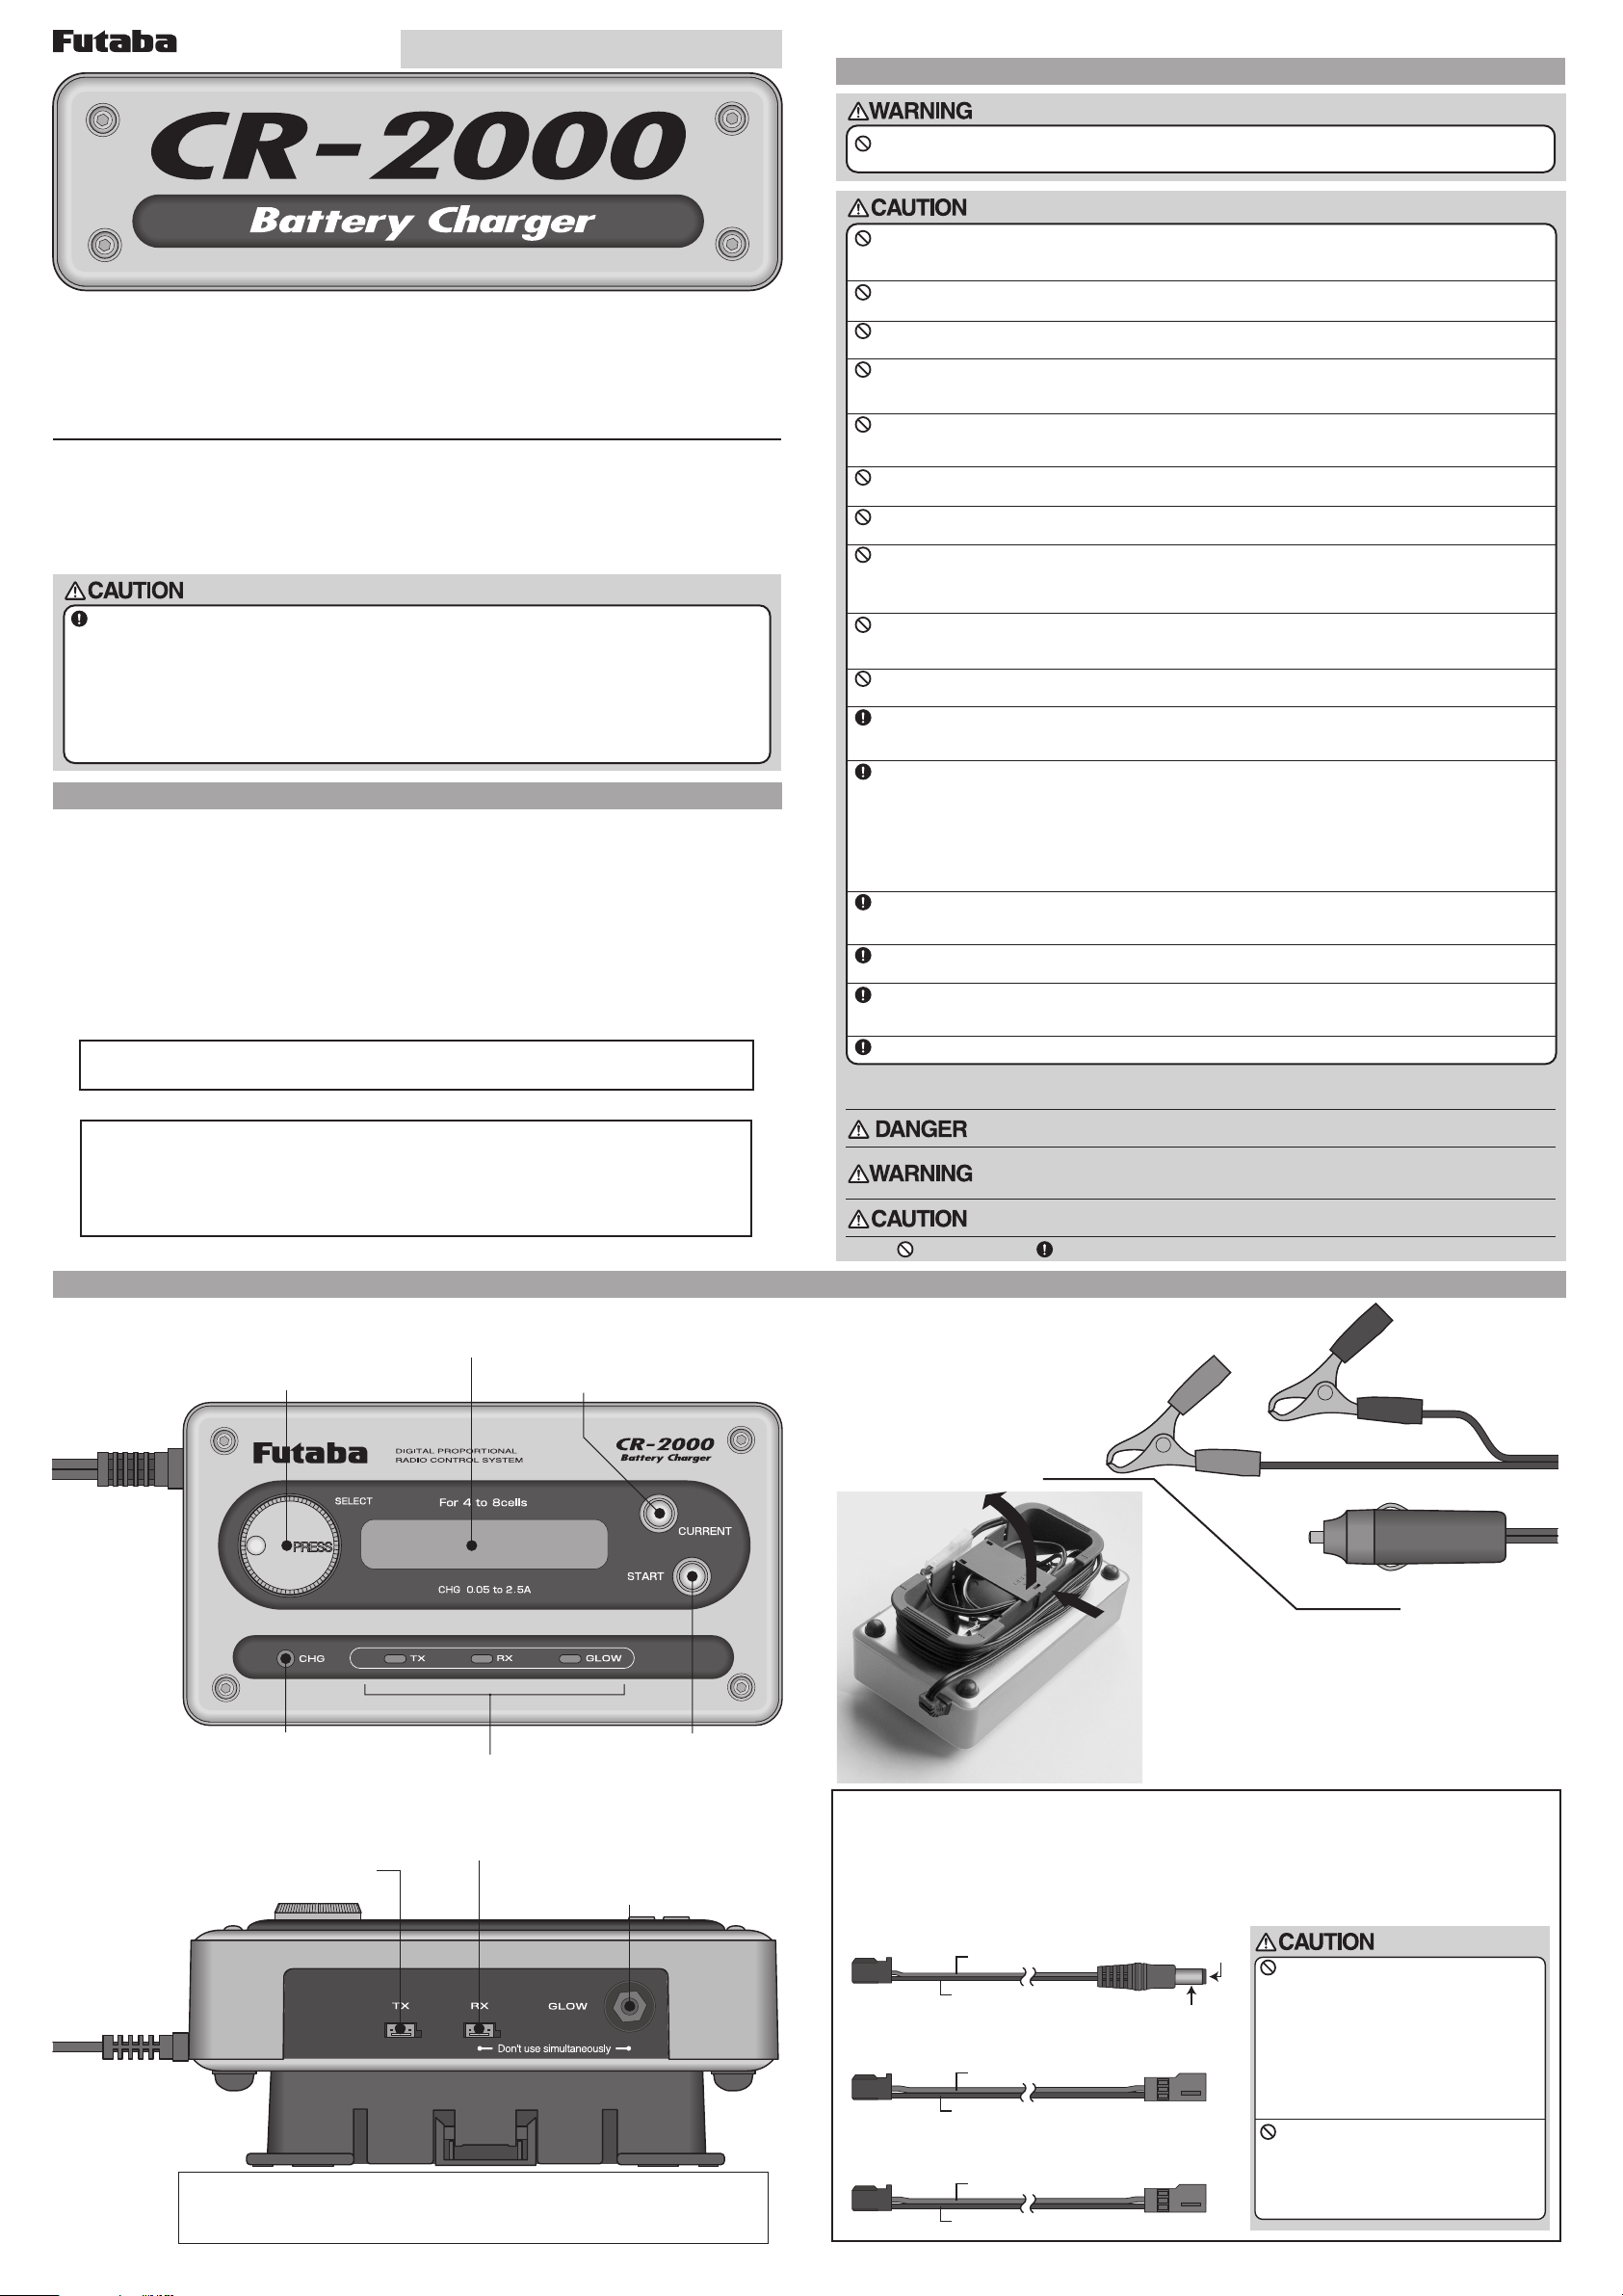
Description of CR-2000 Parts
SELECT dial
Used to set (at current setting screen) the charging
current by setting and to switch the screen display
TX/RX/GLOW mode by pressing.
CHG LED display
Lights during charging.
TX output connector
Charging output for transmitter battery.
*TX and RX or TX and GLOW can be charged simultaneously.
*RX output and GLOW output cannot be used simultaneously. Only the
GLOW side is effective even if a battery is connected to both outputs.
LCD display
Displays the charging current setting screen, output
data, input voltage, operation mode, and error state.
CURRENT button
Calls the charging current setting screen.
START button
TX/RX/GLOW LED display
The output data corresponding to the lit LED is displayed on
the LCD display. (TX: Red, RX: Green, GLOW: Orange)
Charging start/stop button
RX output connector
Charging output for receiver battery.
GLOW output connector
Charging output for glow booster battery.
Input cord (cigarette socket/clip)
Use the cigarette socket and clip appropriately.
The CR-2000 does not have a power switch. When the input
cord is connected, the power is automatically turned on.
Connect the red input clip to the + side of the input
power supply and the black clip to the - side.
Input clip (black)
Input clip (red)
Cigarette socket
(While pressing the side wall)
[Cord storage example]
The photograph shows an example.
Open and close the cover while pressing the arrow
part in the photograph. If the cover is forced open,
the lock claw may be broken.
[Accessories]
The following charging cords (3 types) are supplied with the CR-2000 set. Use these cords
when charging a battery mounted in the fuselage and when charging the battery by
connecting the charger to the charging jack of a transmitter.
TX charging adapter (70cm)
Use when connecting the charger to the charging jack of
a transmitter.
(+) side (red)
(-) side (black)
Charging adapter (50cm)
Use when connecting the charger to a battery, etc. mounted
in the fuselage.
(+) side (red)
(-) side (black)
Charging adapter (200cm)
Use when connecting the charger to a battery, etc. mounted
in the fuselage.
(+) side (red)
(-) side (black)
(+) side
(-) side
Do not use the accessory TX
charging adapter (transmitter
extension cord) with other makes
of transmitter. This extension cord
is designed to be used with
Futaba transmitters only.
•The polarity (+, -) of the transmitter
charging jack may be different.
Do not modify the accessory
charging adapter (extension cord).
•If shorted or connected in reverse, the
CR-2000 or the battery will be abnormally
heated and damaged.
Page 2
Charging method
Avoid charging where the charger will be exposed to direct sunlight.
Perform charging within the 5~40。C range.
•Normal charging will become impossible and will cause abnormal heating.
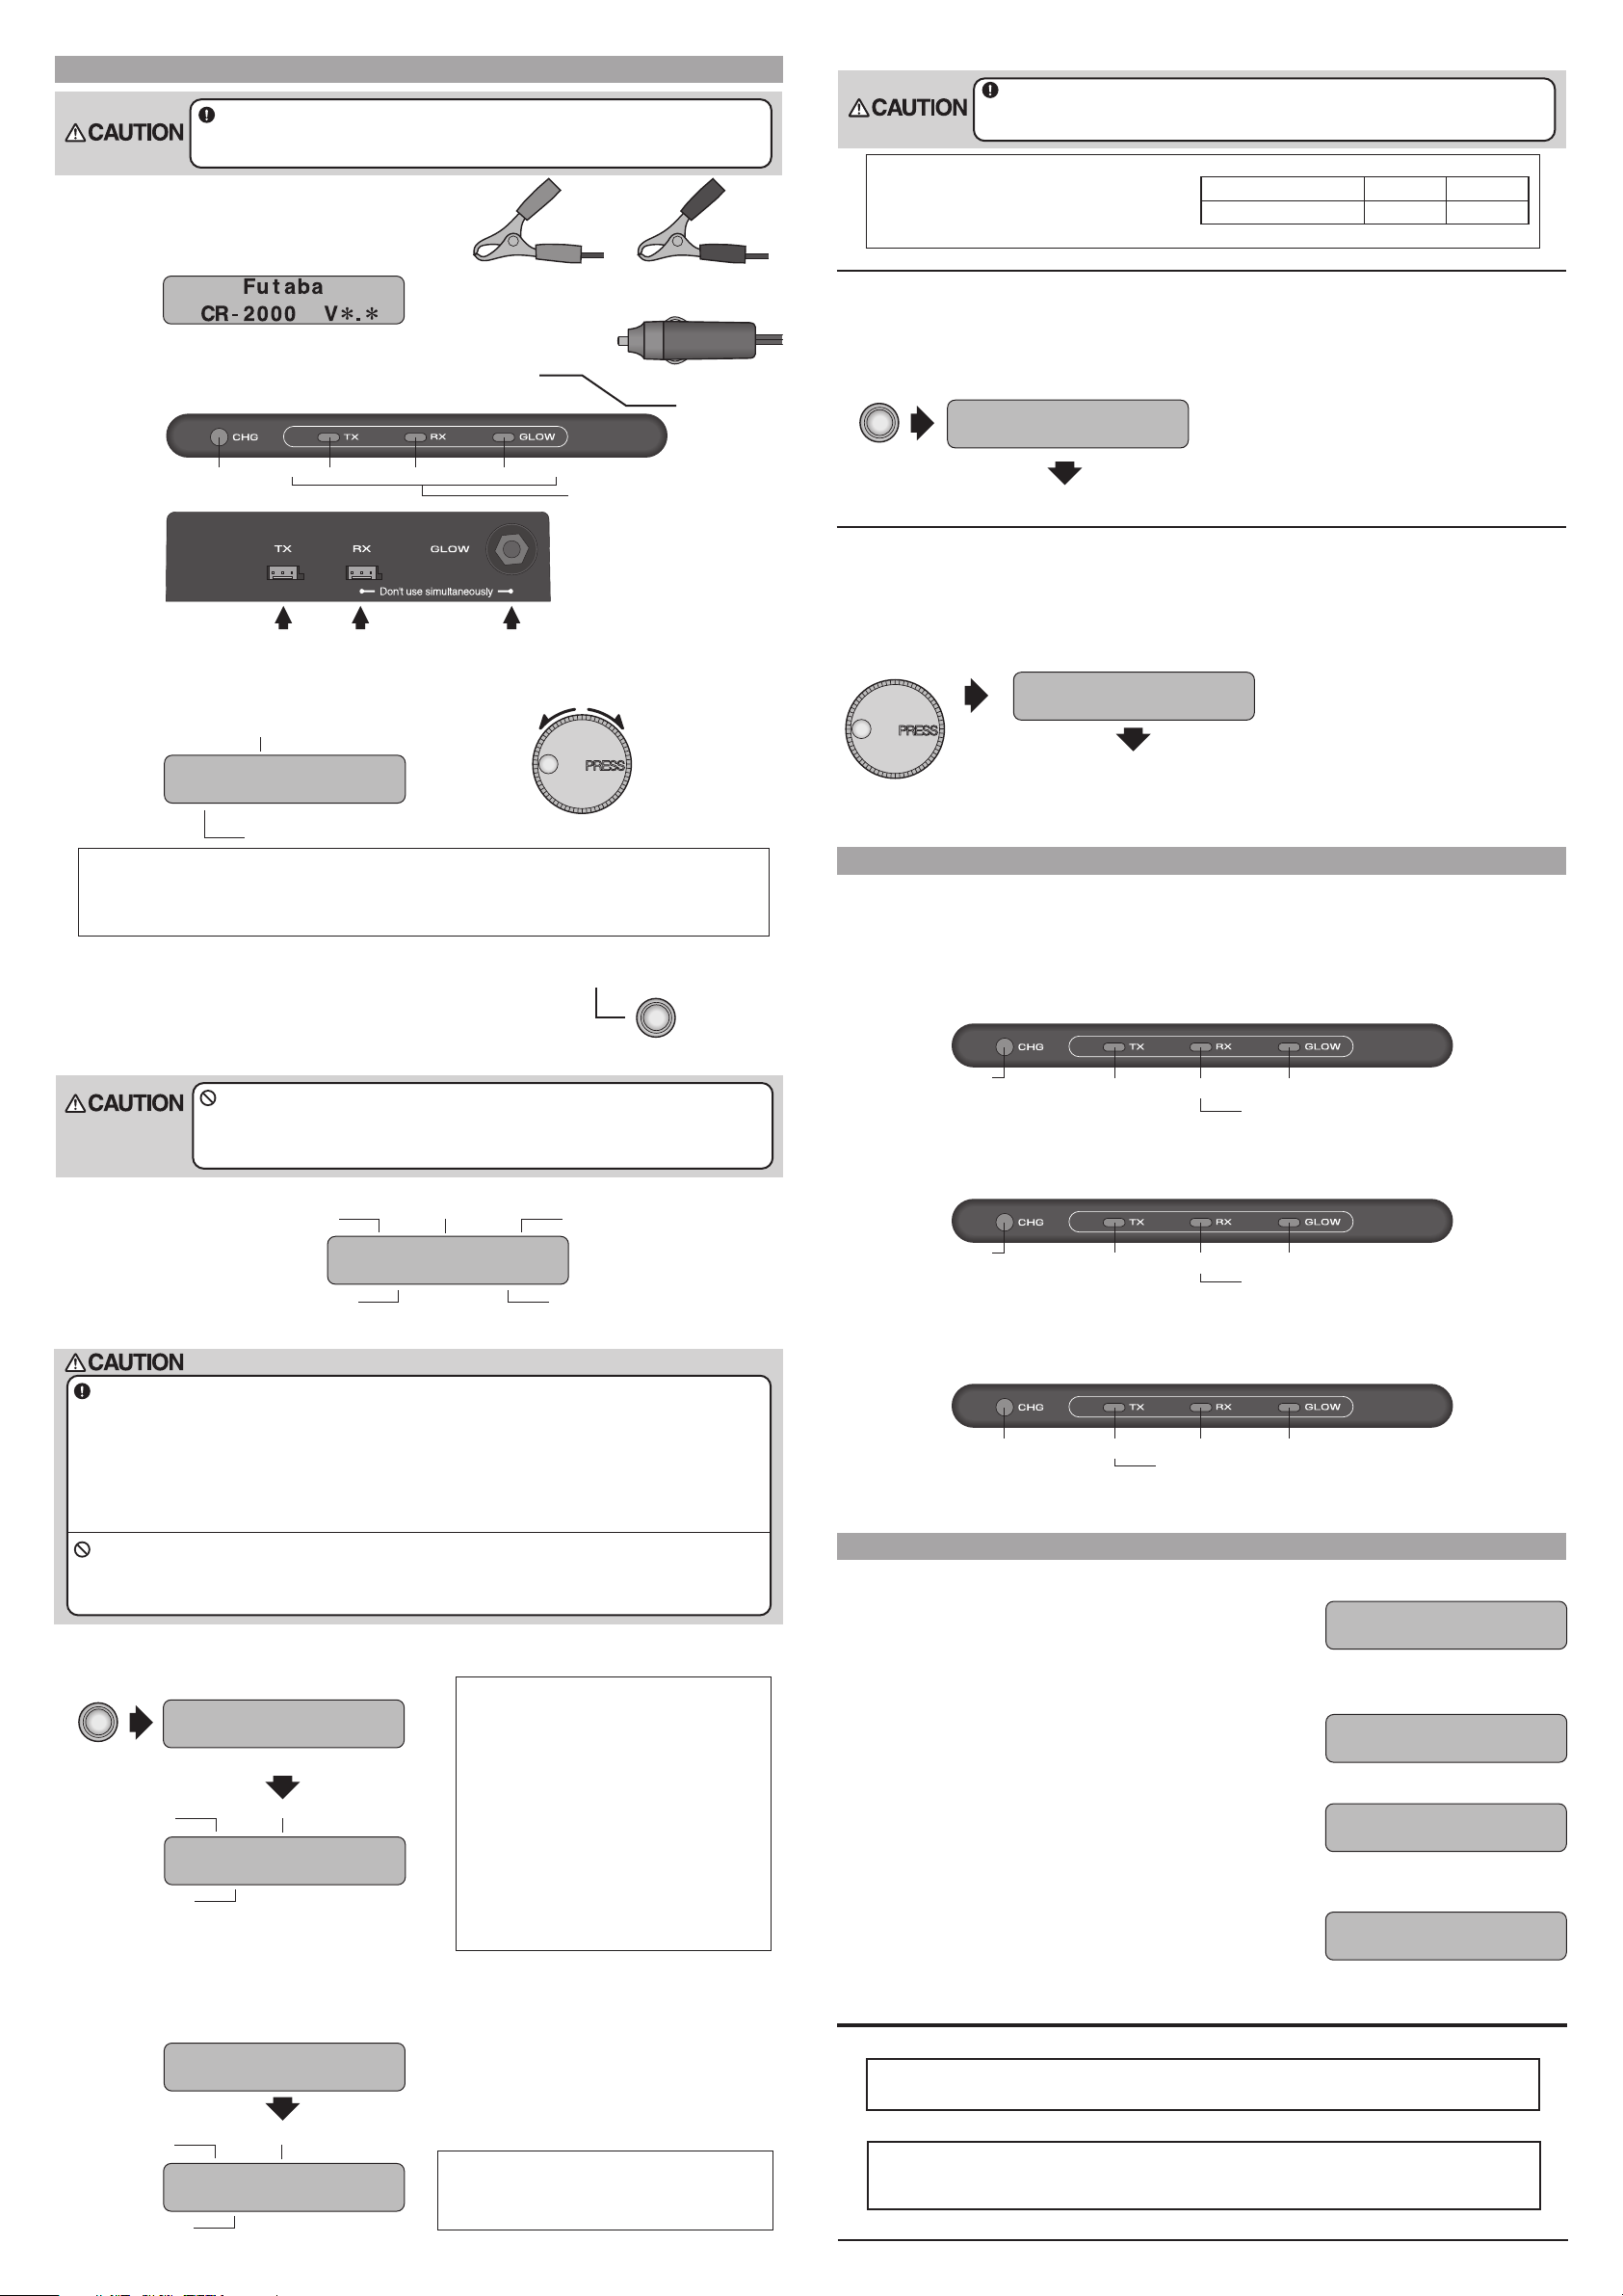
1 Power supply connection
When the input cord is connected to the parent power
supply and the power is turned on, the CR-2000
automatically starts.
Connect to the + output of
the parent power supply.
(Displayed for about 2 secs)
Red
Connect to the - output of
the parent power supply.
(or)
*After the opening screen display, the TX data display screen appears.
Plug into a car cigarette
2 Battery connection (TX/RX/GLOW)
"TX" LED "RX" LED "GLOW" LED"CHG" LED
(charging display)
Transmitter battery Receiver battery Glow booster
Steady light:
Shows that data display and
charging start and end operations
are possible.
Blinking:
Shows that the charging current
can be set.
lighter socket.
Connect the charger to the output connector matched to the type of battery to be charged. The
corresponding LED in the "TX", "RX", and "GLOW" LEDs lights. The charging current
setting screen is also automatically displayed.
"TX", "RX", or "GLOW" is displayed according to the connected
connector position.
SET TX CURREN
T
0.50A for 500mAh
(Displayed for about 5 secs)
Current charging current set value
SELECT dial
The charging current
can be changed with
the SELECT dial
during current setting
screen display.
When an over discharged battery was connected, the charger may not be able to detect
the battery and the LED lamp will not light. Wait 2~3 minutes in the connected state.
If the LED lamp lights, charging is possible. If the LED lamp does not light, try
charging with a charger of the standard charging current (0.1C).
Check the charging current at the current setting screen. To change the charging current, turn
the SELECT dial while this screen is being displayed. When the CURRENT button is pressed,
the current setting screen can be recalled even if it is closed.
(Charging current setting range)
TX: 0.5A~2.0A (0.1A steps)
RX: 0.05A~2.0A (0.05A steps)
GLOW: 1.00A~2.5A (0.5A steps)
Never charge with a current exceeding the nominal capacity (1C) of the
charged battery.
•Charging with a current exceeding 1C will cause the battery to abnormally heat up
and deteriorate.
CURRENT button
The current setting screen closes and the data display screen opens. Each data is displayed
during charging.
Output voltage
Charging current
Peak voltage
10 . 20V0.0A 0.00P
0SEC 0mAh
Charging time
Charging amount
Black
3 Starting and ending charging
Do not leave the side while charging. If you notice an abnormality at the charger or
battery during charging, immediately stop charging. If the battery temperature rises to
60˚C or higher, it is extremely dangerous. If the battery suddenly becomes hot,
immediately stop charging.
•When a nickel cadmium or nickel metal hydride battery is new or has not been used for a long time,
the delta peak, which is the criteria for the end of charging, will be difficult to obtain and may not be
detected. If charging is continued, the battery will be overcharged and become abnormally hot and is
extremely dangerous.
When taking power from a car, do not operate the ignition key during charging. Also, do
not charge while the car is in motion.
•It will cause input voltage changes and erroneous operation due to vibration, etc. when an
abnormality occurs while running, it cannot be coped with and is associated with serious accidents.
When the START button is pressed, charging starts. At this time, the "CHG" LED lights. Also,
after the start screen is displayed for about 5 seconds, the display switches to the data display
screen and the charging state can be monitored.
START
START button
(Displayed for about 5 secs)
Output voltage
TX CHARG I NG
Charging current
Peak voltage
11 . 10V0.5A11.10P
1 6 0SEC 22mAh
Charging time
When charging is complete, about 5 seconds after an audible alarm (beep beep beep beep,
beep beep beep beep, beep beep beep beep) sounds and the finished charging screen appears,
the display switches to the data display screen. The "CHG" LED goes off. After the end of
charging, the charger switches to the trickle charge (5mA) mode.
(Displayed for about 5 secs)
FINISHED
Charging amount
TX CHARG I NG
[When starting charging]
When a battery is connected, the charger
automatically checks the battery. When the
START button is pressed immediately after
connection, an error may be displayed,
depending on the state of the battery. In this case,
reset the error display by pressing the CURRENT
button. After the data display screen output
voltage display rises to about 10V, start charging
by pressing the START button.
Always check the charging current at the current
setting screen before starting charging. Set the
charging current to the nominal capacity (1C) or
less of the battery. For example, for a 600mAH
battery set the charging current to 0.6A or less.
At the end of charging, check the peak voltage, charging amount, and
other data and that the battery is about body temperature, and then
disconnect the battery from the charger.
[Charging current after auto cut]
After auto cut, the charger automatically switches
to a low charging current and continues charging.
The charging current value after auto cut varies,
depending on the charging current set value.
Charging current set value 0.05-0.45A 0.5-2.5A
Charging current after auto cut 5mA 70mA
(Forced end)
When the START button is pressed when you want to forcibly end charging midway, charging
ends. At this time, the display switches to the data display screen about 5 seconds after an
audible alarm (beep beep beep beep, beep beep beep beep, beep beep beep beep) sounds and
the forced end screen appears. The "CHG" LED goes off.
(Displayed for about 5 secs)
START button
STOP
TX CHARG I NG
(Data display screen)
(Data display and charging operation output switching)
Normally, when a battery is connected, its output data is automatically displayed and the
charging operation by button becomes possible. However, when connecting batteries to the
two outputs simultaneously, you may want to switch the output that is operated. In this case,
switch the output by pressing the SELECT button. Each time the SELECT button is pressed,
the output is switched in TX->RX->GLOW->TX--- order.
(Displayed for about 5 secs)
DISPLAY GlowDAT
A
INPUT: 12.00V
Switch the output to
(Data display screen)
SELECT button
be operated by pressing
the SELECT button.
LED display for 2 outputs simultaneous connection
When charging 2 outputs simultaneously, part of the LED of the "Charging Method" item at
the left may be different. Perform charging by referring to the display example shown below.
[Connection example]
When a receiver battery was connected while charging a transmitter battery, the LEDs are
displayed as shown below and the charger enters the receiver battery side charging current
setting mode.
Off
(Displays the RX
side state.)
Rapid blink
(Shows that the
charger is charging.)
Blink Off
(Charging current setting mode)
When a charging current setting mode was finished, the LEDs are displayed as shown below
and the receiver battery side data display and charging start and end operations are possible.
Off
(Displays the RX
side state.)
Rapid blink
(Shows that the
charger is charging.)
Steady light Off
(Shows that data display and charging operation
and end operations are possible.)
When the screen display mode was switched to the "TX" side by pressing the SELECT button
twice, the LEDs are displayed as shown below and the transmitter battery side data display
and charging start and end operations are possible.
(Displays the TX
side state.)
Steady light Off OffSteady light
(Shows that data display and charging operation
and end operations are possible.)
Error display, etc.
[When battery disconnected while charging]
When the battery is disconnected while charging, an audible
alarm sounds and the error message shown at the right
appears. The "CHG" LED goes off.
[When input voltage dropped]
When the input voltage dropped, the error message shown at
the right appears. Check the parent power supply.
[When output side shorted]
When the output side of the charger is shorted, the error
message shown at the right appears. Remove the short
circuit.
[When output voltage rose abnormally]
When the output voltage of the charger rose abnormally,
charging is forcibly ended and the error message shown at
the right is displayed. Check the battery.
<When requesting repair>
Before requesting repair, read this instruction manual again and check
the charger. When there is an abnormality, request repair to your local Futaba dealer.
NO CONNEC T
TX BATTERY
Er ror : INPUT
LOW BAT TERY
Er ror :OUTPUT
SHORT OR REVERSE
Er ror :OUTPUT
HIGH PEAK
Output voltage
Charging time
Charging current
Peak voltage
11 . 52V0.5A12.38
50 4 0 S EC 700mAh
Charging amount
<Recycling nickel batteries>
P
[Data display screen]
Each data other than the output voltage is displayed
until the next battery is connected even if charging
is finished and the battery is disconnected.
Used nickel batteries are a valuable resource. Tape or other wise process the
terminals so that are not shorted and take the used battery to your local recycling
center.
©FUTABA CORPORATION 2003,05 (1)
 Loading...