

Page 1
NAVIGATOR MANUAL
NAVIGATOR
Doc. P/N: WSP-009-003
Version: V1.4
Issue Date: June 2012
Page 2
Navigator Manual
Document Revision History
Revision Date Reason for Change Version
4 Feb 2010 Converted from original MS Word version V1.0
13 Feb 2010 Completed rst release version. V1.1
28 Jan 2011 Added features from second release version V1.2
20 Nov 2011 Updated gures & specs V1.3
27 June 2012 V1.01 updates V1.4
Related Documents
Document P/Number Title
WSP-009-002 WASSP System Installation Manual
WSP-009-001 WASSP Operator Manual
General Notices
ENL reserves the right to change the contents of this
manual and any system specications without notice.
Contact ENL regarding copying or reproducing this
manual.
WASSP is not designed to comply with hydrographic
mapping standards and therefore must not be used as a
navigational mapping tool.
Warnings, Cautions, and Notes
Warnings, cautions, and notes are indicated by the
following icons throughout this manual:
Safety Notices
The installer of the equipment is solely
responsible for the correct installation of the
equipment. ENL assumes no responsibility
for any damage associated with incorrect
installation.
Electrical Safety
► Fire, electrical shock, or equipment damage may occur if
the transceiver becomes wet.
A WARNING indicates that if the
instruction is not heeded, the action may
result in loss of life or serious injury.
A CAUTION indicates that if the instruction
is not heeded, the action may result
in equipment damage or software
malfunction.
A Note indicates a tip or additional information that
could be helpful while performing a procedure.
Page 2 of 34
www.wassp.com
Doc. P/N: WSP-009-003
Version: V1.4
Issue Date: June 2012
Page 3

Navigator Manual
Contents
4 Purpose of this Manual
4 Introducing the WMB Navigator System
6 System Conguration
7 Software Installation
7 Software Installation
7 Hardware Connection
8 Loading and Launching Navigator
9 Chart Loading
10 Navigator Operation
12 System Setup
12 System Tab
14 Display Tab
16 Database Tab
20 Tools
22 Overlays
27 Ship
28 Marks
31 3D Window
31 Vertical Scale
Doc. P/N: WSP-009-003
Version: V1.4
Issue Date: June 2012
20 Options
33 3D Fish
Page 3 of 34
www.wassp.com
Page 4

Navigator Manual
Purpose of this Manual
This manual describes how to operate the WMB Navigator software program
through its graphical user interface.
Introducing the WASSP Navigator System
The WASSP Navigator is an adjunct to the WASSP Multibeam Sonar System. The
Navigator software connects to the WASSP software and processes the WASSP
output data to produce geo-referenced maps in real time. The interconnection
uses the computer network which allows WASSP and Navigator to be operated on
two different computers, thus providing a performance improvement.
The Navigator maps can subsequently be viewed independently to the WASSP
system. The operator can move to any part of the globe and view previously
recorded maps in 2D and 3D. The maps provide an ability to dynamically change
the depth colours while viewing and to adjust the colours and shading for depth,
contours and backscatter displays.
Main Features
The 3D display on the Navigator provides an ability to change the vertical scale
(1x, 2x, 4x), to rotate the view from any angle, and can provide a simple 3D view
of water column data such as sh.
The WASSP Navigator provides the following features:
► Create maps in real-time from the WASSP.
Generate new maps from the WASSP bottom detections at up to four times the
resolution of the current WASSP maps.
► Maps can be found at any part of the globe.
The operator can position the displayed view to be in any part of the world.
The view can be zoomed in or out to show smaller or larger areas.
► Dynamic Resolution.
The displayed resolution of the maps is dynamically changed to suit the current
level of zoom. This provides a performance advantage because the operator is
not delayed while unnecessary detail is loaded.
► Map Resolution Based on Depth.
The Navigator dynamically changes the resolution of the stored maps to suit
the depth of the seaoor. Shallow seaoor is stored at resolutions as high as
250mm to give the maximum detail available, while deep seaoors have their
resolution restricted to 4m to avoid saving spurious ne detail.
► Chart Overlay.
The Navigator can display the WASSP seaoor data overlaid on a vector
Navionics hydrographic chart. The displayed chart features can be selectively
turned on of off as required.
Page 4 of 34
www.wassp.com
Doc. P/N: WSP-009-003
Version: V1.4
Issue Date: June 2012
Page 5

Navigator Manual
► Use Your Existing Navionics Charts.
The Wassp Navigator uses standard Navionics Gold SD Card maps plugged in
to a Navionics card reader. Maps are available from Navionics to cover almost
every part of the World.
► Boat Position Shown.
The position of the boat is shown on the map as the data is received from the
Wassp in real time. The boat icon also indicates the current boat heading and
thus provides a simple but effective charting function.
► Depth Indicators.
The depth under the cursor at any point on the Wassp seaoor displayed can
be dynamically displayed on the 2D and 3D maps. The depth is updated continuously as the cursor is moved.
► Vessel Track.
The track of the vessel may be displayed if desired.
► Marks
The chart can be annotated with marks at the current vessel position and
marks at the cursor position. A menu options allows marks to be displayed or
hidden. Marks can be edited, colour and symbol changed.
► Prole
Using the two prole markers a cross section of the seaoor can be displayed
in a separate prole window.
► Databases.
The Navigator uses one or more database to store and display the Wassp data
including the depths, backscatter, and water column information. Additional
databases can be created at any time and the incoming data switched to it.
Existing databases can be selected for viewing at any time and it is possible to
view one database while recording to another. The databases are not restricted
by geographic area (they can span the whole world) nor by resolution (they will
contain all depth resolutions proportional to the depths of the points stored).
Doc. P/N: WSP-009-003
Version: V1.4
Issue Date: June 2012
Page 5 of 34
www.wassp.com
Page 6
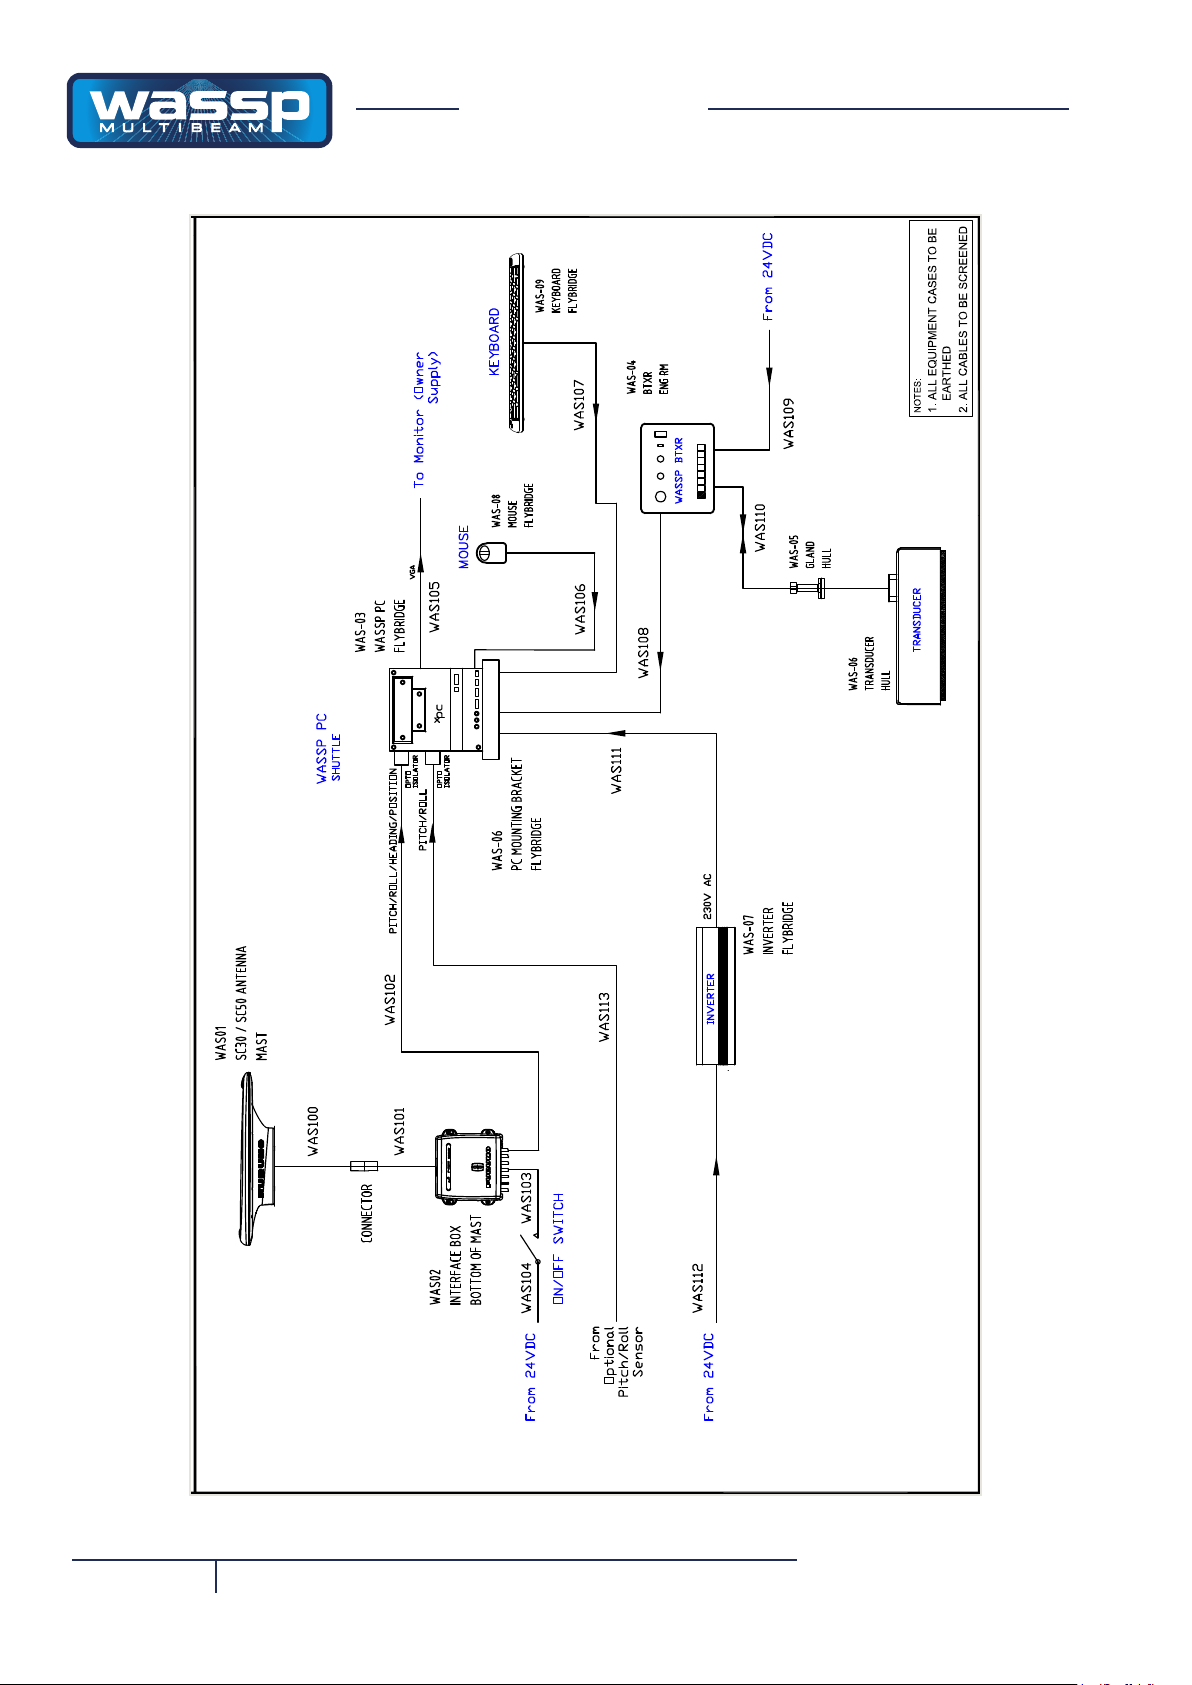
System Conguration
23.11.11
4
23.11.11 ADDED USB
KR
SR
Navigator Manual
Figure 1 – Overview of a Fully Functional WMB-160F Navigator System
Page 6 of 34
www.wassp.com
Doc. P/N: WSP-009-003
Version: V1.4
Issue Date: June 2012
Page 7

Navigator Manual
Software Installation
Dongle
The Navigator requires the use of a USB Dongle to operate. If the correct
dongle is not detected then the program will not operate.
The Dongle contains encrypted les and structures. Do not edit any les on
the Dongle. Additionally, do not re-format the Dongle or copy the les to
another Dongle as this will damage the Dongle and it will not operate.
Hardware Connection
Doc. P/N: WSP-009-003
Version: V1.4
Issue Date: June 2012
Wassp Navigator can either be be run on the WASSP shuttle computer or a
seperate computer connected to your existing WASSP shuttle computer via an
Ethernet hub/switch. Refer to the WASSP Navigator Interconnection Diagram
(Fig.1) for more information.
Connecting cables are straight CAT5E or equivalent with RJ45 connectors each
end.
Note that if an Ethernet hub/switch is used it will normally come with its own
plug-pack power supply which will require its own power outlet.
Page 7 of 34
www.wassp.com
Page 8
Navigator Manual
Loading and Launching
Navigator
The WASSP Navigator setup is located on the supplied dongle.
Install the Navigator software by double-clicking on the “setup” icon. Follow the
on-screen installation instructions.
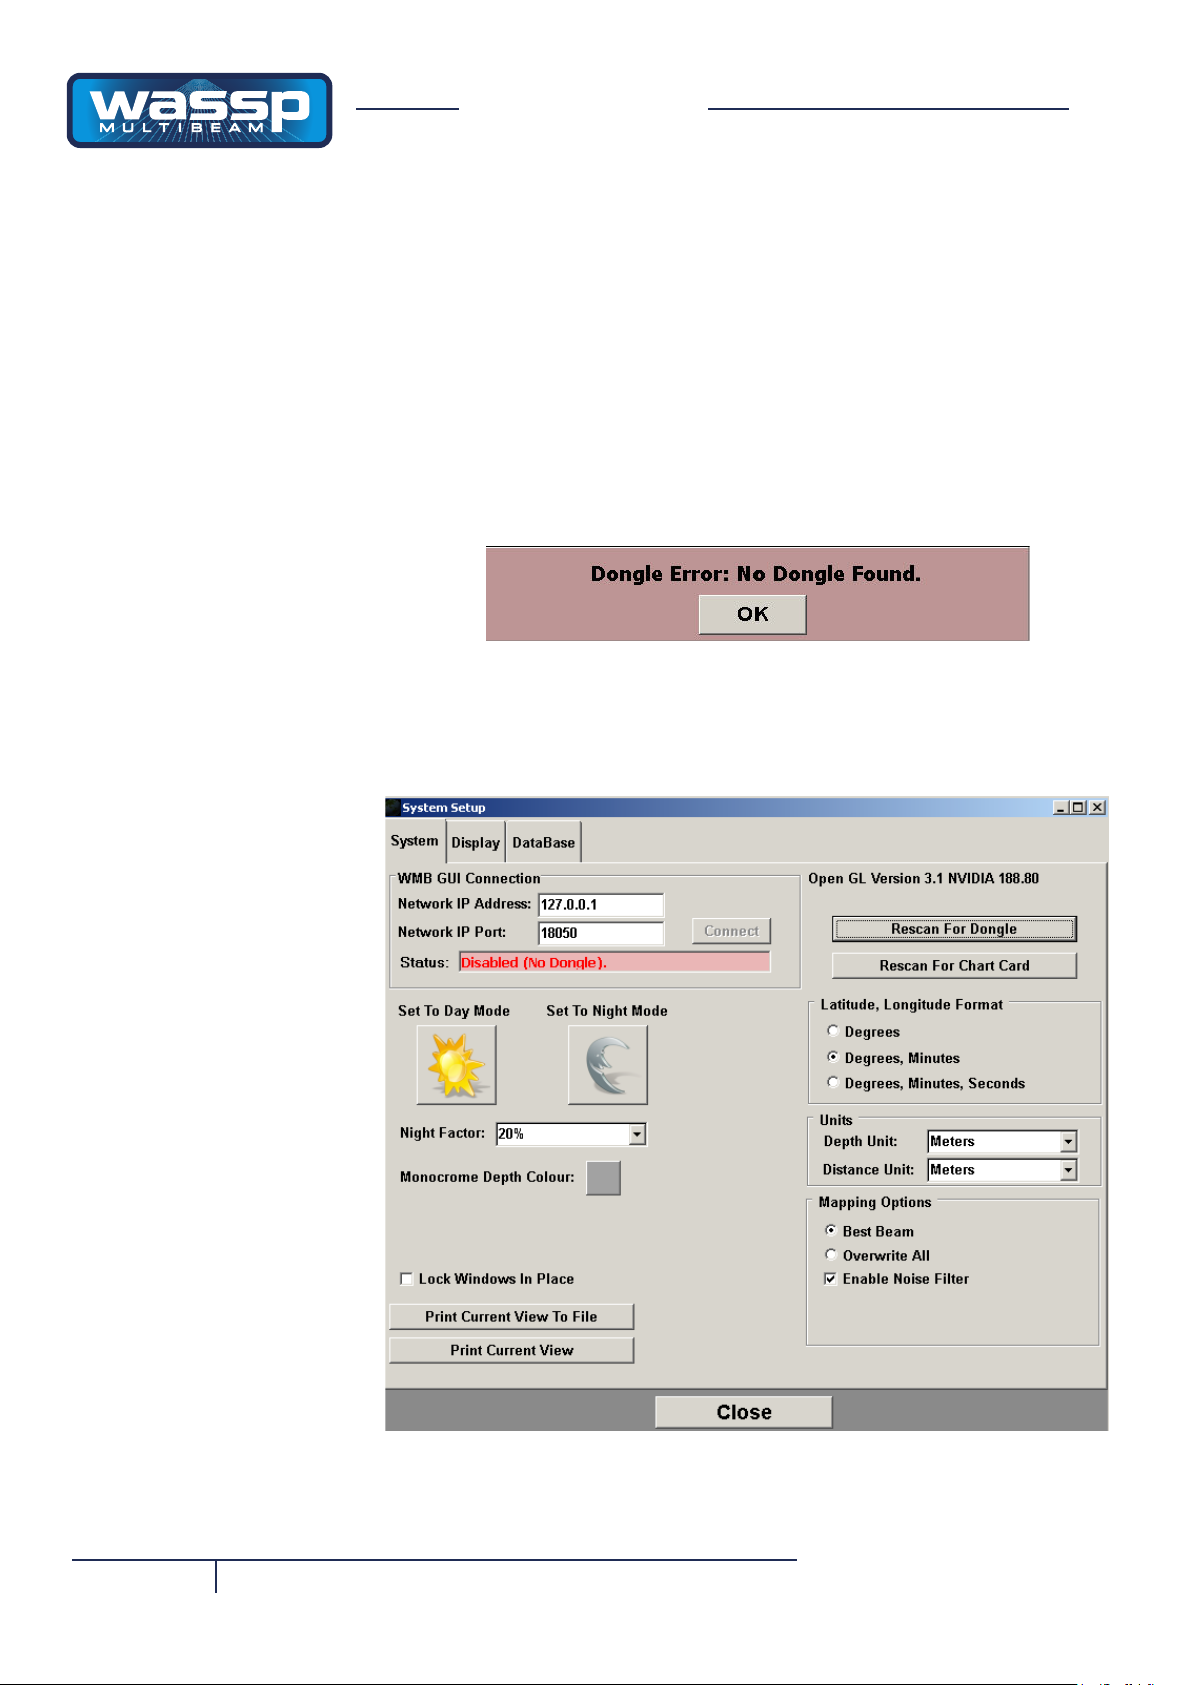
Once installed the Navigator is launched by double-clicking on the Navigator
desktop icon. On start up Navigator rst checks for the Dongle.
If the dongle is not found then Navigator will not run in realtime. Click on OK. If
you wish to use the connection to the WASSP to create maps or move the vessel
about on the map you will need to insert a dongle and rescan for a dongle, or
restart the Navigator application.
Page 8 of 34
www.wassp.com
Doc. P/N: WSP-009-003
Version: V1.4
Issue Date: June 2012
Page 9
Navigator Manual
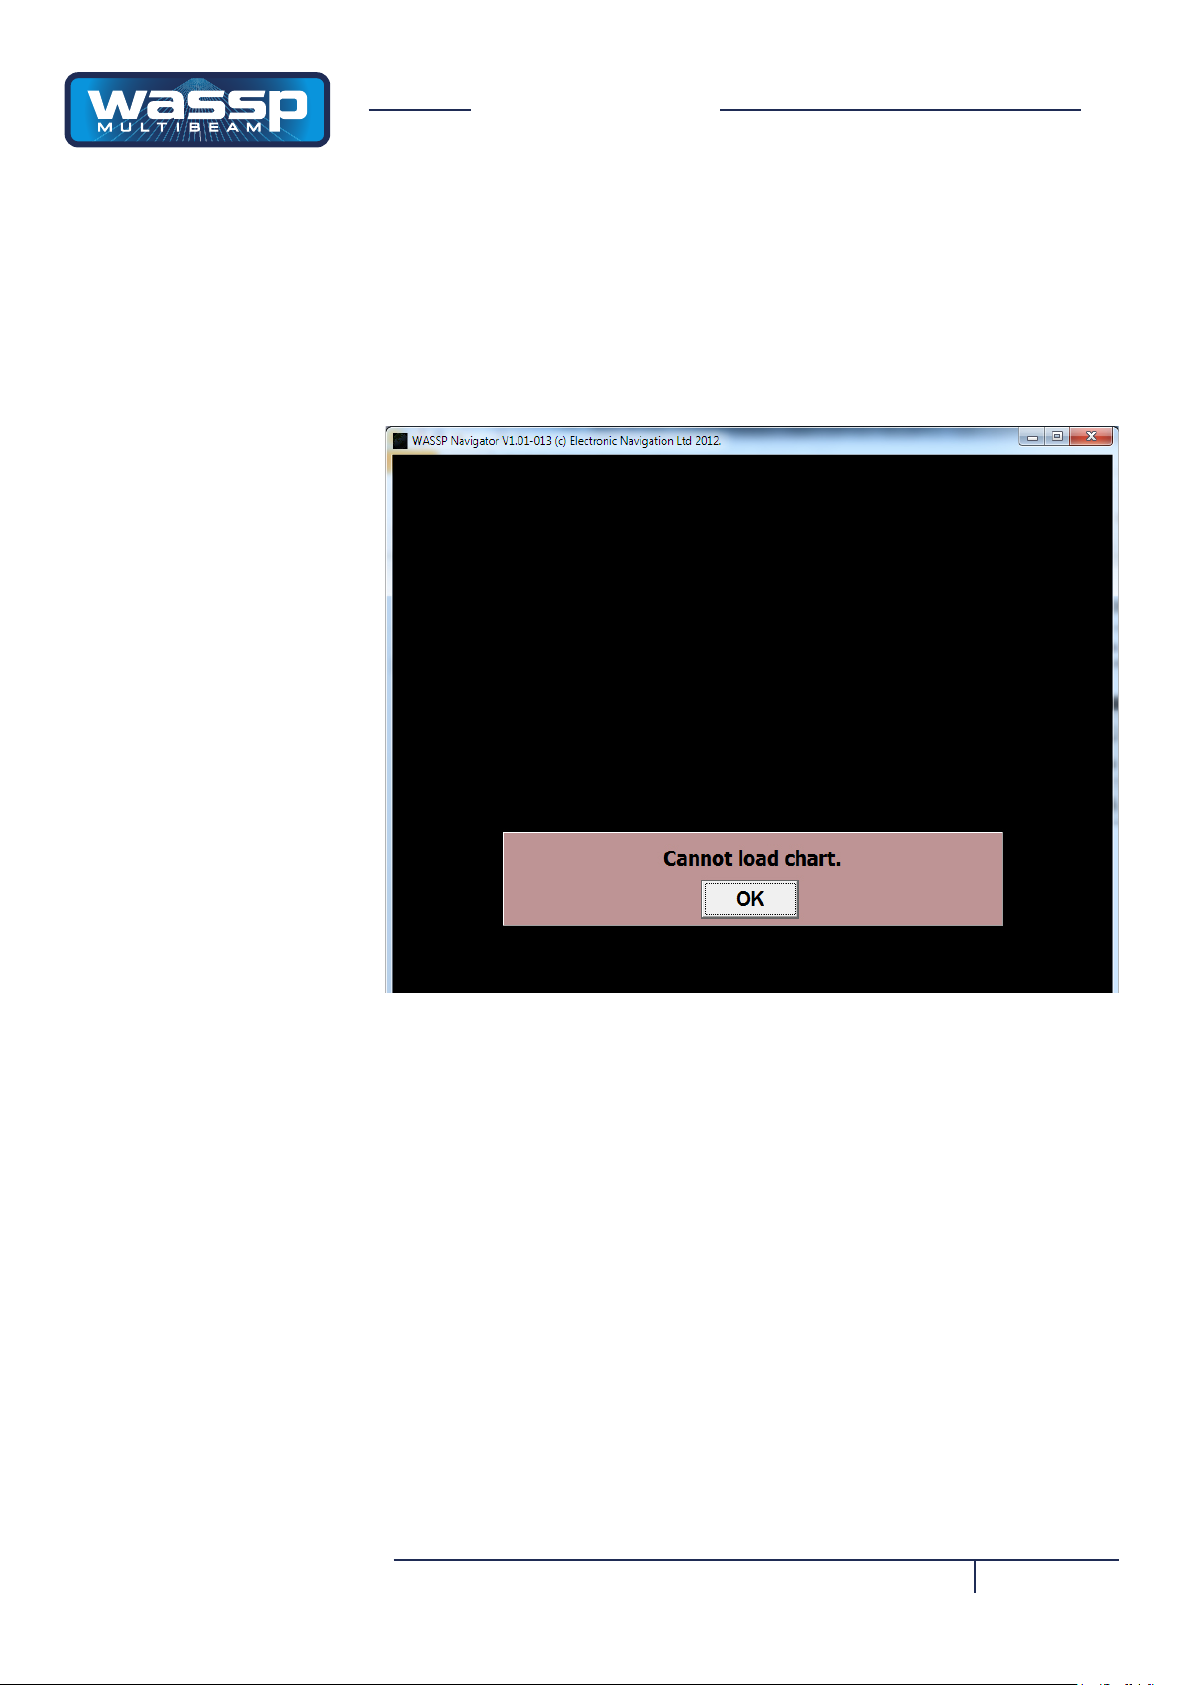
Chart Loading
When the Navigator starts up, it checks for a Navionics Map Reader and Map. If
a map cannot be found then Navigator displays a message advising that no maps
could be loaded. In this conguration, the world map is used.
Doc. P/N: WSP-009-003
Version: V1.4
Issue Date: June 2012
If you get an error message “unable to load charts”, click on OK. Conrm that the
SD Chart Card is correctly inserted in the Navionics Chart Card Reader and select
“Rescan for Chart Card” in the System Setup window - see page 12.
If the SD chart card is changed, the “Rescan for Chart Card” must also be selected.
Page 9 of 34
www.wassp.com
Page 10
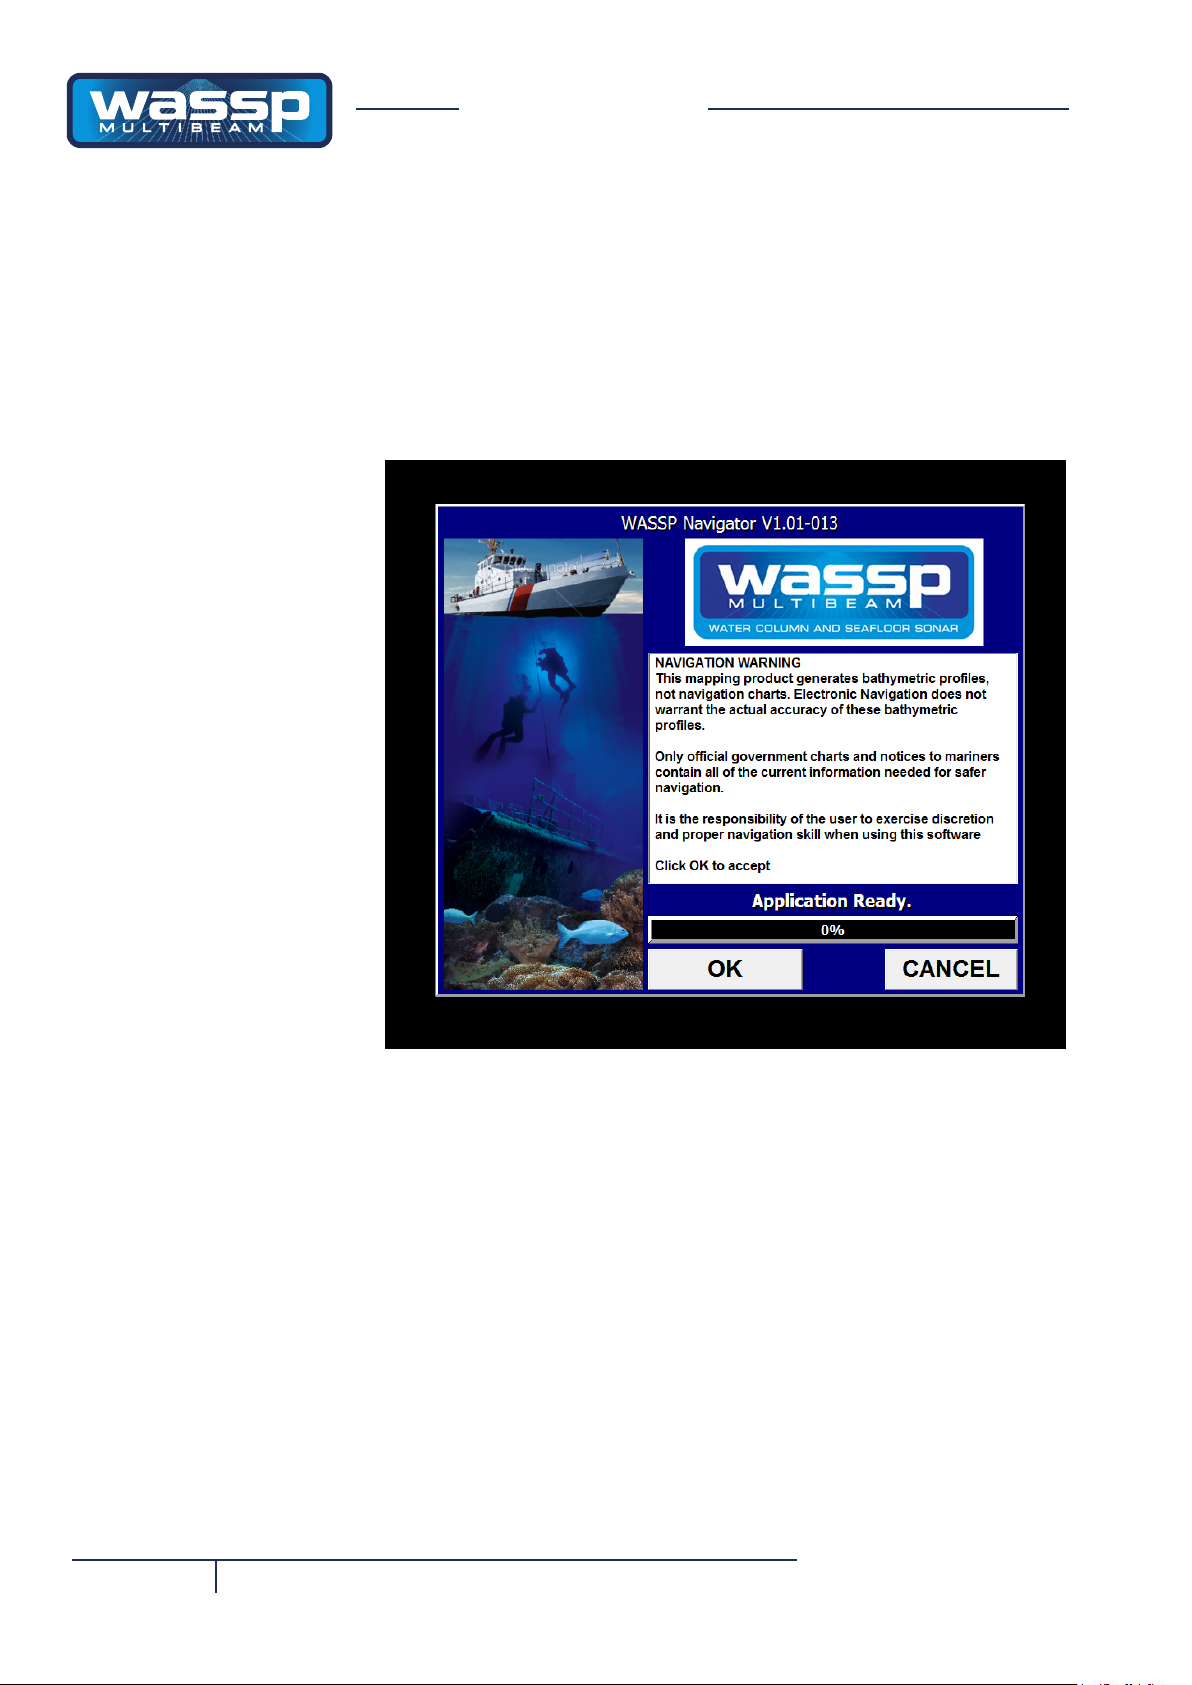
Navigator Operation
After clicking on the Navigator Icon on your computer’s desktop, the Navigator
application will load. After a few seconds, you will see the start-up screen display
shown below:
Navigator Manual
Page 10 of 34
Click on OK to continue on to the Navigator chart screen - see next page.
www.wassp.com
Doc. P/N: WSP-009-003
Version: V1.4
Issue Date: June 2012
Page 11
Navigator Manual
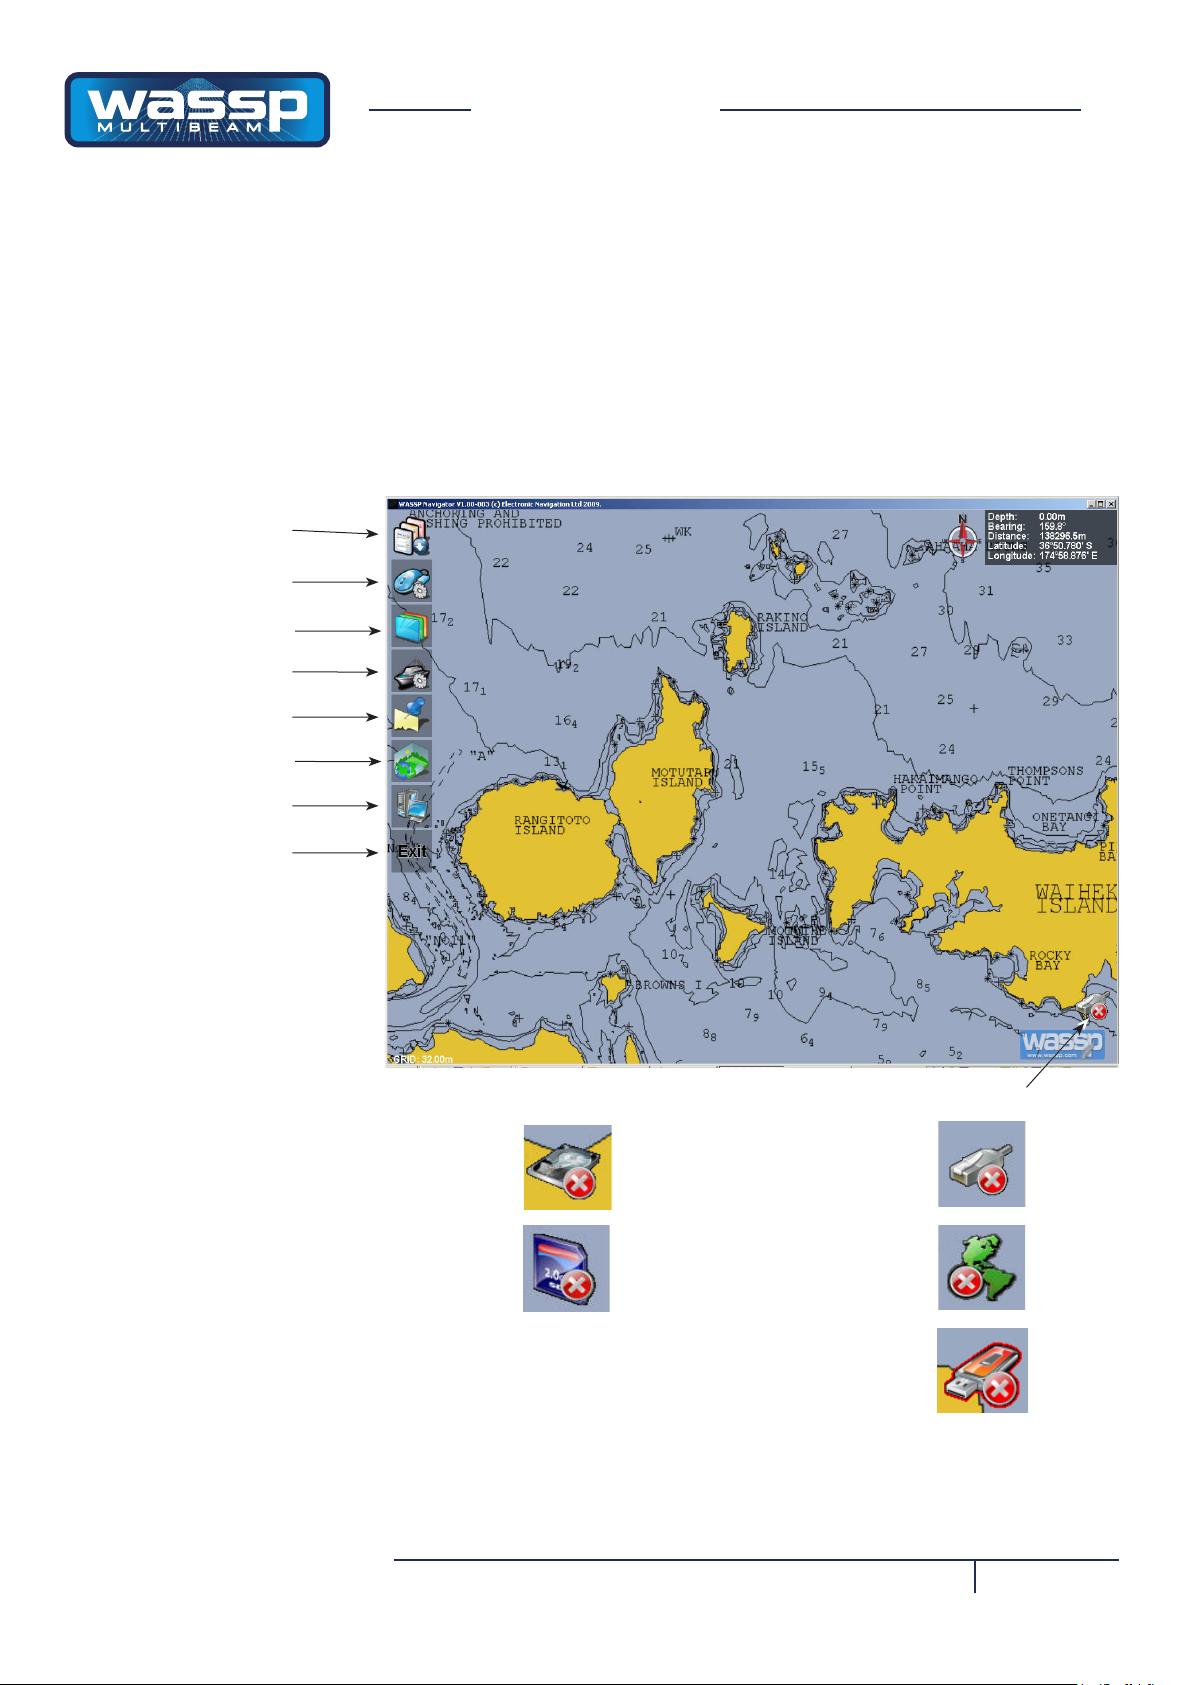
Once the initial splash screens have been displayed the Navigator displays the last viewed map at the previous location and zoom scale.
The System Menu is initially shown as an icon at the top left hand corner of the display. Clicking on this icon reveals
a number of further icons that provide access to lower level menu functions.
Click to
show/hide
Icons Menu
Tools
Overlays
Ship
Marks
Show 3D Window
System Cong.
Exit Navigator
Database recording change
No chart card or chart card
is not being read by reader.
Error Icons
No Network Connection
Chart Overlay turned off
Doc. P/N: WSP-009-003
Version: V1.4
Issue Date: June 2012
No Dongle Found
(WASSP Link Disabled)
Page 11 of 34
www.wassp.com
Page 12

Navigator Manual
System Setup
Network IP Address
Connect button
The System Setup Menu provides an on-screen window with three tabs. These
tabs allow the user to set the interface between the Navigator and Wassp, to
congure the information that is displayed on various Overlays, and to select and
administer the Databases.
System Tab
Page 12 of 34
Software default
settings are
shown, e.g. depth
in Meters. These
may be changed
to suit individual
preferences.
WMB GUI Connection
For real-time operation with Wassp, the Network IP Address must be set to the
network address of the computer that the Wassp GUI is running on. If Wassp,
GUI and Navigator are running on the same PC network the IP address should be
set to 127.0.0.1
Click on the “Connect” button to establish a connection if the conguration is rst
setup or changed.
Day/Night
Two buttons are provided to switch between daytime and night-time viewing
modes. Note: If Windows XP is not set to “Windows Classic” under Display, the
title bar will not dim in night mode.
Night Factor is used to set the amount of dimming used for night mode.
www.wassp.com
Doc. P/N: WSP-009-003
Version: V1.4
Issue Date: June 2012
Page 13

Navigator Manual
Monochrome Depth Colour
This allows the user to select the colour the seaoor will appear in monochrome
mode. The seaoor will be rendered in this colour with shading. It is useful for
when the 3D water column information is being shown.
Print Current View
Print Current View To File will save an image of the current screen.
Print Current View will send the current view to the selected printer.
Note: if the view is in night mode, the output to le/printer will also be dark.
Rescan For Dongle
Used to rescan for the WASSP Navigator dongle if it is no longer detected.
The system will check for the presence of the dongle periodically and if the dongle is missing, the realtime inputs will be disabled.
It is recommended
to .select Best
Beam method
and to enable the
noise lter.
Rescan For Chart Card
If the Navionics Gold SD card is not read correctly on startup or if you change the
SD card after running the Navigator you can use this button to re-scan for the
chart card.
Latitude, Longitude Format
Allow selection of how the latitude and longitude will be displayed in the Nav Box
on the main window.
Units
Selects the unit used for showing depth soundings and measurements. This will
only effect vertical depth values and not horizontal distance values.
Mapping Options
► Best Beam
This stops less accurate points from the outside beams overwriting the
more accurate points from the inside beams.
► Overwrite All
This option allows the user to overwrite all map points with new points as
they are received.
► Enable Noise Filter
When enabled this lter will reduce the noisy points which occur when the
detection line mistracks the seaoor.
Doc. P/N: WSP-009-003
Version: V1.4
Issue Date: June 2012
Page 13 of 34
www.wassp.com
Page 14

Navigator Manual
Display Tab
The Display Tab provides the operator with the ability to determine which information is displayed on the Navionics charts by turning the chart layers on or
off, how the vessel track is displayed, and where and how depth information is
displayed.
Page 14 of 34
Nav Text Box
These options effect what is shown in the Nav Box overlay on the main window.
► Depth At Cursor
► Bearing From Vessel
mouse cursor.
► Distance From Vessel
cursor.
► Latitude, Longitude
cursor position.
www.wassp.com
Shows the depth value at the mouse cursor.
The angle from the center of the vessel to the
Distance from center of the vessel to the mouse
Shows the latitude and longitude at the mouse
Doc. P/N: WSP-009-003
Version: V1.4
Issue Date: June 2012
Page 15

Navigator Manual
Chart Layers
Selects the layers which will be shown on the chart overlay. Set must be pressed
for changes to occur.
► Anchorage Areas
ties and wharfs.
► Cables
► Depth Contours
► Depth Soundings
► Nature Of Seabed
► Nav Aids
markers
► Port
► Pipeline
► Wreck, Rocks
► Names
also show warnings and information.
Areas where vessels can anchor and shows marinas, jet
Overlays locations of underwater cables.
Shows the depth contour lines from the chart card.
Shows the single depth soundings from the chart card.
Indicates what the seabed is at various locations.
Shows location of navigational lights, beacons, buoys and
Show port shapes such as pylons.
Show location of pipelines.
Locations of wrecks and rocky areas.
Shows names of harbours and locations on the chart. Will
Vessel Track
Allows customising how the vessel track will be shown on the main window.
► Colour
► Thickness Changes how thick the vessel track will be drawn.
► Distance Distance between track points when using distance
mode.
► Time Time between adding new vessel track points when using
Allows the colour of the vessel track to be changed.
.
time mode.
► Mode Selects track by distance or time.
Other Settings
► 3D Fish Age Select how long 3D sh are displayed for.
► Show Depth At Cursor 2D Shows depth label at mouse cursor on 2D.
► Show Depth At Cursor 3D Shows depth label at mouse cursor on 3D.
► Show Menu Labels Draws menu title next to menu icons.
► Lighting for Hardness When selecting backscatter overlay, this will show
lighting changes due to slope if enabled.
► Draw COG Line Shows a shorter course over ground line from
vessel icon.
► Draw Line To Seaoor Draws vertical line from vessel to seaoor in 3D.
► Hdg Line Width Changes thickness of the heading line drawn from
the vessel icon.
► Contour Interval Sets how often the contour lines are drawn for the
generate WASSP data when in contour mode.
► Menu Position Allows re-location of where the icon menu will be
displayed. This can be useful if using a touch
screen.
► Show Single Beam Pos This section enables a hand to display the
position of the Cursor of the WASSP Fish Finder View in Navigator.
Doc. P/N: WSP-009-003
Version: V1.4
Issue Date: June 2012
Page 15 of 34
www.wassp.com
Page 16

Navigator Manual
Database Tab
Navigator stores and displays the Wassp information in Databases. Each database can store information from any geographic area or areas. The areas do not
have to be co-located or continuous but can cover different parts of the globe if
desired.
Disk Space Remaining
Indication.
The Database File Path must be set to the directory in which the databases are
created. Additional databases can be created by clicking on the “New” button.
The databases allow the operator to store Wassp information from one or more
visits to an area. This allows changes between the visits to be easily compared
for example. A database may however be over written by selecting it for writing
on a subsequent visit.
The Database Tab provides an ability to select both a “Viewing” and a “Recording” database. The information displayed on the Navigator is always taken from
the “Viewing” database. Incoming data from the Wassp is always written to the
“Recording” database. The two databases are usually the same but they do not
have to be. By selecting a different database for “Viewing” than “Recording”, the
operator is able to look at the information previously recorded while still saving to
the recording database.
Page 16 of 34
www.wassp.com
Doc. P/N: WSP-009-003
Version: V1.4
Issue Date: June 2012
Page 17

Database Grid
Size can be
chosen (0.25,
0.5 or 1; 1m
being the lowest
resolution for
smaller le size)
Navigator Manual
When the WASSP Navigator is rst installed a Database called “Default” will be
generated. This is automatically setup ready for storing WASSP information.
Adding a new database
To add a new database, click on the “NEW” button at the bottom right of the
As the database
will be created as
a new folder on
the PC. It is best
to use plain text
and numbers as
some characters
cannot be used.
Enter a name for the database. And click “OK’ to add.
The new database will show up on both the viewing and recording side.
The database les are sorted by name so the database may not show
up at the bottom of the list.
Database Management
Database Management allows you to export recorded databases to an
external storage location such as a USB drive. This allows you to free up
space on the WASSP PC.
Database Export
Click on the “Manage” button on the bottom right of the window.
Select the database you want to export.
Doc. P/N: WSP-009-003
Version: V1.4
Issue Date: June 2012
Page 17 of 34
www.wassp.com
Page 18

Navigator Manual
Click “Save Database to Disk” and select location to save.
Database Reduction
A database on the WASSP PC can be reduced in size by converting it
from a high resolution to a medium resolution database. When this is
done the grid size is changed from 0.25 to 0.5 metres.
Before reducing the database, carry out the database export as above,
as all high resolution data will be lost.
Click on the “Manage” button on the bottom right of the window.
Select the database you want to export.
In the window the size of the database is displayed.
Next to the “Convert to 0.5 Gridding” button, the size redution is
indicated.
Click the “Convert to 0.5 Gridding” button and select location to save.
Database File Path
Databases will be generated in C:\WMBData\BathMaps as default. This
can be changed by clicking on the “...” button. Several locations on the
PC hard-drive can be used if required and changed when necessary.
Page 18 of 34
Be aware that if you change the le path while recording to a database,
that data base will no longer be visible and data loss can occur.
www.wassp.com
Doc. P/N: WSP-009-003
Version: V1.4
Issue Date: June 2012
Page 19

Navigator Manual
Demo
As part of a standard WASSP Navigator install there is a small demo database
which can be selected by pressing the Demo Button. When green this demo
database is shown on the “viewing” side.
If the demo database is selected, the Navigator will automatically go to the
location of the database for demo viewing. When the demo button is clicked
again, the Navigator will return the view to the previous position.
The text ‘Demo Mode’ will be present on the main window when in demo mode.
Show Bookmarks
This button opens the Bookmarks List. For more information about bookmarks
read about the Add Bookmark mark function.
Doc. P/N: WSP-009-003
Version: V1.4
Issue Date: June 2012
Page 19 of 34
www.wassp.com
Page 20

Navigator Manual
2D Window
Tools
The 2D window shows a birds-eye view of the chart and WASSP seaoor
data. This is the main window and is used for moving around the globe
and zooming in/out.
The interface to the Navigator uses the functions of a standard mouse or
touch screen.
Left Mouse Button Select menu, interface with map.
Mouse Wheel Zoom In/Out
The Tools Menu offers a selection of functions to enhance viewing of the
map.
Pan
The pan mode allows the user to left click on the map and then move the
mouse which in turn will move/pan the map.
Once the mouse button is released then the map will be re-drawn at the
new position.
This allows the user to move from one location on the map to another.
Zoom In
Zoom Out
Zoom In/Out buttons are provided in case there is not mouse wheel available. They can also be used when running on a touch screen.
Left click/press and hold down to zoom In/Out.
Goto Cursor
Goto cursor mode allows the user to click/select a position on the map
which then will be centered in the middle of the main window.
This is useful as the map zooms in/out based on the center of the main
window. So goto cursor allows selection of an area of interest.
Also goto cursor provides a way of navigating the map on a touch screen
instead of dragging your nger across the screen in pan mode.
Page 20 of 34
www.wassp.com
Doc. P/N: WSP-009-003
Version: V1.4
Issue Date: June 2012
Page 21

Navigator Manual
Add Measure
When the Add Measure button is clicked and green. The next two left
mouse clicks will add two measure markers on the main window.
After placing marker #1 the distance between both markers will be displayed on the line between them.
When placing marker #2 the line will then be anchored in place.
After this both marker can be re-located by placing the mouse cursor over
the marker and then holding down the left mouse button and dragging
the marker to a new location.
The marker purpose is to provide a measuring tool between two points
on the map and also to provide a proling function which will provide a
cross section of the sea oor depths between the two marks in the prole
window.
Click the Add Measure button again to remove markers.
Show Prole Window
Opens a new window which shows the cross section of the sea oor between the two markers.
When the mouse cursor is placed over the prole window the two values
at the bottom of the window are updated to give the cursor depth and
distance from marker #1.
Doc. P/N: WSP-009-003
Version: V1.4
Issue Date: June 2012
Page 21 of 34
www.wassp.com
Page 22

Navigator Manual
Overlays
The Overlay Menus select the type of information to be displayed on the map.
Conguration
The conguration button will open a new window for setting the colours,
lighting and hardness.
The Colour tab window shown allows you
to set the depth limits over which the colour
range will apply when viewing seaoor data.
There are two angled arrow buttons.
The top one sets the depth the colours will
start from.
The bottom one sets the depth the colours
will end at.
Both buttons can be clicked on with the left
mouse button and then dragged up/down.
Then the mouse button is released the colours will change on the main window.
The other four up/down arrow buttons can
be used to ne-tune the colour range.
Colours only effect the display of seaoor
data if in colour depth mode.
The Auto Colour From WASSP check box
links the Navigator Depth Colour selection to
that of the WASSP GUI. When the WASSP
Colours change the Navigator colour settings
change to match those of the WASSP system. This means if the WASSP Auto colour
feature is selected the colours on Navigator
will update automatically.
It is not possible to change the colour range
in Navigator unless the Auto Colour From
WASSP check box is unchecked.
Page 22 of 34
www.wassp.com
Doc. P/N: WSP-009-003
Version: V1.4
Issue Date: June 2012
Page 23

Navigator Manual
The Lighting tab window shown here
allows you to set the direction from which
the apparent light is coming from when
viewing a seaoor data.
There are four choices.
Light from North, South, East or West.
Left click on one of the four buttons around
the globe image to change the lighting
direction.
The Light Level slider can be left clicked
with the mouse and dragged to change the
intensity of the lighting.
When the left mouse is released, the
seaoor data shown will be updated with
the new lighting level.
The Shadow Level slider can be used in a
similar way to the Light Level slider to adjust
the length of shadows cast by objects on
the sea-oor. The darkness of the shadow
is adjusted by the Light Level slider.
Shadow Level set to zero,
and it is dicult to tell the
signicance of this wreck.
Shadow Level set to eight
makes this wreck cast a
shadow. The length of the
shadow reects how big
the wreck is.
Doc. P/N: WSP-009-003
Version: V1.4
Issue Date: June 2012
Page 23 of 34
www.wassp.com
Page 24

Navigator Manual
The Hardness tab window shown here
allows you to set the backscatter colour
range.
Correct setting of these controls will greatly
help display seaoor changes.
To change the gain values for Soft/Steep
bottom (top arrow) or Hard/Flat bottom
(bottom arrow), left click on one of the
buttons and hold, then drag up/down to
change the values.
Colour or black and white (grey) backscatter can be selected by clicking on the
Colour or Grey buttons at the bottom of the
window.
Click on Close to exit the Conguration
window.
Colour Depth
Colour by depth allows the user to
show the seaoor data coloured
between the selected values on
the conguration windows.
By changing this range of colours
you can show up more detail of
the area you are viewing.
Any area which is outside the
selected colour range will show
up as grey.
Page 24 of 34
www.wassp.com
Doc. P/N: WSP-009-003
Version: V1.4
Issue Date: June 2012
Page 25

Overlays
Navigator Manual
Monochrome Depth
Monochrome depth is used to
display the seaoor using only
one colour.
This colour can be changed from
the System Cong (System Page).
The seaoor image will still be
lit from the selected lighting
direction.
This mode is useful if using 3D
water column to help distinguish
between the 3D water column
marks and the seaoor.
Show Backscatter
Show backscatter is used to
display the backscatter/hardness
information on top of the seaoor
map.
The backscatter information can
be displayed in grey-scale or
colour-scale.
Changes in hardness will show up
as different intensity/colour.
This mode is very useful for
nding the changes in seaoor
even when the seaoor is very
at. Giving the user a good
indication on where the rocky/
hard areas and the soft/muddy
areas are.
Doc. P/N: WSP-009-003
Version: V1.4
Issue Date: June 2012
Page 25 of 34
www.wassp.com
Page 26

Navigator Manual
Show 3D Fish
Show 3D Fish will overlay the
detected water column marks on
the 2D seaoor display.
These marks are coloured by
intensity, so red marks are strong
echoes and blue marks weak
echoes.
The sh marks are stored on
the computers hard-drive. There
is a nite number of sh marks
which can be stored. Once this
maximum has been reached for a
geographical area, the oldest sh
marks are removed.
These marks also show up on the
3D window.
Contour Lines
This mode draws the seaoor by
colour and traces the contours
of the sea oor at the specied
interval.
This interval is setup in the
System Cong under the Display
Tab.
Show Chart
When this button is enabled the
Navionics Gold SD card charts
are overlaid on top of the WASSP
Navigator seaoor data.
Page 26 of 34
If the button is disabled, the
charts will not be drawn and a
warning icon will show.
www.wassp.com
Doc. P/N: WSP-009-003
Version: V1.4
Issue Date: June 2012
Page 27

Ship
Navigator Manual
Center On Ship
When this button is enabled,
the map will scroll along with
the vessel as new GPS position
information is received.
To disable this mode click on the
icon again or pan the display.
North Up
When this button is enabled, the
map will always be drawn with
north pointing directly up the
screen.
The vessel will rotate to show
current heading.
Heading Up
When this button is enabled, the
map rotate around the vessel.
The vessel icon will always point
directly up the screen.
Show Vessel Track
Doc. P/N: WSP-009-003
Version: V1.4
Issue Date: June 2012
When this button is enabled, the
vessel track will be displayed over
the seaoor map and chart.
This track will continue to update
based on user settings under
System Cong on the Display Tab.
Page 27 of 34
www.wassp.com
Page 28

Navigator Manual
Marks
Marks are used to place a user marker at a location of interest
Mark At Vessel
When this button is clicked a mark will be placed at the current vessel
position.
This mark will be identical to the last mark added. To change the mark
settings simply left click on the mark you wish to change.
Mark At Cursor
When this button is clicked a mark will show under the mouse cursor.
The next time the left mouse button is clicked this mark will be placed
at the mouse cursor position. This mark will be identical to the last mark
added. To change the mark settings simply left click on the mark you
wish to change.
The mark will have a yellow circle when it
is highlighted. Left clicking will bring up
the Mark Setup window. Conguring the
mark is optional.
Press to Close AND Activate
changes made to the Mark
Page 28 of 34
Press this to enable deleting the mark.
Press UPDATE to complete the process.
www.wassp.com
Press to change
Mark Colour
Press to change
Mark Shape
Enter Mark Name
Enter a number
Mark Position can be
changed.
Press to Close
without saving
changes.
Doc. P/N: WSP-009-003
Version: V1.4
Issue Date: June 2012
Page 29

Navigator Manual
Mark At Lat/Long
When this button is clicked the Mark Setup form will appear.
Enter mark information including the mark position and press Add to
add a new mark at the entered latitude and longitude. As with all marks
the colour, shape, name and value can be modied as desired.
Enter a position in the form
degrees, decimal minutes,
quadrant (N/S/E/W) and
press ADD to create the
mark at his position.
Add Bookmark
When this button is clicked a bookmark will be placed at the cursor
position when the operator next presses the left mouse button.
What is a bookmark?
A bookmark is similar to a marked screen position. It is designed for
saving the area you can currently see. If you GOTO a bookmark:
► The Current view location changes to centre on the bookmark’s
position.
► The Zoom level changes to the zoom level at time of bookmark
creation.
► The Current Viewing DataBase changes to the database being
shown at the time the bookmark was created.
Doc. P/N: WSP-009-003
Version: V1.4
Issue Date: June 2012
Left clicking on a Bookmark brings up the Bookmark list, and this
enables moving to another bookmark, changing the name of any of
the bookmarks, and shows the position and date of creation of each
bookmark. The icon for a bookmark cannot be changed, unlike a mark.
Page 29 of 34
www.wassp.com
Page 30

Navigator Manual
Left click on one of these
marks to select it.
Press to update the name
of the selected bookmark
to the text entered..
Press this button to Close this window and to
GOTO the selected bookmark.
Mark Enable
When this button is enabled all marks will be shown on top the of map/
chart. When disabled all marks will be removed from the map display.
This allows the user to see the seaoor detail which the mark image
may obscure.
Pressing this button deletes the
bookmark permanently.
Press to
Close
Page 30 of 34
www.wassp.com
Doc. P/N: WSP-009-003
Version: V1.4
Issue Date: June 2012
Page 31

Show 3D Window
Navigator Manual
This button is used to bring up the 3D window.
3D Window
Vertical Scale
The 3D window is used to show a 3D view of what is shown on the main
window. This view can be moved/rotated to view the seaoor data in 3D.
3D image data is the same data as shown on the 2D main window.
The interface to the Navigator uses the functions of a standard mouse or
touch screen.
Left Mouse Button Select menu, interface with display.
Mouse Wheel Zoom In/Out.
Right Mouse Button Move display up/down.
Cursor Keys Pan display left/right/up/down.
Double Left Click Return to center of display.
1x Vertical Scale
This scale is 1:1 so all features
are drawn as the would be seen
underwater.
Doc. P/N: WSP-009-003
Version: V1.4
Issue Date: June 2012
2x Vertical Scale
This scale is 2:1 so all features are
drawn twice as high as they would
be seen underwater.
Depths will also be shown twice as
deep.
4x Vertical Scale
This scale is 4:1 so all features are
drawn four times as high as they
would be seen underwater.
Depths will also be shown four
times as deep.
Page 31 of 34
www.wassp.com
Page 32

Options
Navigator Manual
Show Swath
Enabling show swath will draw a
green/red swath coverage indicator
under the current vessel position.
This can be used to give an
indication on the area the sonar is
currently seeing.
North Up
Selecting North up mode is the
same as on the main window.
North will always be up/into the
screen.
North Up in the 3D window can be
different from the setting on the
main window.
Heading Up
Selecting Heading up mode is the
same as on the main window.
The vessel will always point up/into
the screen.
Heading Up in the 3D window can
be different from the setting on the
main window.
Free Rotate
Selecting Free Rotate allows the
user to use the mouse to rotate,
zoom and pan the 3D display using
the mouse and keyboard cursor
keys.
Page 32 of 34
www.wassp.com
Doc. P/N: WSP-009-003
Version: V1.4
Issue Date: June 2012
Page 33

3D Fish
Navigator Manual
Show 3D Fish will overlay the detected water column marks on the 2D
and 3D displays.
These marks are coloured by intensity, so red marks are strong echoes
and blue marks weak echoes.
The sh marks are stored on the computers hard-drive. There is a nite
number of sh marks which can be stored. Once this maximum has been
reached for a geographical area, the oldest sh marks are removed.
To get the best from the water column
data, the WASSP WMB160F or WMB80F
sh overlay settings should be correctly
set.
It is recommended that the sh threshold
in WASSP be set to 4 or above depending
on how noisy the sonar display is.
The Start Depth/End Depth are not used
in WASSP for the Navigator software at
this time.
WMB160F/WMB80F Fish Options
Doc. P/N: WSP-009-003
Version: V1.4
Issue Date: June 2012
Page 33 of 34
www.wassp.com
Page 34

Navigator Manual
NOTES:
Release Notes:
V100-004 Release Version Enhancements
► Added bookmarks to allow user to mark a location and then jump back to that location and zoom level.
► Shadows can now be cast North, South, East, West on seaoor data. Angle of shadows can also be set.
► Navigator can now link into WASSP V104 colours for depth. This will automatically change Navigator colours when
WASSP V104 colours change.
► Improved map buffering to disk progress bar updating.
► Navigator will now run in Demo mode if no dongle is found and allow viewing of map data. Realtime is disabled.
► Added ability to lock 2D & 3D window to current position, removing the title bar.
► Marks can now be added by entering latitude and longitude, marks can be moved by modifying their latitude, longitude.
► Prole form can now be re-sized and cursor depth is now shown.
► Prole will update if vessel travels over area for prole or user zooms.
► Added pointer on 2D map for where cursor is on WASSP V104 single beam display (middle beam)
► Improved drawing of lines for chart contours.
► Added indicator icon when marks are disabled and now shown
► Added indicator to show if hard drive is getting below 5%, also indicator bar on Database page.
► When opening cong window, it will default to depth/backscatter depending on drawing mode.
► Added cross to Enable Mark button to indicate when marks are disabled.
► Added Speed Over Ground to nav display window.
► When moving prole line, distance reading will move to prole point being moved/highlighted instead of middle of line.
► Distance can now be set to feet or meters.
► Prole distance now in nautical miles.
► Cursor depth in 3D window will now give the depth of sh points.
► 3D Fish can now be set to show only sh up to 1 day ago or show all sh.
► Improved positioning of map data.
► Improved user interface for use on touch screen displays.
► Mouse wheel can now be used to change depth colours by hovering the mouse pointer over the up/down buttons
Page 34 of 34
www.wassp.com
Doc. P/N: WSP-009-003
Version: V1.4
Issue Date: June 2012
 Loading...