

Page 1
GP32/37 Operations and Information Quick Guide
Specifications: 12-24 VDC, 340 ma (max), settling time ~12 sec’s (90 sec’s initial), accuracy (95%) ~5-7 m, 1-3m w/WAAS or DGPS
Receiver status: 2D or 3D with either a D
[differential] (GP37 only) or W [WAAS] prefix
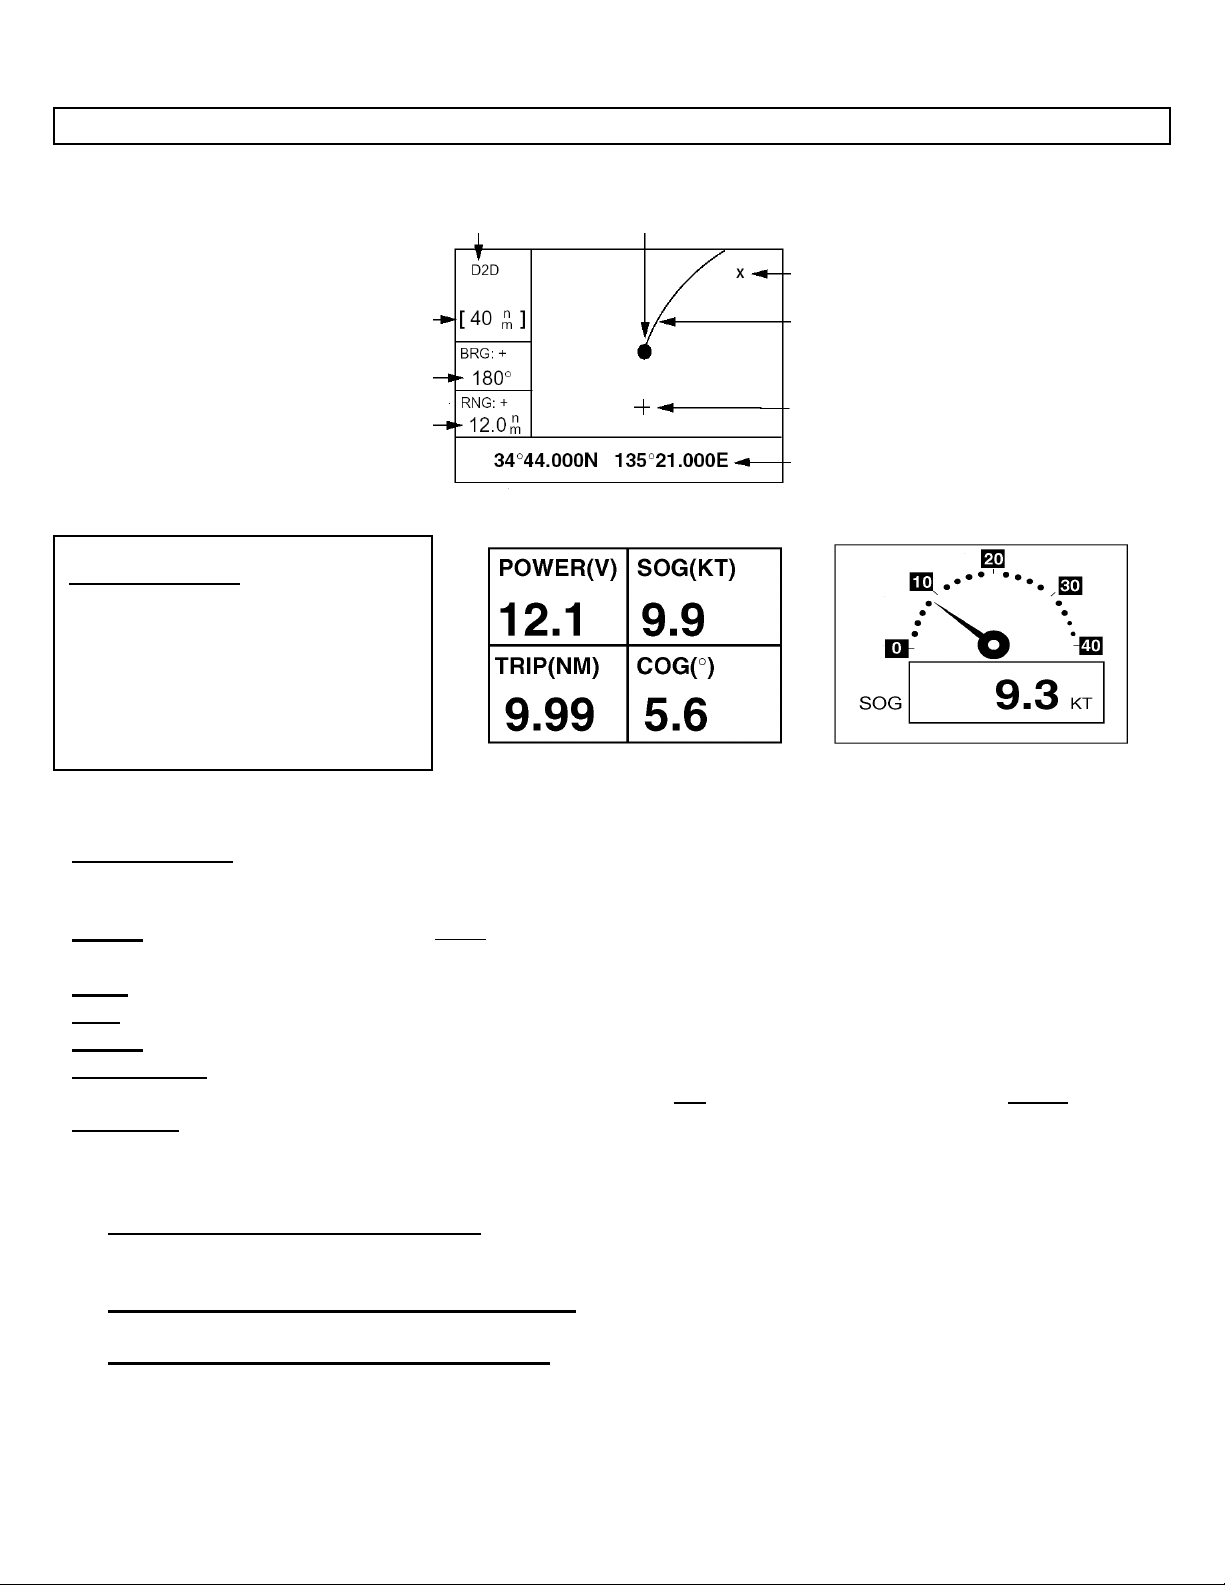
Horizontal “plotter range adjustment”
Press [MENU] key “once” for ZOOM IN/OUT? or
“SHIP TO CENTER?” and [ENT] key; for zoom
use cursor up/down to adjust range, press [ENT]
Bearing to cursor*
Range to cursor*
* = COG and SOG replace bearing to cursor and
range to cursor when the cursor is not displayed.
User display (digital)
Selectable sentences
NONE ODO
TIME POSN POWER
SOG COG WPT
XTE TTG ETA
Press [MENU] until “MAIN MENU” appears
Select “USER DISP” and follow prompts
(example shown right)
TRIP
Own ship mark
(blinking)
Waypoint mark (Shape selectable)
Menu selectable display [ALL], [RTE], [GOTO]
Vessel’s track
Cursor (Displayed
six (6) seconds)
Cursor position
(Own ship’s position when
Plotter display
User display (digital) User display (speedometer)
cursor is not displayed.)
Keypad Operations:
CURSOR PAD - Shifts cursor (cursor displayed) and display (with cursor off)
- Selects items on menus
- Enters alphanumeric data
MENU – “MAIN MENU” press once (twice when in “plotter” or “high way” screen)
- [Plotter screen only] press once to “Zoom” or “Ship to center” also use to escape current function
- Chooses display mode (press until desired mode is displayed)
DISP
ENT - Confirms menu selection and entered information
GOTO - Sets/cancels destination (press and select function from menu options)
MARK/MOB - Momentary press: Creates mark (waypoint)
- Long press: Creates MOB (Man Over Board)
can edit or replace with new position (cannot erase)
DIM/PWR - Momentary press: Turns power “on”, press for brilliance and contrast, use cursor pad to adjust
- Long press: Turns power “off” (after three second count down)
Waypoint Operations: (total of: 999 waypoints with comments)
• Entering a waypoint with the cursor
1. Use cursor pad to move cursor to desired location
2. Press the [ENT] key, then follow screen prompts
• Entering a waypoint at “own ship’s” position
1. Press the [MARK/MOB] key, then follow screen prompts
• Entering a waypoint from the waypoint list
1. Press [MENU] until “MAIN MENU” appears
2. Select “WAYPOINT” using the “cursor pad” and press [ENT] key
3. Choose “List” (complete) or “Nearest” (closest 35 waypoints from present location), press [ENT] key
4. Follow screen prompts using cursor pad to edit and/or add information, confirm using the [ENT] key
GP32/37 Operations and Information Quick Guide GP Page 1 11/22/2004
Page 2

Route Operations: (total of: 50 routes with 30 waypoints each)
• Creating a route with “cursor” (using “LOG RTE” function)
1. Use cursor pad to move cursor to desired location (shown at bottom of screen), press [ENT]
2. Use cursor pad to edit waypoint name and press [ENT] to display waypoint information screen
3. Use cursor pad to edit any additional information, then select [LOG RTE?] and press [ENT]
4. Repeat steps 1 – 3 for additional waypoints (total of 30), selecting [LOG RTE?] before pressing [ENT]
5. See GOTO operations below for navigating using a route
• Creating a route with the “route menu”
1. Press [MENU] until “MAIN MENU” appears, select “ROUTE” using the cursor pad, press [ENT]
2. “NEW?” is selected; press the [ENT] key. New route screen is displayed, press [ENT] to add waypoints
3. Use the cursor pad to select appropriate waypoint and press the [ENT] key
4. Repeat step 3 to select additional waypoints (total of 30)
5. When finished adding waypoints use the cursor pad to select [EXIT?] and press the [ENT] key
• Creating a route with the “waypoint list”
1. Press [MENU] until “MAIN MENU” appears
2. Select “WAYPOINTS” using the cursor pad, press [ENT] key
3. Choose “List” (complete) or “Nearest” (closest 35 waypoints from present location), press [ENT] key
4. Select a waypoint, then press [ENT] key, use the cursor pad to select [LOG RTE?], press [ENT] key
5. Repeat step 4 to add additional waypoints until route completed
6. Press [MENU] (once only)
7. Select “ROUTE” from “main menu” using the cursor pad and press [ENT] key
8. Select [LOG] using the cursor pad and press [ENT]; “MOVE?
• Creating “track based” route manually
1. Press the [MARK/MOB] momentarily, edit waypoint if required, select [LOG RTE?], press [ENT]
2. Repeat step 1 at course change or any other interval required
3. When finished adding waypoints, press [MENU] key twice
4. Select “LOG” and press [ENT]; “MOVE?
• Creating “track based” route automatically
1. Press [MENU] until “MAIN MENU” appears
2. Select “ROUTES” using the cursor pad, press [ENT] key
3. Use cursor pad and [ENT] to select “INTERVAL:” TIME or DISTANCE (select appropriate values)
4. Use cursor pad to select “VOYAGE ROUTE” and press [ENT]
5. Select “START” and press [ENT], press the [MENU] key twice
6. When finished adding waypoints, press [MENU] key twice
7. Select “LOG” and press [ENT]; “MOVE?
” is selected, press [ENT] twice
(position saved sequentially, display shows “saved”, beep sounds)
” is selected, press [ENT] twice
” is selected, press [ENT] twice
and select “ROUTES”, press [ENT]
to finish (or message after 30 saved)
and select “ROUTES”, press [ENT]
GOTO Operations: Navigating to a waypoint, route or cursor
• Press [GOTO] key, select from the following using the cursor pad and confirm using [ENT] key
o WPT-LIST? Destination by “list” (complete), select desired waypoint and press [ENT]
o WPT-NEAR? Destination by “near” (closest 35), select desired waypoint and press [ENT]
o ROUTE? Destination by “route” select desired route and press [ENT]
o CURSOR? Destination by “cursor” (?) mark appears, move cursor to location, press [ENT]
o - - - - - -? * Location of user waypoint (example “HOME”), select and press [ENT] to confirm
o OFF? Stops all waypoint or route navigation functions
o SETUP? * Used to set “User Waypoint”, select from waypoint list and press [ENT]
Position Display Format: XX.XXX’ (decimal), XX’XX.X’ (minutes/seconds), LC TD (Loran C “TD’S)
• Press [MENU] until “MAIN MENU” appears, select TD SETUP, press [ENT], select format, press [ENT]
o TD setup requires selecting the “GRI” and “TD” set closest to but under the local area TD numbers
o Example: Local numbers (GRI area 7980) 14445.6 & 45535.6, set “TD SETUP” to GRI: 7980 11-43
o Use TD1 and TD2 offsets to correct difference between “known” TD position and displayed position
GP32/37 Operations and Information Quick Guide GP Page 2 11/22/2004
 Loading...