

Page 1
COLOR DGPS/PLOTTER/SOUNDER GP-1850DF
COLOR GPS/PLOTTER/SOUNDER GP-1850F
Operator’s Guide
The purpose of this operator's guide is to provide the basic operating procedures for this equipment.
For detailed information, refer to the operator's manual.
Turning the Power On/Off
Press and hold down the [POWER/BRILL]
switch.
Adjusting Tone and Brilliance
1. Press the [POWER/BRILL] key with a touchand-release action.
2. Press the appropriate soft key or cursor pad
to adjust.
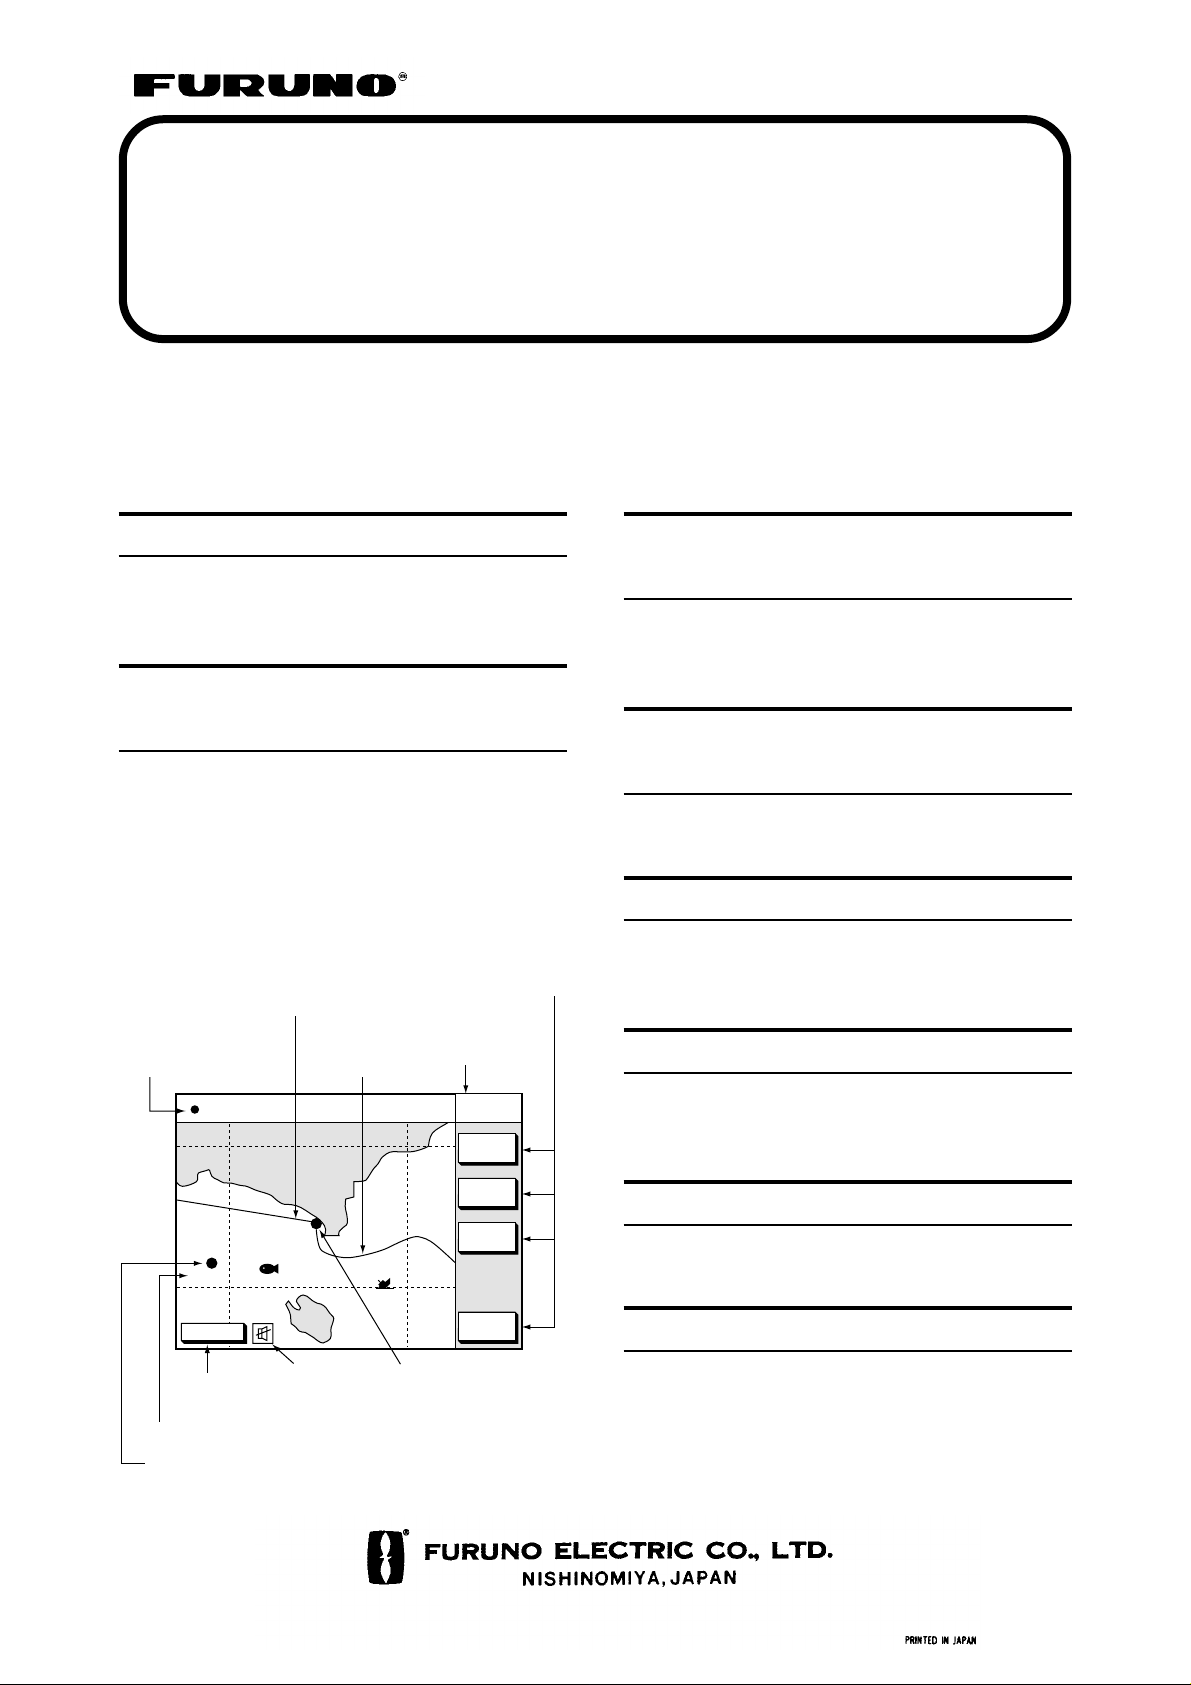
♦PLOTTER♦
Functions for
Course bar
Nav information
window
34° 12.345’ N
135° 12.345’ E
002WP
DGPS 3D
FISH
Current display mode
Track
CSE
245.8°
16.3kt
SPD
BRIDGE
soft key
(north-up)
NORTH
UP
ZOOM
IN
ZOOM
OUT
COURSE
UP
NAV
WPT
Displaying Electronic Chart at Power Up
Insert mini chart card in slot and turn on the
power.
Selecting Nav Data Displays
Press the soft key NAV L/L (WPT, S/C).
Changing Chart Scale
Press the soft key [ZOOM IN] to enlarge;
[ZOOM OUT] to shrink.
Turning the Cursor On/Off
Cursor On: Operate the cursor pad.
Cursor Off: Press the soft key [CENTER].
Shifting the Cursor
Operate the cursor pad.
Shifting the Display
GPS status
Waypoint name
Waypoint mark
Typical indications on the plotter display
Icon (alarm)
Own ship
mark
Press and hold down the cursor pad.
Page 2
Returning Own Ship to
Stopping, Restarting
Screen Center
Press the soft key CENTER.
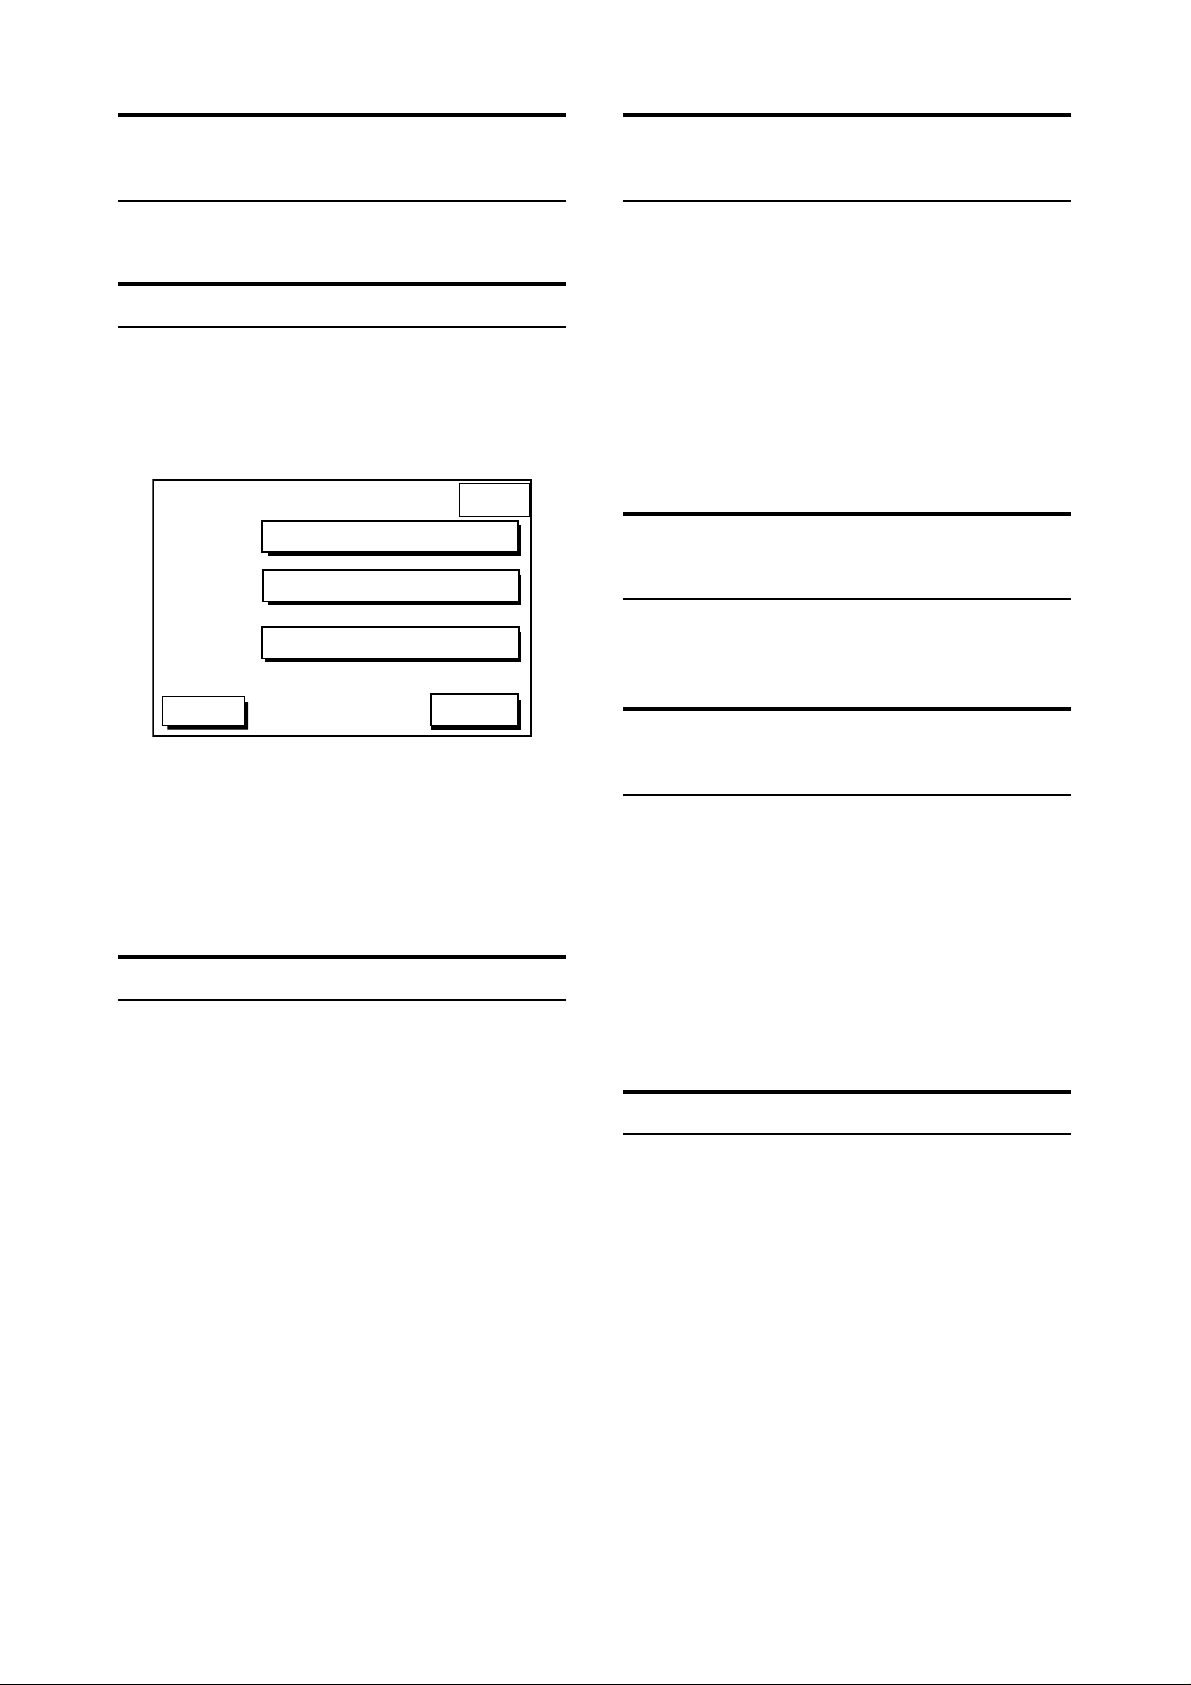
Changing the Plot Interval
1. Press the [MENU] key to show the main
menu.
2. Press the soft key CHART SETUP OPTIONS
to show the chart setup options menu.
CHART
SETUP
CHART OFFSET
TRACK CONTROL
CHART DETAILS
DGPS 3D
3. Press the soft key TRACK CONTROL.
4. Press ▲ or ▼ to select TIME INTERVAL or
DIST INTERVAL.
5. Press the soft key EDIT.
6. Key in the interval desired.
RETURN
Entering Mark
1. Press the [MENU] key and the soft key DISPLAY OPTIONS.
2. Press ▼ to select OPERATION MODE.
3. Press the soft key EDIT.
4. Press ▼ to select FISHING.
5. Press the soft key ENTER or the [ENTER]
key.
6. Press the PLOT key to display the plotter
display.
7. Press the [HIDE/SHOW] key to display the
soft key MARK ENTRY.
8. Press the soft key MARK ENTRY.
When the cursor is displayed, a mark which its
shape and color are presetted is entered to
cursor position. When the cursor is not displayed, a mark is entered to own ship position.
The mark attributes can be changed by the soft
key MARK EDIT.
Recording of Track
1. Press the [MENU] key.
2. Press the soft key CHART SETUP OPTIONS.
3. Press the soft key TRACK CONTROL.
4. Press the soft key STOP TRACK. NOT
TRACKING indication appears at the bottom
of the display.
To restart recording, press the soft key START
TRACK.
Entering Waypoints at Own Ship Position
Press the [SAVE/MOB] key with a touch-andrelease action.
Entering Waypoints By Cursor
1. Press the [WPT/RTE] key.
2. Press the soft key WAYPOINTS.
3. Press the soft key WA YPOINT BY CURSOR
to show the plotter display.
4. Operate the cursor to place the cursor on
the position you want to enter the waypoint.
5. Press the soft key NEW WPT.
6. Press the soft key SAVE.
Registering Routes
1. Press the [WPT/RTE] key.
2. Press the soft key ROUTES.
3. Press the soft key NEW ROUTE.
4. Press the soft key LOCAL LIST or ALPHA
LIST.
5. Press ▲ or ▼ to select a waypoint.
6. Press the soft key ADD WPT.
7. Repeat step 5-7.
8. Press the soft key SAVE.
2
Page 3

Setting Destination by Waypoint Number
1. Place the cursor on the waypoint you want
to go on the plotter display.
2. Press the soft key GO TO WPT.
Cancelling Destination
1. Press the [WPT/RTE] key.
2. Press the soft key LOG.
3. Press ▲ or ▼ to select the waypoint desired.
4. Press the soft key STOP.
5. Press the [ENTER] key to select YES on the
confirmation window.
6. Press the soft key RELEASE to show the
confirmation window.
7. Press the [ENTER] key to select YES.
♦SOUNDER♦
Functions for
soft key
Depth scale
SOUNDER
RANGE
20
GAIN
30
SHIFT
40
MODE/
FREQ
50
SNDR
FUNC
Depth
Nav information
window
Color
bar
Temp.
scale
Water
temp.
graph
Water
temp.
display
30
20
10
0
54.0m
DGPS 3D
GPS status
34° 12.345’ N
135° 12.345’ E
50k
Tx frequency
Variable
Range
Marker
(White)
CSE
245.8°
SPD
16.3kt
Typical indications on
normal video sounder display
Showing the Sounder
Setting Arrival Alarm
1. Press the [ALARM] key to show the alarm
menu.
s
AUDIO ALARM
ARRIVAL ALARM
ANCHOR ALARM
PROXMTY ALARM
XTE ALARM
SPEED ALARM
ALARM INFORMATION
DGPS 3D
NO ALARM
ON
ON 0.100nm
ON 0.050nm
ON
ON 0.100nm
OVER/UNDER
12.5 ~ 15.0kt
2. Select ARRIVAL ALARM.
3. Press the soft key EDIT
4. Press ▲ or ▼ to select ON.
5. Key in the alarm range.
6. Press the soft key ENTER.
Silencing audible alarm: [CLEAR] key.
Disabling alarm: Select OFF at step 3 above.
ALARM1
EDIT
CLEAR
ALARM
NEXT
PAGE
Display
Press the [SNDR] key.
Each pressing of this key toggles the display
among Plotter/Sounder display, Normal sounder
display and Dual-frequency display.
Selecting the Sounder Display Mode
1. On the normal display, press the soft key
SNDR FUNC.
2. Select the mode desired.
3. Press the soft key RETURN.
Automatic Sounder Operation
1. On the normal or dual-frequency display,
press the soft key MODE/FREQ. When the
plotter/sounder display is displayed, press the
soft key SNDR, and then press the soft key
MODE/FREQ.
2. Select AUTO.
3. Press the soft key RETURN.
3
Page 4

Manual Sounder
Suppressing Low Level
Operation
1. On the normal or dual-frequency display,
press the soft key MODE/FREQ. When the
plotter/sounder display is displayed, press the
soft key SNDR, and then press the soft key
MODE/FREQ.
2. Select MANUAL.
3. Press the soft key RETURN.
Adjusting the gain
Press the soft key GAIN, and then press ▲ or
▼ to set the gain.
Selecting range
Press the soft key RANGE, and then press ▲
or ▼ to select range.
Shifting the basic range
Press the soft key SHIFT, and then press ▲ or
▼ to shift the basic range.
Noise
1. Press the [MENU] key, and then press the
soft key SOUNDER SETUP OPTIONS to
show the sounder setup menu.
2. Press ▲ or ▼ to select CLUTTER.
3. Press the soft key EDIT.
4. Press ▲ or ▼ to select clutter rejection level.
5. Press the soft key RETURN.
Selecting Picture Advance Speed
1. Press the [MENU] key, and then press the
soft key SOUNDER SETUP OPTIONS to
show the sounder setup menu.
2. Press ▲ or ▼ to select PICTURE ADV ANCE.
3. Press the soft key EDIT.
4. Press ▲ or ▼ to select speed.
5. Press the soft key RETURN.
Activating Sounder Alarms
Suppressing Interference
1. Press the [MENU] key, and then press the
soft key SOUNDER SETUP OPTIONS to
open the sounder setup menu.
SOUNDER
s
NOISE LIMITER
CLUTTER
WHITE MARKER
HUE
SIGNAL LEVEL
PICTURE ADVANCE
DGPS 3D
OFF
4
0
1
OFF
1/1
2. Press ▲ or ▼ to select NOISE LIMITER.
3. Press the soft key EDIT.
3. Press ▲ or ▼ to select NL1, NL2 or NL3.
4. Press the soft key RETURN.
SETUP
EDIT
EDIT
RANGE
HOLD
SETUP
SYSTEM
SETUP
RETURN
1. Press the [ALARM] key, and then press the
soft key NEXT PAGE to show the alarm 2
menu.
s
BOTTOM ALARM
FISH (B/L) ALARM
FISH (NORMAL)
TEMP. ALARM
ALARM INFORMATION
NO ALARM
DGPS 3D
OFF
OFF
OFF
OFF
ALARM2
EDIT
CLEAR
ALARM
RETURN
2. Press ▲ or ▼ to select the alarm among
BOTTOM, FISH (B/L), FISH (NORMAL) and
TEMP. (temperature).
3. Press the soft key EDIT.
4. Press ▲ or ▼ to select on, and then key in
the range to set.
5. Press the soft key ENTER.
4
PUB.NO.OSE-43950-D
(0005,TATA) GP-1850F/1850DF
 Loading...