

Page 1
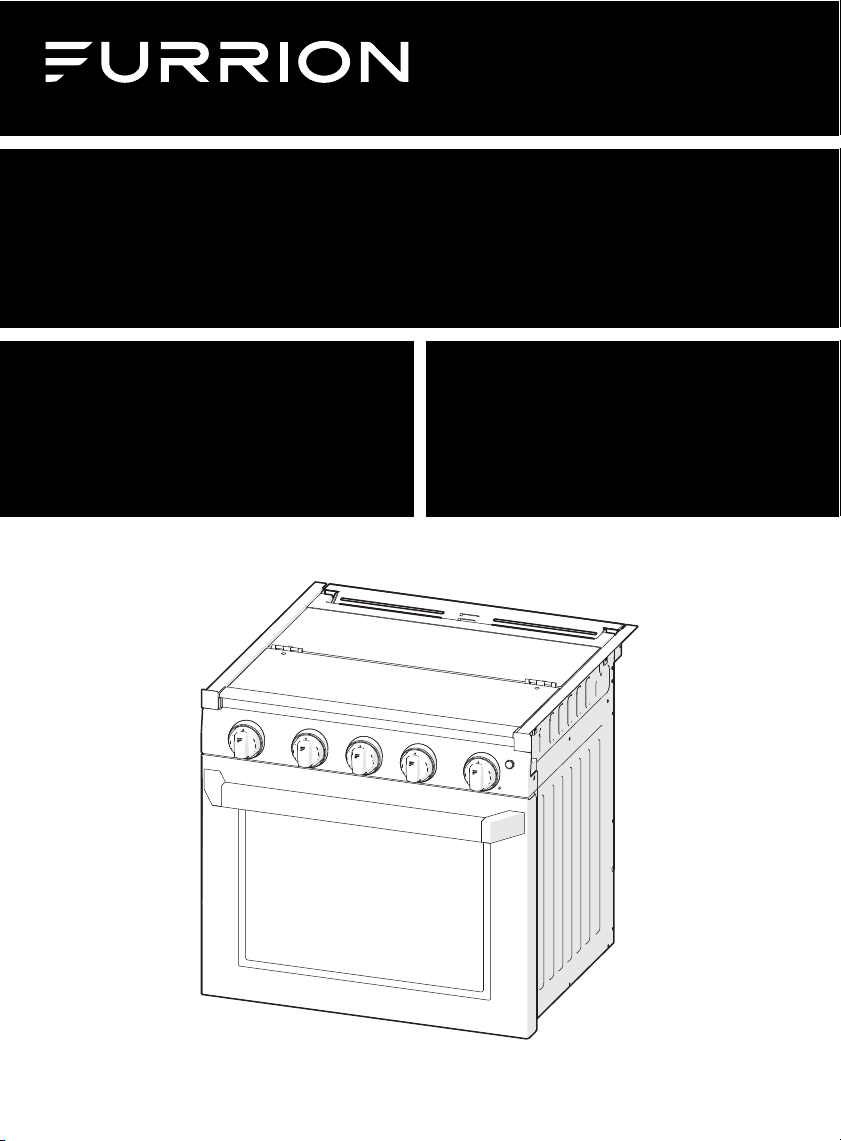
2-in-1 Range Oven
Four de cuisinière 2 en 1
Cocina con horno y anafe 2 en 1
In struct ion Ma nual
Manuel d’in structions
Manual de instrucciones
Model/Modèle/Modelo:
FS17WB4A-BL/FS21DB4A-BL
FS17DB4A-SS/FS17WB4A-SS
FS21DB4A-SS/FS17DB4A-BL
* Picture shown here is for reference only.
* L’image montrée ici est pour référence seulement.
* La imagen que se muestra aquí es sólo para referencia.
Page 2
Thank you for purchasing this Furrion® product. Before operating your new appliance, please read these instructions carefully.
This instruction manual contains information for safe use, installation and maintenance of the appliance.
Please keep this instruction manual in a safe place for future reference. This will ensure safe use and reduce the risk of injury.
Be sure to pass on this manual to new owners of this appliance.
The manufacturer does not accept responsibility for any damages due to not observing these instructions.
WARNING: If the information in this manual is not followed exactly, a fire or explosion may
result causing property damage, personal injury or death.
− Do not store or use gasoline or other flammable vapors and liquids in the vicinity of this or
English
any appliance.
− WHAT TO DO IF YOU SMELL GAS:
ƔDo not try to light any appliances.
ƔDo not touch any electrical switches.
ƔDo not use any phone in your recreational vehicle.
ƔClear the recreational vehicle of all occupants.
ƔTurn off the LP container valve or main container.
ƔImmediately call your gas supplier for instructions.
ƔIf you cannot reach your gas supplier, call the fire department.
− Have the gas system checked and leakage source corrected by a qualified installer, service
agency, manufacturer, dealer or the gas supplier.
2
Page 3
Table of Contents
Table of Contents ..........................................................................................................................................................................3
Explanation of Symbols ...............................................................................................................................................................4
Important Safety Instructions .....................................................................................................................................................4
General Safety Warnings ..................................................................................................................................................................................................... 4
Cooktop Safety Warnings ....................................................................................................................................................................................................5
Oven Safety Warnings ........................................................................................................................................................................................................... 6
Product Overview .........................................................................................................................................................................6
Installation .....................................................................................................................................................................................7
What’s in the Box ...................................................................................................................................................................................................................... 7
Cabinet Cutout Instructions ................................................................................................................................................................................................ 7
Oven Installation....................................................................................................................................................................................................................... 8
Gas Connection ....................................................................................................................................................................................................................... 8
Electrical Connection ............................................................................................................................................................................................................9
Glass Cover Replacement ................................................................................................................................................................................................... 9
Leak Check ................................................................................................................................................................................................................................. 10
Operation........................................................................................................................................................................................10
Lighting the Cooktop ............................................................................................................................................................................................................. 10
Turning Off Cooktop ............................................................................................................................................................................................................... 12
Lighting the Oven .................................................................................................................................................................................................................... 12
Turning Off the Oven .............................................................................................................................................................................................................. 12
The Burner Flame .................................................................................................................................................................................................................... 13
Light Control ..............................................................................................................................................................................................................................13
Slow Cooking ............................................................................................................................................................................................................................ 13
Cooking Advice .............................................................................................................................................................................13
Preheating ................................................................................................................................................................................................................................... 13
Baking Cakes ............................................................................................................................................................................................................................. 13
Cooking Pizza ............................................................................................................................................................................................................................ 13
Cooking Fish and Meat .........................................................................................................................................................................................................14
Cleaning and Maintenance ..........................................................................................................................................................14
The Oven Door .......................................................................................................................................................................................................................... 15
Replacing an Oven Light ......................................................................................................................................................................................................16
Replacing the Control Knob LED ..................................................................................................................................................................................... 16
Storage ...........................................................................................................................................................................................17
Troubleshooting ............................................................................................................................................................................17
Specification .................................................................................................................................................................................17
English
3
Page 4
Explanation of Symbols
This manual has safety information and instructions to help
you eliminate or reduce the risk of accidents and injuries.
Always respect all safety warnings identified with these
symbols. A signal word will identify safety messages and
property damage messages, and will indicate the degree or
level of hazard seriousness.
English
Indicates an imminently hazardous situation which, if not
avoided, will result in death or serious injury.
DANGER
Important Safety Instructions
WARNING
Indicates a potentially hazardous situation which, if not
avoided, could result in death or serious injury.
CAUTION
Indicates a potentially hazardous situation which, if not
avoided, may result in minor or moderate personal injury, or
property damage.
Warning and important safety instructions appearing in this
guide are not meant to cover all possible conditions and
situations that may occur. Common sense, caution, and care
must be exercised when installing, maintaining, or operating
the appliance.
Always contact the manufacturer about problems or
conditions you do not understand.
Read and follow all instructions before using this appliance
to prevent the potential risk of fire, electric shock, personal
injury or damage to the appliance as a result of improper
usage of the appliance. Use appliance only for its intended
purpose as described in this guide.
If an external electrical source is utilized, the appliance must
be electrically grounded in accordance with state or other
codes or, in the absence of such codes, with the National
Electrical Code, ANSI/NFPA 70. Do not attempt to adjust,
repair, service or replace any part of your appliance unless it
is specifically recommended in this guide. All other servicing
should be referred to a qualified service technician.
General Safety Warnings
WARNING
Ɣ Improper installation, adjustment, service or
maintenance can cause injury, property damage or
death. Refer to this manual. For assistance or additional
information, consult a qualified installer, service agency,
manufacturer or the gas supplier.
Ɣ Avoid using your appliance or any other appliance if
you smell gas. Do not assume that the smell of gas in
your RV is normal. Any time you detect the odor of gas,
it is to be considered life threatening and corrected
immediately. Extinguish any open flames including
cigarettes and evacuate all persons from the vehicle.
Shut off gas supply at LP gas bottle.
Ɣ If the user of this appliance fails to maintain it in the
condition in which it was shipped from the factory or if
the appliance is not used solely for its intended purpose
or if appliance is not maintained in accordance with the
4
instructions in this manual, then the risk of a fire and/or the
production of carbon monoxide exists which can cause
personal injury, property damage or loss of life.
WARNING
EXPLOSION OR FIRE
Ɣ Shut off all gas appliances and pilot lights when
refueling gasoline tanks, LP tanks or when vehicle is in
motion.
Ɣ Furrion gas operated cooking appliances are for use
with LP gas only, and for installation in recreation
vehicles only (e.g. travel trailers, motor homes, tent
campers, etc.).
WARNING
CARBON MONOXIDE POISONING
Ɣ DO NOT use this appliance for warming or heating
vehicle. You could be burned or injured, a fire could start,
or deplete oxygen in the vehicle.
Ɣ A window or air vent should be open slightly while using
any cooking appliance. Gas flames consume oxygen
which must be replaced to assure proper combustion.
Ɣ DO NOT store or use gasoline or other flammable vapors
and liquids in the vicinity of this or any other appliance.
Ɣ DO NOT operate the appliance if it is damaged or not
working properly.
Ɣ Never attempt to repair the appliance yourself. Any repairs
to or installation of this appliance must be performed by
a qualified installer, service agency or the gas supplier
and in accordance with the instructions in this manual.
Service of your appliance by a non-approved service
person or agency could result in failure of the integrity of
the appliance and could lead to property damage, serious
injury or loss of life.
Ɣ Have your dealer show you where the main gas shut-off
valve is located and how to shut it off in an emergency.
Ɣ Use your appliance only for its intended use.
Ɣ Children should be taught that the appliance is not a toy.
They should not be allowed to play with the controls or
Page 5
any other parts of the appliance. Do not allow anyone
to stand or sit on top of the appliance. Not only can this
damage the appliance, but personal injuries could result.
Ɣ Do not store items of interest to children in cabinets above
or near the appliance. Children climbing on the appliance
to reach items could be seriously injured.
Ɣ All control knobs must be turned off when not in use.
Fire and/or burning hazard may occur if a burner is
accidentally left on.
Ɣ If any burner should extinguish (after initially lighting or
due to accidental blow-out), turn all burner knobs off and
wait five (5) minutes before again attempting to light the
burner.
Ɣ DO NOT store flammable materials on, in, or near the
appliance. Any fumes can create an explosion and/or fire
hazard.
Ɣ Do not wear loose fitting clothing or long-hanging sleeved
clothing while using the appliance. If they contact the
open flame of the burner, they could ignite and cause
severe burns.
Ɣ Use only dry potholders to remove hot utensils. Using
damp potholders on hot surfaces could result in burns to
hands. Do not use a towel or bulky cloth for a pot holder.
The cloth could contact open flame and catch fire.
Ɣ Never heat an unopened container. Pressure build-up
within the container can cause it to explode.
Ɣ Do not use water on grease fires. Never pick-up a flaming
pan. Smother a flaming pan with a lid or flat pan. Flaming
grease outside the pan can be extinguished with baking
soda or a multipurpose dry chemical fire extinguisher.
Ɣ This pplince is intended to be built-in to cbinet
structure only nd is not intended for ttchment to the
building structure.
Cooktop Safety Warnings
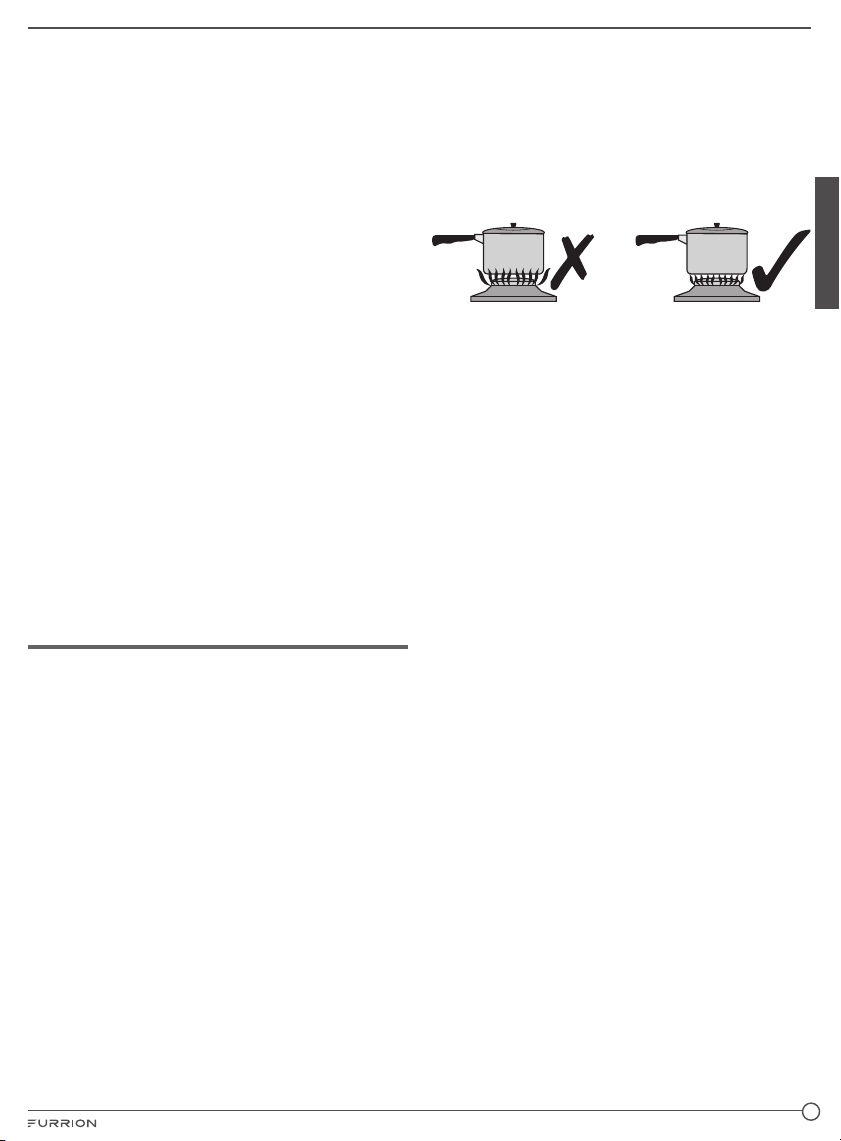
Ɣ Do not place pans onto glass surface. Raise cover into full
open position before operating burners. Let cooktop cool
before closing glass cover.
Ɣ If the cooktop is near a window, proper precautions
should be taken to prevent curtains from blowing over
burners creating a fire hazard.
Ɣ Keep the area around the cooktop clean and clear of
any combustible materials, gasoline or other flammable
vapors and liquids. Not doing so can cause an explosion
and/or fire.
Ɣ Do not leave children alone or unsupervised in area where
cooktop is being used. The top burners, burner grates
and other areas near the burners become hot enough to
cause severe burns.
Ɣ Keep the cooktop clean. The build-up of grease and food
boil-over and/or spillage can create a fire hazard.
Ɣ Turn pan handles inward or toward back of cooktop and
out of the way of people walking past cooktop and/or out
of the reach of children. Do not turn handles to where they
are over the burners.
Ɣ Never leave top burner(s) unattended.
− For such reasons as down drafts that could be created
by opening and closing of cabinet doors or doors
within the RV or by positive or negative air pressures
affecting burners due to improper installation. (See
Installation section) The burner could extinguish
resulting in gas escaping into the RV. Remember, gas
flow to each burner is controlled manually, you must
turn gas flow “ON” and “OFF”.
− A boil over could occur and the spill could ignite.
Ɣ Flame size
− Never extend the flame beyond the outer edge of the
utensil. A higher flame simply wastes heat and energy.
− Correct flame size is determined by utensil size and
material, what you are cooking and whether or not you
are cooking with liquid.
Ɣ To prevent damage to the cooktop, top burners, or top
grate, never operate a top burner without a pan in place.
The top burners, especially the high input burner, should
not be operated on high for an extended period of time.
The high setting should be used only to start the food
cooking or to bring liquids to a boil, then reduce the flame
to a lower setting to continue cooking. Use the low flame
setting to keep food warm. Remember, a gas range heats
quicker than an electric range, therefore, experiment with
various settings until you feel comfortable cooking with
gas.
Ɣ Never use cookware which extends beyond one inch
of the grate (maximum pan size 10” diameter). Never
place cooking utensil on grate to where it rests over two
operating top burners. This will cause excessive heat
buildup, which could result in damage to the grate, top
burner(s) and cooktop.
Ɣ Verify sufficient gas supply before attempting to light
any top burner. Air in the gas supply line will significantly
delay burner ignition, and a burner may light unexpectedly
as the air in the line clears out and is replaced by LP
gas, this unexpected ignition may burn you. Air may be
introduced into the supply line when the vehicle gas bottle
is replaced, during servicing of other gas appliances, etc.
Ɣ DO NOT touch top burners, burner grates, or other areas
near top burners during and after use. Do not let clothing
or other flammable materials to contact top burners or
areas near top burners until they have had sufficient time
to cool.
Ɣ Make sure the utensils you use are large enough to
contain food and avoid boil overs and spillovers. Heavy
splattering or spillovers left on the cooktop can ignite and
burn you.
Ɣ Be sure that glass cooking utensils are safe for use on the
cooktop. Only certain kinds of glass utensils are suitable
for surface or top burner use without breaking due to the
sudden changes in temperature.
Ɣ Grease is flammable. Never allow grease to collect
around top burners or on cooktop surface. Wipe spillovers
immediately.
Ɣ Use care when lighting a top burner by hand. If the burner
lights unexpectedly, or your hand is close to the burner,
you may be burned.
Ɣ DO NOT drop pans on the porcelain surface. Cracks or
chips in the porcelain surface may result.
Ɣ DO NOT leave an empty utensil, or one which has boiled
English
5
Page 6
dry, on a hot top burner. The utensil could overheat and
damage the utensil or the cooking appliance.
Oven Safety Warnings
Ɣ DO NOT touch any inner surfaces of the oven or oven
door, or the wire rack inside, or any utensils inside the
oven during and after use until these areas have had
sufficient time to cool. You could be burned or injured.
During and after use, do not let clothing or other
flammable materials contact these areas until they have
had sufficient time to cool.
Ɣ DO NOT touch the outer surface of the oven door or
English
the oven vent while the oven is in use. These areas may
become hot enough to cause burns. During and after use,
do not let clothing or other flammable materials contact
these areas until they have had sufficient time to cool.
Ɣ DO NOT cover the ventilation holes in the Flame Spreader
Rack (shelf above oven burner). The air circulation inside
the oven will be interrupted and cooking times will vary
from normal, food may be burned or undercooked.
Ɣ DO NOT use oven as a storage area.
Ɣ If oven pilot should extinguish after initial lighting or due
to accidental blowout, turn oven knob off and wait five (5)
minutes before again attempting to light oven.
Ɣ Alwys plce oven rcks in desired loction while oven is
cool. If rck must be moved while oven is hot, do not let
potholder contct hot heting element in oven.
Ɣ Use cre when opening the oven door, let hot ir or stem
Product Overview
1
2
3
4
escpe before removing or replcing food.
Ɣ Do not cover the oven vent openings whenever oven
is being used. Covering the vents restricts the flow of
combustion air to the oven burner and could cause poor
combustion and the formation of carbon monoxide.
Oven Vent
1
Glass Cover
2
Grate
3
Cooktop Burner
4
Ignition Knob
5
Oven Door
6
12
11
10
9
8
7
Oven Burner
7
Flame Spreader Rack
8
Cooking Rack
9
Oven Light
10
Oven Control Knob
11
Light Switch
12
Top Burner Control Knobs
6
5
6
Page 7
Installation
WARNING
FIRE, EXPLOSION, BURN INJURY CARBON
MONOXIDE POISONING
Ɣ The cooking appliance must be completely separated
and/or sealed from other air moving or air consuming
devices such as, but not limited to furnaces, microwave
ovens clothes dryers, cooling fans and doors or drawers
in common cabinets. Failure to do so will affect the
appliance(s) combustion air supply by creating either a
negative or positive draft.
Ɣ NEGATIVE DRAFT caused by air moving appliances
may draw the top burner flame down into or toward
the cooktop resulting in cooktop damage, burn hazard,
explosion possibility and/or carbon monoxide build up.
Ɣ POSITIVE DRAFT may blow out the top burner flame
during use resulting in an explosion and/or fire hazard
and/or injury to the occupants of the vehicle.
Ɣ DO NOT operate the appliance in excessive windy
conditions as this may cause a negative or positive
draft.
WARNING
Installation of this appliance must be made in accordance
with the written instructions provided in this manual. No
agent, representative or employee of Furrion or other
persons has the authority to change, modify or waive any
provision of the instructions contained in this manual.
The installation must conform with local codes or in the
absence of such codes, refer to the latest edition of:
In the U.S.A.:
a. Standard for Recreational Vehicles NFPA 1192
b. National Fuel Gas Code ANSI Z223.1/NFPA 54
In Canada, the installation must conform with:
a. Standard CAN/CSA Z-240.4.2-08, Installation
Requirements for Propane Appliances and Equipment in
Recreational Vehicles.
b. Any applicable local codes and regulations
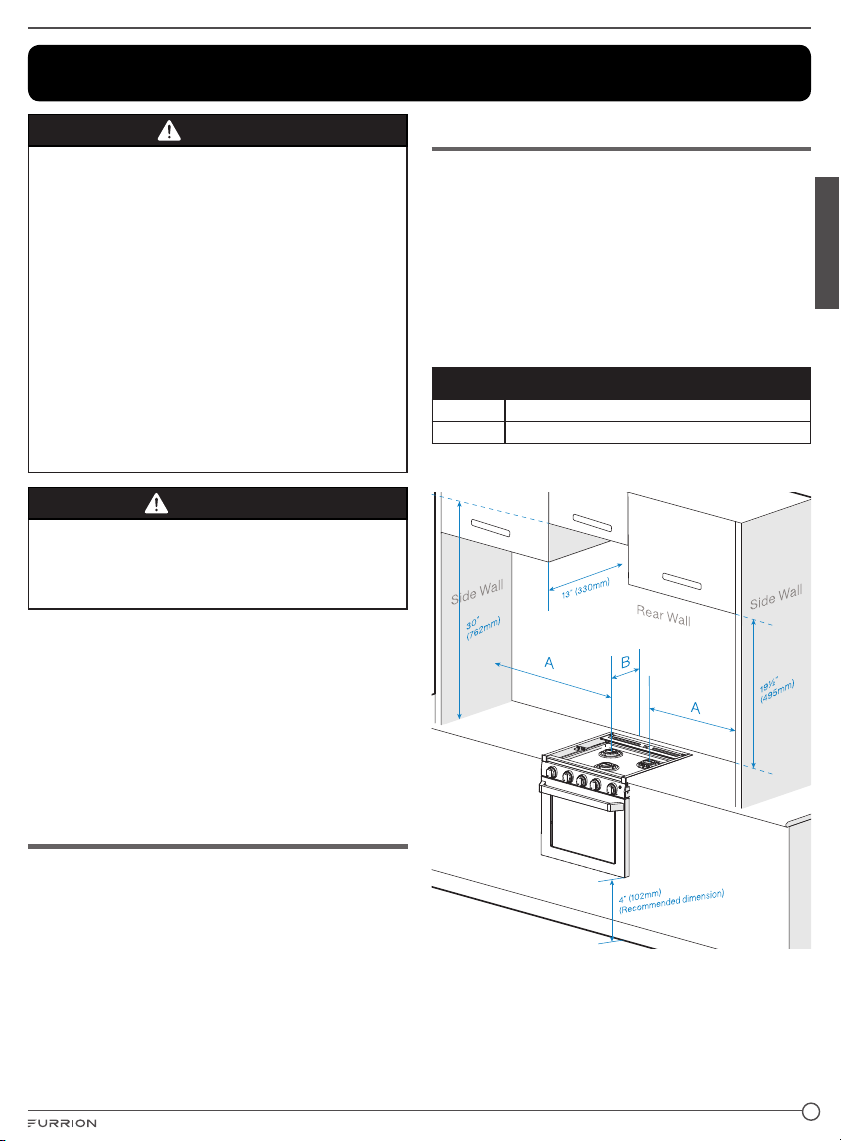
Cabinet Cutout Instructions
For proper operation of your cooking appliance, the cabinets
must be properly constructed and squared with respect to
the counter top and the cabinet face.
For proper operation of these units, the cabinet must be level
and the bottom of the range must be supported.
NOTES: When planning the location, consider curtains or
other combustible materials installed around the appliance
so as not to create a fire hazard.
The minimum horizontal distance(s) from sides and back of
appliance to adjacent vertical combustible walls extending
above the top panel:
Item Dimension
A 7¼” Min. (184mm Min.)
B 8” Min. (203mm Min.)
NOTE: These distances shall be from the burner center of
the appliance.
English
What’s in the Box
Make sure you have all the following items included in the
packaging. If any item is damaged or missing, contact your
dealer.
Ɣ Range Oven x 1
Ɣ Cooktop Grate x 2
Ɣ Cooking Rack x 1
Ɣ Instruction Manual x 1
Ɣ Warranty Manual x 1
7
Page 8
WARNING
The minimum vertical distance to combustible material
above the range cooking top is 30” (762mm), provided the
overhead construction does not extend 13” (330 mm) from
the rear wall. The recommended distance between the
floor and the bottom of the cutout opening is 4” (102mm).
NOTE: If installing a range hood or microwave hood
combination above the cooking surface, follow the
range hood or microwave hood combination installation
instructions for dimensional clearances above the cooktop
surface.
English
Cabinet and counter cutout dimensions:
Item
17” RV Range 21” RV Range
A 17¾”(451mm) 17¾”(451mm)
B 20⅛”(511mm) 20⅛”(511mm)
C 16⅛”(410mm) 20⁄”(510mm)
D ⁄”(23mm) max. ⁄”(23mm) max.
E 1½”(38mm) max. 1½”(38mm) max.
F 4⁄” (110mm) 4⁄” (110mm)
G 3⁄” (90mm) 3⁄” (90mm)
A
D
E
Model
Gas Hose Hole
G
F
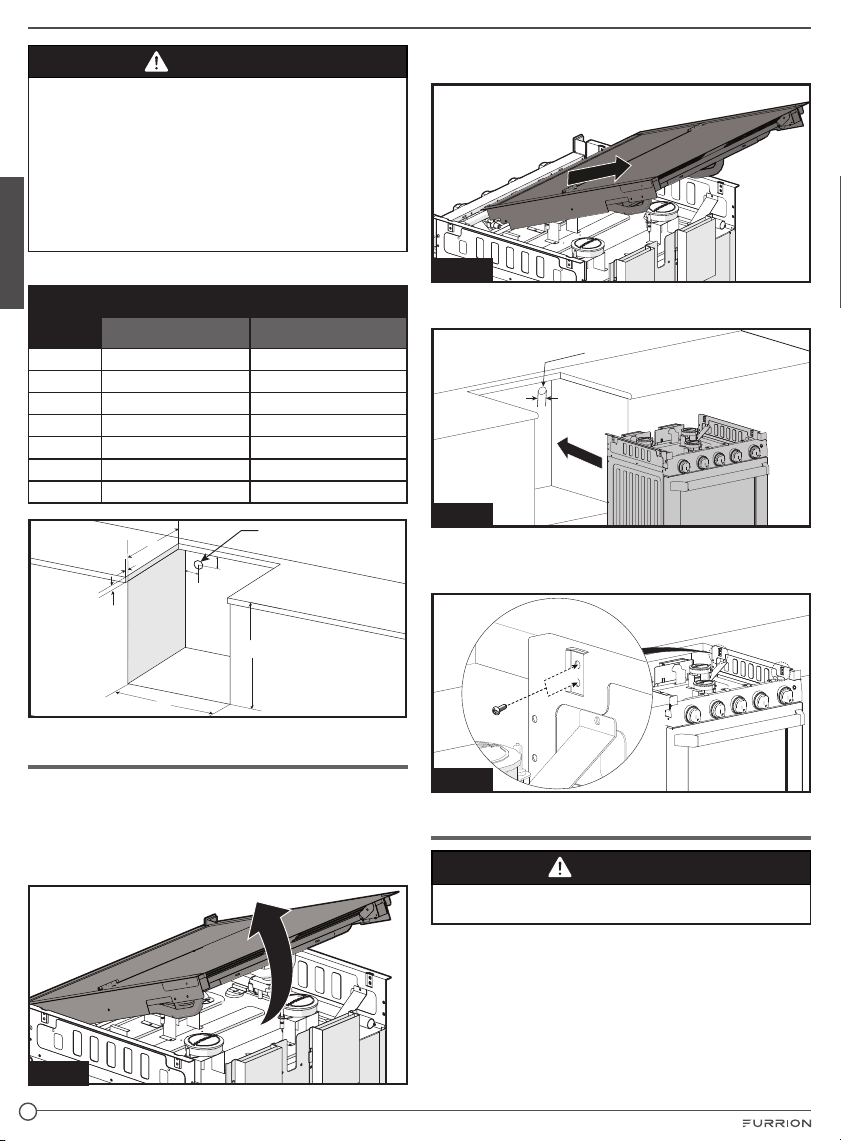
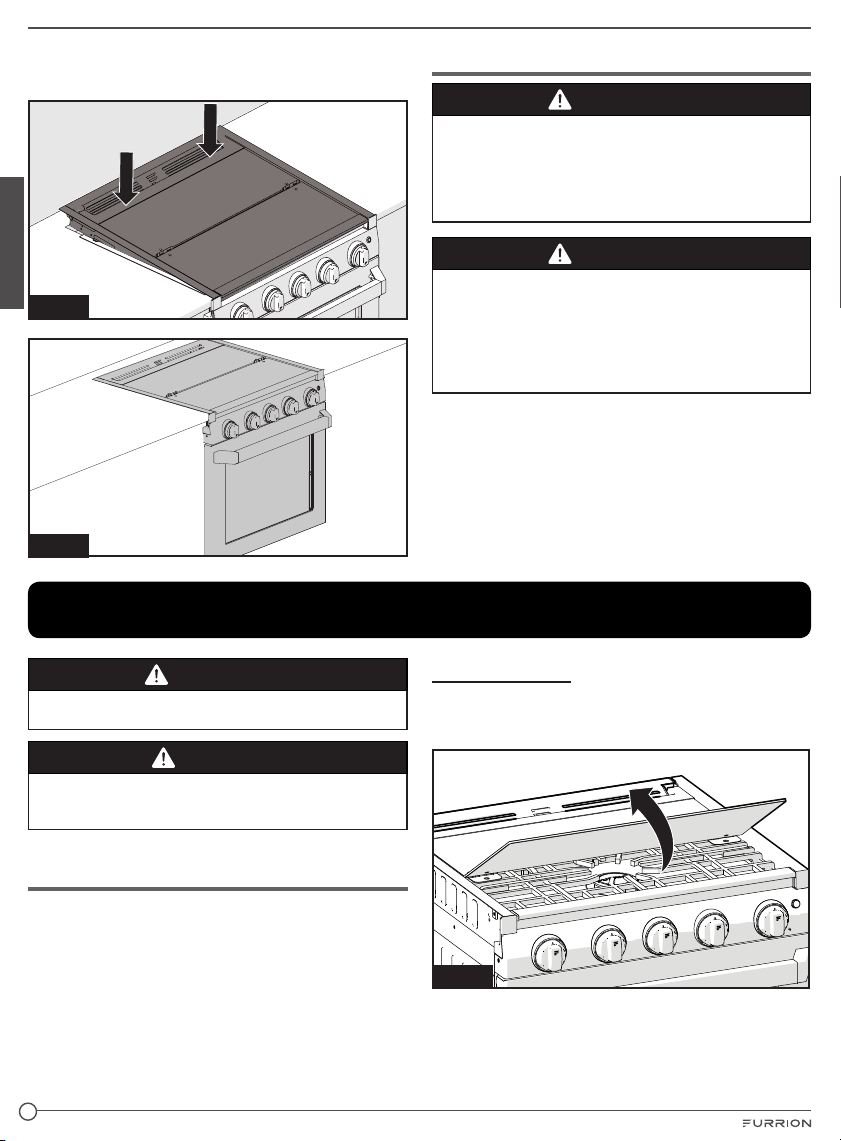
3. Push towards the rear of the oven and lift to remove to
remove the top glass cover from the oven. (Fig. 2)
Fig. 2
4. Slide the range oven into the cabinet opening. Verify that
the oven is level from side to side and front to rear. (Fig. 3)
Electrical Connection Hole
15
1
/
16
"
(50mm)
Fig. 3
5. Fix the range oven in the cabinet opening on both left and
right using four self-tapping screws on both left and right
(2 screws each side). (Fig. 4)
C
B
Oven Installation
When the cabinet has been prepared according to the
dimensions given and the gas line is in place.
1. Take your range oven out of the carton and place on a flat
surface. Remove the packing materials.
2. Hold the baffle and pull upward to release the top glass
cover assembly from the oven. (Fig. 1)
Fig. 1
8
Fig. 4
Gas Connection
WARNING
Gas supply pipe must be installed with clearance from
knives contacting or cutting gas lines.
Connect a propane supply line with a ⅜” Flare Female
connection to the cooktop in the upper left rear corner of the
cabinet. (Fig. 5) Tighten the gas line joint to the cooktop using
2 wrenches.
IMPORTANT: Leave adequate space around the gas supply
pipe in case of bend or damage during installation. Make sure
the gas supply pipe cannot contact any moving parts after
installed. Be sure all openings in the cabinets around the gas
line are sealed at time of installation.
Page 9
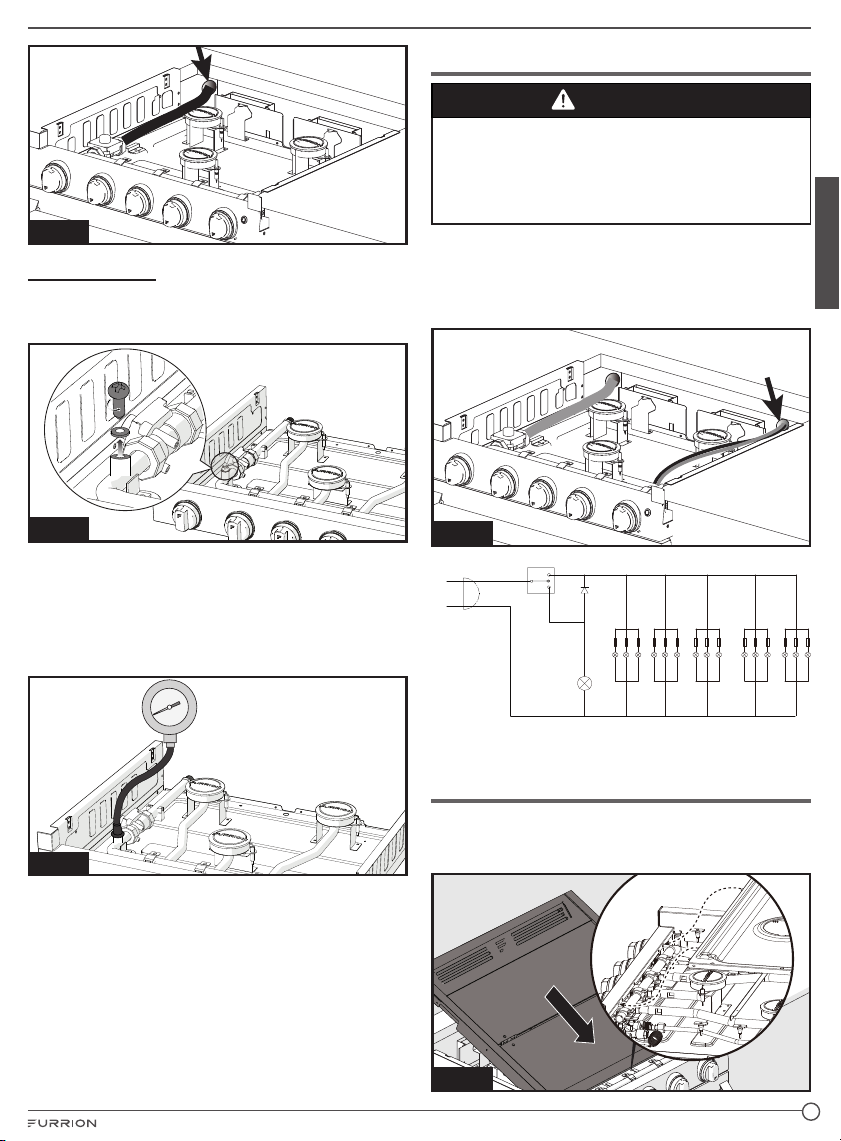
Fig. 5
Pressure Check
1. Turn LP gas off to the appliance.
2. Remove the Screw with the sealing gasket from the
pressure test port on the range. (Fig. 6)
Electrical Connection
CAUTION
PRODUCT DAMAGE HAZARD
Ɣ Connect to 12V DC service only.
Ɣ Connect only to protected circuit fused for not more
than 15 Amps.
Ɣ DO NOT hi-pot range unless electronic ignition system
has been disconnected.
Connect a positive 12V power supply wire to the range oven
black 12V light wire and a negative 12V power supply wire to
the range oven white 12V light wire. (Fig. 8)
NOTE: Ensure to connect the wires with the correct polarity.
Black is “+” and White is “-”.
English
Fig. 6
3. Using the rubber tube from the pressure check measuring
device, slide the rubber tube down over the gas pressure
test port. The rubber tube should seal around the pressure
test port on the range.
4. Turn on the LP gas to the appliance.
5. The pressure gauge tester should measure between 10”
WC to 13.8” WC. (Fig. 7)
Fig. 7
6. Turn off the LP gas to the appliance.
7. Remove the rubber tube of the pressure check measuring
device.
8. Replace the screw with the gasket from step 2. Before
replacing the screw, inspect the rubber gasket seal for any
signs of damage. Replace seal if damaged.
9. Tighten the screw to 1.3 Nm to 1.7 Nm.
NOTE: Ensure the product is gas leak checked after the
pressure check test is completed by also testing the pressure
check port screw. If any leaks are detected around the
pressure check port screw and gasket, a new one can be
purchased. Call Furrion support for a replacement.
Fig. 8
+
12V DC
-
22# AWG
Switch
22# AWG
12V Lamp
Diode
Thermostate
Valve LED
Right Burner
Knob LED
Center
Burner Knob
LED
Left Burner
Knob LED
Ignition
Knob LED
Wiring Diagram
Glass Cover Replacement
1. Align the top glass cover assembly tabs x 2 with the slots
on the back side of the console and place it into the top of
the range cooktop. (Fig. 9)
Fig. 9
9
Page 10
2. Press the backside of the top glass cover and you will
hear a click noise. The top glass cover is now locked into
place. (Fig. 10 and Fig. 11)
Leak Check
WARNING
FIRE OR EXPLOSION
Ɣ Extinguish all open flames.
Ɣ NEVER leak test when smoking. Never use a flame.
Ɣ Do not use the appliance until connection has been leak
tested and does not leak.
Ɣ Pressure/Leak test using 11-13.8 WC pressure.
English
Fig. 10
Fig. 11
Operation
WARNING
Keep your arms and face away from being directly above
the cooking area while in operating the appliance.
DANGER
Ɣ The top glass cover must be kept open when lighting
and using the cooktop.
Ɣ Do not attempt to light more than one burner at a time.
WARNING
Ɣ Gas leaks may occur in your system and result in
a dangerous situation. Always perform a leak test
for possible leaks according to the manufacturer’s
instructions after installation and before any operation.
Ɣ Gas leaks may not be detected by smell alone. Gas
suppliers recommend you purchase and install a UL
approved gas detector.
1. Make sure all control knobs are in the OFF position.
2. Apply a gas leak detection liquid to the connections. Any
gas leaks will be indicated by bubbles.
3. If a gas leak is detected, tighten the loose joint, or replace
the faulty part with a replacement part recommended by
Furrion authorized retailer.
Standard Ignition
1. Lift to open the cooktop glass cover. (Fig. 12) The top
glass cover must be kept open when lighting and using the
cooktop.
Lighting the Cooktop
Before lighting, check and make sure all the control knobs
are in the OFF position. Make sure the main gas tank valve is
opened.
10
Fig. 12
Page 11
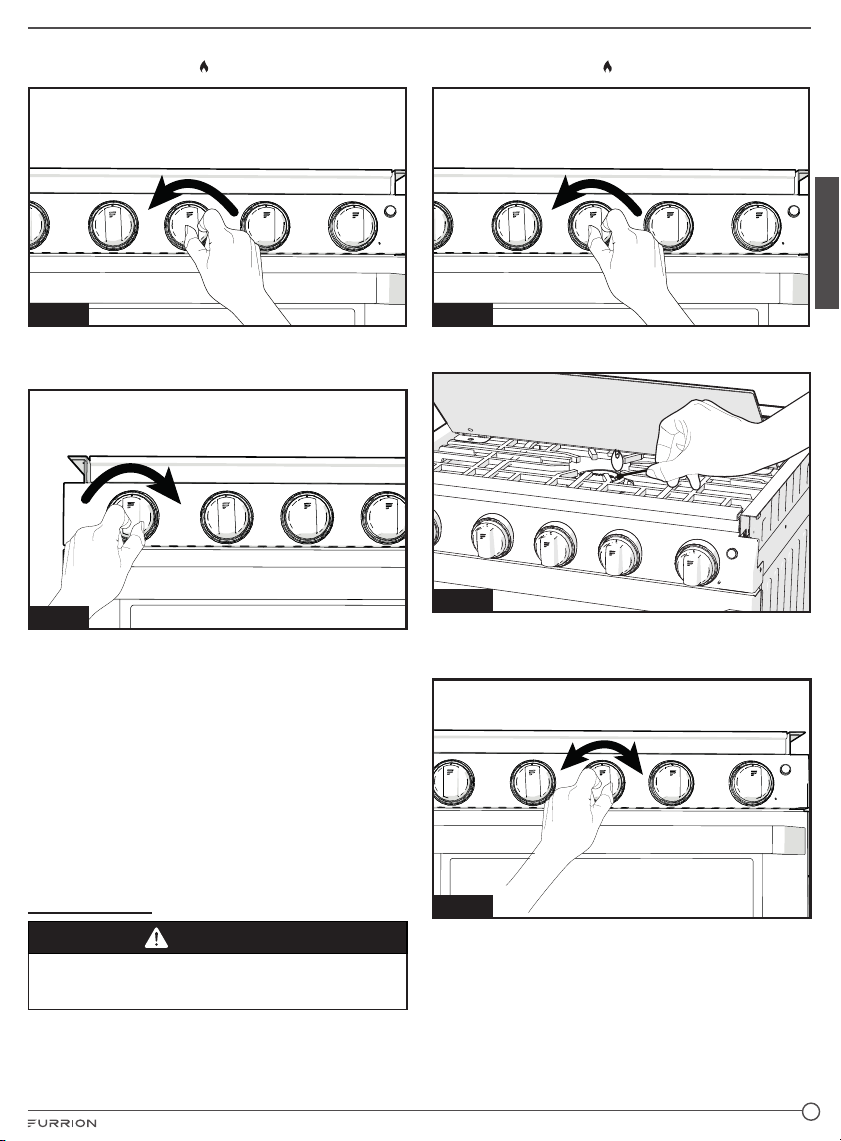
2. Push and turn the appropriate burner control knob
counterclockwise to the position. (Fig. 13)
1. Turn the appropriate burner control knob
counterclockwise to the
position. (Fig. 15)
English
Fig. 13
3. Keep the burner control knob pushed in and turn the
ignition knob clockwise repeatedly until the burner is lit.
(Fig. 14)
Fig. 14
4. Once the cooktop burner is lit, keep the ignition button
pushed in for about 5 seconds until the flame becomes
steady.
5. Rotate the burner control knob to adjust the flame to
desired level.
6. Repeat steps 2 and 5 to light the other burner(s) as
required.
If the burner does not ignite
In the event of failure to light the burner within 5 seconds,
immediately turn the control knob clockwise to the OFF
position. Wait at least 5 minutes and repeat the igniting
procedure. If ignition still not occur, use a gas lighter or a
match to light the burner. Refer to the ‘Manual Ignition’
section.
Manual Ignition
Fig. 15
2. Immediately strike and place a burning long wooden
match or a gas lighter near the burner to light. (Fig. 16)
Fig. 16
3. Repeat steps 1 to 2 to light the other burner(s) as required
4. Rotate the burner control knob to adjust the flame to
desired level. (Fig. 17)
Fig. 17
WARNING
Use care when lighting the burners by hand. If a burner
lights unexpectedly, or your hand is to close to the burner,
you could be burned.
In the event of failure to ignite the burner in standard ignition,
you may light the burner manually by following the steps
below:
11
Page 12
If the Flame Goes Out
WARNING
If the flame goes out accidentally, gas will escape. Never
leave the gas burner unattended during operation. Ensure
that there are no drafts that can affect the burner flame.
Immediately turn the control knob to OFF position. Wait at
least 5 minutes and light the burner again.
Turning Off Cooktop
English
Risk of Fire!
WARNING
Always turn off the gas tank valve when refueling or
traveling.
To turn the cooktop burners off, rotate the control knobs
clockwise to the OFF position.
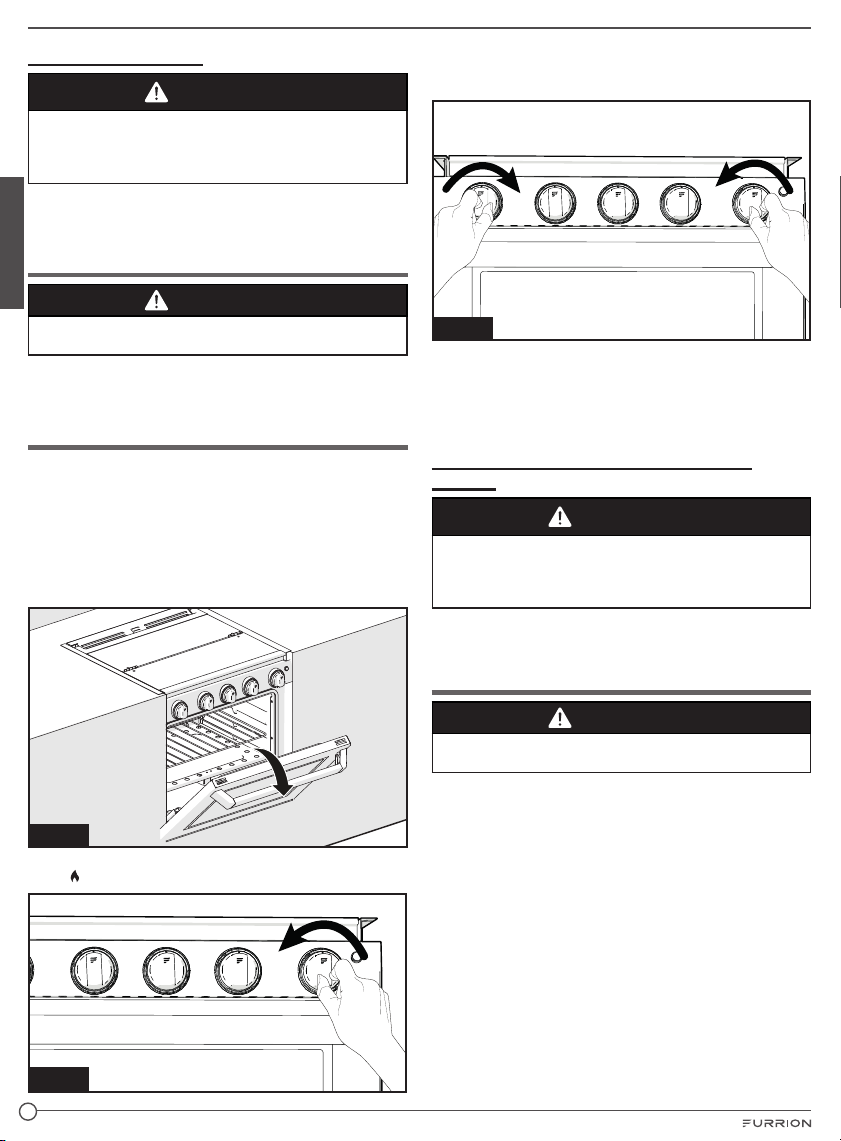
Lighting the Oven
NOTE: Before the oven burner will operate, the oven pilot
must be lit.
Before lighting, check and make sure all the control knobs
are in the OFF position. Make sure the main gas tank valve is
opened.
1. Pull the oven handle to open the door. If you smell gas
STOP! Refer to the installation section and follow the
instructions as listed for the appliance. (Fig. 18)
3. Keep the oven control knob pushed in and rotate the
ignition knob clockwise repeatedly until the oven burner is
lit. (Fig. 20)
Fig. 20
4. Once the oven burner is lit, keep the ignition button
pushed in for about 5 seconds until the flame becomes
steady.
5. Rotate the oven control knob to adjust the flame to
desired level.
If the flame goes out during the lighting
process
WARNING
Risk of Fire!
If the flame goes out accidentally, gas will escape. Never
leave the gas burner unattended during operation. Ensure
that there are no drafts.
Immediately turn the control knob to the OFF position. Wait
at least 5 minutes before trying to re-light the oven burner.
Fig. 18
2. Push and turn the oven control knob counterclockwise to
the position. (Fig. 19)
Fig. 19
12
Turning Off the Oven
WARNING
Always turn off the gas tank valve when refueling or
traveling.
To turn off the oven, rotate the oven control knob clockwise
to the OFF position.
Page 13
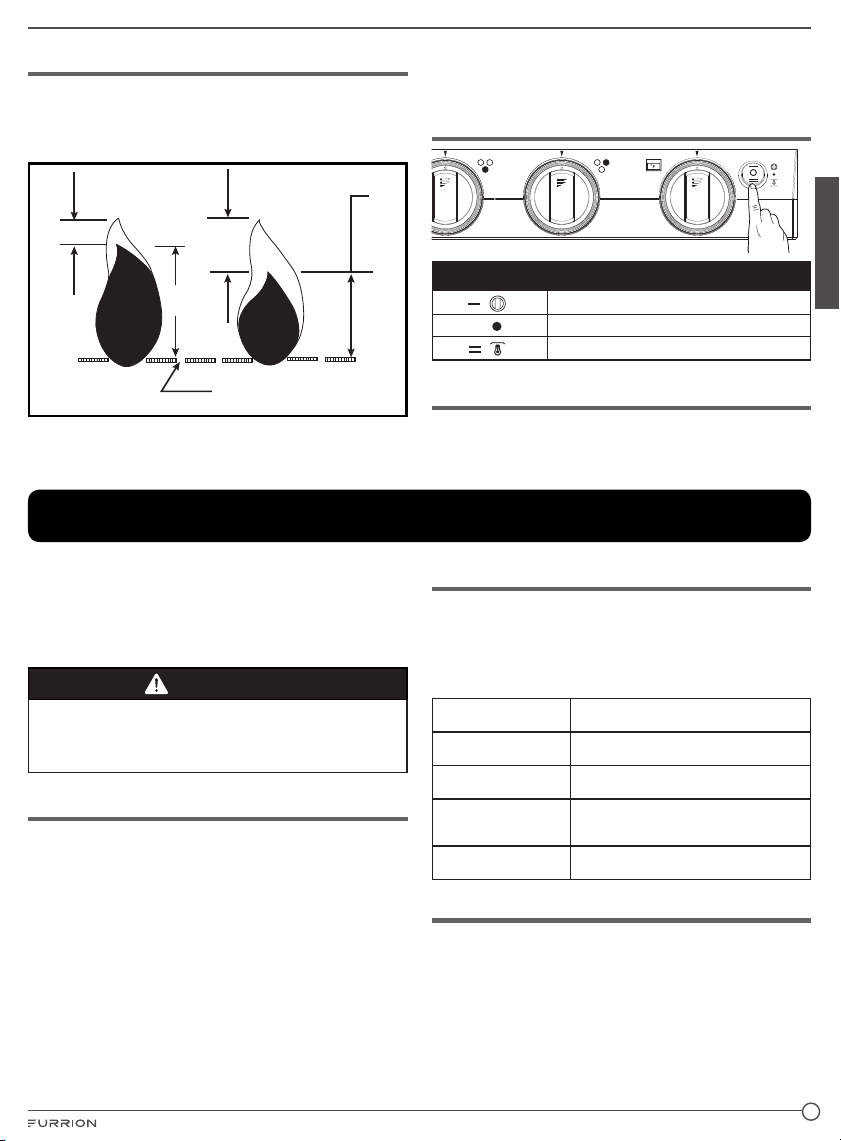
The Burner Flame
Keep your arms and face away from being directly above the
cooking area.
Flames should appear similar to the good flame shown in
diagram below.
Bad
Blue
Yellow
Yellow
Good
Blue
If flames are excessively yellow and irregular, the oil residue
may not be completely burned off, or the venturi may be
clogged or may not be properly positioned over the orifices.
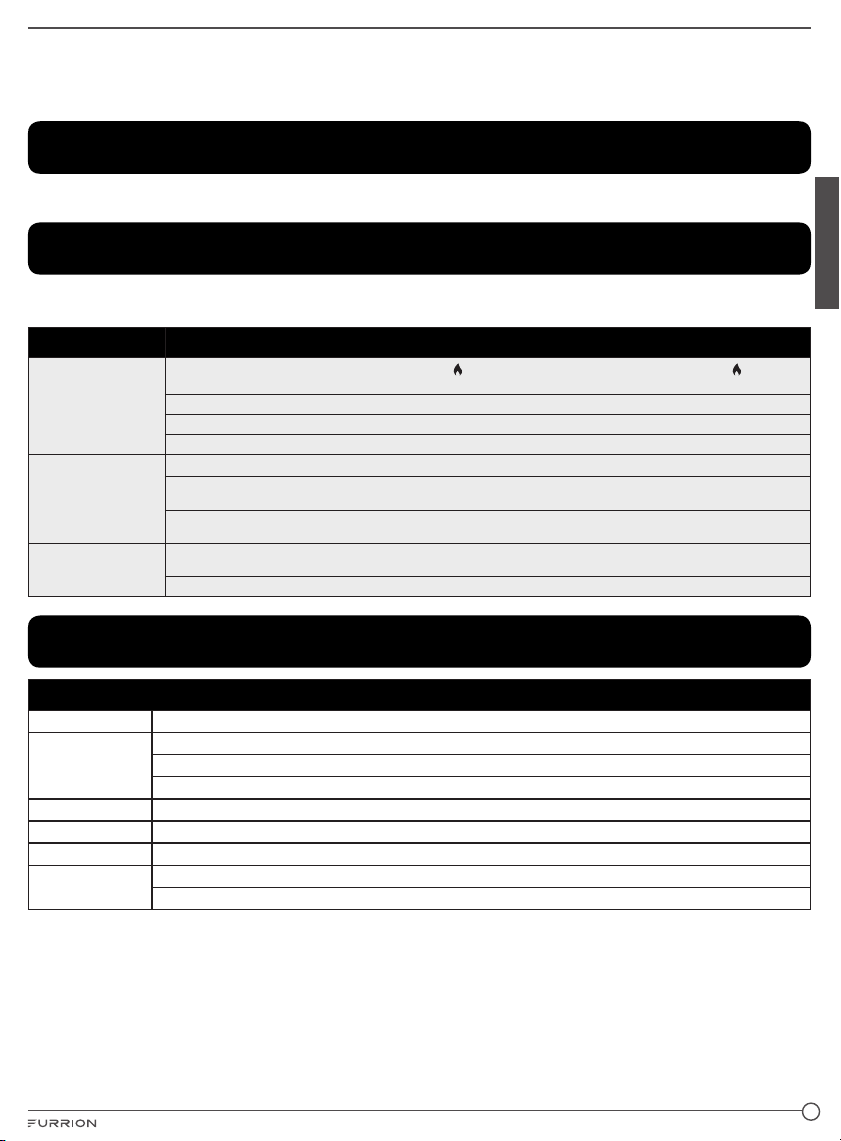
Light Control
Position Meaning
( )
O (
( )
All control knob lights are on
All lights are off
)
All control knob lights and oven light on
English
Holes in Burner
A good flame should be blue with a yellow tip.
Some yellow tips on flames up to 1” (25.4mm) in length are
acceptable as long as no carbon or soot deposits appear.
Cooking Advice
The oven offers a wide range of alternatives which allow you
to cook any type of food in the best possible way. With time
you will learn to make the best use of this versatile cooking
appliance and the following directions are only a guideline
which may be varied according to your own personal
experience.
WARNING
Food Poisoning Hazard
Ɣ Do not let food sit in oven more than one hour before or
after cooking.
Ɣ Doing so can result in food poisoning sickness.
Preheating
Preheating the gas oven doesn’t just heat the air in the oven
but the walls and the door, which ensures that the oven will
quickly return to that temperature when the door has been
opened and then closed again.
Based on the cooking temperature to be set, the preheating
time may vary. The suggested minimum preheat time is 15
minutes.
Slow Cooking
The power of the side burners is lower than the center burner,
we recommend you use the side burners for slow cooking
purpose.
Baking Cakes
When baking cakes, always place in the oven after it has
been preheated (about 15 minutes). The temperature is
normally around 350°F. Do not open the door while the cake
is baking in order to prevent it from dropping.
In general:
Pastry is too dry
Pastry dropped
Pastry is too dark on
top
Cooked well on the
inside but sticky on the
outside
The pastry sticks to
the pan
Increase the temperature by 50
the cooking time
Use less liquid or lower the temperature by
50°F
Place it on a lower rack, lower the
temperature, and increase the cooking time.
Use less liquid, lower the temperature, and
increase the cooking time.
Grease the pan well and sprinkle it with a
dusting of flour or use greaseproof paper
o
F and reduce
Cooking Pizza
For tasty crispy pizzas:
Ɣ Preheat the oven for at least 15 minutes.
Ɣ Place the pizza pan on the rack supplied with the oven. If
the dripping pan is used, this will extend the cooking time,
making it difficult to get a crispy crust.
Ɣ Do not open the oven door frequently while the pizza is
cooking;
Ɣ If the pizza has a lot of toppings (three or four), we
recommend you add the mozzarella cheese on top
halfway through the cooking process.
13
Page 14
Cooking Fish and Meat
When cooking white meat, fowl and fish, use temperature
settings from 335°F to 375°F.
For red meat that should be well done on the outside while
tender and juicy in the inside, it is a good idea to start with a
high temperature setting (375°F~425°F) for a short time, then
turn the oven down afterwards.
In general, the larger the roast, the lower the temperature
setting. Place the meat on the center of the grate and place
the dripping pan beneath to catch the drippings.
Make sure that grate is inserted so that it is in the center of
the oven. If you would like to increase the amount of heat
English
from below, use the low rack heights. For savory roasts
(especially duck and wild game), dress the meat with lard or
bacon on the top.
Cleaning and Maintenance
Ɣ Make sure all the control knobs are off and the appliance
is cool before cleaning.
Ɣ Make sure all the appliance surfaces, burner grates and
burners are cool before cleaning or disassembling.
Ɣ DO NOT use bleach or rust removers on the cooktop or
burner grates.
Ɣ DO NOT obstruct the flow of combustion and ventilation
air.
Ɣ Keep the appliance area clear of combustible materials,
gasoline and other flammable vapors and liquids.
Ɣ Clean oven with oven cleaner only. Follow directions on
the container.
Ɣ Never use a wire brush or metallic item for cleaning burner
ports or orifices. Brush may “shed” bristles that may lodge
in the orifice or burner ports and cause a fire or explosion.
Ɣ Clean all surfaces as soon as possible after boilovers or
spillovers.
Ɣ Use warm soapy water only to clean the burner grates,
cooktops, painted surfaces, porcelain surfaces, stainless
steel surfaces and plastic items on your range or cooktop.
Do not use grit or acid-type cleaners. Do not use cleaners
with ammonia, Cleaners of these types are corrosive and
could damage component parts in the range.
Ɣ DO NOT use steel wool, or abrasive cleaners, or acid type
cleaners such as chlorine bleach on your cooktop or grate
systems. They will damage your range or cooktop. Use
only non-abrasive plastic scrubbing pads.
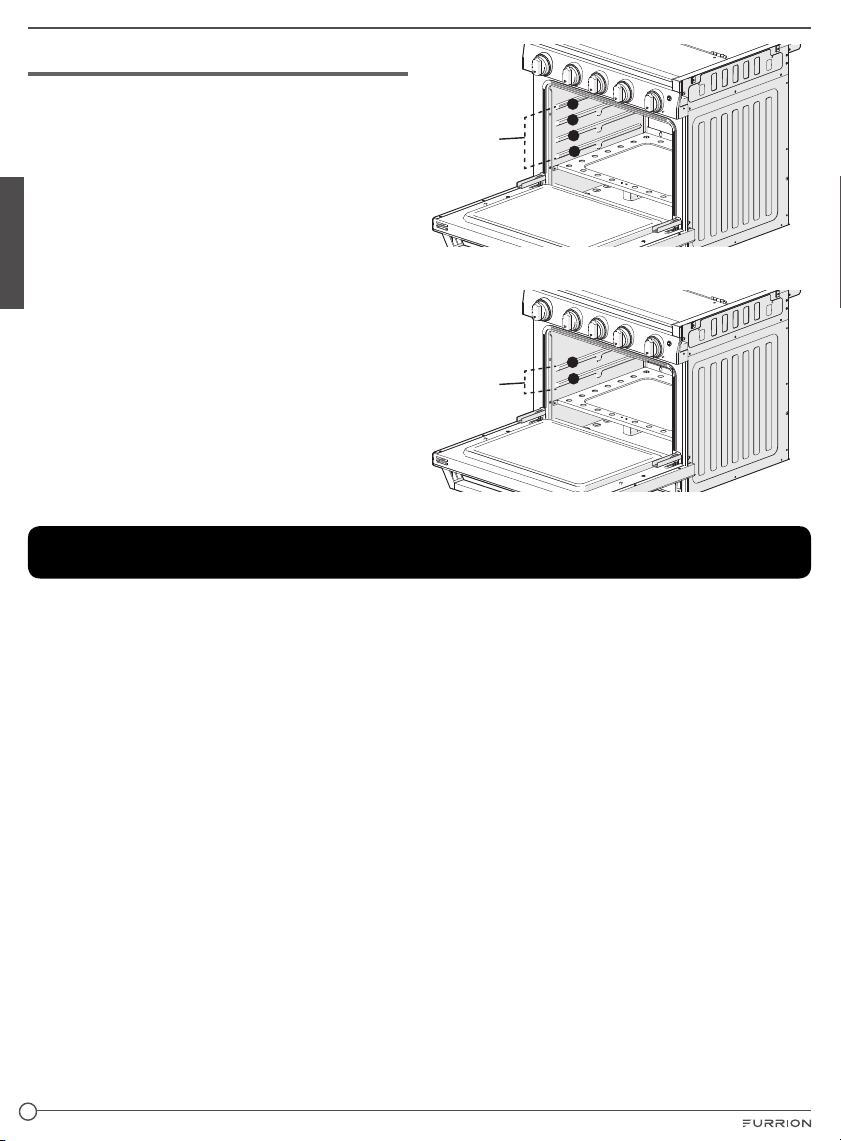
1
Rack
Position
2
3
4
21” Range Oven
Rack
Position
1
2
17” Range Oven
Ɣ DO NOT allow foods containing acids (such as lemons or
tomato juice, or vinegar) to remain on porcelain or painted
surfaces. Acids may remove the glossy finish. Wipe up
egg spills when cooktop is cool.
Ɣ DO NOT wash warm porcelain surfaces. Allow these
areas to cool before cleaning. You could burn yourself or
the porcelain could crack.
Ɣ Pitting and discoloration will result if spills are allowed to
remain for any length of time on stainless steel.
Ɣ DO NOT allow spillovers to remain on the burner caps.
The caps could become permanently stained.
Ɣ When cleaning around the burners use care to prevent
damage to the electrode (if so equipped). If a sponge or
cloth should catch the metal igniter electrode, it could
damage or break the electrode. If this occurs the burner
will not light.
14
Page 15
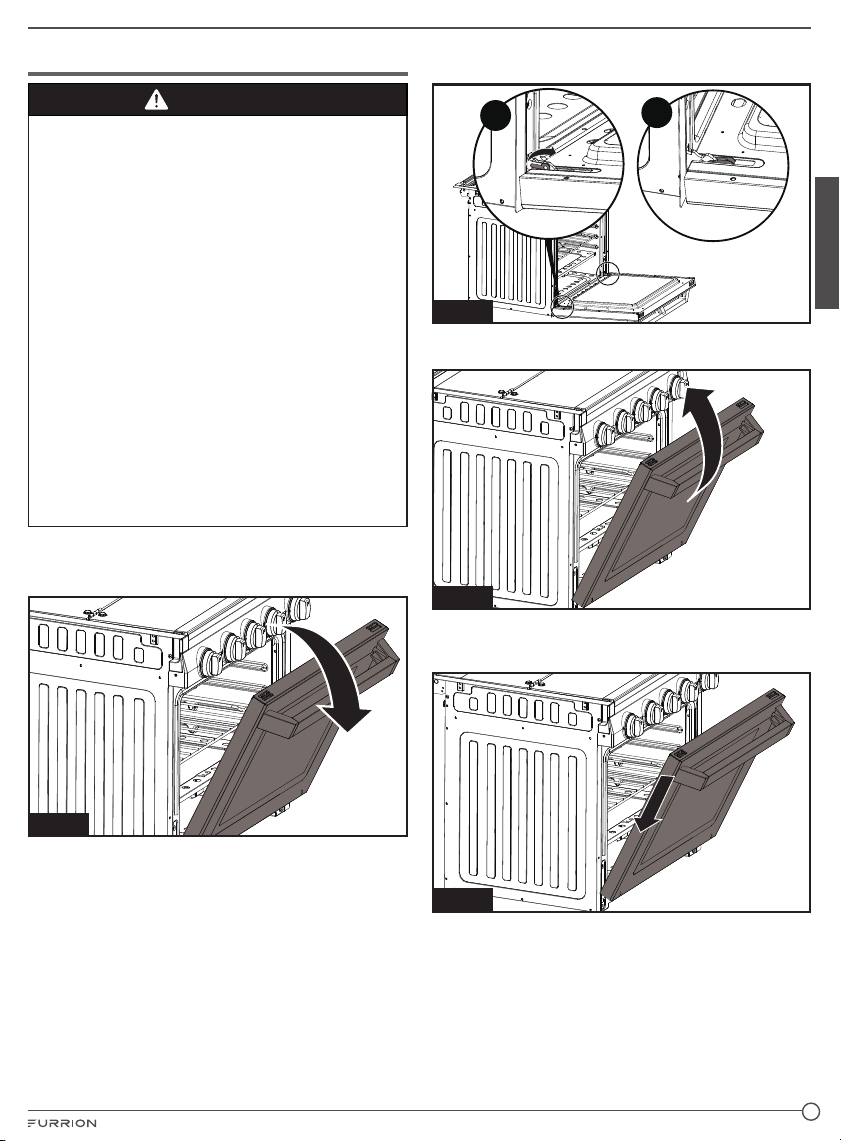
The Oven Door
3. Flip levers on hinges (one on each side) toward you.
(Fig. 22)
WARNING
When removing the door:
Ɣ Do not place excessive weight on an open oven door or
stand on an open oven door as, in some cases, it could
cause the range to tip over, break or damage the door
to the extent that the range would be unsafe to use, or
cause serious injury to the user.
Ɣ When opening the oven door, allow steam and hot air to
escape before reaching in oven to check, add or remove
food.
Ɣ Make sure oven is cool and power to the oven has been
turned off before removing the door. Failure to do so
could result in electrical shock or burns.
Ɣ The oven door is heavy and fragile. Use both hands to
remove the oven door. The door front is glass. Handle
carefully to avoid breaking.
Ɣ Grasp only the sides of the oven door. Do not grasp the
handle as it may swing in your hand and cause damage
or injury.
Ɣ Failure to grasp the oven door firmly and properly could
result in personal injury or product damage.
Ɣ To avoid injury from hinge bracket snapping closed,
be sure that both levers are securely in place before
removing door. Also, do not force door open or closed the hinge could be damaged and injury could result.
1. Be sure to read the above WARNING before attempting to
remove oven door.
2. Open the door all the way. (Fig. 21)
a
Fig. 22
4. Close the door until it stops. It will be about halfway open.
(Fig. 23)
Fig. 23
5. Holding the door firmly on both sides and using both
hands, pull the door straight out of the hinge slots. (Fig. 24,
Fig. 25 and Fig. 26) Hold firmly, the door is heavy.
b
English
Fig. 21
Fig. 24
15
Page 16
English
Fig. 25
Fig. 26
6. Place the door on a flat surface that is protected so the
door does not damage the material of the surface.
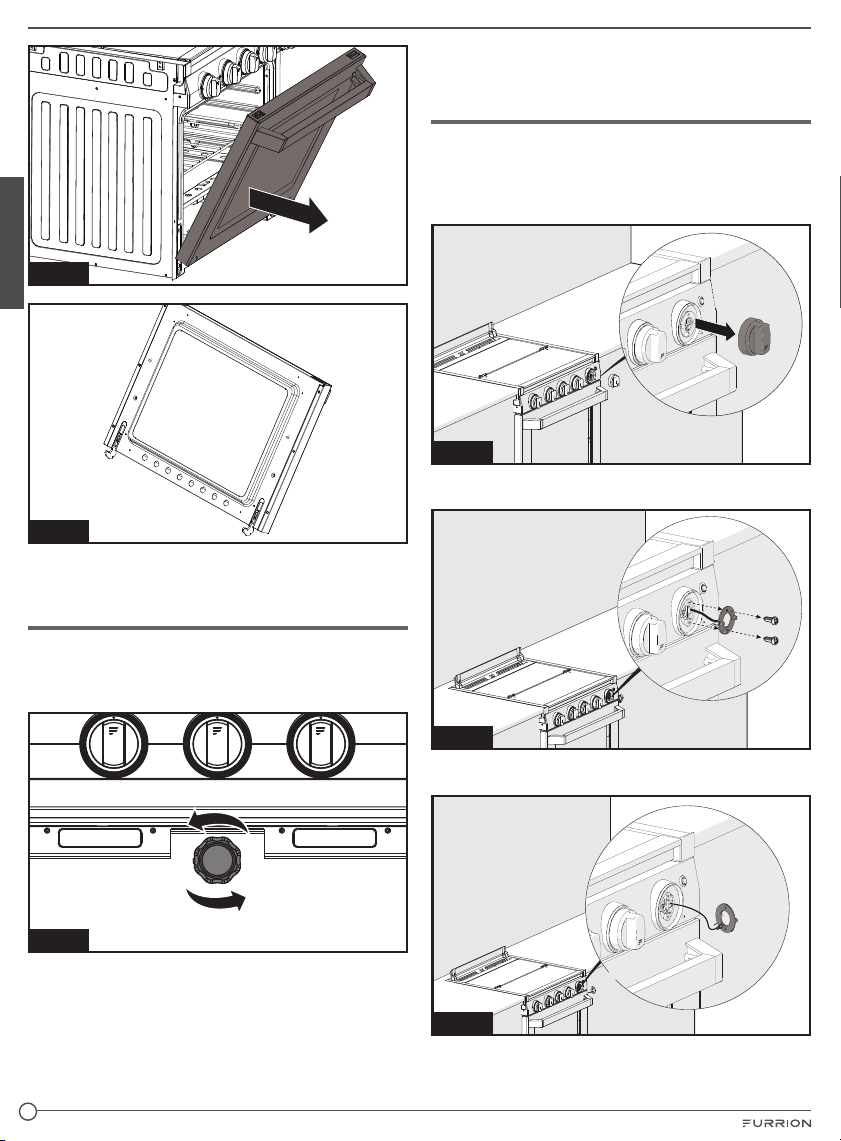
Replacing an Oven Light
To reorder the Furrion oven light bulb replacement, please
call Furrion service for assistance.
Replacing the Control Knob LED
1. Disconnect the oven from the power supply by means of
the switch used to connect the appliance to the electrical
mains, or unplug the appliance if the plug is accessible.
2. Grasp and pull on the control knob with the broken LED
light. (Fig. 28)
Fig. 28
3. Remove the two screws holding the LED light using a
Phillips screwdriver. (Fig. 29)
1. Disconnect the oven from the power supply by means of
the switch used to connect the appliance to the electrical
mains, or unplug the appliance if the plug is accessible.
2. Remove the glass cover of the lamp-holder. (Fig. 27)
Fig. 27
3. Remove the lamp and replace with a lamp resistant to high
temperatures (572oF) with the following characteristics:
- Voltage: 12V
- Wattage: 15 W
- Type: G9
- Lamp Type: Halogen
4. Replace the glass cover.
5. Reconnect the power to the oven.
16
Fig. 29
4. Remove the LED assembly and disconnect the wire from
the base of the LED assembly. (Fig. 30)
Fig. 30
Page 17
5. Plug the wire harness connector into the new LED
assembly.
6. Reattach the LED assembly to the console with the
2 screws removed in step 3. Ensure the wires are not
pinched during this process.
7. Reattach the control knob by aligning the stem of the
control into the opening in the control knob housing and
pushing it back into position.
Storage
Dry all surfaces and burner box, then spray surfaces with cooking oil substance to preserve the surface from rusting during
long term storage. Wipe off oil coating before reuse.
Troubleshooting
Before calling for service, review this list. It may save you both time and expense. This list includes common experiences that
are not the result of defective workmanship or material in your appliance.
Problem Possible Causes / Solution
Surface burners do not
light
Surface burner flame
burns half way around
Surface burner flame
is orange
Surface Control Knob has not been completely turned to
until burner ignites and then turn control to desired flame size.
Ensure gas supply valve is open.
Burner ports or slots are clogged. With the burner off, use a small-gauge wire or needle to clean ports or slots.
Low gas supply level in cylinder.
Moisture is present on the burner, dry burner thoroughly.
Burner ports or slots are clogged. With the burner off, clean ports with a small-gauge wire or needle to clean ports or slots.
Moisture is present after cleaning. Lightly fan the flame and allow burner to operate until flame is full. Dry the burners thoroughly.
Dust particles in main line. Allow the burner to operate a few minutes until flame turns blue.
In coastal areas, a slightly orange flame is unavoidable due to salt air.
position. Push in and turn the Surface Control knob to position
English
Specification
Technical Specifications
Optional Power
BTU/HR
Fuel / Power
Inlet Pressure
Power Input
Inner Volume of
the Oven
This appliance conforms with the directives: ANSI Z21.57a-(2012) Rec / CAN1-1.16-M79 (R2011)
Gas power
Left and Right Burner: 6500 BTU
Front Burner: 8000 BTU
Oven: 7100 BTU
Propane
10” WC Min to 13.8” WC Max
12V DC < 2 Amp
17” Range Oven: 35L
21” Range Oven: 51L
17
Page 18

Merci d’avoir acheté ce produit Furrion®. Avant d’utiliser votre nouvel appareil, veuillez lire attentivement les présentes
consignes. Le présent manuel d’instructions contient des consignes qui permettent une utilisation, une installation et un
entretien de l’appareil en toute sécurité.
Veuillez conserver le présent manuel d’instructions en lieu sûr afin de pouvoir vous y référer ultérieurement. Cela garantit
une utilisation en toute sécurité et réduit tout risque de blessures. Veillez à transmettre le présent manuel à tout nouveau
propriétaire de cet appareil.
Le fabricant décline toute responsabilité pour tous dommages résultant du non-respect des présentes consignes.
AVERTISSEMENT: En cas de non-respect strict des consignes contenues dans le présent
manuel, cela présente des risques d’incendie ou d’explosion susceptibles d’entraîner des
dommages matériels, des blessures corporelles, voire la mort.
− Ne pas ranger ni utiliser de l'essence ou d'autres liquides et vapeurs inflammables à
proximité de cet appareil ou de tout autre appareil.
− QUE FAIRE SI VOUS SENTEZ UNE ODEUR DE GAZ?
ƔN'essayez d'allumer aucun appareil.
Français
ƔNe touchez aucun interrupteur électrique.
ƔN'utilisez aucun téléphone dans votre véhicule récréatif.
ƔFaites évacuer le véhicule récréatif par tous ses occupants.
ƔFermez la soupape du récipient de GPL ou le récipient principal.
ƔAppelez immédiatement votre fournisseur de gaz, qui vous donnera des instructions.
ƔSi vous ne pouvez joindre votre fournisseur de gaz, appelez les services d'incendie.
− Faites vérifier le système de gaz, faites corriger la source de fuite par un installateur
qualifié, une agence d'entretien, le fabricant, le revendeur ou le fournisseur de gaz.
18
Page 19

Table des matières
Table des matières ........................................................................................................................................................................19
Explication des symboles ............................................................................................................................................................20
Consignes de sécurité importantes ...........................................................................................................................................20
Mises en garde générales et consignes de sécurité. .............................................................................................................................................. 20
Consignes de sécurité relatives à la table de cuisson. ........................................................................................................................................... 21
Consignes de sécurité relatives au four. ........................................................................................................................................................................ 22
Présentation du produit ...............................................................................................................................................................23
Installation .....................................................................................................................................................................................24
Contenu de l’emballage ........................................................................................................................................................................................................ 24
Instructions de découpe de l’armoire ............................................................................................................................................................................. 24
Installation du four ................................................................................................................................................................................................................... 25
Raccordement de gaz ........................................................................................................................................................................................................... 26
Branchement électrique ....................................................................................................................................................................................................... 27
Couvercle en verre de rechange....................................................................................................................................................................................... 27
Essais de détection des fuites ........................................................................................................................................................................................... 28
Utilisation .......................................................................................................................................................................................28
Allumage de la table de cuisson........................................................................................................................................................................................ 28
Arrêt de la table de cuisson ................................................................................................................................................................................................. 29
Allumage du four ...................................................................................................................................................................................................................... 29
Arrêt du four ............................................................................................................................................................................................................................... 30
Flammes du brûleur ................................................................................................................................................................................................................ 30
Contrôle de la lampe ..............................................................................................................................................................................................................30
Cuisson lente ............................................................................................................................................................................................................................. 30
Conseils de cuisson ......................................................................................................................................................................31
Préchauffage ............................................................................................................................................................................................................................. 31
Cuisson de gâteaux ................................................................................................................................................................................................................ 31
Cuisson de pizzas .................................................................................................................................................................................................................... 31
Cuisson de poisson et de viande ...................................................................................................................................................................................... 31
Nettoyage et Entretien .................................................................................................................................................................32
Porte du four .............................................................................................................................................................................................................................. 32
Remplacement de la lampe d’un four ............................................................................................................................................................................. 33
Remplacement du voyant LED du bouton de réglage ............................................................................................................................................ 34
Rangement .....................................................................................................................................................................................34
Dépannage .....................................................................................................................................................................................34
Caractéristiques ............................................................................................................................................................................35
Français
19
Page 20

Explication des symboles
Le présent manuel contient des consignes de sécurité et des
instructions visant à vous aider à éliminer ou à réduire tout
risque d’accidents et de blessures. Respectez toujours tous
les avertissements de sécurité indiqués par les symboles
ci-après. Un terme de mise en garde indique des messages
de sécurité ainsi que des messages signalant des risques
de dommages matériels, et indique le degré ou le niveau de
gravité du danger.
DANGER
Indique une situation de danger immédiat qui, si elle n’est
pas évitée, provoque des blessures graves, voire la mort.
Consignes de sécurité importantes
Français
Les avertissements et les consignes de sécurité importantes
figurant dans le présent guide n’ont pas vocation à couvrir
toutes les conditions et situations possibles. Il convient
de faire preuve de bon sens, de prudence et user de de
circonspection lors de l’installation, de l’entretien ou de
l’utilisation de l’appareil.
Contactez toujours le fabricant en cas de dysfonctionnement
de l’appareil
Veuillez lire et respecter toutes les consignes avant
d’utiliser cet appareil afin de prévenir tout risque potentiel
d’incendie, d’électrocution, de blessures corporelles ou
d’endommagement de l’appareil du fait d’une utilisation
incorrecte de celui-ci. Utilisez cet appareil uniquement aux
fins pour lesquelles il a été conçu, ainsi que décrit dans le
présent guide.
En cas d’utilisation d’une source d’alimentation externe,
l’appareil doit être mis à la terre conformément aux codes de
l’État ou à tous autres codes ou, en l’absence de tels codes,
au code national d’électricité américain (NEC), ANSI/NFPA
70. N’essayez de régler, réparer, réviser ou remplacer aucune
pièce de votre appareil, sauf recommandation expresse dans
le présent guide. Tout autre entretien doit être confié à un
technicien qualifié.
AVERTISSEMENT
Indique une situation de danger potentiel qui, si elle n’est
pas évitée, peut provoquer des blessures graves, voire la
mort.
ATTENTION
Indique une situation de danger potentiel qui, si elle n’est
pas évitée, peut provoquer des blessures corporelles
mineures ou modérées ou des dommages matériels.
Mises en garde générales et consignes
de sécurité.
AVERTISSEMENT
Ɣ Toute installation, tout réglage, toute réparation ou tout
entretien incorrect peut entraîner des blessures, des
dommages matériels, voire la mort. Veuillez consulter
le présent manuel. Pour obtenir de l'aide ou des
informations supplémentaires, consultez un installateur
qualifié, un organisme de services, le fabricant ou le
fournisseur de gaz.
Ɣ Évitez d'utiliser votre appareil ou tout autre appareil si
vous sentez une odeur de gaz. Ne pas supposer que
la présence de d’odeur de gaz dans votre VR est un
phénomène normal. Chaque fois que vous détectez
une odeur de gaz, celle-ci doit être considérée
comme constituant un danger de mort et corrigée
immédiatement. Éteignez toutes les flammes nues, y
compris les cigarettes, puis évacuez du véhicule tous
ses passagers. Fermez l'alimentation de gaz au robinet
d'arrêt de la bouteille de GPL.
Ɣ Si l’utilisateur de cet appareil ne parvient pas à le
conserver dans l’état où il a été expédié de l’usine ou
si l’appareil n’est pas utilisé uniquement aux fins pour
lesquelles il a été conçu ou si l’appareil n’est pas entretenu
conformément aux instructions du présent manuel, cela
présente des risques d’incendie pouvant entraîner des
blessures corporelles, des dommages matériels, voire la
mort.
20
Page 21

AVERTISSEMENT
RISQUE D’EXPLOSION OU D’INCENDIE
Ɣ Éteignez tous les appareils à gaz et les veilleuses avant
de faire le plein de réservoirs d’essence ou de bouteilles
de propane liquide ou lors du déplacement du véhicule.
Ɣ Les appareils de cuisson à gaz Furrion doivent être
utilisés exclusivement avec du gaz propane liquide
et pour une installation dans des véhicules récréatifs
uniquement (p. ex., des remorques de tourisme, des
autocaravanes, des campeurs en tente, etc.).
AVERTISSEMENT
INTOXICATION AU MONOXYDE DE CARBONE
Ɣ NE PAS utiliser cet appareil pour réchauffer ou chauffer
un véhicule. Vous pourriez subir des brûlures ou des
blessures, un incendie pourrait se déclarer ou vous
risquez d’épuiser l'oxygène disponible dans le véhicule.
Ɣ Une fenêtre ou un orifice d'aération doit être légèrement
ouverte lors de l'utilisation d'un appareil de cuisson. Les
flammes de gaz consomment de l'oxygène, qui doit être
remplacé afin d’assurer une combustion correcte.
Ɣ NE PAS ranger et ne pas utiliser d’essence ou d’autres
liquides et vapeurs inflammables à proximité de cet
appareil ou de tout autre appareil.
Ɣ NE PAS utiliser l’appareil s’il est endommagé ou ne
fonctionne pas correctement.
Ɣ Ne jamais essayer de réparer l’appareil par vous-même.
Toute réparation ou installation de cet appareil doit
être effectuée par un installateur qualifié, une agence
d’entretien ou le fournisseur de gaz et conformément
aux instructions du présent manuel. La réparation ou
l’entretien de votre appareil par un technicien ou une
agence d’entretien non agréé(e) peut entraîner une perte
de son intégrité et entraîner des dommages matériels, des
blessures graves, voire la mort.
Ɣ Faites-vous indiquer par le revendeur l’emplacement du
robinet d’arrêt de gaz principal et comment fermer celui-ci
en cas d’urgence.
Ɣ Utilisez votre appareil uniquement aux fins pour lesquelles
il a été conçu.
Ɣ Il convient de faire savoir aux enfants que l’appareil n’est
pas un jouet. Ils ne doivent pas être autorisés à jouer
avec les commandes de l’appareil, ni avec aucune autre
pièce de celui-ci. Ne laissez personne se tenir debout
ou s’asseoir sur l’appareil. Cela peut non seulement
endommager l’appareil, mais également entraîner des
blessures corporelles.
Ɣ Ne pas ranger d’objets susceptibles d’intéresser des
enfants dans des armoires situées au-dessus ou à
proximité de l’appareil. Les enfants qui grimpent sur
l’appareil pour atteindre des objets risquent de se blesser
gravement.
Ɣ Tous les boutons de réglage doivent être positionnés
sur «OFF» lorsque vous ne les utilisez pas. Risques
d’incendie et/ou de brûlures possibles si un brûleur est
laissé allumé accidentellement.
Ɣ Si un brûleur doit s’éteindre (après l’allumage initial ou
en raison d’une extinction accidentelle), fermez tous les
boutons des brûleurs, puis patientez cinq (5) minutes
avant de tenter à nouveau d’allumer le brûleur.
Ɣ NE PAS ranger de matériaux inflammables sur, dans ou
à proximité de l’appareil. Toute émanation peut créer des
risques d’explosion et/ou d’incendie.
Ɣ Ne pas porter des vêtements amples ni des vêtements
à manches longues lors de l’utilisation de l’appareil. Si
ceux-ci entrent en contact avec la flamme nue du brûleur,
ils risquent de s’enflammer et de provoquer de graves
brûlures.
Ɣ Utilisez uniquement des maniques sèches pour retirer les
ustensiles chauds. L’utilisation de maniques humides sur
des surfaces chaudes peut provoquer des brûlures aux
mains. Ne pas utiliser de serviette ni de tissu encombrant
en guise de manique. Le tissu pourrait entrer en contact
avec une flamme nue et prendre feu.
Ɣ Ne jamais chauffer un récipient non ouvert. L’accumulation
de pression dans le récipient peut provoquer son
explosion.
Ɣ Ne pas utiliser de l’eau sur les feux de friture Ne jamais
prendre une poêle en feu. Étouffez la poêle en feu à
l’aide d’un couvercle ou d’une poêle plate. La graisse
enflammée à l’extérieur de la poêle peut être éteinte
à l’aide de bicarbonate de soude ou d’un extincteur à
poudre chimique à usages multiples.
Ɣ Cet ppreil est conçu pour être intégré dns une
structure d’rmoire uniquement. Il n’ ps voction être
fixé l structure du btiment.
Consignes de sécurité relatives à la
table de cuisson.
Ɣ Ne pas poser de poêles sur la surface en verre. Soulevez
le couvercle pour l’ouvrir complètement avant d’utiliser
les brûleurs. Laissez refroidir la table de cuisson avant de
fermer le couvercle en verre.
Ɣ Si la table de cuisson se trouve à proximité d’une fenêtre,
des précautions appropriées doivent être prises afin
d’empêcher l’agitation des rideaux au-dessus des
brûleurs sous l’effet de courants d’air et de créer ainsi des
risques d’incendie.
Ɣ Gardez la zone autour de la table de cuisson propre et
exempte de matériaux combustibles, d’essence ou de
tous autres liquides et vapeurs inflammables. Dans le cas
contraire, cela peut entraîner des risques d’explosion et/
ou d’incendie.
Ɣ Ne pas laisser les enfants seuls ou sans surveillance dans
un endroit où la table de cuisson est utilisée. Les brûleurs
supérieurs, les grilles des brûleurs et les autres zones
proches des brûleurs deviennent suffisamment chauds
pour causer de graves brûlures.
Ɣ Gardez la table de cuisson propre. L’accumulation de
graisse et les débordements et/ou projections d’aliments
peuvent créer un risque d’incendie.
Ɣ Tournez les poignées de la poêle vers l’intérieur ou vers
l’arrière de la table de cuisson et à l’écart des personnes
qui passent devant la table de cuisson et/ou hors de la
portée des enfants. Ne pas tourner les poignées vers
une zone où elles risquent de se trouver au-dessus des
brûleurs.
Ɣ Ne jamais laisser le ou les brûleurs supérieurs sans
surveillance.
Français
21
Page 22

− Pour des raisons telles que des courants d’air vers
le bas qui pourraient être créés par l’ouverture et
la fermeture des portes d’armoires ou du véhicule
récréatif ou par des pressions d’air positives ou
négatives affectant les brûleurs en raison d’une
installation incorrecte. (Voir la section Installation)
Le brûleur pourrait s’éteindre, ce qui provoquerait
un dégagement de gaz dans le véhicule récréatif.
Remarque: le débit de gaz vers chaque brûleur est
commandé manuellement. Vous devez démarrer (ON)
ou arrêter (OFF) le flux de gaz.
− Un débordement pourrait se produire et les aliments
répandus s’enflammer.
Ɣ Taille des flammes
− Ne jamais augmenter les flammes au-delà du bord
extérieur de l’ustensile. Des flammes plus hautes
riment simplement avec gaspillage de chaleur et
d’énergie.
− La taille correcte des flammes est déterminée par les
dimensions et le matériau de l’ustensile, les aliments
en cours de cuisson. En outre, la cuisson est-elle faite
Français
avec ou sans liquide?
Ɣ Pour éviter d’endommager la table de cuisson, les
brûleurs supérieurs ou la grille supérieure, ne faites
jamais utiliser un brûleur supérieur sans poêle en place.
Les brûleurs supérieurs, en particulier le brûleur qui
fonctionne moyennant l’apport d’une quantité importante
de gaz, ne doivent pas être utilisés à puissance élevée
pendant une période prolongée. Le réglage élevé ne doit
être utilisé que pour démarrer la cuisson d’aliments ou
pour amener des liquides à ébullition. Ensuite, réduisez les
flammes à un réglage plus bas pour poursuivre la cuisson.
Utilisez le réglage feu doux pour conserver les aliments
au chaud. Remarque: une cuisinière à gaz chauffe plus
rapidement qu’une cuisinière électrique. En conséquence,
essayez différents réglages jusqu’à ce que vous soyez à
l’aise pour cuisiner au gaz.
Ɣ Ne jamais utiliser d’ustensiles de cuisson qui dépassent
d’un pouce la grille (dimensions maximales de la
poêle: diamètre: 10po). Ne jamais placer l’ustensile
de cuisine sur la grille jusqu’à ce qu’il repose sur deux
brûleurs supérieurs en marche. Cela provoquerait une
accumulation excessive de chaleur pouvant endommager
la grille, le ou les brûleurs supérieurs ainsi que la table de
cuisson.
Ɣ Assurez-vous que l’alimentation en gaz est suffisante
avant d’allumer un brûleur supérieur. L’air présent
dans la conduite d’alimentation en gaz retardera
considérablement l’allumage du brûleur, et un brûleur
peut s’allumer de manière inattendue lorsque l’air présent
dans la conduite disparaît et est remplacé par du GPL. Cet
allumage inattendu présente des risques de brûlures. De
l’air peut être introduit dans la conduite d’alimentation lors
du remplacement de la bouteille de gaz du véhicule, lors
de l’entretien d’autres appareils à gaz, etc.
Ɣ NE PAS toucher les brûleurs supérieurs, les grilles
22
des brûleurs ou toute autre zone proche des brûleurs
supérieurs pendant et après utilisation. Ne pas laisser vos
vêtements ou tous autres matériaux inflammables entrer
en contact avec les brûleurs supérieurs ou les zones
proches des brûleurs avant que ceux-ci aient eu le temps
de refroidir.
Ɣ Assurez-vous que les ustensiles que vous utilisez sont
suffisamment grands pour contenir des aliments et éviter
tous débordements et toutes projections. De grosses
éclaboussures ou des projections laissés en l’état sur la
table de cuisson présentent des risques d’inflammation et
de brûlures.
Ɣ Assurez-vous que l’utilisation d’ustensiles de cuisson en
verre sur la table de cuisson ne présente aucun danger.
Seuls certains types d’ustensiles en verre conviennent à
l’utilisation sur des surfaces ou têtes de brûleurs sans se
briser en raison des variations brusques de température.
Ɣ Les graisses sont inflammables. Ne jamais laisser des
graisses s’accumuler autour des brûleurs supérieurs ou
sur la surface de la table de cuisson. Veuillez essuyer
immédiatement tous débordements.
Ɣ Faites attention lorsque vous allumez un brûleur supérieur
à la main. Si le brûleur s’allume de manière inattendue ou
si votre main est proche du brûleur, vous risquez de vous
brûler.
Ɣ NE PAS laisser tomber de poêles sur la surface en
porcelaine. Cela peut entraîner des fissures ou des
craquelures sur la surface de la porcelaine.
Ɣ NE PAS laisser d’ustensile vide ou qui a bouilli à sec sur un
brûleur supérieur brûlant. L’ustensile peut surchauffer et
être endommagé ou endommager l’appareil de cuisson.
Consignes de sécurité relatives au
four.
Ɣ NE PAS toucher les surfaces internes du four ou de la
porte du four, ni la grille à l’intérieur, ni les ustensiles à
l’intérieur du four pendant et après utilisation, jusqu’à
refroidissement suffisant de ces zones. Vous pourriez
subir des brûlures ou des blessures. Pendant et après
utilisation, ne pas laisser des vêtements ou tous autres
matériaux inflammables entrer en contact avec ces zones
jusqu’à refroidissement suffisant.
Ɣ NE PAS toucher la surface extérieure de la porte du four
ou de l’évent du four en cours d’utilisation. Ces zones
peuvent devenir suffisamment chaudes pour occasionner
des brûlures. Pendant et après utilisation, ne pas laisser
des vêtements ou tous autres matériaux inflammables
entrer en contact avec ces zones jusqu’à refroidissement
suffisant.
Ɣ NE PAS couvrir les orifices d’aération de la grille de
diffuseur de flammes (clayette située au-dessus du
brûleur du four). La circulation de l’air à l’intérieur du four
sera interrompue et les temps de cuisson seront différents
de la normale, les aliments pourraient être brûlés ou
insuffisamment cuits.
Ɣ NE PAS utiliser le four comme espace de rangement.
Ɣ Si la veilleuse du four doit s’éteindre après l’allumage
initial ou en raison d’une extinction accidentelle, fermez le
bouton du four, puis patientez cinq (5) minutes avant de
tenter à nouveau d’allumer le four.
Page 23

Ɣ Plcez toujours les grilles du four l’endroit souhité
pendnt que le four est froid. Si l grille doit être déplcée
lors que le four est chud, ne ps lisser l mnique
entrer en contct vec l’élément chuffnt chud du four.
Ɣ Fites preuve de prudence lorsque vous ouvrez l porte
du four, lissez l’ir chud ou l vpeur s’en échpper
vnt d’en retirer ou d’y replcer des liments.
Ɣ Ne pas couvrir les orifices d’aération du four en cours
d’utilisation. Le fait de recouvrir les orifices d’aération
limite le débit d’air de combustion vers le brûleur du four
et pourrait provoquer une mauvaise combustion et la
formation de monoxyde de carbone.
Présentation du produit
1
2
3
4
Oven Vent
Français
1
Couvercle en verre
2
Grille
3
Brûleur de la table de cuisson
4
Bouton d’allumage
5
Porte du four
6
12
11
10
9
8
7
Brûleur du four
7
Grille de diffuseur de flammes
8
Grille de cuisson
9
Lampe du four
10
Bouton de réglage du four
11
Interrupteur de la lampe
12
Boutons de réglage des brûleurs supérieurs
6
5
23
Page 24

Installation
AVERTISSEMENT
INCENDIE, EXPLOSION, BRÛLURES, INTOXICATION
Ɣ L'appareil de cuisson doit être complètement séparé
et/ou scellé des autres appareils à circulation d'air ou
consommateurs d'air, tels que fourneaux, fours à microondes, sécheuses, ventilateurs de refroidissement
et portes ou tiroirs d’armoires. Dans le cas contraire,
l'alimentation en air de combustion de l'appareil ou des
appareils en serait affectée en créant un tirage négatif
ou positif.
Ɣ LES TIRAGES NÉGATIFS causés par des appareils
de circulation d'air peuvent attirer la flamme du brûleur
supérieur dans ou vers la table de cuisson, ce qui peut
l'endommager, provoquer des brûlures, une possibilité
d'explosion et/ou une accumulation de monoxyde de
Français
carbone.
Ɣ LES TIRAGES POSITIFS peuvent éteindre les flammes
du brûleur supérieur lors de son utilisation, ce qui peut
entraîner des risques d’explosion et/ou d’incendie et/ou
blesser les occupants du véhicule.
Ɣ NE PAS utiliser l'appareil dans des conditions de vent
excessif car cela pourrait causer un tirage négatif ou
positif.
AU MONOXYDE DE CARBONE
AVERTISSEMENT
L'installation de cet appareil doit être effectuée
conformément aux instructions écrites fournies dans ce
manuel. Aucun agent, représentant ou salarié de Furrion ni
toute autre personne n’est autorisé à changer, à modifier ou
à renoncer à appliquer toute dispositions des instructions
contenues dans ce manuel.
L’installation doit être conforme aux codes locaux ou, en
l’absence desdits codes, veuillez vous référer à la dernière
édition de:
Aux États-Unis:
a. Norme nationale américaine pour les véhicules récréatifs
(Standard for Recreational Vehicles) NFPA 1192
b. National Fuel Gas Code ANSI Z223.1/NFPA 54
Au Canada, l’installation doit être conforme à:
a. Norme CAN/CSA Z-240.4.2-08, Exigences relatives à
l’installation des appareils et équipements fonctionnant au
propane dans les véhicules récréatifs.
b. Tous les codes et réglementations locaux en vigueur
Instructions de découpe de l’armoire
Pour obtenir un bon fonctionnement de votre appareil de
cuisson, l’armoire doit être correctement construite et
centrée par rapport au dessus du comptoir et à la façade de
l’armoire.
Pour obtenir un fonctionnement correct de ces unités,
l’armoire doit être de niveau et la partie inférieure de la
cuisinière doit être soutenue.
REMARQUES: Lors de la planification de l’emplacement
de l’appareil, envisagez l’utilisation de rideaux ou d’autres
matériaux combustibles installés autour du four afin de
prévenir tous risques d’incendie.
La ou les distances minimales à l’horizontale entre les côtés
et l’arrière de l’appareil et les murs combustibles verticaux
adjacents s’étendant au-dessus du panneau supérieur:
Article Dimension
A 7¼po au minimum (184mm au minimum)
B 8po au minimum (203mm au minimum)
REMARQUE: Ces distances doivent être prises à partir du
centre du brûleur de l’appareil.
Contenu de l’emballage
Assu rez-vous que tous les éléments suivants sont présents
dans l’emballage. Si un élément est endommagé ou
manquant, contactez votre revendeur.
Ɣ Four de la cuisinière x 1
Ɣ Grille de la table de cuisson x 2
Ɣ Grilles de cuisson x 1
Ɣ Manuel d’instructions x 1
Ɣ Manuel de garantie x 1
24
Page 25

AVERTISSEMENT
La distance minimale à la verticale par rapport aux
matériaux combustibles au-dessus de la surface de
cuisson est de 30po (762mm), à condition que la
construction en hauteur ne se prolonge pas jusqu’à 13po
(330mm) par rapport au mur arrière. Distance minimum
entre le sol et la partie inférieure de la découpe formant une
ouverture: 4po (102mm).
REMARQUE: Si vous installez une combinaison de hotte
de cuisinière ou de micro-ondes au-dessus de la surface
de cuisson, suivez les instructions d'installation de la
combinaison de hotte de cuisine ou de hotte micro-ondes
pour connaître les espaces libres au-dessus de la surface
de la table de cuisson.
Dimensions de la découpe du comptoir et de l’armoire:
Modèle
Article
Cuisinière de
véhicule récréatif
de 17po
A 17¾po (451mm) 17¾po (451mm)
B 20⅛po (511mm) 20⅛po (511mm)
C 16⅛po (410mm) 20⁄po (510mm)
D ⁄po (23mm) au
max.
E 1½po (38mm) au
max.
F 4⁄po (110mm) 4⁄po (110mm)
G 3⁄po (90mm) 3⁄po (90mm)
Cuisinière de
véhicule récréatif de
21po
⁄po (23mm) au
max.
1½po (38mm) au max.
Installation du four
Lorsque l’armoire a été apprêtée selon les dimensions
indiquées et que le tuyau d’alimentation en gaz est en place.
1. Sortez votre four de la cuisinière du carton, puis posezle sur une surface plane. Retirez-en les matériaux
d’emballage.
2. Tenez le déflecteur, puis tirez-le vers le haut pour libérer le
couvercle en verre supérieur du four. (Ill.1)
Français
Ill.1
3. Poussez le couvercle en verre vers l’arrière du four, puis
soulevez-le pour le retirer du four. (Ill.2)
Gas Hose Hole
A
D
E
G
F
Ill.2
4. Faites glisser le four dans l’ouverture de l’armoire.
Assurez-vous que le four est au niveau sur les deux côtés
et de l’avant vers l’arrière. (Ill.3)
C
Electrical Connection Hole
15
1
/
16
"
B
Ill.3
(50mm)
25
Page 26

5. Fixez le four de la cuisinière dans l’ouverture de l’armoire à
gauche et à droite à l’aide de quatre vis autotaraudeuses
(2vis de chaque côté). (Ill.4)
Contrôle de la pression
1. Coupez l’alimentation en GPL de l’appareil.
2. Retirez la vis et le joint d’étanchéité de l’orifice de contrôle
de pression de la ligne. (Ill.6)
Ill.4
Raccordement de gaz
Français
AVERTISSEMENT
Le tuyau d’alimentation en gaz doit être installé de manière
à éviter tout contact entre les couteaux et les conduites de
gaz ou des coupures de celles-ci.
Raccordez une conduite d’alimentation en propane à l’aide
d’un raccord femelle à servir de ⅜po à la table de cuisson
dans le coin supérieur gauche de l’armoire. (Ill. 5) Serrez le
raccord de la conduite de gaz à la table de cuisson à l’aide de
2clés.
IMPORTANT: Laissez un espace suffisant autour du tuyau
d’alimentation en gaz en cas de coude ou d’endommagement
lors de l’installation. Assurez-vous que le tuyau d’alimentation
en gaz ne peut entrer en contact avec aucune pièce
mobile après son installation. Assurez-vous que toutes les
ouvertures des armoires autour de la conduite de gaz sont
scellées au moment de l’installation.
Ill.5
Ill.6
3. Utilisez le tube en caoutchouc de l’appareil pour le
contrôle de la pression et faites glisser le tube en
caoutchouc vers le bas sur l’orifice de test de pression
de gaz. Le tube en caoutchouc doit sceller tout autour de
l’orifice de contrôle de la pression sur la ligne.
4. Démarrez l’alimentation en GPL de l’appareil.
5. Le manomètre doit mesurer entre 10po colonne d’eau et
13,8po colonne d’eau. (Ill.7)
Ill.7
6. Coupez l’alimentation en GPL de l’appareil.
7. Retirez le tube en caoutchouc de l’appareil de mesure de
pression.
8. Remplacez la vis par le joint d’étanchéité de l’étape2.
Avant de remplacer la vis, vérifiez si le joint d’étanchéité
en caoutchouc ne présente aucun endommagement.
Remplacez le joint s’il est endommagé.
9. Serrez la vis de 1,3Nm à 1,7Nm.
REMARQUE: Assurez-vous que le produit a été vérifié après
le test de contrôle de la pression en examinant également la
vis de la sortie de contrôle de la pression. Si des fuites sont
détectées autour de la vis et du joint de l’orifice de contrôle
de pression, il est possible d’en acheter un nouveau. Appelez
le service à la clientèle Furrion pour un remplacement.
26
Page 27

Branchement électrique
Couvercle en verre de rechange
ATTENTION
RISQUE D’ENDOMMAGEMENT DU PRODUIT
Ɣ Branchez à une tension de service de 12V DC
exclusivement.
Ɣ Branchez seulement à un circuit protégé par un
disjoncteur d’une intensité maximale de 15A.
Ɣ NE PAS utiliser une cuisinière diélectrique à moins que
le système d’allumage électronique n’ait été débranché.
Branchez un câble d’alimentation positif de 12V au câble noir
de 12V du four de la cuisinière et un câble négatif de 12V au
câble blanc de 12V du four de la cuisinière. (Ill.8)
REMARQUE: Assurez-vous de brancher les câbles en
respectant les polarités correctes. Le noir correspond à «+»
et le blanc à «-».
Ill.8
+
12V DC
-
22# AWG
Switch
22# AWG
Diode
1. Alignez les 2languettes du couvercle en verre supérieur
sur les fentes situées au dos de la console, puis placez-le
dans la partie supérieure de la table de cuisson. (Ill.9)
Français
Ill.9
2. Appuyez sur la face arrière du couvercle en verre
supérieur et vous entendrez un bruit de cliquetis. Le
couvercle en verre supérieur est maintenant verrouillé.
(Ill. 10 et Ill. 11)
Ill.10
12V Lamp
Thermostate
Valve LED
Wiring Diagram
Right Burner
Knob LED
Center
Burner Knob
LED
Left Burner
Knob LED
Ignition
Knob LED
Ill.11
27
Page 28

Essais de détection des fuites
AVERTISSEMENT
RISQUE D’INCENDIE OU D’EXPLOSION
Ɣ Éteignez toutes les flammes nues.
Ɣ Ne JAMAIS effectuer de tests d'étanchéité lorsque vous
fumez. Ne jamais utiliser une flamme.
Ɣ Ne jamais utiliser l'appareil avant d'avoir procédé à des
essais de détection des fuites sur tous les raccords et
de vous assurer de l’absence de fuites éventuelles.
Ɣ Essai de pression/de détection des fuites au moyen
d’une pression de 11-13,8WC.
Français
Utilisation
AVERTISSEMENT
Ɣ Des fuites de gaz peuvent se produire dans votre
système et créer une situation dangereuse. Effectuez
toujours des essais de détection des fuites afin de
détecter les éventuelles fuites conformément aux
instructions du fabricant après l’installation et avant
toute utilisation.
Ɣ Les fuites de gaz peuvent ne pas être détectées pour
l’odeur uniquement. Les fournisseurs de gaz vous
conseillent d'acheter et d'installer un détecteur de gaz
approuvé UL.
1. Positionnez le bouton de réglage sur OFF.
2. Appliquez un liquide de détection de fuites de gaz sur les
raccords. Toute fuite de gaz est indiquée par des bulles.
3. En cas de détection d’une fuite de gaz, serrez le joint
desserré ou remplacez la pièce défectueuse par une
pièce de rechange recommandée par le revendeur agréé
Furrion.
AVERTISSEMENT
Veillez à ce que vos bras et votre visage ne se trouvent pas
directement au-dessus de la zone de cuisson lorsque vous
utilisez l'appareil.
DANGER
Ɣ Le couvercle en verre supérieur doit rester ouvert lors
de l’allumage et de l’utilisation de la table de cuisson.
Ɣ Ne pas essayer d'allumer plusieurs brûleurs à la fois.
Allumage de la table de cuisson
Avant allumage, vérifiez tous les boutons de réglage et
assu rez-vous que ceux-ci sont positionnés sur OFF Assurezvous que le robinet du réservoir de gaz principal est ouvert.
Allumage standard:
1. Soulevez le couvercle en verre de la table de cuisson pour
l’ouvrir. (Ill. 12) Le couvercle en verre supérieur doit rester
ouvert lors de l’allumage et de l’utilisation de la table de
cuisson.
Ill.12
28
2. Appuyez et tournez le bouton approprié du brûleur
dans le sens inverse des aiguilles d’une montre pour le
positionner sur . (Ill.13)
Ill.13
3. Maintenez le bouton de réglage du four enfoncé, puis
tournez le bouton d’allumage dans le sens des aiguilles
d’une montre à plusieurs reprises jusqu’à ce le brûleur
s’allume. (Ill.14)
Ill.14
4. Une fois le brûleur de la table de cuisson allumé,
maintenez le bouton d’allumage enfoncé pendant environ
5secondes jusqu’à ce que la flamme se stabilise.
Page 29

5. Tournez le bouton de réglage du brûleur pour régler les
flammes au niveau souhaité.
6. Répétez l’exécution des étapes 2 et 5 pour allumer le ou
les autres brûleurs, selon les besoins.
Si le brûleur ne s’allume pas:
Si vous ne parvenez pas à allumer le brûleur dans les
5secondes, tournez immédiatement le bouton de réglage
dans le sens des aiguilles d’une montre pour le positionner
sur OFF. Patientez au moins 5minutes, puis répétez la
procédure d’allumage. Si l’allumage ne se produit toujours
pas, utilisez un briquet à gaz ou une allumette pour allumer le
brûleur. Reportez-vous à la section «Allumage manuel».
Allumage manuel:
AVERTISSEMENT
Faites attention lorsque vous allumez les brûleurs à la main.
Si un brûleur s'allume de manière inattendue ou si votre
main est trop près du brûleur, vous pourriez vous brûler.
En cas de non-allumage du brûleur en allumage standard,
vous pouvez l’allumer manuellement en exécutant les étapes
ci-dessous:
1. Appuyez et tournez le bouton approprié du brûleur
dans le sens inverse des aiguilles d’une montre pour le
positionner sur
. (Ill.15)
Ill.17
En cas d’extinction de la flamme
AVERTISSEMENT
Risques d’incendie!
Si les flammes s'éteignent accidentellement, du gaz
se dégagera. Ne jamais laisser le brûleur à gaz sans
surveillance en cours d'utilisation. Assurez-vous qu'aucun
courant d'air ne puisse affecter les flammes des brûleurs.
Positionnez immédiatement le bouton de réglage sur OFF.
Patientez au moins 5minutes, puis rallumez le brûleur.
Arrêt de la table de cuisson
AVERTISSEMENT
Fermez toujours le robinet de la bouteille de gaz lors du
ravitaillement ou en déplacement.
Pour éteindre les brûleurs de la table de cuisson, tournez les
boutons de réglage dans le sens des aiguilles d’une montre
pour les positionner sur OFF.
Français
Ill.15
2. Allumez immédiatement une longue allumette en bois,
puis placez celle-ci ou un briquet à gaz près du brûleur
pour l’allumer. (Ill.16)
Ill.16
3. Répétez l’exécution des étapes 1 et 2 pour allumer le ou
les autres brûleurs, selon les besoins.
4. Tournez le bouton de réglage du brûleur pour régler la
flamme au niveau souhaité. (Ill.17)
Allumage du four
REMARQUE: Avant que le brûleur du four ne fonctionne, la
veilleuse du four doit être allumée.
Avant allumage, vérifiez tous les boutons de réglage et
assu rez-vous que ceux-ci sont positionnés sur OFF Assurezvous que le robinet du réservoir de gaz principal est ouvert.
1. Tirez la poignée du four pour en ouvrir la porte. Si vous
sentez une odeur de gaz, ARRÊTEZ tout! Reportezvous à la section relative à l’installation, puis suivez les
instructions répertoriées concernant l’appareil. (Ill.18)
Ill.18
29
Page 30

2. Appuyez et tournez le bouton de réglage du four dans
le sens inverse des aiguilles d’une montre pour le
positionner sur . (Ill.19)
Ill.19
3. Maintenez le bouton de réglage du four enfoncé, puis
tournez le bouton d’allumage dans le sens des aiguilles
d’une montre à plusieurs reprises jusqu’à ce le brûleur du
four s’allume. (Ill.20)
Flammes du brûleur
Veillez à ce que vos bras et votre visage ne se trouvent pas
directement au-dessus de la zone de cuisson lorsque vous
utilisez le produit.
Les flammes doivent ressembler à la bonne flamme illustrée
dans le schéma ci-dessous.
Bad
Blue
Yellow
Yellow
Good
Blue
Français
Ill.20
4. Une fois le brûleur du four allumé, maintenez le bouton
d’allumage enfoncé pendant environ 5 secondes jusqu’à
ce que les flammes se stabilisent.
5. Tournez le bouton de réglage du four pour régler les
flammes au niveau souhaité.
En cas d’extinction des flammes pendant le
processus d’allumage
AVERTISSEMENT
Risques d’incendie!
Si les flammes s'éteignent accidentellement, du gaz
se dégagera. Ne jamais laisser le brûleur à gaz sans
surveillance en cours d'utilisation. Assurez-vous qu'il n'y a
pas de courants d’air.
Positionnez immédiatement le bouton de réglage sur OFF.
Patientez au moins 5 minutes avant de tenter de rallumer le
brûleur du four.
Arrêt du four
AVERTISSEMENT
Fermez toujours le robinet de la bouteille de gaz lors du
ravitaillement ou en déplacement.
Pour éteindre le four, tournez le bouton de réglage du four
dans le sens des aiguilles d’une montre pour le positionner
sur OFF.
30
Holes in Burner
Elles doivent être bleues avec des pointes droites et jaunes.
Certaines pointes jaunes sur des flammes d’une longueur
maximale de 1po (25,4mm) sont acceptables tant qu’aucun
dépôt de carbone ou de suie n’apparaît.
Si les flammes sont excessivement jaunes et irrégulières, les
résidus d’huile peuvent ne pas être complètement brûlés, ou
le venturi peut être bouché ou peut ne pas être correctement
positionné sur les orifices.
Contrôle de la lampe
Position Signification
( )
O (
( )
Tous les voyants des boutons de réglage
sont allumés.
Tous les voyants sont éteints
)
Tous les voyants des boutons de réglage
et la lampe du four sont allumés.
Cuisson lente
La puissance des brûleurs latéraux est inférieure à celle
du brûleur central. Nous vous recommandons d’utiliser les
brûleurs latéraux pour toute cuisson lente.
Page 31

Conseils de cuisson
Le four offre une large gamme de modes de cuisson vous
permettant de faire cuire tout type d’aliments de la meilleure
façon possible. Avec le temps, vous apprendrez à tirer
le meilleur parti de cet appareil de cuisson polyvalent.
Les instructions suivantes ne constituent que directives
susceptibles d’être modifiées en fonction de votre
expérience personnelle.
AVERTISSEMENT
Ɣ Ne pas laisser des aliments dans le four plus d'une
Ɣ Cela risque de provoquer une intoxication alimentaire.
Préchauffage
Le préchauffage du four à gaz ne réchauffe pas seulement
l’air mais les parois et la porte, ce qui garantit que le four
reviendra rapidement à cette température après ouverture et
fermeture de la porte.
Le temps de préchauffage peut varier en fonction de la
température de cuisson à régler. Temps de préchauffage
minimum suggéré: 15minutes.
Cuisson de gâteaux
Lorsque vous préparez des gâteaux, placez-les toujours au
four après préchauffage (environ 15minutes). La température
se situe habituellement autour de 350°F. Ne pas ouvrir la
porte pendant la cuisson du gâteau afin de l’empêcher de
s’affaisser.
En règle générale:
La pâte est trop sèche.
La pâte s’est affaissée
La pâte est trop
sombre en surface.
Bien cuite à l'intérieur
mais collante à
l'extérieur.
La pâte colle à la poêle.
Cuisson de pizzas
Risque d’intoxication alimentaire
heure avant ou après cuisson.
Augmentez la température de 50°F, puis
réduisez le temps de cuisson.
Utilisez moins de liquide ou réduisez la
température de 50°F.
Placez-la sur une grille inférieure, réduisez
la température, puis augmentez le temps de
cuisson.
Utilisez moins de liquide, réduisez la
température, puis augmentez le temps de
cuisson.
Graissez convenablement la poêle et la
saupoudrer de farine ou utiliser du papier
sulfurisé.
Ɣ Si la pizza contient beaucoup de garnitures (trois ou
quatre), nous vous recommandons d’y ajouter le fromage
mozzarella à mi-cuisson.
Cuisson de poisson et de viande
Lorsque vous cuisinez de la viande blanche, de la volaille et
du poisson, utilisez des réglages de température comprises
entre 335°F et 375°F.
Pour les viandes rouges qui doivent être cuites à point à
l’extérieur tout en étant tendres et juteuses à l’intérieur, il
est judicieux de commencer par un réglage de température
élevée (375°F à 425°F) pendant un court moment, puis
réduisez la température du four par la suite.
En règle générale, plus le rôti est gros, plus le réglage de
la température est bas. Placez la viande au centre de la
grille, puis placez la lèchefrite en dessous pour récupérer la
graisse.
Veillez à insérer la grille afin qu’elle soit au centre du four.
Si vous souhaitez augmenter la quantité de chaleur par le
bas, utilisez les hauteurs de la grille inférieure. Pour les rôtis
savoureux (en particulier du canard et du gibier sauvage),
assaisonnez la viande avec du saindoux ou du bacon.
1
Position
des
grilles
Position
des
grilles
2
3
4
Four de cuisinière 21po
1
2
Français
Pour préparer de délicieuses pizzas croustillantes:
Ɣ Préchauffez le four pendant au moins 15minutes.
Ɣ Placez la plaque à pizza sur la grille livrée avec le four.
Si vous utilisez la lèchefrite, le temps de cuisson sera
prolongé, ce qui rendra difficile l’obtention d’une croûte
croustillante.
Ɣ Ne pas ouvrir la porte du four fréquemment pendant la
cuisson de la pizza.
Four de cuisinière 17po
31
Page 32

Nettoyage et Entretien
Ɣ Assurez-vous que tous les boutons de réglage sont
positionnés sur «OFF» et que l’appareil est froid avant de
le nettoyer.
Ɣ Assurez-vous que toutes les surfaces de l’appareil, les
grilles des brûleurs ainsi que les brûleurs sont froids avant
de les nettoyer ou de les démonter.
Ɣ NE PAS utilisez de javellisant ni de décapants pour la
rouille sur la table de cuisson ou les grilles des brûleurs.
Ɣ NE PAS obstruer le flux d’air de combustion et d’aération.
Ɣ Veuillez tenir les matériaux combustibles, l’essence,
les diluants à peinture et autres vapeurs et liquides
inflammables à l’écart de la zone de l’appareil.
Ɣ Nettoyez le four à l’aide d’un nettoyant à four uniquement.
Suivez les instructions qui figurent sur le contenant.
Ɣ Ne jamais utiliser de brosse métallique ou d’objet
métallique pour nettoyer les orifices du brûleur. La brosse
risque de «perdre» des poils qui peuvent se loger dans
Français
l’orifice ou dans les orifices des brûleurs et entraîner des
risques d’incendie ou d’explosion.
Ɣ Nettoyez toutes les surfaces dès que possible après des
débordements.
Ɣ Utilisez uniquement de l’eau tiède savonneuse pour
nettoyer les grilles des brûleurs, les tables de cuisson, les
surfaces peintes, les surfaces en porcelaine, les surfaces
en acier inoxydable et les objets en plastique de votre
cuisinière ou de votre table de cuisson. Ne pas utiliser
de produits de nettoyage abrasifs ou à base d’acide.
Ne pas utiliser de produits de nettoyage contenant de
l’ammoniac. Ces produits de nettoyage sont corrosifs et
pourraient endommager les composants de la cuisinière.
Ɣ NE PAS utiliser de laine d’acier, ni de produits de
nettoyage abrasifs, ni de produits de nettoyage à base
d’acide tels que l’eau de Javel au chlore sur votre table
de cuisson ou votre système de grille. Ceux-ci risquent
d’endommager votre cuisinière ou votre table de cuisson.
Utilisez uniquement des tampons à récurer non abrasifs
en plastique.
Ɣ NE PAS laisser des aliments contenant des acides
(notamment du citron, du jus de tomate ou du vinaigre) sur
des surfaces en porcelaine ou des surfaces peintes. Les
acides risquent d’enlever le fini brillant. Essuyez les œufs
renversés lorsque la table de cuisson est froide.
Ɣ NE PAS laver les surfaces en porcelaine tièdes. Laissez
refroidir ces zones avant de les nettoyer. Vous risquez des
brûlures ou la porcelaine pourrait se fissurer.
Ɣ De la corrosion par piqûres et de la décoloration risquent
de se produire si vous laissez des déversements en l’état
pendant un certain temps sur de l’acier inoxydable.
Ɣ NE PAS laisser de débordements en l’état sur les
chapeaux de brûleurs. Lesdits chapeaux pourraient être
tachés de façon permanente.
Ɣ Lorsque vous nettoyez autour des brûleurs, veillez à ne
pas endommager l’électrode (le cas échéant). Si une
éponge ou un chiffon attrape l’électrode métallique de
l’allumeur, cela pourrait l’endommager ou la casser. Si cela
se produit, le brûleur ne s’allumera pas.
Porte du four
AVERTISSEMENT
Lors du retrait de la porte:
Ɣ Ne pas placer un poids excessif sur une porte de four
ouverte et ne pas se tenir debout sur une porte de four
ouverte car, dans certains cas, la cuisinière pourrait
se renverser, se casser ou être endommagée au point
de rendre la cuisinière trop dangereuse, ou blesser
gravement l'utilisateur.
Ɣ Lorsque vous ouvrez la porte du four, laissez la vapeur
et l'air chaud s'en échapper avant de faire entrer les
mains dans le four pour vérifier, y ajouter ou en retirer
des aliments.
Ɣ Assurez-vous que le four est froid et que le four a été
mis hors tension avant d’en retirer la porte. Le nonrespect de cette consigne peut entraîner des risques
d’électrocution ou de brûlures.
Ɣ La porte du four est lourde et fragile. Utilisez les deux
mains pour retirer la porte du four. L’avant de la porte est
en verre. À manipuler avec précaution afin de prévenir
tout risque de bris.
Ɣ Saisissez uniquement les côtés de la porte du four. Ne
pas saisir la poignée, car elle risquerait de se balancer
et de provoquer des dommages ou des blessures.
Ɣ Le fait de ne pas saisir la porte du four correctement
et fermement peut entraîner des risques de blessures
corporelles ou endommager le produit.
Ɣ Pour prévenir tout risque de blessure en cas de
fermeture du support de la charnière, assurez-vous
que les deux leviers sont solidement en place avant
de retirer la porte. En outre, ne pas ouvrir ou fermer de
force la porte: la charnière risque d’être endommagée
et d’entraîner des risques de blessures.
1. Veillez à lire l’AVERTISSEMENT ci-dessus avant
d’essayer de retirer la porte du four.
2. Ouvrez complètement la porte. (Ill.21)
Ill.21
32
Page 33

3. Faites pivoter vers vous les leviers situés sur les
charnières (un de chaque côté). (Ill.22)
a
Ill.22
4. Fermez hermétiquement la porte. Elle sera à moitié
ouverte. (Ill.23)
Ill.23
5. En tenant la porte fermement des deux côtés et des
deux mains, tirez la porte pour la déloger des fentes des
charnières. (Ill. 24, Ill. 25 et Ill. 26) Tenez fermement, la
porte est lourde.
b
Ill.25
Français
Ill.26
6. Placez la porte sur une surface plane protégée afin qu’elle
n’endommage pas le matériau de la surface.
Remplacement de la lampe d’un four
1. Débranchez le four de la source d’alimentation à l’aide
du commutateur ayant servi à brancher l’appareil à une
prise de courant ou débranchez l’appareil si la fiche est
accessible.
2. Retirez le couvercle en verre de la douille de la lampe.
(Ill.27)
Ill.24
Ill.27
33
Page 34

3. Retirez la lampe, puis remplacez-la par une lampe
résistante aux températures élevées (572°F) présentant
les caractéristiques suivantes:
- Tension: 12V
- Puissance en watts: 15W
- Type: G9
- Type de lampe: Halogène
4. Remettez en place le couvercle en verre.
5. Rebranchez le four.
Pour passer commande de l’ampoule de rechange du four
Furrion, veuillez contacter le service technique Furrion pour
obtenir de l’aide.
Remplacement du voyant LED du
bouton de réglage
1. Débranchez le four de la source d’alimentation à l’aide
du commutateur ayant servi à brancher l’appareil à une
prise de courant ou débranchez l’appareil si la fiche est
accessible.
Français
2. Saisissez, puis tirez sur le bouton de réglage dont le
voyant LED est brisé. (Ill.28)
Ill.28
3. Retirez les deux vis qui retiennent le voyant LED à l’aide
d’un tournevis Phillips. (Ill.29)
Ill.29
4. Retirez le module LED, puis débranchez le câble du socle
du module LED. (Ill.30)
Ill.30
5. Branchez le connecteur de faisceaux de câbles dans le
nouveau module LED.
6. Refixez le module LED à la console à l’aide des 2vis
retirées à l’étape 3. Assurez-vous que les câbles ne sont
pas pincés pendant ce processus.
7. Refixez le bouton de réglage en alignant la tige de la
commande sur l’ouverture située dans le logement du
bouton de réglage et en appuyant dessus pour qu’il se
remette en place.
Rangement
Séchez toutes les surfaces ainsi que le boîtier du brûleur, puis pulvérisez une substance à base d’huile de cuisson sur les
surfaces afin de prévenir toute formation de rouille sur celles-ci en cas de rangement prolongé. Essuyez la couche d’huile avant
toute nouvelle utilisation.
Dépannage
Avant de faire appel au service technique, veuillez consulter la liste ci-après. Cette démarche peut vous faire gagner du temps
et économiser de l’argent. Cette liste répertorie les expériences courantes qui ne résultent pas d’une fabrication ou d’un
matériau défectueux dans votre appareil.
34
Page 35

Problème Cause/Solution possible
. Enfoncez et tournez le bouton de réglage de
Les brûleurs de
surface ne s'allument
pas.
Les flammes du
brûleur de surface
brûlent sur la moitié de
la circonférence de la
tête du brûleur.
Les flammes du
brûleur de surface sont
oranges
Le bouton de réglage de surface n’a pas été complètement positionné sur
surface pour le positionner sur
souhaitée.
Assurez-vous que le robinet d'alimentation en gaz est ouvert.
Les orifices ou les fentes du brûleur sont bouchés. Lorsque le brûleur est éteint, utilisez un fil ou une aiguille de petite épaisseur
pour nettoyer les orifices ou les fentes.
Niveau de gaz bas dans la bouteille.
De l'humidité est présente sur le brûleur, séchez soigneusement le brûleur.
Les orifices ou les fentes du brûleur sont bouchés. Lorsque le brûleur est éteint, nettoyez les orifices ou les fentes à l’aide d’un fil
ou d’une aiguille de petite épaisseur.
De l'humidité persiste après nettoyage. Attisez légèrement les flammes, puis laissez le brûleur fonctionner jusqu'à ce que les
flammes soient complètes. Séchez les brûleurs à fond.
Présence de particules de poussière dans la conduite principale. Laissez le brûleur fonctionner quelques minutes jusqu'à ce que
les flammes deviennent bleues.
Dans les zones côtières, des flammes légèrement oranges sont inévitables en raison de l'air salin.
jusqu'à ce que le brûleur s'allume, puis tournez le bouton de réglage sur la taille de flammes
Caractéristiques
Caractéristiques techniques
Alimentation
optionnelle
BTU/HR
Carburant/
Électricité
Pression
d'entrée
Puissance
d’entrée
Volume intérieur
du four
Cet appareil est conforme aux directives suivantes: ANSI Z21.57a-(2012) Rec/CAN1-1.16-M79 (R2011)
Alimentation par gaz
Brûleurs gauche et droit: 6500BTU
Brûleur avant 8000BTU
Four 7100BTU
Propane
10po WC Min à 13,8po WC Max
12V DC < 2A
Four de cuisinière de 17po 35l
Four de cuisinière de 21po 51l
Français
35
Page 36

Gracias por comprar este producto de Furrion®. Antes de usar su nuevo electrodoméstico, lea atentamente estas
instrucciones. Este manual de instrucciones contiene información relativa al uso seguro, a la instalación y al mantenimiento
del electrodoméstico.
Guarde este manual de instrucciones en un lugar seguro para usarlo como referencia a futuro. Esto garantizará un uso seguro
y reducirá el riesgo de lesiones. Asegúrese de entregar este manual a los nuevos propietarios del electrodoméstico.
El fabricante no acepta responsabilidad por daños provocados por no seguir estas instrucciones.
ADVERTENCIA: Si no se sigue exactamente la información de este manual, puede
producirse un incendio o una explosión que provoque daños materiales, lesiones
personales o la muerte.
− No almacene ni utilice gasolina u otros vapores y líquidos inflamables cerca de este o
cualquier otro electrodoméstico.
− QUE DEBE HACER SI HAY OLOR A GAS:
ƔNo intente encender ningún electrodoméstico.
ƔNo toque ningún interruptor eléctrico.
ƔNo utilice ningún teléfono en su casa rodante.
ƔEvacúe a todos los ocupantes de la casa rodante.
ƔCierre la válvula del contenedor de gas o el contenedor principal.
ƔLlame inmediatamente a su proveedor de gas para obtener instrucciones.
ƔSi no puede comunicarse con su proveedor de gas, llame al departamento de bomberos.
− Haga revisar el sistema de gas y solucione la fuga con un instalador cualificado, una
agencia de servicio, un fabricante, un distribuidor o el proveedor de gas.
Español
36
Page 37

Índice
Índice ..............................................................................................................................................................................................37
Explicación de los símbolos ........................................................................................................................................................38
Instrucciones de seguridad importantes ..................................................................................................................................38
Advertencias generales de seguridad ........................................................................................................................................................................... 38
Advertencias generales del anafe.................................................................................................................................................................................... 39
Advertencias de seguridad del horno ............................................................................................................................................................................ 40
Resumen del producto .................................................................................................................................................................41
Instalación ......................................................................................................................................................................................42
Contenido .................................................................................................................................................................................................................................... 42
Instrucciones de corte para el armario .......................................................................................................................................................................... 42
Instalación del horno .............................................................................................................................................................................................................. 43
Conexión de gas ...................................................................................................................................................................................................................... 44
Conexión eléctrica .................................................................................................................................................................................................................. 45
Reemplazo de la tapa de vidrio .........................................................................................................................................................................................45
Verificación de fugas .............................................................................................................................................................................................................. 46
Funcionamiento ............................................................................................................................................................................46
Encendido del anafe ............................................................................................................................................................................................................... 46
Apagado del anafe .................................................................................................................................................................................................................. 47
Encendido del horno .............................................................................................................................................................................................................. 47
Apagado del horno ................................................................................................................................................................................................................. 48
La llama del quemador .......................................................................................................................................................................................................... 48
Control de la luz ........................................................................................................................................................................................................................ 48
Cocción lenta ............................................................................................................................................................................................................................. 48
Consejos de cocción ....................................................................................................................................................................49
Precalentamiento .................................................................................................................................................................................................................... 49
Hornenado de pasteles ......................................................................................................................................................................................................... 49
Cocción de pizza...................................................................................................................................................................................................................... 49
Cocción de carne y pescado ............................................................................................................................................................................................. 49
Limpieza y Mantenimiento ...........................................................................................................................................................50
La puerta del horno ................................................................................................................................................................................................................. 50
Cambio de la lámpara del horno ....................................................................................................................................................................................... 51
Cambio de la luz LED de la perilla de control .............................................................................................................................................................. 52
Almacenamiento ...........................................................................................................................................................................52
Resolución de problemas ............................................................................................................................................................53
Especificaciones ...........................................................................................................................................................................53
Español
37
Page 38

Explicación de los símbolos
Este manual tiene información de seguridad e instrucciones
para ayudarle a eliminar o reducir el riesgo de accidentes
y lesiones. Respete siempre todas las advertencias de
seguridad identificadas con estos símbolos. Una palabra de
aviso identificará los mensajes de seguridad y de daños a la
propiedad, e indicará el grado o nivel de gravedad del peligro.
PELIGRO
Indica una situación peligrosa que, de no evitarse,
provocará la muerte o lesiones graves.
Indica una situación potencialmente peligrosa que, de no
evitarse, podría provocar la muerte o lesiones graves.
Indica una situación potencialmente peligrosa que, de no
evitarse, podría provocar lesiones personales menores o
moderadas, o bien daño a la propiedad.
Instrucciones de seguridad importantes
ADVERTENCIA
PRECAUCIÓN
Las advertencias e instrucciones de seguridad importantes
que aparecen en esta guía no están hechas para cubrir
todas las posibles condiciones situaciones que puedan
ocurrir. Se debe usar el sentido común, la precaución y el
cuidado en todo momento al instalar, mantener y usar el
electrodoméstico.
Contacte siempre al fabricante en torno a problemas o
condiciones que no comprenda.
Lea y siga todas las instrucciones antes de usar este
electrodoméstico para prevenir el riesgo potencial de
incendio, descarga eléctrica, lesiones personales o daños al
electrodoméstico como resultado de un uso inadecuado del
Español
mismo. Utilice el electrodoméstico únicamente para el uso
previsto, tal y como se describe en esta guía.
Si se utiliza una fuente eléctrica externa, el electrodoméstico
debe estar conectado a tierra de acuerdo con las normas
del estado u otros códigos o, en ausencia de dichas normas,
con el Código Eléctrico Nacional, ANSI/NFPA 70. No intente
ajustar, reparar, realizar el mantenimiento o reemplazar
ninguna pieza de su electrodoméstico a menos que se
recomiende específicamente en esta guía. Todas las demás
reparaciones deben ser realizadas por un técnico de servicio
cualificado.
Advertencias generales de seguridad
ADVERTENCIA
Ɣ Una instalación, ajuste, servicio o mantenimiento
inadecuados pueden provocar lesiones, daños
materiales o la muerte. Consulte este manual. Para
obtener asistencia o información adicional, consulte a
un instalador cualificado, a una agencia de servicio, al
fabricante o al proveedor de gas.
Ɣ Evite utilizar su electrodoméstico o cualquier otro
aparato si hay olor a gas. No suponga que el olor a gas en
su casa rodante es normal. Cada vez que usted detecte
olor a gas, debe considerarse como una amenaza con
riesgo de vida y se debe corregir inmediatamente.
Apague cualquier llama abierta, incluidos los cigarrillos,
y evacúe a todas las personas del vehículo. Cierre el
suministro de gas en el tanque de gas.
38
Ɣ Si el usuario de este electrodoméstico no lo mantiene en
el estado en que fue enviado de fábrica o si el aparato
no se utiliza exclusivamente para el uso previsto o si el
aparato no se mantiene de acuerdo con las instrucciones
de este manual, existe el riesgo de que se produzca un
incendio y/o que se genere monóxido de carbono que
pueda causar lesiones personales, daños materiales o
víctimas mortales.
ADVERTENCIA
EXPLOSIÓN O INCENDIO
Ɣ Apague todos los aparatos de gas y las luces piloto
cuando reabastezca los tanques de gasolina o gas o
cuando el vehículo esté en movimiento.
Ɣ Los electrodomésticos de cocción a gas Furrion se
utilizan únicamente con gas licuado de petróleo y se
instalan únicamente en vehículos recreativos (por
ejemplo, remolques de viaje, autocaravanas, casas
rodantes, etc.).
ADVERTENCIA
INTOXICACIÓN POR MONÓXIDO DE CARBONO
Ɣ NO utilice este aparato para calentar o calefaccionar el
vehículo. Podría sufrir quemaduras o lesiones, provocar
un incendio o agotar el oxígeno en el vehículo.
Ɣ Se debe tener una ventana o una salida de aire
ligeramente abiertas mientras se use cualquier aparato
de cocción. Las llamas de gas consumen oxígeno,
el cual debe ser reemplazado para asegurar una
combustión adecuada.
Ɣ NO almacene ni utilice gasolina u otros vapores y
líquidos inflamables cerca de este o cualquier otro
electrodoméstico.
Ɣ NO utilice el electrodoméstico si está dañado o no
funciona correctamente.
Ɣ Nunca intente reparar el electrodoméstico usted
mismo. Cualquier reparación o instalación de este
electrodoméstico debe ser realizada por un instalador
cualificado, una agencia de servicio o el proveedor de
Page 39

gas y conforme a las instrucciones de este manual.
La reparación o mantenimiento del electrodoméstico
por parte de una persona o agencia de servicio no
autorizada podría provocar una falla en la integridad del
electrodoméstico y podría ocasionar daños materiales,
lesiones graves o víctimas mortales.
Ɣ Solicite a su distribuidor que le muestre dónde se
encuentra la válvula principal de cierre de gas y cómo
cerrarla en caso de emergencia.
Ɣ Utilice el electrodoméstico únicamente para el uso
previsto.
Ɣ Se debe enseñar a los niños que el electrodoméstico
no es un juguete. No se les debe permitir jugar con los
controles ni con ninguna otra parte del electrodoméstico.
No permita que nadie se pare o se siente encima
del electrodoméstico. Esto no sólo puede dañar el
electrodoméstico, sino que también puede ocasionar
lesiones personales.
Ɣ No guarde objetos de interés para los niños en armarios
que estén encima o cerca del electrodoméstico. Si los
niños se suben al electrodoméstico para alcanzar objetos
pueden sufrir lesiones graves.
Ɣ Todas las perillas de control deben estar apagadas
cuando no estén en uso. Puede haber peligro de
incendio y/o sufrir quemaduras si se deja encendido
accidentalmente un quemador.
Ɣ Si algún quemador se apaga (después de haberlo
encendido o debido al viento), cierre todas las perillas
de los quemadores y espere cinco (5) minutos antes de
intentar encenderlo de nuevo.
Ɣ NO guarde materiales inflamables sobre, dentro o cerca
del electrodoméstico. Cualquier vapor o gas puede crear
una explosión y/o peligro de incendio.
Ɣ No use ropa holgada o de manga larga mientras utilice
el electrodoméstico. Si entran en contacto con la llama
abierta del quemador, podrían encenderse y causar
quemaduras graves.
Ɣ Utilice únicamente paños o guantes de cocina secos para
quitar los utensilios calientes. El uso de paños o guantes
de cocina húmedos en superficies calientes puede
provocar quemaduras en las manos. No utilice una toalla
o un paño voluminoso como guante de cocina. El paño
podría entrar en contacto con la llama abierta y prenderse
fuego.
Ɣ Nunca caliente un recipiente sin abrir. La acumulación de
presión dentro del recipiente puede hacer que explote.
Ɣ No utilice agua para apagar incendios provocados por
grasa o aceite. Nunca recoja un recipiente de cocción en
llamas. Ahogue el fuego de un recipiente de cocción en
llamas con una tapa u otro recipiente plano. La grasa en
llamas fuera del recipiente de cocción se puede extinguir
con bicarbonato de sodio o con un extintor de polvo
químico seco multipropósito.
Ɣ Este electrodoméstico est diseñdo pr ser instldo
en un estructur de rmrio únicmente y no est
diseñdo pr ser instldo l estructur del edificio.
Advertencias generales del anafe
Ɣ No coloque las ollas sobre la superficie del vidrio. Levante
la tapa hasta la posición completamente abierta antes de
encender los quemadores. Deje enfriar el anafe antes de
cerrar la tapa de vidrio.
Ɣ Si el anafe está cerca de una ventana, se deben tomar las
precauciones adecuadas para evitar que el viento mueva
las cortinas sobre los quemadores lo cual genera un
riesgo de incendio.
Ɣ Mantenga limpia el área alrededor del anafe y retire
cualquier material combustible, gasolina u otros vapores
y líquidos inflamables. Si no lo hace, puede provocar una
explosión y/o un incendio.
Ɣ No deje a los niños solos o sin supervisión en el área
donde se esté usando el anafe. Los quemadores
superiores, las rejillas de los quemadores y otras áreas
cercanas a los quemadores se calientan lo suficiente
como para provocar quemaduras graves.
Ɣ Mantenga limpio el anafe. La acumulación de grasa y
alimentos derramados o vertidos puede generar un riesgo
de incendio.
Ɣ Gire las asas de las ollas hacia adentro o hacia atrás del
anafe y fuera del alcance de las personas que pasen por
delante del anafe y/o fuera del alcance de los niños. No
gire las manijas hacia donde están sobre los quemadores.
Ɣ Nunca deje los quemadores superiores desatendidos.
− Por motivos tales como corrientes de aire que podrían
generarse al abrir y cerrar puertas de los armarios
o puertas dentro de la casa rodante o por presiones
de aire positivas o negativas que afecten a los
quemadores debido a una instalación inadecuada.
(Consulte la sección de instalación) El quemador
podría apagarse, lo que provocaría la salida de gas
hacia la casa rodante. Recuerde, el flujo de gas hacia
cada quemador se controla manualmente, debe girar
las perillas para encender y apagar el flujo de gas.
− Podría producirse un rebosamiento y el derrame
podría inflamarse.
Ɣ Tamaño de la llama
− Nunca permita que la llama se extienda más allá del
borde exterior del recipiente de cocción. Una llama
más alta simplemente desperdicia calor y energía.
− El tamaño correcto de la llama se determina por el
tamaño y el material del recipiente de cocción, lo que
se está cocinando y si se está cocinando, o no, con
líquidos.
Ɣ Para evitar daños en el anafe, los quemadores superiores
o la rejilla superior, nunca encienda un quemador superior
sin colocar un recipiente de cocción en su lugar. Los
quemadores superiores, especialmente los que cuentan
con ajuste fuerte, no se deben utilizar con fuego fuerte
durante un período de tiempo prolongado. El ajuste de
fuego fuerte debe utilizarse únicamente para comenzar a
cocinar los alimentos o para llevar los líquidos al punto de
ebullición y luego se debe reducir la llama a un ajuste más
bajo para continuar la cocción. Utilice el ajuste de llama
baja para mantener los alimentos calientes. Recuerde,
una cocina a gas se calienta más rápido que una cocina
eléctrica, por lo tanto, experimente con varios ajustes
hasta que se acostumbre a cocinar con gas.
Español
39
Page 40

Ɣ Nunca use utensilios de cocina que sobresalgan más
de una pulgada de la rejilla (tamaño máximo de los
recipientes de cocción: 10” de diámetro). Nunca coloque
el utensilio de cocina sobre la rejilla en dos quemadores
superiores encendidos. Esto generará una acumulación
excesiva de calor que podría provocar daños a la parrilla,
quemadores superiores y anafe.
Ɣ Verifique que haya suficiente suministro de gas antes de
intentar encender cualquier quemador superior. El aire en
la línea de suministro de gas retrasará significativamente
el encendido del quemador y un quemador puede
encenderse inesperadamente cuando el aire en la línea
se despeje y sea reemplazado por gas, este encendido
inesperado puede provocarle quemaduras. Puede entrar
aire en el conducto de suministro cuando se sustituya el
cilindro de gas del vehículo, durante el mantenimiento de
otros electrodomésticos a gas, etc.
Ɣ NO toque los quemadores superiores, las rejillas de los
quemadores ni otras áreas cercanas a los quemadores
superiores durante y después de su uso. No permita que
la ropa u otros materiales inflamables entren en contacto
con los quemadores superiores o las áreas cercanas a los
quemadores superiores hasta que hayan tenido suficiente
tiempo para enfriarse.
Ɣ Asegúrese de que los utensilios que utiliza sean lo
suficientemente grandes para contener alimentos y evite
que rebosen y se desborden. Las salpicaduras fuertes o
los derrames que queden en el anafe pueden encenderse
y provocarle quemaduras.
Ɣ Asegúrese de que los utensilios de cocina de vidrio sean
seguros para su uso en el anafe. Solo ciertos tipos de
utensilios de vidrio son adecuados para utilizarse en la
superficie o en los quemadores superiores sin romperse
Español
debido a los cambios repentinos de temperatura.
Ɣ La grasa es inflamable. Nunca permita que se acumule
grasa alrededor de los quemadores superiores o en la
superficie del anafe. Limpie los derrames inmediatamente.
Ɣ Tenga cuidado al encender un quemador superior a
mano. Si el quemador se enciende inesperadamente o
si su mano está cerca del quemador, usted puede sufrir
quemaduras.
Ɣ NO deje caer bandejas sobre la superficie esmaltada . El
esmalte puede agrietarse o astillarse.
Ɣ NO deje un utensilio vacío, o uno que haya hervido hasta
secarse, en un quemador superior caliente. El utensilio
podría sobrecalentarse y se podría dañar el utensilio o la
cocina.
Ɣ NO toque la superficie exterior de la puerta del horno ni la
rejilla de ventilación mientras el horno esté en uso. Estas
superficies pueden calentarse lo suficiente como para
provocar quemaduras. Durante y después del uso, no
permita que la ropa u otros materiales inflamables entren
en contacto con estas áreas hasta que hayan tenido
suficiente tiempo para enfriarse.
Ɣ NO cubra los orificios de ventilación en la Rejilla
difusora de llamas (encima del quemador del horno). La
circulación de aire dentro del horno se interrumpirá y los
tiempos de cocción normales sufrirán variaciones, los
alimentos pueden quemarse o no quedar bien cocidos.
Ɣ NO utilice el horno como área de almacenamiento.
Ɣ Si el piloto del horno se apaga después de haberlo
encendido o debido al viento, cierre todas las perillas
del horno y espere cinco (5) minutos antes de intentar
encenderlo de nuevo.
Ɣ Siempre coloque ls rejills del horno en el lugr desedo
mientrs el horno esté frío. Si se debe mover un rejill
mientrs el horno esté cliente, no permit que el pño
o gunte de cocin entre en contcto con el elemento
clefctor del horno.
Ɣ Teng cuiddo l brir l puert del horno, permit que
slg el ire cliente o el vpor ntes de retirr o volver
colocr limentos.
Ɣ No cubra las aberturas de ventilación del horno cuando
se esté usando el horno. Si se cubren las rejillas de
ventilación se restringe el flujo de aire de combustión
hacia el quemador del horno y podría causar una mala
combustión y la formación de monóxido de carbono.
Oven Vent
Advertencias de seguridad del horno
Ɣ NO toque ninguna superficie interior del horno o de la
puerta del horno, ni la rejilla interior, ni ningún utensilio
dentro del horno durante y después de su uso hasta que
estas superficies hayan tenido suficiente tiempo para
enfriarse. Podría sufrir quemaduras o lesiones. Durante y
después del uso, no permita que la ropa u otros materiales
inflamables entren en contacto con estas áreas hasta que
hayan tenido suficiente tiempo para enfriarse.
40
Page 41

Resumen del producto
1
2
3
4
5
1
Tapa de vidrio
2
Rejilla
3
Quemador del anafe
4
Perilla de ignición
5
Puerta del horno
6
12
11
10
9
8
7
Quemador del horno
7
Rejilla difusora de llamas
8
Rejilla de cocción
9
Luz del horno
10
Perilla de control del horno
11
Interruptor de la luz
12
Perillas de control de los quemadores del
anafe
6
Español
41
Page 42

Instalación
ADVERTENCIA
INCENDIO, EXPLOSIÓN, LESIÓN POR QUEMADURAS,
INTOXICACIÓN POR MONÓXIDO DE CARBONO
Ɣ El electrodoméstico de cocina debe estar
completamente separado y/o aislado de otros
dispositivos que muevan o consuman aire, tales
como, aunque no exclusivamente, calderas, hornos
de microondas, secadoras de ropa, ventiladores de
enfriamiento y puertas o cajones en armarios comunes.
Si no lo hace, el suministro de aire de combustión del
electrodoméstico se verá afectado por la creación de
una corriente de aire negativa o positiva.
Ɣ La CORRIENTE DE AIRE NEGATIVA causada por
electrodomésticos que mueven aire puede hacer que la
llama del quemador superior descienda hacia o dentro
del anafe y que provoque daños en el anafe, peligro
de sufrir quemaduras, posibilidad de explosión y/o
acumulación de monóxido de carbono.
Ɣ La CORRIENTE DE AIRE NEGATIVA puede apagar la
llama del quemador superior durante el uso y provocar
una explosión y/o peligro de incendio y/o lesiones a los
ocupantes del vehículo.
Ɣ NO opere el electrodoméstico en condiciones de viento
excesivo, ya que esto puede causar una corriente de
aire negativa o positiva.
Español
La instalación de este electrodoméstico se debe ejecutar
siguiendo las instrucciones indicadas en este manual.
Ningún agente, representante o empleado de Furrion u
otras personas tienen la autoridad de cambiar, modificar o
anular lo indicado en las instrucciones de este manual.
La instalación debe cumplir con las normas locales o, en
caso de no existir una reglamentación específica, consulte la
última edición de las siguientes normas:
En los Estados Unidos:
a. Norma para vehículos recreativos NFPA 1192
b. Código Nacional de Gas Combustible ANSI Z223.1/NFPA
54
En Canadá, la instalación debe cumplir con:
a. Norma CAN/CSA Z-240.4.2-08, Requisitos de instalación
para equipos y electrodomésticos a gas propano en
vehículos recreativos.
b. Todos los códigos y regulaciones locales aplicables.
ADVERTENCIA
Ɣ 1Manual de instrucciones
Ɣ 1 Manual de garantía
Instrucciones de corte para el armario
Para el funcionamiento correcto de su aparato de cocción,
los armarios deben estar correctamente construidos y a
escuadra con respecto a la parte superior de la encimera y a
la parte frontal del armario.
Para que estas unidades funcionen correctamente,
el armario debe estar nivelado y la parte inferior del
electrodoméstico debe estar apoyada.
NOTAS: Cuando planifique el lugar de instalación, tenga
en cuenta las cortinas u otros materiales combustibles
instalados alrededor del electrodoméstico para no generar
un riesgo de incendio.
La distancias horizontales mínimas desde los laterales y
parte posterior del electrodoméstico hasta las paredes
combustibles verticales adyacentes que se extienden por
encima del panel superior son las siguientes:
Objeto Dimensiones
A 7¼” Mín. (184mm Mín.)
B 8” Mín. (203mm Mín.)
NOTA: Estas distancias se deben medir desde el centro del
quemador del electrodoméstico.
Contenido
Asegúrese de que todos los artículos siguientes estén
incluidos en el empaque. Si alguno de estos elementos está
dañado o no viene incluido en el empaque, contacte al punto
de venta donde adquirió el producto.
Ɣ 1 Cocina con horno y anafe
Ɣ 2 Rejillas del anafe
Ɣ 1 Rejilla
42
Page 43

ADVERTENCIA
La distancia vertical mínima con respecto al material
combustible por encima de la superficie de cocción es de
30" (762mm), siempre y cuando la construcción superior
no se extienda 13" (330mm) desde la pared trasera. La
distancia recomendada entre el suelo y la parte inferior de
la abertura del corte es 4” (102mm).
NOTA: Si instala una campana de cocina o una
combinación de campana con microondas encima
del anafe, siga las instrucciones de instalación de la
campana de cocina o de la combinación de campana con
microondas para respetar las distancias de separación
encima de la superficie de cocción.
Dimensiones de corte del armario y la encimera:
Objeto
Gama RV 17" Gama RV 21"
A 17¾” (451mm) 17¾” (451mm)
B 20⅛” (511mm) 20⅛” (511mm)
C 16⅛” (410mm) 20⁄” (510mm)
D ⁄” (23mm) máx. ⁄” (23mm) máx.
E 1½” (38mm) máx. 1½” (38mm) máx.
F 4⁄” (110mm) 4⁄” (110mm)
G 3⁄” (90mm) 3⁄” (90mm)
A
D
E
Modelo
Gas Hose Hole
G
F
Fig. 1
3. Empuje hacia la parte posterior del horno y levante para
retirar la tapa superior de vidrio del horno. (Fig. 2)
Español
Fig. 2
4. Deslice la cocina en la abertura del armario. Verifique que
el horno esté nivelado de lado a lado y de adelante hacia
atrás. (Fig. 3)
Electrical Connection Hole
C
B
Instalación del horno
Cuando el armario haya sido preparado de acuerdo con las
dimensiones especificadas y la línea de gas esté en su lugar:
1. Retire la cocina de la caja de cartón y colóquela en una
superficie plana. Retire los materiales del embalaje.
2. Sostenga el separador y tire hacia arriba para liberar la
unidad que conforma la cubierta superior de vidrio del
horno. (Fig. 1)
15
1
/
16
"
(50mm)
Fig. 3
5. Atornille la cocina en la abertura del armario en el
lateral izquierdo y derecho con los cuatro tornillos
autorroscantes (2tornillos en cada lado). (Fig. 4)
43
Page 44

Fig. 4
Verificación de presión
1. Cierre el pase de gas al equipo.
2. Quite el tornillo con su junta de sellado del puerto de
prueba de presión de la cocina. (Fig.6)
Conexión de gas
ADVERTENCIA
La tubería de suministro de gas debe instalarse
manteniendo una separación de las cuchillas que puedan
entrar en contacto o corten las líneas de gas.
Conecte una tubería de suministro de propano con una
conexión de rosca hembra de ⅜” al anafe en la esquina
superior izquierda trasera del armario. (Fig. 5) Apriete la
unión de la tubería de gas al anafe con 2llaves.
IMPORTANTE: Deje un espacio adecuado alrededor de la
tubería de suministro de gas en caso de que haya alguna
curva o se dañe durante la instalación. Asegúrese de que la
tubería de suministro de gas no pueda entrar en contacto con
ninguna pieza móvil después de su instalación. Asegúrese de
Español
que todas las aberturas en el armario alrededor de la tubería
de gas estén selladas en el momento de la instalación.
Fig. 5
Fig. 6
3. Tome el tubo de goma del dispositivo de medida de
verificación de la presión y deslícelo para conectarlo al
puerto de prueba de presión de gas. El tubo de goma
debería quedar ajustado al perímetro del puerto de
prueba de presión de la cocina.
4. Abra el pase de gas al equipo.
5. El probador de nivel de presión debería indicar entre 10”
WC y 13.8” WC. (Fig.7)
Fig. 7
6. Cierre el pase de gas al equipo.
7. Retire el tubo de goma del dispositivo de medición de
presión.
8. Vuelva a colocar el tornillo con la junta del paso 2. Antes
de volver a colocar al tornillo, revise la junta de sellado de
goma para comprobar que no tenga signos de daño. Si la
junta está dañada, cámbiela.
9. Apriete el tornillo a entre 1.3Nm y 1.7Nm.
NOTA: Luego de completar la prueba de verificación de
presión revise que el producto no tenga pérdidas de gas, sin
olvidar revisar el tornillo del puerto de verificación de presión.
Si detecta cualquier pérdida en el entorno del tornillo y la
junta del puerto de verificación de presión, puede comprar
repuestos de los mismos. Para obtener repuestos, llame al
servicio técnico de Furrion.
44
Page 45

Conexión eléctrica
Reemplazo de la tapa de vidrio
PRECAUCIÓN
PELIGRO DE DAÑO DEL PRODUCTO
Ɣ Conectar únicamente a una fuente de 12V CC.
Ɣ Conecte únicamente a un circuito protegido con fusible
para una corriente no mayor a 15A.
Ɣ NO realizar una Prueba de Resistencia Dieléctrica de
Alto Potencial a menos que el sistema de encendido
electrónico haya sido desconectado.
Conecte el cable positivo de suministro de 12V al cable
negro de 12V de la cocina y el cable negativo de suministro
de 12V al cable blanco de 12V de la cocina. (Fig. 8)
NOTA: Asegúrese de conectar los cables con la polaridad
correcta. Negro es “+” y Blanco es “-”.
Fig. 8
+
12V DC
-
22# AWG
Switch
22# AWG
Diode
1. Oriente las 2pestañas de instalación de la tapa superior
de vidrio de forma alineada con las ranuras de la parte
posterior de la consola y colóquela sobre la cocina.
(Fig. 9)
Fig. 9
2. Presione la parte trasera de la cubierta superior de vidrio
hasta que oiga un clic. La tapa superior de cristal ahora
queda fija en su lugar. (Fig. 10 y Fig. 11)
Español
12V Lamp
Thermostate
Valve LED
Wiring Diagram
Right Burner
Knob LED
Center
Burner Knob
LED
Left Burner
Knob LED
Ignition
Knob LED
Fig. 10
Fig. 11
45
Page 46

Verificación de fugas
ADVERTENCIA
INCENDIO O EXPLOSIÓN
Ɣ Apaguen todas las llamas abiertas.
Ɣ NUNCA realice una prueba de fugas cuando esté
fumando. Nunca use una llama.
Ɣ No utilice el electrodoméstico hasta que la conexión
haya sido probada y no tenga fugas.
Ɣ Para realizar la prueba de presión/fugas utilice entre 11
y 13,8 c.a.
Funcionamiento
ADVERTENCIA
Ɣ Se pueden producir fugas de gas en su sistema y
generar en una situación peligrosa. Realice siempre
una prueba de fugas para detectar posibles fugas de
acuerdo con las instrucciones del fabricante después
de la instalación y antes del funcionamiento.
Ɣ Las fugas de gas pueden no ser detectadas solo por el
olor. Los proveedores de gas recomiendan que compre
e instale un detector de gas aprobado por UL.
1. Asegúrese de que todas las perillas de control estén en la
posición OFF (apagado).
2. Aplique un líquido de detección de fugas de gas a las
conexiones. Cualquier fuga de gas será indicada con
burbujas.
3. Si se detecta una fuga de gas, apriete la junta suelta o
reemplace la pieza defectuosa con una pieza de repuesto
recomendada por un distribuidor autorizado de Furrion.
ADVERTENCIA
Mantenga los brazos y la cara alejados de la parte
directamente encima del área de cocción mientras use el
electrodoméstico.
PELIGRO
Ɣ La tapa superior de vidrio debe mantenerse abierta
cuando se encienda y se utilice el anafe.
Español
Ɣ No intente encender más de un quemador a la vez.
Encendido del anafe
Antes de encenderlo, compruebe y asegúrese de que todas
las perillas de control estén en la posición OFF (apagado).
Asegúrese de que la válvula principal del tanque de gas esté
abierta.
Encendido estándar:
1. Levante para abrir la tapa de vidrio del anafe. (Fig. 12) La
tapa superior de vidrio debe mantenerse abierta cuando
se encienda y se utilice la placa de cocción.
Fig. 12
2. Presione y gire la perilla de control del quemador
correspondiente en sentido contrario a las agujas del reloj
hasta la posición . (Fig. 13)
Fig. 13
3. Mantenga presionada la perilla de control del quemador
y gire la perilla de encendido hacia la derecha
repetidamente hasta que el quemador se encienda.
(Fig. 14)
Fig. 14
4. Una vez encendido el quemador del anafe, mantenga el
botón de encendido presionado durante unos 5 segundos
hasta que la llama se estabilice.
5. Gire la perilla de control del quemador para ajustar la
llama al nivel deseado.
6. Repita los pasos 2 y 5 para encender los otros
quemadores según sea necesario.
46
Page 47

Si el quemador no se enciende
En caso de que no se encienda el quemador dentro de
los 5segundos, gire inmediatamente la perilla de control
en el sentido de las agujas del reloj hasta la posición
OFF (apagado). Espere al menos 5minutos y repita el
procedimiento de encendido. Si aun así no se enciende,
utilice un encendedor de gas o un fósforo para encender el
quemador. Consulte la sección ‘Encendido manual’.
Encendido manual:
ADVERTENCIA
Tenga cuidado al encender los quemadores a mano. Si el
quemador se enciende inesperadamente o si tiene la mano
cerca del quemador, puede sufrir quemaduras.
En caso de que el quemador no se encienda con el
encendido estándar, puede encenderlo manualmente
siguiendo los pasos que se indican a continuación:
1. Gire la perilla de control del quemador correspondiente
en sentido contrario a las agujas del reloj hasta la posición
. (Fig. 15)
Si se apaga la llama
ADVERTENCIA
¡Peligro de incendio!
Si la llama se apaga accidentalmente, se producirá una
fuga de gas. Nunca deje el quemador de gas desatendido
durante el funcionamiento. Asegúrese de que no haya
corrientes de aire que puedan afectar a la llama del
quemador.
Gire inmediatamente la perilla de control hasta la posición
OFF (apagado). Espere al menos 5minutos y vuelva a
encender el quemador.
Apagado del anafe
ADVERTENCIA
Siempre cierre la válvula del tanque de gas cuando esté
repostando o en viaje.
Para apagar los quemadores del anafe, gire las perillas de
control en el sentido de las agujas del reloj hasta la posición
OFF (apagado).
Encendido del horno
Fig. 15
2. Encienda y coloque inmediatamente un fósforo largo de
madera o un encendedor de gas cerca del quemador para
encenderlo. (Fig. 16)
Fig. 16
3. Repita los pasos 1 y 2 para encender los otros
quemadores según sea necesario.
4. Gire la perilla de control del quemador para ajustar la
llama al nivel deseado. (Fig. 17)
Fig. 17
NOTA: Antes de que funcione el quemador del horno, el
piloto del horno debe estar encendido.
Antes de encenderlo, compruebe y asegúrese de que todas
las perillas de control estén en la posición OFF (apagado).
Asegúrese de que la válvula principal del tanque de gas esté
abierta.
1. Tire de la manija del horno para abrir la puerta. Si
siente olor a gas, ¡deténgase! Consulte la sección de
instalación y siga las instrucciones que se indican para el
electrodoméstico. (Fig. 1)8
Fig. 18
Español
47
Page 48

2. Presione y gire la perilla de control del horno en sentido
contrario a las agujas del reloj hasta la posición . (Fig. 19)
La llama del quemador
Mantenga los brazos y la cara alejados de la parte
directamente encima del área de cocción.
Las llamas deben verse similares al ejemplo de llama
correcta que se muestra en el diagrama a continuación.
Good
Bad
Yellow
Blue
Fig. 19
3. Mantenga presionada la perilla de control del horno y gire
la perilla de encendido hacia la derecha repetidamente
hasta que se encienda el quemador. (Fig. 20)
Fig. 20
4. Una vez encendido el quemador del horno, mantenga el
botón de encendido presionado durante unos 5 segundos
Español
hasta que la llama se estabilice.
5. Gire la perilla de control del horno para ajustar la llama al
nivel deseado.
Si se apaga la llama durante el proceso de
encendido
ADVERTENCIA
Si la llama se apaga accidentalmente, se producirá una
fuga de gas. Nunca deje el quemador de gas desatendido
durante el funcionamiento. Asegúrese de que no haya
corrientes de aire.
Gire inmediatamente la perilla de control hasta la posición
OFF (apagado). Espere al menos 5 minutos antes de intentar
volver a encender el quemador del horno.
Apagado del horno
¡Peligro de incendio!
ADVERTENCIA
Siempre cierre la válvula del tanque de gas cuando esté
repostando o en viaje.
Para apagar el horno, gire la perilla de control del horno
en el sentido de las agujas del reloj hasta la posición OFF
(apagado).
Yellow
Una llama correcta debería ser azul con una punta amarilla.
Algunas puntas amarillas en llamas de hasta 1” (25,4mm)
de longitud son aceptables siempre y cuando no aparezcan
depósitos de carbón u hollín.
Si las llamas son excesivamente amarillas e irregulares, es
posible que el residuo de aceite no se queme por completo, o
que el tubo de venturi esté obstruido o que no esté colocado
correctamente sobre los orificios.
Blue
Holes in Burner
Control de la luz
Posición Significado
( )
O (
( )
Todas las luces de la perilla de control
están encendidas
Todas las luces están apagadas
)
Todas las luces de la perilla de control y
la luz del horno están encendidas
Cocción lenta
La potencia de los quemadores laterales es menor que
la del quemador central, le recomendamos que utilice los
quemadores laterales para una cocción lenta.
48
Page 49

Consejos de cocción
El horno ofrece una amplia gama de alternativas que
permiten cocinar cualquier tipo de comida de la mejor
manera posible. Con el tiempo aprenderá a sacar el máximo
provecho de este versátil electrodoméstico de cocina y
las siguientes instrucciones son simplemente una guía que
puede variar según su experiencia personal.
ADVERTENCIA
Peligro de intoxicación alimentaria
Ɣ No deje los alimentos en el horno más de una hora
antes o después de cocinarlos.
Ɣ Si lo hace, puede provocar una enfermedad por
intoxicación alimentaria.
Precalentamiento
El precalentamiento del horno de gas no solo calienta el
aire del horno, sino también las paredes y la puerta, lo que
garantiza que el horno vuelva rápidamente a esa temperatura
cuando se abre y se cierra la puerta.
En función de la temperatura de cocción que se ajuste, el
tiempo de precalentamiento puede variar. El tiempo mínimo
de precalentamiento sugerido es de 15minutos.
Hornenado de pasteles
Cuando hornee pasteles, colóquelos siempre en el horno
después de haberlo precalentado (unos 15minutos). La
temperatura generalmente ronda en los 350°F. No abra
la puerta mientras se hornea el pastel para evitar que se
apelmace.
En general:
La masa está
demasiado seca
La masa no crece y se
apelmaza
La masa está
demasiado oscura en la
parte superior.
Bien cocida por dentro,
pero pegajosa por
fuera.
La masa se pega a la
bandeja
Aumente la temperatura en 50
tiempo de cocción.
Utilice menos líquido o baje la temperatura en
50
Colóquela en una rejilla inferior, baje la
temperatura y aumente el tiempo de cocción.
Utilice menos líquido, baje la temperatura y
aumente el tiempo de cocción.
Engrase bien la bandeja y espolvoréela con
un poco de harina o utilice papel antigrasa.
Cocción de pizza
o
F.
o
F y reduzca el
Ɣ Si la pizza tiene muchos ingredientes (tres o cuatro), le
recomendamos que agregue el queso mozzarella en la
parte superior a la mitad del proceso de cocción.
Cocción de carne y pescado
Cuando cocine carne blanca, aves y pescado, utilice los
ajustes de temperatura de 335°F a 375°F.
Para carnes rojas que deben estar bien cocidas por fuera y
tiernas y jugosas por dentro, es una buena idea comenzar
con un ajuste de temperatura alta (375°F ~ 425°F) durante
un corto tiempo y luego bajar la temperatura del horno.
En general, cuanto mayor sea el tamaño de lo que desee
tostar, menor será el ajuste de temperatura. Coloque la carne
en el centro de la rejilla y coloque la bandeja de goteo debajo
para recoger la grasa que gotea.
Asegúrese de que la rejilla esté insertada de manera que
quede en el centro del horno. Si desea aumentar la cantidad
de calor desde abajo, utilice las alturas de las rejillas bajas.
Para un rostizado sabroso (especialmente carne de pato y
caza silvestre), aderece la carne con manteca de cerdo o
tocino en la parte superior.
1
Posición
de rejilla
Posición
de rejilla
2
3
4
Horno de 21"
1
2
Español
Para lograr pizzas crujientes y sabrosas:
Ɣ Precaliente el horno durante al menos 15minutos.
Ɣ Coloque la bandeja de la pizza en la rejilla suministrada
con el horno. Si se utiliza la bandeja de goteo, prolongará
el tiempo de cocción y dificultará la obtención de una
masa crujiente.
Ɣ No abra la puerta del horno con frecuencia mientras la
pizza se esté cocinando.
Horno de 17"
49
Page 50

Limpieza y Mantenimiento
Ɣ Asegúrese de que todas las perillas de control estén
apagadas y de que el electrodoméstico esté frío antes de
limpiarlo.
Ɣ Asegúrese de que todas las superficies, las rejillas de
los quemadores y los quemadores del electrodoméstico
estén fríos antes de limpiarlos o desmontarlos.
Ɣ NO utilice blanqueador ni removedores de óxido en el
anafe o en las rejillas de los quemadores.
Ɣ NO obstruya el flujo de aire de combustión y ventilación.
Ɣ Mantenga los materiales combustibles, gasolina y otros
vapores y líquidos inflamables fuera del el área del
electrodoméstico.
Ɣ Limpie el horno únicamente con limpiador de horno. Siga
las instrucciones del envase.
Ɣ Nunca utilice un cepillo de alambre u objeto metálico para
limpiar las aberturas u orificios del quemador. El cepillo
puede “desprender” cerdas que pueden alojarse en el
orificio o las aberturas del quemador y causar un incendio
o una explosión.
Ɣ Limpie todas las superficies tan pronto como sea posible
después de los derrames por ebullición o vertidos.
Ɣ Utilice agua tibia jabonosa solo para limpiar las rejillas
del quemador, el anafe, las superficies pintadas, las
superficies esmaltadas, las superficies de acero
inoxidable y las piezas de plástico de su cocina. No utilice
limpiadores de grano o ácidos. No utilice limpiadores con
amoníaco, los limpiadores de este tipo son corrosivos y
podrían dañar los componentes de la cocina.
Ɣ NO use lana de acero, o limpiadores abrasivos, o
Español
limpiadores de tipo ácido como blanqueador de cloro en
el anafe o sistemas de rejillas. Dañarán su horno o anafe.
Utilice únicamente esponjas de limpieza de plástico no
abrasivo.
Ɣ NO permita que los alimentos que contengan ácidos
(como jugo de limón, tomate o vinagre) permanezcan
en las superficies pintadas o de porcelana. Los ácidos
pueden eliminar el acabado brillante. Limpie los derrames
de huevos cuando el anafe esté frío.
Ɣ NO lave las superficies de porcelana cuando estén
calientes. Deje que estas superficies se enfríen antes de
limpiar. Podría sufrir quemaduras o la porcelana podría
quebrarse.
Ɣ Se producirán picaduras y decoloración si se permite que
los derrames permanezcan durante un período de tiempo
cualquiera en el acero inoxidable.
Ɣ NO permita que los derrames permanezcan en las tapas
del quemador. Las tapas podrían mancharse de forma
permanente.
Ɣ Cuando limpie alrededor de los quemadores, tenga
cuidado de no dañar el electrodo (si lo tiene incluido). Si
engancha el electrodo de encendido metálico con una
esponja o un paño, podría dañarlo o romperlo. Si esto
ocurre, el quemador no se encenderá.
La puerta del horno
ADVERTENCIA
Cuando se desee quitar la puerta:
Ɣ No coloque el peso excesivo sobre la puerta abierta del
horno ni se pare sobre la puerta abierta del horno dado
que, en algunos casos, podría provocar que el horno se
voltee, que se rompa o dañe la puerta hasta el punto en
que el uso del horno no sea seguro o que se generen
lesiones graves al usuario.
Ɣ Al abrir la puerta del horno, permita que salga el vapor y
el aire caliente antes de acercarse al horno para revisar,
agregar o quitar alimentos.
Ɣ Asegúrese de que el horno esté frío y que se haya
desconectado la corriente antes de quitar la puerta. De
lo contrario, se podrían producir descargas eléctricas o
quemaduras.
Ɣ La puerta del horno es pesada y frágil. Retire la puerta
del horno con ambas manos. El frente de la puerta es de
cristal. Se debe manipular con cuidado para evitar que
se rompa.
Ɣ Sujete únicamente los lados de la puerta del horno.
No sujete la manija, porque puede oscilar en la mano y
causar daños o lesiones.
Ɣ Si no se sujeta de manera firme y adecuada la puerta
del horno, se pueden producir lesiones personales o
daños al producto.
Ɣ Para evitar lesiones por el cierre a presión del soporte
de la bisagra, asegúrese de que ambas palancas
estén bien fijadas en su sitio antes de retirar la puerta.
Además, no debe forzar la puerta a abrirse o cerrarse,
porque la bisagra podría dañarse y provocar lesiones.
1. Asegúrese de leer la ADVERTENCIA indicada
anteriormente antes de intentar extraer la puerta del
horno.
2. Abra la puerta hasta el final. (Fig. 21)
Fig. 21
50
Page 51

3. Voltee las palancas de las bisagras (una a cada lado)
hacia usted. (Fig. 22)
a
Fig. 22
4. Cierre la puerta hasta que se detenga. Quedará a medio
abrir. (Fig. 23)
Fig. 23
5. Sujete la puerta firmemente de ambos lados y, con
ambas manos, tire de la puerta directamente hacia fuera
de las ranuras de las bisagras. (Fig. 24, Fig. 25 y Fig. 26)
Sostener la puerta con firmeza porque es pesada.
b
Fig. 25
Fig. 26
6. Coloque la puerta sobre una superficie plana que esté
protegida para que la puerta no dañe el material de la
superficie.
Cambio de la lámpara del horno
1. Desconecte el horno de la alimentación eléctrica
con el interruptor que se utiliza para conectar el
electrodoméstico a la red eléctrica, o desenchufe el
electrodoméstico si tiene acceso al enchufe.
2. Retire la tapa de vidrio del portalámparas. (Fig. 27)
Español
Fig. 24
Fig. 27
51
Page 52

3. Retire la lámpara y reemplácela por una lámpara
resistente a altas temperaturas (572oF) con las siguientes
características:
- Voltaje: 12V
- Potencia: 15W
- Tipo: G9
- Tipo de lámpara: Halógena
4. Vuelva a colocar la tapa de vidrio.
5. Vuelva a conectar la alimentación eléctrica al horno.
Para solicitar el repuesto de la lámpara del horno Furrion,
llame al servicio de asistencia de Furrion.
Cambio de la luz LED de la perilla de
control
1. Desconecte el horno de la alimentación eléctrica
con el interruptor que se utiliza para conectar el
electrodoméstico a la red eléctrica, o desenchufe el
electrodoméstico si tiene acceso al enchufe.
2. Sujete y tire de la perilla de control con la luz LED rota.
(Fig. 28)
3. Retire los dos tornillos que sujetan la luz LED con un
destornillador Phillips. (Fig. 29)
Fig. 29
4. Retire la unidad de LED y desconecte el cable de la base
de la unidad de LED. (Fig. 30)
Español
Fig. 28
Fig. 30
5. Enchufe el conector del cableado en la nueva unidad de
LED.
6. Vuelva a ajustar la unidad de LED en la consola con los
2tornillos que se quitaron en el paso 3. Asegúrese de no
pellizcar los cables durante este proceso.
7. Vuelva a colocar la perilla de control alineando el vástago
del control en la abertura de la carcasa de la perilla de
control y empújela hasta que vuelva a su posición.
Almacenamiento
Seque todas las superficies y la caja del quemador, luego rocíe las superficies con una sustancia de aceite de cocina para
evitar que la superficie se oxide durante el almacenamiento a largo plazo. Limpie la capa de aceite antes de volver a utilizarlo.
52
Page 53

Resolución de problemas
Antes de llamar al servicio técnico, revise esta lista. Puede ahorrarle tiempo y dinero. Esta lista incluye experiencias comunes
que no son el resultado de mano de obra o material defectuoso en su electrodoméstico.
Problema Posible causa / solución
. Presione y gire la perilla de control de
Los quemadores de
la superficie no se
encienden
La llama del quemador
de superficie está
encendida por la mitad
La llama del quemador
de superficie es
naranja
La perilla de control de la superficie no se ha girado completamente a su posición
superficie a la posición
Asegúrese de que la válvula de suministro de gas esté abierta.
Los orificios o ranuras del quemador están obstruidos. Con el quemador apagado, utilice un alambre o una aguja de calibre
pequeño para limpiar los orificios o las ranuras.
Nivel bajo de suministro de gas en el cilindro.
Hay humedad en el quemador, seque bien el quemador.
Los orificios o ranuras del quemador están obstruidos. Con el quemador apagado, limpie los orificios o las ranuras con un
alambre o una aguja de calibre pequeño.
Ha quedado humedad después de la limpieza. Airee la llama ligeramente y deje que el quemador funcione hasta que la llama
esté completa. Seque bien los quemadores.
Hay partículas de polvo en la línea principal. Deje que el quemador funcione unos minutos hasta que la llama se vuelva azul.
En las zonas costeras, es inevitable que la llama esté ligeramente anaranjada debido al aire salino.
hasta que el quemador se encienda y luego gire la perilla hasta lograr el tamaño de llama deseado.
Especificaciones
Especificaciones técnicas
Potencia
opcional
BTU/HR
Combustible /
alimentación
Presión de
entrada
Entrada de
alimentación
Volumen interno
del horno
Este electrodoméstico cumple con las siguientes normativas: ANSI Z21.57a-(2012) Rec / CAN1-1.16-M79 (R2011)
Potencia de gas
Quemador izquierdo y derecho: 6500BTU
Quemador frontal: 8000BTU
Horno: 7100BTU
Propano
10” c.a. mín. a 13,8” c.a. máx.
12V CC < 2Amp.
Horno de 17": 35L
Horno de 21": 51L
Español
53
Page 54

Page 55

Page 56

Furrion Innovation Center & Institute of Technology
Ɣ 52567 Independence Ct., Elkhart, IN 46514, USA Ɣ Toll free:1-800-789-3341
©2007-2020 Furrion Ltd. Furrion® and the Furrion logo are trademarks licensed for use by Furrion Ltd. and registered
©2007-2020 Furrion Ltd. Furrion® et le logo Furrion sont des marques déposées par Furrion Ltd. et enregistrées aux
©2007-2020 Furrion Ltd. Furrion® y el logotipo de Furrion y son marcas comerciales con licencia de uso de Furrion
Ltd. y están registradas en los Estados Unidos y en otros países.
U.S. D839038, D851,978, D851,979, D851,990 and other patents pending / et autres brevets en instance / y otras
patentes pendientes (FS17WB4A-BL, FS17WB4A-SS, FS21DB4A-BL, FS21DB4A-SS)
Ɣ Email: support@furrion.com
in the U.S. and other countries.
Etats-Unis et ailleurs.
www.furrion.com
IM-FHA00083 V3.0
 Loading...