

Photo Printer
FDP-100
User's Guide
Introduction
Prepare
Printing from the
Printing from the
We would like to take this opportunity to thank you for purchasing this Photo Printer.
Please read this User’s guide carefully and keep it for future reference.
camera
computer
appendix

Contents
Introduction
IMPORTANT SAFEGUARDS ......................................................................... 4
Connection to Power (For UK)............................................................ 8
Introduction.................................................................................................... 9
Standard Accessories ......................................................................... 9
Notice.................................................................................................. 9
Copyrights......................................................................................... 10
Trademarks....................................................................................... 10
Others ............................................................................................... 10
Features........................................................................................................ 11
Flow of the Printer Operation ..................................................................... 12
Quick Guide.................................................................................................. 13
Safety Precautions ...................................................................................... 15
WARNINGS ...................................................................................... 15
CAUTIONS ....................................................................................... 16
Usage/Handling Note................................................................................... 17
Location Notes .................................................................................. 17
Handling/Maintenance Notes............................................................ 17
Notes in Printing................................................................................ 18
Paper/Paper Tray Notes ................................................................... 18
Prints Notes ...................................................................................... 19
Ink Cartridge Notes ........................................................................... 19
Condensation Notes ......................................................................... 19
Controls and Components.......................................................................... 20
Paper/Ink cartridge ...................................................................................... 22
Prepare
Set the Ink Cartridge in the Printer ............................................................ 23
How to Eject the Ink Cartridge ..........................................................24
Set the Paper in the Paper Tray.................................................................. 25
Set the Paper Tray in the Printer ................................................................ 26
Turning on the Power (Connecting)........................................................... 27
2

Printing from the Camera
Printing from the Camera (PictBridge Printing)........................................ 28
Connecting to the Camera ................................................................ 28
Printing from the Camera.................................................................. 29
Printing from the Computer
System Requirements ................................................................................. 30
Windows ........................................................................................... 30
Macintosh.......................................................................................... 30
Installing the Printer Driver......................................................................... 31
Windows ........................................................................................... 31
Macintosh.......................................................................................... 32
Connecting the Printer to a Computer....................................................... 33
Printing from the Computer........................................................................ 34
Uninstalling the Printer Driver.................................................................... 35
Windows ........................................................................................... 35
Macintosh.......................................................................................... 35
Appendix
Contents
If Errors have Occurred............................................................................... 36
Error Messages................................................................................. 36
[ERROR] Lamp ................................................................................. 37
Before Requesting Services ....................................................................... 38
Troubleshooting ................................................................................38
If Paper Jam has Occurred... ............................................................ 40
Using the Cleaner ............................................................................. 41
Specifications .............................................................................................. 42
Main Specifications ........................................................................... 42
FUNAI SOFTWARE LICENSE AGREEMENT.............................................. 43
FUNAI SOFTWARE LICENSE AGREEMENT.................................. 43
3
IMPORTANT SAFEGUARDS
WARNING: TO REDUCE THE RISK OF FIRE OR ELECTRIC SHOCK, DO NOT EXPOSE
THIS APPLIANCE TO RAIN OR MOISTURE.
CAUTION
RISK OF ELECTRIC SHOCK
DO NOT OPEN
CAUTION:
TO REDUCE THE RISK OF ELECTRIC SHOCK, DO NOT REMOVE
COVER (OR BACK). NO USER SERVICEABLE PARTS INSIDE.
REFER SERVICING TO QUALIFIED SERVICE PERSONNEL.
The lightning flash with arrowhead symbol, within an equilateral triangle, is
intended to alert the user to the presence of uninsulated “dangerous voltage”
within the unit’s enclosure that may be of sufficient magnitude to constitute a risk
of electric shock to persons.
The exclamation point within an equilateral triangle is intended to alert the user
to the presence of important operating and maintenance (servicing) instructions
in the literature accompanying the appliance.
IMPORTANT SAFEGUARDS
1) Read Instructions - All the safety and operating instructions should be read before the
appliance is operated.
2) Retain Instructions - The safety and operating instructions should be retained for future
reference.
3) Heed Warnings - All warnings on the appliance and in the operating instructions should be
adhered to.
4) Follow Instructions - All operating and use instructions should be followed.
5) Cleaning - Unplug this unit from the wall outlet before cleaning. Do not use liquid cleaners
or aerosol cleaners. Use a damp cloth for cleaning.
6) Attachments - Do not use attachments not recommended by the product manufacturer as
they may cause hazards.
7) Water and Moisture - Do not use this unit near water, for example, near a bath tub, wash
bowl, kitchen sink or laundry tub, in a wet basement, or near a swimming pool, and the like.
8) Accessories - Do not place this unit on an unstable cart, stand, tripod, bracket, or table. The
unit may fall, causing serious injury to a child or adult, and serious damage to the
appliance. Use only with a cart, stand, tripod, bracket, or table recommended by the
manufacturer, or sold with the unit. Any mounting of the appliance should follow the
manufacturer’s instructions and should use a mounting accessory
recommended by the manufacturer.
9) Cart - An appliance and cart combination should be moved with care. Quick
stops, excessive force, and uneven surfaces may cause the appliance and cart
combination to overturn.
4

IMPORTANT SAFEGUARDS
10) Ventilation - Slots and openings in the cabinet are provided for ventilation. To ensure
reliable operation of the unit and to protect it from overheating, these openings must not be
blocked or covered. The openings should never be blocked by placing the unit on a bed,
sofa, rug, or other similar surface. This unit should not be placed in a built-in installation
such as a bookcase or rack unless proper ventilation is provided or the manufacturer's
instructions have been adhered to.
11) Power Sources - This unit should be operated only from the type of power source indicated
on the marking label. If you are not sure of the type of power supply to your home, consult
your product dealer or local power company.
12) Power supply cords - Do not use power supply cords other than the power cord and the AC
adapter supplied with this unit.
13) Power Cord Protection - Power supply cords should be routed so that they are not likely to
be walked on or pinched by items placed upon or against them, paying particular attention
to cords at plugs, convenience receptacles, and the point where they exit from the
appliance.
14) Overloading - Do not overload wall outlets and extension cords as this can result in a risk of
fire or electric shock.
15) Object and Liquid Entry - Never push objects of any kind into this unit through any openings
as they may touch dangerous voltage points or short-out parts that could result in a fire or
electric shock. Never spill liquid of any kind on the unit.
16) Servicing - Do not attempt to service this unit yourself as opening or removing covers may
expose you to dangerous voltage or other hazards. Refer all servicing to qualified service
personnel.
17) Damage Requiring Service - Unplug this unit from the wall outlet and refer servicing to
qualified service personnel under the following conditions:
a )When the power-supply cord or plug is damaged.
b )If liquid has been spilled, or objects have fallen into the unit.
c )If the unit has been exposed to rain or water.
d )If the unit does not operate normally by following the operating instructions. Adjust only
those controls that are covered by the operating instructions as an improper adjustment
of other controls may result in damage and will often require extensive work by a
qualified technician to restore the unit to its normal operation.
e )If the unit has been dropped or damaged in any way.
f )When the unit exhibits a distinct change in performance, this indicates a need for
service.
18) Replacement Parts - When replacement parts are required, be sure the service technician
has used replacement parts specified by the manufacturer or that have the same
characteristics as the original part. Unauthorized substitutions may result in fire, electric
shock or other hazards.
19) Safety Check - Upon completion of any service or repairs to this unit, ask the service
technician to perform safety checks to determine that the unit is in proper operating
condition.
20) Heat - This unit should be situated away from heat sources such as radiators, heat
registers, stoves, or other products (including amplifiers) that produce heat.
5

IMPORTANT SAFEGUARDS
Installation Location
For safety and optimum performance of this unit:
z Do not install the unit vertically. Install the unit in a horizontal and stable position.
z Do not place anything directly on top of the unit.
z Shield the unit from direct sunlight and keep the unit away from sources of intense heat.
z Avoid dusty or humid places.
z Use the unit at temperatures of 10°C - 35°C.
z Avoid places with insufficient ventilation for proper heat dissipation.
z Do not block the ventilation holes on the back of the unit.
z Avoid locations subject to strong vibration or strong magnetic fields.
Avoid the Hazards of Electrical Shock and Fire
z Do not handle the power cord with wet hands.
z Do not pull the power cord when disconnecting it from AC wall outlet. Grasp it by the plug.
z If, by accident, liquid is spilled on this unit, unplug the power cord immediately and take the
unit to our Authorized Service Center for servicing.
z Do not put your fingers or objects into the unit other than those specified in the operating
instructions.
FCC WARNING-This equipment may generate or use radio frequency energy. Changes or
modifications to this equipment may cause harmful interference unless the modifications are
expressly approved in the instruction manual. The user could lose the authority to operate this
equipment if an unauthorized change or modification is made.
This equipment has been tested and found to comply with the limits for a Class B digital
device, pursuant to Part15 of the FCC Rules. These limits are designed to provide reasonable
protection against harmful interference in a residential installation. This equipment generates,
uses, and can radiate radio frequency energy and, if not installed or used in accordance with
the instructions, may cause harmful interference to radio communications.
However, there is no guarantee that interference will not occur in a particular installation. If
this equipment does cause harmful interference to radio or television reception, which can be
determined by turning the equipment off and on, the user is encouraged to try to correct the
interference by one or more of the following measures:
1) Reorient or relocate the receiving antenna.
2) Increase the separation between the equipment and receiver.
3) Connect the equipment to an outlet on a circuit different from that to which the receiver is
connected.
4) Consult the dealer or an experienced radio/TV technician for help.
Canadian DOC statement
DOC Class B Compliance - This Class B digital apparatus complies with Canadian ICES-
003.
6

IMPORTANT SAFEGUARDS
Before Use
z Please read this User’s guide carefully before using your photo printer, and keep it for future
reference.
z This unit is intended for household use only.
For Customer Use:
Read carefully the information located at the back of this unit and enter the Numbers below.
Retain this information for future reference.
Model No.
Serial No.
Declaration of Conformity
We declare under our sole responsibility that this product, to which this declaration relates, is in
conformity with the following standards:
EN60950-1, EN55022, EN55024, EN61000-3-2 and EN61000-3-3. Following the provisions of
73/23/EEC, 89/336/EEC and 93/68/EEC Directive.
About Recycling
z This product and the accessories packed together are the applicable product
to the WEEE directive.
z This product’s packaging materials are recyclable and can be reused.
z Please dispose of any materials in accordance with your local recycling
regulations. When discarding the unit, comply with your local rules or
regulations.
7

Connection to Power (For UK)
Before Switching on make sure that the voltage of your electricity supply is the same as that
indicated on the rating plate.
Mains Cord
This appliance may be fitted with a nonrewireable plug. If it is necessary to change
the fuse in a nonrewireable plug the fuse
cover must be refitted. If the fuse cover is
lost or damaged, the plug must not be used
until a replacement available from the
appliance manufacturer is obtained.
It is important that the colour of the
replacement fuse cover corresponds with the
rating marking on the base of the plug.
If the plug has to be changed because it is
not suitable for your socket, or becomes
damaged, it should be cut off and an
appropriate plug fitted following the wiring
instructions below. The plug removed must
be disposed of safely as insertion into a 13A
socket is likely to cause an electrical hazard.
For your own safety read the following
instructions carefully before attempting to
connect this unit to mains.
The wires in this mains lead are coloured in
accordance with the following code:
BLUE=NEUTRAL, BROWN=LIVE
Important
As the colours of the wires in the mains lead
of this appliance may not correspond with
the coloured markings identifying the
terminals in your plug, proceed as follows:
The wire which is coloured blue must be
connected to the terminal which is marked
with the letter N or coloured black.
The wire which is coloured brown must be
connected to the terminal which is marked
with the letter L or coloured red.
No connection is to be made to the earth
terminal of the plug.
If a 13 Amp (BS 1363) Plug is used, a 3 Amp
Fuse must be fitted, or if any other type of
Plug is used a 3 or 5 Amp Fuse must be
fitted, either in the Plug or Adaptor, or on the
Distribution Board.
Mains Supply:220 - 240 V 50 Hz - AC only
Do not make any connection to the larger pin
marked with the letter “E” or by the symbol
or coloured green or green and yellow.
FUSE
BROWN
BLUE
(Neutral)
OUTER SHEATH OF THE WIRE
(Live)
CORD GRIP
8
Introduction
z Please read the FUNAI SOFTWARE LICENSE AGREEMENT described on page 43 in this
User’s guide carefully.
Introduction
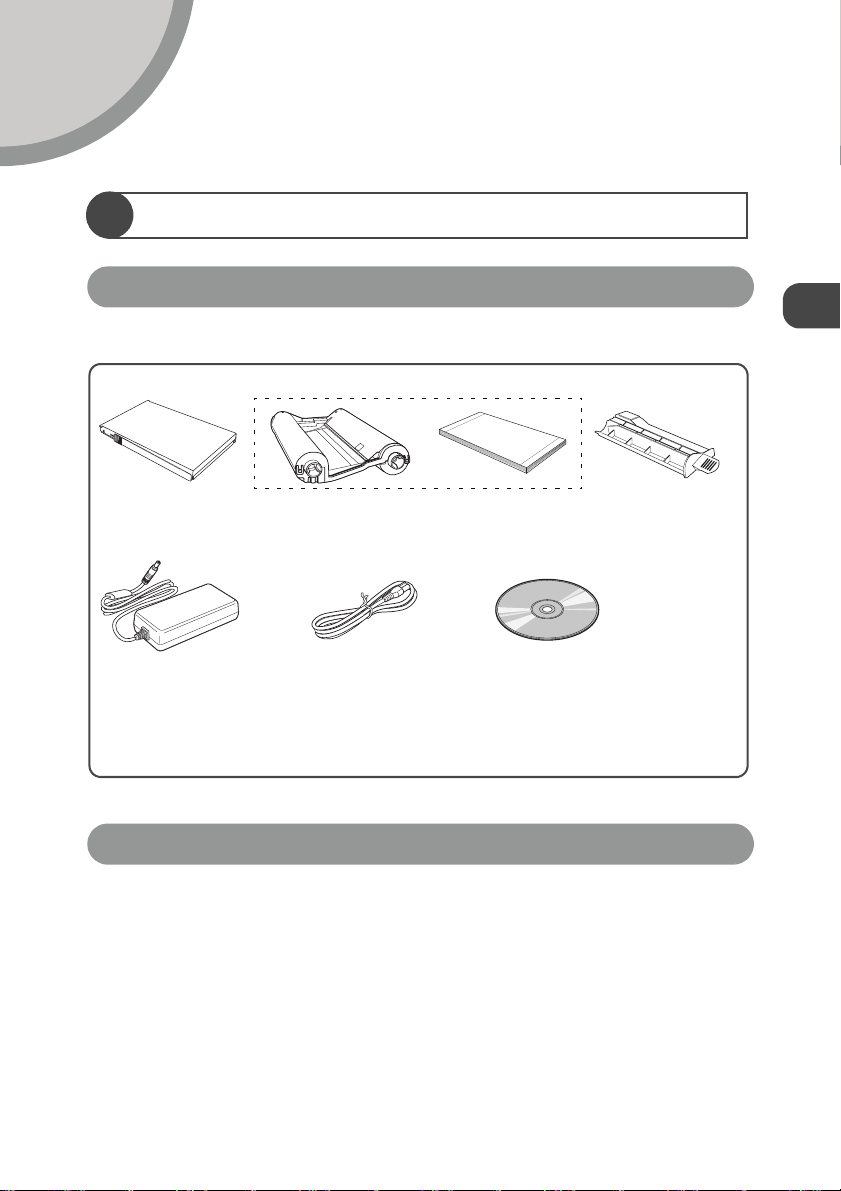
Standard Accessories
Please check and make sure that you have all items listed below:
Paper tray Ink cartridge/Paper set (for 5 prints)
AC adapter
(UADPDCAATE02)
- Quick Start Guide
z Refer to optional accessories (Paper/Ink cartridge) on page 22.
Power cord
CD-ROM
- Printer driver
- Application software
- User’s guide
Cleaner
Notice
z In this User’s guide, “camera” refers to digital devices such as digital cameras or
digital video cameras which are compatible with PictBridge-standard.
z No person shall duplicate, photocopy, or reproduce any part of the User’s guide.
z All information included herein is subject to change without notice.
z We shall not be responsible for any loss, damages, direct or indirect, arising from or
related to improper use of this product.
9

Introduction
Copyrights
Trademarks
z Whatever you have printed can be used for your personal entertainment only. Under
copyright laws, other materials cannot be used without obtaining permission from the
holders of the copyrights.
z Microsoft
United States and/or other countries.
z Macintosh and Mac OS are either registered trademarks or trademarks of Apple
Computer Inc. in the United States and/or other countries.
z Adobe
United States and/or other countries.
z Adobe
Adobe products.
z Other names and products mentioned in this User’s guide may be registered
trademarks or trademarks of their respective companies.
®
and Windows® are registered trademarks of Microsoft Corporation in the
®
is registered trademark or trademark of Adobe Systems Incorporated in the
®
Reader® and Adobe® Photoshop® Album Starter Edition are free version of
Others
:This mark denotes precautions or issues that may affect the operation or maintenance
of the printer.
:This mark denotes supplementary information or tips in use.
10

Features
Direct print
Images in the camera which is compatible with PictBridge-standard
can be printed easily by connecting with the printer.
Printing from your computer
Images can be printed from your computer.
(Windows/Macintosh)
Multiple image print (2/4/9/16 split)
Same images can be printed on one sheet of paper.
Index print*
Images in the camera are printed as view format.
42 images can be printed on one sheet of paper.
Image correction
Brightness, contrast, and color saturation of the images can be
adjusted to print from the computer.
Introduction
DPOF print*
Only the images specified with DPOF settings on the camera
can be printed automatically.
Date print*
Images can be printed with shooting date.
*Some functions cannot be used depending on the type of camera.
11
Introduction
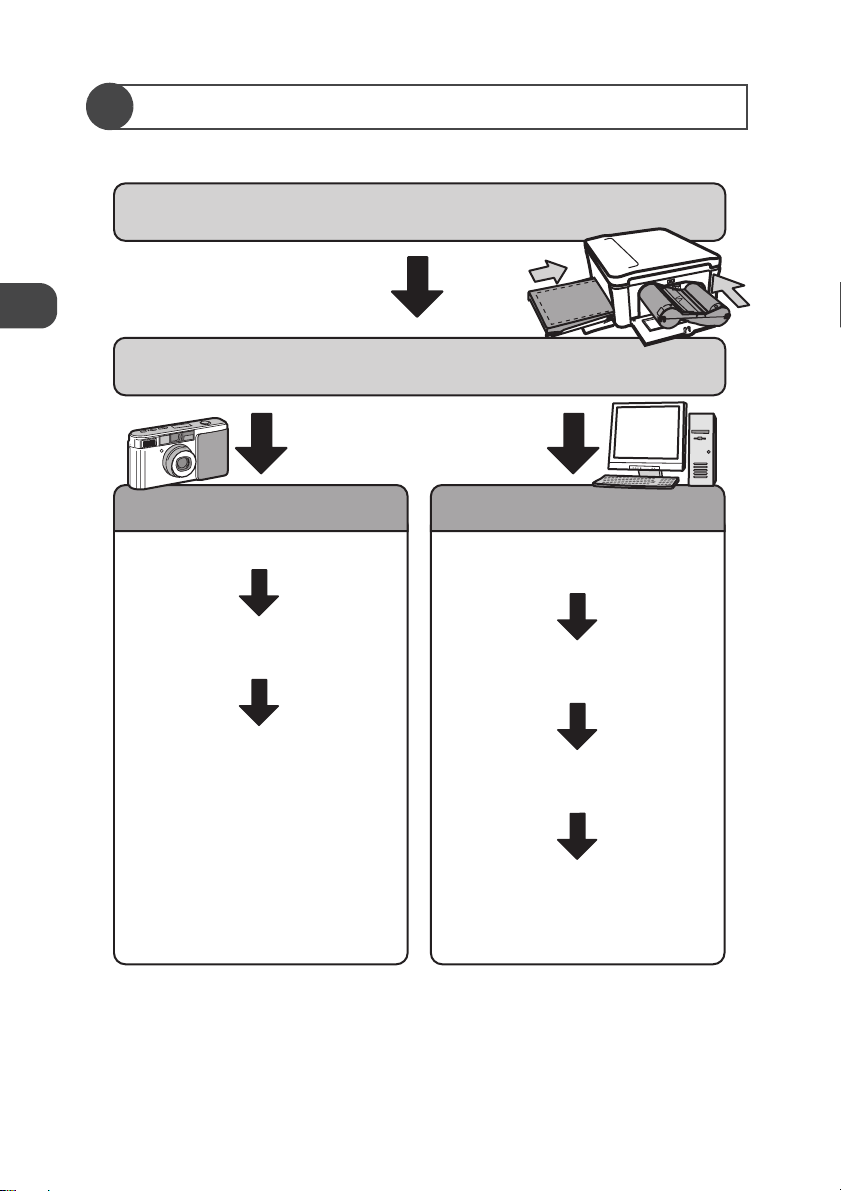
FlowofthePrinterOperation
You can print in the following order. For actual operating, refer to the page indicated below.
Insert the Ink cartridge.→ p.23
Set the paper.→ p.25, 26
Camera printing Computer printing
Plug the power cord→ p.27
Connect the camera with
the printer.→ p.28
Print images from the
camera. → p.29
Install the printer driver.
→ p.31
Plug the power cord.
→ p.27
Connect the computer with
the printer. → p.33
Print images from the
computer.→ p.34
12
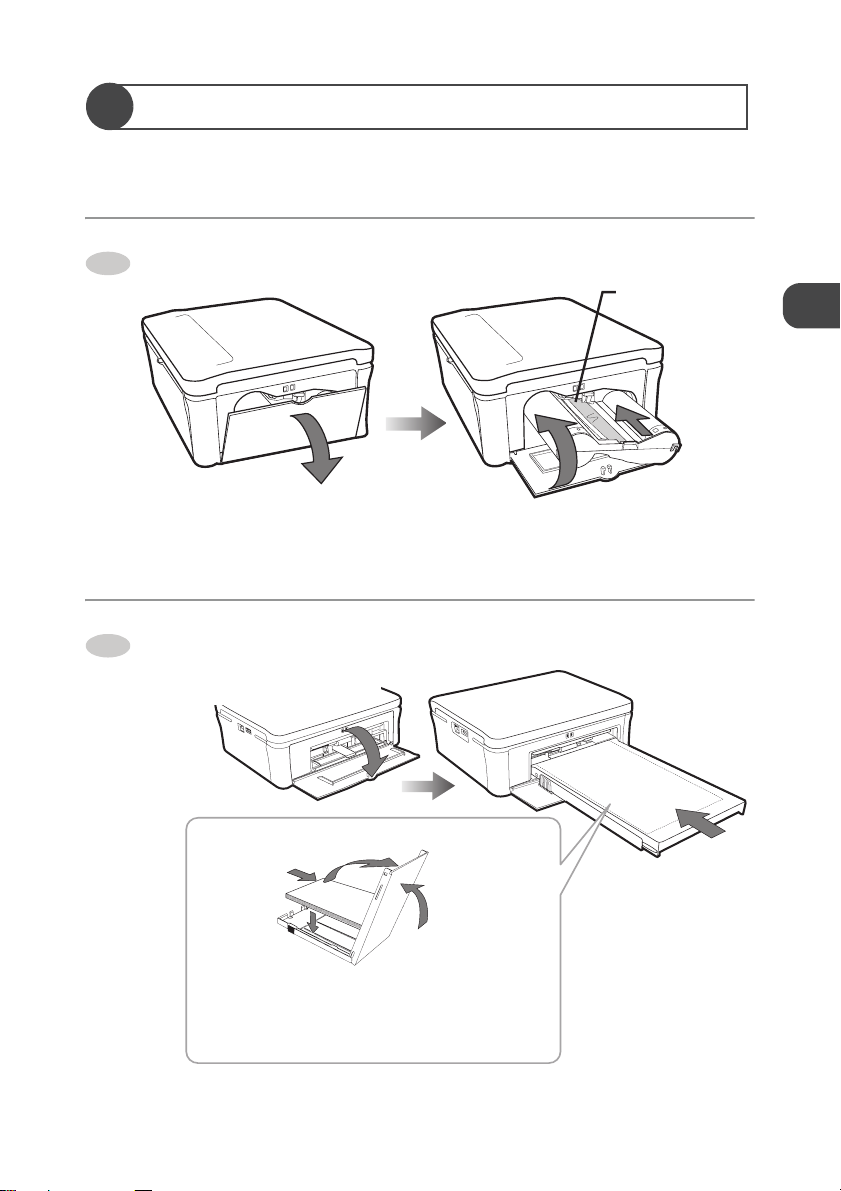
QuickGuide
Let’s try to print images by connecting the printer with the camera.
z Refer to the pages below for the details.
Inserting the Ink cartridge.→ p.23
1
Introduction
Make sure there is
no slack in the Ink
cartridge.
a Open the Ink cartridge
compartment door.
Setting the paper.→ p.25, 26
2
a Open the Paper tray
compartment door.
b Slide and open the top cover.
c Set the paper in the
Paper tray with the
print side (glossy side)
facing upwards.
c Close the
cover.
d Close the top
cover.
Paper tray
b Insert the Ink
cartridge until it
clicks.
e Insert the Paper
tray with the top
cover slid.
13
Introduction
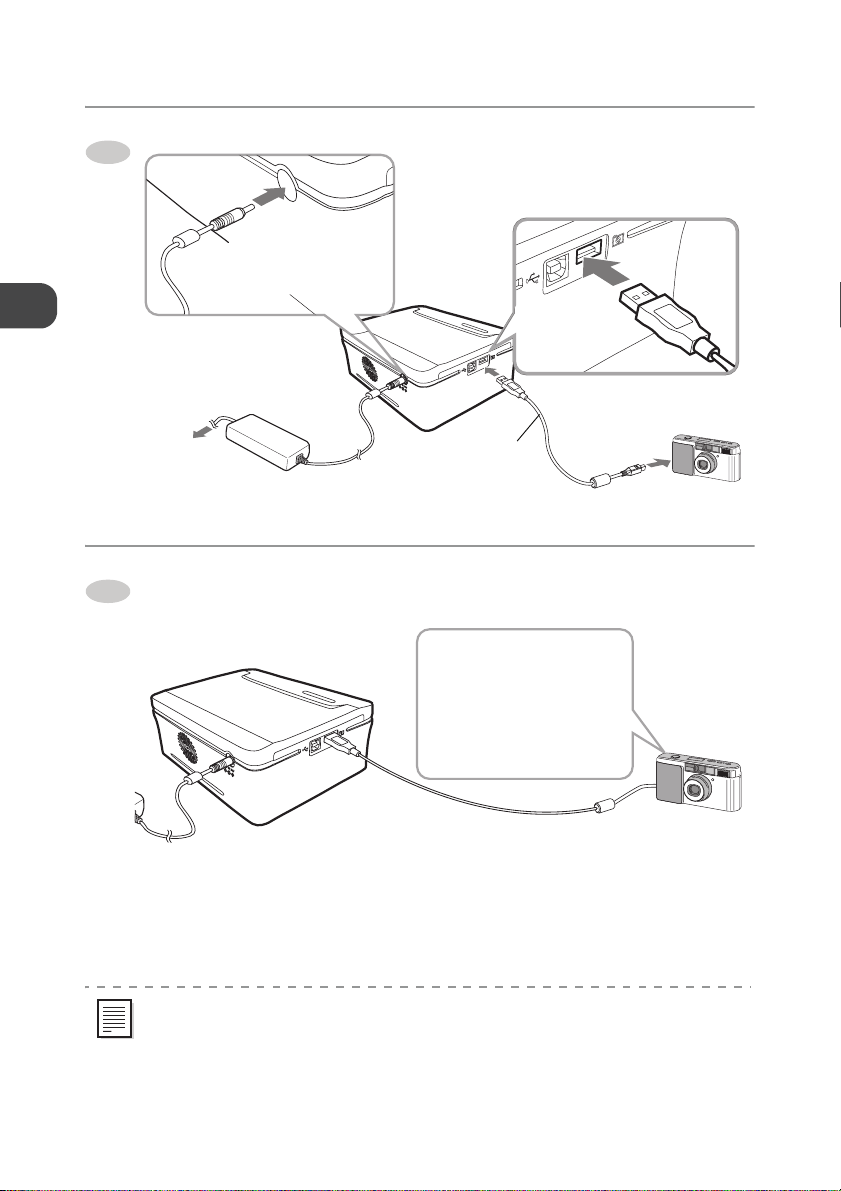
3
4
Connecting→ p.28
a Connect to the
printer.
b Connect to the
AC adapter.
To power
outlet
c Plug the power cord.
Printing→ p.29
d Connect to the printer.
e Connect to
the camera.
USB cable (supplied
with the camera)
14
a Turn on the camera.
b Operate the camera
to print images.
z Printing method varies depending on the camera models. Refer to the user’s guide of the
camera.

Introduction
SafetyPrecautions
Before using the printer, read the safety precautions and follow them, or there may be fire,
electric shock, injuries or malfunction.
WARNINGS
z Do not disassemble or remodel the printer.
z Do not use the printer if the printer is dropped or the casing becomes damaged.
z Unplug the power cord immediately if the printer emits smoke or abnormal odor,
or shows other signs of significant malfunction.
z Do not place liquid containers such as glasses, vases or flowerpots on the printer
for preventing water or foreign objects from getting into the printer.
z Do not drop or insert foreign objects such as metallic or flammable objects.
z Do not touch the power plug during thunderstorms to avoid electric shock.
z Do not damage the power cord.
Unplug the power cord immediately if it becomes damaged, and consult your
dealer.
Do not handle the power cord in the following manner.
− Pulls the power cord forcibly.
− Binds up the power cord.
− Converts the power cord.
− Bends or twists the power cord excessively.
− Heats the power cord.
− Rests heavy objects on the power cord.
z Do not operate the printer outside of the specified voltage rating.
z Do not handle the power cord with the wet hands.
z Do not use the AC adapter or the power cord other than those specified.
z Do not use the AC adapter or the power cord supplied with the printer for other
products.
z Do not install the printer on an unstable or tilted table.
z Do not let the printer get wet.
z Do not plug too many leads into a single socket.
15

Introduction
CAUTIONS
z Do not install the printer in the following places.
− Smoky or dusty places
− Places subject to direct sunlight
− Steamy places
− Places close to heating equipment
− Places subject to high temperature such as sun-heated cars
z Do not place heavy objects on the printer.
z Do not get on top of the printer.
z Unplug the power cord of the printer when the printer is not in use.
z Do not move the printer while being plugged in.
z Remove dust or other foreign matters adhering to the power plug periodically.
z Confirm that the power cord is plugged into the power outlet firmly.
z Do not plug/unplug the power cord with the wet hands.
z Do not block the air vents on the printer.
z Do not reach into internal parts of the printer other than those specified in the
User’s guide.
z Do not install the printer in narrow or ill-ventilated places.
− Do not install the printer on the bookshelves or into the closet.
− Do not install the printer on the carpet or mattress.
− Do not cover the printer with table cloth and like that.
z Unplug the power cord before cleaning or maintenance.
z Do not remove the Paper tray during printing.
z Do not use the printer near open flames.
16

Introduction
Usage/HandlingNote
Location Notes
z Do not install the printer in humid or dusty places.
z Leave approx. 20 cm of clearance at the front/back side of the printer.
Make sure to leave clearance around the paper-handling slot so that paper has room
enough to jut out from the slot during printing.
Do not let the cables get tangled around the paper-handling slot.
z Do not install the printer near strong magnets or devices that produce strong
electromagnetic fields.
Electromagnetic radiation from devices such as TVs, mobile-phones and speakers may
cause distortion in printed images.
z Do not install the printer vertically.
Handling/Maintenance Notes
z Unplug the power cord from the power outlet when the printer is not in use.
Note that you should plug in and operate the printer at least once every 6 months to
ensure the printer remains functional.
z When the printer is not in use for extended period, eject the Ink cartridge and the
Paper tray from the printer.
Paper may deteriorate due to dust or damp. Remove the unused paper from the Paper
tray, put it into the original bag, and store the bag horizontally.
Use the supplied cleaner before printing if the printer has not been used for extended
period.→ p.41
z When using insecticides or other volatile solvents in the vicinity of the printer,
keep the printer off these solvents.
Do not allow rubber or vinyl materials to remain touched with the printer for a
long time.
These materials may cause deformation of the printer’s casing.
z To clean the printer, wipe up any dust with a soft and dry cloth. If the printer is
heavily dirty, soak the cloth in mild kitchen detergent diluted with water and wipe
off the dust with the cloth and wipe again with dry cloth.
Do not use solvents such as benzene and paint thinner to wipe the printer. It may result
in coming off the surface of the printer or deformation of the printer's casing.
z Before transporting the printer, remove the Paper tray and the Ink cartridge, close
the compartment doors, and put the printer into the original package or wrap it
with soft cloth.
17

Introduction
Notes in Printing
z Do not remove the Ink cartridge or Paper tray forcibly during printing.
It may cause malfunction.
z Do not add any oscillation or shock to the printer.
It may cause malfunction.
z Do not allow more than 10 sheets of printed paper to accumulate on the print
output receptacle (on the top cover of the Paper tray).
It may cause paper jam.
z Do not touch the paper during printing.
It may cause malfunction.
z Do not turn on and off the printer needlessly to avoid waste of the Ink cartridge.
The allotted number of sheets of paper may not be printed.
z The printer may temporarily stop operating due to ambient temperature or
internal temperature of the printer. It is not caused by malfunction.
The printer will resume normal printing when it cools down. Halting a printing process
temporarily is most likely to occur in the following cases:
a When printing continuously
b When ambient temperature is excessively high
c When the air vents on the backside of the printer are blocked or ventilation is
inadequate
Paper/Paper Tray Notes
18
z Use the specified types of paper for the printer.
z Set the paper in the Paper tray with the print side (the glossy side ) facing
upwards.
Fan a stack of paper to remove static cling and set the paper not to stick out of the
Paper tray.
z Do not touch the print side of the paper with your fingers.
Keep the paper surface free from fingerprints, flaws, dust, and oil spots, etc., or clear
images may not be printed.
z Do not tear or bend the paper's perforated line before printing.
Such paper cannot be used.
z Do not bend or fold the paper.
z Up to 20 sheets of paper can be set in the Paper tray.
Do not set more than 20 sheets of the paper for preventing paper jam.
z Do not write characters and like that on the paper before printing.
It may cause malfunction.
z Do not reuse the paper that has already been printed.
It may cause malfunction.

Introduction
Prints Notes
z Do not touch the printed surface with adhesive tape, rubber goods or plastic, etc.,
and do not leave the printed surface in contact with other objects.
It may cause color loss, change of color or color transfer.
z Select albums with nylon-based sleeves, polypropylene sleeves or cellophane
sleeves for storing prints.
Other type of sleeves may cause color loss or change of color.
z To avoid print quality deterioration, do not store prints under the following
conditions:
− Locations exposed to direct sunlight
− High temperatures (above 40 °C)
− High humidity
− Dust-laden environment
z Even if prints are stored avoiding the conditions above, change of color or print
quality deterioration may occur.
Ink Cartridge Notes
z Use the specified Ink cartridge for the printer.
z Do not touch the Ink ribbon or pull it out from the Ink cartridge.
The allotted number of sheets of paper may not be printed.
z Rotate the screw hole of the Ink cartridge in the direction of the arrow with the
screw hole pressed to remove slack of the Ink ribbon and then insert the Ink
cartridge.
z Confirm the direction of the Ink cartridge and insert all the way into the Ink
cartridge slot.
z Do not reuse the Ink cartridge that has already been consumed.
Condensation Notes
z If condensation forms inside the printer, stop using the printer and leave it at
ordinary temperatures until the water droplets have evaporated completely.
Water droplets will form on the windows of the warm room. These droplets are called
condensation. They can form on the printer, the Ink cartridge, the Paper tray, and the
paper when transporting these items from cold place to warm place.
z If condensation forms on the Ink cartridge, the Paper tray or the paper, wipe off
the water droplets and allow to reach to room temperature before use.
z When transporting the printer, including the Ink cartridge, the Paper tray, and the
paper from cold place to warm place, seal them into a plastic bag to avoid
condensation. Then allow to reach to ambient temperature before use.
19

Introduction
POWER
ACCESS
ERROR
ControlsandComponents
Printer (Front view)
POWER
ACCESS
ERROR
a b c
d e f g h
Printer (Back view)
20
l m
i j k

Introduction
a [POWER] Lamp
Lights up when the printer is plugged
to the power outlet. Connect the
printer to the AC adapter (supplied),
and connect the AC adapter to the
power outlet.
b [ACCESS] Lamp
Lights up when the printer is
connected to the computer/camera.
c [ERROR] Lamp
Lights up if an error (such as paper
out) has been detected.
d Paper Tray Slot
Inserts the Paper tray into this slot.
e Paper Tray Compartment Door
Opens this door when inserting the
Paper tray. Close it when the printer
is not in use.
f Ink Cartridge Slot
Inserts the Ink cartridge into this slot.
g Ink Cartridge Eject Lever
Presses up the lever to remove the
Ink cartridge.
h Ink Cartridge Compartment
Door
Opens this door to insert/remove the
Ink cartridge. Close it when using the
printer.
i Air Vent
Prevents the printer from rising its
internal temperature excessively.
j Paper-handling Slot
Protrudes the paper from this slot
during printing. Do not touch the
protruding paper.
k DC IN Terminal
Connects the AC adapter to supply
the power.
l USB Port
Connects the USB cable (sold
separately) to this port for using the
printer with a computer.
m PictBridge Port
Connects the USB cable (supplied
with the camera) to this port for using
the printer with a PictBridgecompliant camera.
21

Introduction
Paper/Inkcartridge
Use the following paper. (Use the Ink cartridge included in the print set.)
Postcard size paper (100 x 148 mm)
Print set :FCP-40P
Postcard size paper (40 sheets)/Ink cartridge (for 40 prints).
z Do not disassemble the Ink cartridge.
z Do not open the print set (paper/Ink cartridge) until you use it.
22

Prepare
Please use the specified paper and Ink cartridge.
Set the Ink Cartridge in the Printer
Confirm that there is no slack in
1
the Ink cartridge.
z If the Ink ribbon is slack, turn a to the
direction of the arrow pressing a in until the
Ink ribbon is strained. (You cannot print
allotted sheets of paper in the print set if you
turn around a too much.)
Open the Ink cartridge
2
compartment door.
Insert the Ink cartridge all the way
3
into the Ink cartridge slot until it
clicks.
z Confirm that the direction of the Ink
cartridge is correct before inserting it.
Close the Ink cartridge
4
compartment door.
Ink ribbon
a
23

Prepare
How to Eject the Ink Cartridge
Open the Ink cartridge
1
compartment door.
Press up the Ink cartridge eject
2
lever.
z The Ink cartridge is flipped out of the Ink
cartridge slot.
Pull out the Ink cartridge
3
horizontally.
24
Close the Ink cartridge
4
compartment door.
z Never reuse the Ink cartridge that has been already consumed. It may cause malfunction.
z Do not touch the Ink ribbon or pull it out of the Ink cartridge.
z Exchange a new Ink cartridge if it has worn out.

Set the Paper in the Paper Tray
Do not use the paper other than the specified paper.
Slide the top cover of the Paper
1
tray to the direction of the arrow.
Open the top cover.
2
Set the paper in the Paper tray with
3
the print side (glossy side) facing
upwards.
z Do not set more than 20 sheets of the paper
in the Paper tray.
z Do not have the paper stuck out of the
Paper tray.
z Do not touch the print side of the paper.
→ p. 18
z Do not tear or bend the paper's perforated
line before printing.
→ p. 18
Prepare
Close the top cover.
4
25

Prepare
1
2
3
Set the Paper Tray in the Printer
Slide the top cover of the Paper
tray to the direction of the arrow.
Open the Paper tray compartment
door.
Insert the Paper tray horizontally
into the Paper tray slot.
How to reject the Paper Tray
Pull the Paper Tray out horizontally and close the Paper tray compartment door.
26

Turning on the Power (Connecting)
Place the printer on a flat area.
1
z Do not place any obstacles within 20 cm of
the front/back side of the printer. Paper
moves in and out to/from the slot during
printing.
Connect the power cord to the AC
2
adapter.
Prepare
20cm
20cm
Connect the AC adapter to the DC
3
IN terminal of the printer.
To power
outlet
Plug the power cord (connected to
4
the AC adapter) into a power outlet.
z The printer turns on, and the [POWER]
lamp lights.
How to turn off the power
Disconnect the power cord from the power outlet, so the [POWER] lamp goes out and turn
off the power.
27

Printing from the Camera
Printing from the Camera (PictBridge Printing)
Connecting the camera with the printer, you can print images directly by the operation of the
camera.
z Images can be printed directly with the camera which is compatible with “PictBridge”
standard.
z It may be necessary to switch the camera to the “PictBridge” mode before connecting to the
printer. Configure the setting of the camera according to the user’s guide of the camera.
Connecting to the Camera
Set the paper and the Ink cartridge.→ p.23-26
Connect the printer to the camera.
1
28
Connect the AC
adapter→ p.27
To power
outlet
Turn the camera’s power on.
2
z The [ACCESS] lamp lights.
z Images can be printed by operating the camera.
z For the details, refer to the user’s guide of the camera.
z Some camera models automatically turn the power on when the cable is connected to the
printer.
z is written in the manual of cameras compatible with PictBridge-standards, and is
displayed on the LCD monitor of some camera models when connecting to the printer.
z When disconnecting the cable, follow the user’s guide of the camera.
Use the USB cable supplied with the camera

Printing from the Camera
Printing from the Camera
Perform the printing operation from the camera.
1
z Printing operation is performed viewing the LCD monitor of the camera.
z The operation method varies depending on the camera specification. Refer to the
user’s guide of the camera.
The printer starts printing.
2
z The paper is moved forward and
backward several times and the printed
paper exits on the top cover of the Paper
tray. That is the end of printing process.
z Do not disconnect the cable while
printing.
About print settings:
z Some items cannot be selected depending on the camera models. In that case, images are
printed as follows. (the default settings of the printer)
a Paper size
Images are printed in accordance with the size of paper set in the Paper tray.
b Layout specification
Images are printed with [Borderless].
c Date
Date is not printed. (Date is printed if it is set to “ON” in the camera.)
z When the error occurs while printing, the error message is displayed on the LCD monitor
of the camera.→ p.36
z “Standard Setting” or “Follow the Printer Setting” may be selectable in some camera
models. When selecting them, images are printed with the default settings above.
z When printing from the camera, you are recommended to use a domestic power supply as
the power source of the camera.
29

Printing from the Computer
System Requirements
Please install the printer driver on a computer meeting the following minimum requirements.
Windows
OS Windows XP (Including Service Pack 1 and Service Pack 2)
Computer Model The above OS should be pre-installed on computers with a
CPU Pentium 500 MHz or higher processor
RAM 256 MB or more
Interface USB
Free Hard Disk
Space
Display 1,024°768 pixels/High color (16bit) or better
Windows 2000 Service Pack 4
built-in USB port.
500 MB or more
Macintosh
OS Mac OS X (v10.2 - v10.3)
Computer Model The above OS should be pre-installed on computers with a
CPU PowerPC G3/G4/G5
RAM 256 MB or more
Interface USB
Free Hard Disk
Space
Display 1,024°768 pixels/32,000 colors or better
built-in USB port.
500 MB or more
30
− A CD-ROM drive is required to install the printer driver.
− It is not necessarily guaranteed that the printer driver functions in all the computer which
meets the system requirements.

Printing from the Computer
Installing the Printer Driver
The CD-ROM contains the printer driver required for printing from your computer. Install the
printer driver according to the following steps.
Windows
z Be sure to install the printer driver before connecting the printer with the computer.
(During the installation, if the message says that the printer should be connected to the
computer, follow the message.)
z Be sure to log on with administrator privileges (computer system administrator) when
installing the printer driver.
Close any programs that are running.
1
Place the CD-ROM disc in the CD-ROM
2
drive.
z The pop-up menu appears automatically. If the
pop-up menu does not automatically appear,
display the pop-up menu in the following steps:
− For Windows XP, click the [start] button and select
[My computer], then double-click the CD-ROM icon
in the next windows.
− For Windows 2000, double-click the [My computer]
icon on the desktop screen, and double-click the CDROM icon in the next window.
Click “Install” of the Printer Driver.
3
z The install starts.
Follow the screen messages to proceed.
4
31

Printing from the Computer
Macintosh
z
When installing on Mac OS X 10.2, be sure to connect
USB cable (commercial item) and turn on the printer before installing the printer driver
z
When installing on Mac OS X 10.3, install the printer driver and then connect
the computer by the USB cable (commercial item) and turn on the printer
z Be sure to log on with administrator privileges when installing the printer driver. And
enter password if it is required.
Close any programs that are running.
the printer with the computer by the
1
Place the CD-ROM disc in the CD-ROM drive.
2
Select “Mac” folder in the CD-ROM disc and double-click
3
“FunaiFDP100.dmg”.
Double-click “FunaiFDP100.pkg”.
4
Follow the screen messages to proceed.
5
.
the printer with
.
32
z When printing on MacOS X 10.2, additional packages may be required to install
depending on the application used for printing. For details refer to “Mac” folder in the CDROM.

Printing from the Computer
Connecting the Printer to a Computer
z Connects the printer to the computer by the USB cable (A-B type / commercial item).
z Confirm that a camera is not connected with the printer before connecting it to the
computer.
Connect one end of the USB cable (commercial item) to the USB
1
port on the printer and the other end to a USB port on your
computer.
USB cable (commercial item)
To po w e r
outlet
z When connecting the printer to your computer, make sure that the connectors on the
ends of the USB cable match the ports on the printer and on your computer. For the
location and the terminal form of the USB port on your computer, refer to the user’s
guide of your computer.
Confirm that the [ACCESS] lamp lights.
2
z Connect the printer directly to the USB port of your computer with the USB cable. (Do not
connect to the USB port on the USB keyboard.)
z When connecting the printer, do not use other USB devices (with the exception of a USB
mouse or USB keyboard). The printer may not function properly.
33

Printing from the Computer
Printing from the Computer
Display/Select an image to be printed on your application.
1
Display the print screen and set the printer name to “FUNAI FDP-
2
100” (“FDP-100” (Mac OS)).
z Printing and printer selection methods varies depending on the application. Refer to
the user’s guide of your application.
Display the details screen.
3
Set “Print direction”, “Layout specification” and “No. of copies”.
4
z The same images are printed on one sheet of paper by the specified number of
splits.
z Split specification cannot be selected when selecting “Borderless”.
z Selectable split number is as follows.
34
2-split
Click “Image processing setting”, and drag the “ ” to
5
manipulate an image.
Brightness Adjust brightness.
Contrast When sliding it to the strong side, the image becomes distinct, and
Saturation When sliding it to the increase side, the dull image becomes vivid.
Click “OK”.
6
z The print screen is displayed.
4-split 9-split 16-split
when sliding it to the weak side, a middle tone increases and the image
lacks depth in color.

Printing from the Computer
Start printing.
7
z The status monitor is displayed while printing and the information such as file name
and printing status are displayed on the status monitor.
z Refer to "Error Messages" if error messages are displayed.→ p.36
z Depending on dimensions of an image, the whole image may not be printed.
Not printed
Image
Uninstalling the Printer Driver
Windows
Place the CD-ROM disc in the CD-ROM drive.
1
Click “Uninstall” of the Printer Driver.
2
Follow the screen messages to proceed.
3
Macintosh
Click “Applications” “Utilities” folder, and double-click
1
“Printer Setup Utility” (“Printer Center”) icon.
Select “FDP-100” and click “Delete”.
2
35

Appendix
If Errors have Occurred...
Error Messages
When connecting with a camera:
If an error (such as print error) has been detected when connecting with a camera, the error
message is displayed on the LCD monitor of the camera.
z The following is an example of error messages.
z Error messages vary in some measure by the camera models.
z Some cameras may have no error messages displayed on the LCD monitor.
When connecting with a computer:
If an error (such as print error) has been detected when connecting with a computer, the error
message is displayed on the computer monitor.
Monitor Display Examples Status of the Printer/Solution Page
No paper z The printer has no paper in the Paper tray.
Set paper in the Paper tray.
Wrong paper/ribbon z Specified paper or Ink ribbon is not set.
Check that the specified paper and Ink
cartridge are set.
The ribbon cartridge is
depleted
Mismatch between printed
data and loaded paper
No ribbon cartridge z The printer has no Ink cartridge. Insert the
No paper cartridge z The printer has no Paper tray. Insert the
Paper stack z Paper jam has occurred. Turn off the printer
Wrong paper tray/paper z Specified paper is not set. Set the specified
Marker detect error z Remove the Ink cartridge and take up the
z The Ink ribbon in the Ink cartridge has been
consumed. Insert a new Ink cartridge.
z Paper in the Paper tray or the Ink cartridge
does not match the printing data. Use the
specified paper or Ink cartridge for the
printing data.
Ink cartridge all the way in the Ink cartridge
slot until it clicks.
Paper tray into the printer firmly.
and turn on again, so the paper is discharged
from the printer.
paper into the Paper tray.
slack. Then insert it again.
25
22,26
23
22
23
26
40
22
23
36

Monitor Display Examples Status of the Printer/Solution Page
POWER
ACCESS
ERROR
Other paper errors z More than 2 sheets of paper are sent inside
of the printer at a time as the paper sticks
together and like that. Turn off the printer and
turn on again, so the paper is discharged
from the printer.
z Paper jam has occurred. Turn off the printer
and turn on again, so the paper is discharged
from the printer.
File error z The printer failed to get DPOF setting
information. Check if the DPOF settings are
correctly configured.
z An image that is not supported by the printer
is tried to be printed.
[ERROR] Lamp
Appendix
40
-
The [ERROR] lamp lighting indicates the following
probable causes.
About the paper:
z Paper jam has occurred.
z The Paper tray is not set.
z There is no paper in the Paper tray.
z Specified paper is not set in the Paper tray. (Set the
paper supplied with the Ink cartridge.)
About the Ink cartridge:
z The Ink cartridge is not set.
z The Ink ribbon in the Ink cartridge has been
consumed.(The [ERROR] lamp flashes.)
POWER
ACCESS
ERROR
37

Appendix
Before Requesting Services
Troubleshooting
If the printer is not responding properly, check the following items before requesting services.
General printer problems
Symptom Possible cause page
The [POWER] lamp does not
light on.
Print fails. z The Ink cartridge is not inserted with the
It takes long time to print
images.
Images cannot be printed
clearly.
The printed images are
distorted.
38
z The power cord or the AC adapter is not
connected correctly.
correct orientation into the Ink cartridge slot
firmly.
z The Ink ribbon is slack. 23
z The paper is not set. 25, 26
z Specified paper is not set. 22
z The paper is set inside out. 25
z The Ink ribbon in the Ink cartridge has been
consumed.
z Images which are not supported by the printer
are tried to be printed. Exif-JPEG images are
supported by the printer.
z Condensation forms inside the printer. Leave
it for a while. (approx. 1-2 hours)
z High resolution images are tried to be printed.
It takes long time to read such images.
z The internal temperature of the printer is too
high. Wait for a while. (The printer will resume
printing.)
z Specified paper is not set.
z The paper is not set correctly. 25
z The Ink ribbon or paper is dirty. Insert the
clean Ink cartridge or paper.
z Internal part of the printer gets dusty. Clean it
with the supplied cleaner.
z The printer is installed near a TV, a video
game or other devices that radiate
electromagnetic waves. Keep the printer off
these devices while printing.
z The printer is installed near a stereo speaker,
large monitor or other devices that generate a
strong magnetic field. Keep the printer off
these devices while printing.
27
23
23, 24
-
19
-
-
22
23, 25
41
-
-

Symptom Possible cause page
Paper jams occur frequently. z More than 20 sheets of paper are set in the
Paper tray. Up to 20 sheets of paper can be
set.
z The paper creases or warps. Use the flat
paper.
z Too many sheets of paper are accumulated on
the print output receptacle (on top of the
Paper tray). Do not allow more than 10 sheets
of printed paper to be accumulated.
The full picture is printed
with upper/lower parts of the
z Depending on dimensions of an image, the
whole image may not be printed.
image cutting off.
The allotted number of
sheets in the print set cannot
be printed.
z Turning on and off needlessly may cause the
printer to miss printing the allotted number of
sheets. (When turning on the printer, the Ink
ribbon is winded a bit for initialization.)
z Pulling the Ink ribbon out may cause the
printer to miss printing the allotted number of
sheets.
z If the paper’s perforated line is torn or bent,
that paper cannot be used for printing.
Problems in printing from the camera:
Symptom Possible cause page
Print fails. z The printer is not connected with the camera
correctly. (Use the USB cable supplied with
the camera)
z Your camera does not support PictBridge
printing.
z It may be necessary to switch the camera to
the "PictBridge" mode before connecting to
the printer.
z Printing operation is required from the
camera. Refer to the user’s guide of the
camera.
How to stop printing in
progress?
Index print or multiple image
print function cannot be
used.
Some images are not printed
in the index-prints.
z Stop printing by operation of the camera.
z If the camera does not have such functions as
Index print or multiple image print, these
functions cannot be used on the printer.
z Images not supported by the printer are not
printed. (Parts of these images remains
blank.)
Appendix
25
-
-
35
-
-
-
28
28
28
29
-
-
-
39

Appendix
Symptom Possible cause page
More than 2 sheets of paper
are printed.
Prints has no shooting date. z Shooting date (time) can be printed only if the
z If the DPOF settings are configured on the
camera, all of the DPOF setting images are
printed.
z The number of paper specified on the camera
is printed.
date print function of the camera is activated.
Problems in printing from the computer
Symptom Possible cause page
Print fails. z The printer is not connected with the
How to stop printing in
progress?
computer correctly. (Use the USB cable for
the computer)
z The printer driver is not installed on the
computer. Install the printer driver in the
supplied CD-ROM, and then connect the
printer with the computer.
z Another printer is selected for printing on the
computer. Select this printer and then print
images.
z Set the specified paper. 22
z Both a camera and a computer are connected
to the printer. Images cannot be printed from
the computer if a camera is connected to the
printer. Disconnect the camera from the
printer.
z Clicking [Print cancel] on the computer can
stop printing images.
-
-
29
33
31, 32
-
-
-
If Paper Jam has Occurred...
Remove the paper in the following steps when the paper jam has occurred.
Unplug the power cord from the power outlet.
1
Plug the power cord after approx. 10 seconds.
2
z The paper is discharged from the printer automatically.
z Do not remove the paper from the printer forcibly. It may cause malfunction.
40

Appendix
Using the Cleaner
Faint stripes or spots may be printed on the image if internal part of the printer gets dusty, Clear
the printer out of dust or dirt in the following steps.
Press up the Ink cartridge eject
1
lever and remove the Ink cartridge.
p.24
→
Insert the supplied cleaner as
2
indicated, and move the cleaner in
and out.
z Even if images cannot be printed clearly
after cleaning internal part of the printer,
consult your dealer.
41

Appendix
Specifications
Main Specifications
Photo printer
Power source:
Power consumption: approx. 60 W
Operating temperature: 10°C- 35°C
Operating humidity: 20-80 %
Dimensions: 183.5 (W) × 71.0 (H) × 144.5 (D) mm (including protruding
Weight: approx. 965 g (not including Ink cartridge/Paper tray)
Printing system: Dye-sublimation thermal transfer (with overcoating)
Maximum number of printing
pixels:
Gradation: 256 gradations/color
Image format: DPOF compatible, Exif Ver.2.1/2.2, JPEG 4:4:4/4:2:2/4:2:0
Paper: Postcard size 100 × 148 mm (100 × 177 mm, before cutting
Ink: Dedicated Ink cartridge (Y/M/C+overcoating)
Print size: Postcard size:
Print speed: Postcard size: approx. 78 sec.
Print mode: Full image print (with/without borders),Multiple image print,
Signal transfer method: PictBridge (with camera)
Connection method: USB (full speed)
24 V ,2.5 A
parts)
300 × 300 dpi
out)
100 × 148 mm (without borders)
91.4 × 121.3 mm (with borders)
Index print
AC adapter (UADPDCAATE02)
Input Voltage:
Rated Output:
Power consumption: 120-165 VA
Operating temperature: 10°C- 35°C
Operating humidity: 20-80 %
Dimensions: 120 (W) × 38 (H) × 60 (D) mm
Weight: approx. 350 g
42
100-240 V , 1.5 A, 47-63 Hz
24 V ,2.5 A

Appendix
FUNAI SOFTWARE LICENSE AGREEMENT
PLEASE READ THE TERMS AND CONDITIONS OF THIS LICENSE CAREFULLY BEFORE
USING THE SOFTWARE STORED IN THE CD-ROM IN THIS BOX! This document is a legal
agreement ("Agreement") between you and FUNAI ELECTRIC CO., LTD. ("FUNAI") and
governing your use of the software stored in the CD-ROM and the user manual in this box
(including without limitation, sound data and image data, correctively, the "Software"). BY
USING THE SOFTWARE, YOU ARE DEEMED TO HAVE AGREED TO THE TERMS OF THIS
AGREEMENT. IF YOU DO NOT AGREE TO THE TERMS OF THIS AGREEMENT, DO NOT
USE THE SOFTWARE AND RETURN IT TO FUNAI FOR A REFUND
FUNAI SOFTWARE LICENSE AGREEMENT
1. GRANT OF LICENSE:
FUNAI grants you a personal, nonexclusive, limited license to install and use the Software. You
may also make copies of the Software as necessary for backup and archival purposes. The
term Software shall include the software components, media, all copies made by you and any
upgrades, modified versions, updates, additions and copies of the Software licensed to you by
FUNAI or its subsidiaries.
2. OWNERSHIP:
In all respects the title, ownership and intellectual property rights in and to the Software shall
remain FUNAI and/or its subsidiaries. You own only the CD-ROM media in which the Software
is stored. Except as expressly provided herein, no license or right, express or implied, is
hereby conveyed or granted by FUNAI to you for any intellectual property of FUNAI.
3. RESTRICTIONS:
(1) You may not modify, remove or delete any and all copyright notices (i) which are contained
in the Software, including any copy thereof, and (ii) which are on the original CD-ROM and on
the medium of a back-up copy made pursuant to Section 1 above, if any.
(2) You shall not use, copy or transfer the Software except as expressly granted or permitted
herein, and shall not assign, sublicense, sell, rent, lease, loan or convey to any third party the
Software, and you also shall not have any third party to do so.
(3) You shall not alter, translate, modify, convert to other programming languages, disassemble,
decompile or otherwise attempt to discover the source code of the Software and you also shall
not have any third party to do so.
4. LIMITED WARRANTY AND DISCLAIMER OF INDEMNITY:
You acknowledge and agree that the use of the Software is at your own risk. THE SOFTWARE
IS PROVIDED "AS IS" AND WITHOUT ANY WARRANTY OF ANY KIND. FUNAI, FUNAI'S
SUBSIDIARIES AND AFFILIATES, THEIR DISTRIBUTORS AND DEALERS DO NOT AND
CANNOT WARRANT THE PERFORMANCE OR RESULTS YOU MAY OBTAIN BY USING
THE SOFTWARE.FUNAI, FUNAI'S SUBSIDIARIES AND AFFILIATES, THEIR
DISTRIBUTORS AND DEALERS MAKE NO WARRANTIES, EXPRESS OR IMPLIED, AS TO
NON INFRINGEMENT, MERCHANTABILITY OR FITNESS FOR ANY PARTICULAR
PURPOSE.
FUNAI, FUNAI's subsidiaries and affiliates, their distributors and dealers do not warrant that the
functions contained in the Software will meet your requirements or that the operation of the
43

Appendix
Software will be uninterrupted or error free. However, FUNAI or FUNAI's subsidiary warrants a
medium on which the CD-ROM on which the Software is stored to be free of material or
manufacturing defects under normal use and operating conditions for a period of ninety (90)
days from the date of you obtained the same as evidenced by a receipt or otherwise.
CUSTOMER REMEDIES. FUNAI, FUNAI's subsidiaries and affiliates, their distributors and
dealers' entire liability and your exclusive remedy shall be the replacement of the medium not
meeting the LIMITED WARRANTY. The LIMITED WARRANTY does not apply if failure of the
medium has resulted from accident, abuse or misapplication of the Software and shall not
extend to anyone other than the original user of the Software.
5. NO LIABILITY FOR DAMAGES.
IN NO EVENT SHALL FUNAI, FUNAI'S SUBSIDIARIES AND AFFILIATES, THEIR
DISTRIBUTORS AND DEALERS BE LIABLE FOR ANY DAMAGES WHATSOEVER
(INCLUDING WITHOUT LIMITATION, LOSS OF BUSINESS PROFITS, LOSS OF DATA,
LOSS OF BUSINESS INFORMATION, LOSS OF BUSINESS INTERRUPTION OR OTHER
COMPENSATORY, INCIDENTAL OR CONSEQUENTIAL DAMAGES) ARISING OUT OF THE
SOFTWARE, USE THEREOF OR INABILITY TO USE THE SOFTWARE EVEN IF FUNAI,
FUNAI'S SUBSIDIARIES OR AFFILIATES, THEIR DISTRIBUTORS OR DEALERS HAVE
BEEN ADVISED OF THE POSSIBILITY OF SUCH DAMAGES. SOME STATES OR LEGAL
JURISDICTIONS DO NOT ALLOW THE LIMITATION OR EXCLUSION OF LIABILITY FOR
INCIDENTAL OR CONSEQUENTIAL DAMAGES, OR PERSONAL INJURY OR DEATH
RESULTING FROM NEGLIGENCE ON THE PART OF SELLER, SO THE ABOVE
LIMITATION OR EXCLUSION MAY NOT APPLY TO YOU.
DISCLAIMER OF INDEMNITY. FUNAI, FUNAI'S SUBSIDIARIES AND AFFILIATES, THEIR
DISTRIBUTORS AND DEALERS SHALL ASSUME NO OBLIGATION TO INDEMNIFY YOU
AGAINST ANY CLAIM OR SUIT BROUGHT BY A THIRD PARTY ALLEGING THAT THE
SOFTWARE OR USE THEREOF INFRINGES ANY INTELLECTUAL PROPERTY OF SUCH
THIRD PARTY.
6. EXPORT RESTRICTIONS:
You agree to comply with all export laws and restrictions and regulations of the country
involved, and not to export or re-export, directly or indirectly, the Software in violation of any
such laws and restrictions and regulations, or without all necessary approvals.
7. US GOVERNMENT RESTRICTED RIGHTS:
This Software and the documentation are provided with "RESTRICTED RIGHTS" applicable to
private and public licenses alike. Without limiting the foregoing, use, duplication, or disclosure
by the U.S. Government is subject to restrictions as set forth in this EULA and as provided in
DFARS 227.7202-1(a) and 227.7202-3(a) (1995), DFARS 252.227-7013 (c)(1)(ii)(OCT 1988),
FAR 12.212(a)(1995), FAR 52.227-19, or FAR 52.227-14, as applicable.
8. TERM:
This Agreement is effective upon your acceptance hereof by using the Software and remains in
effect until terminated. "Use" shall mean when the Software is loaded on a temporary memory
of your PC such as RAM or installed in a fixed memory (hard disc and other memory devices).
You may terminate this Agreement with a 30 days prior written notice or by destroying the
Software including any and all copies thereof. This Agreement shall also terminate if you fail to
comply with any terms of this Agreement. In the event that this Agreement terminates for your
failure to comply with this Agreement, in addition to FUNAI enforcing its respective legal rights,
you must promptly destroy the Software including any and all copies thereof. Notwithstanding
the foregoing, Sections 2, 4, 5, 6, 7, 8, 9 and 10 shall survive any termination of this
Agreement.
44

Appendix
9. SEVERABILITY:
In the event that any of the provisions of this Agreement proves to be invalid or illegal, that will
not in no way affect, impair or invalidate any other provision, and all other provisions of this
Agreement will be in full force and effect.
10. GOVERNING LAW:
The terms and conditions of this Agreement are governed by the laws of Japan. Any litigation
arising from the interpretation or execution of this license shall be submitted to Osaka District
Court.
© 2005-2006 FUNAI EUROPE GMBH. All rights reserved.
JA321EA
45
 Loading...