

Page 1

LIFELINE
FSH 804 ID TS
Page 2

Page 3
Caro Cliente,
sentitamente La ringraziamo e ci
congratuliamo per la scelta da Lei fatta.
Questo nuovo prodotto, accuratamente
progettato e costruito con materiali di
primissima qualità, e stato accuratamente
collaudato per poter soddisfare tutte le Sue
esigenze di una perfetta cottura.
La preghiamo pertanto di leggere e rispettare
le facili istruzioni che Le permetteranno
di raggiungere eccellenti risultati sin dalla
prima utilizzazione. Con questo moderno
apparecchio Le formuliamo i nostri più vivi
auguri.
IL COSTRUTTORE
Sommario
Principio di funzionamento 4
Istruzioni per l’utente 5
I
GB
FR
DE
ES
PT
Italiano
English
Français
Deutsch
Español
Português
I
Istruzioni per l’installatore 15
QUESTO PRODOTTO È STATO CONCEPITO
PER UN IMPIEGO DI TIPO DOMESTICO.
IL COSTRUTTORE DECLINA OGNI
RESPONSABILITÀ NEL CASO DI EVENTUALI
DANNI A COSE O PERSONE DERIVANTI DA
UNA NON CORRETTA INSTALLAZIONE O DA
USO IMPROPRIO, ERRONEO OD ASSURDO.
L’APPARECCHIO NON DEVE ESSERE
USATO DA PERSONE (COMPRESI BAMBINI)
CON RIDOTTE CAPACITÀ FISICHE,
SENSORIALI O MENTALI, O DA PERSONE
3
CHE MANCANO DELL’ESPERIENZA E DELLE
CONOSCENZE NECESSARIE SE NON SOTTO
LA SUPERVISIONE O DIETRO ISTRUZIONI
SULL’USO DELL’APPARECCHIO DA PARTE
DI UNA PERSONA RESPONSABILE PER LA
LORO SICUREZZA.
I BAMBINI DEVONO ESSERE CONTROLLATI
PER ASSICURARSI CHE NON GIOCHINO
CON L’APPARECCHIO.
Page 4

Principio di funzionamento
Induzione
I
Il riscaldamento per induzione è la forma
più efficiente, disponibile, per cucinare.
Il calore viene prodotto, con un campo
elettromagnetico, direttamente sul fondo
della pentola o padella utilizzata. La
superficie non coinvolta nel contatto rimane
pressoché fredda; una volta terminata la
cottura e rimosso il contenitore non rimane
calore residuo.
Efficiente perché non spreca energia per
dispersione, come i bruciatori a gas, dal
30 al 50% più rapida dei normali piani
con tecnologia HGL, consente risparmi
energetici fino al 25%.
In presenza di trabocco di liquido dal
contenitore non si attacca alla superficie del
piano in quanto è tiepido.
Principio di funzionamento
E’ basato sulle proprieta elettromagnetiche
della maggior parte dei recipienti per la
cottura.
Il circuito elettronico governa il
funzionamento della bobina (induttore)
creante un campo magnetico.
Il calore e trasmesso dallo stesso recipiente
al cibo.
La cottura avviene come sotto descritto.
- minima dispersione (alto rendimento);
- il ritiro della pentola (basta il solo
sollevamento) provoca automaticamente
l’arresto del sistema;
- il sistema elettronico permette la massima
flessibilita e finezza di regolazione.
Fig. 1
1 - Recipiente
2 - Corrente indotta
3 - Campo magnetico
4 - Induttore
5 - Circuito elettronico
6 - Alimentazione elettrica
4
Page 5
Istruzioni per l’utente
Istallazione
Tutte le operazioni relative all’stallazione
(allacciamento elettrico) devono essere
eseguite da personale qualificato secondo
le norme vigenti.
Per le istruzioni specifiche vedi parte
riservata all’istallatore.
NON FISSARE INTENSAMENTE I LED E
I DISPLAY.
Utilizzazione
Per prima cosa posizionare la pentola nella
zona di cottura prescelta.
La mancanza della pentola display non
consente l’avvio del sistema.
Rilevamento pentola
Una certezza che contraddistingue l’utilizzo
consapevole della tecnologia a favore del
consumatore
I
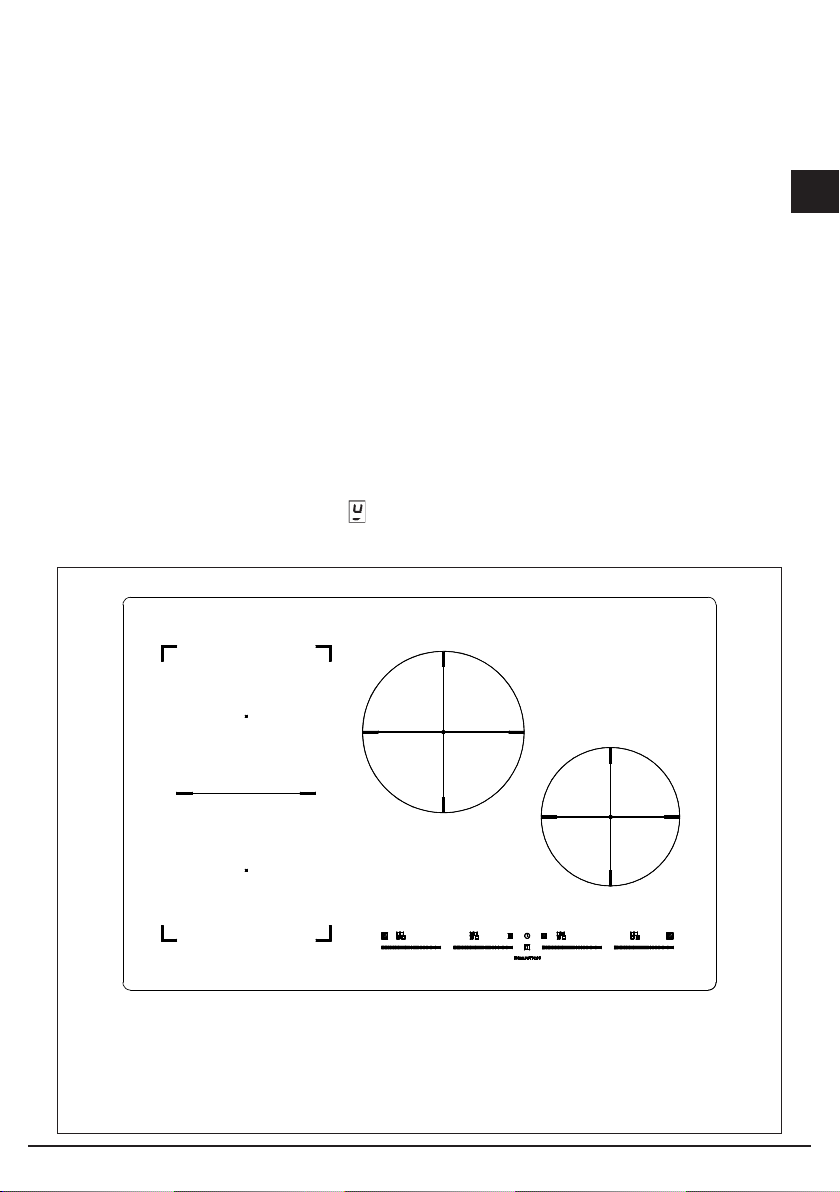
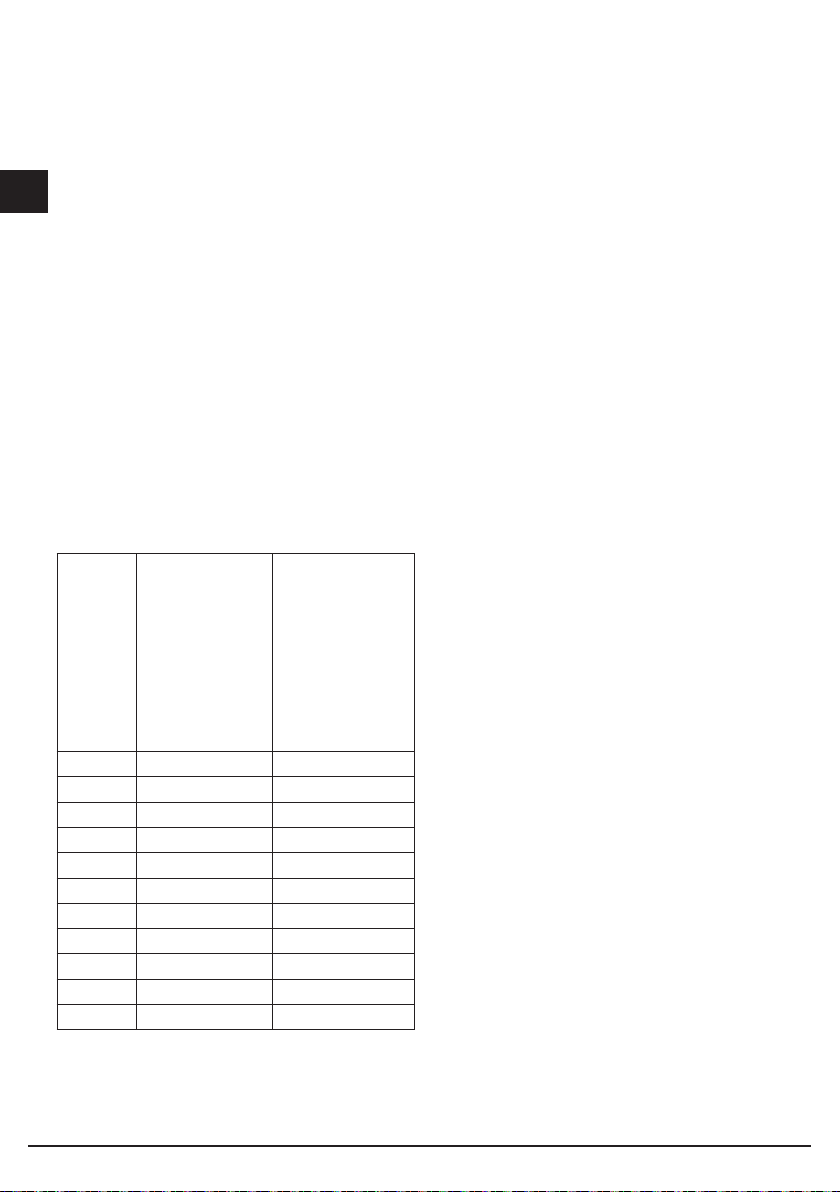
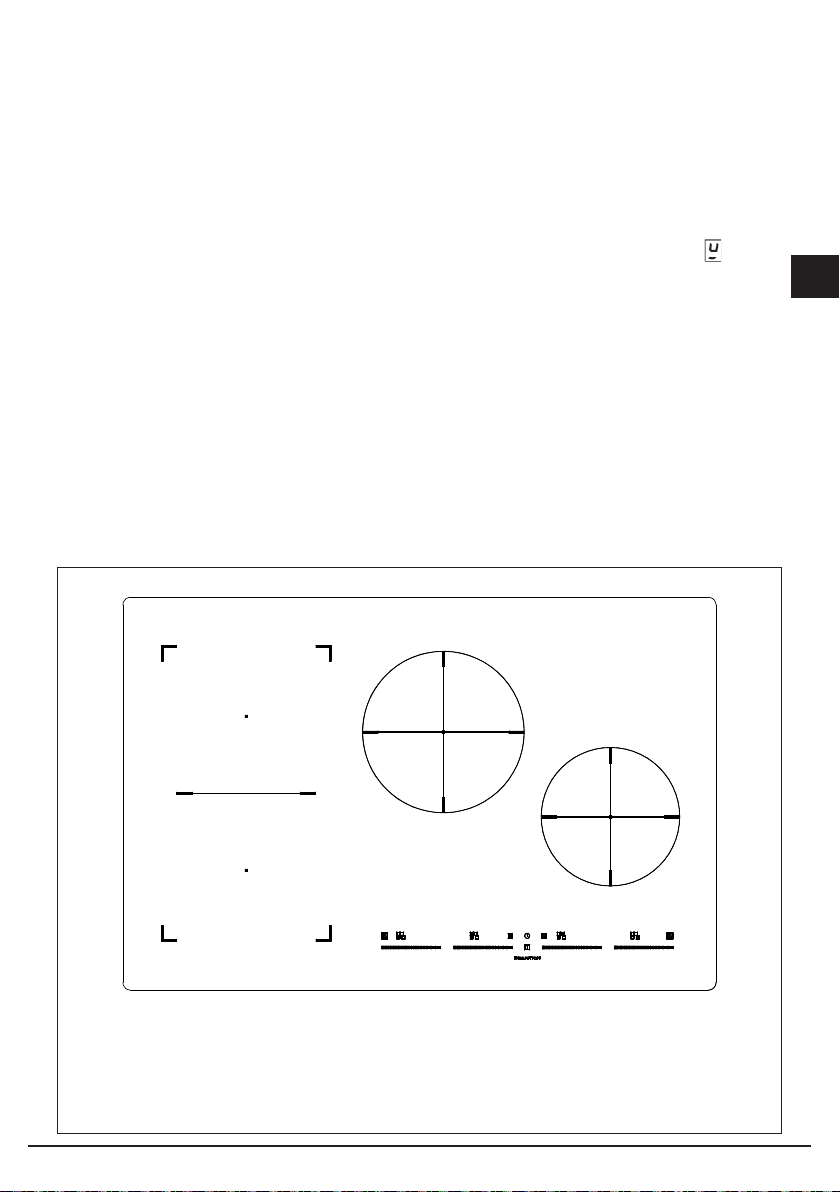
A: ZONA COTTURA INDUZIONE 220x180 2300/3700 W
B: ZONA COTTURA INDUZIONE 220x180 2300/3700 W
C: ZONA COTTURA INDUZIONE ø210 2300/3700 W
D: ZONA COTTURA INDUZIONE ø180 1850/3000 W
5
Fig. 2
Page 6
I
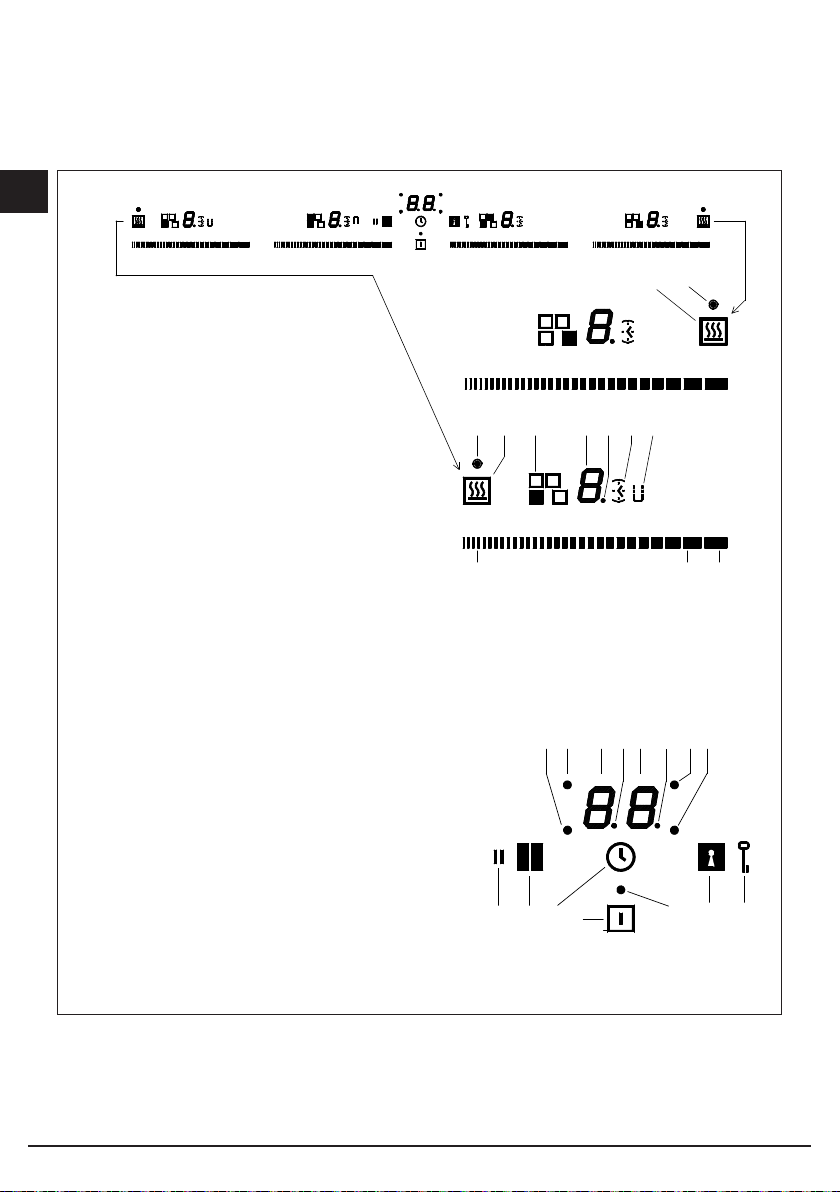
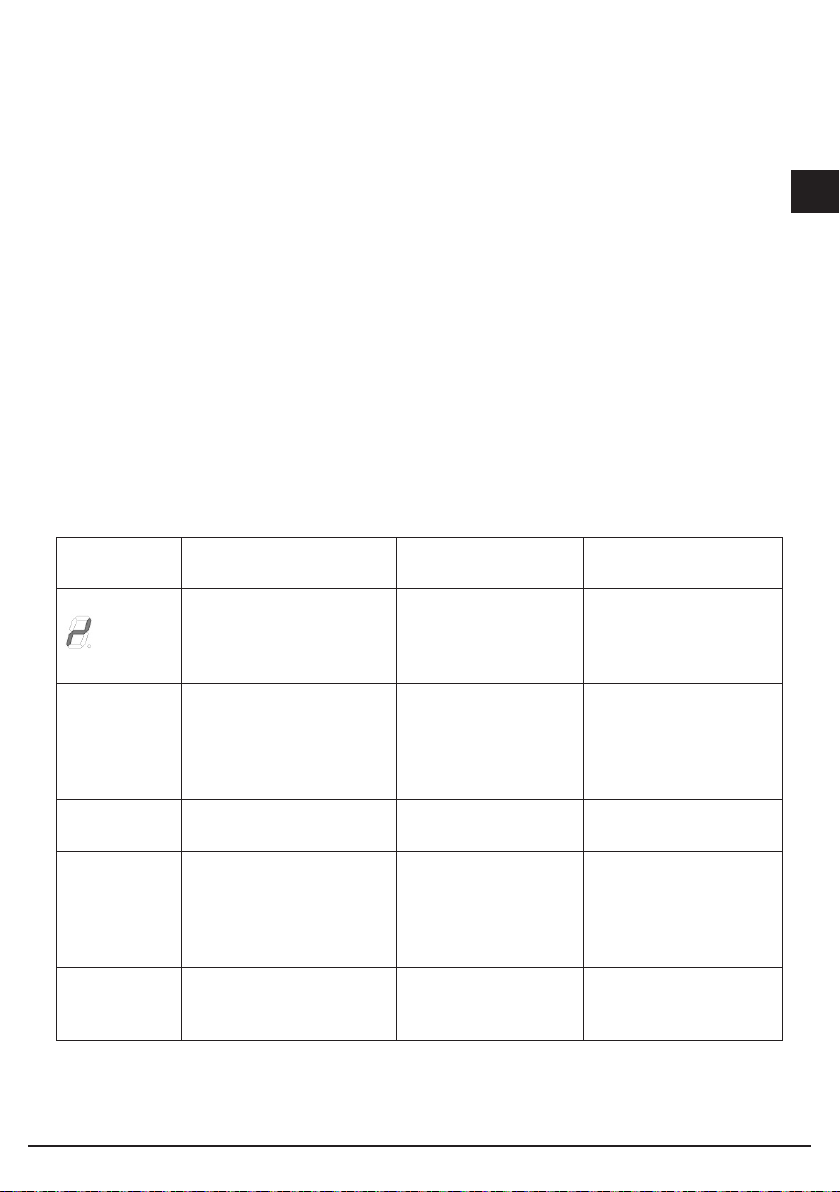
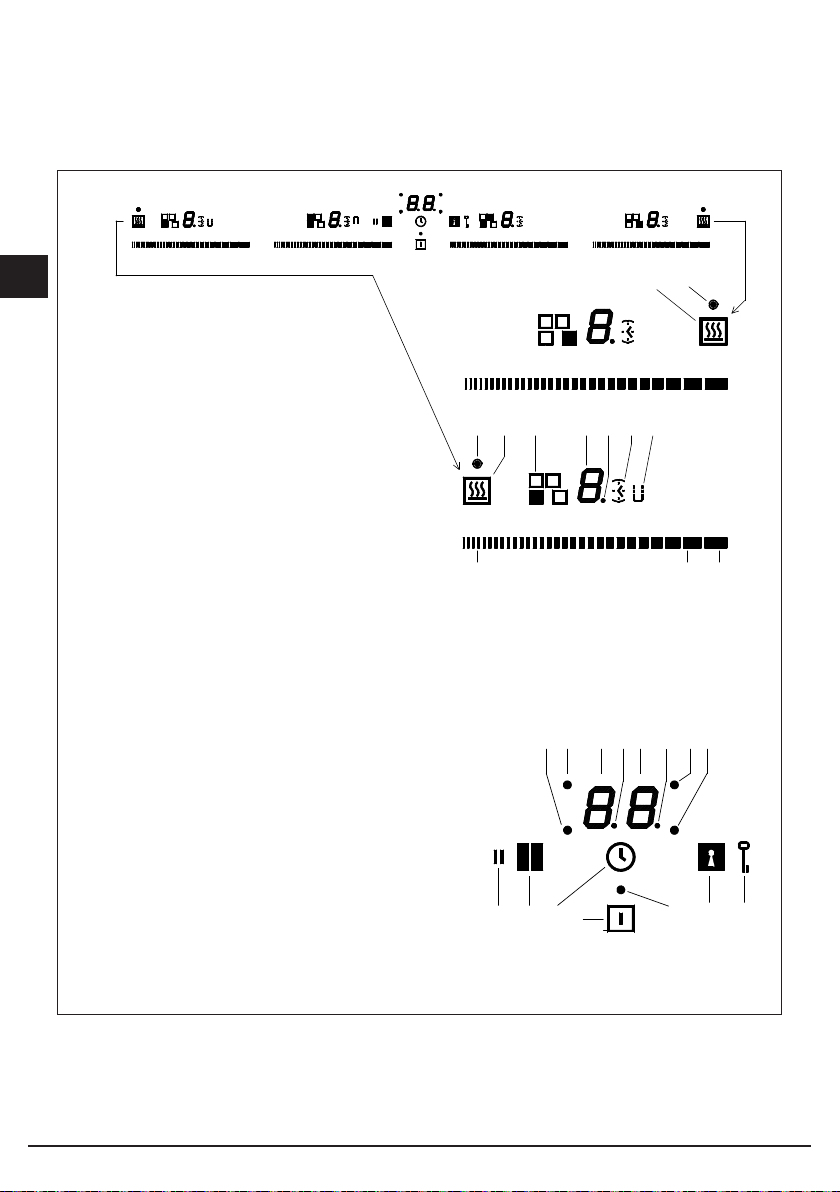
1 Accensione / Spegnimento ON/OFF
2 Spia led Accensione
3 Icona pausa
4 Pulsante di inserimento pausa
5 Pulsante timer
6 Pulsante chiave
7 Icona chiave
8 Spia timer attivo zona cottura anteriore
sinistra
9 Spia timer attivo zona cottura posteriore
sinistra
10 Display timer minuti
11 Punto di separazione timer
12 Display timer minuti
13 Punto di separazione timer
14 Spia timer attivo zona cottura posteriore
destra
15 Spia timer attivo zona cottura anteriore destra
16 Area cursore attivazione livello minimo
17 Area cursore attivazione livello massimo
18 Area cursore attivazione Power Booster (P)
19 Icona attivazione funzione speciale
20 Pulsante attivazione funzione speciale (u)
21 Solo indicazione posizione zona cottura
22 Display valore impostato
23 Punto dislay
24 Icona Timer per zona cottura
25 Icona funzione estensione inserita
26 Pulsante di attivazione funzione speciale (U)
27 Icona attivazione funzione speciale
Fig. 3
6
Page 7

Indicatore di calore residuo
Serve a indicare all’utente che il vetro è
ad una temperatura pericolosa in caso di
contatto con tutta l’area sovrastante la zona
cottura. La temperatura viene determinata
seguendo un modello matematico e un
eventuale calore residuo viene indicato con
una “H” dal corrispondente display a sette
segmenti.
Il riscaldamento e il raffreddamento sono
calcolati in relazione a:
- Il livello di potenza selezionato (da “0“ a
“9“);
- Il periodo di attivazione dei relè.
Dopo aver spento la zona cottura, il
corrispondente display mostra“H” fino a che
la temperatura della zona non scende al di
sotto del livello critico (≤ 60°C) secondo il
modello matematico.
Protezione in caso di accensione
involontaria.
- Se il controllo elettronico verifica
un’attivazione continua di un tasto per
circa 10 sec. si spegne automaticamente.
Il controllo emette un segnale acustico di
errore per 10 secondi che avverte l’utente
della presenza di un oggetto sui sensori.
I displays mostrano il codice di errore di
uso permanente, che verrà visualizzato
sul display fintanto che il controllo
elettronico avverte l’errore. Se la zona
di cottura “scotta”, una “H“ apparirà sul
display alternativamente al segnale di
errore.
- Se nessuna zona cottura verrà attivata
entro 20 secondi dall’accensione del
Touch, il controllo ritorna alla modalità
stand-by.
- Quando il controllo è acceso il tasto
ON/OFF ha priorità su tutti gli altri tasti,
cosicché il controllo può essere spento
in qualsiasi momento anche in caso di
attivazione multipla o continua di tasti.
- Nella modalità stand-by un’attivazione
continua di tasti non avrà alcun effetto.
Comunque, prima che il controllo
elettronico possa essere acceso
nuovamente, deve riconoscere che non
ci sia alcun tasto attivato.
Precauzioni
- Al verificarsi di una anche minima frattura
della superficie vetroceramica disinserire
immediatamente l’alimentazione elettrica;
- durante il funzionamento allontanare
materiale magnetizzabile come carte di
credito, dischetti, calcolatrici, ecc.;
- non usare mai fogli di carta alluminata o
appoggiare prodotti avvolti con alluminio
direttamente sul piano
- oggetti metallici quali coltelli, forchette,
cucchiai e coperchi non devono essere
posti sulla superficie del piano per evitare
che si scaldino;
- nella cottura con recipienti a fondo
antiaderente, senza apporto di
condimento, limitare l’eventuale tempo di
preriscaldamento a uno o due minuti;
- la cottura di alimenti con tendenza ad
attaccare sul fondo iniziare a potenza
minima per poi aumentare mescolando
frequentemente;
- dopo l’uso spegnere con l’apposito
dispositivo (decremento sino a “0”) e non
fare affidamento sul rilevatore di pentole.
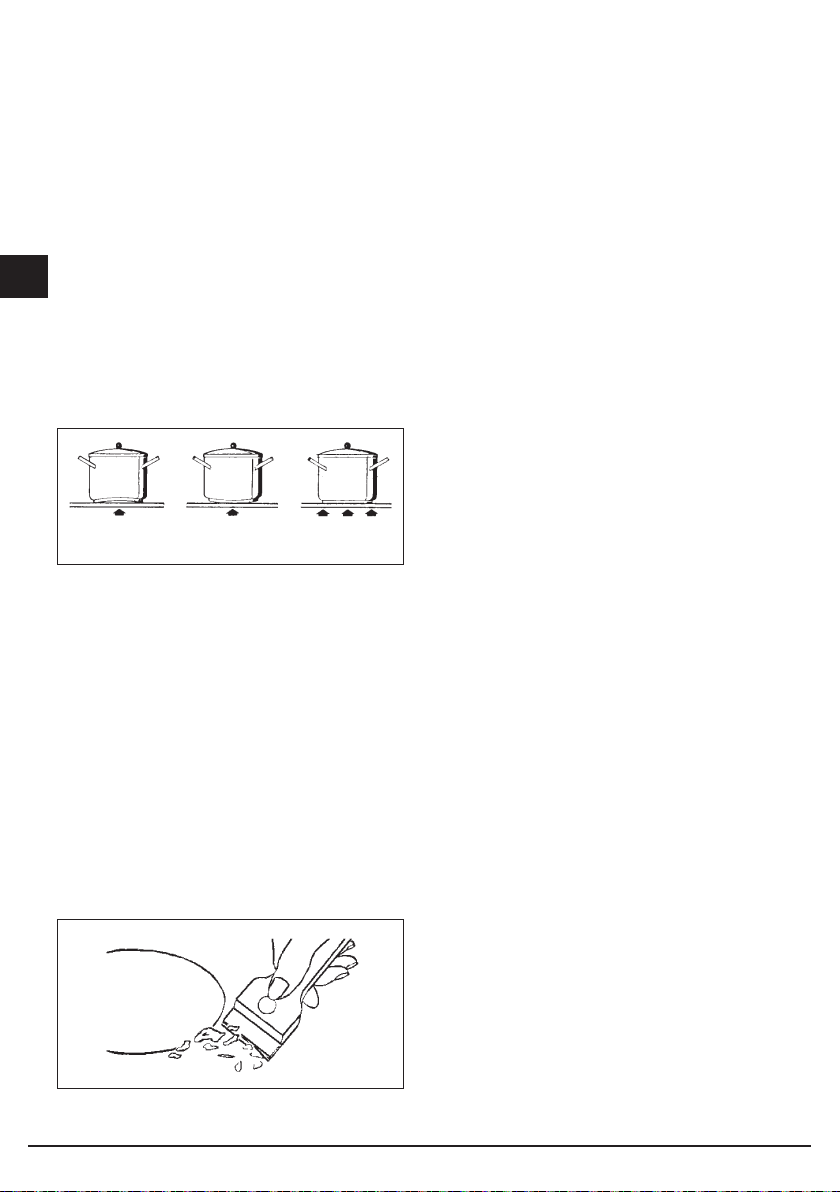
Pentolame (Fig. 4)
- Se una calamita avvicinata al fondo di un
recipiente rimane attratta questa può già
essere una pentola adatta alla cottura ad
induzione;
- preferire pentolame dichiarato anche per
cottura ad induzione;
- pentolame a fondo piatto e spesso;
I
7
Page 8
- una pentola di 20 cm di diametro permette
I
di sfruttare la massima potenza;
- una pentola più piccola riduce la potenza
ma non causerà dispersione d’energia.
E’ comunque sconsigliabile l’utilizzo di
recipienti di diametro inferiore a 12 cm;
- recipienti inox con fondo multistrato o
inox ferritico se precisato sul fondo: per
induction;
- recipienti in ghisa meglio se con fondo
smaltato per evitare graffiature al piano
vetroceramico;
- sono sconsigliati e non convengono
recipienti in vetro, ceramica, terra cotta
e recipienti in alluminio, rame o inox non
magnetico (austenitico).
SiNo No
Fig. 4
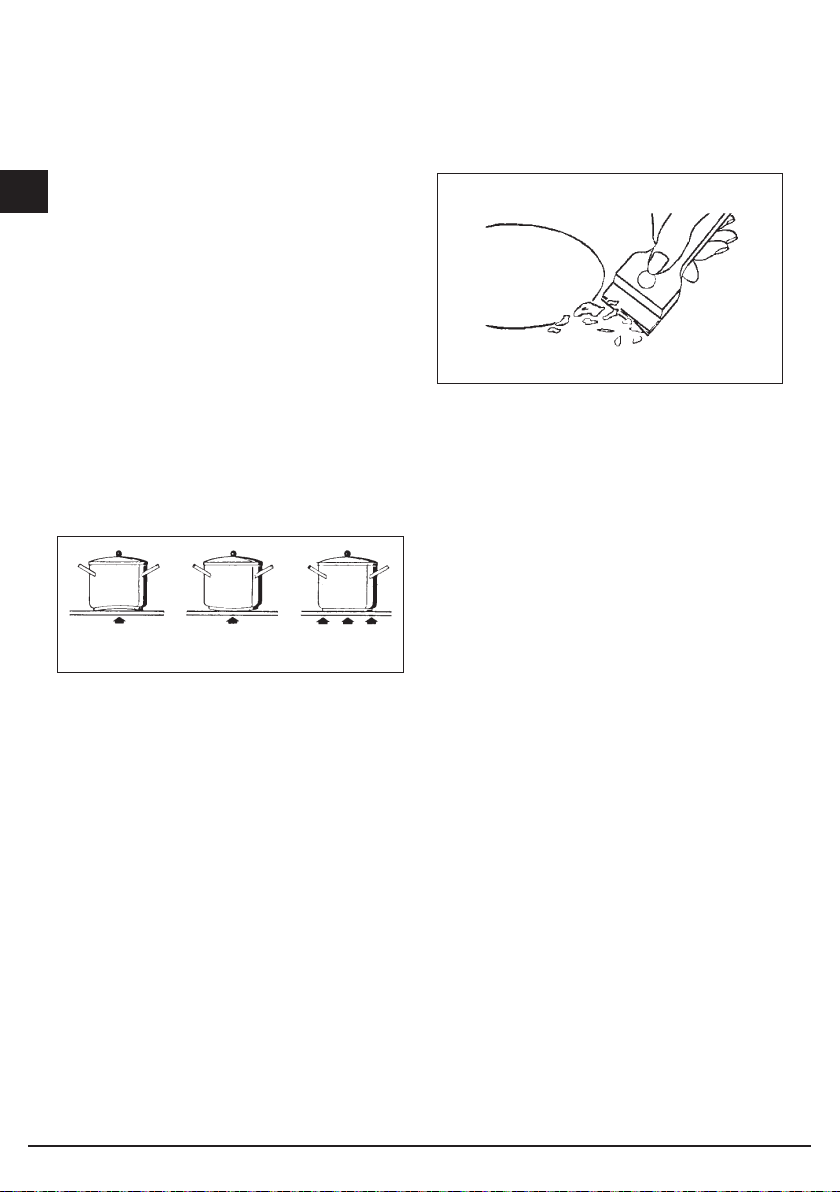
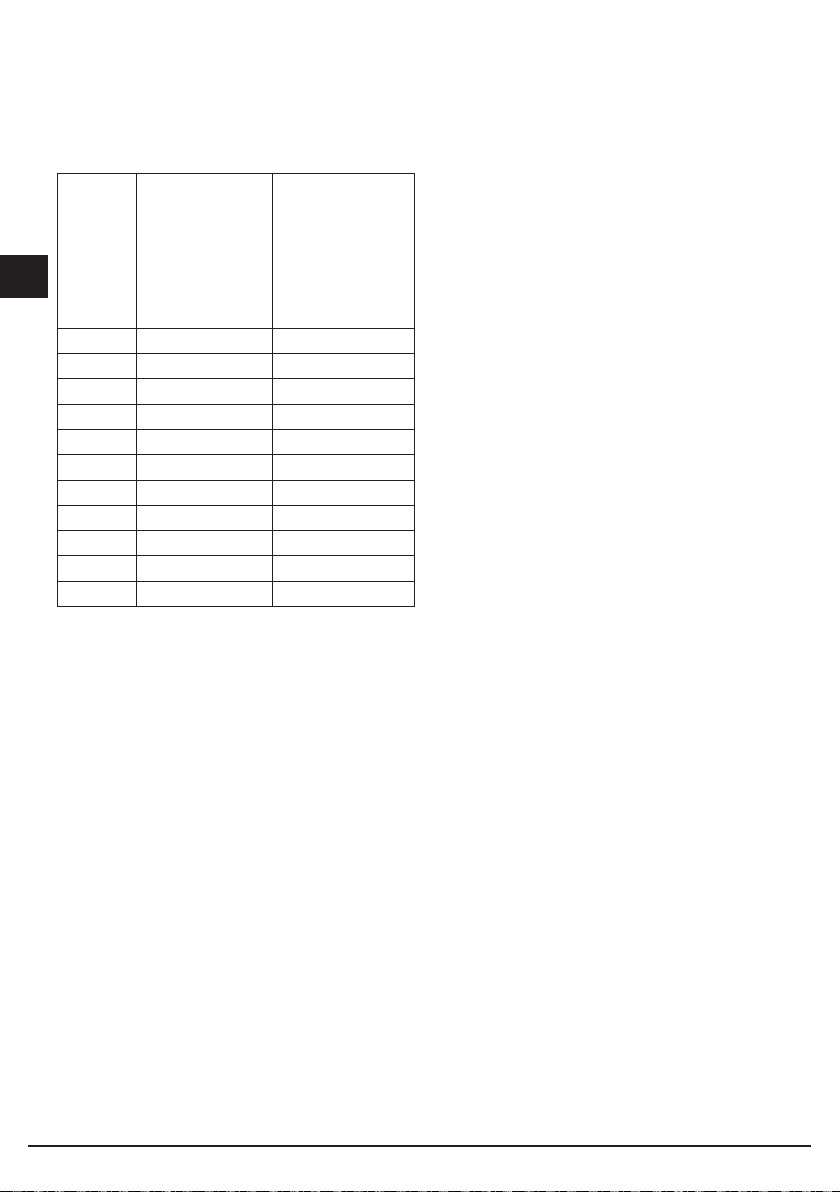
Manutenzione (Fig. 5)
Tracce di fogli di alluminio, residui di cibo
spruzzi di grasso, zucchero o cibi fortemente
saccariferi devono essere immediatamente
rimossi dal piano dicottura con un raschietto
per evitarepossibili danni alla superficie del
piano.
Successivamente pulire con SIDOL
o STANFIX e carta da cucina, quindi
risciacquare con acqua e asciugare con
uno straccio pulito.
In nessun caso usare spugne o strofinacci
abrasivi; evitare anche l’uso di detersivi
chimici aggressivi come FORNOSPRAY o
SMACCHIATORI.
NON UTILIZZARE PULITORI A VAPORE
Fig. 5
Accensione/Spegnimento del
piano cottura
Il piano cottura si accende premendo il tasto
“centrale” On/Off (1), si sente un breve bip
e si accendono i 4 display a sette segmenti
mostrando uno “0”.
Se una zona cottura “scotta”, il display
mostra in alternanza “H” e “0”.
Dopo l’accensione il touch control rimane
attivo per 10 secondi. Se non si seleziona ne
una zona cottura ne il timer il touch ritorna
nello stato di stand-by automaticamente.
Segnale acustico (cicalino)
Durante l’utilizzo le seguenti attività vengono
segnalate tramite un cicalino:
- Normale attivazione dei tasti con un
suono breve.
- Attivazione continua dei tasti per più di
10 sec con un suono lungo intermittente
(compare un simbolo di errore e se si
protrae l’operazione il touch control viene
spento)
Accensione di una zona cottura
Posizionare una pentola e toccare un area
del cursore relativa alla zona cottura dove è
presente la pentola (16-17-18), far scivolare
il dito verso destra per incrementare il livello
8
Page 9

di cottura (17), mentre per diminuire far
scivolare il dito verso sinistra (16).
Spegnimento di una zona cottura
Una singola zona di cottura può essere
spenta direttamente selezionando la
posizione di “0” facendo scivolare il dito
verso sinistra nell’area del cursore relativa
alla zona di cottura in funzione.
Le zone cottura calde verranno visualizzate
con una lettera “H”.
Lo spegnimento immediato di tutte le zone
cottura si può ottenere in qualsiasi momento
tramite il pulsante di alimentazione On/Off
(1).
Se durante la cottura si è spento
involontariamente il piano durante l’utilizzo
dei comandi lo si può riaccendere con
il tasto On/Off e si hanno 6 secondi
per premere il tasto pausa (4) che sarà
evidenziato dall’icona (3) lampeggiante,
così facendo il piano si riaccende con le
stesse impostazioni che aveva prima dello
spegnimento involontario.
Livello di potenza
La potenza della zona cottura può
essere impostata dal livello 1 al livello 9.
Un ulteriore livello P (Power booster) è
disponibile per permettere un riscaldamento
particolarmente rapido del cibo e permette
quindi all’utente di risparmiare tempo.
Il livello di potenza rappesentato dalla lettera
“A” intermittente rappresenta l’attivazione
della funzione riscaldamento automatico.
Booster e gestione della potenza.
Il generatore, con Booster attivato, mette
a disposizione della zona di cottura una
potenza significativamente superiore
alla potenza nominale, il display della
zona cottura selezionata mostra una “P”
La funzione Booster può essere attivata
premendo nella parte finale dell’area del
cursore della zona cottura (18).
L’incremento di potenza è diverso a seconda
della grandezza della zona cottura:
1) Per zona cottura ø180 la potenza passa
dal livello 9 di 1850 W al livello Booster
3000 W per una durata di 10 minuti.
2) Per zona cottura Rettangolare (220x190)
la potenza passa dal livello 9 di 2300 W
al livello Booster 3700 W per una durata
di 10 minuti.
3) Per zona cottura ø210 la potenza passa
dal livello 9 di 2300 W al livello Booster
3700 W per una durata di 10 minuti Per
motivi di sicurezza, la funzione Booster
ha una durata limitata.
Se durante il tempo Booster la pentola
viene tolta dalla zona di cottura, la funzione
Booster rimane attivata e anche il tempo
Booster non viene disattivato.
Con il Booster attivato lo spostamento del
valore impostato con il dito nell’area del
cursore della zona cottura determina la
disattivazione del Booster.
La funzione Booster “P” è attivabile in tutte le
zone cottura ma viene data priorità all’ultimo
Booster attivato riducendo eventuali altri
livelli di cottura.
Riscaldamento automatico
(o funzione “heat-up”)
Questa funzione facilita la cottura. Non
è necessario essere presenti in modo
permanente durante la cottura, il piano si
riscalda automaticamente a piena potenza
e ritorna poi al livello di potenza selezionato
dopo un certo tempo (ved. tabella 1).
I
9
Page 10
Attivare il riscaldamento
I
automatico (o funzione “heatup”)
Tenere premuto un area del cursore relativa
alla zona di cottura in funzione per circa 3
secondi fino al suono di un bip (ad esempio
ad 1/3 della lunghezza della zona cursore).
Es. Selezionare il livello 3 e attivanre la
funzione di riscaldamento automatico
tenendo il dito premuto per 3 secondi, si
attiva la funzione. Il display corrispondente
mostra la lettera “A” intermittente con il “3”.
Con queste impostazioni il piano cottura
riscalda la zona cottura al livello massimo
“9” per 2 minuti poi continua la cottura al
livello “3”.
Durata
Durata
Livello
di
Potenza
0 1 0’ 40” 516
2 1’ 12” 402
3 2’ 318
4 2’ 56” 258
5 4’ 16” 210
6 7’ 12” 138
7 2’ 138
8 3’ 12” 108
9 - 90
P - 10
Funzione
Riscaldamento
Automatico
(tempo in
minuti)
Massimo
Tempo di
Funzionamento
Senza
Interventi
nei Comandi
(tempo in
minuti)
Funzione estensione
(per tegami di grandi dimensioni)
Questa funzione facilita la cottura con
pentole rettangolari grandi, è disponibile
solo per le zone cottura rettangolari e si
attiva premendo contemporaneamente 2
aree cursore delle 2 zone cottura coinvolte,
a questo punto si accenderà vicino al display
che visualizza i livelli (22) un icona fatta ad
“U” (25), la zona cottura ora può essere
comandata dall’area cursore di sinistra.
Funzioni speciali
Accendendo il touch si può programmare
una funzione speciale premendo i tasti
dedicati (20-26) ci sarà un lampeggio
dell’icona (19-27) per 5 secondi durante
i quali si potrà assegnare a quale zona
cottura attivare la funzione. Questa
funzione è presente per ogni zona cottura
ed è in grado di “aiutare la cottura” e viene
visualizzata da una “u” o una “U”
C’è la possibilità di attivare 2 livelli di
“cottura”:
1) Fondere con una temperatura all’incirca
di 42 °C “u”.
2) Riscaldare con una temperatura
all’incirca di 70 °C “U”.
Queste temperature sono da considerarsi
indicative e dipendono.
molto dalla pentola e dalla quantità di cibo
presente.
Blocco comandi
(sicurezza bambini)
L’attivazione si effettua solo quando il piano
è acceso ma nessuna zona di cottura è
accesa.
Premere contemporaneamente il tasto
chiave (6) e il tasto pausa (4) e poi
successivamente premere il tasto pausa
(4).
Per alcuni secondi verranno visualizzate
10
Page 11

le lettere “L” nei display, dopo di che si
spegneranno i dislay.
Tentando di accendere il piano cottura
dal fasto On/Off (1) il piano mostrerà
nuovamente le lettere “L” e non sarà
possibile cucinare.
Sbloccaggio/disattivazione
sicurezza bambini
Ci sono 2 tipi di sbloccaggio:
1) Sbloccaggio per una sola volta:
Per disattivare la funzione bisogna
accendere il piano cottura e premere
contemporaneamente la pausa (4) e
la chiave (6). Le lettere L spariranno e
al loro posto compariranno gli “0” per
ogni zona cottura. Se una volta finito di
utilizzare il piano cottura lo spegniamo,
al successivo riavvio si ripresentano le
L che indicano appunto che il piano è
bloccato.
2) Sbloccaggio definitivo: Per disattivare la
funzione in maniera definitiva bisogna
accendere il piano cottura e premere
contemporaneamente la chiave (6) e la
pausa (4) rilasciare questi 2 comandi e
poi successivamente premere di nuovo
il tasto chiave (6).
Chiave
Questo piano di cottura dispone della
possibilità di impostare un blocco tastiera
con l’apposito tasto chiave (6). Può
essere utile bloccare la tastiera durante il
funzionamento ad esempio per la pulizia
della zona comandi o comunque se non si
vuole modificare nessuna impostazione.
Il tasto On/Off (1) ha comunque la priorità.
Pausa
Questo piano di cottura dispone della
possibilità di impostare una pausa (4) durante
la cottura (utile ad esempio per rispondere
ad una telefonata). Questa funzione una
volta premuto il pulsante accende un led
sopra il comando, fa visualizzare in tutti
i display delle zone cottura il simbolo “II”
e congela le impostazioni di cottura e dei
timer per al massimo 10 minuti dopo di che
il piano cottura si spegne.
Disattivazione Pausa
Una volta attivata la funzione si può
disattivare premendo nuovamente il
pulsante pausa (4). L’icona (3) lampeggia,
ed entro 10 secondi bisogna selezionare
un area del cursore. Così facendo il piano
riprende la cottura e il timer riparte dallo
stesso punto in cui si era fermato.
Funzione di Timer
La funzione timer è realizzata in due
versioni:
- Un Timer autonomo, da 1minuto fino a
99 min: segnale sonoro quando il tempo
è scaduto. Questa funzione è disponibile
anche quando delle zone cottura sono
accese.
- Timer per ogni zona cottura, da 1minuto
fino a 99 min: segnale sonoro quando
il tempo è scaduto e spegnimento della
zona di cottura nella quale è impostato,
le 4 zone cottura possono essere
programmate in maniera indipendente.
Il timer parte da un valore predefinito di 10
minuti e il punto di selezione timer è attivo
(13), posizionandosi nell’area cursore livello
minimo (16) il tempo inizia a diminuire,
mentre posizionandosi nell’area cursore
livello massimo (17) il tempo inizia a salire.
Qualsiasi tipo di timer sia stato attivato nei
I
11
Page 12

display dedicati (10-12) viene evidenziato
I
il timer con tempo minore in scadenza.
Se il tempo minore è relativo ad un timer
autonomo viene visualizzato semplicemente
il valore senza segnalazioni particolari,
mentre se il tempo minore è relativo ad un
timer per zona cottura l’icona timer (24)
lampeggia insieme alla corrispettiva spia
(8-9-14-15), gli altri timer impostati sono
comunque attivi ed in funzione ma avranno
l’icona ad orologio (24) accesa ma non
lampeggiante.
Il solo puntino di separazione (13) è acceso
quando il timer è stato selezionato e
modificabile.
Timer autonomo
- Se il touch è acceso e tutte le zone cottura
sono in posizione di “0” il timer autonomo
può essere utilizzato premendo il tasto
timer (5) e selezionando una qualsiasi
delle aree cursore di qualsiasi zona cottura.
Se invece ci sono delle zone cottura
accese per selezionare il timer autonomo
bisogna premere 2 volte il tasto timer (5)
e poi selezionare una qualsiasi delle aree
cursore.
Entro 10 secondi il timer disattiva la sua
selezione se non si seleziona nessun tasto.
- Modifiche del valore (0-99min), possono
essere effettuate con incrementi di un
minuto tenendo il dito nell’area cursore
(17).
- Un’attivazione continua del tasto (16-17)
danno luogo a un incremento dinamico
della velocità di variazione fino ad un
valore massimo o minimo, senza segnali
sonori.
- Se il tasto (16-17) viene rilasciato, la
velocità di incremento (decremento) inizia
nuovamente dal valore iniziale.
- L’impostazione del timer può essere fatta
sia con attivazioni continue dei tasti (16-
17) sia con attivazioni a tocchi successivi
(con segnale sonoro).
Dopo che il timer è stato impostato inizia il
conto alla rovescia. Lo scadere del tempo
verrà notificato dal lampeggiare del display
del timer che mostrerà “00” e da un segnale
sonoro della durata massima di 2 minuti.
Il segnale sonoro non si fermerà finche non
verrà premuto un tasto. Il display smette di
lampeggiare e si spegne.
Spegnere/modificare il timer
- Il timer può essere modificato o spento
in qualsiasi momento accendendo
nuovamente il touch se nessuna zona
cottura è accesa, azionando il tasto timer
(5) per selezionare il timer e a questo
punto portarlo a “0” premendo in una
qualsiasi delle aree cursore livello minimo
(16) per spegnerlo, oppure premendo
una qualsiasi delle aree cursore livello
massimo (17) si modifica aumentando il
tempo impostato.
- Il timer autonomo rimane attivo anche
premendo il tasto On/Off
Programmazione del timer
per le zone cottura
Accendendo il touch si può programmare
un timer indipendente per ogni zona cottura.
- Deve esserci almeno una zona cottura
accesa e impostata ad un certo livello.
- Attivando la zona cottura, selezionando
l’area cursore (16-17) poi premendo il
pulsante timer (5), si può impostare un
conto alla rovescia per spegnere la zona
cottura. Così facendo si accenderanno
affianco al display della zona di cottura
delle icone luminose fatte ad orologio
(24). Per impostare il timer su di una zona
cottura quando ci sono più zone cottura
accese bisogna:
12
Page 13
- Quando il timer della zona cottura viene
selezionato la relativa icona dell’orologio
vicino al display I timer programmati per
ogni zona cottura rimangono comunque
attivi.
- Ulteriori comportamenti del timer
corrispondono a quelli del timer
autonomo. Per incrementare il valore
deve essere utilizzato il tasto di selezione
più.
il LED della zona cottura assegnata
al timer lampeggia. La zona cottura
viene spenta e una “H” viene mostrata
se la zona “scotta”, altrimenti il display
della zona mostra un trattino. Il segnale
sonoro e il lampeggiamento del display si
interromperanno:
- Automaticamente dopo 2 minuti.
- Azionando il pulsante orologio il display
del timer si spegne.
- Lo scadere del tempo viene notificato da
un segnale acustico e da “00” sul display,
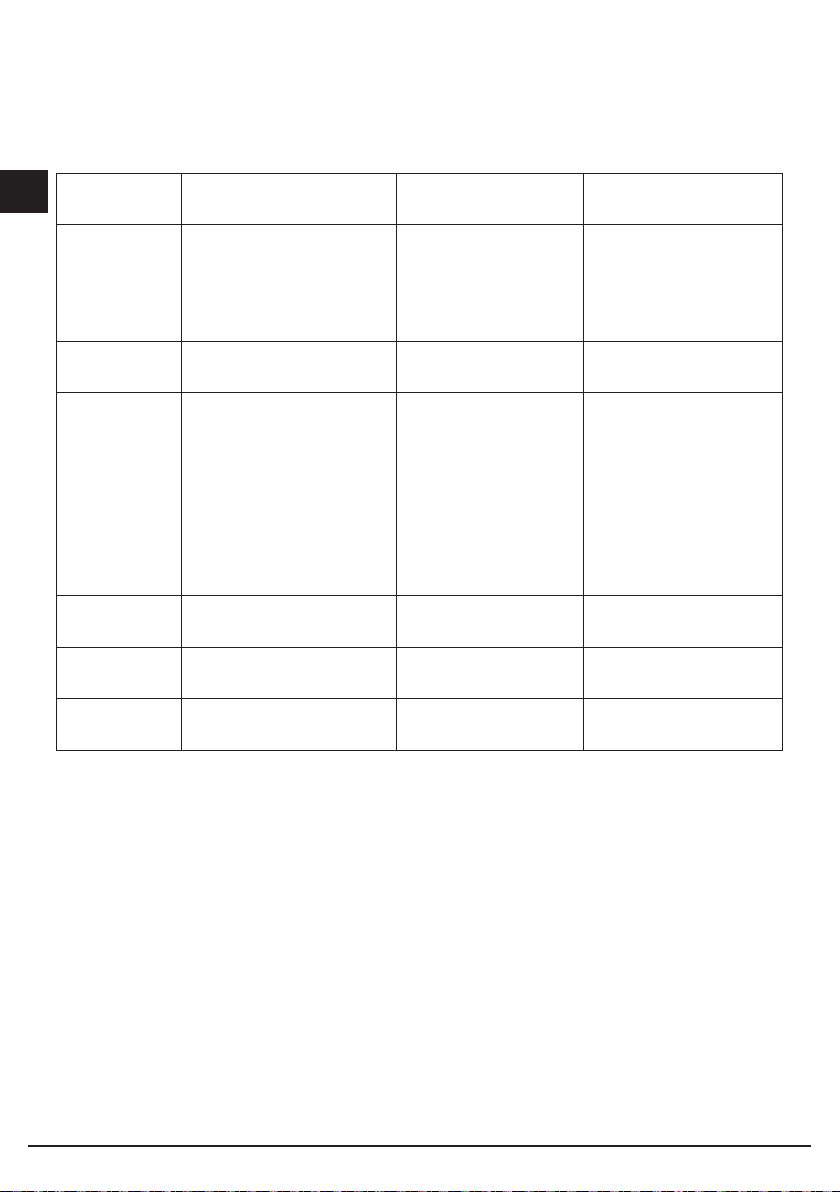
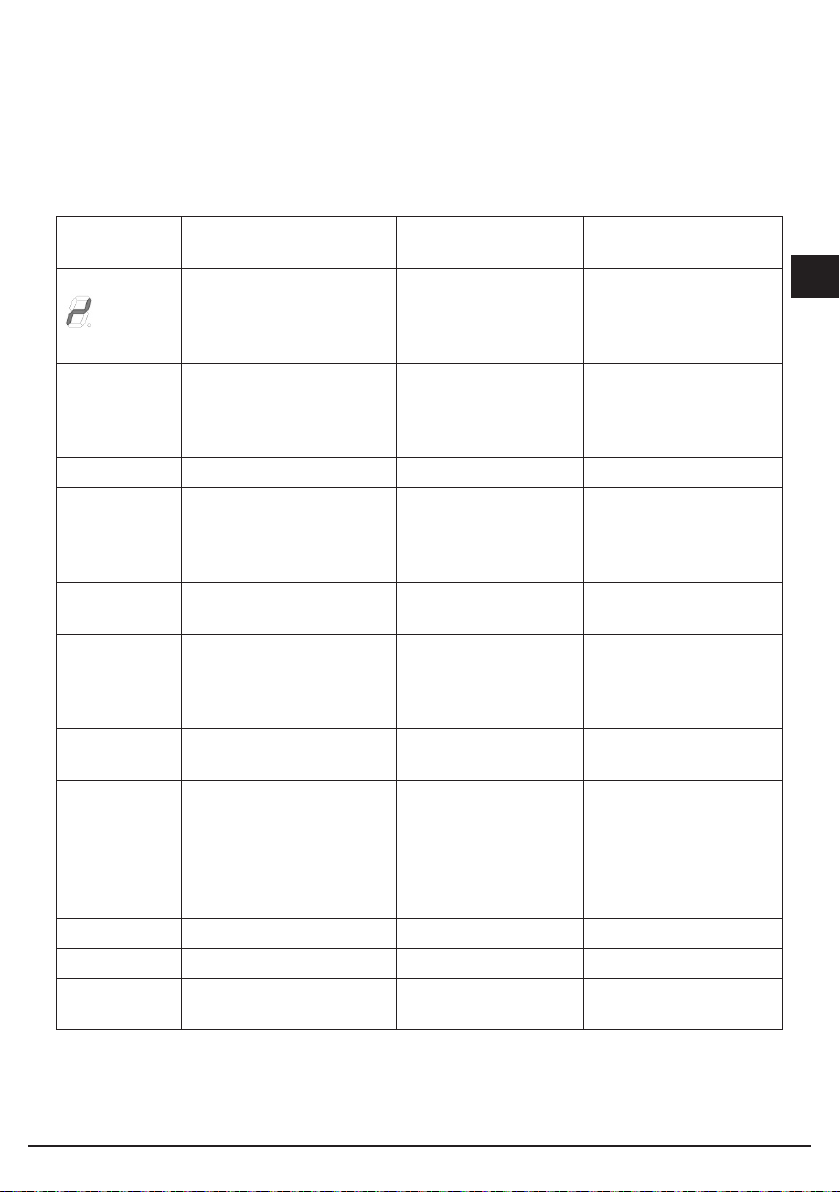
Codici di errore mostrati dai display a 7 segmenti “E” “ER” più il numero dell’errore.
I
Messaggio
di errore
“flash”
Descrizione
Uso continuo dei tasti;
L’unità di comando si
spegne dopo 10 secondi
Possibile causa
dell’errore
Acqua o utensili
da cucina sul vetro
sopra l’unità di
Riparazione del
problema
Pulire la superficie di
lavoro
comando
Er 22 Valutazione tasto
difettoso.
L’unità di comando si
spegne dopo 3.5 – 7.5
Cortocircuito o
interruzione nel
range di valutazione
del tasto.
Cambiare l’unità di
comando.
secondi
Er20 Guasto Flash µC- difettoso Cambiare l’unità di
comando
Er36 Il valore NTC non è nel
range di valori specificati
Cortocircuito o
spegnimento NTC
Scambiare l’unità di
comando
(valore < 200mV o >
4.9V; l’unità di comando
si spegne
Er31 Dati di configurazione
errati
Necessaria
configurazione
Nuova Configurazione
dell’induzione
13
Page 14
Messaggio
I
di errore
Descrizione
Er47 Errore di comunicazione
tra TC e induzione
Possibile causa
dell’errore
Comunicazione
assente o difettosa!
Riparazione del
problema
Verificare che il cavo
di collegamento
sia collegato
correttamente e
funzionante.
E2 Surriscaldamento delle
bobine di induzione
U400 Tensione secondaria
dell’unità di
alimentazione troppo
Errato collegamento
dell’unità di comando
Necessario
raffreddamento
Collegare alla tensione
di alimentazione
corretta
elevata (primaria
> 300V). L’unità di
comando si spegne
dopo 1 secondo
emettendo un suono
continuo.
E5 Errore sulla scheda filtro Cambiare la scheda
filtro
E6 Errore sull’unità di
alimentazione
E9 Sensore di temperatura
bobina difettoso
Cambiare la scheda di
alimentazione
Cambiare il sensore di
temperatura
14
Page 15

Istruzioni per l’installatore
Installazione
Le presenti istruzioni sono rivolte
all’installatore qualificato quale
guida all’installazione, regolazione e
manutenzione secondo le leggi e le
normative in vigore. Gli interventi devono
sempre essere effettuati ad apparecchiatura
disinserita elettricamente.
Posizionamento (Fig. 6-7)
L’apparecchio è previsto per essere
incassato in un piano come illustrato
nell’apposita figura. Predisporre su tutto il
perimetro del piano il sigillante a corredo. E’
sconsigliabile l’installazione sopra un forno
contrariamente accertarsi che:
- il forno sia munito di un efficace sistema
di raffreddamento;
- che non avvenga in nessun caso
passaggio di aria calda dal forno verso il
piano;
- prevedere passaggi d’aria come indicato
in figura.
50°C a quella ambiente.
Per il collegamento diretto alla rete
è necessrio interporre un interruttore
omnipolare dimensionato per il carico di
targa che assicuri la sconnesione della rete
con una distanza di apertura dei contatti che
consenta la disconnesione completa nelle
condizioni della categoria di sovratensione
III, conformemente alle regole di istallazione
(il cavo di terra giallo/verde non deve essere
interrotto).
La presa o interrutore omnipolare devono
essere facilmente raggiungibili con
l’apparecchiatura installata.
N.B.:
- Il costruttore declina ogni responsabilità
Se il cavo di alimentazione è danneggiato,
esso deve essere sostituito dal costruttore
o dal suo servizio assistenza tecnica o
comunque da una persona con qualifica
similare, in modo da prevenire ogni rischio.
Collegamento elettrico
(Fig. 8)
Prima di effettuare l’allacciamento elettrico
accertarsi che:
- le caratteristiche dell’impianto siano tali
da soddisfare quanto indicato sulla targa
matricola applicata sul fondo del piano;
- che l’impianto sia munito di un efficace
collegamento di terra secondo le norme
e le disposizioni di legge in vigore. La
messa a terra è obbligatoria a termini di
legge.
Nel caso in cui l’apparecchiatura non sia
munita di cavo e/o di relativa spina utilizzare
materiale idoneo per l’assorbimento indicato
in targa matricola e per la temperatura
di lavoro. Il cavo in nessun punto dovrà
raggiungere una temperatura superiore di
15
I
nel caso che quanto sopra e le usuali
norme antinfortunistiche non vengano
rispettate.
Page 16

I
INDUZIONE INDUCTION
INDUCCIØN INDUÎÍO
50 MIN.
20 MIN.
induzione - induction - induction - Induktion
- inducción - inductie - indução
ZONA FORNO O ARMADIETTO
OVEN ZONE OR CUPBOARD
ZONE FOUR OU PLACARD
OFENBEREICH ODER SCHRANK
ZONA HORNO O ARMARIO
OVENRUIMTE OF KASTJE
ZONA DO FORNO OU ARMÁRIO
50 MIN.
aria - air - air - Luft - aire - lucht - ar
100 cm2 MIN.
(2 x 500)
ATTENZIONE : il mancato rispetto
delle indicazioni costruttive del mobile
comportano la perdita della garanzia sul
prodotto
aria - air - air - Luft - aire - lucht - ar
100 cm2 MIN.
Fig. 6
16
Page 17

0
N.B. Per versione
R
3
800
Semifilotop l’abbassamento
di 4.8 mm non è necessario
R
3.
5
750
+0.5
4.8
I
0
+1
0
510
FSH 804 ID TS BK
FSH 804 ID TS MAT
FSH 804 ID TS WH
+1
511
801
N.B. Non incollare o siliconare il
vetro nell’abbassamento di 4.8 mm
0
+1
0
+1
490
Fig. 7
~
400V 2N
N
N
L1L2
1.016.410
230V~
L
SERVIZIO ASSISTENZA TECNICA: 199.151.195
Fig. 8
17
Page 18

Page 19
Dear Customer,
we would like to thank you and congratulate
you on your choice.
This new product has been carefully designed
and built using top quality materials, and
meticulously tested to ensure that it meets all
your culinary requirements.
Please read and observe these simple
instructions, which will enable you to achieve
excellent results from the very first time you
use it. This state-of-the-art appliance comes
to you with our very best wishes.
THE MANUFACTURER
Index
Operating principle 21
User instructions 22
I
GB
FR
DE
ES
PT
Italiano
English
Français
Deutsch
Español
Português
GB
Installation instructions 30
THIS PRODUCT IS DESIGNED FOR
DOMESTIC USE.
THE MANUFACTURER DECLINES ALL
RESPONSIBILITY FOR DAMAGES TO THINGS
OR PEOPLE DERIVING FROM INCORRECT
INSTALLATION OR IMPROPER, ERRONEOUS
OR UNSUITABLE USE.
THE APPLIANCE MUST NOT BE USED
BY PEOPLE (INCLUDING CHILDREN)
WITH PHYSICAL, SENSORIAL OR
MENTAL IMPAIRMENTS, OR BY PEOPLE
19
WITHOUT THE NECESSARY EXPERIENCE
OR KNOWLEDGE, UNLESS THEY ARE
SUPERVISED OR INSTRUCTED IN THE
USE OF THE APPLIANCE BY A PERSON
RESPONSIBLE FOR THEIR SAFETY.
CHILDREN MUST BE SUPERVISED TO
ENSURE THAT THEY DO NOT PLAY WITH THE
APPLIANCE.
Page 20

Operating principle
Induction
Heating by induction is the most efficient
form of cooking available.
The heat is generated by an electromagnetic
field, directly on the bottom of the pan or pot
GB
used.
The surface which is free from contact
remains virtually cold. When the cooking
time is up and the container is removed,
there is no residual heat. It is efficient
become there is no waste of energy due to
dispersion, as happens with gas burners, it
is 30 to 50% faster than normal hobs using
HGL technology and allows energy savings
of up to 25%.
If liquid overflow from the container, it does
not stick to the surface of the hob, because
this is just slightly warm.
Operating principle
This is based on the electromagnetic
properties of most cooking containers.
The electronic circuit governs the operation
of the coil (inductor), creating a magnetic
field.
The heat is transmitted by the container to
the food.
Te cooking process takes place as follows:
- minimum dispersion (high performance);
- the removal of the pan (simply lifting it)
automatically stops the system;
- the electronic system allows maximum
flexibility and precision of regulation.
1 - Recipient
2 - Induced current
3 - Magnetic field
4 - Inductor
5 - Electronic circuit
6 - Electricity supply
Fig. 1
20
Page 21
User instructions
Installation
All installation operations (electrical
connection) must be carried out by people
qualified in compliance with the laws in
force.
For specific instructions, see the installation
section.
DO NOT FOCUS INENSEL ON THE LEDS
AND DISPLAYS.
Use
First of all, position the pan in the chosen
cooking area.
The absence of the pan display means
the system cannot start.
Pan detection
A certainty which distinguishes the
knowledgeable use of technology in favour
of the consumer.
A: INDUCTION COOKING AREA 220x180 2300/3700 W
B: INDUCTION COOKING AREA 220x180 2300/3700 W
C: INDUCTION COOKING AREA ø210 2300/3700 W
D: INDUCTION COOKING AREA ø180 1850/3000 W
21GB21
Fig. 2
Page 22
GB
1 ON/OFF
2 Power-on LED
3 Pause icon
4 Pause button
5 Timer button
6 Key button
7 Key icon
8 Timer on light - front left cooking area
9 Timer on light - rear left cooking area
10 Timer minute display
11 Timer separator dot
12 Timer minute display
13 Timer separator dot
14 Timer on light - rear right cooking area
15 Timer on light - front right cooking area
16 Minimum level cursor area
17 Maximum level cursor area
18 Power Booster (P) cursor area
19 Special function on icon
20 Special function (u) button
21 Only an indication of the cooking area position
22 Display value set
23 Display point
24 Timer icon for cooking area
25 Extension function on icon
26 Special function (U) button
27 Special function on icon
22
Fig. 3
Page 23

Residual heat indicator
this tells the user that the glass is at a
dangerously high heat in case of contract
with the whole area over the cooking zone.
The temperature is determined using a
mathematical model and any residual heat
is indicated with an “H” by the corresponding
seven-segment display.
Heating and cooling are calculated in
relation to:
- the power level selected (from “0“ to “9“);
- the relay activation period.
After switching off the cooking zone, the
corresponding display shows an “H” until
the temperature in the zone falls below the
critical level (≤ 60°C) in compliance with the
mathematical model.
Protection in the event of
accidental switching on
- If the electronic control sense continuous
activation of a key for about 10 sec. it
switches off automatically. The control
gives off an acoustic error signal for
10 seconds, warning the user of the
presence of an object on the sensors.
The displays show the permanent error
code, which will be displayed as long as
the electronic control senses the error.
If the cooking zone “burns”, an “H” will
appear on the display, alternating with the
error signal.
- If no cooking zone is activated within 20
seconds of switching on the touch control,
the control returns to stand-by mode.
(See also paragraph 1.2.
- When the touch control is on, the ON/OFF
key takes priority over all the other key, so
the touch control can be switched off at
any time, even in the case of multiple or
continuous activation of the keys.
- In stand-by mode, continuous activation
of the keys will have no effect. However,
before the electronic control can be
switched on again, it must acknowledge
that no key is active.
GB
Precautions
- If there is even the tiniest crack in the
ceramic glass surface, immediately
disconnect the hob from the electricity
supply;
- during operation, move any magnetic
materials such as credit cards, computer
disks, calculators, etc., away from the
area;
- never use cooking foil or rest products
wrapped in foil directly on the hob;
- metallic objects such as knives, forks,
spoons and lids must not be rested on the
surface of the hob to prevent them from
heating up;
- with cooking with non-stick containers,
without using water or oil, limit any
preheating time to one or two minutes;
- when cooking foods which tend to stick to
the bottom of the pan, start at minimum
power and gradually increase the heat,
stirring frequently;
- after use, switching off correctly
(decreasing to “0”) and avoid relying on
the pan sensor.
Pans (Fig. 4)
- If a magnet is attracted by the bottom of
a container, the container is suitable for
induction cooking;
- prefer pans declared as suitable for
induction cooking;
- flat, thick-bottomed pans;
- a 20 cm diameter saucepan can benefit
from maximum power;
- a small saucepan reduces the power but
will not cause energy dispersion. The use
of containers with a diameter of less than
23
Page 24
12 cm is not recommended;
- stainless steel containers with multilayer
bottom or ferrite stainless steel if the
bottom indicates: for induction;
- cast iron containers, better with an
GB
enamelled bottom to avoid scratching the
ceramic glass hob;
- containers made of glass, ceramic,
terracotta, aluminium, copper or nonmagnetic stainless steel (austenitic) are
not recommended and are unsuitable.
Turning the cooking surface on
and off
The cooking surface is turned on by
pressing the “centre” On/Off button (1),
you will hear a short beep and the 4 sevensegment displays light up showing “0”.
If a cooking zone is “hot”, the display will
alternate between “H” and “0”.
After switching on, the touch control
remains active for 10 seconds. If you do not
select either a cooking zone or the times,
the touch control automatically returns to
stand-by mode.
YesNo No
Fig. 4
Maintenance (Fig. 5)
Traces of foil, food residues, splashes of
fat, sugar or very sugary foods must be
removed immediately from the hob using a
scraper to avoid damaging the hob surface.
Then clean with SIDOL or STANFIX and
kitchen paper, rinse with water and dry with
a clean cloth.
Never use abrasive sponges or clothes and
avoid using aggressive chemical cleansers
such as OVEN SPRAYS or STAIN
REMOVERS.
DO NOT USE STEAM CLEANERS
Fig. 5
Acoustic signal (buzzer)
During use, the following activities are
signaled by a buzzer:
- Normal pressing of the buttons with a
short beep.
- Holding down buttons for more than 10
seconds with a long intermittent sound
(an error symbol is displayed and, if you
continue, the touch control is turned off)
Turning on a cooking area
Position a pot and touch an area of the
cursor for the cooking area where the pot
is (16-17-18), slide your finger to the right to
increase the cooking level (17), or slide your
finger to the left to decrease it (16).
Turning off a cooking area
A single cooking area can be turned off
directly by selecting the “0” position by
sliding your finger to the left in the cursor
area for the cooking area that is working.
Hot cooking areas will be displayed with a
letter “H”.
You can turn off all cooking areas
immediately at any time using the power
24
Page 25

On/Off button (1).
If, during cooking, you inadvertently turn off
the surface while using the controls, you
can turn it on again with the On/Off button
and you will have 6 seconds to press the
pause button (4) that will be indicated by
the (3) flashing icon; doing so will turn the
surface on again with the same settings it
had before it was accidentally turned off.
Power level
The power level of the cooking area can be
set from level 1 to level 9. A further level
P (Power Booster) is available that allows
a very rapid heating of food and, therefore,
saves you time.
The power level represented by an
intermittent letter “A” is the activation of the
automatic heating function.
Booster and power management.
The generator, with Booster enabled,
provides the cooking area power that is
significantly higher than the rated power; the
display of the selected cooking area shows
a “P”. The Booster function can be activated
by pressing at the end of the cursor of the
cooking area (18).
The power increase is different depending
on the size of the cooking area:
1) For a cooking area with a diameter of
180 mm, the power goes from a level 9
of 1850 W to the Booster level of 3000
W for 10 minutes.
2) For a rectangular cooking area
(220x190), the power goes from a level
9 of 2300 W to the Booster level of 3700
W for 10 minutes.
3) For a cooking area with a diameter of
210, the power goes from a level 9 of
2300 W to the Booster level of 3700 W
for 10 minutes.
If during pot is removed from the cooking
area during the Booster time, the Booster
remains active and the Booster time is not
deactivated.
With the Booster activated, changing the
value set with your finger in the cursor area
deactivates the Booster.
The Booster function “P” can be activated in
all cooking areas, but priority is given to the
last Booster activated, reducing any other
cooking levels.
Automatic preheating
(or “heat-up” function)
This feature makes cooking easier. You do
not need to be permanently present during
cooking: the surface automatically heats
up at Full Power and then returns to the
selected power level after a certain time
(see Table 1).
Activating automatic heating (or
“heat-up” function)
Press and hold an area of the cursor for
the cooking area that is working for about 3
seconds until you hear a beep (such as 1/3
of the length of the cursor area).
For example: Select level 3 and activate the
automatic heating function by pressing your
finger for 3 seconds. The corresponding
display shows the letter “A” alternating with
“3”. With these settings, the cooking surface
heats the cooking area at the maximum
level “9” for 2 minutes and then continues
cooking level at level “3”.
GB
25
Page 26
Maximum
Duration
of Working
Time without
Commands
(time in
minutes)
GB
Duration
Automatic
POWER
LEVEL
0 1 0’ 40” 516
2 1’ 12” 402
3 2’ 318
4 2’ 56” 258
5 4’ 16” 210
6 7’ 12” 138
7 2’ 138
8 3’ 12” 108
9 - 90
P - 10
HEATING
Function (time
in minutes)
Extension function
(For large pans)
This function facilitates cooking with large
rectangular pans, is only available for the
rectangular cooking areas and is activated
by simultaneously pressing the 2 cursors of
the 2 cooking areas involved. At this point, a
“U” icon (25) will light up next to the display
of the levels (22) and the cooking area can
now be controlled with the cursor to the left.
Special functions
By turning on the touch display, you can
program a special function by pressing the
dedicated buttons (20-26). The icon (19-27)
will flash for 5 seconds during which you
can assign the function to a cooking area.
This function is available to “assist cooking”
in each cooking area and is indicated by a
“u” or “U”
It is possible to activate 2 “cooking” levels:
1) Melting with a temperature of
approximately 42 °C “u”.
2) Heating with a temperature of
approximately 70 °C “U”.
These temperatures are approximate and
are greatly dependent on the pot and the
quantity of food.
Control lock
(child safety)
It is only activated when the cooking surface
is on but no cooking area is on.
Simultaneously press the key button (6)
and the pause button (4) and then press the
pause button (4).
The letter “L” will appear on both displays
for 10 seconds and then they will turn off.
When you try to turn on the cooking surface
with the On/Off button (1), the letters “L” will
be displayed and it will not be possible to
cook.
Unlocking/deactivation
child safety
There are two types of unlocking:
1) Unlocking for one time only: To disable
the function, turn on the cooking surface
and simultaneously press the pause
(4) and key (6) buttons. The letters L
disappear and are replaced by a “0”
for each cooking area. If you turn off
the cooking surface after use, when it
is turned on again, the letters L will be
displayed to indicate that the surface is
locked.
2) Permanent unlocking: To disable the
function permanently, turn on the
cooking surface and simultaneously
press the pause (4) and key (6) buttons.
Then release these 2 buttons and press
the key button (6) again.
26
Page 27

Key
This cooking surface allows setting a keypad
lock using the lock button (6). It may be
useful to lock the keypad during operation,
for example for cleaning the control area or,
in any case, if you do not want to change
any settings.
The On/Off button (1) still has priority.
Pause
This cooking surface allows setting a pause
(4) during cooking (which is useful, for
example, when answering a phone call).
When this function is pressed, an LED
lights above the button and the symbol “II”
is displayed in all the cooking areas and the
cooking settings and timers are frozen for
a maximum of 10 minutes, after which the
cooking surface turns off.
be programmed independently.
The timer starts with a default time of 10
minutes and the timer selection point (13)
is active in the cursor area. When you touch
the
minimum level (16), the time decreases and
when you touch the maximum level (17), it
increases.
The type of timer activated is shown in the
dedicated displays (10-12) and the timer
with the least time left is highlighted. If the
least time is related to an independent timer,
the time is simply displayed without any
particular indication while, if the least time
is realted to a cooking area timer, the timer
icon (24) flashes together with the related
indicator light (8-9-14-15). The other timer
settings are still active and running, but will
have a clock icon (24) lit but not flashing.
Just the separator dot (13) is lit when the
timer is selected and modifiable.
GB
Deactivating Pause
Once activated, the functioncan be
deactivated by pressing the pause button
(4) again. The icon (3) flashes and you must
select a cursor area within 10 seconds.
This allows the surface to resume cooking
and the timer starts from the same point at
which it was stopped.
Timer function
There are two versions of the timer function:
- An independent timer from 1 to 99
minutes: it beeps when the time has run
out. This function is available even when
the cooking areas are on.
- A timer from 1 to 99 minutes for each
cooking area: it beeps when the time has
run out and turns off the cooking area
where it was set. The 4 cooking areas can
27
Independent timer
- If the touch display is on and all the cooking
areas are at level “0”, the independent timer
can be used by pressing the timer button
(5) and selecting any of the cursors of
any cooking area. If, however, there are
cooking areas switched on, to select the
independent timer, you have to press the
timer button (5) two times and then select
any of the cursors.
If you do not select any button, the timer
deactivates within 10 seconds.
- The time setting (0-99 minutes) can be
changed in increments of one minute by
keeping your finger in the cursor (17).
- Holding down the button (16-17)
dynamically increases the rate of change
up to a maximum or minimum value,
without beeps.
- If the key (16-17) is released, the rate of
Page 28

increase (decrease) starts again from the
initial value.
- The timer can be set by either
continuously pressing the buttons (16-17)
or by pressing successively (with beeps).
GB
After the timer is set, it begins to count
down. When the time runs out, the timer
display will flash and display “00”, beeping
for a maximum of 2 minutes.
The beep will not stop until a button is
pressed. The display stops flashing and
turns off.
Turning off/changing the timer
- The timer can be changed or turned off at
any time by turning on the touch display
again, if no cooking area is on, and
pressing the timer button (5) to select the
timer. At this point, set it to “0” by pressing
the minimum level in any of the cursors
(16) to turn it off, or by pressing the
maximum level (17) of any of the cursors
to increase the time setting.
- The independent timer remains active
even when the On/Off button is pressed
- Activate the cooking area by selecting the
cursor (16-17) then press the timer button
(5). In this way, you can set a countdown
to turn off the cooking area. Illuminated
clock icons (24) will light up next to the
cooking area display. To set To set the
timer on a cooking area when there is
more than one cooking area on, you
must:
- Other functions of the timer are are the
same as the independent timer. To
increase the time, use the plus button.
- The expiry of the time is signalled by a
beep and “00” on the display and the LED
of the cooking area assigned to the timer
flashes. The cooking area is turned off
and an “H” is shown if the area is “hot”,
otherwise the display shows a hyphen.
The beeping and flashing of the display
stop:
- Automatically after 2 minutes.
- When you press the clock button, the
timer display turns off.
Programming the timer
for the cooking areas
By turning on the touch display, you can
program an independent timer for each
cooking area.
- At least one cooking area must be on and
set to a certain level.
- Activate the cooking area, select a cursor
(16-17) and then press the timer button
(5) to set a countdown time for turning off
the cooking area. The clock icons (24)
will light next to the display of the cooking
area. To set the timer of a cooking area
when there is more than one cooking
area on, you must:
28
Page 29
Error codes are displayed by the 7-segment display with “E” or “ER” plus the error number.
Error
message
“flash”
Description
Permanent use of keys;
Control unit cuts off after
10 sec
Possible error
reason
Water or cooking
utensils on the glass
above the control
Troubleshooting
Cleaning of the
operational surface
unit
Er 22 Defective Key
evaluation.
Control unit cuts off after
3.5 – 7.5 sec.
Short-circuit or
discontinuation in
the range of the key
evaluation
Exchange control unit
Er20 Flash-failure µC- faulty Exchange control unit
Er36 NTC value is not within
its specification (value <
Short-circuit or cutoff at NTC
Exchange control unit
200mV or > 4.9V; control
unit cuts off
Er31 Configuration data
incorrect
Er47 Communication error
between TC and
induction
Configuration of
induction necessary
None or faulty
communication!
New Configuration
Ensure that
connection cable is
plugged on correctly
and functional.
E2 Overheating of the
induction coils
U400 Secondary voltage
of the power unit to
Control unit is
wrongly connected.
Cooling down
necessary
Connect to correct
mains voltage
high (primary > 300V).
Control unit cuts off
after 1 sec releasing a
permanent tone.
E5 Error on filter board Exchange filter board
E6 Error on power unit Exchange power unit
E9 Coil temperature sensor
defective
Exchange temperature
sensore
GB
29
Page 30

Installation instructions
Installation
these instructions are aimed at qualified
fitters as a guide to installation, adjustment
and maintenance in compliance with the
laws and standards in force. The operations
GB
must always be carried out with the
appliance disconnected from the electricity
supply.
Positioning (Fig. 6-7)
The appliance is made to be fitted into a
counter top, as show in the figure. Apply
the sealant supplied around the whole
perimeter of the hob. Installation over an
oven is not recommended, but if this is
necessary, check that:
- the oven has an efficient cooling system;
- there is no passage of hot air from the
oven to the hob;
- allow air passages as shown in the figure.
Electrical connection (Fig. 8)
Before connecting to the electricity supply,
ensure that:
- the characteristics of the system are
such as to satisfy that indicated on the
registration plate applied to the bottom of
the hob;
- the system has an effective earth
connection compliant with the standards
and laws in force. Connection to earth is
compulsory by law.
If the appliance has no cable and/or plug,
use material suitable for the absorption
indicated on the registration plate and for
the working temperature. The cable must
not reach a temperature higher than 50°C
above room temperature in any point.
For direct connection to the network it is
necessary to fit an omnipolar switch of a
suitable size to ensure disconnection of he
network with a contact opening distance
that allows complete disconnection in the
conditions of the overtension category III,
compliant with the installation regulations
(the yellow/green earth wire must not be
interrupted).
The omnipolar socket or switch must
be easy to reach when the appliance is
installed.
N.B.:
- The manufacturer declines all responsibility
if the usual accident prevention standards
and the above instructions are not observed.
If the power cable is damaged, it must be
replaced by the manufacturer or by the
manufacturer’s technical servicing network,
or by a similarly qualified operator, to
prevent every possible risk.
30
Page 31

50 MIN.
INDUZIONE INDUCTION
INDUCCIØN INDUÎÍ O
GB
20 MIN.
induzione - induction - induction - Induktion
- inducción - inductie - indução
ZONA FORNO O ARMADIETTO
OVEN ZONE OR CUPBOARD
ZONE FOUR OU PLACARD
OFENBEREICH ODER SCHRANK
ZONA HORNO O ARMARIO
OVENRUIMTE OF KASTJE
ZONA DO FORNO OU ARMÁRIO
50 MIN.
aria - air - air - Luft - aire - lucht - ar
100 cm2 MIN.
(2 x 500)
ATTENTION: failure to follow the
construction instructions for the cabinet will
void the product warranty
aria - air - air - Luft - aire - lucht - ar
100 cm2 MIN.
POSITION OF SEALANT IN THE SEMI
FLUSH WITH TOP VERSION
POSITION OF SEALANT IN THE
FLUSH WITH TOP VERSION
Fig. 6
31
Page 32

GB
0
Note: Semifilotop models do
R
3
800
not need to be lowered by
4.8 mm
R
3.
5
750
+0.5
4.8
0
+1
0
510
FSH 804 ID TS BK
FSH 804 ID TS MAT
FSH 804 ID TS WH
+1
511
801
Note: Do not glue or silicone the
glass when lowering by 4.8 mm
0
+1
0
+1
490
Fig. 7
~
400V 2N
N
N
L1L2
1.016.410
230V~
L
32
Fig. 8
Page 33

Cher Client,
Vous venez d’acheter l’un de nos produits et
nous vous en remercions vivement.
Ce nouveau produit, minutieusement conçu
et construit avec des matériaux de tout
premier choix, a été soigneusement testé afin
de satisfaire chacune de vos exigences en
matière de cuisson.
Nous vous prions de lire et de respecter ces
instructions simples qui vous permettront
d’obtenir d’excellents résultats dès la première
utilisation. Nous vous souhaitons une bonne
cuisine avec cet appareil moderne.
LE CONSTRUCTEUR
Sommaire
Principe de fonctionnement 34
Instructions pour l’utilisateur 35
I
GB
FR
DE
ES
PT
Italiano
English
Français
Deutsch
Español
Português
FR
Instructions pour l’installateur 45
CE PRODUIT A ETE CONÇU POUR UN USAGE
DOMESTIQUE.
LE CONSTRUCTEUR DECLINE TOUTE
RESPONSABILITÉ EN CAS DE DOMMAGES
SUBIS PAR LES CHOSES OU LES PERSONNES
DERIVANT D’UNE INSTALLATION
INCORRECTE OU D’UN USAGE IMPROPRE,
ERRONE OU INCOHERENT.
NE PAS CONFIER L’UTILISATION DE
L’APPAREIL A DES PERSONNES (Y COMPRIS
DES ENFANTS) AYANT DES CAPACITES
PHYSIQUES, SENSORIELLES OU MENTALES
33
REDUITES, OU A DES PERSONNES QUI
NE POSSEDENT PAS L’EXPERIENCE ET
LES CONNAISSANCES NECESSAIRES ; LA
SUPERVISION D’UN ADULTE RESPONSABLE
POUR LEUR SECURITE ET EN MESURE DE
COMPRENDRE LE MODE D’EMPLOI DE
L’APPAREIL EST OBLIGATOIRE.
IL FAUT SURVEILLER LES ENFANTS POUR
S’ASSURER QU’ILS NE JOUENT PAS AVEC
L’APPAREIL.
Page 34

Principe de fonctionnement
Induction
Le réchauffage par induction est la méthode
la plus efficiente et immédiate pour cuisiner.
La chaleur est produite moyennant un
champ électromagnétique, directement au
niveau du fond de la casserole ou de la
poêle utilisée.
La surface non concernée par le contact
reste pratiquement froide ; il ne reste pas
FR
de chaleur résiduelle une fois la cuisson
terminée et après le retrait de la casserole.
Le réchauffage par induction est plus
efficient car il évite tout gaspillage d’énergie
par dispersion, comme les brûleurs à gaz ;
plus rapide de 30 à 50% que les tables de
cuisson normales appliquant la technologie
HGL, il permet d’économiser jusqu’à 25%
d’énergie.
En présence d’un débordement de liquide,
celui-ci n’adhère pas à la surface de la table
car elle est tiède.
Principe de fonctionnement
Le fonctionnement est basé sur les
propriétés électromagnétiques de la plupart
des récipients de cuisson.
Le circuit électronique commande le
fonctionnement de la bobine (inducteur)
créant un champ magnétique.
La chaleur est transmise du récipient aux
aliments.
La cuisson se produit tel qu’on le décrit
ci-après :
- Dispersion minimale (haut rendement) ;
- L’enlèvement de la casserole (il suffit de
la soulever) provoque automatiquement
l’arrêt du système;
- le système électronique permet la plus
grande flexibilité et finesse de réglage.
Fig. 1
1 - Récipient
2 - Courant induit
3 - Champ magnétique
4 - Inducteur
5 - Circuit électronique
6 - Alimentation électrique
34
Page 35

Instructions pour l’utilisateur
Installation
Toutes les opérations relatives à
l’installation (branchement électrique)
doivent être effectuées par du personnel
qualifié conformément aux normes en
vigueur.
Pour les instructions spécifiques, voir la
partie réservée à l’ installateur.
NE PAS FIXER INTENSEMENT LES
VOYANTS ET L’AFFICHEUR DU REGARD.
Utilisation
Tout d’abord, positionner la casserole sur la
zone de cuisson choisie.
L’activation du système est inhibée en
l’absence de casserole (affichage du
symbole
).
Détection du récipient
Le système de détection du récipient est
une certitude our le consommateur qui
permet une utilisation responsable e la
technologie.
A: ZONE DE CUISSON À INDUCTION 220x180 2300/3700 W
B: ZONE DE CUISSON À INDUCTION 220x180 2300/3700 W
C: ZONE DE CUISSON À INDUCTION ø210 2300/3700 W
D: ZONE DE CUISSON À INDUCTION ø180 1850/3000 W
35FR35
Fig. 2
Page 36

1 Allumage / Extinction ON/OFF
FR
2 Voyant DEL Allumage
3 Icône pause
4 Bouton d’activation pause
5 Bouton minuterie
6 Bouton clé
7 Icône clé
8 Voyant minuterie active zone de cuisson
avant gauche
9 Voyant minuterie active zone de cuisson
arrière gauche
10 Afficheur minuterie minutes
11 Point de séparation minuterie
12 Afficheur minuterie minutes
13 Point de séparation minuterie
14 Voyant minuterie active zone de cuisson
arrière droite
15 Voyant minuterie active zone de cuisson
avant droite
16 Zone du curseur activation niveau minimum
17 Zone du curseur activation niveau maximum
18 Zone du curseur activation Power Booster (P)
19 Icône activation fonction spéciale
20 Bouton activation fonction spéciale (u)
21 Uniquement indication position zone de
cuisson
22 Afficheur valeur sélectionnée
23 Point afficheur
24 Icône Minuterie pour zone de cuisson
25 Icône fonction extension activée
26 Bouton d’activation fonction spéciale (U)
27 Icône activation fonction spéciale
Fig. 3
36
Page 37

Indicateur de chaleur résiduelle
Il sert à indiquer à l’utilisateur que la
température du verre est dangereuse
en cas de contact avec l’ensemble de la
zone se trouvant au-dessus de la zone de
cuisson. La température est déterminée
suivant un modèle mathématique et une
éventuelle chaleur résiduelle est indiquée
par un « H » sur l’afficheur correspondant à
sept segments.
Le réchauffage et le refroidissement sont
calculés par rapport :
- au niveau de puissance sélectionné (de «
0 » à « 9 ») ;
- à la période d’activation des relais.
Après avoir éteint la zone de cuisson,
l’afficheur correspondant affiche « H »
jusqu’à ce que la température de la zone
baisse sous le niveau critique (≤ 60° C)
selon le modèle mathématique.
Protection en cas d’allumage
involontaire.
- Si le contrôle électronique détermine
l’activation continue d’une touche
pendant env. 10 s., celle-ci s’éteint
automatiquement. Le contrôle émet
un signal sonore d’erreur pendant 10
secondes, informant l’utilisateur de la
présence d’un objet sur les capteurs.
Les afficheurs indiquent le code d’erreur
d’utilisation permanente, qui s’affichera
aussi longtemps que le contrôle
électronique détecte l’erreur. Si la zone
de cuisson « brûle », un « H » alterne
avec le signal d’erreur.
- Si aucune zone de cuisson n’est activée
dans un délai de 20 secondes après
l’activation du Touch, le contrôle revient
en modalité stand-by, (voir également le
paragraphe 1.2).
- Quand le dispositif de contrôle est actif,
la touche ON/OFF a la priorité sur toutes
les autres touches, de manière à ce
qu’on puisse désactiver le contrôle à
tout moment même en cas d’activation
multiple ou continue de touches.
- En modalité stand-by, une activation
continue des touches ne produit aucun
effet. Mais pour pouvoir de nouveau
activer le contrôle électronique, celuici doit identifier qu’aucune touche n’est
allumée.
Précautions
- Couper immédiatement l’alimentation
électrique à la moindre fracture de la
surface en vitrocéramique ;
- durant le fonctionnement, éloigner tout
matériel démagnétisable comme les
cartes de crédit, les disquettes, les
calculatrices, etc. ;
- ne jamais utiliser du papier aluminium et
ne pas poser directement sur la table des
produits enveloppés dans de l’aluminium ;
- ne pas poser d’objets métalliques comme
des couteaux, des fourchettes, des
cuillers ou des couvercles sur la surface
de la table pour éviter qu’ils ne chauffent ;
- durant la cuisson avec des récipients
à fond anti-adhérent, sans apport de
condiment, limiter l’éventuel temps de
préchauffage à une ou deux minutes ;
- pour cuire des aliments ayant tendance
à se coller sur le fond, commencer à la
puissance minimale puis augmenter en
mélangeant fréquemment ;
- après l’utilisation, éteindre au moyen du
dispositif spécifique (diminution jusqu’au
« 0 ») et ne pas se fier du détecteur de
casserole.
FR
37
Page 38

Récipients (Fig. 4)
- Si en approchant un aimant du fond d’un
récipient celui-ci est attiré par le métal,
cela signifie que la casserole est indiquée
pour la cuisson à induction ;
- préconiser des casseroles indiquées pour
la cuisson à induction ;
- des casseroles à fond plat et épais ;
- une casserole de 20 cm de diamètre
FR
permet d’utiliser la puissance maximale ;
- une casserole d’un diamètre inférieur
réduit la puissance mais ne provoquera
aucune dispersion d’énergie. Il est donc
conseillé d’utiliser des récipients d’un
diamètre inférieur à 12 cm ;
- des récipients inox à fond multicouche
ou en inox ferritique, s’il est précisé sur le
fond : pour l’induction ;
- des récipients en fonte, éventuellement à
fond émaillé pour éviter de rayer la table
de cuisson en vitrocéramique ;
- on déconseille les récipients en verre, en
céramique, en terre cuite, les récipients
en aluminium, en cuivre ou en inox non
magnétique (austénitique).
Entretien (Fig. 5)
Des traces de papier aluminium, des résidus
d’aliments, des éclaboussures de graisse,
du sucre ou des aliments fortement sucrés
doivent immédiatement être éliminés de la
table de cuisson avec un racloir pour éviter
d’endommager la surface de la table.
Ensuite, nettoyer avec du SIDOL ou du
STANFIX et du papier absorbant, puis rincer
à l’eau et sécher avec un chiffon propre.
OuiNon Non
Fig. 4
Ne jamais utiliser d’éponges ou de chiffons
abrasifs ; éviter également les détergents
chimiques agressifs comme des SPRAY
NETTOYANTS POUR FOUR ou des
DETACHANTS.
NE PAS UTILISER D’APPAREILS DE
NETTOYAGE A LA VAPEUR
Fig. 5
Mise sous tension/hors tension
du plan de cuisson
Le plan de cuisson s’allume lorsqu’on
appuie sur la touche “centrale” On/Off (1) ;
on entend un bip bref et les 4 afficheurs à 7
segment s’allument, indiquant un “0”.
Si une zone de cuisson “est brûlante”,
l’afficheur indique en alternance “H” et “0”.
Après la mise sous tension, le touch control
reste actif pendant 10 secondes. Si l’on ne
sélectionne ni une zone de cuisson ni la
minuterie, le touch revient automatiquement
à l’état de stand-by.
Signal sonore (vibreur)
Au cours de l’utilisation, les activités
suivantes sont signalées par un vibreur
sonore :
- Activation normale des touches signalée
par un son bref.
- Activation continue des touches pendant
plus de 10 secondes avec un son long
38
Page 39

intermittent (un symbole d’erreur s’affiche
et le touch control s’éteint si l’on poursuit
l’opération).
Allumage d’une zone de cuisson
Positionner une casserole et effleurer
une zone du curseur relative à la zone de
cuisson sur laquelle se trouve la casserole
(16-17-18), faire glisser le doigt vers la
droite pour augmenter le niveau de cuisson
(17), et le faire glisser vers la gauche pour
diminuer (16).
Extinction d’une zone de cuisson
Une zone de cuisson peut être éteinte
directement en sélectionnant la position de
“0” en faisant glisser le doigt vers la gauche
sur la zone du curseur relative à la zone de
cuisson en fonction.
Les zones de cuisson chaudes seront
affichées par la lettre “H”.
On obtient l’extinction immédiate de toutes
les zones de cuisson, à tout moment, par
l’intermédiaire de la touche d’alimentation
On/Off (1).
Si le plan s’éteint involontairement durant
la cuisson, pendant l’utilisation des
commandes on peut le rallumer avec la
touche On/Off et l’on dispose de 6 secondes
pour appuyer sur la touche pause (4); cette
condition sera indiquée par l’icône (3)
clignotante. Ainsi, le plan se rallume avec
les sélections antécédentes à l’extinction
involontaire.
Niveau de puissance
La puissance de la zone de cuisson peut
être sélectionnée du niveau 1 au haut
niveau 9. Un ultérieur niveau P (Power
booster) est disponible pour un réchauffage
particulièrement rapide des aliments, et
cours permettre à l’utilisateur d’économiser
du temps.
Le niveau de puissance représenté par la
lettre “A” clignotante représente l’activation
de la fonction de réchauffage automatique.
Booster et gestion de la
puissance
Lorsque le Booster est activé, le générateur
met à la disposition de la zone de cuisson
une puissance considérablement supérieure
à la puissance nominale ; l’afficheur de la
zone de cuisson sélectionnée indique un
“P”. La fonction Booster peut être activée
en appuyant dans la partie finale du curseur
de la zone de cuisson (18).
L’augmentation de puissance est différente
suivant la grandeur de la zone de cuisson :
1) Pour la zone de cuisson ø180 la
puissance passe du niveau 9 de 1850
W au niveau Booster 3000 W pendant
10 minutes.
2) Pour la zone de cuisson Rectangulaire
(210x190) la puissance passe du niveau
9 de 2300 W au niveau Booster 3700 W
pendant 10 minutes.
3) Pour la zone de cuisson ø260 la
puissance passe du niveau 9 de 2300 W
au niveau Booster 3700 W pendant 10
minutes. Pour des raisons de sécurité,
la fonction Booster a une durée limitée.
Si durant le temps Booster, la casserole est
retirée de la zone de cuisson, la fonction
reste active et le temps Booster n’est pas
désactivé.
Lorsque le Booster est activé, le
déplacement de la valeur sélectionnée avec
le doigt dans la zone du curseur de la zone
de cuisson, détermine la désactivation du
Booster.
La fonction Booster “P” est activable dans
toutes les zones de cuisson mais le dernier
Booster activé est prioritaire, réduisant
FR
39
Page 40

d’autres niveaux de cuisson éventuels.
Réchauffage automatique
(ou fonction «heat-up»)
Cette fonction facilite la cuisson. Il n’est
pas nécessaire d’être présent de façon
permanente durant la cuisson : le plan
FR
chauffe automatiquement à la pleine
puissance et revient au niveau de puissance
sélectionné au bout d’un certain temps (voir
tableau 1).
Activer le réchauffage
automatique (ou fonction “heatup”)
Presser une zone du curseur relative à la
zone de cuisson et la maintenir enfoncée
pendant environ trois secondes jusqu’au
bip (par exemple à 1/3 de la longueur de la
zone du curseur).
Ex. Sélectionner le niveau 3 et activer la
fonction de réchauffage automatique en
maintenant la pression du doigt pendant 3
secondes : la fonction s’active. L’afficheur
correspondant indique la lettre “A” alternant
avec le “3”. Avec ses sélections, le plan de
cuisson réchauffe la zone de cuisson au
niveau maximum «9» pendant deux minutes
puis il continue la cuisson au niveau «3».
Durée Maximum
Durée
Fonction
Niveau de
Puissance
Réchauffage
Automatique
(temps en
minutes)
0 1 0’ 40” 516
2 1’ 12” 402
3 2’ 318
4 2’ 56” 258
5 4’ 16” 210
6 7’ 12” 138
7 2’ 138
8 3’ 12” 108
9 - 90
P - 10
Temps de
Fonctionnement
Sans
Intervention sur
les Commandes
(temps en
minutes)
Fonction extension
(pour les casseroles de grande
dimension)
Cette fonction facilite la cuisson avec de
grandes casseroles rectangulaires ; elle
n’est disponible que pour les zones de
cuisson rectangulaires et elle s’active
lorsqu’on appuie simultanément sur 2
zones du curseur des 2 zones de cuisson
concernées ; à présent, une icône en “U”
(25) s’allume à côté de l’afficheur qui indique
les niveaux (22) ; la zone de cuisson peut
maintenant être commandée à partir de la
zone du curseur de gauche.
Fonctions spéciales
Lorsqu’on active le touch, on peut
programmer une fonction spéciale en
appuyant sur les touches dédiées (20-
26) ; l’icône (19-27) clignote pendant cinq
40
Page 41

secondes au cours desquelles on pourra
choisir la zone de cuisson pour activer
la fonction. Cette fonction est présente
pour chaque zone de cuisson et elle est
en mesure d’»aider la cuisson» ; elle est
affichée par un «u» ou par un «U».
On peut activer 2 niveaux de «cuisson» :
1) Fondre à une température d’environ 42
°C «u»
2) Fondre à une température d’environ 70
°C «U»
Ces températures sont fournies à titre
indicatif et dépendent
en grande partie de la casserole et de la
quantité d’aliments présente.
Blocage des commandes
(sécurité enfants)
L’activation s’effectue uniquement lorsque
le plan est allumé et que les zones de
cuisson sont éteintes.
Appuyer simultanément sur la touche clé
(6) et sur la touche pause (4) puis appuyer
sur la touche pause (4).
Que Les lettres “L” s’affichent pendant
quelques secondes, après quoi les
afficheurs s’éteignent.
Si l’on essaye d’allumer le plan de cuisson
avec la touche On/Off (1), les lettres “L”
s’affichent de nouveau et il sera impossible
de cuisiner.
Déblocage/désactivation
sécurité enfants
On dispose de 2 types de déblocage :
1) Déblocage pour une seule fois :
Pour désactiver la fonction, il faut
allumer le plan de cuisson et appuyer
simultanément sur la touche de pause
(4) et sur la touche clé (6). Les lettres L
disparaîtront et elles seront remplacées
par les “0” pour chaque zone de cuisson.
Si l’on éteint le plan de cuisson après
l’utilisation, les lettres L s’afficheront
à l’activation successive, indiquant
justement que le plan est bloqué.
2) Déblocage définitif : Pour désactiver
la fonction de façon définitive, il faut
allumer le plan de cuisson et appuyer
simultanément sur la touche clé (6) et
sur la touche pause (4), relâcher ces
deux commandes puis appuyer de
nouveau sur la touche clé (6).
Clé
Ce plan de cuisson permet de sélectionner
un blocage du clavier au moyen de la
touche clé spécifique (6). Il peut être utile de
bloquer le clavier durant le fonctionnement,
par exemple pour le nettoyage de la zone
des commandes ou quoi qu’il en soit si l’on
ne souhaite modifier aucune sélection.
La touche On/Off (1) est toujours prioritaire.
Pause
Ce plan de cuisson permet de sélectionner
une pause (4) durant la cuisson (ce qui
peut être utile par exemple pour répondre
à un appel téléphonique). Une fois que
l’on a appuyé sur cette fonction, le bouton
à DEL devient lumineux au-dessus de la
commande, il provoque l’indication sur
tous les afficheurs des zones de cuisson
du symbole “II” et bloque les sélections
de cuisson et les minuteries pendant un
maximum de 10 minutes, après quoi le plan
de cuisson s’éteint.
Désactivation Pause
Une fois la fonction activée, on peut la
désactiver en appuyant de nouveau sur le
bouton pause (4). L’icône (3) clignote, et il
FR
41
Page 42

faut sélectionner une zone du curseur dans
un délai de 10 secondes. De cette manière,
le plan reprend la cuisson et la minuterie
redémarre à partir du point où elle s’était
arrêtée.
Fonction de Minuterie
La fonction minuterie est réalisée en deux
FR
versions :
- Une Minuterie autonome, de 1 minute
à 99 min. : signal sonore lorsque le
temps s’est écoulé. Cette fonction n’est
disponible que lorsque des zones de
cuisson sont allumées.
- Minuteries pour chaque zone de cuisson,
de 1 minute à 99 min. : signal sonore
indiquant que le temps s’est écoulé et
que la zone de cuisson concernée par la
sélection s’éteint ; les 4 zones de cuisson
peuvent être programmées de façon
indépendante.
La minuterie démarre à partir d’une valeur
prédéfinie de 10 minutes (13), lorsqu’on
se positionne dans la zone du curseur au
niveau
minimum (16); le temps commence à
diminuer, tandis que si on se positionne sur
la zone du curseur au niveau maximum (17)
le temps commence à augmenter.
Quel que soit le type de minuterie activée sur
les afficheurs dédiés (10-12), la minuterie
avec un temps inférieur en cours est
indiquée. Si le temps inférieur correspond
à une minuterie autonome, la valeur est
simplement affichée sans signalisation
particulière, tandis que si le temps inférieur
correspond à une minuterie par zone de
cuisson, l’icône de minuterie (24) clignote
avec le voyant correspondant (8-9-14-15) ;
les autres minuteries sélectionnées restent
actives et en fonction mais l’icône en forme
d’horloge (24) sera allumée mais non
clignotante.
Le point de séparation (13) est allumé
quand la minuterie a été sélectionnée et
qu’elle est modifiable.
Minuterie autonome
- Si le touch est actif et que toutes les
zones de cuisson sont sur «0”, la minuterie
autonome peut être utilisée en appuyant sur
la touche minuterie (5) et en sélectionnant
une zone quelconque des zones du curseur
de toute zone de cuisson. En revanche s’il
y a des zones de cuisson allumées, pour
sélectionner la minuterie autonome, il faut
appuyer 2 fois sur la touche minuterie (5)
puis sélectionner une zone quelconque des
zones du curseur.
Dans un délai de 10 secondes, la minuterie
désactive sa sélection si aucune touche
n’est sélectionnée.
- Modifications de la valeur (0-99min.), elles
peuvent être effectuées en augmentant
d’une minute en maintenant le doigt dans
la zone du curseur (17).
- Une activation continue de la touche (16-
17) provoque l’augmentation dynamique
de la vitesse de variation jusqu’à une
valeur maximale ou minimale, sans
signaux sonores.
- Si la touche (16-17) est relâchée, la
vitesse d’augmentation (diminution)
recommence à partir de la valeur initiale.
- Le réglage de la minuterie peut être
effectué avec des activations continues
des touches (16-17) ou avec des
activations par effleurements successifs
(avec un signal sonore).
Le compte à rebours commence après
le réglage de la minuterie. L’échéance du
temps sera notifiée par le clignotement
de l’afficheur de la minuterie qui indiquera
“00” et par un signal sonore d’une durée
maximale de 2 minutes.
Le signal sonore ne s’arrêtera que lorsqu’on
42
Page 43

appuiera sur une touche. L’afficheur cesse
de clignoter et s’éteint.
Éteindre/modifier la minuterie
- La minuterie peut être modifiée ou éteinte
à tout moment en activant de nouveau le
touch si aucune zone de cuisson n’est
allumée, en actionnant la touche minuterie
(5) pour sélectionner la minuterie, et
donc l’amener à “0” en appuyant sur
une zone quelconque des zones du
curseur au niveau minimum (16) pour
l’éteindre, ou bien en appuyant sur une
zone quelconque des zones du curseur
au niveau maximum (17), on modifie en
augmentant le temps sélectionné.
- La minuterie autonome reste active
même lorsqu’on appuie sur la touche On/
Off
Programmation de la minuterie :
pour les zones de cuisson
En activant le touch, on peut programmer
une minuterie indépendante pour chaque
zone de cuisson.
- Au moins une zone de cuisson doit être
allumée et sélectionnée à un niveau
donné.
- En activant la zone de cuisson, en
sélectionnant la zone du curseur (16-17)
et en appuyant sur le bouton minuterie
(5), on peut sélectionner un compte à
rebours pour éteindre la zone de cuisson.
De cette manière, à côté de l’afficheur de
la zone de cuisson se trouvent des icônes
lumineuses en forme d’horloge (24). Pour
sélectionner la minuterie sur une zone de
cuisson en présence de plusieurs zones
de cuisson allumées, il faut :
- Quand la minuterie de la zone de cuisson
est sélectionnée, l’icône correspondante
de l’horloge à proximité de l’afficheur
est sélectionnée. Les minuteries
programmées pour chaque zone de
cuisson restent quoi qu’il en soit actives.
- Les autres comportements de la minuterie
correspondent à ceux de la minuterie
autonome. Pour augmenter la valeur, il
faut utiliser la touche de sélection plus.
- L’écoulement du temps est notifié par un
signal sonore et par “00” sur l’afficheur ;
la DEL de la zone de cuisson attribuée à
la minuterie clignote. La zone de cuisson
s’éteint et un “H” s’affiche si la zone “est
brûlante” ; dans le cas contraire, l’afficheur
de la zone indique un -. Le signal sonore
et le clignotement de l’afficheur sont
interrompus :
- Automatiquement au bout de 2 minutes.
- En actionnant le bouton en forme
d’horloge, l’afficheur de la minuterie s’est.
FR
43
Page 44

Codes d’erreur indiqués par les afficheurs à 7 segments “E” “ER” plus le numéro de l’erreur.
Message
d'erreur
“flash”
Utilisation permanente de
touches. L'unité de contrôle
coupe le courant au bout
de 10 s.
Er 22 Evaluation touche
FR
défectueuse.
L’unité de contrôle coupe le
courant au bout de 3,5-7,5
Description Cause possible
Présence d'eau ou
d'ustensiles de cuisine
sur le verre au-dessus
de l'unité de contrôle
Court-circuit ou
interruption dans la
gamme d'évaluation de
la touche
Solution du
problème
Nettoyage de la
surface de travail
Changer l'unité de
contrôle.
s.
Er20 Erreur flash µC-défectueux Changer l'unité de
contrôle.
Er36 La valeur de NTC ne se
trouve pas dans sa plage
de valeurs (valeur <
Court-circuit ou
interruption au niveau
de NTC
Changer l'unité de
contrôle.
200mV ou > 4.9V; l'unité de
contrôle coupe le courant
Er31 Données de configuration
erronées
Er47 Erreur de communication
entre TC et l'induction
Configuration de
l'induction nécessaire
Communication absente
ou défectueuse
Nouvelle
configuration
Vérifier que le câble
de raccordement
est bien branché
et fonctionne
correctement.
E2 Surchauffe des bobines
d'induction
U400 Voltage secondaire de
l'unité d'alimentation trop
haut (primaire > 300V).
L'unité de contrôle coupe
L'unité de contrôle est
mal branchée.
Refroidissement
nécessaire.
Brancher à
la tension
d'alimentation
correcte.
le courant au bout de 1 s
tout en émettant un son
permanent.
E5 Erreur sur carte filtre Changer carte filtre
E6 Erreur sur unité
d'alimentation
E9 Détecteur température
bobine défectueux
Changer l'unité
d'alimentation
Changer le
détecteur de
température
44
Page 45

Instructions pour l’installateur
Installation
Les présentes instructions s’adressent
aux installateurs qualifiés et représentent
un guide à l’installation, au réglage et à
l’entretien, conformément aux lois et aux
normes en vigueur. Toujours débrancher
l’appareil avant toute intervention.
Positionnement (Fig. 6-7)
L’appareil est prévu pour être encastré
dans un plan de travail tel que l’indique
la figure. Disposer le produit de scellage
fourni sur tout le périmètre de la table. Il est
déconseillé de placer la table au-dessus
d’un four ; le cas échéant, s’assurer que :
- le four est équipé d’un système de
refroidissement efficace ;
- l’air chaud ne peut pas s’échapper du four
vers la table ;
- des passages d’air sont prévus d’après la
figure.
Branchement électrique (Fig. 8)
Avant de réaliser le branchement électrique,
s’assurer que :
- les caractéristiques de l’installation
correspondent à celles indiquées sur la
plaque appliquée sur le fond de la table ;
- l’installation est munie d’un branchement
de terre efficace conforme aux normes et
aux dispositions législatives en vigueur.
La mise à la terre est rendue obligatoire
par la loi.
Au cas où l’appareil serait muni d’un câble
et/ou de la fiche correspondante, utiliser
du matériel adapté à l’absorption indiquée
sur la plaque et à la température de
fonctionnement. Le câble ne devra atteindre
en aucun point une température supérieure
à 50° C à la température ambiante.
Pour réaliser le branchement directement
sur le réseau, interposer un interrupteur
omnipolaire dimensionné pour la
charge nominale en mesure d’assurer
la déconnexion du réseau avec une
distance d’ouverture des contacts pour
une déconnexion complète dans les
conditions de la catégorie de surtension III,
conformément aux consignes d’installation
(le câble de terre jaune/vert ne doit pas être
interrompu).
La prise ou l’interrupteur omnipolaire
doivent être facilement accessibles après
l’installation de l’appareil.
N.B. :
- Le constructeur décline toute responsabilité
en cas d’erreurs d’installation et de
non respect des normes habituelles de
prévention des accidents.
Si le câble d’alimentation est endommagé,
demander au constructeur, à son service
d’assistance technique ou simplement à
une personne possédant une qualification
similaire de le remplacer de manière à
prévenir tout risque.
FR
45
Page 46

INDUZIONE INDUCTION
INDUCCIØN INDUÎÍ O
FR
20 MIN.
50 MIN.
induzione - induction - induction - Induktion
- inducción - inductie - indução
ZONA FORNO O ARMADIETTO
OVEN ZONE OR CUPBOARD
ZONE FOUR OU PLACARD
OFENBEREICH ODER SCHRANK
ZONA HORNO O ARMARIO
OVENRUIMTE OF KASTJE
ZONA DO FORNO OU ARMÁRIO
50 MIN.
aria - air - air - Luft - aire - lucht - ar
100 cm2 MIN.
(2 x 500)
ATTENTION: le non-respect des indications
de construction du meuble provoquera la
perte d’effet de la garantie sur le produit.
aria - air - air - Luft - aire - lucht - ar
100 cm2 MIN.
POSITION JOINT DE SCELLAGE
POUR LA VERSION SEMIFILOTOP
POSITION JOINT DE SCELLAGE
POUR LA VERSION FILOTOP
Fig. 6
46
Page 47

0
N.B. Pour la version
R
3
800
Semifilotop l’abaissement de
4,8 mm n’est pas nécessaire
R
3.
5
750
+0.5
4.8
0
+1
0
510
FSH 804 ID TS BK
FSH 804 ID TS MAT
FSH 804 ID TS WH
+1
511
801
N.B. Ne pas coller/siliconer le verre
dans l’abaissement de 4,8 mm
0
+1
0
+1
490
FR
Fig. 7
~
400V 2N
N
N
L1L2
1.016.410
230V~
L
47
Fig. 8
Page 48

Page 49

Sehr verehrte Kundin, sehr verehrter
Kunde,
wir danken Ihnen und beglückwünschen Sie
zu Ihrer Wahl.
Dieses neue, sorgfältig konzipierte und aus
erstklassigen Materialien hergestellte Produkt
wurde akkurat kontrolliert, um allen Ihren
Bedürfnissen für das perfekte Kochen zu
entsprechen.
Wir bitten Sie deshalb, diese leichten
Anleitungen zu lesen und einzuhalten, mit
denen Sie schon ab dem ersten Gebrauch
herausragende Resultate erzielen werden. Mit
diesem modernen Gerät möchten wir Ihnen
unsere besten Glückwünsche aussprechen.
I
GB
FR
DE
Italiano
English
Français
Deutsch
DE
DER HERSTELLER
Inhalt
Funktionsprinzip 50
Anleitungen für den Anwender 51
Anleitungen für den Installateur 61
DIESES PRODUKT WURDE FÜR DEN
HEIMISCHEN GEBRAUCH KONZIPIERT.
DER HERSTELLER HAFTET NICHT FPR
SACH- ODER PERSONENSCHÄDEN, DIE
AUS EINER FALSCHEN INSTALLATION ODER
DER UNSACHGEMÄSSEN, FALSCHEN ODER
ABSURDEN VERWENDUNG DES GERÄTS
ENTSTEHEN.
DAS GERÄT DARF NICHT VON PERSONEN
(EINSCHLIESSLICH KINDERN) MIT
EINGESCHRÄNKTEN KÖRPERLICHEN
ODER GEISTIGEN FÄHIGKEITEN ODER
EINSCHRÄNKUNG DER SINNE VERWENDET
WERDEN ODER VON PERSONEN, DIE NICHT
ÜBER DIE NOTWENDIGE ERFAHRUNG
ODER KENNTNIS VERFÜGEN, WENN DIESE
NICHT VON EINER FÜR IHRE SICHERHEIT
VERANTWORTLICHEN PERSON
BEAUFSICHTIGT WERDEN.
KINDER MÜSSEN KONTROLLIERT WERDEN
UM SICHERZUSTELLEN, DASS SIE NICHT
MIT DEM GERÄT SPIELEN.
ES
PT
Español
Português
49
Page 50

Funktionsprinzip
Induktion
Das Erwärmen mit Induktion ist die
wirkungsvollste verfügbare Form des
Kochens.
Die Wärme wird mit einem
elektromagnetischen Feld direkt auf dem
Boden des benutzten Topfs oder Pfanne
erzeigt.
Die nicht berührte Oberfläche bleibt fast
kalt. Nach dem Ende des Kochvorgangs
und wenn der Topf entfernt wird, bleibt
keine Restwärme vorhanden. Induktion
ist effizient, denn es geht keine
DE
Energie verloren, wie beispielsweise bei
Gasbrennern und dann ist diese Form des
Kochens auch 30 bis 59% schneller als die
normalen Kochflächen mit HGL-Technologie
und gestattet eine Energieersparnis von bis
zu 25%.
Wenn Flüssigkeit aus dem Topf überkocht,
brennt sie nicht auf der Kochfläche ein, da
diese nur lauwarm ist.
Funktionsprinzip
Es basiert auf den elektromagnetischen
Eigenschaften der meisten Kochgeschirre.
Der Elektronikschaltkreis steuert den
Betrieb der Spule (Induktor) , die das
Magnetfeld erzeugt.
Die Wärme wird vom Topf selbst an das
Essen übertragen.
Das Garen erfolgt wie nachstehend
beschrieben.
- Minimale Dispersion (hoher
Wirkungsgrad);
- Bei Entfernen des Topfs (einfaches
Anheben reicht) wird das System
automatisch abgeschaltet;
- Das Elektroniksystem gestattet maximale
Flexibilität und Feinheit der Einstellung.
1 - Topf
2 – Induzierter Strom
3 - Magnetfeld
4 - Induktor
5 - Elektronikschaltkreis
6 - Stromzufuhr
Abb. 1
50
Page 51

Anleitungen für den Anwender
Installation
Alle Installationsarbeiten (Stromanschluss)
müssen von qualifiziertem Personal nach
den einschlägige Vorschriften ausgeführt
werden.
Für spezifische Anleitungen siehe die dem
Installateur vorbehaltenen Anleitungen.
DIE LED UND DAS DISPLAY NICHT
INTENSIV ANSCHAUEN.
Gebrauch
Zuerst den Topf auf die gewünschte
Kochzone stellen.
Wenn kein Topf vorhanden ist, Display
, kann das System nicht gestartet werden.
Topferkennung
Diese Sicherheit zeichnet die bewusste
Nutzung der Technologie zugunsten des
Verbrauchers aus.
DE
A: INDUKTIONSKOCHZONE 220x180 2300/3700 W
B: INDUKTIONSKOCHZONE 220x180 2300/3700 W
C: INDUKTIONSKOCHZONE ø210 2300/3700 W
D: INDUKTIONSKOCHZONE ø180 1850/3000 W
51
Abb. 2
Page 52

1 Ein-/Abschaltung EIN/AUS
2 LED-Anzeigelampe Einschaltung
3 Symbol Pause
4 Ein-Taste Pause
5 Timer-Taste
6 Schlüssel-Taste
DE
7 Schlüssel-Symbol
8 Anzeigelampe Timer aktiv Kochzone vorne
links
9 Anzeigelampe Timer aktiv Kochzone hinten
links
10 Display Minutentimer
11 Trennpunkt Timer
12 Display Minutentimer
13 Timer-Trennpunkt
14 Anzeigelampe Timer aktiv Kochzone hinten
rechts
15 Anzeigelampe Timer aktiv Kochzone vorne
rechts
16 Kursorenbereich Mindeststufe aktivieren
17 Kursorenbereich Höchststufe aktivieren
18 Kursorenbereich Power Booster (P) aktivieren
19 Symbol Sonderfunktion aktivieren
20 Ein-Taste Sonderfunktion (u)
21 Nur Positionsanzeige Kochzone
22 Display eingestellter Wert
23 Display-Punkt
24 Symbol Timer für Kochzone
25 Symbol Funktion Erweiterung eingeschaltet
26 Ein-Taste Sonderfunktion (U)
27 Symbol Sonderfunktion aktivieren
Abb. 3
52
Page 53

Restwärmeanzeiger
Dient zur Anzeige, dass das Glas auf einer
gefährlichen Temperatur ist, wenn man mit
dem über der Kochzone liegenden Bereich
in Berührung kommt. Die Temperatur
wird nach einem mathematischen Modell
bestimmt und die ggf. vorhandene
Restwärme wird von einem “H” auf dem
entsprechenden 7-stelligen Display
angezeigt.
Das Aufheizen und Abkühlen werden
berechnet bezogen auf:
- die gewählte Leistungsstufe (von “0“ bis
“9“);
- die Aktivierungszeit der Relais.
Nach dem Ausschalten der Kochzone zeigt
das entsprechende Display so lange „H“,
bis die Temperatur der Zone nach dem
mathematischen Modell nicht unter die
kritische Stufe (≤ 60°C) sinkt.
Schutz bei ungewolltem
Einschalten
- Wenn die elektronische Steuerung die
kontinuierliche Betätigung einer Taste
über einen Zeitraum von ca. 10 Sekunden
erkennt, dann schaltet sie automatisch ab.
Die Steuerung gibt einen Fehler-Signalton
aus, der ca. 10 Sekunden dauert und
den Anwender auf das Vorhandensein
eines Gegenstands auf den Sensoren
hinweist. Die Displays weisen einen
Dauerbetätigungsfehlercode auf, die
auf dem Display sichtbar sind, bis die
elektronische Steuerung den Fehler
erfasst. Wenn die Kochzone „heiß“
ist, erscheint auf dem Display ein “H“
abwechselnd mit dem Fehlercode.
- Wenn innerhalb von 20 Sekunden nach
dem Einschalten der Touch Control
keine Kochzone aktiviert wird, kehrt die
Steuerung in den Wartezustand zurück
(siehe auch Absatz 1.2).
- Wenn die Steuerung eingeschaltet ist,
dann hat die Taste ON/OFF Vorrang vor
allen anderen tasten, so dass die Kontrolle
jederzeit ausgeschaltet werden kann,
auch bei mehrfacher oder kontinuierlicher
Betätigung der Tasten.
- Im Wartezustand hat die kontinuierliche
Aktivierung der Tasten keine Auswirkung.
Bevor die Steuerung aber wieder
eingeschaltet werden kann, muss sie
erkennen, dass keine Taste aktiviert ist.
DE
Vorsichtsmaßnahmen
- Wenn auch ein nur minimaler Riss auf
der Glaskeramikfläche zu sehen ist,
muss sofort die Stromzufuhr abgetrennt
werden;
- Während des Betriebs
magnetempfindliches Material wie
Kreditkarten, Disketten, Taschenrechner
usw. entfernen;
- Keine Alufolie verwenden und keine in
Alufolie eingewickelten Produkte direkt
auf die Kochfläche legen;
- Metallische Gegenstände wie Messer,
Gabeln, Löffel und Deckel dürfen nicht
auf die Kochmulde gelegt werden, damit
sie sich nicht erhitzen;
- Wenn mit Töpfen mit Antihaftbeschichtung
ohne den Zusatz von Fett gekocht wird,
sollte die Vorheizzeit auf 1 bis 2 Minuten
beschränkt werden;
- Beim Garen von Lebensmitteln, die
zum Anbrennen neigen, mit minimaler
Leistung starten und dann steigern. Dabei
häufig umrühren;
- Nach dem Gebrauch mit der
entsprechenden Vorrichtung ausschalten
(Herunterstellen auf “0”) und sich nicht
auf die Topferkennung verlassen.
53
Page 54

Kochgeschirr (Abb. 4)
- Wenn ein Magnet, der dem Topfboden
genähert wird, an diesem haftet, dann
kann dieser Topf für den Induktionsherd
benutzt werden;
- Bevorzugen Sie Kochgeschirr, das
ausdrücklich für Induktionsherde geeignet
ist;
- Kochgeschirr mit planem und dickem
Boden;
- Ein Topf mit 20 cm Durchmesser
ermöglicht die maximale Nutzung der
Leistung;
DE
- Kleinere Töpfe verringern die Leistung,
führen aber nicht zu Energieverlust. Es
wird in jedem Fall von der Verwendung
von Behältnissen mit einem Durchmesser
von weniger als 12 cm abgeraten;
- Edelstahlkochgeschirr mit
Mehrschichtboden oder aus FerritEdelstahl, wenn auf dem Boden markiert
ist: per induction;
- Gusstöpfe, besser wenn mit emailliertem
Boden, um die Glaskeramikfläche nicht
zu verkratzen;
- Von Kochgeschirr aus Glas, Keramik,
Terrakotta, Aluminium, Kupfer oder nicht
magnetischem Edelstahl (Austenit-Stahl)
wird abgeraten.
Instandhaltung (Abb. 5)
Spuren von Alufolie, Essensreste,
Fettspritzer, Zucker oder stark zuckerhaltiger
Lebensmittel müssen sofort mit einem
Schaber von der Kochfläche entfernt
JaNein Nein
Abb. 4
werden, um mögliche Beschädigungen der
Oberfläche zu vermeiden.
Anschließend mit SIDOL oder STANFIX
und Küchentüchern reinigen, mit Wasser
abspülen und mit einem sauberen Tuch
trocknen.
Auf keinen Fall Scheuerschwämme
oder -tücher benutzen. Auch keine
aggressiven chemischen Reinigungsmittel
wie BACKOFENSPRAY oder
FLECKENTFERNER verwenden.
KEINE DAMPFREINIGER BENUTZEN
Abb. 5
Ein-/Abschaltung des Kochfeldes
Das Kochfeld wird durch Betätigen der
mittleren Ein-/Aus-Taste (1) eingeschaltet.
Es erfolgt ein kurzer Bip-Ton und die 4
Displays mit 7 Segmenten zeigen den Wert
„0“ an.
Wenn eine Kochzone heiß ist zeigt das
Display abwechselnd „H“ und „0“ an.
Nach dem Einschalten bleibt die
Touchcontrol für 10 Sekunden aktiv. Wenn
weder eine Kochzone noch ein Timer
gewählt wird, kehrt der Touchscreen
automatisch in den Stand-by-Zustand
zurück.
54
Page 55

Warnton (Summer)
Während des Betriebs werden folgende
Tätigkeiten durch einen Summer gemeldet:
- Normale Betätigung der Tasten mit einem
kurzen Ton.
- Ständige Betätigung der Tasten
für 10 Sekunden mit einem langen
intermittierenden Ton. (Es wird ein
Fehlersymbol angezeigt und bei längerer
Tätigkeit die Touchcontrol abgeschaltet)
Leistungsstufe
Die Leistungsstufe der Kochzone kann
zwischen 1 und 9 eingestellt werden. Eine
weitere Stufe P (Power booster) gestattet
eine besonders rasche Erhitzung der
Nahrungsmittel, wodurch Zeit gespart
werden kann.
Die mit dem Buchstaben „A“ blinkend
dargestellte Leistungsstufe zeigt die
Aktivierung der Funktion automatische
Erhitzung an.
Einschaltung einer Kochzone
Einen Kochtopf auf die Kochzone setzen
und einen Kursorenbereich für die Kochzone
mit dem Kochtopf (16-17-18) berühren.
Den Finger nach rechts schieben, um die
Kochstufe (17) zu erhöhen bzw. nach links
(16) schieben, um sie zu reduzieren.
Abschaltung einer Kochzone
Um eine Kochzone direkt abzuschalten,
den Finger im Kursorenbereich der aktiven
Kochzone nach links ziehen und die
Position „0“ wählen.
Die heißen Kochzonen werden durch den
Buchstaben „H“ angezeigt.
Alle Kochzonen können jederzeit mit der
Ein-/Aus-Taste (1) sofort abgeschaltet
werden.
Wenn bei Betätigung der Tasten das
Kochfeld während des Kochvorgangs
ungewollt abgeschaltet wird, kann es mit
der Ein-/Aus-Taste wieder eingeschaltet
werden. Wird innerhalb von 6 Sekunden
die Pausentaste (4) gedrückt, während das
Symbol (3) blinkt, hat das Kochfeld nach
dem Einschalten dieselben Einstellungen
wie vor der ungewollten Abschaltung.
DE
Booster und Leistungssteuerung
Der Generator mit aktiven Booster bietet der
Kochzone eine Leistung deutlich über der
Nennleistung. Das Display in der gewählten
Kochzone zeigt ein „P“ an. Die BoosterFunktion kann durch Betätigen des Endteils
des Kursorenbereichs in der Kochzone (18)
aktiviert werden.
Die Leistungssteigerung ist je nach der
Größe der Kochzone unterschiedlich:
1) Für die Kochzone ø180 erreicht die
Stufe 9 mit 1850 W auf der BoosterStufe für 10 Minuten 3000 W.
2) Für die viereckige Kochzone (220x190)
erreicht die Stufe 9 mit 2300 W auf der
Booster-Stufe für 10 Minuten 3700 W.
3) Für die Kochzone ø210 erreicht die
Stufe 9 mit 2300 W auf der BoosterStufe für 10 Minuten 3700 W. Aus
Sicherheitsgründen hat die BoosterFunktion eine begrenzte Dauer.
Wenn der Kochtopf während der BoosterZeit von der Kochzone genommen wird,
bleibt die Booster-Funktion aktiv und auch
die Booster-Dauer wird nicht deaktiviert.
Bei aktivem Booster wird durch Verstellen
mit dem Finger des eingestellten Wertes im
Kursorenbereich der Kochzone der Booster
deaktiviert.
Die Booster-Funktion „P“ ist in allen
55
Page 56

Kochzonen aktivierbar. Die Priorität hat
jedoch der zuletzt aktivierte Booster, wobei
etwaige andere Kochstufen reduziert
werden.
Automatische Erhitzung
(bzw. „Heat-up“-Funktion)
Diese Funktion erleichtert den Kochvorgang.
Es ist nicht notwendig, während des
Kochvorgangs ständig präsent zu sein,
weil sich die Kochfläche mit voller Leistung
DE
erwärmt und nach einer gewissen Zeit
automatisch wieder auf die gewählte
Leistungsstufe zurückkehrt (siehe Tabelle
1).
Automatische Erhitzung (bzw.
„Heat-up“-Funktion) aktivieren
Einen Bereich des Zeigers für die
eingeschaltete Kochzone für ungefähr
3 Sekunden betätigen, bis ein Bip-Ton
vernehmbar ist (z.B. bei 1/3 der Länge des
Zeigerbereichs).
z.B. Die Stufe 3 wählen, dann mit dem
Finger für 3 Sekunden auf die Funktion
automatische Erhitzung drücken, um
die Funktion zu aktivieren. Auf dem
betreffenden Display wird abwechselnd der
Buchstabe „A“ und die Ziffer „3“ angezeigt.
Durch diese Einstellungen erwärmt die
Kochfläche die Kochzone für 2 Minuten auf
die Höchststufe „9“ und setzt darauf den
Kochvorgang mit Stufe „3“ fort.
Dauer der
Leistungs-
stufe
0 1 0’ 40” 516
2 1’ 12” 402
3 2’ 318
4 2’ 56” 258
5 4’ 16” 210
6 7’ 12” 138
7 2’ 138
8 3’ 12” 108
9 - 90
P - 10
Funktion
Automatische
Erhitzung
(Zeit in Minuten)
Höchstdauer der
Betriebszeit ohne
Tastenbetätigung
(Zeit in Minuten)
Erweiterungsfunktion
(für große Töpfe)
Diese Funktion erleichtert das Kochen mit
großen viereckigen Töpfen. Sie ist nur
für viereckige Kochzonen verfügbar und
wird durch gleichzeitiges Betätigen von
2 Kursorbereichen in den 2 betreffenden
Kochzonen aktiviert. Durch Einschalten
eines U-förmigen Symbols (25) neben dem
Display, das die Stufen (22) anzeigt, kann
die Kochzone vom linken Kursorenbereich
gesteuert werden, weil der andere
gleichzeitig mit derselben Stufe betrieben
wird.
Spezialfunktionen
Beim Einschalten des Touchscreens kann
eine Spezialfunktion durch Betätigen der
betreffenden Tasten (20-26) programmiert
werden. Es blinkt ein Symbol (19-27) für
5 Sekunden. Während dieser Zeit kann
festgelegt werden, für welche Kochzone
die Funktion aktiviert werden soll. Diese
Funktion ist für jede Kochzone vorhanden.
56
Page 57

Sie unterstützt den Kochvorgang und wird
durch ein „u“ oder ein „U“ angezeigt.
Es können 2 Kochstufen aktiviert werden:
1) Schmelzen mit einer Temperatur von
ungefähr 42°C „u“.
2) Erhitzen mit einer Temperatur von
ungefähr 70 °C „U“.
Diese Temperaturen sind Richtwerte, die
stark
vom Kochtopf und von der vorhandenen
Nahrungsmenge abhängen.
Tastensperre
(Kindersicherung)
Diese Funktion wird nur aktiviert, wenn
das Kochfeld, aber keine Kochzone
eingeschaltet ist.
Gleichzeitig die Schlüsseltaste (6) und
die Pausentaste (4) und darauf erneut die
Pausentaste (4) betätigen.
Auf den Displays wird in einigen Sekunden
der Buchstabe „L“ angezeigt, wonach sich
die Displays abschalten.
Wenn man versucht, das Kochfeld mit der
Ein-/-Aus-Taste (1) einzuschalten, wird
auf dem Kochfeld erneut der Buchstabe
„L“ angezeigt. Es kann aber nicht gekocht
werden.
Entsperrung/Deaktivierung der
Kindersicherung
Es gibt 2 Entsperrungsweisen:
1) Einmalige Entsperrung: Zum
Deaktivieren der Funktion das Kochfeld
einschalten und gleichzeitig die Pausen(4) und Schlüsseltaste (6) betätigen.
Der Buchstabe „L“ erlischt und an seiner
Stelle wird an jeder Kochzone die Ziffer
„0“ angezeigt. Wird das Kochfeld nach
der Benutzung abgeschaltet, wird beim
Wiedereinschalten der Buchstabe „L“
angezeigt, der darauf hinweist, dass das
Kochfeld gesperrt ist.
2) Endgültige Entsperrung: Zum
endgültigen Deaktivieren der Funktion
muss die Kochfläche eingeschaltet und
gleichzeitig die Schlüssel- (6) und die
Pausentaste (4) betätigt werden. Darauf
diese 2 Tasten auslassen und erneut
die Schlüsseltaste (6) betätigen.
Schlüssel
Für dieses Kochfeld kann mit dem
betreffenden Schlüsselschalter (6) eine
Tastatursperre eingestellt werden. Es
kann nützlich sein, während des Betriebs
die Tastatur z.B. für die Reinigung des
Tastenbereichs oder zur Beibehaltung der
Einstellungen zu sperren.
Die Ein-/Aus-Taste (1) hat immer Priorität.
DE
Pause
Für dieses Kochfeld kann während des
Kochvorgangs eine Pause (4) eingestellt
werden (z.B. um ein Telefonat entgegen
zunehmen). Nach Betätigung dieser
Funktion schaltet sich eine LED über
der Taste ein. Auf allen Displays in der
Kochzone leuchtet das Symbol „II“ auf. Die
Koch- und Timereinstellungen werden für
höchstens 10 Minuten eingefroren, wonach
sich das Kochfeld abschaltet.
Deaktivierung der Pause
Nachdem die Funktion aktiviert wurde,
erneut die Pausentaste (4) betätigen.
Das Symbol (3) blinkt. Innerhalb von 10
Sekunden muss ein Kursorenbereich
gewählt werden. Dadurch setzt das
Kochfeld den Kochvorgang fort und der
Timer läuft am selben Punkt weiter, an dem
57
Page 58

er stehen geblieben ist.
Timerfunktion
Die Timerfunktion ist in zwei Ausführungen
verfügbar:
- Als unabhängiger Timer: einstellbar
zwischen 1 und 99 Minuten, gibt nach
Ablauf der Zeit einen Warnton ab. Diese
Funktion ist auch verfügbar, wenn
Kochzonen eingeschaltet sind.
- Timer pro Kochzone: einstellbar zwischen
DE
1 und 99 Minuten, gibt nach Ablauf der
Zeit einen Warnton ab und schaltet
die betreffende Kochzone ab. Die 4
Zonen sind unabhängig voneinander
programmierbar.
Der Timer startet von einem festgelegten
Wert von 10 Minuten. Der Timerwahlpunkt
ist aktiv (13). Befindet er sich im
Kursorenbereich der Mindeststufe
(16), wird die Zeit reduziert, im
Kursorenbereich der Höchststufe (17) wird
sie hingegen erhöht.
Unabhängig von der aktivierten
Timerausführung in den betreffenden
Displays (10-12) wird der Timer mit der
zuerst ablaufenden Zeit hervorgehoben.
Wenn die kürzere Zeit sich auf einen
unabhängigen Timer bezieht, wird nur
der Wert ohne besondere Meldungen
angezeigt. Betrifft sie hingegen einen Timer
für eine Kochzone, blinkt das Timersymbol
(24) mit der betreffenden Anzeigelampe (89-14-15). Die anderen eingestellten Timer
sind ebenfalls aktiv und in Betrieb. Das
Uhrsymbol (24) leuchtet auf, blinkt aber
nicht.
Es leuchtet nur der Trennungspunkt (13)
auf, wenn der Timer gewählt wurde und
veränderbar ist.
Unabhängiger Timer
- Wenn der Touchscreen eingeschaltet ist
und sich alle Kochzonen in der Position
„0“ befinden kann der unabhängige Timer
durch Betätigen der Timertaste (5) und
die Wahl eines Kursorenbereichs in einer
beliebigen Kochzone benutzt werden. Sind
hingegen Kochzonen eingeschaltet muss
für die Wahl des unabhängigen Timers 2
Mal die Timertaste (5) betätigt und darauf
ein beliebiger Kursorenbereich gewählt
werden.
Der Timer schließt innerhalb von 10
Sekunden seine Wahl ab, wenn keine Taste
gewählt wird.
- Der Wert (0-99 Minuten) kann mit dem
Finger im Kursorenbereich (17) in
1-Minuten-Schritten erhöht werden.
- Durch die ständige Betätigung der
Taste (16-17) erfolgt eine dynamische
Erhöhung der Änderungsgeschwindigkeit
bis zum Höchst- oder Mindestwert ohne
dass ein Warnton abgegeben wird.
- Wenn die Taste (16-17) freigegeben wird,
beginnt die Geschwindigkeitserhöhung
(Reduzierung) wieder beim Anfangswert.
- Der Timer kann durch ständiges
Betätigen der Tasten (16-17) oder durch
aufeinander folgende Berührungen (mit
Warnsignal) eingestellt werden.
Nach der Einstellung des Timers beginnt die
Abzählung. Der Ablauf der Zeit wird durch
das Blinken des Timerdisplays gemeldet,
das den Wert „00“ anzeigt und für maximal
2 Minuten einen Warnton abgibt.
Der Warnton wird nicht abgeschaltet,
solange eine Taste betätigt wird. Das
Display hört auf zu blinken und schaltet sich
ab.
58
Page 59

Timer abschalten/ändern
- Der Timer kann jederzeit durch erneutes
Aktivieren des Touchscreens verändert
oder abgeschaltet werden, wenn keine
Kochzone eingeschaltet ist. Zur Wahl
des Timers die Timertaste (5) betätigen.
Danach einen beliebigen Kursorenbereich
der Mindeststufe (16) betätigen den Wert
auf „0“ stellen und den Timer abzuschalten
oder einen beliebigen Kursorenbereich
der Höchststufe (17) drücken, um die
eingestellte Zeit zu erhöhen.
- Der unabhängige Timer bleibt auch bei
Betätigung der Ein-/-Aus-Taste aktiv.
Programmierung des Timers
für die Kochzonen
Bei eingeschaltetem Touchscreen kann
für jede Kochzone ein unabhängiger Timer
programmiert werden.
- Es muss mindestens eine Kochzone
eingeschaltet und eine gewisse Stufe
eingestellt sein.
- Durch Aktivieren der Kochzone, die
Wahl des Kursorenbereichs (16-17)
und Betätigen der Timertaste (5) kann
eine Abzählung eingestellt werden, um
die Kochzone abzuschalten. Auf diese
Weise leuchten neben dem Display der
Kochzone leuchtende Uhrsymbole (24)
auf. Um den Timer auf eine Kochzone
einzustellen, wenn mehrere Kochzonen
eingeschaltet sind:
- Wenn der Timer in der Kochzone gewählt
wird, wird das Uhrsymbol neben dem
Display heller. Die programmierten Timer
für die Kochzone bleiben ebenfalls aktiv.
- Die anderen Funktionen entsprechen
denen des unabhängigen Timers. Zur
Erhöhung des Wertes muss die Wahltaste
+ benutzt werden.
- Der Ablauf der Zeit wird durch einen
Warnton und durch Anzeige des Wertes
„00“ auf dem Display mitgeteilt. Die LED
in der Kochzone des Timers blinkt. Die
Kochzone wird abgeschaltet und ein „H“
zeigt an, ob die Zone heiß ist, anderenfalls
ist auf dem Display ein Bindestrich
erkennbar. Der Warnton und das Blinken
auf dem Display werden unterbrochen:
- Automatisch nach 2 Minuten.
- Durch Betätigen der Uhrtaste schaltet
sich das Timerdisplay ab.
DE
59
Page 60

Fehlercodes werden auf den Displays mit 7 Segmenten „E“ „ER“ plus Fehlernummer
angezeigt.
Fehler-
meldung
“blinde”
Beschreibung
Ständige Betätigung der
Tasten. Steuereinheit
schaltet sich nach 10
Sekunden ab.
Er 22 Blinklichtausfall Falsche
Auswertung.
DE
Steuereinheit schaltet nach
3,5 – 7,5 Sekunden ab.
Mögliche
Fehlerursache
Wasser oder
Kochutensilien am
Glas oberhalb der
Steuereinheit
Kurzschluss oder
Einstellung im
Auswertungsbereich
Behebung
Betätigungsoberfläche
reinigen
Steuereinheit
austauschen
Er20 Blinklichtausfall µC-Fehler Steuereinheit
austauschen
Er36 NTC-Wert außerhalb des
Kennwerts (Wert < 200 mV
Kurzschluss oder
Abschalten bei NTC
Steuereinheit
austauschen
oder > 4,9 V) Steuereinheit
schaltet sich ab.
Er31 Falsche Konfigurationsdaten Erforderliche
Neu konfigurieren
Konfiguration der
Induktion
Er47 Kommunikationsfehler
zwischen TC und Induktion
Keine oder
fehlerhafte
Kommunikation!
Sicherstellen, dass
das Kabel korrekt
angeschlossen und
funktionstüchtig ist
E2 Überhitzung der
Abkühlen lassen
Induktionsspulen
U400 Sekundärspannung des
Netzteils ist zu hoch
(Primärspannung > 300 V).
Steuereinheit ist
falsch angeschlossen
An korrekte
Netzspannung
anschließen
Steuereinheit schaltet sich 1
Sekunde nach der Ausgabe
eines Dauertons ab.
E5 Fehler an der Filterkarte Filterkarte
austauschen
E6 Fehler am Netzteil Netzteil austauschen
E9 Spulentemperatursensor ist
defekt
Temperaturfühler
austauschen
60
Page 61

Anleitungen für den Monteur
Installation
Diese Anleitungen sind für den
qualifizierten Installateur bestimmt und
sollen als Installations-, Einstellungs- und
Instandhaltungsanleitung gemäß den
einschlägigen Gesetzen und Vorschriften
dienen. Die Arbeiten müssen immer bei
elektrisch abgetrenntem Gerät ausgeführt
werden.
Positionierung (Abb. 6-7)
Das Gerät ist für den Einbau in eine
Arbeitsfläche vorgesehen, wie in der
entsprechenden Abbildung zu sehen. Auf
dem gesamten Umfang der Kochmulde
das mitgelieferte Dichtmittel auftragen. Es
wird von einer Installation über dem Ofen
abgeraten, ansonsten sicherstellen, dass:
- der Ofen über ein ausreichenden
Kühlsystem verfügt;
- die warme Ofenluft auf keinen Fall zur
Kochmulde geleitet wird;
- Luftpassagen vorgesehen werden, wie in
der Abbildung zu sehen.
über der Umgebungstemperatur liegen.
Für den direkten Anschluss an das Stromnetz
muss ein Schaltautomat eingebaut werden,
der für die Kennlast bemessen ist und
der das Abtrennen vom Stromnetz mit
einem Öffnungsabstand der Kontakte
für das komplette Abtrennen unter den
Bedingungen der Überspannungsklasse
III gemäß den Installationsvorschriften
gestattet (das gelb-grüne Erdkabel darf
nicht unterbrochen werden.
Die Steckdose oder der Schaltautomat
müssen bei installiertem Gerät leicht zu
erreichen sein.
Bitte beachten:
- Der Hersteller haftet nicht, falls die
obigen Anleitungen und die üblichen
Unfallschutzmaßnahmen nicht
eingehalten werden.
Wenn das Netzkabel beschädigt ist, muss
es vom Hersteller oder dessen technischen
Kundendienst oder in jedem Fall von
einer Person mit ähnlicher Qualifizierung
ausgewechselt werden, um allen Gefahren
vorzubeugen.
DE
Stromanschluss (Abb. 8)
Vor dem Stromanschluss sicherstellen,
dass:
- die Anlagenmerkmale dem Kennschild
auf der Unterseite der Kochmulde
entsprechen;
- die Anlage angemessen nach den
einschlägigen Vorschriften und
gesetzlichen Auflagen geerdet ist. Die
Erdung ist gesetzlich vorgeschrieben.
Falls das Gerät nicht mit dem Kabel und/
oder dem entsprechenden Stecker versehen
sein sollte, verwenden Sie Material, das
für die auf dem Kennschild genannte
Aufnahme und die Arbeitstemperatur
geeignet ist. Das Kabel darf auf keinen Fall
Temperaturen erreichen, die über 50°C
61
Page 62

50 MIN.
INDUZIONE INDUCTION
INDUCCIØN INDUÎÍ O
DE
20 MIN.
induzione - induction - induction - Induktion
- inducción - inductie - indução
ZONA FORNO O ARMADIETTO
OVEN ZONE OR CUPBOARD
ZONE FOUR OU PLACARD
OFENBEREICH ODER SCHRANK
ZONA HORNO O ARMARIO
OVENRUIMTE OF KASTJE
ZONA DO FORNO OU ARMÁRIO
50 MIN.
aria - air - air - Luft - aire - lucht - ar
100 cm2 MIN.
(2 x 500)
WARNUNG: Ein Nichtbeachten der
konstruktiven Bestimmungen des
Möbelstücks führt zum Garantieverlust
aria - air - air - Luft - aire - lucht - ar
100 cm2 MIN.
POSITION DER DICHTUNG BEI DER
VERSION SEMIFILOTOP
POSITION DER DICHTUNG BEI DER
VERSION FILOTOP (bündig)
Abb. 6
62
Page 63

0
N.B.: Bei der Version
R
3
800
Semifilotop ist ein Tieferlegen
von 4,8 mm nicht erforderlich.
R
3.
5
750
+0.5
4.8
0
+1
0
510
FSH 804 ID TS BK
+1
511
0
+1
801
0
+1
490
DE
FSH 804 ID TS MAT
FSH 804 ID TS WH
N.B.: Das Glas nicht an die Tieferlegung
von 4,8 mm ankleben oder versiegeln.
Abb. 7
~
400V 2N
N
N
L1L2
1.016.410
230V~
L
63
Abb. 8
Page 64

Page 65

Estimado cliente,
Le agradecemos sinceramente y nos
complace que haya escogido uno de nuestros
productos.
Este nuevo producto, cuidadosamente
diseñado y construido con materiales
de primera calidad, se ha verificado
cuidadosamente para poder satisfacer todas
sus exigencias de una perfecta cocción.
Por lo tanto, le rogamos que lea y respete
estas sencillas instrucciones que le permitirán
conseguir resultados excelentes ya desde
su primera utilización. Con este moderno
aparato le deseamos lo mejor.
EL FABRICANTE
Sumario
Principio de funcionamiento 66
Instrucciones para el usuario 67
I
GB
FR
DE
ES
PT
Italiano
English
Français
Deutsch
Español
Português
ES
Instrucciones para el instalador 77
ESTE PRODUCTO SE HA CONCEBIDO
PARA UN USO DE TIPO EXCLUSIVAMENTE
DOMÉSTICO.
EL FABRICANTE DECLINA CUALQUIER
RESPONSABILIDAD EN EL CASO DE
EVENTUALES DAÑOS A COSAS O
PERSONAS QUE DERIVEN DE UNA
INSTALACIÓN INCORRECTA O DE UN USO
IMPROPIO, ERRÓNEO O ABSURDO.
ESTE APARATO NO PUEDEN UTILIZARLO
PERSONAS (INCLUIDOS NIÑOS) CON
CAPACIDADES FÍSICAS, SENSORIALES
65
O MENTALES REDUCIDAS, O PERSONAS
QUE NO DISPONGAN DE LA EXPERIENCIA
Y DE LOS CONOCIMIENTOS NECESARIOS
A MENOS QUE SE ENCUENTREN BAJO LA
SUPERVISIÓN O HAYAN RECIBIDO LAS
INSTRUCCIONES NECESARIAS SOBRE
EL USO DEL APARATO POR PARTE DE
UNA PERSONA RESPONSABLE DE SU
SEGURIDAD.
LOS NIÑOS TIENEN QUE ESTAR
CONTROLADOS PARA ASEGURARSE QUE
NO JUEGAN CON EL APARATO.
Page 66

Principio de funcionamiento
Inducción
El calentamiento por inducción es la forma
más eficiente, disponible en la actualidad,
para cocinar.
El calor se produce, con un campo
electromagnético, directamente debajo de
la olla o de la sartén utilizada.
La superficie no interesada en el contacto
permanece casi fría; después de la cocción
y después de haber sacado el recipiente no
queda calor restante. Es eficiente porque
no malgasta energía por dispersión, como
los quemadores de gas, es entre un 30 y un
50% más rápido que las placas de cocción
normales con tecnología HGL y permite un
ahorro energético de hasta el 25%.
Ante un desbordamiento del recipiente el
ES
líquido no se engancha a la superficie de la
placa de cocción ya que está fría.
Principio de funcionamiento
Se basa en las propiedades
electromagnéticas de la mayor parte de los
recipientes para la cocción.
El circuito electrónico gobierna el
funcionamiento de la bobina (inductor) que
crea un campo magnético.
El calor se transmite desde el recipiente a
los alimentos.
La cocción se efectúa tal como se describe
a continuación.
- mínima dispersión (alta rentabilidad);
- el hecho de retirar la olla (aunque sea sólo
levantarla) provoca la parada automática
del sistema;
- el sistema electrónico permite la máxima
flexibilidad y delicadeza en la regulación.
Fig. 1
1 - Recipiente
2 - Corriente inducida
3 - Campo magnético
4 - Inductor
5 - Circuito electrónico
6 - Alimentación eléctrica
66
Page 67

Instrucciones para el usuario
Instalación
Todas las operaciones relativas a la
instalación (conexión eléctrica) tiene que
efectuarlas personal cualificado según las
normas vigentes.
Para las instrucciones específicas véase la
parte reservada al instalador.
NO OBSERVAR INTENSAMENTE LOS
LED Y LOS DISPLAY.
Utilización
Para empezar colocar la olla en la zona de
cocción escogida.
La ausencia de olla (display ) no permite
la puesta en marcha del sistema.
Detección de la olla
Una certeza que caracteriza la utilización
consciente de la tecnología en favor del
consumidor.
A: ZONA DE COCCIÓN INDUCCIÓN 220x180 2300/3700 W
B: ZONA DE COCCIÓN INDUCCIÓN 220x180 2300/3700 W
C: ZONA DE COCCIÓN INDUCCIÓN ø210 2300/3700 W
D: ZONA DE COCCIÓN INDUCCIÓN ø180 1850/3000 W
67ES67
Fig. 2
Page 68

1 Encendido / Apagado ON/OFF
2 Piloto led Encendido
3 Icono pausa
4 Botón de activación pausa
5 Botón timer
6 Botón llave
7 Icono llave
8 Piloto timer activo zona de cocción anterior
izquierda
9 Piloto timer activo zona de cocción posterior
ES
izquierda
10 Pantalla de visualización timer minutos
11 Punto de separación timer
12 Pantalla de visualización timer minutos
13 Punto de separación timer
14 Piloto timer activo zona de cocción posterior
derecha
15 Piloto timer activo zona de cocción anterior
derecha
16 Área cursor activación nivel mínimo
17 Área cursor activación nivel máximo
18 Área cursor activación Power Booster (P)
19 Icono activación función especial
20 Botón activación función especial (u)
21 Sólo indicación posición zona de cocción
22 Pantalla de visualización valor configurado
23 Punto pantalla de visualización
24 Icono Timer para zona de cocción
25 Icono función extensión activada
26 Botón de activación función especial (U)
27 Icono activación función especial
Fig. 3
68
Page 69

Indicador de calor restante
Sirve para indicar al usuario que el vidrio
se encuentra a una temperatura peligrosa
en caso de contacto con todo el área de
la zona de cocción. La temperatura se
determina siguiendo un modelo matemático
y un eventual calor restante se indica
mediante una “H” desde el correspondiente
display de siete segmentos.
El calentamiento y el enfriamiento se
calculan en relación con:
- el nivel de potencia seleccionado (de “0“
a “9“);
- el periodo de activación de los relés.
Tras haber apagado la zona de cocción, el
correspondiente display muestra “H” hasta
que la temperatura de la zona no desciende
por debajo del nivel crítico (≤ 60°C) según
el modelo matemático.
Protección en caso de encendido
involuntario
- Si el control electrónico detecta una
activación continua de una tecla durante
aproximadamente 10 segundos se apaga
de forma automática. El control emite
una señal acústica de error durante
10 segundos que avisa al usuario de
la presencia de un objeto sobre los
sensores. Las pantallas de visualización
muestran el código de error de uso
permanente, que se mostrará en la
pantalla de visualización mientras el
control electrónico advierta el error. Si la
zona de cocción “quema”, aparecerá una
“H“ en el display de forma alternativa con
la señal de error.
- Si ninguna zona de cocción se activa
en los siguientes 20 segundos tras el
encendido del Touch, el control vuelve a
la modalidad stand-by. (véase también el
apartado 1.2).
- Cuando el control está encendido la tecla
ON/OFF tiene prioridad sobre todas las
demás teclas, de forma que el control
se puede apagar en cualquier momento
incluso en caso de activación múltiple o
continua de teclas.
- En la modalidad stand-by una activación
continua de teclas no tendrá ningún tipo
de efecto. De todas formas, antes de que
el control electrónico se pueda encender
de nuevo, tiene que reconocer que no
hay ninguna tecla activa.
Precauciones
- Cuando se verifica una fractura, incluso
mínima, de la superficie vitrocerámica
es necesario desconectar de forma
inmediata la alimentación eléctrica;
- durante el funcionamiento es necesario
alejar el material magnetizable
como tarjetas de crédito, disquetes,
calculadoras, etc.;
- no utilizar nunca papel de aluminio o
apoyar productos envueltos con papel de
aluminio directamente sobre la placa de
cocción;
- los objetos metálicos como cuchillos,
tenedores, cucharas y tapas no se
pueden colocar sobre la superficie de
la placa de cocción para evitar que se
calienten;
- en la cocción con recipientes de fondo
antiadherente, sin la utilización de
condimento, limite el eventual tiempo de
precalentamiento a uno o dos minutos;
- la cocción de alimentos con tendencia a
engancharse en el fondo empieza con la
potencia mínima para aumentar luego
mezclando con frecuencia;
- después del uso apagar con el
correspondiente dispositivo (disminución
hasta “0”) y no fiarse del detector de ollas.
ES
69
Page 70

Batería de cocina (Fig. 4)
- Si al acercar un imán al fondo de un
recipiente el imán permanece enganchado
en el fondo, esta olla se puede considerar
adecuada para la cocción por inducción;
- preferir baterías de cocina declaradas
también para cocción por inducción;
- batería de cocina con fondo plano y
grueso;
- una olla de 20 cm de diámetro permite
aprovechar la máxima potencia;
- una olla más pequeña reduce la potencia
pero no provocará dispersión de energía.
De todas formas se desaconseja la
utilización de recipientes con un diámetro
inferior a 12 cm;
- recipientes inox con fondo multicapa o
ES
inox ferrítico si en el fondo se especifica:
por inducción;
- recipientes en arrabio mejor si con el
fondo esmaltado para evitar rasguños en
la placa de cocción vitrocerámica;
- se desaconsejan y no convienen los
recipientes en vidrio, cerámica, terracota,
recipientes en aluminio, cobre o inox no
magnético (austenítico).
Mantenimiento (Fig. 5)
Restos de hojas de aluminio, residuos de
alimentos, salpicaduras de grasa, azúcar
o alimentos muy sacaríferos se tienen
que eliminar inmediatamente de la placa
de cocción con una rasqueta para evitar
posibles desperfectos en la superficie.
Sucesivamente limpiar con SIDOL o
STANFIX y papel de cocina, luego enjuagar
SiNo No
Fig. 4
con agua y secar con un trapo limpio.
No utilizar en ningún caso esponjas o
estropajos abrasivos; evitar también la
utilización de detersivos químicos agresivos
como FORNOSPRAY o QUITAMANCHAS.
NO UTILIZAR LIMPIADORES DE VAPOR
Fig. 5
Encendido/Apagado de la placa
de cocción
La placa de cocción se enciende pulsando
la tecla “central” On/Off (1), se escucha un
bip breve y se encienden las 4 pantallas
de visualización de siete segmentos
mostrando un “0”.
Si una zona de cocción “quema”, la pantalla
de visualización muestra de forma alternada
“H” y “0”.
Tras el encendido el touch control
permanece activo durante 10 segundos. Si
no se selecciona ni una zona de cocción ni
el timer el touch vuelve al estado de standby de forma automática.
Señal acústica (zumbador)
Durante la utilización se señalan las
siguientes actividades mediante un
zumbador:
- Activación normal de las teclas con un
sonido breve.
- Activación continua de las teclas durante
70
Page 71

más de 10 seg. con un sonido largo
intermitente (aparece un símbolo de error
y si se prolonga la operación el touch
control se apaga)
Encendido de una zona de
cocción
Colocar una olla y tocar un área del cursor
correspondiente a la zona de cocción
donde se encuentra la olla (16-17-18),
hacer resbalar el dedo hacia la derecha
para aumentar el nivel de cocción (17) y
hacia la izquierda para disminuirlo (16).
Apagado de una zona de cocción
Es posible apagar una única zona de
cocción directamente seleccionando la
posición de “0”. Para ello es necesario
hacer resbalar el dedo hacia la izquierda en
el área del cursor correspondiente a la zona
de cocción en función.
Las zonas de cocción calientes se muestran
con una letra “H”.
El apagado inmediato de todas las zonas
de cocción se puede obtener en cualquier
momento mediante el botón de alimentación
On/Off (1).
Si durante la cocción se apaga de forma
involuntaria la placa, durante la utilización
de los controles será posible encenderla de
nuevo con la tecla On/Off. Se dispondrá de
6 segundos para pulsar la tecla pausa (4)
que se señalará con el parpadeo del icono
(3). De esta forma la placa se encenderá de
nuevo con las mismas configuraciones que
tenía antes del apagado involuntario.
Nivel de potencia
La potencia de la zona de cocción se puede
configurar del nivel 1 al nivel 9. Un ulterior
nivel P (Power booster) se encuentra
disponible para permitir un calentamiento
especialmente rápido de los alimentos y
permitir ahorrar tiempo al usuario.
El nivel de potencia representado por la letra
“A” intermitente representa la activación de
la función calentamiento automático.
Booster y gestión de la potencia.
El generador, con Booster activado,
pone a disposición de la zona de cocción
una potencia significativamente superior
a la potencia nominal, la pantalla de
visualización de la zona de cocción
seleccionada muestra una “P”. La función
Booster se puede activar pulsando en la
parte final del área del cursor de la zona de
cocción (18).
El aumento de potencia es distinto según el
tamaño de la zona de cocción:
1) Para una zona de cocción ø180 la
potencia pasa del nivel 9 de 1850 W al
nivel Booster 3000 W y dura 10 minutos.
2) Para una zona de cocción Rectangular
(220x190) la potencia pasa del nivel 9
de 2300 W al nivel Booster 3700 W y
dura 10 minutos.
3) Para una zona de cocción ø210 la
potencia pasa del nivel 9 de 2300 W al
nivel Booster 3700 W y dura 10 minutos
Por motivos de seguridad, la función
Booster tiene una duración limitada.
Si durante el tiempo Booster la olla se saca
de la zona de cocción, la función Booster
permanece activada y el tiempo Booster
tampoco se desactiva
Con el Booster activado el desplazamiento
del valor configurado con el dedo en el área
del cursor de la zona de cocción determina
la desactivación del Booster.
La función Booster “P” se puede activar
en todas las zonas de cocción pero se
da prioridad al último Booster activado
ES
71
Page 72

reduciendo otros eventuales niveles de
cocción.
Calentamiento automático
(o función “heat-up”)
Esta función facilita la cocción. No es
necesario estar presente de forma
permanente durante la cocción, la placa
se calienta de forma automática a plena
potencia y vuelve luego al nivel de potencia
seleccionado tras un cierto tiempo (véase
tabla 1).
Activar el calentamiento
ES
automático (o función “heat-up”)
Mantener pulsada un área del cursor
correspondiente a la zona de cocción
en función durante aproximadamente 3
segundos hasta que suene un bip (por
ejemplo a 1/3 de la longitud de la zona del
cursor).
Ej. Seleccionar el nivel 3 y activar la función
de calentamiento automático manteniendo
el dedo pulsado durante 3 segundos,
se activará la función. La pantalla de
visualización correspondiente mostrará la
letra “A” intermitente con el “3”. Con estas
configuraciones la placa de cocción calienta
la zona de cocción al nivel máximo “9”
durante 2 minutos y luego sigue la cocción
al nivel “3”.
Duración
Duración
Función
Nivel de
potencia
Calentamiento
Automático
(tiempo en
minutos)
0 1 0’ 40” 516
2 1’ 12” 402
3 2’ 318
4 2’ 56” 258
5 4’ 16” 210
6 7’ 12” 138
7 2’ 138
8 3’ 12” 108
9 - 90
P - 10
Máximo
Tiempo de
Funcionamiento
Sin
Intervenciones
en los Controles
(tiempo en
minutos)
Función extensión
(para bandejas de gran tamaño)
Esta función facilita la cocción con ollas
rectangulares grandes, se encuentra
disponible sólo para las zonas de cocción
rectangulares y se activa pulsando de forma
contemporánea 2 áreas cursor de las 2
zonas de cocción implicadas, se encenderá
entonces un icono en forma de “U” (25)
al lado de la pantalla de visualización que
mostrará los niveles (22), la zona de cocción
se podrá controlar ahora sólo desde el área
cursor de la izquierda.
Funciones especiales
Encendiendo el touch se puede programar
una función especial, pulsando las teclas
exclusivas (20-26) se producirá un parpadeo
del icono (19-27) durante 5 segundos
72
Page 73

durante los cuales se podrá asignar en qué
zona de cocción activar la función. Esta
función se encuentra presente para cada
zona de cocción, es capaz de “ayudar en
la cocción” y se muestra mediante una “u”
o una “U”
Es posible activar 2 niveles de “cocción”:
1) Fundir con una temperatura de
aproximadamente 42 °C “u”.
2) Calentar con una temperatura de
aproximadamente 70 °C “U”.
Estas temperaturas tienen que considerarse
indicativas y dependen
mucho de la olla y de la cantidad de comida
presente.
Bloqueo controles
(seguridad niños)
La activación se efectúa sólo cuando la
placa está encendida pero ninguna zona de
cocción está encendida.
Pulsar de forma contemporánea la tecla
llave (6) y la tecla pausa (4) y luego
sucesivamente pulsar la tecla pausa (4).
Durante algunos segundos se muestran las
letras “L” en las pantallas de visualización
que luego se apagarán.
Intentando encender la placa de cocción
desde la tecla On/Off (1) la placa mostrará
de nuevo las letras “L” y ya no será posible
cocinar.
Desbloqueo/desactivación
seguridad niños
Existen 2 tipos de desbloqueo:
1) Desbloqueo para una única vez: Para
desactivar la función será necesario
encender la placa de cocción y pulsar
de forma contemporánea la pausa (4) y
la llave (6). Las letras L desaparecerán
y en su lugar aparecerán los “0” para
cada zona de cocción. Si después de
acabar de utilizar la placa de cocción la
apagamos, en el encendido sucesivo se
presentarán de nuevo las L que indican
justamente que la placa está bloqueada.
2) Desbloqueo definitivo: Para desactivar
la función de forma definitiva es
necesario encender la placa de cocción
y pulsar de forma contemporánea la
llave (6) y la pausa (4), soltar estos 2
controles y luego de forma sucesiva
pulsar de nuevo la tecla llave (6).
Llave
Esta placa de cocción permite configurar un
bloqueo del teclado con la correspondiente
tecla llave (6). Puede ser útil bloquear
el teclado durante el funcionamiento por
ejemplo para la limpieza de la zona de
controles o en cualquier caso si no se desea
modificar ninguna configuración.
La tecla On/Off (1) tiene la prioridad en
cualquier caso.
Pausa
Esta placa de cocción permite configurar
una pausa (4) durante la cocción (útil por
ejemplo para responder a una llamada de
teléfono). Esta función enciende, tras pulsar
el botón, un led encima del control, muestra
en todas las pantallas de visualización
de las zonas de cocción el símbolo “II” y
congela las configuraciones de cocción y de
los timer durante un máximo de 10 minutos,
luego la placa de cocción se apaga.
Desactivación Pausa
Tras la activación de la función, es posible
desactivarla pulsando de nuevo el botón
pausa (4). El icono (3) parpadeará y en
los 10 segundos siguientes será necesario
ES
73
Page 74

seleccionar un área del cursor. De esta
forma la placa reanuda la cocción y el timer
sigue contando desde el mismo punto en el
que se había detenido.
Función de Timer
La función timer se realiza en dos versiones:
- Un Timer autónomo, de 1 hasta 99
minutos: señal sonora cuando el tiempo
ha vencido. Esta función se encuentra
disponible incluso cuando algunas zonas
de cocción están encendidas.
- Timer para cada zona de cocción, de 1
hasta 99 minutos: señal sonora cuando el
tiempo ha vencido y apagado de la zona
de cocción en la que está configurado, las
ES
4 zonas de cocción se pueden programar
de forma independiente.
El timer parte de un valor predefinido de 10
minutos y el punto de selección timer está
activo (13), colocándose en el área cursor
nivel
mínimo (16) el tiempo empieza a disminuir,
mientras colocándose en el área cursor
nivel máximo (17) el tiempo empieza a
aumentar.
Sea cual sea el timer que se active en las
pantallas de visualización exclusivas (10-
12) se señala el timer con tiempo menor
en vencimiento. Si el tiempo menor se
refiere a un timer autónomo se muestra
sencillamente el valor sin indicaciones
particulares, mientras si el tiempo menor
se refiere a un timer por zona de cocción
el icono timer (24) parpadea junto con el
correspondiente piloto (8-9-14-15), los
otros timer configurados están en cualquier
caso activos y funcionan pero tendrán el
icono en forma de reloj (24) encendido pero
sin parpadeo.
Sólo el punto de separación (13) está
encendido cuando el timer se ha
seleccionado y modificado.
Timer autónomo
- Si el touch está encendido y todas las
zonas de cocción están en la posición de
“0” el timer autónomo se puede utilizar
pulsando la tecla timer (5) y seleccionando
una cualquiera de las áreas cursor de
cualquier zona de cocción. Si en cambio
hay zonas de cocción encendidas, para
seleccionar el timer autónomo es necesario
pulsar 2 veces la tecla timer (5) y luego
seleccionar una cualquiera de las áreas del
cursor.
En los siguientes 10 segundos el timer
desactiva la selección si no se selecciona
ninguna tecla.
- Se pueden efectuar modificaciones del
valor (0-99 min) con aumentos de un
minuto manteniendo el dedo en el área
cursor (17).
- Una activación continua de la tecla (16-
17) da lugar a un aumento dinámico de
la velocidad de variación hasta un valor
máximo o mínimo, sin señales sonoras.
- Si la tecla (16-17) se suelta, la velocidad
de aumento (disminución) empieza de
nuevo desde el valor inicial.
- La configuración del timer se puede
efectuar tanto con activaciones
continuas de las teclas (16-17) como con
activaciones con toques sucesivos (con
señal sonora).
Tras la configuración del timer empieza la
cuenta atrás. Cuando el tiempo termina
se notifica con el parpadeo de la pantalla
de visualización del timer que mostrará
“00” y mediante una señal sonora con una
duración máxima de 2 minutos.
La señal sonora no se detendrá hasta que
no se haya pulsado una tecla. La pantalla
de visualización deja de parpadear y se
apaga.
74
Page 75

Apagar/modificar el timer
- El timer se puede modificar o apagar en
cualquier momento encendiendo de
nuevo el touch si ninguna zona de cocción
está encendida y luego accionando
la tecla timer (5) para seleccionar el
timer y colocarlo a “0” pulsando en una
cualquiera de las áreas curso nivel
mínimo (16) para apagarlo, o pulsando
una cualquiera de las áreas cursor nivel
máximo (17) para modificar aumentando
el tiempo configurado.
- El timer autónomo permanece activo
también pulsando la tecla On/Off
utilizar la tecla de selección más.
- Cuando el tiempo termina se notifica
con una señal acústica y con el “00” en
la pantalla de visualización, el LED de
la zona de cocción asignada al timer
parpadeará. La zona de cocción se
apaga y se muestra una “H” si la zona
“quema”, en caso contrario la pantalla
de visualización de la zona muestra un
guión. La señal sonora y el parpadeo
de la pantalla de visualización se
interrumpirán:
- De forma automática a los 2 minutos.
- Accionando el botón reloj la pantalla de
visualización del timer se apaga.
Programación del timer
para las zonas de cocción
Encendiendo el touch se puede programar
un timer independiente para cada zona de
cocción.
- Tiene que haber por lo menos una zona
de cocción encendida y configurada a un
cierto nivel.
- Activando la zona de cocción,
seleccionando el área cursor (16-17)
y luego pulsando el botón timer (5), es
posible configurar una cuenta atrás para
apagar la zona de cocción. De esta forma
se encenderán, al lado de la pantalla de
visualización de la zona de cocción, los
iconos luminosos en forma de reloj (24).
Para configurar el timer en una zona de
cocción cuando existen diversas zonas
de cocción encendidas es necesario:
- Cuando el timer de la zona de cocción
se selecciona, el icono correspondiente
del reloj al lado de la pantalla se vuelve
más luminosa. Los timer programados
para cada zona de cocción siguen en
cualquier caso activos.
- Ulteriores comportamientos del timer
coinciden con los del timer autónomo.
Para aumentar el valor se tiene que
ES
75
Page 76

Códigos de error mostrados en las pantallas de visualización de 7 segmentos “E” “ER” más
el número del error.
Mensaje
de error
“flash”
Descripción Causa posible
Utilización permanente de
las teclas. La unidad de
control corta la corriente trás
10 seg.
Presencia de agua o
de herramientas de
cocina sobre el cristal
encima de la unidad de
Solución del
problemazación
Limpiar la superficie
de trabajo
control
Er 22 Evaluación de la tecla
defectuosa.
La unidad de control corta la
corriente trás 3,5-7,5 seg.
Corto-circuito o
interrupción en la gama
de evaluación de la
tecla
Cambiar la unidad
de control.
Er20 Error flash µC-defectuoso Cambiar la unidad
de control.
Er36 El valor de NTC no se
ES
encuentra en su zona de
valores (valor < 200mV o
Corto-circuito o
interrupción a nivel de
NTC
Cambiar la unidad
de control.
> 4.9V; la unidad de control
corta la corriente
Er31 Datos de configuración
erróneos
Er47 Error de comunicación entre
TC y la inducción
Configuración de la
inducción necesaria
Comunicación ausente
o defectuosa
Nueva configuración
Comprobar que el
cable de conexión
está bien enchufado
y funciona
correctamente.
E2 Sobrecalentamiento de las
bobinas de inducción
U400 Voltaje secundario de la
unidad de alimentación
demasiado alto (primario >
La unidad de control
está mal conectada.
Enfriamiento
necesario.
Conectar la tensión
de alimentación
correcta.
300V). La unidad de control
corta la corriente tras 1
seg emitiendo un sonido
permanente.
E5 Error en el papel del filtro Cambiar el papel del
filtro
E6 Error en la unidad de
alimentación
E9 Detector de temperatura de
las bobinas defectuoso
Cambiar la unidad
de alimentación
Cambiar el detector
de temperaturas
76
Page 77

Instrucciones para el instalador
Instalación
Las presentes instrucciones están dirigidas
al instalador cualificado como guía para
la instalación, regulación y mantenimiento
según las leyes y las normativas en vigor.
Las intervenciones tienen que efectuarse
siempre con el equipo desconectado de la
corriente eléctrica.
Emplazamiento (Fig. 6-7)
El aparato está previsto para ser empotrado
en una plataforma tal como se ilustra
en la correspondiente figura. Preparar
previamente en todo el perímetro de la
plataforma el sellador que se entrega de
serie. Se desaconseja la instalación encima
de un horno, en caso contrario:
- comprobar que el horno disponga de un
eficaz sistema de enfriamiento;
- comprobar que no se produzca en ningún
caso un paso de aire caliente del horno
hacia la placa de cocción;
- prever pasos de aire tal como se indica
en la figura.
Conexión eléctrica (Fig. 8)
Antes de efectuar la conexión eléctrica
comprobar:
- que las características de la instalación
sean tales que satisfagan lo que se
indica en la chapa con el número de
serie aplicada en el fondo de la placa de
cocción;
- que la instalación disponga de una
conexión de tierra eficaz según las
normas y las disposiciones legales en
vigor. La conexión a tierra es obligatoria
según la ley.
Si el equipo no dispone de cable y/o de
la correspondiente clavija, utilizar material
adecuado para la absorción, tal como se
indica en la chapa con el número de serie
y para la temperatura de trabajo. El cable
no tiene que alcanzar en ningún punto
una temperatura superior de 50°C a la
ambiental.
Para la conexión directa a la red es necesario
interponer un interruptor omnipolar
adaptado para la carga que aparece en
la chapa que asegure la desconexión de
la red con una distancia de apertura de
los contactos que permita la desconexión
completa en las condiciones de la categoría
de sobretensión III, de forma conforme con
las reglas de instalación (el cable de tierra
amarillo/verde no se tiene que interrumpir).
El enchufe o interruptor omnipolar tienen
que ser fáciles de alcanzar con el equipo
instalado.
N.B.:
- El fabricante declina cualquier
responsabilidad en el caso que lo que se
acaba de describir y las normales normas
contra los accidentes no se respeten.
Si el cable de alimentación está deteriorado,
será necesario sustituirlo. Tendrá que
ocuparse de la sustitución el fabricante,
su servicio de asistencia técnica o una
persona con categoría similar, de forma
que sea posible prevenir cualquier riesgo.
ES
77
Page 78

50 MIN.
INDUZIONE INDUCTION
INDUCCIØN INDUÎÍ O
ES
20 MIN.
induzione - induction - induction - Induktion
- inducción - inductie - indução
ZONA FORNO O ARMADIETTO
OVEN ZONE OR CUPBOARD
ZONE FOUR OU PLACARD
OFENBEREICH ODER SCHRANK
ZONA HORNO O ARMARIO
OVENRUIMTE OF KASTJE
ZONA DO FORNO OU ARMÁRIO
50 MIN.
aria - air - air - Luft - aire - lucht - ar
100 cm2 MIN.
(2 x 500)
ATENCIÓN: el no respeto de las
indicaciones de construcción del mueble
implicará la pérdida de la garantía sobre el
producto.
aria - air - air - Luft - aire - lucht - ar
100 cm2 MIN.
POSICIÓN GUARNICIÓN SELLADOR EN
LA VERSIÓN SEMI A RAS DE ENCIMERA
POSICIÓN GUARNICIÓN SELLADOR
EN LA VERSIÓN A RAS DE ENCIMERA
Fig. 6
78
Page 79

0
N.B. Para la versión
R
3
800
Semifilotop no es necesaria
la rebaja de 4,8 mm
R
3.
5
750
+0.5
4.8
0
+1
0
510
FSH 804 ID TS BK
FSH 804 ID TS MAT
FSH 804 ID TS WH
+1
511
801
N.B. No pegar ni siliconar el cristal
en la rebaja de 4,8 mm
0
+1
0
+1
490
ES
Fig. 7
~
400V 2N
N
N
L1L2
1.016.410
230V~
L
79
Fig. 8
Page 80

Page 81

Prezado Cliente,
Agradecemos e congratulamo-nos pela sua
escolha. Este novo produto, cuidadosamente
projectado e fabricado com materiais de
primeiríssima qualidade, foi meticulosamente
testado para poder satisfazer todas as suas
exigências para uma perfeita cozedura.
Portanto, pedimos-lhe que leia e respeite as
fáceis instruções que lhe permitirão alcançar
excelentes resultados desde a primeira
utilização. Com este moderno aparelho
enviamos também as nossas felicitações.
O FABRICANTE
I
GB
FR
DE
ES
Italiano
English
Français
Deutsch
Español
Sumário
Principio de funcionamento 82
Instruções para o utilizador 83
Instruções para o instalador 93
ESTE PRODUTO FOI CONCEBIDO PARA UM
USO DE TIPO DOMESTICO. O FABRICANTE
DECLINA QUALQUER RESPONSABILIDADE
EM CASO DE EVENTUAIS DANOS CAUSADOS
A PESSOAS OU COISAS DERIVANTES
DE UMA INSTALAÇÃO INCORRECTA
OU DE USO INADEQUADO, ERRADO OU
ABSURDO. O APARELHO NÃO DEVE
SER USADO POR PESSOAS (INCLUSIVE
CRIANÇAS) COM CAPACIDADES FÍSICAS,
SENSORIAIS E MENTAIS REDUZIDAS, OU
SEM EXPERIÊNCIA E CONHECIMENTOS
81
PT
Português
NECESSÁRIOS, A NÃO SER QUE SEJAM
SUPERVISIONADAS OU INSTRUÍDAS PARA
OUSO DO APARELHO, POR PESSOAS
RESPONSÁVEIS PELO DISPOSITIVO DE
SEGURANÇA DAS MESMAS.
AS CRIANÇAS DEVEM SER CONTROLADAS
PARA SE TER CERTEZA DE QUE NÃO
BRINQUEM COM O APARELHO.
PT
Page 82

Principio de funcionamento
Indução
O aquecimento por indução é a forma
mais eficiente e disponível para cozinhar.
O calor é produzido com um campo
electromagnético, directamente no fundo
do recipiente, tacho ou frigideira, utilizado.
A superfície não envolvida no contacto
permanece quase fria; uma vez terminada
a cozedura e removido o recipiente, não
permanece calor residual. É eficiente
porque não desperdiça energia por
dispersão como os queimadores a gás, de
30 a 50% mais rápido do que os normais
planos com tecnologia HGL, permite
poupar energia até 25%. Em presença de
transbordamento de liquido do recipiente
este não gruda na superfície do plano, pois,
a mesma é morna.
PT
Principio de funcionamento
Está baseado nas propriedades
electromagnéticas da maioria dos
recipientes para a cozedura. O circuito
electrónico controla o funcionamento
da bobina (indutor) que cria um campo
magnético. O calor é transmitido ao
alimento pelo próprio recipiente.
A cozedura realiza-se como abaixo
descrito:
- mínima dispersão (alto rendimento);
- a extracção do tacho (basta só a
elevação) provoca automaticamente a
paragem do sistema;
- o sistema electrónico permite a máxima
flexibilidade e precisão de regulação.
Fig. 1
1 - Recipiente
2 - Corrente induzida
3 - Campo magnético
4 - Indutor
5 - Circuito electrónico
6 - Alimentação eléctrica
82
Page 83

Instruções para o utilizador
Instalação
Todas as operações relativas à instalação
(ligação eléctrica) devem ser realizadas por
pessoal qualificado segundo as normas em
vigor.
Para as instruções específicas ver a parte
reservada ao instalador.
NÃO FIXAR INTENSAMENTE OS LEDS E
OS DISPLAYS.
Utilização
Em primeiro lugar posicionar o tacho na
zona de cozedura pré-escolhida.
A falta do tacho display não permite a
ignição do sistema.
Detecção do tacho
Uma certeza que caracteriza o uso
consciente da tecnologia a favor do
consumidor.
A: ZONA COZEDURA INDUÇÃO 220x180 2300/3700 W
B: ZONA COZEDURA INDUÇÃO 220x180 2300/3700 W
C: ZONA COZEDURA INDUÇÃO ø210 2300/3700 W
D: ZONA COZEDURA INDUÇÃO ø180 1850/3000 W
83PT83
Fig. 2
Page 84

1 Ativação / Desativação ON/OFF
2 Luz Avisadora Led de Ativação
3 Ícone pausa
4 Botão de inserção da pausa
5 Botão timer
6 Botão chave
7 Ícone chave
8 Luz Avisadora timer ativo zona de cozedura
dianteira esquerda
9 Luz Avisadora timer ativo zona de cozedura
traseira esquerda
10 Ecrã timer minutos
11 Ponto de separação timer
PT
12 Ecrã timer minutos
13 Ponto de separação timer
14 Luz Avisadora timer ativo zona de cozedura
traseira direita
15 Luz Avisadora timer ativo zona de cozedura
dianteira direita
16 Área cursor ativação nível mínimo
17 Área cursor ativação nível máximo
18 Área cursor ativação Power Booster (P)
19 Ícone ativação função especial
20 Botão ativação função especial (u)
21 Só indicação posição zona cozedura
22 Ecrã valor configurado
23 Ponto ecrã
24 Ícone Timer para zona cozedura
25 Ícone função extensão inserida
26 Botão de ativação função especial (U)
27 Ícone ativação função especial
Fig. 3
84
Page 85

Indicador de calor residual
Serve para indicar ao utilizador que o vidro
está numa temperatura perigosa em caso de
contacto com toda a área ao redor da zona
de cozedura. Determina-se a temperatura
seguindo um modelo matemático e um
eventual calor residual é indicado com
um “H” pelo correspondente display,
com sete segmentos. O aquecimento e o
arrefecimento são calculados em relação
ao:
- nível de potência seleccionado (da “0“ a
“9“);
- período de activação dos relés.
Após ter desligado a zona de cozedura, o
correspondente display mostra “H” até que
a temperatura da zona não desça abaixo
do nível critico (≤60°C) segundo o modelo
matemático.
Protecção em caso de ligação
involuntária
- Se o controlo electrónico verificar
uma activação contínua de uma tecla
durante cerca de 10 seg. desliga-se
automaticamente. O controlo emite um
sinal acústico de erro por 10 segundos, que
avisa o utilizador sobre a presença de um
objecto nos sensores. Os ecrãs exibem
o código de erro de uso permanente,
que será visualizado enquanto o controlo
eletrónico advertir o erro. Se a zona de
cozedura “queima”, aparecerá um “H“ no
display alternadamente ao sinal de erro.
- Se nenhuma zona de cozedura for
activada dentro de 20 segundos desde a
activação do Touch, o controlo volta para
a modalidade stand-by. (Ver também
parágrafo 1.2)
- Quando o controlo for ligado a tecla ON/
OFF tem prioridade sobre todas as outras
teclas, de modo que o controlo possa
ser desligado em qualquer momento,
inclusive em caso de activação múltipla
ou contínua de teclas.
- Na modalidade stand-by uma activação
contínua de teclas não terá nenhum
efeito. Todavia, antes que o controlo
electrónico possa ser ligado novamente,
deve reconhecer que não haja nenhuma
tecla activada.
Precauções
- Ao se verificar mesmo se uma mínima
fractura da superfície vitrocerâmica,
desligar imediatamente a alimentação
eléctrica;
- durante o funcionamento afastar materiais
magnetizáveis tais como cartões de
crédito, disquetes, calculadoras, etc.;
- nunca usar folhas de papel alumínio
ou apoiar produtos embrulhados com
alumínio directamente no plano;
- objectos metálicos tais como facas,
garfos, colheres e tampas não devem ser
postos na superfície do plano para evitar
que se aqueçam;
- na cozedura em recipientes com fundo
anti-aderente, sem adição de tempero,
limitar o eventual tempo de préaquecimento a um ou dois minutos;
- a cozedura de alimentos com tendência
de grudar no fundo do recipiente deve
iniciar com potência mínima para depois
aumentar, misturando sempre o alimento;
- após o uso desligar com o respectivo
dispositivo (diminuição até “0”) e não
confiar no detector de tachos.
Tachos (Fig. 4)
- Se um íman, aproximado no fundo de um
recipiente, permanecer atraído este pode
já ser um tacho indicado para a cozedura
por indução;
- preferir tachos declarados também para
PT
85
Page 86

cozedura por indução;
- tachos com fundo chato e espesso;
- um tacho com 20 cm de diâmetro permite
aproveitar a máxima potência;
- um tacho menor reduz a potência mas
não causa dispersão de energia. Todavia,
não é aconselhável utilizar recipientes
com diâmetro inferior a 12 cm;
- recipientes inox com fundo multicamada
ou inox ferrítico se especificado no fundo
que é para indução;
- recipientes em gusa, melhor se for com
fundo esmaltado, para evitar arranhões
no plano vitrocerâmico;
- não são aconselhados e não convém
usar recipientes de vidro, cerâmica,
terracota, recipientes de alumínio, cobre
ou inox não magnético (austenítico).
PT
SimNão Não
Fig. 4
Fig. 5
Ativação/Desativação da placa
A placa é ativada pressionando a tecla
“central” On/Off (1); ouve-se um breve
bipe e acendem-se os 4 ecrãs com sete
segmentos mostrando um “0”.
Se uma zona de cozedura “queima”, o ecrã
mostra alternadamente “H” e “0”.
Depois da ativação, o touch control
permanece ativo durante 10 segundos. Se
não selecionar uma zona de cozedura ou o
timer, o touch retorna ao estado de standby automaticamente.
Manutenção (Fig. 5)
Traços de papel alumínio, resíduos de
alimento, espirros de gordura, açúcar ou
alimentos fortemente sacaríferos devem
ser imediatamente removidos do plano de
cozedura com um raspador, para evitar
possíveis danos na superfície do plano.
Sucessivamente limpar com SIDOL ou
STANFIX e papel de cozinha, depois
enxaguar com água e enxugar com um trapo
limpo. Em nenhum caso usar esponjas ou
panos de limpeza abrasivos; evitar também
o uso de detergentes químicos agressivos
tais como SPRAY PARA FORNOS ou
REMOVEDOR DE MANCHAS.
NÃO UTILIZAR LIMPADORES A VAPORE
Sinal acústico (campainha)
Durante a utilização as seguintes atividades
são indicadas mediante uma campainha:
- Ativação normal das teclas com um som
breve.
- Ativação contínua das teclas, durante
mais de 10 s, com um som longo
intermitente (aparece um símbolo de erro
e se a operação continuar o touch control
desliga-se)
Ativação de uma zona de
cozedura
Posicionar uma panela, tocar a área
do cursor correspondente à zona de
cozedura em que ela foi colocada (16-17-
18) e deslizar o dedo para a direita para
86
Page 87

aumentar o nível de cozedura (17) ou para
a esquerda diminuí-lo (16).
Desativação de uma zona de
cozedura
Uma zona de cozedura específica pode
ser desligada diretamente selecionando
a posição “0” deslizando o dedo para a
esquerda na área do cursor correspondente
à zona de cozedura em função.
As zonas de cozedura quentes serão
exibidas com uma letra “H”.
A desativação imediata de todas as zonas
de cozedura pode ser feita a qualquer
momento mediante o botão de alimentação
On/Off (1).
Se durante a cozedura a placa for
desativada involuntariamente durante
a utilização dos comandos, é possível
ativá-la novamente com a tecla On/Off,
pressionando, dentro de 6 segundos, a
tecla de pausa (4), que será indicada pela
intermitência do ícone (3). Desta forma,
a placa será ativada novamente com as
mesmas configurações presentes antes da
sua desativação involuntária.
Nível de potência
A potência da zona de cozedura pode ser
configurada do nível 1 ao nível 9. Está
disponível um ulterior nível P (Power
booster), que permite aquecer rapidamente
os alimentos e poupar tempo.
O nível de potência representado pela letra
“A” intermitente indica que foi ativada a
função de aquecimento automático.
Booster e gestão da potência.
O gerador, com Booster ativado, coloca
à disposição da zona de cozedura uma
potência significativamente superior
à potência nominal. O ecrã da zona
87
de cozedura selecionada exibe a letra
“P”. A função Booster pode ser ativada
pressionando a extremidade final da área
do cursor da zona de cozedura (18).
O aumento da potência é diferente conforme
a dimensão da zona de cozedura:
1) Para zona de cozedura de ø180, a
potência passa do nível 9 de 1850 W ao
nível Booster 3000 W com duração de
10 minutos.
2) Para zona de cozedura Retangular
(220x190), a potência passa do nível
9 de 2300 W ao nível Booster 3700 W
com duração de 10 minutos.
3) Para zona de cozedura de ø210, a
potência passa do nível 9 de 2300 W ao
nível Booster 3700 W com duração de
10 minutos. Por motivos de segurança,
a função Booster tem duração limitada.
Se durante o tempo Booster a panela for
removida da zona de cozedura, a função
Booster permanece ativada e o tempo
Booster não é desativado.
Com o Booster ativado, a alteração do valor
configurado deslocando o dedo na área
do cursor da zona de cozedura provoca a
desativação do Booster.
A função Booster “P” pode ser ativada
em todas as zonas de cozedura, mas é
dada prioridade ao último Booster ativado,
reduzindo eventuais outros níveis de
cozedura.
Aquecimento automático
(ou função “heat-up”)
Esta função facilita a cozedura.
Não é necessário estar presente
permanentemente durante a cozedura, a
placa aquece-se automaticamente com
potência total e retorna, depois, ao nível de
potência selecionado após um determinado
intervalo de tempo (ver tabela 1).
PT
Page 88

Ativar o aquecimento automático
(ou função “heat-up”)
Manter pressionada a área do cursor
correspondente à zona de cozedura em
função durante cerca de 3 segundos até
escutar um bipe (por exemplo em 1/3 do
comprimento da zona do cursor).
Exemplo: selecionar o nível 3 e ativar
a função de aquecimento automático
mantendo a pressão durante 3 segundos. O
ecrã correspondente exibe alternadamente
a letra “A” e o número “3”. Com estas
configurações, a placa aquece a zona de
cozedura com o nível máximo “9” durante 2
minutos e depois continua a cozedura com
o nível “3”.
Duração
Máxima do
Tempo de
Funcionamento
sem
Intervenções
com os
Comandos
(tempo em
minutos)
PT
Duração da
Função
Nível de
Potência
0 1 0’ 40” 516
2 1’ 12” 402
3 2’ 318
4 2’ 56” 258
5 4’ 16” 210
6 7’ 12” 138
7 2’ 138
8 3’ 12” 108
9 - 90
P - 10
de
Aquecimento
Automático
(tempo em
minutos)
Função de extensão
(para panelas de grandes
dimensões)
Esta função facilita a cozedura com panelas
retangulares grandes, está disponível
apenas para as zonas de cozedura
retangulares e é ativada pressionando
simultaneamente 2 áreas do cursor das
2 zonas de cozedura em questão. Então,
acenderá ao lado do ecrã que exibe os
níveis (22) um ícone em forma de “U” (25) e
a zona de cozedura poderá ser comandada
através da área do cursor da esquerda.
Funções especiais
Ao acender o touch é possível programar
uma função especial pressionando as
teclas específicas (20-26); o ícone irá
piscar (19-27) durante 5 segundos, durante
os quais pode-se escolher em que zona de
cozedura ativar a função. Esta função está
disponível para cada zona de cozedura,
pode “ajudar a cozedura” e é indicada por
uma letra “u” ou “U”.
É possível ativar 2 níveis de “cozedura”:
1) Derreter com uma temperatura de
aproximadamente 42 °C “u”..
2) Aquecer com uma temperatura de
aproximadamente 70 °C “U”.
Estas temperaturas devem ser consideradas
indicativas e dependem
muito do tipo de panela e da quantidade de
alimento presente.
Bloqueio dos comandos
(segurança das crianças)
A ativação é feita somente quando a placa
está ligada mas nenhuma zona de cozedura
foi ativada.
Pressionar simultaneamente a tecla chave
(6) e a tecla de pausa (4) e, em seguida,
pressionar a tecla pausa (4).
88
Page 89

Durante alguns segundos serão exibidas
as letras “L” nos ecrãs e, depois, os ecrãs
serão desativados.
Tentando ativar a placa com a tecla On/Off
(1) serão exibidas novamente as letras “L”
e não será possível cozinhar.
Desbloqueio/desativação
da segurança das crianças
Há 2 tipos de desbloqueio:
1) Desbloqueio uma única vez: Para
desativar a função é preciso ativar a
placa e pressionar simultaneamente
as teclas de pausa (4) e de chave (6).
As letras L desaparecerão e, no seu
lugar, será indicado “0” em cada zona
de cozedura. Se a placa for desativada
depois da sua utilização, durante a
ativação sucessiva serão exibidas as
letras L, que indicam que a placa está
bloqueada.
2) Desbloqueio definitivo: Para desativar
a função de forma definitiva é
preciso ativar a placa e pressionar
simultaneamente as teclas de chave (6)
e de pausa (4), soltar estes 2 comandos
e, em seguida, pressionar novamente a
tecla de pausa (6).
Chave
Com esta placa é possível configurar
o bloqueio do teclado mediante a
tecla específica de chave (6). Pode
ser útil bloquear o teclado durante o
funcionamento, por exemplo para limpar a
zona dos comandos ou se não pretender
modificar nenhuma configuração.
Em todo caso, a tecla On/Off (1) tem
prioridade.
Pausa
Com esta placa é possível configurar uma
pausa (4) durante a cozedura (útil, por
exemplo, para atender uma ligação). Com
esta função, depois de pressionada a tecla,
acende-se um led acima do comando, todos
os ecrãs das zonas de cozedura exibem o
símbolo “II” e as configurações de cozedura
e dos timers são congeladas durante um
intervalo máximo de 10 minutos, após o
qual a placa é desativada.
Desativação da Pausa
Depois de ativada, esta função pode ser
desativada pressionando novamente a
tecla de pausa (4). O ícone (3) pisca e
dentro de 10 segundos deve-se selecionar
uma área do cursor. Desta forma, a placa
retoma a cozedura e o timer é reiniciado no
ponto em que parou.
Função de Timer
A função de timer é realizada em duas
versões:
- Um Timer autónomo, de 1 minuto a 99
min: sinal sonoro quando o tempo tiver
expirado. Esta função está disponível
mesmo com zonas de cozedura acesas.
- Timer para cada zona de cozedura, de
1 minuto a 99 min: sinal sonoro quando
o tempo tiver expirado e desativação da
zona de cozedura na qual foi programado.
As 4 zonas de cozedura podem ser
programadas de maneira independente.
O timer inicia com um valor predefinido de
10 minutos e o ponto de seleção do timer
é ativado (13); posicionando-se na área do
cursor de nível
mínimo (16), o tempo começa a diminuir,
posicionando-se na área do cursor de nível
máximo (17), o tempo começa a aumentar.
Independentemente do tipo de timer que
foi ativado, nos ecrãs correspondentes (10-
PT
89
Page 90

12) é destacado o timer com tempo menor
em expiração. Se o tempo menor referese a um timer autónomo, é visualizado
simplesmente o valor sem sinalizações
especiais. Por sua vez, se o tempo menor
refere-se a um timer para zona de cozedura,
o ícone timer (24) pisca juntamente com a
respetiva luz avisadora (8-9-14-15). Os
outros timers configurados permanecerão
ativados e em funcionamento, mas
apresentarão o ícone de relógio (24) aceso
mas não intermitente.
Apenas o ponto de separação (13) acendese quando o timer foi selecionado e pode
ser modificado.
Timer autónomo
- Se o touch foi ativado e todas as zonas
de cozedura estão na posição “0”, o timer
autónomo pode ser utilizado pressionando
PT
a tecla timer (5) e selecionando uma área
do cursor qualquer de qualquer zona de
cozedura. Se, por sua vez, há zonas de
cozedura acesas, para selecionar o timer
autónomo deve-se pressionar 2 vezes a
tecla timer (5) e, então, selecionar uma
área do cursor qualquer.
Dentro de 10 segundos o timer desativa a
sua seleção se não for utilizada nenhuma
tecla.
- Podem ser realizadas modificações do
valor (0-99min) com incrementos de um
minuto mantendo o dedo na área do
cursor (17).
- A ativação contínua da tecla (16-17)
provoca o incremento dinâmico da
velocidade de variação até um valor
máximo ou mínimo, sem sinalizações
sonoras.
- Se a tecla (16-17) for liberada, a velocidade
de incremento (ou decremento) começa
novamente a partir do valor inicial.
- A configuração do timer pode ser feita
quer com a pressão contínua das teclas
(16-17), quer com pressões com toques
sucessivos (com sinal sonoro).
Depois da configuração do timer, começa
a contagem regressiva. A expiração do
tempo será notificada pelo ecrã intermitente
a exibir “00” e por uma sinalização sonora
com duração máxima de 2 minutos.
A sinalização sonora prosseguirá até que
seja pressionada uma tecla. O ecrã para de
piscar e apaga.
Desligar/modificar o timer
O timer pode ser modificado ou desligado
a qualquer momento acendendo
novamente o touch, se nenhuma zona de
cozedura estiver acesa, acionando a tecla
timer (5) para selecionar o timer e, depois,
colocando em “0” pressionando uma área
qualquer do cursor de nível mínimo (16)
para desligá-lo ou pressionando uma
área qualquer do cursor de nível máximo
(17) para aumentar o tempo configurado.
- O timer autónomo permanece ativo
mesmo se for pressionada a tecla On/Off
Programação do timer
para as zonas de cozedura
Ao acender o touch é possível programar
um timer independente para cada zona de
cozedura.
- Deve haver pelo menos uma zona de
cozedura acesa e configurada com um
determinado nível.
- Ativar a zona de cozedura selecionando a
área do cursor (16-17) e, então, pressionar
o botão timer (5). Desta forma, é possível
configurar uma contagem regressiva para
desligar a zona de cozedura. Ao lado do
ecrã da zona de cozedura irão acender
os ícones luminosos em forma de relógio
(24). Para configurar o timer em uma
zona de cozedura em caso de mais de
uma zona de cozedura acesa, é preciso:
90
Page 91

- Quando o timer da zona de cozedura é
selecionado, o respetivo ícone do relógio
próximo ao ecrã torna-se mais luminoso.
Em todo caso, os timers programados
para cada zona de cozedura permanecem
ativos.
- Ulteriores comportamentos do timer
correspondem àqueles do timer
autónomo. Para incrementar o valor,
deve ser utilizada a tecla de seleção
mais.
- A expiração do tempo é notificada por um
sinal acústico e pela exibição de “00” no
ecrã. O LED da zona de cozedura com
o timer programado pisca. A zona de
cozedura apaga e a letra “H” é mostrada
se a zona “queima”, caso contrário o ecrã
da zona mostra um traço. A sinalização
sonora e a intermitência do ecrã são
interrompidas:
- Automaticamente depois de 2 minutos.
- Acionando o botão de relógio o ecrã do
timer apaga.
PT
91
Page 92

Códigos de erro mostrados pelos ecrãs de 7 segmentos “E” “ER” com o número do erro.
Mensagem
de erro
“flash”
Descrição
Pressão permanente
das teclas; A unidade de
controlo é interrompida
Possível causa do
erro
Água ou utensílios de
cozinha no vidro sobre
a unidade de controlo
Resolução
Limpar a superfície
de operação
após 10 s
Er 22 Reposta da tecla avariada.
A unidade de controlo é
interrompida após 3.5 –
7.5 s.
Curto-circuito ou
descontinuidade da
faixa de resposta da
tecla
Trocar a unidade
de controlo
Er20 Falha Flash Falha µC Trocar a unidade
de controlo
Er36 O valor NTC não está
de acordo com as
Curto-circuito ou
interrupção em NTC
Trocar a unidade
de controlo
especificações (valor
< 200mV ou > 4.9V; a
unidade de controlo é
interrompida
Er31 Dados de configuração
PT
incorretos
Er47 Erro de comunicação entre
TC e indução
Configuração da
indução necessária
Comunicação ausente
ou errada!
Nova Configuração
Certificar-se de que
o cabo de conexão
foi conectado
corretamente e está
eficiente
E2 Superaquecimento das
bobinas de indução
U400 Tensão secundária da
unidade de potência
demasiado alta (primária
Unidade de controlo
conectada de forma
errada
É necessário
arrefecer
Conectar com a
tensão principal
correta
> 300V). A unidade de
controlo é interrompida
após 1 s com um bipe
constante
E5 Erro no quadro do filtro Trocar o quadro do
filtro
E6 Erro da unidade de
potência
E9 Sensor de temperatura da
bobina avariado
Trocar a unidade
de potência
Trocar o sensor de
temperatura
92
Page 93

Instruções para o instalador
Instalação
As presentes instruções dirigem-se ao
instalador qualificado como guia para
a instalação, regulação e manutenção,
segundo as leis e as normativas em
vigor. As intervenções devem sempre ser
efectuadas com a aparelhagem desligada
electricamente.
Posicionamento (Fig. 6-7)
O aparelho está previsto para ser encaixado
num plano como ilustrado na respectiva
figura. Predispor ao longo de todo o
perímetro do plano o selante que vem
fornecido. É desaconselhável a instalação
em cima de um forno, em caso contrário,
controlar que:
- o forno esteja equipado com um sistema
de arrefecimento eficaz;
- que não aconteça, em nenhum caso,
passagem de ar quente do forno para o
plano;
- predispor passagens de ar como indicado
na figura.
à temperatura ambiente. Para a ligação
directa na rede é necessário interpor um
interruptor omnipolar dimensionado para
a carga indicada na plaqueta, que garanta
a desconexão da rede com uma distância
de abertura dos contactos que permita a
desconexão completa nas condições da
categoria de sobretensão III, conforme
as regras de instalação (o cabo de terra
amarelo/verde não deve ser interrompido).
A tomada ou interruptor omnipolar
devem ser facilmente alcançáveis com a
aparelhagem instalada.
N.B.:
- O fabricante declina qualquer
responsabilidade se, o que acima dito e
as usuais normas de segurança contra
acidentes, não forem respeitadas.
Se o cabo de alimentação estiver danificado,
este deve ser substituído pelo fabricante ou
pelo seu serviço de assistência técnica ou,
todavia, por uma pessoa com qualificação
equivalente, de modo a prevenir qualquer
risco.
PT
Ligação eléctrica (Fig. 8)
Antes de efectuar a ligação eléctrica
controlar que:
- as características da instalação
satisfaçam as indicações da placa de
matrícula aplicada no fundo do plano;
-que a instalação esteja equipada com
uma eficaz ligação à terra, segundo as
normas e as disposições de lei em vigor.
A ligação à terra é obrigatória nos termos
de lei. No caso em que a aparelhagem não
estiver equipada com cabo e/ou com relativa
ficha, utilizar material adequado para a
absorção indicado na placa de matrícula
e para a temperatura de trabalho. O cabo,
em nenhum ponto, deverá alcançar uma
temperatura superior a 50°C em relação
93
Page 94

50 MIN.
INDUZIONE INDUCTION
INDUCCIØN INDUÎÍ O
PT
20 MIN.
induzione - induction - induction - Induktion
- inducción - inductie - indução
ZONA FORNO O ARMADIETTO
OVEN ZONE OR CUPBOARD
ZONE FOUR OU PLACARD
OFENBEREICH ODER SCHRANK
ZONA HORNO O ARMARIO
OVENRUIMTE OF KASTJE
ZONA DO FORNO OU ARMÁRIO
50 MIN.
aria - air - air - Luft - aire - lucht - ar
100 cm2 MIN.
(2 x 500)
ATENÇÃO : em caso de inobservância
das indicações de construção do móvel, o
produto perde a sua garantia
aria - air - air - Luft - aire - lucht - ar
100 cm2 MIN.
POSIÇÃO GUARNIÇÃO SELANTE NA
VERSÃO SEMI RENTE AO TOPE
POSIÇÃO GUARNIÇÃO SELANTE NA
VERSÃO RENTE AO TOPE
Fig. 6
94
Page 95

0
N.B. Para a versão semifilotop
R
3
800
não é necessário realizar o
abaixamento de 4.8 mm
R
3.
5
750
+0.5
4.8
0
+1
0
510
FSH 804 ID TS BK
+1
511
0
+1
801
0
+1
490
FSH 804 ID TS MAT
FSH 804 ID TS WH
N.B. Não colar ou fixar com silicone
o vidro no abaixamento de 4.8 mm
Fig. 7
PT
~
400V 2N
N
N
L1L2
1.016.410
230V~
L
95
Fig. 8
Page 96

note
Page 97

note
Page 98

note
Page 99

Page 100

Cod. 1.009.74.0
FULGOR MILANO
®
Meneghetti S.p.a. Via Borgo Lunardon, 8 • 36027 Rosà (Vicenza) - Italy
http://www.fulgor-milano.com • e-mail: info@fulgor-milano.com
 Loading...