

Page 1

FCO 4512 TM
FCO 6213 TM
FCOS 6213 TM
FCO 7513 TM
FCO 9013 TM
FCO 9613 TM 2F
FORNI ELETTRONICI
IT
ISTRUZIONI PER L’INSTALLAZIONE E L’USO
ELECTRONIC OVENS
FOURS ELECTRONIQUES
BACKOFEN MIT
SENSORSTEUERUNG
HORNOS ELECTRÓNICOS
ELEKTRONISCHE OVENS
FORNOS ELETRÓNICOS
EN
FR
DE
ES
NL
PT
INSTRUCTIONS FOR INSTALLATION AND USE
INSTRUCTIONS POUR L’INSTALLATION ET L’UTILISATION
INSTALLATION UND GEBRAUCH
INSTRUCCIONES PARA LA INSTALACIÓN Y USO
INSTALLATIE-EN GEBRUIKSHANDLEIDING
INSTRUÇÕES DE INSTALAÇÃO E UTILIZAÇÃO
Page 2

Page 3

IT
INDICE PAGINA
1 - Istruzioni di Sicurezza
2 - Caratteristiche del Prodotto
3 - Installazione del Forno
Caratteristiche Elettriche
Rispetto per l’ambiente
Collegamento alla rete elettrica
4 - Istruzioni per l’Uso
Primo utilizzo del forno
Guide Estraibili (se presenti)
5 - Pannello di controllo
Tastiera
6 - Informazioni Generali Forno
Codici errore
Segnali acustici
Impostazioni Predefinite
Numero Codici Guasti
Preriscaldamento e Preriscaldamento Rapido
Timer
7 - Suggerimenti Generali Forno
Preriscaldare il Forno
Suggerimenti per il Funzionamento
Utensili
Condensazione e Temperatura Forno
Cottura al Forno ad Alta Quota
8 - Introduzione
Istruzioni per l'accensione iniziale
9 - Impostazioni Utente
Lingua
Temperatura e Peso
Ora
Data
Luminosità
Volume
10 - Impostazioni di Sistema
Registro Eventi
Demo
11 - Avviare il Forno
Accendere e spegnere il forno
Selezionare la modalità di cottura
Cambiare la modalità di cottura
Cambiare la temperatura
10
11
11
11
12
12
13
13
13
13
13
13
13
14
14
14
14
14
14
15
15
16
16
16
16
17
17
17
18
18
18
19
19
19
19
19
INDICE PAGINA
2
3
4
4
4
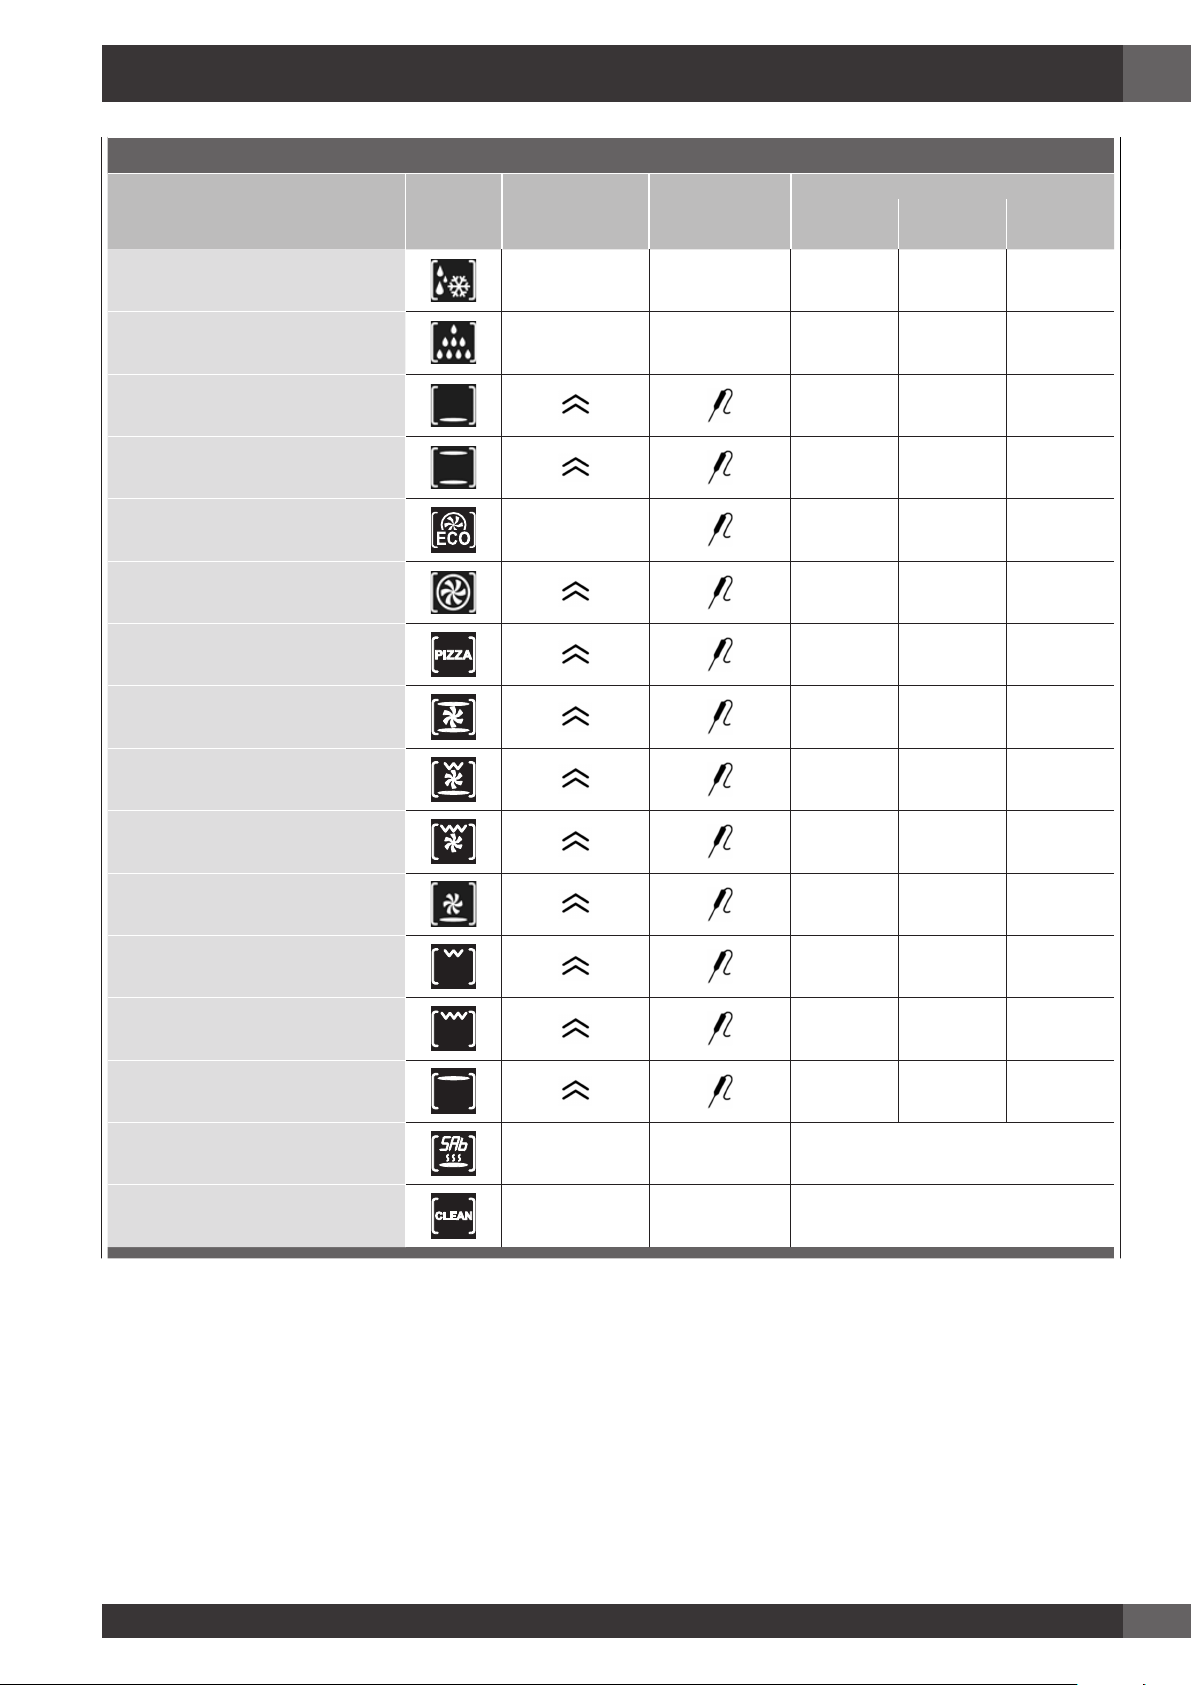
12 - Tabella Modalità di Cottura
Fase di preriscaldamento
Preriscaldamento Rapido
Eco
Utilizzo Luci Forno
13 - Funzionamento Forno in Modalità a Tempo
Tempo di Cottura
Ora Fine
14 - Impostazione Sonda Termica Carne (se presente)
15 -
Capire le Varie Modalità di Funzionamento del
Forno
Suggerimenti e Tecniche per la Cottura
Linee Guida Generali
Suggerimenti e Tecniche per la Cottura Circolare
Ventilata
Suggerimenti e Tecniche per la Cottura Ventilata
Suggerimenti e Tecniche per la Cottura alla Griglia
Ventilata
Suggerimenti e Tecniche per la Cottura alla Griglia
Suggerimenti e Tecniche per Essiccare
Tabella Essiccazione
16 - Ricette
17 - Istruzioni Modalità Sabbath (Su Alcuni Modelli)
18 - Cura e Pulizia del Forno
Pulizia
Rimozione porta
Rimozione binario porta forno
Come smontare i vetri interni della porta
panoramica“ FULL GLASS”
Sostituzione della luce del forno
19 - Risoluzione Problemi di Cottura al Forno
20 - Risoluzione Problemi Funzionali
21 - Assistenza o Manutenzione
Record Dati Manutenzione
20
22
22
22
22
23
23
23
24
26
26
26
26
27
27
27
27
28
29
31
32
32
32
33
33
34
35
36
37
37
1
Page 4
IT
1 - Istruzioni di Sicurezza
IMPORTANTE
• I bambini devono essere sorvegliati per assicurarsi
che non giochino con l’apparecchio.
• Tenere lontani i bambini sotto gli 8 anni se non
continuamente sorvegliati.
• Questo apparecchio non è destinato all'utilizzo da
parte di persone (inclusi bambini di età superiore
agli 8 anni) con ridotte capacità sensoriali o
facoltà mentali, o mancanza di esperienza o
dimestichezza, a meno che siano sottoposti
a supervisione o vengano date loro istruzioni
concernenti l'utilizzo dell’apparecchio da parte di
una persona responsabile della loro sicurezza.
• Le operazioni di pulizia e di manutenzione non
devono essere effettuate dai bambini senza
supervisione.
La targhetta con i dati identificativi del forno è
accessibile anche ad apparecchio installato. La
targhetta è visibile semplicemente aprendo la
porta. Menzionare sempre i dettagli ivi presenti
per identificare l'elettrodomestico al momento
dell'ordine di pezzi di ricambio.
• Per evitare il danneggiamento dello smalto, non
coprire in alcun modo la suola della muffola (ad
es. con fogli di alluminio, teglie e simili).
• Non usare pulitori abrasivi o raschietti metallici
taglienti per pulire il vetro della porta del forno,
essi possono graffiare la superficie provocando la
frantumazione del vetro.
• Per la pulizia non devono essere utilizzati detergenti
• Non smontare nessuna parte prima di aver
abrasivi né pulitori a vapore.
scollegato il forno dalla rete elettrica.
• L'elettrodomestico non deve essere installato dietro
• Non usare l’elettrodomestico in caso una qualunque
porte decorative onde evitare il surriscaldamento.
sua parte sia rotta (ad esempio un vetro). Scollegarlo
dalla rete elettrica e chiamare l'assistenza tecnica.
• ATTENZIONE: Assicurarsi che l'elettrodomestico sia
spento prima di sostituire la lampadina onde evitare
• Prima di utilizzare il forno, è opportuno farlo
il rischio di folgorazioni.
funzionare vuoto alla massima temperatura
per circa un’ora al fine di eliminare l’odore del
materiale isolante.
• Il forno deve essere freddo e l’alimentazione
scollegata prima di togliere la porta. In caso
contrario, vi è il rischio di folgorazioni o ustioni.
• In tutti i modelli, tenere la porta chiusa quando
viene utilizzato il grill.
• Utilizzare esclusivamente la sonda termica carne
fornita con l’elettrodomestico.
• La ventola di raffreddamento può rimanere in
funzione fintanto che il forno è caldo, anche dopo
lo spegnimento dello stesso.
IMPORTANTE
• Durante l'utilizzo l'elettrodomestico si riscalda molto:
non toccare le resistenze riscaldanti all’interno del
forno.
• Genitori e persone adulte devono prestare
particolare attenzione quando utilizzano
Se il forno viene installato ad una temperatura
ambiente inferiore ai 37°F (3° C), può apparire
F*0117 quando si raggiunge una temperatura
ambiente superiore, l'errore non verrà più
visualizzato.
l’apparecchio in presenza di bambini.
2
Page 5

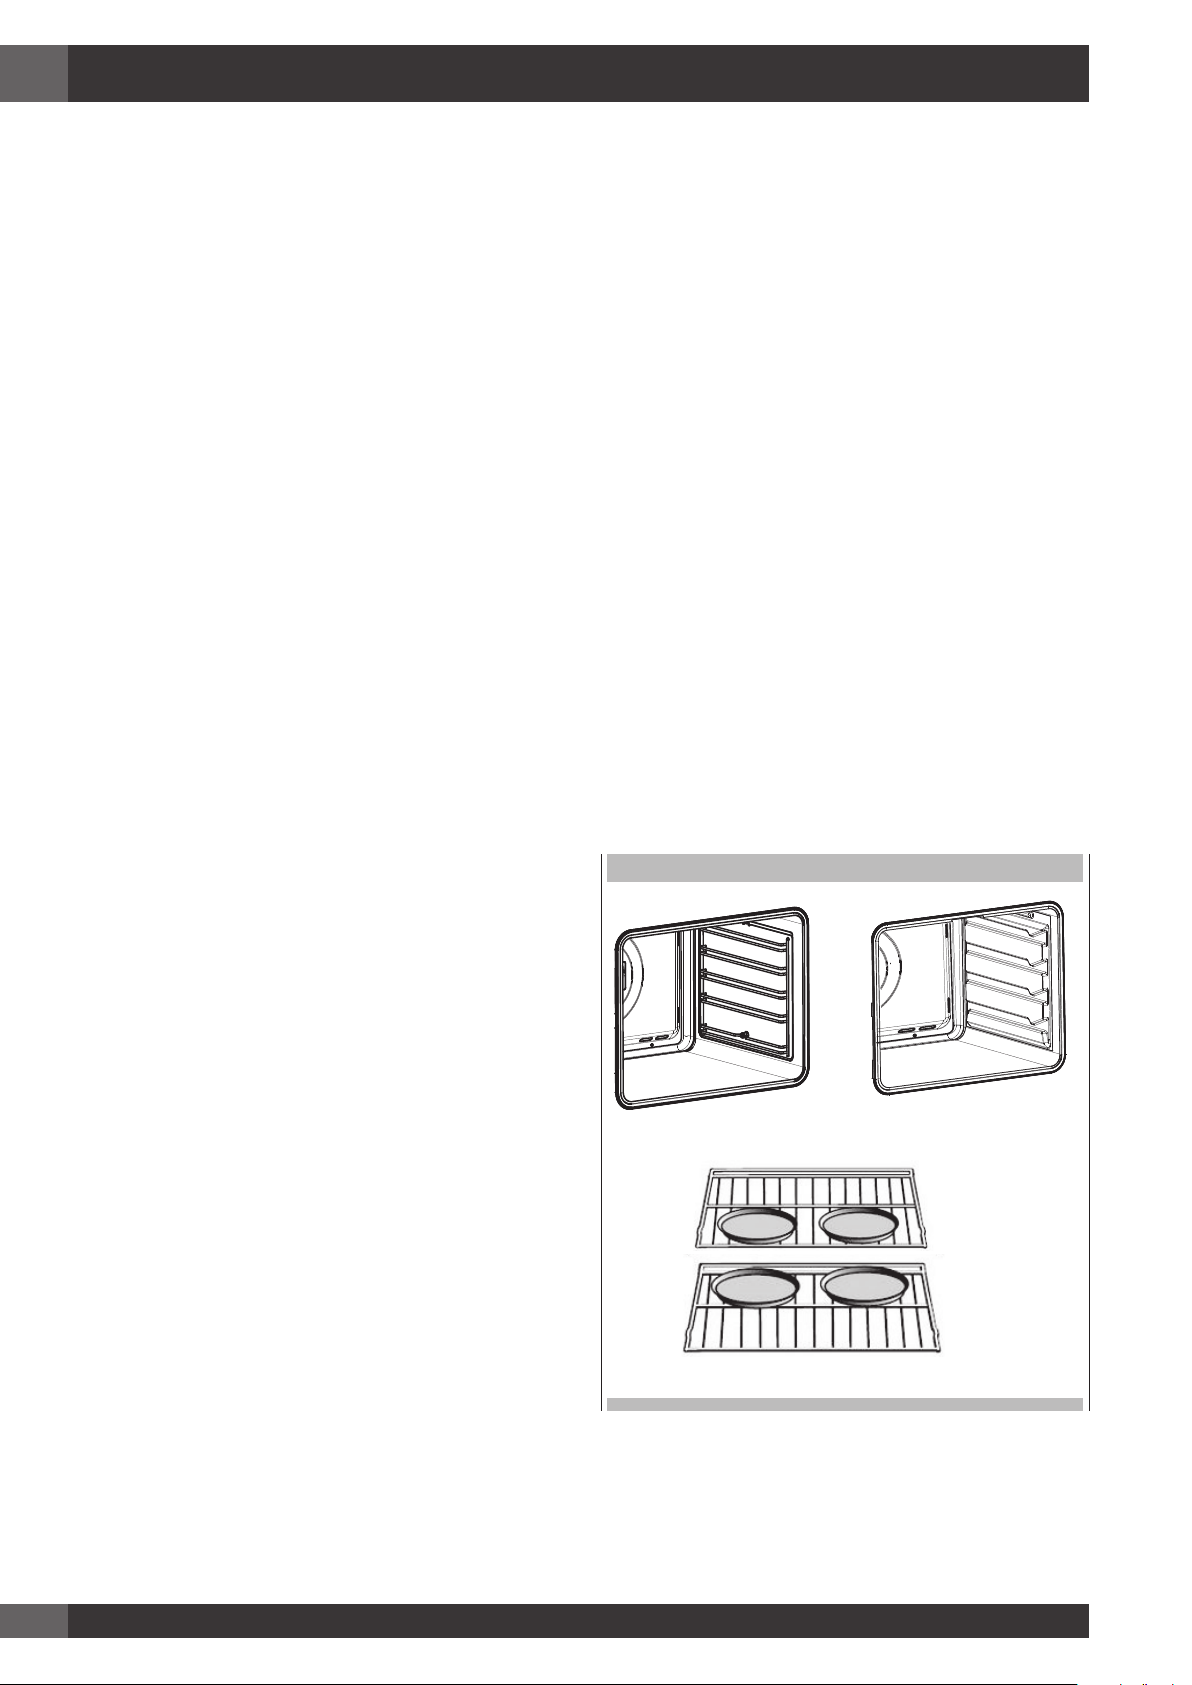
Fare riferimento alle figure sotto per il corretto inserimento delle griglie
GUIDE PROFILATE
2 - Caratteristiche del Prodotto
IT
GUIDE ESTRAIBILI
3
Page 6
IT
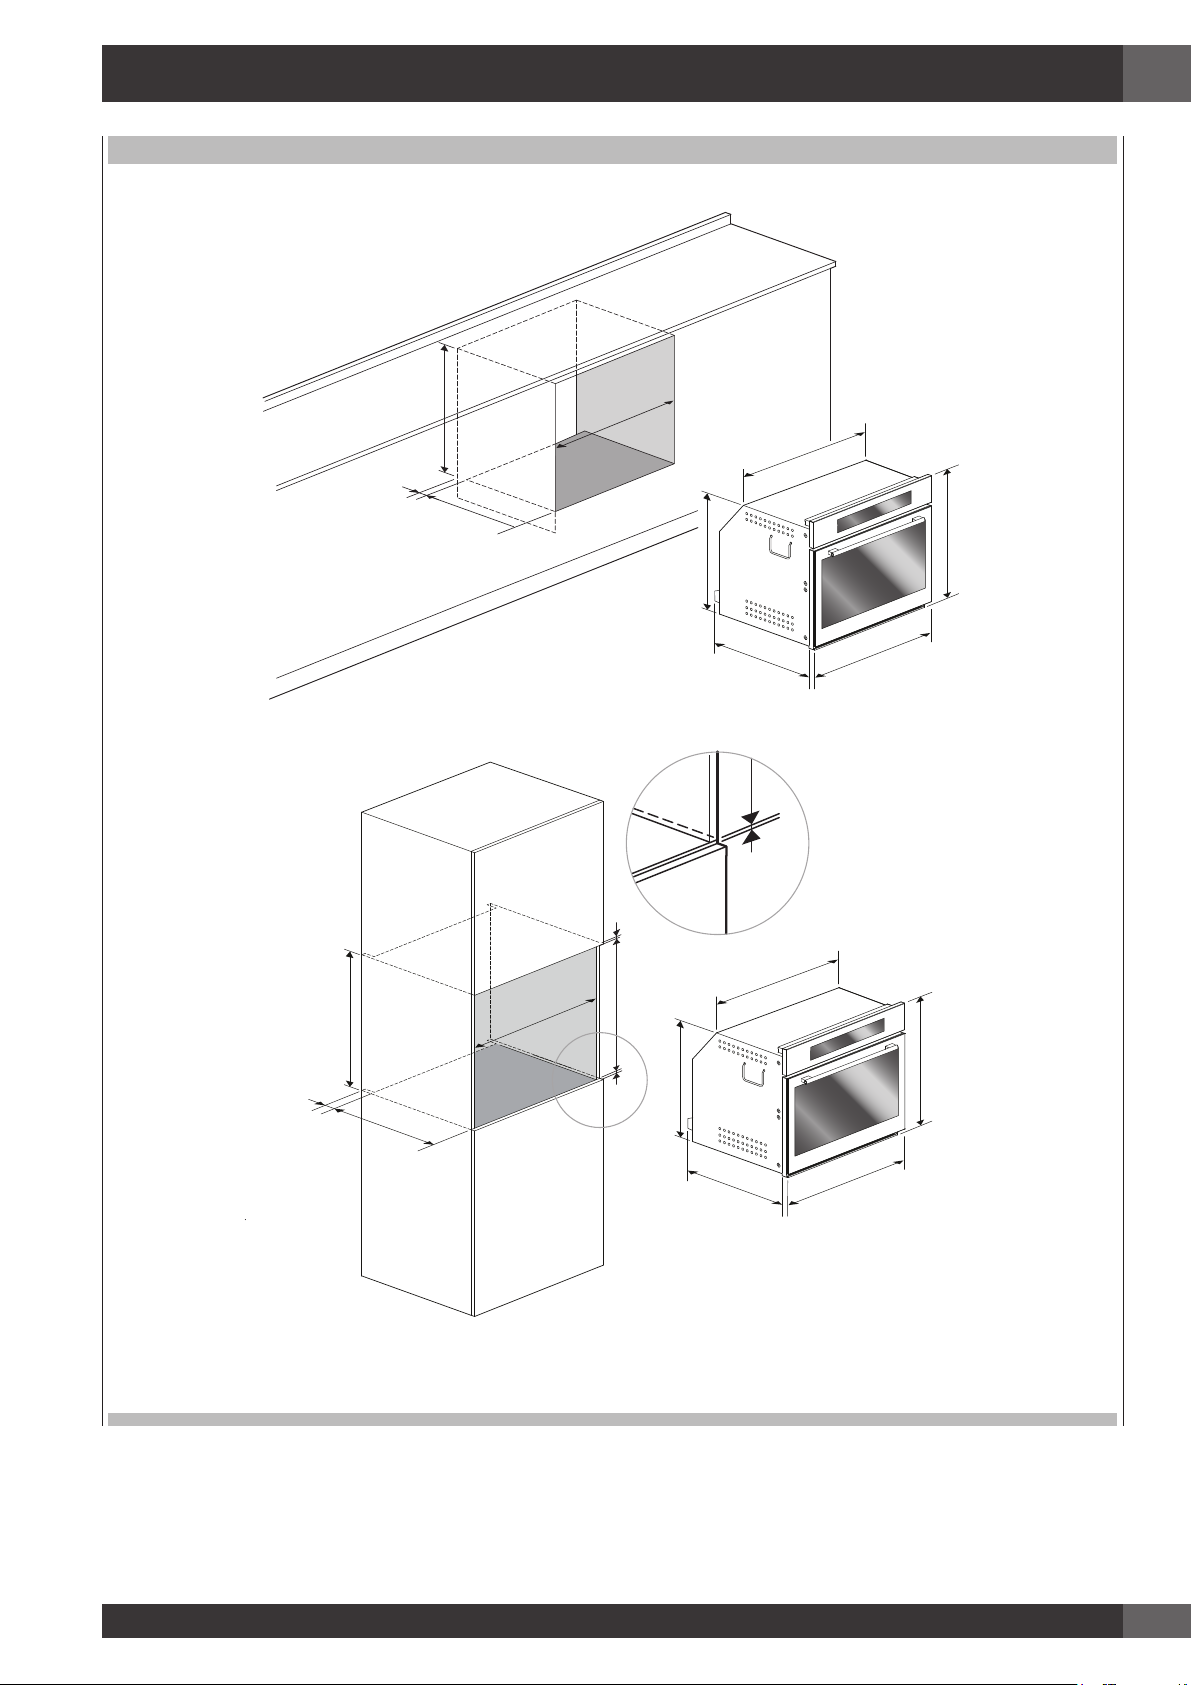
3 - Installazione del Forno
Rispetto per l’ambiente
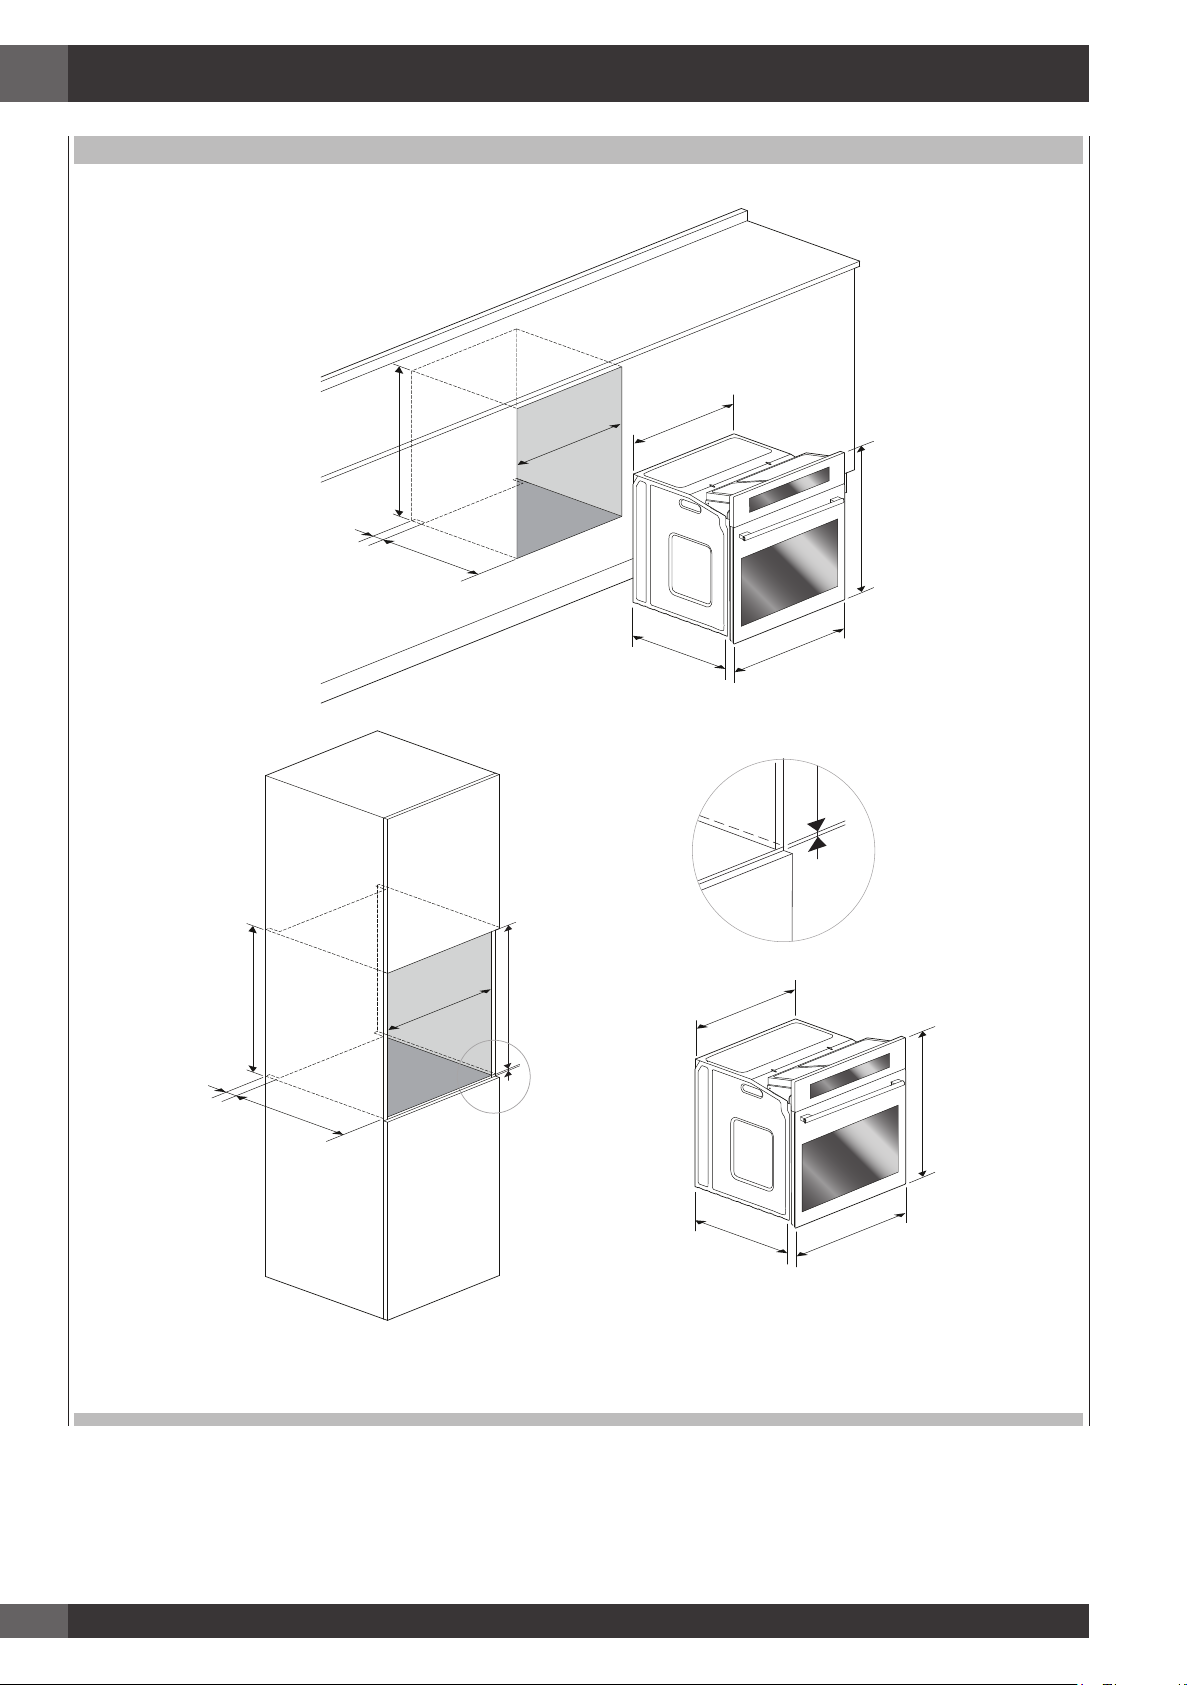
Per l’installazione del forno nella cucina, praticare un vano di
incasso secondo le dimensioni indicate nella figura Vani da Incasso
e Dimensioni.
L’apparecchio deve essere fissato al mobile sopra tramite le due viti
fornite in dotazione nel kit, attraverso i fori praticati sui montanti del
forno.
Il vano in cui l’apparecchio è incassato deve avere la parte posteriore
aperta in modo da consentire una sufficiente aerazione e prevenire
surriscaldamento.
ATTENZIONE
Poiché questo apparecchio è inserito nei mobili della cucina,
assicurarsi che ciascuna superficie a contatto con il forno resista ad
una temperatura di circa 90°C.
Caratteristiche Elettriche
Potenza massima assorbita: (vedere la targhetta).
Tensione di alimentazione: (vedere la targhetta).
La documentazione del presente elettrodomestico utilizza carta
sbiancata senza cloro oppure carta riciclata allo scopo di contribuire
alla tutela dell’ambiente. Gli imballaggi sono concepiti per evitare di
danneggiare l’ambiente; sono prodotti ecologici che possono essere
recuperati o riciclati.
Riciclando l’imballaggio, si contribuirà ad un risparmio di materie
prime e ad una riduzione del volume degli scarti industriali e domestici.
IL MATERIALE DI IMBALLAGGIO è riciclabile al 100% ed è
contrassegnato dal simbolo del riciclaggio. Per lo smaltimento
seguire le normative locali. Il materiale di imballaggio (sacchetti
di plastica, parti in polistirolo, ecc.) deve essere tenuto fuori dalla
portata dei bambini in quanto potenzialmente pericoloso. QUESTO
ELETTRODOMESTICO è contrassegnato in conformità alla Direttiva
Europea 2012/96/UE, Rifiuti di Apparecchiature Elettriche ed
Elettroniche (RAEE). Assicurandosi che questo prodotto venga
smaltito in modo corretto, l’utente contribuisce a prevenire potenziali
conseguenze negative per l’ambiente e la salute.
IL SIMBOLO sul prodotto o sulla documentazione di accompagnamento
indica che questo prodotto non deve essere trattato come rifiuto
domestico, ma deve essere consegnato presso l’idoneo punto di
raccolta per il riciclaggio di apparecchiature elettriche ed elettroniche.
4
Page 7
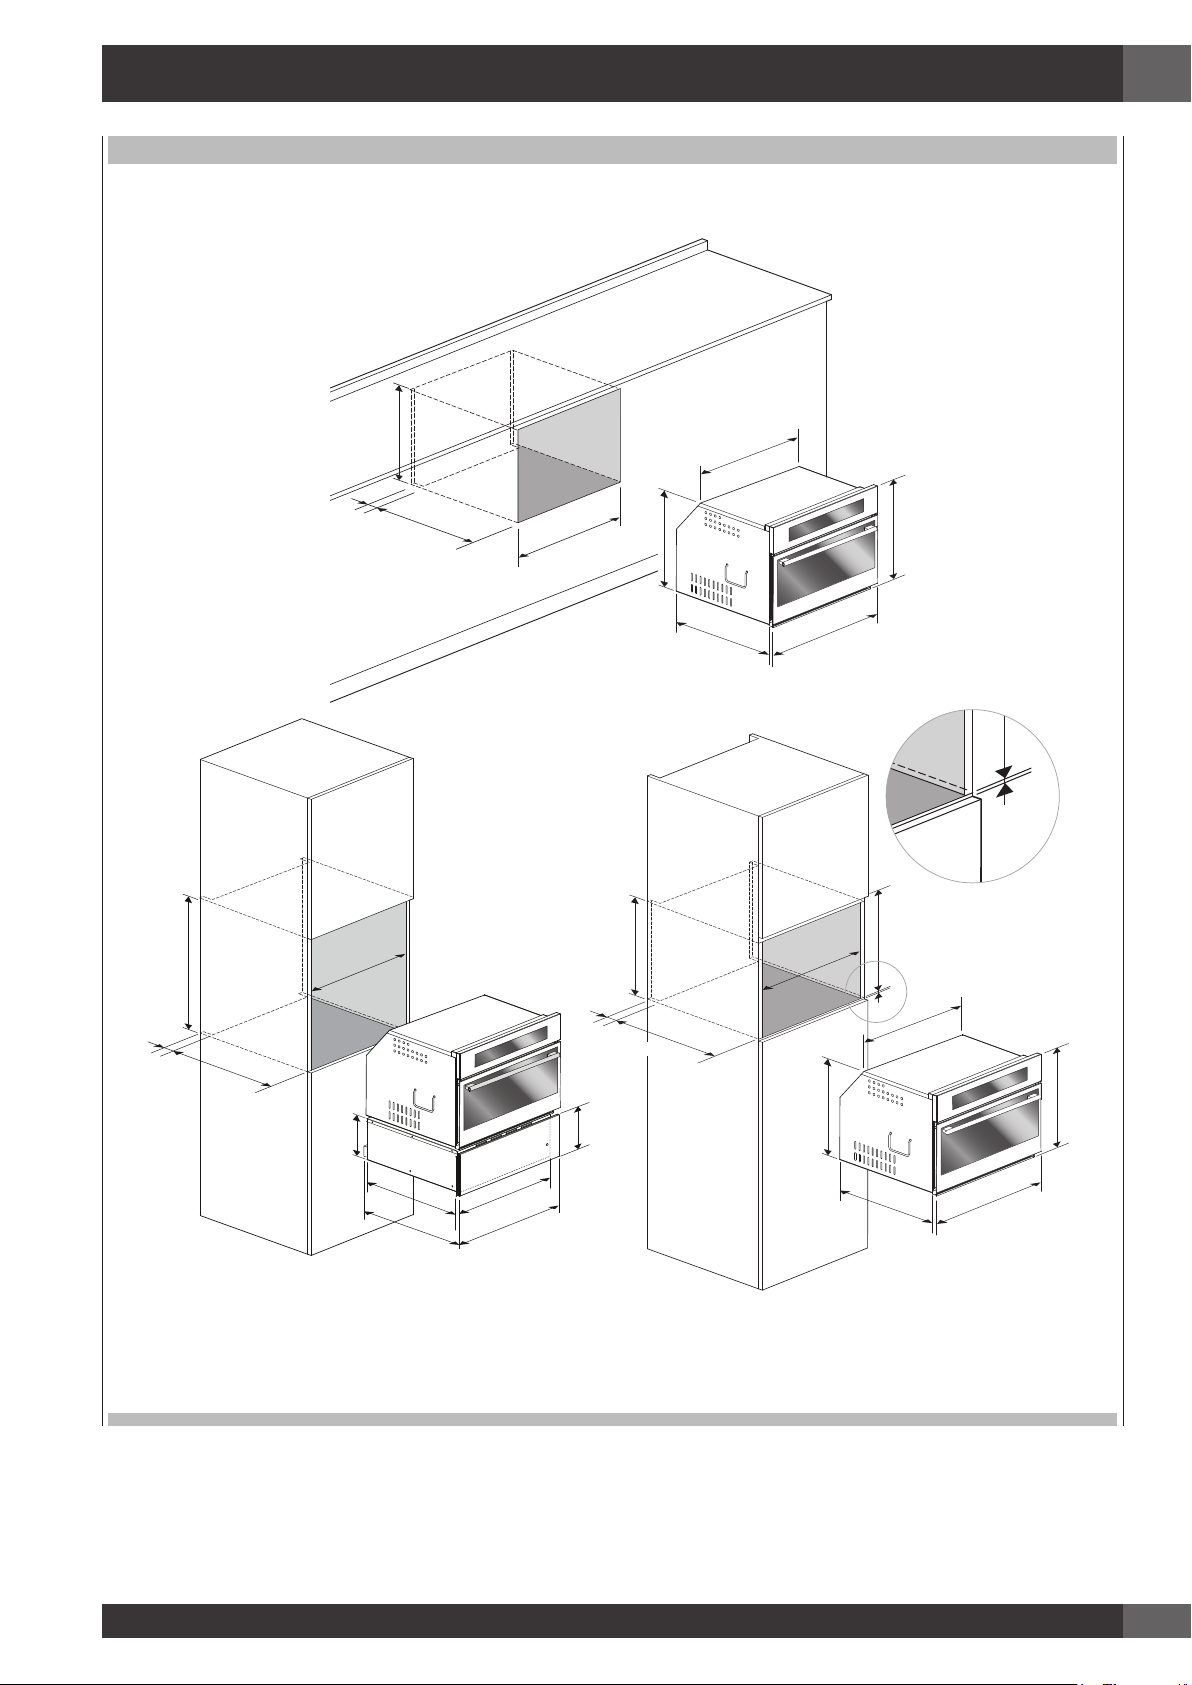
MOD. 45
min 3
IT
min 460
50
510
595
50
510
560
140
560
50
144
min
432
450
510
533
540
560
432
594
min
455
min 458
3
540
455
528
545
554
26
596
533
594
Le dimensioni sono in millimetri
5
Page 8
IT
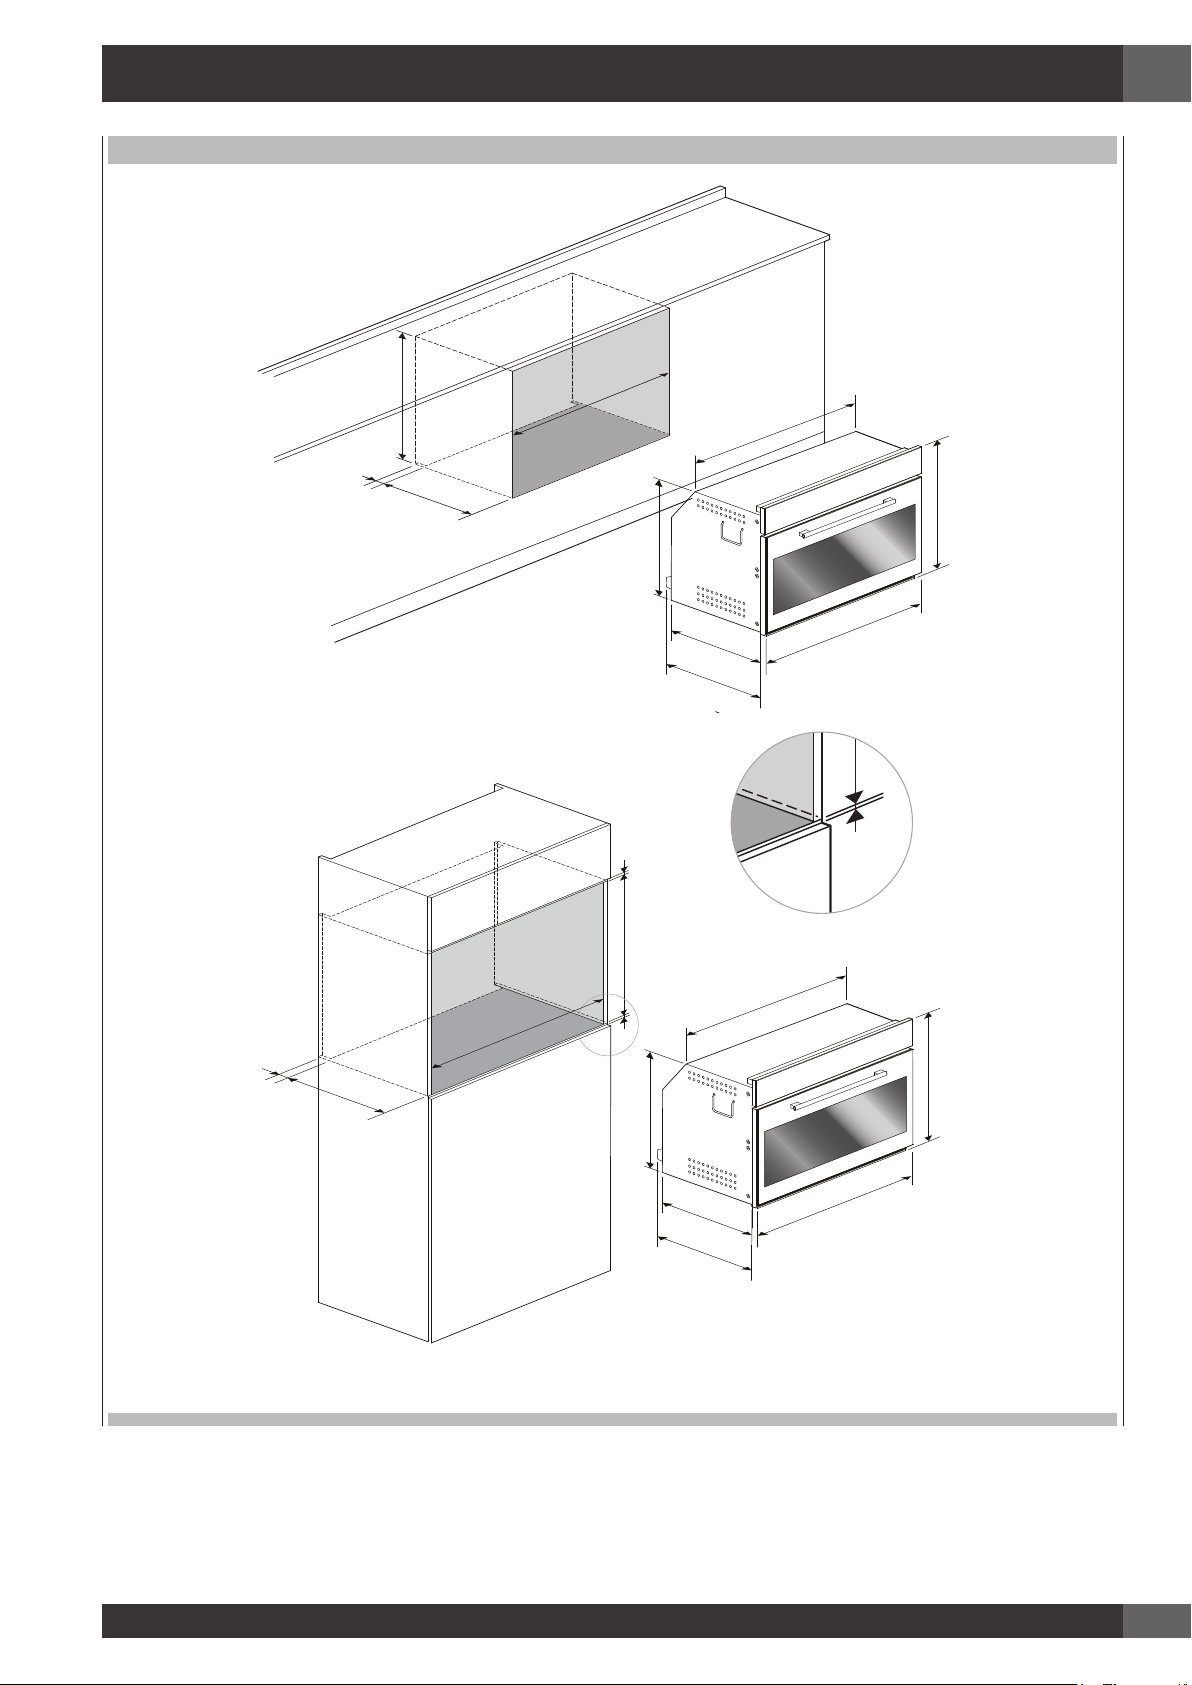
MOD. 60
595
50
510
560
510
594
595
535
21
min 5
595
50
510
560
min
min 600
5
540
594
594
535
21
Le dimensioni sono in millimetri
6
Page 9
MOD. 75
IT
595
50
510
710
568
545
682
594
750
21
min 5
5
min
682
min
585
5
594
568
595
50
510
710
545
750
21
Le dimensioni sono in millimetri
7
Page 10

IT
min 5
MOD. 90x48
480
min
50
510
860
849
477
472
893
517
538
5
min
475
min
860
50
510
min
5
472
517
538
849
477
893
Le dimensioni sono in millimetri
8
Page 11
MOD. 90x60
min 5
IT
595
50
510
860
826
594
563
895
530
551
min 5
595
860
50
510
min 5
563
530
551
826
594
895
Le dimensioni sono in millimetri
9
Page 12
IT
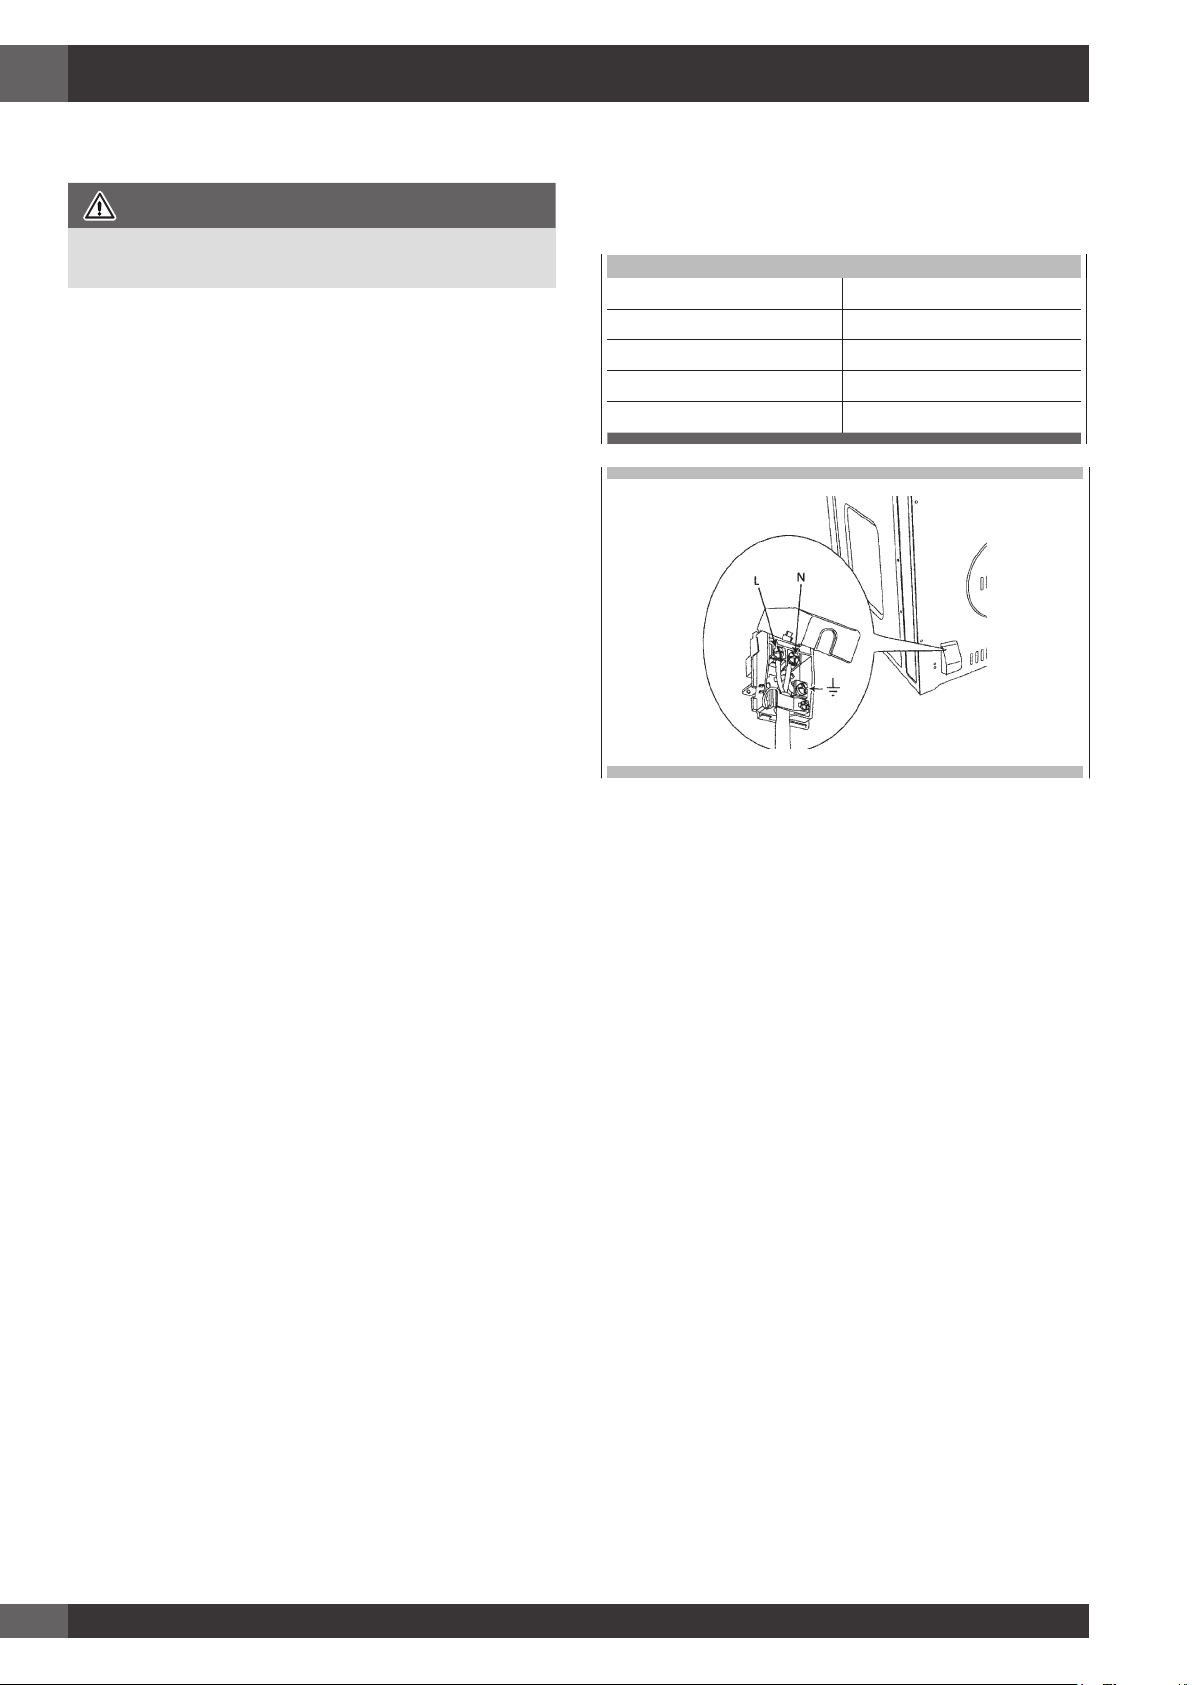
Collegamento alla rete elettrica
ATTENZIONE
L’apparecchio deve essere collegato alla messa a terra.
Il forno è solo per uso domestico.
La tensione di alimentazione e la potenza assorbita sono indicate
sulla targhetta identificativa posta sul montante sinistro, visibile a porta
aperta.
Il collegamento deve essere eseguito da personale qualificato e
conformemente alle normative in vigore.
La mancata osservanza solleva il costruttore da qualsivoglia
responsabilità per eventuali danni a persone o cose.
Se il cavo di alimentazione è danneggiato, deve essere sostituito dal
costruttore, un suo tecnico o da una persona altrettanto qualificata al
fine di evitare rischi.
Il forno deve essere collegato alla rete elettrica tramite un disgiuntone
multipolare avente una distanza d’apertura dei contatti di almeno 3
mm accertandosi però che non venga interrotto il conduttore di messa
a terra. Per il collegamento usare un cavo flessibile ricordandosi di
lasciarlo sufficientemente lungo per consentire l’estrazione del forno
dal vano d’incasso qualora sia necessaria manutenzione.
Tale dispositivo deve essere provvisto di alimentazione elettrica in
conformità alle normative
in materia di installazioni elettriche.
La presa o interruttore devono essere facilmente accessibili a forno
installato.
TIPI DI CAVO E DIAMETRI MINIMI
SASO
H05RR-F 3x1,5 mm² H05RR-F 3x2,5 mm²
H05VV-F 3x1,5 mm² H05VV-F 3x2,5 mm²
H05RN-F 3x1,5 mm² H05RN-F 3x2,5 mm²
H05V2V2-F 3x1,5 mm² H05V2V2-F 3x2,5 mm²
10
Page 13
Primo utilizzo del forno
Pulire accuratamente il forno con acqua saponata e sciacquare bene.
Far funzionare il forno per circa 30 minuti alla massima temperatura
per bruciare tutte le tracce di
grasso che potrebbero altrimenti creare odori sgradevoli durante la
cottura.
ATTENZIONE
Non usare mai fogli di alluminio per coprire le griglie del forno o
per rivestire il forno. Ciò può danneggiare il rivestimento del forno
qualora il calore venga trattenuto sotto il foglio.
ATTENZIONE
Assicurarsi di non forzare la griglia per evitare di danneggiare lo
smalto.
4 - Istruzioni per l’Uso
IT
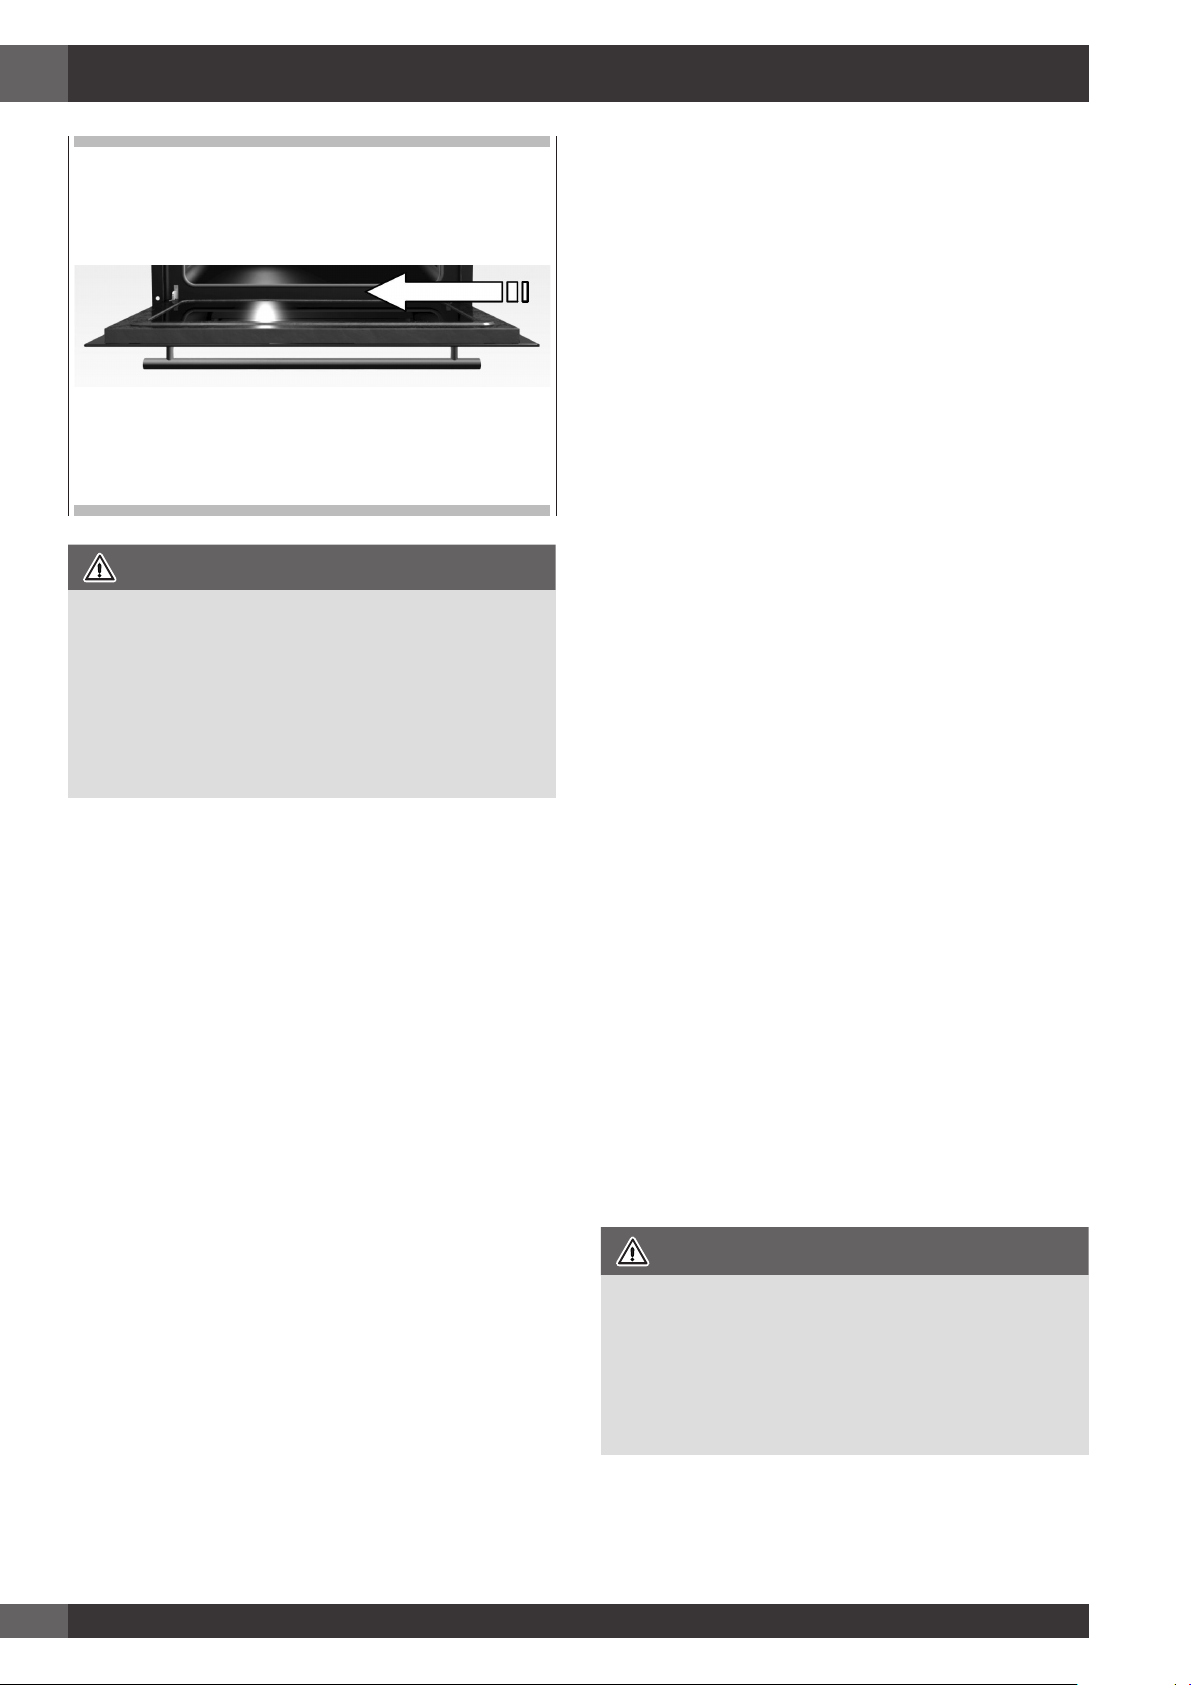
Guide Estraibili (se presenti)
Per rimuovere i telai laterali dai forni a pareti lisce, procedere come
mostrato in figura.
11
Page 14
IT
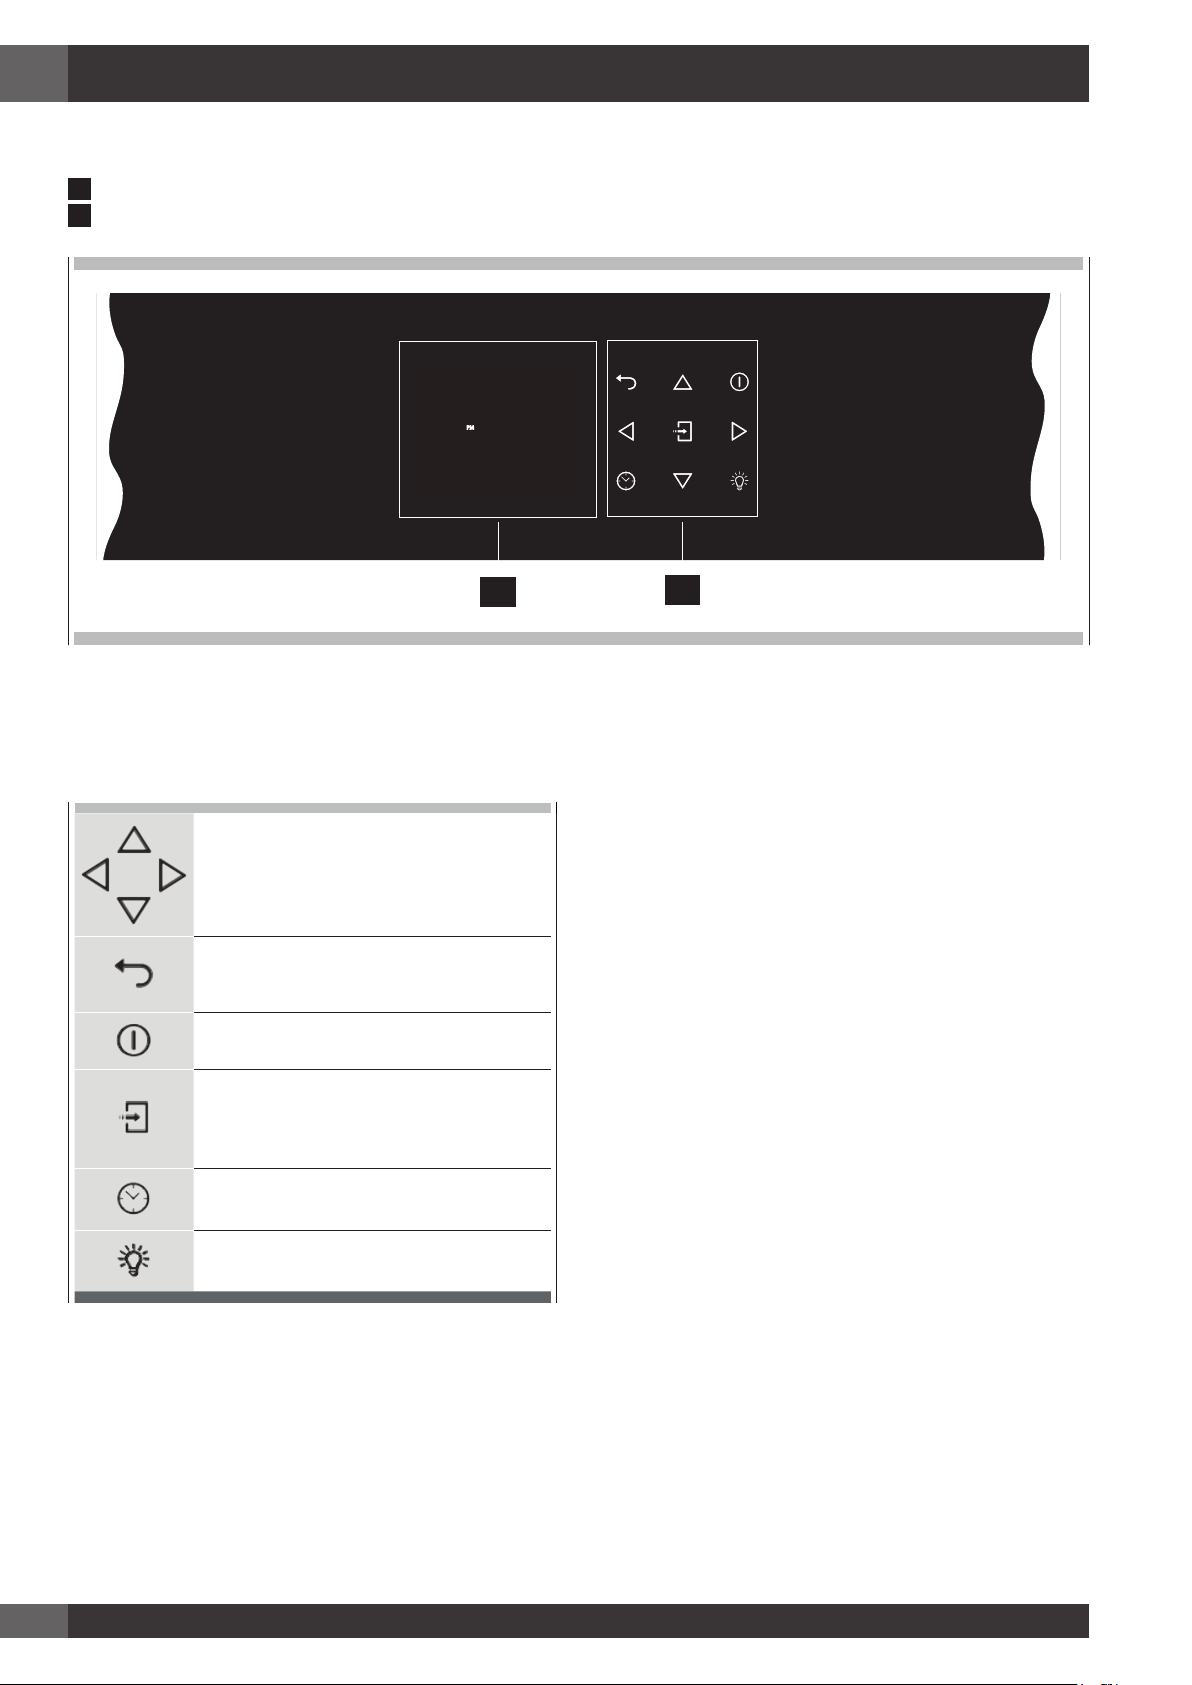
5 - Pannello di controllo
Il vostro elettrodomestico potrebbe differire leggermente dalle illustrazioni sottostanti.
A
- Tastiera
B
- Schermo display
VENERDÌ 11/20/2015
PM
04:26
B
Tastiera
Per far funzionare i tasti, premere delicatamente. La tastiera non
funziona se più tasti vengono premuti contemporaneamente.
Frecce di spostamento
Ritornare alla schermata del display precedente
Tenere premuto per tornare alla Schermata
principale
Accendere e spegnere il forno
Conferma le impostazioni ed avvia le
operazioni di cottura. Quando premuto durante
un'operazione di cottura, la funzione viene messa
in pausa. Premere nuovamente per riavviare.
A
12
Per impostare il timer.
Accedere al menù funzioni durante la cottura.
Accendere e spegnere la luce interna del forno.
Page 15
6 - Informazioni Generali Forno
Prima di utilizzare il forno per la prima volta rimuovere tutto l'imballaggio e corpi estranei dal forno(i). Qualunque materiale di questo tipo lasciato
all'interno potrebbe fondersi o bruciare durante l'utilizzo dell'elettrodomestico.
IT
Codici errore
Questo codice appare in caso il controllo elettrico indichi un guasto.
Quando appare l'errore, la funzione corrente viene bloccata. Se il
tipo di errore è relativo ad una funzione di sicurezza, il forno diventa
inutilizzabile e ogni qualvolta si tenti di avviarlo, appare lo stesso errore
(nel cui caso chiamare l'assistenza post-vendita), mentre se l'errore
riguarda un guasto minore, dopo averlo riavviato, il forno può essere
utilizzato per le funzioni che non includono la parte danneggiata (ad
es. un elemento riscaldante).
Segnali acustici
Conferma che il comando è stato ricevuto a seguito della pressione
di un tasto.
Indica inoltre che una funzione a tempo è stata completata (ad es.
Timer o Cottura a Tempo). Durante l'esecuzione di una ricetta, un
segnale acustico avverte l'utente che il forno è in attesa di istruzioni da
parte dell'utente (ad es. inserire il piatto o girarlo).
I segnali acustici segnalano inoltre un guasto del forno.
Impostazioni Predefinite
Le modalità di cottura selezionano automaticamente una temperatura
adatta; quando necessario, questa può essere cambiata.
Numero Codici Guasti
Preriscaldamento e Preriscaldamento Rapido
Ogni qualvolta viene impostata una modalità cottura e il forno si
riscalda, si avvia il preriscaldamento; durante tale periodo, viene
mostrata la temperatura corrente insieme all'icona del termometro.
Non appena raggiunge il 100%, il controllo emette un suono di "fine
del preriscaldamento" e il valore della temperatura corrente scompare.
Quando è necessario riscaldare il forno rapidamente, è disponibile
una modalità di Preriscaldamento Rapido; essa utilizza gli elementi
riscaldanti e la ventola di convezione in una maniera specifica al fine
di ridurre il più possibile il tempo di riscaldamento.
Dopo aver impostato una delle funzioni di cottura per cui è disponibile
il preriscaldamento e aver impostato il valore della temperatura
desiderata, toccare il tasto , dopo essere entrato nel menù funzioni,
selezionare l'icona
testo
.
Non appena viene raggiunta la temperatura impostata, il controllo
suona e sia l'"Icona Preriscaldamento Rapido" sia "temperatura
corrente" scompaiono. Il forno passa automaticamente alla modalità
di cottura desiderata precedentemente impostata: inserire le pietanze.
tramite i tasti e confermare tramite il
Timer
ATTENZIONE
Il timer nel vostro forno non accende o spegne l'elettrodomestico; il
suo unico scopo è quello si allertarvi tramite il campanello. Quando
volete spegnere il forno in modo automatico, utilizzare la funzione
fine-della-cottura o cottura ritardata.
Tali codici vengono mostrati quando il controllo elettronico rileva un
problema nel forno o nell'elettronica.
Il codice errore è registrato nel Registro Errori nel Menù impostazioni.
Tale errore può essere comunicato al tecnico dell'assistenza cosicché
lui/lei possa comprendere le possibili cause del problema in anticipo.
NOTA Premere il tasto OFF non reimposta né arresta il timer.
1. Premere il pulsante
le frecce e confermare con il pulsante . Per cambiare la
selezione tra ore e minuti utilizzare le frecce .
2. Il tempo può essere impostato da 1 minuto a 12 ore e 59 minuti
e, quando impostata, il tempo rimanente è sempre visibile nella
barra di stato inferiore fino a che il tempo non finisca o venga
reimpostato.
3. Per cambiare o cancellare il tempo impostato, dovete reimpostare
il timer tenendo premuto il tasto
4. Il formato del timer è solitamente HR MIN, passando a MIN SEC
durante l'ultimo minuto.
5. Quando scade il tempo, il display mostra 00:00 e il campanello
suona per un minuto o fino a che non venga premuto il pulsante
.
e impostare il tempo desiderato utilizzando
per alcuni secondi.
13
Page 16

IT
7 - Suggerimenti Generali Forno
Preriscaldare il Forno
• Preriscaldare il forno quando utilizzate le modalità Cottura Inferiore,
Inferiore Ventilata e Ventilata.
• Utilizzare la modalità di Preriscaldamento Rapido quando si
desidera un tempo minore per preriscaldare il forno.
• Selezionare una temperatura maggiore non accorcia il tempo di
preriscaldamento.
• Il preriscaldamento è necessario per buoni risultati quando si
cuociono al forno dolci, biscotti, pasticcini e pane.
• Preriscaldare aiuterà a rosolare arrosti e a non disperdere i succhi
della carne.
• Mettere le griglie da forno in posizione prima di preriscaldare.
• Durante il preriscaldamento, la temperatura di cottura selezionata
viene sempre mostrata.
• Un segnale acustico confermerà che il forno è preriscaldato e la
"temperatura rilevata" si spegnerà.
Suggerimenti per il Funzionamento
• Dono posizionare teglie sulla porta del forno aperta.
• Utilizzare le luci interne del forno per vedere le pietanze attraverso
il vetro della porta del forno piuttosto che aprire frequentemente la
porta.
Condensazione e Temperatura Forno
• È normale che una certa quantità di umidità evapori dalle pietanze
durante qualunque processo di cottura. La quantità dipende
dall'umidità contenuta nelle pietanze. L'umidità può condensarsi su
qualunque superficie più fredda rispetto all'interno del forno, ad
esempio il pannello di controllo.
• Il vostro nuovo forno ha un sensore di temperatura elettronico
che permette di mantenere una temperatura accurata. Il vostro
precedente forno può aver avuto un termostato meccanico che si
spostava gradualmente nel tempo verso una più alta temperatura. È
normale che possiate avere la necessità di adattare le vostre ricette
quando cucinate in un nuovo forno.
Cottura al Forno ad Alta Quota
• Quando si cucina ad altitudini elevate, le ricette e i tempi di cottura
variano.
Utensili
• I piatti da forno in vetro assorbono calore. Ridurre la temperatura
del forno di 25°F (15°C) quando si cuoce su vetro.
• Utilizzare teglie che conferiscano la doratura desiderata. Il tipo di
finitura della teglia aiuterà a determinare il grado di doratura che
conferirà.
• Teglie lucide, di metallo liscio o leggermente antiaderenti /
anodizzate riflettono il calore, conferendo una doratura più leggera
e delicata. Dolci e biscotti richiedono questo tipo di utensili.
• Teglie scure, ruvide o opache assorbiranno il calore, rendendo la
crosta più dorata e croccante. Utilizzare questo tipo per le torte.
• Per croste scure e croccanti, utilizzare utensili di metallo scuro antiaderenti / anodizzati o scuro, opaco o articoli da forno in vetro.
Teglie da forno coibentate possono allungare il tempo di cottura.
• Non utilizzare le funzioni di cottura con la teglia vuota in forno, in
quanto ciò potrebbe cambiare le prestazioni di cottura.
• Conservare la teglia per grigliare fuori dal forno.
14
Page 17
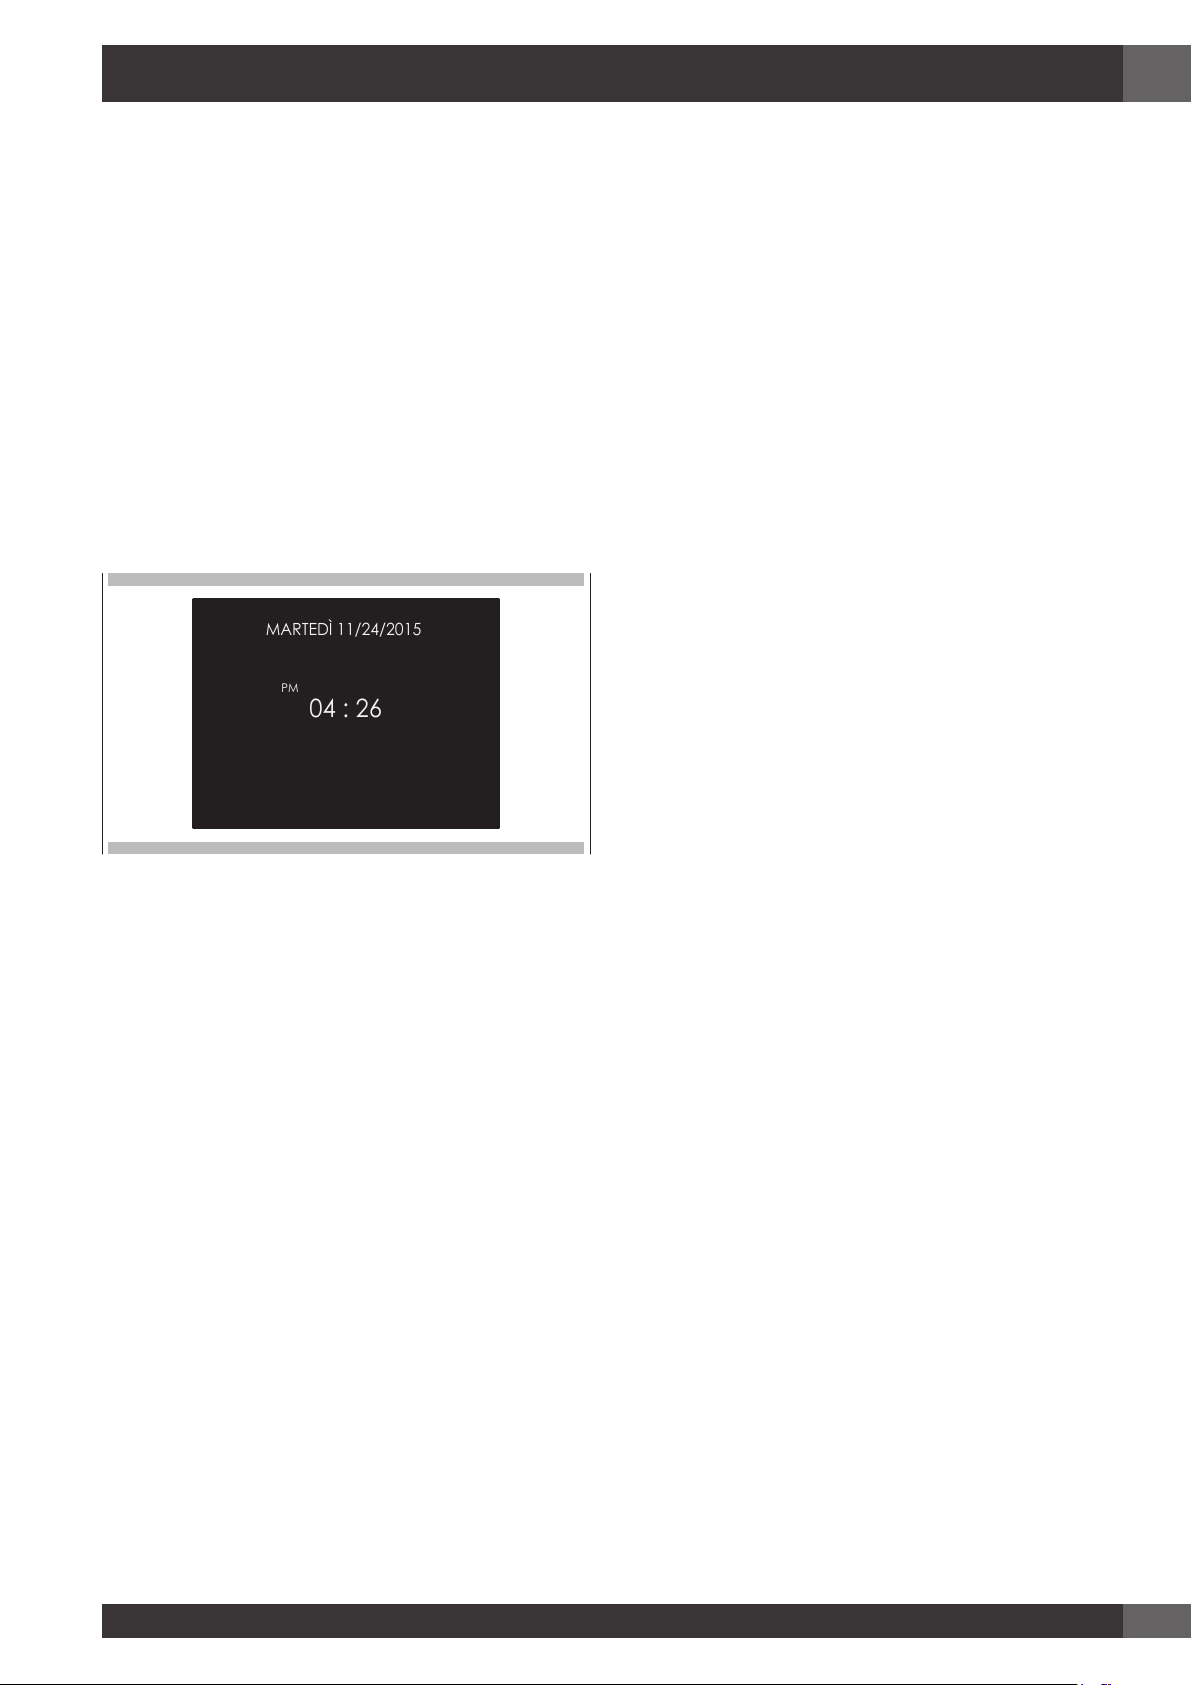
Istruzioni per l'accensione iniziale
04 : 26
PM
MARTEDÌ 11/24/2015
Una volta che il forno è stato collegato alla corrente elettrica per la
prima volta, il controllo si prepara automaticamente per impostare una
serie di impostazioni utente, che rimangono immagazzinate in caso di
successive accensioni.
• Lingua
• Temperatura e Peso
• Ora
• Data
Fare riferimento al paragrafo IMPOSTAZIONI UTENTE per le istruzioni
di impostazione.
Dopo aver effettuato le impostazioni utente, il controllo si sposta
automaticamente alla schermata "Standby" del display.
8 - Introduzione
IT
15
Page 18
IT
IMPOSTAZIONE
IMPOSTAZIONI
12
yk
abc
IMPOSTAZIONE
LINGUA
°F
°ClbKg
12h
24h
AM
PM
04 : 26
PM
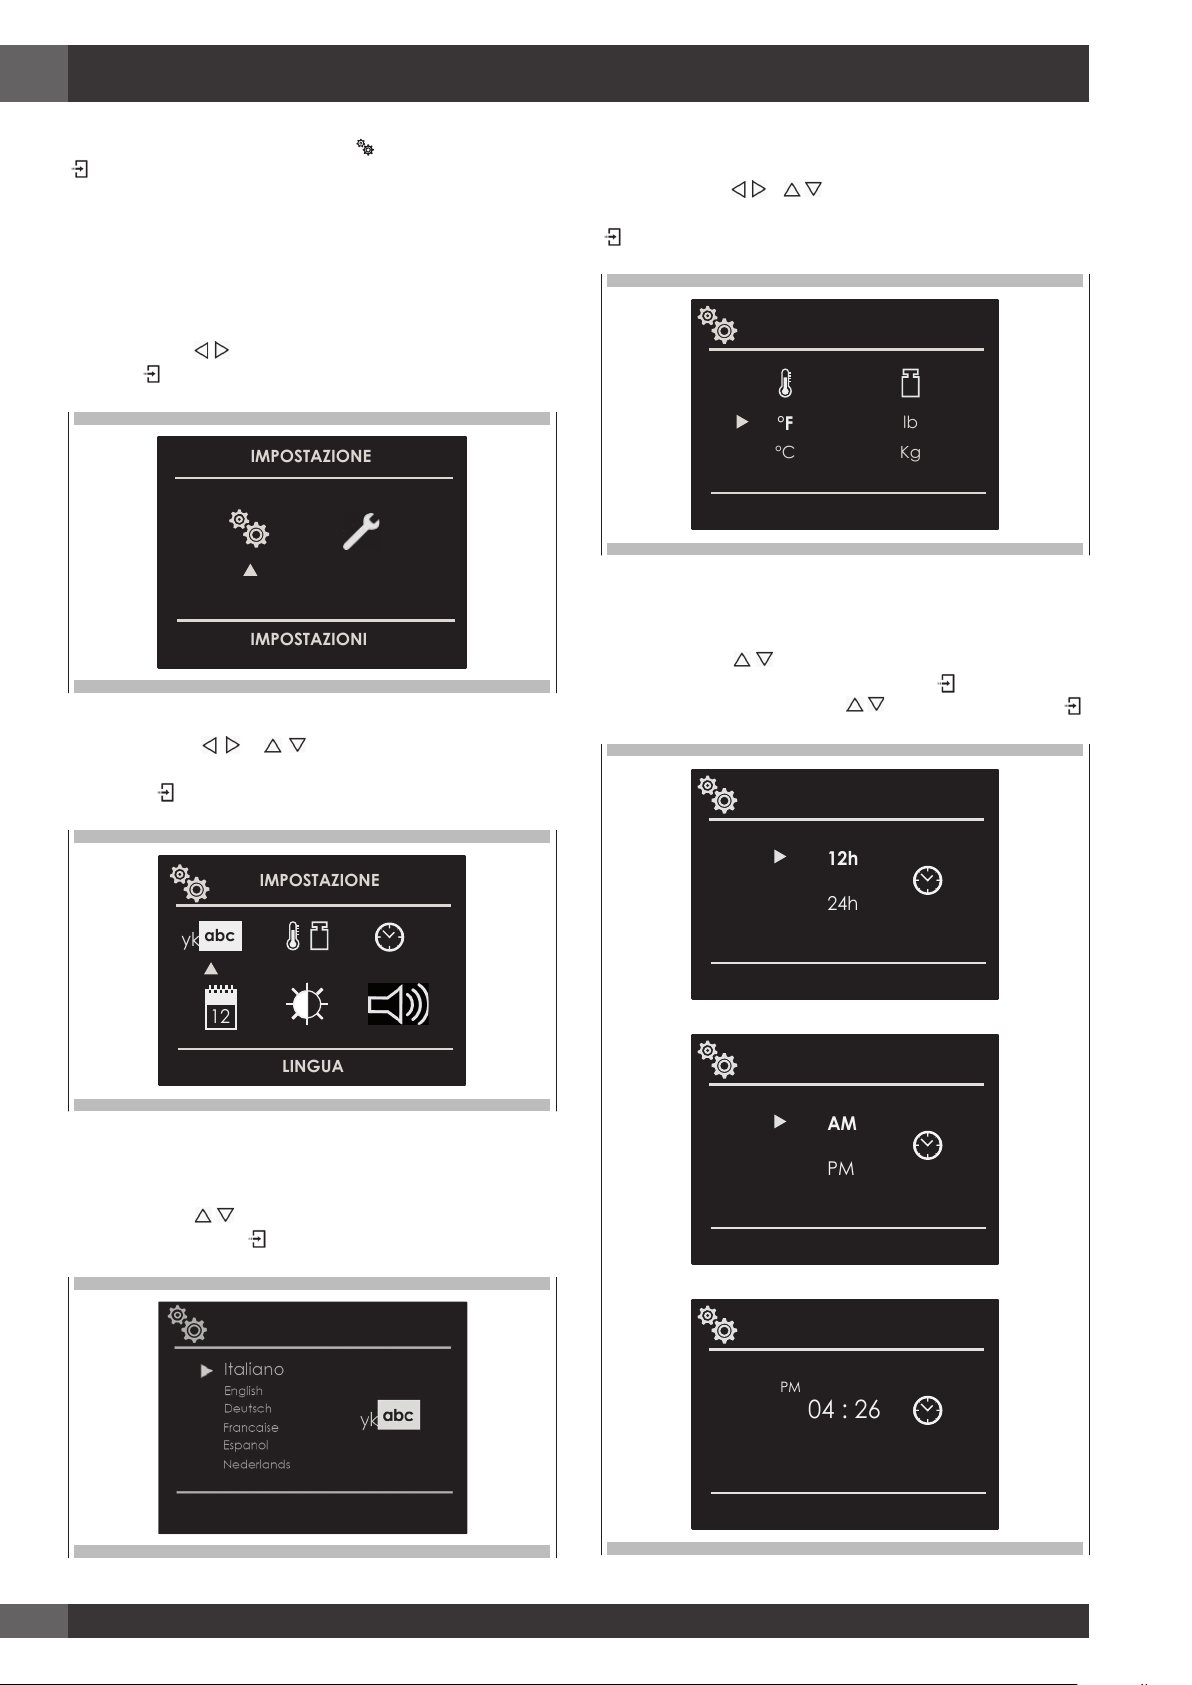
9 - Impostazioni Utente
Con il forno acceso, selezionare l'icona e confermare con il tasto
per accedere al menù IMPOSTAZIONI. Tale menù permette di
personalizzare le impostazioni del vostro forno. Per accedervi, non
devono essere in corso cotture né funzioni a tempo.
NOTA Il Menù impostazioni non può mai essere impostato se una
qualunque funzione a tempo è già impostata: cancellare
prima qualunque funzione a tempo attiva.
1. Premere i tasti per selezionare il sottomenù e confermare con
il tasto
2. Utilizzare il presente menù per cambiare le seguenti impostazioni:
Premere i tasti o per selezionare le impostazioni o
cambiare un sottomenù tra i sei disponibili e confermare per mezzo
del tasto .
.
Temperatura e Peso
Premere la freccia e per selezionare una delle due opzioni
temperatura “°C/°F” o opzioni peso Kg/lb e confermare con il tasto
.
Ora
Premere la freccia per selezionare il formato ora tra le opzioni
"12h AM/PM o 24h” e confermare con il tasto
impostare l'ora premendo le frecce e confermare con il tasto .
. Successivamente,
Lingua
Premere la freccia per selezionare la lingua tra quelle disponibili
e confermare con il tasto .
16
Page 19
IT
12
D.M.Y.
Y.M.D.
M.D.Y.
12
11/20/2015
ON
STAND-BY
BASSO
MEDIO
ALTO
BUIO
MEDIO
ALTO
LIVELLO
BASSO
MEDIO
ALTO
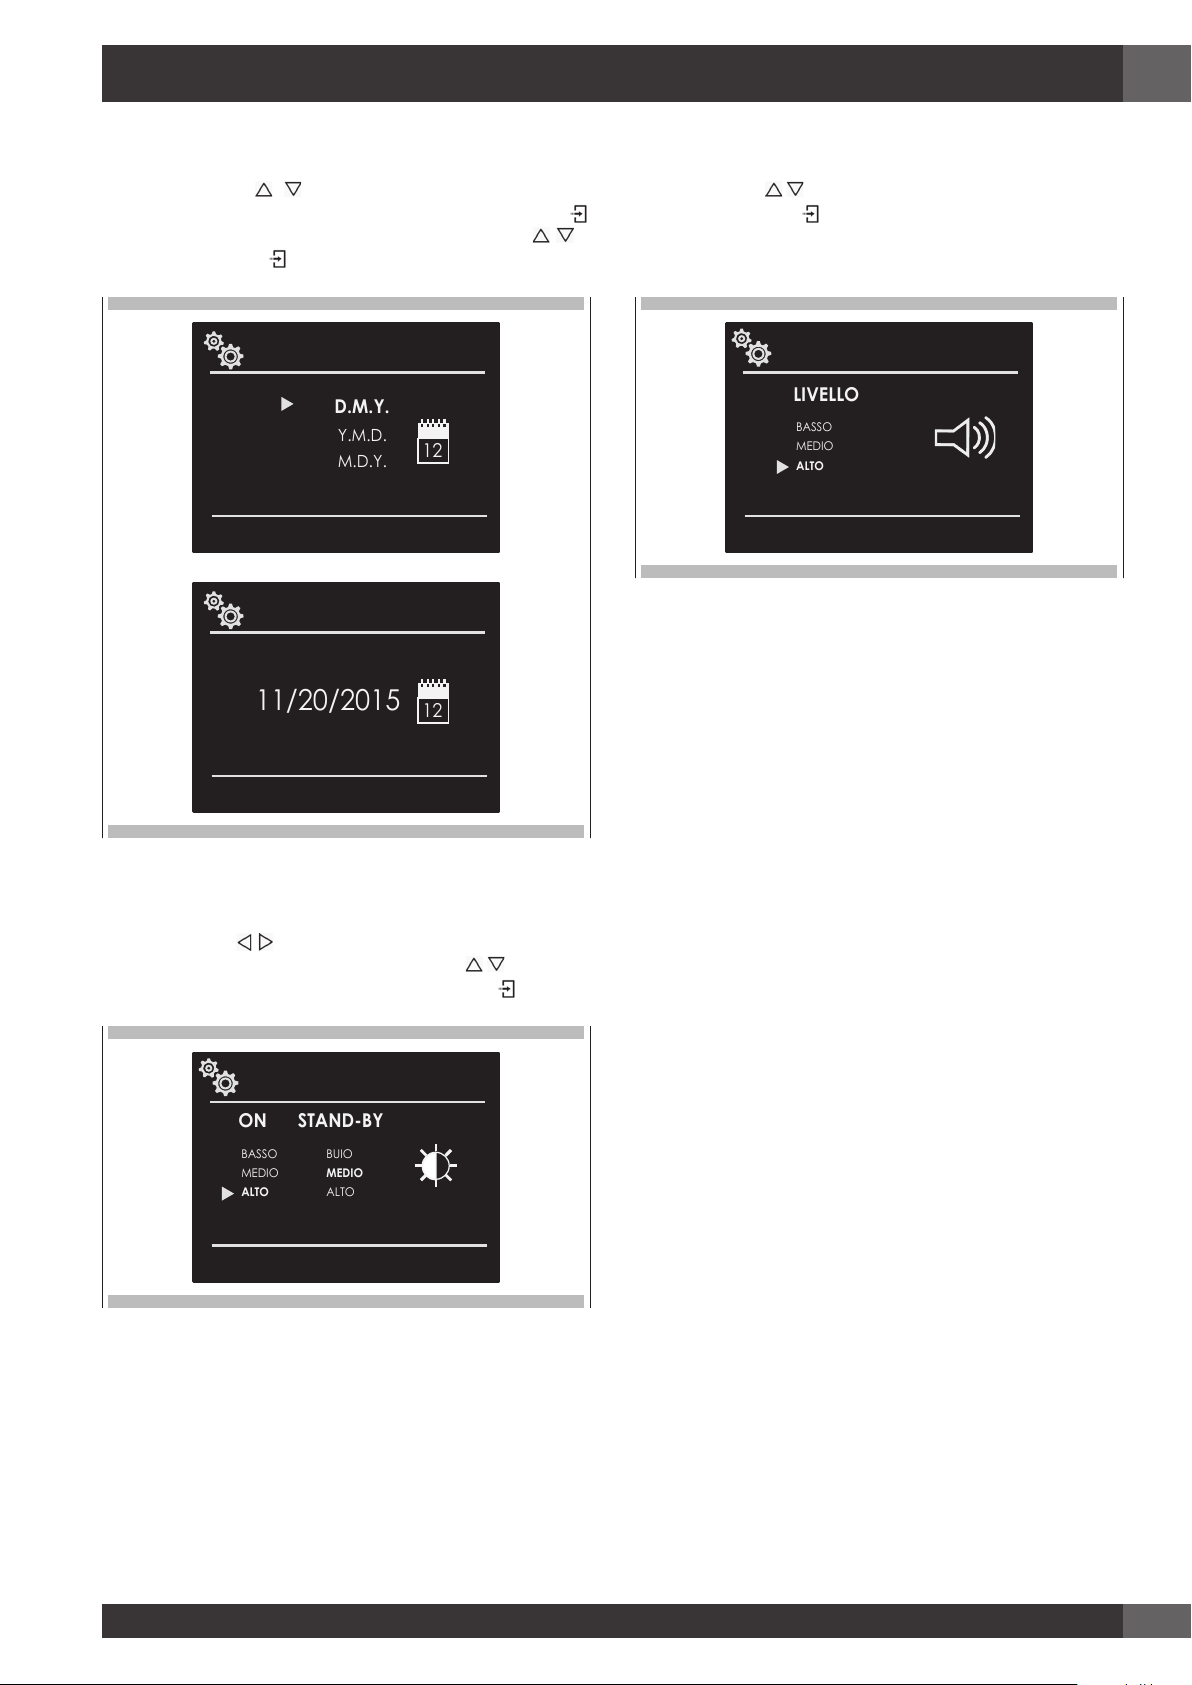
Data
Premere la freccia per selezionare il formato data tra
l'opzione "D.M.Y. – Y.M.D. - M.D.Y." e confermare con il tasto
. Successivamente, impostare il valore premendo le frecce e
confermare con il tasto .
Volume
Premere la freccia per selezionare il grado di volume richiesto e
confermare con il tasto .
Luminosità
Premere la freccia per scegliere quale impostazione luminosità
cambiare tra ON o STANDBY, poi tramite le frecce
il grado di luminosità richiesto e confermare con il tasto .
selezionare
17
Page 20
IT
IMPOSTAZIONE
SERVICE
SISTEMA
REGISTRO EVENTI
TENSIONE DI RETE
DEMO
OM 15
01 12/11/2015 07:06 CODE: F10305
REGISTRO EVENTI
02 17/11/2015 13:17 CODE: F10305
DEMO
ON
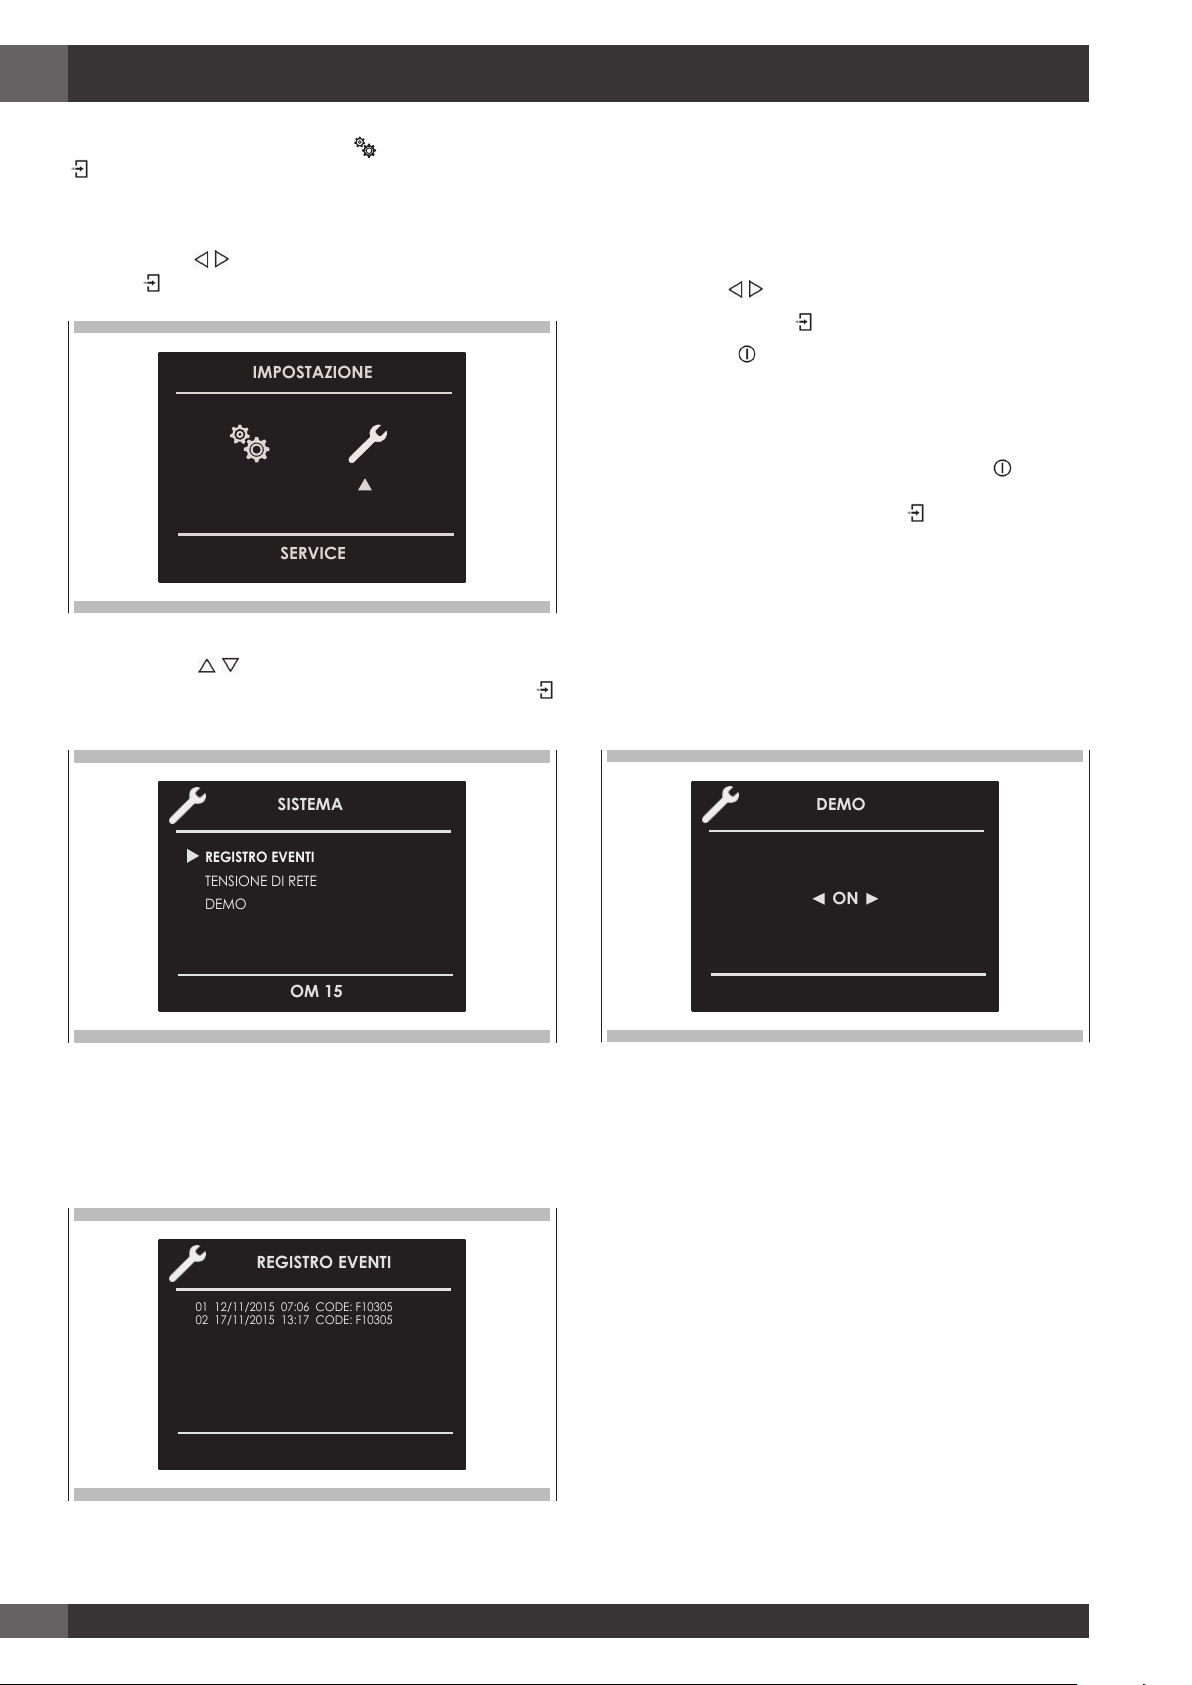
10 - Impostazioni di Sistema
Con il forno acceso, selezionare l'icona e confermare con il tasto
per accedere al menù IMPOSTAZIONI. Tale menù permette di
impostare una serie di parametri o funzioni speciali. Permette inoltre
di accedere alla lista eventi errore.
1. Premere i tasti per selezionare il sottomenù e confermare con
il tasto .
2. Utilizzare il presente menù per cambiare le seguenti impostazioni:
Premere i tasti per selezionare la voce da impostare o da
mostrare sul display dai tre disponibili e confermare con il tasto
.
Demo
Lo scopo di tale funzione è quello di impostare la modalità DEMO che
rende il forno inutilizzabile per cucinare ma esegue una dimostrazione
delle funzioni in automatico.
1. Premere i tasti
2. Confermare con il tasto
3. Premere il tasto
Dopo circa 30 secondi il forno inizia a funzionare in tale modalità.
Per arrestare momentaneamente la funzione DEMO, tenere
semplicemente premuto qualunque tasto per pochi secondi fino a che
il forno vada in standby. Per riavviarla, premere il tasto .
Per disabilitare la funzione, accedere alla schermata DEMO e
impostarla su OFF. Confermare con il tasto .
NOTA Una volta impostata, la funzione rimane abilitata anche se il
forno è disconnesso dall'alimentazione elettrica.
per selezionare la voce ON.
.
.
Registro Eventi
Il menù permette di controllare qualunque errore registrato. Tali codici
possono essere notificati al servizio di assistenza post-vendita.
18
Page 21
11 - Avviare il Forno
IT
Accendere e spegnere il forno
IMPORTANTE
• Il tasto non arresta la funzione.
• Dopo aver spento il forno, la ventola di raffreddamento continua
a funzionare fino a che le parti interne del forno non si siano
raffreddate.
Premere
spegnerlo. Il forno torna in modalità standby.
per accendere il forno e premere nuovamente per
Selezionare la modalità di cottura
IMPORTANTE
• Non lasciare la porta aperta per lungo tempo durante la cottura.
• La porta deve essere tenuta chiusa durante le funzioni di
COTTURA ALLA GRIGLIA.
• Posizionare il grill o i grill sul livello appropriato.
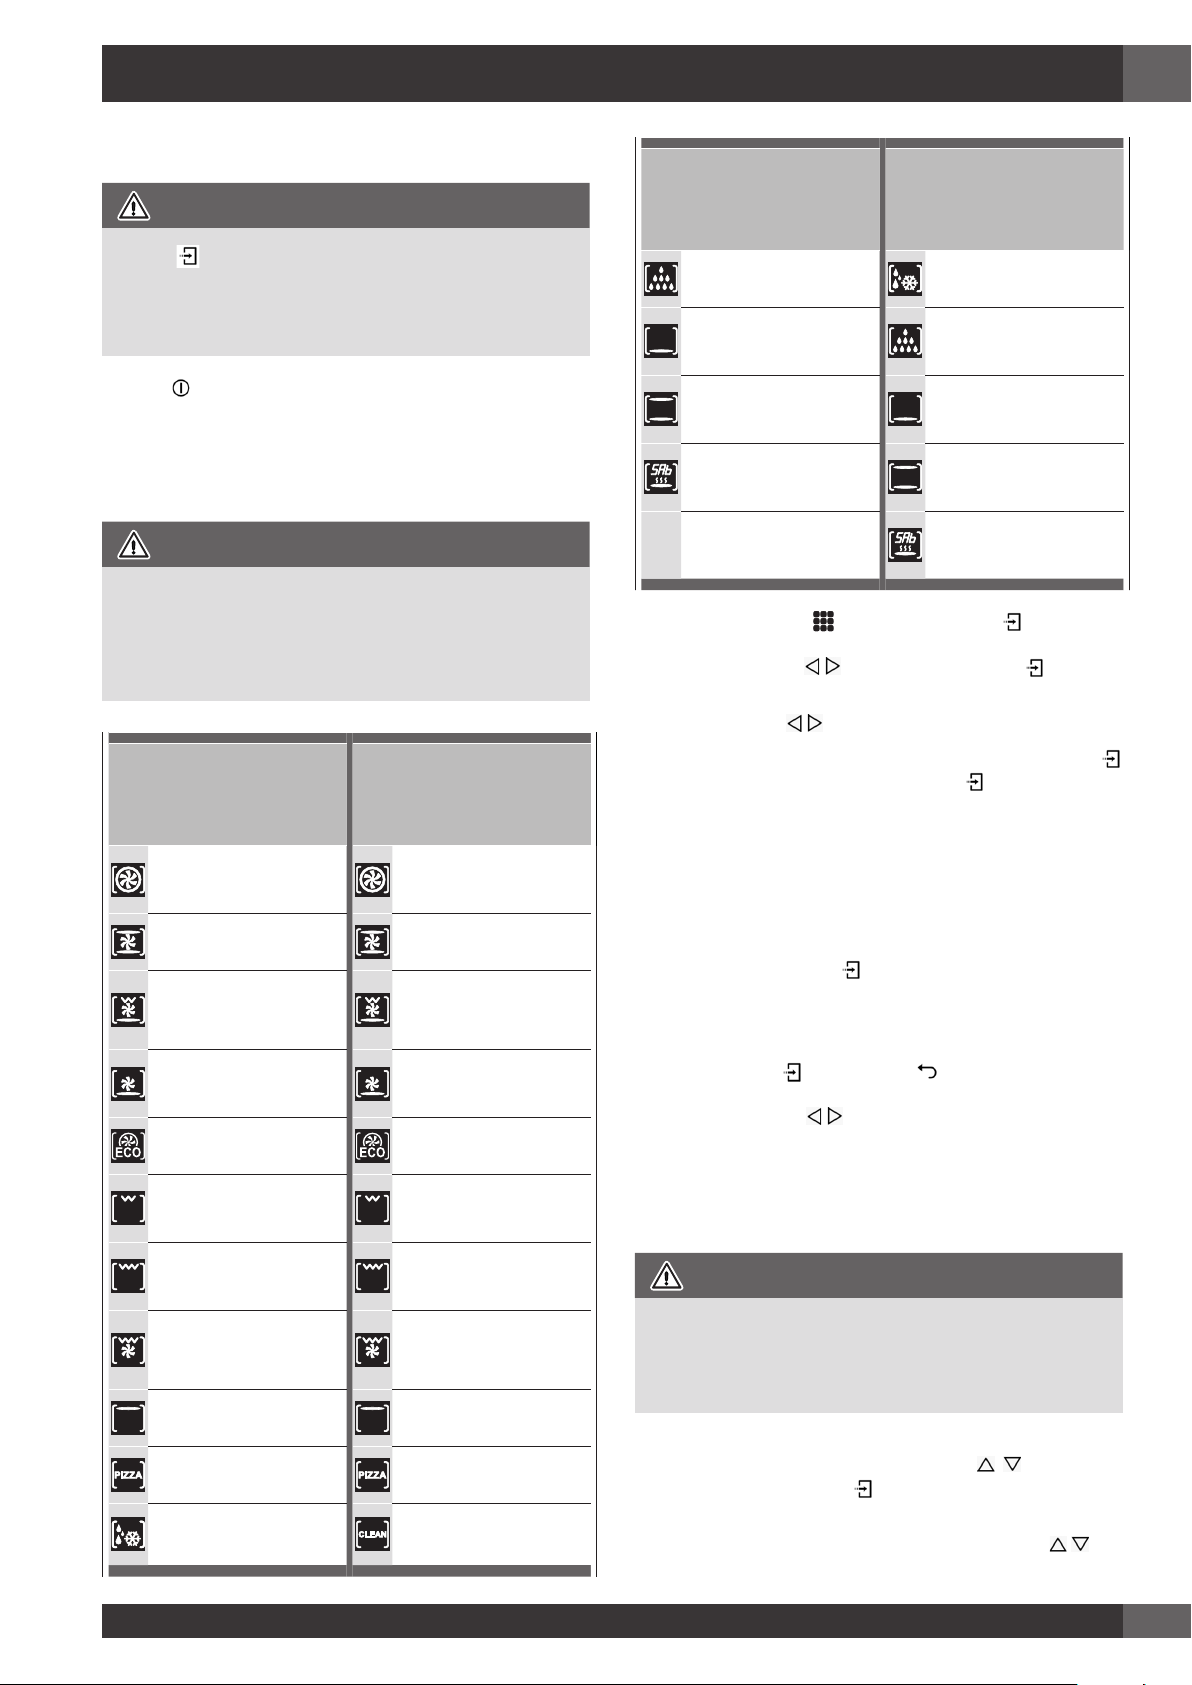
FORNO 45 cm
FORNO
75 cm
90x48 cm
90X60 cm
60 cm
FORNO 45 cm
DISIDRATAZIONE SCONGELAMENTO
COTTURA INFERIORE DISIDRATAZIONE
COTTURA COTTURA INFERIORE
SABBATH
Su alcuni modelli
1. Selezionare l'icona
la modalità di cottura adeguata per gli alimenti da cuocere
utilizzando le frecce e confermare con il tasto .
2. Sul display è ancora possibile cambiare la modalità di cottura
utilizzando i tasti
3. Se la temperatura proposta è corretta, confermare con il tasto
per avviare la cottura, altrimenti, se il tasto non viene premuto
entro 10 secondi, il forno cambia in modalità automatica e l'icona
della modalità di cottura diventa animata.
.
FORNO
75 cm
90x48 cm
90X60 cm
e premere il tasto . Selezionare
60 cm
COTTURA
SABBATH
Su alcuni modelli
COTTURA CIRCOLARE
VENTILATA
COTTURA VENTILATA COTTURA VENTILATA
GRILL VENTILATO
INFERIORE
COTTURA VENTILATA
INFERIORE
COTTURA ECO COTTURA ECO
GRILL GRILL
DOPPIO GRILL DOPPIO GRILL
DOPPIO GRILL
VENTILATO
COTTURA SUPERIORE COTTURA SUPERIORE
PIZZA PIZZA
COTTURA CIRCOLARE
VENTILATA
GRILL VENTILATO
INFERIORE
COTTURA VENTILATA
INFERIORE
DOPPIO GRILL
VENTILATO
Cambiare la modalità di cottura
1. Durante la cottura non a tempo, s può impostare una pausa di
cottura premendo il tasto . Tutte le impostazioni della funzione
di cottura impostata si conservano e possono essere riattivate
premendo nuovamente lo stesso tasto.
2. Per cambiare la modalità di cottura mentre il forno è in funzione,
premere il tasto
selezionare un'altra modalità di cottura tra quelle disponibili nella
lista tramite le frecce .
e poi il tasto . A questo punto, si può
Cambiare la temperatura
IMPORTANTE
• In tutte le modalità di cottura in cui la temperatura è fissa, essa no
viene mostrata sullo schermo.
• Alla fine di una funzione, lo schermo mostra la temperatura
residua interna dalla schermata di standby.
1. Dalla schermata di anteprima della modalità di cottura, si può
cambiare la temperatura tramite le frecce
successivamente con il tasto .
confermando
SCONGELAMENTO PULIZIA
2. Una volta che la cottura è iniziata, la temperatura può comunque
essere cambiata in qualsiasi momento, tramite le frecce
.
19
Page 22
IT
12 - Tabella Modalità di Cottura
FORNO 45 cm
MODALITÀ DI COTTURA ICONA
PRERISCALDAMENTO
RAPIDO
SONDA
TERMICA
CARNE
Min.
TEMPERATURA
Preimpostare
Max.
SCONGELAMENTO
DISIDRATAZIONE
COTTURA INFERIORE 50°C 50°C 200°C
COTTURA
COTTURA ECO
COTTURA CIRCOLARE VENTILATA 50°C 165°C 230°C
PIZZA
COTTURA VENTILATA
GRILL VENTILATO INFERIORE
DOPPIO GRILL VENTILATO 50°C 165°C 230°C
*** *** ***
50°C 60°C 70°C
50°C 190°C 230°C
50°C 165°C 230°C
50°C 230°C 230°C
50°C 165°C 230°C
50°C 165°C 230°C
COTTURA VENTILATA INFERIORE
GRILL
DOPPIO GRILL
COTTURA SUPERIORE
SABBATH (se presente)
50°C 165°C 200°C
50°C 230°C 230°C
50°C 230°C 230°C
50°C 180°C 230°C
60°C
20
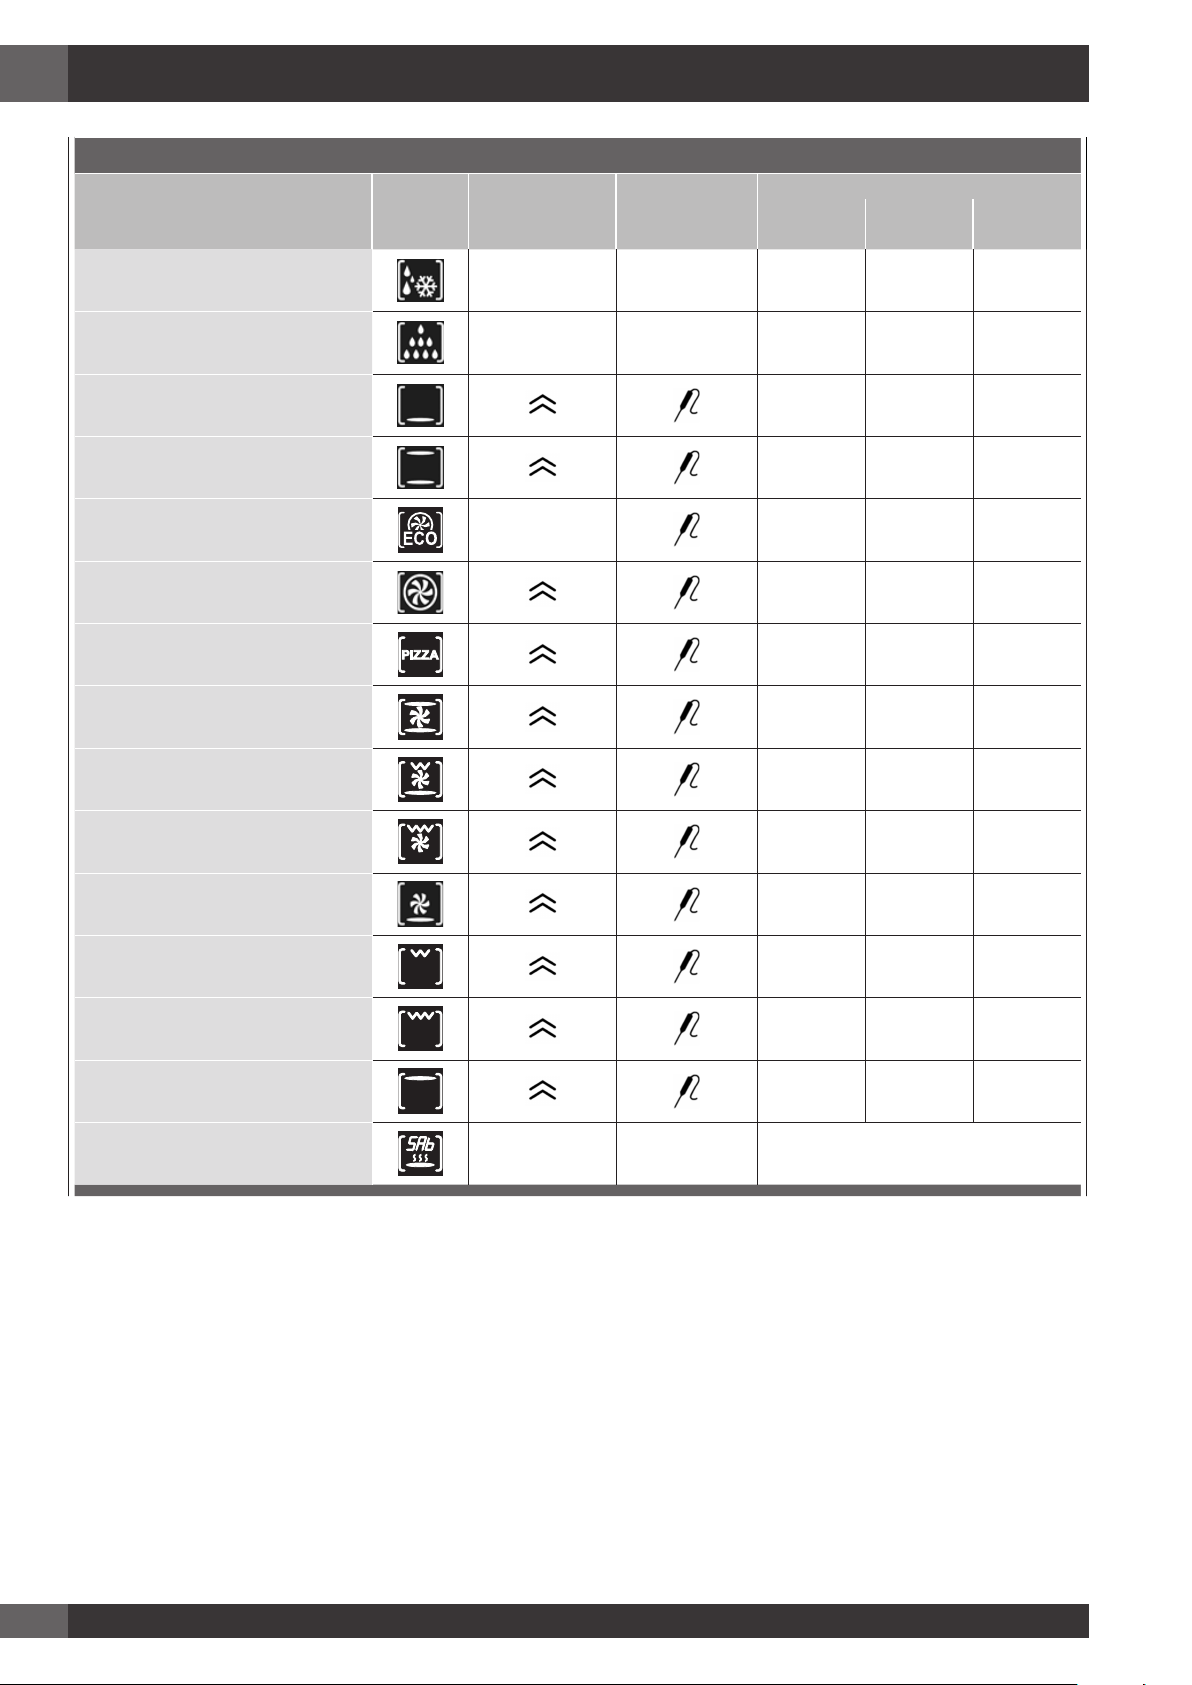
Page 23
FORNO 60 cm - FORNO 75 cm - FORNO 90x48 cm - FORNO 90X60 cm
MODALITÀ DI COTTURA ICONA
PRERISCALDAMENTO
RAPIDO
SONDA
TERMICA
CARNE
Min.
TEMPERATURA
Preimpostare
IT
Max.
SCONGELAMENTO
DISIDRATAZIONE
COTTURA INFERIORE 50°C 50°C 250°C
COTTURA
COTTURA ECO
COTTURA CIRCOLARE VENTILATA 50°C 165°C 250°C
PIZZA
COTTURA VENTILATA
GRILL VENTILATO INFERIORE (*)
DOPPIO GRILL VENTILATO (*) 50°C 165°C 250°C
*** *** ***
50°C 60°C 70°C
50°C 190°C 250°C
50°C 165°C 250°C
50°C 230°C 250°C
50°C 165°C 250°C
50°C 165°C 250°C
COTTURA VENTILATA INFERIORE
GRILL (*)
DOPPIO GRILL (*)
COTTURA SUPERIORE
SABBATH (se presente)
PULIZIA
(*) Alcuni forni possono essere completi di motorino asta e spiedo per cottura al girarrosto.
50°C 165°C 250°C
50°C 230°C 250°C
50°C 230°C 250°C
50°C 180°C 250°C
60°C
250°C
21
Page 24
IT
325°F
275°F
11:00 am
COTTURA CIRCOLARE VENTILATA
++
--
325°F
11:06 am
COTTURA CIRCOLARE VENTILATA
++
--
325°F
11:00 am
COTTURA CIRCOLARE VENTILATA
++
--
325°F
275°F
11:00 am
++
--
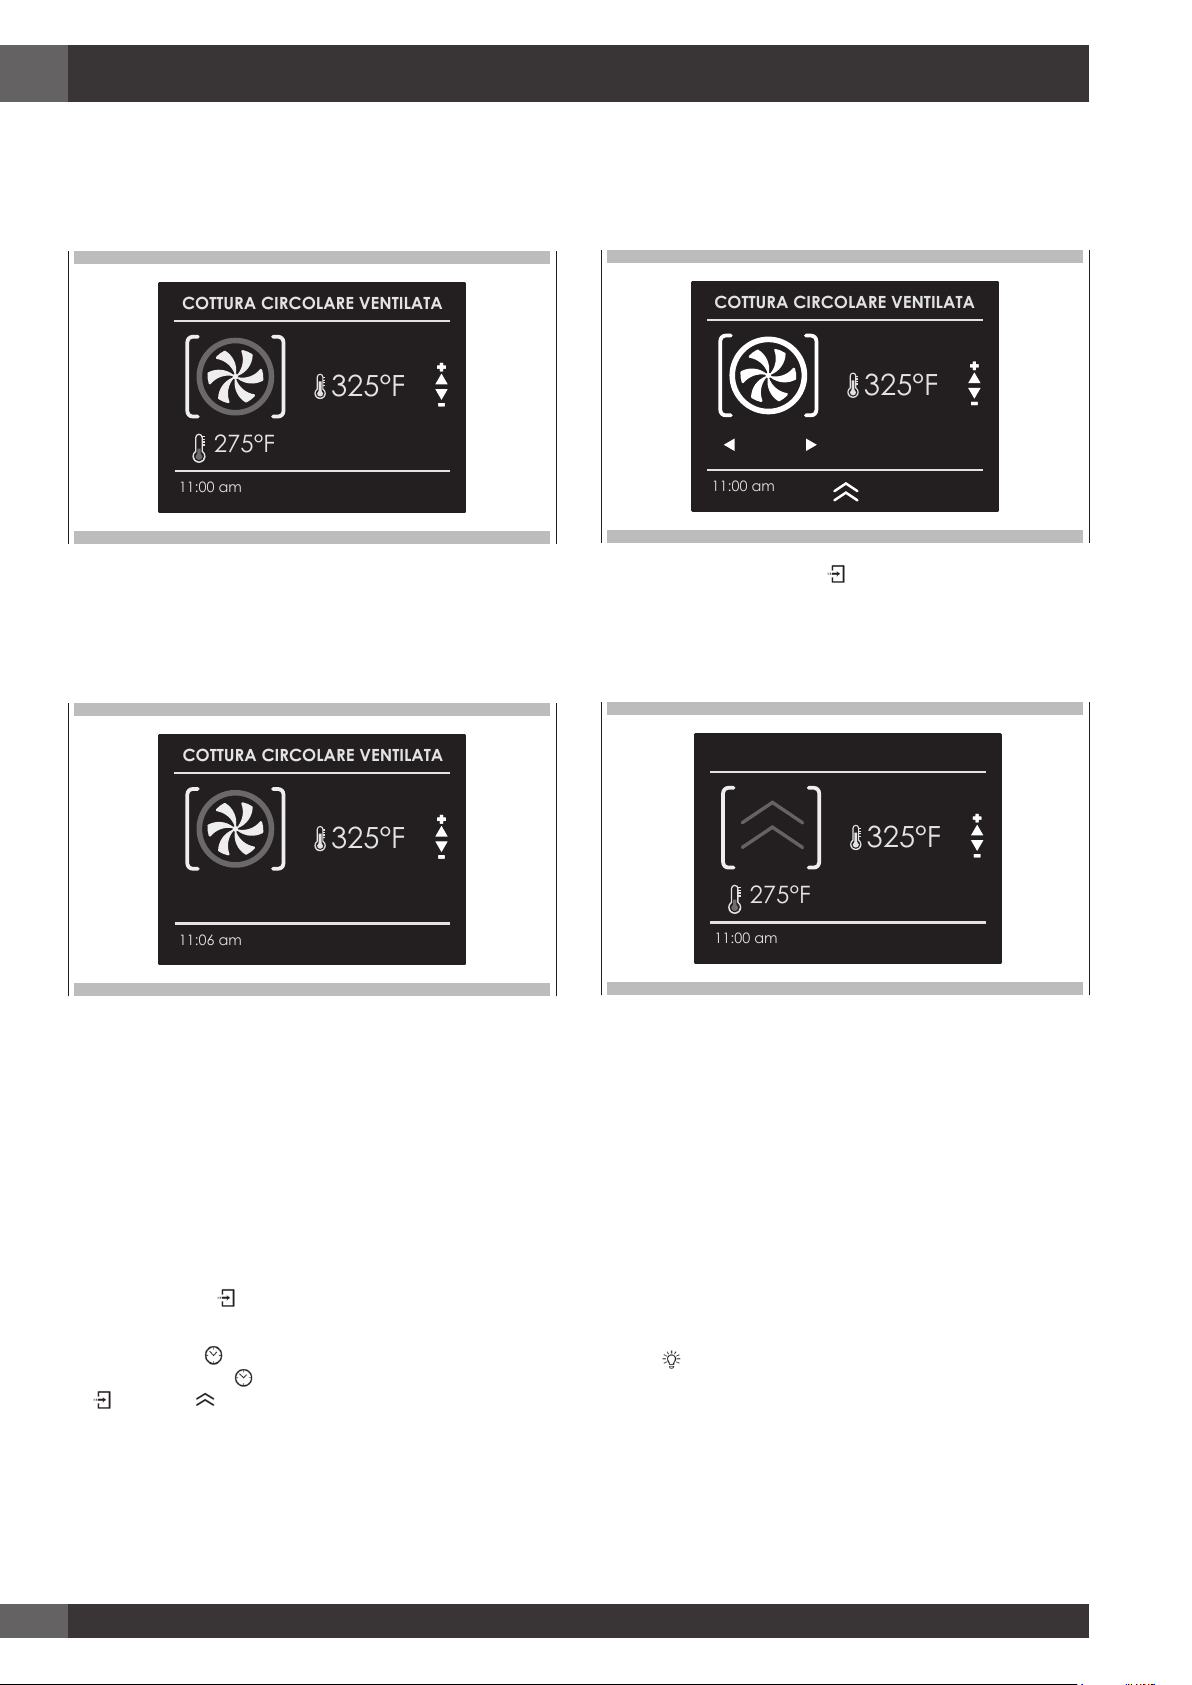
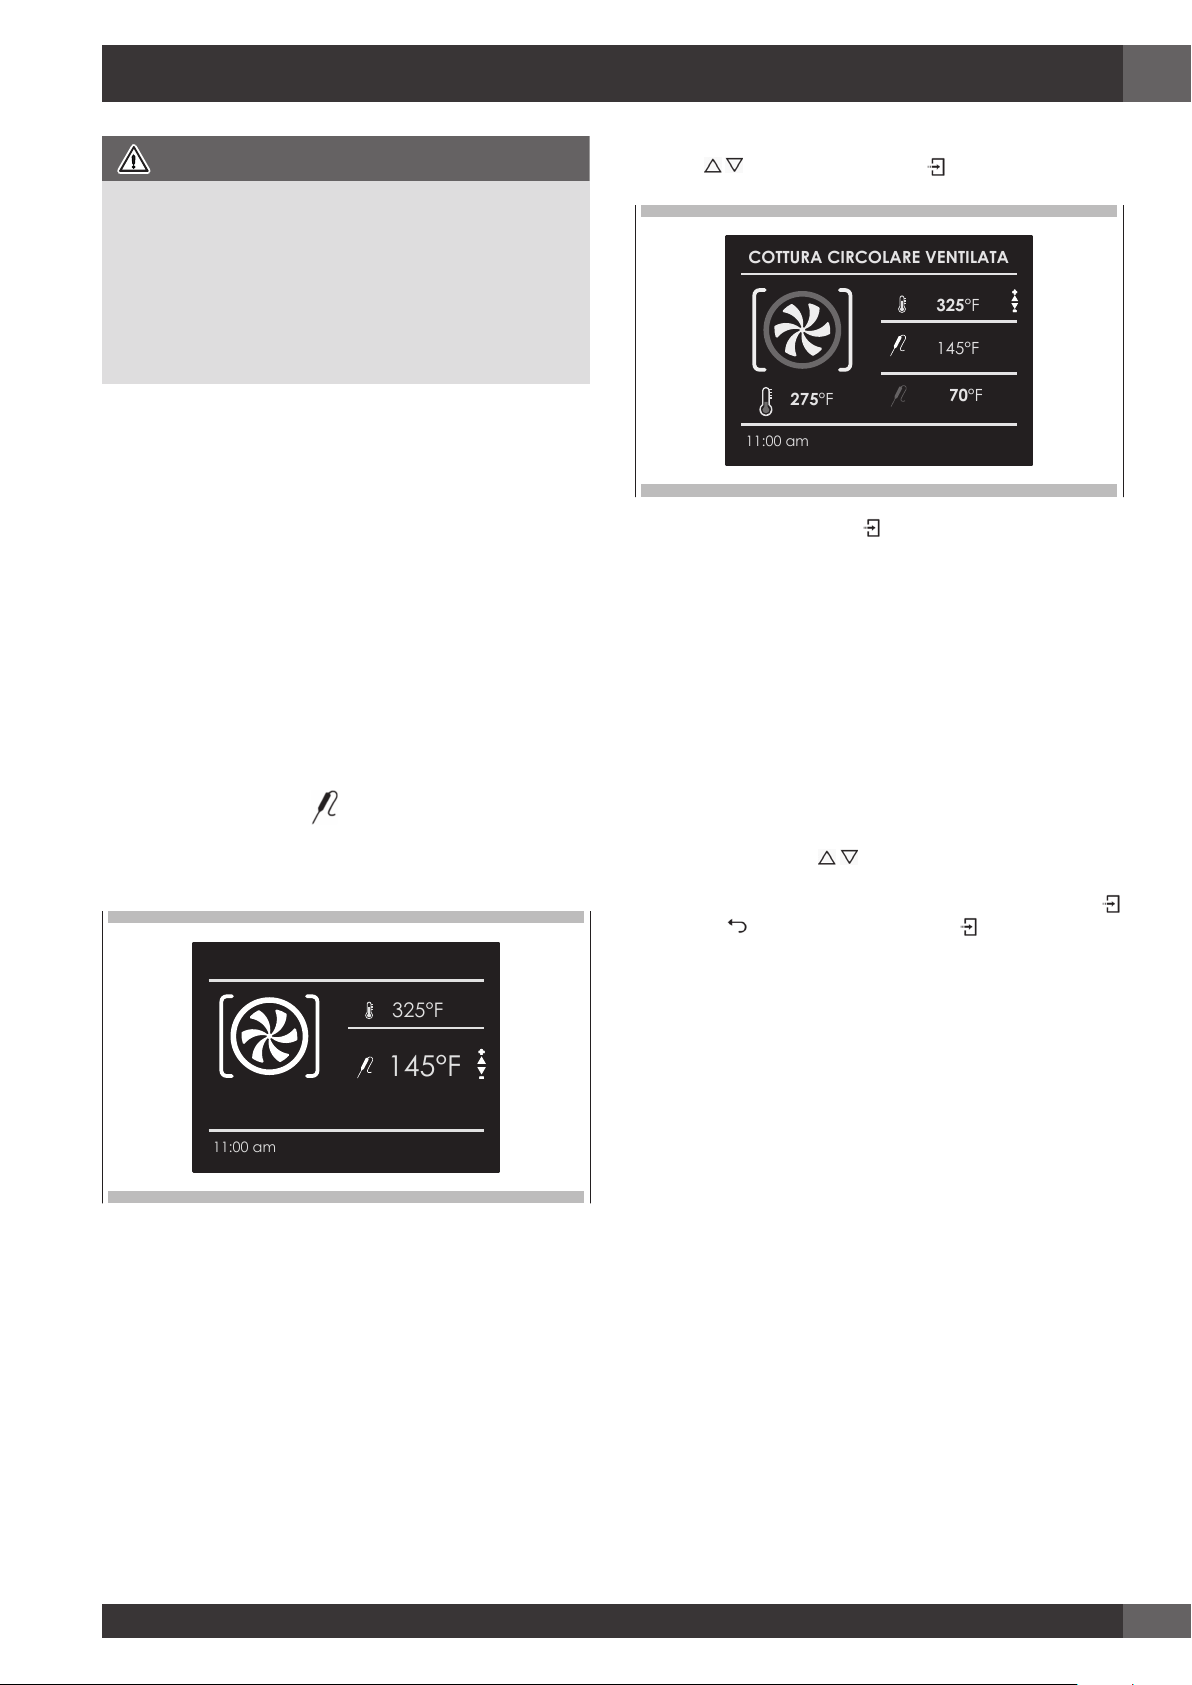
Fase di preriscaldamento
Mentre il forno è in fase di preriscaldamento, la temperatura corrente
viene mostrata sotto l'icona della modalità di cottura.
Non appena viene raggiunta la temperatura impostata, viene emesso
un segnale acustico e la temperatura corrente scompare.
Preriscaldamento Rapido
La funzione PRERISCALDAMENTO RAPIDO permette di raggiungere
la temperatura desiderata più velocemente rispetto al preriscaldamento
standard. La funzione può essere abilitata per tutte le modalità di
cottura nei gruppi COTTURA INFERIORE (ad eccezione di Sabbath e
Eco), VENTILATA e PIZZA.
Per selezionare PRERISCALDAMENTO RAPIDO:
3. Premere nuovamente il tasto per avviare la funzione.
La schermata del display mostra l'icona delle funzioni attive
fino a che non viene raggiunta la temperatura impostata.
Successivamente la funzione passa in automatico alla modalità di
cottura selezionata.
COTTURA CIRCOLARE VENTILATA
Eco
Tale modalità è destinata al risparmio energetico.
Ideale per pietanze surgelate o precotte e per pasti porzionati di
piccole dimensioni. Il tempo di preriscaldamento è molto breve e la
cottura tende ad essere più lenta. Non è raccomandato per carichi
pesanti quali, ad esempio, grandi porzioni o preparazioni di pasti di
grandi dimensioni.
1. Selezionare la modalità di cottura come precedentemente indicato
e premere il tasto per mostrare la schermata di anteprima della
modalità di cottura.
2. Premere il tasto
Selezionare l'icona tramite le frecce e confermare con il tasto
. Il simbolo appare nella parte più in basso dello schermo.
22
.
Utilizzo Luci Forno
Un sono tasto luci le attiva tutte.
Toccare per accendere o spegnere le luci.
Le luci del forno si accendono automaticamente quando la porta è
aperta.
Quando un forno viene utilizzato, le luci si accendono automaticamente
all'avvio di una modalità di cottura.
Le luci del forno si spegneranno automaticamente quando una
modalità di cottura viene cancellata.
NOTA: Una volta accese, le luci si spengono automaticamente dopo
3 minuti. Per riaccenderle premere il tasto o aprire la porta.
Page 25
13 - Funzionamento Forno in Modalità a Tempo
275°F
11:00 am
COTTURA CIRCOLARE VENTILATA
325°F
++
--
FINE
TEMPO
11:50 am
00:50
275°F
11:00 am
COTTURA CIRCOLARE VENTILATA
325°F
++
--
FINE
START
12:30 pm
11:40
Start
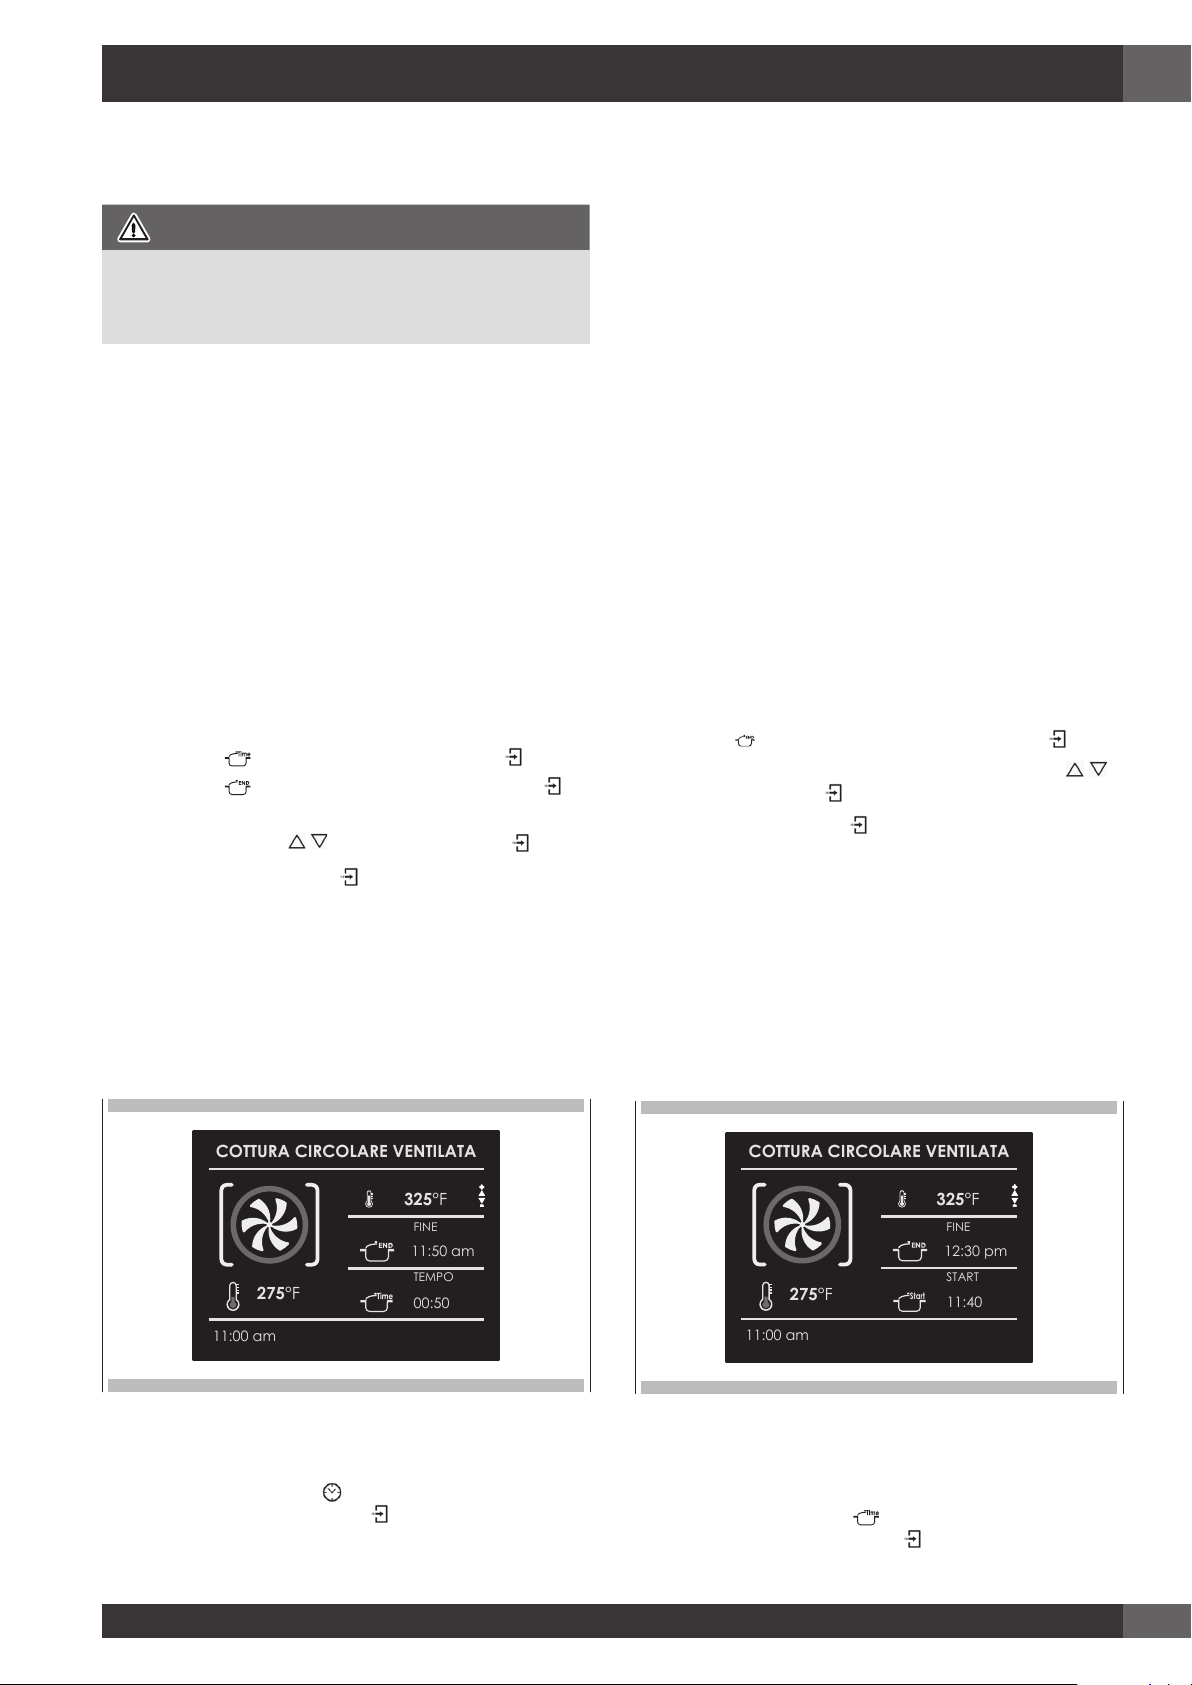
Assicurarsi che data e ora siano impostate correttamente..
La modalità a tempo spegne il forno alla fine del tempo di cottura.
ATTENZIONE
Non lasciare mai pietanze nel forno per più di un'ora prima e dopo
la cottura. Ciò potrebbe causare il deterioramento delle pietanze
stesse.
NOTA Le funzioni a tempo non possono essere utilizzate se la
sonda termica carne è accesa. Il tempo di cottura massimo
che può essere impostato è 12 h.
IT
Tempo di Cottura
Utilizzare la funzione "Tempo di Cottura" per far funzionare il forno
per un determinato periodo di tempo. Il forno si avvia immediatamente
e si spegne automaticamente una volta che il tempo è terminato.
Per Impostare una Modalità a Tempo
1. Selezionare la modalità di cottura e la temperatura.
2. Ci sono due modi di impostare la funzione.
a) Sezionare
b) Sezionare
3. Dopo aver selezionato una delle suddette opzioni, impostare il
tempo tramite le frecce
4. Dopo aver premuto il tasto
informazioni sul tempo di cottura vengono mostrate sulla schermata
del display.
• Modalità di cottura
• Temperatura
• Tempo di cottura
• Fine del tempo di cottura
per impostare la durata e premere .
per impostare l'ora di arresto e premere .
e confermare con il tasto .
, la cottura viene avviata e le
Ora Fine
Utilizzare la funzione "Ora Fine" per ritardare l'avvio della cottura a
tempo. Inserire l'ora di fine cottura e il forno calcolerà in automatico
l'ora di avvio. Il forno si accende e si spegne automaticamente.
Per Ritardare l'Inizio della Modalità a Tempo
1 Prima di tutto impostare il tempo di cottura richiesto come indicato
nel paragrafo "TEMPO DI COTTURA".
2 Sezionare per impostare l'ora di arresto e premere .
3 Impostare l'ora di arresto della cottura tramite le frecce
confermare con il tasto .
4 Dopo aver premuto il tasto
, la funzione viene messa in standby
e i dettagli della cottura posticipata sono mostrati sullo schermo.
• Modalità di cottura
• Temperatura
• Fine cottura
• Avvio cottura
e
5 Dopo la cottura, il forno si spegne ed un segnale acustico avvisa
che la cottura è terminata.
Per cambiare il tempo di cottura quando il forno è già in funzione,
premere semplicemente il tasto e inserire il nuovo tempo di cottura
prima di premere nuovamente il tasto .
• Dopo la cottura, il forno si spegne ed un segnale acustico avvisa
che la cottura è terminata.
Per cambiare il tempo di cottura quando il forno è già in funzione,
premere semplicemente il tasto e inserire il nuovo tempo di cottura
prima di premere nuovamente il tasto .
23
Page 26
IT
14 - Impostazione Sonda Termica Carne (se presente)
Quando vengono cotti arrosti, bistecche o pollame, questo è il modo
migliore per vedere quando la pietanza è adeguatamente cotta.
Questo forno è opzionalmente provvisto della funzione sonda termica
carne per sentire la temperatura interna della carne e arrestare la
cottura non appena viene raggiunto il valore impostato.
Quando viene utilizzata la sonda termica, il forno controlla
automaticamente il tempo di cottura.
NOTA: la sonda termica per alimenti è un accessorio disponibile solo
in alcune versioni del prodotto.
La tenerezza, il gusto ed il sapore sono il risultato di un
controllo preciso e funzionale.
La sonda termica per alimenti è un termometro che, inserito
nella pietanza, permette di controllarne la temperatura
interna e di usarla per stabilire la fine della cottura.
La carne, ad esempio, può sembrare cotta all'esterno, ma
all’interno può essere ancora rosa!
La temperatura raggiunta dalle pietanze durante la cottura è
strettamente connessa con problemi di salute e igiene. I batteri possono
essere contenuti in qualsivoglia tipo di carne, pollame, pesce, così
come nelle uova crude.
Alcuni tipi di batteri fanno deteriorare il cibo, altri, come la Salmonella,
Campylobacter jejuni, Listeria monocytogenes, Escherichia coli e lo
Staphylococcus aureo, possono nuocere gravemente alla salute. I batteri
si moltiplicano molto rapidamente sopra i 4.4º fino a 60ºC. La carne
macinata è particolarmente a rischio da questo punto di vista.
Per evitare la moltiplicazione dei batteri, è necessario prendere le
seguenti misure:
• Non scongelare i cibi a temperatura ambiente, ma sempre in frigo
oppure in forno utilizzando l’apposita funzione. In quest’ultimo caso
cucinare il cibo immediatamente dopo.
• Riempire il pollame poco prima di mangiarlo. Non acquistare mai
pollame ripieno confezionato e comprare il pollame ripieno già
cotto quando si intende mangiarlo entro 2 ore.
• Marinare il cibo in frigo, non a temperatura ambiente.
• Usare una sonda termica per alimenti per controllare la temperatura
della carne, del pesce e del pollame se sono più spessi di 5 cm in
modo da accertarsi che vengano raggiunte le temperature minime
di cottura.
• I maggiori pericoli vengono dal pollame cotto male, particolarmente
pericoloso per la Salmonella.
• Evitare di interrompere il processo di cottura, ad esempio, cuocendo
parzialmente le pietanze, conservandoli e finendoli di cuocere
successivamente. Tale sequenza aumenta la proliferazione di batteri
grazie alle temperature "calde" raggiunte all'interno delle pietanze.
• Arrostire la carne ed il pollame in forno a temperature di almeno 165°C.
NB: Utilizzare esclusivamente la sonda termica carne fornita con
l’elettrodomestico.
In ogni caso, raccomandiamo la consultazione della seguente tabella
presa dal Database della National Food Safety (USA).
Pietanza Temperatura interna minima
Macinati
Hamburger 71° C
Manzo, vitello, agnello, maiale 74° C
Pollo, tacchino 74° C
Manzo, vitello, agnello
Arrosti e bistecche:
Al sangue
Poco cotta 63° C
Media 71° C
Ben cotta 77° C
Maiale
Braciole, arrosti, costolette:
Media 71° C
Ben cotta 77° C
Prosciutto fresco 71° C
Salsicce fresche 71° C
Pollame
Pollo intero o a pezzi 82° C
Anatra 82° C
Tacchino intero (non ripieno) 82° C
Petto di tacchino 77° C
La temperatura per la cottura al sangue non viene riportata dal NFSD
perché non sicura dal punto di vista sanitario.
24
Page 27
IT
11:00 am
325°F
++
--
145°F
275°F
11:00 am
COTTURA CIRCOLARE VENTILATA
325°F
++
--
145°F
70°F
ATTENZIONE
• Per evitare ustioni, utilizzare un guanto da cucina per rimuovere
la sonda termica carne quando il forno è caldo.
• Rimuovere sempre la sonda termica utilizzando l'impugnatura.
Se rimossa utilizzando il cavo, potrebbe danneggiarsi.
• Assicurarsi che gli alimenti siano completamente scongelati
quando viene inserita la sonda termica. Altrimenti potrebbe
danneggiarsi.
NOTA: La sonda termica carne non è abilitata al funzionamento
per tutte le funzioni (funzione sonda termica carne non
disponibile neanche per Ricette). Se inserita durante una di
queste funzioni, appare un messaggio di rimozione della
sonda termica sullo schermo.
Se la sonda termica carne viene accidentalmente rimossa
durante il funzionamento, compare un messaggio di
avvertimento sullo schermo.
La temperatura della sonda termica può essere impostata tra
104°F e 212°F (40°C - 100°C).
Il forno conserva l'ultima temperatura impostata dall'utente.
Inserire la punta della sonda termica nella parte centrale e più spessa
della carne.
Assicurarsi che la sonda termica non sia a contatto con grasso, ossa,
parti del forno o dei contenitori.
Quando inserita, la sonda termica carne viene automaticamente
riconosciuta e appare l'icona
Quando una modalità di cottura viene avviata con la sonda termica
inserita, compare automaticamente la schermata del display per
impostare la funzione.
sullo schermo.
1. Impostare la temperatura della sonda termica richiesta tramite le
frecce e confermare con il tasto .
2. Dopo aver premuto il tasto , la cottura viene avviata e tutti i
dettagli di cottura con sonda termica vengono mostrati sul display.
• Modalità di cottura
• Temperatura forno
• Impostazione temperatura sonda termica
• Temperatura corrente sonda termica
Una volta che la temperatura della sonda termica impostata viene
raggiunta, il forno si spegne ed un segnale acustico avvisa che la
cottura è terminata.
NOTA: Una volta che la cottura è iniziata, la temperatura del forno
può comunque essere cambiata in qualsiasi momento
tramite le frecce
.
Per cambiare la temperatura della sonda termica,premere il tasto
e poi il tasto ed infine nuovamente il tasto .
25
Page 28
IT
15 - Capire le Varie Modalità di Funzionamento del Forno
Suggerimenti e Tecniche per la Cottura
Cuocere significa preparare cibi con aria riscaldata. Sia gli elementi
superiori che inferiori nel forno vengono utilizzati per riscaldare l'aria,
ma non viene utilizzata la ventola per far circolare l'aria.
Seguire la ricetta o le indicazioni per cibi precotti per le temperature,
tempi e posizione griglia. Il tempo di cottura arrosto varia con la
temperatura degli ingredienti, dimensioni, forma e finitura degli
utensili per la cottura al forno.
Linee Guida Generali
• Per risultati migliori, cuocere al forno pietanze su un solo ripiano
con almeno 1” - 1 ½” (2,5 - 3cm) di spazio tra gli utensili e le pareti
del forno.
• Utilizzare una griglia quando si seleziona la modalità cottura al
forno.
• Verificare la cottura al tempo di cottura minimo.
• Utilizzare prodotti in metallo (antiaderenti o non), vetro resistente al
calore, vetroceramica, ceramica o altri utensili adatti al forno.
• Quando si utilizza vetro resistente al calore, ridurre la temperatura
raccomandata di 25°F (15°C).
• Utilizzare teglie da forno con o senza bordi o stampi da forno.
• Teglie di metallo scuro o coperture antiaderenti cucinano più in
fretta con maggiore doratura. Teglie da forno coibentate allungano
leggermente il tempo di cottura per la maggior parte dei cibi.
• Non utilizzare fogli di alluminio o vassoi di alluminio usa e getta
per coprire parti del forno. L'alluminio è un ottimo isolante e il
calore verrebbe intrappolato al di sotto di esso. Ciò altererebbe
l'esecuzione della cottura e può danneggiare la finitura del forno.
• Evitare di utilizzare la porta aperta per poggiare le teglie.
• Suggerimenti per Risolvere Problemi di Cottura al Forno si trovano
a Pagina 35.
Suggerimenti e Tecniche per la Cottura Circolare Ventilata
• Ridurre la temperatura della ricetta per cottura al forno di 25°F
(15°C).
• Per risultati migliori, le pietanze devono essere cotte scoperte, in
teglie con bordi bassi per sfruttare al meglio la circolazione d'aria.
Utilizzare teglie di alluminio brillante per risultati migliori a meno
che diversamente specificato.
• Possono essere utilizzati vetro resistente al calore o ceramica.
Ridurre la temperatura di altri 25°F (15°C) quando si utilizzano
pirofile di vetro resistente al calore per una diminuzione totale di
50°F (30°C).
• Possono essere utilizzate teglie di metallo scuro. Notare che le
pietanze potrebbero scurirsi più velocemente con l'utilizzo di teglie
da forno di metallo scuro.
• Il numero di griglie utilizzate è dato dall'altezza delle pietanze da
cuocere.
• Prodotti da forno, per la maggior parte, cuociono estremamente
bene in convezione. Non provare a convertire ricette quali creme,
quiches, torta di zucca o cheesecake che non traggono alcun
beneficio dal processo di riscaldamento ventilato. Utilizzare la
modalità di Cottura al Forno standard per questo tipo di pietanze.
• La cottura su più griglie per prodotti da forno viene effettuata su
griglie in posizione 1, 2, 3 e 4. Tutti e quattro le griglie possono
essere utilizzate per dolcetti, biscotti e aperitivi.
- Cottura al forno su 2 griglie Usare le posizioni 1 e 3.
- Quando si cuoce al forno una torta a quattro strati nello stesso
momento, distribuire le teglie cosicché una teglia non sia
direttamente sopra l'altra. Per risultati migliori, posizionare i
dolci nella parte anteriore della griglia superiore e nella parte
posteriore della griglia inferiore (Vedere il grafico a destra).
Lasciare uno spazio di 1” - 1 ½” (2,5 - 3cm) intorno alla teglia.
• Convertire le vostre ricette può essere facile. Scegliere una ricetta
che può funzionare bene in cottura ventilata.
• Ridurre la temperatura e il tempo di cottura se necessario. Potrebbero
volerci alcune prove ed errori per raggiungere un risultato perfetto.
Tenere traccia della vostra tecnica per la prossima volta che vorrete
preparare la ricetta utilizzando la cottura ventilata.
• Suggerimenti per Risolvere Problemi di Cottura al Forno si trovano
a Pagina35.
Pietanze raccomandate per la modalità Cottura Inferiore Ventilata:
Aperitivi Biscotti Dolcetti da Caffè
Dolcetti (da 2 a 4 griglie) Pane al Lievito fresco
Bignè
Muffin
Stufati e Antipasti
Prodotti da Forno (posizione griglia 1, 2, 3)
Prodotti Lievitati ad Aria (Soufflé, Dolci con Top di Meringa, Torta
Paradiso, Torta Chiffon)
POSIZIONE GRIGLIA
5
4
3
2
1
Griglia 3
Griglia 1
4
3
2
1
Suggerimenti ricette facili e veloci
Convertire dalla COTTURA INFERIORE standard a quella VENTILATA:
• Ridurre la temperatura di 25°F (15°C).
• Utilizzare lo stesso tempo della cottura al forno se inferiore ai 10 15 minuti.
26
Page 29

IT
• La cottura di pietanze con un tempo di cottura al forno inferiore ai
30 minuti devono essere controllati 5 minuti prima che nelle ricette
per la cottura al forno standard.
• Se le pietanze vengono cotte al forno per più di 40 - 45 minuti, il
tempo di cottura al forno dovrebbe essere ridotto del 25%.
•
Suggerimenti e Tecniche per la Cottura Ventilata
• Non preriscaldare per la Cottura Ventilata
• Cuocere in una teglia con bordi bassi e scoperta.
• Quando si cuociono arrosto polli o tacchini interi, cucirne le ali
dietro la schiena e legare le zampe non troppo strette con dello
spago da cucina.
• Utilizzare una teglia a due pezzi per cuocere arrosto scoperto.
• Utilizzare la sonda termica o un termometro per carne per
determinare la cottura interna alla temperatura "FINALE".
• Ricontrollare la temperatura interna di carne o pollame inserendo il
termometro da carne in un altro punto.
• Volatili di grandi dimensioni potrebbero aver bisogno di essere
coperti con foglio di alluminio (e fatti rosolare in padella) durante
una parte del tempo di cottura arrosto per prevenire una eccessiva
doratura.
I tempi di cottura alla griglia standard o ventilata sono approssimativi
e potrebbero variare leggermente.
I tempi di cottura sono indicativi e dipendono anche dallo spessore e
dalla temperatura di partenza della carne prima della cottura.
Suggerimenti e Tecniche per la Cottura alla Griglia
• Posizionare la griglia nella posizione richiesta prima di accendere
il forno.
• Utilizzare la Cottura alla Griglia con la porta del forno chiusa.
• Preriscaldare il forno 5 minuti prima di utilizzarlo.
• Utilizzare una teglia a due pezzi.
• Girare le carni a metà cottura (vedere tabella cottura alla griglia
ventilata).
I tempi di cottura alla griglia standard o ventilata sono approssimativi
e potrebbero variare leggermente.
I tempi di cottura sono indicativi e dipendono anche dallo spessore e
dalla temperatura di partenza della carne prima della cottura.
Suggerimenti ricette facili e veloci
Convertire dalla COTTURA INFERIORE standard a quella
VENTILATA:
• Le temperature non devono essere abbassate.
• Arrosti, grandi tagli di carne e pollame in generale necessitano del
10-20% in meno del tempo di cottura. Controllare in anticipo la
cottura.
• Stufati o brasati cotti al forno coperti durante la COTTURA VENTILATA
cuociono all'incirca nello stesso tempo.
• Per motivi igienico-sanitari, la temperatura minima per pollame
ripieno è 165°F (75°C).
• Dopo aver rimosso il prodotto dal forno, appoggiarvi sopra un
foglio di alluminio per 10 - 15 minuti prima di tagliare se necessario
per aumentare la temperatura finale delle pietanze di 5° - 10°F
(3° - 6°C).
I tempi di cottura sono indicativi e dipendono anche dallo spessore e
dalla temperatura di partenza della carne prima della cottura.
Suggerimenti e Tecniche per la Cottura alla Griglia
Ventilata
• Posizionare la griglia nella posizione richiesta prima di accendere
il forno.
• Utilizzare la Cottura alla Griglia Ventilata con la porta del forno
chiusa.
• Non preriscaldare il forno.
• Utilizzare una teglia a due pezzi.
• Girare le carni a metà cottura (vedere tabella cottura alla griglia
ventilata).
Suggerimenti e Tecniche per Essiccare
• L'essiccazione può essere effettuata utilizzando la modalità
Essiccatore. Viene utilizzata una temperatura più bassa e
l'aria riscaldata in circolo rimuove lentamente l'umidità per la
conservazione degli alimenti.
• La temperatura della modalità Essiccatore è pre-programmata a
140°F (60°C).
• Le temperature disponibili nella modalità Essiccatore vanno da
120°F (50°C) a 160°F (70°C).
• Più griglie posso essere utilizzate contemporaneamente.
• Alcuni alimenti richiedono fino a 14-15 ore di tempo per essiccarsi
completamente.
• Consultare un libro di conservazione degli alimenti per gli specifici
tempi e la gestione dei diversi alimenti.
• Tale modalità è adatta ad una varietà di frutta, verdura, spezie e
strisce di carne.
• Retini per essiccare possono essere acquistati in negozi di cucina
specializzati.
• Utilizzando fogli di carta, l'umidità di alcuni alimenti (quali
pomodori a fette o pesche a fette) può venire assorbita prima che
l'essiccazione abbia inizio.
27
Page 30
IT
Tabella Essiccazione
ALIMENTO PREPARAZIONE TEMPO DI ESSICCAZIONE
APPROSSIMATIVO* (ore)
FRUTTA
Mele
Immerse in ¼ di tazza di succo di
limone e 2 tazze d'acqua, ¼ fette
CONTROLLO ESSICCAZIONE
11 - 15 Leggermente duttili
Banane
Ciliegie
Bucce e Fette di arance
Anelli di ananas
Fragole
VERDURE
Peperoni
Funghi
Immerse in ¼ di tazza di succo di
limone e 2 tazze d'acqua, ¼ fette
Lavare e tamponare.
Per ciliegie fresche, rimuovere i
noccioli
¼ fette di arancia;
parte di buccia di arancia finemente
pelata
Tamponati
Lavare e tamponare.
Fettate spesse ½” ,
buccia (esterno) sulla griglia
Lavare e tamponare.
Rimuovere la membrana del pepero
ne, tagliare grossolanamente a pezzi
di circa 1”
Lavare e tamponare.
Tagliare il gambo
Tagliare a fette di 1/8”
-
Bucce:
Fette:
In scatola:
Freschi
11 - 15 Leggermente duttili
10 - 15 Duttili, coriacee, gommose
212--4
98--13
12 - 17 Secche, friabili
16 - 20
7 - 12 Duri e coriacei, secchi
Buccia di arancia: secca e friabile
Fette di arancia: la buccia è secca
16
e friabile, il frutto è leggermente
umido
Morbidi e duttili
12
Coriacei non umidi
all'interno
Pomodori
SPEZIE
Origano, salvia, prezzemolo,
timo e finocchio
Basilico
Lavare e tamponare.
Tagliare a fette spesse 1/8”, asciuga
re bene
Sciacquare e asciugare con asciuga
mano di carta
Utilizzare foglie di basilico di 3 - 4
pollici dalla punta. Spruzzare con
acqua, scuotere via l'umidità e
asciugare.
-
-
Seccare a
120°F (60°C)
Seccare a
120°F (60°C)
16 - 23 Secchi, color rosso mattone
3 - 5 Croccanti e friabili
3 - 5 Croccanti e friabili
28
Page 31

16 - Ricette
SALVARE
TACCHINO ARROSTO
START
GRIGLIA RETTANGOLARE
LIVELLO
PESO
TEMPO DI COTTURA
PRERISCALDO
1
3800g
03:00
SI
La funzione Ricette del vostro forno vi da la possibilità di cucinare pietanze senza dover ogni volta impostare il forno manualmente. Selezionando
una ricetta "SET", la modalità cottura, la temperatura e il tempo vengono impostati automaticamente in base alla ricetta selezionata dal menù.
Lista Ricette Tipo di Alimento Condizione alimento Lista Ricette Informazioni mostrate
FRESCO
PASTA PIZZA PRIMI
PIATTI
SURGELATO
INTERO
CARNE
A PEZZI
IT
PREIMPOSTATE O PERSONALI
INTERO
A PEZZI
INTERO
A PEZZI
-
-
-
-
POLLAME
PESCE
VERDURE
TORTE
TIPO DI ACCESSORIO
POSIZIONE LIVELLO
PESO ALIMENTO
TEMPO DI COTTURA
PRERISCALDAMENTO
RICHIESTO
(SÌ/NO)
Selezionare una ricetta già impostata:
1. Accendere il forno, selezionare l'icona e premere il tasto .
2. Utilizzando le frecce
"PERSONALI" e confermare tramite il tasto .
3. Scegliere il tipo di alimento da cuocere utilizzando le frecce
e le frecce e confermare tramite il tasto .
4. Utilizzando le frecce
o in altri casi tra "INTERO" o "A PEZZI" e confermare tramite il
tasto .
5. Selezionare la ricetta richiesta richiesta tramite le frecce
confermare con il tasto .
6. Quando la ricetta è selezionata, compare la seguente schermata
sul display:
selezionare la lista "PREIMPOSTATE" o
scegliere tra "FRESCO" o "SURGELATO"
e
29
Page 32

IT
POLLAME
3800g
PESO
POLLAME
03:00
TEMPO DI COTTURA
SALVARE
TACCHINO ARROSTO
START
GRIGLIA RETTANGOLARE
LIVELLO
PESO
TEMPO DI COTTURA
PRERISCALDO
1
2500g
02:00
SI
POLLAME
NO
SI
VUOI ELIMINARE LA RICETTA?
7. Per avviare una ricetta, confermare con il tasto .
Durante una ricetta, una serie di messaggi sonori e visivi vi chiedono
di eseguire le seguenti operazioni. Seguire semplicemente le
istruzioni sullo schermo.
8. Dopo la cottura, il forno si spegne ed un segnale acustico avvisa
che la ricetta è terminata.
Salvare una ricetta personalizzata:
Una volta che la ricetta è stata selezionata, le impostazioni "Tempo"
e "Peso" possono essere cambiate e la ricetta può essere salvata tra
quelle "PERSONALI".
1. Una volta che la ricetta è stata selezionata, premere il tasto
confermare tramite il tasto .
2. Per cambiare il peso, inserire il peso desiderato tramite le frecce
e confermare con il tasto .
e
4. A questo punto, la ricetta può essere salvata su "PERSONALI"
selezionando "SALVA" e confermando tramite il tasto
.
NOTA Se i valori di tempo e peso vengono cambiati e non salvati
subito, alla fine della ricetta, compare un messaggio che
chiede se si vogliano salvare o no.
5. Per avviare la ricetta, premere il tasto
.
Cancellare una ricetta personalizzata:
1. Per eliminare una ricetta dalla lista delle ricette personalizzate,
selezionare la ricetta.
2. Premere il tasto
.
e selezionare la scelta e confermare con il tasto
3. Il forno passa automaticamente al tempo di cottura. Per cambiare
questo tempo, utilizzare le frecce
tramite il tasto
.
e confermare nuovamente
30
Page 33

17 - Istruzioni Modalità Sabbath (Su Alcuni Modelli)
11:06 am
SABBATH
La funzione Modalità Sabbath del vostro forno rispetta le norme
Ebraiche. Tale funzione permette la forno di eseguire solo la funzione
statica.
Quando la funzione Sabbath è selezionata, le seguenti funzioni sono
disabilitate:
• Luci del forno
• Tutti i tasti tranne ON/OFF
• Funzione Sonda Termica Carne
• Funzioni di cottura a tempo
• Funzione timer
• L'icona dello schermo del display è fissa e non animata come in
caso di modalità di cottura tradizionale.
• Schermo del display e segnali acustici principali.
Per impostare la funzione Modalità Sabbath, accendere il forno e
selezionare l'icona
Sabbath tramite le frecce e confermare con il tasto .
La funzione si avvia mostrando l'icona sullo schermo del display.
e premere il tasto . Selezionare la funzione
IT
NOTA La funzione dura al massimo 72 ore.
La temperatura non è regolabile ma fissa a 140°F (60°C).
La funzione può essere disabilitata in qualsiasi momento
premendo il tasto OFF.
31
Page 34

IT
18 - Cura e Pulizia del Forno
Rimozione porta
Per la pulizia non devono essere utilizzati detergenti abrasivi né
pulitori a vapore.
ATTENZIONE
Non usare pulitori abrasivi o raschietti metallici taglienti per pulire
il vetro della porta del forno, essi possono graffiare la superficie
provocando la frantumazione del vetro.
Pulizia
Pulizia assistita
Ciclo ad elevata temperatura (250°C) combinato con i pannelli autopulenti per una pulizia delicata e non invasiva del vano cottura.
Il corretto funzionamento è combinato con l'utilizzo dei pannelli laterali
e la copertura della ventola catalitica; il forno è trattato con una smalto
speciale con una struttura micro-porosa che disaggrega i grassi sparsi
grazie ad un processo di ossidazione catalitica che trasforma i residui
in prodotti gassosi.
La funzione di pulizia turbo viene attivata solamente quando nessuna
funzione di cottura p stata selezionata, così: accendere il forno e
premere il simbolo come mostrato in figura per cinque secondi.
ATTENZIONE
Il processo di pulizia avviene alla temperatura di 250°C e dura
un'ora. Non utilizzarlo per cucinare alimenti!
ATTENZIONE
Assicurarsi che:
• Il forno sia freddo e l’alimentazione scollegata prima di togliere
la porta. In caso contrario, vi è il rischio di folgorazioni o ustioni.
• La porta del forno è pesante e fragile. Usare entrambe le mani
per togliere la porta del forno. La porta del forno è di vetro.
Maneggiarla con cura per evitare di romperla.
• Afferrare soltanto i lati della porta. Non afferrare la maniglia,
perché potrebbe scivolare nella vostra mano e causare danni o
lesioni.
• Se non si afferra la porta del forno in modo saldo e corretto, si
possono provocare lesioni alla persona o danni al prodotto.
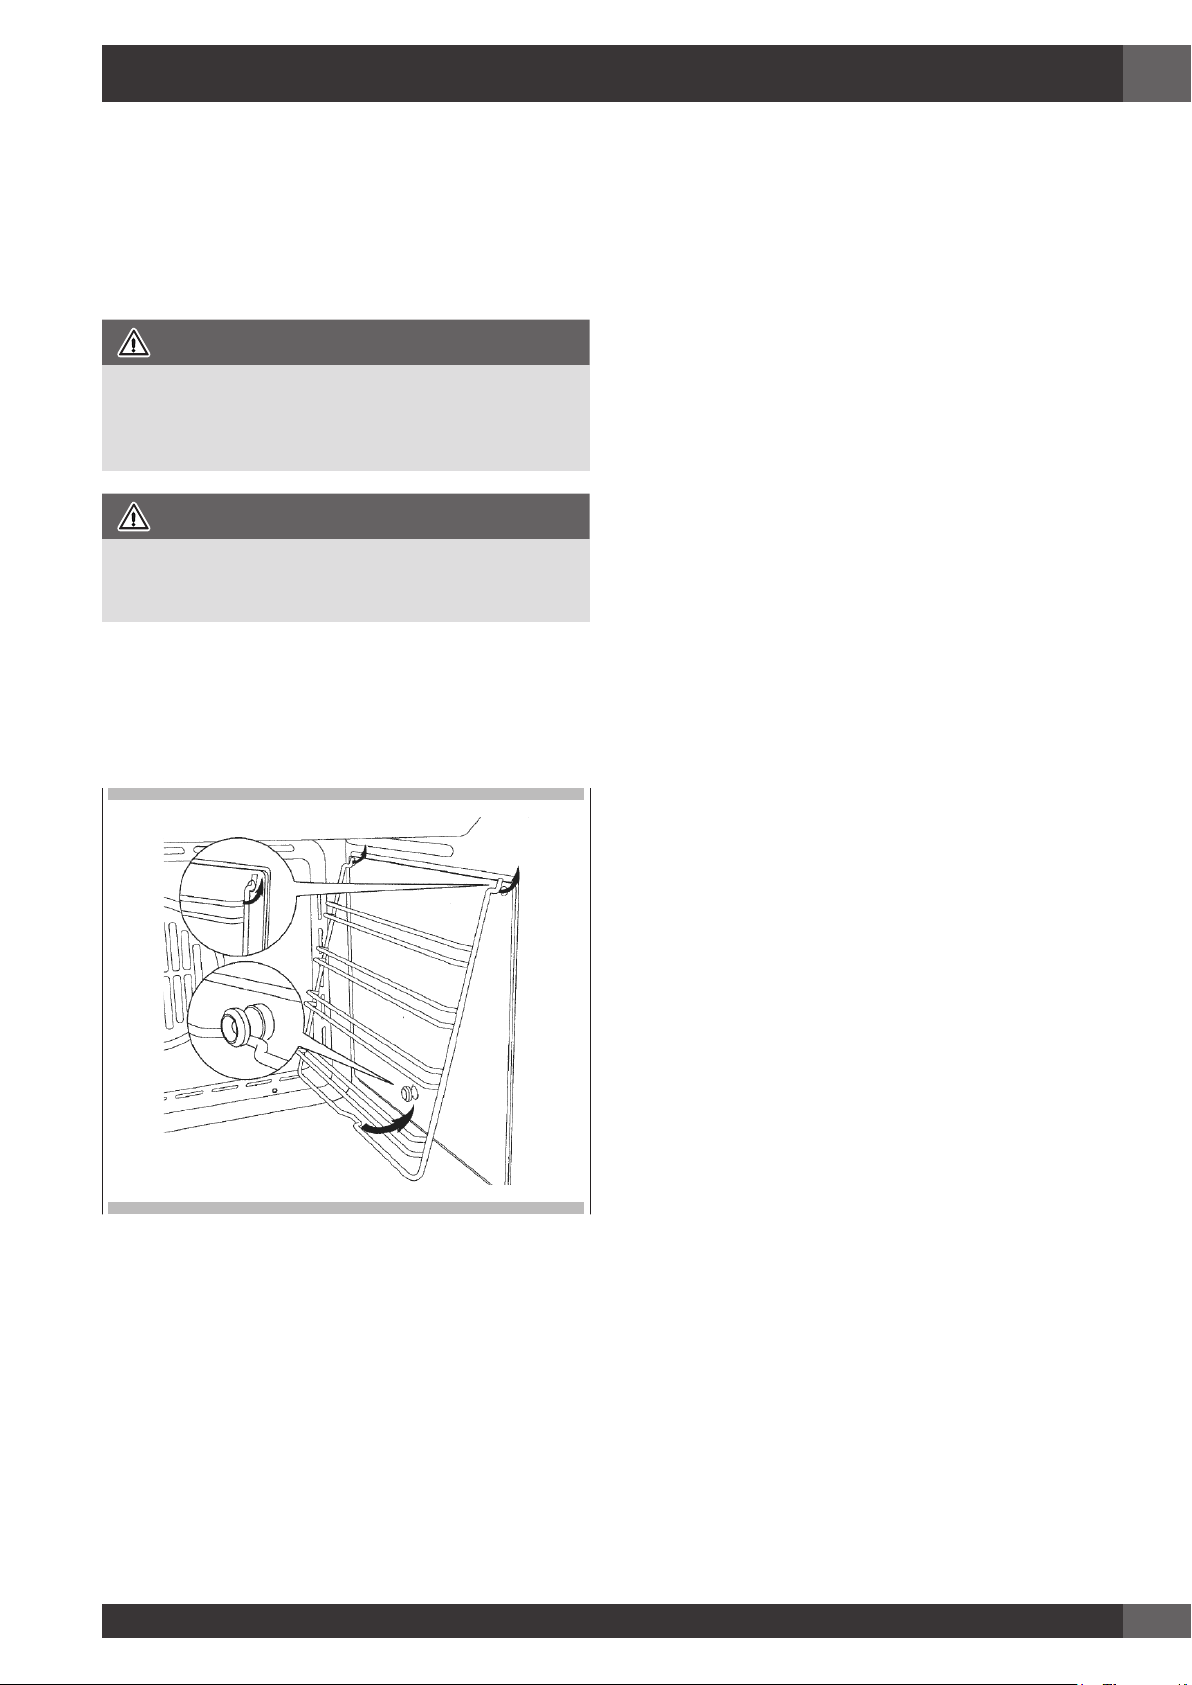
Rimozione binario porta forno
La porta del forno può essere rimossa velocemente e semplicemente.
Per far ciò, procedere come segue:
• Aprire la porta completamente.
• Sollevare le due leve mostrate sotto.
• Chiudere la porta sino al primo arresto (causato dalle leve sollevate).
• Sollevare la porta verso l'alto e in fuori per rimuoverla dai supporti
di montaggio.
Per rimontare la porta, posizionare i cardini sui supporti e abbassare
le due leve.
La luce del forno viene attivata e può essere spenta e riaccesa in
qualunque momento.
Tutti i pannelli autopulenti funzionano in maniera efficiente per trenta
processi di pulizia, dopo questo limite i pannelli possono essere
sostituiti.
I pannelli devono essere puliti esclusivamente con acqua di rubinetto e
i sostituti possono essere ordinati dal vostro rivenditore specializzato.
32
Page 35

IT
Rimozione binario porta forno
1. Decidere qualora si voglia aprire la porta verso sinistra o verso
destra prima di posizionare l'elettrodomestico nel vano forno.
2. Aprire completamente la porta
3. Rimuovere le quattro viti di fissaggio dai cardini della porta.
NOTA: Assicurarsi che la porta del forno sia perfettamente parallela
al pannello frontale. In caso contrario, aggiustarla tramite le
viti appena inserite.
7. Fissare il forno nel vano utilizzando le 4 viti e gli spessori di plastica
forniti.
Come smontare i vetri interni della porta panoramica“
FULL GLASS”
4. Rimuovere i quattro tappi di plastica dai lati opposti e svitare i perni
di bloccaggio.
5. Girare la porta di 180°.
1. Indossare guanti protettivi.
2. Posizionare la porta su un piano orizzontale appoggiandola su un
panno morbido per evitare graffi sulla parte visibile.
3. Premere contemporaneamente i tasti dei due tappi laterali
estraendo il listello superiore.
6. Assicurare la porta nella sua nuova posizione utilizzando le 4 viti
precedentemente rimosse.
33
Page 36

IT
4. Sfilare il vetro interno come mostrato sotto. Sfilare il secondo e
terzo vetro (pannelli intermedi) per la pulizia sfilando la striscia di
gomma.
NOTA un leggero gioco tra il vetri intermedi e i supporti laterali è
da considerarsi normale in quanto serve a compensare le
dilatazioni termiche dei vetri.
6. Posizionare il pacco dei tre vetri tra i due montanti e riposizionare
il listello superiore.
Sostituzione della luce del forno
ATTENZIONE
5. Dopo la pulizia per riposizionare i vetri intermedi procedere in
modo inverso, controllando che i vetri abbiano la scritta INTERNAL
SIDE orientata in modo da essere correttamente leggibile.
Assicurarsi che:
• Il forno e le luci siano fredde e l’alimentazione sia scollegata
prima di sostituire la lampadina(e). In caso contrario, vi è il rischio
di folgorazioni o ustioni.
• I paraluce devono essere in posizione quando si usa il forno.
• I paraluce servono a proteggere la lampadina dalla rottura.
• I paraluce sono fatti di vetro. Maneggiarli con cura per evitare di
romperli. Il vetro rotto potrebbe causare lesioni.
1
3
1
(230V - 15 o 25W)
1
2
2
(230V - 25W G9)
3
2
(230V - 25W G9)
34
1 Togliere corrente dall’alimentazione principale (fusibile o quadro
elettrico).
2 Togliere il paraluce (1).
3 Togliere la lampadina (2) dal portalampada (3).
4 Sostituire la lampadina (2) con una nuova. Evitare di toccare
la lampadina con le dita, perché l’unto delle mani potrebbe
danneggiare la lampadina quando diventa calda.
5 Usarne una che abbia lo stesso voltaggio e gli stessi Watt (vedere
figura).
6 Riavvitare il paraluce (1).
7 Ripristinare la corrente (quadro elettrico o quadro elettrico).
Page 37

19 - Risoluzione Problemi di Cottura al Forno
Sia con la Cottura Tradizionale che quella Ventilata si possono avere risultati scarsi per una serie di motivi oltre che per malfunzionamento del forno.
Controllare la tabella sottostante per le cause dei problemi più comuni. Dato che la dimensione, forma e materiale degli utensili da forno influiscono
in maniera diretta sui risultati della cottura al forno, la soluzione migliore potrebbe essere quella di sostituire utensili da forno vecchi che si sono
scuriti o si sono deformati col tempo e l'utilizzo.
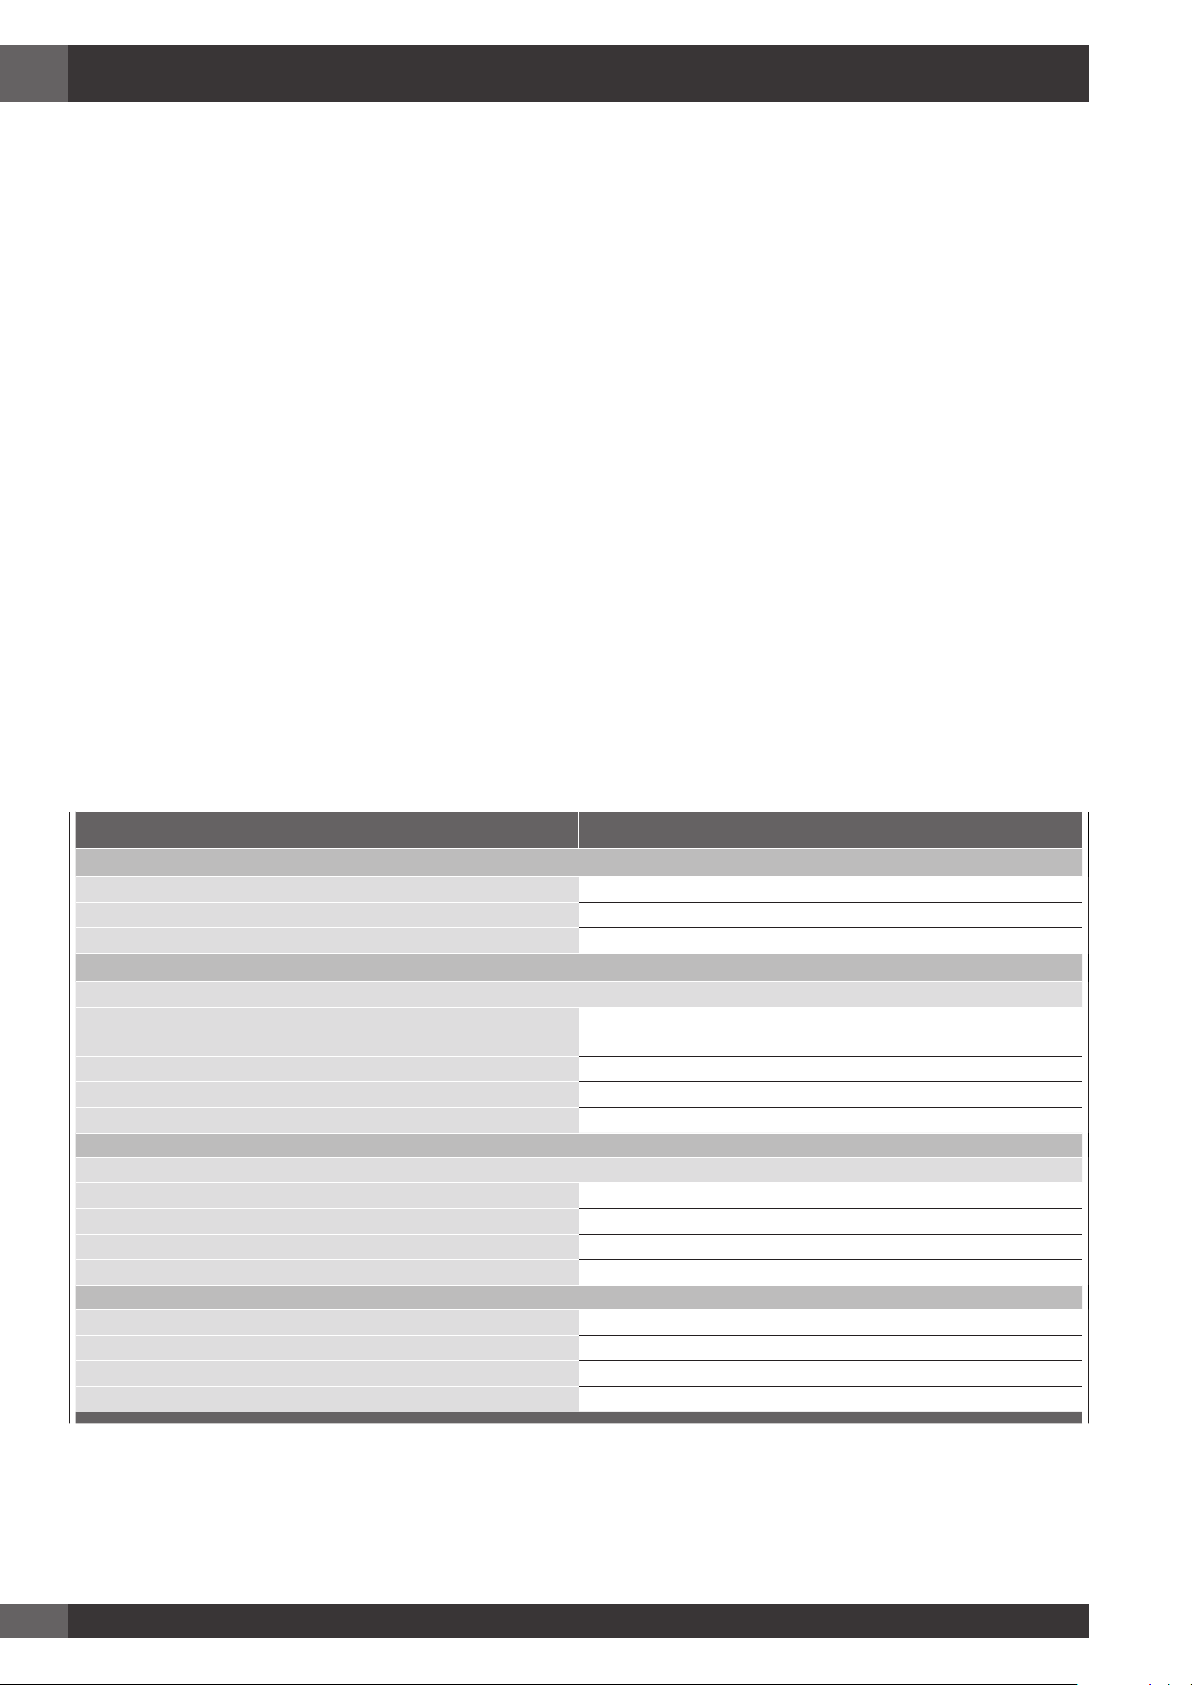
Problema di Cottura Causa
Le pietanze non si dorano in maniera uniforme - Forno non preriscaldato
- Foglio di alluminio presente sulla griglia o sul fondo del forno
- Utensili da forno troppo grandi per la ricetta
- Teglie a contatto l'una con l'altra o con le pareti del forno
Pietanze troppo scure sotto - Forno non preriscaldato
- Utilizza di teglie di vetro o di metallo opaco o scurito
- Posizione griglia non corretta
- Teglie a contatto l'una con l'altra o con le pareti del forno
Pietanze secche o eccessivamente rimpicciolite - Temperatura forno troppo bassa
- Forno non preriscaldato
- Porta forno aperta frequentemente
- Sigillato stretto con foglio di alluminio
- Dimensione teglia troppo piccola
IT
Le pietanze si cuociono o si arrostiscono troppo lentamente - Temperatura forno troppo bassa
- Forno non preriscaldato
- Porta forno aperta frequentemente
- Sigillato stretto con foglio di alluminio
- Dimensione teglia troppo piccola
Le croste delle torte non si scuriscono sul fondo o hanno una
crosta molliccia
Torte pallide, piatte e probabilmente non cotte all'interno - Temperatura forno troppo bassa
Torte alte nel mezzo con crepe sopra - Temperatura di cottura al forno troppo elevata
- Tempo di cottura al forno non sufficientemente lungo
- Utilizzo di teglie di acciaio brillante
- Posizione griglia non corretta
- Temperatura forno troppo bassa
- Tempo di cottura al forno non corretto
- Prova torta troppo presto
- Porta forno aperta troppo di frequente
- Dimensione teglia probabilmente troppo grande
- Tempo di cottura al forno troppo lungo
- Teglie a contatto l'una con l'altra o con le pareti del forno
- Posizione griglia non corretta
- Dimensione teglia troppo piccola
Bordi delle croste delle torte troppo scuriti - Temperatura forno troppo elevata
- Bordi della crosta troppo fini
35
Page 38

IT
20 - Risoluzione Problemi Funzionali
Prima di contattare il centro assistenza, controllare quanto segue per evitare costi di assistenza inutili.
Problema forno Fasi Risoluzione Problema
Altri Errori __F compaiono sullo schermo del display. Rimuovere la corrente e riaccenderla dopo pochi secondi,. Se la
condizione persiste, annotare il numero di codice (nella lista REGISTRO
EVENTI) e contattare il centro assistenza.
Il display del forno rimane SPENTO. Togliere corrente dall’alimentazione principale (fusibile o quadro elettrico).
Riaccendere il quadro elettrico.
Se la condizione persiste, chiamare un centro assistenza autorizzato.
La ventola di raffreddamento continua a funzionare anche quando
il forno è spento
Il forno non si riscalda Controllare l'interruttore magnetotermico o la scatola portafusibili di casa
Il forno non si riscalda in maniera uniforme Fare riferimento alle tabelle per il corretto posizionamento della griglia.
La luce del forno non funziona adeguatamente. Sostituire o reinserire la lampadina se allentata o difettosa. Vedere
La luce del forno rimane accesa Controllare eventuali ostruzioni sulla porta del forno. Controllare se il
L'orologio e il timer non funzionano adeguatamente Assicurarsi che il forno sia adeguatamente alimentato da corrente elettrica.
Eccessiva umidità Quando si utilizza la modalità Cottura al Forno, preriscaldare il forno
La porcellana si scheggia Quando le griglie del forno vengono rimosse o riposizionate, sollevarle
La ventola si spegne automaticamente quando le componenti elettriche si
sono raffreddate a sufficienza.
vostra. Assicurarsi che il forno sia adeguatamente alimentato da corrente
elettrica. Assicurarsi che la temperatura del forno sia stata selezionata.
Ridurre sempre la temperatura della ricetta di 25°F (15°C) quando si
cuoce con la modalità Cottura Inferiore Ventilata.
pagina 34. Evitare di toccare il vetro della lampadina a mani nude in
quanto il sebo delle dita potrebbe causare l'esaurimento prematuro della
lampadina.
cardine è piegato o l'interruttore della porta rotto.
Vedere le sezioni Orologio a Pagina 16.
prima. Cottura Inferiore Ventilata e quella Ventilata eliminano qualunque
umidità nel forno (questo è uno dei vantaggi della convezione).
sempre verso l'alto e non forzarle per evitare che la porcellana si scheggi.
36
Page 39

Prima di contattare il centro assistenza, si prega di controllare
"Risoluzione Problemi". Vi potrebbe far risparmiare il costo della
chiamata per assistenza.
Se avete ancora bisogno di aiuto, seguire le istruzioni sottostanti. Al
momento della chiamata, si prega di conoscere la data di acquisto,
il modello completo e il numero di serie del vostro elettrodomestico.
Queste informazioni ci aiuteranno a rispondere in maniera migliore
alla vostra richiesta.
Record Dati Manutenzione
Per assistenza o parti autorizzate vedere il paragrafo "GARANZIA per
Elettrodomestici".
Per assistenza o parti autorizzate vedere il paragrafo "GARANZIA
per Elettrodomestici".
Per la collocazione della targhetta seriale vedere Pagina 2. Ora è
un buon momento per scrivere tali informazioni nello spazio apposito
in basso.
Conservare la fattura per la convalida della garanzia.
21 - Assistenza o Manutenzione
IT
Record Dati Manutenzione
Modello Numero _________________________________
Numero di Serie __________________________________
Data di Installazione o di Presa di Possesso __________________
37
Page 40

IT
38
Page 41

EN
TABLE OF CONTENTS PAG E
1 -
Safety Instructions 2
2 -
Product Features 3
3 -
Installation of the Oven 4
Electricals 4
Respect for the environment 4
Connection to the electrical power mains 10
4 -
Instructions for Use 11
The first time you use the oven 11
Removable Guides (if present) 11
5 -
Control panel 12
Keypad 12
6 -
General Oven Information 13
Error codes 13
Beeps 13
Default Settings 13
F Failure Number Codes 13
Preheat and Fast Preheat 13
Timer 13
7 -
General Oven Tips 14
Preheating the Oven 14
Operational Suggestions 14
Utensils 14
Oven Condensation and Temperature 14
High Altitude Baking 14
8 -
Getting Started 15
Instructions for initial switch-on 15
9 -
User Settings 16
Language 16
Temperature & Weight 16
Time 16
Date 17
Brightness 17
Volume 17
10 -
System Setting 18
Event Log 18
Demo 18
11 -
Starting your Oven 19
Switching the oven on and offf 19
Selecting the cooking mode 19
Changing the cooking mode 19
Changing temperature 19
TABLE OF CONTENTS PAG E
12 -
Cooking Mode Tables 20
Pre-heating phase 22
Fast Preheat 22
Eco 22
Using Oven Lights 22
13 -
Time Oven Mode Operation 23
Cook Time 23
Stop Time 23
14 -
Setting the Meat Probe (if present) 24
15 -
Understanding the Various Oven Modes
Roast Tips and Techniques 26
General Guidelines 26
True Convection Tips and Techniques 26
Convection Roast Tips and Techniques 27
Convection Broil Tips and Techniques 27
Broil Tips and Techniques 27
Dehydrate Tips and Techniques 27
Dehydrate Chart 28
16 -
Recipes 29
17 -
Sabbath Mode Instructions (on some models) 31
18 -
Oven Care and Cleaning 32
Clean 32
Removing the door 32
Removing the slide oven door 33
How to remove the inner glass of the “FULL
GLASS” panoramic door
Replacement of the oven light 34
19 -
Solving Baking Problems 35
20 -
Solving Operational Problems 36
21 -
Assistance or Service 37
Service Data Record 37
26
33
1
Page 42

EN
1 - Safety Instructions
IMPORTANT
The oven’s data plate is accessible even with the
oven fully installed. The plate is visible simply by
opening the door. Always quote the details from
it to identify the appliance when ordering spare
parts.
• Children should be overseen so as to ensure that they
don’t play with the equipment.
• Keep children under age 8 away, unless constantly
supervised.
• This appliance is not intended for use by persons
(including children over age 8) with reduced
physical sensory or mental capabilities, or lack of
experience and knowledge, unless they have been
given supervision or instruction concerning use of the
appliance by a person responsable for their safety.
• Children may not perform cleaning and maintenance
unsupervised.
• In order to avoid damage to the oven enamel coat,
do not cover the oven muffle sole with any item (e.g.
aluminum foil, pans and the likes).
• Do not use harsh abrasive cleaners or sharp metal
scrapers to clean the oven door glass since they can
scratch the surface, which may result in shattering of
the glass.
• Abrasive detergents and steam cleaning equipment
should not be used for cleaning.
• Do not disassemble any parts prior to having
disconnected the oven from the mains.
• Do not use the appliance if any part is broken (for
example a glass). Disconnect it from the mains and
call service.
• Before using the oven, it is recommended to make it
operate at noload at the maximum temperature for
an hour to eliminate the insulating material odour.
• In all models, leave the door closed when the grill is
used.
• The cooling fan may remain in operation so long as
the oven is hot, even after it has been switched off.
• During the use the appliance becomes very hot; don’t
touch the heating elements inside the oven.
• Parents and adults should pay particular attention
when using the product in presence of children.
• The appliance must not be installedbehind a
decorative door in order to avoid overheating.
• WARNING: Ensure that the appliance is switched off
before replacing the lamp to avoid the possibility of
electric shock.
• The oven is cool and power to the oven has been
turned off before removing the door. Failure to do so
could result in electrical shock or burns.
• Use only the meat probe supplied with the appliance.
IMPORTANT
If the oven is installed in an ambient temperature
below 37 °F (3 °C), F*0117 may appear; when
a higher ambient temperature is reached, the error
will no longer appear.
2
Page 43

Refer to the figures below for the correct placement of the grills
EMBOSSED GUIDES
2 - Product Features
EN
REMOVABLE GUIDES
3
Page 44

EN
3 - Installation of the Oven
Respect for the environment
To install the oven into the kitchen a cutout should be made
in accordance with the dimensions shown in the Cutout &
Dimensions figure.
The apparatus is to be fastened to the top by means of the two
screws provided in the kit through the holes made on the oven
uprights.
The cabinet in which the apparatus is installed shall be open
on the back side to ensure a sufficient air circulation and
prevent overheating.
WARNING
As the apparatus is to be fitted in your kitchen furniture,
make sure that all surfaces in contact with the oven can resist
a temperature of approx 90°C.
Electricals
Maximum absorbed power: (see data plate).
Supply voltage: (see data plate).
The documentation for this appliance is printed on paper
bleached without chlorine or recycled paper to contribute to
protecting the environment. The packaging was designed
to prevent damage to the environment; they are ecological
products that can be recovered or recycled.
Recycling the packing saves raw materials and reduces the
volume of industrial and domestic waste.
THE PACKING MATERIAL is 100% recyclable and marked
with the recycling symbol. Dispose of in conformity with
local law. The packing material (plastic bags, polystyrene
parts, etc.) must be kept out of the reach of children because
it is potentially dangerous. THIS APPLIANCE is marked in
conformity with European Directive 2012/96/UE, Waste
Electrical and Electronic Equipment (WEEE). By making sure
that this product is disposed of correctly, the user contributes
to preventing potential negative consequences for the
environment and health.
THE SYMBOL on the product or accompanying documentation
indicates that this product must not be treated as domestic
waste but must be delivered to a suitable collection point for
the recycling of electrical and electronic equipment.
4
Page 45

MOD. 45
min 3
EN
min 460
50
510
595
50
510
560
140
560
50
144
min
432
450
510
533
540
560
432
594
min
455
min 458
3
540
455
528
545
554
26
596
533
594
Dimensions are in millimeters
5
Page 46

EN
MOD. 60
595
50
510
560
510
594
595
535
21
min 5
595
50
510
560
min
min 600
5
540
594
594
535
21
Dimensions are in millimeters
6
Page 47

MOD. 75
EN
595
50
510
710
568
545
682
594
750
21
min 5
5
min
682
min
585
5
594
568
595
50
510
710
545
750
21
Dimensions are in millimeters
7
Page 48

EN
min 5
MOD. 90x48
480
min
50
510
860
849
477
472
893
517
538
5
min
475
min
860
50
510
min
5
472
517
538
849
477
893
Dimensions are in millimeters
8
Page 49

MOD. 90x60
min 5
EN
595
50
510
860
826
594
563
895
530
551
min 5
595
860
50
510
min 5
563
530
551
826
594
895
Dimensions are in millimeters
9
Page 50

EN
Connection to the electrical power mains
WARNING
This apparatus must be earthed.
The oven is only for domestic use.
The feed voltage and the absorbed power are as indicated on
the data plate attached to the left-hand side upright, which can
be seen when the oven door is open.
Connecting must be carried out by qualified personnel and in
accordance with the regulations currently in force.
The manufacturer can not be held responsible for any
damages to persons or objects caused by failure to observe
these instructions.
If the supply cord is damaged, it must be replaced by the
manufacturer, its service agent or similarly qualified persons in
order to avoid a hazard.
The oven must be connected to the mains through a multipole
circuit breaker with a contact-to-contact gap of at least 3
mm, making sure that the earth wire is not disconnected. For
connecting use a flexible cable remembering to make it long
enough to allow the oven to be removed from its housing unit
when maintenance work is required.
Such a device must be fitted to the power supply in compliance
with the regulations
governing electrical installations.
The socket or switch must be easily reachable with the oven
fully installed.
CABLE TYPES AND MINIMAL DIAMETERS
SASO
H05RR-F 3x1,5 mm² H05RR-F 3x2,5 mm²
H05VV-F 3x1,5 mm² H05VV-F 3x2,5 mm²
H05RN-F 3x1,5 mm² H05RN-F 3x2,5 mm²
H05V2V2-F 3x1,5 mm² H05V2V2-F 3x2,5 mm²
10
Page 51

The first time you use the oven
Clean the oven thoroughly with soapy water and rinse well.
Operate the oven for about 30 minutes at maximum
temperature to burn off all traces of
grease which might otherwise create unpleasant smells when
cooking.
WARNING
Never use aluminum foil to cover the oven racks or to line
the oven. It can cause damage to the oven liner if heat is
trapped under the foil.
WARNING
Make sure you do not force it to avoid damage to the
enamel.
4 - Instructions for Use
EN
Removable Guides (if present)
To remove the lateral frames from smooth-walled ovens,
proceed as shown in the figure.
11
Page 52

EN
5 - Control panel
Your appliance could vary slightly compared to the illustrations below.
A
- Keypad
B
- Display screen
FRIDAY 11/20/2015
PM
04:26
Keypad
To operate the key, press gently. The keypad will not work if
more than one key is pressed at the same time.
Movement arrows
Return to previous display page. Keep
pressed to return to Home page
Switches the oven on and off.
Confirms the settings and starts cooking
operations. When pressed during a
cooking operation, the function is placed in
pause. Press again to restart.
To set the timer.
Enter the functions menu during cooking.
B
A
12
Switches the inner oven light on and off.
Page 53

6 - General Oven Information
Before using your oven for the first time remove all packing and foreign materials from the oven(s). Any material of this sort left inside
may melt or burn when the appliance is used.
EN
Error codes
This code appears in the event of the electronic control
indicating a fault. When the error appears, the current function
is blocked. If the type of error is related to a safety function,
the oven becomes unusable and every time a start attempt is
made, the same error appears (in which case call in the aftersales service), while if the error relates to a minor fault, after
being restarted the oven can be used for the functions that do
not involve the faulty part (e.g., a heating element).
Beeps
Confirms that the command has been received after a key has
been pressed.
It also indicates that a time function has been completed (e.g.
Timer or Timed Cooking). During the execution of a recipe,
an acoustic signal warns the user that the oven is waiting for
operation by the user (e.g., insert the dish or turn it over).
Beeps also signal an oven fault.
Default Settings
Preheat and Fast Preheat
Whenever a cooking mode is set and the oven is heating,
the preheating starts, during this period, the instantaneous
temperature is displayed together with the thermometer icon.
As soon as the 100% is reached, the control sounds an “end of
preheat” tone and the current temperature value disappears.
When it’s necessary to heat up the oven rapidly, a Fast
Preheat mode is available: it uses the heating elements and the
convection fan in a special way, in order to reduce the heating
time as long as possible.
After having set one of the cooking functions for which the
fast preheat is available and set the desired temperature value
touch the key, after entering the functions menu, select the
icon
of the key
As soon as the set-point temperature is reached, the control
sounds a and both “Fast Preheat Icon” and “current
temperature” disappear. The oven switches automatically to
the desired cooking mode that was previously set: put the food
inside now.
by means of the keys and confirm by means
.
Timer
The cooking modes automatically select a suitable temperature
when the cooking mode is selected, these can be changed
when a different one is needed.
F Failure Number Codes
These codes are displayed when the electronic control detects
a problem in the oven or in the electronics.
The error code is recorded in the Error Log in the Setup menu.
This error can be communicated to the service technician so
he/she can understand the possible cause of the problem in
advance.
WARNING
The timer on your oven does not turn the appliance on or
off, its only purpose is to alert you through the buzzer. When
you want to turn off the oven automatically, use the end-ofcooking or delayed cooking function.
NOTE Pressing the OFF button does not reset or stop the
timer.
1. Press the button
arrows and confirm with the button . To switch
the selection between hours and minutes use the arrows
.
2. The time can be set from 1 minute to 12 hours and 59
minutes and, when set, the remaining time is always visible
in the bottom status bar until the time expires or is reset.
3. To change or cancel the time set, you must reset the timer
by pressing and holding the button
4. Timer format is usually HR:MIN, switching into MIN:SEC
during the last minute.
5. When the time expires, the display shows 00:00 and the
buzzer will sound for one minute or until the button
pressed.
and set the desired time using the
for a few seconds.
is
13
Page 54

EN
7 - General Oven Tips
Preheating the Oven
• Preheat the oven when using the Bake, Convection Bake and
Convection Roast modes.
• Use Fast Preheat mode when a shorter time is desired to
preheat the oven.
• Selecting a higher temperature does not shorten the preheat
time.
• Preheating is necessary for good results when baking cakes,
cookies, pastry and breads.
• Preheating will help to sear roasts and seal in meat juices.
• Place oven racks in their proper position before preheating.
• During preheating, the selected cooking temperature is
always displayed.
• A beep will confirm that the oven is preheated and the
“detected temperature” will turn off.
Operational Suggestions
• Do not set pans on the open oven door.
• Use the interior oven lights to view the food through the oven
door window rather than opening the door frequently.
Oven Condensation and Temperature
• It is normal for a certain amount of moisture to evaporate
from the food during any cooking process. The amount
depends on the moisture content of the food. The moisture
may condense on any surface cooler than the inside of the
oven, such as the control panel.
• Your new oven has an electronic temperature sensor that
allows maintaining an accurate temperature. Your previous
oven may have had a mechanical thermostat that drifted
gradually over time to a higher temperature. It is normal that
you may need to adjust your favorite recipes when cooking
in a new oven.
High Altitude Baking
• When cooking at high altitude, recipes and cooking time
will vary from the standard.
Utensils
• Glass baking dishes absorb heat. Reduce oven temperature
25°F (15°C) when baking in glass.
• Use pans that give the desired browning. The type of finish
on the pan will help determine the amount of browning that
will occur.
• Shiny, smooth metal or light non-stick / anodized pans reflect
heat, resulting in lighter, more delicate browning. Cakes and
cookies require this type of utensil.
• Dark, rough or dull pans will absorb heat resulting in a
browner, crisper crust. Use this type for pies.
• For brown, crisp crusts, use dark non-stick / anodized or
dark, dull metal utensils or glass bake ware. Insulated baking
pans may increase the length of cooking time.
• Do not cook with the empty broiler pan in the oven, as this
could change cooking performance.
• Store the broil pan outside of the oven.
14
Page 55

Instructions for initial switch-on
Once the oven has been connected to the power supply for
the first time, the control automatically prepares for setting a
number of user settings, which remain stored in case of any
subsequent switch-on.
• Language
• Temperature & Weight
• Time
• Date
Refer to the USER SETTING paragraph for setting instructions.
After making the user settings, the control moves automatically
to the “Standby” display page.
8 - Getting Started
EN
15
Page 56

EN
SETUP
\
SETTING
12
yk
abc
SETUP
LANGUAGE
°F
°ClbKg
12h
24h
AM
PM
04 : 26
PM
9 - User Settings
Temperature & Weight
With the oven on, select the icon and confirm with the
key to enter the SETTINGS menu. This menu permits
personalizing the settings of your oven. To make access, no
active cooking or any set time functions must be in progress.
NOTE The Setting menù can never be set if any time function
is already set: first delete all the active time functions.
1. Press the keys
means of the
2. Use this menu to change the following settings:
Press the keys or to select the setting or change
a sub menu from among the six available ones and confirm
by means of the key.
to select the sub menu and confirm by
key.
Press the arrow key and to select one of the two
temperature options “°C/°F” or weight options Kg/ib and
confirm with the key.
Time
Press the arrow key to select the time format between the
options “12h AM/PM or 24h” and confirm with the
Subsequently, set the time using the arrows and confirm
with the key.
key.
Language
Press the arrow key to select a language from among
those available, and confirm with the key.
16
Page 57

EN
12
D.M.Y.
Y.M.D.
M.D.Y.
12
11/20/2015
ON
STAND-BY
LOW
MID
HIGH
DARK
MID
HIGH
LEVEL
LOW
MID
HIGH
Date
Press the arrow key to select the date format from among
the options “D.M.Y. – Y.M.D. – M.D.Y.” and confirm with the
key. Subsequently set the value using the arrows and
confirm with the key.
Volume
Press the arrow to select the desired volume level and
confirm by pressing the key.
Brightness
Press the arrow key to choose which luminosity setting
to change between ON or STANDBY, then by means of the
arrows
confirm with the
select the required degree of luminosity and
key.
17
Page 58

EN
SETUP
SERVICE
EVENT LOGS
MAIN VOLTAGE
SYSTEM
DEMO
OM 15
01 12/11/2015 07:06 CODE: F10305
EVENT LOGS
02 17/11/2015 13:17 CODE: F10305
DEMO
ON
10 - System Setting
Demo
With the oven on, select the icon and confirm with the
key to enter the SETTINGS menu. This menu permits setting
a number of parameters or special functions. It also permits
accessing the error events list.
1. Press the keys
key.
the
to select the sub menu and confirm with
2. Use this menu to change the following settings:
Press the keys to select the item to be set or to be
displayed from among the three available ones and confirm
with the key.
The purpose of this function is to set the DEMO mode, which
makes the oven useless for cooking but automatically performs
a demonstration of functions.
1. Press the keys
2. Confirm with the
3. Press the
to select the item ON.
key.
key.
After about 30 seconds, the oven starts to operate in this mode.
To temporarily stop the DEMO function, simply keep any key
pressed for a few seconds until the oven switches to standby.
To start it again, press the key.
To disable the function, enter the DEMO display page and set
OFF. Confirm using the key.
NOTE Once set, the function remains enabled even if the
oven is disconnected from the power mains.
Event Log
The menu permits checking any recorded errors. These codes
can be notified to the after-sales service.
18
Page 59

11 - Starting your Oven
EN
Switching the oven on and offf
IMPORTANT
• The key does not stop the function.
• After switching off the oven, the cooling fan could continue
to operate until the inner parts of the oven have cooled
down.
Press
The oven returns to standby mode.
to switch the oven on and press again to switch it off.
Selecting the cooking mode
IMPORTANT
• Do not leave the door open for a long time during cooking.
• The door must be kept closed during the BROIL functions.
• Position the grill or grills on an appropriate level.
OVEN 45 cm
TRUE CONVECTION
(FAN HEAT)
CONVECTION ROAST
(TURBO
CONVENTIONAL HEAT)
CONVECTION GRILL
(TURBO GRILL & BASE
HEAT)
CONVECTION BAKE
(TURBO BASE HEAT)
ECO BAKING ECO BAKING
60 cm
OVEN
75 cm
90x48 cm
90X60 cm
TRUE CONVECTION
(FAN HEAT)
CONVECTION ROAST
(TURBO
CONVENTIONAL HEAT)
CONVECTION GRILL
(TURBO GRILL & BASE
HEAT)
CONVECTION BAKE
(TURBO BASE HEAT)
OVEN 45 cm
DEHYDRATE DEFROST
BAKE
(BASE HEAT)
ROAST
(CONVENTIONAL HEAT)
SABBATH
On some models
1. Select the icon
appropriate cooking mode according to the food to be
cooked using the arrows and confirm with the key .
2. On this display page, it is still possible to change the
cooking mode by using the
3. If the proposed temperature is correct, confirm with the
key to start cooking, otherwise, if the key is not pressed
within 10 seconds, the oven switches to automatic mode
and the cooking mode icon becomes animated.
and press the key Select the
60 cm
OVEN
75 cm
90x48 cm
90X60 cm
DEHYDRATE
BAKE
(BASE HEAT)
ROAST
(CONVENTIONAL HEAT)
SABBATH
On some models
keys.
Changing the cooking mode
1. During untimed cooking, a cooking pause can be set
by pressing the key. All the settings of the suspended
cooking operation remain stored and can be reactivated by
pressing the same key again.
2. To change the cooking mode while the oven is working,
press the
cooking mode can be selected from among those available
in the group by means of the arrows .
key and then the , key. At this point, another
BROIL
(ECO GRILL)
DOUBLE GRILL
(FULL GRILL)
DOUBLE
CONVECTION GRILL
(TURBO GRILL)
UPPER BAKING UPPER BAKING
PIZZA PIZZA
DEFROST CLEAN
BROIL
(ECO GRILL)
DOUBLE GRILL
(FULL GRILL)
DOUBLE
CONVECTION GRILL
(TURBO GRILL)
Changing temperature
IMPORTANT
• In all the cooking modes where the temperature is fixed,
this is not shown on the screen.
• At the end of a function, the display screen shows the
residual compartment heat temperature from the standby
page.
1. From the cooking mode preview display page, the
temperature can be changed by means of the arrows
subsequently confirming by means of the key.
2. Once cooking has started, the temperature can in any case
be changed, at any time, by means of the arrows
.
19
Page 60

EN
12 - Cooking Mode Tables
OVEN 45 cm
COOKING MODE ICON FAST PREHEAT MEAT PROBE TEMPERATURE
Min. Preset Max.
DEFROST *** *** ***
DEHYDRATE
BAKE
(BASE HEAT)
ROAST
(CONVENTIONAL HEAT)
ECO BAKING
TRUE CONVECTION
(FAN HEAT)
PIZZA
CONVECTION ROAST
(TURBO CONVENTIONAL HEAT)
CONVECTION GRILL
(TURBO CONVENTIONAL HEAT)
DOUBLE CONVECTION GRILL
(TURBO GRILL)
CONVECTION BAKE
(TURBO BASE HEAT)
50°C 60°C 70°C
50°C 50°C 200°C
50°C 190°C 230°C
50°C 165°C 230°C
50°C 165°C 230°C
50°C 230°C 230°C
50°C 165°C 230°C
50°C 165°C 230°C
50°C 165°C 230°C
50°C 165°C 200°C
BROIL
(ECO GRILL)
DOUBLE GRILL
(FULL GRILL)
UPPER BAKING
SABBATH (if present)
50°C 230°C 230°C
50°C 230°C 230°C
50°C 180°C 230°C
60°C
20
Page 61

OVEN 60 cm - OVEN 75 cm - OVEN 90x48 cm - OVEN 90X60 cm
COOKING MODE ICON FAST PREHEAT MEAT PROBE TEMPERATURE
Min. Preset Max.
DEFROST *** *** ***
EN
DEHYDRATE
BAKE
(BASE HEAT)
ROAST
(CONVENTIONAL HEAT)
ECO BAKING
TRUE CONVECTION
(FAN HEAT)
PIZZA
CONVECTION ROAST
(TURBO CONVENTIONAL HEAT)
CONVECTION GRILL (*)
(TURBO CONVENTIONAL HEAT)
DOUBLE CONVECTION GRILL (*)
(TURBO GRILL)
CONVECTION BAKE
(TURBO BASE HEAT)
50°C 60°C 70°C
50°C 50°C 250°C
50°C 190°C 250°C
50°C 165°C 250°C
50°C 165°C 250°C
50°C 230°C 250°C
50°C 165°C 250°C
50°C 165°C 250°C
50°C 165°C 250°C
50°C 165°C 250°C
BROIL (*)
(ECO GRILL)
DOUBLE GRILL (*)
(FULL GRILL)
UPPER BAKING
SABBATH (if present)
CLEAN
(*) Some ovens can even have a motorised rod for cooking on a spit.
50°C 230°C 250°C
50°C 230°C 250°C
50°C 180°C 250°C
60°C
250°C
21
Page 62

EN
325°F
275°F
11:00 am
TRUE CONVECTION
++
--
325°F
11:06 am
TRUE CONVECTION
++
--
325°F
11:00 am
TRUE CONVECTION
++
--
325°F
275°F
11:00 am
TRUE CONVECTION
++
--
Pre-heating phase
While the oven is in pre-heating phase, the instantaneous
temperature is displayed underneath the cooking mode icon.
Just as soon as the set temperature is reached, an acoustic
signal is heard and the instantaneous temperature indication
disappears.
Fast Preheat
The FAST PREHEAT function permits reaching the desired
temperature quicker compared to standard preheating. The
function can be enabled for all the cooking modes in the BAKE
(except the Sabbath and ECO), CONVECT and PIZZA groups.
To select FAST PREHEAT:
3. Press the key again to run the function.
The display page shows the icon of the active functions
until the set temperature has been reached. Afterwards,
the function switches to automatic in the selected cooking
mode.
Eco
This mode is intended to save energy.
Ideal for frozen or precooked food, and small portions-meals.
The preheat time is very short and cooking tends
to be slower. It is not recommended for heavy loads e.g. large
portions or big meal preparation.
1. Select the cooking mode as previously indicated and press
the key to display the cooking mode preview display
page.
2. Press the
Select the icon by means of the arrows and confirm with
the key . The symbol appears in the lower part of the
screen.
22
key.
Using Oven Lights
A single light key activates the lights.
Touch to turn lights on or off .
Oven lights turn on automatically when the door is opened.
When an oven is in use, oven lights turn on automatically
when a mode is started.
Oven lights will turn off automatically when the oven mode is
cancelled.
NOTE: Once switched on, the lights go off automatically after
3 minutes. To switch them back on, press the key or
open the door.
Page 63

Be sure that the time-of-day clock is displaying the correct time.
275°F
11:00 am
TRUE CONVECTION
325°F
++
--
END
TIME
11:50 am
00:50
275°F
11:00 am
TRUE CONVECTION
325°F
++
--
END
START
12:30 pm
11:40
Start
The timed mode turns off the oven at the end of the cook time.
CAUTION
Never leave food in the oven for more than one hour before
and after cooking. This could deteriorate the properties of
the food itself.
NOTE The time functions cannot be used if the meat probe is
on. The maximum cooking time that can be set is 12
h.
13 - Time Oven Mode Operation
EN
Cook Time
Use the “Cook Time” function to operate the oven for a
determinate period of time. The oven starts immediately and
switches off automatically once the time has expired.
To Set a Timed Mode
1. Select the cooking mode and temperature.
2. There are two ways to set the function.
a) Select
b) Select
3. After selecting one of the two above options, set the time by
means of the arrows
4. After pressing the
cooking information is shown on the display page.
• Cooking mode
• Temperature
• Cooking time
• End of cooking time
to set the duration and press .
to set the stop time and press .
and confirm with the key.
key, cooking starts and the time
Stop Time
Use the “Stop Time” function to delay the start of timed
cooking. Enter the cooking stop time and the oven will
automatically calculate the start time. The oven switches on
and off automatically.
To Delay the Start of a Timed Mode
1 First of all set the required timed cooking as indicated in the
“COOK TIME” paragraph.
2 Select to set the stop time and press .
3 Set the cooking stop time by means the arrows
confirm by means of the key.
4 After pressing the
key, the function positions in standby
and the postponed cooking details are shown on the screen.
• Cooking mode
• Temperature
• Cooking stop time
• Cooking start time
and
5 After cooking, the oven switches off and an acoustic signal
warns that cooking has terminated.
To change the cooking time when the oven is already operating,
simply press the e key and enter the new cooking time
before pressing the key again.
• After cooking, the oven switches off and an acoustic signal
warns that cooking has terminated.
To change the cooking time and stop time when the oven is
already operating, simply press the key and enter the new
cooking time or cooking stop time and press the key again.
23
Page 64

EN
14 - Setting the Meat Probe (if present)
When roasts, steaks or poultry are being cooked, this is the
best way to tell when the food is correctly cooked.
This oven is optionally provided with the meat probe feature to
sense the temperature inside meat and stop cooking as soon
as the set value is reached.
When the probe is used, the oven automatically checks the
cooking time.
NOTE : the food probe is an accessory available only in some
versions of the product.
Tenderness, aroma and flavour are the result of
precise, functional control.
The food probe is a thermometer which, when inserted
into the food, makes it possible to check the internal
temperature and use it to establish the end of cooking.
For example, meat may look like it is cooked on the
outside, but still be pink on the inside!
The temperature reached by food during cooking is closely
linked to problems relating to health and hygiene. Bacteria
can be contained in every kind of meat, poultry and fish, as
well as raw eggs.
Certain types of bacteria make food go off, while others, such
as Salmonella, Campylobacter jejuni, Listeria monocytogenes,
Escherichia coli and Staphylococcus aureus can be seriously
harmful to human health. Bacteria multiply very quickly above
a temperature of 4.4° up to 60°C. Mince is particularly at risk
from this point of view.
To prevent bacteria from multiplying, it is necessary to take the
following measures:
• Do not defrost food at room temperature, always in the
fridge or in the oven using the specific function. In the latter
case, cook the food immediately afterwards.
• Stuff chicken just before eating it. Never buy pre-packed
ready-stuffed chicken and only buy ready-cooked stuffed
chicken when you intend to eat it within 2 hours.
• Marinate food in the fridge, not at room temperature.
• Use a food probe to check the temperature of meat, fish and
poultry if they are more than 5 cm thick, to ensure that the
minimum cooking temperatures are reached.
• The greatest hazards are posed by poorly cooked chicken,
particularly at risk from Salmonella.
• Avoid interrupting the cooking process, i.e., partially cooking
food, storing it and completing the cooking process later.
This sequence encourages the growth of bacteria due to the
“warm” temperatures reached inside the food.
• Roast meat and poultry in the oven at temperatures of at
least 165°C.
NB: Use only the meat probe supplied with the appliance.
In any case, we recommend that you consult the following
table taken from the National Food Safety Database (USA).
Food Minimum internal temperature
Mince
Hamburger 71° C
Beef, veal, lamb, pork 74° C
Chicken, turkey 74° C
Beef, veal, lamb
Roasts and steaks:
Rare
Medium-rare 63° C
Medium 71° C
Well done 77° C
Pork
Chops, roasts, ribs:
Medium 71° C
Well done 77° C
Fresh ham 71° C
Fresh sausages 71° C
Poultry
Whole chicken or chicken pieces 82° C
Duck 82° C
Whole turkey (not stuffed) 82° C
Turkey breast 77° C
The cooking temperature for rare meat is not indicated by the
NFSD as it is unsafe for health reasons
24
Page 65

EN
11:00 am
325°F
++
--
145°F
275°F
11:00 am
TRUE CONVECTION
325°F
++
--
145°F
70°F
WARNING
• To avoid burns, use a kitchen glove to fit and remove the
meat probe when the oven is hot.
• Always remove the probe using the grip. If it is removed
by pulling the cable, it could suffer damage.
• Make sure the food is completely de-frozen when the
probe is fitted. Otherwise it could suffer damage.
NOTE: The meat probe is not enabled for all functions (meat
probe function not available also for Recipes). If it is
fitted during one of these functions, a probe removal
message appears on the screen.
If the meat probe is accidentally removed during
operation, a warning message appears on the screen.
The temperature of the probe can be set between
104°F and 212°F (40°C - 100°C).
The oven stores the last temperature set by the user.
Insert the tip of the probe in the central and thickest part of the
meat.
Make sure the probe is not in contact with the fat, bone, oven
parts or dishes.
The meat probe is automatically recognised when it is inserted
and the icon
When a cooking mode is started with the probe inserted, the
display page for setting the function appears automatically.
appears on the screen.
1. Set the required probe temperature by means of the arrows
and confirm with the key.
2. After pressing the key, cooking starts and all probe
cooking details appear on the screen.
• Cooking mode
• Oven temperature
• Set probe temperature
• Instantaneous probe temperature
Once the set probe temperature is reached, the oven switches
off and an acoustic signal warns that cooking has terminated.
NOTE: After cooking has started, the oven temperature can
in any case be changed at any time by means of the
arrows
.
To change the probe temperature, press the key and then
the key and finally, the key again.
25
Page 66

EN
15 - Understanding the Various Oven Modes
Roast Tips and Techniques
Roasting is cooking with heated air. Both upper and lower
elements in the oven are used to heat the air but no fan is used
to circulate the heat.
Follow the recipe or convenience food directions for baking
temperature, time and rack position. Baking time will vary with
the temperature of ingredients and the size, shape and finish
of the baking utensil.
General Guidelines
• For best results, bake food on a single rack with at least 1”
- 1 ½” (2,5 - 3cm) space between utensils and oven walls.
• Use one rack when selecting the bake mode.
• Check for doneness at the minimum time.
• Use metal bake ware (with or without a non stick finish),
heatproof glass, glass-ceramic, pottery or other utensils
suitable for the oven.
• When using heatproof glass, reduce temperature by 25°F
(15°C) from recommended temperature.
• Use baking sheets with or without sides or jelly roll pans.
• Dark metal pans or nonstick coatings will cook faster with
more browning. Insulated bake ware will slightly lengthen
the cooking time for most foods.
• Do not use aluminum foil or disposable aluminum trays to line
any part of the oven. Foil is an excellent heat insulator and
heat will be trapped beneath it. This will alter the cooking
performance and can damage the finish of the oven.
• Avoid using the opened door as a shelf to place pans.
• Tips for Solving Baking Problems are found on Page 35.
- 2 Rack baking: Use positions 1 and 3.
- When baking four cake layers at the same time, stagger
pans so that one pan is not directly above another. For
best results, place cakes on front of upper rack and back
of lower rack (See graphic at right). Allow 1” - 1 ½” (2,5
- 3cm).air space around pans.
• Converting your own recipe can be easy. Choose a recipe
that will work well in convection.
• Reduce the temperature and cooking time if necessary. It
may take some trial and error to achieve a perfect result.
Keep track of your technique for the next time you want to
prepare the recipe using convection.
• Tips for Solving Baking Problems are found on Page35.
Foods recommended for Convection Bake mode:
Appetizers Biscuits Coffee Cakes
Cookies (2 to 4 racks) Yeast Breads
Cream Puffs
Popovers
Casseroles and One-Dish Entreés
Oven Meals (rack positions 1, 2, 3)
Air Leavened Foods (Soufflés, Meringue, Meringue- Topped
Desserts, Angel Food Cakes, Chiffon Cakes)
RACK POSITION
5
4
3
2
1
4
3
2
1
True Convection Tips and Techniques
• Reduce recipe baking temperatures by 25°F (15°C).
• For best results, foods should be cooked uncovered, in lowsided pans to take advantage of the forced air circulation.
Use shiny aluminum pans for best results unless otherwise
specified.
• Heatproof glass or ceramic can be used. Reduce temperature
by another 25°F (15°C) when using heatproof glass dishes
for a total reduction of 50°F (30°C).
• Dark metal pans may be used. Note that food may brown
faster when using dark metal bake ware.
• The number of racks used is determined by the height of the
food to be cooked.
• Baked items, for the most part, cook extremely well in
convection. Don’t try to convert recipes such as custards,
quiches, pumpkin pie , or cheesecakes, which do not benefit
from the convection-heating process. Use the regular Bake
mode for these foods.
• Multiple rack cooking for oven meals is done on rack
positions 1, 2, 3 , and 4. All four racks can be used for
cookies, biscuits and appetizers.
Rack 3
Rack 1
Quick and easy recipe tips
Converting from standard BAKE to CONVECTION BAKE:
• Reduce the temperature by 25°F (15°C).
• Use the same baking time as Bake mode if under 10 to 15
minutes.
• Foods with a baking time of less than 30 minutes should
be checked for doneness 5 minutes earlier than in standard
bake recipes.
• If food is baked for more than 40 to 45 minutes, bake time
should be reduced by 25%.
26
Page 67

EN
Convection Roast Tips and Techniques
• Do not preheat for Convection Roast.
• Roast in a low-sided, uncovered pan.
• When roasting whole chickens or turkey, tuck wings behind
back and loosely tie legs with kitchen string.
• Use the 2-piece broil pan for roasting uncovered.
• Use the probe or a meat thermometer to determine the
internal doneness on “END” temperature.
• Double-check the internal temperature of meat or poultry by
inserting meat thermometer into another position.
• Large birds may also need to be covered with foil (and pan
roasted) during a portion of the roasting time to prevent overbrowning.
Quick and easy recipe tips
Converting from standard BAKE to CONVECTION ROAST:
• Temperature does not have to be lowered.
• Roasts, large cuts of meat and poultry generally take 1020% less cooking time. Check doneness early.
• Casseroles or pot roasts that are baked covered in
CONVECTION ROAST will cook in about the same amount
of time.
• The minimum safe temperature for stuffing in poultry is 165ºF
(75ºC).
• After removing the item from the oven, cover loosely with foil
for 10 to 15 minutes before carving if necessary to increase
the final foodstuff temperature by 5° to 10°F (3° to 6° C).
Cooking times are indicative and also depend on the thickness
and the starting temperature of the meat before cooking.
Convection Broil Tips and Techniques
• Place rack in the required position needed before turning
on the oven.
• Use Convection Broil mode with the oven door closed.
• Do not preheat oven.
• Use the 2-piece broil pan.
• Turn meats once halfway through the cooking time (see
convection broil chart).
Broil Tips and Techniques
• Place rack in the required position needed before turning
on the oven.
• Use Broil mode with the oven door closed.
• Preheat oven for 5 minutes before use.
• Use the 2-piece broil pan.
• Turn meats once halfway through the cooking time (see
convection broil chart).
Broiling and convection broiling times are approximate and
may vary slightly.
Cooking times are indicative and also depend on the thickness
and the starting temperature of the meat before cooking.
Dehydrate Tips and Techniques
• Dehydrating can be done using the Dehydrate mode. A
lower temperature is used and the circulating heated air
slowly removes the moisture for food preservation.
• The Dehydrate mode temperature is pre-programmed at
140ºF (60ºC).
• The Dehydrate mode temperatures available are 120ºF
(50ºC) to 160ºF (70ºC).
• Multiple racks can be used simultaneously.
• Some foods require as much as 14-15 hours of time to fully
dehydrate.
• Consult a food preservation book for specific times and the
handling of various foods.
• This mode is suitable for a variety of fruits, vegetables, herbs
and meat strips.
• Drying screens can be purchased at specialty kitchen shops.
• By using paper towels, some food moisture can be absorbed
before dehydrating begins (such as with sliced tomatoes or
sliced peaches).
Broiling and convection broiling times are approximate and
may vary slightly.
Cooking times are indicative and also depend on the thickness
and the starting temperature of the meat before cooking.
27
Page 68

EN
Dehydrate Chart
FOOD PREPARATION APPROXIMATE
DRYING TIME* (hrs)
FRUIT
Apples
Dipped in ¼ cup lemon juice and
2 cups water, ¼ slices
11 - 15 Slightly pliable
TEST FOR DONENESS
Bananas
Cherries
Oranges Peels and slices
Pineapple rings
Strawberries
VEGETABLE
Peppers
Mushrooms
Tomatoes
HERBS
Oregano, sage parsley and
thyme, and fennel
Dipped in ¼ cup lemon juice and
2 cups water, ¼ slices
Wash and towel dry.
For fresh cherries, remove pits
¼ slices of orange;
orange part of skin thinly peeled
from oranges
Towel dried
Wash and towel dry.
Sliced ½” thick,
skin (outside) down on rack
Wash and towel dry.
Remove membrane of pepper,
coarsely chopped about 1” pieces
Wash and towel dry.
Cut of stem end.
Cut into 1/8” slices
Wash and towel dry.
Cut this slices, 1/8” thick, dry well
Rinse and dry with paper towel
Peels:
Slices:
Canned:
Fresh:
Dry at 120°F
(60°C)
11 - 15 Slightly pliable
10 - 15 Pliable, leathery, chewy
212--416Orange peel: dry and brittle
Orange slices: skins are dry
and brittle, fruit is slightly moist
98--13
12 - 17 Dry, brittle
16 - 20
7 - 12 Tough and leathery, dry
16 - 23 Dry, brick red color
3 - 5 Crisp and brittle
Soft and pliable
12
Leathery with no moisture
inside
Basil
Use basil leaves 3 to 4 inches
from top. Spray with water, shake
off moisture and pat dry
Dry at 120°F
(60°C)
3 - 5 Crisp and brittle
28
Page 69

16 - Recipes
SAVE
ROASTED TURKEY
START
RECTANGULAR GRID
LEVEL
WEIGHT
COOKING TIME
PREHEAT
1
3800g
03:00
YES
The Recipe function of your oven gives you the chance to cook food without having to set the oven manually every time. By selecting
a “SET” recipe, the cooking mode, the temperature and the time are automatically set according to the recipe selected from the
menu.
Recipe List Type of Food Food condition Recipes List Information displayed
FRESH
BREAD PIZZA FIRST
FROZEN
WHOLE
MEAT
IN PEICES
EN
PRESET OR PERSONAL
Select an already-set recipe:
WHOLE
IN PEICES
WHOLE
IN PEICES
-
-
-
-
POULTRY
FISH
VEGETABLES
PIES
TYPE OF ACCESSORY
LEVEL POSITION
FOOD WEIGHT
COOKING TIME
PREHEAT REQUIRED
(YES/NO)
1. Switch the oven, select the icon and press the button .
2. Using the arrows
3. Choose the type of food to be cooked using the arrows
4. Using the arrows
5. Select the required recipe by means of the arrows
6. When the recipe is selected, the following display page
select the list between “PRESET” or
“PERSONAL” and confirm by means of the key.
and the arrows and confirm by means of the
key.
choose between “FRESH” or
“FROZEN” or in other cases between “WHOLE” or “IN
PEICES” and confirm with the key.
and
confirm using the key.
appears on the screen:
29
Page 70

EN
POULTRY
3800g
WEIGHT
POULTRY
03:00
COOKING TIME
SAVE
ROASTED TURKEY
START
RECTANGULAR GRID
LEVEL
WEIGHT
COOKING TIME
PREHEAT
1
2500g
02:00
YES
POULTRY
YES
DO YOU WANT REMOVE RECIPE
N0
7. To start the recipe, confirm with the key.
During a recipe, a number of acoustic and visual messages
will ask you to perform the following operations. Simply
follow the instructions on the screen.
8. Upon termination, the oven switches off and an acoustic
and visual signal warns that the recipe has terminated.
Saving a personalized recipe:
Once a recipe has been selected, the “Time” and “Weight”
setting can be changed and the recipe can be saved among
the “PERSONAL” ones.
1. Once a recipe has been selected, press the key
confirm by means of the key.
2. To change the weight, enter the desired weight by means of
the arrows
and confirm by means of the key.
and
4. At this point, the recipe can be saved in the list of
“PERSONAL” recipes by selecting “SAVE” and confirming
by means of the
key.
NOTE If the time and weight values are changed and not
saved straight away, at the end of the recipe, a
message appears which asks whether you want to
save it.
5. To start the recipe press the key.
Cancelling a Personalized recipe:
3. The oven switches automatically to the cooking time. To
change this time, use the arrows
by means of the
key.
and confirm again
1. To eliminate a recipe from the list of personalized recipes,
select the recipe.
2. Press the key
and select the choice and confirm with the
key.
30
Page 71

17 - Sabbath Mode Instructions (on some models)
11:06 am
SABBATH
The Sabbath Mode function of your oven complied with Jewish
laws. This function allows the oven to perform only the static
function.
When the Sabbath function is selected, the following functions
are disabled:
• Oven lights
• All the keys except ON/OFF
• Meat Probe Function
• Timed cooking function
• Timer function
• The icon on the display screen is steady and not animated as
in the case of traditional cooking modes.
• Display screen and key acoustic warnings.
To set the Sabbath Mode function, switch on the oven and
select the icon
function by means of the arrows and confirm twice with
the key .
The function starts by showing the icon on the display screen.
and press the key . Select the Sabbath
EN
NOTE The function lasts at most 72 hours.
The temperature is not adjustable but fixed at 140°F
(60°C) The function can be disabled at any time by
pressing the OFF key.
31
Page 72

EN
18 - Oven Care and Cleaning
Removing the door
Abrasive detergents and steam cleaning equipment should not
be used for cleaning.
WARNING
Do not use harsh abrasive cleaners or sharp metal scrapers
to clean the oven door glass since they can scratch the
surface, which may result in shattering of the glass.
Clean
Assisted cleaning
High temperature cycle (250°C), combined with self-cleaning
panels for gentle, non-invasive cleaning of the cooking
chamber.
Correct operation is combined with the use of the lateral
panels and catalytic fan cover: the oven is treated with special
enamel with a micro-porous structure, which breaks down the
fat projected thanks to a catalytic oxidisation process which
transforms residues into gaseous products.
The turbo clean function is only activated when no cooking
function has been selected, so: switch on the oven and touch
the symbol as shown in the figure for five seconds.
WARNING
The cleaning process takes place at a temperature of 250°C
and lasts one hour. Do not use it for cooking food!!
WARNING
Make sure that:
• The oven is cool and power to the oven has been turned
off before removing the door. Failure to do so could result
in electrical shock or burns.
• The oven door is heavy and fragile. Use both hands to
remove the oven door. The door front is glass. Handle
care-fully to avoid breakage.
• Grasp only the sides of the oven door. Do not grasp the
handle as it may swing in your hand and cause damage
or injury.
• Failure to grasp the oven door firmly and properly could
result in personal injury or product damage.
Removing the standard oven door
The oven door can be removed quickly and easily. To do so,
proceed as follows:
• Open the door fully.
• Lift the two levers shown below.
• Close the door as far as the first stop (caused by the raised
levers).
• Lift the door upwards and outwards to remove it fromits
mountings.
To replace fit the door, fit the hinges in their mountings and
lower the two levers
The oven light is activated and can be switched off and on
again at any time.
All the self-cleaning panels will perform effectively for thirty
cleaning processes, after this limit the panels must be replaced.
The panels should be cleaned exclusively with tap water and
replacements can be ordered from your specialised dealer.
32
Page 73

EN
Removing the slide oven door
1. Decide whether you want the door to open to the left or right
before positioning the appliance in the oven recess.
2. Fully open the door.
3. Remove the four fixing screws from the door hinge.
NOTE: Make sure that the oven door is perfectly parallel with
the front panel. If it is not, adjust it by means of the
screws you have just inserted.
7. Fix the oven in the oven recess using the 4 screws and the
plastic spacers provided.
How to remove the inner glass of the “FULL
GLASS” panoramic door
4. Remove the four plastic caps from the opposite side and
unscrew the locking pin.
5. Turn the door 180°.
1. Wear protective gloves.
2. Place the door on a flat horizontal surface face down on a
soft cloth to avoid scratching the visible part.
3. Simultaneously press the keys of the two side covers,
removing the upper strip.
6. Secure the door in its new position using the 4 screws
removed previously.
33
Page 74

EN
4. Slide out the internal glass as shown below. Remove the
second and third panes of glass (middle panes) for cleaning
sliding out the rubber strip.
NOTE: a slight gap between the middle panes and the side
supports is normal because it allows for the heat
expansion of the glass.
6. Place the pack of three glass panes between the two uprights
and replace the top strip.
Replacement of the oven light
WARNING
5. Replace the middle panes after cleaning in reverse order,
checking that they are oriented so the words INTERNAL
SIDE are properly legible.
Make sure that:
• The oven and lights are cool and power to the oven has
been turned off before replacing the light bulb(s). Failure
to do so could result in electrical shock or burns.
• The lenses must be in place when using the oven.
• The lenses serve to protect the light bulb from breaking.
• The lenses are made of glass. Handle carefully to avoid
breakage. Broken glass could cause an injury.
1
3
1
(230V - 15 or 25W)
1
2
2
(230V - 25W G9)
3
2
(230V - 25W G9)
34
1 Turn off power at the main power supply (fuse or breaker
box).
2 Remove the lens (1).
3 Remove the light bulb (2) from its socket (3).
4 Replace the bulb (2) with a new one. Avoid touching the
bulb with fingers, as oils from hands can damage the bulb
when it becomes hot.
5 Use one with the same Volt and Watt (see figure).
6 Screw the lens (1) back on.
7 Turn power back on at the main power supply (fuse or
breaker box).
Page 75

19 - Solving Baking Problems
With either Bake or Convection Bake, poor results can occur for many reasons other than a malfunction of the oven. Check the chart
below for causes of the most common problems. Since the size, shape and material of baking utensils directly affect the baking
results, the best solution may be to replace old baking utensils that have darkened and warped with age and use.
Baking Problem Cause
Food browns unevenly - Oven not preheated
- Aluminum foil on oven rack or oven bottom
- Baking utensil too large for recipe
- Pans touching each other or oven walls
Food too brown on bottom - Oven not preheated
- Using glass, dull or darkened metal pans
- Incorrect rack position
- Pans touching each other or oven walls
Food is dry or has shrunk excessively - Oven temperature too low
- Oven not preheated
- Oven door opened frequently
- Tightly sealed with aluminum foil
- Pan size too small
EN
Food is baking or roasting too slowly - Oven temperature too low
- Oven not preheated
- Oven door opened frequently
- Tightly sealed with aluminum foil
- Pan size too small
Pie crusts do not brown on bottom or have soggy crust - Baking time not long enough
- Using shiny steel pans
- Incorrect rack position
- Oven temperature is too low
Cakes pale, flat and may not be done inside - Oven temperature too low
- Incorrect baking time
- Cake tested too soon
- Oven door opened too often
- Pan size may be too large
Cakes high in middle with crack on top - Baking temperature too high
- Baking time too long
- Pans touching each other or oven walls
- Incorrect rack position
- Pan size too small
Pie crust edges too brown - Oven temperature too high
- Edges of crust too thin
35
Page 76

EN
20 - Solving Operational Problems
Before contacting service, check the following to avoid unnecessary service charges.
Oven Problem Problem Solving Steps
Other F__ Error appears in the display window. Remove power and turn it back on again after a few seconds. If
condition persists, note the code number (in the EVENT LOG list)
and contact service.
The oven display stays OFF Turn off power at the main power supply (fuse or breaker box).
Turn breaker back on.
If condition persists, call an authorized service.
Cooling fan continues to run after oven is turned off The fan turns off automatically when the electronic components
have cooled sufficiently.
Oven is not heating Check the circuit breaker or fuse box to your house. Make sure
there is proper electrical power to the oven. Make sure the oven
temperature has been selected.
Oven is not cooking evenly Refer to cooking charts for recommended rack position. Always
reduce recipe temperature by 25°F (15°C) when baking with
Convection Bake mode.
Oven light is not working properly Replace or reinsert the light bulb if loose or defective. See Page
34. Avoid touching the bulb glass with bare fingers as finger oil
may cause bulbs to burn out prematurely.
Oven light stays on Check for obstruction in oven door. Check to see if hinge is bent
or door switch broken.
Clock and timer are not working properly Make sure there is proper electrical power to the oven. See the
Clock sections on Page 16.
Excessive moisture When using Bake mode, preheat the oven first. Convection Bake
and Convection Roast will eliminate any moisture in oven (this is
one of the advantages of convection).
Porcelain chips When oven racks are removed and replaced, always tilt racks
upward and do not force them to avoid chipping the porcelain.
36
Page 77

Before contacting service, please check “Troubleshooting.” It
may save you the cost of a service call.
If you still need help, follow the instructions below. When
calling, please know the purchase date and the complete
model and serial number of your appliance. This information
will help us to better respond to your request.
Service Data Record
For authorized service or parts information see paragraph
“WARRANTY for Home Appliances”.
For authorized service or parts information see paragraph
“WARRANTY for Home Appliances”.
For serial tag location see Page 2. Now is a good time to
write this information in the space provided below.
Keep your invoice for warranty validation.
Service Data Record
Model Number _________________________________
21 - Assistance or Service
EN
Serial Number __________________________________
Date of Installation or Occupancy __________________
37
Page 78

EN
38
Page 79

FR
TABLE DES MATIERES PAGE
Consignes de sécurité 2
1 2 -
Caractéristiques du produit 3
3 -
Installation du four 4
Caractéristiques électriques 4
Respect de l’environnement 4
Branchement du four au réseau électrique 10
4 -
Mode d’emploi 11
Première utilisation du four 11
Grilles du four amovibles (si présentes) 11
5 -
Tableau de commande 12
Clavier 12
6 -
Généralités concernant le four 13
Codes d’erreur 13
Bips sonores 13
Réglages par défaut 13
F Codes numériques d’erreur 13
Préchauffage et Préchauffage rapide 13
Minuterie 13
7 -
Conseils Généraux Sur le Four 14
Préchauffage du four 14
Suggestions d’utilisation 14
Ustensiles 14
Condensation du four et température 14
Cuisson à haute altitude 14
8 -
Démarrage 15
Instructions à suivre lors du premier
allumage
9 -
Réglages utilisateur 16
Langue 16
Température et poids 16
Heure 16
Date 17
Luminosité 17
Volume 17
10 -
Réglage du système 18
Journal d’événements 18
Démo 18
11 -
Mise en marche du four 19
Allumage et arrêt du four 19
Sélection du mode de cuisson 19
Modification du mode de cuisson 19
Modification de la température 19
15
TABLE DES MATIERES PAGE
Tableaux des modes de cuisson 20
12 -
Phase de préchauffage 22
Préchauffage rapide 22
Eco 22
Éclairage du four 22
13 -
Fonctionnement du mode temporisé 23
Temps de cuisson 23
Temps d’arrêt 23
14 -
Réglage de la sonde thermique
(le cas échéant) 24
15 -
Comprendre les différents modes de
fonctionnement du four 26
Conseils et techniques de rôtissage 26
Directives générales 26
Conseils et techniques de vraie convection 26
Conseils et techniques de convection
cuisson 27
Conseils et techniques pour le convection
grill 27
Conseils et Techniques de Grill (Broil) 27
Conseils et Techniques de Déshydratation 27
Tableau de grillade à déshydratation 28
16 -
16 - Recettes 29
17 -
Instructions pur le mode Shabbat (sur certains
modèles) 31
18 -
Entretien du four et nettoyage 32
Nettoyage 32
Retirer la porte 32
Retirer la porte du four coulissante 33
Comment démonter les vitres internes de la
porte panoramique« FULL GLASS »
Pour remplacer une ampoule 34
19 -
Résolutions des problèmes de cuisson 35
20 -
Résolution des Problèmes de Fonctionnement 36
21 -
Assistance ou Service Après-Vente 37
Enregistrement des données d'entretien 37
33
1
Page 80

FR
1 - Consignes de sécurité
• Tenir à l’écart les enfants de moins de 8 ans sans
surveillance constante.
• Cet appareil n’est pas sensé être utilisé par des
personnes(y compris enfants de plus de 8 ans) dont les
capacités physiques, sensorielles ou mentales sont
diminuées ou dont l’expérience et la connaissance
sont insuffisantes sauf si une personne responsable de
la sûreté de ces appareils a au préalable supervisé
ou expliqué le fonctionnement de cet appareil.
• Les opérations de nettoyage et d’entretien ne doivent
pas être réalisées par des enfants sans surveillance.
IMPORTANT
• Pour éviter d’endommager l’émail, ne couvrez pas
la sole du four avec une feuille d’aluminium, la
Il est possible d’accéder à la plaque des
caractéristiques du four même lorsque l’appareil
est installé. La plaque est visible simplement en
ouvrant la porte. Toujours indiquer les informations
indiquées sur la plaque pour identifier l'appareil
lors de la commande de pièces de rechange.
lèchefrite ou d’autres choses.
• Ne pas utiliser des produits nettoyants abrasifs ou
des grattoirs métalliques aiguisés pour nettoyer
le verre de la porte du four dans la mesure où ils
peuvent rayer la surface et entraîner l’éclatement du
verre.
• Les détergents abrasifs et les équipements de
• Avant de procéder au démontage d’une pièce, prenez
soin de débrancher le câble du réseau électrique.
• Ne pas utiliser l’appareil si des composants de ce
dernier sont cassés (par ex. La vitre). Débranchezle du
réseau électrique et appelez l’assistance technique.
• Avant de passer à la première utilisation du four,
il est recommandé de le faire fonctionner à vide à
température maximale, pendant une heure environ
pour éliminer les odeurs.
• Lorsque le gril est employé, pour tous les modèles
laisser la porte fermèe.
• La turbine de refroidissement, peut rester en
fonctionnement tant que le four est chaud, même
nettoyage à vapeur ne devraient pas être utilisés
pour le nettoyage.
• L'appareil ne doit pas être installé derrière une porte
décorative afin d'éviter toute surchauffe.
• AVERTISSEMENT : S'assurer que l'appareil est éteint
avant de remplacer la lampe, afin d'éviter le risque
d'électrocution.
• Le four est froid et hors tension avant d’enlever la
porte sinon vous pouvez vous électrocuter ou vous
brûler. Le non-respect de ces consignes peut entraîner
une électrocution ou des brûlures.
• Utiliser exclusivement la sonde à viande fournie avec
l’appareil.
quand on l’a éteint.
• En cours de fonctionnement, les éléments & accessoires
internes du four sont très chaud.
Si le four est installé dans une pièce avec une
• Les parents et adultes devraient être particulièrement
vigilants lorsqu’ils utilisent le produit en présence
d’enfants.
• Veuillez surveiller les enfants afin qu’ils ne jouent pas
température ambiante inférieure à 37°F (3°C),
F*0117 peut s'afficher. Quand une température
ambiante plus élevée est atteinte, le message
d'erreur disparaît.
avec l’appareil.
IMPORTANT
2
Page 81

Consulter les figures ci-dessous pour l’introduction correcte des grilles.
GLISSIÈRES EMBOUTIES
2 - Caractéristiques du produit
FR
GLISSIÈRES DÉMONTABLES
3
Page 82

FR
3 - Installation du four
Respect de l’environnement
Pour encastrer le four dans le meuble, il suffira de faire une découpe
ayant les dimensions indiquées dans la figure Découpe et Dimensions.
Le four doit être fixé au meuble au moyen des deux vis fournies à cet
effet dans les trous prévus sur les montants du four.
La partie arrière de la niche ou le four est encastré doit être ouverte
de façon à assurer une ventilation suffisante à éviter que le meuble se
surchauffe.
AVERTISSEMENT
Comme l’appareil est installé dans le meuble, s’assurer que les
surfaces en contact avec le four peuvent tolérer une température
d’environ 90 °C.
Caractéristiques électriques
Puissance absorbée maximum : (voir plaquette d'identification).
Tension d’alimentation : (voir plaquette d'identification).
La documentation relative à cet appareil est réalisée avec du papier
blanchi, sans chlore, ou du papier recyclé, dans le but de contribuer
à la protection de l’environnement. Les emballages sont conçus de
manière à ne pas polluer la nature ; il s’agit de produits écologiques
qui peuvent être récupérés ou recyclés.
En recyclant l’emballage, on contribue à économiser les matières
premières et à réduire le volume des déchets industriels et ménagers.
LE MATERIEL D’EMBALLAGE est recyclable à 100% et est marqué par
le symbole du recyclage. Pour l’élimination, suivre les règlementations
locales. Le matériel d’emballage (sachets en plastique, parties
en polystyrène, etc.) doit être tenu hors de la portée des enfants,
car il représente une source potentielle de danger. CET APPAREIL
est marqué conformément à la Directive Européenne 2012/96/
UE, Déchets d’équipements électriques et électroniques provenant
des Equipements Electriques et Electroniques [Waste Electrical and
Electronic Equipment] (WEEE). L’utilisateur doit s’assurer que ce produit
est éliminé correctement, et contribue ainsi à éviter les conséquences
négatives potentielles pour l’environnement et la santé.
LE SYMBOLE sur le produit ou sur la documentation d’accompagnement
indique que ce produit ne doit pas traité comme un déchet domestique,
mais doit être remis auprès du centre de collecte approprié pour le
recyclage des appareils électriques et électroniques.
4
Page 83

MOD. 45
min 3
FR
min 460
50
510
595
50
510
560
140
560
50
144
min
432
450
510
533
540
560
432
594
min
455
min 458
3
540
455
528
545
554
26
596
533
594
Les dimensions sont exprimées en centimètres
5
Page 84

FR
MOD. 60
595
50
510
560
510
594
595
535
21
min 5
595
50
510
560
min
min 600
5
540
594
594
535
21
Les dimensions sont exprimées en centimètres
6
Page 85

MOD. 75
FR
595
50
510
710
568
545
682
594
750
21
min 5
5
min
682
min
585
5
594
568
595
50
510
710
545
750
21
Les dimensions sont exprimées en centimètres
7
Page 86

FR
min 5
MOD. 90x48
480
min
50
510
860
849
477
472
893
517
538
5
min
475
min
860
50
510
min
5
472
517
538
849
477
893
Les dimensions sont exprimées en centimètres
8
Page 87

MOD. 90x60
min 5
FR
595
50
510
860
826
594
563
895
530
551
min 5
595
860
50
510
min 5
563
530
551
826
594
895
Les dimensions sont exprimées en centimètres
9
Page 88

FR
Branchement du four au réseau électrique
AVERTISSEMENT
Cet appareil doit être relié à la terre.
Le four est prévu exclusivement pour usage domestique.
La tension d’alimentation et la puissance absorbée sont indiquées sur
la plaquette située sur le montant de gauche, visible lorsque la porte
est ouverte.
Le branchement doit être effectué par du personnel qualifié, et
conformément aux normes en vigueur.
Si ces règles ne sont pas respectées, le constructeur n’est pas
responsable des dommages provoqués à des personnes ou à des
choses.
Si le câble d’alimentation est endommagé, il ne doit être remplacé
que par le fabricant, son agent de service ou une personne qualifiée
similaire afin d’éviter tout danger.
Le four doit être branché au réseau électrique au moyen d’un dispositif
d’interruption omnipolaire ayant une distance d’ouverture des contacts
d’au moins 3 mm, en s’assurant cependant que le fil de mise à la terre
ne soit pas interrompu. Pour le branchement, utiliser un câble flexible,
en veillant à le laisser suffisamment long pour permettre l’extraction du
four pour les opérations d’entretien nécessaire.
Un tel appareil doit être doté d'une alimentation électrique conforme
aux réglementations
régissant les installations électriques.
La prise ou l'interrupteur doit être facilement accessible quand le four
est entièrement installé.
TYPES DE CABLES ET DIAMETRES MINIMAUX
SASO
H05RR-F 3x1,5 mm² H05RR-F 3x2,5 mm²
H05VV-F 3x1,5 mm² H05VV-F 3x2,5 mm²
H05RN-F 3x1,5 mm² H05RN-F 3x2,5 mm²
H05V2V2-F 3x1,5 mm² H05V2V2-F 3x2,5 mm²
10
Page 89

Première utilisation du four
Nettoyer soigneusement le four avec de l'eau savonneuse et bien
rincer.
Faire fonctionner le four pendant environ 30 minutes à la température
maximale afin de brûler toute trace de
graisse qui, autrement, pourrait générer des odeurs désagréables lors
de la cuisson.
AVERTISSEMENT
Ne jamais utiliser de feuilles d'aluminium pour couvrir les grilles ou
le fond du four. La chaleur coincée sous l’aluminium peut causer des
dégâts au four.
AVERTISSEMENT
Veillez à ne pas le forcer pour éviter d’endommager l’émail.
4 - Mode d’emploi
FR
Grilles du four amovibles (si présentes)
Pour retirer les cadres latéraux des fours aux parois lisses, procéder
comme indiqué dans la figure.
11
Page 90

FR
5 - Tableau de commande
Votre appareil peut présenter des petites différences par rapport à l'illustration ci-dessous.
A
- Clavier
B
- Ecran
VENDREDI 11/20/2015
PM
04:26
B
Clavier
Pour utiliser les touches, appuyer dessus, légèrement. Le clavier ne
fonctionnera pas si on enfonce pus d'une touche à la fois.
Flèches de déplacement
Retour à la page-écran précédente: la pression
continue permet de retourner à la page d'accueil.
Allumage et arrêt du four
Confirme les paramètres et démarre les
opérations de cuisson Quand la touche est
enfoncée pendant une opération de cuisson, la
fonction est mise en pause. Appuyer de nouveau
pour faire remettre en marche.
A
12
Pour configurer la minuterie.
Accéder au menu Fonctions pendant la cuisson.
Allumage et arrêt de la lumière du four.
Page 91

6 - Généralités concernant le four
Avant d’utiliser le four pour la première fois, retirez tous les matériaux d’emballage et autres. En effet, tous ces matériaux pourraient fondre ou brûler
une fois l’appareil allumé.
FR
Codes d’erreur
Ce code s'affiche quand la commande électrique indique une
défaillance. Quand une erreur s'affiche, la fonction en cours est
bloquée. Si le type d’erreur est lié à une fonction de sécurité, le four
devient inutilisable et l’erreur se représente à chaque redémarrage
(dans ce cas, appeler le service d’assistance); si, en revanche, l’erreur
correspond à une défaillance d’importance secondaire, le four pourra
encore être utilisé au redémarrage dans les fonctions n’impliquant pas
la partie défaillante (par exemple un élément thermique).
Bips sonores
Valide la réception de la commande après la pression d’une touche.
Il signale également qu’une fonction temporisée s’est achevée (ex.
horloge ou cuisson temporisée). Pendant l’exécution d’une recette, le
signal sonore prévient l’utilisateur que le four attend une opération de
sa part (par ex. introduire le plat ou le retourner).
Les bips sonores indiquent aussi une défaillance du four.
Réglages par défaut
Dès la sélection d’un mode de cuisson, celui-ci sélectionne
automatiquement une température adaptée, qui peut cependant être
modifiée au besoin.
Préchauffage et Préchauffage rapide
Lorsque vous sélectionnez un mode de cuisson, le préchauffage
démarre ; pendant ce temps, la température instantanée s’affiche avec
l’icône du thermomètre.
Dès que la valeur 100% de la température est atteinte, un signal
sonore indique la fin du préchauffage et la valeur de température
actuelle disparaît
Si vous avez besoin de faire chauffer le four rapidement, vous pouvez
utiliser le mode de préchauffage rapide, qui utilise les résistances et le
ventilateur de convection d’une manière spéciale pour réduire le plus
possible le temps de réchauffement.
Une fois que les fonctions de cuisson pour lesquelles un préchauffage
rapide est disponible, ont été paramétrées et après que la température
souhaitée a été réglée, cliquer sur la touche
au menu Fonctions, sélectionner l'icône
puis confirmer avec la touche .
Dès que la température de consigne est atteinte, le signal sonore
correspondant se déclenche et les deux icônes « Préchauffage
rapide » et « Température actuelle » disparaissent. Le four passe
automatiquement sur le mode de cuisson qui avait été défini
précédemment : maintenant il est possible d'enfourner les aliments.
. Après avoir accédé
avec les touches
Minuterie
AVERTISSEMENT
F Codes numériques d’erreur
Ces codes s’affichent quand l’unité de commande électronique détecte
un problème au niveau du four ou de l’électronique de contrôle.
Le code d’erreur est enregistré dans le journal des erreurs du menu
Setup. Cette erreur peut être communiquée au technicien du service
d’assistance pour qu’il comprenne à l’avance la cause possible
d’erreur.
La minuterie du four n'allume pas et n'éteint pas le four ; elle sert
uniquement à vous avertir avec l'avertisseur sonore. Quand on
souhaite éteindre le four automatiquement, il est nécessaire d'utiliser
la fonction Fin de cuisson et la fonction de cuisson retardée.
REMARQUE Enfoncer le bouton OFF ne réinitialise pas et n'arrête
pas non plus la minuterie.
1. Enfoncer le bouton
flèches puis confirmer avec le bouton . Pour faire
basculer la sélection entre les heures et les minutes, utiliser les
flèches .
2. Il est possible de paramétrer le temps de 1 minutes à 12 heures
et 59 minutes et, quand celui-ci est paramétré, le temps restant
est toujours visible dans la barre d'état du bas jusqu'à ce que ce
temps se soit écoulé ou que la minuterie soit réinitialisée.
3. Pour modifier ou annuler le temps paramétré, il est nécessaire de
remettre la minuterie à zéro et de maintenir le bouton
pendant quelques secondes.
4. Le format de la minuterie est généralement HR:MIN, puis il passe
en MIN:SEC pendant la dernière minute.
5. Quand le temps est écoulé, l'écran affiche 00:00 et l'avertisseur
sonore sonne pendant une minute ou jusqu'à ce que le bouton
soit enfoncé.
et régler le temps souhaité à l'aide des
enfoncé
13
Page 92

FR
7 - Conseils Généraux Sur le Four
Préchauffage du four
• Préchauffez le four pour les modes de Cuisson, Convection Europ.
et Convection Cuisson.
• Utilisez le mode de préchauffage rapide lorsqu’un bref délai est
nécessaire pour préchauffer le four.
• Sélectionnez une température plus élevée ne réduit pas le temps de
préchauffage.
• Le préchauffage est nécessaire pour de bons résultats lorsque vous
cuisinez des gâteaux, des biscuits, des pâtisseries et du pain.
• Le préchauffage aidera à saisir les rôtis et à garder la viande juteuse.
• Places les grilles de four dans leur position appropriée avant le
préchauffage.
• Pendant le préchauffage, la température de cuisson choisie est
toujours affichée.
• Un signal va confirmer que le four est préchauffé et l’écriture
“température détectée” s’éteindra.
Suggestions d’utilisation
• Ne posez pas les plats sur la porte ouverte.
• Utilisez la lumière intérieure du four pour voir la nourriture à travers la
fenêtre de la porte du four plutôt que d’ouvrir la porte fréquemment.
Condensation du four et température
• Il est normal qu’une certaine quantité d’humidité s’évapore des
aliments pendant la cuisson. La quantité dépend de l’humidité
contenue dans la nourriture. L’humidité peut se condenser sur toute
surface plus froide que l’intérieur du four, comme le tableau de
commande.
• Votre nouveau four a un capteur électronique de température qui
permet de maintenir soigneusement la température sélectionnée.
Votre ancien four devait avoir un thermostat mécanique qui passait
graduellement à une température plus élevée. Il est normal que vous
ayez à ajuster vos recettes préférées en cuisinant dans un nouveau
four.
Cuisson à haute altitude
• Lorsque vous cuisinez à haute altitude, les recettes et les durées de
cuisson varient de la norme.
Ustensiles
• Les plats en verre absorbent la chaleur. Réduisez la température du
four de 25 °F (15 °C) lorsque vous utilisez des plats en verre.
• Utilisez des plats qui donnent le brunissage désiré. Le type du
finissage du plat aide à déterminer le brunissage.
• Les plats métallisés lisses et brillants ou anodisés/antiadhésifs plus
pâles réfléchissent la chaleur, donnant un brunissage plus léger, plus
délicat. Les gâteaux et les biscuits nécessitent ce type de plat.
• Les plats mats, rugueux, foncés vont absorber la chaleur donnant
une croûte plus brune plus croustillante. Utilisez ceux-ci pour les
tartes.
• Pour des croûtes croustillantes, brunes, utilisez des plats anodisés/
antiadhésifs ou foncés ou en métal mat ou en verre. Des plats isolés
peuvent augmenter le temps de cuisson.
• Ne cuisez pas avec le gril vide dans le four, cela pourrait changer
la performance de cuisson.
• Rangez-le en dehors du four.
14
Page 93

Instructions à suivre lors du premier allumage
04 : 26
PM
MARDI 11/24/2015
Une fois le four branché pour la première fois à l’alimentation
électrique, l’unité de contrôle se prépare automatiquement à la mise au
point de certains paramètres utilisateur qui seront gardés en mémoire
à chaque allumage successif.
• Langue
• Température et poids
• Heure
• Date
Pour les instructions de mise au point, consulter le paragraphe USER
SETTING.
Après avoir mis au point les paramètres utilisateur, l’unité de contrôle
se porte automatiquement à la page « Stand-by ».
8 - Démarrage
FR
15
Page 94

FR
RÉGLAGE
REGLAGES
12
yk
abc
RÉGLAGE
LANGUE
°F
°ClbKg
12h
24h
AM
PM
04 : 26
PM
9 - Réglages utilisateur
Quand le four est allumé, sélectionner l'icône puis confirmer avec
la touche
de personnaliser les paramètres du four. Pour pouvoir accéder, vérifier
qu’il n’y a pas de cuisson active ni de fonction temporisée activée.
REMARQUE Le menu Paramètres ne peut jamais tre paramétré si
1. Enfoncer les touches
confirmer avec la touche
2. Utiliser ce menu pour modifier les paramètres suivants:
Enfoncer les touches ou pour sélectionner la paramètre
ou changer un sous-menu parmi les six disponibles, puis confirmer
avec la touche .
pour accéder au menu PARAMETRES. Ce menu permet
une fonction temporisée quelconque est déjà activée.
il convient donc, tout 'abord, de supprimer toutes les
fonctions temporisées activées.
pour sélectionner le sous-menu et
.
Température et poids
Enfoncer la touche flèche et pour sélectionner une des
deux options de température “°C/°F” ou l'une des options de poids
Kg/ib puis confirmer avec la touche .
Heure
Enfoncer la touche flèche pour sélectionner le format de l'heure
:“ 12h AM/PM ou 24h” , puis confirmer avec la touche
paramétrer l'heure avec les flèches puis confirmer avec la touche
.
. Ensuite,
16
Langue
Enfoncer la touche flèche pour sélectionner une langue parmi
celles disponibles puis confirmer avec la touche
.
Page 95

FR
12
J.M.A.
A.M.J.
M.J.A.
12
11/20/2015
ON MISE EN VEILLE
BAS
MOYEN
HAUT
OBSCURITÉ
MOYEN
HAUT
NIVEAU
BAS
MOYEN
HAUT
Date
Enfoncer la touche flèche pour sélectionner le format de la
date parmi les options disponibles : “J.M.A. – A.M.J. – M.J.A.”, puis
confirmer avec la touche . Ensuite, paramétrer la valeur avec les
flèches puis confirmer avec la touche .
Volume
Appuyer sur la flèche pour sélectionner le degré de volume
requis et confirmer avec la touche .
Luminosité
Enfoncer la touche flèche pour choisir le paramétrage de
luminosité à changer entre ON ou STANDBY puis, avec les touches
flèches
avec la touche
sélectionner le degré de luminosité souhaité et confirmer
.
17
Page 96

FR
RÉGLAGE
SERVICE
SYSTÈME
REGISTRE ÉVÉNEMENTS
TENSION DE SECTEUR
DEMO
OM 15
01 12/11/2015 07:06 CODE: F10305
REGISTRE ÉVÉNEMENTS
02 17/11/2015 13:17 CODE: F10305
DEMO
ON
10 - Réglage du système
Démo
Quand le four est allumé, sélectionner l'icône puis confirmer avec
la touche pour accéder au menu PARAMETRES. Ce menu permet
de configurer certains paramètres ou des fonctions spéciales. Il permet
également d'accéder à la liste des erreurs.
1. Cliquer sur les touches
confirmer avec la touche
pour sélectionner le sous-menu, puis
.
2. Utiliser ce menu pour modifier les paramètres suivants:
Cliquer sur les touches pour sélectionner l'élément à
paramétrer ou à afficher parmi les trois disponibles, puis confirmer
avec la touche .
Cette fonction sert à activer le mode DEMO, qui rend le four inutilisable
pour les cuissons mais effectue automatiquement une démonstration
des fonctions.
1. Cliquer sur les touches
2. Confirmer avec la touche
3. Cliquer sur la touche
pour sélectionner "ON"
.
.
Après 30 secondes environ, le four se met à fonctionner dans cette
modalité.
Pour suspendre momentanément la fonction DEMO, il suffit de
maintenir enfoncée quelques secondes une touche quelconque jusqu’à
ce que le four se mette en veille ; pour le redémarrer, cliquer sur la
touche .
Pour désactiver cette fonction, accéder à la page DEMO et choisir
l'option OFF. Confirmer avec la touche .
REMARQUE : Si elle est sélectionnée, la fonction reste active même si
le four est débranché de la prise de courant du secteur.
Journal d’événements
Ce menu permet de vérifier les erreurs enregistrées. Ces codes peuvent
être communiqués au servie après-vente,
18
Page 97

11 - Mise en marche du four
FR
Allumage et arrêt du four
IMPORTANT
• La touche n'arrête pas la fonction.
• Une fois le four éteint, le ventilateur de refroidissement pourrait
continuer à fonctionner jusqu’à ce que les parties internes du four
se soient refroidies.
Cliquer sur
pour l'éteindre. Le four retourne en mode de veille.
pour allumer le four puis appuyer une nouvelle fois
Sélection du mode de cuisson
IMPORTANT
• Ne laissez pas longtemps la porte ouverte pendant la cuisson.
• La porte doit rester fermée pendant les fonctions BROIL.
• Positionner la ou les grilles sur le niveau approprié.
FOUR 45 cm
CUISSON CIRCULAIRE
PAR CONVECTION
CUISSON PAR
CONVECTION
GRILL PAR CONVECTION
INFÉRIEUR
CUISSON INFÉRIEURE
PAR CONVECTION
CUISSON ÉCO CUISSON ÉCO
60 cm
FOUR
75 cm
90x48 cm
90X60 cm
CUISSON CIRCULAIRE
PAR CONVECTION
CUISSON PAR
CONVECTION
GRILL PAR CONVECTION
INFÉRIEUR
CUISSON INFÉRIEURE
PAR CONVECTION
FOUR 45 cm
DÉSHYDRATATION DÉCONGÉLATION
CUISSON DE SOLE DÉSHYDRATATION
CUISSON CUISSON DE SOLE
SABBAT
sur certains modèles
1. Sélectionner l'icône
le mode de cuisson approprié en fonction des aliments à cuire, à
l'aide des flèches puis confirmer avec la touche .
2. Sur cette page, il est possible de modifier le mode de cuisson en
utilisant les touches
3. Si la température proposée est correcte, validez avec la touche
pour démarrer la cuisson ; autrement, en l’absence de pression
sur la touche , elle s’active automatiquement au bout de 10
secondes et l’icône du mode de cuisson devient animée.
puis cliquer sur la touche . Sélectionner
.
60 cm
FOUR
75 cm
90x48 cm
90X60 cm
CUISSON
SABBAT
sur certains modèles
Modification du mode de cuisson
1. Pour mettre en pause la marche du four pendant une cuisson non
temporisée, cliquer sur la touche . Tous les paramètres de la
cuisson interrompue restent mémorisés ; pour redémarrer, appuyez
à nouveau sur cette touche.
2. Pour changer le mode de cuisson quand le four est en marche,
cliquer sur la touche
de choisir un autre mode de cuisson parmi ceux disponibles dans
le groupe, à l'aide des des flèches .
puis sur la touche . Il est alors possible
GRILL GRILL
DOUBLE GRILL DOUBLE GRILL
DOUBLE GRILL
VENTILÉ
CUISSON DE VOÛTE CUISSON DE VOÛTE
PIZZA PIZZA
DÉCONGÉLATION NETTOYAGE
DOUBLE GRILL
VENTILÉ
Modification de la température
IMPORTANT
• Dans les modes de cuisson où la température est fixe, la valeur
n’est pas affichée.
• À la fin d’une fonction, l’afficheur montre, la température de
chaleur résiduelle de la cavité à la page de stand-by
1. Il est possible de modifier la température à la page d’aperçu du
mode de cuisson avec les flèches
touche .
2. Une fois que la cuisson a démarré, il est possible de changer la
température à n’importe quel moment, avec les flèches
puis en confirmant avec la
.
19
Page 98

FR
12 - Tableaux des modes de cuisson
FOUR 45 cm
MODE DE CUISSON ICÔNE PRÉCHAUFFAGE
RAPIDE
DÉCONGÉLATION 40°C 50°C 60°C
SONDE DE TEM
PÉRATURE
Min. Prédéfinie Max.
TEMPÉRATURE
DÉSHYDRATATION
CUISSON DE SOLE 50°C 50°C 200°C
CUISSON
CUISSON ÉCO 50°C 165°C 230°C
CUISSON CIRCULAIRE PAR
CONVECTION
PIZZA
CUISSON PAR CONVECTION
GRILL PAR CONVECTION
INFÉRIEUR
DOUBLE GRILL VENTILÉ
CUISSON INFÉRIEURE PAR
CONVECTION
50°C 60°C 70°C
50°C 190°C 230°C
50°C 165°C 230°C
50°C 230°C 230°C
50°C 165°C 230°C
50°C 165°C 230°C
50°C 165°C 230°C
50°C 165°C 200°C
GRILL
DOUBLE GRILL
CUISSON DE VOÛTE
SABBAT (si présent)
50°C 230°C 230°C
50°C 230°C 230°C
50°C 180°C 230°C
60°C
20
Page 99

FOUR 60 cm - FOUR 75 cm - FOUR 90x48 cm - FOUR 90X60 cm
MODE DE CUISSON ICÔNE PRÉCHAUFFAGE
RAPIDE
DÉCONGÉLATION 40°C 50°C 60°C
SONDE DE TEM
PÉRATURE
Min. Prédéfinie Max.
TEMPÉRATURE
FR
DÉSHYDRATATION
CUISSON DE SOLE 50°C 50°C 250°C
CUISSON
CUISSON ÉCO 50°C 165°C 250°C
CUISSON CIRCULAIRE PAR
CONVECTION
PIZZA
CUISSON PAR CONVECTION
GRILL PAR CONVECTION
INFÉRIEUR (*)
DOUBLE GRILL VENTILÉ (*)
CUISSON INFÉRIEURE PAR
CONVECTION
50°C 60°C 70°C
50°C 190°C 250°C
50°C 165°C 250°C
50°C 230°C 250°C
50°C 165°C 250°C
50°C 165°C 250°C
50°C 165°C 250°C
50°C 165°C 250°C
GRILL (*)
DOUBLE GRILL (*)
CUISSON DE VOÛTE
SABBAT (si présent)
NETTOYAGE
(*) Certains fours peuvent être équipés de moteur de la tige et de la broche pour la cuisson au tournebroche.
50°C 230°C 250°C
50°C 230°C 250°C
50°C 180°C 250°C
60°C
250°C
21
Page 100

FR
325°F
275°F
11:00 am
CUISSON CIRCULAIRE PAR CONVECTION
++
--
325°F
11:06 am
CUISSON CIRCULAIRE PAR CONVECTION
++
--
325°F
11:00 am
CUISSON CIRCULAIRE PAR CONVECTION
++
--
325°F
275°F
11:00 am
CUISSON CIRCULAIRE PAR CONVECTION
++
--
Phase de préchauffage
Pendant que le four est en préchauffage, la température instantanée
s’affiche sous l’icône du mode du cuisson.
Dès que la température de consigne est atteinte, le four émet un signal
sonore et l’indication de la température instantanée disparaît.
Préchauffage rapide
La fonction FAST PREHEAT permet d’atteindre la température souhaitée
dans un délai plus bref par rapport au préchauffage standard. La
fonction peut être activée pour tous les modes de cuisson des groupes
BAKE (sauf le Sabbat et Eco), CONVECT et PIZZA
Pour sélectionner FAST PREHEAT :
3. Cliquer de nouveau sur la touche pour faire partir la fonction.
L’icône de la fonction active reste affichée jusqu’à ce que la
température de consigne soit atteinte. La fonction commute ensuite
automatiquement au mode de cuisson choisi.
Eco
Ce mode est conçu pour réaliser des économies d’énergie.
Il est parfait pour les aliments surgelées ou précuits et pour des
repas composes de petites portions. Le temps de préchauffage est
extrêmement court et la cuisson tend à être plus lente. Il est déconseillé
pour les charges importantes, par exemple des grosses portions et la
préparation de grands repas.
1. Sélectionner le mode de cuisson comme indiqué précédemment et
cliquer sur la touche pour afficher la page d’aperçu du mode
cuisson.
2. Cliquer sur la touche
Sélectionner l'icône à l'aide des flèches et confirmer avec la
touche . Le symbole s'affiche en bas de l'écran.
22
.
Éclairage du four
Un seul bouton lumineux active les lampes des fours.
Toucher pour allumer ou éteindre les lumières.
L’éclairage du four s’allume automatiquement à l’ouverture de la porte.
Quand un four est en service, les lampes du four s’allument
automatiquement lors de l’activation d’un mode de fonctionnement.
Les lampes du four s’éteignent automatiquement à la désactivation du
mode de fonctionnement.
REMARQUE : Une fois allumées, les lumières s'éteignent
automatiquement après 3 minutes. Pour les rallumer,
cliquer sur la touche ou ouvrir la porte.
 Loading...