

Page 1
FCMO 4511 TM
FCMO 4507 TM
FORNO A MICROONDE
MICROWAVE OVEN
FOUR A MICRO-ONDES
MIKROWELLE
HORNO MICROONDAS
MAGNETRONOVEN
FORNO MICROONDAS
IT INSTALLAZIONE - UTILIZZO - MANUTENZIONE
EN INSTALLATION - USE - MAINTENANCE
FR INSTALLATION - UTILISATION - MAINTENANCE
DE EINBAU - BENUTZUNG - WARTUNG
ES INSTALACIÓN - USO - MANTENIMIENTO
NL INSTALLATIE - GEBRUIK - ONDERHOUD
PT INSTALAÇÃO - UTILIZAÇÃO - MANUTENÇÃO
Page 2

Page 3

IT
INDICE PAG .
1 - Avvertenze per Forni a Microonde 4
Preparazione Cibo 4
Pentole e teglie 4
Potenza e durata microonde 4
Imballaggi 4
Bevande 4
Alimenti per neonati 4
Cibi con pelle o buccia 5
Essiccare cibo 5
Olio 5
Cause di danni 5
Primo utilizzo 7
Montare e smontare la griglia piana 7
Rispetto per l’ambiente 8
2 - Pannello di Controllo 9
Tastiera 9
3 - Informazioni Generali Forno 10
Codici errore 10
Segnali acustici 10
Impostazioni Predefinite 10
Numero Codici Guasti F 10
Preriscaldamento 10
Timer 10
4 - Suggerimenti Generali Forno 11
Preriscaldare il Forno 11
Suggerimenti per il Funzionamento 11
Funzionamento con microonde 11
Condensazione e Temperatura Forno 11
Cottura al Forno ad Alta Quota 11
5 - Introduzione 12
Istruzioni per l'accensione iniziale 12
INDICE PAG .
7 - Impostazioni di Sistema 15
Registro Eventi 15
Demo 15
8 - Avviare il Forno 16
Accendere e spegnere il forno 16
Tabella Modalità di Cottura 17
9 - Cottura Tradizionale 18
Cambiare la modalità di cottura 18
Cambiare la temperatura 18
Fase di preriscaldamento 18
10 - Funzionamento Forno in Modalità a Tempo 19
Tempo di Cottura 19
Ora Fine 19
11 - Cottura a Microonde 20
Funzione di Scongelamento a Tempo 20
Funzione di Scongelamento a Peso 20
Funzione a Microonde 20
Funzione Microonde + Grill 21
Funzione Microonde + Circolare 21
Cambiare i Watt di Potenza 22
Cambiare il Tempo 22
Cambiare la Temperatura 22
Cambiare il Peso 22
12 - Utilizzo Luci Forno 23
13 - Ricette 24
14 - Per l'Installatore 26
Collegamento Elettrico 27
Risoluzione Problemi Tipici della Cottura al
15 -
Forno
16 - Risoluzione Problemi Funzionali 29
28
6 - Impostazioni Utente 13
Lingua 13
Temperatura e Peso 13
Ora 13
Data 14
Luminosità 14
Volume 14
17 - Assistenza o Manutenzione 30
Record Dati Manutenzione 30
1
Page 4

IT
ISTRUZIONI IMPORTANTI E
AVVERTENZE DI SICUREZZA
Leggere attentamente e conservare per futuro utilizzo
Gentile Cliente,
La ringraziamo e ci congratuliamo per la Sua scelta.
Questo nuovo prodotto è stato accuratamente
progettato e costruito con materiali di primissima qualità
e accuratamente collaudato per poter soddisfare tutte le
Sue esigenze culinarie.
La preghiamo pertanto di leggere e rispettare le
facili istruzioni che Le permetteranno di raggiungere
eccellenti risultati sin dal primo utilizzo. Insieme a
questo innovativo elettrodomestico Le porgiamo i nostri
migliori auguri.
QUESTO PRODOTTO È PROGETTATO ESCLUSIVAMENTE
PER UTILIZZO DOMESTICO. IL COSTRUTTORE DECLINA
OGNI RESPONSABILITÀ PER LESIONI A PERSONE O
DANNI A COSE DERIVANTI DA INSTALLAZIONE NON
CORRETTA O IMPORPRIA, UTILIZZO ERRATO O NON
IDONEO.
QUESTO APPARECCHIO NON È DESTINATO
ALL'UTILIZZO DA PARTE DI PERSONE (INCLUSI BAMBINI)
CON RIDOTTE CAPACITÀ FISICHE, SENSORIALI O
FACOLTÀ MENTALI, O PERSONE CON MANCANZA
DI ESPERIENZA O DIMESTICHEZZA, A MENO CHE
SIANO SOTTOPOSTI A SUPERVISIONE O VENGANO
DATE LORO ISTRUZIONI CONCERNENTI L'UTILIZZO
DELL’APPARECCHIO DA PARTE DI UNA PERSONA
RESPONSABILE DELLA LORO SICUREZZA.
I BAMBINI DEVONO ESSERE SORVEGLIATI AL FINE DI
EVITARE CHE GIOCHINO CON L'ELETTRODOMESTICO.
NON POSIZIONARE FOGLI DI ALLUMINIO, PENTOLE O
OGGETTI SIMILI A CONTATTO CON LA BASE INTERNA
DEL FORNO PER LA COTTURA. L'AZIONE RISCALDANTE
DELL'ELEMENTO RISCALDANTE INFERIORE CAUSA
SURRISCALDAMENTO DELLA PARTE INFERIORE DEL
FORNO PROVOCANDO DANNI E CONSEGUENZE
GRAVI (RISCHIO DI INCENDIO) ANCHE ALL'INCASSO
SOTTOSTANTE IL FORNO.
• Se la porta o la guarnizione della porta sono
• È pericoloso per chiunque non sia un tecnico
• Liquidi o altri alimenti non devono essere riscaldati
• I bambini non possono utilizzare il forno
• Utilizzare solamente utensili adatti a forni a
• Quando si riscalda il cibo in contenitori di plastica
• Se vedete del fumo fuoriuscire, spegnere
• Riscaldare bevande nel microonde spesso causa
ATTENZIONE
danneggiati, il forno non può essere utilizzato
fino a che non vengano riparate da un tecnico
dell'assistenza qualificato;
dell'assistenza effettuare qualunque attività di
manutenzione o riparazione che coinvolga la
rimozione di qualsivoglia copertura che protegga
dall'esposizione alle microonde;
in contenitori sotto vuoto in quanto potrebbero
esplodere;
senza supervisione fino a che non vengano
adeguatamente istruiti al suo utilizzo sicuro e
capiscano i pericoli del suo incorretto utilizzo;
microonde;
o carta, controllare spesso il forno a causa del
rischio di incendio;
l'elettrodomestico o rimuovere la spina e tenere la
porta chiusa per far estinguere eventuali fiamme;
un'ebollizione ritardata; maneggiare dunque il
contenitore con cautela;
L'ELETTRODOMESTICO RAGGIUNGE TEMPERATURE
ELEVATE DURNATE L'UTILIZZO.
ATTENZIONE: NON TOCCARE GLI ELEMENTI
RISCALDANTI ALL'INTERNO DEL FORNO.
2
• I contenuti di biberon o cibi per neonati in vasetti
devono essere mescolati o agitati e la loro
temperatura deve essere controllata prima di
somministrarli per evitare scottature;
Page 5

ATTENZIONE
• Uova con guscio e uova sode intere non devono
essere riscaldate nel microonde in quanto
potrebbero esplodere anche dopo la fine del
riscaldamento al microonde;
• Una spiegazione dettagliata per la pulizia della
guarnizione delle porte della cavità e delle parti
adiacenti;
IT
• Il forno deve essere pulito periodicamente e tutti i
residui di cibo devono essere rimossi;
• In caso contrario, le superfici del forno si
deterioreranno e ciò potrà ridurre la vita
dell'elettrodomestico e generare condizioni di
pericolo;
• Non utilizzare pulitori abrasivi o raschietti metallici
taglienti per pulire il vetro della porta del forno
in quanto potrebbero graffiare la superficie
provocando la frantumazione del vetro.
• Non utilizzare pulitori a vapore per pulire
l'elettrodomestico.
3
Page 6
IT
1 - Avvertenze per Forni a Microonde
Preparazione Cibo
Pericolo di incendio!
Utilizzare la funzione a microonde solamente per la
preparazione di pietanze da mangiare.
Qualunque altro utilizzo potrebbe essere pericoloso
o causare danni.
Ad esempio, pantofole o cuscini riempiti di granella
o cereali e riscaldati potrebbero prendere fuoco
anche dopo varie ore.
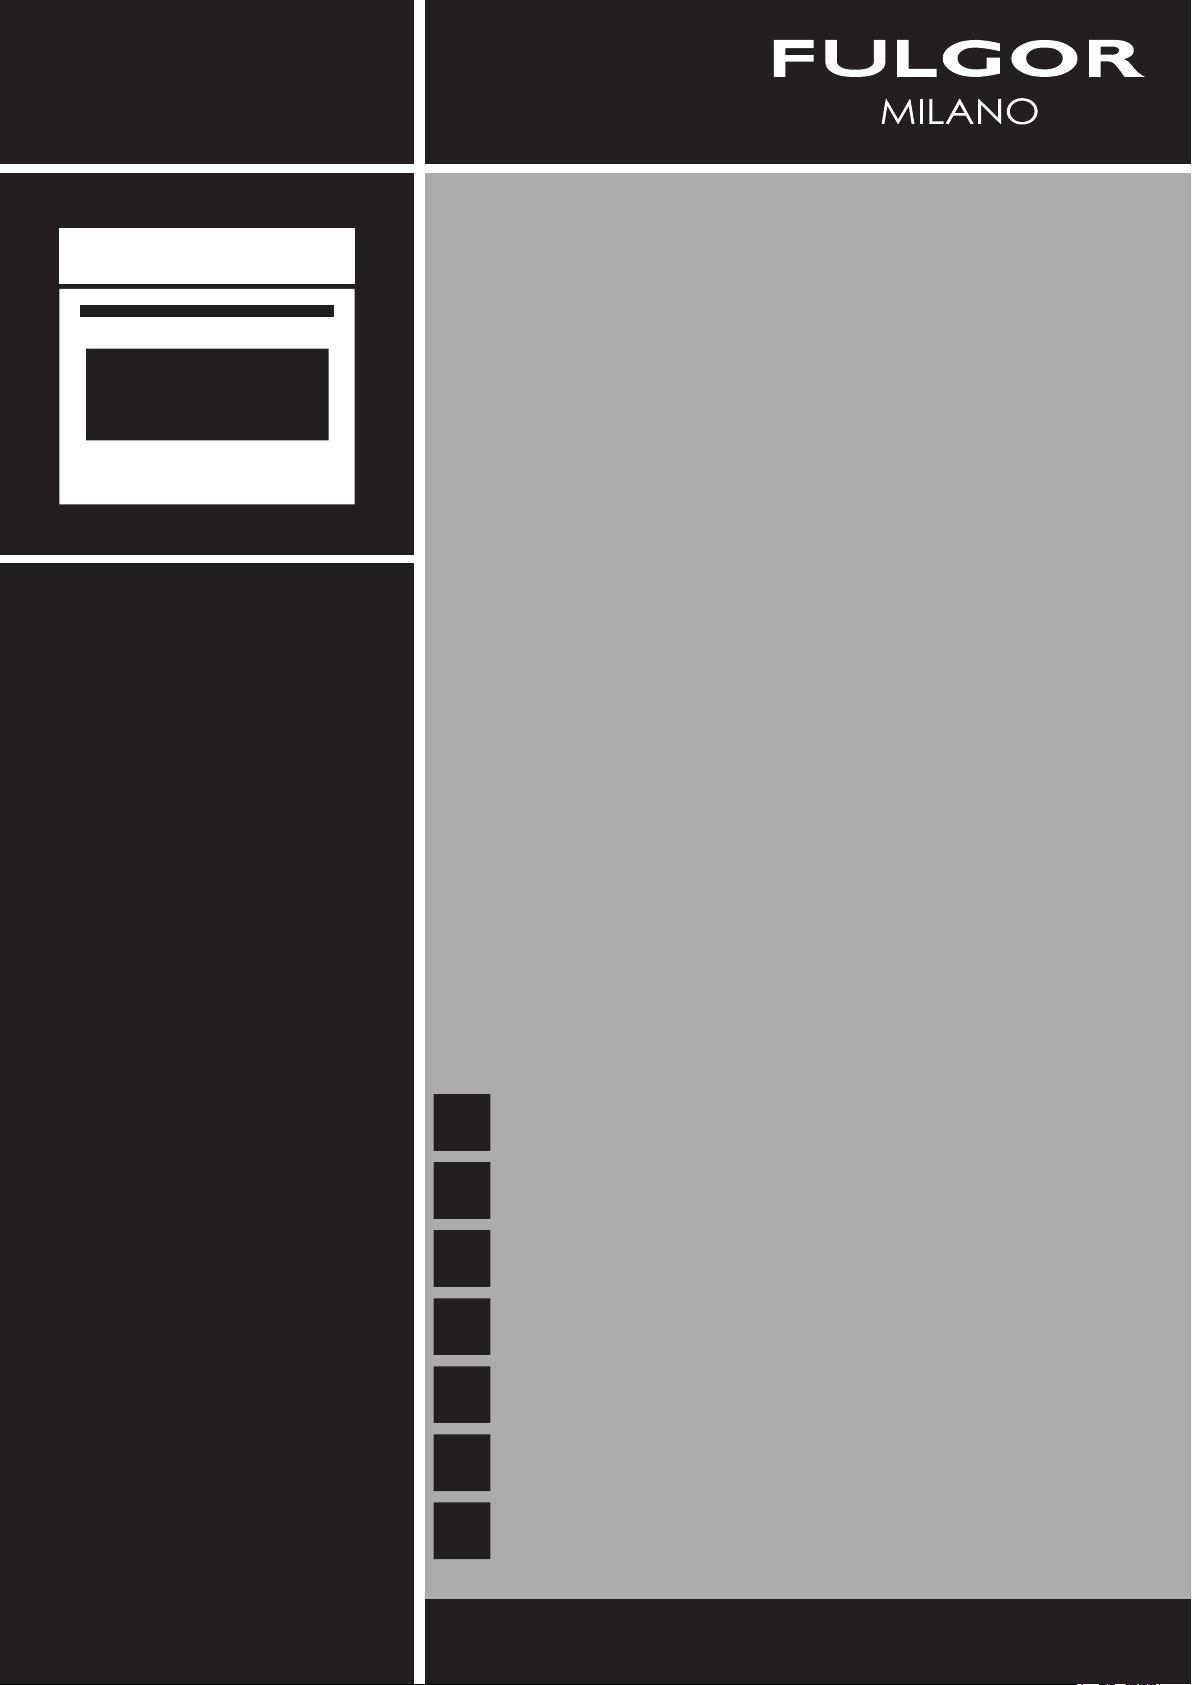
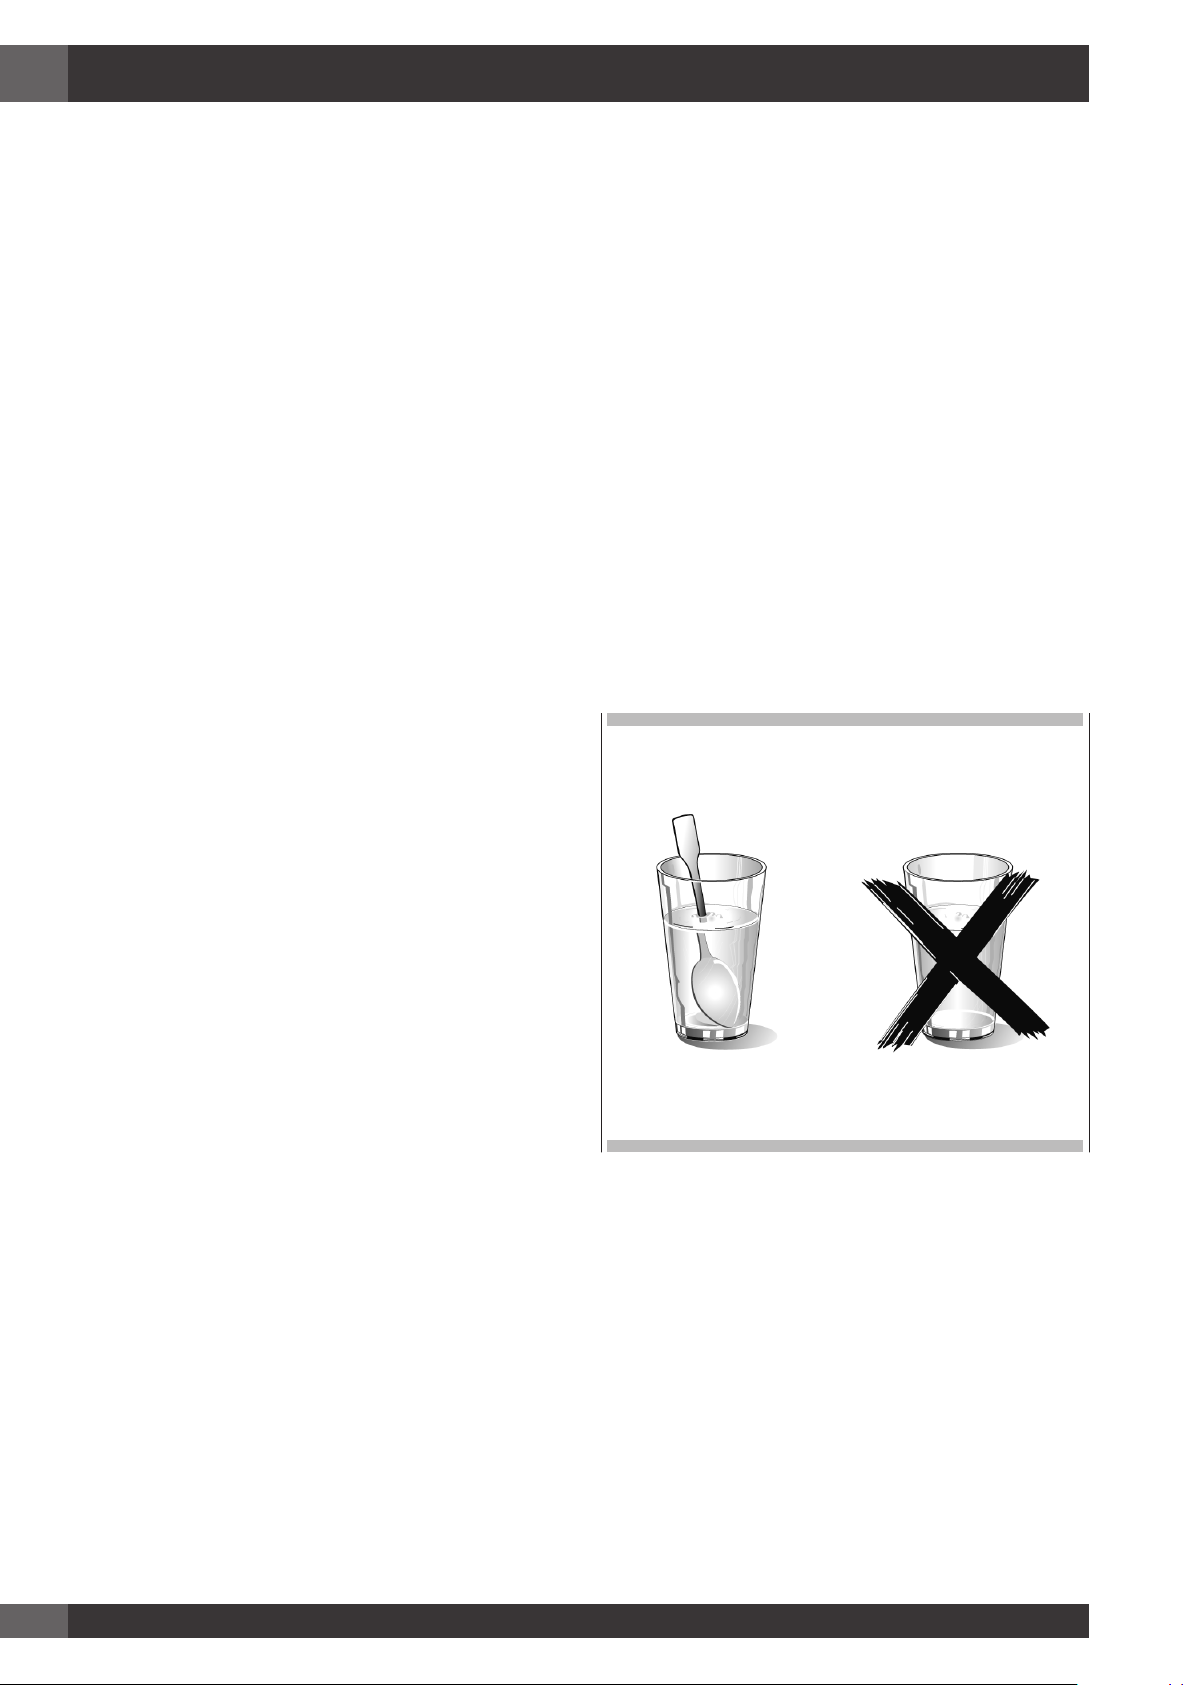
Bevande
Pericolo di ustioni!
Quando si riscaldano liquidi, l'ebollizione può
essere ritardata.
Ciò vuol dire che la temperatura di ebollizione è
stata raggiunta senza il verificarsi delle tipiche bolle
di vapore. Anche un piccolo colpo può provocare la
fuoriuscita improvvisa di liquidi o spruzzi.
Quando si riscaldano liquidi, mettere sempre un
cucchiaio nel contenitore per evitare l'ebollizione
ritardata.
Pentole e teglie
Pericolo di lesioni!
Stoviglie di porcellana e ceramica possono avere
piccoli fori su maniglie e coperchi.
Potrebbero esservi cavità nascoste dietro tali fori.
Se l'acqua entra nelle cavità, le stoviglie potrebbero
rompersi.
Non utilizzare stoviglie non adatte ai forni a
microonde.
Pericolo di esplosioni!
Non riscaldare mai bevande o altri tipi di pietanze
in contenitori coperti.
Non riscaldare mai eccessivamente bevande
alcoliche.
Pericolo di ustioni!
Il calore delle pietanze può riscaldare i piatti.
Utilizzare sempre delle presine per rimuovere i piatti
e gli accessori del vano cottura.
Potenza e durata microonde
Pericolo di incendio!
Non impostare mai valori troppo alti per potenza del
microonde o tempo di cottura. Le pietanze potrebbero
prendere fuoco e danneggiare l'elettrodomestico.
Seguire le regole nelle presenti istruzioni.
Imballaggi
Pericolo di incendio!
Non riscaldare mai le pietanze in contenitori termici.
Cibi in contenitori di plastica, carta o altri materiali
infiammabili devono essere controllati costantemente.
Pericolo di ustioni!
Confezioni sotto vuoto potrebbero esplodere. Seguire
le istruzioni riportate sulla confezione. Utilizzare
sempre delle presine per rimuovere i piatti.
Alimenti per neonati
Pericolo di ustioni!
Non riscaldare mai cibo per neonati in contenitori
coperti. Rimuovere sempre il coperchio o la tettarella.
Quando si è finito di riscaldare, agitare o mescolare
sempre accuratamente cosicché il calore venga
distribuito uniformemente.
Verificare la temperatura prima di somministrare il
cibo al neonato.
4
Page 7

IT
Cibi con pelle o buccia
Pericolo di ustioni!
Non cuocere mai uova con il guscio. Non riscaldare
mai uova sode in quanto potrebbero esplodere
anche dopo che il microonde è spento. Ciò vale
anche per molluschi e crostacei.
In caso di uova fritte, perforare prima il tuorlo.
In caso di cibi con buccia o pelle dura quali mele,
pomodori, patate o salsicce, la buccia o la pelle
potrebbe esplodere.
Perforare la pelle o la buccia prima di cucinare.
Cause di danni
Succo che scola dalla frutta.
Quando si preparano dolci che contengono frutta
molto succosa, non riempire troppo la teglia. Succhi
di frutta che fuoriescono dalla teglia possono lasciare
macchie indelebili.
Guasto tecnico
Non utilizzare mai teglie smaltate nel microonde in
quanto ciò potrebbe causare un guasto tecnico.
Raffreddare con la porta dell'elettrodomestico
Essiccare cibo
Pericolo di incendio!
Non essiccare mai cibo nel microonde.
Alimenti con basso contenuto d'acqua
aperta.
Il vano cottura deve essere raffreddato solamente
con la porta chiusa. Controllare che non vi sia nulla
incastrato nella porta dell'elettrodomestico.
Anche se la porta è solo socchiusa, nel tempo, i
mobiletti vicini si possono danneggiare.
Pericolo di incendio!
Non scongelare o riscaldare mai cibi con un basso
contenuto d'acqua, quali pane, per un periodo
troppo lungo o ad una potenza eccessiva.
Guarnizione molto sporca
Se la guarnizione è molto sporca, la porta
dell'elettrodomestico non si chiude correttamente
durante il funzionamento. Le superfici dei mobiletti
vicini possono venire danneggiate.
Tenere sempre pulita la guarnizione.
Olio
Utilizzo della porta dell'elettrodomestico come
Pericolo di incendio!
Non utilizzare mai il microonde per riscaldare
solamente olio.
superficie di appoggio
Non appoggiatevi sula porta aperta
dell'elettrodomestico e non mettetevi sopra stoviglie
o accessori.
Utilizzo del microonde senza cibo all'interno
Accendere il microonde esclusivamente dopo aver
inserito del cibo nel vano cottura. Senza cibo
all'interno, l'elettrodomestico si sovraccarica. L'unica
eccezione permessa sono brevi test di stoviglie (a
tale proposito, vedere le avvertenze circa pentole e
teglie)
Alimenti umidi
Non lasciare alimenti umidi nel vano cottura per
lunghi periodi di tempo.
5
Page 8
IT
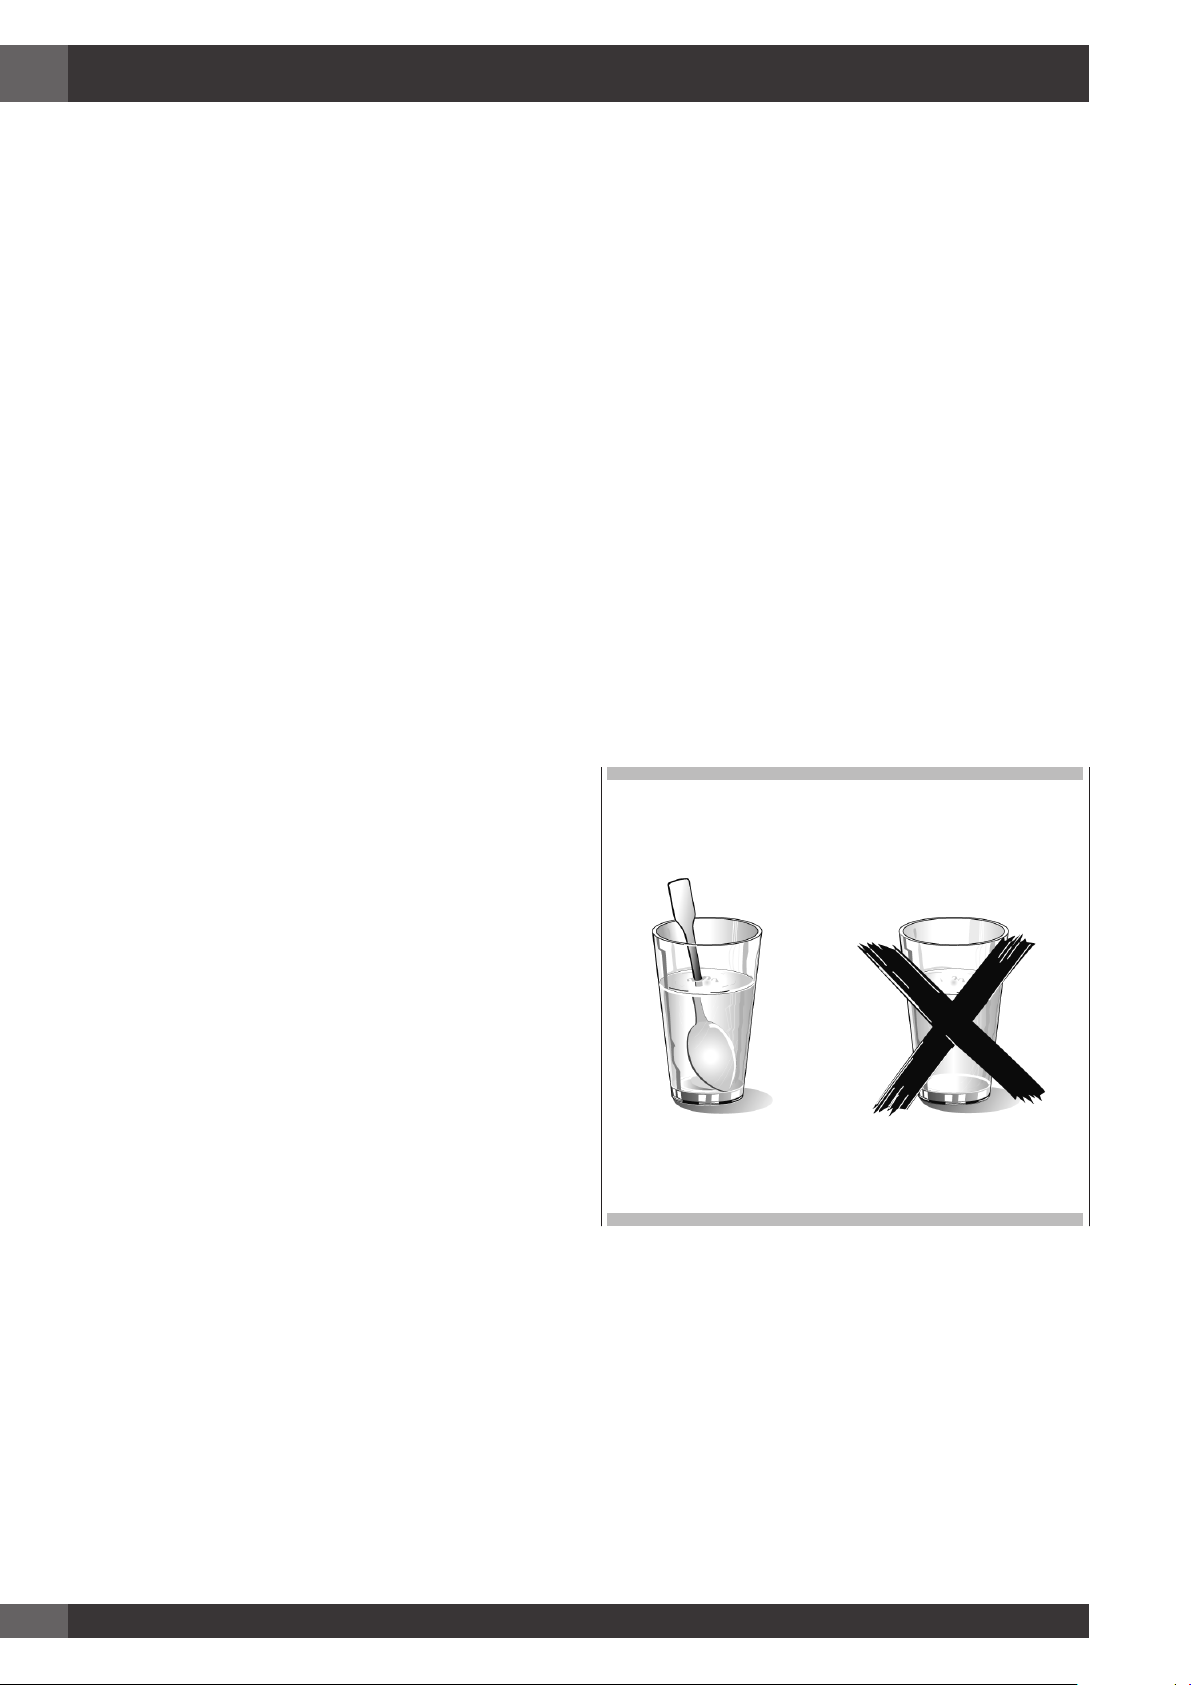
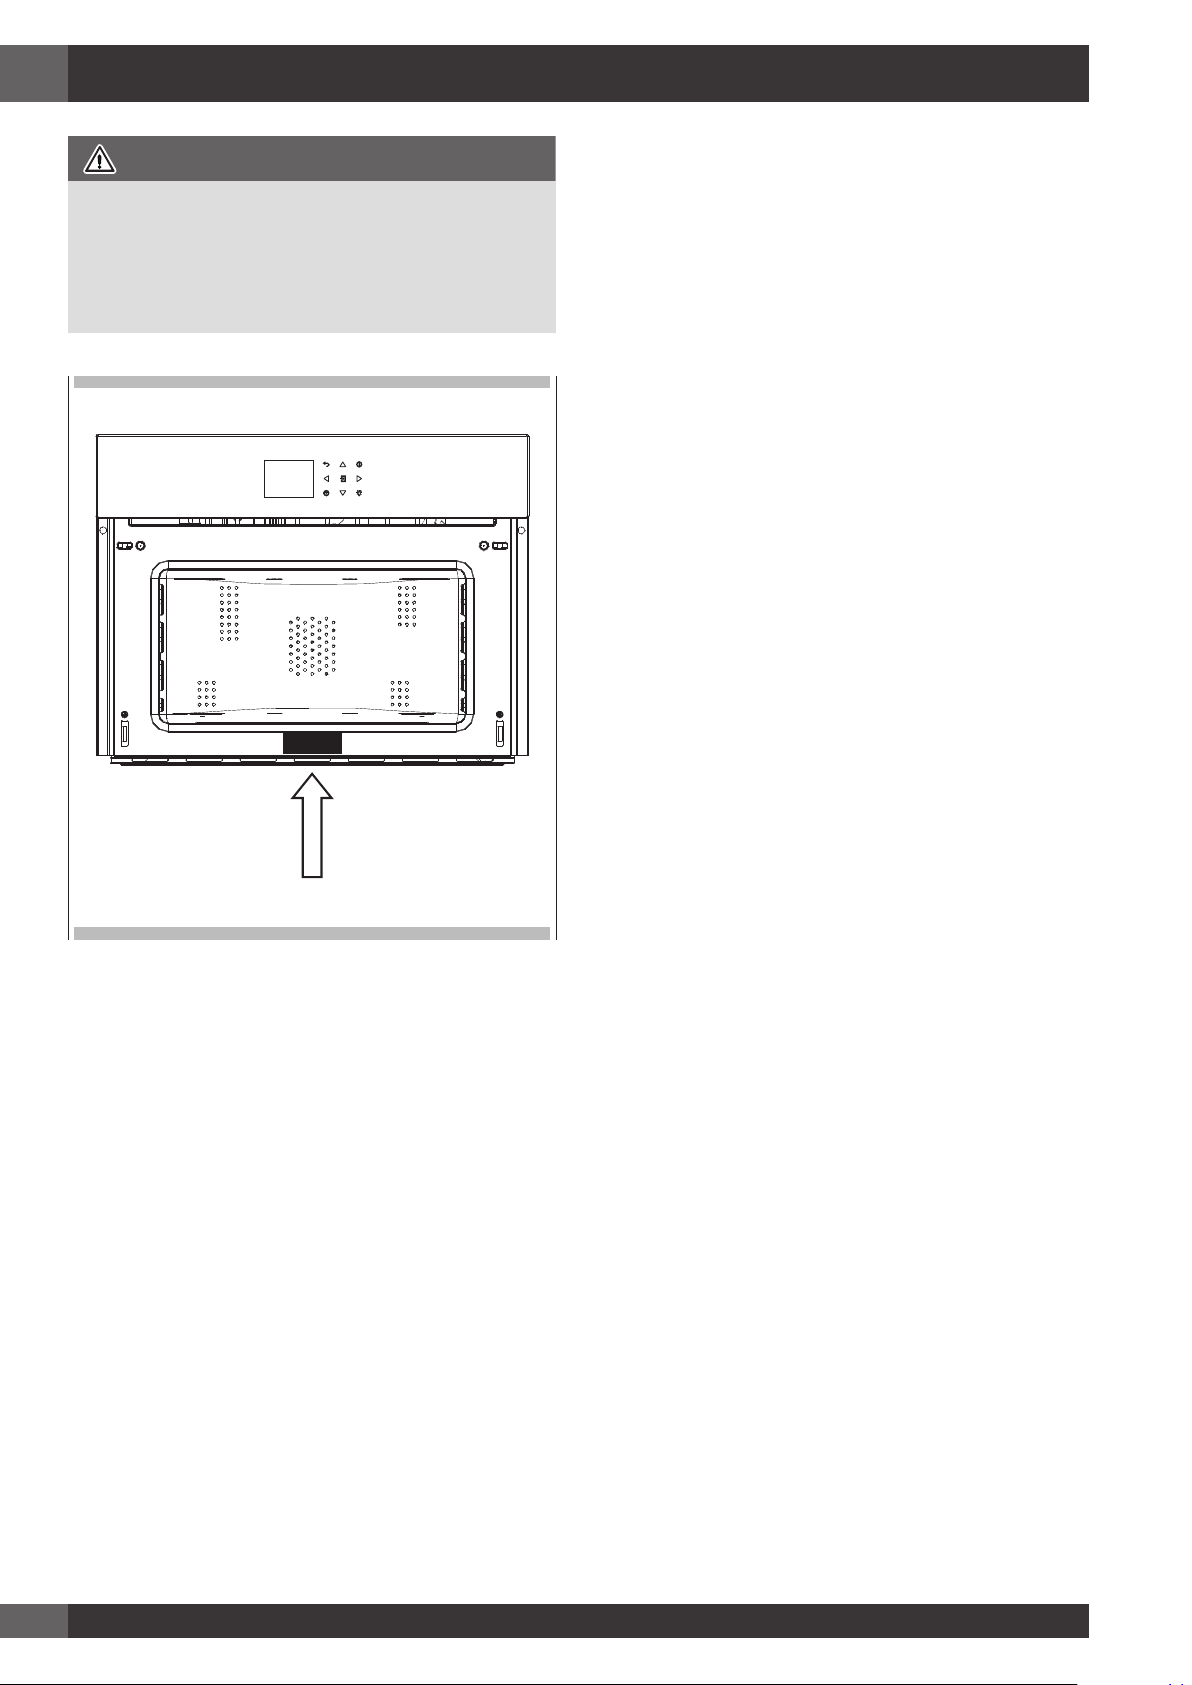
IMPORTANTE
La targhetta identificativa del forno è accessibile
anche quando l'elettrodomestico è installato Tale
targhetta identificativa, visibile a porta aperta, mostra
tutte le informazioni necessarie nel richiedere parti di
ricambio dell'elettrodomestico.
6
Page 9

Primo utilizzo
Il forno deve essere pulito accuratamente con acqua saponata e sciacquato con cura.
Riscaldare il forno per circa 30 minuti alla massima temperatura; ciò elimina tutti gli eventuali oli residui dalla fabbricazione che potrebbero causare
odori sgradevoli durante la cottura. Utilizzare la funzione ventola plus circolare senza accessori nel forno. Prima di utilizzare gli accessori per la
prima volta, pulirli accuratamente con una soluzione di lavaggio alcalina molto calda e un panno morbido.
Montare e smontare la griglia piana
Per rimuovere la griglia piana, tirare la griglia verso di voi fino a che non si fermi e poi sollevarla, tirando verso l'alto, fino a che non venga
completamente fuori.
Per reinserire la griglia piana, inserirla ad un angolo di 45° e poi posizionarla in orizzontale e spingerla fino in fondo al binario della griglia.
Se la griglia piana ha una teglia raccogligocce (vassoio), per rimuoverla sollevarla leggermente e farla scorrere verso di voi. Per reinserirla, farla
scorrere indietro fino a che non sia correttamente posizionata.
IT
IMPORTANTE
Per precauzione, prima di pulire il forno, scollegare sempre la spina dalla presa o rimuovere il cavo elettrico dell'elettrodomestico. Inoltre, evitare
di utilizzare sostanze acide o alcaline (quali limone, aceto, sale, pomodori, ecc.). Evitare di utilizzare prodotti che contengono cloro, acidi o
abrasivi, in particolare per la pulizia di parti verniciate.
7
Page 10
IT
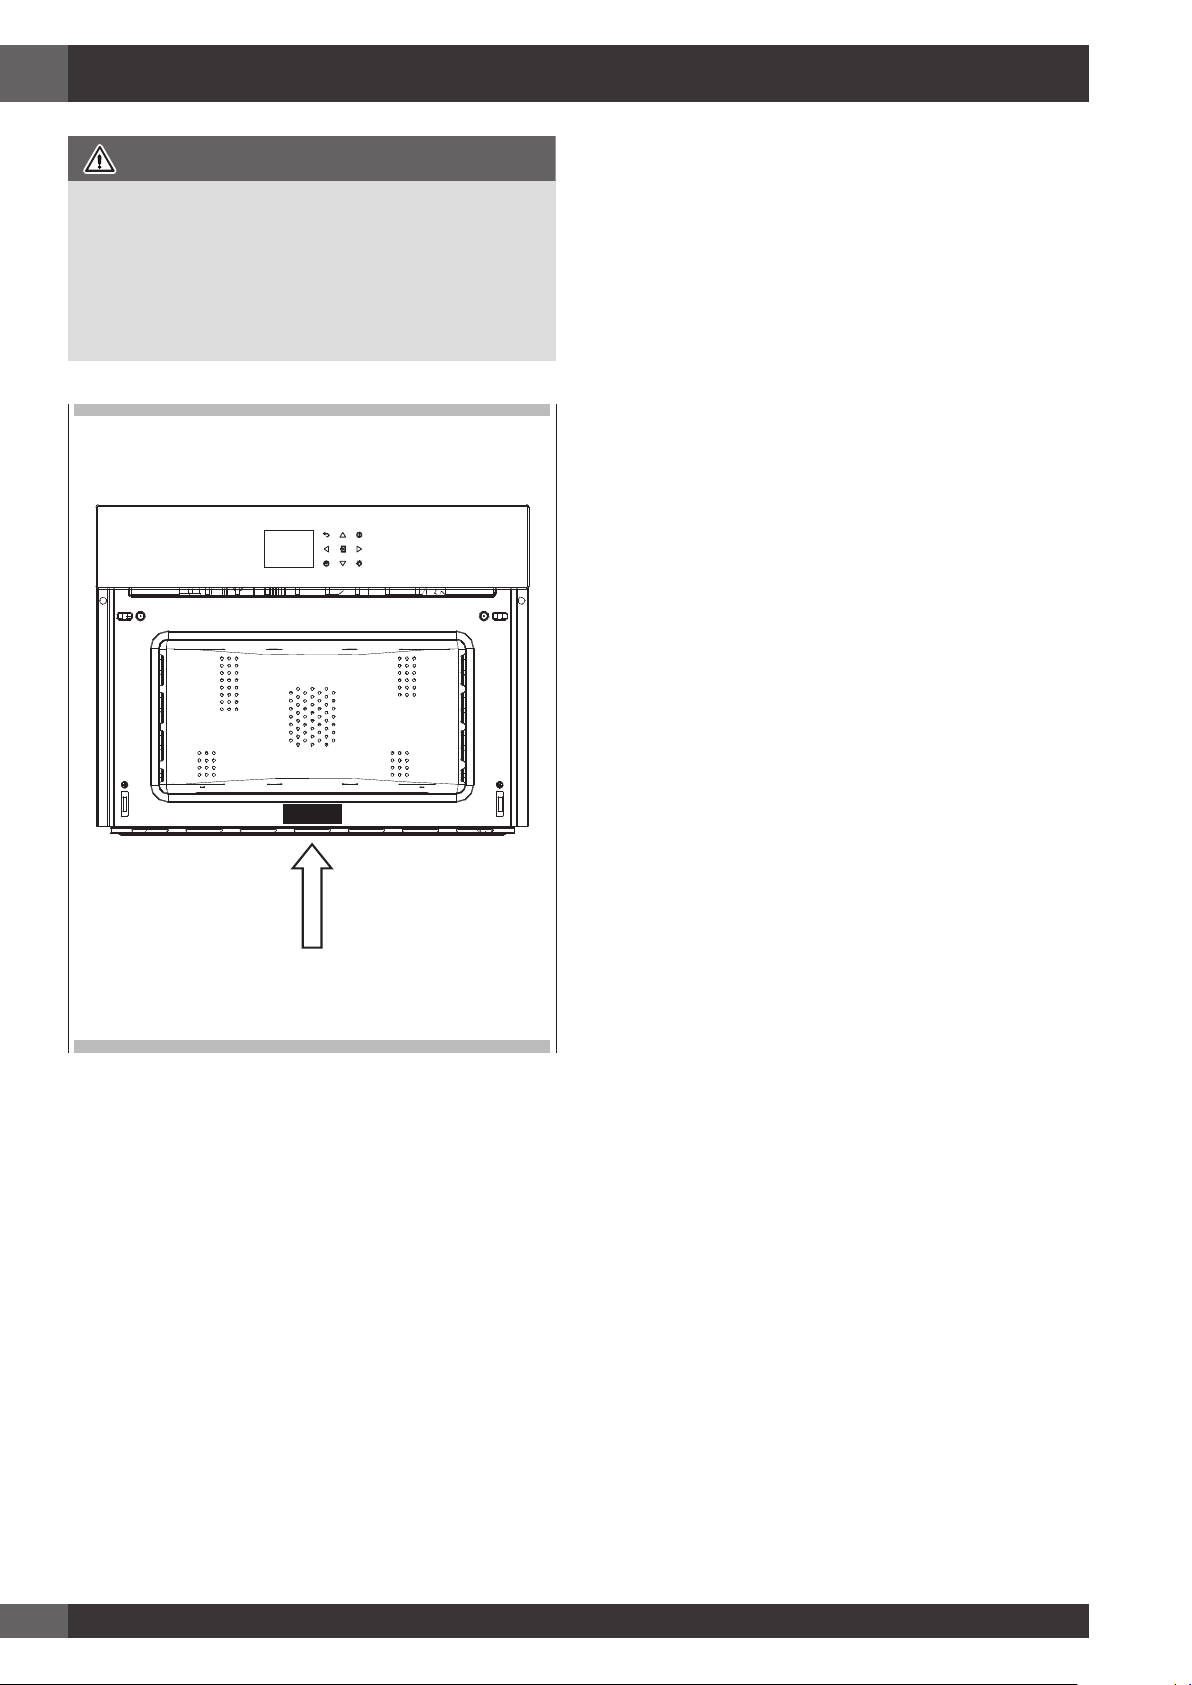
Rispetto per l’ambiente
La documentazione del presente elettrodomestico utilizza carta
sbiancata senza cloro oppure carta riciclata allo scopo di contribuire
alla tutela dell’ambiente. Gli imballaggi sono concepiti per evitare di
danneggiare l’ambiente; sono prodotti ecologici che possono essere
recuperati o riciclati.
Riciclando l’imballaggio, si contribuirà ad un risparmio di materie
prime e ad una riduzione del volume degli scarti industriali e domestici.
IL MATERIALE DI IMBALLAGGIO è riciclabile al 100% ed è
contrassegnato dal simbolo del riciclaggio. Per lo smaltimento seguire
le normative locali. Il materiale di imballaggio (sacchetti di plastica,
parti in polistirolo, ecc.) deve essere tenuto fuori dalla portata dei
bambini in quanto potenzialmente pericoloso.
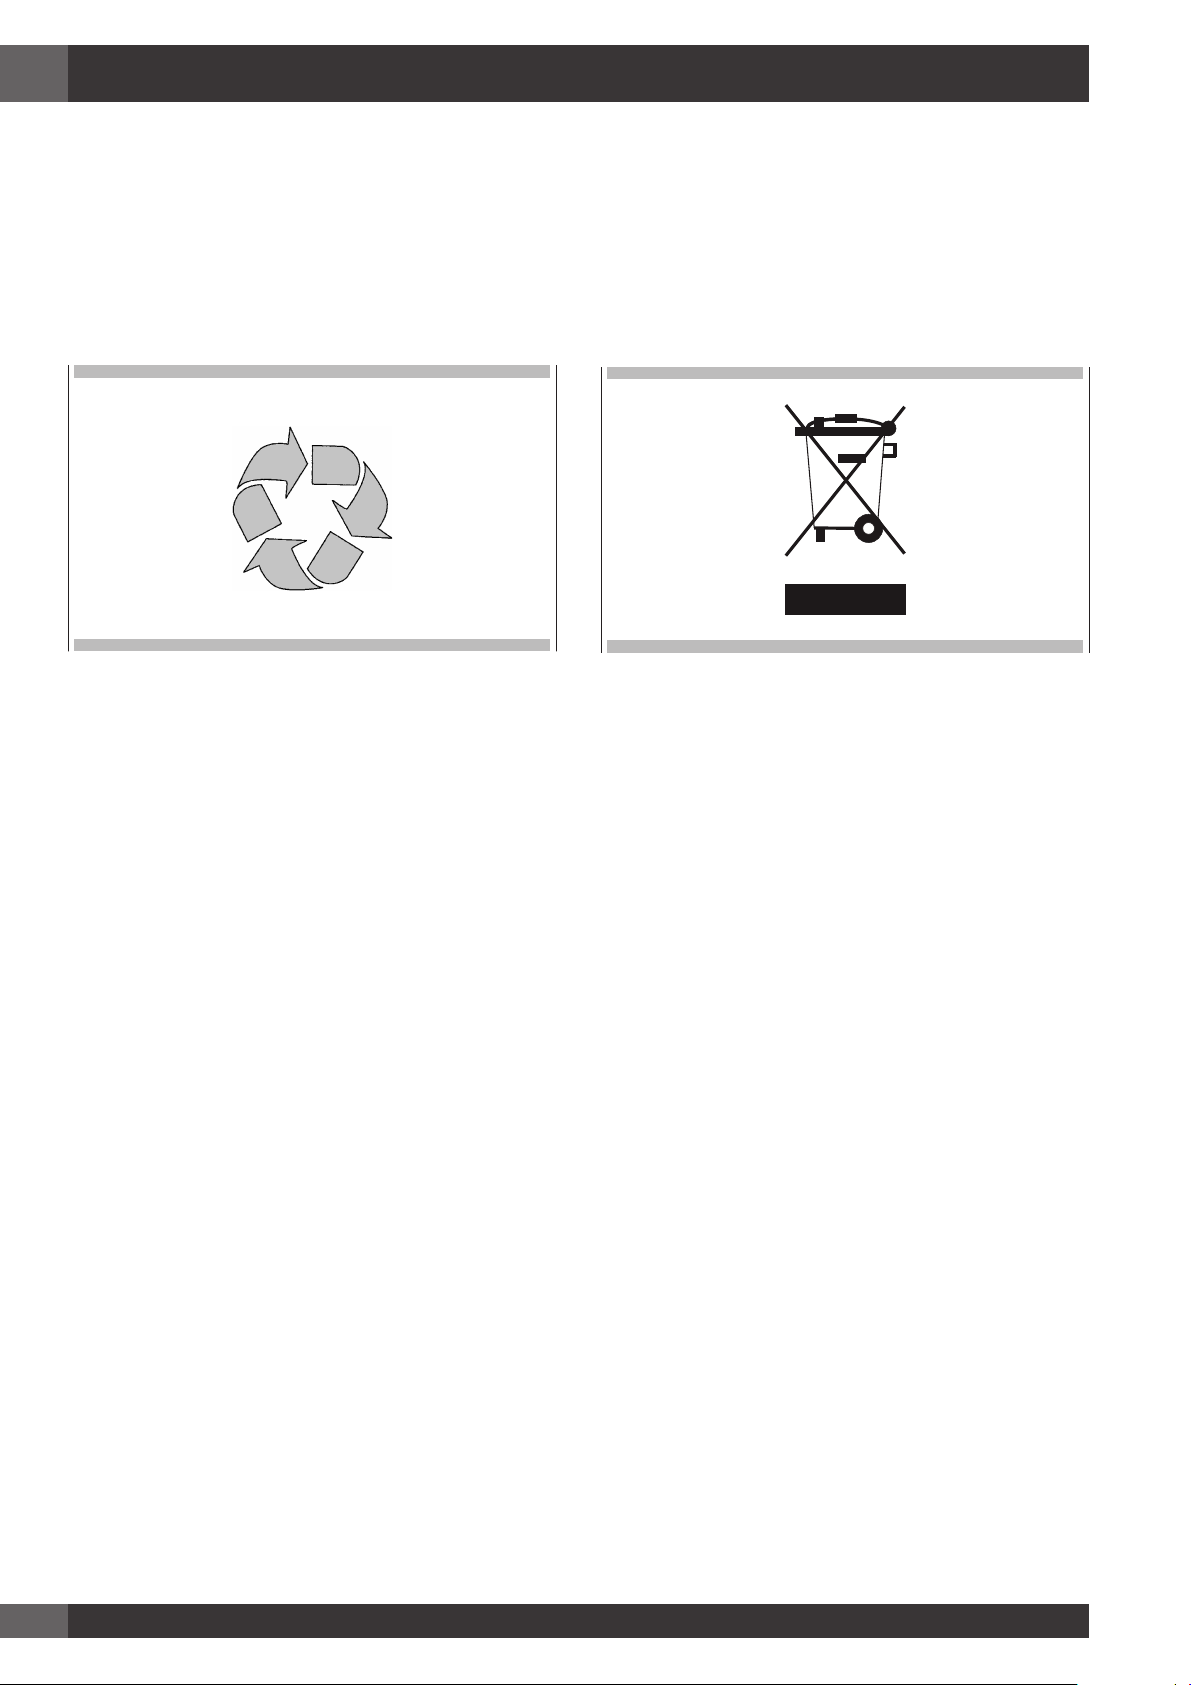
QUESTO ELETTRODOMESTICO è contrassegnato in conformità alla
Direttiva Europea 2002/96/UE, Rifiuti di Apparecchiature Elettriche
ed Elettroniche (RAEE). Assicurandosi che questo prodotto venga
smaltito in modo corretto, l’utente contribuisce a prevenire potenziali
conseguenze negative per l’ambiente e la salute.
IL SIMBOLO sul prodotto o insieme alla documentazione indica che
questo prodotto potrebbe non dover essere trattato
come rifiuto domestico, ma deve essere condotto presso un punto di
raccolta adeguato per il riciclo ci apparecchiatura
elettrica ed elettronica.
LO SMALTIMENTO DEVE AVVENIRE in conformità alle normative
locali in materia di smaltimento dei rifiuti.
PER INFORMAZIONI AGGIUNTIVE sul trattamento, recupero e riciclo
di questo prodotto, contattare l'ufficio locale di competenza, il servizio
di raccolta di rifiuti domestici o il negozio in cui è stato acquistato il
prodotto.
PRIMA DELLA ROTTAMAZIONE, renderlo inutilizzabile tagliando il
cavo elettrico.
8
Page 11
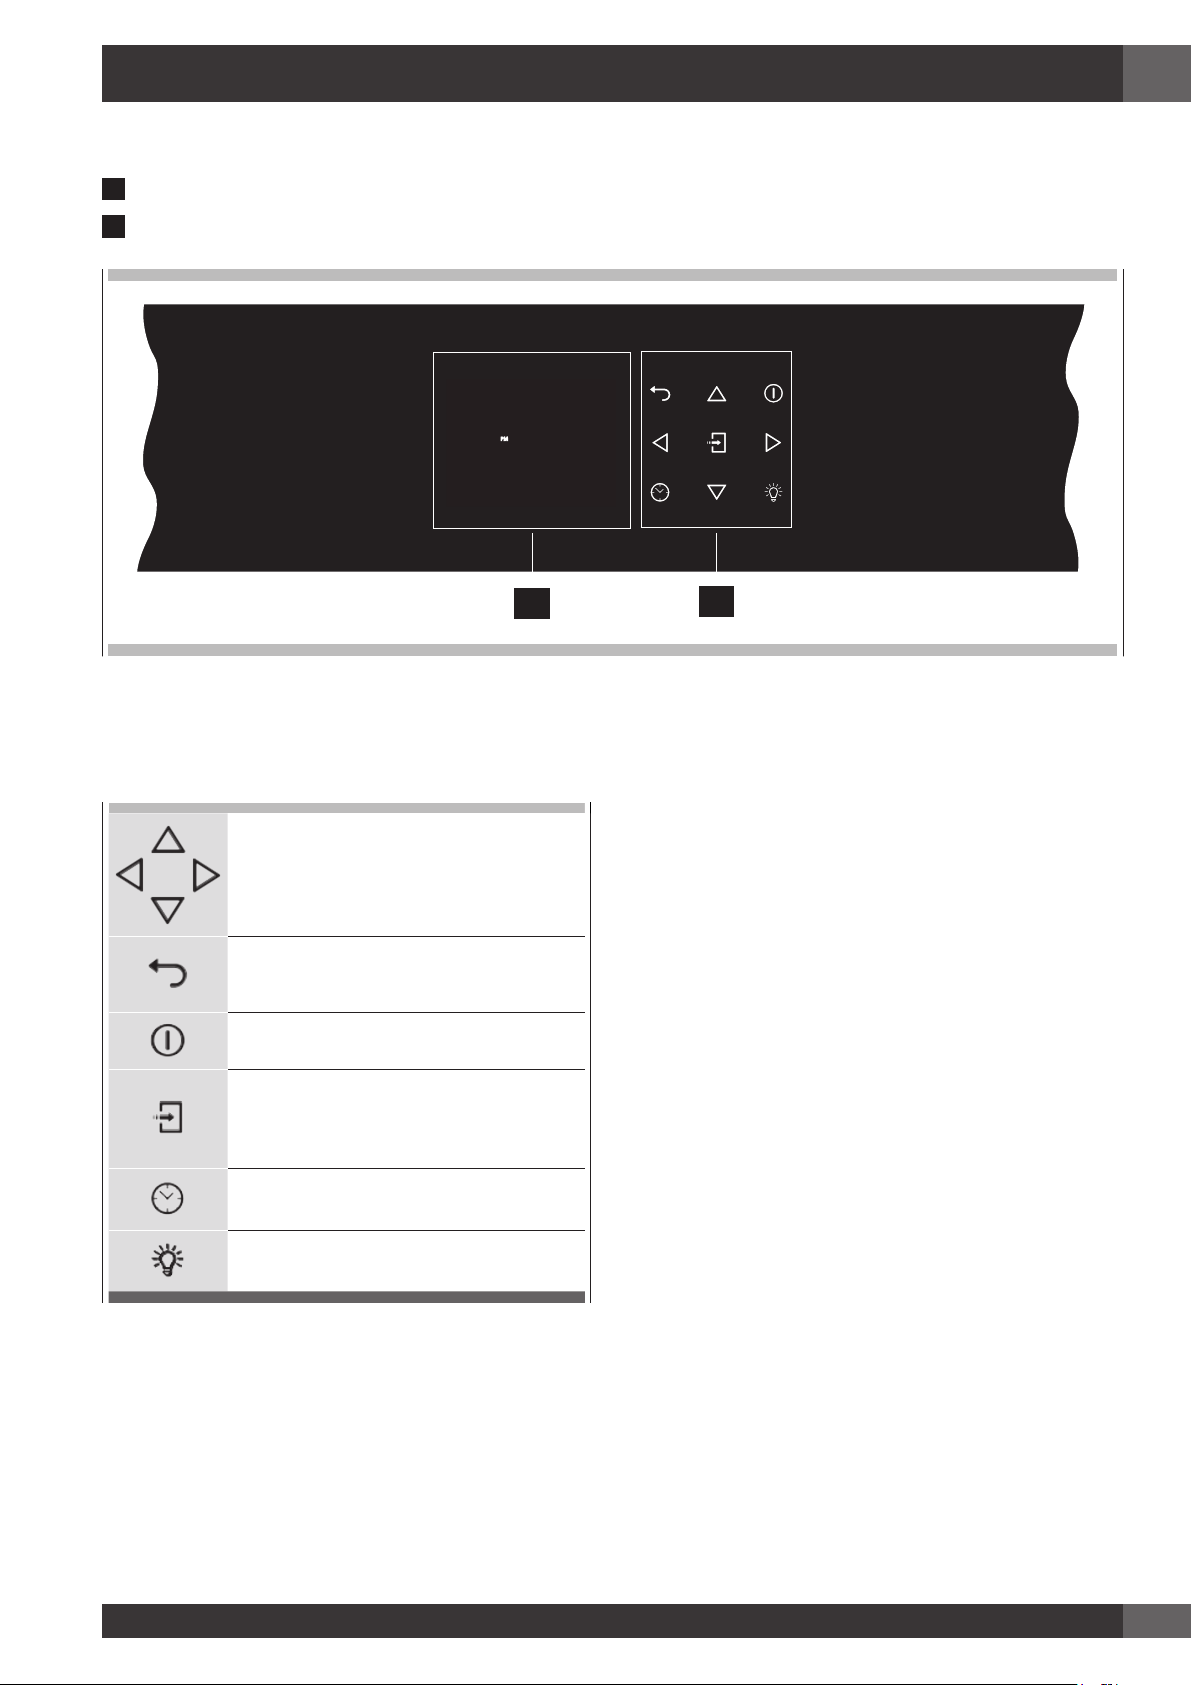
Il vostro elettrodomestico potrebbe differire leggermente dalle illustrazioni sottostanti.
A
- Tastiera
B
- Schermo display
VENERDÌ 11/20/2015
PM
04:26
2 - Pannello di Controllo
IT
B
Tastiera
Per far funzionare i tasti, premere delicatamente. La tastiera non
funziona se più tasti vengono premuti contemporaneamente.
Frecce di spostamento
Ritornare alla schermata del display precedente.
Tenere premuto per tornare alla Schermata
principale
Accendere e spegnere il forno.
Conferma le impostazioni ed avvia le
operazioni di cottura. Quando premuto durante
un'operazione di cottura, la funzione viene messa
in pausa. Premere nuovamente per riavviare.
A
Per impostare il timer.
Accedere al menù funzioni durante la cottura.
Accendere e spegnere la luce interna del forno.
9
Page 12
IT
3 - Informazioni Generali Forno
Prima di utilizzare il forno per la prima volta rimuovere tutto l'imballaggio e i corpi estranei dal forno(i). Qualunque materiale di questo tipo lasciato
all'interno potrebbe fondersi o bruciare durante l'utilizzo dell'elettrodomestico.
Codici errore
Questo codice appare in caso il controllo elettrico indichi un guasto.
Quando appare l'errore, la funzione corrente viene bloccata. Se il
tipo di errore è relativo ad una funzione di sicurezza, il forno diventa
inutilizzabile e ogni qualvolta si tenti di avviarlo, appare lo stesso errore
(nel cui caso chiamare l'assistenza post-vendita), mentre se l'errore
riguarda un guasto minore, dopo averlo riavviato, il forno può essere
utilizzato per le funzioni che non includono la parte danneggiata (ad
es. un elemento riscaldante).
Segnali acustici
Conferma che il comando è stato ricevuto a seguito della pressione
di un tasto.
Indica inoltre che una funzione a tempo è stata completata (ad es.
Timer o Cottura a Tempo). Durante l'esecuzione di una ricetta, un
segnale acustico avverte l'utente che il forno è in attesa di istruzioni da
parte dell'utente (ad es. inserire il piatto o rivoltarlo).
I segnali acustici segnalano inoltre un guasto del forno.
Impostazioni Predefinite
Le modalità di cottura selezionano automaticamente una temperatura
adatta; quando necessario, questa può essere cambiata.
Timer
ATTENZIONE
Il timer nel vostro forno non accende o spegne l'elettrodomestico; il
suo unico scopo è quello di allertarvi tramite il campanello. Quando
volete spegnere il forno in modo automatico, utilizzare la funzione
cottura-terminata o cottura ritardata.
NOTA: Premere il tasto OFF non reimposta né arresta il timer.
1. Premere il pulsante
le frecce e confermare con il pulsante . Per cambiare la
selezione tra ore e minuti utilizzare le frecce
2. Il tempo può essere impostato da 1 minuto a 12 ore e 59 minuti
e, quando impostato, il tempo rimanente è sempre visibile nella
barra di stato inferiore fino a che il tempo non finisca o venga
reimpostato.
3. Per cambiare o cancellare il tempo impostato, dovete reimpostare
il timer tenendo premuto il tasto
4. Il formato del timer è solitamente HR MIN, passando a MIN SEC
durante l'ultimo minuto.
5. Quando scade il tempo, il display mostra 00:00 e il campanello
suona per un minuto o fino a che non venga premuto il pulsante
.
e impostare il tempo desiderato utilizzando
.
per alcuni secondi.
Numero Codici Guasti F
Tali codici vengono mostrati quando il controllo elettronico rileva un
problema nel forno o nell'elettronica.
Il codice errore è registrato nel Registro Errori nel Menù impostazioni.
Tale errore può essere comunicato al tecnico dell'assistenza cosicché
lui/lei possa comprendere le possibili cause del problema in anticipo.
Preriscaldamento
Ogni qualvolta viene impostata una modalità di cottura e il forno
riscalda, si avvia il preriscaldamento; durante tale periodo, viene
mostrata la temperatura corrente insieme all'icona del termometro.
Non appena raggiunge il 100%, il controllo emette un suono di "fine
del preriscaldamento" e il valore della temperatura corrente scompare.
10
Page 13

Preriscaldare il Forno
4 - Suggerimenti Generali Forno
IT
• Selezionare una temperatura maggiore non accorcia il tempo di
preriscaldamento.
• Il preriscaldamento è necessario per buoni risultati quando si
cuciono al forno dolci, biscotti, pasticcini e pane.
• Preriscaldare aiuterà a rosolare arrosti e a non disperdere i succhi
della carne.
• Mettere le griglie da forno in posizione prima di preriscaldare.
• Durante il preriscaldamento, la temperatura di cottura selezionata
viene sempre mostrata.
• Un segnale acustico confermerà che il forno è preriscaldato e la
“temperatura rilevata” si spegnerà.
Suggerimenti per il Funzionamento
• Non posizionare teglie sulla porta del forno aperta.
• Utilizzare le luci interne del forno per vedere le pietanze attraverso il
vetro della porta del forno piuttosto che aprire frequentemente la porta.
Funzionamento con microonde
Le microonde vengono trasformate in calore all’interno degli alimenti.
Le microonde possono essere utilizzate da sole o in combinazione
con altri tipi di riscaldamento. La presente sezione contiene
informazioni circa le stoviglie e istruzioni per impostare
il forno a microonde.
T
estare le stoviglie
Non accendere mai il microonde prima di aver inserito le pietanze.
L’unica eccezione permessa è per provare le stoviglie.
In caso non siate sicuri qualora le vostre stoviglie posano essere
utilizzate nel forno a microonde, vi
raccomandiamo di effettuare il seguente test:
posizionare una pentola vuota nell’elettrodomestico per ½ - 1 minuto
alla massima
potenza. Controllare la temperatura. La pentola deve essere fredda o
leggermente calda. Se è
bollente o vi sono scintille, la pentola non è adatta.
Condensazione e Temperatura Forno
• È normale che una certa quantità di umidità evapori dalle pietanze
durante qualunque processo di cottura. La quantità dipende
dall’umidità contenuta nelle pietanze. L’umidità può condensarsi su
qualunque superficie più fredda rispetto all’interno del forno quale,
ad esempio, il pannello di controllo.
• Il vostro nuovo forno ha un sensore di temperatura elettronico che
permette di mantenere una temperatura accurata.
AVVERTENZE PER LE STOVIGLIE
Stoviglie adatte
Si possono utilizzare stoviglie resistenti al calore fatte di vetro,
vetroceramica, porcellana, ceramica o plastiche refrattarie. Tali
materiali sono permeabili alle microonde.
È inoltre possibile utilizzare piatti normali. In tal modo, non sarà
necessario trasferire le pietanze.
Stoviglie con decorazioni in oro o argento possono essere utilizzate
solamente se il produttore assicura che possano essere usate in forni
a microonde.
Ricordare che, quando si utilizza il forno in modalità a microonde, il
piatto deve essere posizionato sul piatto rotante.
Quando si utilizza il forno in modalità combinata, è preferibile
posizionare la pietanza da cucinare sulla griglia rotonda inferiore
supportata in modo che sia centrata sul piatto rotante.
Stoviglie non adatte
Stoviglie di metallo non possono essere utilizzate.
Il metallo non è permeabile alle microonde. Le pietanze in contenitori
di metallo rimarranno fredde.
Attenzione! Elementi di metallo, quali cucchiai nei bicchieri, devono
stare per lo meno a 2 cm dalle pareti del forno e dall’interno della
porta. Difatti, le scintille potrebbero gravemente danneggiare l’interno
della porta di vetro.
Attenzione! La griglia piana deve essere rimossa quando si utilizzano
le modalità a microonde e combinata. Utilizzarla solamente con le
funzioni forno tradizionale.
Cottura al Forno ad Alta Quota
• Quando si cucina ad altitudini elevate, le ricette e i tempi di cottura
variano.
11
Page 14
IT
04 : 26
PM
MARTEDÌ 11/24/2015
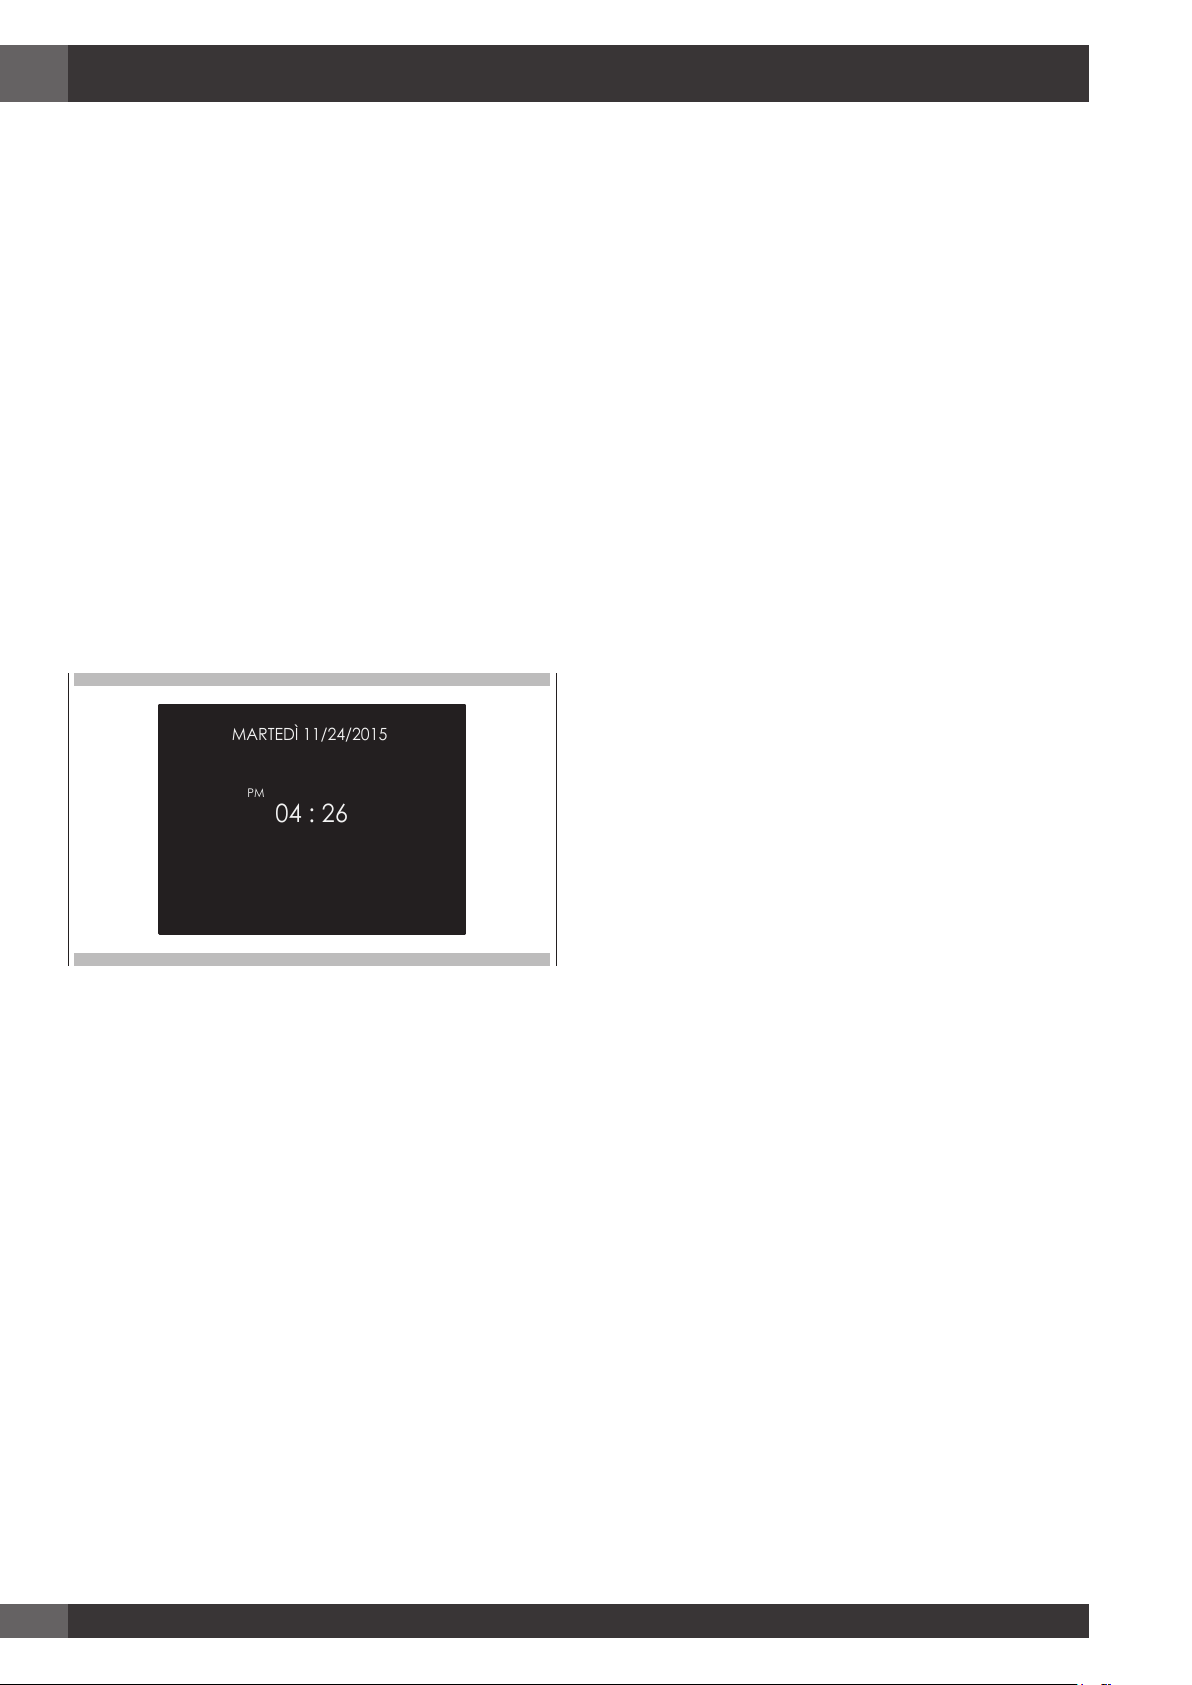
5 - Introduzione
Istruzioni per l'accensione iniziale
Una volta che il forno è stato collegato alla corrente elettrica per la
prima volta, il controllo si prepara automaticamente per impostare una
serie di impostazioni utente, che rimangono immagazzinate in caso di
successive accensioni.
NOTA: Sia durante il primo che i successivi collegamenti alla corrente
elettrica, il meccanismo di bloccaggio della porta si calibra -
in questa fase, tenere sempre la porta chiusa.
• Lingua
• Temperatura e Peso
• Ora
• Data
Fare riferimento al paragrafo IMPOSTAZIONI UTENTE per le istruzioni
di impostazione.
Dopo aver effettuato le impostazioni utente, il controllo si sposta
automaticamente alla schermata "Standby" del display.
12
Page 15
6 - Impostazioni Utente
IMPOSTAZIONE
IMPOSTAZIONI
12
yk
abc
IMPOSTAZIONE
LINGUA
°F
°ClbKg
12h
24h
AM
PM
04 : 26
PM
IT
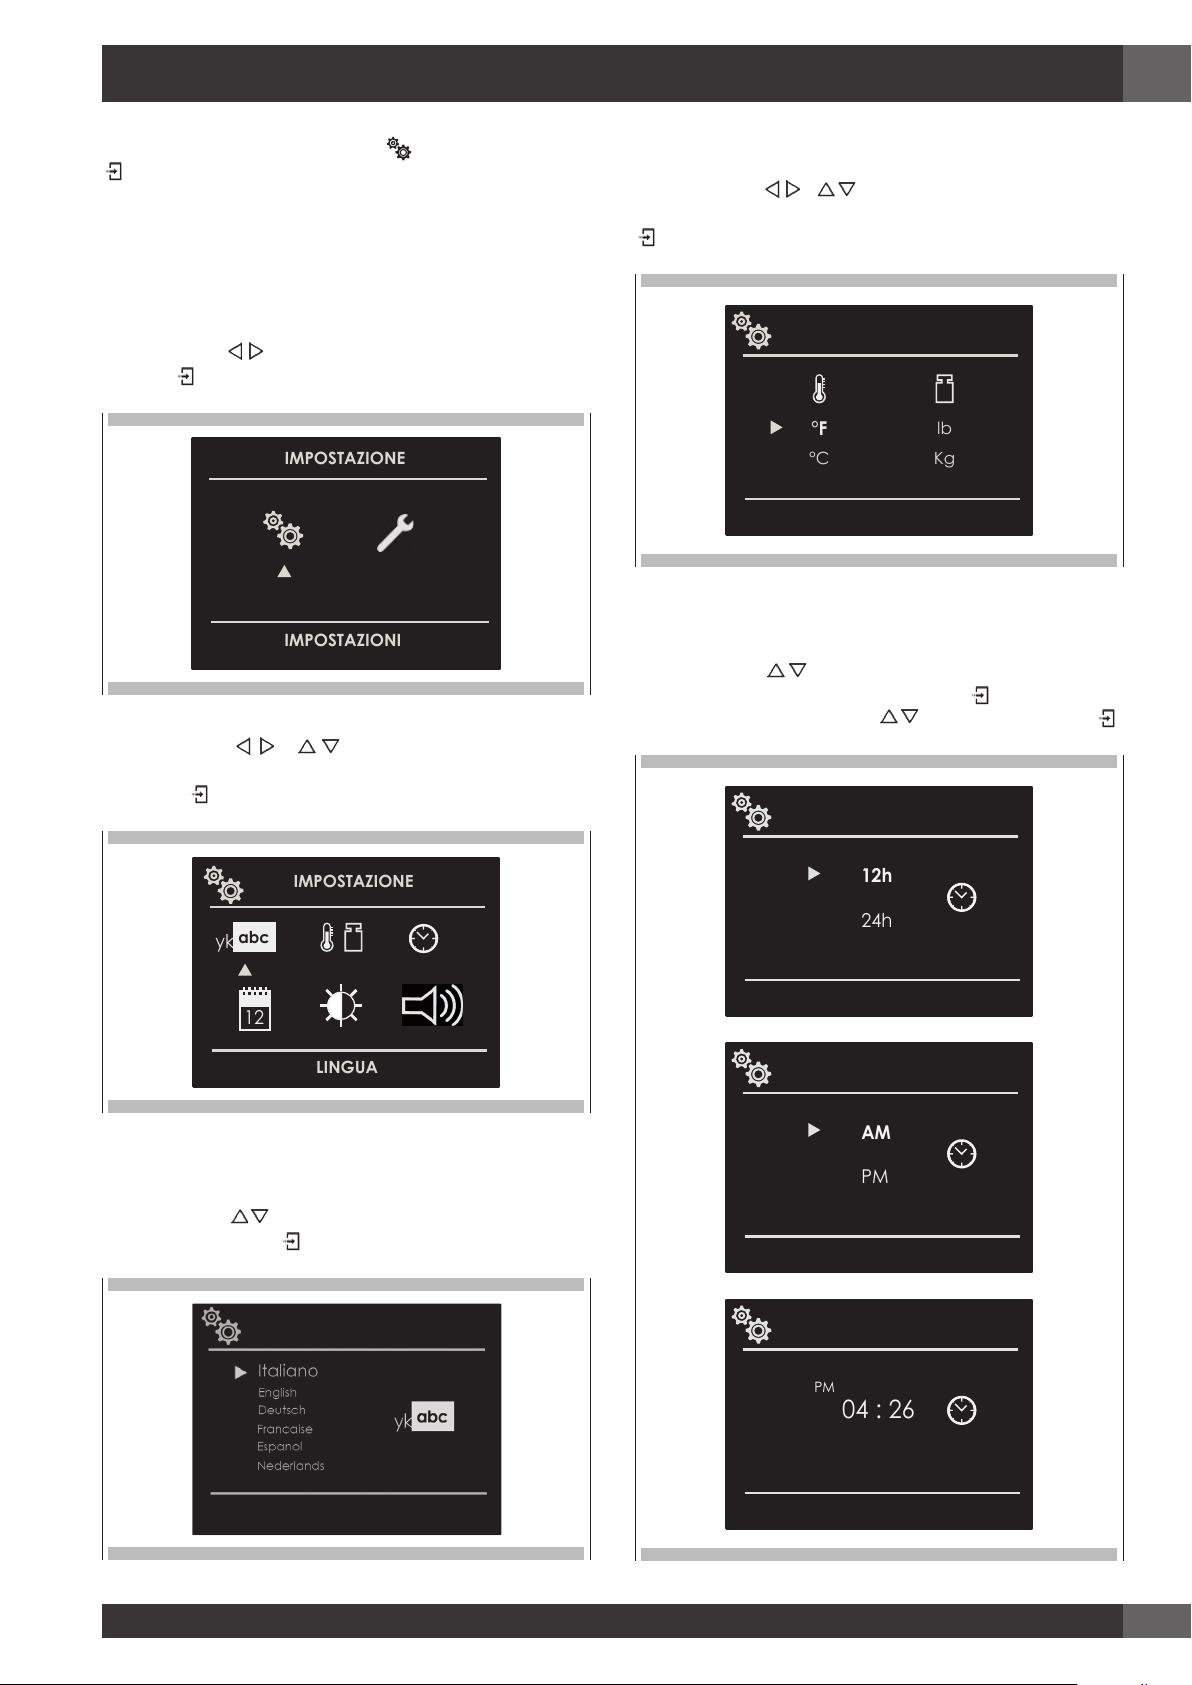
Con il forno acceso, selezionare l'icona e confermare con il tasto
per accedere al menù IMPOSTAZIONI. Tale menù permette di
personalizzare le impostazioni del vostro forno. Per accedervi, non
devono essere in corso cotture né funzioni a tempo.
NOTA: Il Menù impostazioni non può mai essere impostato se una
qualunque funzione a tempo è già impostata: cancellare
prima qualunque funzione a tempo attiva.
1. Premere i tasti per selezionare il sottomenù e confermare con
il tasto .
2. Utilizzare il presente menù per cambiare le seguenti impostazioni:
Premere i tasti o per selezionare le impostazioni o
cambiare un sottomenù tra i sei disponibili e confermare per mezzo
del tasto .
Temperatura e Peso
Premere la freccia e per selezionare una delle due opzioni
temperatura “°C/°F” o opzioni peso Kg/lb e confermare con il tasto
.
Ora
Premere la freccia per selezionare il formato ora tra le opzioni
"12h AM/PM o 24h” e confermare con il tasto . Successivamente,
impostare l'ora premendo le frecce e confermare con il tasto .
Lingua
Premere la freccia per selezionare la lingua tra quelle disponibili
e confermare con il tasto .
13
Page 16
IT
12
D.M.Y.
Y.M.D.
M.D.Y.
12
11/20/2015
ON
STAND-BY
BASSO
MEDIO
ALTO
BUIO
MEDIO
ALTO
LIVELLO
BASSO
MEDIO
ALTO
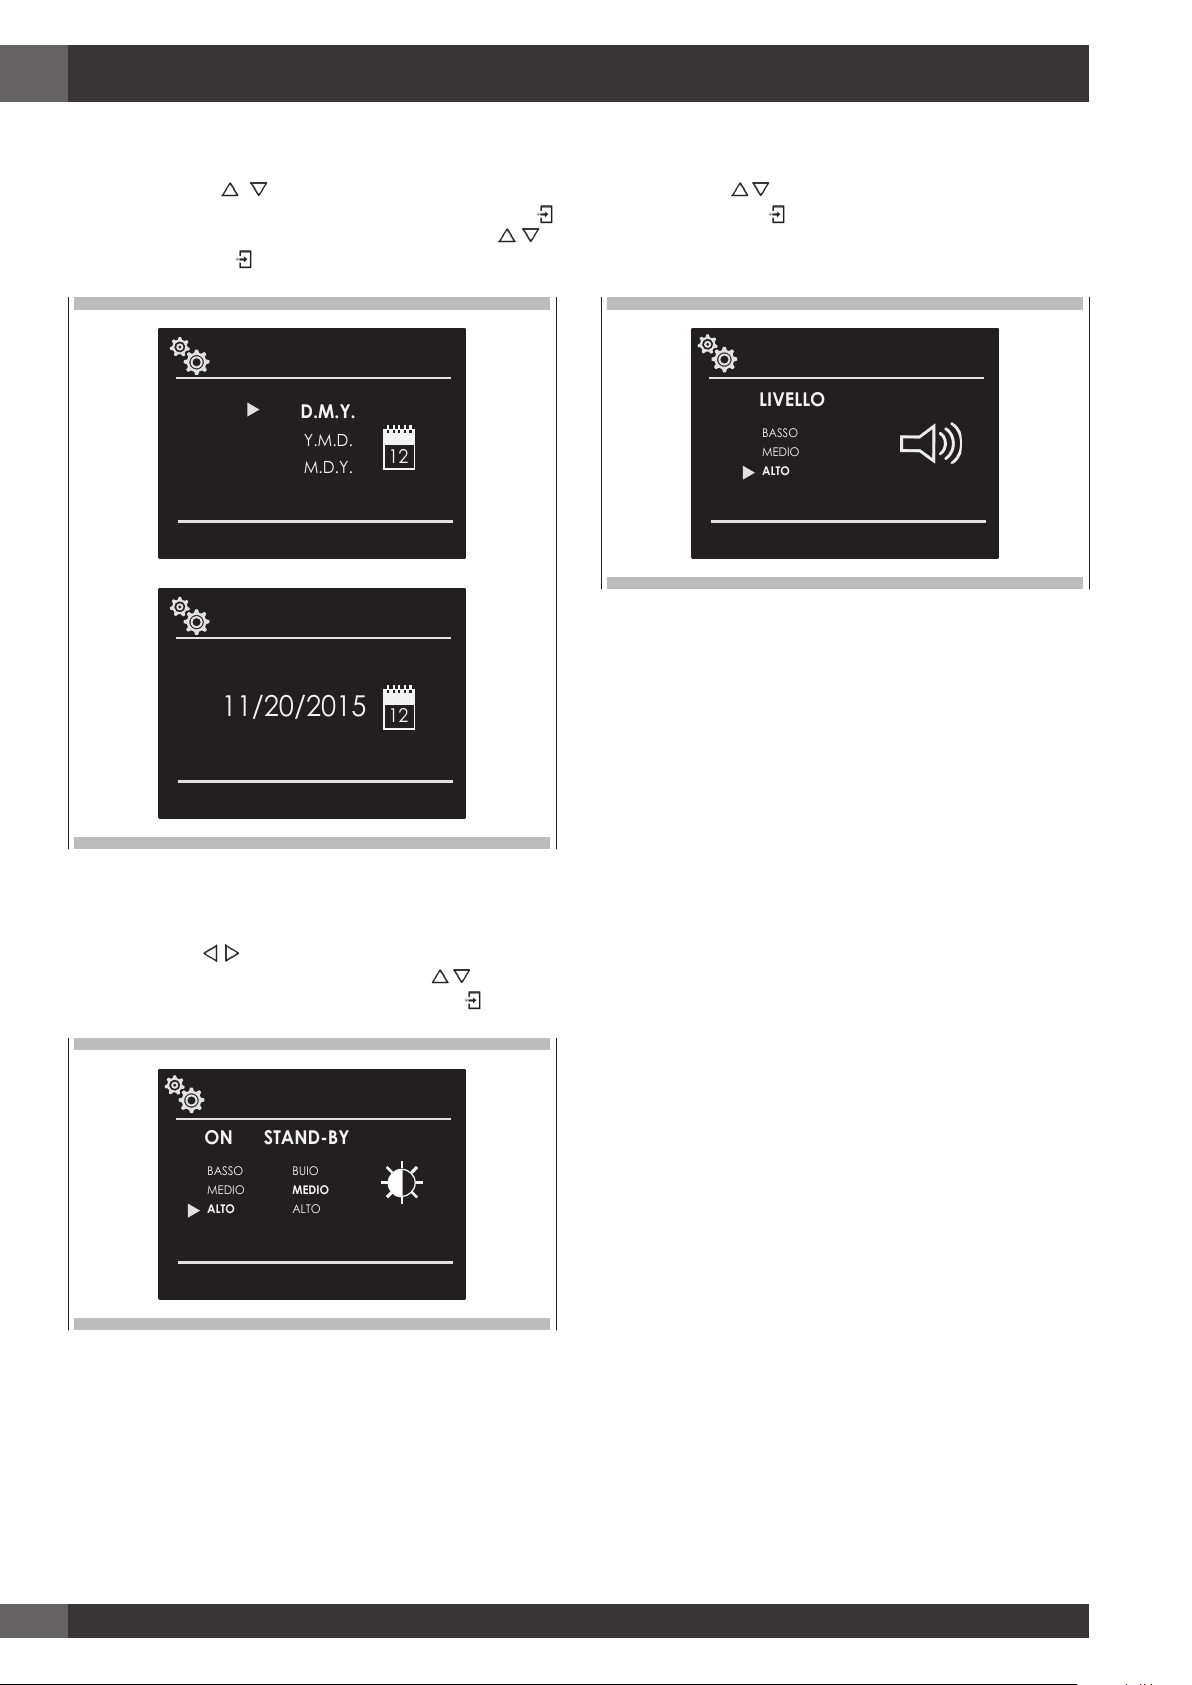
Data
Premere la freccia per selezionare il formato data tra
l'opzione "D.M.Y. – Y.M.D. - M.D.Y." e confermare con il tasto
. Successivamente, impostare il valore premendo le frecce e
confermare con il tasto .
Volume
Premere la freccia per selezionare il grado di volume richiesto e
confermare con il tasto .
Luminosità
Premere la freccia per scegliere quale impostazione luminosità
cambiare tra ON o STANDBY, poi tramite le frecce selezionare
il grado di luminosità richiesto e confermare con il tasto .
14
Page 17
IMPOSTAZIONE
SERVICE
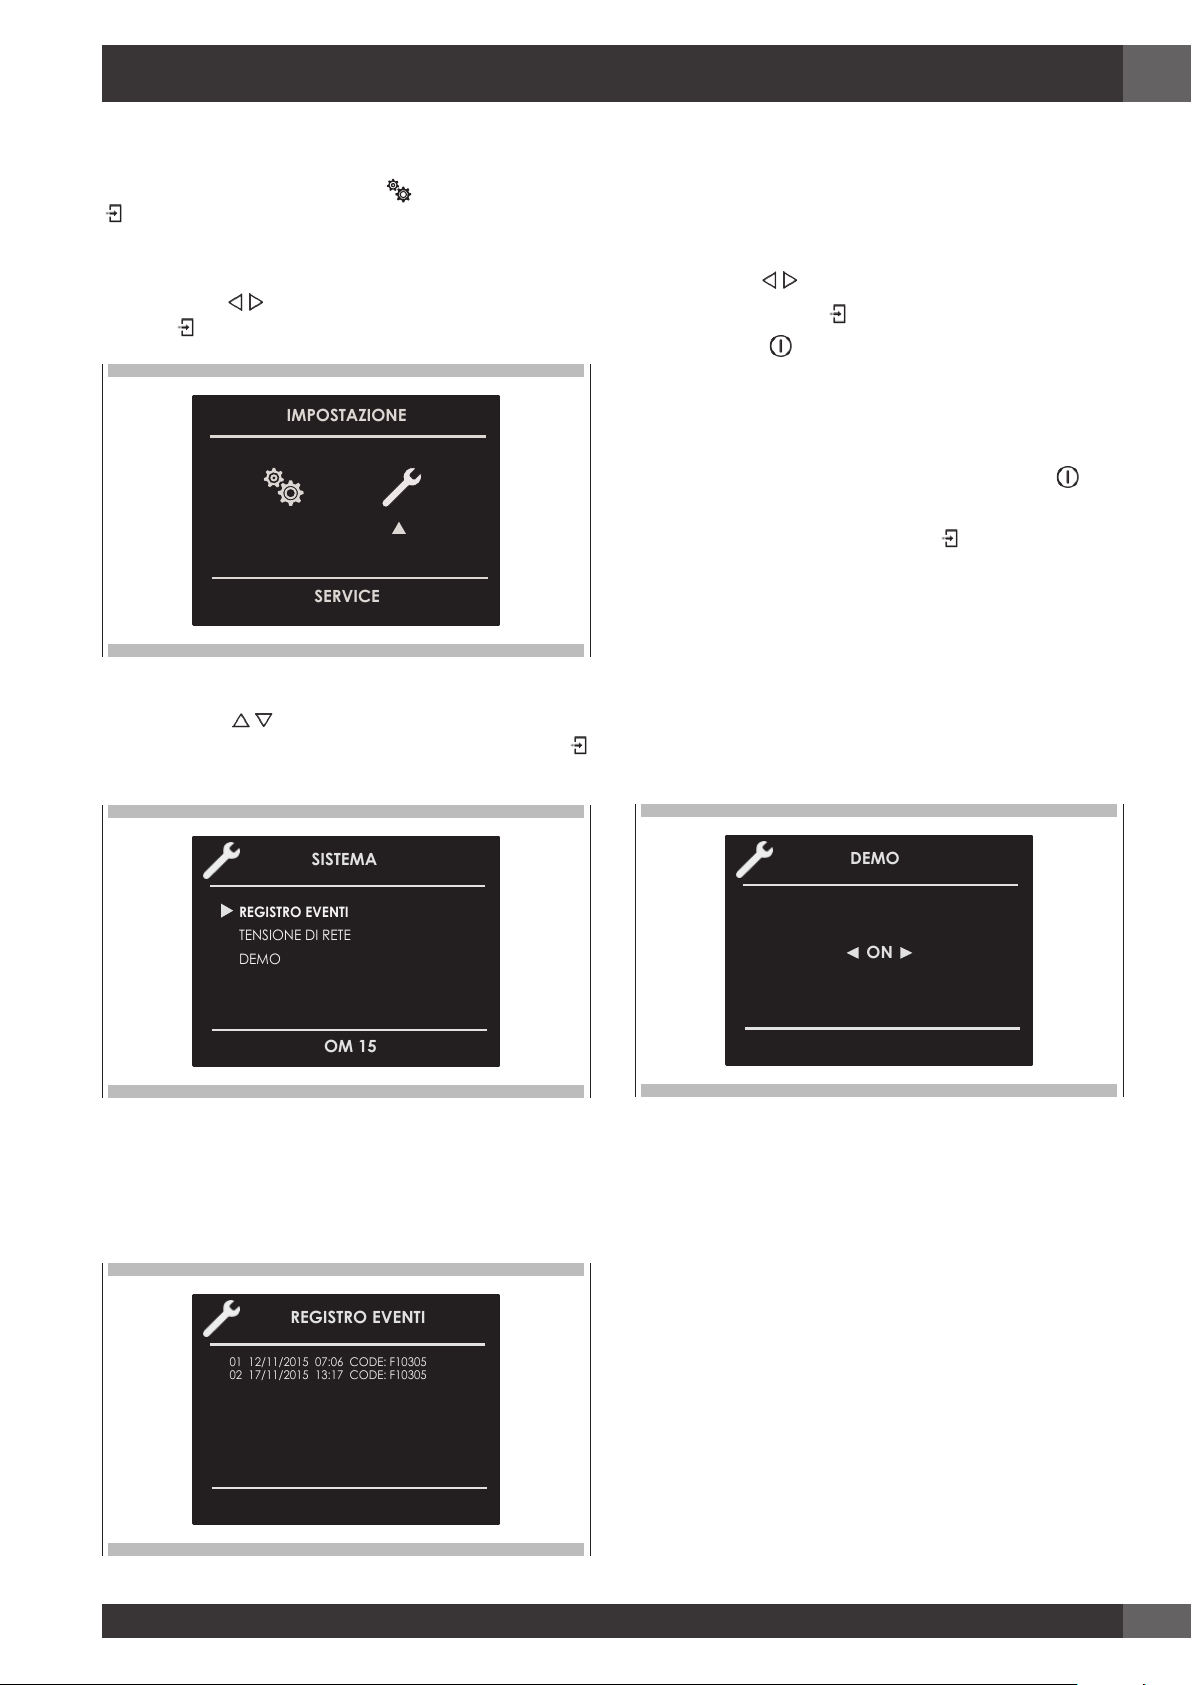
SISTEMA
REGISTRO EVENTI
TENSIONE DI RETE
DEMO
OM 15
01 12/11/2015 07:06 CODE: F10305
REGISTRO EVENTI
02 17/11/2015 13:17 CODE: F10305
Demo
DEMO
ON
7 - Impostazioni di Sistema
IT
Con il forno acceso, selezionare l'icona e confermare con il tasto
per accedere al menù IMPOSTAZIONI. Tale menù permette di
impostare una serie di parametri o funzioni speciali. Permette inoltre
di accedere alla lista eventi errore.
1. Premere i tasti per selezionare il sottomenù e confermare con
il tasto .
2. Utilizzare il presente menù per cambiare le seguenti impostazioni:
Premere i tasti
per selezionare la voce da impostare o da
mostrare sul display dai tre disponibili e confermare con il tasto
.
Lo scopo di tale funzione è quello di impostare la modalità DEMO che
rende il forno inutilizzabile per cucinare, ma esegue una dimostrazione
delle funzioni in automatico.
1. Premere i tasti per selezionare la voce ON.
2. Confermare con il tasto
3. Premere il tasto
.
.
Dopo circa 30 secondi il forno inizia a funzionare in tale modalità.
Per arrestare momentaneamente la funzione DEMO, tenere
semplicemente premuto qualunque tasto per pochi secondi fino a che
il forno non vada in standby. Per riavviarla, premere il tasto
.
Per disabilitare la funzione, accedere alla schermata DEMO e
impostarla su OFF. Confermare con il tasto
.
NOTA: Una volta impostata, la funzione rimane abilitata anche se il
forno è disconnesso dall'alimentazione elettrica.
Registro Eventi
Il menù permette di controllare qualunque errore registrato. Tali codici
possono essere notificati al servizio di assistenza post-vendita.
15
Page 18
IT
8 - Avviare il Forno
Accendere e spegnere il forno
IMPORTANTE
• Il tasto non arresta la funzione.
• Dopo aver spento il forno, la ventola di raffreddamento continua a funzionare fino a che le parti interne del forno non si siano raffreddate.
Premere
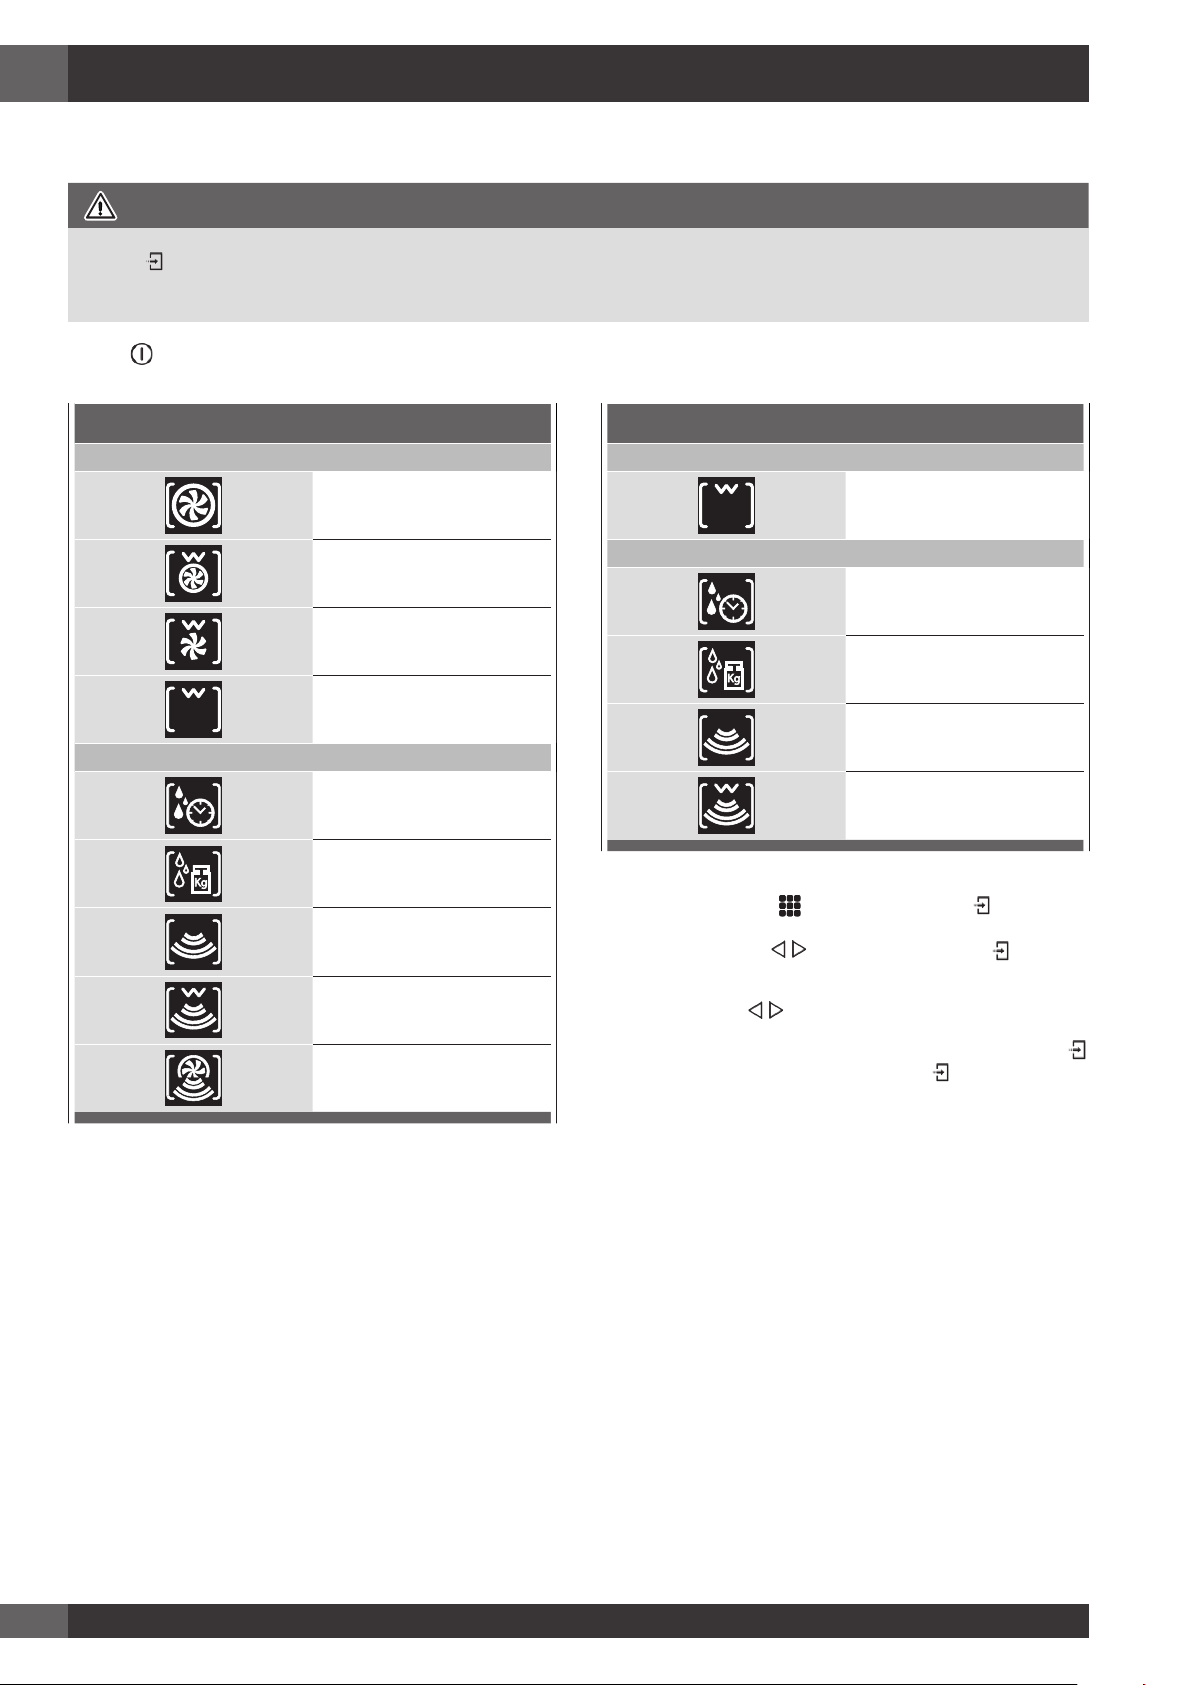
Forno Multifunzione
Cottura Tradizionale
Cottura a Microonde
per accendere il forno e premere nuovamente per spegnerlo. Il forno torna in modalità standby.
COTTURA CIRCOLARE
VENTILATA
CIRCOLARE E GRILL
GRILL VENTILATO
GRILL
SCONGELAMENTO A TEMPO
SCONGELAMENTO A PESO
COTTURA A MICROONDE
Forno Termico
Cottura Tradizionale
GRILL
Cottura a Microonde
SCONGELAMENTO A TEMPO
SCONGELAMENTO A PESO
COTTURA A MICROONDE
MICROONDE E GRILL
1. Selezionare l'icona
la modalità di cottura adeguata per le pietanze da cuocere
utilizzando le frecce e confermare con il tasto .
e premere il tasto Selezionare
MICROONDE E GRILL
MICROONDE E CIRCOLARE
2. Sul display è ancora possibile cambiare la modalità di cottura
utilizzando i tasti
3. Se la temperatura proposta è corretta, confermare con il tasto
per avviare la cottura, altrimenti, se il tasto non viene premuto
entro 10 secondi, il forno cambia in modalità automatica e l'icona
della modalità di cottura diventa animata.
.
16
Page 19

Tabella Modalità di Cottura
Cottura Tradizionale
MODALITÀ DI COTTURA ICONA TEMPERATURA
Min. Preimpostare Max.
IT
COTTURA CIRCOLARE VENTILATA
CIRCOLARE E GRILL
GRILL VENTILATO
GRILL
Cottura a Microonde
MODALITÀ DI COTTURA ICONA
SCONGELAMENTO A
TEMPO
50° C 165° C 230° C
50° C 210° C 230° C
50° C 165° C 230° C
50° C 230° C 230° C
IMPOSTARE
Min.
Pane 100 g 500 g 600 g 150 W
PESO WATT TEMPERATURA
Preimpostare
Max. Min.
Preimpostare
150 W
Max. Min.
Preimpostare
Max.
SCONGELAMENTO A
PESO
COTTURA A
MICROONDE
MICROONDE E GRILL
MICROONDE E
CIRCOLARE
Verdure 100 g 500 g 1000 g 150 W
Carne 100 g 500 g 1500 g 150 W
Pesce 100 g 500 g 800 g 150 W
150 W 900 W 900 W
150W 150 W 200° C
300W 300 W
450W 450 W
150W 150 W 50° C 100° C 200° C
300W 300 W
450W 450 W
17
Page 20
IT
325°F
275°F
11:00 am
COTTURA CIRCOLARE VENTILATA
++
--
325°F
11:06 am
COTTURA CIRCOLARE VENTILATA
++
--
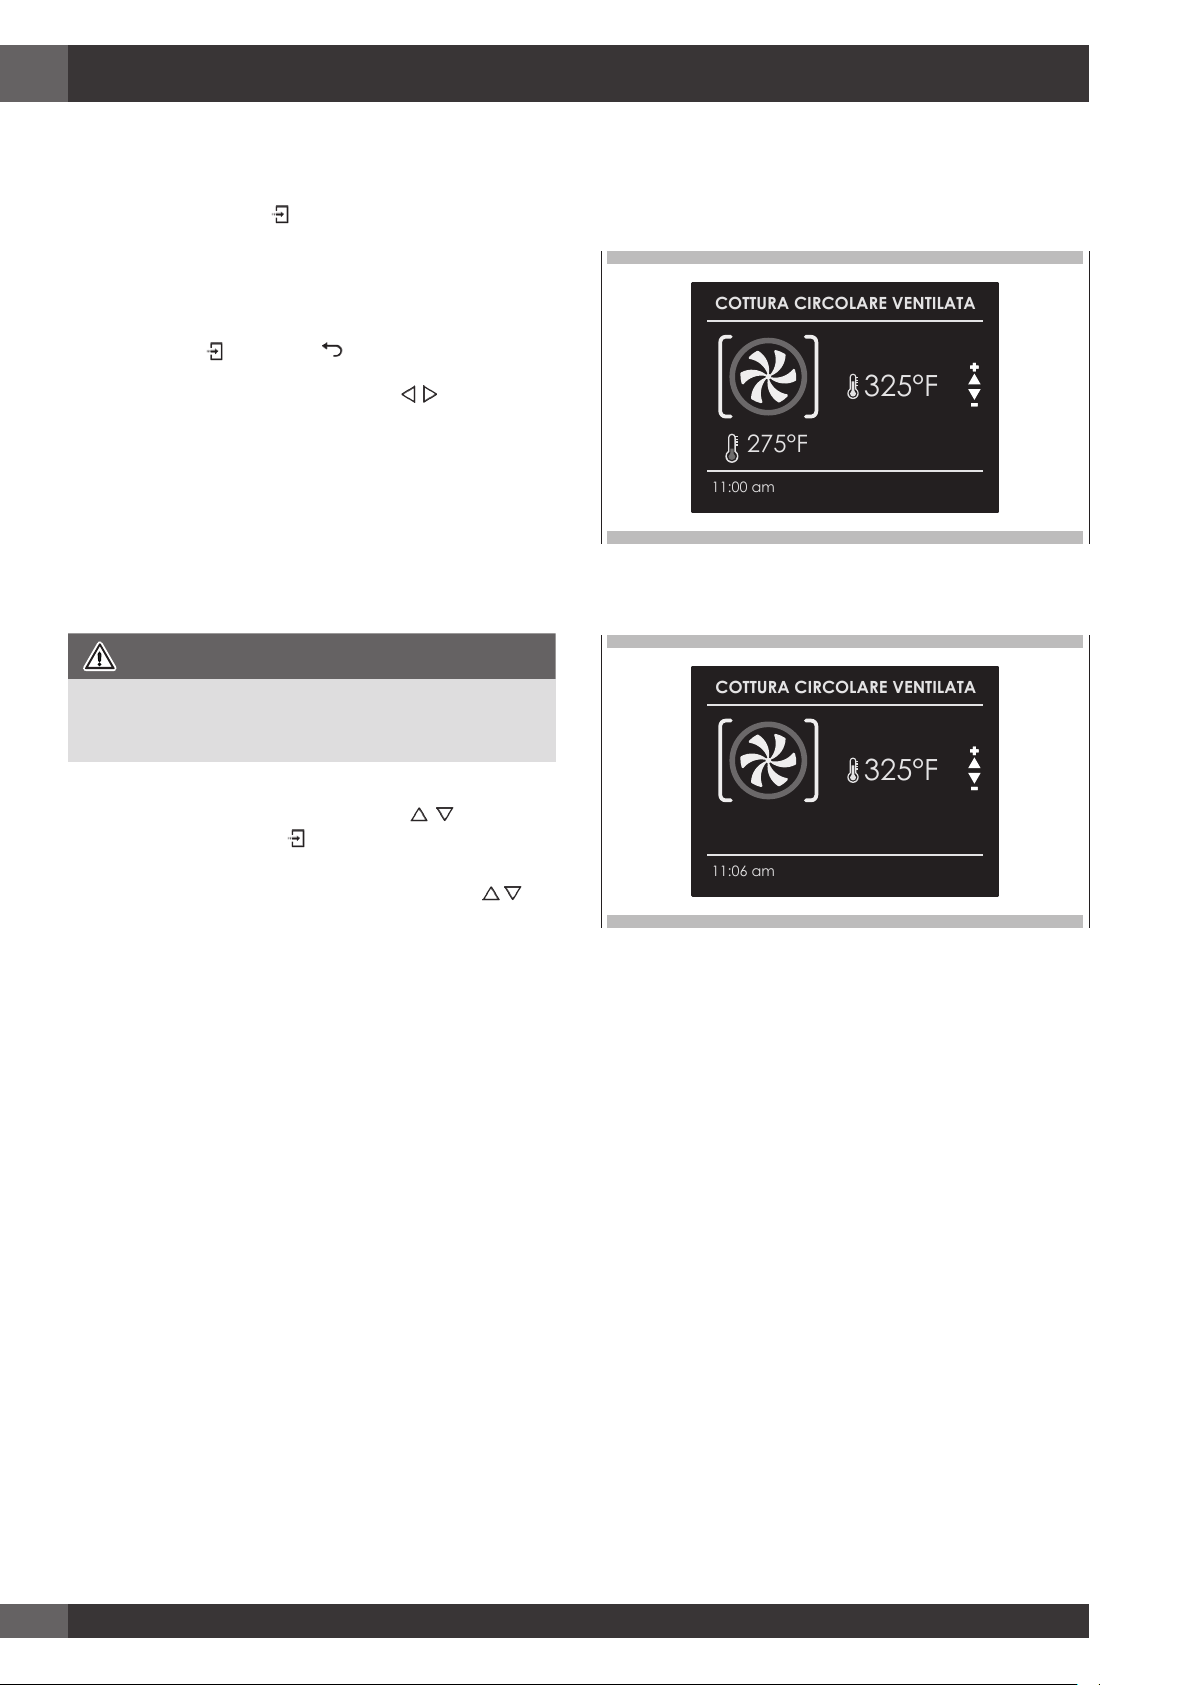
9 - Cottura Tradizionale
Cambiare la modalità di cottura
1. Durante la cottura non a tempo, si può impostare una pausa di
cottura premendo il tasto .
Tutte le impostazioni della funzione di cottura impostata si
conservano e possono essere riattivate premendo nuovamente lo
stesso tasto.
2. Per cambiare la modalità di cottura mentre il forno è in funzione,
premere il tasto e poi il tasto .
A questo punto, si può selezionare un'altra modalità di cottura tra
quelle disponibili nella lista tramite le frecce .
Cambiare la temperatura
IMPORTANTE
• Alla fine di una funzione, lo schermo mostra la temperatura
residua interna sulla schermata di standby.
Fase di preriscaldamento
Mentre il forno è in fase di preriscaldamento, la temperatura corrente
viene mostrata sotto l'icona della modalità di cottura.
Non appena viene raggiunta la temperatura impostata, viene emesso
un segnale acustico e la temperatura corrente scompare.
1. Dalla schermata di anteprima della modalità di cottura, si può
cambiare la temperatura tramite le frecce
successivamente con il tasto .
2. Una volta che la cottura è iniziata, la temperatura può comunque
essere cambiata in qualsiasi momento, tramite le frecce
confermando
.
18
Page 21
10 - Funzionamento Forno in Modalità a Tempo
275°F
11:00 am
COTTURA CIRCOLARE VENTILATA
325°F
++
--
FINE
TEMPO
11:50 am
00:50
275°F
11:00 am
COTTURA CIRCOLARE VENTILATA
325°F
++
--
FINE
START
12:30 pm
11:40
Start
IT
Assicurarsi che data e ora siano impostate correttamente.
La modalità a tempo spegne il forno alla fine del tempo di cottura.
ATTENZIONE
Non lasciare mai pietanze nel forno per più di un'ora prima e dopo
la cottura. Ciò potrebbe causare il deterioramento delle pietanze
stesse.
NOTA: Il tempo di cottura massimo che può essere impostato è 12 h.
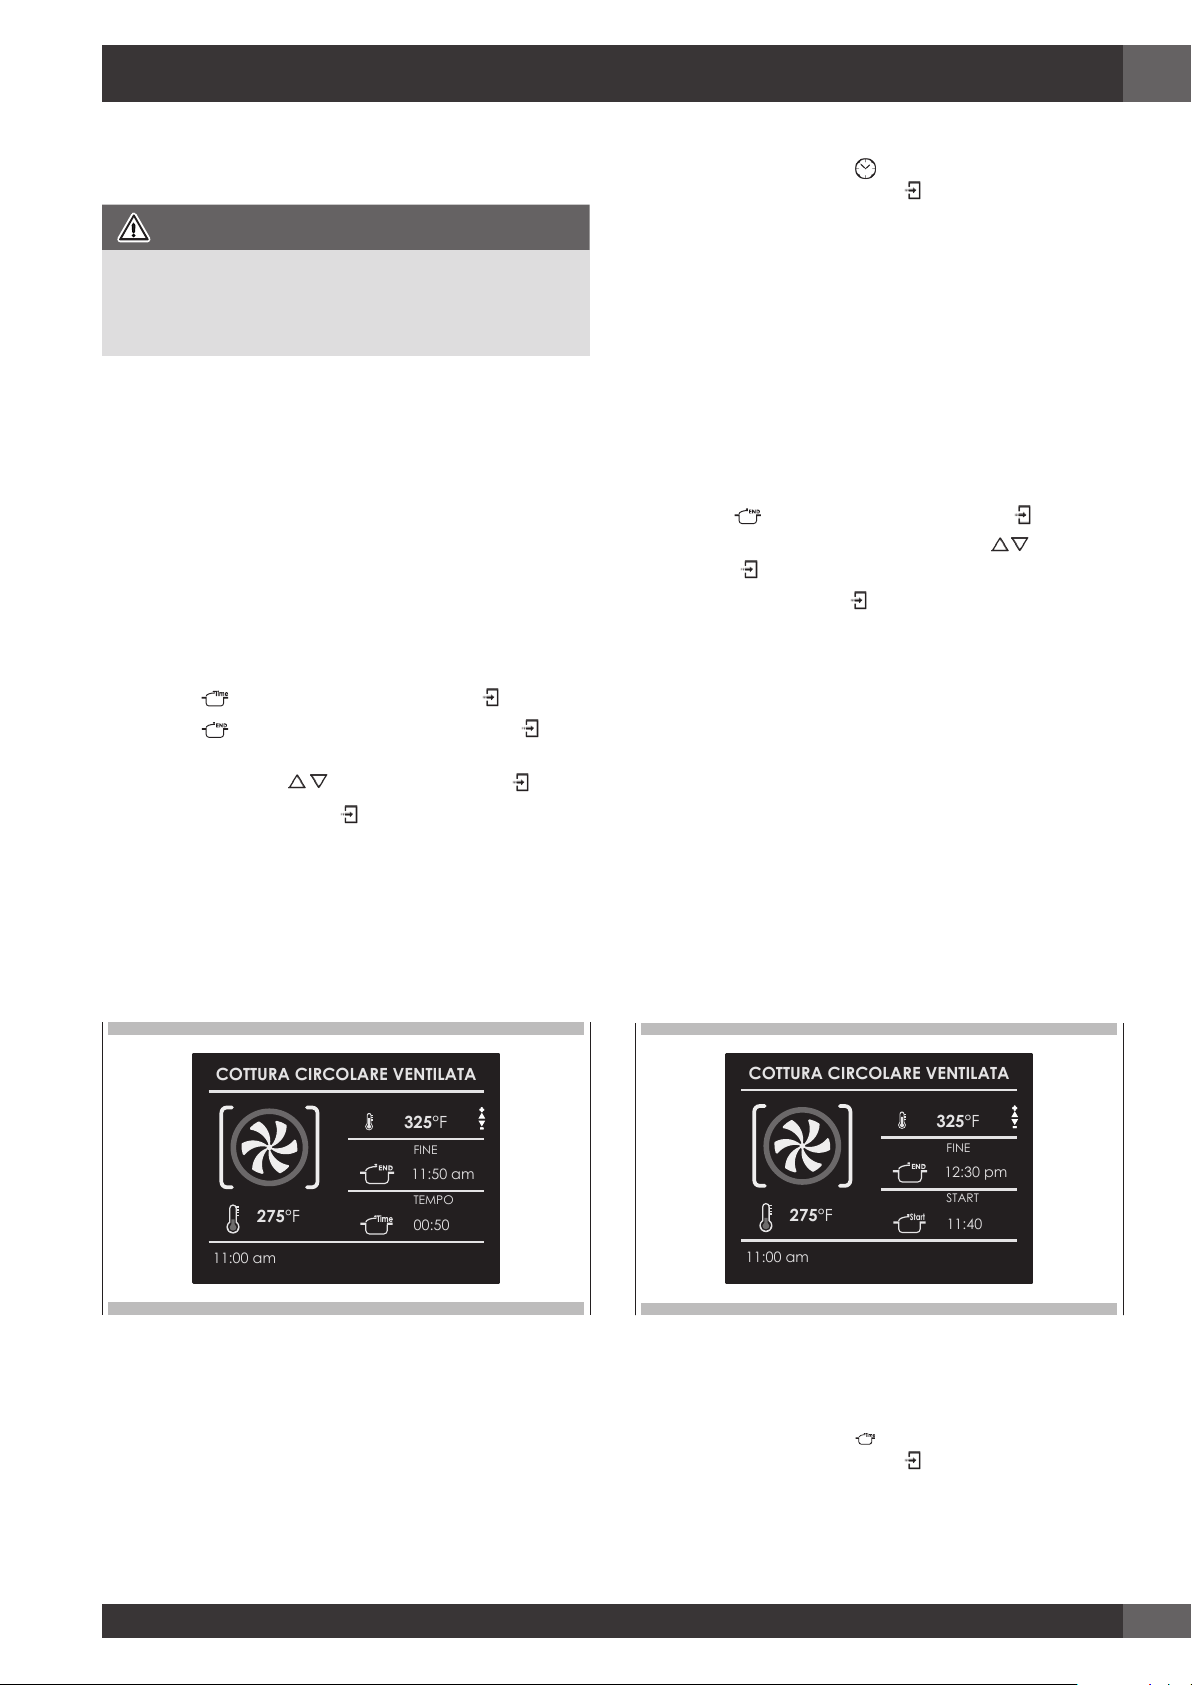
Tempo di Cottura
Utilizzare la funzione "Tempo di Cottura" per far funzionare il forno
per un determinato periodo di tempo. Il forno si avvia immediatamente
e si spegne automaticamente una volta che il tempo è terminato.
Per Impostare una Modalità a Tempo
1. Selezionare la modalità di cottura e la temperatura.
2. Ci sono due modi di impostare la funzione.
a) Sezionare
b) Sezionare
3. Dopo aver selezionato una delle suddette opzioni, impostare il
tempo tramite le frecce
4. Dopo aver premuto il tasto
informazioni sul tempo di cottura vengono mostrate sulla schermata
del display.
• Modalità di cottura
• Temperatura
• Tempo di cottura
• Fine del tempo di cottura
per impostare la durata e premere .
per impostare l'ora di arresto e premere .
e confermare con il tasto .
, la cottura viene avviata e le
Per cambiare il tempo di cottura quando il forno è già in funzione,
premere semplicemente il tasto
e inserire il nuovo tempo di cottura
prima di premere nuovamente il tasto .
Ora Fine
Utilizzare la funzione "Ora Fine" per ritardare l'avvio della cottura
a tempo. Inserire l'ora di arresto della cottura e il forno calcolerà
in automatico l'ora di avvio. Il forno si accende e si spegne
automaticamente.
Per Ritardare l'Inizio della Modalità a Tempo
1 Prima di tutto impostare il tempo di cottura richiesto come indicato
nel paragrafo "TEMPO DI COTTURA".
2 Sezionare
3 Impostare l'ora fine della cottura tramite le frecce
con il tasto
4 Dopo aver premuto il tasto
e i dettagli della cottura posticipata sono mostrati sullo schermo.
• Modalità di cottura
• Temperatura
• Ora fine cottura
• Ora avvio cottura
per impostare l'ora fine e premere .
e confermare
.
, la funzione viene messa in standby
5 Dopo la cottura, il forno si spegne ed un segnale acustico avvisa
che la cottura è terminata.
Dopo la cottura, il forno si spegne ed un segnale acustico avvisa che
la cottura è terminata.
Per cambiare il tempo di cottura quando il forno è già in funzione,
premere semplicemente il tasto
prima di premere nuovamente il tasto
e inserire il nuovo tempo di cottura
.
19
Page 22
IT
SCONGELAMENTO A TEMPO
00’ 20”
Time
11:00
SCONGELAMENTO A PESO
450g
11:00
COTTURE A MICROONDE
00’ 30”
Time
11:00
COTTURE A MICROONDE
900W
Time
11:00
11 - Cottura a Microonde
NOTA: È fondamentale leggere attentamente le istruzioni e le
avvertenze per un corretto utilizzo.
ATTENZIONE
Le funzioni a microonde non inizieranno finché la porta non sarà
chiusa. Se la porta è aperta mentre il forno è acceso, il forno andrà
in modalità pausa e sul display verrà mostrato il messaggio "PORTA
APERTA".
Per riavviare la funzione, la porta deve essere chiusa.
La funzione può essere messa in pausa in qualunque momento con il
tasto
, quando viene premuto nuovamente la funzione riparte.
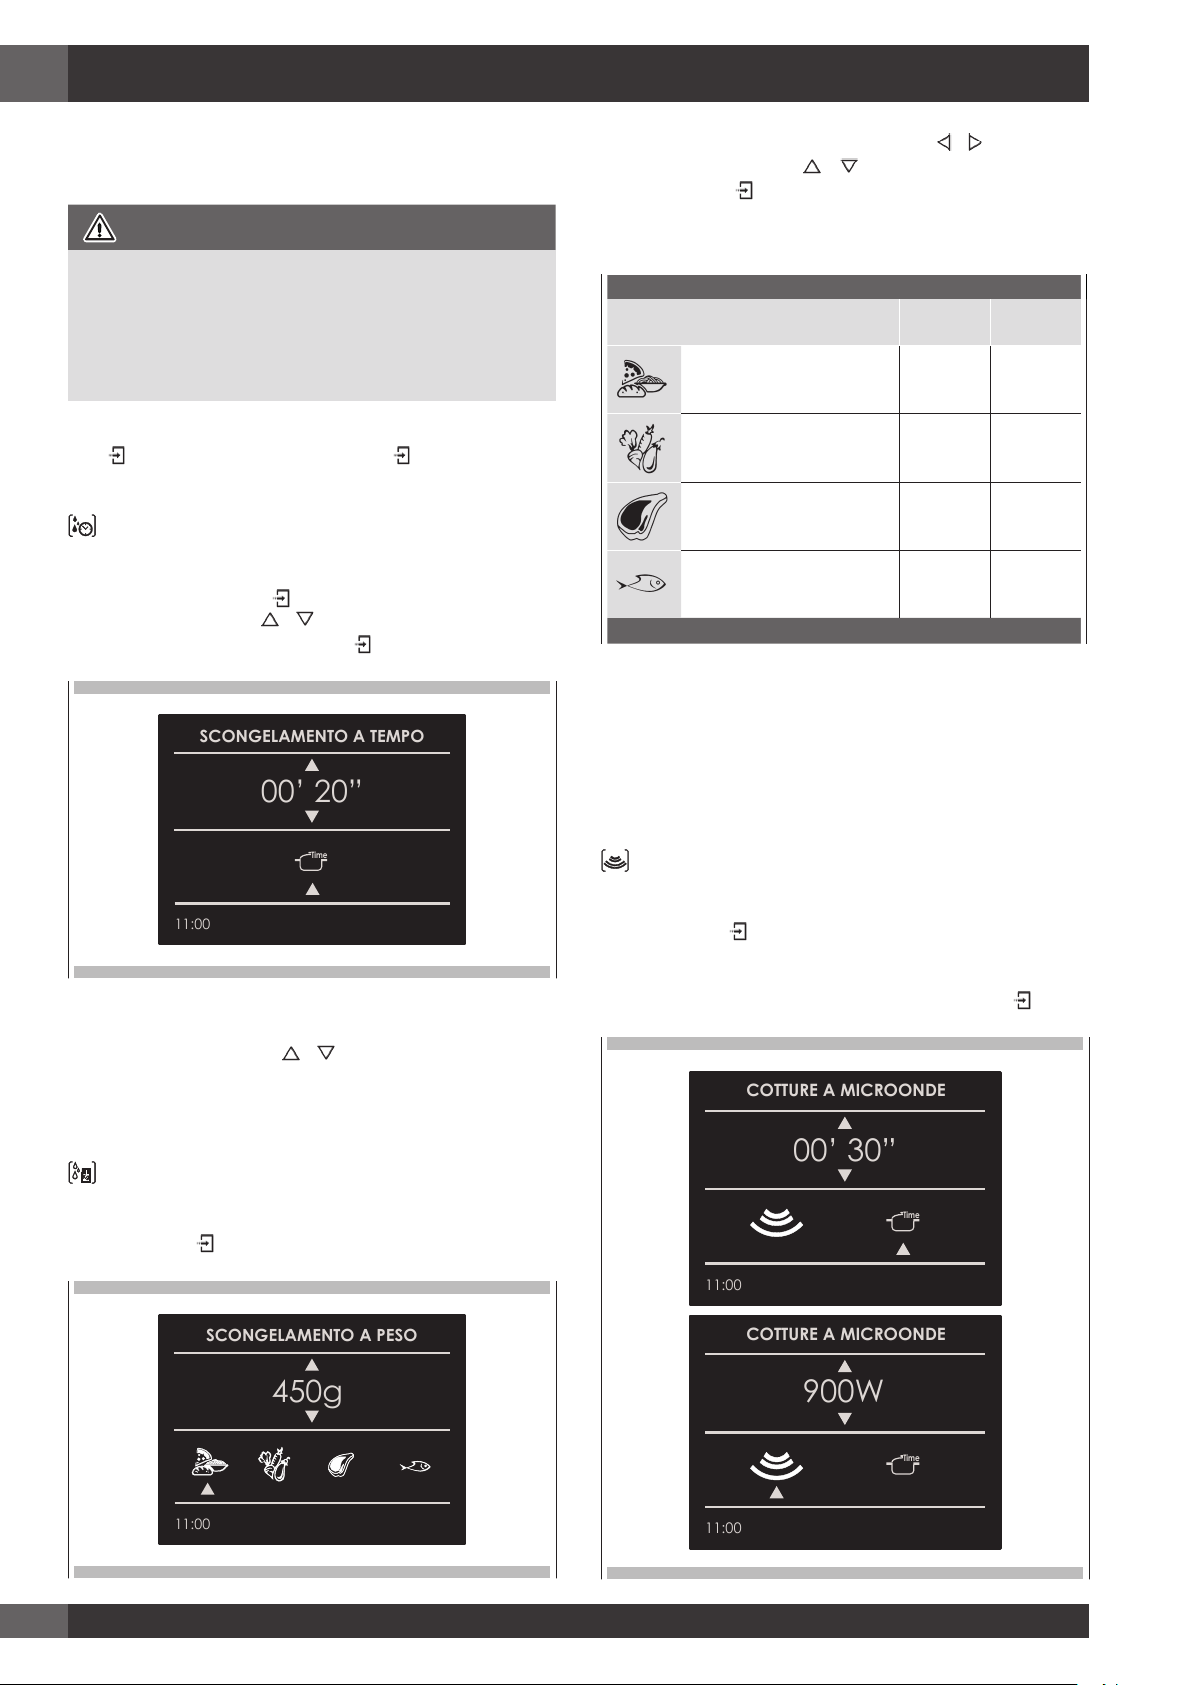
Funzione di Scongelamento a Tempo
Selezionare l'icona per lo scongelamento a tempo utilizzando le
frecce e premendo il tasto , poi impostare lo scongelamento a
tempo utilizzando le frecce e .
Per avviare la funzione, premere il tasto .
Selezionare il tipo di pasto utilizzando le frecce e , poi impostare
il peso utilizzando le frecce e ,infine avviare lo scongelamento
utilizzando il tasto .
Di seguito i tipi di pasto e relativi pesi che possono essere impostati:
PIETANZA MIN
Peso (g)
Pane Pizza Primi Piatti 100 600
Verdure 100 1000
Carne 100 1500
Frutti di Mare 100 800
Il tempo di scongelamento viene calcolato in maniera completamente
automatica e senza bisogno di impostare alcun parametro di tempo, in
base ai tipi di pasto e peso impostati.
MAX
Peso (g)
Una volta che la funzione è stata avviata, sul display verrà mostrato
un conto alla rovescia. Il tempo può essere modificato in qualunque
momento utilizzando le frecce e .
Quando lo scongelamento è completato, sul display comparirà il
messaggio "SCONGELAMENTO COMPLETATO".
Funzione di Scongelamento a Peso
Selezionare l'icona per lo scongelamento a peso utilizzando le frecce
e premere il tasto .
Quando lo scongelamento è completato, sul display comparirà il
messaggio "SCONGELAMENTO COMPLETATO".
Funzione a Microonde
Selezionare l'icona per lo funzione a Microonde utilizzando le frecce
e premere il tasto .
Se desiderate avviare la funzione immediatamente con il tempo preimpostato
di 30 sec e una potenza preimpostata di 900W, premere il tasto .
20
Page 23

IT
MICROONDE E GRILL
00’ 20”
Time
11:00
MICROONDE E GRILL
300W
Time
11:00
MICROONDE E CIRCOLARE
00’ 20”
11:00
Time
MICROONDE E CIRCOLARE
100°C
11:00
Time
MICROONDE E CIRCOLARE
300W
11:00
Time
Se volete personalizzare tempo e potenza, aprire il sottomenù
organizzato come segue:
• TEMPO: Selezionare l'icona
e utilizzare i tasti e per
personalizzare il tempo.
• POTENZA MICROONDE: Selezionare l'icona
e utilizzare i tasti
e per selezionare la potenza del microonde dai 6 possibili
livelli, 150W - 300W - 450W - 600W - 750W - 900W.
Una volta che il nuovo parametro è stato impostato, premere il tasto
per avviare la cottura.
Una volta che la cottura è stata avviata, sul display verrà mostrato
un conto alla rovescia. Il tempo può essere modificato in qualunque
momento utilizzando le frecce e .
Quando la cottura è completata, sul display comparirà il messaggio
"COTTURA TERMINATA".
Funzione Microonde + Grill
Selezionare l'icona per la funzione Microonde + Grill utilizzando
le frecce e premendo il tasto , poi impostare lo scongelamento a
tempo utilizzando le frecce e .
Una volta che la cottura è stata avviata, sul display verrà mostrato
un conto alla rovescia. Il tempo può essere modificato in qualunque
momento utilizzando le frecce
e .
Quando la cottura è completata, sul display comparirà il messaggio
"COTTURA TERMINATA".
Funzione Microonde + Circolare
Selezionare l'icona per la funzione Microonde + Circolare
utilizzando le frecce e premendo il tasto , poi impostare il tempo di
scongelamento utilizzando le frecce e .
Se desiderate avviare la funzione immediatamente con il tempo
preimpostato ed una temperatura preimpostata di 100°C, con una
potenza microonde preimpostata di 300W, premere il tasto .
Se desiderate avviare la funzione immediatamente con il tempo
preimpostato ed una potenza preimpostata di 300W, premere il tasto
.
Se volete personalizzare la potenza, aprire il sottomenù organizzato
come segue:
• POTENZA MICROONDE: Selezionare l'icona
e per selezionare la potenza del microonde dai 3 possibili
livelli, 150W - 300W - 450W.
Una volta che il nuovo parametro è stato impostato, premere il tasto
per avviare la cottura.
e utilizzare i tasti
Se volete personalizzare temperatura e potenza, aprire il sottomenù
organizzato come segue:
• TEMPERATURA: Selezionare l'icona
e utilizzare i tasti e
per personalizzare la temperatura tra 50°C e 200°C.
• POTENZA MICROONDE: Selezionare l'icona
e utilizzare i tasti
e per selezionare la potenza del microonde dai 3 possibili
livelli, 150W - 300W - 450W.
21
Page 24
IT
Una volta che il nuovo parametro è stato impostato, premere il tasto
per avviare la cottura.
Una volta che la cottura è stata avviata, sul display verrà mostrato
un conto alla rovescia. Il tempo può essere modificato in qualunque
momento utilizzando le frecce e .
Quando la cottura è completata, sul display comparirà il messaggio
"COTTURA TERMINATA".
Cambiare i Watt di Potenza
Selezionare l'icona e premere il tasto Selezionare l'icona
microonde e cambiare la potenza di wattaggio utilizzando le frecce
e confermare con il tasto .
Cambiare il Tempo
Premere l’icona e premere il tasto
Selezionare l’icona tempo e cambiare il valore del tempo tramite le
frecce
e confermare con il tasto .
Cambiare la Temperatura
(disponibile solamente per microonde e ring)
Selezionare l'icona e premere il tasto Selezionare l'icona
microonde e cambiare l'impostazione temperatura utilizzando le
frecce e confermare con il tasto .
Cambiare il Peso
(disponibile solamente per scongelamento a peso)
Premere l'icona e cambiare il peso tramite le frecce e
confermare con il tasto .
22
Page 25

Un solo tasto luce attiva le luci.
Premere per accendere o spegnere le luci.
Le luci del forno si accendono automaticamente quando la porta è
aperta.
Quando un forno viene utilizzato, le luci si accendono automaticamente
all'avvio di una modalità di cottura.
Le luci del forno si spegneranno automaticamente quando una
modalità di cottura viene cancellata.
NOTA: Una volta accese, le luci si spengono automaticamente dopo
3 minuti. Per riaccenderle premere il tasto o aprire la porta.
12 - Utilizzo Luci Forno
IT
23
Page 26
IT
SALVARE
TACCHINO ARROSTO
START
GRIGLIA RETTANGOLARE
LIVELLO
PESO
TEMPO DI COTTURA
PRERISCALDO
1
3800g
03:00
SI
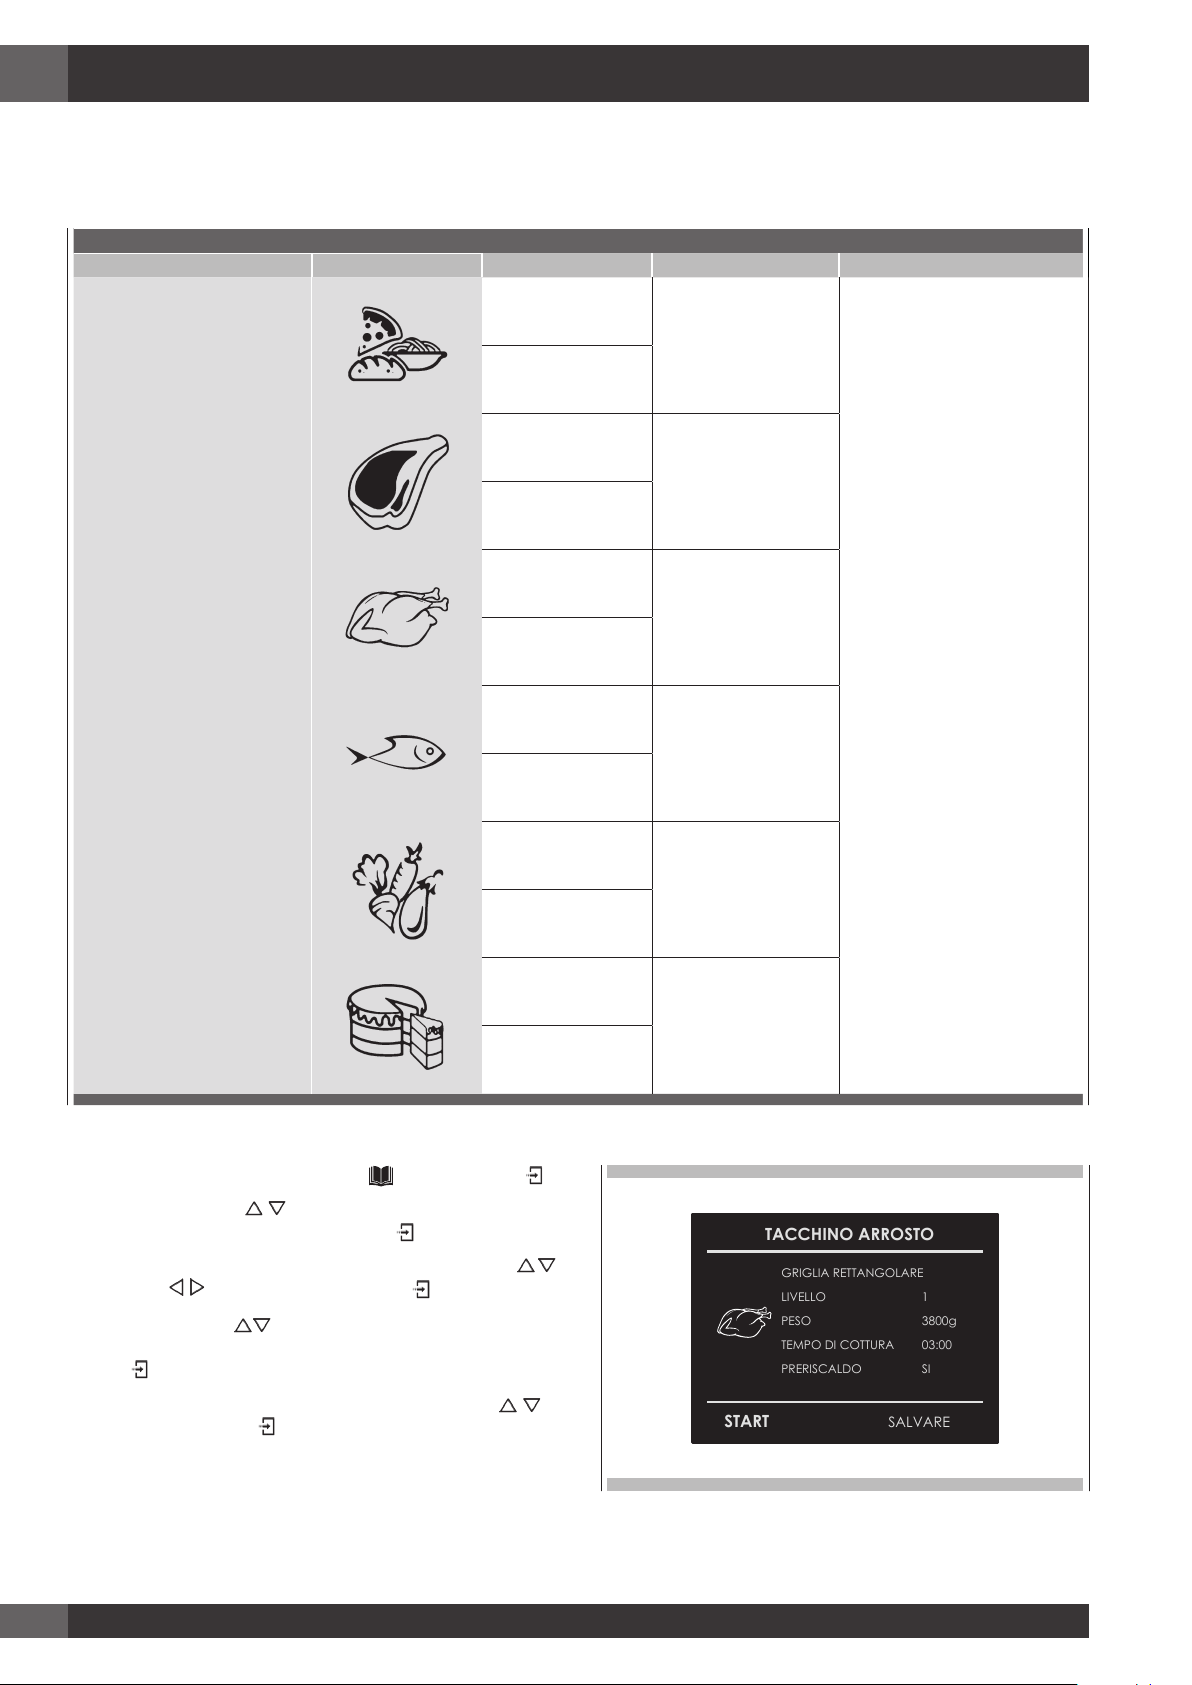
13 - Ricette
La funzione Ricette del vostro forno vi da la possibilità di cucinare pietanze senza dover ogni volta impostare il forno manualmente. Selezionando
una ricetta "DEFINITA", la modalità di cottura, la temperatura e il tempo vengono impostati automaticamente in base alla ricetta selezionata dal
menù.
Lista Ricette Tipo di Alimento Condizione alimento Lista Ricette Informazioni mostrate
FRESCO
PASTA PIZZA PRIMI
PIATTI
SURGELATO
INTERO
CARNE
A PEZZI
PREDEFINITE O PERSONALI
Selezionare una ricetta già definita:
INTERO
A PEZZI
INTERO
A PEZZI
-
-
-
-
POLLAME
PESCE
VERDURE
TORTE
TIPO DI ACCESSORIO
POSIZIONE LIVELLO
PESO ALIMENTO
TEMPO DI COTTURA
PRERISCALDAMENTO
RICHIESTO
(SÌ/NO)
1. Accendere il forno, selezionare l'icona e premere il tasto .
2. Utilizzando le frecce
"PERSONALI" e confermare tramite il tasto .
3. Scegliere il tipo di alimento da cuocere utilizzando le frecce
e le frecce e confermare tramite il tasto .
4. Utilizzando le frecce
o in altri casi tra "INTERO" o "A PEZZI" e confermare tramite il
tasto .
5. Selezionare la ricetta richiesta richiesta tramite le frecce
confermare con il tasto .
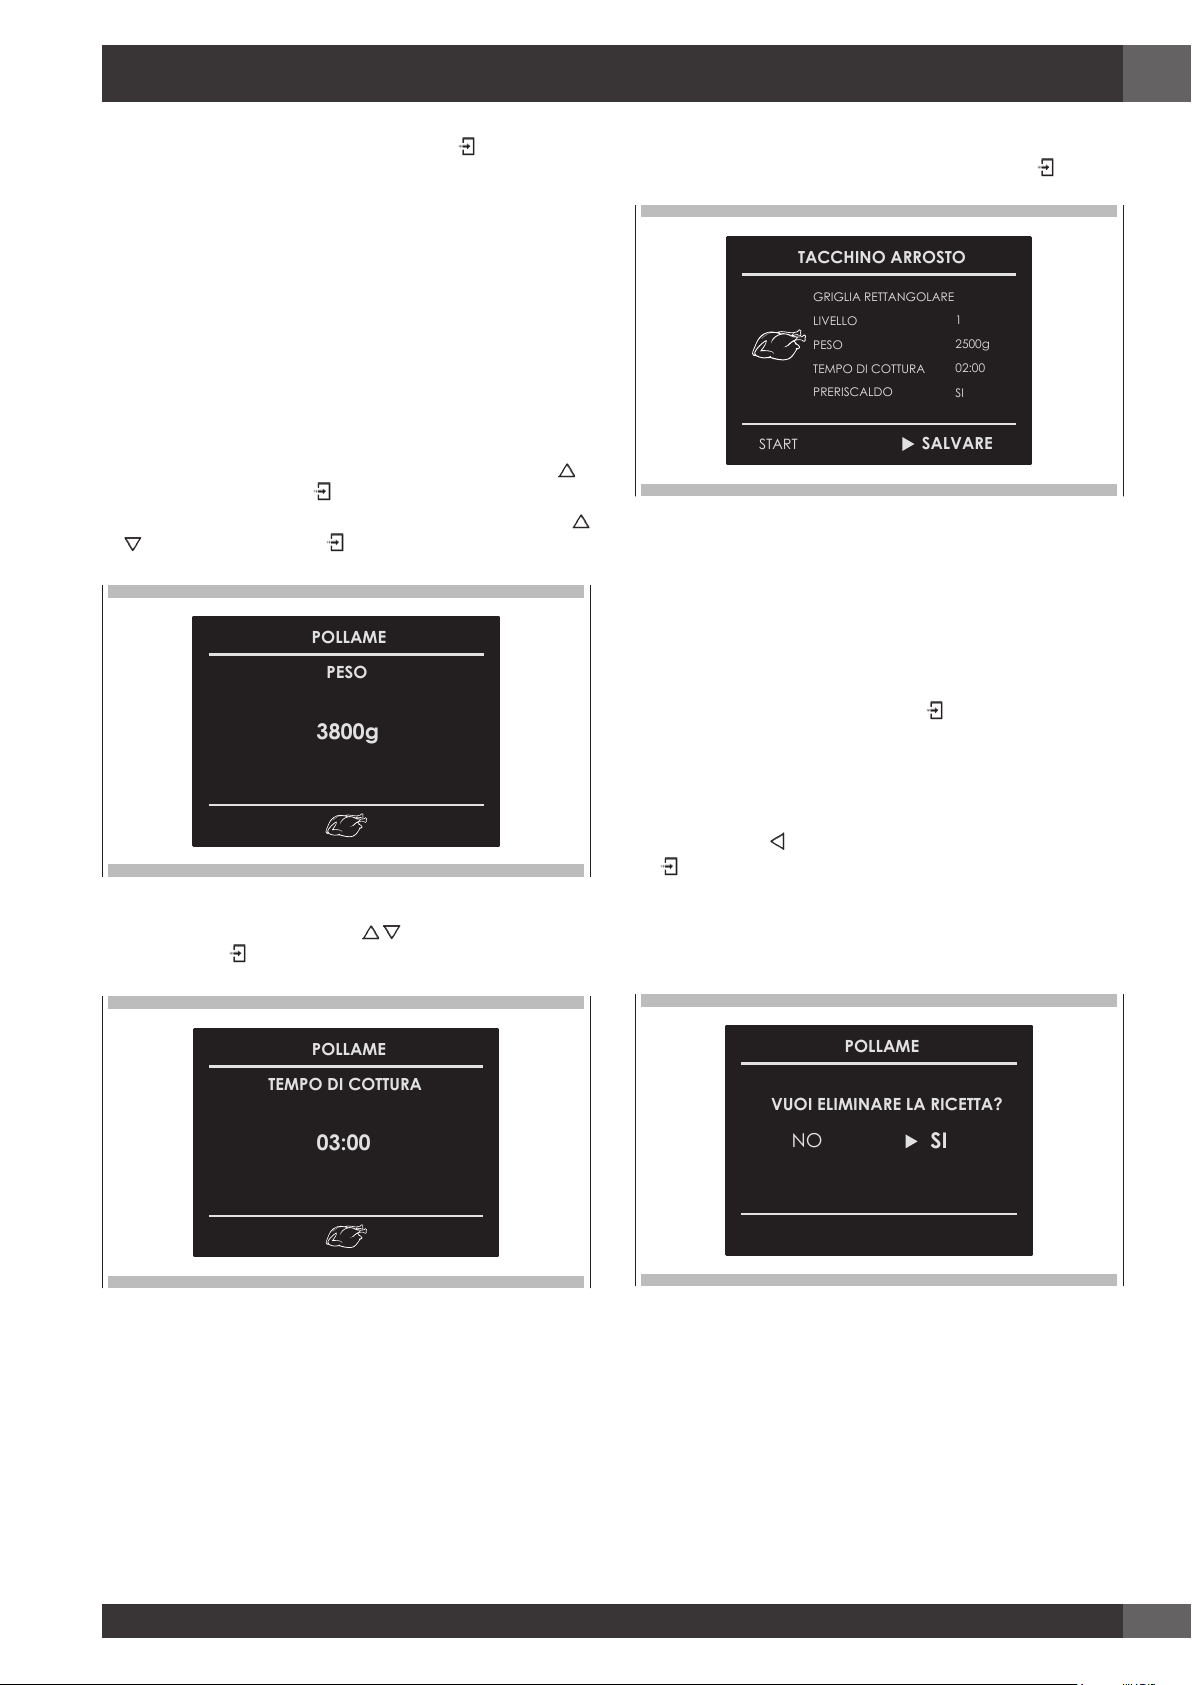
6. Quando la ricetta viene selezionata, sul display compare la
seguente schermata:
24
selezionare la lista "PREDEFINITE" o
scegliere tra "FRESCO" o "SURGELATO"
e
Page 27
IT
POLLAME
3800g
PESO
POLLAME
03:00
TEMPO DI COTTURA
SALVARE
TACCHINO ARROSTO
START
GRIGLIA RETTANGOLARE
LIVELLO
PESO
TEMPO DI COTTURA
PRERISCALDO
1
2500g
02:00
SI
POLLAME
NO
SI
VUOI ELIMINARE LA RICETTA?
7. Per avviare una ricetta, confermare con il tasto .
Durante una ricetta, una serie di messaggi sonori e visivi vi chiedono
di eseguire le seguenti operazioni. Seguire semplicemente le
istruzioni sullo schermo.
8. Dopo la cottura, il forno si spegne ed un segnale acustico avvisa
che la ricetta è terminata.
Salvare una ricetta personalizzata:
Una volta che la ricetta è stata selezionata, le impostazioni "Tempo" e
"Peso" possono essere cambiate e la ricetta può essere salvata tra
quelle "PERSONALI".
1. Una volta che la ricetta è stata selezionata, premere il tasto
confermare tramite il tasto .
2. Per cambiare il peso, inserire il peso desiderato tramite le frecce
e confermare con il tasto .
e
4. A questo punto, la ricetta può essere salvata su "PERSONALI"
selezionando "SALVA" e confermando tramite il tasto
.
NOTA: Se i valori di tempo e peso vengono cambiati e non salvati
subito, alla fine della ricetta, compare un messaggio che
chiede se si vogliano salvare o no.
5. Per avviare la ricetta, premere il tasto .
3. Il forno passa automaticamente al tempo di cottura. Per cambiare
questo tempo, utilizzare le frecce e confermare nuovamente
tramite il tasto .
Cancellare una ricetta personalizzata:
1. Per eliminare una ricetta dalla lista delle ricette personalizzate,
selezionare la ricetta.
2. Premere il tasto
.
e selezionare la scelta e confermare con il tasto
25
Page 28
IT
min 3
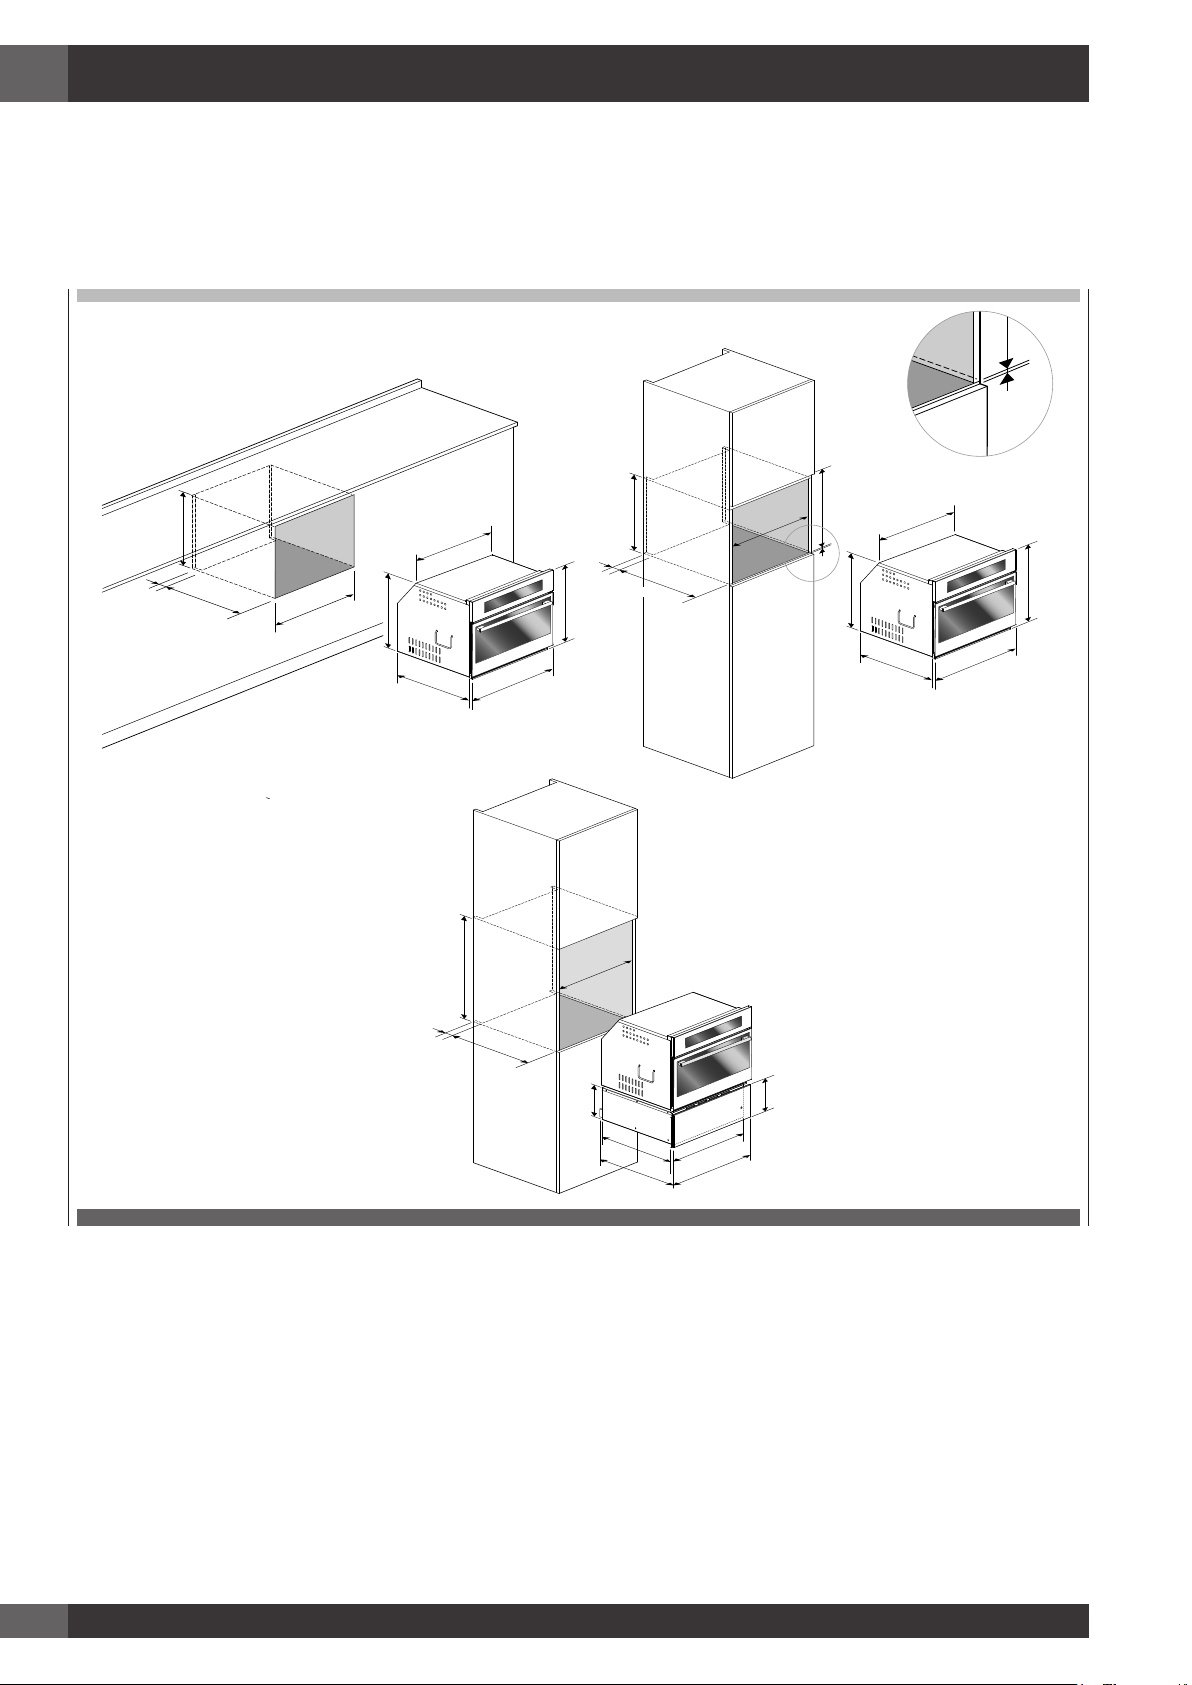
14 - Per l'Installatore
Installare il forno da incasso.
Il forno deve essere installato sotto un piano cottura, in una colonna, o combinato con il relativo cassetto scaldavivande.
Le dimensioni dello spazio devono essere quelle mostrate in figura.
Il materiale del vano deve essere in grado di sopportare il calore.
Il forno deve essere centrato all'interno delle pareti del vano e fissato con le viti e le boccole fornite.
50
min 460
min
min 458
3
432
540
455
533
594
min
450
540
50
510
560
432
533
595
50
594
510
455
510
560
560
26
140
528
545
144
554
26
596
Page 29
IT
DATI TECNICI
Alimentazione elettrica
Potenza massima assorbita 3200 W
Potenza microonde 900 W
Grill 1500 W
Aria calda 1500 W
Frequenza microonde 2450 MHz
220-240 V~, 50 Hz
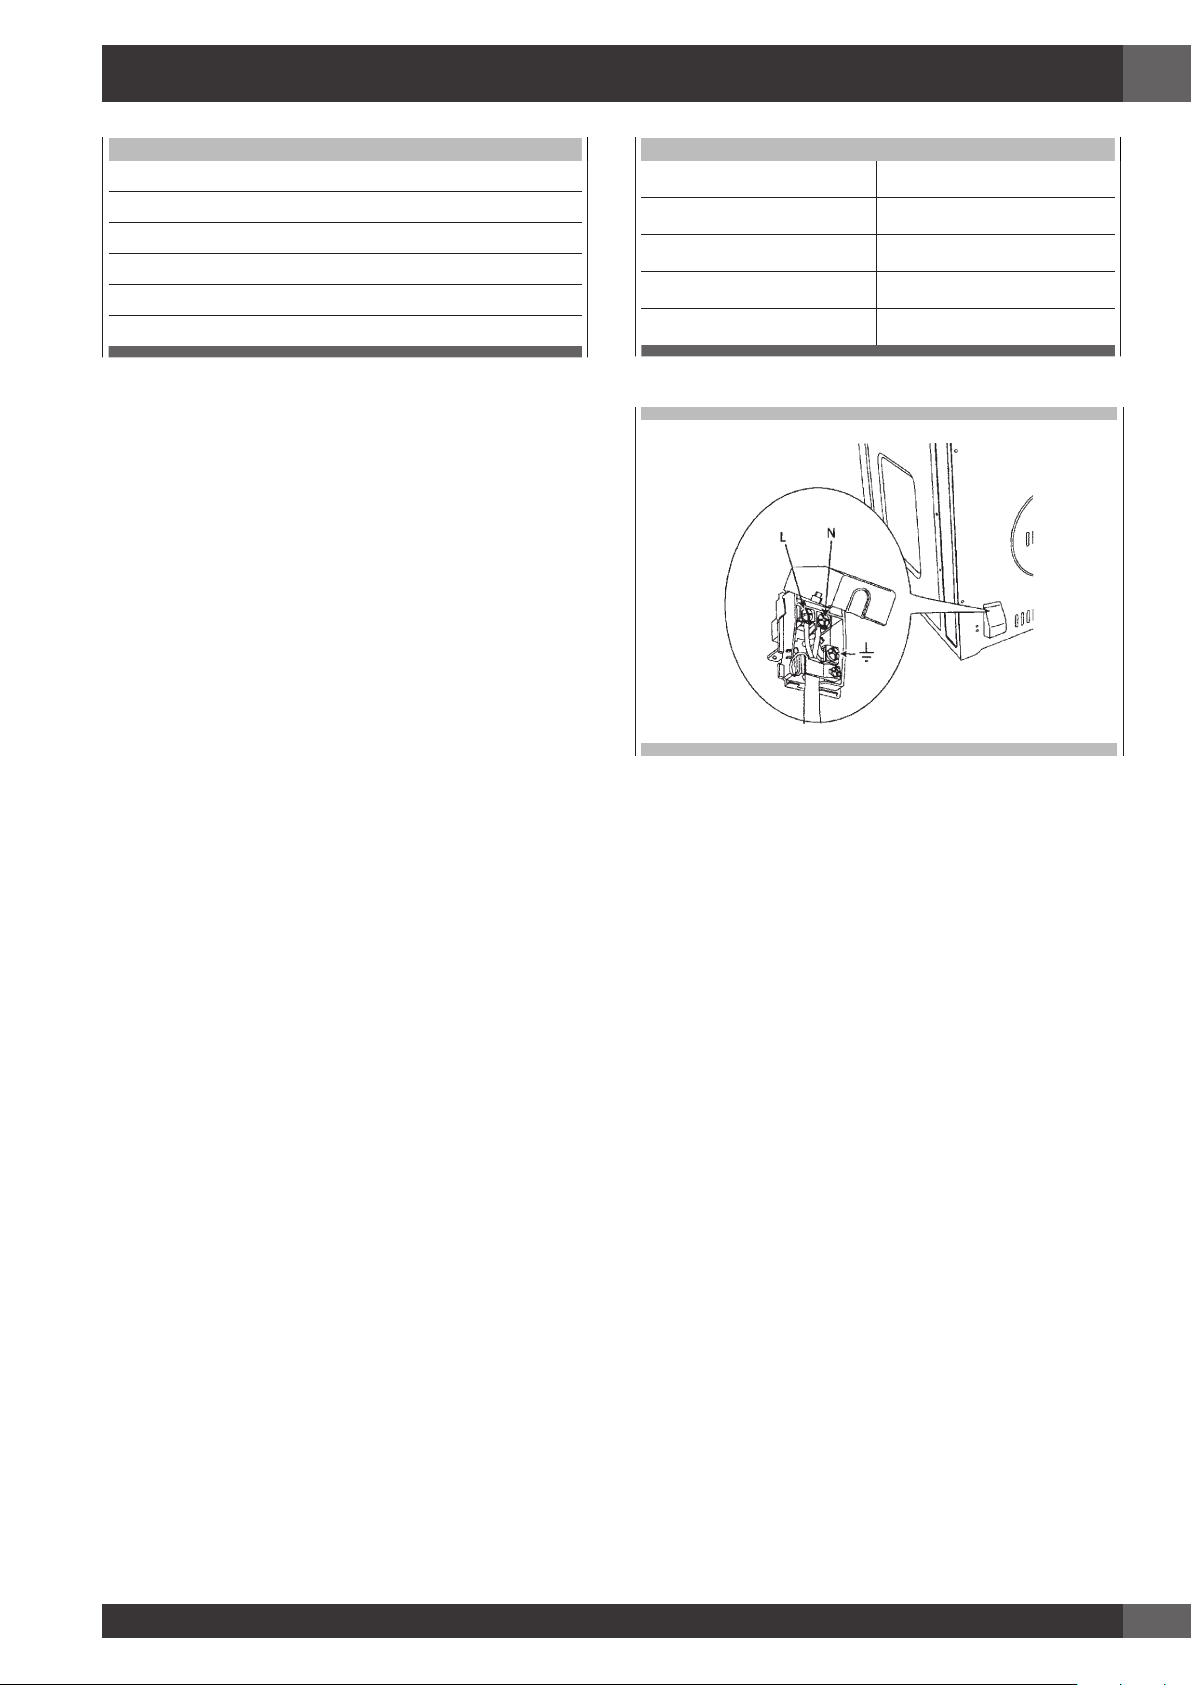
Collegamento Elettrico
Prima di effettuare il collegamento elettrico, assicurarsi che:
• le caratteristiche del sistema elettrico soddisfino quanto mostrato
sulla targhetta con il numero di serie applicato nella parte frontale
del forno;
• il sistema elettrico abbia un effettivo collegamento a terra conforme
alle norme e leggi in vigore.
Il collegamento a terra è previsto dalla legge.
Il cavo non deve in nessun momento raggiungere una temperatura di
50°C superiore alla temperatura ambiente.
Questo forno può essere collegato alla corrente tramite cavo dotato di
spina adeguatamente nominalizzata che sia compatibile con le prese
del sotto-circuito finale nel cablaggio fisso destinato ad alimentare il
presente forno.
Se un elettrodomestico fisso non ha un cavo di alimentazione e una
presa, o un altro dispositivo che ne assicuri lo scollegamento dalla
rete elettrica, con una distanza di apertura dei contatti che permetta
il completo scollegamento in condizioni di sovraccarico di corrente
categoria III, tali dispositivi di scollegamento devono essere forniti
nella fornitura di corrente elettrica in conformità con la normativa
sull'installazione.
La presa o l'interruttore onnipolare deve essere facilmente raggiungibile
ad elettrodomestico installato.
TIPO E DIAMETRO MINIMO DEI CAVI
SASO
H05RR-F 3x1,5 mm² H05RR-F 3x2,5 mm²
H05VV-F 3x1,5 mm² H05VV-F 3x2,5 mm²
H05RN-F 3x1,5 mm² H05RN-F 3x2,5 mm²
H05V2V2-F 3x1,5 mm² H05V2V2-F 3x2,5 mm²
NOTA: Il costruttore declina ogni responsabilità qualora le norme
antinfortunistiche convenzionali e le sopracitate istruzioni non
vengano rispettate.
27
Page 30
IT
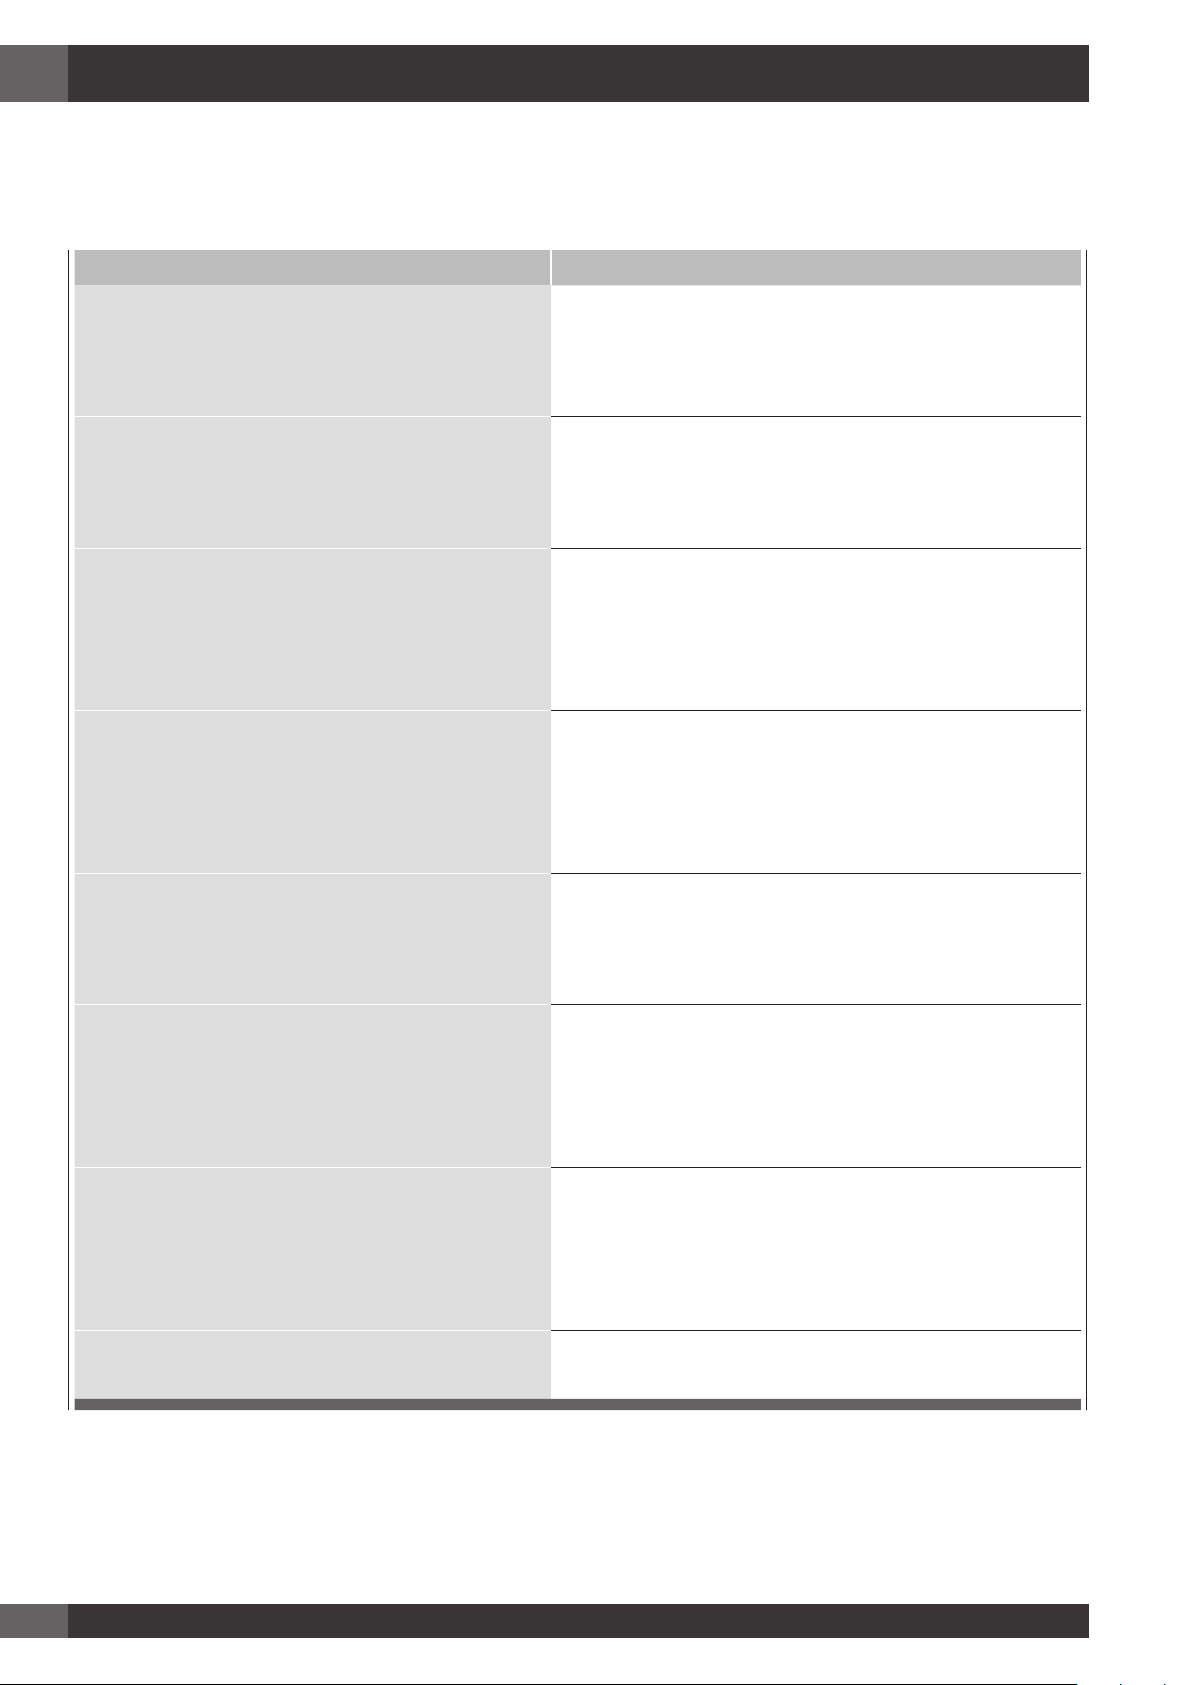
15 - Risoluzione Problemi Tipici della Cottura al Forno
Sia con la Cottura al Forno Tradizionale che con quella Ventilata si possono avere risultati insoddisfacenti per una serie di motivi che esulano dal
cattivo funzionamento del forno. Controllare la tabella sottostante per le cause dei problemi più comuni. Dato che la dimensione, forma e materiale
degli utensili da forno influiscono in maniera diretta sui risultati della cottura, la soluzione migliore potrebbe essere quella di sostituire utensili da
forno vecchi che si sono scuriti o si sono deformati col tempo e l'utilizzo.
Problema di Cottura Causa
Le pietanze non si dorano in maniera uniforme - Forno non preriscaldato
- Foglio di alluminio presente sulla griglia o sul fondo del forno
- Utensili da forno troppo grandi per la ricetta
- Teglie a contatto l'una con l'altra o con le pareti del forno
Pietanze troppo scure sotto - Forno non preriscaldato
- Utilizzo di teglie di vetro o di metallo opaco o scurito
- Posizione griglia non corretta
- Teglie a contatto l'una con l'altra o con le pareti del forno
Pietanze secche o eccessivamente rimpicciolite - Temperatura forno troppo bassa
- Forno non preriscaldato
- Porta forno aperta frequentemente
- Sigillato stretto con foglio di alluminio
- Dimensione teglia troppo piccola
Le pietanze si cuociono o si arrostiscono troppo lentamente - Temperatura forno troppo bassa
- Forno non preriscaldato
- Porta forno aperta frequentemente
- Sigillato stretto con foglio di alluminio
- Dimensione teglia troppo piccola
Le croste dei tortini non si scuriscono sul fondo o hanno una
crosta molliccia
Torte pallide, piatte e probabilmente non cotte all'interno - Temperatura forno troppo bassa
Torte alte nel mezzo con crepe sopra - Temperatura di cottura al forno troppo elevata
- Tempo di cottura al forno non sufficientemente lungo
- Utilizzo di teglie di acciaio brillante
- Posizione griglia non corretta
- Temperatura forno troppo bassa
- Tempo di cottura al forno non corretto
- Prova torta troppo presto
- Porta forno aperta troppo di frequente
- Dimensione teglia probabilmente troppo grande
- Tempo di cottura al forno troppo lungo
- Teglie a contatto l'una con l'altra o con le pareti del forno
- Posizione griglia non corretta
- Dimensione teglia troppo piccola
Bordi delle croste dei tortini troppo dorati - Temperatura forno troppo elevata
- Bordi della crosta troppo fini
28
Page 31

16 - Risoluzione Problemi Funzionali
Prima di contattare il centro assistenza, controllare quanto segue per evitare costi di assistenza inutili.
Problema forno Fasi Risoluzione Problema
Altri Errori __F compaiono sullo schermo del display. Rimuovere la corrente e riaccenderla dopo pochi secondi,. Se la
condizione persiste, annotare il numero di codice (nella lista REGISTRO
EVENTI) e contattare il centro assistenza.
Il display del forno rimane SPENTO. Togliere corrente dall’alimentazione principale (fusibile o quadro elettrico).
Riaccendere il quadro elettrico.
Se la condizione persiste, chiamare un centro assistenza autorizzato.
IT
La ventola di raffreddamento continua a funzionare anche quando
il forno è spento
Il forno non si riscalda Controllare l'interruttore magnetotermico o la scatola portafusibili di casa
Il forno non si riscalda in maniera uniforme Fare riferimento alle tabelle per il corretto posizionamento della griglia.
L'orologio e il timer non funzionano correttamente Assicurarsi che il forno sia adeguatamente alimentato da corrente elettrica.
Eccessiva umidità Le modalità ventilate eliminano qualunque umidità nel forno (questo è uno
La ventola si spegne automaticamente quando le componenti elettriche si
sono raffreddate a sufficienza.
vostra. Assicurarsi che il forno sia adeguatamente alimentato da corrente
elettrica. Assicurarsi che la temperatura del forno sia stata selezionata.
Ridurre sempre la temperatura della ricetta di 25°F (15°C) quando si
cuoce con la modalità Cottura Ventilata.
Vedere le sezioni Orologio a Pagina 10 e 13.
dei vantaggi della ventilazione).
29
Page 32

IT
17 - Assistenza o Manutenzione
Prima di contattare il centro assistenza, si prega di controllare
"Risoluzione Problemi". Vi potrebbe far risparmiare il costo della
chiamata per assistenza.
Se avete ancora bisogno di aiuto, seguite le istruzioni sottostanti. Al
momento della chiamata, si prega di conoscere la data di acquisto,
il modello completo e il numero di serie del vostro elettrodomestico.
Queste informazioni ci aiuteranno a rispondere in maniera migliore
alla vostra richiesta.
Record Dati Manutenzione
Per assistenza o parti autorizzate vedere il paragrafo "GARANZIA per
Elettrodomestici".
Per la collocazione della targhetta seriale vedere Pagina 5. Ora è
un buon momento per scrivere tali informazioni nello spazio apposito
in basso.
Conservare la fattura per la convalida della garanzia.
Record Dati Manutenzione
Modello Numero _________________________________
Numero di Serie __________________________________
Data di Installazione o di Presa di Possesso __________________
30
Page 33

EN
TABLE OF CONTENTS PAGE
1 - Warnings for Microwave Ovens 4
Food preparation 4
Pots and pans 4
Microwave power and duration 4
Packaging 4
Beverages 4
Foods for newborns 4
Foods with skin or peel 5
Drying foods 5
Oil 5
Causes of damage 5
First use 7
Assembling and disassembling the flat grill 7
Respect for the environment 8
2 - The Control Panel 9
Keypad 9
3 - General Oven Information 10
Error codes 10
Beeps 10
Default Settings
F Failure Number Codes 10
Preheat 10
Timer 10
4 - General Oven Tips 11
Preheating the Oven 11
Operational Suggestions 11
Operation with microwaves 11
Oven Condensation and Temperature 11
High Altitude Baking 11
5 - Getting Started 12
Instructions for initial switch-on 12
6 - User Settings 13
Language 13
Temperature & Weight 13
Time 13
Date 14
Brightness 14
Volume 14
10
TABLE OF CONTENTS PAGE
7 - System Setting 15
Event Log 15
Demo 15
8 - Starting Your Oven 16
Switching the oven on and off 16
Cooking Mode Tables 17
9 - Traditional Cooking 18
Changing the cooking mode 18
Changing temperature 18
Pre-heating phase 18
10 - Time Oven Mode Operation 19
Cook Time 19
Stop Time 19
11 - Microwave Cooking 20
Timed Thawing Function 20
Weight Thawing Function 20
Microwave Function 20
Microwave + Grill Function 21
Microwave + Ring Function 21
Changing Watts Power 22
Changing Time 22
Changing Temperature 22
Changing Weight 22
12 - Using Oven Lights 23
13 - Recipes 24
14 - For the Installer 26
Electrical Hook-Up 27
15 - Solving Traditional Baking Problems 28
16 - Solving Operational Problems 29
17 - Assistance or Service 30
Service Data Record 30
1
Page 34

EN
IMPORTANT INSTRUCTIONS
AND SAFETY WARNINGS
Read carefully and keep for future use
Dear Customer,
We would like to thank you and congratulate you on
your choice.
This new product has been carefully designed and
built using top quality materials, and meticulously
tested to ensure that it meets all your culinary
requirements.
Please read and observe these simple instructions,
which will enable you to achieve excellent results
from the very first time you use it. This state-of-the-art
appliance comes to you with our very best wishes.
THIS PRODUCT IS DESIGNED FOR DOMESTIC USE.
THE MANUFACTURER DECLINES ALL RESPONSIBILITY
FOR PERSONAL INJURY OR PROPERTY DAMAGE
DERIVING FROM INCORRECT INSTALLATION OR
IMPROPER, ERRONEOUS OR UNSUITABLE USE.
THE APPLIANCE MUST NOT BE USED BY PEOPLE
(INCLUDING CHILDREN) WITH PHYSICAL,
SENSORIAL OR MENTAL IMPAIRMENTS, OR BY
PEOPLE WITHOUT THE NECESSARY EXPERIENCE OR
KNOWLEDGE, UNLESS THEY ARE SUPERVISED OR
INSTRUCTED IN THE USE OF THE APPLIANCE BY A
PERSON RESPONSIBLE FOR THEIR SAFETY.
• If the door or the gasket seals of the door are
damaged, the oven may not gb be used until it
repaired by a qualified service technician;
• It dangerous for anyone other than a service
technician to perform any maintenance or
repairs that involve the removal of any cover that
protects against exposure to microwaves;
• Liquids or other foods must not be heated in airtight contains because they could explode;
• Children may not use the oven without supervision
until they have been adequately instructed in its
safe use and understand the dangers of using it
incorrectly;
• Only use untensils that are appropriate for
microwave ovens;
• When heating food in plastic or paper containers,
check the oven frequently because of the risks of
fire;
ATTENTION
CHILDREN MUST BE SUPERVISED TO ENSURE THAT
THEY DO NOT PLAY WITH THE APPLIANCE. DO NOT
PLACE ALUMINIUM FOIL, POTS OR SIMILAR OBJECTS
IN CONTACT WITH THE BASE INSIDE THE OVEN FOR
COOKING. THE HEATING ACTION OF THE LOWER
HEATING ELEMENT CAUSES OVERHEATING OF THE
LOWER PART OF THE OVEN CAUSING DAMAGE AND
SERIOUS CONSEQUENCES (RISK OF FIRE) EVEN TO
THE COUNTER UNDER THE OVEN.
THE APPLIANCE GETS VERY HOT DURING USE.
WARNING: DON’T TOUCH THE HEATING ELEMENTS
INSIDE THE OVEN.
2
• If you see smoke coming out, turn off the
appliance or remove its plug and keep the door
closed to extinguish any flames;
• Heating beverages in the microwave oven can
cause a delayed boil-over, so be careful when
handling the container;
• The contents of baby bottles and baby food
in jars must be mixed or shaken and their
temperature must be checked before feeding to
avoid scalding;
Page 35

ATTENTION
• Eggs in the shell and whole hardboiled eggs
must not be heated in microwave ovens because
they could explode even after the end of heating
in the microwave;
• A detailed explanation for cleaning the gasket
seals of the doors of the cavity and adjacent
parts;
• The oven must be cleaned periodically and all
food residues must be removed;
EN
• Failure to keep the oven clean could cause
deterioration of the surfaces that could reduce
the life of the appliance and cause dangerous
conditions;
• Do not use rough abrasives or sharp metal
scrapers to clean the glass door of the oven
because they could scratch the surface and cause
the glass to shatter.
• Do not use steam cleaners to clean the appliance.
3
Page 36
EN
1 - Warnings for Microwave Ovens
Food preparation
Danger of fire!
Only use the microwave function for the preparation
of food to be eaten.
Any other uses can be dangerous or cause damage.
For example, heated slippers or pillows filled with
grain or cereals can catch fire even after several
hours.
Beverages
Danger of burns!
When heating liquids, boiling can be delayed.
This means that the boiling temperature has been
reached without forming the typical little steam
bubbles. Even a slight knock can cause the sudden
overflow of liquid or sprays.
When heating liquids, always put a spoon in the
container to avoid delayed boiling.
Pots and pans
Danger of injury!
Porcelain and ceramic crockery can have small holes
in the handles and cover.
There can be cavities hidden behind these holes.
If water gets into these cavities, the crockery could
break.
Do not use crockery that is unsuitable for microwave
ovens.
Danger of explosion!
Never heat beverages or other types of food in
covered containers.
Never heat alcoholic beverages excessively.
Danger of burns!
The heat of the food can heat the dish. Always use
a pot holder to remove dishes and accessories from
the cooking chamber.
Microwave power and duration
Danger of fire!
Never set values that are too high for the microwave
power or the cooking time. The food could catch fire
and damage the appliance. Follow the rules in these
instructions.
Packaging
Danger of fire!
Never heat food in thermal packaging.
Food in containers made of plastic, paper or other
inflammable materials must be watched constantly.
Danger of burns!
Air-tight packaging can explode. Follow the
instructions shown on the package. Always use a
pot holder to remove dishes.
Foods for newborns
Danger of burns!
Never heat baby foods in a covered container.
Always remove the cover or nipple.
When finished heating, always carefully shake or
mix so that the heat is evenly distributed.
Test the temperature before giving the food to the
baby.
4
Page 37

EN
Foods with skin or peel
Danger of burns!
Never cook eggs in the shell. Never heat hard-boiled
eggs because they could explode even after the
microwave is turned off. This also goes for molluscs
and crustaceans.
In the case of fried eggs, first pierce the yolk.
In the case of foods with a hard peel or skin like
apples, tomatoes, potatoes or sausage, the peel or
skin could explode.
Pierce the peel or skin before cooking.
Drying foods
Danger of fire!
Never dry food in the microwave.
Causes of damage
Juice leaking from fruit
When preparing sweets containing very juicy fruit,
do not overfill the baking dish. Fruit juices that
overflow the baking dish can leave indelible stains.
Technical breakdown
Never use enamelled baking dishes in the microwave
because it could cause a technical breakdown.
Cooling with the door of the appliance open
The cooking chamber must only be cooled with the
door closed. Check that nothing is stuck on the door
of the appliance.
Even if the door is only ajar, nearby cabinets can be
damaged over time.
Foods with low water content
Danger of fire!
Never defrost or heat foods with low water content,
like bread, for too long or at an excessive power.
Very dirty gasket seal
If the gasket seal is very dirty, the door of the
appliance does not close correctly during operation.
The surfaces of nearby cabinets can be damaged.
Always keep the gasket seal clean.
Oil
Danger of fire!
Never use the microwave to heat just oil.
Using the door of the appliance as a support surface
Do not rest or lean on the open door of the appliance
and do not put dishware or accessories on it.
Using the microwave without food in the
chamber
Only turn on the microwave after you have put the
food in the cooking chamber. Without food inside,
the appliance can become overloaded. The only
exception allowed are brief tests of dishware (in this
regard, see the warnings about pots and pans).
Moist foods
Do not leave moist foods in the cooking chamber for
extended periods of time.
5
Page 38
EN
IMPORTANT
The oven’s identification plate is even accessible when the
appliance is installed. This identification plate, which is
visible when you open the door, shows all the information
you will need when requesting replacement parts for the
appliance.
6
Page 39

First use
The oven should be thoroughly cleaned with soap and water and carefully rinsed.
Heat the oven for about 30 minutes at the maximum temperature; this eliminates all the residual manufacturing oils that could cause
unpleasant odours during cooking. Use the circular plus fan function without accessories in the oven. Before using the accessories
for the first time, clean them carefully with a very hot alkaline washing solution and a soft cloth.
Assembling and disassembling the flat grill
To remove the flat grill, pull the grill towards you until it stops and then lift, by pulling upwards, until it comes completely out.
To put the flat grill back in, insert it at a 45-degree angle and then position it horizontally and push it all the way in to the end of
the grill track.
If the flat grill has a drip-pan (tray), to remove it, lift slightly and slide it towards you. To reinsert it, slide it back until it is correctly
seated.
EN
IMPORTANT
As a safety precaution, before cleaning the oven, always disconnect the plug from the outlet or remove the appliance’s power
cord. In addition, avoid using acid or alkaline substances such as lemon, vinegar, salt, tomatoes, etc.). Avoid using products
containing chlorine, acids or abrasives, especially for cleaning the painted walls.
7
Page 40

EN
Respect for the environment
The documentation for this appliance is printed on paper
bleached without chlorine or recycled paper to contribute to
protecting the environment. The packaging was designed
to prevent damage to the environment; they are ecological
products that can be recovered or recycled.
Recycling the packing saves raw materials and reduces the
volume of industrial and domestic waste.
THE PACKING MATERIAL is 100% recyclable and marked
with the recycling symbol. Dispose of in conformity with local
law. The packing material (plastic bags, polystyrene parts,
etc.) must be kept out of the reach of children because it is
potentially dangerous.
THIS APPLIANCE is marked in conformity with European
Directive 2002/96/EC, Waste Electrical and Electronic
Equipment (WEEE). By making sure that this product is disposed
of correctly, the user contributes to preventing potential negative
consequences for the environment and health.
THE SYMBOL on the product or accompanying documentation
indicates that this product must not be treated
as domestic waste but must be delivered to a suitable collection
point for the recycling of electrical and
electronic equipment.
DISPOSAL MUST BE MADE in conformity with local laws on
waste disposal.
FOR ADDITIONAL INFORMATION about the treatment,
recovery and recycling of this product, contact the local office
of competence, the domestic waste collection service or the
store where the product was purchased.
BEFORE SCRAPPING, make it unusable by cutting the electrical
cord.
8
Page 41

Your appliance could vary slightly compared to the illustrations below.
A
- Keypad
B
- Display screen
FRIDAY 11/20/2015
PM
04:26
2 - The Control Panel
EN
Keypad
To operate the key, press gently. The keypad will not work if
more than one key is pressed at the same time.
Movement arrows
Return to previous display page. Keep
pressed to return to Home page
Switches the oven on and off.
Confirms the settings and starts cooking
operations. When pressed during a
cooking operation, the function is placed in
pause. Press again to restart.
To set the timer.
Enter the functions menu during cooking.
B
A
Switches the inner oven light on and off.
9
Page 42

EN
3 - General Oven Information
Before using your oven for the first time remove all packing and foreign materials from the oven(s). Any material of this sort left inside
may melt or burn when the appliance is used.
Error codes
This code appears in the event of the electronic control
indicating a fault. When the error appears, the current function
is blocked. If the type of error is related to a safety function,
the oven becomes unusable and every time a start attempt is
made, the same error appears (in which case call in the aftersales service), while if the error relates to a minor fault, after
being restarted the oven can be used for the functions that do
not involve the faulty part (e.g., a heating element).
Beeps
Confirms that the command has been received after a key has
been pressed.
It also indicates that a time function has been completed (e.g.
Timer or Timed Cooking). During the execution of a recipe,
an acoustic signal warns the user that the oven is waiting for
operation by the user (e.g., insert the dish or turn it over).
Beeps also signal an oven fault.
Default Settings
The cooking modes automatically select a suitable temperature
when the cooking mode is selected, these can be changed
when a different one is needed.
Timer
WARNING
The timer on your oven does not turn the appliance on or off,
its only purpose is to alert you through the buzzer. When
you want to turn off the oven automatically, use the end-ofcooking or delayed cooking function.
NOTE: Pressing the OFF button does not reset or stop the timer.
1. Press the button
arrows and confirm with the button . To switch
the selection between hours and minutes use the arrows
.
2. The time can be set from 1 minute to 12 hours and 59
minutes and, when set, the remaining time is always visible
in the bottom status bar until the time expires or is reset.
3. To change or cancel the time set, you must reset the timer
by pressing and holding the button for a few seconds.
4. Timer format is usually HR:MIN, switching into MIN:SEC
during the last minute.
5. When the time expires, the display shows 00:00 and the
buzzer will sound for one minute or until the button
pressed.
and set the desired time using the
is
F Failure Number Codes
These codes are displayed when the electronic control detects
a problem in the oven or in the electronics.
The error code is recorded in the Error Log in the Setup menu.
This error can be communicated to the service technician so
he/she can understand the possible cause of the problem in
advance.
Preheat
Whenever a cooking mode is set and the oven is heating,
the preheating starts, during this period, the instantaneous
temperature is displayed together with the thermometer icon.
As soon as the 100% is reached, the control sounds an “end of
preheat” tone and the current temperature value disappears.
10
Page 43

Preheating the Oven
• Selecting a higher temperature does not shorten the preheat
time.
• Preheating is necessary for good results when baking cakes,
cookies, pastry and breads.
• Preheating will help to sear roasts and seal in meat juices.
• Place oven racks in their proper position before preheating.
• During preheating, the selected cooking temperature is
always displayed.
• A beep will confirm that the oven is preheated and the
“detected temperature” will turn off.
4 - General Oven Tips
esting dishware
T
Never turn on the microwave oven before you have put in the
food.
The only exception allowed is testing dishware.
If you unsure if your dishware can be used in the microwave
oven, we
recommend performing the following test:
place the empty pot in the appliance for ½ - 1 minute at the
maximum
power. Check the temperature. The pat must be cold or slightly
warm. If it is
hot or there are sparks, the pot is not suitable.
EN
Operational Suggestions
• Do not set pans on the open oven door.
• Use the interior oven lights to view the food through the oven
door window rather than opening the door frequently.
Operation with microwaves
The microwaves are transformed into heat inside foods. The
microwave oven can be used by itself or in combination
with other types of heating. This section contains information
about the dishware and instructions for setting
the microwave oven.
WARNINGS FOR DISHWARE
Suitable dishware
You can use heat-resistant dishware made of glass, glass
ceramic, porcelain, ceramic or refractory plastics. These
materials are permeable to microwaves.
It is also possible to use normal plates. In this way, it won’t be
necessary to transfer the food.
Dishware with gold or silver decorations can only be used if the
manufacture guarantees that they can be used in microwave
ovens.
Remember that, when using the oven in microwave mode, the
dish must be placed on the rotating plate.
When using the oven in combination mode, it is preferable to
place the dish to be cooked on the low, round grill, supported
so that it is centred on the rotating plate.
Oven Condensation and Temperature
• It is normal for a certain amount of moisture to evaporate
from the food during any cooking process. The amount
depends on the moisture content of the food. The moisture
may condense on any surface cooler than the inside of the
oven, such as the control panel.
• Your new oven has an electronic temperature sensor that
allows maintaining an accurate temperature.
High Altitude Baking
• When cooking at high altitude, recipes and cooking time
will vary from the standard.
Unsuitable dishware
Metal dishware cannot be used.
Metal is not permeable to microwaves. Food in metal containers
will remain cold.
Warning! Metal components, such as spoons in glasses, must
stay at least 2 cm from the walls of the oven and the inside of
the door. In fact, sparks could seriously damage the inside of
the glass door.
Warning! The flat grill must be removed when using the
microwave and combined modes. Use it only with traditional
oven functions.
11
Page 44

EN
04 : 26
PM
TUESDAY 11/24/2015
5 - Getting Started
Instructions for initial switch-on
Once the oven has been connected to the power supply for
the first time, the control automatically prepares for setting a
number of user settings, which remain stored in case of any
subsequent switch-on.
NOTE: Both at the first and subsequent connections to the
power supply, the door lock mechanism performs a
calibration run – in this phase, always keep the door
closed.
• Language
• Temperature & Weight
• Time
• Date
Refer to the USER SETTING paragraph for setting instructions.
After making the user settings, the control moves automatically
to the “Standby” display page.
12
Page 45

SETUP
\
SETTING
12
yk
abc
SETUP
LANGUAGE
Temperature & Weight
°F
°ClbKg
12h
24h
AM
PM
04 : 26
PM
6 - User Settings
EN
With the oven on, select the icon and confirm with the
key
to enter the SETTINGS menu. This menu permits
personalizing the settings of your oven. To make access, no
active cooking or any set time functions must be in progress.
NOTE: The Setting menù can never be set if any time function
is already set: first delete all the active time functions.
1. Press the keys to select the sub menu and confirm by
means of the key.
2. Use this menu to change the following settings:
Press the keys or to select the setting or change
a sub menu from among the six available ones and confirm
by means of the key.
Press the arrow key and to select one of the two
temperature options “°C/°F” or weight options Kg/ib and
confirm with the key.
Time
Press the arrow key to select the time format between the
options “12h AM/PM or 24h” and confirm with the key.
Subsequently, set the time using the arrows and confirm
with the key.
Language
Press the arrow key to select a language from among
those available, and confirm with the
key.
13
Page 46

EN
12
D.M.Y.
Y.M.D.
M.D.Y.
12
11/20/2015
ON
STAND-BY
LOW
MID
HIGH
DARK
MID
HIGH
LEVEL
LOW
MID
HIGH
Date
Press the arrow key to select the date format from among
the options “D.M.Y. – Y.M.D. – M.D.Y.” and confirm with the
key. Subsequently set the value using the arrows and
confirm with the key.
Volume
Press the arrow to select the desired volume level and
confirm by pressing the key.
Brightness
Press the arrow key to choose which luminosity setting
to change between ON or STANDBY, then by means of the
arrows select the required degree of luminosity and
confirm with the key.
14
Page 47

SETUP
SERVICE
EVENT LOGS
MAIN VOLTAGE
SYSTEM
DEMO
OM 15
01 12/11/2015 07:06 CODE: F10305
EVENT LOGS
02 17/11/2015 13:17 CODE: F10305
Demo
DEMO
ON
7 - System Setting
EN
With the oven on, select the icon and confirm with the
key to enter the SETTINGS menu. This menu permits setting
a number of parameters or special functions. It also permits
accessing the error events list.
1. Press the keys to select the sub menu and confirm with
the key.
2. Use this menu to change the following settings:
Press the keys
to select the item to be set or to be
displayed from among the three available ones and confirm
with the key.
The purpose of this function is to set the DEMO mode, which
makes the oven useless for cooking but automatically performs
a demonstration of functions.
1. Press the keys to select the item ON.
2. Confirm with the
3. Press the
key.
key.
After about 30 seconds, the oven starts to operate in this mode.
To temporarily stop the DEMO function, simply keep any key
pressed for a few seconds until the oven switches to standby.
To start it again, press the
key.
To disable the function, enter the DEMO display page and set
OFF. Confirm using the
key.
NOTE: Once set, the function remains enabled even if the oven
is disconnected from the power mains.
Event Log
The menu permits checking any recorded errors. These codes
can be notified to the after-sales service.
15
Page 48

EN
8 - Starting Your Oven
Switching the oven on and off
IMPORTANT
• The key does not stop the function.
• After switching off the oven, the cooling fan could continue to operate until the inner parts of the oven have cooled down.
Press
to switch the oven on and press again to switch it off. The oven returns to standby mode.
Multifunction Oven
Traditional Cooking
Microwave Cooking
TRUE CONVECTION
(FAN HEAT)
RING & GRILL
(FAN HEAT & GRILL)
CONVECTION BROIL
(TURBO GRILL & BASE HEAT)
BROIL
(ECO GRILL)
DEFROST BY TIME
DEFROST BY WEIGHT
MICROWAVE COOKING
Thermal Oven
Traditional Cooking
BROIL
(ECO GRILL)
Microwave Cooking
DEFROST BY TIME
DEFROST BY WEIGHT
MICROWAVE COOKING
MICROWAVE AND GRILL
1. Select the icon
appropriate cooking mode according to the food to be
cooked using the arrows and confirm with the key .
and press the key Select the
MICROWAVE AND GRILL
MICROWAVE AND RING
(MICROWAVE AND FAN HEAT)
2. On this display page, it is still possible to change the
cooking mode by using the
3. If the proposed temperature is correct, confirm with the
key to start cooking, otherwise, if the key is not pressed
within 10 seconds, the oven switches to automatic mode
and the cooking mode icon becomes animated.
keys.
16
Page 49

Cooking Mode Tables
Traditional Cooking
COOKING MODE ICON TEMPERATURE
Min. Preset Max.
EN
TRUE CONVECTION
(FAN HEAT)
RING & GRILL
(FAN HEAT & GRILL)
CONVECTION BROIL
(TURBO GRILL & BASE HEAT)
BROIL
(ECO GRILL)
50° C 165° C 230° C
50° C 210° C 230° C
50° C 165° C 230° C
50° C 230° C 230° C
Microwave Cooking
COOKING MODE ICON SET WEIGHT WATT TEMPERATURE
Min. Preset Max. Min. Preset Max. Min. Preset Max.
DEFROST BY TIME
Bread 100 g 500 g 600 g 150 W
150 W
DEFROST BY
WEIGHT
MICROWAVE
COOKING
MICROWAVE AND
GRILL
MICROWAVE AND
RING
(MICROWAVE AND
FAN HEAT)
Vegetable 100 g 500 g 1000 g 150 W
Meat 100 g 500 g 1500 g 150 W
Fish 100 g 500 g 800 g 150 W
150 W 900 W 900 W
150W 150 W 200° C
300W 300 W
450W 450 W
150W 150 W 50° C 100° C 200° C
300W 300 W
450W 450 W
17
Page 50

EN
325°F
275°F
11:00 am
TRUE CONVECTION
++
--
325°F
11:06 am
TRUE CONVECTION
++
--
9 - Traditional Cooking
Changing the cooking mode
1. During untimed cooking, a cooking pause can be set by
pressing the key.
All the settings of the suspended cooking operation remain
stored and can be reactivated by pressing the same key
again.
2. To change the cooking mode while the oven is working,
press the key and then the , key.
At this point, another cooking mode can be selected from
among those available in the group by means of the arrows
.
Changing temperature
IMPORTANT
Pre-heating phase
While the oven is in pre-heating phase, the instantaneous
temperature is displayed underneath the cooking mode icon.
Just as soon as the set temperature is reached, an acoustic
signal is heard and the instantaneous temperature indication
disappears.
• At the end of a function, the display screen shows the
residual compartment heat temperature from the standby
page.
1. From the cooking mode preview display page, the
temperature can be changed by means of the arrows
subsequently confirming by means of the key.
2. Once cooking has started, the temperature can in any case
be changed, at any time, by means of the arrows
.
18
Page 51
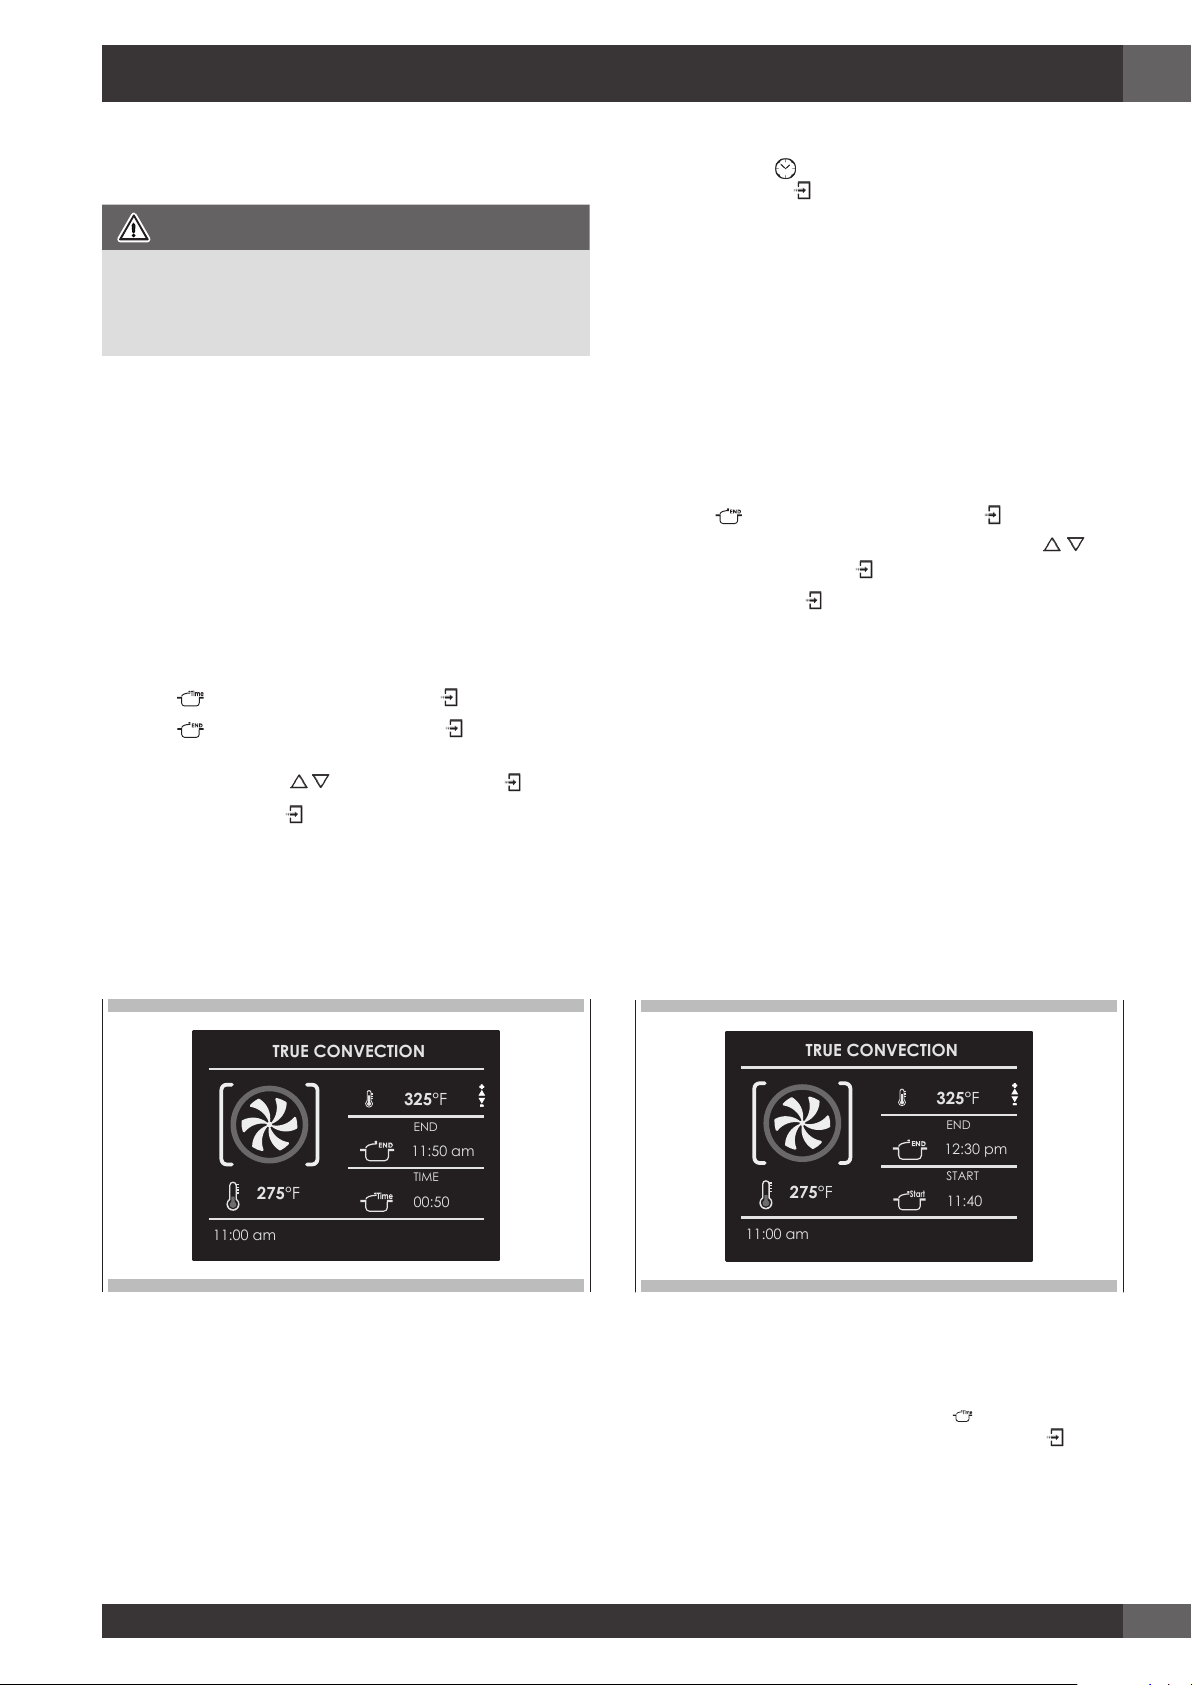
10 - Time Oven Mode Operation
275°F
11:00 am
TRUE CONVECTION
325°F
++
--
END
TIME
11:50 am
00:50
275°F
11:00 am
TRUE CONVECTION
325°F
++
--
END
START
12:30 pm
11:40
Start
EN
Be sure that the time-of-day clock is displaying the correct time.
The timed mode turns off the oven at the end of the cook time.
CAUTION
Never leave food in the oven for more than one hour before
and after cooking. This could deteriorate the properties of
the food itself.
NOTE: The maximum cooking time that can be set is 12 h.
Cook Time
Use the “Cook Time” function to operate the oven for a
determinate period of time. The oven starts immediately and
switches off automatically once the time has expired.
To Set a Timed Mode
1. Select the cooking mode and temperature.
2. There are two ways to set the function.
a) Select
b) Select
3. After selecting one of the two above options, set the time by
means of the arrows
4. After pressing the
cooking information is shown on the display page.
• Cooking mode
• Temperature
• Cooking time
• End of cooking time
to set the duration and press .
to set the stop time and press .
and confirm with the key.
key, cooking starts and the time
To change the cooking time when the oven is already operating,
simply press the
e key and enter the new cooking time
before pressing the key again.
Stop Time
Use the “Stop Time” function to delay the start of timed
cooking. Enter the cooking stop time and the oven will
automatically calculate the start time. The oven switches on
and off automatically.
To Delay the Start of a Timed Mode
1 First of all set the required timed cooking as indicated in the
“COOK TIME” paragraph.
2 Select
3 Set the cooking stop time by means the arrows
confirm by means of the
4 After pressing the
and the postponed cooking details are shown on the screen.
• Cooking mode
• Temperature
• Cooking stop time
• Cooking start time
to set the stop time and press .
and
key.
key, the function positions in standby
5 After cooking, the oven switches off and an acoustic signal
warns that cooking has terminated.
After cooking, the oven switches off and an acoustic signal
warns that cooking has terminated.
To change the cooking time and stop time when the oven is
already operating, simply press the key
cooking time or cooking stop time and press the key
and enter the new
again.
19
Page 52

EN
DEFROST BY TIME
00’ 20”
Time
11:00
DEFROST BY WEIGHT
450g
11:00
MICROWAVE COOKING
00’ 30”
Time
11:00
MICROWAVE COOKING
900W
Time
11:00
11 - Microwave Cooking
NOTE: it is essential to carefully read the instructions and
warnings to ensure correct use.
ATTENTION
Microwave functions will not start until the door has been
closed. If the door is opened while the oven is on, the oven
will go into pause mode and the message “DOOR OPEN”
will appear on the display.
To restart the function, the door needs to be closed.
The function can be paused at any time using the key
when it is pressed again la funzione riparte.
,
Timed Thawing Function
Select the timed thawing icon using the arrows and press the
key , then set the thawing time using the arrows and .
To start the function press the key .
Select the type of meal using the arrows and , then set the
weight using the arrows and , finally start thawing using
the key
Following are types of meals and relative weights that can be
set:
MEAL
The thawing time is calculated completely automatically and
without needing to set any time parameters, based on the set
type of meal and weight.
.
MIN
Weight (g)
Bread Pizza Pasta Dishes 100 600
Vegetables 100 1000
Meat 100 1500
Seafood 100 800
MAX
Weight (g)
Once the function has been started, a countdown will be
shown on the display. The time can be changed at any time
using the arrows and .
When thawing is complete, the message “DEFROSTING
FINISHED” will appear on the display.
Weight Thawing Function
Select the weight thawing icon using the arrows and press the
key .
When thawing is complete, the message DEFROSTING
FINISHED will appear on the display.
Microwave Function
Select the Microwave function icon using the arrows and press
the key .
If you wish to start the function immediately with a preset time
of 30 sec and a preset output of 900W, press the key .
20
Page 53

EN
MICROWAVE AND GRILL
00’ 20”
Time
11:00
MICROWAVE AND GRILL
300W
Time
11:00
MICROWAVE AND RING
00’ 20”
11:00
Time
MICROWAVE AND RING
100°C
11:00
Time
MICROWAVE AND RING
300W
11:00
Time
If you wish to personalise the time and output, open the submenu managed as follows:
• TIME: Select the icon
and use the keys and to
personalise the time.
• MICROWAVE OUTPUT: Select the icon
and use the keys
and to select the microwave output setting from the 6
possible levels, 150W - 300W - 450W - 600W - 750W
- 900W.
Once the new parameters have been set, press the key
to
start cooking.
Once cooking has started, a countdown will be shown on the
display. The time can be changed at any time using the arrows
and .
At the end of cooking, the message “END COOKING” will
appear on the display.
Microwave + Grill Function
Select the Microwave+Grill function icon using the arrows and
press the key , then set the thawing time using the arrows
and .
Once cooking has started, a countdown will be shown on the
display. The time can be changed at any time using the arrows
and .
At the end of cooking, the message “END COOKING” will
appear on the display.
Microwave + Ring Function
Select the Microwave+Ring function icon using the arrows and
press the key , then set the thawing time using the arrows
and .
If you wish to start the function immediately with the preset time
and a preset temperature of 100°C, with a preset microwave
output of 300W, press the key .
If you wish to start the function immediately with the preset time
and a preset output of 300W, press the key .
If you wish to personalise the output, open the sub-menu
managed as follows:
• MICROWAVE OUTPUT: Select the icon
and to select the microwave output setting from the 3
possible levels, 150W - 300W - 450W.
Once the new parameter has been set, press the key to
start cooking.
and use the keys
If you wish to personalise the temperature and output, open the
sub-menu managed as follows:
• TEMPERATURE: Select the icon
and use the keys and
to personalise the temperature between 50°C and 200°C.
• MICROWAVE OUTPUT: Select the icon
and use the keys
and to select the microwave output setting from the 3
possible levels, 150W - 300W - 450W.
21
Page 54

EN
Once the new parameters have been set, press the key to
start cooking.
Once cooking has started, a countdown will be shown on the
display. The time can be changed at any time using the arrows
and .
At the end of cooking, the message “END COOKING” will
appear on the display.
Changing Watts Power
Press the icon and press the key Select the microwave
icon and change the power wattage by means the arrows
and confirm with the key
.
Changing Time
Press the icon and press the key Select the time icon and
change the time value by means the arrows and confirm
with the key
.
Changing Temperature
(only available for microwave and ring)
Press the icon and press the key Select the cooking
mode icon and change the setting temperature by means the
arrows and confirm with the key .
Changing Weight
(only available for defrost by weight)
Press the icon and change the weight by means the arrows
and confirm with the key .
22
Page 55

A single light key activates the lights.
Touch to turn lights on or off .
Oven lights turn on automatically when the door is opened.
When an oven is in use, oven lights turn on automatically
when a mode is started.
Oven lights will turn off automatically when the oven mode is
cancelled.
NOTE: Once switched on, the lights go off automatically after
3 minutes. To switch them back on, press the key or
open the door.
12 - Using Oven Lights
EN
23
Page 56

EN
SAVE
ROASTED TURKEY
START
RECTANGULAR GRID
LEVEL
WEIGHT
COOKING TIME
PREHEAT
1
3800g
03:00
YES
13 - Recipes
The Recipe function of your oven gives you the chance to cook food without having to set the oven manually every time. By selecting
a “SET” recipe, the cooking mode, the temperature and the time are automatically set according to the recipe selected from the
menu.
Recipe List Type of Food Food condition Recipes List Information displayed
FRESH
BREAD PIZZA FIRST
FROZEN
WHOLE
MEAT
IN PEICES
PRESET OR PERSONAL
Select an already-set recipe:
WHOLE
IN PEICES
WHOLE
IN PEICES
-
-
-
-
POULTRY
FISH
VEGETABLES
PIES
TYPE OF ACCESSORY
LEVEL POSITION
FOOD WEIGHT
COOKING TIME
PREHEAT REQUIRED
(YES/NO)
1. Switch the oven, select the icon and press the button .
2. Using the arrows select the list between “PRESET” or
“PERSONAL” and confirm by means of the key.
3. Choose the type of food to be cooked using the arrows
and the arrows and confirm by means of the
key.
4. Using the arrows
“FROZEN” or in other cases between “WHOLE” or “IN
PEICES” and confirm with the key.
5. Select the required recipe by means of the arrows
confirm using the key.
6. When the recipe is selected, the following display page
appears on the screen:
24
choose between “FRESH” or
and
Page 57

EN
POULTRY
3800g
WEIGHT
POULTRY
03:00
COOKING TIME
SAVE
ROASTED TURKEY
START
RECTANGULAR GRID
LEVEL
WEIGHT
COOKING TIME
PREHEAT
1
2500g
02:00
YES
POULTRY
YES
DO YOU WANT REMOVE RECIPE
N0
7. To start the recipe, confirm with the key.
During a recipe, a number of acoustic and visual messages
will ask you to perform the following operations. Simply
follow the instructions on the screen.
8. Upon termination, the oven switches off and an acoustic
and visual signal warns that the recipe has terminated.
Saving a personalized recipe:
Once a recipe has been selected, the “Time” and “Weight”
setting can be changed and the recipe can be saved among
the “PERSONAL” ones.
1. Once a recipe has been selected, press the key
confirm by means of the key.
2. To change the weight, enter the desired weight by means of
the arrows
and confirm by means of the key.
and
4. At this point, the recipe can be saved in the list of
“PERSONAL” recipes by selecting “SAVE” and confirming
by means of the
key.
NOTE: If the time and weight values are changed and not
saved straight away, at the end of the recipe, a message
appears which asks whether you want to save it.
5. To start the recipe press the key.
3. The oven switches automatically to the cooking time. To
change this time, use the arrows and confirm again
by means of the key.
Cancelling a Personalized recipe:
1. To eliminate a recipe from the list of personalized recipes,
select the recipe.
2. Press the key
key.
and select the choice and confirm with the
25
Page 58

EN
min 3
14 - For the Installer
Install the oven in the counter
The oven must be installed under a cook top, in a column, or combined with the relative food-warmer drawer.
The dimensions of the space must be those shown in figure.
The cabinet material must be able to withstand the heat.
The oven must be centred within the walls of the cabinet and fixed with the screws and bushings that are provided.
50
min 460
min
min 458
3
432
540
455
533
594
min
450
540
50
510
560
432
533
595
50
594
510
455
510
560
560
26
140
528
545
144
554
26
596
Page 59

EN
TECHNICAL DATA
Power supply
Maximum absorbed power 3200 W
Microwave power 900 W
Grill 1500 W
Hot air 1500 W
Microwave frequency 2450 MHz
220-240 V~, 50 Hz
Electrical Hook-Up
Before making the electrical hook-up, make sure that:
• the characteristics of the electrical system satisfy what is
shown on the serial number plate applied to the front of the
oven;
• the electrical system has an effect earth connection
conforming to standards and current law.
The earth connection is required by law.
The cable must not, at any point, reach a temperature greater
than 50 °C above the ambient temperature.
This oven must be connected to the supply by a supply cord
fitted with an appropriately rated plug that is compatible with
the socket-outlet fitted to the final sub-circuit in the fixed wiring
that is intended to supply this oven.
If a fixed appliance does not have a power cord and plug,
or another device that ensures disconnection from the mains,
with an opening distance of the contacts that allows complete
disconnection under the conditions of excessive voltage
category III, such disconnection devices must be provided in
the power supply mains conforming to the installation rules.
The omnipolar socket or switch must be easy to reach when the
appliance is installed.
TYPE AND MINIMUM DIAMETER OF THE CABLES
SASO
H05RR-F 3x1,5 mm² H05RR-F 3x2,5 mm²
H05VV-F 3x1,5 mm² H05VV-F 3x2,5 mm²
H05RN-F 3x1,5 mm² H05RN-F 3x2,5 mm²
H05V2V2-F 3x1,5 mm² H05V2V2-F 3x2,5 mm²
NOTE: The manufacturer declines all liability if the usual accident
prevention standards and the above instructions are not
followed.
27
Page 60

EN
15 - Solving Traditional Baking Problems
With either Bake or Convection Bake, poor results can occur for many reasons other than a malfunction of the oven. Check the chart
below for causes of the most common problems. Since the size, shape and material of baking utensils directly affect the baking
results, the best solution may be to replace old baking utensils that have darkened and warped with age and use.
Baking Problem Cause
Food browns unevenly - Oven not preheated
- Aluminum foil on oven rack or oven bottom
- Baking utensil too large for recipe
- Pans touching each other or oven walls
Food too brown on bottom - Oven not preheated
- Using glass, dull or darkened metal pans
- Incorrect rack position
- Pans touching each other or oven walls
Food is dry or has shrunk excessively - Oven temperature too low
- Oven not preheated
- Oven door opened frequently
- Tightly sealed with aluminum foil
- Pan size too small
Food is baking or roasting too slowly - Oven temperature too low
- Oven not preheated
- Oven door opened frequently
- Tightly sealed with aluminum foil
- Pan size too small
Pie crusts do not brown on bottom or have soggy crust - Baking time not long enough
- Using shiny steel pans
- Incorrect rack position
- Oven temperature is too low
Cakes pale, flat and may not be done inside - Oven temperature too low
- Incorrect baking time
- Cake tested too soon
- Oven door opened too often
- Pan size may be too large
Cakes high in middle with crack on top - Baking temperature too high
- Baking time too long
- Pans touching each other or oven walls
- Incorrect rack position
- Pan size too small
Pie crust edges too brown - Oven temperature too high
- Edges of crust too thin
28
Page 61

16 - Solving Operational Problems
Before contacting service, check the following to avoid unnecessary service charges.
Oven Problem Problem Solving Steps
Other F__ Error appears in the display window. Remove power and turn it back on again after a few seconds. If
condition persists, note the code number (in the EVENT LOG list)
and contact service.
The oven display stays OFF Turn off power at the main power supply (fuse or breaker box).
Turn breaker back on.
If condition persists, call an authorized service.
Cooling fan continues to run after oven is turned off The fan turns off automatically when the electronic components
have cooled sufficiently.
Oven is not heating Check the circuit breaker or fuse box to your house. Make sure
there is proper electrical power to the oven. Make sure the oven
temperature has been selected.
Oven is not cooking evenly Refer to cooking charts for recommended rack position. Always
reduce recipe temperature by 25°F (15°C) when baking with
Convection Bake mode.
Clock and timer are not working properly Make sure there is proper electrical power to the oven. See the
Clock sections on pages 10 and 13.
EN
Excessive moisture Convection modes will eliminate any moisture in oven (this is one
of the advantages of convection).
29
Page 62

EN
17 - Assistance or Service
Before contacting service, please check “Troubleshooting.” It
may save you the cost of a service call.
If you still need help, follow the instructions below. When
calling, please know the purchase date and the complete
model and serial number of your appliance. This information
will help us to better respond to your request.
Service Data Record
For authorized service or parts information see paragraph
“WARRANTY for Home Appliances”.
For serial tag location see Page 5. Now is a good time to
write this information in the space provided below.
Keep your invoice for warranty validation.
Service Data Record
Model Number _________________________________
Serial Number __________________________________
Date of Installation or Occupancy __________________
30
Page 63

FR
TABLE DES MATIERES PAG E
1 - Avertissements pour les fours à microondes 4
Préparation des aliments 4
Plats et récipients 4
Puissance des microondes et durée 4
Emballage 4
Boissons 4
Aliments pour les nouveaux-nés 4
Aliments avec peau 5
Sécher des aliments 5
Huile 5
Causes de dommage 5
Première utilisation 7
Montage et démontage du grill plat 7
Respect de l’environnement 8
2 - Tableau de commande 9
Clavier 9
3 - Généralités concernant le four 10
Codes d’erreur 10
Bips sonores 10
Réglages par défaut 10
F Codes numériques d’erreur 10
Préchauffage 10
Minuterie 10
4 - Conseils Généraux Sur le Four 11
Préchauffage du four 11
Suggestions d’utilisation 11
Fonctionnement des microondes 11
Condensation du four et température 11
Cuisson à haute altitude 11
5 - Démarrage 12
Instructions à suivre lors du premier allumage 12
6 - Réglages utilisateur 13
Langue 13
Température et poids 13
Heure 13
Date 14
Luminosité 14
Volume 14
TABLE DES MATIERES PAG E
7 - Réglage du système 15
Journal d’événements 15
Démo 15
8 - Mise en marche du four 16
Allumage et arrêt du four 16
Tableaux des modes de cuisson 17
9 - Cuisson traditionnelle 18
Modification du mode de cuisson 18
Modification de la température 18
Phase de préchauffage 18
10 - Fonctionnement du mode temporisé 19
Temps de cuisson 19
Temps d’arrêt 19
11 - Cuisson aux microondes 20
Fonction décongélation temporisée 20
Fonction décongélation poids 20
Fonction Micro-ondes 20
Fonction micro-ondes + grill 21
Fonction Microonde + Ring 21
Modifier la puissance en Watts 22
Changer l'heure 22
Changer la température 22
Changer le poids 22
12 - Utilisation des lumières du four 23
13 - Recettes 24
14 - Pour l'installateur 26
Branchement Electrique 27
15 - Résolutions des problèmes de cuisson 28
16 - Résolution des Problèmes de Fonctionnement 29
17 - Assistance ou Service Après-Vente 30
Enregistrement des données d'entretien 30
1
Page 64

FR
INSTRUCTIONS IMPORTANTES
ET CONSIGNES DE SECURITE
Lire attentivement et conserver pour un usage futur
Cher Client,
Vous venez d’acheter l’un de nos produits et nous
vous en remercions vivement.
Ce nouveau produit, minutieusement conçu et
construit avec des matériaux de tout premier choix,
a été soigneusement testé afin de satisfaire chacune
de vos exigences en matière de cuisson.
Nous vous prions de lire et de respecter ces
instructions simples qui vous permettront d’obtenir
d’excellents résultats dès la première utilisation.
Nous vous souhaitons une bonne cuisine avec cet
appareil moderne.
CE PRODUIT EST CONÇU POUR UN USAGE
DOMESTIQUE. LE FABRICANT DECLINE TOUTE
RESPONSABILITE EN CAS DE LESIONS CORPORELLES
OU DE DOMMAGE AUX BIENS DE PROPRIETE
DERIVANT D'UNE INSTALLATION INCORRECTE OU
D'UNE UTILISATOIN INCORREXTE, ERRONEE OU
INAPPROPRIEE.
L'APPAREIL NE DOIT PAS ETRE UTILISE PAR DES
PERSONNES (Y COMPRIS LES ENFANTS) AYANT
DES HANDICAPS PHYSIQUES, SENSORIELS OU
MENTAUX OU PAR DES PERSONNES NE POSSEDANT
PAS L'EXPERIENCE OU LES CONNAISSANCES
NECESSAIRES, SAUF SI CELLES-CI SONT SURVEILLEES
OU FORMEES A L'UTILISATION DE L'APPAREIL PAR
UNE PERSONNE RESPONSABLE DE LEUR SECURITE.
LES ENFANTS DOIVENT ETRE SURVEILLLES POUR
GARANTIR QU'ILS NE JOUENT PAS AVEC L'APPAREIL.
NE PAS METTRE DE FEUILLES D'ALUMINIUM, DE
PLATS OU OBJETS SIMILAIRES EN CONTACT AVEC LA
BASE A L'INTERIEUR DU FOUR, POUR LA CUISSON.
L'ACTION CHAUFFANTE DE LA RESISTANCE
INFERIEURE ENTRAINE UNE SURCHAUFFE DE LA
PARTIE INFERIEURE DU FOUR CE QUI PROVOQUE
DES DOMMAGES ET A DE GRAVES CONSEQUENCES
(RISQUE D'INCENDIE) Y COMPRIS AU PLAN DE
TRAVAIL SITUE SOUS LE FOUR.
L'APPAREIL DEVIENT TRES CHAUD PENDANT
L'UTILISATION.
AVERTISSEMENT : NE PAS TOUCHER LES RESISTANCES
SE TROUVANT DANS LE FOUR.
• Si la porte ou les joints d'étanchéité de la porte
• Il est dangereux pour toute autre personne que
• Il est interdit de réchauffer des liquides et tout
• Les enfants ne doivent pas utiliser le four sans
• Utiliser uniquement des ustensiles adaptés aux
• Quand on réchauffe des aliments dans des
• Si on constate que de la fumée sort du four,
• Réchauffer des boissons dans le four à
AVERTISSEMENT
sont endommagés, le four ne doit pas être utilisé
tant qu'il n'a pas été réparé par un technicien
d'assistance qualifié.
le technicien d'effectuer des interventions de
maintenance ou des réparations qui impliquent
de retirer tout carter de protection contre une
exposition aux micro-ondes.
autre aliment dans des récipients hermétiques
car ces derniers pourraient exploser.
surveillance sauf s'ils ont reçu des instructions
adéquates pour une utilisation en toute sécurité et
qu'ils comprennent les dangers d'une utilisation
incorrecte.
fours à microondes.
récipients en plastique ou en papier, vérifier le
four fréquemment en raison des risques de feu.
l'éteindre immédiatement ou le débrancher de la
prise électrique et laisser la porte fermée pour
éteindre les flammes.
microondes peut entraîner un débordement par
bouillonnement retardé ; il convient donc d'être
particulièrement attentif quand on manipule le
récipient.
2
Page 65

AVERTISSEMENT
• Le contenu des biberons et les aliments pour
bébés en pots doivent être mélangés ou secoués
et leur température doit être contrôlée avant de
les donner à l'enfant afin d'éviter toute brûlure et
tout échaudage.
• Les œufs à la coque et les œufs durs entiers ne
doivent pas être chauffés au four à microondes
car ils pourraient exploser même après la fin de
la cuisson dans le four.
FR
• Une explication détaillée pour le nettoyage des
joints d'étanchéité des portes de la chambre de
cuisson et des composants adjacents est fournie.
• Le four doit être nettoyé périodiquement et tous
les résidus de nourriture doivent être éliminés.
• Ne pas maintenir la propreté du four pourrait
causer une détérioration des surfaces ce qui
pourrait réduire la durée de vie de l'appareil et
causer des conditions dangereuses.
• Ne pas utiliser des brosses à récurer abrasives
ou métalliques acérées pour nettoyer la vitre de
la porte du four car elles rayeraient la vitre avec
le risque de la briser.
• Ne pas utiliser des dispositifs à vapeur pour
nettoyer l'appareil.
3
Page 66

FR
1 - Avertissements pour les fours à microondes
Préparation des aliments
Risque d'incendie !
Utiliser la fonction microonde uniquement pour la
préparation d'aliments à manger.
Toute autre utilisation peut être dangereuse ou causer
des dommages.
Par exemple, réchauffer des pantoufles ou des
oreillers remplis de céréales etc. peuvent prendre feu
même après plusieurs heures.
Plats et récipients
Risque de blessure !
La vaisselle en porcelaine et en céramique doit avoir
des petits trous dans les poignées et le couvercle.
Il peut y avoir des cavités cachées derrière ces trous.
Si de l'eau pénètre dans ces cavités, la vaisselle peut
se rompre.
Ne pas utiliser de vaisselle qui n'est pas adaptée
aux fours à microondes.
Risque de brûlures !
La chaleur des aliments peut chauffer le plat. Toujours
utiliser une manique pour retirer les plats et les
accessoires de la chambre de cuisson.
Risque de brûlures !
Les emballages hermétiques peuvent exploser. Suivre
les instructions fournies sur l'emballage. Toujours
utiliser une manique pour retirer les plats.
Boissons
Risque de brûlures !
Quand on réchauffe des liquides, l'ébullition peut
être retardée.
Cela signifie que la température d'ébullition a été
atteinte sans former les typiques bulles de vapeur.
Même un choc léger peut provoquer un débordement
soudain du liquide ou des éclaboussures.
Quand on réchauffe des liquides, toujours mettre une
cuillère dans le récipient pour éviter une ébullition
retardée.
Risque d'explosion !
Ne jamais réchauffer des boissons ou des aliments
dans des récipients fermés.
Ne jamais réchauffer des boissons alcoolisées de
manière excessive.
Puissance des microondes et durée
Risque d'incendie !
Ne jamais programmer des valeurs trop élevées par
rapport à la puissance du four à micro-ondes ou le
temps de cuisson. L'aliment pourrait prendre feu et
endommager l'appareil. Suivre les règles fournies
dans ce manuel d'utilisation.
Emballage
Risque d'incendie !
Ne jamais réchauffer d'aliments dans un emballage
thermique.
Les aliments contenus dans des emballages en
plastique, en papier ou dans d'autres matériaux
inflammables doivent constamment être contrôlés.
Aliments pour les nouveaux-nés
Risque de brûlures !
Ne jamais réchauffer d'aliments pour bébés dans un
récipient fermé. Toujours retirer le couvercle ou la
tétine. Quand on a fini de réchauffer les aliments
ou la boisson, toujours secouer ou mélanger avec
précaution de manière à ce que la chaleur soit
répartie de manière homogène.
Tester la température avant de donner la nourriture
au bébé.
4
Page 67

FR
Aliments avec peau
Risque de brûlures !
Ne jamais cuire des œufs dans leur coque. Ne
jamais réchauffer des œufs durs car ils pourraient
exploser, même une fois que le four à micro-ondes a
été éteint. Ceci est valable aussi pour les mollusques
et les crustacés.
En cas d'œufs sur le plat, percer d'abord le jaune.
En cas d'aliment avec une peau dure comme les
pommes, les tomates, les pommes de terre ou les
saucisses, la peau peut exploser.
Percer la peau avant de faire cuire.
Sécher des aliments
Risque d'incendie !
Ne jamais sécher des aliments dans le four à
micro-ondes.
Aliments avec une faible teneur en eau
Risque d'incendie !
Ne jamais décongeler ni réchauffer des aliments
ayant une faible teneur en eau (par ex. pain) pendant
trop de temps ou avec une puissance excessive.
Causes de dommage
Jus perdu par des fruits
Quand on prépare des desserts contenant des fruits
très juteux, ne pas trop remplir le plat de cuisson. Les
jus de fruit qui débordent du plat de cuisson peuvent
laisser des taches indélébiles.
Panne technique
Ne jamais utiliser des plats de cuisson émaillés dans
le four à micro-ondes car cela pourrait provoquer
une panne technique.
Refroidir le four avec la porte ouverte.
La chambre de cuisson doit être refroidie uniquement
avec la porte ouverte. Vérifier que rien n'est collé à
la porte de l'appareil.
Même si la porte est seulement entretaillée, les
placards à proximité peuvent être endommagés au
fil du temps.
Joint très sale
Si le joint d'étanchéité est très sale, la porte de
l'appareil ne ferme pas correctement pendant
le fonctionnement. Les surfaces des placards à
proximité peuvent être endommagées.
Toujours maintenir le joint d'étanchéité propre.
Huile
Risque d'incendie !
Ne jamais utiliser le four à micro-ondes pour
réchauffer uniquement de l'huile.
Utiliser la porte de l'appareil comme surface d'appui
Ne rien poser et ne pas s'appuyer à la porte
ouverte de l'appareil et ne pas poser de vaisselle ni
d'accessoires dessus.
Utiliser le four à micro-ondes sans aliments dans la
chambre de cuisson
Allumer le four à micro-ondes uniquement après
avoir mis les aliments dans la chambre de cuisson.
Sans aliments à l'intérieur, l'appareil peut se mettre
en surcharge. La seule exception admise sont des
brefs tests pour des plats (à cet égard, voir les mises
en garde sur les plats et les récipients).
5
Page 68
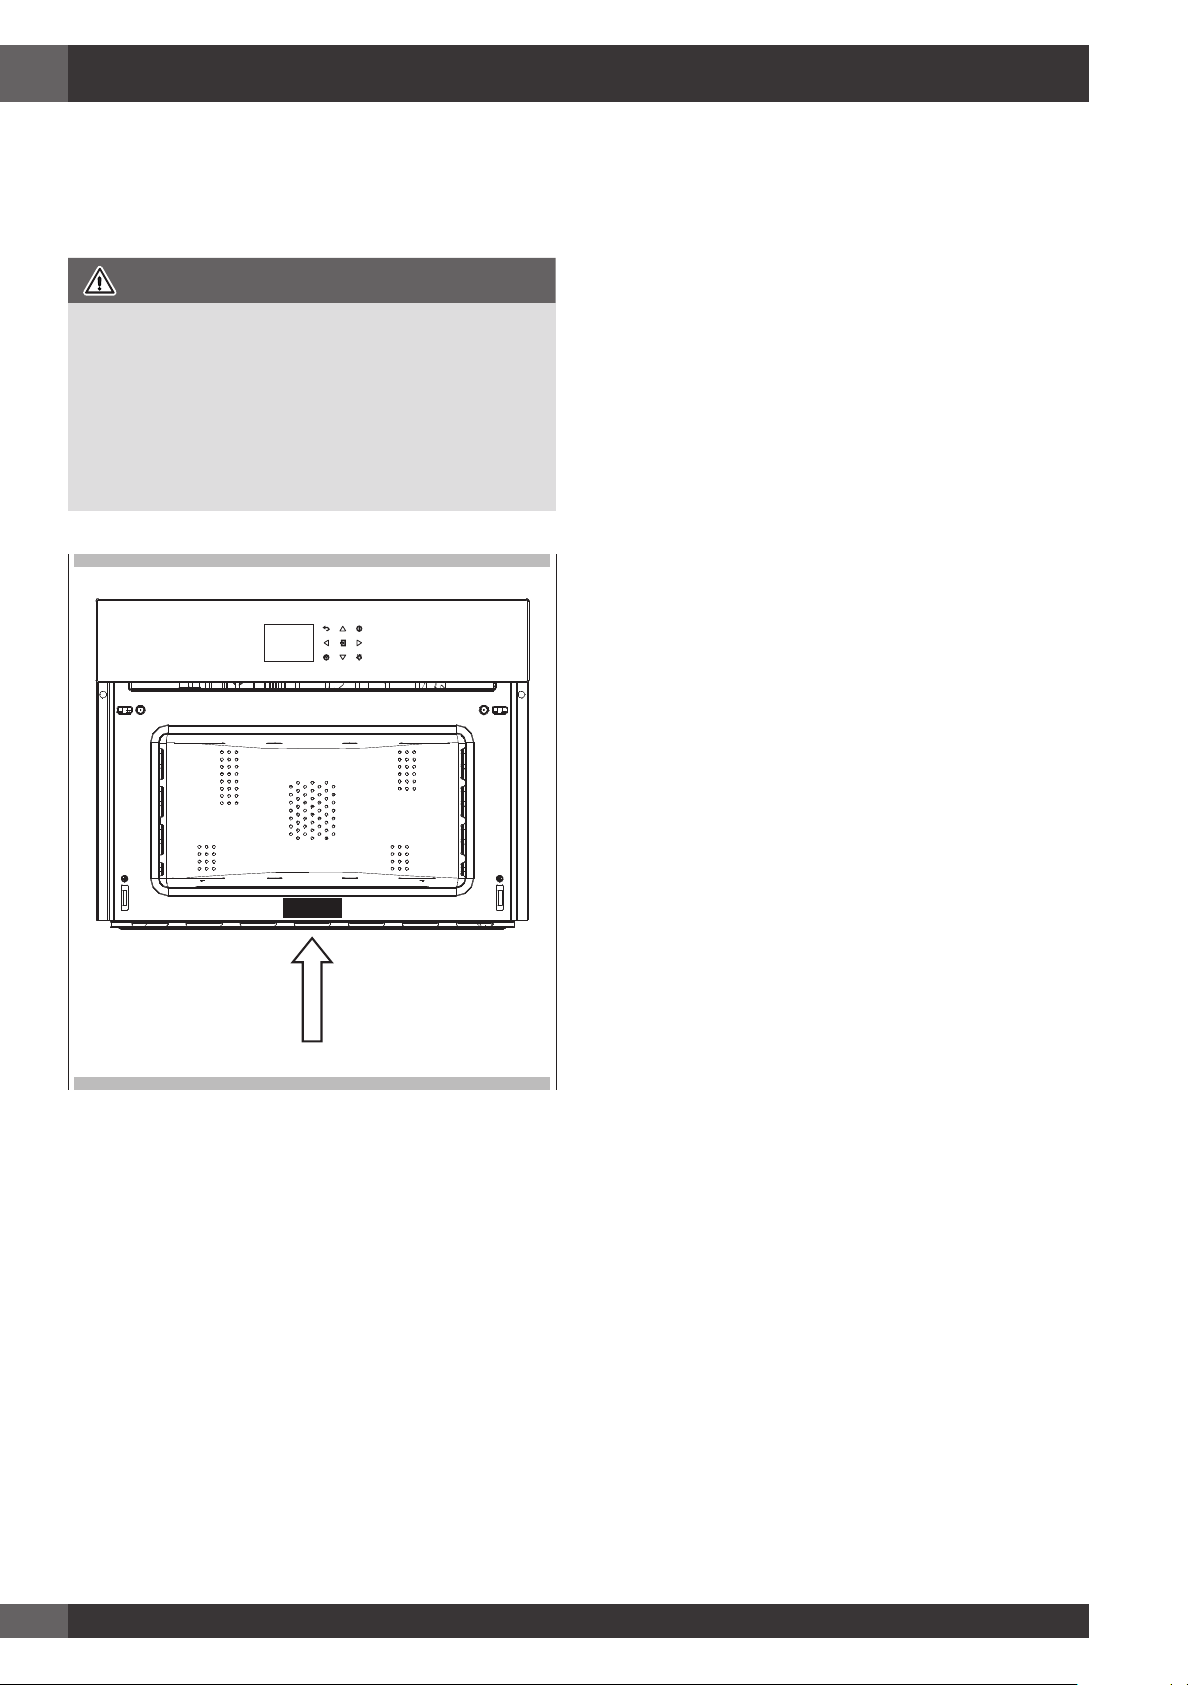
FR
Aliments humides
Ne pas laisser des aliments humides dans la chambre
de cuisson pendant des périodes prolongées.
IMPORTANT
La plaque d'identification du four est encore
accessible après que l'appareil a été installé.
Cette plaque d'identification qui est visible quand
on ouvre la porte du four, indique toutes les
informations nécessaires quand on demande une
pièce de rechange pour l'appareil.
6
Page 69
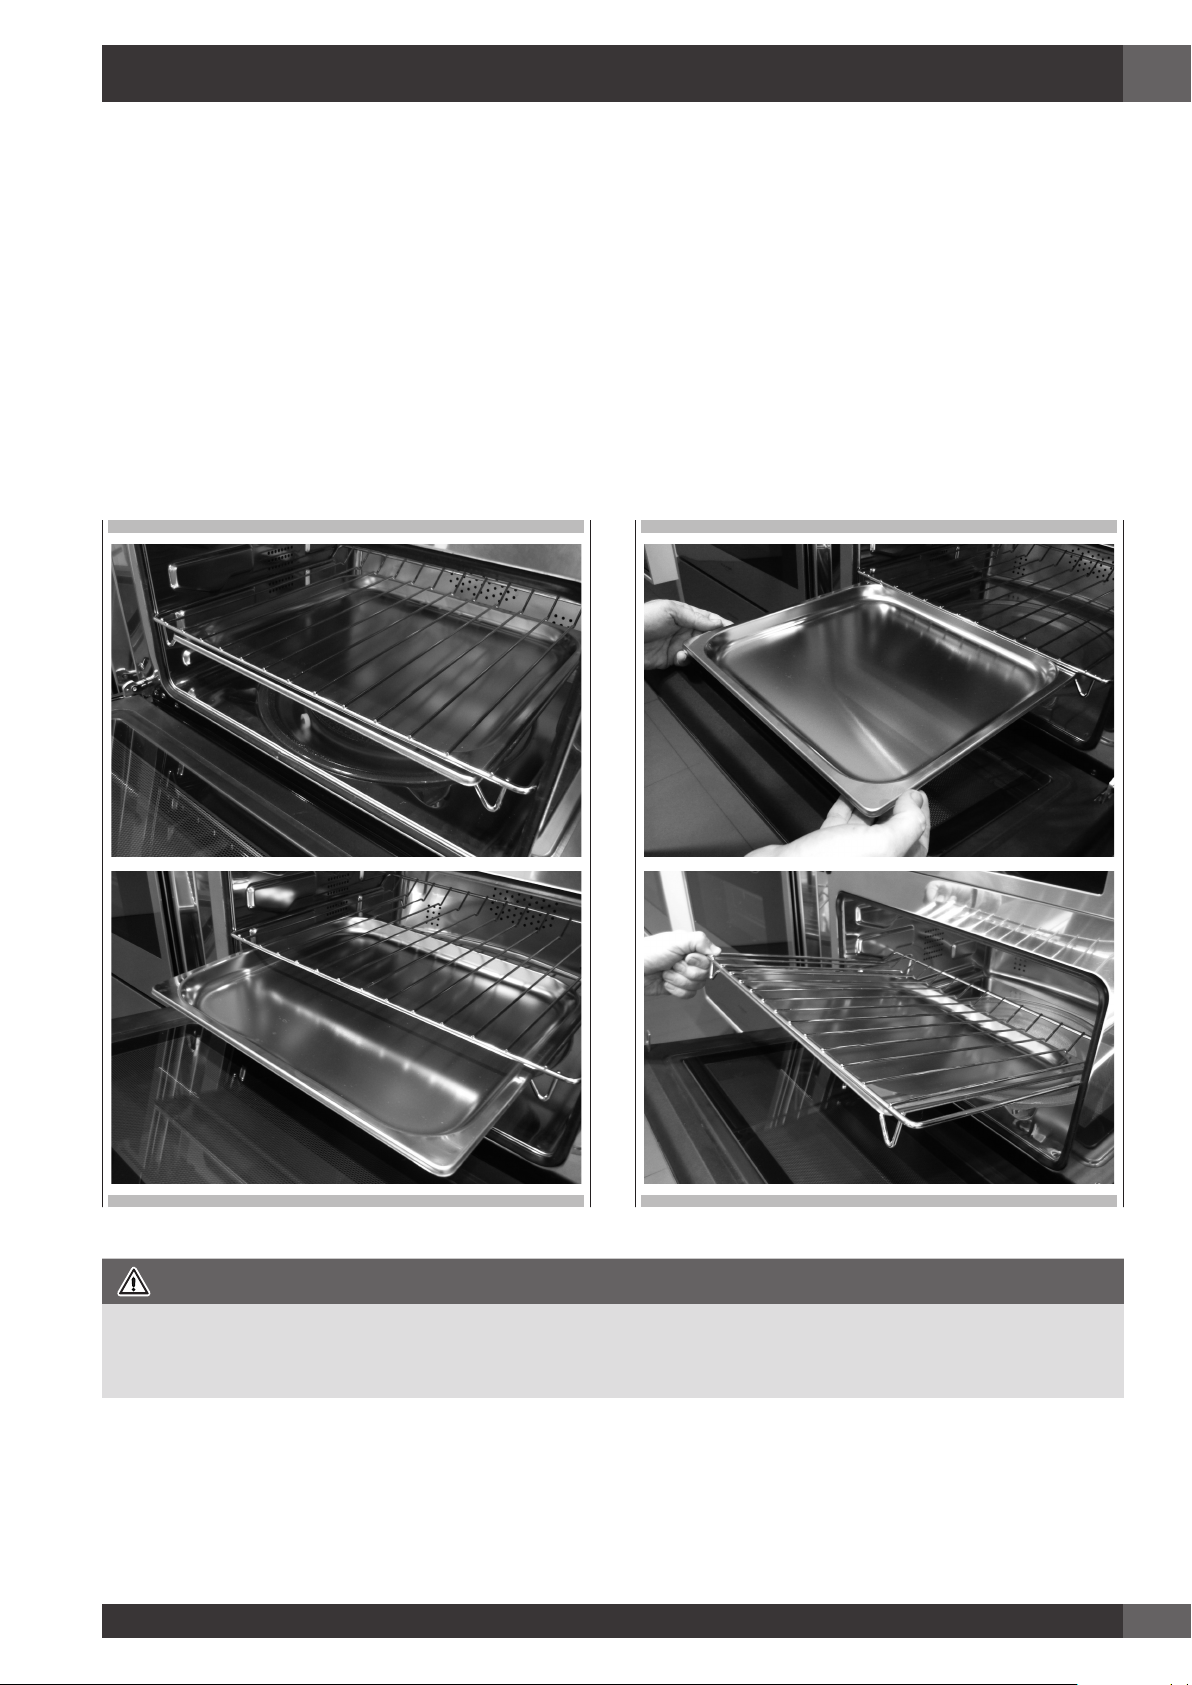
FR
Première utilisation
Le four doit être parfaitement nettoyé au savon et à l'eau et être soigneusement rincé.
Chauffer le four pendant environ 30 minutes, à la température maximale. Ceci permet d'éliminer toutes les huiles résiduelles dérivant de la
production. Celles-ci pourraient provoquer des odeurs désagréables pendant la cuisson. Utiliser la fonction "Circular plus Fan" (circulaire plus
ventilateur) sans les accessoires dans le four. Avant d'utiliser les accessoires pour la première fois, les nettoyer avec soin avec une solution alcaline
très chaude et un chiffon doux.
Montage et démontage du grill plat
Pour retirer le grill plat, tirer le grill vers soi jusqu'à ce qu'il s'arrête, puis le soulever en tirant vers le haut, jusqu'à ce qu'il se dégage complètement.
Pour remettre le grill plat en place, l'introduire avec un angle de 45° puis le placer horizontalement et le pousser sur toute le profondeur de la
chambre de cuisson.
Si ce grill plat à un lèche-frites bas, le retirer , le relever légèrement et le faire glisser faire vous. Pour le remettre en place, le faire glisser de nouveau
jusqu'à ce qu'il soit correctement en place.
IMPORTANT
Par mesure de précaution, avant de nettoyer le four, toujours débrancher la fiche de la prise de courant ou retirer le cordon électrique de
l'appareil. De plus, éviter d'utiliser des substances acides ou alcalines (telles que citron. vinaigre, sel, tomates etc.) Eviter d'utiliser des produits
contenant du chlore, des acides ou des produits abrasifs, notamment pour nettoyer les parois peintes.
7
Page 70

FR
Respect de l’environnement
La documentation relative à cet appareil est réalisée avec du papier
blanchi, sans chlore, ou du papier recyclé, dans le but de contribuer
à la protection de l’environnement. Les emballages sont conçus de
manière à ne pas polluer la nature ; il s’agit de produits écologiques
qui peuvent être récupérés ou recyclés.
En recyclant l’emballage, on contribue à économiser les matières
premières et à réduire le volume des déchets industriels et ménagers.
LE MATERIEL D’EMBALLAGE est recyclable à 100% et est marqué par
le symbole du recyclage. Pour l’élimination, suivre les règlementations
locales. Le matériel d’emballage (sachets en plastique, parties en
polystyrène, etc.) doit être tenu hors de la portée des enfants, car il
représente une source potentielle de danger.
CET APPAREIL est marqué conformément à la Directive Européenne
2002/96/CE, Déchets d’équipements électriques et électroniques
provenant des Equipements Electriques et Electroniques [Waste
Electrical and Electronic Equipment] (WEEE). L’utilisateur doit s’assurer
que ce produit est éliminé correctement, et contribue ainsi à éviter les
conséquences négatives potentielles pour l’environnement et la santé.
LE SYMBOLE sur le produit ou sur la documentation d’accompagnement
indique que ce produit ne doit pas traité
comme un déchet domestique, mais doit être remis auprès du centre
de collecte approprié pour le recyclage des appareils
électriques et électroniques.
LA MISE AU REBUT DOIT ETRE EFFECTUEE en conformité avec les lois
locales sur l'élimination des déchets.
POUR PLUS D'INFORMATIONS sur le traitement, la récupération et
le recyclage de ce produit, contacter l'organisme local compétent , le
service de ramassage des déchets domestiques ou le magasin où le
produit a été acheté.
AVANT LA MISE AU REBUT, rendre le produit inutilisable en coupant
le cordon électrique.
8
Page 71

Votre appareil peut présenter des petites différences par rapport à l'illustration ci-dessous.
A
- Clavier
B
- Ecran
VENDREDI 11/20/2015
PM
04:26
2 - Tableau de commande
FR
B
Clavier
Pour utiliser les touches, appuyer dessus, légèrement. Le clavier ne
fonctionnera pas si on enfonce pus d'une touche à la fois.
Flèches de déplacement
Retour à la page-écran précédente: la pression
continue permet de retourner à la page d'accueil.
Allumage et arrêt du four
Confirme les paramètres et démarre les
opérations de cuisson Quand la touche est
enfoncée pendant une opération de cuisson, la
fonction est mise en pause. Appuyer de nouveau
pour faire remettre en marche.
A
Pour configurer la minuterie.
Accéder au menu Fonctions pendant la cuisson.
Allumage et arrêt de la lumière du four.
9
Page 72
FR
3 - Généralités concernant le four
Avant d’utiliser le four pour la première fois, retirez tous les matériaux d’emballage et autres. En effet, tous ces matériaux pourraient fondre ou brûler
une fois l’appareil allumé.
Codes d’erreur
Ce code s'affiche quand la commande électrique indique une
défaillance. Quand une erreur s'affiche, la fonction en cours est
bloquée. Si le type d’erreur est lié à une fonction de sécurité, le four
devient inutilisable et l’erreur se représente à chaque redémarrage
(dans ce cas, appeler le service d’assistance); si, en revanche, l’erreur
correspond à une défaillance d’importance secondaire, le four pourra
encore être utilisé au redémarrage dans les fonctions n’impliquant pas
la partie défaillante (par exemple un élément thermique).
Bips sonores
Valide la réception de la commande après la pression d’une touche.
Il signale également qu’une fonction temporisée s’est achevée (ex.
horloge ou cuisson temporisée). Pendant l’exécution d’une recette, le
signal sonore prévient l’utilisateur que le four attend une opération de
sa part (par ex. introduire le plat ou le retourner).
Les bips sonores indiquent aussi une défaillance du four.
Réglages par défaut
Dès la sélection d’un mode de cuisson, celui-ci sélectionne
automatiquement une température adaptée, qui peut cependant être
modifiée au besoin.
F Codes numériques d’erreur
Minuterie
AVERTISSEMENT
La minuterie du four n'allume pas et n'éteint pas le four ; elle sert
uniquement à vous avertir avec l'avertisseur sonore. Quand on
souhaite éteindre le four automatiquement, il est nécessaire d'utiliser
la fonction Fin de cuisson et la fonction de cuisson retardée.
REMARQUE : Enfoncer le bouton OFF ne réinitialise pas et n'arrête
pas non plus la minuterie.
1. Enfoncer le bouton
flèches
basculer la sélection entre les heures et les minutes, utiliser les
flèches .
2. Il est possible de paramétrer le temps de 1 minutes à 12 heures
et 59 minutes et, quand celui-ci est paramétré, le temps restant
est toujours visible dans la barre d'état du bas jusqu'à ce que ce
temps se soit écoulé ou que la minuterie soit réinitialisée.
3. Pour modifier ou annuler le temps paramétré, il est nécessaire de
remettre la minuterie à zéro et de maintenir le bouton
pendant quelques secondes.
4. Le format de la minuterie est généralement HR:MIN, puis il passe
en MIN:SEC pendant la dernière minute.
5. Quand le temps est écoulé, l'écran affiche 00:00 et l'avertisseur
sonore sonne pendant une minute ou jusqu'à ce que le bouton
soit enfoncé.
puis confirmer avec le bouton . Pour faire
et régler le temps souhaité à l'aide des
enfoncé
Ces codes s’affichent quand l’unité de commande électronique détecte
un problème au niveau du four ou de l’électronique de contrôle.
Le code d’erreur est enregistré dans le journal des erreurs du menu
Setup. Cette erreur peut être communiquée au technicien du service
d’assistance pour qu’il comprenne à l’avance la cause possible
d’erreur.
Préchauffage
Lorsque vous sélectionnez un mode de cuisson, le préchauffage
démarre ; pendant ce temps, la température instantanée s’affiche avec
l’icône du thermomètre.
Dès que la valeur 100% de la température est atteinte, un signal
sonore indique la fin du préchauffage et la valeur de température
actuelle disparaît
10
Page 73

Préchauffage du four
• Sélectionnez une température plus élevée ne réduit pas le temps de
préchauffage.
• Le préchauffage est nécessaire pour de bons résultats lorsque vous
cuisinez des gâteaux, des biscuits, des pâtisseries et du pain.
• Le préchauffage aidera à saisir les rôtis et à garder la viande juteuse.
• Places les grilles de four dans leur position appropriée avant le
préchauffage.
• Pendant le préchauffage, la température de cuisson choisie est
toujours affichée.
• Un signal va confirmer que le four est préchauffé et l’écriture
“température détectée” s’éteindra.
Suggestions d’utilisation
• Ne posez pas les plats sur la porte ouverte.
• Utilisez la lumière intérieure du four pour voir la nourriture à travers la
fenêtre de la porte du four plutôt que d’ouvrir la porte fréquemment.
Fonctionnement des microondes
4 - Conseils Généraux Sur le Four
T
ester la vaisselle
Ne jamais allumer le four à micro-ondes avant d’y avoir introduit les
aliments.
La seule exception autorisée est le fait de tester la vaisselle.
Si vous n’êtes pas certain que votre vaisselle peut etre utilisée dans le
four à micro-ondes, nous
recommandons d’effectuer le test suivant :
mettre le récipient ou le plat vide dans l’appareil pendant 30 s - 1
min à la
puissance maximale. Vérifier la température. Le récipient doit être froid
ou légèrement tiède. Si il est
chaud ou s’il y a des étincelles, le récipient ne convient pas.
Condensation du four et température
• Il est normal qu’une certaine quantité d’humidité s’évapore des
aliments pendant la cuisson. La quantité dépend de l’humidité
contenue dans la nourriture. L’humidité peut se condenser sur toute
surface plus froide que l’intérieur du four, comme le tableau de
commande.
• Votre nouveau four a un capteur électronique de température qui
permet de maintenir soigneusement la température sélectionnée.
FR
Les microondes sont transformées en chaleur dans les aliments. Le four
a microondes peut être utilisé de manière autonome ou associé
avec d’autres types de chauffage. Cette section contient des
informations sur la vaisselle et des instructions sur la programmation
du four à microondes.
Avertissement pour la vaisselle
Vaisselle adaptée
Il est possible d’utiliser de la vaisselle résistant à la chaleur, en verre,
en vitrocéramique, en porcelaine, en céramique ou en plastiques
réfractaires. Ces matériaux sont perméables aux micro-ondes.
Il est aussi possible d’utiliser des assiettes ordinaires. De cette façon, il
ne sera pas nécessaire de transférer la nourriture.
Vaisselle avec des décorations en or ou en argent ne peut être utilisée
que si le fabricant garantit qu’elle peut être utilisé dans les fours à
micro-ondes.
Il convient de se rappeler que, quand on utiliser le four en mode microondes, le plat doit être placé sur le plateau rotatif.
Quand on utiliser le four avec un mode combiné, il est préférable
de placer le plat devant être cuit sur le grill rond, bas, supporté de
manière à ce qu’il soit centrée sur le plateau rotatif.
Vaisselle incompatible
Il n’est pas possible d’utiliser la vaisselle métallique.
Le métal n’est pas perméable aux micro-ondes. Les aliments dans des
récipients métalliques resteront froids.
Avertissement ! Les ustensiles métalliques tels que cuillères en verre,
doivent rester à, au moins 2 cm, des parois du four et l’intérieur de
la porte. En effet, les étincelles peuvent endommager gravement
l’intérieur de la porte vitrée.
Avertissement ! Le grill plat doit être retiré quand on utilise les modes
micro-ondes et combinés. L’utiliser uniquement avec des fonctions four
traditionnelles.
Cuisson à haute altitude
• Lorsque vous cuisinez à haute altitude, les recettes et les durées de
cuisson varient de la norme.
11
Page 74

FR
04 : 26
PM
MARDI 11/24/2015
5 - Démarrage
Instructions à suivre lors du premier allumage
Une fois le four branché pour la première fois à l’alimentation
électrique, l’unité de contrôle se prépare automatiquement à la mise au
point de certains paramètres utilisateur qui seront gardés en mémoire
à chaque allumage successif.
REMARQUE : lors du premier raccordement à l’alimentation électrique
et à chaque raccordement postérieur, le mécanisme de
verrouillage de porte accomplit un tour de calibrage – il
est important de toujours laisser la porte fermée pendant
cette phase.
• Langue
• Température et poids
• Heure
• Date
Pour les instructions de mise au point, consulter le paragraphe USER
SETTING.
Après avoir mis au point les paramètres utilisateur, l’unité de contrôle
se porte automatiquement à la page « Stand-by ».
12
Page 75

6 - Réglages utilisateur
RÉGLAGE
REGLAGES
12
yk
abc
RÉGLAGE
LANGUE
°F
°ClbKg
12h
24h
AM
PM
04 : 26
PM
FR
Quand le four est allumé, sélectionner l'icône puis confirmer avec
la touche pour accéder au menu PARAMETRES. Ce menu permet
de personnaliser les paramètres du four. Pour pouvoir accéder, vérifier
qu’il n’y a pas de cuisson active ni de fonction temporisée activée.
REMARQUE : Le menu Paramètres ne peut jamais être paramétré si
une fonction temporisée quelconque est déjà activée.
il convient donc, tout 'abord, de supprimer toutes les
fonctions temporisées activées.
1. Enfoncer les touches pour sélectionner le sous-menu et
confirmer avec la touche .
2. Utiliser ce menu pour modifier les paramètres suivants:
Enfoncer les touches ou pour sélectionner la paramètre
ou changer un sous-menu parmi les six disponibles, puis confirmer
avec la touche .
Température et poids
Enfoncer la touche flèche et pour sélectionner une des
deux options de température “°C/°F” ou l'une des options de poids
Kg/lb puis confirmer avec la touche .
Heure
Enfoncer la touche flèche pour sélectionner le format de l'heure :“ 12h
AM/PM ou 24h” , puis confirmer avec la touche . Ensuite, paramétrer
l'heure avec les flèches puis confirmer avec la touche .
Langue
Enfoncer la touche flèche pour sélectionner une langue parmi
celles disponibles puis confirmer avec la touche .
13
Page 76

FR
12
J.M.A.
A.M.J.
M.J.A.
12
11/20/2015
ON MISE EN VEILLE
BAS
MOYEN
HAUT
OBSCURITÉ
MOYEN
HAUT
NIVEAU
BAS
MOYEN
HAUT
Date
Enfoncer la touche flèche pour sélectionner le format de la
date parmi les options disponibles : “J.M.A. – A.M.J. – M.J.A.”, puis
confirmer avec la touche . Ensuite, paramétrer la valeur avec les
flèches puis confirmer avec la touche .
Volume
Appuyer sur la flèche pour sélectionner le degré de volume
requis et confirmer avec la touche .
Luminosité
Enfoncer la touche flèche pour choisir le paramétrage de
luminosité à changer entre ON ou STANDBY puis, avec les touches
flèches sélectionner le degré de luminosité souhaité et confirmer
avec la touche .
14
Page 77

RÉGLAGE
SERVICE
SYSTÈME
REGISTRE ÉVÉNEMENTS
TENSION DE SECTEUR
DEMO
OM 15
01 12/11/2015 07:06 CODE: F10305
REGISTRE ÉVÉNEMENTS
02 17/11/2015 13:17 CODE: F10305
Démo
DEMO
ON
7 - Réglage du système
FR
Quand le four est allumé, sélectionner l'icône puis confirmer avec
la touche pour accéder au menu PARAMETRES. Ce menu permet
de configurer certains paramètres ou des fonctions spéciales. Il permet
également d'accéder à la liste des erreurs.
1. Cliquer sur les touches pour sélectionner le sous-menu, puis
confirmer avec la touche .
2. Utiliser ce menu pour modifier les paramètres suivants:
Cliquer sur les touches
pour sélectionner l'élément à
paramétrer ou à afficher parmi les trois disponibles, puis confirmer
avec la touche .
Cette fonction sert à activer le mode DEMO, qui rend le four inutilisable
pour les cuissons mais effectue automatiquement une démonstration
des fonctions.
1. Cliquer sur les touches pour sélectionner "ON"
2. Confirmer avec la touche
3. Cliquer sur la touche
.
.
Après 30 secondes environ, le four se met à fonctionner dans cette
modalité.
Pour suspendre momentanément la fonction DEMO, il suffit de
maintenir enfoncée quelques secondes une touche quelconque jusqu’à
ce que le four se mette en veille ; pour le redémarrer, cliquer sur la
touche
.
Pour désactiver cette fonction, accéder à la page DEMO et choisir
l'option OFF. Confirmer avec la touche
.
REMARQUE : Si elle est sélectionnée, la fonction reste active même si
le four est débranché de la prise de courant du secteur.
Journal d’événements
Ce menu permet de vérifier les erreurs enregistrées. Ces codes peuvent
être communiqués au servie après-vente,
15
Page 78

FR
8 - Mise en marche du four
Allumage et arrêt du four
IMPORTANT
• La touche n'arrête pas la fonction.
• Une fois le four éteint, le ventilateur de refroidissement pourrait continuer à fonctionner jusqu’à ce que les parties internes du four se soient
refroidies.
Cliquer sur
Four multifonction
Cuisson traditionnelle
Cuisson aux microondes
pour allumer le four puis appuyer une nouvelle fois pour l'éteindre. Le four retourne en mode de veille.
CUISSON CIRCULAIRE PAR
CONVECTION
CUISSON CIRCULAIRE & GRILL
GRILL PAR CONVECTION
GRILL
DÉCONGÉLATION TEMPS
DÉCONGÉLATION POIDS
CUISSON MICRO-ONDES
Four thermique
Cuisson traditionnelle
GRILL
Cuisson aux microondes
DÉCONGÉLATION TEMPS
DÉCONGÉLATION POIDS
CUISSON MICRO-ONDES
CUISSON CIRCULAIRE & GRILL
1. Sélectionner l'icône
le mode de cuisson approprié en fonction des aliments à cuire, à
l'aide des flèches puis confirmer avec la touche .
puis cliquer sur la touche . Sélectionner
MICRO-ONDES ET GRILL
MICRO-ONDES ET
CONVECTION
2. Sur cette page, il est possible de modifier le mode de cuisson en
utilisant les touches
3. Si la température proposée est correcte, validez avec la touche
pour démarrer la cuisson ; autrement, en l’absence de pression
sur la touche , elle s’active automatiquement au bout de 10
secondes et l’icône du mode de cuisson devient animée.
.
16
Page 79

Tableaux des modes de cuisson
Cuisson traditionnelle
MODE DE CUISSON ICÔNE TEMPÉRATURE
Min. Prédéfinie Max.
FR
CUISSON CIRCULAIRE PAR CONVECTION
RING & GRILL
GRILLADES SOUS GRILL (BROIL) PAR
CONVECTION
GRILL
50° C 165° C 230° C
50° C 210° C 230° C
50° C 165° C 230° C
50° C 230° C 230° C
Cuisson aux microondes
MODE DE CUISSON ICÔNE SET POIDS WATT TEMPÉRATURE
Prédéfinie
DÉCONGÉLATION
TEMPS
Min.
Prédéfinie
Max. Min.
Prédéfinie
150 W
Pain 100 g 500 g 600 g 150 W
Max. Min.
Max.
DÉCONGÉLATION
POIDS
CUISSON
MICRO-ONDES
MICRO-ONDES ET
GRILL
MICRO-ONDES ET
CONVECTION
Légumes 100 g 500 g 1000 g 150 W
Viande 100 g 500 g 1500 g 150 W
Poisson 100 g 500 g 800 g 150 W
150 W 900 W 900 W
150W 150 W 200° C
300W 300 W
450W 450 W
150W 150 W 50° C 100° C 200° C
300W 300 W
450W 450 W
17
Page 80
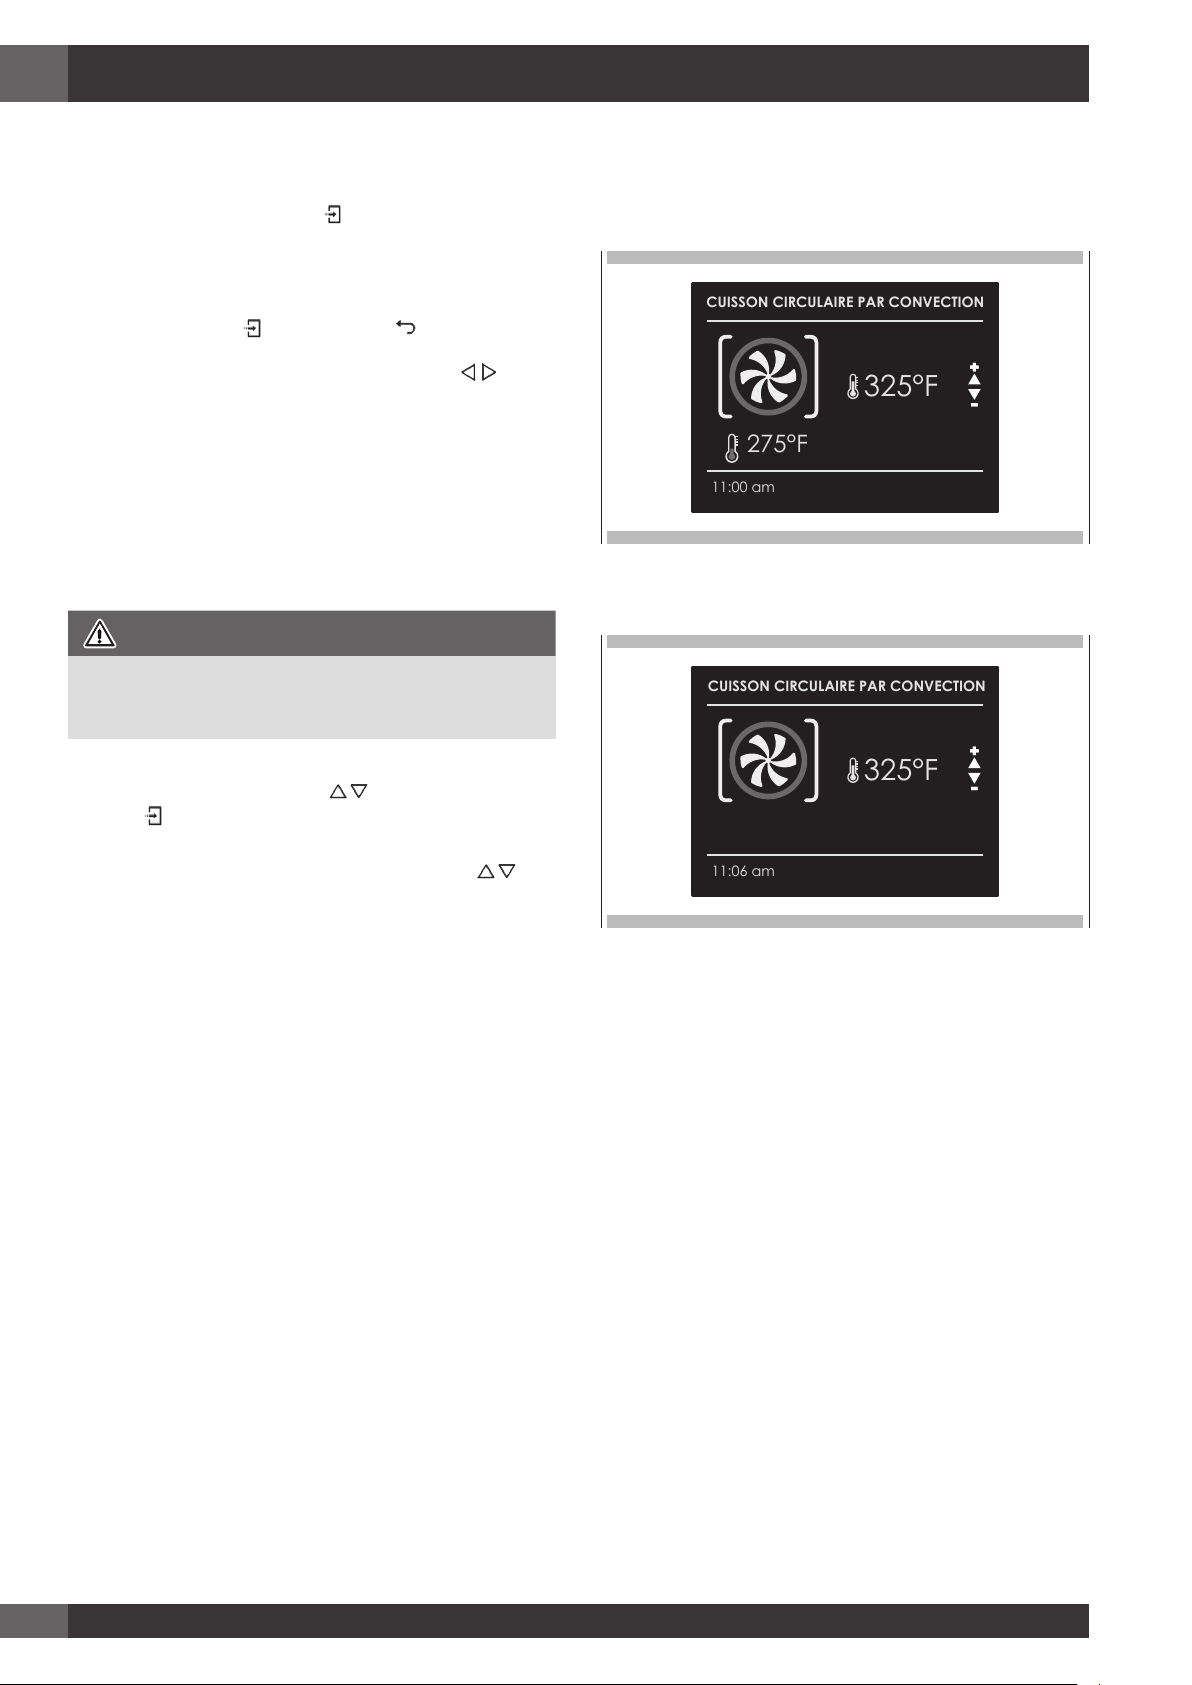
FR
325°F
275°F
11:00 am
CUISSON CIRCULAIRE PAR CONVECTION
++
--
325°F
11:06 am
CUISSON CIRCULAIRE PAR CONVECTION
++
--
9 - Cuisson traditionnelle
Modification du mode de cuisson
1. Pour mettre en pause la marche du four pendant une cuisson non
temporisée, cliquer sur la touche .
Tous les paramètres de la cuisson interrompue restent mémorisés ;
pour redémarrer, appuyez à nouveau sur cette touche.
2. Pour changer le mode de cuisson quand le four est en marche,
cliquer sur la touche puis sur la touche .
Il est alors possible de choisir un autre mode de cuisson parmi ceux
disponibles dans le groupe, à l'aide des des flèches .
Modification de la température
IMPORTANT
• À la fin d’une fonction, l’afficheur montre, la température de
chaleur résiduelle de la cavité à la page de stand-by
Phase de préchauffage
Pendant que le four est en préchauffage, la température instantanée
s’affiche sous l’icône du mode du cuisson.
Dès que la température de consigne est atteinte, le four émet un signal
sonore et l’indication de la température instantanée disparaît.
1. Il est possible de modifier la température à la page d’aperçu du
mode de cuisson avec les flèches
touche .
2. Une fois que la cuisson a démarré, il est possible de changer la
température à n’importe quel moment, avec les flèches
puis en confirmant avec la
.
18
Page 81

10 - Fonctionnement du mode temporisé
275°F
11:00 am
CUISSON CIRCULAIRE PAR CONVECTION
325°F
++
--
FIN
TEMPS
11:50 am
00:50
275°F
11:00 am
CUISSON CIRCULAIRE PAR CONVECTION
325°F
++
--
FIN
START
12:30 pm
11:40
Start
FR
Assurez-vous que l’horloge en temps réel affiche l’heure correcte.
Dans le mode temporisé, le four s’éteint à la fin du temps de cuisson
programmé.
MISE EN GARDE
Ne jamais laisser les aliments dans le four pendant plus d'une heure
avant et après la cuisson. Ceci pourrait compromettre les propriétés
des aliments.
REMARQUE : Le temps maximum programmable pour une cuisson est
de 12h.
Temps de cuisson
Utilisez la fonction « Cook Time » pour faire fonctionner le four pendant
une période de temps déterminée. Le four démarre immédiatement et
s’éteint automatiquement quand le temps a expiré.
Régler un mode temporisé
1. Sélectionnez le mode de cuisson et la température.
2. Il existe deux manières de paramétrer la fonction.
a) Sélectionner
b) Sélectionner
3. Après avoir sélectionné une des deux options ci-dessus, régler la
valeur de temps à l’aide des flèches
touche .
4. Après avoir enfoncé la touche
informations de la cuisson temporisée s’affichent..
• Mode cuisson
• Température
• Temps de cuisson
• Heure de fin de cuisson
pour régler la durée puis cliquer sur .
pour régler l'heure d'arrêt puis cliquer sur .
puis confirmer avec la
, la cuisson démarre et les
Pour modifier le temps de cuisson quand le four est déjà en marche,
il suffit de cliquer sur la touche
puis de saisir le nouveau temps de
cuisson en cliquant de nouveau sur la touche .
Temps d’arrêt
Utilisez la fonction « Stop Time » pour retarder le démarrage de
la cuisson temporisée. Réglez le temps de fin de cuisson et le four
calculera automatiquement l’heure de démarrage. Le four démarre et
s’éteint automatiquement.
Pour retarder le démarrage d’un mode temporisé
1 En premier lieu, régler la cuisson temporisée comme indiqué au
paragraphe « COOK TIME » (temps de cuisson).
2 Sélectionner
3 Régler l'heure de fin de cuisson à l'aide des flèches
conformer avec la touche
1 Après avoir enfoncé la touche
les informations de cuisson retardée s’affichent à l'écran.
• Mode cuisson
• Température
• Heure de fin de cuisson
• Heure de début de cuisson
pour régler l'heure d'arrêt puis cliquer sur .
puis
.
, la fonction se met en attente et
5 Une fois la cuisson terminée, le four s'éteint et un signal acoustique
avertit que la cuisson est finie.
À la fin le four s’éteint et un signal sonore indique que la cuisson est
terminée.
Pour modifier le temps de cuisson et l'heure de fin de cuisson quand le
four est déjà en marche, il suffit de cliquer sur la touche
et d'entrer
le nouveau temps de cuisson ou la nouvelle heure d'arrêt de cuisson
puis de cliquer de nouveau sur la touche .
19
Page 82
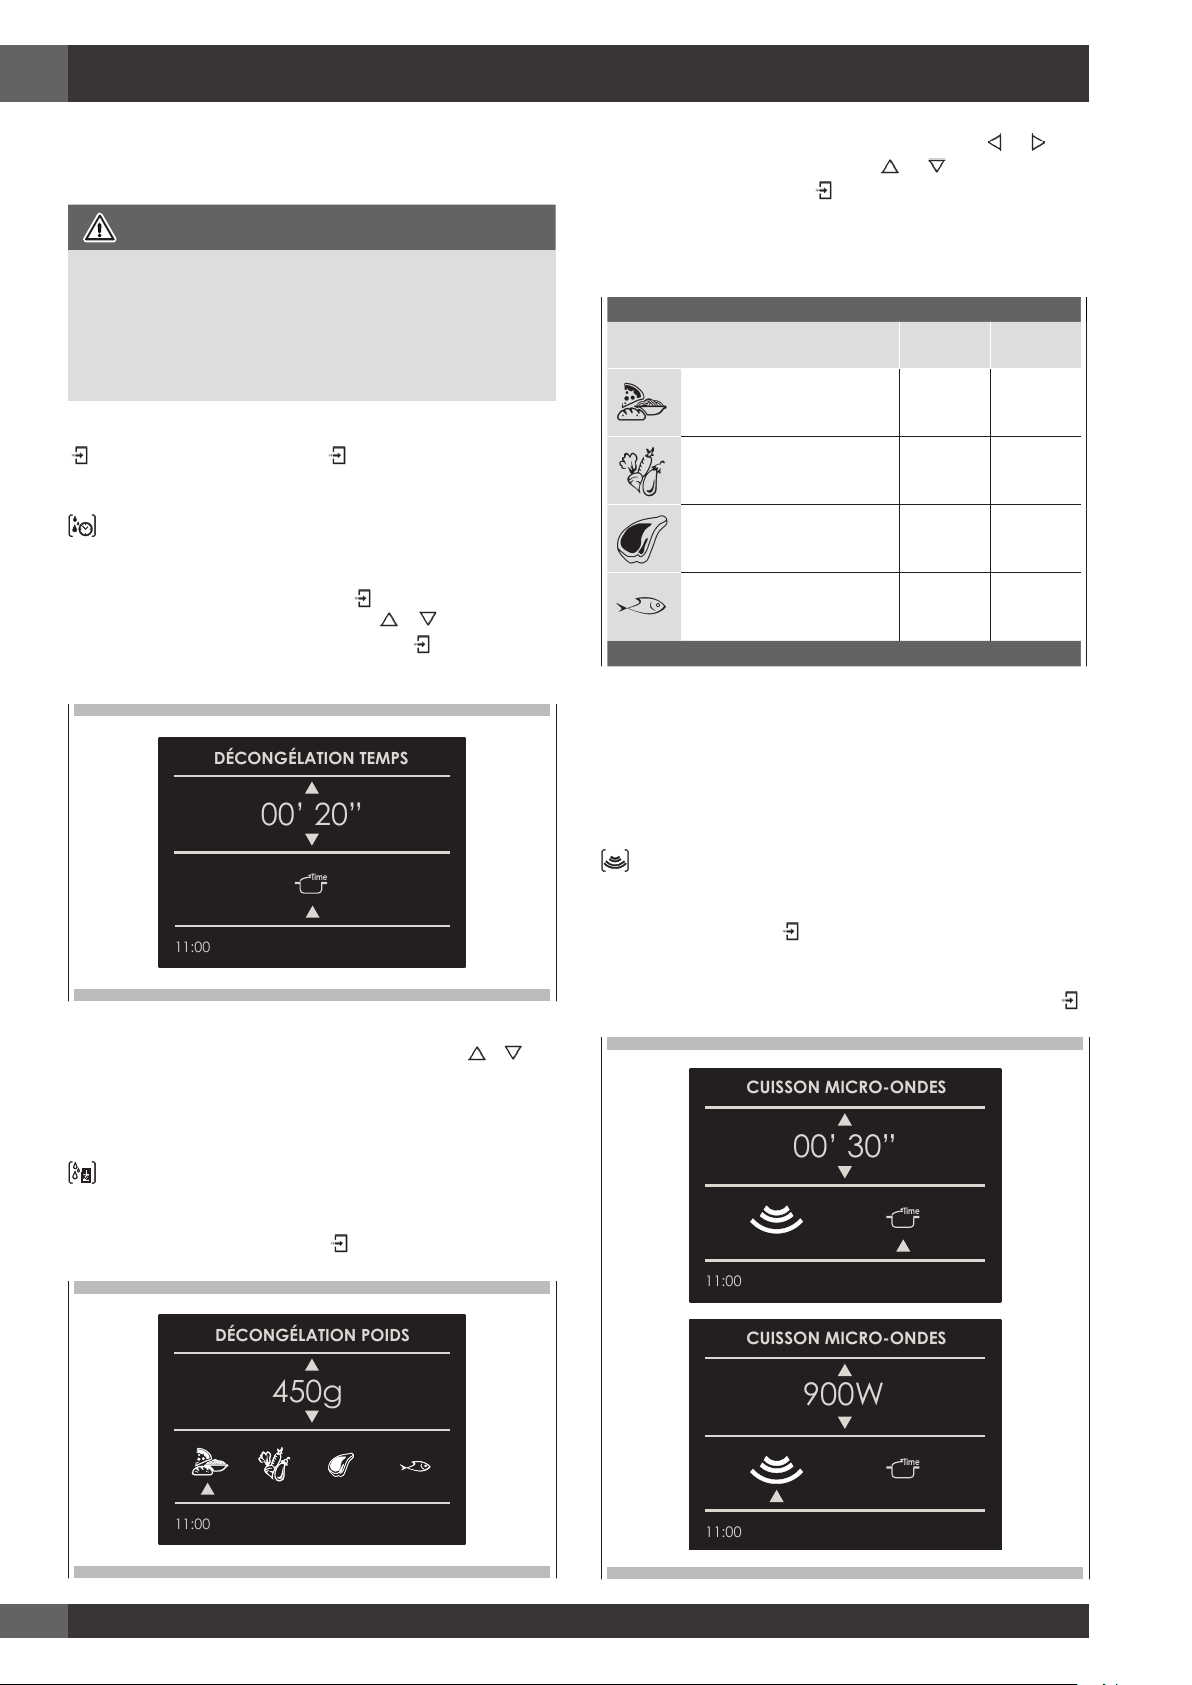
FR
DÉCONGÉLATION TEMPS
00’ 20”
Time
11:00
DÉCONGÉLATION POIDS
450g
11:00
CUISSON MICRO-ONDES
00’ 30”
Time
11:00
CUISSON MICRO-ONDES
900W
Time
11:00
11 - Cuisson aux microondes
REMARQUE : il est essentiel de lire attentivement les instructions et les
mies en garde afin de garantir une utilisation correcte.
ATTENTION
Les fonctions microondes démarreront uniquement une fois que la
porte sera fermée. Si la porte est ouverte pendant que le four est en
marche, le four se met sur pause et le message "PORTE OUVERTE"
s'affiche à l'écran.
Pour redémarrer la fonction, il est nécessaire de refermer la porte.
La fonction peut être mise sur pause à tout moment à l'aide de la touche
; il suffit de cliquer de nouveau sur pour redémarrer la fonction.
Fonction décongélation temporisée
Sélectionner l'icône de la fonction décongélation temporisée à l'aide
des flèches puis cliquer sur la touche , ensuite, programmer le
temps de décongélation à l'aide des flèches et .
Pour faire partir la fonction, cliquer sur la touche .
Sélectionner le type de repas à l'aide des flèches et , puis
paramétrer le poids avec les flèches et enfin, démarrer la
décongélation avec la touche .
Les types de repas et les poids correspondants pouvant être
programmés sont indiqués ci-après :
REPAS Poids MIN
(g)
Pain Pizza Plats de pâtes 100 600
Légumes 100 1000
Viande 100 1500
Fruits de mer 100 800
Le temps de décongélation est calculé entièrement en automatique et
sans qu'il ne soit nécessaire de programmer des paramètres de temps,
en fonction du type de repas et du poids paramétrés.
Poids
MAX (g)
Quand la cuisson a commencé, un compte à rebours s'affiche à l'écran. Il est
possible de modifier le temps, à tout moment, avec les flèches et .
Quand la décongélation est terminée, le message "DECONGELATION
TERMINEE" s'affiche à l'écran.
Fonction décongélation poids
Sélectionner l'icône de la décongélation en fonction du poids, à l'aide
des flèches puis cliquer sur la touche .
Quand la décongélation est terminée, le message "DECONGELATION
TERMINEE" s'affiche à l'écran.
Fonction Micro-ondes
Sélectionner l'icône de la fonction Micro-ondes, à l'aide des flèches
puis cliquer sur la touche .
Si on souhaite démarrer la fonction immédiatement avec un temps préétabli
de 30 s. et une puissance prédéfinie de 900W, cliquer sur la touche .
20
Page 83
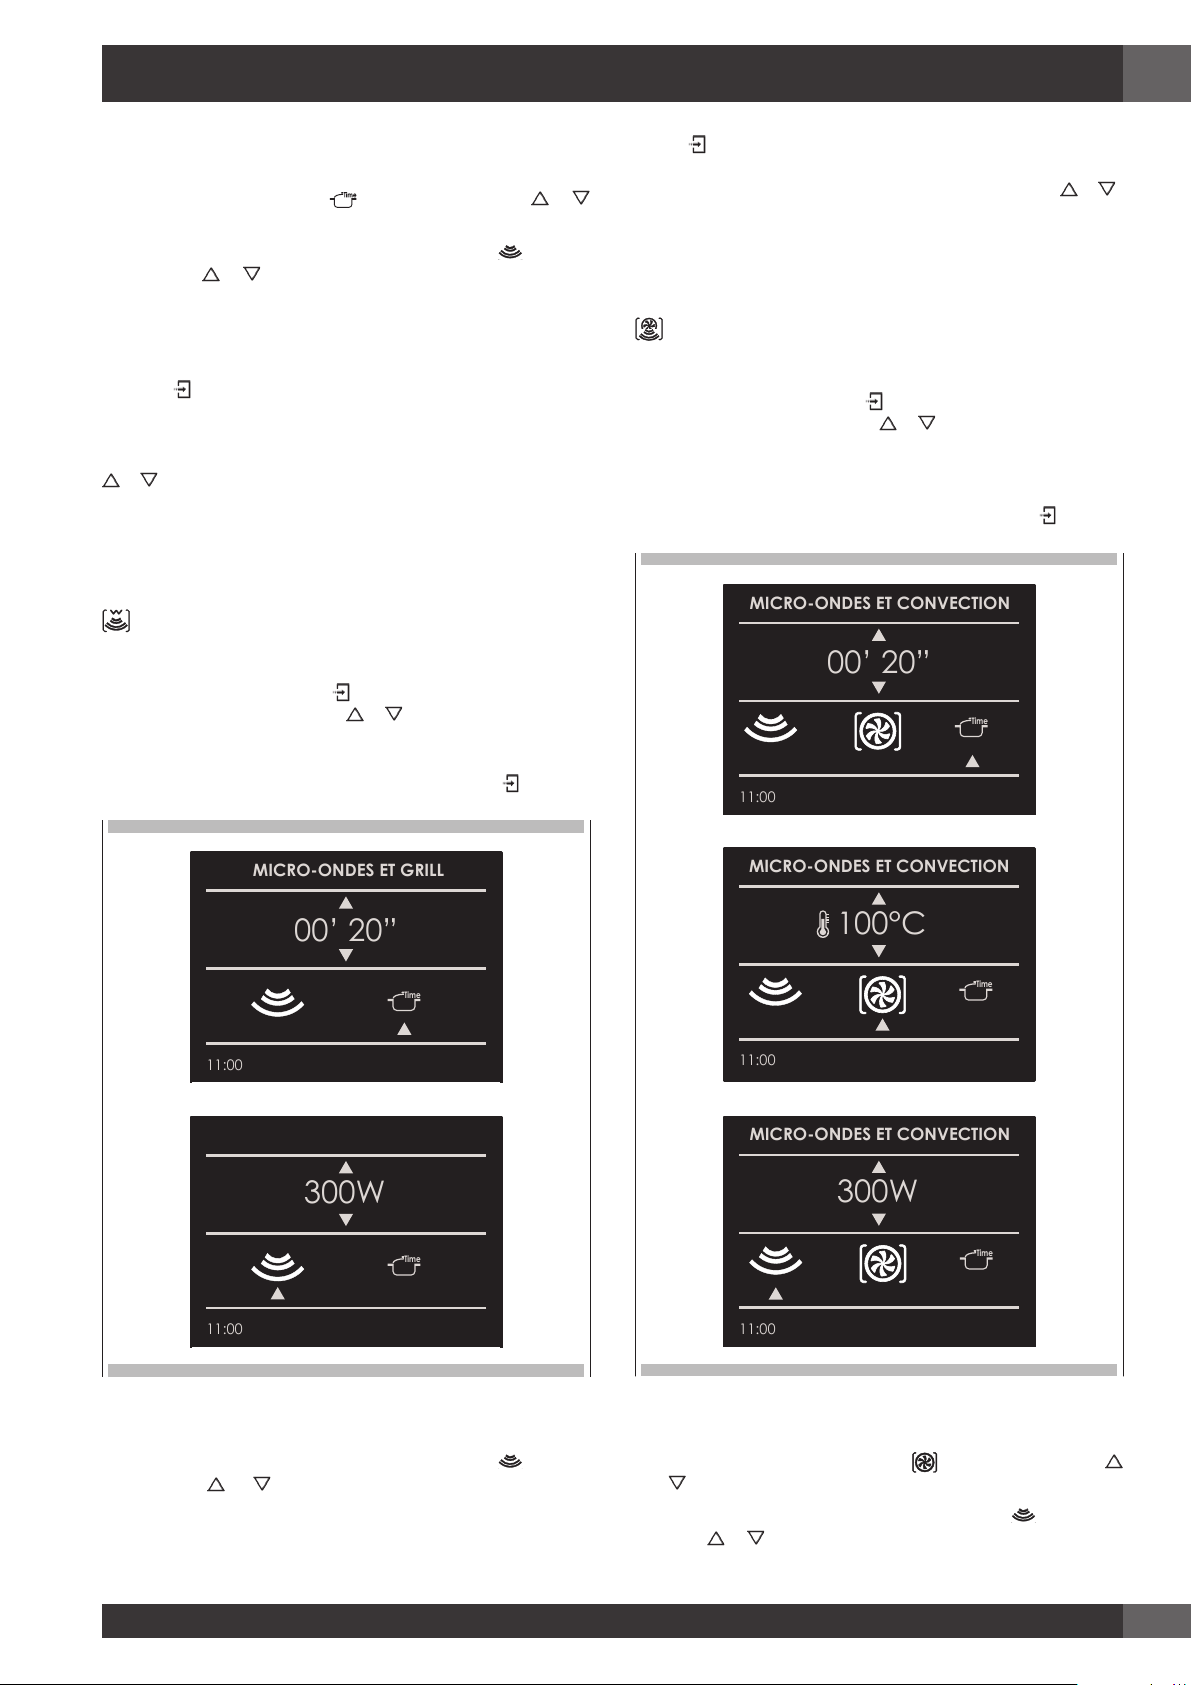
FR
MICRO-ONDES ET GRILL
00’ 20”
Time
11:00
300W
Time
11:00
MICRO-ONDES ET CONVECTION
00’ 20”
11:00
Time
MICRO-ONDES ET CONVECTION
100°C
11:00
Time
MICRO-ONDES ET CONVECTION
300W
11:00
Time
Si on souhaite personnaliser le temps et la puissance, ouvrir le sousmenu géré comme suit :
• TEMPS : Sélectionner l'icône
puis utiliser les touches et
pour personnaliser la durée.
• PUISSANCE DE MICROONDE : Sélectionner l'icône
les touches
et pour sélectionner la puissance des micro-ondes
et utiliser
entre les 6 niveaux disponibles : 150W - 300W - 450W - 600W
- 750W - 900W.
Une fois que les nouveaux paramètres ont été programmés, cliquer sur
la touche pour démarrer la cuisson.
Quand la cuisson commence, un compte à rebours s'affiche à l'écran.
Il est possible de modifier le temps, à tout moment, avec les flèches
et .
Quand la cuisson est terminée, le message "FIN DE CUISSON"
s'affiche à l'écran.
Fonction micro-ondes + grill
Sélectionner l'icône de la fonction Microonde+Grill à l'aide des
flèches puis cliquer sur la touche , ensuite, programmer le temps de
décongélation à l'aide des flèches et .
touche
pour démarrer la cuisson.
Quand la cuisson commence, un compte à rebours s'affiche à l'écran. Il est
possible de modifier le temps, à tout moment, avec les flèches et .
Quand la cuisson est terminée, le message "FIN DE CUISSON"
s'affiche à l'écran.
Fonction Microonde + Ring
Sélectionner l'icône de la fonction Microonde+Ring à l'aide des
flèches puis cliquer sur la touche , ensuite, programmer le temps de
décongélation à l'aide des flèches et .
Si on souhaite démarrer la fonction immédiatement avec le temps
préétabli et une température prédéfinie de 100°C avec une puissance
de microonde préétablie de 300W, cliquer sur la touche .
Si on souhaite démarrer la fonction immédiatement avec le temps préétabli
et une puissance prédéfinie de 300W, cliquer sur la touche .
MICRO-ONDES ET GRILL
Si on souhaite personnaliser la puissance, ouvrir le sous-menu géré
comme suit :
• PUISSANCE DE MICROONDE : Sélectionner l'icône
les touches
et pour sélectionner la programmation de la
puissance de microonde selon 3 niveaux disponibles : 150W 300W - 450W.
Une fois que le nouveau paramètre a été programmé, cliquer sur la
et utiliser
Si on souhaite personnaliser la température et la puissance, ouvrir le
sous-menu géré comme suit :
• TEMPÉRATURE : Sélectionner l'icône
puis utiliser les touches
et pour personnaliser la température entre 50°C et 200°C.
• PUISSANCE DE MICROONDE : Sélectionner l'icône et utiliser les
touches
et pour sélectionner la programmation de la puissance
de microonde selon 3 niveaux disponibles : 150W - 300W - 450W.
21
Page 84
FR
Une fois que les nouveaux paramètres ont été programmés, cliquer sur
la touche pour démarrer la cuisson.
Quand la cuisson commence, un compte à rebours s'affiche à l'écran.
Il est possible de modifier le temps, à tout moment, avec les flèches
et .
Quand la cuisson est terminée, le message "FIN DE CUISSON"
s'affiche à l'écran.
Modifier la puissance en Watts
Cliquer sur l'icône puis sur la touche . Sélectionner l'icône
microonde et modifier la puissance avec les flèches et confirmer
avec la touche .
Changer l'heure
Cliquer sur l’icône puis cliquer sur la touche . Sélectionner
l’icône de temps et changer la valeur de temps à l’aide des flèches
et confirmer avec la touche .
Changer la température
(disponible uniquement pour microondes et Ring (résistance circulaire))
Cliquer sur l'icône puis sur la touche . Sélectionner l'icône du
mode de cuisson et modifier la programmation de la température avec
les flèches et confirmer avec la touche .
Changer le poids
(disponible uniquement pour la décongélation en fonction du poids)
Cliquer sur l'icône et modifier le poids avec les flèches et
confirmer avec la touche .
22
Page 85

Un seul bouton lumineux active les lampes des fours.
Toucher pour allumer ou éteindre les lumières.
L’éclairage du four s’allume automatiquement à l’ouverture de la porte.
Quand un four est en service, les lampes du four s’allument
automatiquement lors de l’activation d’un mode de fonctionnement.
Les lampes du four s’éteignent automatiquement à la désactivation du
mode de fonctionnement.
REMARQUE : Une fois allumées, les lumières s'éteignent
automatiquement après 3 minutes. Pour les rallumer,
cliquer sur la touche ou ouvrir la porte.
12 - Utilisation des lumières du four
FR
23
Page 86

FR
SAUVER
DINDE FARCIE
START
GRILLE RECTANGULAIRE
NIVEAU
POIDS
TEMPS DE CUISSON
PRECHAUFFAGE
1
3800g
03:00
OUI
13 - Recettes
La fonction Recettes de votre four vous permet de cuisiner sans avoir à programmer manuellement le four à chaque fois. Quand vous sélectionnez
une recette « PROGRAMMÉE», le mode de cuisson et la température sont réglés automatiquement en fonction de la recette choisie dans le menu.
Liste de recettes Type d’aliments Conditions des
aliments
FRAIS
SURGELÉ
ENTIER
EN MORCEAUX
ENTIER
EN MORCEAUX
PRECONFIGUREES OU
PERSONNELLES
ENTIER
EN MORCEAUX
Liste de recettes Informations affichées
PAIN PIZZA ENTREES
VIANDE
TYPE D’ACCESSOIRE
VOLAILLE
POSITION NIVEAU
POIDS DES ALIMENTS
TEMPS DE CUISSON
POISSON
PRÉCHAUFFAGE NÉCESSAIRE
(OUI/NON)
Sélectionner une recette déjà programmée :
1. Allumer le four, sélectionner l'icône et enfoncer le bouton .
2. A l'aide des flèches
(PRECONFIGUREE) et “PERSONAL” (PERSONNELLE) et confirmer
avec la touche .
3. Sélectionner le type d'aliment à cuire, à l'aide des flèches
des flèches puis confirmer avec la touche .
4. A l'aide des flèches
“FROZEN” (CONGELE) ou, dans d'autres cas, entre “WHOLE”
(ENTIER) ou “IN PEICES” (EN MORCEAUX) puis confirmer avec la
touche .
sélectionner la liste entre “PRESET”
et
choisir entre “FRESH” (FRAIS) ou
LEGUMES
-
-
TARTES
-
5. Sélectionner la recette souhaitée avec les flèches
confirmer avec la touche .
Quand la recette est sélectionnée, la page-écran suivante s’affiche :
6.
24
puis
Page 87
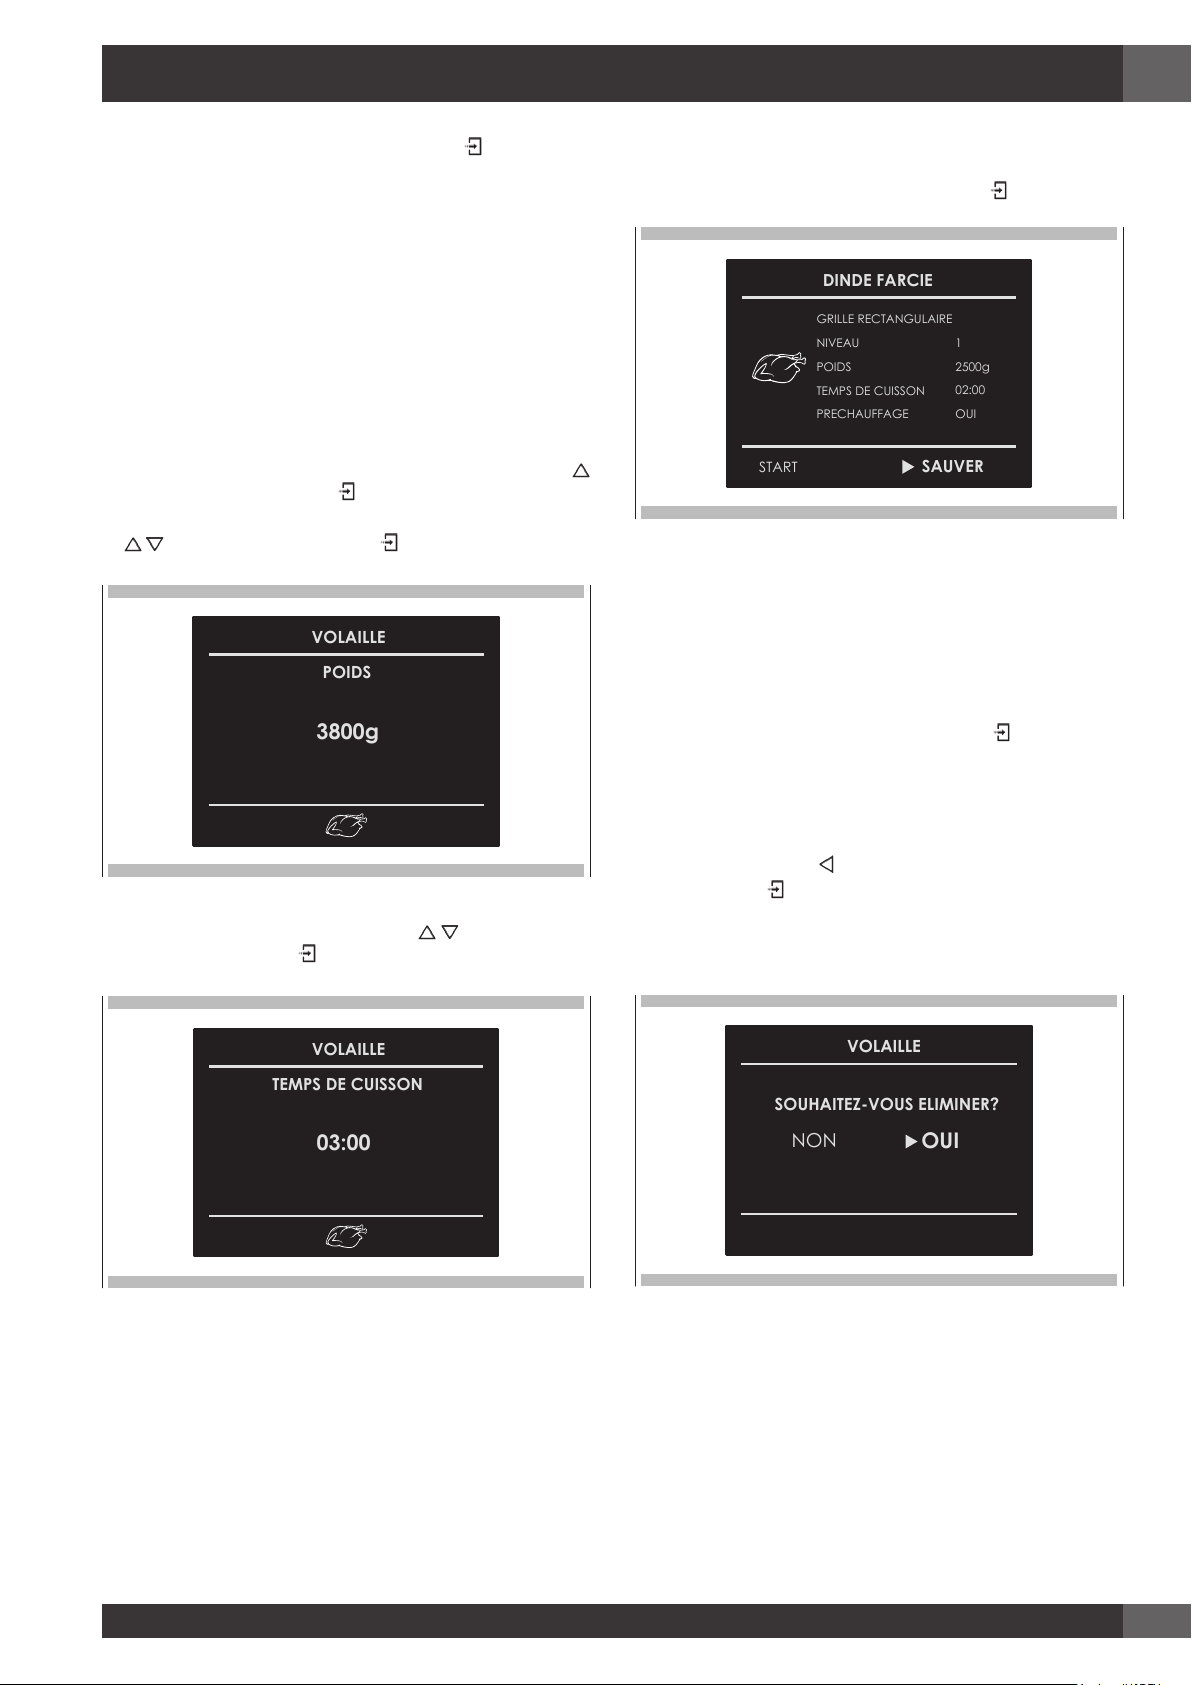
FR
VOLAILLE
3800g
POIDS
VOLAILLE
03:00
TEMPS DE CUISSON
SAUVER
DINDE FARCIE
START
GRILLE RECTANGULAIRE
NIVEAU
POIDS
TEMPS DE CUISSON
PRECHAUFFAGE
1
2500g
02:00
OUI
VOLAILLE
NON
OUI
SOUHAITEZ-VOUS ELIMINER?
7. Pour démarrer la recette, valider avec la touche .
Au cours de la réalisation d’une recette, des signaux sonores et
visuels demandent d’effectuer quelques opérations. Simplement
suivre les instructions qui s'affichent à l'écran.
8. À la fin le four s’éteint et un signal sonore et visuel (à l’écran)
indique que la recette est terminée.
Sauvegarder une recette personnalisée :
Une fois une recette sélectionnée, il est possible de changer les
paramètres de Temps et de Poids en sauvegardant la recette parmi
les recettes PERSONNELLES.
1. Une fois qu'une recette a été sélectionnée, cliquer sur la touche
puis confirmer avec la touche .
2. Pour modifier le poids, entrer le poids souhaité à l'aide des flèches
puis confirmer avec la touche .
4. Il est alors possible d'enregistrer la recette dans la liste des
recettes “PERSONAL” (PERSONNELLES) en sélectionnant “SAVE”
(ENREGISTRER), puis confirmer avec la touche
.
REMARQUE : Si vous modifiez les valeurs de temps ou de poids mais
ne les sauvegardez pas tout de suite, un message vous
demandant si vous souhaitez l’enregistrer va s’afficher
à la fin de la recette.
3. Le système passe automatiquement à la page du temps de cuisson.
Pour modifier le temps, utiliser les flèches puis confirmer de
nouveau avec la touche .
5. Pour faire partir la recette, cliquer sur la touche .
Effacer une recette personnalisée :
1. Pour éliminer une recette de la liste des personnalisées,
sélectionnez-la.
2. Cliquer sur la touche
avec la touche .
, puis sélectionner le choix et confirmer
25
Page 88
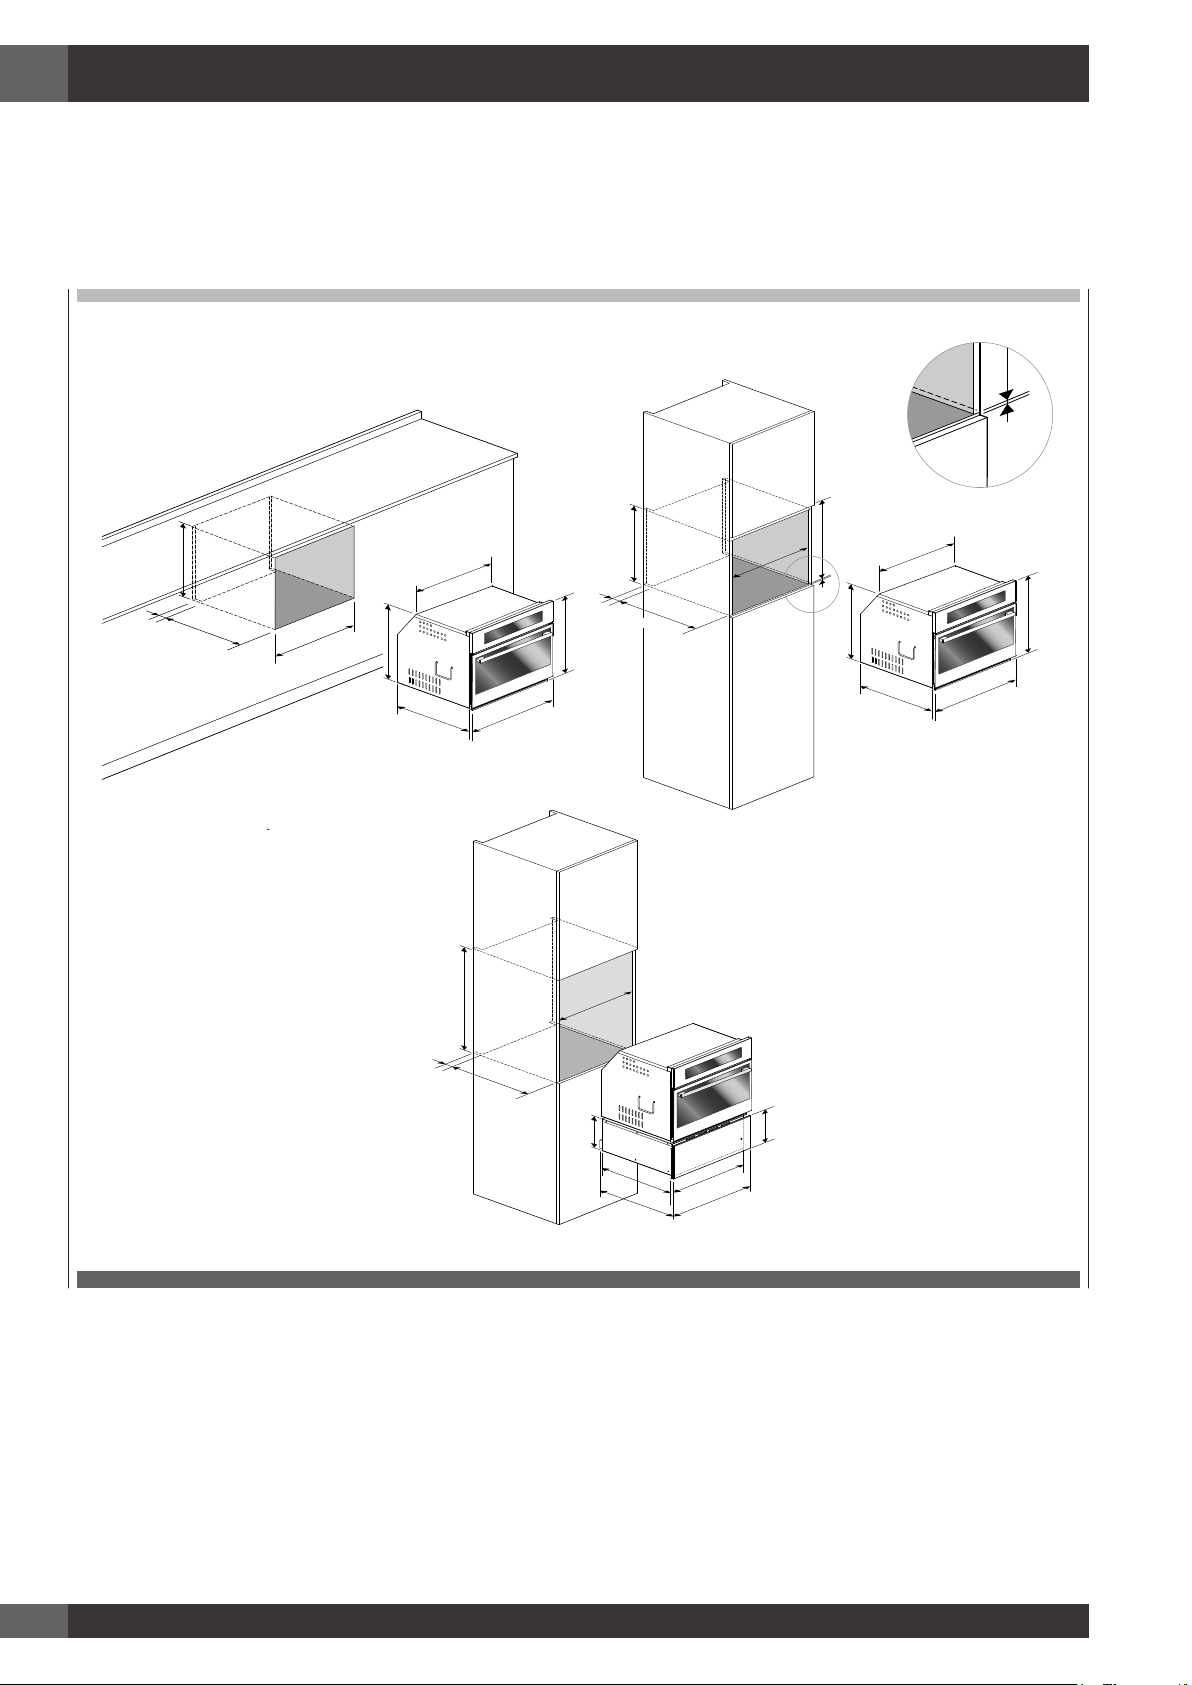
FR
min 3
14 - Pour l'installateur
Installer le four dans une niche.
Le four doit être installé sous une "surface de cuisson", dans une colonne ou combiné au tiroir chauffe-plat correspondant.
Les dimensions de l'espace doivent être celles indiquées sur la figure.
Le matériau de la niche doit être en mesure de résister à la chaleur.
Le four doit être centré entre les parois de la niche et fixé avec les vis et les douilles fournies.
50
min 460
min
min 458
3
432
540
455
533
594
min
450
540
50
510
560
432
533
595
50
594
510
455
510
560
560
26
140
528
545
144
554
26
596
Page 89

FR
CARACTERISTIQUES TECHNIQUES
Alimentation électrique
Puissance absorbée maximum 3200 W
Puissance microondes 900 W
Grill 1500 W
Air chaud 1500 W
Fréquence des microondes 2450 MHz
220-240 V~, 50 Hz
BRANCHEMENT ELECTRIQUE
Avant d'effectuer le branchement électrique, s'assurer que :
• les caractéristiques du système électrique satisfont les caractéristiques
requises sur la plaque du numéro de série située à l'avant du four ;
• le système électrique a une mise à la terre efficace, conforme aux
normes et aux lois en vigueur.
La connexion à la terre est requise par la loi.
Le câble ne doit jamais atteindre une température supérieure à 50°C
au-dessus de la température ambiante.
Ce four doit être branché à une alimentation électrique avec un cordon
d'alimentation doté d'une fiche ayant des caractéristiques appropriées
qui est compatible avec la prise de courant installée sur le sous-circuit
final dans le câblage fixe qui doit alimenté ce four.
Si un appareil fixé ne dispose ni d'un câble électrique ni d'une prise
ou si un autre dispositif qui garantit le sectionnement du secteur,
avec une distance d'ouverture des contacts permettant une coupure
complète dans des conditions de tension excessive de catégorie III,
ces dispositifs de sectionnement doivent être installés sur la ligne
d'alimentation électrique principale (secteur) conformément aux règles
d'installation.
La prise ou l'interrupteur omnipolaire doivent être à portée de main
quand l'appareil est installé.
TYPE DE CABLES ET LEUR DIAMETRE MINIMUM
SASO
H05RR-F 3x1,5 mm² H05RR-F 3x2,5 mm²
H05VV-F 3x1,5 mm² H05VV-F 3x2,5 mm²
H05RN-F 3x1,5 mm² H05RN-F 3x2,5 mm²
H05V2V2-F 3x1,5 mm² H05V2V2-F 3x2,5 mm²
REMARQUE : Le fabricant décline toute responsabilité si les normes
habituelles de prévention des accidents et les instructions
ci-dessus n'ont pas été respectées.
27
Page 90

FR
15 - Résolutions des problèmes de cuisson
Avec la cuisson comme la cuisson à convection, des problèmes de cuisson peuvent arriver pour de nombreuses raisons autre qu’un mauvais
fonctionnement du four. Vérifiez le tableau ci-dessous qui répond à la plupart des problèmes communs. Etant donné que la taille, la forme et le
matériel de cuisson affectent les résultats de la cuisson, la meilleure solution est de remplacer les vieux plats qui sont devenus sombres et qui se sont
voilés avec le temps et leur utilisation.
Problème de cuisson Cause
Aliment brunissant de façon hétérogène - Four non préchauffé
- Papier aluminium sur la grille ou au fond du four
- Plat de cuisson trop grand pour la recette
- Plat touchant aux autres plats ou la paroi du four
Aliment trop brun au fond - Four non préchauffé
- Utilisation de plat en verre, mat ou foncé
- Position de grille incorrecte
- Plat touchant aux autres plats ou la paroi du four
Aliment sec ou ayant excessivement rétréci - Température du four trop élevée
- Four non préchauffé
- Porte du four trop souvent ouverte
- Scellé hermétiquement avec du papier aluminium
- Plat trop grand
Aliment cuisant ou rôtissant trop lentement - Température du four trop élevée
- Four non préchauffé
- Porte du four trop souvent ouverte
- Scellé hermétiquement avec du papier aluminium
- Plat trop grand
Croûte à tarte non brunie au fond ou croûte non cuit - Temps de cuisson pas assez long
- Utilisation de plat en acier brillant
- Position de grille incorrecte
- Température du four trop basse
Gâteau pâle, plat, ou non cuit à l’intérieur - Température du four trop élevée
- Temps de cuisson incorrect
- Gâteau vérifié trop tôt
- Porte du four trop souvent ouverte
- Plat trop grand
Gâteau haut au centre avec craquelure sur le dessus. - Température du four trop élevée
- Temps de cuisson trop long
- Plat touchant aux autres plats ou la paroi du four
- Position de grille incorrecte
- Plat trop grand
Bords de croûte de tarte trop bruns - Température du four trop élevée
- Bords de croûte trop minces
28
Page 91

16 - Résolution des Problèmes de Fonctionnement
Avant d’appeler un dépannage, vérifiez ce qui suit pour éviter des charges de dépannage non nécessaires.
Problème de four Solution des problèmes par étape
Autre erreur F________ figurant à l’affichage Eteignez le four et le rallumez après quelques secondes. Si le problème
persiste, notez le code d’erreur et téléphonez au centre de service agréé.
Le display du four ne s’éteint pas Coupez l’alimentation à la source principale (fusible ou disjoncteur).
Remettez le disjoncteur.
Si le problème persiste, téléphonez au centre de service agréé.
FR
Ventilateur de refroidissement continuant à fonctionner une fois le
four éteint
Le four ne chauffe pas Vérifiez le disjoncteur ou la boîte de fusibles de votre habitation. Assurez-
Le four ne cuit pas uniformément Reportez-vous aux tableaux de cuisson pour la position des grilles
La pendule et la minuterie ne fonctionnent pas correctement Assurez-vous que le four est bien branché. Voir les sections Horloge aux
Humidité excessive Les modes de convection éliminent l’humidité du four (c’est un des
Le ventilateur s’éteint automatiquement lorsque les composants
électroniques sont suffisamment froids.
vous que le four est bien branché. Vérifiez que la température du four est
correctement sélectionnée.
recommandée. Réduisez toujours votre recette de 25 °F (15 °C) lorsque
vous cuisinez avec le mode de cuisson à convection.
pages 10 et 13.
avantages de la convection).
29
Page 92

FR
17 - Assistance ou Service Après-Vente
Avant de contacter l'assistance, merci de vérifier la section "Diagnostic
de pannes". Cela pourrait vous épargnez le coût d'un appel
d'assistance.
Si vous avez encore besoin d'aide, suivez les instructions ci-dessous.
Quand vous appelez, merci d'indiquer la date d'achat et le modèle
complet ainsi que le numéro de série de votre appareil. Ces
informations nous aident à mieux répondre à votre demande.
Enregistrement des données d'entretien
Pour un centre de service autorisé ou de l’information sur les pièces, voir
le paragraphe “GARANTIE pour l’électroménager”.
Pour l'emplacement de la plaquette d'identification, voir Page 5.
Notez cette information dans l’espace prévu à cet effet ci-dessous.
Gardez votre facture pour la validation de votre garantie.
Enregistrement des données d'entretien
Numéro de modèle ______________________________
Numéro de série ________________________________
Date d’installation ou de prise de possession __________________
30
Page 93

DE
Index SEITE
1 - Warnungen für Mikrowellen 4
Zubereitung von Speisen 4
Töpfe und Pfannen 4
Leistung und Dauer der Mikrowelle 4
Verpackungen 4
Getränke 4
Speisen für Kleinkinder 4
Nahrungsmittel mit Haut oder Schale 5
Nahrungsmittel trocknen 5
Öl 5
Beschädigungsursachen 5
Erste Anwendung 7
Montage und Demontage des Flachgrills 7
Umweltverträglichkeit 8
2 - Das Bedienfeld 9
Tastenfeld 9
3 - Allgemeine Informationen über den Ofen 10
Fehlercodes 10
Piepstöne 10
Standardeinstellungen 10
F Fehlercodes 10
Vorheizen 10
Timer 10
4 - Allgemeine Tipps zum Ofen 11
Den Ofen vorheizen 11
Bedienungshinweise 11
Umgang mit Mikrowellen 11
Ofenkondensation und -temperatur 11
Kochen in großer Höhe 11
5 - Inbetriebnahme 12
Anleitung fürs erste Einschalten 12
6 - Nutzereinstellungen 13
Sprache 13
Temperatur & Gewicht 13
Uhrzeit 13
Datum 14
Hellligkeit 14
Stärke der Helligkeit 14
Index SEITE
7 - Systemeinstellungen 15
Ereignisprotokoll 15
Demo 15
8 - Den Ofen einschalten 16
Den Ofen ein- und ausschalten 16
Tabelle der Garfunktionen 17
9 - Klassisches Garen 18
Garfunktion verändern 18
Temperatur verändern 18
Vorheizen 18
10 - Bedienung mit Zeitschaltung 19
Garzeit 19
Stoppzeit 19
11 - Garen mit Mikrowelle 20
Zeitgesteuertes Auftauen 20
Gewichtsgesteuertes Auftauen 20
Funktion Mikrowelle 20
Funktion Mirkrowelle + Grill 21
Funktion Mirkrowelle + Heizelement 21
Wattleistung verändern 22
Zeiteinstellung verändern 22
Temperatur verändern 22
Gewicht verändern 22
12 - Ofenbeleuchtung benutzen 23
13 - Rezepte 24
14 - Für den Installateur 26
Stromanschluss 27
15 - Lösung klassischer Probleme beim Backen 28
16 - Lösung von Betriebsproblemen 29
17 - Assistenz oder Kundendienst 30
Liste der Wartungseinsätze 30
1
Page 94

DE
WICHTIGE BEDIENUNGS- UND
SICHERHEITSANLEITUNGEN
Vor Gebrauch sorgfältig durchlesen
Sehr verehrte Kundin, sehr verehrter Kunde,
wir danken Ihnen und beglückwünschen Sie zu Ihrer
Wahl.
Dieses neue, sorgfältig konzipierte und aus
erstklassigen Materialien hergestellte Produkt wurde
akkurat kontrolliert, um allen Ihren Bedürfnissen für
das perfekte Kochen zu entsprechen.
Wir bitten Sie deshalb, diese einfachen Anleitungen
zu lesen und einzuhalten, mit denen Sie schon ab dem
ersten Gebrauch herausragende Ergebnisse erzielen
werden. Mit diesem modernen Gerät möchten wir
Ihnen unsere besten Glückwünsche aussprechen.
DIESES PRODUKT IST FÜR DEN HAUSGEBRAUCH
BESTIMMT. DER HERSTELLER LEHNT JEGLICHE
VERANTWORTUNG FÜR SCHÄDEN AN PERSONEN
UND GEGENSTÄNDEN AB, DIE AUF EINE FALSCHE
INSTALLATION ODER UNSACHGEMÄSSEN,
FALSCHEN ODER UNGEGEIGNETEN GEBRAUCH
ZURÜCKZUFÜHREN SIND.
DIE VORRICHTUNG DARF NICHT VON PERSONEN
(KINDER INBEGRIFFEN) BENUTZT WERDEN, DIE
KÖRPERLICHE, SENSORIALE ODER GEISTIGE
BEHINDERUNGEN HABEN ODER VON PERSONEN
OHNE DIE NOTWENDIGE ERFAHRUNG ODER
WISSEN, ES SEI DENN SIE WERDEN VON
EINER PERSON, DIE FÜR DEREN SICHERHEIT
VERANTWORTLICH IST, ÜBERWACHT UND
ANGEWIESEN.
KINDER MÜSSEN ÜBERWACHT WERDEN, DAMIT
SIE MIT DEM APPARAT NICH SPIELEN. KEINE
ALUMINIUMFOLIE, TÖPFE ODER ÄHNLICHE
GEGENSTÄNDE, DIE DIE BASIS BERÜHREN, IN DEN
OFEN ZUM GAREN STELLEN. DER HEIZVORGANG
DES UNTEREN HEIZELELMENTS ERZEUGT EINE
ÜBERHITZUNG DES UNTEREN OFENTEILS, WAS
SCHWERWIEGENDE KONSEQUENZEN HABEN
KANN (AUCH FEUER), AUCH DER ZÄHLER UNTER
DEM OFEN KANN BESCHÄDIGT WERDEN.
DER APPARAT WIRD WÄHREND DER BENUTZUNG
SEHR HEISS.
WARNUNG: DIE HEIZELEMENTE DES OFENS NICHT
BERÜHREN
• Sind die Türdichtungen oder die Tür beschädigt,
dann darf der Ofen erst nach der Reparatur
durch einen Fachmann wieder benutzt werden.
• Es ist gefährlich Wartungen oder Reparaturen
durchzuführen und dazu Abdeckungen, die vor
Mikrowellen schützen, abzunehmen. Dies darf
nur der Fachmann!
• Flüssigkeiten und andere Nahrungsmittel dürfen
nicht in luftdicht verschlossenen Behältern erhitzt
werden, da diese explodieren können;
• Kinder dürfen den Ofen nicht ohne Überwachung
benutzen solange sie nicht entsprechend
eingewiesen wurden und die Gefahren, die
durch unsachgemäßen Gebrauch entstehen,
verstanden haben.
• Nur Küchengeräte verwenden, die für die
Mikrowelle geeignet sind.
• Werden Nahrungsmittel in Plastik oder
Papierbehältern erhitzt, dann den Ofen
regelmäßig überprüfen, da Brandgefahr besteht.
• Falls Rauch aus dem Ofen dringt, den Apparat
ausschalten oder den Stecker ziehen und die Tür
geschlossen halten, damit die Flammen ersticken.
• Beim Erhitzen von Getränken in der Mikrowelle
kann es zu einem verspäteten Überkochen
kommen, daher muss sehr sorgsam mit dem
Behälter umgegangen werden.
• Der Inhalt von Babyfläschchen und Babynahrung
muss umgerührt oder geschüttelt werden und
deren Temperatur überprüft werden, bevor
sie verfüttert werden, um Überhitzungen zu
vermeiden.
ACHTUNG
2
Page 95

ACHTUNG
• Eier in der Schale und hartgekochte Eier dürfen
nicht in der Mikrowelle erhitzt werden, da diese
sogar nach dem Erhitzen in der Mikrowelle
explodieren könnten.
• Detaillierte Erläuterung der Reinigung der
Türdichtungen und naheliegender Bauteile;
• Der Ofen muss regelmäßig gereinigt werden und
Speisereste müssen entfernt werden;
DE
• Wird der Ofen nicht gereinigt, dann können
die Oberflächen beschädigt werden, die
Lebensdauer verkürzt sich und es können
gefährliche Bedingungen entstehen;
• Keine groben Scheuermittel oder scharfe
Metallkratzer verwenden, um die Glastüren
des Ofens zu reinigen, denn diese können die
Oberfläche verkratzen und das Glas zerbrechen.
• Keine Dampfstrahler zur Reinigung des Apparats
verwenden.
3
Page 96

DE
1 - Warnungen für Mikrowellen
Zubereitung von Speisen
Brandgefahr!
Die Mikrowelle nur zur Zubereitung von
Nahrungsmitteln verwenden.
Jeglicher anderweitiger Gebrauch kann gefährlich
sein oder Schäden erzeugen.
Beispielsweise können sich Hausschuhe oder Kissen,
die mit Korn oder Getreide gefüllt sind auch noch
nach mehren Stunden entzünden.
Töpfe und Pfannen
Verletzungsgefahr!
Porzellan- und Keramikgeschirr können kleine Löcher
an Griffen oder Deckel haben.
Dahinter können sich Hohlräume verstecken. Gelangt
Wasser in diese Hohlräume, dann kann das Geschirr
zerbrechen.
Kein Geschirr verwenden, dass für den Gebrauch in
der Mikrowelle nicht geeignet ist.
Brandgefahr!
Luftdicht verschlossene Verpackungen können
explodieren. Den Anweisungen auf der Verpackung
folgen. Immer einen Topflappen verwenden, um
Teller zu entnehmen.
Getränke
Brandgefahr!
Beim erhitzen von Flüssigkeiten kann sich das Kochen
verzögern.
Dies bedeutet, dass die Siedetemperatur erreicht
wurde, ohne die typischen Dampfblasen zu
entwickeln. Sogar ein leichtes Klopfen kann zu
einem plötzlichen Überlaufen von Flüssigkeiten oder
Sprays führen.
Beim Erhitzen von Flüssigkeiten immer einen Löffel
in den Behälter stecken, um verzögertes Kochen zu
vermeiden.
Brandgefahr!
Die Hitze der Nahrungsmittel kann auch den Teller
erwärmen. Immer einen Topflappen werden, um
Teller oder Zubehör aus dem Garraum zu entnehmen.
Explosionsgefahr!
Niemals Getränke oder Lebensmittel in abgedeckten
Behältern erhitzen.
Alkoholische Getränke niemals übermäßig erhitzen.
Leistung und Dauer der Mikrowelle
Brandgefahr!
Niemals Werte einstellen, die die Leistung der
Mikrowelle oder die Garzeit übertreffen. Die
Nahrungsmittel können sich entzünden und
den Apparat beschädigen. Diesen Regeln und
Anleitungen folgen.
Verpackungen
Brandgefahr!
Nahrungsmittel niemals in Isolierverpackungen
erhitzen.
Nahrungsmittel in Plastik- und Papierbehältern oder
anderem, entzündlichen Material, muss ständig
überwacht werden.
Speisen für Kleinkinder
Brandgefahr!
Babynahrung niemals in abgedeckten Behältern
erhitzen. Deckel oder Sauger immer entfernen.
Nach dem Erhitzen sorgfältig schütteln oder mischen,
so dass sich die Wärme verteilen kann.
Immer die Temperatur prüfen, bevor die Nahrung
dem Baby gegeben wird.
4
Page 97

DE
Nahrungsmittel mit Haut oder Schale
Brandgefahr!
Niemals Eier in der Schalte kochen. Niemals
hartgekochte Eier erhitzen, da diese, auch nachdem
die Mikrowelle ausgeschaltet ist, explodieren
können. Dies gilt auch für Weich- und Krustentiere.
Bei Spiegeleiern zuerst das Eigelb anstechen.
Bei Nahrungsmitteln mit harter Schale oder Haut,
wie Äpfel, Tomaten, Kartoffeln oder Würstchen,
können Schale oder Haut explodieren.
Vor dem Garen die Schale oder Haut anstechen.
Nahrungsmittel trocknen
Brandgefahr!
Niemals Nahrungsmittel in der Mikrowelle trocknen.
Nahrungsmittel mit geringem Flüssigkeitsanteil.
Beschädigungsursachen
Saftverlust von Obst
Bei der Zubereitung von Kuchen mit sehr safthaltigem
Obst, das Backblech nicht zu sehr befüllen. Obstsaft
kann über das Blech hinüberlaufen und unlösliche
Flecken erzeugen.
Störungen
Niemals emaillierte Backbleche in der Mikrowelle
verwenden, da diese zu technischen Störungen
führen können.
Abkühlen mit offener Tür des Apparats
Die Garkammer darf nur mit geschlossener Tür
abkühlen. Überprüfen, dass sich nichts in der Tür des
Apparats verklemmt hat.
Auch wenn die Tür nur angelehnt ist, können
naheliegende Schränke dauerhaft beschädigt
werden.
Brandgefahr!
Niemals Lebensmittel mit geringem Flüssigkeitsanteil
zu lange oder zu stark auftauen oder erhitzen (z.B.
Brot).
Öl
Brandgefahr!
Die Mikrowelle niemals dazu verwenden, um nur Öl
aufzuheizen.
Sehr schmutzige Dichtung
Sollte die Dichtung sehr schmutzig sein, dann kann
es sein, dass die Tür des Apparats während des
Betriebs nicht korrekt schließt. Die Oberflächen
naheliegender Schränke kann beschädigt werden.
Dichtungen immer sauber halten.
Tür als zusätzliche Oberfläche verwenden
Sich nicht an die offene Tür des Apparats anlehnen,
kein Geschirr oder Zubehör darin aufbewahren.
Benutzung der Mikrowelle ohne Nahrungsmittel
Die Mikrowelle nur anschalten, wenn sich Lebensmittel
in der Garkammer befinden. Ohne Lebensmittel
kann es zu einer Überladung kommen. Eine erlaubt
Ausnahme stellen kurze Tests von Geschirr dar (siehe
Warnungen zu Töpfen und Pflannen).
Feuchtfutter
Feuchtfutter nicht zu lange in der Garkammer lassen.
5
Page 98

DE
WICHTIG
Das Typenschild des Ofens muss auch nach dem
Einbau zugänglich sein. Das Typenschild, das
sichtbar ist, wenn die Tür geöffnet wird, gibt alle
Informationen an, die zur Anfrage von Ersatztei
-
len des Apparats benötigt werden.
6
Page 99

Erste Anwendung
Der Ofen sollte völlig mit Seife und Wasser gereinigt und sorgfältig gespült werden.
Den Ofen etwa 30 Minuten lang auf maximale Temperatur aufheizen; dabei wird das gesamte Restöl der Herstellung, das beim Garen unangenehme
Gerüche erzeugen könnte, entfernt. Die Umluftfunktion ohne Zubehör im Ofen verwenden. Vor der ersten Verwendung des Zubehörs, dieses
sorgfältig mit einer sehr heißen Lauge waschen und mit einem weichen Tuch trocknen.
Montage und Demontage des Flachgrills
Um den Flachgrill herauszunehmen, ziehen Sie den Grill in ihre Richtung, bis dieser stoppt. Dann anheben und herausziehen.
Um ihn wieder einzubauen, in einem Winkel von 45 Grad einschieben, dann horizontal positionieren und dann völlig einschieben.
Verfügt der Grill über eine Fettpfanne (Backblech), dann muss diese leicht angehoben werden, um sie dann herauszuziehen. Zum Einsetzen diese
wieder langsam hereinschieben, bis sie richtig sitzt.
DE
WICHTIG
Als Vorsichtsmaßnahme immer den Stecker ziehen, bevor der Ofen gereinigt wird. Möglichst keine sauren oder basischen Substanzen, wie
Zitrone, Essig, Salz, Tomaten, etc. verwenden. Möglichst keine chlor- oder säurehaltigen oder kratzenden Produkte verwenden, vor allem, für die
beschichteten Wände.
7
Page 100

DE
Umweltverträglichkeit
Zum Schutz der Umwelt wurde für die Unterlagen zu diesem Geräts
chlorfrei gebleichtes Papier oder Recyclingpapier verwendet. Die
Verpackung wurde aus umweltfreundlichen Produkten hergestellt und
kann daher wieder verwendet oder recycelt werden.
Das Recyceln der Verpackung trägt zur Einsparung von Rohstoffen und
zu einer Reduzierung der Industrie- und Haushaltsmüllmengen bei.
DAS VERPACKUNGSMATERIAL ist 100% recycelbar und mit dem
Recyclingsymbol versehen. Für die Entsorgung die örtlichen Auflagen
befolgen. Das Verpackungsmaterial (Plastiktüten, Polystyrolteile usw.)
muss außerhalb der Reichweite von Kindern aufbewahrt werden, da
es sich um potentielle Gefahrenquellen handelt.
DIESES GERÄT stimmt mit der EU-Richtlinie 2002/96/UE, Waste
Electrical and Electronic Equipment (WEEE, über Elektro- und
Elektronik-Altgeräte) überein und ist dementsprechend markiert. Wenn
der Anwender sicherstellt, dass das Produkt sachgerecht entsorgt
wird, trägt er dazu bei, den negativen Umwirkungen auf Umwelt und
Gesundheit vorzubeugen.
DAS SYMBOL am Produkt oder in den beiliegenden Unterlagen zeigt
an, dass dieses nicht
als Haushaltsmüll entsorgt werden darf, sondern zu einer
Recyclingsammelstelle für elektrische und
elektronische Apparate gebracht werden muss.
DIE ENTSORGUNG MUSS in Übereinstimmung mit der örtlichen
Gesetzgebung zur Müllentsorgung GESCHEHEN.
Für ZUSÄTZLICHE INFORMATIONEN über Entsorgung und Recycling
dieses Produkts, setzten Sie sich bitte mit dem örtlich zuständigem Amt,
der Müllentsorgungsstelle oder dem Geschäft, in dem Sie das Produkt
gekauft haben, in Verbindung.
Machen Sie den Apparat vor dem ABWACKEN unverwendbar, in
dem Sie das Stromkabel durchschneiden.
8
 Loading...