

Page 1

answers 2
Betriebsanleitung / Operating Manual
MYRICA V17-1
Deutsch - English
Page 2

Sie haben ...
... technische Fragen oder Probleme?
Wenden Sie sich bitte an
unseren Help Desk (siehe Garantieheft).
Aktuelle Informationen zu unseren Produkten, Tipps, Updates usw. finden Sie im Internet:
http://www.fujitsu-siemens.com
Are there ...
... any technical problems or other
questions you need clarified?
Please contact
our Help Desk (see Warranty Booklet).
The latest information on our products, tips, updates, etc., can be found on the Internet under:
http://www.fujitsu-siemens.com
Page 3

Page 4

Dieses Handbuch wurde auf Recycling-Papier gedruckt.
This manual has been printed on recycled paper.
Ce manuel est imprimé sur du papier recyclé.
Este manual ha sido impreso sobre papel reciclado.
Questo manuale è stato stampato su carta da riciclaggio.
Denna handbok är tryckt på recyclingpapper.
Dit handboek werd op recycling-papier gedrukt.
Herausgegeben von/Published by
Fujitsu Siemens Computers GmbH
Bestell-Nr./Order No.: A26361-K961-Z100-1-5E19
Ausgabe/Edition 2
Printed in Netherlands
AG 0804 08/04
Page 5

Deutsch
MYRICA V17-1
Betriebsanleitung
Operating Manual
English
Ausgabe August 2004
August 2004 edition
Page 6

VESA, DDC und DPMS sind eingetragene Warenzeichen der Video Electronics Standards
Association.
Alle Rechte vorbehalten, insbesondere (auch auszugsweise) die der Übersetzung, des
Nachdrucks, der Wiedergabe durch Kopieren oder ähnliche Verfahren.
Zuwiderhandlungen verpflichten zu Schadenersatz.
Alle Rechte vorbehalten, insbesondere für den Fall der Patenterteilung oder GM-Eintragung.
Liefermöglichkeiten und technische Änderungen vorbehalten.
Copyright Fujitsu Siemens Computers GmbH 2004
VESA, DDC and DPMS are registered trademarks of Video Electronics Standards
Association.
All rights, including rights of translation, reproduction by printing, copying or similar methods,
even of parts are reserved.
Offenders will be liable for damages.
All rights, including rights created by patent grant or registration of a utility model or design,
are reserved.
Delivery subject to availability. Right of technical modification reserved.
Page 7

Contents
Safety and precautions ...................................................................................................................1
Operating safety ................................................................................................................................1
Repair................................................................................................................................................1
Notes for service engineers .......................................................................................................2
Point of use ...............................................................................................................................2
Environmental conditions...........................................................................................................2
Connecting ................................................................................................................................2
Disposal and recycling...............................................................................................................3
Precautions .......................................................................................................................................4
Important additional safety instructions..............................................................................................4
Introduction .....................................................................................................................................5
Performance characteristics ..............................................................................................................5
Included equipment ...........................................................................................................................6
Connecting external devices ..........................................................................................................7
Controls and location......................................................................................................................9
Remote control ..............................................................................................................................11
A.P.S. first time installation ..........................................................................................................15
General controls and adjustment.................................................................................................17
Tuning display on and off.................................................................................................................17
Viewing the menus and On-Screen Displays ...................................................................................17
Switching between TV/PC/AV..........................................................................................................18
Volume control ................................................................................................................................18
Menu items......................................................................................................................................19
Setting the sleep timer.....................................................................................................................19
Contrast and brightness settings .....................................................................................................20
Setup menu settings........................................................................................................................21
Audio menu settings ........................................................................................................................22
TV mode adjustment .....................................................................................................................25
Altering the TV settings ...................................................................................................................25
Automatic search programs.............................................................................................................26
Manuel search programs .................................................................................................................27
Program list settings........................................................................................................................28
Change or edit names .....................................................................................................................29
Delete the program..........................................................................................................................29
Insert the program ...........................................................................................................................29
Setting the child lock........................................................................................................................30
NICAM/IGR broadcast selection ......................................................................................................31
Colour/sharpness settings ...............................................................................................................32
Teletext...........................................................................................................................................33
PC mode adjustment.....................................................................................................................37
Image settings ................................................................................................................................. 37
Colour settings.................................................................................................................................39
Viewing Picture in Picture (PIP)....................................................................................................41
Quick way to activate PIP................................................................................................................41
PIP setup menu...............................................................................................................................41
A26361-K961-Z100-1-5E19, edition 2
Page 8

Contents
AV mode adjustment..................................................................................................................... 45
Other functions ............................................................................................................................. 47
Troubleshooting............................................................................................................................ 48
Dimensions.................................................................................................................................... 51
PC input preset timing table......................................................................................................... 53
Specifications................................................................................................................................ 55
A26361-K961-Z100-1-5E19, edition 2
Page 9

Safety and precautions
Please read through this section carefully and follow the instructions to maximize the reliable
operation and lifetime of your LCD display. Always keep these instructions handy and close by your
LCD display. Keep the instructions and the packaging so that if you sell or give away your LCD
display you can give them to the new owner.
Operating safety
● Do not insert any objects through the slots and openings of the LCD display. This may lead to
● Do not allow children to play unattended with electrical equipment. Children may not always
● This LCD display is intended for personal use only. It not intended for commercial use in a
● An injury hazard exists when the display breaks. Wear protective gloves to pack the broken
● Never exert pressure on the display. This could break the LCD display.
● Do not touch the display with your fingers or with sharp objects to avoid damage.
● Contact the Call Center immediately in any of the following situations. Do NOT plug in or turn
Never open the housing of the LCD display /power supply! When the housing is open
there is a danger of injury from electric shock!
!
an electrical short-circuit or even fire resulting in damage to your LCD display.
Slots and openings in the LCD display are for ventilation purpose. Do not cover these
openings, as this may lead to overheating.
!
correctly recognize danger.
heavy industry environment.
parts and send them into your service center for proper disposal. Then wash your hands with
soap, because it is possible for chemicals to escape.
on your display:
– if the power cable/power supply overheats or is damaged
– if liquid has gotten into the LCD display
– if the LCD display is dropped or the housing damaged
Repair
● Leave all repairs of your LCD display to authorized and qualified personnel only.
● Should a repair be necessary, please contact one of our authorized service partners only.
A26361-K961-Z100-1-5E19, edition 2 1
Page 10

Safety and precautions
Notes for service engineers
● Before opening the housing, disconnect the product from all power sources and remove any
connecting cables. If the display has not been disconnected from the power outlet before being
opened, there is a danger to life through electric shock. There is also a risk of damage to the
components.
● Internal components of the LCD display may be damaged by electrostatic discharge (ESD).
Carry out repairs in an ESD-protected workshop. If no such workshop is available, wear an
antistatic wrist strap or touch a highly conductive metal object. We can repair damage
sustained by inappropriate handling for a fee.
● Use only original spare parts.
Point of use
● Keep your LCD display and all units connected to it away from moisture and avoid dust, heat
and direct sunlight. Failure to observe these instructions can lead to malfunctions or damage
to the LCD display.
● Place and operate all units on a stable, level and vibration-free surface in order to avoid the
LCD display from falling.
Environmental conditions
● The LCD display can be operated most reliably at ambient temperatures between +41°F and
+95°F (5°C to 35°C) and at a relative humidity between 20% and 85% (without condensation).
● When switched off, the LCD display can be stored most reliably between -4°F and +140°F
(20°C - +60° C), up to the maximum height of 39,000 ft (12,000 m) above sea level at a
relative humidity between 10% and 85% (without condensation).
● After transporting your LCD display please wait until it has assumed the ambient temperature
before connecting and switching it on. Extremely high variations in the temperature or humidity
may result in condensation forming on the inside of the LCD display which could cause an
electrical short-circuit.
Connecting
Observe the following instructions to connect your LCD display properly:
Power supply
● Operate your LCD display only with grounded outlets with AC 100-240V~/ 50-60 Hz. If you are
● Use only the power supply and power connection cable provided.
● For additional safety we recommend use of a surge protector to protect your LCD display from
● To remove the LCD display from the power supply, disconnect the plug from the AC outlet.
2 A26361-K961-Z100-1-5E19, edition 2
Do not open the power supply housing. An open housing presents a lethal hazard from
electrical shock. There are no parts inside to be cleaned or serviced.
!
not sure about the power supply at your location, check with your power company.
damage resulting from voltage surges or lightning.
Page 11

Safety and precautions
● The power outlet must be in the vicinity of your LCD display and within reach of the power
cables. Do not stretch the power cables tightly to reach a power outlet.
● You should arrange the LCD display cables in a manner that no one can trip over or step on
them.
● To avoid damage of cable do not place any objects or furniture on the cable.
● You can adjust your LCD display a maximum of about 5° downward and a maximal 20°
upward. If you attempt to force the display further, you may damage your display.
Disposal and recycling
This device has been manufactured to the highest possible degree from materials which can be
recycled or disposed of in a manner that is not environmentally damaging. The device may be taken
back after use to be recycled, provided that it is returned in a condition that is the result of normal
use. Any components not reclaimed will be disposed of in an environmentally acceptable manner.
If you have any questions on disposal, please contact your local office, our help desk, or:
Deutschland Belgien Schweiz
Fujitsu Siemens Computers
GmbH
Remarketing und Recycling
D-33106 Paderborn
Tel.: +49 5251 / 81 80 10
Fax: +49 5251 / 81 80 15
http://www.fujitsusiemens.de/wvm
RECUPEL
Boulevard Reyers, 80
B-1030 Brussels
Tel.: +32 2 / 706 86 16
Fax: +32 2 / 706 86 13
E-Mail: info@recupel.be
http://www.recupel.be http://www.swico.ch
SWICO
Schweizerischer
Wirtschaftsverband der
Informations-,
Kommunikations- und
Organisationstechnik
A list of the SWICO
Acceptance places can be
found at:
A26361-K961-Z100-1-5E19, edition 2 3
Page 12

Safety and precautions
Precautions
You can increase the life of your LCD display by taking the following precautions:
● Before cleaning always disconnect the power line and all connection cables.
● Do not use any solvents, caustic or gaseous cleaning agents.
● Clean the display with a soft, lint-free cloth.
● Ensure that no water droplets remain on the screen. Water can cause permanent
● Do not expose the screen to bright sunlight or ultraviolet radiation.
Caution! There are no parts which can be serviced or cleaned inside of the LCD display
housing.
!
discoloration.
Important additional safety instructions
When using any electronic equipment, basic safety precautions should always be taken. Following
the guidelines below can reduce the risk of fire, electric shock and injury to person:
● Do not use this product near water (e.g., near a bathtub, wash bowl, kitchen sink or laundry
tub, in a wet basement or near a swimming pool).
● Avoid using a telephone/modem (other than a cordless type) during an electrical storm. There
may be a remote risk of electric shock from lightning.
● Do not use the telephone/modem to report a gas leak in the vicinity of the leak.
● Use only the power cord indicated in this manual. Do not dispose of batteries in a fire. They
may explode. Check with local codes for possible special disposal instructions.
● Keep batteries away from children at all times.
4 A26361-K961-Z100-1-5E19, edition 2
Page 13

Introduction
Thank you for purchasing our LCD Multi-Media display. We thank you for your confidence in our
products and are pleased to greet you as a new customer.
We focused on great features, ease of use and reliability in manufacturing your LCD display.
Performance characteristics
Advantages in relation to CRT (cathode ray tube) displays:
● Less space required
● Lower weight
● Power savings
High image quality
● WXGA standard: resolution up to 1280 x 768
Further features
● The LCD display is a plug and play device which is automatically recognized by your operating
system.
● The power management fulfills the VESA DPMS standard. During idle times (OFF mode) the
power consumption is automatically reduced by up to 95%.
● The terminals include Tuner receiving terminal, PC Input, SCART (Video & RGB), Video, S-
Video and Component (YCbCr / YPbPr) Input.
● Rotate and tilt features for optimizing the viewing position.
● Easy-to-use remote control.
● Easy-to-use on-screen menu system.
● PIP, picture in picture, double screen: PC display(Main) and Video display (Sub) on the same
screen.
● Normal, Panscan, Zoom and Full screen format available by pressing ARC button.
● Headphone socket for private listening.
● Built-in, dual channel speakers.
● A built-in NICAM/IGR sound decoder for stereo and bilingual listening.
● Automatic programming system (A.P.S.).
● A sleep timer.
● Child lock function.
● Full function Teletext.
A26361-K961-Z100-1-5E19, edition 2 5
Page 14

Introduction
Included equipment
Please make sure the following items are included with your LCD Display. Notify us within 14 days
after purchase if it is not complete. With your LCD Display you receive:
User’s Manual
Power Cord
15 Pin D-sub
Signal Cable
Remote Control &
Batterie s (AAA X2)
AC-Adapter
Cable Clamp
(One big, two small)
6 A26361-K961-Z100-1-5E19, edition 2
Page 15
A
A
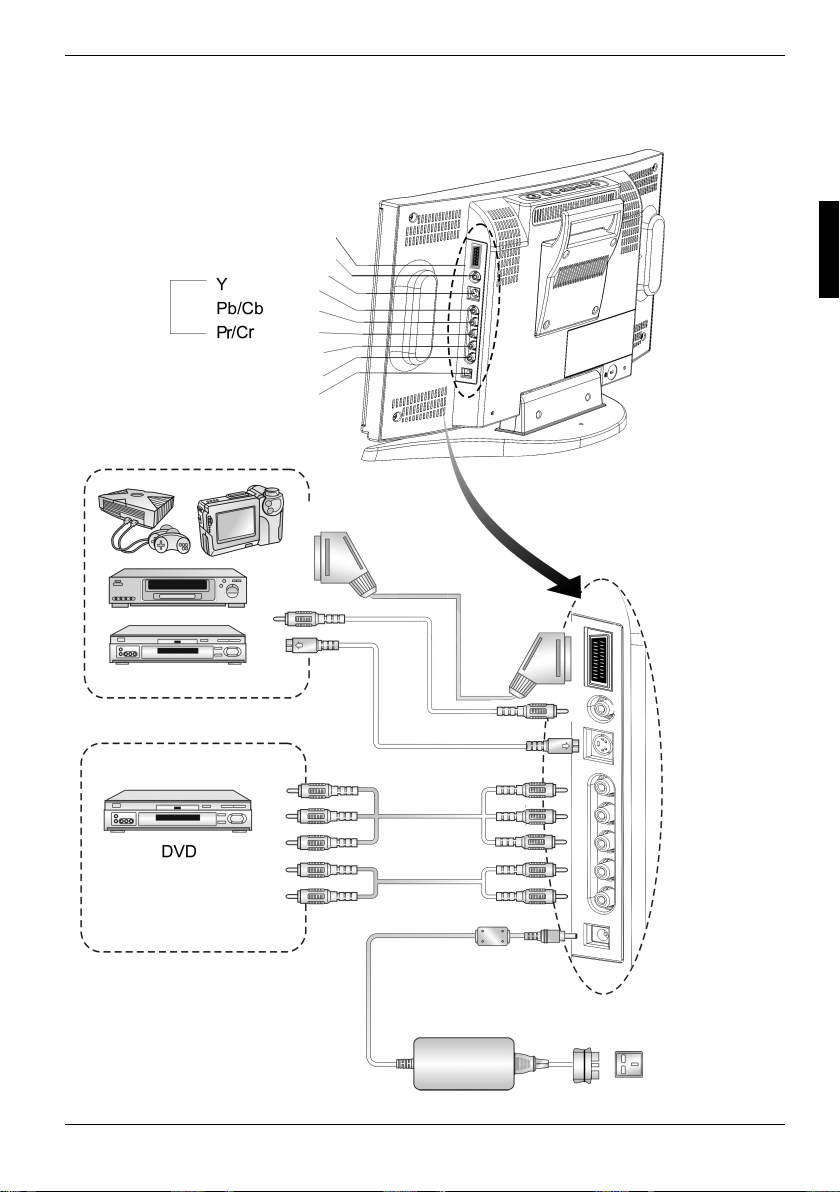
Connecting external devices
COMPONENT
VIDEO device
SCART
VIDEO IN
S-VIDEO
UDIO IN L
AUDIO IN R
12V DC IN
C adapterAC cord
A26361-K961-Z100-1-5E19, edition 2 7
Page 16

Connecting external devices
Audio-Out L/R:
The level of audio output cannot be changed using the volume, treble, and bass controls
i
on your display. This connector should be used with an external audio amplifier that can
be used to control the volume.
VCR-Recording:
The main display must set to TV mode in order to use the audio and video output to
record a programme using a VCR.
PIP sound:
When using the PIP feature in PC mode, to hear the Sub display sound you must set the
sound to Sub.
VIDEO OUT (TV only)
AUDIO OUT L
AUDIO OUT R
D-SUB (PC Input)
PC AUDIO-IN
HEAD PHONE
75 Ohm AERIAL
INPUT SOCKET
8 A26361-K961-Z100-1-5E19, edition 2
Page 17
A
A
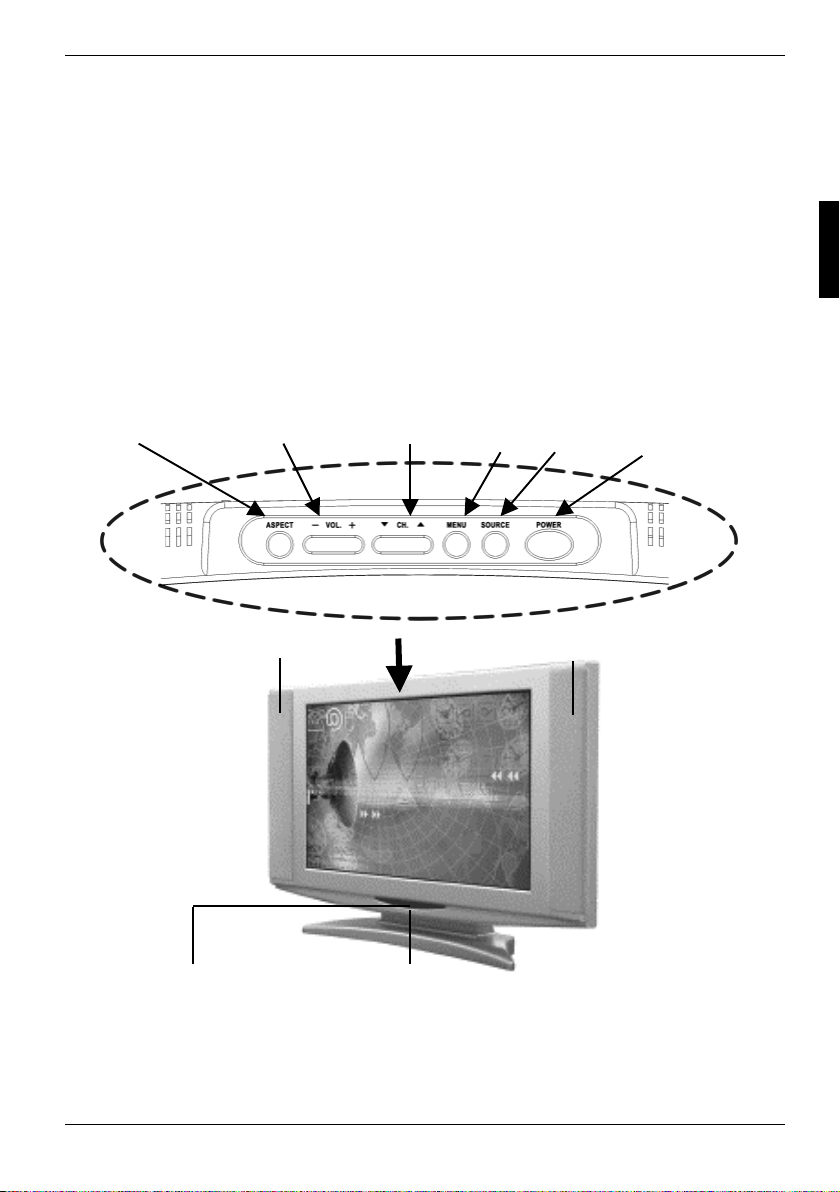
Controls and location
These buttons control your display’s basic features, including the on-screen menu.To use the more
advanced features, you must use the remote control.
POWER turn on or turn off the LCD display.
SOURCE select input source (PC, TV, SCART Video/SCART RGB, Video, S-
MENU display the main menu.
CHANNEL (down/up) change channels.
VOLUME (-/+) turn up or turn down the volume.
ASPECT RATIO set up the display (Normal, Panscan, Zoom or Full).
ASPECT RATIO VOLUME( -/+ ) CHANNEL(down/up) MENU SOURCE POWER
Video, Component).
Loudspeaker
Lautsprecher
Remote sensor window
im the remote control towards this
region on the LCD display.
A26361-K961-Z100-1-5E19, edition 2 9
Power indicator
green indicator lights when the power is on
and a red indicator lights when in the standby
mode (the indicator will not light when the main
power is off).
Loudspeaker
Lautsprecher
Page 18

Page 19
A
A
prog
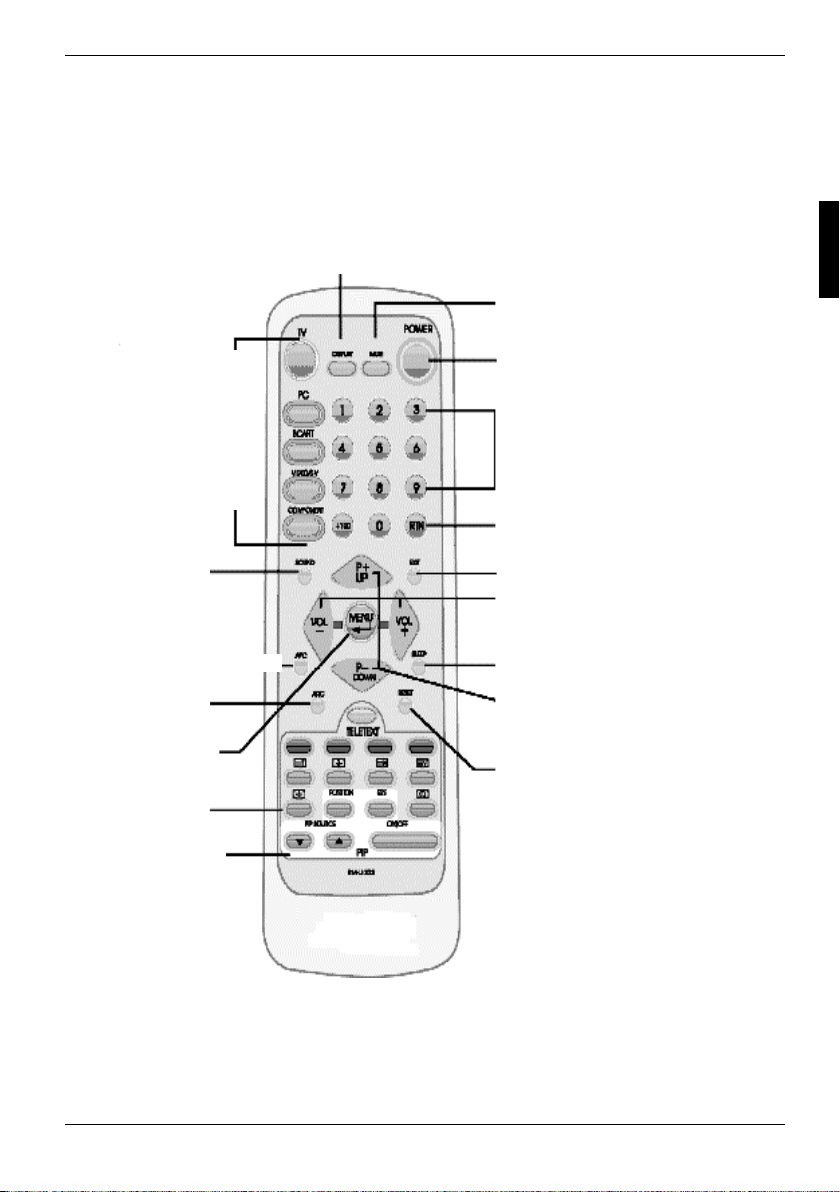
Remote control
The remote control pad works almost same as ordinary TV remote control that includes the basic
function needed while viewing a live video.
Main Display Sources:
● TV
● PC
● SCART Video
SCART RGB
● Video/S-Video
● Component
YpbPr/Y CbCr
SOUND:
● Stereo
● Monoaural
utomatic Picture Control
spect Ratio
Control
MENU/ENTER
TELETEXT
Functions
PIP Functions
DISPLAY: Display the current source or program digits.
MUTE
POWER
Program/TELETEXT Page
Select
RETURN
Return to previous
ratext page
EXIT
VOLUME +/-
SLEEP TIMER
Program/TELETEXT Page
MENU Item
Select
RESET:
Reset to the factory settings
A26361-K961-Z100-1-5E19, edition 2 11
Page 20

Remote control
Summary of control buttons
Selecting the Signal Source
TV Switch to the TV mode.
PC Switch to the PC mode.
SCART Switch to the Video mode or RGB mode from SCART.
VIDEO/S-V Switch to the Video mode from RCA pocket oder S-Video mode.
COMPONENT Switch to the Component mode (YpbPr oder YcbCr).
DISPLAY Display the current source.
Menu Setting
MENU/ENTER Display the main on-screen menu or enter the next menu.
UP/DOWN Press to select the item you want to adjust in the OSD menu.
VOL-/VOL+ Press to decrease or increase the value in the OSD control bar.
EXIT Exit from the menu.
Changing Channels
P-/P+ Press P- or P+ to change Programs in TV mode or Teletext page in
0-9 To select programs directly in TV mode.
DISPLAY Display the current program digits.
RTN Press to return to the previous program.
Sound Control
VOL+VOL- Press to turn up or turn down the volume.
MUTE Press to switch the sound on or off.
SOUND Press to choose Stereo, Bilingual and Monaural broadcasts.
TELETEXT mode.
12 A26361-K961-Z100-1-5E19, edition 2
Page 21

Remote control
Teletext
TELETEXT Press to show the Teletext Service. Press again to return to TV
INDEX Press INDEX button to show the list of teletext contents.
HOLD Press HOLD button to stop the automatic page change.
UPDATE Press UPDATE button to switch to TV while waiting for the next
REVEAL Press REVEAL button to display concealed information, such
EXPAND Press EXPAND button to enlarge the top half or bottom half of
SUB-PAGE / TIME Press SUB-PAGE / TIME button to access to the sub-page you
RTN Press to return to the previous viewed Teletext page.
PIP
ON / OFF Press to watch one of the video sources on Sub-display, whilst
PIP Source Press to select the PIP window input source as:
SIZE To make the PIP window double, large or small.
POSITION Press to move the PIP window to:
IWhen you set Main-display at 1280 x 768/1024 x 768 resolution of PC mode and Sub-
display YPbPr, the screen will appear Not Available. You should reduce the PC resolution
i
to 800 x 600 or 640 x 480. The PIP function will then work.
Viewing.
text page.
as solutions of riddles or a quiz.
the Teletext page.
required.
in PC mode. Press again to turn off the Sub-display.
Press ▲ button:
TV – SCART Video – SCART RGB – Video – S-Video –
Component
Press ▼ button:
Component – S-Video – Video – SCART RGB – SCART Video
– TV
Top Left – Top Right – Bottom Right – Bottom Left – Repeat.
A26361-K961-Z100-1-5E19, edition 2 13
Page 22

Remote control
Other Function
RESET Reset to the original factory settings, such as the
ARC Set the picture window to Normal (4:3) – Panscan –
APC To select Clear, Dark, Nomal mode for picture
SLEEP Press to select a preset time interval for automatic
SUB-PAGE / TIME Press SUB-PAGE / TIME to display the digital
Luminance/Contrast/Color Temp.
Zoom – Full (16:9).
control.
power off.
clock in TV mode.
14 A26361-K961-Z100-1-5E19, edition 2
Page 23

A.P.S. first time installation
► After removing the LCD display packaging, ensure the product is installed in a safe and well
ventilated position.
► Insert two AAA type batteries into battery compartment on the rear of the remote control.
► Make sure the 75 ohm external aerial and Power cord are properly connected.
► Press the POWER button to switch the set on.
► The Automatic Search menu will appear when switching on the TV first time.
Automatic Search Language
Country
Language
Start
Exit
► Select Country with UP/DOWN button, then press MENU button repeatedly to select the
country you are now located.
► Select Language with UP/DOWN button, then press MENU button. Select a menu language
with UP/DOWN button, press MENU button, and the menu language will be changed at once.
Press MENU button again to return to the previous screen.
► Select Start with UP/DOWN button, then press MENU button to start APS. The APS
(Automatic Programming System) menu will appear on the screen.
APS RUNNING PLEASE WAIT
► To cancel APS press the EXIT button.
After APS is finalized, the Program List will appear on the screen. You can select,
rename, delete, insert programs within the Program List. (For details, see ”Program list
i
settings”.)
Use the number buttons to directly access the program. For example, to select
program 27, press 2 then 7. The TV will change programs when you press the second
number. You can also press P-/P+ button on remote control to change programs.
English
Français
Deutsch
Español
Italiano
Svenska
Português
Magyar
Pycckий
Česky
Exit
A26361-K961-Z100-1-5E19, edition 2 15
Page 24

Page 25

General controls and adjustment
Tuning display on and off
Press the POWER button on the Remote Control. You can also use the POWER button on the top
of the panel.
Viewing the menus and On-Screen Displays
► With the power on, press the MENU button. The main menu appears on the screen.
► Use the UP/DOWN button to select one of the menu options, and then press the MENU button
► Press the MENU button to return to the previous screen or press the EXIT button to exit from
To turn the unit on, the POWER button must be held down at least 0.5 seconds before it
is released. This is to prevent the unit from being turned on accidentally.
!
Main Menu Screen
Main Display
Sub Display
Contrast/Brightness
Auto Image Adjust
Image
Colour
Menu Setup
Audio
PIP Setup
Reset
Exit
to access to the Sub-menu.
the menu.
The menu varies with which input source is selected.
i
A26361-K961-Z100-1-5E19, edition 2 17
Page 26

General controls and adjustment
Switching between TV/PC/AV
► Turn on the power of the connected video equipment.
► Press the applicable button.
– Press TV button to switch to TV mode.
– Press PC button to switch to PC mode.
– Press SCART button once to switch to SCART Video mode (Composite Signal Input via
SCART).
– Press SCART button again to switch to SCART RGB mode (RGB Signal Input via
SCART).
– Press VIDEO/S-V button once to switch to Video mode (Composite Signal Input Via RCA
Socket).
– Press VIDEO/S-V button again to switch to S-Video mode.
– Press COMPONENT button to switch to YCbCr or YPbPr.
Volume control
Using Volume Control
► Press VOL-/ VOL+ button to turn up or turn down the sound volume.
Using Mute
At any time, you can temporarily turn off the sound by pressing the MUTE button.
► Press the MUTE button and the sound cuts off.
► Press the MUTE again or VOL- / VOL+ button to turn the sound back to the previous level.
The mute function is automatically turned off if VOL- / VOL+ is pressed.
i
18 A26361-K961-Z100-1-5E19, edition 2
Page 27

General controls and adjustment
Menu items
► Press the MENU button to display the main menu screen.
► Press UP/DOWN button to select the desired menu item.
► Press VOL- / VOL+ to make adjustments.
► Press the MENU button to return to the previous screen or press the EXIT button to exit.
Main Menu Screen
Main Display
Sub Display
Contrast/Brightness
Auto Image Adjust
Image
Colour
Menu Setup
Audio
PIP Setup
Reset
Exit
Setting the sleep timer
You can set the Sleep Timer to automatically turn off the TV view of LCD display.
► Press the SLEEP button to display the Sleep Timer screen.
► Press the SLEEP button repeatedly to change the sleep time (in minutes).
The time can be set to 30 minutes, 60 minutes or 90 minutes.
30 min – 60 min – 90 min – off
A26361-K961-Z100-1-5E19, edition 2 19
Page 28

General controls and adjustment
Contrast and brightness settings
You may need to perform separate adjustments for brightness and contrast for the different video
modes. Typically, PC mode will be best viewed with lower brightness and contrast settings than are
appropriate for the other modes.
► Press the MENU button to display the main menu.
► Press the UP/DOWN button to move cursor to Contrast / Brightness.
► Press the MENU button to enter Contrast / Brightness.
► Press the VOL- / VOL+ button to set the Brightness or Contrast.
► Press the MENU button to return to the previous screen or press the EXIT button to exit.
Main Menu Screen
Main Display
Sub Display
Contrast / Brightness
Auto Image Adjust
Image
Colour
Menu Setup
Audio
PIP Setup
Reset
Exit
Contrast / Brightness
Brightness
Contrast
Exit
Contrast
0..................................................................100
Contrast / Brightness
Brightness
Contrast
Exit
Brightness
-50.................................................................50
20 A26361-K961-Z100-1-5E19, edition 2
Page 29

General controls and adjustment
Setup menu settings
► Press the MENU button to display the main menu screen.
► Press the UP/DOWN button to move the cusor to Menu Setup.
► Press the MENU button to enter Setup Menu.
► This adjusts the blue background of the menu screens.
► Decrease or increase the transparence of Menu.
► Press the MENU button to return to the previous screen or press the EXIT button to exit.
Main Menu Screen
Main Display
Contrast/Brightness
Auto Image Adjust
Image
Colour
Menu Setup
Audio
PIP Setup
Reset
Exit
Menu Setup
Transparence
Ende (Exit)
Transparence
0....................................................................15
A26361-K961-Z100-1-5E19, edition 2 21
Page 30

General controls and adjustment
Audio menu settings
► Press the MENU button to display the main menu screen.
► Press the UP/DOWN button to move the cusor to Audio Menu.
► Press the MENU button to enter Audio Menu.
► Press the UP/DOWN button to select the desired item (Bass, Treble or Sound Source).
► Press the MENU button to enter the desired item (Bass, Treble or Sound Source).
► Press the MENU button to return to the previous screen or press the EXIT button to exit.
Main Menu Screen
Main Display
Sub Display
Contrast/Brightness
Auto Image Adjust
Image
Colour
Menu Setup
Audio
PIP Setup
Reset
Exit
Audio
Bass
Treble
Sound Source
Exit
Bass
-5...................................................................+5
Treble
-5.................................................…………....+5
22 A26361-K961-Z100-1-5E19, edition 2
Page 31

General controls and adjustment
Audio
Bass
Treble
Sound Source
Exit
Sound Source
Main
Sub
Exit
When using the PIP feature in PC mode, you can listen to the sound of the sub screen
i
instead of the main screen. To do so:
► Select Audio.
► Select Sound Source.
► Select Sub.
Then adjust the volume of the Sub-display using VOL+ / VOL-.
A26361-K961-Z100-1-5E19, edition 2 23
Page 32

Page 33

TV mode adjustment
Altering the TV settings
► Use the remote control TV button to set the input source to TV mode.
► Press the MENU button to display the main menu screen.
► Press the UP/DOWN button to select Programs.
► Press the MENU button to enter.
► Press the UP/DOWN button to the desired item.
► Press the MENU button to set the desired item.
► Select EXIT to return to the main menu screen or press the EXIT button to exit.
Main Menu Screen
Main Display
Contrast/Brightness
Colour/Sharpness
Menu Setup
Audio
Programs
Child Lock
Reset
Exit
Programs
Automatic Search
Manual Search
Program List
Exit
A26361-K961-Z100-1-5E19, edition 2 25
Page 34

TV mode adjustment
Automatic search programs
► Press the MENU button to display the main menu screen.
► Press the UP/DOWN button to select Programs and press MENU button.
► Select Country you are now located and the Language you desired, and then select Start to run
APS. The APS menu will appear on the screen.
APS RUNNING PLEASE WAIT
► Press EXIT button to exit.
To cancel APS, press the EXIT button. (For details, please see “A.P.S. first time
installation” on page 15).
i
After APS is finalized, the Program List will appear on the screen.
You can select, rename, delete or insert programs within the Program List. (For detail, please
see “Program list settings” on page 28)
Main Menu Screen
Main Display
Contrast/Brightness
Colour/Sharpness
Menu Setup
Audio
Programs
Child Lock
Reset
Ende (Exit)
Programs
Automatic Search
Manual Search
Program List
Exit
Automatic Search
Country
Language
Start
Exit
26 A26361-K961-Z100-1-5E19, edition 2
Page 35

TV mode adjustment
Manuel search programs
To program a channel in a TV’s program number manually:
► Press MENU button to display the main menu.
► Press UP / DOWN button to select Programs, and then press MENU button.
► Press UP / DOWN button to select Manual Search, and then press MENU button.
► Press UP / DOWN button to select Program, and then press VOL-/ VOL+ button to select the
program number where you want the tuned channel to be stored.
► Press UP / DOWN button to select System, and then press VOL-/ VOL+ button to set to B/G,
D/K, I or L/L’.
► Press UP / DOWN button to select Search, and then press VOL- / VOL+ button.
– Press VOL+ button to search forwards. If the found program isn’t the desired one, press
VOL+ button again to search next available program.
– Press VOL- button to search backwards. If the found program isn’t the desired one,
press VOL-button again to search previous available program.
– To stop searching before a channel is found, press the reverse direction button. For
example, when the TV is searching forward with VOL+ button, press VOL- button to stop
searching.
► Press UP / DOWN button to select Store, and then press MENU button to store the searched
channel to the program number you set.
► Press EXIT to exit from the menu.
Programs
Automatic Search
Manual Search
Program List
Exit
Manual Search
Program 02
System B/G
Suche (Search)
Store
Exit
A26361-K961-Z100-1-5E19, edition 2 27
Page 36

TV mode adjustment
Program list settings
Program List is used to display the Program numbers and names. You can use this list to change /
edit Name, Delete, or Insert programs.
► Press MENU button to display the main menu.
► Press UP / DOWN button to select Programs, and then press MENU button.
► Press UP / DOWN button to select Program List, and then press MENU button. All the program
names of the tuned channels will be shown by the yellow colour.
► Press P+ / P- / VOL- / VOL+ button to select program. The selected Program number will be
shown by the Green colour.
► Press EXIT button to exit.
Programs
Automatic Search
Manual Search
Program List
Exit
Program List
1. ARD_ _
2. ZDF_ _
3. RTL_ _
4. RTL2_
5. SAT1_
6. _ _ _ _ _
7. _ _ _ _ _
8. _ _ _ _ _
9. _ _ _ _ _
10. _ _ _ _ _
Name Delete
Insert
11. _ _ _ _ _
12. _ _ _ _ _
13. _ _ _ _ _
14. _ _ _ _ _
15. _ _ _ _ _
16. _ _ _ _ _
17. _ _ _ _ _
18. _ _ _ _ _
19. _ _ _ _ _
20. _ _ _ _ _
28 A26361-K961-Z100-1-5E19, edition 2
Page 37

TV mode adjustment
Change or edit names
► Move to the program number you want to rename or edit name by pressing P+ / P- / VOL- /
VOL+ button.
► Press RED button.
► Press P+ / P- button repeatedly to select a letter , and then press VOL- / VOL+ button to select
the position. (Each program name could be edited with 5 characters)
► Press RED button again to Store.
Store P+
V- V+
P-
Delete the program
► Move to the program number you want to delete by pressing P+ / P- / VOL- / VOL+ button.
The selected program number will be shown by the Green colour.
► Press GREEN button. The corresponding channel will be deleted and all the other channels
below this program number will be moved one program number up.
► Press GREEN button again to Store.
P+
V- V+
Store P-
Insert the program
► Move to the program to be inserted by pressing P+ / P- / VOL- / VOL+ button.The selected
program number will be shown by the Green colour.
► Press YELLOW button.
► Press P+ / P- / VOL- / VOL+ button to move the selected program to the desired program
number.
► Press YELLOW button again to move off.
P+
V- V+
Move off P-
A26361-K961-Z100-1-5E19, edition 2 29
Page 38

TV mode adjustment
Setting the child lock
The Child Lock feature automatically locks out the program that you selected.
Setting up your Personal ID Number (PIN)
► Press the MENU button to display the main menu.
► Press the UP/DOWN button to move the cursor to Child Lock, and then press the MENU
button.
► The Please Enter Pin screen will appear. At first time, you must enter 1111 (initial code).
► Select Channel Lock.
► Press MENU button. On will appear on the right side and the current program will be locked.
► Press MENU button again. Off will appear on the right side and the current program will be
unlocked.
► Select Change Pin, if you want to change the Pin. As soon as the 4-digits are entered, the
Confirm new Pin screen appears. Re-enter the same 4-digits. When the Confirm screen
disappears, your PIN has been memorized. Press the EXIT button to exit.
Main Menu Screen
Main Display
Contrast/Brightness
Colour/Sharpness
Menu Setup
Audio
Programs
Child Lock
Reset
Exit
Please Enter Pin
Channel Lock On
Change Pin
Exit
- - - -
30 A26361-K961-Z100-1-5E19, edition 2
Page 39

TV mode adjustment
NICAM/IGR broadcast selection
Depending on the particular program being broadcast, you can press the SOUND button to listen to
stereo, bilingual or monaural.
► Press the SOUND button directly to display the three states on the top right of the screen.
► Press the SOUND button repeatedly to select the following states.
Stereo broadcast
● Each time you press SOUND, the mode changes between Stereo and Mono.
● When Mono is selected, the TV sound is output monaurally.
In stereo reception, if the stereo signal is weak, you can switch to Mono.
Bilingual broadcast
Each time you press SOUND, the mode changes as follows: A – B – A/B – Mono.
● A sends the primary broadcast language to the loudspeakers.
● B sends the secondary broadcast language to the loudspeakers.
● A/B sends a seperate language to each loudspeaker.
Monaural broadcast (For NICAM broadcasts)
● Each time you press SOUND, the mode changes between Nicam and Mono.
A26361-K961-Z100-1-5E19, edition 2 31
Page 40

TV mode adjustment
Colour/sharpness settings
► Press the MENU button to display the main menu screen.
► Press the UP/DOWN button to move the cusor to Colour/Sharpness.
► Press the MENU button to enter.
► Press the UP/DOWN button to the desired item (Colour Saturation or Sharpness).
► Press the MENU button to set the desired item (Colour Saturation or Sharpness).
► Select EXIT to return to the main menu screen.
Main Menu Screen
Main Display
Contrast/Brightness
Colour/Sharpness
Menu Setup
Audio
Programs
Child Lock
Reset
Exit
Colour/Sharpness
Colour Saturation
Sharpness
Exit
Colour Saturation
0..................................................................100
Sharpness
-5...................................................................+5
32 A26361-K961-Z100-1-5E19, edition 2
Page 41

Teletext
Teletext is a free service broadcast by most TV stations which gives up-to-the-minute information
news, weather, television programs, share prices, subtitles, and many other topics.
To operate Teletext
● Select a TV station on which Teletext is being transmitted.
● Press the TELETEXT button once to appear the teletext screen.
● Press the TELETEXT button again to switch off teletext. The previous program reappears.
Teletext Page Selection
► Enter the required Teletext page as a three digit numbers.
► The P+ / P- button can be used to select the preceding or following page.
► Fastext movement by the 4 coloured buttons.
No OSD adjustment apart from volume control will be available in teletext mode.
i
In teletext mode, NUMBER buttons, P+/P- and RTN buttons are used for Teletext
function.
Two page numbers, TV station name, date, and time are displayed on the screen headline.
The first page number indicates your selection, while the second shows the current page
displayed.
The selected page number is displayed at the top left corner of the screen. The Teletext page
counter searches until the selected page number is located, so that the desired page is
displayed on the screen.
Four subject-heading pages can be selected quickly by pressing the corresponding coloured
button Red, Green, Yellow, or Blue on the remote control handset.
A26361-K961-Z100-1-5E19, edition 2 33
Page 42

Teletext
Useful features for Teletext
INDEX Press this button to select the index page that displays the list of
HOLD The teletext page you have selected may contain more information
UPDATE In the Teletext mode, pressing UPDATE button will switch the
REVEAL Press this button once to display concealed information, such as
EXPAND Select double height text.
teletext contents.
than what is on the screen; the rest of the information will be
displayed after a period of time on a sub-page.
Press HOLD button to stop the automatic page change.
The HOLD symbol will be displayed at the top left-hand corner on
the screen and the automatic page change will be stopped.
Press HOLD button again to continue.
screen to the TV mode while waiting for the next text page.
Select required page number in Teletext mode.
Press UPDATE button to switch to TV mode while waiting for the
text page. A small blue box in which --- shows appears on the
upper left corner.
When the required text page is found, the required page number
appears in the blue box.
Press UPDATE button again to revert to Teletext mode.
solutions of riddles, puzzles, or a quiz.
Press this button again to conceal the revealed answers.
Press this button to enlarge the top half of the page.
Press this button again to enlarge the bottom half of the page.
Press this button once more to return to the normal display.
34 A26361-K961-Z100-1-5E19, edition 2
Page 43

Teletext
SUB-PAGE / TIME
Teletext-Mode
In Teletext mode , sub pages are subsections of long Teletext
pages that can only be displayed on the screen one section at a
time.
Select the required teletext page. (e.g. 524)
Press SUB-PAGE button. S**** will be display on the upper left
corner.
Select the required sub page number by pressing four digit buttons
(e.g. 0001).
If the selected sub page is not displayed in a short time, press
UPDATE button. TV program will be displayed on the screen.
Teletext page number will be displayed on the upper left corner of
the screen when the selected page is found.
Press SUB-PAGE button twice to return to normal page sequence.
TV-Mode
In TV mode, press this button to display the time.
While watching a TV program with Teletext transmission press
TIME button. The current time information will be displayed on the
upper right corner of the screen.
The time information will disappear after pressing TIME button
again.
A26361-K961-Z100-1-5E19, edition 2 35
Page 44

Page 45

PC mode adjustment
Press the PC button to directly switch to PC mode. If PC input timing isn’t the LCD TV’s preset
timing (refer to "PC input preset timing table" on page 53) press Auto Image Adjust to optimize the
image. If it still has Horizontal interference on screen, adjust Fine Tune to correct the phase.
Image settings
► Press the MENU button to display the main menu screen.
► Press UP/DOWN button to move the cusor to Image.
► Press the MENU button to enter Image adjust.
► Press the UP/DOWN button to the desired item (H./V. Position, H. Phase, Fine Tune).
► Press the MENU button to set the desired item (H./V. Position, H. Phase, Fine Tune).
► Press the MENU button to return to the previous screen or press the EXIT button to exit.
Main Menu Screen
Main Display
Sub Display
Contrast/Brightness
Auto Image Adjust
Image
Colour
Menu Setup
Audio
PIP Setup
Reset
Exit
Image
H./V. Position
H. Phase
Fine Tune
Exit
A26361-K961-Z100-1-5E19, edition 2 37
Page 46

PC mode adjustment
H./V. Position
H. Position
V. Position
Exit
H. Position
V. Position
Image
H./V. Position
H. Phase
Fine Tune
Exit
H.Phase
Image
H./V. Position
H. Phase
Fine Tune
Exit
Fine Tune
MAX
MAX
MAX
MAX
38 A26361-K961-Z100-1-5E19, edition 2
Page 47

PC mode adjustment
Colour settings
► Press the MENU button to display the main menu screen.
► Press the UP/DOWN button to move the cusor to Colour.
► Press the MENU button to enter Colour.
► Press the UP/DOWN button to the desired item (Cool, Neutral, Warm, or User Colour).
► Press the MENU button to set the desired item (Cool, Neutral, Warm, or User Colour).
► Press the MENU button to return to the previous screen or press the EXIT button to exit.
Main Menu Screen
Main Display
Sub Display
Contrast/Brightness
Auto Image Adjust
Image
Colour
Menu Setup
Audio
PIP Setup
Reset
Exit
Colour
Cool
Neutral
Warm
User Colour
Exit
User Colour
Red
Green
Blue
Exit
Read
MAX
A26361-K961-Z100-1-5E19, edition 2 39
Page 48

PC mode adjustment
Green
Blue
MAX
MAX
40 A26361-K961-Z100-1-5E19, edition 2
Page 49

Viewing Picture in Picture (PIP)
PIP: When you select PC source as main display, you can also select another source TV, SCART,
Video, S-Video, or Component (YPbPr/YCbCr) as sub-display.
You can use the PIP feature to watch two video sources simultaneously. (This function works in PC
mode only.)
Quick way to activate PIP
► Press PIP ON/OFF Button on the remote control.
► Select a Signal Source for PIP:
– Press the PIP SOURCE UP/DOWN button repeatedly to cycle through all of the available
signal sources: TV, SCART, Video, S-Video, Component (YPbPr/YCbCr).
► Change the Position of the PIP Window:
– When you press the PIP POSITION button repeatedly, the PIP window moves from
corner to corner on theTV screen.
► Change the Size of the PIP Window:
– Press the PIP SIZE button to alternate between a smaller and Larger PIP window.
PIP setup menu
► Press the MENU button to display the main menu screen.
► Press the UP/DOWN button to select the PIP Setup.
► Press the MENU button to enter PIP Setup.
► Press the UP/DOWN button to the desired item (PIP Position, PIP Border Width,
PIP Border Color, PIP H/V Ratio).
► Press the MENU button to return to the previous screen or press the EXIT button to exit.
A26361-K961-Z100-1-5E19, edition 2 41
Page 50

Viewing Picture in Picture (PIP)
Main Menu Screen
Main Display
Sub Display
Contrast/Brightness
Auto Image Adjust
Image
Colour
Menu Setup
Audio
PIP Setup
Language
Reset
Exit
PIP Setup
PIP Position
PIP Border Width)
PIP Border Colour)
PIP H/V Ratio
Exit
PIP Position
PIP H Position
PIP V Position
Exit
PIP H Position
PIP V Position
MAX
MAX
42 A26361-K961-Z100-1-5E19, edition 2
Page 51

Viewing Picture in Picture (PIP)
PIP Setup
PIP Position
PIP Border Width
PIP Border Colour
PIP H/V Ratio
Exit)
PIP Border Width
PIP Setup
PIP Position
PIP Border Width
PIP Border Colour
PIP H/V Ratio
Exit
PIP Border Colour
White
Blue
Yellow
Green
Red
Black
Brown
Gray
Orange
Exit
MAX
A26361-K961-Z100-1-5E19, edition 2 43
Page 52

Viewing Picture in Picture (PIP)
PIP Setup
PIP Position
PIP Border Width
PIP Border Colour
PIP H/V Ratio
Exit
PIP H/V Ratio
MAX
44 A26361-K961-Z100-1-5E19, edition 2
Page 53

AV mode adjustment
The Video sources include SCART Video/SCART RGB, Video, S-Video, YCbCr/YPbPr. You can
select by pressing SCART, Video/S-V, or COMPONENT button.
Altering the VIDEO Adjust Settings:
► Press the MENU button to display the main menu screen.
► Press the UP/DOWN button to move the cusor to the desired item.
► Press the MENU button to enter and adjust it.
► Press the MENU button to return to the previous screen or press the EXIT button to exit.
Main Menu Screen
Main Display
Contrast/Brightness
Colour/Sharpness
Menu Setup
Audio
Reset
Exit
AllL the adjustment items in AV Menu are described in TV mode menu, so please refer to
the "TV mode adjustment" on page 25.
i
Using the PIP function with Component mode (YCbCr, YPbPr) as the sub-display requires
that the PC resolution be set at no higher than 800 x 600.
A26361-K961-Z100-1-5E19, edition 2 45
Page 54

Page 55

Other functions
To use Channel up/down on the unit control panel as function buttons
● When you press MENU to go into OSD, CH up/down will become the up/down function control
buttons.
To use -VOL+ as level control buttons
● When you press MENU to go into the sub control bar, then the level can be adjusted by the
VOL+ buttons.
To use -VOL+ as Mute control buttons
● When you press both VOL+ and VOL- buttons on the upper control panel simultaneously, the
sound will be muted.
● If you need to switch on the sound again, then either press MUTE button on the remote control
unit or press any VOL+ or VOL- button on the remote control unit or on the LCDTV itself.
Aspect button (Screen Aspect Ratio)
ARC - Aspect Ratio Control
● *Normal: This sets the aspect ration to 4:3 for traditional TV programmes. There will be black
bars at either side of the screen.
● *Panscan: Expands 4:3 video sources to fit the 16:9 screen by magnifying the image at the
edges of the screen. This creates less distortion at the center of the screen.
● *Zoom: Some DVD movies may not fill the top and bottom of the screen. The zoom function
extends the height to fill the screen.
● *Full: This mode expands the width of 4:3 video sources evenly to fill the 16:9 screen. There
will be distortion at the center of the screen as well as the edges.
APC control button (Automatic Picture Control)
● Press APC button on the remote control repeatedly to cycle through the APC settings. These
settings are Normal, Clear or Dark. For example, when the screen is showing night scene or
darker screen, you can use APC to change the screen to Clear and get a brighter picture. If the
screen is too bright, you can use this APC button to change the screen to Normal or Dark.
A26361-K961-Z100-1-5E19, edition 2 47
Page 56

Troubleshooting
Troubleshooting
Many times, problems have simple causes. We would like to give you some tips to solve some
common problems. Should these tips not help, please call us!
There is no picture or sound.
● Make sure the AC adapter is properly inserted in the power outlet.
● Make sure the main power switch of the main unit is on.
There is no picture from AV/TV.
● Make sure the Contrast/Brightness is properly adjusted.
● Make sure all external devices are connected properly.
There is no picture from PC.
● Make sure the LCD display is not in Power Saving mode.
● Press any desired key or move the mouse to deactivate the mode.
There is no sound.
● Make sure the volume is not set to minimum.
● Make sure the sound is not set to mute.
● Make sure that headphones are not connected.
There is no picture or sound, just noise.
● The reception may be weak.
● Make sure the aerial is not disconnected.
Picture is not clear.
● The reception may be weak.
● Make sure the aerial is not disconnected.
Picture is too light.
● Check colour adjustment.
● Check colour system setting.
The picture is too dark.
● Check if the APC button is set to Dark.
● Check Contrast/Brightness adjustment.
Remote control does not work.
● Check the batteries in the remote control are not flat.
● Make sure the remote sensor window is not under strong lighting.
48 A26361-K961-Z100-1-5E19, edition 2
Page 57

Troubleshooting
The picture is doubled or tripled.
● Make sure the aerial is facing the right direction.
● There may be reflected electric waves from mountains or buildings.
The picture is spotted.
● There may be interference from automobiles,trains, high voltage lines, neon light, etc.
● There may be interference between the antenna cable and power cable. Try possible them
further apart.
There are stripes on the screen or colours fade.
● Is the unit receiving interference from other devices? Transmission antennas of radio
broadcasting station and transmission antennas of amateur radio and cellular phones may
also cause interference.
● Use the unit as far apart as possible from device that may cause possible interference.
Permanently unlit or lit pixels.
The standard of production techniques today cannot guarantee an absolutely fault-free screen
display. A few isolated constant lit or unlit pixels may be present. The maximum permitted number
of pixels faults is stipulated in the stringent international standard ISO 13406-2 (Class II).
Example: a 17" flat-screen monitor with a resolution of 1280 x 768 has 1280 x 768 = 983040 pixels.
Each pixel consists of three subpixels (red, green and blue), so there are almost 3 million dots in
total.
According to ISO 13406-2 (Class II), a maximum of 4 pixels and 5 subpixels may be defective, i. e. a
total of 17 faulted dots. This corresponds to approx. 0,0002 % of the entire screen surface!
A26361-K961-Z100-1-5E19, edition 2 49
Page 58

Page 59

Dimensions
Unit: inch (mm)
A26361-K961-Z100-1-5E19, edition 2 51
A: Attach small cable clamp here
i
B: Attach large cable clamp here
C: Kensington slot
Page 60

Page 61

PC input preset timing table
Analog Input
Mode Nr. Mode Name
Resolution
1 VGA 70Hz
640 x 350
2 VGA 60Hz
640 x 480
3 VGA 72Hz
640 x 480
4 VGA 75Hz
640 x 480
5 SVGA 56Hz
800 x 600
6 SVGA 60Hz
800 x 600
7 SVGA 72Hz
800 x 600
8 SVGA 75Hz
800 x 600
9 XGA 60Hz
1024 x 768
10 XGA 70Hz
1024 x 768
11 XGA 75Hz
1024 x 768
12 MAC VGA
640 x 480
13 MAC VGA
832 x 624
14 US Text
720 x 400
15 WXGA 60Hz
1280 x 768
H.Freq. (kHz)
V.Freq. (Hz)
31.469
70.087
31.469
59.941
37.861
72.81
37.5
75.0
35.16
56.25
37.879
60.317
48.077
72.188
46.875
75.0
48.363
60.004
56.476
70.069
60.023
75.029
35.0
66.667
49.725
74.550
31.469
70.087
47.733
60.042
H.Polarität
V.Polarität
Pixel CLK (MHz)
+
-
-
-
-
-
-
-
+
+
+
+
+
+
+
+
-
-
-
+
+
-
-
-
-
+
-
-
25.175
25.175
31.5
31.5
36.0
40.0
50.0
49,5
65.0
75.0
78.75
30.24
57.283
28.322
80
A26361-K961-Z100-1-5E19, edition 2 53
Page 62

Page 63

Specifications
Items Specification
Display Screen Size 17“ TFT-LCD Panel
Aspect Ratio 16 : 9
Resolution 1280 x 768 (WXGA)
Display colors 262,144 colors
Contrast Ratio 400 : 1 (typical)
Brightness 400 cd / m2 (typical)
Viewing Angle 160° (Hor.) / 160° (Ver.)
Response Time Tr =15ms / Tf = 10 ms
OSD Language English, Français, Deutsch, Español, Italian,
TV Function TV Standard (CCIR) B/G, D/K, I und L/L’ (Multi-Europe)
colir system PAL / SECAM
Sound system NICAM / A2 (IGR)
Teletext 10 Seiten (FLOF/TOP)
Video I / O Video-Color System PAL / SECAM / NTSC
AV1 (In / Out) 21-pin Scart (RGB & Composite) x 1
AV2 (In) VFBAS (Composite ) x 1
S-Video x 1
YCbCr&YpbPr
AV3 (Out) VIDEO OUT (Composite ) x 1 (TV only)
PC I / P Signal I/P Analog: D-Sub 15-polig (entfernbares Kabel)
PnP compatibility DDC / 2B
I/P Frequency Analog: fH: 31KHz to 60KHz
Recommended Analog: 1024 x 768 (60Hz)
DTV-ready (via D-Sub 15-polig) DTV System: 625p
Audio I / O Audio I / O : L / R Speaker (built in): 3.5W + 3.5W (rms)
Headphone Mini-jacke for stereo (3.5φ)
Line Out (RCA L/R)
Other
Functions
PIP under PC-mode, Child lock, VESA Flat Panel Wall Mounting holes
Svenska, Português, Magyar, Pycckий, Česky
Audio L/R
x 1
x 1
DTV: 625p
fV : 56Hz to 75Hz
A26361-K961-Z100-1-5E19, edition 2 55
Page 64

Specifications
Items Specification
Power Power Supply DC 12V, 5A
AC 110V~240V, 50/60Hz (external AC-Adapter)
Power Consumption < 60 W
Panel Tilt Forwards / Backwards /
Rotation
Dimension B x H x T 520mm x 303mm x 72mm
B x H x T (with stand) 520mm x 338mm x 200mm
Weight (net) Kg (w/o Acessories) 6.5Kg
Acessories User’s Manual , Remote Control , Batteries , Power cord, AC Adapter , D-sub
Signal Cable, Cable Clamps .
- 5° / + 15° / ± 180°
A26361-K961-Z100-1-5E19, edition 2
56
 Loading...