

Page 1

B1WD-0991-01EN(00)
ATLAS V14
User's Guide
Page 2

Introduction
This manual is for the users of ATLAS V14.0, and is designed to assist them in getting the most
out of the software.
Before You Get Started
Please verify the following:
● One of the following operating systems has been installed on your PC and is operating
normally:
• Windows Vista® Ultimate
• Windows Vista
• Windows Vista
• Windows Vista
• Windows Vista
•Microsoft
•Microsoft
•Microsoft
Hereafter, all the operating systems mentioned above will be referred to as Windows®
● The Japanese Kana-Kanji Conversion function is operating normally.
Thank you for purchasing EJ/JE translation software "ATLAS V14.0."
This product is equipped with various functions such as Translation editor and Web translation.
By using these functions according to your needs, efficient translation is possible.
We hope that this manual is of help to all users.
®
Enterprise
®
Business
®
Home Premium
®
Home Basic
®
Windows® XP Professional
®
Windows® XP Home Edition
®
Windows® 2000 Professional
December 2007
● Microsoft, Windows, Windows Vista, Internet Explorer, PowerPoint, Outlook and Excel are
either registered trademarks or trademarks of Microsoft Corporation in the United States and/
or other countries.
● Adobe, Acrobat, Adobe Reader and Acrobat Reader are either registered trademarks or
trademarks of Adobe Systems Incorporated in the United States and/or other countries.
● Lotus and Lotus Notes are registered trademarks of Lotus Development Corporation.
● Eudora is a registered trademark of QUALCOMM Incorporated.
● Becky! Internet Mail is a registered trademark or trademark of RimArts, Inc.
● Other company and product names in this manual are trademarks or registered trademarks of
their respective owners.
● Screen shots are reprinted with permission from Microsoft Corporation.
ATLAS V14 User's Guide
B1WD-0991-01EN(00)
Edition 1 December, 2007
The contents of this manual may be revised without prior notice.
All Rights Reserved, Copyright© Fujitsu Limited 2007
Printed in Japan
i
Page 3
Contents and Use of This Manual
◆ Organization of This Manual
This manual is intended for users installing ATLAS, using ATLAS for the first time, or wanting
to check particular functions while using ATLAS.
This manual is composed of "Introduction," "Basics," "Advanced Techniques" and
"Appendix." Read them according to your need.
• Introduction "Welcome to ATLAS"
Explains preliminary operations of each ATLAS function. Be sure to read this before
operation.
• Basics "Try Using ATLAS"
Explains ATLAS functions.
Read this when you want to check various functions available in ATLAS.
• Advanced Techniques "Hints for achieving better T ranslation Results"
Explains how to use ATLAS effectively, including how to add wo rds/translation memory items
and how to set the translation environment.
• Appendix
Explains supplementary uses of ATLAS such as shortcut key list and troubleshooting.
Methods for translating using the separately sold Translation Server are also described.
◆ Notations
Notations Meaning
Notes on using A TLAS.
Be sure to read these before operation.
Hints for operation.
Be sure to read these before operation.
Explains useful functions.
Names of windows, dialog boxes, menus, commands and
buttons appearing in dialog boxes are enclosed in square
[Translation Editor]
<<Ctrl>> key Double angle brackets indicate names of keys on the keyboard.
<<Ctrl>> + <<F4>> key
brackets ([ ]). Letters that appear in parentheses following menu
names or "..." indicating that a dialog box will be displayed are
omitted in this document.
Indicates that you should press the key on the right while
pressing down the key on the left.
◆ Notes on screen/illustration/translation sample
This manual uses Windows XP screens in the examples.
Screens, illustrations and translation samples used in this manual are for reference only.
ii
Page 4
They may differ slightly depending on your PC or ATLAS settings.
This manual explains basic use of ATLAS and information helpful for translation. For detailed
explanation of ATLAS, refer to Help.
◆ Abbreviations
In this manual, product names are abbreviated as follows:
Official names Abbreviated names
Windows Vista® Ultimate
Windows Vista® Enterprise
®
Windows Vista
Business
Windows Vista® Home Premium
Windows Vista® Home Basic
®
Microsoft
Windows® XP Professional
Microsoft® Windows® XP Home Edition
Microsoft® Windows® 2000 Professional Windows 2000
®
Microsoft
Office Word 2007 Word 2007
Microsoft® Office Word 2003 Word 2003
Microsoft® Word Version 2002 Word 2002
®
Microsoft
Word 2000 Word 2000
Microsoft® Office Excel® 2007 Excel 2007
Microsoft® Office Excel® 2003 Excel 2003
®
Microsoft
Excel® Version 2002 Excel 2002
Microsoft® Excel® 2000 Excel 2000
Microsoft® Office PowerPoint® 2007 PowerPoint 2007
®
Microsoft
Office PowerPoint® 2003 PowerPoint 2003
Microsoft® PowerPoint® Version 2002 PowerPoint 2002
Microsoft® PowerPoint® 2000 PowerPoint 2000
®
Microsoft
Windows Mail 6 Windows Mail
Microsoft® Office Outlook® 2007
Microsoft® Office Outlook® 2003
®
Microsoft
Outlook® Version 2002
Microsoft® Outlook® 2000
®
Adobe
Acrobat® 8
Adobe® Acrobat® 7
Adobe® Acrobat® 6
®
Adobe
Acrobat® 5
Windows Vista
Windows
Windows XP
Word
Excel
PowerPoint
Outlook
Acrobat
iii
Page 5
Official names Abbreviated names
Adobe® Reader® 8 Adobe Reader 8
Adobe® Reader® 7 Adobe Reader 7
Adobe® Reader® 6 Adobe Reader 6
®
Adobe
Lotus® NotesTMR7.0-7.0.2, R6.5-6.5.5,
R6.0.1-6.0.5, R5.0
Eudora 7J rev2.0, Eudora 7J rev1.0, 7J,
6.2J, 6J, 5.1J, Mini
Acrobat® Reader 5 Adobe Acrobat Reader 5
Lotus Notes Mail
Eudora
Becky! Internet Mail Ver.2, Ver.1 Becky!
®
Windows
Microsoft® Internet Explorer 6
Internet Explorer® 7
Internet Explorer
Accela BizLingo V3.0 Translation Server
ATLAS Double Pack V9.0-V13.0 ATLAS or ATLAS V9-V13
ATLAS Translation Standard V14.0 ATLAS or ATLAS V14
Adobe Reader
iv
Page 6

Table of Contents
Introduction Welcome to ATLAS
Functions of ATLAS . . . . . . . . . . . . . . . . . . . . . . . . . . . . . . . . . . . . . . . . . . . . . 2
Starting ATLAS . . . . . . . . . . . . . . . . . . . . . . . . . . . . . . . . . . . . . . . . . . . . . . . . 4
Translation by Comparing Original and Translated Text [Translation Editor] . 5
Loading a document in < Translation Editor> . . . . . . . . . . . . . . . . . . . . . . . . . . . . .5
Translation using <Translation Editor> . . . . . . . . . . . . . . . . . . . . . . . . . . . . . . . . . .7
Selecting a Character String or a Cell . . . . . . . . . . . . . . . . . . . . . . . . . . . . . . . . . . .9
Displaying other possible translations and modifying translated text
[Change Word] . . . . . . . . . . . . . . . . . . . . . . . . . . . . . . . . . . . . . . . . . . . . . 11
Saving the translation results . . . . . . . . . . . . . . . . . . . . . . . . . . . . . . . . . . . . . . . . .12
Selecting a Text String as a Translation Unit [Insert Control Brackets] . . . . . . . . .12
Selecting a Non-Translation Text String [Insert Non-Translation Brackets] . . . . . .14
Translating Word Files [Word Translation] . . . . . . . . . . . . . . . . . . . . . . . . . . . 15
Translating in Acrobat [Application Translation] . . . . . . . . . . . . . . . . . . . . . . . 17
Translating Contents of the Clipboard [Clipboard Translation] . . . . . . . . . . . 20
Translating Web Pages with Internet Explorer [Web Translation] . . . . . . . . . 22
Translating Mail [Mail Translation] . . . . . . . . . . . . . . . . . . . . . . . . . . . . . . . . . 24
Adding Words [Dictionary Tool] . . . . . . . . . . . . . . . . . . . . . . . . . . . . . . . . . . . 26
Utilizing Translation Memory [Translation Memory] . . . . . . . . . . . . . . . . . . . . 29
Typical Use of Translation Memory . . . . . . . . . . . . . . . . . . . . . . . . . . . . . . . . 31
Finding Detailed Information [Help, Internet Update] . . . . . . . . . . . . . . . . . . . 35
Basics Try Using ATLAS
Chapter 1 Basic ATLAS Functions . . . . . . . . . . . . . . . . . . . . . . . . . . . . . . . . 40
1.1 Flow of Automatic Translation . . . . . . . . . . . . . . . . . . . . . . . . . . . . . . . . . . . . .40
1.2 Flow of Translation Using Translation Memory . . . . . . . . . . . . . . . . . . . . . . . .42
1.3 Suitability of Translation of Various Types of Documents . . . . . . . . . . . . . . . .46
1.4 Setting the Translation Environment [Translation Environment] . . . . . . . . . . .47
1.5 Applications that can be used with ATLAS . . . . . . . . . . . . . . . . . . . . . . . . . . .52
Chapter 2 Basic Operation of Translation Editor . . . . . . . . . . . . . . . . . . . . . . 53
2.1 [Translation Editor] Window . . . . . . . . . . . . . . . . . . . . . . . . . . . . . . . . . . . . . .53
2.2 Translation . . . . . . . . . . . . . . . . . . . . . . . . . . . . . . . . . . . . . . . . . . . . . . . . . . .56
2.3 Switching between EJ and JE Translation Direction s [Translation Direction] .57
2.4 Saving the Translation Results . . . . . . . . . . . . . . . . . . . . . . . . . . . . . . . . . . . .57
2.5 Checking a Translated Word . . . . . . . . . . . . . . . . . . . . . . . . . . . . . . . . . . . . .60
2.6 Checking the Translation Results [Confirmation Translation] . . . . . . . . . . . . .61
2.7 Merging/Dividing the Original Text . . . . . . . . . . . . . . . . . . . . . . . . . . . . . . . . .61
2.8 Disabling Translation and Editing [Translation Lock] . . . . . . . . . . . . . . . . . . .63
2.9 Checking Spelling Errors [Spelling Check] . . . . . . . . . . . . . . . . . . . . . . . . . . .64
2.10 Exporting Undefined Words to an add all text file [Export Undefined Word] .65
2.11 Changing Characters [Convert] . . . . . . . . . . . . . . . . . . . . . . . . . . . . . . . . . .66
v
Page 7

2.12 Formatting Translated Text[Translated Sentence Format] . . . . . . . . . . . . . .67
2.13 Marking a Translated Word from a Dictionary
(other than the Standard Dictionary) [Dictionary of Origin Marks] . . . . . .68
2.14 Searching for and Replacing a Text String [Find] . . . . . . . . . . . . . . . . . . . . .69
2.15 Selecting a Translated Word Used for Further Translation [Change Word] .72
2.16 Specifying Parts of Speech for EJ Translation . . . . . . . . . . . . . . . . . . . . . . .73
2.17 Reading Sentences in the Translation Editor . . . . . . . . . . . . . . . . . . . . . . . .74
2.18 Printing the Translation Results . . . . . . . . . . . . . . . . . . . . . . . . . . . . . . . . . .76
Chapter 3 Basic Operation of Application Translation . . . . . . . . . . . . . . . . . . 78
3.1 Preparation (Setup of Application Translation) . . . . . . . . . . . . . . . . . . . . . . . .79
3.2 Translating by Acrobat / Adobe Reader . . . . . . . . . . . . . . . . . . . . . . . . . . . . .83
3.3 Translating a Word File . . . . . . . . . . . . . . . . . . . . . . . . . . . . . . . . . . . . . . . . . .88
3.4 Translating an Excel File . . . . . . . . . . . . . . . . . . . . . . . . . . . . . . . . . . . . . . . . .95
3.5 Translating a PowerPoint File . . . . . . . . . . . . . . . . . . . . . . . . . . . . . . . . . . . . .98
Chapter 4 Basic Operation of Clipboard Translation . . . . . . . . . . . . . . . . . . 101
4.1 [Clipboard Translation] dialog box . . . . . . . . . . . . . . . . . . . . . . . . . . . . . . . .101
4.2 Hiding [Clipboard Translation] dialog box . . . . . . . . . . . . . . . . . . . . . . . . . . .102
4.3 Changing the [ATLAS Clipboard Translation] Dialog Box Display . . . . . . . .103
Chapter 5 Basic Operation of Web Translation . . . . . . . . . . . . . . . . . . . . . . 104
5.1 About the ATLAS Tool Bar . . . . . . . . . . . . . . . . . . . . . . . . . . . . . . . . . . . . . .104
5.2 Displaying the Original Text . . . . . . . . . . . . . . . . . . . . . . . . . . . . . . . . . . . . .106
5.3 Choose whether or not to perform the translation simultaneously
with the display of the page . . . . . . . . . . . . . . . . . . . . . . . . . . . . . . . . . .107
5.4 Reading Sentences Aloud . . . . . . . . . . . . . . . . . . . . . . . . . . . . . . . . . . . . . .108
Chapter 6 Translating Mail [Mail Translation] . . . . . . . . . . . . . . . . . . . . . . . 109
6.1 Starting Mail Translation . . . . . . . . . . . . . . . . . . . . . . . . . . . . . . . . . . . . . . . .109
6.2 Layout of [Mail Translation] toolbar . . . . . . . . . . . . . . . . . . . . . . . . . . . . . . . .110
6.3 Setting the Mail Translation shortcut key . . . . . . . . . . . . . . . . . . . . . . . . . . .110
6.4 Automatically Starting Mail Translation . . . . . . . . . . . . . . . . . . . . . . . . . . . . .111
Chapter 7 Quick ATLAS Basics . . . . . . . . . . . . . . . . . . . . . . . . . . . . . . . . . . 112
7.1 Using the [Quick ATLAS] icon . . . . . . . . . . . . . . . . . . . . . . . . . . . . . . . . . . . .112
7.2 Clicking to Translate [Mouse Translation] . . . . . . . . . . . . . . . . . . . . . . . . . . .113
7.3 Translating while entering text [Key Type Translation] . . . . . . . . . . . . . . . . .115
7.4 Automatically Translating Text on the Clipboard
[Automatic Clipboard Translation] . . . . . . . . . . . . . . . . . . . . . . . . . . . . . .117
7.5 Layout and Type of Dialog Box (Mouse Translation /
Key Type Translation / Automatic Clipboard Translation) . . . . . . . . . . . .119
7.6 Automatically Starting Quick ATLAS . . . . . . . . . . . . . . . . . . . . . . . . . . . . . . .121
Chapter 8 Using the Dictionary . . . . . . . . . . . . . . . . . . . . . . . . . . . . . . . . . . 122
8.1 About Dictionaries . . . . . . . . . . . . . . . . . . . . . . . . . . . . . . . . . . . . . . . . . . . . .122
8.2 Setting Dictionaries to be Used for Translation
[Dictionaries Used in Translation] . . . . . . . . . . . . . . . . . . . . . . . . . . . . . .126
8.3 Working With User Dictionaries . . . . . . . . . . . . . . . . . . . . . . . . . . . . . . . . . .127
8.4 Setting Changeable Dictionary . . . . . . . . . . . . . . . . . . . . . . . . . . . . . . . . . . .133
8.5 Displaying Contents of Changeable Dictionary
[Display All Changeable Dictionary] . . . . . . . . . . . . . . . . . . . . . . . . . . . .135
8.6 Adding Words . . . . . . . . . . . . . . . . . . . . . . . . . . . . . . . . . . . . . . . . . . . . . . . .136
8.7 Finding Words Registered in Dictionaries . . . . . . . . . . . . . . . . . . . . . . . . . . .149
8.8 Changing Word Settings . . . . . . . . . . . . . . . . . . . . . . . . . . . . . . . . . . . . . . . .151
8.9 Deleting Words [Delete] . . . . . . . . . . . . . . . . . . . . . . . . . . . . . . . . . . . . . . . .153
vi
Page 8

8.10 Listing All Words and Translation Memory
[Word and Translation Memory File Output] . . . . . . . . . . . . . . . . . . . . . .154
Chapter 9 Using the Common Dictionary . . . . . . . . . . . . . . . . . . . . . . . . . . 157
9.1 About the Common Dictionaries . . . . . . . . . . . . . . . . . . . . . . . . . . . . . . . . . .157
9.2 Setting a Common Folder for the Common Dictionary . . . . . . . . . . . . . . . . .160
9.3 Creating a Common Dictionary . . . . . . . . . . . . . . . . . . . . . . . . . . . . . . . . . . .161
9.4 Uploading / Downloading Common Dictionaries . . . . . . . . . . . . . . . . . . . . .163
9.5 Changing the Common Dictionary Administrator . . . . . . . . . . . . . . . . . . . . .165
9.6 Deleting a Common Dictionary . . . . . . . . . . . . . . . . . . . . . . . . . . . . . . . . . . .168
9.7 Common Folder Management Tool . . . . . . . . . . . . . . . . . . . . . . . . . . . . . . .169
9.8 Problems & Solutions . . . . . . . . . . . . . . . . . . . . . . . . . . . . . . . . . . . . . . . . . .169
Chapter 10 Using the Translation Memory . . . . . . . . . . . . . . . . . . . . . . . . . 174
10.1 Searching Stored Translation Memory Data . . . . . . . . . . . . . . . . . . . . . . . .175
10.2 Starting Translation Memory . . . . . . . . . . . . . . . . . . . . . . . . . . . . . . . . . . . .183
10.3 Working with the [Translation Memory] Window . . . . . . . . . . . . . . . . . . . . .185
10.4 Storing Translation Memory Items . . . . . . . . . . . . . . . . . . . . . . . . . . . . . . .191
10.5 Deleting Translation Memory Items . . . . . . . . . . . . . . . . . . . . . . . . . . . . . .198
10.6 Using the Text Alignment Support Tool . . . . . . . . . . . . . . . . . . . . . . . . . . . .199
Advanced Techniques Hints for Achieving Better Transla-
tion Results
Chapter 1 Setting the Translation Style [Translation Style] . . . . . . . . . . . . . 204
1.1 Translation Style (EJ Translation) . . . . . . . . . . . . . . . . . . . . . . . . . . . . . . . . .205
1.2 Translation Style (JE Translation) . . . . . . . . . . . . . . . . . . . . . . . . . . . . . . . . .213
Chapter 2 Adding Words . . . . . . . . . . . . . . . . . . . . . . . . . . . . . . . . . . . . . . . 219
2.1 Available Combinations of Parts of Speech . . . . . . . . . . . . . . . . . . . . . . . . .219
2.2 Entering Text into an Add All Text File . . . . . . . . . . . . . . . . . . . . . . . . . . . . .220
2.3 Adding All Words [Adding All] . . . . . . . . . . . . . . . . . . . . . . . . . . . . . . . . . . . .228
2.4 Adding Multiple Words at Once from Excel . . . . . . . . . . . . . . . . . . . . . . . . .229
Chapter 3 Managing Data of User Dictionaries . . . . . . . . . . . . . . . . . . . . . . 231
3.1 Extracting Data from User Dictionaries [Extract Dictionary Data] . . . . . . . . .231
3.2 Merging Data of User Dictionaries [Merge Dictionary Data] . . . . . . . . . . . .232
3.3 Rebuilding User Dictionaries [Reindex Dictionary] . . . . . . . . . . . . . . . . . . . .234
3.4 Backing Up User Dictionaries [Backup Dictionary] . . . . . . . . . . . . . . . . . . . .236
3.5 Restoring User Dictionaries [Restore Dictionary] . . . . . . . . . . . . . . . . . . . . .238
Chapter 4 Hints on Pre-/Post-editing for EJ Translation . . . . . . . . . . . . . . . 240
4.1 Hints for Creating/Modifying Original Text . . . . . . . . . . . . . . . . . . . . . . . . . .240
4.2 Major Problems and Their Solutions for EJ Translation . . . . . . . . . . . . . . . .243
Chapter 5 Hints on Pre-/Post-editing for JE Translation . . . . . . . . . . . . . . . 246
5.1 Preparing Appropriate Original Japanese Text . . . . . . . . . . . . . . . . . . . . . . .246
5.2 Refining Translation to Proper English . . . . . . . . . . . . . . . . . . . . . . . . . . . . .251
5.3 Major Problems and Their Solutions for JE Translation . . . . . . . . . . . . . . . .253
Chapter 6 Setting the Translation Environment
[Translation Environment Settings] . . . . . . . . . . . . . . . . . . . . . 256
6.1 Displaying Lists of Translation Environments . . . . . . . . . . . . . . . . . . . . . . . .256
6.2 Creating/Editing Translation Environments . . . . . . . . . . . . . . . . . . . . . . . . . .257
6.3 Deleting Translation Environments . . . . . . . . . . . . . . . . . . . . . . . . . . . . . . . .258
6.4 Importing/Exporting Translation Environment . . . . . . . . . . . . . . . . . . . . . . . .259
vii
Page 9

6.5 Translation Environment Options . . . . . . . . . . . . . . . . . . . . . . . . . . . . . . . . .261
Chapter 7 Editing the Main Window . . . . . . . . . . . . . . . . . . . . . . . . . . . . . . 263
Appendix
A List of Shortcut Keys . . . . . . . . . . . . . . . . . . . . . . . . . . . . . . . . . . . . . . . . 266
B Error Messages . . . . . . . . . . . . . . . . . . . . . . . . . . . . . . . . . . . . . . . . . . . . 268
C For Users of Other ATLAS Series Software . . . . . . . . . . . . . . . . . . . . . . 271
C.1 Users of ATLAS V14 and V8 . . . . . . . . . . . . . . . . . . . . . . . . . . . . . . . . . . . .271
D Uninstalling ATLAS . . . . . . . . . . . . . . . . . . . . . . . . . . . . . . . . . . . . . . . . . 273
D.1 Uninstalling Application Translation . . . . . . . . . . . . . . . . . . . . . . . . . . . . . . .273
D.2 Uninstalling ATLAS . . . . . . . . . . . . . . . . . . . . . . . . . . . . . . . . . . . . . . . . . . . .274
E Managing Dictionaries on Translation Server . . . . . . . . . . . . . . . . . . . . . 275
E.1 About Translation Server . . . . . . . . . . . . . . . . . . . . . . . . . . . . . . . . . . . . . . .275
E.2 Configuring Settings for Connecting to the Server . . . . . . . . . . . . . . . . . . . .276
E.3 Uploading Dictionaries . . . . . . . . . . . . . . . . . . . . . . . . . . . . . . . . . . . . . . . . .277
E.4 Downloading Dictionaries from the Server . . . . . . . . . . . . . . . . . . . . . . . . . .281
E.5 Deleting a User Dictionary from the Translation Server . . . . . . . . . . . . . . . .282
E.6 Scheduling Dictionary Synchronization and Confirming Results . . . . . . . . .285
Index . . . . . . . . . . . . . . . . . . . . . . . . . . . . . . . . . . . . . . . . . . . . . . . . . . 289
viii
Page 10

Introduction
Welcome to ATLAS
After installation, try using ATLAS.This part describes operations
introducing the basic functions of ATLAS.
Functions of ATLAS
Starting ATLAS
Translation by Comp aring Original and Translated T ext [Translation Editor]
Translating Word Files [Word Translation]
Translating in Acrobat [Application Translation]
Translating Contents of the Clipboard [Clipboard Tran slation]
Translating Web Pages with Internet Explorer [Web Translation]
Translating Mail [Mail Translation]
Adding Words [Dictionary Tool]
Utilizing Translation Memory [Translation Memory]
Typ ica l Use of Translation Memory
Finding Detailed Information [H elp, Internet Update]
.................................................................................. 2
......................................................................................... 4
................................................. 15
.......................................... 17
..................... 20
................ 22
............................................................. 24
................................................................. 26
.................................... 29
............................................................ 31
.................................. 35
.... 5
1
Page 11

Functions of ATLAS
Explains ATLAS translation functions and their supplementary functions.
■ ATLAS translation functions
ATLAS is equipped with various translation functions.
Function Explanation
Translation Editor Translates by comparing original and translated text. You can load
documents such as word files directly, edit loaded documents and
translation results, and reflect translation results without changing
layout of the original document. In this way, Translation Editor
increases efficiency of the translation process. From Translation
Editor, you can start Translation Memory, which allows you to
compare text to data stored in the translation memory.
Application Translation ATLAS can translate a document that has been opened by another
application such as Microsoft Word or Excel in collaboration with
those applications.
Web Translation Translates a Web page on Internet Explorer.
Mail Translation Translates E-mail.
Clipboard Translation Translates the copied text on the clipboard.
Key Type T ranslation You can translate text without lifting your hands from your keyboard.
Mouse Translation Translates sentences you want to translate on a Web page or on
applications by simply clicking the mouse.
Introduction
■ Translation support functions
ATLAS is equipped with the following functions for supporting translation.
●
Dictionaries
ATLAS analyzes words and grammatical information in the dictionaries to create translated
text. ATLAS provides the following three types of dictionaries:
● "Standard Dictionary" which is provided as the default dictionary
● "Technical Dictionaries" listing technical terms for different fields
● "User Dictionaries" to which users can add words and translations
The "User Dictionaries" includes "Common Dictionaries" which can be shared by multiple
users.
●
Translation Memory
Using the ATLAS Translation Memory increases work efficiency when translating or creating
large amounts of manuals and technical documents with a common sentence style. The
translations created by users are stored and accumulated in the Translation Memory as
translation memory items. They are automatically retrieved from the Translation Memory and
displayed the next time similar sentences are translated.
Reusing these stored translation memory items helps to minimize the correction work,
increasing translation efficiency.
●
Assistance
To obtain better translations, ATLAS is equipped with functions to find typos in the original
text (spell check) and to divide sentences into independent clauses with meaning (sentence
division).
2
Page 12

Functions of ATLAS
●
Translation Environment Settings
You can set dictionaries used and translation styles as the translation environment for each
type of document to be translated (Thesis, Letter/Mail, Contract, etc) to obtain better
translations.
●
Reading Option
When Microsoft Agent is installed, the ATLAS speech function can read text aloud during
Web Translation, Translation Editor or other ATLAS functions.
●
Internet Update
Internet Update allows you to download the latest user dictionaries that can be used with
ATLAS and product plug-ins from the ATLAS Internet Update Web page and integrate them
with your existing ATLAS environment to further improve your translation results.
●
Collaboration with ATLAS Translation Server
If you install the ATLAS Translation Server on a server machine, its translation engine can be
used for translation. This enables dictionaries to be shared, resulting in uniform translation
quality.
Introduction
3
Page 13
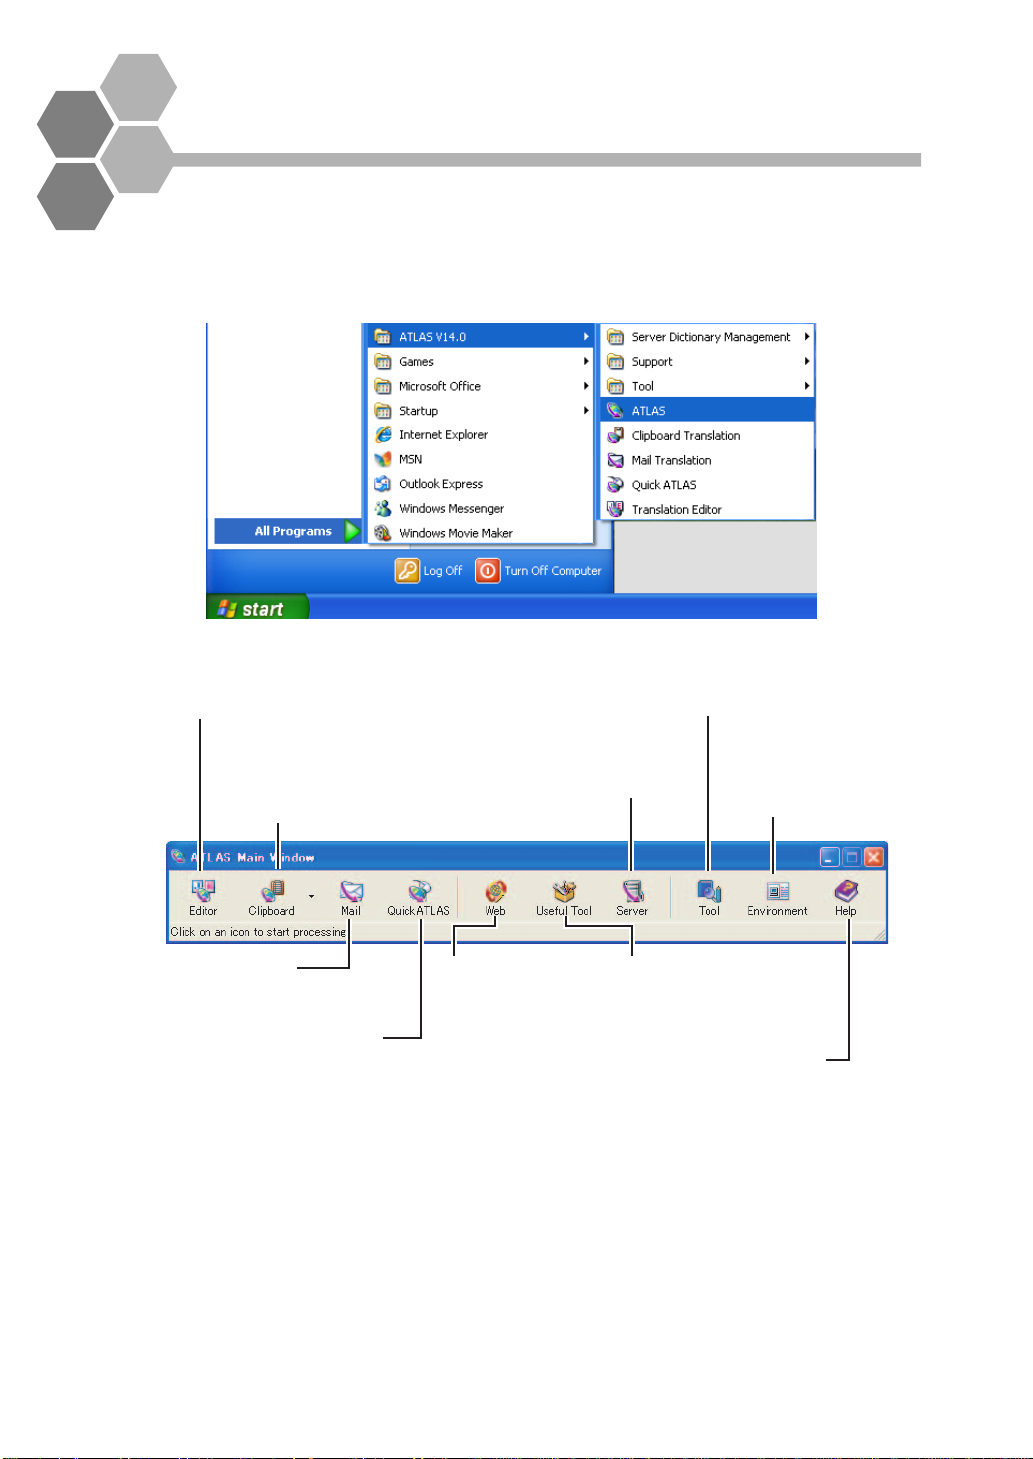
Starting ATLAS
You can start up ATLAS from the [Start] menu.
1
Click the [Start] button, then select [Programs] / [All Programs],
[ATLAS V14.0] and [ATLAS].
A TLAS start s up and the Main Window appears.
Editor
Activates [Translation Editor].
Entered sentences can be translated.
Clipboard
Activates Clipboard Translation.
Translates text copied to the clipboard.
Server
Used to work with dictionaries
in the ATLAS Translation Server
and configure server settings.
Tool
Activates the Dictionary tool functions.
You can add words to User Dictionaries.
Environment
You can customize the
translation environment
according to the type of
document to be translated.
Mail
Activates Mail Translation.
Translates E-mail.
Quick ATLAS
Activates Quick ATLAS.
The [Quick ATLAS] icon
appears on the task tray.
Web
Activates Web Translation.
Translates Web pages on
Internet Explorer.
Useful Tool
Click the [Useful Tool] button,
select [Text Alignment Support
Tool] to start this tool and
create translation memory.
Help
Starts up Help or
Internet Update.
4
Page 14
Introduction
Translation by Comparing Original
and Translated Text
Use the Translation Editor to translate by comparing original and translated
text. The Translation Editor enables you to edit loaded documents before
translation and edit translation results.
[Translation Editor]
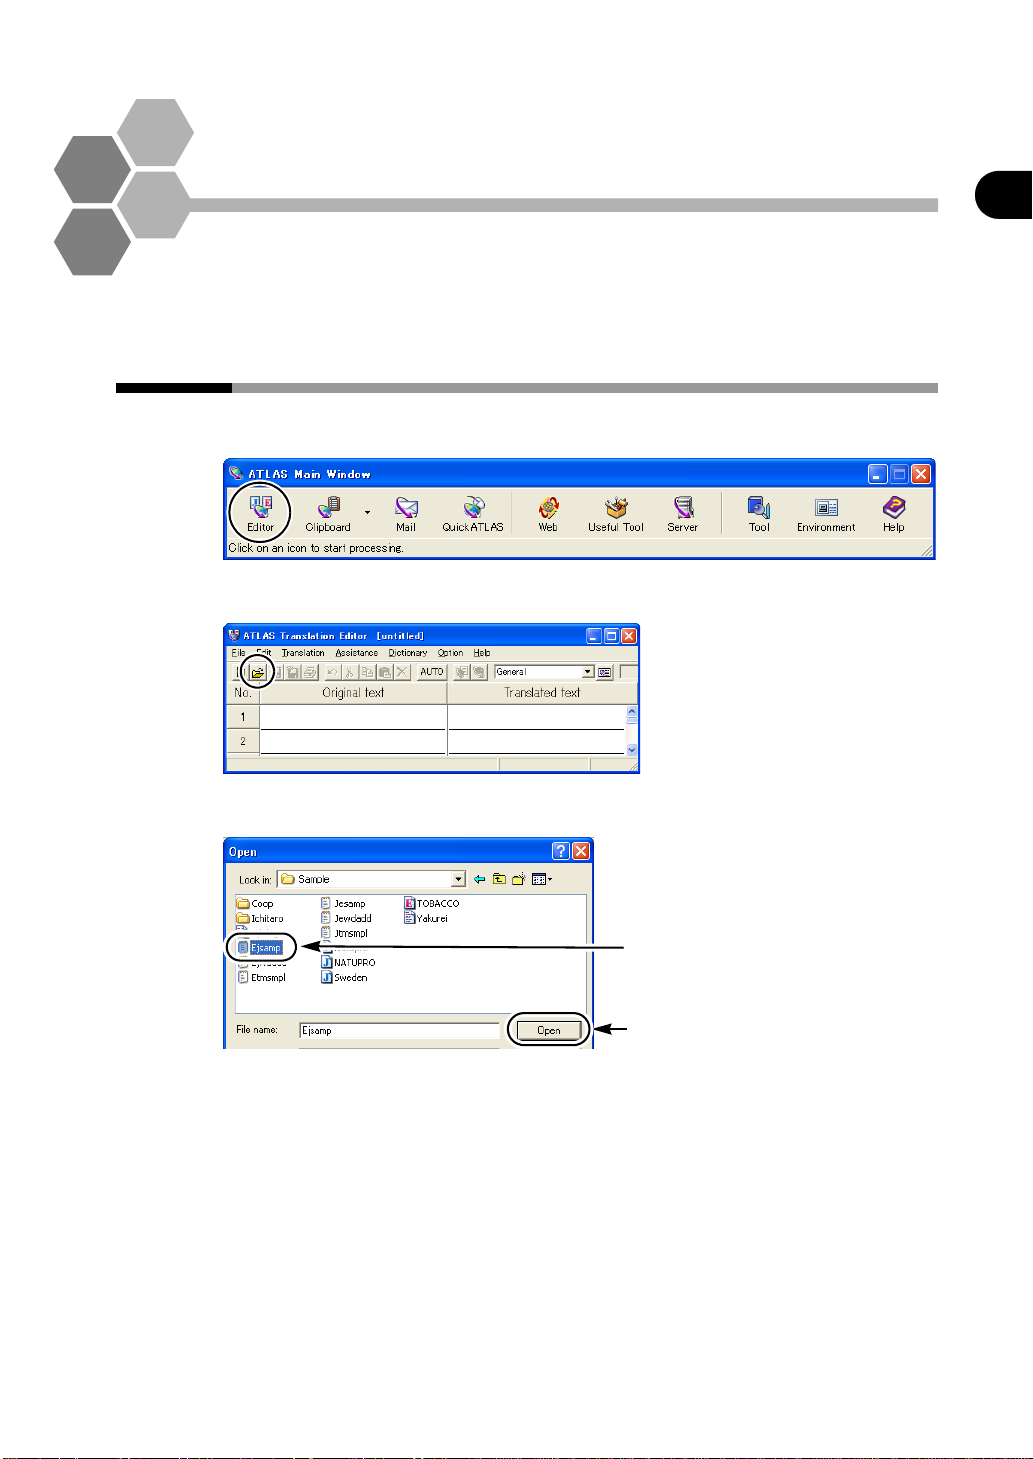
Loading a document in < Translation Editor>
1
Click the [Editor] button in the Main Window.
2
Click the [Open] button.
Introduction
3
Select the file you want to translate, and then click the [Open] button.
1.Select the file
2.Click
Each sentence of the loaded file is displayed in each [Original text] cell on the
[Translation Editor] window.
5
Page 15
Introduction
4
Loading a file from Windows Explorer
You can load a file from Windows Explorer. To do so, right-click a file on the
Windows Explorer, select [Send To] and then [ATLAS Translation Editor].
Also, you can drag and drop a file from Windows Explorer into the Translation Editor.
Files the Translation Editor can read
The Translation Editor can read the following types of files.
Text files (.txt), Horizontal translation files (.trc), Combined translation file (.trd),
Original files (.jpn / .eng), Vertical translation files (.tra) , Translation files (.eng /
.jpn), Rich text format files (.rtf), Excel books (.xls / .xlsx / .xlsm / .xlsb), Word
document files (.doc / .docx / .docm), PDF files (.pdf)*1, PowerPoint files (.ppt /
.pptx / .pptm)
*1: ATLAS can only read PDF files when Acrobat has been installed. ATLAS cannot
read PDF files when only Adobe Reader is installed.
Click the [All Sentence Translation] button.
5
Select [Save As] from the [File] menu.
Translation starts
Translated text
6
Page 16

Translation by Comparing Original and Translated Text [Translation Editor]
6
Specify the type of file and file name, then click the [Save] button.
Loading a file from Windows Explorer
You can load a file from Windows Explorer. To do so, right-click a file on the
Windows Explorer, select [Send To] and then [ATLAS Translation Editor].
Also, you can drag and drop a file from Windows Explorer into the Translation
Editor.
Entering original text from the keyboard
You can input text directly in the Original text cells with the keyboard.
Pasting original text via clipboard
Y ou can load documents created with other applications into the Translation Editor,
via the clipboard.
Check the translated text by re-translation
You can re-translate the translated text back to the original language by selecting
[Confirmation Translation] from the [Translation] menu.
Creating Translation Memory
You can store an edited and completed translation sentence as a translation
memory item to enable the reuse of translation data. For details, refer to "Utilizing
Translation Memory [Translation Memory]" on page 29.
Select the translation environment
You can select the translation environment used with the Translation Editor. For
details, refer to "1.4 Setting the Translation Environment [Translation Environment]"
in "Basics", on page 47.
Files the Translation Editor can Save
The Translation Editor can save the following types of files. For details, refer to "2.4
Saving the Translation Results" in "Basics", on page 57.
• Combined translation files (.trd)
• Horizontal translation files (.trc)
• Vertical translation files (.tra)
• Original files (.jpn / .eng)
• Text files (.txt)
Introduction
Translation using <Translation Editor>
■ Translating all sentences [All Sentence Translation]
1
Open the file you wish to translate.
7
Page 17
Introduction
2
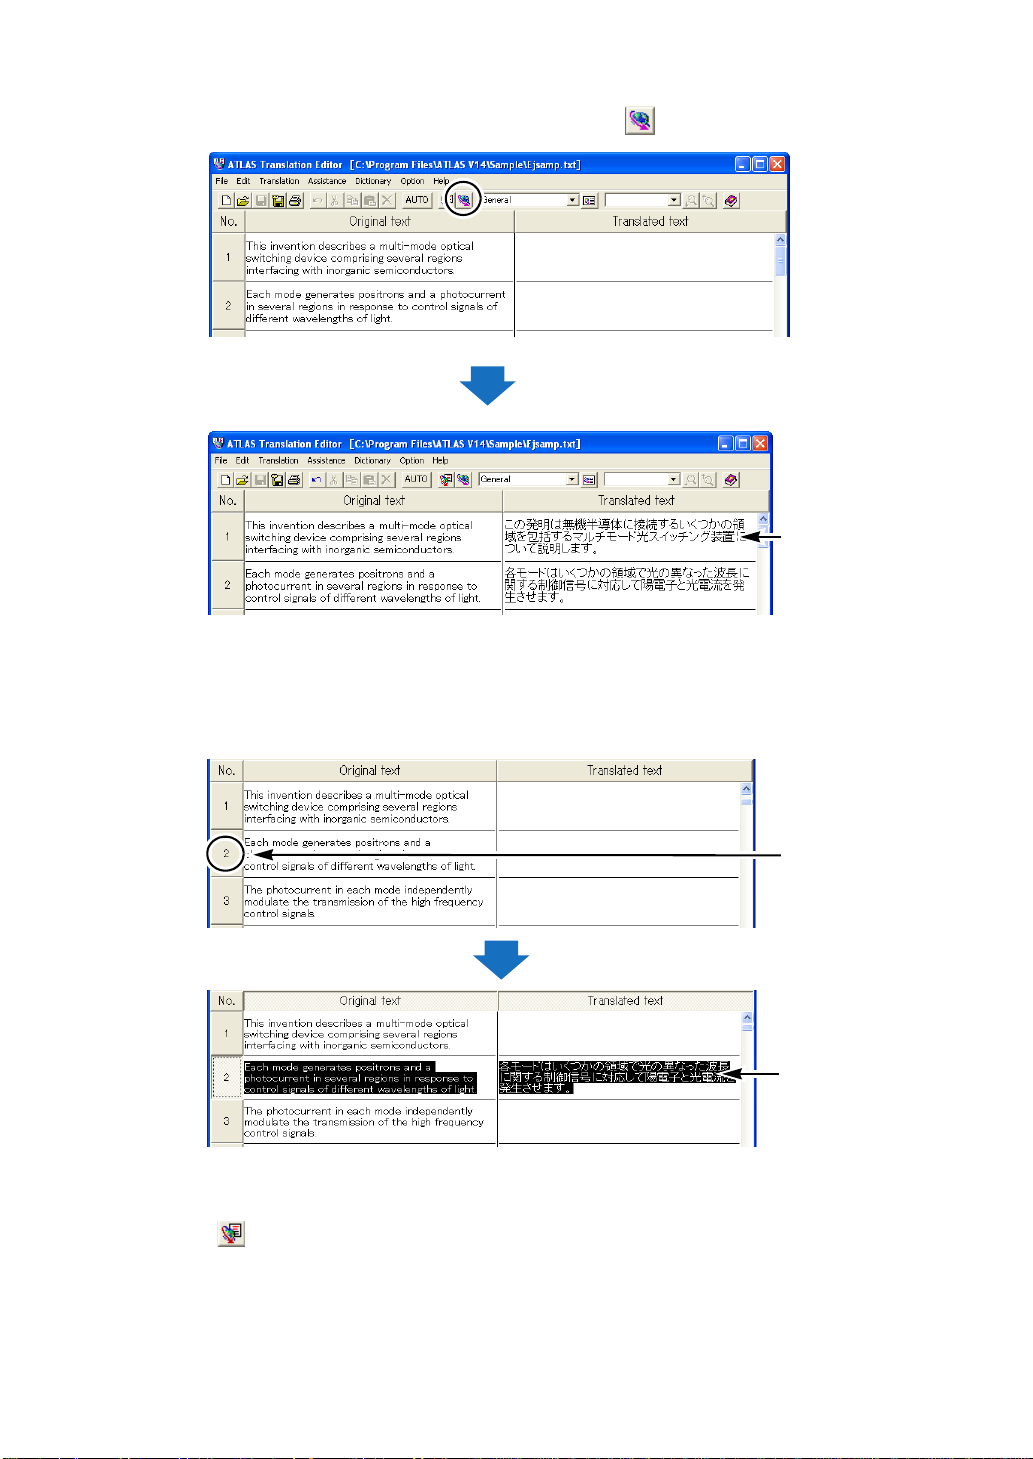
Click the [All Sentence Translation] button ( ).
Translation starts
Translated text
■ Translating one cell only [Translate Single Sentence]
1
Double-click the Sentence Number button of the Original text cell you wish
to translate.
Translation starts
Translation begins.
You can also translate one cell by clicking the [Translate Single Sentence] button
( ) on the tool bar or by selecting [Translate Single Sentence] from the right-click
menu.
Double-click
Translated text
8
Page 18
Translation by Comparing Original and Translated Text [Translation Editor]
■ Translating selected area [Selected Area Translation]
1
Select the character strings in the cell or the Sentence Number button you
wish to translate.
You can select multiple cells located in separate places by clicking the Sentence
Number button while holding down the <<Ctrl>> key.
Highlight by dragging
(Move while pressing the left button)
Click sentence number button
while pressing <<Ctrl>> key
2
Select [Selected Area Translation] from the right-click menu.
Introduction
You can also translate the selected area by clicking the [Selected Area Translation]
button ( ) on the tool bar.
Selecting a Character String or a Cell
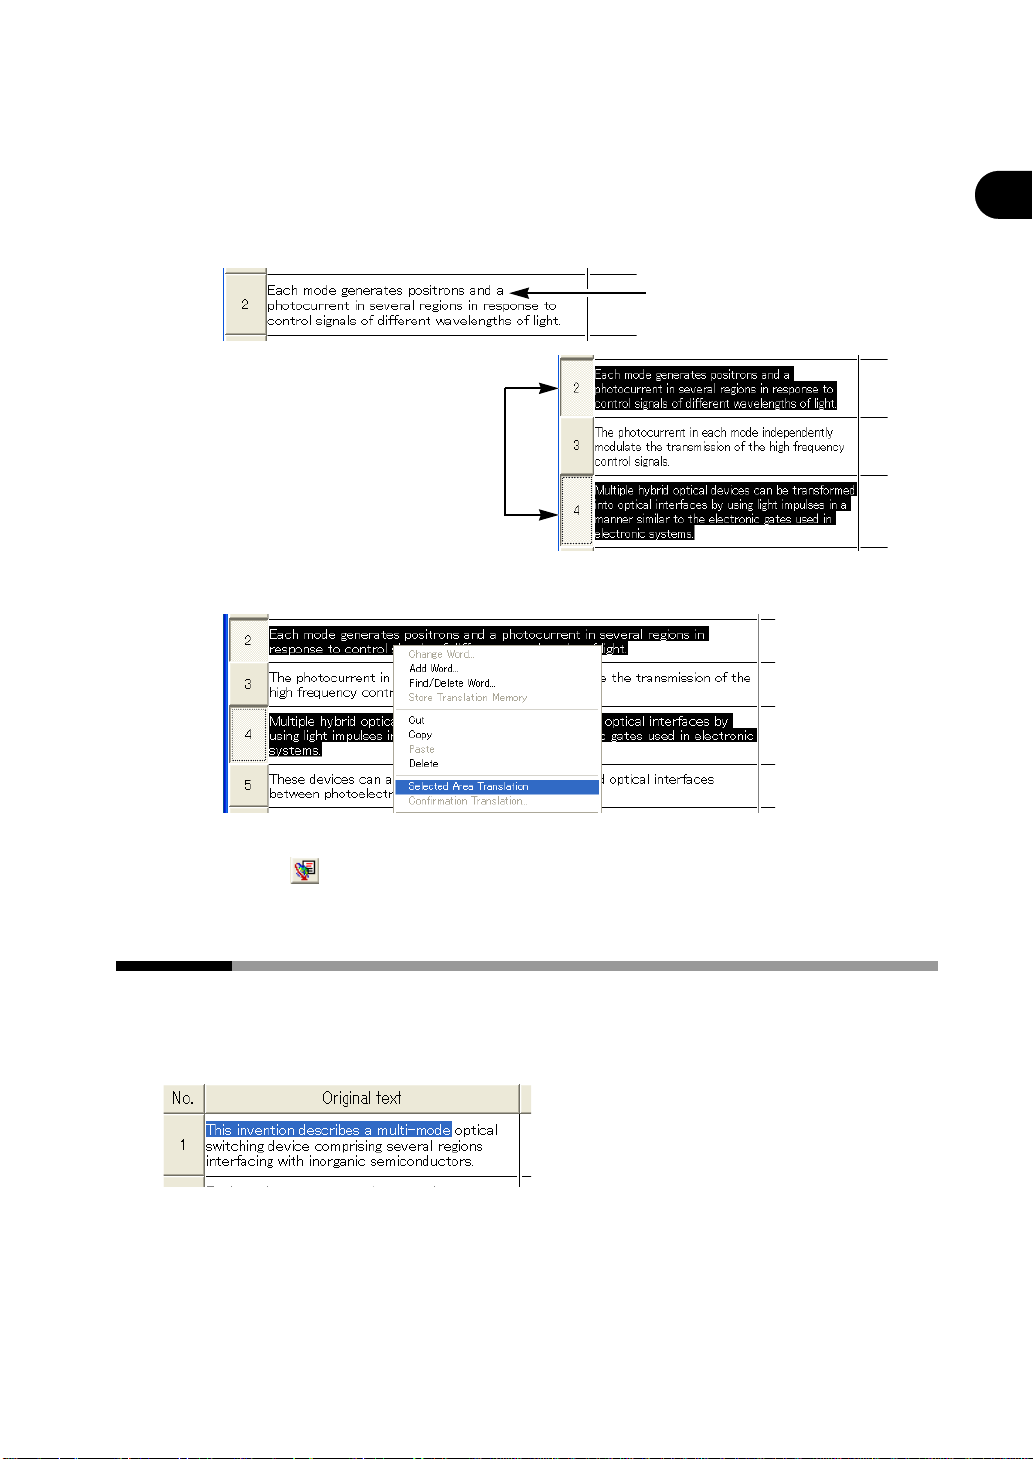
■ Selecting a character string
Select the character string or strings you wish to translate by dragging the mouse (by holding
down the mouse left button).
9
Page 19
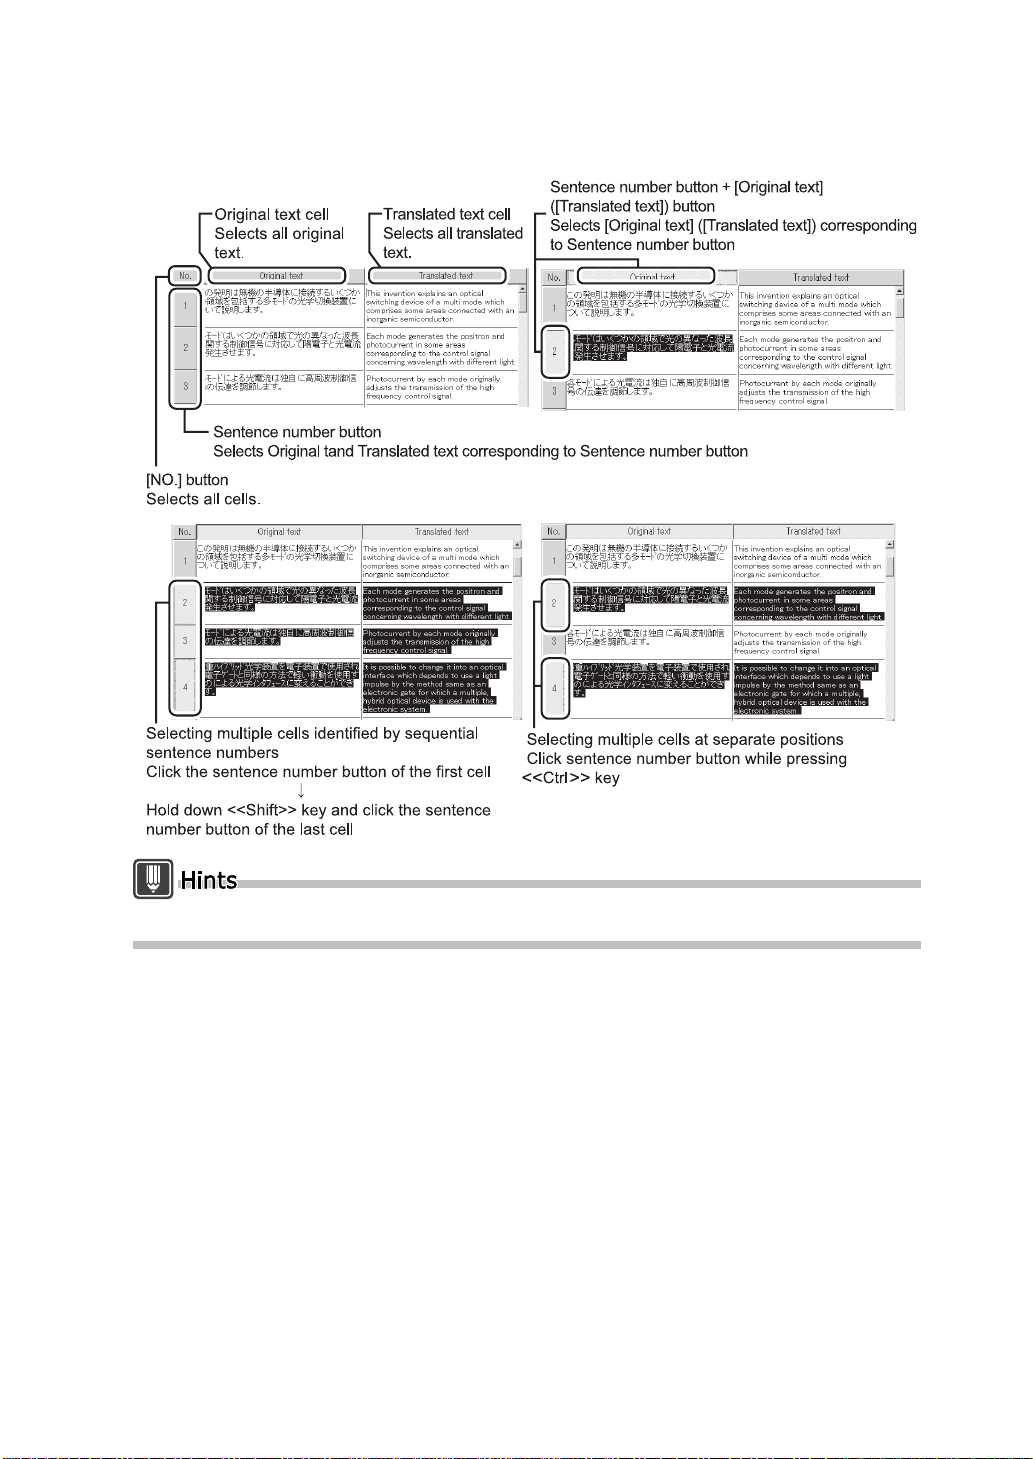
Introduction
■ Selecting a cell
The following explains how to select a text area to edit by cells.
10
To unselect a cell, click any position of the Original text or Translated text cells.
Page 20

Translation by Comparing Original and Translated Text [Translation Editor]
Displaying other possible translations and modifying translated text [Change Word]
1
Double-click the translated word you wish to change in the Translated text cell
or the original word in the Original text ce ll.
Double-click either one
2
Right-click the selected word in the Translated text cell or the Original text cell,
and select [Change Word] from the right-click menu.
Introduction
3
Select the translated word you wish to replace it with and click the [Re plac e]
button.
Check to increase the chance that the
selected translation is used the next time it
appears
1.Select translation
2.Click
Only the selected translated word is replaced.
If an appropriate translation is not found in the list, you may register a new word by
clicking the [Add Word] button.
For details about word registration, refer to "8. 6 Ad ding Words" in "Basics", on page
136.
For details about selecting translation, refer to "2.15 Selecting a Translated Word Used
for Further Translation [Change Word]" in "Basics", on page 72.
11
Page 21
Introduction
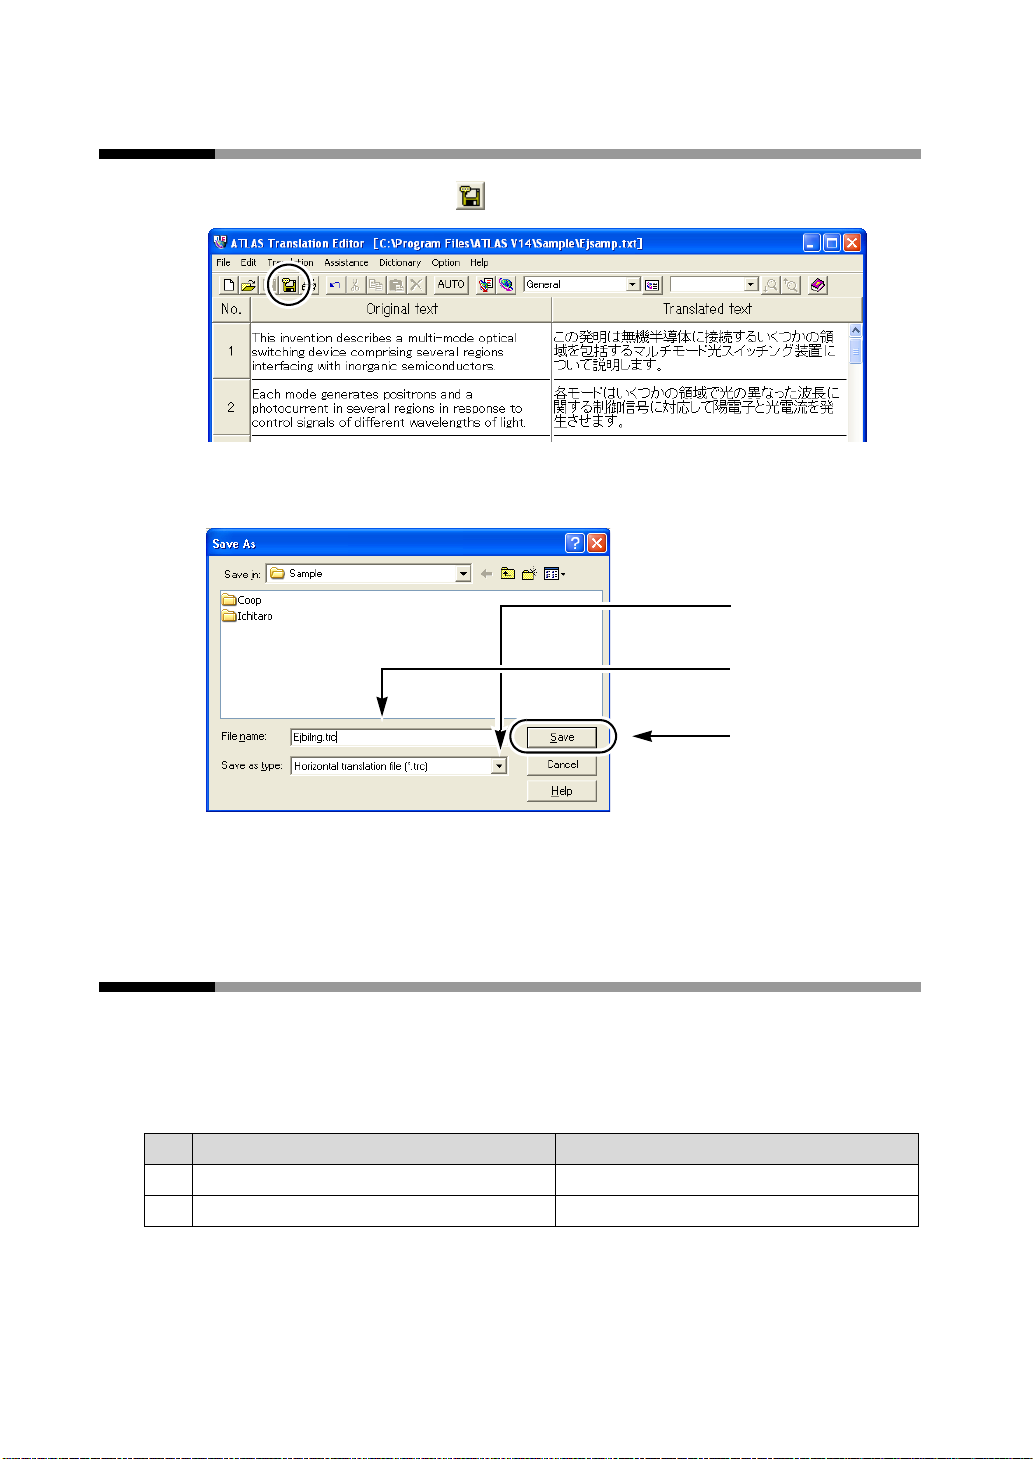
Saving the translation results
1
Click the [Save As] button ( ) on the tool bar.
2
Specify a file type and name, and click the [Save ] button.
The file is saved as a horizontal translation file (.trc).
1.Select the file type
2.Enter file name
3.Click
For the formats in which files can be saved, refer to " ■ Files created by ATLAS" in
"Basics", on page 57.
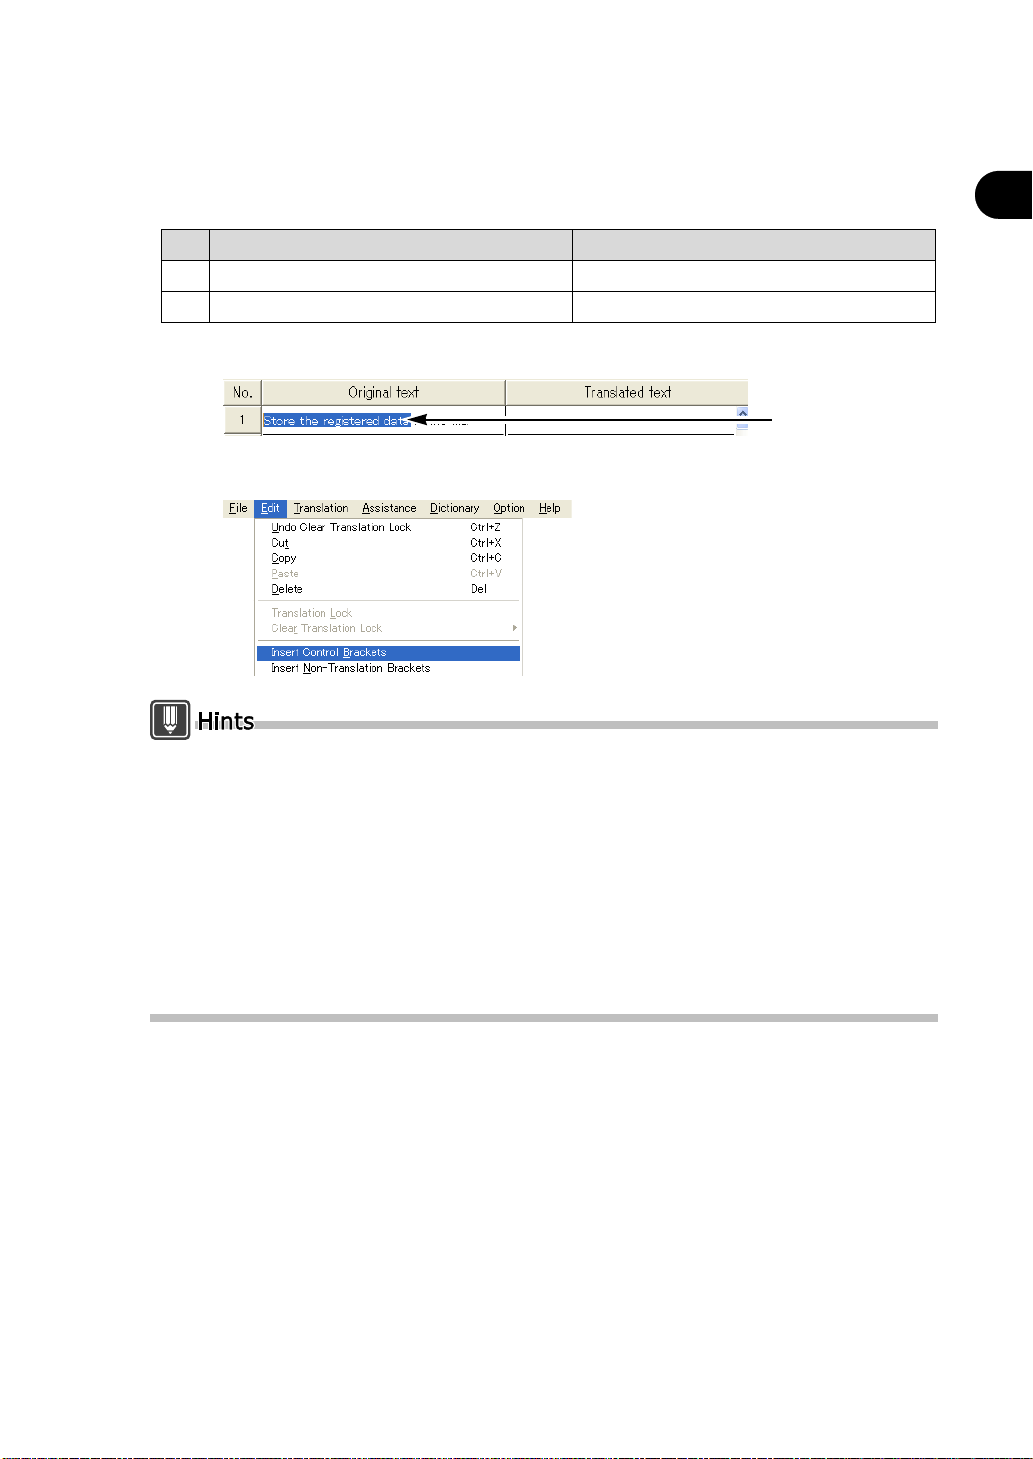
Selecting a Text String as a Translation Unit [Insert Control Brackets]
■ When translating an English text into Japanese
You can select a text string as a clause. The following example shows the selected string in
a pair of brackets ([ ]).
Ex. × : If not specified ○: If specified
Original text Translated text
I looked up the word in the dictionary.
×
I [looked up the word] in the diction ary.
○
私は辞書の単語を 調べ ま し た。
私は辞書で その単語を調べま し た。
12
Page 22
Translation by Comparing Original and Translated Text [Translation Editor]
■ When translating a Japanese text into English
You can define the adjunct (controlled words). The following example shows the selected
words in a pair of brackets ([ ]).
Ex. × : If not specified ○: If specified
Original text Translated text
× フ ァ イルに登録する デー タ を格納せよ。
○ フ ァ イルに [登録するデー タ を格納せよ]。
1
Select the text string you wish to translate as a clause.
2
Select [Insert Control Brackets] from the [Edit] menu.
Store the da ta registered in the file.
Store the registered data in the file.
Select by dragging
Introduction
To delete the control brackets, select [Delete Mark] from the [Assistance] menu and select
[Control Brackets, Non-Translation Brackets] or [All].
The brackets used as [Control Brackets] and [Non-translation Brackets] can be changed.
1. Select [Translation Environment] from the [Translation] menu.
2. Select the [English to Japanese] or [Japanese to English] tab, and click the [Translation Style]
button.
3. Use the [Brackets] tab to set [Control Brackets, Non-Translation Brackets]. Set [Control
Brackets] become single brackets, while set [Non-translation Brackets] become double
brackets.
Set brackets become valid when the next symbol is entered. However, existing symbols are
not changed and the original brackets become invalid when re-translated.
13
Page 23

Introduction
Selecting a Non-Translation Text String [Insert Non-Translation Brackets]
You can select an original text string you want to leave untranslate d in the translat ed
text. The following example shows the selected words in a pair of double brackets ([[ ]]).
Ex.1:
Original text Translated text
We call him the big boss.
We call him the [[big boss]] . 私たちは、 彼を big boss と呼びます。
Ex.2:
Original text Translated text
中国では ト イ レ ッ ト ペーパー を 手紙 と 書 く 。
中国では ト イ レ ッ ト ペーパー を [[手紙]] と 書 く 。 Toilet paper is written 手紙 in China.
1
Select the string of original text you wish to leave as it is in the translated
text.
私たちは、 彼を大きいボス と呼びます。
Toilet paper is written the letter in China.
2
Select [Insert Non-Translation Brackets] from the [Edit] menu.
To delete the control brackets, select [Delete Mark] from the [Assistance] menu and select
[Control Brackets, Non-Translation Brackets] or [All].
The brackets used as [Control Brackets] and [Non-translation Brackets] can be changed.
1. Select [Translation Environment] from the [Translation] menu.
2. Select the [English to Japanese] or [Japanese to English] tab, and click the [Translation Style]
button.
3. Use the [Brackets] tab to set [Control Brackets, Non-Translation Brackets].Set [Control
Brackets] become single brackets, while set [Non-tra nslation Brackets] become double
brackets.
Set brackets become valid when the next symbol is entered. However, existing symbols are
not changed and the original brackets become invalid when re-translated.
14
Page 24
Translating Word Files [Word Translation]
You can translate a Word file with Word Translation.
This section describes how to translate Word files using ATLAS. You can use
ATLAS not only in Word but also in Excel, PowerPoint, Acrobat, and Adobe
Reader by setting up [Application Translation]. For details, refer to "3.1
Preparation (Setup of Application Translation)" in "Basics", on page 79.
1
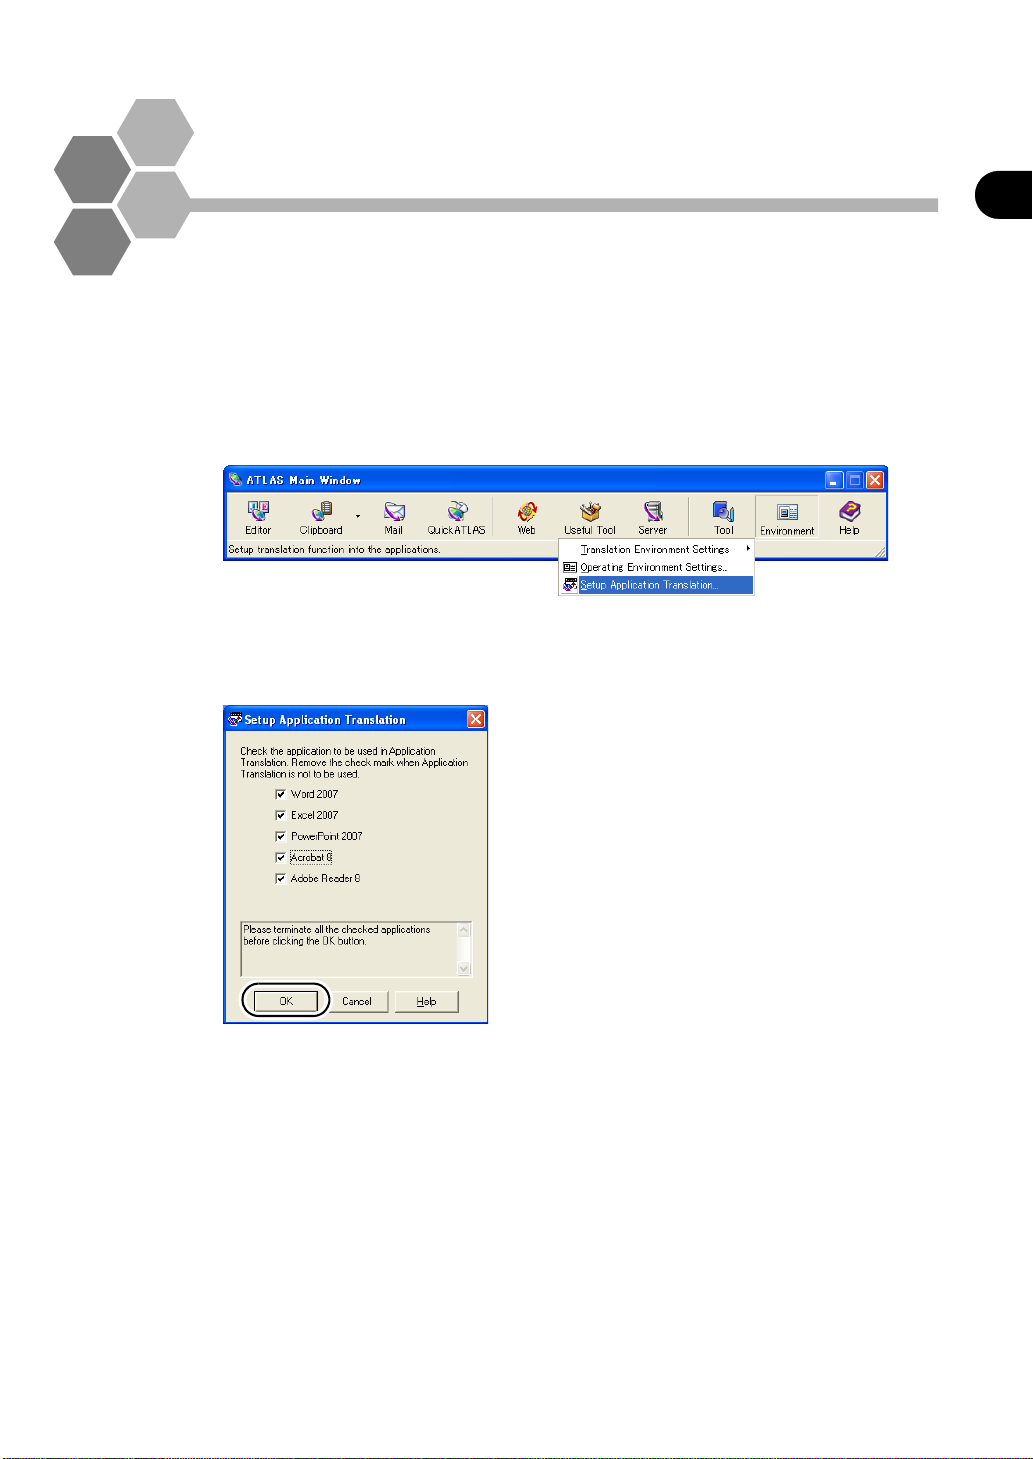
Check whether [Application Translation] is installed.
Click the [Environment Settings] button in the main window, and select [Setup
Application T ransl at ion ].
2
Check the application to be coordinated, and click the [OK] button.
When A T LAS is i nst al led, a chec kmark is auto matic ally plac ed for th e alre ady in st al led
application. Close the checked running applications, and click the [OK] button.
Introduction
A message will appear saying that the application translation setup has been
completed. The [ATLAS] tab (or on the toolbar) will then be displayed the next time you
start the application.
3
Open the Word file you want to translate.
15
Page 25
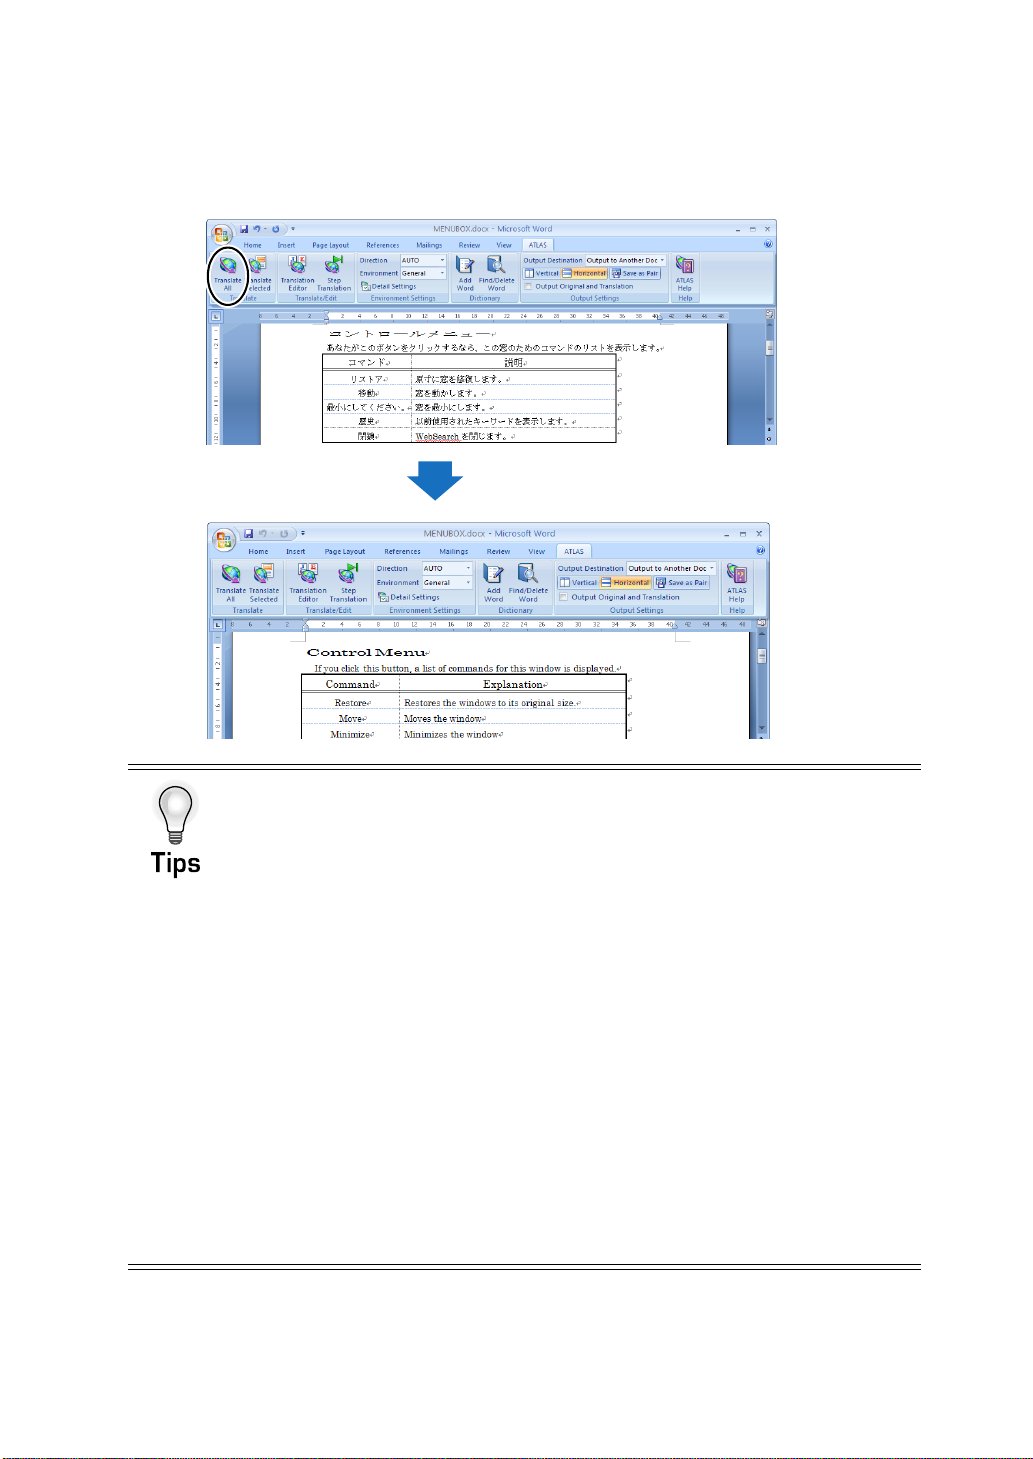
Introduction
4
Click the [Translate All] button on the [ATLAS] tab (or on the toolbar).
The A TLAS toolbar does not appear if Application Translation was not installed during
A TLAS installation; refer to "3.1 Preparation (Setup of Application Translation)" in
"Basics", on page 79.
Translation starts
Selected Sentence Translation
ATLAS can also translate selected parts of Word files. For details, refer to "3.3
Translating a Word File" in "Basics", on page 88.
Select the translation environment
You can specify the translation environment used with Word Translation. For details,
refer to "1.4 Setting the Translation Environment [Translation Environment]" in
"Basics", on page 47.
Reflecting translation results from the Translation Editor in source
documents
Translation Editor can be started from Word Translation. You can reflect translated
text which is translated with the Translation Editor in the original Word document.
For details, refer to " ■ Refl ecting and saving translation results in source
documents" in "Basics", on page 59.
Automatically translating text sentence by sentence
When <Step Translation> is executed from <Word Translation>, text in the Word
document can be automatically translated sentence by sentence. Functions such
as translation memory search and word registration can be used in the [Step
Translation] dialog box.
For details, refer to " ■ Automatically selecting and translating sentences in a
document one by one [Step Translation]" in "Basics", on page 90.
16
Page 26
Translating in Acrobat [Application Translation]
This section describes how to translate in Acrobat using ATLAS.
In addition to Acrobat files, the <Application Translation> function of ATLAS
can also translate Word, Excel, PowerPoint and Adobe Reader files by
setting up [Application Translation].
Check if the <Application Translation> function has been installed by performing steps 1. and
2. of "Translating Word Files [Word Translation]" on page 15.
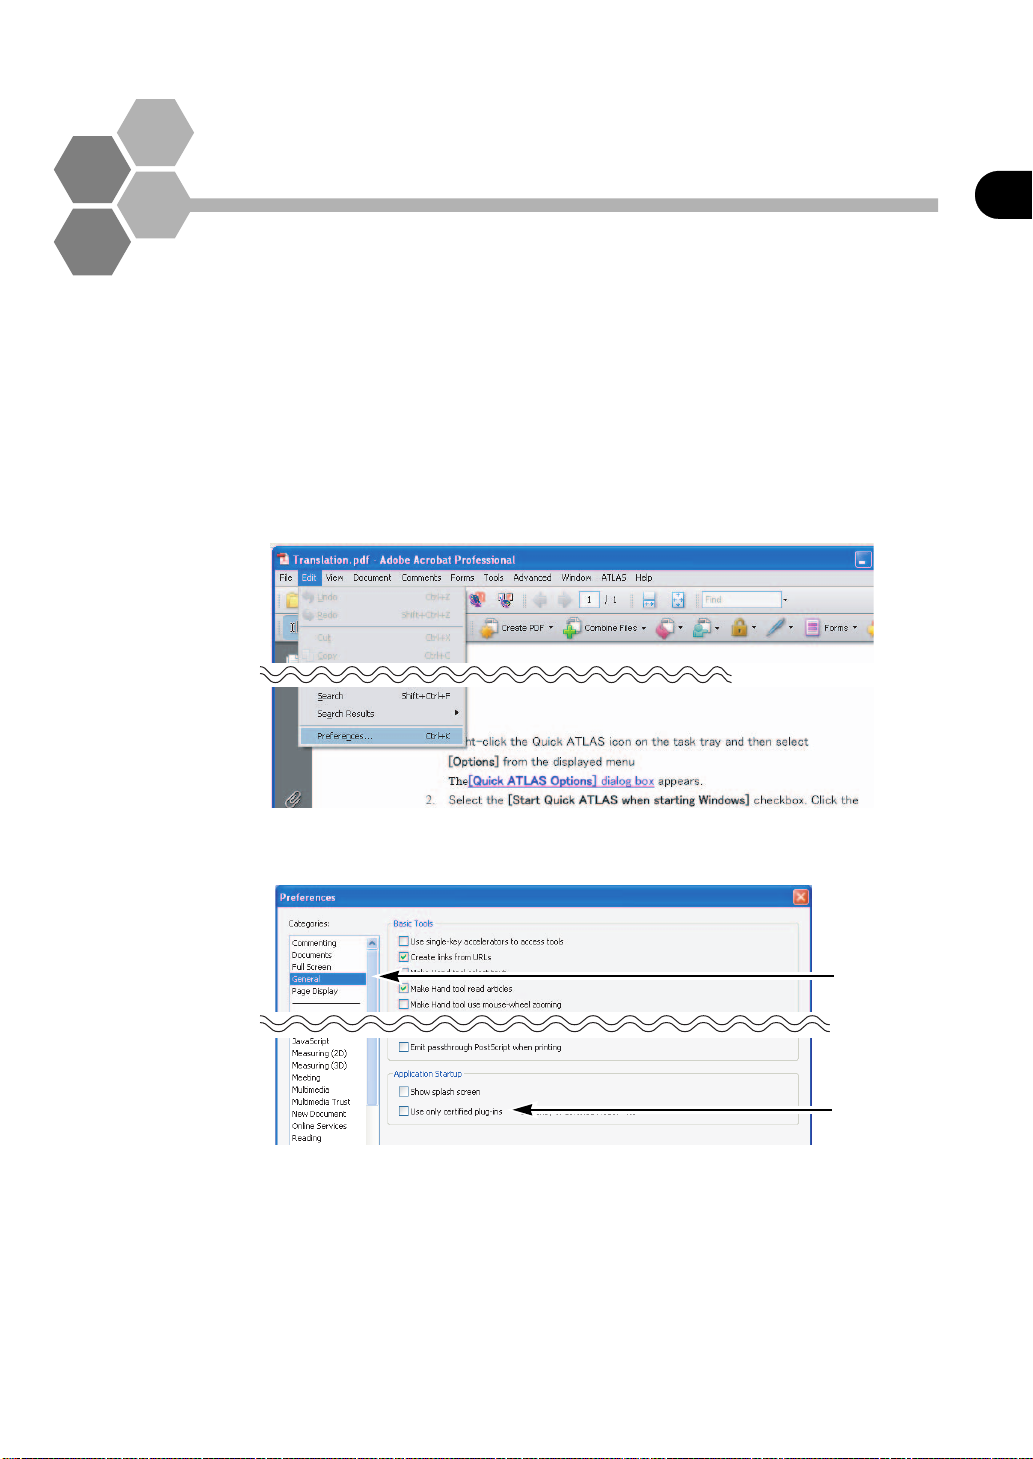
1
Start Acrobat and open the PDF document you wish to translate.
2
Uncheck the box for "Use only certified plug-ins" on Acrobat.
1. Select [Preferences] from the [Edit] menu.
Introduction
2. Click [General] from the list on the left-hand side of the dialog box and uncheck "Use
only certified plug-ins".
1.Click
2.Remove
the check
For details, refer to " ■ Setting up Acrobat and Adobe Reader" in "Basics", on page
80.
17
Page 27

Introduction
3
Click the [Layout Translation] button ( ) on the tool bar.
4
Select the translation range and click the [OK] button.
1.Specify translation range
2.Click
18
Page 28
Translating in Acrobat [Application Translation]
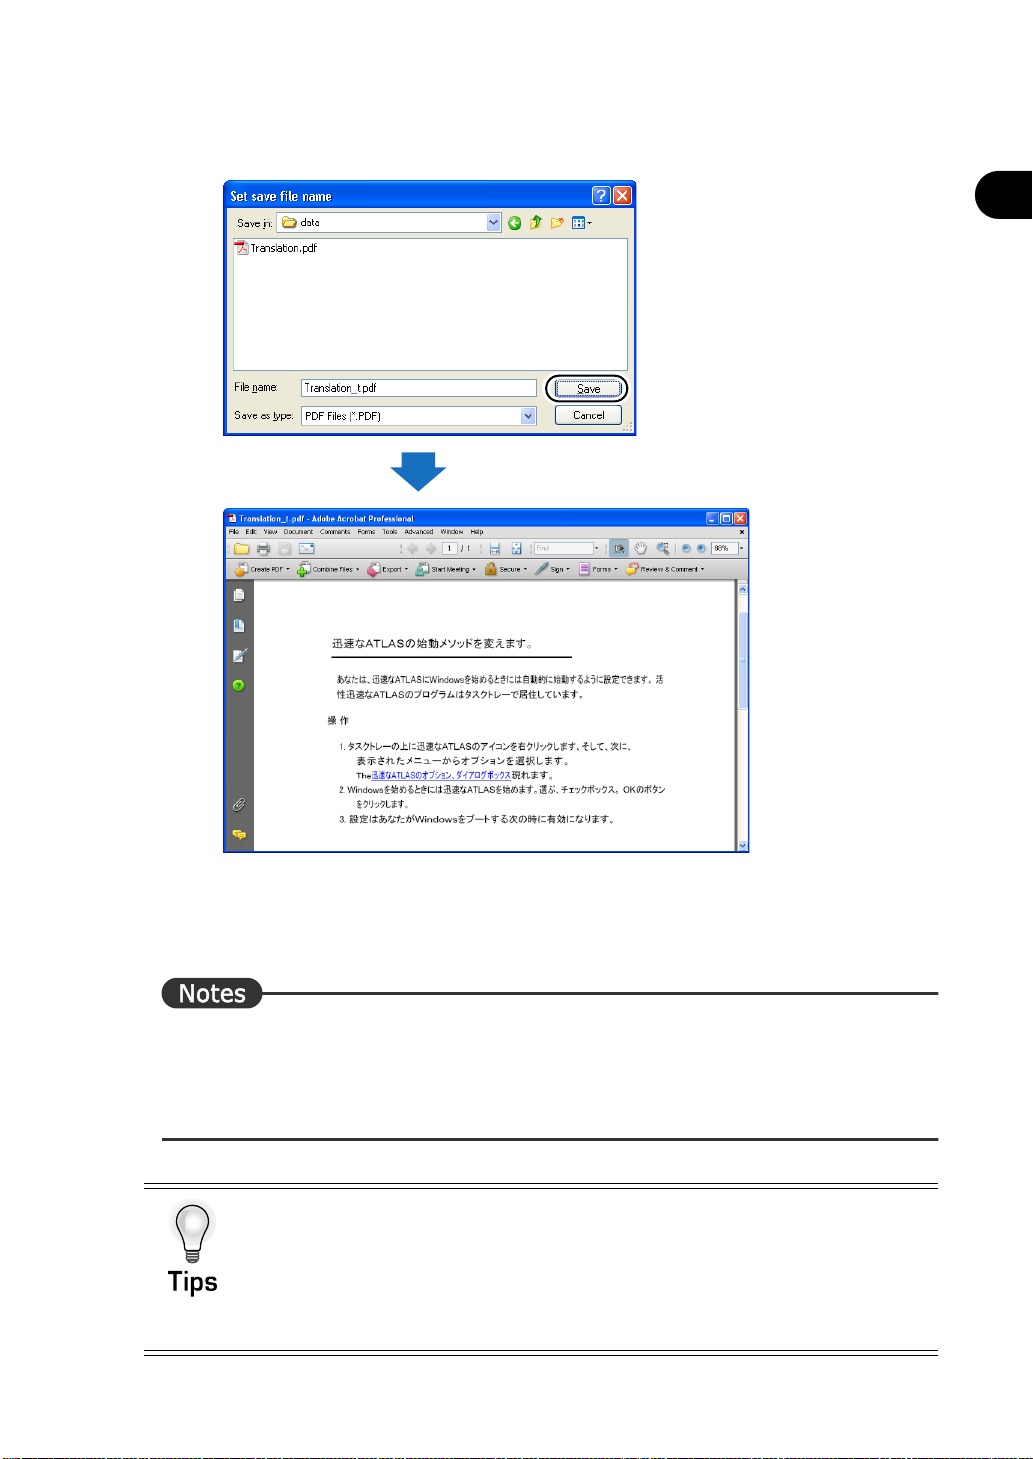
5
Enter the save location and file name of the translation result, and then click the
[Save] button.
Translation starts
Introduction
The translation is executed whereby the layout of the original document is maintained,
and the translated document is saved as a separate file.
It is also possible to translate only the portion selected in Acrobat. For details, refer to "
■ Translating selected sentences" in "Basics", on page 85.
⇒ Depending on the PDF document to be translated, there are cases whe re translation cannot be
implemented due to the setup of security information and setup/reference, which is disabled on
the screen. For details, refer to "Notes" in "■ Setting up Acrobat and Adobe Reader" in
"Basics", on page 80.
Reflecting translated text created with Translation Editor to PDF
document
It is possible to reflect the translated text from Translation Editor to the original PDF
document by starting <Translation Editor> from <Acrobat Translation>.
For details, refer to " ■ Reflecting and saving translation results in source documents " in
"Basics", on page 59.
19
Page 29
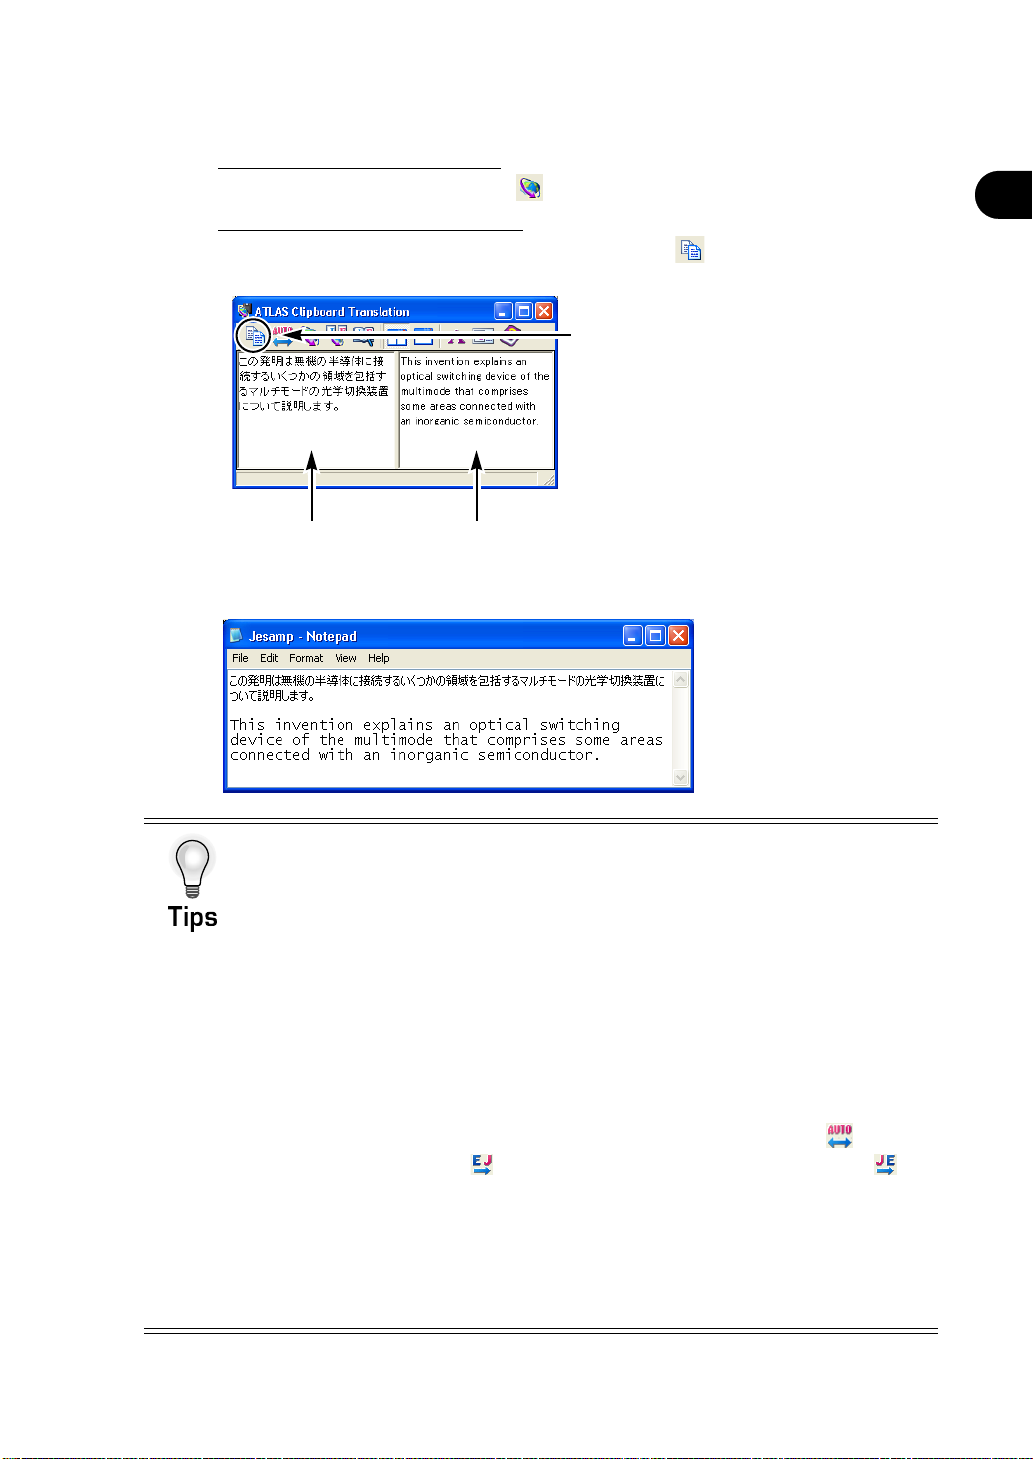
Translating Contents of the Clipboard [Clipboard Translation]
This section describes the method to translate a small amount of sentences
easily.
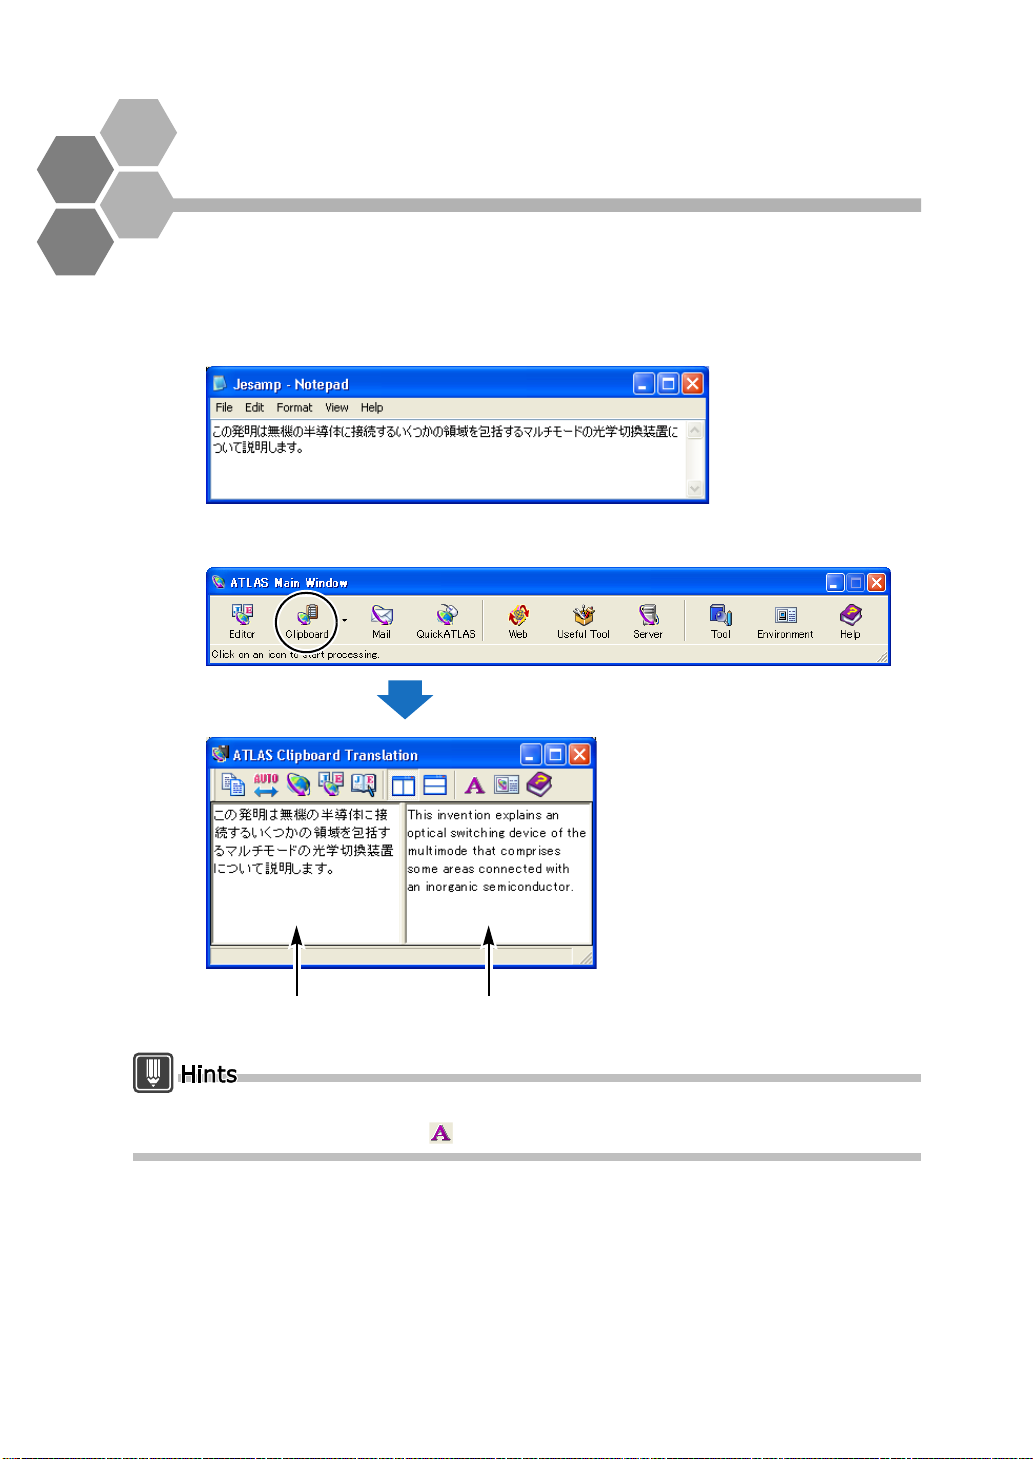
1
Open the text file with Notepad, and then select the text you want to
translate and copy it to the clipboard.
2
Click the [Clipboard] button in the Main Window.
Translation results appear.
20
[Original Text] box [Translated Text] box
The font size used in the origin al an d tr ansl ate d tex t box es can be ch ange d by c licki ng
the [Font Settings] button ( ) in the [Clipboard Translation] dialog box.
Page 30
Translating Contents of the Clipboard [Clipboard Translation]
3
Edit the contents if necessary.
When you edit the original text:
Click the [Start Translation] button ( ) to re-translate.
When you edit the translated text:
Click the [Copy Content of Translated text Box] button ( ) to copy the translation
result.
Click here after editing the contents in
the [Translated text] box.
[Original Text] box [Translated Text] box
4
Paste the translated text into the original file.
Introduction
Automatically Translating the Contents of the Clipboard
Y ou can automatically translate data copied to the clipboard simultaneously when it
is copied. For details, refer to "7.4 Automatically Translating Text on the Clipboard
[Automatic Clipboard Translation]" in "Basics", on page 117.
Select the translation environment
You can select the translation environment used with Clipboard Translation.For
details, refer to "1.4 Setting the Translation Environment [Translation Environment]"
in "Basics", on page 47.
Change the translation direction
For Clipboard Translation, the translation direction is recognized automatically by
default. When both English and Japanese are used in the original text, however,
the direction can be specified before translation.
In this case, you can change the translation direction by clicking the ( ) button.
The button changes to ( ) to translate from English into Japanese or to ( ) to
translate from Japanese into English. The translation direction remains changed
until quitting Clipboard Translation.
Translating using Translation Memory
Clipboard Translation makes it easy to translate into the target language of your
choice using Translation Memory. For details, refer to " ■ Searching Stored
Translation Memory Data in Clipboard Translation" in "Basics", on page 181.
21
Page 31

Translating Web Pages with Internet Explorer [Web Translation]
When Internet Explorer 6-7 is installed on your PC, you can translate Web
pages.
This function requires installation of [Web Translation (Internet Explorer)].
1
Click the [Web] button in the Main Window.
Internet Explorer starts up.
2
Display the Web page you want to translate.
ATLAS Tool Bar
3
Click the [ATLAS Translation] button on the standard buttons toolbar.
For Internet Explorer 7, the [ATLAS Translation] button is hidden by default. Click [>>]
on the right side of the "Command bar" and select [ATLAS T ranslation].
For Internet Explorer 6, if the window is not wide enough to display the [ATLAS
Translatio n] bu tto n, cli ck [>>] on the rig ht si de of the [ Standard Buttons] toolbar and
select [ATLAS Translation].
Translation starts
Click
22
Page 32

Translating Web Pages with Internet Explorer [Web Translation]
⇒ For details on how to use the ATLAS Tool Bar, refer to "5.1 About the ATLAS Tool Bar" in
"Basics", on page 104.
⇒ If you wish to upgrade Internet Explorer, uninstall ATLAS <Web Translation (Internet
Explorer)>. Then install the latest version of [Internet Explorer] before re-installing <Web
Translation (Internet Explorer) >. For details, refer to "Hints" in "5.1 About the ATLAS Tool
Bar" in "Basics", on page 104.
Translate a selected text area
You can also translate a selected text area of a Web page by selecting [Translate
by ATLAS] from the right-click menu.
Read aloud by specifying a range
When you select a character string in Internet Explorer, to have the selected
character string read aloud, right-click the string and then choose [Speech by
ATLAS] from the displayed menu.
Select the translation environment
Y ou can specify the translation environment used with Web T ranslation. For details,
refer to "1.4 Setting the Translation Environment [Translation Environment]" in
"Basics", on page 47.
Specify a range and translate it with Translation Editor
Select and right-click a character string from "Internet Explorer" and select [ATLAS
Translation Editor] from the right-click menu displayed. The selected character
string and its translation are displayed on the Translation Editor.
Introduction
23
Page 33

Translating Mail [Mail Translation]
If you use Outlook, Outlook Express, Windows Mail, Eudora, Lotus Notes
Mail or Becky! you can use the Mail Translation toolbar to translate a
displayed mail item.
Outlook Express is used here as an example.
⇒ During Mail Translation, the clipboard is used to get mail contents.
Also, the translation results are copied to the clipboard.
1
Click the [Mail] button in the Main Window.
The [Mail Tran slat ion] ic on ap pea rs on th e t a sk tr ay and Mai l Translation starts.
2
Launch [Outlook Express] and display the mail you want to translate.
24
Page 34

Translating Mail [Mail Translation]
3
Click the [Start Translation] button on the [Mail Translation] toolbar.
Translation starts
When you are still working on a mail message, the translated text replaces the original text.
The data is also copied to the clipboard. You can then use <<Ctrl>> + <<V>> to paste the data
to other applications such as Notepad.
If ATLAS does not support your mail client, use [Clipboard Translation] or [Mouse Translation]
to translate mail messages.
Introduction
Automatically Starting Mail Translation
You can set Mail Translation to start automatically when you boot up Windows. For
details, refer to "6.4 Automatically Starting Mail Translation" in "Basics", on page
111.
25
Page 35

Adding Words [Dictionary Tool]
During translation, ATLAS analyzes translations and grammatical information
in the dictionaries to create translated text. Through the effective use of the
dictionaries, it is possible to improve the accuracy of translation.
This section describes how to add words not found in the Standard
Dictionary or Technical Dictionaries.
■ Dictionaries
ALTAS has the following three types of dictionaries.
For details, refer to "Chapter 8 Using the Dictionary" in "Basics", on page 122.
Type
Standard ATLAS
Contents
Settings
In order to use User Dictionaries or Technical Dictionaries for translation, they must be set as
"Dictionaries Used in Translation."
ATLAS provides the following Technical Dictionaries as default.
• Business Packet
• Manuals Packet
• Mail Packet
• Entertainment Packet
• Chat Packet
• Patent Packet
• Patent Procedure Packet
• Business mail sample
dictionary
* Cannot change the
contents
None
To be created by the user
* You can create up to 1000
dictionaries
Created by the user
Set in [Dictionaries
Used in Translation]
Set as Changeable
Dictionary
Field-specific Technical
Dictionary
* Cannot change the
contents
Install
(Optional Products)
Set in [Dictionaries
Used in Translation]
26
Page 36

Adding Words [Dictionary Tool]Translating Mail [Mail Translation]
■ Adding words
After ATLAS is installed, "User dictionary0001" is automatically created. The following
explains how to add words to this dictionary.
This section describes the steps to add "IT プロフ ェ ッシ ョナル " as a translation of "IT
Professional."
1
Click the [Tool] button in the Main Window and then select [JE:Add Word].
2
Set the [Japanese], [English] and [Part of Speech] as follows, and click the
[Settings] button.
1.Enter Japanese
2.Enter English
Introduction
3
Click [Add JE] .
3.Select Noun
4.Click
27
Page 37

Introduction
4
When a message appears indicating that word addition is completed, click
the [OK] button.
The word has now been added.
A TL AS will no w tr ansl ate "IT プロフ ェ ッシ ョナル" as "IT Professional."
28
Page 38

Utilizing Translation Memory [Translation Memory]
The results of translation and corrections produced with ATLAS can be stored
as translation examples in the translation memory (in user dictionaries).
Translation examples stored in translation memory are used to translate
similar sentences in manuals, etc., increasing work efficiency.
■ What is translation memory?
㪦㫉㫀㪾㫀㫅㪸㫃㩷㫋㪼㫏㫋
㪫㫉㪸㫅㫊㫃㪸㫋㪼㪻㩷㫋㪼㫏㫋
㪦㫉㫀㪾㫀㫅㪸㫃㩷㫋㪼㫏㫋
㪫㫉㪸㫅㫊㫃㪸㫋㪼㪻㩷㫋㪼㫏㫋
Original manual
Original and translated
text pair are stored in
translation memory
Translation memory item
Introduction
Revised manual
Stored translation memory
items can be used repeatedly
in future
A [translation memory] database stores translation examples consisting of paired original and
translated strings.
Translation memory items are referenced by the translation memory and used during
subsequent translation work when there are similar sentences.
With this function, when manuals and technical documents are revised and the original
sentences are utilized and only partially changed, the stored translation memory items are reused to maintain translation quality and facilitate efficient translation work.
The translation memory is used according to the degree to which source text and the data in
translation memory match, which is referred to as the match value. The match value is set
using the [Match Value of Used Translation Memory] setting in the [Translation Memory] tab
in the Translation Environment Settings. It is set to "100%" by default.
You can use the Translation memory to check match conditions between source text in
stored translation memory data and the original text.
• Ex : [Original text to be translated] → [What do you think of this plan?]
Match value Original text Translated text
[100% Match]
[87% Match]
[47% Match]
What do you think of this plan?
What do you think of my plan?
When do you plan to leave for To kyo?
この計画を ど う 思いますか ?
私の計画を ど う思い ま すか ?
いつ東京へ出発の予定ですか ?
29
Page 39

Introduction
計画をど
■ Mechanism of translation memory function
ATLAS-generated translation text is output in the following order.
When there is a completed sentence in the translation memory that is the same as the
original text, the stored translation memory item is output (indicated in blue). There is no
need for review, increasing translation efficiency.
When data partially match, the translation memory item that meets or exceeds the specified
match value is output (indicated in orange). Usually, only simple corrections are required.
No matches in translation memory; the result of automatic translation is displayed
(indicated in black).
Case 㽲
Case 㽴
Case 㽳
㽴㩷Automatic translation
あなたは、東京
に向けて発つの
をいつ計画しま
すか?
この計画をどう思いますか?
Case 㽴
No matches in translation
memory; the result of
automatic translation is
displayed.
㽲㩷100% match (translation memory) 㽳㩷
Case 㽲
この計画をどう思いますか?
Does not need correction because this is
a 100% match.
Fuzzy match (translation memory) [87%]
Case 㽳
の
う思いますか?
Translator may need to replace
"䈖䈱" with "⑳䈱."
30
Page 40

Typical Use of Translation Memory
This section explains how to use the Translation Editor, using sample
translation memory. For details of how to store new translation memory
items, refer to "Chapter 10 Using the Translation Memory" in "Basics", on
page 174.
For explanatory purposes, lower the default setting of the [Match Value of Used Translation
Memory] setting (which is set to 100% Match by default) in the translation environment to
"70%" or over match (Fuzzy match).
1
Start the Translation Editor and click the [Translation Environment] button.
2
If necessary, import the sample translation memory dictionary ("(66) Basic
Sample") into the [List of Available Dictionaries] displayed in the left panel
of the [Dictionary Settings] tab.
Select "(66) Basic Sample" and click the [Use >>] bu tto n.
Introduction
1.Select the dictionary
2.Click
31
Page 41

Introduction
3
4
5
Click the [Translation Memory] tab, then set the [Match Value of Used
Translation Memory] setting to "70%."
1.Click the [Translation Memory] tab
2.Click [ ▼ ]
Click the [OK] button.
Select "Save as" and enter "Memory 70%" for the [Environment Name],
then click the [OK] button.
1.Enter [Environment Name]
2.Click
6
Click the [Open] button in the Translation Editor and open "Etmsmpl.txt."
"Etmsmpl.txt" is stored in the SAMPLE folder in the folder in which ATLAS V14 is
installed.
Example:C:\Program Files\ATLAS V14\SAMPLE
(When installed on the C drive)
1.Select the file
2.Click
32
Page 42

Typical Use of Translation MemoryUtilizing Translation Memory [Translation Memory]
7
Click the [All Sentences Translation] button.
Translation begins.
When there are translation memory items stored in the translation memory that match
the original text (in accordance wi th th e tran slat ion match v alue se ttin g), th ey are
displayed as follows.
(1) 100% Match (uses translation memory)
Introduction
(2) Fuzzy Match [<100%]
(uses translation memory)
(3) No Translation memory
items that can be used
(Automatic Translation)
(1) 100% Match (translation memory is used)
Characters in the translated text cell are displayed in blue and the translated text of the
translation memory is displayed.
Since this is a 100% match, the translator should not need to change the translation.
(2) Fuzzy Match [<100% match] (translation memory used)
Characters in the translated text cell are displayed in orange and text lifted from
translation memory is displayed in brackets. Also, the match value is indicated in % as
well.
Because this is a fuzzy match, the translated text partially differs from the translation of
the original text. The translator needs to check which part is different and correct the
translated text accordingly.
(3) No translation memory items that can be used (Automatic Translation)
Characters in the translated text cell are displayed in black and the result of automatic
ATLAS translation is di spla yed .
The translator needs to check the translated text and correct as needed.
If you store the results of corrections performed in items (2) and (3) in the translation
memory, they can be used when translating similar sentences the next time.
When processing manuals and technical documents in which similar or identical
expressions and sentences are used frequently, translation efficiency increases if you
store and accumulate corrected items in the translation memory on an ongoing basis.
For details, refer to "Chapter 10 Using the Translation Memory" in "Basics", on page
174.
33
Page 43

Introduction
8
If there are only a few sentences that match the items stored in translation memory (in which
case, text is displayed in blue/orange color), you can try setting a lower match value.
In addition, creating separate translation environment names (files) for each match value
makes it easy to switch between various translation environments.
Y ou can also configure the translation environment to not display the fuzzy match brackets and
the % display that indicates the degree to which a source text string matches items already
stored in translation memory. In addition, you can specify that 100% matches or automatic
translation are placed in brackets, and also change the type of bracket used. For additional
details on this and related topics, refer to Help.
Translation memory data that matches part of a source text string may be utilized in the
translation without displaying [100% Match] or [Fuzzy Match]. The rest of the string is
automatically translated. The [Translated Text] cell characters are shown in black.
Items stored in [Add Example-Based Translation Data] in older versions can be used as is as
translation memory data. For the treatment of the example-based translation data which
includes patterns, refer to "Storing proper nouns and date & time as variables [Store
Translation Memory with Variables]" in "Basics", on page 197.
Translation memory items are stored in the User Dictionary. When two or more user
dictionaries are used, translation memory items are stored in a user dictionary which is set as
the top priority user dictionary (changeable dictionary) in the translation environment. The
translation memory data is applied to all user dictionaries used by translation.
For details about user dictionary, refer to "Chapter 8 Using the Dictionary" in "Basics", on page
122.
If you do not want to use the translation memory setting the next time, set
the Environment Name drop down menu setting in the Translator Editor to
[General].
If you do not need the "Memory70%" translation environment name file created during
this exercise, you can delete it.
• Example: Stored translation memory data:
[Source String]志願者は本人自身で申 し 込む こ とにな っ て い ま す。
[Translated Text] Applicants are requested to apply in person.
• The following string is translated as follows:
[Source String]書類に書き込んだ後に、 志願者は本人自身で申 し 込む こ とにな っ て い ます。
[Translated Text] Applicants are requested to apply in person
* The underline indicates the part of the string that matche s tr anslation memory data.
after filling out the form.
34
Page 44

Finding Detailed Information [Help, Internet Update]
Help allows you to check the meaning or use of a function you are not sure
of while using ATLAS.
■ ATLAS Online Help
1
Click the [Help] button in the Main Window and select [Help Contents].
The Help window is displayed.
Introduction
2
Double click the item you wish to check .
You can also double click the [Index] tab in Help to search by keyword.
Displaying Help for each function
The [Help] button or [Help] menu in each function window allows you to access
Help for each function.
35
Page 45

Introduction
Task Tray
■ ATLAS Online Manual
Follow these procedures to view the PDF version of this guide:
1
Click the Windows Start button and select [All Programs], [ATLAS V14.0],
[Support], [ATLAS User's Guide].
*Adobe Reader must be installe d in ord er to view the PDF man ual. Visit Adobe's
website for information on how to download (http://www.adobe.com/).
■ Startup Guide
When you start Quick ATLAS or Mail Translation, "Startup Guide", a simple explanation of
how to use Quick ATLAS and Mail Translation, is displayed. If you check [Do not show this
dialog next time], the startup guide will not be displayed from the next time. To display
"Startup Guide" again, follow the procedures below.
In this section, Quick ATLAS is used as an example for explanation. For Mail Translation,
read the explanation and replace Quick ATLAS with Mail Translation.
1
Click the [Quick ATLAS] button in the Main Window.
The [Quick ATLAS] icon appears on the Windows task tray and Quick ATLAS start s.
2
Right-click the [Quick ATLAS] icon on the task tray.
PC screen
[Quick ATLAS] icon
Task Tray
36
Page 46

Typical Use of Translation MemoryFinding Detailed Information [Help, Internet Update]
3
Select [Startup Guide] from the menu.
The Quick ATLAS Startup Guide is displayed.
■ Internet Update
If you select [Internet Update] using the [Help] button in the Main Window, your web browser
starts up and takes you to the ATLAS Internet Update Web page.
Dictionaries, program plug-ins and other software can be downloaded from this page and
integrated with your ATLAS environment. For details, refer to the description on this Web
page.
Introduction
37
Page 47

Introduction
38
Page 48

Basics
Try Using ATLAS
This part describes the basic operation of ATLAS.
1 Basic ATLAS Functions
2 Basic Operation of Translation Editor
3 Basic Operation of Application Translation
4 Basic Operation of Clipboard Translation
5 Basic Operation of Web Translation
6 Translating Mail [Mail Translation]
7 Quick ATLAS Basics
8 Using the Dictionary
9 Using the Common Dictionary
10 Using the Translation Memory
........................................................................ 40
.................................................... 53
...................................................... 104
......................................................... 109
............................................................................ 112
............................................................................. 122
.............................................................. 157
.............................................................. 174
............................................ 78
.............................................. 101
39
Page 49

1
Basic ATLAS Functions
This section describes the flow of translation work using translation memory,
which allows you to use ATLAS more effectively.
1.1 Flow of Automatic Translation
Translation by ATLAS can be divided into the following four basic steps.
1
Preparing the source text
ATLAS translates electronic sentence data from the source language into the target
language.
Basics
Create the source text
by entering data in
your PC.
2
Pre-editing
Before starting translation, review and pre-edit the source text. This step involves writing
original text that is optimized for translation. Pre-editing is an effective way to boost
translation quality.
Pre-editing includes:
● Defining the separation between sentences
● Re-writing complicated sentences into plain sentences
● Dividing long sentences into shorter sentences
● Correcting typos and syntax errors
3
Translation
ATLAS translates the source text into the target language. ATLAS has the following
functions.
● Translation of English text into Japanese text and vice versa.
● Translation Editor, Clipboard Translation, Web Translation functions, and Application
Translation.
● Use of the technical and User Dictionaries.
● Changing the translation environment style and the translation method.
4
Post-editing
Review and post-edit the translated text. This step involves checking and completing the
translation. Post-editing is an effective way to boost translation quality.
Post-editing includes:
● Checking the translated text for legibility
● Checking the translated text for syntax errors
Read printed text using a scanner
and convert it into character data
using OCR software.
Prepare already
existing text.
40
Page 50

Chapter 1 Basic ATLAS Functions
■ ATLAS Translation Examples
The following gives typical application examples where ATLAS can be used for text
translation. Read this section as a reference when you use ATLAS.
●
Japanese-to-English rough translation
Use the Translation Editor to get a rough idea of the content of Japanese magazine articles,
etc.
Japanese
magazine
You can get a rough idea of the content by reading the translated text. If a sentence is
unclear, you can check its Japanese text shown at the left.
●
English-to-Japanese presentation document translation
You can quickly translate and create a Japanese presentation document when you need to
make a presentation to Japanese customers.
Use PowerPoint Translation to translate an English presentation document into Japanese
without changing its layout and format.
Read the text using a scanner,
and convert it into text data
using OCR software.
Translate the Japanese text into
English using the Translation Editor,
and output or print out both texts
in parallel layout.
Basics Try Using ATLAS
2
[ATLAS] tab
As the English and Japanese text have different numbers of characters, the translated text
may have an incorrect layout. If this occurs, change the font size or layout using PowerPoint.
41
Page 51

Basics
1.2 Flow of Translation Using Translation
Memory
When translating or creating manuals and technica l documents, usin g ATLAS
translation memory increases translation work efficiency and helps maintain consistent
translation quality. For an overview of translation memory, refer to "Utilizing Translation
Memory [Translation Memory] " in "Introduction."
1
Storing Translation Memory
"Original" and "Translation" stored as pairs of translation examples are stored in ATLAS User
Dictionaries as translation memory data.
Translation memory data can be stored using [Translation Editor] or Excel. Also, you can add
multiple translation memory data items at one time by preparing a text file (.tra / .txt) you want
to register beforehand.
Original Translation
[OK]ボタンをクリックします。 Click the [OK] button.
2
Specifying the method for displaying matching ratio (match value)
and translation
Set the following two items in the ATLAS translation environment settings.
● Match value
Specifies to what degree the sentences to be translated and the translation memory items
should match. Translation memory that matches the setting or better is output as the
translation result.
● Display method
The method for displaying the result of translated text can be changed to differentiate
between text that is translated using the translation memory and text translated by automatic
translation.
3
Translation using translation memory
You can create translation data by consulting data stored in the Translation Memory.
Specifically, when you select a original sentence in an original document opened using an
ATLAS function such as Translation Editor to activate the Translation Memory, any
sentences similar to the original one are retrieved from the translation memory and displayed
in the window. The original text and corresponding original and translated text found in the
translation memory is displayed. Also, this list is color-coded so that you can intuitively
recognize which words or character strings match those in the translation memory.
When you find the right translation from the list, you can then select and apply it to your
translation. On the Translation Memory (Another window), if you cannot find an appropriate
translation in the list, you can use the result of machine translation displayed in the lower
section of the [Translation Memory] window.
42
Page 52

Chapter 1 Basic ATLAS Functions
4
Post-editing
The translation using translation memory specified as "100% match" does not require any
changes. Even for translation with less than 100%, only a partial change completes the
translation.
Original
[Next]ボタンをクリックします。 Click the [OK
At this time, using the Translation Memory allows you to do the following.
● Edit translation memory items
● Delete translation memory items
After that, review the translation for which translation memory is not used (text that is
automatically translated) to perform final checking on the entire translation.
(Translation memory match value)
↓ Change the different part
Click the [Next
Translation
] button.(81% match)
] button.
■ ATLAS Translation Example: …Translation of a revised manual
Translation memory is very suitable for revised manual translation.
Since manuals frequently use similar expressions compared to other types of documents, the
hit ratio (Match Value) of the translation memory is high and the ratio at which translation
memory is used throughout a document is very high.
For that reason, when the old version of translated contents is stored in translation memory
and is used for the revised manual, sentences that are not changed do not need to be
translated again. Furthermore, translation memory is used at a high ratio for not only the
sentences that are partially changed from the old version but also newly added sentences so
that, in many cases, translation can be completed by simply changing part of the translation.
In addition, manuals that use straightforward expressions are suitable for automatic
translation for which translation memory is not used and translation results close to what you
expect can be obtained.
Basics Try Using ATLAS
2
For the actual revised manual translation work, first display and edit the existing manual
translation result (original and translation) in the Translation Editor and perform batch
addition to the translation memory.
At this time, it is more effective if you use [Add Word] to store unique terms such as product
and function names.
Next, use [Word Translation] to use the translation memory for the revised manual. After that,
review the translation to occasionally edit/store the translation memory data to accumulate
translation memory.
43
Page 53

Basics
Translation
Memory
At this time, the larger the translation memory, the greater the match value of the translation
memory, eventually increasing translation work efficiency and maintaining consistent
translation quality.
Store Translation Memory Data
Translation Editor
Excel
Text File
.tra
.txt
Text Alignment Support Tool
Store
Translation
Memory
Search/Edit Translation Memory Data
Translation Memory
(Another window)
Translation Memory
(In the window)
Search/Edit
Start
Can be accessed from:
Translation Editor*
Mail Translation*
1
1
Clipboard Translation
Quick ATLAS (Mouse Translation,
Automatic Clipboard Translation)
Acrobat Translation
Adobe Reader Translation*
WordTranslation
(at the time of Step Translation)
2
44
1
*
Only Translation Memory (Another window).
2
*
Only Translation Memory (In the window).
Page 54

Chapter 1 Basic ATLAS Functions
Translation memory quality can be increased through regular extracting and combining of
accumulated memory during the translation process.
By developing dictionaries in shared folders over a network used by multiple users,
translation style can be standardized. For more about common dictionaries see "Chapter 10
Using the Translation Memory" on page 174.
Administrator
Upload
Download Download
User
Download Download
User
"Match Value" and "Translation Style" of translation memory and dictionaries used can be set
for each translation environment. It is useful to prepare a detailed environment such as the
type of manual, match value, edition/section/chapter unit, etc.
Common Folder
Common Dictionary A
Common Dictionary B
Network Environment
User
User
Basics Try Using ATLAS
2
45
Page 55

Basics
1.3 Suitability of Translation of Various Types of
Documents
Use of ATLAS for various documents and suitability of ATLAS translation is
summarized in the following table.
Use this table when planning translation projects.
Degree of suitability
Classification Usage Suitability of Translation
Parts list Translation Highly useful because of term level
Scanning
Manual
Operation
manual
readme
Function
manual
Instruction
manual
Presentation
material (OHP)
Thesis/technical
documents
Newspapers/
magazines
Patent Translation Highly useful when sentences are short.
Contracts Requires a lot of attention for
Letters Requires a lot of attention because
E-mail Requires a lot of attention because
Advertising/pamphlets Not so suitable because there are many
Translation Highly useful because sentences explain
Scanning
Translation Highly useful because sentences
Scanning
Translation Highly useful because sentences are
Scanning
Translation Highly useful when sentences are short.
Scanning Highly useful.
Translation Not so applicable because there are
Scanning Highly useful.
Scanning Highly useful.
replacement.
procedure and they are relatively short.
explaining functions are usually clear
even though they are relatively long.
short though there are abbreviations.
many current terms, mass media jargon
and also abbreviations.
expressions unique to legal documents.
feelings and special nuances need to be
conveyed.
feelings and special nuances need to be
conveyed. Not so applicable because
there are many unique expressions and
abbreviations.
expressions that appeal to personal
feelings and other literary and special
expressions.
Auto-
translation
○◎
○◎
○◎
○
△○
○-
△△
○-
△△
○-
△△
△△
△△
××
*
Translation
memory
-
-
-
○
-
[Symbols for Degree of Suitability]
Well-suited
◎:
Suited
○:
Suited for J to E translation by ATLAS but requires attention for E to J translation.
*:
Translation requires attention
△:
Not suitable for translation
×:
46
Page 56

Chapter 1 Basic ATLAS Functions
1.4 Setting the Translation Environment
[Translation Environment]
ATLAS provides various translation environments according to the type of the
document to be translated.
■ Translation Environment
ATLAS allows you to set up the Translation Environment that defines the dictionaries and
translation style to be used for translat ion. You can use an appropriate en vironment simply by
switching their names without resetting dictionaries and translation methods every time you
translate documents.
ATLAS provides 9 translation environments as follows:
General, Thesis, Manual, Letter/Mail,
Business, Patent, Contract, Newspaper/Magazine, Entertainment
■ Select the Translation Environment
This section explains how to set the translation environments used for ATLAS.
You can select the translation environment on the ATLAS Main Window or on each ATLAS
function.
After the translation environment is changed for each function, the environment set in Main
Window is also changed.
Use the [Translation Environment] button to view the [Detail Settings] of the current translation
environment when changing translation environments. For details, refer to Help.
●
ATLAS Main Window
Select from the [Environment] button in the Main Window.
Basics Try Using ATLAS
2
47
Page 57

Basics
●
Translation Editor
Select from the list box in the [Translation Editor] window.
●
Clipboard Translation
Click the [Translation Environment Settings] button ( ) in the [Clipboard Translation]
dialog box.
●
Mouse T r ansla tion
Click the [Translation Environment Settings] button ( ) in the [Mouse Translation]
dialog box.
*The translation environment for [Automatic Clipboard Translation] is the same as the
environment specified for [Mouse Translation].
48
Page 58

Chapter 1 Basic ATLAS Functions
●
Key Type Translation
Click the [Translation Environment Settings] button ( ) in the [Key Type Translation]
dialog box.
Basics Try Using ATLAS
●
Mail Translation
Click the [Settings] button on the Mail Translation toolbar.
●
Web Translation
Click the [ATLAS] button on the ATLAS Tool Bar, and click [ATLAS Toolbar Settings].
2
49
Page 59

Basics
●
Application Translation
Word / Excel / PowerPoint
Select from the pull-down menu [Environment (Translation Environment Name)] in the
[Environment Settings] on the ATLAS tab.
ForWord2007
For Word 2003, Excel 2003 and PowerPoint 2003, click the [Environment Settings] button
on the ATLAS toolbar.
50
ForWord2003
ForExcel2003
Acrobat
Select [Translation Environment Settings] from [ATLAS] in the menu bar.
Page 60

Chapter 1 Basic ATLAS Functions
Adobe Reader
Select from the [Translation Environment Settings] button ( ) of the [Acrobat
Translation] dialog box.
●
Text Alignment Support Tool
Select from the list box on the toolbar in the [Text Alignment Support Tool] window.
Basics Try Using ATLAS
2
51
Page 61

Basics
1.5 Applications that can be used with ATLAS
ATLAS can be used with the following applications.
Function Application
Application Word translation Word 2007
Word 2003
Word 2002
Word 2000
Excel translation Excel 2007
Excel 2003
Excel 2002
Excel 2000
PowerPoint translation PowerPoint 2007
PowerPoint 2003
PowerPoint 2002
PowerPoint 2000
Acrobat translation Acrobat 8
Acrobat 7
Acrobat 6
Acrobat 5
Acrobat Reader translation Adobe Reader 8
Adobe Reader 7
Adobe Reader 6
Adobe Acrobat Reader 5
Mail translation Windows Mail 6
Outlook 2007
Outlook 2003
Outlook 2002
Outlook 2000
Outlook Express 6
Outlook Express 5
Lotus Notes R7.0-7.0.2
Lotus Notes R6.5-6.5.5
Lotus Notes R6.0.1-6.0.5
Lotus Notes R5.0
Eudora 7J rev2.0
Eudora 7J rev1.0
Eudora 7J
Eudora 6.2J
Eudora 6J
Eudora 5.1J
Eudora Mini
Becky! Internet Mail Ver.2
Becky! Internet Mail Ver.1
Web translation Internet Explorer 6-7
52
Page 62

2
The Translation Editor translates source text into the target language and
displays both the source text and the translated text in parallel layout.
You can input text directly or read text files or other application files.
Basic Operation of Translation Editor
Basics
2.1 [Translation Editor] Window
The [Translation Editor] window is displayed by clicking the [Editor] button in the
Main Window. The [Translation Editor] window contains the following menus and
buttons.
■ The [Translation Editor] window
buttons.
Basics Try Using ATLAS
that
Displays
When you right-click an Original text cell, Translated text cell or [Sentence Number] button, you
can directly execute many commands for that cell or character string.
You can select multiple sentences by holding down the <<Shift>> or <<Ctrl>> key and clicking
Sentence Number buttons.
Y ou can select [Font] from the [Option] menu to change size and font of characters used in the
[Translation Editor] window.
53
Page 63

Basics
■ Toolbar
54
Setting the Translation Environment
Y ou can set up a unique translation environment when using the Translation Editor .
For details, refer to "1.4 Setting the Translation Environment [Translation
Environment]" on page 47.
Opening Multiple [Translation Editor] Windows
Multiple [Translation Editor] windows can be opened at one time. You can display
original text in different translation directions simultaneously, and you can translate
text in multiple [Translation Editor] windows simultaneously. Select the [New] button
( ) or [Open] button ( ).
Translating with Translation Memory
You can perform translation with the [Translation Editor] and [Translation Memory]
windows aligned horizontally or vertically. For details, refer to "Chapter 10 Using
the Translation Memory" on page 174.
Page 64

Chapter 2 Basic Operation of Translation Editor
■ Various symbols in translated text
When ATLAS translates a text, various symbols may be inserted into the translated text. The
following explains these codes.
●
Japanese-to-English translation
(1)
(2)
(3)
(4)
Basics Try Using ATLAS
(5)
(6)
(1) "*S" identifies a missing subject in the original text.
(2) "*O" identifies a missing object in the original text.
(3) Outputs between ".." and ".." if its analysis has failed. This part may have incomplete translation
or incorrect word order in the translated text.
(4) If the translation has failed, the word-by-word translation results are displayed.
(5) ":" identifies a missing verb in the original text.
(6) When the original text in an Office or PDF document you loaded is separated by a line feed, etc.,
a delimiter is displayed at the corresponding location.
●
English-to-Japanese translation
(1)
(2)
(3)
(1) If the original sentence is long, i t may b e di vid ed into mult ip le se ntences whi ch a re delimi ted by a
semicolon (;) in the translated text.
(2) When the original text in an Office or PDF document you loaded is separated by a line feed, etc.,
a delimiter is displayed at the corresponding location.
(3) If an original sentence cannot be translated due to a synt ax problem, each word of the sentence
is translated separately.
2
In Japanese-to-English translation, if you select [(*S)] for [Omitted Subject] as the translation
style of [Japanese/English translation] in case (1) or if you select [(*O)] for [Omitted Object] in
case (2), the translation results will appear as shown above. For Translation style, refer to
Help.
About the delimiter
The delimiter is about 1/3 the height of the other cells and an “*” is inserted in front of the
sentence number. The delimiter cannot be deleted, copied to the clipboard or cut.
For details on Translation Style, refer to the online help.
55
Page 65

Basics
2.2 Translation
ATLAS translates the sentences you have entered in the Original text cells into the
target language.
■ All Sentence Translation
Translates all sentences in the Original text cells.
1
Click the [All Sentence Translation] button ( ) on the toolbar.
■ Translate Single Sentence
Translates the sentence of the Original text cell at the current cursor position.
1
Move the cursor to the Original text cell you wish to translate.
Click
2
Click the [Translate Single Sentence] button ( ) on the toolbar.
■ Selected Area Translation
Translates original text selected in a cell, or translates selected cells.
1
Click the character string in a cell or the Sentence Number button to select
the text you wish to translate.
Highlight by dragging
(Move while pressing the left button)
Click sentence number button
while pressing <<Ctrl>> key
2
Click the [Selected Area Translation] button ( ) on the toolbar.
Retranslating the translated text for confirmation
Y ou can select [Confirmation T ranslation] from the [Translation] menu to retranslate
the translated text back to the original language for confirmation.
Explorer drag-and-drop function
A file selected in Explorer can be dragged and dropped into the [Translation Editor]
window.
56
Page 66

Chapter 2 Basic Operation of Translation Editor
2.3 Switching between EJ and JE Translation
Directions [Translation Direction]
The translation direction is usually set to automatic selection (AUTO). ATLAS
detects the language of the original text and selects the translation direction
automatically.
If you have an undesirable translation result in AUTO mode, you may solve it by
switching the translation direction.
1
Click [Translation Direction] of the toolbar.
The translation direction is switched in the following sequence each time you click the
button.
Basics Try Using ATLAS
2
click
click
click
2.4 Saving the Translation Results
This section describes the output format and method used to save translation
results.
■ Files created by ATLAS
Text translated by the Translation Editor can be output into the following 6 types of files.
You specify the output format when saving or printing ATLAS translation results.
Each file is identified by its extension. The following defines the file types and their
extensions.
File type Extension Explanation
Horizontal
translation file
Combined
translation file
Vertical
translation file
.trc A data file translated by the Translation Editor. This file has
not only the original and translated text but also information
such as word correspondence.
.trd A data file used by the Translation Editor . This file can be used
when you load Office or PDF documents as a source
document. This file has both the source document data and
also information such as word correspondence.
.tra A data file translated by the Translation Editor. This file has
the original and translated text one after the other. This is a
text file and can be edited with Notepad or other applications.
57
Page 67

Basics
File type Extension Explanation
Original file/
Translation file
Text file .txt An ordinary text file that can be edited with Notepad or other
.jpn A file with the Japanese text only. It is created when:
• English text is translated into Japanese with the
Translation Edit or an d it is saved as a "translated text file"
or
• Japanese text is translated into English with the
Translation Editor and it is saved as the "original text file."
This is a text file and can be edited with Notepad or other
applications.
.eng A file with the English text only. It is created when:
• English text is translated into Japanese with the
Translation Editor and it is saved as the "original text file"
or
• Japanese text is translated into English with the
Translation Edit or an d it is saved as a "translated text file.
This is a text file and can be edited with Notepad or other
applications.
applications.
■ Save
You can save a file by overwriting.
The existing file contents are lost.
Y ou can click the [Save] button to save a combined translation file (.trd), a horizontal translation
file (.trc) or a vertical translation file (.tra) only.
1
Click the [Save] button ( ) on the toolbar.
■ Save As
You can save a file by specifying its format, name and storage location.
1
Click the [Save As] button ( ) on the toolbar.
2
Specify a file type and a file name, and click [Save].
1.Select the file type
2.Enter file name
3.Click
58
Page 68

Chapter 2 Basic Operation of Translation Editor
■ Reflecting and saving translation results in source documents
Operations such as translation and post-editing can be applied to Word, Excel, PowerPoint
and PDF documents as loaded in Translation Editor, and the results can be returned to the
original layout.
1
Select [Open] from the [File] menu, specify the document file to be
translated, then click [Open] button.
The text of the specified document will be loaded to the [Original text] cell.
2
Translate the area you wish to translate.
For detailed explanation of Translation, refer to "2.2 Translation" on page 56.
Delimiter
It is displayed at the corresponding location.
Basics Try Using ATLAS
2
3
Select [Reflect translated sentence in xxx] from the [File] menu.
The name of the application used to create the reflected document is displayed in "xxx."
4
Specify “File Name” and click [Save].
A confirmation message appears asking whether to open the reflected document.
5
Click [Yes].
The document in which the translated text is reflected opens.
The text in which translation is reflected
Checking the source document
Select [Display original document] from the [File] menu to view the original source
document as it was before it was loaded into the Translation Editor.
Displaying the document that reflects translated text before saving it
Select [Display reflected document] from the [File] menu. The document in which
the translated text is reflected opens. You can check the reflection results without
saving the document.
59
Page 69

Basics
2.5 Checking a Translated Word
You can check the translation of any word in the following way.
1
Double-click a word you wish to check within the Translated text or Original
text cell.
Double-click either one
⇒ This function is not available when a vertical translation file (.tra) is opened in the Translation
Editor. If the text is re-translated, this function becomes available.
⇒ If the corresponding word is not found or if you have reentered the original or translated text
after translation, the word correspondence may be lost.
⇒ The following sections are not highlighted.
• Inflection of Japanese verbs and adjectives
• English idioms
• Inflection of English words during Japanese-to-English translation
• English irregular verbs during Japanese-to-English translation
• Fixed part in translation memory with variables
60
Page 70

Chapter 2 Basic Operation of Translation Editor
2.6 Checking the Translation Results
[Confirmation Translation]
You can retranslate the translated text back to the original language for
confirmation.
1
Select the translated text you wish to check.
2
Select [Confirmation Translation] from the [Translation] menu.
Basics Try Using ATLAS
2
If the [Translation Direction] is set to [AUTO], an incorrect translation direction may be selected
depending on the translated text contents. If this occurs, set the [Translation Direction] to [EJ]
or [JE] correctly.
2.7 Merging/Dividing the Original Text
ATLAS automatically recognizes one original sentence at a time, analyzes it, and
creates a translated text. Dividing a sentence at the conjunction where the meaning
breaks down improves the accuracy of the translation.
■ Dividing the Original Text
1
Press the <<Enter>> key at the position where you wish to divide the
sentence.
Place the cursor
Enter ey
61
Page 71

Basics
You can divide the sentence by selecting the sentence number of the Original text you wish to
divide and selecting [Sentence Division] from the [Assistant] menu. In this case, the position
where the sentence is divided is automatically decided.
■ Merging the Original Text
1
Press the <<Delete>> key at the end of a sentence to merge with the
following sentence.
Place at sentence end
I
Delete Key
Selecting a Text String as a Translation Unit [Insert Control
Brackets]
By specifying text strings as translation units or clauses before starting translation,
you can increase translation accuracy. When translating from English to Japanese,
you can specify the text string as a clause or coordinate phrase. When translating
from Japanese to English, you can clarify the modifying expressions (which
modifier corresponds to which modificand).
Select the character string and right click [Inserting Brackets]. For details, refer to "
Selecting a Text String as a Translation Unit [Insert Control Brackets]" in
"Introduction", on page 12.
Selecting a Non-Translation Text String [Insert Non-Translation Brackets]
You can select a text string you want to leave untranslated in the translated text.
Select the string of original text you wish to leave in the translated text and right
click [Insert Non-Translation Brackets].
For details, refer to " Selecting a Non-Translation Text String [Insert NonTranslation Brackets]" in "Introduction", on page 14.
62
Page 72

Chapter 2 Basic Operation of Translation Editor
2.8 Disabling Translation and Editing
[Translation Lock]
After you have reviewed or corrected a cell of translated text, you can protect it by disabling
further translation and editing. You can suppress the following operations.
● Translation commands (Translate Single Sentence, Selected Sentence Translation, and All
Sentence Translation)
● Assistance commands (Sentence Division, Spelling Check, and Delete Mark)
● Edit commands (Cut, Paste, Delete, Convert, and Replace)
● Control mark insertion commands (Insert Control Brackets, Insert Non-Translation Brackets,
and Insert Translation Memory Variables)
The locked cell will be enclosed with blue lines.
■ Disabling translation and editing
1
Select the sentence number of the cell you wish to lock.
Basics Try Using ATLAS
2
Click Sentence Number button
2
Select [Translation Lock] from the [Edit] menu.
■ Releasing the translation lock
1
Select the sentence number of the cell you wish to unlock.
Click Sentence Number button
63
Page 73

Basics
2
Select [Clear Translation Lock] from the [Edit] menu, and select [Clear
Sentence Number Selecti on ].
If you wish to unlock all cells at the same time, select [Clear Translation Lock] and [Clear All] in
this order.
2.9 Checking Spelling Errors [Spelling Check]
A word not found in the dictionaries is detected when the Original text cell is
checked for spelling.
The detected word is shown in a pair of brackets (【 】).
1
Select the cell or cells you wish to check for spelling.
2
Select [Spelling Check] from the [Assistance] menu.
New words can be extracted from a text and added to the dictionary using batch addition. Do
this by adding extracted files. For details, refer to "2.10 Exporting Undefined Words to an add
all text file [Export Undefined Word]" on page 65.
To delete the spelling check marks (such as 【 】), select [Delete Mark] from the [Assistance]
menu and select [Spelling Check Mark] or [All].
To change the spell check mark type, select [Translation Environment] from the [Translation]
menu and click the [English to Japanese] or [Japanese to English] tab. Then, click the
[Translation Style] button and set the spell check mark using the [Brackets] tab.
64
Page 74

Chapter 2 Basic Operation of Translation Editor
2.10 Exporting Undefined Words to an add all text
file [Export Undefined Word]
The Translation Editor allows you to write words in [Original Text] cell that are not
defined in the ATLAS Standard Dictionary or other dictionaries into an "add all text
file" format file.
Using a text editor, you can edit this output file and check that the contents are
correct. This completes the "add all text file" process.
1
Select [Export Undefined Word] in the [Assistance] menu.
Spell-ch ecki ng is perf ormed a nd the [ Undefi ned W ord Export ] dialo g box is disp lay ed.
2
Specify the output folder and filename and click the [Save] button.
Basics Try Using ATLAS
2
1.Specify the folder
2.Enter file name
3.Click
Undefined words are exported in a file.
(1)(2)(3)(4)(5)
Extracted original text is displayed after “ ; .” Words extracted as undefined words
appear within 【 】 .
(1) Part of speech
(2) Undefined words : extracted undefined words
(3) ??? : Location storing translation
(4) English inflection : 0 (regular)
(5) Noun Meaning number
: 名詞-名詞
: 1 (concrete object)
65
Page 75

Basics
3
Use a text editor to open the output file and enter the correct translation
into the ? ? ? area.
4
Save the file.
The "add all text file" is now completed. For details on how to use this file to add all words,
refer to "2.3 Adding All Words [Adding All]" in "Advanced Techniques", on page 228.
For details on add all text files, refer to "2.2 Entering Text into an Add All Text File" in
"Advanced Techniques", on page 220.
2.11 Changing Characters [Convert]
A text string in a cell can be converted as follows.
Option Function Example
Upper-to lowercase
conversion
Lower-to uppercase
conversion
Capitalization Converts the first character of an English
Double-to single-byte
conversion
Single-to double-byte
conversion
*"Decode English extension into Japanese" function has been included in ATLAS V12 to
avoid garbled characters when using the Windows 95 operating system. However, Windows
95 and "Decode English extension into Japanese" are not supported for ATLAS V13 and
later versions.
The following explains how to convert a single-byte " ハイブリッド " into double byte " ハイブリ ッ
ド ."
Converts uppercase letters of the specified
text into lowercase letters.
Converts lowercase letters of the specified
text into uppercase letters.
word into uppercase letter but converts the
remaining characters into lowercase letters.
Changes double-byte English, Japanese
Kana, and symbol characters of a text into
single-byte characters.
Changes single-byte English, Japanese
Kana, and symbol characters of a text into
double-byte characters.
TOKYO → tokyo
tokyo → TOKYO
TOKYO → Tokyo
KATOU<カトウ>
→ KATOU< カトウ >
KATOU< カトウ > →
KATOU<カトウ>
66
Page 76

Chapter 2 Basic Operation of Translation Editor
1
Select " ハイブリッド ."
2
Select [Convert] from the [Edit] menu, and select [1-byte code -> 2-byte
code].
Basics Try Using ATLAS
2
2.12 Formatting Translated Text[Translated
Sentence Format]
You can unify double/single byte text and number forms when formatting translated
text.
Beforehand, you must click [Translated Sentence Format] in the [Assistance] menu
to display the [Translated Sentence Format Settings] dialog box and then set the
format.
⇒ When only delimiter is selected, the translated text cannot be formatted. In such a case,
select the sentence number for the translated text.
1
From the [Translated Text] cell, select the sentence number of the
translated text you want to format.
67
Page 77

Basics
2
Select [Translated Sentence Format] from the [Assistance] menu.
The translated text is formatted according to the settings.
2.13 Marking a Translated Word from a
Dictionary(other than the Standard
Dictionary) [Dictionary of Origin Marks]
You can mark translated words from dictionaries other than the standard dictionary.
Use a mark not used in the text, as the mark is inserted as a character.
1
Select [Dictionary of Origin Marks] from the [Assistance] menu.
68
2
Select a dictionary and a mark type, and click the [OK] button.
It is possible to set a different mark for each dictionary.
1.Select a mark.
2.Select a dictionary.
3.Click
Page 78

Chapter 2 Basic Operation of Translation Editor
3
Perform translation (see page 56).
The translated words taken from the dictionaries other than the Standard Dictionary are
marked.
Follow these steps to delete source dictionary marks.
If the translated text includes the same marks(brackets) as the selected source dictionary mark
they are deleted as well as the source dictionary ma rks.
1. Select the [Translated text] cell or string whose source dictionary marks you want to delete.
2. Select [Dictionary of Origin Marks] from the [Assistance] menu and click [Delete marks]. If no
cell or string is selected, the operation is applied to all translated sentences.
All source dictionary marks in the selection are deleted from the text.
Basics Try Using ATLAS
2
2.14 Searching for and Replacing a Text String
[Find]
A specific text string can be searched for and replaced with another text string.
■ Find
1
Place the cursor in an Original text or Translated text cell.
Cursor
2
Enter the text string you wish to search for in the [Find] box of the toolbar.
3
Click [Find Next] or [Find Upward].
69
Page 79

Basics
4
Repeat Step 3 for continuous search.
A text string is searched in an upward or downward direction from the cursor position. To
search all the cells efficiently, jump to the beginning or end of the cell and start searching.
Y ou can also search for a text string by selecting [Find] from the [Edit] menu and clicking [Find].
During this search, you can distinguish between upper- and lowercase letters.
■ Replace
1
Place the cursor in an Original text or Translated text cell.
2
Select [Find] from the [Edit] menu, and click [Replace].
Cursor
70
Page 80

Chapter 2 Basic Operation of Translation Editor
3
Enter the existing string in the [Find what] box, and enter the new string in
the [Replace with] box.
Check this box to select the casesensitive search for a string.
4
Replace the text string.
Click here to search and replace a string
one by one.
Click here to search and replace all strings
automatically.
A text string is searched for and replaced in an upward or downward direction from the cursor
position. To search all the cell s efficiently, jump to the beginning or end of the cell and start
searching.
Y ou can change the cell to search by clicking an Original text or Translated text cell when searching.
Click the [Undo] button ( ) on the toolbar to cancel the most recent action and return to the
previous state.
Basics Try Using ATLAS
2
71
Page 81

Basics
2.15 Selecting a Translated Word Used for
Further Translation [Change Word]
If the translated text has an inappropriate word, you can change it to another one.
When you specify a word, it is searched for in the "Dictionaries Used in Translation"
(the Standard Dictionary, Technical Dictionary, or User Dictionaries).
⇒ For a vertical translation file (.tra), you can select this option after re-translating the current
text.
1
Double-click the translated word you wish to change or its original word in
the Translated text or Original text cell.
Double-click either one
2
Select [Change Word] from the [Assistance] menu.
3
Select the translated word you wish to change it to, check the [Learn] box,
and click [Re-translate].
When there is no suitable word in the list, enter the [Translated text] directly.
When translated text is selected as a replacement, the [Dictionary name] storing the text
is displayed.
1.Select translation
Check if you want to use
next time
2.Click
72
Page 82

Chapter 2 Basic Operation of Translation Editor
To re-translate specified translated text, click the [Learn] check box in Step 3 and click the [Retranslate] button. Selected translated text is re-translated .
When you click [Add Word], the [Part of Speech] dialog box opens. For details, refer to "8.6
Adding Words" on page 136.
⇒ If the translated text is a Japanese verb or adjective, only its stem is replaced. When the
conjugated form or part of speech differs, the endi ng of a word ma y not be replaced correctly.
Manually replace it and reenter the word.
⇒ When translating into English, all of the replaced words are displayed in the original form.
Correct the ending of the word when necessary.
2.16 Specifying Parts of Speech for EJ
Translation
Basics Try Using ATLAS
2
You can improve the translation accuracy by adding a symbol specifying the part of
speech after the word. The following symbols can be added as parts of speech.
Noun: "_N" (or "_n") Verb: "_V" (or "_v")
Adjective: "_A" (or "_a")
1
Double-click the word whose part of speech you wish to add.
2
Select [Insert Part of Speech Code] from the [Edit] menu, and select a part
of speech ([Noun Code] in this example).
Adverb: "_D" (or "_d")
A code (“_N“ in this sample) identifying the part of speech will be added after the text
you have specified.
73
Page 83

Basics
3
Translate the text.
The translation result will be displayed.
You can directly enter a part-of-speech symbol in the Original text cell.
You can also use the code to specify the part of speech for other translation functions (such as
Application Translation).
You cannot use this function for Japanese/English translation.
2.17 Reading Sentences in the Translation Editor
When Microsoft Agent is installed on your PC, you can have it read sentences in the
Translation Editor window. Microsoft Agent can read both Japanese and English
sentences.
For details on how to download Microsoft Agent, visit the ATLAS Web page (http://
software.fujitsu.com/jp/atlas/).
Before using the speech function, perform the following operations to confirm that the speech
function is enabled.
1. Click the [Environment] button in the Main window and select [Operating Environment Settings].
The [Operating Environment Settings] dialog box appears.
2. Check the [Enable Reading function] check box and click the [OK] button.
To confirm that Microsoft Agent is properly installed, click the [Environment] button in the Main
Window, select [Reading Option] and then confirm that Microsoft Agent, Japanese Engine, and
English Engine are all set to "Enable". [Reading Option] is displayed when the [Enable
Reading function] checkbox is selected under [Operating Environment Settings].
The Japanese Engine can only be used when you login as Administrator, or as a user with
Administrator permissions. However, in Windows Vista, logging in as Administrator gives the
same permissions as a standard user so the Japanese reading feature is not available.
74
Page 84

Chapter 2 Basic Operation of Translation Editor
1
Select the cell that contains a sentence you want to hear.
2
Select [Reading] from the [Assistance] menu.
A character appears on the screen and begins reading the sentences in the selected
cell. The sentences are shown in the speech balloon while being read. When you
select the original text and the associated translation (as a pair), they are read aloud
alternately.
If Microsoft Agent is not installed on your PC the [Reading] item is not available on the
[Assistance] menu.
Basics Try Using ATLAS
2
Text speech begins.
75
Page 85

Basics
The function can read two or more selected cells in sequence.
During reading, a [Break] menu appears and the [Break] button ( ) appears on the toolbar.
Clicking the [Break] menu or [Break] button halts reading on a line basis (i.e. for the cell that
includes the original text and the associated translation).
Right-clicking the character and selecting [Hide] from the displayed pop-up menu immediately
halts reading.
The Speech Function cannot be used simultaneously in multiple screens.
Follow these procedures to change the speech speed:
1. Click the [Environment] button on the Main Window and select [Reading Option].
The [Reading Option] dialog box appears.
2. Click the [Option] button. The [Advanced Character Options] dialog box appears.
3. Click the [Output] tab and follow the instructions on the screen to change the speech speed.
2.18 Printing the Translation Results
You can print out both the original text and its translated text from the [Translation
Editor] window. The print format can be horizontal layout, vertical layout, original
text only, or translated text only.
1
Click the [Print] button ( ) of the toolbar.
To print a specific cell, select the sentence number of the cell and click the [Print] button.
2
Select options and click the [OK] button.
The [Font] button allows you to select the type and size of font that is printed.
In the initial setting, characters are printed in the same typeface and size as the
characters displayed on the screen.
Check this box to print out the file name.
The translated text is printed according to the settings.
76
Page 86

■ Printout examples
●
Horizontal translation
±ʃɰɱ˂ʑʽသّ ЛйоздпнпжУчедео
²ާпȻผާɁɬʓʚɮʃБдцйгепжубжефщбодрхвмйгребге
³ʃɰɱ˂ʑʽɁผާɂɁ
ʲ˂ʷʍʛចّɛɝɕᓦȗ
ȻɢɟȹȗɞȲɔǾоّ
ȪȲȻȲɦȾȟɓȟ
۹ȗɛșȺȬǿ
●
Ve rtical translation
К¼¼ʃɰɱ˂ʑʽသّ
Е¾¾ЛйоздпнпжУчедео
К¼¼ާпȻผާɁɬʓʚɮʃ
Е¾¾Бдцйгепжубжефщбодрхвмйгребге
К¼¼ʃɰɱ˂ʑʽɁผާɂɁʲ˂ʷʍʛចّɛɝɕᓦȗȻɢɟȹȗɞȲɔǾ
оّȪȲȻȲɦȾȟɓȟ۹ȗɛșȺȬǿ
Е¾¾Фиетеуеенфпвебмпфпжрепрмефпчипнфиеобфхтемппуеоубууппо
буеофетйозбгпхофтщвегбхуепжвейозубйдфибффиерхвмйгребгепж
УчедеойувеффетфибофибфпжпфиетЕхтпребообфйпоу®
Chapter 2 Basic Operation of Translation Editor
Фиетеуеенфпвебмпфпжрепрмефп
чипнфиеобфхтемппуеоубууппобу
еофетйозбгпхофтщвегбхуепжвейоз
убйдфибффиерхвмйгребгепжУчедео
йувеффетфибофибфпжпфиетЕхтпребо
обфйпоу®
Basics Try Using ATLAS
2
●
Original text
ʃɰɱ˂ʑʽသّ
ާпȻผާɁɬʓʚɮʃ
ʃɰɱ˂ʑʽɁผާɂɁʲ˂ʷʍʛចّɛɝɕᓦȗȻɢɟȹȗɞȲɔǾ
оّȪȲȻȲɦȾȟɓȟ۹ȗɛșȺȬǿ
●
Translated text
ЛйоздпнпжУчедеоБдцйгепжубжефщбодрхвмйгребгеФиетеуеенфпвеб
мпфпжрепрмефпчипнфиеобфхтемппуеоубууппобуеофетйозбгпхофтщ
вегбхуепжвейозубйдфибффиерхвмйгребгепжУчедеойувеффетфибофибф
пжпфиетЕхтпребообфйпоу®
77
Page 87

3
Basic Operation of Application Translation
ATLAS can translate Word, Excel and PowerPoint files when the
[Translation] button is clicked on each application screen.
Basics
ATLAS supports application translation together with the following application software.
Application Contents
Word Word 2007, Word 2003, Word 2002, Word 2000
Excel Excel 2007, Excel 2003, Excel 2002, Excel 2000
PowerPoint PowerPoint 2007, PowerPoint 2003, PowerPoint 2002, PowerPoint 2000
Acrobat Acrobat 8, Acrobat 7, Acrobat 6, Acrobat 5
Adobe Reader Adobe Reader 8, Adobe Reader 7, Adobe Reader 6,
Adobe Acrobat Reader 5
⇒ When upgrading Word, Excel or PowerPoint, first uninstall or upgrade the corresponding
Application Translation, for example Word Translation for Word, before upgrading the
application.
⇒ If the security level of Office products (Word, Excel, or PowerPoint) is set to "High" or
"Medium", a security warning dialog box may appear after installing Application Translation.
This is not a problem. Click the [Enable Macros] button to continue operation. If the [Enable
Macros] button is disabled, you can select the [Always trust macros from this source.] check
box to enable the [Enable Macros] button. For details, refer to the online help.
⇒ If you have installed Office but have not yet run any Office applications, set up of Application
Translation may fail. Before trying to set up Application Translation, first confirm that Office
applications (Word/Excel/PowerPoint) can start up normally.
Basics Try Using ATLAS
78
Page 88

Chapter 3 Basic Operation of Application Translation
In the initial settings, the translation direction is determined automatically based on the te xt
selected for translation.
If the translation direction is incorrect, set it manually. For Application Translation, the settings
can be found as follows.
• Word Translation
Click the [ATLAS] tab in [Environment Settings].
(For versions of Word earlier than Word 2003, click the [Translation Settings] tab in the
[Environment Settings] dialog box.)
• Excel Translation
Click the [ATLAS] tab in [Environment Settings].
(For versions of Excel earlier than Excel 2003, in the [Environment Settings] dialog box.)
• PowerPoint Translation
Click the [ATLAS] tab in [Environment Settings].
(For versions of PowerPoint earlier than PowerPoint 2003, in the [Environment Settings] dialog
box.)
• Acrobat Translation
Open the [Layout Translation] dialog box, the [Translation Editor] dialog box or the [Acrobat Translation]
dialog box.
• Acrobat Reader Translation
Open the [Acrobat Translation] dialog box.
For Outlook, Outlook Express and Windows Mail Translation see " Translating Mail [Mail
Translation]" in "Introduction", on page 24.
Basics Try Using ATLAS
2
Setting the Translation Environment
Y ou can set up a translation environment including dictionaries and translation style
for Word, Excel, PowerPoint, Adobe Reader, or Acrobat Translation respectively
(see page 50).
3.1
Preparation (Setup of Application Translation)
You must install Application Translation to translate in applications such as
Microsoft Word or Adobe Acrobat.
There are two installation methods:
● Perform the setup at the time of ATLAS installation
● Perform the setup from the [Setup Application Translation] dialog box
The following explains how to install the Application Translation that you did not select during
ATLAS installation.
⇒ Be careful to:
• Login as Administrator before installing or uninstalling Application Translation for Acrobat or
Adobe Reader.
• Install and uninstall Application Translation for Word, Excel and PowerPoint separately for each
user.
79
Page 89

Basics
1
Click the [Environment] button in the Main Window, and select [Setup
Application Translatio n].
2
Check the application to be used with ATLAS and click the [OK] button.
The applications for which the Application Translation was installed when ATLAS was
installed are checked by default. If the checked applications are open, close them and
click the [OK] button.
After the installation of Application Translation is successfully completed, the [Exiting
Application Translation setup.] message appears. When the application is started, the
A TLAS tab appears.
In case of Word ATLAS tab
■ Setting up Acrobat and Adobe Reader
To translate in Acrobat or Adobe Reader you must remove the check mark in the [Certified
Plug-ins Only] check box after installing Application Translation.
●
Acrobat 8 / Adobe Reader 8
1
Select [Preferences] from the [Edit] menu.
80
Page 90

Chapter 3 Basic Operation of Application Translation
2
Click [General] from the list on the left of the dialog that appears.
3
Uncheck the box for [Use Only Certified Plug-ins].
In case of Acrobat 8
4
Click [OK].
●
Acrobat 7 / Adobe Reader 7 / Acrobat 6 / Adobe Reader 6
1
Select [Preferences] from the [Edit] menu.
2
Click [Startup] from the list on the left of the dialog that appears.
1.Click
2.Remove
the check
Basics Try Using ATLAS
2
3
Uncheck the box for [Use Only Certified Plug-ins].
4
Click [OK].
●
Acrobat 5
1
Select [Preferences] - [General] from the [Edit] menu.
2
Click [Options] from the list on the left of the dialog that appears.
3
Uncheck the box for [Use Only Certified Plug-ins].
4
Click [OK].
●
Adobe Acrobat Reader 5
1
Select [Preferences] from the [Edit] menu.
2
Click [Options] in the list on the left side of the dialog box that appears.
81
Page 91

Basics
3
Uncheck the box for [Use Only Certified Plug-ins].
4
Click [OK].
⇒ Translation of PDF documents may not be possible for documents whose security does not
permit setting or browsing.
■ [Layout Translation]
All security features except [Printing] must be set to [Allowed].
■ [Page Translation/Selected Sentence Translation]
The following security features must be set to [Allowed].
- Acrobat 7 and Acrobat 6 [Content Copying or Extraction]
- Acrobat 5 [Content Copying or Extr ac ti on ]
Check Acrobat security settings as described below.
• [Adobe Reader 7 / Acrobat 7] / [Adobe Reader 6 / Acrobat 6]
Select [Document properties] - [Security] from the [File] menu.
• [Acrobat 5]
Select [Document Security] from the [File] menu,then click [Display Setting] button in the dialog
that appears.
• [Adobe Acrobat Reader 5]
Select [Document Security] from the [File] menu.
82
Page 92

Chapter 3 Basic Operation of Application Translation
3.2 Translating by Acrobat / Adobe Reader
The following explains how to translate PDF files by Acrobat / Adobe Reader.
■ ATLAS Toolbar and [ATLAS Acrobat Translation] Dialog Box
This section explains about ATLAS Toolbar (Acrobat Translation).
The toolbar buttons shown on Acrobat differ from those on Adobe Reader.
Selection Translation
Translation Editor
Translates using
Translation Editor.
Layout Translation
Translates PDF documents while
maintaining the original layout.
When you translate a page or selected area, the translated results are shown in the [ATLAS
Acrobat Translation] dialog box. Some functions differ in Acrobat and Adobe Reader.
Translates the selected text.
Page Translation
Extracts all the text on
the displayed page and
translates it.
Toolbar
Basics Try Using ATLAS
2
Copy Content of Translated text Box
Copies translation results.
Switch Translation Direction
Changes the translation direction
when re-translating as follows:
ψψ
Start Translation
Starts retranslation when
the original text has been edited.
Translation Editor*
Starts up the Translation Editor.
Translation Memory
Starts up the Translation Memory.
Display Horizontally
Displays original and translated text
horizontally.
Font Settings
Changes
Display Vertically
Displays original and
translated text vertically.
Original Text box
Displays the original text.
You can edit directly.
Translated Text box
Displays the translated text.
You can edit directly.
Translation Memory
(In the window)
Appears when you click
the [Translation Memory]
button (Default setting).
the font size and style.
Help
Display help.
Translation
Environment Settings
Changes Translation
environment.
* When Adobe Reader is used for translation, this icon is not displayed.
83
Page 93

Basics
■ Maintaining layout during translation
The Acrobat PDF file is translated while maintaining the layout of the original document.
This function is not available in Adobe Reader.
Start the procedure after you open a PDF file.
1
Click the [Layout Translation] button ( ) on the ATLAS toolbar.
2
Select the translation range and click the [OK] button.
1.Specify translation range
2.Click
3
Enter the save location and file name of the translation result, and click the
[Save] button.
Translation starts.
84
Page 94

Chapter 3 Basic Operation of Application Translation
■ Translating Text on Displayed Pages
The text on an PDF document page is translated.
1
Open the PDF document in Adobe Reader to the page you wis h to translate.
Check the Current Page indication.
2
Click the [Page Translation] button ( ) on the ATLAS toolbar.
Basics Try Using ATLAS
2
When the translation is completed, the results are displayed in the [Acrobat Translation]
dialog box.
■ Translating selected sentences
You can translate a selected range of text in an PDF document.
Start the procedure after you open a PDF file.
1
Click the [Select Tool] button to select the range of the translation.
85
Page 95

Basics
2
Click the [Selection Translation] button ( ) on the ATLAS toolbar.
When the translation is completed, the results are displayed in the [Acrobat Translation]
dialog box.
PDF documents contain special fonts that can make it impossible to export the original text
correctly without garbling the characters. This makes it difficult for A T LAS to correctly assess
the translation direction and produce a good translation.
• When characters are not correctly imported, edit characters directly in the [Acrobat
Translation] dialog box, and click the [Start Translation] button ( ) to translate the text
again.
• When the translation direction is not correctly assessed, click the button to change the
translation direction to the button ( ) or ( ). This change can be made when the
[Acrobat Translation] dialog box is displayed. When this dialog box is closed, this returns to
.
You can search and register translation memory items while using Acrobat.
When you use Acrobat, you can display the [Translation Memory] window by clicking the
[Translation Memory] button ( ) from the toolbar in the [Acrobat Translation] dialog box.
Using this dialog box, you can search the translation memory or add items to the translation
memory.
For details on the [Acrobat Translation] dialog box, refer to Help. Click the [Help] button ( )
to open the Help file.
86
Page 96

Chapter 3 Basic Operation of Application Translation
■ [Acrobat Translation] dialog box
You can customize the layout of the [Acrobat Translation] dialog box, such as by switching
how the source and translation boxes are aligned (horizontally or vertically) and changing th e
display font size.
●
Changing Display Tiling
1
Click the [Display Horizontally] button (
The window display changes accordingly.
●
Changing the Font Size/Style
1
Click the [Font Settings] button ( ).
2
Change the font size and/or style and then click [OK] button.
)
or [Display Vertically] button ( ).
Basics Try Using ATLAS
2
87
Page 97

Basics
3.3 Translating a Word File
The following explains how to translate Word files.
There are two ways to translate Word files: translate the entire document, or
translate selected ran ge s.
In addition, you can change how translation results (transla ted text) are displayed.
■ ATLAS Tab and ATLAS Toolbar
ATLAS Tab for Word 2007
a.All Sentence Translation
Translates the entire
document at once.
b.Selected Sentence
Translation
Translates the selected text.
f.Add Word
Adds words to a
user dictionary.
c.Translation Editor
Opens the entire
document or
selected text in
Translation Editor.
d.Step Translation
Translates sentences
one at a time in the Step
Translation dialog box.
h.Align Right and Left/
i.Align Top and Bottom
Displays the original text and
translation aligned vertically or
horizontally.
g.Find/Delete Word
Searches for words in a translation
dictionary. Lets you change the
priority of a translation and delete
words saved to a user dictionary.
j.Save as Pair
Links original
document and
translation and saves.
k.ATLAS Help
Displays the help
menu for application
translation.
e.
Translation Direction
Specifies the input and
output language.
Select from AUTO, EJ
and JE.
Translation Environment
Select the translation
environment settings best
suited for your document.
Detail Settings
Create a new translation environment or change the settings.
Text Output
Destination
Specifies the output
destination of the
translation.
Output Original and Translation
Translation is inserted after the
original text.
l.Cancel
Quits the
current
translation.
ATLAS Toolbar for Word 2003
a.All Sentence Translation
b.Selected Sentence
Translation
l.Quit Translating
c.Translation Editor
d.Step Translation
f.Add Word
g.Find/Delete Word
88
h.Align Right and Left
i.Align Top and Bottom
e.
j.Save as Pair
k.ATLAS Help
Page 98

Chapter 3 Basic Operation of Application Translation
■ Translating a file [All Sentence Translation]
The entire text of a Word file is translated.
Open a Word file to be translated.
1
Click the [Translate All] button on the [ATLAS] tab (or on the toolbar).
When the translation is completed, the results are displayed.
Basics Try Using ATLAS
2
To change the appearance of the translation, select [Output Settings] from the [ATLAS] tab.
To change the translation appearance for versions prior to and including Word 2003, select
[Text Output Destination] or [Output Format of Translation Text] in the [Environment Settings]
dialog box.
89
Page 99

Basics
■ Automatically selecting and translating sentences in a document
one by one [Step Translation]
Texts in Word are translated sentence by sentence.
Start operation when the document is open in Word.
1
Place the cursor over the sentence you want to translate, and click the [Step
Translation] button on the [ATLAS] tab (or on the toolbar).
• If a range was not selected at the time of translation, the text where the cursor is
located becomes the object of translation.
• If a range was selected, the text located at the top of the selected range becomes the
object of translation.
• If a dictionary containing translation memory is set in the available dictionaries, the
translation memory search will occur simultaneously. To perform the Translation
memory search simultaneously, [Search for Translation Memory simultaneously when
the translation button is clicked.] in the [Translation Environment Settings] has to be
checked and Translation Memory has to be displayed in the window.
The [ATLAS Step Translation] dialog box opens, which displays the original text and
translated result.
2
Correct the translation re sul t, as re qui red .
There are a variety of available operations, including translation memory search, word
search/registration, and word select ion.
For details on the Translation Memory, word search/registration and word selection,
refer to one of the following respectively.
• Translation Memory → "10.3 Working with the [Translation Memory] Window" on page
185.
• Word Search/Registration → "8.7 Finding Words Registered in Dictionaries" on page
149. "8.6 Adding Words" on page 136.
• Change Word → "2.15 Selecting a Translated Word Used for Further Translation
[Change Word]" on page 72.
3
Click the [Next] button or [Replace] button.
• When you click the [Next] button, the selected range is replaced by step translation,
and the next text is continuously translated.
If [Always replace] is not checked, the selected range is not replaced by translated text,
but the next text will be translated.
• When you click the [Replace] button, the [ATLAS Step Translation ] dia log box closes,
and the selected range is replaced by translated text.
90
Page 100

Chapter 3 Basic Operation of Application Translation
■ Translating selected sentences [Selected Sentence Translation]
You can translate a sentence selected in Word or translate a sentence where the cursor is
located.
Open a Word file to be translated.
In the example given below, [Output Destination] on the [ATLAS] tab is set to [Replace Using
Original]. For versions prior to and including Word 2003, [Text Output Destination] is set to
[Replace Using Original] in [Environment Settings].
1
Select the original text you wish to translate.
Basics Try Using ATLAS
2
2
Click the [Tranlate Selected] button on the [ATLAS] tab (or on the toolbar).
When the translation is completed, the results are displayed.
91
 Loading...