

Page 1

Operating manual
FUJITSU Tablet STYLISTIC V727
System
Page 2

Congratulations on your pu
product from Fujitsu.
rchase of an innovative
The latest information about our products, tips, updates etc. can be found
on the Internet at: "
You can find driver updates at: "http://support.ts.fujitsu.com/download"
Should you have any technical questions, please contact:
• our Hotline/Service Desk ("
• Your sales partner
• Your sales office
We hope you enjoy working with your new Fujitsu system!
http://www.fujitsu.com/fts/"
http://support.ts.fujitsu.com/contact/servicedesk")
Page 3

Page 4

Published by / Contact address in the EU
chnology Solutions GmbH
Fujitsu Te
Mies-van-der-Rohe-Straße 8
80807 Munich, Germany
www.fujitsu.com/fts/"
http://
"
Copyright
u Technology Solutions GmbH 2018. All rights reserved.
©Fujits
Publication Date
06/2018
Order No.: A26391-K480-Z320-1-7619, edition 1
Page 5

FUJITSU Tablet STYLISTIC V727
Operating manual
Innovative technology 7
Ports and controls 9
Important notes 12
First-time setup of your device 16
WorkingwiththeTabletPC 19
Accessories for your Tablet PC
(optional) 39
Security functions 50
Connecting external devices 59
Settings in BIOS Setup Utility 64
Troubleshooting and tips 67
Technical data 76
Manufacturer’s notes 80
Index 81
Page 6

Remarks
Information on the product description meets the design specifications of Fujitsu and
is provided for comparison purposes. Several factors may cause the actual results to
differ. Technical data is subject to change without prior notification. Fujitsu rejects any
responsibility with regard to technical or editorial mistakes or omissions.
Trademarks
Fujitsu, the Fujitsu logo and STYLISTIC are registered trademarks of Fujitsu Limited
or its subsidiaries in the USA and other countries.
Microsoft and Windows are trademarks or registered trademarks of Microsoft
Corporation in the USA and/or other countries.
HDMI and High-Definition Multimedia Interface are trademarks or registered
trademarks of HDMI Licensing, LLC.s.
Bluetooth® and the Bluetooth logo are registered trademarks of Bluetooth SIG, Inc.
Adobe Reader is a trademark of Adobe Systems Incorporated.
USB Type-C™ and USB-C™ are trademarks of the USB Implementers Forum
in the USA and other countries.
All other trademarks specified here are the property of their respective owners.
Copyright
No part of this publication may be copied, reproduced or translated without
the prior written consent of Fujitsu.
No part of this publication may be saved or transferred by any electronic means
without the written approval of Fujitsu.
Page 7

Contents
Contents
Innovativetechnology ................................................................. 7
Further information ...................................................................... 7
Notational conventions .................................................................. 8
Ports andcontrols ..................................................................... 9
Important notes ........................................................................ 12
Safetynotes ............................................................................ 12
Additional safety notes for devices with wireless components . . ............................. 12
Caution: Device contains magnets . ....................................................... 13
Protectingthe display screen ............................................................ 13
Energysaving .......................................................................... 13
Energy saving under Windows ....................................................... 13
Travelling with yourTablet PC ............................................................ 14
Before you travel ................................................................... 14
Transporting theTabletPC ........................................................... 14
Cleaning the Tablet PC .................................................................. 15
First-time setup
Unpacking and che
Selectingaloca
Mains adapter co
Switchingonth
Working with theTablet PC ............................................................ 19
Statusindicators ........................................................................ 19
Switching on theTabletPC .............................................................. 21
Programmingthe ON/OFF button ..................................................... 21
Switching theTabletPCoff .............................................................. 22
Handwriting recognition .................................................................. 22
Touchscreen ........................................................................... 22
Select display orientation (portrait or landscape orientation) . . . . . . . .......................... 23
Using fingers . .......................................................................... 24
Calibrating the monitor for pen or finger tip input . . . .................................... 24
Usingthestyluspen .................................................................... 24
Pen position ........................................................................ 26
Energysavingfunctions of the pen ................................................... 26
Charging the penbattery ............................................................. 26
Setting the pen ...................................................................... 27
Calibrating the pen .................................................................. 27
Securing the pen tether (optional) . . ................................................... 27
Tablet buttons .......................................................................... 28
Camera ................................................................................ 29
Rechargeable battery ................................................................... 30
Charging and maintaining thebattery ................................................. 30
Removing and installing the battery ................................................... 31
Usingthepower-managementfeatures ................................................... 33
Memorycards .......................................................................... 33
Supported formats .................................................................. 33
Inserting thememory card ........................................................... 34
Removing the memory card .......................................................... 34
SIM card (configuration dependent) ....................................................... 35
of your device .........................................................
ckingthe device ......................................................
tion .....................................................................
nnecting . . . . ...........................................................
edevicefor the first time ..................................................
16
16
17
17
18
Fujitsu 3
Page 8

Contents
Inserting theSIM card ............................................................... 35
Removing the SIMcard .............................................................. 36
Wireless LAN / Bluetooth / LTE radio components (configuration dependent) ................. 37
Switching the wireless components on and off ......................................... 37
Setting up WLAN access ............................................................ 37
Accessvia LTE ..................................................................... 37
Ethernet and LAN (optional, only with cradle or adapter cable) .............................. 38
GPS ................................................................................... 38
Accessories for your Tablet PC (optional) . ............................................. 39
Your cradle (optional) . . . . ................................................................40
Cradle components . . ................................................................40
Setting up the cradle ................................................................ 40
Connecting the Tablet PC to the cradle . . . ............................................. 41
Disconnecting the Tablet PC from the cradle . . ......................................... 42
Magnetic keyboard (optional) ............................................................ 43
Components of the magnetic keyboard . . . ............................................. 43
Connecting the Tablet PC to the magnetic keyboard . . .................................. 44
Disconnecting the Tablet PC from the magnetic keyboard .............................. 45
Flip-Cover Stand (optional) . . ............................................................ 45
Insertthe Tablet PC intothe flip-cover stand ........................................... 46
Connect the Tablet PC with flip-cover stand to the magnetic keyboard ................... 49
Security functions ..................................................................... 50
Setting up the fingerprint sensor (configuration dependent) . . . .............................. 51
Usingthesecurity lock(cradleonly) ...................................................... 51
Configuringpassword protection inBIOS SetupUtility ...................................... 52
Protecting BIOS Setup Utility (supervisor and user password) . .......................... 52
Password protection for booting of the operating system . .............................. 53
Password protection for the harddisk ................................................. 54
SmartCard reader (depending on configuration) . . ......................................... 55
Inserting theSmartCard ............................................................. 56
Trusted Platform Module - TPM (depending on configuration) . .............................. 57
Enabling TPM ....................................................................... 57
Disabling TPM ...................................................................... 57
Enable password entry using the on-screen keyboard (on-screen keyboard for BitLocker
password) .......................................................................... 58
Connectingexternaldevices ........................................................... 59
Connecting an external monitor . . ........................................................ 59
Display port (cradleonly) ............................................................ 59
VGA monitor port(cradleonly) ....................................................... 60
Connecting USB devices ................................................................61
USB portwith charging function(USB Type-C) ......................................... 62
How to remove USB devices correctly ................................................ 62
Headphones/microphone/Line-In/Line-Out/headset combination port . . ...................... 63
Settings in BIOS Setup Utility . . ........................................................ 64
Starting the BIOS Setup Utility ........................................................... 64
Operating BIOS Setup Utility ............................................................. 65
Exiting BIOS Setup Utility ................................................................ 66
Exit Saving Changes - save changes and exit BIOS Setup Utility . . . . ................... 66
Exit Discarding Changes – Discard changes and exit BIOS Setup Utility . . . . ............. 66
Load Setup Defaults – Copy Standard Entries ......................................... 66
4 Fujitsu
Page 9

Contents
Discard Changes – Discard changes without exiting the BIOS Setup Utility . .............. 66
Save Changes - save changes without exiting the BIOS Setup Utility . . . . . . . ............. 66
Save Changes and Power Off . ....................................................... 66
Troubleshooting and tips .............................................................. 67
Help if problemsoccur ................................................................... 67
The Tablet PC’sdate or timeisincorrect .................................................. 68
Battery charging indicatornot lit .......................................................... 68
The Tablet PC’stouchscreenremainsdark ................................................ 68
The display on the Tablet PC’s touchscreen is difficult to read. . ............................. 68
The external monitor remainsblank ...................................................... 69
The external monitor isblank or theimage is unstable ..................................... 69
The cursor does not correctly follow the pen movements . . . . . . ............................. 69
Pen inputnot working ................................................................... 70
The Tablet PC doesnotstartafter switch on ............................................... 70
The Tablet PC stops working ............................................................. 70
The printer does not print . . . . . ........................................................... 71
The wireless connection to a network does not work . . . .................................... 71
The battery discharges too quickly ........................................................ 71
SmartCard reader is not recognised. . . . ................................................... 72
SmartCard PINforgotten ................................................................ 72
SmartCard lost ......................................................................... 72
Acoustic warnings ....................................................................... 72
Error messageson the screen ........................................................... 73
Restoring the system under Windows 10 . . . . . . ............................................ 75
Technical data ......................................................................... 76
Tablet PC .............................................................................. 76
Screenresolutionsfor integratedscreenandexternal screens .............................. 77
Rechargeable battery ................................................................... 78
Mains adapter (65 W) for the Tablet PC with/without the magnetic keyboard . ................ 78
Mains adapter (90 W) for the Tablet PC with cradle ........................................ 78
Cradle(optional) ........................................................................ 79
Magnetic keyboard (optional) . ........................................................... 79
Manufacturer’s notes .................................................................. 80
Disposal and recycling .................................................................. 80
Electrical safety including ergonomic requirements (GS, depending on thedevice) ........... 80
SAR limitvalue (SpecificAbsorption Rate) ................................................ 80
Other certificationmarkings .............................................................. 80
Index .................................................................................. 81
Fujitsu 5
Page 10

Contents
6 Fujitsu
Page 11
Innovative technology
Innovative technology
... and ergonomic design make your device a reliable and convenient companion.
The device boots very quickly, is ready for immediate use and offers a particularly
long operating time because of its high capacity battery.
The user-friendly "BIOS Setup Utility" offers powerful password protection functions which can be
used to control your Tablet PC’s hardware and protect your system better against unauthorised use.
Information on the connections and controls for your Tablet PC can be
found in chapter "
Ports and controls", Page 9.
Further information
The Windows drivers for your device can be found on our Internet site.
The factory installation of your device does not support any other operating
system. Fujitsu Technology Solutions accepts no liability whatsoever
if any other operating system is used.
Software oriented components of these instructions refer to Microsoft products,
if they come within the scope of the delivery.
If you install other software products, pay attention to the operating
instructions of the manufacturer.
Fujitsu 7
Page 12
Innovative technology
Notational conventions
Pay particular attention to text marked with this symbol. Failure to observe
these warnings could pose a risk to health, damage the device or lead
to loss of data. The warranty will be invalidated if the device becomes
defective through failure to observe these warnings.
Indicates important informa
tion for the proper use of the device.
►
This font
This font
This font
"This font"
Key
This font
Indicates an activity that must be performed
Indicates a result
indicates data entered
the command line, e.g.
start a program (star
indicates information that is displayed on the screen by a program, e.g.:
Installation is complete.
indicates
• terms and texts used in a software interface, e.g.: Click on Save
• names of programs or files, e.g. Windows or setup.exe.
indicates
• cross-references to another section, e.g. "Safety information"
• cross-references to an external source, e.g. a web address: For more
information, go to "
• Names of CDs, DVDs and titles or designations for other materials,
e.g.: "CD/DVD Drivers & Utilities" or "Safety/Regulations" manual
indicates a key on the keyboard, e.g:
indicates terms and texts that are emphasised or highlighted, e.g.: Do
not switch off the device
using the keyboard in a program dialogue or at
your password (Name123) or a command used to
t.exe)
http://www.fujitsu.com/fts/"
F10
8 Fujitsu
Page 13
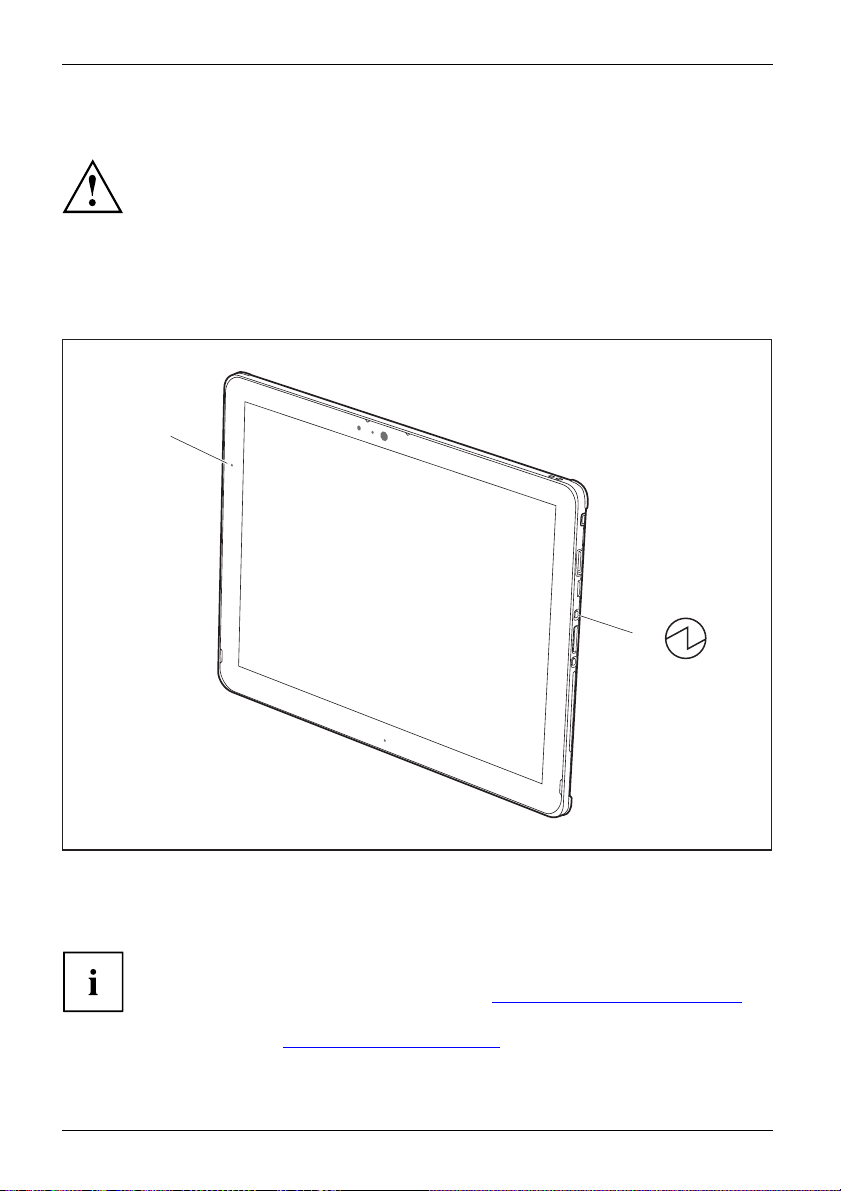
Ports and controls
Ports and controls
This chapter presents the individual hardware components of your device. It gives you
an overview of the device’s indicators and connections. Please familiarise yourself with
these components before you start to work with the device.
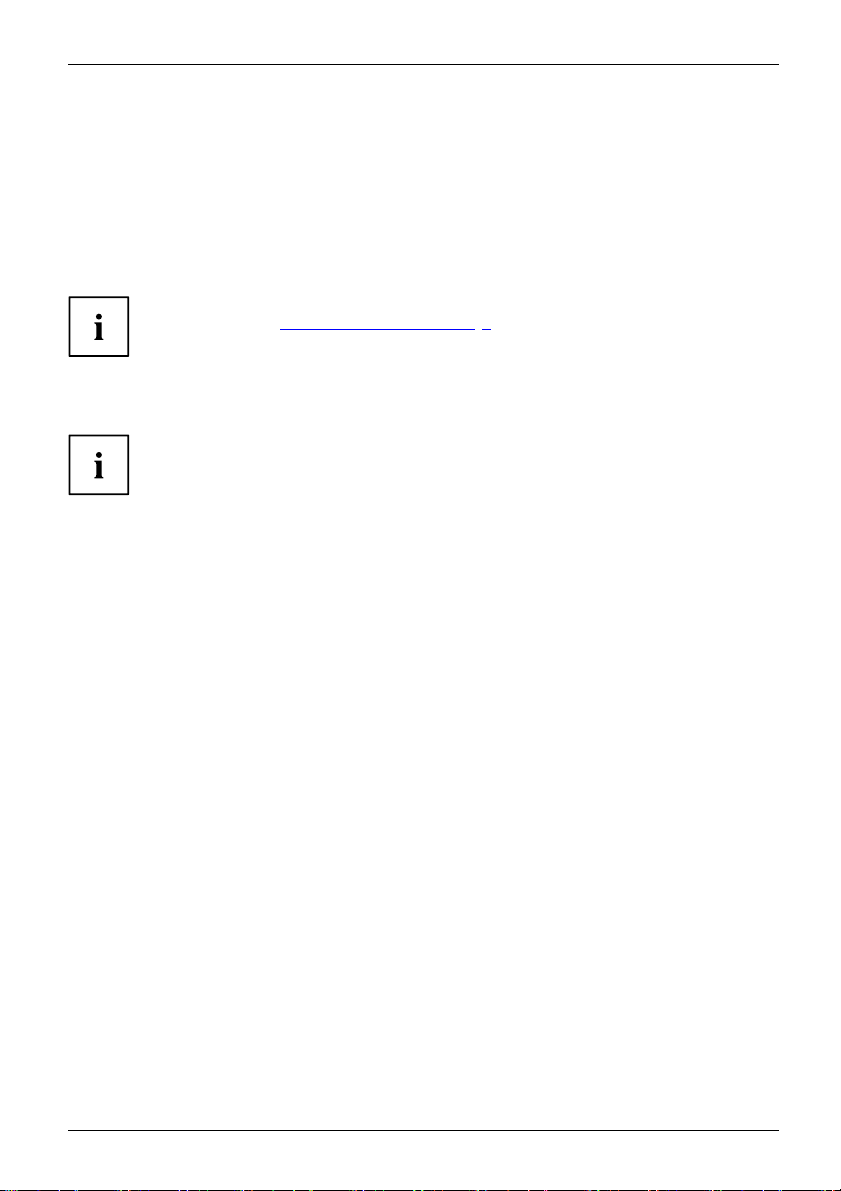
Front
7
8
9
1 = Power indicator
2 = Touchscree
3=CameraLED
4 = Ambient li
5 = Microphone
6=Camera
n
ght sensor
10
5
4
1
11
9
2
8
7 = Loudspeaker
8 = Mechanical
9 = Mechanical fixture for magnetic keyboard
10 = Docking po
11 = Alignment marking
3
7
fixture for cradle
rt
56
Fujitsu 9
Page 14
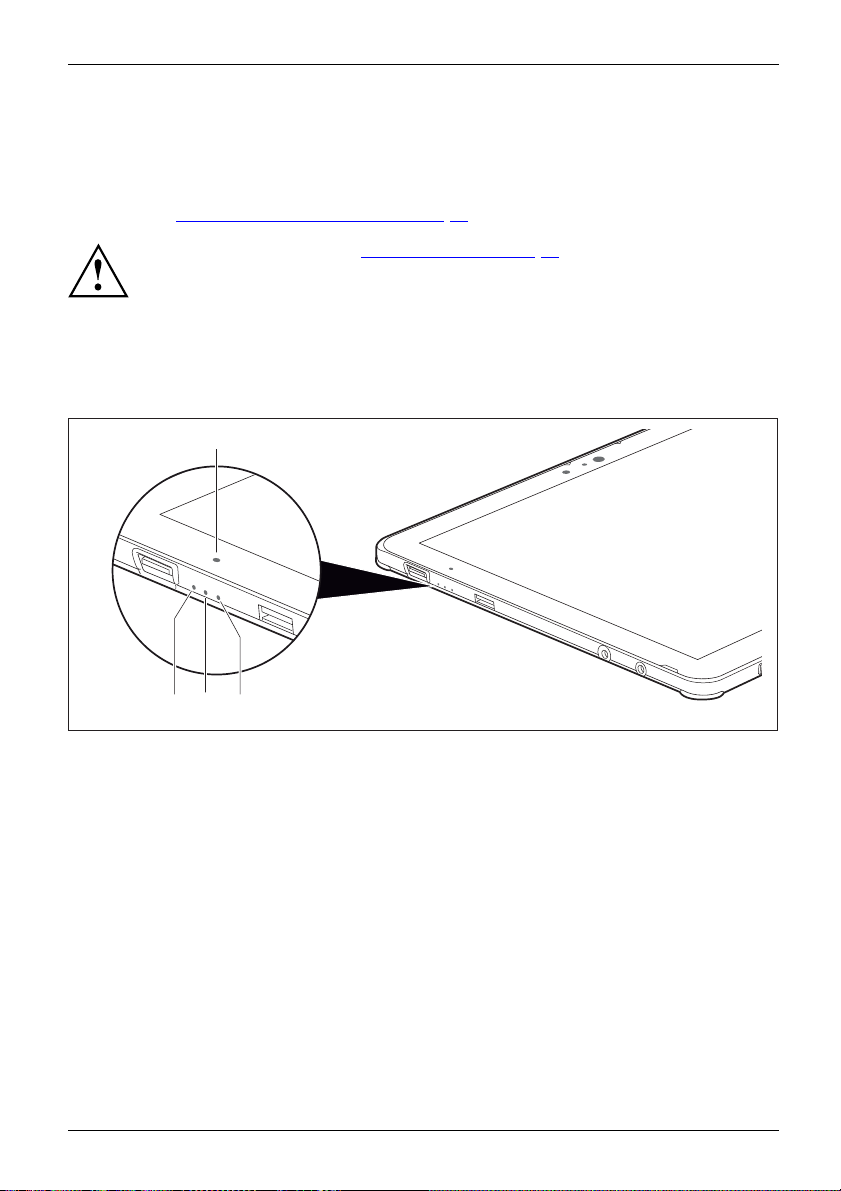
Ports and controls
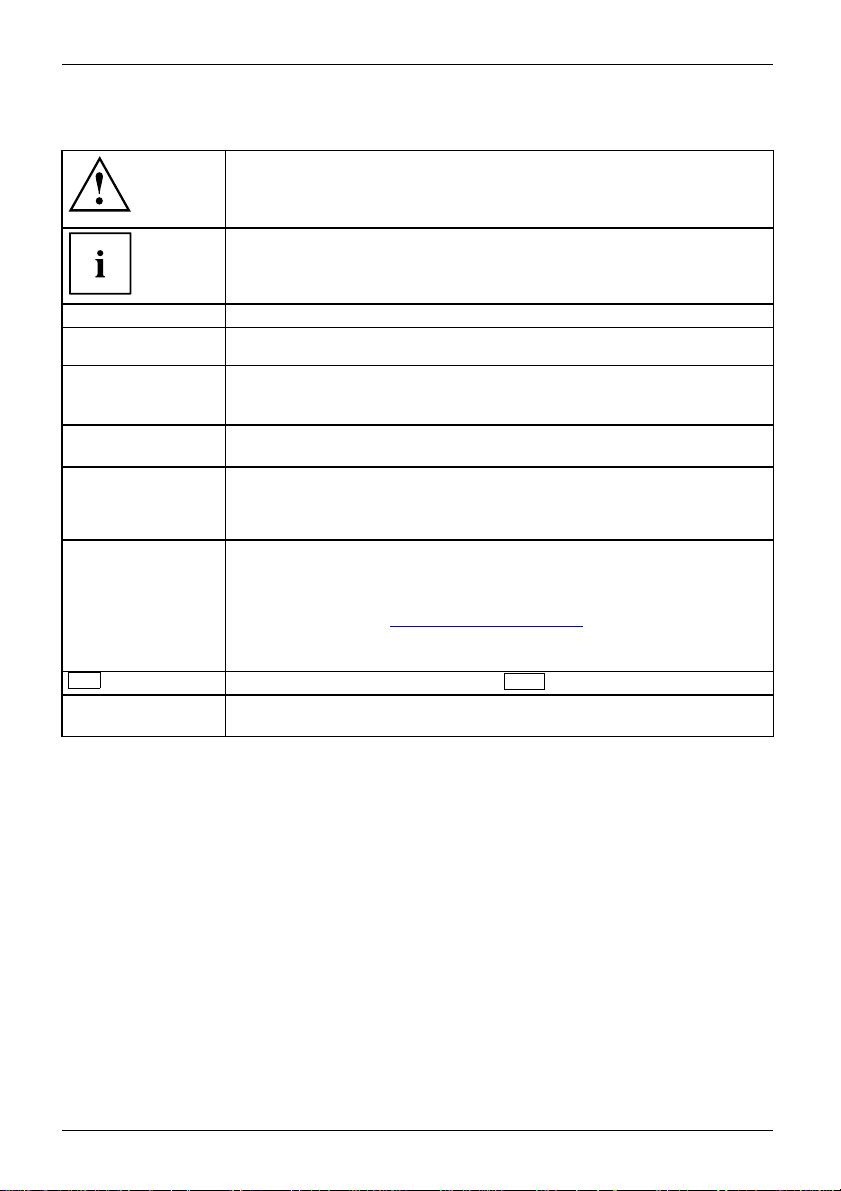
Left side
2 41 3
1 = USB port 2.0 (USB Type-A)
2 = Power-on indicator
3 = Battery charging indicator
4 = Wireless indicator
Right side
5
5 = Memory card slot
6 = Combined headphone and
microphone port
7 = DC input connector (DC IN)
1
2 3 4 5
76
7 86
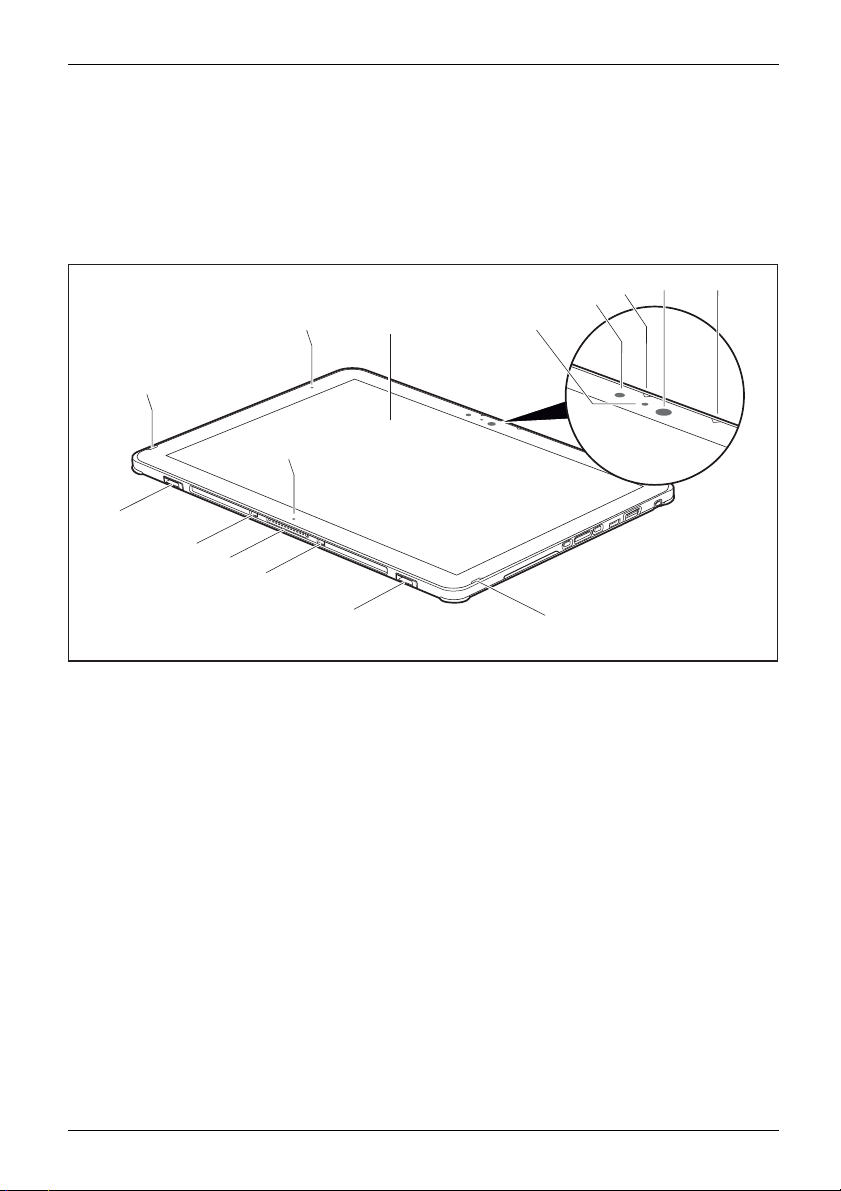
1 = SmartCard slot
(configuration-dependent)
2 = Shortcut button
3 = Volume down button
4 = Volume up button
10 Fujitsu
5 = ON/OFF button
6 = USB 3.1 Gen1 port with charging
function (USB Type-C)
7 = USB port 3.0 (USB Type-A)
8=Penslot
Page 15
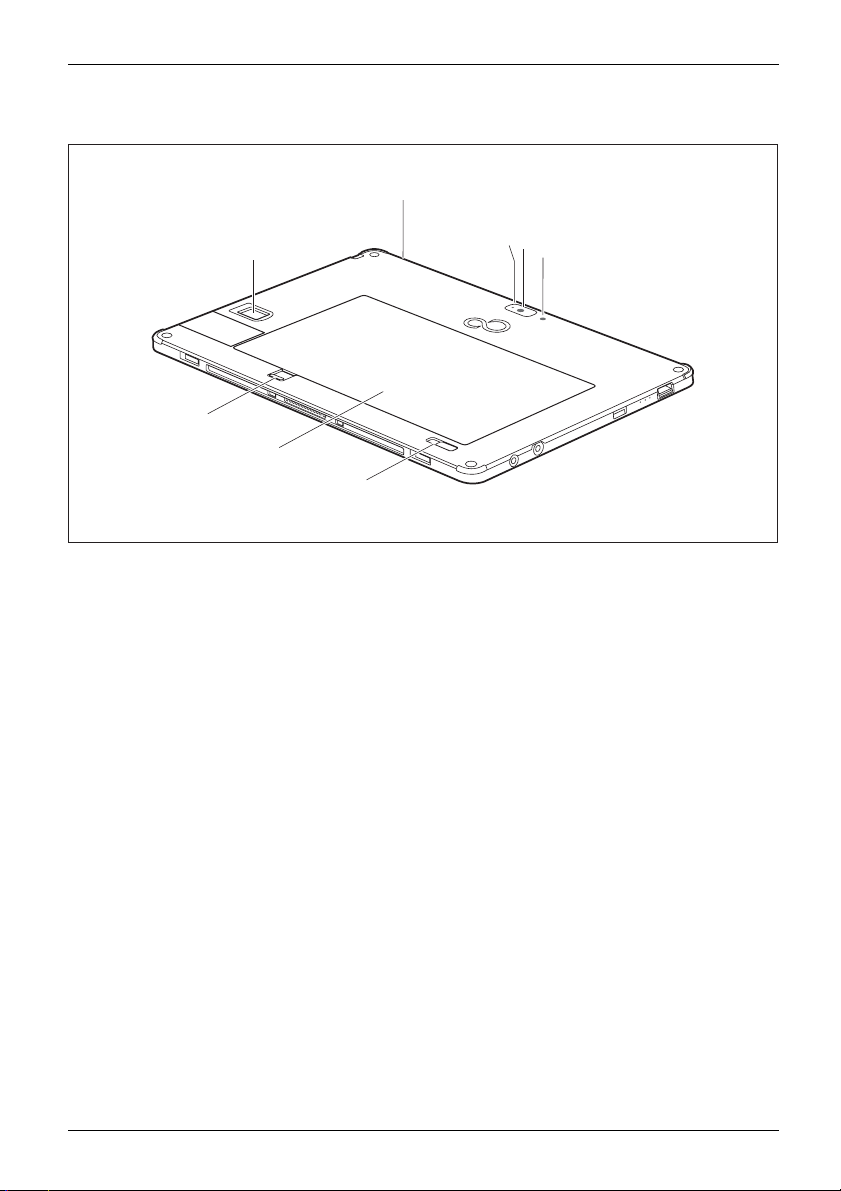
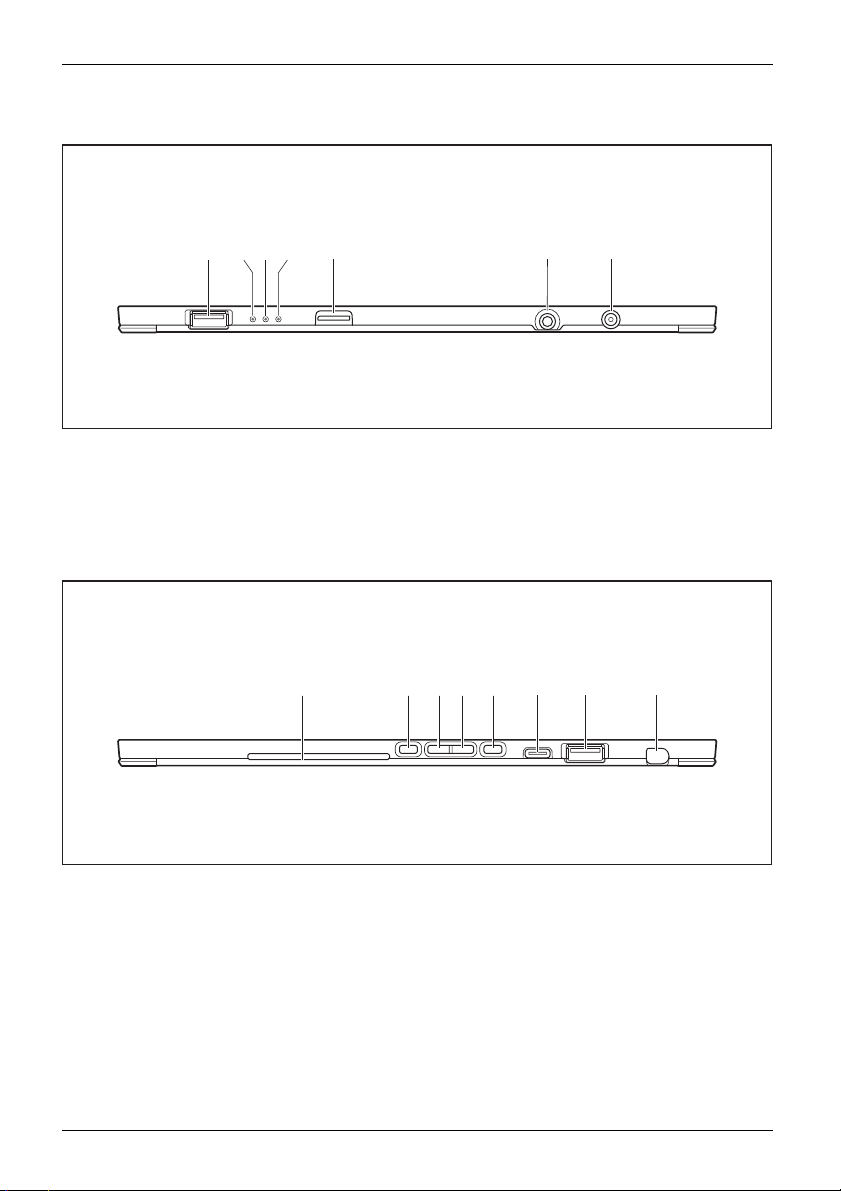
Rear
Ports and controls
2
3
1
4
5
6
7
6
1 = Fingerprint sensor
(configuration-dependent)
2 = Eyelet for pen tether (top of device)
3=CameraLED
4=Camera
Fujitsu 11
5 = Camera light
6 = Battery release slider
7 = Battery compartment with SIM card
slot under the battery
(SIM card slot configuration-dependent)
Page 16
Important notes
Important notes
ImportantnotesNotes
Safety notes
SafetynotesNotes
This chapter contains essential safety information which must be followed when working
with your Tablet PC. The other notes provide useful information on your Tablet PC.
Please follow the safety notes provided in the "Safety/Regulations" manual
as well as the safety notes given below.
Please pay special attention to the sections in the manual marked
with the symbol on the left.
When connecting and disconnecting cables, observe the relevant
notes in this operating manual.
Read the information on the ambient conditions in the "
chapter and the information in the "First-time setup of your device", Page 16 chapter
before preparing your Tablet PC for use and switching it on for the first time.
When cleaning the device, please observe the relevant notes in the
section "
Pay attention to the additional safety notes for devices with wireless components
provided in the "Safety/Regulations" manual.
Cleaning the Tablet PC", Page 15.
Technical data", Page 76
This Tablet PC c
If you have que
environment,
omplies with the relevant safety regulations for data processing equipment.
stions as to whether you can set up the Tablet PC in the intended
please contact your sales point or our hotline/help desk.
Additional safety notes for devices with wireless components
Wirelesscomponent:WirelessLAN:Bluetooth,safetynotes
If a wireless component (Wireless LAN/ Bluetooth, UMTS/LTE) is integrated in your Tablet PC, you
must be sure to observe the following safety precautions when using your Tablet PC:
• Switch off the wireless components when you are in an aircraft or driving inacar.
• Switch off the wireless components when you are in a hospital, an operating
room or near a medical electronics system. The transmitted radio waves
can impair the operation of medical devices.
• Switch off the wireless components when you let the device get near flammable
gases or into hazardous environments (e.g. petrol station, paintshops), as the
transmitted radio waves can cause an explosion or a fire.
For information on how to switch wireless components on and off, see chapter
Switching the wireless components on and off", Page 37.
"
12 Fujitsu
Page 17

Important notes
Caution: Device contains magnets
Magnets generate magnetic fields that can damage items or cause technical malfunctions.
Data on magnetic data storage devices (e.g. credit cards, EC cards or
other magnetic stripe cards) might be erased.
The operation of pacemakers can be impaired.
Measuring instruments may be affected.
Keep this device away from items that are sensitive to magnetic fields. Observe
the safety distances recommended by the manufacturers for their products.For
details, please refer to the manufacturer’s instructions.
Protecting the display screen
Do not pour liquids o
place items on the t
During normal use o
can become embedd
warranty does not
n the device or wash it with a heavily soaked cloth. Do not
op of the screen, or damage may occur.
f the device, small particles from the environment
ed in the pen tip and scratch the screen. The
cover a scratched screen.
Energy saving
NotesEnergyEnergysaving
Switch off your Tablet PC if you do not need to use it. Switch off connected external devices
if you are not using them. If you use the energy saving functions, the Tablet PC uses less
power. You will then be able to work for longer before having to recharge the battery.
Power efficiency is increased and environmental pollution reduced. You
save money and help protect the environment.
Energy saving under Windows
► Make use of the power management features (see ""Using the power-management features",
Page 33").
Fujitsu 13
Page 18
Important notes
Travelling with your Tablet PC
MobileoperationNotesTransp ortationTabletPC
Please observe the points listed below when travelling with your Tablet PC.
Before you travel
► Back up important data stored on your hard disk.
BeforeyoutravelTravel
► Switch off the wireless c
connection, it is also po
omponent for data security reasons. With data traffic via a wireless
ssible for unauthorised third parties to receive data.
Information on activat
for your wireless compo
► If you wish to use your Tablet PC during a flight, check with the airline whether this is allowed.
ing data encryption is provided in the documentation
nent.
When travelling in other countries
► If you are travelling abroad, check that the mains adapter can be operated with the
local mains voltage. If this is not the case, obtain the appropriate mains adapter
for your Tablet PC. Do not use any other voltage converter!
► Check whether the local mains voltage and the power cable are compatible. If this is
not the case, buy a power cable that matches the local conditions.
► Ask the appropriate government office for your travel destination, whether you may use your
Tablet PC with its installed radio component. Please observe the additional safety instructions
for devices with radio components, found in the handbook “Safety/formalities”.
Transportin
► Switch off the Tablet PC.
► Unplug the mains adapter and all external devices from the power socket.
► Disconnect the mains adapter cable and the data cables for all external devices.
► To protect against damaging jolts and bumps, use a Tablet PC carrying
case to transport your Tablet PC.
g the Tablet PC
Protect the Tablet PC from severe shocks and extreme temperatures
(e.g., direct sunlight in a car).
14 Fujitsu
Page 19

Cleaning the Tablet PC
Do not clean any interior parts yourself; leave this job to a service technician.
Only use cleaning products designed for computers. Normal household
cleaners and polishes can damage the markings on the keyboard and the
Tablet, the paintwork or the Tablet PC itself.
Please ensure that no liquid enters the Tablet PC.
The touchscreen is very sensitive to scratches! Only clean the display
surface with a very soft, slightly damp cloth.
Important notes
► Switch the Tablet PC off
CleaningNotesTablet PCKeyboardTouchpadTouchscreen
► To prevent the device switching on unintentionally, disconnect the mainsplugofthe
mains adapter from the mains socket and remove the rechargeable battery (see
chapter "
The casing surfaces may be cleaned with a dry cloth. If particularly dirty, use a damp cloth that
has been dipped in water mixed with mild domestic detergent and then carefully wrung out.
Removing and installing the battery", Page 31).
.
Fujitsu 15
Page 20
First-time setup of your device
First-time setup of your devic
First-timesetu pGettingstarted
On delivery, the battery can be found in the battery compartment or in the accessories kit.
The battery must be charged if you want to operate your device using the battery.
When used on the move, the built-in battery provides the device with the necessary power. You
can increase the operating time by using the available energy-saving functions.
For instructions on how to connect external devices (e.g. mouse, printer) to your Tablet
PC, please refer to the operating manual for your device.
Unpacking and
► Unpack all the individual parts.
► Check your
Please read the chapter "Important notes", Page 12.
If your device is equipped with a Windows operating system, the necessary
hardware drivers and supplied software are already pre-installed.
Before you switch on the device for the first time, connect it to the mains voltage
using the mains adapter, see "
adapter must be connected during the entire installation process.
A system test is performed when your device is first switched on. Various messages
can appear. The display may remain dark for a short time or may flicker.
Please follow the instructions on the screen.
NEVER switch off your device during the first-time setup process.
Mains adapter connecting", Page 17.Themains
checking the device
Should you discover any damage that occurred during transportation,
notify your local sales outlet immediately!
PackagingTransport
device for any visible damage which may have occurred during transportation.
e
You may ne
16 Fujitsu
ed the packaging in the future, if you need to transport your device.
Page 21

Selecting a location
SelectingalocationDeviceMainsadapter
Select a suitable location for the device before setting it up. Follow
the instructions below when doing so:
• Never place the device or the mains adapter on a heat-sensitive surface.
The surface could be damaged as a result.
• Never place the device on a soft surface (e.g. carpeting, upholstered furniture,
bed). This can result in damage caused by overheating.
• The underside of the device heats up during normal operation. Prolonged contact
with the skin may become unpleasant or even result in burns.
• Place the device on a stable, flat, non-slippery surface. Please note that the
rubber feet of the device may mark certain types of delicate surfaces.
• Keep other objects at least 100 mm / 4 inches away from the device and
its mains adapter to ensure adequate ventilation.
• Do not expose the device to extreme environmental conditions. Protect
the device against dust, moisture and heat.
Mains adapter connecting
PreparingforoperationMainsadapter
Observe the safet
The supplied pow
which you purcha
for use in the co
3
y notes in the enclosed "Safety/Regulations" manual.
er cable conforms to the requirements of the country in
sed your device. Make sure that the power cable is approved
untry in which you intend to use it.
First-time setup of your device
► Connect the power cable (1) to the
mains adapter.
► Plug the mains cable (2) into a mains outlet.
► Connect the mains adapter cable (3) to
the DC jack (DC IN) of the device.
2
1
Fujitsu 17
Page 22
First-time setup of your device
Switching on the device for the first time
Switchingonforthefirsttime
When you switch on the device for the first time, the supplied software is
installed and configured. Because this procedure must not be interrupted,
you should set aside enough time for it to be fully completed and connect
the device to the mains using the mains adapter.
During the installation process, DO NOT restart the device unless
you are requested to do so!
To make it easier to use yo
is pre-installed on the
ur device for the first time, the operating system
hard disk.
2
► Press the ON/OFF button (1) for about one second to switch the device on.
The power-on indicator (2) lights up as long as the system is switched on.
► During installation, follow the instructions on screen.
1
If a Windows operating system is installed on your device, you will find more information
on the system and drivers, help programmes, updates, manuals etc. on the device. This
information can also be found on the Internet at "
You can find information and help on the Windows operating system functions
on the Internet at "
18 Fujitsu
http://windows.microsoft.com".
http://www.fujitsu.com/fts/support/".
Page 23
Working with the Tablet PC
Working with the Tablet PC
TabletPC,operationTabletPC
This chapter describes the basics for operating your Tablet PC. You can find instructions
on how to connect external devices (e.g. mouse, flash memory) to the Tablet PC
in the chapter "
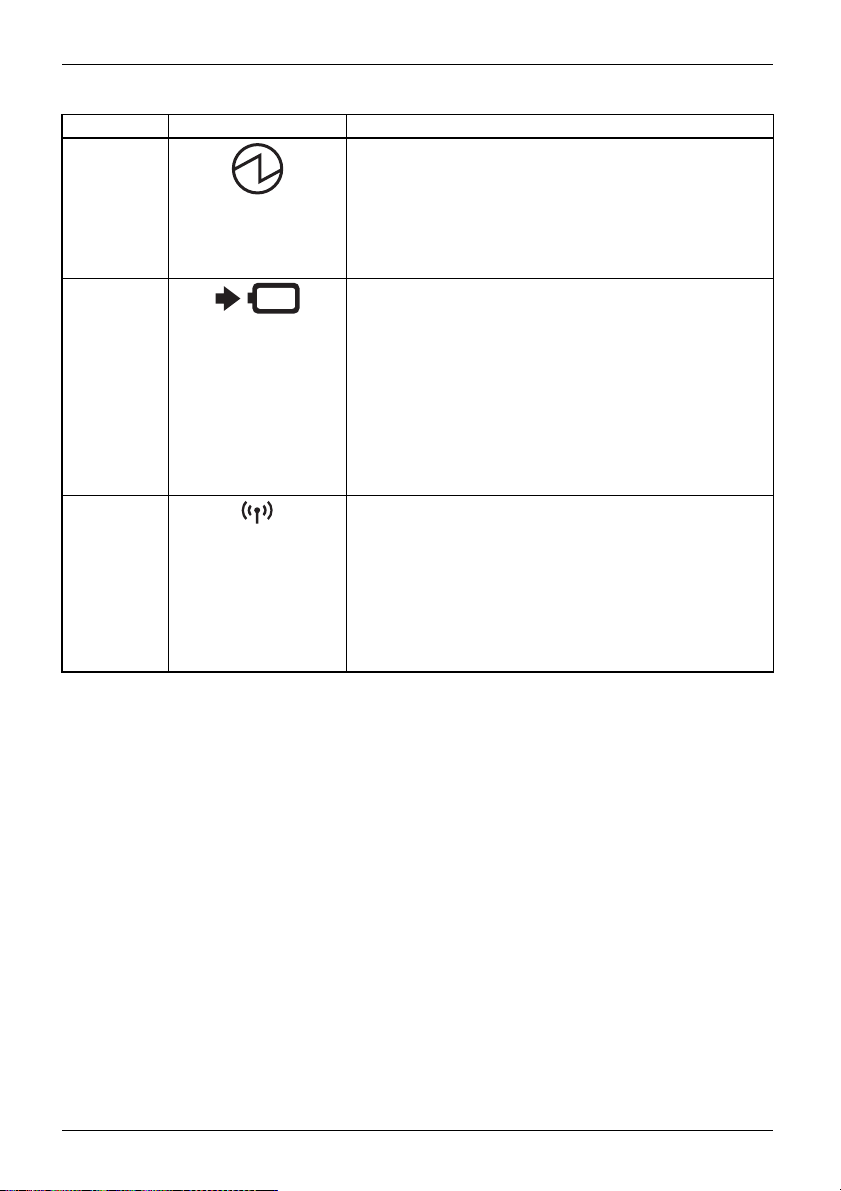
Status indicators
StatusindicatorsSymbols
The status indicators (1, 2, 3) provide information about the condition of the power
supply, the rechargeable battery and the wireless components.
Connecting external devices", Page 59.
Please refer to the notes in "Important notes", Page 12.
1
231
Fujitsu 19
Page 24
Working with the Tablet PC
No. Status displays Description
1 Power-on indicator
• The indicator lights up white: The tablet PC is switched
on.
• The indicator flashes: The Tablet PC is in sleep mode
(Save-to-RAM).
• The indicator is not lit: The Tablet PC is switched off
or in Save-to-Disk mode.
2 Battery charging indicator
Please note: If the mains adapter is connected when the
state of charge of the battery is more than 90 %, charging
will not be started. When the state of charge of the battery
is less than 90 %, the battery will be charged to 100 % as
soon as the mains adapter is connected.
• The indicator light is orange: The battery is being
charged.
• The indicator is not lit: The battery is not being charged
(the battery is already more than 90% charged or the
mains adapter is not connected).
3 Wireless components indicator
• The indicator lights up white: The wireless components
are switched on, while the Tablet PC is switched on.
• The indicator is flashing: The wireless components are
switched on and Wake On Wireless LAN is enabled,
while the Tablet PC is in sleep mode or in save-to-disk
mode, or is switched off.
• The indicator is not illuminated: The wireless
components are switched off.
20 Fujitsu
Page 25
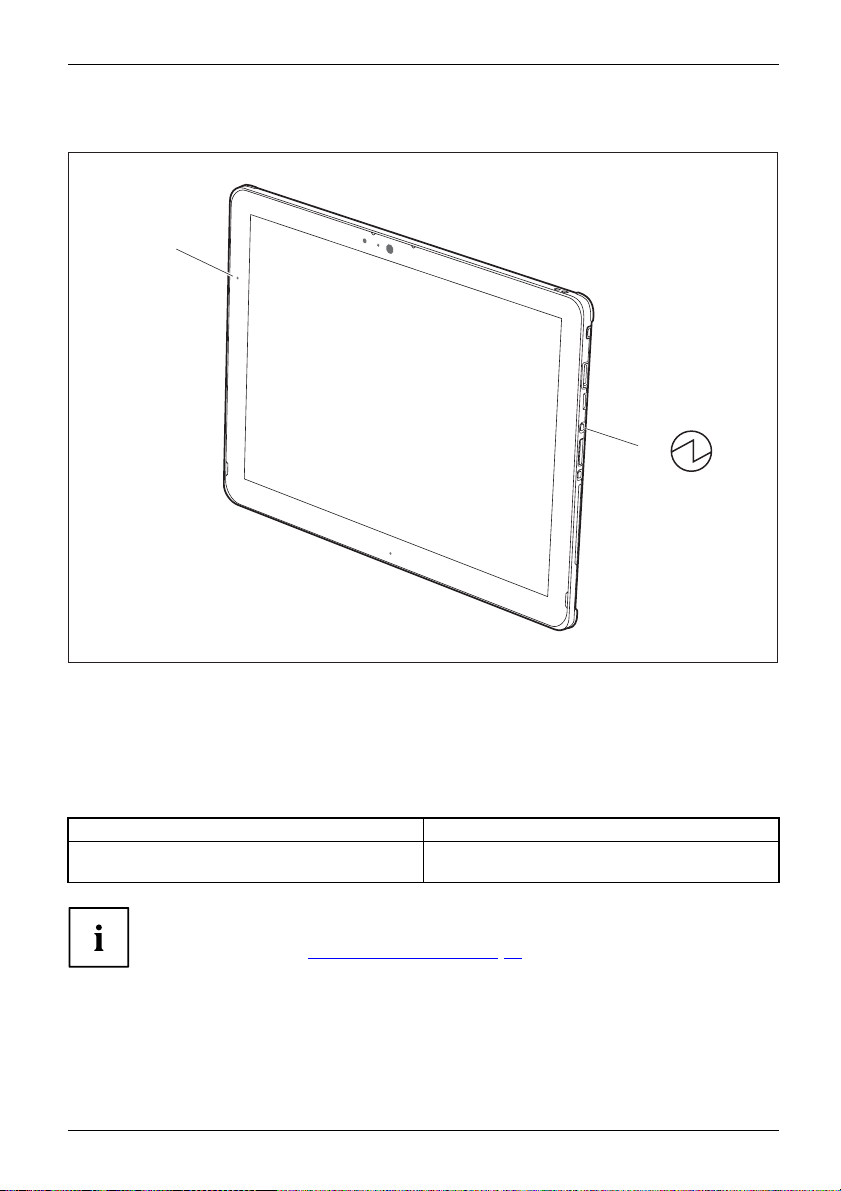
Switching on the Tablet PC
TabletPC:switchingonPower-onindicator
2
Working with the Tablet PC
1
►PresstheON
The power-on indicator (2) lights up as long as the system is switched on.
/OFF button (1) for about one second to switch the device on.
Programming the ON/OFF button
You can program the ON/OFF button:
Operating system Menu
Windows 10
If you have assigned a password, you must enter this when requested to
do so, in order to start the operating system. Detailed information can be
found in the chapter "
Fujitsu 21
Security functions", Page 50.
Control Panel - Hardware and Sound - Power
Options
Page 26
Working with the Tablet PC
Switching the Tablet PC off
Back up your data and close all applications before you switch off your
device. Otherwise data might be lost.
► Shut down the operating system correctly.
Switchingoff
► If the Tablet PC does not switch off automatically, press the ON/OFF button for about five seconds.
Handwriting recognition
For detailed information on handwriting recognition, see the documentation on your operating system.
At present, handwriting recognition under Windows supports the following languages:
English, German, French, Italian, Japanese, Korean, Chinese (traditional and simplified), Dutch,
Portuguese, Spanish, Brazilian, Norwegian (Bokmål and Nynorsk), Swedish, Finnish, Danish,
Polish, Rumanian, Serbian (Cyrillic and Latin script), Catalan, Russian, Czech and Croatian.
Under Windows you can set the required language under Control Panel –
Time, Language and Region – Language.
Touch screen
Touchsc ree nNotes
Information on screen resolution can be found in the section "Screen resolutions
for integrated screen and external screens", Page 77.
High-qualit
these scree
only be ensu
which diff
The screen
With the p
cannot be
elements
specifie
Exampl
A monit
subpix
9241or an e
22 Fujitsu
y LCD screens (TFT) are installed in Fujitsu Tablet PCs. For technical reasons,
ns are manufactured for a certain resolution. An optimum and sharp image can
red with the resolution intended for the particular screen. A screen resolution
ers from the specification can result in an unclear image.
resolution of your Tablet PC’s touchscreen is optimally set at the factory.
resent standards of production technology, absolutely flawless screen images
guaranteed. There may be a few constantly light or dark pixels (picture
) on the screen. The maximum permitted number of such faulty pixels is
d in the international standard ISO 9241-307 (Class II).
e:
or with an HD resolution of 1280 x 1024 has 1,310,720 pixels. Each pixel consists of three
els (red, green and blue), so there are almost 3.9 million subpixels in total. According to ISO
307 (class II), a maximum of 3 light and 3 dark pixels and in addition 7 light or 13 dark subpixels
quivalent mix (1 light subpixel counts as 2 dark subpixels) are allowed to be defective.
Page 27

Working with the Tablet PC
Pixel
A pixel consists of 3 subpixels, normally red, green and
blue. A pixel is the smallest element that can be generated
by complete functionality of the display.
Subpixel
A subpixel is a separately addressable internal structure
within a pixel that enhances the pixel function.
Cluster A cluster contains two or more
subpixels in a 5 x 5 pixel bloc
defective pixels or
k.
Background lighting
LCD screens are operated with background lighting. The luminosity of the background
lighting can decrease over the period of use of the Tablet PC. However, you can
set the brightness of your screen individually.
Ambient light sensor
If your Tablet PC was shipped with the Windows operating system, the screen brightness
is regulated by the ambient light sensor according to the particular light conditions. This
results in optimum readability and longer battery life at the same time.
If your Tablet PC was shipped with Windows 10, the adaptive brightness setting is enabled. To
change the ambient light sensor settings, select Control Panel - System and Security - Power Options -
Change plan settings - Change advanced power options - Display - Activate adaptive brightness setting.
Synchronising the display on the touchscreen and an external monitor
In Windows 10 you can proceed as follows to set the output type:
► Wipe your finger over the screen starting from the right-hand edge.
► Select All settings.
► Look for the keyword "project".
► Select the required function.
Select display orientation (portrait or landscape orientation)
eorientation
orientation
rientation
Landscap
Portrait
Displayo
You can choose to use either portrait or landscape orientation for the display, or whether the
display orientation should automatically adapt to the orientation of the Tablet PC.
The automatic adaptation of the display orientation is disabled while
a magnetic keyboard is attached.
In the settings there are profiles saved for operation with different screen orientations.
These profiles have preset standard configurations that can be modified as desired.
These settings do not just affect the monitor settings on the tablet PC, but
also on any external monitors that may be connected.
You can change these settings under Control Panel - Hardware and Sound
- Windows Mobility Center / Rotate screen.
Fujitsu 23
Page 28

Working with the Tablet PC
Using fingers
You can execute certain commands by using your finger tip on the touchscreen of your device.
Everything which you can select or activate using your finger tip can
also be selected or activated using the pen.
Calibrating the monitor for pen or finger tip input
Via the operating system, you must calibrate your tablet PC before first use with
your fingers, so that it detects your finger tips as accurately as possible.
As soon as you ascertain that the accuracy is deteriorating, you
must recalibrate the device.
Operating system Menu
Windows 10
To calibrate, call up the Hardware and Sound / Tablet PC Settings function
in the Control Panel. You need to calibrate both portrait and landscape
formats.
Using the stylus pen
Pen
5
4
1 = pen tip
2 = pen button (=
3 = pen button (=
4 = charging co
5 = eyelet for o
delete function)
right mouse button)
ntacts
ptional pen strap
2
1
You can use the pen on your Tablet PC as an electronic writing implement to select items, and to
navigate through programs on it. Programs that support handwriting recognition also allow you to
write characters directly on the screen with the pen. You can also use the pen as a drawing tool.
A pen tether is available as an optional extra and you can use this to tie the
eyelet on the pen to the eyelet on the Tablet PC.
24 Fujitsu
3
Page 29

Working with the Tablet PC
Use only the pen provided with your Tablet PC. Do not use substitutes that
were not designed for your Tablet PC. Replace the stylus tip if it is worn.
The warranty does not cover a scratched screen.
While writing, you should take care not to scratch the surface of the
display (e.g. with a wristwatch or bracelet).
The Tablet PC’s pen is an elec
used improperly. Handle t
The following list contai
• Do not gesture with the pe
tronic instrument that can be damaged if
he pen with care.
ns guidelines for proper pen handling:
n.
• Do not use the pen as a pointer.
• Donotusethepenonsurf
aces other than the screen of the Tablet PC.
• Do not try to turn the thumb grip on the pen. The grip is used to place
the pen in its slot or to remove it from the slot.
• Never store the pen w
down in a pen holder)
have an adverse effe
In this case the pen
To avoid damage, th
ith the tip bearing the weight of the pen (e.g. with the tip
. If the pen is stored with the tip pointing down, this may
ct on the pen mechanism (particularly at high temperatures).
tip may react as though it is constantly being pressed down.
e pen should be stored in the slot when not in use.
The pen can be influenced by electromagnetic fields (cursor quivers or
jumps). There may be a few areas on the screen where the cursor quivers
slightly in spite of pressing the pen down firmly.
The screen responds to entries made with the tip of the finger or the pen when the tip
of the finger or the pen is in direct contact with the screen.
You can use the pen to run all functions for which you would otherwise use a mouse.
Handling Mouse Pen
Selecting menu
Click with the left-hand mouse button.
Touch the menu entry with the pen tip.
items
Starting programs Double click with the left-hand mouse
button.
Moving an
object/window
Drag with the left-hand mouse button
held pressed.
Briefly touch the program icon twice
with the pen tip.
Place the pen tip directly on the
object/window. Hold the pen tip
pressed against the screen. Move the
desired object/window.
Opening a context
menu
Click with the right-hand mouse
button.
Place the pen directly on the required
element and hold the pen pressed
against the screen.
Moving the cursor
-
Place the pen tip directly on the
screen.
Fujitsu 25
Page 30

Working with the Tablet PC
Pen position
To prevent the pen from becoming jammed in its slot (1), make sure that you always insert
the pen into its slot the correct way round (see "
Charging the pen battery", Page 26).
1
Energy saving fu
To save energy, the pen automatically switches off after 10 minutes of inactivity
and is then in power saving mode.
The pen automatically returns to normal operating mode after the next contact with the pen tip.
nctions of the pen
Charging the pen battery
The pen contains an integrated battery, which is automatically charged when the
pen is fully inserted into its slot. The pen is also charged when the Tablet PCisin
power saving mode or is switched off. A charging time of approximately 15 seconds
is sufficient to enable to pen to be used for 90 minutes again.
► Insert the pen fully in the slot.
After a charging period of approximately 5
minutes, the pen battery is fully charged.
26 Fujitsu
Page 31

Working with the Tablet PC
Setting the pen
Operating system Menu
Windows 10
You can make various settings for the pen under System Control -
Hardware and Sound - Pen and Touch.
Calibrating the pen
Via the operating system, you must calibrate your tablet PC before first use with the
pen, so that it recognises the pen as accurately as possible.
You should also always repeat the calibration if the co-ordination betweenthe
pen and cursor movement deteriorates.
Operating system Menu
Windows 10
To calibrate, call up the Hardware and Sound / Tablet PC Settings function
in the Control Panel. You need to calibrate both portrait and landscape
formats.
Securing the pen tether (optional)
You can attach the pen with an optional pen tether to prevent accidentally dropping it or losing it.
► Secure one end of the pen tether to the pen and the other end to the Tablet PC.
Fujitsu 27
Page 32

Working with the Tablet PC
Tablet buttons
In addition to the ON/OFF switch (1), your Tablet PC is also equipped with three tablet buttons.
4 3 2 1
No. Description Functions
2 Volume up button Increase the volume
3 Volume down button Decrease the volume
4
Shortcut button Start function m
If the ON/OFF switch of the Tablet PC is pressed in combination with
the volume-down button, this corresponds to the function of the key
combination
Ctrl+Alt+Del
on a keyboard.
anager or screen shot function
28 Fujitsu
Page 33

Working with the Tablet PC
Camera
Camera
Each camera has its own status indicator. The status indicator lights up when the camera is active.
Depending on the software used, you can use your camera to take pictures,
record video clips or take part in web chats.
• The picture quality depends on the lighting conditions and the software being used.
• You can only use the camera with a particular application (e.g. an Internet telephony
• When using the camera, the Tablet PC support must not shake.
• The camera automatically adjusts itself to the current light level. For this reason the
Your device has two cameras: one on the front of the device and one on the back.
program or a video conferencing program which supports a camera).
touchscreen may flicker while the light level is adjusted.
Further information on use of the camera and additional settings can be found
in the Help function of the program which uses the camera.
Fujitsu 29
Page 34

Working with the Tablet PC
Rechargeable battery
RechargeablebatteryBatteryLife,batteryRechargeablebatteryRechargeablebattery
For mobile use, the built-in battery provides the Tablet PC with the necessary power.
You can increase the life of the battery by caring for the battery properly. The average
battery life is around 500 charge/discharge cycles.
You can extend the battery life by taking advantage of the available energy saving functions.
Charging and maintaining the battery
BatteryBattery
The rechargeable battery of the Tablet PC can only be charged when the ambient temperature
is between 5 °C / 41 °F and a maximum temperature of 35 °C / 95 °F.
You can charge the battery by connecting the Tablet PC to the mains adapter
Mains adapter connecting", Page 17).
(see "
If the mains adapter is connected when the state of charge of the battery is more than 90%,
charging will not be started. When the state of charge of the battery is less than 90%, the
battery will be charged to 100% as soon as the mains adapter is connected.
If the battery is running low you will hear a warning alarm. If you do not connect the mains adapter
within five minutes of the warning alarm described above, your Tablet PC will switch off automatically.
monitoring the battery charging level
BatteryBatterystatusmeter
In the system bar / status display there is a battery symbol shown for monitoring the
battery capacity. The battery symbol shows you the battery charge.
If you place the mouse cursor over the battery symbol, the system shows
you the level of charge of the battery.
Storing the battery
BatteryBatterySelf-discharge,batterychargecapacity,battery
Store battery packs in a dry environment at a temperature between 0°C / 32°F and 30°C / 86°F. The
lower the temperature at which the batteries are stored, the lower the rate of self-discharge.
If you will be storing batteries for an extended period (longer than two
months), the level of charge of the battery should be about 30 %. To prevent
exhaustive discharge which would permanently damage the battery, check
the level of charge of the battery at regular intervals.
To be able to make use of the optimum charge capacity of the battery, it should
be completely discharged and then fully recharged.
If you do not use the batteries for long periods, remove them from the
Tablet PC. Do not store batteries in the device!
30 Fujitsu
Page 35

Working with the Tablet PC
Removing and installing the battery
Only use batteries approved by Fujitsu for your tablet PC.
Never use force when fitting or removing a battery.
Make sure that no foreign bodies get into the battery connections.
Never store a battery for longer periods in the discharged state. This
can make it impossible to recharge.
Removing the battery
Please observe the safet
Remove the power plug fr
► Switch off the tablet PC.
The device must not be in energy-saving mode.
► Remove all the cables from the device.
► Turn the device over and place it on a stable, flat and clean surface. If necessary, place a
slip-resistant cloth on this surface to prevent the device from being scratched.
y information in chapter "
om the mains outlet!
Important notes", Page 12.
3
1
2
► Slide the battery release in the direction of the arrow (1) and hold it in place.
► Slide the battery release in the direction of the arrow (2).
► Lift the battery out of the battery compartment (3).
Fujitsu 31
Page 36

Working with the Tablet PC
Installing the battery
1
2
► Insert the battery in the battery compartment (1).
► Slide the battery release in the direction of the arrow (2).
The battery is now secured in place.
► Turn the Tablet PC the correct way around again and place it on a flat surface.
► Reconnect the cables that were previously disconnected.
32 Fujitsu
Page 37

Working with the Tablet PC
Using the power-management features
PowerPowerBattery
The Tablet PC uses less power when the power management features are enabled. You will
then be able to work longer when using the battery before having to recharge it.
Power efficiency is increased and environmental pollution reduced. By
choosing the best power options, you can make significant savings and
at the same time help protect the environment.
► Select the power managem
ent functions in your Control Panel.
When the Tablet PC is in power saving mode, you must remember the following:
During power saving mode, open files are held in the main memory
orinaswapfileontheharddisk.
Never switch off the Tablet PC while it is in a power saving mode. If the built-in battery is
nearly flat, close the open files and do not go into power saving mode.
If you do not intend to use your Tablet PC for a long period of time:
► Exit the power savi
ng mode if necessary via touching the screen or by switching on the
Tablet PC.
► Close all opened programs and completely shut down the Tablet PC.
Memory cards
Slot
Your Tablet PC is equipped with an integrated memory card reader. You can use
memory cards to increase the storage of your Tablet PC.
Observe the manufacturer ’s instructions when handling the memory cards.
Memorycard
Supported formats
It supports the following formats:
• Micro Secure Digital (microSD
•microSDHC
•microSDXC
TM
Card)
Fujitsu 33
Page 38

Working with the Tablet PC
Inserting the memory card
a
Removing the memory card
Memorycard
To avoid any loss of data, always follow the correct procedure for removing the
card (see the documentation for your operating system).
► Carefully push the memory card into the slot
until you feel it click into place. The label
area must face the front of the Tablet PC. Do
not apply any force, otherwise the delicate
contact surfaces could be damaged.
Memorycard
► Press the edge of the memory card
so that the memory card jumps (1)
slightly out of the slot (a).
► Pull the memory
in the directio
cardoutoftheslot(a)
n of the arrow (2).
a
1
2
34 Fujitsu
Page 39

Working with the Tablet PC
SIM card (configuration dependent)
A SIM card (Subscriber Identity Module) is a chip card which is inserted in a mobile telephone or
Tablet PC and, together with an integrated UMTS/LTE module, enables access to a mobile network.
Follow the instructions supplied by the provider of the SIM card.
The SIM card slot is located in the battery compartment and is only
accessible after the battery has been removed.
Please note that the SIM
card formats, such as fu
do not fit in the SIM card s
Please do not insert an
jam or could even damag
card format must be nano-SIM (4FF). Other SIM
ll-size (1FF), mini-SIM (2FF) or micro-SIM (3FF)
lot of your Tablet PC.
y other format of SIM card as they could
e the system.
Inserting the SIM card
► Remove the battery, see "Removing the battery", Page 31.
1
3
► Pull the SIM card holder out of the slot (1).
► Insert t
► Slide the SIM card holder with the SIM card into its slot (3).
►Instal
he SIM card (2) into the SIM card holder as shown in the diagram on the SIM card holder.
l the battery again, see "
Installing the battery", Page 32.
2
Fujitsu 35
Page 40

Working with the Tablet PC
Removing the SIM card
► Remove the battery, see "Removing the battery", Page 31.
1
3
► Pull the SIM card holder out of the slot (1).
► Remove the SIM car
► Slide the SIM card holder back into its slot (3).
► Install the bat
d from the SIM card holder (2).
tery again, see "
Installing the battery", Page 32.
2
36 Fujitsu
Page 41

Working with the Tablet PC
Wireless LAN / Bluetooth / LTE radio components
(configuration dependent)
The installation of radio components not approved by Fujitsu will invalidate
the certifications issued for this device.
Switching the wireless components on and off
wireless components are switched on and off via the corresponding functions of the operating system.
► To switch wireless components on and off individually, select Settings – Change
PC settings – Network – Airplane mode.
Setting up WLAN access
• Requirement: A WLAN must be available and you must have the
corresponding access information.
Information on configuring the WLAN access can be found in the
documentation for your operating system.
Access via LTE
If you ordered an integrated LTE module with your system, you can fully enjoyoptimum
reception and maximum energy efficiency without the hassle of cables or antennae.
An installed LTE module is ready for immediate use.
If you did not order an LTE module, you can purchase the accessories for LTE reception
from your retailer or your Fujitsu Technology Solutions dealer.
For information about connecting with the LTE network, please see the documentation
for the hardware that you will be using.
You can connect your device to the internet via LTE. To do this, use one
of the following connection types:
• Integrated LTE module (the type depends on your model variant)
• a USB dongle (a USB stick with your mobile phone provider’s SIM card)
• a mobile end-device (e.g. mobile phone with Bluetooth or cable connection)
Fujitsu 37
Page 42

Working with the Tablet PC
Ethernet and LAN (optional, only with cradle or adapter cable)
EthernetLAN
With optionally available accessories, you can establish a connection to alocal
network (LAN = Local Area Network).
► Connect the network cable to the LAN
port of the accessory (1).
► Connect the network cable to your
network connection (2).
1
2
Your network administrator can help you to configure and use the LAN connections.
The network cable is not included in the delivery scope. This type of
cable can be obtained from a specialist dealer.
Use a shielded network cable (CAT 5e).
GPS
GPS
Whether your device has this function or not depends on the device configuration chosen.
38 Fujitsu
Page 43

Accessories for your Tablet PC (opti
onal)
Accessories for your Tablet PC
The following accessories are available for your Tablet PC:
• Cradle for charging the Tablet PC and with additional ports
• Magnetic keyboard
• Flip-cover stand
• USB - LAN adapter cable
• Adapter cable USB Type-C - HDMI
The following sections provide more information on handling the accessories.
(optional)
Fujitsu 39
Page 44

Accessories for your Tablet PC (opti
onal)
Your cradle (optional)
As well as providing rapid charging, your cradle is a device which helps you to quickly connect
your tablet PC to your peripheral devices, such as a display, keyboard, mouse, etc. You only
need to dock the tablet PC in order to work with your peripheral devices.
Cradle components
PortsPortsCradle
1
2
3
4
5
6
7
8
9
1 = Release button
2 = Status LED
3 = Connector on the cradle for the docking
port of the Tablet PC
4 = USB 3.0 port (Type-A)
5 = VGA (video graphics array) screen
connection
The status LED (2) of the cradle lights up as soon as the Tablet PC is connected
to the cradle, even if the Tablet PC is switched off.
6 = Display port
HDMI port
7 = LAN port
8 = Security Lock Device
9 = DC input connector (DC IN)
Setting up the cradle
Select a suitable location for the cradle before setting it up. Follow
the instructions below when doing so:
• Place the cradle on a flat, stable, nonslippery surface.
• Never place the cradle and the mains adapter on a heat-sensitive surface.
• Do not expose the cradle to extreme environmental conditions.
• Protect the cradle from dust, humidity and heat.
40 Fujitsu
Page 45

Accessories for your Tablet PC (opti
Connecting the Tablet PC to the cradle
It is possible to connect the Tablet PC to the cradle while it is operating.
Unplug the mains adapter from the Tablet PC before you connect
the Tablet PC to the cradle.
If the tablet PC is connected to the cradle, you must connect the mains adapter
to the cradle in order to be able to use all of the cradle’s functions.
cradle
► Remove the power plug of the mains adapter from the mains socket.
► Pull the mains adapter cable out of the DC jack (DC IN) of the Tablet PC.
onal)
2
1
4
3
► Position the Tablet PC so that it lies on the surface of the tray on the cradle.
► Push the tablet PC onto the cradle in the direction of the arrow (1) until you feel it engage
in the connector and until the release button has returned to its original position.
► Plug the DC output connector on the mains adapter into the DC input
connector (DC IN) on the cradle (2).
► Connect the power cable to the mains adapter (3).
► Plug the power cable into the mains socket (4).
Fujitsu 41
Page 46

Accessories for your Tablet PC (opti
onal)
Disconnecting the Tablet PC from the cradle
It is possible to separate the Tablet PC from the cradle during operation.
2
1
► Push the release button in the direction of the arrow (1) until it remains inthe
pressed position (red marking becomes visible).
► While holdi
the cradle i
42 Fujitsu
ng the bottom part of the cradle, lift the Tablet PC away from
n the direction of the arrow (2).
Page 47

Accessories for your Tablet PC (opti
Magnetic keyboard (optional)
The magnetic keyboard is a device which is optimised for the convenient input
of text. You only need to dock the Tablet PC.
onal)
Components of the magnetic
MagnetickeyboardPorts
2
3
1 = Docking port for the Tablet PC
2 = Function Lock indicator (execute Fn
functions by directly pressing the keys)
3 = Num Lock indicator (switch virtual
keypad on and off)
A microfibre cloth is provided with your magnetic keyboard. To protect your
Tablet PC’s touchscreen, we recommend placing the microfibre cloth betweenthe
keyboard and the touchscreen when the device is folded closed.
keyboard
1
4
5
4 = Caps Lock indicator (switch upper case
writing function on and off)
5 = Scroll Lock indicator (scroll, function
depends on application program)
Fujitsu 43
Page 48

Accessories for your Tablet PC (opti
Connecting the Tablet PC to the magnetic keyboard
Magnetickeyboard
onal)
2
1
4
3
► Position the Tablet PC so that the docking ports of the Tablet PC and the magnetic keyboard
approach in the direction of the arrow (1) and the magnetic connection clicks into place.
► Connect the mains adapter cable to the DC input connector (DC IN) on the Tablet PC (2).
► Connect the mains cable to the mains adapter (3).
► Plug the mains cable into the mains socket (4).
44 Fujitsu
Page 49

Accessories for your Tablet PC (opti
Disconnecting the Tablet PC from the magnetic keyboard
It is possible to disconnect the Tablet PC from the magnetic keyboard while it is operating.
1
onal)
► While holding the lower area of the magnetic keyboard, lift the Tablet PC away from
the magnetic keyboard in the direction of the arrow (1).
Flip-Cover Stand (optional)
With the Tablet PC installed in the flip-cover stand, you can use it in the upright position
by itself or together with a magnetic keyboard. When it is folded over, the flip-cover stand
serves as a protective cover for the Tablet PC and magnetic keyboard.
The flip-cover stand contains magnets. Please take into account the
safety information in chapter "
Device contains magnets", Page 13.
Fujitsu 45
Important notes", Page 12, section "Caution:
Page 50

Accessories for your Tablet PC (opti
Please clean the inner surfaces of the flip-cover stand regularly to remove any dust or dirt.
In order to protect the touchscreen, we recommend that the Tablet PC is
always carried together with the magnetic keyboard in the flip-cover stand.In
this way you will prevent any particles of dirt on the inside of the flip-cover
from causing scratches on the touchscreen.
The flip-cover stand has an adhesive surface on the inside for securing the Tablet PC.
Only separate the flip-cover stand from the Tablet PC in exceptional circumstances,
because otherwise the permanent adhesive ability will be reduced.
onal)
Insert the Tablet PC into the flip-cover stand
► Switch the Tablet PC off before attaching the flip-cover stand.
► Remove the mains adapter, the magnetic keyboard and all other connected devices.
► When necessary, clean the back of the Tablet PC to remove dust and dirt.
1
► Remove the film from the adhesive surface of the flip-cover stand (1).
46 Fujitsu
Page 51

Accessories for your Tablet PC (opti
When inserting the Tablet PC into the flip-cover stand, only apply light pressure to
the touchscreen. Do not use any tools. Make sure that no cables or other objects
become trapped between the Tablet PC and the flip-cover stand.
2
onal)
3
► Apply the Tabl
► Place the Tablet PC down on the flip-cover stand (3).
► Carefully li
When required, the Tablet PC and flip-cover stand can be connected to
the magnetic keyboard (optional).
et PC to the edge of the flip-cover stand as shown (2).
ft the Tablet PC and flip-cover stand and check that they are firmly connected together.
2
Fujitsu 47
Page 52

Accessories for your Tablet PC (opti
The following illustration shows you the many ways in which the cover can be used:
onal)
48 Fujitsu
Page 53

Accessories for your Tablet PC (opti
Connect the Tablet PC with flip-cover stand to
the magnetic keyboard
2
onal)
2
► Move the Tablet PC into the upright position with the aid of the flip-cover stand (1).
► Position the Tablet PC so that the docking ports of the Tablet PC and the magnetic keyboard
approach in the direction of the arrow (2) and the magnetic connection clicks into place.
1
Fujitsu 49
Page 54

Security functions
Security functions
Securityfunctions
Your Tablet PC has several security features that you can use to secure your
system from unauthorised access.
This chapter explains how to use each function, and what the benefits are.
Please remember that in some cases, for example, forgetting your password,
you may be locked out and unable to access your data. Therefore,
please note the following information:
• Back up your data on external data carriers at regular intervals.
• Some security functio
of the passwords and ke
If you forget your passwords you will need to contact the our Service
Desk. Deletion or resetting of passwords is not covered by your warranty
and a charge will be made for assistance.
ns need you to choose passwords. Make a note
ep them in a safe place.
50 Fujitsu
Page 55

Setting up the fingerprint sensor
(configuration dependent)
FingerprintsensorFingerprintsensor
Whether your device has a fingerprint sensor or not depends on the
device configuration that you ordered.
Security functions
The fingerprint sensor ca
software, this image can
► You must install the fingerprint software in order to be able to use the fingerprint sensor (1).
The current Workplace Protect software for the fingerprint sensor can be found on the
Internet at
http://www.fujitsu.com/fts/solutions/business-technology/security/secure/index.html."
"
n record an image of a fingerprint. With additional fingerprint
be processed and used instead of a password.
1
Using the security lock (cradle only)
SecurityLockAnti-theftprotectionSecurityLock
Your cradle (optional) is equipped with a security device for a Kensington lock cable. You
can use the Kensington lock cable, a sturdy steel cable, to protect the cradle against
theft. The Kensington lock cable is available as an accessory.
► Fit the Kensington lock cable to the
device on your cradle.
Fujitsu 51
Page 56

Security functions
Configuring password protection in BIOS Setup Utility
Before using the various options for password protection in the BIOS Setup utility
to increase data security, please observe the following:
Make a note of the passwords and keep them in a safe place. If you forget your
supervisor password you will not be able to access your Tablet PC. Deletion of the
password is not covered by your warranty and a charge will be made for assistance.
Passwordprotection
Your password can be up to
special characters. A di
When using special char
country version of the k
Protecting BIOS Setup Utility (supervisor and user password)
If you have opened these operating instructions on the screen, we
recommend that you print them out. You cannot call the instructions onto
the screen while you are setting up the password.
BIOSSetupUtility
The supervisor password and the user password both prevent unauthorised use of the BIOS Setup
Utility. With the aid of the supervisor password you can access all of the functions of the BIOS
Setup Utility, while the user password will only give you access to some of the functions. You
can only set up a user password if a supervisor password has already been assigned.
Please refer to section "Settings in BIOS Setup Utility", Page 64 for a description
of how to call up and operate the BIOS-Setup-Utility.
32 characters long and can contain letters, numbers and
stinction is made between upper and lower case.
acters, please remember that they depend on the
eyboard being used.
Setting supervisor and user password
► Start the BI
► Select the Set Supervisor Password field and press the Enter key.
With Enter
► Enter the password and press the Enter key.
Confirm ne
► Enter the password again and press the Enter key.
Changes
► To set the user password, select Set User Password and proceed exactly as
when configuring the supervisor password.
If you d
►IntheExit menu, select the option Save Changes & Exit.
► Selec
PasswordSupervisorpasswordUserpassword
The Tablet PC is rebooted and the new password is effective. It will now be necessary to
first enter your supervisor or user password in order to open the BIOS Setup Utility. Please
note that the user password only provides access to a few of the BIOS settings.
52 Fujitsu
OS Setup Utility and go to the Security menu.
new Password: you are asked to enter a password.
w Password requires you to confirm the password.
have been saved is a confirmation that the new password has been saved.
o not want to change any other settings, you can exit BIOS Setup Utility.
t Yes and press the Enter key.
Page 57

Security functions
Changing the supervisor or user password
You can only change the supervisor password when you have logged into the
BIOS Setup Utility with the supervisor password.
PasswordSupervisorpasswordUserpassword
► Call the B IOS Setup Utility and go to the Security menu.
► When changing the password, proceed exactly as for password assignment.
Removing passwords
To remove a password (without setting a new password) perform the following steps:
PasswordSupervisorpasswordUserpassword
► Start the BIOS Setup Utility and go to the Security menu.
► Highlight the Set Supervisor Password or Set User Password field and press the Enter key.
You will be requested to enter the current password by the Enter Current Password prompt.
You will be requested to enter a new password by the Enter New Password prompt.
► Press the Enter key twice.
►IntheExit menu, select the option Save Changes & Exit.
► Select Yes and press the Enter key.
The Tablet PC is rebooted and the password is cancelled.
Removing the supervisor password simultaneously deactivates the user password.
Password protection for booting of the operating system
With the superv
section "
prevent start
Operatingsystem
isor password you have set in the BIOS Setup Utility (see
ng supervisor and user password", Page 52), you can also
Setti
ing of the operating system.
Activating system protection
► Start the BIOS Setup Utility and go to the Security menu.
Operatingsystem
► Select the PasswordonBootoption and press the Enter key.
► Select the desired option (First Boot or Every Boot) and press Enter
► Select the Save Changes & Exit option under Exit.
The Tablet PC reboots. You will be prompted to enter your password (the supervisor password).
Deactivating system protection
► Start the BIOS Setup Utility and go to the Security menu.
Operatingsystem
► Select the PasswordonBootoption and press the Enter key.
► Select the Disabled option and press the Enter key.
If you do not want to change any other settings, you can exit BIOS Setup Utility.
► Select the Save Changes & Exit option under Exit.
The Tablet PC reboots. The system is no longer password-protected.
Fujitsu 53
Page 58

Security functions
Password protection for the hard disk
Passwordprotection:
The hard disk password prevents unauthorised access to the hard disk drives
and is checked internally each time the system is booted. The prerequisite for
this is that you have assigned at least the supervisor password.
Activating hard disk protection
► Call up the BIOS Setup and select the Security menu.
If you have not assigned BIOS passwords yet, define the supervisor and the user
password now, if desired (see "
►MarktheHard Disk Security field and press the Enter key.
►IntheDrive0 area mark the Set Master Password field and press the Enter key.
Enter new Password then appears and you are asked to enter a password.
► Enter the password and press the Enter key.
Confirm new Password requires you to confirm the password.
► Enter the password again and press the Enter key.
Setup Notice: Changes have been saved is displayed to confirm that the
new password has been saved.
The field Password Entry on Boot is set to Enabled by default. You can exit the BIOS
Setup once you have finished changing the settings.
►FromtheExit menu, choose the option Exit Saving Changes.
► Press the Enter key and select Yes.
The Table PC reboots and your hard disk is now protected with a password. The
password prompt is enabled as soon as the Tablet PC has rebooted.
Security functions", Page 50).
Deactivating hard disk protection
To cancel a password without setting a new one, proceed as follows:
► Call up the BIOS Setup and select the Security menu.
►MarktheHard Disk Security field and press the Enter key.
►IntheDrive0 area mark the Set Master Password field and press the Enter key.
You will be initially requested to enter the old password by the Enter current Password prompt.
You will then be requested to enter a new password by the Enter new Password prompt.
► After providing the input, press the Enter key three times.
►FromtheExit menu, choose the option Exit Saving Changes.
► Press the Enter key and select Yes.
The Tablet PC reboots and there is no longer any password protection for thisharddisk.
54 Fujitsu
Page 59

Security functions
SmartCard reader (depending on configuration)
Depending on the selected model, your device may be equipped with a SmartCard reader.
Securityfunctions,Securityfunctions
SmartCards are not supplied as standard equipment. You can use all SmartCards that comply with
the ISO standard 7816-1, -2 or -3. These SmartCards are available from various manufacturers.
With the appropriate software you can use your SmartCard as an alternative to password protection,
but also as a digital signature, for encrypting your e-mails or for home banking.
We recommend that you always use two SmartCards. Always keep one of the SmartCards
in a safe place if you are carrying the other SmartCard with you.
In order to be able to take advantage of all the security features of your Tablet
PC, you will need a CardOS SmartCard from Fujitsu.
The SmartCard can only be used with a PIN, offering maximum protection even if
you lose the SmartCard. In order to maximise your security, the CardOS SmartCard
is disabled if three incorrect attempts are made to enter the PIN.
When you use the CardOS SmartCard for the first time, you will either need to enter the
preset PIN "12345678" or the PIN given to you by your systems administrator.
Fujitsu 55
Page 60

Security functions
Inserting the SmartCard
Depending on the selected model, your device may be equipped with a SmartCard reader.
Do not use force when inserting and removing the SmartCard.
Make sure that foreign objects do not fall into the SmartCard reader.
1
► Push the SmartCard into the SmartCard reader (1) with the chip towards the front of the Tablet PC.
56 Fujitsu
Page 61

Security functions
Trusted Platform Module - TPM (depending
on configuration)
TPMTrustedPlatformModule
To use the TPM, you must activate the TPM in the BIOS Setup before the software
is installed. The condition for this is that you have assigned at least the supervisor
password (see "
Enabling TPM
• Requirement: You have set a supervisor password, see "Security functions", Page 50.
► Call up the BIOS Setup and select the Security menu.
► Mark the TPM Security Chip Setting field and press the Enter key.
► Select Enabled to activate the TPM.
Once you have activated the TPM the Clear Security Chip option appears.
Select Clear Security Chip to delete the holder in the TPM. By clicking on Enabled,
all secret keys (e.g. SRK - Storage Root Keys, AIK - Attestation Identity Keys
etc.) generated by applications are deleted.
Please note that you will then no longer be able to access the data you have
encrypted with the keys based on that holder.
►IntheExit menu, choose the option Exit Saving Changes.
► Press the enter key and select Yes.
The tablet PC restarts and the TPM is switched on after the reboot.
Security functions", Page 50).
Disabling TP
• Requirement: You have set a supervisor password, see "Security functions", Page 50.
► Call up the B
► Mark the TPM Security Chip Setting field and press the Enter key.
► Select Dis
►FromtheExit menu, choose the option Exit Saving Changes.
►Pressthe
The tablet PC is rebooted and the TPM is disabled.
Fujitsu 57
M
IOS Setup and select the Security menu.
abled to deactivate the TPM.
Enter key and select Yes.
Page 62

Security functions
Enable password entry using the on-screen keyboard
(on-screen keyboard for BitLo
If TPM is enabled, you can enable an OnScreen keyboard for the internal
touchscreen in the BIOS Setup.
► Call BIOS Setup and select the Advanced menu.
►MarkBoot Configurations a
►FromtheUEFI Boot On-Screen Keyboard selection, choose the option Enabled.
►IntheExit menu, choose t
► Press the enter key and select Yes.
The tablet PC is reboote
Tap on the password field to enable the on-screen keyboard.
nd press the enter key.
he option Exit Saving Changes.
d and the password dialogue is displayed.
cker password)
58 Fujitsu
Page 63

Connecting external devices
Connecting external devices
Under all circumstances, please observe the safety notes provided in the
Important notes", Page 12 chapter before connecting or disconnecting
"
any devices to or from your Tablet PC.
Always read the documentation supplied with the device you wish to connect.
Never connect or disconnect cables during a thunderstorm.
Never pull at a cable when disconnecting it. Always grasp the plug.
With some devices, such as USB devices, it is not necessary to switch off
the Tablet PC and the device before connecting/disconnecting. For more
information about whether or not devices need to be switched off, please refer
to the documentation supplied with the external device.
Some of the external devices require special drivers (see the operating
system and external device documentation).
Connecting an external monitor
Display port (cradle only)
Displayport
The display port of the cradle can be used to connect a display, LCD TV or a plasma TV with an
appropriate port. The screen output is limited to a maximum of two external screens at the same time.
► Connect the data cable to the
external device.
► Connect the data cable to the display
port of the cradle.
Some LCD televisions have only two loudspeaker connections and therefore
cannot reproduce Dolby Digital or DTS. In order to reproduce the sound, you
must go into Windows and adjust the sound settings.
► To do this, deactivate the DTS Audio and Dolby Dig ital settings in the control
panel for the Realtek HDMI Output.
Fujitsu 59
Page 64

Connecting external devices
VGA monitor port (cradle only)
An analogue monitor is connected to the analogue VGA monitor port. The screen output
is limited to a maximum of two external screens at the same time.
MonitorVGAconnectionsocketScreenportMonitorport
► Switch off the Tablet PC and the
external monitor.
► Plug the data cable of the external
monitor into the monitor port.
► First switch on external monitor and
then the Tablet PC.
You can also switch back and forth between the external monitor and the LCD
screen of the Tablet PC, see "
Touch screen", Page 22.
You can display the same picture on the external monitor and the LCD
screen of the Tablet PC simultaneously.
60 Fujitsu
Page 65

Connecting external devices
Connecting USB devices
USBports
On the USB ports, you can connect external devices that also have a USB port
(e.g. a DVD drive, a printer, a scanner or a modem).
USB devices are hot-pluggable. This means you can connect and disconnect
devices while your operating system is running.
USB 1.x has a maximum data transfer rate of 12 Mbit/s.
USB 2.0 has a data transfer rate of up to 480 Mbit/s.
USB 3.0 has a data trans
USB 3.1 (Gen1) has a dat
USB 3.1 (Gen2) has a da
Additional informat
fer rate of up to 5 Gbit/s.
a transfer rate of up to 5 Gbit/s.
ta transfer rate of up to 10 Gbit/s.
ion can be found in the documentation for the USB devices.
► Connect the data cable to the
external device.
► Connect the data cable to the USB
port on the Tablet PC.
or
► Connect the data cable to a USB
port of the cradle.
Device drivers
USB devices will be automatically recognised and installed by your operating system.
Fujitsu 61
Page 66

Connecting external devices
USBportwithchargingfunction(USBType-C)
USBconnectionwithchargingfunction(USBType-C™)
At this USB port, you can charge a connected USB device or operate devices
without additional power supply.
This is also possible with the Tablet PC switched off, by activating the USB Type-C Power
Delivery o n System Off function in the Advanced - Miscellaneous Con figurations menu of the
BIOS Setup Utility. Instructions on how to call up and use the BIOS Setup Utility can be
found in the "
Settings in BIOS Setup Utility", Page 64 section.
USB devices are hot-pluggable. This means you can connect and disconnect
the cables of USB devices while the system is running.
Additional information can be found in the documentation for the USB devices.
► Connect the data cable to the
+
external device.
► Connect the data cable to a USB port
(USB Type-C) of the Tablet PC.
How to remove USB devices correctly
Always correctly remove the device according to the rules described below,
to ensure that none of your data is lost.
► Tap the symbol for safe removal of the hardware.
► Select the device which you want to shut down and remove.
►TapOK.
Wait for the dialogue box which tells you that it is now safe to remove the device.
62 Fujitsu
Page 67

Connecting external devices
Headphones/microphone/Line-In/Line-Out/headset combination port
ConnectingaudiodevicesAudioportsC onnectingheadphones
Using the headphones/microphone/Line-In/Line-Out/headset-combi port, you can connect a
headset, headphones, a microphone or external loudspeakers to your TabletPC.
► Connect the audio cable to the
external device.
► Connect the audio cable to the headphone
port of the Tablet PC.
The internal loudspeakers are disabled.
If you purchase a cable from a retailer, please note the following information:
The headphones/microphone/Line-In/Line-Out/headset-combi port on your
Tablet PC is a "3.5 mm jack socket".
If you want to connect headphones or a speaker you will need a "3.5 mm jack plug".
Fujitsu 63
Page 68

Settings in BIOS Setup Utility
Settings in BIOS Setup Utility
BIOSSetupUtilitySystemsettings,BIOSSetupUtilityConfiguration,BIOSSetupUtilitySetupSystemconfigurationHardwareconfiguration
The BIOS Setup Utility allows you to set the system functions and the hardware
configuration for the Tablet PC.
When it is delivered, the Tablet PC is set to factory default settings. You can
change these settings in BIOS Setup Utility. Any changes you make take effect as
soon as you save and exit the BIOS Setup Utility.
The BIOS Setup Utility program contains the following menus:
About
System
Advanced
Security
Boot
Exit
Starting the BIOS Setup Utility
► Press and hold the volume down button and switch the tablet PC on.
► If a password has been assigned, enter the password and press the Enter key.
To navigate more easily in the BIOS Setup Utility, you can use an external USB keyboard.
Displays information relating to the BIOS, processor and Tablet PC
Advanced system settings
Configuration of various hardware components, such as mouse, keyboard,
processor
Password settings and security functions
Configuration of the start-up sequence
Exits the BIOS Setup Utility
BIOSSetupUtility
If you have forgotten the password, contact your system administrator
or contact our customer service centre.
The BIOS Setup Utility starts.
64 Fujitsu
Page 69

Settings in BIOS Setup Utility
Operating BIOS Setup Utility
BIOSSetupUtility
► Use the cursor keys
► Select the option you want to change with the cursor keys
► Press the Enter key.
►Pressthe
► For future reference, make a note of the changes you have made (for example, in this manual).
Press theF1key to display help on the operation of the BIOS Setup Utility. The description
of the individual settings is shown in the right-hand window of the BIOS Setup Utility.
With the
F9
key you can load the default settings of the BIOS Setup Utility.
←
→
or
to select the menu you wish to access to make changes.
The menu is displayed on the screen.
↑
or↓.
ESC
key to exit the selected menu.
Fujitsu 65
Page 70

Settings in BIOS Setup Utility
Exiting BIOS Setup Utility
BIOSSetupUtility
You need to select the desired option in the Exit menu and activate it by pressing the Enter key:
Exit Saving Changes - save ch
► To save the current menu settings and exit the BIOS Setup Utility, select Exit SavingChanges and Yes.
The Tablet PC is rebooted
and the new settings come into effect.
anges and exit BIOS Setup Utility
Exit Discarding Changes – Discard changes and exit BIOS Setup Utility
► To discard the changes, select Exit Discarding Changes and Yes.
The settings in place when BIOS Setup Utility was called remain effective. The BIOS
Setup Utility is terminated and the Tablet PC is rebooted.
Load Setup Defaul
► To copy the standard entries for all menus of the BIOS Setup Utility,
choose Load Setup Defaults and Yes.
ts – Copy Standard Entries
Discard Changes – Discard changes without exiting the BIOS Setup Utility
► To discard the changes you have made, select Discard Changes and Yes.
The settings in place when BIOS Setup Utility was called remain effective.
You can now make additional settings in the BIOS Setup Utility.
► If you want to exitBIOS Setup Ut ilitywith these settings, select Exit Saving Changes and Yes.
Save Chan
ges - save changes without exiting
the BIOS Setup Utility
► To save the changes, select Save Changes and Yes.
The changes are saved. You can now make additional settings in the BIOS Setup Utility.
► If you want to exit BIOS Setup Utility with these settings, choose Exit Saving Changes and Yes.
Save Changes and Power Off
► To save the changes and switch off your device, select Save Changes and Power Off and Yes.
The changes are saved. Your device is shut down.
66 Fujitsu
Page 71

Troubleshooting and tips
Troubleshooting and tips
TroubleshootingTipsFaultTroubleshooting
If a fault occurs, try to correct it as described. If you fail to correct the problem, proceed as follows:
► Make a note of the steps and the circumstances that led to the fault. Also
► Switch the Tablet PC off.
► Please contact the Hotline/Service Desk.
Follow the safety notes in the "Safety/Regulations" manual when
connecting or disconnecting cables.
make a note of any error messages displayed.
You will find the telephone numbers at "http://support.ts.fujitsu.com/contact/servicedesk"
Have the following information ready when you call:
• The model name and serial number of the Tablet PC. The serial number
is located on a sticker on the underside of the Tablet PC.
• Notes of any messages that appear on the screen and information on acoustic signals.
• Any changes you have made to the hardware or software after
receiving the Tablet PC.
• Any changes you have made to the BIOS Setup settings after receiving the Tablet PC.
• Your system configuration and all peripheral devices connected to your system.
• Your sales contract.
Our Tablet PCs
means that con
in terms of we
configuratio
compared to a
games with i
been appro
losses or m
versions c
Help if pr
Should you encounter a problem with your computer that you cannot resolve yourself:
► Note the ID number of your device. The ID number is found on the type rating
plate on the back or underside of the casing.
► Contact the Service Desk responsible for your country for clarification of the problem:
http://support.ts.fujitsu.com/contact/servicedesk". When you do this, please have
"
ready the ID number and serial number of your system.
Fujitsu 67
oblems occur
have been designed primarily with mobile applications in mind. This
siderable effort has been made to optimise components and equipment
ight, space and energy requirements. Depending on the particular
n you have purchased, it is possible that functionality may be slightly reduced
desktop PC if you are running processor-intensive gaming software, e.g.
ntensive 3D graphics. Updating your hardware with drivers which have not
ved by Fujitsu Technology Solutions may result in performance losses, data
alfunction of the equipment. A list of approved drivers and current BIOS
an be downloaded from: "
http://support.ts.fujitsu.com/Download/Index.asp"
Page 72

Troubleshooting and tips
TheTabletPC’sdateortimeisincorrect
SummertimeTime,daylightsavingsTimenotcorrectTimenotcorrectIncorrectdat e/timeDateisincorrect
Cause Troubleshooting
Time and date are incorrect. ► With the BIOS-Setup-Utility, you can set the
date and time in the main menu.
Date and time are still set incorrectly after
switching on the Tablet PC.
► Please contact your sales outlet or our
Hotline/Service Desk.
Battery charging indicator not lit
Cause
The battery is not being charged.
Fault elimination
► Connect the Tablet PC to a mains outlet
using the mains adapter.
Note: The battery will only be charged again
when the battery capacity is less than 90%.
The Tablet PC’s touchscreen remains dark
Touchsc ree ntouchscreenistoodark
Cause Troubleshooting
Touchscreen is switched off. ► Press a key (external keyboard) or tap on
External monitor or television set connected.
the touchscreen.
► Check whether the graphics driver settings
are correct or whether an external monitor
has been detected in "Intel Graphics Media
Accelerator Driver for mobile".
The display on the Tablet PC’s touchscreen
is difficult to read.
een
een
Touchsc r
Touchsc r
Cause Troubleshooting
Reflected glare ► Move the Tablet PC into a different position.
► Increase the brightness of the screen.
68 Fujitsu
Page 73

Troubleshooting and tips
The external monitor remains bl
Monitor
Cause Troubleshooting
Monitor is switched off. ► Switch the external monitor on.
Power saving has been activated (monitor is
blank).
Brightness is set to dark.
Screen output is set on the Tablet PC’s
touchscreen.
The external monitor’s power cable or data
cable is not connected properly.
The external mo
ScreenMonitor
Cause Troubleshooti
The wrong exte
or the wrong sc
the applicat
rnal monitor has been selected
reen resolution has been set for
ion program.
nitor is blank or the image is unstable
► Press a key (external keyboard) or tap on
► Adjust the brightness of the
► Check whether the graphics driver settings
► Switch off the Tablet PC and the external
► Check whether the power cable is plugged
► Check whether the data cable is properly
► Switch on the Tablet PC and the external
► Terminate the
► Set the screen resolution: Set the screen
►Selectmo
ank
the touchscreen.
are correct or whether an external monitor
has been detected in "Intel Graphics Media
Accelerator Driver for mobile".
monitor.
properly into the external monitor and into
the power socket.
connected to the Tablet PC and the external
monitor (if it is plugged in with a connector).
monitor.
ng
application program in
Windows. If th
terminating
combination
in order to s
tablet PC. C
resolution as described in the documentation
for your operating system.
describe
operatin
e error persists after
the program, use the key
for switching the screen output
witch to the touchscreen of the
hange the following setting:
nitor: Select monitor 1 or 2 as
d in the documentation for your
g system.
monitor.
The cursor does not correctly follow the pen movements
Cause
Pen incorrectly calibrated
Fujitsu 69
Fault elimination
► Calibrate the pen as described in chapters
Setting the pen", Page 27 and "Calibrating
"
the pen", Page 27.
Page 74

Troubleshooting and tips
Pen input not working
Cause
The pen is in power-saving mode
The pen battery is completely
discharged.
.
Troubleshooting
► Press the pen button gently to w
from sleep mode.
► Insert the pen fully into its slot on the Tablet
PC to charge the pen battery.
The Tablet PC does not start after switch on
TheTabletPC
Cause Troubleshooting
The battery is not installed correctly.
The battery is dead.
The power adapter is not connected correctly.
► Check whether the battery is installed
correctly in its compartment.
► Switch on the Tablet P
► Charge the battery.
or
► Insert a charged bat
or
► Connect the mains adapter to the Tablet
PC.
► Check whether th
connected corr
► Switch on the Tablet PC.
C.
tery.
e mains adapter is
ectly to the Tablet PC.
ake the pen
The Tablet PC stops working
TheTabletPCEnergysavingmode
Cause Troubleshooting
The Tablet PC is in energy saving mode.
An application programme has caused the
malfunction.
The batte
70 Fujitsu
ry is dead.
► Leave energy saving mode.
► Close the ap
the Tablet
system or s
on again).
► Charge the battery.
or
► Insert a
or
► Connect the mains adapter to the Tablet
PC.
plication program or restart
PC (by restarting the operating
witching the device off and back
charged battery.
Page 75

Troubleshooting and tips
The printer does not print
Printerdoesnotprint
Cause Troubleshooting
The printer is not switched on. ► Make sure that the printer is sw
The printer is not connected c
The printer driver is faulty or not correctly
installed, or it is the wrong printer driver.
orrectly.
on and ready for operation (ref
documentation supplied with t
► Check that the data cable connecting
the Table PC to the printer is properly
connected.
► Check that the data cable connecting
the Tablet PC to the printer is properly
connected.
► Check whether the correct printer driver is
loaded (refer to the printer documentation).
itched
er to the
he printer).
The wireless connec
ctiontoanetworkdoesnotw ork
Thewirelessconne
Cause Troubleshooting
The wireless compo
The wireless component is enabled. Despite
this, the wireless connection to a network does
not work.
The battery d
Battery:
Cause
The battery
case the bat
You may have an application running that
consumes a great deal of power due to frequent
accessing of the hard disk or optical drive.
The maximum brightness may have been set
for the screen.
nent is disabled.
ischarges too quickly
is either too hot or too cold. In this
tery indicator flashes.
tion to a network does not work
► Switch the wireless component on (see
"
Switching the wireless components on and
off", Page 37).
► Check whether the wireless connection is
switched on via the software.
► Further information on using the wireless
component can be found in the help files.
Troubleshooting
► Bring the Tablet PC up/down to a normal
temperature again.
► If the operating time of the battery life is
extremely short, the battery is probably too
old. Replace battery if necessary.
► Use the mains adapter as frequently as
possible.
► Reduce the brightness of the screen to
lower energy consumption: You will find the
setting under Control Panel – Hardware and
Sounds – Windows Mobility Center.
Fujitsu 71
Page 76

Troubleshooting and tips
SmartCard reader is not recognised.
Cause
Chip card inserted incorrectly.
Troubleshooting
► Make sure you have inserted your
SmartCard into the SmartCard reader
with the chip facing upwards/downwards
(device-dependent).
► Check whether the SmartCard you are using
is supported. Your SmartCard must comply
with the ISO standard 7816-1, -2, -3 and -4.
SmartCard PIN forgotten
Cause
PIN forgotten ► If you work in a netwo
Troubleshooting
system administrat
Tablet PC with a sup
rk, contact your
or, who can unlock your
ervisor PIN.
SmartCard lost
Cause
SmartCard lost ► If you work in a network, contact your
Troubleshooting
system administrator, who can boot your
Tablet PC with a Supervisor SmartCard.
Acoustic war
AcousticerrormessagesErrors
Cause
A beep sounds every few seconds.
The battery is almost flat.
72 Fujitsu
nings
Troubleshooting
► Charge the battery.
Page 77

Troubleshooting and tips
Error messages on the screen
ErrormessagesonthescreenErrormessage:
This section describes the error messages generated by the BIOS Setup. Error messages displayed
by the operating system or programmes are described in the relevant documentation.
If the error message appears repeatedly, despite troubleshooting measures, please
contact the place of purchase or our customer service centre.
Fujitsu 73
Page 78

Troubleshooting and tips
Error message/cause Resolution
CMOS battery bad
If the error message occurs repeatedly, the
► Contact your sales outlet or our
service centre.
buffer battery in the Tablet PC is flat.
System CMOS checksum bad - default configuration
used
The system configuration information is
incorrect.
► Switch off the Tablet PC.
► Switch on the Tablet PC.
►IntheBIOS Setup, select t
► Select the entry Load Setup Defaults.
► Select OK and press the En
Extended memory failed
zzzz zzzz
When testing the exten
resulted at the addre
Failure Fixed Disk
The settings of th
Keyboard contro
at offset: xxxx Failing Bits:
ded memory an error has
ss xxxx.
n
eharddiskdriveareincorrect.
ller error
► Contact your sales outlet or our customer
service centre.
► Start the BIOS Setup (Primary Master
submenu) and select the correct settings.
► Switch off your Tablet PC using the ON/OFF
button.
► Wait 3 - 5 seconds and switch on the Tablet
PC again.
Keyboard error
If you are using an external keyboard:
► Check the connection and reboot the Tablet
PC.
nn Stuck key
Operating system not found
► Make sure that no key is pressed.
► Check in the BIOS Setup whether your hard
disk has been set correctly.
► Make sure t
installe
Press <F1> to resume, <F2> to SETUP
This error message appears if an error occurs
during the self-test before starting the operating
system.
time clock error
Real
► PressthevolumeupbuttontostartBIOS
Setup.
or
►Ifyoua
► Contact your sales outlet or our customer
service centre.
nnnnK Shadow R AM failed at offset: xxxx Failing
Bits: zzzz
System battery is dead - Replace and run SETUP
ystem cache error - Cache disabled
S
► Contact your sales outlet or our customer
service centre.
ntact your sales outlet or our customer
►Co
rvice centre.
se
► Contact your sales outlet or our customer
service centre.
ystem timer error
S
► Contact your sales outlet or our customer
service centre.
he Exit menu.
ter key.
hat the operating system is
d on the corresponding drive.
re working with an external
keybo
the ke
ard, press the
yboard.
F1
customer
F2
or
key on
74 Fujitsu
Page 79

Troubleshooting and tips
Restoring the system under Wind
If necessary, you can reset your system to the original state of the hard disk.
► Beginning at the right edge of the Windows Start screen or the desktop, use a
finger to sweep over the screen to open the Action Centre.
► Select All settings.
► Select Update & security.
► Select Recovery.
► Select according to your requirements from the options given.
ows 10
Fujitsu 75
Page 80

Technical data
Technical data
Tablet PC
General
Processor
Main memory (SO DIMM) 4 GB / 8 GB DIMM onboard
Electrical data
Protection class II
Maximum power consumption (when the Tablet
PC is switched on and the battery is being
charged):
Touchscreen
Size 12.3" WUXGA Antiglare
Resolution
Pixel class II
Brightness control 12 levels
Cameras
Graphics card
Chip Intel® Gra
Maximum re
Dimensio
Width x d
Weight depending on configuration from 770 g / 1.70 lbs
Input devices
Tablet buttons 4 keys
Pen (optional)
ots
Sl
mory card slot
Me
SIM card slot (configuration-dependent) 1 x Nano-SIM
SmartCard reader (configuration dependent)
orts
P
Combined headphone and microphone port
Docking port 1 x
USB (Universal Serial Bus) 1 x USB 2.0 (Type-A), 1 x USB 3.0 (Type-A), 1 x
Ambient conditions
Environment class DIN IEC 721
Mechanism class DIN IEC 721
solution on external display:
ns
epth x height
7th. Gen Intel® Core
with magnetic keyboard: 65 W
with cradle: 90 W
1920 x 1280 / 16 million colours
• Front: 5 megapixels
• Back: 8 megapixels, autofocus, mobile light
phics 615
4096 x 2160
295.2 x 2
11. 6 2 x
Pen with 2 pen buttons
1xmicroSD
1x
3
USB 3.1 with charging function (USB-Type-C)
7K1
7M2
09.3 x 8.9 mm
8.24 x 0.35 inches
.5 mm stereo mini jack
TM
processor
76 Fujitsu
Page 81

Operating temperature 5 °C .... 35 °C / 41 °F .... 95 °F
Transport temperature (2K2) –15 °C .... 60 °C / 5 °F .... 140 °F
Screen resolutions for integrated screen and external screens
System
interface Ports on the cradle
Port VGA
---
-
-
-
-
3840x2160
@60Hz
3840x2160
@60Hz
-
--
3840x2160
@60Hz
3840x2160
@60Hz
3840x2160
@60Hz
3840x2160
@60Hz
-
3840x2160
@60Hz
1920x1200
1920x1200
1920x1200
1024x768
1024x768
--
--
@60Hz*
@60Hz*
-
@60Hz*
-
@60Hz
@60Hz
Only Tablet
PC
with cradle
Max.
number of
screens
1
21
2
32
Number of
external
screens
0
1
1
2
Integrated
screen Display
1920x1280
@60Hz
1920x1280
@60Hz
1920x1280
@60Hz
1920x1280
@60Hz
1920x1280
@60Hz
1920x1280
@60Hz
1920x1280
@60Hz
Technical data
Display
Port
-
1920x1200
@60Hz*
-
1920x1200
@60Hz*
-
1920x1200
@60Hz*
1024x768
@60Hz
1024x768
@60Hz
* with reduced blanking
Fujitsu 77
Page 82

Technical data
Rechargeable battery
You can find information on the batteries used in your device on the
Internet at "
Rated voltage 11.25 V
Rated capacity 35 Wh
http://www.fujitsu.com/fts/support/".
6-cell lithium-ion rechargeable battery 3140 mAh
Mains adapter (65 W) for the Tablet PC with/without the magnetic keyboard
Technicaldata
Rated voltage 19 V
Max. rated current 3.42 A
An additional mains adapter or power cable can be ordered at any time.
Mains adapter (90
Technicaldata
Rated voltage 19 V
Max. rated current 4.74 A
An additional m
ains adapter or power cable can be ordered at any time.
W) for the Tablet PC with cradle
78 Fujitsu
Page 83

Cradle (optional)
Electrical data
Protection class II
Ports
Docking port 11-pin
Display port 1 x
VGA monitor port
Maximum resolution on an external monitor
USB (Universal Seria
LAN port 1 x
Security Lock device
Ambient conditions
Environment class DIN IEC 721
Mechanism clas
Operating temperature 5 °C .... 35 °C / 41 °F .... 95 °F
Transport temperature
lBus)
s DIN IEC 721
1x
1920 x 1200 (VGA or display port)
3xUSB3.0
1x
7K1
7M2
–15 °C .... 60 °C / 5 °F .... 140 °F
Magnetic keyboard (optional)
Electrical data
Protection class II
Ports
Docking port 11-pin
Environmental conditions
Environment class DIN IEC 721
Mechanism class DIN IEC 721
Operating temperature 5 °C .... 35 °C / 41 °F .... 95 °F
Temperature during transportation
7K1
7M2
–15 °C .... 60 °C / 5 °F .... 140 °F
Technical data
Fujitsu 79
Page 84

Manufacturer’s notes
Manufacturer’s notes
Disposal and recycling
Notes
You can find information on this subject on your Tablet PC or on our website
http://www.fujitsu.com/fts/about/fts/environment-care/").
("
Electrical safety including ergonomic requirements (GS, depending on the device)
Please refer to the associated data sheet to establish whether the model variant of
your device has GS certification. You can find further information on the Internet at
http://www.fujitsu.com/fts/products/computing/pc/tablets/datasheets".
"
Intended viewing distance 400 mm as a hand-held
product.
A monitor and a keyboard
should be connected externally
for use in an office.
SAR limit value (Specific Absorption Rate)
SAR
The SAR limit value < 2W/kg is complied with.
Other certification markings
Certificationmarkings
Any other c
Additiona
If such mar
"
http://
80 Fujitsu
ertification markings are listed in the "Manual Appendix -
l Certifications" supplement.
kings are available, you can find the supplement on the Internet at
support.ts.fujitsu.com/Manuals/" with the Operating Manual for your device.
Page 85

Index
Index
A
Acoustic error messages 72
Anti-theft protection 51
Audio ports 63
B
Battery
battery life 30
caring for and maintaining 30
charge level 30, 33
charging 30
Self-discharge 30
storing 30
Battery status meter 30
Battery:
discharges too quickly 71
Before you travel 14
BIOS Setup Utility
calling 64
exiting 66
operating 65
protecting with password 52
settings 64
Bluetooth, safety notes 12
C
Camera 29
Certification markings 80
charge capacity, battery 30
Cleaning 15
Configuration, BIOS Setup Utility 64
Connecting audio devices 63
Connecting headphones 63
cradle
Connecting a Tablet PC 41
Cradle 40
D
Date is incorrect 68
Device
setting up 17
Display orientation
selecting 23
Display port 59
E
Energy
energy saving 13
Energy saving 13
Energy saving mode
leaving 70
Error message:
on the screen 73
Error messages on the screen 73
Errors
Acoustic warnings 72
Ethernet LAN 38
F
Fault
correction 67
Fingerprint sensor 51
configure 51
First-time setup 16
G
Getting started 16
GPS 38
H
Hardware configuration 64
I
Important notes 12
Incorrect date/time 68
K
Keyboard
cleaning 15
L
Landscape orientation
screen 23
Life, battery 30
M
Magnetic keyboard
Connecting Tablet PC 44
ports 43
Mains adapter
connecting 17
setting up 17
Memory card
handling 33
inserting 34
removing 34
Fujitsu 81
Page 86

Index
Mobile operation 14
Monitor
connecting 60
drifting display 69
remains blank 69
Monitor port
see VGA connection socket 60
N
Notes 12
cleaning 15
disposal / recycling 80
energy saving 13
Safety 12
touchscreen 22
transport 14
O
Operating system
activating system protection 53
cancel system protection 53
protecting with password 53
P
Packaging 16
Password
changing 53
entering 52
removing 53
Password protection 52
Password protection:
hard disk 54
Pen 24
Portrait orientation
screen 23
Ports 40
magnetic keyboard 43
Power
power consumption 33
power-management features 33
Power-on indicator 21
Preparing for operation 17
Printer does not print 71
R
Rechargeable battery 30
see Battery 30
S
Safety notes 12
SAR 80
Screen
no screen display 69
Screen port
see VGA connection socket 60
Security functions 50
SystemLock 55
Security functions,
SmartCard 55
Security Lock
anti-theft protection 51
Using 51
Selecting a location 17
Self-discharge, battery 30
Setup
see BIOS Setup Utility 64
Slot
Memory cards 33
Status indicators 19
Summer time 68
Supervisor password
changing 53
entering 52
removing 53
Switching off
Tablet PC 22
Switchingonforthefirsttime 18
Symbols
indicators 19
System configuration 64
System settings, BIOS Setup Utility 64
T
Tablet PC
cleaning 15
transporting 14
using 19
Tablet PC, operation 19
Tablet PC: switching on 21
Technical data
Mains adapter 78
The Tablet PC
cannot be started 70
doesn’t work. 70
The wireless connection to a network
does not work 71
Time not correct 68
Time, daylight savings 68
Tips 67
Touchpad
cleaning 15
82 Fujitsu
Page 87

Index
Touchscreen
cleaning 15
difficult to read 68
notes 22
reflected glare 68
remains blank 68
touchscreen is too dark 68
TPM 57
Transport
Transport damage 16
Transportation 14
Travel 14
Troubleshooting 67
Trusted Platform Module 57
U
USB connection with charging function
(USB Type-C™) 62
USB ports 61
User password
changing 53
entering 52
removing 53
V
VGA connection socket 60
W
Wireless component:
safety notes 12
Wireless LAN:
safety notes 12
Fujitsu 83
 Loading...