

Page 1

Basic Operation Guide
P3PC-4962-11ENZ2
(Windows)
Page 2

Contents
About This Manual ................................................................................................................. 4
Safety Information.................................................................................................................................. 5
Manuals ...............................................................................................................................................6
Trademarks...........................................................................................................................................9
Manufacturer....................................................................................................................................... 10
Symbols Used in This Manual................................................................................................................ 11
Arrow Symbols in This Manual............................................................................................................... 12
Screen Examples in This Manual ........................................................................................................... 13
Abbreviations Used in This Manual ........................................................................................................ 14
What You Can Do with the ScanSnap ................................................................................. 16
Scanning a Document.......................................................................................................... 19
Scanning Documents with the ScanSnap by Inserting Two Documents at a Time or by
Inserting the Next Document While the Current Document Is Being Scanned .............. 24
Scanning Documents Larger Than A4 or Letter Size (by Directly Inserting Them in the
ScanSnap) .....................................................................................................................30
ScanSnap Overview............................................................................................................. 34
Parts and Functions .............................................................................................................................35
Charging the Battery ............................................................................................................................ 38
System Requirements ..........................................................................................................................40
Overview of the Software Related to the ScanSnap.................................................................................. 42
How to Install the Software.................................................................................................................... 43
ScanSnap Manager Icon....................................................................................................................... 44
Right-Click Menu .................................................................................................................................45
ScanSnap Setup Window ..................................................................................................................... 47
Turning the ScanSnap On or Off ............................................................................................................ 48
Turning the ScanSnap On.............................................................................................................. 49
Turning the ScanSnap Off.............................................................................................................. 51
Sleep Mode.................................................................................................................................. 52
Automatic Power OFF ...................................................................................................................53
Checking the Remaining Battery Power ........................................................................................... 54
Connecting the ScanSnap via Wireless LAN............................................................................................ 55
Preparation .................................................................................................................................. 56
Setting a Wireless LAN Using the ScanSnap Wireless Setup Tool....................................................... 57
Connecting a Computer in Access Point Connect Mode..................................................................... 58
Connecting a Mobile Device in Access Point Connect Mode............................................................... 60
Connecting a Computer in Direct Connect Mode ............................................................................... 61
Connecting a Mobile Device in Direct Connect Mode ......................................................................... 63
Reconnecting to a Wireless Access Point Using the ScanSnap WPS Button......................................... 64
Documents to Scan.............................................................................................................................. 66
Documents That Can Be Loaded Directly into the ScanSnap .............................................................. 67
Documents That Can Be Scanned Using the Carrier Sheet ................................................................69
What You Can Do with Related Software ............................................................................ 71
What You Can Do with the ScanSnap Organizer...................................................................................... 72
Basic Operation Procedure of ScanSnap Organizer .......................................................................... 73
2
Page 3

Managing Files ............................................................................................................................. 75
Using Files................................................................................................................................... 77
What You Can Do with CardMinder ........................................................................................................ 78
Basic Operation Procedure of CardMinder ....................................................................................... 80
Linking Card Data with Other Applications........................................................................................ 83
Searching Card Data with the Basic Search Toolbar.......................................................................... 84
Searching Card Data with CardMinder Viewer ..................................................................................85
Attaching a File to Card Data.......................................................................................................... 86
Useful Usages...................................................................................................................... 87
Managing Paper Documents by Folder on a Computer .............................................................................88
Saving Business Cards to a Computer.................................................................................................... 91
Scanning Documents Larger Than A4 or Letter Size (with the Carrier Sheet) ............................................... 94
Scanning Documents Such as Photographs and Clippings ........................................................................ 99
Troubleshooting .................................................................................................................103
How to Find Your Solution................................................................................................................... 104
If Your First Attempt to Install Failed ..................................................................................................... 105
If You Have Installed the Software Before ............................................................................................. 106
Uninstalling the Software ............................................................................................................. 107
Removing the Installation Information ............................................................................................ 108
Installing the Software from the [ScanSnap Setup] Window .............................................................. 112
Installing One Software at a Time.................................................................................................. 113
When the ScanSnap Manager Icon Does Not Appear............................................................................. 114
Displaying the ScanSnap Manager Icon......................................................................................... 115
When ScanSnap Manager Does Not Operate Normally .......................................................................... 116
Removing Unnecessary Icons from the Notification Area.................................................................. 117
Checking the Connection between the ScanSnap and the Computer ................................................. 118
Checking If ScanSnap Manager Is Operating Normally .................................................................... 119
Removing the ScanSnap's Connection Information ......................................................................... 122
When You Cannot Uninstall the Software.............................................................................................. 123
Cleaning ............................................................................................................................. 124
Cleaning Materials ............................................................................................................................. 125
Cleaning the Outside of the ScanSnap ................................................................................................. 126
Cleaning the Inside of the ScanSnap .................................................................................................... 127
Cleaning the Carrier Sheet .................................................................................................................. 130
Appendix ............................................................................................................................ 131
Updating the Software ........................................................................................................................ 132
Uninstalling the Software .................................................................................................................... 133
Specifications of Optional Parts ........................................................................................................... 135
Specifications of Wireless LAN ............................................................................................................ 136
Specifications of the ScanSnap............................................................................................................ 137
About Customer Support and Maintenance ....................................................................... 139
3
Page 4

About This Manual
l "Safety Information" (page 5)
l "Manuals" (page 6)
l "Trademarks" (page 9)
l "Manufacturer" (page 10)
l "Symbols Used in This Manual" (page 11)
l "Arrow Symbols in This Manual" (page 12)
l "Screen Examples in This Manual" (page 13)
l "Abbreviations Used in This Manual" (page 14)
About This Manual
4
Page 5

Safety Information
Safety Information
The attached "Safety Precautions" manual contains important information about the safe and correct
use of the ScanSnap. Make sure that you read and understand it before using the ScanSnap.
5
Page 6

Manuals
Read the following manuals according to your needs when using the ScanSnap.
Before Using the ScanSnap
Manual Description and Location
Safety Precautions This manual contains important information about the safe use of the ScanSnap.
Make sure you read this manual before using the ScanSnap.
This manual is included in the package.
In addition, after installing the software you can refer to this manual in the following
procedure:
l Windows 10
Select [Start] menu → [ScanSnap Manuals] → [iX100 Safety Precautions].
l Windows 8.1
Click on the lower left side of the Start screen, and select [iX100 Safety
Precautions] under [ScanSnap Manuals] on the All apps screen.
l Windows 7
Select [Start] menu → [All Programs] → [ScanSnap Manuals] → [iX100 Safety
Precautions].
Manuals
When Setting Up the ScanSnap
Manual Description and Location
ScanSnap iX100 Getting
Started
This manual explains the setup procedure from the moment you open the package to
testing the operations.
Getting Started is included in the package.
In addition, after installing the software you can refer to this manual in the following
procedure:
l Windows 10
Select [Start] menu → [ScanSnap Manuals] → [iX100 Getting Started].
l Windows 8.1
Click
Started] under [ScanSnap Manuals] on the All apps screen.
l Windows 7
Select [Start] menu → [All Programs] → [ScanSnap Manuals] → [iX100 Getting
Started].
on the lower left side of the Start screen, and select [iX100 Getting
When Operating the ScanSnap
Manual
ScanSnap iX100 Basic
Operation Guide (this
manual)
ScanSnap Advanced
Operation Guide
Description and Location
This manual explains the basic operations and cleaning procedure for the ScanSnap.
This manual describes operations including various scanning methods and useful
usages of the ScanSnap.
You can refer to this manual at the following website.
http://www.pfu.fujitsu.com/imaging/downloads/manual/advanced/v62/en/common/
index.html
6
Page 7
Manuals
Manual Description and Location
ScanSnap Manager Help This Help file describes the windows, operational troubles and the solutions, as well as
messages of the ScanSnap Manager.
This manual can be accessed by one of the following methods:
l Right-click the ScanSnap Manager icon in the notification area located at the
far right of the taskbar, and select [Help] → [Help] from the "Right-Click Menu"
(page 45).
l Click the Help button ( ) for ScanSnap Manager.
l Press the [F1] key on the keyboard while a window is displayed.
l Click the [Help] button in any window.
ScanSnap Wireless Setup
Tool Help
This Help file explains about operations, operational troubles and their solutions,
windows, and messages of the ScanSnap Wireless Setup Tool.
This Help file can be accessed by one of the following methods:
l Press the [F1] key on the keyboard while a window is displayed.
l Click [About this screen] or [About this message] on each screen.
When Saving Scanned Images to a Mobile Device
Manual Description and Location
ScanSnap Basic Operation
Guide (Mobile Connection
for iOS)
ScanSnap Basic Operation
Guide (Mobile Connection
for Android)
Scan to Mobile Help This Help file describes the operations, windows, and messages of Scan to Mobile.
This manual describes operations to be performed on an iOS-based mobile device
when you save scanned images to the mobile device.
This manual can be accessed by the following method:
1. Start up ScanSnap Connect Application on the mobile device.
a The [File List] screen appears.
2. Tap
a The [Information] screen appears.
3. Tap the [Help] button.
This manual describes operations to be performed on an Android-based mobile device
when you save scanned images to the mobile device.
This manual can be accessed by the following method:
1. Start up ScanSnap Connect Application on the mobile device.
a The [File List] screen appears.
2. Tap .
a The menu appears.
3. Tap [Help].
This Help file can be accessed by one of the following methods:
l The [Scan to Mobile] icon is displayed in the menu that appears when you click
.
in the notification area located at the far right of the taskbar. Right-click the
[Scan to Mobile] icon, and select [Help] from the menu that appears.
l Press the [F1] key on the keyboard while a window is displayed.
l Click the [Help] button in any window.
7
Page 8

Manuals
When Updating the Software
Manual Description and Location
ScanSnap Online Update
Help
This Help file describes the operations, windows, and messages of ScanSnap Online
Update.
This Help file can be accessed by one of the following methods:
l Press the [F1] key on the keyboard while a window is displayed.
l Click the Help button in any window.
When Using Related Applications
Manual Description and Location
ScanSnap Organizer Help This Help file describes the operations, windows, and messages of ScanSnap
Organizer.
This Help file can be accessed by one of the following methods:
l Click the Help button ( ) for ScanSnap Organizer.
l Press the [F1] key on the keyboard while a window is displayed.
l Click the [Help] button in any window.
CardMinder Help This Help file describes the operations, windows, and messages of CardMinder.
This Help file can be accessed by one of the following methods:
ABBYY FineReader for
ScanSnap User's Guide
l Click the Help button ( ) next to the Basic Search Toolbar.
l Press the [F1] key on the keyboard while a window is displayed.
l Click the [Help] button in any window.
This manual describes the overview and operations of ABBYY FineReader for
ScanSnap.
This Help file can be accessed by one of the following methods:
l Press the [F1] key on the keyboard while a window is displayed.
l Click the [Help] button in any window.
8
Page 9

Trademarks
Trademarks
Microsoft, Windows, Windows Vista, Excel, PowerPoint, Outlook, SharePoint, Windows Live,
Internet Explorer, and OneDrive are either registered trademarks or trademarks of Microsoft
Corporation in the United States and/or other countries.
Word is the product of Microsoft Corporation in the United States.
Apple, App Store, the Apple logo, Mac, Mac OS, OS X, macOS, iPad, iPhoto, iPod touch, and
iTunes are trademarks of Apple Inc.
Adobe, Acrobat, and Reader are either registered trademarks or trade names of Adobe Systems
Incorporated in the United States and/or other countries.
Intel and Intel Core are registered trademarks or trademarks of Intel Corporation in the United States
and other countries.
ABBYY™ FineReader™ Engine © ABBYY. OCR by ABBYY
ABBYY and FineReader are trademarks of ABBYY Software, Ltd. which may be registered in some
jurisdictions.
Evernote is a registered trademark or trademark of Evernote Corporation.
Google, Android, Google Play, and Google Drive are registered trademarks or trademarks of Google
Inc. Use of these registered trademarks or trademarks is subject to Google Permissions.
Salesforce, the Salesforce logo, and Salesforce CRM are registered trademarks or trademarks of
salesforce.com, inc. in the United States and other countries.
Wi-Fi, Wi-Fi Protected Setup, and the Wi-Fi Protected Setup logo are trademarks of Wi-Fi Alliance.
Amazon is a trademark of Amazon.com, Inc. or its affiliates.
Besides the software authored by the product developer (PFU Limited), the ScanSnap contains
other free software created by third parties. For details concerning the conditions of the licenses,
refer to "Terms and Conditions for End User License" (file name: OSS_License.pdf) contained in the
installation folder of ScanSnap Manager.
ScanSnap, the ScanSnap logo, ScanSnap Manager, ScanSnap Organizer, CardMinder, and Rack2Filer are registered trademarks or trademarks of PFU Limited in Japan.
Other company names and product names are the registered trademarks or trademarks of the
respective companies.
9
Page 10

Manufacturer
Manufacturer
PFU Limited
YOKOHAMA i-MARK PLACE, 4-4-5 Minatomirai, Nishi-ku, Yokohama, Kanagawa, 220-8567, Japan
© PFU Limited 2014-2017
10
Page 11

CAUTION
Symbols Used in This Manual
Symbols Used in This Manual
The following indications are used in this manual to obviate any chance of accident or damage to
you and people near you, and your property. Warning labels indicate the warning level and
statements. The symbols indicating warning levels and their meanings are as follows.
Indication Description
This indication alerts operators of an operation that, if not strictly observed, may result
in safety hazards to personnel or damage to the product.
11
Page 12

Arrow Symbols in This Manual
Arrow Symbols in This Manual
Right-arrow symbols (→) are used to connect icons or menu options you should select in
succession.
Example: Select [Start] menu → [Computer].
12
Page 13
Screen Examples in This Manual
Screen Examples in This Manual
Microsoft product screenshots are reprinted with permission from Microsoft Corporation.
The screenshots used in this manual are of Windows 7.
The actual windows and operations may differ depending on the operating system.
Icon in the Notification Area
The ScanSnap Manager icon is displayed in the menu which appears when you click in
the notification area.
To have the ScanSnap Manager icon always displayed in the notification area, drag the icon
and drop it onto the notification area.
The notification area is located at the far right of the taskbar.
The explanations in this manual use the case in which the ScanSnap Manager icon is always
displayed in the notification area.
13
Page 14

Abbreviations Used in This Manual
Also, the following abbreviations are used in this manual.
Abbreviation Used Designation
Windows 10
Windows 8.1
Windows 7
Windows Windows 10, Windows 8.1, or Windows 7 operating system
Microsoft Office
Word
Excel
PowerPoint
SharePoint
Internet Explorer
Microsoft Edge
Outlook
.NET Framework
Adobe Acrobat
ABBYY FineReader for
ScanSnap
Google Drive
Windows® 10 Home operating system, English Version
Windows® 10 Pro operating system, English Version
Windows® 10 Enterprise operating system, English Version
Windows® 10 Education operating system, English Version
Windows® 8.1 operating system, English Version
Windows® 8.1 Pro operating system, English Version
Windows® 8.1 Enterprise operating system, English Version
Windows® 7 Starter operating system, English Version
Windows® 7 Home Premium operating system, English Version
Windows® 7 Professional operating system, English Version
Windows® 7 Enterprise operating system, English Version
Windows® 7 Ultimate operating system, English Version
Microsoft® Office
Microsoft® Word
Microsoft® Office Word
Microsoft® Excel
Microsoft® Office Excel
Microsoft® PowerPoint
Microsoft® Office PowerPoint
Microsoft® SharePoint® Server
Microsoft® SharePoint® Foundation
Microsoft® SharePoint® Online
Windows® Internet Explorer
Microsoft® Edge
Microsoft® Outlook
Microsoft® Office Outlook
Microsoft® .NET Framework
Adobe® Acrobat
ABBYY FineReader for ScanSnap
All the descriptions in this manual assume the usage of ABBYY FineReader for
ScanSnap bundled with the ScanSnap. Unless otherwise specified, the term ABBYY
FineReader for ScanSnap refers to the ABBYY FineReader for ScanSnap bundled
with the ScanSnap.
Note that ABBYY FineReader for ScanSnap may be upgraded without notice. If the
descriptions in this manual differ from the actual displayed screens, refer to the
ABBYY FineReader for ScanSnap User's Guide.
Google Drive
®
®
®
®
®
®
®
®
™
™
Abbreviations Used in This Manual
Android
WPS
Android
Wi-Fi Protected Setup
™
™
14
Page 15

Abbreviation Used Designation
Wireless access point Wireless access point
Wireless router
ScanSnap Color Image Scanner ScanSnap iX100
Carrier Sheet ScanSnap Carrier Sheet
Abbreviations Used in This Manual
15
Page 16
What You Can Do with the ScanSnap
What You Can Do with the ScanSnap
Scanning Multiple Documents Continuously
When you scan multiple documents with the ScanSnap, you can scan one or two document at a
time. To scan two documents at a time, you can insert two documents at a time or you can insert the
next document while another document is being scanned.
l Scanning one document at a time
After scanning a document is completed, when you insert the next document in the ScanSnap,
the next scan is started automatically.
For details, refer to "Scanning a Document" (page 19).
l Scanning documents by inserting two documents at a time or by inserting the next document
while the current document is being scanned (dual scan)
When scanning small size documents such as business cards and postcards, you can insert two
documents at a time in the ScanSnap. Alternatively, you can insert the next document while
another document is being scanned. In either method, you can scan up to 20 documents
continuously in a single scanning operation.
These scanning methods are referred to as dual scans.
For details, refer to "Scanning Documents with the ScanSnap by Inserting Two Documents at a
Time or by Inserting the Next Document While the Current Document Is Being Scanned" (page
24).
Scanning Documents Larger Than A4 or Letter Size by Directly
Inserting Them in the ScanSnap
By folding an A3, B4, or Double Letter size document in half and scanning each side continuously,
the scanned images of both sides can be automatically merged into a single image.
16
Page 17
What You Can Do with the ScanSnap
Scanned images can be merged only when there is text, diagram, or a table on the fold line of the
folded document.
For details, refer to "Scanning Documents Larger Than A4 or Letter Size (by Directly Inserting Them
in the ScanSnap)" (page 30).
Scanning Documents That Cannot Be Inserted Directly in the
ScanSnap
You can use the optional Carrier Sheet to scan the following documents.
l Documents that are larger than A4/Letter size and not larger than A3 size
For details, refer to "Scanning Documents Larger Than A4 or Letter Size (with the Carrier
Sheet)" (page 94).
l Documents that can be damaged quite easily such as photographs, or non-standard size
documents such as clippings
For details, refer to "Scanning Documents Such as Photographs and Clippings" (page 99).
17
Page 18
What You Can Do with the ScanSnap
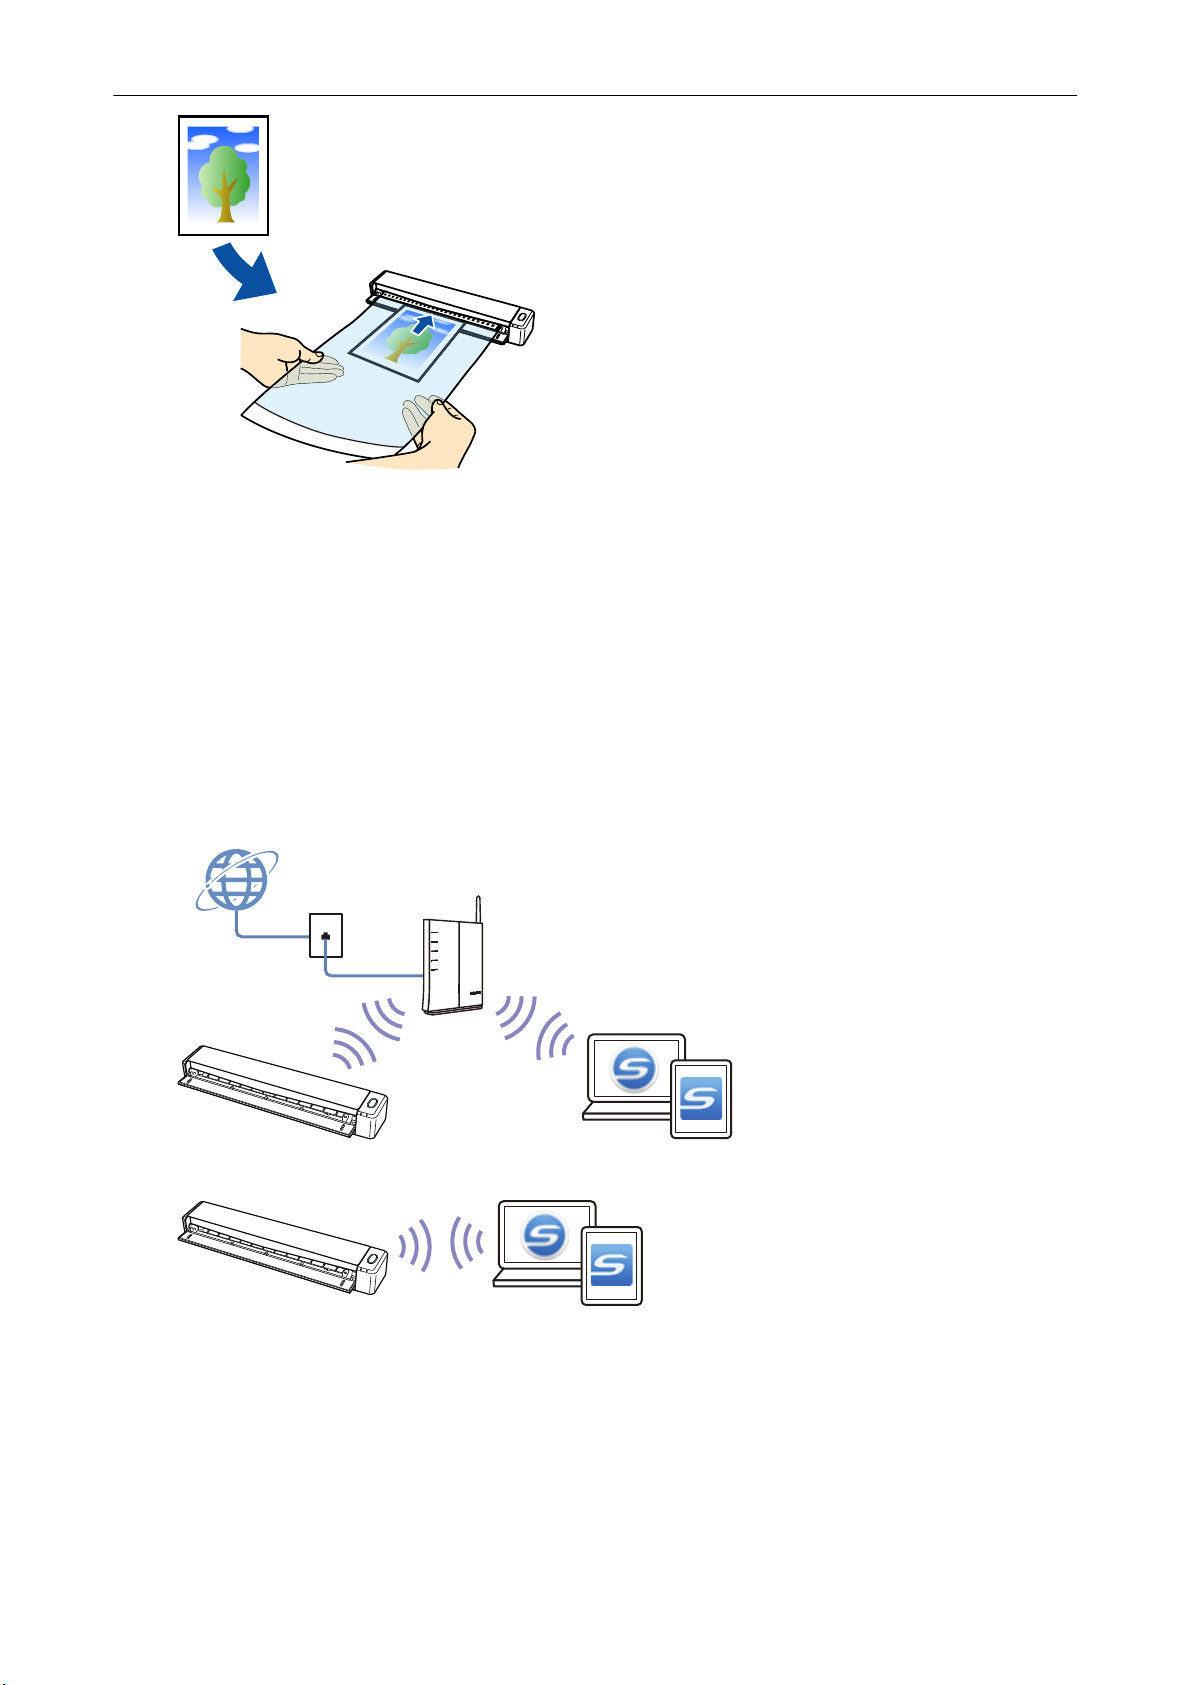
Connecting the ScanSnap via Wireless LAN
You can connect the ScanSnap and a computer or mobile device via wireless LAN.
To connect them, you can use either the Access Point Connect mode in which a wireless access
point is used for connection or the Direct Connect mode in which a computer or mobile device is
directly connected to the ScanSnap. Select a suitable connection mode depending on whether there
is wireless LAN in a place where you use the ScanSnap or not.
To configure the wireless settings for the ScanSnap, use the ScanSnap Wireless Setup Tool, which
is installed together with ScanSnap Manager.
For details, refer to "Connecting the ScanSnap via Wireless LAN" (page 55).
l Access Point Connect mode
l Direct Connect mode
18
Page 19

Feed Guide
Output Guide
Scanning a Document
Scanning a Document
The procedure for scanning documents by inserting one document at a time is as follows.
For details about documents that can be scanned, refer to "Documents to Scan" (page 66).
1. Open the feed guide of the ScanSnap.
HINT
l If you want the document to be ejected from the front of the ScanSnap or when there is not
enough space where the document exits the ScanSnap, open the output guide.
For details about documents that can be scanned with the output guide open, refer to
"Documents to Scan" (page 66).
l How the document is ejected differs as below depending on whether the output guide is open
or closed.
- When the output guide is closed
- When the output guide is open
a The [Scan/Stop] button flashes in blue. The button returns to being lit normally when
document scanning is enabled.
19
Page 20
Scanning a Document
In addition, the ScanSnap Manager icon in the notification area located at the far right of
the taskbar changes from to .
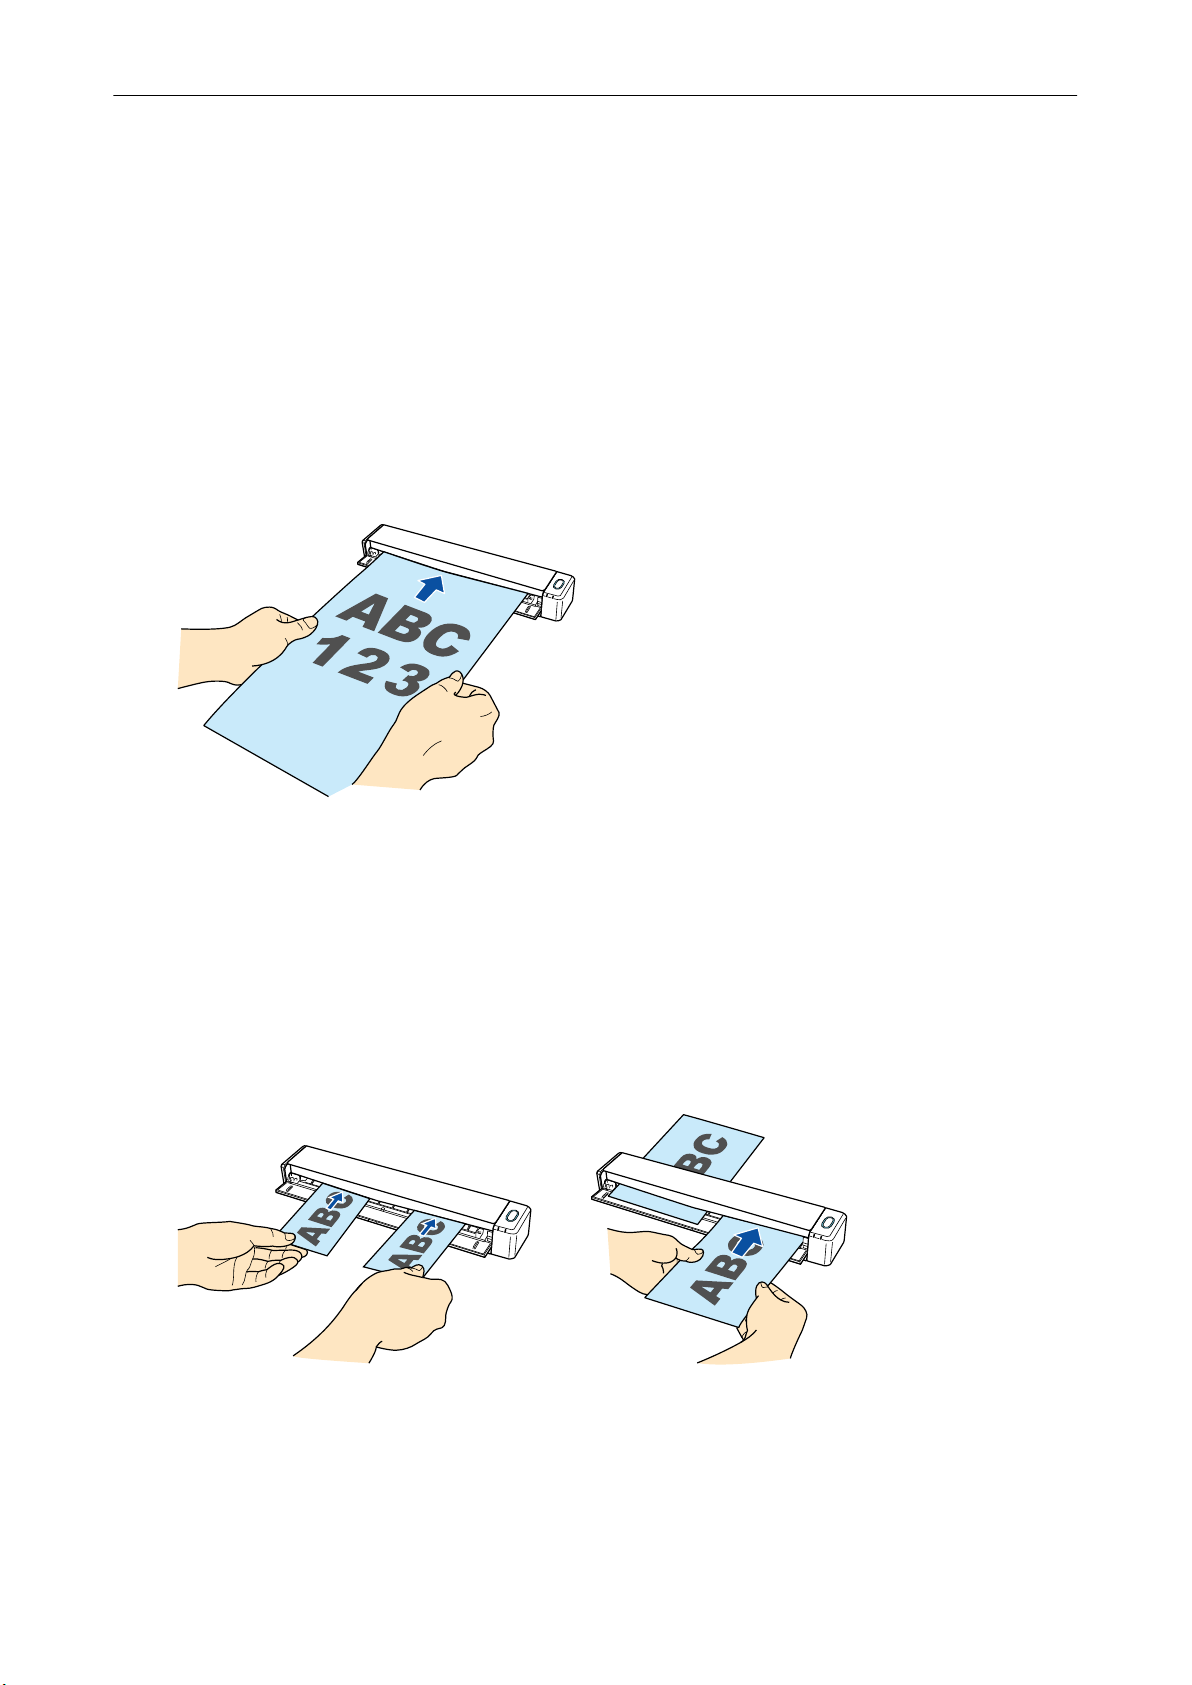
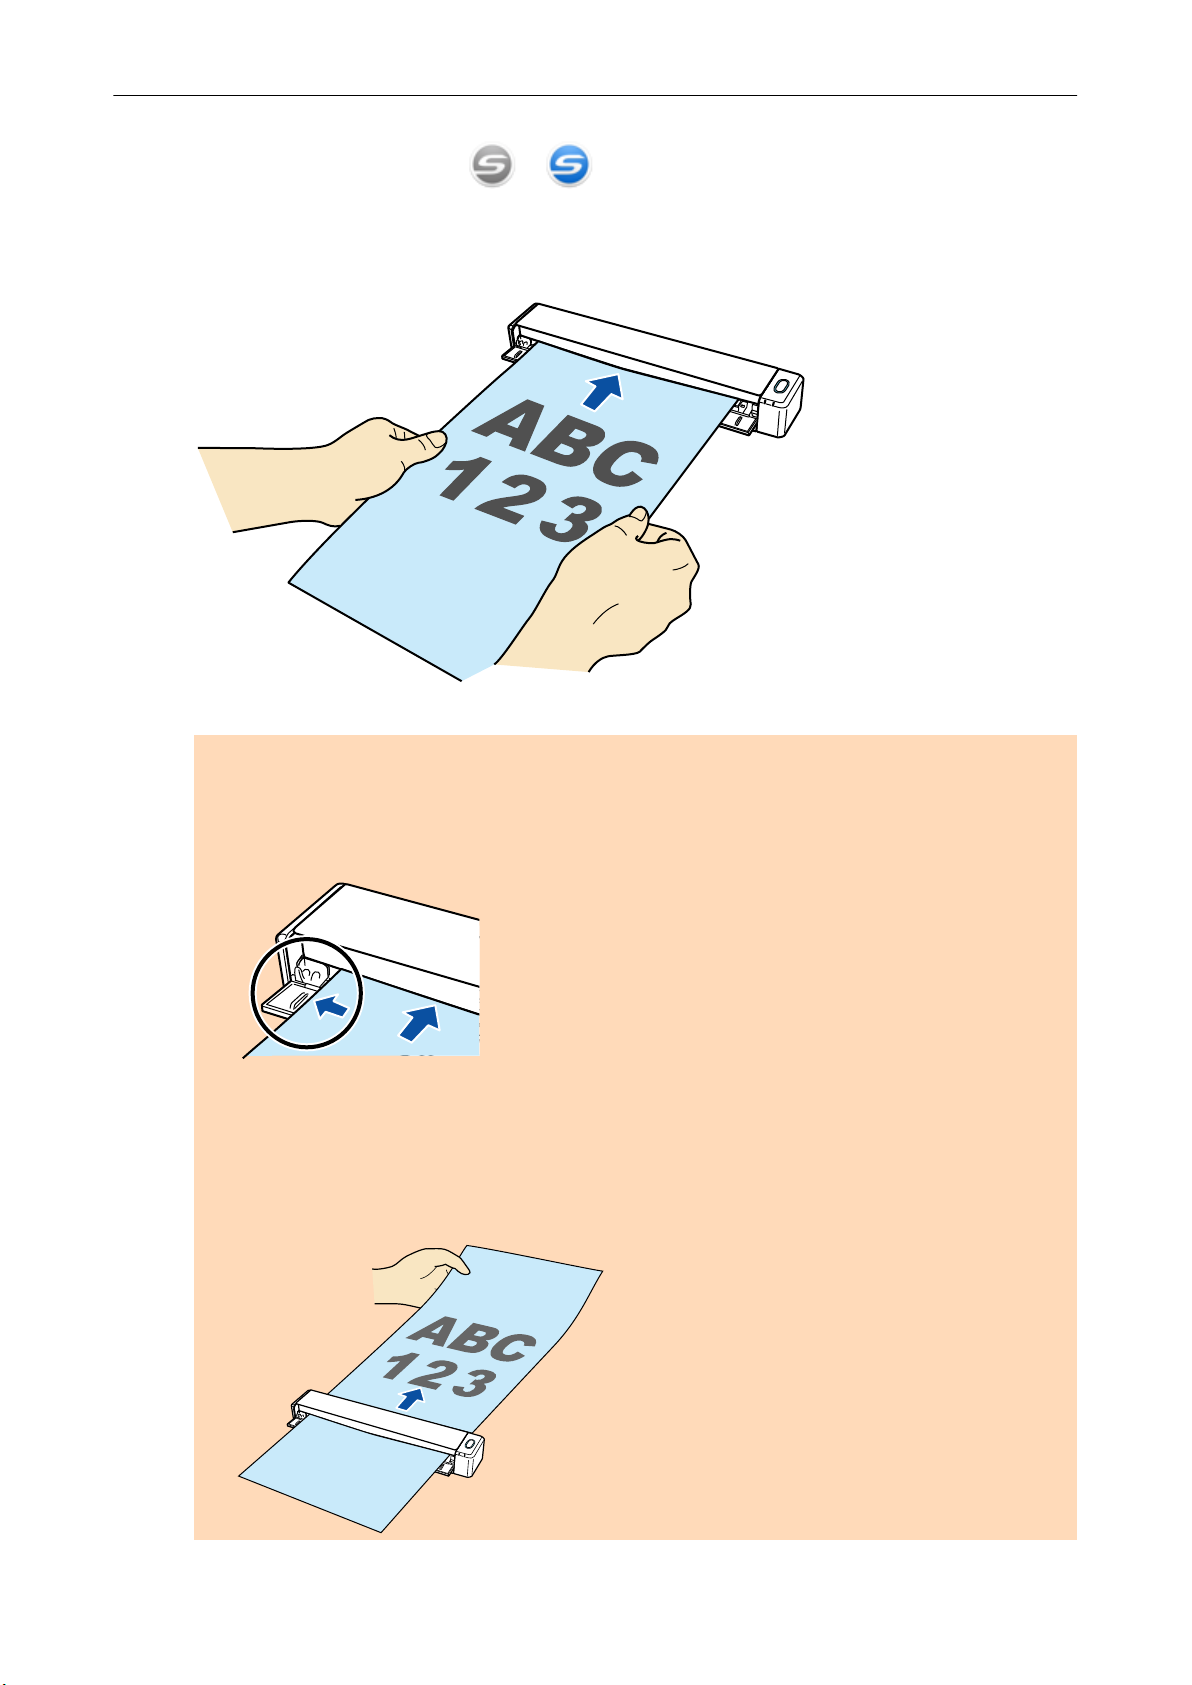
2. Insert the document straight into the feeding section of the ScanSnap, with
the scanning side facing up.
a The document is pulled in until it is set inside the ScanSnap.
ATTENTION
l If you specify a standard size instead of selecting [Automatic detection] (default), insert the
document by aligning it with the left edge of the feeding section.
You can configure the scan settings in the "ScanSnap Setup Window" (page 47).
l When you perform scanning with the output guide closed, leave enough space at the back of
the ScanSnap to allow the document to be completely ejected. In addition, when you scan
long page documents, hold the scanned documents with your hands to prevent them from
falling off the unit where the ScanSnap is placed on.
Make sure that the area where the document exits the scanner is clear of any obstacles.
Otherwise, paper jam may occur.
20
Page 21
Output Guide
Scanning a Document
l If you scan the following documents with the output guide open, a paper jam may occur and
damage the documents. Scan the following documents with the output guide closed.
- Thick paper (80 g/m2 [20 lb] or heavier)
- Postcards
- Business cards
- Plastic cards
- Carrier Sheet
3. Press the [Scan/Stop] button on the ScanSnap to start scanning.
ATTENTION
Do not perform the following operations during scanning. Doing so will stop scanning.
l Connect or disconnect the ScanSnap and other USB devices.
l Close the feed guide.
l Switch users.
l Allow the computer to enter sleep mode.
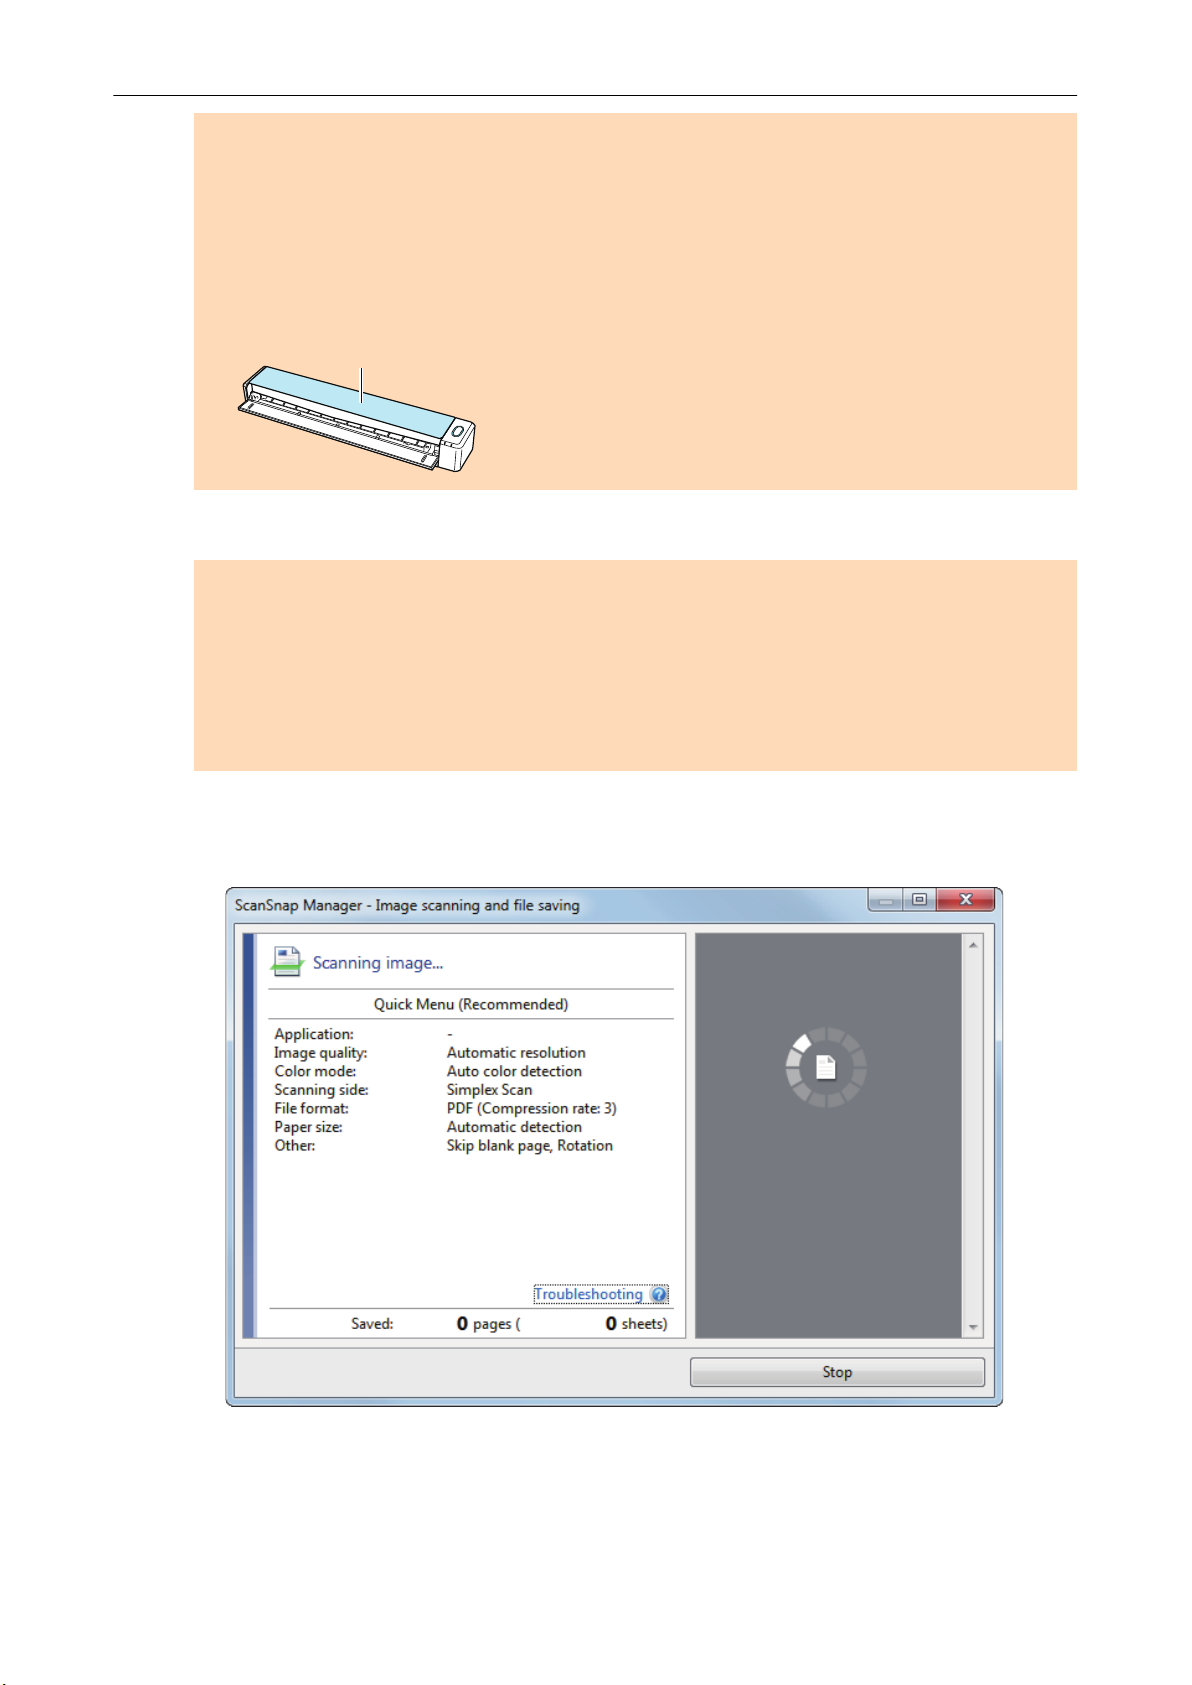
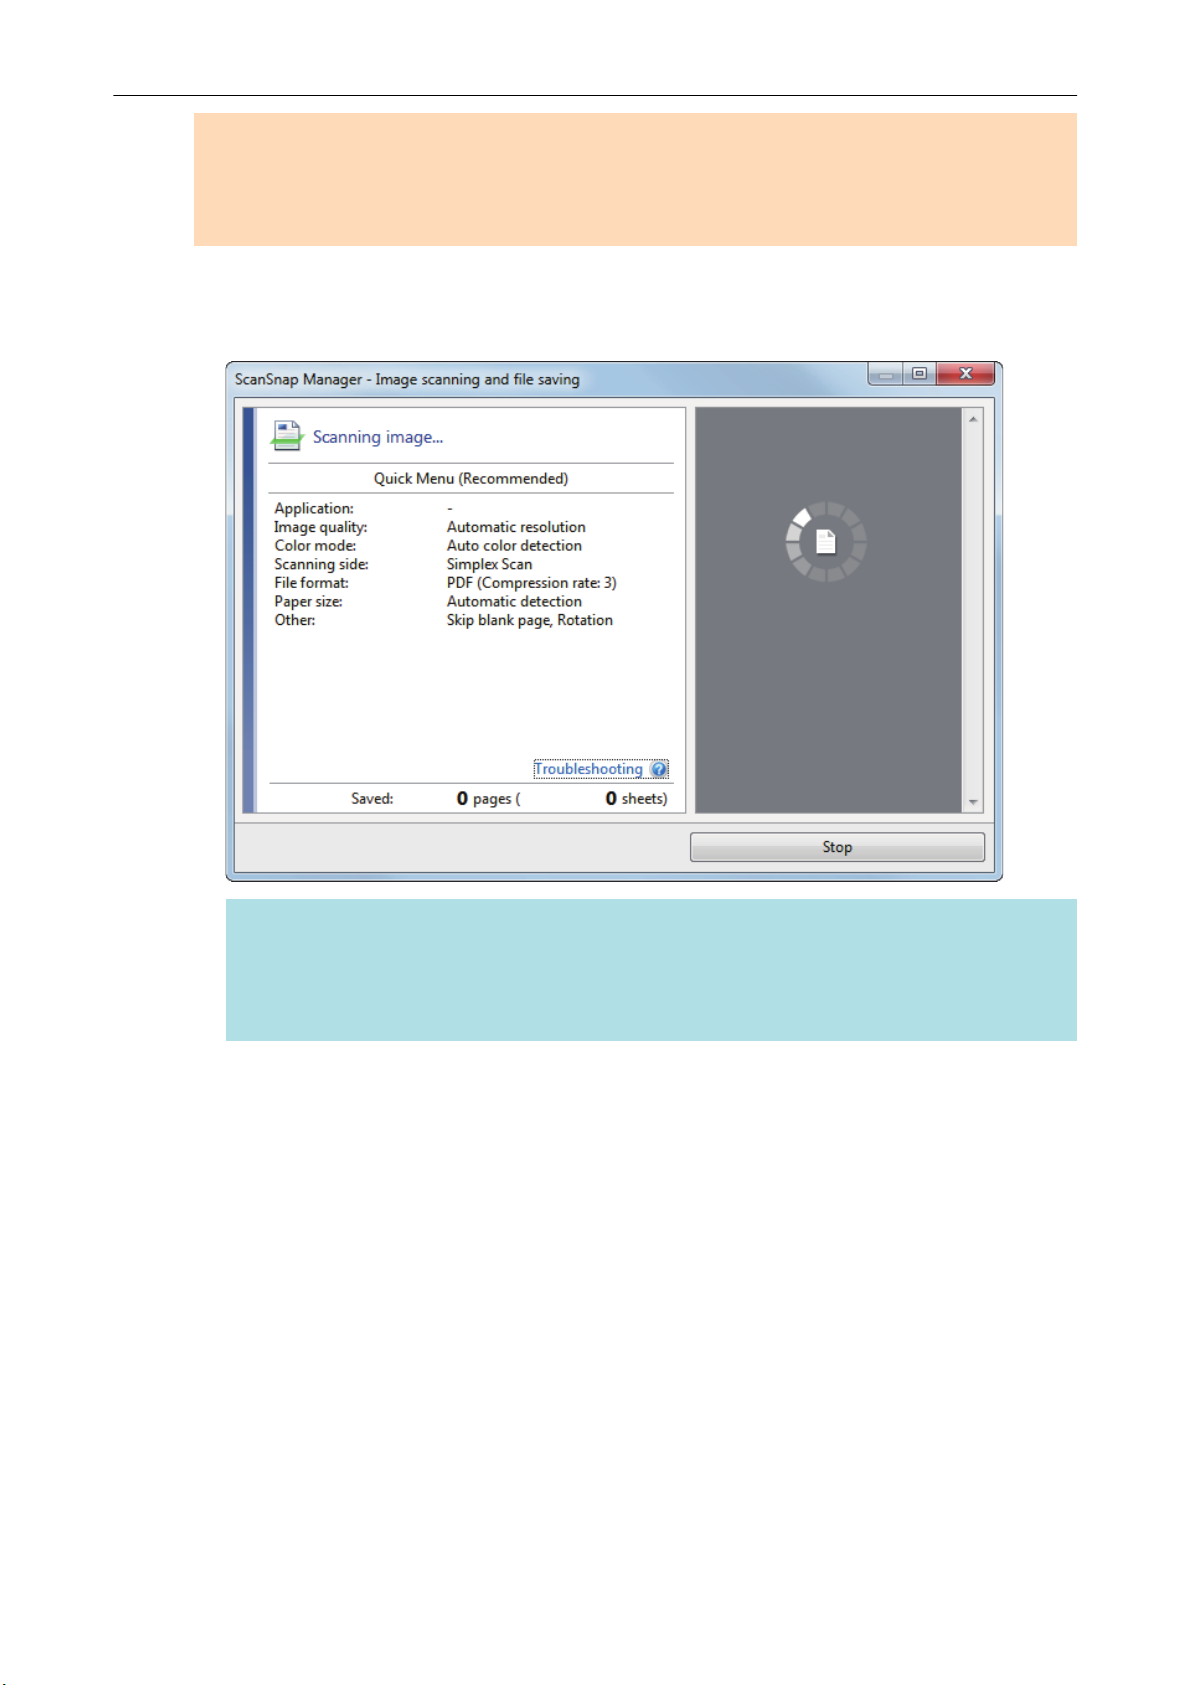
a The [Scan/Stop] button on the ScanSnap flashes in blue while the documents are being
scanned.
The [ScanSnap Manager - Image scanning and file saving] window appears.
a When scanning is complete, the [ScanSnap Manager - Image scanning and file saving]
window displays a scanning standby status.
21
Page 22

Scanning a Document
HINT
To continue scanning, insert the next document to be scanned. When the document is inserted,
scanning starts automatically.
4. Press the [Scan/Stop] button on the ScanSnap to finish scanning.
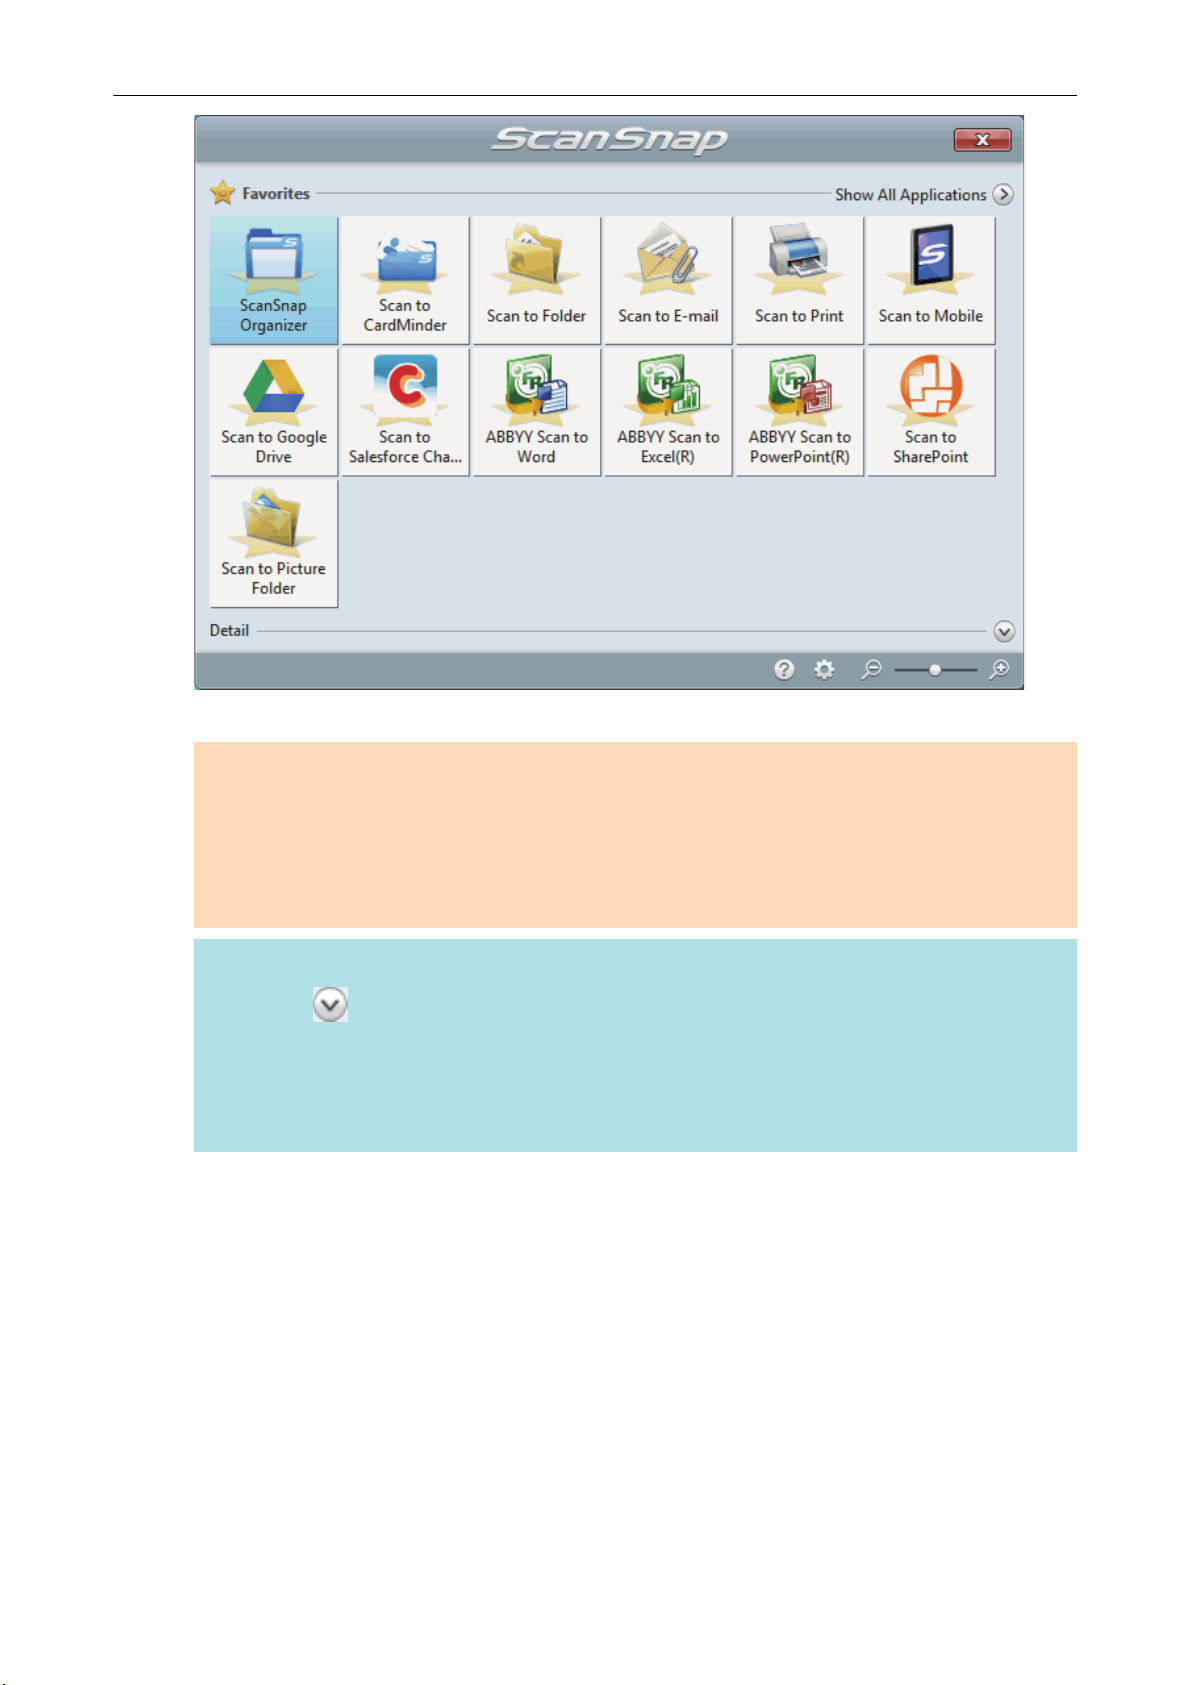
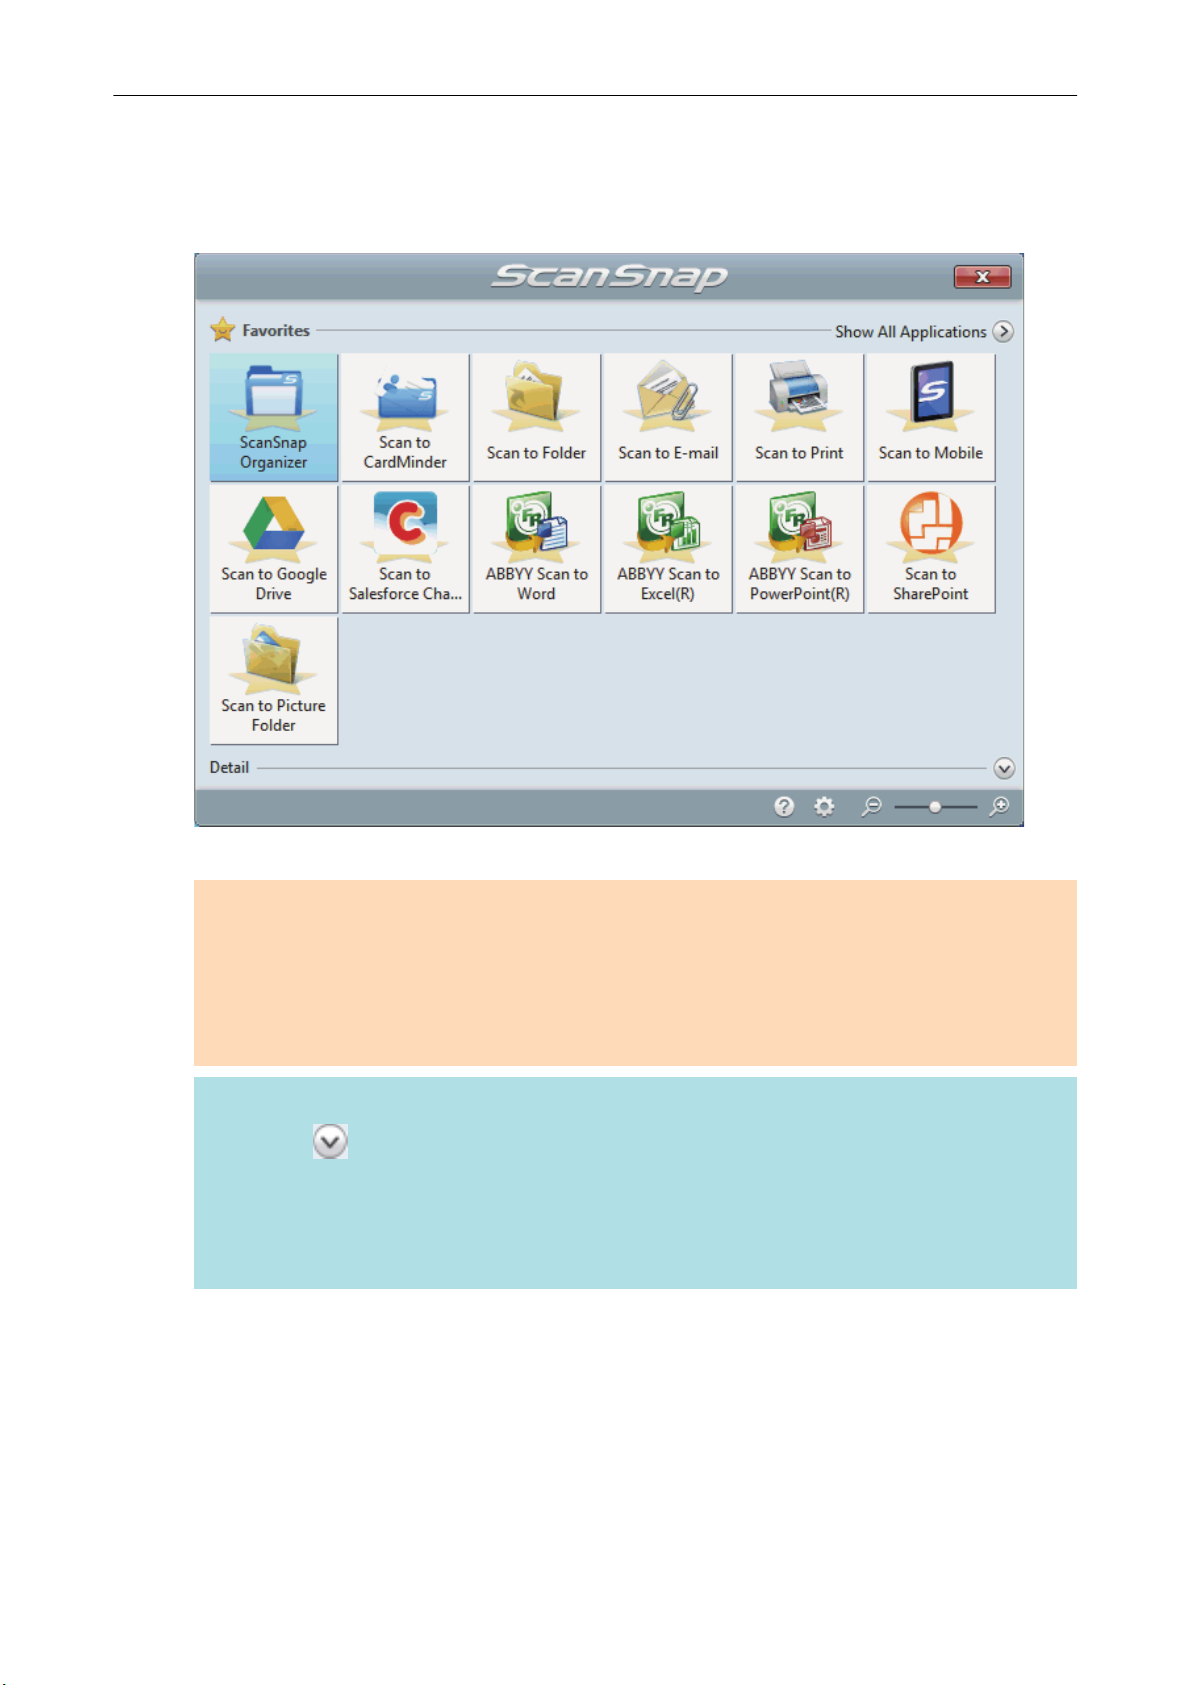
a The Quick Menu appears.
5. In the Quick Menu, click the icon of the application to link with ScanSnap
Manager.
For details about linking the following applications with ScanSnap Manager, refer to "Useful
Usages" (page 87).
l ScanSnap Organizer
l Scan to CardMinder
22
Page 23
Scanning a Document
a The selected application starts up. For details, refer to the Advanced Operation Guide.
ATTENTION
l You cannot start scanning when the Quick Menu is displayed. Either select an icon from the
Quick Menu and finish the process, or close the Quick Menu before you perform the next
scan.
l Do not move, delete, or rename scanned images using other applications while the Quick
Menu is displayed.
HINT
l Clicking displays the description of an application. Placing the mouse cursor over the
icon of another application displays the description of the application.
l Performing a scan while an application that can be automatically linked with is active
automatically starts the linkage between ScanSnap Manager and the application.
For details, refer to the Advanced Operation Guide.
23
Page 24
Scanning Documents with the ScanSnap by Inserting Two Documents at a Time or by Inserting the Next Document While the Current
Document Is Being Scanned
Scanning Documents with the ScanSnap by Inserting Two Documents at a Time or by Inserting the Next Document While the Current Document Is Being Scanned
When scanning small size documents such as business cards and postcards with the ScanSnap,
you can insert two documents at a time or you can insert the next document while the current
document is being scanned. These scanning methods are referred to as dual scans.
Documents can be inserted in the following two methods:
l Inserting two documents at a time in the ScanSnap
l Inserting the next document while the current document is being scanned
For details about documents that can be scanned, refer to "Documents to Scan" (page 66).
ATTENTION
l When you select an option other than [Automatic detection] for [Paper size] in the [Paper] tab of the
"ScanSnap Setup Window" (page 47), the dual scan function is disabled.
l Use a dual scan to scan a document within the following ranges. If one of the following ranges is
exceeded, a length error occurs and part of the document may not appear in the scanned image.
- Maximum scanning length: 863 mm (34 in.) (355.6 mm (14 in.) when [Excellent] is specified for
[Image Quality] in the [Scanning] tab of the "ScanSnap Setup Window" (page 47))
- Maximum number of documents for scanning: 20 sheets
l When you continue scanning by inserting the next document while the current document is being
scanned, the [Scan/Stop] button flashes more quickly if the scanning length exceeds 650 mm (26
24
Page 25
Feed Guide
Output Guide
Scanning Documents with the ScanSnap by Inserting Two Documents at a Time or by Inserting the Next Document While the Current
in.). If this occurs, wait until scanning is complete without continuing to insert more documents.
After scanning is complete, insert the next document. The next scan is started automatically.
Document Is Being Scanned
1. Open the feed guide of the ScanSnap.
HINT
l If you want the document to be ejected from the front of the ScanSnap or when there is not
enough space where the document exits the ScanSnap, open the output guide.
For details about documents that can be scanned with the output guide open, refer to
"Documents to Scan" (page 66).
l How the document is ejected differs as below depending on whether the output guide is open
or closed.
- When the output guide is closed
- When the output guide is open
a The [Scan/Stop] button flashes in blue. The button returns to being lit normally when
document scanning is enabled.
In addition, the ScanSnap Manager icon in the notification area located at the far right of
the taskbar changes from to .
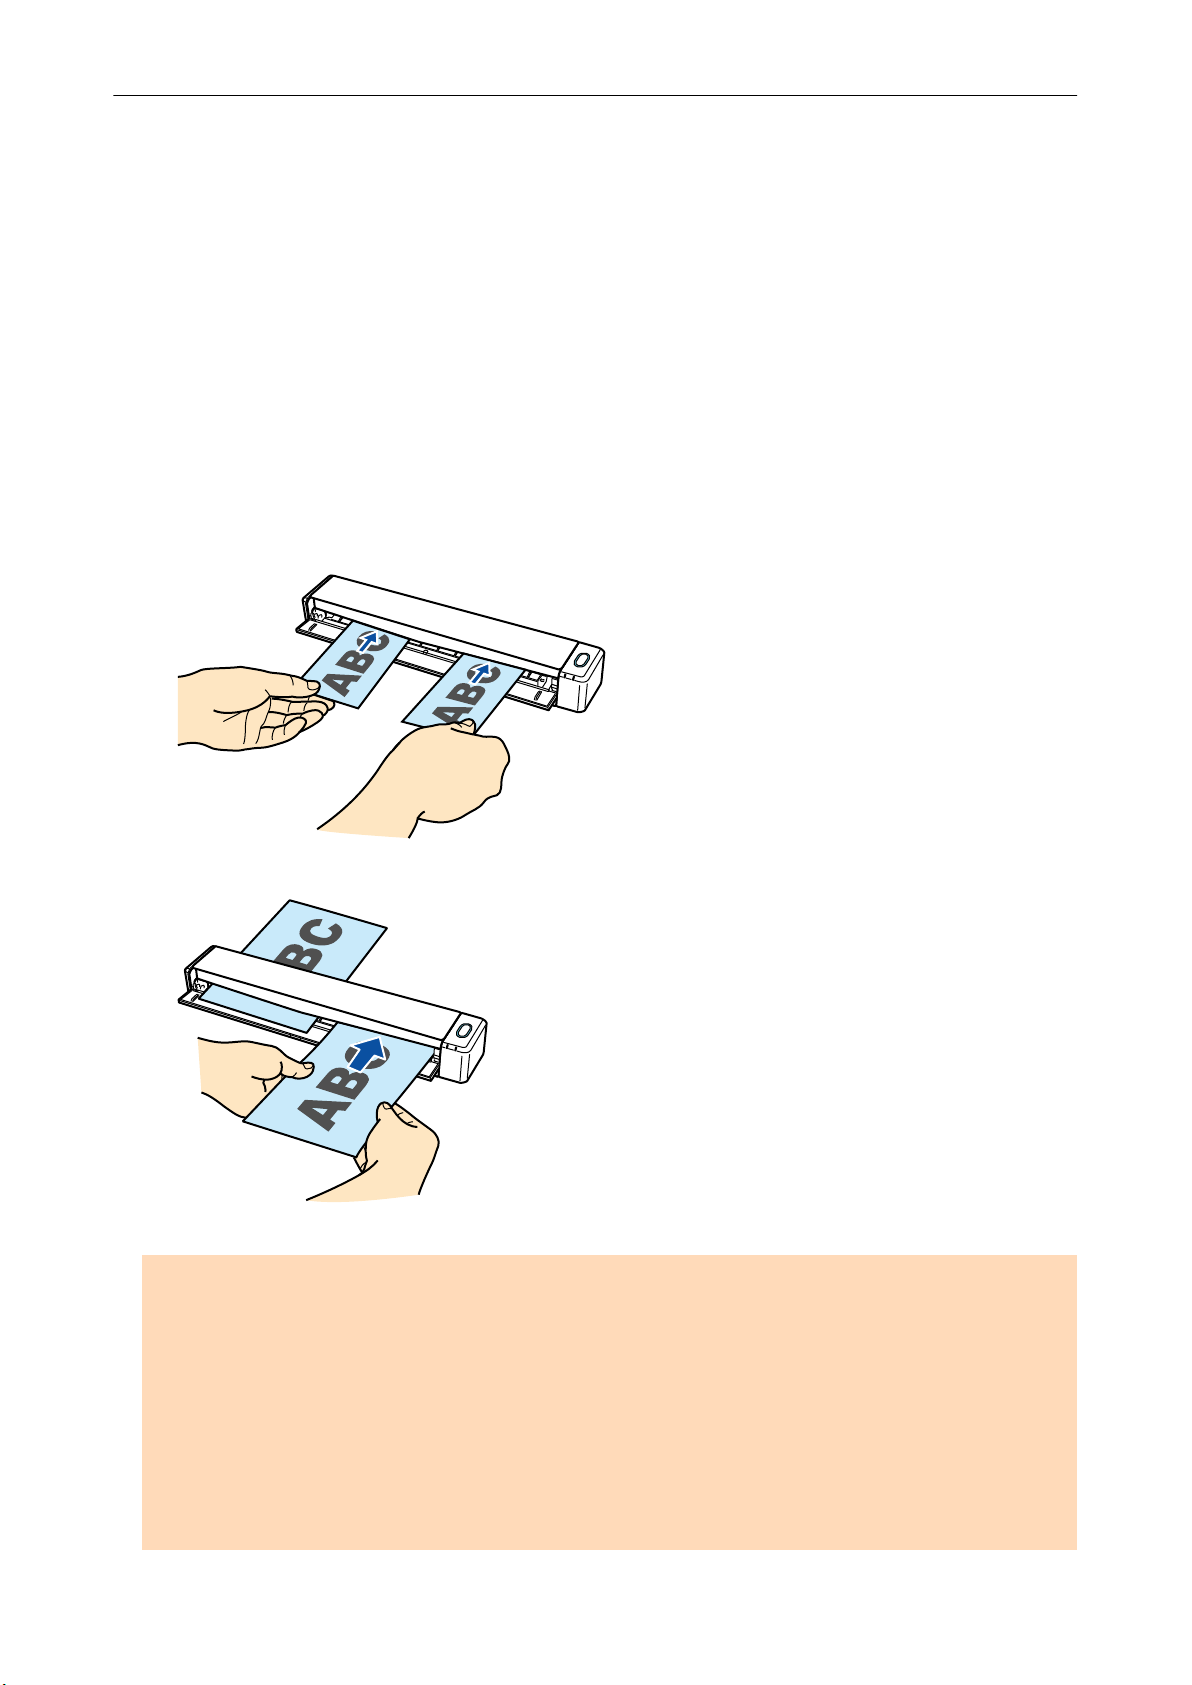
2. Insert the document straight into the feeding section of the ScanSnap, with
the scanning side facing up.
25
Page 26
Output Guide
Scanning Documents with the ScanSnap by Inserting Two Documents at a Time or by Inserting the Next Document While the Current
Document Is Being Scanned
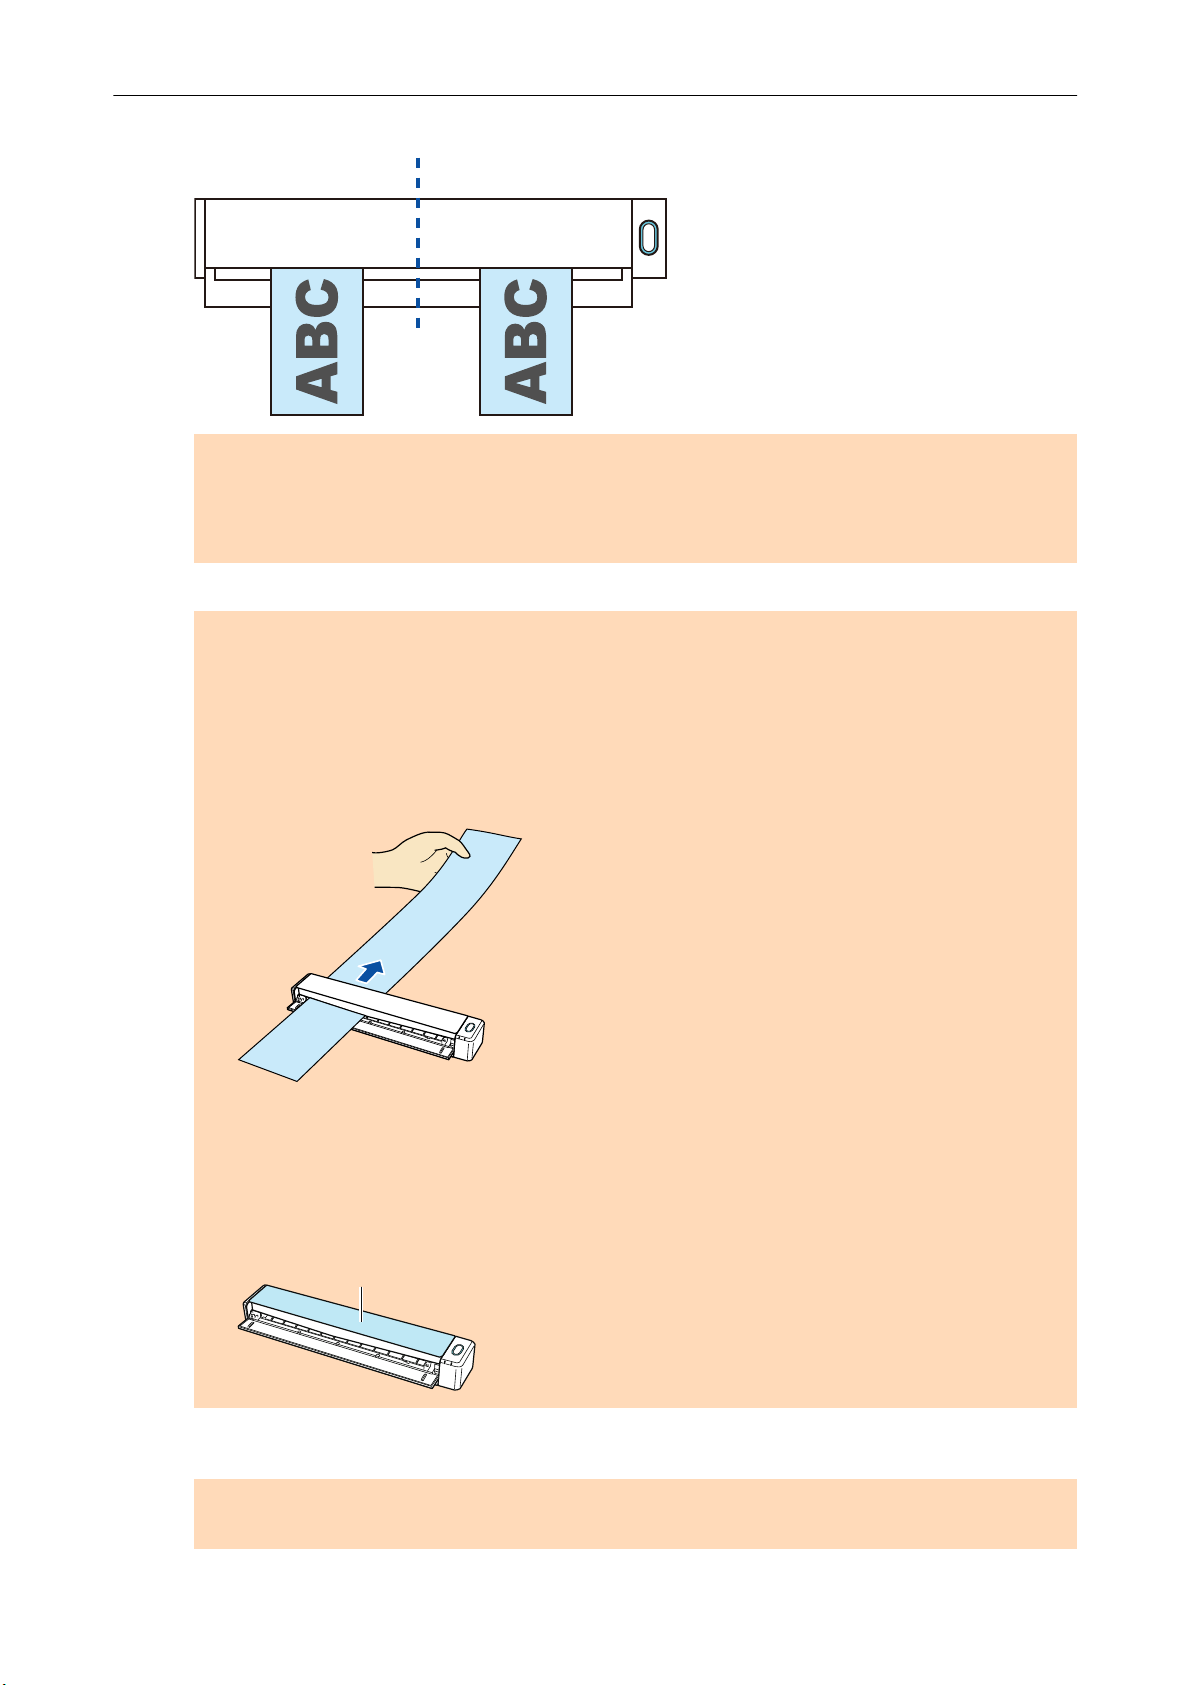
Insert each document in the center of the left or right half of the feeding section.
ATTENTION
When inserting the documents, insert them at least 10 mm (0.39 in.) apart from each other. If the
space between the documents is less than 10 mm (0.39 in.), the scanned images may not be
cropped correctly.
a The document is pulled in until it is set inside the ScanSnap.
ATTENTION
l When you perform scanning with the output guide closed, leave enough space at the back of
the ScanSnap to allow the document to be completely ejected. In addition, when you scan
long page documents, hold the scanned documents with your hands to prevent them from
falling off the unit where the ScanSnap is placed on.
Make sure that the area where the document exits the scanner is clear of any obstacles.
Otherwise, paper jam may occur.
3. Press the [Scan/Stop] button on the ScanSnap to start scanning.
l If you scan the following documents with the output guide open, a paper jam may occur and
damage the documents. Scan the following documents with the output guide closed.
- Thick paper (80 g/m2 [20 lb] or heavier)
- Postcards
- Business cards
ATTENTION
Do not perform the following operations during scanning. Doing so will stop scanning.
26
Page 27
Scanning Documents with the ScanSnap by Inserting Two Documents at a Time or by Inserting the Next Document While the Current
Document Is Being Scanned
l Connect or disconnect the ScanSnap and other USB devices.
l Close the feed guide.
l Switch users.
l Allow the computer to enter sleep mode.
a The [Scan/Stop] button on the ScanSnap flashes in blue while the documents are being
scanned.
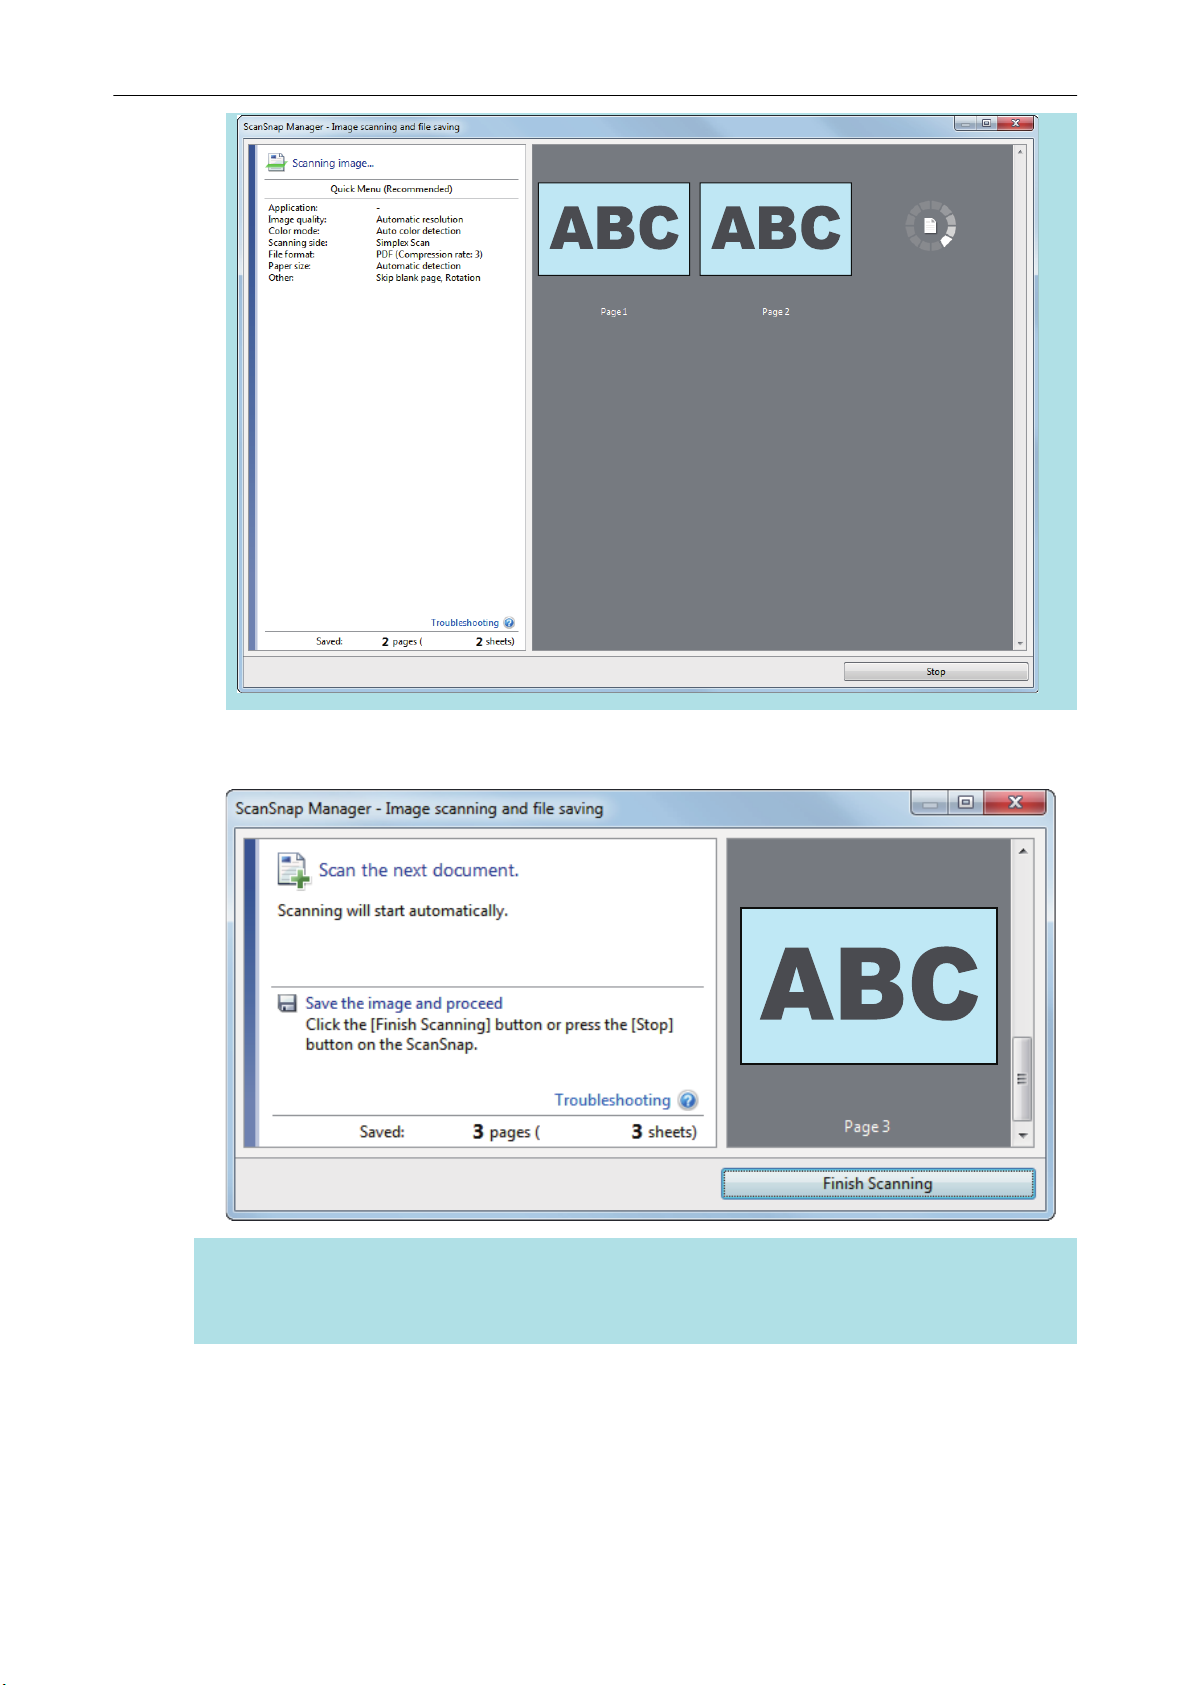
The [ScanSnap Manager - Image scanning and file saving] window appears.
HINT
When the [ScanSnap Manager - Image scanning and file saving] window is maximized,
multiple scanned images are displayed in the preview area. When you use a dual scan, it is
recommended that you maximize the [ScanSnap Manager - Image scanning and file saving]
window to check that scanned images are created correctly while scanning documents.
27
Page 28
Scanning Documents with the ScanSnap by Inserting Two Documents at a Time or by Inserting the Next Document While the Current
Document Is Being Scanned
a When scanning is complete, the [ScanSnap Manager - Image scanning and file saving]
window displays a scanning standby status.
HINT
To continue scanning, insert the next document to be scanned. When the document is inserted,
scanning starts automatically.
4. Press the [Scan/Stop] button on the ScanSnap to finish scanning.
a The Quick Menu appears.
5. In the Quick Menu, click the icon of the application to link with ScanSnap
Manager.
28
Page 29
Scanning Documents with the ScanSnap by Inserting Two Documents at a Time or by Inserting the Next Document While the Current
Document Is Being Scanned
For details about linking the following applications with ScanSnap Manager, refer to "Useful
Usages" (page 87).
l ScanSnap Organizer
l Scan to CardMinder
a The selected application starts up. For details, refer to the Advanced Operation Guide.
ATTENTION
l You cannot start scanning when the Quick Menu is displayed. Either select an icon from the
Quick Menu and finish the process, or close the Quick Menu before you perform the next
scan.
l Do not move, delete, or rename scanned images using other applications while the Quick
Menu is displayed.
HINT
l Clicking
icon of another application displays the description of the application.
l Performing a scan while an application that can be automatically linked with is active
automatically starts the linkage between ScanSnap Manager and the application.
For details, refer to the Advanced Operation Guide.
displays the description of an application. Placing the mouse cursor over the
29
Page 30
Scanning Documents Larger Than A4 or Letter Size (by Directly Inserting Them in the ScanSnap)
Scanning Documents Larger Than A4 or Letter
Size (by Directly Inserting Them in the
ScanSnap)
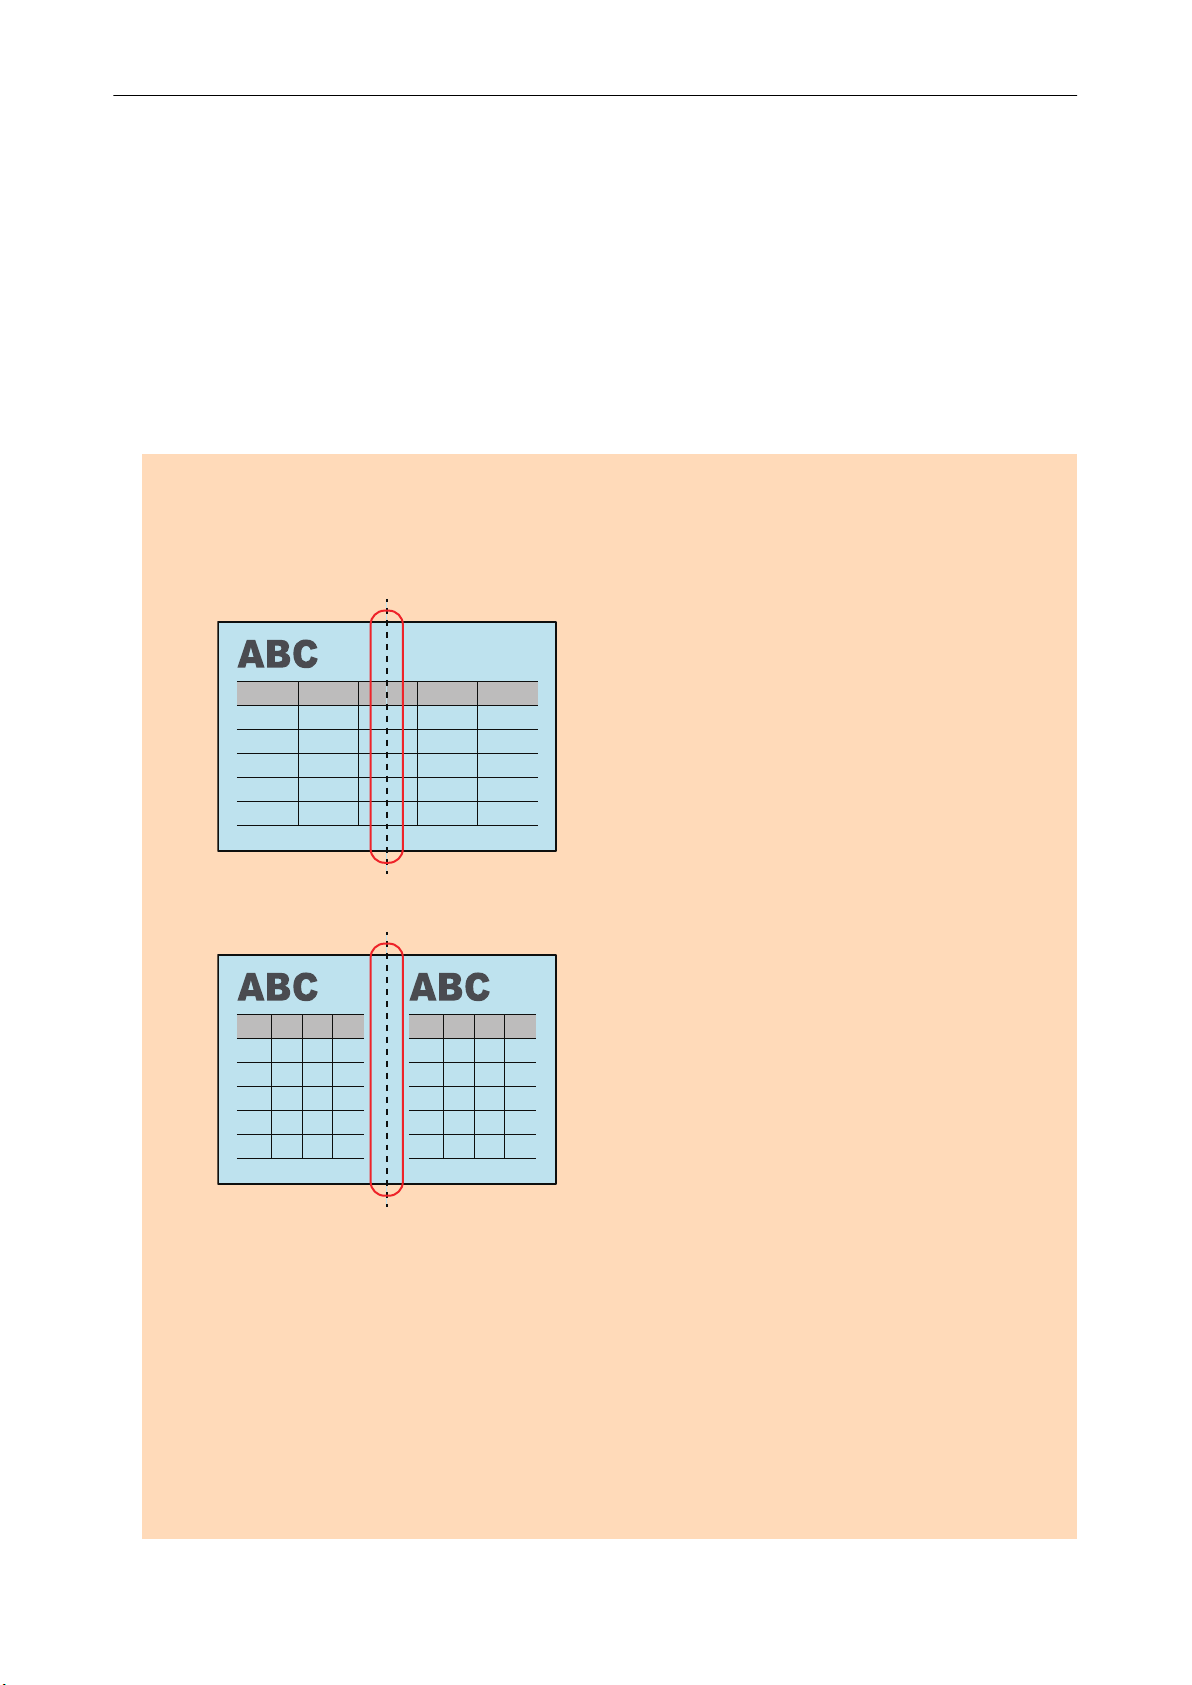
By folding an A3, B4, or Double Letter size document in half and scanning each side continuously,
the scanned images of both sides are automatically merged and saved as a single image.
For details about documents that can be scanned, refer to "Documents to Scan" (page 66).
ATTENTION
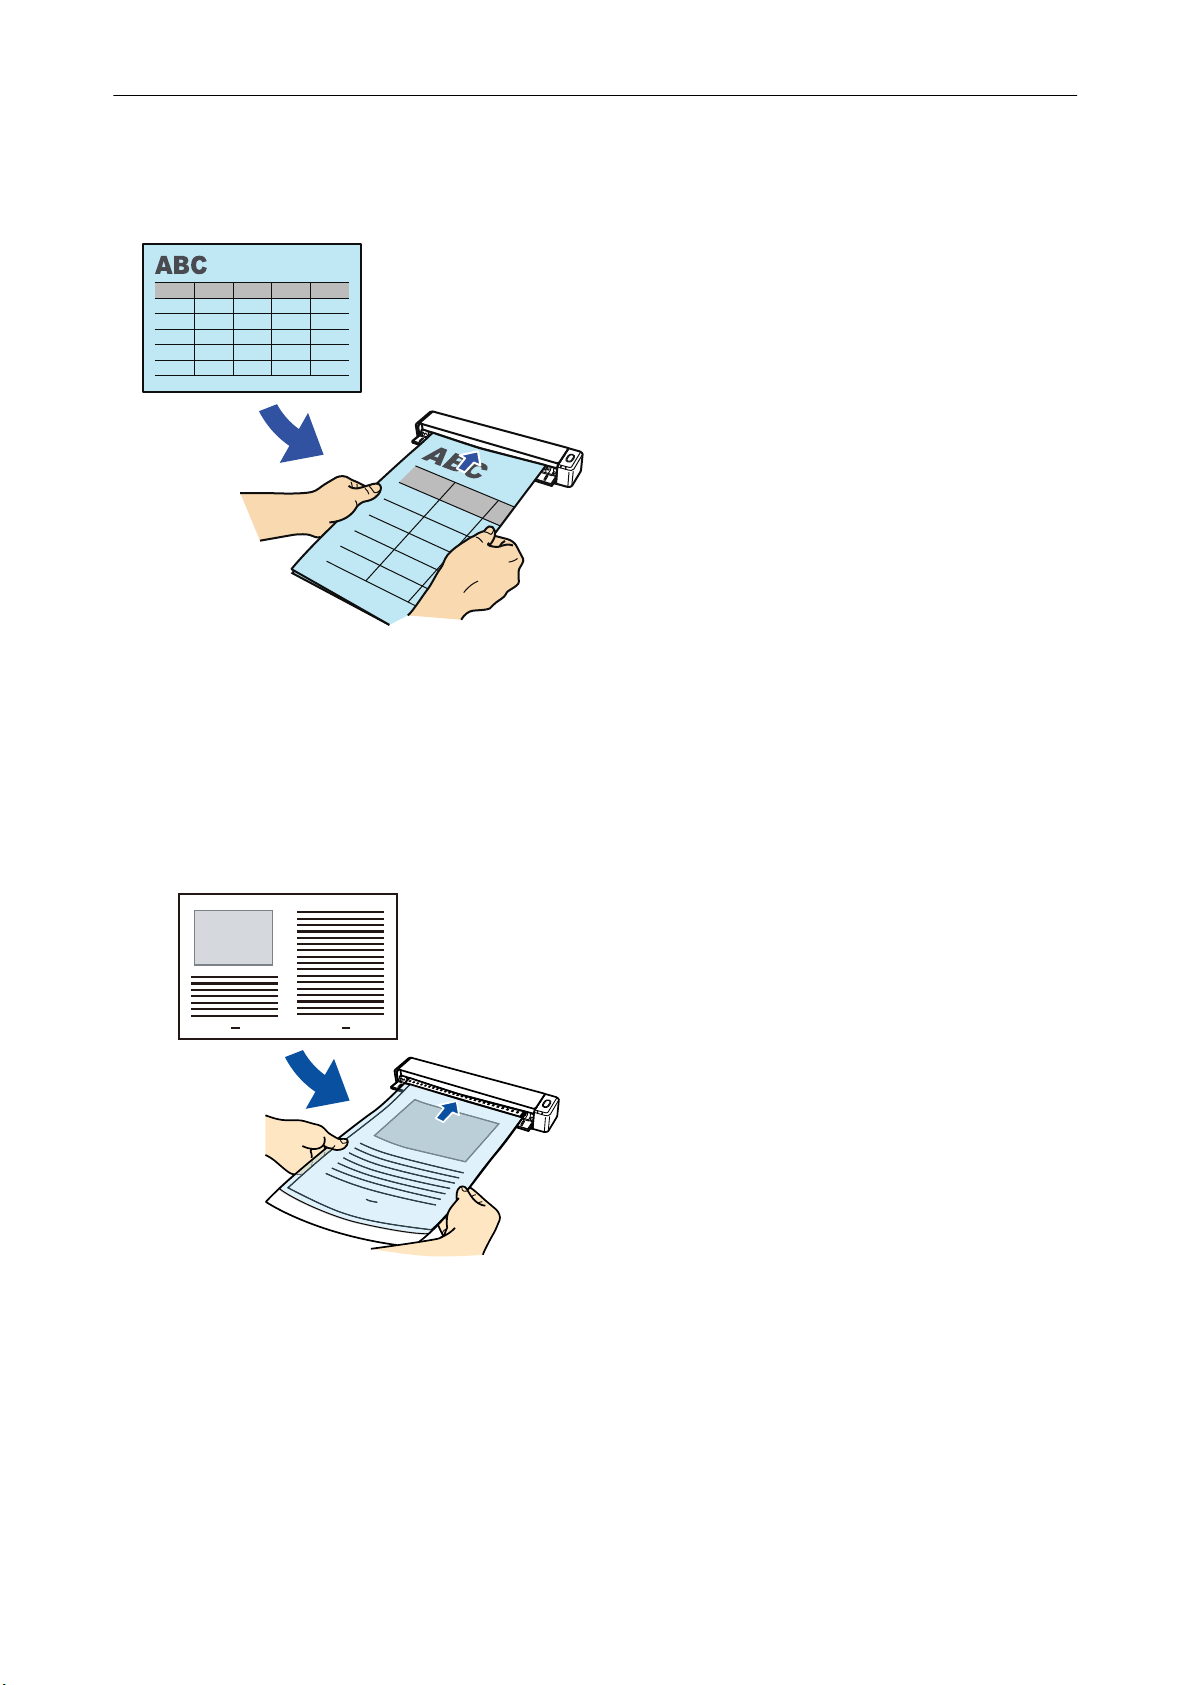
l Scanned images are automatically merged only when there is text, diagram, or a table on the fold
line of the folded document.
- When scanned images are automatically merged
- When scanned images are not automatically merged
l After a document is scanned, if the scanned images are not merged automatically, you can use the
ScanSnap Organizer Merge Pages function to merge the scanned images.
For details, refer to the ScanSnap Organizer Help.
l For a document that will have scanned images which are merged automatically, you can use the
optional Carrier Sheet to scan the document and merge the scanned images automatically.
For details, refer to "Scanning Documents Larger Than A4 or Letter Size (with the Carrier Sheet)"
(page 94).
l If scanned images are unexpectedly merged, clear the [Merge both side images] checkbox on the
[Scanning mode option] window, and then scan the document again.
To open the [Scanning mode option] window, click the [Option] button in the [Scanning] tab of the
"ScanSnap Setup Window" (page 47).
30
Page 31

Feed Guide
Scanning Documents Larger Than A4 or Letter Size (by Directly Inserting Them in the ScanSnap)
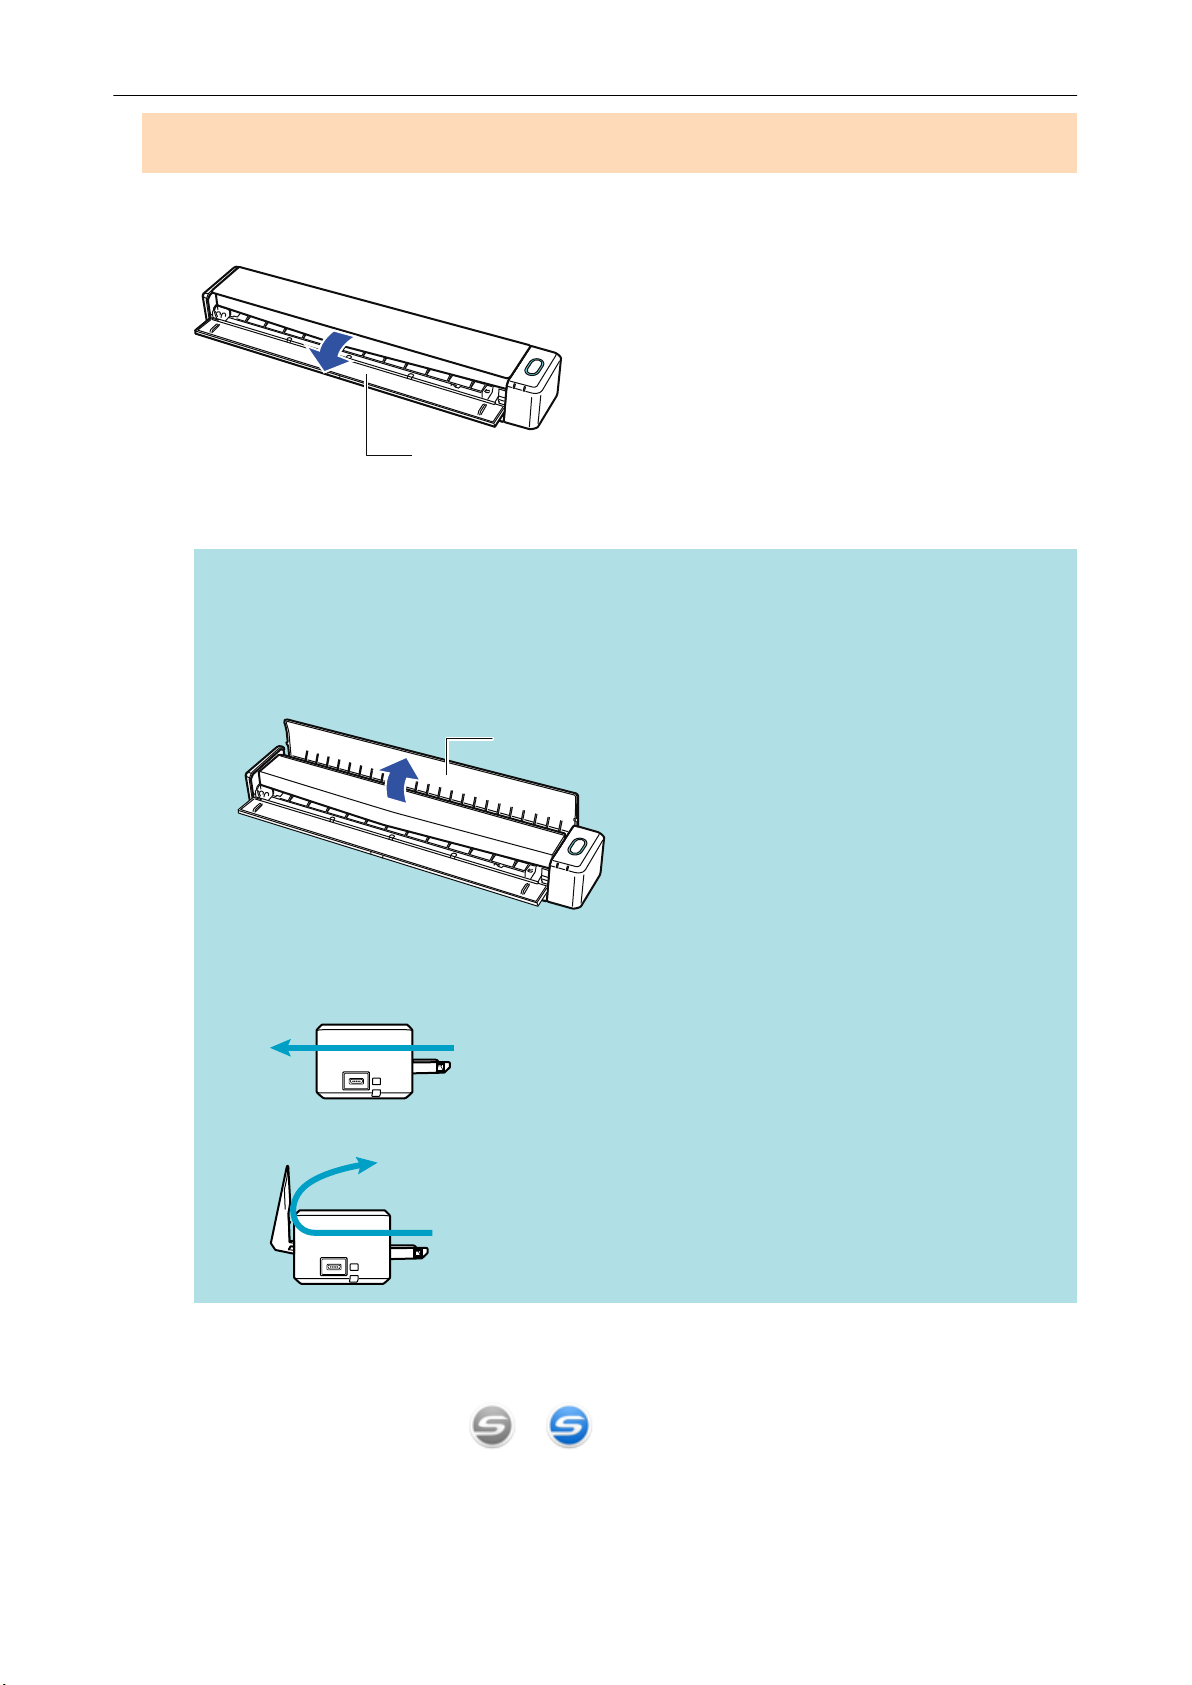
1. Open the feed guide of the ScanSnap.
a The [Scan/Stop] button flashes in blue. The button returns to being lit normally when
document scanning is enabled.
In addition, the ScanSnap Manager icon in the notification area located at the far right of
the taskbar changes from
to .
2. Fold the document in half so that the sides to be scanned are facing out.
ATTENTION
Fold the long side of the document in half. If the left and right areas of the folded document are
different in size from each other, the scanned images may not be merged automatically.
3. Insert the document straight into the feeding section of the ScanSnap, with
the scanning side facing up.
31
Page 32

Output Guide
Scanning Documents Larger Than A4 or Letter Size (by Directly Inserting Them in the ScanSnap)
a The document is pulled in until it is set inside the ScanSnap.
HINT
If you scan a document folded in half with the output guide open, a paper jam may occur. Make
sure to close the output guide when you scan a document folded in half.
4. Press the [Scan/Stop] button on the ScanSnap to start scanning.
a The [Scan/Stop] button on the ScanSnap flashes in blue and the [ScanSnap Manager -
Image scanning and file saving] window appears while the document is being scanned.
When scanning is complete, the scanned image of the scanning side is displayed in the
preview area.
5.
6. Press the [Scan/Stop] button on the ScanSnap to finish scanning.
7. In the Quick Menu, click the icon of the application to link with ScanSnap
Turn over the document and insert it as described in step 3.
ATTENTION
Make sure to scan the front and back sides of the document folded in half consecutively.
a Scanning starts automatically.
HINT
Repeat steps 2 to 5 to continue scanning more A3, B4, or Double Letter size documents. You
can also continue scanning documents smaller than A4 or Letter size.
For details about scanning a document, refer to "Scanning a Document" (page 19).
a The Quick Menu appears.
Manager.
32
Page 33

Scanning Documents Larger Than A4 or Letter Size (by Directly Inserting Them in the ScanSnap)
When you select , you can manage scanned images by folder with ScanSnap
Organizer.
For details, refer to "Managing Paper Documents by Folder on a Computer" (page 88).
a The selected application starts up. For details, refer to the Advanced Operation Guide.
ATTENTION
l You cannot start scanning when the Quick Menu is displayed. Either select an icon from the
Quick Menu and finish the process, or close the Quick Menu before you perform the next
scan.
l Do not move, delete, or rename scanned images using other applications while the Quick
Menu is displayed.
HINT
l Clicking
icon of another application displays the description of the application.
l Performing a scan while an application that can be automatically linked with is active
automatically starts the linkage between ScanSnap Manager and the application.
For details, refer to the Advanced Operation Guide.
displays the description of an application. Placing the mouse cursor over the
33
Page 34

ScanSnap Overview
ScanSnap Overview
This section provides an overview that you should be aware of before operating ScanSnap.
l "Parts and Functions" (page 35)
l "Charging the Battery" (page 38)
l "System Requirements" (page 40)
l "Overview of the Software Related to the ScanSnap" (page 42)
l "How to Install the Software" (page 43)
l "ScanSnap Manager Icon" (page 44)
l "Right-Click Menu" (page 45)
l "ScanSnap Setup Window" (page 47)
l "Turning the ScanSnap On or Off" (page 48)
l "Connecting the ScanSnap via Wireless LAN" (page 55)
l "Documents to Scan" (page 66)
34
Page 35

Parts and Functions
3
1
2
4
7
6
5
This section explains the names and functions of the ScanSnap parts.
Front
Parts and Functions
No. Name Description
1 Feed guide (*1) Open it to use the ScanSnap.
2 Output guide Open it to eject documents from the front of the ScanSnap.
Opening it turns on the ScanSnap. Then, you can place a document
on it to insert the document.
Select an ejection method depending on the document type you are
scanning.
For details about documents that can be scanned with the
ScanSnap, refer to "Documents to Scan" (page 66).
l When the output guide is closed
l When the output guide is open
35
Page 36

8
9
Parts and Functions
No. Name Description
3 Top cover Open it to remove jammed documents or clean the inside of the
ScanSnap.
For details about how to clean the inside of the ScanSnap, refer to
"Cleaning the Inside of the ScanSnap" (page 127).
4 [Scan/Stop] button (*1) Press this button to start or finish scanning.
Indicates the status of the ScanSnap as follows:
Blue (lit): Ready
Blue (flashing): Scanning
Orange (flashing): Error
5 Battery indicator Indicates the remaining battery power and battery charging status.
When the ScanSnap is turned on
Blue (lit): Fully charged
Orange (lit): Charging
Orange (flashing): Low battery
When the ScanSnap is turned off
Orange (lit): Charging
6 Wi-Fi indicator Indicates the status of the ScanSnap connected via wireless LAN as
follows:
Blue (lit): Connected (Access Point Connect mode)
Blue (flashing): Standby
Green (lit): Connected (Direct Connect mode)
Orange (lit): Not Connectable or waiting for connection in Direct
Connect mode
Orange (flashing): Not Connectable (WPS error)
7 Feeding section Insert the document here to load.
*1: When the ScanSnap has turned off automatically because of the automatic power off function,
either press the [Scan/Stop] button (this will not start scanning), or close the feed guide, then
open it again to turn the ScanSnap back on.
For details, refer to "Automatic Power OFF" (page 53).
Side
No. Name Description
8 Tape seal Remove this tape seal after installing the software.
36
Page 37

10
11
Parts and Functions
No. Name Description
9 USB connector Used to connect a USB cable.
Back
No. Name Description
10 WPS button Press this button to connect to a WPS compatible device by using
the push button method.
11 Wi-Fi switch Turn this switch on to connect the ScanSnap via wireless LAN.
37
Page 38

Charging the Battery
Charging the Battery
The battery of the ScanSnap can be charged by connecting the ScanSnap and the computer with
the supplied USB cable.
Charge the ScanSnap's battery in the following procedure.
ATTENTION
l The ScanSnap is powered and charged through a USB port on a computer. Use the USB port that
provides a power supply of 500 mA to charge the battery.
l Use the supplied USB cable or the optional USB power adapter to charge the battery.
l Charge the battery in proper air temperature conditions (5 to 35 degrees C/41 to 95 degrees F).
l Do not charge the battery in the following cases:
- The shape of the USB cable plug was once deformed.
- The USB cable is damaged.
- Foreign objects get on the plugs of the USB cable and the USB connector which is on the
ScanSnap.
l Do not charge the battery in the following environments:
- Places which are subject to high humidity, dust, or vibration
- Places near conventional phones, televisions, or radios
l Check that the ScanSnap does not get wet before charging.
l The battery can be charged while the ScanSnap is being used. Although the following symptoms
may occur during a charge, it does not affect the ScanSnap in any way.
- It takes time until charging completes.
- The remaining battery power is reduced and charging is not completed.
- The ScanSnap is automatically turned off during a scan.
l The battery reaches the end of its life after 300 to 500 times of charges and discharges. The battery
life varies depending on the conditions that the ScanSnap is used in
l The battery naturally discharges over time even if it is not used.
l When you use the ScanSnap in low temperatures, the charged battery may run out quickly.
1. Connect the USB cable to the USB connector on the ScanSnap and the USB
port on the computer.
38
Page 39

a The battery indicator lights up in orange.
When charging completes, the battery indicator turns off.
HINT
You can use the optional USB power adapter to charge the battery in a shorter time.
Charging the Battery
39
Page 40

System Requirements
System Requirements
The ScanSnap has the following system requirements.
For the latest information on requirements, please visit the ScanSnap Support Site at:
http://scansnap.fujitsu.com/g-support/en/
Operating system Windows 10 (32-bit/64-bit) (*1)
Windows 8.1 (32-bit/64-bit) (*2)
Windows 7 (32-bit/64-bit)
CPU
Memory 4 GB or more
Display resolution (*3) Windows 10/Windows 8.1: 1024 × 768 pixels or higher
Disk space Free space required to install the software related to the ScanSnap is as follows:
USB port USB 3.0 (*6)/USB 2.0/USB 1.1
Intel® Core™ i5 2.5 GHz or higher
Windows 7: 800 × 600 pixels or higher
(*4)
l ScanSnap Manager: 700 MB
l ScanSnap Organizer: 290 MB
l CardMinder: 730 MB
l ABBYY FineReader for ScanSnap: 710 MB
l ScanSnap Online Update: 50 MB
l Scan to Microsoft SharePoint: 40 MB
l OCR Pack (*5)
l ScanSnap iX100 Basic Operation Guide: 10 MB
*1: The software bundled with the ScanSnap operates in desktop mode.
*2: The software bundled with the ScanSnap operates as a desktop application.
*3: When the font size is large, some screens may not be displayed correctly.
In such a case, use a smaller font size.
*4: To save scanned images, more free space is required.
For details about estimated image data size, refer to the ScanSnap Manager Help.
*5: By installing the OCR Pack, you can add extra languages to recognize text.
For the amount of free space required to install the OCR Pack, refer to the following:
http://www.fujitsu.com/global/support/products/computing/peripheral/scanners/scansnap/
software/ocrpack-setup.html
*6: When the ScanSnap is connected to a USB 3.0 port, the port operates as a USB 2.0 port.
ATTENTION
l If the system requirements above are not satisfied, the ScanSnap may not operate.
l If a USB port on the keyboard or on the monitor is in use, the ScanSnap may not operate.
l When using a commercially available USB hub, use a type that is powered from an electrical power
supply (and that comes with an adapter).
l Scanning speed decreases in the following cases:
- The CPU or the memory does not meet the recommended specifications.
- The version of the USB port or the USB hub is USB 1.1.
l The actual disk space used for the installation of the software and the disk space required for the
installation may be different because of the disk management in your Windows system.
40
Page 41

System Requirements
l To scan a document, a disk space that is approximately three times larger than the size of the file
to be saved is required.
l If characters are not correctly displayed when you use the following functions, install the universal
font (Arial Unicode MS) from the setup disk of Microsoft Office 2007 or later:
- CardMinder
- Scan to Mobile
- Scan to Salesforce Chatter
- Scan to Dropbox
HINT
l For Windows 7, when the following software programs are installed, .NET Framework 4 or an in-
place update for .NET Framework 4 (which requires 2 GB of free disk space at most) may be
installed:
- ScanSnap Manager
- ScanSnap Organizer
After installing .NET Framework, apply the updates in Windows Update.
l For Windows 10 or Windows 8.1, when the following software programs are installed, .NET
Framework 3.5 SP1 (which requires 500 MB of free disk space at most) may be installed at the
same time:
- ScanSnap Manager
- ScanSnap Organizer
- CardMinder
41
Page 42

Overview of the Software Related to the ScanSnap
Overview of the Software Related to the ScanSnap
This section gives an overview of each bundled software and their functions. You can edit, manage,
and arrange the scanned image by using the following software:
ScanSnap Manager
This scanner driver is required to scan documents with the ScanSnap. Scanned images can be
saved as PDF or JPEG files to a computer.
You need to have ScanSnap Connect Application installed on your mobile device to save PDF or
JPEG files to your mobile device.
You can download ScanSnap Connect Application for your mobile device from its application
market.
ScanSnap Organizer
You can use this application to display image data (PDF or JPEG files) without opening them,
create folders and arrange files as you like.
CardMinder
You can use this application to efficiently digitalize a large number of business cards.
Text recognition can be performed on business cards and you can create a database to facilitate
card data management and searches. Data in the database can be printed and linked with various
applications.
ABBYY FineReader for ScanSnap
This application can perform text recognition on the scanned images using OCR (Optical
Character Recognition) to convert the image data to Word, Excel, or PowerPoint files that can be
edited.
ScanSnap Online Update
This application checks whether the latest updates or software programs are available on the
download server. When the latest updates or software programs are available, you can
automatically apply updates or download and install the software programs manually.
Scan to Microsoft SharePoint
You can easily save files in SharePoint using the ScanSnap.
Evernote for Windows
You can easily save files in Evernote using the ScanSnap.
Dropbox for Windows
You can easily save files to your Dropbox folder using the ScanSnap.
42
Page 43

How to Install the Software
How to Install the Software
When you insert the Setup DVD-ROM into the DVD-ROM drive on your computer, the [ScanSnap
Setup] window appears.
ATTENTION
l Do not connect the ScanSnap to the computer before installing the software. Doing so may cause
the ScanSnap not to be recognized by the computer. In that case, install the software, and then
reconnect the ScanSnap to the computer.
l If a DVD-ROM drive is not available, the installers for the software programs can be downloaded
from the following web page.
http://scansnap.fujitsu.com/g-support/en/
The functions of each button in the [ScanSnap Setup] window are as follows.
Button
Readme Displays the [Readme] window. You can refer to the Readme file of each software in
Install Products Displays the [Install Products] window. You can start installing software.
Manuals Displays the [Manuals] window. You can refer to Safety Precautions, Getting Started,
Browse DVD Contents Opens Windows Explorer to display the files from the Setup DVD-ROM.
Support Displays contact information for customer support.
Function
this window.
the Basic Operation Guide (this manual), and the manual of each software program in
this window.
43
Page 44

ScanSnap Manager Icon
ScanSnap Manager Icon
When ScanSnap Manager is running, the ScanSnap Manager icon is displayed in the notification
area. The notification area is located at the far right of the taskbar.
The ScanSnap Manager icon indicates whether or not ScanSnap Manager is successfully
communicating with the ScanSnap. The appearance of the icon changes according to the
communication status as shown below.
This manual assumes that the ScanSnap is connected to a computer with a USB cable.
Communication Status ScanSnap Manager Icon
Communicating When the ScanSnap is connected to a computer with a USB cable
When the ScanSnap is connected to a computer via wireless LAN
Not communicating
When the ScanSnap is connected to a mobile device via wireless
LAN
HINT
Turn the ScanSnap on to begin communication between ScanSnap Manager and the ScanSnap. For
details about how to turn on the ScanSnap, refer to "Turning the ScanSnap On" (page 49).
You can display the menu for scanning documents and ScanSnap Manager settings from the
ScanSnap Manager icon.
l Right-clicking
Displays the "Right-Click Menu" (page 45).
l Left-clicking
Displays the Left-Click Menu.
For details, refer to the Advanced Operation Guide.
44
Page 45

Right-Click Menu
Right-Click Menu
This menu appears when you right-click the ScanSnap Manager icon in the notification area
located at the far right of the taskbar.
Item Function
Scan Scans the document inserted in the ScanSnap. Follows the settings configured in
[Scan Button Settings].
Scan Button Settings Displays the "ScanSnap Setup Window" (page 47). You can configure the scan
settings in this window.
Profile Management Displays the [ScanSnap Manager - Profile Management] window.
You cannot select [Profile Management] when the [Use Quick Menu] checkbox is
selected in the ScanSnap setup window.
For details, refer to the Advanced Operation Guide.
Connect by Wi-Fi Displays the [ScanSnap Manager - Connect by Wi-Fi] window.
You can connect the ScanSnap to a computer via wireless LAN. This cannot be
selected when the ScanSnap is connected to a computer via a USB cable.
For details, refer to "Connecting the ScanSnap via Wireless LAN" (page 55).
ScanSnap Folder Settings Displays the ScanSnap setup window. You can configure the scan settings for using
ScanSnap Folder in this window.
For details, refer to the Advanced Operation Guide.
45
Page 46

Right-Click Menu
Item Function
Show scanning results After scanning is completed, a message appears to inform you whether the image is
rotated.
Preferences Displays the [ScanSnap Manager - Preferences] window.
Help Displays the following menu:
l Help
Opens the ScanSnap Manager Help.
l Troubleshooting
Displays [Troubleshooting] in the ScanSnap Manager Help.
l ScanSnap Portal Site
Opens the ScanSnap global homepage (http://scansnap.fujitsu.com).
l About ScanSnap Manager
Displays the [ScanSnap Manager - Version Information] window.
l ScanSnap information
Displays the [ScanSnap Manager - Scanner and driver information] window.
Displayed when the ScanSnap and computer are connected.
l Online Update
Starts the ScanSnap Online Update.
For details, refer to "Updating the Software" (page 132).
To establish connection Displayed when ScanSnap Manager is not communicating with the ScanSnap
correctly.
Battery You can check the remaining battery power and battery charging status. This is
displayed when the ScanSnap is connected to the computer.
When you click this, the [ScanSnap Manager - Scanner and driver information]
window appears.
Exit Exits ScanSnap Manager.
46
Page 47

Profile Buttons
Detail Setting Tabs
ScanSnap Setup Window
ScanSnap Setup Window
When you right-click the ScanSnap Manager icon in the notification area located at the far right
of the taskbar, and select [Scan Button Settings] from the "Right-Click Menu" (page 45), the
following ScanSnap setup window appears.
In the ScanSnap setup window, you can use the [Use Quick Menu] checkbox to specify whether or
not to use the Quick Menu. You can also use the profile buttons and detail setting tabs to specify
scan settings according to your scanning needs.
For details, refer to the ScanSnap Manager Help.
47
Page 48

Turning the ScanSnap On or Off
Turning the ScanSnap On or Off
This section explains how to turn the ScanSnap on or off and how to check the remaining battery
power.
l "Turning the ScanSnap On" (page 49)
l "Turning the ScanSnap Off" (page 51)
l "Sleep Mode" (page 52)
l "Automatic Power OFF" (page 53)
l "Checking the Remaining Battery Power" (page 54)
48
Page 49

Turning the ScanSnap On
1. Turn on the computer.
HINT
If you connect the ScanSnap and a mobile device via a wireless LAN and then scan a document,
you do not have to turn on the computer.
Turning the ScanSnap On or Off
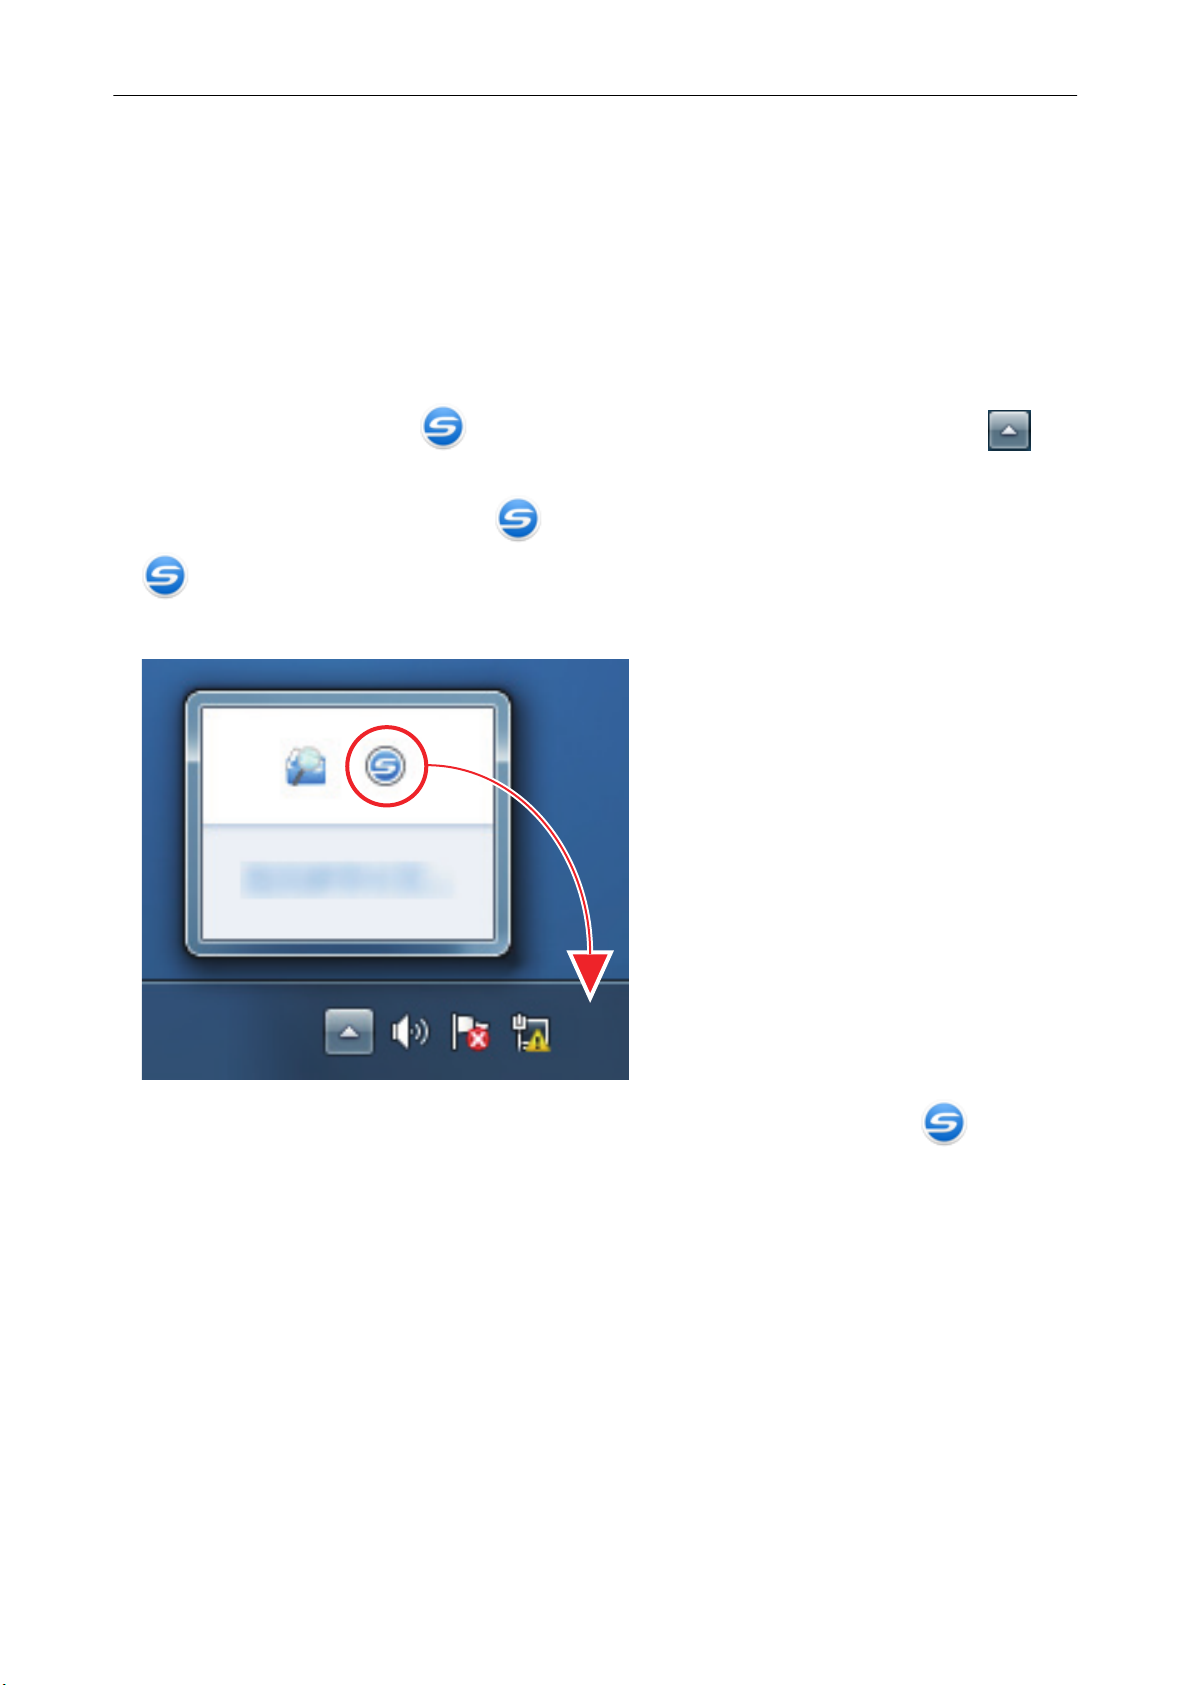
a The computer starts up and the ScanSnap Manager icon
area located at the far right of the taskbar.
appears in the notification
HINT
l If the ScanSnap Manager icon is not displayed in the notification area, start ScanSnap
Manager. Start ScanSnap Manager in the following procedure.
- Windows 10
Select [Start] menu → [ScanSnap Manager] → [ScanSnap Manager].
- Windows 8.1
Click
[ScanSnap Manager] on the All apps screen.
- Windows 7
Select [Start] menu → [All Programs] → [ScanSnap Manager] → [ScanSnap Manager].
l If ScanSnap Manager does not automatically start when you log on to your computer, change
the setting in the following procedure:
on the lower left side of the Start screen, and select [ScanSnap Manager] under
1. Right-click the ScanSnap Manager icon in the notification area and select
[Preferences] from the "Right-Click Menu" (page 45).
a The [ScanSnap Manager - Preferences] window appears.
2. In the [Auto Startup] list, select the [Start up ScanSnap Manager when you log on]
checkbox.
2. Open the feed guide of the ScanSnap to turn the power on.
49
Page 50

Example: When a USB Cable is Used for Connection
Turning the ScanSnap On or Off
a The [Scan/Stop] button flashes in blue. The button returns to being lit normally when
document scanning is enabled.
In addition, the ScanSnap Manager icon in the notification area changes from
to
.
ATTENTION
With some computers, the initialization of the ScanSnap may be performed several times when
the computer is started up.
HINT
l It may take more time for the ScanSnap Manager icon in the notification area to change to
depending on computer performance, operating environment, or loading, for example,
when many software programs are running at the same time.
l When the ScanSnap is turned on, a notification informs you of the ScanSnap's
communication status.
To disable notifications of the ScanSnap's communication status, change the setting in the
following procedure:
1. Right-click the ScanSnap Manager icon
[Preferences] from the "Right-Click Menu" (page 45).
a The [ScanSnap Manager - Preferences] window appears.
in the notification area and select
2. Clear the [Notify of the communication status] checkbox in the [Status Display] list.
50
Page 51

Turning the ScanSnap Off
Example: When a USB Cable is Used for Connection
1. Close the feed guide.
a The [Scan/Stop] button turns off.
Turning the ScanSnap On or Off
In addition, the ScanSnap Manager icon in the notification area changes from to
.
ATTENTION
If moving the ScanSnap, first turn the power off and remove all cables.
HINT
l If the Wi-Fi switch is off, the power of the ScanSnap and the computer operate together. If
you keep the ScanSnap connected to the computer, you do not have to worry about turning
the power ON/OFF.
l With some computers, it may take 2 to 3 minutes until the light of the [Scan] button goes out
after the computer is turned off.
l When the ScanSnap is turned off, a notification informs you of the ScanSnap's
communication status.
To disable notifications of the ScanSnap's communication status, change the setting in the
following procedure:
1. Right-click the ScanSnap Manager icon in the notification area and select
[Preferences] from the "Right-Click Menu" (page 45).
a The [ScanSnap Manager - Preferences] window appears.
2. Clear the [Notify of the communication status] checkbox in the [Status Display] list.
51
Page 52

Turning the ScanSnap On or Off
Sleep Mode
When the ScanSnap is on and has not been used for one minute, it enters sleep (power saving)
mode.
52
Page 53

Turning the ScanSnap On or Off
Automatic Power OFF
When the ScanSnap connected with a USB cable is turned on and left unused for the specified time
(default is "4 hours"), it will turn itself off automatically.
When the ScanSnap powered by a battery is turned on and left unused for the specified time (default
is "5 minutes"), it will turn itself off automatically.
To turn the ScanSnap back on, perform one of the following operations:
l Press the [Scan/Stop] button on the ScanSnap
l Close the feed guide and open it again
HINT
l To continue using the ScanSnap, reset the time until auto power-off by performing one of the
following:
- Load a document in the ScanSnap
- Press the [Scan/Stop] button on the ScanSnap
- Close the feed guide and open it again
l You can change the time of the ScanSnap to turn off automatically or change the setting so that it
will not turn off automatically. Set according to the following procedures:
1. Right-click the ScanSnap Manager icon in the notification area and select [Preferences]
from the "Right-Click Menu" (page 45).
a The [ScanSnap Manager - Preferences] window appears.
2. In the [Power] list, change the settings for [Power setting] based on how it is connected.
l A notification appears in the following cases:
- When a USB cable is used for connection, the ScanSnap will turn off automatically five minutes
later.
- When the ScanSnap is powered by the battery, the ScanSnap has turned off automatically.
53
Page 54

Turning the ScanSnap On or Off
Checking the Remaining Battery Power
The ScanSnap has a battery.
To check the remaining battery power, right-click the ScanSnap Manager icon in the
notification area located at the far right of the taskbar, and check [Battery] in the "Right-Click Menu"
(page 45).
HINT
l The remaining battery power can be checked also in the [ScanSnap Manager - Scanner and driver
information] window.
To open the [ScanSnap Manager - Scanner and driver information] window, select [ScanSnap
information] in the "Right-Click Menu" (page 45).
l A notification appears in the following cases:
- The remaining battery power is 10% or less.
- No battery power remains and the ScanSnap is turned off.
54
Page 55

Connecting the ScanSnap via Wireless LAN
Connecting the ScanSnap via Wireless LAN
By connecting the ScanSnap to a computer or a mobile device via wireless LAN, you can scan
documents.
Select one of the following wireless modes to connect the ScanSnap to the computer or mobile
device.
l Access Point Connect mode
When a wireless LAN environment has already been configured, the ScanSnap and the
computer or mobile device are connected via a wireless access point.
l Direct Connect mode
When a wireless LAN environment has not been configured, the ScanSnap and the computer or
mobile device are connected directly via wireless LAN.
The wireless mode automatically switches to the mode in accordance with the wireless LAN
environment in which the ScanSnap is used.
When the ScanSnap is turned on, it is connected to the wireless access point that was set in the
ScanSnap Wireless Setup Tool. If no wireless access point is detected, the mode is switched to the
Direct Connect mode.
HINT
l When the wireless access point that was set in the ScanSnap Wireless Setup Tool is detected,
even if the wireless access point is not connectable, the mode is not switched from the Access
Point Connect mode to the Direct Connect mode.
To switch the mode to the Direct Connect mode, turn off the ScanSnap and then turn it on again in
an environment in which no wireless access point is detected.
l Even if the wireless access point that was set in the ScanSnap Wireless Setup Tool is detected
after the mode is switched to the Direct Connect mode, the mode is still not switched to the Access
Point Connect mode.
To connect the ScanSnap in Access Point Connect mode, turn off the ScanSnap and then turn it on
again.
For details about how to switch the wireless mode and how to set the wireless mode, refer to the
ScanSnap Wireless Setup Tool Help.
l "Preparation" (page 56)
l "Setting a Wireless LAN Using the ScanSnap Wireless Setup Tool" (page 57)
l "Connecting a Computer in Access Point Connect Mode" (page 58)
l "Connecting a Mobile Device in Access Point Connect Mode" (page 60)
l "Connecting a Computer in Direct Connect Mode" (page 61)
l "Connecting a Mobile Device in Direct Connect Mode" (page 63)
l "Reconnecting to a Wireless Access Point Using the ScanSnap WPS Button" (page 64)
55
Page 56

Connecting the ScanSnap via Wireless LAN
Preparation
To connect the ScanSnap via wireless LAN, prepare the following:
l An environment in which a wireless LAN is available
To connect the ScanSnap and a computer or a mobile device in Access Point Connect mode,
prepare the wireless LAN environment.
When connecting the ScanSnap to a wireless access point, you may need information such as
an SSID (network name) and a security key (password).
For details, refer to the manual for the wireless access point.
ATTENTION
Do not place the following within 100 mm (3.9 in.) of the ScanSnap, or near your wireless access
point.
- Obstacles that block radio waves (such as walls and metal plates)
- Devices that may cause signal interference (such as microwaves and cordless phones) and
wireless devices
l ScanSnap Connect Application
To connect the ScanSnap and a mobile device, you need to install ScanSnap Connect
Application on your mobile device.
Download ScanSnap Connect Application for the mobile device from the following application
stores:
- App Store
- Google Play
- Amazon Appstore
56
Page 57

Connecting the ScanSnap via Wireless LAN
Setting a Wireless LAN Using the ScanSnap Wireless Setup Tool
The ScanSnap Wireless Setup Tool is an application to configure the wireless settings required for
connecting your ScanSnap via wireless LAN in a wizard format. The ScanSnap Wireless Setup Tool
can be used to configure and check the following wireless LAN settings and connection.
l Connecting the ScanSnap to a wireless access point
l Registering the computer that will be connected to the ScanSnap via wireless LAN
l Setting the IP address, name, and password for the ScanSnap
l Checking the connection between the ScanSnap and the computer
l Checking the connection between the ScanSnap and the mobile device
Follow the procedure below to start the ScanSnap Wireless Setup Tool and configure the wireless
settings.
1.
Start the ScanSnap Wireless Setup Tool.
l Windows 10
Select [Start] menu → [ScanSnap Manager] → [ScanSnap Wireless Setup Tool].
l Windows 8.1
Click on the lower left side of the Start screen, and select [ScanSnap Wireless Setup
Tool] under [ScanSnap Manager] on the All apps screen.
l Windows 7
Select [Start] menu → [All Programs] → [ScanSnap Manager] → [ScanSnap Wireless
Setup Tool].
a The ScanSnap Wireless Setup Tool will start running.
2. Click the [Wireless Network Setup Wizard] button
in the main
menu.
a The Wireless Network Setup Wizard appears.
3. Follow the instructions in the Wireless Network Setup Wizard to configure
the wireless settings.
Configure and check the wireless settings based on the wireless LAN environment in which the
ScanSnap is used.
HINT
l For details and operation of ScanSnap Wireless Setup Tool, refer to the ScanSnap Wireless Setup
Tool Help.
l The ScanSnap Wireless Setup Tool is also started up when the ScanSnap software is installed.
57
Page 58

Connecting the ScanSnap via Wireless LAN
Connecting a Computer in Access Point Connect Mode
By using the ScanSnap Wireless Setup Tool Wizard, you can configure and check the connection
between the ScanSnap and a computer.
For details, refer to "Setting a Wireless LAN Using the ScanSnap Wireless Setup Tool" (page 57).
The following explains how to connect the ScanSnap and a computer when the wireless settings
have already been configured by using the ScanSnap Wireless Setup Tool Wizard.
1. Disconnect the USB cable connecting the ScanSnap to the computer.
ATTENTION
If the ScanSnap Manager icon is
device.
a The ScanSnap is automatically connected to a computer via wireless LAN and the
ScanSnap Manager icon changes to .
If the icon does not change, go to step 2.
, exit ScanSnap Connect Application on the mobile
HINT
l If the [Connect automatically to previous ScanSnap by Wi-Fi] checkbox is selected and the
previously connected ScanSnap is available for the connection, the computer is connected to
the ScanSnap automatically.
l The computer can be connected to only one ScanSnap.
l Only one computer can be connected to the ScanSnap via wireless LAN.
l When you automatically connect a computer and the ScanSnap that had been connected via
wireless LAN before, if the password for the ScanSnap to be connected is changed, a
notification informs you of the status.
2. Right-click the ScanSnap Manager icon in the notification area located
at the far right of the taskbar and select [Connect by Wi-Fi] from the "Right-
Click Menu" (page 45).
a The [ScanSnap Manager - Connect by Wi-Fi] window appears.
3. From the list of the ScanSnap units to be connected, select the ScanSnap
that you want to connect, and click the [Connect] button.
ATTENTION
l If the [ScanSnap Manager - Enter Destination Password] window appears, enter the
password to connect.
The default password is the last four digits of the ScanSnap serial number.
The password can be changed with the ScanSnap Wireless Setup Tool. For details, refer to
the ScanSnap Wireless Setup Tool Help.
l If the intended ScanSnap for connection does not appear in the list of the ScanSnap units to
be connected, refer to the ScanSnap Manager Help.
58
Page 59

Connecting the ScanSnap via Wireless LAN
a The ScanSnap is connected to a computer via wireless LAN and the ScanSnap Manager
icon changes to
.
HINT
When the ScanSnap and a computer are connected via wireless LAN, a notification informs you
of the communication status.
59
Page 60

Connecting the ScanSnap via Wireless LAN
Connecting a Mobile Device in Access Point Connect Mode
By using the ScanSnap Wireless Setup Tool Wizard, you can configure and check the connection
between the ScanSnap and a mobile device.
For details, refer to "Setting a Wireless LAN Using the ScanSnap Wireless Setup Tool" (page 57).
The following explains how to connect the ScanSnap and a mobile device when the wireless settings
have already been configured by using the ScanSnap Wireless Setup Tool Wizard.
1. Start ScanSnap Connect Application on your mobile device.
a The mobile device will automatically be connected to an available ScanSnap on the same
network.
HINT
l If more than one available ScanSnap is detected, or if ScanSnap Connect Application is set
not to connect a mobile device to a ScanSnap automatically, then tap the ScanSnap that you
want by name, in order to connect to the mobile device, under [ScanSnap] on the [Connect
to] screen. For details, refer to the Basic Operation Guide (Mobile Connection) for your
mobile device.
l A notification appears in the following cases:
- When the ScanSnap and the mobile device are connected via wireless LAN, and the
communication with ScanSnap Manager is disconnected
- When you log onto the computer which is connected to the ScanSnap with the ScanSnap
and the mobile device already connected via wireless LAN
60
Page 61

Connecting the ScanSnap via Wireless LAN
Connecting a Computer in Direct Connect Mode
By using the ScanSnap Wireless Setup Tool Wizard, you can configure and check the connection
between the ScanSnap and a computer.
For details, refer to "Setting a Wireless LAN Using the ScanSnap Wireless Setup Tool" (page 57).
The following explains how to connect the ScanSnap and a computer when the computer to be
connected has already been registered by using the ScanSnap Wireless Setup Tool Wizard.
1. Click in the notification area located at the far right of the taskbar, and
connect the ScanSnap network displayed in the wireless network list.
The ScanSnap network name (SSID) and the security key are printed on the label attached to
the bottom of the scanner.
HINT
The network name (SSID) and the security key can be checked or changed with the ScanSnap
Wireless Setup Tool.
2. Disconnect the USB cable connecting the ScanSnap to the computer.
ATTENTION
If the ScanSnap Manager icon is
device.
a The ScanSnap is automatically connected to a computer via wireless LAN and the
ScanSnap Manager icon changes to
If the icon does not change, go to step 3.
HINT
l If the [Connect automatically to previous ScanSnap by Wi-Fi] checkbox is selected and the
previously connected ScanSnap is available for the connection, the computer is connected to
the ScanSnap automatically.
l The computer can be connected to only one ScanSnap.
l Only one computer can be connected to the ScanSnap via wireless LAN.
l When you automatically connect a computer and the ScanSnap that had been connected via
wireless LAN before, if the password for the ScanSnap to be connected is changed, a
notification informs you of the status.
, exit ScanSnap Connect Application on the mobile
.
3. Right-click the ScanSnap Manager icon in the notification area located
at the far right of the taskbar and select [Connect by Wi-Fi] from the "Right-
Click Menu" (page 45).
a The [ScanSnap Manager - Connect by Wi-Fi] window appears.
61
Page 62

Connecting the ScanSnap via Wireless LAN
4. From the list of the ScanSnap units to be connected, select the ScanSnap
that you want to connect, and click the [Connect] button.
ATTENTION
l If the [ScanSnap Manager - Enter Destination Password] window appears, enter the
password to connect.
The default password is the last four digits of the ScanSnap serial number.
The password can be changed with the ScanSnap Wireless Setup Tool. For details, refer to
the ScanSnap Wireless Setup Tool Help.
l If the intended ScanSnap for connection does not appear in the list of the ScanSnap units to
be connected, refer to the ScanSnap Manager Help.
a The ScanSnap is connected to the computer via a wireless access point and the ScanSnap
Manager icon changes to .
HINT
When the ScanSnap and a computer are connected via wireless LAN, a notification informs you
of the communication status.
62
Page 63

Connecting the ScanSnap via Wireless LAN
Connecting a Mobile Device in Direct Connect Mode
When you connect a mobile device to the ScanSnap in Direct Connect mode, you do not need to
configure settings in the ScanSnap Wireless Setup Tool.
For details, refer to the Basic Operation Guide (Mobile Connection).
63
Page 64

Wi-Fi
OFF
ON
Wi-Fi Switch
Connecting the ScanSnap via Wireless LAN
Reconnecting to a Wireless Access Point Using the ScanSnap WPS Button
If the Wi-Fi indicator lights up or flashes in orange, reconnect the ScanSnap to a WPS compatible
wireless access point. The reconnection can be established easily by pressing the WPS button on
the ScanSnap.
ATTENTION
Perform the following before you connect using the WPS button.
l If the ScanSnap Wireless Setup Tool is running while the ScanSnap is being connected to the
computer with a USB cable, exit the ScanSnap Wireless Setup Tool.
l If scanning is currently being performed from ScanSnap Manager or a mobile device, end the
scanning operation.
HINT
Button names and operating procedures may differ depending on the wireless access point. For
details, refer to the manual for your wireless access point.
1. Turn on the Wi-Fi switch on the back of the ScanSnap.
2. Turn on the ScanSnap.
For details, refer to "Turning the ScanSnap On" (page 49).
a After blinking blue, the Wi-Fi indicator lights up in blue or orange.
3. Press the WPS button of the wireless access point.
64
Page 65

WPS Button
Connecting the ScanSnap via Wireless LAN
4. Press and hold (3 seconds or longer) the WPS button on the back of the
ScanSnap within 2 minutes after pressing the WPS button of the wireless
access point.
a The ScanSnap is connected to the wireless access point and the Wi-Fi indicator lights up in
blue.
If connection cannot be established, the Wi-Fi indicator blinks or lights up in orange.
ATTENTION
If you cannot connect the ScanSnap to a wireless access point, refer to "Troubleshooting" in the
ScanSnap Manager Help.
HINT
For details about the Wi-Fi indicator status, refer to "Parts and Functions" (page 35).
65
Page 66

Documents to Scan
Documents to Scan
This section explains about the conditions for documents that can be loaded directly into the
ScanSnap and the conditions for documents that can be scanned using the Carrier Sheet.
l "Documents That Can Be Loaded Directly into the ScanSnap" (page 67)
l "Documents That Can Be Scanned Using the Carrier Sheet" (page 69)
66
Page 67

Documents to Scan
Documents That Can Be Loaded Directly into the ScanSnap
Conditions for documents that can be loaded directly into the ScanSnap are as follows:
Eject method
(*1)
Document type Office paper, postcards, business cards
Paper weight
Paper size Width
With the output guide closed With the output guide open
Plastic cards conforming to the ISO7810 ID-1
type (54 × 86 mm/3.37 × 2.13 in.) (*2)
52.3 to 209.3 g/m2 (14 to 56.1 lb)
When merging scanned images
automatically (*3)
52.3 to 104.7 g/m2 (14 to 28 lb)
Plastic cards
0.76 mm (0.03 in.) or less (embossed cards
can be used)
25.4 to 216 mm (1 to 8.5 in.)
For a dual scan, a total width of 200 mm (7.87 in.) or less for two documents
Length
25.4 to 863 mm (1 to 34 in.)
When merging scanned images automatically (*3)
l A3 (297 × 420 mm)
l B4 (257 × 364 mm)
l Double Letter (11 × 17 in. (279.4 × 432 mm))
Office paper
52.3 to 80 g/m2 (14 to 20 lb)
*1: For details about the eject methods, refer to "Parts and Functions" (page 35).
*2: A dual scan cannot be used for plastic cards.
*3: Fold in half to scan.
ATTENTION
l The following types of documents must not be scanned:
- Documents attached with the metals such as paper clips or staples that can damage the inside
of the ScanSnap
Remove the metals for scanning.
- Documents on which the ink is still wet
Wait until the ink dries completely to scan these documents.
- Documents larger than 216 × 863 (mm)/8.5 × 34 (in.) (width × length)
- Documents other than paper such as fabric, metal foil and OHP film
l When you scan picture postcards, be aware that the picture side may get damaged. It is the
responsibility of the customer to scan picture postcards.
l Be careful of the following when you scan plastic cards:
- Cards that are bent may not be fed properly.
- If the surface of the card is dirty with grease marks such as fingerprints, perform scanning after
wiping the dirt off.
67
Page 68

1234567890
ABCDEFG
1234567890
ABCDEFG
Documents to Scan
- Insert the plastic card straight into the feeding section of the ScanSnap. Do not tilt the plastic
card when you insert it because the plastic card may not be fed properly.
- When you scan plastic cards with strong luster, some parts of the image may appear lighter or
darker than the original.
Example:
gold colored credit card
- When you scan an embossed card, insert it in the direction shown below.
- If the embossed characters are not coated in gold or silver and the background color of the card
and the color of the embossed characters are similar, it may be difficult for the ScanSnap to
recognize embossed characters.
In which case, performing the following may result in an improvement.
1. Click the [Option] button in the [Scanning] tab of the "ScanSnap Setup Window" (page 47).
a The [Scanning mode option] window appears.
2. Select the [Increase text contrast] checkbox.
68
Page 69

CAUTION
Documents to Scan
Documents That Can Be Scanned Using the Carrier Sheet
The optional Carrier Sheet is a sheet designed to transport documents through the ScanSnap.
You can scan documents that are larger than A4/Letter size, photographs, and clippings.
Conditions for documents that can be scanned using the Carrier Sheet are as follows:
l Do not use a damaged Carrier Sheet. Otherwise, it may damage or cause
the ScanSnap to malfunction.
Eject method With the output guide closed
Document type Documents that cannot be loaded directly into the ScanSnap
Paper weight
Paper size Carrier Sheet size (216 × 297 mm)
l Be careful not to cut your finger on the edge of the Carrier Sheet.
Up to 52.3 to 209.3 g/m2 (14 to 56 lb)
When scanning documents folded in half:
Up to 104.7 g/m2 (28 lb)
A3 (297 × 420 mm) (*1)
A4 (210 × 297 mm)
A5 (148 × 210 mm)
A6 (105 × 148 mm)
B4 (257 × 364 mm) (*1)
B5 (182 × 257 mm)
B6 (128 × 182 mm)
Postcard (100 × 148 mm)
Business card (90 × 55 mm, 55 × 90 mm)
Letter (8.5 × 11 in. (216 × 279.4 mm))
11 × 17 in. (279.4 × 431.8 mm) (*1)
Custom size
Width: 25.4 to 216 mm (1 to 8.5 in.)
Length: 25.4 to 297 mm (1 to 11.69 in.)
*1:
Documents for Which the Carrier Sheet is Recommended for
Scanning
It is recommended that you use the Carrier Sheet to scan the following documents.
l Documents written in pencil
l Carbonless paper
Fold in half to scan.
Because there may be black traces left on the documents, it is recommended that you use the
Carrier Sheet to scan such documents.
When you scan such documents directly without using a Carrier Sheet, dirt will accumulate on
the rollers, which may cause feeding errors. Clean the rollers occasionally.
For details about how to perform cleaning, refer to "Cleaning the Inside of the ScanSnap" (page
127).
69
Page 70

Documents to Scan
Because carbonless paper may contain chemicals that can harm the ScanSnap internal rollers, it
is recommended that you use the Carrier Sheet to scan such documents.
Make sure to clean the rollers occasionally to maintain the scanner performance when scanning
carbonless paper directly without using the Carrier Sheet. For details about how to perform
cleaning, refer to "Cleaning the Inside of the ScanSnap" (page 127).
Depending on the type of carbonless paper, the life span of the scanner may be shortened
compared to scanning office paper.
l Scanning the following types of documents without using the Carrier Sheet can result in
documents being damaged or scanned incorrectly
- Documents smaller than 25.4 × 25.4 (mm)/1 × 1 (in.) (width × length)
Documents whose paper weight is less than 52.3 g/m2 (14 lb)
-
- Documents with an uneven surface (such as envelopes and paper sheets with attached
materials)
- Wrinkled or curled documents
- Folded or torn documents
- Tracing paper
- Coated paper
- Photographs (photographic paper)
- Perforated or punched documents
- Documents that are not rectangular or square
- Carbon paper or thermal paper
- Documents with memo papers or sticky notes attached
ATTENTION
l Using the Carrier Sheet
Be careful of the following when you use the Carrier Sheet:
- Do not stain, or cut the end with a black & white pattern. Otherwise, the Carrier Sheet will not be
recognized properly.
- Do not place the Carrier Sheet upside down. Otherwise, a paper jam may occur and damage
the Carrier Sheet and the document inside.
- Do not fold or pull the Carrier Sheet.
- Paper jams may occur when several small size documents such as photographs and postcards
are placed inside the Carrier Sheet to be scanned at once. It is recommended that you scan
such documents one at a time.
l Storing the Carrier Sheet
Be careful of the following when you store the Carrier Sheet:
- Do not leave your document inside the Carrier Sheet for a long time. Otherwise, the ink on the
document may be transferred onto the Carrier Sheet.
- Do not leave the Carrier Sheet in high temperature places such as under direct sunlight or near
a heating apparatus for a long time. Also, do not use the Carrier Sheet in high temperature
places. The Carrier Sheet may be deformed.
- To avoid deformation, store the Carrier Sheet on a flat surface without any weight on it.
70
Page 71

What You Can Do with Related Software
What You Can Do with Related Software
This section explains the basic operation procedure of software related to the ScanSnap and gives
an overview of its functions.
l "What You Can Do with the ScanSnap Organizer" (page 72)
l "What You Can Do with CardMinder" (page 78)
71
Page 72

Main Window
Scan documents with the ScanSnap
Check thumbnails and
organize files for various uses
What You Can Do with the ScanSnap Organizer
What You Can Do with the ScanSnap Organizer
ScanSnap Organizer is an application used for displaying, organizing, and managing image data
(PDF or JPEG files) scanned with the ScanSnap.
You can use this application to display image data (PDF or JPEG files) without opening them, create
folders and arrange files for various uses.
Pages of a PDF file can also be flipped through in thumbnails to verify the scanned image data.
l "Basic Operation Procedure of ScanSnap Organizer" (page 73)
l "Managing Files" (page 75)
l "Using Files" (page 77)
72
Page 73

What You Can Do with the ScanSnap Organizer
Basic Operation Procedure of ScanSnap Organizer
This section explains the basic operation procedure of ScanSnap Organizer.
1. Start up ScanSnap Organizer.
Start up ScanSnap Organizer by double-clicking the [ScanSnap Organizer] icon on the
desktop.
2. Scan documents with the ScanSnap.
a A list of scanned images is displayed in ScanSnap Organizer.
3. Start up ScanSnap Organizer Viewer.
Double-click a scanned image to start up the Viewer Window for displaying and editing
scanned images.
73
Page 74

What You Can Do with the ScanSnap Organizer
4. In the Viewer Window, check the orientation of scanned images, and check
for unnecessary pages.
Rotate any scanned images that are not oriented correctly. Delete any unnecessary pages.
Make other edits such as inserting a page where necessary.
5. Exit ScanSnap Organizer Viewer.
To exit ScanSnap Organizer Viewer, click the Application button and then click the [Exit] button
in the menu that appears.
74
Page 75

Proposal
If you set "proposal"
as a keyword,
you can recognize that
the file is the proposal file
without opening it.
Mark the characters
on a document
"Proposal" can be used as a keyword
to search for the file
Document PDF file with a keyword
Proposal
Proposal
Scan the document
with the ScanSnap
What You Can Do with the ScanSnap Organizer
Managing Files
For details about operations, refer to the ScanSnap Organizer Help.
Setting Keywords for a File
You can set a character string (keyword) indicating the content of a PDF file so that you can
immediately recognize the file without opening it.
Setting a Marked Character String as a Keyword
Keywords can be set to a PDF file by using the keyword setting function.
These keywords can be used when you search for PDF files.
When black and white documents that have been marked are scanned by the ScanSnap, the
marked character strings are set as keywords for the PDF file.
For other keyword setting methods, refer to ScanSnap Organizer Help.
Recognizing a Character String in a Page to Embed It into the Page
By using text recognition (OCR) software, you can embed character strings into the page of a PDF
file scanned by the ScanSnap, and then search the PDF file using the character strings.
75
Page 76

OCR recognizes "proposal"
as textual information.
PDF file
"Proposal" can be used
as a keyword
to search for the file
Proposal
Proposal
Proposal
PDF files with keywords Main Window
Statistical Table
Statistical Table
What You Can Do with the ScanSnap Organizer
Searching Files
You can search files that are managed in ScanSnap Organizer.
There are two search methods of Adobe Acrobat search and Windows Desktop Search.
Automatically Distributing Files According to Set Conditions
You can use the keyword distribution function so that PDF files are automatically distributed into
cabinets and folders according to the keywords that have been set.
76
Page 77

Document
Main Window
Scan the document
with the ScanSnap
What You Can Do with the ScanSnap Organizer
Using Files
For details about operations, refer to the ScanSnap Organizer Help.
Linking Files with Other Applications
You can use files with a variety of applications.
The applications that can be used are displayed in the Application List Pane at the lower left corner
of the Main Window.
Sending Files by E-mail
Files can be sent by e-mail.
Clipping Important Items from Documents
You can use the marked section cropping function to clip important items from documents.
Mark the necessary sections of a black & white document and scan it with the ScanSnap to create a
new PDF or JPEG file that contains only the marked section.
Using Files by Syncing with a Mobile Device
By using the ScanSnap Sync function, an image file scanned by the ScanSnap can be synced
automatically with a mobile device and can be used easily anytime or anywhere via a cloud service.
The files are organized and managed in the "ScanSnap Sync" folder in ScanSnap Organizer.
Syncing Files Made up of Images That Were Saved Together ("JPEG
(Save together)" Files)
Using the ScanSnap Sync function allows you to sync "JPEG (Save together)" files between a
mobile device and ScanSnap Organizer.
A "JPEG (Save together)" file consists of multiple images that are scanned with ScanSnap Connect
Application.
77
Page 78

Share the recognized data with PIM
(Example: Outlook)
Card
Scan
CardMinder window
Recognized data
What You Can Do with CardMinder
What You Can Do with CardMinder
CardMinder is an application used for displaying, organizing, and managing card image data
scanned with a scanner.
This application digitalizes large amounts of business cards into images at a high speed and
recognizes text on those cards, thus allowing you to search for your clients' business cards from
those data quickly, and create your client databases conveniently. CardMinder uses an Optical
Character Recognition (OCR) engine to recognize text on cards and shares the data with Personal
Information Manager (PIM) applications.
CardMinder contains two separate functions: CardMinder Viewer to enable business card data to be
quickly searched from other applications, and CardMinder Mobile Viewer to enable scanned
business card data to be viewed on a computer in which CardMinder is not installed.
l "Basic Operation Procedure of CardMinder" (page 80)
l "Linking Card Data with Other Applications" (page 83)
l "Searching Card Data with the Basic Search Toolbar" (page 84)
78
Page 79

l "Searching Card Data with CardMinder Viewer" (page 85)
l "Attaching a File to Card Data" (page 86)
What You Can Do with CardMinder
79
Page 80

Basic Operation Procedure of CardMinder
This section explains the basic operation procedure of CardMinder.
1. Start CardMinder.
Start up CardMinder by double-clicking the [CardMinder] icon on the desktop.
What You Can Do with CardMinder
Scan a card with the scanner.
2.
Click the [Scanner] button on the [Home] tab to start scanning a card.
When scanning is complete, the information printed on the card (such as name, company, and
address) is automatically recognized as text and displayed in the Edit Data pane.
The image data scanned from the card is displayed in the Card Image pane.
ATTENTION
ScanSnap Manager must be installed on your computer when you want to recognize the
following languages:
l Chinese (simplified)
l Chinese (traditional)
l Korean
3. Check the card data.
80
Page 81

Edit Data Pane
Card Image Pane
What You Can Do with CardMinder
Make sure that the front and back card images are correct, and that the text on the card
images are displayed correctly in the Edit Data pane.
4. If the language to be used for text recognition is different, perform text
recognition again in the following procedure:
1. Click
a The recognized languages are displayed.
2. Select a language for the character strings to be recognized.
a The icon for the [Recognize] button changes to the selected language.
3. Click the icon for the [Recognize] button.
Example: To recognize English, click .
a A confirmation message for the recognition process is displayed.
4. Click the [Yes] button.
a Character strings on the card data will be recognized as the selected language.
on the [Home] tab.
5. Correct the card data, if necessary.
The card data can be corrected in the following ways. For details, refer to the CardMinder
Help.
l Redoing the recognition process on the character strings in the selected areas
l Entering text directly in the Edit Data pane
l Correcting the orientation of the card image or switching the front and back images
81
Page 82

2
3
1
What You Can Do with CardMinder
No. Description
1 In the [Image Operation] tab, you can perform corrections, such as rotating the card image or switching
the front and back images.
2 By selecting character strings in the card image and then clicking the buttons of the appropriate fields in
the Edit Data pane, you can redo the recognition process on the selected areas.
3 You can directly correct the text of each field in the Edit Data pane.
6. Exit CardMinder.
To exit CardMinder, click the application button and then click the [Exit] button in the menu that
appears.
82
Page 83

12 3
4
What You Can Do with CardMinder
Linking Card Data with Other Applications
Click the following buttons on the [Home] tab to use card data in a variety of applications.
No. Item Description
1 E-mail You can start an e-mail program, using the e-mail address specified in [E-mail] for
the card data as the destination address.
2 Internet search You can search the URL specified in [Website] for the card data with a web browser.
3 Linking card data with
another application
4 Outputting card data in
a different format
You can link card data with another application such as Outlook or Salesforce CRM
to use the card data in the linked application. You can also link card data with USB
media to use the card data on a different computer.
You can output card data in the vCard, CSV, text, or ContactXML format.
For details, refer to CardMinder Help.
83
Page 84

Search cards (Basic Search Toolbar)
What You Can Do with CardMinder
Searching Card Data with the Basic Search Toolbar
This section explains how to search card data with the CardMinder Basic Search Toolbar.
To search card data, type in a search term (such as an individual name or a company name) in the
Basic Search Toolbar.
The search results are displayed in the main window.
If multiple cards match the search conditions, click
the main window.
to display the next result of the search in
84
Page 85

What You Can Do with CardMinder
Searching Card Data with CardMinder Viewer
This section explains how to search card data with CardMinder Viewer.
Even when CardMinder is not running, you can search card data by using a character string in
another application (such as Microsoft Notepad) as the keyword for searching.
1. Drag the mouse to select a character string you want to search for.
2. Press [Alt] + [F3] keys on the keyboard at the same time.
a CardMinder Viewer starts and the card data found, based on the search conditions entered
(such as an individual name and a company name), is displayed in the window.
If multiple cards match the search conditions, click
search in the CardMinder Viewer window.
HINT
Click to display in the CardMinder window the details of the card data selected in the CardMinder
Viewer window.
to display the next result of the
85
Page 86

Attaching a File to Card Data
A file can be attached to card data easily by dragging and dropping it.
What You Can Do with CardMinder
86
Page 87

Useful Usages
Useful Usages
This section explains how to use related software for the scanned image that is created after a
document is scanned with the ScanSnap and how to scan a document with a setting other than the
default setting.
l "Managing Paper Documents by Folder on a Computer" (page 88)
l "Saving Business Cards to a Computer" (page 91)
l "Scanning Documents Larger Than A4 or Letter Size (with the Carrier Sheet)" (page 94)
l "Scanning Documents Such as Photographs and Clippings" (page 99)
87
Page 88

Managing Paper Documents by Folder on a Computer
Managing Paper Documents by Folder on a Computer
This section explains how to digitize paper documents and manage the data by folder in ScanSnap
Organizer.
1. Scan a paper document with the ScanSnap.
For details about scanning a document, refer to "Scanning a Document" (page 19).
a The Quick Menu appears.
2. Click the [ScanSnap Organizer] icon in the Quick Menu.
a The [ScanSnap Organizer] window appears.
88
Page 89

Managing Paper Documents by Folder on a Computer
3. Click on the [Home] tab.
a A new cabinet is created in the folder list.
4. Rename the created cabinet.
HINT
To create multiple cabinets, repeat steps 3 to 4.
5. Select the scanned image from the file list, and drag and drop it to the
cabinet.
89
Page 90

Managing Paper Documents by Folder on a Computer
a The scanned image is moved to the cabinet.
HINT
ScanSnap Organizer has various functions for using saved files.
For details, refer to the ScanSnap Organizer Help.
90
Page 91

Saving Business Cards to a Computer
Saving Business Cards to a Computer
This section explains how to digitize business cards and save the card data in CardMinder.
ATTENTION
If you do not log on as a user with Administrator privileges, you may not be able to link the ScanSnap
with another application properly.
1. Scan business cards with the ScanSnap.
For details about scanning business cards, refer to the following.
l "Scanning a Document" (page 19)
l "Scanning Documents with the ScanSnap by Inserting Two Documents at a Time or by
Inserting the Next Document While the Current Document Is Being Scanned" (page 24)
a The Quick Menu appears.
2. Click the [Scan to CardMinder] icon in the Quick Menu.
a The [CardMinder] window appears.
91
Page 92

Edit Data Pane
Card Image Pane
Saving Business Cards to a Computer
3. Check the card data.
Make sure that the text on the card images are displayed correctly in the Edit Data pane.
If the card data must be corrected, click the text to be corrected and then directly edit it.
HINT
When you scan double-sided business cards, you must scan one side of each card and edit the card
data in CardMinder.
92
Page 93

For details, refer to the CardMinder Help.
Saving Business Cards to a Computer
93
Page 94

Scanning Documents Larger Than A4 or Letter Size (with the Carrier Sheet)
Scanning Documents Larger Than A4 or Letter Size
(with the Carrier Sheet)
Documents larger than A4/Letter size (such as A3, 11 × 17 in. and B4) can be scanned with the
optional Carrier Sheet. By folding the document in half and scanning both sides, one at a time, the
two sides are merged into a single image.
For details about documents that can be loaded, refer to "Documents That Can Be Scanned Using
the Carrier Sheet" (page 69).
ATTENTION
The [Deskew by text on document] checkbox in the [Scanning mode option] window will be disabled.
To open the [Scanning mode option] window, click the [Option] button in the [Scanning] tab of the
"ScanSnap Setup Window" (page 47).
HINT
Both sides of a double-sided A4/Letter size document or smaller can also be scanned and merged into
a single image.
1. Right-click the ScanSnap Manager icon in the notification area located
at the far right of the taskbar, and select the [Scan Button Settings] from the
"Right-Click Menu" (page 45).
a The ScanSnap setup window appears.
2. In the [Paper] tab, select [Automatic detection] in [Paper size], and then click
the [Carrier Sheet Settings] button.
a The [Carrier Sheet Settings] window appears.
3. Select [one double-page spread image] in [Save as] and click the [OK]
button.
For details, refer to the ScanSnap Manager Help.
94
Page 95

Scanning Documents Larger Than A4 or Letter Size (with the Carrier Sheet)
4. Click the [OK] button to close the ScanSnap setup window.
5. Place the document inside the Carrier Sheet.
1. Fold the document in half with the sides to be scanned facing out.
Fold it tightly and smooth out any creases.
2. Open the Carrier Sheet to bind the document.
Align the fold line with the right edge of the Carrier Sheet so that the document fits in the
upper right-hand corner of the Carrier Sheet.
95
Page 96

Output Guide
Scanning Documents Larger Than A4 or Letter Size (with the Carrier Sheet)
HINT
Note that the front side of the Carrier Sheet has a black and white pattern at the top and a
thick vertical line in the upper right-hand corner.
6. Insert the part with the black and white pattern straight into the feeding
section of the ScanSnap, with the front side of the Carrier Sheet facing up.
7. Press the [Scan/Stop] button on the ScanSnap to start scanning.
a The Carrier Sheet is pulled in until it is set inside the ScanSnap.
HINT
If you perform a scan using the Carrier Sheet with the output guide open, a paper jam may occur
and damage the documents. Make sure to close the output guide when you perform a scan using
the Carrier Sheet.
a Scanning starts and the [ScanSnap Manager - Image scanning and file saving] window
appears. When the front side of the Carrier Sheet is scanned, the scanned image is
displayed in the preview area.
96
Page 97

Scanning Documents Larger Than A4 or Letter Size (with the Carrier Sheet)
8. Turn over the Carrier Sheet and insert it as described in step 6.
ATTENTION
Make sure to scan the front and back side of the Carrier Sheet consecutively.
a Scanning starts automatically and the [ScanSnap Manager - Image scanning and file
saving] window appears. When scanning is completed, scanned images of the front and
back side of the document inside the Carrier Sheet are displayed as a double-page spread
image in the preview area.
HINT
Repeat steps 5 to 8 to scan more documents larger than A4/Letter size. You can continue to
scan documents that can be inserted directly in the ScanSnap.
For details about scanning a document, refer to "Scanning a Document" (page 19).
9. Press the [Scan/Stop] button on the ScanSnap to finish scanning.
a The scanned images of the front and back sides of the document are saved as a double-
page spread image.
97
Page 98

Scanning Documents Larger Than A4 or Letter Size (with the Carrier Sheet)
ATTENTION
l There may be a line or a gap appearing between the front and back side images. Also when you
scan a thick document in the Carrier Sheet, the scanned image on the left and the scanned image
on the right of a double-page spread image may skew towards each other from the top.
These symptoms may be improved when you place the document in the Carrier Sheet as follows:
- Fold the document properly
- Neatly align the edges of the document with the edges of the Carrier Sheet
- Turn over the Carrier Sheet to the other (reverse) side
l If [Automatic detection] is specified for [Paper size] in the [Carrier Sheet Settings] window, an
optimal size will be selected automatically from the available standard sizes (A3, B4, or 11 × 17 in.)
in [Paper size]. Note that the size of the image may become smaller than the original document
depending on the document.
Example:
To output the scanned image in its original size, specify the document size in [Paper size].
l Part of the scanned image around where the document is folded may appear missing. In that case,
place the document so that its edge is about 1 mm (0.04 in.) inside from the edge of the Carrier
Sheet.
When characters and illustrations are printed to fit in A4 size in the center of an A3
size document, the scanned image is output in B4 size.
98
Page 99

Scanning Documents Such as Photographs and Clippings
Scanning Documents Such as Photographs and
Clippings
Using the optional Carrier Sheet allows you to scan documents that can be damaged quite easily
such as photographs, or non-standard size documents that are difficult to load directly such as
clippings.
For details about documents that can be loaded, refer to "Documents That Can Be Scanned Using
the Carrier Sheet" (page 69).
ATTENTION
The [Deskew by text on document] checkbox in the [Scanning mode option] window will be disabled.
To open the [Scanning mode option] window, click the [Option] button in the [Scanning] tab of the
"ScanSnap Setup Window" (page 47).
1. Right-click the ScanSnap Manager icon in the notification area located
at the far right of the taskbar, and select the [Scan Button Settings] from the
"Right-Click Menu" (page 45).
a The ScanSnap setup window appears.
2. In the [Paper] tab, select [Automatic detection] in [Paper size], and then click
the [Carrier Sheet Settings] button.
a The [Carrier Sheet Settings] window appears.
3. Select [two separate images (front and back)] in [Save as] and click the [OK]
button.
For details, refer to the ScanSnap Manager Help.
99
Page 100

Scanning Documents Such as Photographs and Clippings
4. Click the [OK] button to close the ScanSnap setup window.
5. Place the document inside the Carrier Sheet.
Open the Carrier Sheet and place the top of the document against the top center of the Carrier
Sheet.
6. Insert the part with the black and white pattern straight into the feeding
section of the ScanSnap, with the scanning side of the document inside the
Carrier Sheet facing up.
100
 Loading...