

Page 1
SP25/SP30/SP30F
P3PC-4772-02ENZ0
TOP
Contents
Index
Introduction
Operator's Guide
Thank you for purchasing our Color Image Scanner ScanPartner.
This manual explains about the basic operations and handling of the scanner.
For details about scanner installation and connections, refer to the Quick Installation Sheet.
Explains the names and functions of parts
and basic scanner operation.
Explains how to load documents on the
scanner.
Explains how to use the Operator Panel.
Explains about various ways of scanning.
Explains how to clean the scanner.
Explains how to replace the consumables.
Explains about troubleshooting.
Scanner
Overview
How to Load
Documents
How to Use the
Operator Panel
Various Ways to
Scan
Daily Care
Replacing the
Consumables
Troubleshooting
Explains how to configure settings in the
Software Operation Panel.
How to Use This Manual
Operational
Settings
Appendix
Glossary
Page 2
How to Use This Manual
Jumps to the first page of each chapter.
This tab is on every page.
TOP: Jumps to the cover page.
Contents: Jumps to the contents
page.
Index: Jumps to the index page.
Jumps to this page.
Click a blue character string
to jump to the link.
Click on a title to jump to the link.
Click on a page number to jump to the link.
TOP
Contents
How to Use This Manual
The following shows the tips for using this manual.
z To display or print this manual, either Adobe® Acrobat® (7.0 or later)
®
or Adobe
z In this manual, you can use the Search tool of Adobe
Adobe
For details, refer to the Adobe
z Use the [Page Up] key to return to the previous page, and the [Page
Down] key to go to the next page.
z Click a blue character string, tab or contents/index title (where the mouse
cursor changes into a shape such as ) to jump to the link.
- Common for all pages
Reader® (7.0 or later) is required.
®
Reader®.
®
Acrobat® or Adobe® Reader® Help.
®
Acrobat® or
- Contents page
- Index page
Index
Introduction
Scanner
Overview
How to Load
Documents
How to Use the
Operator Panel
Various Ways to
Scan
Daily Care
Replacing the
Consumables
Troubleshooting
Operational
Settings
Appendix
Glossary
2
Page 3

Introduction
TOP
Contents
Introduction
Thank you for purchasing our Color Image Scanner
ScanPartner.
About This Product
"This product" refers to the Color Image Scanner ScanPartner.
Each scanner is equipped with an Automatic Document
Feeder (ADF) that allows duplex (double-sided) scanning, and
supports USB interfaces.
The following table shows the differences between each
model.
Model Scanner type Scanning speed (*2)
ADF Flatbed (*1)
ScanPartner SP25 Yes - 25 ppm/50 ipm
ScanPartner SP30 Yes - 30 ppm/60 ipm
ScanPartner SP30F Yes Yes 30 ppm/60 ipm
Yes: Available
- : Not available
*1 : Flatbed allows you to scan thin paper and thick documents such as a
book.
*2 : When scanning A4 size documents at 300 dpi with JPEG
compression.
Manuals
The following manuals are included for this product. Read
them as needed.
Manual Description
Safety Precautions
(paper, PDF)
Quick Installation Sheet Explains how to install and configure the
Operator's Guide
(this manual) (PDF)
Error Recovery Guide
(HTML Help)
Help (scanner driver) Explains how to use and configure the
Contains important information about the
safe use of this product.
Make sure to read this manual before
using the scanner. The PDF version is
included in the Setup DVD-ROM.
scanner.
Provides detailed information on how to
operate and maintain the scanner daily,
how to replace the consumables, and how
to troubleshoot problems. Included in the
Setup DVD-ROM.
Details the status of the scanner and
explains how to resolve problems
encountered.
Contains movies that explain how to clean
and replace the consumables. Included in
the Setup DVD-ROM.
settings for the scanner drivers.
Can be referenced from each scanner
driver.
Index
Introduction
Scanner
Overview
How to Load
Documents
How to Use the
Operator Panel
Various Ways to
Scan
Daily Care
Replacing the
Consumables
Troubleshooting
Operational
Settings
Help (application) Explains how to use and configure the
settings for the application software. Can
be referenced from each application.
Appendix
Glossary
3
Page 4

Introduction
Trademarks
Microsoft, Windows, Windows Server, Windows Vista, and
Excel are either registered trademarks or trademarks of
Microsoft Corporation in the United States and/or other
countries.
Word is the product of Microsoft Corporation in the United
States.
Adobe, the Adobe logo, Acrobat, and Reader are either
registered trademarks or trade names of Adobe Systems
Incorporated in the United States and/or other countries.
Intel, Pentium, and Intel Core are registered trademarks or
trademarks of Intel Corporation in the United States and other
countries.
ABBYY™ FineReader™ 9.0 Sprint
© 2013 ABBYY, All rights reserved.
ABBYY and FineReader are trademarks of ABBYY Software,
Ltd. which may be registered in some jurisdictions.
Manufacturer
PFU LIMITED
Solid Square East Tower, 580 Horikawa-cho, Saiwai-ku,
Kawasaki, Kanagawa 212-8563, JAPAN.
Phone: (81-44) 540-4668
© PFU LIMITED 2014
TOP
Contents
Index
Introduction
Scanner
Overview
How to Load
Documents
How to Use the
Operator Panel
Various Ways to
Scan
Daily Care
Presto!™ PageManager™ 9
© 2002-2013, NewSoft Technology Corp. All Rights Reserved.
NewSoft, Presto! and PageManager are either registered
trademarks or trademarks of NewSoft Technology Corp.
ScanSnap and PaperStream are registered trademarks of
PFU LIMITED in Japan.
Other company names and product names are the registered
trademarks or trademarks of the respective companies.
Replacing the
Consumables
Troubleshooting
Operational
Settings
Appendix
Glossary
4
Page 5

Introduction
Contact for Inquiries
Refer to the contact list on the last page of the Safety
Precautions manual.
For ABBYY FineReader Sprint, refer to the following web
page:
http://www.abbyy.com
For Presto! PageManager, refer to the following web page:
http://www.newsoftinc.com/support/index.php
http://uk.newsoft.eu.com/support/index.php
TOP
Contents
Index
Introduction
Scanner
Overview
How to Load
Documents
How to Use the
Operator Panel
For other inquiries regarding the scanner, refer to the following
web page:
http://imagescanner.fujitsu.com/scanpartner.html
If the solution to your problem cannot be found on the above
web page, refer to the contact information for your Fujitsu
office on the following web page:
http://imagescanner.fujitsu.com/warranty.html
Contact for Purchasing Consumables or Cleaning
Materials
http://www.fujitsu.com/global/shop/computing/
IMAGE_index.html
Various Ways to
Scan
Daily Care
Replacing the
Consumables
Troubleshooting
Operational
Settings
Appendix
Glossary
5
Page 6
Conventions
TOP
Contents
Conventions
Safety Information
The attached "Safety Precautions" manual contains important
information about the safe and correct use of this product.
Make sure that you read and understand it before using the
scanner.
Symbols Used in This Manual
The following indications are used in this manual to obviate
any chance of accident or damage to you, people near you,
and your property. Warning labels consist of a symbol
indicating the severity and a warning statement. The symbols
and their meanings are as follows.
This indication alerts operators to an operation
that, if not strictly observed, may result in severe
injury or death.
This indication alerts operators to an operation
that, if not strictly observed, may result in safety
hazards to personnel or damage to the product.
Abbreviations Used in This Manual
The operating systems and products in this manual are
indicated as follows.
Name Indication
Windows
Windows
Windows
Windows Vista
Windows Vista
Windows Vista
Windows Vista
Windows Vista
Windows Server
Windows Server
Windows
Windows
®
XP Home Edition
®
XP Professional
®
XP Professional x64 Edition
®
7 Home Premium (32-bit/64-bit)
®
7 Professional (32-bit/64-bit)
®
Home Basic (32-bit/64-bit)
®
Home Premium (32-bit/64-bit)
®
Business (32-bit/64-bit)
®
Enterprise (32-bit/64-bit)
®
Ultimate (32-bit/64-bit)
®
2008 Standard (32-bit/64-bit)
®
2008 R2 Standard (64-bit)
Windows XP
(*1)
Windows
Vista (*1)
Windows
Server 2008
(*1)
Windows 7
(*1)
Index
Introduction
Scanner
Overview
How to Load
Documents
How to Use the
Operator Panel
Various Ways to
Scan
Daily Care
Replacing the
Consumables
Troubleshooting
Operational
Settings
Windows
Windows
®
7 Enterprise (32-bit/64-bit)
®
7 Ultimate (32-bit/64-bit)
Appendix
Glossary
6
Page 7

Conventions
Name Indication
Windows Server® 2012 Standard (64-bit)
Windows Server
Windows
Windows
Windows
Windows
Windows
®
®
®
®
®
®
2012 R2 Standard (64-bit)
8 (32-bit/64-bit)
8 Pro (32-bit/64-bit)
8 Enterprise (32-bit/64-bit)
8.1 (32-bit/64-bit)
8.1 Pro (32-bit/64-bit)
Windows
Server 2012
(*1)
Windows
Server 2012
R2 (*1)
Windows 8
(*1)
Windows 8.1
(*1)
Name Indication
PaperStream IP (TWAIN) for ScanPartner PaperStream
IP driver
PaperStream IP (TWAIN x64) for ScanPartner
PaperStream IP (ISIS) for ScanPartner
*1: Where there is no distinction between the different versions of the
above operating system, the general term "Windows" is used.
*2: This is optional. For details, refer to "A.4 Scanner Options" (page 151).
Arrow Symbols in This Manual
Right-arrow symbols (J) are used to separate icons or menu
options you should select in succession.
Example: Click [Start] menu J [Control Panel].
TOP
Contents
Index
Introduction
Scanner
Overview
How to Load
Documents
How to Use the
Operator Panel
Various Ways to
Scan
Windows
Microsoft
Microsoft
Microsoft
Microsoft
Presto!™ PageManager™ 9
ABBYY
ScanSnap Carrier Sheet (*2) Carrier Sheet
®
8.1 Enterprise (32-bit/64-bit)
®
Word
®
Office Word
®
®
™
FineReader™ 9.0 Sprint
®
Excel
Office Excel
®
Word
Excel
Presto!
PageManager
ABBYY
FineReader
Sprint
Daily Care
Replacing the
Consumables
Troubleshooting
Operational
Settings
Appendix
Glossary
7
Page 8

Conventions
Screen Examples in This Manual
Microsoft product screenshots are reprinted with permission
from Microsoft Corporation.
The screen examples in this manual are subject to change
without notice in the interest of product improvement.
If the actual displayed screen differs from the screen
examples in this manual, operate by following the actual
displayed screen while referring to the user's manual of the
scanner application that you are using.
The screen examples used in this manual are of the
PaperStream IP driver.
The screenshots used in this manual are of Windows 7. The
actual windows and operations may differ depending on the
operating system. Also, note that with some scanner models,
the screens and operations may differ from this manual when
you update the PaperStream IP driver. In that case, refer to
the manual provided upon updating the driver.
TOP
Contents
Index
Introduction
Scanner
Overview
How to Load
Documents
How to Use the
Operator Panel
Various Ways to
Scan
Daily Care
Replacing the
Consumables
Troubleshooting
Operational
Settings
Appendix
Glossary
8
Page 9

Contents
TOP
Contents
Contents
How to Use This Manual ................................................................................................................................... 2
Introduction ........................................................................................................................................................ 3
Conventions ....................................................................................................................................................... 6
Chapter 1 Scanner Overview ........................................................................................................................ 15
1.1 Main Features .............................................................................................................................................................. 16
1.2 Parts and Functions .................................................................................................................................................... 17
ScanPartner SP25/ScanPartner SP30........................................................................................................................... 17
ScanPartner SP30F ....................................................................................................................................................... 20
1.3 Turning the Power ON/OFF ........................................................................................................................................ 24
How to Turn the Power ON ............................................................................................................................................ 24
How to Turn the Power OFF .......................................................................................................................................... 24
1.4 Opening/Closing the ADF ........................................................................................................................................... 25
How to Open the ADF .................................................................................................................................................... 25
How to Close the ADF.................................................................................................................................................... 25
Index
Introduction
Scanner
Overview
How to Load
Documents
How to Use the
Operator Panel
Various Ways to
Scan
Daily Care
Replacing the
Consumables
1.5 Opening/Closing the Document Cover (ScanPartner SP30F) ................................................................................. 26
How to Open the Document Cover ................................................................................................................................ 26
How to Close the Document Cover ................................................................................................................................ 26
1.6 Setting Up the ADF Paper Chute (feeder) ................................................................................................................. 27
1.7 Setting Up the Stacker ................................................................................................................................................ 28
ScanPartner SP25/ScanPartner SP30........................................................................................................................... 28
ScanPartner SP30F ....................................................................................................................................................... 30
1.8 Power Saving Mode .................................................................................................................................................... 32
1.9 Basic Flow of Scanning Operation ............................................................................................................................ 33
Troubleshooting
Operational
Settings
Appendix
Glossary
9
Page 10

Contents
1.10 Bundled Software ........................................................................................................................................................ 35
Bundled Software Overview ........................................................................................................................................... 35
System Requirements .................................................................................................................................................... 36
TOP
Contents
Index
Introduction
How to Install the Bundled Software .............................................................................................................................. 37
Chapter 2 How to Load Documents ............................................................................................................. 38
2.1 Loading Documents in the ADF ................................................................................................................................. 39
Preparation..................................................................................................................................................................... 39
How to Load Documents ................................................................................................................................................ 40
2.2 Loading Documents on the Flatbed (ScanPartner SP30F) ...................................................................................... 41
2.3 Documents for Scanning ............................................................................................................................................ 42
Paper Size...................................................................................................................................................................... 42
Conditions ...................................................................................................................................................................... 42
Loading Capacity............................................................................................................................................................ 45
Area Not to be Perforated .............................................................................................................................................. 46
Conditions for Multifeed Detection ................................................................................................................................. 46
Conditions for Mixed Batch Scanning ............................................................................................................................ 48
Conditions for Automatic Page Size Detection............................................................................................................... 50
Conditions for Using the Carrier Sheet........................................................................................................................... 51
Chapter 3 How to Use the Operator Panel ..................................................................................................52
3.1 Operator Panel ............................................................................................................................................................. 53
Scanner
Overview
How to Load
Documents
How to Use the
Operator Panel
Various Ways to
Scan
Daily Care
Replacing the
Consumables
Troubleshooting
Names and Functions .................................................................................................................................................... 53
Signals on the indicator .................................................................................................................................................. 54
Chapter 4 Various Ways to Scan ................................................................................................................. 55
4.1 Summary ...................................................................................................................................................................... 56
4.2 Scanning Documents of Different Types and Sizes ................................................................................................ 57
Documents with Different Widths ................................................................................................................................... 57
Documents Larger than A4/Letter Size .......................................................................................................................... 58
Operational
Settings
Appendix
Glossary
10
Page 11

Contents
Scanning Photographs and Clippings ............................................................................................................................ 60
Long Page Scanning ...................................................................................................................................................... 62
Scanning a Book (ScanPartner SP30F)......................................................................................................................... 63
TOP
Contents
Index
Introduction
Scanning a Large Document on the Flatbed (ScanPartner SP30F) .............................................................................. 65
4.3 Advanced Scanning .................................................................................................................................................... 67
Feeding Documents Manually in the ADF...................................................................................................................... 67
4.4 Customizing the Scanner Settings ............................................................................................................................ 68
Using a Button on the Scanner to Start Scanning.......................................................................................................... 68
Chapter 5 Daily Care ..................................................................................................................................... 70
5.1 Cleaning Materials and Locations that Require Cleaning ....................................................................................... 71
Cleaning Materials.......................................................................................................................................................... 71
Location and Frequency................................................................................................................................................. 72
5.2 Cleaning the Outside .................................................................................................................................................. 73
For ScanPartner SP25/ScanPartner SP30 .................................................................................................................... 73
For ScanPartner SP30F ................................................................................................................................................. 73
5.3 Cleaning the Inside ..................................................................................................................................................... 74
Cleaning the ADF (with Cleaning Paper) ....................................................................................................................... 74
Cleaning the ADF (with cloth)......................................................................................................................................... 75
Cleaning the Flatbed (ScanPartner SP30F)................................................................................................................... 78
5.4 Cleaning the Carrier Sheet ......................................................................................................................................... 79
Scanner
Overview
How to Load
Documents
How to Use the
Operator Panel
Various Ways to
Scan
Daily Care
Replacing the
Consumables
Troubleshooting
Chapter 6 Replacing the Consumables ....................................................................................................... 80
6.1 Consumables and Replacement Cycles ................................................................................................................... 81
6.2 Replacing the Brake Roller ......................................................................................................................................... 82
6.3 Replacing the Pick Roller ........................................................................................................................................... 84
Operational
Settings
Appendix
Glossary
11
Page 12

Contents
Chapter 7 Troubleshooting ........................................................................................................................... 87
7.1 Paper Jam .................................................................................................................................................................... 88
7.2 Error Indications on Operator Panel ......................................................................................................................... 90
TOP
Contents
Index
Introduction
Temporary Errors ........................................................................................................................................................... 91
Device Errors.................................................................................................................................................................. 92
7.3 Troubleshooting .......................................................................................................................................................... 94
Scanner cannot be powered ON. ................................................................................................................................... 95
Scanning does not start.................................................................................................................................................. 96
Image quality is poor when scanning pictures/photos in black & white.......................................................................... 97
Quality of scanned text or lines is unsatisfactory. .......................................................................................................... 98
Images are distorted or not clear.................................................................................................................................... 99
Vertical streaks appear on the scanned image. ........................................................................................................... 100
When the scanner is turned on, the Check indicator on the operator panel turns on or flashes.................................. 101
Multifeed error occurs frequently.................................................................................................................................. 102
Situation in which the document is not fed into the ADF occurs frequently.................................................................. 104
Paper jams/pick errors occur frequently....................................................................................................................... 105
Scanned images turn out elongated............................................................................................................................. 106
A shadow appears at the top or the bottom of the scanned image. ............................................................................. 107
There are black traces on the document...................................................................................................................... 108
The Carrier Sheet is not fed smoothly. / Paper jams occur. ......................................................................................... 109
Part of the image appears missing when using the Carrier Sheet. .............................................................................. 111
Scanner
Overview
How to Load
Documents
How to Use the
Operator Panel
Various Ways to
Scan
Daily Care
Replacing the
Consumables
Troubleshooting
7.4 Before You Contact the Scanner Service Provider ................................................................................................ 112
General......................................................................................................................................................................... 112
Error Status .................................................................................................................................................................. 113
7.5 Checking the Product Labels ................................................................................................................................... 114
Location........................................................................................................................................................................ 114
Operational
Settings
Appendix
Glossary
12
Page 13

Contents
Chapter 8 Operational Settings .................................................................................................................. 115
8.1 Starting Up the Software Operation Panel .............................................................................................................. 116
8.2 Password Setting ...................................................................................................................................................... 118
TOP
Contents
Index
Introduction
Setting a Password ...................................................................................................................................................... 118
Setting [View Only mode] ............................................................................................................................................. 119
Clearing [View Only mode]........................................................................................................................................... 120
Changing the Password ............................................................................................................................................... 121
Clearing the Password ................................................................................................................................................. 122
Resetting the Password ............................................................................................................................................... 123
8.3 Configuration Items .................................................................................................................................................. 124
Device Setting .............................................................................................................................................................. 124
Device Setting 2 ........................................................................................................................................................... 126
8.4 Settings Related to Sheet Counters ........................................................................................................................ 129
Checking and Resetting the Sheet Counters ............................................................................................................... 129
Replacement Cycle of Consumables [Life Counter Alarm Setting] .............................................................................. 131
8.5 Settings Related to Scanning ................................................................................................................................... 132
Adjusting the Position to Start the Scan [Offset/Vertical magnification Adjustment] .................................................... 132
Removing Shadows/Streaks that Appear around the Scanned Image
[Page Edge Filler (ADF)]/[Page Edge Filler (FB)] (ScanPartner SP30F).................................................................. 133
Removing a Color from the Scanned Image [Dropout color]........................................................................................ 135
Shortening the Scanning Intervals [Pre-Pick]............................................................................................................... 136
Scanner
Overview
How to Load
Documents
How to Use the
Operator Panel
Various Ways to
Scan
Daily Care
Replacing the
Consumables
Troubleshooting
Number of Paper Feeding Retries................................................................................................................................ 137
Scanning at High Altitude [High Altitude Mode]............................................................................................................ 137
8.6 Settings Related to Multifeed Detection .................................................................................................................. 138
Specifying a Multifeed Detection Method [Multifeed] ................................................................................................... 138
Specifying the Area to Detect Multifeed [Document check area specification for Multifeed Detection]........................ 140
8.7 Settings Related to Waiting Time ............................................................................................................................ 143
Waiting Time in Manual Feed Mode [Manual-feed timeout]......................................................................................... 143
Operational
Settings
Appendix
Glossary
13
Page 14

Contents
Waiting Time to Enter Power Saving Mode [Power saving] ......................................................................................... 144
8.8 Settings Related to Power ON/OFF ......................................................................................................................... 145
Method of Turning the Scanner ON/OFF [Power SW Control]..................................................................................... 145
TOP
Contents
Index
Introduction
Appendix ..................................................................................................................................................... 146
A.1 Basic Specification ................................................................................................................................................... 147
A.2 Installation Specifications ........................................................................................................................................ 149
A.3 Outer Dimensions ..................................................................................................................................................... 150
ScanPartner SP25/ScanPartner SP30......................................................................................................................... 150
ScanPartner SP30F ..................................................................................................................................................... 150
A.4 Scanner Options ........................................................................................................................................................ 151
A.5 Uninstalling the Software ......................................................................................................................................... 152
Glossary ....................................................................................................................................................... 153
Index ............................................................................................................................................................. 162
Scanner
Overview
How to Load
Documents
How to Use the
Operator Panel
Various Ways to
Scan
Daily Care
Replacing the
Consumables
Troubleshooting
Operational
Settings
Appendix
Glossary
14
Page 15

TOP
Contents
Index
Chapter 1 Scanner Overview
This chapter explains about the names and functions of the scanner components, as well as the methods for basic
operations.
1.1 Main Features.............................................................................................................................................16
1.2 Parts and Functions....................................................................................................................................17
1.3 Turning the Power ON/OFF........................................................................................................................24
1.4 Opening/Closing the ADF...........................................................................................................................25
1.5 Opening/Closing the Document Cover (ScanPartner SP30F)....................................................................26
1.6 Setting Up the ADF Paper Chute (feeder)..................................................................................................27
1.7 Setting Up the Stacker................................................................................................................................28
1.8 Power Saving Mode ...................................................................................................................................32
1.9 Basic Flow of Scanning Operation .............................................................................................................33
Introduction
Scanner
Overview
How to Load
Documents
How to Use the
Operator Panel
Various Ways to
Scan
Daily Care
Replacing the
Consumables
1.10 Bundled Software .....................................................................................................................................35
Troubleshooting
Operational
Settings
Appendix
Glossary
Page 16

Chapter 1 Scanner Overview
TOP
Contents
1.1 Main Features
This section explains about the main features of this product.
The scanner is equipped with the following features:
High speed scanning
Realizes a scanning speed of 25 ppm/50 ipm [ScanPartner SP25] (*1),
or 30 ppm/60 ipm [ScanPartner SP30/ScanPartner SP30F] (*1).
Furthermore, you can load up to 50 sheets of documents for continuous
scanning which allows you to quickly digitize a large volume of
documents.
Improved efficiency for pre-scan work
The scanner can perform "batch scanning" which allows you to scan
documents with different paper weights and sizes at once, simplifying
the process of sorting the documents before scanning.
Reduced work loss caused by multifeeds
The scanner mounts an ultrasonic multifeed sensor that accurately
detects "multifeed" errors where two or more sheets are fed through the
scanner at once. This multifeed detection is reliable even when
scanning a mixed batch of documents with different paper weights and
sizes, avoiding potential work loss.
Capable of scanning photographs, clippings, and
documents larger than A4/Letter size
The "Carrier Sheet" is optional, which allows you to scan documents
that are larger than A4/Letter size, as well as non-standard size
documents such as photographs and clippings. You can load multiple
Carrier Sheets or mix it with regular documents in the same batch.
*1: When scanning A4 size documents at 300 dpi.
Index
Introduction
Scanner
Overview
How to Load
Documents
How to Use the
Operator Panel
Various Ways to
Scan
Daily Care
Replacing the
Consumables
Troubleshooting
Operational
Settings
Appendix
Glossary
16
Page 17
Chapter 1 Scanner Overview
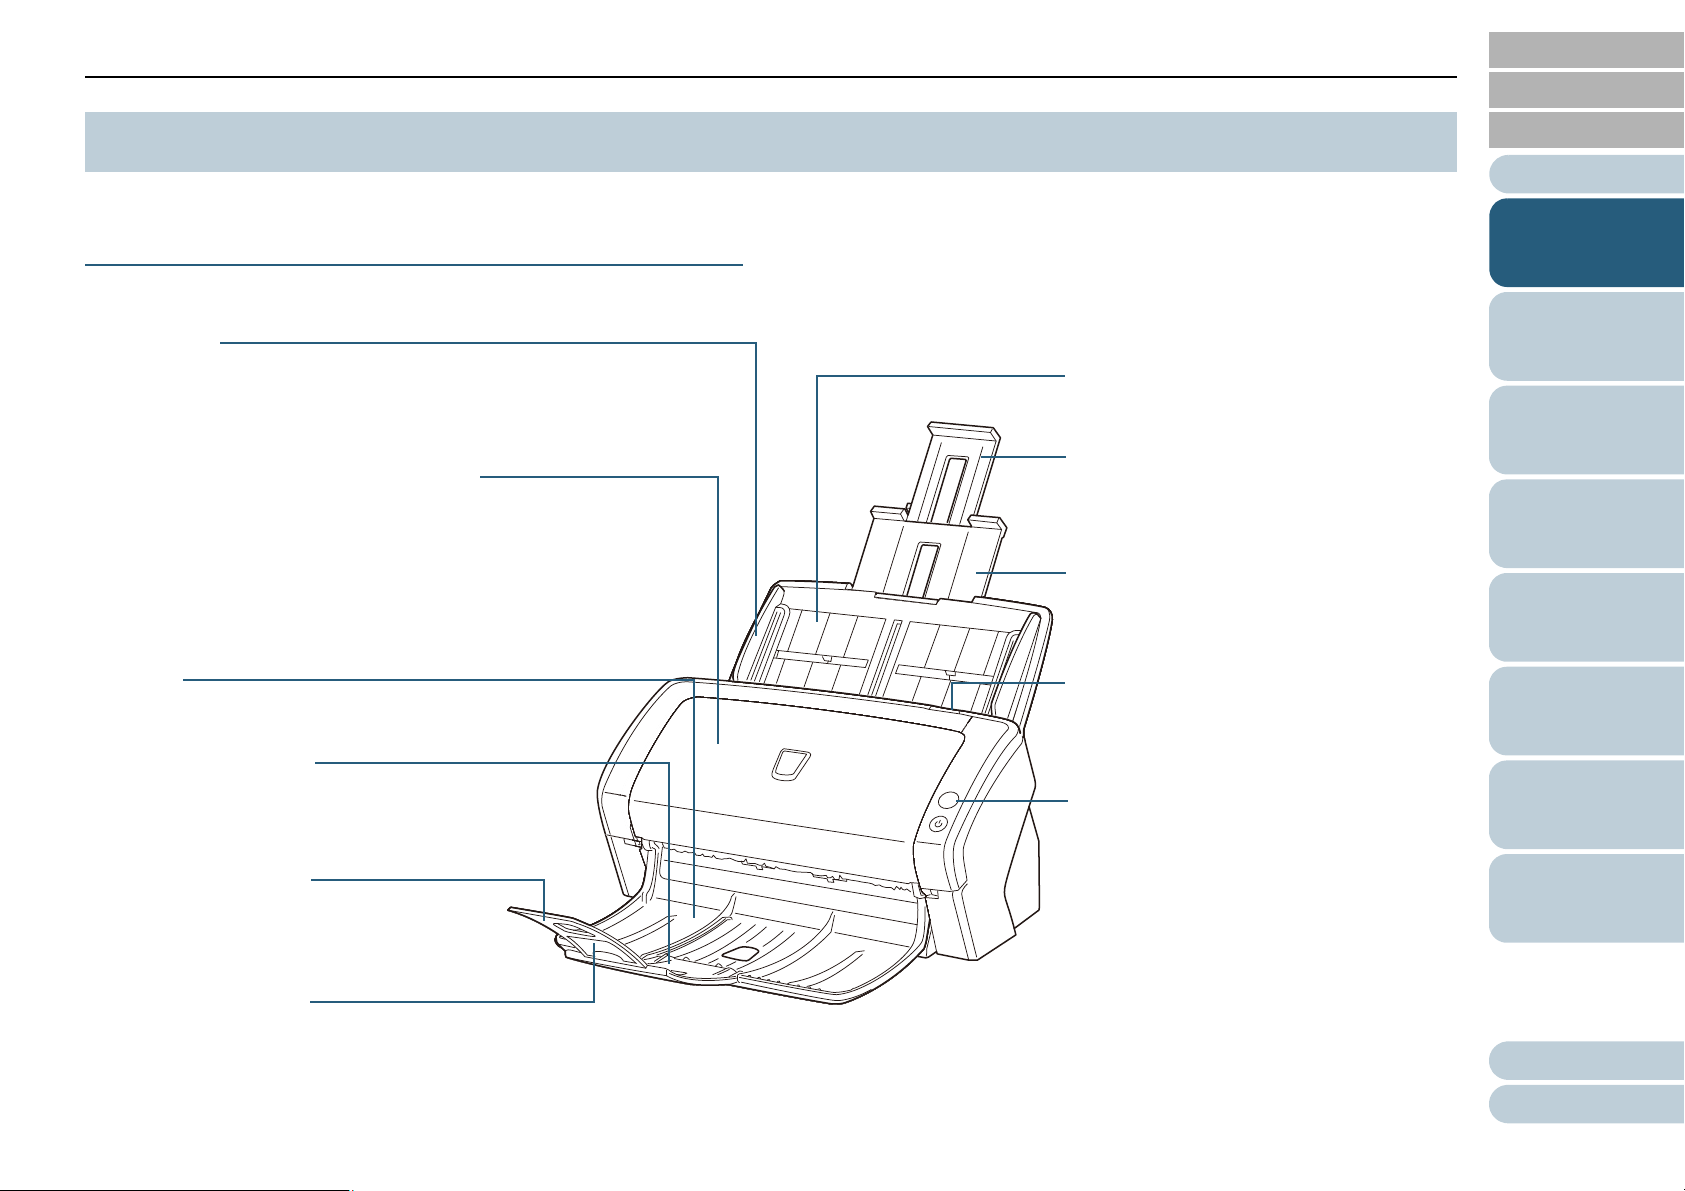
Stacker
Stacks up the ejected documents.
Operator panel
Consists of buttons and indicators (LED).
Can be used to operate the scanner or
check the status.
For details, refer to "Chapter 3 How to Use
the Operator Panel" (page 52).
ADF (Automatic Document Feeder)
Pulls and feeds the documents one sheet at
a time from the ADF paper chute (feeder).
Open to replace consumables or clean the
inside of the scanner.
Side guide
Guides the documents in the width
direction as they are fed into the scanner.
Chute extension 2
Pull out to adjust to the document length.
ADF paper chute (feeder)
Holds the documents to be scanned.
ADF release tab
Pull this tab to open the ADF.
Stacker extension 2
Lift up to adjust to the document length.
Chute extension 1
Pull out to adjust to the document length.
Stacker extension 1
Slide out to adjust to the document length.
Stacker extension 3
Lift up to adjust to the document length.
TOP
Contents
1.2 Parts and Functions
This section shows the names of the scanner parts.
ScanPartner SP25/ScanPartner SP30
■Front
Index
Introduction
Scanner
Overview
How to Load
Documents
How to Use the
Operator Panel
Various Ways to
Scan
Daily Care
Replacing the
Consumables
Troubleshooting
Operational
Settings
Appendix
Glossary
17
Page 18
Chapter 1 Scanner Overview
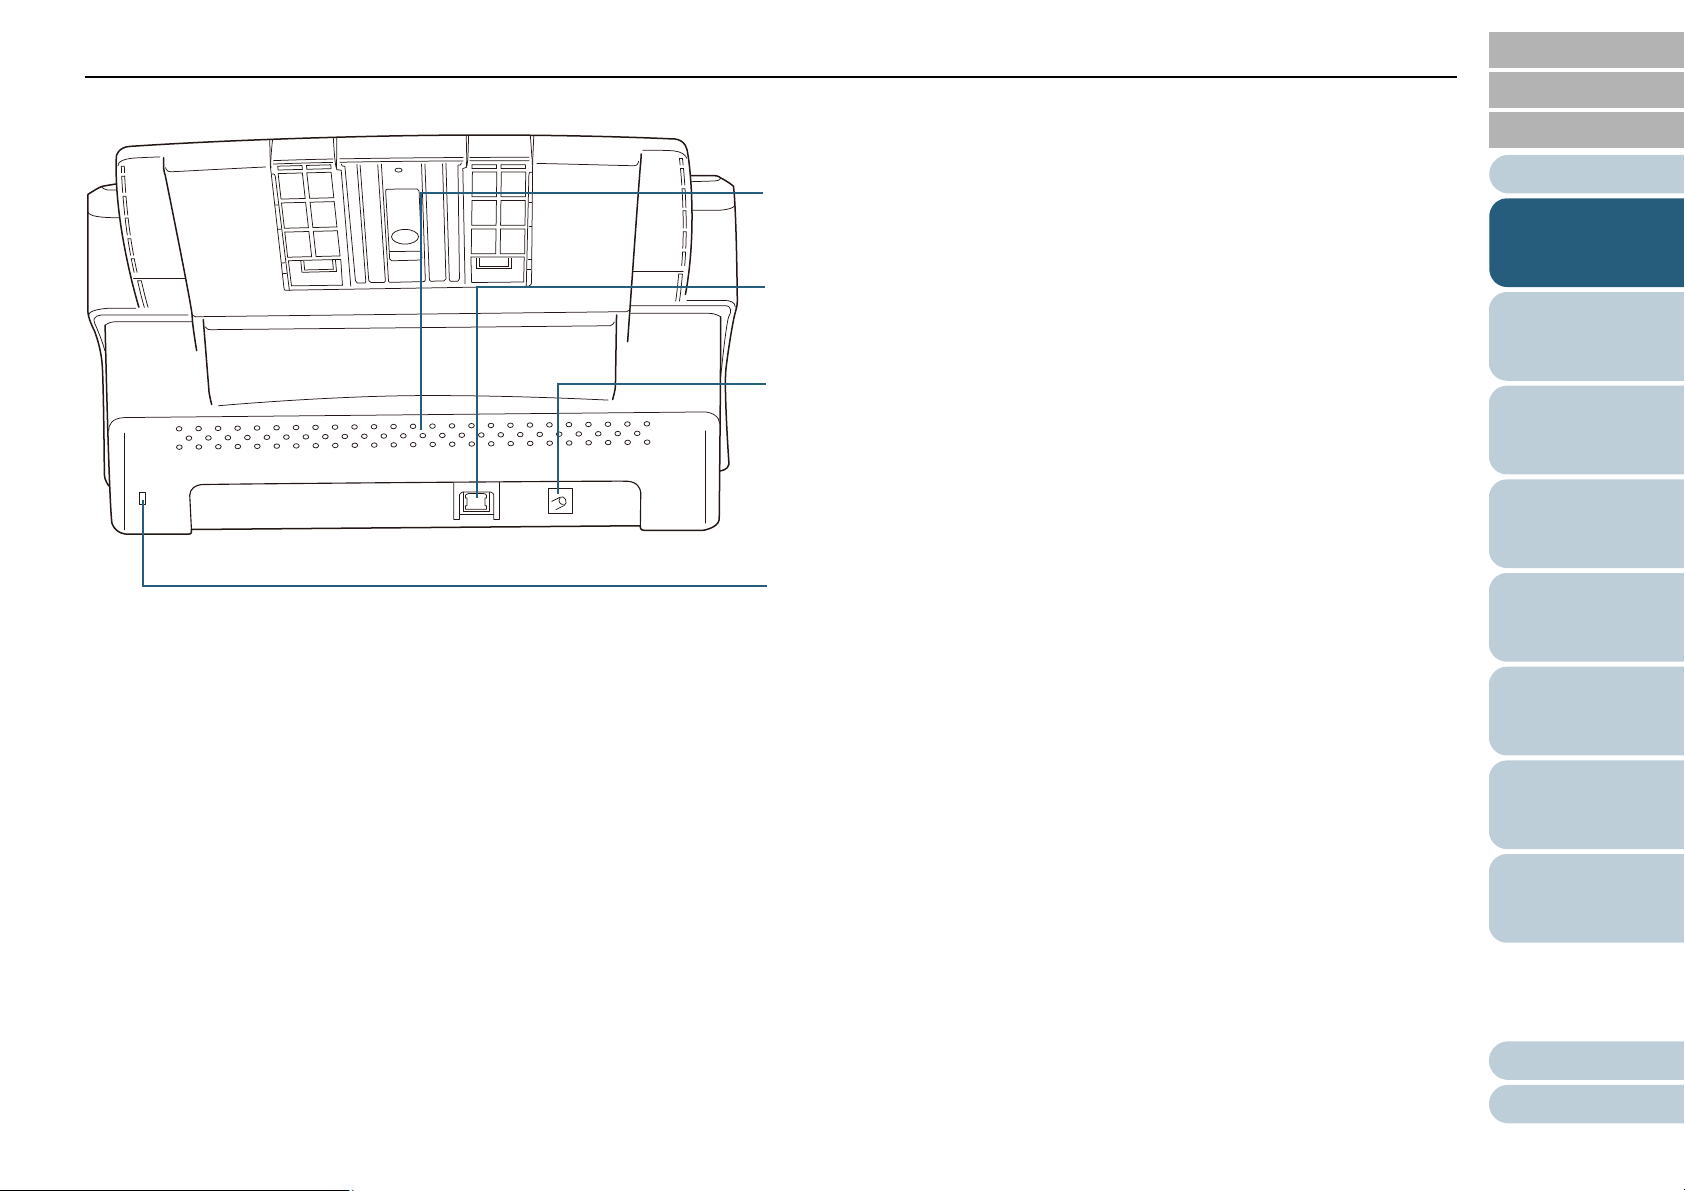
USB connector
Used to connect a USB cable.
Security cable slot
Used to connect an anti-theft security cable (commercially available).
Ventilation port
Holes for ventilating hot air from inside the scanner.
Power connector
Used to connect the power cable.
"Power cable" refers to the AC cable and AC adaptor connected together.
■Back
TOP
Contents
Index
Introduction
Scanner
Overview
How to Load
Documents
How to Use the
Operator Panel
Various Ways to
Scan
Daily Care
Replacing the
Consumables
Troubleshooting
Operational
Settings
Appendix
Glossary
18
Page 19
Chapter 1 Scanner Overview
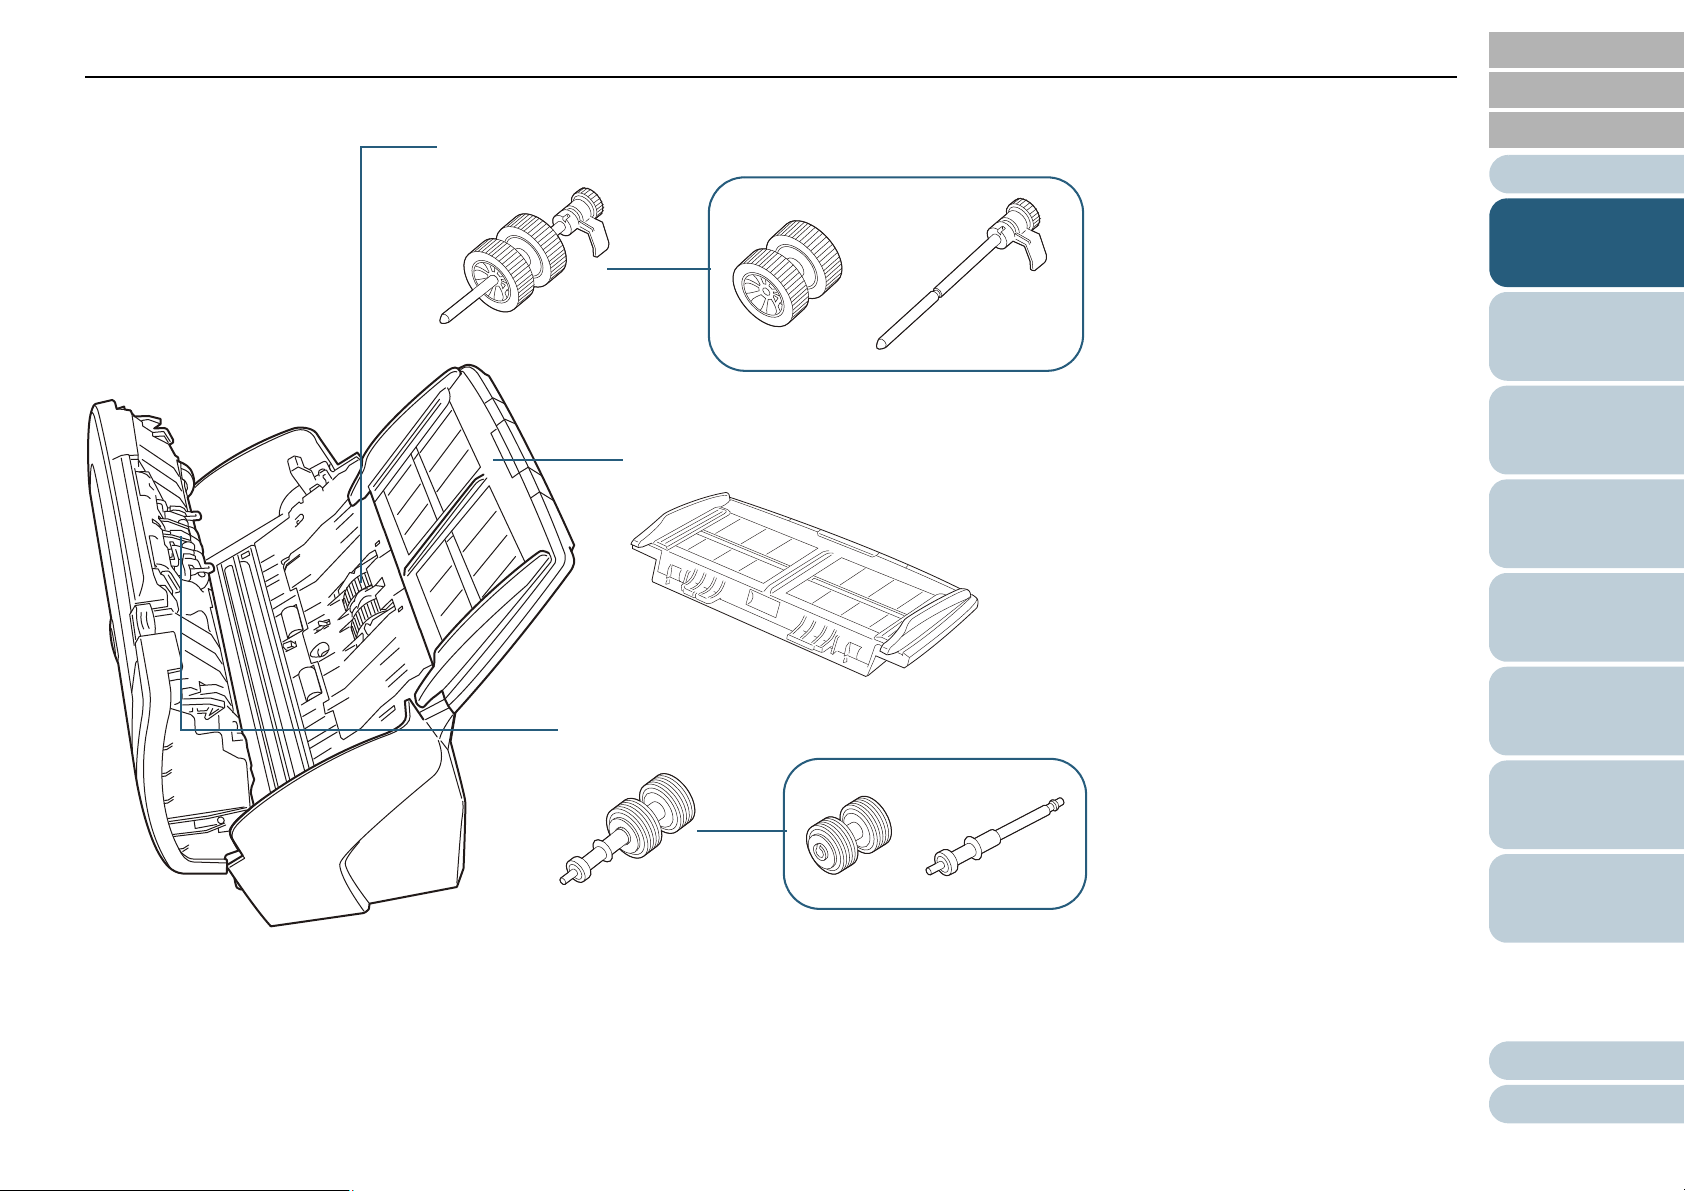
Pick roller
ADF paper chute (feeder)
Brake roller
■Removable Parts
TOP
Contents
Index
Introduction
Scanner
Overview
How to Load
Documents
How to Use the
Operator Panel
Various Ways to
Scan
Daily Care
Replacing the
Consumables
Troubleshooting
Operational
Settings
Appendix
Glossary
19
Page 20

Chapter 1 Scanner Overview
Stacker
Stacks up the ejected documents.
Operator panel
Consists of buttons and indicators.
Can be used to operate the scanner or
check the status.
For details, refer to "Chapter 3 How to Use
the Operator Panel" (page 52).
ADF (Automatic Document Feeder)
Pulls and feeds the documents one sheet at
a time from the ADF paper chute (feeder).
Open to replace consumables or clean the
inside of the scanner.
Side guide
Guides the documents in the width direction
as they are fed into the scanner.
Chute extension 2
Pull out to adjust to the document length.
ADF paper chute (feeder)
Holds the documents to be scanned.
ADF release tab
Pull this tab to open the ADF.
Flatbed
For scanning documents (e.g. thin paper,
books) that cannot be scanned with the
ADF.
Chute extension 1
Pull out to adjust to the document length.
Stacker extension
Lift up to adjust to the document length.
Transport lock switch
Locks the carrier unit (which is inside the
flatbed) to prevent damage during
transportation.
ScanPartner SP30F
TOP
Contents
Index
■Front
Introduction
Scanner
Overview
How to Load
Documents
How to Use the
Operator Panel
Various Ways to
Scan
Daily Care
Replacing the
Consumables
Troubleshooting
Operational
Settings
Appendix
Glossary
20
Page 21

Chapter 1 Scanner Overview
Document bed
Place a document on the glass section.
Document pad
Holds the document down against the document bed.
Document cover
Close it to hold the document in place.
■Inside
TOP
Contents
Index
Introduction
Scanner
Overview
How to Load
Documents
How to Use the
Operator Panel
Various Ways to
Scan
Daily Care
Replacing the
Consumables
Troubleshooting
Operational
Settings
Appendix
Glossary
21
Page 22
Chapter 1 Scanner Overview
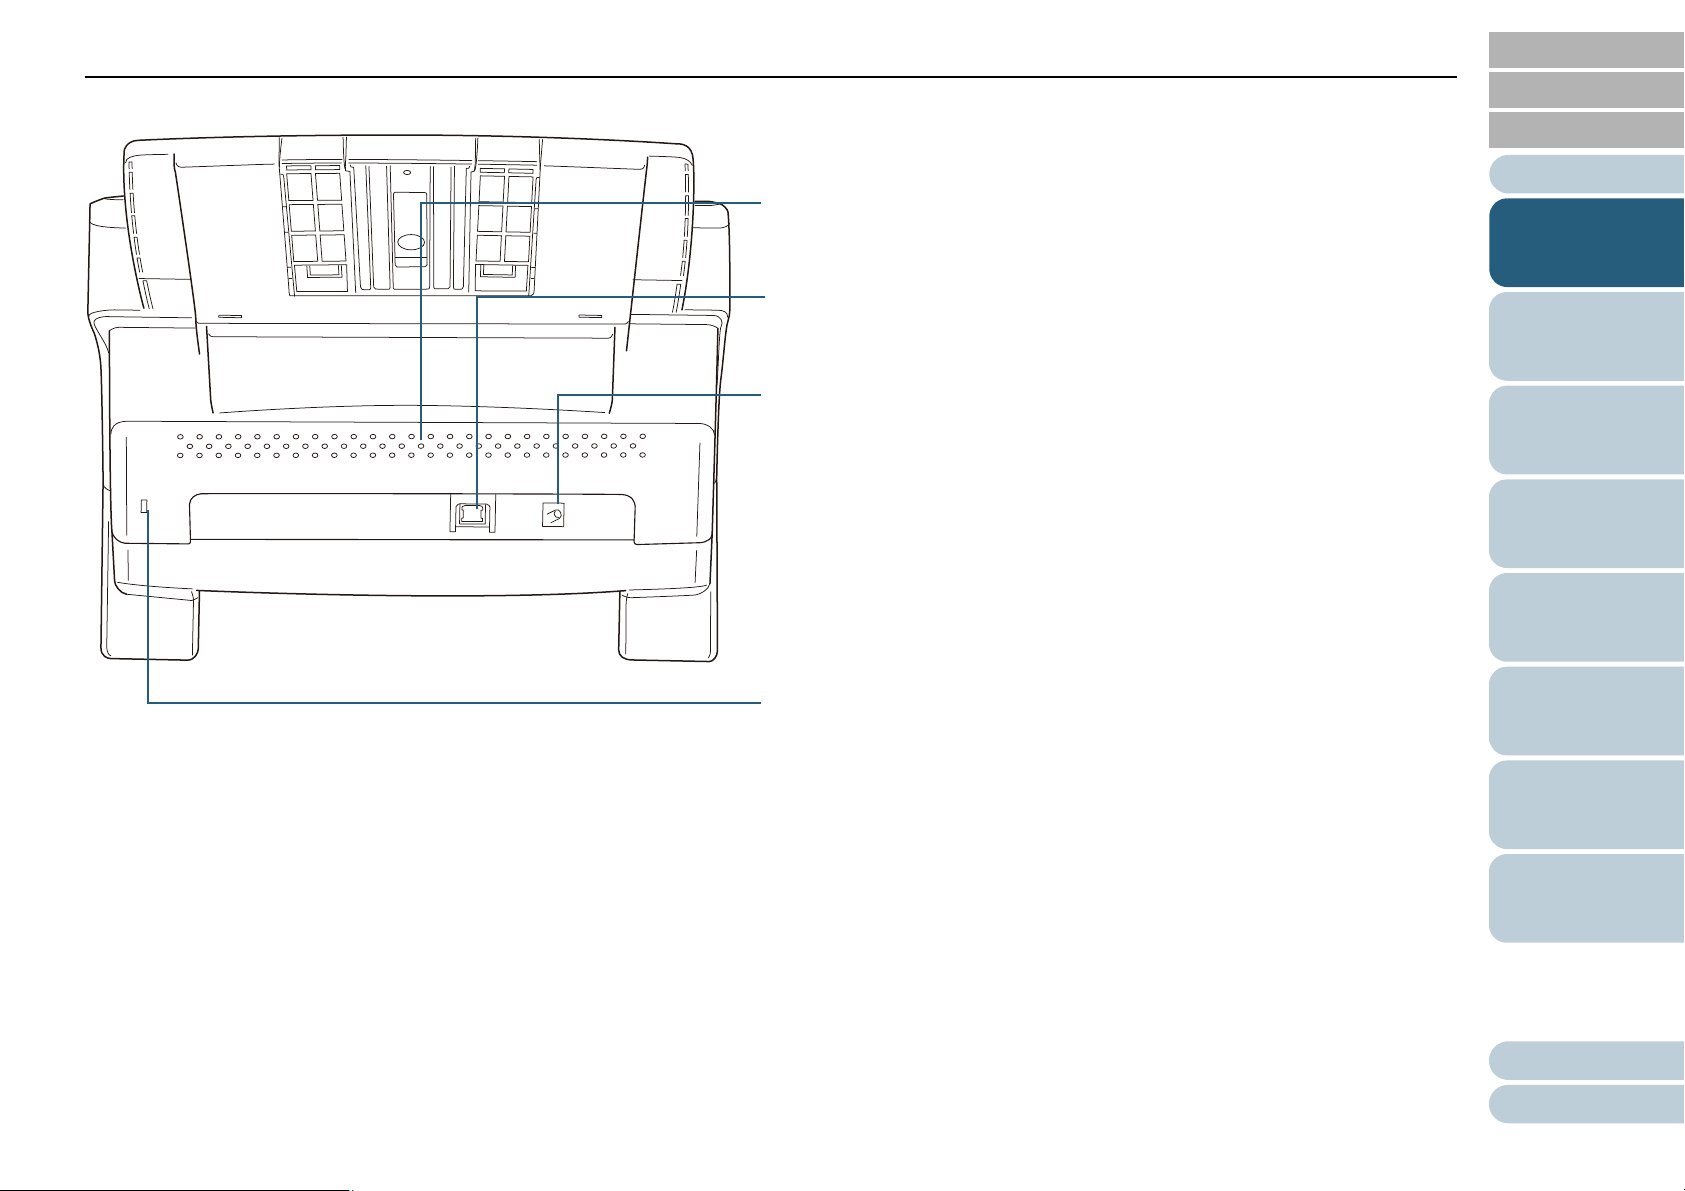
USB connector
Used to connect a USB cable.
Security cable slot
Used to connect an anti-theft security cable (commercially available).
Ventilation port
Holes for ventilating hot air from inside the scanner.
Power connector
Used to connect the power cable.
"Power cable" refers to the AC cable and AC adaptor connected together.
■Back
TOP
Contents
Index
Introduction
Scanner
Overview
How to Load
Documents
How to Use the
Operator Panel
Various Ways to
Scan
Daily Care
Replacing the
Consumables
Troubleshooting
Operational
Settings
Appendix
Glossary
22
Page 23
Chapter 1 Scanner Overview
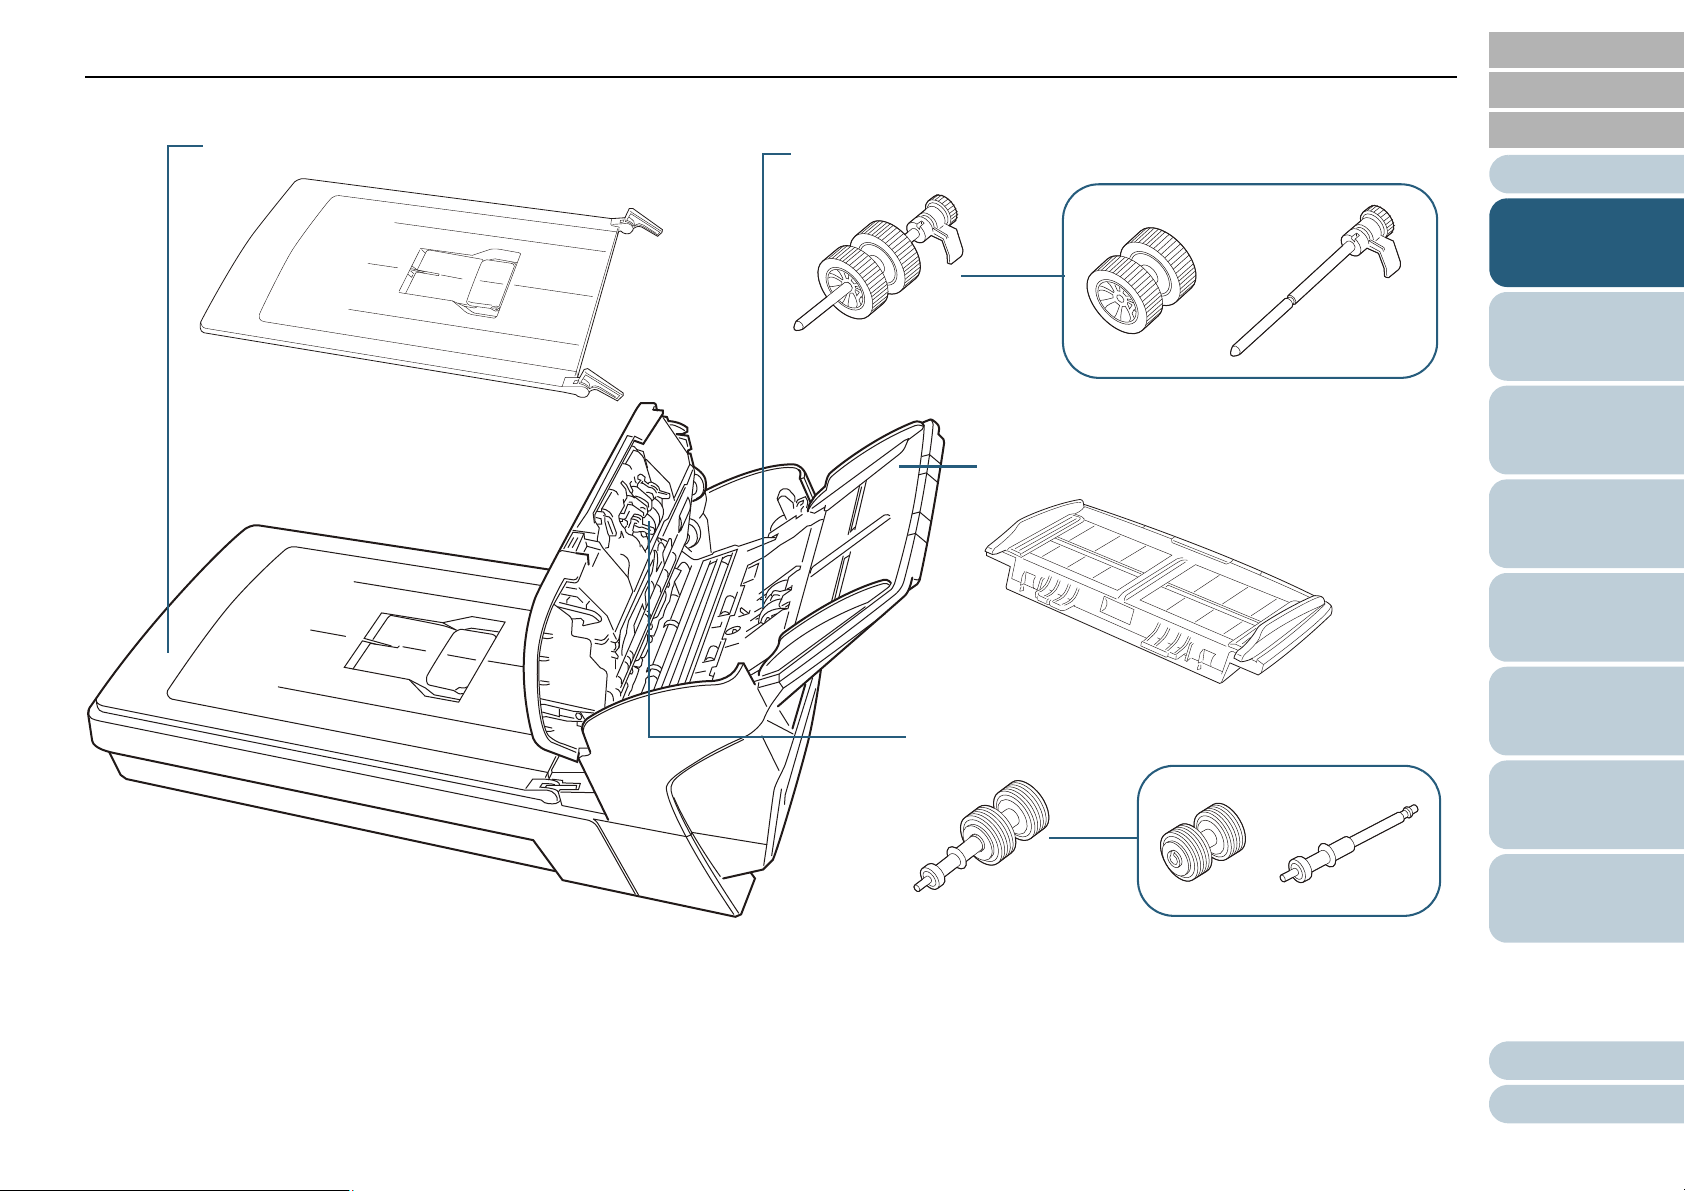
Pick roller
ADF paper chute (feeder)
Brake roller
Document cover
■Removable Parts
TOP
Contents
Index
Introduction
Scanner
Overview
How to Load
Documents
How to Use the
Operator Panel
Various Ways to
Scan
Daily Care
Replacing the
Consumables
Troubleshooting
Operational
Settings
Appendix
Glossary
23
Page 24
Chapter 1 Scanner Overview
[Power] Button
TOP
Contents
1.3 Turning the Power ON/OFF
This section explains how to power on/off the scanner.
HINT
You can select a method by which the scanner is powered on/off from
one of the following:
z Press the [Power] button on the operator panel
z Use an AC power strip that handles the power supply for peripherals
such as a scanner when the computer is powered on/off
z Have the scanner turn on/off in sync with the computer's power
For details, refer to "Method of Turning the Scanner ON/OFF [Power
SW Control]" (page 145).
How to Turn the Power ON
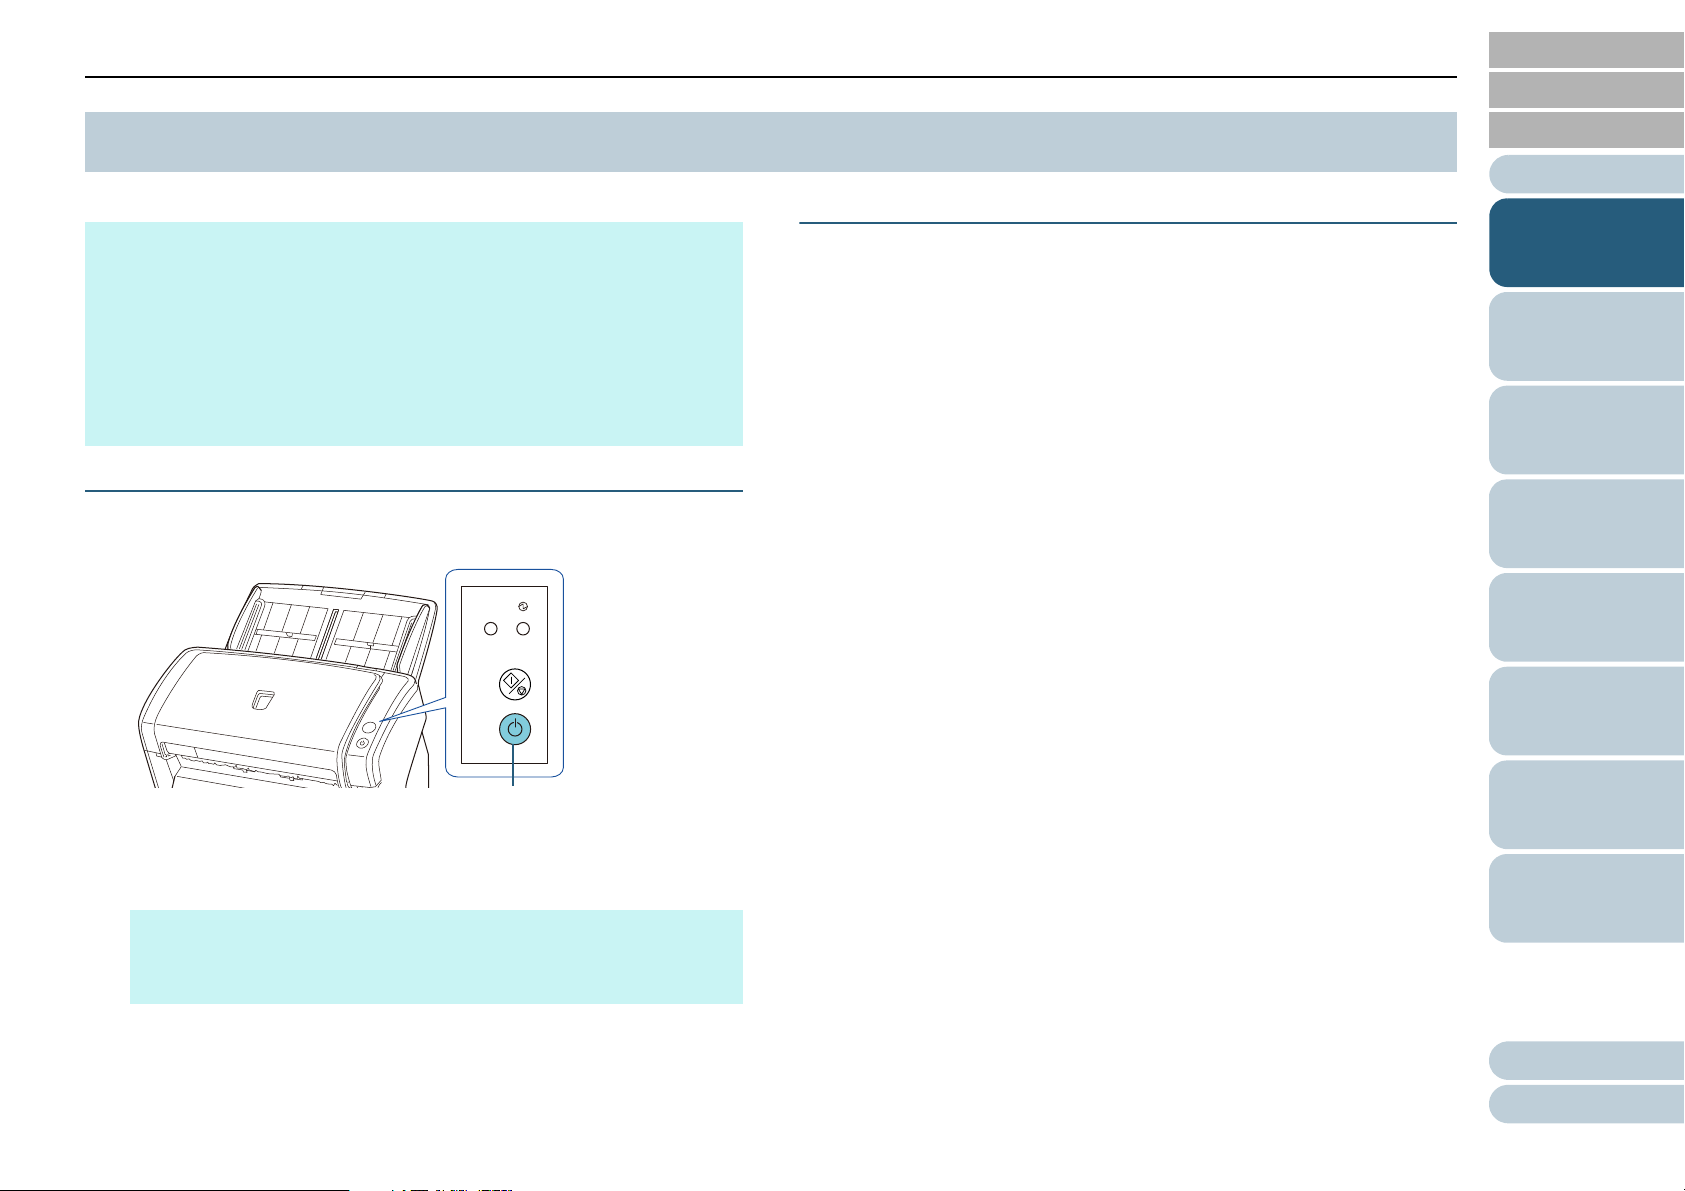
1 Press the [Power] button on the operator panel.
Check
Scan
/Stop
Power
How to Turn the Power OFF
1 Press the [Power] button on the operator panel for more
than 2 seconds.
D The scanner is turned off, and the Power indicator turns off.
Index
Introduction
Scanner
Overview
How to Load
Documents
How to Use the
Operator Panel
Various Ways to
Scan
Daily Care
Replacing the
Consumables
D The scanner is turned on, and during initialization, the Power
indicator flashes.
When the Power indicator turns on, the scanner is in ready status.
HINT
When you press the [Power] button, the Check indicator will flash
once. Note that this is an initial diagnosis, and not a malfunction.
Troubleshooting
Operational
Settings
Appendix
Glossary
24
Page 25

Chapter 1 Scanner Overview
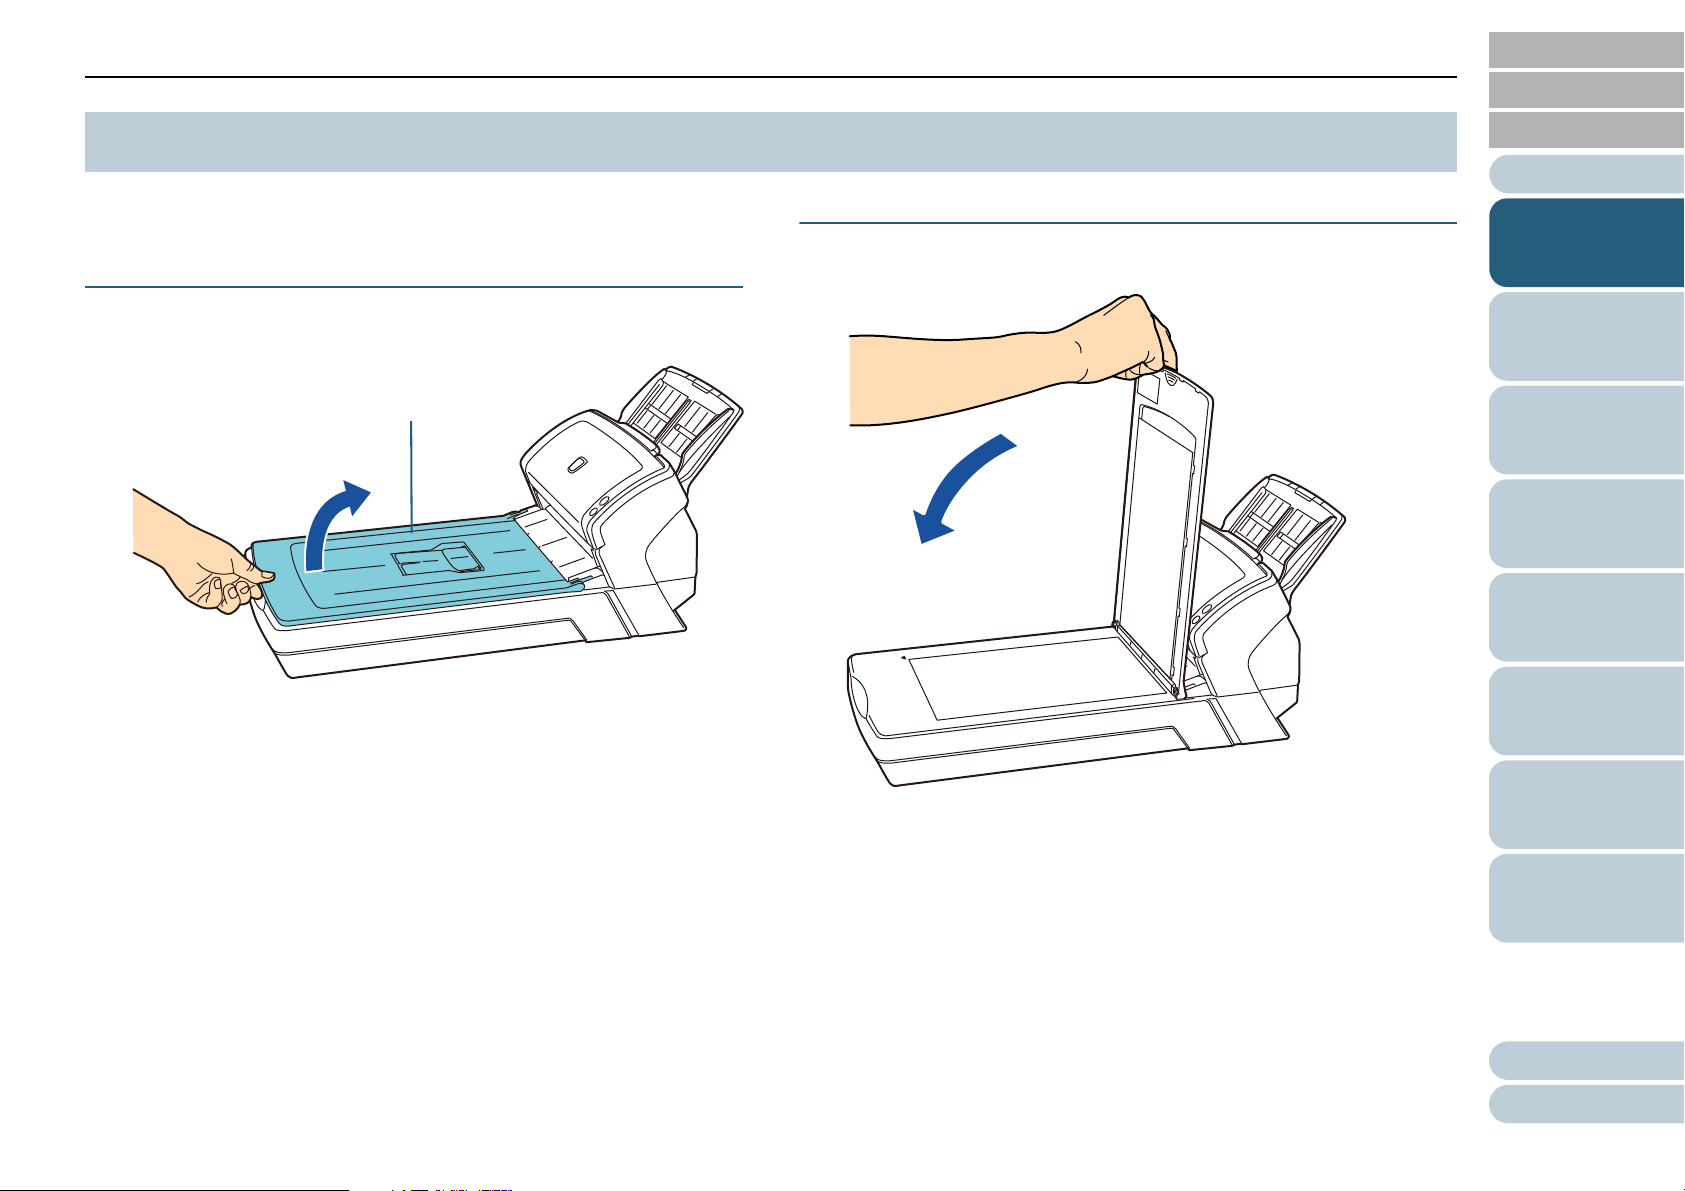
ADF release tab
TOP
Contents
1.4 Opening/Closing the ADF
This section describes how to open and close the ADF.
How to Open the ADF
1 Remove all documents from the ADF paper chute
(feeder).
2 Pull the ADF release tab towards you to open the ADF.
Index
Introduction
How to Close the ADF
Scanner
Overview
1 Close the ADF.
Push the center of the ADF until it locks in place.
How to Load
Documents
How to Use the
Operator Panel
Various Ways to
Scan
Daily Care
Be careful not to have your fingers caught
when the ADF closes.
Replacing the
Consumables
ATTENTION
Make sure that there is no foreign matter caught inside the ADF.
Troubleshooting
Be careful not to have your fingers caught
when the ADF closes.
Operational
Settings
Appendix
Glossary
25
Page 26
Chapter 1 Scanner Overview
Document cover
TOP
Contents
1.5 Opening/Closing the Document Cover (ScanPartner SP30F)
This section describes how to open and close the document
cover.
How to Open the Document Cover
1 Open the document cover.
How to Close the Document Cover
1 Gently close the document cover.
Index
Introduction
Scanner
Overview
How to Load
Documents
How to Use the
Operator Panel
Various Ways to
Scan
Daily Care
Replacing the
Consumables
Troubleshooting
Operational
Settings
Appendix
Glossary
26
Page 27
Chapter 1 Scanner Overview
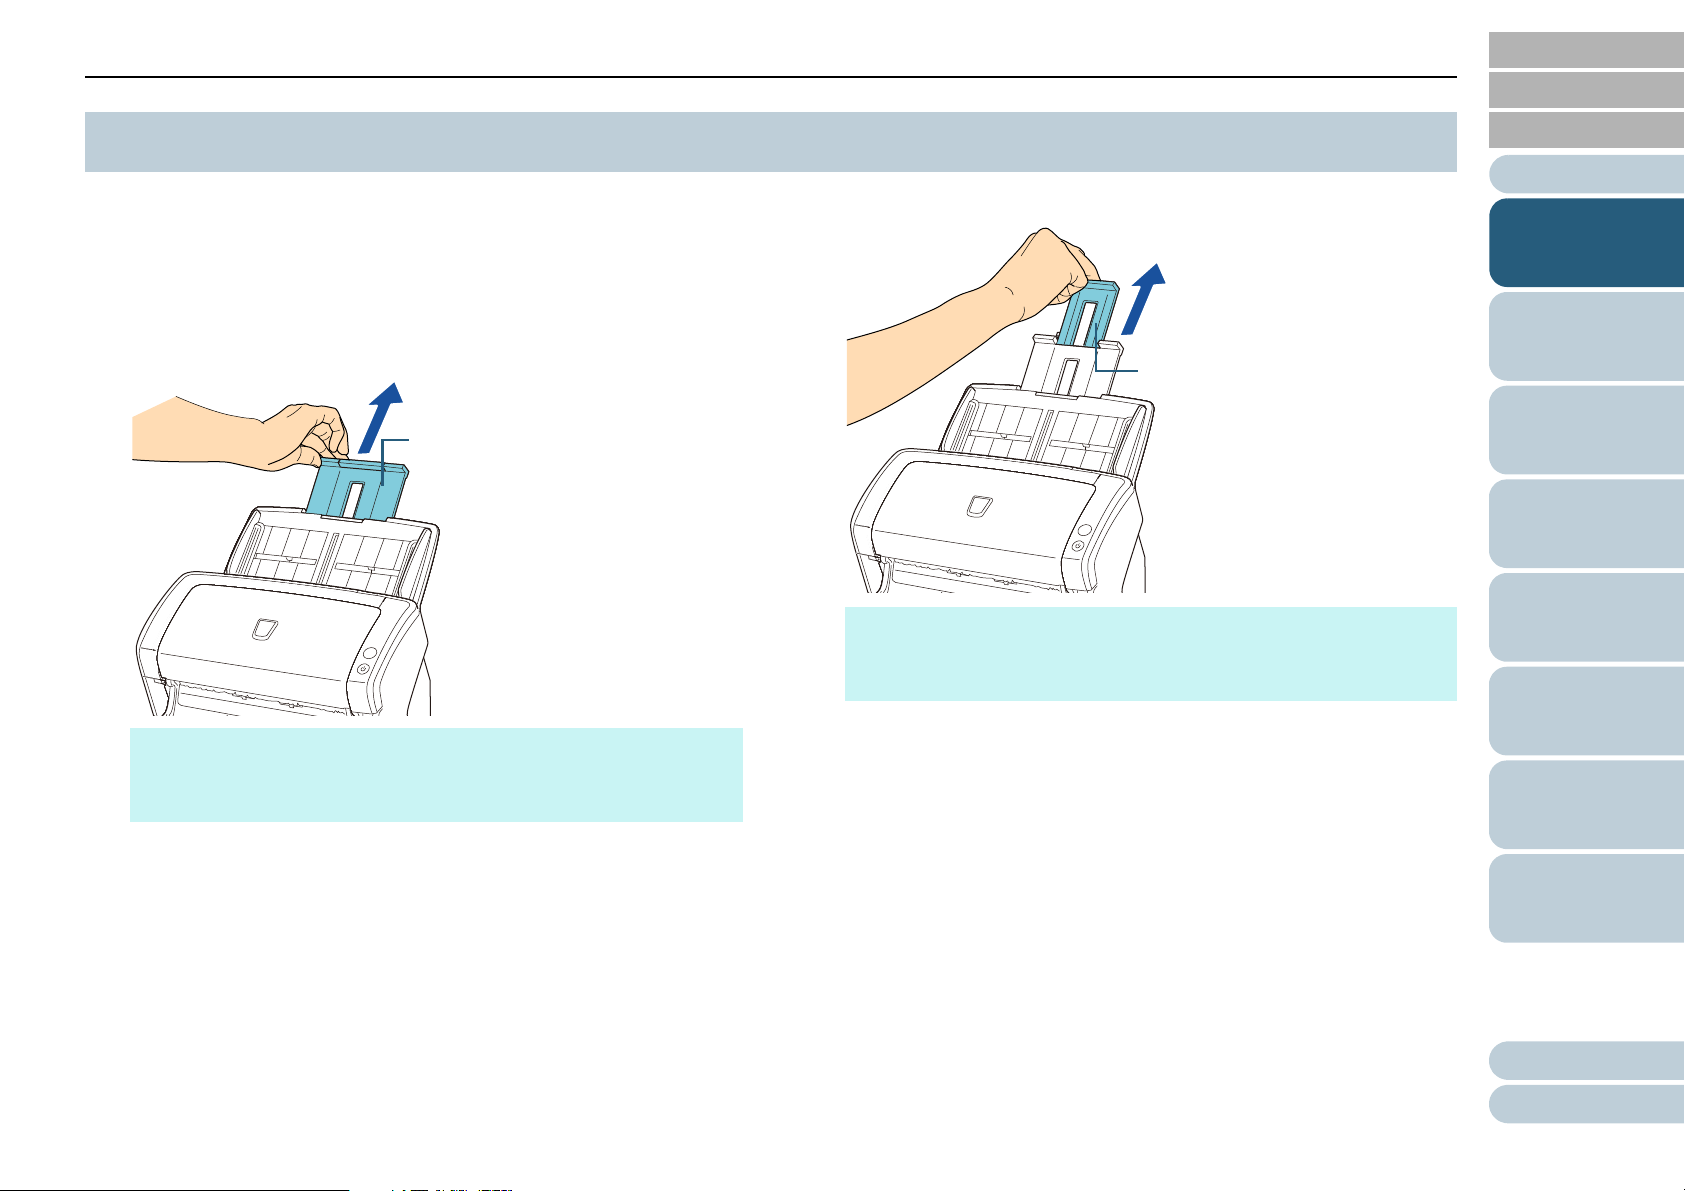
Chute extension 1
Chute extension 2
TOP
Contents
1.6 Setting Up the ADF Paper Chute (feeder)
Documents loaded in the ADF paper chute (feeder) are fed
into the ADF one by one.
Using the chute extensions will keep the documents straight
and feed them smoothly.
1 Pull out chute extension 1.
HINT
Make sure to hold the scanner while you pull out the chute
extension 1.
2 Pull out chute extension 2.
HINT
Make sure to hold the scanner while you pull out the chute
extension 2.
Index
Introduction
Scanner
Overview
How to Load
Documents
How to Use the
Operator Panel
Various Ways to
Scan
Daily Care
Replacing the
Consumables
Troubleshooting
Operational
Settings
Appendix
Glossary
27
Page 28
Chapter 1 Scanner Overview
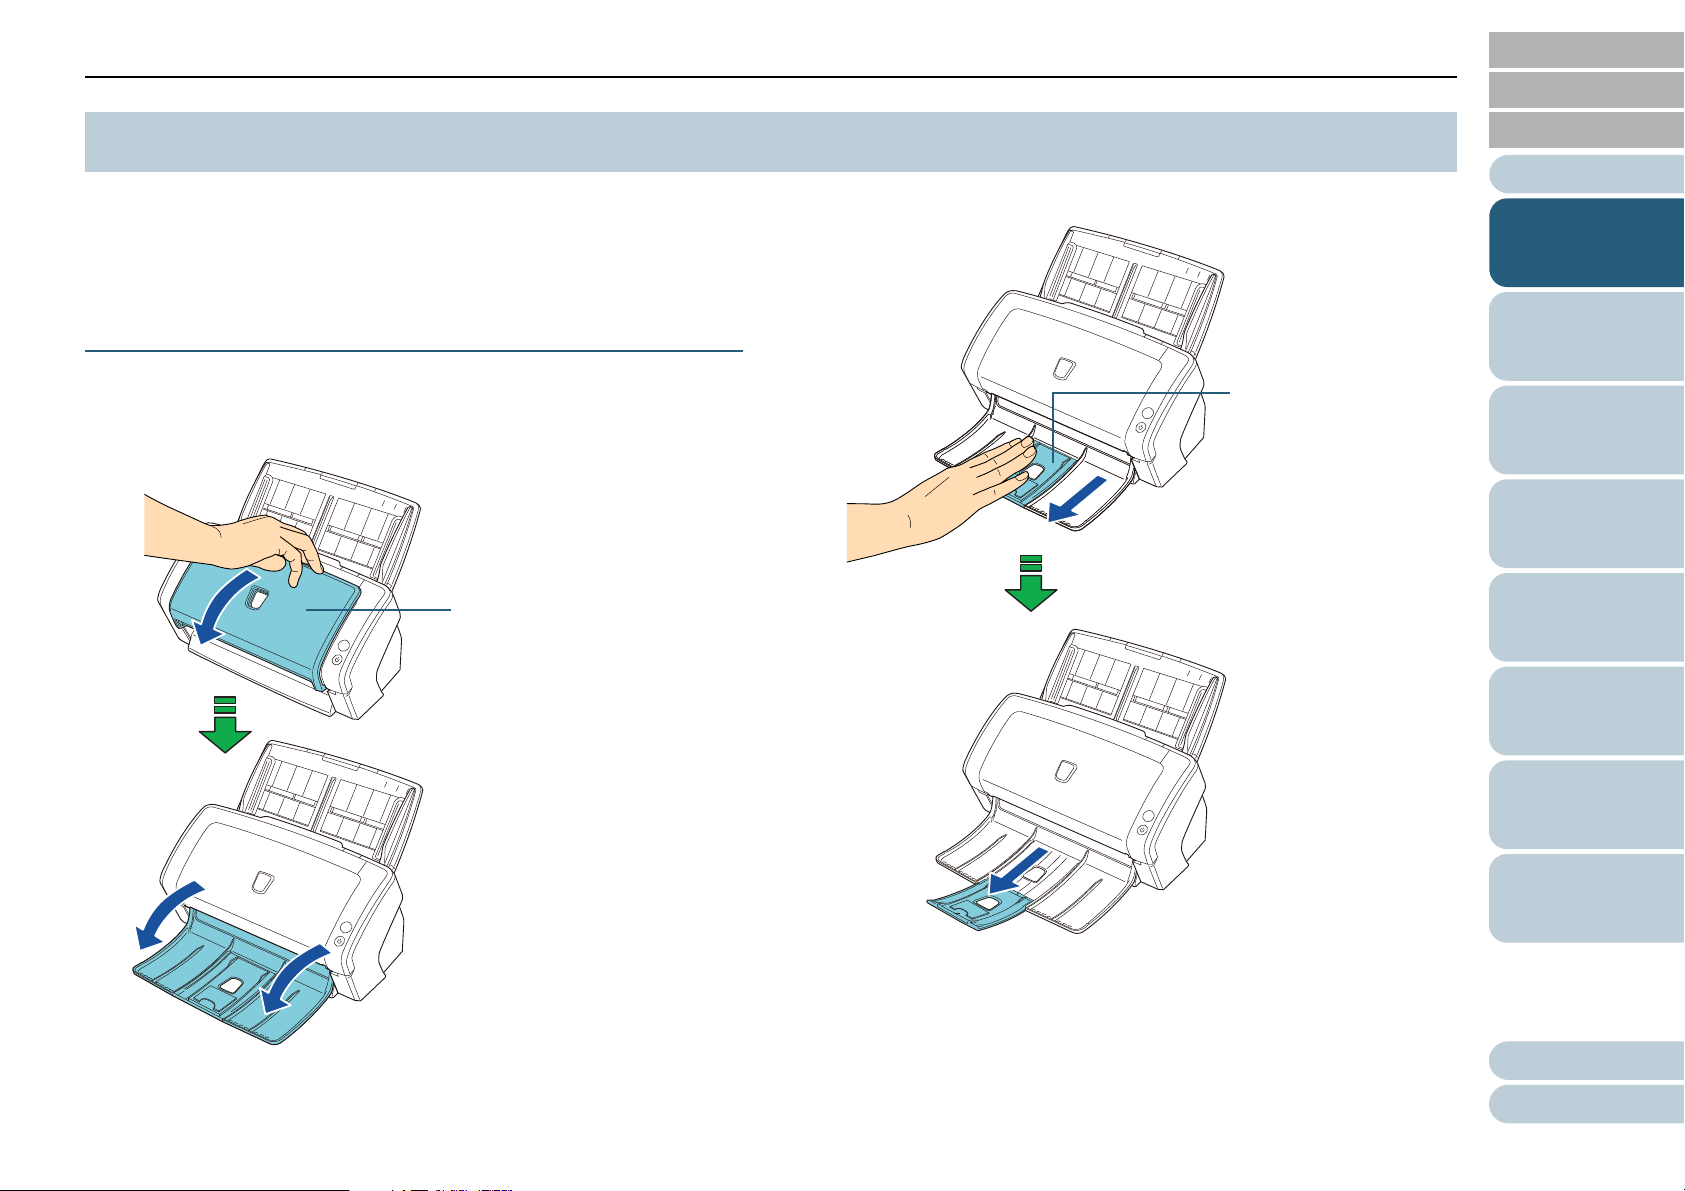
Stacker
Stacker
extension 1
TOP
Contents
1.7 Setting Up the Stacker
Documents loaded in the ADF paper chute (feeder) are
ejected onto the stacker one by one.
Using the stacker and stacker extensions will keep the
documents straight and stack them neatly.
ScanPartner SP25/ScanPartner SP30
■A6 (landscape) or larger
1 Bring down the stacker from the top towards you.
Index
Introduction
2 Slide out stacker extension 1 towards you.
Scanner
Overview
How to Load
Documents
How to Use the
Operator Panel
Various Ways to
Scan
Daily Care
Replacing the
Consumables
Troubleshooting
Operational
Settings
Appendix
Glossary
28
Page 29
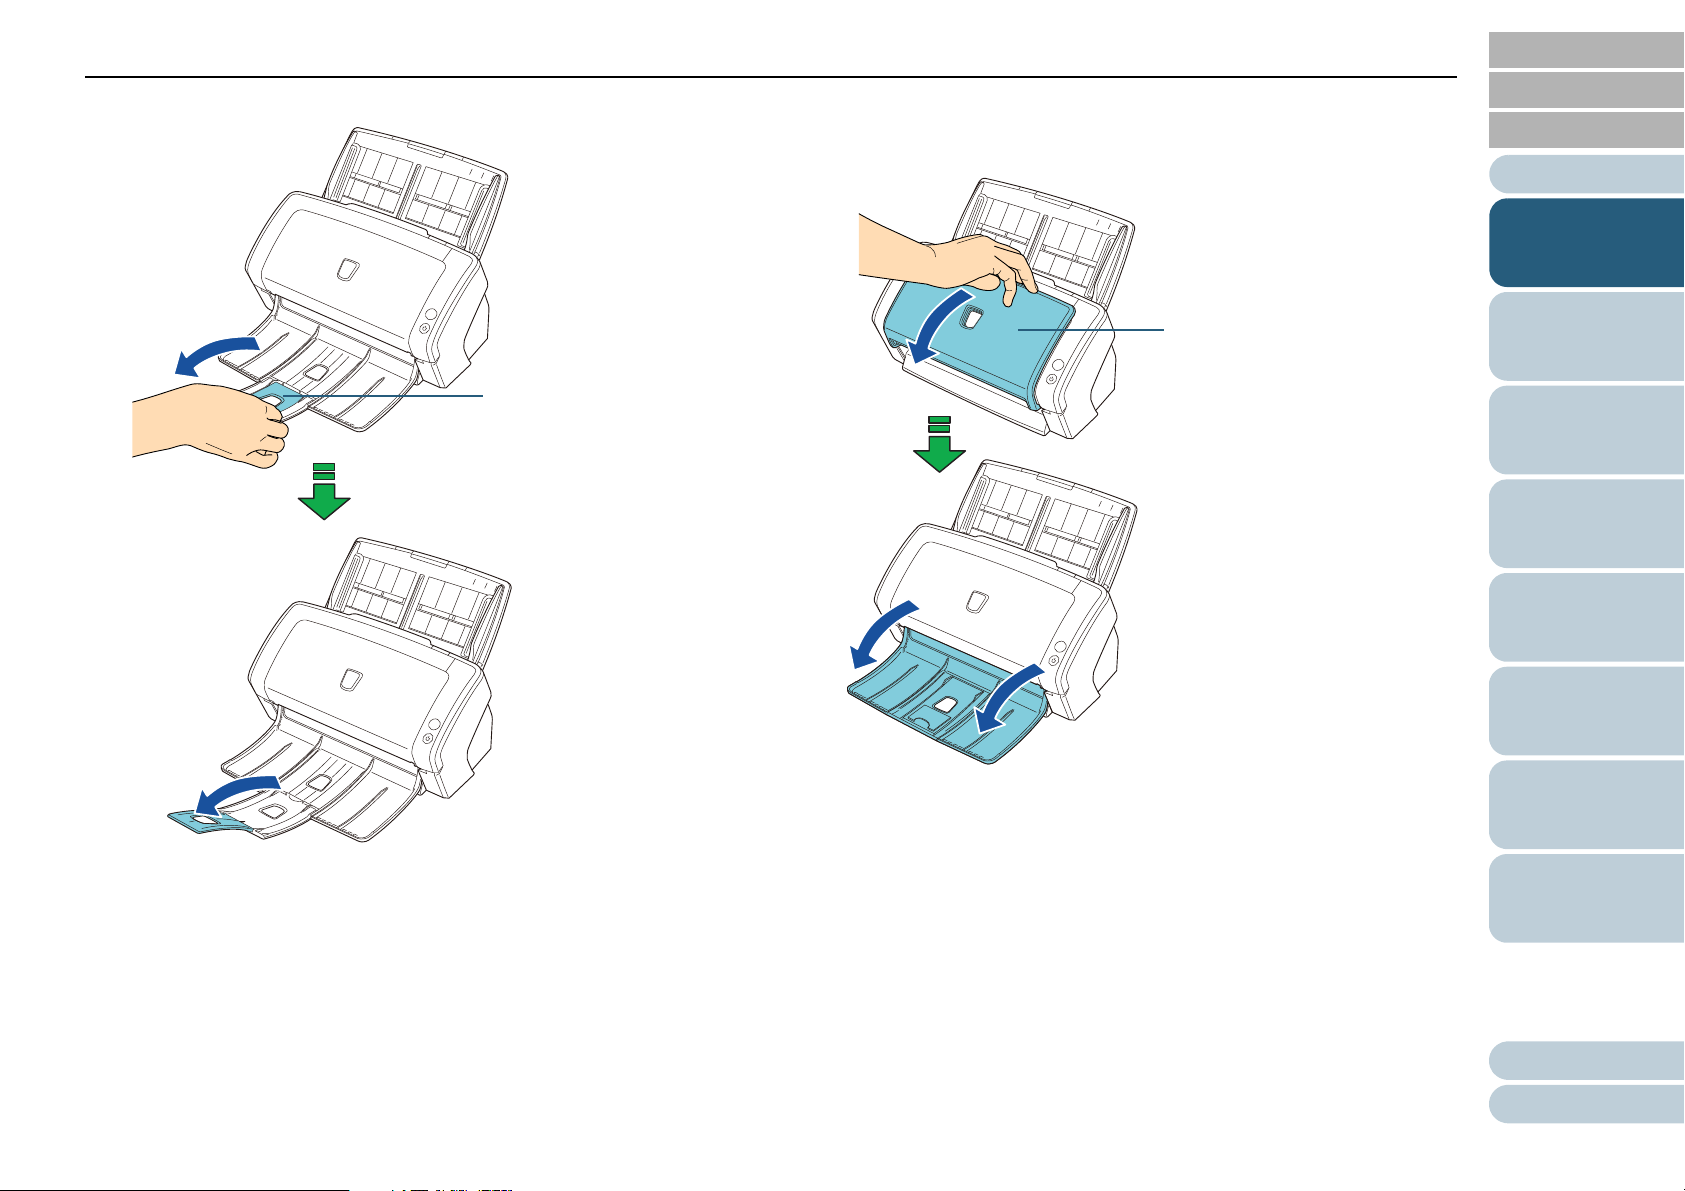
Chapter 1 Scanner Overview
Stacker extension 2
Stacker
3 Lift up stacker extension 2 towards you.
TOP
Contents
■A7 (landscape) or smaller
Index
1 Bring down the stacker from the top towards you.
Introduction
Scanner
Overview
How to Load
Documents
How to Use the
Operator Panel
Various Ways to
Scan
Daily Care
Replacing the
Consumables
Troubleshooting
Operational
Settings
Appendix
Glossary
29
Page 30
Chapter 1 Scanner Overview
Stacker extension 3
Stacker
2 Lift up stacker extension 3.
TOP
Contents
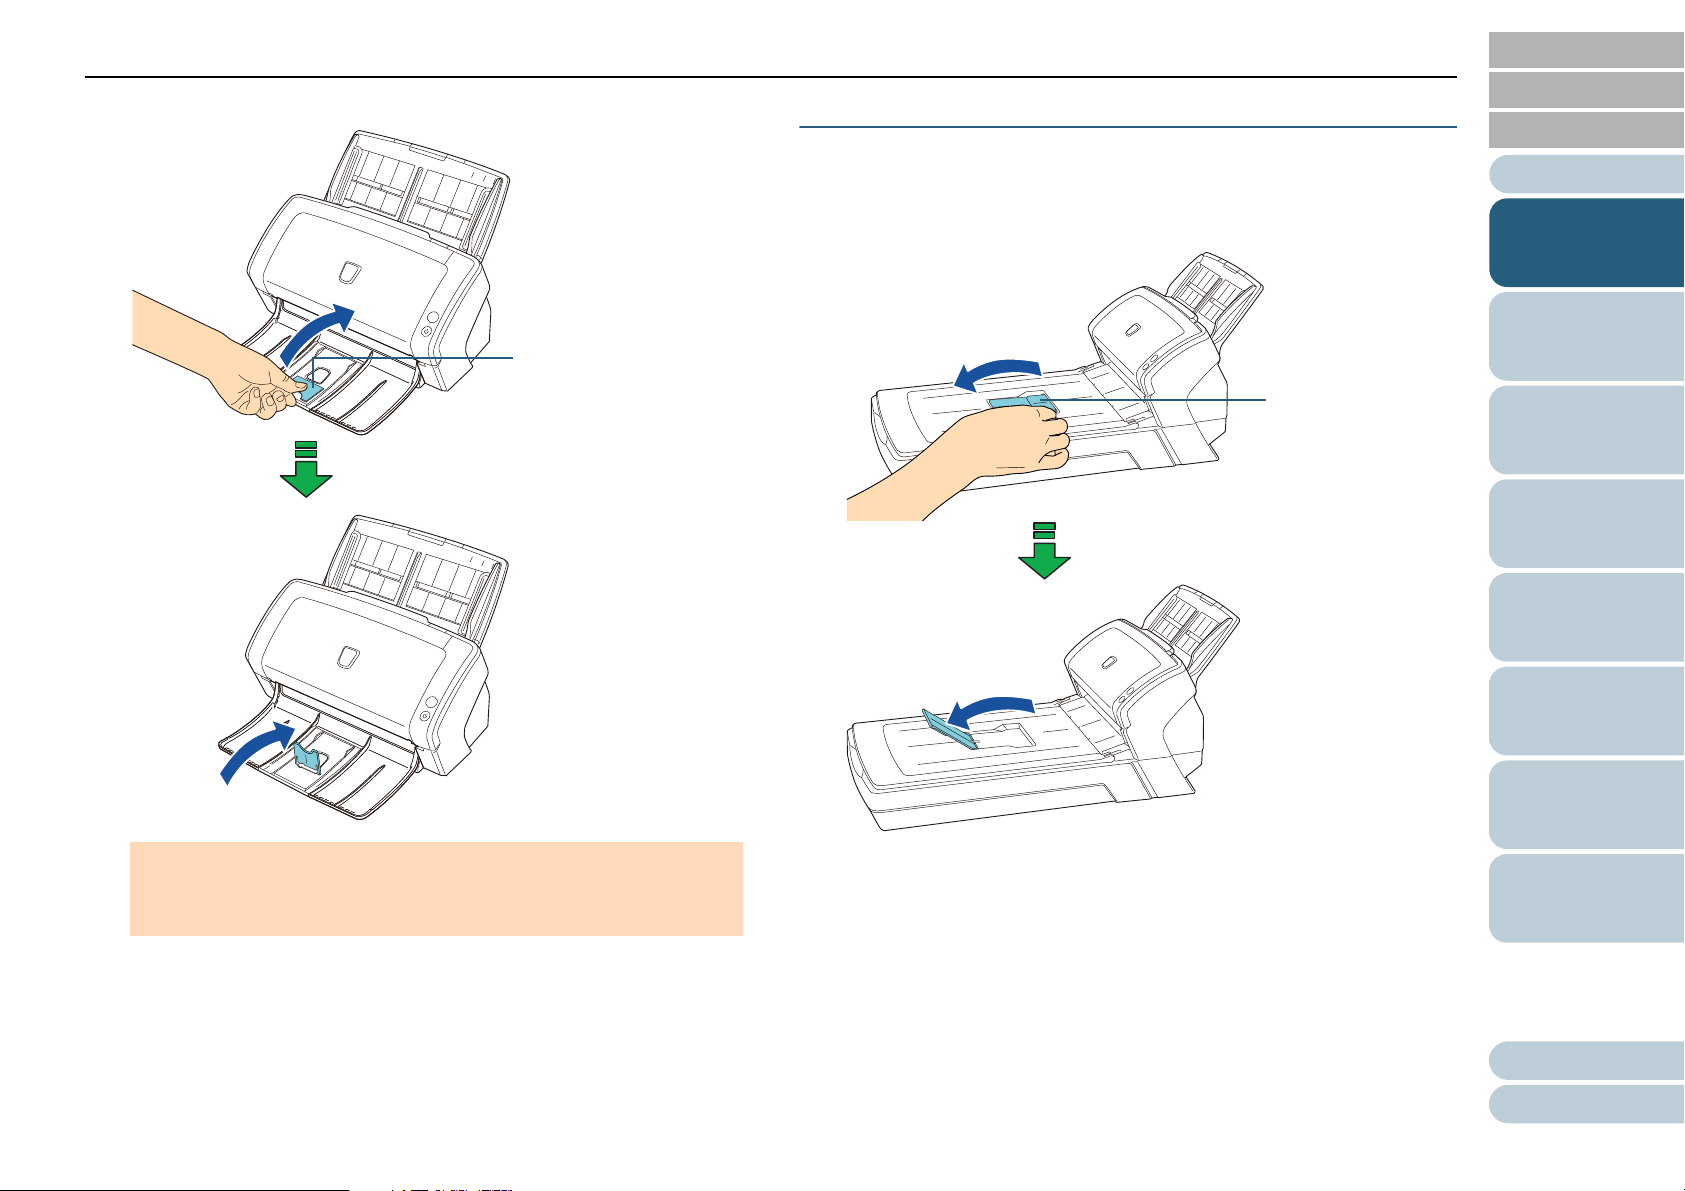
ScanPartner SP30F
Index
■A5 (portrait) or larger
1 Lift up the stacker towards you.
Introduction
Scanner
Overview
How to Load
Documents
How to Use the
Operator Panel
Various Ways to
Scan
Daily Care
Replacing the
Consumables
ATTENTION
Do not bend stacker extension 3 more than 90 degrees, because it
may break.
Troubleshooting
Operational
Settings
Appendix
Glossary
30
Page 31

Chapter 1 Scanner Overview
Stacker extension
■A6 (portrait)/A5 (landscape) or smaller
TOP
Contents
Index
1 Lift up the stacker extension.
Introduction
Scanner
Overview
How to Load
Documents
How to Use the
Operator Panel
Various Ways to
Scan
Daily Care
Replacing the
Consumables
ATTENTION
Do not bend the stacker extension more than 90 degrees, because
it may break.
Troubleshooting
Operational
Settings
Appendix
Glossary
31
Page 32

Chapter 1 Scanner Overview
TOP
Contents
1.8 Power Saving Mode
Power saving mode keeps the power consumption low when
the scanner has not been used for a certain period of time.
If the scanner is left powered on for 15 minutes without being
used, it automatically enters power saving mode.
Even after the scanner enters power saving mode, the Power
indicator remains turned on.
To resume from power saving mode, perform one of the
following:
z Load a document in the ADF paper chute (feeder).
z Press the [Scan/Stop] button on the operator panel.
z Perform scanning from an application.
When the scanner resumes from power saving mode, the
Power indicator flashes until the scanner enters ready status.
If the scanner is not operated for a certain period of time, it
turns off automatically to reduce power consumption while the
scanner is in standby.
To disable this function, clear the [Power off after a certain
period of time] check box in [Device Setting] of the Software
Operation Panel. For details, refer to "Waiting Time to Enter
Power Saving Mode [Power saving]" (page 144).
To turn the scanner back on after it has turned off
automatically, press the [Power] button on the operator panel.
For details, refer to "1.3 Turning the Power ON/OFF" (page
24).
ATTENTION
z The scanner may not enter power saving mode if there was a
document remaining on the paper path.
For details about how to remove a document, refer to "7.1 Paper
Jam" (page 88).
z Depending on the application being used, the scanner might not turn
off even if the [Power off after a certain period of time] check box is
selected.
z If the scanner turns off automatically while you are using an image
scanning application, close the application before you turn the
scanner back on.
HINT
The waiting time for entering power saving mode can be changed in the
Software Operation Panel.
For details, refer to "Waiting Time to Enter Power Saving Mode [Power
saving]" (page 144).
Index
Introduction
Scanner
Overview
How to Load
Documents
How to Use the
Operator Panel
Various Ways to
Scan
Daily Care
Replacing the
Consumables
Troubleshooting
Operational
Settings
Appendix
Glossary
32
Page 33

Chapter 1 Scanner Overview
TOP
Contents
1.9 Basic Flow of Scanning Operation
This section explains about the basic flow of performing a
scan.
In order to perform a scan, you need a scanner driver and an
image scanning application that supports the scanner driver.
This product includes the following scanner drivers, and an
image scanning application.
z Scanner drivers
- PaperStream IP (TWAIN) for ScanPartner
- PaperStream IP (TWAIN x64) for ScanPartner
- PaperStream IP (ISIS) for ScanPartner
z Image scanning application
- Presto! PageManager
- ABBYY FineReader Sprint
HINT
For details about the scanner drivers and image scanning application,
refer to "1.10 Bundled Software" (page 35).
Scanning procedures and operations will vary slightly
according to the image scanning application.
For details, refer to the manual of the image scanning
application.
The following describes the normal procedure for scanning.
1 Turn on the scanner.
For details, refer to "1.3 Turning the Power ON/OFF" (page 24).
2 Load a document in the ADF paper chute (feeder).
Load a document face-down in the ADF paper chute (feeder).
For details, refer to "Chapter 2 How to Load Documents" (page 38).
3 Start the image scanning application.
4 Select a scanner driver.
For some image scanning applications, it may not be necessary to
select a scanner driver.
5 In the scanner driver's setup dialog box, configure the
scan settings.
For some image scanning applications, the scanner driver's setup
dialog box may not appear.
Index
Introduction
Scanner
Overview
How to Load
Documents
How to Use the
Operator Panel
Various Ways to
Scan
Daily Care
Replacing the
Consumables
Troubleshooting
Operational
Settings
Appendix
Glossary
33
Page 34

Chapter 1 Scanner Overview
6 Scan the document with the image scanning application.
ATTENTION
Do not unplug the USB cable or log off the user account when the
scanner and the computer are communicating, for instance, during
scanning.
TOP
Contents
Index
Introduction
Scanner
Overview
How to Load
Documents
How to Use the
Operator Panel
Various Ways to
Scan
Daily Care
Replacing the
Consumables
Troubleshooting
Operational
Settings
Appendix
Glossary
34
Page 35

Chapter 1 Scanner Overview
TOP
Contents
1.10 Bundled Software
Bundled Software Overview
The following software is bundled with this product.
z PaperStream IP drivers
PaperStream IP drivers are scanner drivers that conform to TWAIN/
ISIS standards. There are three types of
PaperStream IP drivers.
- PaperStream IP (TWAIN) for ScanPartner
This scanner driver conforms to the TWAIN standard. It is used
to operate the scanner from 32-bit applications that conform to
the TWAIN standard.
- PaperStream IP (TWAIN x64) for ScanPartner
This scanner driver conforms to the TWAIN standard. It is used
to operate the scanner from 64-bit applications that conform to
the TWAIN standard.
This driver can be installed in 64-bit operating systems.
- PaperStream IP (ISIS) for ScanPartner
This scanner driver conforms to the ISIS standard. It is used to
operate the scanner from applications that conform to the ISIS
standard.
For details, refer to the PaperStream IP driver Help.
z Software Operation Panel
This application allows you to configure various settings such as the
operation of the scanner and managing the consumables. It is
installed together with the PaperStream IP driver.
For details, refer to "Chapter 8 Operational Settings" (page 115).
z Error Recovery Guide
Details the status of the scanner and explains how to resolve
problems encountered. It is installed together with the PaperStream
IP driver.
z Presto! PageManager
This image scanning application supports PaperStream IP (TWAIN)
for ScanPartner. It allows the easy scanning, sharing, and organizing
of documents.
For details, refer to the Presto! PageManager Help and manual.
z ABBYY FineReader Sprint
This application supports PaperStream IP (TWAIN) for ScanPartner.
The WIA driver is not supported. This application allows you to
convert scanned images into Word or Excel (*1) files.
For details, refer to the ABBYY FineReader Sprint Help.
z Manual
Safety Precautions and the Operator's Guide are installed.
*1: Microsoft
®
Office products must be installed.
For details about how to configure scanner settings and scan
different types of documents with the image scanning
application, refer to "Chapter 4 Various Ways to Scan" (page
55).
Index
Introduction
Scanner
Overview
How to Load
Documents
How to Use the
Operator Panel
Various Ways to
Scan
Daily Care
Replacing the
Consumables
Troubleshooting
Operational
Settings
Appendix
Glossary
35
Page 36

Chapter 1 Scanner Overview
System Requirements
System requirements are described below.
Operating
system
z Windows
later)
z Windows
z Windows
Pack 2 or later)
z Windows Vista
Pack 1 or later)
z Windows Vista
(Service Pack 1 or later)
z Windows Vista
Pack 1 or later)
z Windows Vista
Pack 1 or later)
z Windows Vista
Pack 1 or later)
z Windows Server
z Windows Server
z Windows
z Windows
z Windows
z Windows
z Windows Server
z Windows Server
®
XP Home Edition (Service Pack 3 or
®
XP Professional (Service Pack 3 or later)
®
XP Professional x64 Edition (Service
®
Home Basic (32-bit/64-bit) (Service
®
Home Premium (32-bit/64-bit)
®
Business (32-bit/64-bit) (Service
®
Enterprise (32-bit/64-bit ) (Service
®
Ultimate (32-bit/64-bit) (Service
®
2008 Standard (32-bit/64-bit) (*1)
®
2008 R2 Standard (64-bit) (*1)
®
7 Home Premium (32-bit/64-bit)
®
7 Professional (32-bit/64-bit)
®
7 Enterprise (32-bit/64-bit)
®
7 Ultimate (32-bit/64-bit)
®
2012 Standard (64-bit) (*1)(*2)
®
2012 R2 Standard (64-bit) (*1)(*2)
Operating
system
CPU
Memory 1 GB or more (Recommended: 4 GB or more)
Display
resolution
Disk space 2.2 GB or more of free hard disk space (*3)
DVD drive Required for software installation
Interface USB 2.0/1.1
*1: Presto! PageManager and ABBYY FineReader Sprint are not
supported.
*2: The software bundled with the scanner operates as a desktop
application.
*3: Disk space is required based on the size of files to be saved during
scanning.
z Windows
z Windows
z Windows
z Windows
z Windows
z Windows
®
Intel
(Recommended: Intel
except mobile device processors)
1024 × 768 pixels or higher, 65536 colors or more
®
8 (32-bit/64-bit) (*2)
®
8 Pro (32-bit/64-bit) (*2)
®
8 Enterprise (32-bit/64-bit) (*2)
®
8.1 (32-bit/64-bit) (*2)
®
8.1 Pro (32-bit/64-bit) (*2)
®
8.1 Enterprise (32-bit/64-bit) (*2)
Pentium® 4 1.8 GHz or higher
®
Core™ i5 2.5 GHz or higher,
TOP
Contents
Index
Introduction
Scanner
Overview
How to Load
Documents
How to Use the
Operator Panel
Various Ways to
Scan
Daily Care
Replacing the
Consumables
Troubleshooting
Operational
Settings
Appendix
Glossary
36
Page 37

Chapter 1 Scanner Overview
How to Install the Bundled Software
This section describes how to install the software included on
the "Setup DVD-ROM".
The following software can be installed:
z PaperStream IP (TWAIN) for ScanPartner
z PaperStream IP (TWAIN x64) for ScanPartner
z PaperStream IP (ISIS) for ScanPartner
z Software Operation Panel
z Error Recovery Guide
z Presto! PageManager
z ABBYY FineReader Sprint
z Manual
TOP
Contents
3 Click the [Install software] button.
Index
Introduction
Scanner
Overview
How to Load
Documents
How to Use the
Operator Panel
ATTENTION
If previous versions of this software have already been installed,
uninstall them before continuing. For details about how to uninstall
software, refer to "A.5 Uninstalling the Software" (page 152).
1 Turn on the computer, and log on to Windows as a user
with Administrator privileges.
2 Insert the Setup DVD-ROM into the DVD drive.
D The [ScanPartner Setup] dialog box is displayed.
HINT
If the [ScanPartner Setup] dialog box is not displayed, use either
"Explorer" or "Computer" to locate and double-click on "Setup.exe"
on the Setup DVD-ROM.
D The software information window appears.
4 Check the information and click the [Next] button.
5 Click the button for the software you want to install.
6 Follow the instructions displayed on the dialog box to
install the software.
Various Ways to
Scan
Daily Care
Replacing the
Consumables
Troubleshooting
Operational
Settings
Appendix
Glossary
37
Page 38

TOP
Contents
Index
Chapter 2 How to Load Documents
This chapter explains how to load documents on the scanner.
2.1 Loading Documents in the ADF..................................................................................................................39
2.2 Loading Documents on the Flatbed (ScanPartner SP30F) ........................................................................41
2.3 Documents for Scanning ............................................................................................................................42
Introduction
Scanner
Overview
How to Load
Documents
How to Use the
Operator Panel
Various Ways to
Scan
Daily Care
Replacing the
Consumables
Troubleshooting
Operational
Settings
Appendix
Glossary
Page 39

Chapter 2 How to Load Documents
TOP
Contents
2.1 Loading Documents in the ADF
This section explains how to load documents in the ADF.
Preparation
HINT
For details about the paper size and quality required for normal
operations, refer to "2.3 Documents for Scanning" (page 42).
1 If you are loading multiple sheets, check the documents.
1 Check if the documents to be loaded are of the same width or
different widths.
Ways to load documents differ depending on whether they are the
same width or not.
If the document width varies, refer to "Conditions for Mixed Batch
Scanning" (page 48) or "Documents with Different Widths" (page
57).
2 Check the number of sheets.
Up to 50 sheets can be loaded (with paper weight of 80 g/m
and thickness of the document stack under 5 mm).
For details, refer to "Loading Capacity" (page 45).
2
[20 lb]
2 Fan the documents.
1 Grab a stack of documents, which should be 5 mm or less.
2 Hold both ends of the documents and fan them a few times.
3 Rotate the documents by 90 degrees and fan them in the same
manner.
4 Perform steps 1 to 3 for all documents.
5 Align the edges of the documents.
HINT
For more details about how to fan documents, refer to the Error
Recovery Guide.
Index
Introduction
Scanner
Overview
How to Load
Documents
How to Use the
Operator Panel
Various Ways to
Scan
Daily Care
Replacing the
Consumables
Troubleshooting
Operational
Settings
Appendix
Glossary
39
Page 40

Chapter 2 How to Load Documents
Side guides
How to Load Documents
1 Pull out the chute extensions according to the length of
the document.
For details, refer to "1.6 Setting Up the ADF Paper Chute (feeder)"
(page 27).
4 Adjust the side guides to the width of the document.
Do not leave space between the side guides and the document.
Otherwise, the document may be fed skewed.
TOP
Contents
Index
Introduction
Scanner
Overview
2 Lift the stacker and stacker extension according to the
3 Load a document in the ADF paper chute (feeder).
length of the document.
For details, refer to "1.7 Setting Up the Stacker" (page 28).
Load a document face-down in the ADF paper chute (feeder).
ATTENTION
Remove all paper clips and staples. Reduce the number of sheets
if a multifeed or pick error occurs.
5 Scan the document with the image scanning application.
For details, refer to the manual of the image scanning application.
How to Load
Documents
How to Use the
Operator Panel
Various Ways to
Scan
Daily Care
Replacing the
Consumables
Troubleshooting
Operational
Settings
Appendix
Glossary
40
Page 41

Chapter 2 How to Load Documents
ABC
ABC
ABC
Reference point
TOP
Contents
2.2 Loading Documents on the Flatbed (ScanPartner SP30F)
1 Open the document cover.
For details, refer to "1.5 Opening/Closing the Document Cover
(ScanPartner SP30F)" (page 26).
2 Load a document on the document bed.
Place the document face-down to align its top left-hand corner with
the reference point.
3 Close the document cover.
For details, refer to "1.5 Opening/Closing the Document Cover
(ScanPartner SP30F)" (page 26).
4 Scan the document with the image scanning application.
For details, refer to the manual of the image scanning application.
Index
Introduction
Scanner
Overview
How to Load
Documents
How to Use the
Operator Panel
Various Ways to
Scan
Daily Care
Replacing the
Consumables
Troubleshooting
Operational
Settings
Appendix
Glossary
41
Page 42

Chapter 2 How to Load Documents
TOP
Contents
2.3 Documents for Scanning
Paper Size
The following paper sizes can be scanned:
ADF Maximum: A4 portrait (210 × 297 mm/8.3 × 11.7 in.),
legal (8.5 × 14 in.), long page (*1) (216 × 863 mm/8.5
× 34 in., 210 × 3048 mm/8.3 × 120 in.)
Minimum: A8 (52 × 74 mm/2 × 2.9 in.)
Flatbed Maximum: 216 × 297 mm/8.5 × 11.7 in.
*1: Depending on the application or scan settings (e.g. paper size), there
may be insufficient memory to perform scanning.
To scan documents longer than 863 mm (34 in.), set the resolution to
200 dpi or lower.
Conditions
Paper type
The following paper types are recommended:
z Wood-free paper
z Wood-containing paper
z PPC paper (recycled)
z Plastic card
When using paper types other than the above, make sure to test with
the same type of paper first to check if the document can be scanned.
Paper weight (thickness)
The following paper weights can be used:
2
z 41 to 209 g/m
z 127 to 209 g/m
z 1.4 mm or less for plastic cards
(11 to 56 lb)
2
(34 to 56 lb) for A8 size
Index
Introduction
Scanner
Overview
How to Load
Documents
How to Use the
Operator Panel
Various Ways to
Scan
Daily Care
Replacing the
Consumables
Troubleshooting
Operational
Settings
Appendix
Glossary
42
Page 43

Chapter 2 How to Load Documents
Precautions
The following types of documents may not be scanned successfully:
z Documents of non-uniform thickness (e.g. envelopes, documents with
attachments)
z Wrinkled or curled documents
z Folded or torn documents
z Tracing paper
z Coated paper
z Carbon paper
z Photosensitive paper
z Perforated documents
z Documents that are not square or rectangular
z Thin paper (less than 41 g/m
z Photographs (photographic paper)
The following types of documents must not be scanned:
z Paper-clipped or stapled documents
z Documents on which the ink is still wet
z Documents smaller than A8 size (portrait)
z Documents wider than 216 mm (8.5 in.)
z Documents other than paper/plastic card such as fabric, metal foil
and OHP film
z Important documents that must not be damaged or smeared
2
)
ATTENTION
z Since carbonless papers contain chemical substances that may
harm the rollers (e.g. pick roller), take note of the following.
Cleaning : If paper jams occur frequently, clean the brake
roller and pick roller.
For details, refer to "Chapter 5 Daily Care"
(page 70).
Consumable replacement: The life of the brake roller and pick roller
may end sooner compared to scanning woodcontaining papers.
z When scanning wood-containing papers, the life of the brake roller
and pick roller may end sooner compared to scanning wood-free
papers.
z Brake roller and pick roller may be damaged when a photo/sticky
note on the document contacts these parts during scanning.
z The surface of the document may be damaged when scanning gloss
papers such as photographs.
TOP
Contents
Index
Introduction
Scanner
Overview
How to Load
Documents
How to Use the
Operator Panel
Various Ways to
Scan
Daily Care
Replacing the
Consumables
Troubleshooting
Operational
Settings
Appendix
Glossary
43
Page 44

Chapter 2 How to Load Documents
Back
ATTENTION
z When you scan plastic cards, take note of the following.
- Up to three plastic cards can be loaded in the ADF paper chute
(feeder).
Note that you can only load one card at a time if the plastic card is
embossed.
- It is recommended to place the card face-down in the ADF paper
chute (feeder).
- Cards should be within the following specifications:
ISO7810 ID-1 type compliant
Size : 85.6 × 53.98 mm
Thickness : 1.4 mm or less
Material : PVC (polyvinyl chloride) or PVCA (polyvinyl chloride
acetate)
Make sure to check if the card can be scanned first.
- Rigid cards may not be fed properly.
- If the surface of the card is dirty with grease marks (e.g.
fingerprints) and such, perform scanning after wiping the dirt off.
- Scanning thick documents such as plastic cards will be falsely
detected as multifeed.
In that case, disable multifeed detection.
HINT
z When scanning semi-transparent documents, increase the
brightness for scanning to avoid bleed-through.
z When you scan documents written in lead pencil, make sure to clean
the rollers frequently. Otherwise, the rollers will be contaminated
which may leave black traces on the document or cause feeding
errors.
For details about cleaning, refer to "Chapter 5 Daily Care" (page 70).
z If multifeeds, pick errors or paper jams occur frequently, refer to "7.3
Troubleshooting" (page 94).
z When you scan documents with the ADF, all documents must be flat
on the leading edge. Make sure that curls on the leading edge of the
documents are kept within the following range.
30 mm or more
(1.18 in.)
Feeding direction
Leading edgeLeading edge
3 mm
or less
(0.12 in.)
30 mm or more
(1.18 in.)
Feeding direction
5 mm
or less
Scanned side Scanned side
(0.20 in.)
TOP
Contents
Index
Introduction
Scanner
Overview
How to Load
Documents
How to Use the
Operator Panel
Various Ways to
Scan
Daily Care
Replacing the
Consumables
Troubleshooting
Operational
Settings
Appendix
Glossary
44
Page 45

Chapter 2 How to Load Documents
Loading Capacity
TOP
Contents
Index
The number of sheets that can be loaded in the ADF paper chute (feeder) is determined by the paper size and paper weight. See
the graph below.
A4/Letter or smaller
Legal
60
50
40
30
Capacity (sheets)
20
10
0
41 64
60
50
52
Paper weight (g/m
50
41
35
29
80 104 127
2
)
29
24
25
20
157
19
15
209
Introduction
Scanner
Overview
How to Load
Documents
How to Use the
Operator Panel
Various Ways to
Scan
Daily Care
Replacing the
Consumables
Unit Conversion
2
g/m
lb 11 14 17 20 21 24 28 34 42 56
kg 35 45 55 64.5 69 77.5 90 110 135 180
41 52 64 75 80 90 104 127 157 209
Troubleshooting
Operational
Settings
Appendix
Glossary
45
Page 46

Chapter 2 How to Load Documents
( Unit: mm)
To p
Reference point
Front side
Feed
direction
Bottom
35
Center
Area Not to be Perforated
An error may occur when there are punched holes in the area
shaded in light blue in the following figure. Such documents
can be scanned by using the flatbed (ScanPartner SP30F).
ATTENTION
The above condition applies when the document is set to the center of
the pick roller width.
HINT
If there are any holes in the 35 mm-wide central column, you can move
the document to the left or right to avoid an error.
Conditions for Multifeed Detection
Multifeed is an error where two or more sheets are fed through
the ADF at once. It is also called a multifeed when a different
document length is detected.
Multifeed detection is performed by either checking the
overlapping of documents, length of the documents, or the
combination of both. The following conditions are required for
an accurate detection.
Detection by overlapping
z Paper weight: 41 to 209 g/m2 (11 to 56 lb)
z Do not punch holes within 35 mm (1.38 in.) over the center of the
document. See Fig.1.
z Do not attach other documents within 35 mm (1.38 in.) over the
center of the document. See Fig.1.
Detection by length
z Load documents of the same paper length in the ADF paper chute
(feeder).
z Variance in document lengths: 1% or less
z Do not punch holes within 35 mm (1.38 in.) over the center of the
document. See Fig.1.
Detection by overlapping and length
z Load documents of the same paper length in the ADF paper chute
(feeder).
z Paper weight: 41 to 209 g/m
z Variance in document lengths: 1% or less
z Do not punch holes within 35 mm (1.38 in.) over the center of the
document. See Fig.1.
z Do not attach other documents within 35 mm (1.38 in.) over the
center of the document. See Fig.1.
2
(11 to 56 lb)
TOP
Contents
Index
Introduction
Scanner
Overview
How to Load
Documents
How to Use the
Operator Panel
Various Ways to
Scan
Daily Care
Replacing the
Consumables
Troubleshooting
Operational
Settings
Appendix
Glossary
46
Page 47

Chapter 2 How to Load Documents
Fig. 1
Reference point
Front side
35
To p
HINT
z Accuracy of multifeed detection may drop with some documents.
Multifeed cannot be detected for the top 30 mm of a document.
z For the shaded area in Fig. 1, you can also specify a length not to
detect multifeeds in the Software Operation Panel.
For details, refer to "8.6 Settings Related to Multifeed Detection"
(page 138).
TOP
Contents
Index
Introduction
Scanner
Overview
How to Load
Documents
Feed
direction
Bottom
Center
ATTENTION
z The above condition applies when the document is set to the center
of the pick roller width.
z When you use detection by overlapping, scanning thick documents
such as plastic cards will be falsely detected as multifeed.
In that case, disable multifeed detection.
( Unit: mm)
How to Use the
Operator Panel
Various Ways to
Scan
Daily Care
Replacing the
Consumables
Troubleshooting
Operational
Settings
Appendix
Glossary
47
Page 48

Chapter 2 How to Load Documents
39 mm
Pick roller
Conditions for Mixed Batch Scanning
The following conditions apply when scanning a mixed batch
of documents with different paper weights/friction coefficients/
sizes. Make sure to test a few sheets first to check if the
documents can be scanned.
For details about scanning, refer to "Documents with Different
Widths" (page 57).
Paper direction
Align the direction of the paper fiber with the feed direction.
Paper weight
The following paper weights can be used:
2
41 to 209 g/m
Friction coefficient
It is recommended to use the same type of paper from the same
manufacturer.
When papers of different manufacturers/brands are mixed, it affects the
feeding performance as the difference in the friction coefficient
increases.
The following friction coefficients are recommended:
0.35 to 0.60 (reference value for paper friction coefficient)
Document position
Use paper sizes that fit the 39 mm width of the pick roller in the center.
(11 to 56 lb)
Paper size
When you scan a mixed batch with different sizes, not feeding the
documents straight may cause paper jams or part of the image to
appear missing.
It is recommended to check the documents thoroughly before scanning
and also check the image if the document was skewed.
ATTENTION
z When scanning a mixed batch with different sizes, documents are
more likely to skew because the side guides do not contact every
sheet.
z Do not use [Check Length] or [Check Overlapping and Length] for
multifeed detection.
Documents that cannot be scanned in a mixed batch
The following types of documents cannot be mixed in the same batch:
z Carbonless paper
z Bond paper
z Perforated documents
z Thermal paper
z Carbon-backed paper
z OHP film
z Tracing paper
TOP
Contents
Index
Introduction
Scanner
Overview
How to Load
Documents
How to Use the
Operator Panel
Various Ways to
Scan
Daily Care
Replacing the
Consumables
Troubleshooting
Operational
Settings
Appendix
Glossary
48
Page 49

Chapter 2 How to Load Documents
Combinations of standard paper sizes in a mixed batch
Refer to the table below for a guideline of the range available for mixed batch scanning.
However, note that not feeding the documents straight may cause paper jams or part of the image to appear missing.
It is recommended to check the documents thoroughly before scanning and also check the image if the document was skewed.
Maximum size LTR (P)
Carrier
Sheet
Width (mm) (*1) 216 210 182 149 129 105 91 74.3 64.3 52.5
LTR (P )
216
A4 (P)
A5 (L)
Carrier Sheet
A4 (P)
A5 (L)
B5 (P)
B6 (L)
A5 (P)
A6 (L)
B6 (P)
B7 (L)
A6 (P)
A7 (L)
Minimum size
B7 (P)
B8 (L)
A7 (P)
A8 (L)
B8 (P) 64.3
210
182 Available range
149
129
105
91
74.3
B5 (P)
B6 (L)
A5 (P)
A6 (L)
B6 (P)
B7 (L)
A6 (P)
A7 (L)
B7 (P)
B8 (L)
A7 (P)
A8 (L)
B8 (P) A8 (P)
TOP
Contents
Index
Introduction
Scanner
Overview
How to Load
Documents
How to Use the
Operator Panel
Various Ways to
Scan
Daily Care
Replacing the
Consumables
Troubleshooting
A8 (P) 52.5
LTR: Letter size
(P) : Portrait
(L) : Landscape
Operational
Settings
Appendix
Glossary
49
Page 50

Chapter 2 How to Load Documents
Maximum width
Minimum width
Side guides
Narrowest document
Widest document
*1: The following picture shows how to set the widest and the narrowest
documents of the batch between the side guides.
TOP
Contents
Conditions for Automatic Page Size Detection
Index
ATTENTION
B8 (portrait) and A8 (portrait) cannot be scanned with other paper sizes.
[Automatic Page Size Detection] does not work with the
following types of documents:
z Non-rectangular documents
In addition, [Automatic Page Size Detection] may not work
with the following types of documents:
z Documents lighter than 52g/m2 (14lb)
z White documents with glossy edges
z Documents with slightly dark (gray) edges
Introduction
Scanner
Overview
How to Load
Documents
How to Use the
Operator Panel
Various Ways to
Scan
Daily Care
Replacing the
Consumables
Troubleshooting
Operational
Settings
Appendix
Glossary
50
Page 51

Chapter 2 How to Load Documents
Conditions for Using the Carrier Sheet
■Paper size
The following paper sizes can be scanned:
z Carrier Sheet (216 × 297 mm)
z A3 (297 × 420 mm) (*1)
z A4 (210 × 297 mm)
z A5 (148 × 210 mm)
z A6 (105 × 148 mm)
z B4 (257 × 364mm) (*1)
z B5 (182 × 257mm)
z B6 (128 × 182 mm)
z Post card (100 × 148 mm)
z Business card (91 × 55 mm, 55 × 91 mm)
z Letter (8.5 × 11 in./216 × 279.4 mm)
z Double Letter (11 × 17 in./279.4 × 431.8 mm) (*1)
z Custom size
Width : 25.4 to 216 mm (1 to 8.5 in.)
Length : 25.4 to 297 mm (1 to 11.69 in.)
*1: Fold in half for scanning.
■Conditions
Paper type
The following paper type is recommended:
Standard office paper
Paper weight
The following paper weights can be used:
2
Up to 127g/m
Up to 63.5 g/m
Precautions
Take note of the following:
z Up to three Carrier Sheets can be loaded at once.
z Depending on the amount of memory used by running applications,
there may be insufficient memory to scan a double-page spread
(34 lb)
2
(17 lb) when folded in half
document with the Carrier Sheet in high resolution. In that case,
specify a lower resolution and try scanning again.
z Do not write on, color, stain, or cut the end with a black and white
pattern on the Carrier Sheet.
z Do not place the Carrier Sheet upside down. Otherwise, a paper jam
may occur and damage the Carrier Sheet and the document inside.
z Do not leave your document inside the Carrier Sheet for a long time.
Otherwise, the ink on the document may be transferred onto the
Carrier Sheet.
z To avoid deformation, do not use or leave the Carrier Sheet in high
temperature places such as under direct sunlight or near a heating
apparatus for a long time.
z Do not fold or pull the Carrier Sheet.
z Do not use a damaged Carrier Sheet because it may damage or
cause the scanner to malfunction.
z To avoid deformation, keep the Carrier Sheet on a flat surface without
any weight on it.
z Be careful not to cut your finger on the edge of the Carrier Sheet.
z If paper jams occur frequently, feed about 50 sheets of PPC paper
(recycled paper) before scanning with the Carrier Sheet.
The PPC paper can either be blank or printed.
z Paper jams may occur when you place several small documents (e.g.
photos, postcards) in the Carrier Sheet for scanning. It is
recommended to place only one document at a time in the Carrier
Sheet.
TOP
Contents
Index
Introduction
Scanner
Overview
How to Load
Documents
How to Use the
Operator Panel
Various Ways to
Scan
Daily Care
Replacing the
Consumables
Troubleshooting
Operational
Settings
Appendix
Glossary
51
Page 52

TOP
Contents
Index
Chapter 3 How to Use the Operator Panel
This chapter explains how to use the operator panel.
3.1 Operator Panel ...........................................................................................................................................53
Introduction
Scanner
Overview
How to Load
Documents
How to Use the
Operator Panel
Various Ways to
Scan
Daily Care
Replacing the
Consumables
Troubleshooting
Operational
Settings
Appendix
Glossary
Page 53

Chapter 3 How to Use the Operator Panel
Check
Scan
/Stop
Power
Check indicator
Lights or flashes in orange when an error occurs.
[Scan/Stop] button (*1)
Launches the linked application software.
Clears the displayed error indication.
Cancels the scan.
[Power] button
Turns the power on/off.
*1: For details about how to scan by pressing the [Scan/Stop] button, refer to the scanner driver Help (included in the Setup DVD-ROM) or "Using a
Button on the Scanner to Start Scanning" (page 68).
Power indicator
Lights in green when the scanner is turned on.
This indicator flashes immediately after the scanner is turned on,
when resuming from power saving mode, or when a device error
occurs.
TOP
Contents
3.1 Operator Panel
The operator panel consists of buttons and indicators.
Names and Functions
Index
Introduction
Scanner
Overview
How to Load
Documents
How to Use the
Operator Panel
Various Ways to
Scan
Daily Care
Replacing the
Consumables
Troubleshooting
Operational
Settings
Appendix
Glossary
53
Page 54

Chapter 3 How to Use the Operator Panel
Signals on the indicator
TOP
Contents
Index
Check
indicator
Turns off Flashes Processing initialization.
Turns off Turns on Ready to start scanning.
Turns on Turns on Indicates that a temporary error occurred
Power
indicator
Description
Shown when resuming from power saving
mode or until the scanner is ready after the
ADF is closed.
Indicates that the initialization was
successfully completed.
This is referred to as "ready" status.
When the scanner is ready, the Check
indicator turns off and the Power indicator
turns on.
The indicators operate in the same way when
the scanner is in power saving mode.
during scanning.
The Check indicator turns on.
For details about errors, refer to "Temporary
Errors" (page 91).
The indicators return to the ready status if the
[Scan/Stop] button is pressed.
Introduction
Scanner
Overview
How to Load
Documents
How to Use the
Operator Panel
Various Ways to
Scan
Daily Care
Replacing the
Consumables
Flashes Turns on
or flashes
Indicates that a device error (alarm) occurred
during initialization or scanning.
The Power indicator turns on or flashes and
the Check indicator flashes.
For details about errors, refer to "Device
Errors" (page 92).
The indicators return to the ready status if the
[Scan/Stop] button is pressed.
If this alarm occurs, turn the power off and
then back on. If the problem persists after
turning the power back on, contact your
FUJITSU scanner dealer or an authorized
FUJITSU scanner service provider.
Troubleshooting
Operational
Settings
Appendix
Glossary
54
Page 55

TOP
Contents
Index
Chapter 4 Various Ways to Scan
This chapter explains how to configure scanner settings and scan different types of documents with the image scanning
application.
4.1 Summary ....................................................................................................................................................56
4.2 Scanning Documents of Different Types and Sizes....................................................................................57
4.3 Advanced Scanning....................................................................................................................................67
4.4 Customizing the Scanner Settings .............................................................................................................68
Introduction
Scanner
Overview
How to Load
Documents
How to Use the
Operator Panel
Various Ways to
Scan
Daily Care
Replacing the
Consumables
Troubleshooting
Operational
Settings
Appendix
Glossary
Page 56

Chapter 4 Various Ways to Scan
TOP
Contents
4.1 Summary
The following lists the main ways of scanning documents.
Scanning documents of different types and sizes
z "Documents with Different Widths" (page 57)
z "Documents Larger than A4/Letter Size" (page 58)
z "Scanning Photographs and Clippings" (page 60)
z "Long Page Scanning" (page 62)
z "Scanning a Book (ScanPartner SP30F)" (page 63)
z "Scanning a Large Document on the Flatbed (ScanPartner SP30F)"
(page 65)
Advanced scanning
z "Feeding Documents Manually in the ADF" (page 67)
Customizing the scanner settings
z "Using a Button on the Scanner to Start Scanning" (page 68)
For information on other ways of scanning, refer to the
scanner driver's Help.
Index
Introduction
Scanner
Overview
How to Load
Documents
How to Use the
Operator Panel
Various Ways to
Scan
Daily Care
Replacing the
Consumables
Troubleshooting
Operational
Settings
Appendix
Glossary
56
Page 57

Chapter 4 Various Ways to Scan
Pick roller's width
Good
Pick roller's width
Bad
TOP
Contents
4.2 Scanning Documents of Different Types and Sizes
Documents with Different Widths
ATTENTION
When you scan a mixed batch with different widths, some of the smaller
documents may be skewed or not fed into the ADF. In that case,
separate the documents by their widths, and scan them in different
batches.
HINT
For more details about scanning a mixed batch of documents, refer to
"Conditions for Mixed Batch Scanning" (page 48).
ATTENTION
Make sure that all documents are placed underneath the pick
roller. Otherwise, some documents may be skewed or not fed into
the ADF.
1 Align the top of the documents.
Index
Introduction
Scanner
Overview
How to Load
Documents
How to Use the
Operator Panel
Various Ways to
Scan
Daily Care
Replacing the
Consumables
2 Place the documents at the center of the ADF paper chute
(feeder), and adjust the side guides to the widest
document in the batch.
For details, refer to "Chapter 2 How to Load Documents" (page 38).
Troubleshooting
Operational
Settings
Appendix
Glossary
57
Page 58

Chapter 4 Various Ways to Scan
3 In the scanner driver, configure the scan settings to detect
the paper size automatically.
For details, refer to the scanner driver's Help.
4 Scan the document with the image scanning application.
For details, refer to the manual of the image scanning application.
Documents Larger than A4/Letter Size
The Carrier Sheet can be used to scan documents larger than
A4/Letter size, such as A3 and B4. By folding the document in
half and scanning in duplex mode, the two sides are merged
into a single image.
ATTENTION
Part of the image around where the document is folded may appear
missing. Using the Carrier Sheet is not recommended for obtaining high
quality image.
HINT
You can also scan a double-sided document that is smaller than A4
size, and output the image as a double-page spread image.
In this case, place the double-sided document that is smaller than A4
size inside the Carrier Sheet in step 2.
TOP
Contents
Index
Introduction
Scanner
Overview
How to Load
Documents
How to Use the
Operator Panel
Various Ways to
Scan
1 Place the document inside the Carrier Sheet.
1 Fold the document in half so that the sides to be scanned are
facing out.
Fold it tightly and smooth out any creases.
Otherwise, it may cause the document to skew during feeding.
Daily Care
Replacing the
Consumables
Troubleshooting
Operational
Settings
Appendix
Glossary
58
Page 59

Chapter 4 Various Ways to Scan
2 Place the document inside the Carrier Sheet.
Align the fold line with the right edge of the Carrier Sheet so that
the document fits in the upper right-hand corner.
2 Load the Carrier Sheet face-down in the ADF paper chute
(feeder).
Secure the Carrier Sheet with the side guides to avoid skewing.
TOP
Contents
Index
Introduction
Scanner
Overview
How to Load
Documents
How to Use the
Operator Panel
HINT
The front side of the Carrier Sheet has a thick vertical line on
the right side of the black & white pattern.
3 In the scanner driver, configure the scan settings for using
the Carrier Sheet.
For details, refer to the scanner driver's Help.
For some image scanning applications, the scanner driver's setup
dialog box may not appear.
4 Scan the document with the image scanning application.
For details, refer to the manual of the image scanning application.
DThe images on the front and back are merged into a single image.
Various Ways to
Scan
Daily Care
Replacing the
Consumables
Troubleshooting
Operational
Settings
Appendix
Glossary
59
Page 60

Chapter 4 Various Ways to Scan
ATTENTION
z There may be a line or a gap appearing between the front and
back side images.
Also when you scan thick papers, images on both left and right
may skew towards each other from the top.
These symptoms may be improved when you perform the
following:
- Fold the document tightly
- Align the edges of the document neatly with the edges of the
Carrier Sheet
- Turn over the Carrier Sheet to the other (reverse) side
z When [Automatic detection] is specified for [Paper Size], the
closest standard size (A3, A4 or Double Letter) is selected from
the same drop-down list. Note that the size of the image may
become smaller than the original document depending on the
document scanned.
Example: When you scan an A3 size document whose content
is printed to fit A4 size in the center
DThe image is output in B4 size.
To output the scanned image in the actual size of the document,
specify the document size for [Paper size].
z Part of the image around where the document is folded may
appear missing. In that case, set the document so its edge is
about 1 mm inside from the edge of the Carrier Sheet.
z When [Black & White] is specified for [Image Mode], the edges
around the image may appear in black from the shadow of the
document.
Scanning Photographs and Clippings
Using the Carrier Sheet allows you to scan documents that
can be damaged quite easily such as photographs, or
documents that are difficult to load directly such as newspaper
clippings.
1 Place the document inside the Carrier Sheet.
Place it against the top center of the Carrier Sheet.
TOP
Contents
Index
Introduction
Scanner
Overview
How to Load
Documents
How to Use the
Operator Panel
Various Ways to
Scan
Daily Care
Replacing the
Consumables
Troubleshooting
Operational
Settings
Appendix
Glossary
60
Page 61

Chapter 4 Various Ways to Scan
$CEM
$CEM
Blank
sheet
2 Load the Carrier Sheet face-down in the ADF paper chute
(feeder), as shown below.
Secure the Carrier Sheet with the side guides to avoid skewing.
ATTENTION
z The image is output at the center of the page in the size
specified in [Paper Size].
z When [Automatic detection] is specified for [Paper Size], the
closest standard size is selected from the same drop-down list.
Note that the size of the image may become smaller than the
original document depending on the document scanned, or part
of the image may appear missing.
Example: When an A5 size image is printed in the center of an
A4 size document
DThe image is output in A5 size.
To output the scanned image in the actual size of the document,
specify the document size for [Paper size].
TOP
Contents
Index
Introduction
Scanner
Overview
How to Load
Documents
How to Use the
Operator Panel
3 In the scanner driver, configure the scan settings for using
the Carrier Sheet.
For details, refer to the scanner driver's Help.
4 Scan the document with the image scanning application.
For details, refer to the manual of the image scanning application.
HINT
In the following cases, place a blank (white) sheet of paper
underneath the document when scanning.
z The scanned image is not output in the correct size when
[Automatic detection] is selected in the [Paper size] drop-down
list
z Shadows appear around the edges of the scanned image
z Black lines appear around the edges of a uniquely shaped
cutting
z Colors outside the document appear on the scanned image
Various Ways to
Scan
Daily Care
Replacing the
Consumables
Troubleshooting
Operational
Settings
Appendix
Glossary
61
Page 62

Chapter 4 Various Ways to Scan
Long Page Scanning
Documents with a length up to 3,048 mm (120 in.) can be
scanned by long page scanning.
Document sizes that can be scanned will vary according to the
image scanning application.
For details, refer to the manual of the image scanning
application.
1 Load a document in the ADF paper chute (feeder).
For details, refer to "Chapter 2 How to Load Documents" (page 38).
ATTENTION
z Long page documents should be loaded one sheet at a time in
the ADF paper chute (feeder).
z When you scan long pages, take note of the following.
- Loading
Hold the document with your hand so it does not fall out of the
ADF paper chute (feeder).
-Removing
Secure enough space around the stacker to prevent the
ejected sheet from falling off the stacker.
HINT
To scan documents longer than A4/Letter size, perform the
following:
z Pull out the chute extensions all the way.
For details, refer to "1.6 Setting Up the ADF Paper Chute
(feeder)" (page 27).
z Lift the stacker and stacker extension towards you.
For details, refer to "1.7 Setting Up the Stacker" (page 28).
TOP
Contents
Index
Introduction
Scanner
Overview
How to Load
Documents
How to Use the
Operator Panel
Various Ways to
Scan
Daily Care
Replacing the
Consumables
Troubleshooting
2 In the scanner driver, configure the scan settings to scan
the paper size of the long page.
For details, refer to the scanner driver's Help.
For some image scanning applications, the scanner driver's setup
dialog box may not appear.
Operational
Settings
Appendix
Glossary
62
Page 63

Chapter 4 Various Ways to Scan
3 Scan the document with the image scanning application.
For details, refer to the manual of the image scanning application.
Scanning a Book (ScanPartner SP30F)
1 Open the document cover.
For details, refer to "1.5 Opening/Closing the Document Cover
(ScanPartner SP30F)" (page 26).
TOP
Contents
Index
Introduction
Scanner
Overview
2 Remove the document cover by pulling it out in the
direction of the arrow.
How to Load
Documents
How to Use the
Operator Panel
Various Ways to
Scan
Daily Care
Replacing the
Consumables
Troubleshooting
Operational
Settings
Appendix
Glossary
63
Page 64

Chapter 4 Various Ways to Scan
Reference point
3 Load the document on the document bed.
Place the document face-down to align its top left-hand corner with
the reference point.
4 In the scanner driver, configure the scan settings for using
the flatbed.
For details, refer to the scanner driver's Help.
7 Close the document cover.
For details, refer to "1.5 Opening/Closing the Document Cover
(ScanPartner SP30F)" (page 26).
TOP
Contents
Index
Introduction
Scanner
Overview
How to Load
Documents
How to Use the
Operator Panel
Various Ways to
Scan
Daily Care
5 Scan the document with the image scanning application.
For details, refer to the manual of the image scanning application.
Do not look directly into the light source.
ATTENTION
Do not move the document during scanning.
6 Attach the document cover.
Replacing the
Consumables
Troubleshooting
Operational
Settings
Appendix
Glossary
64
Page 65

Chapter 4 Various Ways to Scan
Reference point
Scanning a Large Document on the Flatbed (ScanPartner SP30F)
Place the document face-down to align its top left-hand corner with
the reference point.
TOP
Contents
Index
Introduction
1 Open the document cover.
For details, refer to "1.5 Opening/Closing the Document Cover
(ScanPartner SP30F)" (page 26).
2 Remove the document cover by pulling it out in the
direction of the arrow.
4 In the scanner driver, configure the scan settings for using
the flatbed.
For details, refer to the scanner driver's Help.
5 Scan the document with the image scanning application.
For details, refer to the manual of the image scanning application.
Scanner
Overview
How to Load
Documents
How to Use the
Operator Panel
Various Ways to
Scan
Daily Care
Replacing the
Consumables
Troubleshooting
3 Load the document on the document bed.
Do not look directly into the light source.
ATTENTION
Do not move the document during scanning.
6 Attach the document cover.
Operational
Settings
Appendix
Glossary
65
Page 66

Chapter 4 Various Ways to Scan
7 Close the document cover.
For details, refer to "1.5 Opening/Closing the Document Cover
(ScanPartner SP30F)" (page 26).
TOP
Contents
Index
Introduction
Scanner
Overview
How to Load
Documents
How to Use the
Operator Panel
Various Ways to
Scan
Daily Care
Replacing the
Consumables
Troubleshooting
Operational
Settings
Appendix
Glossary
66
Page 67

Chapter 4 Various Ways to Scan
TOP
Contents
4.3 Advanced Scanning
Feeding Documents Manually in the ADF
Documents can also be loaded manually one sheet at a time
in the ADF.
Normally, in automatic feeding, the scanner stops scanning
once all the documents loaded in the ADF paper chute have
been scanned. In manual feeding, the scanner waits for the
next document to be loaded within a specified time. Scanning
will continue as long as another document is loaded within the
set time, and stops if no document is loaded.
By using this method, you can perform scanning as you check
the documents one by one.
Manual feeding is effective in the following cases.
z To scan as you check the contents of each sheet.
z To scan documents that cause multifeed or paper jam when loaded
together in the same batch.
z To continue scanning documents such as magazine/newspaper
clippings that cannot be loaded together.
1 Enable manual feeding in the Software Operation Panel.
For details, refer to "Waiting Time in Manual Feed Mode [Manual-feed
timeout]" (page 143).
3 Scan the document with the image scanning application.
For details, refer to the manual of the image scanning application.
DAfter the document is scanned, the rollers inside the ADF keep
rotating, waiting for the next document to be loaded for the time
specified in the Software Operation Panel.
4 Load the next document in the ADF paper chute (feeder).
DThe document is scanned.
5 Repeat step 4 until all documents are scanned.
DScanning will stop if no document is loaded within the set time.
HINT
z When the scanner waits for the next document to be loaded,
you can stop scanning by pressing the [Scan/Stop] button on
the operator panel.
z When [Manual-feed timeout] is enabled, the scanner will wait
for the set time even if you start scanning with no document in
the ADF paper chute (feeder).
z When you use manual feeding frequently, replacement cycle of
the consumables may be shortened.
Index
Introduction
Scanner
Overview
How to Load
Documents
How to Use the
Operator Panel
Various Ways to
Scan
Daily Care
Replacing the
Consumables
Troubleshooting
2 Load a document in the ADF paper chute (feeder).
For details, refer to "Chapter 2 How to Load Documents" (page 38).
Operational
Settings
Appendix
Glossary
67
Page 68

Chapter 4 Various Ways to Scan
TOP
Contents
4.4 Customizing the Scanner Settings
Using a Button on the Scanner to Start Scanning
The [Scan/Stop] button on the operator panel can be
configured to perform scanning by pressing the button.
To configure this setting, you first need to assign an
application to be launched from the [Scan/Stop] button.
Computer setup
1 Confirm that the scanner is connected to the computer,
then turn on the scanner.
For details about how to connect the scanner to the computer, refer to
the Quick Installation Sheet.
For details about how to turn on the scanner, refer to "1.3 Turning the
Power ON/OFF" (page 24).
2 Display the [Control Panel] dialog box.
z Windows XP/Windows Vista/Windows Server 2008/Windows 7
Click [Start] menu J [Control Panel].
z Windows Server 2012/Windows 8
Right-click the Start screen, and select [All apps] on the app bar J
[Control Panel] under [Windows System].
z Windows Server 2012 R2/Windows 8.1
Select [↓] on the lower left side of the Start screen J [Control
Panel] under [Windows System].
To display [↓], move the mouse cursor.
4 Right-click on the scanner icon, and select [Scan
properties] from the displayed menu.
DThe properties dialog box of the scanner appears.
5 Click the [Events] tab and select an event.
From the [Select an event] drop-down list, select an event from which
you want to launch an application.
In this function, the following events can be specified:
z [Scan Button] (press the [Scan/Stop] button)
Index
Introduction
Scanner
Overview
How to Load
Documents
How to Use the
Operator Panel
Various Ways to
Scan
Daily Care
Replacing the
Consumables
Troubleshooting
Operational
Settings
3 Click [View devices and printers].
DThe [Devices and Printers] dialog box appears.
Appendix
Glossary
68
Page 69

Chapter 4 Various Ways to Scan
Check
Scan
/Stop
Power
[Scan/Stop] button
6 Select an action and an application to be launched by the
scanner button event.
Click [Start this program] under [Actions], and select an application
from the drop-down list on the right.
TOP
Contents
Scanner setup
Index
Introduction
Scanner
Overview
7 Click the [OK] button.
The setup of the computer is completed. Proceed to configure the
scanner settings.
No particular setting is required.
DThe specified application is launched when you press the [Scan/
Stop] button.
HINT
For details, refer to "Chapter 3 How to Use the Operator Panel" (page
52).
How to Load
Documents
How to Use the
Operator Panel
Various Ways to
Scan
Daily Care
Replacing the
Consumables
Troubleshooting
Operational
Settings
Appendix
Glossary
69
Page 70

TOP
Contents
Index
Chapter 5 Daily Care
This chapter describes how to clean the scanner.
Do not use aerosol spray or spray that contains alcohol to clean
the scanner. Dust blown up by strong air from the spray may
enter inside the scanner which may cause the scanner to fail or
malfunction.
Also note that sparks generated by static electricity may cause a
fire.
The glasses inside the ADF become very hot when the scanner
is being used.
Before you start cleaning the inside, make sure to turn off the
power, unplug the power cable and wait at least 15 minutes for
the ADF glass to cool down.
Introduction
Scanner
Overview
How to Load
Documents
How to Use the
Operator Panel
Various Ways to
Scan
Daily Care
Replacing the
Consumables
5.1 Cleaning Materials and Locations that Require Cleaning...........................................................................71
5.2 Cleaning the Outside ..................................................................................................................................73
5.3 Cleaning the Inside.....................................................................................................................................74
5.4 Cleaning the Carrier Sheet .........................................................................................................................79
Troubleshooting
Operational
Settings
Appendix
Glossary
Page 71

Chapter 5 Daily Care
TOP
Contents
5.1 Cleaning Materials and Locations that Require Cleaning
Cleaning Materials
Name Part No. Notes
Cleaner F1 PA03950-0352 100 ml
Moisten a cloth or Cleaning
Paper with this liquid to
wipe the scanner clean.
It may take a long time to
dry if an excessive amount
is used. Use it in small
quantity. Wipe off the
cleaner completely to leave
no residue on the cleaned
parts.
Cleaning Paper CA99501-0012 10 sheets
Use this non-woven sheet
with Cleaner F1.
Cleaning Wipe PA03950-0419 24 packets
Pre-moistened with Cleaner F1.
It can be used instead of
moistening a cloth with Cleaner
F1.
ATTENTION
In order to use the cleaning materials safely and correctly, read the
precautions on each product thoroughly.
For more information about the cleaning materials, contact
your FUJITSU scanner dealer or an authorized FUJITSU
scanner service provider.
Index
Introduction
Scanner
Overview
How to Load
Documents
How to Use the
Operator Panel
Various Ways to
Scan
Daily Care
Replacing the
Consumables
Troubleshooting
Cotton swab Commercially available
Dry cloth
Operational
Settings
Appendix
Glossary
71
Page 72

Chapter 5 Daily Care
Location and Frequency
TOP
Contents
Index
Location Frequency
ADF Brake roller Every 5,000 sheets
Pick roller
Plastic idlerroller
Glass
Ultrasonic sensor
Feed roller
Eject roller
Flatbed
(ScanPartner
SP30F)
ATTENTION
Cleaning cycles may vary depending on the condition of the documents.
Also, cleaning must be performed more frequently when the following
types of documents are scanned:
z Smooth-faced documents such as coated paper
z Documents with printed text/graphics that almost cover the entire
surface
z Chemically-treated documents such as carbonless paper
z Documents containing a large amount of calcium carbonate
z Documents written in lead pencil
z Documents on which the toner is not sufficiently fused
Document pad
Document bed
Plastic frame
Introduction
Scanner
Overview
How to Load
Documents
How to Use the
Operator Panel
Various Ways to
Scan
Daily Care
Replacing the
Consumables
Troubleshooting
Operational
Settings
Appendix
Glossary
72
Page 73

Chapter 5 Daily Care
Thinner
Cleaner F1
or mild detergent
Cloth
Cleaning Wipe
Thinner
Cleaner F1
or mild detergent
Cloth
Cleaning Wipe
TOP
Contents
5.2 Cleaning the Outside
The outside of the scanner, including the ADF paper chute
(feeder) and the stacker, should be cleaned with either a piece
of dry cloth, a cloth moistened with Cleaner F1/mild detergent,
or a sheet of Cleaning Wipe.
ATTENTION
z To avoid deformation and discoloration, never use paint thinner or
any other organic solvents.
z Be careful not to let any moisture or water inside the scanner during
cleaning.
z It may take a long time to dry if an excessive amount of Cleaner F1/
mild detergent is used. Use it in small quantity. Wipe off the cleaner
completely to leave no residue on the cleaned parts.
For ScanPartner SP25/ScanPartner SP30
Index
Introduction
For ScanPartner SP30F
Scanner
Overview
How to Load
Documents
How to Use the
Operator Panel
Various Ways to
Scan
Daily Care
Replacing the
Consumables
Troubleshooting
Operational
Settings
Appendix
Glossary
73
Page 74
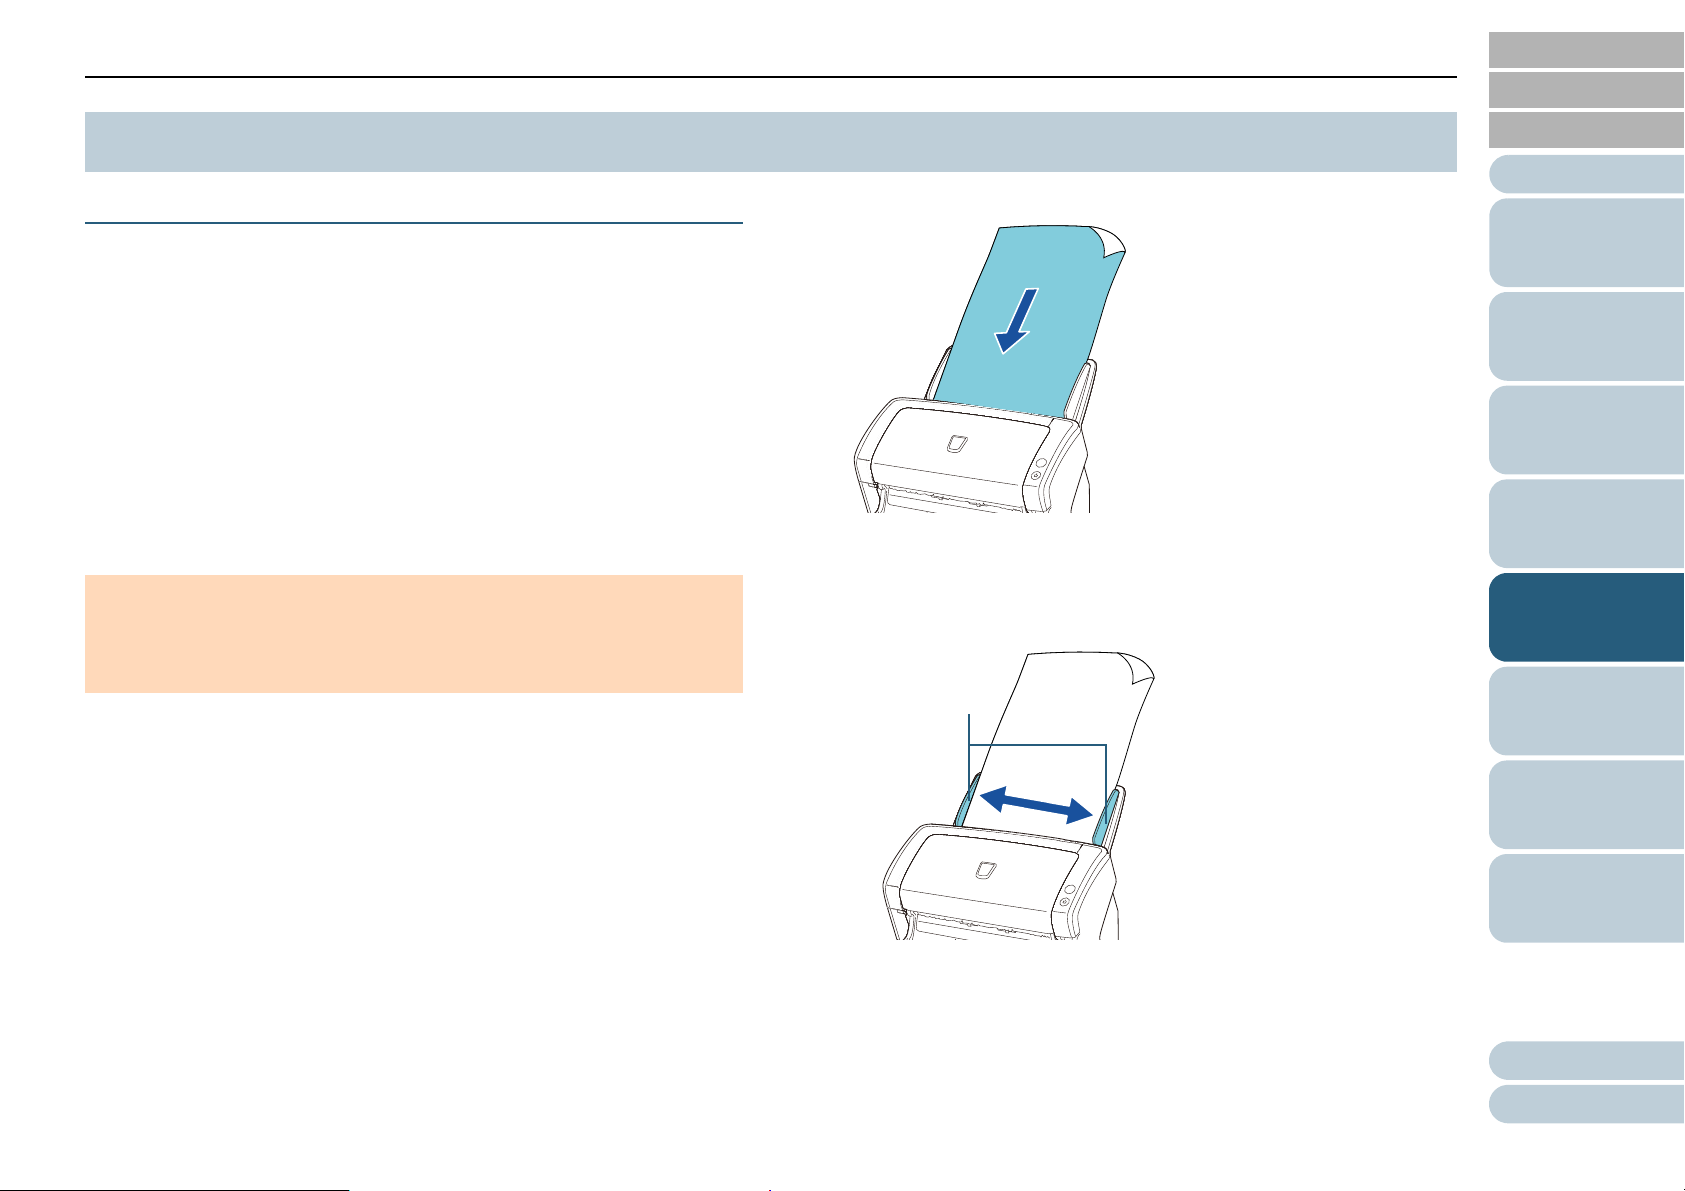
Chapter 5 Daily Care
Side guides
TOP
Contents
5.3 Cleaning the Inside
Cleaning the ADF (with Cleaning Paper)
The ADF can be cleaned with a sheet of Cleaning Paper
moistened with Cleaner F1.
As the scanner continues to feed the documents, paper dust
will accumulate inside the ADF and it may cause scanning
errors.
Cleaning should be performed approximately every 5,000
sheets scanned. Note that this guideline varies depending on
the types of documents you scan. For instance, it may be
necessary to clean the scanner more frequently when you
scan documents on which the toner is not sufficiently fused.
ATTENTION
z Do not use water or mild detergent to clean the ADF.
z It may take a long time to dry if an excessive amount of Cleaner F1 is
used. Use it in small quantity.
1 Turn on the scanner.
For details, refer to "1.3 Turning the Power ON/OFF" (page 24).
5 Load the Cleaning Paper in the ADF paper chute (feeder).
6 Adjust the side guides to the width of the Cleaning Paper.
Do not leave space between the side guides and the Cleaning Paper.
Otherwise, the Cleaning Paper may be fed skewed.
Index
Introduction
Scanner
Overview
How to Load
Documents
How to Use the
Operator Panel
Various Ways to
Scan
Daily Care
Replacing the
Consumables
2 Spray the Cleaning Paper with Cleaner F1.
3 Pull out the chute extensions according to the length of
4 Lift the stacker and stacker extension according to the
the Cleaning Paper.
For details, refer to "1.6 Setting Up the ADF Paper Chute (feeder)"
(page 27).
length of the Cleaning Paper.
For details, refer to "1.7 Setting Up the Stacker" (page 28).
Troubleshooting
Operational
Settings
7 Start up an application for scanning and perform a scan.
Appendix
Glossary
74
Page 75

Chapter 5 Daily Care
Glass (× 2)
Pick roller
(× 2)
Ultrasonic sensor (× 2)
Plastic idler roller
(× 4)
Feed roller
(× 2)
Eject roller
(× 2)
Brake roller
(× 2)
Cleaning the ADF (with cloth)
The ADF can be cleaned with a piece of cloth moistened with
Cleaner F1, or a sheet of Cleaning Wipe.
As the scanner continues to feed the documents, paper dust
will accumulate inside the ADF and it may cause scanning
errors.
Cleaning should be performed approximately every 5,000
sheets scanned. Note that this guideline varies depending on
the types of documents you scan. For instance, it may be
necessary to clean the scanner more frequently when you
scan documents on which the toner is not sufficiently fused.
3 Clean the following locations with a cloth moistened with
Cleaner F1 or a sheet of Cleaning Wipe.
TOP
Contents
Index
Introduction
Scanner
Overview
How to Load
Documents
How to Use the
Operator Panel
ATTENTION
z Do not use water or mild detergent to clean the ADF.
z It may take a long time to dry if an excessive amount of Cleaner F1 is
1 Turn off the scanner and wait for at least 15 minutes.
2 Open the ADF.
The glasses inside the ADF become very hot
when the scanner is being used.
Before you start cleaning the inside, make sure to
turn off the power, unplug the power cable and
wait at least 15 minutes for the ADF glass to cool
down.
used. Use it in small quantity. Wipe off the cleaner completely to
leave no residue on the cleaned parts.
For details, refer to "1.3 Turning the Power ON/OFF" (page 24).
For details, refer to "1.4 Opening/Closing the ADF" (page 25).
Be careful not to have your fingers caught
when the ADF closes.
Various Ways to
Scan
Daily Care
Replacing the
Consumables
Troubleshooting
Operational
Settings
Appendix
Glossary
75
Page 76

Chapter 5 Daily Care
Document sensor
ATTENTION
Make sure that the cloth does not get caught and damage the
document sensors.
Plastic idler roller (× 4)
Gently wipe the surface of the rollers. Make sure that it is cleaned
properly because residue on the roller will affect the feeding
performance. Also be careful not to damage the sponge which is
attached on each roller.
Glass (× 2)
Gently wipe the dirt and dust off the surface of the glass sections.
TOP
Contents
Index
Introduction
Scanner
Overview
Brake roller (× 2)
Remove the roller from the scanner.
For details about removing the brake roller, refer to "6.2 Replacing the
Brake Roller" (page 82).
Gently wipe along the grooves, taking care not to damage the roller
surface.
Pick roller (× 2)
Gently wipe along the grooves as you rotate the roller manually, taking
care not to damage the roller surface. Make sure that it is cleaned
properly because residue on the roller will affect the feeding
performance.
ATTENTION
Vertical streaks may appear on the scanned image when the glass is
dirty.
How to Load
Documents
How to Use the
Operator Panel
Various Ways to
Scan
Daily Care
Replacing the
Consumables
Troubleshooting
Operational
Settings
Appendix
Glossary
76
Page 77

Chapter 5 Daily Care
Ultrasonic sensor
Check
Scan
/Stop
Power
[Scan/Stop] button
Ultrasonic sensor (× 2)
Gently wipe the dirt and dust off the surface of the ultrasonic sensors.
If it is difficult to clean, use a cotton swab.
Feed roller (× 2)/Eject roller (× 2)
The power must be turned on to rotate the feed/eject rollers.
1 Turn on the scanner.
For details, refer to "1.3 Turning the Power ON/OFF" (page 24).
2 When the operator panel is in ready status, open the ADF.
For details, refer to "1.4 Opening/Closing the ADF" (page 25).
3 When you press the [Scan/Stop] button on the operator panel, the
feed/eject rollers rotate a certain amount.
When you press the [Scan/Stop] button,
the feed/eject rollers rotate at the same
time. Be careful not to touch the rollers
with your hand while they are rotating.
TOP
Contents
Index
Introduction
Scanner
Overview
How to Load
Documents
How to Use the
Operator Panel
Various Ways to
Scan
Daily Care
4 Put a piece of cloth moistened with Cleaner F1 or a sheet of
Cleaning Wipe against the roller surface, and wipe horizontally.
Wipe the whole surface by pressing the [Scan/Stop] button to
rotate the rollers.
Make sure that it is cleaned properly because residue on the roller
will affect the feeding performance.
As a guideline, pressing the [Scan/Stop] button seven times will
rotate the feed/eject rollers one revolution.
Replacing the
Consumables
Troubleshooting
Operational
Settings
Appendix
Glossary
77
Page 78

Chapter 5 Daily Care
Plastic frame
Document bed
Document pad
4 Close the ADF.
For details, refer to "1.4 Opening/Closing the ADF" (page 25).
TOP
Contents
Cleaning the Flatbed (ScanPartner SP30F)
Index
Be careful not to have your fingers caught
when the ADF closes.
ATTENTION
Confirm that the ADF is closed properly. Otherwise, the document
may not be fed into the ADF.
The flatbed should be cleaned with a piece of cloth moistened
with Cleaner F1, or a sheet of Cleaning Wipe.
1 Open the document cover.
For details, refer to "1.5 Opening/Closing the Document Cover
(ScanPartner SP30F)" (page 26).
2 Clean the following locations with a cloth moistened with
Cleaner F1 or a sheet of Cleaning Wipe.
Introduction
Scanner
Overview
How to Load
Documents
How to Use the
Operator Panel
Various Ways to
Scan
Daily Care
Replacing the
Consumables
ATTENTION
Be careful not to let the cleaner in between the document bed and
the plastic frame.
3 Wait for the cleaned parts to dry.
4 Close the document cover.
For details, refer to "1.5 Opening/Closing the Document Cover
(ScanPartner SP30F)" (page 26).
Troubleshooting
Operational
Settings
Appendix
Glossary
78
Page 79

Chapter 5 Daily Care
TOP
Contents
5.4 Cleaning the Carrier Sheet
The Carrier Sheet should be cleaned with either a piece of dry
cloth, a cloth moistened with Cleaner F1, or a sheet of
Cleaning Wipe.
Gently wipe the dirt and dust off the surface and the inside of
the Carrier Sheet.
As you keep using the Carrier Sheet, dirt and dust will
accumulate on the surface and the inside.
Clean it regularly because it may result in scanning errors.
ATTENTION
z Be careful to avoid creasing the Carrier Sheet.
z To avoid deformation and discoloration, never use paint thinner or
any other organic solvents.
z Do not use force to rub against the Carrier Sheet because it may be
damaged or deformed.
z After cleaning the inside, do not close the Carrier Sheet until it is
completely dry.
z The Carrier Sheet should be replaced approximately every 500
scans.
For information on purchasing the Carrier Sheet, contact your
FUJITSU scanner dealer or an authorized FUJITSU scanner service
provider.
Index
Introduction
Scanner
Overview
How to Load
Documents
How to Use the
Operator Panel
Various Ways to
Scan
Daily Care
Replacing the
Consumables
Troubleshooting
Operational
Settings
Appendix
Glossary
79
Page 80

TOP
Contents
Index
Chapter 6 Replacing the Consumables
This chapter describes how to replace the consumables for the scanner.
The glasses inside the ADF become very hot when
the scanner is being used.
Before you replace the consumables, make sure to
turn off the power, unplug the power cable and wait
at least 15 minutes for the ADF glass to cool down.
6.1 Consumables and Replacement Cycles.....................................................................................................81
6.2 Replacing the Brake Roller.........................................................................................................................82
Introduction
Scanner
Overview
How to Load
Documents
How to Use the
Operator Panel
Various Ways to
Scan
Daily Care
Replacing the
Consumables
6.3 Replacing the Pick Roller ...........................................................................................................................84
Troubleshooting
Operational
Settings
Appendix
Glossary
Page 81

Chapter 6 Replacing the Consumables
TOP
Contents
6.1 Consumables and Replacement Cycles
The following table shows the consumables used for the
scanner.
Name Part No. Suggested replacement
cycle
BRAKE ROLLER PA03540-
0001
PICK ROLLER PA03540-
0002
200,000 sheets or one year
200,000 sheets or one year
Consumables need to be replaced periodically. It is
recommended that you keep a stock of new consumables and
replace them before it reaches the end of the consumable life.
The scanner records the number of sheets scanned after
replacing the consumables (brake roller/pick roller), which
allows you to check the status on each consumable.
For details, refer to "8.4 Settings Related to Sheet Counters"
(page 129).
Note that the suggested replacement cycles are guidelines for
using A4 (80 g/m2 [20 lb]) wood-free or wood-containing
paper, as these cycles vary depending on the type of
documents scanned and how often the scanner is used and
cleaned.
HINT
Only use the specified consumables.
To purchase the consumables, contact your FUJITSU scanner
dealer or an authorized FUJITSU scanner service provider.
Index
Introduction
Scanner
Overview
How to Load
Documents
How to Use the
Operator Panel
Various Ways to
Scan
Daily Care
Replacing the
Consumables
Troubleshooting
Operational
Settings
Appendix
Glossary
81
Page 82

Chapter 6 Replacing the Consumables
Cover
2
1
Brake roller
Shaft
Shaft
Brake roller
Slot
Protrusion
Shaft
Brake roller
TOP
Contents
6.2 Replacing the Brake Roller
Replace the brake roller in following procedure.
1 Remove all documents from the ADF paper chute
(feeder).
2 Open the ADF.
For details, refer to "1.4 Opening/Closing the ADF" (page 25).
Be careful not to have your fingers caught
when the ADF closes.
3 Remove the brake roller.
1 Hold both ends of the cover, and open it in the direction of the
arrow.
2 Lift the right side of the roller first, then pull out the shaft from the
slot on the left.
4 Remove the brake roller from its shaft.
Index
Introduction
Scanner
Overview
How to Load
Documents
How to Use the
Operator Panel
Various Ways to
Scan
Daily Care
Replacing the
Consumables
5 Attach a new brake roller on the shaft.
Troubleshooting
Insert the protrusion on the shaft into the slot.
Operational
Settings
Appendix
Glossary
82
Page 83

Chapter 6 Replacing the Consumables
2
1
Brake roller
Shaft
6 Attach the shaft.
1 Insert the left side of the shaft into the hole, and then attach the
right side of the shaft.
2 Close the cover.
ATTENTION
Confirm that the brake roller is installed properly. Otherwise, it may
cause feeding errors such as paper jams.
TOP
Contents
Index
Introduction
Scanner
Overview
How to Load
Documents
How to Use the
Operator Panel
Various Ways to
Scan
7 Close the ADF.
For details, refer to "1.4 Opening/Closing the ADF" (page 25).
Be careful not to have your fingers caught
when closing the ADF.
8 Reset the consumable counter.
Start up the Software Operation Panel and reset the counter.
For details, refer to "Resetting the sheet counters" (page 130).
Daily Care
Replacing the
Consumables
Troubleshooting
Operational
Settings
Appendix
Glossary
83
Page 84

Chapter 6 Replacing the Consumables
1
2
2
1
ADF paper chute
(feeder)
Tab
Sheet guide
Bushing
Shaft
TOP
Contents
6.3 Replacing the Pick Roller
Replace the pick roller in following procedure.
1 Remove all documents from the ADF paper chute
(feeder).
2 Remove the ADF paper chute (feeder).
Hold both ends of the ADF paper chute (feeder), and lift then pull it
out in the direction of the arrow.
4 Remove the pick roller.
1 Open the sheet guide by lifting the tab.
2 Rotate the bushing on the shaft.
Index
Introduction
Scanner
Overview
How to Load
Documents
How to Use the
Operator Panel
Various Ways to
Scan
Daily Care
Replacing the
Consumables
Troubleshooting
3 Open the ADF.
For details, refer to "1.4 Opening/Closing the ADF" (page 25).
Be careful not to have your fingers caught
when the ADF closes.
Operational
Settings
Appendix
Glossary
84
Page 85

Chapter 6 Replacing the Consumables
Bushing
Shaft
Shaft
Retaining clip
Pick roller
2
1
Shaft
Pick roller
Protrusion
Slot
3 Lift the bushing first, then pull out the shaft.
ATTENTION
Lifting the retaining clip with your fingernail may hurt or damage
your fingernail.
Use a paper clip or something alike if you have trouble lifting it up.
TOP
Contents
Index
Introduction
Scanner
Overview
How to Load
Documents
ATTENTION
Be careful not to touch the gear near the bushing on the shaft as it
contains grease.
5 Remove the pick roller from its shaft.
Pull out the shaft as you lift the retaining clip.
6 Attach a new pick roller on the shaft.
Insert the protrusion on the shaft into the slot.
ATTENTION
Confirm that the pick roller is installed properly. Otherwise, it may
cause feeding errors such as paper jams.
Make sure to insert the pick roller until locks in place.
How to Use the
Operator Panel
Various Ways to
Scan
Daily Care
Replacing the
Consumables
Troubleshooting
Operational
Settings
Appendix
Glossary
85
Page 86

Chapter 6 Replacing the Consumables
Shaft
Bushing
Shaft
ADF paper chute
(feeder)
Ta b
2
1
Side guides
7 Attach the shaft.
1 Insert the right end of the shaft into the slot, and lower the other
end gradually.
8 Close the ADF.
For details, refer to "1.4 Opening/Closing the ADF" (page 25).
Be careful not to have your fingers caught
when closing the ADF.
TOP
Contents
Index
Introduction
Scanner
Overview
2 Rotate the bushing to lock the shaft.
3 Close the sheet guide. Make sure that both ends of the sheet guide
are locked firmly.
9 Attach the ADF paper chute (feeder).
Insert the tabs into the slots on the back of the scanner, and tilt the
ADF paper chute (feeder) backwards until it locks in place.
10 Reset the consumable counter.
Start up the Software Operation Panel and reset the counter.
For details, refer to "Resetting the sheet counters" (page 130).
How to Load
Documents
How to Use the
Operator Panel
Various Ways to
Scan
Daily Care
Replacing the
Consumables
Troubleshooting
Operational
Settings
ATTENTION
Confirm that the pick roller is installed properly. Otherwise, it may
cause feeding errors such as paper jams.
Appendix
Glossary
86
Page 87

TOP
Contents
Index
Chapter 7 Troubleshooting
This chapter explains about the countermeasures against paper jams and other troubles, items to check before contacting
your scanner service provider, and how to read the product labels on the scanner.
ATTENTION
For details about errors/troubles not mentioned in this chapter, refer to
the scanner driver Help or Error Recovery Guide.
7.1 Paper Jam ..................................................................................................................................................88
7.2 Error Indications on Operator Panel ...........................................................................................................90
7.3 Troubleshooting..........................................................................................................................................94
7.4 Before You Contact the Scanner Service Provider...................................................................................112
7.5 Checking the Product Labels.................................................................................................................... 114
Introduction
Scanner
Overview
How to Load
Documents
How to Use the
Operator Panel
Various Ways to
Scan
Daily Care
Replacing the
Consumables
Troubleshooting
Operational
Settings
Appendix
Glossary
Page 88

Chapter 7 Troubleshooting
TOP
Contents
7.1 Paper Jam
When your document is jammed inside the scanner, remove
the document in the following procedure.
z Do not use force to pull out the jammed
document, and make sure to open the ADF
first.
z Be careful not to touch any sharp parts upon
removing jammed documents. Doing so could
result in injury.
z Be careful not to get your accessories (e.g.
ties, necklaces) or hair caught inside the
scanner.
z The glass surface may become extremely hot
during operation.
1 Remove all documents from the ADF paper chute
(feeder).
2 Open the ADF.
For details, refer to "1.4 Opening/Closing the ADF" (page 25).
Be careful not to have your fingers caught
when the ADF closes.
3 Remove the jammed document.
ATTENTION
z Make sure to check the documents and the paper path
thoroughly and remove all staples and paper clips as they
cause paper jams.
z Be careful not to damage the glass surface and the guides
when removing documents with staples or paper clips.
Index
Introduction
Scanner
Overview
How to Load
Documents
How to Use the
Operator Panel
Various Ways to
Scan
Daily Care
Replacing the
Consumables
Troubleshooting
Operational
Settings
Appendix
Glossary
88
Page 89

Chapter 7 Troubleshooting
4 Close the ADF.
For details, refer to "1.4 Opening/Closing the ADF" (page 25).
Be careful not to have your fingers caught
when the ADF closes.
TOP
Contents
Index
Introduction
Scanner
Overview
ATTENTION
z Confirm that the ADF is closed properly. Otherwise, the
document may not be fed into the ADF.
z Occasionally when scanning is complete or canceled,
documents may remain in the ADF without any error message
displayed. In that case, remove the documents by following the
above steps 1 to 4.
How to Load
Documents
How to Use the
Operator Panel
Various Ways to
Scan
Daily Care
Replacing the
Consumables
Troubleshooting
Operational
Settings
Appendix
Glossary
89
Page 90

Chapter 7 Troubleshooting
Check
Scan
/Stop
Power
[Scan/Stop] button
Power indicator
Check indicator
TOP
Contents
7.2 Error Indications on Operator Panel
When an error occurs during scanning, the operator panel
indicators turn on as shown below.
z Temporary errors
The Check indicator turns on.
The Power indicator stays on.
z Device errors
The Check indicator flashes.
The Power indicator turns on or flashes.
Temporary errors can be recovered by the operator, whereas
device errors require a service engineer to perform recovery.
The indicators return to the ready status if the [Scan/Stop]
button is pressed during a temporary error alert. Note that a
paper jam message disappears after a certain period of time
elapses if there are no documents (ready status) in the
scanner.
If the Error Recovery Guide is installed in your computer, the
Error Recovery Guide window appears when the Windows
operating system is started up. When an error occurs, the
Error Recovery Guide window displays related information
such as the name of the error and the error code (number).
Write down the information shown in the dialog box and click
the [More Info] button to check for troubleshooting methods.
Index
Introduction
Scanner
Overview
How to Load
Documents
How to Use the
Operator Panel
Various Ways to
Scan
Daily Care
Replacing the
Consumables
Troubleshooting
Operational
Settings
Appendix
Glossary
90
Page 91

Chapter 7 Troubleshooting
Temporary Errors
The following are lists of temporary errors which can be
recovered by operators.
When a temporary error occurs, the Check indicator turns on.
■ Other errors
Item Resolution
Transport lock error
(ScanPartner SP30F)
Unlock the transport lock switch.
For details, refer to the Quick
Installation Sheet.
TOP
Contents
Index
Introduction
Scanner
Overview
■ Paper feeding errors
Item Resolution
Paper jam 1 Remove the jammed document.
For details, refer to "7.1 Paper Jam"
(page 88).
2 Check if the document is suitable for
scanning by ADF.
For details, refer to "2.3 Documents
for Scanning" (page 42).
Multifeed When you press the [Scan/Stop] button
on the operator panel, the documents
are ejected.
Cover open (ADF) Close the ADF and reload the
documents.
How to Load
Documents
How to Use the
Operator Panel
Various Ways to
Scan
Daily Care
Replacing the
Consumables
Troubleshooting
Operational
Settings
Appendix
Glossary
91
Page 92

Chapter 7 Troubleshooting
Device Errors
TOP
Contents
Index
The following are lists of device errors which require troubleshooting by a service engineer.
■ Flatbed motor malfunction, optical error, and internal error
Check
indicator
Flashes
2 times
Flashes
3 times
Flashes
4 times
Flashes
7 times
Flashes
5 times
Flashes
6 times
Power
indicator
Turns on Optical error (ADF Front) 1 Clean the glass section.
Turns on Optical error (ADF Back)
Turns on Flatbed motor malfunction
(ScanPartner SP30F)
Turns on Optical error (Flatbed)
(ScanPartner SP30F)
Turns on Operator panel error Turn the scanner off then back on.
Turns on EEPROM error
Item Resolution
For details, refer to "Chapter 5 Daily Care" (page 70).
2 Turn the scanner off then back on.
If the problem persists, write down the status of the indicators and contact your
FUJITSU scanner dealer or an authorized FUJITSU scanner service provider.
1 Confirm that the transport lock switch is not locked.
2 Turn the scanner off then back on.
If the problem persists, write down the status of the indicators and contact your
FUJITSU scanner dealer or an authorized FUJITSU scanner service provider.
If the problem persists, write down the status of the indicators and contact your
FUJITSU scanner dealer or an authorized FUJITSU scanner service provider.
Introduction
Scanner
Overview
How to Load
Documents
How to Use the
Operator Panel
Various Ways to
Scan
Daily Care
Replacing the
Consumables
Flashes
7 times
Flashes
7 times
Memory error
Troubleshooting
Operational
Settings
Appendix
Glossary
92
Page 93

Chapter 7 Troubleshooting
■ Chip error
Check
indicator
Power
indicator
Item Resolution
TOP
Contents
Index
Introduction
Flashes
3 times
Flashes
3 times
■ Motor circuit error
Check
indicator
Flashes
2 times
Flashes
6 times
Power
indicator
Flashes
2 times
Flashes
6 times
■ Sensor error
Check
indicator
Flashes
4 times
Power
indicator
Flashes
4 times
LSI error Turn the scanner off then back on.
If the problem persists, write down the status of the indicators and contact your
FUJITSU scanner dealer or an authorized FUJITSU scanner service provider.
Item Resolution
Lamp circuit error Turn the scanner off then back on.
Motor circuit error
Item Resolution
Sensor error 1 Clear any dust around the ultrasonic sensors.
If the problem persists, write down the status of the indicators and contact your
FUJITSU scanner dealer or an authorized FUJITSU scanner service provider.
2 Turn the scanner off then back on.
If the problem persists, write down the status of the indicators and contact your
FUJITSU scanner dealer or an authorized FUJITSU scanner service provider.
Scanner
Overview
How to Load
Documents
How to Use the
Operator Panel
Various Ways to
Scan
Daily Care
Replacing the
Consumables
Troubleshooting
Operational
Settings
Appendix
Glossary
93
Page 94

Chapter 7 Troubleshooting
TOP
Contents
7.3 Troubleshooting
This section describes the resolutions for troubles that may
occur while using the scanner. Please check the following
items before you request a repair. If the problem persists,
check each item in "7.4 Before You Contact the Scanner
Service Provider" (page 112), and then contact your FUJITSU
scanner dealer or an authorized FUJITSU scanner service
provider.
The following are some examples of troubles that you may
experience.
Symptoms
"Scanner cannot be powered ON." (page 95)
"Scanning does not start." (page 96)
"Image quality is poor when scanning pictures/photos in black & white."
(page 97)
"Quality of scanned text or lines is unsatisfactory." (page 98)
Symptoms
"A shadow appears at the top or the bottom of the scanned image."
(page 107)
"There are black traces on the document." (page 108)
"The Carrier Sheet is not fed smoothly. / Paper jams occur." (page 109)
"Part of the image appears missing when using the Carrier Sheet."
(page 111)
Index
Introduction
Scanner
Overview
How to Load
Documents
How to Use the
Operator Panel
Various Ways to
Scan
Daily Care
Replacing the
Consumables
"Images are distorted or not clear." (page 99)
"Vertical streaks appear on the scanned image." (page 100)
"When the scanner is turned on, the Check indicator on the operator
panel turns on or flashes." (page 101)
"Multifeed error occurs frequently." (page 102)
"Situation in which the document is not fed into the ADF occurs
frequently." (page 104)
"Paper jams/pick errors occur frequently." (page 105)
"Scanned images turn out elongated." (page 106)
Troubleshooting
Operational
Settings
Appendix
Glossary
94
Page 95
Chapter 7 Troubleshooting
Scanner cannot be powered ON.
TOP
Contents
Index
Is the power cable connected properly?
Yes
Did you press the [Power] button on the scanner's
operator panel?
Yes
No
No
Connect the power cable properly.
Press the [Power] button on the operator panel.
If the problem persists, check the items in "7.4 Before You Contact the Scanner
Service Provider" (page 112) first, then contact your FUJITSU scanner dealer or
an authorized FUJITSU scanner service provider.
Introduction
Scanner
Overview
How to Load
Documents
How to Use the
Operator Panel
Various Ways to
Scan
Daily Care
Replacing the
Consumables
Troubleshooting
Operational
Settings
Appendix
Glossary
95
Page 96

Chapter 7 Troubleshooting
Scanning does not start.
TOP
Contents
Index
Did you unlock the transport lock switch?
(ScanPartner SP30F)
Yes
Is the document loaded in the ADF paper chute (feeder)
correctly?
Yes
Is the ADF closed properly?
Yes
Is the USB cable connected properly?
Yes
Is the connector on the USB cable broken or damaged?
No
Does scanning start after turning the scanner off then back
on?
No
No
No
No
No
Yes
Yes
Turn off the scanner, and unlock the transport lock switch.
For details about how to turn off the scanner, refer to "1.3 Turning the Power ON/
OFF" (page 24).
For details, refer to the Quick Installation Sheet.
Reload the document in the ADF paper chute (feeder).
Close the ADF firmly.
If the document is caught in the ADF, remove the document and close the ADF.
Connect the USB cable properly.
For details, refer to the Quick Installation Sheet.
Use a new cable and make sure that it is connected properly.
The scanner is operating correctly.
If the problem persists, check the items in "7.4 Before You Contact the Scanner
Service Provider" (page 112) first, then contact your FUJITSU scanner dealer or
an authorized FUJITSU scanner service provider.
Introduction
Scanner
Overview
How to Load
Documents
How to Use the
Operator Panel
Various Ways to
Scan
Daily Care
Replacing the
Consumables
Troubleshooting
Operational
Settings
Appendix
Glossary
96
Page 97

Chapter 7 Troubleshooting
Image quality is poor when scanning pictures/ photos in black & white.
TOP
Contents
Index
Introduction
Are the scan settings configured to not simply "binarize"
(output in black & white), such as grayscale?
No
Yes
Are the glasses inside the ADF clean?
No
Yes
*1: The scanned image may differ from the original image significantly if you simply "binarize" (output in black & white) a picture or a photo. If possible, use a
scanner driver to configure grayscale or other scan settings that do not simply "binarize" (output in black & white), and then perform a scan.
Use a scanner driver to configure grayscale or other scan settings that do not
simply "binarize" (output in black & white), and then perform a scan. (*1)
Clean the inside of the ADF.
For details, refer to "Chapter 5 Daily Care" (page 70).
If the problem persists, check the items in "7.4 Before You Contact the Scanner
Service Provider" (page 112) first, then contact your FUJITSU scanner dealer or
an authorized FUJITSU scanner service provider.
Scanner
Overview
How to Load
Documents
How to Use the
Operator Panel
Various Ways to
Scan
Daily Care
Replacing the
Consumables
Troubleshooting
Operational
Settings
Appendix
Glossary
97
Page 98

Chapter 7 Troubleshooting
Quality of scanned text or lines is unsatisfactory.
TOP
Contents
Index
ADF:
Are the glass and rollers inside the ADF clean?
Flatbed (ScanPartner SP30F):
Is the document pad clean?
Yes
Is the resolution appropriate?
Yes
Did you select the scan settings that simply "binarize"
(output in black & white)?
Yes
Is there any foreign matter (e.g. dust, paper dust) on the
document?
No
*1: When scanning in grayscale or color, the scanned image may not become sharp and clear. If possible, use a scanner driver to configure the scan settings
that simply "binarize" (output in black & white), and then perform a scan.
No
No
No
Yes
Clean the inside of the ADF.
For details, refer to "Chapter 5 Daily Care" (page 70).
Specify a higher resolution in the scanner driver.
In the scanner driver, select the scan settings that simply "binarize" (output in black
& white). (*1)
Remove any foreign matter off the document.
It may be carried onto the glass inside the ADF or the document bed of the flatbed
(ScanPartner SP30F), and cause the image to become dirty.
If the problem persists, check the items in "7.4 Before You Contact the Scanner
Service Provider" (page 112) first, then contact your FUJITSU scanner dealer or
an authorized FUJITSU scanner service provider.
Introduction
Scanner
Overview
How to Load
Documents
How to Use the
Operator Panel
Various Ways to
Scan
Daily Care
Replacing the
Consumables
Troubleshooting
Operational
Settings
Appendix
Glossary
98
Page 99

Chapter 7 Troubleshooting
Images are distorted or not clear.
TOP
Contents
Index
ADF:
Are the glass and rollers inside the ADF clean?
Flatbed (ScanPartner SP30F):
Is the document pad clean?
Yes
Is the ADF being pushed down during scanning? Is there a
heavy object on top of the ADF?
No
Is anything causing the scanner to vibrate during
scanning?
No
Is the scanner placed on a flat, level surface? Are the
rubber pads attached on the bottom of the scanner?
Yes
No
Yes
Yes
No
Clean the inside of the ADF.
For details, refer to "Chapter 5 Daily Care" (page 70).
Do not push down the top of the ADF, or place any heavy objects on the ADF
during scanning.
Do not allow the scanner to vibrate during scanning.
Either place the scanner on a flat and level surface, or attach the rubber pads on
the bottom of the scanner.
If the problem persists, check the items in "7.4 Before You Contact the Scanner
Service Provider" (page 112) first, then contact your FUJITSU scanner dealer or
an authorized FUJITSU scanner service provider.
Introduction
Scanner
Overview
How to Load
Documents
How to Use the
Operator Panel
Various Ways to
Scan
Daily Care
Replacing the
Consumables
Troubleshooting
Operational
Settings
Appendix
Glossary
99
Page 100

Chapter 7 Troubleshooting
Vertical streaks appear on the scanned image.
TOP
Contents
Index
Do the streaks always appear in the same location?
No
Does the vertical streak disappear when you set a lower
resolution?
No
Is there any foreign matter (e.g. dust, paper dust) on the
document?
No
Yes
Yes
Yes
Clean the glass and rollers inside the ADF, or the document bed of the flatbed
(ScanPartner SP30F).
For details, refer to "Chapter 5 Daily Care" (page 70).
Specify a lower resolution.
Remove any foreign matter off the document.
It may be carried onto the glass inside the ADF or the document bed of the flatbed
(ScanPartner SP30F), and cause vertical streaks on the scanned image.
If the problem persists, check the items in "7.4 Before You Contact the Scanner
Service Provider" (page 112) first, then contact your FUJITSU scanner dealer or
an authorized FUJITSU scanner service provider.
Introduction
Scanner
Overview
How to Load
Documents
How to Use the
Operator Panel
Various Ways to
Scan
Daily Care
Replacing the
Consumables
Troubleshooting
Operational
Settings
Appendix
Glossary
100
 Loading...