

Page 1

User’s Guide
Learn how to use your Fujitsu
STYLISTIC® M532 Android Tablet
Guide
d’utilisation
Découvrez comment utiliser
votre tablette Android
Fujitsu STYLISTIC® M532
Page 2

User’s
Guide
Learn how to use your
Fujitsu STYLISTIC® M532
Android Tablet
Page 3

Copyright and Trademark Information
Fujitsu America, Inc.has made every effort to ensure the accuracy and completeness of this document. Because ongoing development efforts are made to
continually improve the capabilities of our products, however, the data contained herein represents Fuj itsu design objectives and is provided for comparative
purposes; actual results may vary based on a variety of factors. This product data does not constitute a warranty. Specifications are subject to change without
knowledge.
Fujitsu and the Fujitsu logo are registered trademarks of Fujitsu Limited; STYLISTIC is a registered trademark of Fujitsu America, Incorporated.
Google, the Google Logo, Android, the Android Logo, Android Market, the Android Market Logo, Google Play, the Google Play Logo, Gmail, the Gmail
Logo, Google Mail, the Google Mail Logo, Google Latitude, YouTube, the YouTube Logo and Picasa are registered trademarks of Google Incorporated.
Adobe Reader is a trademark of Adobe Systems Incorporated.
NVIDIA and Tegra are trademarks and/or registered trademarks in the United States and other countries.
Absolute and Computrace are registered trademarks of Absolute Software Corporation.
Norton is a trademark of Symantec Corporation in the United States and other countries.
Bluetooth and the Bluetooth logo are registered trademarks of Bluetooth SIG, Inc.
All rights reserved, including intellectual property rights. Subject to technical alterations. Delivery subject to availability. No warranty is offered or liability
accepted in regard of the completeness, correctness, or current applicability of any data or illustrations. Brand names may be protected trademarks of
the respective manufacturer and/or protected by copyright. Use of these by third parties for their own purposes may constitute an infringement of the
holders’ rights.
Copyright 2012 Fujitsu America, Incorporated. All rights reserved. No part of this publication may be copied, reproduced, or translated, without the prior
written consent of Fujitsu America, Incorporated. No part of this publication may be stored or transmitted in any electronic form without the prior consent
of Fujitsu America, Incorporated. B6FJ-9251-01ENZ0-00
Page 4
+
AC adapter output polarity:
DECLARATION OF CONFORMITY
according to FCC Part 15
Responsible Party Name: Fujitsu America, Inc.
Address: 1250 E. Arques Avenue
Sunnyvale, CA 94085
Telephone: (408) 746-6000
Declares that product: Base Model Configuration: STYLISTIC M532 Android Tablet
Complies with Part 15 of the FCC Rules.
This device complies with Part 15 of the FCC rules. Operations are subject to the following two conditions:
(1) This device may not cause harmful interference, (2) This device must accept any interference received,
including interference that may cause undesired operation.
IMPORTANT SAFETY INSTRUCTIONS
This unit requires an AC adapter to operate. Use only UL Listed I.T.E. Class II Adapters with an output rating of 19 VDC, with a current of 1.58 A (30 W).
When using your tablet, basic safety precautions should always be followed to reduce the risk of fire, electric shock and injury to persons, including the
following:
• Do not use this product near water for example, near a bathtub, washbowl, kitchen sink or laundry tub, in a wet basement or near a
swimming pool.
• Use only the power cord and batteries indicated in this manual. Do not dispose of batteries in a fire. They may explode. Check with local
codes for possible special disposal instructions.
CAUTION: HOT SURFACE: T
DEVICE, TAKE CAUTION TO LIMIT LONG TERM OR CONTINUOUS USE WHILE RESTING IT ON EXPOSED SKIN, SUCH AS THE LAP.
HE BOTTOM OF THIS COMPUTER CAN BECOME HOT WHEN USED FOR LONG PERIODS OF TIME. WHEN USING THIS
Page 5

For Authorized Repair Technicians Only
DANGER OF EXPLOSION IF LITHIUM (CLOCK) BATTERY IS INCORRECTLY REPLACED. REPLACE ONLY WITH THE SAME OR EQUIVALENT TYPE
RECOMMENDED BY THE MANUFACTURER. DISPOSE OF USED BATTERIES ACCORDING TO THE MANUFACTURER’S INSTRUCTION.
OR CONTINUED PROTECTION AGAINST RISK OF FIRE, REPLACE ONLY WITH THE SAME TYPE AND RATING FUSE.
F
SAVE THESE INSTRUCTIONS
Page 6

Contents
About This Guide . . . . . . . . . . . . . . . . . . . . . . . . . . . . . . . . . . . . . . . . . . . . . .8
Conventions Used in the Guide . . . . . . . . . . . . . . . . . . . . . . . . . . . . . . . . 8
Fujitsu Contact Information . . . . . . . . . . . . . . . . . . . . . . . . . . . . . . . . . . . 9
Chapter 1 Getting to Know Your Android Tablet
Overview. . . . . . . . . . . . . . . . . . . . . . . . . . . . . . . . . . . . . . . . . . . . . . . . . . . . .10
Locating the Connectors and Controls. . . . . . . . . . . . . . . . . . . . . . . . . . . . .11
Front Features. . . . . . . . . . . . . . . . . . . . . . . . . . . . . . . . . . . . . . . . . . . . . . 11
Back Features . . . . . . . . . . . . . . . . . . . . . . . . . . . . . . . . . . . . . . . . . . . . . . 13
Chapter 2 Getting Started with Your Android Tablet
First-time setup of your tablet. . . . . . . . . . . . . . . . . . . . . . . . . . . . . . . . . . .15
Unpacking and checking the device . . . . . . . . . . . . . . . . . . . . . . . . . . . . 16
Selecting a suitable location . . . . . . . . . . . . . . . . . . . . . . . . . . . . . . . . . . 16
Power Sources. . . . . . . . . . . . . . . . . . . . . . . . . . . . . . . . . . . . . . . . . . . . . . 16
Turning on the system the first time . . . . . . . . . . . . . . . . . . . . . . . . . . . . 17
5
Page 7

Chapter 3 Working with Your Android Tablet
Tablet Features . . . . . . . . . . . . . . . . . . . . . . . . . . . . . . . . . . . . . . . . . . . . . . 18
Battery charging indicator . . . . . . . . . . . . . . . . . . . . . . . . . . . . . . . . . . . . 18
Turning the Tablet On and Off . . . . . . . . . . . . . . . . . . . . . . . . . . . . . . . . . 19
Touchscreen . . . . . . . . . . . . . . . . . . . . . . . . . . . . . . . . . . . . . . . . . . . . . . . 19
Background lighting . . . . . . . . . . . . . . . . . . . . . . . . . . . . . . . . . . . . . . . . . 19
Selecting display orientation . . . . . . . . . . . . . . . . . . . . . . . . . . . . . . . . . . 19
Android Tablet buttons. . . . . . . . . . . . . . . . . . . . . . . . . . . . . . . . . . . . . . . 20
Web Cams . . . . . . . . . . . . . . . . . . . . . . . . . . . . . . . . . . . . . . . . . . . . . . . . . 21
Rechargeable battery . . . . . . . . . . . . . . . . . . . . . . . . . . . . . . . . . . . . . . . . 21
User-Installable Devices . . . . . . . . . . . . . . . . . . . . . . . . . . . . . . . . . . . . . . . 23
Memory cards . . . . . . . . . . . . . . . . . . . . . . . . . . . . . . . . . . . . . . . . . . . . . . 23
Switching the wireless components on and off . . . . . . . . . . . . . . . . . . . . 24
WLAN and Bluetooth . . . . . . . . . . . . . . . . . . . . . . . . . . . . . . . . . . . . . . . . 24
GPS. . . . . . . . . . . . . . . . . . . . . . . . . . . . . . . . . . . . . . . . . . . . . . . . . . . . . . . 24
Using the optional cradle . . . . . . . . . . . . . . . . . . . . . . . . . . . . . . . . . . . . . . 25
Setting up the Cradle . . . . . . . . . . . . . . . . . . . . . . . . . . . . . . . . . . . . . . . . 25
Chapter 4 Working with Android
Getting Started with Android . . . . . . . . . . . . . . . . . . . . . . . . . . . . . . . . . . . 29
Initial setup of your device with Android . . . . . . . . . . . . . . . . . . . . . . . . . 29
Home Page . . . . . . . . . . . . . . . . . . . . . . . . . . . . . . . . . . . . . . . . . . . . . . . . 30
Navigating on the home page . . . . . . . . . . . . . . . . . . . . . . . . . . . . . . . . . 31
Customizing the home page . . . . . . . . . . . . . . . . . . . . . . . . . . . . . . . . . . 32
Operation . . . . . . . . . . . . . . . . . . . . . . . . . . . . . . . . . . . . . . . . . . . . . . . . . 33
Settings . . . . . . . . . . . . . . . . . . . . . . . . . . . . . . . . . . . . . . . . . . . . . . . . . . . 39
System updates. . . . . . . . . . . . . . . . . . . . . . . . . . . . . . . . . . . . . . . . . . . . . 47
Apps. . . . . . . . . . . . . . . . . . . . . . . . . . . . . . . . . . . . . . . . . . . . . . . . . . . . . . 49
6
-
Page 8

Chapter 5 Connecting External Devices
Peripheral Device Connections. . . . . . . . . . . . . . . . . . . . . . . . . . . . . . . . . . 52
Connecting USB devices . . . . . . . . . . . . . . . . . . . . . . . . . . . . . . . . . . . . . . 52
HDMI port . . . . . . . . . . . . . . . . . . . . . . . . . . . . . . . . . . . . . . . . . . . . . . . . . 53
Headphone/Microphone port . . . . . . . . . . . . . . . . . . . . . . . . . . . . . . . . . . 54
Chapter 6 Troubleshooting Your Android Tablet
Troubleshooting. . . . . . . . . . . . . . . . . . . . . . . . . . . . . . . . . . . . . . . . . . . . . . 55
Identifying the Problem . . . . . . . . . . . . . . . . . . . . . . . . . . . . . . . . . . . . . . 55
Using the Reset Button. . . . . . . . . . . . . . . . . . . . . . . . . . . . . . . . . . . . . . . 56
Specific Problems . . . . . . . . . . . . . . . . . . . . . . . . . . . . . . . . . . . . . . . . . . . 57
Chapter 7 System Specifications
Specifications . . . . . . . . . . . . . . . . . . . . . . . . . . . . . . . . . . . . . . . . . . . . . . . . 59
Android Tablet. . . . . . . . . . . . . . . . . . . . . . . . . . . . . . . . . . . . . . . . . . . . . . 59
Rechargeable Battery . . . . . . . . . . . . . . . . . . . . . . . . . . . . . . . . . . . . . . . . 61
AC Adapter. . . . . . . . . . . . . . . . . . . . . . . . . . . . . . . . . . . . . . . . . . . . . . . . . 61
Optional Cradle . . . . . . . . . . . . . . . . . . . . . . . . . . . . . . . . . . . . . . . . . . . . . 62
Chapter 8 Regulatory Information
For Android Tablets without radio device . . . . . . . . . . . . . . . . . . . . . . . . . . . . . 63
For Android Tablets with radio device . . . . . . . . . . . . . . . . . . . . . . . . . . . . . . . . 64
7
-
Page 9
Preface
About This Guide
The STYLISTIC® M532 Android Tablet offers innovative technology and an ergonomic design, making it a reliable and
convenient companion. The responsive touch screen design and on-screen keyboard allow you to interact with it easily
and enjoyably. The STYLISTIC M532 was pre-installed with the Android™ operating system along with many useful
applications.
The STYLISTIC M532 Android Tablet is a completely self-contained unit with a 10.1” TFT WXGA high-brightness LED,
front and rear web cameras, and an NVIDIA® Tegra® processor.
This manual explains how to operate your Android Tablet hardware and built-in system software.
Conventions Used in the Guide
Pages with additional information about a specific topic are cross-referenced within the text.
On screen buttons or menu items appear in bold. Example: Click OK to restart your Android Tablet.
THE INFORMATION ICON HIGHLIGHTS INFORMATION THAT WILL ENHANCE YOUR UNDERSTANDING OF THE SUBJECT MATERIAL.
HE CAUTION ICON HIGHLIGHTS INFORMATION THAT IS IMPORTANT TO THE SAFE OPERATION OF YOUR COMPUTER, OR TO THE INTEGRITY OF YOUR
T
FILES. PLEASE READ ALL CAUTION INFORMATION CAREFULLY.
8
Page 10
THE WARNING ICON HIGHLIGHTS INFORMATION THAT CAN BE HAZARDOUS TO EITHER YOU, YOUR TABLET, OR YOUR FILES. PLEASE READ ALL
WARNING INFORMATION CAREFULLY.
Fujitsu Contact Information
Service and Support
You can contact Fujitsu Service and Support in the following ways:
• Toll free: 1-800-8Fujitsu (1-800-838-5487)
• Website: http://solutions.us.fujitsu.com/www/content/support/contact/index.php
Before you place the call, you should have the following information ready so that the customer support
representative can provide you with the fastest possible solution:
• Product name
• Product configuration and serial numbers
• Purchase date
• Conditions under which the problem occurred
• Any error messages that have occurred
• Type of device connected, if any
Fujitsu Shopping Online
You can go directly to the online by going to the website at: www.shopfujitsu.com.
Limited Warranty
Your STYLISTIC M532 Android Tablet is backed by a Fujitsu International Limited Warranty. Check the service kit that
came with your tablet for the Limited Warranty period and terms and conditions.
9
- About This Guide
Page 11
Chapter 1
Getting to Know Your Android Tablet
Overview
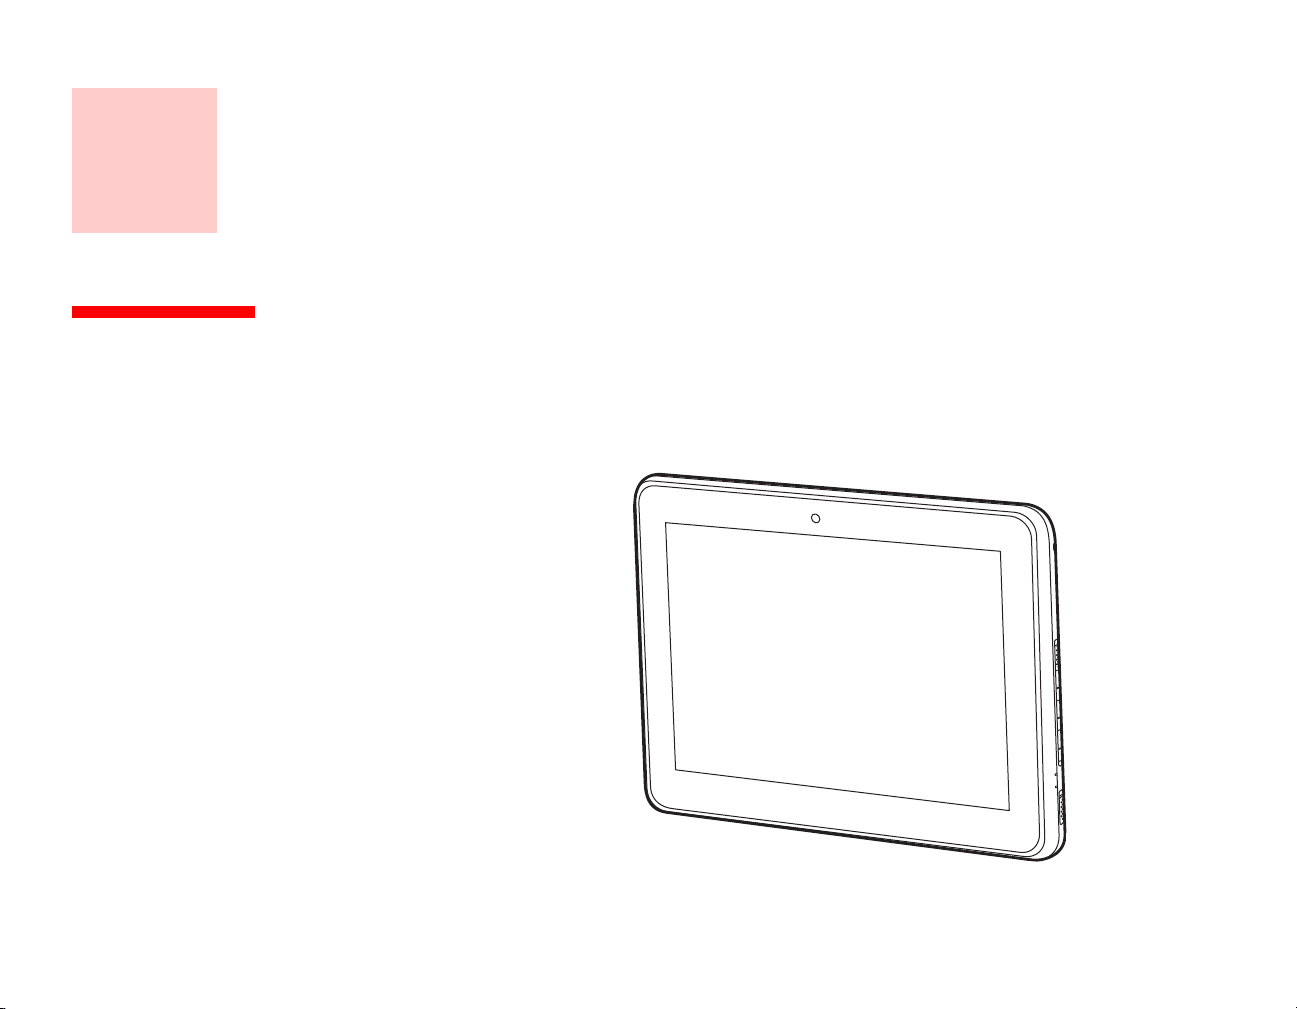
The STYLISTIC® M532 Android Tablet is a
highly-efficient computer that has been
designed to support the Android™ 4.0
operating system.
This chapter presents the individual
hardware components of your device. It
gives you an overview of the tablet’s
indicators and connections. Please
familiarize yourself with these
components before you start to work
with the device.
Figure 1. STYLISTIC M532 Android Tablet
10
Page 12
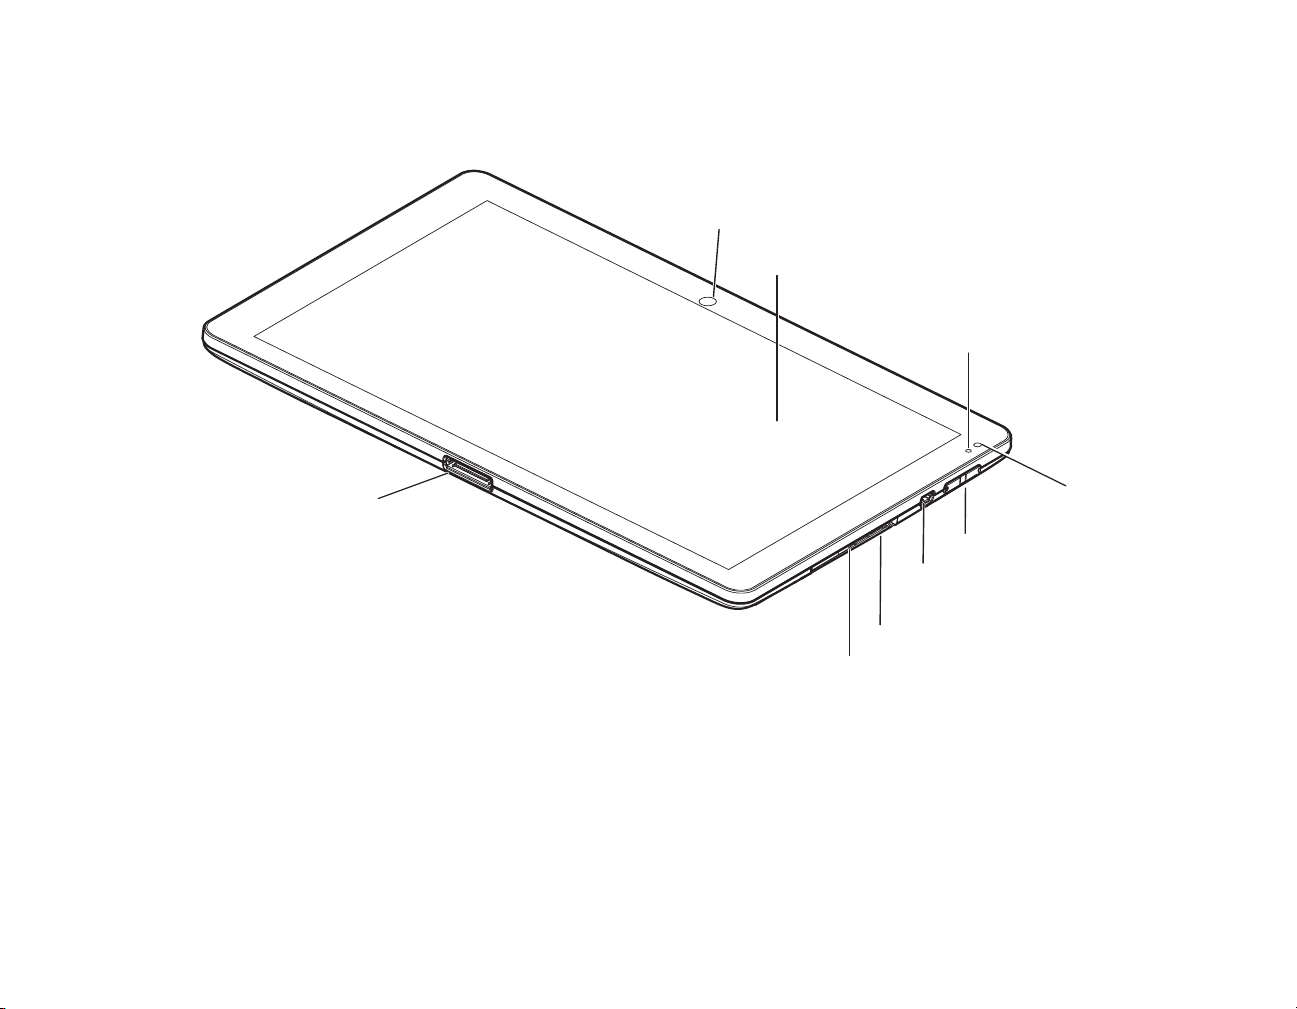
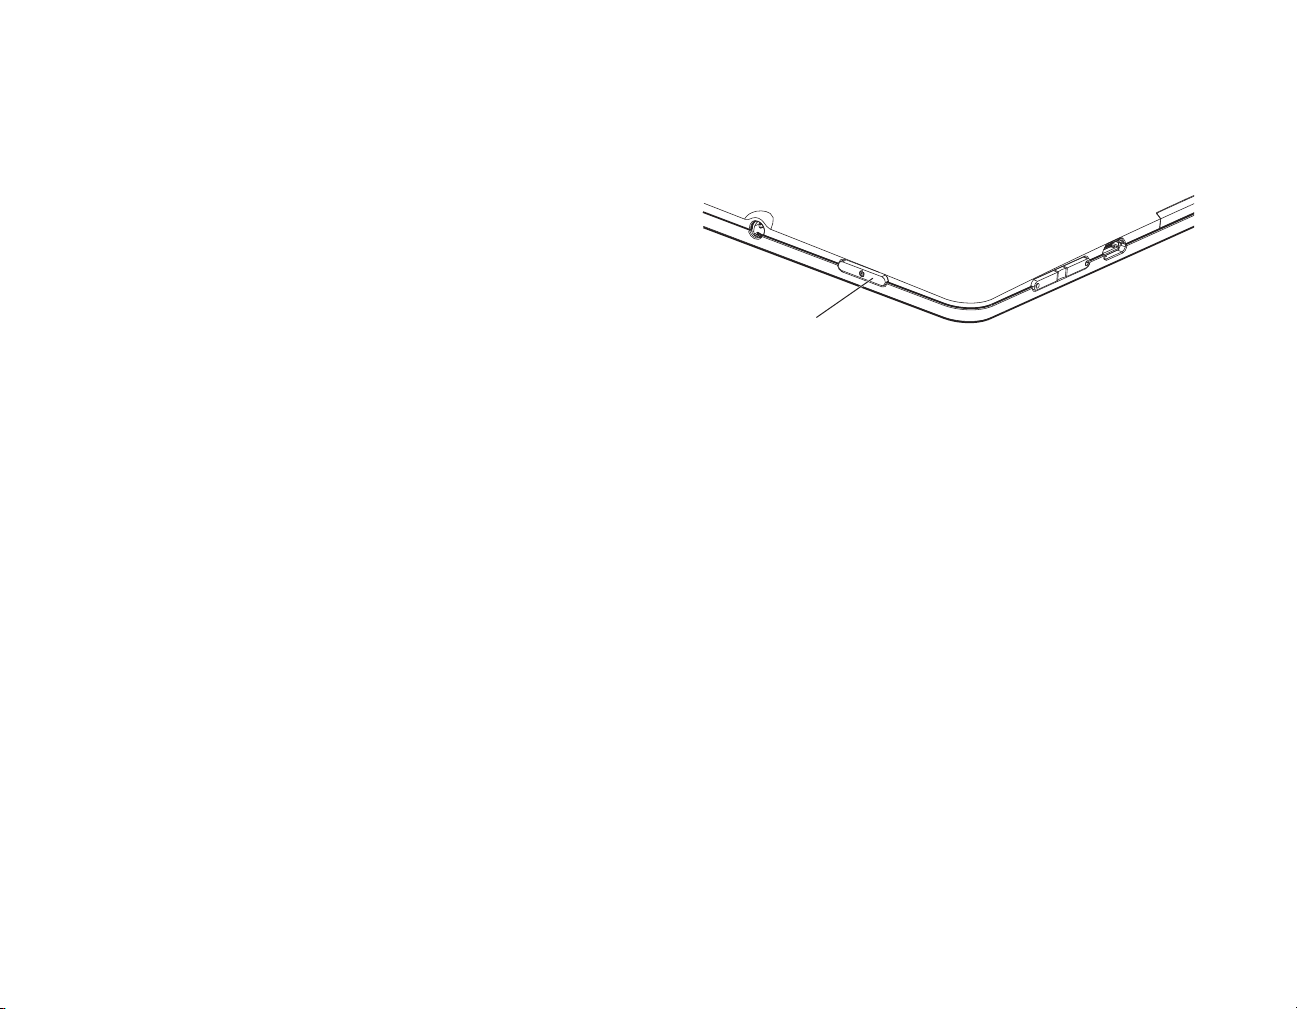
Locating the Connectors and Controls
Front Web Camera
Connector for Docking Cradle
Display
Ambient Light Sensor
Battery Charging Indicator
Volume Buttons
Micro-USB Port
Reset Button (under cover)
Micro SD Card Slot (under cover)
and AC Adapter
Features and controls that you use to operate your Android Tablet are outlined below and illustrated in Figures 2 and
3. Details on using these features and controls are provided later in this manual.
Figure 2. STYLISTIC M532 Android Tablet Features (Bottom, Right View)
Front Features
Front Web Camera
The front-facing VGA web camera allows you to take pictures of yourself to send over the internet.
Display
The 10.1” Wide XGA display offers wide vertical and horizontal viewing angles.
11
- Locating the Connectors and Controls
Page 13

Battery Charging Indicator
The battery charging indicator displays the current power condition of the internal battery. (See “Battery charging
indicator” on page 18).
Ambient Light Sensor
The ambient light sensor automatically recognizes lighting conditions and adjusts the display to provide optimum
battery life.
Volume Buttons
The volume buttons allow you to adjust the system volume. (See “Android Tablet buttons” on page 20).
Micro-USB Port
The Micro USB port allows you to connect a USB device by using a Micro USB adapter (See “Connecting USB devices”
on page 52).
Reset Button
The Reset Button allows you to do a hard reset of your system in the event the device no longer reacts to input or the
ON/OFF switch. (See “Using the Reset Button” on page 56)
Micro SD Card Slot
The Micro SD card allows you to save data on removable Micro SD memory cards. (See “Memory cards” on page 23)
Docking Cradle and AC Adapter Connector
Allows you to connect the optional STYLISTIC Docking Cradle (see “Using the optional cradle” on page 25) or an AC
Adapter (see“Power Sources” on page 16).
12
- Locating the Connectors and Controls
Page 14
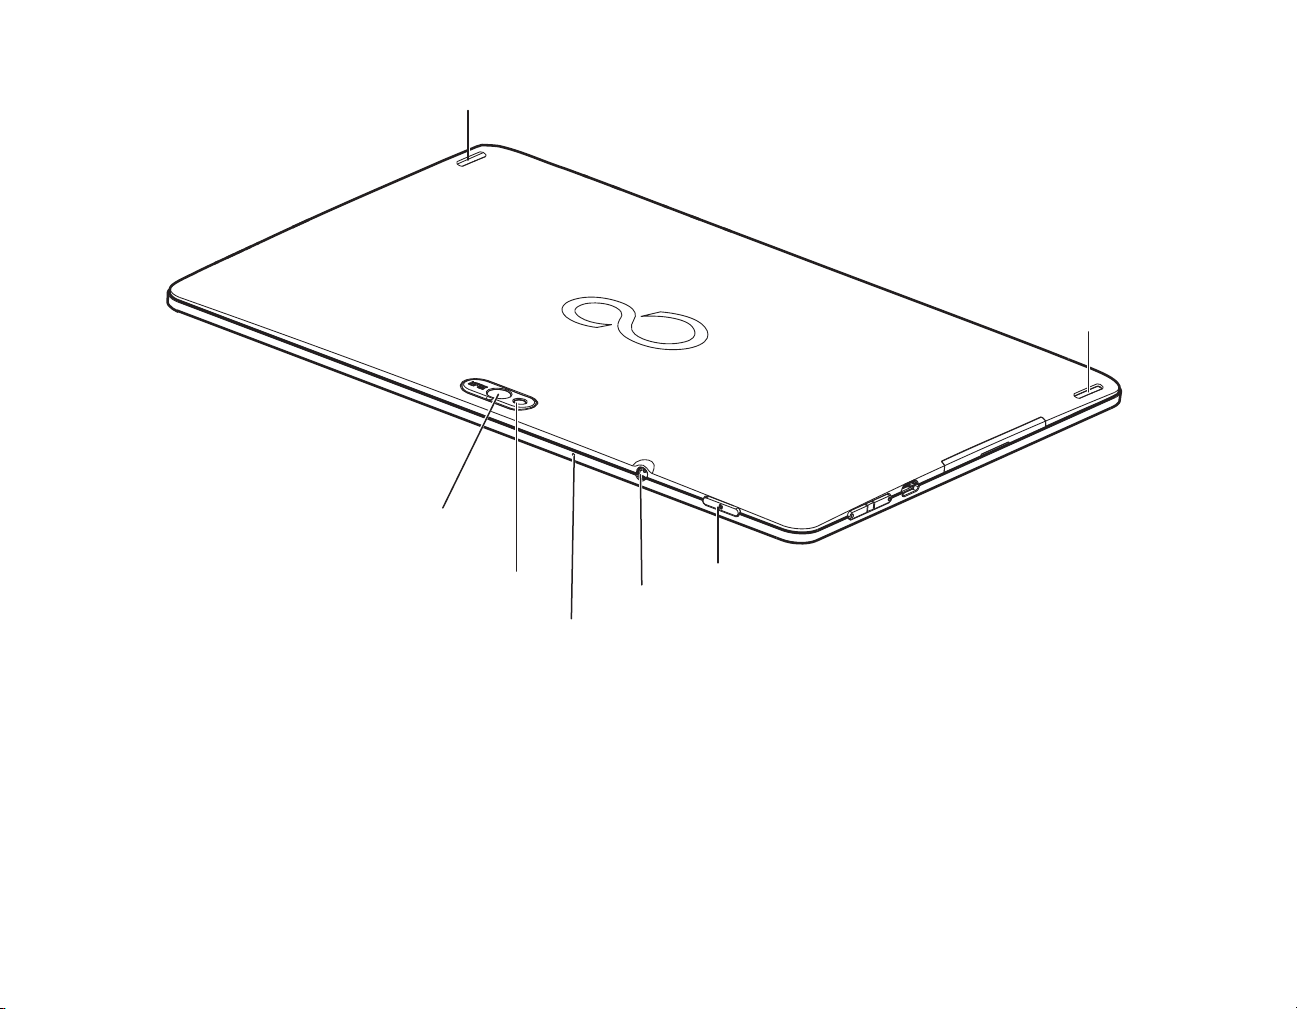
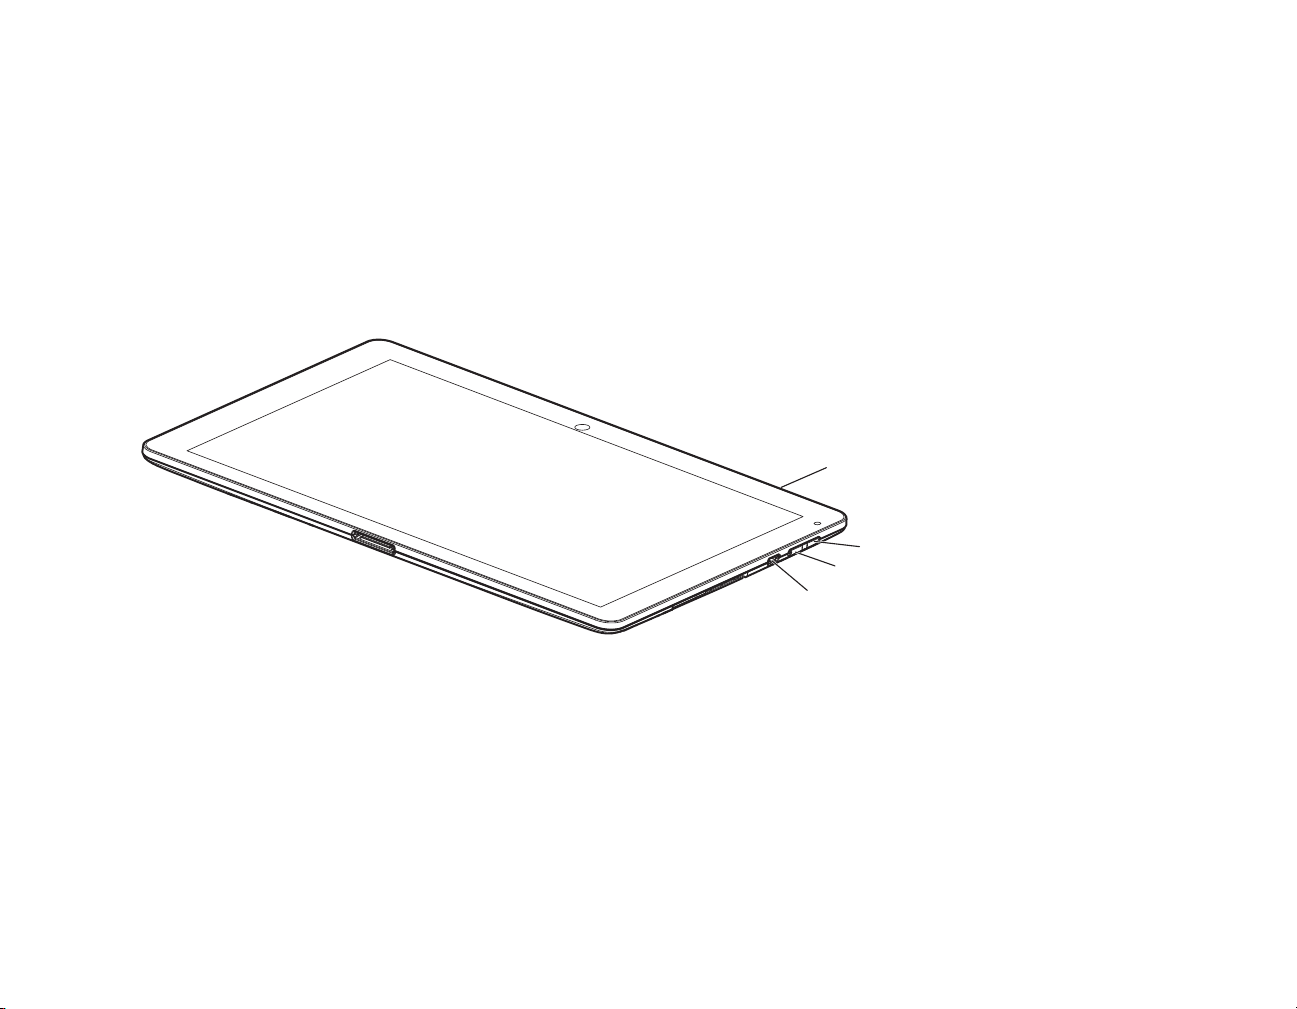
Rear Web Camera
Stereo Speaker
Stereo Speaker
On/Off Switch
Headphone/Microphone Port
Microphone
Photoflash
Figure 3. STYLISTIC M532 Android Tablet Features (Back View)
Back Features
Stereo Speakers
The built-in dual speakers allow for stereo sound.
On/Off Switch
The On/Off Switch allows you to power your system on and off (see “Turning on the system the first time” on page 17).
13
- Locating the Connectors and Controls
Page 15

Headphone/Microphone Port
The headphone/microphone port allows you to set up connect headphones, a microphone or external loudspeakers
to your Android Tablet. (See “Headphone/Microphone port” on page 54)
Microphone
The internal microphone allows you to record audio files.
Photoflash
The Photoflash acts as a flash device when you are using the rear-facing web camera.
Rear Web Camera
The rear web camera allows you to take pictures of objects in front of you for sharing over the internet.
14
- Locating the Connectors and Controls
Page 16

Chapter 2
Getting Started with Your Android Tablet
First-time setup of your tablet
• THE NECESSARY HARDWARE DRIVERS AND THE SUPPLIED SOFTWARE FOR THE DEVICE ARE ALREADY PRE-INSTALLED.
• BEFORE YOU SWITCH ON THE DEVICE FOR THE FIRST TIME, CONNECT IT TO THE POWER USING THE AC ADAPTER. THE AC ADAPTER MUST BE
CONNECTED DURING THE ENTIRE INSTALLATION PROCESS.
• A SYSTEM TEST IS PERFORMED WHEN YOUR DEVICE IS FIRST SWITCHED ON. VARIOUS MESSAGES CAN APPEAR. THE DISPLAY MAY REMAIN DARK
FOR A SHORT TIME OR MAY FLICKER.
• PLEASE FOLLOW THE INSTRUCTIONS ON THE SCREEN.
• NEVER SWITCH OFF YOUR DEVICE DURING THE FIRST-TIME SETUP PROCESS.
The battery is permanently installed in the system and must be charged if you want to use your device under
battery operation.
When used on the move, the built-in battery provides the device with the necessary power. You can increase the
operating time by using the available energy-saving functions.
Please refer to “Connecting External Devices” on page 52 for instructions on how to connect external devices (e.g.,
mouse, flash storage) to your device.
15
Page 17
Unpacking and checking the device
SHOULD YOU DISCOVER ANY MISSING ITEMS OR DAMAGE THAT OCCURRED DURING TRANSPORTATION, CONTACT YOUR SUPPORT REPRESENTATIVE:
T
OLL FREE: 1-800-8FUJITSU (1-800-838-5487)
W
EB SITE: HTTP://SOLUTIONS.US.FUJITSU.COM/WWW/CONTENT/SUPPORT/CONTACT/INDEX.PHP
1 Unpack all the individual parts from the packing box.
2
Check your
device and peripherals for any visible damage which may have occurred during transportation.
3 Save the packaging in the event you need it to transport your system in the future.
Selecting a suitable location
There are several factors to consider when choosing a location for your system. Please observe the following
precautions when doing so.
• NEVER PLACE THE DEVICE OR THE AC ADAPTER ON A HEAT-SENSITIVE SURFACE. THE SURFACE COULD BE DAMAGED AS A RESULT.
• THE UNDERSIDE OF THE DEVICE HEATS UP DURING NORMAL OPERATION. PROLONGED CONTACT WITH THE SKIN MAY BECOME UNPLEASANTLY
HOT.
• KEEP OTHER OBJECTS AT LEAST 100 MM AWAY FROM THE DEVICE AND ITS AC ADAPTER TO ENSURE ADEQUATE VENTILATION.
• DO NOT EXPOSE THE DEVICE TO EXTREME ENVIRONMENTAL CONDITIONS. PROTECT THE DEVICE AGAINST DUST, HUMIDITY AND HEAT.
Power Sources
Your Fujitsu STYLISTIC Android Tablet has three possible power sources: an internal Lithium Polymer battery, an AC
adapter or an optional docking cradle.
16
- First-time setup of your tablet
Page 18
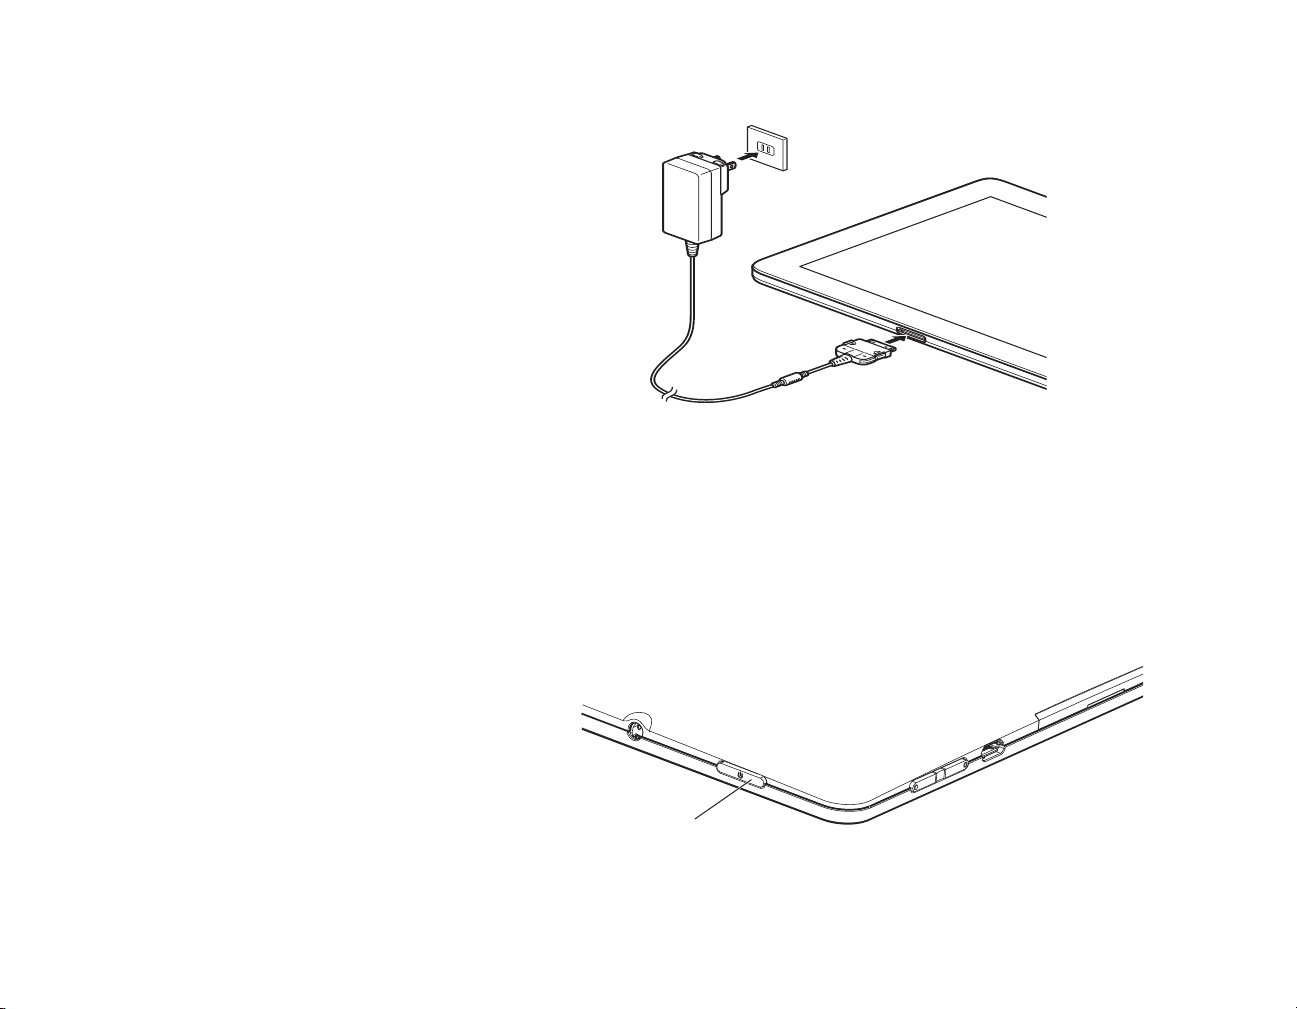
Connecting the AC Adapter
On/Off Switch
The AC adapter provides power for operating your
Android Tablet and charges the battery.
1 Plug the AC Adapter cable into the AC Adapter
connector on the bottom edge of your tablet.
(Figure 4)
2 Plug the AC adapter into an AC electrical outlet.
Figure 4. Connecting the AC Adapter
Turning on the system the first time
When you switch on the device for the first time, the supplied software is installed and configured. Because this
procedure must NOT be interrupted, you should set aside enough time for it to be fully completed and connect
the device to power using the AC adapter.
During the installation process, DO NOT restart
the device unless you are requested to do so. To
make it easier to use your device for the first
time, the operating system
is pre-installed.
1 Press the On/Off switch (1) for 2 seconds to
switch the Android Tablet on.
2
During installation, follow the instructions
on screen.
17
- First-time setup of your tablet
Figure 5. Powering on the system
Page 19

Chapter 3
Battery Charging Indicator
Working with Your Android Tablet
This chapter describes the basics for operating your Android Tablet. Even if you are already familiar with
operating a computer, you should read this chapter to ensure you are familiar with all of the features.
Tablet Features
Battery charging indicator
When the AC adapter is connected, the battery
charging indicator provides information on the
state of the power supply.
Battery LED
Condition
Red, lit The battery is being charged
White, lit The battery is 100% charged
Description
18
Figure 6. Battery Charging Indicator
Page 20
Turning the Tablet On and Off
On/Off Switch
To turn the tablet on: Press the On/Off switch (Figure 7) for
two seconds. The tablet may vibrate slightly while it is
starting up.
To turn the tablet off: Press the On/Off switch until a
message appears asking if you want to turn off the tablet.
Confirm that you do. The tablet may vibrate slightly while it
is shutting down.
Figure 7. Powering the system on and off
Touchscreen
High-quality TFT displays are installed in Fujitsu Android Tablets. TFT monitors are manufactured for a specific
resolution. An optimal, clear picture can only be ensured with the correct resolution intended for the relevant
TFT monitor. A monitor resolution that differs from the specification can result in an unclear picture.
The screen resolution of your Android Tablet’s touchscreen is optimally set at the factory.
Background lighting
TFT monitors are operated with background lighting. The luminosity of the background lighting can decrease
while the tablet is in use; however, you can set the brightness of your monitor individually.
Selecting display orientation
You can choose to use either portrait (vertical) or landscape (horizontal) orientation for the display.
The alignment of the screen adapts automatically to the alignment in which you are using the tablet. If you hold
the tablet in portrait orientation, the image will be shown in portrait format. If you hold the tablet in landscape
orientation, the image will be shown in landscape format.
If you want to disable automatic matching of the alignment, proceed as follows:
19
- Tablet Features
Page 21
1 From
On/Off Switch
Volume Button - Up
Volume Button - Down
Reset Button
All apps
, select the
Settings
option and select
Display.
2 Uncheck
Auto-rotate screen
. When the checkmark on the setting disappears, automatic alignment matching is
disabled.
3 To re-enable matching of the alignment, tap again on the setting
Auto-rotate screen
the setting appears, automatic alignment matching is enabled.
Android Tablet buttons
Your tablet has three tablet buttons: On/Off, Volume Up and Down, and Reset.
Figure 8. Tablet Buttons
.
When the checkmark
on
Button Description
On/Off Switch Switch the tablet on and off
Volume Button - Up Increase the volume
Volume Button - Down Decrease the volume.
Reset Button If the device no longer reacts to input and does not respond to the ON/OFF switch, use the
Reset button to restart the device (
See “Using the Reset Button” on page 56.).
20
- Tablet Features
Page 22

Web Cam
s
Your device has two web cams: one on the front side of the device and one on the rear.
Depending on the software used, you can use your web cam to take pictures, record video clips
or take part in web chats.
• The picture quality depends on the lighting conditions and the software being used.
• You can only operate the webcam with a particular application (e.g., an Internet telephony program or a
video conferencing program which supports a webcam).
• When using the webcam, the tablet support must not wobble.
• The webcam automatically adjusts itself to the current light level. For this reason the touchscreen
may flicker while the light level is be in g adjusted.
Rechargeable battery
For mobile use, the built-in battery provides the tablet with the necessary power. You can increase the
life of the battery by caring for the battery properly. The average battery life is around 500
charge/discharge cycles. In the event you should need to have your battery replaced, please contact your
Fujitsu Support Representative.
You can also extend the battery life by taking advantage of the available energy saving functions.
Charging, caring for and maintaining the battery
The Android Tablet battery can only be charged when the ambient temperature is between 5°C and 35°C.
You can charge the battery by connecting the tablet to the AC adapter
(see “Power Sources” on page 16).
If the battery is running low you will hear a warning alarm. If you do not connect the AC adapter within five
minutes of the warning alarm described above, your tablet will switch off automatically.
Monitoring the battery charging level
In the system bar / status display there is a battery symbol shown for monitoring the battery capacity.
The battery symbol shows you the remai ning battery charge.
21
- Tablet Features
Page 23

Using the power-management features
The Android Tablet uses less power when the power management features are enabled. That allows you to work
longer when using the battery before having to recharge it.
When you use the power-management features, power efficiency is increased and environmental pollution
reduced. By choosing the best power options, you can make significant savings while helping to protect the
environment.
We recommend the following settings: Hibernate the Tablet after 5 minutes without activity.
To change your power settings, select
When the Android Tablet is in p
Settings > Display
and set the desired value for
Hibernate
ower saving mode, you must remember the following:
.
• During power saving mode, open files are held in the main memory or in a swap file.
• Never switch off the tablet while it is in a power saving mode. If the built-in battery is nearly discharged, close
the open files and do not go into power saving mode.
If you do not intend to use your tablet for a long period of time:
• Exit the power saving mode if necessary via touching the screen or by switching on the tablet.
• Close all opened programs and completely shut down the tablet.
22
- Tablet Features
Page 24
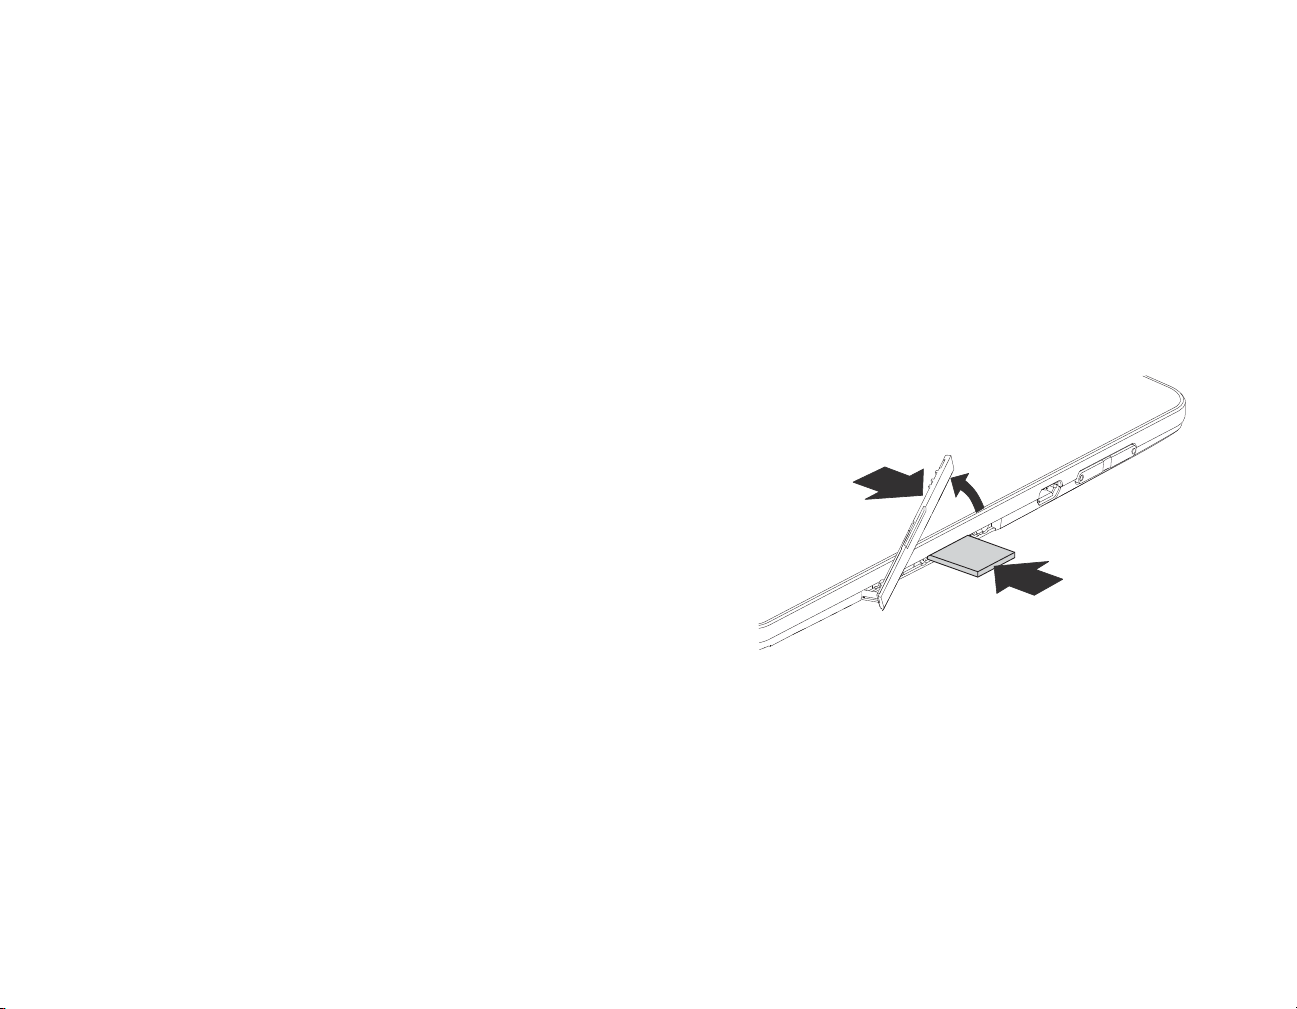
User-Installable Devices
1
2
Memory cards
Your Android Tablet is equipped with an integrated memory card reader.
instructions when handling memory cards.
Supported format
The memory card reader supports the following format:
Be sure to observe the manufacturer’s
• MicroSD Card
™
Inserting a memory card
To insert a MicroSD card:
1 Open the slot cover (Figure 9, #1).
2 Position the card so that the card label is facing upwards.
3 Gently push the memory card into the slot (Figure 9, #2) until
you feel it click into place. Do not use too much force, otherwise
the sensitive contact surfaces could be damaged.
4 Replace the slot cover.
Figure 9. Inserting a MicroSD Card
23
- User-Installable Devices
Page 25
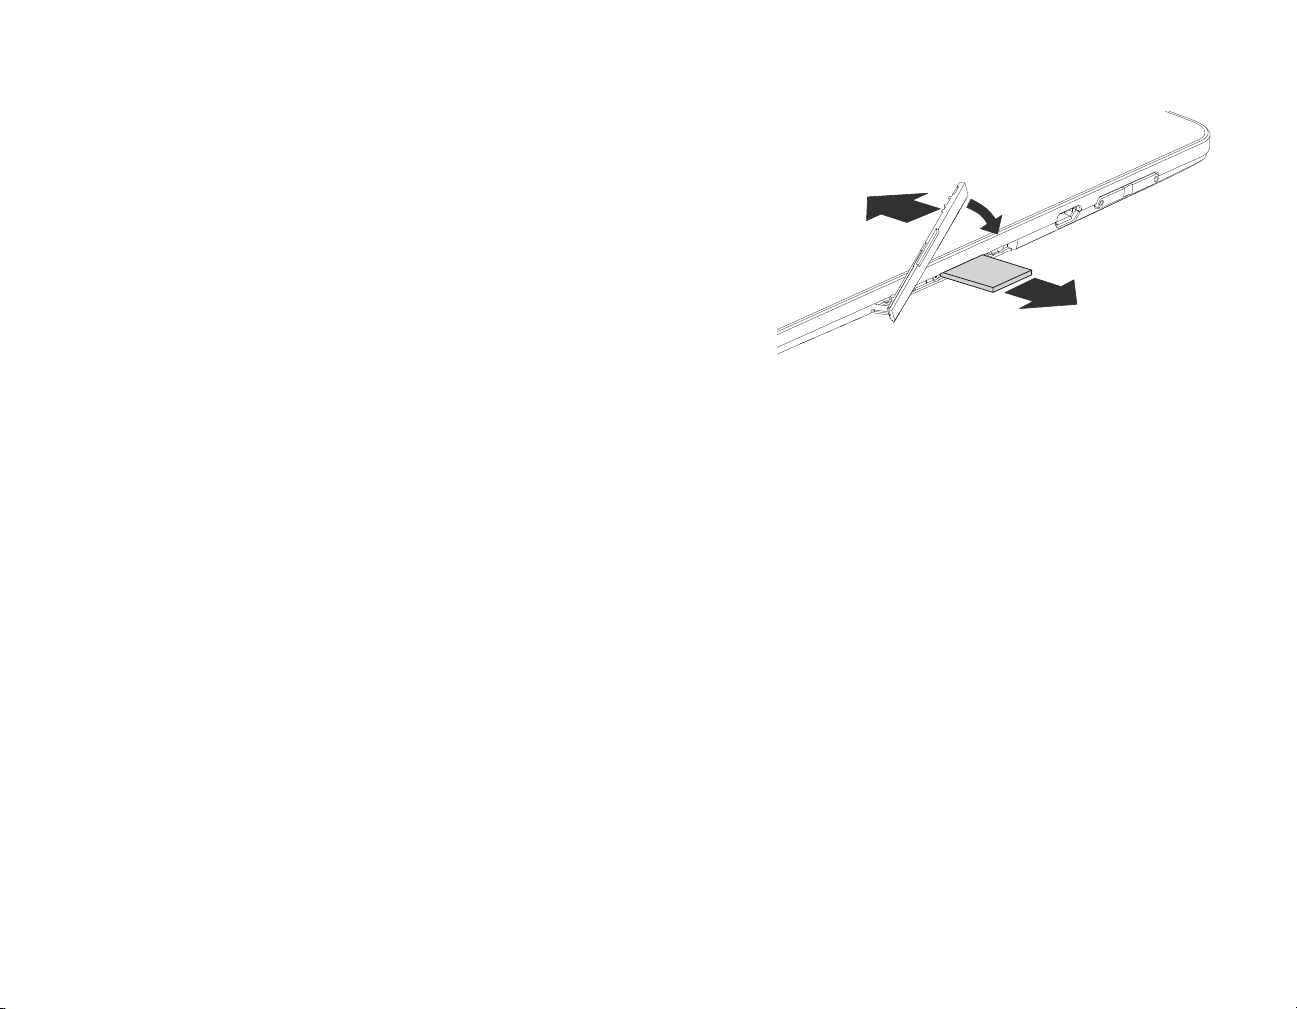
Removing a memory card
1
2
It is very important that the correct procedure be used for removing
the memory card. Failure to do so could result in data loss.
To remove a MicroSD card, you must log the memory card out of the
system before you can remove it. Proceed as follows:
1 Select
are displayed
2 Select
3 Confirm the message with
4 Press the memory card slightly inwards so that the catch
disengages.
5 Pull the memory card out of the slot (Figure 10, #1).
6
Replace the slot cover (Figure 10, #2)10
Settings > Memory
.
Remove SD card
.
. In
Memory
OK.
, all the memory components
The memory card is logged out.
Figure 10. Removing a MicroSD Card
Switching the wireless components on and off
WLAN and Bluetooth
1 Select
2 Set the switch for WLAN or Bluetooth to ON.
3 Click on WLAN and select your preferred network.
4 Click on
GPS
Your device is equipped with an integrated GPS module. With the aid of suitable software, you can therefore use
your device as a navigation system.
Settings
Bluetooth
.
and select the Bluetooth device with which you would like to connect your tablet.
24
- Switching the wireless components on and off
Page 26
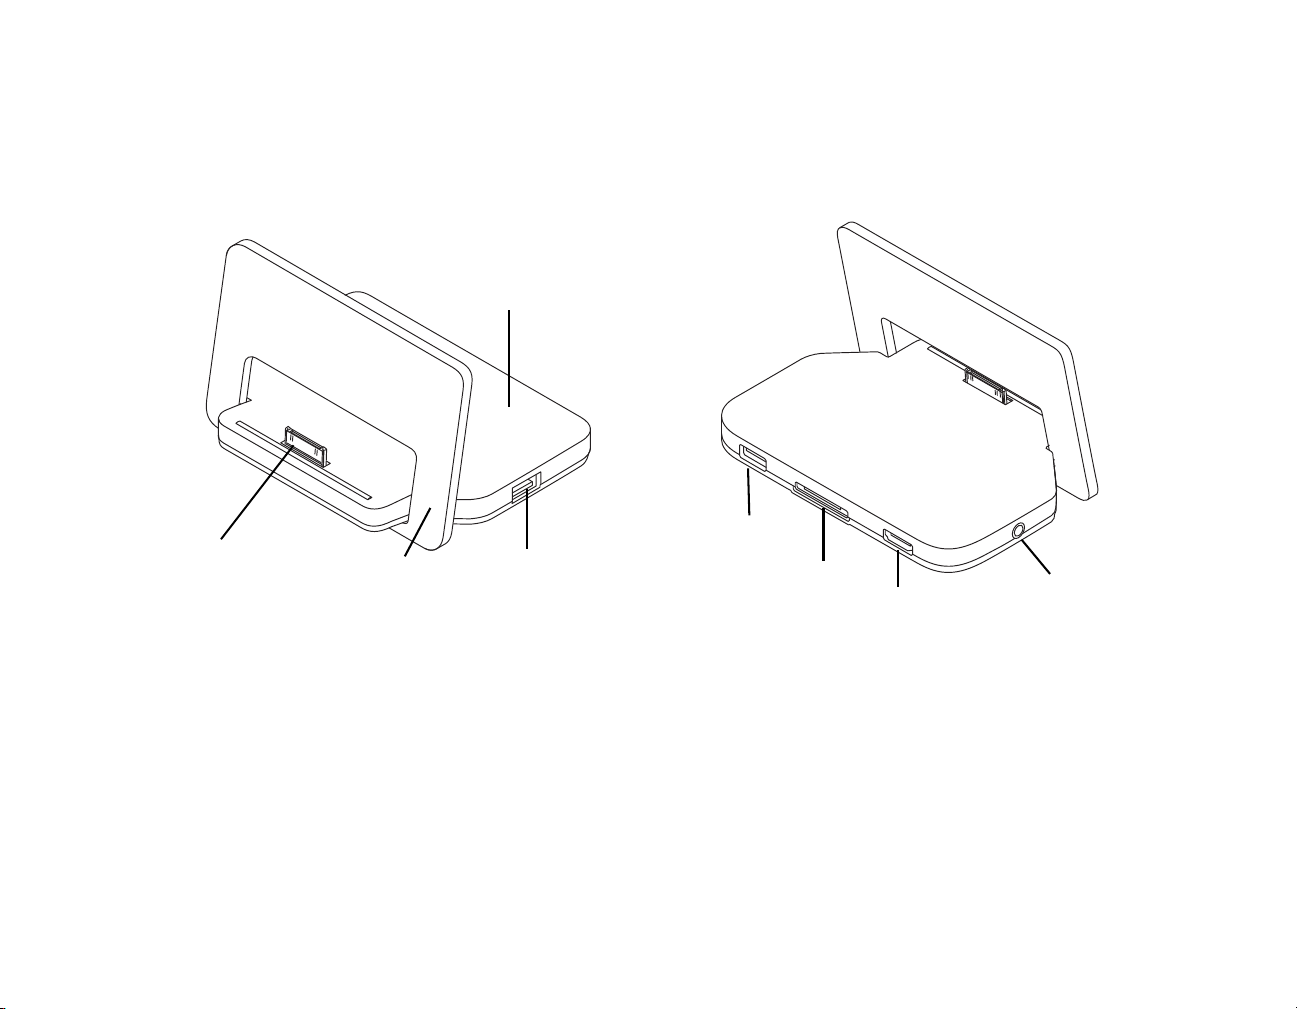
Using the optional cradle
Cradle Base
Cradle Easel
USB Port
Docking
Connector
Line Out
USB Port
HDMI Port
DC In
The optional cradle is a device with which you can quickly connect your Android Tablet to your peripheral devices
such as a display screen, keyboard, mouse, headphones, etc.
You only need to dock the tablet in order to work with your peripheral devices.
Figure 11. Cradle - Front Figure 12. Cradle - Rear
Figure 13. Docking Cradle Components
Setting up the Cradle
Select a suitable location for the cradle before setting it up. Observe the following conditions when doing so:
• Place the cradle on a flat, stable, non-slippery surface.
• Never place the cradle and the AC adapter on a heat-sensitive surface.
• Do not expose the cradle to extreme environmental conditions.
•
Protect the cradle from dust, humidity and
heat.
25
- Using the optional cradle
Page 27
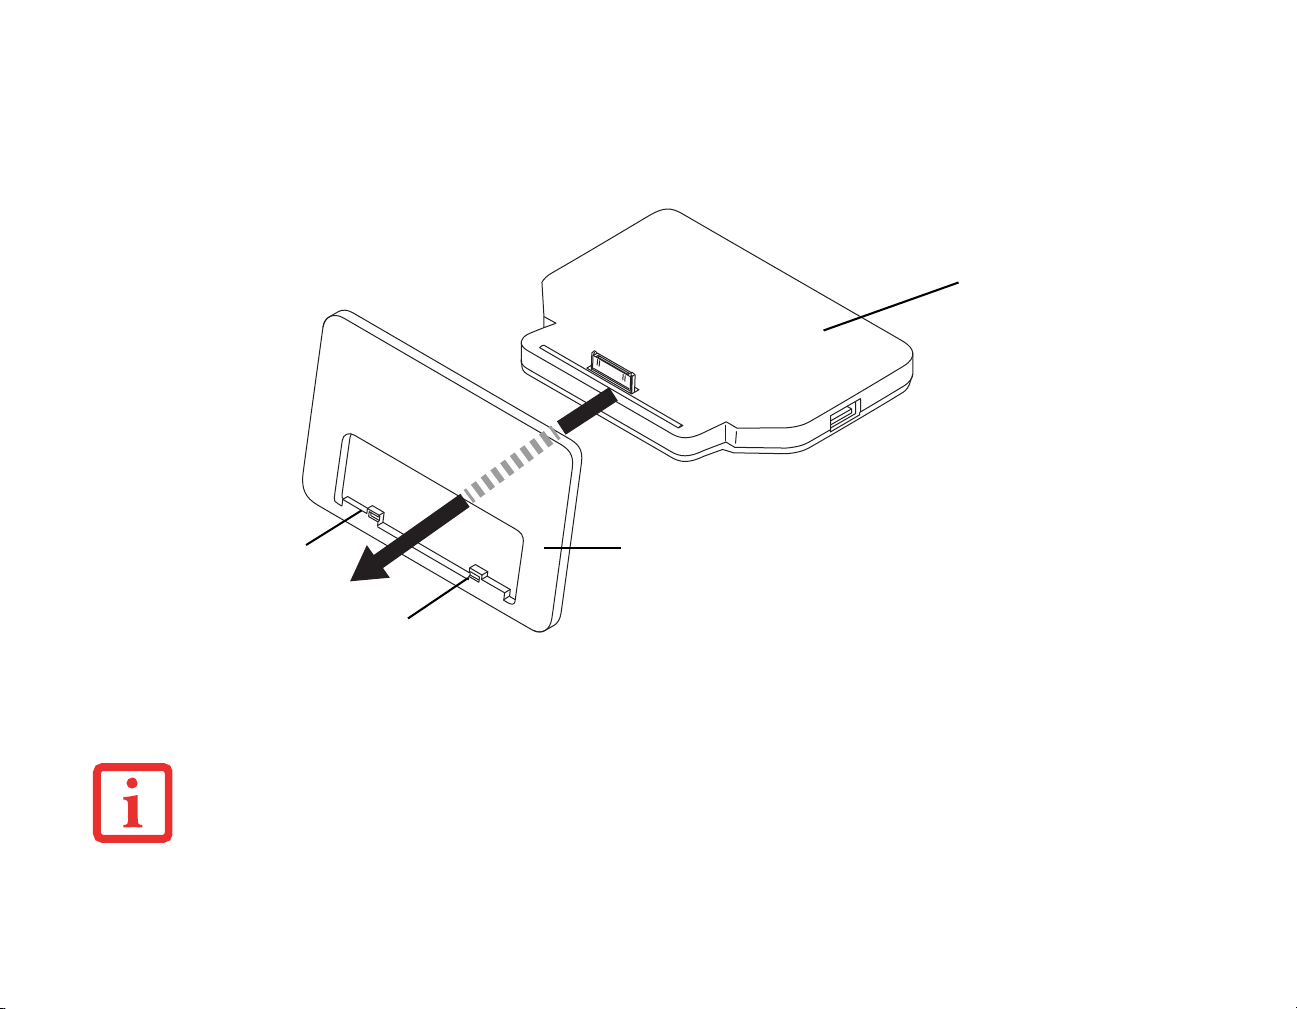
Assembling the Cradle
Cradle Base
Cradle Easel
Alignment Point
Alignment Point
The cradle consists of two pieces: The cradle base and the cradle easel.
To assemble the cradle, simply slide the narrow end of the base into the slot in the easel until the notches in the
bottom of the base are aligned above the alignment point. Rest the base on the easel.
Connecting the Tablet to the Cradle
• IF YOU CONNECT THE TABLET TO THE CRADLE DURING OPERATION, PROBLEMS CAN OCCUR. WE RECOMMEND THAT YOU SWITCH OFF THE
TABLET BEFOREHAND.
• IF THE TABLET IS CONNECTED TO THE CRADLE, YOU MUST CONNECT THE AC ADAPTER TO THE CRADLE IN ORDER TO CHARGE OR POWER
THE TABLET.
1 Switch off the tablet.
Figure 14. Assembling the Cradle
26
- Using the optional cradle
Page 28
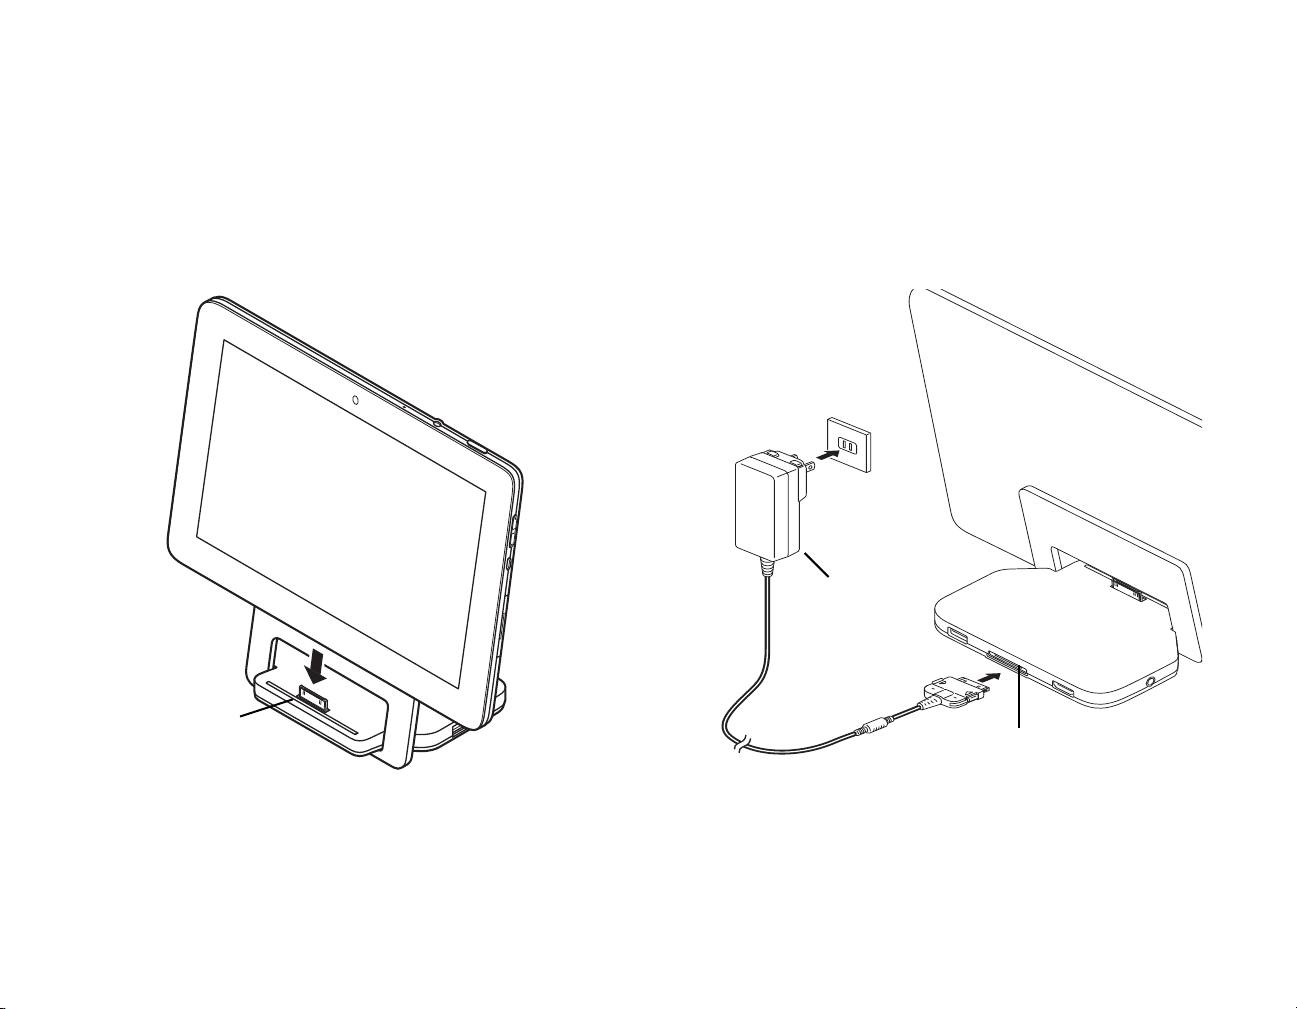
2 If connected, remove the AC adapter cable from the DC In connector on the rear of the cradle base (Figure 16).
Docking
Connector
AC Adapter
DC In
3 Position the tablet so that the docking connector on the bottom of the unit is aligned with the docking
connector on the cradle base (Figure 15).
4 Push the tablet onto the cradle in the direction of the arrow until it engages with the plug.
5 Plug the AC adapter into the DC In connector on the rear of the cradle.
6 Plug the AC adapter cable into an AC socket.
Figure 15. Connecting the tablet to the cradle Figure 16. Powering the tablet with the cradle
27
- Using the optional cradle
Page 29

Disconnecting the Tablet from the Cradle
If you connect the tablet to the cradle during operation, problems can occur. We recommend that the tablet be
switched off or that the appropriate undocking function provided by the operating system is executed.
1 Switch off the tablet.
2 Lift the tablet from the cradle while supporting the underneath of the cradle.
28
- Using the optional cradle
Page 30

Chapter 4
Working with Android
Getting Started with Android
Your Android Tablet is pre-installed with the Android 4.0 operating system and many useful apps. Android 4.0 has
been specially optimized for the operation of Android Tablets using the finger, so that you will quickly become
familiar with it, without any long training periods.
Initial setup of your device with Android
When you switch on your device for the first time the welcome page is displayed. Follow the onscreen instructions.
You can choose your language on the welcome screen. If you wish to set another language, select it from the menu
by tapping on it and then confirm with
You will be asked for your Google account information during the installation process. If you have not already set
this up, you can do so now.
Start
.
YOU CAN SKIP SETTING UP THE GOOGLE ACCOUNT AND PUT YOUR ANDROID TABLET INTO OPERATION WITHOUT A GOOGLE ACCOUNT.
H
OWEVER, SOME APPLICATIONS REQUIRE THAT A GOOGLE ACCOUNT IS SET UP, FOR INSTANCE GMAIL / GOOGLE MAIL. YOU CAN SET UP THE
G
OOGLE ACCOUNT AT A LATER TIME (“PERSONAL SETTINGS” ON PAGE 42). WHEN YOU SET UP A GOOGLE ACCOUNT, ALL EMAILS, CONTACTS,
CALENDAR EVENTS AND OTHER DATA WHICH ARE LINKED TO THIS ACCOUNT WILL AUTOMATICALLY BE SYNCHRONISED WITH YOUR TABLET.
When the installation process is complete, the home page will be displayed.
29
Page 31

Home Page
1
2
345
6
1: Google Search
2: Applications and Widgets
3: Back
4: Desktop
5: Recently Used Apps
6: System Bar / Status Display
30
- Getting Started with Android
Page 32

Navigating on the home page
There are three navigation buttons shown on the lower left of the home page. These buttons are always available
while your Android Tablet is operating.
IF THE BUTTONS HAVE NOT BEEN USED FOR SOME TIME, THEY MAY BE HIDDEN OR REPLACED BY SMALL DOTS, DEPENDING ON THE APP.
T
HEY ARE STILL ACTIVE HOWEVER; SIMPLY TOUCH THE DOT OR THE CORRESPONDING POSITION.
Button Description
Back Button:
Opens the previously used page. This can also return to another app.
Desktop Button (homepage):
Displays your primary home page.
Recently Used Apps Button:
Shows a list of the apps you have most recently used. Includes thumbnails for quick
identification.
> To open one of the listed apps, tap on it.
> To delete an app from the list, swipe it to the left or right.
31
- Getting Started with Android
Page 33

Customizing the home page
Changing between home
pages
Five home pages are available. You are on the third screen by default (the central home page).
• To change between the five home pages, stroke the home page toward the left or right with your finger.
• To return to the central home page, tap on the desktop button.
Changing the
background
• To change the background for all home pages, tap and hold your finger at a free position on a home
page. A list of options will be displayed, from which you can choose a background:
• Gallery:
– Select a photo which you have taken with the camera or which you have downloaded.
– Select the layout and tap on
Cut
to select the background from the gallery.
• Live background: Select an animated background.
• Backgrounds:
– Select a background from the system.
– You can select additional backgrounds from the Android Market.
32
- Getting Started with Android
Page 34

Operation
Using fingers
You can use your finger on the touch screen to execute commands and start applications.
Action
Tapping
Tap and hold
Dragging
Stroke or slide
Double-tap
Zoom in/Zoom out
Input fields
Description
Tap on a symbol, menu, button or folder to select this option or to activate it.
Tap on a button and let your finger stay there longer until the action is
taken.
Tap and hold a symbol and drag it to another place.
You can - for instance - drag apps or widgets onto the home page in this way.
Stroke your finger quickly on the screen in one direction. In this way you can
switch between different home pages.
To enlarge a view, quickly tap twice on a web page, map or another screen.
When you double-tap on an image in a web browser, it will be enlarged
and another double-tap will make it smaller again.
With some apps (
fingers on the screen and moving them apart, and make smaller by moving
the fingers together.
Data must be entered for some apps, such as on an Internet page or your
name and password.
When you tap on the input field, an on-screen keyboard opens, with which you
can enter your data.
maps, browser
and
gallery
) you can enlarge by putting two
33
- Getting Started with Android
Page 35

Entering text via the on-screen keyboard
If you tap on an input field, an on-screen keyboard opens and you can enter text.
Action Description
> Move the cursor to the position where you wish to enter text. A tab will be
Enter text
shown under the position.
> To move the curs
[Clear] Button
Delete text or letters
Tap on
Clear
before the cursor
or, pull the tab
. The text or letters before the cursor will be cleared.
34
- Getting Started with Android
Page 36

Selecting text
> Tap and hold or double-tap on the text.
The nearest word will be highlighted and a tab will be shown at the start
and end of the selection.
> To change the selection, pull the tabs.
The tabs will disappear after a certain time. If you tap on the text again, they
will reappear.
Cutting, copying, inserting text
> Select a text.
> Tap on the Cut, Copy or Insert buttons in the top right-hand corner.
Entering an uppercase letter > Tap the shift key.
> Hold the shift key during the input.
> To switch back to lower case letters, release the shift key.
Entering several letters in uppercase
> Double-tap on the Caps Lock key.
> To switch back to lower case letters, tap the shift key again.
Entering numbers and symbols
> Tap on the [
?123]
> To show a wider selection, tap on the
Quickly show common punctuation
marks and symbols
> Press and hold the key to the right of the space bar.
Special characters are shown on the keyboard as small grey colored fields in
the corner.
Entering special characters
> Press and hold down the shift key while you tap on the key for the special
character.
> Press and hold any key to show alternative characters, symbols or numbers.
Changing the entry language for the
keyboard
Tap on the key for the keyboard settings at the lower left on the keyboard.
or
key.
[=\>
] key.
35
- Getting Started with Android
Page 37

Using the dictation function
A mobile or WiFi network is required to be able to use this function.
Using the speech recognition facility from
Google
, you can enter text by dictation. At most places where you can
enter text via the keyboard, you can also use the dictation function.
> To use the speech recognition, tap on the field where you would like to enter text.
The on-screen keyboard is
displayed.
> Press the microphone key on the on-screen keyboard.
> When you see the microphone symbol, speak your text.
If you pause, the spoken words are converted into text by the speech recognition program and displayed in the
text field with underscore.
The underscore disappears if you enter more text via the keyboard or via the dictation function. You can delete the
underscored text using the delete key.
> For punctuation, say "comma", "full stop", "question mark" or "exclamation mark".
Messages, status and system symbols
You will be informed of new messages, calendar events, warning messages and app updates, etc.
In the system bar or status display (lower right on the home page), there is a digital clock, with status symbols
displayed on its left and system symbols on its right. Status symbols represent app messages. System symbols
show the current strength of the wireless and network connections, battery state of charge, etc.
36
- Getting Started with Android
Page 38

Managing
Action Description
Display messages > Tap on the clock or the symbols
Reacting to messages > Tap on the message
Discarding a message > Slide the message away to the left or right
Discarding all messages > Tap on the X in the bottom right-hand corner
messages
When the list with the messages is displayed, you can call up the
symbol.
Working with apps/widgets
Action
“All Apps” button
Show all apps
Switching between apps and
widgets
Starting an app or widget
Installing additional apps/widgets
from the Android Market (now
called Google Play Store)
Description
> With the button on the top right of your screen, you can navigate to all the
apps and widgets which are installed on your Android Tablet.
> Tap on
All the apps and widgets will be displayed on the lower right at the edge of the
screen.
> Stroke to the left or right
or
> Tap on the
Tap on the app or widget.
>
> Tap on the
> Tap on the Market symbol (now the Play
or
> Tap on the shop symbol in the right lower corner.
All apps
37
.
Apps
or
Widgets
Apps
tab.
- Getting Started with Android
Settings
tab. A list of the apps/widgets is shown.
menu by tapping on the "Quick settings"
Store symbol) in the list of apps.
Page 39

Placing an app or widget on a home
page
> Tap on
All apps
.
All the apps and widgets will be displayed on the lower right at the edge of the
screen.
> Tap on the corresponding symbol and then hold it. The home page is
displayed.
> Slide the symbol to a free place on your home page.
> As soon as the symbol is at the desired place, lift the finger.
The app or widget is placed at this location.
Note: Widgets can have different sizes. If there is not enough space where the
app or widget should be placed, it will not be added to the home page.
Putting apps or widgets in a folder
Opening a folder
Changing a folder name
Removing an app, folder or widget
from a home page.
> Drag the app/widget to another app/widget and put it down there.
A folder with these two apps/widgets will be created.
You can add further apps/widgets to this folder and use various folders to
categorize the apps/widgets on your home page.
> Ta p o n t h e f o l de r .
The list of the apps or widgets contained in this folder will be displayed.
> Open the folder on the home page and type on the name.
> Tap and hold the symbol and slide it upwards onto the edge of the screen.
38
- Getting Started with Android
Page 40

Settings
Managing the WiFi network
Everywhere that there is a wireless access point, you can make a connection to a network.
Action
Making a network connection
Entering the proxy server for the
network
Changing existing network
connections
Removing network connection
(deactivating automatic
connection or if this will no longer
be used)
Customizing WiFi information,
rules and other advanced options
Description
> From
> Select
> To switch on the WiFi or WLAN, slide the switch to ON.
Your Android Tablet searches for available WiFi networks and displays a list of those it has
found.
> Select a network. You will be asked to enter your logon information.
Proxy settings are used by browser apps but not by other apps.
> If network requires a proxy server, tap and hold the network name in the WiFi settings.
> Select
If you select
> Tap on the network name and hold the network name.
> Select
If you save these network settings, the next time that you are in this district your device
will automatically make a connection.
> Tap on the menu button.
> Select
All apps
Wireless networks and networks
Change
> Tap on the network name and hold the network name.
> Select
, select the option
Change network
.
Display advanced options
.
Discard
Advanced
.
.
Settings
.
.
, you can make the proxy settings manually.
39
- Getting Started with Android
Page 41

Establishing a Bluetooth connection
> Switch on the Bluetooth function of your tablet.
> From
> Select
> To switch on the Bluetooth, slide the switch to ON.
All apps
, select the option
Settings
Wireless networks and networks
.
.
A list of the available Bluetooth devices in your vicinity is
displayed.
WHEN YOU USE A NEW BLUETOOTH DEVICE FOR THE FIRST TIME, THE TWO DEVICES MUST BE "PAIRED" SO THAT A SECURE CONNECTION CAN BE
MADE. AFTERWARDS, THE DEVICES AUTOMATICALLY CREATE A CONNECTION. THE DEVICES STAY PAIRED UNTIL YOU CANCEL THE CONNECTION.
> Under
Your device searches for Bluetooth devices
Settings - Wireless networks and networks
within range and shows them.
, select the option
Bluetooth
.
> Select the device with which you wish to connect your tablet and follow the instructions.
Limiting data volumes for mobile data use
You can give your mobile data use a limit, so that the mobile network switches off when the data volume is
reached.
> From
> Select
All apps
, select the option
Data usage
Settings
.
.
The previous data volume usage will be shown. You can specify a limit for mobile data.
Airplane Mode, VPN, Tethering and Portable Hotspot, and WiFi Direct
> From
> Select
All apps
Further...
, select the option
Settings
, to make further settings.
.
40
- Getting Started with Android
Page 42

The following options are possible:
DEVICE SETTINGS
Option Description
Airplane Mode
VPN
Tethering and Portable Hotspot
WiFi Direct
IF YOUR NETWORK SETTINGS ARE NOT AUTOMATICALLY CONFIGURED, PLEASE ASK YOUR MOBILE NETWORK PROVIDER FOR THE SETTINGS AND ENTER
THIS DATA UNDER
> From
> Select
All apps
Device
, select the option
, to make further settings.
Option Description
Sounds
For setting the volume, ring tone and vibration alarm
WIFI D
All radio connections of your Android Tablet will be disabled when this mode is
set.
Permits connection to virtual private networks.
Tethering allows the use of your Android Tablet as a modem, so that external
devices which are connected via USB, WiFi or Bluetooth can make an Internet
connection.
Manage all the settings and options for mobile data networks. This includes the
activation/deactivation of mobile data networks and data roaming, as well as
the management of APNs (Access Point Names) and network administrators.
IRECT
.
Settings
.
41
- Getting Started with Android
Page 43

Display
To set the brightness, background, automatic rotation, time until sleep mode and font size information.
Ambient light sensor
The ambient light sensor adapts the brightness depending on the ambient light. You can enable and
disable automatic brightness in the
Sensor for recognizing the screen orientation
The sensor detects the orientation and changes the screen view accordingly. You can enable or disable
automatic turning of the screen display via the
Brightness
menu.
Automatically turn display
control box.
Memory
Battery
Apps
Informs you of the internal and external memory usage and free memory space and allows you to clear
the SD card.
Shows the battery state of charge and battery consumption data as well as a list of the applications and
their battery consumptions in percent.
Displays the following app lists:
• All the pre-installed apps and in addition the apps installed from the Android Market (now called Play
S
• Only additionally installed apps
• Apps on the SD card
• Only active applications
By tapping on an app you can de-install it (if it was additionally installed from the Android Market),
cancel the application or erase data and cache.
Personal settings
> From
> Select
All apps
Personal...
, select the option
tore)
Settings
, to make further settings.
.
42
- Getting Started with Android
Page 44

The following options are possible:
Option Description
Accounts and Sync.
You can use several Google accounts and Microsoft Exchange ActiveSync accounts on your
device. Depending on your apps, you can possibly also add or delete other accounts.
Location services
You can enable or disable Google location services and GPS satellites.
Security/screen security You may wish to lock your tablet to prevent unauthorized access. If a screen lock was set
up, the screen locks automatically when your tablet switches to the quiescent state.
There are the following options for the screen lock:
Move finger
Offers no protection. You do however reach the home screen quickly or can open the camera
immediately with a stroking movement. To unlock and return to the home screen, stroke
towards the right. Stroke upwards to the left to open the camera.
Unlocking through face recognition
Offers minimal protection. The device can be unlocked by recognition of your face via the
front camera.
Pattern
Offers minimal protection. The locking can be overridden by a simple pattern with the
finger.
43
- Getting Started with Android
Page 45

Security/screen security
(continued)
Password
At least four or more characters are required. The best security is offered by a password with
8 characters, consisting of digits, letters and special characters and which does not contain
any easy to guess words or phrases.
Owner information
You can enter a text such as name and telephone number via the owner information;
these will then be displayed on the locked screen.
Security/encryption
You can encrypt all the data on your Android Tablet: Google accounts, application data, music
and other media, downloaded information etc. Encryption offers additional protection if your
tablet is stolen and it may be required or recommended in some companies.
If there is encryption however, every time your tablet is switched on you have to enter a
numeric PIN or a password. Please note that this must be the same password or the same
PIN that you have used to lock the screen. A separate password cannot be set up.
Warning: An encryption is irreversible. The only way to remove an encryption is to
reset your tablet to the factory settings.
Setting up encryption
Contact your system administrator before you set up encryption. In many cases, the PIN or
the password for the encryption is managed by the system administrator. Before you
enable encryption, make the following preparations:
> Enter a PIN or a password for the screen locking.
> Connect your Android Tablet with the AC Adapter.
> Fully charge the battery.
> Plan for about one hour for the encryption process: The encryption process must not be
interrupted; an interruption will cause you to lose some or all data.
44
- Getting Started with Android
Page 46

Language and entry
You can change the language, enable or disable spelling and change the keyboard and
language settings.
Backup and reset
Backup and reset /
backup my data
Backup and reset /
backup account
You can perform a backup of your settings and other data which are associated with one
or more of your Google accounts. If you replace your device or have to reset it to the
factory settings, you can access your previously saved data on this account and restore
your data.
When you enable this option, a major part of your data is automatically saved by a
backup, this also includes:
•your WiFi passwords
• your browser bookmarks
• the list of your apps which you have installed via the App Market (now Play Store
app)
• the words which you have entered in the dictionary used by the on-screen keyboard
• most of the settings which you have made
Some apps from third-party suppliers can also use this function, so that you can recreate your
data after reinstallation of an app.
If you disable this option, your data will no longer be secured through a backup and the
existing backups will be deleted from your Google accounts.
Shows the Google accounts where the information is backed up. On a new or reset device,
you must register for one or more accounts to be able to access the corresponding
information.
> To add a new account, select
45
- Getting Started with Android
Backup account - Add account
.
Page 47

Backup and reset /
automatic restore
> Enable this option to restore the settings and other data when an app is reinstalled. This
function requires that you back up your data via a Google account and that the app uses
the backup service.
Backup and reset / reset
to the factory data
Deletes all personal data on the internal memory, including information on your Google
account, other accounts, your system and app settings, downloaded applications, your
music, photos, videos and other files.
> To reset the Android Tablet to the factory data, select
resetting your tablet, you must enter the same data that you
setup. If you have backed up the data on a Google
during the setup.
Reset to factory state
entered during the first
account, you can restore the data
. After
System settings
> From
> Select
All apps
System
, select the option
Settings
to make further settings.
.
The following options are possible:
• Date and time: To set the date, time and time zone. Select the time format (12 hour or 24 hour clock)
and the display format for the date
• Input aids such as TalkBack, large fonts, automatic turning of the screen or spoken password input
• Developer options such as USB debugging or user interface
options
• Via the tablet: serial number of the tablet, unique IMEI number, status and detailed tablet information. You
will find the serial number in the status menu.
46
- Getting Started with Android
Page 48

System updates
Fujitsu can make system updates available for your tablet, to resolve problems or to update the operating system
or applications.
You can choose between two update methods:
• Over-the-air (OTA): Updating over the Internet directly from your Android Tablet.
•
Updating
Over-the-air (OTA)
1 Go to Settings and select About Tablet. Click on System Updates. You will automatically be sent to the OTA portal
and will be presented with either index.html or noupdate.html.
2 Follow the instructions on the screen to complete the procedure.
Updating via an external memory card (micro SD card)
1 Open the Internet browser on your tablet or another computer.
via an external memory card (micro SD card)
FUJITSU ACCEPTS NO RESPONSIBILITY FOR LOSS OF YOUR DATA AFTER A SYSTEM UPDATE.
B
EFORE AN UPDATE, YOU SHOULD WITHOUT FAIL PERFORM A DATA BACKUP.
2 Navigate to "http://support.ts.fujitsu.com".
3 Select
4 Search for your tablet in the list of devices.
5 Download the current system update package which is identified as an SD card update.
6 Copy this system update package onto an external memory card (micro SD card).
7 Slide the memory card (micro SD card) into your tablet.
Drivers & Downloads
.
47
- Getting Started with Android
Page 49

8 Switch your tablet off by one long press of the ON/OFF switch and confirm the question on the shut down
with OK.
9 Switch your tablet on again.
10 When you see the Android logo on the screen, press the ON/OFF switch and the volume button (increase volume)
and keep them pressed for 2 seconds and then release them.
IF THE FUJITSU LOGO APPEARS ON THE SCREEN, THEN YOU HAVE NOT REACHED THE RESTORE MODE. REPEAT THE ABOVE STEP UNTIL YOU
REACH THE RESTORE MODE.
11
Select
wipe data/factory reset
AVIGATE AS FOLLOWS THROUGH THE MENU:
N
.
After a few seconds you reach the restore mode.
• VOLUME BUTTON (INCREASE VOLUME) TO SELECT AN OPTION ABOVE THE CURRENT OPTION
• VOLUME BUTTON (DECREASE VOLUME) TO SELECT AN OPTION BELOW THE CURRENT OPTION
• ON/OFF SWITCH TO CONFIRM THE SELECTION
12 Follow the instructions on the screen to perform the system update. After the system update has completed,
you will be in the restore mode again.
13 Select
Reboot system now
to finish the system update.
48
- Getting Started with Android
Page 50

Apps
In the following section you will find a list of some of the practical apps which are pre-installed on your Android
Tablet. Via the Android Market (whose new name is Play Store), you have direct access to practical apps for games
and much more, which you can download and install on your tablet.
TO GAIN ACCESS TO THE ANDROID MARKET (NOW CALLED PLAY STORE), YOU NEED A GOOGLE ACCOUNT AND INTERNET ACCESS.
UJITSU IS NOT LIABLE FOR MALFUNCTIONS WHICH ARE CAUSED BY ADDITIONAL APPS WHICH YOU HAVE INSTALLED. IN SUCH CASES, A
F
REPAIR IS CHARGEABLE, EVEN WITHIN THE WARRANTY PERIOD.
F
UJITSU IS NOT LIABLE FOR ANY DAMAGES INCURRED BY YOU OR A THIRD PARTY PROVIDER, ARISING FROM AN INSTALLATION PERFORMED BY
YOU.
A
LWAYS CHECK THE SECURITY OF ADDITIONAL APPLICATIONS. INSTALLATION IS CARRIED OUT AT YOUR OWN RISK. A NORTON SECURITY PACKAGE IS
PRE-INSTALLED ON YOUR TABLET. ACTIVATE THIS SOFTWARE TO PROTECT YOURSELF AGAINST ATTACKS FROM THE INTERNET AND FROM MALICIOUS
SOFTWARE.
F THEY WERE NOT PRE-INSTALLED ON YOUR TABLET, FUJITSU DOES NOT FURNISH ANY GUARANTEE NOR GIVE ANY SUPPORT FOR APPS FROM
I
THIRD PARTY SUPPLIERS.
S
OME APPLICATIONS AUTOMATICALLY MAKE AN INTERNET CONNECTION AND COMMUNICATE. PLEASE NOTE THAT THIS MAY LEAD TO HIGHER
TELECOMMUNICATION COSTS.
49
- Getting Started with Android
Page 51

Applications
App Description
Browser
Downloads
Settings
Email
Gallery
Google Mail/GMail
Google+
Calendar
Camera
Contacts
Latitude
Maps
Music
Displays web pages from the Internet
Offers easy access to downloaded files
Allows system and personal settings on your tablet Email
Manages your emails from various accounts
Displays pictures and videos on your tablet
Manages your Google mail
Enables updates and social networking
Calendar applications
Creates recordings and videos with the rear or front camera
Manages your contacts
Exchanges your own location and that of your friends and shows these on a map
Shows your location and much more on a map
Plays your favorite music
Navigation
Places
Android Market (now Play
Store)
Shows the route to your destination
Classifies places and gives recommendations
Offers access to Android apps, games and more
50
- Getting Started with Android
Page 52

Sound Recorder
Allows recordings of messages
Talk
Video Studio
YouTube
Absolute® Computrace®
Allows you to chat with your Google Talk contacts
Allows video editing
Shows YouTube videos
Your Android Tablet is equipped with Computrace® persistence technology from Absolute®
Software.
Once enabled, the Computrace persistence technology creates a permanent connection to
your device. If the device is lost or stolen, it can be frozen with this technology, data can be
deleted and other remote security or administrative functions can be performed.
Note: This technology is disabled by default. A separate license is required to enable the
Computrace persistence technology. Contact your local dealer.
Provider: Absolute Software Web page: "http://www.absolute.com/absolute-tablet"
51
- Getting Started with Android
Page 53

Chapter 5
Connecting External Devices
Peripheral Device Connections
• ALWAYS READ THE DOCUMENTATION SUPPLIED WITH THE DEVICE YOU WISH TO CONNECT. NEVER CONNECT OR DISCONNECT CABLES DURING
A THUNDERSTORM.
• NEVER PULL AT A CABLE WHEN DISCONNECTING IT. ALWAYS GRASP THE PLUG.
• WITH SOME DEVICES, SUCH AS USB DEVICES, IT IS NOT NECESSARY TO SWITCH OFF THE TABLET AND THE DEVICE BEFORE
CONNECTING/DISCONNECTING. FOR MORE INFORMATION ABOUT WHETHER OR NOT DEVICES NEED TO BE SWITCHED OFF, PLEASE REFER TO
THE DOCUMENTATION SUPPLIED WITH THE EXTERNAL DEVICE.
Connecting USB devices
If your external USB devices have a micro USB interface, you can connect external devices to the USB port. If they
have a traditional USB interface, you can also connect devices to the optionally available docking cradle (e.g., a
keyboard, mouse or memory stick).
• USB DEVICES ARE HOT-PLUGGABLE. THIS MEANS YOU CAN CONNECT AND DISCONNECT DEVICES WHILE YOUR OPERATING SYSTEM IS RUNNING.
• USB 2.0 HAS A DATA TRANSFER RATE OF UP TO 480 MBIT/S.
•
ADDITIONAL INFORMATION CAN BE FOUND IN THE DOCUMENTATION FOR THE USB DEVICES.
52
Page 54

To connect a USB device to your tablet:
1 Connect the data cable to the external device.
2 Connect the data cable to a USB port or to the
cradle of the tablet.
To remove a USB device from your tablet:
Always correctly remove the device according to the
steps below, to ensure that none of your data is lost.
1 Select Settings > Memory > Remove USB memory.
It is now safe to remove the USB device.
DEVICE DRIVERS
USB DEVICES WILL BE AUTOMATICALLY RECOGNIZED AND INSTALLED BY YOUR OPERATING SYSTEM.
HDMI port
You can use the optionally available cradle to connect
HDMI-capable end devices such as an LCD, plasma TV or
video projector.
2 Place the tablet in the cradle.
3 Connect the data cable to the HDMI port of the
cradle.
53
- Peripheral Device Connections
Figure 17. Connecting a USB Device
Figure 18. Connecting an HDMI Device
Page 55

Headphone/Microphone port
You can connect headphones, a microphone or
external loudspeakers to your tablet via the
headphones port.
1 Connect the audio cable to the external device.
2 Connect the audio cable to the headphone port of
the tablet.
The internal speakers are disabled when the
external device is plugged in.
IF YOU PURCHASE A CABLE FROM A RETAILER, PLEASE NOTE THE FOLLOWING INFORMATION: THE HEADPHONE PORT ON YOUR TABLET IS A "3.5
MM JACK SOCKET".
I
F YOU WANT TO CONNECT HEADPHONES OR A SPEAKER YOU WILL NEED A "3.5 MM JACK PLUG".
Figure 19. Connecting a Headphone Device
54
-
Page 56

Chapter 6
Troubleshooting Your Android Tablet
Troubleshooting
There may be occasions when you encounter simple setup or operating problems that you can solve on the spot, or
problems with peripheral devices that can be solved by replacing the device. The information in this section helps you
isolate and resolve some of these straightforward issues and identify failures that require service.
Identifying the Problem
If you encounter a problem, go through the following procedure before pursuing complex troubleshooting:
1 Turn off your STYLISTIC Android Tablet.
2 Make sure the AC adapter is plugged into your tablet and to an active AC power source.
3 Make sure that any devices connected to the external connectors are plugged in properly. You can also disconnect
such devices, thus eliminating them as possible causes of failure.
4 Turn on your tablet. Make sure it has been off at least 10 seconds before you turn it back on.
5 If the problem has not been resolved, try resetting your system with the Reset Button (See “Using the Reset
Button” on page 56). If that doesn’t solve the problem, refer to the Troubleshooting Table for more detailed
troubleshooting information.
55
Page 57

IF YOU KEEP NOTES ABOUT WHAT YOU HAVE TRIED, YOUR SUPPORT REPRESENTATIVE MAY BE ABLE TO HELP YOU MORE QUICKLY BY GIVING
ADDITIONAL SUGGESTIONS OVER THE PHONE.
6 If you have tried the solutions suggested in the Troubleshooting Table without success, contact your support
representative:
Toll free: 1-800-8Fujitsu (1-800-838-5487)
Web site: http://solutions.us.fujitsu.com/www/content/support/contact/index.php
Before you place the call, you should have the following information ready so that the customer support
representative can provide you with the fastest possible solution:
• Product name
• Product configuration number
• Product serial number
• Purchase date
• Conditions under which the problem occurred
• Any error messages that have occurred
• Type of device connected, if any
See the Configuration Label on the bottom of your tablet for configuration and serial numbers.
Using the Reset Button
If the device no longer reacts to input or the ON/OFF switch, use the Reset key to restart the device.
1 Disconnect the tablet from the AC adapter.
2 Open the slot cover of the memory card.
3 Press a small, rigid wire (e.g., a paper clip) into the opening of the Reset key for approximately five seconds
to restart the device.
4 Replace the slot cover.
56
- Troubleshooting
Page 58

5 Connect the AC adapter to the device again.
Specific Problems
Using the Troubleshooting Table
If you have problems with your Android Tablet, try to find the symptoms under the Problem column of the
troubleshooting table for the feature giving you difficulty. You will find a description of common causes for that
symptom under the column Possible Cause and what, if anything, you can do to correct the condition under Possible
Solutions. All possible causes or solutions may not apply to your tablet.
Troubleshooting Table
Problem Possible Cause Possible Solutions
The Android Tablet’s date or
time is incorrect
The display on the touchscreen is difficult to read
The external monitor remains
blank
Time and date are incorrect.
Date and time are still set
incorrectly after switching on the
tablet.
Reflected glare
Monitor is switch
Power saving has been activated
(monitor is blank).
Brightness is set too dark. Adjust the brightness of the monitor.
The external monitor’s power
cable or data cable is not
connected properly.
ed off
Select
Settings > Date & Time
Please contact your sales outlet or our Service and Support.
, then adjust the settings.
• Move the tablet into a different position.
•
Increase the brightness of the screen.
Switch the extern
Press a key (external keyboard) or tap on the touchscreen.
Switch off the ANdroid Tablet and the external monitor.
al monitor on.
• Check whether the power cable is plugged properly into the
external monitor and into the power socket.
• Check whether the data cable is properly connected to the
tablet and the external monitor (if it is plugged in with a
connector).
• Switch on the tablet and the external monitor.
57
- Troubleshooting
Page 59

Problem Possible Cause Possible Solutions
The tablet does not start after
powering on
The tablet stops working The tablet is in energy saving
The radio connection to a network does not work
The battery discharges too
quickly
The power adapter is not
connected correctly.
mode.
An application has caused the
malfunction.
The battery is dead.
The tablet does not respond to
inputs.
The wireless component is
disabled.
The wireless component is
enabled. Despite this, the
wireless connection to a network
does not work.
You may have an application
running that consumes a great
deal of power due to frequent
accessing of radio, GPS or network
connections.
• Check whether the AC adapter is connected correctly to the
tablet.
• Switch on the tablet.
Leave the energy saving mode: Press the ON/OFF switch.
Close the application program or
the operating system or switching the device off and back on
again).
Charge the battery, or, c
Restart the tablet manually (see “Using the Reset Button” on
page 56).
Switch the radio component on.
Check that the wireless connection is correctly set up via
the
Settings
.
onnect the AC adapter to the Tablet
restart the tablet
(by restarting
.
• Use the AC adapter as frequently as possible.
• Close unnecessary applications, reduce the frequency of the
access to radio components or the network or switch off the
radio components in a targeted way via the settings.
Acoustic warnings
The maximum brightness may
have been set for the screen.
A beep sounds every few
seconds., indicating the battery is
almost empty.
58
- Troubleshooting
Reduce the brightness of the screen to lower energy consumption: you will find the adjustment under
Brightness
Charge the battery.
.
Settings > Display >
Page 60

Chapter 7
System Specifications
Specifications
This section provides the hardware and environmental specifications for your Fujitsu STYLISTIC Android Tablet.
Specifications of particular configurations will vary.
Android Tablet
General Specs
Processor
Main Memory (SO DIMM) 1GB LPDDR2 onboard
Electrical
Safety Regulations CE
Protection Class II
Maximum power consumption:
(Tablet on with ba ttery chargin g)
NVIDIA® Tegra® 3 T30S, Quad Core ARM Cortex A9 (1.4
30 W
59
GHz)
Page 61

Touchscreen
Size 10.1 “ (25.7 cm) TFT WXGA
Resolution 1280 x 800 pixels
Pixel Class II
Technology Wide-view high brightness LED display with rugged glass
Cameras
Front: 2 megapixels
Rear: 8 megapixels with auto focus and flash
Maximum external display resolution Full HD 1920 x 1080 pixels
Dimensions
Width x depth x height 10.3” x 6.9” x 0.35” (262.6 mm x 175.4 mm x 8.6 mm)
Weight 1.23 lb. (.56 kg)
Input Devices
Tablet Buttons 3 keys
Slots
Memory Card Slot 1 x MicroSD
Ports
HDMI Port 1 x (optionally via cradle)
Headphone Port/Line Out 3.5 mm stereo mini jack
Docking Port 1 x
Micro USB Port 1 x USB 2.0
60
- Specifications
Page 62

Ambient Conditions
Environment Class DIN IEC 721 7K1
Mechanism Class DIN IEC 721 7M2
Operating Temperature 41° to 104° F (5° to 40° C)
Transport Temperature 5° to 140° F (–15° to 60° C)
Rechargeable Battery
Type 2-cell Lithium Polymer 3170 mAh rechargeable battery
Rated Voltage 12 V
Rated Capacity 38 Wh
AC Adapter
Rated Voltage 19 V
Maximum Rated Current 1.58 A
61
- Specifications
Page 63

Optional Cradle
Electrical
Safety Regulations CE
Protection Class II
Ports
Universal Serial Bus (USB) 2 x USB 2.0
Docking Port 30-pin
Ambient Conditions
Environment Class DIN IEC 721 7K1
Mechanism Class DIN IEC 721 7M2
Operating Temperature 41° to 95° F (5° to 35° C)
Transport Temperature 5° to 140° F (–15° to 60° C)
62
- Specifications
Page 64

Chapter 8
Regulatory Information
IF THERE IS NO FCC LOGO OR FCC ID ON THE DEVICE THEN THIS DEVICE IS NOT APPROVED BY THE FEDERAL COMMUNICATIONS COMMISSION
(FCC)
OF THE USA. ALTHOUGH IT IS NOT EXPLICITLY FORBIDDEN TO TRAVEL IN THE US TRADING AREA CARRYING THIS DEVICE, TO AVOID
TROUBLE AT CUSTOMS CLEARANCE, FUJITSU RECOMMENDS NOT TO BRING THIS DEVICE INTO THE US TRADING AREA.
Regulatory information for Android Tablets without radio device
NOTICE:
Changes or modifications not expressly approved by Fujitsu could void this user’s authority to operate the equipment.
Notice to Users of Radios and Television
These limits are designed to provide reasonable protection against harmful interference in a residential installation. This
equipment generates, uses, and can radiate radio frequency energy and, if not installed and used in accordance with the
instructions, may cause harmful interference to radio communications. However, there is no guarantee that interference will
not occur in a particular installation. If this equipment does cause harmful interference to radio or television reception, which
can be determined by turning the equipment off and on, the user is encouraged to try to correct the interference by one or
more of the following measures:
• Reorient or relocate the receiving antenna.
• Increase the separation between the equipment and receiver.
63
Page 65

• Connect the equipment into an outlet that is on a different circuit than the receiver.
• Consult the dealer or an experienced radio/TV technician for help.
DOC (Industry CANADA) notices
Notice to Users of Radios and Television
This Class B digital apparatus meets all requirements of Canadian Interference-Causing Equipment Regulations.
CET appareil numérique de la class B respecte toutes les exigence du Réglement sur le matérial brouilleur du Canada.
FCC Regulatory information for Android Tablets with radio device
Federal Communications Commission statement
This device complies with Part 15 of FCC Rules. Operation is subject to the following two conditions: (1) this device may
not cause interference, and (2) this device must accept any interference, including interference that may cause undesired
operation of this device.
FCC Interference Statement
This equipment has been tested and found to comply with the limits for a Class B digital device, pursuant to Part 15 of the
FCC Rules. These limits are designed to provide reasonable protection against harmful interference in a residential
installation. This equipment generates, uses, and can radiate radio frequency energy. If not installed and used in accordance
with the instructions, it may cause harmful interference to radio communications.
However, there is no guarantee that interference will not occur in a particular installation. If this equipment does cause
harmful interference to radio or television reception, which can be determined by turning the equipment off and on, the
user is encouraged to try to correct the interference by one or more of the following measures:
1. Reorient or relocate the receiving antenna.
2. Increase the distance between the equipment and the receiver.
3. Connect the equipment to an outlet on a circuit different from the one the receiver is connected to.
4. Consult the dealer or an experienced radio/TV technician for help.
Please note the following regulatory information related to the optional radio device.
64
- FCC Regulatory information for Android Tablets with radio device
Page 66

RF Exposure Information (SAR)
This device is in compliance with Specific Absorption Rate (SAR) for general population /uncontrolled exposure limits in
ANSI/IEEE C95.1-1999 and has been tested in accordance with the measurement methods and procedures specified in OET
Bulletin 65 Supplement C. This equipment complies with FCC RF radiation exposure limits set forth for an uncontrolled
environment. This device was tested for operations with the device contacted directly to the human body to the back side of the
EUT. To maintain compliance with FCC RF exposure compliance requirements, avoid direct contact with the transmitted antenna
during transmitting.
OPERATION ON THE 5.15-5.2 5GHZ FREQUENCY BAND IS RESTRICTED TO INDOOR USE ONLY. THE FCC REQUIRES INDOOR USE FOR THE 5.15-
5.25 GH
ONLY TRANSMIT ON THE 5.25-5.35 GHZ, 5.47-5.725 GHZ AND 5.725 –5.850 GHZ BAND WHEN ASSOCIATED WITH AN ACCESS POINT (AP).
L
L'
(1)
(2) L'UTILISATEUR DE L'APPAREIL DOIT ACCEPTER TOUT BROUILLAGE RADIOÉLECTRIQUE SUBI, MÊME SI LE BROUILLAGE EST SUSCEPTIBLE D'EN
COMPROMETTRE LE FONCTIONNEMENT."
T
N
REQUIRED BY THE TECHNOLOGY.
Z BAND TO REDUCE THE POTENTIAL FOR HARMFUL INTERFERENCE TO CO-CHANNEL MOBILE SATELLITE SYSTEMS. THEREFORE, IT WILL
E PRÉSENT APPAREIL EST CONFORME AUX CNR D'INDUSTRIE CANADA APPLICABLES AUX APPAREILS RADIO EXEMPTS DE LICENCE.
EXPLOITATION EST AUTORISÉE AUX DEUX CONDITIONS SUIVANTES:
L'APPAREIL NE DOIT PAS PRODUIRE DE BROUILLAGE, ET
HE DEVICE COULD AUTOMATICALLY DISCONTINUE TRANSMISSION IN CASE OF ABSENCE OF INFORMATION TO TRANSMIT, OR OPERATIONAL FAILURE.
OTE THAT THIS IS NOT INTENDED TO PROHIBIT TRANSMISSION OF CONTROL OR SIGNALING INFORMATION OR THE USE OF REPETITIVE CODES WHERE
T
HE DEVICE FOR THE BAND 5150-5250 MHZ IS ONLY FOR INDOOR USAGE TO REDUCE POTENTIAL FOR HARMFUL INTERFERENCE TO CO-CHANNEL
MOBILE SATELLITE SYSTEMS; THE MAXIMUM ANTENNA GAIN PERMITTED (FOR DEVICES IN THE BANDS 5250-5350 MHZ AND 5470-5725 MHZ)
TO COMPLY WITH THE E.I.R.P. LIMIT; AND THE MAXIMUM ANTENNA GAIN PERMITTED (FOR DEVICES IN THE BAND 5725-5850 MHZ) TO COMPLY
WITH THE E.I.R.P. LIMITS SPECIFIED FOR POINT-TO-POINT AND NON POINT-TO-POINT OPERATION AS APPROPRIATE, AS STATED IN SECTION A9.2(3).
I
N ADDITION, HIGH-POWER RADARS ARE ALLOCATED AS PRIMARY USERS (MEANING THEY HAVE PRIORITY) OF THE BAND 5250-5350 MHZ AND
THIS RADAR COULD CAUSE INTERFERENCE AND/OR DAMAGE TO LE-LAN DEVICES.
HE COUNTY CODE SELECTION FEATURE IS DISABLED FOR PRODUCTS MARKETED IN THE US/CANADA. FOR PRODUCT AVAILABLE IN THE
T
USA/C
ANADA MARKETS, ONLY CHANNEL 1~11 CAN BE OPERATED. SELECTION OF OTHER CHANNELS IS NOT POSSIBLE.
65
- FCC Regulatory information for Android Tablets with radio device
Page 67

Regulatory Notes and Statements
Radio device, health and authorization for use
Radio-frequency electromagnetic energy is emitted from the wireless devices. The energy levels of these emissions, however,
are far much less than the electromagnetic energy emissions from wireless devices such as mobile phones. Radio devices are
safe for use by consumers because they operate within the guidelines found in radio frequency safety standards and
recommendations.
The use of the radio devices may be restricted in some situations or environments, such as:
• on board an airplane, or
• in an explosive environment, or
• in situations where the interference risk to other devices or services is perceived or identified as harmful.
In cases in which the policy regarding use of radio devices in specific environments is not clear (e.g., airports, hospitals,
chemical/oil/gas industrial plants, private buildings), obtain authorization to use these devices prior to operating the
equipment.
Regulatory Information/Disclaimers
Installation and use of this radio device must be in strict accordance with the instructions
included in
the user documentation
provided with the product. Any changes or modifications made to this device that are not expressly approved by the
manufacturer may void the user’s authority to operate the equipment. The manufacturer is not responsible for any radio or
television interference caused by unauthorized modification of this device, or the substitution or attachment of connecting
cables and equipment other than those specified by the manufacturer. It is the responsibility of the user to correct any
interference caused by such unauthorized modification, substitution or attachment. The manufacturer and its authorized
resellers or distributors will assume no liability for any damage or violation of government regulations arising from failure to
comply with these guidelines.
Export restrictions
This product or software contains encryption code which may not be exported or transferred from the US or Canada without
an approved US Department of Commerce export license. This device complies with Part 15 of FCC Rules, as well as ICES
003 B / NMB 003 B. Operation is subject to the following two conditions:
(1) this device may not cause harmful interference, and
(2) this device must accept any interference received, including interference that may cause undesirable operation.
Modifications not expressly authorized by Fujitsu may invalidate the user’s right to operate this equipment.
66
- FCC Regulatory information for Android Tablets with radio device
Page 68
Guide
d’utilisation
Découvrez comment
utiliser votre tablette
Android Fujitsu
STYLISTIC
®
M532
Page 69

Informations sur les droits d’auteurs
et les marques commerciales
La société Fujitsu America, Inc. s’est efforcée d’assurer la précision ainsi que l’intégralité de ce document. Toutefois, en raison de développements continus
visant à améliorer constamment les capacités de nos produits, les données contenues dans ce document représentent seulement les objectifs de conception
de Fujitsu et ne sont données qu’à titre indicatif ; les résultats réels peuvent varier en fonction de facteurs très variés. Les données relatives à ce produit
ne sont pas garanties. Les spécifications sont sujettes à modification sans préavis.
Fujitsu et le logo Fujitsu sont des marques déposées de Fujitsu, Limited. STYLISTIC est une marque déposée de la société Fujitsu America, Inc.
Google, le logo Google, Android, le logo Android, Android Market, le logo Android Market, Google Play, le logo Google Play, Gmail, le logo Gmail,
Google Mail, le Google Mail, Google Latitude, YouTube, le logo YouTube et Picasa sont des marques déposées de Google Incorporated.
Adobe Reader est une marque de commerce d’Adobe Systems Incorporated.
NVIDIA et Tegra sont des marques de commerce et/ou des marques déposées aux États-Unis et dans d’autres pays.
Absolute et Computrace sont des marques déposées d’Absolute Software Corporation.
Norton est une marque de commerce de la société Symantec aux États-Unis et dans d’autres pays.
Bluetooth et le logo Bluetooth sont des marques déposées de la société Bluetooth SIG, Inc.
Tous droits réservés, y compris les droits de propriété intellectuelle. Sous réserve de modifications techniques. Sous réserve de disponibilité pour livraison.
Aucune garantie et aucune responsabilité ne pourra être engagée quant à l’exactitude, au caractère exhaustif ou à la pleine applicabilité actuelle des données
et des illustrations du présent manuel. Il est possible que les noms de marque soient des marques de commerce protégées appartenant à leurs fabricants
respectifs et/ou qu’elles soient protégées par des droits d’auteur. L’utilisation de ces dernières par une tierce partie à ses propres fins peut constituer une
violation des droits des propriétaires.
© 2012 Fujitsu America, Incorporated. Tous droits réservés. Aucune partie de cette publication ne peut être copiée, reproduite ou traduite sans le consentement
préalable de la société Fujitsu America, Inc. Aucune partie de cette publication ne peut être enregistrée ou transmise électroniquement sans le consentement
écrit préalable de la société Fujitsu America, Inc. B6FJ-9251-01ENZ0-00
Page 70

DÉCLARATION DE CONFORMITÉ
selon la partie 15 des règles de la FCC
Nom de la partie responsable : Fujitsu America, Inc.
Adresse : 1250 E. Arques Avenue,
Sunnyvale, CA 94085
Téléphone : (408) 746-6000
Déclare que le produit : Configuration du modèle de base : Tablette Android STYLISTIC M532
est conforme aux exigences de la partie 15 des règles de la FCC.
Cet appareil est conforme aux exigences de la partie 15 des règles de la FCC. L’utilisation est sujette aux deux
conditions suivantes :
(1) cet appareil ne doit pas causer d’interférence nuisible ; (2) cet appareil doit accepter toutes les interférences
reçues, y compris celles pouvant causer un mauvais fonctionnement de l’appareil.
CONSIGNES DE SÉCURITÉ IMPORTANTES
Pour fonctionner, cet appareil nécessite un adaptateur secteur. Utilisez uniquement un adaptateur de classe 2 pour équipement informatique,
homologué UL I.T.E., avec une sortie nominale de 19 V c.c. et un courant de 1,58 A (30 W).
Polarité de sortie de l'adaptateur secteur :
Lors de l’utilisation de votre tablette, observez systématiquement les consignes de sécurité élémentaires suivantes afin de réduire les risques d’incendie,
d’électrocution et de blessures, notamment :
ATTENTION : SURFACE CHAUDE : LE DESSOUS DE CET ORDINATEUR PEUT S’ÉCHAUFFER LORSQUE L’APPAREIL EST UTILISÉ PENDANT UNE LONGUE
PÉRIODE. LORSQUE VOUS UTILISEZ CET ORDINATEUR ET QU’IL REPOSE À MÊME LA PEAU (SUR LES JAMBES NUES), PRENEZ GARDE À NE PAS L’UTILISER
PENDANT TROP LONGTEMPS OU DE MANIÈRE CONTINUE.
• N’utilisez pas ce produit à proximité d’un point d’eau (baignoire, lavabo, évier de cuisine, évier de buanderie) ni dans un sous-sol humide
ou à côté d’une piscine.
• Utilisez uniquement le cordon d’alimentation et les piles recommandés dans ce manuel. Ne jetez pas les batteries dans le feu.
Elles risquent d’exploser. Vérifiez si la réglementation locale com
CONSERVEZ CES INSTRUCTIONS
porte des instructions spéciales d’élimination.
Page 71

Avis réservé à des réparateurs qualifiés
DANGER D’EXPLOSION SI LA BATTERIE AU LITHIUM (HORLOGE) EST INCORRECTEMENT REMPLACÉE. LA PILE DOIT ÊTRE REMPLACÉE UNIQUEMENT PAR
UNE PILE IDENTIQUE OU D’UN TYPE ÉQUIVALENT RECOMMANDÉ PAR LE FABRICANT. JETEZ LES BATTERIES USÉES CONFORMÉMENT AUX INSTRUCTIONS
DU FABRICANT.
P
OUR BÉNÉFICIER D’UNE PROTECTION CONTINUE CONTRE LES RISQUES D’INCENDIE, LE FUSIBLE NE DOIT ÊTRE REMPLACÉ QUE PAR UN AUTRE FUSIBLE
DE MÊME TYPE ET DE MÊME CAPACITÉ.
Page 72

Table des matières
À propos de ce guide . . . . . . . . . . . . . . . . . . . . . . . . . . . . . . . . . . . . . . . . . . .8
Conventions utilisées dans ce guide . . . . . . . . . . . . . . . . . . . . . . . . . . . . 8
Coordonnées pour contacter Fujitsu . . . . . . . . . . . . . . . . . . . . . . . . . . . . 9
Chapitre 1 À la découverte votre tablette Android
Aperçu général. . . . . . . . . . . . . . . . . . . . . . . . . . . . . . . . . . . . . . . . . . . . . . . .10
Emplacement des commandes et des connecteurs . . . . . . . . . . . . . . . . . .11
Éléments situés à l’avant . . . . . . . . . . . . . . . . . . . . . . . . . . . . . . . . . . . . . 11
Éléments situés à l’arrière . . . . . . . . . . . . . . . . . . . . . . . . . . . . . . . . . . . . 13
Chapitre 2 Prise en main de votre tablette Android
Première configuration de votre tablette. . . . . . . . . . . . . . . . . . . . . . . . . .15
Déballage et vérification de l’appareil. . . . . . . . . . . . . . . . . . . . . . . . . . . 16
Sélection d’un emplacement approprié. . . . . . . . . . . . . . . . . . . . . . . . . . 16
Sources d’alimentation. . . . . . . . . . . . . . . . . . . . . . . . . . . . . . . . . . . . . . . 16
Première mise en marche du système. . . . . . . . . . . . . . . . . . . . . . . . . . . 17
5
Page 73

Chapitre 3 Utilisation de votre tablette Android
Fonctionnalités de la tablette . . . . . . . . . . . . . . . . . . . . . . . . . . . . . . . . . . 18
Voyant de charge en cours . . . . . . . . . . . . . . . . . . . . . . . . . . . . . . . . . . . . 18
Mise en marche et arrêt de la tablette . . . . . . . . . . . . . . . . . . . . . . . . . . 19
Écran tactile . . . . . . . . . . . . . . . . . . . . . . . . . . . . . . . . . . . . . . . . . . . . . . . 19
Rétroéclairage. . . . . . . . . . . . . . . . . . . . . . . . . . . . . . . . . . . . . . . . . . . . . . 19
Sélection de l’orientation de l’affichage. . . . . . . . . . . . . . . . . . . . . . . . . . 19
Boutons de la tablette Android . . . . . . . . . . . . . . . . . . . . . . . . . . . . . . . . 20
Caméras Web . . . . . . . . . . . . . . . . . . . . . . . . . . . . . . . . . . . . . . . . . . . . . . 21
Batterie rechargeable. . . . . . . . . . . . . . . . . . . . . . . . . . . . . . . . . . . . . . . . 21
Périphériques installables par l’utilisateur. . . . . . . . . . . . . . . . . . . . . . . . 23
Cartes mémoire. . . . . . . . . . . . . . . . . . . . . . . . . . . . . . . . . . . . . . . . . . . . . 23
Mise en marche/arrêt des composants sans fil. . . . . . . . . . . . . . . . . . . . . 24
Réseau local sans fil et Bluetooth . . . . . . . . . . . . . . . . . . . . . . . . . . . . . . 24
GPS. . . . . . . . . . . . . . . . . . . . . . . . . . . . . . . . . . . . . . . . . . . . . . . . . . . . . . . 24
Utilisation de la station d’arrimage en option. . . . . . . . . . . . . . . . . . . . . 25
Montage de la station d’arrimage . . . . . . . . . . . . . . . . . . . . . . . . . . . . . . 25
Chapitre 4 Utilisation du système d’exploitation Android
Prise en main d’Android . . . . . . . . . . . . . . . . . . . . . . . . . . . . . . . . . . . . . . . 29
Première utilisation de votre tablette sur Android . . . . . . . . . . . . . . . . . 29
Page d’accueil . . . . . . . . . . . . . . . . . . . . . . . . . . . . . . . . . . . . . . . . . . . . . . 30
Navigation sur la page d’accueil . . . . . . . . . . . .
Personnalisation de la page d’accueil . . . . . . . .
Utilisation . . . . . . . . . . . . . . . . . . . . . . . . . . . . . . . . . . . . . . . . . . . . . . . . . 33
Paramètres . . . . . . . . . . . . . . . . . . . . . . . . . . . . . . . . . . . . . . . . . . . . . . . . 39
Mises à jour du système . . . . . . . . . . . . . . . . . . . . . . . . . . . . . . . . . . . . . . 47
Applications. . . . . . . . . . . . . . . . . . . . . . . . . . . . . . . . . . . . . . . . . . . . . . . . 49
. . . . . . . . . . . . . . . . . . . 31
. . . . . . . . . . . . . . . . . . . 32
6
-
Page 74

Chapitre 5 Connexion de périphériques externes
Connexion des périphériques . . . . . . . . . . . . . . . . . . . . . . . . . . . . . . . . . . . 52
Connexion des périphériques USB . . . . . . . . . . . . . . . . . . . . . . . . . . . . . . 52
Port HDMI . . . . . . . . . . . . . . . . . . . . . . . . . . . . . . . . . . . . . . . . . . . . . . . . . 53
Port de casque d’écoute/microphone . . . . . . . . . . . . . . . . . . . . . . . . . . . . 54
Chapitre 6 Dépannage de votre tablette Android
Dépannage . . . . . . . . . . . . . . . . . . . . . . . . . . . . . . . . . . . . . . . . . . . . . . . . . . 55
Identification du problème. . . . . . . . . . . . . . . . . . . . . . . . . . . . . . . . . . . . 55
Utilisation du bouton de réinitialisation . . . . . . . . . . . . . . . . . . . . . . . . . 56
Problèmes spécifiques . . . . . . . . . . . . . . . . . . . . . . . . . . . . . . . . . . . . . . . 57
Chapitre 7 Spécifications techniques
Spécifications . . . . . . . . . . . . . . . . . . . . . . . . . . . . . . . . . . . . . . . . . . . . . . . . 59
Tablette Android . . . . . . . . . . . . . . . . . . . . . . . . . . . . . . . . . . . . . . . . . . . . 59
Batterie rechargeable. . . . . . . . . . . . . . . . . . . . . . . . . . . . . . . . . . . . . . . . 61
Adaptateur secteur . . . . . . . . . . . . . . . . . . . . . . . . . . . . . . . . . . . . . . . . . . 61
Station en option . . . . . . . . . . . . . . . . . . . . . . . . . . . . . . . . . . . . . . . . . . . 62
Chapitre 8 Renseignements sur la réglementation
Des tablettes Android avec composants radio désactivés . . . . . . . . . . . . . . . . . . . . 63
Des tablettes Android équipées de composants radio. . . . . . . . . . . . . . . . . . . . . . . 64
7
-
Page 75

Préface
À propos de ce guide
La tablette Android STYLISTIC M532 de Fujitsu associe à une technologie de pointe un design ergonomique, en faisant
ainsi un compagnon de travail à la fois fiable et pratique. Son écran tactile rapide et son clavier visuel vous offrent une
interaction agréable en toute simplicité. La tablette STYLISTIC M532 est livrée avec le système d’exploitation Android™
préinstallé, accompagné de nombreuses autres applications qui vous seront utiles.
La tablette STYLISTIC M532 est un système monobloc entièrement équipé, doté d’un écran à DEL haute luminosité
WXGA TFT de 10,1 pouces, de caméras Web avant et arrière, et d’un processeur NVIDIA® Tegra®.
Ce manuel présente le mode d’emploi de la tablette Android et de ses logiciels intégrés.
Conventions utilisées dans ce guide
Le texte contient plusieurs renvois vers des pages contenant des informations supplémentaires sur un sujet quelconque.
Les boutons affichés à l’écran et les éléments de menu sont indiqués en caractères gras. Exemple Touchez OK pour
redémarrer la tablette Android.
L’ICÔNE D’INFORMATIONS MET EN ÉVIDENCE DES RENSEIGNEMENTS QUI VOUS AIDERONT À MIEUX COMPRENDRE LE SUJET TRAITÉ.
ICÔNE DE MISE EN GARDE MET EN ÉVIDENCE DES INFORMATIONS IMPORTANTES POUR L’UTILISATION SÉCURITAIRE DE VOTRE ORDINATEUR
L’
OU POUR L’INTÉGRITÉ DE VOS FICHIERS. VEUILLEZ LIRE ATTENTIVEMENT TOUTES LES MISES EN GARDE.
8
Page 76

L’ ICÔNE D’AVERTISSEMENT MET EN ÉVIDENCE DES INFORMATIONS SUR DES DANGERS PESANT SUR VOUS, VOTRE TABLETTE OU VOS FICHIERS.
EUILLEZ LIRE ATTENTIVEMENT TOUS LES AVERTISSEMENTS.
V
Coordonnées pour contacter Fujitsu
Service et assistance
Plusieurs façons s’offrent à vous pour contacter l’équipe de service et assistance de Fujitsu :
• Appel sans frais : 1-800-8Fujitsu (1-800-838-5487)
• Site Internet : http://solutions.us.fujitsu.com/www/content/support/contact/index.php
Avant de nous contacter, veuillez avoir les informations suivantes à portée de main pour que notre préposé du service
à la clientèle puisse vous venir en aide le plus rapidement possible
• Nom du produit
• Configuration de l’ordinateur et numéros de série
• Date d’achat
• Conditions dans lesquelles le problème est survenu
• Texte des messages d’erreur reçus
• Types de périphériques connectés, si applicable
Site de vente par internet de Fujitsu
Vous pouvez vous rendre sur ce site directement à www.shopfujitsu.com.
Garantie limitée
Votre tablette STYLISTIC M532 bénéficie d’une garantie limitée internationale de Fujitsu. Pour connaître les conditions
générales et la durée de votre garantie limitée, consultez la pochette de service livrée avec votre tablette.
9
- À propos de ce guide
Page 77

Chapitre 1
À la découverte votre tablette Android
Aperçu général
La tablette Android STYLISTIC M532
est un ordinateur hautes performances
conçu pour fonctionner avec le système
d’exploitation Android™ 4.0.
Ce chapitre décrit les composants
matériels individuels de l’appareil.
Il présente les différents voyants et
connecteurs de votre tablette. Nous
vous recommandons de vous familiariser
avec ces composants avant d’utiliser
votre tablette.
Figure 1. Tablette Android STYLISTIC M532
10
Page 78

Emplacement des commandes et des connecteurs
Caméra Web avant
Connecteur pour station d’arrimage
Écran
Voyant de
Boutons de réglage du volume
Port micro-USB
Fente pour cartes micro SD (protégée par un clapet)
et adaptateur secteur
Bouton de réinitialisation
(protégé par clapet)
Capteur de
lumière ambante
charge en ours
Les fonctions et commandes qui vous permettront d’utiliser votre tablette sont présentées et illustrées aux Figures 2 et 3.
Des informations plus détaillées sur ces fonctions et commandes sont données dans les chapitres suivants.
Figure 2. Commandes et connecteurs de la tablette STYLISTIC M532 (dessous, vue du côté droit)
Éléments situés à l’avant
Caméra Web avant
La caméra web VGA située à l’avant vous permet de transmettre sur Internet des images de vous-même.
Écran
Le grand écran XGA 10,1 pouces offre de nombreux angles de vision verticale et horizontale.
11
- Emplacement des commandes et des connecteurs
Page 79

Voyant de charge en cours
Le voyant de charge en cours indique l’état d’alimentation actuel de la batterie interne. (Voir «Voyant de charge
en cours» en page 18).
Capteur de lumière ambiante
Le capteur de lumière ambiante reconnaît les conditions d’éclairage et règle automatiquement l’affichage
en conséquence afin d’optimiser la longévité de la batterie.
Boutons de réglage du volume
Les boutons de réglage du volume vous permettent de régler le volume du système. (Voir «Boutons de la tablette
Android» en page 20).
Port micro-USB
Le port micro-USB vous permet de connecter un périphérique USB à l’aide d’un adaptateur micro-USB
(voir «Connexion des périphériques externes» en page 52).
Bouton de réinitialisation
Le bouton de réinitialisation vous permet d’effectuer une réinitialisation matérielle du système si votre appareil
ne répond plus à l’actionnement des boutons ou du commutateur Marche/Arrêt. (Voir «Utilisation du bouton
de réinitialisation» en page 56)
Fente pour cartes micro SD
La fente pour cartes micro SD vous permet d’enregistrer vos données sur des cartes mémoire micro SD.
(Voir «Mise en marche/arrêt du système» en page 19)
Connecteur pour adaptateur secteur et station d’arrimage
Ce connecteur vous permet de connecter la station d’arrimage STYLISTIC en option (voir «Montage de la station
d’arrimage» en page 25) ou de brancher l’adaptateur secteur (voir «Sources d’alimentation» en page 16).
12
- Emplacement des commandes et des connecteurs
Page 80

Caméra Web arrière
Haut-parleur stéréo
Haut-parleur stéréo
Commutateur Marche/Arrêt
Port pour casque d’écoute/microphone
Microphone
Flash photo
Figure 3. Commandes et connecteurs de la tablette STYLISTIC M532 (vue arrière)
Éléments situés à l’arrière
Haut-parleurs stéréo
Les deux haut-parleurs intégrés permettent une écoute en stéréophonie.
Commutateur Marche/Arrêt
Le commutateur Marche/Arrêt vous permet d’allumer ou d’éteindre votre système (voir «Première mise
en marche du système» en page 17).
13
- Emplacement des commandes et des connecteurs
Page 81

Port pour casque d’écoute/microphone
Le port casque d’écoute/microphone permet de connecter à votre tablette Android un casque, un microphone
ou des haut-parleurs externes amplifiés (voir «Connexion des périphériques externes » en page 52).
Microphone
Le microphone intégré vous permet d’enregistrer des fichiers audio.
Flash photo
Le flash photo assure un éclairage instantané lorsque vous utilisez la caméra Web arrière.
Caméra Web arrière
La caméra Web arrière vous permet de prendre des photos des objets situés devant vous et de les échanger sur Internet.
14
- Emplacement des commandes et des connecteurs
Page 82

Chapitre 2
Prise en main de votre tablette Android
Première configuration de votre tablette
• TOUS LES PILOTES MATÉRIELS ET LES LOGICIELS NÉCESSAIRES AU FONCTIONNEMENT DE L’APPAREIL SONT DÉJÀ INSTALLÉS.
• AVANT D’ALLUMER L’APPAREIL POUR LA PREMIÈRE FOIS, BRANCHEZ-LE SUR UNE PRISE ÉLECTRIQUE À L’AIDE DE L’ADAPTATEUR SECTEUR.
ADAPTATEUR SECTEUR DOIT RESTER BRANCHÉ TOUT AU LONG DE LA PROCÉDURE D’INSTALLATION.
L’
• À SA PREMIÈRE MISE EN MARCHE, L’APPAREIL EXÉCUTE UN TEST DU SYSTÈME. VOUS VERREZ DIFFÉRENTS MESSAGES S’AFFICHER À L’ÉCRAN.
L EST POSSIBLE QUE L’ÉCRAN CLIGNOTE OU RESTE NOIR DURANT QUELQUES SECONDES.
I
• VEUILLEZ SUIVRE LES DIRECTIVES AFFICHÉES À L’ÉCRAN.
• VEILLEZ À NE JAMAIS ÉTEINDRE VOTRE APPAREIL LORS DE LA PROCÉDURE DE CONFIGURATION INITIALE.
La batterie étant intégrée de façon fixe au système, elle doit être pleinement chargée si vous souhaitez utiliser votre
tablette sur batterie.
Lorsque vous serez en déplacement, la batterie intégrée assurera l’alimentation électrique nécessaire au fonctionnement
de votre appareil. Pour prolonger la durée d’utilisation de la batterie, vous pouvez utiliser les fonctionnalités d’économie
d’énergie intégrées.
Pour savoir comment connecter des périphériques externes (souris, cartes mémoire Flash) à votre tablette,
veuillez consulter la section «Connexion des périphériques externes» en page 52.
15
Page 83

Déballage et vérification de l’appareil
SI VOUS CONSTATEZ AU TERME DU DÉBALLAGE QU’UN ARTICLE EST MANQUANT OU A SUBI DES DOMMAGES SUITE AU TRANSPORT,
VEUILLEZ PRENDRE CONTACT AVEC LE SERVICE D’ASSISTANCE :
A
PPEL SANS FRAIS : 1-800-8FUJITSU (1-800-838-5487)
ITE WEB HTTP://SOLUTIONS.US.FUJITSU.COM/WWW/CONTENT/SUPPORT/CONTACT/INDEX.PHP
S
1 Sortez tous les composants du carton et déballez-les.
2 Vérifiez que l’appareil et ses périphériques ne présentent aucune trace de dommage visible potentiellement
occasionné par le transport.
3 Conservez l’emballage, il vous sera utile si vous devez réexpédier à l’avenir le système.
Sélection d’un emplacement approprié
Il est nécessaire de tenir compte de certains facteurs lors du choix de l’emplacement du système. À cet effet,
veuillez prendre les précautions suivantes.
• NE POSEZ JAMAIS L’APPAREIL OU L’ADAPTATEUR SECTEUR SUR UNE SURFACE THERMOSENSIBLE. LA SURFACE RISQUERAIT D’ÊTRE ENDOMMAGÉE.
• EN FONCTIONNEMENT NORMAL, LE DESSOUS DE L’APPAREIL S’ÉCHAUFFERA. LE CONTACT PROLONGÉ AVEC LA PEAU RISQUE D’ENTRAÎNER
UNE SENSATION DE CHALEUR DÉSAGRÉABLE.
• AFIN QUE LE SYSTÈME RESTE CORRECTEMENT VENTILÉ, VEILLEZ À LAISSER UN ESPACE D’AU MOINS 100 MM ENTRE L’APPAREIL ET SON
ADAPTATEUR SECTEUR ET LES DIFFÉRENTS OBJETS.
• N’UTILISEZ PAS L’APPAREIL DANS DES CONDITIONS AMBIANTES EXTRÊMES. TENEZ L’APPAREIL PROTÉGÉ DES POUSSIÈRES,
DE L’HUMIDITÉ ET DE LA CHALEUR.
Sources d’alimentation
Votre tablette Android STYLISTIC Fujitsu peut utiliser trois sources d’alimentation différentes : une batterie
au lithium-polymère interne, un adaptateur secteur et une station d’arrimage en option.
16
- Première configuration de votre tablette
Page 84

Connexion de l’adaptateur secteur
Commutateur Marche/Arrêt
L’adaptateur secteur permet de faire fonctionner
votre tablette Android et d’en charger les batteries.
1 Branchez le câble de l’adaptateur secteur sur le
connecteur dédié situé sur la tranche inférieure
de votre tablette. (Figure 4)
2 Branchez l’adaptateur secteur sur une prise
électrique secteur (c.a.).
Figure 4. Branchement de l’adaptateur secteur
Première mise en marche du système
Lorsque vous allumez le système pour la première fois, la procédure installera et configurera le logiciel intégré. Cette
procédure ne devant être EN AUCUN CAS interrompue, assurez-vous de prévoir suffisamment de temps pour qu’elle
arrive à terme, et branchez l’appareil sur l’adaptateur secteur.
Lors de la procédure d’installation, NE REDÉMARREZ
PAS l’appareil, sauf indication contraire. Afin de
faciliter la première utilisation de la tablette,
son système d’exploitation est préinstallé.
1 Appuyez sur le commutateur Marche/Arrêt
(1) pendant 2 secondes pour allumer
votre tablette Android.
2 Tout au long de l’installation, suivez
les directives affichées à l’écran.
Figure 5. Mise en marche du système
17
- Première configuration de votre tablette
Page 85

Chapitre 3
Voyant de charge en cours
Utilisation de votre tablette Android
Ce chapitre présente les fondamentaux d’utilisation de votre tablette Android. Même si vous êtes habitué à utiliser
un ordinateur, nous vous conseillons de lire ce chapitre afin de vous familiariser à l’ensemble des fonctionnalités
de la tablette.
Fonctionnalités de la tablette
Voyant de charge en cours
Lorsque l’adaptateur secteur est raccordé à la tablette,
le voyant de charge en cours indique l’état
de l’alimentation électrique.
État du voyant
DEL de batterie
Rouge fixe : Batterie en cours de chargement
Blanc fixe : Batterie pleinement chargée
Description
18
Figure 6. Voyant de charge en cours
Page 86

Mise en marche et arrêt de la tablette
Commutateur Marche/Arrêt
Pour allumer la tablette : Appuyez sur le commutateur
Marche/Arrêt (Figure7) pendant deux secondes. Lorsque
la tablette démarre, il est possible qu’elle vibre légèrement.
Pour éteindre la tablette : Appuyez sur le commutateur
Marche/Arrêt jusqu’à l’apparition d’un message vous
demandant si vous souhaitez éteindre la tablette.
Confirmez. Lorsque la tablette s’éteint, il est possible
qu’elle vibre légèrement.
Figure 7. Mise en marche/arrêt du système
Écran tactile
Votre tablette Android Fujitsu est équipée d’un écran TFT haute qualité. Ces écrans TFT sont conçus et fabriqués
selon une résolution particulière. Seule la résolution conçue pour l’écran TFT de votre tablette vous garantira
des images nettes et de haute qualité. Toute autre résolution d’écran compromettra la netteté des images.
La résolution de l’écran tactile de votre tablette Android est réglée en usine pour vous assurer une qualité optimale.
Rétroéclairage
Les écrans TFT fonctionnent par rétroéclairage. La luminosité du rétroéclairage peut diminuer lorsque vous utilisez
la tablette. Toutefois, vous pouvez régler de manière séparée la luminosité de l’écran.
Sélection de l’orientation de l’affichage
Votre tablette peut être utilisée avec une orientation de l’affichage type portrait (à la verticale) ou paysage
(à l’horizontale).
L’alignement de l’écran s’adapte automatiquement à la manière dont vous tenez la tablette. Si vous tenez la
tablette à la verticale, l’image s’affiche avec une orientation portrait. Si vous tenez la tablette à l’horizontale,
l’image s’affiche avec une orientation paysage.
Pour désactiver la correspondance automatique de l’alignement de l’écran, procédez comme suit :
19
- Fonctionnalités de la tablette
Page 87

1 Dans le menu
Commutateur Marche/Arrêt
Bouton d’augmentation du volume
Bouton de réduction du volume
Bouton de réinitialisation
2 Décochez l’option
Toutes les applications
, touchez l’option
Rotation automatique de l’écran
Paramètres
et sélectionnez
Affichage
.
. Une fois cette option décochée, la correspondance
automatique de l’alignement sera désactivée.
3 Pour réactiver cette option, touchez de nouveau le réglage
Rotation automatique de l’écran.
Une fois cette option
cochée, la correspondance automatique de l’alignement sera activée.
Boutons de la tablette Android
Votre tablette comprend trois boutons : le commutateur Marche/Arrêt, les boutons de réglage du volume et le bouton
de réinitialisation.
Figure 8. Boutons de la tablette
Bouton Description
Commutateur Marche/Arrêt Permet la mise en marche/l’arrêt de la tablette
Bouton d’augmentation
du volume
Bouton de réduction
du volume
Bouton de réinitialisation Si la tablette ne répond plus à l’actionnement des to
Permet d’augmenter le volume du système
Permet de diminuer le volume du sys
utilisez le bouton de réinitialisation pour la redémarrer (Voir «Dépannage de vo
Android» en page 55.).
20
- Fonctionnalités de la tablette
tème
uches ou du commutateur Marche/Arrêt,
tre tablette
Page 88

Caméras Web
Votre appareil est équipé de deux caméras Web : l’une est située à l’avant et l’autre à l’arrière.
Selon les fonctionnalités du logiciel utilisé, ces caméras Web vous permettent de prendre des photos,
d’enregistrer des vidéos ou de participer à des conversations sur Internet.
• La qualité de l’image dépendra de l’éclairage et du logiciel utilisé.
• L’utilisation des caméras Web n’est possible qu’avec des applications prenant en charge une caméra Web
(programme de téléphonie sur Internet ou de visioconférence).
• La tablette doit être parfaitement stable lorsque vous utilisez la caméra Web.
• La caméra Web s’adapte automatiquement au niveau de luminosité ambiante. C’est pourquoi il est possible
que l’écran tactile clignote quelques secondes lors du réglage du niveau de luminosité.
Batterie rechargeable
Lorsque vous serez en déplacement, la batterie intégrée assurera l’alimentation électrique nécessaire au
fonctionnement de votre appareil. Un bon entretien de la batterie vous permettra d’en prolonger la durée
de vie. La durée de vie d’une batterie correspond à environ 500 cycles de chargement/déchargement. Si
le remplacement de votre batterie s’avère nécessaire, veuillez contacter le service d’assistance Fujitsu.
Vous pouvez également prolonger la durée d’utilisation de la batterie à l’aide des fonctionnalités
d’économie d’énergie intégrées.
Chargement et entretien de la batterie
Le chargement de la batterie de la tablette Android ne doit s’effectuer qu’à des températures ambiantes comprises
entre 5 °C et 35 °C.
Pour recharger la batterie, branchez l’adaptateur secteur sur la tablette.
(Voir «Première configuration de votre tablette» en page 15).
L’épuisement de la batterie s’accompagne d’un signal sonore d’avertissement. Si vous ne branchez pas l’adaptateur
secteur dans les cinq minutes suivant le signal d’avertissement précédemment mentionné, la tablette s’éteindra
automatiquement.
21
- Fonctionnalités de la tablette
Page 89

Surveillance du niveau de charge de la batterie
Le symbole de batterie présent sur la barre système / zone d’états vous permet de surveiller la capacité
de cette dernière. Le symbole de batterie vous indique la capacité de batterie restante.
Utilisation des options de gestion d’alimentation
Les options de gestion d’alimentation de la tablette Android vous permettent d’en réduire la consommation d’énergie.
Vous bénéficierez ainsi d’une durée prolongée d’utilisation de la tablette avant de la recharger.
L’activation des options de gestion de l’alimentation permet d’optimiser l’efficacité énergétique et de réduire l’impact
environnemental. En choisissant les meilleures options d’alimentation, vous réaliserez de considérables économies
tout en contribuant à la préservation de l’environnement.
Nous vous recommandons d’utiliser les réglages suivants : Mettez la tablette en veille prolongée pour une durée
de 5 minutes.
Pour modifier les paramètres d’alimentation, touchez le menu
pour la
Mise en veille prolongée
.
Paramètres > Affichage
, puis réglez la valeur de choix
Lorsque vous utilisez votre tablette Android en mode économie d’énergie, veuillez garder à l’esprit
les points suivants :
• En mode économie d’énergie, les fichiers ouverts seront conservés dans la mémoire principale ou dans
un fichier d’échange.
• N’éteignez jamais la tablette lorsqu’elle fonctionne en mode économie d’énergie. Si la batterie intégrée
est presque déchargée, fermez les fichiers ouverts et n’activez pas le mode d’économie d’énergie.
Si vous ne comptez pas utiliser votre tablette pendant une période prolongée :
• Désactivez le mode économie d’énergie en touchant l’écran ou en allumant la tablette.
• Fermez tous les programmes en cours et éteignez la tablette selon la procédure adéquate.
22
- Fonctionnalités de la tablette
Page 90

Périphériques installables par l’utilisateur
1
2
Cartes mémoire
Votre tablette Android est équipée d’un lecteur de carte mémoire intégré. Assurez-vous de manipuler les cartes
mémoire conformément aux consignes du fabricant.
Format pris en charge
Le lecteur de cartes mémoire assure la prise en charge du format suivant :
• Carte micro SD™
Insertion d’une carte mémoire
Pour insérer une carte micro SD :
1 Ouvrez le clapet de la fente (Figure 7, n° 2)
2 Positionnez la carte, étiquette faisant face vers le haut.
3 Enfoncez délicatement la carte mémoire dans la fente
(Figure 7, n° 2) jusqu’à ce qu’elle s’encastre en produisant
un clic. Veillez à ne pas forcer l’insertion, au risque
d’endommager les surfaces de contact fragiles.
4 Remettez le clapet de la fente en place.
Figure 9. Insertion d’une carte mémoire micro SD
23
- Périphériques installables par l’utilisateur
Page 91

1
2
Retrait d’une carte mémoire
Il est primordial de retirer les cartes mémoire selon la procédure
adéquate. Le non-respect de cette consigne risque d’entraîner
la perte des données.
Pour retirer une carte mémoire micro SD, vous devez déconnecter
la carte mémoire du système avant de la retirer physiquement.
Pour ce faire, procédez comme suit :
1 Touchez le menu
Paramètres > Mémoire
. La fenêtre
Mémoire
affiche tous les composants de mémoire du système.
2 Touchez
3 Confirmer le message en touchant
est désormais déconnectée du système.
4 Appuyez doucement sur la carte mémoire de manière à la débloquer.
5 Retirez la carte mémoire de la fente (Figure 10, n° 1).
6 Remettez le clapet de la fente en place. (Figure 10, n° 2)
Retirer la carte SD
.
OK
. La carte mémoire
Figure 10. Retrait d’une carte mémoire micro SD
Mise en marche/arrêt des composants sans fil
Réseau local sans fil et Bluetooth
1 Touchez le menu
2 Réglez l’option Réseau local sans fil ou Bluetooth sur MARCHE.
3 Touchez l’option Réseau local sans fil, puis sélectionnez le réseau de votre choix.
4 Touchez l’option
depuis votre tablette.
GPS
Votre appareil est équipé d’un module GPS intégré. Si vous utilisez le logiciel adéquat, votre tablette devient
un système de navigation à part entière.
Paramètres
Bluetooth
.
, puis sélectionnez le périphérique Bluetooth auquel vous souhaitez vous connecter
24
- Mise en marche/arrêt des composants sans fil
Page 92

Utilisation de la station d’arrimage en option
Socle de la station
Chevalet de la
Port USB
Piédestal
Connecteur
station d’arrimge
d’arrimage
Ligne de sortie
Port USB
Port HDMI
Prise c.c.
Cette station en option est un périphérique vous permettant de connecter rapidement votre tablette Android à d’autres
périphériques tels qu’un moniteur, un clavier, une souris, un casque, etc.
Il vous suffit d’y arrimer la tablette afin de l’utiliser avec vos différents périphériques.
Figure 11. Station d’arrimage - Avant Figure 12. Station d’arrimage - Arrière
Figure 13. Composants du piédestal
Montage de la station d’arrimage
Avant d’installer la station d’arrimage, choisissez d’abord un emplacement adapté. À cet effet, veuillez prendre
les précautions suivantes.
• Placez la station d’arrimage sur une surface plane, stable et non glissante.
• Ne posez jamais la station d’arrimage et l’adaptateur secteur sur une surface thermosensible.
• N’utilisez pas la station d’arrimage dans des conditions ambiantes extrêmes.
• Tenez la station d’arrimage protégée des poussières, de l’humidité et de la chaleur.
25
- Utilisation de la station d’arrimage en option
Page 93

Montage de la station d’arrimage
Socle de la station d’arrimage
Chevalet de la station d’arrimage
Point d’alignement
Point d’alignement
La station d’arrimage se compose de deux éléments : le socle et le chevalet.
Pour monter la station d’arrimage, il vous suffit de faire glisser la partie avant du socle sur la fente du chevalet, jusqu’à
ce que les charnières au bas du socle soient positionnées sur le point d’alignement. Posez le socle sur le chevalet.
Figure 14. Montage de la station d’arrimage
Raccordement de la tablette à la station d’arrimage
• DES PROBLÈMES SONT SUSCEPTIBLES DE SE PRODUIRE SI LA TABLETTE FONCTIONNE LORSQUE VOUS LA RACCORDEZ À LA STATION D’ARRIMAGE.
EST POURQUOI NOUS VOUS RECOMMANDONS D’ÉTEINDRE VOTRE TABLETTE AU PRÉALABLE.
C’
• UNE FOIS LA TABLETTE RACCORDÉE À LA STATION D’ARRIMAGE, BRANCHEZ L’ADAPTATEUR SECTEUR SUR CETTE DERNIÈRE POUR ASSURER
L’ALIMENTATION ÉLECTRIQUE DE LA TABLETTE OU RECHARGER SA BATTERIE.
26
- Utilisation de la station d’arrimage en option
Page 94

1 Éteignez la tablette.
Piédestal
Connecteur
Adaptateur secteur
Prise c.c.
2 Le cas échéant, débranchez le câble de l’adaptateur secteur de la prise c.c. située à l’arrière du socle de la station
d’arrimage (Figure7).
3 Positionnez la tablette de manière à ce que le connecteur situé au bas de l’appareil soit aligné avec le connecteur
du socle (Figure7).
4 Enfoncez la tablette sur la station d’arrimage tel qu’indiqué par les flèches, jusqu’à ce qu’elle soit en place.
5 Branchez l’adaptateur secteur sur la prise c.c. située à l’arrière de la station d’arrimage.
6 Branchez le câble de l’adaptateur secteur sur une prise électrique.
Figure 15. Raccordement de la tablette à la station d’arrimage Figure 16. Alimentation de la tablette sur la station d’arrimage
27
- Utilisation de la station d’arrimage en option
Page 95

Retrait de la tablette sur la station d’arrimage
Des problèmes sont susceptibles de se produire si la tablette fonctionne lorsque vous la raccordez à la station d’arrimage.
Nous vous recommandons d’éteindre la tablette ou d’exécuter la fonction de retrait de la station d’arrimage disponible
sur le système d’exploitation.
1 Éteignez la tablette.
2 Soulevez la tablette hors de la station d’arrimage tout en maintenant fermement le socle.
28
- Utilisation de la station d’arrimage en option
Page 96

Chapitre 4
Utilisation du système d’exploitation Android
Prise en main d’Android
Votre tablette Android est livrée avec le système d’exploitation Android 4.0 préinstallé, accompagné de nombreuses
autres applications utiles. Android 4.0 a été spécialement optimisé pour l’utilisation aux doigts des tablettes Android :
vous serez ainsi rapidement familiarisé avec l’environnement, sans passer par de longues phases d’apprentissage.
Première utilisation de votre tablette sur Android
Lorsque vous allumez votre appareil pour la première fois, la page de bienvenue apparaît. Suivez les instructions indiquées
à l’écran. La page de bienvenue vous permet de sélectionner la langue. Si vous souhaitez utiliser une autre langue,
touchez dans le menu la langue de votre choix pour la sélectionner, puis confirmez votre choix en touchant
Lors de l’installation, vous serez invité par le système à fournir des informations sur votre compte Google. Si vous
le souhaitez et que vous ne l’avez pas encore fait, saisissez maintenant ces informations.
Démarrer
.
VOUS POUVEZ IGNORER CETTE ÉTAPE ET UTILISER DIRECTEMENT VOTRE TABLETTE ANDROID SANS COMPTE GOOGLE.
C
EPENDANT, CERTAINES APPLICATIONS NÉCESSITENT LA CONFIGURATION D’UN COMPTE GOOGLE, COMME PAR EXEMPLE GMAIL, LA MESSAGERIE
OOGLE. VOUS AUREZ L’OCCASION DE CONFIGURER VOTRE COMPTE GOOGLE ULTÉRIEUREMENT (VOIR « PARAMÈTRES PERSONNELS » EN PAGE 42).
G
ORS DE LA CONFIGURATION DE VOTRE COMPTE GOOGLE, TOUS VOS COURRIELS, CONTACTS, CALENDRIERS, ÉVÈNEMENTS ET AUTRES DONNÉES
L
ASSOCIÉS À VOTRE COMPTE SERONT AUTOMATIQUEMENT SYNCHRONISÉS AVEC VOTRE TABLETTE.
Au terme de la procédure d’installation, la page d’accueil s’affiche.
29
Page 97

Page d’accueil
1
2
345
6
1: Recherche Google
2: Applications et gadgets
3: Retour
4: Bureau
5: Dernières applications utilisées
6: Barre système / Zone d’états
30
- Prise en main d’Android
Page 98

Navigation sur la page d’accueil
La page d’accueil en bas à gauche comprend trois boutons de navigation. Ces boutons sont en permanence
accessibles lorsque vous utilisez votre tablette Android.
SI VOUS N’AVEZ PAS UTILISÉ CES BOUTONS APRÈS UN CERTAIN TEMPS, ILS SERONT MASQUÉS OU REMPLACÉS PAR DES PETITS POINTS, EN FONCTION
DE L’APPLICATION UTILISÉE. CEPENDANT, ILS SONT TOUJOURS ACTIFS. POUR LES RÉUTILISER, IL VOUS SUFFIT DE TOUCHER LE POINT OU LA POSITION
CORRESPONDANTE.
Bouton Description
Bouton de retour :
Ouvre la dernière page utilisée. Peut également renvoyer vers une autre application.
Bouton du bureau (page d’accueil) :
Affiche votre page d’accueil principale.
Bouton des dernières applications utilisées :
Affiche une liste des dernières applications que vous avez utilisées. Les vignettes vous permettent
d’identifier rapidement les applications.
> Touchez l’une des applications figurant dans la liste pour l’ouvrir.
> Pour supprimer une application de la liste, faites-la glisser à gauche ou à droite.
31
- Prise en main d’Android
Page 99

Personnalisation de la page d’accueil
Changement de pages d’accueil
Le système vous propose cinq pages d’accueil différentes. Par défaut, il utilise le troisième écran (page d’accueil centrale).
• Pour basculer sur une des cinq pages d’accueil, faites glisser la page d’accueil au doigt vers la gauche ou la droite.
• Pour revenir à la page d’accueil centrale, touchez le bouton Bureau.
Modification de l’arrière-plan
• Pour modifier l’arrière-plan sur toutes les pages d’accueil, touchez une zone libre de la page d’accueil et laissez
votre doigt posé. Une liste des options apparaît alors, vous permettant de choisir un arrière-plan.
• Galerie :
- Sélectionnez une photo que vous avez prise avec votre caméra ou que vous avez téléchargée.
- Sélectionnez la disposition, puis touchez
Couper
pour sélectionner l’arrière-plan dans la galerie.
• Arrière-plan animé : Sélectionnez un arrière-plan animé.
• Arrière-plans :
- Sélectionnez un arrière-plan dans la liste du système.
- Vous pouvez choisir d’autres arrière-plans sur la plate-forme Android Market.
32
- Prise en main d’Android
Page 100

Utilisation
Aux doigts
Vous pouvez utiliser l’écran tactile aux doigts pour exécuter des commandes et lancer des applications.
Action
En touchant
Toucher et maintenir
Glisser
Tapoter ou glisser
Double-tapoter
Agrandissement/rétrécissement
Champs de saisie de données
Description
Touchez un symbole, un menu, un bouton ou un dossier pour sélectionner l’option
ou l’activer.
Touchez un bouton et laissez votre doigt posé dessus jusqu’à ce que l’action
se produise.
Touchez un symbole, laissez le doigt posé dessus, puis faites-le glisser sur l’écran.
Cette méthode vous permet par exemple de déplacer des applications ou des gadgets
sur votre page d’accueil.
Faites glisser rapidement votre doigt dans un sens sur l’écran. Vous pouvez ainsi
basculer entre les différentes pages d’accueil.
Pour effectuer un agrandissement, tapotez rapidement deux fois sur une page Web,
une carte ou un autre écran.
Sur un navigateur Web, double-tapotez sur une image pour l’agrandir,
puis encore une fois pour la réduire.
Certaines applications (
cartes, navigateur et galerie
) vous permettent d’agrandir
l’image en plaçant deux doigts sur l’écran et en les écartant. Pour rétrécir l’image,
rapprochez les deux doigts simultanément.
Certaines applications nécessitent de saisir des données, comme par exemple
un nom et un mot de passe sur une page Internet.
Touchez le champ de saisie pour ouvrir un clavier visuel et saisir vos informations.
33
- Prise en main d’Android
 Loading...