

Page 1

P3PC-E452-03EN
M4099D Image Scanner
Operator's Guide
Page 2

Note
Treatment of This Manual
READ ALL OF THIS MANUAL CAREFULLY BEFORE USING THIS PRODUCT,
IF NOT USED CORRECTLY, UNEXPECTED INJURY MAY BE CAUSED TO
USERS OR BYSTANDERS.
While all efforts have been made to ensure the accuracy of all information in this
manual, PFU assumes no liability to any party for any damage caused by errors
or omissions or by statements of any kind in this manual, its updates or supplements,
whether such errors are omissions or statements resulting from negligence,
accidents, or any other cause. PFU further assumes no liability arising from the
application or use of any product or system described herein; nor any liability for
incidental or consequential damages arising from the use of this manual. PFU
disclaims all warranties regarding the information contained herein, whether
expressed, implied, or statutory.
PFU reserves the right to make changes to any products herein, to improve
reliability, function, or design, without further notice and without obligation.
EMC and Safety
This equipment has been tested and found to comply with the limits for a Class A
digital device, pursuant to Part 15 of the FCC Rules. These limits are designed to
provide reasonable protection against harmful interference when the equipment is
operated in a commercial environment. This equipment generates, uses, and can
radiate radio frequency energy and, if not installed and used in accordance with the
instruction manual, may cause harmful interference to radio communications.
Operation of this equipment in a residential area is likely to cause harmful
interference in which case the user will be required to correct the interference at
his own expense.
This digital apparatus does not exceed the Class A limit for radio noise emissions
from digital apparatus set out in the Radio interference Regulations of the
Canadian Department of Communications.
This class A digital apparatus complies with Canadian ICES-003.
Le pésent appareil numérique n’ément pas de bruits radioélectriques dépassant
les limites applicables aux appareils numériques de la classe A prescridtes dans
le Réglesment sur le brouillage radioélectrique dicté par le ministere des Communications du Canada.
Cet appareil numérique de la classe A est conformme à la norme NMB-003 du
Canada.
i
Page 3

Bescheinigung des Herstellers/Importeurs
Hiermit wird bescheinigt, daß
• fi-4099C in Übereinstimmung mit den Bestimmungen der
• AmtsblVfg 243/1991 funkentstört ist. Der Deutschen Bundespost wurde das
Inverkehrbringen dieses Gerätes angezeigt und die Berechtigung zur
Überprüfung der Serie auf Einhaltung der Bestimmungen eingeräumt.
• Maschinenlärminformationsverordnung 3. GS GV, 18.01.1991:
Der höchste Schalldruckpegel beträgt 70 dB (A) order weniger gemäß
ISO7779.
der/die/das
Warning on Use Requiring Extreamely High Safety Levels
This Product is designed, developed and manufactured as contemplated for
general use, including without limitation, general office use, personal use and
household use, but is not designed, developed and manufactured as contemplated
for use accompanying fatal risks or dangers that, unless extremely high safety is
secured, could lead directly to death, personal injury, severe physical damage or
other loss (hereinafter “High Safety Required Use”), including without limitation,
nuclear power core control, airplane control, air traffic control, mass transport
operation control, life support, weapon launching control. You shall not use this
Product without securing the sufficient safety required for the High Safety Required
Use. If you wish to use this Product for High Safety Required Use, please consult
with our sale person in charge before such use.
Warning on Reproduction
Reproducing bills, coins, government securities and passports, licenses issued by
public author or civilian organizations, official documents and private paper is
illegal and brought to justice.
About Copyright
Literary works like books, paintings, wood-block prints, maps, drawings and
photographs should not be reproduced other than the personal or domestic use or
the use within other limit without the rightful person's permission.
ii
Page 4

Trademark Acknowledgment
• Windows® and Windows NT® are registered trademarks of Microsoft
Corporation America in the United States and any other countries.
• ISIS is a registered trademark of Pixel Translations, A Division of Actionpoint
Inc.
• All other brand names and product names of this manual are trademarks or
registered trade marks.
• Reproducing in whole or in part of this manual against the Copyright law.
• The contents of this manual may be revised without prior notice.
• We are unaccountable for any damages or passive damages from the use
of this equipment or this manual and any compensation of third party.
All Rights Reserved, Copyright © 1999-2003 PFU LIMITED.
Conventions for Alert Messages
Special information, such as warnings, cautions, and notes are indicated as
follows:
WARNING
WARNING indicates that serious personal injury may result if you do not follow
a procedure correctly.
CAUTION
CAUTION indicates that minor personal injury, loss of data, or damage to the
scanner may result if you do not follow a procedure correctly.
NOTE
NOTE indicates remarks, tips, and other useful supplementary information.
The following symbols are used in this manual.
Used for general WARNING and CAUTION.
Used for NOTE.
iii
Page 5

PFU Offices
Please send your comments on this manual or on PFU products
to the following addresses:
PFU LIMITED
Computer Products Business Group
658-1 Tsuruma Machida-shi, Tokyo 194-8510,
Japan
Phone: (81-42)796-5211
Fax: (81-42)788-7651
Website: http://www.pfu.fujitsu.com
E-mail: imaging@pfu.fujitsu.com
Corporate headquarters
Nu 98-2 Unoke, Unoke-machi, kahoku-gun,
Ishikawa 929-1192, Japan
Phone: (81-76)283-1212
Fax: (81-76)283-4689
North America
FUJITSU COMPUTER PRODUCTS OF
AMERICA, INC.
2904 Orchard Parkway,
San Jose, California CA95134-2009, U.S.A.
Phone: 1-800-591-5924;(1-408)432-6333
Technical Assistance Center: (1-800)626-4686
Fax: (1-408)894-1709
Website: http://www.fcpa.com/
E-mail: info@fcpa.fujitsu.com
FUJITSU CANADA, INC.
2800 Matheson Boulevard East,
Mississauga, Ontario L4W 4X5, Canada
Phone: (1-905)602-5454
Fax: (1-905)602-5457
Website: http://www.fujitsu.ca/
E-mail: imaging@fujitsu.ca (for sales questions)
scantech@fujitsu.ca (for technical questions)
Europa
FUJITSU EUROPE LTD.
Hayes Park Central, Hayes End Road, Hayes
Middlesex UB4 8FE, England
Phone: (44-208)573-4444
Fax: (44-208)573-2643
Website: http://www.fujitsu-europe.com/home/
E-mail: iwebmaster@fujitsu-europe.com
FUJITSU DEUTSCHLAND GMBH.
Frankfurter Ring 211,
80807 München 40, Germany
Phone: (49-89)323-78-0
Fax: (49-89)323-78-100
Website: http://www.fujitsu.de/
E-mail: webmaster@fujitsu.de
FUJITSU NORDIC AB
Kung Hans Väg 12,
S-192 68 Sollentuna, Sweden
Phone: (46-8)626-45-00
Fax: (46-8)626-45-88
Website: http://www.fujitsu-europe.com/home/
FUJITSU ITALIA S.p.A.
Via Nazario Sauro, 38
20099 Sesto San Giovanni (Milan), Italy
Phone: (39-02)26294-1
Fax: (39-02)26294-201
Website: http://www.fujitsu-europe.com/home/
FUJITSU FRANCE S.A.
1, Place des Etats-Unis,
Silic 310, 94588 Rungis Cedex, France
Phone: (33-1)41-80-38-88
Fax: (33-1)41-80-3850
Website: http://www.fujitsu-europe.com/home/
FUJITSU ICL ESPAÑA, S.A.
Camino Cerro de los Gamos, 1 28224,
Pozuelo de Alarcon, Madrid, Spain
Phone: (34-91)784-9000
Fax: (34-91)784-9317
Website: http://www.fujitsu-europe.com/home/
E-mail: imagemaster@mail.fujitsu.es
Australia
FUJITSU AUSTRALIA LTD.
2 Julius Avenue
North Ryde, N.S.W 2113 Australia
Phone: (61-2)9776-4555
Fax: (61-2)9776-4556
CompuServe: GO FUJITSU
Website: http://www.fujitsu.com.au/
iv
Page 6

Asia
FUJITSU COMPUTER (SINGAPORE) PTE. LTD.
20 Science Park Road, #03-01, Tele Teck Park
Singapore Science Park II, Singapore 117674
Phone: (65)777-6577
Fax: (65)771-5499
Website: http://www.fujitsu-computers.com.sg
E-mail: inquiry@fcsl.fujitsu.com.sg
FUJITSU TAIWAN LTD.
19th Fl., No39, 1 Sec. chung-Hwa Rd.,
Taipei, Taiwan
Phone: (886-2)2311-2255
Fax: (886-2)2311-2277
FUJITSU HONG KONG LTD.
10/F., Lincoln House,
979 King’s Road,
Taikoo Place,
Island East, Hong Kong
Phone: (852)2827-5780
Fax: (852)2827-4724
E-mail: scanner@fujitsu.com.hk
FUJITSU SYSTEMS BUSINESS (THAILAND)
LTD.
12th Fl., Olympia Thai Tower,
444 Rachadapisek Road, Samsennok,
Huay kwang, Bangkok 10320, Thailand
Phone: (662)512-6066
Fax: (662)512-6068
FUJITSU KOREA LTD.
5-11 Fl., Coryo Finance Center Building,
Youido-Dong 23-6, Young DungPo-gu,
Seoul, Korea, 150-010
Phone: (82-2)3787-5970
Fax: (82-2)3787-6070
Website: http://www.fujitsu.co.kr
E-mail: webmaster@fkl.fujitsu.co.kr
FUJITSU SYSTEMS BUSINESS (MALAYSIA)
SDN, BHD.
Fujitsu Plaza 1A, Japan Tandang 204, P.O.Box
636,
Jalan Sultan, 46770, Petaling Jaya Selangor Darul
Ehsan, Malaysia
Phone: (60-3)793-3888
Fax: (60-3)7783-0888
FUJITSU PHILIPPINES, INC
2nd Fl., United Life Building, Pasay Road,
Legaspi Village Makati, Metro Manila, Philippines
Phone: (63-2)812-4002
Fax: (63-2)817-7576
v
Page 7

Preface
This manual explains how to use the M4099D image scanner. This scanner
can be equipped with an optional endorser; however, Illustrations in this
manual do not include the endorser except those in Chapter 5. For details of
the endorser, refer to its Operator Guide.
This manual contains COMPONENTS, INSTALLATION AND CONNECTIONS,
OPERATING INSTRUCTION, DOCUMENT SPECIFICATION, SPECIFICATIONS, and SETUP, BROWSE, AND TEST MODES.
Refer to the CD-ROM for the information about the routine operation of the
M4099D.
The CD-ROM contains OPERATING INSTRUCTION, CLEANING, REPLACEMENT OF PARTS, ADJUSTMENT and TROUBLESHOOTING.
The M4099D is very fast and highly functional image scanner developed for
volume filing, using charge-coupled device (CCD) image sensors. This scanner features duplex scanning and high quality image processing with an
automatic document feeder (ADF).
Edition
Date published
01 December, 1999 First edition
02 February, 2000 Setup descriptions reviewed
03 March, 2003 Setup functions added
Manual code: P3PC-E452-03EN
Revised contents
vii
Page 8

CONTENTS
❑ CHAPTER 1 COMPONENTS
❑ CHAPTER 2 INSTALLATION AND CONNECTIONS
❑ CHAPTER 3 OPERATING INSTRUCTION
❑ CHAPTER 4 DOCUMENT SPECIFICATION
Checking the Components ........................................................1-1
Units and Assemblies ................................................................1-2
Operator Panel ..........................................................................1-5
Buzzer .......................................................................................1-8
Precautions................................................................................2-1
Inspection ..................................................................................2-2
Cable Connection ......................................................................2-4
Turning the Power On ...............................................................3-1
Basic Operation of the Operator Panel......................................3-2
Document Size ..........................................................................4-1
Document Quality ......................................................................4-2
❑ CHAPTER 5 SPECIFICATIONS
Installation Specifications ..........................................................5-1
External Dimensions..................................................................5-2
Consumables.............................................................................5-3
Options ......................................................................................5-4
❑ CHAPTER 6 SETUP, BROWSE, AND TEST MODES
Setup, Browse, and Test Modes ...............................................6-1
Activating the Setup or Browse Mode .......................................6-2
Contents of the Setup or Browse Mode.....................................6-4
Activating the Test Mode .........................................................6-54
Contents of the Test Mode ......................................................6-56
❑ GLOSSARY OF TERMS................................................................................GL-1
❑ INDEX ............................................................................................................. IN-1
❑ DECLARATION OF CONFORMITY
ix
Page 9

CHAPTER
CHAPTER
INSTALLA TION AND CONNECTIONS
2
CHAPTER
CHAPTER
4
OPERATING INSTRUCTION
3
DOCUMENT SPECIFICATION
1
COMPONENTS
COMPONENTS
INSTALLATION AND
CONNECTIONS
OPERATING
INSTRUCTION
DOCUMENT
SPECIFICATION
CHAPTER
CHAPTER
SETUP, BROWSE, AND TEST MODES
6
SPECIFICATIONS
5
GLOSSARY OF TERMS
SPECIFICATIONS
SETUP, BROWSE,
AND TEST MODES
GLOSSARY
OF TERMS
INDEX
INDEX
xi
Page 10

CHAPTER
1
COMPONENTS
After unpacking the scanner, confirm that all the components have been
received. This chapter describes the components of the scanner, part
names, and operator panel arrangement and their function.
Checking the Components
Units and Assemblies
Operator Panel
Buzzer
Page 11

Checking the Components
These high precision components must be handled with care.
Confirm that all the components shown in the following figure have been received. Mount the stop
lever on the stacker of the scanner.
If any component is missing, please contact your sales agent.
* Stop lever
Operator’s Guide
(this manual) and
two CD-ROMs
Scanner
*
Power cable
for North America
Power cable
for Europe
or
1-1
Page 12

Units and Assemblies
This section shows the exterior view and assemblies of the scanner. This section also provides names
of each part and describes their functions.
Units
16
19
1718
17
15
12
6
7
4
8
9
10
11
5
4
3
13
14
7
1
2
1-2
20
21
22
23
Page 13

No. Name Function
1 Operator panel Used to operate the scanner.
2 Power switch Used to power on or off.
3 Hopper Document input tray.
4 Hopper guides Used to adjust the document width.
5 Hopper extension For use with long documents.
6 Automatic document feeder (ADF) Feeds documents automatically.
7 ADF release lever Used to open the ADF.
8 Pick roller unit Picks top page in document stack.
9 Guide plate The pad is mounted on.
10 Pad Separates top page from document stack.
11 Brake roller Separates top page from document stack.
12 Upper transport unit Opens for easy access.
13 Lever Used to open the upper transport unit.
14 Side cover Opens to access back-side lamp.
15 Stacker Document exit tray.
16 Check stopper Adjustable stopper for shorter length documents.
17 Stacker guides Helps guide documents into stacker.
18 Stop lever Used to keep documents in the stacker.
19 Stacker extension For use with long documents.
20 Main line switch Controls supply of line power to the scanner.
21 Power inlet Power cable connection.
22 Interface connectors Video and RS-232C
23 Interface connectors Two SCSIs.
1-3
Page 14

Assemblies
Lower sheet guide assembly
Pick roller unit
1-4
Brake roller
Pad
Lamp unit (back side)
Lamp
Lamp unit (front side)
Lamp
Guide plate
Page 15

Operator Panel
The operator panel is located at the lower right hand side of the scanner. The panel consists of an
LCD (24 character x 2 line), LEDs, and buttons.
Arrangement
Operator panel
CHECK
LCD
POWER
24 characters x 2 lines
DATA
F1
F2
F3
MENU
ENTER
CANCEL
1-5
Page 16

Button/LED Function
Button name Function
Turns on or off the power when the main line switch is set to “I”.
MENU
ENTER
CANCEL
F1
F2
F3
Sets the scanner in setup or browse mode. It is also used to set test mode. (See Chapter 6)
Setup mode is used for customizing the scanner. Browse mode is used for glancing conditions of the scanner.
Test mode is used for testing the scanner offline.
Used in setup, browse, or test mode.
• Clears an error if any.
• Stops current scanning when the video interface is used.
• Used in setup, browse, or test mode.
• Lifts the hopper in normal mode without errors.
• Used in setup, browse, or test mode.
• Lowers the hopper in normal mode without errors.
• Used in setup, browse, or test mode.
Used in setup, browse, or test mode.
Used in setup, browse, or test mode.
Available as shortcut keys when functions are defined in setup mode.
LED Function
POWER
DATA
CHECK
LCD Display
LCD Function
1-6
Lights when the power is on.
Lights when the image buffer contains data.
Blinks when an equipment error occurs.
Displays equipment status or error contents.
Page 17
Operation status display
After power is turned on, the LCD indicates the following messages in normal mode.
Please wait Wait for a moment. This is indicated when processing takes a long
time.
When this is displayed after turning power on, the second line
indicates initializing messages.
Ready The scanner can receive a command from the host computer and
can be set in setup or browse mode.
Manual Feeding Load documents on the hopper table manually.
Feeding The scanner is feeding documents. The second line indicates the
number of documents fed per batch.
Transferring Data The scanner is sending data to the host computer.
Error status display
When the scanner detects errors, the LCD indicates the following messages. There are two types of
errors: temporary errors and equipment errors.
Temporary errors: The message is cleared just by following the next message.
Hopper empty Mis-pick Cover open
Equipment errors: To clear the message, you must clean or replace the specified part.
Optical error: Front
1-7
Page 18
Buzzer
The scanner has a buzzer to indicate that an error has occurred or an operator panel button is
pressed. The buzzer function can be set on or off by following the procedure “Buzzer” in Chapter 6
SETUP, BROWSE, AND TEST MODES.
Sound condition Function
Error occurred Sounds continuously. The buzzer turns off when any button is pressed or the
power is turned off. Even when a button is pressed, the scanner continues
to display the error.
Button pressed Sounds briefly. This sound cannot be disabled by the buzzer setup.
1-8
Page 19

CHAPTER
2
INSTALLATION AND CONNECTIONS
The chapter describes how to install and connect the scanner.
Precautions
Inspection
Cable Connection
Page 20

WARNING
Place the machine with no portion of the scanner hangs over the desktop.
Never attempt to move or relocate the machine without help. And hold the
horizontal plane of the scanner bottom. (Not inclined plane)
ACHTUNG
Precautions
This section describes precautions when installing the scanner.
Do not install the scanner in the following places and environments.
• Place the scanner away from electrical noise sources, strong magnetic fields and air flow. If the scanner
is used near an air conditioner, copying machine, or TV set, the scanner may operate incorrectly.
• Keep the scanner out of the sun and away from heaters. These environments may shorten the scanner
life or cause hardware failures.
• Do not install the scanner in a place where vibrations may occur. This environment may cause hardware
failures or may cause the scanner to operate incorrectly.
• Do not install the scanner in a humid, dusty, or damp places. These environments may shorten the
scanner life or cause hardware failures. Do not place the scanner where liquid spills may occur.
Stellen Sie den Scanner sicher auf eine waagerechte, ebene Flache.
Bewegen Sie den Scanner nicht ohne Hilfe.
• Be aware of the static electricity. Be sure that the flooring and the desk are made of materials that do
not generate the static electricity.
See Chapter 5 SPECIFICATIONS for the information such as the size of the installation space.
2-1
Page 21

Inspection
This section describes how to check the labels.
Three labels
2-2
Label A (An example)
Page 22

Label B (An example)
MODEL M4099D IMAGE SCANNER
PART NO. CA04315-B002 AC100-240V
SER. NO. 1 phase 50/60Hz
DATE 1999-10 2.9/1.5A 65 kgf
Label C (An example)
MODEL NAME M4099D
PART NO. CA04315-B002
MODEL - 0 1 2 3 4 5 6 7 8 9
REV. - 0 1 2 3 4 5 6 7 8 9
- 0 1 2 3 4 5 6 7 8 9
PFU Limited
MADE IN JAPAN
2-3
Page 23

Cable Connection
This section describes how to connect the cables.
Connect the cables as follows:
Turning the main line switch off
Press “O” side of the main line switch to turn the power off.
Main line switch
Connecting the power cable
Connect the power cable to the power inlet of the device and a power outlet.
2-4
Page 24
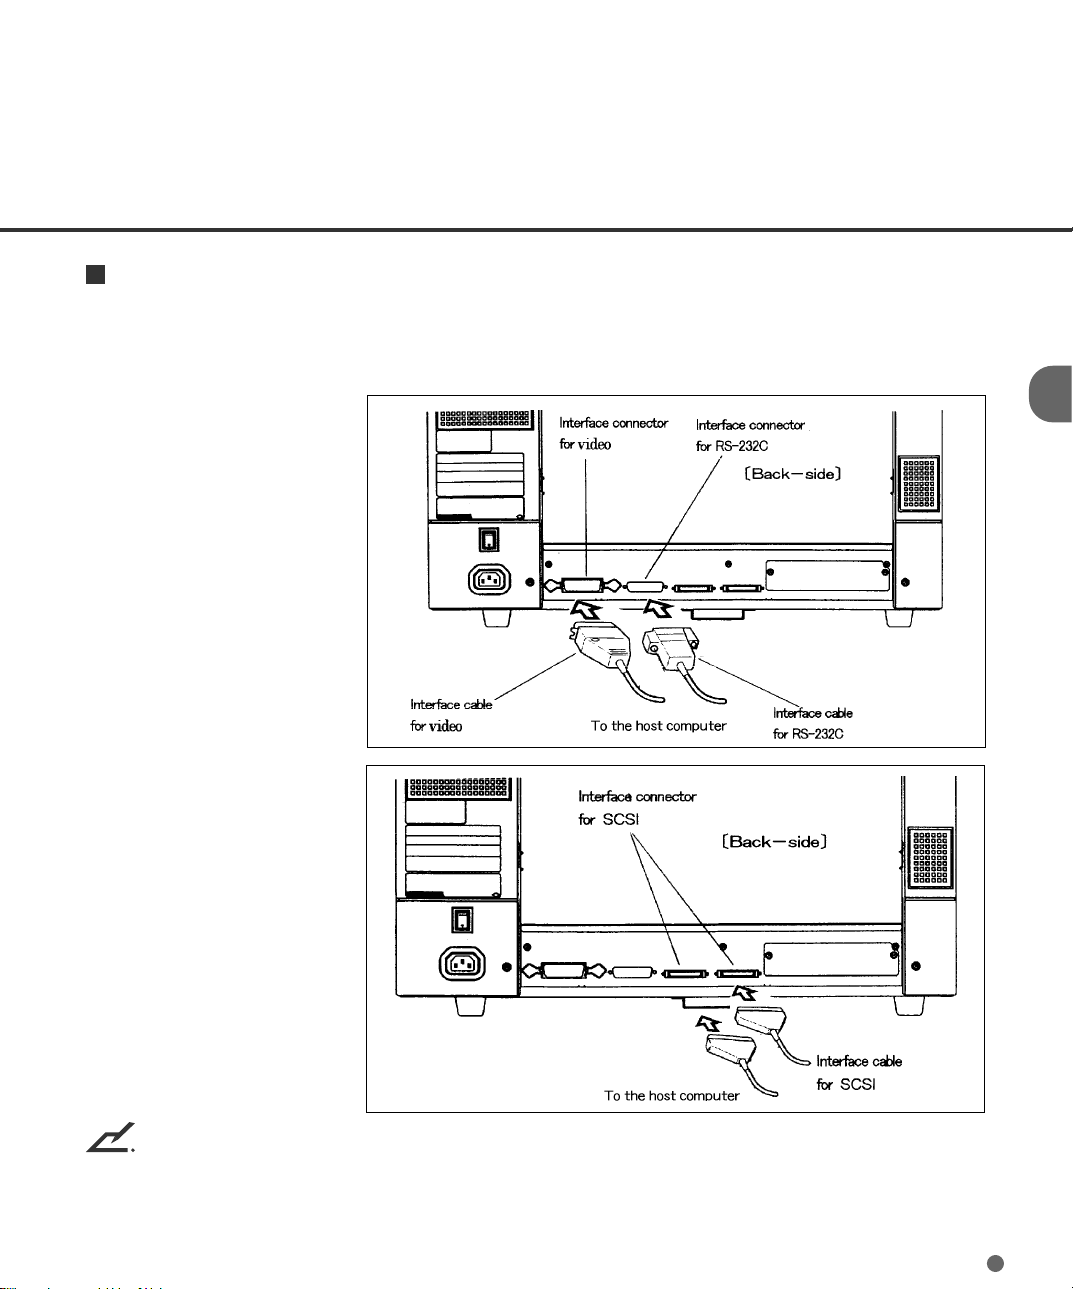
Connecting the interface cable
Connect the video interface, RS-232C interface, or SCSI interface cables and secure them with hooks
or screws. Connect the other ends to the host computer.
NOTE
• SCSI-ID is set to No. 5 at shipment. Refer to Chapter 6 when changing the setting.
• No SCSI terminator is required for an open connector thanks to the automatic switch function.
2-5
Page 25

CHAPTER
3
OPERATING INSTRUCTION
This chapter describes how to turn the power on, and also describes how to operate the operator panel (basic operation).
Refer to Reference Guide about information on loading document and
opening/closing the upper transport unit.
Turning the Power On
Basic Operation of the Operator Panel
Page 26

3
Turning the Power On
This section describes how to turn the power on.
Press “I” side of the main line switch located at the back of the scanner. Press the power switch of
the operator panel. The power goes on and the green POWER lamp at the operator panel lights.
Main line switch
Operator panel
Power switch
3-1
Page 27

Basic Operation of the Operator Panel
This section describes basic operation of the operator panel including how to enter the mode selection in which you can use setup mode, browse mode, and test mode.
Displaying detailed information if an error occurred
If an error occurs, the CHECK LED blinks and the error message is displayed on the LCD. For
example, the LCD indicates as follows:
Cover open
Press
CANCEL
to clear the error (depending on an error, it cannot be cleared).
3-2
Page 28
Lifting or lowering the hopper
When the scanner has no error (the CHECK LED does not light), pressing lifts the hopper
and pressing lowers the hopper.
CAUTION
During hopper height adjustment, do not touch the hopper table or do not put
anything on the hopper table to prevent your fingers from being caught. If
something is caught in the mechanism, the scanner may be damaged.
This function is valid when:
Ready is displayed.
In details:
• The DATA LED does not light (the scanner contains no data),
• The scanning operation is not in progress,
• The scanner is not in test mode (except the offline feed test), and
• The scanner is not in setup or browse mode.
The hopper stops at the pick position or at the 250-, 500-, or 1000-sheet position depending on the
hopper height adjustment in setup mode. At the pick position, the top paper of stack (the hopper
table when no paper is loaded on the hopper) is aligned to the pick roller. At the 250-sheet position,
for example, the hopper table can load about 250 sheets of paper.
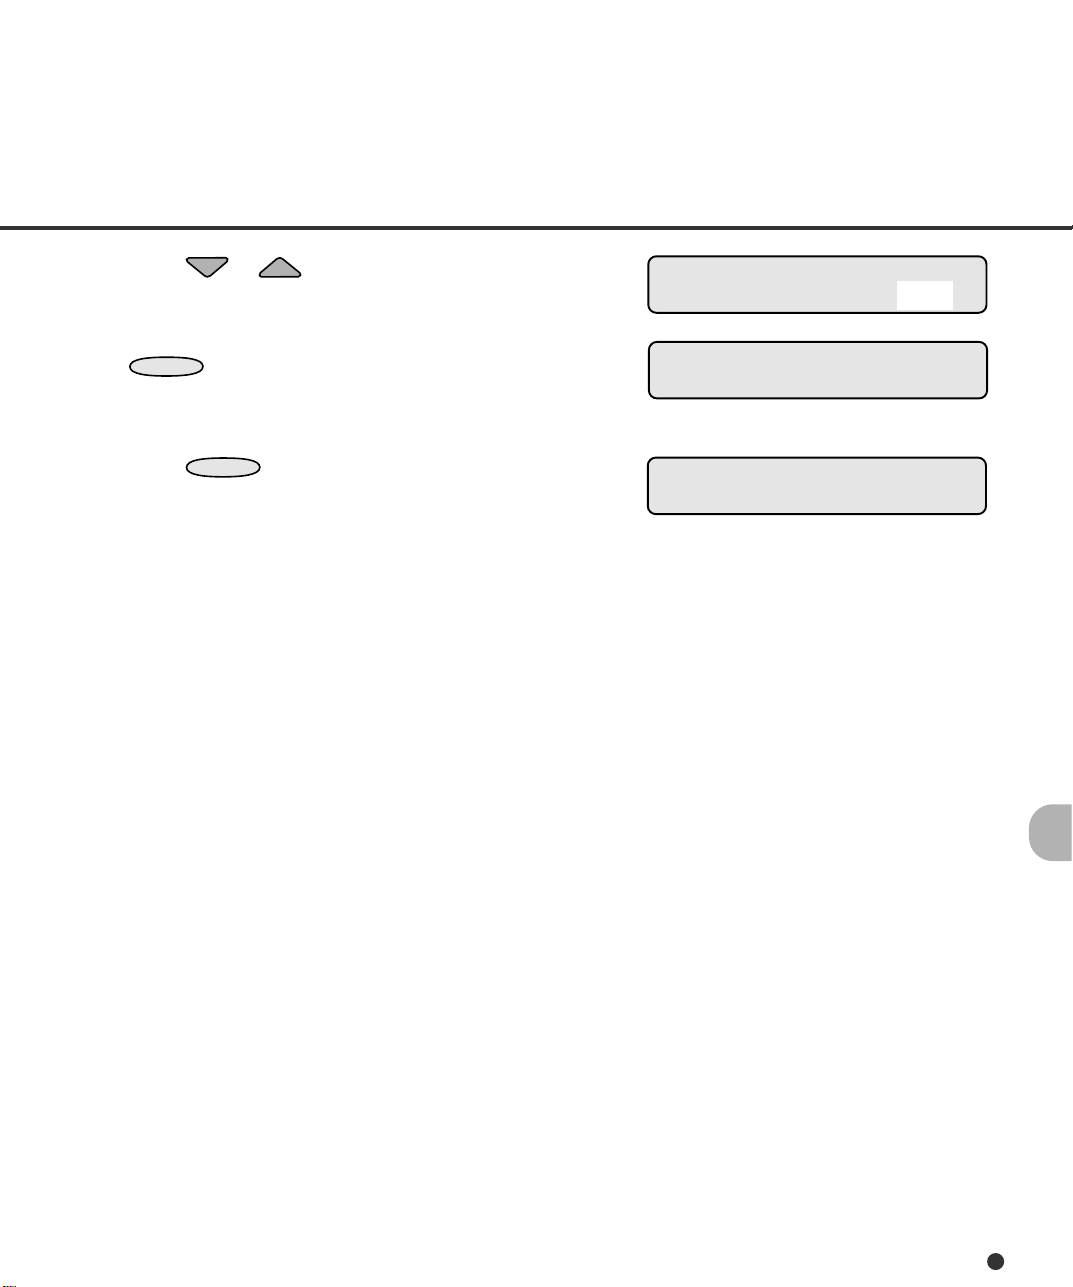
Each time you press or , the hopper lifts or lowers by one position. Pressing when paper
is loaded, the hopper lifts up to the pick position.
3-3
Page 29
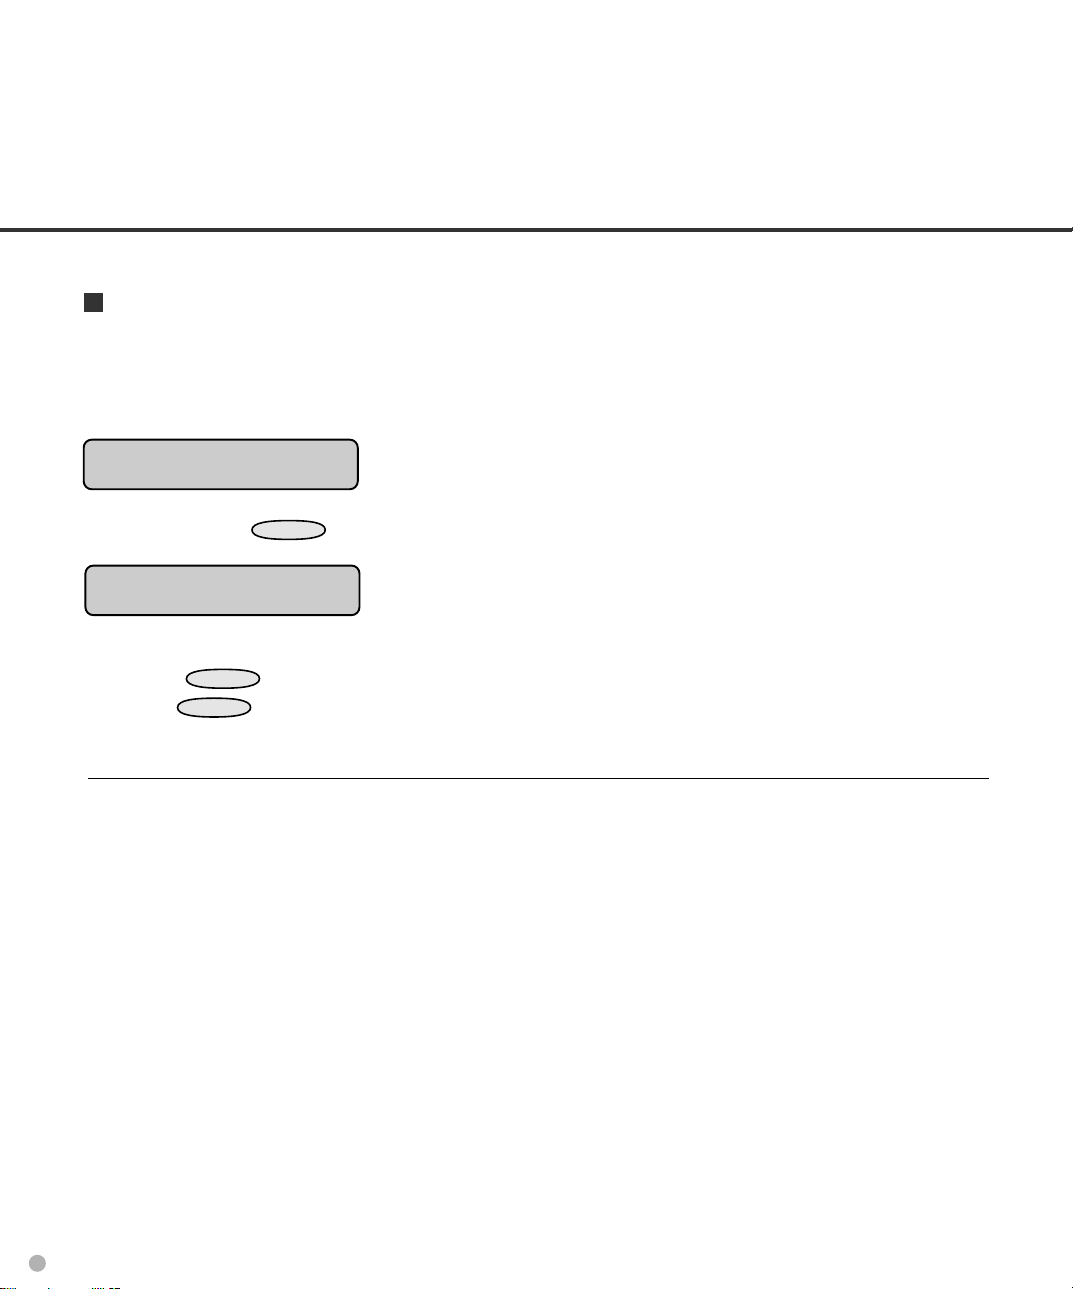
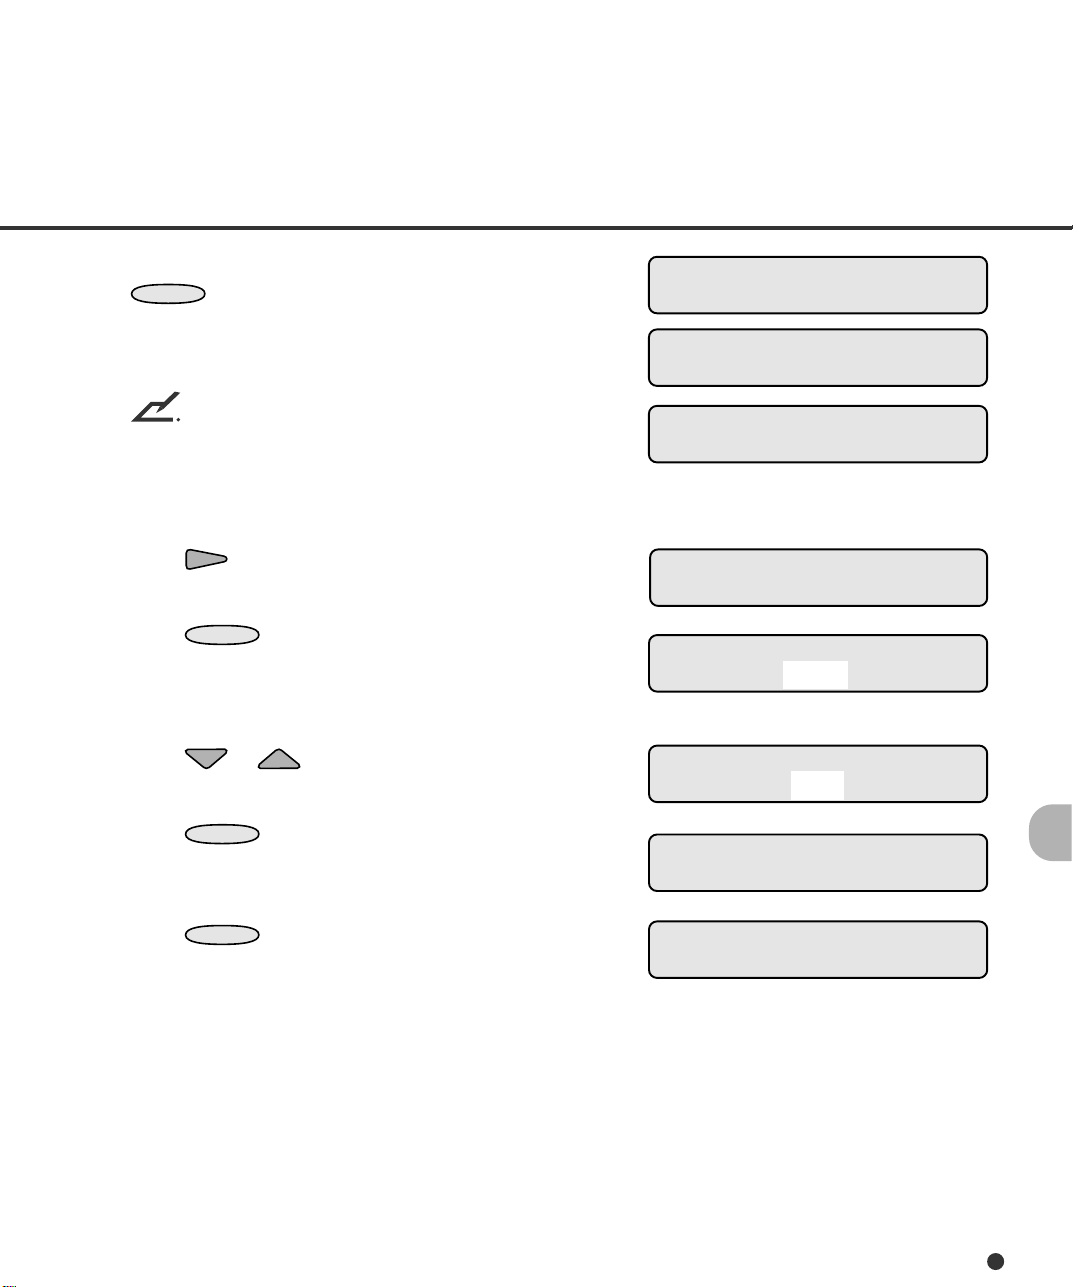
Clearing a consumable life alarm
This scanner has the consumable counter to estimate the life of consumables. When the consumable counter reaches the prescribed value, the LCD indicates an alarm that the consumable may
be expired. For example, the following message appears:
Consumable life alarm
In this case, press
CANCEL
. The LCD indicates the following message:
Reset Consumable Counter?
Yes:Enter No:Cancel
Yes (press
No (press
ENTER
CANCEL
): The scanner resets the consumable counter to zero.
): The scanner does not reset the consumable counter. In this case, the
consumable life alarm recurs when the next sheet is fed.
3-4
Page 30

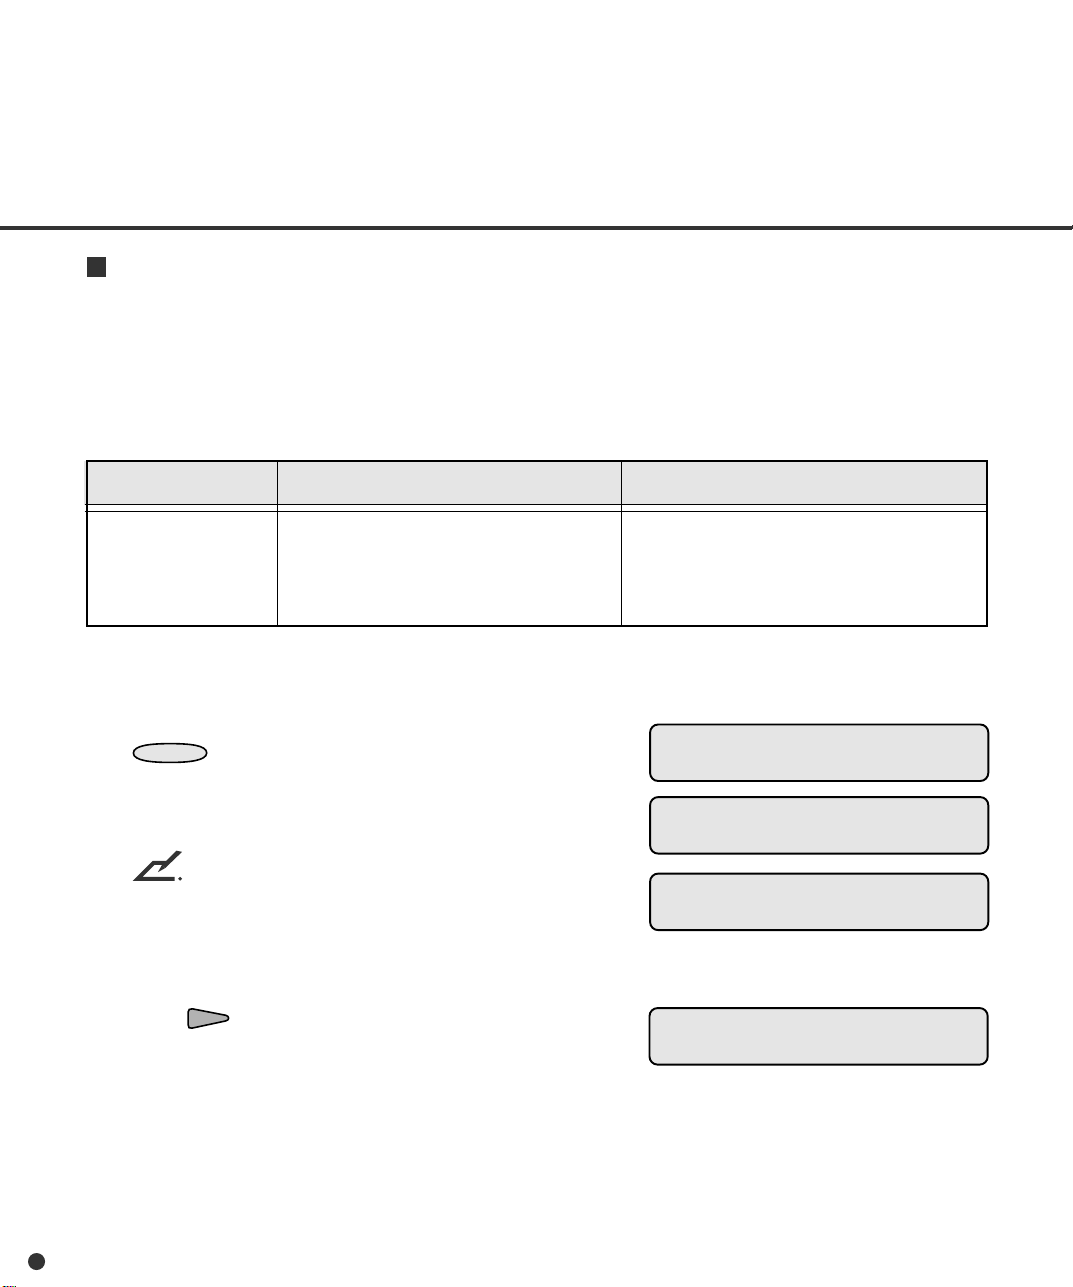
Confirming the number of sheets processed by the scanner
The LCD indicates the numbers of sheets scanned during online or in test mode (offline feed test).
The LCD indicates the numbers as follows:
Scanning
AAAAAAAA MMMM
Value Meaning Description
AAAAAAAA Abrasion counter Eight columns of numbers indicate the accumulative
number of sheets fed by this scanner.
MMMM Batch counter Four columns of numbers indicate the number of sheets fed
per hopper.
3-5
Page 31

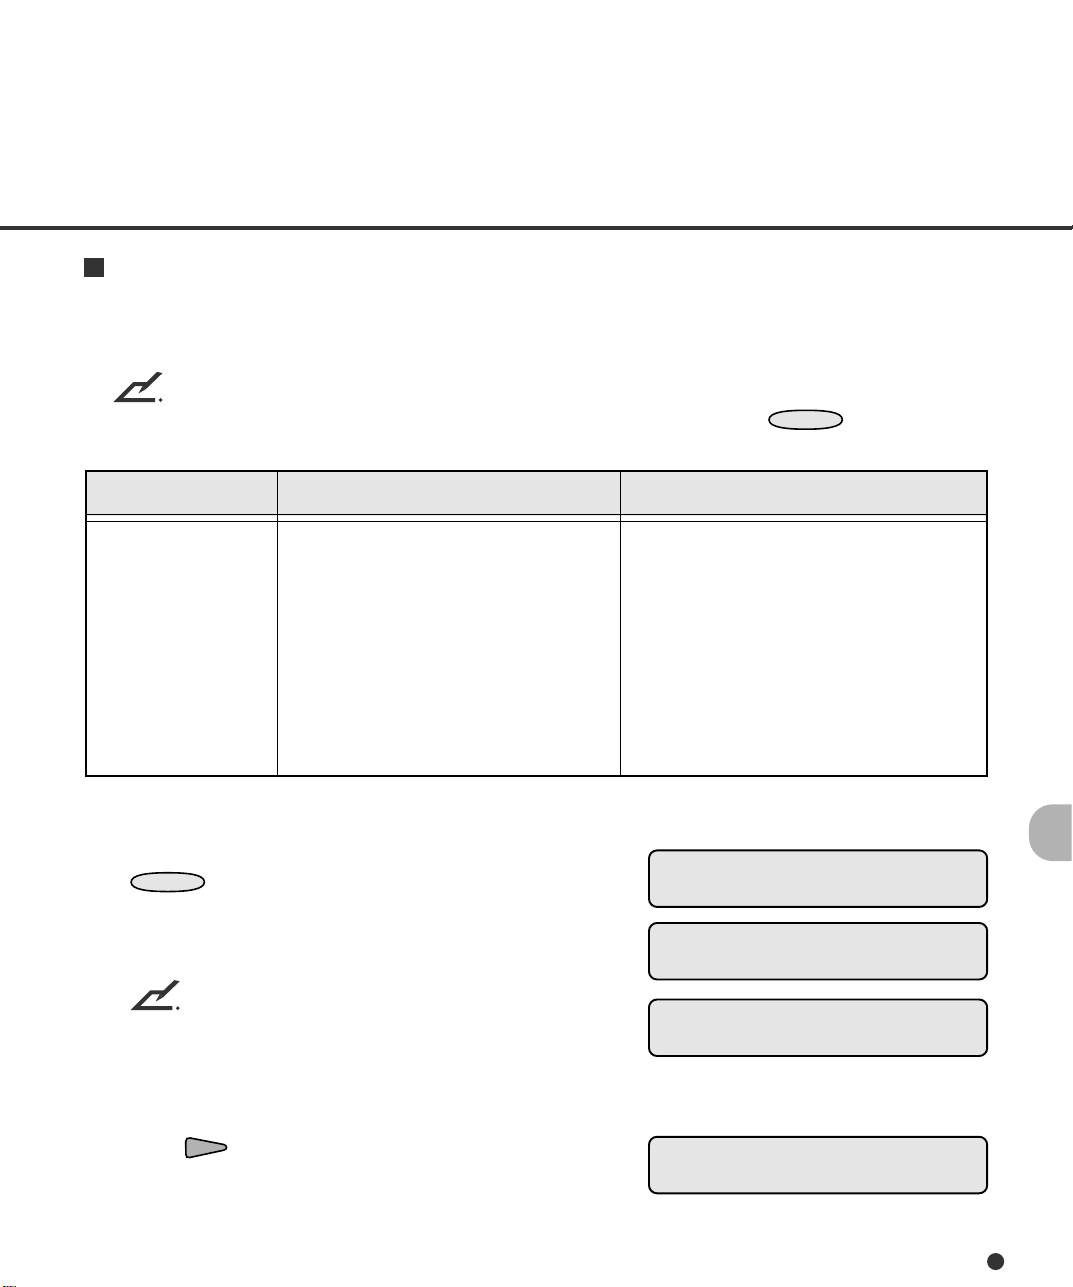
Using the function buttons (F1, F2, and F3)
This scanner has the three function buttons (
F1
,
F2
, and
) to one of which you
F3
can allot a setup function which involves tedious operation. Use these buttons as shortcut keys
when you frequently use certain setup functions for your jobs. See Chapter 6 for details.
You can use function buttons after allocating a setup function to it. This allocation can be done in
setup mode. After allocation, the allocated function can be easily accessed just by pressing the
function button. For allocatable setup functions, see Chapter 6.
The function buttons are available when:
Ready is displayed.
In details:
• The DATA LED does not light (the scanner contains no data),
• The scanning operation is not in progress,
• The scanner is not in test mode, and
• The scanner is not in setup or browse mode.
The function buttons are available even in the setup mode lock state (see Chapter 6).
3-6
Page 32
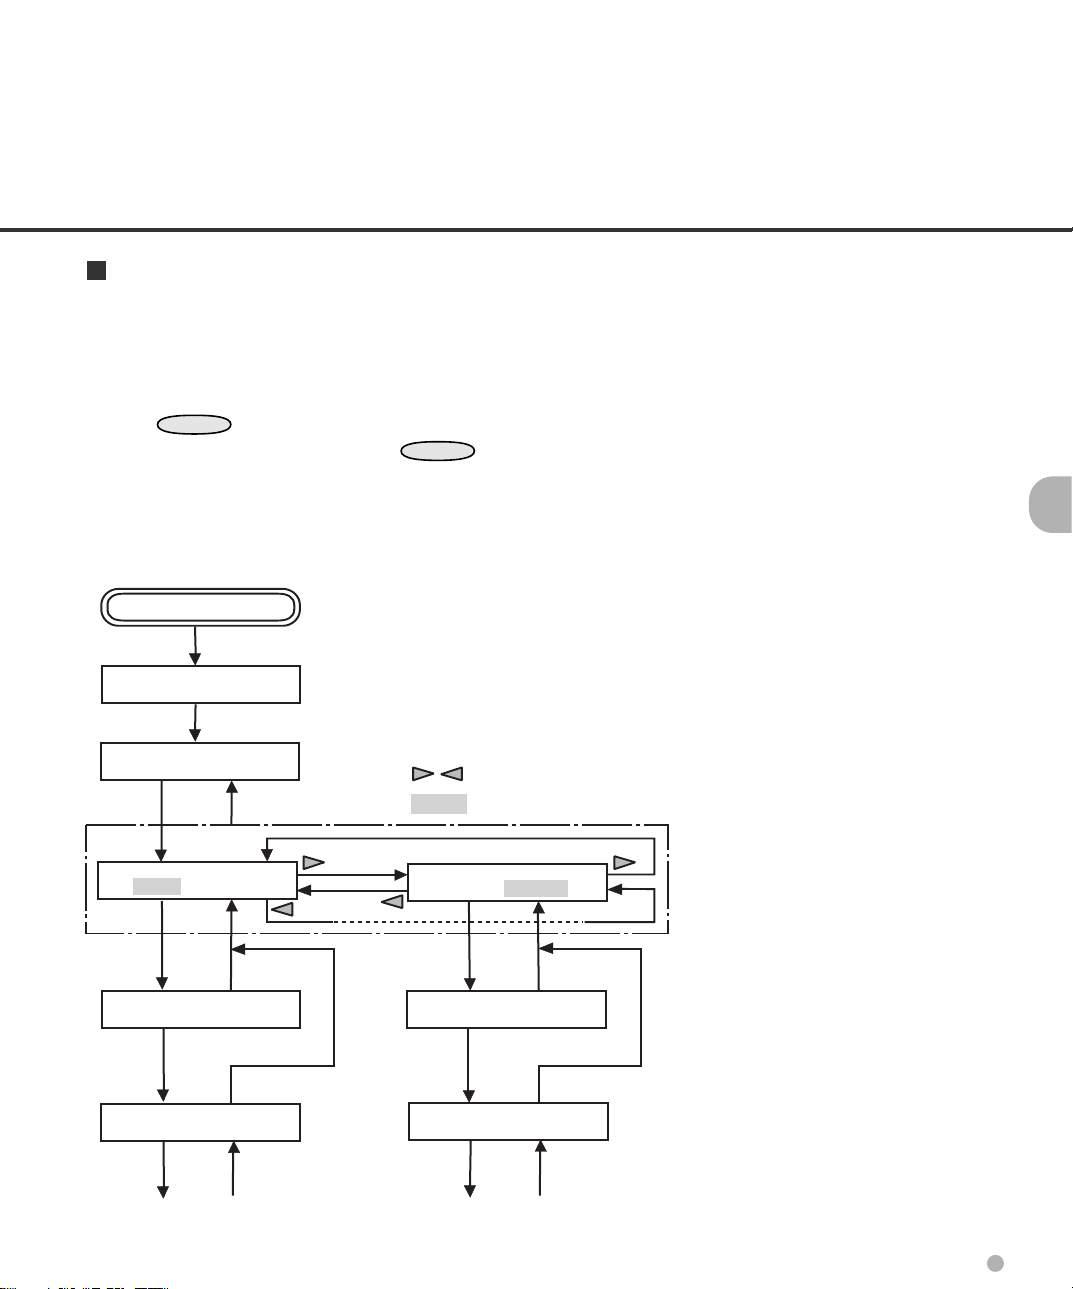
Using the setup, browse, and test modes
This scanner has the setup mode, browse mode, and test mode for customizing the scanner,
glancing setup conditions of the scanner, and testing the scanner offline respectively.
There are two ways to enter these modes:
• Press
• Turn the power on while pressing
Available functions differ with the two ways. For details, see Chapter 6.
In the following way, you can use the setup mode and browse mode.
POWER ON
Please wait
MENU
when the LCD indicates “Ready”. [In this case, the test mode is unavailable.]
MENU
.
MENU
Ready
: Cursor buttons
CANCEL
: Blinking
<<MODE SELECT>>
SETUP BROWSE
ENTER
<<SETUP MODE>>
ENTER
<<SETUP MODE>>
XXXXX
ENTER
CANCEL
CANCEL
CANCEL
<<MODE SELECT>>
SETUP BROWSE
ENTER
<<BROWSE MODE>>
ENTER
<<BROWSE MODE>>
XXXXX
ENTER
CANCEL
CANCEL
CANCEL
3-7
Page 33

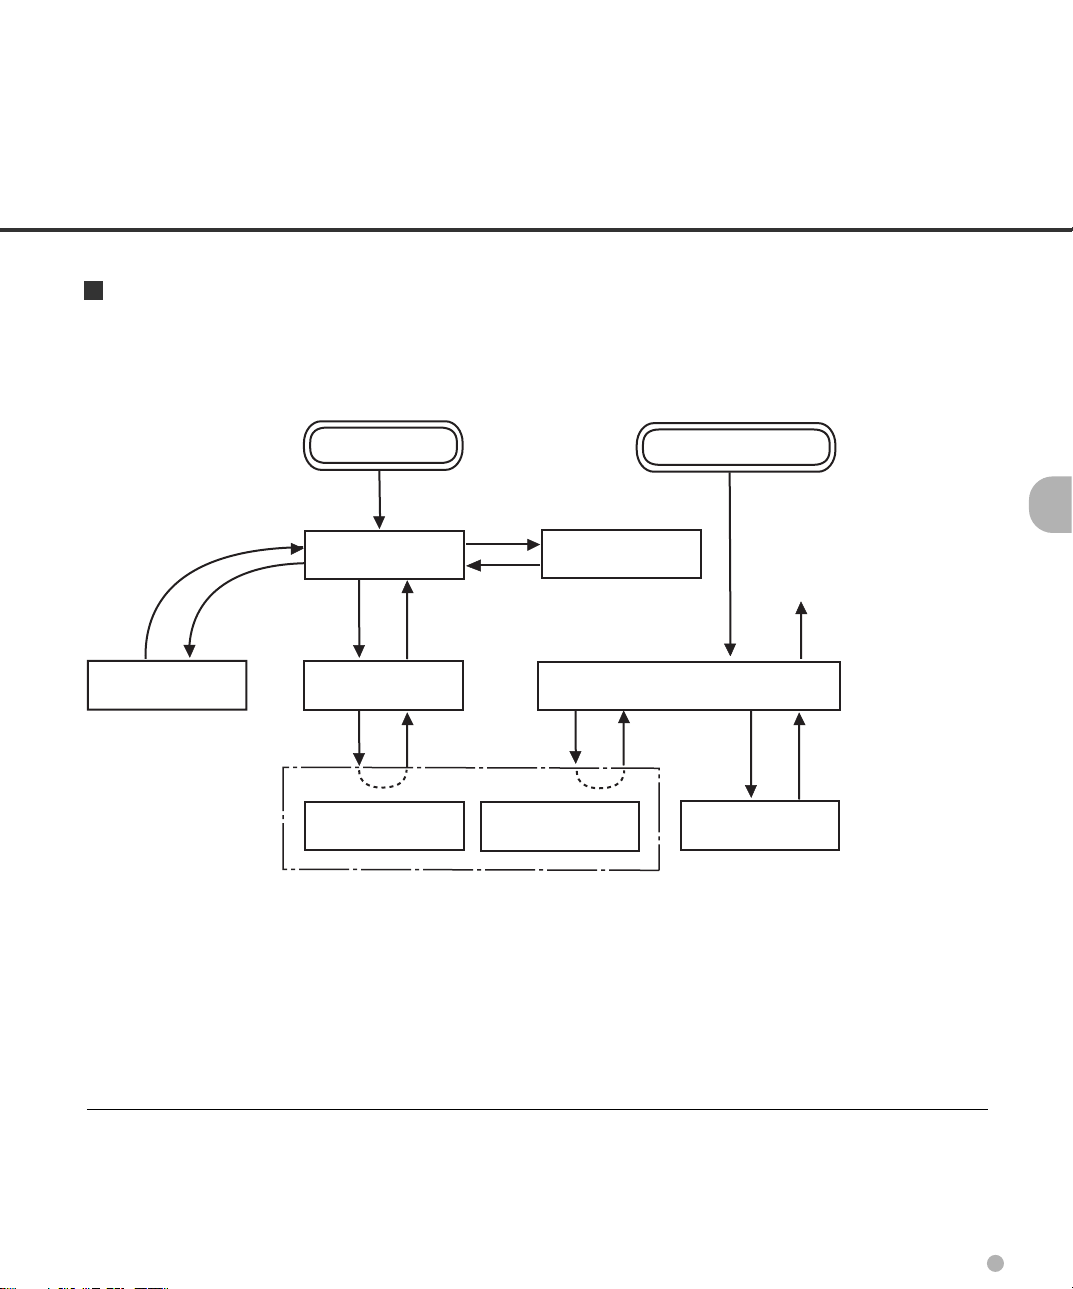
In the following way, you can use the test mode in addition to the setup mode and browse mode.
To quit these modes, turn the power off.
POWER ON with MENU ON
T Please wait
* Turn off to quit <<MODE SELECT>>.
<<MODE SELECT>>
SETUP BROWSE TEST
ENTER
CANCEL
<<SETUP MODE>>
ENTER
CANCEL
<<SETUP MODE>>
XXXXX
ENTER
CANCEL
<<MODE SELECT>>
SETUP BROWSE TEST
ENTER
CANCEL
<<BROWSE MODE>>
ENTER
CANCEL
<<BROWSE MODE>>
XXXXX
ENTER
CANCEL
*
: Cursor buttons
: Blinking
<<MODE SELECT>>
SETUP BROWSE TEST
ENTER
ENTER
ENTER
<<TEST MODE>>
<<TEST MODE>>
Offline Feed Test
CANCEL
CANCEL
CANCEL
3-8
Page 34
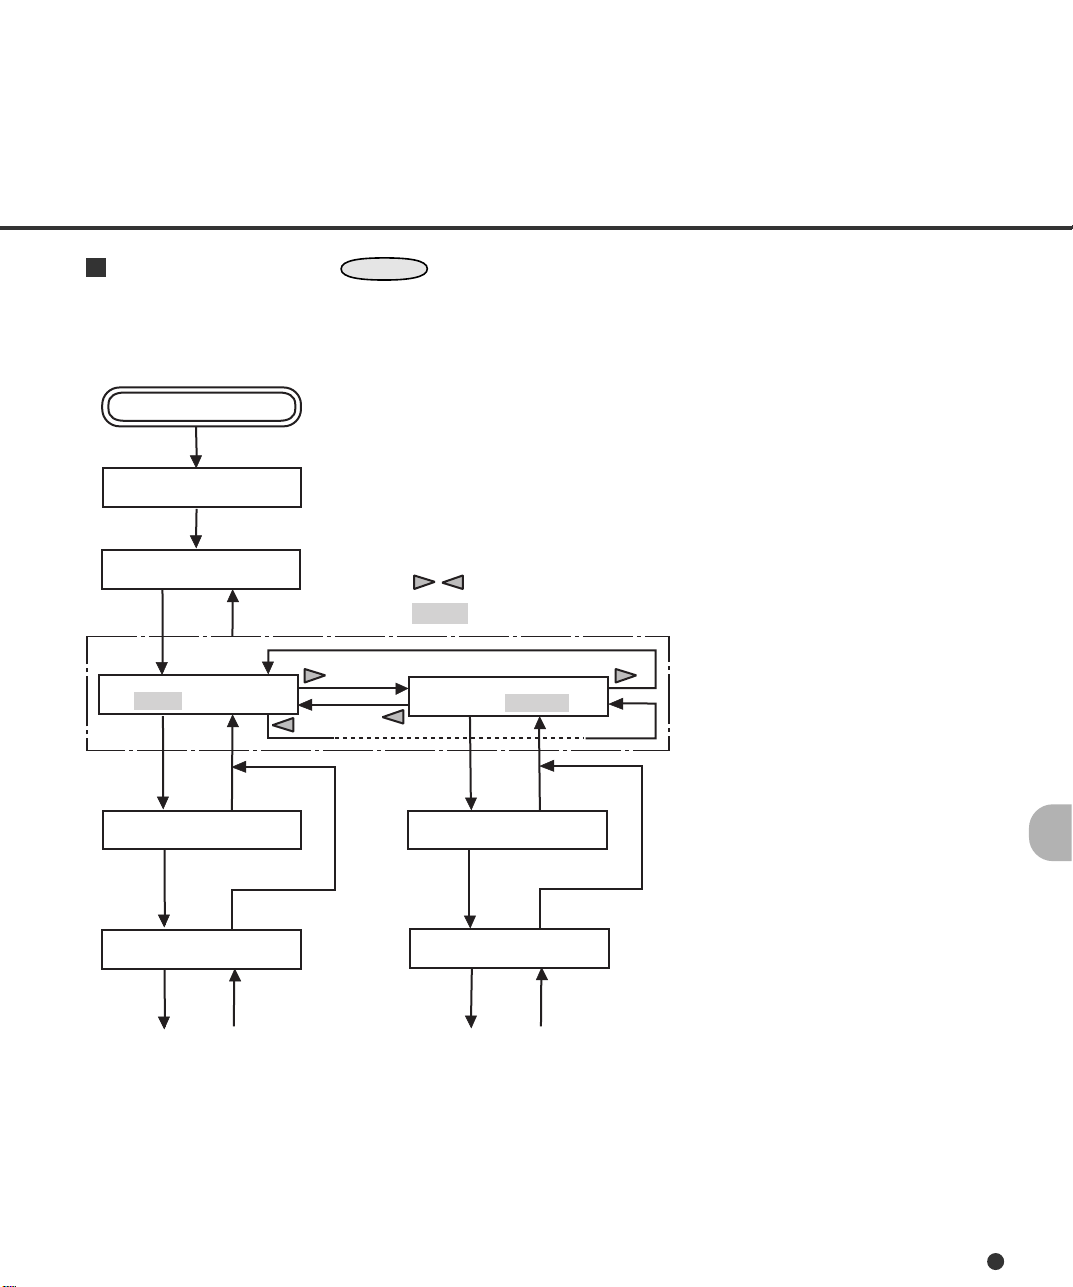
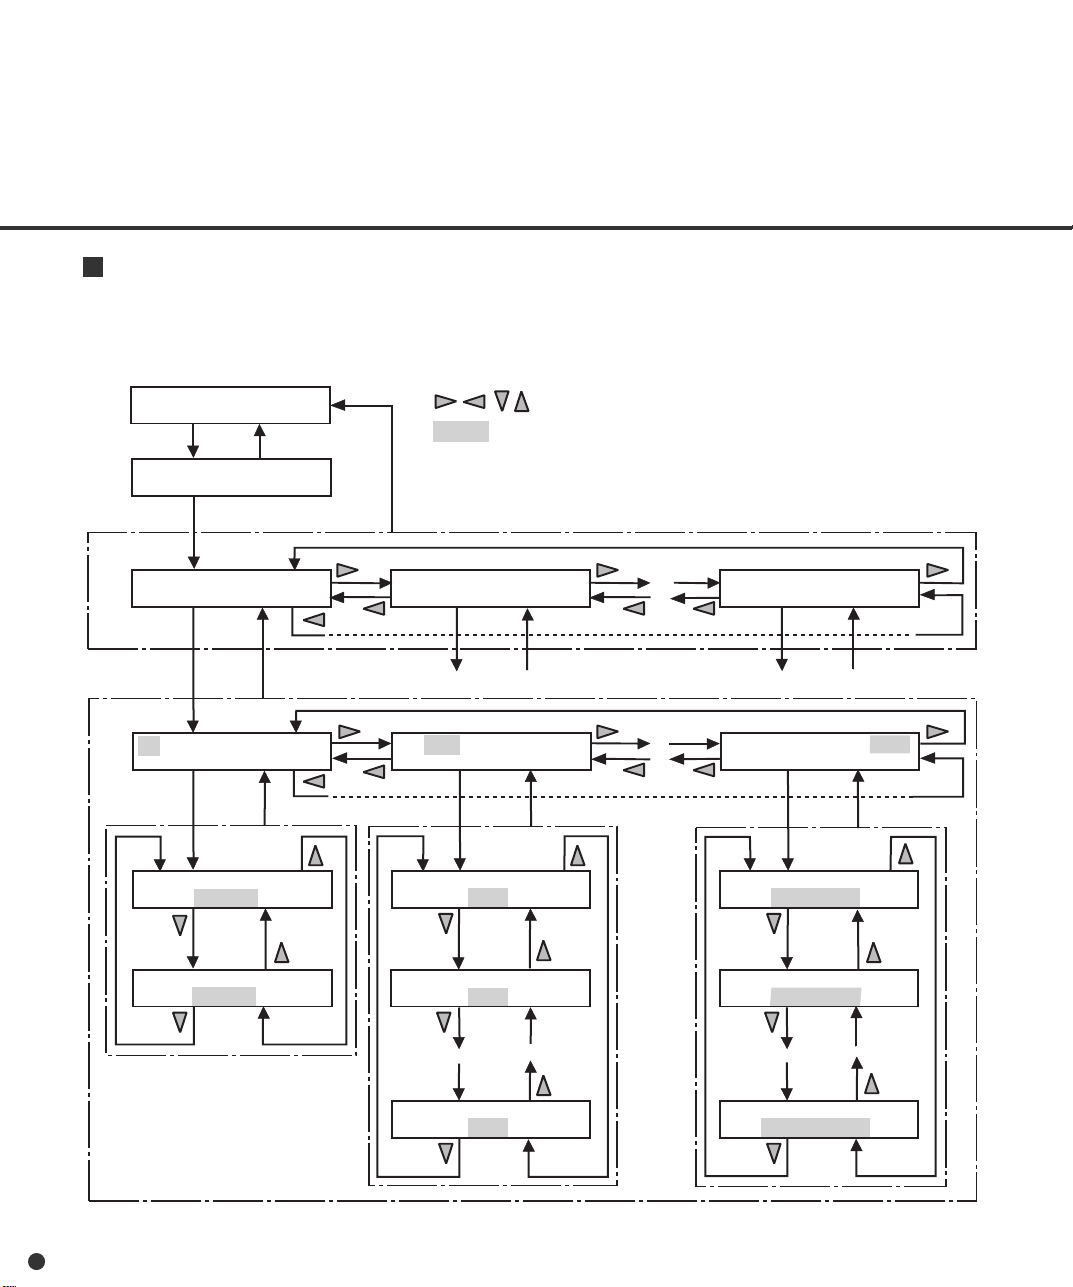
T ransition of operator panel status and display
The following outlines the transition of status and display of the operator panel.
CANCEL
Error message
Error
occurred
POWER ON
Ready
(normal mode)
MENU
Mode select screen
(Setup and Browse)
ENTER
Setup mode
CANCEL
CANCEL
F1, F2, F3
ENTER
Browse mode
POWER ON with MENU ON
Shortcut to
setup functions
Mode select screen
(Setup, Browse, and Test)
CANCEL
ENTER
Test mode
Turn power
off to quit.
CANCEL
3-9
Page 35

CHAPTER
4
DOCUMENT SPECIFICATION
This chapter describes the document size and document quality
of the scanner.
Document Size
Document Quality
Page 36

Document Size
The following figure shows document sizes that the scanner can read.
A
Feeding Direction
Scanner
M4099D
Maximum
A
297 (11.7 in)
B
432 (17 in)
B
Minimum
A7 size
= 74 (2.9 in) x 105 (4.1 in):
Available in both portrait
and landscape orientations
(Unit : mm)
4-1
Page 37

Document Quality
This section describes paper types of documents and ream weights of paper available for the scanner, and precautions.
Paper types of documents
The recommended paper types of documents are as follows:
NOTE
Use the specified papery. (Otherwise, double feeding or document damage may occur.)
• Fine paper
• Plain paper (for example, the paper specified for XEROX4024)
• OCR paper
When using any other paper types of documents, perform feed tests with the ADF in advance.
NOTE
Because documents may be damaged when an error occurs, do not feed an important original
document.
Ream weight of paper
The ream weight of paper is as follows:
• 52 to 127 g/m2 (13.9 to 34 lb)
NOTE
lb indicates the pound weight of 500 sheets of 17 x 22 inch paper (3.76 g/m2).
4-2
Page 38

Precautions
Be careful not to scan the following document. Preliminary document feed test may be necessary to
avoid the unexpected errors. If the document slips in ADF (JAM error) or double feed occurs frequently, refer to “Improving Document Separation” in Reference Guide.
• Paper with clips or staples
• Paper with wet ink
• Paper of which thickness is not constantly equal. (like envelope)
• Paper with large rumples or curl. (See NOTE on the next page.)
• Paper with folds or tears
• Tracing paper
• Coating paper
• Carbon paper
• Carbonless paper
• Paper smaller than A7 size, or larger than A3 size
• Other than paper: clothes, metal foils, or OHP films
• Photographic paper
• Paper with notches on its side
• Other than rectangle paper
When scanning a translucent document, set the density to light mode.
To prevent roller smudging, avoid scanning a document filled out in pencil. Clean the roller as often as
possible when scanning many document. Once every 1000 sheets is recommended.
The chemical composition of some carbonless papers may react with the roller rubber and damage the
rubber. Check the carbonless papers before use.
When using carbonless paper, follow these conditions:
• Ream weight of the paper is 52 g/m2 (13.9 lb) or more.
• Hopper load is 500 sheets or fewer.
4-3
Page 39
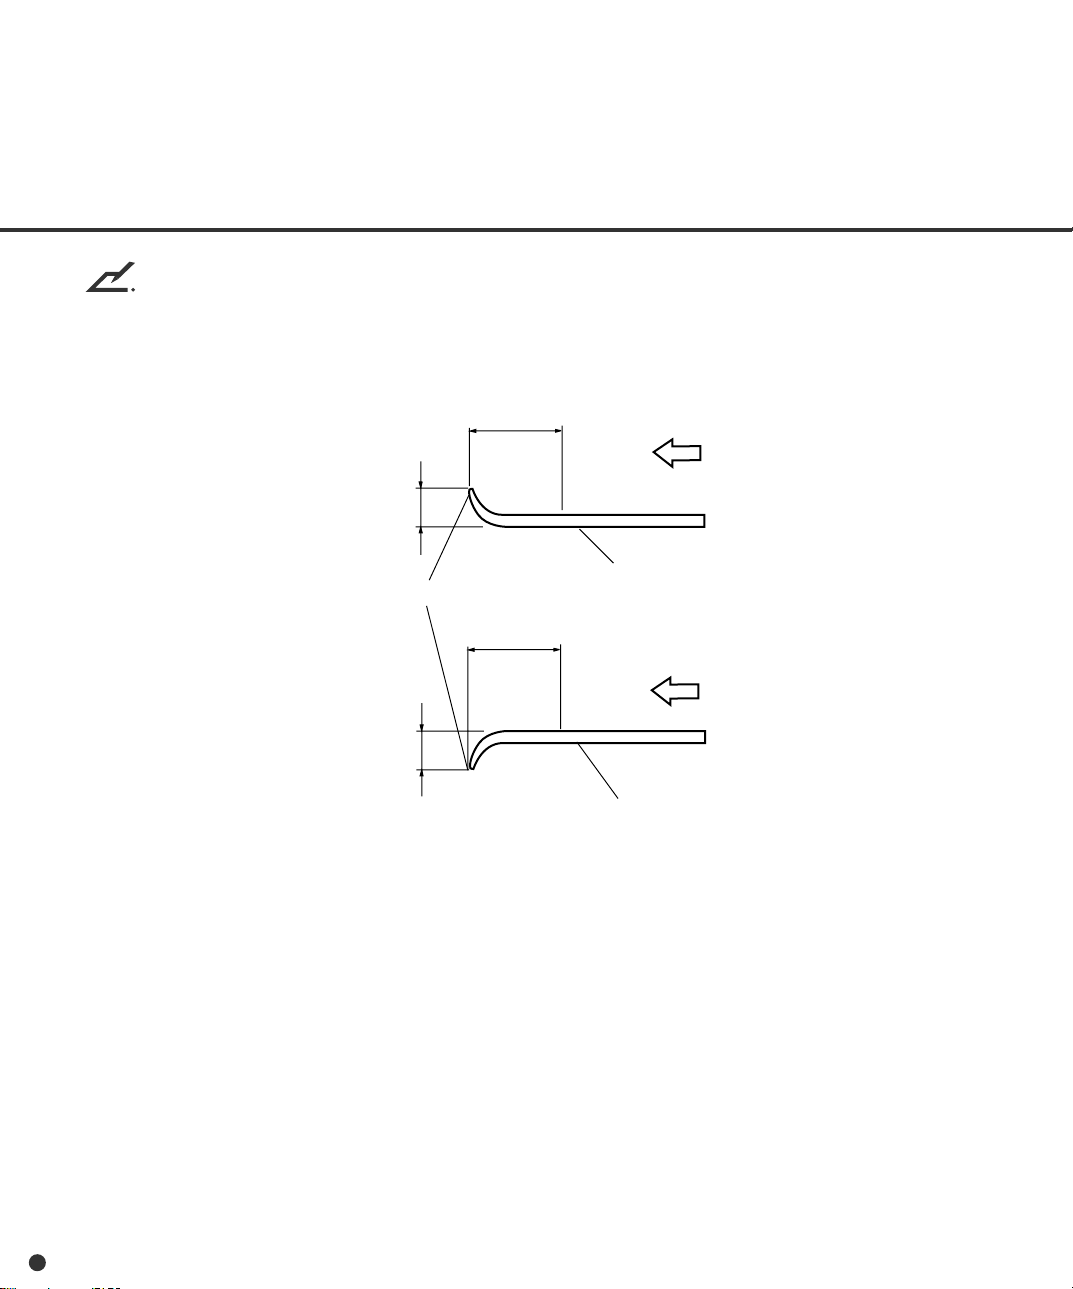
NOTE
• If carbonless papers are used, clean the roller twice as often as usual.
• Documents should be straightened to fit the condition below.
More than
30 mm
Less than
Feed direction
3 mm
Read surface
Top of the paper
More than
30 mm
Feed direction
Less than
5 mm
Read surface
• When you read curled, wrinkled, or creased documents, documents may not be successfully
arranged in the stacker.
4-4
Page 40

CHAPTER
5
SPECIFICATIONS
This chapter describes the installation specifications, external
dimensions, consumables, option.
Installation Specifications
External Dimensions
Consumables
Options
Page 41
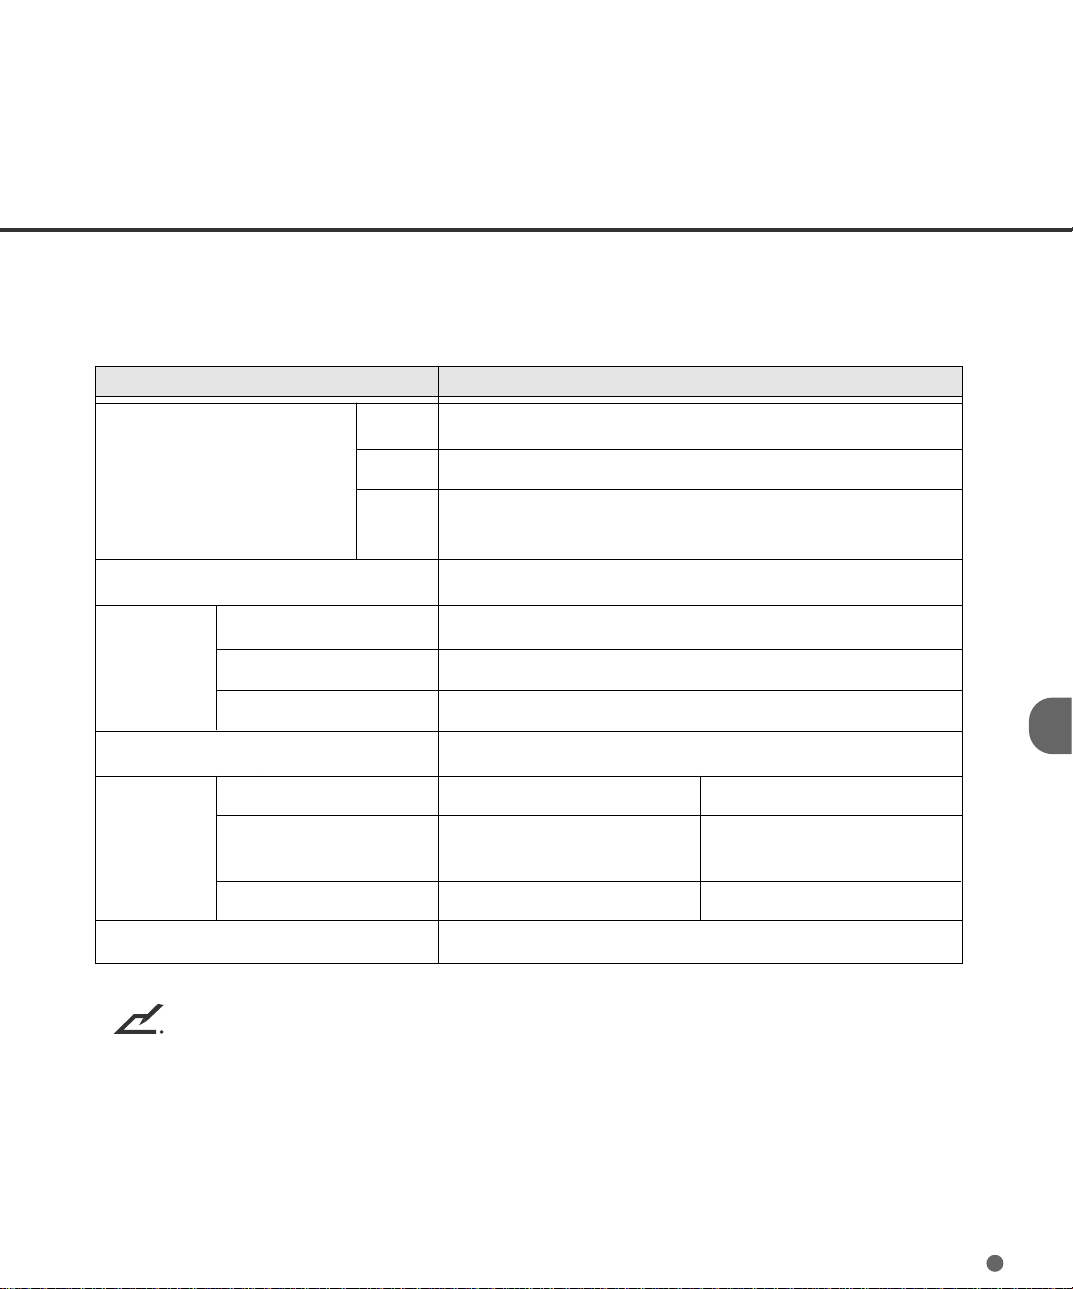
Installation Specifications
The following table lists the installation specifications of the scanner.
Item Specification
Dimensions (mm)
Weight (kg)
Voltage
Input power
Power consumption 250 VA or less
Ambient
condition
Life of the scanner 5 years or 2,000,000 sheets
Phases
Frequency
Device status Operating Not operating
Temperature 15 to 35°C -20 to 60°C
Humidity 20 to 80 % 8 to 95 %
Width
Depth
Height
590 (23.2 in)
690 (27.2 in)
540 (21.3 in) without optional endorser
610 (24.0 in) with optional endorser
65 (143 lb.)
100 to 240 VAC ±10 %
Single-phase
50/60 Hz + 2% -4%
(60 to 95°F) (-4 to 140°F)
NOTE
• The life span of this scanner is 5 years after you purchase the scanner or 2,000,000 scanned
sheets, whichever comes first.
• If you are using the scanner after the expiration of the scanner life, the scanner may be damaged or the reading performance may be degraded.
5-1
Page 42

External Dimensions
5-2
(unit: mm)
Page 43

Consumables
The following table lists consumables used for the scanner. Be sure to prepare consumables before their
expiration. Customer is responsible to change these consumables periodically. The consumable counter
can be used to check the number of scanned documents. (See page 3-4.)
Name Specification Service life and remarks
Lamp CA04315-0430 1000 hours or more. Two lamps used per scanner.
Brake roller CA04315-F705 300,000 sheets or one year.
Pick roller unit CA04315-F711 300,000 sheets or one year.
Pad CA04315-G730 300,000 sheets or one year.
Print head CA01023-0701 20,000 sheets (10 characters/sheet).
Black ink cartridge for endorser.
NOTE
• The above values are not absolute ones, but show guidelines. These service lives (replacement
cycles) may be shortened depending on paper types of documents scanned or the degree of
cleaning the scanner.
• When using special paper like carbon-less paper, the replacement cycle is shortened. So, these
parts need replacing earlier than the above.
5-3
Page 44

Options
The following table lists options of this scanner.
Name Specification Remark
Endorser CA04315-D201 Ink jet printing method
• Back-side print
• Max. 30 characters
Black background kit CA04315-E250
Contact your Fujitsu sales agent for more information.
5-4
Page 45

CHAPTER
6
SETUP, BROWSE, AND TEST MODES
This chapter describes the setup, browse, and test modes of the
scanner.
Setup, Browse, and Test Modes
Activating the Setup or Browse Mode
Contents of the Setup or Browse Mode
Activating the Test Mode
Contents of the Test Mode
Page 46

Setup, Browse, and Test Modes
This scanner has the setup mode, browse mode, and test mode to ease setting up.
• Setup mode for customizing the scanner for user requirements
• Browse mode for glancing setup conditions of the scanner
• Test mode for testing the scanner offline
There are two ways to enter these modes:
• Way 1
Press
You can use the setup mode and browse mode. To quit a mode, press
• Way 2
Turn the power on while pressing
You can use the test mode in addition to the setup mode and browse mode. To quit a mode, turn
off the power.
Available functions differ with modes or with ways. For details, see descriptions of each function.
Functions not available in setup mode
Way Functions not available
MENU
when the LCD indicates “Ready”.
MENU
CANCEL
.
MENU
pressed in Ready status Interface, TP_IF baud rate, RS232C baud rate, SCSI ID, Product ID, Function key, Setup
mode lock, Black background
.
Power on with
pressed Settings
MENU
Functions not available in browse mode
Functions not available
Paper thickness setup
6-1
Page 47

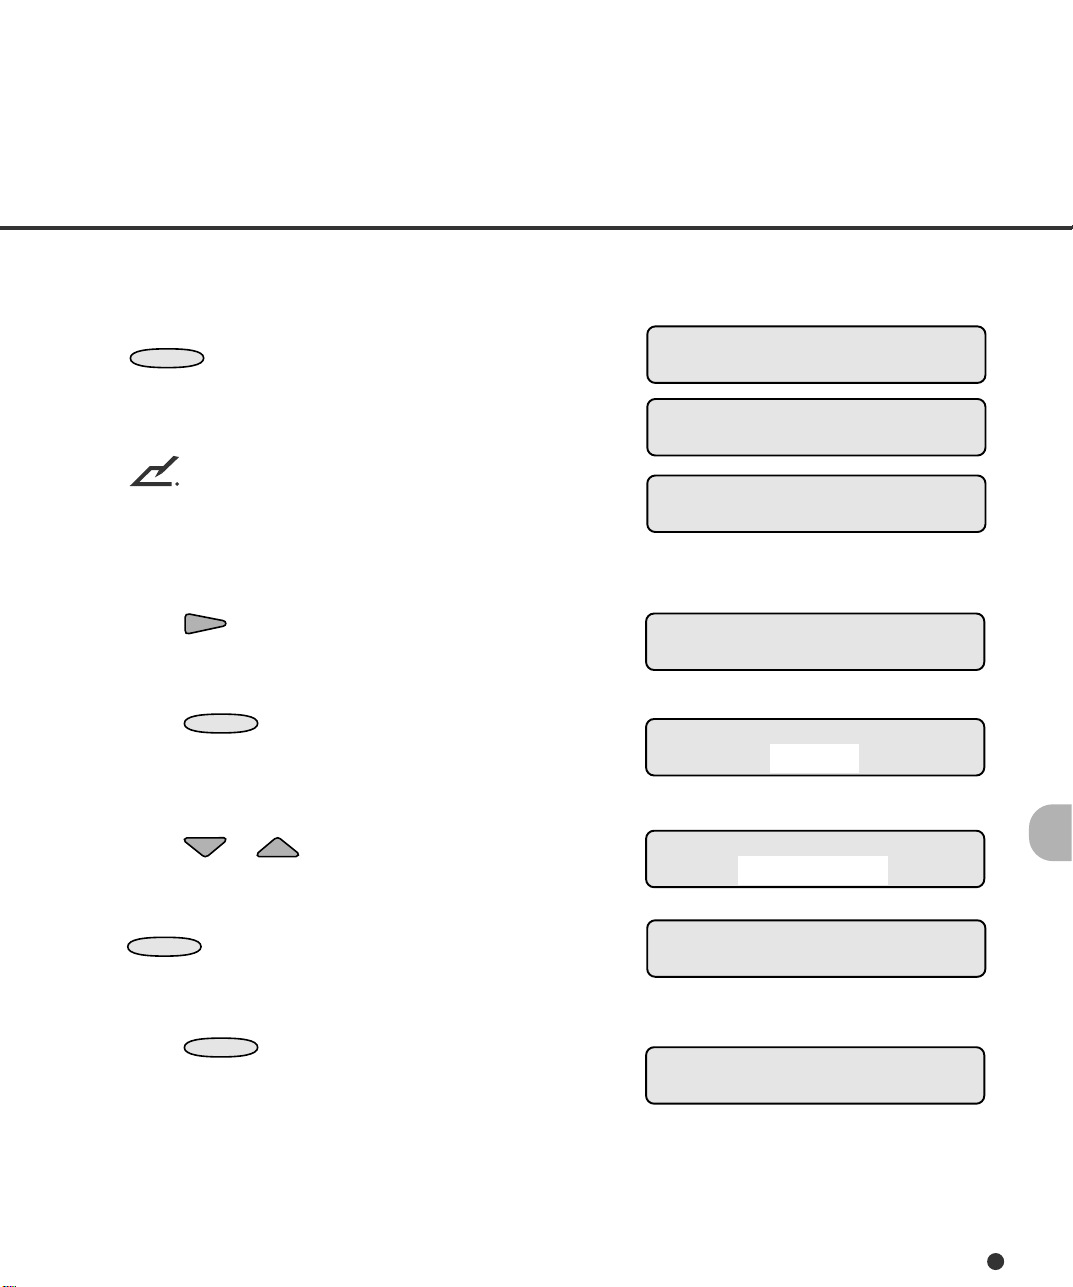
Activating the Setup or Browse Mode
To activate the setup mode, follow these steps:
1. While the LCD is indicating “Ready”, press
The <<MODE SELECT>> screen appears with
MENU
.
Ready
“SETUP” blinking.
<<MODE SELECT>>
SETUP BROWSE
2. Press
ENTER
The <<SETUP MODE>> initial screen (*) appears.
.
* <<SETUP MODE>> Initial screen
<<SETUP MODE>>
3. Press
ENTER
The <<SETUP MODE>> menu screen (**) appears.
.
** <<SETUP MODE>> menu screen
<<SETUP MODE>>
XXXXX
To activate the browse mode, press before step 2 to make “BROWSE” blinking, then follows
steps 2 and 3. The <<BROWSE MODE>> screen appears.
To quit the setup mode, press
CANCEL
.
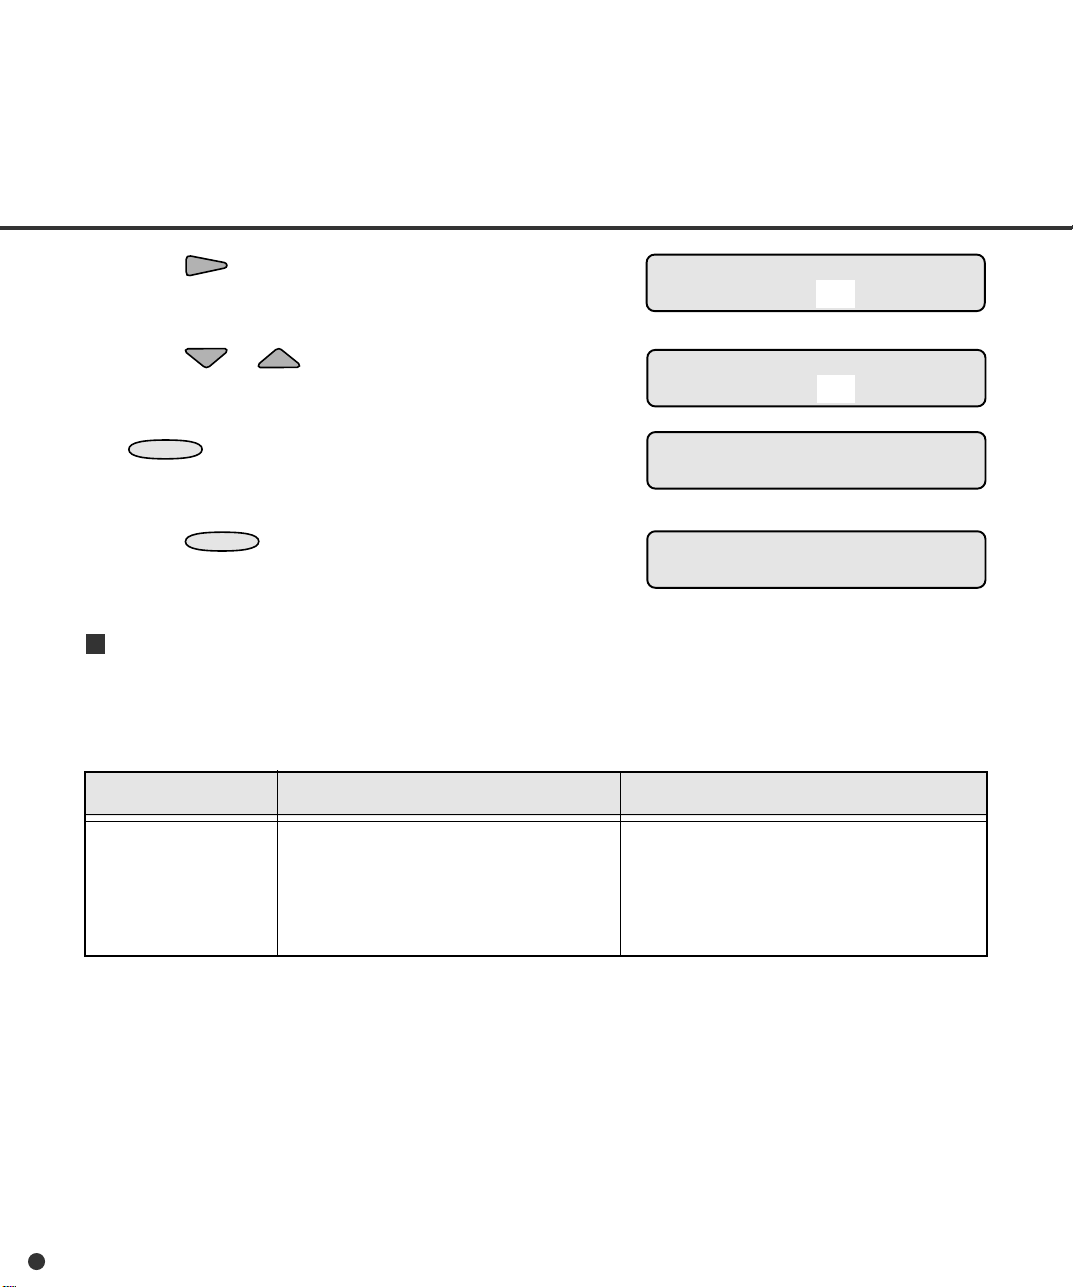
Button functions in setup or browse mode
Button name Function
MENU
ENTER
CANCEL
Returns to the <<SETUP MODE>> menu screen without saving the change (*).
Returns to the previous screen while saving the change (*).
Returns to the previous screen without saving the change (*).
• Displays the next function at the right in the menu.
• Moves to the right item.
• Displays the next test function at the left in the menu.
• Moves to the left item.
Changes parameters.
Changes parameters.
* In browse mode, “saving the change” does not occur.
6-2
Page 48
Mode selection (
MENU
pressed in Ready status)
There is another mode selection which enables you to execute the user test on the scanner without the
host computer. See “ Activating the Test Mode” later in this chapter.
POWER ON
Please wait
Ready
: Cursor buttons
MENU
CANCEL
: Blinking
<<MODE SELECT>>
SETUP BROWSE
ENTER
<<SETUP MODE>>
ENTER
<<SETUP MODE>>
XXXXX
ENTER
CANCEL
CANCEL
CANCEL
<<MODE SELECT>>
SETUP BROWSE
ENTER
<<BROWSE MODE>>
ENTER
<<BROWSE MODE>>
XXXXX
ENTER
CANCEL
CANCEL
CANCEL
6-3
Page 49
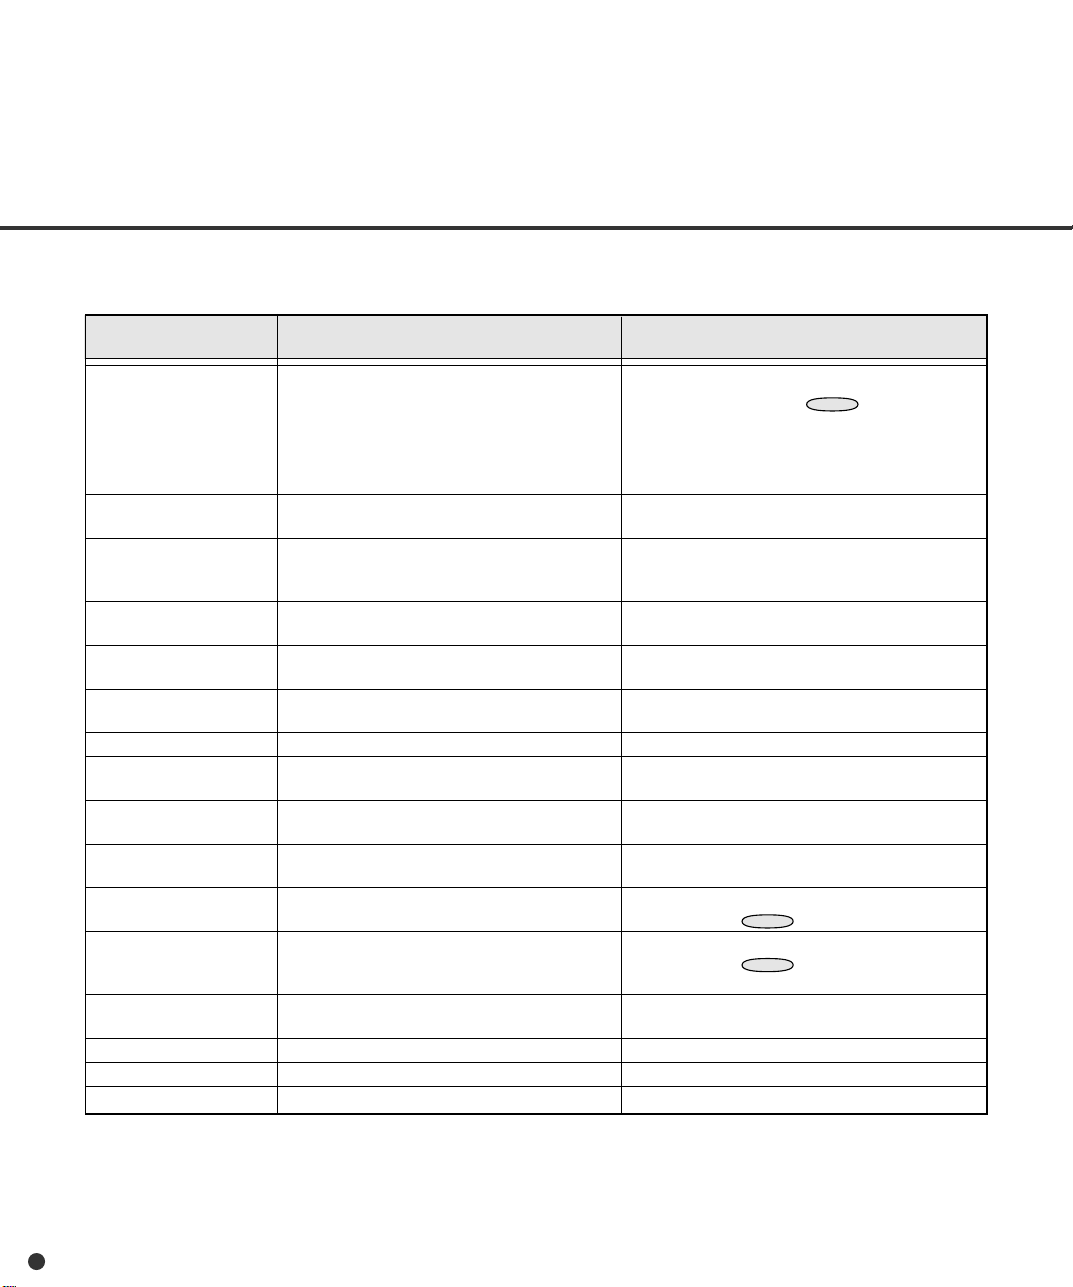
Contents of the Setup or Browse Mode
This section describes the contents of the setup mode.
The setup mode can be classified into 26 types.
Setup item
Settings
Paper length check
Paper thickness check
Paper thickness setup
Skew check
IPC-3 mode
Hopper height
Paper separation level
Drop-out color
Consumable counter
Consumable counter
reset
Consumable alarm
mode
Buzzer
Buzzer volume
LCD contrast
Picking speed
Description
Sets simplex/duplex scanning, paper size,
density, resolution, and halftone.
Enables or disables the function which
detects a paper length error.
Makes the paper thickness detetion function
enabled or disabled, and sets the detection
method.
Sets the permissible paper thickness to
detect a double feed error.
Enables or disables the function which
detects a skew error.
Selects a pattern to be set in the image
processing option.
Sets the initial position of the hopper.
Sets the power of separating sheets of
paper.
Selects a drop-out color.
Sets the interval (in ten thousands) in which
a consumable alarm occurs.
Resets the accumulated count of the
consumable counter.
Sets how to notify the alarm when the
accumulated count of the consumable
counter reaches the set value.
Activates or inactivates the buzzer sound
when an error occurs.
Sets the volume of buzzer or click sound.
Sets the contrast of the LCD.
Selects the speed of the pick roller.
Remarks
• Not displayed in setup mode selected by
turning power on with
• Displayed when the video or TP interface is
used.
• Parameters set by the host computer cannot
be changed.
The selection set by the host computer cannot
be changed.
The selection set by the host computer cannot
be changed.
Overrides the selection set by the host
computer.
The selection set by the host computer cannot
be changed.
Displayed in setup mode selected by turning
power on with
Displayed in setup mode selected by turning
power on with
MENU
MENU
pressed.
pressed.
MENU
pressed.
6-4
Page 50
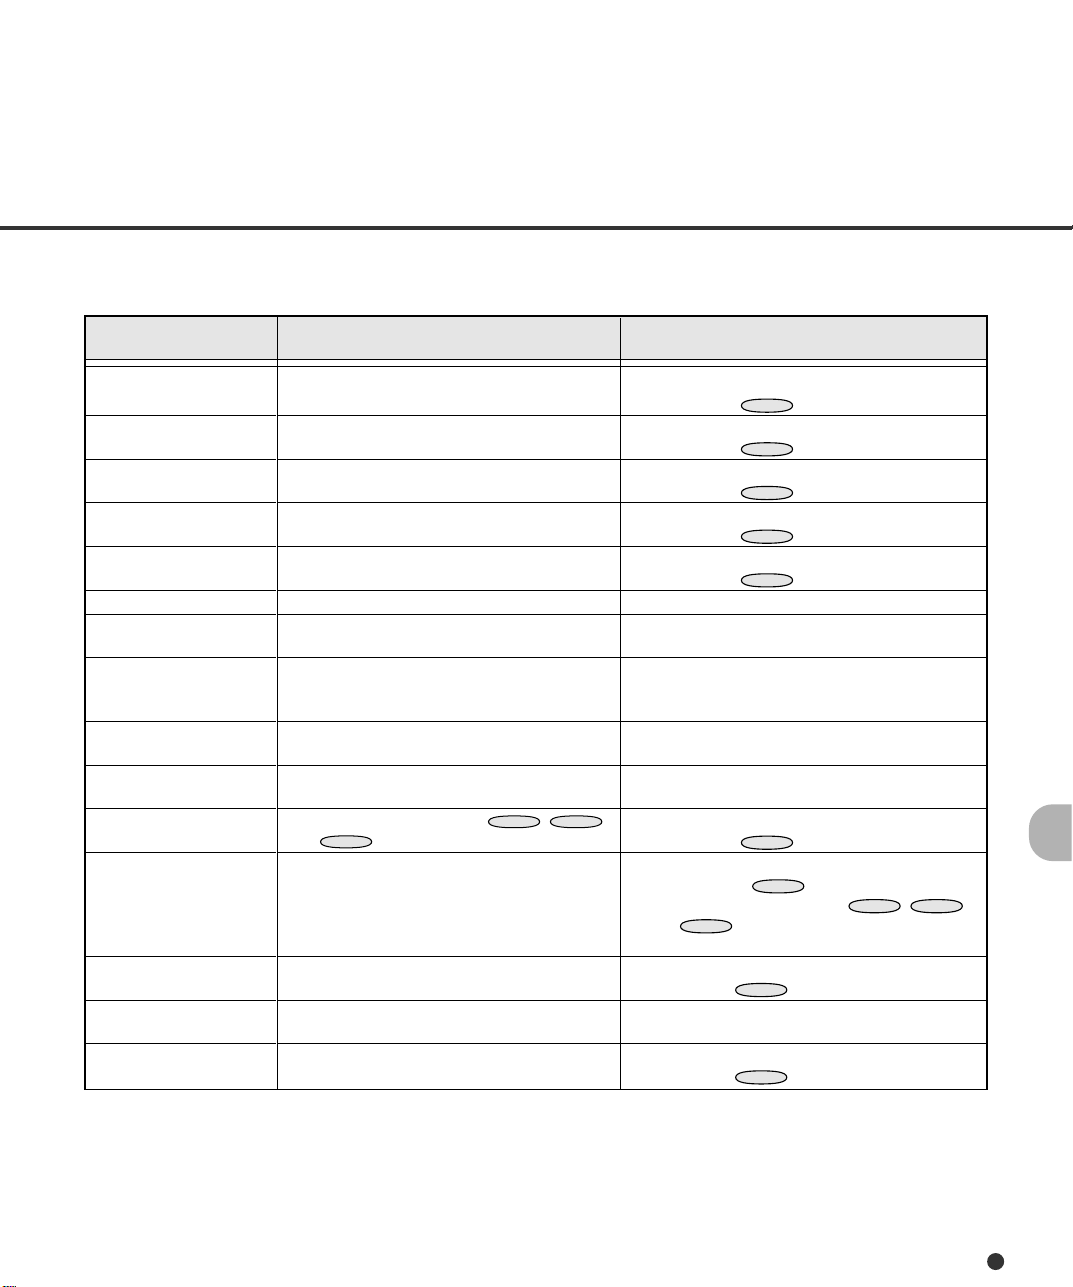
Setup item
Description
Remarks
Interface
TP_IF baud rate
RS232C baud rate
SCSI ID
Product ID
Pre-pick
Pick start time
Manual feed timeout
Paper pick retry
Paper feed retry
Function key
Setup mode lock
Black background
Language
White follower mode
Selects the host interface.
Selects the control data transfer rate (2400,
4800, 9600, or 19200) for the TP interface.
Selects the transfer rate (2400, 4800, 9600,
or 19200) for the RS-232C interface.
Sets the SCSI ID of this scanner.
Sets the product ID of this scanner.
Enables or disables pre-picking.
Sets the period from when paper is loaded
manually to when the pick operation starts.
Sets the waiting period from when the host
computer issues a scan command to when
paper is loaded manually.
Sets the pick motor operation time and retry
count.
Sets the feed motor operation time and retry
count.
Allocates setup functions to
F3
and
buttons.
F1
F2
,
Inhibits the operator panel from entering
setup mode from normal mode.
Set this function enabled when the black
background is mounted.
Selects an operation panel LCD language
(Japanese or English).
Sets how to follow the white color as the
reference.
Displayed in setup mode selected by turning
power on with
MENU
pressed.
Displayed in setup mode selected by turning
power on with
MENU
pressed.
Displayed in setup mode selected by turning
power on with
MENU
pressed.
Displayed in setup mode selected by turning
power on with
MENU
pressed.
Displayed in setup mode selected by turning
power on with
Displayed in setup mode selected by turning
,
power on with
MENU
MENU
pressed.
pressed.
• Displayed in setup mode selected by turning
power on with
• Setup functions allocated to
and
buttons are always valid
F3
MENU
pressed.
F1
regardless of this setting.
Displayed in setup mode selected by turning
power on with
MENU
pressed.
Displayed in setup mode selected by turning
power on with
MENU
pressed.
,
,
F2
6-5
Page 51
T ransition of screens in setup mode
This flowchart indicates the transition of screens in setup mode for reference to the setup operation
described in the following pages.
<<SETUP MODE>>
SETUP BROWSE
ENTER
<<SETUP MODE>>
ENTER
<<SETUP MODE>>
ENTER
S A4P AT2 200 LA
AT2 LA
ENTER
SIMPLEX/DUPLEX
SIMPLEX
CANCEL
Settings
CANCEL
ENTER/CANCEL (*)
CANCEL
: Cursor buttons
: Blinking
Setup mode menu screen
<<SETUP MODE>>
Paper Length Check
ENTER
CANCEL
S A4P AT2 200 LA
AT2 LA
ENTER ENTER
ENTER/CANCEL (*)
PAPER SIZE
A4P
ENTER
S A4P AT2 200 LA
AT2 LA
<<SETUP MODE>>
Setup Mode Lock
CANCEL
HALFTONE
LA(LINEART)
ENTER/CANCEL (*)
6-6
SIMPLEX/DUPLEX
DUPLEX
* To save the change,
press ENTER.
To quit without saving
change, press CANCEL.
PAPER SIZE
B4P
PAPER SIZE
LGP
HALFTONE
LH2(LA+HT2)
HALFTONE
HT1(DITHER)
Page 52

Settings
This function sets simplex/duplex scanning mode, paper size/orientation, density, resolution, and
halftone processing. It is valid when the scanner operates in normal mode through the video or TP
(third party) interface. It is also valid in the offline feed test in test mode. You cannot change settings
if they are set by the host computer.
LCD display
Settings
Options
S/D:
xxx: A3P, DLP, LGP, B4P, A4P, LTP, B5P,
A5P, A4L, LTL, B5L, A5L, NPS
n q • • q (5 combinations), AT1, AT2
xxx: 200, 240, 300, 400
xxx: LA, HT1, HT2, LH1, LH2
Remarks
Scanning mode (simplex or duplex)
Paper size/orientation
P: portrait
L: landscape
An: standard size A
Bn: standard size B
DL: double letter
LG: legal
LT: letter
NPS:nonstandard size, displayed if it is set by
the host computer
Density
n q q q q: Light
n n n n n: Dark
AT1: automatic
AT2: simple automatic
Resolution (unit: dpi)
Halftone processing
LA: line art (no halftone)
HT1: dither
HT2: error diffusion
LH1: line art for character area and dither for
halftone area
LH2: line art for character area and error
diffusion for halftone area
* Symbols of density may differ from the actual symbols used in the LCD.
The following is an example of operation when you change the resolution.
NOTE
• The “Settings” screen does not appear when your scanner is not controlled through the video or
TP interface.
• You cannot use this function when the setup mode is brought by turning power on with
pressed.
MENU
6-7
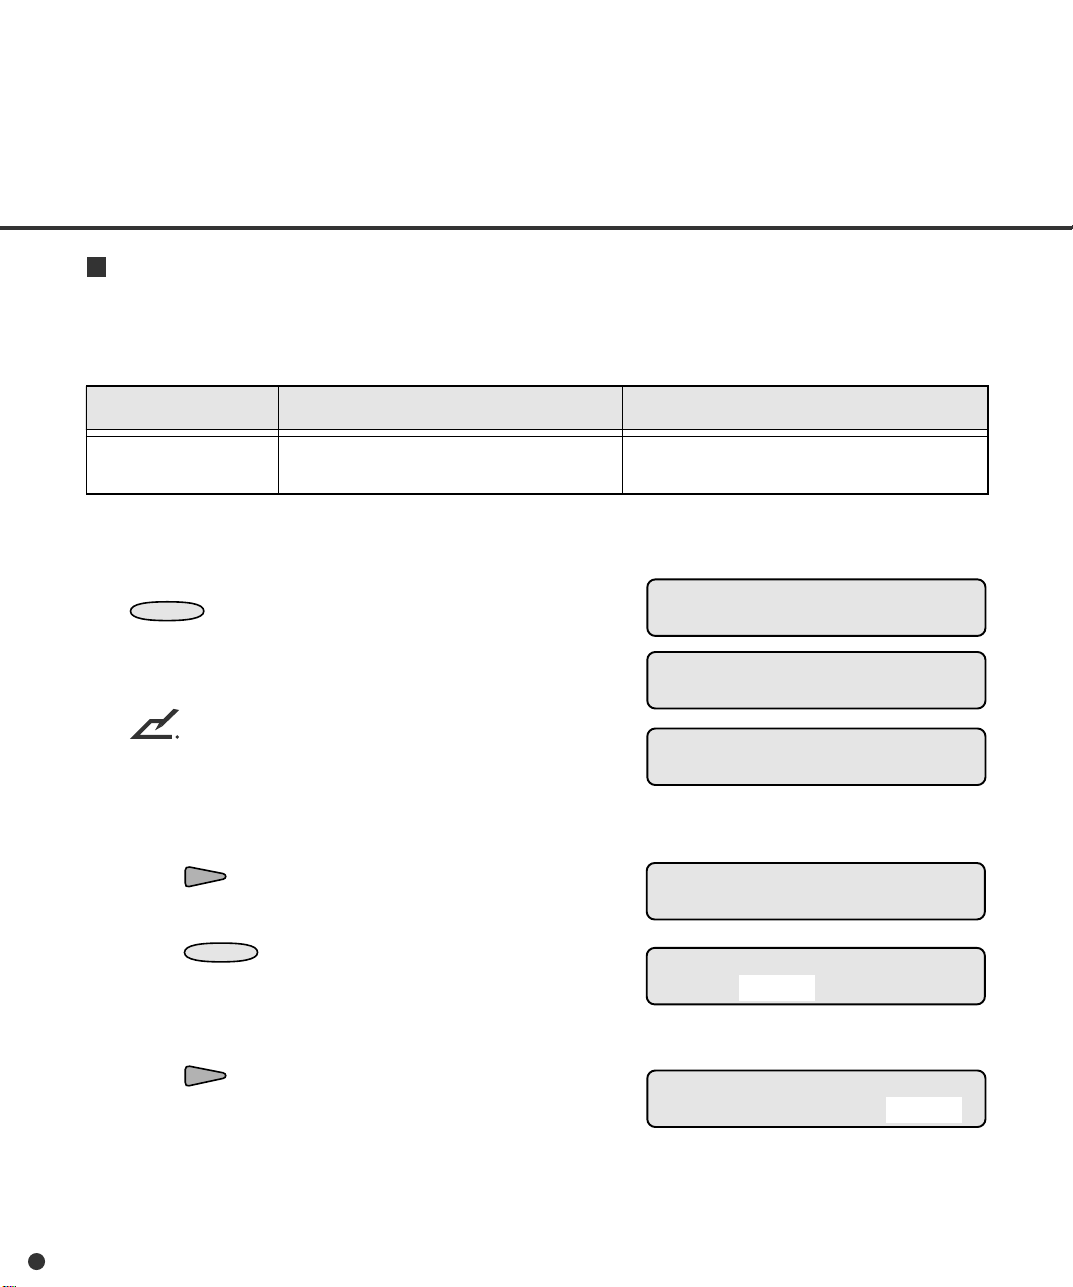
Page 53

1. In <<SETUP MODE>> initial screen, press
ENTER
The <<SETUP MODE>> menu screen
(Settings) appears.
.
<<SETUP MODE>>
<<SETUP MODE>>
Settings
2. Press
The option list screen indicates the current
options with S blinking (blinking indicates
“selected”).
3. Press three times.
The current resolution 200 blinks.
4. Press
RESOLUTION screen appears with 200
blinking (blinking indicates “changeable”).
5. Press or .
The displayed option changes (240, 300, or
400).
6. When the desired value appears, press
The option list screen appears with the new
value blinking.
7. Press
The LCD returns to the Ready screen.
ENTER
ENTER
ENTER
CANCEL
again.
.
to save the change.
three times.
S A4P AT2 200 LA
AT2
LA
S A4P AT2 200 LA
AT2
LA
RESOLUTION
200
RESOLUTION
400
S A4P AT2 400 LA
AT2
LA
Ready
6-8
Page 54

Paper length check
This function sets and detects a difference in paper length. You cannot change settings if they are set
by the host computer.
LCD display
Paper Length Check
Options
On, Off (Default: Off)
10 mm, 15 mm, 20 mm (Default: 10 mm)
Remarks
Checked or not
Difference:
XX mm means that it is not regarded as an
error when the actual difference of paper length
is within the limits of ±XX mm.
The following is an example of operation when you use this function.
1. In <<SETUP MODE>> initial screen, press
ENTER
.
The <<SETUP MODE>> menu screen
(Settings) appears.
NOTE
The “Settings” screen does not appear and
the “Paper Length Check” screen first appears when your scanner is not controlled
through the video or TP interface.
2. When the menu screen indicates “Settings”,
press .
The <<SETUP MODE>> menu screen (Paper
Length Check) appears.
<<SETUP MODE>>
<<SETUP MODE>>
Settings
<<SETUP MODE>>
Paper Length Check
3. Press
ENTER
.
The option select screen indicates the current
options with ON blinking (blinking indicates
“changeable”).
Paper Length Check
ON 10 mm
6-9
Page 55
4. Press .
The current difference 10 mm blinks (blinking
indicates “changeable”).
Paper Length Check
ON 10 mm
5. Press or .
The displayed option changes (15 mm or 20 mm).
Paper Length Check
ON 20 mm
6. When the desired value appears, press
ENTER
The LCD returns to the <<SETUP MODE>>
to save the change.
<<SETUP MODE>>
Paper Length Check
menu screen (Paper Length Check).
7. Press
CANCEL
The LCD returns to the Ready screen.
two times.
Ready
Paper thickness check
This function determines whether or not to enable the paper thickness which is set by the “paper
thickness setup” function to detect a double feed error. You cannot change settings if they are set by
the host computer.
LCD display
Paper Thickness Check
Options
Off, Thickness & Roller, Thickness Check
(Default: Off)
Remarks
Off: sets the double feed check disabled.
Thickness & Roller: detects a double feed error
by checking the document transmissivity
and the rotation of the brake roller.
Thickness Check: detects a double feed error
by checking the document transmissivity.
The following is an example of operation when you use this function.
6-10
Page 56

1. In <<SETUP MODE>> initial screen, press
ENTER
The <<SETUP MODE>> menu screen (Settings or Paper Length Check) appears.
The “Settings” screen does not appear and
the “Paper Length Check” screen first appears
when your scanner is not controlled through
the video or TP interface.
.
NOTE
<<SETUP MODE>>
<<SETUP MODE>>
Settings
<<SETUP MODE>>
Paper Length Check
2. Press .
The <<SETUP MODE>> menu screen (Paper
Thickness Check) appears.
3. Press
The option select screen appears with the
current option OFF blinking (blinking indicates
“changeable”).
4. Press or .
The displayed option changes (Thickness &
Roller blinks).
5. Press
The LCD returns to the <<SETUP MODE>>
menu screen (Paper Thickness Check).
6. Press
The LCD returns to the Ready screen.
ENTER
ENTER
CANCEL
.
to save the change.
two times.
<<SETUP MODE>>
Paper Thickness Check
Paper Thickness Check
OFF
Paper Thickness Check
Thickness & Roller
<<SETUP MODE>>
Paper Thickness Check
Ready
Paper thickness setup
This function sets the paper thickness which is used as the reference for detecting a double feed
error. Whether this function is enabled or disabled is determined by the “paper thickness check”
function in setup mode.
NOTE
This setting cannot be displayed in browse mode.
The following is an example of operation when you use this function.
6-11
Page 57

1. In <<SETUP MODE>> initial screen, press
CANCEL
ENTER
The <<SETUP MODE>> menu screen (Settings
or Paper Length Check) appears.
The “Settings” screen does not appear and the
“Paper Length Check” screen first appears when
your scanner is not controlled through the video
or TP interface.
.
NOTE
<<SETUP MODE>>
<<SETUP MODE>>
Settings
<<SETUP MODE>>
Paper Length Check
2. Press twice.
The <<SETUP MODE>> menu screen (Paper
Thickness Setup) appears.
3. Press
The paper load prompting screen appears,
requesting adjustment paper.
4. Select thickest paper used for your jobs and put
the paper on the hopper.
5. Press
The “Adjusting!!” message appears. The scanner
lifts the hopper, feeds the paper, and adjusts the
sensing level of the sensor, then saves its value.
After ejecting the sheet, the “Finished!!” message
appears for two seconds, then the LCD returns to
the <<SETUP MODE>> menu screen (Paper
Thickness Setup).
If an error (for example, Mis-pick) occurs during
adjustment, remove the paper and press
appears again. Repeat steps 4 and 5.
ENTER
ENTER
.
.
. The paper load prompting screen
<<SETUP MODE>>
Paper Thickness Setup
Paper Thickness Setup
Set the adjustment paper
Paper Thickness Setup
Adjusting!!
Paper Thickness Setup
Finished!!
<<SETUP MODE>>
Paper Thickness Setup
6-12
6. Press
The LCD returns to the Ready screen.
CANCEL
two times.
Ready
Page 58

Skew check
This function determines if abnormal skew is detected or not. You cannot change the setting if it is
set by the host computer.
Options
Skew Check
The following is an example of operation when you use this function.
1.
In <<SETUP MODE>> initial screen, press
The <<SETUP MODE>> menu screen
(Settings or Paper Length Check) appears.
NOTE
The “Settings” screen does not appear and
the “Paper Length Check” screen first appears when your scanner is not controlled
through the video or TP interface.
2. Press three times.
The <<SETUP MODE>> menu screen (Skew
Check) appears.
3. Press
The option select screen appears with the
current option OFF blinking (blinking indicates
“changeable”).
ENTER
On, Off (Default: Off)
.
ENTER
.
RemarksLCD display
<<SETUP MODE>>
<<SETUP MODE>>
Settings
<<SETUP MODE>>
Paper Length Check
<<SETUP MODE>>
Skew Check
Skew Check
Check: OFF
4. Press or .
The displayed option changes (ON blinks).
5. Press
The LCD returns to the <<SETUP MODE>>
menu screen (Skew Check).
6. Press
The LCD returns to the Ready screen.
ENTER
CANCEL
to save the change.
two times.
Skew Check
Check: ON
<<SETUP MODE>>
Skew Check
Ready
6-13
Page 59

IPC-3 mode
This function selects a pattern to be set in the IPC-3 image processing feature.
LCD display
IPC-3 Mode
The following is an example of operation when you use this function.
1. In <<SETUP MODE>> initial screen, press
ENTER
The <<SETUP MODE>> menu screen
(Settings or Paper Length Check) appears.
The “Settings” screen does not appear and
the “Paper Length Check” screen first appears when your scanner is not controlled
through the video or TP interface.
2. Press four times.
The <<SETUP MODE>> menu screen (IPC-3
Mode) appears.
3. Press
The option select screen appears with the
current setting 0 blinking (blinking indicates
“changeable”).
.
NOTE
ENTER
Options
0, 1, 2, 3, 4, 5
.
Remarks
0: do not select any pattern
1 to 5: select pattern numbers 1 to 5
<<SETUP MODE>>
<<SETUP MODE>>
Settings
<<SETUP MODE>>
Paper Length Check
<<SETUP MODE>>
IPC-3 Mode
IPC-3 Mode
0
4. Press or .
The displayed option changes (1, 2, 3, 4, 5).
5. When the desired pattern number appears,
6-14
press
The LCD returns to the <<SETUP MODE>>
menu screen (IPC-3 Mode).
ENTER
to save the change.
IPC-3 Mode
5
<<SETUP MODE>>
IPC-3 Mode
Page 60

NOTE
When you set from the Function Key, the
dialogue appears whether you want to save the
revised data. If you want to save the process,
press
ENTER
process, press
. If you do not want to save the
CANCEL
.
6. Press
CANCEL
three times.
Ready
The LCD returns to the Ready screen.
● Paper types and corresponding pattern numbers
User’s paper is classified into five types in line art (no halftone) mode as shown in the following table.
• The horizontal axis shows the density and color of background on paper.
• The vertical axis shows the density of characters or lines.
Background density Background color
Red
4: Light character on
red or similar
background
Green
5: Light character on
green or similar
background
Blue
Character
density
Normal
↑
↓
Light
Normal ←
1: Normal back-
ground and
normal character
2: Normal back-
ground and light
character
→ Dark
3: Dark back-
ground and
normal character
* 1 to 5 are pattern numbers.
NOTE
When IPC-3 mode is executed in online status, the reading parameter is valid or invalid (host
setting is invalid) as follows:
6-15
Page 61

● Reading parameter validity
Reading parameter
Valid
Invalid
Valid
Invalid
Valid
Invalid
Reading
mode
X
DTC
X
ConversionXSharpness
Transfer
mode
X
Size
X
X
Transfer
rate
X
Portrait/
Landscape
X
Reading parameter
Outline
extraction
X
ReductionXStart of
Picking
Overlay
reading
X
Reading parameter
Document
selection
X
X
X
Simplified
DTC
X
Density
X
r patternsXContrast
Zooming
X
Line-art/
Photo
X
X
Halftone
X
Automatic
separation
X
Hopper height
This function sets the initial height of the hopper. Set the height which you frequently use.
RemarksLCD display
6-16
Hopper Height
Options
250 sheets, 500 sheets, 1000 sheets
Page 62

The following is an example of operation when you use this function.
CANCEL
1. In <<SETUP MODE>> initial screen, press
ENTER
The <<SETUP MODE>> menu screen (Settings
or Paper Length Check) appears.
The “Settings” screen does not appear and the
“Paper Length Check” screen first appears when
your scanner is not controlled through the video
or TP interface.
2. Press repeatedly until “Hopper Height”
appears in the lower line of the menu screen.
3. Press
The option select screen appears with the current
height setting 1000 sheets blinking (blinking
indicates “changeable”).
4. Press .
The hopper moves to the 500-sheet position and
the new height setting 500 sheets blinks.
.
NOTE
ENTER
.
<<SETUP MODE>>
<<SETUP MODE>>
Settings
<<SETUP MODE>>
Paper Length Check
<<SETUP MODE>>
Hopper Height
Hopper Height
1000 sheets
Hopper Height
500 sheets
NOTE
Each time you press or , the hopper
moves to the next position and its position is
automatically saved. Repeat this operation until
the hopper is positioned at the desired height.
If an error occurs during positioning, press
. The LCD returns to the option select
screen. Repeat step 4.
6-17
Page 63

5. Press
CANCEL
three times.
Ready
The LCD returns to the Ready screen.
After this setting, the hopper is set at the new
height whenever power is turned on.
Paper separation level
This function sets the power of the brake roller for proper paper separation in picking documents.
LCD display
Paper Separation Level
Options
Thick, Medium Thick, Normal, Medium Thin,
Thin (Default: Normal)
Remarks
Thick: strong braking power for thick paper
| (changes according to paper thickness)
Thin: weak braking power for thin paper
If the following errors frequently occur, set the braking power as explained below.
• Double feed
• Mis-pick
• SF2 did not detect leading edge of paper
Set “braking power” according to the table below.
Setting
Thick
Medium
Thick
Normal
Medium
Thin
Braking power
Strong
Less strong
Medium
(factory default)
Less weak
“Double feed” frequently occurs.
Make the braking
power stronger.
“Mis-pick” or “SF2 ···” frequently occurs.
Make the braking
power weaker.
6-18
Thin
Weak
Page 64
The following is an example of operation when you use this function.
1. In <<SETUP MODE>> initial screen, press
ENTER
The <<SETUP MODE>> menu screen
(Settings or Paper Length Check) appears.
The “Settings” screen does not appear and
the “Paper Length Check” screen first appears when your scanner is not controlled
through the video or TP interface.
2. Press repeatedly until “Paper Separation
Level” appears in the lower line of the menu
screen.
3. Press
The option select screen appears with the
current option Normal blinking (blinking
indicates “changeable”).
4. Press or .
The displayed option changes (Thick to Thin).
.
NOTE
ENTER
.
<<SETUP MODE>>
<<SETUP MODE>>
Settings
<<SETUP MODE>>
Paper Length Check
<<SETUP MODE>>
Paper Separation Level
Paper Separation Level
Normal
Paper Separation Level
Medium Thin
5. When the desired option appears, press
ENTER
The LCD returns to the <<SETUP MODE>>
menu screen (Paper Separation Level).
6. Press
The LCD returns to the Ready screen.
to save the change.
CANCEL
two times.
<<SETUP MODE>>
Paper Separation Level
Ready
6-19
Page 65
Drop-out color
This function sets a drop-out color for front and back sides of paper respectively. You cannot change
settings if they are selected by the host computer.
Options
Drop-out Color
The following is an example of operation when you use this function.
1. In <<SETUP MODE>> initial screen, press
ENTER
The <<SETUP MODE>> menu screen
(Settings or Paper Length Check) appears.
The “Settings” screen does not appear and
the “Paper Length Check” screen first appears when your scanner is not controlled
through the video or TP interface.
2. Press repeatedly until “Drop-out Color”
appears in the lower line of the menu screen.
3. Press
The option select screen appears with the
current setting Green (for Front) blinking
(blinking indicates “changeable”).
.
NOTE
ENTER
Front: Green, Red, Blue (Default: Green)
Back: Green, Red, Blue (Default: Green)
.
RemarksLCD display
Front: Green Back: Green
<<SETUP MODE>>
<<SETUP MODE>>
Settings
<<SETUP MODE>>
Paper Length Check
<<SETUP MODE>>
Drop-out Color
Drop-out Color
4. Press .
Green (current option for Back) blinks (blinking indicates “changeable”).
6-20
Drop-out Color
Front: Green Back: Green
Page 66
5. Press or .
The displayed option changes (Blue or Red).
6. When the desired option appears, press
ENTER
The LCD returns to the <<SETUP MODE>>
menu screen (Drop-out Color).
to save the change.
Drop-out Color
Front: Green Back: Red
<<SETUP MODE>>
Drop-out Color
7. Press
The LCD returns to the Ready screen.
CANCEL
two times.
Ready
6-21
Page 67
Consumable counter
This function displays or sets a value of the counter which informs the user of the life (replacement
cycle) of a consumable. When the number of sheets fed reaches the set value, an alarm occurs. Set
this value according to types of paper you use. When using fine paper, the standard replacement
cycle of pick roller units, brake rollers, and pads is per three hundred thousands of sheets fed. So,
we recommend you to set the value to 0300000.
LCD display
Consumable Counter
The following is an example of operation when you use this function.
1. In <<SETUP MODE>> initial screen, press
ENTER
The <<SETUP MODE>> menu screen
(Settings or Paper Length Check) appears.
The “Settings” screen does not appear and
the “Paper Length Check” screen first appears when your scanner is not controlled
through the video or TP interface.
2. Press repeatedly until “Consumable
Counter” appears in the lower line of the
menu screen.
.
NOTE
Options
10000 to 2560000 sheets
(Default: 2560000 sheets)
Remarks
This setting can be changed in ten
thousands of sheets. The least four
digits of zeros are automatically
added.
<<SETUP MODE>>
<<SETUP MODE>>
Settings
<<SETUP MODE>>
Paper Length Check
<<SETUP MODE>>
Consumable Counter
6-22
Page 68

3. Press
MENU
ENTER
.
The option select screen appears with the
current value blinking (blinking indicates
“changeable”).
Consumable Counter
256 0000 sheets
4. Press or .
The displayed value changes (1 to 256).
(Value can be changed in ten thousands of
Consumable Counter
030 0000 sheets
sheets.) Pressing and holding down or
speeds up the change.
5. When the desired value appears, press
ENTER
to save the change.
<<SETUP MODE>>
Consumable Counter
The LCD returns to the <<SETUP MODE>>
menu screen (Consumable Counter).
6. Press
CANCEL
two times.
Ready
The LCD returns to the Ready screen.
Consumable counter reset
This function is to be used when the consumble parts are replaced before the accumulated count of
the consumable counter reaches the set value.
NOTE
You cannot use this function when the setup mode is brought by pressing
status.
in the Ready
LCD display
Consumable Counter
Reset
Options
Yes, No
Remarks
Yes: resets the accumulated value of the
No: cancels the resetting of the consumable
The following is an example of operation when you use this function.
consumable counter.
counter.
6-23
Page 69

1. In <<SETUP MODE>> initial screen, press
ENTER
The <<SETUP MODE>> menu screen
(Settings or Paper Length Check) appears.
.
<<SETUP MODE>>
<<SETUP MODE>>
Settings
NOTE
The “Settings” screen does not appear and
the “Paper Length Check” screen first appears when your scanner is not controlled
through the video or TP interface.
2. Press repeatedly until “Consumable
Counter Reset” appears in the lower line of
the menu screen.
3. Press
The option select screen appears with the
current setting NO blinking (blinking indicates
“changeable”).
4. Press or .
The displayed option changes (YES blinks).
5. Press
counter.
The LCD returns to the <<SETUP MODE>>
menu screen (Consumable Counter Reset).
6. To quit the <<SETUP MODE>>, turn off the
power.
ENTER
ENTER
.
to reset the consumable
<<SETUP MODE>>
Paper Length Check
<<SETUP MODE>>
Consumable Counter Reset
Reset Counter Value
NO 00250000
Reset Counter Value
YES 00250000
Finished resetting !!
<<SETUP MODE>>
Consumable Counter Reset
6-24
Page 70
Consumable alarm mode
MENU
This function is to be used how to notify the alarm when the accumulated count of the consumable
counter reaches the set value.
NOTE
You cannot use this function when the setup mode is brought by pressing
status.
in the Ready
LCD display
Consumable Alarm
Mode
Options
Alarm & Stop scanning
Message only
Remarks
Alarm & Stop scanning: When the
accumulated count reaches the set
value of the consumable counter,
the alarm is displayed on the LCD
and the scanning operation stops.
Message only: When the accumu-
lated count reaches the set value of
the consumable counter, the alarm
is displayed on the LCD. (The
scanning operation does not stop.)
The following is an example of operation when you use this function.
1. In <<SETUP MODE>> initial screen, press
ENTER
.
The <<SETUP MODE>> menu screen
(Settings or Paper Length Check) appears.
NOTE
The “Settings” screen does not appear and
the “Paper Length Check” screen first appears when your scanner is not controlled
through the video or TP interface.
<<SETUP MODE>>
<<SETUP MODE>>
Settings
<<SETUP MODE>>
Paper Length Check
2. Press repeatedly until “Consumable
Alarm Mode” appears in the lower line of the
menu screen.
<<SETUP MODE>>
Consumable Alarm Mode
6-25
Page 71

3. Press
The option select screen appears with the
current setting “Alarm & Stop scanning”
blinking (blinking indicates “changeable”).
ENTER
.
Consumable Alarm Mode
Alarm & Stop scanning
4. Press or .
The displayed option changes (“Message
only” blinks).
5. Press
The LCD returns to the <<SETUP MODE>>
menu screen (Consumable Alarm Mode).
6. To quit the <<SETUP MODE>>, turn off the
power.
ENTER
to save the change.
Consumable Alarm Mode
<<SETUP MODE>>
Consumable Alarm Mode
Buzzer
This function enables or disables the buzzer sound when an error occurs.
NOTE
The buzzer sounds regardless of this setting when use this function.
Buzzer
Options
On, Off (Default: Off)
RemarksLCD display
Message only
The following is an example of operation when you use this function.
6-26
Page 72
1. In <<SETUP MODE>> initial screen, press
ENTER
The <<SETUP MODE>> menu screen
(Settings or Paper Length Check) appears.
.
<<SETUP MODE>>
<<SETUP MODE>>
Settings
NOTE
The “Settings” screen does not appear and
the “Paper Length Check” screen first appears when your scanner is not controlled
through the video or TP interface.
2. Press repeatedly until “Buzzer” appears
in the lower line of the menu screen.
3. Press
The option select screen appears with the
current setting OFF blinking (blinking indicates
“changeable”).
4. Press or .
The displayed option changes (ON blinks).
5. Press
The LCD returns to the <<SETUP MODE>>
menu screen (Buzzer).
6. Press
The LCD returns to the Ready screen.
ENTER
ENTER
CANCEL
.
to save the change.
two times.
<<SETUP MODE>>
Paper Length Check
<<SETUP MODE>>
Buzzer
Buzzer
OFF
Buzzer
ON
<<SETUP MODE>>
Buzzer
Ready
6-27
Page 73

Buzzer volume
This function sets the sound volume of the buzzer in six steps.
NOTE
This setting is valid both for occurrence of an error and for press of an operator panel button.
LCD display
Buzzer Volume
Options
n q q q q q
to (Default: n n q q q q)
n n n n n n
Remarks
Minimum
to (six steps)
Maximum
* Symbols of volume may differ from the actual symbols used in the LCD.
The following is an example of operation when you use this function.
1. In <<SETUP MODE>> initial screen, press
ENTER
.
<<SETUP MODE>>
The <<SETUP MODE>> menu screen
(Settings or Paper Length Check) appears.
NOTE
The “Settings” screen does not appear and
the “Paper Length Check” screen first ap-
<<SETUP MODE>>
<<SETUP MODE>>
Paper Length Check
pears when your scanner is not controlled
through the video or TP interface.
2. Press repeatedly until “Buzzer Volume”
appears in the lower line of the menu screen.
<<SETUP MODE>>
Settings
Buzzer Volume
3. Press
6-28
ENTER
.
The option select screen appears with the
current setting n n q q q q (no blinking but
changeable).
Buzzer Volume
Min n n q q q q Max
Page 74

4. Press or .
The displayed option changes (n n n q q q to
n n n n n n or n q q q q q).
5. When the desired option appears, press
ENTER
to save the change.
The LCD returns to the <<SETUP MODE>>
menu screen (Buzzer Volume).
Buzzer Volume
Min n n n q q q Max
<<SETUP MODE>>
Buzzer Volume
6. Press
CANCEL
two times.
The LCD returns to the Ready screen.
LCD contrast
This function sets the contrast of the LCD on the operator panel in six steps.
LCD display
LCD Contrast
Options
n q q q q q
to (Default: n n q q q q)
n n n n n n
* Symbols of volume may differ from the actual symbols used in the LCD.
The following is an example of operation when you use this function.
1. In <<SETUP MODE>> initial screen, press
ENTER
.
The <<SETUP MODE>> menu screen
(Settings or Paper Length Check) appears.
Remarks
Dark (low contrast)
to (six steps)
Bright (high contrast)
<<SETUP MODE>>
<<SETUP MODE>>
Ready
Settings
NOTE
The “Settings” screen does not appear and
the “Paper Length Check” screen first appears when your scanner is not controlled
through the video or TP interface.
<<SETUP MODE>>
Paper Length Check
6-29
Page 75

2. Press repeatedly until “LCD Contrast”
appears in the lower line of the menu screen.
<<SETUP MODE>>
LCD Contrast
3. Press
The option select screen appears with the
current setting n n q q q q (no blinking but
changeable).
4. Press or .
The displayed option changes (n n n q q q
to n n n n n n or n q q q q q).
5. When the desired option appears, press
The LCD returns to the <<SETUP MODE>>
menu screen (LCD Contrast).
6. Press
The LCD returns to the Ready screen.
ENTER
ENTER
CANCEL
.
to save the change.
two times.
LCD Contrast
Dark n n q q q q Bright
LCD Contrast
Dark n n n q q q Bright
<<SETUP MODE>>
LCD Contrast
Ready
Picking speed
This function sets the rotational speed of the pick roller. Slow speed is recommended when you use
thin or flexible paper which is liable to mis-pick.
6-30
Options
Picking Speed
NOTE
Processing speed of scanning in 200 dpi is reduced when the picking speed is set “Slow”.
Slow, Fast (Default: Fast)
RemarksLCD display
Page 76
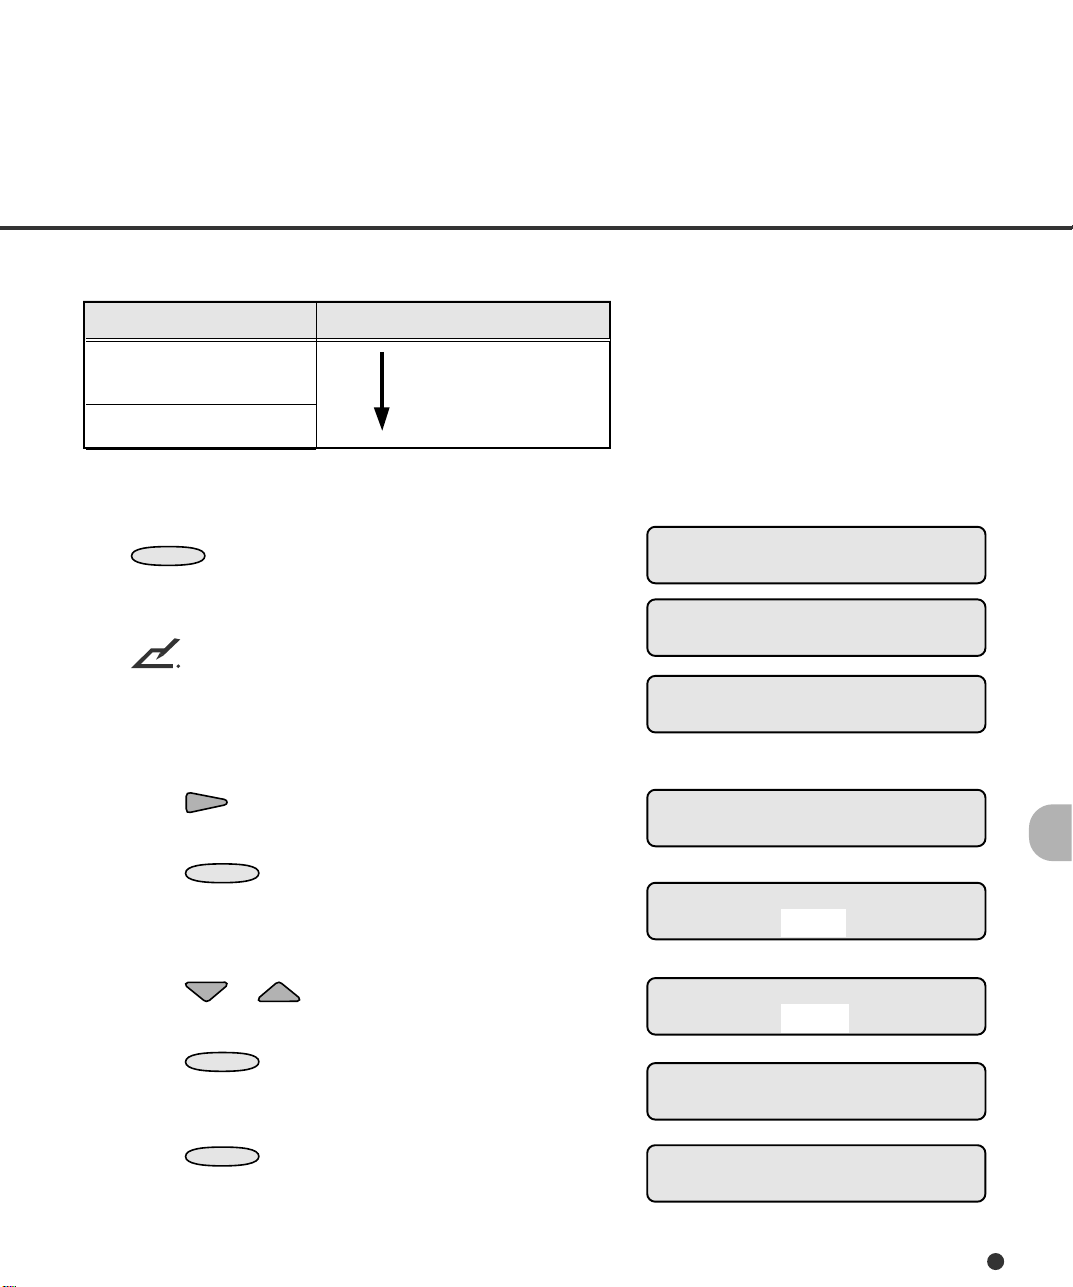
Set “picking speed” according to the table below.
Picking speed
Fast
(factory default)
Slow
The following is an example of operation when you use this function.
1. In <<SETUP MODE>> initial screen, press
ENTER
The <<SETUP MODE>> menu screen
(Settings or Paper Length Check) appears.
The “Settings” screen does not appear and
the “Paper Length Check” screen first
appears when your scanner is not controlled
through the video or TP interface.
2. Press repeatedly until “Picking Speed”
appears in the lower line of the menu screen.
3. Press
The option select screen appears with the
current setting Fast blinking (blinking indicates “changeable”).
.
NOTE
ENTER
.
“Mis-pick” frequently occurs.
Make the picking
speed slow.
<<SETUP MODE>>
<<SETUP MODE>>
Settings
<<SETUP MODE>>
Paper Length Check
<<SETUP MODE>>
Picking Speed
Picking Speed
Fast
4. Press or .
The displayed option changes (Slow blinks).
5. Press
The LCD returns to the <<SETUP MODE>>
menu screen (Picking Speed).
6. Press
The LCD returns to the Ready screen.
ENTER
CANCEL
to save the change.
two times.
Picking Speed
Slow
<<SETUP MODE>>
Picking Speed
Ready
6-31
Page 77

Interface
MENU
This function sets the host interface.
NOTE
You cannot use this function when the setup mode is brought by pressing
status.
in the Ready
LCD display
Interface
Options
Auto, SCSI, Video, TP_IF (Default: Auto)
Remarks
Auto: The scanner automatically detects the
TP_IF: Third party’s interface
The following is an example of operation when you use this function.
1. In <<SETUP MODE>> initial screen, press
ENTER
.
The <<SETUP MODE>> menu screen
(Settings or Paper Length Check) appears.
NOTE
The “Settings” screen does not appear and
the “Paper Length Check” screen first appears when your scanner is not controlled
through the video or TP interface.
2. Press repeatedly until “Interface” appears in the lower line of the menu screen.
interface through which a host
computer issues a command.
<<SETUP MODE>>
<<SETUP MODE>>
Settings
<<SETUP MODE>>
Paper Length Check
<<SETUP MODE>>
Interface
3. Press
6-32
ENTER
.
The option select screen appears with the
current setting AUTO blinking (blinking
indicates “changeable”).
Interface
AUTO
Page 78

4. Press or .
MENU
The displayed option changes (SCSI, VIDEO,
TP_IF ).
Interface
VIDEO
5. When the desired interface appears, press
ENTER
The LCD returns to the <<SETUP MODE>>
menu screen (Interface).
6. To quit the <<SETUP MODE>>, turn off the
power.
to save the change.
<<SETUP MODE>>
Interface
TP_IF baud rate
This function sets the baud rate (signaling speed) according to the baud rate of the third party interface (TP_IF). Set the speed slower than that of the host interface.
NOTE
You cannot use this function when the setup mode is brought by pressing
status.
LCD display
TP_IF Baud Rate
The following is an example of operation when you use this function.
Options
2400, 4800, 9600, 19200 (Default: 9600)
Remarks
Unit: baud
in the Ready
1. In <<SETUP MODE>> initial screen, press
ENTER
The <<SETUP MODE>> menu screen
(Settings or Paper Length Check) appears.
The “Settings” screen does not appear and
the “Paper Length Check” screen first appears when your scanner is not controlled
through the video or TP interface.
.
NOTE
<<SETUP MODE>>
<<SETUP MODE>>
Settings
<<SETUP MODE>>
Paper Length Check
6-33
Page 79

2. Press repeatedly until “TP_IF Baud Rate”
MENU
appears in the lower line of the menu screen.
<<SETUP MODE>>
TP_IF Baud Rate
3. Press
ENTER
The option select screen appears with the current
setting 9600 blinking (blinking indicates “change-
.
TP_IF Baud Rate
9600
able”).
4. Press or .
The displayed option changes (19200, 2400,
TP_IF Baud Rate
19200
4800 ).
5. When the desired option appears, press
to save the change.
The LCD returns to the <<SETUP MODE>>
ENTER
<<SETUP MODE>>
TP_IF Baud Rate
menu screen (TP_IF Baud Rate).
6. To quit the <<SETUP MODE>>, turn off the
power.
RS232C baud rate
This function sets the baud rate (signaling speed) according to the baud rate of the RS-232C interface. Set the speed slower than that of the host interface.
NOTE
You cannot use this function when the setup mode is brought by pressing
status.
in the Ready
LCD display
RS232C Baud Rate
Options
2400, 4800, 9600, 19200 (Default: 4800)
The following is an example of operation when you use this function.
6-34
Remarks
Unit: baud
Page 80

1. In <<SETUP MODE>> initial screen, press
ENTER
The <<SETUP MODE>> menu screen
(Settings or Paper Length Check) appears.
.
<<SETUP MODE>>
<<SETUP MODE>>
Settings
NOTE
The “Settings” screen does not appear and
the “Paper Length Check” screen first appears when your scanner is not controlled
through the video or TP interface.
2. Press repeatedly until “RS232C Baud
Rate” appears in the lower line of the menu
screen.
3. Press
The option select screen appears with the
current setting 4800 blinking (blinking indicates “changeable”).
4. Press or .
The displayed option changes (9600, 19200,
2400).
5. When the desired option appears, press
The LCD returns to the <<SETUP MODE>>
menu screen (RS232C Baud Rate).
ENTER
ENTER
.
to save the change.
<<SETUP MODE>>
Paper Length Check
<<SETUP MODE>>
RS232C Baud Rate
RS232C Baud Rate
4800
RS232C Baud Rate
19200
<<SETUP MODE>>
RS232C Baud Rate
6. To quit the <<SETUP MODE>>, turn off the
power.
6-35
Page 81
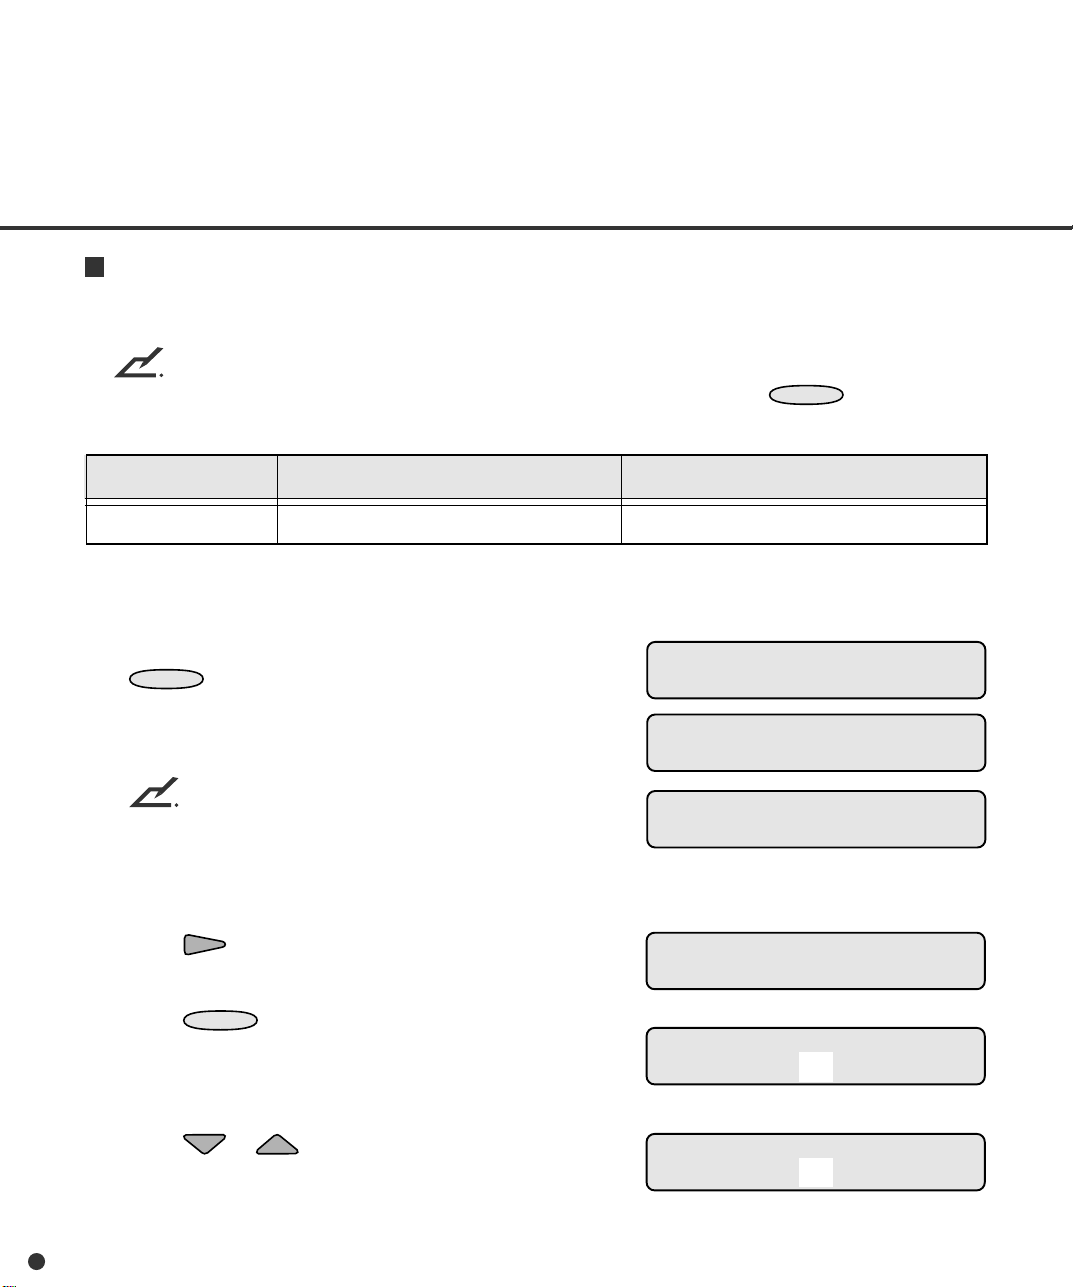
SCSI ID
MENU
This function sets the ID number for the SCSI interface.
NOTE
You cannot use this function when the setup mode is brought by pressing
status.
in the Ready
Options
SCSI ID
The following is an example of operation when you use this function.
1. In <<SETUP MODE>> initial screen, press
ENTER
The <<SETUP MODE>> menu screen (Settings
or Paper Length Check) appears.
The “Settings” screen does not appear and the
“Paper Length Check” screen first appears when
your scanner is not controlled through the video
or TP interface.
2. Press repeatedly until “SCSI ID” appears in
the lower line of the menu screen.
3. Press
The option select screen appears with the current
setting 5 blinking (blinking indicates “changeable”).
.
NOTE
ENTER
0 to 7 (Default: 5)
.
RemarksLCD display
<<SETUP MODE>>
<<SETUP MODE>>
Settings
<<SETUP MODE>>
Paper Length Check
<<SETUP MODE>>
SCSI ID
SCSI ID
5
4. Press or .
The displayed option changes (6, 7, 0, 1, 2, 3, 4).
6-36
SCSI ID
3
Page 82

5. When the desired value appears, press
MENU
ENTER
to save the change.
<<SETUP MODE>>
SCSI ID
The LCD returns to the <<SETUP MODE>>
menu screen (SCSI ID).
6. To quit the <<SETUP MODE>>, turn off the
power.
Product ID
This function sets the product ID of the scanner. Usually, you need not change this setting.
NOTE
You cannot use this function when the setup mode is brought by pressing
status.
in the Ready
Product ID
Options
M4099D, M3099G (Default: M4099D)
RemarksLCD display
Model number of this scanner
* The model number of this scanner is M4099D.
The following is an example of operation when you use this function.
1. In <<SETUP MODE>> initial screen, press
ENTER
.
The <<SETUP MODE>> menu screen
(Settings or Paper Length Check) appears.
NOTE
The “Settings” screen does not appear and
the “Paper Length Check” screen first appears when your scanner is not controlled
through the video or TP interface.
<<SETUP MODE>>
<<SETUP MODE>>
Settings
<<SETUP MODE>>
Paper Length Check
6-37
Page 83

2. Press repeatedly until “Product ID”
appears in the lower line of the menu screen.
<<SETUP MODE>>
Product ID
3. Press
The option select screen appears with the
current setting M4099D blinking (blinking
indicates “changeable”).
4. Press or .
The displayed option changes (M3099G
blinks).
5. Press
The LCD returns to the <<SETUP MODE>>
menu screen (Product ID).
6. To quit the <<SETUP MODE>>, turn off the
power.
ENTER
ENTER
.
to save the change.
Pre-pick
This function enables or disables pre-picking of paper.
Options
Product ID
M4099D
Product ID
M3099G
<<SETUP MODE>>
Product ID
RemarksLCD display
Pre-pick
The following is an example of operation when you use this function.
6-38
On, Off (Default: On)
Page 84

1. In <<SETUP MODE>> initial screen, press
ENTER
The <<SETUP MODE>> menu screen
(Settings or Paper Length Check) appears.
.
<<SETUP MODE>>
<<SETUP MODE>>
Settings
NOTE
The “Settings” screen does not appear and
the “Paper Length Check” screen first appears when your scanner is not controlled
through the video or TP interface.
2. Press repeatedly until “Pre-pick” appears in the lower line of the menu screen.
3. Press
The option select screen appears with the
current setting ON blinking (blinking indicates
“changeable”).
4. Press or .
The displayed option changes (OFF blinks).
5. Press
The LCD returns to the <<SETUP MODE>>
menu screen (Pre-pick).
6. Press
The LCD returns to the Ready screen.
ENTER
ENTER
CANCEL
.
to save the change.
two times.
<<SETUP MODE>>
Paper Length Check
<<SETUP MODE>>
Pre-pick
Pre-pick
ON
Pre-pick
OFF
<<SETUP MODE>>
Pre-pick
Ready
6-39
Page 85
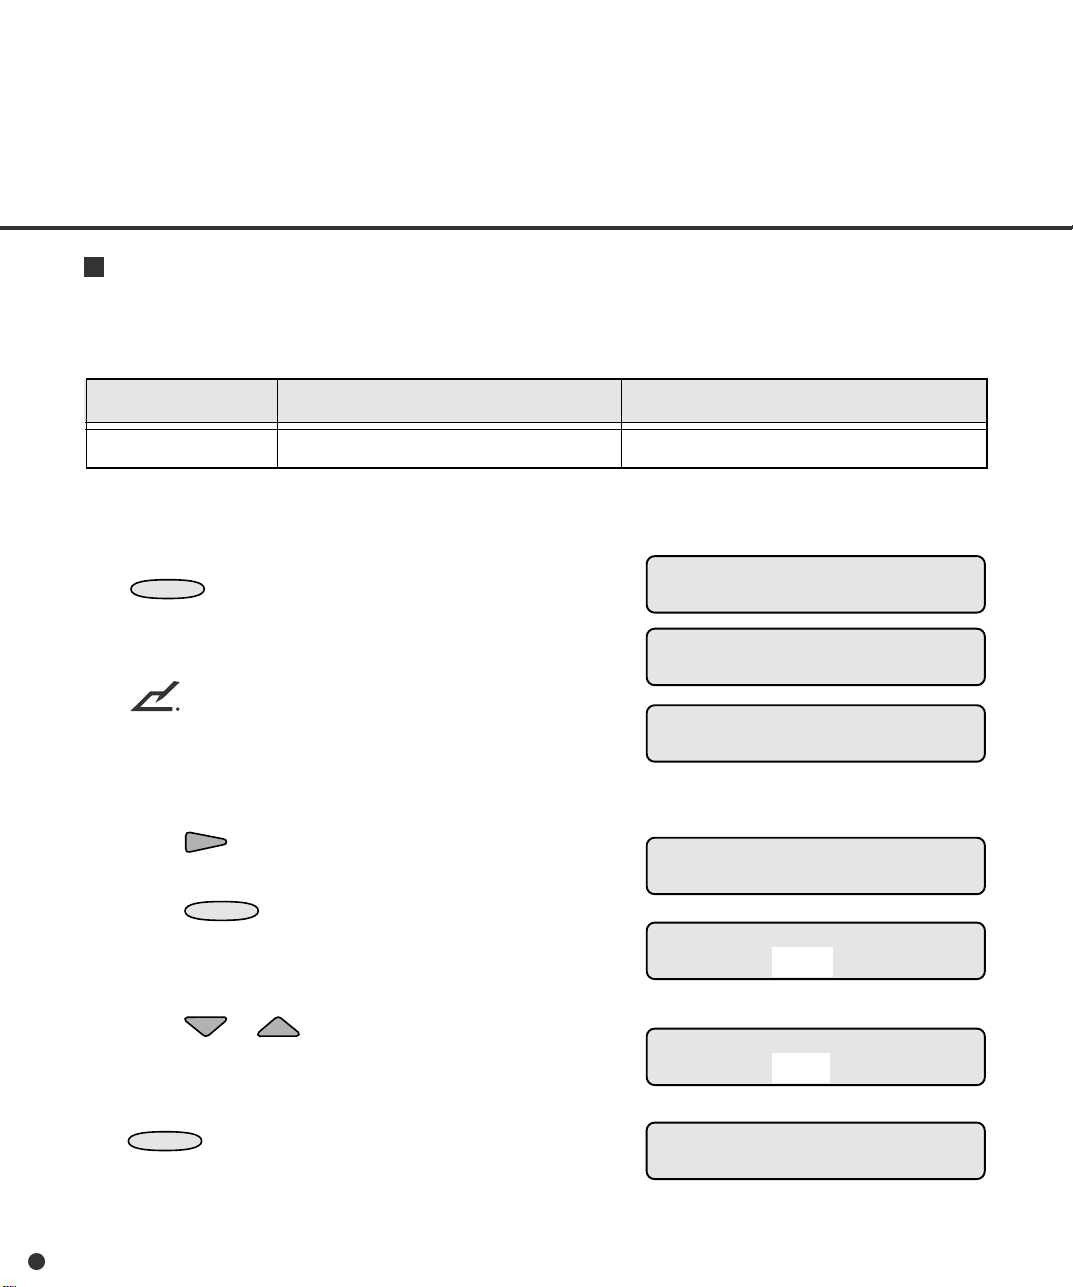
Pick start time
This function sets the period from when paper is manually put on the hopper to when the pick operation starts.
LCD display
Pick start time
The following is an example of operation when you use this function.
1. In <<SETUP MODE>> initial screen, press
ENTER
The <<SETUP MODE>> menu screen
(Settings or Paper Length Check) appears.
The “Settings” screen does not appear and
the “Paper Length Check” screen first appears when your scanner is not controlled
through the video or TP interface.
2. Press repeatedly until “Pick start time”
appears in the lower line of the menu screen.
3. Press
The option select screen appears with the
current setting 01.0S blinking (blinking indicates “changeable”).
.
NOTE
ENTER
Options
00.2 S to 29.8 S (Default: 01.0 S)
.
Remarks
In units of 0.2 second
<<SETUP MODE>>
<<SETUP MODE>>
Settings
<<SETUP MODE>>
Paper Length Check
<<SETUP MODE>>
Pick start time
Pick start time
01.0 S
4. Press or .
The displayed option changes (00.2S to
29.8S). The value changes in 0.2 seconds.
5. When the desired value appears, press
ENTER
The LCD returns to the <<SETUP MODE>>
menu screen (Pick start time).
6-40
to save the change.
Pick start time
05.0 S
<<SETUP MODE>>
Pick start time
Page 86

6. Press
The LCD returns to the Ready screen.
CANCEL
two times.
Ready
Manual feed timeout
This function sets the waiting time from when the host computer issues a scan command to when
paper is manually put on the hopper. A manual feed timeout error occurs if this time elapses without
putting paper on the hopper.
LCD display
Manual Feed Timeout
The following is an example of operation when you use this function.
1. In <<SETUP MODE>> initial screen, press
ENTER
The <<SETUP MODE>> menu screen
(Settings or Paper Length Check) appears.
The “Settings” screen does not appear and
the “Paper Length Check” screen first appears when your scanner is not controlled
through the video or TP interface.
2. Press repeatedly until “Manual Feed
Timeout” appears in the lower line of the
menu screen.
3. Press
The option select screen appears with the
current setting 30 S blinking (blinking indicates “changeable”).
.
NOTE
ENTER
Options
1 S to 255 S (Default: 30 S)
.
Remarks
Unit: second
<<SETUP MODE>>
<<SETUP MODE>>
Settings
<<SETUP MODE>>
Paper Length Check
<<SETUP MODE>>
Manual Feed Timeout
Manual Feed Timeout
30 S
6-41
Page 87

4. Press or .
The displayed option changes (1 S to 255 S).
The value changes in seconds.
5. When the desired value appears, press
ENTER
to save the change.
The LCD returns to the <<SETUP MODE>>
menu screen (Manual Feed Timeout).
Manual Feed Timeout
10 S
<<SETUP MODE>>
Manual Feed Timeout
6. Press
CANCEL
two times.
The LCD returns to the Ready screen.
Paper pick retry
This function sets the pick motor rotation period and the retry count.
LCD display
Paper Pick retry
Options
Step: 1 to 7 (Default: 2)
Times: 1 to 7 (Default: 4)
The following is an example of operation when you use this function.
Remarks
1 to 7: one time to seven times the standard
1 to 7: one retry to seven retries
Ready
steps
6-42
Page 88

1. In <<SETUP MODE>> initial screen, press
ENTER
The <<SETUP MODE>> menu screen
(Settings or Paper Length Check) appears.
.
<<SETUP MODE>>
<<SETUP MODE>>
Settings
NOTE
The “Settings” screen does not appear and
the “Paper Length Check” screen first appears when your scanner is not controlled
through the video or TP interface.
2. Press repeatedly until “Paper Pick retry”
appears in the lower line of the menu screen.
3. Press
The option select screen appears with the
current setting 2 (for Step) blinking (blinking
indicates “changeable”).
4. Press .
The current count setting 4 blinks.
5. Press or .
The displayed option changes (1, 2, 3, 4, 5, 6,
7).
6. When the desired value appears, press
The LCD returns to the <<SETUP MODE>>
menu screen (Paper Pick retry).
ENTER
ENTER
.
to save the change.
<<SETUP MODE>>
Paper Length Check
<<SETUP MODE>>
Paper Pick retry
Paper Pick retry
Step: 2 Times: 4
Paper Pick retry
Step: 2 Times: 4
Paper Pick retry
Step: 2 Times: 7
<<SETUP MODE>>
Paper Pick retry
7. Press
The LCD returns to the Ready screen.
CANCEL
two times.
Ready
6-43
Page 89
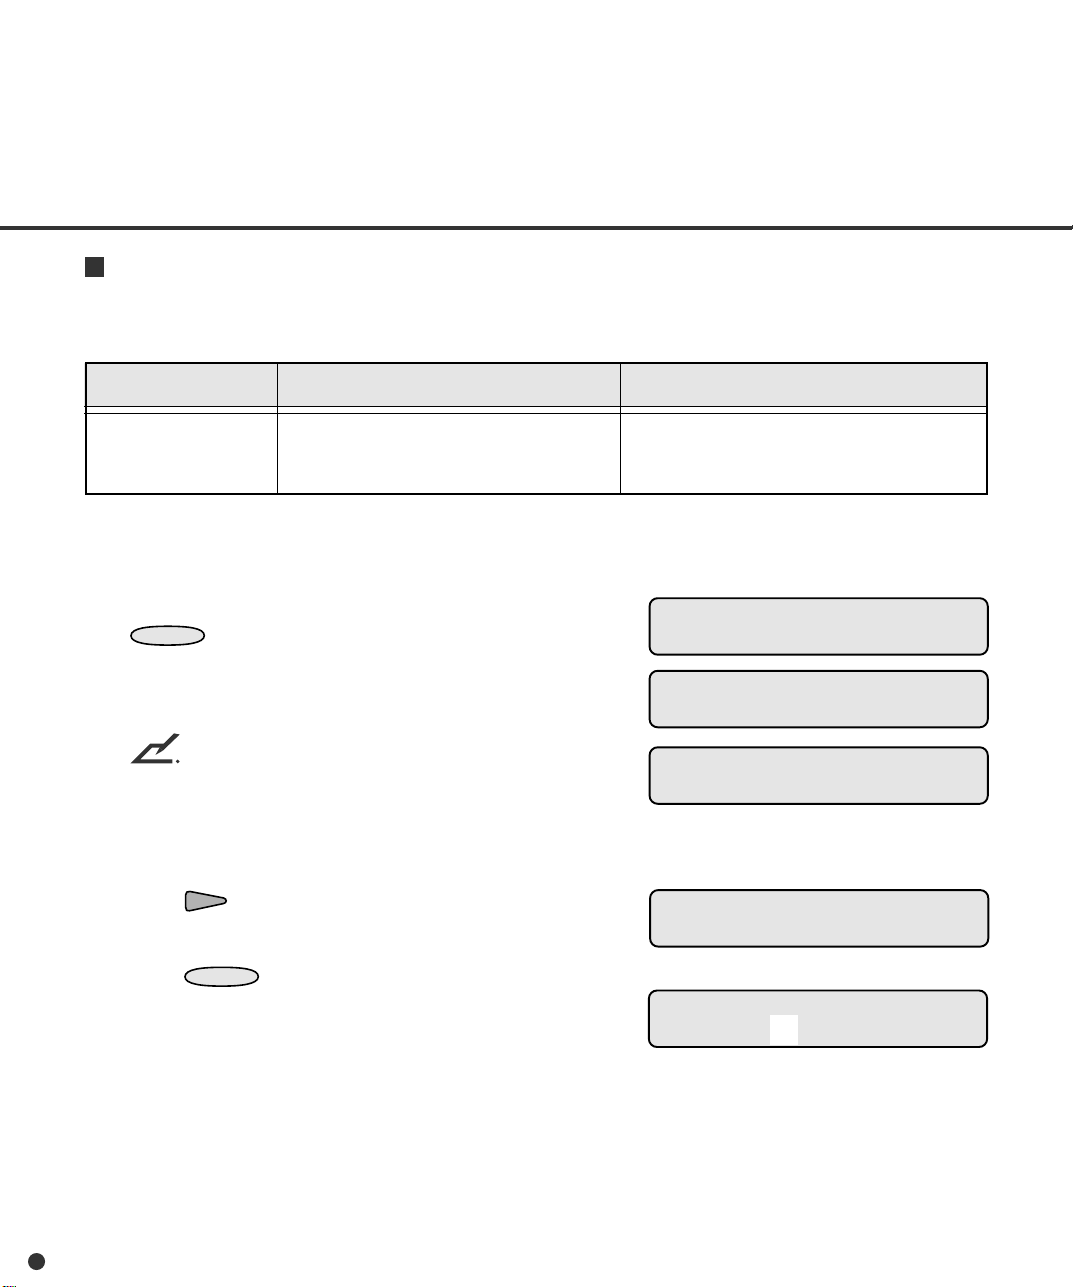
Paper feed retry
This function sets the feed motor rotation period and the retry count.
LCD display
Paper Feed Retry
Options
Step: 1 to 7 (Default: 1)
Times: 1 to 7 (Default: 4)
Remarks
1 to 7: one time to seven times the standard
1 to 7: one retry to seven retries
The following is an example of operation when you use this function.
1. In <<SETUP MODE>> initial screen, press
ENTER
.
The <<SETUP MODE>> menu screen
(Settings or Paper Length Check) appears.
NOTE
The “Settings” screen does not appear and
the “Paper Length Check” screen first appears when your scanner is not controlled
through the video or TP interface.
2. Press repeatedly until “Paper Feed retry”
appears in the lower line of the menu screen.
steps
<<SETUP MODE>>
<<SETUP MODE>>
Settings
<<SETUP MODE>>
Paper Length Check
<<SETUP MODE>>
Paper Feed retry
3. Press
6-44
ENTER
.
The option select screen appears with the
current setting 1 (for Step) blinking (blinking
indicates “changeable”).
Paper Feed retry
Step: 1 Times: 4
Page 90

4. Press .
The current count setting 4 blinks.
5. Press or .
The displayed option changes (1, 2, 3, 4, 5, 6,
7).
Paper Feed retry
Step: 1 Times: 4
Paper Feed retry
Step: 1 Times: 7
6. When the desired value appears, press
ENTER
The LCD returns to the <<SETUP MODE>>
menu screen (Paper Feed retry).
7. Press
The LCD returns to the Ready screen.
to save the change.
CANCEL
two times.
<<SETUP MODE>>
Paper Feed retry
Ready
6-45
Page 91
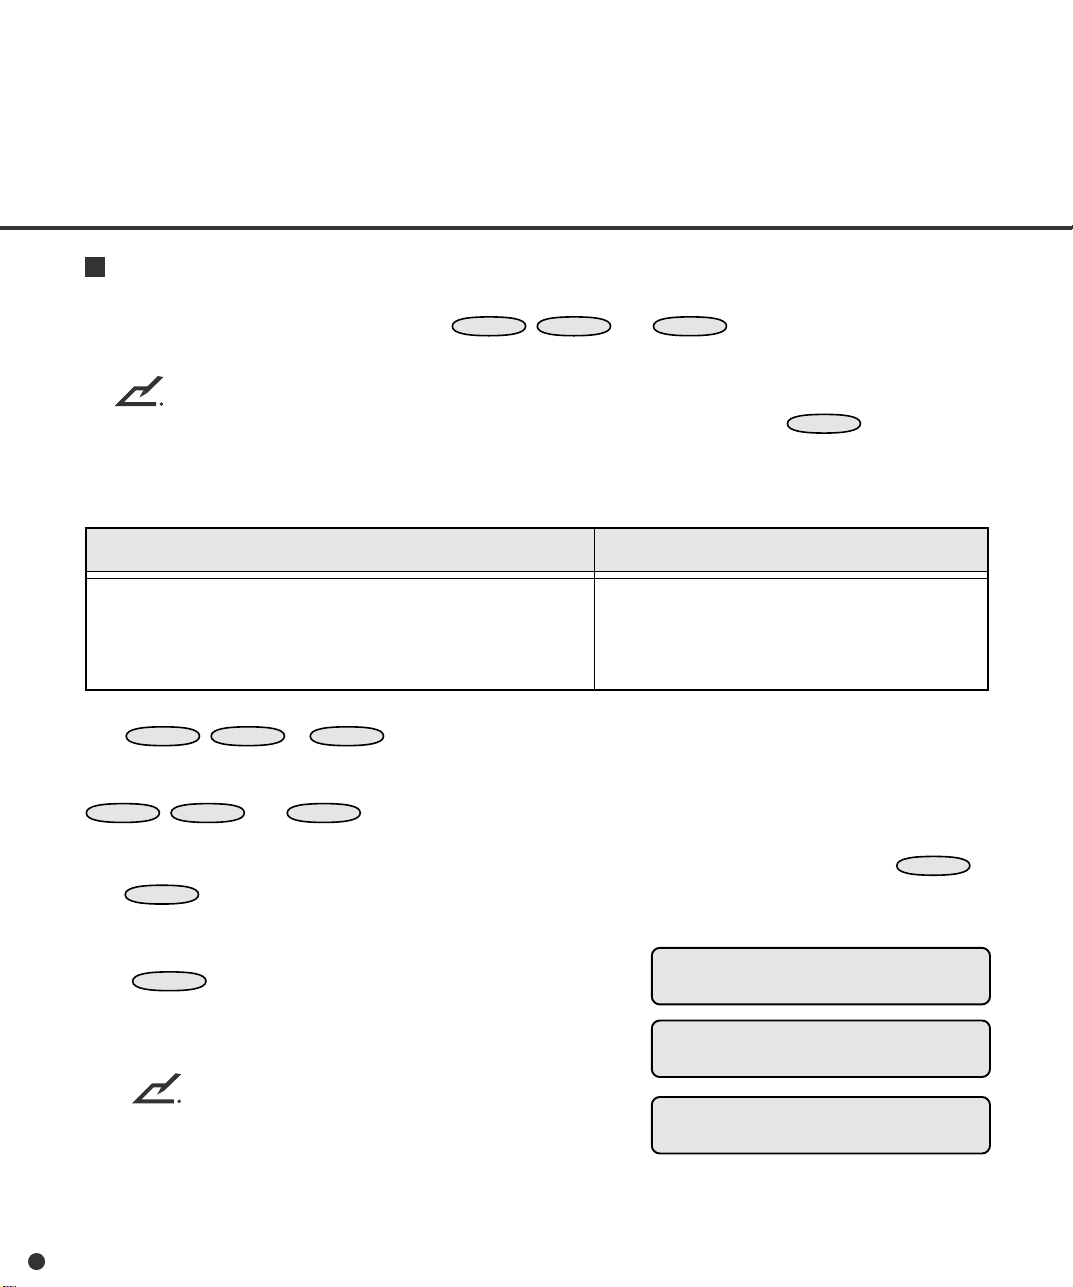
Function key
This function allocates setup functions to
F1
,
F2
, and
buttons. You can allocate
F3
up to three setup functions.
NOTE
• You cannot use this function when the setup mode is brought by pressing
MENU
in the Ready
status.
• You cannot allocate the following functions: Interface, TP_IF Baud Rate, RS232C Baud Rate,
SCSI ID, Product ID, Setup Mode Lock, Black Background, and Function Key itself.
Allocatable setup functions and other special functions
Setup functions noted above
START key
EJECT key
(Default: Undefined)
The
F1
,
F2
,or
button can be used as a shortcut key which enables you to access
F3
Remarks
START: starts the operation stopped by EJECT and
sends data to the host computer.
EJECT:stops operation and ejects the paper in the
transport unit.
the allocated setup function just by pressing the button whenever the scanner is in the Ready state.
This function is valid even in the setup mode lock state (refer to the next function). However, the
,
F1
The following is an example of operation when you allocate START and EJECT keys to the
and
F2
F2
, and
buttons are invalid in setup, browse, and test modes.
F3
buttons respectively.
F1
1. In <<SETUP MODE>> initial screen, press
ENTER
.
The <<SETUP MODE>> menu screen
(Settings or Paper Length Check) appears.
NOTE
The “Settings” screen does not appear and
the “Paper Length Check” screen first appears when your scanner is not controlled
through the video or TP interface.
6-46
<<SETUP MODE>>
<<SETUP MODE>>
Settings
<<SETUP MODE>>
Paper Length Check
Page 92

2. Press repeatedly until “Function Key”
appears in the lower line of the menu screen.
<<SETUP MODE>>
Function Key
3. Press
The function key select screen appears with F1
blinking (blinking indicates “selectable”).
4. Press
The F1 selection screen appears with the
current setting Undefined blinking (blinking
indicates “changeable”).
5. Press or .
The setup functions, START key, and EJECT
key are displayed in sequence at the lower line.
6. When START key is displayed, press
The LCD returns to the function key select
screen with F1 blinking.
7. Press twice.
F3 blinks.
8. Press
The F3 selection screen appears with the
current setting Undefined blinking (blinking
indicates “changeable”).
ENTER
ENTER
ENTER
.
.
.
ENTER
Function Key
F1 F2 F3
F1 selection
Undefined
F1 selection
START key
.
Function Key
F1 F2 F3
Function Key
F1 F2 F3
F3 selection
Undefined
9. Press or .
The setup functions, START key, and EJECT
key are displayed in sequence at the lower line.
10. When STOP key is displayed, press
to save the change.
The LCD returns to the function key select
screen with F3 blinking.
11. To quit the <<SETUP MODE>>, turn off the
power.
ENTER
F3 selection
EJECT key
Function Key
F1 F2 F3
6-47
Page 93

Setup mode lock
MENU
This function inhibits the operator panel from entering setup mode from normal mode, protecting the
operator panel from misoperation. Once the operator panel is locked, you cannot use the setup items
except those allocated to the
NOTE
You cannot use this function when the setup mode is brought by pressing
status.
F1
,
F2
, and
F3
buttons.
in the Ready
RemarksLCD display
Setup Mode Lock
Options
On, Off (Default: Off)
To cancel the setup mode lock state, turn off the power and turn on the power while pressing the
button to enter the setup mode. In the setup mode, select the Setup Mode Lock function
MENU
and set the option to OFF.
The following is an example of operation when you use this function.
1. In <<SETUP MODE>> initial screen, press
ENTER
.
<<SETUP MODE>>
The <<SETUP MODE>> menu screen
(Settings or Paper Length Check) appears.
<<SETUP MODE>>
Settings
NOTE
The “Settings” screen does not appear and
the “Paper Length Check” screen first appears when your scanner is not controlled
through the video or TP interface.
2. Press repeatedly until “Setup Mode
Lock” appears in the lower line of the menu
screen.
<<SETUP MODE>>
Paper Length Check
<<SETUP MODE>>
Setup Mode Lock
6-48
Page 94

3. Press
MENU
ENTER
.
The option select screen appears with the
current setting OFF blinking (blinking indicates
“changeable”).
Setup Mode Lock
OFF
4. Press or .
The displayed option changes (ON blinks).
5. Press
ENTER
to save the change.
The LCD returns to the <<SETUP MODE>>
Setup Mode Lock
ON
<<SETUP MODE>>
Setup Mode Lock
menu screen (Setup Mode Lock).
6. To quit the <<SETUP MODE>>, turn off the
power.
Black background
This function is set to ON when the “Black Background” is mounted on the scanner. After mounting
the “Black Background”, set this function to ON and adjust the gain of the amplifier by the “Amp Gain
Adjustment” in the test mode.
NOTE (Image Quality):
The quality of the scanned image becomes low when the “Black Background” function is set to ON
without mounting the “Black Background”.
NOTE
You cannot use this function when the setup mode is brought by pressing
status.
in the Ready
RemarksLCD display
Black Background
Options
Front: On, Off (Default: Off)
Back: On, Off (Default: Off)
The following is an example of operation when you change the setting.
6-49
Page 95

1. In <<SETUP MODE>> initial screen, press
ENTER
The <<SETUP MODE>> menu screen
(Settings or Paper Length Check) appears.
.
<<SETUP MODE>>
<<SETUP MODE>>
Settings
NOTE
The “Settings” screen does not appear and
the “Paper Length Check” screen first appears when your scanner is not controlled
through the video or TP interface.
2. Press repeatedly until “Black Back-
ground” appears in the lower line of the menu
screen.
3. Press
The option select screen appears with the
current setting OFF (for Front) blinking
(blinking indicates “changeable”).
4. Press or .
The displayed option changes (ON blinks).
5. Press .
OFF (current option for Back) blinks (blinking
indicates “changeable”).
6. Press or .
The displayed option changes (ON blinks).
ENTER
.
<<SETUP MODE>>
Paper length Check
<<SETUP MODE>>
Black Background
Black Background
Front: OFF Back: OFF
Black Background
Front: ON Back: OFF
Black Background
Front: ON Back: OFF
Black Background
Front: ON Back: ON
7. When the desired option appears, press
ENTER
The LCD returns to the <<SETUP MODE>>
menu screen (Black Background).
8. To quit the <<SETUP MODE>>, turn off the
power.
6-50
to save the change.
<<SETUP MODE>>
Black Background
Page 96

Language
This function sets the message language of the LCD to English or Japanese.
Options
Language
The following is an example of operation when you change the setting.
1. In <<SETUP MODE>> initial screen, press
ENTER
The <<SETUP MODE>> menu screen
(Settings or Paper Length Check) appears.
The “Settings” screen does not appear and
the “Paper Length Check” screen first appears when your scanner is not controlled
through the video or TP interface.
2. Press repeatedly until “Language”
appears in the lower line of the menu screen.
3. Press
The option select screen appears with the
current setting English blinking (blinking
indicates “changeable”).
.
NOTE
ENTER
English, (Default: English)
.
RemarksLCD display
<<SETUP MODE>>
<<SETUP MODE>>
Settings
<<SETUP MODE>>
Paper Length Check
<<SETUP MODE>>
Language
Language
English
4. Press or .
The displayed option changes (
blinks).
5. When the desired option appears, press
ENTER
The LCD returns to the <<SETUP MODE>>
menu screen (Language).
6. Press
The LCD returns to the screen.
to save the change.
CANCEL
two times.
Language
<<SETUP MODE>>
Language
6-51
Page 97
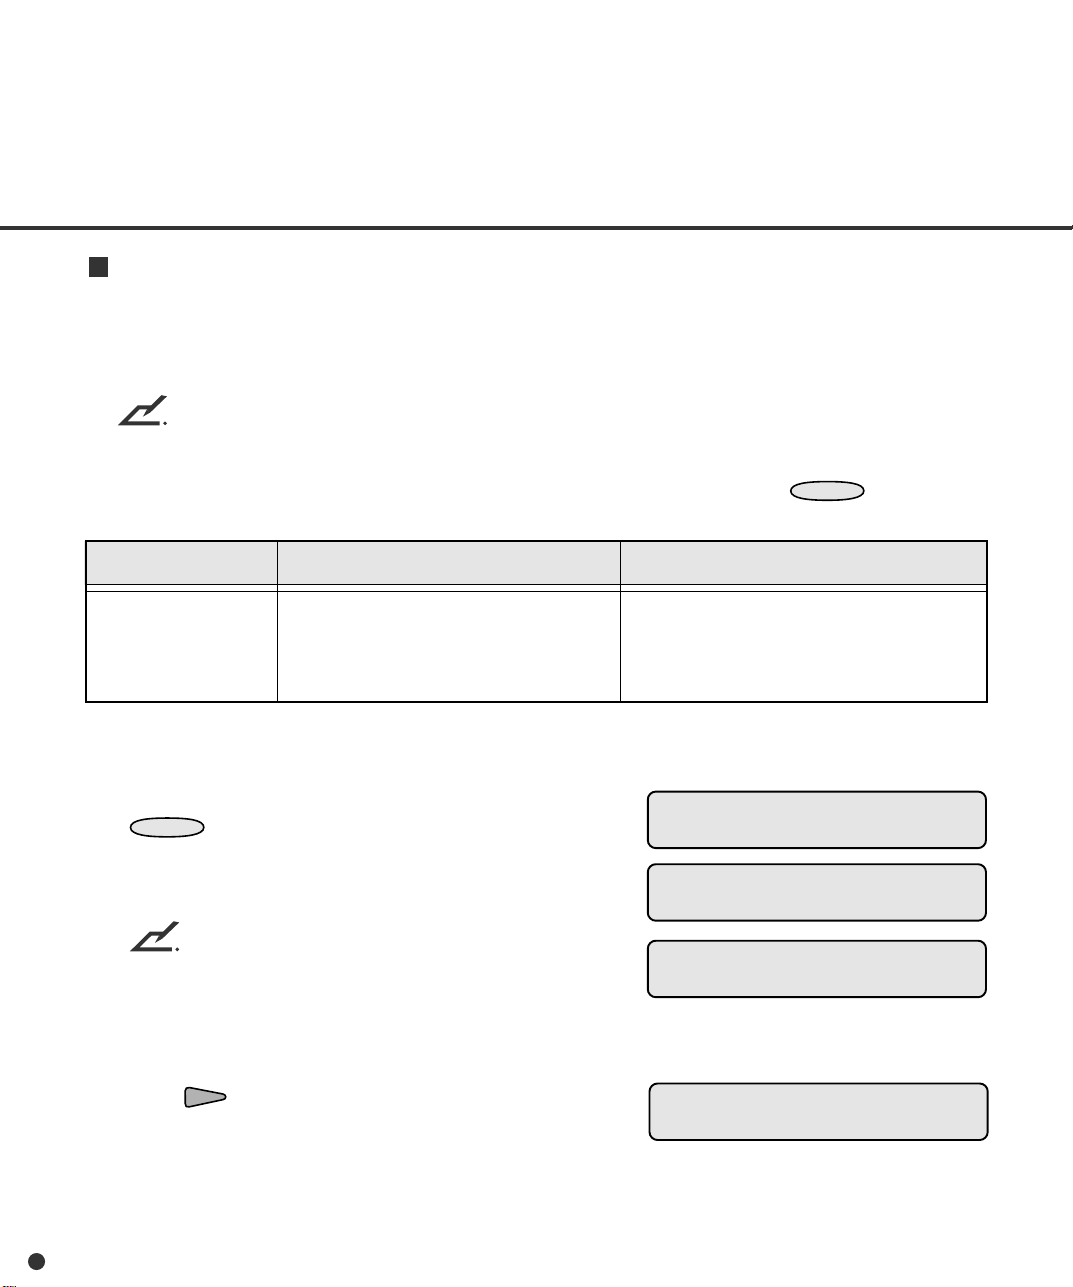
White follower mode
This function sets how to follow the white color as the reference during scanning documents. When
the whole ground of a document is colored and “1” is set in this mode, the scanner scans the leading
edge of the document as the white reference. Then the ground of the scanned image will be white.
NOTE
• The area about 3 mm from the leading edge of a document must be in the same color when “1”
is set.
• You cannot use this function when the setup mode is brought by pressing
status.
MENU
in the Ready
LCD display
White follower mode
The following is an example of operation when you change the setting.
1. In <<SETUP MODE>> initial screen, press
ENTER
The <<SETUP MODE>> menu screen
(Settings or Paper Length Check) appears.
The “Settings” screen does not appear and
the “Paper Length Check” screen first appears when your scanner is not controlled
through the video or TP interface.
2. Press repeatedly until “White follower
mode” appears in the lower line of the menu
screen.
.
NOTE
Options
1, 0 (Default: 0)
Remarks
0:
The white background in the scanner
is regarded as the white reference.
1: The leading edge of the paper is
regarded as the white reference.
<<SETUP MODE>>
<<SETUP MODE>>
Settings
<<SETUP MODE>>
Paper Length Check
<<SETUP MODE>>
White follower mode
6-52
Page 98

3. Press
The option select screen appears with the
current setting 0 blinking (blinking indicates
“changeable”).
ENTER
.
White follower mode
0
4. Press or .
The displayed option changes (1 blinks).
5. Press
The LCD returns to the <<SETUP MODE>>
menu screen (Language).
6. To quit the <<SETUP MODE>>, turn off the
power.
ENTER
to save the change.
White follower mode
1
<<SETUP MODE>>
White follower mode
6-53
Page 99

Activating the Test Mode
To activate the test mode:
1. Turning power on with
MENU
pressed.
The LCD indicates “Please wait” then “<<MODE
SELECT>>” with “SETUP” blinking.
2. Press twice.
“TEST” blinks (blinking indicates “selectable).
3. Press
ENTER
.
The <<TEST MODE>> initial screen (*) appears.
4. Press
ENTER
.
The <<TEST MODE>> menu screen (**) appears.
To quit the test mode, turn power off.
Button functions in test mode
Button name Function
MENU
ENTER
CANCEL
Returns to the <<TEST MODE>> menu screen.
• Executes the test.
• Returns to the previous screen.
• Displays the next lower level screen, if any.
Returns to the previous screen without saving the change.
• Displays the next function at the right in the menu.
• Moves to the right item.
• Displays the next test function at the left in the menu.
• Moves to the left item.
T Please wait
<<MODE SELECT>>
SETUP BROWSE TEST
<<MODE SELECT>>
SETUP BROWSE TEST
* <<TEST MODE>> Initial screen
<<TEST MODE>>
** <<TEST MODE>> menu screen
<<TEST MODE>>
Offline Feed Test
6-54
Scrolls the option downward.
Scrolls the option upward.
Page 100
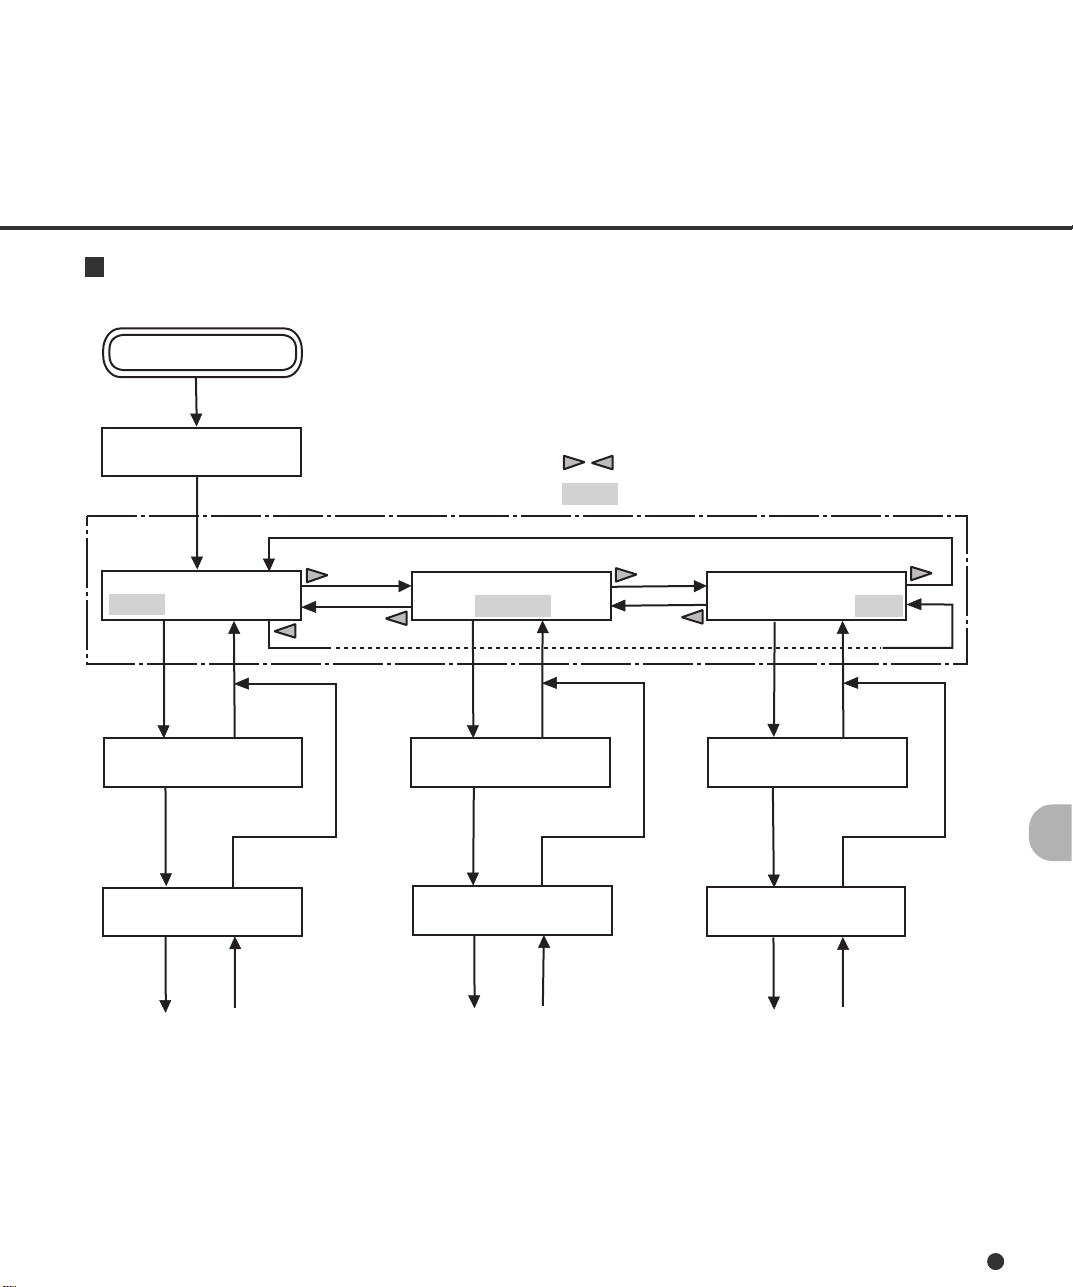
Mode selection (power on with MENU pressed)
POWER ON with MENU ON
T Please wait
* Turn off to quit <<MODE SELECT>>.
<<MODE SELECT>>
SETUP BROWSE TEST
ENTER
CANCEL
<<SETUP MODE>>
ENTER
CANCEL
<<SETUP MODE>>
XXXXX
ENTER
CANCEL
<<MODE SELECT>>
SETUP BROWSE TEST
ENTER
CANCEL
<<BROWSE MODE>>
ENTER
CANCEL
<<BROWSE MODE>>
XXXXX
ENTER
CANCEL
*
: Cursor buttons
: Blinking
<<MODE SELECT>>
SETUP BROWSE TEST
ENTER
ENTER
ENTER
CANCEL
<<TEST MODE>>
CANCEL
<<TEST MODE>>
Offline Feed Test
CANCEL
6-55
 Loading...