

Page 1

LIFEBOOK Bay Projector
Page 2

Congratulations! You have decided to buy an
innovative Fujitsu product.
The latest information about our products, useful tips, updates etc. is available from our website:
http://ts.fujitsu.com
For automatic driver updates, please go to: http://support.ts.fujitsu.com/com/support/index.html
Should you have any technical questions, please contact:
● our Hotline/Service Desk (see Service Desk list or visit:
http://ts.fujitsu.com/support/servicedesk.html)
● your sales partner
● your sales office
We hope you really enjoy using your new Fujitsu system.
Page 3

Page 4

Copyright
Fujitsu Technology Solutions 2011/06
Published by
Fujitsu Technology Solutions GmbH
Mies-van-der-Rohe-Straße 8
80807 München, Germany
Contact
http://ts.fujitsu.com/support
All rights reserved, including intellectual property rights. Technical data is subject to changes; deliverability is dependent on
availability. No guarantee of completeness, topicality or correctness of the data and illustrations is given and any liability associated
therewith is excluded. Brand names may be protected trademarks of the respective manufacturer and/or protected by copyright. Their
use by third parties for their own purposes could represent a violation of the rights of the owner. For more information, see
http://ts.fujitsu.com/terms_of_use.html
Order No. Fujitsu Technology Solutions: A26391-F954-Z320-1-8N19, Edition 1
Page 5

LIFEBOOK Bay Projector
Operating Manual
English
Deutsch
Français
Italiano
Español
1
19
39
59
79
Page 6

Copyright © Fujitsu Technology Solutions GmbH 2011
LIFEBOOK is a registered trademark of Fujitsu Technology Solutions GmbH.
All rights, including rights of translation, reproduction by printing, copying or similar methods,
even of parts are reserved.
Offenders will be liable for damages.
All rights, including rights created by patent grant or registration of a utility model or design,
are reserved.
Delivery subject to availability. Right of technical modification reserved.
Page 7

Contents English - 1
Contents
Innovative technology........................................................................................................................ 3
Notational conventions ......................................................................................................................... 3
Ports and operating elements........................................................................................................... 4
Control buttons ..................................................................................................................................... 5
Control button states ............................................................................................................................ 5
Button operation in relation to button status......................................................................................... 6
Important notes .................................................................................................................................. 7
Safety notes.......................................................................................................................................... 7
Laser safety.......................................................................................................................................... 7
Transporting and positioning the device............................................................................................... 7
General information concerning operation ........................................................................................... 8
First-time setup of your device ......................................................................................................... 9
Installing drivers.................................................................................................................................... 9
Installing the Bay Projector................................................................................................................. 10
Removing the Bay Projector............................................................................................................... 11
Working with the Bay Projector ...................................................................................................... 12
Switching on the Bay Projector........................................................................................................... 12
Adjusting projection angles and image rotation.................................................................................. 13
Using the focus wheel to adjust image sharpness ............................................................................. 14
Switching display modes .................................................................................................................... 15
Switching off the Bay Projector........................................................................................................... 16
Frequently Asked Questions – FAQ................................................................................................ 17
Technical data................................................................................................................................... 18
Fujitsu Technology Solutions 1
Page 8

English - 2 Contents
2 Fujitsu Technology Solutions
Page 9
Innovative technology English - 3
Innovative technology
Your Bay Projector is the world’s first projector built in to a modular notebook bay for LIFEBOOK
P771 and LIFEBOOK S761. The fold-out Bay Projector is ready to use in seconds and adds
convenience and mobility to your notebook: no external beamer or external cables are required to
share slides, spreadsheets or YouTube videos with colleagues or friends.
Set-up is simple: the built-in beamer is immediately ready to use once the lens and bulb are folded
out of the DVD-size modular bay and clicked into place.
The Bay Projector works on almost any surface. Brightness and keystone correction are adjusted
directly via built-in buttons. Laser beam technology provides high contrast and colour depth to
guarantee crisp, clear images. In addition to its portability, the Bay Projector is quieter and more
robust than a traditional beamer, whose lens bulbs are easily damaged.
At the end of a long day for business travellers, the Bay Projector can also double-up as a hotel room
personal cinema, where it can be used for playing back movies on a bigger screen, providing more
comfortable viewing.
The Bay Projector extends the flexibility of modular bays in LIFEBOOK notebooks. When not in use,
the Bay Projector can be easily removed and replaced with a modular second battery, a DVD Super
Multi drive, or simply a weight saver.
The images in this manual show the LIFEBOOK S761.
i
Notational conventions
The meanings of the symbols and fonts used in this manual are as follows:
!
Indicates information which is important for your health or for preventing
material damage.
Indicates important information which is required to use the system properly.
i
► Texts which follow this symbol describe steps that must be performed in the
This font Indicates screen outputs.
This font Indicates programme names, commands, or menu items.
"Quotation marks" Indicate names of chapters, data carriers, and terms that are being
Fujitsu Technology Solutions 3
order shown.
emphasised.
Page 10

English - 4 Ports and operating elements
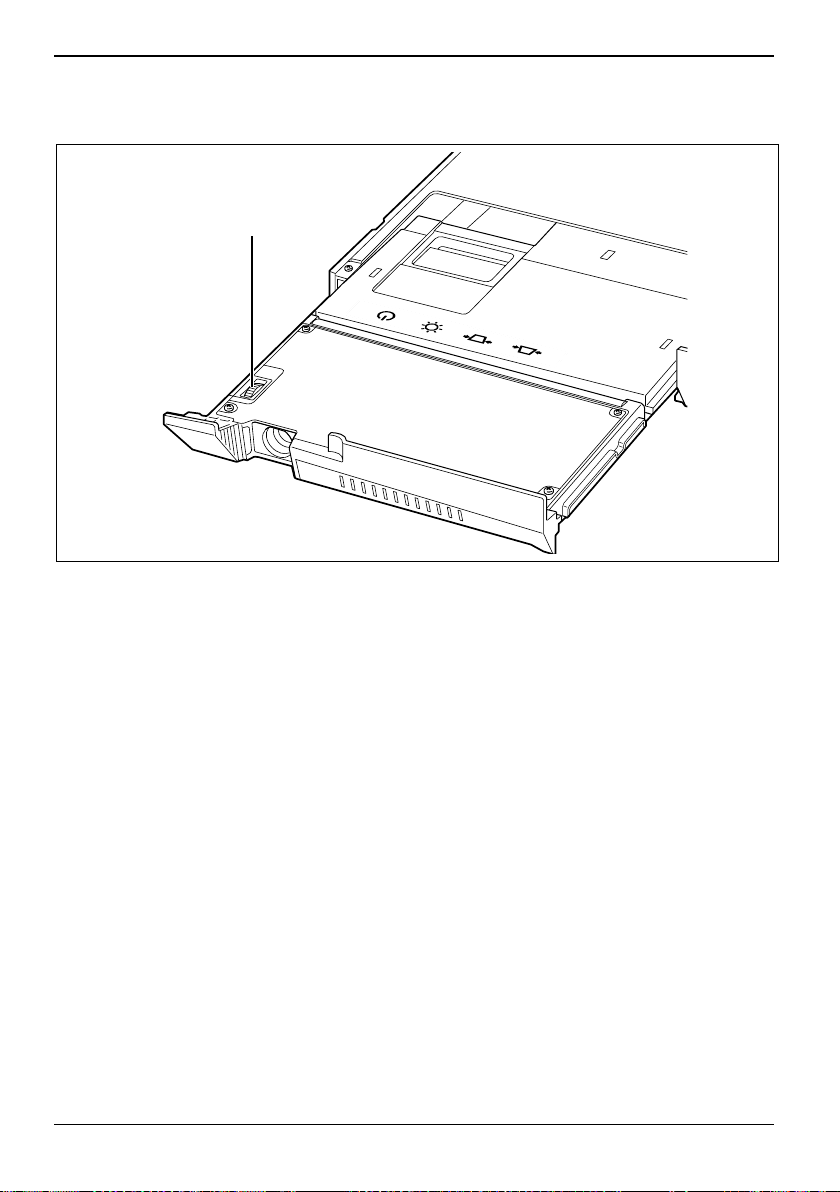
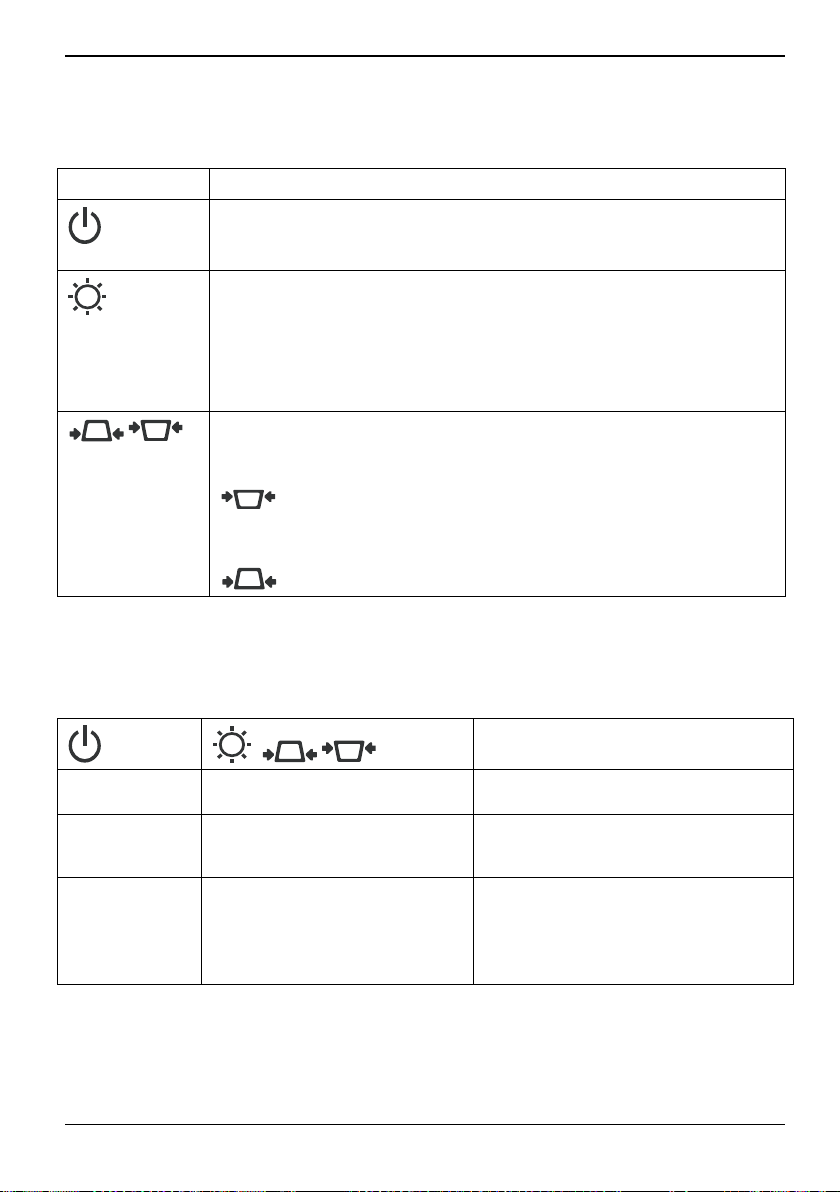
Ports and operating elements
This chapter presents the individual hardware components of your device. It gives an overview of the
indicators and ports of the device. Please familiarise yourself with these components before you start
to work with the device.
6
5
1 = Laser lens
2 = Air vents
3 = Projector
1
2
3
4 = Release lever
5 = Focus wheel
6 = Control buttons
4
4 Fujitsu Technology Solutions
Page 11
Ports and operating elements English - 5
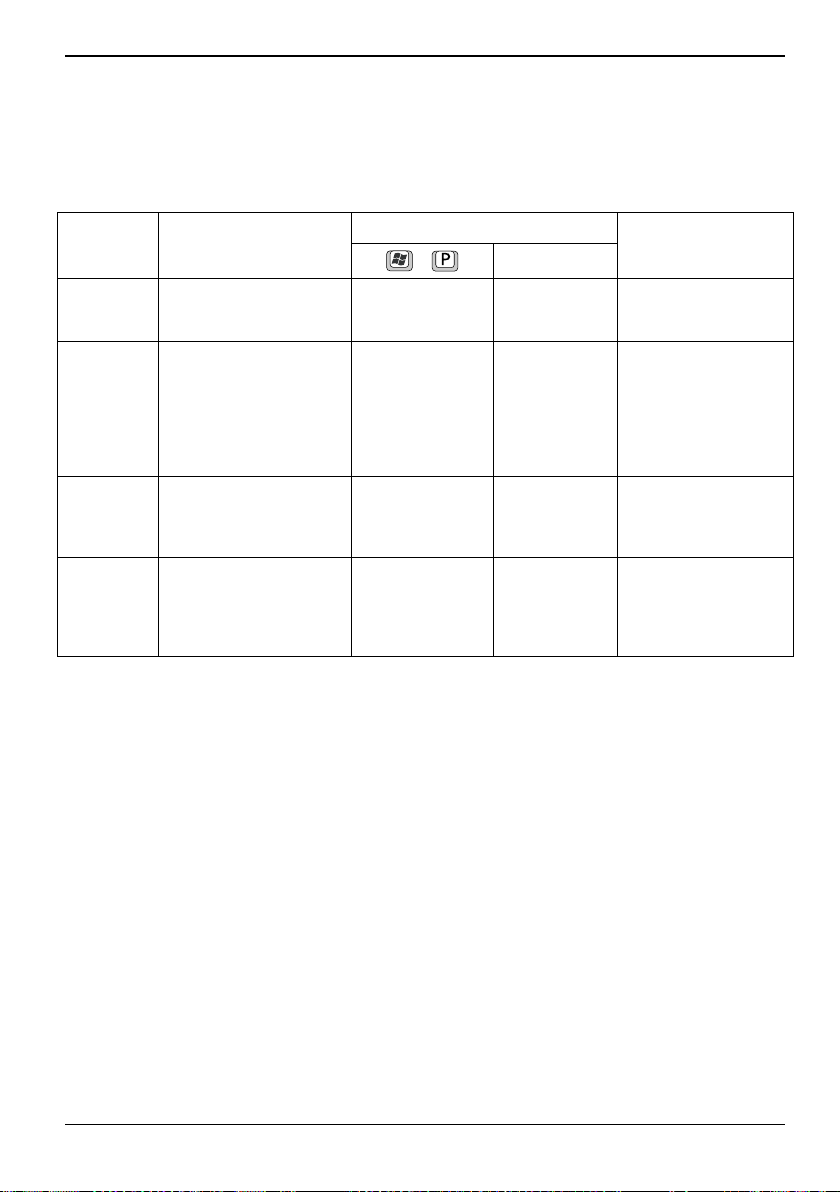
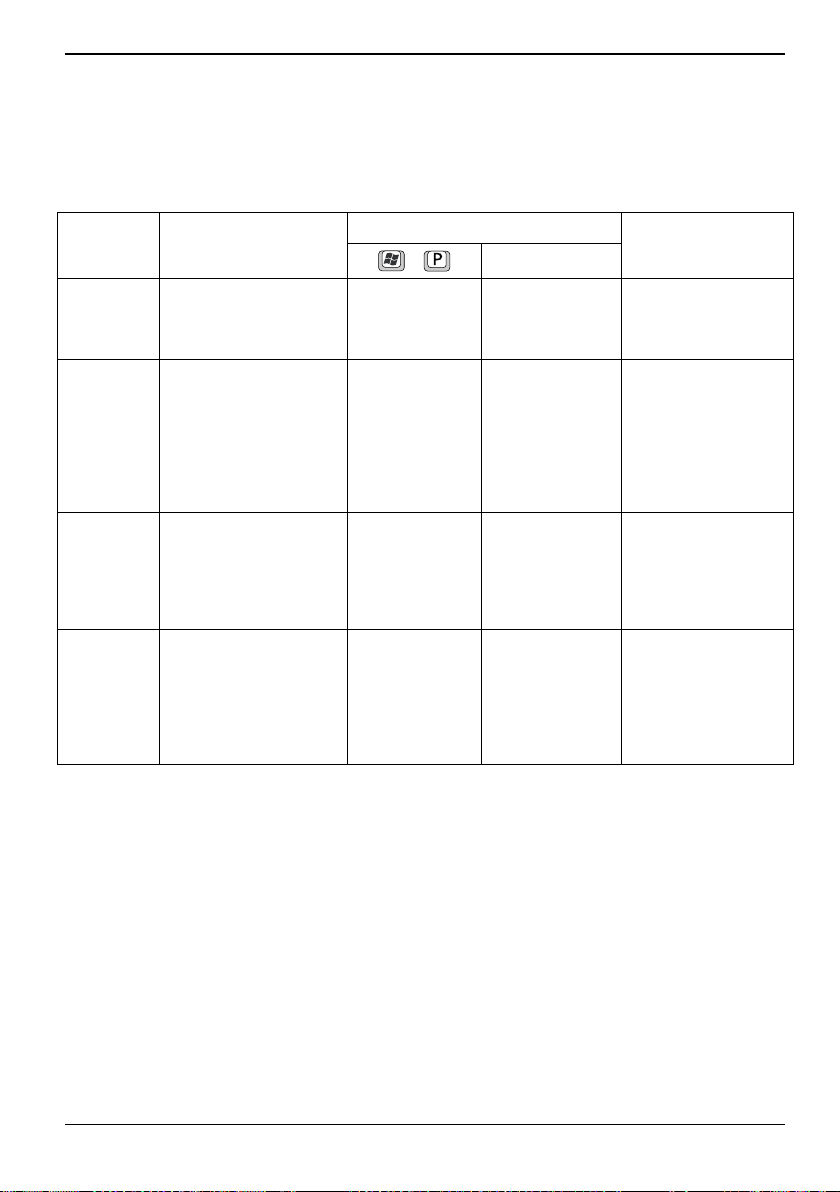
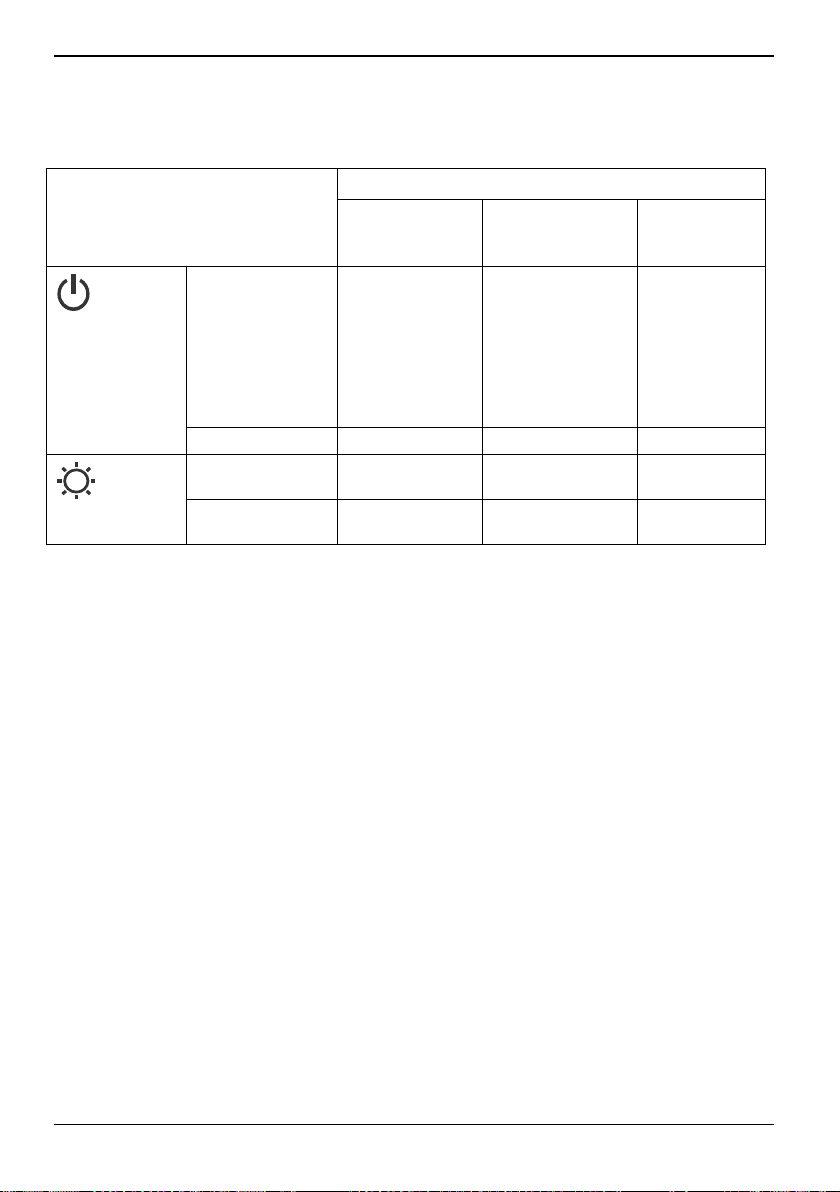
Control buttons
Button Description
Laser On/Off button.
To switch the projector on and off, see chapter "
Projector".
Brightness button.
To control the brightness of the image.
By pressing the Brightness button you can switch between two brightness
levels (depending on the power status of your notebook).
When your notebook runs on battery power, the brightness is lower.
Keystone buttons (top, bottom).
► To shrink the upper part of the image, press the Top Keystone button:
► To shrink the lower part of the image, press the Bottom Keystone button:
Switching on the Bay
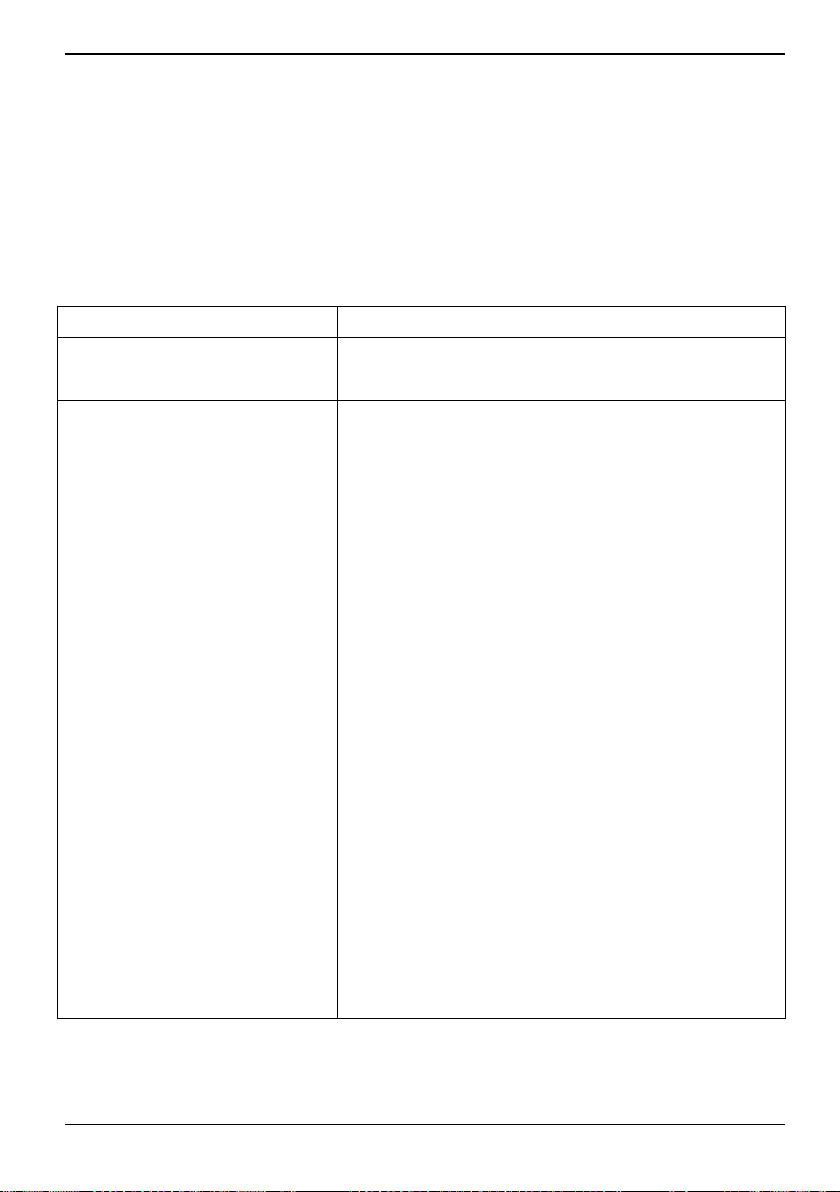
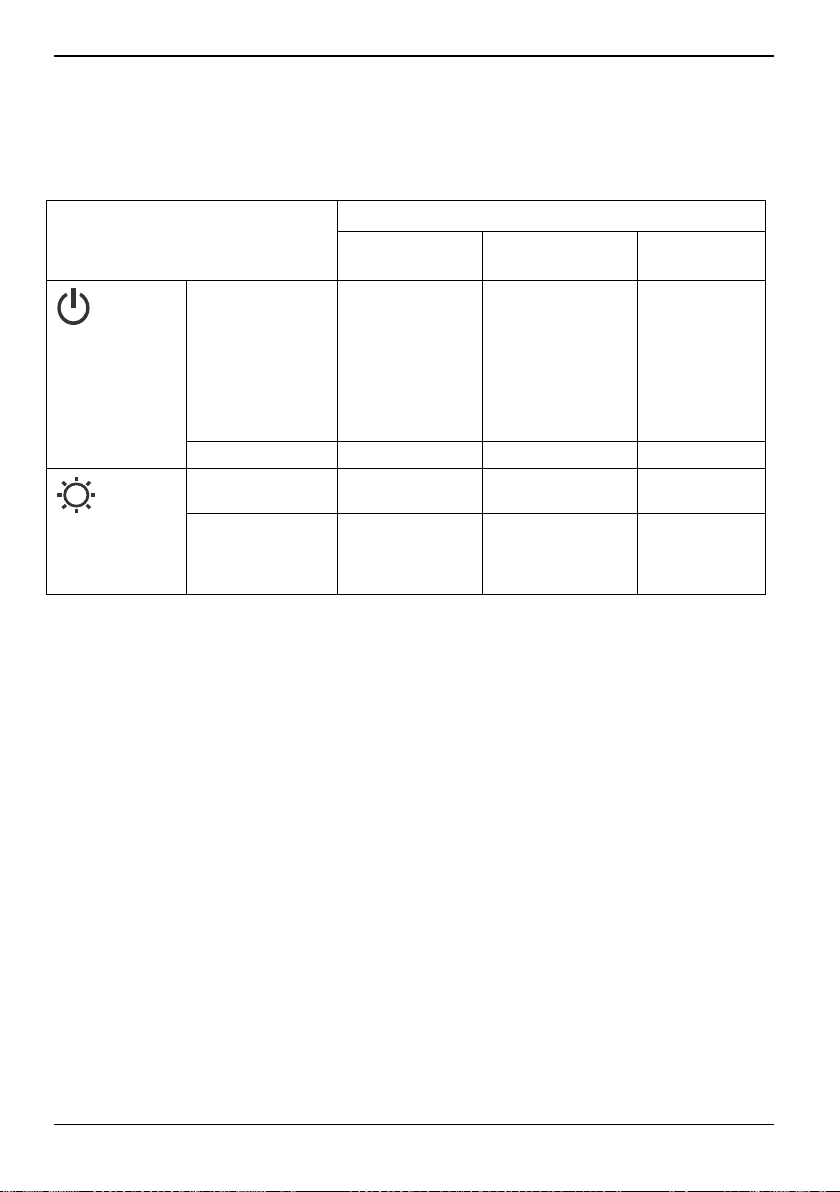
Control button states
The different states of the control buttons provide additional information about the status of the Bay
Projector.
Green, solid
Orange, solid
Orange, blinking
Fujitsu Technology Solutions 5
Blinking
Blinking
Blinking
Description
Room temperature is about to grow too
high, please pay attention.
The Bay Projector is to hot. Let it cool
down before putting it into operation
again.
A problem has occurred. Retract the
projector part.
If the problem continues and the button
does not stop blinking, contact your
Fujitsu Service Desk.
Page 12

English - 6 Ports and operating elements
Button operation in relation to button status
Button operation
Initial status
Colour Orange.
Status of laser Off On -
Laser brightness
(Battery)
Laser brightness
(AC adapter)
When the
Projector is
switched on, the
Laser On/Off
button lights up
orange.
30 lm 20 lm -
40 lm 30 lm -
Push Push more
than 2 sec
Green -
6 Fujitsu Technology Solutions
Page 13

Important notes English - 7
Important notes
In this chapter you will find information regarding safety which it is essential to take note of when
working with your device.
Safety notes
Pay attention to the information provided in the "Safety / Regulations" manual and in the
following safety notes.
!
• Do not put the notebook on your lap or any other part of your body for a longer period of time.
The bottom of the notebook and of the Bay Projector will get hot. This may lead to burns.
• Do not touch the air vents or any other hot surface of the Bay Projector while the Bay Projector
is running. This may lead to burns.
• Do not put items close to the air vents of the Bay Projector or block the air vents while the Bay
Projector is running. The Bay Projector may overheat. Fire hazard!
• Do not touch the lens of the Bay Projector. The edges of the lens are both hot and sharp, which
can lead to injuries.
• Do not use the notebook and the Bay Projector in an unstable, wet or dusty environment.
• Do not touch the connector of the Bay Projector.
• Avoid shock and vibrations.
• The laser lens is made of glass. Avoid impact to prevent the lens from breaking.
Laser safety
This device uses a Class 1 laser. It complies with Class 1 of the international laser product standard
IEC 60825-1.
Never look directly into the laser beam.
!
Never point a laser beam at a person, and do not allow children to use this product.
Transporting and positioning the device
• Prior to extracting or retracting the Bay Projector, put your notebook on a desk or other stable,
even surface.
• Prior to transporting the notebook, push the Bay Projector back into the bay. Otherwise
vibrations or impact may damage the Bay Projector.
Fujitsu Technology Solutions 7
Page 14

English - 8 Important notes
General information concerning operation
• This device cannot display protected content.
• Windows XP operating systems: The Bay Projector cannot project 3D content or DirectX-based
games.
• Hardware acceleration is not supported.
• There may be stuck and/or dead pixels in the projected image. This does not represent a
malfunction. Effective pixels are 99.99% or more.
8 Fujitsu Technology Solutions
Page 15

First-time setup of your device English - 9
First-time setup of your device
Installing drivers
► Insert the Bay Projector Driver CD/DVD in the optical drive of your notebook.
Or
► Insert the driver's CD/DVD in an external CD/DVD drive.
For Windows 7:
► Select Start - All Programs - Accessories - Run.
► Enter e:\Win7\setup.exe and confirm with OK.
For Windows XP:
► Select Start - Run.
► Enter e:\WinXP\setup.exe and confirm with OK.
"e:" represents the drive letter of your CD/DVD drive. You can enter both of capital and
small letters.
i
► Follow the instructions on the screen.
The installation starts.
During installation, ensure the following:
!
• Do not cancel the installation process.
• Do not start any other software application.
• Do not turn off your notebook.
► Once installation is complete, reboot your notebook when prompted.
Fujitsu Technology Solutions 9
Page 16
English - 10 First-time setup of your device
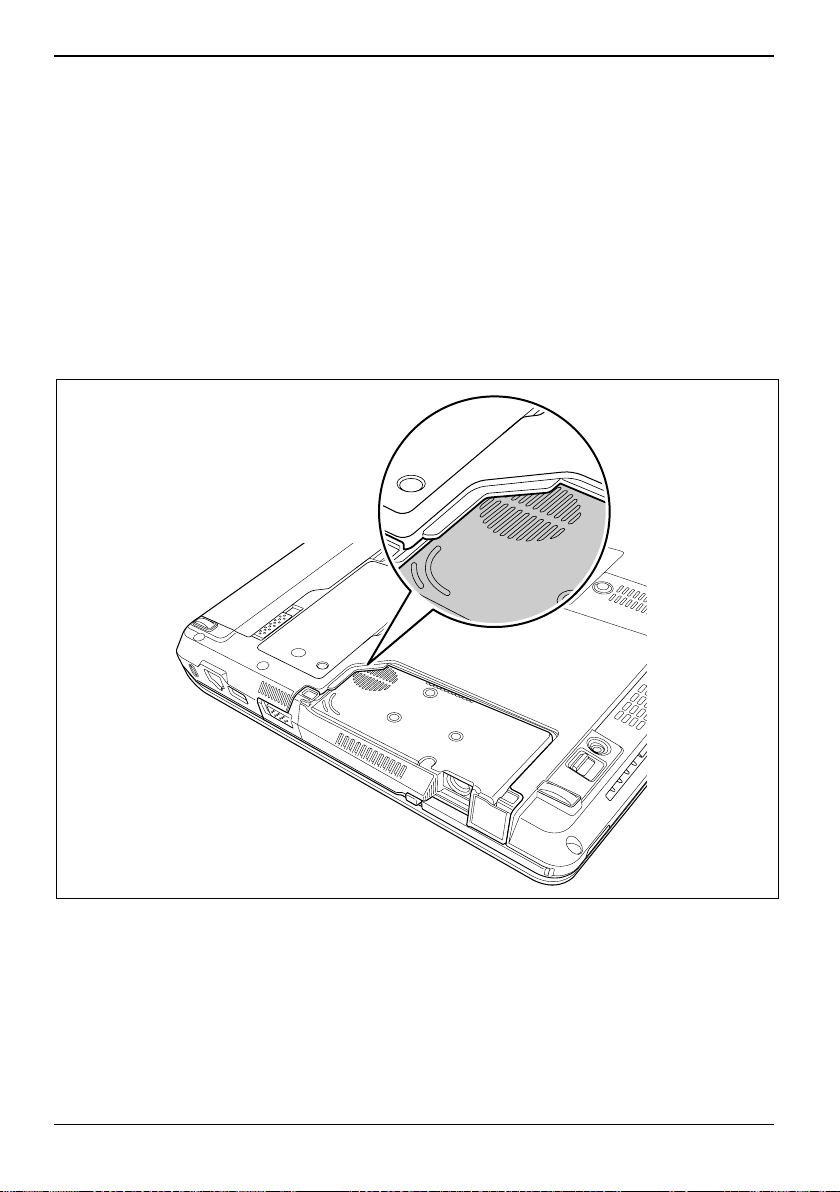
Installing the Bay Projector
► Close the LCD screen of the notebook.
► Remove all the cables from the notebook.
► Turn the notebook over and place it on a stable, flat and clean surface. If necessary, lay an
anti-slip cloth on this surface to prevent the device from being scratched.
► Ensure that the notebook bay is empty.
► Push the Bay Projector into the notebook bay.
In case of LIFEBOOK S Series, the bottom of the Bay Projector is not level with the bottom of the
LIFEBOOK itself (see circle):
10 Fujitsu Technology Solutions
Page 17

First-time setup of your device English - 11
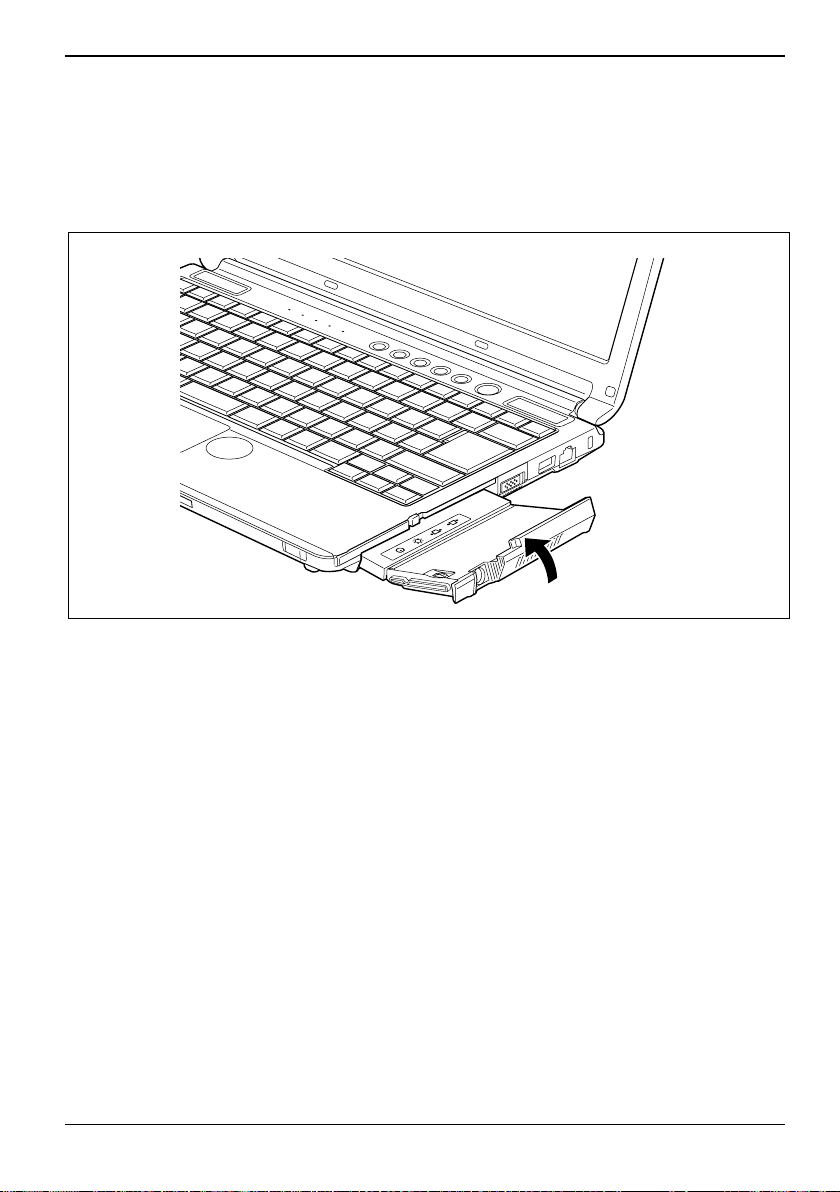
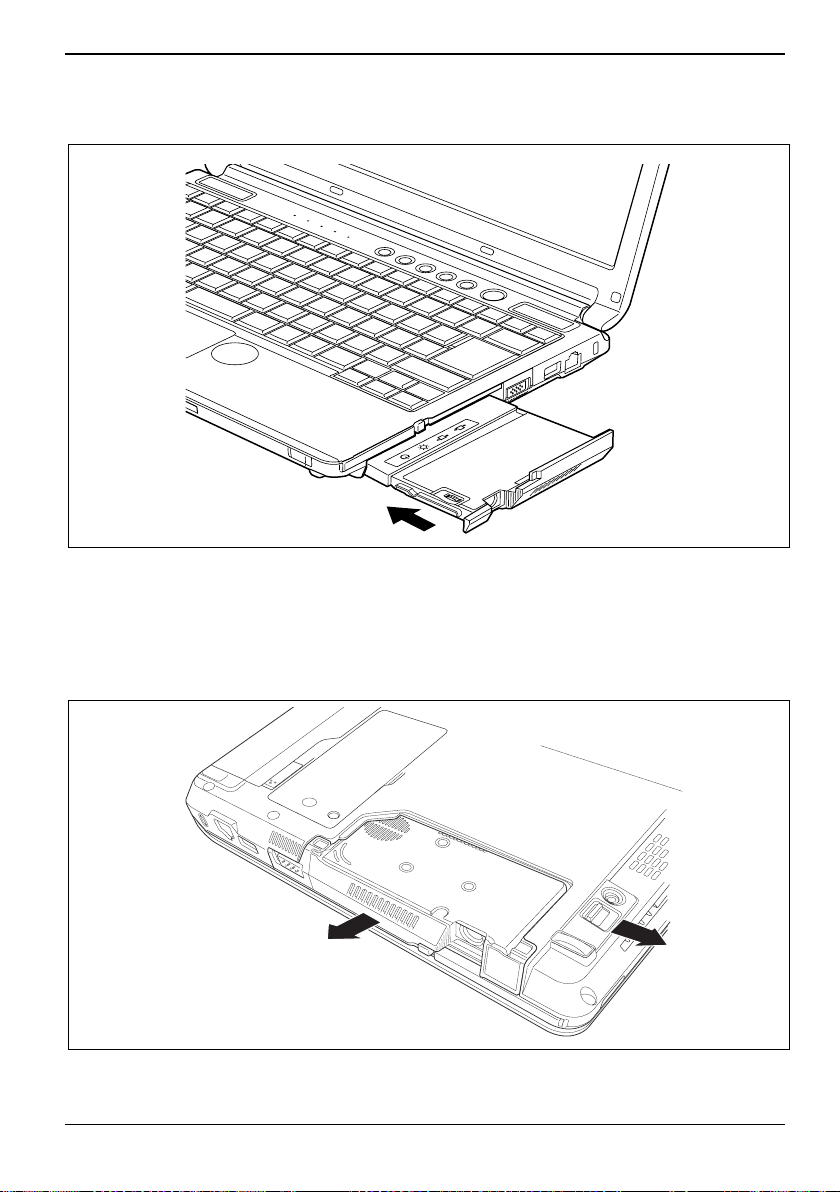
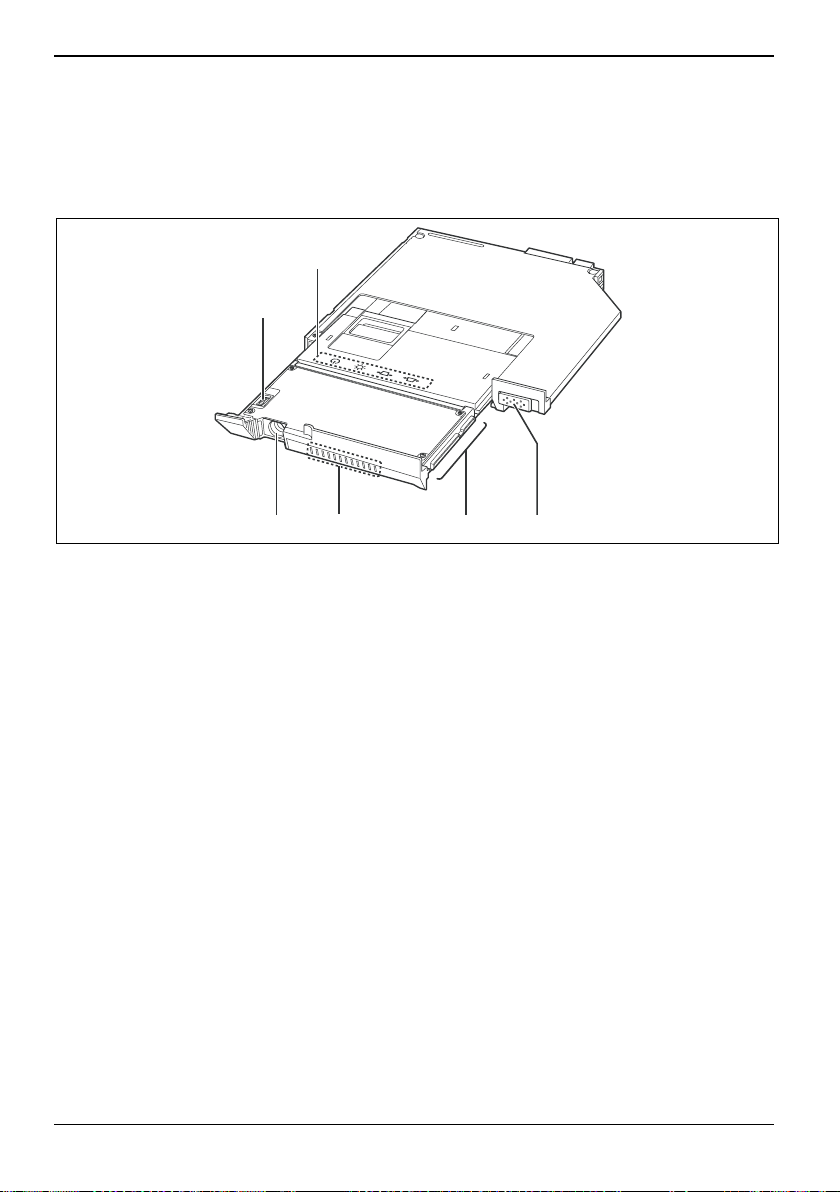
Removing the Bay Projector
► Before removing the Bay Projector, retract the Bay Projector into the notebook bay.
► Close the LCD screen of the notebook.
► Remove all the cables from the notebook.
► Turn the notebook over and place it on a stable, flat and clean surface. If necessary, lay an
anti-slip cloth on this surface to prevent the device from being scratched.
2
► Slide the release mechanism (1) in the direction of the arrow and hold.
► Pull the Bay Projector (2) out of the notebook bay.
1
Fujitsu Technology Solutions 11
Page 18
English - 12 Working with the Bay Projector
Working with the Bay Projector
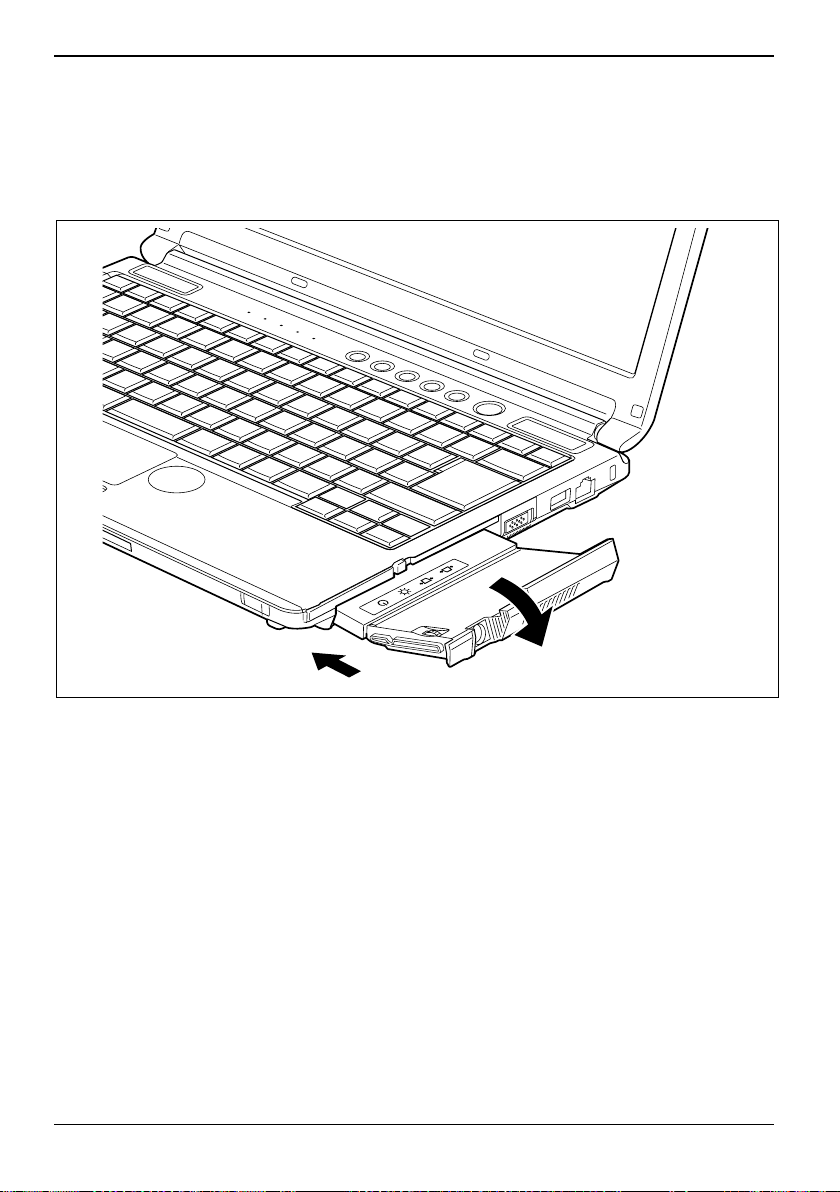
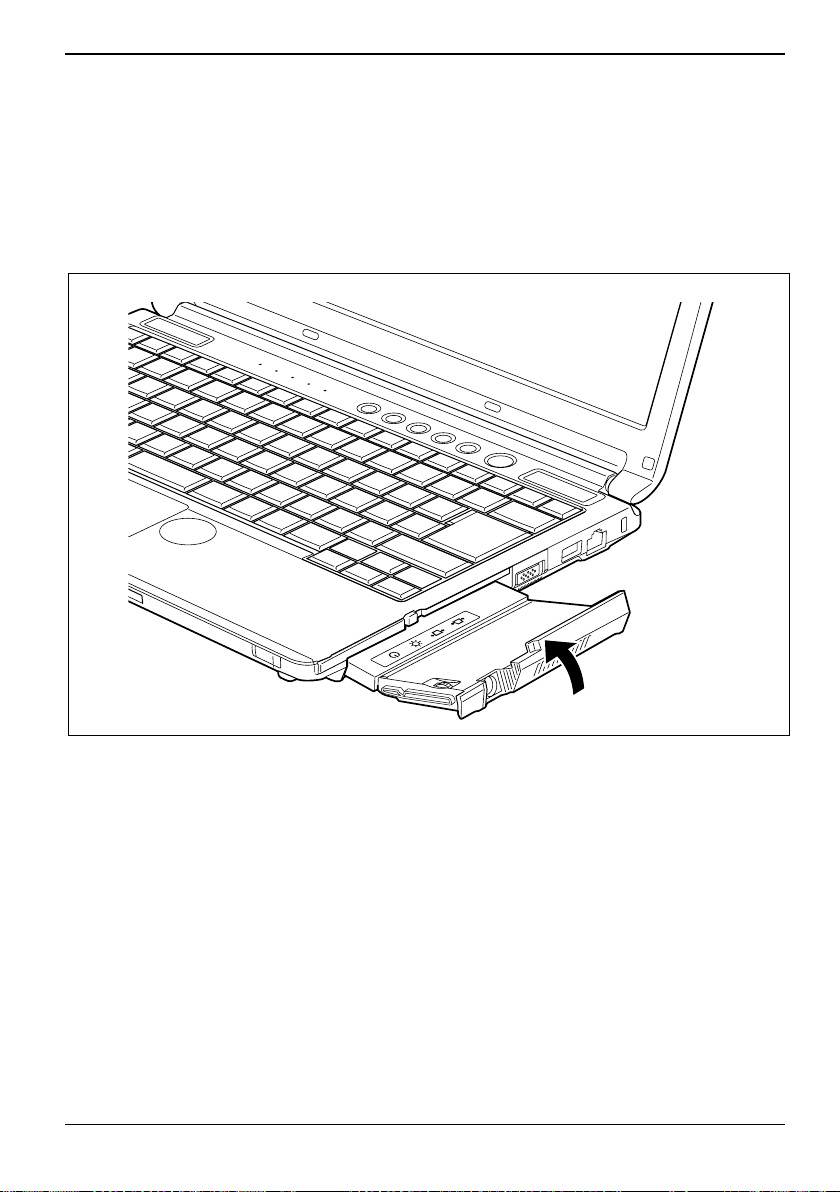
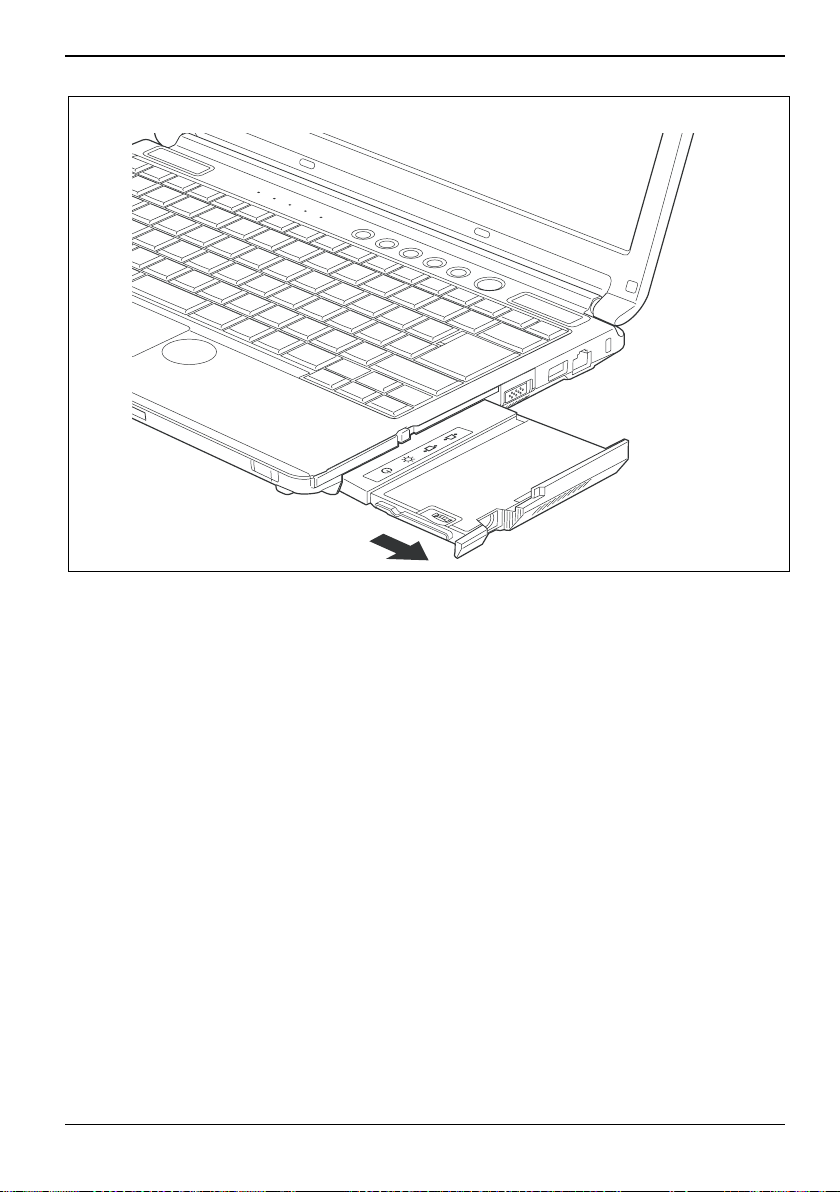
Switching on the Bay Projector
► To unlock the Bay Projector, slide the release lever in the direction of the arrow.
► Pull the Bay Projector out of the bay until you can see the control buttons.
The Bay Projector is automatically switched on.
The Laser On/Off button lights up orange.
12 Fujitsu Technology Solutions
Page 19
Working with the Bay Projector English - 13
► Press the Laser On/Off button.
The laser is switched on. The Laser On/Off button lights up green.
Adjusting projection angles and image rotation
► If necessary, adjust the angle of the Bay Projector to between 0 and 90 angular degrees.
Fujitsu Technology Solutions 13
Page 20

English - 14 Working with the Bay Projector
Using the focus wheel to adjust image sharpness
1
► To adjust image sharpness, scroll the focus wheel (1) up or down.
14 Fujitsu Technology Solutions
Page 21
Working with the Bay Projector English - 15
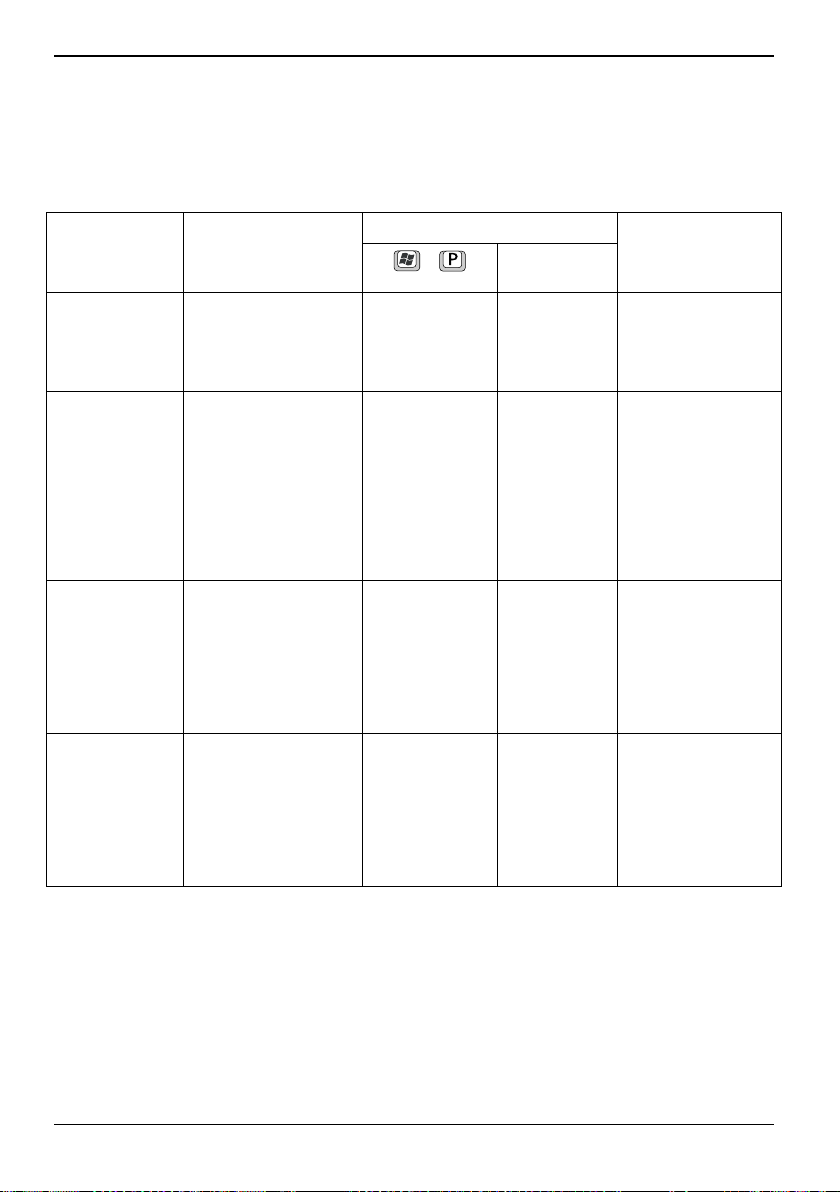
Switching display modes
You can select the display mode of your notebook and your Bay Projector. Use the display mode
functionality of your respective Windows operating system:
Display
mode
Extended
Desktop
Clone
mode
Projector
only
Projector
off
Description
Extends the right side of
your internal display to
the projector screen.
Displays the same
image on both your
internal display and the
Bay Projector. Both
displays must be set to
the same display
resolution.
Displays the image on
the Bay Projector only.
Displays the image on
your notebook only.
Projector is turned off
when you press the
Laser On/Off button.
Option in Windows 7
Multi Display
Display
Mode
Desktop to
Secondary
Display
Display
Desktop to
Primary
Display
+
Extended Extend
Duplicate Use Clone
Projector Only Display
Disconnect
Projector
Option in Windows
XP
Projector: Secondary
Display
Projector:
Clone Display
Projector: --
Projector-off
Fujitsu Technology Solutions 15
Page 22
English - 16 Working with the Bay Projector
Switching off the Bay Projector
► Press the Laser On/Off button.
The Laser On/Off Button changes to orange. The laser is turned off.
1
2
► Lower the Bay Projector until it reaches 0 angular degrees (1).
► Retract the Bay Projector into the notebook bay (2).
The Bay Projector is turned off.
16 Fujitsu Technology Solutions
Page 23
Frequently Asked Questions – FAQ English - 17
Frequently Asked Questions – FAQ
This section helps you to resolve problems you may encounter while setting up or using the Bay
Projector.
Some problems may not be directly linked to the Bay Projector. Therefore, also check any other
equipment connected to your notebook.
If you are not able to solve a particular problem, please contact your distributor or Fujitsu Service
Desk.
Problem Troubleshooting
The Bay Projector cannot be
switched on.
No picture. Is the Laser On/Off button blinking?
Blue screen
Picture is not sharp
► Check if the projector is properly installed in the bay,
see chapter "
Installing the Bay Projector".
• The Laser On/Off button starts blinking orange once
room temperature or Bay Projector temperature are
getting too high.
► Retract the projector part.
► If the problem continues and the button does not stop
blinking, contact your Fujitsu Service Desk.
Are all of control buttons blinking?
• All of control buttons start blinking when problems
occur.
► Retract the projector part.
► If the problem continues and the buttons do not stop
blinking, contact your Fujitsu Service Desk.
Is the Laser On/Off button solid orange?
After resuming operation from Sleep/Hibernate mode, or
immediately after extracting the Projector Bay, the button
remains orange and there is no picture.
► Press the Laser On/Off button to resume operation
(Laser On/Off button turns green).
Is Disconnect projector selected as display mode?
• The Bay Projector is switched off.
► Refer to chapter "
the display mode.
Room temperature is too low.
► Select another location to setup your Bay Projector.
► Adjust image sharpness, see chapter "
wheel to adjust image sharpness".
Switching display modes" to switch
Using the focus
Fujitsu Technology Solutions 17
Page 24

English - 18 Technical data
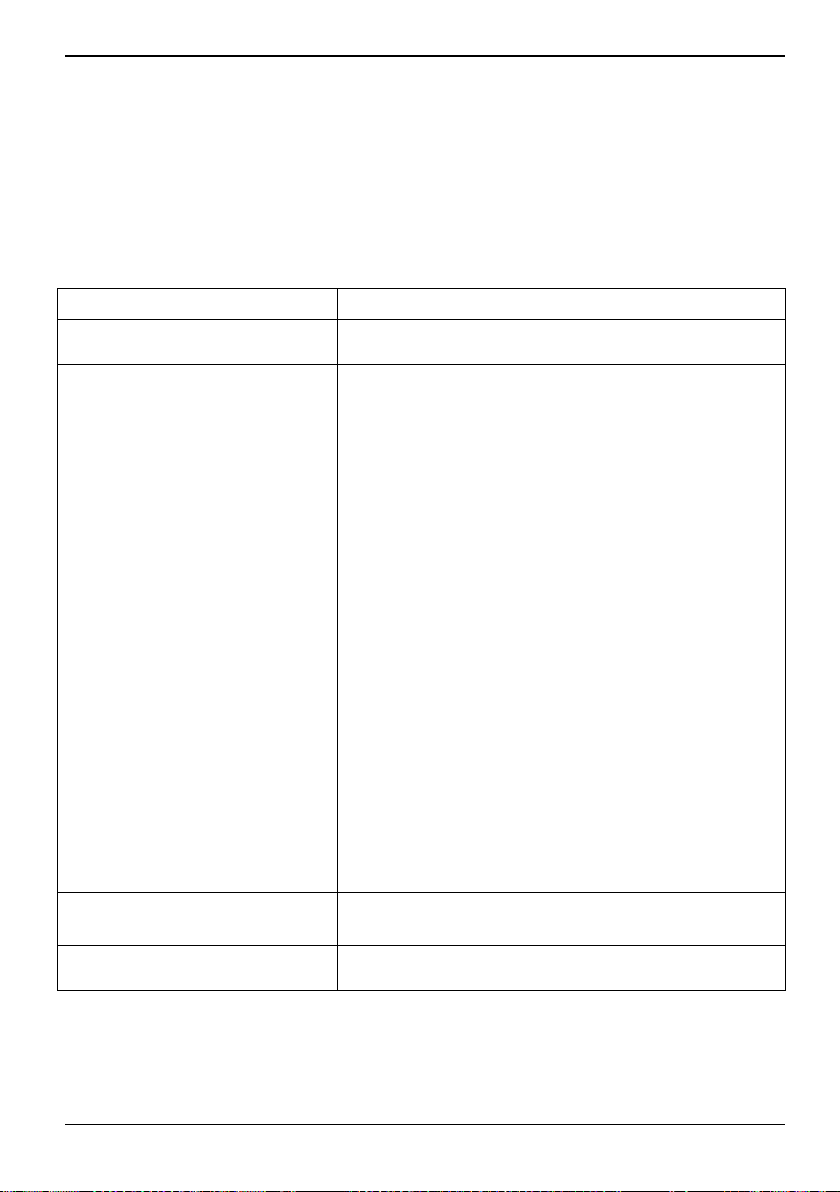
Technical data
Bay Projector for
Resolution 800 x 600 pixels
Image size (Projection
distance)
Brightness 40 lm / 30 lm (AC Adapter)
Keystone Manual / Auto 0 to 18 angular degrees: 3 steps
Temperature /
Humidity
Outside dimensions
(Protrusion included):
Width x depth x height
Weight 220 g
LIFEBOOK S761
15 inches to 75 inches (0.5 m to 2.5 m)
30 lm / 20 lm (Battery)
Operating Temperature: 5 to 35 °C / 20 to 80 % RH (Non-condensing)
Storage Temperature: -10 to 60 °C / 20 to 80 % RH (Non-condensing)
132.4 mm x 139.7 mm x 21.5 mm 130.1 mm x 135.3 mm x 15.9 mm
Bay Projector for
LIFEBOOK P771
18 Fujitsu Technology Solutions
Page 25

Inhalt Deutsch - 1
Inhalt
Innovative Technologie...................................................................................................................... 3
Handbuchkonventionen........................................................................................................................ 3
Anschlüsse und Komponenten......................................................................................................... 4
Bedienungstasten................................................................................................................................. 5
Zustandsanzeige der Bedienungstasten .............................................................................................. 5
Tastenbedienung mit Bezug auf die Zustandsanzeige......................................................................... 6
Wichtige Hinweise..............................................................................................................................7
Sicherheitshinweise.............................................................................................................................. 7
Lasersicherheit ..................................................................................................................................... 7
Transport und Ausrichtung des Geräts................................................................................................. 7
Allgemeine Informationen zum Betrieb................................................................................................. 8
Inbetriebnahme Ihres Geräts.............................................................................................................9
Treiberinstallation ................................................................................................................................. 9
Einbau des Bay Projectors ................................................................................................................. 10
Ausbau des Bay Projectors ................................................................................................................ 11
Arbeiten mit dem Bay Projector......................................................................................................12
Einschalten des Bay Projectors.......................................................................................................... 12
Einstellung von Projektionswinkel und Bilddrehung ........................................................................... 13
Verwendung des Fokusrads zum Scharfstellen ................................................................................. 14
Umschalten zwischen Display-Modi................................................................................................... 15
Ausschalten des Bay Projectors......................................................................................................... 16
Häufig gestellte Fragen – FAQ ........................................................................................................ 17
Technische Daten............................................................................................................................. 19
Fujitsu Technology Solutions 19
Page 26

Deutsch - 2 Inhalt
20 Fujitsu Technology Solutions
Page 27

Innovative Technologie Deutsch - 3
Innovative Technologie
Ihr Bay Projector ist der weltweit erste Projektor, der in den modularen Schacht der Notebooks
LIFEBOOK P771 und LIFEBOOK S761 eingebaut werden kann. Der ausklappbare Bay Projector
kann innerhalb von Sekunden verwendet werden und macht Ihr Notebook noch komfortabler und
mobiler: Sie können Ihren Kollegen und Freunden Präsentationen, Tabellenkalkulationen oder
YouTube-Videos zeigen, ohne einen externen Beamer oder zusätzliche Kabel einsetzen zu müssen.
Der Aufbau ist ganz einfach: Um den eingebauten Beamer einzusetzen, müssen nur das Objektiv
und die Lampe aus dem modularen Schacht ausgeklappt und eingerastet werden.
Der Bay Projector kann auf fast allen Oberflächen eingesetzt werden. Helligkeits- und
Trapezkorrektur werden über eingebaute Tasten direkt vorgenommen. Die Lasertechnologie liefert
Kontrastreichtum und große Farbtiefe und garantiert scharfe, klare Bilder. Abgesehen von seiner
Mobilität ist der Bay Projector auch ruhiger und robuster als traditionelle Beamer, bei denen Objektiv
und Lampe leicht zu beschädigen sind.
Für Geschäftsreisende kann der Bay Projector nach einem langen Arbeitstag auch zum Heimkino im
Hotelzimmer werden, wo ganze Filme viel komfortabler und größer wiedergegeben werden können.
Der Bay Projector erweitert die Flexibilität des modularen Schachts in LIFEBOOK-Notebooks. Wenn
er nicht gebraucht wird, kann der Bay Projector leicht entfernt und gegen einen modularen zweiten
Akku, ein Super-Multi-DVD-Laufwerk oder einfach gegen einen Leereinschub (Weight-Saver)
ausgetauscht werden.
Die Abbildungen in diesem Handbuch zeigen das LIFEBOOK S761.
i
Handbuchkonventionen
Bedeutung der in diesem Handbuch verwendeten Symbole und Schriftarten:
!
i
► In Texten mit diesem Symbol werden Schritte beschrieben, die in der
Diese Schriftart kennzeichnet Bildschirmausgaben.
Diese Schriftart kennzeichnet Programmnamen, Befehle oder Menüoptionen.
"Anführungszeichen" kennzeichnen Kapitelnamen und Begriffe, die hervorgehoben werden sollen.
Fujitsu Technology Solutions 21
kennzeichnet Hinweise, deren Nichtbeachtung die Gesundheit gefährdet
oder zu Sachschäden führt.
kennzeichnet wichtige Informationen und Tipps für den sachgerechten
Umgang mit dem System.
aufgelisteten Reihenfolge durchgeführt werden müssen.
Page 28

Deutsch - 4 Anschlüsse und Komponenten
Anschlüsse und Komponenten
In diesem Kapitel werden die einzelnen Hardwarekomponenten des Geräts vorgestellt. Es enthält
eine Übersicht über Anzeigen und Anschlüsse des Geräts. Machen Sie sich vor der Arbeit mit dem
Gerät mit diesen Komponenten vertraut.
6
5
1 = Laserobjektiv
2 = Lüftungsöffnungen
3 = Projektor
1
2
3
4 = Entriegelung
5 = Fokusrad
6 = Bedienungstasten
4
22 Fujitsu Technology Solutions
Page 29

Anschlüsse und Komponenten Deutsch - 5
Bedienungstasten
Taste Beschreibung
Laser Ein/Aus-Taste.
Um den Projektor ein- und auszuschalten, siehe Kapitel "
Projectors".
Helligkeits-Taste.
Zur Regelung der Bildhelligkeit.
Mehrfaches Drücken der Helligkeits-Taste schaltet zwischen zwei
Helligkeitsstufen um (abhängig vom Ladezustand Ihres Notebooks).
Wird Ihr Notebook über den Akku betrieben, ist die Helligkeit niedriger.
Trapezeinstellungs-Tasten (oben, unten).
► Um die Breite des oberen Bildteils zu verringern, drücken Sie die obere
Trapezeinstellungs-Taste:
► Um die Breite des unteren Bildteils zu verringern, drücken Sie die untere
Trapezeinstellungs-Taste:
Einschalten des Bay
Zustandsanzeige der Bedienungstasten
Die Beleuchtung der Bedienungstasten liefert weitere Informationen über den Zustand des Bay
Projectors.
Grün, leuchtet
Orange, leuchtet
Orange, blinkt
Fujitsu Technology Solutions 23
Blinken
Blinken
Blinken
Beschreibung
Zimmertemperatur ist im Grenzbereich,
bitte beachten.
Der Bay Projector ist zu heiß. Lassen Sie
ihn vor erneuter Inbetriebnahme
abkühlen.
Ein Problem ist aufgetreten. Schieben Sie
den Projektor wieder hinein.
Falls das Problem weiterhin besteht und
die Taste nicht aufhört zu blinken,
wenden Sie sich an Ihr Service Desk.
Page 30

Deutsch - 6 Anschlüsse und Komponenten
Tastenbedienung mit Bezug auf die Zustandsanzeige
Tastenbedienung
Ausgangszustand
Farbe Orange
Laserstatus Aus Ein -
Laserhelligkeit
(Akkubetrieb)
Laserhelligkeit
(Netzbetrieb)
Wird der Projektor
eingeschaltet,
leuchtet die Laser
Ein/Aus-Taste
zunächst orange.
30 lm 20 lm -
40 lm 30 lm -
Drücken Länger als 2
Sek. drücken
Grün -
24 Fujitsu Technology Solutions
Page 31

Wichtige Hinweise Deutsch - 7
Wichtige Hinweise
Dieses Kapitel enthält Hinweise zur Sicherheit, die bei der Arbeit mit dem Gerät unbedingt beachtet
werden müssen.
Sicherheitshinweise
Beachten Sie die Angaben im Dokument "Sicherheit / Regularien" und in den folgenden
Hinweisen.
!
• Legen Sie das Notebook nie für längere Zeit auf Ihren Schoß oder auf einen anderen Körperteil.
Die Unterseite des Notebooks und des Bay Projectors wird heiß. Dies kann zu Verbrennungen
führen.
• Berühren Sie nicht die Lüftungsöffnungen oder andere heiße Oberflächen des Bay Projectors,
während dieser in Betrieb ist. Dies kann zu Verbrennungen führen.
• Stellen Sie keine Gegenstände vor die Lüftungsöffnungen des Bay Projectors und blockieren
Sie die Öffnungen nicht während des Betriebs. Der Bay Projector kann dabei überhitzen.
Feuergefahr!
• Berühren Sie das Objektiv des Bay Projectors nicht. Der Rand der Objektivlinse ist heiß und
scharf - Verletzungsgefahr!
• Verwenden Sie das Notebook und den Bay Projector nicht auf instabilem Untergrund oder in
einer feuchten oder staubigen Umgebung.
• Berühren Sie den Anschluss des Bay Projectors nicht.
• Vermeiden Sie Stöße und Erschütterungen.
• Das Laserobjektiv besteht aus Glas. Vermeiden Sie Stöße, um Linsenbruch zu verhindern.
Lasersicherheit
In diesem Gerät wird ein Laser der Klasse 1 verwendet. Er erfüllt die Anforderungen für Klasse 1 der
internationalen Norm für Laserprodukte IEC 60825-1.
Schauen Sie nie direkt in den Laserstrahl.
!
Richten Sie niemals einen Laserstrahl auf eine Person und lassen Sie Kinder dieses Gerät
nicht benutzen.
Transport und Ausrichtung des Geräts
• Bevor Sie den Bay Projector herausziehen oder hineinschieben, muss Ihr Notebook auf einem
Tisch oder auf einer anderen stabilen, ebenen Oberfläche stehen.
• Schieben Sie den Bay Projector zurück in den Schacht, bevor Sie das Notebook transportieren.
Ansonsten kann der Bay Projector durch Erschütterungen oder Stöße beschädigt werden.
Fujitsu Technology Solutions 25
Page 32

Deutsch - 8 Wichtige Hinweise
Allgemeine Informationen zum Betrieb
• Dieses Gerät kann keine geschützten Inhalte wiedergeben.
• Für Windows XP-Betriebssysteme: Der Bay Projector kann keine 3D-Inhalte oder auf DirectX
basierende Spiele darstellen.
• Hardwarebeschleunigung wird nicht unterstützt.
• Im projizierten Bild können ständig leuchtende oder ständig schwarze Pixel auftreten. Dabei
handelt es sich nicht um eine Fehlfunktion. Der Anteil der effektiven Pixel liegt bei 99,99 % oder
darüber.
26 Fujitsu Technology Solutions
Page 33
Inbetriebnahme Ihres Geräts Deutsch - 9
Inbetriebnahme Ihres Geräts
Treiberinstallation
► Legen Sie die Treiber-CD/DVD des Bay Projectors in das optische Laufwerk Ihres Notebooks
ein.
Oder
► Legen Sie die Treiber-CD/DVD in ein externes CD-/DVD-Laufwerk ein.
Für Windows 7:
► Wählen Sie Start - Alle Programme - Zubehör - Ausführen.
► Geben Sie e:\Win7\setup.exe ein und bestätigen Sie mit OK.
Windows XP:
► Wählen Sie Start - Ausführen.
► Geben Sie e:\WinXP\setup.exe ein und bestätigen Sie mit OK.
"e:" steht für den Laufwerkbuchstaben Ihres CD-/DVD-Laufwerks. Sie können sowohl
Groß- als auch Kleinbuchstaben verwenden.
i
► Befolgen Sie die Anweisungen auf dem Bildschirm.
Die Installation beginnt.
Beachten Sie während der Installation die folgenden Punkte:
!
• Brechen Sie den Installationsprozess nicht ab.
• Starten Sie keine andere Softwareanwendung.
• Schalten Sie Ihr Notebook nicht ab.
► Starten Sie nach Abschluss der Installation Ihr Notebook neu, wenn Sie dazu aufgefordert
werden.
Fujitsu Technology Solutions 27
Page 34
Deutsch - 10 Inbetriebnahme Ihres Geräts
Einbau des Bay Projectors
► Schließen Sie den LCD-Bildschirm Ihres Notebooks.
► Entfernen Sie alle Kabel von Ihrem Notebook.
► Drehen Sie das Notebook um und legen Sie es auf eine stabile, ebene und saubere
Oberfläche. Legen Sie gegebenenfalls ein Antirutschtuch auf diese Oberfläche, um Kratzer auf
dem Gerät zu verhindern.
► Stellen Sie sicher, dass der Notebookschacht leer ist.
► Schieben Sie den Bay Projector in den Notebookschacht.
Bei der LIFEBOOK-S-Serie schließt die Unterseite des Bay Projectors nicht eben mit der Unterseite
des LIFEBOOK selbst ab (siehe Kreis):
28 Fujitsu Technology Solutions
Page 35
Inbetriebnahme Ihres Geräts Deutsch - 11
Ausbau des Bay Projectors
► Schieben Sie den Bay Projector in den Notebookschacht, bevor Sie ihn ausbauen.
► Schließen Sie den LCD-Bildschirm Ihres Notebooks.
► Entfernen Sie alle Kabel von Ihrem Notebook.
► Drehen Sie das Notebook um und legen Sie es auf eine stabile, ebene und saubere
Oberfläche. Legen Sie gegebenenfalls ein Antirutschtuch auf diese Oberfläche, um Kratzer auf
dem Gerät zu verhindern.
2
► Schieben Sie die Haltevorrichtung (1) in Pfeilrichtung und halten Sie sie dort fest.
► Ziehen Sie den Bay Projector (2) aus dem Notebookschacht.
1
Fujitsu Technology Solutions 29
Page 36

Deutsch - 12 Arbeiten mit dem Bay Projector
Arbeiten mit dem Bay Projector
Einschalten des Bay Projectors
► Schieben Sie die Entriegelung in Pfeilrichtung, um den Bay Projector zu entriegeln.
► Ziehen Sie den Bay Projector heraus, bis Sie die Bedienungstasten sehen können.
30 Fujitsu Technology Solutions
Page 37
Arbeiten mit dem Bay Projector Deutsch - 13
Der Bay Projector wird automatisch eingeschaltet.
Die Laser Ein/Aus-Taste leuchtet orange.
► Drücken Sie die Laser Ein/Aus-Taste.
Der Laser wird eingeschaltet. Die Laser Ein/Aus-Taste leuchtet grün.
Einstellung von Projektionswinkel und Bilddrehung
► Gegebenenfalls kann der Winkel des Bay Projectors zwischen 0° und 90° eingestellt werden.
Fujitsu Technology Solutions 31
Page 38
Deutsch - 14 Arbeiten mit dem Bay Projector
Verwendung des Fokusrads zum Scharfstellen
1
► Drehen Sie das Fokusrad (1) nach oben oder unten, um die Bildschärfe einzustellen.
32 Fujitsu Technology Solutions
Page 39
Arbeiten mit dem Bay Projector Deutsch - 15
Umschalten zwischen Display-Modi
Sie können die Display-Modi Ihres Notebooks und Ihres Bay Projectors wählen. Verwenden Sie
hierzu die jeweilige Funktion Ihres Windows-Betriebssystems:
DisplayModus
Erweiterter
Desktop
Klonmodus Zeigt dasselbe Bild auf
Nur
Projektor
Projektor
aus
Beschreibung
Erweitert Ihre interne
Anzeige auf der
rechten Seite um den
Projektor.
der internen Anzeige
und auf dem Bay
Projector. Beide
Displays müssen auf
dieselbe
Bildschirmauflösung
eingestellt sein.
Zeigt das Bild nur auf
dem Bay Projector an.
Das Bild wird nur auf
Ihrem Notebook
dargestellt. Der
Projektor wird
ausgeschaltet, wenn
Sie die Laser Ein/AusTaste drücken.
Option in Windows 7
+
Erweitert Extend Display
Gespiegelt Use Clone
Nur Projektor Display Desktop
Verbindung mit
Projektor
trennen
Multidisplay
(Display
erweitern)
Mode
(Klonmodus
verwenden)
to Secondary
Display
(Desktop auf
Sekundärdisplay
anzeigen)
Display Desktop
to Primary
Display
(Desktop auf
Primärdisplay
anzeigen)
Option in Windows
XP
Projektor: Secondary
Display
(Sekundärdisplay)
Projektor:
Clone Display
(Display klonen)
Projektor: --
Projektor aus
Fujitsu Technology Solutions 33
Page 40

Deutsch - 16 Arbeiten mit dem Bay Projector
Ausschalten des Bay Projectors
► Drücken Sie die Laser Ein/Aus-Taste.
Die Laser Ein/Aus-Taste wechselt auf orange. Der Laser ist ausgeschaltet.
1
2
► Klappen Sie den Bay Projector (1) auf 0° herunter.
► Schieben Sie den Bay Projector in den Notebookschacht (2).
Der Bay Projector ist nun ausgeschaltet.
34 Fujitsu Technology Solutions
Page 41
Häufig gestellte Fragen – FAQ Deutsch - 17
Häufig gestellte Fragen – FAQ
Dieser Abschnitt hilft Ihnen dabei, Probleme beim Einrichten oder bei der Benutzung des Bay
Projectors zu beheben.
Manche von diesen Problemen hängen möglicherweise nur indirekt mit dem Bay Projector
zusammen. Überprüfen Sie also auch jegliches übrige Zubehör, das an Ihr Notebook angeschlossen
ist.
Wenn Sie das Problem nicht lösen können, verständigen Sie bitte Ihren Händler oder das Service
Desk.
Problem Lösung des Problems
Der Bay Projector lässt sich nicht
einschalten.
Kein Bild. Blinkt die Laser Ein/Aus-Taste?
► Überprüfen Sie, ob der Projektor korrekt im Schacht
eingebaut ist, siehe Kapitel "
Projectors".
Einbau des Bay
• Die Laser Ein/Aus-Taste beginnt orange zu blinken,
wenn Zimmertemperatur oder Temperatur des Bay
Projectors zu hoch sind.
► Schieben Sie den Projektor wieder hinein.
► Falls das Problem weiterhin besteht und die Taste
nicht aufhört zu blinken, wenden Sie sich an Ihr
Service Desk.
Blinken alle Bedienungstasten?
• Wenn ein Problem auftritt, beginnen alle
Bedienungstasten zu blinken.
► Schieben Sie den Projektor wieder hinein.
► Falls das Problem weiterhin besteht und die Tasten
nicht aufhören zu blinken, wenden Sie sich an Ihr
Service Desk.
Leuchtet die Laser Ein/Aus-Taste orange?
Wird das Gerät aus dem Energiesparmodus oder dem
Ruhezustand in den Normalmodus versetzt, oder wird der
Bay Projector ausgezogen, leuchtet die Taste zunächst
orange und es wird kein Bild dargestellt.
► Drücken Sie die Laser Ein/Aus-Taste um den Betrieb
wieder aufzunehmen (Laser Ein/Aus-Taste wechselt
auf grün).
Wurde Verbindung mit Projektor trennen als Display-Modus
ausgewählt?
• Der Bay Projector ist ausgeschaltet.
► Lesen Sie das Kapitel "
Modi", um den Display-Modus umzuschalten.
Umschalten zwischen Display-
Fujitsu Technology Solutions 35
Page 42

Deutsch - 18 Häufig gestellte Fragen – FAQ
Problem Lösung des Problems
Die projizierte Anzeige ist Blau.
Das Bild ist unscharf.
Die Zimmertemperatur ist zu niedrig.
► Stellen Sie Ihren Bay Projector an einem anderen Ort
auf.
► Stellen Sie die Bildschärfe ein, siehe Kapitel
"
Verwendung des Fokusrads zum Scharfstellen".
36 Fujitsu Technology Solutions
Page 43

Technische Daten Deutsch - 19
Technische Daten
Bay Projector für
Auflösung 800 x 600 Pixel
Bilddiagonale
(Projektionsabstand)
Helligkeit 40 lm / 30 lm (Netzbetrieb)
Trapezeinstellung Manuell / automatisch 0° bis 18°: 3 Schritte
Temperatur /
Feuchtigkeit
Abmessungen
(einschließlich
vorstehender Teile):
Breite x Tiefe x Höhe
Gewicht 220 g
LIFEBOOK S761
15 bis 75 Zoll (0,5 bis 2,5 m)
30 lm / 20 lm (Akkubetrieb)
Betriebstemperatur: 5 bis 35 °C / 20 bis 80 % relative Luftfeuchtigkeit
(nicht kondensierend)
Lagerungstemperatur: -10 bis 60 °C / 20 bis 80 % relative Luftfeuchtigkeit
(nicht kondensierend)
132,4 mm x 139,7 mm x 21,5 mm 130,1 mm x 135,3 mm x 15,9 mm
Bay Projector für
LIFEBOOK P771
Fujitsu Technology Solutions 37
Page 44

Deutsch - 20 Technische Daten
38 Fujitsu Technology Solutions
Page 45

Sommaire Français - 1
Sommaire
Technologie innovante....................................................................................................................... 3
Conventions de notation....................................................................................................................... 3
Ports et éléments de commande....................................................................................................... 4
Boutons de commande......................................................................................................................... 5
Etats des boutons de commande......................................................................................................... 5
Fonctionnement du bouton par rapport à l'état du bouton................................................................... 6
Remarques importantes .................................................................................................................... 7
Consignes de sécurité.......................................................................................................................... 7
Sécurité du laser................................................................................................................................... 7
Transport et positionnement du système ............................................................................................. 7
Informations générales concernant le fonctionnement......................................................................... 8
Première utilisation du système........................................................................................................ 9
Installation des pilotes .......................................................................................................................... 9
Installation du Bay Projector............................................................................................................... 10
Dépose du Bay Projector.................................................................................................................... 11
Utilisation du Bay Projector............................................................................................................. 12
Mise sous tension du Bay Projector ................................................................................................... 12
Réglage des angles de projection et de la rotation de l'image ........................................................... 14
Utilisation de la molette de mise au point pour régler la netteté de l'image ....................................... 15
Commutation des modes d'affichage ................................................................................................. 16
Mise hors tension du Bay Projector.................................................................................................... 17
Questions fréquemment posées – FAQ ......................................................................................... 18
Caractéristiques techniques ........................................................................................................... 19
Fujitsu Technology Solutions 39
Page 46

Français - 2 Sommaire
40 Fujitsu Technology Solutions
Page 47

Technologie innovante Français - 3
Technologie innovante
Votre Bay Projector est le premier projecteur au monde à être intégré dans une baie de notebook
modulaire pour LIFEBOOK P771 et LIFEBOOK S761. Le Bay Projector escamotable est prêt à
l'emploi en quelques secondes et ajoute de la commodité et de la mobilité à votre notebook : aucun
vidéoprojecteur externe ou câble externe n'est nécessaire pour partager des diapositives, des
feuilles de calcul ou des vidéos YouTube avec des collègues ou amis.
L'installation est aisée : le vidéoprojecteur intégré est immédiatement opérationnel dès que la lentille
et l'ampoule sont extraits de la baie modulaire de format DVD et correctement positionnés.
Le Bay Projector fonctionne sur presque n'importe quelle surface. Le réglage de la luminosité et la
correction du trapèze s'effectuent directement au moyen de boutons intégrés. La technologie laser
offre un haut niveau de contraste et une bonne profondeur de couleurs garantissant des images
claires et nettes. Outre sa portabilité, le Bay Projector est plus silencieux et plus robuste qu'un
vidéoprojecteur traditionnel dont les ampoules sont facilement endommagées.
Après une longue journée de travail, le voyageur d'affaires peut aussi utiliser le Bay Projector
comme "cinéma personnel de chambre d'hôtel", pour diffuser des films sur un plus grand écran pour
davantage de confort.
Le Bay Projector étend la polyvalence des baies modulaires dans les notebooks LIFEBOOK.
Lorsqu'il n'est pas utilisé, le Bay Projector se dépose facilement pour être remplacé par une seconde
batterie modulaire, un lecteur DVD Super Multi ou simplement un économiseur de poids.
Les images dans ce manuel montrent le LIFEBOOK S761.
i
Conventions de notation
Signification des symboles et polices de caractères utilisés dans ce manuel :
!
Indique des informations importantes pour votre santé ou pour éviter des
dommages matériels.
Indique des informations importantes pour la bonne utilisation du système.
i
► Le texte qui suit ce symbole décrit des opérations qui doivent être réalisées
Cette police Indique des sorties écran.
Cette police Indique des noms de programme, des commandes ou des options de menu.
"Guillemets" Indiquent des titres de chapitres, des supports de données et des termes
Fujitsu Technology Solutions 41
dans l'ordre indiqué.
que nous avons souhaité mettre en évidence.
Page 48
Français - 4 Ports et éléments de commande
Ports et éléments de commande
Ce chapitre présente les différents composants matériels de votre système. Il donne une vue
d'ensemble des indicateurs et ports du projecteur. Veuillez vous familiariser avec ces composants
avant de l'utiliser pour la première fois.
6
5
1 = Lentille laser
2 = Fentes d'aération
3 = Projecteur
1
2
3
4 = Levier de déblocage
5 = Molette de mise au point
6 = Boutons de commande
4
42 Fujitsu Technology Solutions
Page 49
Ports et éléments de commande Français - 5
Boutons de commande
Bouton Description
Bouton marche/arrêt du laser
Pour allumer et éteindre le projecteur. Se reporter au chapitre "
tension du Bay Projector".
Bouton Luminosité
Pour commander la luminosité de l'image.
En appuyant sur le bouton Luminosité, vous pouvez basculer entre deux
niveaux de luminosité (selon le type d'alimentation de votre notebook).
Lorsque votre notebook fonctionne sur l'alimentation batterie, la luminosité est
plus faible.
Boutons Correction du trapèze (haut, bas)
► Pour réduire la partie supérieure de l'image, appuyez sur le bouton
Trapèze supérieur :
► Pour réduire la partie inférieure de l'image, appuyez sur le bouton
Trapèze inférieur :
Mise sous
Etats des boutons de commande
Les différents états des boutons de commande fournissent des informations supplémentaires sur le
fonctionnement instantané du Bay Projector.
Vert, continu
Orange, continu
Orange,
clignotant
Fujitsu Technology Solutions 43
Clignotant
Clignotant
Clignotant
Description
Attention, la température ambiante va
bientôt atteindre un niveau excessif.
Le Bay Projector est trop chaud. Le
laisser refroidir avant de le remettre en
service.
Un problème s'est produit. Rentrez la
partie projecteur.
Si le problème persiste et le bouton ne
cesse pas de clignoter, contactez votre
Service Desk Fujitsu.
Page 50
Français - 6 Ports et éléments de commande
Fonctionnement du bouton par rapport à l'état du bouton
Fonctionnement du bouton
Etat initial
Couleur Orange.
Etat du laser Off On -
Luminosité du
laser (batterie)
Luminosité du
laser
(adaptateur
secteur)
A la mise sous
tension du
projecteur, le
bouton
marche/arrêt du
laser s'allume en
orange.
30 lm 20 lm -
40 lm 30 lm -
Pousser Pousser plus
de 2 s
Vert -
44 Fujitsu Technology Solutions
Page 51

Remarques importantes Français - 7
Remarques importantes
Ce chapitre contient des consignes de sécurité que vous devez impérativement respecter lors de
l'utilisation du système.
Consignes de sécurité
Suivez les informations fournies dans le manuel "Sécurité / Réglementation" et dans les
consignes de sécurité suivantes.
!
• Ne placez pas le notebook sur vos genoux ou toute autre partie du corps pendant une période
prolongée. La base du notebook et du Bay Projector s'échauffent. Risque de brûlures.
• Ne touchez pas les fentes d'aération ou toute autre surface chaude du Bay Projector pendant
son fonctionnement. Risque de brûlures.
• Ne posez pas des objets à proximité des fentes d'aération du Bay Projector et n'obstruez pas
les fentes d'aération du Bay Projector pendant son fonctionnement. Risque de surchauffe du
Bay Projector. Risque d'incendie !
• Ne touchez pas la lentille du Bay Projector. Les bords de la lentille sont chauds et coupants.
Risque de blessures.
• N'utilisez pas le notebook et le Bay Projector dans un environnement instable, humide ou
poussiéreux.
• Ne touchez pas le connecteur du Bay Projector.
• Evitez les chocs et vibrations.
• La lentille laser est en verre. Evitez tout choc qui pourrait casser le verre.
Sécurité du laser
Cet appareil utilise un laser de classe I. Il est conforme à la classe I de la norme internationale IEC
60825-1 relative aux produits laser.
Ne regardez pas directement le faisceau laser.
!
Ne dirigez jamais un faisceau laser vers une personne et ne laissez pas des enfants
utiliser ce produit.
Transport et positionnement du système
• Avant d'extraire ou de rentrer le Bay Projector, placez votre notebook sur un bureau ou autre
surface stable et régulière.
• Avant de transporter le notebook, repoussez le Bay Projector dans la baie faute de quoi des
vibrations ou chocs pourraient endommager le projecteur.
Fujitsu Technology Solutions 45
Page 52

Français - 8 Remarques importantes
Informations générales concernant le fonctionnement
• Cet appareil ne peut pas afficher un contenu protégé.
• Systèmes d'exploitation Windows XP : Le Bay Projector ne peut pas projeter un contenu 3D ou
des jeux basés sur DirectX.
• L'accélération matérielle n'est pas prise en charge.
• Des pixels bloqués et/ou morts peuvent être présents dans l'image projetée. Il ne s'agit pas
d'une anomalie. Les pixels efficaces représentent 99,99% ou plus du total.
46 Fujitsu Technology Solutions
Page 53

Première utilisation du système Français - 9
Première utilisation du système
Installation des pilotes
► Insérez le CD/DVD du pilote du Bay Projector dans le lecteur optique de votre notebook.
Ou
► Insérez le CD/DVD dans un lecteur de CD/DVD externe.
Pour Windows 7 :
► Sélectionnez Démarrer - Tous les programmes - Accessoires - Exécuter.
► Entrez e:\Win7\setup.exe et confirmez avec OK.
Pour Windows XP :
► Sélectionnez Démarrer - Aller à démarrer - Exécuter.
► Entrez e:\WinXP\setup.exe et confirmez avec OK.
"e:" représente votre lecteur de CD/DVD. Vous pouvez saisir indifféremment des
majuscules ou des minuscules.
i
► Suivez les instructions apparaissant à l'écran.
L'installation commence.
Pendant l'installation, suivez les consignes suivantes :
!
• Ne pas annuler le processus d'installation.
• Ne pas lancer une autre application logicielle.
• Ne pas mettre le notebook hors tension.
► Une fois l'installation terminée, redémarrez le notebook lorsque cela vous est demandé.
Fujitsu Technology Solutions 47
Page 54

Français - 10 Première utilisation du système
Installation du Bay Projector
► Fermez l'écran LCD du notebook.
► Retirez tous les câbles du notebook.
► Retournez le notebook et placez-le sur une surface stable, propre et plate. Si nécessaire,
placez un tissu antidérapant sur cette surface pour ne pas rayer le périphérique.
► Assurez-vous que la baie du notebook est vide.
► Enfoncez le Bay Projector dans la baie du notebook.
Si le notebook est de type LIFEBOOK S, la base du Bay Projector n'est pas au même niveau que la
base du LIFEBOOK lui-même (voir cercle) :
48 Fujitsu Technology Solutions
Page 55
Première utilisation du système Français - 11
Dépose du Bay Projector
► Avant de déposer le Bay Projector, rentrez-le dans la baie du notebook.
► Fermez l'écran LCD du notebook.
► Retirez tous les câbles du notebook.
► Retournez le notebook et placez-le sur une surface stable, propre et plate. Si nécessaire,
placez un tissu antidérapant sur cette surface pour ne pas rayer le périphérique.
► Faites glisser le mécanisme de déblocage (1) dans le sens de la flèche et maintenez-le dans
cette position.
► Retirez le Bay Projector (2) de la baie du notebook.
2
1
Fujitsu Technology Solutions 49
Page 56

Français - 12 Utilisation du Bay Projector
Utilisation du Bay Projector
Mise sous tension du Bay Projector
► Pour débloquer le Bay Projector, faites glisser le levier de déblocage dans le sens de la flèche.
50 Fujitsu Technology Solutions
Page 57
Utilisation du Bay Projector Français - 13
► Retirez le Bay Projector de la baie jusqu'à ce que vous puissiez voir les boutons de
commande.
Le Bay Projector se met automatiquement sous tension.
Le bouton marche/arrêt du laser s'allume en orange.
► Appuyez sur le bouton marche/arrêt du laser.
Le laser s'allume. Le bouton marche/arrêt du laser s'allume en vert.
Fujitsu Technology Solutions 51
Page 58

Français - 14 Utilisation du Bay Projector
Réglage des angles de projection et de la rotation de l'image
► Si nécessaire, réglez l'angle du Bay Projector à une valeur entre 0 et 90 degrés.
52 Fujitsu Technology Solutions
Page 59

Utilisation du Bay Projector Français - 15
Utilisation de la molette de mise au point pour régler la netteté de l'image
1
► Pour régler la netteté de l'image, tournez la molette de mise au point (1) vers le haut ou le bas.
Fujitsu Technology Solutions 53
Page 60

Français - 16 Utilisation du Bay Projector
Commutation des modes d'affichage
Vous pouvez sélectionner le mode d'affichage de votre notebook et de votre Bay Projector. Utilisez
la fonctionnalité de mode d'affichage de votre système d'exploitation Windows :
Mode
d'affichage
Bureau
étendu
Clone
mode
(Mode
clone)
Projector
only
(Projecteur
seulement)
Projector
off
(Projecteur
éteint)
Description
Etendez le côté droit de
votre affichage interne
vers l'écran du
projecteur.
Affiche la même image
sur votre affichage
interne et le Bay
Projector. Les deux
affichages doivent être
réglés sur la même
résolution.
Affiche l'image sur le
Bay Projector
seulement.
Affiche l'image sur
votre notebook
seulement. Lorsque
vous appuyez sur le
bouton marche/arrêt du
laser, le projecteur
s'éteint.
Option dans Windows 7
Multi Display
Extend
Display
(Etendre
l'affichage)
Mode (Utiliser
le mode
clone)
Display
Desktop to
Secondary
Display
(Afficher le
bureau sur
l'affichage
secondaire)
Display
Desktop to
Primary
Display
(Afficher le
bureau sur
l'affichage
principal)
+
Extended
(Etendu)
Dupliquer Use Clone
Projector Only
(Projecteur
seulement)
Disconnect
Projector
(Déconnecter le
projecteur)
Option dans
Windows XP
Projecteur :
Affichage secondaire
Projecteur :
Clone Display
(Affichage clone)
Projecteur : --
Projector-off
(Projecteur éteint)
54 Fujitsu Technology Solutions
Page 61

Utilisation du Bay Projector Français - 17
Mise hors tension du Bay Projector
► Appuyez sur le bouton marche/arrêt du laser.
Le bouton marche/arrêt du laser devient orange. Le laser est éteint.
1
2
► Abaisser le Bay Projector jusqu'à un angle de 0 degré (1).
► Rentrez le Bay Projector dans la baie du notebook (2).
Le Bay Projector s'éteint.
Fujitsu Technology Solutions 55
Page 62

Français - 18 Questions fréquemment posées – FAQ
Questions fréquemment posées – FAQ
Cette section vous aide à résoudre les problèmes susceptibles d'être rencontrés pendant
l'installation ou l'utilisation du Bay Projector.
Certains peuvent ne pas être directement liés au Bay Projector. Par conséquent, vérifiez aussi tout
autre matériel raccordé à votre notebook.
Si vous n'êtes pas en mesure de résoudre un problème particulier, veuillez contacter votre
distributeur ou Service Desk Fujitsu.
Problème Dépannage
Impossible d'allumer le Bay
Projector.
Pas d'image. Le bouton marche/arrêt du laser clignote-t-il ?
Ecran bleu
L'image n'est pas nette
► Vérifiez que le projecteur est correctement installé
dans la baie, voir chapitre "
Projector".
Installation du Bay
• Le bouton marche/arrêt du laser clignote en orange
lorsque la température ambiante ou la température du
Bay Projector devient trop élevée.
► Rentrez la partie projecteur.
► Si le problème persiste et les boutons ne cessent pas
de clignoter, contactez votre Service Desk Fujitsu.
Tous les boutons de commande clignotent-ils ?
• Tous les boutons de commande clignotent lorsqu'un
problème se produit.
► Rentrez la partie projecteur.
► Si le problème persiste et les boutons ne cessent pas
de clignoter, contactez votre Service Desk Fujitsu.
Le bouton marche/arrêt du laser reste-t-il constamment
allumé en orange ?
Après reprise du fonctionnement à partir du mode
Veille/hibernation ou immédiatement après extraction du
Projector Bay, le bouton reste orange et il n'y a pas d'image.
► Appuyez sur le bouton marche/arrêt du laser pour
reprendre le fonctionnement (le bouton devient vert).
Le mode d'affichage Débrancher le projecteur est-il
sélectionné ?
• Le Bay Projector est mis hors tension.
► Reportez-vous au chapitre "
d'affichage" pour changer le mode d'affichage.
La température ambiante est trop basse.
► Choisissez un autre emplacement pour installer le Bay
Projector.
► Réglez la netteté de l'image, voir chapitre "
de la molette de mise au point pour régler la netteté
de l'image".
Commutation des modes
Utilisation
56 Fujitsu Technology Solutions
Page 63

Caractéristiques techniques Français - 19
Caractéristiques techniques
Bay Projector pour
Résolution 800 x 600 pixels
Taille d'image
(distance de
projection)
Luminosité 40 lm / 30 lm (adaptateur secteur)
Correction du trapèze Manuelle / auto 0 à 18 degrés : 3 niveaux
Température /
humidité
Dimensions
extérieures (partie
saillante incluse) :
Largeur x profondeur x
hauteur
Poids 220 g
LIFEBOOK S761
0,5 à 2,5 m (15 à 75 pouces)
30 lm / 20 lm (batterie)
Température de fonctionnement : 5 à 35 °C / 20 à 80 % d'humidité
relative (sans condensation)
Température de stockage : -10 à 60 °C / 20 à 80 % d'humidité relative
(sans condensation)
132,4 mm x 139,7 mm x 21,5 mm 130,1 mm x 135,3 mm x 15,9 mm
Bay Projector pour
LIFEBOOK P771
Fujitsu Technology Solutions 57
Page 64

Français - 20 Caractéristiques techniques
58 Fujitsu Technology Solutions
Page 65

Sommario Italiano - 1
Sommario
Tecnologia innovativa........................................................................................................................3
Convenzioni di notazione ..................................................................................................................... 3
Porte e componenti operativi............................................................................................................ 4
Pulsanti di comando ............................................................................................................................. 5
Stati pulsanti di comando ..................................................................................................................... 5
Funzionamento dei pulsanti in base al relativo stato............................................................................ 6
Note importanti...................................................................................................................................7
Note di sicurezza.................................................................................................................................. 7
Sicurezza del laser ............................................................................................................................... 7
Trasporto e posizionamento del dispositivo ......................................................................................... 7
Informazioni generali sul funzionamento.............................................................................................. 8
Impostazione iniziale del dispositivo................................................................................................ 9
Installazione dei driver.......................................................................................................................... 9
Installazione del Bay Projector ........................................................................................................... 10
Rimozione del Bay Projector .............................................................................................................. 11
Utilizzo del Bay Projector.................................................................................................................12
Accensione del Bay Projector............................................................................................................. 12
Regolazione dell'angolazione di proiezione e della rotazione dell'immagine ..................................... 14
Utilizzo della ghiera di messa a fuoco per la regolazione della nitidezza immagine.......................... 15
Commutazione delle modalità di visualizzazione ............................................................................... 16
Spegnimento del Bay Projector.......................................................................................................... 17
Domande frequenti...........................................................................................................................18
Dati tecnici ........................................................................................................................................ 20
Fujitsu Technology Solutions 59
Page 66

Italiano - 2 Sommario
60 Fujitsu Technology Solutions
Page 67
Tecnologia innovativa Italiano - 3
Tecnologia innovativa
Il Bay Projector è il primo proiettore al mondo integrato in un vano modulare del notebook,
disponibile per LIFEBOOK P771 e LIFEBOOK S761. Il Bay Projectorestraibile è pronto all'uso in
pochi secondi e aggiunge convenienza e mobilità al vostro notebook: è ora possibile condividere
diapositive, fogli elettronici e video di YouTube con colleghi e amici senza l'uso di proiettori e cavi
esterni.
Installazione semplice: il proiettore integrato è immediatamente pronto all'uso una volta che la lente
e la lampadina vengono estratte dal vano modulare DVD e fatte scattare in posizione.
Il Bay Projector funziona su quasi tutti i tipi di superficie. Luminosità e correzione trapezoidale sono
regolate direttamente tramite i pulsanti integrati sul dispositivo. La tecnologia laser offre un elevato
contrasto e profondità di colore per garantire immagini chiare e nitide. Oltre alla sua estrema
portabilità, il Projector Bay è più silenzioso e più robusto di un proiettore tradizionale, le cui
lampadine per obiettivo sono facilmente danneggiabili.
Al termine di una lunga giornata per i viaggiatori d’affari, il Bay Projector può anche trasformare una
camera d’albergo in una sala cinematografica personale, ed essere quindi utilizzato per riprodurre i
filmati su uno schermo più grande, fornendo una visione più agevole di un tradizionale display da
notebook.
Il Bay Projector estende la flessibilità dei vani modulari nei notebook LIFEBOOK. Quando non in
uso, il Bay Projector può essere facilmente rimosso e sostituito con una batteria modulare
aggiuntiva, un'unità DVD Super Multi o semplicemente con un modulo weight saver.
Le immagini riportate nel presente manuale fanno riferimento al notebook LIFEBOOK
S761.
i
Convenzioni di notazione
I significati dei simboli e dei caratteri utilizzati in questo manuale sono i seguenti:
!
Indica informazioni importanti per la salute e la prevenzione di danni
materiali.
Indica informazioni importanti che richiedono l'uso corretto del sistema.
i
► Il testo riportato accanto a questo simbolo descrive i passaggi da eseguire
Questo carattere Indica gli output a video.
Questo carattere indica nomi di programma, comandi oppure opzioni di menu.
"Virgolette" indicano i nomi dei capitoli, dei supporti dati e i termini evidenziati.
Fujitsu Technology Solutions 61
nell'ordine indicato.
Page 68

Italiano - 4 Porte e componenti operativi
Porte e componenti operativi
In questo capitolo vengono presentati i diversi componenti hardware del dispositivo e viene fornita
una panoramica delle spie e delle porte. Si invita l'utente ad acquisire dimestichezza con tali
componenti prima di iniziare a utilizzare il dispositivo.
6
5
1 = Lente laser
2 = Prese d'aria
3 = Proiettore
1
2
3
4 = Leva di sblocco
5 = Ghiera di messa a fuoco
6 = Pulsanti di comando
4
62 Fujitsu Technology Solutions
Page 69

Porte e componenti operativi Italiano - 5
Pulsanti di comando
Pulsante Descrizione
Pulsante On/Off laser.
Per informazioni sull'accensione e lo spegnimento del proiettore, vedere il
capitolo "
Pulsante luminosità.
Consente il controllo della luminosità dell'immagine.
Premendo il pulsante luminosità è possibile impostare uno dei due livelli di
luminosità (a seconda dello stato dell'alimentazione del notebook).
In caso di funzionamento del notebook tramite alimentazione a batteria, la
luminosità risulta inferiore.
Pulsanti correzione trapezoidale (superiore, inferiore).
► Per ridurre la parte superiore dell'immagine, premere il pulsante
► Per ridurre la parte inferiore dell'immagine, premere il pulsante
Accensione del Bay Projector".
correzione trapezoidale superiore.
correzione trapezoidale inferiore.
Stati pulsanti di comando
I diversi stati dei pulsanti di comando forniscono informazioni aggiuntive sullo stato del Bay
Projector.
Verde, costante
Arancione,
costante
Arancione,
lampeggiante
Fujitsu Technology Solutions 63
Lampeggiante
Lampeggiante
Lampeggiante
Descrizione
La temperatura ambiente sta per
raggiungere un livello troppo elevato,
prestare attenzione.
Il Bay Projector è troppo caldo. Farlo
raffreddare prima di utilizzarlo
nuovamente.
Si è verificato un problema. Riporre la
parte del proiettore nel notebook.
Se il problema persiste e il pulsante
continua a lampeggiare, contattare il
Service Desk Fujitsu.
Page 70
Italiano - 6 Porte e componenti operativi
Funzionamento dei pulsanti in base al relativo stato
Funzionamento del pulsante
Stato iniziale
Colore Arancione.
Stato del laser Disattivato Attivato -
Luminosità laser
(batteria)
Luminosità laser
(adattatore CA)
In caso di
proiettore
acceso, il
pulsante On/Off
del laser si
accende in
arancione.
30 lm 20 lm -
40 lm 30 lm -
Pressione Pressione
superiore ai 2
sec.
Verde -
64 Fujitsu Technology Solutions
Page 71

Note importanti Italiano - 7
Note importanti
In questo capitolo vengono fornite informazioni riguardanti la sicurezza di cui è necessario tenere
conto quando si utilizza il dispositivo.
Note di sicurezza
Prestare attenzione alle informazioni fornite nel manuale "Sicurezza/Norme" e nelle note
sulla sicurezza seguenti.
!
• Non posizionare il notebook sulle ginocchia o su altre parti del corpo per un periodo di tempo
prolungato. La parte inferiore del notebook e del Bay Projector si riscalda e potrebbe causare
ustioni.
• Non toccare le prese d'aria o altre superfici calde del Bay Projector mentre è in funzione. Ciò
potrebbe causare ustioni.
• Non bloccare le prese d'aria del Bay Projector e non collocarvi vicino alcun oggetto mentre il
dispositivo è in funzione. Il Bay Projector potrebbe surriscaldarsi e sussiste il rischio di incendio.
• Non toccare le lenti del Bay Projector in quanto i bordi sono caldi e affilati e potrebbero
provocare infortuni.
• Non utilizzare il notebook e il Bay Projector su una superficie instabile e in un ambiente umido o
polveroso.
• Non toccare il connettore del Bay Projector.
• Evitare urti e vibrazioni.
• La lente del laser è di vetro, pertanto prevenire impatti per evitare che si rompa.
Sicurezza del laser
Il dispositivo utilizza un laser di Classe 1 conforme alla Classe 1 della norma internazionale IEC
60825-1 relativa agli apparecchi laser.
Non guardare mai direttamente nel raggio laser.
!
Non puntare mai un raggio laser verso una persona e non consentire ai bambini l'utilizzo
di questo prodotto.
Trasporto e posizionamento del dispositivo
• Prima di estrarre o riporre nel notebook il Bay Projector, posizionare il notebook su una
scrivania o una superficie piana e stabile.
• Prima di trasportare il notebook, spingere nuovamente il Bay Project nel vano. In caso
contrario, le vibrazioni o un eventuale urto potrebbero danneggiare il Bay Projector.
Fujitsu Technology Solutions 65
Page 72

Italiano - 8 Note importanti
Informazioni generali sul funzionamento
• Questo dispositivo non può visualizzare contenuti protetti.
• Sistemi operativi Windows XP: il Bay Projector non è in grado di proiettare contenuti 3D o giochi
basati su DirectX.
• L'accelerazione hardware non è supportata.
• L'immagine proiettata potrebbe contenere pixel bloccati e/o morti ma questo non rappresenta
un malfunzionamento. I pixel effettivi sono 99,99% o più.
66 Fujitsu Technology Solutions
Page 73
Impostazione iniziale del dispositivo Italiano - 9
Impostazione iniziale del dispositivo
Installazione dei driver
► Inserire il CD/DVD del driver Bay Projector nell'unità ottica del notebook.
Oppure
► Inserire il CD/DVD del driver in un'unità CD/DVD esterna.
Per Windows 7:
► Selezionare Start - Esegui.
► Inserire e:\Win7\setup.exe e confermare con OK.
Per Windows XP:
► Selezionare Start - Esegui.
► Inserire e:\WinXP\setup.exe e confermare con OK.
"e:" rappresenta la lettera del drive per l'unità CD/DVD. Possono essere inserite lettere in
maiuscolo e in minuscolo.
i
► Seguire le istruzioni visualizzate.
L'installazione inizia.
Durante l'installazione, attenersi alle istruzioni seguenti:
!
• Non cancellare il processo di installazione.
• Non avviare altre applicazioni software.
• Non spegnere il notebook.
► Una volta completata l'installazione, riavviare il notebook quando viene richiesto.
Fujitsu Technology Solutions 67
Page 74

Italiano - 10 Impostazione iniziale del dispositivo
Installazione del Bay Projector
► Chiudere lo schermo LCD del notebook.
► Rimuovere tutti i cavi collegati al notebook.
► Capovolgere il notebook e posizionarlo su una superficie stabile, piana e pulita. Se necessario,
disporre un panno antiscivolo sulla superficie per evitare che il dispositivo si graffi.
► Assicurarsi che il vano del notebook sia vuoto.
► Spingere il Bay Projector nel vano del notebook.
Nel caso della serie S LIFEBOOK, la parte inferiore del Bay Projector non è a livello di quella del
LIFEBOOK (vedere parte cerchiata in figura):
68 Fujitsu Technology Solutions
Page 75

Impostazione iniziale del dispositivo Italiano - 11
Rimozione del Bay Projector
► Prima di rimuovere il Bay Projector, ritrarre il Bay Projector nel vano del notebook.
► Chiudere lo schermo LCD del notebook.
► Rimuovere tutti i cavi collegati al notebook.
► Capovolgere il notebook e posizionarlo su una superficie stabile, piana e pulita. Se necessario,
disporre un panno antiscivolo sulla superficie per evitare che il dispositivo si graffi.
2
► Fare scorrere il meccanismo di sblocco (1) nella direzione indicata dalla freccia e mantenerlo in
posizione.
► Estrarre il Bay Projector (2) dal vano del notebook.
1
Fujitsu Technology Solutions 69
Page 76

Italiano - 12 Utilizzo del Bay Projector
Utilizzo del Bay Projector
Accensione del Bay Projector
► Per sbloccare il Bay Projector, fare scorrere la leva di sblocco nella direzione indicata dalla
freccia.
70 Fujitsu Technology Solutions
Page 77

Utilizzo del Bay Projector Italiano - 13
► Estrarre il Bay Projector dal vano finché è possibile vedere tutti i pulsanti di comando.
Il Bay Projector si accende automaticamente.
Il pulsante On/Off del laser si accende in arancione.
► Premere il pulsante On/Off del laser.
Il laser è acceso. Il pulsante On/Off del laser si accende in verde.
Fujitsu Technology Solutions 71
Page 78

Italiano - 14 Utilizzo del Bay Projector
Regolazione dell'angolazione di proiezione e della rotazione dell'immagine
► Se necessario, regolare l'angolazione del Bay Projector tra 0 a 90 gradi.
72 Fujitsu Technology Solutions
Page 79

Utilizzo del Bay Projector Italiano - 15
Utilizzo della ghiera di messa a fuoco per la regolazione della nitidezza immagine
1
► Per regolare la nitidezza dell'immagine, girare la ghiera di messa a fuoco (1) su e giù.
Fujitsu Technology Solutions 73
Page 80
Italiano - 16 Utilizzo del Bay Projector
Commutazione delle modalità di visualizzazione
È possibile selezionare la modalità di visualizzazione del notebook e del Bay Projector. Utilizzare la
funzionalità delle modalità di visualizzazione del sistema operativo Windows in uso:
Modalità di
visualizzazione
Desktop esteso Consente di
Modo
clonazione
Solo proiettore Consente di
Proiettore
spento
Descrizione
estendere la parte
destra dello schermo
interno sullo schermo
di proiezione.
Consente di
visualizzare la stessa
immagine sullo
schermo esterno e sul
Bay Projector.
Entrambi gli schermi
devono essere
impostati con la
stessa risoluzione
schermo.
visualizzare
l'immagine solo sul
Bay Projector.
Consente di
visualizzare
l'immagine solo sul
notebook. Il proiettore
viene spento quando
si preme il pulsante
On/Off laser.
Opzione in Windows 7
Multischermo
Display
(Estendi
schermo)
Mode
(Utilizza
modo
clonazione)
Desktop to
Secondary
Display
(Visualizza
desktop su
schermo
secondario)
Display
Desktop to
Primary
Display
(Visualizza
desktop su
schermo
principale)
+
Esteso Extend
Duplicato Use Clone
Solo proiettore Display
Disconnetti
proiettore
Opzione in
Windows XP
Projector:
Secondary Display
(Proiettore:
schermo
secondario)
Projector:
Clone Display
(Proiettore: clona
schermo)
Projector: --
Projector-off
(Proiettore spento)
74 Fujitsu Technology Solutions
Page 81
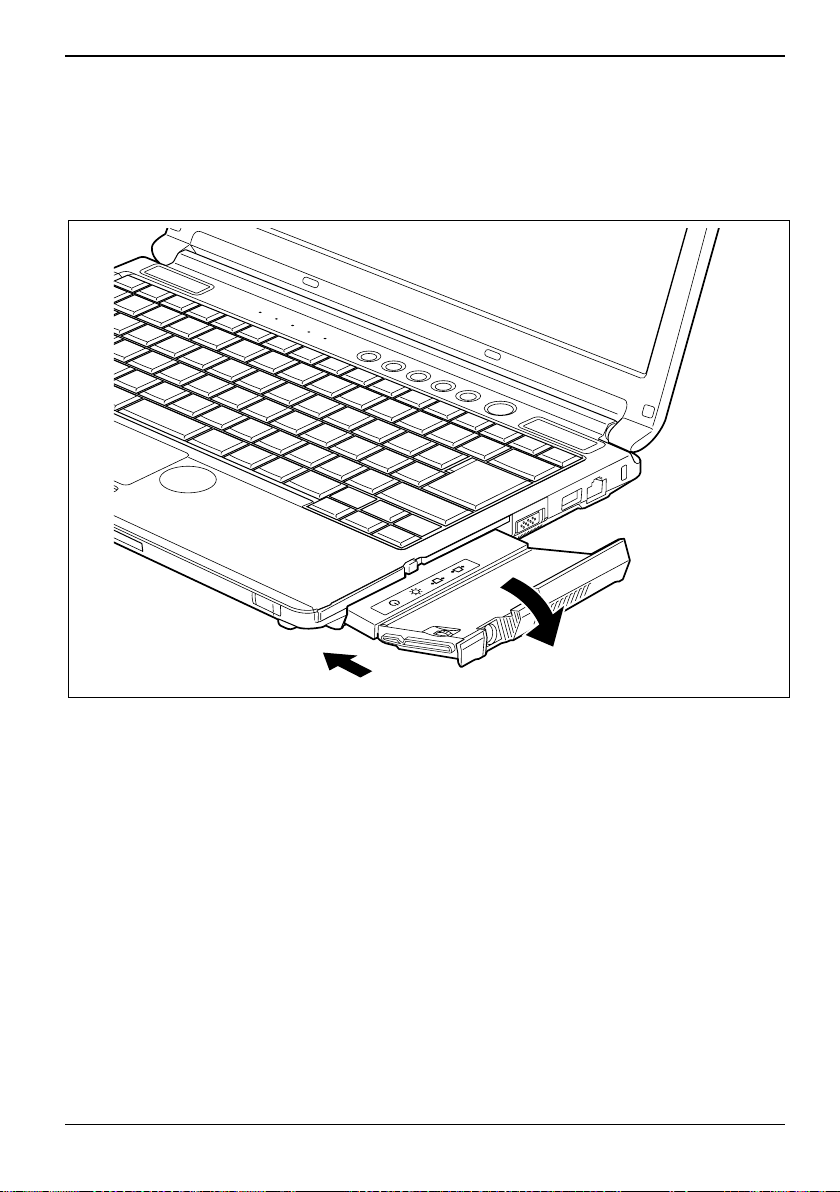
Utilizzo del Bay Projector Italiano - 17
Spegnimento del Bay Projector
► Premere il pulsante On/Off del laser.
Il pulsante On/Off del laser diventa arancione. Il laser viene spento.
1
2
► Abbassare il Bay Projector finché l'angolazione è pari a 0 gradi (1).
► Riporre il Bay Projector nel vano del notebook (2).
Il Bay Projector si spegne.
Fujitsu Technology Solutions 75
Page 82
Italiano - 18 Domande frequenti
Domande frequenti
Questa sezione supporta l'utente nella risoluzione dei problemi che possono verificarsi durante
l'impostazione e l'utilizzo del Bay Projector.
Alcuni problemi potrebbero non essere direttamente associati al Bay Projector. Pertanto, controllare
anche eventuali altri dispositivi collegati al notebook.
Se non è possibile risolvere un determinato problema, contattare il distributore o il Service Desk
Fujitsu.
Problema Risoluzione dei problemi
Non è possibile accendere il Bay
Projector.
Nessuna immagine presente. Il pulsante On/Off del laser lampeggia?
► Controllare se il proiettore è installato correttamente
nel vano; vedere il capitolo "
Projector".
Installazione del Bay
• Il pulsante On/Off del laser inizia a lampeggiare in
arancione in caso di incremento della temperatura
ambiente o del Bay Projector.
► Riporre la parte del proiettore nel notebook.
► Se il problema persiste e il pulsante continua a
lampeggiare, contattare il Service Desk Fujitsu.
Lampeggiano tutti i pulsanti di comando?
• Tutti i pulsanti di comando iniziano a lampeggiare
quando si verificano dei problemi.
► Riporre la parte del proiettore nel notebook.
► Se il problema persiste e i pulsanti continuano a
lampeggiare, contattare il Service Desk Fujitsu.
Il pulsante On/Off del laser è acceso in arancione?
Alla ripresa dal modo Sospensione/Ibernazione o
immediatamente dopo l'estrazione del Bay Projector, il
pulsante rimane acceso in arancione e non viene
visualizzata alcuna immagine.
► Premere il pulsante On/Off laser per riprendere le
operazioni (il pulsante On/Off laser si accende in
verde).
È selezionata la modalità di visualizzazione Disconnetti
proiettore?
• Il Bay Projector è spento.
► Per informazioni sulla commutazione della modalità di
visualizzazione, fare riferimento al capitolo
Commutazione delle modalità di visualizzazione".
"
76 Fujitsu Technology Solutions
Page 83

Domande frequenti Italiano - 19
Problema Risoluzione dei problemi
Immagine proiettata blu
Immagine non nitida
La temperatura ambiente è troppo bassa.
► Selezionare un'altra collocazione per il Bay Projector.
► Regolare la nitidezza dell'immagine; vedere il capitolo
"
Utilizzo della ghiera di messa a fuoco per la
regolazione della nitidezza immagine".
Fujitsu Technology Solutions 77
Page 84
Italiano - 20 Dati tecnici
Dati tecnici
Bay Projector per
Risoluzione 800 x 600 pixel
Dimensione
dell'immagine
(distanza proiezione)
Luminosità 40 lm/30 lm (adattatore CA)
Regolazione
trapezoidale
Temperatura/umidità Temperatura di funzionamento: da 5 a 35°C/UR da 20 a 80% RH (senza
Dimensioni esterne
(sporgenza inclusa):
Larghezza x
profondità x altezza
Peso 220 g
LIFEBOOK S761
Da 15 a 75 pollici (da 0,5 m a 2,5 m)
30 lm/20 lm (batteria)
Manuale/automatica da 0 a 18 gradi angolari: 3 incrementi
condensa)
Temperatura di conservazione: da -10 a 60°C/UR da 20 a 80% RH
(senza condensa)
132,4 mm x 139,7 mm x 21,5 mm 130,1 mm x 135,3 mm x 15,9 mm
Bay Projector per
LIFEBOOK P771
78 Fujitsu Technology Solutions
Page 85

Índice Español - 1
Índice
Tecnología innovadora ...................................................................................................................... 3
Convenciones tipográficas ................................................................................................................... 4
Puertos y componentes..................................................................................................................... 5
Botones de control................................................................................................................................ 6
Estados de los botones de control ....................................................................................................... 6
Funcionamiento de los botones con respecto a su estado .................................................................. 7
Importante...........................................................................................................................................8
Indicaciones de seguridad.................................................................................................................... 8
Seguridad del láser............................................................................................................................... 8
Transporte y colocación del dispositivo................................................................................................ 8
Información general sobre el funcionamiento....................................................................................... 9
Configuración inicial del dispositivo..............................................................................................10
Instalación de controladores............................................................................................................... 10
Instalación del proyector integrado..................................................................................................... 11
Extracción del proyector integrado..................................................................................................... 12
Trabajo con el proyector integrado ................................................................................................ 13
Encendido del proyector integrado..................................................................................................... 13
Ajuste de los ángulos de proyección y rotación de la imagen............................................................ 15
Uso de la rueda de enfoque para ajustar la nitidez de la imagen ...................................................... 16
Cambio entre modos de pantalla........................................................................................................ 17
Apagado del proyector integrado ....................................................................................................... 18
Preguntas frecuentes - FAQ............................................................................................................ 19
Datos técnicos..................................................................................................................................21
Fujitsu Technology Solutions 79
Page 86

Español - 2 Índice
80 Fujitsu Technology Solutions
Page 87

Tecnología innovadora Español - 3
Tecnología innovadora
Su proyector integrado es el primer proyector del mundo que se integra en el compartimento para
módulos de los portátiles LIFEBOOK P771 y LIFEBOOK S761. El proyector integrado orientable
está listo para usar en unos segundos y proporciona mayor comodidad y movilidad para su portátil:
no necesita un proyector ni cables externos para compartir diapositivas, hojas de cálculo o vídeos
de YouTube con sus compañeros o amigos.
La instalación es sencilla: el proyector integrado está listo para su uso inmediato en cuanto el
objetivo y la lámpara se despliega del compartimento modular del tamaño de la unidad de DVD y se
coloca en posición mediante un clic.
El proyector integrado funciona prácticamente en cualquier superficie. El brillo y la distorsión de
imagen se ajustan directamente mediante botones incorporados. La tecnología de haz láser ofrece
un alto contraste y profundidad de color para obtener unas imágenes nítidas y definidas. Además de
la movilidad, el proyector integrado es más silencioso y más resistente que un proyector tradicional,
cuyas lámparas del objetivo se dañan fácilmente.
Al final de una larga jornada para los hombres de negocios que viajan, el proyector integrado
también se convierte en un proyector de cine personal en la habitación del hotel, donde se puede
utilizar para reproducir películas en una pantalla más grande, ofreciendo una visión más confortable.
El proyector integrado aumenta la versatilidad de los compartimentos modulares de los portátiles
LIFEBOOK. Cuando no se utiliza, el proyector integrado se puede retirar fácilmente para sustituirlo
por una segunda batería modular, una unidad de DVD multiformato, o sencillamente para aligerar el
portátil.
Las imágenes de este manual corresponden al LIFEBOOK S761.
i
Fujitsu Technology Solutions 81
Page 88

Español - 4 Tecnología innovadora
Convenciones tipográficas
A continuación se indica al significado de los símbolos y los tipos de letra que se utilizan en este
manual:
!
Indica información importante para la salud o para prevenir posibles daños
materiales.
Indica información importante que permite utilizar el sistema correctamente.
i
► El texto que aparece a continuación de este símbolo indica los pasos que
Este tipo de
letra
Este tipo de letra Indica nombres de programas, comandos o elementos de menú.
Las "comillas" Indican los títulos de los capítulos, nombres de soportes de datos y términos
deben realizarse en el orden indicado.
Indica información que aparece en pantalla.
que desean destacarse.
82 Fujitsu Technology Solutions
Page 89
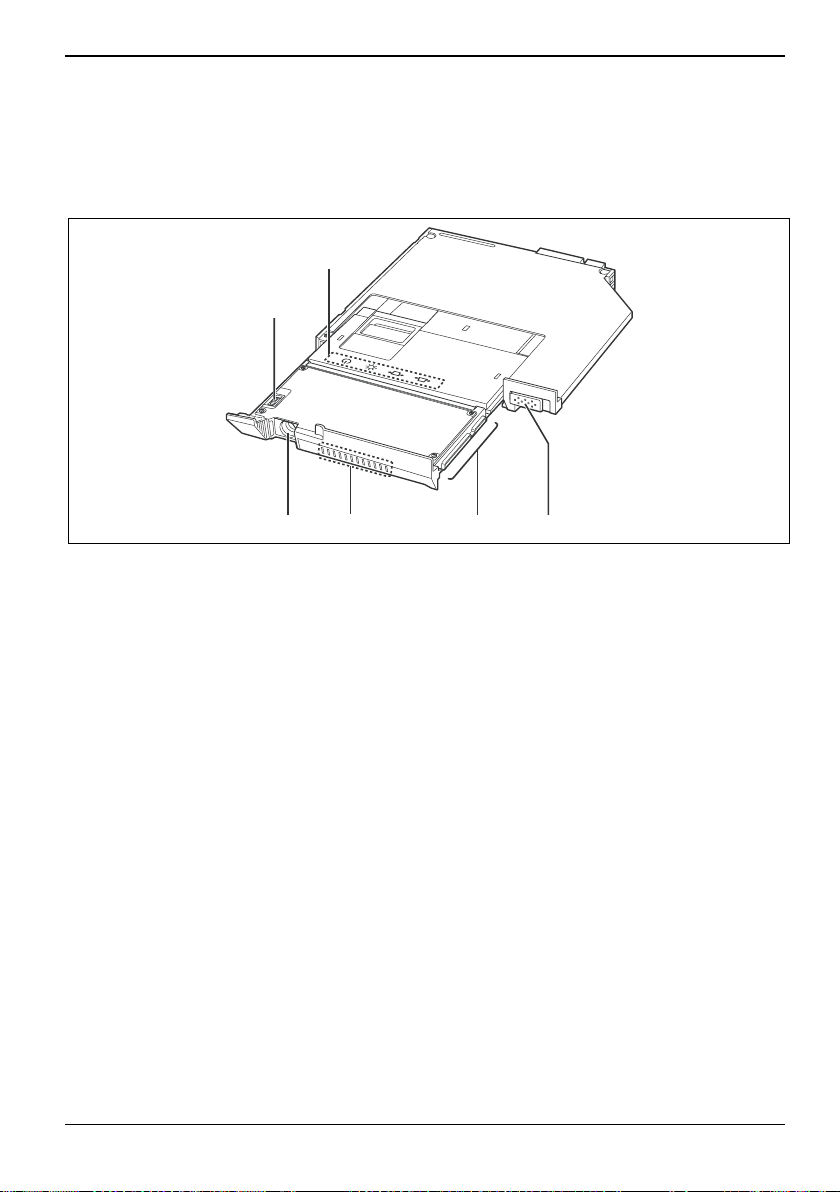
Puertos y componentes Español - 5
Puertos y componentes
En este capítulo se presentan los distintos componentes del dispositivo. Proporciona una
descripción general de los indicadores y puertos del dispositivo. Familiarícese con estos
componentes antes de utilizar el dispositivo.
6
5
1 = Objetivo láser
2 = Salidas de aire
3 = Proyector
1
2
3
4 = Palanca de desbloqueo
5 = Rueda de enfoque
6 = Botones de control
4
Fujitsu Technology Solutions 83
Page 90

Español - 6 Puertos y componentes
Botones de control
Botón Descripción
Botón de encendido/apagado del láser.
Para encender y apagar el proyector, véase el capítulo "
proyector integrado".
Botón de brillo.
Permite controlar el brillo de la imagen.
Pulsando el botón de brillo puede cambiar entre dos niveles de brillo
(dependiendo del estado de la alimentación del portátil).
Cuando el portátil funciona con alimentación de la batería, el brillo es menor.
Botones de corrección de distorsión (superior, inferior)
► Para reducir la parte superior de la imagen, pulse el botón de corrección
de distorsión superior:
► Para reducir la parte inferior de la imagen, pulse el botón de corrección
de distorsión inferior:
Encendido del
Estados de los botones de control
Los distintos estados de los botones de control ofrecen información adicional sobre el estado del
proyector integrado.
Verde,
permanente
Naranja,
permanente
Naranja,
parpadeando
84 Fujitsu Technology Solutions
Parpadeando
Parpadeando
Parpadeando
Descripción
La temperatura ambiente está a punto de
aumentar demasiado; preste atención al
respecto.
El proyector integrado está demasiado
caliente. Déjelo enfriar antes de utilizarlo
de nuevo.
Se ha producido un problema. Repliegue
la parte correspondiente al proyector.
Si el problema persiste y el botón no deja
de parpadear, póngase en contacto con
la asistencia técnica de Fujitsu.
Page 91
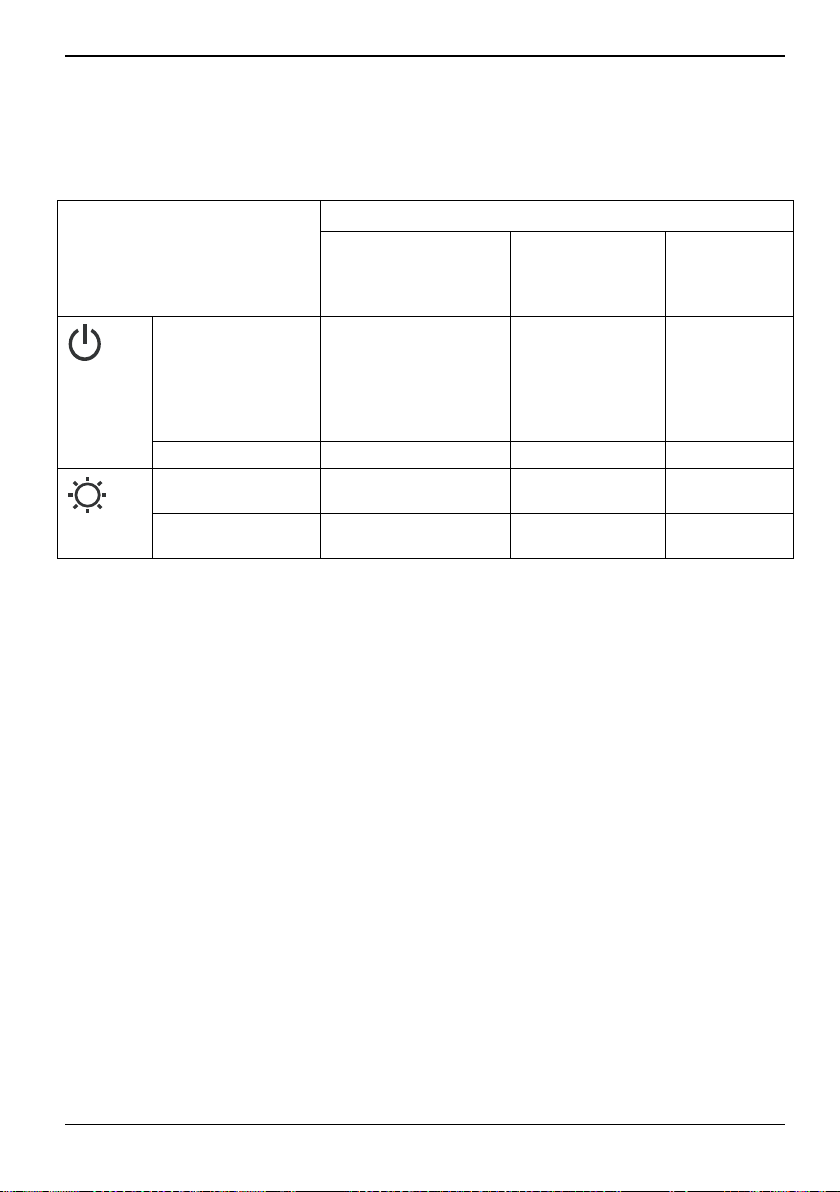
Puertos y componentes Español - 7
Funcionamiento de los botones con respecto a su estado
Funcionamiento del botón
Estado inicial
Color Naranja.
Estado del láser Desactivado Activado -
Brillo del láser
(batería)
Brillo del láser
(adaptador de CA)
Cuando se enciende el
proyector, el botón de
encendido/apagado del
láser se ilumina en
color naranja.
30 lm 20 lm -
40 lm 30 lm -
Pulsado Pulsado
durante más
de 2
segundos
Verde -
Fujitsu Technology Solutions 85
Page 92

Español - 8 Importante
Importante
En este capítulo encontrará información sobre seguridad que es muy importante observar cuando se
está trabajando con el aparato.
Indicaciones de seguridad
Preste atención a la información facilitada en el manual "Seguridad y normativa" y en las
siguientes indicaciones de seguridad.
!
• No coloque el portátil sobre el regazo ni cualquier otra parte de su cuerpo durante un período
de tiempo prolongado. La parte inferior del portátil y del proyector integrado se calentarán. Esto
puede provocar quemaduras.
• No toque las salidas de aire u otra superficie caliente del proyector integrado mientras está en
funcionamiento. Esto puede provocar quemaduras.
• No coloque nada cerca de las salidas de aire del proyector integrado ni las obstruya mientras
está en funcionamiento. El proyector integrado puede calentarse en exceso. Riesgo de
incendio.
• No toque el objetivo del proyector integrado. Los bordes del objetivo están calientes y afilados,
lo que puede producir lesiones.
• No utilice el portátil y el proyector integrado en una superficie inestable, húmeda o polvorienta.
• No toque el conector del proyector integrado.
• Evite los golpes y las vibraciones.
• El objetivo láser es de cristal. Evite los impactos para impedir su rotura.
Seguridad del láser
Este dispositivo utiliza un láser de Clase 1. Cumple con las especificaciones de la Clase 1 de la
norma internacional IEC 60825-1 para productos con láser.
Nunca mire directamente al haz láser.
!
Nunca apunte el haz láser a una persona, ni deje que los niños utilicen este equipo.
Transporte y colocación del dispositivo
• Antes de extraer o replegar el proyector integrado, coloque el portátil sobre un escritorio u otra
superficie estable y nivelada.
• Antes de transportar el portátil, empuje de nuevo el proyector integrado dentro del
compartimento. De lo contrario, las vibraciones y los golpes pueden dañar el proyector
integrado.
86 Fujitsu Technology Solutions
Page 93

Importante Español - 9
Información general sobre el funcionamiento
• En este dispositivo no se puede visualizar contenido protegido.
• Sistema operativo Windows XP: El proyector integrado no puede proyectar contenidos 3D o
juegos basados en DirectX.
• No admite aceleración de hardware.
• Es posible que haya píxeles fijos en un color y/o apagados en la imagen proyectada. Esto no
representa una anomalía. Los píxeles efectivos son como mínimo el 99,99%.
Fujitsu Technology Solutions 87
Page 94

Español - 10 Configuración inicial del dispositivo
Configuración inicial del dispositivo
Instalación de controladores
► Introduzca el CD/DVD con los controladores del proyector integrado en su portátil.
o
► Introduzca el CD/DVD con los controladores en una unidad de CD/DVD externa.
Para Windows 7:
► Seleccione Inicio - Todos los programas - Accesorios - Ejecutar.
► Introduzca e:\Win7\setup.exe y confirme con Aceptar.
Para Windows XP:
► Seleccione Inicio - Ejecutar.
► Introduzca e:\WinXP\setup.exe y confirme con Aceptar.
"e:" representa la letra de la unidad de CD/DVD. Puede introducir tanto mayúsculas como
minúsculas.
i
► Siga las instrucciones de la pantalla.
Se inicia la instalación.
Durante la instalación, asegúrese de lo siguiente:
!
• No cancele el proceso de instalación.
• No inicie ninguna otra aplicación de software.
• No apague el portátil.
► Una vez completada la instalación, reinicie el portátil cuando se le solicite.
88 Fujitsu Technology Solutions
Page 95

Configuración inicial del dispositivo Español - 11
Instalación del proyector integrado
► Cierre la pantalla LCD del portátil.
► Retire todos los cables del portátil.
► Dé la vuelta al portátil y colóquelo sobre una superficie estable, nivelada y limpia. Si es
necesario, coloque un paño antideslizante sobre la superficie para evitar rayar el dispositivo.
► Asegúrese de que el compartimento del portátil está vacío.
► Empuje el proyector integrado en el compartimento del portátil.
En el caso de la serie LIFEBOOK S, la parte inferior del proyector integrado no queda al mismo nivel
que la parte inferior del propio LIFEBOOK (véase el círculo):
Fujitsu Technology Solutions 89
Page 96
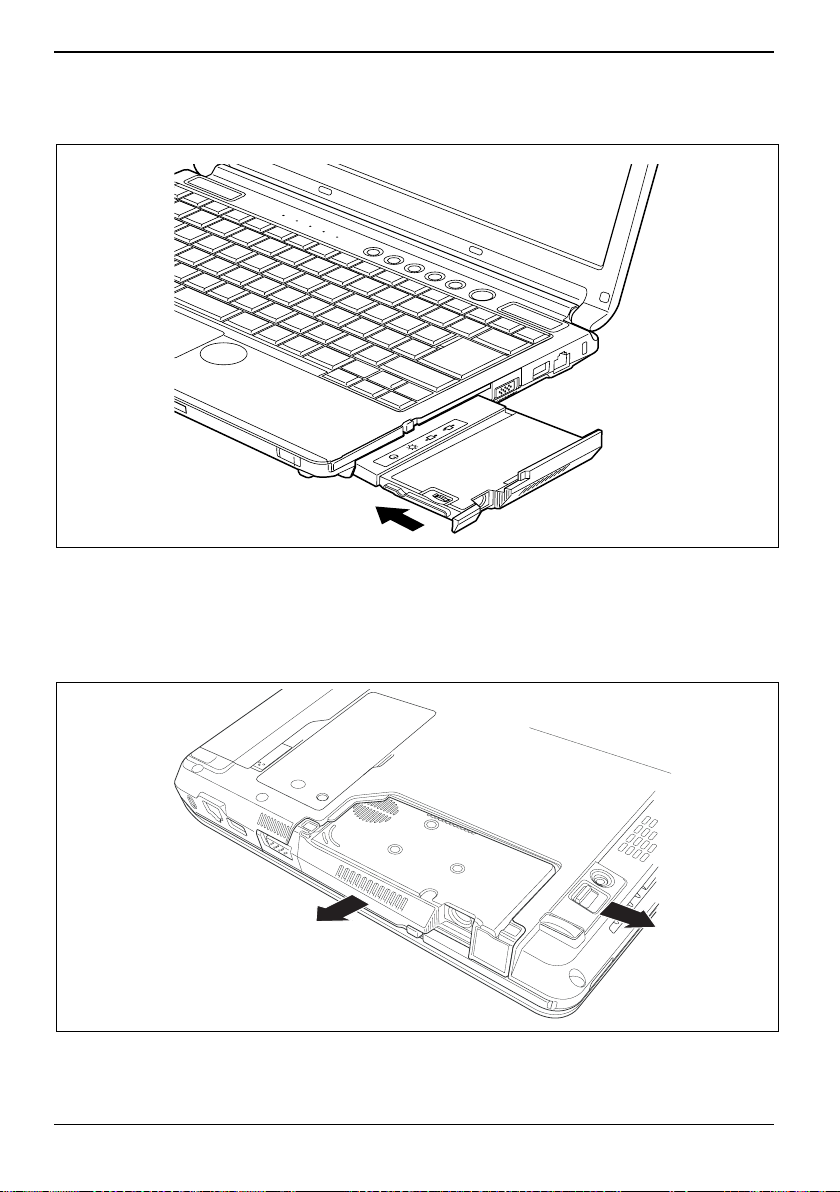
Español - 12 Configuración inicial del dispositivo
Extracción del proyector integrado
► Antes de extraer el proyector integrado, repliéguelo en el compartimento del portátil.
► Cierre la pantalla LCD del portátil.
► Retire todos los cables del portátil.
► Dé la vuelta al portátil y colóquelo sobre una superficie estable, nivelada y limpia. Si es
necesario, coloque un paño antideslizante sobre la superficie para evitar rayar el dispositivo.
► Deslice el mecanismo de desbloqueo (1) en la dirección de la flecha y manténgalo así.
► Tire del proyector integrado (2) y extráigalo del compartimento del portátil.
2
1
90 Fujitsu Technology Solutions
Page 97
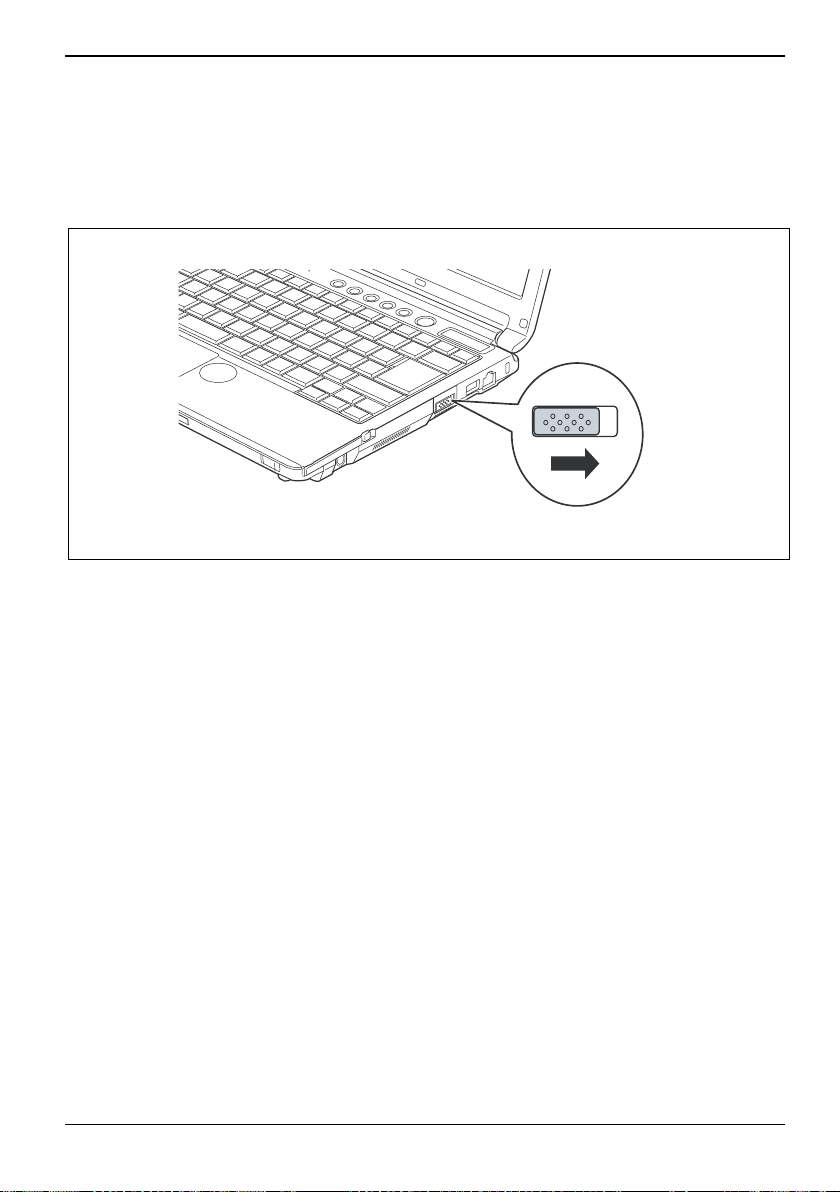
Trabajo con el proyector integrado Español - 13
Trabajo con el proyector integrado
Encendido del proyector integrado
► Para desbloquear el proyector integrado, deslice la palanca de desbloqueo en la dirección de
la flecha.
Fujitsu Technology Solutions 91
Page 98
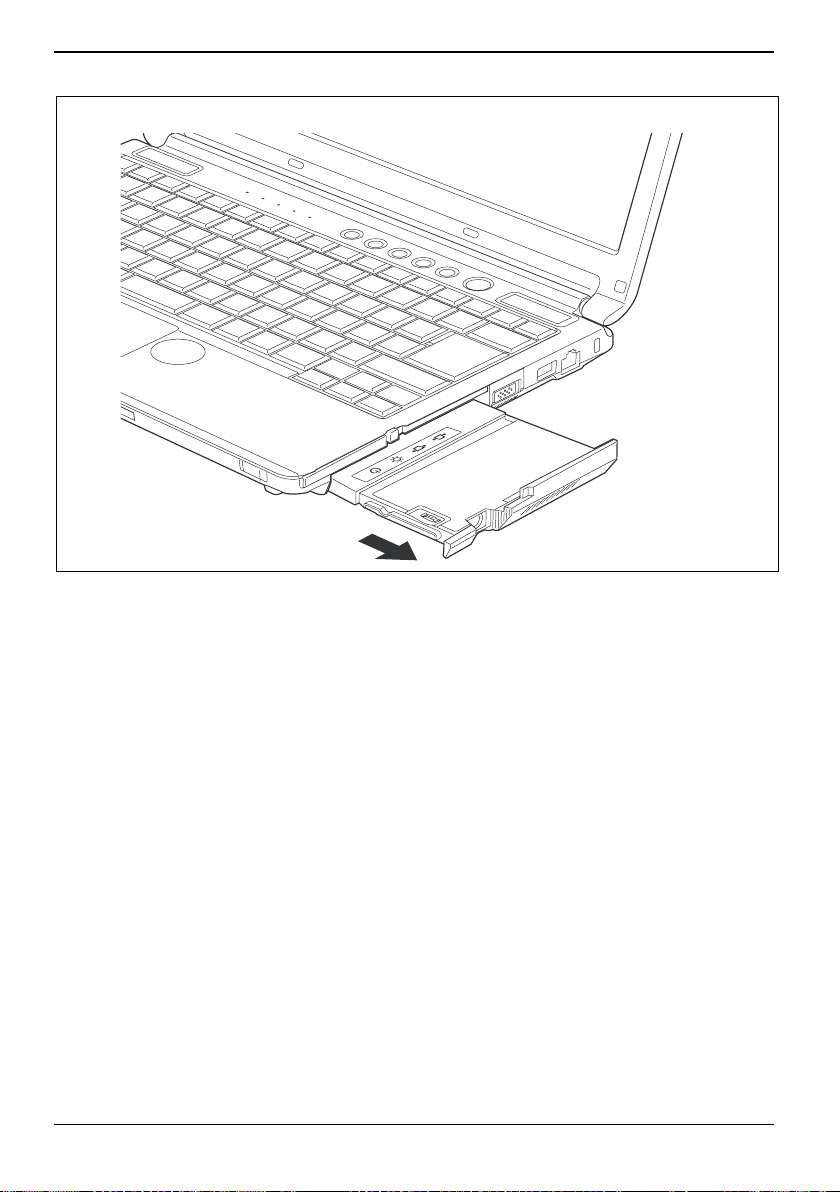
Español - 14 Trabajo con el proyector integrado
► Tire del proyector integrado hacia fuera hasta que pueda ver los botones de control.
El proyector integrado se enciende automáticamente.
El botón de encendido/apagado del láser se ilumina en color naranja.
► Pulse el botón de encendido/apagado del láser.
El láser se enciende. El botón de encendido/apagado del láser se ilumina en color verde.
92 Fujitsu Technology Solutions
Page 99
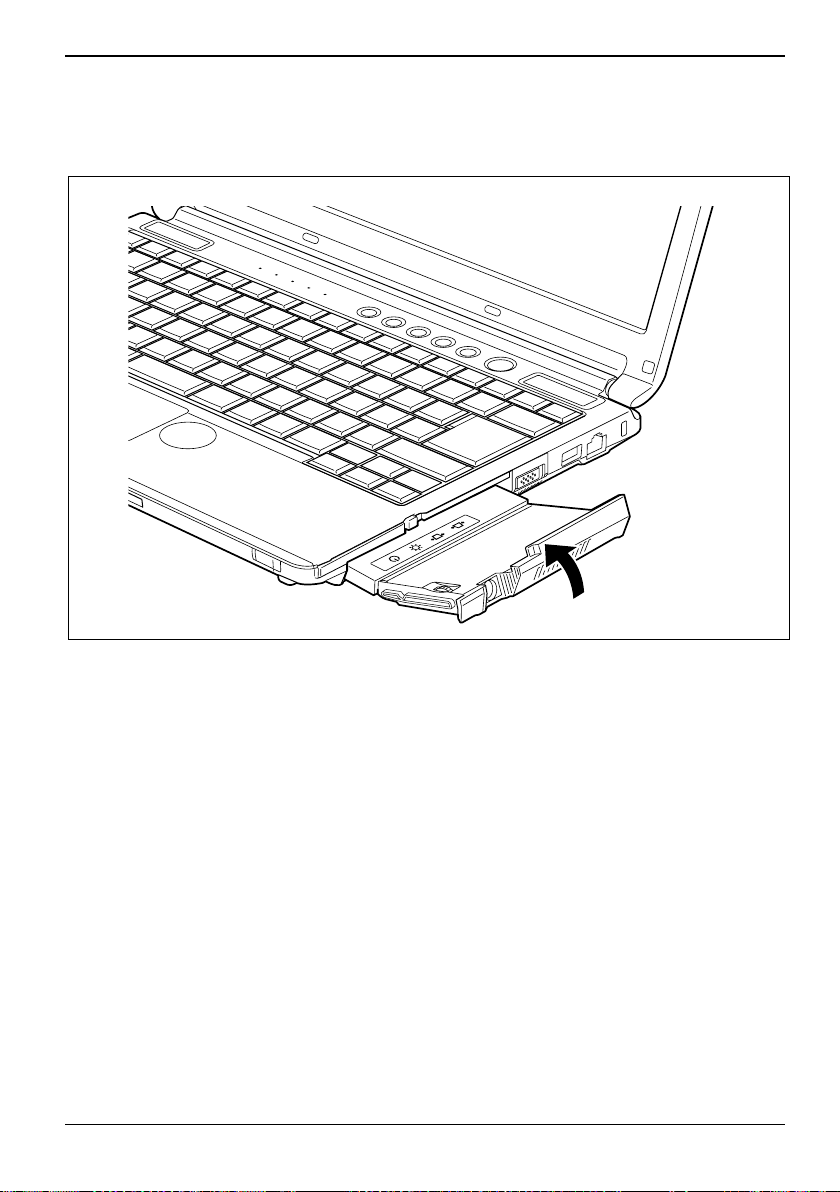
Trabajo con el proyector integrado Español - 15
Ajuste de los ángulos de proyección y rotación de la imagen
► Si es necesario, ajuste el ángulo del proyector integrado entre 0 y 90 grados.
Fujitsu Technology Solutions 93
Page 100
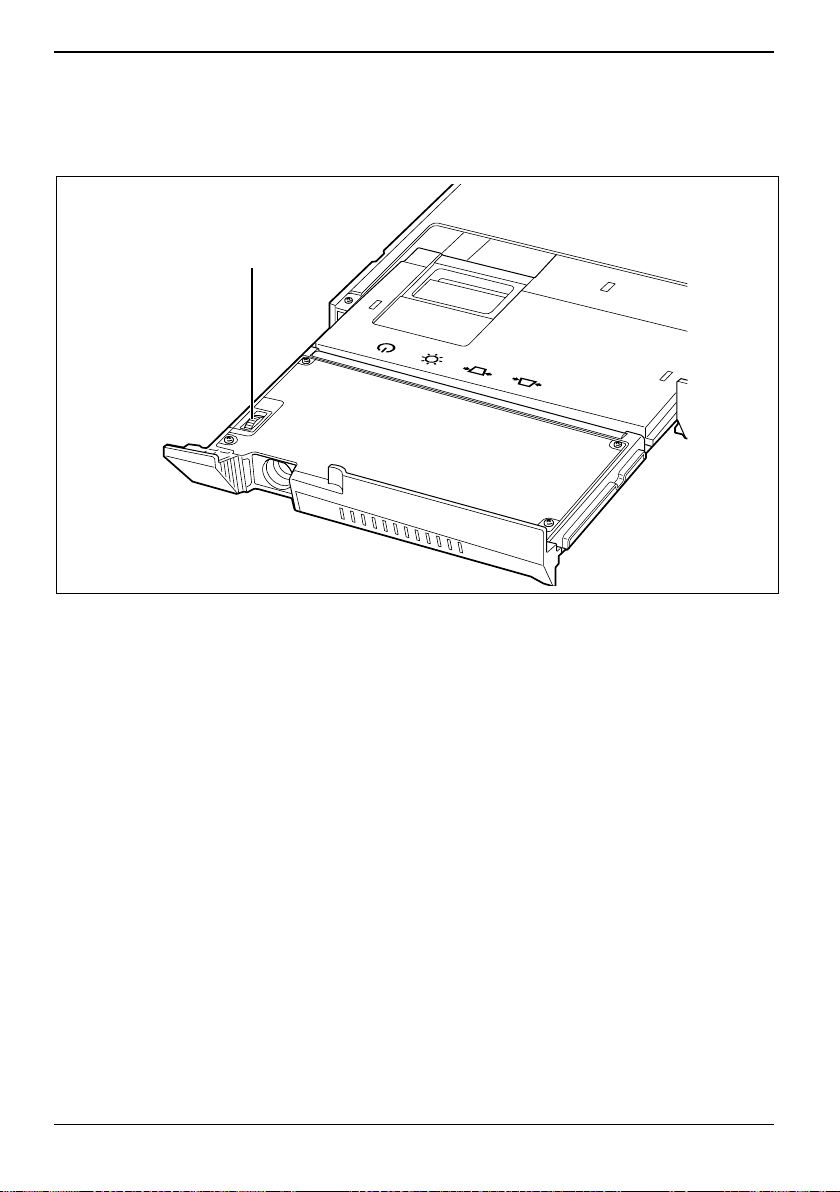
Español - 16 Trabajo con el proyector integrado
Uso de la rueda de enfoque para ajustar la nitidez de la imagen
1
► Para ajustar la nitidez de la imagen, gire la rueda de enfoque (1) hacia arriba o hacia abajo.
94 Fujitsu Technology Solutions
 Loading...