

Page 1

» Together, we
make more out
of each day.
«
SCALEO
Benutzerhandbuch
User Manual
Manuel de l'utilisateur
Manuale di istruzioni
Gebruikershandleiding
.de .uk .fr .it .nl
4126_FSC_CoverA5_SCALEO_generisch_sw.indd 14126_FSC_CoverA5_SCALEO_generisch_sw.indd 1 01.12.2005 14:02:0201.12.2005 14:02:02
Page 2

Copyright
© Fujitsu Siemens Computers 2005
SAP: 10600666788
FSP: 440000234
Published by
Fujitsu Siemens Computers GmbH
Domagkstraße 28
80807 München, Germany
Contact
www.fujitsu-siemens.com/support
All rights reserved, including rights created by patent grant
or registration of a utility model. All designations used in
this document may be trademarks, the use of which by third
parties for their own purposes could violate the rights of their
owners. We reserve the right to change delivery options or
make technical modifi cations.
4126_FSC_CoverA5_SCALEO_generisch_sw.indd 24126_FSC_CoverA5_SCALEO_generisch_sw.indd 2 01.12.2005 14:02:2001.12.2005 14:02:20
Page 3

.de
.uk
.fr
.it
.nl
bostext
12/05
Page 4

bostext
Page 5

.de
Benutzerhandbuch
bostext
Page 6

Die Informationen in diesem Handbuch können ohne vorherige Ankündigung
geändert werden. Trotz sorgfältigster Ausarbeitung kann nicht ausgeschlossen
werden, dass Fehler oder Unvollständigkeiten in diesem Handbuch enthalten sind.
Es wird keinerlei Haftung für Fehler oder Datenverlust als Folge hieraus
übernommen.
Vor Erstinbetriebnahme des PC empfehlen wir, die in diesem Handbuch
beschriebenen Verfahren zu lesen.
Die verwendeten Warenzeichen sind durch die jeweiligen Inhaberfirmen gesetzlich
geschützt.
Alle anderen Warenzeichen sind Warenzeichen oder eingetragene Warenzeichen
der jeweiligen Inhaber und werden als geschützt anerkannt.
Copyright © Fujitsu Siemens Computers GmbH 2005
Alle Rechte vorbehalten, insbesondere (auch auszugsweise) die der Übersetzung,
des Nachdrucks, der Wiedergabe durch Kopieren oder ähnliche Verfahren.
Zuwiderhandlungen verpflichten zu Schadenersatz.
Alle Rechte vorbehalten, insbesondere für den Fall der Patenterteilung oder
GM-Eintragung.
Liefermöglichkeiten und technische Änderungen vorbehalten.
Stand: November 2005
bostext
Page 7

Inhaltsverzeichnis
Vorwort.......................................................................................................................1
Hinweise zur elektronischen Dokumentation.............................................................1
1 Sicherheits-, Vorsorge- und Beachtungshinweise ..................................................2
2 Inbetriebnahme .......................................................................................................7
2.1 Anschließen des Computers ...........................................................................7
2.1.1 Anschlüsse Ihres Computers....................................................................7
2.1.2 Anschlüsse, Bedien- und Anzeigeelemente auf der Vorderseite..............9
2.2 Anschließen...................................................................................................10
2.3 Erstmalige Inbetriebnahme vorinstallierter Software.....................................10
3 Wiederherstellung installierter Software ...............................................................12
3.1 Einleitung.......................................................................................................12
3.2 Wiederherstellung installierter Software........................................................13
3.2.1 Varianten der Systemwiederherstellung ................................................. 13
3.2.2. Wiederherstellung durch Aktivierung eines "Wiederherstellungspunktes"
("Restore checkpoint") ..................................................................................... 13
3.2.3. Wiederherstellung mit "Erweiterte Windows Startoption"
("Advanced Windows Startup Option") ............................................................ 14
3.2.4 Wiederherstellung mit der "Drivers & Utilities CD/DVD" ......................... 14
3.2.5 Wiederherstellung des Windows-Betriebssystems mit der
"Fujitsu Siemens Product Recovery CD/DVD" ................................................16
3.3. Wiederherstellung von Treibern, Handbücher und spezieller Software .......17
3.3.1 Die Wiederherstellung von Treibern .......................................................17
3.3.2 Die Wiederherstellung zusätzlicher Software .........................................18
3.3.3 Die Wiederherstellung der Online Dokumentation..................................18
4 Transport des Systems .........................................................................................19
5 Garantieleistungen................................................................................................ 19
6 Rücknahme von Altgeräten...................................................................................20
Technische Daten und Betriebsbedingungen........................................................ A-1
Ergänzung zur Bedienungsanleitung..................................................................... A-2
.de
bostext
Page 8

Vorwort
Der Kauf Ihres Personal Computers ist eine wertvolle Investition in die Zukunft.
Mit einem Computer von Fujitsu Siemens Computers haben Sie ein High-TechProdukt, das Ihnen die perfekte Kombination aus höchstmöglicher Qualität,
Zuverlässigkeit und Leistung bietet. Denn Computer von Fujitsu Siemens
Computers sind konzipiert, um das Leben und den Alltag etwas einfacher zu
gestalten.
Wir wünschen Ihnen nun viel Spaß und Freude im Umgang mit Ihrem Computer.
Hinweise zur elektronischen Dokumentation
Weitergehende Informationen zu Ihrem Computer finden Sie im elektronischen
“Benutzerhandbuch“, zusätzlich wird entsprechend Ihrer Konfiguration automatisch
bei der Erstinbetriebnahme die entsprechende Dokumentation der Komponenten im
Ordner "Handbücher" angelegt. Diese Dokumentationen können Sie nach der
Erstinbetriebnahme unter "Start" - "Alle Programme" - "Handbücher" aufrufen. Für
den Fall einer Neuinstallation werden die Dokumentationen für Komponenten und
das "Benutzerhandbuch“ in elektronischer Form auf der "Drivers & Utilities DVD“
mitgeliefert.
Zu folgenden Themen finden Sie hier u. a. weitere Informationen:
• Tastatur
• Laufwerke (optional je nach Systemkonfiguration)
• Öffnen des Gehäuses
• Einbau von Erweiterungskarten
• Einbau zusätzlicher Festplatten und Laufwerke
• Softwareinstallation
• Häufig gestellte Fragen
• Tipps und Tricks
bostext
1
Page 9

Sicherheitshinweise
1 Sicherheits-, Vorsorge- und Beachtungshinweise
Ihr Gerät entspricht den einschlägigen Sicherheitsbestimmungen für Einrichtungen
der Informationstechnik. Falls Sie Fragen haben, ob Sie das Gerät in der
vorgesehenen Umgebung benutzen können, wenden Sie sich bitte an Ihre
Verkaufsstelle oder an unseren Service.
• Heben Sie diese Sicherheitshinweise und die weitere Dokumentation (wie zum
Beispiel Kurzanleitung, Betriebsanleitung und CD) zusammen mit dem Gerät
auf. Wenn Sie das Gerät an Dritte weitergeben, geben Sie bitte auch die
gesamte Dokumentation weiter.
Stromschlaggefahr
• Für das Gerät ist eine sicherheitsgeprüfte Netzleitung entsprechend den
Vorschriften des Einsatzlandes erforderlich.
• Kontrollieren Sie die Kabel / Leitungen und Netzstecker regelmäßig auf
Beschädigungen.
• Das Gerät darf nur an eine vorschriftsmäßige, den Sicherheitsbestimmungen
des Einsatzlandes entsprechende Schutzkontakt-Steckdose angeschlossen
werden.
• Sie dürfen das Gerät nur betreiben, wenn die Nennspannung des Gerätes mit
der örtlichen Netzspannung übereinstimmt.
• Eine sichere Trennung vom Netz wird nur durch Ziehen des Netzsteckers
gewährleistet, Nichtleuchten der “Power-LED“ garantiert keine
Spannungsfreiheit. Es genügt nicht, den PC und die Zusatzgeräte nur
auszuschalten.
Explosionsgefahr
• Allgemeiner Warnhinweis:
Ihr System ist mit einer wechselbaren Lithium-Batterie ausgestattet. Diese
befindet sich auf der Systemplatine (Siehe Handbuch Systemplatine). Nach
Ende der Lebensdauer der Batterie ist ein müheloser Austausch möglich.
Vorsicht!
Explosionsgefahr bei unsachgemäßem Austausch der Batterie.
Ersatz nur durch denselben oder einen vom Hersteller empfohlenen
gleichwertigen Typ.
Elektromagnetische Verträglichkeit
• Der Anschluss von externen Geräten, wie z.B. Monitor, Joystick usw., an den
Interfaceausgängen muss mit geschirmtem Kabel erfolgen, um die Vorgaben
der harmonisierten Normen nach EMVG (Gesetz über die elektromagnetische
Verträglichkeit von Geräten) zu erfüllen.
• Sie dürfen das Gerät nur betreiben, wenn die Nennspannung des Gerätes mit
der örtlichen Netzspannung übereinstimmt.
.de
bostext
2
Page 10

Sicherheitshinweise
Hinweis zur R&TTE Richtlinie
• Hiermit erklärt Fujitsu Siemens Computers, dass sich das eingebaute Modem
in Übereinstimmung mit den grundlegenden Anforderungen und den
relevanten Vorschriften der Richtlinie 1999/5/EG befindet.
• Die vollständige Original-Konformitätserklärung zur R&TTE Richtlinie finden
Sie in der elektronischen Dokumentation Ihres Computers.
Aufrüsten des Computers
• Bevor Sie das Gehäuse zum Wechseln, Ein- oder Ausbauen von
Komponenten öffnen, müssen Sie das Gerät ausschalten und den Netzstecker
ziehen. Trennen Sie auch alle an das Gerät angeschlossenen peripheren
Geräte (Stecker ziehen), wie z.B. Telefonleitung.
• Der bestimmungsgemäße Betrieb (gem. IEC60950/EN60950) des Gerätes ist
nur bei vollständig montiertem Gehäuse und eingebauten Abdeckungen für
Einbauplätze gewährleistet (elektrischer Schlag, Kühlung, Brandschutz,
Funkentstörung).
• Das Öffnen des Gerätes sollte nur von autorisierten Personen durchgeführt
werden. Unsachgemäße Eingriffe führen zum Verlust der Garantieansprüche
und zum Wegfall der Gewährleistungspflicht des Herstellers zur Einhaltung der
harmonisierten Normen entsprechend EMVG und Niederspannungsrichtlinie.
• Alle integrierten Schaltungen und Speichermodule sowie die Kontakte aller
Buchsen und Stecker sind gegenüber statischer Elektrizität anfällig. Schützen
Sie diese gegen statische Elektrizität. Die Einwirkung von statischer
Elektrizität, schnellen Transienten oder starken elektromagnetischen Feldern
auf das Gerät kann Störungen verursachen. Wenn Sie eine Karte oder ein
Speichermodul austauschen oder installieren, berühren Sie einen geerdeten
Gegenstand oder tragen Sie ein Erdungsband, um eine eventuell
elektrostatische Aufladung Ihres Körpers abzuleiten.
• Alle Schnittstellen sind nur zum Anschluss von Sicherheitskleinspannung
(SELV) ausgelegt.
• Das Gerät kann mit einer Netzausgangsbuchse ausgerüstet sein, die nur zum
Anschluss eines Monitors vorgesehen ist.
• Öffnen Sie niemals das Netzteil! Die mit einem Warnhinweis (z. B. Blitzpfeil)
gekennzeichneten Komponenten (z. B. Stromversorgung) dürfen nur von
autorisiertem Fachpersonal geöffnet, ausgebaut oder ausgetauscht werden.
• Sollte eine Aktualisierung des BIOS notwendig sein, so sind grundsätzlich
Fujitsu Siemens Computers Updates zu verwenden.
• Achten Sie beim Einbau zusätzlicher Komponenten (z.B. Festplatten) auf
ausreichende Kühlung.
Reparatur
• Reparaturen am Gerät dürfen nur von autorisierten Personen durchgeführt
werden. Durch unbefugtes Öffnen und unsachgemäße Reparaturen können
erhebliche Gefahren für den Benutzer entstehen (Gefahr von elektrischem
Schlag, Brandgefahr).
bostext
3
Page 11

Sicherheitshinweise
Optische Laufwerke
• Verwenden Sie in Ihrem optischen Laufwerk ausschließlich völlig einwandfreie
Datenträger (z.B. CD, DVD), um Datenverlust, Beschädigungen am Gerät und
Verletzungen zu vermeiden.
• Überprüfen Sie daher jede CD/DVD vor dem Einlegen in das Laufwerk auf
Beschädigungen wie feine Risse, Bruchstellen oder dergleichen.
• Beachten Sie, dass zusätzlich aufgebrachte Aufkleber die mechanischen
Eigenschaften einer CD/DVD verändern und zu Unwucht führen können.
• Beschädigte und unwuchtige CDs/DVDs können bei hohen
Laufwerksgeschwindigkeiten brechen (Datenverlust). Unter Umständen
können scharfkantige Bruchstücke die Abdeckung des Laufwerkes
durchdringen (Beschädigungen am Gerät) und aus dem Gerät geschleudert
werden (Verletzungsgefahr, insbesondere an unbedeckten Körperpartien wie
Gesicht oder Hals).
• Sie schonen das optische Laufwerk und verhindern mechanische
Beschädigungen sowie vorzeitigen Verschleiß der Datenträger, indem Sie
folgende Ratschläge beachten:
− Legen Sie die CDs/DVDs nur bei Bedarf in das Laufwerk und entnehmen
Sie sie nach Gebrauch.
− Bewahren Sie die CDs/DVDs in geeigneten Hüllen auf. Schützen Sie sie
vor Hitze und direkter Sonneneinstrahlung.
Reinigung
• Säubern Sie Ihren PC gelegentlich. Schalten Sie dazu den PC und alle daran
angeschlossenen Geräte aus, und ziehen Sie den Netzstecker aus der
Steckdose.
• Verwenden Sie ein nichtaggressives Reinigungsmittel und/oder einen leicht
feuchten Lappen.
• Vermeiden Sie Reinigungssprays und jede Art von alkoholhaltigen oder
sonstigen brennbaren Lösungen. Verwenden Sie deshalb für die Reinigung
kein Scheuerpulver und keine Kunststoff lösenden Reinigungsmittel.
• Reinigen Sie die Bildfläche des Bildschirms mit einem weichen,
angefeuchteten, Tuch, das nicht fusselt.
Zusätzliche Hinweise für den bestimmungsgemäßen Betrieb
• Stellen Sie das Gerät so auf, dass genügend Luft zur Kühlung zur Verfügung
steht. Verdecken Sie niemals die Lüftungsschlitze des Gerätes. Dadurch
könnte es zu Überhitzungen kommen, die die Lebensdauer Ihres Gerätes
verkürzen.
• Bei einigen Geräten sind herstellungsbedingt zum Schutz vor mechanischen
Beschädigungen von empfindlichen Oberflächen Folien aufgebracht. Diese
Schutzfolien sollten Sie vor Inbetriebnahme entfernen.
• Wir empfehlen Ihnen, das Gerät auf eine rutschfeste Unterlage zu stellen. Bei
der Vielfalt der bei Möbeln verwendeten Beschichtungen und Lacke ist es nicht
auszuschließen, dass die Gummi-/Kunststoff-Füße der Geräte Schäden auf
der Stellfläche verursachen.
• Schützen Sie Ihr Gerät vor sehr hoher Luftfeuchtigkeit, direktem Sonnenlicht
sowie hohen und extrem niedrigen Temperaturen. Wenn das Gerät aus kalter
Umgebung in den Betriebsraum gebracht wird, kann Betauung auftreten.
.de
bostext
4
Page 12

Sicherheitshinweise
Warten Sie, bis das Gerät temperaturangeglichen und absolut trocken ist,
bevor Sie es in Betrieb nehmen (ca. 2 bis 4 Stunden)
• Das Gerät ist nicht wasserfest! Tauchen Sie das Gerät nie ins Wasser und
schützen Sie es vor Spritzwasser (Regen, Meerwasser).
• Bei anormalen Gerüchen, Rauchbildung und in Notfällen (z. B. bei
Beschädigung von Gehäuse, Bedienelementen oder Netzleitung, bei
Eindringen von Flüssigkeiten oder Fremdkörpern) schalten Sie das Gerät
sofort aus, ziehen Sie den Netzstecker, und verständigen Sie Ihre
Verkaufsstelle oder unsere Hotline/Help Desk.
• Rauchen Sie nicht direkt neben dem Gerät. Die Rußpartikel setzen sich auf
dem Monitor oder im Inneren des Computers ab.
• Essen Sie nicht über der Tastatur, da herabfallende Krümel deren
Funktionstüchtigkeit stören könnten.
• Verlegen Sie die Leitungen so, dass sie keine Gefahrenquelle (Stolpergefahr)
bilden und nicht beschädigt werden.
• Der Transport sollte vorzugsweise in der Originalverpackung erfolgen, da diese
spezifisch für die Systemeinheit dimensioniert wurde.
• Das Typenschild kann auch auf der Unterseite des Gehäuses angebracht sein.
• Auf der Mausunterseite muss gegebenenfalls eine Transportsicherung entfernt
werden.
• Bei ATX-und µATX-Systemen ist nach dem Abschalten das System nicht
stromlos (Standby). Um das Gerät stromlos zu machen, ist es erforderlich, den
Netzstecker zu ziehen.
• Wird der Monitor an der Spannungsbuchse des PC-Netzteils (wenn
vorhanden) angeschlossen, wird dieser bei Abschalten des PC nicht
ausgeschaltet.
• Haben Sie einen Monitor, der Powermanagement unterstützt, geht dieser
ebenfalls in Standby. Hat der Monitor diese Funktion nicht, müssen Sie ihn
separat ausschalten, wenn Sie die Arbeit mit dem PC beenden.
• Die Festplatte ist bereits formatiert und das Betriebssystem installiert. Das
Formatieren ist nur erforderlich, falls die Festplatte erneut eingerichtet werden
soll.
• Die beiliegende "Product Recovery CD/DVD“ kann nur zur
Wiederherstellung/Neuinstallation Ihres Betriebssystems genutzt werden, wenn
ein Motherboard mit einem BIOS von Fujitsu Siemens Computers verwendet
wird.
• Consumer PC Systeme sind nicht für Hochsicherheits- sowie
medizintechnische Anwendungen geeignet.
Sicherheitshinweise zu Geräten mit Flüssigkeitskühlsystem
Das Kühlsystem ist ein geschlossenes Sicherheitskühlsystem mit einer
umweltzertifizierten Kühlflüssigkeit. Diese Flüssigkeit ist ungiftig, nicht brennbar,
nicht elektrisch leitfähig und recyclingfähig.
Das Flüssigkeitskühlsystem wird durch das BIOS überwacht. Sollte in diesem
Flüssigkeitskühlsystem ein Fehler auftreten, aktiviert das BIOS beim Starten des
Systems eine Fehlermeldung.
• Beim Reinigen verwenden Sie keine aggressiven Reinigungsmittel oder spitze
bzw. scharfe Gegenstände, die beim Eindringen in technisch bedingte
bostext
5
Page 13
Sicherheitshinweise
Öffnungen Schäden an den Verbindungsleitungen des Kühlsystems
verursachen können.
• In Ländern, in denen mit sehr niedrigen oder sehr hohen Außentemperaturen
zu rechnen ist, beachten Sie beim Transport im Freien die
Transporttemperatur, die Sie im Benutzerhandbuch unter "Technische Daten
und Betriebsbedingungen“ finden.
Reparatur, Umbau und Aufrüsten des Computers
Da dieses System so konzipiert wurde, dass es hardwaretechnisch und
wärmetechnisch aufeinander abgestimmt ist, so dass eine einwandfreie Funktion
vom Hersteller gewährleistet werden kann, lassen Sie Hardwarereparaturen oder
Änderungen nur
Der unsachgemäße Einbau von Komponenten, die vom Hersteller nicht zertifiziert
sind, kann zu folgeschweren Schäden am Gerät führen. Für daraus entstehende
Folgeschäden übernimmt Fujitsu Siemens Computers keine Haftung. Bei Fragen
wenden Sie sich an den Hersteller oder an die Hotline.
Datensicherung
• Legen Sie von Ihren Arbeitsdateien regelmäßig Sicherheitskopien an. Nur so
schützen Sie sich z.B. bei einem Festplattendefekt vor Datenverlust
• Ansprüche wegen Datenverlust können nicht geltend gemacht werden.
Sonderbehandlung von Batterien und Akkus
• Die Batterien / Akkus in unseren Geräten enthalten keine Cd- und Hg-
Verbindungen.
• Ihr System ist mit einer wechselbaren Lithium-Batterie ausgestattet. Diese
befindet sich auf der Systemplatine. Nach Ende der Lebensdauer der Batterie
ist ein Austausch möglich.
Hinweis zur Batterieverordnung vom 27.03.1998:
Bitte beachten Sie:
Batterien und Akkus gehören nicht in den Hausmüll. Sie werden vom
Hersteller, Händler oder deren Beauftragten kostenlos zurückgenommen, um
sie einer Verwertung bzw. Entsorgung zuzuführen!
durch autorisierte Personen durchführen.
Das Gerät darf nicht mit dem Siedlungsabfall (Hausmüll) entsorgt
werden. Dieses Gerät ist entsprechend der europäischen Richtlinie
2002/96/EG über Elektro- und Elektronik-Altgeräte (waste electrical
and electronic equipment - WEEE) gekennzeichnet.
Die Richtlinie gibt den Rahmen für eine EU-weit gültige Rücknahme
und Verwertung der Altgeräte vor. Für die Rückgabe Ihres Altgeräts
nutzen Sie bitte die Ihnen zur Verfügung stehenden Rückgabe- und
Sammelsysteme. Weitere Informationen hierzu finden Sie unter
www.fujitsu-siemens.com
.de
bostext
6
Page 14

Inbetriebnahme
2 Inbetriebnahme
2.1 Anschließen des Computers
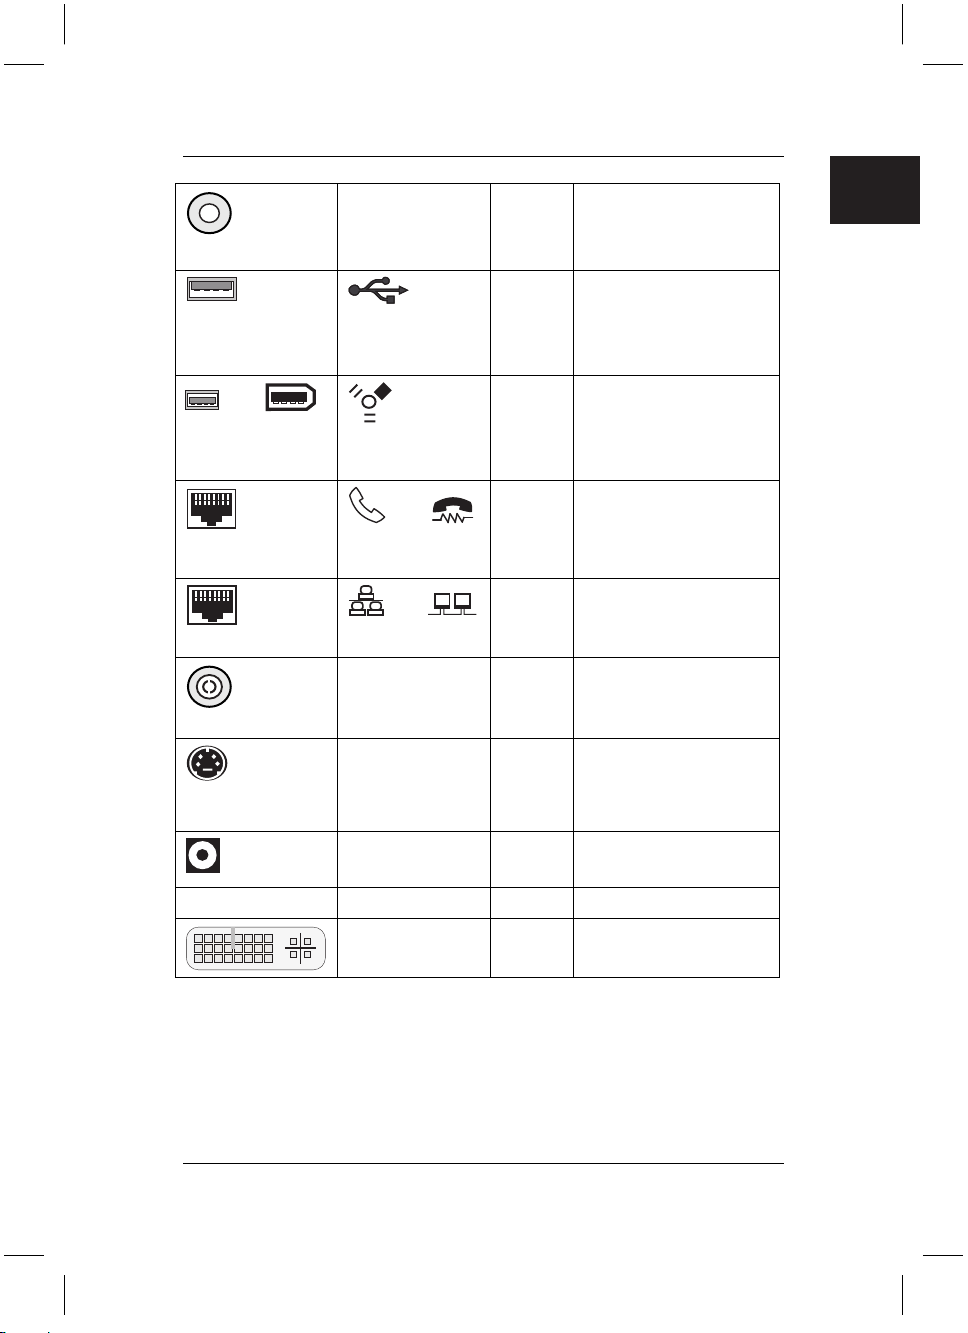
2.1.1 Anschlüsse Ihres Computers
Die meisten Anschlüsse eines Computers befinden sich auf dessen Rückseite.
Welche Anschlüsse vorhanden sind und wo sie sich befinden, ist vom jeweiligen
Computer-Modell abhängig. Im Folgenden sind die gängigsten Anschlüsse
dargestellt.
Anschlussbild Symbol Farbe Anschluss
Kaltgerätestecker
PS/2 Buchse
6-polig
PS/2 Buchse
6-polig
Subminiatur DBuchse 15-polig
Subminiatur
D-Buchse 25-polig
Subminiatur
D-Stecker 9-polig
3,5 mm
Klinkenbuchsen
schwarz Spannungsversorgung
lila PS/2-Tastatur
Keyb.
grün PS/2-Maus
oder
oder VGA
LPT
SERIAL
Line In
Line Out
Mic
AUDIO
digital out
1
oder
blau Monitor
burgund Drucker
türkis COM1
hellblau
hellgrün
pink
gelb
1) 4)
des PC
(parallele Schnittstelle)
(serielle Schnittstelle)
Sound
(Externe Tonquellen, z.B.
Aktivlautsprecher,
Mikrofon)
- Soundkarte
- Sound onboard
2)
bostext
7
Page 15
Inbetriebnahme
Cinch-Buchse
USB Buchse
oder
FireWire Buchse
SPDIF IN
SPDIF Out
oder
USB
IEEE 1394
gelb
schwarz
weiß
schwarz
weiß
Digitaler Soundanschluss
siehe auch Handbuch
zum Motherboard und in
"Tipps und Tricks“
Anschluss für USB2.0Geräte (z. B.Tastatur; IRSender/EmpfängerModul, Scanner, Drucker)
3)
USB 2.0
Anschluss für IEEkompatible Geräte (z. B.
Videorekorder,
Digitalkamera)
FireWire
ohne Modem
RJ-11 Buchse
oder
oder LINE
oder PHONE
ohne Netzwerk oder DSL-
RJ-45 Buchse
oder
oder LAN
Modem
CATV ohne Kabel-,
Antennenanschluss
Antennenbuchse
4- od. mehrpolige
Buchse
SVIDEO IN
SVIDEO OUT
SPDIF
optic
schwarz Videoeingangs- und
Ausgangsanschluss
(siehe Dokumentation zur
VGA-/TV-Karte)
schwarz Digitaler optischer
Soundanschluss
● LED WLAN LINK grün WLAN Betriebsanzeige
DVI weiß Anschluss für digitales
1)
Achtung: Unter dem Anschluss kann sich ein Umschalter für Netzspannungen
von 230 V~ auf 115 V~ befinden. Werksseitig erfolgt die Einstellung auf 230 V~.
2)
Bei zusätzlich eingebauter Soundkarte ist die Soundfunktion auf dem Motherboard
nicht aktiviert bzw. "Sound onboard“ ist nicht vorhanden.
3)
Wichtiger Hinweis zu USB 2.0: Um eine sichere Datenübertragungsrate zu
Videosignal (Monitor)
gewährleisten, empfehlen wir Ihnen, USB-Anschlusskabel mit einer Länge von
max. 4 m zu verwenden.
.de
bostext
8
Page 16
Inbetriebnahme
4)
Bedienelemente am Netzteil (optional)
1
0
230 115
Netz Ein/Aus- Schalter
Spannungsumschalter
optional
Achtung! Bitte achten Sie auf das Stromversorgungsnetz, an das Ihr
Computer angeschlossen werden soll und vergleichen Sie mit der
Werkseinstellung.
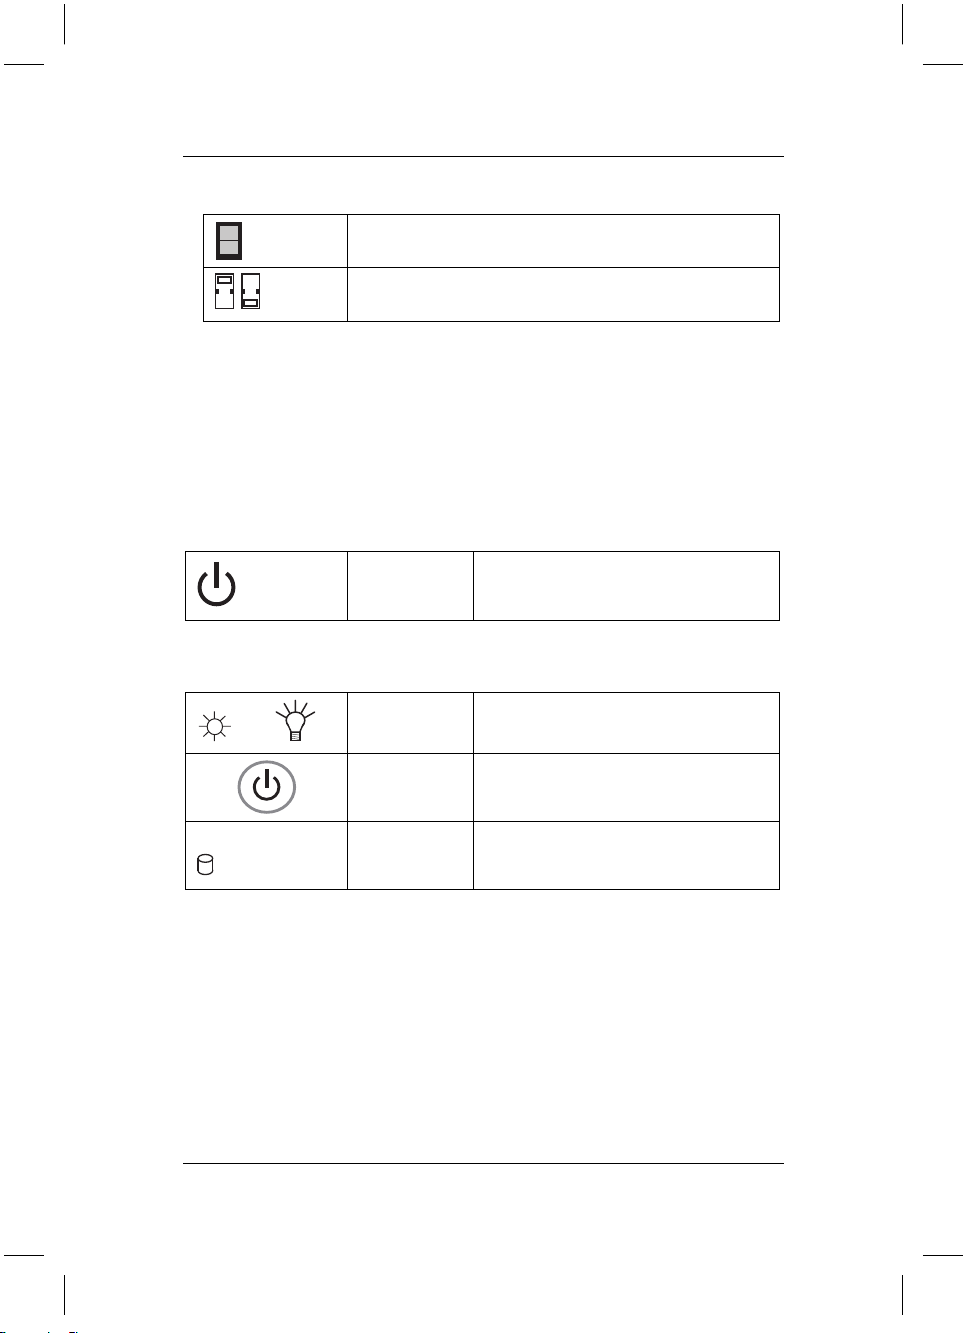
2.1.2 Anschlüsse, Bedien- und Anzeigeelemente auf der Vorderseite
Anschlüsse
Die Bezeichnung der Anschlüsse entnehmen Sie bitte der vorherigen Tabelle.
Bedienelemente
Standby-Taste Taste zum Aktivieren der Standby-
Funktion bzw. Ein-/Aus für ATXSysteme.
Anzeigen
Netz-LED an Das System ist eingeschaltet (POWER)
oder
Netz Taster Das System ist eingeschaltet, wenn der
HDD-LED an Zeigt an, dass ein Zugriff auf die
blaue Ring leuchtet
Festplatte erfolgt.
(HDD)
bostext
9
Page 17

Inbetriebnahme
2.2 Anschließen
Vor dem Einschalten des Computers, schließen Sie
1. Monitor, Tastatur, Maus, ggf. Drucker, Modem und andere periphere Geräte
an den PC an. Beachten Sie bitte hierzu auch die Hinweise im Kapitel
"Anschlüsse Ihres Computers“ sowie die Hinweise im "Quick Start Guide“.
2. Schließen Sie das mitgelieferte Netzkabel zunächst an die Netzteilbuchse des
PC und dann an eine 230V~/115V~ Schutzkontakt-Steckdose
(Steckdosenleiste) an. Sie dürfen das Gerät nur betreiben, wenn die
Nennspannung des Gerätes mit der örtlichen Netzspannung übereinstimmt.
Wenn Ihr Computer über einen Doppelspannungsumschalter verfügt, müssen
Sie darauf achten, dass dieser auf die in Ihrem Land geltende Netzspannung
eingestellt ist. Die Standardeinstellung vom Hersteller ist 230V~.
Nach dem Verkabeln
3. schalten Sie den Monitor ein.
4. Schalten Sie dann, falls vorhanden, den Netzschalter auf der Rückseite des
Computers ein. Zum Starten des Computers drücken Sie auf die StandbyTaste, die sich auf der Vorderseite des Computers befindet.
Das Gerät ist betriebsbereit, wenn die grüne Anzeigelampe / blauer Ring
aufleuchtet.
2.3 Erstmalige Inbetriebnahme vorinstallierter Software
Auf Ihrem Computer ist ein Microsoft®Windows-Betriebssystem vorinstalliert.
Nach dem Einschalten Ihres Computers ist dieser betriebsbereit. Sie können mit
dem Windows Betriebssystem sofort arbeiten. Eventuell müssen Sie noch einige
Einstellungen vornehmen. Folgen Sie hierzu den Anweisungen auf dem Bildschirm.
Hinweis: Nach Auslieferung ab Werk wird beim ersten Mal Einschalten unter
"First Steps" das Systems einer Systemprüfung unterzogen. Nehmen
Sie während dieses Tests keine Handlungen an den Eingabe- und
Bedienelementen des PCs vor.
Die vorinstallierte Software finden Sie unter: ”Start / Alle Programme".
Hinweis zu Microsoft®Windows XP Home Edition bzw. Professional und
Microsoft®Windows Media Center Edition
Eines dieser Microsoft®Windows Produkte wurde von Fujitsu Siemens Computers
so vorinstalliert, dass Sie das Produkt sofort nutzen können. Wenn Sie wesentliche
Hardware-Komponenten verändern, kann eine erneute Aktivierung erforderlich
werden. In diesem Fall folgen Sie bitte den Programmanweisungen nach der
Änderung der Hardware. Bei Fragen wenden Sie sich bitte an unseren Help Desk
(www.fujitsu-siemens.com/service).
.de
bostext
10
Page 18

Inbetriebnahme
Hinweis zu Microsoft®Word
Für Microsoft®Word hat Microsoft eine Aktivierung durch den Nutzer vorgesehen.
Folgen Sie hierzu bitte den Programmanweisungen nach dem Programmstart. Bei
Fragen wenden Sie sich bitte an unseren Help Desk (www.fujitsusiemens.com/service).
bostext
11
Page 19

Wiederherstellung installierter Software
3 Wiederherstellung installierter Software
3.1 Einleitung
Sollte Ihr Betriebssystem nicht starten oder sollte es auf Ihrer Festplatte zu Fehlern
kommen, kann es notwendig werden, die vorinstallierte Software wiederherzustellen. Mit folgenden Hilfsmitteln können Sie diese wiederherstellen.
Zum Lieferumfang Ihres Computers gehören:
• "Fujitsu Siemens Product Recovery CD/DVD"
• "Drivers & Utilities CD/DVD"
• Treiber / Applikations-CDs/DVDs (optional)
• Handbuch für Windows-Betriebssystem
• CoA (Certificate of Authenticity) Label
Dieser Registrierungscode wird beim Wiederherstellen von Windows nicht
abgefragt.
Dieser Lieferumfang gilt nur für Betriebssysteme von Microsoft®.
ACHTUNG! Legen Sie bitte regelmäßig Sicherheitskopien von Ihren Dateien an.
Wenn es zu einem Datenverlust kommen sollte, können Sie Ihre
Anwendungen mit Hilfe der originalen Datenträger wiederherstellen.
Wenn Ihnen jedoch von Ihren eigenen Datendateien keine
Sicherheitskopien zur Verfügung stehen, ist ein Wiederherstellen
dieser nicht mehr möglich.
Wir empfehlen dringend, soweit noch möglich, alle eigenen
Datendateien vor der Neuinstallation des Betriebssystems zu
sichern, da sämtliche Dateien durch den Wiederherstellungsvorgang
von der Festplatte gelöscht werden können. Sie müssen alle
Programme neu installieren, die Sie seit dem Kauf des Computers
selbst installiert haben, und dann Ihre Datendateien mit Hilfe der
Sicherungskopien wiederherstellen. Es wird keinerlei Haftung für
Fehler oder Datenverlust als Folge hieraus übernommen.
TIPP! Wenn Ihr PC mit einem Combo-Laufwerk (Brenner) ausgestattet ist,
so nutzen Sie dieses zum Herstellen der Sicherheitskopien. Brennen
Sie sich eine Daten-CD. Eine nützliche Ergänzung für Ihren PC ist
auch ein externer USB-Massenspeicher (Festplatte oder
Memorystick).
.de
bostext
12
Page 20

Wiederherstellung installierter Software
3.2 Wiederherstellung installierter Software
3.2.1 Varianten der Systemwiederherstellung
Im Folgenden sind einige Verfahrenswege dargestellt, mit denen Sie die Möglichkeit
haben, Ihr System wiederherzustellen. Wir empfehlen Ihnen, je nach Schweregrad
des Fehlers, die Varianten bis zur Problemlösung nacheinander zu nutzen.
1. Wiederherstellung durch Aktivierung eines "Restore checkpoint"
("Wiederherstellungspunktes“).
Hier bleiben Ihre erstellten Dateien und installierten Programme, die bis zum
Zeitpunkt des gewählten Wiederherstellungspunktes auf Ihrem PC waren,
erhalten.
2. Wiederherstellung mit "Advanced Windows Startup Option" ("Erweiterte
Windows Startoption“).
Hier wird die letzte als funktionierend bekannte Konfiguration vom System
selbst wiederhergestellt. Es werden alle Dateien und Programme
wiederhergestellt, die beim letzten erfolgreichen Windowsstart existierten.
3. Wiederherstellung mit der "Drivers & Utilities CD/DVD“.
Hier wird Ihr System in den Auslieferungszustand versetzt, einschließlich der
im Auslieferungszustand vorinstallierten Programme, Treiber und
Dokumentationen.
4. Wiederherstellung mit der "Fujitsu Siemens Product Recovery CD/DVD".
Hier wird Ihr System nicht komplett, sondern nur das Betriebssystem
wiederhergestellt. Sie müssen alle zusätzlichen Programme, Treiber und
Dokumentationen neu installieren.
3.2.2. Wiederherstellung durch Aktivierung eines
"Wiederherstellungspunktes" ("Restore checkpoint")
bostext
Im Falle eines Problems können Sie einen früheren Zustand des System
wiederherstellen, ohne dass dabei persönliche Datendateien (z.B. Dokumente,
Internetfavoriten und E-Mail) verloren gehen. Die Systemwiederherstellung von
WindowsXP überwacht Änderungen auf dem Computer und erstellt regelmäßig
leicht identifizierbare Wiederherstellungspunkte.
Zum Wiederherstellen eines früheren Systemzustands gehen Sie wie folgt vor:
1. Klicken Sie auf "Start"/"Control Panel"/"Performance and Maintenance"
("Start“ - "Systemsteuerung“ - "Leistung und Wartung“) anschließend auf
"System recovery" ("Systemwiederherstellung“).
2. Wählen Sie die Option "Restore computer to a previous point in time"
("Computer zu einem früheren Zeitpunkt wiederherstellen“). Bestätigen Sie
mit "Continue" ("Weiter“). Im folgenden Bild kann der
Wiederherstellungspunkt ausgewählt werden.
Sollten Sie Fragen oder weitere Hilfe benötigen, so verwenden Sie das
umfangreiche "Help and Support Center" ("Hilfe und Supportcenter“), indem Sie
auf das
Fragezeichen rechts oben im Bild klicken.
13
Page 21

Wiederherstellung installierter Software
Weitere Hinweise zum Erstellen eines Wiederherstellungspunkt finden Sie im
elektronischen "Benutzerhandbuch für einen Fujitsu-Siemens PC“
3.2.3. Wiederherstellung mit "Erweiterte Windows Startoption" ("Advanced
Windows Startup Option")
Sollte bei mehrmaligem Hochfahren (Booten) eine Fehlermeldung oder z.B. ein
blaues Fenster erscheinen, starten Sie Ihren Computer neu. Drücken Sie während
des Bootens die Taste F8 in sehr kurzen Abständen, bis die Meldung "Advanced
Startup Options" ("Erweiterte Windows Startoption“) erscheint. Wählen Sie
"Last known good configuration" ("Letzte als funktionierend bekannte
Konfiguration“).
Ist diese Vorgehensweise erfolglos, so führen Sie eine vollständige Neuinstallation
des Windows-Betriebssystems, wie unter 3.2.4 beschrieben, aus.
3.2.4 Wiederherstellung mit der "Drivers & Utilities CD/DVD"
Um Ihr System in den Auslieferungszustand zurückzuversetzen, einschließlich der
im Auslieferungszustand vorinstallierten Programme,Treiber und Dokumentationen,
gehen Sie wie folgt vor:
1. Legen Sie die "Drivers & Utilities CD/DVD" bei eingeschaltetem Computer in
das DVD-Laufwerk ein.
2. Schalten Sie den Computer aus, warten Sie einen Moment und schalten Sie
den Computer wieder ein.
3. Wenn die Aufforderung “Press any key to boot from CD …“ ("Drücken Sie
eine beliebige Taste, um von der CD zu starten…“) auf dem Bildschirm
erscheint, drücken Sie eine beliebige Taste auf der Tastatur. Das
Installationsprogramm wird gestartet, und das Menü "Recovery²" wird
angezeigt.
Der Computer lädt die benötigten Dateien vom DVD-/CD-Laufwerk, um
Windows auf Ihrem Computer wiederherzustellen. Dieser Vorgang dauert
einige Minuten.
4. Klicken Sie auf "Start" ("Start") und "Continue" ("Weiter"), um den
Wiederherstellungsvorgang zu starten.
Der Wiederherstellungsvorgang wird gestartet. Alle notwendigen Dateien
werden kopiert. Der Computer wird dann in den Auslieferungszustand
zurückgesetzt. Dieser Vorgang dauert einige Minuten.
.de
bostext
14
Page 22

Wiederherstellung installierter Software
Achtung!
Wenn die Meldung "Recovery Folder not found. Please restore your
System from the Recovery CD" ("Wiederherstellungsordner nicht
gefunden. Bitte verwenden Sie die Recovery CD, um das System
wiederherzustellen“) angezeigt wird, müssen Sie das Betriebssystem mit der
mitgelieferten "Fujitsu Siemens Product Recovery CD/DVD"
wiederherstellen. Das kann beispielsweise in folgenden Fällen passieren:
• eine systemrelevante Datei für den Recoveryprozess nicht gefunden
wurde oder eine dieser Dateien defekt ist.
• nach dem Austausch der Originalfestplatte, die zum Auslieferungszustand
gehörte.
Entnehmen Sie in diesem Fall die "Drivers & Utilities DVD" aus dem
optischen Laufwerk, und stellen Sie das Windows-Betriebssystem wie unter
Pkt. 3.2.5 beschrieben wieder her.
5. Entfernen Sie die "Drivers & Utilities CD/DVD" aus dem Laufwerk, wenn die
Meldung "The recovery process is complete. Remove the Driver & Utilities
CD/DVD from the drive and switch off the computer. If your system fails
to boot once switched on again, please contact the relevant service
provider." ("Der Recovery-Prozess ist abgeschlossen. Entfernen Sie die
Driver & Utilities-DVD aus dem Laufwerk, und schalten Sie den Computer
aus. Sollte nach erneutem Einschalten Ihr System nicht booten, wenden
Sie sich bitte an den zuständigen Serviceanbieter.“) angezeigt wird.
Bestätigen Sie die folgenden Meldungen mit "OK". Der Computer wird dann
neu gestartet.
Ihr Computer befindet sich softwaremäßig nun in dem Zustand, in dem Sie ihn
erworben haben. Nach dem Neustart beginnt die Windows
Einrichtungsprozedur.
6. Windows blendet einen Begrüßungsbildschirm zu Microsoft Windows ein.
Klicken Sie in der unteren rechten Bildschirmecke auf "Continue" ("Weiter"),
um fortzufahren.
7. Folgen Sie den Anweisungen auf dem Bildschirm.
8. Der Installationsvorgang wird angehalten, und auf dem Bildschirm wird "End
user license agreement" ("Endbenutzer-Lizenzvertrag“) angezeigt. Sie
müssen erst dem Lizenzvertrag zustimmen, bevor Sie mit der Installation
fortfahren können. Klicken Sie auf die Schaltfläche "Yes, I agree to the
license agreement" ("Ja, ich stimme dem Lizenzvertrag zu“), und klicken
Sie dann auf die Schaltfläche "Continue" ("Weiter“).
9. Folgen Sie den Anweisungen auf dem Bildschirm.
10. Sie werden aufgefordert, die Namen für die Personen, die den Computer
nutzen, einzugeben. Sie können bis zu 5 Namen eintragen. Es muss ein
Name eingegeben werden. Für jeden Benutzer wird ein unterschiedliches
Benutzerkonto eingerichtet. Klicken Sie auf "Continue" ("Weiter“), wenn Sie
die Eingabe beendet haben.
11. Windows beendet die Installation. Klicken Sie in der unteren rechten
Bildschirmecke auf "Finish" ("Fertig stellen“).
bostext
15
Page 23

Wiederherstellung installierter Software
3.2.5 Wiederherstellung des Windows-Betriebssystems mit der "Fujitsu
Siemens Product Recovery CD/DVD"
1. Legen Sie die "Product Recovery CD/DVD" bei eingeschaltetem Computer in
das DVD-Laufwerk ein.
2. Schalten Sie den Computer aus, warten Sie einen Moment und schalten Sie
den Computer wieder ein.
3. Wenn die Aufforderung "Press any key to boot from CD …" ("Drücken Sie
eine beliebige Taste, um von der CD zu starten…“) zum ersten Mal auf dem
Bildschirm erscheint, drücken Sie eine beliebige Taste auf der Tastatur.
Achtung!
4. Das Installationsprogramm startet. Nach dem Laden der entsprechenden
Dateien (dauert einige Minuten), erscheint das Menü "Windows … Setup".
Drücken Sie die "Eingabetaste", um mit der Installation fortzufahren.
5. Dem "Windows License Agreement“
Sie mit F8 zustimmen, um mit der Installation fortfahren zu können.
6. Im folgenden Menü drücken Sie die "Esc“ Taste (nicht reparieren).
7. Im nächsten Menü wählen Sie ggf. mit den oben/unten Tasten (↓↑) Laufwerk
C: aus drücken die "D"-Taste und bestätigen mit der "Eingabetaste".
8. Drücken Sie im nächsten Bild die "L“-Taste und bestätigen Sie nochmals den
Vorgang mit der "Eingabetaste".
9. Wählen Sie im nächsten Menü mit den oben/unten Tasten (↓↑) die Option
"Format partition using the NTFS file system" ("Partition mit dem NTFS
Dateisystem formatieren“) und bestätigen mit der "Eingabetaste".
Die Festplatte wird gelöscht und neu formatiert. Es werden Dateien von der
CD/DVD auf die Festplatte kopiert, um den Installationsprozess fortführen zu
können. Der Computer führt automatisch einen Neustart durch. Nach dem
Neustart beginnt der Windows Installationsprozess.
Hinweis! Bei der Funktion "Format partition using the NTFS file system
10. Während des Installationsprozesses können Sie spezielle Einstellungen
vornehmen oder die Standardeinstellungen verwenden, d.h., die Angaben mit
"Continue" ("Weiter“) bestätigen. Folgen Sie den Anweisungen auf dem
Bildschirm.
Es werden weitere Daten kopiert. Dieses dauert einige Minuten. Der Computer
führt automatisch einen Neustart durch. Nach dem Neustart wird der Windows
Installationsprozess fortgesetzt.
11. Es erscheint die Aufforderung "Screen resolution will be adjusted
automatically to improve the appearance of visual elements" (“Die
Bildschirmauflösung wird automatisch angepasst, um die Darstellung
Diese Meldung erscheint im Laufe des Installationsprozesses
nach jedem Neustart. Bitte an diesen Stellen diese Meldung
ignorieren, da nur erstmalig von CD aus gestartet wird.
("Windows-Lizenzvertrag“) müssen
(fast)" ("Partition mit dem NTFS Dateisystem formatieren
(schnell)“) wird die Festplatte nur
formatiert.
gelöscht und nicht neu
.de
bostext
16
Page 24

Wiederherstellung installierter Software
von visuellen Elementen zu verbessern“). Klicken Sie auf "OK“. Bestätigen
Sie die anschließende Meldung mit "OK“.
12. Das Windows "Welcome" ("Wilkommen“) Menü erscheint. Klicken Sie auf
"Continue" ("Weiter“) und folgen Sie den Anweisungen auf dem Bildschirm.
13. Sie werden aufgefordert, die Namen für die Personen, die den Computer
nutzen, einzugeben. Sie können bis zu 5 Namen eintragen. Es muss ein
Name eingegeben werden. Für jeden Benutzer wird ein unterschiedliches
Benutzerkonto eingerichtet. Klicken Sie auf "Continue" ("Weiter“), wenn Sie
die Eingabe beendet haben.
14. Windows beendet die Installation. Klicken Sie in der unteren rechten
Bildschirmecke auf "Finish" ("Fertig stellen“).
15. Es erscheint das Windows "Start Menu" ("Start Menü“).
16. Nehmen Sie die "Product Recovery CD/DVD“ aus dem DVD-Laufwerk.
Zur Installation der Treiber, zusätzlicher Software und zur Wiederherstellung der
Online Dokumentation legen Sie die mitgelieferte "Drivers & Utilities CD/DVD" in
das DVD-Laufwerk ein.
HINWEIS Lesen Sie die Meldungen sehr aufmerksam.
3.3. Wiederherstellung von Treibern, Handbücher und
spezieller Software
Mit der "Drivers & Utilities CD/DVD“ können Treiber, die zusätzliche Software und
die elektronische Dokumentation Ihres Systems wiederhergestellt werden.
Wir empfehlen Ihnen die Wiederherstellung in nachfolgend beschriebener
Reihenfolge vorzunehmen.
3.3.1 Die Wiederherstellung von Treibern
bostext
Die Wiederherstellung von Treibern kann durchgeführt werden, ohne dass Sie
Windows dafür herunterfahren müssen. Sie können alle vorinstallierten
Dienstprogramme und Treiber wiederherstellen, wobei die Funktionalität des
Windows-Betriebssystems unverändert bleibt.
1. Legen Sie bei laufendem Windows die "Drivers & Utilities CD/DVD“ in das
DVD-Laufwerk ein.
Es erscheint die "wizard information“ Es werden von der DVD notwendige
Microsoft Updates installiert, die zum Zeitpunkt der Fertigung des Systems
verfügbar waren.(Herstellung des Auslieferungszustandes) Dieser Vorgang
läuft automatisch ab und dauert einige Minuten. Nach Fertigstellung erscheint
das "wizard@home-pc" Menü.
2. Wählen Sie im "wizard@home-pc" der CD/DVD "Treiber ". Es werden
automatisch alle Treiber für die Komponenten neu installiert, die im
Auslieferungszustand Bestandteil des Computers waren. In diesen
Installationsvorgang kann nicht eingegriffen werden.
17
Page 25

Wiederherstellung installierter Software
Nach dem Installationsprozess führt der Computer automatisch einen Neustart
durch. Nach dem Neustart nehmen Sie die "Drivers & Utilities CD/DVD“ aus dem
DVD- Laufwerk.
Sollte Ihrem System optional eine Treiber CD/DVD für Komponenten beiliegen, so
legen Sie zur Installation der Treiber diese CD/DVD in das DVD- Laufwerk ein und
folgen Sie den Anweisungen auf dem Bildschirm.
3.3.2 Die Wiederherstellung zusätzlicher Software
1. Legen Sie bei laufendem Windows die "Drivers & Utilities CD/DVD“ in das
DVD-Laufwerk ein.
2. Wählen Sie im "wizard@home-pc" Menü der CD/DVD "Programme &
Links". Installieren Sie zur vollständigen
hier zur Verfügung gestellten Programme & Links.
alle
3. Klicken Sie mit dem Mauszeiger im Auswahlmenü auf das entsprechende
Programm bzw. Link und folgen Sie den Anweisungen auf dem Bildschirm. Die
in dieser Auswahl angebotenen Links werden als Favoriten im Internetexplorer
hinterlegt.
4. Nehmen Sie die "Drivers & Utilities CD/DVD“ aus dem DVD-Laufwerk.
Um den softwaretechnische Auslieferungszustand zu komplettieren, müssen Sie
nun die ggf. zum Lieferumfang gehörenden Programme CD/DVDs einlegen und die
Programme auf Ihren PC installieren.
3.3.3 Die Wiederherstellung der Online Dokumentation
1. Legen Sie bei laufendem Windows die "Drivers & Utilities CD/DVD“ das
DVD-Laufwerk ein.
2. Wählen Sie im "wizard@home-pc" Menü der CD/DVD "Handbücher". Die
elektronische Dokumentation wird entsprechend Ihrer Konfiguration erstellt.
Wiederherstellung des PC Systems
.de
bostext
18
Page 26

Transport des Systems
4 Transport des Systems
Soll Ihr Computer über eine größere Strecke transportiert werden, d. h. auch mit
einem Fahrzeug, müssen Sie darauf achten, dass die Datenträger nicht durch den
Transport gefährdet werden. Bei einem Transport mit einem Fahrzeug sollte auf alle
Fälle eine komplette Datensicherung der Festplatte auf externe Datenträger
vorgenommen werden.
Wenn Sie den PC nur über eine kurze Entfernung, d. h. nur in ein anderes Zimmer
oder auf einen anderen Arbeitsplatz transportieren, muss nicht unbedingt eine
Datensicherung durchgeführt werden. Sie müssen allerdings darauf achten, dass
das Gerät vorsichtig transportiert wird.
Verwenden Sie für den Wiederversand und sonstigen Transport die
Originalverpackung oder eine andere geeignete Verpackung, die Schutz gegen
Stoß und Schlag gewährt.
Lösen Sie die Kabelverbindungen aller externen Geräte und transportieren Sie alle
Geräte getrennt und nur in Originalverpackung oder in einer anderen geeigneten
Verpackung, die Schutz gegen Stoß und Schlag gewährt.
Lassen Sie das Gerät nicht fallen und setzen Sie das Gerät keinen heftigen
Erschütterungen aus.
ACHTUNG! Der Transport sollte vorzugsweise in der Originalverpackung
Für die Verpackung unserer Geräte wird prinzipiell recyclingfähiges Material
eingesetzt.
5 Garantieleistungen
Für unsere Systeme gewähren wir generell die Garantieansprüche gemäß BGB
sowie darüber hinaus Garantieleistungen nach Vereinbarung (siehe dazu auch
entsprechende Serviceunterlagen).
Das von Ihnen erworbene System wurde in unserem nach DIN EN ISO 9001 und
DIN EN ISO 14001 zertifizierten Unternehmen umwelt- und qualitätsgerecht
produziert. Für alle unsere Produkte gewähren wir die gesetzlich vorgeschriebene
Garantie bzw. eine Garantieverlängerung nach Vereinbarung.
erfolgen, da diese spezifisch dafür entwickelt wurde.
bostext
19
Page 27

Rücknahme von Altgeräten
6 Rücknahme von Altgeräten
Die Rücknahme und Recyclingfähigkeit unserer Systeme ist in unserem nach DIN
EN ISO 14001 zertifizierten Umweltmanagement geregelt und garantiert.
Unsere Geräte sind weitestgehend aus Materialien hergestellt, die einem
fachgerechten Recycling zugeführt werden können. Nach seinem Gebrauch wird
das Gerät zurückgenommen, um es einer Wiederverwendung bzw. wertstofflichen
Verwertung zuzuführen, soweit es in einem Zustand zurückgegeben wird, der dem
bestimmungsgemäßen Gebrauch entspricht. Nicht verwertbare Geräteteile werden
sachgemäß entsorgt.
Zur Rückgabe eines Gerätes nutzen Sie bitte die in Ihrem Land vorhandenen
Recycling- und Entsorgungsmöglichkeiten.
Weitere Informationen über die länderspezifischen Recycling- und
Entsorgungsmöglichkeiten finden Sie im Internet unter:
www.fujitsu-siemens.com
Wenn Sie darüber hinaus Fragen zur Entsorgung haben, wenden Sie sich bitte an
Ihre Verkaufsstelle oder unseren Help Desk.
.de
bostext
20
Page 28
Technische Daten und Betriebsbedingungen
Technische Daten und Betriebsbedingungen
Technische Daten
Leistungsaufnahme wenn Gerät abgeschaltet –
ATX-Netzteil
Netzeingangsspannung 230 V~
Netzfrequenz 50 Hz (60Hz)
Netzeingangsstrom (entsprechend Angabe Label auf
Geräterück- oder Unterseite)
Betriebsbedingungen
Umgebungstemperatur
Transporttemparatur
Lautstärke
Schalleistungspegel max. 55 dB (A)
(DIN EN27779, ISO3744, ISO 9296, RAL UZ-78)
Geräteklassifizierung
Schutzklasse I
Verschmutzungsklasse 2
Überspannungskategorie II
≤ 5 W
(0 W nur möglich, wenn
direkte Trennung vom
Netz erfolgt –
Netzstecker ziehen bzw.
Gerät ausschalten mittels
Netzschalter an
Gehäuserückseite )
(optional Wide-Range
100V-240V 50/60Hz)
4A bzw. 5A bei
230V/50Hz
(9A bzw. 10A bei
115V/60Hz)
10 ... 35 °C
20 ... 85 % relative
Luftfeuchte nicht
kondensierend
-25 °C bis 60 °C
bostext
A-1
Page 29

Ergänzung zur Bedienungsanleitung
Ergänzung zur Bedienungsanleitung
Richtlinien und Umweltschutz
Eine wichtige Eigenschaft unserer Produkte ist neben Qualität und
Leistungsfähigkeit die Umweltfreundlichkeit.
(I) Ressourcenschutz durch Energiesparfunktionen
Unsere Geräte haben im Regelfall energiesparende Arbeitszustände.
(II) Gerätesicherheit
Die Geräte erfüllen die Anforderungen der Niederspannungsrichtlinie 73/23/EWG
einschließlich der Änderung 93/68/EWG, zertifiziert nach EN 60950, und der
Richtlinie zur elektromagnetischen Verträglichkeit 89/336/EWG einschließlich der
Änderung 93/68/EWG.
(III) Gewährleistung der elektromagnetischen Verträglichkeit
Alle Daten- und Signalleitungen müssen über eine ausreichende Schirmung
verfügen. Als minimale Anforderung gilt die Verwendung eines geschirmten Kabels
der Kategorie 5 für 10/100 Ethernet, bzw. der Kategorie 5e für Gigabit Ethernet. Alle
Gehäuseabdeckungen müssen, wie in der Betriebsanleitung beschrieben, installiert
sein.
(IV) Anforderung an Bildschirmarbeitsplätze
Unsere Geräte erfüllen die Anforderungen für Bildschirmarbeitsplätze entsprechend
der EU-Bildschirmrichtlinie 90/270/EWG im Sinne der EU-Richtlinie 89/391/EWG.
(V) Laserhinweis
Sollte Ihr System mit einem optischen Laufwerk, wie z.B. CD-ROM-, CD-RW-, DVDoder einem kombinierten Laufwerk ausgestattet sein dann gilt:
Die eingesetzten optischen- Laufwerke entsprechen, bei geschlossenen PC
Gehäuse, der Laser Klasse 1 nach IEC 60825-1. Diese enthalten Licht emittierende
Dioden (LED), die unter Umständen einen stärkeren Laserstrahl als Laser Klasse 1
erzeugen. Ein direkter Blick, auch mit optischen Hilfsmitteln, in diesen Strahl ist
gefährlich und führt zu gesundheitlichen Schäden. Deshalb dürfen keine
Gehäuseteile des optischen Laufwerks entfernt werden.
(VI) Bedienungsanleitung
Die zu dem Gerät mitgelieferte Dokumentation wird ausschließlich auf chlorfreiem
Papier erstellt.
Diese o. a. Dokumente können bei Bedarf beim Hersteller eingesehen werden.
.de
bostext
A-2
Page 30

bostext
Page 31

.com
User Manual
bostext
Page 32

The information in this manual is subject to change without prior notification.
Despite every care being taken in its production, we cannot rule out the possibility
that this manual may contain errors or omissions. No liability whatsoever is
accepted for errors or loss of data as a consequence of this.
We recommend reading this manual carefully before operating your PC for the first
time.
The trademarks used are protected by the respective owners.
All other trademarks are trademarks or registered trademarks of the respective
owner and are recognised as protected.
Copyright © Fujitsu Siemens Computers GmbH 2005
All rights reserved, in particular (also extracts) those of translation, reprinting,
reproduction through copying or similar processes.
Any infringements will result in the payment of compensation.
All rights reserved, in particular for the granting of patents or registration of
Community Trademarks.
We reserve the right to make technical changes and alter delivery options.
As of: November 2005
bostext
Page 33

Contents
Foreword....................................................................................................................1
Notes on the electronic documentation......................................................................1
1 Safety, precautionary and compliance instructions.................................................2
2 Startup ....................................................................................................................7
2.1 Connecting the computer ................................................................................7
2.1.1 Computer connections..............................................................................7
2.1.2 Connections, controls and indicators on the front of the PC.....................9
2.2 Connection ....................................................................................................10
2.3 Initial startup of preinstalled software ............................................................10
3 Restoring Installed Software.................................................................................12
3.1 Introduction.................................................................................................... 12
3.2 Restoring Installed Software..........................................................................13
3.2.1 System restoration variants ....................................................................13
3.2.2. Restoring by activation of a "Restore checkpoint" ................................. 13
3.2.3. Restore with "Advanced Windows Startup Option" ...............................14
3.2.4 Restoring with the "Drivers & Utilities CD/DVD" .....................................14
3.2.5 Restoring the Windows operating system with the "Fujitsu Siemens
Product Recovery CD/DVD" ............................................................................15
3.3. Restoring drivers, manuals and special software.........................................16
3.3.1 Restoring drivers..................................................................................... 16
3.3.2 Restoring additional software .................................................................17
3.3.3 Restoring the online documentation .......................................................17
4 Transporting the system .......................................................................................18
5 Warranty services .................................................................................................18
6 Return of old units.................................................................................................19
Technical data and operating conditions ............................................................... A-1
Supplement to the operating instructions............................................................... A-2
.com
bostext
Page 34

Foreword
By purchasing your new computer you have made a valuable investment in the
future.
Fujitsu Siemens Computers are high-tech products providing the perfect
combination of maximum quality, reliability and performance. Fujitsu Siemens
Computers are designed to make your life and everyday work easier.
We hope you enjoy working and playing on your computer.
Notes on the electronic documentation
You will find further information on your computer in the electronic "User Manual", in
addition the relevant component documentation will automatically be created in the
"Manuals" folder in accordance with your configuration on initial startup. This
documentation can be accessed after initial startup under "Start" - "All Programs" "Manuals". The component documentation and the "User Manual" are also supplied
in electronic form on the "Drivers & Utility DVD" in case reinstallation is required.
Further information on the following topics can be found here:
• Keyboard
• Drives (optional depending on system configuration)
• Opening the housing
• Installing expansion cards
• Installing additional hard disks and drives
• Software installation
• Frequently asked questions
• Tips and tricks
bostext
1
Page 35

Safety instructions
1 Safety, precautionary and compliance instructions
Your PC complies with the relevant safety regulations for IT equipment. Should you
have any questions with regard to whether you can use the unit where intended
please contact your sales agent or our service department.
• Keep this safety information and the other documentation (such as the quick
guide, operating instructions and CD) with the unit. When you pass on the unit
to a third party, please also pass on all the documentation.
Risk of electrocution
• The unit requires a safety-tested power cable which complies with the
regulations of the country of use.
• Check the cables and power plug for signs of damage on a regular basis.
• The device may only be connected to a power socket installed in accordance
with the safety regulations of the country of use.
• You may only operate the unit if its rated voltage matches the local mains
voltage.
• Safe disconnection from the mains supply is only guaranteed by removing the
power plug from the mains socket. Just because the "Power LED" is not
illuminated, does not mean that the unit is isolated. Simply switching off the PC
and add-on devices is not enough.
Risk of explosion
• General warnings:
Your system is equipped with a replaceable lithium battery. It is located on the
system board (see system board manual). Once the battery is flat, it can be
easily exchanged.
Caution!
There is a risk of explosion if the battery is exchanged incorrectly
Replace only with a battery of the same type or with an equivalent
recommended by the manufacturer.
Electromagnetic compatibility
• External units, such as monitors, joysticks, etc., may only be connected to the
interface ports with screened cables to meet the harmonised standards under
electromagnetic compatibility (EMC) legislation.
• You may only operate the unit if its rated voltage matches the local mains
voltage.
Information on R&TTE Directive
• Fujitsu Siemens Computers hereby declares that the built-in modem conforms
to the fundamental requirements and the relevant standards contained in the
directive 1999/5/EC.
• The complete original declaration of conformity for the R&TTE Directive can be
found in your PC’s electronic documentation.
.com
bostext
2
Page 36

Safety instructions
Computer setup
• Before you open the housing to change, install or remove components, you
must switch the PC off and remove the plug from the socket. You must also
disconnect all peripherals (remove plug) from the device, e.g. telephone line,
• The proper operation (according to IEC 60950/EN 60950) of the unit is only
guaranteed with a fully attached housing and covers for installation slots
(electrical shock, cooling, fire prevention, noise suppression).
• Only authorised persons should open the unit. Tampering with the unit will
result in a loss of the right to guarantee claims and the discontinuation of the
manufacturer's guarantee obligation to uphold the harmonised standards
according to the law regarding the electromagnetic compatibility of units and
low voltage directive.
• All integrated circuits and memory modules, as well as the contacts on all
sockets and plugs, are susceptible to static electricity. Protect these from static
electricity. The effect of static electricity, rapid transients or strong
electromagnetic fields on the unit may cause faults. When exchanging or
installing a board or a memory module, touch an earthed object or carry a
ground strap to divert any electrostatic charge from your body.
• All ports are only designed for connection of safety extra-low voltage (SELV).
• The unit can be equipped with a power output which may only be used to
connect a monitor.
• Never open the power supply unit! The components (e. g. power supply)
marked with a warning (e.g. lightning) may only be opened, removed or
exchanged by authorised qualified personnel.
• If the BIOS needs to be updated, only Fujitsu Siemens Computers updates
are to be used.
• When installing additional components (e.g. hard disks) ensure that there is
adequate cooling.
Repairs
• Repairs to the unit may only be carried out by authorised persons.
Unauthorised opening and incorrect repairs may pose considerable risk to the
user (risk of electric shock or fire).
Optical drives
• Use only completely perfect storage media (e.g. CD, DVD) in your optical drive
to avoid data loss, damage to the machine and injury.
• Each CD/DVD should be checked for damage such as fine cracks, fractures or
similar prior to insertion in the drive.
• Note that additional adhesive changes the mechanical properties of a CD/DVD
and may lead to an imbalance.
• Damaged and unbalanced CDs/DVDs may break at high drive speeds (data
loss). Under some circumstances, sharp-edged fractures may penetrate the
cover of the drive (damage to the machine) and be thrown out of the machine
(risk of injury, in particular to exposed parts of the body such as face and
neck).
• Look after the optical drive and prevent mechanical damage as well as
premature ware of the storage media by taking the following advice:
bostext
3
Page 37

Safety instructions
− Only insert CDs/DVDs in the drive when required and remove them after
use.
− Store the CDs/DVDs in appropriate cases. Protect them from heat and
direct sunlight.
Cleaning
• Clean your PC regularly. Before doing so, switch off the PC and any
peripherals, removing the plug from the socket.
• Use a non-abrasive cleaning product and/or a lightly dampened cloth.
• Avoid using cleaning sprays and any kind of solution containing alcohol or
other flammable liquids. Therefore do not use any abrasive powder or cleaning
agent which dissolves plastic for cleaning.
• Clean the monitor screen with a soft, lint-free dampened cloth.
Additional notes for proper operation
• Position the unit so that there is adequate air for cooling. Never cover the
ventilation slots on the unit. This could cause overheating and thus shorten the
life of your unit.
• With some devices, the manufacturer has applied films to sensitive surfaces to
protect against mechanical damage. These protective films should be removed
before startup.
• We recommend that you place the unit on a non-slip surface. The diversity of
coatings and varnishes used on furniture means that we cannot guarantee that
the rubber/plastic feet on the unit will not cause damage to the surface on
which it stands.
• Protect your device from very high humidity, direct sunlight as well as high and
extremely low temperatures. If the device is brought from a cold environment
into a warmer installation site, bedewing may occur. Wait until the temperature
of the device has equalised and it is completely dry before you put it into
operation (approx. 2 to 4 hours).
• The device is not watertight. Do not immerse the device in water and protect it
from spray (rain, sea water).
• Should an abnormal odour or smoke be produced and in emergencies (e.g.
damage to the housing, operating controls or power cable, and liquid or foreign
bodies entering the unit), switch the device off immediately, remove the plug
and contact your sales agent or our hotline/Help Desk.
• Do not smoke in the vicinity of the unit. Particles of ash may settle on the
monitor or inside your computer.
• Do not eat over the keyboard as crumbs may cause it to malfunction.
• Ensure that the cables from the computer do not pose any risk (danger of
stumbling) and cannot be damaged.
• The computer should preferably be transported in the original packaging as it
has been specially designed for the system unit.
• The ID plate may also be located underneath the housing.
• You may have to remove a securing device used during transportation from
the underside of the mouse.
• When you switch off ATX and µATX systems, the system will still be in standby
mode and still be connected to the mains. You will have to disconnect the
mains plug to isolate the unit.
.com
bostext
4
Page 38

Safety instructions
• If the monitor is connected to the power socket on the PC power supply unit (if
available), it will not be turned off when the PC is switched off.
• If you have a monitor which supports power management, it will also switch to
standby. If the monitor does not have this function, you must switch it off
separately when you finish working with the PC.
• The hard disk has already been formatted and the operating system has been
installed. It will only need to be formatted if the drive has to be reconfigured.
• The "Product Recovery CD/DVD" supplied can only be used to restore/install
your operating system if a motherboard with a Fujitsu Siemens Computers
BIOS is being used.
• Consumer PC systems are not suitable for high security and medical
applications.
Safety Information for Units with Liquid Cooling Systems
The cooling system is housed in a sealed safety cooling system which uses an
environmentally certified coolant. This liquid is non-toxic, non-combustible, nonconductive and recyclable.
The liquid cooling system is monitored by the BIOS. Should a fault occur in this
liquid cooling system, the BIOS activates an error message when the system is
started.
• When cleaning the device, do not use any aggressive cleaning agents or
pointed or sharp objects which could cause damage to the connection cables
of the cooling system if allowed to penetrate the outer casing.
• In countries subject to very low or very high outside temperatures, please note
the transport temperature specified in the user manual under "Technical Data
and Operating Conditions" when transporting the unit outdoors.
Repair, modification and upgrading the computer
As this system was designed in such that its hardware and thermal technology
dovetail, enabling the manufacturer to guarantee faultless function, hardware
repairs and changes must only
The incorrect installation of components not certified by the manufacturer may
cause serious damage to the unit. Fujitsu Siemens Computers bears no liability for
any resulting consequential damage. If you have any questions, please contact the
manufacturer or the hotline.
Data backup
• Create backup copies of your work files on a regular basis. This is the only way
to protect against data loss, e.g. in the event of a hard disk fault.
• No liability shall be accepted for loss of data.
Special handling of batteries and rechargeable batteries
• The batteries/rechargeable batteries in our units do not contain any Cd or Hg
compounds.
• Your system is equipped with a replaceable lithium battery. It is located on the
system board. Once the battery is flat, it can be exchanged.
be carried out by authorised persons.
bostext
5
Page 39

Safety instructions
Information about the battery regulations of 27.03.1998:
Please note:
Batteries and rechargeable batteries should not be disposed of in domestic
waste. They are to be returned to the manufacturer, dealer or agent free of
charge to ensure that they are recycled or correctly disposed of.
The device may not be disposed of with the municipal waste
(household rubbish). This device is labelled in accordance with
European Directive 2002/96/EU on Waste Electrical and Electronic
Equipment - WEEE.
The directive details the Europe-wide regulations regarding the return
and recycling of waste equipment. Please use the return and collection
systems available to you for disposal of devices which are no longer
required. Further information on this topic can be found at www.fujitsu-
siemens.com.
.com
bostext
6
Page 40

Startup
2 Startup
2.1 Connecting the computer
2.1.1 Computer connections
Most of a computer's connections are located at its rear. Which connections are
present – and where they can be found – depends on the particular model involved.
The most commonly used connections are listed in the following table.
Connection image Icon Colour
black
Cold device plug
purple
PS/2 socket, 6 pole
PS/2 socket, 6 pole
Subminiature
D socket, 15-pin
Subminiature
D socket, 25-pin
Subminiature
D plug, 9-pin
3.5 mm
Jack sockets
Keyb.
or or
VGA
LPT
1
or
SERIAL
Line In
Line Out
Mic
AUDIO
digital out
green
Monitor
blue
burgundy
turquoise
light blue
light green
pink
yellow
Connection
PC power supply
PS/2 keyboard
PS/2 mouse
Printer
(parallel port)
COM1
(serial port)
2)
Sound
(external sound
sources, e.g. active
loudspeaker,
microphone)
– Soundcard
– Sound onboard
1) 4)
bostext
7
Page 41

Startup
SPDIF IN
Cinch socket
USB socket
or
FireWire socket
RJ-11 socket
RJ-45 socket
Antenna socket
4-pole or more
socket
● LED WLAN LINK green WLAN operational
SPDIF Out
or
USB
IEEE 1394
or
or LINE
or PHONE
or
or LAN
CATV none
SVIDEO IN
SVIDEO OUT
SPDIF
optic
DVI white
yellow
black
white
black
white
none
Modem
Network or DSL
none
Digital sound
connection
see also manual on
the motherboard and
"Tips and tricks"
Connection for USB
2.0 devices (e.g.
keyboard, IR
sender/receiver
module, scanner,
printer) USB 2.0
Connection for IEEcompatible devices
(e.g. video recorder,
digital camera)
FireWire
modem
Cable, antenna
connection
Video input and
black
Digital optical sound
black
output connection
(see documentation
about the VGA/TV
card)
connection
display
Connection for digital
video signal (monitor)
3)
.com
bostext
8
Page 42

Startup
1)
Caution: Under the connection, there may be a toggle switch for changing the
power supply from 230 V to 115 V. The factory setting is 230 V.
2)
With an additionally installed soundcard, the sound function on the motherboard is
not activated or "Sound onboard" is not available.
3)
Important information on USB 2.0: In order to guarantee a reliable data transfer
rate, we recommend that you use USB connecting cable with a maximum length
of 4 m.
4)
Controls on the power supply (optional)
1
0
230 115
Mains on/off switch
Voltage selector
optional
Caution! Please note the mains power supply to which your computer is to be
connected and compare it with the default setting.
2.1.2 Connections, controls and indicators on the front of the PC
Connections
The descriptions of the various connections can be found in the previous table.
Controls
Standby
button
Button to activate the standby function
and on/off for ATX systems.
Indicators
Power LED
or
on
Power button The system is switched on when the
HDD LED on Shows that the hard disk is being
The system is switched on (POWER)
blue ring is illuminated
accessed.
(HDD)
bostext
9
Page 43

Startup
2.2 Connection
Before you switch on the computer, please connect
1. the monitor, keyboard, mouse, printer (if applicable), modem and any other
peripheral units to the PC. Please refer to the information in the chapter
"Computer Connections", as well as the information in the "Quick Start Guide".
2. First connect the power cable supplied to the power socket on the PC and then
plug it into a 230 V or 115 V power socket (plug strip). You may only operate
the unit if its rated voltage matches the local mains voltage. If your computer
has a double-voltage toggle switch, please ensure that it has been set to the
correct mains voltage for your country. The manufacturer’s default setting is
230 V.
After cabling
3. Turn on your monitor.
4. Then, if applicable, switch on the on/off switch on the back of the computer.
To start the computer, press the standby button located on the front of the
computer.
The device is ready for operation when the green lamp / blue ring is illuminated.
2.3 Initial startup of preinstalled software
A Microsoft®Windows operating system is pre-installed on your computer. After
turning on the computer, it is ready to use. You can use the Windows operating
system immediately. You may have to make some adjustments. To do this, follow
the on-screen instructions.
Note: After delivery from the factory, the first time your PC is switched on, a
system check is carried out under "First Steps". During this test do not
attempt to use the entry or operating elements of the PC.
You can find the pre-installed software under: "Start / All Programs".
Note on Microsoft®Windows XP Home Edition or Professional and
Microsoft®Windows Media Center Edition
Fujitsu Siemens Computers has pre-installed one of these Microsoft®Windows
products in such a way that you can use the product immediately. If you want to
change critical hardware components, it may be necessary to reactivate the system.
In this case, follow the program instructions after changing the hardware. If you
have any questions, please contact our Help Desk
(www.fujitsu-siemens.com/service).
.com
bostext
10
Page 44

Startup
Note on Microsoft®Word
Microsoft has provided user activation for Microsoft®Word. Follow the program
instructions after starting the program. In case of queries, please contact our Help
Desk (www.fujitsu-siemens.com/service).
bostext
11
Page 45

Restoring Installed Software
3 Restoring Installed Software
3.1 Introduction
If your operating system should fail to start, or if faults should occur on your hard
drive, it may be necessary to reinstall the pre-installed software. You can restore
this with the following resources.
Supplied with your computer are:
• "Fujitsu Siemens Product Recovery CD/DVD"
• "Drivers & Utilities CD/DVD"
• Driver/application CDs/DVDs (optional)
• Manual for Windows operating system
• CoA (Certificate of Authenticity) Label
You are not asked for this registration code when restoring Windows.
This delivery applies only to Microsoft® operating systems.
IMPORTANT! Please create backup copies of your files on a regular basis. If data
is damaged or lost, you can restore your applications using the
original data carriers. However, if you do not have backup copies of
your own data files, they cannot be restored.
We urgently recommend that, as far as is possible, you back up all
your data files prior to reinstalling the operating system as all files
may be deleted from the hard disk as a result of the restore process.
You must reinstall all programs you have installed yourself since
purchasing your computer and then restore your data files using the
backup copies. No liability whatsoever is accepted for errors or loss
of data as a consequence of this.
TIP! If your PC is equipped with a combo driver (burner), use this to
create the backup copies. Burn a data CD. An external USB bulk
memory (hard disk or memory stick) is a useful expansion to your
PC.
.com
bostext
12
Page 46

Restoring Installed Software
3.2 Restoring Installed Software
3.2.1 System restoration variants
Below are a few processes which enable you to restore your system. Depending on
the severity of the fault, we recommend to use the variants one after each other
until the problem is solved.
1. Restoring by activation of a "Restore checkpoint".
This retains the files and programs you have created and installed on your PC
up to the selected restore checkpoint.
2. Restore with "Advanced Windows Startup Option".
This restores the system's last known good configuration. All the data and
programs which existed at the time of the last successful Windows bootup will
be restored.
3. Restoring with the "Drivers & Utilities CD/DVD".
This returns your system to how it was when you acquired it, including the
preinstalled programs, drivers and documentation.
4. Restoring with the "Fujitsu Siemens Product Recovery CD/DVD".
This only restores the operating system, not the complete system. You must
reinstall all additional programs, drivers and documentation.
3.2.2. Restoring by activation of a "Restore checkpoint"
In case of a problem, you can restore the system to its state an earlier date, without
losing personal data files (e.g. documents, Internet favourites and e-mail).
Windows XP system recovery monitors changes to the computer and generates
easily identifiable recovery checkpoints on a regular basis.
To restore the system to its status at an earlier date, proceed as follows:
1. Click on "Start"/"Control Panel"/"Performance and Maintenance" and then
on "System recovery".
2. Select the option "Restore computer to a previous point in time". Confirm
with "Continue". The checkpoint can be selected in the subsequent screen.
If you have any questions or require further help, you should use the
comprehensive "Help and Support Center" by clicking on the question mark in the
top right of the screen.
Further information on creating a restore checkpoint can be found in the electronic
"User Manual for a Fujitsu-Siemens PC".
bostext
13
Page 47

Restoring Installed Software
3.2.3. Restore with "Advanced Windows Startup Option"
If an error message or a blue screen, for example, appears after repeated starting
(booting), restart your computer. During the boot process, press the F8 key at very
short intervals, until the message "Advanced Startup Options" appears. Select
"Last known good configuration".
If this operation is unsuccessful, completely reinstall the Windows operating system
as described under 3.2.4.
3.2.4 Restoring with the "Drivers & Utilities CD/DVD"
In order to restore your system to its delivery status, including the programs, drivers
and documentation pre-installed in the delivery status, proceed as follows:
1. Insert the "Drivers & Utility CD/DVD" into the DVD drive while the computer is
switched on.
2. Switch the computer off, wait a moment and then switch the computer on
again.
3. When the prompt "Press any key to boot from CD …" appears on the screen
for the first time, press any key on the keyboard. The installation program is
started and the "Recovery²" menu is displayed.
The computer loads the required files from the DVD/CD drive in order to
restore Windows on your computer. This may take a few minutes.
4. Click on "Start" and "Continue" to start the restore process.
The restore process is started. All necessary files are copied. The computer is
then restored to its condition as purchased. This may take a few minutes.
Caution!
If the message "Recovery folder not found. Please restore your system
from the Recovery CD" is displayed, you must restore the operating system
with the "Fujitsu Siemens Product Recovery CD/DVD" supplied. This may
occur in the following cases:
• a system file required for the recovery process was not found or one of
these files is defective.
• after replacement of the original hard disk which was included in the
delivery.
If this is the case, remove the "Drivers & Utilities DVD" from the optical drive,
and restore the Windows operating system as described in 3.2.5.
5. Remove the "Drivers & Utilities CD/DVD" from the drive, if the message "The
recovery process is complete. Remove the Driver & Utilities CD/DVD from
the drive and switch off the computer. If your system fails to boot once
switched on again, please contact the relevant service provider." is
shown. Confirm the following messages with "OK". The computer is then
rebooted.
.com
bostext
14
Page 48

Restoring Installed Software
Your computer is now in the condition in which you bought it in terms of
software. After the restart the Windows installation process begins.
6. Windows displays a welcome screen to Microsoft Windows. Click on
"Continue" in the bottom right corner of the screen.
7. Follow the on-screen instructions.
8. The installation process is stopped, and the "End user license agreement" is
displayed on the screen. You must agree to the license agreement before you
can continue with the installation. Click on the "Yes, I agree to the license
agreement" button, and then on the "Continue" button.
9. Follow the on-screen instructions.
10. You will be asked to enter the names of the people who will be using the
computer. You may enter up to 5 names. At least one name must be entered.
A separate user account will be set up for each user. Click on "Continue" once
data entry is complete.
11. Windows completes the installation. Click on "Finish" in the bottom right
corner of the screen.
3.2.5 Restoring the Windows operating system with the "Fujitsu Siemens
Product Recovery CD/DVD"
1. Insert the "Product Recovery CD/DVD" in the DVD drive with the computer
turned on.
2. Switch the computer off, wait a moment and then switch the computer on
again.
3. When the prompt "Press any key to boot from CD …" appears on the screen
for the first time, press any key on the keyboard.
Caution! This message will appear after each restart during the installation
4. The installation program starts up. Once the relevant files have been loaded
(this may take a few minutes), the menu "Windows … Setup" will appear.
Press "Enter" to proceed with installation.
5. You must then hit F8 to agree to the "Windows License Agreement" before
you can proceed with installation.
6. In the following menu, press the "Esc" button (Don’t repair).
7. In the next menu, select the C: drive if necessary using the up/down keys (↓↑).
Press the "D" key and confirm by hitting "Enter".
8. In the next screen, press the "L" key and confirm once again by hitting "Enter".
9. In the next menu, use the up/down keys (↓↑) to select the "Format partition
using the NTFS file system"
The hard disk will be wiped and reformatted. Files will be copied from the
CD/DVD onto the hard disk, so that the installation process can continue. The
computer will automatically perform a restart. After the restart the Windows
installation process begins.
Note With the "Format partition using the NTFS file system (fast)"
process. Please ignore this message in these cases as the
computer is only booted from CD once.
option and confirm with "Enter".
option, the hard disk will only
be wiped and not reformatted.
bostext
15
Page 49

Restoring Installed Software
10. During the installation process you can either make special settings or use the
default settings, i.e. confirm the details with "Continue". Follow the on-screen
instructions.
Further data will be copied. This may take a few minutes. The computer will
automatically perform a restart. After the restart, the Windows installation
process can be continued.
11. The prompt "Screen resolution will be adjusted automatically to improve
the appearance of visual elements" appears. Click on "OK". Confirm the
next message with "OK".
12. The Windows "Welcome" menu will appear. Click on "Continue" and follow
the on-screen instructions.
13. You will be asked to enter the names of the people who will be using the
computer. You may enter up to 5 names. At least one name must be entered.
A separate user account will be set up for each user. Click on "Continue" once
data entry is complete.
14. Windows completes the installation. Click on "Finish" in the bottom right
corner of the screen.
15. The Windows "Start Menu" will appear.
16. Remove the "Product Recovery CD/DVD" from the DVD drive.
To install the drivers, additional software and to restore the online documentation,
insert the "Drivers & Utilities CD/DVD" supplied in the DVD drive.
NOTE Read the messages very carefully.
3.3. Restoring drivers, manuals and special software
.com
bostext
The "Drivers & Utilities CD/DVD" can be used to restore the drivers, additional
software and the electronic documentation for your system.
We recommend that you undertake the restore process in the sequence described
below.
3.3.1 Restoring drivers
Drivers can be restored without having to shut down Windows. You can restore all
pre-installed utilities and drivers, without affecting the functionality of the Windows
operating system.
1. Insert the "Drivers & Utilities CD/DVD" into the DVD drive while Windows is
running.
"Wizard information" will appear. Necessary Microsoft Updates available at
the time of manufacture will be installed from the DVD (manufacture of delivery
status). This process runs automatically and takes a few minutes. The
"wizard@home-pc" menu appears after completion.
2. In the "wizard@home-pc" menu on the CD/DVD, select "Drivers". All drivers
for the components that were on the computer when purchased are
automatically reinstalled. You cannot intervene in this installation operation.
16
Page 50

Restoring Installed Software
After the installation process the computer will automatically perform a restart. After
the restart, remove the "Drivers & Utilities CD/DVD" from the DVD drive.
Should a drivers CD/DVD for components be optionally included with your system,
insert this CD/DVD in the DVD drive to install the drivers and follow the on-screen
instructions.
3.3.2 Restoring additional software
1. Insert the "Drivers & Utilities CD/DVD" into the DVD drive while Windows is
running.
2. In the "wizard@home-pc" menu on the CD/DVD, select "Programs & Links".
To completely
here.
3. Click on the appropriate program or link in the selection menu and follow the
on-screen instructions. The links offered in this selection are stored in Internet
Explorer as Favorites.
4. Remove the "Drivers & Utilities CD/DVD“ from the DVD drive.
In order to complete the software delivery status, you must now insert the program
CD/DVDs provided with the delivery and install the programs on your PC.
3.3.3 Restoring the online documentation
1. Insert the "Drivers & Utilities CD/DVD" into the DVD drive while Windows is
running.
2. In the "wizard@home-pc" menu on the CD/DVD, select "Manuals". The
electronic documentation will be created according to your configuration.
restore your PC system, install all programs & links available
bostext
17
Page 51

Transporting the system
4 Transporting the system
If you are going to transport your computer over a long distance, for example in a
vehicle, you must ensure that the data carriers are not at risk of being damaged by
the transport. When transporting the computer in a vehicle, always make a
complete backup of the hard disk on an external data carrier.
If you are transporting the PC only a short distance, i.e. only to another room or to a
different desk, a backup need not necessarily be carried out. However, you must
make sure that the unit is transported carefully.
For the onward shipment of the product or other transport, use the original
packaging or other suitable packaging which provides protection against shock and
impact.
Detach all external cable connections and transport all devices separately and only
in their original packaging or in other suitable packaging which guarantees
protection against shock and impact.
Do not drop the device and do not expose it to severe vibrations.
CAUTION! The computer should ideally be transported in the original packaging
We only use recyclable material to package our units.
5 Warranty services
For our systems we generally grant guarantee claims according to the German
Civil Code as well as additional guarantee services on agreement (see the
corresponding service documentation for details).
The system you have purchased has been produced to environmentally sound
standards and strict quality standards by our company, which is certified to DIN
ISO 9001 and DIN EN ISO 144001. We provide a statutory guarantee on all of our
products, or an extended warranty by arrangement.
which has been specifically designed for this purpose.
.com
bostext
18
Page 52

Return of old units
6 Return of old units
The offer of taking back and recycling our systems is regulated and guaranteed by
our environmental management which has been certified according to DIN EN ISO
14001.
As far as possible, our devices are produced from materials which can be
appropriately recycled. After use, the device is taken back for re-utilisation or
recycling of the materials, insofar as it is returned in a state corresponding to proper
use. Non-recyclable device components are disposed of appropriately.
To return a device, please use the recycling and disposal facilities available in your
country.
Further information about country-specific recycling and disposal facilities can be
found on the Internet at:
If you have any other questions about disposal, please contact your sales agent or
our Help Desk.
www.fujitsu-siemens.com
bostext
19
Page 53

Technical data and operating conditions
Technical data and operating conditions
Technical data
Power drain when unit is switched off –
ATX mains supply unit
Input voltage 230 V~
Rated frequency 50 Hz (60 Hz)
Rated input current (corresponds to details on the
label on the rear or underside of the unit)
Operating conditions
Ambient temperature
Transport temperature
Volume
Sound power level max. 55 dB (A)
(DIN EN27779, ISO3744, ISO 9296, RAL UZ -78)
Unit classification
Protective rating I
Faulting class 2
Over voltage category II
≤ 5 W
(0 W only possible when
directly disconnected from
the power supply –
disconnect the power plug
or switch off the unit with the
on/off switch on the rear of
the housing)
(optional wide range 100 V240 V 50/60 Hz)
4 A or 5 A at 230 V/50 Hz
(9 A or 10 A at 115 V/60 Hz)
10 ... 35° C
20 ... 85% relative noncondensing humidity
-25°C to 60°C
.com
bostext
A-1
Page 54

Supplement to the operating instructions
Supplement to the operating instructions
Guidelines and Environmental Protection
An important characteristic of our products, alongside quality and performance, is
environmental friendliness.
(I) Protection of resources with energy-saving functions
Our units generally have energy-saving modes.
(II) Device safety
The units meet the requirements of the low voltage directive 73/23/EEC including
the amendment 93/68/EEC, certified in accordance with EN 60950, and the
directive on electromagnetic compatibility 89/336/EEC including the amendment
93/68/EEC.
(III) Guarantee of electromagnetic compatibility
All data and signal cables must be provided with sufficient shielding. The minimum
requirement is a Category 5 shielded cable for 10/100 Ethernet, or Category 5e for
Gigabit Ethernet. As described in the operating instructions, all of the housing parts
must be installed.
(IV) Requirements for work with monitors
Our units meet the requirements set for work with monitors in accordance with the
EU screen directive 90/270/EEC for the purposes of the EU directive 89/391/EEC.
(V) Lasers
If your system has an optical drive such as a CD-ROM, CD-RW, DVD or combined
drive, the following applies:
With closed PC housings, the optical drives used correspond to laser class 1 in
accordance with IEC 60825-1. These contain light-emitting diodes (LED) which
under some circumstances may generate a stronger light beam than laser class 1.
A direct glance into this beam, even with protective eyewear, is dangerous and may
lead to injury. Therefore, no
(VI) Operating instructions
The documentation delivered with the unit has been printed solely on chlorine-free
paper.
The documents referred to above may be viewed at the manufacturer if required.
parts of the optical drive housing are to be removed.
bostext
A-2
Page 55

.fr
Manuel de l'utilisateur
bostext
Page 56

Les informations de ce manuel peuvent être modifiées sans préavis. Malgré le soin
que nous apportons à la vérification de ce manuel, nous ne pouvons exclure la
présence d'erreurs ou d'omissions. Nous ne pouvons en aucun cas être tenus pour
responsables des dysfonctionnements ou pertes de données pouvant en résulter.
Nous vous recommandons avant la première mise en service de votre PC de lire
attentivement le contenu de ce manuel.
Les marques citées dans ce manuel sont la propriété des sociétés qui les ont
déposées.
Toutes les autres marques sont les appellations commerciales ou les marques
déposées de leurs propriétaires respectifs.
Copyright © Fujitsu Siemens Computers GmbH 2005
Tous droits réservés, en particulier les droits de traduction (même partielle),
d'impression, de transmission du document par reproduction ou procédés
similaires.
Le non-respect de ces droits peut entraîner des dommages et intérêts.
Tous droits réservés, en particulier en cas de délivrance de brevet ou
d'enregistrement d’un produit ou d’un modèle.
Sous réserve de modifications techniques et de disponibilité.
Version : Novembre 2005
bostext
Page 57

Table des matières
Préface.......................................................................................................................1
Informations sur la documentation électronique ........................................................1
1 Consignes de sécurité et d'entretien et points importants ......................................2
2 Mise en service .......................................................................................................7
2.1 Branchement de l'ordinateur ...........................................................................7
2.1.1 Douilles de branchement sur la machine..................................................7
2.1.2 Branchements, éléments de commande et témoins en façade................9
2.2 Raccordement ............................................................................................... 10
2.3 Première mise en service des logiciels préinstallés ......................................10
3 Restauration des logiciels installés.......................................................................12
3.1 Introduction.................................................................................................... 12
3.2 Restauration des logiciels installés................................................................13
3.2.1 Variantes de restauration du système ....................................................13
3.2.2. Restauration par activation d'un "Point de restauration"
("Restore checkpoint") ..................................................................................... 13
3.2.3. Restauration par le "Menu d'option avancée de Windows XP"
("Advanced Windows Startup Option") ............................................................ 14
3.2.4 Restauration avec le "CD/DVD Drivers & Utilities" .................................14
3.2.5 Restauration du système d'exploitation Windows avec le "CD/DVD
Product Recovery de Fujitsu Siemens" ...........................................................16
3.3. Restauration des pilotes, de la documentation en ligne et des logiciels
spécifiques...........................................................................................................17
3.3.1 Restauration des pilotes .........................................................................18
3.3.2 Restauration des logiciels supplémentaires ...........................................18
3.3.3 Restauration du manuel d'utilisation en ligne .........................................18
4 Transport du système ...........................................................................................19
5 Garantie ................................................................................................................19
6 Reprise des anciens appareils.............................................................................. 20
Caractéristiques techniques et conditions d'utilisation........................................... A-1
Complément au manuel d'utilisation ...................................................................... A-2
.fr
bostext
Page 58

Préface
L'achat d'un micro-ordinateur est un bon investissement pour l'avenir.
Cet ordinateur Fujitsu Siemens est un produit à la pointe de la technique, la parfaite
symbiose entre un maximum de qualité, de fiabilité et de puissance. Les ordinateurs
signés Fujitsu Siemens Computers sont en effet conçus pour vous faciliter la vie au
quotidien.
Profitez bien des nombreuses fonctionnalités de votre nouvel ordinateur Fujitsu
Siemens.
Informations sur la documentation électronique
Vous trouverez des informations plus détaillées concernant votre ordinateur dans le
"manuel de l'utilisateur" électronique ; de plus, la documentation correspondant à
votre configuration sera automatiquement installée dans le répertoire "Manuels"
lors de la première mise en service. Après la première mise en service, vous
pourrez la trouver sous "Démarrage"-"Tous les programmes"-"Manuels". Dans le
cas d'une réinstallation, la documentation des composants et le "Manuel de
l'utilisateur" sont disponibles sous forme de fichier sur le "DVD Drivers & Utilities"
livré avec la machine.
Il contient notamment des informations sur les thèmes ci-après :
• Clavier
• Lecteurs (en option selon la configuration du système)
• Ouverture du châssis
• Intégration de cartes d'extension
• Intégration de disques durs et lecteurs supplémentaires
• Installation de logiciels
• Questions fréquemment posées
• Trucs et Conseils
bostext
1
Page 59

Consignes de sécurité
1 Consignes de sécurité et d'entretien et points
importants
Votre appareil est conforme aux dispositions de sécurité en vigueur relatives aux
équipements informatiques. En cas de questions quant à la possibilité d'utiliser
votre appareil dans l'environnement prévu, veuillez contacter votre revendeur ou
notre S.A.V.
• Conservez ces consignes de sécurité et le reste de la documentation (par
Risque d'électrocution
• L'appareil nécessite un câble d'alimentation secteur contrôlé sur le plan de la
• Contrôlez régulièrement l'état des câbles/fils électriques et du cordon
• L'appareil ne doit être raccordé qu'à une prise secteur de sécurité conforme
• Vous ne pouvez faire fonctionner l'appareil que si sa tension nominale
• Pour mettre l'appareil réellement hors tension, il est nécessaire de débrancher
Risque d'explosion
• Avertissement général :
Compatibilité électromagnétique
• Les câbles utilisés pour le branchement de périphériques externes (moniteur,
• Vous ne pouvez faire fonctionner l'appareil que si sa tension nominale coïncide
exemple mini-guide, notice d'utilisation et CD) avec l'appareil. Si vous devez
transmettre l'appareil à un tiers, veillez à lui fournir également la
documentation complète.
sécurité conformément aux prescriptions du pays d'utilisation.
d'alimentation.
aux règlements en vigueur et dans le respect des prescriptions de sécurité qui
s'appliquent dans le pays où l'ordinateur est utilisé.
coïncide avec la tension nominale locale.
le connecteur d'alimentation du secteur. Quand l'appareil est éteint avec
l'interrupteur d'alimentation, il n'est pas déconnecté de l'alimentation secteur.
Il ne suffit pas d'éteindre l'ordinateur et ses périphériques.
Votre système est équipé d'une pile au lithium remplaçable. Elle est intégrée
sur la carte mère (voir manuel de la carte mère). A la fin de sa durée de
service, la pile peut être très facilement remplacée.
Attention !
Risque d'explosion en cas de remplacement incorrect de la pile.
N'utilisez qu'une pile de même modèle ou d'un modèle conseillé par le
constructeur.
manette de jeu, etc.) doivent être blindés afin de respecter les exigences des
normes harmonisées conformément à la loi sur la compatibilité
électromagnétique des appareils.
avec la tension nominale locale.
.fr
bostext
2
Page 60

Consignes de sécurité
Remarque sur la directive R&TTE
• Fujitsu Siemens Computers déclare par la présente que le modem intégré est
conforme aux exigences fondamentales et aux dispositions de la directive
communautaire 1999/5/CE.
• La déclaration originale complète de conformité à la directive R&TTE est
disponible dans la documentation électronique de votre ordinateur.
Équipement de l’appareil
• Avant d'ouvrir le châssis pour remplacer, intégrer ou retirer des composants,
vous devez éteindre l'appareil et débrancher la prise secteur. Débranchez
également tous les périphériques raccordés (en retirant les cordons
d'alimentation des prises), par ex. la ligne téléphonique.
• Le fonctionnement conforme (suivant IEC60950/EN60950) de l'appareil n'est
garanti que lorsque le châssis est entièrement monté et les capots des
emplacements de montage installés (choc électrique, refroidissement,
protection incendie, anti-parasitage).
• Seuls des personnels autorisés sont habilités à ouvrir votre appareil. Toute
intervention non conforme rend la garantie caduque et dégage le constructeur
de l’obligation de conformité aux normes harmonisées relatives à la loi sur la
CEM et à la directive sur les basses tensions.
• Tous les circuits intégrés, barrettes de mémoire, contacts de toutes les douilles
et connecteurs sont sensibles à l'électricité statique. Protégez-les contre
l'électricité statique. L'effet de l'électricité statique, des transitoires rapides ou
des forts champs électromagnétiques sur l'appareil peut provoquer des
dysfonctionnements de ce dernier. Lorsque vous installez ou remplacez une
carte ou une barrette de mémoire, touchez auparavant un objet mis à la terre
ou portez un ruban de mise à la terre afin de vous décharger de toute
électricité statique potentielle.
• Les interfaces sont conçues uniquement pour le branchement d'appareils à
très basse tension de sécurité (TBTS - SELV).
• L'appareil peut être équipé d'une prise de sortie secteur uniquement prévue
pour le branchement d'un moniteur.
• N'ouvrez jamais le boîtier d'alimentation ! Les composants (p. ex. bloc
d'alimentation secteur) comportant une étiquette d'avertissement (p. ex. éclair)
ne peuvent être ouverts, démontés ou remplacés que par des techniciens
autorisés.
• Pour procéder aux actualisations éventuellement nécessaires du BIOS, utilisez
exclusivement les mises à jour "Fujitsu Siemens Computers".
• Lors du montage de composants supplémentaires (p. ex. disques durs),
prévoyez un refroidissement suffisant.
Réparation
• Seuls des personnels autorisés sont habilités à procéder à des réparations de
l'appareil. L'ouverture non autorisée et les réparations inappropriées peuvent
présenter des dangers considérables pour l'utilisateur (danger d’électrocution,
risque d'incendie).
bostext
3
Page 61

Consignes de sécurité
Lecteurs optiques
• N'introduisez dans le lecteur optique que des supports de données
absolument indemnes de défauts (CD, DVD), pour éviter des pertes de
données, des dommages au lecteur ou des blessures.
• Avant d’insérer un CD/DVD dans le lecteur, contrôlez soigneusement qu’il ne
présente aucun dommage tel que fissure, impact ou autre.
• Soyez attentif au fait que des étiquettes collées sur un CD ou un DVD altèrent
ses propriétés mécaniques et sont susceptibles de déséquilibrer le disque.
• Des CD ou DVD endommagés ou déséquilibrés peuvent se briser lorsque la
vitesse de lecture est élevée (perte de données). Dans certaines
circonstances, des éclats à angles vifs peuvent s'immiscer dans le couvercle
du lecteur (détérioration de l'appareil) et en être éjectés (risque de blessure, en
particulier au niveau des parties du corps non couvertes comme le visage ou
le cou).
• Pour préserver votre lecteur optique et prévenir des dommages mécaniques
aux supports et leur usure prématurée, suivez les conseils ci-dessous :
− N'insérez les CD/DVD dans le lecteur que lorsque vous les utilisez et
retirez-les après usage.
− Conservez les CD/DVD dans un boîtier adéquat. Protégez-les de la
Nettoyage
• Nettoyez régulièrement l'ordinateur. Eteignez pour cela l'ordinateur et tous les
• Utilisez un produit nettoyant doux et/ou un chiffon légèrement humide.
• N'utilisez pas de produits nettoyants en aérosol ni de solutions à base d’alcool
• Nettoyez la surface de l'écran à l'aide d'un chiffon doux, légèrement humide et
Consignes complémentaires pour une utilisation conforme
• Laissez suffisamment de place autour de l'ordinateur afin de garantir une
• Sur certains appareils, des films de protection sont collés sur les surfaces
• Nous vous recommandons de placer cet appareil sur une surface
• Ne faites pas fonctionner votre appareil dans un environnement humide, ne le
chaleur et de l'ensoleillement direct.
périphériques raccordés, puis débranchez le cordon d'alimentation secteur de
la prise de courant.
ou inflammables. N'employez donc pas de poudres à récurer, ni de produits
nettoyants qui attaquent le plastique.
non pelucheux.
bonne ventilation. Ne recouvrez jamais les orifices de ventilation de l'appareil.
Vous risquez sinon d’occasionner une surchauffe du système et d’abréger sa
durée de vie.
fragiles afin de les protéger de tout dommage de contact lors de la fabrication.
Ces films de protection doivent être tous retirés avant la mise en service.
antidérapante. Du fait de la diversité des revêtements et des peintures
appliqués sur les meubles, il n'est pas exclu que les pieds en caoutchouc ou
en plastique des éléments fassent des marques à l'endroit où ils seront posés.
soumettez pas à un rayonnement solaire direct ni à des températures
extrêmes. Si l’appareil a séjourné dans un endroit froid, de la condensation
pourra se former si vous le mettez en service dans un local plus chaud.
Attendez que l'ordinateur soit à la température de la pièce et soit entièrement
sec avant de le mettre en service (2 à 4 heures environ).
.fr
bostext
4
Page 62

Consignes de sécurité
• L'appareil n'est pas étanche à l'eau ! Ne plongez jamais l'appareil dans l'eau et
protégez-le des projections d'eau (pluie, eau de mer).
• En présence d'odeurs anormales, d'émanation de fumée et dans les cas
d'urgence (p. ex. endommagement du châssis, d'éléments de commande ou
du câble d'alimentation, intrusion de liquides ou de corps étrangers), éteignez
immédiatement l'appareil, débranchez le cordon d'alimentation et avisez votre
revendeur ou notre assistance en ligne/service technique.
• Ne fumez pas à proximité de l'ordinateur. Les particules de suie se fixent sur le
moniteur ou à l'intérieur de la machine.
• Ne mangez pas au-dessus du clavier, les miettes pouvant entraîner des
dysfonctionnements.
• Disposez les câbles de manière à éviter tout risque potentiel (risque de
trébuchement) ou tout dommage.
• Pour le transport de l’appareil, il est recommandé d’utiliser l’emballage
d'origine dont les dimensions ont été spécifiquement calculées en fonction du
système.
• La plaque signalétique peut également se trouver sous le châssis.
• Avant d'utiliser la souris, vous devez, le cas échéant, retirer la cale de
transport.
• Sur les systèmes ATX et µATX, le système est toujours sous tension (veille),
même s'il est éteint. Pour mettre l'appareil hors tension, il est nécessaire de le
débrancher du secteur.
• Si le moniteur est branché sur la prise du boîtier d'alimentation du PC (le cas
échéant), il ne va pas s'éteindre à l'arrêt du PC.
• Si vous possédez un moniteur supportant les fonctions de gestion
d'alimentation, il passe lui aussi en mode veille. Si le moniteur ne possède pas
de telles fonctions, vous devez l'éteindre séparément quand vous avez terminé
votre travail sur le PC.
• Le disque dur est déjà formaté et le système d'exploitation installé. Un
formatage n'est nécessaire qu'en cas de réinstallation complète du disque.
• Le "CD/DVD Product Recovery" joint ne peut être utilisé pour la restauration
ou la réinstallation de votre système d'exploitation que si la carte mère utilisée
dispose d'un BIOS de Fujitsu Siemens Computers.
• Les systèmes PC domestiques ne sont pas conçus pour des applications de
haute sécurité ou de technique médicale.
Consignes de sécurité pour les appareils avec circuit de liquide de
refroidissement
Le circuit de refroidissement est un circuit fermé entièrement sécurisé où circule un
liquide de refroidissement compatible avec l'environnement. Ce liquide est non
toxique, non inflammable, non conducteur électriquement et peut être recyclé.
Le circuit de refroidissement est contrôlé par le BIOS. Si un défaut survient dans ce
système, le BIOS émet un message d'erreur au démarrage de l'ordinateur.
• Pour le nettoyage, n'utilisez pas de détergents agressifs, ni d'objets pointus ou
coupants qui pourraient provoquer des dommages sur les conduites du circuit
de refroidissement s'ils pénétraient accidentellement dans les orifices
techniques.
bostext
5
Page 63

Consignes de sécurité
• Dans les pays où la température extérieure peut être extrêmement basse ou
élevée, veillez à ce que la température autour de l'appareil reste à tout
moment conforme aux indications spécifiées dans le manuel de l'utilisateur
sous "Données techniques et conditions d'utilisation" si celui-ci doit être
transporté en extérieur.
Réparation, conversion et équipement de l’appareil
Ce système ayant été conçu pour que le fabricant puisse vous garantir une parfaite
compatibilité technique du matériel et des échanges thermiques, veuillez faire
effectuer toutes réparations ou modifications des composants uniquement
personnel agréé.
Une intégration inappropriée de composants non agréés par le fabricant peut
provoquer des dommages sérieux à cet appareil. Fujitsu Siemens Computers ne
saurait être tenu responsable d'aucun dommage en découlant. Si vous avez des
questions, contactez le fabricant ou l'assistance technique téléphonique.
Sauvegarde des données
• Effectuez régulièrement des copies de sauvegarde de vos fichiers de travail.
C'est le seul moyen de vous protéger d'une perte de données en cas de
problème, par ex. panne du disque dur.
• Il ne pourra être fait aucune réclamation portant sur une perte de données.
Traitement spécial des piles et accumulateurs
• Les piles/accumulateurs utilisés dans nos appareils ne contiennent pas de
composés de cadmium ni de mercure.
• Votre système est équipé d'une pile au lithium remplaçable. Celle-ci est
intégrée sur la carte mère. A la fin de sa durée de service, la pile peut être
remplacée.
Arrêté sur les piles du 27.03.1998 :
Remarque :
Ne jetez pas piles et accus usagés dans les ordures ménagères. Ils sont repris
gratuitement par le fabricant, le revendeur ou leur représentant afin de garantir
leur recyclage ou élimination !
Cet appareil ne doit pas être jeté aux ordures ménagères. Cet appareil
comporte un marquage conforme à la directive européenne
2002/96/CE relative aux déchets d'équipements électriques et
électroniques (DEEE).
Cette directive établit un cadre pour la collecte et le recyclage des
appareils usagés valable dans toute l'UE. Pour la restitution d'un
appareil usagé, veuillez utiliser les possibilités de restitution et de
collecte applicables dans votre pays. Vous trouverez de plus amples
informations sous www.fujitsu-siemens.com.
par un
.fr
bostext
6
Page 64

Mise en service
2 Mise en service
2.1 Branchement de l'ordinateur
2.1.1 Douilles de branchement sur la machine
La plupart des douilles de branchement de l'ordinateur se trouvent sur la partie
arrière. Le type de douille disponible et leur emplacement dépendent du modèle
d'ordinateur. Vous trouverez ci-après une description des douilles les plus
courantes.
Schéma de la
douille
Prise CEE
Douille PS/2
6 broches
Douille PS/2
6 broches
Prise Sub-D,
15 broches
Prise Sub-D,
25 broches
Prise Sub-D,
9 broches
3,5 mm
Prise jack
Symbole Couleur Connecteur
noir Alimentation électrique
lilas Clavier PS/2
Clav.
vert Souris PS/2
ou
ou VGA
Port
imprimante
SERIAL
Entrée ligne
Sortie ligne
Microphone
AUDIO
sortie
numérique
1
ou
bleu Moniteur
bordeaux Imprimante (interface
turquoise COM1
bleu clair
vert clair
rose
jaune
de l'ordinateur
parallèle)
(Interface série)
2)
Son
(Sources audio
externes, par ex. hautparleur actif, micro)
- Carte son
- Son intégré
1) 4)
bostext
7
Page 65

Mise en service
Entrée SPDIF
Prise Cinch
Port USB
ou
Port FireWire
Douille RJ-11
Douille RJ-45
Douille d'antenne
Douille 4 broches
ou supérieur
● LED LIAISON WLAN vert Affichage mode WLAN
Sortie SPDIF
ou
USB
IEEE 1394
ou
ou LINE
ou PHONE
ou
ou LAN
CATV incolore Branchement câble,
ENTREE SVIDEO
SORTIE SVIDEO
SPDIF
optique
DVI blanc Raccordement pour
jaune
noir
blanc
noir
blanc
incolore Modem
incolore Réseau ou modem
noir Douille d'entrée et de
noir Raccordement audio
Branchement audio
numérique
voir aussi le "Manuel
d'utilisation" de la carte
mère et "Trucs et
astuces"
Branchement de
périphériques USB 2.0
(par ex. clavier, module
émetteur/récepteur IR,
scanner, imprimante)
Branchement de
périphériques
compatibles IEEE (par
ex. magnétoscope,
appareil photo
numérique)
FireWire
ADSL
antenne
sortie vidéo
(voir documentation sur
la carte VGA/TV)
optique numérique
signal vidéo numérique
(moniteur)
3)
.fr
bostext
8
Page 66

Mise en service
1)
Attention : sous la prise, il peut y avoir un commutateur pour basculer entre les
tensions 230 et 115 V~. Il est positionné en usine sur 230 V~.
2)
Avec une carte son intégrée supplémentaire, la fonction audio de la carte mère
est inhibée, ou le "Sound Onboard" n'est pas disponible.
3)
Remarque importante sur l'USB 2.0 : pour garantir un taux de transfert de
données optimal, nous vous recommandons d'utiliser un câble de raccordement
USB d'une longueur max. de 4 m.
4)
Eléments de commande sur la partie réseau (en option)
1
0
230 115
Bouton Marche/Arrêt secteur
Convertisseur de tension
en option
ATTENTION ! Veuillez vous renseigner sur le voltage du secteur auquel votre
ordinateur va être raccordé et assurez-vous qu'il est conforme
avec le réglage usine.
2.1.2 Branchements, éléments de commande et témoins en façade
Branchements
La désignation des branchements se trouve dans le tableau présenté plus haut.
Eléments de commande
Touche de
veille
Commutateur servant à activer la
fonction de veille ou à allumer/éteindre
un système ATX.
Témoins
ou
LED secteur
allumée
Bouton M/A Le système est sous tension lorsque
LED DD
allumée
Le système est sous tension
(MARCHE).
l'anneau bleu est allumé.
Indique que le système communique
avec le disque dur.
(DD).
bostext
9
Page 67

Mise en service
2.2 Raccordement
Avant la mise sous tension de l'ordinateur, raccordez
1. Le moniteur, le clavier, la souris, et selon ce que vous possédez, l'imprimante,
le modem ainsi que les autres appareils périphériques. Pour cela, tenez
compte des consignes du paragraphe "Douilles de branchement sur la
machine" et des consignes du "Quick Start Guide (Guide de démarrage
rapide)".
2. Branchez d'abord une extrémité du câble d'alimentation fourni sur la prise du
Après le câblage
3. Allumez le moniteur.
4. Le cas échéant, mettez en position de marche le commutateur marche/arrêt
L'appareil est prêt à fonctionner quand le témoin d'alimentation vert ou l'anneau
bleu est allumé.
boîtier d'alimentation du PC et ensuite l'autre extrémité sur une prise secteur
de sécurité 230V~/115V~ (bloc multiprises). Vous ne pouvez faire fonctionner
l'appareil que si sa tension nominale coïncide avec la tension nominale locale.
Si votre ordinateur est équipé d'un convertisseur double tension, veillez à ce
qu'il soit réglé sur le voltage délivré sur le lieu de branchement. Le réglage
usine standard est de 230 V~.
situé à l'arrière de la machine. Pour le démarrage de l'ordinateur, pressez le
bouton de veille placé sur la face avant de l'ordinateur.
2.3 Première mise en service des logiciels préinstallés
Un système d'exploitation Microsoft®Windows est préinstallé en série sur votre
ordinateur. Après la mise sous tension, celui-ci est prêt à fonctionner. Vous pouvez
travailler immédiatement avec le système d'exploitation Windows. Vous devrez
éventuellement effectuer quelques réglages supplémentaires. Dans ce cas, suivez
les instructions affichées à l’écran.
Attention : Après sa sortie d'usine et à la première mise sous tension, le système
Le logiciel préinstallé se trouve sous la rubrique : "Démarrage / Tous les
programmes".
est soumis à un contrôle d'ensemble (voir "First Steps (Premiers
pas)"). Tant que ce test n'est pas terminé, n'effectuez aucune
manipulation sur les terminaux de saisie et les éléments de commande
de l'ordinateur.
.fr
bostext
10
Page 68

Mise en service
Remarque sur Microsoft® Windows XP Edition Familiale ou Professionnelle et
Microsoft®Windows Edition Media Center
L'un de ces produits Microsoft®Windows a été préinstallé par Fujitsu Siemens
Computers afin que vous puissiez utiliser le produit immédiatement. Si vous
modifiez des composants matériels essentiels, une nouvelle activation pourra
s’avérer nécessaire. Dans ce cas, veuillez suivre les instructions du programme
après la modification du matériel. Si vous avez des questions, adressez-vous à
notre assistance en ligne
(www.fujitsu-siemens.com/service).
Remarque sur Microsoft® Word
Microsoft a mis en place une activation par l'utilisateur pour Microsoft® Word.
Veuillez suivre les instructions du programme après son démarrage. Si vous avez
des questions, adressez-vous à notre assistance en ligne (www.fujitsusiemens.com/service).
bostext
11
Page 69

Restauration des logiciels installés
3 Restauration des logiciels installés
3.1 Introduction
Si votre système d'exploitation ne se lance pas ou que des erreurs se produisent au
niveau du disque dur, il peut être parfois nécessaire de restaurer les logiciels
préinstallés. Les outils suivants vous permettent de restaurer ces logiciels.
Sont compris dans la fourniture de votre ordinateur :
• "CD/DVD Product Recovery de Fujitsu Siemens"
• "CD/DVD Drivers & Utilities"
• CD/DVD de pilotes et applications (en option)
• La documentation pour le système d'exploitation Windows
• L'étiquette de CoA (Certificat d'Authenticité)
Ce code d'enregistrement n'est pas demandé lors de la restauration de
Windows.
Cette liste de fournitures ne vaut que pour les systèmes d'exploitation Microsoft®.
ATTENTION ! Effectuez régulièrement des copies de sauvegarde de vos fichiers.
Nous vous recommandons vivement, si c'est encore possible, de
CONSEIL : Si votre PC est équipé d'un lecteur Combo (graveur), veuillez utiliser
Si une perte de données venait à se produire, vous pouvez toujours
restaurer les applications à l'aide des supports de données d'origine.
Ceci n'est toutefois possible que si vous disposez d'une copie de
sauvegarde de vos propres fichiers.
sauvegarder à part tous vos fichiers personnels de données avant la
restauration complète d'un système d'exploitation, car toutes les
données seront supprimées de votre disque dur lors de ce
processus. Tous les programmes supplémentaires installés depuis
l'achat de l'ordinateur doivent être réinstallés, puis vos propres
fichiers de données doivent être restaurés à l'aide des copies de
sauvegarde. Nous ne pouvons en aucun cas être tenus pour
responsables des dysfonctionnements ou pertes de données
pouvant en résulter.
celui-ci pour créer vos copies de sauvegarde. Gravez-vous un CD
de données. Un complément utile à votre ordinateur serait aussi un
périphérique de stockage de masse USB (disque dur ou
memorystick).
.fr
bostext
12
Page 70

Restauration des logiciels installés
3.2 Restauration des logiciels installés
3.2.1 Variantes de restauration du système
Vous trouverez ci-dessous quelques méthodes possibles qui vous permettront de
restaurer votre système. Nous vous recommandons, selon le degré de gravité du
problème, d'essayer les différentes méthodes l'une après l'autre jusqu’à résolution
du problème.
1. Restauration par activation d'un "Restore checkpoint" ("Point de
2. Restauration par le "Advanced Windows Startup Option" ("Menu d'option
3. Restauration avec le "CD/DVD Drivers & Utilities".
4. Restauration avec le "CD/DVD Product Recovery de Fujitsu Siemens"
3.2.2. Restauration par activation d'un "Point de restauration" ("Restore
checkpoint")
En cas de problème, vous pourrez toujours revenir à un état antérieur du système
sans perdre toutes vos données personnelles (par ex. documents, liste de favoris
Internet et e-mails). La restauration du système Windows XP contrôle les
modifications apportées à l'ordinateur et se crée régulièrement des points de repère
de restauration facilement reconnaissables.
Pour revenir à un état antérieur de votre système, veuillez procéder comme suit :
1. Cliquez sur "Start"/"Control Panel"/"Performance and Maintenance"
2. Sélectionnez l'option "Restore computer to a previous point in time"
Si vous avez des questions ou besoin d'aide à ce sujet, utilisez le "Help and
Support Center" ("Centre d'aide et de support") qui contient un très grand
nombre d'informations en cliquant en haut à droite sur le point d'interrogation.
restauration").
Dans ce cas, les fichiers que vous avez créés et les programmes que vous
avez installés jusqu'à la date du point de restauration sélectionné, seront
conservés.
avancée de Windows XP").
Dans ce cas, la dernière bonne configuration du système est conservée. Tous
les fichiers et programmes qui étaient présents au dernier démarrage correct
de Windows sont restaurés.
Dans ce cas, votre système est ramené à son état de livraison, les
programmes, pilotes et documentations préinstallés par défaut sont restaurés.
Dans ce cas, seul le système d'exploitation est restauré, et non l'intégralité de
votre système. Vous devez réinstaller tous les programmes, pilotes et
documentations supplémentaires.
("Démarrer" / "Panneau de configuration" / "Performances et
maintenance" et enfin sur "Restaurer le système").
("Restaurer mon ordinateur à une heure antérieure"). Confirmez avec
"Suivant". Dans la fenêtre qui suit, vous pouvez choisir le point de restauration
souhaité.
bostext
13
Page 71

Restauration des logiciels installés
Vous trouverez d'autres remarques relatives à la création d'un point de restauration
dans le manuel électronique "Manuel d'utilisation d'un ordinateur Fujitsu-Siemens".
3.2.3. Restauration par le "Menu d'option avancée de Windows XP"
("Advanced Windows Startup Option")
Si un message d'erreur ou une fenêtre bleue apparaît après plusieurs tentatives de
démarrage (amorçage), redémarrez l'ordinateur. Pendant l'amorçage, appuyez sur
la touche F8 à intervalles rapprochés, jusqu'à ce que le message "Advanced
Startup Options" ("Menu d'option avancée de Windows XP") apparaisse.
Sélectionnez "Last known good configuration" ("Dernière bonne configuration
connue").
Si cette démarche reste infructueuse, effectuez une réinstallation complète du
système d'exploitation Windows comme décrit au point 3.2.4.
3.2.4 Restauration avec le "CD/DVD Drivers & Utilities"
Pour ramener votre système à son état de livraison, y compris les programmes,
pilotes et documentations préinstallés, veuillez procéder comme suit :
1. L'ordinateur allumé, insérez le "CD/DVD Drivers & Utilities" dans le lecteur de
2. Eteignez l'ordinateur, attendez un moment et rallumez-le.
3. Dès que le message suivant "Press any key to boot from CD …" (Appuyez
4. Cliquez sur "Start" ("Démarrer") et "Continue" ("Suivant") pour lancer le
DVD.
sur une touche pour démarrer le CD…) apparaît à l'écran, pressez
n'importe quelle touche du clavier. Le programme d'installation démarre, et
le menu "Recovery²" apparaît à l’écran.
L'ordinateur charge toutes les données dont il a besoin à partir du lecteur de
CD/DVD pour restaurer Windows dans votre système. Ce processus dure
quelques minutes.
processus de restauration.
Le processus de restauration commence. Tous les fichiers nécessaires sont
copiés. L'ordinateur est ramené à son état de sortie d'usine. Ce processus
dure quelques minutes.
.fr
bostext
14
Page 72

Restauration des logiciels installés
ATTENTION !
Si le message "Recovery Folder not found. Please restore your System
from the Recovery CD" ("Répertoire de récupération non trouvé. Veuillez
utiliser le CD de récupération pour restaurer le système") s'affiche, vous
devez restaurer le système d'exploitation avec le "CD/DVD Product Recovery
de Fujitsu Siemens" fourni avec votre ordinateur. Ceci peut se produire dans
les cas suivants, par ex. :
• un fichier important pour le processus de récupération n'a pas été trouvé,
ou est défectueux.
• le disque dur d'origine a été remplacé par un autre.
Dans ces cas, retirez le "CD/DVD Drivers & Utilities" du lecteur optique et
restaurez le système d'exploitation Windows comme décrit au point 3.2.5.
5. Retirez le "CD/DVD Drivers & Utilities" du lecteur lorsque le message " The
recovery process is complete. Remove the Driver & Utilities CD/DVD from
the drive and switch off the computer. If your system fails to boot once
switched on again, please contact the relevant service provider." ("Le
processus de restauration est terminé. Retirez le CD/DVD Drivers &
Utilities du lecteur et éteignez l'ordinateur. Si le système ne démarre pas
correctement au prochain redémarrage, veuillez contacter votre
prestataire de services.") s'affiche. Confirmez les messages suivants avec
"OK". L'ordinateur redémarre.
Votre ordinateur se trouve maintenant dans l'état logiciel où il se trouvait au
moment où vous l'avez acheté. Après le redémarrage, Windows commence le
processus d'installation.
6. Windows affiche un écran de bienvenue à Microsoft Windows. Cliquez sur
"Continue" ("Suivant") dans le coin en bas à droite de l'écran pour continuer.
7. Suivez les instructions affichées à l’écran.
8. Le processus d'installation est interrompu, et le "End user license
agreement" ("Contrat de licence d'utilisateur final") apparaît à l’écran. Vous
devez accepter les termes du contrat de licence pour pouvoir poursuivre
l'installation. Cliquez sur le bouton "Yes, I agree to the license agreement"
("Oui, j'accepte les termes du contrat de licence"), et cliquez sur
"Continue" ("Suivant").
9. Suivez les instructions affichées à l’écran.
10. Il vous demande alors de saisir les noms des personnes qui vont utiliser
l'ordinateur. Vous pouvez entrer jusqu'à 5 noms. Il faut saisir au moins un
nom. Un compte utilisateur différent est établi pour chaque utilisateur. Cliquez
sur "Continue" ("Suivant") quand la saisie est terminée.
bostext
11. Windows termine l'installation. Cliquez sur "Finish" ("Terminer") dans le coin
en bas à droite de l'écran.
15
Page 73

Restauration des logiciels installés
3.2.5 Restauration du système d'exploitation Windows avec le "CD/DVD
Product Recovery de Fujitsu Siemens"
1. Insérez le "CD/DVD Product Recovery" dans le lecteur de DVD, ordinateur
allumé.
2. Eteignez l'ordinateur, attendez un moment et rallumez-le.
3. Dès que le message suivant "Press any key to boot from CD …" ("Appuyez
sur une touche pour démarrer le CD…") apparaît pour la première fois à
l'écran, pressez n'importe quelle touche du clavier.
ATTENTION !
4. Le programme d'installation se lance automatiquement. Après le chargement
des données correspondantes (qui dure quelques minutes), le menu
"Installation de Windows" apparaît à l’écran. Appuyez sur la touche "Entrée"
pour poursuivre l'installation.
5. Vous devez accepter les termes du "Windows License Agreement“
("Contrat de licence Windows") en appuyant sur la touche F8 pour pouvoir
poursuivre l'installation.
6. Pressez dans le menu suivant la touche "Echap" (pour ne pas réparer).
7. Dans le menu suivant, sélectionnez le lecteur C: avec les flèches haut/bas
(↓↑) puis pressez la touche "D" et confirmez avec la touche "Entrée".
8. Pressez à l'écran suivant la touche "L" et confirmez de nouveau avec la
touche "Entrée".
9. Dans le menu suivant, sélectionnez à l'aide des flèches haut/bas (↓↑) l'option
"Format partition using the NTFS file system" ("Formater la partition en
utilisant le système de fichier NTFS") et confirmez avec la touche "Entrée".
Le disque dur est effacé et reformaté. Des fichiers sont ensuite copiés du
CD/DVD vers le disque dur pour pouvoir poursuivre le processus d'installation.
L'ordinateur effectue automatiquement le redémarrage du système. Après le
redémarrage, Windows commence le processus d'installation.
Ce message apparaît au cours du processus d'installation
après chaque redémarrage. Veuillez ignorer ce message à ce
stade, puisque le démarrage est effectué uniquement la première
fois à partir du CD.
.fr
bostext
Remarque ! En exécutant l'option "Format partition using the NTFS file
system (fast)" ("Formater la partition en utilisant le système
de fichier NTFS (rapide)"), le disque dur est seulement
sans
être reformaté.
16
effacé
Page 74

Restauration des logiciels installés
10. Au cours du processus d'installation, vous pouvez définir des réglages
spécifiques ou utiliser les paramètres standard en confirmant les données par
"Continue" ("Suivant"). Suivez les instructions affichées à l’écran.
D'autres données sont alors copiées. Ceci dure quelques minutes. L'ordinateur
effectue automatiquement le redémarrage du système. Après le redémarrage,
Windows poursuit le processus d'installation.
11. L'information "Screen resolution will be adjusted automatically to
improve the appearance of visual elements" ("Pour améliorer
l'affichage des éléments visuels, Windows va configurer
automatiquement la résolution de votre écran") s'affiche. Cliquez sur
"OK". Confirmez le dernier message avec "OK".
12. Le menu "Welcome" ("Bienvenue") de Windows apparaît. Cliquez sur
"Continue" ("Suivant") et suivez les instructions à l'écran.
13. Il vous demande alors de saisir les noms des personnes qui vont utiliser
l'ordinateur. Vous pouvez entrer jusqu'à 5 noms. Il faut saisir au moins un
nom. Un compte utilisateur différent est établi pour chaque utilisateur.
Cliquez sur "Continue" ("Suivant") quand la saisie est terminée.
14. Windows termine l'installation. Cliquez sur "Finish" ("Terminer") dans le
coin en bas à droite de l'écran.
15. Le "Start Menu" ("Menu démarrer") de Windows apparaît.
16. Sortez le "CD/DVD Product Recovery" du lecteur de DVD.
Pour l'installation des pilotes, de logiciels supplémentaires et pour la restauration du
manuel d'utilisation en ligne, insérez le "CD/DVD Drivers & Utilities" dans le
lecteur de DVD.
REMARQUE Lisez très attentivement les messages affichés.
3.3. Restauration des pilotes, de la documentation en ligne et
des logiciels spécifiques
Le "CD/DVD Drivers & Utilities" permet également de restaurer les pilotes, la
documentation électronique de votre système et les programmes ajoutés.
Nous vous recommandons de procéder à la restauration dans l'ordre décrit ciaprès.
17
bostext
Page 75

Restauration des logiciels installés
3.3.1 Restauration des pilotes
La restauration des pilotes peut être effectuée sans arrêter Windows. Vous pouvez
restaurer tous les utilitaires préinstallés ainsi que les pilotes sans modifier le
système d'exploitation.
1. Avec Windows ouvert, insérez le "CD/DVD Drivers & Utilities" dans le lecteur
de DVD.
La fenêtre "Wizard information" apparaît à l’écran. Toutes les mises à jour
Microsoft requises disponibles à la date de fabrication de l'ordinateur sont
installées à partir du DVD. (Restauration de l'état d'origine usine). Ce
processus est automatique et dure quelques minutes. La recherche terminée,
le menu "wizard@home-pc" apparaît.
2. Dans "wizard@home-pc", sélectionnez le CD/DVD "Pilotes". Tous les pilotes
des composants inclus dans l'ordinateur à la livraison seront automatiquement
installés. Il n'est pas possible d'intervenir sur ce processus d'installation.
A la fin du processus d'installation, l'ordinateur effectue automatiquement le
redémarrage du système. Après le redémarrage, retirez le "CD/DVD Drivers &
Utilities" du lecteur de DVD.
Si un CD/DVD de pilotes pour composants optionnel est joint à votre ordinateur,
insérez ce CD/DVD dans le lecteur de DVD pour installer les pilotes et suivez les
instructions à l'écran.
3.3.2 Restauration des logiciels supplémentaires
1. Avec Windows ouvert, insérez le "CD/DVD Drivers & Utilities" dans le lecteur
de DVD.
2. Dans "wizard@home-pc", sélectionnez le CD/DVD "Programmes & Liens".
Pour une restauration complète
et liens présentés ici.
3. Cliquez dans le menu de sélection sur le programme ou le lien correspondant
et suivez les instructions à l'écran. Les liens proposés dans cette sélection
seront enregistrés comme favoris dans Internet Explorer.
4. Retirez le "CD/DVD Drivers & Utilities" du lecteur de DVD.
Pour compléter l'état d'origine au niveau logiciel, vous devez maintenant insérer les
CD/DVD des programmes contenus dans la livraison et installer ces programmes
dans votre ordinateur.
3.3.3 Restauration du manuel d'utilisation en ligne
1. Avec Windows ouvert, insérez le "CD/DVD Drivers & Utilities" dans le lecteur
de DVD.
2. Dans "wizard@home-pc", sélectionnez le CD/DVD "Manuels". La
documentation électronique est installée en fonction de votre configuration.
de l'ordinateur, installez tous les programmes
.fr
bostext
18
Page 76

Transport du système
4 Transport du système
Si vous devez transporter votre ordinateur sur une longue distance (par ex. dans un
véhicule), faites attention à ne pas endommager les supports de données durant le
transport. En cas de transport dans un véhicule, une sauvegarde complète du
disque dur sur un support de stockage externe s’impose.
Si vous transportez le PC sur une courte distance (par ex. dans un autre bureau), la
sauvegarde des données n'est pas obligatoirement nécessaire. Veillez néanmoins
à prendre toutes les précautions utiles lors du transport.
Pour la réexpédition et tout autre transport, mettez l’appareil dans son emballage
d'origine ou dans tout autre emballage approprié susceptible de le protéger
efficacement contre les chocs et les coups.
Débranchez les câbles de tous les périphériques externes et transportez tous les
appareils séparément et uniquement dans leur emballage d'origine ou dans un
autre emballage approprié garantissant la protection contre les chocs et les coups.
Ne laissez pas tomber l'appareil et ne l'exposez à aucune secousse.
ATTENTION ! Il est vivement recommandé de transporter l'appareil dans son
Les emballages de nos appareils sont toujours à base de matériaux recyclables.
5 Garantie
Nous accordons pour tous nos systèmes la garantie légale pouvant être étendue
sur demande (voir à ce sujet les documents de services correspondants).
L'appareil que vous venez d'acquérir a été produit en respect des critères de
protection de l’environnement et de garantie de qualité au sein de notre entreprise
certifiée selon les normes DIN EN ISO 9001 et DIN EN ISO 14001. Tous nos
produits bénéficient de la garantie légale dont la durée pourra être prolongée sur
demande.
emballage d'origine qui a été spécifiquement conçu à cette fin.
bostext
19
Page 77

Reprise des anciens appareils
6 Reprise des anciens appareils
La reprise et le recyclage de nos systèmes sont garantis et organisés au sein de
notre entreprise certifiée selon DIN EN ISO 14001.
Nos appareils sont fabriqués dans la mesure du possible avec des matériaux qui
peuvent être facilement recyclés. Après son utilisation, cet appareil est repris pour
effectuer un recyclage ou une revalorisation des matériaux, dans la mesure où son
état de restitution est conforme aux prescriptions en vigueur. Les pièces non
recyclables seront traitées selon les prescriptions en vigueur.
Pour la restitution d'un appareil, veuillez utiliser les possibilités de recyclage et de
traitement applicables dans votre pays.
Pour plus de renseignements sur les possibilités de recyclage et de traitement
spécifiques par pays, vous pouvez consulter l'adresse Internet :
www.fujitsu-siemens.com
Si vous avez d'autres questions au sujet du traitement, vous pouvez vous adresser
à votre vendeur ou à notre service d'assistance.
.fr
bostext
20
Page 78

Caractéristiques techniques et conditions d'utilisation
Caractéristiques techniques et conditions d'utilisation
Caractéristiques techniques
Puissance absorbée, appareil éteint –
Boîtier ATX
Tension d'alimentation secteur 230 V~
Fréquence 50 Hz (60 Hz)
Courant d'entrée secteur (suivant les informations
sur l'étiquette figurant derrière ou sous l'appareil)
Conditions d'utilisation
Température ambiante
Température de transport
Volume sonore
Niveau de puissance sonore max. 55 dB (A)
(DIN EN27779, ISO3744, ISO 9296, RAL UZ-78)
Classification de l'appareil
Classe de protection I
Classe d'encrassement 2
Catégorie de surtension II
≤ 5 W
(0 W, uniquement si
l’appareil est isolé du
secteur : cordon
d'alimentation débranché ou
appareil éteint avec
l'interrupteur placé à l'arrière
du châssis)
(en option Wide-Range
100 V-240 V 50/60 Hz)
4 A ou 5 A à 230 V/50 Hz
(9 A ou 10 A à 115 V/60 Hz)
10 ... 35 °C
20 ... 85 % d'humidité
relative sans condensation
-25 °C à 60 °C
bostext
A-1
Page 79

Complément au manuel d'utilisation
Complément au manuel d'utilisation
Directives et protection de l'environnement
Outre leur qualité et leurs performances, nos produits se distinguent par leur
conception écologique.
(I) Protection des ressources grâce aux fonctions d'économie
En règle générale, les états de fonctionnement de nos appareils occasionnent une
faible consommation d'énergie.
(II) Sécurité de l'appareil
Nos appareils satisfont aux exigences de la directive basse tension 73/23/CEE,
modifiée par la directive 93/68/CEE, et sont certifiés conformes à la norme
EN 60950 et à la directive sur la CEM 89/336/CEE, modifiée par la directive
93/68/CEE.
(III) Garantie de compatibilité électromagnétique
Tous les câbles de données et de signaux doivent être dotés d’un blindage
approprié. L'exigence minimale requise est l'utilisation d'un câble blindé de
catégorie 5 pour 10/100 Ethernet, ou de catégorie 5e pour Gigabit Ethernet. Tous
les couvercles de boîtier doivent être installés conformément aux instructions de la
notice d'utilisation.
(IV) Exigences relatives au travail sur équipements à écran de
Nos appareils satisfont aux exigences relatives aux équipements à écran prescrites
dans la directive européenne sur les écrans de visualisation 90/270/CEE dans le
sens de la directive européenne 89/391/CEE.
(V) Laser
Si votre système est équipé d'un lecteur optique, par ex. lecteur de CD-ROM,
CD-RW, DVD ou d'un lecteur combiné, les dispositions suivantes s’appliquent :
Les lecteurs optiques mis en œuvre correspondent à un laser classe 1 de la norme
CEI 60825-1, pour les appareils à boîtier fermé. Ils contiennent des diodes
électroluminescentes (DEL) susceptibles d’émettre dans certaines conditions un
rayon laser plus puissant qu'un laser classe 1. Même avec une protection optique,
la vision directe du rayon est dangereuse et provoque des lésions irréversibles.
Pour cette raison, ne démonter aucun
(VI) Manuel d'utilisation
La documentation fournie avec l'appareil est imprimée exclusivement sur du papier
sans chlore.
Au besoin, vous pouvez consulter chez le fabricant les documents cités ci-dessus.
d'énergie
visualisation
élément du boîtier du lecteur optique.
.fr
bostext
A-2
Page 80

bostext
Page 81

Manuale di istruzioni
.it
bostext
Page 82

Le informazioni contenute nel presente manuale possono essere soggette a
modifiche senza preavviso. Nonostante l'accurata elaborazione non è possibile
escludere con assoluta certezza la presenza di errori o incompletezze all'interno del
presente manuale. Per questo motivo decliniamo qualsiasi responsabilità per errori
o perdita di dati.
Prima di mettere in funzione per la prima volta il PC, raccomandiamo di leggere con
cura le procedure descritte nel presente manuale.
I marchi utilizzati sono protetti per legge dalle relative società proprietarie.
Tutti gli altri marchi sono marchi di fabbrica o marchi di fabbrica registrati del
rispettivo titolare e sono protetti dalla legge sul diritto d‘autore.
Copyright © Fujitsu Siemens Computers GmbH 2005
Tutti i diritti riservati, in particolare (anche sommariamente) quelli relativi alla
traduzione, alla ristampa, alla riproduzione mediante copia o procedimenti simili.
I trasgressori saranno tenuti al risarcimento dei danni.
Tutti i diritti riservati, in particolare nel caso di assegnazione di brevetto o di
registrazione di marchio comunitario.
Possibilità di consegna e modifiche tecniche riservate.
Versione: Novembre 2005
bostext
Page 83

Indice
Prefazione..................................................................................................................1
Informazioni sulla documentazione elettronica..........................................................1
1 Norme di sicurezza, di prevenzione e avvertenze .................................................. 2
2 Messa in funzione ...................................................................................................7
2.1 Collegamento del computer.............................................................................7
2.1.1 Collegamenti del vostro computer ............................................................7
2.1.2 Collegamenti, elementi di comando e di indicazione sul pannello
anteriore............................................................................................................. 9
2.2 Collegamento ................................................................................................10
2.3 Prima messa in funzione del software preinstallato ......................................10
3 Ripristino del software installato ...........................................................................12
3.1 Introduzione................................................................................................... 12
3.2 Ripristino del software installato....................................................................13
3.2.1 Varianti del ripristino del sistema ............................................................13
3.2.2. Ripristino mediante attivazione di un "Punto di ripristino"
("Restore checkpoint") ..................................................................................... 13
3.2.3. Ripristino con "Opzione di avvio avanzata di Windows"
("Advanced Windows Startup Option") ............................................................ 14
3.2.4 Ripristino con il "CD/DVD Drivers & Utilities"..........................................14
3.2.5 Ripristino del sistema operativo di Windows con il "CD-ROM Product
Recovery Fujitsu Siemens".............................................................................. 15
3.3. Ripristino di driver, documentazione e software speciali..............................17
3.3.1 Ripristino dei driver ................................................................................. 17
3.3.2 Ripristino di software supplementare......................................................17
3.3.3 Ripristino della documentazione online ..................................................18
4 Trasporto del PC...................................................................................................19
5 Prestazioni di garanzia..........................................................................................19
6 Ritiro di apparecchi usati.......................................................................................20
Dati tecnici e condizioni di funzionamento............................................................. A-1
Informazioni complementari alle istruzioni d'uso ................................................... A-2
.it
bostext
Page 84

Prefazione
L'acquisto del vostro personal computer è un prezioso investimento per il futuro.
Con un computer di Fujitsu Siemens Computers disponete di un prodotto ad alta
tecnologia che vi offre una perfetta combinazione tra qualità, affidabilità e
prestazioni di massimo livello. Infatti, i computer di Fujitsu Siemens Computers
sono concepiti per rendere un po’ più facile la vita di ogni giorno.
Vi auguriamo buon divertimento con il vostro computer.
Informazioni sulla documentazione elettronica
Ulteriori informazioni sul vostro computer sono disponibili nel “Manuale dell‘utente”
elettronico, inoltre, conformemente alla vostra configurazione, la corrispondente
documentazione dei componenti viene collocata nella cartella "Manuali
d’istruzioni" al momento della prima messa in funzione. È possibile richiamare
questa documentazione dopo la prima messa in funzione scegliendo "Start" –
"Tutti i programmi" – "Manuali d’istruzione". In caso di reinstallazione, la
documentazione relativa ai componenti e il “Manuale per l’utente” sono disponibili in
formato elettronico nel "DVD Drivers & Utilities" fornito in dotazione.
Il manuale contiene, tra l’altro, ulteriori informazioni sui seguenti argomenti:
• Tastiera
• Unità (opzionali in base alla configurazione del sistema)
• Apertura del case
• Installazione di schede di espansione
• Montaggio di dischi fissi e unità aggiuntive
• Installazione software
• FAQ
• Suggerimenti ed espedienti
bostext
1
Page 85

Norme di sicurezza, di prevenzione e avvertenze
1 Norme di sicurezza, di prevenzione e avvertenze
Il vostro apparecchio è conforme alle disposizioni di sicurezza pertinenti per
dispositivi della tecnologia delle informazioni. In caso di domande sulla possibilità di
utilizzare l’apparecchio nell’ambiente previsto, rivolgetevi al vostro rivenditore di
fiducia o al nostro servizio di assistenza.
• Conservate insieme all’apparecchio le presenti informazioni di sicurezza e
l’ulteriore documentazione (come per es. istruzioni ridotte, istruzioni per l’uso e
CD). Qualora trasferiate a terzi il vostro PC, fornite loro anche tutta la relativa
documentazione.
Pericolo di scosse elettriche
• Per l’apparecchio è necessario un cavo di rete testato rispetto alla sicurezza e
conforme alle prescrizioni vigenti nel paese di utilizzo.
• Controllate ad intervalli regolari che i cavi/conduttori e i connettori di rete non
siano danneggiati.
• L‘apparecchio deve essere collegato esclusivamente a una presa con contatto
di terra installata conformemente alle disposizioni di legge vigenti nel paese di
impiego.
• Mettete in funzione l‘apparecchio solo se la tensione di rete dello stesso
corrisponde alla tensione di rete locale.
• La disconnessione dalla rete è garantita esclusivamente quando la spina
elettrica è scollegata; il fatto che il LED "Power" sia spento non garantisce
l'assenza di tensione elettrica. Il solo spegnimento del PC e dei dispositivi
supplementari non è una condizione sufficiente.
Pericolo di esplosione
• Avvertenza generale:
Il vostro sistema è dotato di una batteria intercambiabile al litio, situata sulla
scheda madre (vedere il rispettivo manuale). Quando la batteria è esaurita,
può essere sostituita senza alcuna difficoltà.
Cautela!
Pericolo di esplosione qualora la batteria venga sostituita in modo scorretto.
Sostituire la batteria esclusivamente con una batteria dello stesso tipo o di tipo
equivalente raccomandato dal costruttore.
Compatibilità elettromagnetica
• Il collegamento di apparecchi esterni, come monitor, joystick ecc., alle uscite di
interfaccia deve essere effettuato con cavi schermati, per soddisfare le norme
armonizzate in base alla EMVG (legge sulla compatibilità elettromagnetica di
apparecchi).
• Mettete in funzione l‘apparecchio solo se la tensione di rete dello stesso
corrisponde alla tensione di rete locale.
.it
bostext
2
Page 86

Norme di sicurezza, di prevenzione e avvertenze
Informazioni riguardanti la direttiva R&TTE
• Fujitsu Siemens Computers dichiara che il modem integrato è conforme alle
caratteristiche di base e alle disposizioni rilevanti della direttiva 1999/5/CE.
• La completa dichiarazione di conformità originale per la direttiva R&TTE si
trova nella documentazione elettronica del vostro computer.
Montaggio del computer
• Prima di aprire il case per sostituzione, montaggio o smontaggio dei
componenti, è necessario spegnere l’apparecchio ed estrarre il connettore.
Staccate anche tutte le periferiche collegate (estraete la spina), quali la linea
telefonica.
• Il funzionamento regolamentare (conforme alla norma IEC60950/EN60950)
dell’apparecchio è garantito solo se il case è interamente montato e i pannelli
sono inseriti (scossa elettrica, raffreddamento, protezione antincendio,
soppressione di radiodisturbi).
• L'apertura dell’apparecchio deve essere eseguita esclusivamente da
personale autorizzato. Gli interventi non specialistici possono causare la
perdita del diritto di garanzia e liberare il produttore dai propri obblighi di
garanzia relativi al rispetto delle norme armonizzate ai sensi delle direttive
sulla compatibilità elettromagnetica e sulla bassa tensione.
• Tutti i circuiti integrati e i moduli di memoria nonché i contatti di tutti i connettori
e delle spine sono sensibili alle cariche elettrostatiche. Proteggeteli
dall’elettricità statica. L’effetto sull’apparecchio dell’elettricità statica, di
transienti rapidi o di intensi campi elettromagnetici può causare dei disturbi.
Se sostituite o installate una scheda o un modulo di memoria, toccate
dapprima un oggetto collegato a terra oppure indossate una fascia di messa a
terra al fine di scaricare un’eventuale carica elettrostatica del vostro corpo.
• Tutte le interfacce sono dimensionate esclusivamente per il collegamento di
bassa tensione di sicurezza (SELV).
• L'apparecchio può essere dotato di una presa di uscita di rete destinata
esclusivamente al collegamento di un monitor.
• Non aprite mai l'alimentatore! I componenti (per es. alimentazione elettrica)
contrassegnati con un‘indicazione d‘avvertimento (ad es. fulmine) devono
essere aperti, smontati o sostituiti esclusivamente da personale specializzato
autorizzato.
• Se dovesse rendersi indispensabile aggiornare il BIOS, è necessario utilizzare
gli update della Fujitsu Siemens Computers.
• Durante il montaggio di componenti aggiunti (per es. dischi fissi), fate
attenzione che sia garantito un raffreddamento sufficiente.
Riparazione
• Le riparazioni dell’apparecchio devono essere eseguite esclusivamente da
personale autorizzato. L'apertura non autorizzata e le riparazioni improprie
possono essere fonte di notevole pericolo per l'utente (pericolo di scosse
elettriche, pericolo di incendi).
Unità ottiche
• Per prevenire perdite di dati, danneggiamenti dell'apparecchio nonché lesioni,
utilizzate esclusivamente supporti dei dati (ad es. CD, DVD) in perfetto stato
nell'unità ottica del vostro apparecchio.
bostext
3
Page 87

Norme di sicurezza, di prevenzione e avvertenze
• Controllate l'assenza di eventuali danneggiamenti sul CD/DVD, quali crepe
sottili, rotture o simili, prima di inserirlo nell'unità.
• Gli adesivi applicati successivamente possono modificare le proprietà
meccaniche del CD/DVD e provocare vibrazioni.
• I CD/DVD danneggiati o sbilanciati possono rompersi alle elevate velocità
dell'unità (perdita di dati). In determinate circostanze gli spigoli taglienti dei
frammenti possono penetrare attraverso il pannello dell'unità (danneggiamento
dell'apparecchio) ed essere proiettati fuori dall'apparecchio (pericolo di lesioni,
in particolare sulle parti del corpo non coperte da indumenti, ad esempio il viso
e il collo).
• Osservando i seguenti suggerimenti potete proteggere la vostra unità ottica e
prevenire dei danneggiamenti meccanici nonché un'usura precoce dei supporti
dei dati:
− introducete i CD/DVD nell'unità soltanto se necessario ed estraeteli dopo
l'uso.
− Conservate i CD/DVD in appositi involucri. Proteggete i CD/DVD da fonti
di calore e dalla diretta esposizione ai raggi solari.
Pulizia
• Pulite il vostro PC di tanto in tanto. Spegnete il PC e tutti gli apparecchi
collegati ed estraete il connettore dalla presa.
• Usate detergenti non aggressivi e/o un panno umido.
• Evitate di usare spray detergenti e qualsiasi tipo di sostanza alcolica o altre
sostanze infiammabili. Pertanto, per la pulizia non utilizzate polvere abrasiva
né detersivi che attaccano la plastica.
• Pulite la superficie dello schermo con un panno morbido inumidito che non si
sfilaccia.
Informazioni supplementari per il funzionamento regolamentare
• Sistemate l'apparecchio in modo da permettere una sufficiente circolazione di
aria per il suo raffreddamento. Non coprite mai le fessure di ventilazione
dell’apparecchio. In caso contrario l'apparecchio potrebbe surriscaldarsi, fatto
che diminuirebbe la sua durata.
• Alcuni apparecchi presentano delle pellicole per proteggere dai danni
meccanici le superfici delicate. Rimuovere tali pellicole protettive prima di
mettere in funzione la macchina.
• Consigliamo di collocare l'apparecchio su una base antisdrucciolevole. Vista la
moltitudine di rivestimenti e vernici diversi utilizzati per i mobili, non è da
escludere che i piedini di gomma/plastica degli apparecchi possano
danneggiare la superficie di appoggio.
• Proteggete l'apparecchio dall'umidità eccessiva, dall'irraggiamento solare
diretto e da temperature estremamente alte o basse. Se trasportate
l'apparecchio da un ambiente freddo nel locale d'uso, non è da escludere una
formazione di condensa. In questo caso si raccomanda di attendere finché
l'apparecchio non si è adattato al cambiamento di temperatura e
completamente asciugato, prima di metterlo in funzione (da 2 a 4 ore circa).
• L’apparecchio non è impermeabile! Non immergete mai l’apparecchio
nell’acqua e proteggetelo dagli spruzzi (pioggia, acqua di mare).
• In caso di odori anomali, presenza di fumo e in casi di emergenza (ad es. in
caso di danni al case, agli elementi di comando o al cavo di rete oppure di
.it
bostext
4
Page 88

Norme di sicurezza, di prevenzione e avvertenze
penetrazione di liquidi o di corpi estranei), spegnete immediatamente
l‘apparecchio, estraete la spina e informate il vostro rivenditore di fiducia o la
nostra Hotline/Help Desk.
• Non fumate direttamente accanto all'apparecchio. Le particelle di fumo si
depositano sul monitor o all'interno del computer.
• Non mangiate sopra la tastiera per evitare che briciole possano cadere negli
interstizi dei tasti impedendone il funzionamento.
• Posate i cavi in modo che non possano costituire fonte di pericolo (pericolo di
inciampare) né essere danneggiati.
• Per il trasporto si consiglia di utilizzare l'imballaggio originale, studiato
appositamente per questo scopo.
• La targhetta di omologazione può trovarsi anche sul fondo del computer.
• Rimuovete l'eventuale fermo di sicurezza per il trasporto posto sul lato inferiore
del mouse.
• Nei sistemi ATX e µATX, lo spegnimento non implica assenza di corrente
(standby). Per togliere la corrente al sistema è necessario staccare la spina
elettrica.
• Se il monitor viene collegato alla presa di tensione dell'alimentatore del PC
(se disponibile), spegnendo il PC non si spegne il monitor.
• Se disponete di un monitor che supporta la gestione di energia, anche il
monitor andrà in modalità di standby. Se il monitor non dispone di questa
funzione, dovete spegnerlo separatamente quando terminate di usare il PC.
• Il disco fisso è già formattato e il sistema operativo è già installato. La
formattazione è necessaria solamente qualora dovesse rendersi necessario
reinstallare il disco fisso.
• Il "CD/DVD Product Recovery" in dotazione deve essere utilizzato
esclusivamente per il ripristino o la reinstallazione del vostro sistema operativo
se si utilizza una scheda madre dotata di un BIOS di Fujitsu Siemens
Computers.
• I sistemi Consumer PC non sono idonei per applicazioni di alta sicurezza o
tecnico-mediche.
Informazioni di sicurezza sugli apparecchi con sistema di raffreddamento a
liquido
Si tratta di un sistema di raffreddamento di sicurezza chiuso con un liquido di
raffreddamento certificato a basso impatto ambientale. Questo liquido non è
velenoso, infiammabile né conduttore di elettricità, inoltre può essere riciclato.
Il sistema di raffreddamento a liquido viene controllato tramite il BIOS. In caso di
guasto al sistema di raffreddamento a liquido, il BIOS attiva un messaggio di errore
all’avvio del sistema.
• Per la pulizia non utilizzare detergenti aggressivi né oggetti appuntiti o affilati
che, penetrando nelle aperture praticate per motivi tecnici, possono
danneggiare i cavi di collegamento del sistema di raffreddamento.
• Nei paesi in cui si registrano temperature estreme, durante il trasporto
all'aperto, osservate la temperatura di trasporto, rilevabile dal manuale di
istruzioni al capitolo "Dati tecnici e condizioni di funzionamento".
bostext
5
Page 89

Norme di sicurezza, di prevenzione e avvertenze
Riparazione, trasformazione e upgrade del computer
Poiché il sistema è stato concepito adattando tra loro la tecnologia dell‘hardware e
la tecnologia del raffreddamento, in modo che il produttore possa garantire un
funzionamento ineccepibile, le riparazioni dell‘hardware o le modifiche devono
essere eseguite esclusivamente
L'installazione non corretta di componenti non certificati dal produttore può
danneggiare gravemente l'apparecchio. Fujitsu Siemens Computers declina
qualsiasi responsabilità dei danni consequenziali derivanti. In caso di domande,
rivolgetevi al produttore o alla hotline.
Salvataggio dati
• Effettuate periodicamente copie di sicurezza dei vostri file. Solo in questo
modo potete evitare la perdita di dati in caso di guasto al disco fisso.
• Non si accettano reclami per la perdita di dati.
Trattamento speciale di batterie e accumulatori
• Le batterie e gli accumulatori contenuti nei nostri apparecchi non contengono
elementi al cadmio e al mercurio.
• Il vostro sistema è dotato di una batteria intercambiabile al litio, che si trova
sulla scheda madre del sistema. Quando la batteria è esaurita, può essere
sostituita.
Nota sull'ordinamento per le batterie del 27.03.1998:
Osservate quanto segue:
batterie e accumulatori non vanno gettati nei rifiuti domestici. Essi devono
essere ritirati gratuitamente da produttori, rivenditori o incaricati per essere
condotti al riciclaggio o allo smaltimento!
Non smaltire l’apparecchio con i rifiuti domestici. Quest‘apparecchio è
certificato in base alla direttiva europea 2002/96/CE sui rifiuti di
apparecchiature elettriche ed elettroniche (RAEE) (waste electrical and
electronic equipment - WEEE).
La direttiva fornisce indicazioni sul ritiro e il recupero degli apparecchi
usati validi a livello europeo. Per il ritiro degli apparecchi usati,
utilizzate i sistemi di ritiro e raccolta a voi disponibili. Per ulteriori
informazioni, visitate il sito web www.fujitsu-siemens.com
da persone autorizzate.
.it
bostext
6
Page 90

Messa in funzione
2 Messa in funzione
2.1 Collegamento del computer
2.1.1 Collegamenti del vostro computer
La maggior parte dei collegamenti del computer è disposta sul pannello posteriore. I
collegamenti presenti e la loro posizione dipendono dal modello di computer. Di
seguito sono riportati i collegamenti più frequenti.
Tipo di
collegamento
Connettore per
collegamento a
freddo
Connettore PS/2
6-pin
Connettore PS/2
6-pin
Connettore D
subminiatura
15-pin
Connettore D
subminiatura
25-pin
Connettore Dsubminiatura 9-pin
Simbolo Colore Collegamento
nero Alimentazione del
lilla Tastiera PS/2
Keyb.
verde Mouse PS/2
oppure VGA
oppure
LPT
1
oppure
SERIALE
blu Monitor
rosso Stampante
turchese COM1
1) 4)
PC
(interfaccia parallela)
(interfaccia seriale)
bostext
7
Page 91

Messa in funzione
3,5 mm
Connettori jack
Connettore cinch
Connettore USB
oppure
Connettore
FireWire
Connettore RJ-11
Connettore RJ-45
Uscita per antenna
Connettore a 4 o
più poli
2)
Line In
Line Out
Mic
AUDIO
digital out
SPDIF IN
SPDIF Out
celeste
verdino
fucsia
giallo
giallo
Sound
(fonti sonore esterne,
p.es. casse attive,
microfono)
- scheda audio
- Sound onboard
Connessione digitale
audio
vedi anche manuale
sulla scheda madre e
in "Suggerimenti e
consigli"
USB
oppure
bianco
e nero
Porta di connessione
per dispositivi USB2.0
(ad es. tastiera,
modulo
ricevitore/trasmettitore
IR, scanner,
stampante)
3)
IEEE 1394
bianco
e nero
USB 2.0
Porta di connessione
per apparecchi
compatibili IEE (ad
es. videoregistratore,
videocamera digitale)
FireWire
assente Modem
oppure
oppure LINE
oppure PHONE
assente Rete o modem DSL
oppure
oppure LAN
CATV assente Uscita cavo, antenna
SVIDEO IN
SVIDEO OUT
nero Collegamento video
entrata e uscita
(vedi documentazione
su scheda VGA/TV)
.it
bostext
8
Page 92

Messa in funzione
SPDIF
optic
nero Connessione audio
digitale ottica
● LED WLAN LINK verde Indicatore di
funzionamento WLAN
DVI bianco Collegamento per
1)
Attenzione: Sotto il connettore si può trovare un commutatore per tensioni
elettriche da 230 V~ a 115 V. La tensione impostata di fabbrica è 230 V~.
2)
Se la scheda audio è stata montata successivamente, la funzione audio non è
ancora attivata sulla scheda madre oppure "Sound onboard" non è presente.
3)
Nota importante su USB 2.0: al fine di garantire una velocità di trasmissione dei
dati sicura, si consiglia l'utilizzo di un cavo USB con lunghezza max. 4 m.
4)
Comandi sull'alimentatore (opzionale)
1
0
230 115
Interruttore di rete on/off
Commutatore di tensione
segnale video digitale
(monitor)
opzionale
Attenzione! Prestate attenzione ai valori della rete elettrica alla quale si
collega il computer e confrontateli con i valori impostati di
fabbrica.
2.1.2 Collegamenti, elementi di comando e di indicazione sul pannello
anteriore
Collegamenti
La definizione delle connessioni è riportata nella tabella precedente.
Elementi di comando
bostext
Tasto standby Tasto per l'attivazione della funzione
standby o per l'accensione/spegnimento
nei sistemi ATX.
9
Page 93

Messa in funzione
Indicatori
oppure
LED di rete
acceso
Pulsante di
rete
LED HDD
acceso
Il sistema è acceso (POWER)
Il sistema è acceso quando l’anello blu
si accende
Indica che si stanno leggendo dati sul
disco fisso.
(HDD)
2.2 Collegamento
Prima di accendere il computer
1. Collegate al PC il
periferiche. A tal fine osservate anche le indicazioni riportate al capitolo
"Collegamenti del PC" e le indicazioni riportate nella "Quick Start Guide".
2. Collegate il cavo di alimentazione in dotazione dapprima alla presa di rete del
PC e poi a una presa con contatto di terra (o presa multipla) 230V~/115V~.
Mettete in funzione l‘apparecchio solo se la tensione di rete dello stesso
corrisponde alla tensione di rete locale. Se il vostro computer è dotato di un
commutatore di tensione, assicuratevi che sia impostato sulla tensione di rete
in uso nel vostro paese. L'impostazione standard di fabbrica è 230V~.
Dopo aver collegato il cavo
3. accendete il monitor.
4. Quindi accendete l'interruttore di alimentazione sul pannello posteriore del
computer, se presente. Per avviare il computer, premete il tasto standby sul
pannello anteriore del computer.
L'apparecchio è pronto al funzionamento se la spia luminosa verde / l’anello blu si
accende.
monitor, la tastiera, il mouse, la stampante e le altre
.it
bostext
2.3 Prima messa in funzione del software preinstallato
Sul computer è preinstallato un sistema operativo Microsoft®Windows. Dopo
l'accensione del computer il sistema operativo sarà immediatamente disponibile.
Con il sistema operativo di Windows potete mettervi subito al lavoro. È possibile
che debbano essere eseguiti alcuni adattamenti. A tal scopo, seguite le istruzioni
che compaiono sullo schermo.
Avvertenza: Quando l‘apparecchio viene acceso per la prima volta, in "First
Steps" il sistema viene sottoposto a un controllo. Nel corso del test
non manipolate gli elementi di immissione e di comando del PC.
10
Page 94

Messa in funzione
Il software preinstallato si trova in: "Start / Tutti i programmi".
Istruzioni per Microsoft®Windows XP Home Edition e/o Professional e
Microsoft®Windows Media Center Edition
I prodotti Microsoft®Windows sono stati preinstallati da Fujitsu Siemens
Computers e il computer è pronto per l'uso. In caso di modifiche essenziali dei
componenti hardware potrebbe essere necessario il riavvio. In questo caso seguite
le istruzioni del programma dopo la modifica dell'hardware. In caso di domande,
rivolgetevi al nostro help desk.
(www.fujitsu-siemens.com/service).
Informazioni su Microsoft®Word
Microsoft prevede l'attivazione di Microsoft®Word da parte dell'utente. A tal fine è
sufficiente seguire le istruzioni del programma dopo l'avvio dello stesso. In caso di
domande rivolgetevi al nostro Help Desk (www.fujitsu-siemens.com/service).
bostext
11
Page 95

Ripristino del software installato
3 Ripristino del software installato
3.1 Introduzione
In caso di mancato avvio del sistema operativo o di errori sul disco fisso potrebbe
essere necessario il ripristino del software preinstallato. Utilizzando i seguenti
sussidi è possibile ripristinare il software.
Dotazione del computer:
• "CD/DVD Product Recovery Fujitsu Siemens"
• "CD/DVD Drivers & Utilities"
• Driver / CD/DVD applicazioni (opzionale)
• Manuale del sistema operativo Windows
• CoA (Certificate of Authenticity) Label
Questo codice di registrazione non viene richiesto al ripristino di Windows.
Questa dotazione si riferisce unicamente ai sistemi operativi di Microsoft®.
ATTENZIONE! Eseguite ad intervalli regolari delle copie di sicurezza dei vostri
file. In caso di perdita dei dati, potete ripristinare le vostre
applicazioni usando i supporti dei dati originali. Se non
disponete di copie di sicurezza dei file dati non è più possibile
eseguire il ripristino.
Per quanto possibile, raccomandiamo di salvare tutti i file di dati
prima di reinstallare il sistema operativo, in quanto la procedura
di ripristino può determinarne l‘eliminazione dal disco fisso.
Sarà necessario reinstallare tutti i programmi inseriti dal
momento dell'acquisto del computer e ripristinare poi i file di
dati per mezzo delle copie di sicurezza. Per questo motivo
decliniamo qualsiasi responsabilità per errori o perdita di dati.
SUGGERIMENTO! Se il PC è dotato di un drive Combo (masterizzatore),
utilizzatelo per creare le copie di sicurezza. Masterizzate un CD
di dati. Con il PC, è utile integrare una memoria di massa USB
esterna (disco fisso o Memorystick).
.it
bostext
12
Page 96

Ripristino del software installato
3.2 Ripristino del software installato
3.2.1 Varianti del ripristino del sistema
Di seguito sono illustrati dei procedimenti per il ripristino del sistema. A seconda
della gravità dell’errore, consigliamo di utilizzare l’una dopo l’altra queste varianti,
fino a pervenire alla risoluzione del problema.
1. Ripristino mediante attivazione di un "Restore checkpoint" ("Punto di
ripristino").
In questo caso vengono conservati i file da voi creati e i programmi da voi
installati presenti nel PC fino al momento del punto di ripristino selezionato.
2. Ripristino con "Advanced Windows Startup Option" ("Opzione di avvio
avanzata di Windows“).
In questo caso viene ripristinata l'ultima configurazione funzionante
riconosciuta dal sistema. Vengono ripristinati tutti i file e programmi esistenti
l'ultima volta che Windows è stato avviato correttamente.
3. Ripristino con il "CD/DVD Drivers & Utilities".
In questo caso il sistema viene riportato nello stato della consegna, incluso i
programmi, driver e documenti preinstallati alla consegna.
4. Ripristino con il "CD/DVD Product Recovery Fujitsu Siemens".
In questo caso viene ripristinato solo il sistema operativo e non l‘intero
sistema. È necessario reinstallare tutti i programmi, driver e documenti
supplementari.
3.2.2. Ripristino mediante attivazione di un "Punto di ripristino" ("Restore
checkpoint")
Nel caso di un eventuale problema potete anche ripristinare uno stato remoto del
sistema, senza temere alcuna perdita di dati o file personali (ad esempio
documenti, preferiti su Internet ed E-mail). Il ripristino del sistema operativo
WindowsXP controlla tra l'altro eventuali cambiamenti del computer e crea
periodicamente punti di ripristino facilmente identificabili.
Per il ripristino di uno stato di sistema remoto, procedete come segue:
1. Fate clic su "Start"/"Control Panel"/"Performance and Maintenance" ("Start“
- "Pannello di controllo“ - "Prestazioni e manutenzione“) e quindi su
"System recovery" ("Ripristino sistema“).
2. Selezionata l'opzione "Restore computer to a previous point in time"
("Ripristinare il computer ad un momento remoto“). Confermate con
"Continue" ("Avanti“). Dopodiché nella schermata successiva si potrà
selezionare il punto di ripristino.
In caso di domande o supporto, utilizzate la completa "Help and Support Center"
("Guida e centro di supporto“), facendo clic sul punto interrogativo in alto a
destra.
Ulteriori istruzioni per la creazione di un punto di ripristino sono contenute nel
"Manuale di istruzioni per un PC Fujitsu-Siemens" in formato elettronico
bostext
13
Page 97

Ripristino del software installato
3.2.3. Ripristino con "Opzione di avvio avanzata di Windows" ("Advanced
Windows Startup Option")
Se all'accensione del PC dovesse comparire più volte un messaggio di errore o una
finestra blu, riavviate il computer. Durante la fase di avvio premete il tasto F8 a
brevissimi intervalli, sino a che compare il messaggio "Advanced Startup Options"
("Opzioni avanzate di Windows"). Selezionate "Last known good configuration"
("Ultima configurazione valida“).
Se così facendo non siete in grado di risolvere il problema, reinstallate il sistema
operativo Windows come descritto al punto 3.2.4.
3.2.4 Ripristino con il "CD/DVD Drivers & Utilities"
Per riportare il sistema allo stato della consegna, incluso i programmi, driver e
documenti preinstallati alla consegna, procedete come segue:
1. Inserite il "CD/DVD Drivers & Utilities" nell'unità DVD a computer acceso.
2. Spegnete il computer, attendete un istante e riaccendetelo.
3. Quando sullo schermo appare il prompt "Press any Key to boot from CD…"
("Premere un tasto qualsiasi per avviare dal CD…"), premete un tasto
qualsiasi della tastiera. Il programma di installazione viene avviato e viene
visualizzato il menu "Recovery²".
Il computer carica i file dall'unità DVD/CD per ripristinare Windows sul
computer. Questa procedura ha una durata di alcuni minuti.
4. Fate clic su "Start" ("Start") e "Continue" ("Avanti"), per avviare la procedura
di ripristino.
La procedura di ripristino viene avviata. Tutti i file necessari vengono copiati. Il
computer viene quindi riportato allo stato della consegna. Questa procedura ha
una durata di alcuni minuti.
Attenzione!
Se viene visualizzato il messaggio "Recovery Folder not found. Please
restore your System from the Recovery CD" ("Cartella di ripristino non
trovata. Utilizzare il CD Recovery per ripristinare il sistema"), è necessario
ripristinare il sistema operativo utilizzando il "CD/DVD Product Recovery
Fujitsu Siemens" fornito in dotazione. In via esplicativa, è possibile che ciò si
verifichi nei seguenti casi:
• un file di sistema per il processo di ripristino non è stato trovato oppure è
corrotto.
• dopo la sostituzione del disco fisso originale fornito in dotazione.
In tal caso estraete il "DVD Drivers & Utilities“ dall'unità ottica e ripristinate il
sistema operativo di Windows come descritto al punto 3.2.5.
.it
bostext
14
Page 98

Ripristino del software installato
5. Estraete il "CD/DVD Drivers & Utilities" quando viene visualizzato il "The
recovery process is complete. Remove the Driver & Utilities CD/DVD from
the drive and switch off the computer. If your system fails to boot once
switched on again, please contact the relevant service provider." ("Il
processo di ripristino è terminato. Rimuovete il DVD Driver & Utilities
dall’unità e spegnete il computer. Se, riaccendendo il computer, il
sistema non dovesse effettuare la procedura di avvio, rivolgersi al centro
di assistenza competente."). Confermate il messaggio successivo con "OK".
Il computer viene riavviato.
A questo punto, per quanto riguarda il software, il computer si trova nelle
condizioni in cui era all’acquisto. Dopo il riavvio inizia la procedura di
installazione di Windows.
6. Windows visualizza la schermata di benvenuto a Microsoft Windows. Fate clic
su "Continue" ("Avanti") nell'angolo inferiore destro dello schermo per
proseguire.
7. Seguite le istruzioni che compaiono sullo schermo.
8. La procedura di installazione si interrompe e sullo schermo viene visualizzato
"End user license agreement" ("Contratto di licenza utente finale"). Dovete
dare il vostro consenso al contratto di licenza prima di proseguire
l'installazione. Fate clic sul pulsante "Yes, I agree to the license agreement"
("Accetto il contratto di licenza") e quindi sul pulsante "Continue" ("Avanti").
9. Seguite le istruzioni che compaiono sullo schermo.
10. Viene richiesto di inserire i nomi delle persone che utilizzano il computer.
Potete inserire fino a 5 nominativi. È necessario inserire almeno un nome. Per
ogni utente viene aperto un account specifico. Al termine, fate clic su
"Continue" ("Avanti“).
11. Windows termina l'installazione. Fate clic su "Finish" ("Ultimazione")
nell'angolo inferiore destro dello schermo.
bostext
3.2.5 Ripristino del sistema operativo di Windows con il "CD-ROM Product
Recovery Fujitsu Siemens"
1. Inserite il "CD/DVD Product Recovery" nell'unità DVD a computer acceso.
2. Spegnete il computer, attendete un istante e riaccendetelo.
3. Quando sullo schermo viene visualizzato per la prima volta il prompt "Press
any key to boot from CD …" ("Premere un tasto qualsiasi per avviare dal
CD…“), premete un tasto qualsiasi sulla tastiera.
Attenzione! Questo messaggio viene visualizzato dopo ogni riavvio nel corso
4. Viene avviato il programma di installazione. Dopo aver caricato i file
corrispondenti (operazione che richiede alcuni minuti), viene visualizzato il
menu "
l'installazione.
5. Per proseguire l'installazione è necessario accettare il "Windows License
Agreement“
della dell'installazione. Ignorate questo messaggio in questi punti,
poiché il riavvio viene effettuato dal CD solo la prima volta.
Windows … Setup". Premete il tasto "Invio" per proseguire
("Contratto di licenza Windows“) con il tasto F8.
15
Page 99

Ripristino del software installato
6. Nel menu successivo premete il tasto "Esc" (non riparare).
7. Nel menu successivo selezionate eventualmente l'unità C: con i tasti su/giù
(↓↑): premete il tasto "D" e confermate il menu successivo con il tasto "Invio".
8. Nell'immagine successiva premete il tasto "L" e confermate nuovamente la
procedura con il tasto Invio.
9. Nel menu successivo selezionate con i tasti su/giù (↓↑) l'opzione "Format
partition using the NTFS file system" ("Formattare la partizione usando il
file system NTFS“) e confermate con il "tasto Invio".
Il disco fisso viene cancellato e riformattato. Sul disco fisso vengono copiati i
file dal CD/DVD per ultimare il processo di installazione. Il computer viene
riavviato automaticamente. Dopo il riavvio inizia la procedura di installazione di
Windows.
Nota! Con la funzione "Format partition using the NTFS file system
10. Durante l'installazione potete effettuare alcune impostazioni particolari o
applicare le impostazioni standard confermando i dati con "Continue"
("Avanti“) Seguite le istruzioni che compaiono sullo schermo.
Vengono copiati altri dati. Questa operazione richiede alcuni minuti. Il
computer viene riavviato automaticamente. Dopo il riavvio prosegue
l'installazione di Windows.
11. Viene visualizzato il prompt "Screen resolution will be adjusted
automatically to improve the appearance of visual elements" (“Per
migliorare la visualizzazione di elementi visivi, la risoluzione dello
schermo viene impostata automaticamente“). Fate clic su "OK".
Confermate il messaggio successivo con "OK".
12. Viene visualizzato il menu "Welcome" ("Benvenuto") di Windows. Fate clic su
"Continue" ("Avanti") e seguite le istruzioni che compaiono sullo schermo.
13. Viene richiesto di inserire i nomi delle persone che utilizzano il computer.
Potete inserire fino a 5 nominativi. È necessario inserire almeno un nome. Per
ogni utente viene aperto un account specifico. Al termine, fate clic su
"Continue" ("Avanti“).
14. Windows termina l'installazione. Fate clic su "Finish" ("Ultimazione")
nell'angolo inferiore destro dello schermo.
15. Viene visualizzato lo "Start Menu" ("Menu di avvio") di Windows.
16. Estraete il "CD/DVD Product Recovery" dall'unità DVD.
Per installare i driver e software supplementare nonché ripristinare la
documentazione online, inserite nell'unità DVD il "CD/DVD Drivers & Utilities".
AVVERTENZA Leggete i messaggi molto attentamente.
(fast)" ("Formattare la partizione usando il file system NTFS
(veloce)"), il disco fisso viene solo
riformattato.
cancellato, ma non
.it
bostext
16
Page 100

Ripristino del software installato
3.3. Ripristino di driver, documentazione e software speciali
Il "CD/DVD Drivers & Utilities" vi permette di ripristinare i driver, il software
supplementare e la documentazione elettronica del sistema.
Consigliamo di effettuare il ripristino nella successione descritta di seguito.
3.3.1 Ripristino dei driver
Il ripristino dei driver può essere eseguito senza chiudere Windows. Potete
ripristinare tutti i programmi di servizio e i driver preinstallati, senza andare a
modificare la funzionalità del sistema operativa Windows.
1. Con Windows in funzione, inserite il "CD/DVD Drivers & Utilities" nell'unità
DVD.
Viene visualizzato "wizard information". Dal DVD vengono installati i
necessari update Microsoft disponibili al momento della produzione del
sistema. (Creazione dello stato alla consegna). Questa procedura si svolge
automaticamente e dura alcuni minuti. Al termine viene visualizzato il menu
"wizard@home-pc".
2. In "wizard@home-pc" selezionate il CD/DVD "Driver". Vengono reinstallati
automaticamente tutti i driver dei componenti appartenenti al computer allo
stato della consegna. In questa procedura d'installazione non è possibile
effettuare alcun intervento.
Al termine della procedura d'installazione, il computer si riavvia automaticamente.
Dopo il riavvio estraete il "CD/DVD Drivers & Utilities" dall'unità DVD.
Se nel sistema dovesse essere presente un driver opzionale CD/DVD per
componenti, per installare i driver inserite tale CD/DVD nell'unità DVD e seguite le
istruzioni visualizzate sul monitor.
3.3.2 Ripristino di software supplementare
1. Con Windows in funzione, inserite il "CD/DVD Drivers & Utilities" nell'unità
DVD.
2. Nel menu "wizard@home-pc" selezionate il CD/DVD "Programmi e link". Per
il ripristino completo
disponibili.
3. Con il puntatore del mouse fate clic nel menu visualizzato sul programma e sul
link corrispondente e seguite le istruzioni visualizzate sul monitor. I link offerti
vengono memorizzati in Internet Explorer come Preferiti.
4. Estraete il "CD/DVD Drivers & Utilities" dall'unità DVD.
Per completare lo stato originale dal punto di vista dei software, inserire il CD/DVD
Programmi forniti in dotazione e installare i programmi.
del sistema del PC, installate tutti i Programmi e link
bostext
17
 Loading...