

Page 1

P3PC-E527-02EN
CardMinder
TM
for
TM
ScanSnap!
User’s Guide
Page 2

INTRODUCTION
■ About This Manual
This manual describes the use of CardMinder for ScanSnap! application as follows.
1) About CardMinder
(A quick look at CardMinder)
2) Configuring Before Scanning
(Setting options before scanning)
3) Scanning and Exporting Business Card Data
(Basic procedures for common scanning tasks)
4) Business Card Data Handling
(Maintaining and using your Business Card database)
5) Correction of Recognized Character data
(Correcting the recognized data in a Business card)
6) Setting Preferences
(Setting CardMinder preferences)
7) Troubleshooting
(Detecting and fixing CardMinder errors)
8) Index
Additional information about ScanSnap! fi-4110EOX2 can be found in:
ScanSnap! fi-4110EOX2 Operator’s Guide
ScanSnap! fi-4110EOX2 Getting Started Guide
■ Note, Liability
READ ALL OF THIS MANUAL AND RELATED MANUAL CAREFULLY BEFORE
USING THIS PRODUCT.
IF NOT USED CORRECTLY, UNEXPECTED INJURY MAY BE CAUSED TO USERS
OR BYSTANDERS.
While all efforts have been made to ensure the accuracy of all information in this manual,
PFU LIMITED assumes no liability to any party for any damage caused by errors or
omissions or by statements of any kind in this manual, its updates or supplements, whether
such errors are omissions or statements resulting from negligence, accidents, or any other
cause. PFU LIMITED further assumes no liability arising from the application or use of any
product or system described herein; nor any liability for incidental or consequential damages
arising from the use of this manual. PFU LIMITED disclaims all warranties regarding the
information contained herein, whether expressed, implied, or statutory.
PFU LIMITED reserves the right to make changes to any products herein, to improve
reliability, function, or design, without further notice and without obligation.
CardMinder for ScanSnap! User’s Guide i
Page 3

Use in High-safety Applications
This product has been designed and manufactured on the assumption that it will be used in
office, personal, domestic, regular industrial, and general-purpose applications. It has not
been designed and manufactured for use in applications (simply called "high-safety
applications" from here on) that directly involve serious danger to life and health when an
extremely high degree of safety is required, for example, in the control of nuclear reactions
at nuclear power facilities, automatic flight control of aircraft, air traffic control, operation
control in mass-transport systems, medical equipment for sustaining life, and missile firing
control in weapons systems, and when provisionally the safety in question is not ensured.
The user should use this product without adopting measures for ensuring safety in such highsafety applications. PFU LIMITED assumes no liability whatsoever for damages arising
from use of this product by the user in high-safety applications, and for any claims or
compensation for damages by the user or a third party.
■ Trademarks
PFU is a registered trademark of PFU Limited.
ScanSnap! and CardMinder are trademarks of PFU LIMITED.
Microsoft and Windows are either registered trademarks or trademarks of Microsoft
Corporation of the United States and/or other countries.
ISIS is a registered trademark of Pixel Translations, A Division of Actionpoint Inc.
Adobe and the Adobe logo as well as Acrobat and the Acrobat Logo are either registered
trademarks or trademarks of Adobe Systems Incorporated in the United States and/or other
countries.
Other product names referred to in this manual are registered trademarks or trademarks of
respective companies.
CardMinder for ScanSnap! User’s Guide ii
Page 4

How Trademarks Are Indicated In This Manual
CardMinder for ScanSnap! application is abbreviated as CardMinder.
References to operating systems (OS) are indicated as follows:
Windows 98: Refers to Microsoft® Windows® 98 operating system.
Windows Me: Refers to Refers to Microsoft® Windows® Millennium Edition operating
system.
Windows 2000: Refers to Microsoft® Windows® 2000 Professional operating
Windows XP: Refers to Microsoft® Windows® XP Professional operating system, and
Microsoft® Windows® XP Home Edition operating system.
Where there is no distinction between the different versions of the above operating system,
the general term "Windows® is used.
• The contents of this manual may be revised without prior notice.
• We are unaccountable for any damages or passive damages from the use of this
equipment or this manual and any compensation of third party.
All Rights Reserved, Copyright(c) PFU LIMITED 2003.
The Proximity / Merriam Webster Linguibase
Copyright 1984 All rights reserved
Proximity Technology Inc.
Copyright 1984 All rights reserved
Merriam Webster Inc.
The Proximity / Merriam Webster Linguibase
Copyright 1984 All rights reserved
Proximity Technology Inc.
Copyright 1984 All rights reserved
Williams Collins Sons & Co. Ltd.
No part of this manual may be reproduced in any form without permission.
CardMinder for ScanSnap! User’s Guide iii
Page 5

CONTENTS
INTRODUCTION ............................................................................................ i
■ About This Manual ................................................................. i
■ Note, Liability .......................................................................... i
■ Trademarks ............................................................................ ii
Chapter1 About CardMinder ................................................... 1
1.1 About CardMinder .............................................................. 2
1.2 Features of CardMinder ..................................................... 3
1.3 Flow of Operation ............................................................... 4
1.4 Measurement Windows...................................................... 5
Main window ......................................................................................... 5
Finder window....................................................................................... 7
Chapter2 Configuring Before Scanning ................................ 8
2
Chapter3 Scanning and Exporting the Business Card Data
.................................................................................. 9
Chapter4 Business Card Data Handling .............................. 15
4.1 Data search by character string and hot key ................. 16
4.2 Deleting the data from [Inbox] / [Exported] tab ............. 17
4.3 Deleting data from [Trash] ............................................... 18
CardMinder for ScanSnap! User’s Guide iv
Page 6

4.4 Restoring the data from Trash ........................................ 19
4.5 Extracting the image data ................................................ 21
4.6 Data search by entering keyword ................................... 23
Chapter5 Correction of Recognized Character Data .......... 24
5.1 Recognition of all characters at once............................. 25
5.2 Recognition using Rectangle Selection ......................... 26
5.3 Keyword Recognition using Rectangle Area Selection 28
5.4 Data Correction by Manual Entry .................................... 30
Chapter6 Setting Preferences...............................................32
6.1 Data control settings........................................................ 33
6.2 Export item settings ......................................................... 35
Chapter7 Troubleshooting .................................................... 36
INDEX .......................................................................................................... 38
CardMinder for ScanSnap! User’s Guide v
Page 7

Chapter1
About CardMinder
This chapter describes features and basic operations of CardMinderTM.
1
1.1 About CardMinder................................................................................................... 2
1.2 Features of CardMinder.......................................................................................... 3
1.3 Flow of Operation ................................................................................................... 4
1.4 Measurement Windows .......................................................................................... 5
Main window .......................................................................................................... 5
Finder window........................................................................................................ 7
CardMinder for ScanSnap! User’s Guide 1
Page 8
1.1 About CardMinder
CardMinder is included with your ScanSnap! color duplex scanner. CardMinder provides a quick
scanning, image recognition and database storage solution for all your office scanning needs.
Using an OCR (Optical Character Recognition) engine and sharing recognized data with a PIM
(Personal Information Manager), CardMinder can
• Scan business card(s) and save the image data.
• Recognize the characters on the business card, and send the character data to a PIM (Personal
Information Manager).
• Easily find data on a business card using simple keyword searches.
Image data
1.1 About CardMinder
1
About CardMinder
CardMinder window:
Recognized data
Recognized characters
PIM window (Microsoft® Outlook® for example):
CardMinder ScanSnap! User’s Guide 2
Page 9

1.2 Features of CardMinder
CardMinder has the following features.
• Scans front side or both sides of the business cards just by pressing a button on the scanner
• You can capture Memos on business cards to be reviewed later
• Recognizes characters on business cards and creates keywords automatically for fields like Full
Name or Company.
Keywords: Full Name
Company
Department
Job title
ZIP / Postal codes
Address
Phone number
Fax number
Mobile phone
E-mail
Web site address
Memo
Save date
• Exports recognized data to PIMs (Personal Information Manager)
Supported Applications: Microsoft® Outlook®
Outlook Express
TM
ACT!
GoldMine®
CSV (Excel)
• Searches business cards quickly by Full Name or Company
1.2 Features of CardMinder
1
About CardMinder
CardMinder ScanSnap! User’s Guide 3
Page 10
1.3 Flow of Operation
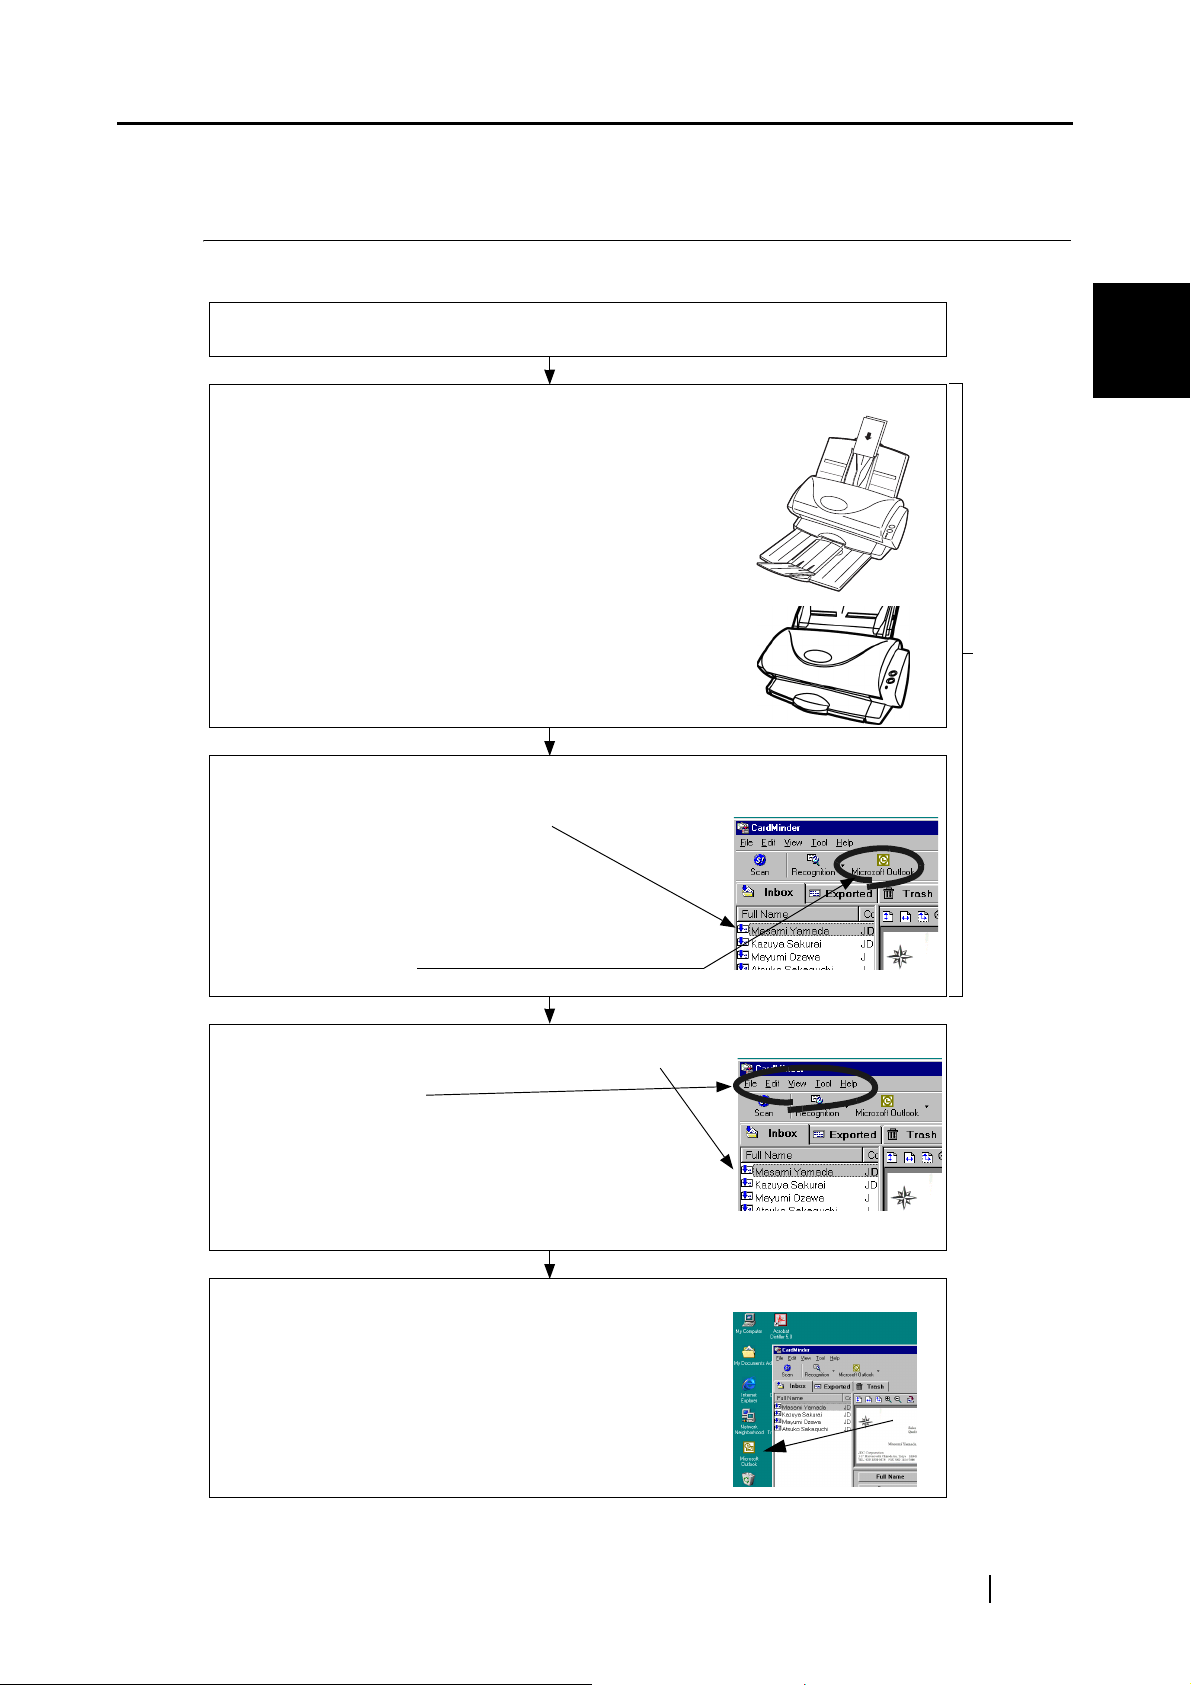
You can start using CardMinder by:
Selecting
• An application where the data is to be exported (See Chapter 2)
1.3 Flow of Operation
1
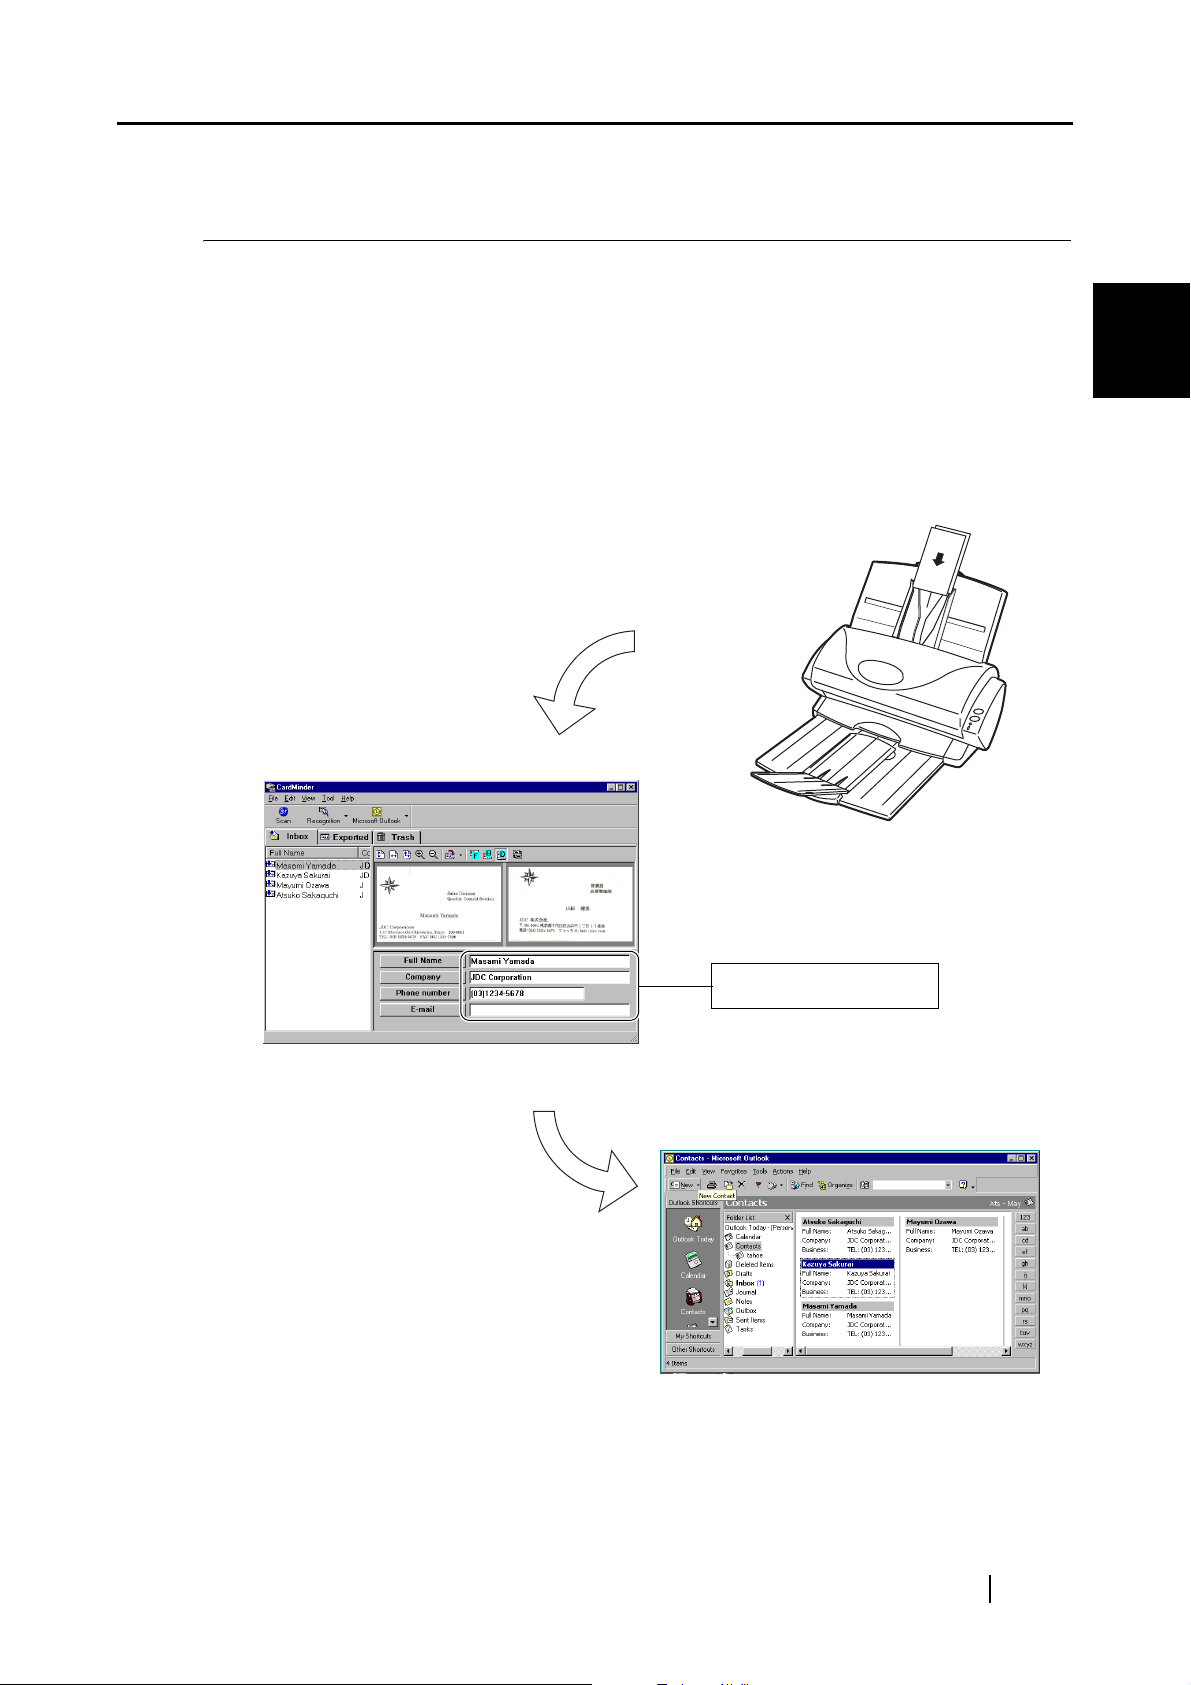
Scanning and recognizing a business card (See Chapter 3)
• Insert the business card(s) into the ADF Paper
Chute.
• Press a button on the scanner.
⇒ Scanned and recognized data will be shown
in Main window.
Exporting the data (See Chapter 3)
• Select the data in [Inbox] tab.
• Click an icon.
About CardMinder
Common
Daily
Tasks
Maintaining the data (See Chapter 4)
• Select the data in [Inbox] or [Exported] tab.
• Click menu to:
Search (See Section 4.1)
Delete from [Inbox] or [Exported] tabs
(See Section 4.2)
Delete from [Trash] tab (See Section 4.3)
Restore (See Section 4.4)
Extracting the data (See Section 4.5)
• Select data from [Inbox] or [Exported] tab.
• Drag and drop the image data to extract.
CardMinder ScanSnap! User’s Guide 4
Page 11
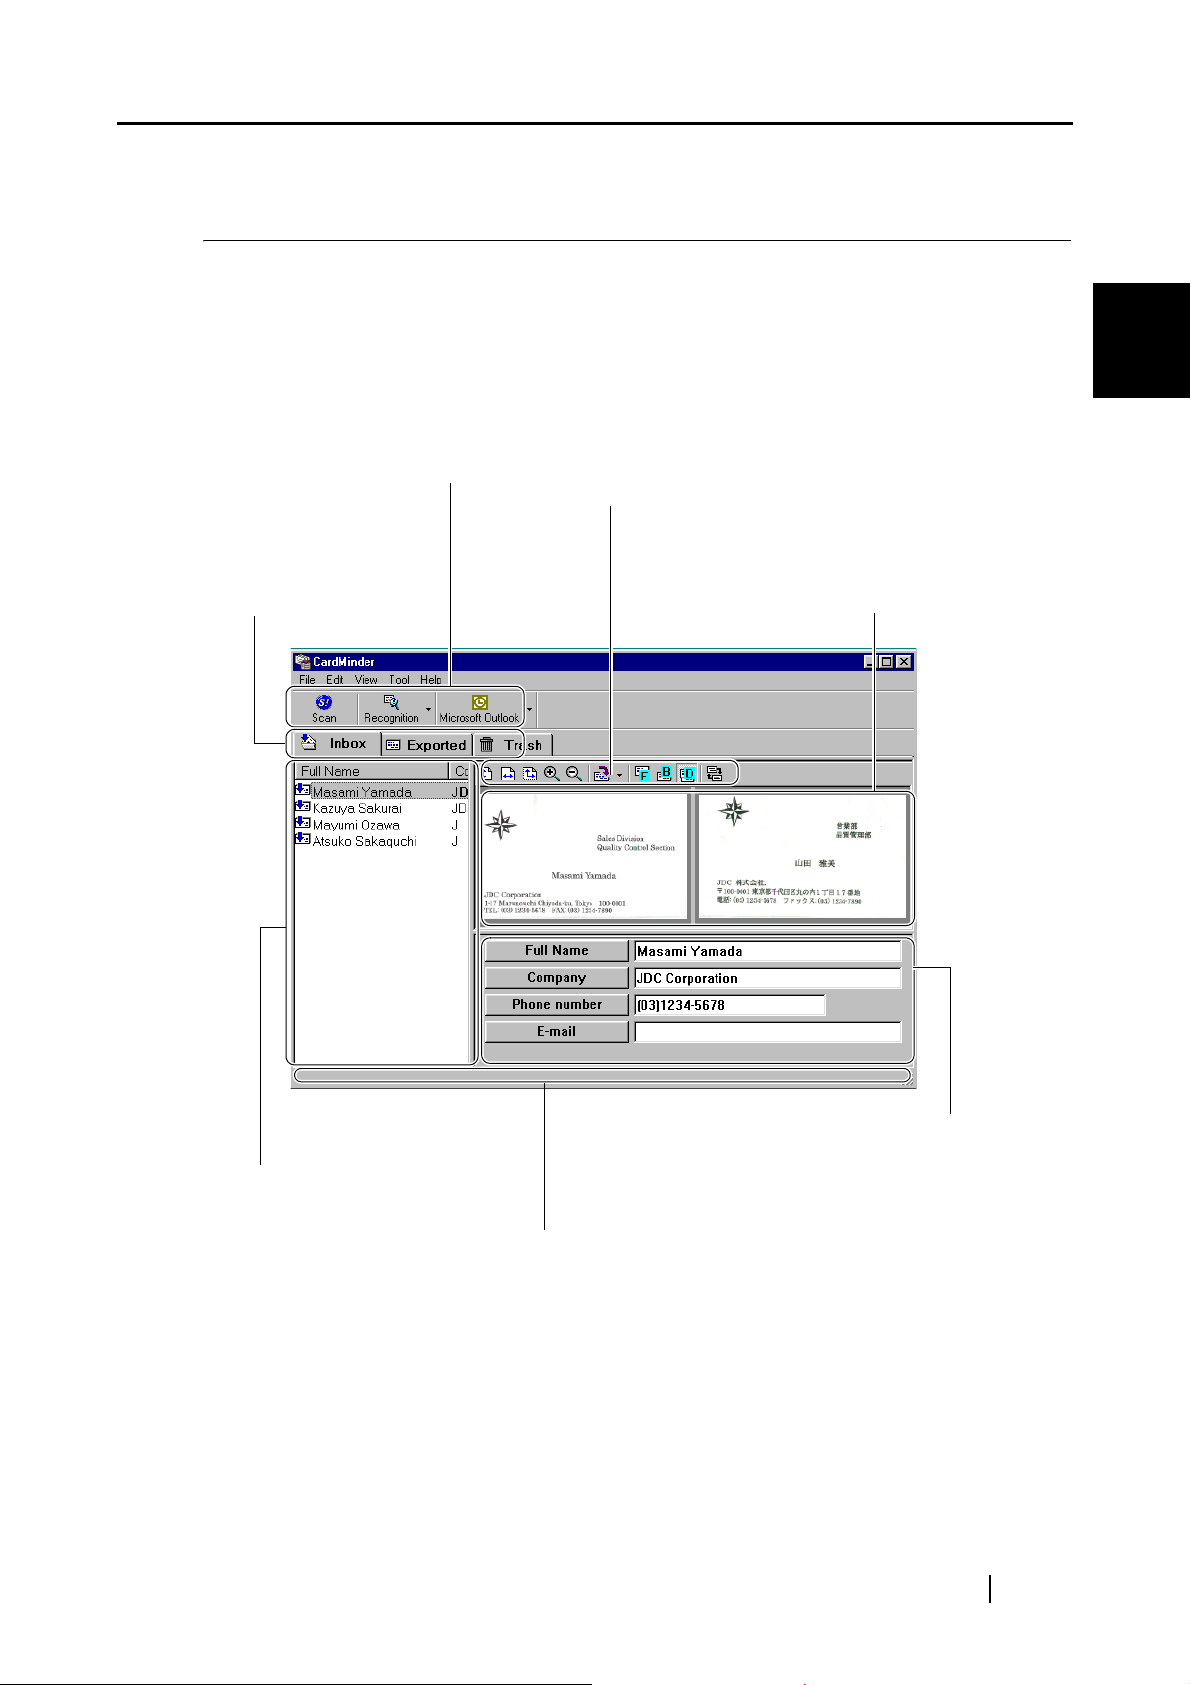
1.4 Measurement Windows
There are two measurement windows in CardMinder.
1.4 Measurement Windows
■ Main window
Command Toolbar
Shows icons for often-used commands.
Mode tabs
Displays data in
each mode.
1
About CardMinder
Image Toolbar
Shows buttons used to adjust the
image display in Image View.
Image View
Displays the image of business card
selected from Data List View.
Data List View
Lists the business card data
Recognition Result / Correction View
Displays recognized data, and is used
for data correction.
Status bar
Help for menus or buttons.
CardMinder ScanSnap! User’s Guide 5
Page 12
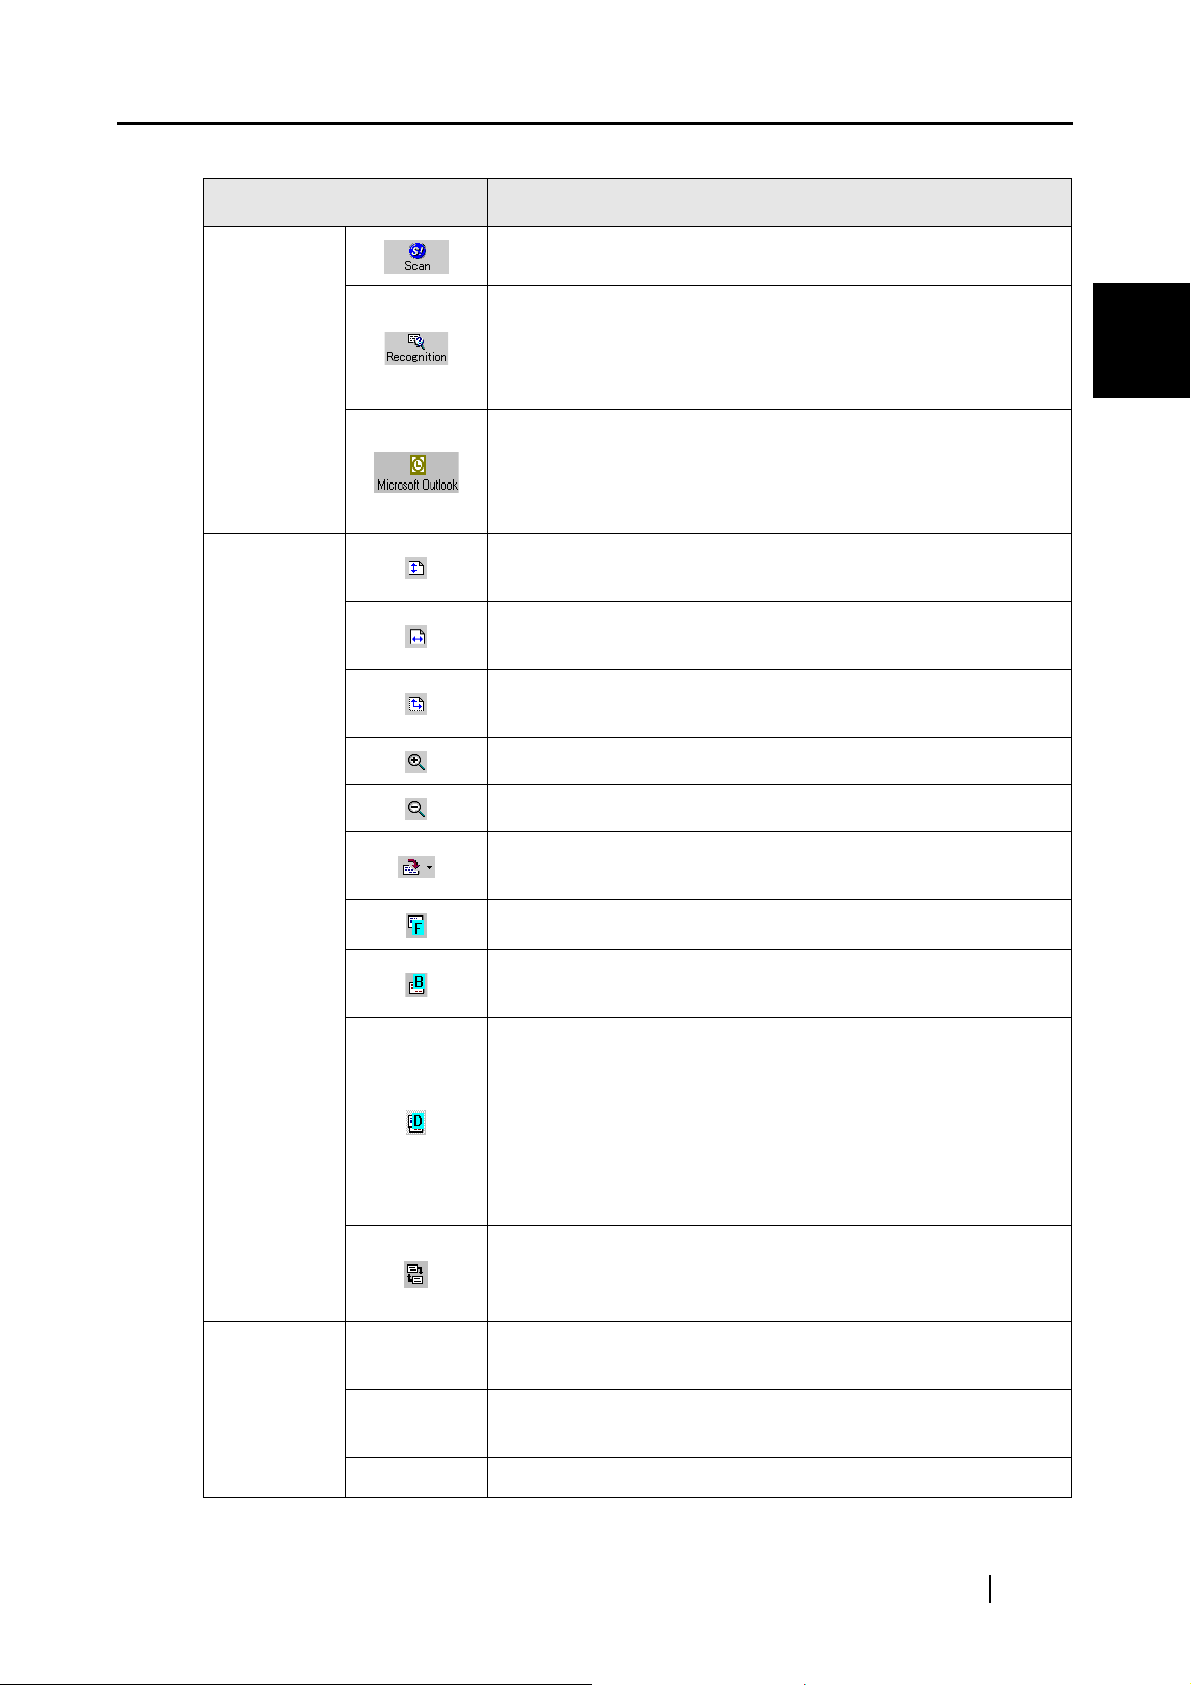
Icon / Display Function
Command
toolbar
1.4 Measurement Windows
Starts Scanning of business card(s) using ScanSnap!.
Activates recognition of the business card selected in Data List
View. Only characters on front side of the business card are
recognized. Automatically displays the recognition result in
Recognition / Correction View.
Exports the business card data to an application. The data is
moved from [Inbox] tab to the [Exported] tab. The icon at the
left shows Microsoft Outlook. Refer to Section 2 to specify
other applications.
The height of the image is adjusted to fit the height of image
display view.
The width of the image is adjusted to fit the width of image
display view.
1
About CardMinder
Image
toolbar
The height or width of the image is adjusted to fit the height or
width of the image display view.
Image size is increased.
Image size is decreased.
Rotates the image 90 degrees clockwise. Clicking [▼] allows a
rotation angle setting.
Displays front side image
Displays back side image. If back side image does not exist,
[No Image] is shown.
Displays front and back side images together. The display
method of front and back image can be adjusted by clicking
[View] menu, [Show duplex image] menu and its submenus.
Left side (or Upper side) of the Image View shows front side of
the business card. Right side (or Lower side) of the Image
View shows back side of the business card. If back side image
does not exit, [No Image] is shown.
Swaps front and back side of Image. The same result is
obtained by clicking [View] menu and [Swap data (front and
back)] submenu.
Mode tabs
[Inbox] tab
[Exported]
tab
[Trash] tab Data that has been sent to the Trash is displayed here.
Data that has been scanned but not exported to an application
is displayed in this tab.
Data that has exported to an application is displayed in this
tab.
CardMinder ScanSnap! User’s Guide 6
Page 13
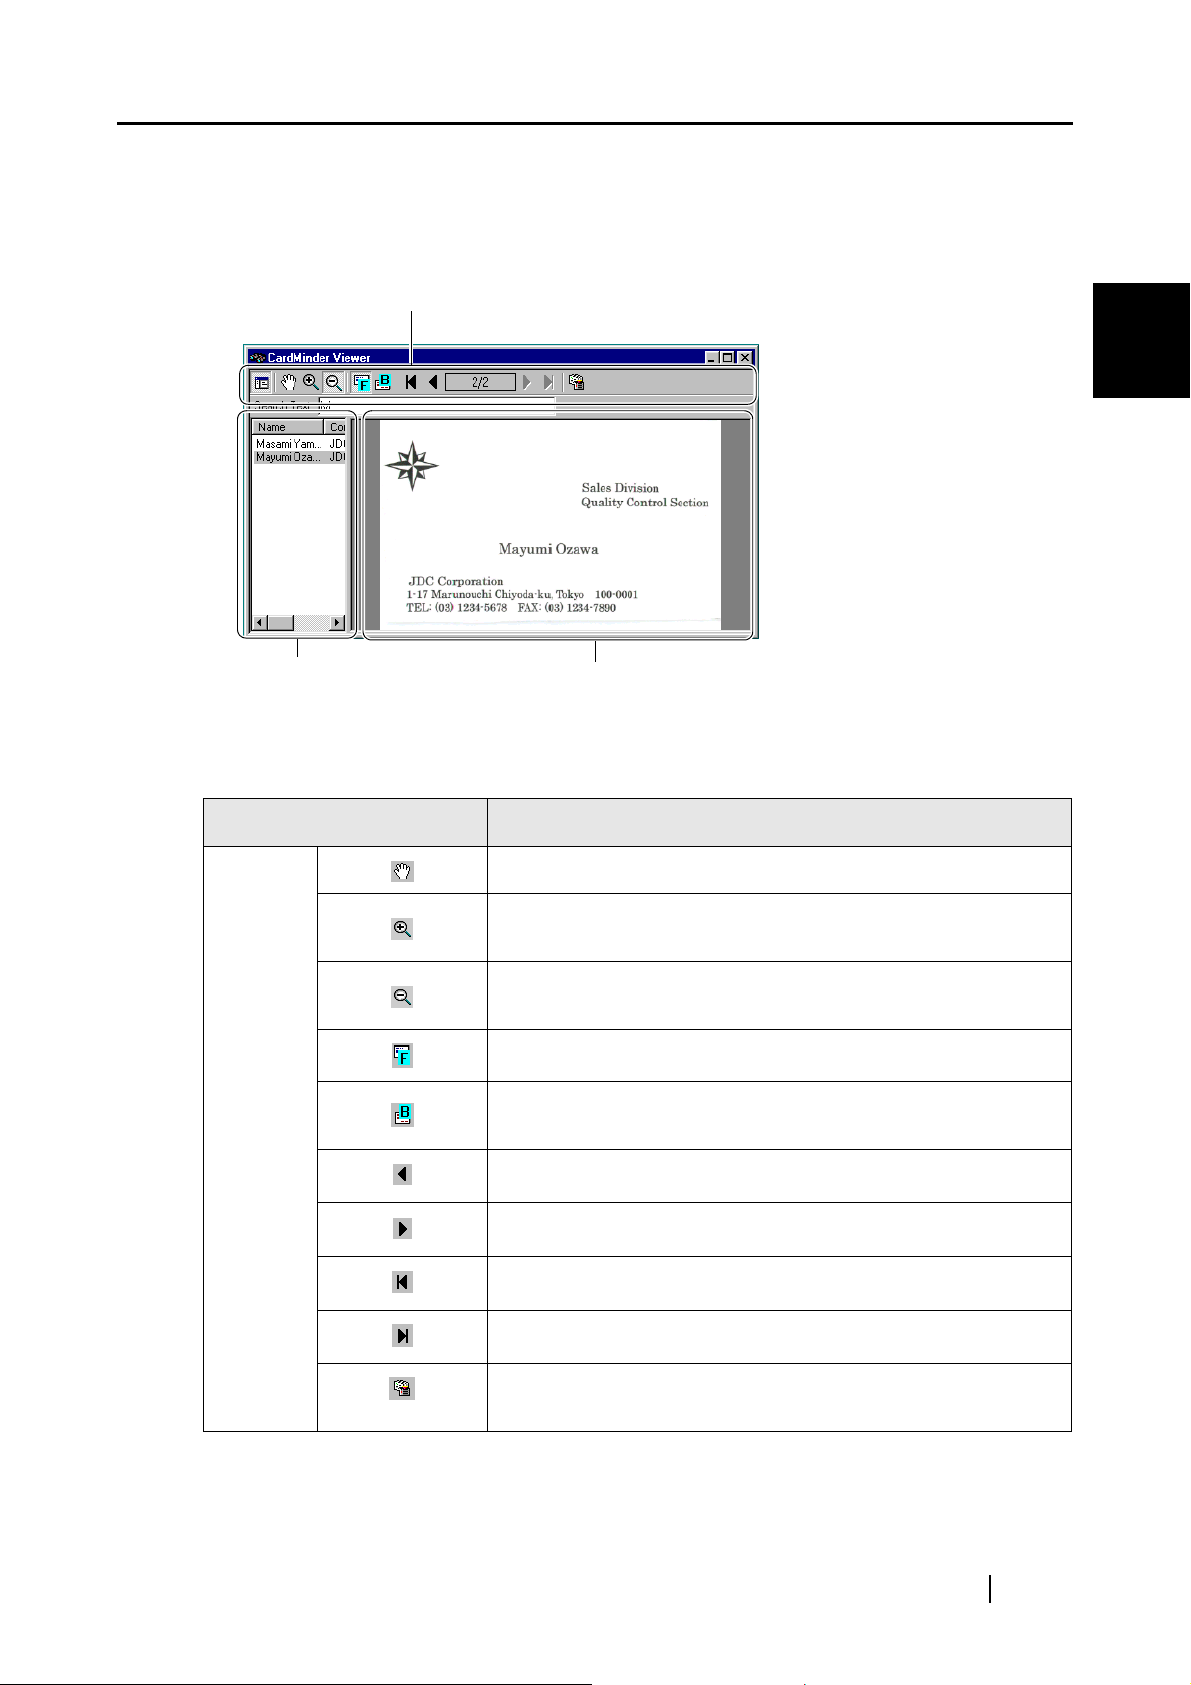
■ Finder window
This window appears when a data search is activated from an application.
Image Toolbar
Shows buttons to adjust image display in Image View.
1.4 Measurement Windows
1
About CardMinder
Data List View
Lists searched business card data.
This view is not shown when there
is only one item.
Icon / Display Function
Moves image of business card when the image is dragged.
Image size is increased so that clicked point is the center of
expansion.
Image size is decreased so that clicked point is the center of
scaling down.
Displays front side image
Displays back side image. If back side image does not exist,
Image
toolbar
this icon is enabled.
Previous business card is shown.
Next business card is shown.
Image View
Displays the image of the business
card selected in Data List View.
Displays first business card data
Displays last business card data
Current business card image and data are shown on the main
window.
CardMinder ScanSnap! User’s Guide 7
Page 14
Chapter2
Configuring Before Scanning
This chapter describes the settings required to use CardMinderTM and how to change the PIM
application selection.
1. Click [Start] in the desktop. Click [Program], [CardMinder] and [CardMinder] again
from submenus.
⇒ Main window of CardMinder appears.
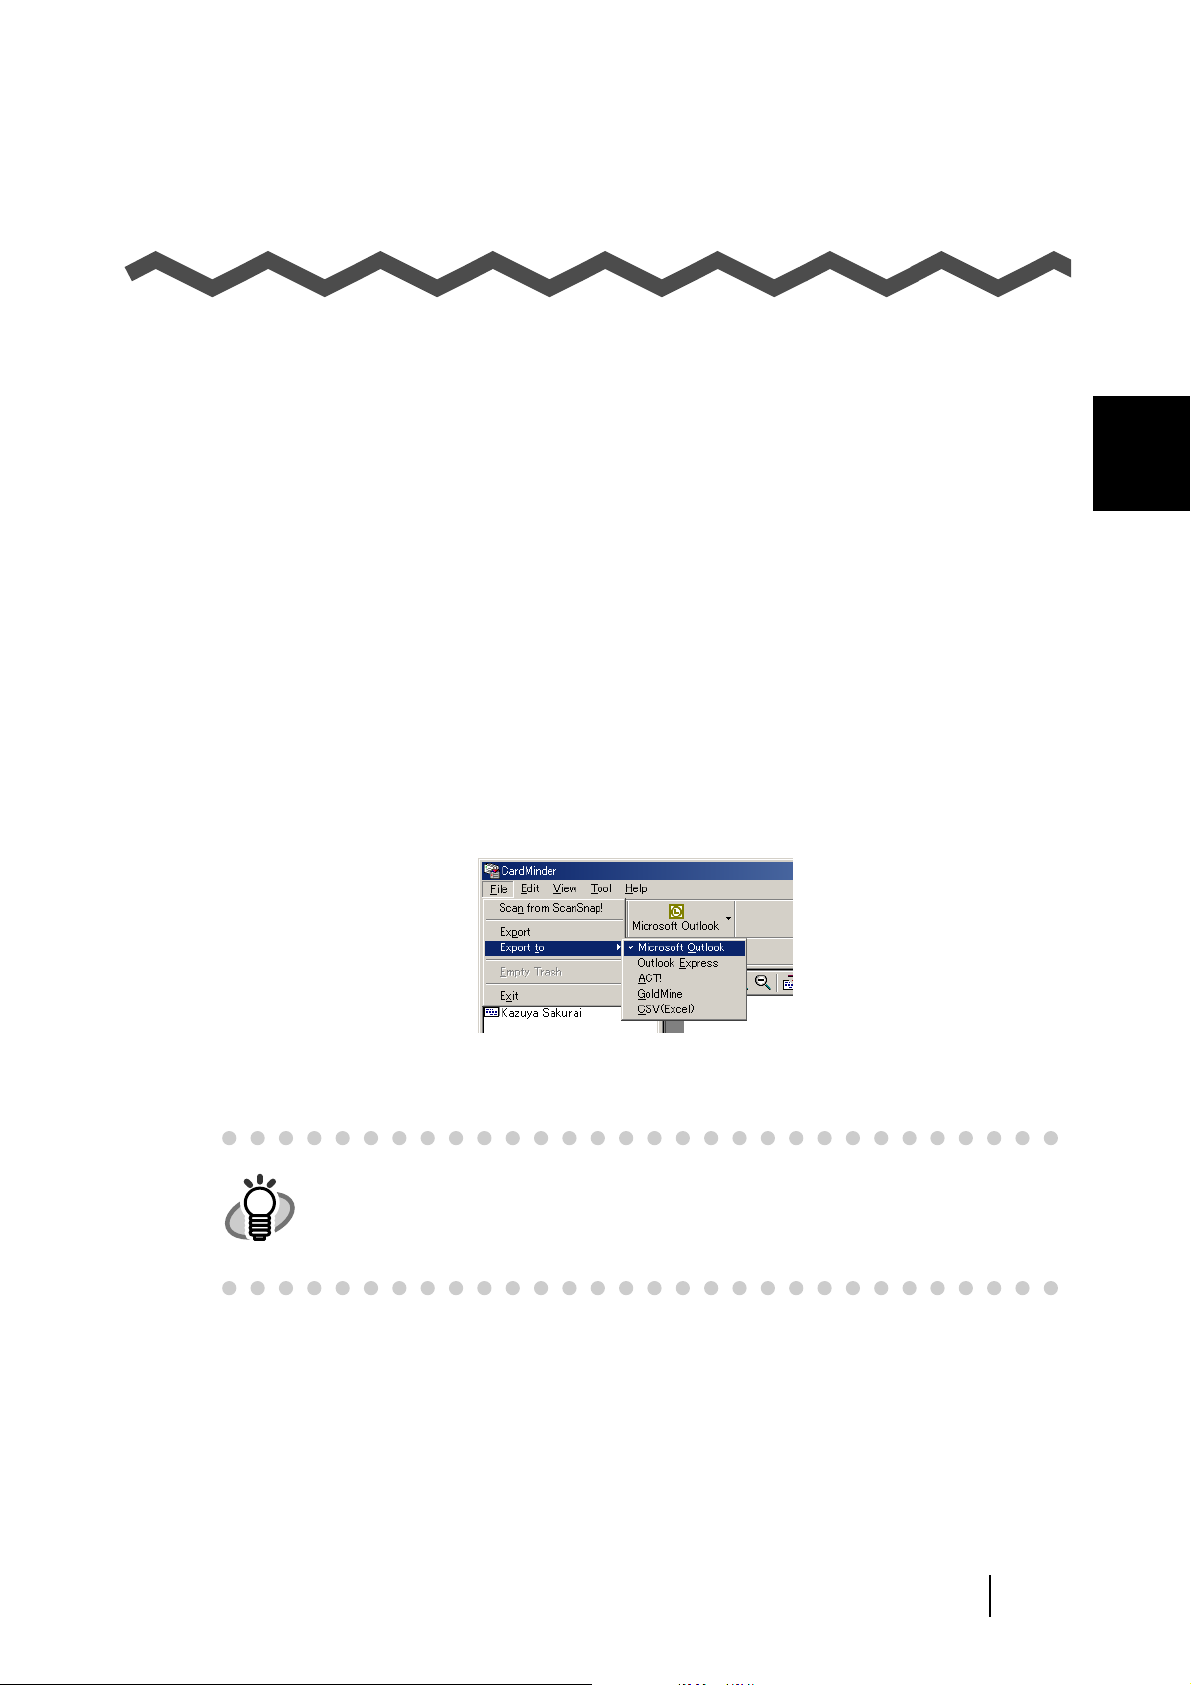
2. Click [File] in menu bar and click [Export to] in submenus.
⇒ A list of PIM applications appears. A check mark by an item indicates the currently
selected of application.
Main window:
2
3. Click an application to which you want to export business card data.
• You can choose only one application. When you change the application, a
HINT
new icon appears in Main window of CardMinder.
• If you choose CSV (Excel) from the list, also specify the file name and file
folder. (See HINT:page. 14)
CardMinder for ScanSnap! User’s Guide 8
Page 15

Chapter3
Scanning and Exporting the Business
Card Data
This chapter describes the procedures for scanning and exporting the data. If you are sure that Step
1 to Step 3 are correct, you can start from Step 4 immediately.
1. Right-click an icon in task bar. And select [Setting...] in menu items.
Click here second
3
Click here first
⇒ The window [ScanSnap! Monitor - Scan and Save Settings] opens.
2. Click a tab [Application], find a menu [CardMinder] in a combo box of [Application],
then click it.
CardMinder for ScanSnap! User’s Guide 9
Page 16

3. Click [OK] button.
⇒ The window [ScanSnap! Monitor - Scan and Save Settings] closes.
4. Insert the business card into the ScanSnap! scanner.
Set card with the short side fed first so that the front of the card is facing the ADF paper
chute.
The front side is the side where the name is printed. Note that you can insert a batch of business cards together.
Set front side down
ADF paper chute
Buttons
Power Lamp
plex
5. Press (for Duplex scanning) or (for Simplex scanning) button on the scanner
Duplex
im
S
of ScanSnap!.
⇒ Scanning starts. The power lamp on the scanner blinks, and the following window opens
to show the scanning status.
3
Scanning and Exporting the Business Card Data
CardMinder for ScanSnap! User’s Guide 10
Page 17

ATTENTION
• Instead of pressing above button, you can start scanning by clicking [File] in
menu, and clicking [Scan from ScanSnap!].
• The scan settings for CardMinder are same as ScanSnap!. See ScanSnap! fi-
4110EOX2 Operator’s Guide for these settings.
• You can also start scanning by clicking in Main window of CardMinder. In this
case, the following scan setting is applied regardless of the setting in ScanSnap!.
Resolution mode: Best
Color mode: Color
Scanning mode: Duplex
Compression: Low
This method of scanning may be useful when ScanSnap has been configured
for documents other than business cards.
<Procedure>
1. Click [Start] in the desktop and click [Programs], [CardMinder] and [CardMinder] again from submenus.
⇒ Main window of CardMinder opens.
2. Configure the business card as described in Step 4 above.
3. Click the Scan icon in a toolbar.
⇒ Duplex scanning starts.
3
Scanning and Exporting the Business Card Data
CardMinder for ScanSnap! User’s Guide 11
Page 18

6. After scanning, the Main window [Inbox] appears. Click on a business card in the
Data list and verify the recognized result for the front image. You can correct recognized data here (See Chapter 5).
Main window:
HINT
Front side
Data list
• This example shows both image sides. (See Section 1.4) The display mode
can be adjusted by clicking [View] in menu bar, and clicking [Show two sided
image] and its submenus.
• If you check the column "Register Card Information automatically" in the pref-
erence setting window, you can immediately save the data without confirming
the recognized result. (See Section 6.1)
This setting is not recommended because a wrong name or company can
enter your database without confirmation.
Backside
Recognized data
3
Scanning and Exporting the Business Card Data
7. Select the data which you want to export.
You can add to the selection by clicking on the item while pressing the [Shift] or [Ctrl] key.
CardMinder for ScanSnap! User’s Guide 12
Page 19

8. The following steps show an example using Microsoft® Outlook®. Click the [Microsoft
Outlook] icon on the toolbar.
Main window:
⇒ The data selected in Step 7 is exported to Microsoft® Outlook®. The data is then erased
from [Inbox] and added to [Exported].
You can confirm the export by activating Microsoft® Outlook®, and opening [Contacts]
folder as follows.
HINT
Export can also be activated by clicking [File] in menu bar, and clicking [Export]
in submenus.
3
Scanning and Exporting the Business Card Data
CardMinder for ScanSnap! User’s Guide 13
Page 20

HINT
• For Outlook Express, ACT!
the same.
• When exporting data to CSV (Excel), click the [CSV (Excel)] icon and specify
a file name and file folder for Excel to save data.
TM
or GoldMine®, only the Icon changes. The methods are
3
Scanning and Exporting the Business Card Data
CardMinder for ScanSnap! User’s Guide 14
Page 21

Chapter4
Business Card Data Handling
This chapter describes how to search, delete, restore and extract data items from a business card.
4
4.1 Data search by character string and hot key ..................................................... 16
4.2 Deleting the data from [Inbox] / [Exported] tab.................................................. 17
4.3 Deleting data from [Trash] ................................................................................... 18
4.4 Restoring the data from Trash............................................................................. 19
4.5 Extracting the image data .................................................................................... 21
4.6 Data search by entering keyword........................................................................ 23
CardMinder for ScanSnap! User’s Guide 15
Page 22

4.1 Data search by character string and hot key
4.1 Data search by character string and hot key
1. Select a character string of a name or a company in some document, and press the
hot key (Alt+F3). CardMinder will then automatically start searching.
⇒ The Finder window opens if the selected character string matches the CardMinder data-
base.
HINT
4
Business Card Data Handling
• Default setting for the hot key is Alt+F3. If you want to change the hot key,
refer to Section 6.1.
• If the searching fails, Finder window may appear (See setting [Action] in Sec-
tion 6.1), but no image on it. You can enter a keyword in [Search Text] column, and continue searching.
CardMinder for ScanSnap! User’s Guide 16
Page 23

4.2 Deleting the data from [Inbox] / [Exported] tab
4.2 Deleting the data from [Inbox] / [Exported] tab
A method to delete the data from [Inbox] or [Exported] tab is as follows. The data is sent to
[Trash].
1. Open CardMinder with [Inbox] or [Exported] selected. Select the data which you want
to delete.
You can add to the selection by clicking the data while pressing the [Shift] or [Ctrl] key.
Main window:
2. Press [Delete] key, or click [Edit] in menu bar and then click [Delete].
Main window:
⇒ The Selected data is sent from the [Inbox] or [Exported] tab to the [Trash]. If you want to
restore data from the Trash, see Section 4.4.
4
Business Card Data Handling
CardMinder for ScanSnap! User’s Guide 17
Page 24

4.3 Deleting data from [Trash]
A method to permanently delete data in the Trash follows. The data is permanently deleted and
cannot be restored by the procedure in Section 4.4.
1. Open CardMinder with [Trash] tab selected. Select the data which you want to delete.
You can add to the selection by clicking on the data while pressing [Shift] or [Ctrl] key.
Main window:
4.3 Deleting data from [Trash]
2. Press [Delete] key, or Click [Edit] in menu bar and click [Delete].
ATTENTION
The data is permanently deleted by this method.
Main window:
4
Business Card Data Handling
⇒ All data in [Trash] tab is deleted from the CardMinder database.
CardMinder for ScanSnap! User’s Guide 18
Page 25

4.4 Restoring the data from Trash
4.4 Restoring the data from Trash
A method to restore the data from the [Trash] is as follows. Restored data is moved to [Inbox] or
[Exported] to the original location.
1. Open CardMinder with [Trash] tab selected.
⇒ Deleted data is shown in the window.
Main window:
2. Select items that you want to restore from [Trash] tab.
You can add to the selection by clicking on the data item while pressing [Shift] or [Ctrl] key.
Main window:
Select the
data
HINT
4
Business Card Data Handling
The data deleted from [Trash] tab cannot be restored.
CardMinder for ScanSnap! User’s Guide 19
Page 26

4.4 Restoring the data from Trash
3. Click [Edit] in menu bar, and click [Undo] in submenus.
Main window:
⇒ Selected data moves from [Trash] to [Inbox] or [Exported] tab.
4
Business Card Data Handling
CardMinder for ScanSnap! User’s Guide 20
Page 27

4.5 Extracting the image data
You extract a business card image data using CardMinder, and attach it to your e-mails as follows.
1. Select which data you want to extract by using the search method described in Section
4.1.
Main window:
Select the
data
4.5 Extracting the image data
4
Business Card Data Handling
CardMinder for ScanSnap! User’s Guide 21
Page 28

4.5 Extracting the image data
2. Drag a business card image from the CardMinder window to any folder in Explorer or
to your Desktop.
If both sides of the card are displayed, only one side can be dragged at a time
HINT
⇒ An image of the business card is created where you drop it.
3. You can attach the image file(s) to your e-mail using your favorite mailing software.
4
Business Card Data Handling
CardMinder for ScanSnap! User’s Guide 22
Page 29

4.6 Data search by entering keyword
4.6 Data search by entering keyword
A method to search the data by entering a keyword is as follows.
1. Open CardMinder, and click [Edit] in menu bar and then click [Find].
Main window:
2. Following [Find] dialog box may appear, Enter a Name or a Company in column [Find
what], Then click [Find] button.
4
⇒ Searched business card data will be displayed on Main window. If searching fails, a mes-
sage [End of SEarch] appears on the screen.
The [Find] dialog box may keep staying on the screen for further searching.
Find dialog box:
[Direction] setting
HINT
Back: Earlier business card data than currently displayed data is searched.
Front: Later business card data than currently displayed data is searched.
Business Card Data Handling
CardMinder for ScanSnap! User’s Guide 23
Page 30

Chapter5
Correction of Recognized Character Data
As the recognition cannot be perfect for all business cards, some revision of the recognized results
may be necessary. This chapter describes how to correct the recognition results.
Some notice before data correction:
• If the orientation of the characters in the front side are incorrect, correct the orientation by click-
ing as shown Section 1.4. Then try again.
• If front side of the business card is shown in right side (or lower side) of the Image View win-
dow, swap the images by clicking , and try the recognizing again (See Section 5.1).
• If a photo or logo is near the character a miss-recognition may occur. In this case, exclude the
image area by using the rectangle selection method (Section 5.2 or 5.3), and try recognition
again.
• If character recognition still does not succeed, enter the correct character(s) manually.
ATTENTION
5.1 Recognition of all characters at once ................................................................. 25
5.2 Recognition using Rectangle Selection ............................................................. 26
• The items to be recognized can be changed. See Section 6.2.
• Good OCR(Optical Character Recognition) are dependent on:
1. The placement of the text on the business card
2. The font size used for the text.
3. The style of font used.
4. The condition of the business card.
5. Other factors may also apply.
• Only English is supported for business card recognition.
5
5.3 Keyword Recognition using Rectangle Area Selection .................................... 28
5.4 Data Correction by Manual Entry ........................................................................ 30
CardMinder for ScanSnap! User’s Guide 24
Page 31

5.1 Recognition of all characters at once
5.1 Recognition of all characters at once
The data in [Inbox] and [Exported] tabs can be corrected using the same method. Correction of
data from the [Inbox] is described below.
1. Select items that you want to recognize from [Inbox] tab.
Main window:
Select
the data
Front side
Characters only from the front side image can be recognized.
HINT
2. Click [Recognition] icon in toolbar.
Main window:
Backside
Recognized
data
5
Correction of Recognized Character Data
⇒ All characters are recognized. Old recognition data is replaced by the new data.
CardMinder for ScanSnap! User’s Guide 25
Page 32

5.2 Recognition using Rectangle Selection
5.2 Recognition using Rectangle Selection
The data in both the [Inbox] and [Exported] tabs can be corrected using this same method.
1. Select items that you want to recognize from [Inbox] tab.
Main window:
Select
the data
Front side Backside
Recognized
data
Characters only in front side image can be recognized.
HINT
2. Select the area to recognize on the front side image by using your mouse as shown
below.
5
Correction of Recognized Character Data
CardMinder for ScanSnap! User’s Guide 26
Page 33

5.2 Recognition using Rectangle Selection
3. Click [Recognition] button in toolbar.
Main window:
⇒ All characters are recognized. Old recognition data is substituted by the new data.
5
Correction of Recognized Character Data
CardMinder for ScanSnap! User’s Guide 27
Page 34

5.3 Keyword Recognition using Rectangle Area Selection
5.3 Keyword Recognition using Rectangle Area
Selection
This Section describes the recognition of keywords selected using a rectangle area.
The data in [Inbox] and [Exported] tabs can be corrected in the same method.
1. Select items that you want to recognize from [Inbox] tab.
Main window:
Select
the data
Front side Backside
Recognized
data
Characters only in front side image can be recognized.
HINT
2. Specify the trimming area for recognition of front side image by mouse as shown
below. Following is an example of [Company] correction.
5
Correction of Recognized Character Data
CardMinder for ScanSnap! User’s Guide 28
Page 35

5.3 Keyword Recognition using Rectangle Area Selection
3. Click the [Company] button located in the lower area of Main window.
⇒ The data in a clicked column is recognized. Old recognition data is replaced by the new
data.
Other columns than [Company] can be corrected using the method above.
HINT
5
Correction of Recognized Character Data
CardMinder for ScanSnap! User’s Guide 29
Page 36

5.4 Data Correction by Manual Entry
5.4 Data Correction by Manual Entry
The data in [Inbox] and [Exported] tabs can be corrected using the same method. Data correction
for [Inbox] tab is described in this example.
1. Select items that you want to recognize from [Inbox] tab.
Main window:
Select
the data
Front side
Characters only in front side image can recognized.
HINT
2. Click on the text you want to correct.
Following is an example of Full Name correction.
Backside
Recognized
data
5
Correction of Recognized Character Data
⇒ A cursor appears in the clicked column.
CardMinder for ScanSnap! User’s Guide 30
Page 37

Other columns than [Full Name] can be corrected using a similar method.
HINT
3. Enter correct Full Name from your keyboard.
5.4 Data Correction by Manual Entry
5
Correction of Recognized Character Data
CardMinder for ScanSnap! User’s Guide 31
Page 38

Chapter6
Setting Preferences
This chapter describes how to set CardMinderTM preferences.
6.1 Data control settings ............................................................................................ 33
6.2 Export item settings ............................................................................................. 35
6
CardMinder for ScanSnap! User’s Guide 32
Page 39

6.1 Data control settings
Following preference for data control can be set in this Section.
• Display or not display a confirmation window for the recognition result.
• Hot key setting for searching.
• CardMinder Database file folder path name.
1. In Main window, click [Tool] in a menu bar, and click [Settings...].
Main window:
⇒ [Settings] dialog box appears.
2. Click [General] tab. Then specify your preference by referring the Hints below.
6.1 Data control settings
6
Setting Preferences
CardMinder ScanSnap! User’s Guide 33
Page 40

HINT
6.1 Data control settings
• Setting [Action when image scan complete]
• Show CardMinder window
Displays the result of character recognition after scanning the business
card.
• Export Business Card data automatically
The recognized data is immediately saved without displaying the recognized result. This is not recommended because a wrong name or company
can enter your database.
• Setting [CardMinder Viewer]
• Hot key
A Hot key to activate searching after selecting a keyword displayed in
other application software is specified by entering the key name in the column.
Specifiable key name is one of the keys, [A] to [Z], [0] to [9], [F1] to [F12].
Also, the key(s) of [Ctrl], [Shift], [Alt] must appear in the beginning.
These keys can be set:
[Ctrl]+[A], [Shift]+[Alt]+[0], [Ctrl]+[Shift]+[Alt]+[F1]
These keys cannot be set:
[9]+[F12], [Ctrl]+[Shift]
• Action
This box is checked as default. When checked, the Finder window appears
even if the searching does not succeed. In this case no image is shown on
Finder window. But you can enter a keyword in [Search Text] column, and
continue searching.
• Setting [Database]
• Database file
The database file folder (Full path) of CardMinder can be specified using
this setting.
When [Browse] is clicked, you can specify the Data save folder in the
[Browse for Folder] dialog box.
As a default, CardMinder saves data to the C: drive. This setting may be
useful when C: drive is nearly full and data saving to another drive is
required.
Default setting of the folder is,
C:\Documents and Settings\<- Log-in User name->\Application
Data\PFU\CardMinder\ENTRY\ENTRYDB.BID
, where <- Log-in User name-> is defined by your network system.
6
Setting Preferences
CardMinder ScanSnap! User’s Guide 34
Page 41

6.2 Export item settings
The items selected in this section are displayed and recognized by the Main window of CardMinder, and exported to other application such as Microsoft Outlook.
1. In the Main window, click [Tool] in a menu bar, and click [Settings...].
Main window:
⇒ [Settings] dialog box appears.
2. Click [Export Item] tab. Then add check marks for the items you wish to export.
[Default] button resets the settings to default state.
6.2 Export item settings
HINT
6
Setting Preferences
The items, [Memo] and [Save date], are displayed in the Main window but not
exported.
CardMinder ScanSnap! User’s Guide 35
Page 42

Chapter7
Troubleshooting
This chapter describes the troubleshooting.
No Phenomena Please confirm,
1 Scanning does not
start
2 Scanned image of
the business card
is not displayed in
window.
3 The image is
scanned, however
Full Name or
Company etc. does
not appear or
incorrectly appear
in Main window.
⇒ Please confirm following items
• Is ScanSnap! driver installed correctly?
Refer to Getting Started of ScanSnap!, and install the
ScanSnap! driver correctly.
• Is the icon of ScanSnap! in task bar looks like ?
If so, set ScanSnap! Monitor by referring ScanSnap!
Operator’s Guide, so that the icon of ScanSnap! Monitor
becomes .
• Is the window, [ScanSnap! Monitor...] open? (See Chapter
3. Step 2)
Scanning is disabled when the window, [ScanSnap!
Monitor...] is open. Close the window.
• Is the scanner supported by ScanSnap!?
CardMinder does not support the scanning by other
scanners than specified by ScanSnap!.
⇒ Is the business card scanned with front side up? The side
which has the name printed (Front side) should be set downward facing ADF paper chute.
⇒ Review and confirm the following items.
• Is the image of the characters aligned horizontally? If not,
correct the direction of the image by pressing , and
press in a toolbar.
• Are front side and back side image switched?
The name should appear on front. Swap front and back
side image by clicking , and pressing in a
toolbar. (See Section 1.4 for button functions)
Otherwise, try the recognition again by referring Chapter 5.
7
CardMinder for ScanSnap! User’s Guide 36
Page 43

No Phenomena Please confirm,
4 Items incorrectly
recognized.
5 The items which
you want to
recognize do not
appear in window.
⇒ Confirm the following
• Is color of the characters
white with a dark
background?
Those characters cannot be
recognized. Manually correct
using your keyboard (See
Section 5.4).
• Are several phone numbers
printed together as in the right
example?
These phone numbers cannot
be recognized. Manually
correct using your keyboard
(See Section 5.4).
⇒ Click [Tool] menu and [Setting..] submenu in Main window.
Then click the [Export Item] tab. Add the checkmark next to the
item you want to recognize and export. (See Section 6.2)
CardMinder User’s Guide 37
7
Troubleshooting
Page 44

INDEX
A
[Action when image scan complete] ....... 34
Add selection
ADF paper chute
Alt+F3
Application
...................................................... 16
........................ 12, 17, 19, 25
..................................... 10
................................................ 8
B
Browse .................................................... 34
Button
...................................................... 10
C
CardMinder ............................................... 2
Character direction
....................................................... 10
Color
Command toolbar
.................................. 36
..................................... 5
[Default]
Default
Deleting data permanently
Deleting data temporarily
Displayed item
Displays result of recognition
Drag
Drop
................................................... 35
............................................... 16, 34
...................... 18
........................ 17
.........................................35
.................. 34
......................................................... 22
......................................................... 22
E
[Export] icon ..............................................6
[Export item]
Export item
[Exported] tab
Exporting data
Extracting image data
............................................35
..............................................35
............................................ 6
......................................... 13
.............................. 21
Configuring CardMinder
Confirmation window
Confirming data in application
Confirming recognition result
Correction by manual entry
CSV (Excel)
........................................ 8, 14
............................ 8
............................... 33
................. 13
.................. 12
..................... 30
D
Data correction ........................................ 24
Data list
Data list view
Data search by entering keyword
[Database]
Database file folder
................................................... 12
......................................... 5, 7
........... 23
............................................... 34
........................... 33, 34
F
[Find] .......................................................34
Finder window
Front side
Full Path
.........................................16
.................................... 10, 24, 36
..................................................34
G
Getting Started Guide ........................... i, 36
H
Hot key ........................................ 16, 33, 34
38
Page 45

I
Image data not displayed ........................ 36
Image toolbar
Image view
........................................ 5, 7
............................................ 5, 7
Rectangle selection method
[Register Card Information automatically]
Resolution mode
Restoring data
.....................................10
......................................... 19
.................... 24
12
[Inbox] tab
................................................. 6
K
Keyword .................................................... 3
M
Main window ............................................. 5
Mode tab
................................................... 5
O
OCR .......................................................... 2
Operator’s Guide
Orientation of card
.........................................i
.................................. 24
P
PIM ............................................................ 2
Power Lamp
Preferences
............................................ 10
............................................. 32
S
Save data without confirming .................. 34
[Scan] icon
Scan setting
Scanning
Scanning not start
ScanSnap!
ScanSnap! driver
ScanSnap! icon
ScanSnap! Monitor
ScanSnap! scanner
Search
Selection
Setting ScanSnap!
[Show two sided image]
Start scanning
Status bar
Super fine
........................................... 6, 10
............................................. 10
...................................................9
...................................36
.................................................2
.....................................36
.......................................36
..............................9, 36
........................... 10, 36
............................................... 16, 23
.................................................. 18
..................................... 9
.......................... 12
.........................................10
.................................................. 5
................................................ 10
R
Recognition at once ................................ 25
[Recognition] icon
Recognition item
Recognition item not shown
Recognition not correct
Recognition of an item
Recognition result/Correction view
Recognition using rectangle selection
Recognized result
Recognized result not displayed
......................... 6, 25, 27
..................................... 35
.................... 37
........................... 37
............................ 28
........... 5
.... 26
................................... 12
............. 36
CardMinder for ScanSnap! User’s Guide 39
Swapping images
Swapping sides
.................................... 24
.......................................36
T
[Trash] tab ................................................. 6
Trimming
........................................... 26, 28
W
White character on black background ..... 37
Wrong character
Wrong Phone number
......................................37
............................. 37
Page 46

CardMinderTM for ScanSnap!TM User’s Guide
P3PC-E527-02EN
Date of issuance: June, 2003
Issuance responsibility: PFU LIMITED
z The contents of this manual are subject to change without notice.
z PFU LIMITED assumes no liability for incidental or consequential
damages arising from the use of this Product, and any claims by a
third party.
z Copying of the contents of this manual in whole or in part and
copying of the scanner application is forbidden under the copyright
law.
 Loading...