

Page 1

BL01765-200
g g
17mm or less
18mm–60mm
61mm or more
Using a Mount Adapter
Thank you for buying a FUJIFILM product. The FUJIFILM M MOUNT ADAPTER
allows M-mount lenses to be mounted on the X-Pro1, which in turn can process
images taken with M-mount lenses as required to maintain image quality and
correct for a variety of e ects. Note that using the M-mount adapter requires
camera rmware version 1.10 or later; check the rmware version before proceeding.
MOUNT ADAPTER SETTING Options
Pressing the function button on the mount adapter displays lMOUNT ADAPTER SETTINGS options.
Choosing a Focal Length
If the lens has a focal length of 21, 24, 28, or 35mm, choose a matching option in the
menu at right. For other lenses, select option 5 or 6 to display the menu shown below
at left, press the selector right to display focal length settings, and use the selector to
enter the focal length.
MOUNT ADAPTOR SETTING
LENS
1
LENS
LENS
LENS
LENS
LENS
FOCAL LENGTH SETTING
2
DISTORTION CORRECTION
3
COLOR SHADING CORRECTION
4
PERIPHERAL ILLUMINATION CORRECTION
5
6
LENS
5
INPUT FOCAL LENGTH
2
1
0 50mm
9
8
SET CANCEL
MOUNT ADAPTOR SETTING
LENS
1
LENS
2
LENS
3
LENS
4
LENS
5
LENS
6
SET
21
24
28
35
50
75
mm
mm
mm
mm
mm
mm
R The camera adjusts the size of the bright frame in the optical view nder according to lens focal length.
17mm or less
2000PF5.6
200
Bright frame not displayed. Both white and blue frames are dis-
played, the former for in nity and
the latter for distances of about
2m/6.6ft.
R The camera does not automati-
18mm–60mm
2000PF5.6
200
61mm or more
2000PF5.6
Both red and blue frames are displayed. The frames are not adjusted
for focal length, making the electronic view nder the recommended choice for framing pictures.
cally correct for parallax.
200
Page 2

Distortion Correction
Choose from STRONG, MEDIUM, or WEAK options to correct BARREL or PINCUSHION
distortion.
LENS
5
DISTORTION CORRECTION
BARREL STRONG
BARREL MEDIUM
BARREL WEAK
OFF
PINCUSHION WEAK
PINCUSHION MEDIUM
SET CANCEL
❚❚Barrel Distortion
Choose BARREL STRONG, BARREL MEDIUM, or BARREL WEAK to correct barrel distortion. In barrel distortion,
vertical and horizontal lines not passing through the center of the image bow outwards; correction reduces this
distortion as shown below.
❚❚Pincushion Distortion
Choose PINCUSHION STRONG, PINCUSHION MEDIUM, or PINCUSHION WEAK to correct pincushion distortion. In
pincushion distortion, vertical and horizontal lines not passing through the center of the image bow inwards; correction reduces this distortion as shown below.
R To determine the amount required, adjust distortion correction while taking photos of graph paper or other objects
featuring repeating vertical and horizontal lines, such as the windows in a high-rise.
Page 3
g
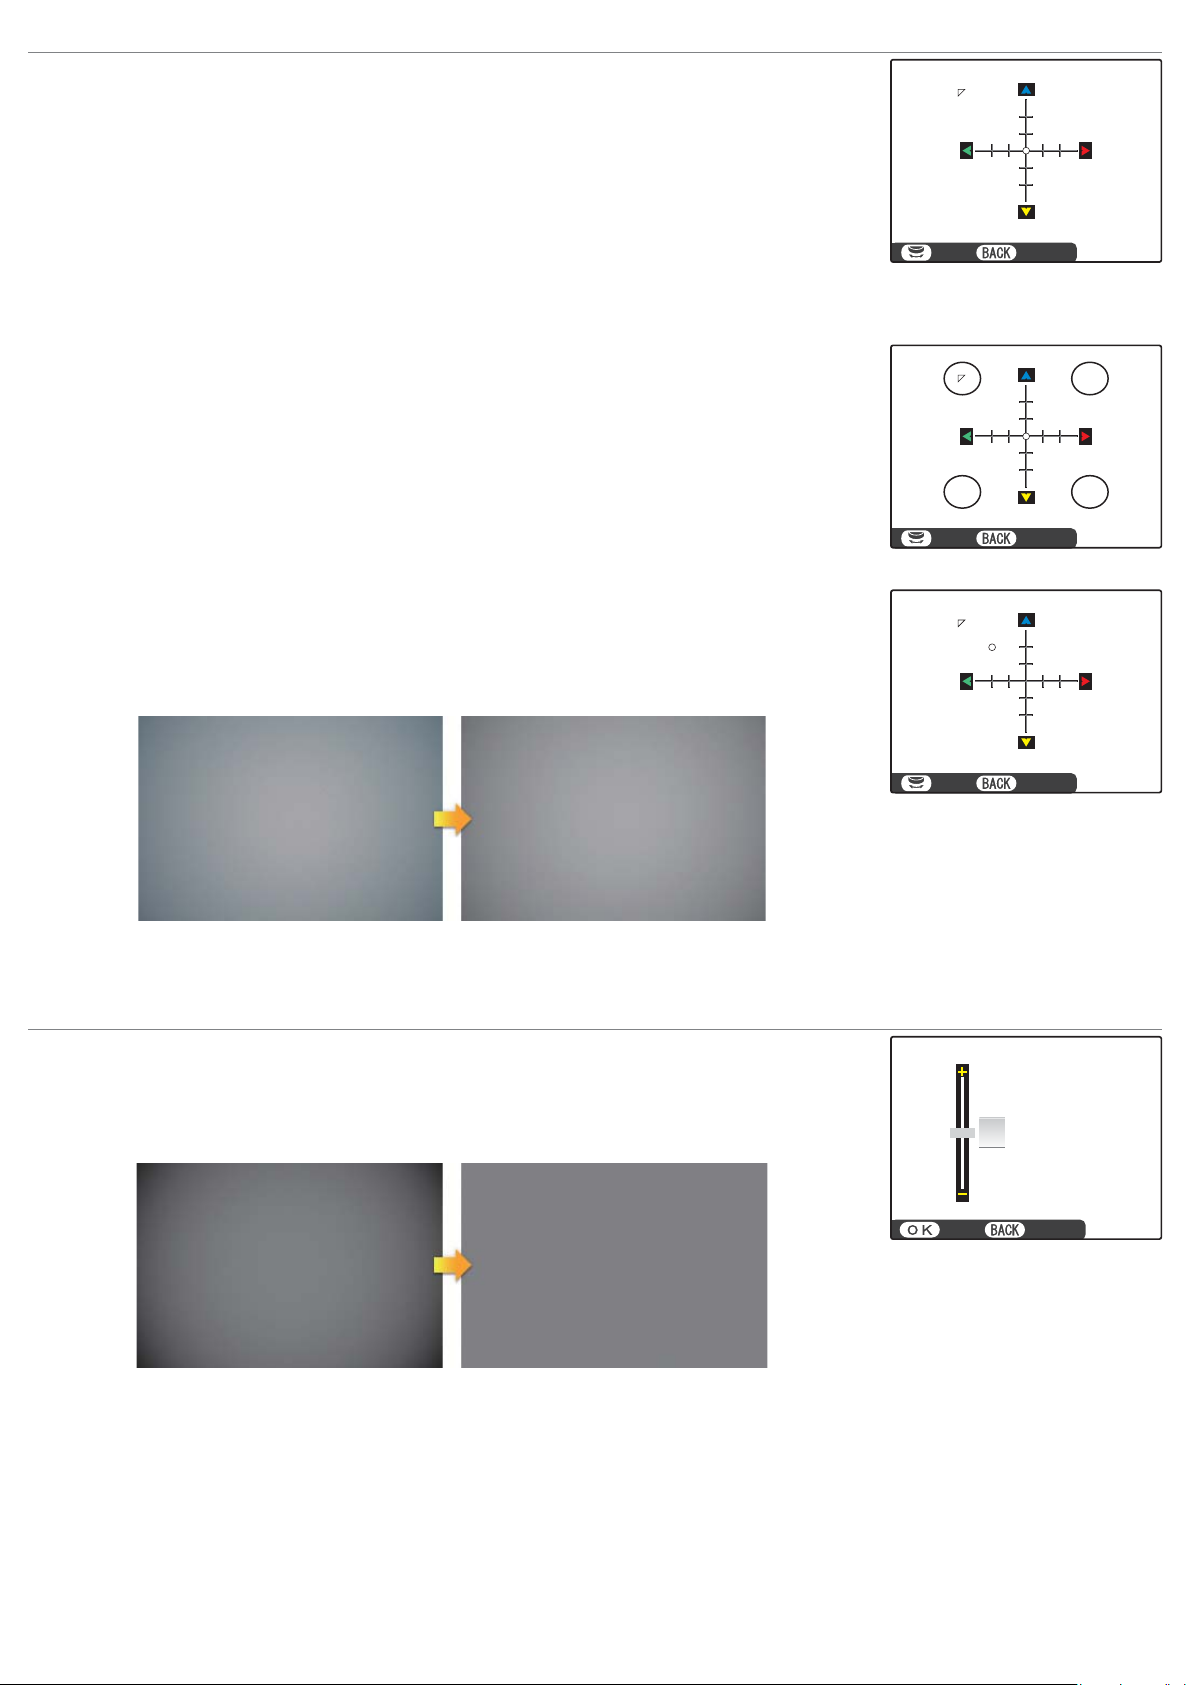
Color Shading Correction
Color (shading) variations between the center and edges of the frame can be adjusted
separately for each corner.
To use color shading correction, follow the steps below.
Choose a corner.
1
Rotate the command dial to choose a corner. The selected corner is indicated by a
triangle.
Adjust shading.
2
Use the selector to adjust shading until there is no visible di erence in color between the selected corner and the center of the image. Press the selector left or
right to adjust colors on the cyan–red axis, up or down to adjust colors on the blue–
yellow axis. There are a total of 19 positions available on each axis.
SET CANCEL
SET CANCEL
SET CANCEL
R To determine the amount required, adjust color shading correction while taking photos of blue sky or a sheet of gray
paper.
Peripheral Illumination Correction
Choose from values between –5 and +5. Choosing positive values increases peripheral illumination, while choosing negative values reduces peripheral illumination. Positive values are recommended for vintage lenses, negative values to create the e ect
of images taken with an antique lens or a pinhole camera.
0
SET CANCEL
R To determine the amount required, adjust peripheral illumination correction while taking photos of blue sky or a
sheet of gray paper.
Page 4

Using a Mount Adapter: Cautions
• Attaching a mount adapter enables mSHOOT WITHOUT LENS and hides the distance indicator in the standard
displays for the LCD monitor and optical/electronic view nder.
• Before checking focus, set the focus mode selector to M.
• If you nd it hard to see the display in the view nder when a mount adapter is attached, follow these steps to
increase view nder brightness:
Use the VIEW MODE button to enable automatic display selection using the eye sensor.
1
Press the Q button.
2
Put your eye to the view nder.
3
Highlight JLCD BRIGHTNESS with the selector and use the command dial to adjust brightness.
4
 Loading...