

Page 1

series
USER’S MANUAL
MICREX-SX Communication Middleware
Models: NP4N-MDLW
FEH246a
Page 2

Preface
This User’s Manual describes the operations, functions, system configurations of and how to use the Communication
Middleware (NP4N-MDLW) for MICREX-SX series. Read this manual thoroughly and use this product correctly.
Also read the related manuals listed below for MICREX-SX Series.
eltiT .oNlaunaM noitpircseD
XS-XERCIM,snoitcurtsnIlaunaMs'resU
HPSseireS
,erawdraHlaunaMs'resU
HPSseireSXS-XERCIM
,>ecnerefeR<2Vniw003DlaunaMs'resU
seireSXS-XERCIM
002HEF,egaugnal,yromemseireSXS-XERCIMehtsebircseD
102HEF dnanoitarugifnocmetsysseireSXS-XERCIMehtsebircseD
452HEF
.cte,snoitinifedmetsys
.seludomfognildnahdnasnoitacificepserawdrah
noitarepolladnasnoci,sunem2Vniw003DsebircseD
.serudecorp
Notes
1. This manual may not be transcribed or reproduced in whole or part without permission.
2. The contents of this manual including the specifications are subject to change without prior notice.
3. This manual has been prepared with extreme care; however, if you find any ambiguous or incorrect description in
this manual, please contact us at one of the addresses listed at the end of this manual. At this time, inform us of
the manual No. given on the cover page.
Page 3

Thoroughly read “Safety Precautions” before using this product.
Safety Precautions
Caution
Some items indicated in
These safety instructions give important information.
Be sure to strictly observe them. Specially important items are given below.
: Incorrect handling of the device may result in minor injury and/or moderate damage.
Caution
may also result in a serious accident depending on the conditions.
Caution
◊ If damage or deformation is found on the product when unpacking, do not use it, or fault or malfunction may occur.
◊ Do not give a shock to the product by dropping or falling it, or damage to the product or malfunction may occur.
◊ The product CD is CD-ROM. Never try to play it on a general audio CD player, or loud noise may cause hearing
disability or audio equipment fault.
◊ Insert loader connectors in the correct direction, or malfunction may occur.
◊ Insert CD-ROM, loader connectors, etc. in the correct direction, or fault or malfunction may occur.
◊ When performing program change or forced output during operation or starting or stopping operation, make sure of
safety. Operation errors may cause damages to the machine or accidents.
◊ Use the product under the software operation environment conditions described in the manual, or fault or malfunction
may occur.
◊ Operate D300win and personal computers under stable conditions to prevent falling, etc., or fault or malfunction may
occur.
Page 4

nodetnirP .oNlaunaM* stnetnocnoisiveR
4002.luJ642HEFnoitidetsriF
Revisions
.launamsihtfoegaprevocehtnorenrocthgir-rewolehtninevigsi.oNlaunamehT*
4002.voNa642HEF
.nettirwersawnoitpircsednoitamrofnimetsysgnitarepoehT
• .deddasawPXswodniWehT
Page 5

Contents
Preface
Safety Precautions
Revisions
Page
Section 1 Overview .......................................................................................1-1
1-1 Outline of NP4N-MDLW .................................................................................................................. 1-1
1-1-1 Data Communication System Configuration Image.............................................................................. 1-1
1-1-2 Outline of system configuration............................................................................................................. 1-2
1-2 Necessary Knowledge ................................................................................................................... 1-4
Section 2 Installation ....................................................................................2-1
2-1 Personal Computer Environment Necessary for SX Communication Middleware ................. 2-1
2-2 Installation Procedure ................................................................................................................... 2-2
2-2-1 Initial screen .......................................................................................................................................... 2-2
2-2-2 Installing SX Communication Middleware............................................................................................. 2-3
2-3 Uninstallation Procedure............................................................................................................... 2-8
Section 3 SX_MDLW Specifications ............................................................3-1
3-1 MICREX-SX Communication Middleware Operational Specifications ...................................... 3-1
3-1-1 Execution environment .......................................................................................................................... 3-1
3-1-2 Development language for client........................................................................................................... 3-1
3-1-3 List of communication interfaces........................................................................................................... 3-1
3-2 Interfaces Supported by SX_MDLW ............................................................................................. 3-2
3-3 Accessing Process Data................................................................................................................ 3-7
3-3-1 Item ID and access path ....................................................................................................................... 3-7
3-3-2 Basics of process data access.............................................................................................................. 3-7
3-3-3 Scheme of process data access ........................................................................................................... 3-9
3-4 OPC Functions Not Supported by SX_MDLW ........................................................................... 3-12
Section 4 Using SX_MDLW...........................................................................4-1
4-1 Setting SX_MDLW .......................................................................................................................... 4-1
4-1-1 Setting OPC server ............................................................................................................................... 4-1
4-2 Setting DCOM ............................................................................................................................... 4-10
4-3 D300win-Related Settings ........................................................................................................... 4-15
4-3-1 Exporting variable names .................................................................................................................... 4-16
Section 5 Connecting from an OPC Client ..................................................5-1
5-1 Preparing for SX_MDLW (OPC Server) Connection ................................................................... 5-1
5-2 Connecting to SX_MDLW .............................................................................................................. 5-2
5-3 Registering Groups ........................................................................................................................ 5-2
5-4 Registering Items ............................................................................................................................ 5-2
Section 6 Troubleshooting ...........................................................................6-1
Page 6

Section 1 Overview
Page
1-1 Outline of NP4N-MDLW .............................................................................................. 1-1
1-1-1 Data Communication System Configuration Image .............................................................. 1-1
1-1-2 Outline of system configuration ............................................................................................. 1-2
(1) Basic system configuration ..................................................................................................................... 1-2
(2) Expanded system configuration .............................................................................................................. 1-3
1-2 Necessary Knowledge ................................................................................................ 1-4
Page 7
Section 1 Overview
1-1 Outline of NP4N-MDLW
The MICREX-SX Communication Middleware (NP4N-MDLW) is a local/remote data access server compliant with OPC
Data Access 2.0 proposed by OPC Council. It provides connection environment for clients (applications created in Visual
Basic, Visual C++, etc.) and MICREX-SX (global variables).
(Hereinafter, the MICREX-SX Communication Middleware may be simply referred to as SX_MDLW.)
SX_NDLW is an interface for connecting between the MICREX-SX SPH system (data source) and applications (data
users) called clients.
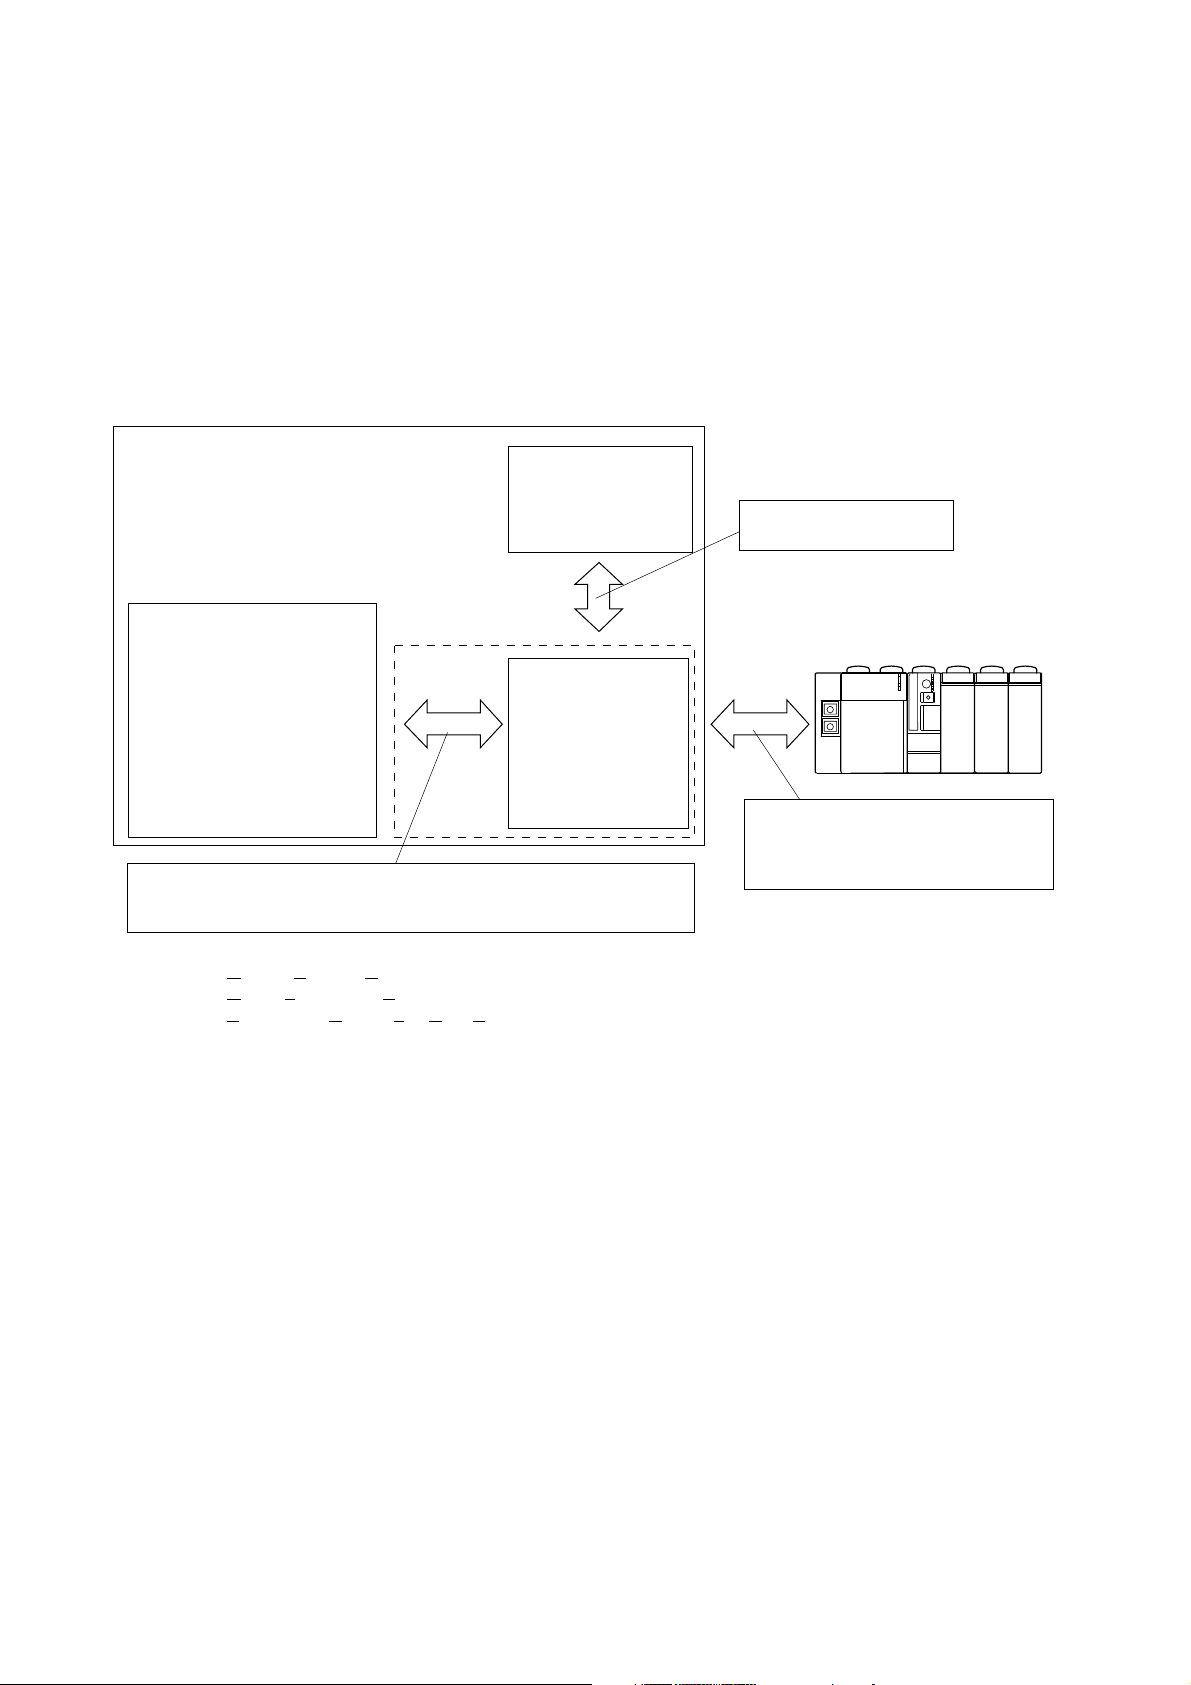
1-1-1 Data Communication System Configuration Image
Personal computer
OPC clients
SX_MDLW
Applications created in
Visual Basic (VB) or Excel
and operating on Windows,
and SCADA software, etc.
OPC clients and the OPC server are connected using automation or custom
interface. For example, automation interface is used for Visual Basic and
custom interface is used for C++.
* OPC ........ OLE for Process Control
OLE ......... Object Linking and Enbeding
SCADA.... Supervisory Control and Data Aquistion
[Hint]
OPC-related information is available at the Web site of OPC Council Japan.
Address: http://www.microsoft.com/japan/partners/industry/opchome.htm
OPC i/f
D300win
(V2.2 or up)
OPC server for
MICREX-SX
Global variable information
from D300win
MICREX-SX SPH Note)
For interfacing between SX_MDLW
(machine equipped with SX_MDLW) and
MICREX-SX system, use Ethernet, RS232C, FL-net, SX bus or modem.
Note: SPS is not currently supported.
1-1
Page 8
1-1 Outline of NP4N-MDLW
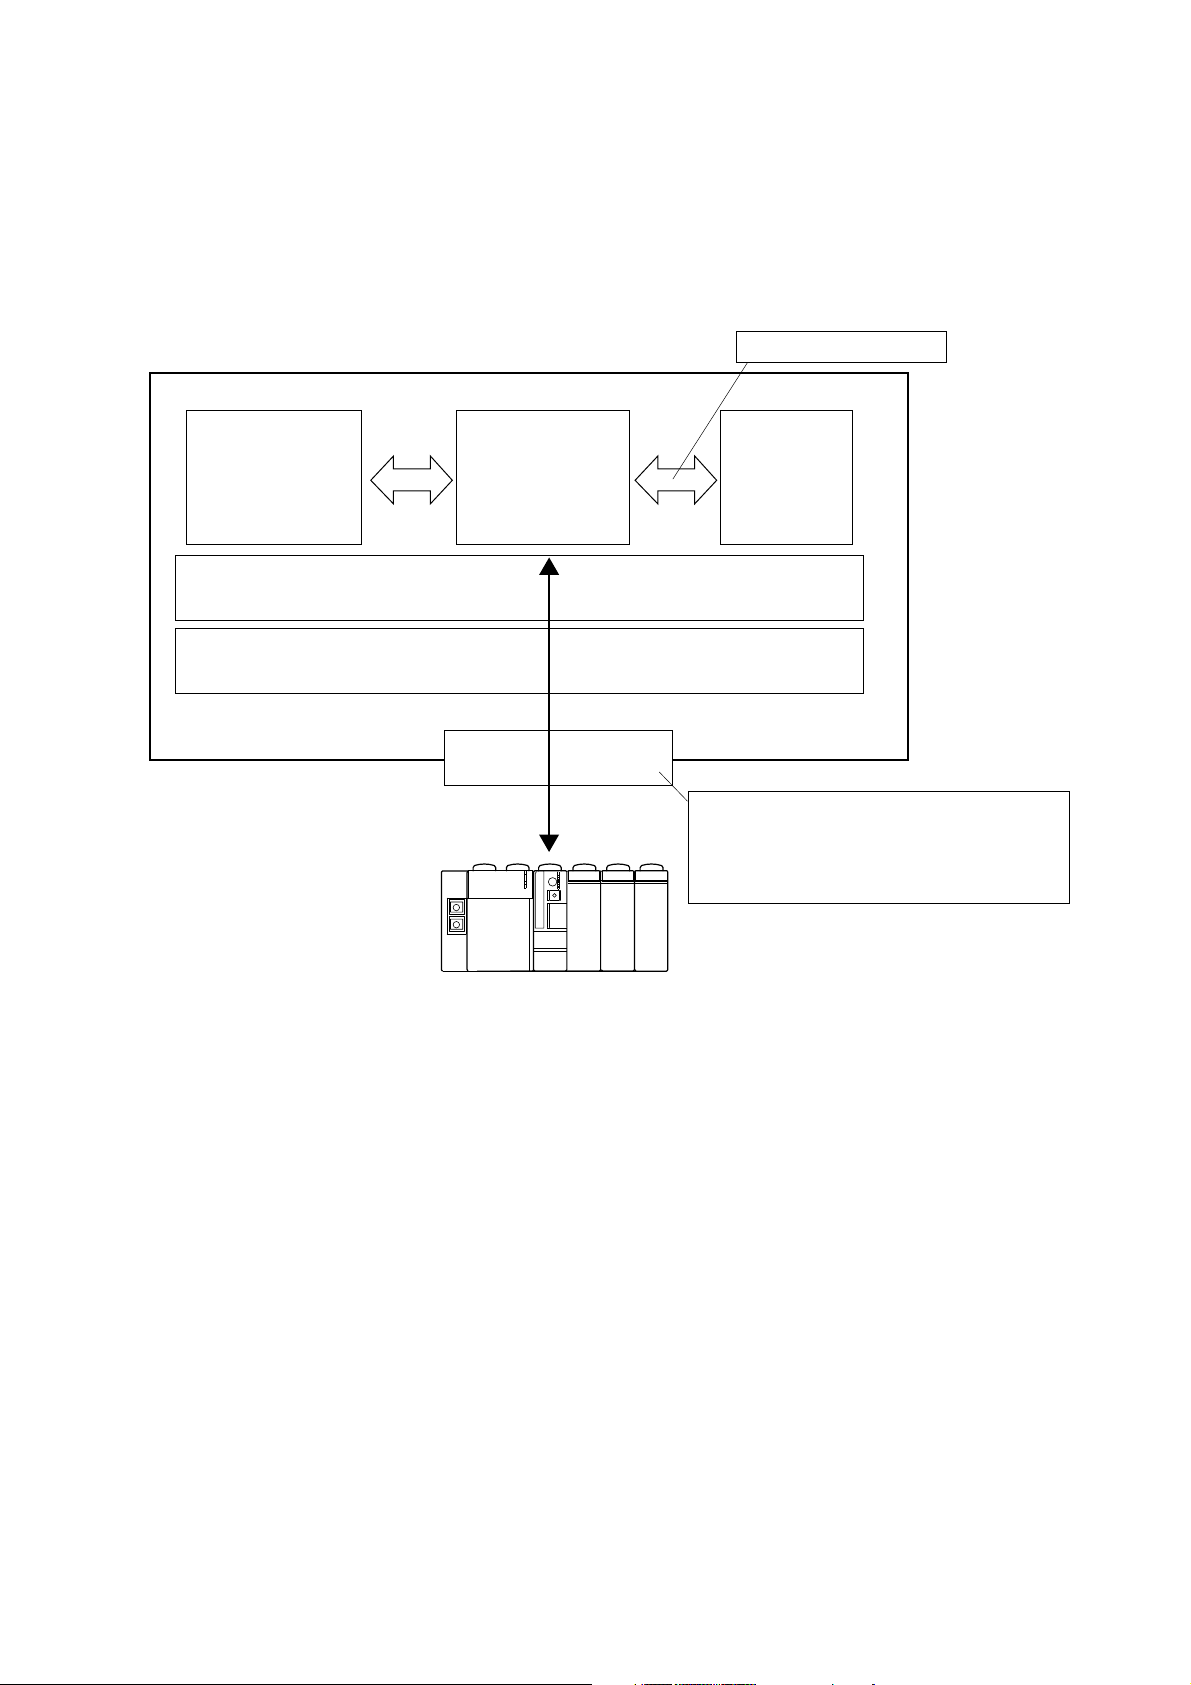
1-1-2 Outline of system configuration
(1) Basic system configuration
In the basic system configuration, communications are made between one personal computer and MICREX-SX. On the
personal computer, SX_MDLW, D300win and OPC client are activated. SX_MDLW can access up to 10 global variable
definition worksheets created by D300win. If a variable name definition file has been exported, SX_MDLW can access to
the MICREX-SX global variables without activating D300win.
Personal computer
Global variable information
OPC client
Message manager (MM)
WindowsNT V4.0 SP3 or up/Windows2000/WindowsXP
MICREX-SX
Notes:
1. The OS of the personal computer must be WindowsNT V4.0 SP3 or up, Windows2000, or WindowsXP.
2. Message Manager is attached to SX_MDLW.
SX_MDLW
(OPC server)
Dedicated
interface
D300win
(V2.2.0.1 or up)
Use RS-232C, Ethernet, etc. for communications
between the personal computers and MICREX-SX.
For details, see Section 3-1 “MICREX-SX
Communication Middleware Operational
Specifications.”
1-2
Page 9
1-1 Outline of NP4N-MDLW
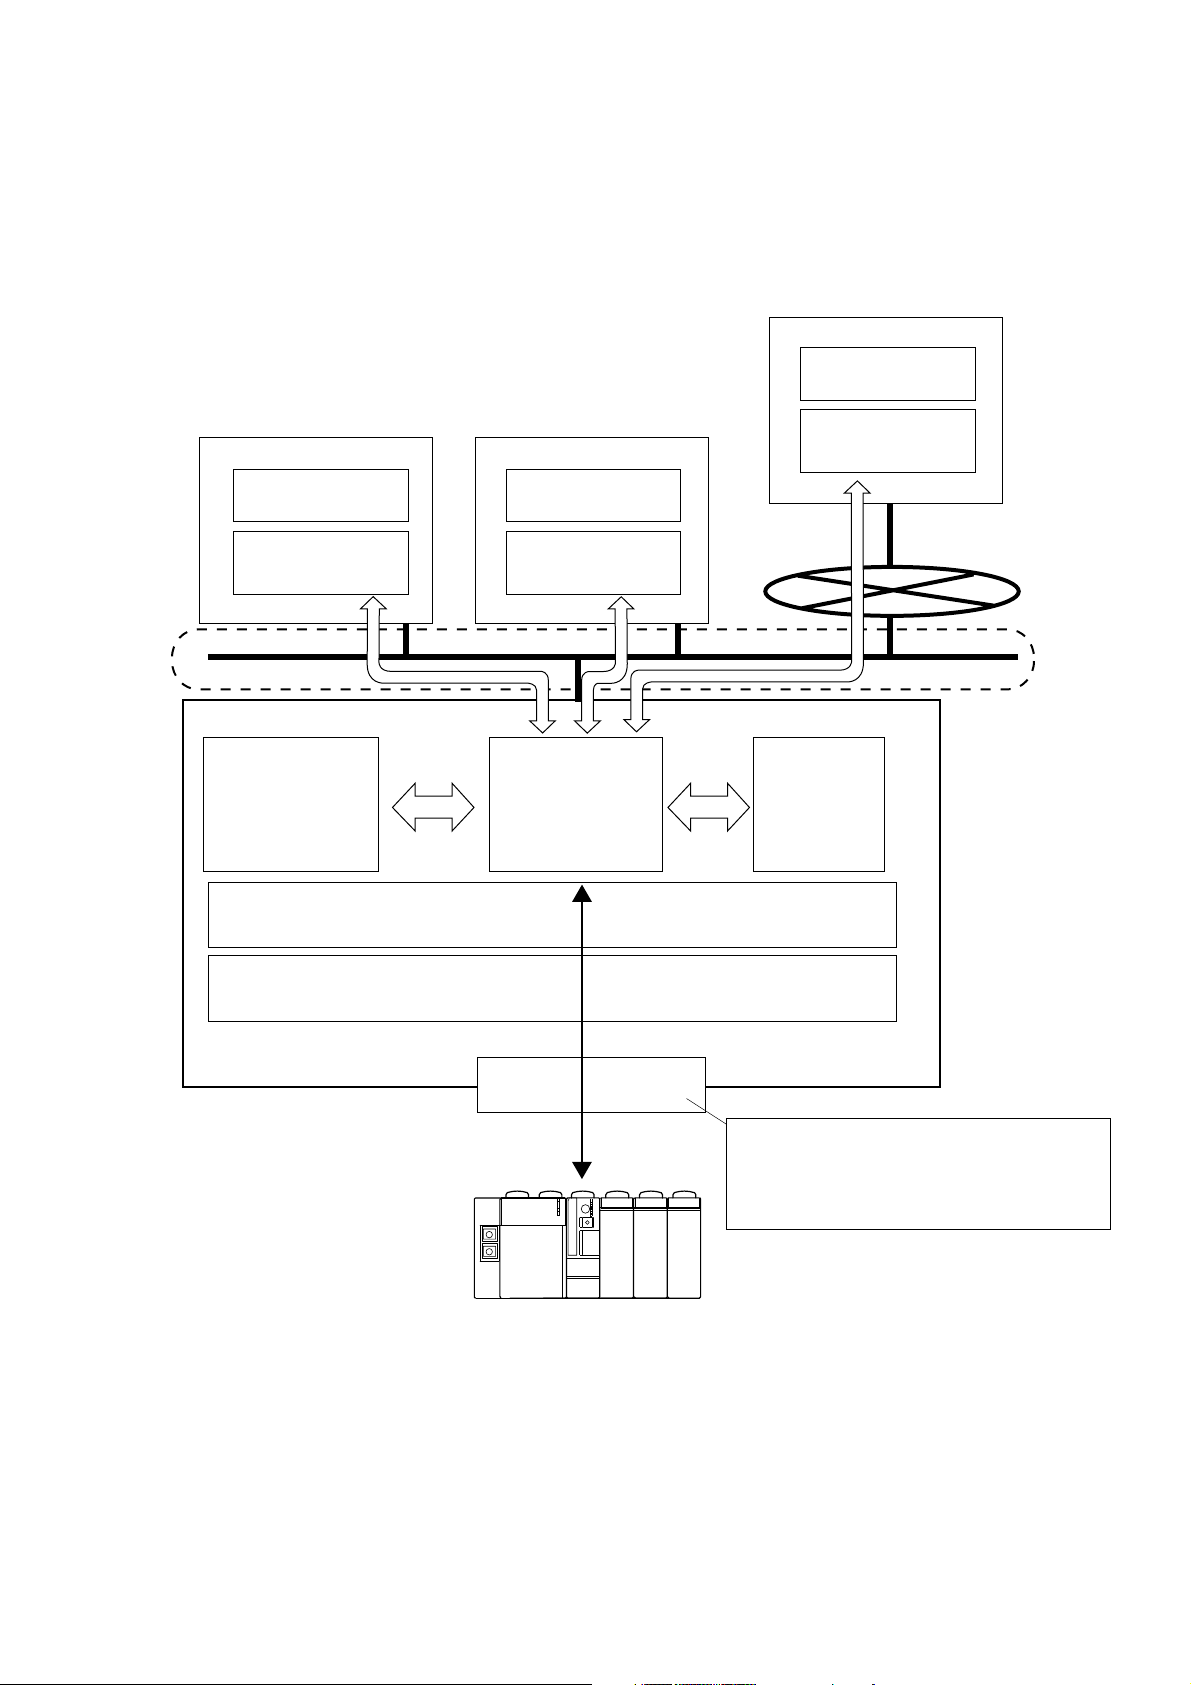
(2) Expanded system configuration
In the expanded system configuration, communications are made between personal computers on LAN and/or Internet
and the MICREX-SX. The SX_MDLW execution environment must be WindowsNT 4.0 or up, Windows2000 or
WindowsXP, and the OPC client execution environment must be WindowsNT V4.0 SP3 or up, Windows2000/WindowsXP.
Personal computer
OPC client
DCOM
Personal computer Personal computer
OPC client
Windows2000
or WindowsXP
OPC client
Message manager (MM)
WindowsNT V4.0 SP3 or up/Windows2000/WindowsXP
OPC client
WindowsNT
SX_MDLW
(OPC server)
Windows2000
or WindowsXP
Internet/intranet
D300win
(V2.2.0.1 and up)
MICREX-SX
Dedicated
interface
Use RS-232C, Ethernet, etc. for communications
between the personal computers and MICREX-SX.
For details, see Section 3-1 “MICREX-SX
Communication Middleware Operational
Specifications.”
1-3
Page 10

1-2 Necessary Knowledge
For development of OPC clients using SX_MDLW, following knowledge is necessary:
<For development with OPC automation interface>
Category Items
Knowledge about OLE standard interface Outline of OLE automation
Knowledge about OPC Knowledge about the interface defined by OPC is necessary.
Knowledge about D300win Knowledge about D300win operations is necessary.
<For development with OPC custom interface>
Category Items
Knowledge about OLE/COM Interface definitions
Knowledge about OLE standard interface Outline of OLE automation
Knowledge about OPC Knowledge about the interface defined by OPC is necessary.
Knowledge about D300win Knowledge about D300win operations is necessary.
1-4
Page 11

Section 2 Installation
Page
2-1
Personal Computer Environment Necessary for SX Communication Middleware .....
2-2 Installation Procedure ................................................................................................ 2-2
2-2-1 Initial screen .......................................................................................................................... 2-2
2-2-2 Installing SX Communication Middleware ............................................................................. 2-3
2-3 Uninstallation Procedure ........................................................................................... 2-8
2-1
Page 12

Section 2 Installation
2-1 Personal Computer Environment Necessary for
SX Communication Middleware
Because MICREX-SX Communication Middleware is incorporated in a user application for operation, its operation
environment is limited by the user application software specifications. The recommended execution environment for the
user application software incorporating the SX Communication Middleware is given below.
Items Specifications
Hardware IBM-AT compatible machine
CPU Intel Pentium 233 MHz or equivalent
Hard disk driv At least 1 drive
External storage device/
interface
Memory capacity 128 Mbytes or more
Keyboard
Mouse USB, bus or PS2 mouse
Display (resolution) 1024 x 768 dots or more
Communication interface
Operating system necessary for SX_MDLW WindowsNT 4.0 SP3 or up, Windows2000, WindowsXP
Floppy disk drive At least 1 drive, Media: 2HD, 1.25/1.44 Mbytes, 3.5 inches
CD-DOM drive
At least 1 drive (quadruple speed or more recommended),
Media: ISO9660 format
106-type Japanese (A01) keyboard (CTRL + alphanumerics) or
101-type English keyboard
Select one of the following interfaces:
• COM port (RS-232C/modem)
• Ethernet
• FL-net
• SX bus (SX bus slave board is necessary.) See Note.
Note: Currently, SX bus slave boards (model: NP3L-SA1SASS) compliant with ISA bus are available.
The SX Middleware Software package is shipped as one CD-ROM. It contains the software itself, installer and product
2-1
Page 13
2-2 Installation Procedure
manual (PDF file).
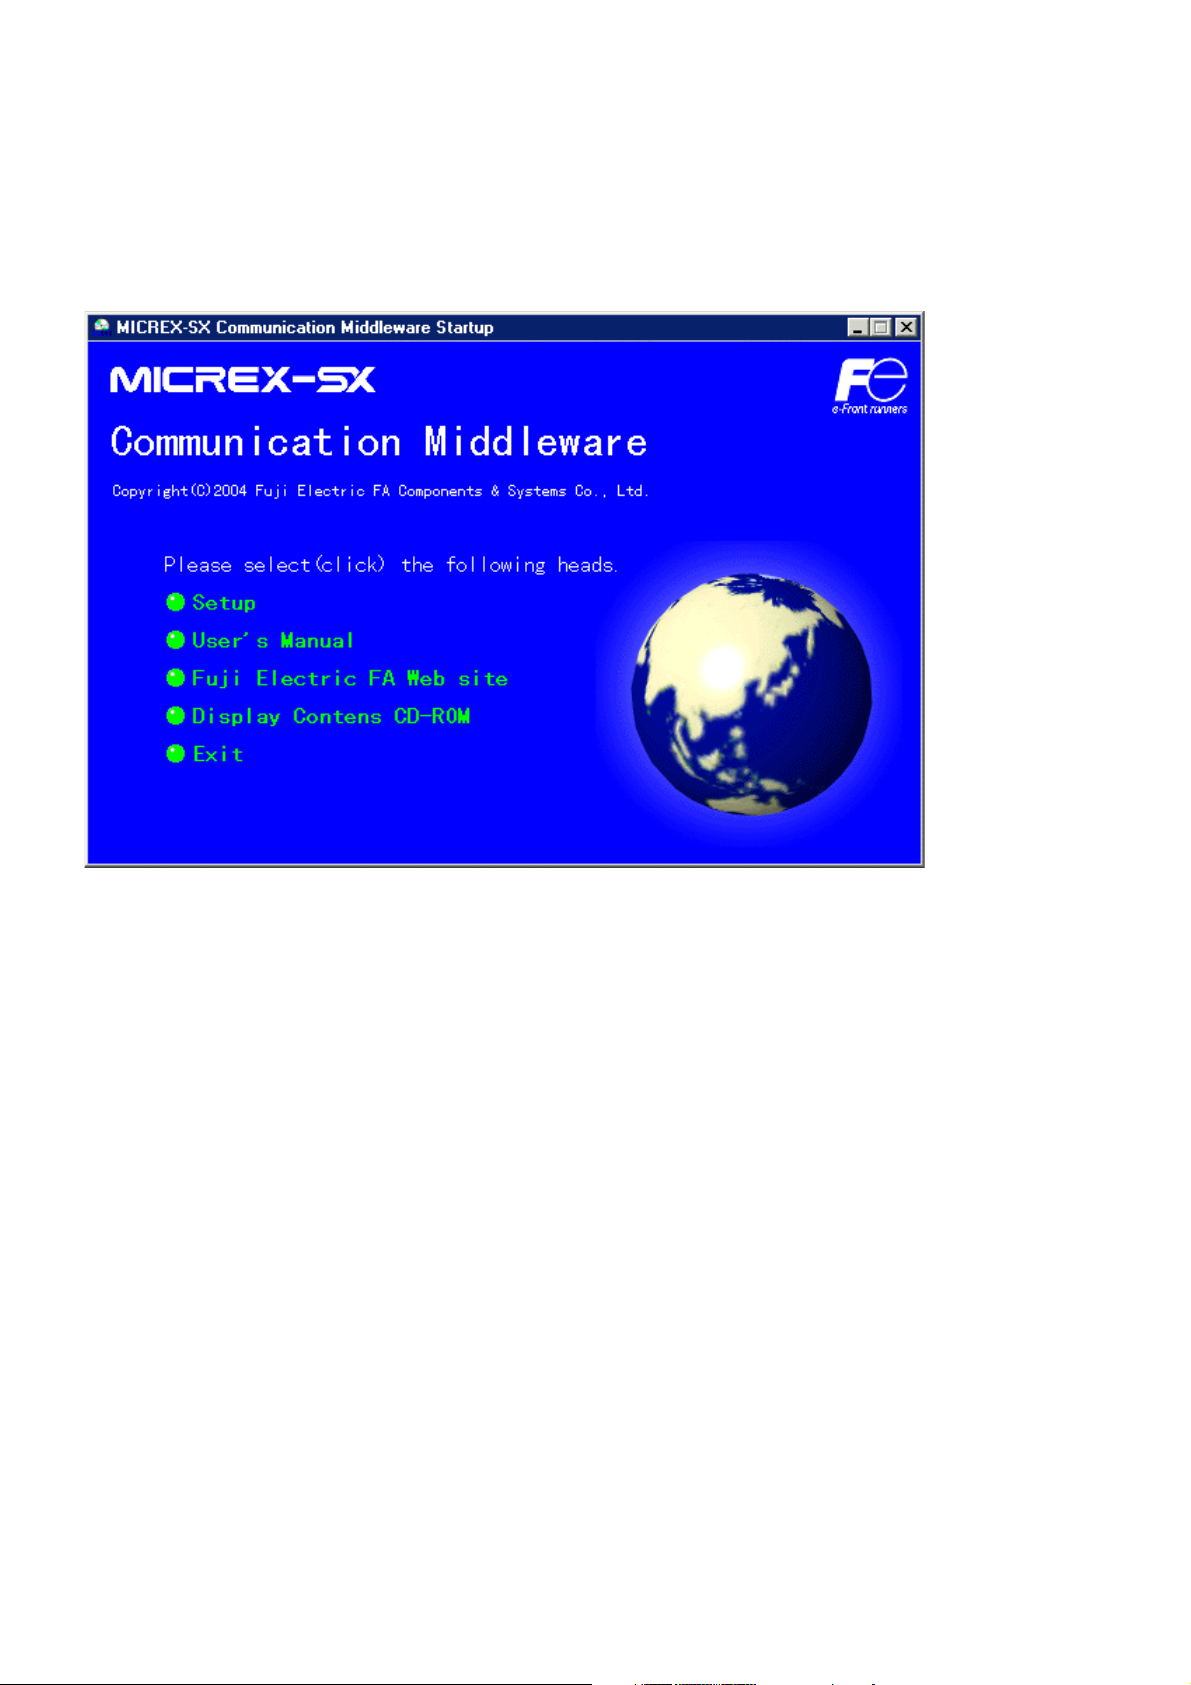
2-2-1 Initial screen
With Windows activated, insert the product CD-ROM in the CD-ROM drive. Then, the screen shown below automatically
appears.
Note: If the installation screen shown above does not appear automatically, perform the following procedure:
Click Windows [Start] ⇒ [Run], specify the name as “(drive where the product CD-ROM is inserted):¥autorun.exe”
and click [OK] button.
2-2
Page 14
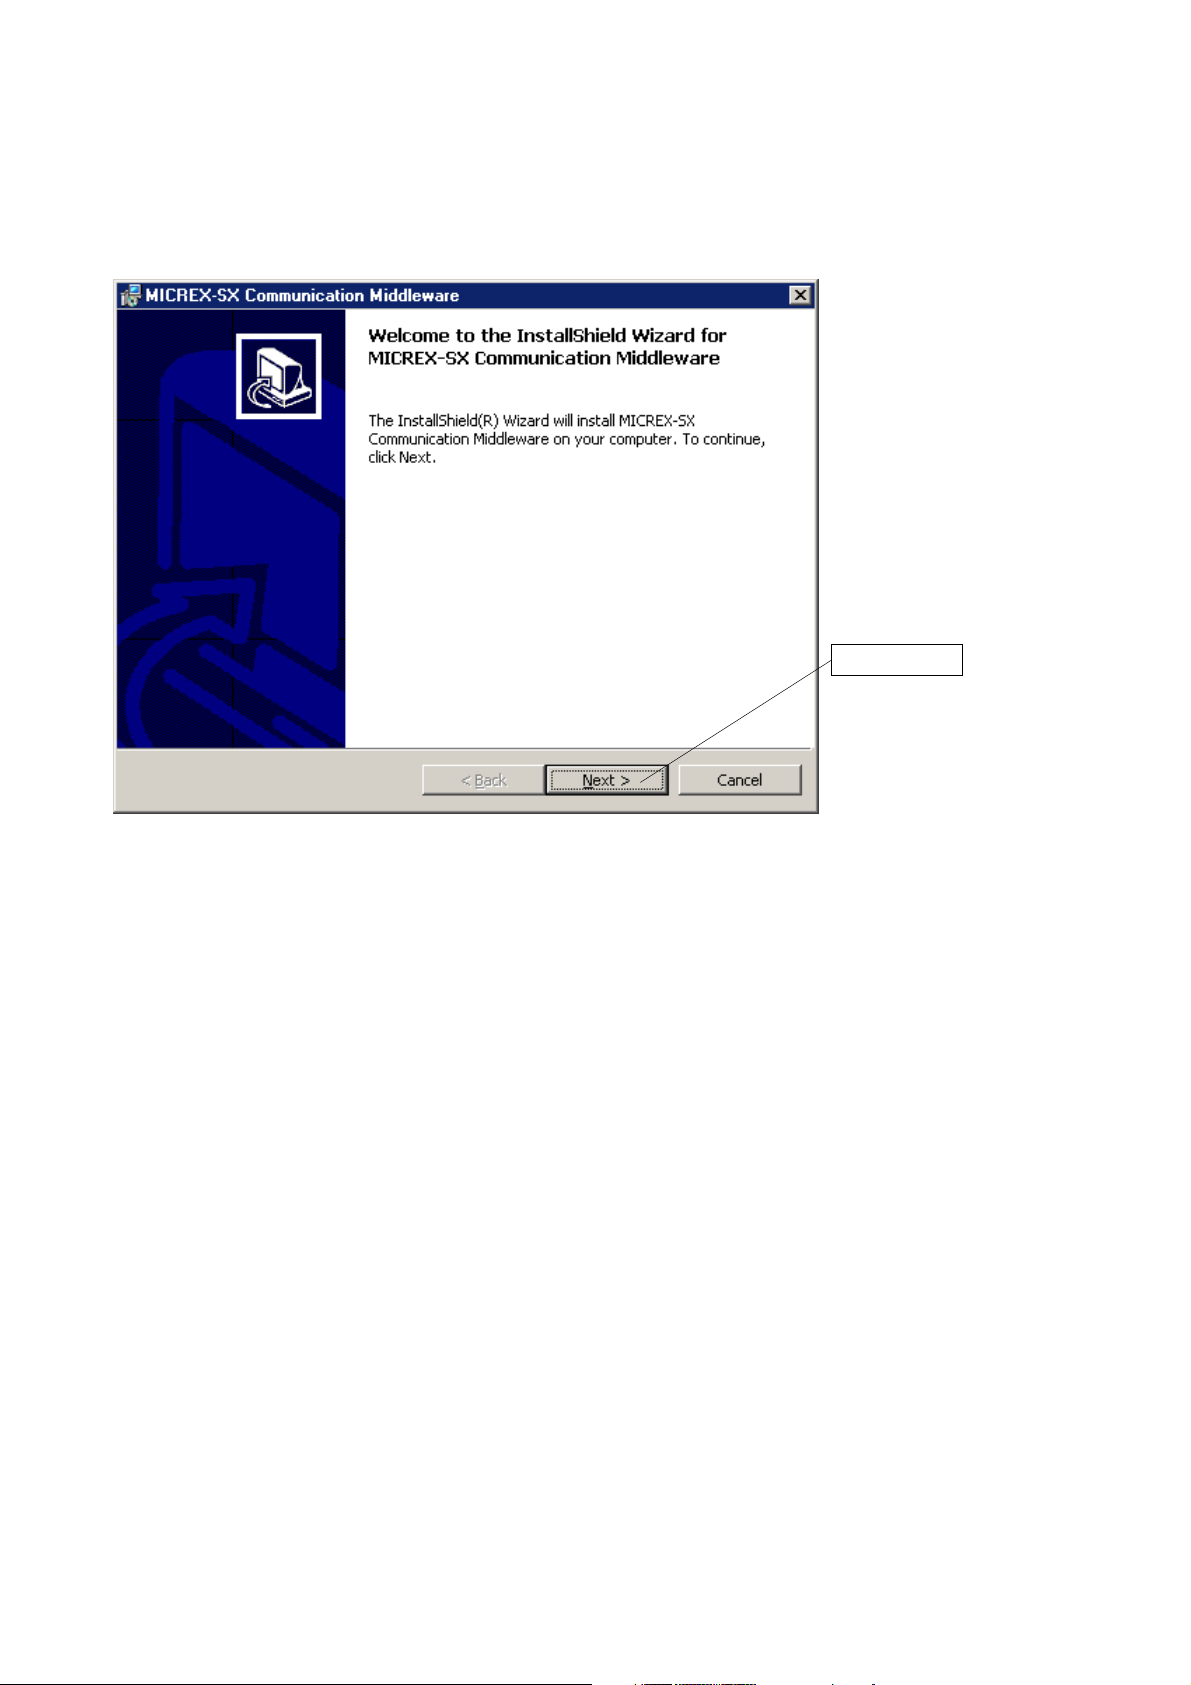
2-2-2 Installing SX Communication Middleware
<Procedure>
1) From the initial screen, click “Setup” to start the installer.
2-2 Installation Procedure
First, click here.
Note: If your personal computer runs on WindowsNT, “Windows Installer” may not have been installed. In this case, install
“Windows Installer” and restart the personal computer.
2-3
Page 15
2-2 Installation Procedure
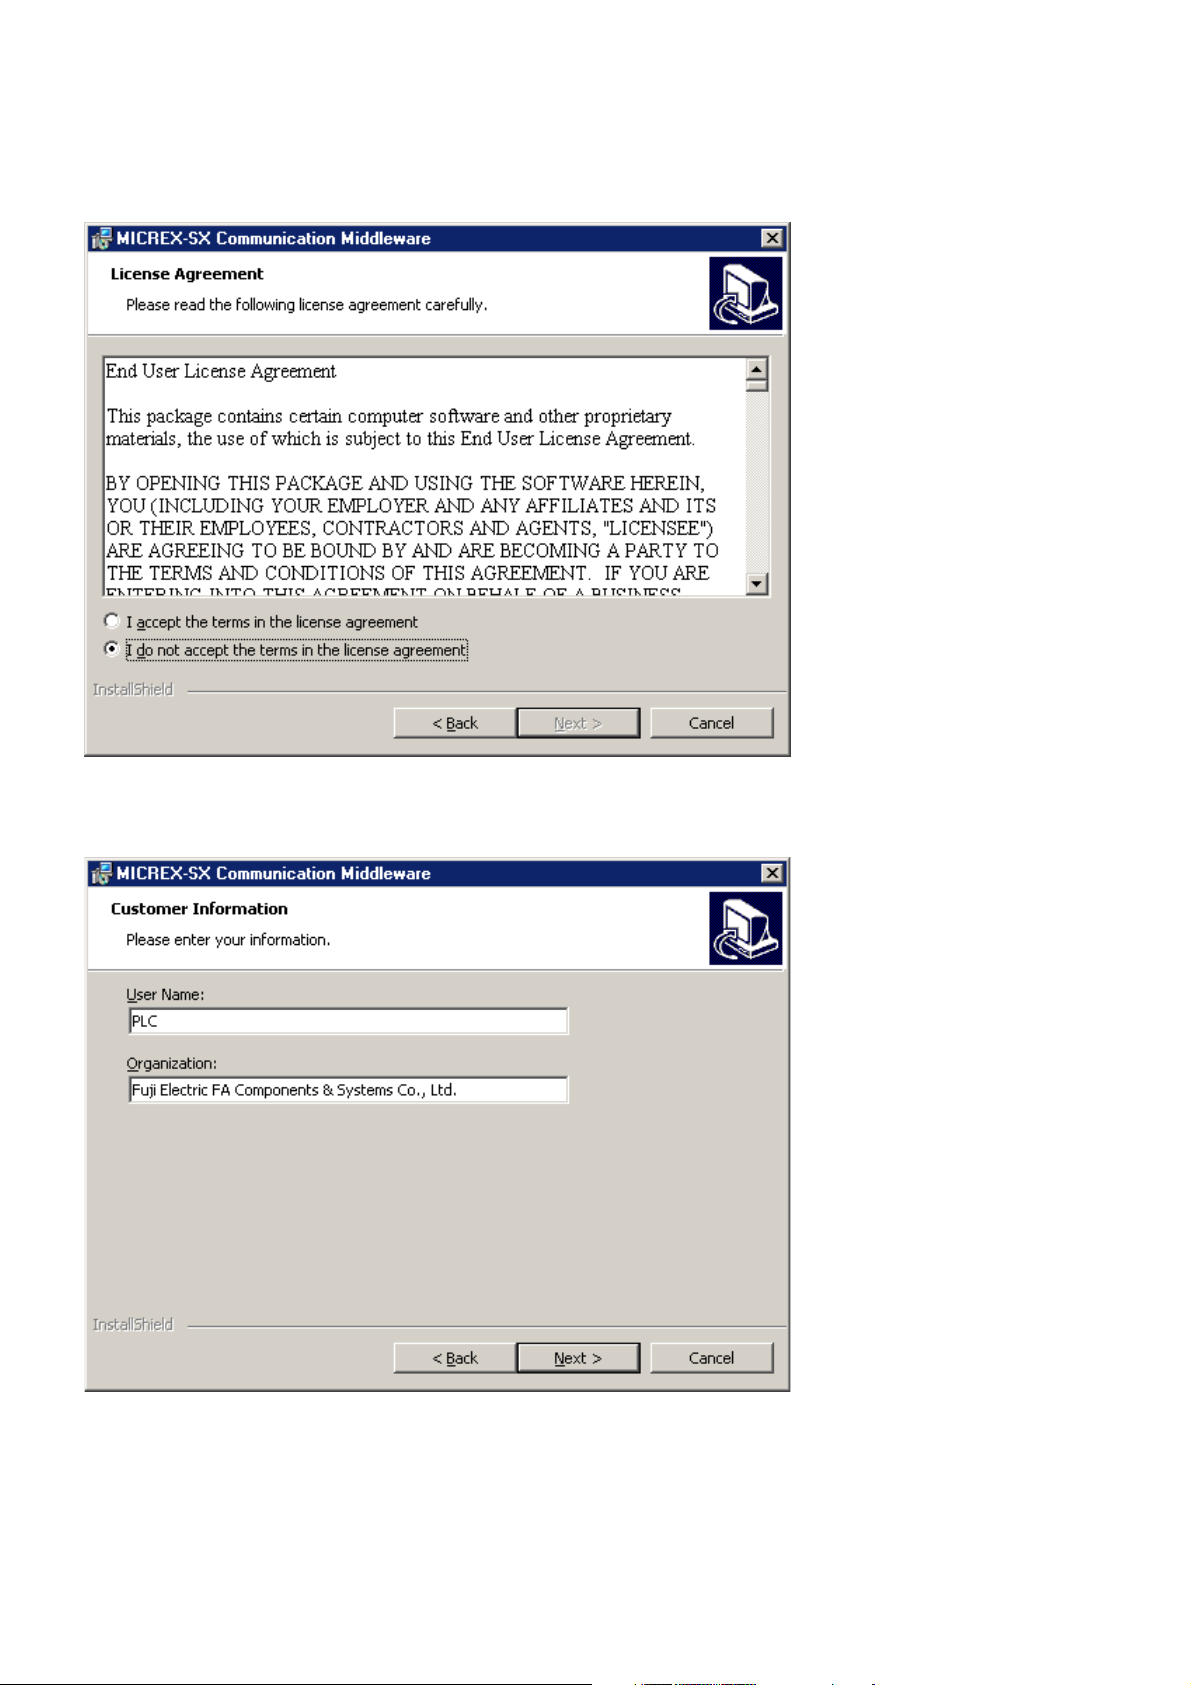
2) The license agreement screen appears. Read the contents and select whether or not to accept the terms of the license.
3) To agree with the terms of the license and continue installation, select “I accept the terms in the license agreement” and
click [Next>] button.
The Customer Information entry screen appears. After entering necessary information, click [Next>] button.
2-4
Page 16
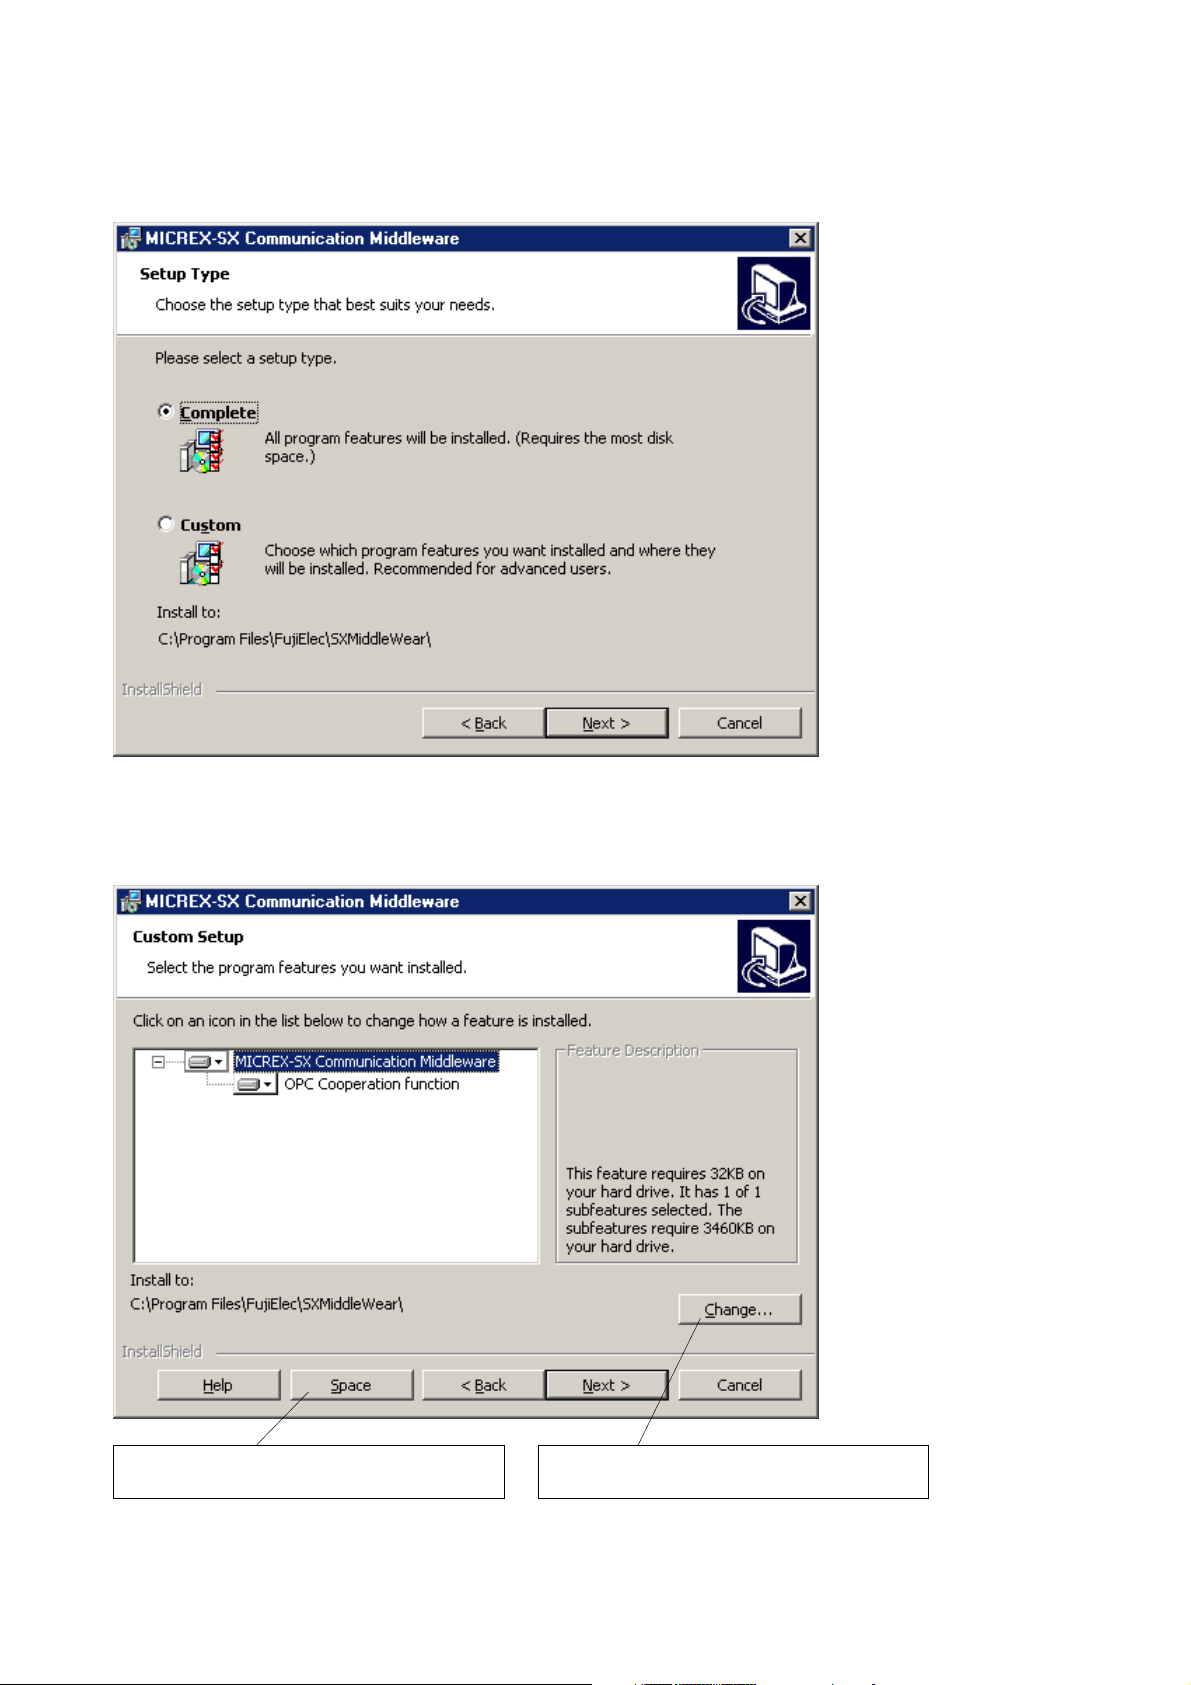
4) Select the setup type.
2-2 Installation Procedure
When “Complete” is selected, the middleware is installed to C:¥Proogram Files¥FujiElec¥SXMiddleWear. To change the
installation destination, select “Custom” and click [Next>] button.
5) From Custom Setup screen, click [Change...] button and setup the installation destination.
After setup, click [Next>] button.
Clicking this button displays empty space size of the
disk necessary for installation.
Clicking this button invokes the screen for changing
the installation destination folder.
2-5
Page 17
2-2 Installation Procedure
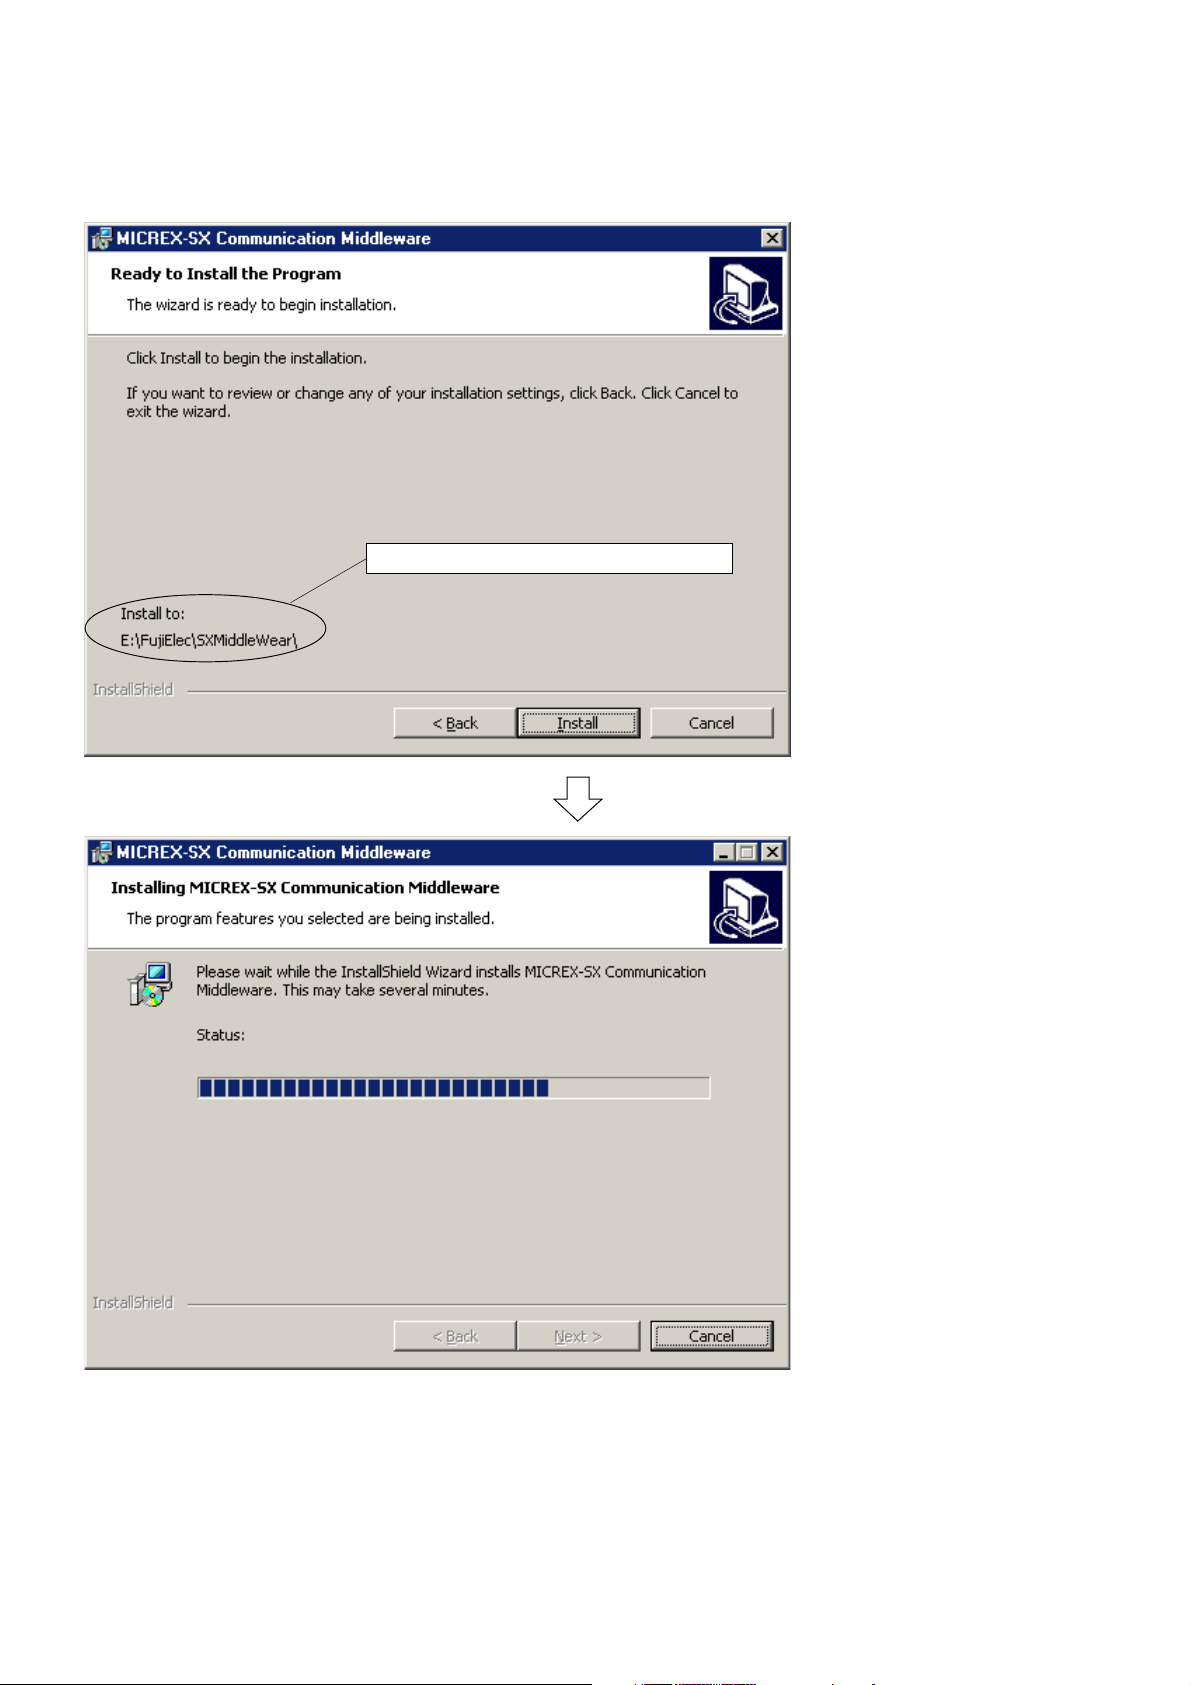
6) The screen shown below appears. From this screen, click [Install] button to start installation.
The installation destination folder is shown here.
2-6
Page 18

2-2 Installation Procedure
7) When installation has completed, the screen shown below appears. Click [Finish] button to exit the wizard screen.
2-7
Page 19

2-3 Uninstallation Procedure
<Procedure>
1) Execute “Add or Remove applications” from Control Panel, select “MICREX-SX Communication Middleware” and click
[Add/Remove] button ([Change/Remove] button for Windows2000/WindowsXP) to invoke the screen shown below.
2) Click [Next>] button to invoke [Program Maintenance] screen. From this screen, click [Remove] radio button and then
click [Next>] button.
2-8
Page 20

2-3 Uninstallation Procedure
3) [Remove the program] screen appears. From this screen, click [Remove] button to start uninstallation.
4) When uninstallation has completed, [Completed] screen appears. Click [Finish] button to exit the wizard screen.
2-9
Page 21

Section 3 SX_MDLW Specifications
Page
3-1 MICREX-SX Communication Middleware Operational Specifications .................... 3-1
3-1-1 Execution environment.......................................................................................................... 3-1
(1) MICREX-SX Communication Middleware execution environment ..........................................................3-1
(2) OPC client execution environment.......................................................................................................... 3-1
(3) D300win applicable version .................................................................................................................... 3-1
3-1-2 Development language for client ...........................................................................................3-1
3-1-3 List of communication interfaces ........................................................................................... 3-1
3-2 Interfaces Supported by SX_MDLW .......................................................................... 3-2
(1) OPC server ............................................................................................................................................. 3-2
(2) DA browser ............................................................................................................................................. 3-3
(3) OPC group collection ..............................................................................................................................3-4
(4) OPC group ..............................................................................................................................................3-5
(5) DA item collection ................................................................................................................................... 3-6
(6) DA item ................................................................................................................................................... 3-6
3-3 Accessing Process Data ............................................................................................ 3-7
3-3-1 Item ID and access path ....................................................................................................... 3-7
3-3-2 Basics of process data access .............................................................................................. 3-7
(1) Process data configuration ..................................................................................................................... 3-7
(2) OPC server data type ............................................................................................................................. 3-7
(3) List of MICREX-SX data types accessible by OPC server ..................................................................... 3-8
3-3-3 Scheme of process data access ........................................................................................... 3-9
(1) Scheme of data access .......................................................................................................................... 3-9
(2) Cache data and device data ................................................................................................................... 3-9
(3) Synchronous access and asynchronous access .................................................................................. 3-10
(4) Update and data change notification (subscription) .............................................................................. 3-11
(5) Quantitative restriction .......................................................................................................................... 3-11
3-4 OPC Functions Not Supported by SX_MDLW ...................................................................... 3-12
Page 22

Section 3 SX_MDLW Specifications
3-1 MICREX-SX Communication Middleware
Operational Specifications
3-1-1 Execution environment
(1) MICREX-SX Communication Middleware execution environment
MICREX-SX Communication Middleware requires WindowsNT 4.0 SP3 or up, Windows2000 or WindowsXP as the
execution environment.
(2) OPC client execution environment
An OPC client accessing SX_MDLW requires WindowsNT4.0 SP3 or up, Windows2000 or WindowsXP as the execution
environment.
(3) D300win applicable version
D300win V2.2.0.1 or up is required.
3-1-2 Development language for client
The development language for the client applications using SX_MDLW is Microsoft Visual C++ or Visual Basic (V5.0 or
up).
3-1-3 List of communication interfaces
For connecting the machine running SX_MDLW and the MICREX-SX system, the communication interfaces given below
are prepared.
noitacinummoC
ecafretni
C232-SR elbaliavayllaicremmocretupmoclanosrepfotropMOC
medoM elbaliavayllaicremmocretupmoclanosrepnognidnepeD
tenrehtE.cte,elbaliavayllaicremmocdraobtenrehtE
ten-LF
subXSsubASIhtiwtnailpmocdraobevalssubXSSSAS1XS-L3PN
erawdraH
emantcudorP edomtcudorP skrameR
elbaliavayllaicremmocdraobtenrehtEroelbaliavayllaicremmocdraobten-LF
)etoNeeS(draobten-LFSCP1LF-L3PNtnempolevedrednusiten-LF
Note: A dedicated driver is required.
3-1
Page 23

3-2 Interfaces Supported by SX_MDLW
SX_MDLW provides automation interfaces for Microsoft Visual Basic and custom interfaces for Microsoft Visual C++. The
automation interfaces are listed below.
For details of automation interfaces, refer to technical documents and specifications such as “Introduction to OPC
Applications” published by OPC Council Japan.
(1) OPC server
tcejbO ytreporP dohteM tnevE weivrevO
)revresCPO(revreSCPO detaercebdluohshcihw,ecnatsnitcejborevresCPOnasisihT
.tcejboresworBCPOnasetaercdna
emiTtratS .)CTU(detratssawrevresADehtemiT
emiTtnerruC .)CTU(revresADehtybdezingoceremittnerruC
emiTetadpUtsaL .)CTU(revresADehtybdezingoceremittnerruC
noisreVrojaM .erawtfosrevresADfonoisrevrojaM
noisreVroniM .erawtfosrevresADfonoisrevroniM
rebmuNdliuB .erawtfosrevresADfo.oNdliuB
ofnIrodneV
etatSrevreS .)sutatSrevreSCPOfotrap(sutatsnoitucexerevresADehtsnruteR
DIelacoL
htdiWdnaB
spuorGCPO .stcejbopuorgADfonoitcelloC
semaNpuorGcilbuP .emanpuorgcilbuprevresehtsnruteR
emaNrevreS
edoNrevreS
emaNtneilC .)gniggubedrof(revresehtniemanstisretsigertneilcehT)W/R(
srevreSCPOteG .)DIgorP(deretsigerrevresADehtfoemanehtsnruteR
tcennoC
tcennocsiD.revresADehtmorfstcennocsiD
resworBetaerC.tcejboresworbADasetaerC
gnirtSrorrEteG
sDIelacoLelbaliavAyreuQ .snoissestneilc/revresnielbaliavaDIelacolehtsnruteR
seitreporPelbaliavAyreuQ .nwonkebotseitreporpehtfoDImetiehtseificepS
seitreporPmetIteG
sDImetIpUkooL
nwoDtuhSrevreS.nwodtuhslliwrevresehttahttneilcehtseifitoN
.revresADehtrofnoitamrofni
.gnirts
.revresehtotelbaliava
.detcennoc
.detcennoc
.ecafretni
.DIelacol
.sDIytreporp
.DI
lanoitiddasaderaperprodnevehtotcificepsgnirtsretcarahC
retcarahc)DIegaugnal(noitacifitnedielacolehtsnruteR)W/R(
)%(oitarhtdiwdnabehtsnrutertI.revresehtotcificepseulaV
neebsahtneilcehthcihwotrevresehtfoemanehtsnruteR
neebsahtneilcehthcihwotrevresehtfoemanedonehtsnruteR
motsucehthtiwdeppiuqerevressseccAataDADehtotstcennoC
ehthtiwdeificepsgnirtsretcarahcehtotedocrorrenastrevnoC
dnametiehtotgnidroccaseulavatadtnerrucfotsilehtsnruteR
noitcellocspuorGCPOsedulcnitI.stcejborehtognicnerefererofeb
ytreporpehtotgnidroccasDImetignidnopserrocfotsilehtsnruteR
3-2
Page 24

(2) DA browser
tcejbO ytreporP dohteM tnevE weivrevO
)resworbAD(resworBAD revresADnismetiehtnidecnereferebotsiemanesohwtcejbO
noitazinagrO .)lacihcrareihrotalf(ecapsemanrevresADfoepyT
retliF .dohtemsfaeLwohSrosehcnarBwohSotdeilppaebotretliF)W/R(
epyTataD .dohtemsfaeLwohSotdeilppaebotepytatadtseuqeR)W/R(
sthgiRsseccA .dohtemsfaeLwohSotdeilppaebotthgirsseccatseuqeR)W/R(
noitisoPtnerruC .noitarugifnoceertninoitisoptnerrucehtsnruteR
tnuoC .noitcellocehtnismetiforebmunehtsnruteR
metI .reificepSmetIhtiwdexedniemanehtsnruteR
sehcnarBwohS
sfaeLwohS
pUevoM.levelenoybyhcrareihehtnipusevoM
tooRoTevoM.reyaltsrifehtsevoM
nwoDevoM.deificepshcnarbrewolehtotsevoM
oTevoM.noitisopetulosbaehtotsevoM
DImetIteG .emanmetiehtotgnidroccaDImetiehtsnruteR
htaPsseccAteG .DImetiehtrofhtapsseccaehtfognirtsretcarahcehtsnruteR
3-2 Interfaces Supported by SX_MDLW
.noitarugifnoc
ehtninoitisopecnerefertnerrucehtfoemanhcnarbehtstuP
.noitcelloc
ehtninoitisopecnerefertnerrucehtfoemanfaelehtstuP
.noitcelloc
3-3
Page 25

3-2 Interfaces Supported by SX_MDLW
(3) OPC group collection
tcejbO ytreporP dohteM tnevE weivrevO
)spuorgCPOfonoitcelloc(spuorGCPO CPOehtnidetaercstcejbopuorgCPOllafonoitcellocnoitamotuA
tneraP .revresADtnerapehtotecnereferehtsnruteR
evitcAsIpuorGtluafeD
etaRetadpUpuorGtluafeD
dnaBdaeDpuorGtluafeD
DIelacaLpuorGtluafeD
saiBemiTpuorGtluafeD
tnuoC.ytreporpnoitcelloC
metI
ddA .noitcellocehtottisddadnapuorgADwenasetaerC
puorGCPOteG.rieificepSmetIfopuorgADehtsnruteR
evomeR.reificepSmetIfopuorgADehtseteleD
llAevomeR
puorGcilbuPtcennoC.puorGcilbuPotstcennoC
puorGcilbuPevomeR.puorGcilbuPseteleD
egnahCataDspuorGllA
.ddA.spuorG
.ddA.puorG
.ddA.spuorG
.nwodtuhs
.spuorg
.tneilcehtybrevres
htiwdetaercspuorGCPOroftluafedsaetatsevitcaehtsteS)W/R(
detaercspuorGCPOrof)sm0001(etaRetaDpUtluafedsteS)W/R(
.ddA.spuorGhtiw
htiwdetaercspuorGCPOrof)%0(dnaBdaeDtluafedsteS)W/R(
htiwdetaercspuorGCPOrofDIelacoLtluafedsteS)W/R(
detaercspuorGCPOrof)etunim0(saiBemiTtluafedsteS)W/R(
.ddA.spuorGhtiw
deificepspuorgCPOehtsnrutertI.spuorGCPOfodohtemtluafeD
.)xedninoitcelloc(reificepSmetIhtiw
revresrofnoitaraperpnismetiADdnaspuorgADllaseteleD
revosegnahcatadsessecorptahtreldnahtnevenagnitnuomroF
3-4
Page 26

(4) OPC group
tcejbO ytreporP dohteM tnevE weivrevO
)puorgCPO(puorGCPO sutatsrofatadgnitcellocrofecnatsnitcejbopuorgCPO
tneraP .tcejborevrestnerapehtotecnerefersnruteR
emaN .emanpuorgasdaerrosetirW)W/R(
cilbuPsI .cilbuPsipuorgehtnehweurTsnruteR
evitcAsI
debircsbuSsI .spuorgotnoitacifitonsuonorhcnysaslortnoC)W/R(
eldnaHtneilC
eldnaHrevreS .revresehtybpuorgehtotdengissaeulaveuqinU
DIelacoL .DIelacolsdaerrosteS)W/R(
saiBemiT
dnaBdaeD .)001ot0,elacsllufotegatnecrep(dnabdaedseificepS)W/R(
etaRetadpU .)sm(etaretadpuseificepS)W/R(
smetICPO .stcejbometICPOfonoitcelloC
daeRcnyS
etirWcnyS
daeRcnysA
etirWcnysA
hserfeRcnysA .puorgehtnismetievitcallarofruccostnevesekaM
lecnaCcnysA.noitcasnartdessecorpnuslecnaC
egnahCataD
3-2 Interfaces Supported by SX_MDLW
.noitcellocmetiCPOrotnemeganam
rofdetcellocsiatadoN.sutatsevitcapuorgehtslortnoC)W/R(
.puorgevitcAnI
rehtegottneilcehtotdenrutersitI.puorgaotnevigeulaV)W/R(
.sutatsdnaatadhtiw
otpmatsemitatadehttrevnocotyrassecennoitamrofnI)W/R(
.emitlacolecived
pmatsemitdnagalfytilauq,eulavatadehtsdaerylsuonorhcnyS
.puorgehtnimetinafo
nimetinaoteulavataddnaeldnahrevresasetirwylsuonorhcnyS
.eciveDotnettirwsieulavatadehT.puorgeht
pmatsemitdnagalfytilauq,eulavatadehtsdaerylsuonorhcnysA
.puorgehtnimetinafo
ataddnaDInoitcasnart,eldnahrevresasetirwylsuonorhcnysA
.puorgehtnimetinaoteulav
nimetinafogalfytilauqeulavatadroeulavatadanehwsruccO
.degnahcsahpuorgeht
etelpmoCdaeRcnysA.detelpmocsahdaeRcnysAnehwsruccO
etelpmoChserfeRcnysA.detelpmocsahhserfeRcnysAnehwsruccO
etelpmoCetirWcnysA.detelpmocsahetirWcnysAnehwsruccO
etelpmoClecnaCcnysA.detelpmocsahlecnaCcnysAnehwsruccO
3-5
Page 27

3-2 Interfaces Supported by SX_MDLW
(5) DA item collection
tcejbO ytreporP dohteM tnevE weivrevO
)noitcellocmetiAD(smetICPO ybrevresADnidetaercstcejbometiADllafonoitcellocnoitamotuA
.tneilceht
tneraP .tnerapehtsitahttcejbopuorgADasnruteR
epyTataDdetseuqeRtluafeD
htaPsseccAtluafeD .)''''(llacddAnagnisurofhtapsseccafoeulavtluafeD)W/R(
evitcAsItluafeD .llacddAnagnisurofeulav)eurT(etatsevitcatluafeD)W/R(
tnuoC .noitcellocehtnistcejboforebmunehtsnruteR
metI
metICPOteG
metIddA .noitcellocehtottisddadnatcejbometiADwenasetaerC
evomeR.metiADaseteleD
etadilaV
evitcAteS .evitcaniroevitcasametiADlaudividninasteS
seldnaHtneilCteS .puorgehtnimetinarofeldnahtneilcasteS
sepyTataDteS .puorgehtnimetinarofepytatadtseuqerasteS
.reificepSmetI
.)eldnah
.dohtemddA
llacddAnagnisurofepytatadtseuqerehtfoeulavtluafeD)W/R(
.))atadlacinonac(ytpmE_TV(
htiwdeificepsnoitcellocmetICPOehtnimetiADasmrofreP
revres(eulavnruterddAehthtiwdeificepsmetiADehtsnruteR
ehtnidetaercyltcerrocneebsahmetiADarehtehwsenimreteD
(6) DA item
tcejbO ytreporP dohteM tnevE weivrevO
)metiAD(metICPO lanif,sutats,eulavtnerruc,snoitinifedmetigniniatniamroftcejbO
tneraP .tnerapehtfotcejbopuorgADaotecnerefersnruteR
eldnaHtneilC .metiADarofeldnahtneilcasteS)W/R(
eldnaHrevreS .revresehtybdengissaatadeldnahsnruteR
htaPsseccA .tneilcehtybdeificepshtapsseccaehtsnruteR
thgiRsseccA .metiehtrofthgirsseccaehtsnruteR
DImetI .metisihtforeifitnedieuqinuehtsnruteR
evitcAsI .metisihtrofgalfsutatsnoitcellocatadehtsteS)W/R(
epyTataDdetseuqeR .metinafoeulavatadehtgninruterrofepytatadtseuqeR)W/R(
eulaV .revresehtmorfdaereulavatadtsetaL
ytilauQ .revresehtmorfdaergalfytilauqtsetaL
pmatSemiT .revresehtmorfdaerpmatsemittsetaL
epyTataDlacinonaC .revresehtniepytatadevitanehtsnruteR
epyTUE .)UE(tinUgnireenignEfoepytehtotdetalernoitamrofnisnruteR
ofnIUE .noitamrofnitinUgnireenignEgnidulcnieulavtnairaV
daeR .revresehtmorfkcolbasasmetisdaeR
etirW.revresehtmorfkcolbasasmetisetirW
.cte,emitetadpu
3-6
Page 28

3-3 Accessing Process Data
Data on MICREX-SX system that can be accessed by SX_MDLW is only the “global variables” defined by D300win.
Therefore, when accessing process data, the global variable information must be given to SX_MDLW. (For the setting
procedure, see “(2) Setting SX” in Section 4-1-1.)
When accessing process data, the OPC client specifies and connects an OPC server, specifies the name (item ID) for
recognizing an individual item from a collection of items accessible from the connected OPC server, and then reads or
writes the related process data.
3-3-1 Item ID and access path
This is UNICODE character string of any size for recognizing an item. It is specified as follows:
directory-name.project-name.configuration-name.resource-name.worksheet-name.global-variable-name
The directory name is the path name of the directory where the D300win project is saved.
The project name, configuration name, resource name and worksheet name are the names created by D300win. Of these,
the variable name in the global variable definition becomes the global variable name.
Accessible item IDs can be acquired using the browse function. In addition, no access paths are used.
3-3-2 Basics of process data access
(1) Process data configuration
Process data consists of three types of data shown below.
epytataD noitpircseD skrameR
eulavataDflestiatadssecorP epytTNAIRAV
galfytilauQ
pmatsemiT )etadpu(noitisiuqcaatadfoemitehtgnitacidniatademiT epytCTU
.deddasidilavnirodilavsiatadssecorpdessecca
ehtrehtehwgnitacidninoitamrofniylnO.atadfoytidilavsetacidnI
(2) OPC server data type
Data types an OPC client can specify when registering an item ID are listed below.
epytataD tnuocetyB noitpircseD
21_TV2 )stib61(regetninoisicerp-elgniS
41_TV2 )stib23(regetninoisicerp-elbuoD
4R_TV4 )stib23(epyttniopgnitaolfnoisicerp-elgniS
8R_TV8 )stib23(epyttniopgnitaolfnoisicerp-elbuoD
LOOB_TV1 eurT:1,eslaF:0
YARRA_TVelbairaVsepytatadevobafoyarralanoisnemid-enO
3-7
Page 29

3-3 Accessing Process Data
(3) List of MICREX-SX data types accessible by OPC server
Types of MICREX-SX data an OPC server can access (data types which can be specified when defining global variables)
are listed below.
epytataD tnuoctiB noitpircseD
LOOB1looB
TNI61regetnI
TNID23regetninoisicerp-elbuoD
TNIU61regetnidengisnU
TNIDU23regetninoisicerp-elbuoddengisnU
LAER23rebmunlaeR
GNIRTSgnirtsretcarahchtgnel-elbairaV
DROW61gnirtstib-61
DROWD23gnirtstib-23
epytataddevireD.elbaliavasiyarralanoisnemid-enoylnO
3-8
Page 30

3-3 Accessing Process Data
3-3-3 Scheme of process data access
(1) Scheme of data access
When an OPC client accesses a global variable (process data) defined by D300win, it first makes item registration
(AddItems) to SX_MDLW (OPC server). In this process, SX_MDLW searches for the related global variable definition of
D300win, acquires the address (ICODE) for accessing MICREX-SX and stores it in the item object. When actually reading
or writing the process data, this stored address is used. This address remains stored until the item object is deleted and its
data cannot be changed.
The OPC client specifies “Item ID”
and node name (for Remote)
when accessing the server.
OPC client
(application created with VB, etc.)
SX_MDLW (OPC server)
Process data
Data in MICREX-SX
(global variable)
When registering “Item ID” from an OPC
client, the variable address (ICODE) in
MICREX-SX is acquired and saved in the
OPC server. This address is used for data
accessing to MICREX-SX.
D300win
Global variable definition
(2) Cache data and device data
When the OPC client reads or writes the OPC server value, it specifies the place to read it from. Cache is a buffer area
where the OPC server is periodically updating the value of MICREX-SX, whish is Device, according to UpdateRate. Cache
specification raises the response speed (performance), but increases the possibility of variation of the value from Device
according to UpdateRate. Device specification allows more reliable acquisition of Device value, but reduces the response
speed. In the cache area, individual update processing can be inhibited by changing the Active/Inactive state of the object.
OPC client
Cache specification
SX_MDLW
Cache
Device specification The value read from the device is
Update Rate
MICREX-SX
Device
(Global variable)
reflected to Cache.
3-9
Page 31

3-3 Accessing Process Data
(3) Synchronous access and asynchronous access
Process data can be accessed in one of two ways: synchronous access and asynchronous access. Access is made in
units of groups any way.
<Synchronous access>
In synchronous access, the process called by an OPC client is transferred to the server and returns to the OPC client
when SX_MDLW has completed the process. Therefore, while SX_MDLW is performing processing, the OPC client
remains in the standby state and cannot perform processing.
Server process
OPC client
application
Standby state
Synchronous process call
Return of synchronous process
Data acquisition completed
t
<Asynchronous access>
In asynchronous access, upon receipt of the OPC client process, the OPC server returns the process to the client. Then,
when the SX_MDLW process has completed, requested data is returned through another route. Because a process from
the OPC server is immediately transferred, the OPC client is allowed to perform other processing until data is returned
from the OPC server.
When cache specification is made for asynchronous access, the processing depends on the UpdateRate cycle. Therefore,
though the processing time has a variation, the load given to the OPC server process can be reduced. This should be also
noticed when setting the UpdateRate cycle with MSXopc.def.
Device side
UpdateRate
Server process
Asynchronous processing done by
Update process
Asynchronous
process call
Return of asynchronous
process
Standby state
Data notified through IOPCDataCallback:
OnReadComplate
t
3-10
Page 32

3-3 Accessing Process Data
(4) Update and data change notification (subscription)
SX_MDLW updates the cache area in the OPC server at each update cycle (UpdateRate) of the group. When connection
with IConnectionPointContainer has been established between the OPC client and server, SX_MDLW checks for data
changes at update time and, for an item with a data change if any, automatically transmits the data to
IOPCDataCallback::OnDataChange of the OPC client. Because this data transmission is indicated with specific value “0”
as a transaction ID, the OPC client can recognize it from refresh data.
(5) Quantitative restriction
The number of items that can be handled by SX_MDLW and that of projects accessed when acquiring an address in
D300win are determined by OPC file setup of SX_MDLW. Specifying large parameter values requires a lot of resources,
lowering the performance; therefore, tuning by the system is necessary. See Section 4-1 “Setting SX_MDLW” for the
setting procedure.
smetI noitpircseD
elcycetadpU )sm(gnissecorpetadpuehcacfoelcyC
stneilcforebmunmumixaM )WLDM_XS(revresCPOenootsseccanactahtstneilcforebmuN
tneilcrepspuorgforebmuN tneilcCPOenoybderetsigerebnactahtspuorgforebmuN
puorgrepsmetiforebmunmumixaM puorgenootderetsigerebnactahtsmetiforebmuN
3-11
Page 33

3-4 OPC Functions Not Supported by SX_MDLW
SX_MDLW does not support a part of the OPC specifications defined by OPC Council. See the table given below.
stcejbO etubirttA noitpircseD
tcejborevreShtdiwdnaB.cte,oitarytivitcA
saiBemiT emitecivedmorfecnereffidfotnemtsujdaroF
tcejbopuorG
tcejbometI
dnaBdaeD
DICL
noitamrofnitinugnireenignE .epytnoitamrofnitinugnireenigneehtnognidnepedyravstnetnocehT
noitamrofnitinugnireenignE
pyt
htapsseccA
dnabdaeD
gnirtsretcarahc
.gnitseuqernehwdeificepsebnacdesu
))egatnecrep(golanasiepytnoitamrofnitinugnireenigneehtnehw(
asaeulavasnruterrevresCPOehtnehwdesureifitnediegaugnaL
ebotenoeht,sdohtemtnereffidniedamebnacsseccaatadssecorpnehW
3-12
Page 34

Section 4 Using SX_MDLW
Page
4-1 Setting SX_MDLW .......................................................................................................4-1
4-1-1 Setting OPC server ............................................................................................................... 4-1
(1) Basic Setting ...........................................................................................................................................4-1
(2) SX setting ............................................................................................................................................... 4-2
(3) Trace setting ............................................................................................................................................ 4-8
4-2 Setting DCOM ............................................................................................................ 4-10
4-3 D300win-Related Settings ........................................................................................4-15
4-3-1 Exporting variable names ................................................................................................... 4-16
Page 35

Section 4 Using SX_MDLW
4-1 Setting SX_MDLW
To operate SX_MDLW (OPC server) itself or connect it to the target device (MICREX-SX global variable), various settings
are required.
4-1-1 Setting OPC server
(1) Basic Setting
Basic Setting allows to set conditions for OPC server operations.
<Procedure>
1) Select Windows [Start] menu → [Program (P)] ⇒ [MICREX-SX Communication Middleware] and start [OPC Server
settings]. Then, [OPC Server settings] dialog appears.
2) Set “UpdateRate,” “Number of maximum clients,” “Number of maximum groups” and “Number of maximum Item.”
<Set items>
smetiteS snoitacificepS
etaRetadpU
sm00063otsm01:egnarelbawollA
stneilcmumixamforebmuN
spuorgmumixamforebmuN
metImumixamforebmuN
01ot1:egnarelbawollA
05ot1:egnarelbawollA
00001ot1:egnarelbawollA
.revresCPOehtsseccanactahtstneilcCPOforebmunmumixamehtteS
.tneilcCPOenootderetsigerebnactahtspuorgforebmunmumixamehtteS
.puorgenootderetsigerebnactahtsmetiforebmunmumixamehtretsigeR
4-1
denimretederpata)elbairavlabolgXS-XERCIM(atadssecorpehtsdaerrevresCPOehT
etadpusihT.revresCPOehtybdetroppusebnactahtelcycmuminimehttes,ereH.elcyc
.erehteseulavehtdeecxetonnactitub,tneilcCPOehtmorfteseboslanacelcyc
Page 36

4-1 Setting SX_MDLW
Note: The update cycle varies depending on the communication interface between MICREX-SX and SX_MDLW. If the
update cycle becomes longer than the set value, the SX_DMLW processing may become slower; therefore,
determine the set value referencing the table given below. The values in this table are those to be used when
“Number of maximum groups” is 1 and “Number of maximum Item” is 500.
ecafretninoitacinummoC eulavteselcycetadpU
tenrehtEsm003
subXSsm003
(2) SX setting
For accessing SX system global variables by SX_MDLW, specify the global variable worksheet in the project created by
D300win and set the communication port.
<Procedure>
1) Click [MICREX-SX Setting] tab from [OPC Server settings] dialog to display the screen shown below.
“D300win” group
[Project Select] button
2) Set whether or not to start D300win in the “D300win” group.
<D300win group>
Specify whether or not to start D300win when starting SX_MDLW. If the project specified by SX_MDLW must start
D300win, check “Execute.” When the project has been directly specified, the OPC server does not normally operate unless
D300win is started. For exporting of a project, see Section 4-3-1 “Exporting variable names.”
Notes:
1. For a *.mwt file, D300win must be started to acquire the project information (global variable) managed by D300win.
2. Whether or not D300win start is required by a project is determined by whether the variable name has been
exported. Because *.ini file is an exported file, it does not require starting of D300win. In addition, an OPC server
can support a maximum of 10 projects.
4-2
Page 37

4-1 Setting SX_MDLW
3) Next, specify the global variable worksheet to be accessed by SX_MDLW. Clicking [Project Select] button opens [Open]
dialog.
4) Select the project containing the global variable worksheet to be accessed by SX_MDLW and click [Open] button to
display the project selected in the project path from [OPC Server settings]. Click the global variable worksheet of
MICREX-SX to be accessed and click [Add] button. A maximum of 10 global variable worksheets can be registered.
Selected object
Global variable
worksheets
4-3
Page 38
4-1 Setting SX_MDLW
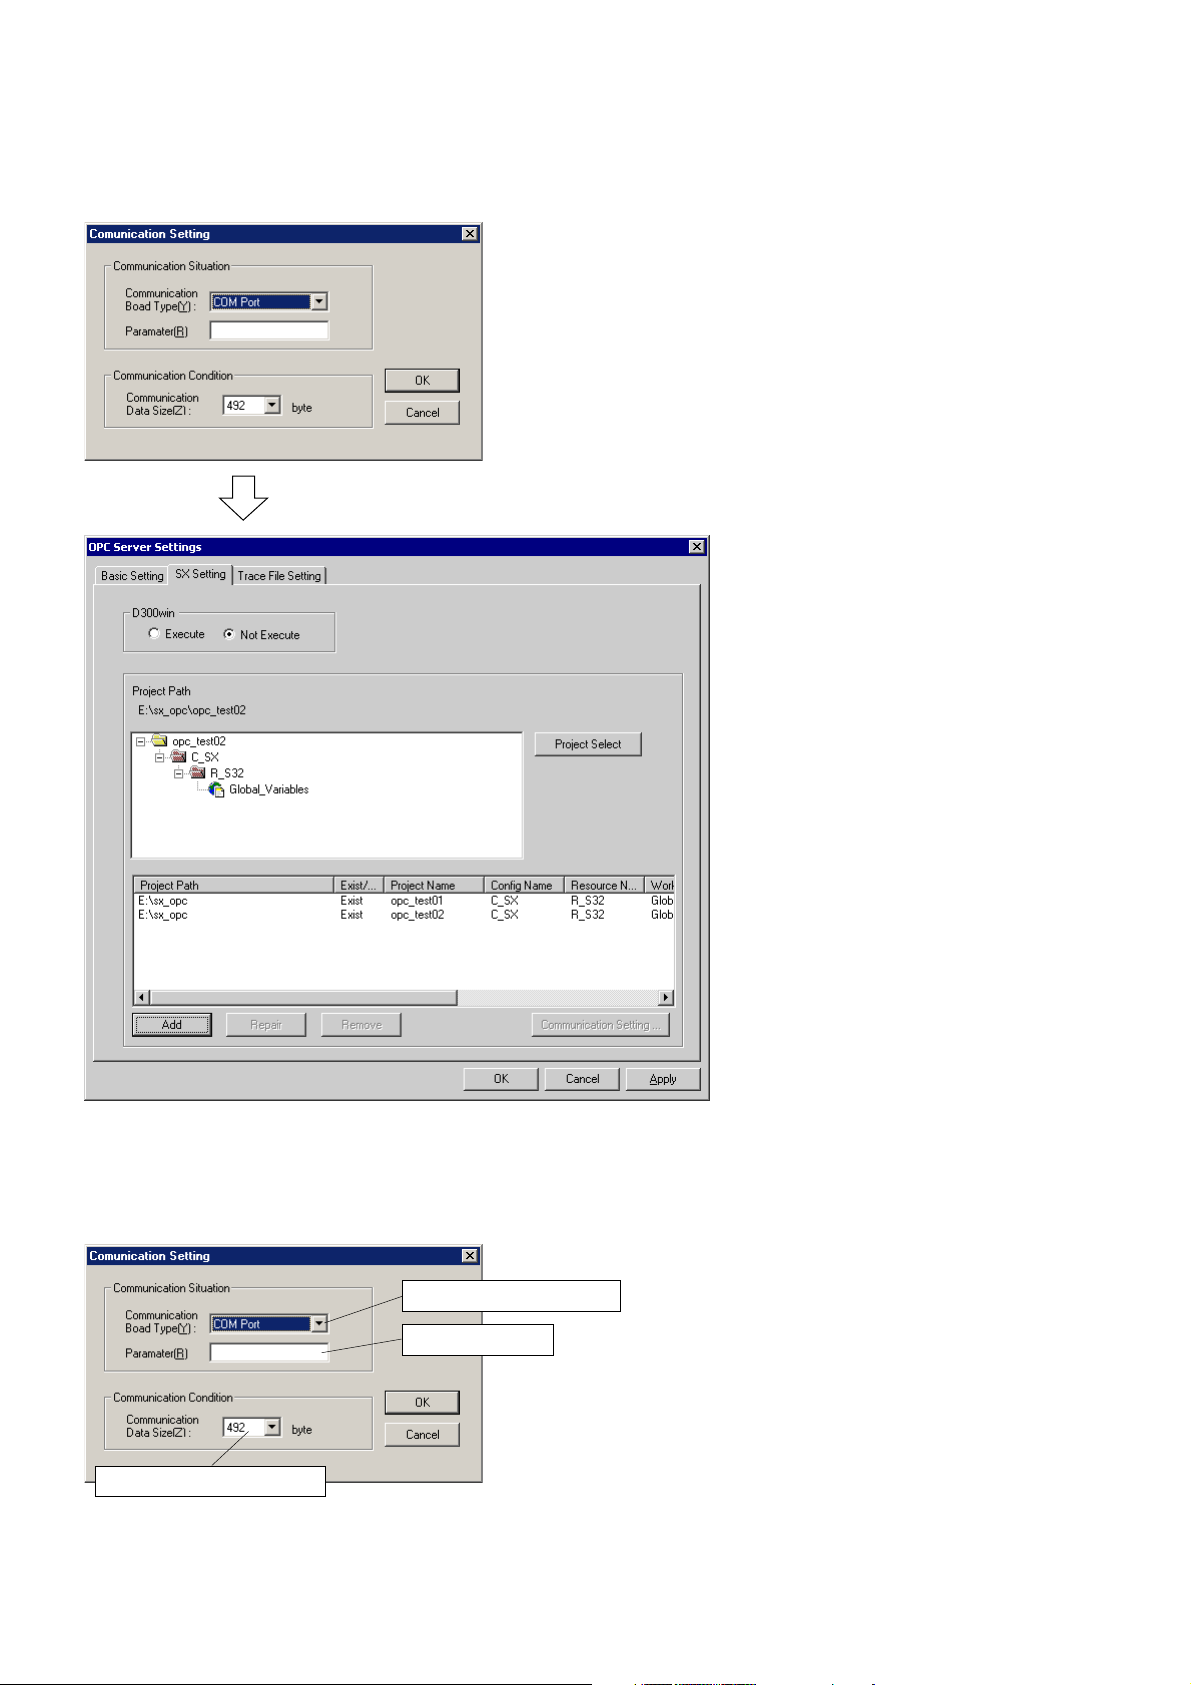
5) [Communication Setting] dialog appears. From this screen, click [OK] button.
6) Set the parameter for communications between SX_MDLW and SX system.
Then, select a global variable and click [Communication Setting] button to display [Communication Setting] dialog. From
this dialog, set the parameter for communications between SX_MDLW and MICREX-SX. For [Communication Data
Size], specify the size of data that can be transmitted in one operation. After setting the necessary items, click [OK]
button.
Set communication method.
Set the parameter.
Set communication data size.
4-4
Page 39
4-1 Setting SX_MDLW
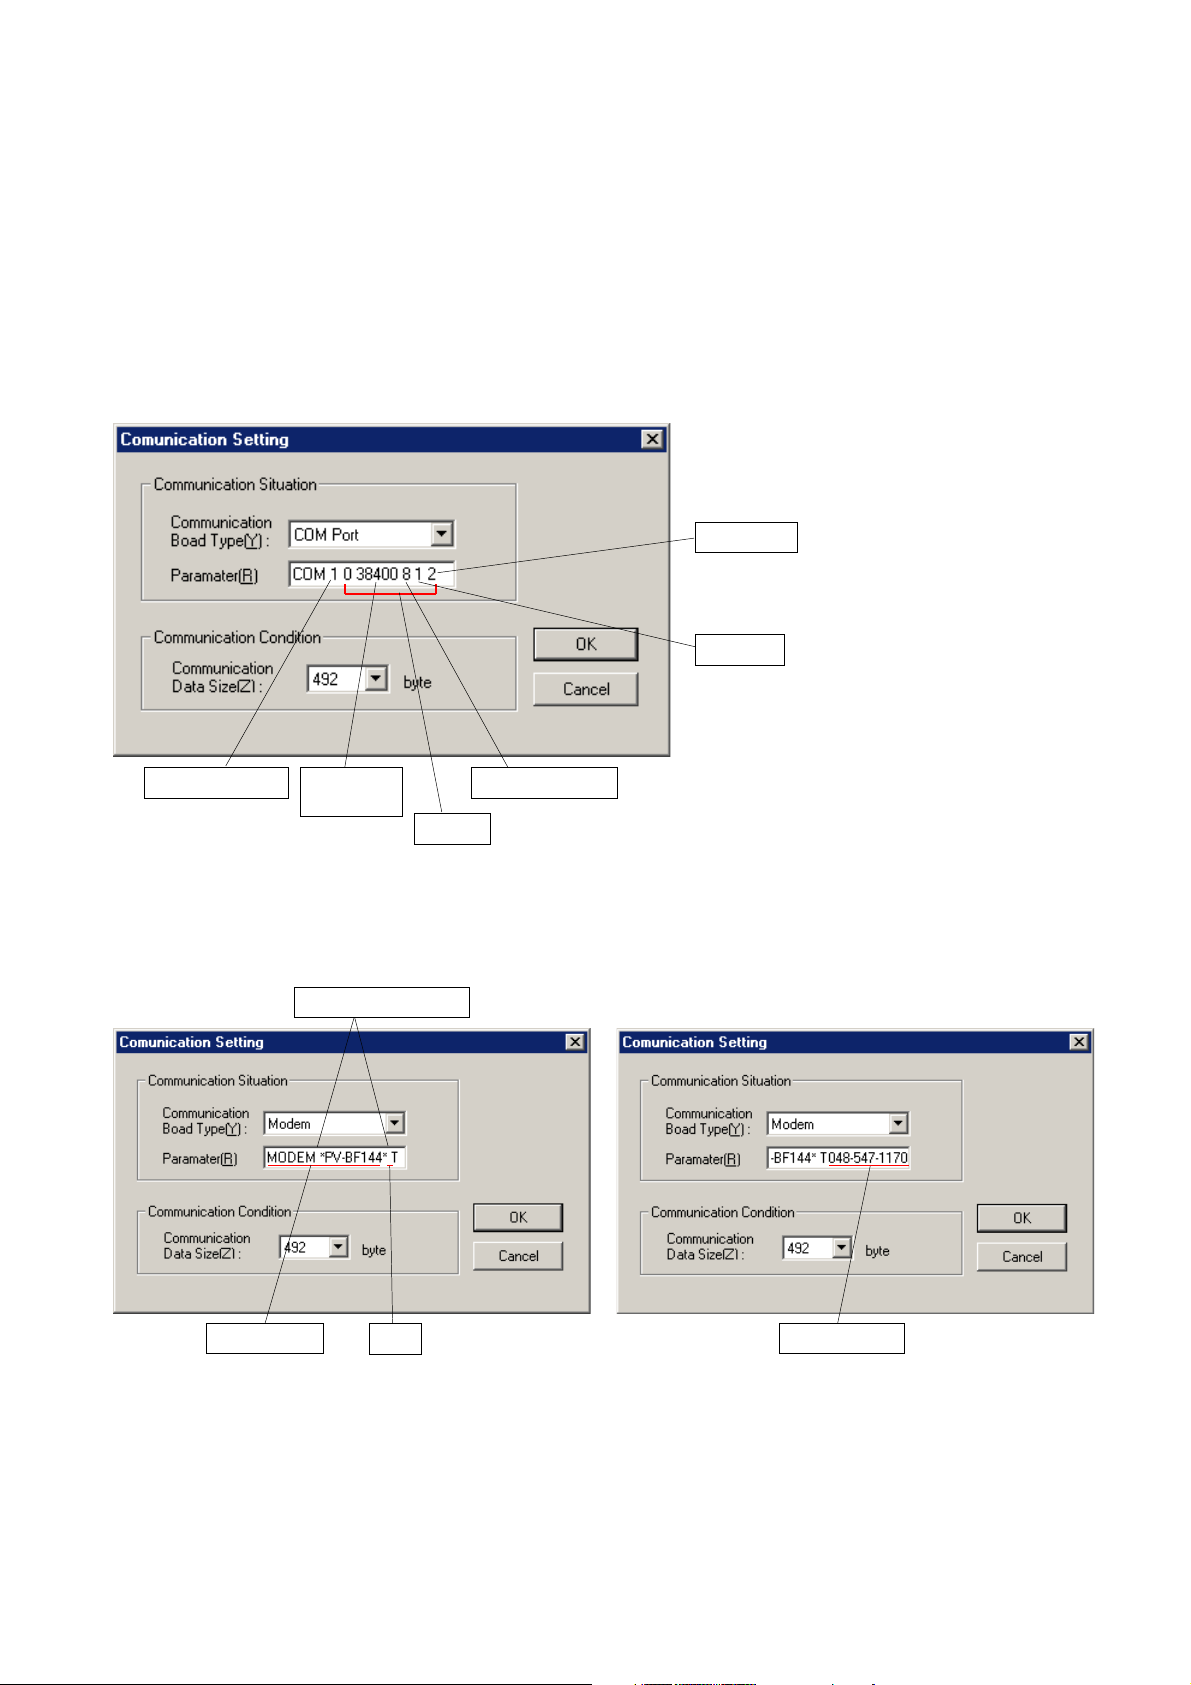
<Procedure for parameter setting>
Set the communication parameter in the procedure given below.
<For RS-232C>
Set “COM Port” as the communication port type and specify the communication port, baud rate, data length, stop bits and
parity as the parameter. Place a 1-byte space between parameters.
Communication baud rate → 38400, 19200, 9600, 4800 or 2400 (bps)
Data length → 8 or 7 (bits)
Stop bits → 1, 1.5 or 2
Parity → 0, 1, 2 or 3 (0: No parity, 1: Odd parity, 2: Even parity, 3: Mark)
<Sample setting>
Parity: Even
Stop bit: 1
COM port: COM1 Baud rate:
38400 baud
Data length: 8 bits
Optional
<For modem>
Set “Modem” as the communication port type and specify the modem name, tone/dial and phone number as the
parameter.
Modem name → As the modem name, enter the modem type enclosed in quotation marks.
Tone/dial → T: Tone, D: Dial
Phone number → Set the phone number. Example: 048-***-****
<Sample setting>
Place a 1-byte space.
V
V
Modem name
Tone
Phone number
4-5
Page 40

4-1 Setting SX_MDLW
<For Ethernet>
Set “Ethernet” as the communication port type and set the connection destination IP address (IP address of PC card I/F
module) and the port number.
<Sample setting>
Place a 1-byte space.
IP address
Port number
<For FL-net>
Set “FL-net (LAN board)” as the communication port type and set the connection destination node number (1 to 254) and
the local station node number (1 to 64).
<Sample setting>
Place a 1-byte space.
* Use of SX_MDLW enables connection
of a LAN board commercially available
to FL-net.
V
Connection destination
node number
Local station node number
(optional)
<SX bus board>
When using SX bus slave boards, a maximum of four SX bus slave boards are available. Select the communication port
type from “SX bus board 0” through “SX bus board 3.” When one SX bus slave board is used, select “SX bus slave board
0.” Parameter settings are not necessary.
<Sample setting>
4-6
Page 41
4-1 Setting SX_MDLW
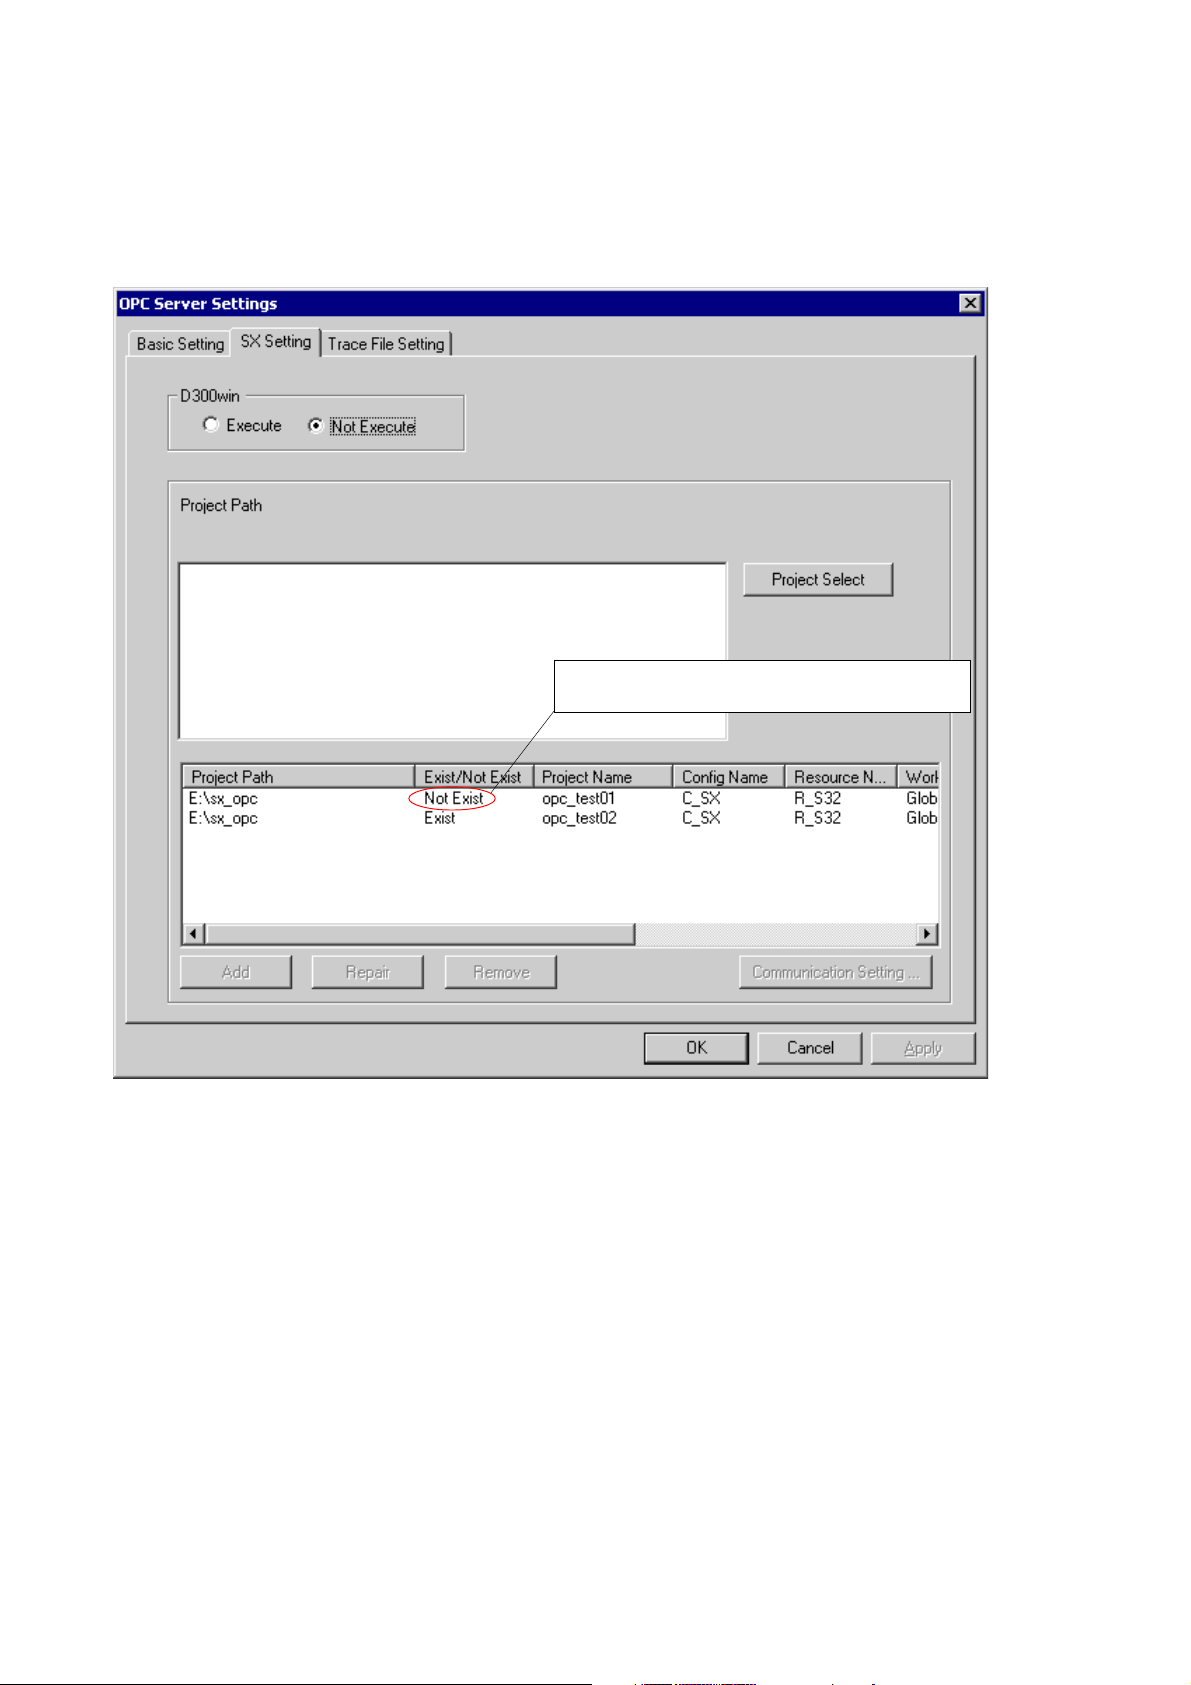
Note: Exist/Not Exist of project
There is “Exist/Not Exist” field on the setting data list screen. “Not Exist” means that the set project does not exist
on the project path for a certain reason or it has been deleted. When “Not Exist” is displayed, delete the data or
make the setting again. If SX_MDLW is started, leaving this field as “Not Exist,” an error will occur.
Indicates that project “opc_test01” does not exist on the
indicated project path.
4-7
Page 42

4-1 Setting SX_MDLW
(3) Trace setting
SX_MDLW can output a trace file (text data) indicating the history of its operations. The output trace file has the name
shown below.
<installation-destination-directory-name>¥Trace¥MSXopctrace.txt
A new trace file will be created when a certain period of time has elapsed or SX_MDLW has restarted after it was stopped.
The old file is saved as another file in the same folder.
<Procedure>
1) From [OPC Server settings] dialog, click [Trace File Setting] tab to display the screen shown below. From this screen,
select the information to be traced.
<Set items>
oN.selifecartonsetaercCPO_XS
rorrE.elifecartehtotCPO_XSniderruccosrorresetirW
dohteM .CPO_XSybdetucexedohtemehtelifecartehtnisetirW
llA .elifecartehtotnoitamrofnidohtemdnarorreehthtobsetirW
The old trace file created by SX_MDLW is deleted.
noitpircseD
4-8
Page 43
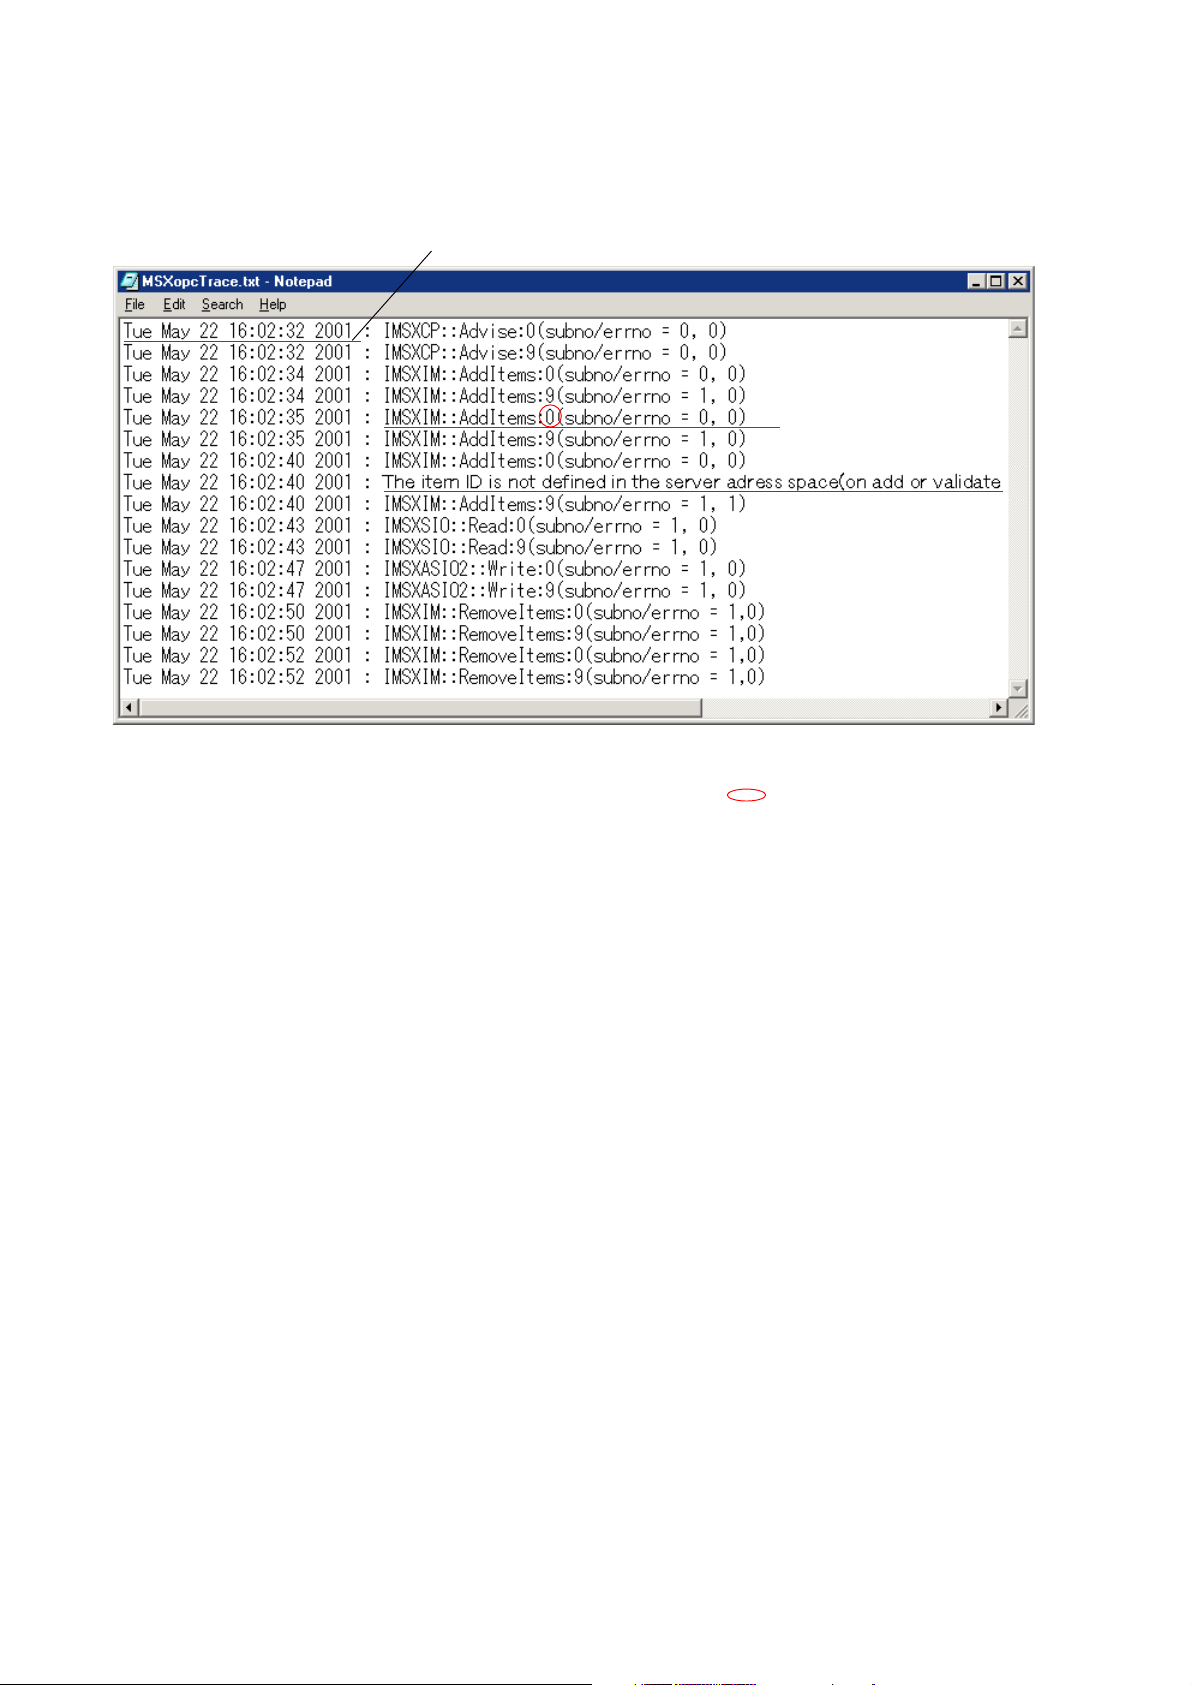
<Contents of trace file>
The contents of a trace file are as shown below.
1)
4-1 Setting SX_MDLW
2)
3)
1) Indicates time.
2) Indicates the method executed by SX_MDLW. “0” or “9” enclosed in circle indicates that there has been a call from
the client or the server has completed method processing, respectively.
3) Indicates error information.
4-9
Page 44

4-2 Setting DCOM
When using SX_MDLW as a remote server, DCOM settings are necessary. It cannot be connected unless DCOM is set.
<Procedure>
1) Click [Run...] from [Start] menu, specify “dcomcnfg.exe” and click [OK] button. Then, [Distributed COM Configuration
Properties] dialog appears.
Select “OPC MICREX-SX” and
click [Properties...] button.
2) [OPC MICREX-SX Properties] dialog appears. Click [Security] tab from [OPC MICREX-SX Properties] dialog and make
security related settings.
Check “Use custom access permissions” and click [Edit...] button.
4-10
Page 45

4-2 Setting DCOM
3) [Registry Value Permissions] dialog appears. From this dialog, click [Add...] button and add “Everyone All Users.”
Select “Everyone” and click [Add] button.
4-11
Page 46

4-2 Setting DCOM
4) Next, edit the user who can start the application.
Check “Use custom launch permissions” and click [Edit...] button.
5) [Registry Value Permissions] dialog appears. From this dialog, click [Add...] button and add “Everyone All Users”.
Select “Everyone” and click [Add] button.
4-12
Page 47
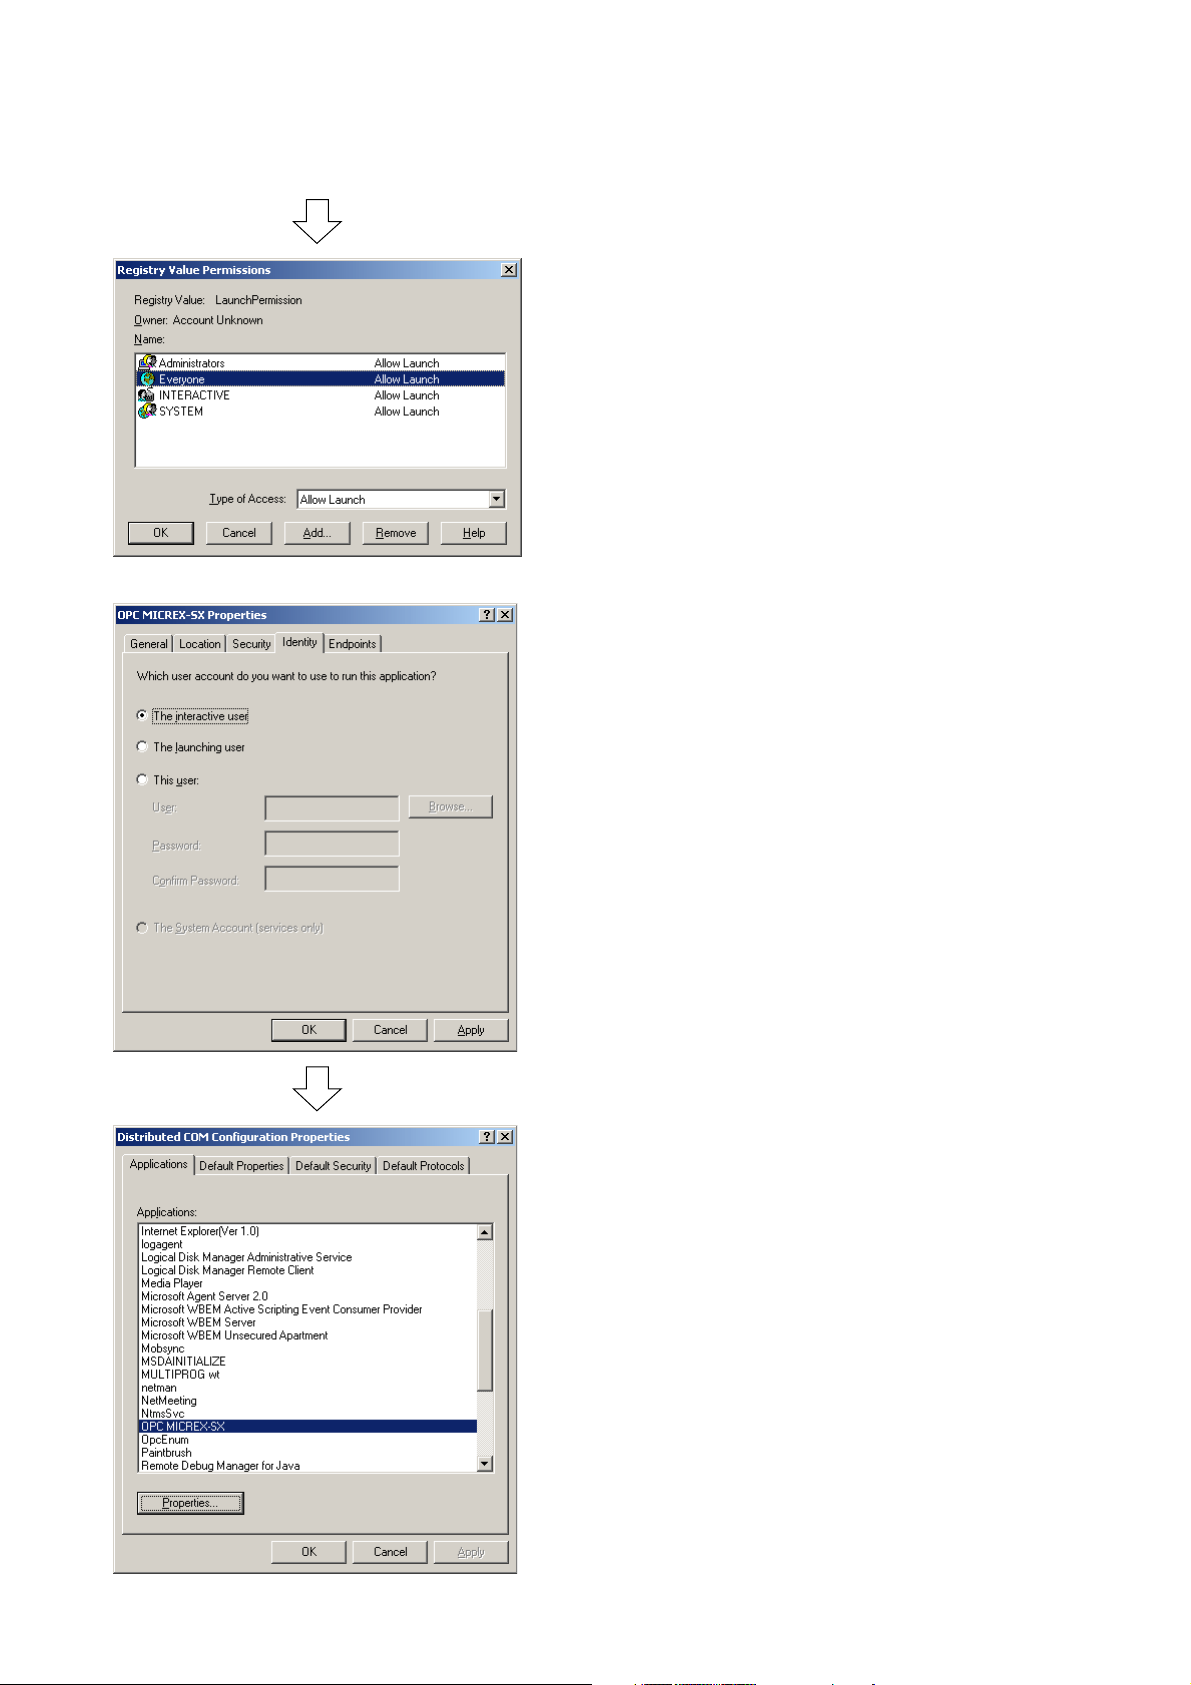
6) Specify the account to be used for application execution.
4-2 Setting DCOM
Click [Identity] tab, check “The interactive user” and click [OK] button.
[Distributed COM Configuration Properties] dialog reappears.
4-13
Page 48

4-2 Setting DCOM
7) Set the default properties. Click [Default Properties] tab.
Set “Default Authentication Level” to “Connect.”
Set “Default Impersonation Level” to “Impersonate.”
Click [OK] button to complete DCOM settings. Though “Everyone” is set for access permissions in this manual, a specific
user may also be set for accessing. Customize it depending on the operational environment.
4-14
Page 49

4-3 D300win-Related Settings
SX_MDLW accesses MICREX-SX system global variables. It cannot access local variables.
Define data to be accessed by SX_MDLW in “Global_Variables.”
Note: When a project has been modified online, SX_MDLW may not operate normally.
If a project has been modified online, be sure to restart SX_MDLW. If an exported project is to be accessed, retry
exporting.
4-15
Page 50

4-3 D300win-Related Settings
4-3-1 Exporting variable names
By exporting a variable name by D300win, the SX_CPU global variable can be accessed without starting D300win.
Because starting of D300win is not necessary, the load given to the personal computer can be reduced (recommended).
<Procedure>
1) Click [Export labels] from D300win [Extras] menu to display [Export labels] dialog.
Set the target configuration and resource.
Specify the export destination folder.
2) From [Export labels] dialog, set the configuration, resource and export destination folder for the global variable to be
exported and click [Export] button.
When export has completed, the dialog shown below appears.
The file exported is assigned file name “project-name.ini.”
Notes:
1. The variable name export function is installed by selecting “POD cooperated support” in D300win custom install.
2. The same file must not be specified as the export source and export destination.
4-16
Page 51

Section 5 Connecting from an OPC Client
Page
5-1 Preparing for SX_MDLW (OPC Server) Connection ................................................ 5-1
5-2 Connecting to SX_MDLW ........................................................................................... 5-2
5-3 Registering Groups .................................................................................................... 5-2
5-4 Registering Items ......................................................................................................... 5-2
Page 52

Section 5 Connecting from an OPC Client
5-1 Preparing for SX_MDLW (OPC Server) Connection
This section describes how an OPC client can be connected to SX_MDLW (OPC server).
Connect SX_MDLW and OPC client in the procedure described below.
Create project
Create MICREX-SX system project by
←
D300win and download it.
Download project
Starting D300win for
communication?
NO
Export variable name
Set SX_MDLW
Start OPC client
YES
See Section 4-3-1 “Exporting variable names.”
See Section 4-1 “Setting SX_MDLW.”
5-1
Page 53

5-2 Connecting to SX_MDLW
To connect to SX_MDLW (OPC server), ProgID of the OPC server to be connected must be specified. ProgID of
SX_MDLW is shown below.
FUJI_ELECTRIC.micrex-sx.001
In addition, when accessing as remote, “NodeName” must be specified. As “NodeName,” set the computer name or TCP/IP
address.
5-3 Registering Groups
After connection to SX_MDLW has completed, register the group. There is information that can be registered to the server
at the same time with group registration. For details, refer to technical documents and specifications such as “Introduction
to OPC Applications” published by OPC Council Japan.
When connecting from SCADA software, group registration may be carried out internally and, in such a case, manual
registration of the group is not necessary. For details about connections, refer to sections related to OPC connections in
SCADA software manuals.
5-4 Registering Items
An OPC client registers an item to read/write the MICREX-SX system global variable. The name of the registered item is
specifically defined by the OPC server. An SX_MDLW item name has a hierarchical structure.
(project-path).(project-name).(configuration-name).(resource-name).(global-variable-worksheet-name).(global-variable-name)
As the project, configuration, resource and worksheet names, specify the names created by D300win. The variable name
in the global variable worksheet contained in them becomes the global variable.
Because SX_MDLW is compliant with OPC Data Access2.0, item names that can be accessed can be acquired using the
browse function.
5-2
Page 54

Section 6 Troubleshooting
(1) SX_MDLW cannot start .......................................................................................................................... 6-1
(2) SX_MDLW goes down when an OPC server tries to connect to the server. .......................................... 6-1
(3) The server functions not in the way specified in processing instructions. ............................................... 6-1
(4) Browsing is disabled. .............................................................................................................................. 6-1
Page
Page 55

Section 6 Troubleshooting
For troubleshooting, also refer to the data output to the trace file.
(1) SX_MDLW cannot start
• For Remote access, starting of SX_MDLW may be inhibited by the security function of DCOM. Check the DCOM
settings. See Section 4-2 “Setting DCOM.”
• Check that the message manager has started.
• The SX_MDLW registry information may contain an error. Make reinstallation.
(2) SX_MDLW goes down when an OPC server tries to connect to the server.
• The proxy stub registration information may contain an error. Make reinstallation.
(3) The server functions not in the way specified in processing instructions.
• The server previously started may have not been completely shut down. Use the task manager to shut down the
previously started server and make a connection again.
(4) Browsing is disabled.
• Recompile the project by D300win and prepare again for connection. See Section 5-1 “Preparing for SX_MDLW (OPC
Server) Connection.”
6-1
Page 56

Gate City Ohsaki, East Tower,
11-2, Osaki 1-chome, Shinagawa-ku, Tokyo 141-0032, Japan
E-mail: micrex-sx@fujielectric.co.jp
URL: http://www.fujielectric.com/
Materials covered in this document are subject to revision due to the modification of the product.
Issued as FE consolidated edition, June 2011
 Loading...