

Page 1
Thank you for purchasing the Fuji module type temperature controller. Once you have
conrmed that this is the product you ordered, please use it in accordance with the
following instructions.For detailed information on operating this equipment, please refer
to the separate user's manual. Please keep this Instruction Manual within easy reach of
persons using this equipment
Model : PUMCL
Instruction Manual (Installation)
Multi-loop Module Type Temperature Controller
Enhanced Communication Module
(CC-Link)
CAUTION
The contents of this manual are subject to change without notice. This manual is
complied with possible care for the purpose of accuracy, however, Fuji Electric
Systems shall not be held liable for any damages, including indirect damage,
caused by typographical errors, absence of information or use of information in
this manual.
Conrming Specications and Accessories
Before using the product, conrm that it
matches the type ordered.
(For model code, please refer to page 4.)
Conrm that all of the following
accessories are included.
Temperature Controller Enhanced
Communication Module (CC-Link) 1 Unit
Instruction Manual 1 copy
Internal Communication Termination
Resistance (100 Ω) 1 Unit
Related Information
Refer to "Module Type Temperature
Controller Enhanced Communication
Module (CC-Link) User's Manual" for
details about the items described in this
manual.
Content Material
name
Material No.
Specication Catalog ECNO 1162
Operating
instruction
CC-Link
Module
User’s
Manual
INP-
TN5A0200-E
Please Read First (Safety Warnings)
Please read this section thoroughly before using, and observe the mentioned safety
warnings fully.
Safety warnings are categorized as “Warning”, “Caution” or “Risk of Electrical Shock”.
Warning Improper use of the equipment may result in death or serious injuries.
Caution
Improper use of the equipment may cause injury to the user or property
damage.
Risk of
Electrical
Shock
Indicates that a risk of electrical shock is present and the associated
warning should be observed.
1 Warning
1-1 Installation and Wiring
-This equipment is intended to be used under the following conditions.
Ambient temperature -10 to 50 degree C
Ambient humidity 90% RH or below (with no condensation)
Vibration 10 to 70Hz less than 9.8m/s² (1G)
Warm-up time 30 min. or more
Installation category IEC1010-1: class II
Pollution level IEC1010-1: degree 2
-Note that the insulation class for this equipment is as follows. Before installing,
please conrm that the insulation class for the equipment meets usage requirements.
Power SLD/FG terminal (CC-Link connecting terminal)
Loader communication CC-Link communication
Functional insulation (AC1000V) Functional insulation (AC500V) Functional insulation (AC50V)
-In cases where damage or problems with this equipment may lead to serious
accidents, install appropriate external protective circuits.
-To prevent damage and failure of the equipment, provide the rated power voltage.
-To prevent electric shock and equipment failure, do not turn the power ON until all
wiring is complete.
-Before turning the power ON, conrm that clearance space has been secured to
prevent shock or re.
-Do not touch the terminal while the machine is ON. Doing so risks shock or
equipment errors.
-Never disassemble, convert, modify or repair this equipment. Doing so risks abnormal
operation, shock or re.
-All of the wiring should be class 1 type wiring or the low voltage wires are routed
separately from the hazardous voltage wires to ensure separation of circuits.
-When using a AWG-16 cable, you should use the crimp terminal that material
thickness is 0.9mm or less.
1-2 Maintenance
-When installing or removing the equipment, turn the power OFF. Otherwise, shock,
operational errors or failures may be caused.
-Periodic maintenance is recommended for continuous and safe use of this
equipment.
-Some parts installed on this equipment have a limited life and/or may deteriorate with
age.
-The warranty period for this unit (including accessories) is one year, if the product is
used properly.
2 Caution
2-1 Cautions when Installing
For install in UL listed enclosure only.
Please avoid installing in the following locations.
-Locations in which the ambient temperature falls outside the range of 0 to 50 degree
C when equipment is in use.
-Locations in which the ambient humidity falls outside the range of 45 to 85% RH
when equipment is in use.
-Locations with rapid temperature changes, leading to dew condensation.
-Locations with corrosive gases (especially sulde gas, ammonia, etc.) or ammable
gases.
-Locations with vibration or shock directly.
-Locations in contact with water, oil, chemicals, steam or hot water.
(If the equipment gets wet, there is a risk of electric shock or re, so have it inspected
by Fuji distributor.)
-Locations with high concentrations of atmospheric dust, salt or iron particles.
-Locations with large inductive interference, resulting in static electricity, magnetic
elds or noise.
-Locations in direct sunlight.
-Locations that build up heat from radiant heat sources, etc.
-A switch or circuit Breaker shall be included in the building installation.
Please be it in close proximately to the equipment and within easy reach of the
operator, and mark it as the disconnecting device for the equipment.
2-2 Cautions when Attaching to DIN rails
-In case of mounting the temperature controllers to DIN rails, remember to push up
the locking tabs to fasten the controllers onto DIN rail.
-To connect controllers, rst release all locking tabs. Then, connect controllers and
push up all locking tabs. Make sure that all locking tabs are fastened.
-Never fail to turn the power OFF, before detaching the terminal block or removing the
main unit from the base part.
-In order to aid heat dissipation, do not block the top and the bottom of the equipment.
-When mounting / dismounting controllers to / from DIN rails, 30mm of clearance
above and under the controllers should be provided.
-Do not use the terminal screws other than those supplied with this product.
2-3 Cautions for Wiring
-For wiring to terminal blocks, apply crimp terminals for M3 screw.
Screw size : M3 x 7 (with square washer)
Screw tightening torque : 0.78 N•m (8 kgf•cm)
-To avoid noise conductor effects, input signal wires should be separated from electric
power lines or load lines.
-To comply with CE marking (EMC), we recommend to attach ferrite core to
communication cable and power cable.
2-4 Error Operation
-The alarm function does not work properly when an error occurs unless the settings
are made correctly. Always verify its setting before operation.
2-5 Others
-Please do not wipe the equipment with organic solvents such as alcohol or benzene,
etc. If wiping is necessary, use a neutral cleaning agent.
-Do not use mobile phones near this equipment (within 50cm). Otherwise a
malfunction may result.
-Malfunctions may occur if the equipment is used near a radio, TV, or wireless device.
-This equipment requires approx. 20 seconds before it starts to output.
-Before installing and wiring, take necessary measures for electrostatic discharge
(ESD).
- 1 -
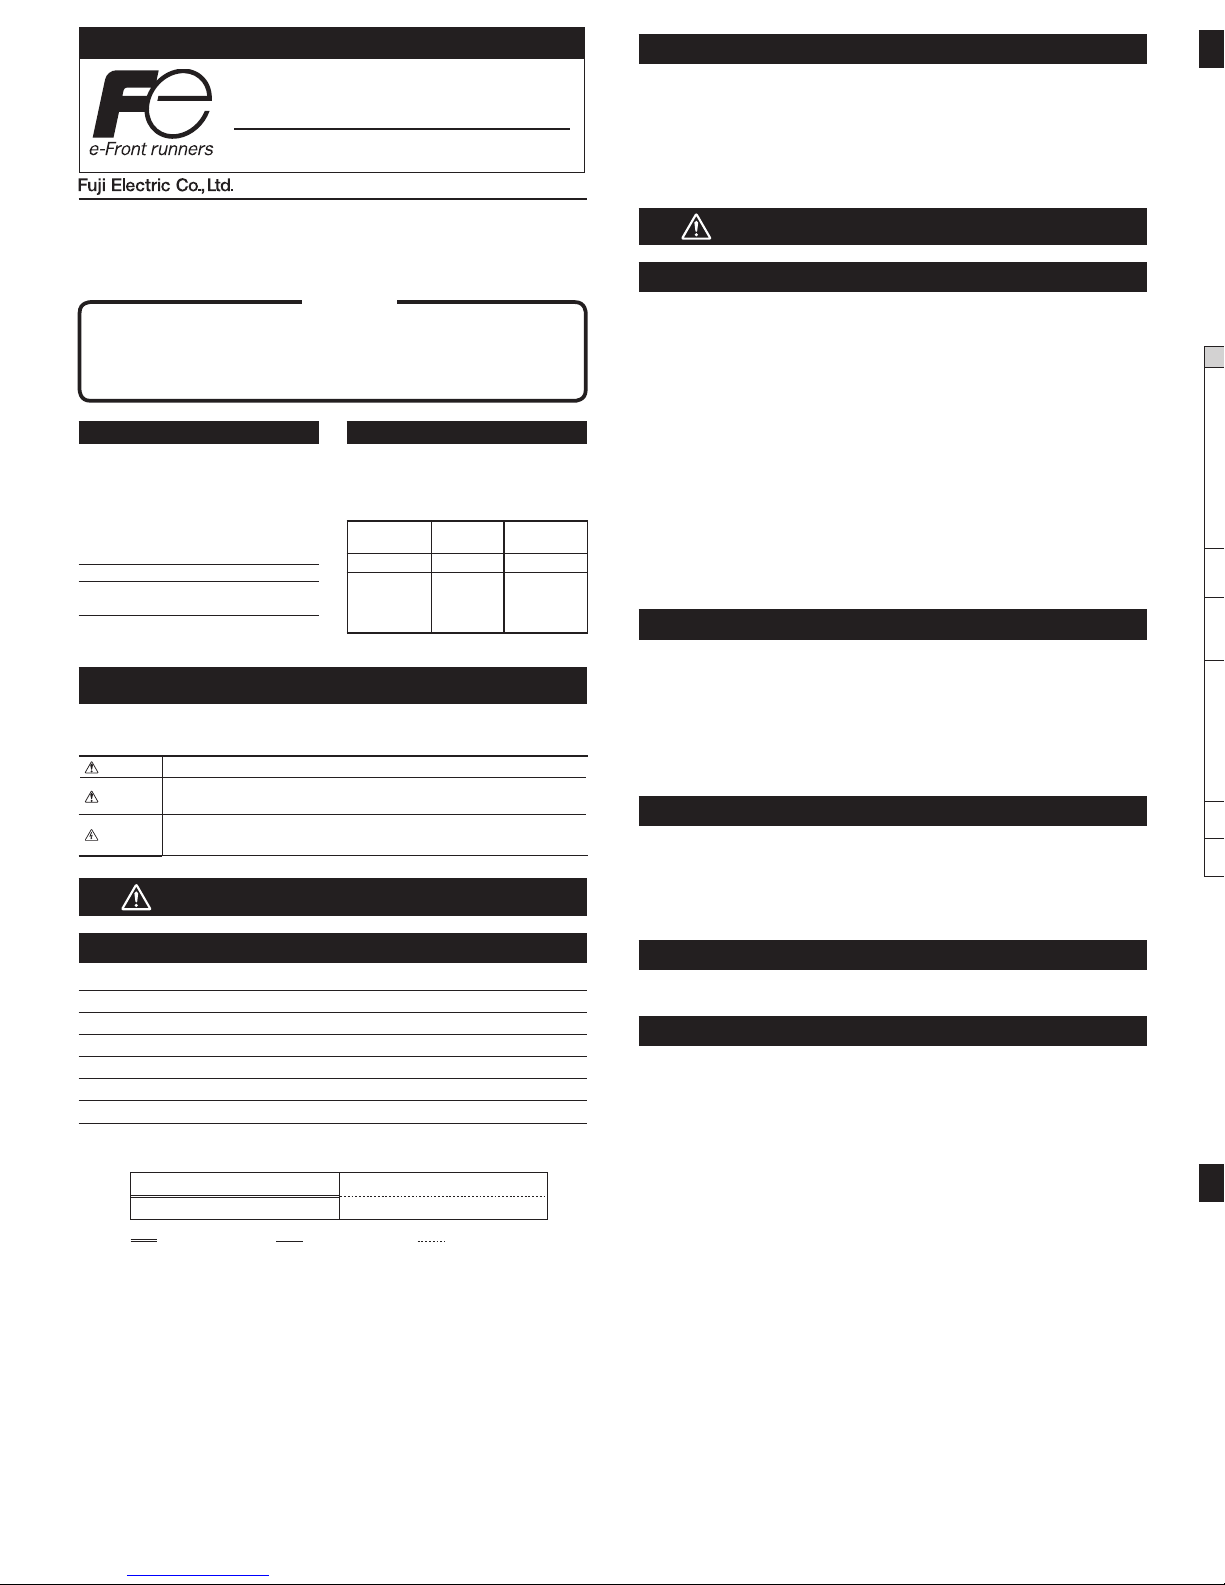
Part names and Functions
-Enhanced communication module controller
LED indicator
Three color LED lamps indicate the following operational conditions.
LED Green Red Orange
PWR
(In priority order)
OFF: Power is OFF
Flash: In a (0.4-second)
1: Modules detected
2: After initial polling,
Flash: In a (0.1 second)
ON: Running
BUS
ON: Receiving by
L. RUN
ON: Data linking
OFF: H/W resetting, or
L.ERR ―
SD
ON: Transmitting the
RD
ON: Receiving the
-Base part
Setting
-Setting CC-Link Station No.
Station No. of CC-Link can be set using the Station No. conguration switch. Setting
range is 1 to 61.
Apply a ne tip at-head screwdriver to turn the Station No. conguration switch.
-CC-Link communication can not perform with the factory-set value (0). Make sure to
set the Station No..
-When selected 0 or over 62, a Station No. selection error will occur and [L.ERR] LED
will be ON.
INP-TN1PUMCLb-E
Page 2
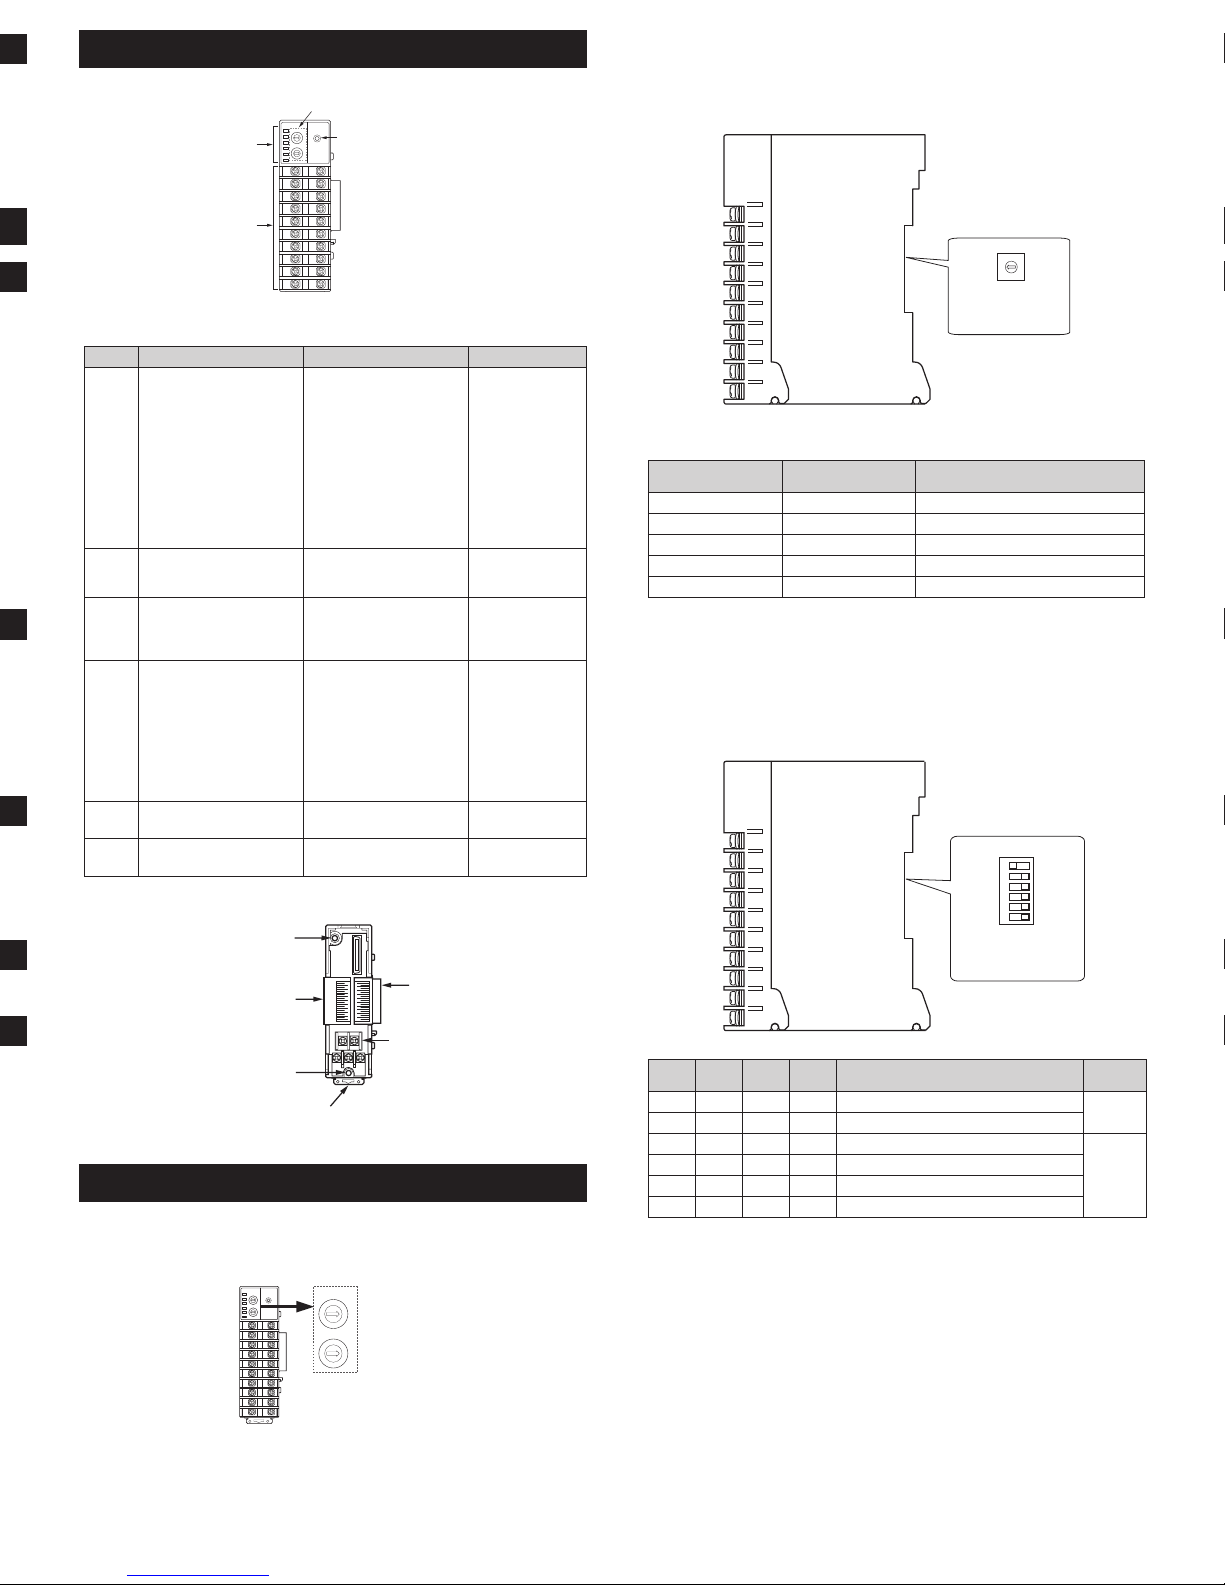
Part names and Functions
-Enhanced communication module controller
LOADER
PUM-C
LED indicator
Loader communication port
Station No.
Configuration switch
See [Setting]
Input/output
terminal block
See [Wiring]
PWR
BUS
L.RUN
L.ERR
SD
RD
STATION No.
7
6
5
4
3
2
1
0
9
8
x10
7
6
5
4
3
2
1
0
9
8
x1
LED indicator
Three color LED lamps indicate the following operational conditions.
LED Green Red Orange
PWR
(In priority order)
OFF: Power is OFF
Flash: In a (0.4-second)
cycle:
1: Modules detected
by initial polling: 0
2: After initial polling,
an inter-module
communication
error occurs
Flash: In a (0.1 second)
cycle: Initial polling
ON: Running
― ―
BUS
ON: Receiving by
inter-module
communication
―
ON: Transmitting by
inter-module
communication
L. RUN
ON: Data linking
OFF: H/W resetting, or
data linking not
performed
― ―
L.ERR ―
ON: Communication error
(CRC error, Station
number setting error,
communication
speed setting error)
OFF: Receiving normally,
or while H/W
resetting
Flash: Setting switches
during the power ON
―
SD
ON: Transmitting the
CC-Link data
― ―
RD
ON: Receiving the
CC-Link data
― ―
-Base part
Mounting screw hole
Module connector
Mounting screw hole
See [Mounting]
Locking tab
Power terminal block
See [Wiring]
Module connector
(Connect modules laterally)
Setting
-Setting CC-Link Station No.
Station No. of CC-Link can be set using the Station No. conguration switch. Setting
range is 1 to 61.
Apply a ne tip at-head screwdriver to turn the Station No. conguration switch.
x10 :
High order setting
(set value x 10)
x1 :
Low order setting
(set value x 1)
Setting range :
1 to 61
(factory-set value = 0)
STATION No.
7
6
5
4
3
2
1
0
9
8
x10
7
6
5
4
3
2
1
0
9
8
x1
LOADER
PUM-C
PWR
BUS
L.RUN
L.ERR
SD
RD
STATION No.
7
6
5
4
3
2
1
0
9
8
x10
7
6
5
4
3
2
1
0
9
8
x1
-CC-Link communication can not perform with the factory-set value (0). Make sure to
set the Station No..
-When selected 0 or over 62, a Station No. selection error will occur and [L.ERR] LED
will be ON.
-Setting CC-Link Communication speed.
Communication speed of CC-Link can be set using the station number conguration
switch on the back of the controller.
Apply a ne tip at-head screwdriver to turn the Station No. conguration switch.
0
1
2
3
4
5
6
7
CC-Link
communication
speed setting
Communication speed and maximum transmission distance
(when using Ver.1.10 compliant CC-Link special cable)
Communication speed
setting
Communication speed
Max. transmission distance
(Max. Network Length)
0 156kbps 1200m
1 625kbps 900m
2 2.5Mbps 400m
3 5Mbps 160m
4 10Mbps 100m
-When 5 to 9 are selected, a communication speed sellection error will occur and
[L.ERR] LED will be ON.
-Setting No.of stations occupied / Extended cyclic
No.of stations occupied/Extended cyclic can be set using the dip switch (SW1 to SW4)
on the back of the controller.
1 2 3 4 5 6
No.of stations occupied /
Extended cyclic setting
SW1 SW2 SW3 SW4
No.of stations occupied, Extended cyclic
(No.of Ch)
Compliant
Ver.
OFF OFF OFF OFF 4 stations occupied x 1 (8Ch)
Ver.1
ON OFF OFF OFF 4 stations occupied x 1 (16Ch)
OFF ON OFF OFF 4 stations occupied x 2 (16Ch)
Ver.2
ON ON OFF OFF 4 stations occupied x 2 (32Ch)
OFF OFF ON OFF 4 stations occupied x 4 (32Ch)
ON OFF ON OFF 4 stations occupied x 4 (64Ch)
-If the setting of the dip switch is other than those above, the actual setting will be "4
stations occupied x 1 (8Ch)"
- 2 -
Page 3

- 3 - - 4 -
Mounting
-Dimensions
1.5
6
30
85
(10)
(8)
(30)
100
5
50
6.1
LOADER
PUM-C
PWR
BUS
L.RUN
L.ERR
SD
RD
STATION No.
7
6
5
4
3
2
1
0
9
8
x10
7
6
5
4
3
2
1
0
9
8
x1
Front screw terminal cover
(optional)
Main unit (when detached from the base part)
Terminal block
(when detached
from the
main unit)
Base part
(when detached from
the main unit)
(mm)
Terminal
screw
size M3
Terminal
screw size M3
When locking tab is released
(when mounting / dismounting to / from DIN rails)
DIN rail
Cautions when mounting
In order to aid heat dissipation, 30mm of clearance (50mm recommended) above and
under the controllers should be provided.
30 or more30 or more
-Mounting to DIN rails
1. Pull down the locking tab of the
base part. Hook the back of the
controller onto the upper part of
DiN rail.
2. Push the controller in the
direction of arrow 2.
3. Push up the locking tab to fasten
the controller to DIN rail.
-When connecting controllers after
attaching to DIN rail, push up
the locking tab after connecting
controllers.
-Attaching end plates
When attaching controllers to DIN rails, we recommend to attach side connecting
terminal covers (right and left 1set), then end plates (option) to the ends of the right
most and left most controllers.
-Fixing with screws
When mounting controllers inside a cabinet with screws, connect the base parts of
controllers rst.
-Fixing screws are not included. Please prepare screws as required.
1. Refer to the gure below for the mounting
screw hole size to decide the mounting position.
2. Remove the main units from the base part.
See [How to detach the base part]
3. Connect base parts. Push up to fasten all the locking tabs.
4. Fixate the base parts onto the mounting position inside the cabinet with screws.
5. Attach the main units to the base parts.
-Connecting controllers
1. Check that locking tabs are pulled down
(released).
2. Connect controllers with each other using
side connectors.
3. After mounting connected controllers onto
DIN rail, make sure to push up all locking
tabs. Controllers are fastened to DIN rail and
to each other.
4. All connected controllers are connected to
power supply via side connectors if one of
controllers is directly connected to them.
Wiring
-Front terminal block
CC-Link
-Base part (power terminal)
Specication
General Specication
Power Supply : DC24V±10%
Power Consumption : Maximum 3.2W (135mA) [when DC24V is applied]
Dimensions : 30 (W) × 100 (H) × 85 (D) mm (excluding the terminal cover and a
Weight : Approx. 200 g
Installation method : Mounting on the wall or, install in the cabinet with the DIN rail with
Ambient temperature * : -10 to 50 degrees C
* "Ambient temperature" is the temperature underneath the controller
Ambient humidity : 90% RH or less (non condensing)
System maximum modules : Up to max. 17 modules of any Model PUMA/B/C/CL/CM/V/N/T plus
System power : 24V dc, 100W maximum, Class 2
Memory backup : Nonvolatile memory (EEPROM) backup
No.of updates : 100,000
Communication function
Compliant version : CC-Link Ver.2.00 / 1.10
Station type : Remote device station
Communication speed and distance
Communication
speed
Communication
distance
* For more details, refer to “CC-Link Cable Wiring Manual” issued by CC-Link Partner Association.
No. of stations occupied / Station No.: 4 stations / Settable Station No. 1 to 61
Communication data length
No.of stations occupied /
Extended cyclic
4 stations occupied x 1 128 bit each 16 words each 2 or 4 units
4 stations occupied x 2 256 bit each 32 words each 4 or 8 units
4 stations occupied x 4 512 bit each 64 words each 8 or 16 units
Connecting cable : Ver.1.10 compliant CC-Link special cable
Connecting method : M3 screw terminal block
Terminating resistance : External (110 ohm, 1/2W)
6.0mm or less
* Material thickness
1 2 3 4 5 6 7 8 9 10
1 2 3 4 5 6 7 8
LOADER
PUM-C
LOADER
PUM-A
PWR
COM
OUT1
OUT2
OUT3
OUT4
STATION
4
3
2
1
0
F
E
D
C
B
A
9
8
7
6
5
Locking tab
Side connector
PWR
BUS
L.RUN
L.ERR
SD
RD
STATION No.
7
6
5
4
3
2
1
0
9
8
x10
7
6
5
4
3
2
1
0
9
8
x1
LOADER
PUM-C
PWR
BUS
L.RUN
L.ERR
SD
RD
LOADER
PUM-A
PWR
COM
OUT1
OUT2
OUT3
OUT4
STATION
4
3
2
1
0
F
E
D
C
B
A
9
8
7
6
5
LOADER
PUM-A
PWR
COM
OUT1
OUT2
OUT3
OUT4
STATION
4
3
2
1
0
F
E
D
C
B
A
9
8
7
6
5
STATION No.
7
6
5
4
3
2
1
0
9
8
x10
7
6
5
4
3
2
1
0
9
8
x1
(30)
9
0.2
88.5
0.2
(100)
(3)
30
+0.7
+0.2
2-M3
[mm]
How to detach the base part
1. Press the lock lever on the top of the
controller.
2. Pull down the upper part of main unit.
3. Detach the cutout on the lower end
of back of the main unit from the
projection on the base part.
-When attaching the main unit to the
base part, take the reverse procedure
to removing the main unit from the
base part.
-Make sure that the lock lever of the
main unit is tted into the base part.
Lock lever
Main
Projection
Locking tab
DIN rail
Hook the back
of controller
LOADER
PUM-C
LOADER
PUM-E
PWR
COM
STATION
4
3
2
1
0
F
E
D
C
B
A
9
8
7
6
5
Di1
Di2
Di3
Di4
Di5
Di6
Di7
Di8
Do1
Do2
Do3
Do4
Do5
Do6
Do7
Do8
LOADER
PUM-E
PWR
COM
STATION
4
3
2
1
0
F
E
D
C
B
A
9
8
7
6
5
Di1
Di2
Di3
Di4
Di5
Di6
Di7
Di8
Do1
Do2
Do3
Do4
Do5
Do6
Do7
Do8
LOADER
PUM-E
PWR
COM
STATION
4
3
2
1
0
F
E
D
C
B
A
9
8
7
6
5
Di1
Di2
Di3
Di4
Di5
Di6
Di7
Di8
Do1
Do2
Do3
Do4
Do5
Do6
Do7
Do8
LOADER
PUM-A
PWR
COM
OUT1
OUT2
OUT3
OUT4
STATION
4
3
2
1
0
F
E
D
C
B
A
9
8
7
6
5
PWR
BUS
L.RUN
L.ERR
SD
RD
STATION No.
7
6
5
4
3
2
1
0
9
8
x10
7
6
5
4
3
2
1
0
9
8
x1
Side connecting terminal cover
(right & left 1 set)
DIN rail mounting
end plate
DIN rail mounting
end plate
Page 4

Wiring
-Front terminal block
Vacant
Vacant
LOADER
PUM-C
PWR
BUS
L.RUN
L.ERR
SD
RD
11
12
13
14
15
16
17
18
19
20
21
22
23
24
25
26
27
28
29
30
STATION No.
7
6
5
4
3
2
1
0
9
8
x10
7
6
5
4
3
2
1
0
9
8
x1
DA
DB
DG
SLD
FG
CC-Link
22
21
23
25
24
Internal Communication
Terminating Resistance
(option)*
* This terminating resistance is different from the CC-Link terminating resistance
(this is the terminating resistance for inter-module communication).
Install the resistance (100Ω) supplied with this controller.
12
11
-Base part (power terminal)
DC 24V (‑)
Power Terminal
DC 24V (+)
Note: The power cables more than one should not be connected.
Specication
General Specication
Power Supply : DC24V±10%
Power Consumption : Maximum 3.2W (135mA) [when DC24V is applied]
Dimensions : 30 (W) × 100 (H) × 85 (D) mm (excluding the terminal cover and a
projection)
Weight : Approx. 200 g
Installation method : Mounting on the wall or, install in the cabinet with the DIN rail with
M3 screws
Ambient temperature * : -10 to 50 degrees C
* "Ambient temperature" is the temperature underneath the controller
inside equipment or the cabinet where the controller is installed.
Ambient humidity : 90% RH or less (non condensing)
System maximum modules : Up to max. 17 modules of any Model PUMA/B/C/CL/CM/V/N/T plus
to max 16 modules of Model PUME
System power : 24V dc, 100W maximum, Class 2
Memory backup : Nonvolatile memory (EEPROM) backup
No.of updates : 100,000
Communication function
Compliant version : CC-Link Ver.2.00 / 1.10
Station type : Remote device station
Communication speed and distance
Communication
speed
156kbps 625kbps 2.5Mbps 5Mbps 10Mbps
Communication
distance
1200m or less 900m or less 400m or less 200m or less 100m or less
* For more details, refer to “CC-Link Cable Wiring Manual” issued by CC-Link Partner Association.
No. of stations occupied / Station No.: 4 stations / Settable Station No. 1 to 61
Communication data length
No.of stations occupied /
Extended cyclic
Remote input/output
(RX/RY)
Remote register
(RWr/RWw)
Control module
(PUM-A) No. of
connectable units
4 stations occupied x 1 128 bit each 16 words each 2 or 4 units
4 stations occupied x 2 256 bit each 32 words each 4 or 8 units
4 stations occupied x 4 512 bit each 64 words each 8 or 16 units
Connecting cable : Ver.1.10 compliant CC-Link special cable
Connecting method : M3 screw terminal block
Terminating resistance : External (110 ohm, 1/2W)
Crimp terminal size
Please prepare cables and crimp terminals of the size indicated below.
When using a AWG-16 cable, you should use the crimp terminal that material thickness is 0.9mm
or less.
Cable type Size
Thermocouple (Compensation lead wire) 0.25 to 1.25mm
2
(AWG 22 to 16)
Power supply, output, others 0.25 to 1.25mm
2
(AWG 22 to 16)
Crimp terminal
Cable size Screw tightening torque
0.25 to 1.25mm
2
(AWG 22 to 16) 0.8 N•m
φ3.2mm
6.0mm or less
Ring crimp terminal Y crimp terminal
3.2mm
6.0mm or less
* Material thickness
0.9mm or less.
Model code
Enhanced communication module (CC-Link)
1 2 3 4 5 6 7 8 9 10
P U 1-0M Y Y
C
L
A
B
Contents
Module type
Advanced communication module
Communication function
CC-Link communication
Instruction manual
Japanese
English
Accessories (Optional)
1 2 3 4 5 6 7 8
P U M Z
*
A 0 2
A 0 3
A 0 4
L 0 1
Contents
DIN rail mounting end plate
Side connecting terminal cover (right & left 1 set)
Front face screw terminal cover
Loader connecting cable (RS-232C)
Gate City Ohsaki, East Tower, 11-2, Osaki 1-chome,
Shinagawa-ku, Tokyo 141-0032, Japan
http://www.fujielectric.com
Phone: 81-3-5435-7280, 7281 Fax: 81-3-5435-7425
http://www.fujielectric.com/products/instruments/
International Sales Div
Sales Group
 Loading...