

Fuji Electric PEN102J1C, PEN302J1RT/30, PEN302J1RT, PEN102J1RT, PEN152J1RT/15 User Manual
...Page 1
取扱説明書/ User’s Manual
小容量無停電電源装置
Uninterruptible Power Supply
Model:
PEN102J1C
PEN102J1RT
PEN152J1RT/15
PEN152J1RT
PEN302J1RT/30
PEN302J1RT
DN074-04-01 C
Page 2

I
Read "User's guide" first of all to the last minute to use the UPS safely that
defends customer's important information.
Especially, it might cause a fire and the injury, etc. when the installation method
and the battery handling are mistaken. It is very dangerous. Guard notes on safety.
And, use it correctly. Moreover, importantly keep this document in the place that
can be seen at any time after it reads.
NOTE
① We are prohibited to reprint part or all of the content of this book without
permission.
② We are to change without a previous notice for the content of this book in the
future.
③ Contact the your service when there are any suggestions like a suspicious
point, the mistake, and the description leakage, etc. about the content of this
document.
④ We cannot assume the responsibility about the influence of the result of the
operation of the customer regardless of the above-mentioned clause 3.
⑤ Units are considered acceptable for use in a maximum ambient of 40°C.
⑥ This UPS may be provided with a maximum of two extensiOn-Battery packs.
⑦ For Replacement of batteries located in an SERVICE ACCESS AREA -.
1) Servicing of batteries should be performed or supervised by personnel
knowledgeable about batteries and the required precautions.
2) Risk of explosion if battery is replaced by an incorrect type. When replacing
batteries, replace with the same type and number of batteries or battery
packs.
3) CAUTION: Do not dispose of batteries in a fire. The batteries may explode.
Dispose of used batteries according to the instructions.
4) CAUTION – Do not open or mutilate batteries. Released electrolyte is
harmful to the skin and eyes. It may be toxic.
5) CAUTION – A battery can present a risk of electrical shock and high short
circuit current. The following precautions should be observed when
working on batteries:
a. Remove watches, rings, or other metal objects.
b. Use tools with insulated handles.
c. Wear rubber gloves and boots.
d. Do not lay tools or metal parts on top of batteries.
e. Disconnect charging source prior to connecting or
disconnecting battery terminals.
f. Determine if battery is inadvertently grounded. If
inadvertently grounded, remove source from ground.
Contact with any part of a grounded battery can result
in electrical shock. The likelihood of such shock can be
reduced if such grounds are removed during installation
Page 3

II
and maintenance (applicable to equipment and remote
battery supplies not having a grounded supply circuit).
Except 3kVA
⑧ For PLUGGABLE EQUIPMENT, the socket-outlet shall be installed near the
equipment and shall be easily accessible.
Only 3kVA
⑨ A disconnect switch shall be provided by others for ac input circuit and output
circuit.
⑩ The instruction manual shall include the statement indicating that overcurrent
protection for the fixed output AC circuit is to be provided by others.
⑪ Use No. 8 AWG, 90C copper wire and 22.5lb-in torque force when
connecting to input/output terminal block.
EMC
Models over 1.5k VA
VCCI
この装置は,クラスA情報技術装置です。この装置を家庭環境で使用す
ると電波妨害を引き起こすことがあります。この場合には使用者が適切な
対策を講ずるよう要求されることがあります。 VCCI-A
FCC Part 15
NOTE : This equipment has been tested and found to comply with the limits for a
Class A digital device, pursuant to part 15 of the FCC Rules.There limits are
designed to provide reasonable protection against harmful interference when the
equipment is operated in a commercial environment. This equipment generates,
uses, and can radiate radio frequency energy and, if not installed and used in
accordance with the instruction manual, may cause harmful interference to radio
communications. Operation of this equipment in a residential area is likely to cause
harmful interference in which case the user will be required to correct the
interference at his own expense.
EN62040-2
WARNING : This is a product for commercial and industrial application in the
second environment installation restrictions or additional measures may be
needed to prevent disturbances.
Models up to 1.5k VA
VCCI
この装置は,クラスB情報技術装置です。この装置は、家庭環境で使用
することを目的としていますが、この装置がラジオやテレビジョン受信機
に近接して使用されると、受信障害を引き起こすことがあります。
取扱説明書に従って正しい取り扱いをして下さい。 VCCI-B
Page 4

III
FCC Part 15
NOTE : This equipment has been tested and found to comply with the limits for a
Class B digital device, pursuant to part 15 of the FCC Rules.There limits are
designed to provide reasonable protection against harmful interference in a
residential installation. This equipment generated, uses, and can radiate radio
frequency energy and, if not installed and used in accordance with the
instructions, may cause harmful interference to radio communications. However,
there is no guarantee that interference will not occur in a particular installation. If
this equipment does cause harmful interference to radio or television reception,
which can be determined by turning the equipment off and on, the user is
encouraged to try to correct the interference by one or more of the following
measures :
- Reorient or relocate the receiving antenna
- Increase the separation between the equipment and receiver.
- Connect the equipment into an outlet on a circuit different from that to
which the receiver is connected.
- Consult the dealer or an experienced radio/TV technician help.
Packing Content
First of all, Open the packing box and confirm contents in the table below.
Contact the service when there is insufficient something. There is the following
form/capacity in the UPS.
Capacity Rack&Tower Type Tower Type
1kVA PEN102J1RT PEN102J1C
1.1kVA PEN152J1RT/15 ―
1.5kVA PEN152J1RT ―
2.4kVA PEN302J1RT/30 ―
3kVA PEN302J1RT ―
UPS Packing parts
UPS 1set
Communication Cable 1set
CD 1set
User’s Guide(with Guarantee)
1set
Flange for Rack(Rack&Tower Type only) 1set
Pedestal(Rack&Tower Type only) 1set
3P-2P Change Plug(1kVA and 1.1kVA only) 1set
Wire Protection (3kVA Only) 2sets
Page 5
IV
ATTENTION
To use device safely
1 Attention
In this paragraph, the matter that we would like you to defend to use this device
safely is shown. Often read this book before it uses it and use it correctly. Keep
this book in by the side to refer soon when it is necessary.
Display and meaning of notes
In this Document, the ranks of notes on safety are distinguished as "Danger" and
"Caution" and "Attention".
Show a pressing dangerous situation of causing
death or a serious injury, when not avoiding it.
Show a dangerous situation with a possibility of
causing death or of a serious injury, when not
avoiding it.
Show a dangerous situation with a possibility of
causing the slight injury or more injury, or show the
case where there is a possibility that only physical loss
or damage may occur, when not avoiding it.
The matter described to attention has the possibility of relating to an important
result according to the situation. Both important content has been described and
defend.
DANGER
!
CAUTION
!
!
Page 6
V
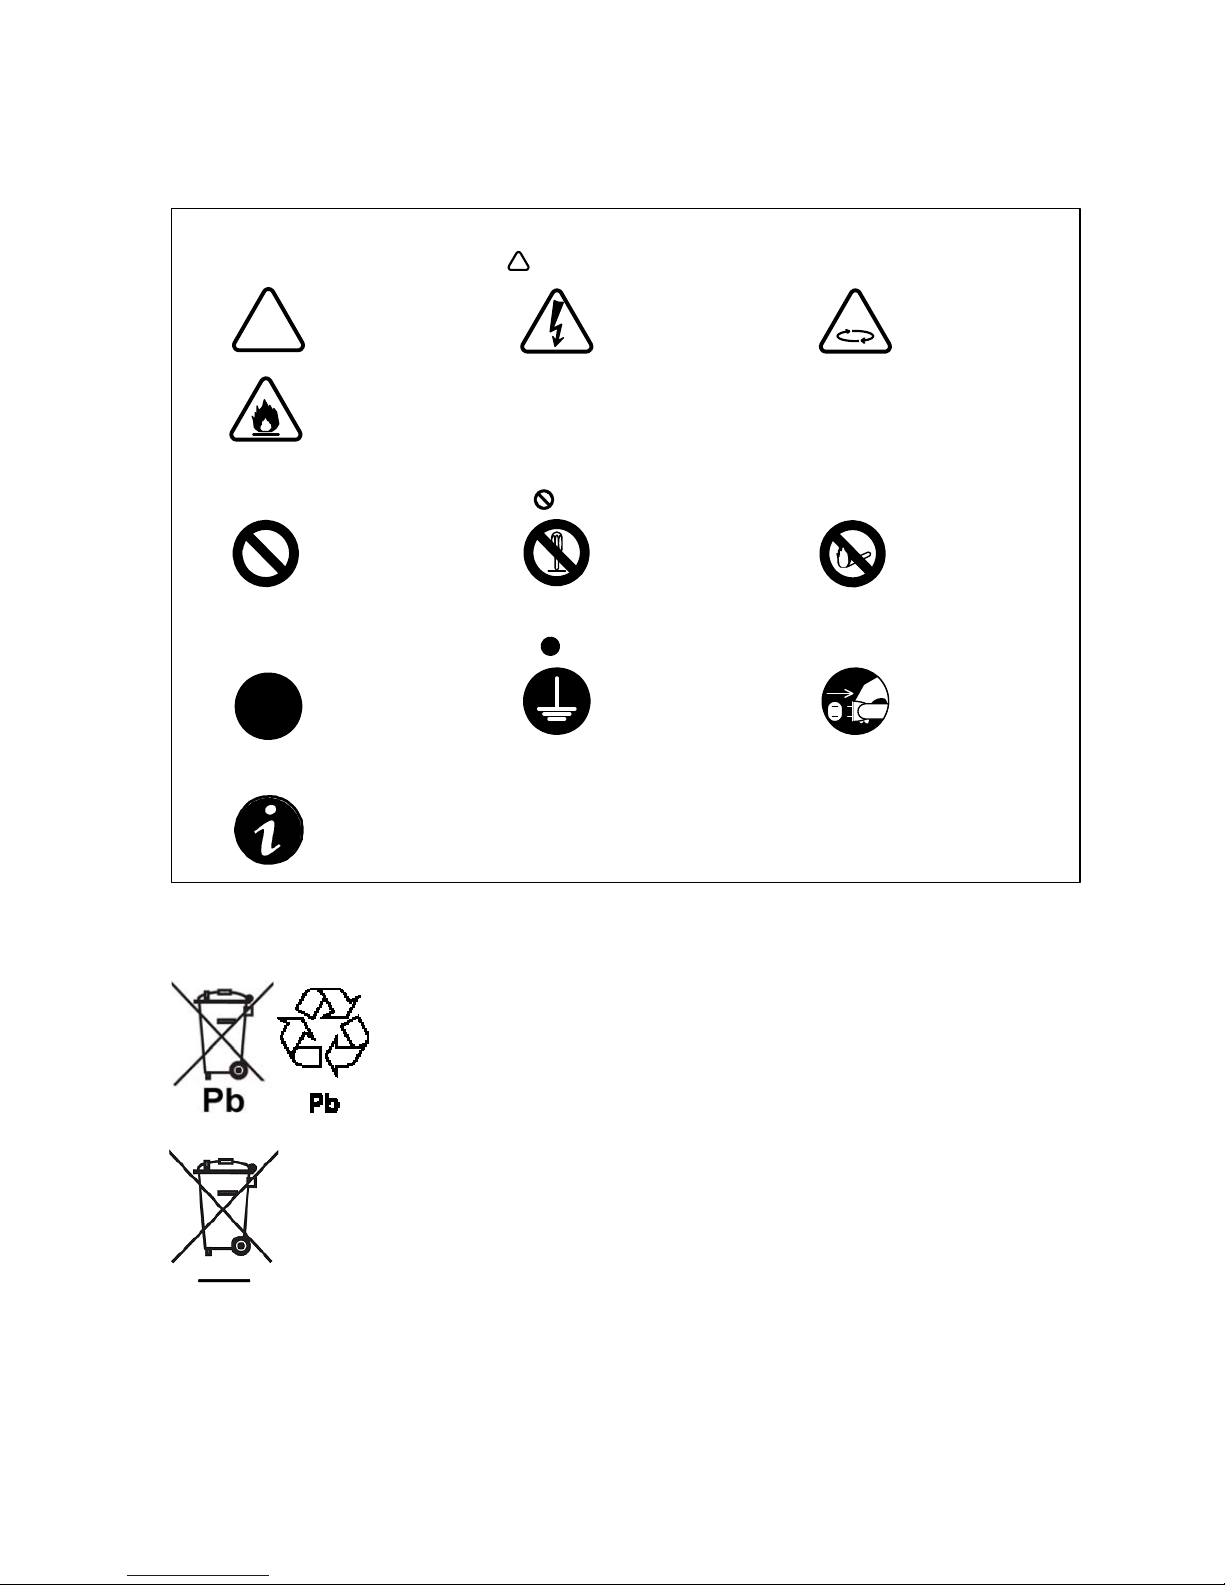
Meaning of sign
Possibility
of a fire
The following signatures show attention.
Attention content is shown in
General
attention
Attention about
Electric shock
Attention
about FAN
The following signatures show prohibition.
Prohibitions content is shown in
General
prohibitions
Resolution
prohibitions
Fire use
prohibition
The following signatures show compulsion.
Compulsions content is shown in
General
compulsion
Compulsion
about earth
Compulsion
about cord
!
!
Note
The following signatures show note.
This symbol indicates that you should not discard the UPS or the UPS
batteries in the trash. This product contains sealed, lead-acid
batteries and must be disposed of properly. For more information,
contact your local recycling/reuse or hazardous waste center.
This symbol indicates that you should discard waste electrical or electronic
equipment(WEEE) in the trash. For proper disposal, contact your local
recycling/reuse or hazardous waste center.
Page 7
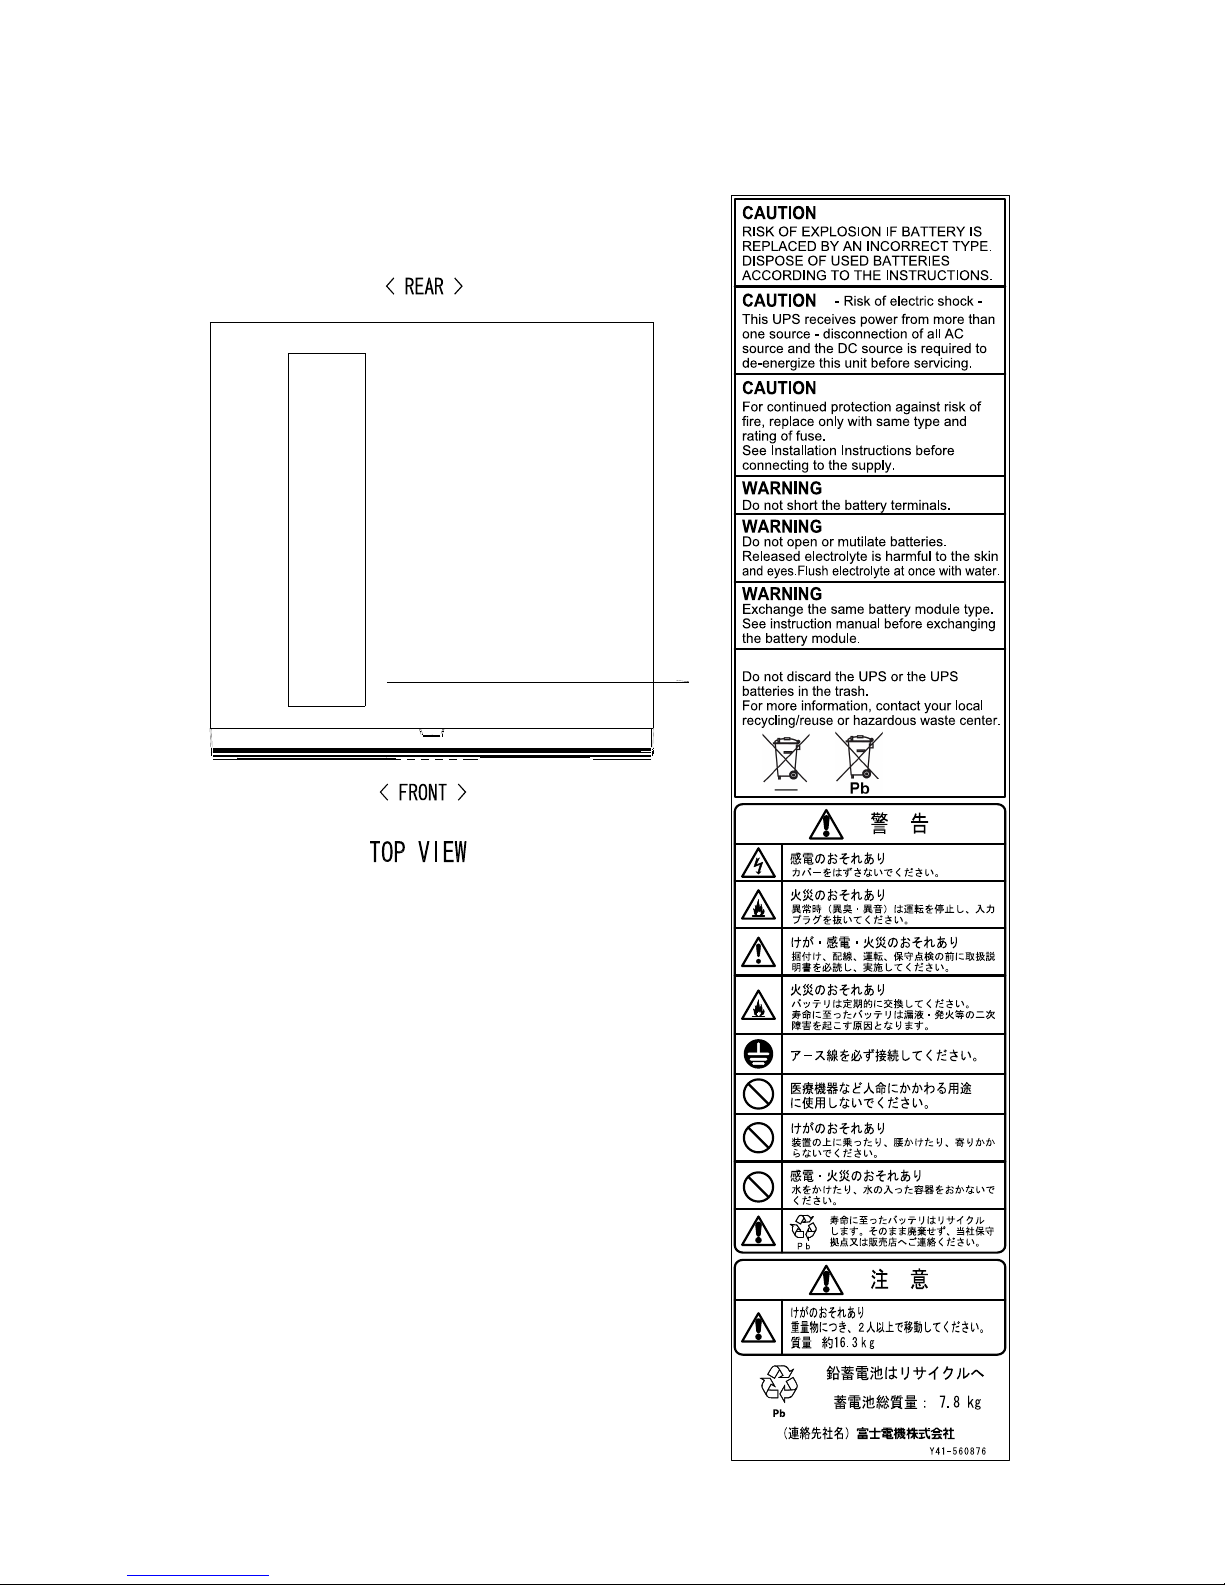
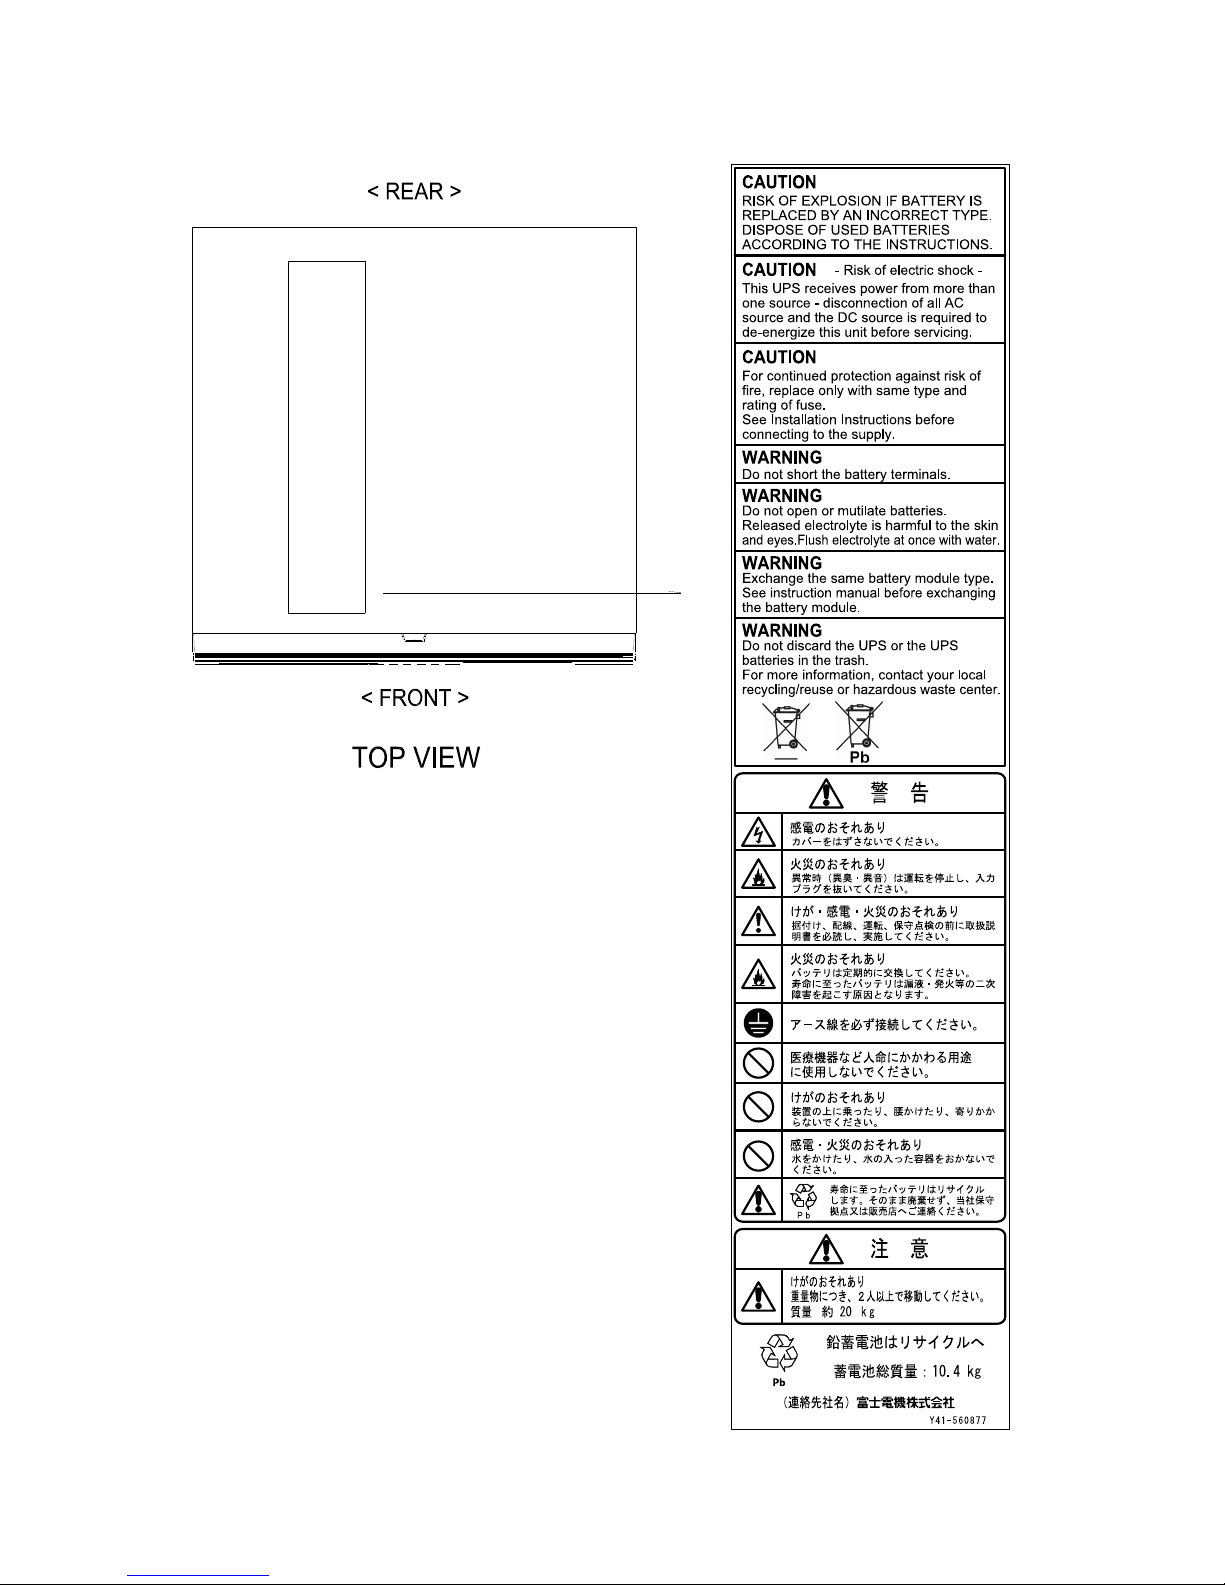
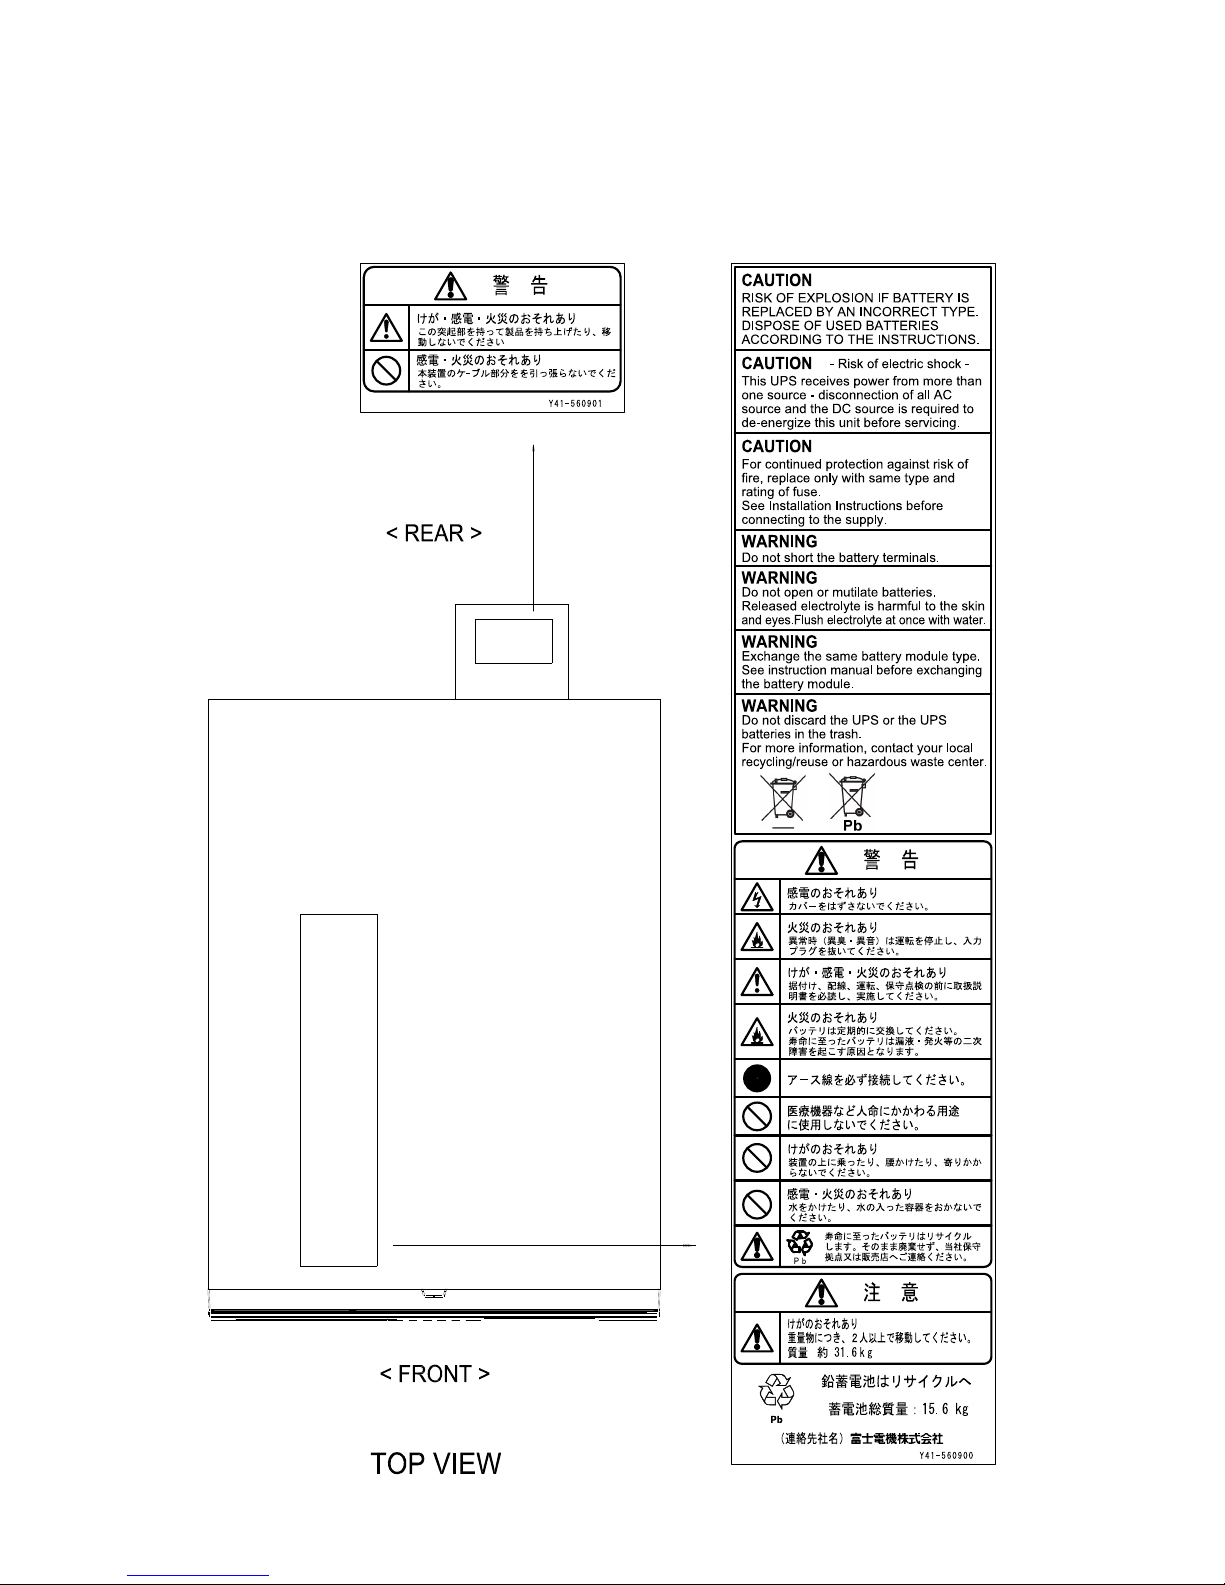
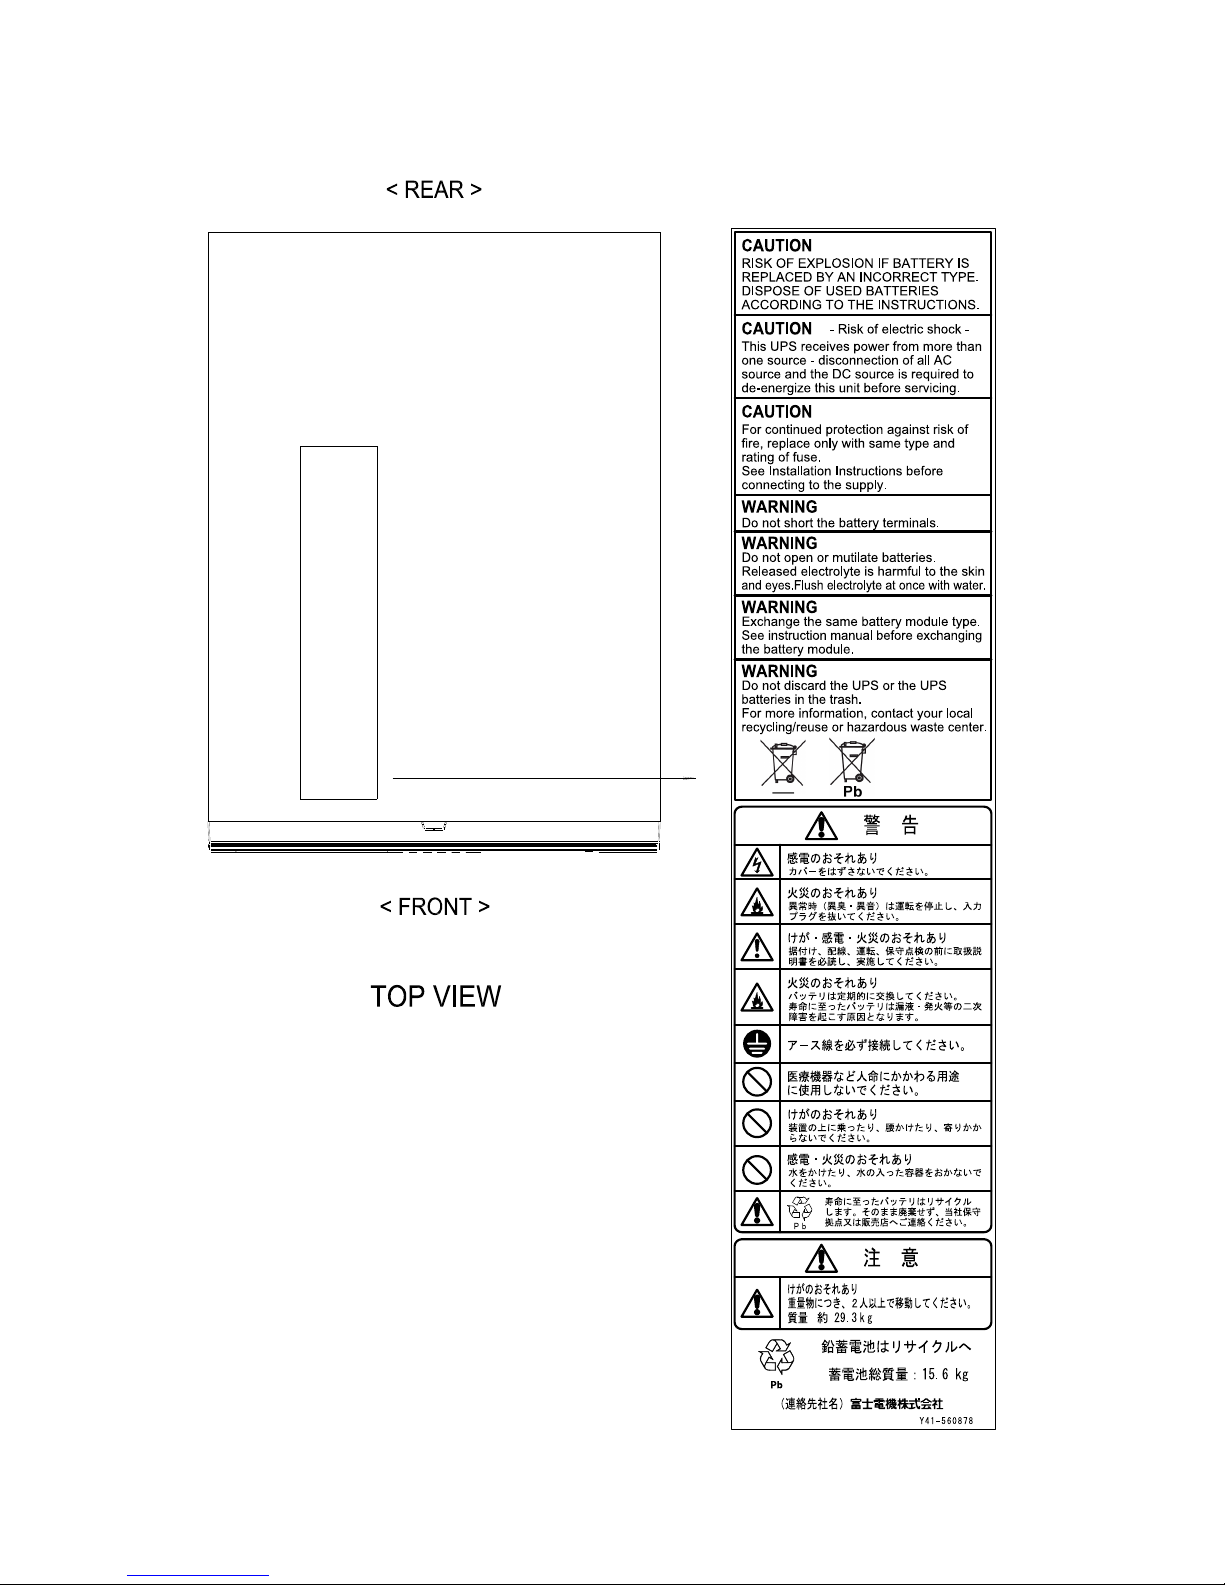
2ContentandpositionofWarningLabel
Rack&TowerType
Theattentionlabelbecomesitasfollows.
1kVA
VI
WARNING
Page 8
1.1kVA/1.5kVA
VII
Page 9
V
III
2.4kVA
Page 10
3kVA
IX
Page 11
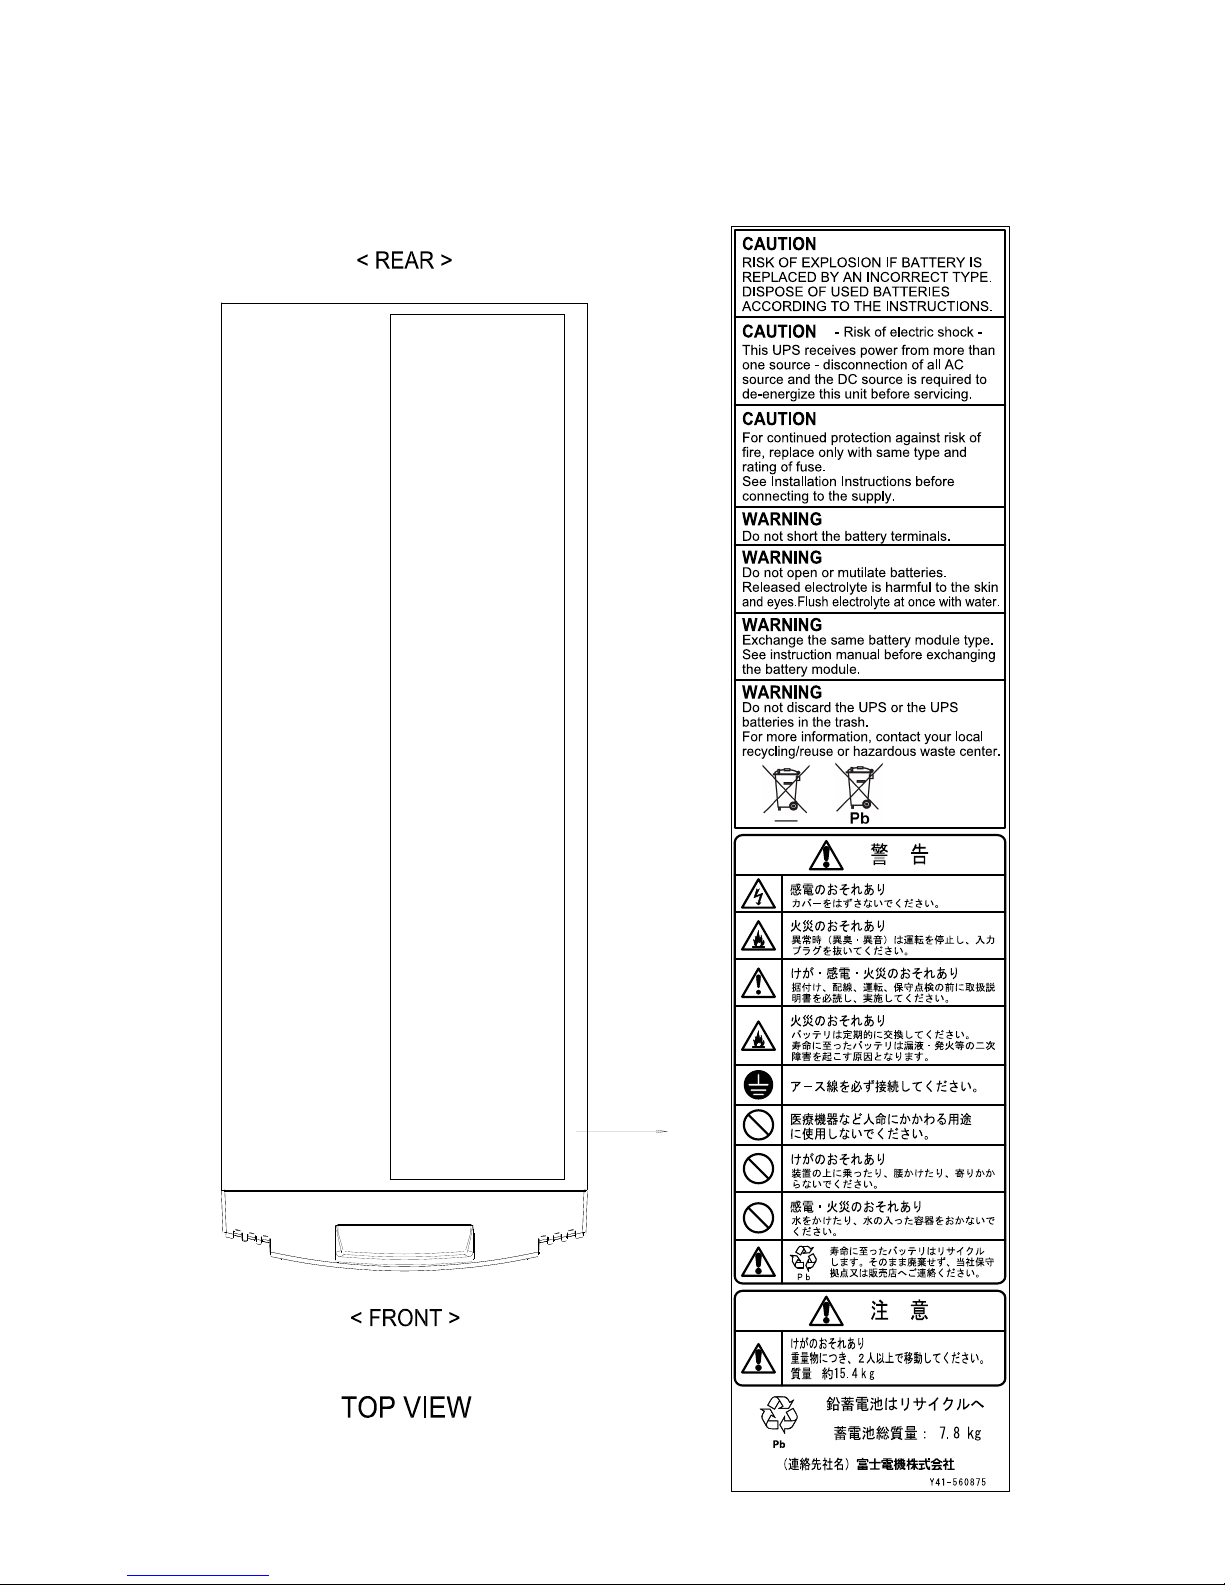
TowerType
Theattentionlabelbecomesitasfollows.
1kVA
X
Page 12

XI
3 Attention for use
Security precaution
To use this device safely and correctly, read notes explain here. When you do
handling to disregard notes, the device just doesn't break down. And there is a
possibility of causing the damage of a human body accident of the death, the
injury, the burn, and the electric shock, etc. and fire and surrounding equipment.
Use of uninterruptive power supply
This device is the one developed as an uninterruptive power supply that
assumes use in the environment such as general offices. Advanced safety and
reliability are needed, or the breakdown, the malfunction, and the trouble of the
equipment might do the life, the body, and the property to the damage, or
against the following usages where it might socially have a large-scale influence,
adaptability, performance, and quality are not guaranteed. As a result the device
operation range and the condition were exceeded or it was used for the particular
application, acknowledge being not able to assume the responsibility about the
occurring damage.
①Air and space appliance
②Equipment for transportation (car, train, and ship, etc.)
③Equipment for medical treatment
④Equipment for power generation control
⑤Equipment related to nuclear power
⑥Equipment used in water
⑦Traffic control equipment
⑧Information Technology equipment with high publicity
⑨Military equipment
⑩Electrothermal articles and burning appliances
⑪Security equipment
⑫Various safety equipment
⑬Device that converts AC into DC by half wave rectification(Heater)
⑭Usage admitted other particular application
When this product is used by a standard usage, because safety or more is
secured, the consideration such as installing the backup circuit, or securing the
protection circuit and the device is preferable.
This device is a Japanese specification. Consult about use in foreign countries
separately. When a Japanese specification is used outside the country, the voltage
and the system requirements might be different, and it cause the expected
operation not to be done.
The check in daily
Check the following matters to use this device safely.
・ Check the maintenance space.
・ Check the presence of an abnormal sound.
Page 13

XII
・ Check abnormality of the rotation sound of FAN.
・ Check the nasty smell.
・ Check whether the surface temperature of the case is abnormal.
・ Check the dust of air- intake area or air – outtake area. Or, check whether
to put the thing.
・ Check whether to put the thing on the device.
About a potential risk of this device
Here, a potential risk means the influence on human body/life.
This devices have the following risks to potential.
・Electric shock
・Fire by heatup or output short
Influence of electromagnetic radiation radiated from device
An electric equipment radiates the electromagnetic radiation from the device by
the principle. The electromagnetic radiation radiated from the device cannot be
completely removed by a present technology. Especially, when this device is used
near the machine that controls remotely by the electric wave, it might cause the
malfunction of the equipment. When this device is used by such an equipment,
measures such as electromagnetic shields are needed.
Notes on handling in use
Do often read this book, and do not do wrong use. Moreover, Pull out the plug
of the input power strip from the outlet, or turn off the input breaker of this
device, after stopping outputting by the OFF button of the front panel of this
device when you felt dangerous. The input power strip is pulled out without
stopping outputting with the OFF button, or when you turn off the input breaker
of this device or the breaker of the input distribution panel, it enters same state of
the backup as the power failure, and the electric power maintained with an
internal battery is consumed
In this case, note that it becomes impossible to secure the backup time assumed
when really power failure.
Page 14

XIII
Attention
Handling instructions
• Do not use it in the place with a gas with the inflammability
and ignited material. It ignites to these materials if the spark is
generated, and there is danger of exploding.
• Do not put the battery of this device in the fire. There is
danger of the explosion, and exploding.
• Do not take apart, do not repair this device, and remodel it.
It is likely not only to operate normally if it resolves, it repair,
and it remodels it but to cause the electric shock and a fire.
• Pull out the input power plug, the output must stop with an
off button because you do not get an electric shock when
you clean this device.
• Take the plug part to remove the input power plug after
stopping outputting with an off button of this device. The
cable is damaged when the cable part is pulled and it causes
a fire and the electric shock.
• Do not touch the input-output terminal while energizing. It is
likely to get an electric shock.
• Do not feel after the connecting cable by a wet hand. It is
likely to get an electric shock.
• Do not touch this device including cables when beginning to
thunder. When striking it, it is likely to get an electric shock.
• The earth construction is necessary for this device for safety.
When the earth construction is not done, it is likely to get an
electric shock.
• Do not share the groundline of the outlet that connects the
input power of this device with the groundline such as
devices that consume the high-power. It causes the
malfunction and the breakdown.
• Do not close air-intake area/air-outtake area of this device.
It not only causes the malfunction and the breakdown when
this temperature in the device rises abnormally, but also it
causes a fire.
• Do not leave this device under the heat of direct sunshine
and the thermal appliance. It causes a fire due to the
breakdown, damage, and deterioration, etc. by heat.
Danger
!
!
!
Page 15
XIV
• This device is for AC100,110,120V 50/60Hz. It breaks
down when using it by the voltage excluding this, and it
causes a fire and the electric shock.
• Do not use the table tap. The tap overheats, and it causes a
fire.
• Do not use the extension cable. The power cable overheats
when the power cable not suitable for the power supply
specification of this device is used and it causes a fire.
• Pull wiring from the input distribution panel directly. Use
wiring suitable for the power supply specification of this
device. The wiring overheats when the wiring not suitable
for this is used and it causes a fire
• Do not tightly bend cables, do not bundle cables, do not put
the one on connected cables. The cable is damaged, and it
causes the electric shock and a fire.
• The connection of cables must not use it imperfectly. It
causes the electric shock and a fire by the short and heatup.
• Wet the cable and neither rear connector nor the terminal
stand of this device with water etc. It causes the electric
shock and a fire.
• Tightening the terminal must not have loosening. It might
cause smoking and the ignition.
• Select the diameter of wire more than the device ratings
current by the voltage-standing 600V or more.
• Do not put the foreign body. Internal parts are
short-circuited when foreign bodies of metals and the
combustible one, etc. enter and it causes the electric shock
and a fire. Stop outputting with the turning off button, and
pull out the power cable when the foreign body enters UPS.
• Do not set up this device in a dusty place. Dust is
accumulated, internal parts are short-circuited, and it causes
the electric shock and a fire.
• Do not use it in the place where salinity and the causticity
gas are generated. Internal parts are short, deteriorated, and
it causes the electric shock and a fire.
!
• This device is a heavy load. Work by two people or more
when you carry. work wearing gloves and the safety shoes,
etc. because it doesn't injure.
• Do not put the container including water on the upper face
of the device.。Might it get an electric shock when falling, and
it cause a fire.
• Pull out the power cable after stopping outputting at once
by off button of UPS when abnormality is caused while
using this device.
• Do not get on on this device, and don't put the one. It is likely
to injure by falling, and breaking.
• Do not set up this device in an unstable place. It is likely to
injure by falling, and breaking.
!
Page 16
XV
Attention
4 Attention for maintenance
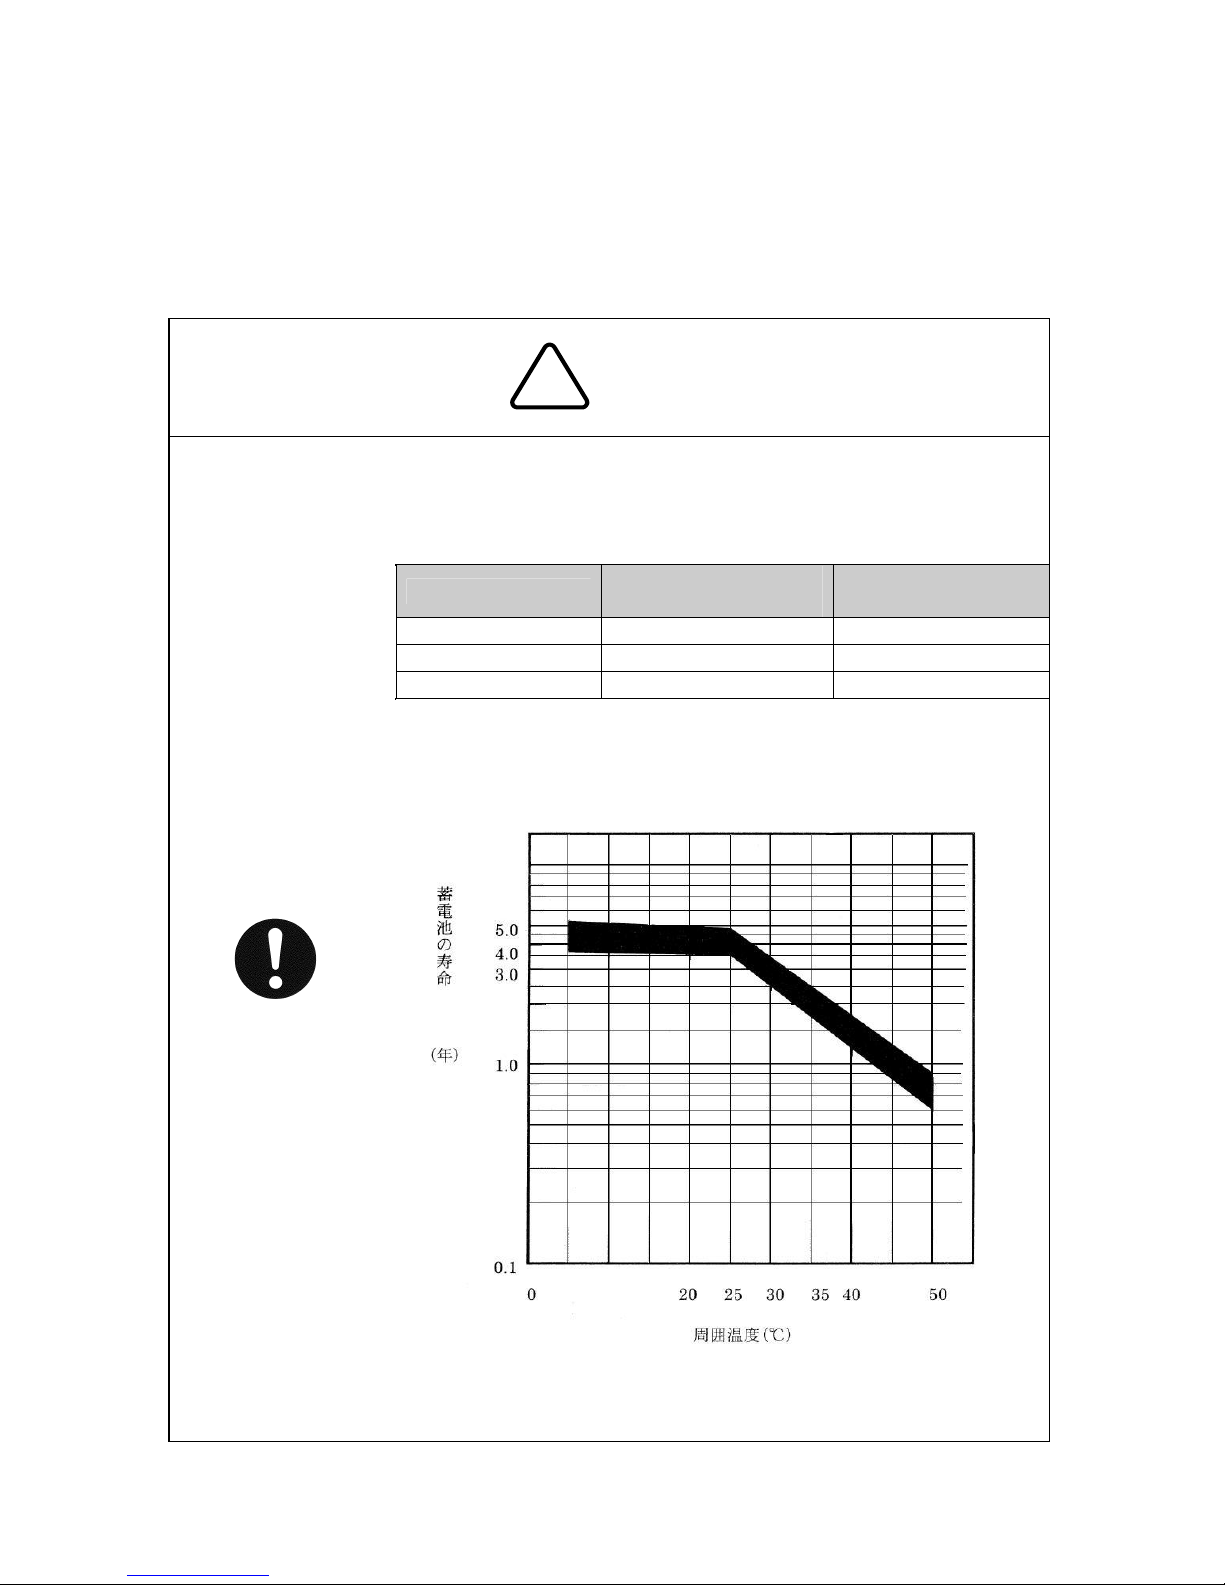
About the exchange and the recycling of the battery
The battery is used so that this device may correspond to the power failure for a
short time. The battery uses the lead and diluted sulphuric acid enough. Note the
following content.
•
W
hen usually using it, the exchange time of the battery is
3-4.5 years (the used temperature 25 ℃ ). Exchange it
regularly. The battery shelf life shortens when the used
temperature is 25℃ or more or there are a lot of electrical
discharge frequencies, and exchange it ahead of time.
Used temp
Battery life
expectancy
Battery Replaced
time
25℃ 3.5~5 years 3~4.5 years
30℃ 2.5~3.5 years 2~3 years
40℃ 1.3~1.8 years 0.7~1.3 years
About the exchange cycle of the battery
The longevity of the battery changes greatly by the installation
environment of UPS. Exchange it in the used environment to
use it safely.
The longevity display of the battery is displayed in accordance
with user's guide line (JEM-TR204:2001).
!
Page 17
XVI
Attention
• The liquid might leak due to the deterioration of the
battery case when using it for a long time without
exchanging the batteries. The leaked liquid causes
smoking and a fire. When the leaked liquid adheres to the
skin, it is possible to cause the burn. It is possible to lose
sight when the leaked liquid catches one's eye. In that
case, wash at once, and consult the doctor.
• Do not discard the UPS or the UPS batteries in the trash.
This product contains sealed lead-cid bateries and must
be disposed of properly. For more information, contact
your local recycling/reuse or hazardous waste center.
• The exchanging work of the battery of this device is
designed intending person who has experience and
knowledge of electric work, to do. Follow the replacement
procedure of the user's guide.
Remodeling and repair
• Because there is a high voltage part in this device, The
people other than the maintenance member repair or
open the cover of this device and it becomes off the
subject of the guarantee. It causes the accident of the
electric shock etc.
5 Other notes
Transfer of this device or attention when selling
Transfer or sell off everything appended to this device when this device is
transferred or is sold off to the third party.
Guarantee
Guarantee is appended to this user's guide. Keep it importantly after confirming
the content of the description. We will repair based on the content of the
guarantee when breaking down by any chance in the guaranteed term. See the
guarantee in detail. When there is no description matter by the shop, it becomes
the repair or an exchange for a fee regardless of the guaranteed term.
!
Page 18

XVII
Chapter1 Summary............................................................................................................................... 1
1-1 Feature ...................................................................................................................................................................... 1
Chapter2 Part name and function............................................................................................ 3
2-1 UPS front................................................................................................................................................................. 3
2-2 UPS rear................................................................................................................................................................... 5
Chapter3 Installation............................................................................................................................ 7
3-1 Confirmation.......................................................................................................................................................... 7
3-2 Place............................................................................................................................................................................ 7
3-3 Installation............................................................................................................................................................... 9
Chapter4 Operation...........................................................................................................................19
4-1 Mode.........................................................................................................................................................................19
4-2 Start・Stop.......................................................................................................................................................... 22
4-3 Self-test..................................................................................................................................................................22
Chapter5 Display..................................................................................................................................23
5-1 LED display.......................................................................................................................................................... 23
5-2 Normal LCD display....................................................................................................................................... 24
5-3 Other LCD display...........................................................................................................................................25
Chapter6 Setting..................................................................................................................................27
6-1 Panel operating ................................................................................................................................................ 28
Chapter7 Maintenance....................................................................................................................41
7-1 Care...........................................................................................................................................................................41
7-2 Storing.....................................................................................................................................................................41
7-3 Battery exchange time.................................................................................................................................41
7-4 Battery exchange ............................................................................................................................................ 42
7-5 Test of new battery....................................................................................................................................... 47
7-6 Recycling................................................................................................................................................................47
7-7 Fuse exchange..................................................................................................................................................47
Chapter8 Communication.............................................................................................................48
Chapter9 Optional card..................................................................................................................49
9-1 Network Agent Card ....................................................................................................................................49
9-2 Dry Contact Card............................................................................................................................................ 50
Chapter10 Specification...............................................................................................................55
Chapter11 Trouble-Shooting...................................................................................................59
11-1 Alarm sound stop ......................................................................................................................................59
11-2 Alarm...................................................................................................................................................................59
11-3 ON Button Recovery................................................................................................................................ 61
11-4 Trouble-shooting........................................................................................................................................ 62
Chapter12 Guarantee and Support....................................................................................64
12-1 Guarantee........................................................................................................................................................64
12-2 Service................................................................................................................................................................ 64
Page 19

Page 20

1
Chapter1
Summary
1-1 Feature
Uninterruptive power supply (UPS) defends an electronic equipment from
the power supply trouble that the power failure, the voltage sag, the
voltage surge, the voltage decrease, the excess voltage, the utility power
noise, the frequency variation, the switching noise, the harmonics wave.
Such a power supply trouble destroys critical data, loses the content of
the work of the unpreservation, and there is a possibility of damaging
hardware. As a result, productivity of long time is lost, and high recovery
cost is generated.
UPS series is composed by UPS and External Battery module(EBM) of
each capacity / form by shown in Table 1-1.
Table 1-1 UPS series
Rack & Tower Type Tower Type
Capacity
UPS EBM UPS EBM
1kVA PEN102J1RT PEB036-2RT PEN102J1C PEB036-2C
1.1kVA PEN152J1RT/15 PEB048-2RT ― ―
1.5kVA PEN152J1RT PEB048-2RT ― ―
2.4kVA PEN302J1RT/30 PEB072-2RT ― ―
3kVA PEN302J1RT PEB072-2RT ― ―
EBM is constituted for increase when the backup is long necessary.
It introduces the feature of UPS that offers the superior performance and
reliability.
・ Normal mode of clean sinusoidal output/High Effeciency(HE) mode
that suppressed power consumption/Intelligent mode that switches
automatically between Normal mode and High Effeciency(HE) mode by
judging utility input, these modes of three stages can be selected from
front panel or communication. In this case, it becomes a compulsion
change.
・ In the Normal mode of a clean sinusoidal output, the exchange input
electric power is filtered, it adjusts, and a steady electric power to the
equipment is offered.
・ The High Effeciency(HE) mode that suppresses power consumption
contributes to the power consumption reduction.
・ The intelligent mode of a possible mode switching can change both the
power consumption reduction and the power supply quality by the
Page 21

2
setting. Because the On Battery is not operated as much as possible,
the consumption of the battery is suppressed. Normally, the input is
judged and the mode is changed by the automatic operation. When the
mode is specified by the communication in intelligent, the mode is
decided by the communication priority, and an automatic operation is
not done. However, if the other mode is possible and the mode
specified by the communication is impossible, UPS becomes the other
mode without OnBattery. When the communication is cut off or the
communication is invalided , or newly communication is connected, or
UPS shuts down, UPS is automatically transfer automatic operation.
・ Important rack space is saved by having pressed height to 2U(about
90mm).
・ Rack&Tower can be used as 19-inch rack installation or a tower
installation.
・ The backup time can be extended by connecting EBM up to two until.
・ The load segment made a group can be started one by one, and it
intercept it one by one.
・ The output can be intercepted from remoteness in the emergency with
the REPO port of a Dry cntact card(option).(REPO)
・ ON/OFF of the UPS output can be remotely controlled by using the
REPO port of a Dry cntact card(option).(REMOTE ON/OFF)
・ The remote supervision/remote operation is possible by the function
installed on the network agent card (option).
・ UPS can be output by the battery start function even when there is no
utility input power.(Default is invalidily.)
・ The state of good visibility can be displayed by the LCD interface.
・ In a compulsion change of the mode by the communication, or in a
change of the mode by the communication in intelligent, It is possible
with a network agent card (Option).
・ This UPS can start without battery.
Page 22
3
Chapter2
Part name and function
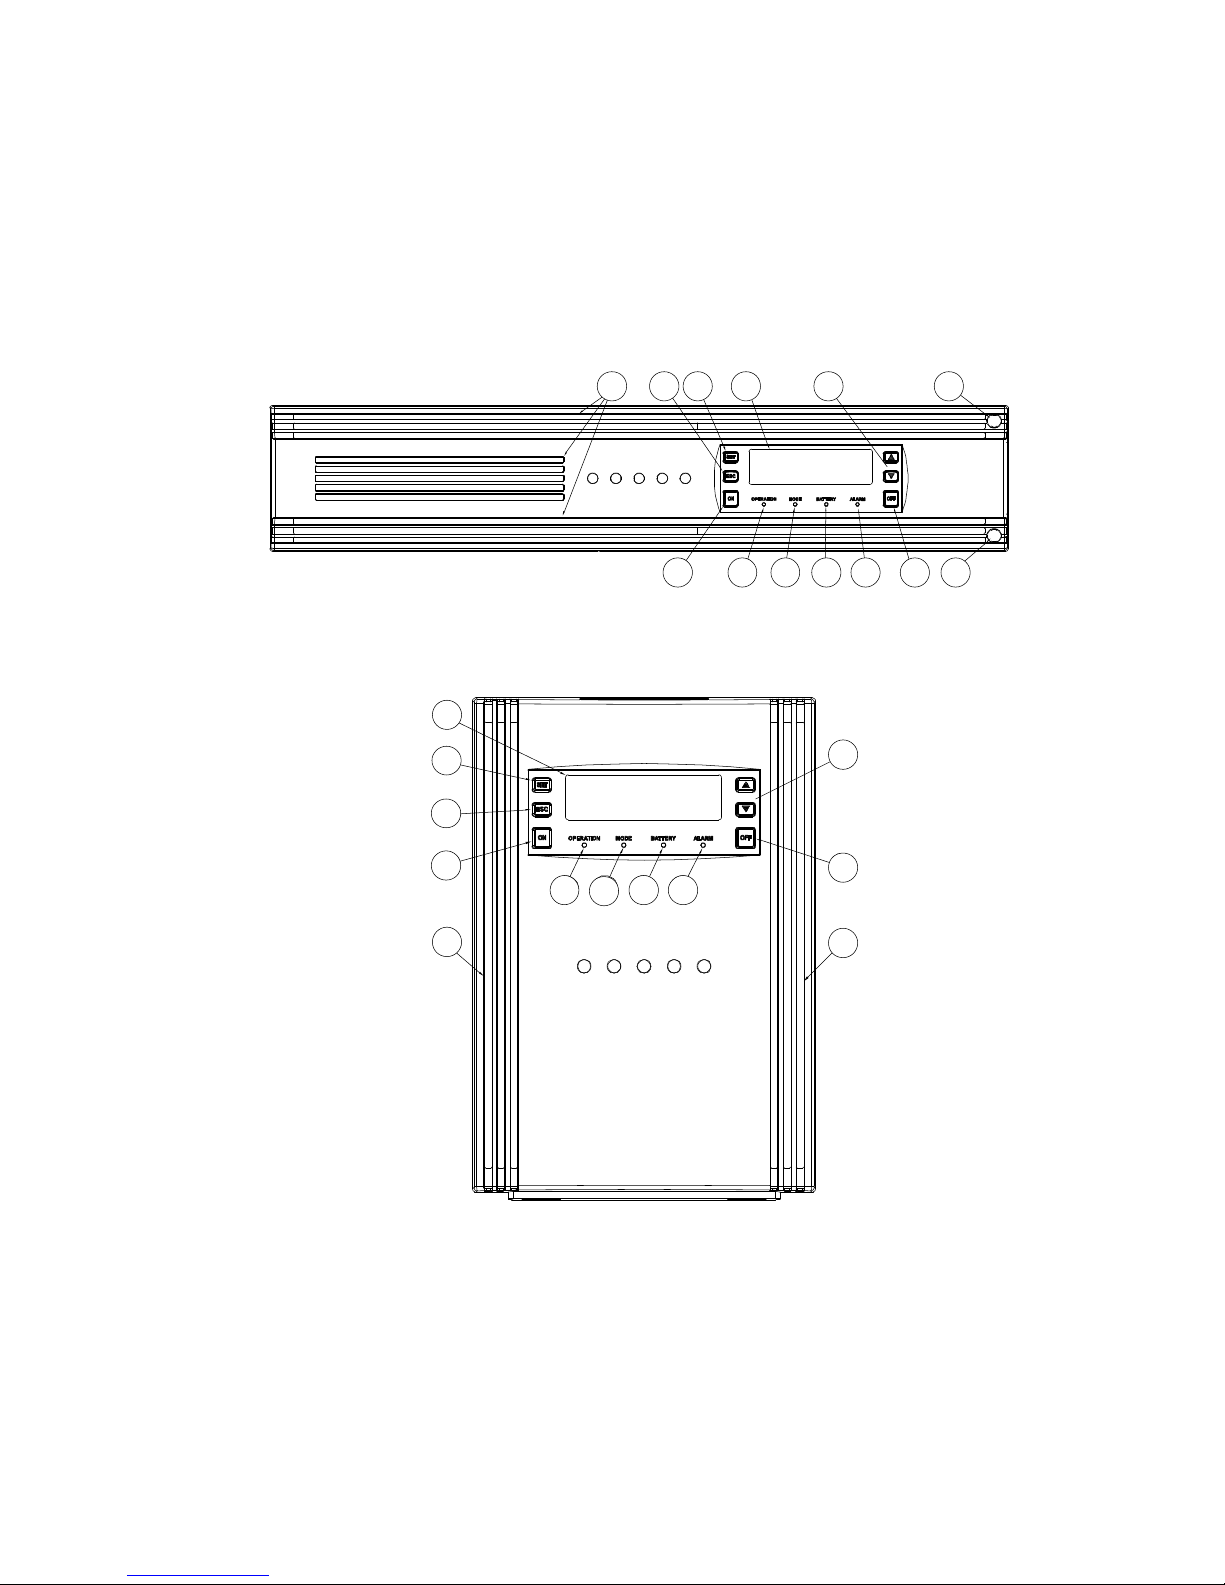
2-1 UPS front
Rack&Tower Type
Tower Type
Figure 2-1 UPS front
1
2
3
4
5
6
7
8
9
10
11
11
1011 12
1 2
5
6 9
3 4
7 8 12
1
3
4
10
2
10
5
6
7
8
9
10
1
2
3
4
6
7
8 9
11
11
5
Page 23
4
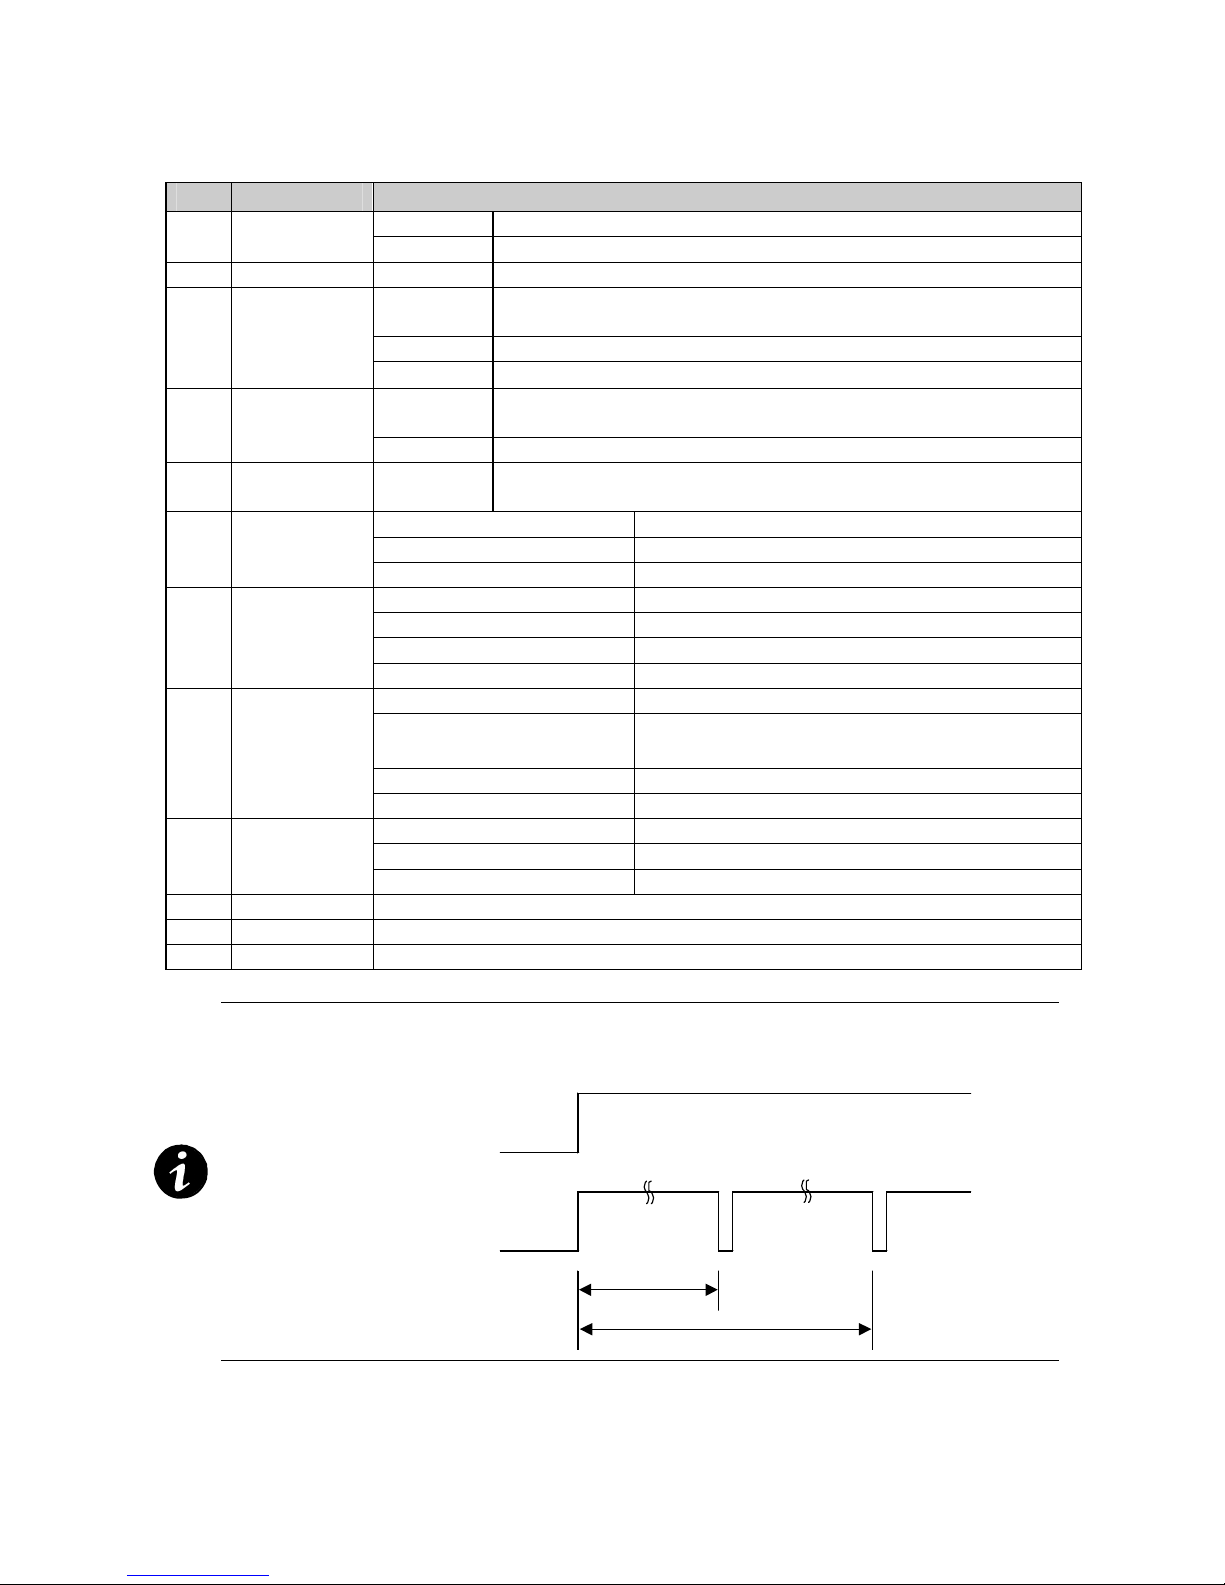
Table 2-1 Name
No Name Function
0.5s push When UTL normally, output
1 ON button
3s push When UTL abnormally, output (On-Battery operation)
2 OFF button 3s push Output stop
0.5s push
Buzzer stop (The buzzer of that time is stopped.)
Configuration mode(select cntent) : Return to Item display.
3s push Return from configuration (Only Configuration mode)
3 ESC button
3s push Self test (Stanby, HE-Standby,On-Line,On-HE only)
0.5s push
Latest alarm display(Automatically return to normal display)
Configuration mode : Select content/Item. 4 SET button
3s push Go to configuration (All mode)
5 ↑ ↓ button 0.5s push
Change the display (Automatically return to initial display)
Configuration mode : Chnage content/Item
ON State of output
1s ON 1s OFF repeat State of no output
6
OPERATION
LED
OFF Converter OFF
ON Normal
OFF Hight Effeciency (HE)
0.5s ON 0.5s OFF repeat Battery
7 MODE LED
2s ON 2s OFF repeat Bypass
ON Battery disconnect
0.5s ON 0.5s OFF repeat
Constant Current Charge
Or Immediately before Battery ShutDown
1s ON 1s OFF repeat Self Test / Low Battery
8
BATTERY
LED
2s ON 2s OFF repeat Service Battery
ON Alarm
1s ON 1s OFF repeat Bypass not available
9 ALARM LED
2s ON 2s OFF repeat Input abnormal
10 LCD State display
11 Air-Intake Air intake area
12 Screw For the panel assembly
・The buzzer stops momentarily at the above time after it presses it. The function
is not recognized when not pressing it until the buzzer sound stops
momentarily. Press it until the buzzer sound stops momentarily.
Ex)ESC button
Buzzer
0.5s
3s
ON
OFF
ESC Button
ON
OFF
Page 24
5
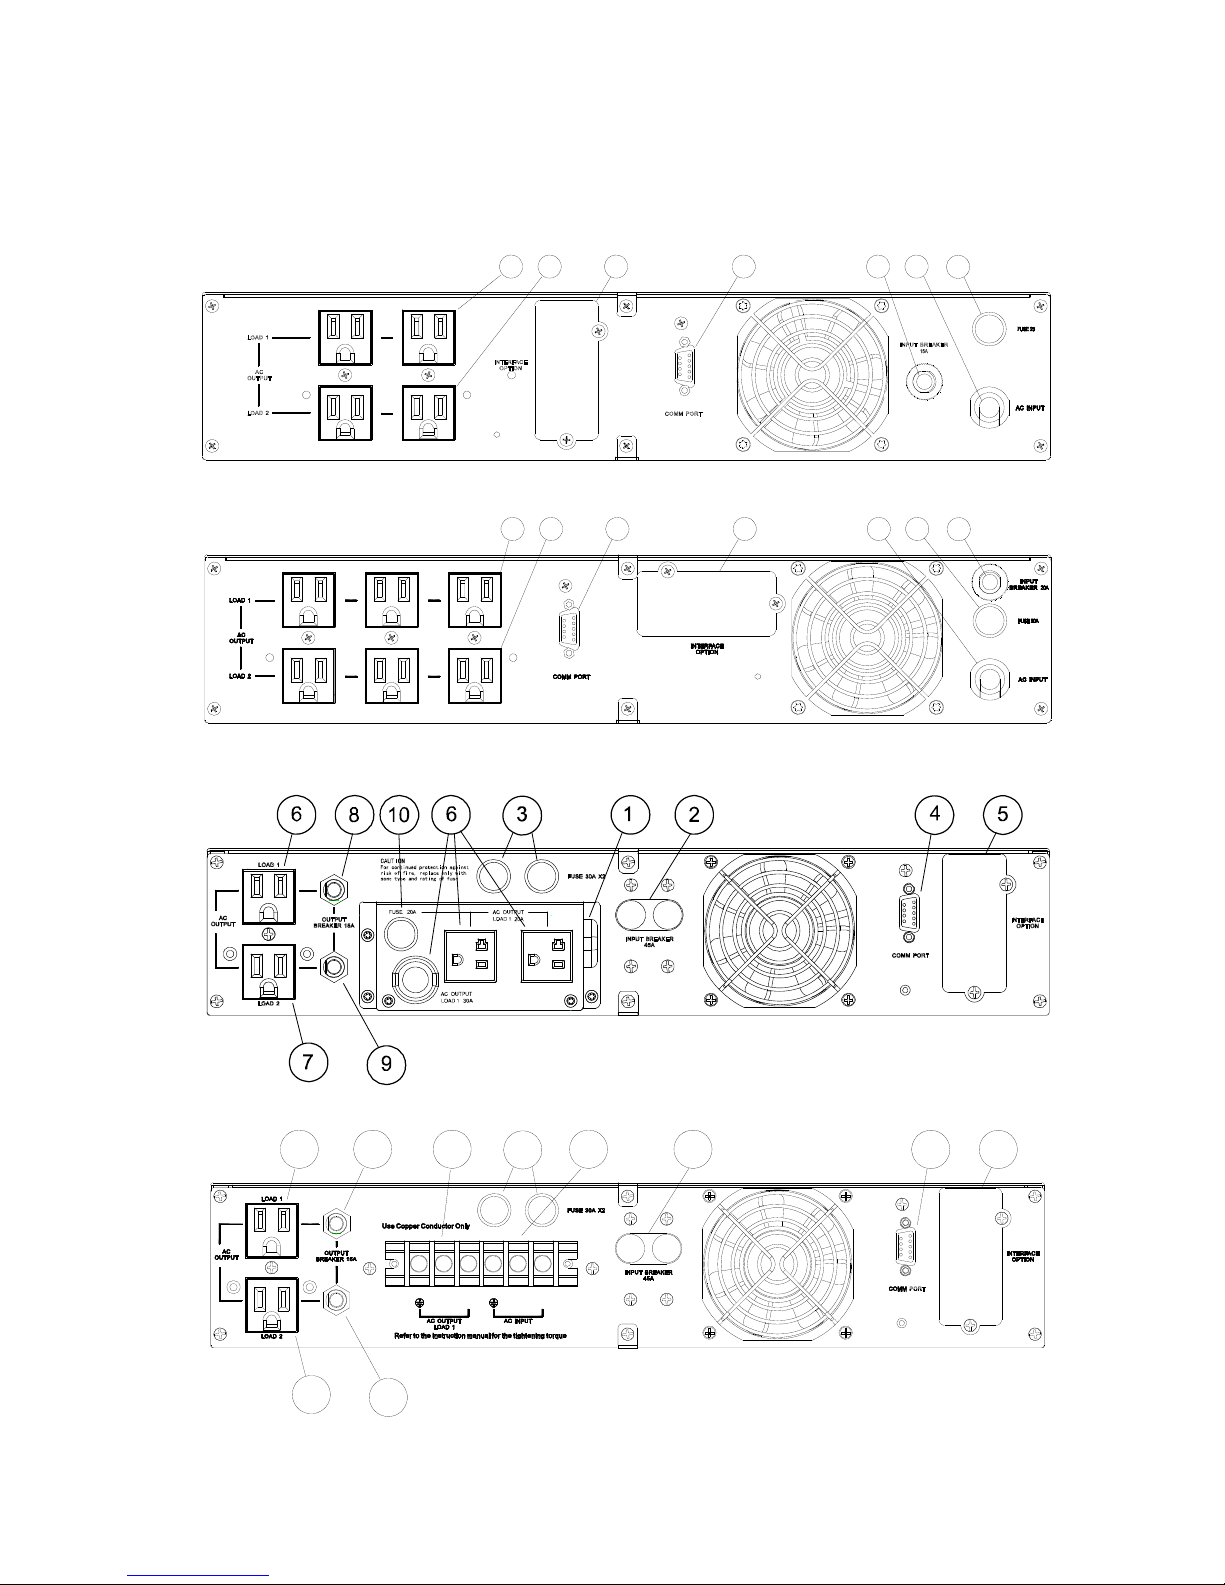
2-2 UPS rear
Rack&Tower Type
1kVA
1.1kVA/1.5kVA
2.4kVA
3kVA
Figure 2-2 Rack&Tower Type UPS rear
5
7
6
4
21 3
CAUTION
See Installation Instruc tions
before connecting to th e supply.
For continued protection against
risk of fire, replace o nly with
same type and rating of fuse
CAUTION
4
7
6
5132
CAUTION
See Installation Instruction s
before connecting to the suppl y.
For continued protection again st
risk of fire, replace only wi th
same type and rating of fuse
CAUTION
before connecting to the supply.
See Installation Instructions
CAUTION
NLNL
CAUTION
same type and rating of fuse
risk of fire, replace only with
For continued protection against
5
4
7
9
2
136
8
6
Page 25
6
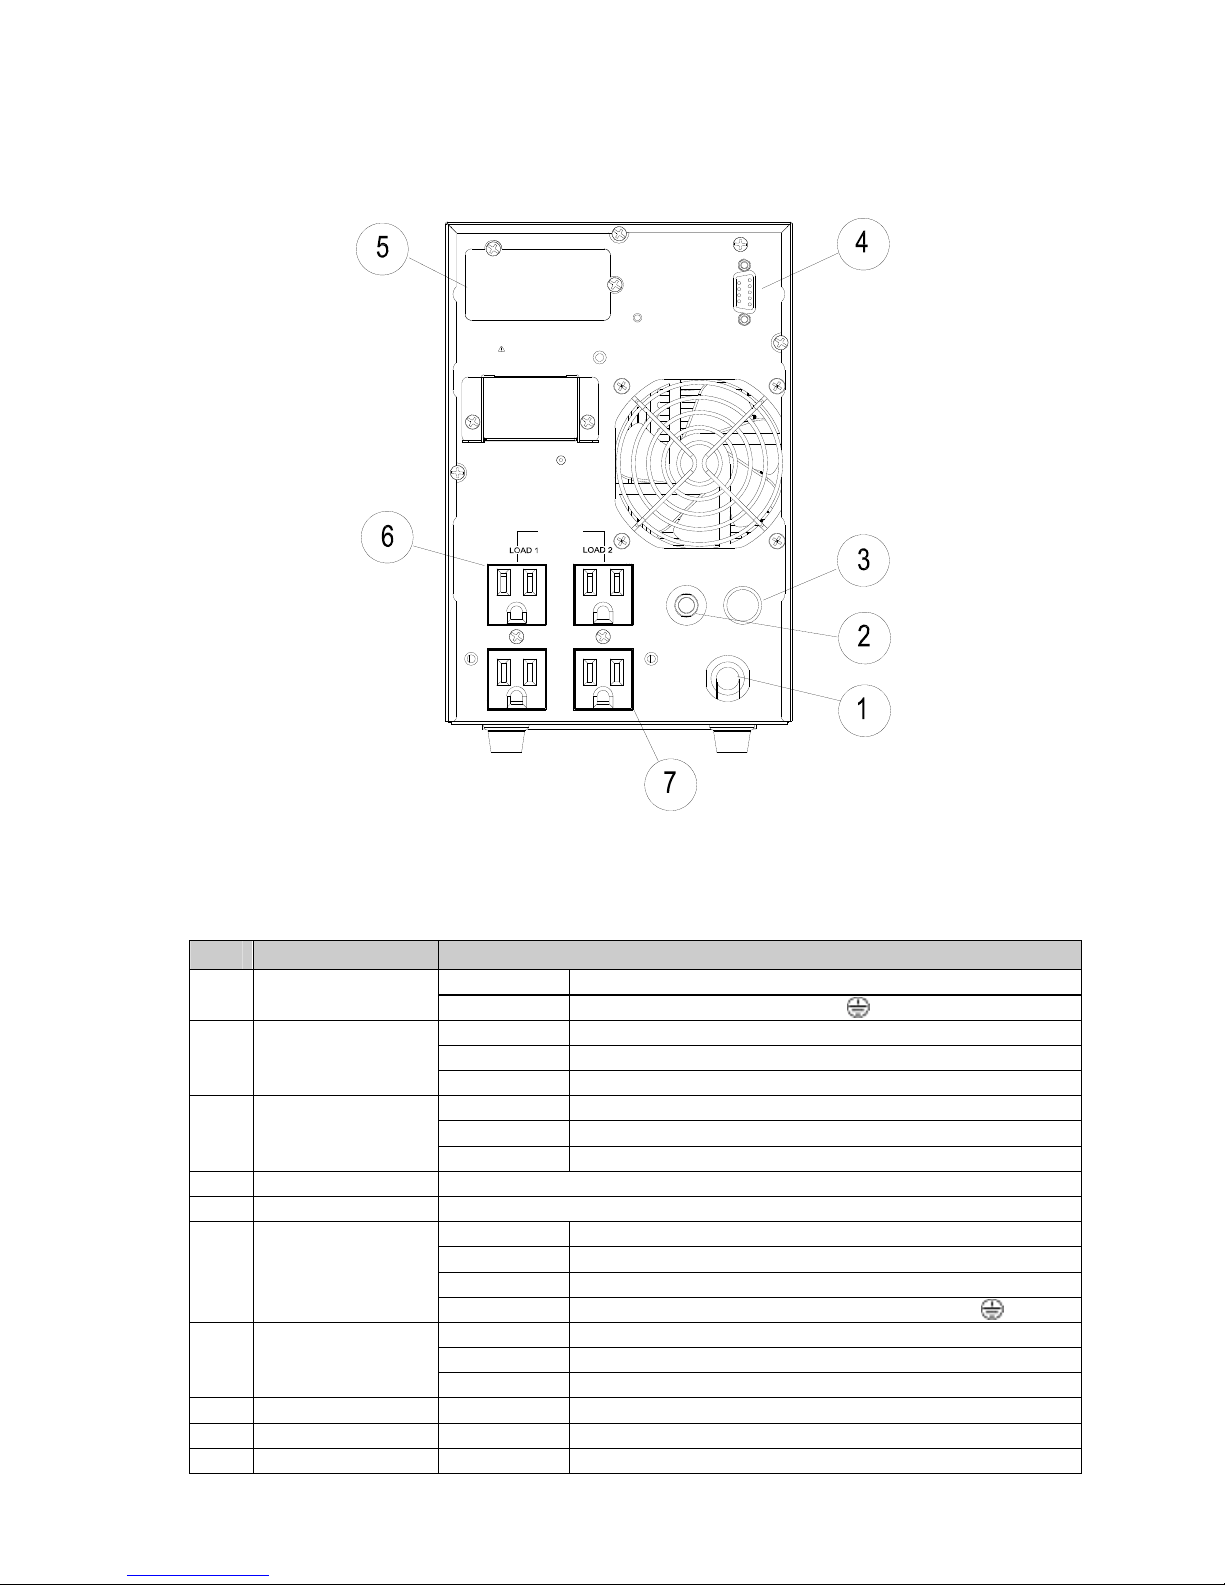
Tower Type
1kVA
Figure 2-3 Tower Type UPS rear
Table 2-2 Name
No Name Function
Except 3k Input cable with plug
1 Input
3k Terminal L-Line, N-Nutral, -Earth
1k 15A Breaker
1.1k/1.5k 20A Breaker
2 Input Breaker
2.4k/3k 45A Breaker
1k 25A
1.1k/1.5k 30A
3 Input Fuse
2.4k/3k 30A x 2
4 RS232C For communication
5 Option Slot For network agent card or Dry contact card
1k 5-15R x 2
1.1k/1.5k 5-15R x 3
2.4k 5-15R x 1, 5-20R x 2, Output cable with L5-30R
6 Load1
3k 5-15R x 1 and Terminal L- Line, N-Nutral, -Earth
1k 5-15R x 2
1.1k/1.5k 5-15R x 3
7 Load2
2.4k/3k 5-15R x 1
8 Output Breaker1 2.4k/3k 15A, for 5-15R (Load1)
9 Output Breaker2 2.4k/3k 15A, for 5-15R (Load2)
10 Output Fuse 2.4k 20A, for 5-20R (Load1)
AC OUTPUT
WHEN DISCONNECTING
COVER THE CONNECTOR
WARNING:
BATTERY CONNECTOR
COMM PORT
INTERFACE OPTION
CAUTION
See Installation Instructions before
connecting to the supply.
15A
INPUT BREAKER
FUSE 25A
CAUTION
For continued protection against
risk of fire, replace only with
same type and rating of fuse
AC INPUT
See Installation Instructions
before connecting to the supply.
CAUTION
Page 26

7
Chapter3 Installation
3-1 Confirmation
Confirm there are all accessories after opening packing, and is no damage
in the UPS and the accessory. Confirm a list of this content of packing in
the user's guide opening and an actual accessory.
Keep the packing box and the transport document when it seems that
damage was received while UPS is transported. And contact your survice.
3-2 Place
UPS is designed for the room. Choose the comforting place to be an
installation. Set up the device in a flat place. Especially, Avoid the
following places.
・Outdoor
・Place of direct sunshine
・Place of high temperature and humidity(Recommendation: 10-25℃)
・Place of strong vibration and strong impact
・Place where salinity and causticity gas are generated
・Sealing room
・Place with inclination
・Near wireless
・Place where a lot of dust exists
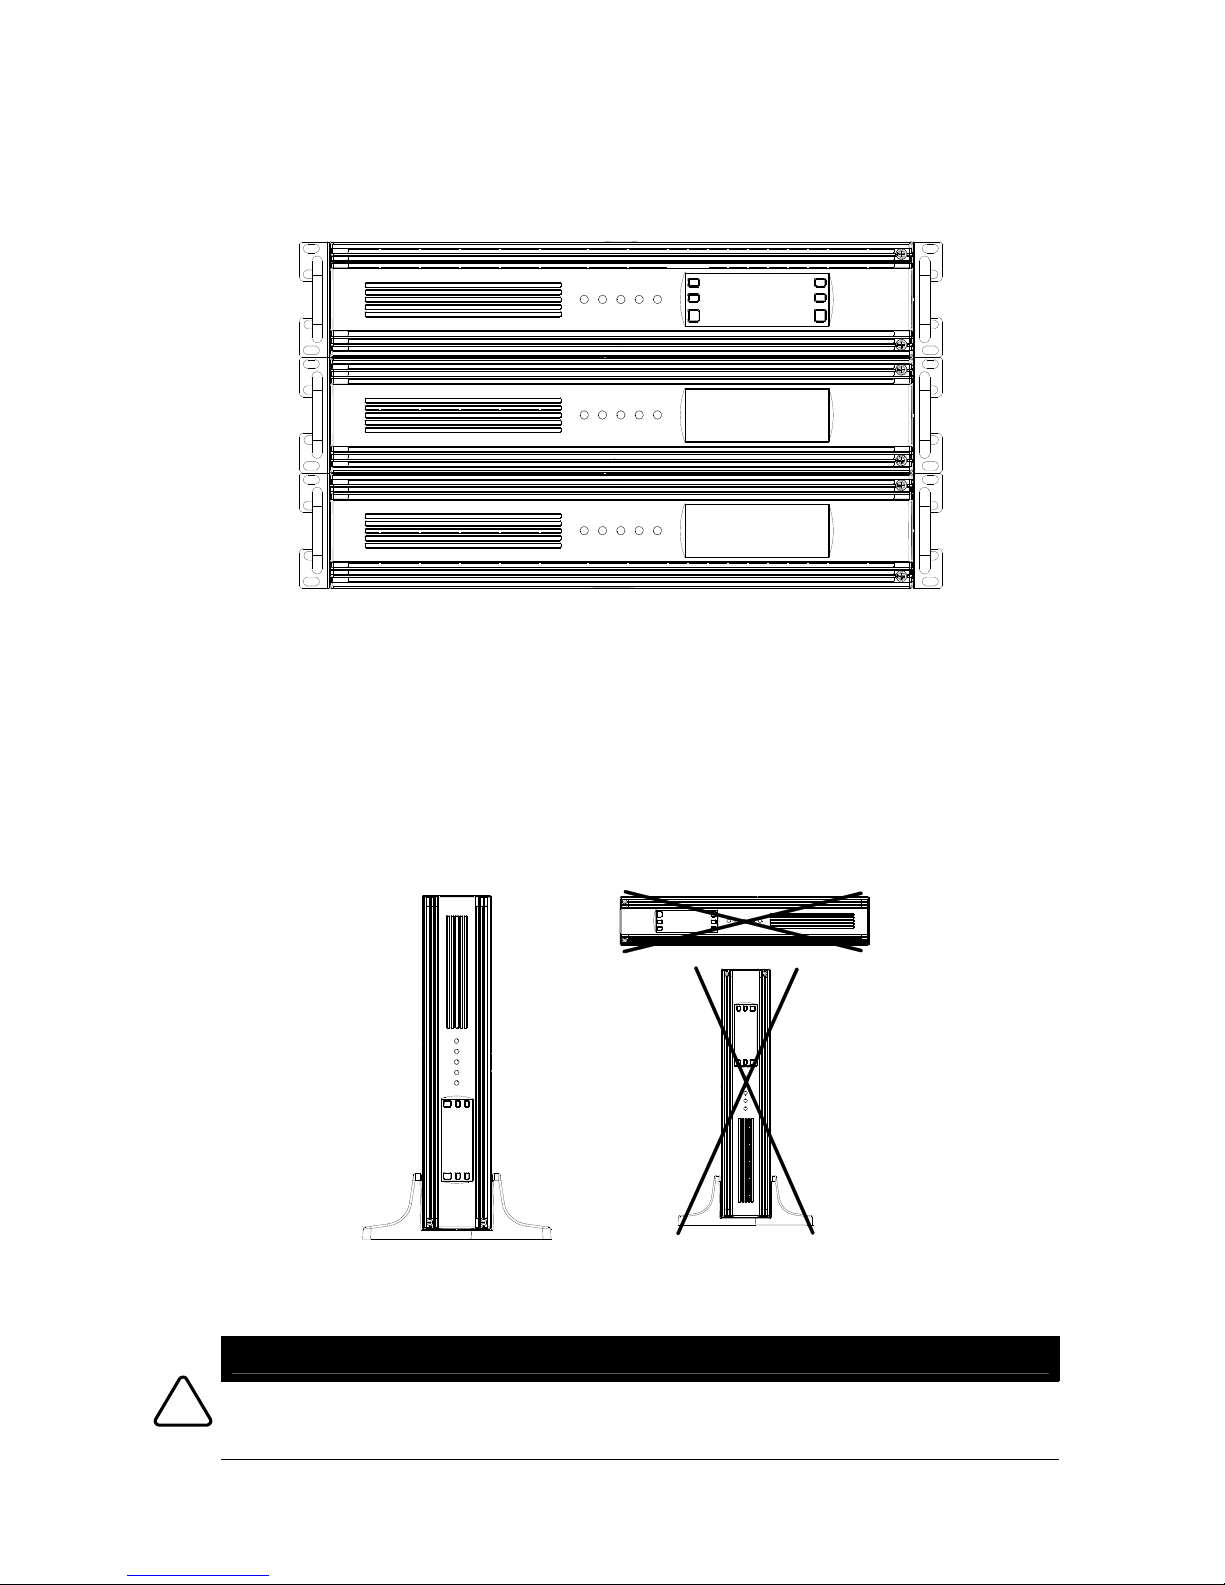
Keep the following space when you set up UPS.
Set up CRT display 30cm or more apart from this devices, because UPS
might give the influence such as shakes against CRT
This device does the forced air cooling.。Therefore, the space of 20cm or
more is each front side/rear side necessary. Moreover, the maintenance
work is done on the front side and rear side. The space of 2m or more is
necessary for the front side/rear side.
Page 27

8
Figure 3-1 Need Space
Page 28

9
3-3 Installation
UPS is designed by a flexible installation. Rack & tower type prepares
accessories necessary to use it as a rackmounting installation or a tower
installation.
3-3-1 Rack & tower type Installation
UPS is possible to set up in 19-inch rack, and only 2U uses valuable rack
space. It is possible to fix to 19-inch rack with the installation fittings
(flange) for rackmounting.
・The screw that fixes the rail and UPS to the frame is not included in
UPS. Prepare the rail for your 19-inch rack.
Installation of Rack type
Install UPS in the rack according to the following procedure.
1. Make the front side of UPS the front, and put UPS on a flat place.
2. Install the handles with the long screw 2pcs appended to two flanges.
3. Fix the flange that installs the handles to the side of UPS with the
short screw 4 pcs of the attachment.(Figure 3-2)
4. Fix to the screw hole in one step interior with the short plate screw
when you want to put out the device forward.
5. Repeat step 3 from step 1 when you set up EBM of the option.
Figure 3-2 Installation of flange
・
Install EBM on the the lower of UPS like Figure 3-3. Use the rail for the mount
every EBM.
SHORT SCREW
LONG SCREW
FLANGE
HANDLE
Page 29
10
6. Do the slide and put UPS and EBM on the rail.
Fix the flange of UPS to the frame of the rack to fix UPS to the rack.
Advance toward clause 3-3-3 3-3-5 to complete the installation.
<= UPS
<= EBM
<= EBM
Figure 3-3 Installation of Rackmount (used EBM)
Installation of Tower type
When UPS is set up in the tower, the pedestal (plinth) for the tower
installation is installed in the bottom of the main flame.
1. The pedestal for the tower installation is assembled.
2. Slowly put UPS on the pedestal, and put UPS on a flat, horizontal
place.
NG
Figure 3-4 Installation of Tower
Attention
・Install the bracket when you add EBM.
・Position the air-intake vent in the upper part at the Tower installation.
!
~
Page 30

11
3. Fix the pedestal of EBM between pedestal of UPS when you set up
EBM.
4. Slowly put UPS and EBM on the pedestal, and put on a flat, horizontal
place.
5. Fix UPS and EBM with a bracket like Figure 3-5.
6. In addition, repeat step 5 from step 3 when you add one EBM
another.
Figure 3-5 Installation of Tower (used EBM)
・Change the EBM connection number setting in clause 6-1-1 when you use
EBM. The predictive value at actual electrical discharge time and the electrical
discharge time is influenced when not normally set.
・Match in the operation form and set "Shutdown timing" of Power ーsol when
EBM and power management software (Power-sol) is additionally used. When
"Power-sol" is used like the factory setting, the backup time expected might not
be able to be kept.
・The recommendation of pedestal intervals is 300mm(3kVA is 350mm). Please
set it up so that pedestal may become symmetry for UPS.
3-3-2 Tower type Installation
Put tower type UPS on a flat, horizontal place.
Attention
・Otherwise, this device might fall, and it injure.
UPS PEDESTAL
SHORT SCREW
BRACKET
EBM
UPS
EBM PESDESTAL
UPS
NO.2 EBM
SHORT SCREW
BRACKET
NO.1 EBM
EBM PEDESTAL
!
Page 31

12
3-3-3 Wiring (up to 1.5kVA)
a) Wiring
b) PLUGSTOP
Figure 3-6 Wiring up to 1.5kVA
・Do not remodel UPS. The UPS breaks down, and the guarantee becomes
invalid.
・Do not connect the large load of instant electric power. (Laser printer etc)
・Ground the earth of the load with the rush current independently on the load
side.
・The output cable connected with the outlet by Plug Stop (option) can be fixed.
Input cable
LOAD1LOAD2
Out put outlet
UPS
EBM
EBM
PLUG STOP
OUTPUT CABLE
Page 32

13
3-3-4 Wiring (Only 2.4kVA)
a) Wiring
b) PLUGSTOP
Figure 3-7 Wiring only 2.4kVA
・Do not remodel UPS. The UPS breaks down, and the guarantee becomes
invalid.
・The input distribution breaker must select the breaker more than 50A.
・Do not connect the large load of instant electric power. (Laser printer etc)
・Ground the earth of the load with the rush current independently on the load
side.
・The output cable connected with the outlet with Plug Stop (option) can be
fixed.
・Do not push an output breaker pin.The output of applicable Load stops.
・Do not place a thing on the line of an output breaker pin.
Be careful not to block a motion of a pin.
・Do not lift UPS, having the fixed part of input/output cable
3-3-5 Wiring (Only 3kVA)
1. 1.Wiring work becomes the customer's work including the connection to
the terminal of UPS. The torque of the terminal shown in Table 3-1 is
showing of the torque of the device terminal.
PLUG STOP
OUTPUT CABLE
Output breaker pin
Page 33

14
2. Make the utility power source non-earth. However, ground the Nutral
side when you ground UPS.
Table 3-1 Selection of distribution breaker and screw size of UPS terminal
WIRE(Recommendation) UPS terminal
Cap
Input
Voltage
Output
Voltage
Distribution breaker
(Recommendation)
Input Output Earth Size Torque
3kVA 100V 100V 50A AWG No.8 M5 22.5lb・in
a) Wiring
Use the wire protection when you connect the wire cable with the terminal.
Wire protection can be an put on the back or the bottom of the TB cover.
Remove the round part of the TB cover, and put it. When removing, the cutting
lack side can be removed by strongly pushing the right and left (i and ⅱ)
several times in the driver as shown in the figure below. Do not beat strongly
Do not push the driver into the space. (ⅲ) The TB cover is damaged. Please
note it.
(i) (ⅱ) (ⅲ)
b) Details when wire protection is used
NLNL
M5
LN LN
LOAD SYSTEM
LOAD SYSTEM
DISTRIBUTION
PANEL
DETAIL OF TERMINAL
10.4013
EARTH
INPUT
Ring terminal
Cap
Input cable (Output cable)
60mm
(Wire cable)
Input cable
Wire protection(Accessory)
TB cover
Screw
TB cover(TOP)
Nut(Wire protection)
Output cable
Terminal
Page 34

15
c) PLUGSTOP
Figure 3-8 Wiring and detailed terminal
・Do not remodel UPS. The UPS breaks down, and the guarantee becomes
invalid.
・ The input distribution breaker must select the breaker more than the
above-mentioned current value.
・The qualification owner must do electrical work.
・Do not connect the large load of instant electric power. (Laser printer etc)
・Ground the earth of the load by itself.
・The output cable connected with the outlet with Plug Stop (option) can be
fixed.
・Do not push an output breaker pin.The output of applicable Load stops.
・Do not place a thing on the line of an output breaker pin.
Be careful not to block a motion of a pin.
・Do not lift UPS, having TB cover.
PLUG STOP
OUTPUT CABLE
Output breaker pin
Page 35

16
3-3-6 Rack & Tower type EBM Installation
UPS
No.1
EBM
No.2
EBM
Figure 3-9 EBM connection
1. When EBM is connected, the front panel of UPS and EBM is detached.
2. The cutting lack under the front panel center of UPS and the cutting
lack on the EBM front panel center are cut out.
3. The connecting cable of UPS is passed through the cutting lack of
UPS and EBM.
4. The connecting cable of UPS and EBM is connected in front of EBM.
5. The cable is fixed to the cable guide in front of EBM.
6. The front panel of UPS and EBM is installed.
7. In addition, when you install one EBM, it is put under EBM that has
already been installed, repeated step 6 from step 1 in above
mentioned .
UPS
NO.1 EBM
NO.2 EBM
UPS BATTERY CONNECTOR
NO.1EBM CONNECTOR
NO.1 EBM BATTERY CONNECTOR
NO.2 EBM CONNECTOR
UPS FRONT PANEL
NO.1 EBM FRONT PANEL
NO.2 EBM FRONT PANEL
NO.1EBM FRONT PANEL : LOWER CUTTING LACK PART.
NO.2EBM FRONT PANEL : UPPER CUTTING LACK PART.
NO.1EBM FRONT PANEL : UPPER CUTTING LACK PART.
Page 36

17
・Operate it after charging with UPS for 24 hours set up first time or after it
preserves it for a long time.
Attention
・A few arcs might occur when EBM is connected with UPS.
・Cconnect the connector of EBM with the connector of UPS firmly.
・Do not work by a wet hand. It is likely to get an electric shock.
3-3-7 Tower type EBM Installation
Figure 3-10 EBM connection
1. When EBM is connected, the battery connector cover on the back of
UPS and the back of EBM is removed, and renewed.
2. An accessory of EBM battery cable is connected with the battery
connector of UPS and EBM.
3. In addition, when you install one EBM, the battery connector cover on
the back of EBM that has already been installed and EBM of the
addition is removed, and renewed. An accessory of EBM battery cable
is connected with the battery connector of EBM and EBM.
・Operate it after charging with UPS for 24 hours set up first time or after it
preserves it for a long time.
Attention
・A few arcs might occur when EBM is connected with UPS.
・Cconnect the connector of EBM with the connector of UPS firmly.
・Do not work by a wet hand. It is likely to get an electric shock.
UPS BATTERY CONNECTOR COVER
EBM BATTERY CONNECTOR COVER
UPS
EBM
UPS
BATTERY CABLE
CONNECTOR COVER
EBM
BREAKER(EBM)
!
!
Page 37

18
3-3-8 Optional card Installation
Figure 3-11 Optional card connection
1. Remove the cover of INTERFACE OPTION on the back of UPS when
you connect an optional card.
2. If used dry contact signal, pass the cable through the window of a
rear panel.
3. If used dry contact signal, fix the cable to the terminal on the
substrate.
4. Make the rail of the slot slide into the card edge, and insert it up to
the interior.
5. Fix wiring from the terminal on the substrate to the rear of UPS by
using Cable Tie stuck on the card.
Cover
Optional card
Cable tie mount base
Cable
Cable tie
Optional card
Page 38

19
Chapter4
Operation
4-1 Mode
The UPS exists the following main seven operation mode, and displays
the status by LCD and LED of UPS. (Refer Chapter5)
Figure 4-1 Panel
4-1-1 On-Line
UPS obtains the electric power from a utility input. And UPS is outputs
through INV.
MODE LED lights, and "On-Line" is displayed in LCD for this period. Other
states can be displayed with the ▲ button/▼ button. The state display
displays the following. Input power(W), input current(A), input voltage(V),
input frequency(Hz), load percent(%), output power(W), output VA(VA),
output current(A), output voltage(V), output frequency(Hz), battery
voltage(V), battery capacity(%), and backup time。As for this display, any
mode is possible.
When the power failure occurs, UPS transfers the On-Battery mode.
When the UPS load exceeds 100%, it is shown for ALARM LED to light,
and to have exceeded the UPS capacity.
・UPS blinks(1s ON/OFF) ALARM LED when the utility input deviates from the
input range of the zero transfer, except for the On-Battery.
the input range of the zero transfer (Bypass available range)
Input voltage :Rated voltage±12%
Input frequency:±3Hz(Default)
*I put frequency range is possible to change by setting of Chapter6.
・When the input deviates from the range of bypass available, if overload/internal
abnormality occurs, the output is cut.
・When the phase match cannot be done even within bypass available, the UPS
doesn't change to the by-pass operation. And output is cut.
・When the load is over 110%, the output is cut after transition to On-Bypass.
・When the load is over 150%, the output is cut.
Page 39

20
・It transfers to the On-Bypass once, when the load is near less than 100%
after detecting the overload.
・When the input deviates from the range of bypass available, if manual bypass is
set, the UPS transfer Bypass with output cut within 10ms.
・The output of UPS might decrease when the big inrush current is connected.
4-1-2 On-HE
It is a mode that supplies a utility input to the load side through UPS.
MODE LED is turned off, and " On-HE " is displayed in LCD for this period.
Other states can be displayed with the ▲ button/▼ button. When the
power failure occurs, UPS transfers the On-Battery mode.
When the UPS load exceeds 100%, it is shown for ALARM LED to light,
and to have exceeded the UPS capacity.
・UPS transfers On-Battery when the utility input deviates from the HE input
range, when the HE mode. (When Input power is cut , the output cut by the
transition of On-HE ⇔ On-Battery is about 10ms.)
HE input range
Input voltage :Rated voltage±5%(Default)
Input frequenvy:±1Hz(Default)
* Input voltage/Input frequency range is possible to change by setting of
Chapter6
・When the load is over 110%, the output is cut after transition to On-Bypass.
・When the load is over 150%, the output is cut.
・If overload/internal abnormality occurs, the UPS transfer Bypass.
・It transfers to the On-Bypass once, when the load is near less than 100%
after detecting the overload.
4-1-3 On-Battery
When an abnormal input occured, UPS transfers On-Battery that does
the backup operation. UPS sounds an intermittent alarm for 2 seconds.
MODE LED blinks 0.5 seconds, and " On-Battery " is displayed in LCD for
this period. Other states can be displayed with the ▲ button/▼ button.
UPS returns to an On-Line mode or On-HE when the utility input power
returns.
Blinking BATTERY LED of UPS shows the low-battery warning. In
addition, the shutdown warning of 0.5 seconds blinking is generated
when advancing. UPS shuts down after it warns of the shutdown, and
the output is stopped.
・If overload/internal abnormality occurs, the output is cut.
・In the case of the deterioration battery, UPS might shut down by not the
electrical discharge shutdown but the alarm. In this case, Autostart cann’t be
done after UTL return.
4-1-4 On-Bypass
When the overload is generated or the internal abnormality occurs, UPS
becomes On-Bypass. The alarm sounding and MODE LED blink every 2
seconds. Other states can be displayed with the ▲ button/▼ button.
Page 40

21
・UPS returns by the autoreturn function when the overload is released. However,
when the input deviates from the range of the zero transfer, the return
operation is not done.
・When the overload of 110% or more continues, the output is cut.
・When the “SET” button is pushed after transfering to the by-pass by the event,
the mode and abnormality when abnormality occurs are displayed. UPS returns
to the normal display when leaving it.
・When the phase match cannot be done even within bypass available, the UPS
doesn't change to the Online operation. And On-Bypass is kept.
4-1-5 Standby
The state that UPS has stopped outputting is indicated. OPERATION LED
blinks for this period. Other states can be displayed with the ▲ button/▼
button. "Standby", “HE Standby”, “Bypass Standby”, “Battery Standby” is
displayed in LCD for this period.
・Battery standby effects only schedule by communication from management
software.
・Bypass standby effects only manual bypass setting.
4-1-6 Converter OFF
Converter OFF indicates the state to have turned off AC/DC, DC/AC,
DC/DC of UPS. OPERATION LED is unlighting, and MODE LED blink every
2 seconds for this period. It changes in this state by alarm generation or
an input abnormal. Other states can be displayed with ▲ button/▼
button. "Converter OFF" is displayed in LCD for this period.
・When the “SET” button is pushed after transfering to the converter OFF by the
internal abnormality, the mode and abnormality when abnormality occurs are
displayed. UPS returns to the normal display when leaving it.
4-1-7 Powerdown
Powerdown indicates the state to have turned off AC/DC, DC/AC,
DC/DC of UPS. MODE LED blink for this period. "Power Down" is
displayed in LCD for this period. The state cannot be transferred from
Power-Down. There is only reset by detaching the plug. Other states can
be displayed with ▲ button/▼ button.
4-1-8 Charging
BATTERY LED blink every 0.5 seconds for fast charging.
Page 41

22
4-2 Start・Stop
4-2-1 Start
Push the ON button after connecting UPS with the utility power .
・If UPS shuts down by battery cut-off, UPS automatically becomes an output
status by utility return.(This is possible to change by item of Chapter6)
・Even if the ON button of UPS is pushed with no Utility Power, UPS can not
start.(This is possible to change by item of Chapter6)
・UPS starts by inputting utility again even if UPS unplugs by the alarm state.
(This is possible to change by item of Chapter6)
4-2-2 Stop
When the OFF button is pressed for 3 seconds or more, the output of
UPS is turned off. Afterwards, UPS will shut down, and stop completely
when the input power plug of UPS is pulled out.
4-3 Self-test
When you keep pushing the ESC button for 3 seconds, the self test of
the battery is begun. The self test is effective at each mode of a standby,
HE standby, On-Line, and On-HE. Moreover, it is necessary to have done
the charge for 12 hours or more. The test is interrupted, and the alarm is
output, when not agreeing with the condition, or when events of the
power failure and the alarm and etc occurred. BATTERY LED blinks while
testing. BATTERY LED blinks every 2 seconds. if the battery is judged to
be longevity after the test ends. However, The test is interrupted, and
the alarm isn’t output, when not agreeing with the condition, or when
events of the power failure and the alarm and etc occurred, in the
automatic battery test.
Figure 4-2 Time Table
・After the battery is charged, the self test is done. Moreover, when UPS is a
On-Battery, it is not executed.
・When the self test cannot be executed, the alarm is output. However, the alarm
isn’t output, when the automatic testing cannot be executed.
・When the utility failure occurs while testing self, it is canceled.
・If Load change occur in selftest, self test might be stopped.
・When the breakdown is found in UPS, the self test is not done.
Discharge Charge
12 hours after from charging
Self test possible
Page 42

23
Chapter5
Display
5-1 LED display
The LED display is as follows.
Table 5-1 LED Display
Status LED
OPERATION MODE
State Note
On-Line standby
On-Line
Normal Mode
On-HE standby
On-HE (High Effeciency)
High Effeciency
(HE) Mode
On-Battery Byzzer : 2s interval
Bypass Standby
On-Bypass
Converter OFF
Power-Down
Status LED
BATTERY ALARM
State Note
- Battery Disconnect
- Battery testing
Standby
On-Line
- Service Battery
HE Standby
On-HE
- Low Battery
- Just befire Low Battery shut Down
On-Battery
Buzzer:
Synchronized
- Fast Charging
-
Allarm
-
Bypass not Available
-
Input Abnormal
2s
2s
2s
0.5s
:1sBlink(Blink)
2s
:2sBlink
0.5s
:0.5sBlink
:Lighting
:UnLightin
g
2s
0.5s
0.5s
2s
Page 43

24
5-2 Normal LCD display
The normal display of LCD is following. The state is displayed in the upper
row and the input power is displayed in the the lower.
Figure 5-1 Normal display
STAND- BY ON LI N E
INPUT P=xxxxW INPUT P=xxxxW
HE STAND-BY ON HE
INPUT P=xxxxW INPUT P=xxxxW
BATTERY STA ND- BY ON B ATT ERY
INPUT P=xxxxW INPUT P=xxxxW
BYPASS STAND-BY ON BYPASS
INPUT P=xxxxW INPUT P=xxxxW
CONVERTER OFF POWER DOWN
INPUT P=xxxxW INPUT P=xxxxW
Page 44

25
5-3 Other LCD display
When ▲ button /▼ button is pushed in normal display, other states are displayed.
The content of the display in the standby as follows. A similar display is done at
other states. If ▲ button /▼ button is not pushed, the display return to usual
display.
Figure 5-2 Other display
Minute/Second display in BACK UP T transfers by backup time.
Refer the BACK UP T as a rough standard.
No8 Effective/Invalidity is displayed only in powerdown.
No8 indicates 6-1-8 .
EBM1 REPOOFF 1 00 EBM1 REPOOFF 1 00
STAND-B Y I NPUT I=xx.xA
EBM1 REPOOFF 1 00 EBM1 REPOOFF 1 00
INPUT V=xxx.xV INPUT F=xx.xHz
EBM1 REPOOFF 1 00 EBM1 REPOOFF 1 00
LOAD% L=xxx% OUTPUT P=xxxxW
EBM1 REPOOFF 1 00 EBM1 REPOOFF 1 00
OUTPUT VA=xxxxVA OUTPUT I=xx.xA
EBM1 REPOOFF 1 00 EBM1 REPOOFF 1 00
OUTPUT V=xxx.xV OUTPUT F=xx.xHz
EBM1 REPOOFF 1 00 EBM1 REPOOFF 1 00
BA TTERY V=xxx.xV BA TTERY CAP=xxx%
EBM1 REPOOFF 1 00 EBM1 REPOOFF 1 00
BACK UP T=xxxmin BACK UP T=xxxscd
EBM1 REPOOFF 1 00 EBM1 REPOOFF 1 00
No8 EFFECTIVE No8 INVALIDITY
Page 45

26
The LCD upper row of other displays displays the content set by 6-1-1 , 6-12 , 6-1-5 .
Figure 5-3 Setting display
EBM0 REPOOFF 1 0 0
EBM AMOUNT : 0set
INPUT V=xxx.xV
EBM1 REPOOFF 1 0 0
EBM AMOUNT : 1set
INPUT V=xxx.xV
EBM2 REPOOFF 1 0 0
EBM AMOUNT : 2sets
INPUT V=xxx.xV
EBM2 REPOOFF 1 0 0
REPO/REMOTE : REPO
INPUT V=xxx.xV Signal : OFF
EBM2 REPO ON 100
REPO/REMOTE : REPO
INPUT V=xxx.xV Signal : ON
EBM2 RMT OFF 1 0 0
REPO/REMOTE : REMOTE
INPUT V=xxx.xV Signal : OFF
EBM2 RMT ON 1 0 0
REPO/REMOTE : REMOTE
INPUT V=xxx.xV Signal : ON
EBM2 1 00
REPO/REMOTE : Invalidity
INPUT V=xxx.xV
EBM2 1 00
RATED VOLTAGE : 100V
INPUT V=xxx.xV
EBM2 1 10
RATED VOLTAGE : 110V
INPUT V=xxx.xV
EBM2 1 20
RATED VOLTAGE : 120V
INPUT V=xxx.xV
Page 46

27
Chapter6
Setting
The following setting can be changed in any mode with an operation
panel of UPS.
No Item Default
① External Battery module(EBM) set 0set
② REPO / REMOTE Invalidity
③ UTL failure signal delay 0 second
④ Output delay 0 second
⑤ Rated Voltage 100V
⑥ Mode select Normal
⑦ Synchronized range ±3Hz
⑧ AUTOSTART after shutdown with alarm Effective
⑨ Polarity Active close
⑩ Buzzer stop No active
⑪ AUTOSTART Effective
⑫ Auto battery test Effective
⑬ Remote shut down signal term 4.5seconds
⑭ Manual Bypass Invalidity
⑮ Voltage range of HE mode ±5%
⑯ Frequency range of HE mode ±1Hz
⑰ Language Japanese
⑱ DC start Invalidity
・When the power cable is pulled out no battery, content of setting change is not
preserved.
・Only ⑥ can be changed from the network agent card by the communication.
This change becomes a compulsion change.
Page 47

28
6-1 Panel operating
The setting method in the operation panel is shown. The item is displayed
in LCD. The item and the content can be changed by using the operation
button (ESC button/SET button /▲ button /▼ button).
Figure 6-1 Panel
Figure 6-1 shows the panel used when setting of ①~⑲, and explains
the operation as follows.
・The alarm generation or the mode changes for this period, and this state is
ended. The content of the setting change is not reflected.
1. Push the SET button for 3 seconds. "Configuration" is displayed in
LCD. At this time, the item of ① on the former page is displayed.
2. ▲ button/▼ button is pushed, and it moves to the item that changes.
3. Push the SET button when you move to the item that changes. The
content of the item is displayed.
4. ▲ button/▼ button is pushed, and it moves to the content that
changes.
5. It is changed to the content to which it wants to change the content
of the item that changes by pushing the SET button. And, it becomes
the next item display of the item that changes. Push the ESC button
when you want to return to the item that changes.
6. This state can be ended by always preserving the content of the
change when the ESC button is pushed for 3 seconds.
・This state ends automatically when a no operation passes 2 minutes. The
content of the change is not reflected.
・When the event is generated on the way, this state is discontinued. At this time,
the content of the change is not reflected.
Page 48

29
6-1-1 EBM set
Figure 6-2 EBM set
It changes into the “EBM set” display in pushing the SET button. Push、▲
button/▼ button when you change the content display. The content is
changed when the SET button is pushed by the content that changes
and it moves to the next item display. Push the ESC button when it
returns to the “EBM set” item.
・Set this when you increase EBM. The deterioration of the battery is fast when
using UPS without setting this.
・Do not change initialization with EBM not increased.
6-1-2 REPO/REMOTE
Figure 6-3 REPO/REMOTE
CONF I GURAT I ON
EBM SET
EBM SET
0SET
EBM SET
1SET
EBM SET
2SET
Factory
Setting
〆
CONF I GURAT I ON
REPO/REMOTE
REPO/REMOTE
INVALIDITY
REPO/REMOTE
REPO SET
REPO/REMOTE
REMOTE SET
Factory
Setting
〆
Page 49

30
It changes into the “REPO/REMOTE” display in pushing the SET button.
Push、▲ button/▼ button when you change the content display. The
content is changed when the SET button is pushed by the content that
changes and it moves to the next item display. Push the ESC button when
it returns to the “REPO/REMOTE” item.
・This setting is a function of installing in the dry contact card of the option. Do
not change the default, when the card uninstalling. The button might become
invalid, and the output might be cut.
・This terminal becomes iREMOTE ON/OFF when changing to the REMOTE
setting.
・ON button/OFF button of the panel becomes invalid when changing to the
REMOTE setting.
・Make it to the remote setting after it changes to the setting that the output is
turned off at 6-1-9 .
6-1-3 UTL failure signal delay
Figure 6-4 UTL failure signal delay
It changes into the “UTL failure signal delay” display in pushing the SET
button. Push、▲ button/▼ button when you change the content display.
The content is changed when the SET button is pushed by the content
that changes and it moves to the next item display. Push the ESC button
when it returns to the “UTL failure signal delay” item.
・This setting is a function of installing in the dry contact card of the option.
・This setting is used for the delay of the input abnormal signal (UTL failure signal)
of 9-2-6 .
CONF I GURAT I ON
UTL FALT DELAY
UTL FALT DELAY
0SECOND
UTL FALT DELAY
5SECONDS
UTL FALT DELAY
30 SECONDS
UTL FALT DELAY
120 SECONDS
Factory
Setting
〆
Page 50

31
6-1-4 Output delay
Figure 6-5 Output delay
It changes into the “Output delay” display in pushing the SET button.
Push、▲ button/▼ button when you change the content display. The
content is changed when the SET button is pushed by the content that
changes and it moves to the next item display. Push the ESC button when
it returns to the “Output delay” item.
・This setting is effective against the OFF button operation when On-Battery.
6-1-5 Rated Voltage
Figure 6-6 Rated Voltage
CONF I GURAT I ON
OUTPUT DELAY
OUTPUT DELAY
0SECOND
OUTPUT DELAY
30 SECONDS
OUTPUT DELAY
60 SECONDS
OUTPUT DELAY
BUTTON INVAL ID
Factory
Setting
〆
CONF I GURA T I ON
RATED VOL TAGE
RATED VOL TAGE
100 V
RATED VOL TAGE
110 V
RATED VOL TAGE
120 V
Factory
Setting
〆
Page 51

32
It changes into the “Rated Voltage” display in pushing the SET button.
Push、▲ button/▼ button when you change the content display. The
content is changed when the SET button is pushed by the content that
changes and it moves to the next item display. Push the ESC button when
it returns to the “Rated Voltage” item.
6-1-6 Mode select
Figure 6-7 Mode select
It changes into the “Mode select” display in pushing the SET button.
Push、▲ button/▼ button when you change the content display. The
content is changed when the SET button is pushed by the content that
changes and it moves to the next item display. Push the ESC button when
it returns to the “Mode select” item.
・Normal mode is fixation in the mode of the On-Line.
・HE mode is fixation in the mode of the On-HE.
・Intelligent mode ijudges a utility input and does the transfering of On-Line ⇔
On-HE.
UPS transfers from On-Line to On-HE by the automatic operation. The
change from On-HE to On-Line, when the input deviates from the HE input
range, and when the input is bypass available transfers by automatic
operation. Moreover, when there is a mode transition by the communication,
it gives priority to the communication, don’t automatic operation. However,
when the UPS changes into the OnBattery by the condition of the AC input,
the change operation is not done.
When the communication is not possible, or the communication is invalided ,
or newly communication is connected, or UPS shuts down, after the mode is
changed by the communication, UPS change to automatic operation.
CONF I GURAT I ON
MOD E S E L E C T
MOD E S E L E C T
NORMAL MODE
MOD E S E L E C T
HE MODE
MOD E S E L E C T
INTELLIGENT MODE
Factory
Setting
〆
Page 52

33
6-1-7 Synchronized range
Figure 6-8 Synchronized range
It changes into the “Synchronized range” display in pushing the SET
button. Push、▲ button/▼ button when you change the content display.
The content is changed when the SET button is pushed by the content
that changes and it moves to the next item display. Push the ESC button
when it returns to the “Synchronized range” item.
・This setting sets the synchronized range in On-Line. The INV output outputs the
frequency within this range.
・The INV output outputs by the asynchronization at a utility input outside of this
range.
・The output is cut when there are an internal abnormality and an overload at the
asynchronization.
6-1-8 AUTOSTART after shutdown with alarm
Figure 6-9 AUTOSTART after shutdown with alarm
CONF I GURAT I ON
SYNCH RANGE
SYNCH RANGE
±3Hz
SYNCH RANGE
±1Hz
SYNCH RANGE
±5Hz
Factory
Setting
〆
CONF I GURA T I ON
START AFTER ALM
START AFTER ALM
EFFECT I VE
START AFTER ALM
INVALIDITY
Factory
Setting
〆
Page 53

34
It changes into the “AUTOSTART after shutdown with alarm” display in
pushing the SET button. Push、▲ button/▼ button when you change the
content display. The content is changed when the SET button is pushed
by the content that changes and it moves to the next item display. Push
the ESC button when it returns to the “AUTOSTART after shutdown with
alarm” item.
・This setting decides whether to start when re-start after shutting down in the
alarm state.
・If UPS shut down with alarm, the mode transfers to the Powerdown in case of
Invalidity.
・When invalidity, ON button recovery is Invalidity.
6-1-9 Polarity
Figure 6-10 Polarity
It changes into the “Polarity” display in pushing the SET button. Push、▲
button/▼ button when you change the content display. The content is
changed when the SET button is pushed by the content that changes
and it moves to the next item display. Push the ESC button when it
returns to the “Polarity” item.
・This setting is a function of installing in the dry contact card of the option.
・An active close becomes REPO ON and REMOTE OFF, When the contact close,
・An active open becomes REPO ON and REMOTE OFF, When the contact open,
CONF I GURAT I ON
POLARITY
POLARITY
ACT I VE CLOSE
POLARITY
ACTIVE OPEN
Factory
Setting
〆
Page 54

35
6-1-10 Buzzer stop
Figure 6-11 Buzzer stop
It changes into the “Buzzer stop” display in pushing the SET button. Push、
▲ button/▼ button when you change the content display. The content is
changed when the SET button is pushed by the content that changes
and it moves to the next item display. Push the ESC button when it
returns to the “Buzzer stop” item.
6-1-11 AUTOSTART
Figure 6-12 AUTOSTART
It changes into the “AUTOSTART” display in pushing the SET button.
Push、▲ button/▼ button when you change the content display. The
content is changed when the SET button is pushed by the content that
CONF I GURAT I ON
BUZZER STOP
BUZZER STOP
NO ACT I VE
BUZZER STOP
ABNOMAL IN ONLY
BUZZER STOP
ACT I VE EXCEPT SW
BUZZER STOP
ACTIVE
Factory
Setting
〆
CONF I GURA T I ON
AUTOSTART
AUTOSTART
EFFECT I VE
AUTOSTART
INVALIDITY
Factory
Setting
〆
Page 55

36
changes and it moves to the next item display. Push the ESC button when
it returns to the “AUTOSTART” item.
・This setting is function of reboot by utility return.
・The output is automatically output by Utility return after shutdown by low
battery when it is effective.
・The output is not automatically output by Utility return after shutdown by low
battery when it is invalidity.
6-1-12 Auto battery test
Figure 6-13 Auto battery test
It changes into the “Auto battery test” display in pushing the SET button.
Push、▲ button/▼ button when you change the content display. The
content is changed when the SET button is pushed by the content that
changes and it moves to the next item display. Push the ESC button when
it returns to the “Auto battery test” item.
・The battery is automatically tested every the 30th in case of effective.
CONF I GURAT I ON
BATTERY TEST
BATTERY TEST
EFFECT I VE
BATTERY TEST
INVALIDITY
Factory
Setting
〆
Page 56

37
6-1-13 Remote shut down signal term
Figure 6-14 Remote shut down signal term
It changes into the “Remote shut down signal term” display in pushing the
SET button. Push、▲ button/▼ button when you change the content
display. The content is changed when the SET button is pushed by the
content that changes and it moves to the next item display. Push the ESC
button when it returns to the “Remote shut down signal term” item.
・This setting is a function of installing in the dry contact card of the option.
・UPS shuts down after confirming the set time.
6-1-14 Manual Bypass
Figure 6-15 Manual Bypass
It changes into the “Manual Bypass” display in pushing the SET button.
Push、▲ button/▼ button when you change the content display. The
content is changed when the SET button is pushed by the content that
changes and it moves to the next item display. Push the ESC button when
CONF I GURAT I ON
RSD S I GNAL TEAM
RSD S I GNAL TEAM
4.5 SECONDS
RSD S I GNAL TEAM
10 SECONDS
RSD S I GNAL TEAM
10 msec
Factory
Setting
〆
CONF I GURA T I ON
MANUAL BYP SET
MANUAL BYP SET
INVALIDITY
MANUAL BYP SET
EFFECT I VE
Factory
Setting
〆
Page 57

38
it returns to the “Manual Bypass” item.
・When a utility input deviates from the Bypass Available, the transition of On-Line
-> On-Bypass have cutting time of output of about 10ms .
・On manual Bypass, when this setting is invalided, if a utility input deviates from
the Bypass Available, there is no transition of On-Bypass -> On-Line.
6-1-15 Voltage range of HE mode
Figure 6-16 Voltage range of HE mode
It changes into the “Voltage range of HE mode” display in pushing the
SET button. Push、▲ button/▼ button when you change the content
display. The content is changed when the SET button is pushed by the
content that changes and it moves to the next item display. Push the ESC
button when it returns to the “Voltage range of HE mode” item.
・When a utility input deviates from this setting range
HE mode : UPS transfer to On-Battery with output cut of moment.
Intelligent mode : UPS transfers to On-Battery with output cut of moment.
And if possible On-Line , UPS transfers to On-Line.
CONF I GURAT I ON
HE VOLT RANGE
HE VOLT RANGE
±5%
HE VOLT RANGE
±10%
HE VOLT RANGE
±15%
Factory
Setting
〆
Page 58

39
6-1-16 Frequency range of HE mode
Figure 6-17 Frequency range of HE mode
It changes into the “Frequency range of HE mode” display in pushing the
SET button. Push、▲ button/▼ button when you change the content
display. The content is changed when the SET button is pushed by the
content that changes and it moves to the next item display. Push the ESC
button when it returns to the “Frequency range of HE mode” item.
・When a utility input deviates from this setting range
HE mode : UPS transfer to On-Battery with output cut of moment.
Intelligent mode : UPS transfers to On-Battery with output cut of moment.
And if possible On-Line , UPS transfers to On-Line.
6-1-17 Language
Figure 6-18 Language
It changes into the “Language” display in pushing the SET button. Push、▲
button/▼ button when you change the content display. The content is
CONF I GURAT I ON
HE FREQ RANGE
HE FREQ RANGE
±1Hz
HE FREQ RANGE
±3Hz
HE FREQ RANGE
±5Hz
Factory
Setting
〆
CONF I GURA T I ON
LANGUAGE SELECT
LANGUAGE SELECT
ニホンコ゛/Japanese
LANGUAGE SELECT
エイコ ゛ / E n g l i s h
Factory
Setting
〆
Page 59

40
changed when the SET button is pushed by the content that changes
and it moves to the next item display. Push the ESC button when it
returns to the “Language” item.
6-1-18 DC start
Figure 6-19 DC start
It changes into the “DC start” display in pushing the SET button. Push、▲
button/▼ button when you change the content display. The content is
changed when the SET button is pushed by the content that changes
and it moves to the next item display. Push the ESC button when it
returns to the “DC start” item.
・In case of effective, UPS transfers to On-Battery in pressing ON button for three
seconds or more even if there is no utility input.
CONF I GURAT I ON
DC START
DC START
INVALIDITY
DC START
EFFECT I VE
Factory
Setting
〆
Page 60

41
Chapter7
Maintenance
7-1 Care
The best approach is to keep the area in UPS surroundings in a clean
state of no dust. Clean the outside of the UPS when air is very dusty. The
longevity of the battery is influenced according to the temperature.
Maintain 25℃ or less to the ambient temperature of UPS.
・Remove dust when dust adheres to the intake vent of the UPS front panel with
UPS stopped. There is a possibility of shortening the longevity of UPS and
abnormal heat by stopped up of the intake vent.
7-2 Storing
UPS is charged every 6 months by plug-in when UPS is kept for a long
term. Use it after charging with UPS for 24 hours after it keeps it a long
term.
7-3 Battery exchange time
When BATTERY LED of UPS blinks every two seconds, it is time of the
battery exchange.
It is necessary to exchange the batteries, and Refer to the paragraph of
"Battery exchange". (The expectation time of the battery exchange is
displayed on the rear of UPS. )
There is longevity in the battery. The longevity of the battery changes
greatly depending on the use temperature condition and the electrical
discharge time / frequency. The battery shelf life to which it is expected by
the temperature is as follows. Exchange it ahead of time.
Tempurature
Expected battery
shelf life
Recommended
exchange time
25℃ 3.5~5 years 3~4.5 years
30℃ 2.5~3.5 years 2~3 years
40℃ 1.3~1. years 0.7~1.3 years
・It is not possible to back up when power failure when used with the battery
shelf life exceeded, and it causes an unexpected trouble to be caused
additionally. Exchange it ahead of time.
Page 61

42
7-4 Battery exchange
Caution
・A Battery can present a risk of electrical shock and high short circuit current.
The following precautions should be observed when working batteries.
a) Remove watches,rings or other metal objects.
b) Use tools with insulated handles.
c) Wear rubber gloves and boots.
d) Do not lay tools or metal parts on top of batteries.
e) Disconnect the charging source prior to connecting or disconnecting battery terminals.
f) Determine if battery is inadvertently grounded. If inadvertently grounded, remove source
from ground. Contact with any part of a grounded battery can result in electrical shock,.
The likelihood of such hock can be reduced if such grounds are removed during
installation and maintenance (applicable to equipment and remote battery supplies not
having a grounded supply circuit).
7-4-1 Internal battery exchange
Attention
・Do the exchanging work by the person who has experience and knowledge of
electric work. There is possible of the breakdown and the electric shock when
doing by the methods other than the following procedures.
Exchange internal battery according to the following procedures.
1. Do the internal battery exchange by the modes other than the
On-Battery.
2. Remove the front panel.
3. Remove the battery connector mutually.
4. Take the screw of the battery bracket in front of the battery, and
detach the battery bracket.
5. Take out a built-in battery, and insert a new battery.
6. Install the battery bracket in UPS.
7. Connect the battery connector (red-red and black-blacks) mutually.
8. Install the front panel.
9. Check that battery LED does not shine after pushing the ESC
button for 3 seconds.
!
!
Page 62

43
Rack&Tower Type
1kVA
1.1kVA/1.5kVA
2.4kVA/3kVA
Figure 7-1 Rack & Tower type internal battery exchange
INTERNAL BATTERY
BATTERY BRACKET
SCREW OF FRONT PANEL
FRONT PANEL
SCREW
BATTERY CONNECTOR OF UPS
BATTERY CONNECTOR
BATTERY BRACKET
SCREW
INTERNAL BATTERY
FRONT PANEL
SCREW OF FRONT PANEL
CONNECTOR OF UPS
BATTERY CONNECTOR
UPS
INTERNAL BATTERY
BATTERY BRACKET
SCREW OF FRONT PANEL
FRONT PLATE
UPS
BATTERY CONNECTOR
UPS CONNECTOR
SCREW
Page 63

44
Figure 7-2 Tower tyoe internal battery exchange
・Insert battery cable surely. When insertion is loose, it causes the breakdown.
・Do not leave UPS with the battery removed.
・The battery is a heavy load. Be careful when you insert it.
7-4-2 Rack & Tower EBM exchange
Attention
・Do the clearing work by the person who has experience and knowledge of
electric work. There is possible of the breakdown and the electric shock when
doing by the methods other than the following procedures.
Exchange EBM according to the following procedure.
1. Do the EBM exchange by the mode other than the On-Battery.
2. The breaker on the rear of EBM is turned off.
3. The front panel of EBM is removed.
4. The connector of EBM connected with the cable from UPS/EBM is
removed.
5. EBM is detached.
6. New EBM is fixed to the rack. The cable from UPS/EBM removed in
front of new EBM ahead is connected with the connector of new
EBM.
7. The front panel of EBM is installed, and the breaker on the rear is
turned on.
8. When EBM is added, it is more similar. Above-mentioned the cable
from UPS becomes a cable from EBM.
!
Page 64

45
The exchange of EBM becomes an exchange of not the internal battery
exchange but EBM units
Figure 7-3 Rack & Tower EBM exchange
・When EBM is exchanged or EBM is added, already exchange all EBM and an
internal battery under use. When a new battery and an old battery are combined
and used, The longevity of the battery is influenced by an old battery, and the
expected life of a new battery shortens.
・Make the UPS side a full charge about the exchange of EBM.
Caution
・Do not short-circuited, and do not take the battery apart. There is a possibility
of the electric shock, and injuring the burn etc.
・When the electrobath of the battery touches the skin and eyes, it is dangerous.
Flush it when having touched.
!
Page 65

46
7-4-3 Tower type EBM exchange
Attention
・Do the clearing work by the person who has experience and knowledge of
electric work. There is possible of the breakdown and the electric shock when
doing by the methods other than the following procedures.
Exchange EBM according to the following procedure.
1. Do the EBM exchange in the mode other than the On-Battery.
2. The breaker on the rear of EBM is turned off.
3. The battery cable on the rear of EBM is removed.
4. EBM is detached.
5. New EBM is fixed. The cable from UPS/EBM removed in rear of
new EBM is connected with the connector of new EBM.
6. The breaker on the rear of EBM is turned on.
7. When EBM is added, it is more similar. Above-mentioned the cable
from UPS becomes a cable from EBM.
The exchange of EBM becomes an exchange of not the internal battery
exchange but EBM units.
Figure 7-4 Tower type EBM exchange
・When EBM is exchanged or EBM is added, already exchange all EBM and an
internal battery under use. When a new battery and an old battery are
combined and used, The longevity of the battery is influenced by an old battery,
and the expected life of a new battery shortens.
・Make the UPS side a full charge about the exchange of EBM.
Caution
・Do not short-circuited, and do not take the battery apart. There is a possibility
of the electric shock, and injuring the burn etc.
・When the electrobath of the battery touches the skin and eyes, it is dangerous.
Flush it when having touched.
UPS
BATTERY CABLE
CONNECTOR COVER
EBM
BREAKER(EBM)
!
!
Page 66

47
7-5 Test of new battery
Do the battery test when you exchange the battery. Check the connection of
the battery when BATTERY LED of UPS blinks every two seconds after
executing the test. Refer to the troubleshooting guide when the problem
continues.
・After the electrical discharge stops, when exchanging the battery with a new
full charge, the battery remainder capacity on management soft will be
correctly displayed after six hours. There is no influence in operation.
・The Battery test is done in only Standby, Online, HE Standby, OnHE. Refer the
section 4-3.
7-6 Recycling
Read “Attention for maintenance” about a correct abandonment method of
a used battery.
Attention
・Do not discard the batteries in the trash. This product contains sealed
lead-cid bateries and must be disposed of properly. For more
information, contact your local recycling/reuse or hazardous waste
center.
Attention
・Do not discard the waste electrical or electronic equipment (WEEE) in the trash.
For proper disposal and more information, contact your local recycling/reuse or
hazardous waste center.
7-7 Fuse exchange
Attention
・Do the clearing work after confirming LED of UPS is not lighting with the input
cable pulled out. There is a possibility of the breakdown and the electric shock
when doing by the methods other than the following procedures.
Exchange fuses in the fuse box on the rear of UPS according to the
following procedures.
1. Remove the input cable of UPS from the power supply.
2. Confirm LED of UPS has been turned off.
3. Remove the lid of the fuse box on the back of UPS, and take out an
inside fuse.
4. Put a new fuse in the fuse box.
5. Turn and tighten the lid in the fuse box.
6. Connect the input cable of UPS with the power supply.
7. Confirm that UPS starts as usual.
!
Page 67

48
Chapter8
Communication
.
The communication port enables what Device of different types, and a
variety of network environments communicates with UPS.
UPS provides with the insulation RS232C by the standard. To establish
the communication between UPS and the computer, it connects it with
the communication port of UPS and RS232C communication port of the
computer by using an attached communications cable. It is possible to
cooperate with the Power management Software(Power-SOL), the Power
Management software can exchange UPS and data by connecting the
communications cable. When abnormality occurs in the utility power, the
software demands the shutdown to OS, and it shuts down the
equipment in regular order.
The pin layout of the communication port is shown in Figure 8-1, and it
explains the pin assignment inTable 8-1.
※ Inch screw use
Figure 8-1 Pin layout
Table 8-1 Pin assignment
Pin No Signal Function Out / In
1 - (No used) 2 TxD Transmission signal OUT
3 RxD Reception signal IN
4 - (No used) 5 - GND 6 - (No used) 7 - (No used) 8 - (No used) 9 - (No used) -
Page 68

49
1 2 345 6 7 8
LED
LED
LED1
LED2
Chapter9
Optional card
The following card is prepared in the UPS with optional.
・Network Agent card(Option)
:Cooperation with Power Management Software (Power-SOL). It is
a card equipped with SNMP agent's function.
・Dry Contact card(Option)
:It is a card equipped with 4 Relay Outputs(Input abnormal, Low
battery, UPS alarm, On-Bypass). It provides with REPO (REMOTE
ON/OFF) function and the remote shutdown function
9-1 Network Agent Card
Externals are shown in Figure 9-1.
Figure 9-1 Network Agent Card
(1)Network port
The card communicates with the administrative terminal where power
supply management software Power-SOL was installed by way of the
network by using this communication port.
The transmission rate corresponds
to 10Mbps/100Mbps.
The hot-swap of the card is possible.
Figure 9-2 Network port
The pin layout and externals of the port and position of LED that shows
communication are shown in Figure 9-2
.
LED1: The state of 10BASE-T /100BASE-TX is shown.
LED2: The communication with UPS is shown.
Page 69

50
(2)Pin assignment of RS232C
The pin assignment of RS232C (D-sub9P connector) is as follows.
Table 9-1 RS232C pin assignment
Pin Singnal ※1) Direction Note
1 Low Battery Reception 5V output
2 RxD Reception Reception signal
3 TxD Transmission Transmission signal
4 DTR Transmission DTR signal output
5 GND ―― GND
6 Alarm Reception 5V output
7 RTS Transmission RTS signal output
8 UTL failure Reception 5V output
9 RI Reception Wakeup on MODEM
※1)
The network agent card is displayed for the DCE by the signal name that
sees from DTE (host terminal).
The cable used is straight.
The RS232C port externals and
the pin layout (D-sub9P connector)
is shown in Figure 9-3.
※ Inch screw use
Figure 9-3 RS232C port
(3)Reset switch
This switch resets the network agent card.
9-2 Dry Contact Card
Externals are shown in Figure 9-4.
Figure 9-4 Dry Contact Card
Page 70

51
The UPS offers four relay (Input abnormal, Low battery, UPS alarm, On-Bypass).
The signal can output the open or the close. Moreover, it provides with the
terminal of REPO (REMOTE ON/OFF) and a Remote Shutdown.
Table 9-2 Terminal on PCB(M4)
No Terminal Signal I/O Jumper Relay Note
1-2 OPEN
1 P1-P2
Input
abnormal
Out JP1
3-2 CLOSE
1-2 OPEN
2 P3-P4
Low
battery
Out JP2
3-2 CLOSE
1-2 OPEN
3 P5-P6 UPS alarm Out JP3
3-2 CLOSE
1-2 OPEN
JP4
3-2 CLOSE
DC30V MAX 2A MAX
AC125V MAX 0.5A MAX
1-2 - On-Bypass output possible
4 P7-P8 On-Bypass Out
JP5
3-2 - On-Bypass output impossible
・Choose the ring tongue terminal of the size that suits M4
・Cover and mount the sleeve on the ring tongue terminal.
Table 9-3 Terminal
No Terminal Signal I/O Spec Note
5 REPO
REPO
REMOTE ON/OFF
In 10mA MAX
This is used for an urgent stop or
remote ON/OFF.
6 RSD
Remote shut
down
In 5V~30V
When remotely shutting down, This is
used.
Prepare the line kind of the following condition in the connection to this terminal.
Table 9-4 Condition
Item Content
Kind Twist or Shield
DIA AWG22~16
Torque 5 lbf・in
Screw M3
Stripping Length 6~7mm
・Defend and use the connection condition and the signal specification. There is a
possibility of damaging it besides.
・Do the static electricity measures when you connect it.
Page 71

52
An internal logic and an electric specification of the card I/O signal are
figures below.
Figure 9-5 Connect in card
9-2-1 REPO(Remote Emergency Power Off)
The UPS supports the REPO function that UPS can be stopped (urgent
stop function) with the terminal. UPS stops by operation(Short/Open) of
the lock switch that the customer prepared from remoteness. REPO is a
set item of Chapter6. It is invalidly set in initialization. Refer Chapter6 to
make the REPO function effective.
The REPO operation stops the power supply to the connected equipment
at once. UPS becomes Converter OFF. UPS transfers automatically to the
standby state, if the REPO signal is released. UPS turns on the output
with a repeated ON button. UPS shuts down by the REPO input when
the On-Battery.
・The terminal REPO is a current of 10mA or less. Choose the lock switch that
corresponds to the ratings. The line kind used must use the twist or shield to
prevent the noise malfunction.
・Separate the input power supply from UPS when you use the REPO function. It
is more certain..
・The REPO function can be set by the method of Chapter6. Note that the metal
piece doesn't come in contact with the terminal when you set REPO. There is a
possibility that UPS stops.
P1
P2
P3
P4
P5
P6
P7
P8
REPO+
REPO-
RSD+
RSD-
ISO12V
GND
10mA MAX
External GND
DC5~30V
3
2
JP1
3
2
JP2
3
2
JP3
JP4
1
1
3
2
1
Low Battery
On Bypass
Input Abnormal
UPS Alarm
DC30Vmax 2Amax
AC125Vmax 0.5Amax
DC30Vmax 2Amax
AC125Vmax 0.5Amax
DC30Vmax 2Amax
AC125Vmax 0.5Amax
DC30Vmax 2Amax
AC125Vmax 0.5Amax
2
1
3
JP5
1
Page 72

53
Install the REPO switch according to the following procedure.
1. Connect it with the terminal REPO and the terminal GND by using
twist or shield and size AWG(16 - 22)(0.3mm
2
– 1.3mm2).
2. Because UPS is not stopped, confirm the prepared lock switch is not
active in 6-1-9
・Install REPO with UPS stopped. Confirm the prepared lock switch is not active in
6-1-9 .
・When you should install REPO when UPS is being output, Confirm the prepared
lock switch is not active in 6-1-9 .
9-2-2 REMOTE ON/OFF
The UPS supports the REMOTE function that you can do UPS ON/OFF
with the terminal. UPS is turned on and off by operation (Short/Open) of
the lock switch that the customer prepared from remoteness. REMOTE
ON/OFF is a set item of Chapter6. It is invalidly set in initialization. Refer
Chapter6 to make the REMOTE ON/OFF function effective. When a
remote ON/OFF function is effective, the ON button and the OFF button
of UPS are invalid.
Install a remote switch according to the following procedure.
1. Connect it with the terminal REMOTE and the terminal GND by using
twist or shield and size AWG(16 - 22)(0.3mm
2
– 1.3mm2).
2. Because UPS is not stopped, confirm the prepared lock switch is not
active in 6-1-9 .
・The terminal REMOTE is a current of 10mA or less. Choose the lock switch that
corresponds to the ratings. The line kind used must use the twist or shield to
prevent the noise malfunction.
・The REMOTE function can be set by the method of Chapter6. Note that the
metal piece doesn't come in contact with the terminal when you set REMOTE.
There is a possibility that UPS stops.
・Install REMOTE with UPS stopped. Confirm the prepared lock switch is not
active in 6-1-9 .
・ When you should install REMOTE when UPS is being output, Confirm the
prepared lock switch is not active in 6-1-9 .
・When a remote ON/OFF function is effective, the ON button and the OFF
button of UPS are invalid.
9-2-3 REMOTE SHUT DOWN
The UPS supports the REMOTE SHUT DOWN function that you can do
UPS OFF in On-Battery from external with the terminal. REMOTE SHUT
DOWN is a set item of Chapter6. It is 4.5seconds set in initialization.
・Use external source (DC5V-30V).
Page 73

54
9-2-4 Low battery
When Low-Battery is detected, the UPS turns on relay contact of
Low-Battery. Open/Close output is possible according to Jumper 2.
The contact spec is (30VDC MAX-2AMAX, 125VACMAX-0.5AMAX).
・Do not deviate from the contact specification. The card is damaged.
・The connecting cable must use the twist or shield for the malfunction
prevention.
9-2-5 On-Bypass
When On-Bypass is detected, the UPS turns on relay contact of
On-Bypass. Open/Close output is possible according to Jumper 4,5.
The contact spec is (30VDC MAX-2AMAX, 125VACMAX-0.5AMAX).
・Do not deviate from the contact specification. The card is damaged.
・The connecting cable must use the twist or shield for the malfunction
prevention.
・This relay is turned on to the output status by the manual bypass.
9-2-6 Input abnormal
When input abnormal is detected, the UPS turns on relay contact of input
abnormal. Open/Close output is possible according to Jumper 1.
The contact spec is (30VDC MAX-2AMAX, 125VACMAX-0.5AMAX).
・Do not deviate from the contact specification. The card is damaged.
・The connecting cable must use the twist or shield for the malfunction
prevention.
9-2-7 UPS alarm
When Alarm is detected, the UPS turns on relay contact of input abnormal.
Open/Close output is possible according to Jumper 3.
The contact spec is (30VDC MAX-2AMAX, 125VACMAX-0.5AMAX).
・Do not deviate from the contact specification. The card is damaged.
・The connecting cable must use the twist or shield for the malfunction
prevention.
・On-Line impossible continuance by the overload and the manual bypass is
excluded.
Page 74

55
Chapter10
Specification
The following specification is described about the UPS.
Product configuration Circuit Block
Electrical specification Expected life
Weight and size Environment and safety
Battery Backup time (At New Battery)
Accessories/ Replaced Parts
Table 10-1 Product configuration
Rack & Tower Type
UPS PEN102J1RT
1kVA
EBM PEB036-2RT
UPS (1.1kVA) PEN152J1RT/15
UPS (1.5kVA) PEN152J1RT
1.5kVA
EBM PEB048-2RT
UPS (2.4kVA) PEN302J1RT/30
UPS (3kVA) PEN302J1RT
3kVA
EBM PEB072-2RT
Tower Type
UPS PEN102J1C
1kVA
EBM PEB036-2C
Figure 10-1 Circuit Block
Input
100V
Fuse
Noize
Filter
Relay
AC/DC
Converter
DC/AC
Converter
AC/DC
Converter
Charger
SPS
DC/DC
Converter
Relay
Triac
Noize
Filter
Circuit
Breaker
Output
100V
Batteries
Control
Page 75

56
Table 10-2 Electrical specification
Rated Voltage 100V/110V/120V
Input Voltage
80-140V
Rated Frequency 50/60Hz (Auto sensing)
Input filter Varistor, Common mode filter
1kVA / 1.1kVA 5-15P
1.5kVA L5-20P
2.4kVA L5-30P
Input cable
Plug
3kVA Terminal(M5)
1kVA 800W/1kVA
1.1kVA 1kW/1.1kVA
1.5kVA 1.2kW/1.5kVA
2.4kVA 2.2kW/2.4kVA
Output Power
3kVA 2.4kW/3kVA
Output reguration < ±3%
Output distortion Linear Load:< 3%
1kVA 5-15R x 4 2 segments
1.1kVA / 1.5kVA 5-15R X 6 2 segments
2.4kVA 5-15R x 2, 5-20R x 2, L5-30R 2 segments
Outlet
3kVA 5-15R x 2 , Terminal(M5) 2 segments
To bypass time
Zero transfer(Synchronized)
INV Output cut(Asynchronized)
INV
102~130%:12s
131~150%:2s
>151%:200ms
Over Load
Bypass
110~130%:5m
131~150%:15s
>151%:200ms
Table 10-3 Expected life
UPS Expected life 7years(25℃) expect battery
Page 76

57
Table 10-4 Mass and size(Body)
PEN102J1RT 438ⅹ431ⅹ86.5 (mm)
PEB036-2RT 438ⅹ431ⅹ86.5 (mm)
PEN152J1RT/15
PEN152J1RT
438ⅹ431ⅹ86.5 (mm)
PEB048-2RT 438ⅹ431ⅹ86.5 (mm)
PEN302J1RT/30 438ⅹ721ⅹ86.5 (mm)
PEN302J1RT 438ⅹ601+70(TB cover)ⅹ86.5 (mm)
Rack & Tower Type
Size(W×D×H)
PEB072-2RT 438ⅹ601ⅹ86.5 (mm)
PEN102J1C 160ⅹ388ⅹ245(with foot) (mm)
Tower Type
Size(W×D×H)
PEB036-2C 160ⅹ388ⅹ245(with foot) (mm)
PEN102J1RT 16.3Kg
PEB036-2RT 22.4Kg
PEN152J1RT/15
PEN152J1RT
20Kg
PEB048-2RT 27.5Kg
PEN302J1RT/30 31.6Kg
PEN302J1RT 29.3Kg
Rack & Tower Type
Mass
PEB072-2RT 40.4Kg
PEN102J1C 15.4Kg
Tower Type Mass
PEB036-2C 19.4Kg
Table 10-5 Environment and safety
Operating temperature 0℃~40℃(Battery Optimum temp;25℃)
Operating humidity 25%~85%(No dewfall)
Storage temperature
-15℃~50℃(the battery expected life shortens
as for keeping 25℃ or more.)
Storage humidity 10%~90%(No dewfall)
Operating altitude < 1,500m
1kVA < 50dBA
Audible noise 1.1kVA / 1.5kVA < 50dBA
2.4kVA / 3kVA < 55dBA
Safty UL1778 , CE
1kVA VCCI / FCC ClassB , CE
EMC 1.1kVA / 1.5kVA VCCI / FCC ClassB , CE
2.4kVA / 3kVA VCCI / FCC ClassA , CE
Table 10-6 Internal Battery
1kVA 12V , 3sets
Battery
1.1kVA / 1.5kVA 12V , 4sets
2.4kVA / 3kVA 12V , 6sets
Battery type Sealed lead storage battery
Expected life 3.5~5 years(25℃, NEW)
Charging 6 hours
The expected life shortens while becoming a high temperature.
Page 77

58
Table 10-7 Back up time(100V、New、25℃)
Capacity Load(W) Internal Battery (M) +1EBM (M) +2EBM (M)
100W 66 230 420
200W 33 118 220
400W 18 58 110
600W 8 37 67
800W /
1kVA
800W 6 27 48
100W 90 320 540
300W 31 116 196
600W 15 52 100
900W 7 32 60
1kW/
1.1kVA
1.2kW/
1.5kVA
1.2kW
*
5 22 42
100W 105 370 620
600W 23 82 155
1.2kW 10 37 70
1.8kW 5 23 42
2.2kW/
2.4kVA
2.4kW/
3kVA
2.4kW
**
4 15 30
Backup times are approximate and vary depending on the load configuration and
charge.
*:Except in 1kW/1.1kVA, ** : Except in 2.2kW/2.4kVA
Table 10-8 Accessories/ Replaced Parts
Category Type name Model name
Rail kits RAIL-KIT-2U-EIA
Network Agent card ES-PS-NAC
Dry Contact card ES-DC-RYB
Plug Stop
1kVA (Rack & Tower Type) PLUG-STOP/PEN102
1.1kVA / 1.5kVA
(Rack & Tower Type)
PLUG-STOP/PEN152
2.4kVA (Rack & Tower Type) PLUG-STOP/PEN242
3kVA (Rack & Tower Type) PLUG-STOP/PEN302
Accessories
1kVA (Tower Type) PLUG-STOP/PEN102
Battery (Rack & Tower Type)
1kVA 9128RBM-1000R
1.1kVA / 1.5kVA 9128RBM-1500R
2.4kVA / 3kVA 9128RBM-3000R
Battery (Tower Type)
1kVA 9128RBM-1000C
Fuse
1kVA LittelFuse 314025 1set
1.1kVA / 1.5kVA LittelFuse 314030 1set
2.4kVA (For output) BUSSMANN MDA-20-R 1set
Replaced Parts
2.4kVA / 3kVA LittelFuse 505030 2sets
Page 78

59
Chapter11
Trouble-Shooting
11-1 Alarm sound stop
To stop the alarm sound, the ESC button is pushed. The alarm rings
newly regardless of the alarm stop when a new trouble occurs in UPS.
11-2 Alarm
When the SET button is pushed, UPS displays the alarm. The upper row
displays the state when the alarm. Table 11-1 is used to judge and to
solve the alarm and the state.
・When the input plug is removed or the input breaker is turned off after the
alarm is generated, the PowerDown mode is continued until falling to safety
internal DC voltage.
Page 79

60
Figure 11-1 Alarm Display
OUTPUT OVE RVOLT OUTPUT UNDERVOLT
OUTPUT OFFSET OVER HEAT
UPS FAULT INPUT OVERCURRT
OUTPUT OVERCURRT DCBUS OVERVOLT
DCBU S UND ERV OL T SH ORT CI RCUI T
CHARGER FAULT FAN FAULT
ABF R LY FAULT SOFT START F AUL T
OVER L OAD OVER L OAD # 1
OVER L OAD # 2 OVER L OAD # 3
TEMP FAUL T #1 TEMP FAUL T #2
BAT TER Y T EST NG
Page 80

61
11-3 ON Button Recovery
When UPS transfers to Converter OFF or On-Bypass by the alarm, UPS
does recovery operation to the alarm that recovery operation is possible by
pushing the ON button for three seconds. However, when the alarm is
detected again while recovery, recovery operation is stopped. Recovery
display is following.
Figure 11-2 Recovery Display
The alarm that can be recovered is the following alarm.
① Output Over/Under Voltage
② Output Offset
③ Input/Output Over Current
④ DC BUS Over Voltage
⑤ FAN Fault
⑥ Charger Fault
⑦ Short Circuit
Though the overload is not a breakdown, the recovery operation is
possible by pushing the ON button for three seconds.
・When 6-1-8 is invalidly set, this operation is not done.
・This operation cannot be done while Manual Bypass. When operate, release the
manual Bypass
・ This operation is effective also for the alarm occured while OnBypass or
Converter off.
EBM1 REPOOFF 100
RE C OV E R Y
Page 81

62
11-4 Trouble-shooting
Table 11-1 UPS trouble-shooting guide
Alarm / State Possible Cause Action
No start Wiring is not correct. Check the connection of the UPS input
wiring.
UPS cannot be output. OFF bottun operation
REMOTE setting
The ON button is pushed.
Do REMOTE ON
Input breaker trip Load trouble Check the load. Separate the load with the
possibility of the trouble.
(Reset pushes the button in the rear.)
UPS trouble There is a possibility that there is a trouble in
UPS when trip is done at once even if the
breaker is reset. Contact your service.
UPS doesn't offer the
expected backup time。
Charges or exchange
is need.
Execute the self test pushing the ESC
button for 3 seconds. Exchange the
batteries when BATTERY LED of UPS blinks
every 2 seconds.
BATTERY LED
Blink
Buzzer every 1second
Low-batery Backup times has shortened.(It is different
depending on the load and the charging
status.)。Prepare the shutdown.
BATTERY LED
0.5sBlink
Buzzer every 0.5second
Worning before
shutdown
Soon the UPS output stops, and will shut
down. Prepare the shutdown.
BATTERY LED
Lightring
No Buzzer
Battery disconnect Connect the battery.
BATTERY LED
2sBlink
No Buzzer
Service Battery Need to exchange Battery
ALARM LED Lightring
LCD : No Display
Continuous Buzzer
The load has
exceeded 100%
Load.
Remove some equipment from UPS.
ALARM LED Blink
LCD : No Display
No Buzzer
Input deviates from
the input range of
the zero transfer
Check the input power.
ALARM LED 2sBlink
LCD : No Display
Buzzer every 2second
Input deviates from
the input range
Check the input power.
Page 82

63
LCD LED Buzzer Possible Cause Action
Lighting Continue
The UPS atmosphere
temperature exceeded
40℃.
Adjust the temperature
to 40℃ or less
Lighting Continue
The UPS atmosphere
temperature exceeded
41℃.
It returns automatically
when the
temperature falls on
40℃ or less.
Lighting Continue
The load has exceeded
102% Load.
Lighting Continue
The load has exceeded
110% Load.
Lighting Continue
The load has exceeded
130% Load.
Lighting Continue
The load has exceeded
150% Load.
Remove some equipment
from UPS.
Unlighting No
The condition of the self
test is not satisfactory.
The event was
generated while testing
self.
The alarm deletes after
one hour from occurd.
Lighting Continue
alarm
Remove equipment
from UPS.
Even retrying , if occur,
It
is necessary to repair
UPS. Contact your
service.
Lighting Continue
alarm
It is necessary to repair
UPS. Contact your
service.
OUT PUT OVE RCURRT
OUTPUT OF FSET
SHORT CI RCUI T
OUTP U T OVE RVOLT
OUTPUT UND ERVOLT
DCBUS OVE RVO LT
DCBUS UND ERVOLT
UP S F AUL T
OVER H EAT
INPUT OVERCURRT
CHARGER F AUL T
AB F R L Y F AU LT
FAN FAULT
SOFT S TART F AUL T
TEMP FAUL T #1
TEMP FAUL T # 2
OVER LOAD
OVER L OAD # 1
OVER L OAD # 2
OVER L OAD # 3
BAT TERY T E ST NG
Page 83

64
Chapter12
Guarantee and Support
12-1 Guarantee
The guarantee is appended to this user's guide. Keep it importantly after
confirming a content and a prescribed matter of the guarantee are filled
in.The guaranteed term is one year from the purchase day.
12-2 Service
If you have any question or problems with the UPS, call your service.
Repair during guaranteed
It will be repaired or exchanged to based on the content of the guarantee.
Have the following information ready when you call for service.
Repair after guaranteed
When the function can be maintained by the repair, it repairs for a fee by
the customer's demand.
Refer the homepage about latest information of the product and the
nearest office.
http://www.fujielectric.co.jp/products/power_supply
①Model name :Discription in guarantee
②Guarantee number :Discription in guarantee
③Purchase date :Discription in guarantee
④Symptoms of failure :In detail
Page 84

Page 85

 Loading...