


CR Console Operation Manual
FUJI COMPUTED RADIOGRAPHY
CR Console
OPERATION MANUAL
13th Edition
June 2011
897N0519M
This Operation Manual provides detailed information about how to use the Fuji
Computed Radiography CR Console as well as important points to note when using
the CR Console.
Before using this product, be sure to read this manual thoroughly. And keep it handy
for future references. In addition, please be sure to read the CR Console Operation
Guide for your understanding of product overview and its basic operation procedure.

END-USER SOFTWARE LICENSE AGREEMENT
FUJIFILM Corporation
The license of the Software (as defined below) granted hereunder is contingent upon the Licensee’s acceptance of
all the terms provided herein, and any use of the Software by the Licensee shall be deemed as such acceptance.
This Product contains software ("Software") and related written materials ("Documentation"). The term "Software"
shall include any updates, upgrades, modified versions, additions and copies of the Software licensed to you by
FUJIFILM Corporation ("FUJI").
1. License. Subject to the terms and conditions of this Agreement, you are granted a limited, non-exclusive, non-transferable and non-
sublicensable license to use the Software and the Documentation only on a single computer until such rights are terminated according to
Section 8 below.
2. Ownership. It is acknowledged and agreed that FUJI retains all title and rights to the Software the Documentation and all copies
thereof, and no title or rights to the Software or the Documentation is transferred or licensed to you except as expressly set forth herein.
3. Restriction on Use. You may: (i) make and retain one extra copy of the Software for backup purposes only; and (ii) copy the
Documentation only as reasonably necessary for user reference and backup purposes. Each copy of the Software and Documentation
made by you shall contain the same proprietary notices, labels, and marks as the original thereof without any alteration. You shall not: (i)
sell, sublicense, assign, lease, encumber or otherwise transfer the Software or the Documentation or the rights granted hereunder; (ii)
reverse engineer, decompile, disassemble or create derivative works of the Software; (iii) remove or alter any proprietary notices, labels or
marks on or contained in any part of the Software or the Documentation; (iv) make any copies of the Software or the Documentation
except as permitted above; or (v) install the Software on any computer other than as permitted by this Agreement. As a condition of the
use of the Software by you, you hereby represent and warrant that you shall not use the Software for any purpose that is unlawful or
prohibited by this Agreement. You agree to abide by all applicable laws and regulations in your use of the Software.
4. Export Control. You shall comply with all export and re-export restrictions and regulations imposed by the government of the United
States and other relevant countries or regions (“Export Restrictions”). You shall not knowingly transfer, directly or indirectly, any restricted
software or technical data received hereunder or the direct product of such data, to any country or region identified as an embargoed
destination or country in the Export Restrictions, unless prior written authorization is obtained from FUJI and each appropriate United
States or other government agencies. This Section shall survive the expiration or termination of this license agreement.
5. Update and Upgrade. FUJI may, at its sole discretion, make any update or upgrade of the Software available; however, FUJI shall
have no obligations to make any update or upgrade of the Software available.
6. Limited Warranty. FUJI hereby warrants that the Software shall operate in substantial conformity with the then current Documentation,
when used in strict compliance with such Documentation. This warranty shall be effective only for one year following your receipt of the
Software (hereinafter referred to as “Warranty Period”). This warranty is conditioned upon the installation and use of the latest version of
the Software released by FUJI in strict compliance with the then current Documentation. If the Software fails to perform as warranted in the
Warranty Period, FUJI shall use commercially reasonable efforts to correct such Software. THE FOREGOING STATES THE SOLE AND
EXCLUSIVE REMEDIES TO WHICH YOU ARE ENTITLED FOR FUJI'S BREACH OF WARRANTY. FUJI HEREBY DISCLAIMS ANY
OTHER WARRANTIES WITH RESPECT TO THE SOFTWARE AND DOCUMENTATION, EXPRESS OR IMPLIED, INCLUDING
WITHOUT LIMITATION ALL WARRANTIES REGARDING MERCHANTABILITY, FITNESS FOR A PARTICULAR PURPOSE AND NONINFRINGEMENT.
7. Limitation of Liability. TO THE FULLEST EXTENT PERMITTED BY APPLICABLE LAW, FUJI SHALL NOT BE LIABLE FOR ANY
INDIRECT, SPECIAL, EXEMPLARY, PUNITIVE, INCIDENTAL, OR CONSEQUENTIAL DAMAGES OF ANY KIND (INCLUDING
WITHOUT LIMITATION, LOST PROFITS OR LOST DATA), WHETHER SUCH DAMAGES ARE BASED ON CONTRACT, TORT
(INCLUDING NEGLIGENCE), PRODUCT LIABILITY OR OTHERWISE (INCLUDING ANY DAMAGES WHICH ARE IN ANY WAY
CONNECTED WITH ANY USE OF THE SOFTWARE OR DOCUMENTATION), EVEN IF IT HAS BEEN ADVISED OF THE POSSIBILITY
OF SUCH DAMAGES.
8. General Provisions. This Agreement shall be governed by and construed according to the laws of Japan, excluding its conflict of laws
rules. You consent to the exclusive jurisdiction of Japanese courts and agree that the venue shall lie exclusively in Japan, in
arising out of or relating to this Agreement. The use of the Software or Documentation is not authorized in any jurisdiction that does not
give effect to all provisions of the terms and conditions of this Agreement, including without limitation this Section 8.
9. Termination. All the rights granted to you hereunder shall automatically terminate upon your breach of any provision herein, and you
must cease the use of the Software and Documentation and destruct all copies of the Software and Documentation in your possession,
including any of backup copy, upon such termination. Any provision herein that by its nature survives shall survive the termination of the
rights granted to you hereunder.
_______________________________________________________________________________________________________________________________________
all disputes
.

FOREWORD
Thank you for purchasing the CR Console.
This Operation Manual applies to the following software.
x CR-IR 348CL Application Software V8.3
1. Unauthorized transfer or duplication of all or any part of the content of this manual is strictly
prohibited.
2. The contents of this Operation Manual are subject to change without prior notice.
3. FUJIFILM Corporation accepts no liability whatsoever with regard to faults or damage arising
from installation, relocation, modifications, maintenance or repairs performed by anyone other
than FUJIFILM Corporation or a contractor approved by FUJIFILM Corporation.
4. FUJIFILM Corporation accepts no liability whatsoever with regard to faults of or damage to this
product caused by third-party products other than those supplied by FUJIFILM Corporation.
5. FUJIFILM Corporation accepts no liability whatsoever with regard to faults or damage arising
from modifications, maintenance or repairs in which replacement parts other than the genuine
parts approved by FUJIFILM Corporation were used.
6. FUJIFILM Corporation accepts no liability whatsoever with regard to faults or damage arising as
a result of a failure to observe the safety precautions and operational procedures provided in this
Operation Manual.
7. FUJIFILM Corporation accepts no liability whatsoever with regard to faults or damage caused by
ambient conditions that deviate from the operating conditions for this product, such as the power
supply and installation environment, that are specified in this Operation Manual.
8. FUJIFILM Corporation accepts no liability whatsoever with regard to faults or damage caused by
natural events such as fires, earthquakes, floods or lightning strikes.
CR Console Operation Manual
This system is classified as a medical device under EC Directive 93/42/EEC.
This equipment has been designed on the assumption that the patient would not come into direct
contact with it or for operation by appropriately trained operator.
Process waste correctly, as stipulated by local law or any regulations that apply.
When discarding the CR Console that incorporates the lithium battery, be sure to contact a licensed
waste disposal contractor because it cannot be disposed of as a general waste.
Caution : Rx Only (Federal law restricts this device to sale by or on the order of a physician.)
Trademark
FCR is a trademark or a registered trademark of FUJIFILM Corporation.
Other holders’ trademarks
Windows is the registered trademark of US Microsoft Corporation in the U. S. A. and other countries.
All other company names and product names described in this manual are the trademarks or
registered trademarks of their respective holders.
Copyright © 2002-2011 FUJIFILM Corporation. All rights reserved.
2011. 06 897N0519M iii

CR Console Operation Manual
CONTENTS
Chapter 1. PRECAUTIONS ___________________________________1-1
1.1 For Safe Operation.................................................................................................
1.1.1 Warnings and Cautions Included in this Operation Manual.......................
1.1.2 Cautions in Using This Equipment Within the Patient Environment.........
1.1.3 Cautions in Using a USB Memory.............................................................
1.2 Electromagnetic Compatibility (EMC)..................................................................
1-2
1-2
1-3
1-3
1-4
Chapter 2. OPERATIONS BASICS ____________________________2-1
2.1 Starting Up and Shutting Down the CR Console ..................................................
2.1.1 Starting Up the CR Console .......................................................................
(1) Login ..........................................................................................................
(2) Logoff.........................................................................................................
2.1.2 Shutting Down the CR Console .................................................................
2.2 Operation Screen ...................................................................................................
2.2.1 Receiving Studies.......................................................................................
(1) Inputting Patient Information ([3.1.1 Inputting Patient Information]) .......
(2) Selecting Exposure Menu ([3.1.3 Selecting Exposure Menu]) ..................
2.2.2 Confirming Study Details...........................................................................
(1) Modifying Patient Information ([3.2.1 Modifying Patient Information]) ..
(2) Modifying Exposure Menu ([3.2.3 Modifying Exposure Menu])..............
2-2
2-2
2-4
2-4
2-5
2-6
2-6
2-6
2-6
2-7
2-7
2-7
2.2.3 Issuing Examination Orders .......................................................................
(1) Issuing Examination Orders ([3.3 Issuing Examination Orders])...............
2.2.4 Executing Studies.......................................................................................
(1) Starting a Study ([3.4.1 Starting a Study]) .................................................
(2) Preparation before Exposure (Study) ([3.2 Confirming Study Details])....
(3) Reading Images ([3.4 Executing Studies]), (4) Performing
Re-exposure/Additional Exposure ([3.6 Performing Re-exposure and
Additional Exposure]) ................................................................................
2.2.5 From “Editing Images”, “Distribution” to “Suspending Studies” and
“Completing Studies”.................................................................................
(1) Editing Images ([3.7 Editing Images]) .......................................................
(2) Image Delivery ([3.8 Image Delivery])......................................................
(3) Suspending Studies ([3.9 Suspending Studies]) and
Completing Studies ([3.10 Completing Studies]) ......................................
2.2.6 Patient Information Input Screen................................................................
(1) List tab (
) ..................................
(2) Screen keyboard .........................................................................................
(3) Patient information input field....................................................................
(4) Scroll view display area (option) ............................................................
2-8
2-8
2-8
2-8
2-9
2-9
2-10
2-10
2-11
2-11
2-12
2-12
2-13
2-13
2-15
iv
2011. 06 897N0519M

CR Console Operation Manual
(5) Image Reader status ....................................................................................
(6) FCR button (
) .............................................................................
(7) If an Error Occurs on Destination Device...................................................
(8) Display of the current time and date ...........................................................
2.2.7 Exposure Menu Selection Screen ...............................................................
2.2.8 Examination Order Issuance Screen ...........................................................
2.2.9 Study Screen ...............................................................................................
2.2.10 Image Edit Screen......................................................................................
2.3 Image Reader Status ...............................................................................................
2.4 Scroll View Display Area (option).........................................................................
2.5 Study Information List ...........................................................................................
2-15
2-15
2-17
2-17
2-18
2-20
2-21
2-25
2-27
2-31
2-32
(1) Display from the “Exposure Menu Selection Screen”,
“Study Execution Screen” and “Image Edit Screen” ..................................
(2) Display from individual lists other than the “Queue” list...........................
2.6 Version Display......................................................................................................
2-32
2-32
2-35
Chapter 3. OPERATIONS STUDY _____________________________ 3-1
3.1 Receiving Studies...................................................................................................
3.1.1 Inputting Patient Information......................................................................
(1) Inputting Patient Information in the “Patient Information Input Screen”...
(2) Ending Input of Patient Information to Display the “Exposure Menu
Selection Screen” ........................................................................................
3.1.2 Patient Information Database function........................................................
(1) Input by keyword retrieval..........................................................................
(2) Input by list retrieval...................................................................................
(3) Deletion.......................................................................................................
3.1.3 Selecting Exposure Menu ...........................................................................
3.2 Confirming Study Details.......................................................................................
3.2.1 Modifying Patient Information ...................................................................
3.2.2 Resetting the patient ID issuance ................................................................
3.2.3 Modifying Exposure Menu .........................................................................
(1) Adding Exposure Menus.............................................................................
(2) Changing Exposure Menus .........................................................................
(3) Deleting Exposure Menus...........................................................................
3-2
3-2
3-2
3-4
3-5
3-5
3-7
3-8
3-9
3-10
3-10
3-12
3-13
3-13
3-13
3-14
3.3 Issuing Examination Orders ...................................................................................
3.3.1 Performance Setting....................................................................................
(1) Property Setting...........................................................................................
(2) Setting the Anatomical Region ...................................................................
3.3.2 Setting for Issuing the Examination Order..................................................
3.4 Executing Studies...................................................................................................
2011. 06 897N0519M v
3-15
3-18
3-18
3-19
3-21
3-22

CR Console Operation Manual
3.4.1 Starting a Study ..........................................................................................
(1) Starting Studies from the Exposure Menu Selection Screen......................
(2) Starting Studies from the “Local WL” List................................................
(3) Starting Studies from the “Delivered” List (additional exposures)............
(4) Starting Studies from the “Examination Order Issuance Screen” ..............
(5) Starting Studies from the Scroll View (option)..........................................
(6) Settings to Get the Next Study Started.......................................................
3.4.2 Preparation before Exposure (Image Reading):
Confirmation and Modification of Exposure Parameters...........................
(1) Setting image flip .......................................................................................
(2) Film output format......................................................................................
(3) EDR mode ..................................................................................................
(4) Filing mode.................................................................................................
(5) Function .....................................................................................................
(6) Film mark ...................................................................................................
(7) Number of film output ...............................................................................
(8) Distribution code .......................................................................................
(9) Reading size ...............................................................................................
(10) SS/CS .........................................................................................................
(11) Pixel density ...............................................................................................
(12) Trimming....................................................................................................
3-22
3-22
3-24
3-26
3-27
3-29
3-31
3-32
3-35
3-36
3-36
3-37
3-38
3-39
3-40
3-40
3-41
3-42
3-42
3-43
3.4.3 Preparation before Exposure (Image Reading):
Adding Exposure Menus ............................................................................
3.4.4 Preparation before Exposure (Image Reading):
Changing Exposure Menus.........................................................................
3.4.5 Preparation before Exposure (Image Reading):
Deleting Exposure Menus ..........................................................................
3.4.6 Preparation before Exposure (Image Reading):
Setting the Auto-repeat Exposure...............................................................
3.4.7 Preparation before Exposure (Image Reading):
Setting the Multi-frame Format..................................................................
3.5 Reading Images .....................................................................................................
3.5.1 Differences in the Operation of Connected Image Readers .......................
(1) FCR Cassette Type Equipment ..................................................................
(2) FCR 5000 series Built-in type....................................................................
(3) FCR VELOCITY series Built-in type........................................................
3.5.2 Changing the Order of Exposure Menus....................................................
3.5.3 Switching Images ......................................................................................
3-45
3-47
3-49
3-50
3-51
3-53
3-55
3-55
3-59
3-61
3-62
3-62
3.5.4 Scrolling the Exposure Menu List..............................................................
3.5.5 Changing Display Image ............................................................................
3.5.6 Changing the Monitor Mode ......................................................................
vi
2011. 06 897N0519M
3-63
3-63
3-63

CR Console Operation Manual
3.5.7 Alternately Changing Image Display Mode ...............................................
3.6 Performing Re-exposure and Additional Exposure................................................
3.6.1 Re-exposure ................................................................................................
3.6.2 Additional Exposure ...................................................................................
3.7 Editing Images........................................................................................................
3.8 Image Delivery.......................................................................................................
(1) Auto-delivery after QA completion ............................................................
(2) Distributes images automatically to all attributes
whenever an image is read ..........................................................................
(3) Distributes images automatically only to Print attribute
whenever an image is read ..........................................................................
(4) Distributes images to all attributes individually..........................................
(5) Distributes images to the Print attribute only individually .........................
(6) Distributes only Print attribute automatically when a certain period
of time has passed after image reading .......................................................
3.9 Suspending Studies ................................................................................................
(1) In the case that the image reading has been done for all exposure menus
in the study ......................................................................................................
(2) In the case that exposure menus of unregistered IP remain in the study.....
3-64
3-65
3-65
3-69
3-70
3-73
3-73
3-73
3-73
3-74
3-74
3-75
3-81
3-81
3-81
3.10 Completing Studies ................................................................................................
3-84
(1) In the case that the image reading has been done for all exposure menus
in the study ......................................................................................................
3-84
(2) In the case that the exposure menus of unregistered IP remain
in the study..................................................................................................
3-86
Chapter 4. OPERATIONS IMAGE EDIT ________________________ 4-1
4.1 Operation Outline...................................................................................................
(1) Displaying Screen .......................................................................................
(2) Editing Images ............................................................................................
(3) Using Utility................................................................................................
(4) Outputting Images.......................................................................................
(5) Completing Image Edit ...............................................................................
(6) Image Edit Function Authentication button................................................
4.2 Displaying Screen ..................................................................................................
4.3 Editing Images........................................................................................................
4.3.1 Palette..........................................................................................................
(1) Changing exposure menus ..........................................................................
(2) Editing patient information .........................................................................
(3) Editing image information ..........................................................................
(4) Editing technologist information ...............................................................
(5) Film marker.................................................................................................
(6) Comments on image/study..........................................................................
4-2
4-2
4-2
4-3
4-3
4-3
4-3
4-4
4-6
4-6
4-7
4-8
4-9
4-10
4-11
4-12
2011. 06 897N0519M vii

CR Console Operation Manual
(7) Changing GA/GS .......................................................................................
(8) Flip/Rotation...............................................................................................
(9) Trimming Adjustment ...............................................................................
(10) Inputting markers .......................................................................................
(11) Inputting annotation characters .................................................................
(12) Changing S/L..............................................................................................
(13) Changing SS/CS.........................................................................................
(14) FNC ............................................................................................................
(15) Detailed Image Processing Parameters Change Box..................................
4.3.2 Delivery......................................................................................................
(1) Print setting.................................................................................................
(2) Filing device/soft copy device setting ........................................................
(3) Changing a filing device ............................................................................
(4) Changing filing mode.................................................................................
(5) Registering additional soft copy devices....................................................
(6) Deleting a soft copy devices.......................................................................
(7) Setting density of soft copy image .............................................................
4.3.3 List..............................................................................................................
(1) Changing order ..........................................................................................
(2) Alternately switching images ....................................................................
(3) Changing display images ...........................................................................
4-12
4-13
4-15
4-17
4-20
4-24
4-25
4-26
4-27
4-28
4-29
4-32
4-33
4-34
4-35
4-36
4-36
4-37
4-37
4-37
4-37
4.4 Using Utility (QA Image Controller Buttons) .......................................................
4.4.1 Magnifying Display Image.........................................................................
4.4.2 Changing Parameters..................................................................................
4.4.3 Reprinting Display Image .........................................................................
4.4.4 Setting the rejection...................................................................................
4.4.5 Locking Studies..........................................................................................
4.4.6 Saving Image..............................................................................................
4.4.7 Outputting DICOM Files............................................................................
4.4.8 Special Image Print ....................................................................................
(1) Example of a specified special print...........................................................
(2) Trimming and release of the range to be magnified/reduced ....................
(3) Assigning a trimmed image into a film format and its release ..................
(4) Specifying a magnification/reduction ratio to assign it into
an image format (edit mode) .....................................................................
(5) Moving the trimming image frame ............................................................
(6) Changing the number of printouts..............................................................
(7) Displaying a printer list .............................................................................
(8) Changing format.........................................................................................
(9) Displaying the previous/next image ..........................................................
(10) Image magnification/reduction ..................................................................
(11) Printing image ............................................................................................
4-38
4-39
4-41
4-41
4-42
4-44
4-45
4-48
4-50
4-51
4-51
4-51
4-52
4-52
4-52
4-53
4-53
4-55
4-55
4-55
viii
2009. 09 897N0519H

CR Console Operation Manual
4.5 Outputting Images ..................................................................................................
4.6 Completing Image Edit ..........................................................................................
(1) When
(2)
is displayed...........................................................................
/ is displayed .......................................................................
4-56
4-57
4-57
4-57
Chapter 5. OPERATIONS LIST _______________________________ 5-1
5.1 List..........................................................................................................................
(1) Study-information sharing function ............................................................
5.1.1 Local WL ....................................................................................................
5.1.2 QA...............................................................................................................
5.1.3 Queue ..........................................................................................................
5.1.4 Delivered.....................................................................................................
5.1.5 All ...............................................................................................................
5.1.6 Today ..........................................................................................................
5.2 List Operation.........................................................................................................
(1) Filtering.......................................................................................................
(2) Search..........................................................................................................
(3) Setting the Sorting Order ............................................................................
(4) Updating the List.........................................................................................
(5) Terminating Studies ....................................................................................
(6) Deletion.......................................................................................................
(7) Select All.....................................................................................................
(8) Urgent Output .............................................................................................
(9) Switching Display Information Alternately................................................
(10) Moving Images ...........................................................................................
(11) Filtering/update of the study list .................................................................
(12) Execution of Next Processing.....................................................................
(13) Study Information List................................................................................
(14) Scroll...........................................................................................................
(15) Printing 12 Frames of Multiple Study Images on One Film.......................
(16) Setting Study List........................................................................................
(17) Redelivery ...................................................................................................
5-2
5-3
5-4
5-5
5-6
5-7
5-8
5-9
5-10
5-10
5-11
5-11
5-12
5-12
5-13
5-14
5-14
5-15
5-15
5-19
5-20
5-22
5-22
5-23
5-24
5-29
Chapter 6. TROUBLESHOOTING _____________________________ 6-1
6.1 Error Messages.......................................................................................................
(1) If an Error Occurs on This Equipment........................................................
(2) If an Error Occurs on Destination Device...................................................
6.2 How to Cope with an Error ....................................................................................
(1) When the System Hangs Up .......................................................................
(2) When the Dose Area Product Measuring System is used ...........................
(3) If a hard disk is damaged ............................................................................
2010. 10 897N0519K ix
6-2
6-2
6-2
6-3
6-3
6-5
6-7

CR Console Operation Manual
Chapter 7. DAILY INSPECTION AND MAINTENANCE _____________7-1
7.1 Performing Daily Inspection and Maintenance .....................................................
(1) PC Main Unit..............................................................................................
7-2
7-2
MAINTENANCE AND INSPECTION______________________________ 1
Maintenance and Inspection Items Assigned to Specified Dealer .....................................2
x
2010. 03 897N0519J

CR Console Operation Manual
FUJI COMPUTED RADIOGRAPHY
Chapter
1
PRECAUTIONS
2006. 10 897N0519C 1 - 1

CR Console Operation Manual
1.1 For Safe Operation
This chapter lists the precautions required to use the CR Console safely. Before starting use, read this
chapter very carefully and understand its operations thoroughly first.
1.1.1 Warnings and Cautions Included in this Operation Manual
Safety precautions described in this manual include “WARNING ( WARNING)” and
“CAUTION (
WARNING
Indicates hazardous situations which may lead to serious injuries or even death if the precaution is
not or could not be followed.
CAUTION
Indicates hazardous situations which may lead to mild or medium injuries if the precaution is not or
could not be followed. Precautions against accidents causing only physical damages.
CAUTION)”, which are explained as follows.
NOTE
Gives procedures requiring special attention, instructions which must be followed, supplementary
explanations, etc.
WARNING
This system supplies high voltage to the inside of unit, etc. The following instructions must be
carefully followed to prevent an electrical shock.
• No one other than service engineers should open the unit cover. Do not touch the high voltage
portion of the above-mentioned parts with your hand, or you may get an electric shock.
WARNING
The supply voltage of the units comprising this system is AC100V to 120V or AC200V to 240V.
The instructions below must be followed to prevent an electrical shock.
• Install the unit where no water may subject the units.
• Check that the ground of each unit has been perfectly connected.
• Check that all the cables have been properly and perfectly connected.
CAUTION
In extended uses of the unit, set aside 10 to 15 minutes after every hour to rest your eyes and hands.
• For image reading purposes, use an image display monitor suited for X-ray imaging diagnosis.
The image display monitor making part of this system is not suited for X-ray imaging diagnosis.
CAUTION
As the CR Console is not supposed to be operated continuously all day long, turn off the personal
computer once a day by performing the shutdown operation.
NOTE
The contents (objects) of the operation screens described in this manual may be changed/added/deleted
without any prior notice because of the software version upgrade.
1 - 2 2010. 10 897N0519K

CR Console Operation Manual
1.1.2 Cautions in Using This Equipment Within the Patient Environment
When connecting to other equipment such as an Image Reader, ensure that the equipment to be
connected is installed properly so that it can be used safely.
For details of installation of equipment to be connected, see the documents provided with it, and
contact our service engineer as necessary.
While this equipment is in operation, pay due attention not to have the patient come into direct
contact with it.
1.1.3 Cautions in Using a USB Memory
• When purchasing a USB memory, note the following points:
• Purchase a product that complies with the FCC/VCCI/CE standards or equivalent.
• Select a product that supports USB2.0 specification.
• Select a product that does not require you to install an exclusive driver or software.
• Select a product with a capacity of 2GB or more.
• Make sure that the product operates normally by performing “Write/Read & Compare” in
Windows Explorer.
If you have any enquiries, contact our authorized distributor.
• When using a USB memory, be careful not to lose it by mistake.
• Connect only one USB memory.
If more than two USB memories are connected simultaneously, they may not operate normally.
• When removing a USB memory from the personal computer, select “Safely Remove Hardware”,
and make sure that the USB memory access lamp is not flashing.
2011. 06 897N0519M 1 - 3

CR Console Operation Manual
1.2 Electromagnetic Compatibility (EMC)
■
Electromagnetic Compatibility (EMC) Related Standard
This equipment complies with the following standard regarding Electromagnetic Compatibility
(EMC).
EMC standard : IEC 60601-1-2:2001+A1:2004
This does not guarantee that there is no harmful electromagnetic interference under any
installation environment.
This equipment can generate, use and radiate radio frequency energy. If the equipment is not
installed and used in accordance with the instructions, or if peripheral devices that are not
complied with the EMC standard, harmful interference may be generated under a particular
environment causing malfunction of the equipment and other devices.
If this equipment causes harmful interference to other devices, or if this equipment is affected by
interference from other devices, the user is encouraged to try to correct the interference by one or
more of the following measures:
• Reorient or relocate the device.
• Increase the separation between the equipment.
• Connect the equipment into an outlet on a circuit different from that to which the other device(s)
are connected.
If the problem cannot be solved with the above measures, stop using this equipment and consult
the
manufacturer or our official dealer for help.
WARNING
Do not place devices generating electromagnetic wave near this equipment.
1 - 4 2009. 09 897N0519H

CR Console Operation Manual
■
Further information for IEC
60601-1-2
(1) Medical electrical equipment is subject to special precautions regarding EMC. The equipment must be
installed and put into service according to the EMC information provided in Tables 1 to 4.
(2) Portable and mobile RF communications equipment can affect medical electrical equipment.
(3) Information regarding the cable affecting EMC is as follows.
Name General
Network Cable Cat5e or more,
straight cable
(4) The use of accessories, transducers and cables other than those specified, with the exception of
transducers and cables sold by FUJIFILM Corporation as replacement parts for internal components,
may result in increased emissions or decreased immunity of the equipment.
(5) The equipment should not be used adjacent to or stacked with other equipment.
Specification
UTP
type and
If adjacent or stacked use is necessary, the equipment should be observed to verify normal operation
in the configuration in which it will be used.
(6) Test items (Tables 1 to 4)
Tab le 1
Guidance and manufacturer’s declaration -
The CR-IR 348CL is intended for use in the electromagnetic environment specified below.
The customer or the user of the CR-IR 348CL should assure that it is used in such an environment.
Emissions
RF emissions
CISPR 11
test
Compliance
Electromagnetic environment -
The CR-IR 348CL uses RF energy only for its internal
function. Therefore, its RF emissions are very low and are
Group 1
not likely to cause any interference in nearby electronic
equipment.
RF emissions
CISPR 11
Harmonic emissions
IEC 61000-3-2
Voltage fluctuations / flicker
emissions
IEC 61000-3-3
Class A
Class D
Does not
comply
The CR-IR 348CL is suitable for use in all establishments
other than domestic and those directly connected to the
public low-voltage power supply network that supplies
buildings used for domestic purposes.
electromagnetic emissions
guidance
2010. 03 897N0519J 1 - 5

CR Console Operation Manual
Tab le 2
Guidance and manufacturer’s declaration -
electromagnetic immunity
The CR-IR 348CL is intended for use in the electromagnetic environment specified below.
The customer or the user of the CR-IR 348CL should assure that it is used in such an environment.
Immunity
test
Electrostatic
discharge (ESD)
IEC 61000-4-2
Electrical fast
transient/burst
IEC 61000-4-4
Surge
IEC 61000-4-5
Voltage dips, short
interruptions and
voltage variations on
power supply input
lines
IEC 61000-4-11
Power frequency
(50/60Hz) magnetic
field
IEC 61000-4-8
IEC 60601 test
±6kV contact
±8kV air
±2kV for power supply
lines
± 1kV for input / output
lines
±1kV differential mode
±2kV common mode
<5%
U
T
(>95% dip in
U
T
for 0.5 cycle
40%
(60% dip in
for 5 cycles
U
T
)
U
T
70%
U
T
(30% dip in
)
U
T
for 25 cycles
<5%
(>95% dip in
for 5 s
3 A/m
U
T
U
T
)
)
level
Compliance
level
±2kV, ±4kV, ±6kV
contact
±2kV, ±4kV, ±8kV air
±2kV for power supply
lines
± 1kV for input / output
lines
±0.5kV, ±1kV
differential mode
±0.5kV, ±1kV, ±2kV
common mode
<5%
U
T
(>95% dip in
)
U
T
for 0.5 cycle
40%
(60% dip in
for 5 cycles
U
T
)
U
T
70%
U
T
(30% dip in
)
U
T
for 25 cycles
<5%
(>95% dip in
for 5 s
3 A/m
U
T
)
U
T
Electromagnetic
environment - guidance
Floors should be wood, concrete
or ceramic tile . If floors are
covered with synthetic material,
the relative humidity should be
at least 30%.
Mains power quality should be
that of a typical commercial or
hospital environment.
Mains power quality should be
that of a typical commercial or
hospital environment.
Mains power quality should be
that of a typical commercial or
hospital environment. If the user
of the CR-IR 348CL requires
continued operation during
power mains interruptions, it is
recommended that the CR-IR
348 C L be powered from an
uninterruptible power supply or
a battery.
Power frequency magnetic fields
should be at levels characteristic
of a typical location in a typical
commercial or hospital
environment.
is the a.c. mains voltage prior to application of the test level.
NOTE
:
U
T
1 - 6 2009. 09 897N0519H

CR Console Operation Manual
Tab le 3
Guidance and manufacturer’s declaration - electromagnetic immunity
The CR-IR 348CL is intended for use in the electromagnetic environment specified below.
The customer or the user of the CR-IR 348CL should assure that it is used in such an environment.
Immunity test IEC 60601 test level
Conducted RF
IEC 61000-4-6
Radiated RF
IEC 61000-4-3
3 Vrms
150 kHz to 80 MHz
3 V/m
80 MHz to 2.5 GHz
Compliance
level
3 Vrms
3 V/m
Electromagnetic environment - guidance
Portable and mobile RF communications
equipment should be used no closer to any part
of the CR-IR 348CL, including cables, than the
recommended separation distance calculated
from the equation applicable to the frequency of
the transmitter.
Recommended separation distance
= 1.2
d
d
d
= 1.2
= 2.3
P
80 MHz to 800 MHz
P
800 MHz to 2.5 GHz
P
where P is the maximum output power rating of
the transmitter in watts (W) according to the
transmitter manufacturer and
is the
d
recommended separation distance in meters
(m). Field strengths from fixed RF transmitters,
as determined by an electromagnetic site
survey,
level in each frequency range.
a
should be less than the compliance
b
Interference may occur in the vicinity of
equipment marked with the following
symbol:
NOTE 1 :
NOTE 2 :
Field strength from fixed transmitters, such as base stations for radio (cellular/cordless) telephones and land
a
At 80 MHz and 800 MHz, the higher frequency range applies.
These guidelines may not apply in all situations. Electromagnetic propagation is affected by
absorption and reflection from structures, objects and people.
mobile radios, amateur radio, AM and FM radio broadcast and TV broadcast cannot be predicted
theoretically with accuracy.
To assess the electromagnetic environment due to fixed RF transmitters, an electromagnetic site survey
should be considered. If the measured field strength in the location in which the CR-IR 348CL is used
exceeds the applicable RF compliance, the CR-IR 348CL should be observed to verify normal operation. If
abnormal performance is observed, additional measures may be necessary, such as reorienting or relocating
the CR-IR 348CL.
b Over the frequency range 150 kHz to 80 MHz, field strength should be less than 3 V/m.
2009. 09 897N0519H 1 - 7

CR Console Operation Manual
Table 4
Recommended separation distances between Portable and mobile RF communications
equipment and the CR-IR 348CL
The CR-IR 348CL is intended for use in the electromagnetic environment in which radiated RF disturbances
are controlled.
The customer or the user of the CR-IR 348CL can help prevent electromagnetic interference by maintaining a
minimum distance between portable and mobile RF communications equipment (transmitters) and the CR-IR
348CL as recommended below, according to the maximum output power of the communications equipment.
Rated maximum
output power of
transmitter
W
Separation distance according to frequency of transmitter
m
150 kHz~80 MHz
= 1.2
d
P
80 MHz~800 MHz
= 1.2
d
P
800 MHz~2.5 GHz
d
= 2.3
P
0.01 0.12 0.12 0.23
0.1 0.38 0.38 0.73
1 1.2 1.2 2.3
10 3.8 3.8 7.3
100 12 12 23
For transmitters rated at a maximum output power not listed above, the recommended separation distance d in
meters (m) can be estimated using the equation applicable to the frequency of the transmitter, where
maximum output power rating of the transmitter in watts (W) according to the transmitter manufacturer.
NOTE 1 :
NOTE 2 :
At 80 MHz and 800 MHz, the separation distance for the higher frequency range applies.
These guidelines may not apply in all situations.
P
is the
Electromagnetic propagation is affected by absorption and reflection from structures, objects and
people.
1 - 8 2009. 09 897N0519H

CR Console Operation Manual
FUJI COMPUTED RADIOGRAPHY
Chapter
2
OPERATIONS
BASICS
2006. 10 897N0519C 2 - 1
CR Console Operation Manual
2.1 Starting Up and Shutting Down the CR Console
This section explains how to start up and shut down the CR Console. Be sure to start up peripheral
devices which are required for the work as well as the Image Reader and display.
2.1.1 Starting Up the CR Console
Turn on the display, then turn on the personal computer.
The application software of the CR Console automatically starts. When the Patient Information Input
Screen is displayed, startup is completed. Depending on the setting of the User Utility, the
“Examination Order Issuance Screen” is displayed.
NOTES
• Do not start up the CR Console before turning on the CR exposure unit. Otherwise, a message
indicating a communication error may appear on the CR Console.
• Be sure to turn on the display first, then turn on the personal computer.
Note that the touch panel may not respond accordingly.
We recommend that you use the equipment with the display turned on.
• User authentication may be required to log into the system, depending on the setting performed at
installation.
2 - 2 2009. 09 897N0519H
CR Console Operation Manual
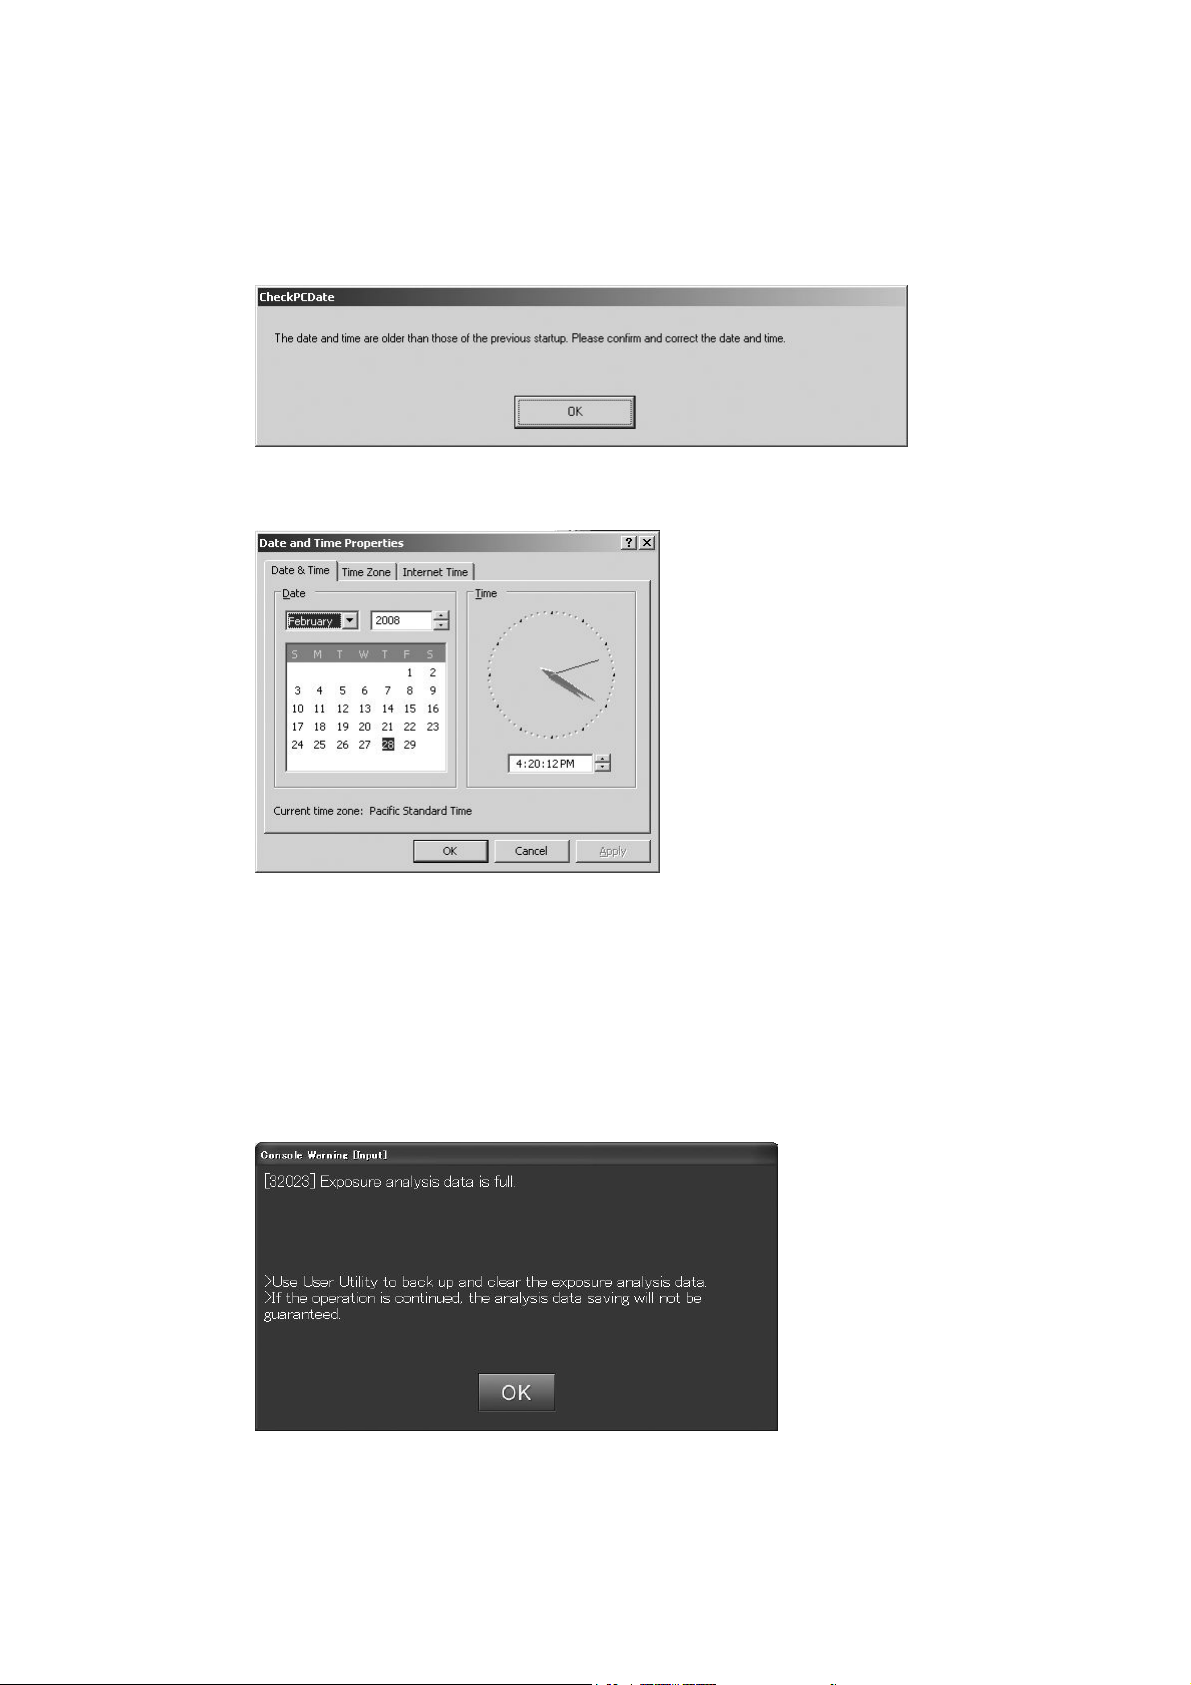
•
If the time displayed on the personal computer is before that of the last time when it was turned on,
the following message appears. In this case, contact our authorized distributor.
“The date and time are older than those of the previous startup. Please confirm and correct the
date and time.”
Selecting [OK] will display the “Date and Time Properties”.
Set the time and date to the current ones, and then select [OK]. The correct time and data will be
displayed on the personal computer.
Clear the logs when a message saying that “Exposure analysis data is full.” appears at the startup
of the CR Console.
For details, see
[Chapter 9 EXPOSURE RESULT LOG / CR Console OPERATION
MANUAL - THE USER UTILITY OPERATIONS].
2011. 06 897N0519M 2 - 3
CR Console Operation Manual
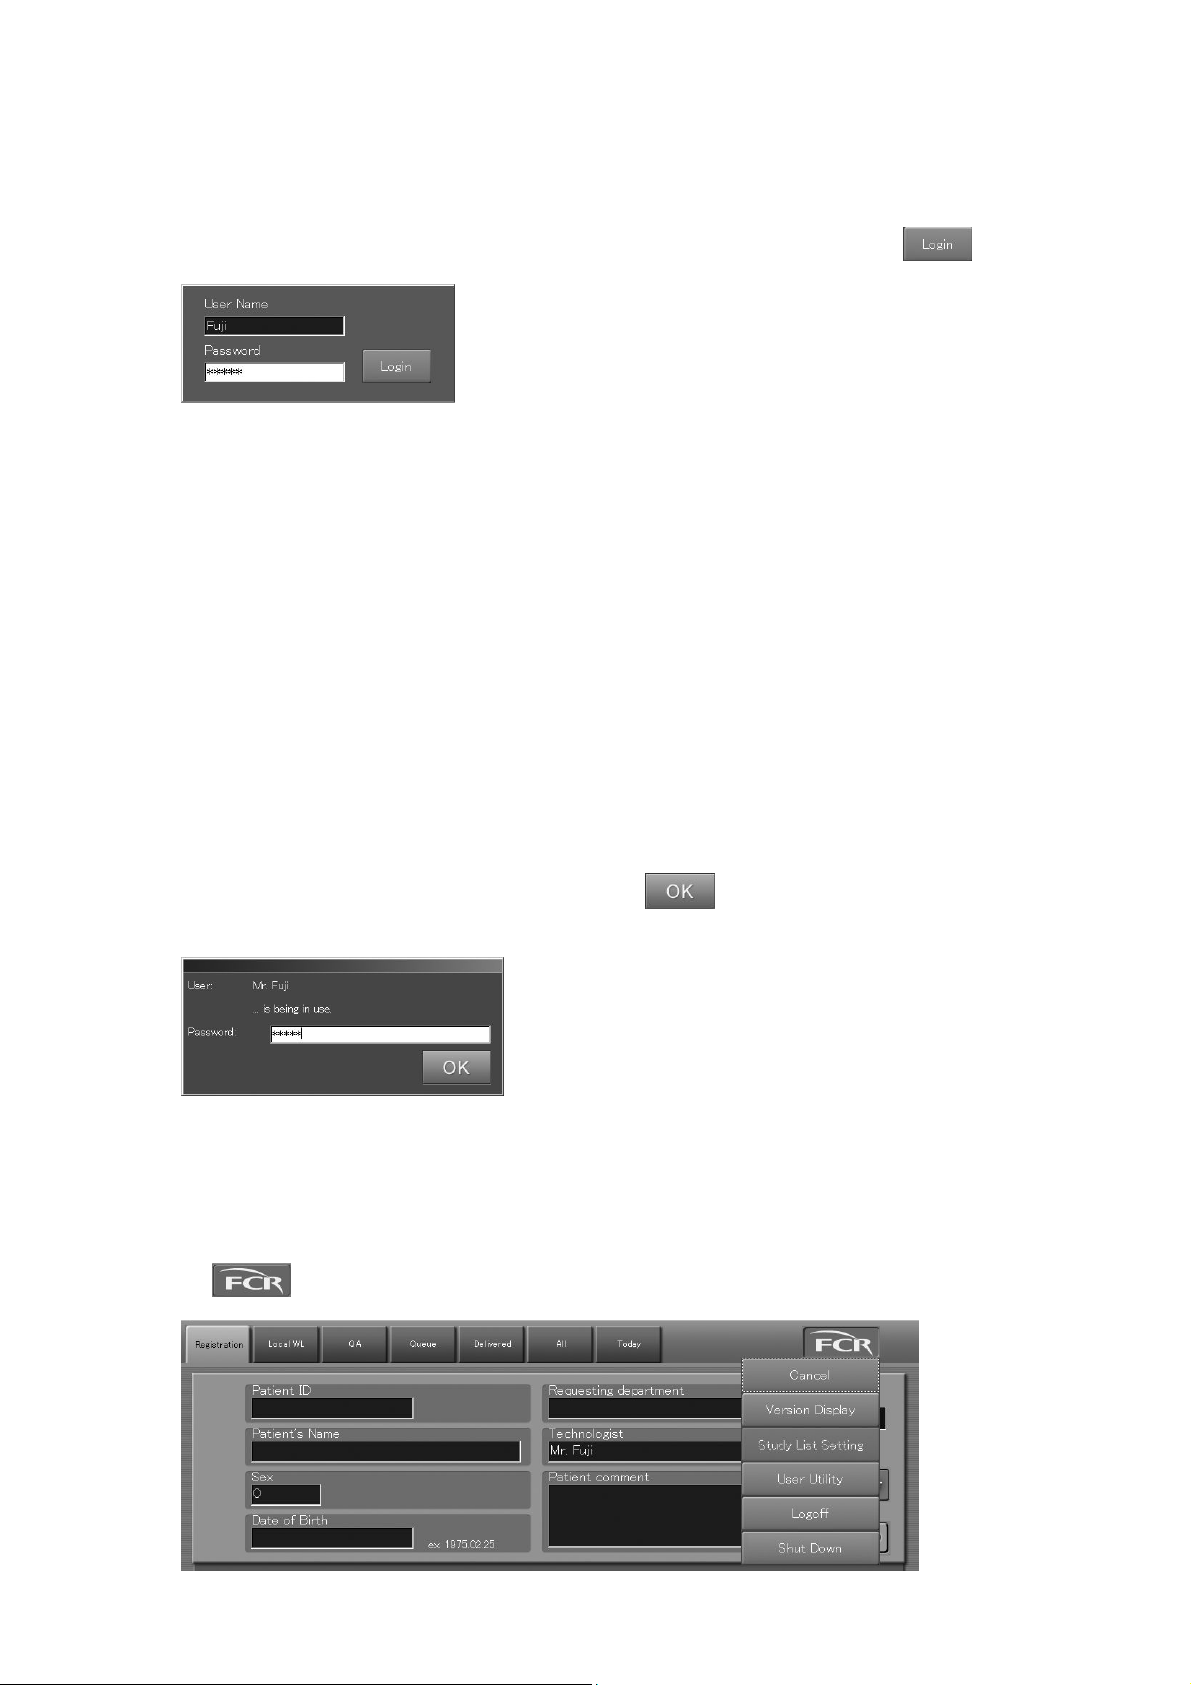
(1) Login
A login box like that shown below opens at CR Console startup and after the previous user has
logged off. The user name appearing in the login box that opens now is the one with which you were
logged in the system previously. Input “User Name” and “Password” and then select
“Login box”
When the user logged in the system, the “Patient Information Input Screen” opens. The user name
input in the “Login box” displays in the Technologist input box. (The technologist name may not be
displayed depending on the setting performed at installation.)
If the “login box” opens when the equipment is left inoperative for a certain period of time
The user logged in the system will be logged off automatically unless any manipulation is performed
over a certain period of time while no studies are being in process.
At this time, the “Login box” appears on the screen. To resume the operation, perform necessary
manipulations in the login box.
If the equipment is left inoperative for a certain period of time while a study is being performed (in
process of image reading on the study screen, for example), the screen will be locked automatically
causing then the “Password input box” to be displayed. This disables on-screen operations until the
screen is unlocked accordingly. (Background processing, such as image reading or image output, is
performed.)
To unlock the screen, input the password ad then select
screen.
.
. The system restores the previous
“Password input box”
(2) Logoff
Be sure to log off the system whenever you are terminating/suspending operations, excepting for
when shutting down the CR Console and disconnecting the power.
Select
2 - 4 2008. 03 897N0519E
to display the exposure menus, and then select the “Logoff” menu.
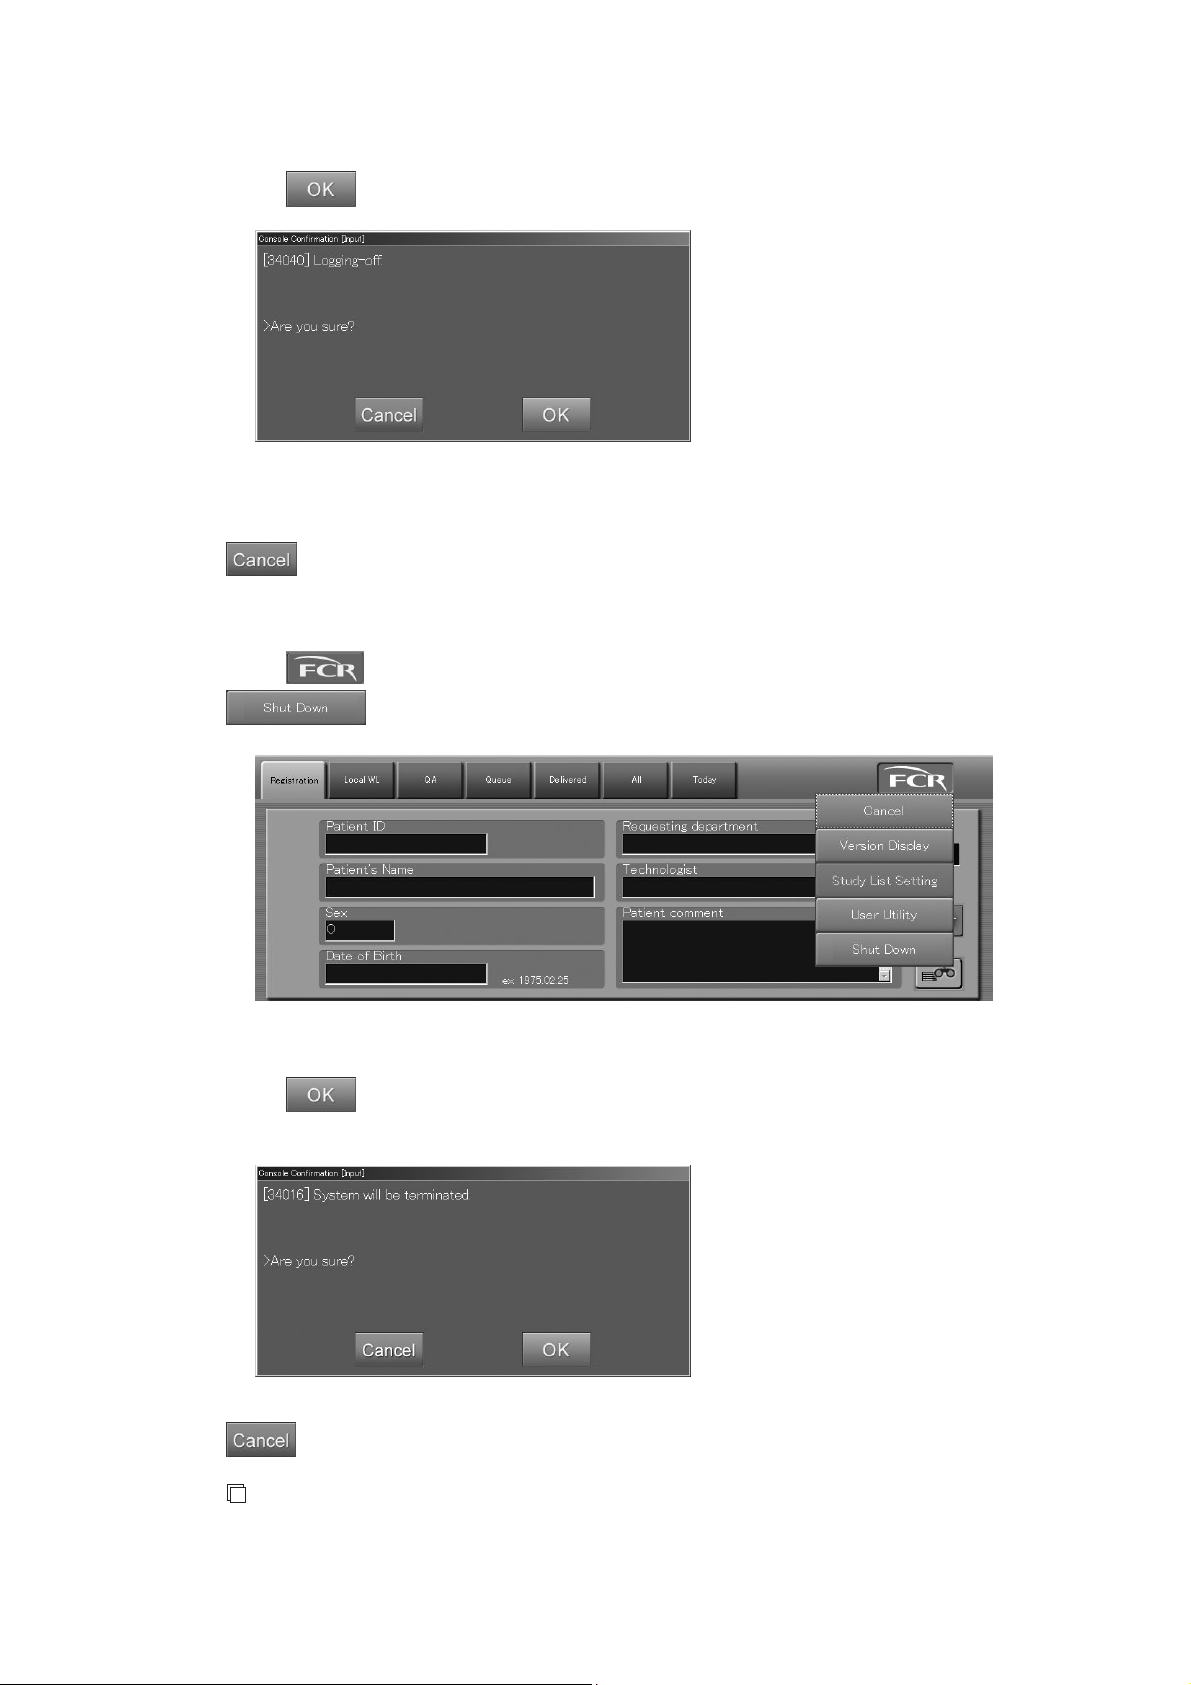
The “Confirmation box” is displayed.
Select
“Confirmation box”
.
This completes logoff processing and the “Login box” opens.
: Cancels operation.
2.1.2 Shutting Down the CR Console
CR Console Operation Manual
Select to display the menu on the Patient Information Input Screen, and then select
.
The “Confirmation box” is displayed.
Select
. The application software of the CR Console ends, and the power of the personal
computer is automatically turned off.
: Cancels operation.
NOTE
• As the CR Console is not supposed to operate continuously all day long, turn off the personal
computer once a day by performing this section’s operation.
2008. 03 897N0519E 2 - 5
CR Console Operation Manual
2.2 Operation Screen
This section explains the operation screen for the basic operations ranging from reception to
completion of a study.
(About the various lists, refer to [
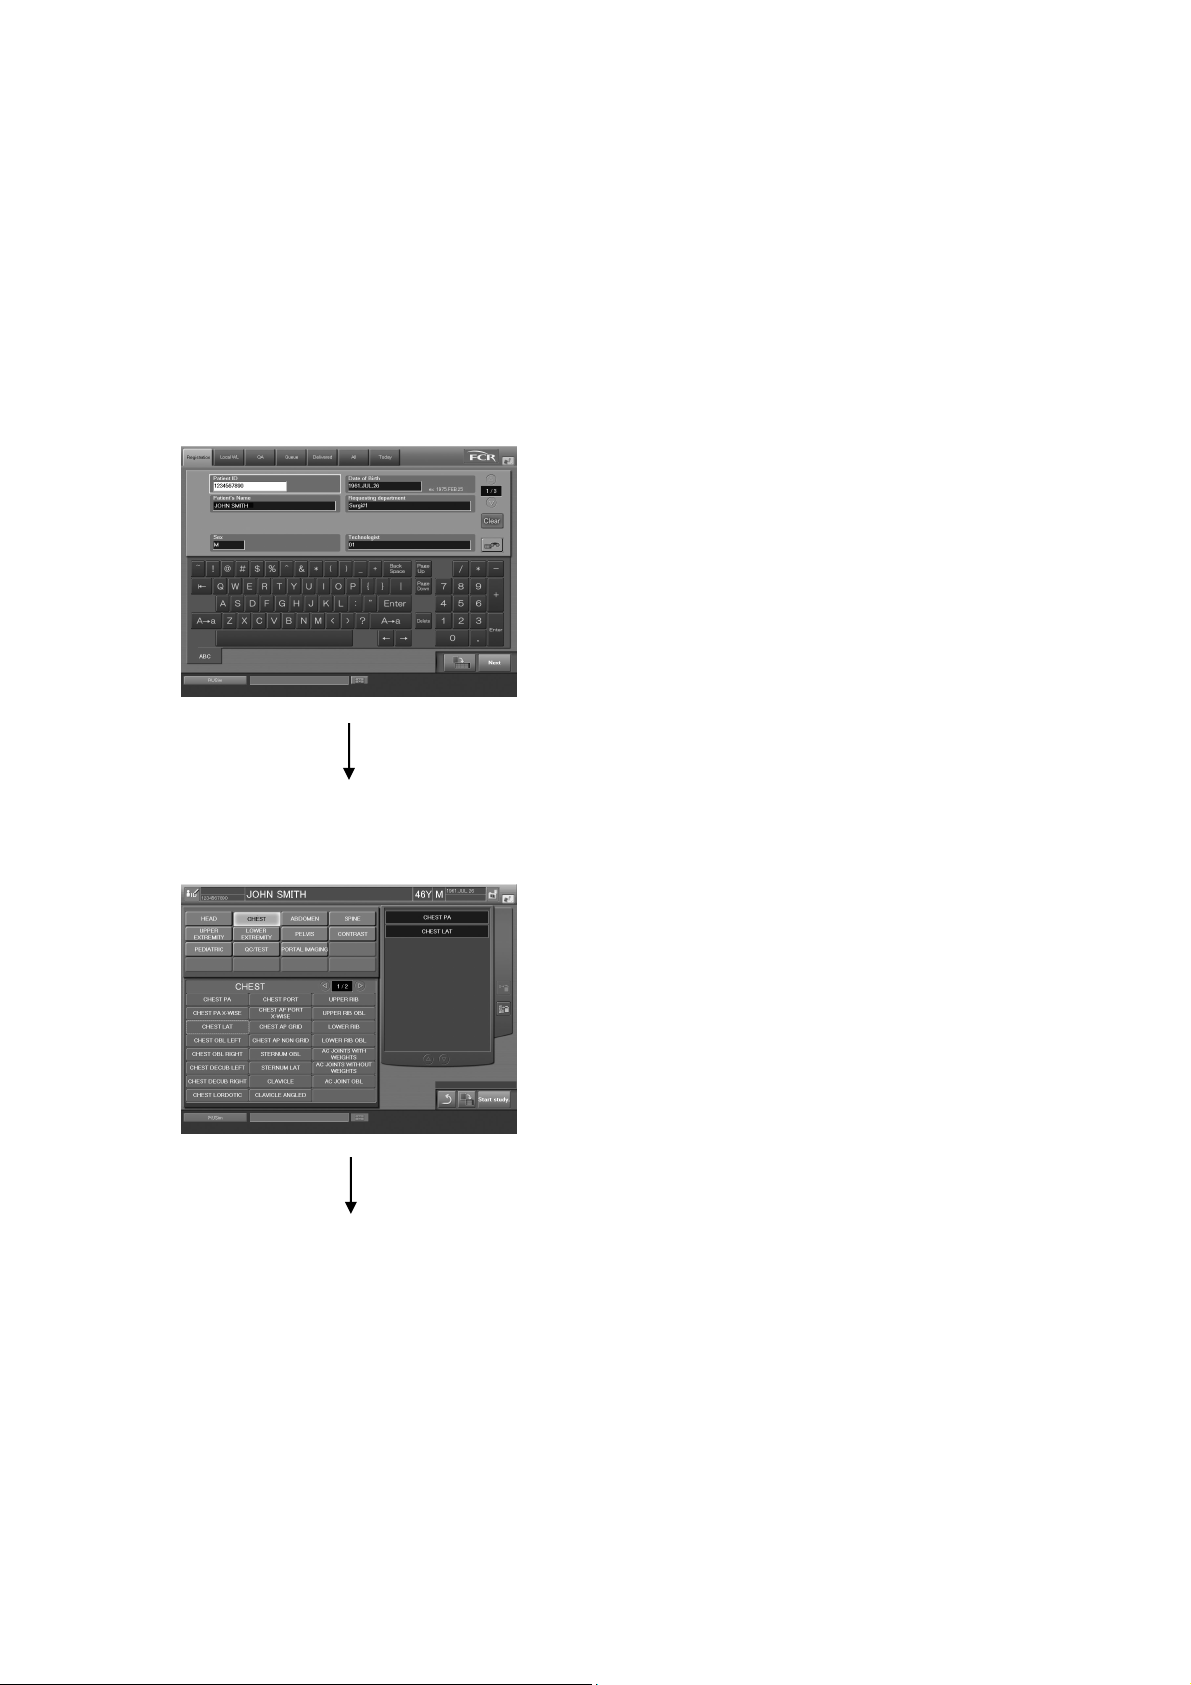
2.2.1 Receiving Studies
Shown below is the transition outline of the basic screens for receiving studies.
(1) Inputting Patient Information ([3.1.1 Inputting Patient Information])
Chapter 5. OPERATIONS - LIST
].)
“Patient Information Input Screen”
To (2) Selecting Exposure Menu
(2) Selecting Exposure Menu ([3.1.3 Selecting Exposure Menu])
“Exposure Menu Selection Screen”
To 2.2.2 Confirming Study Details
2 - 6 2009. 09 897N0519H
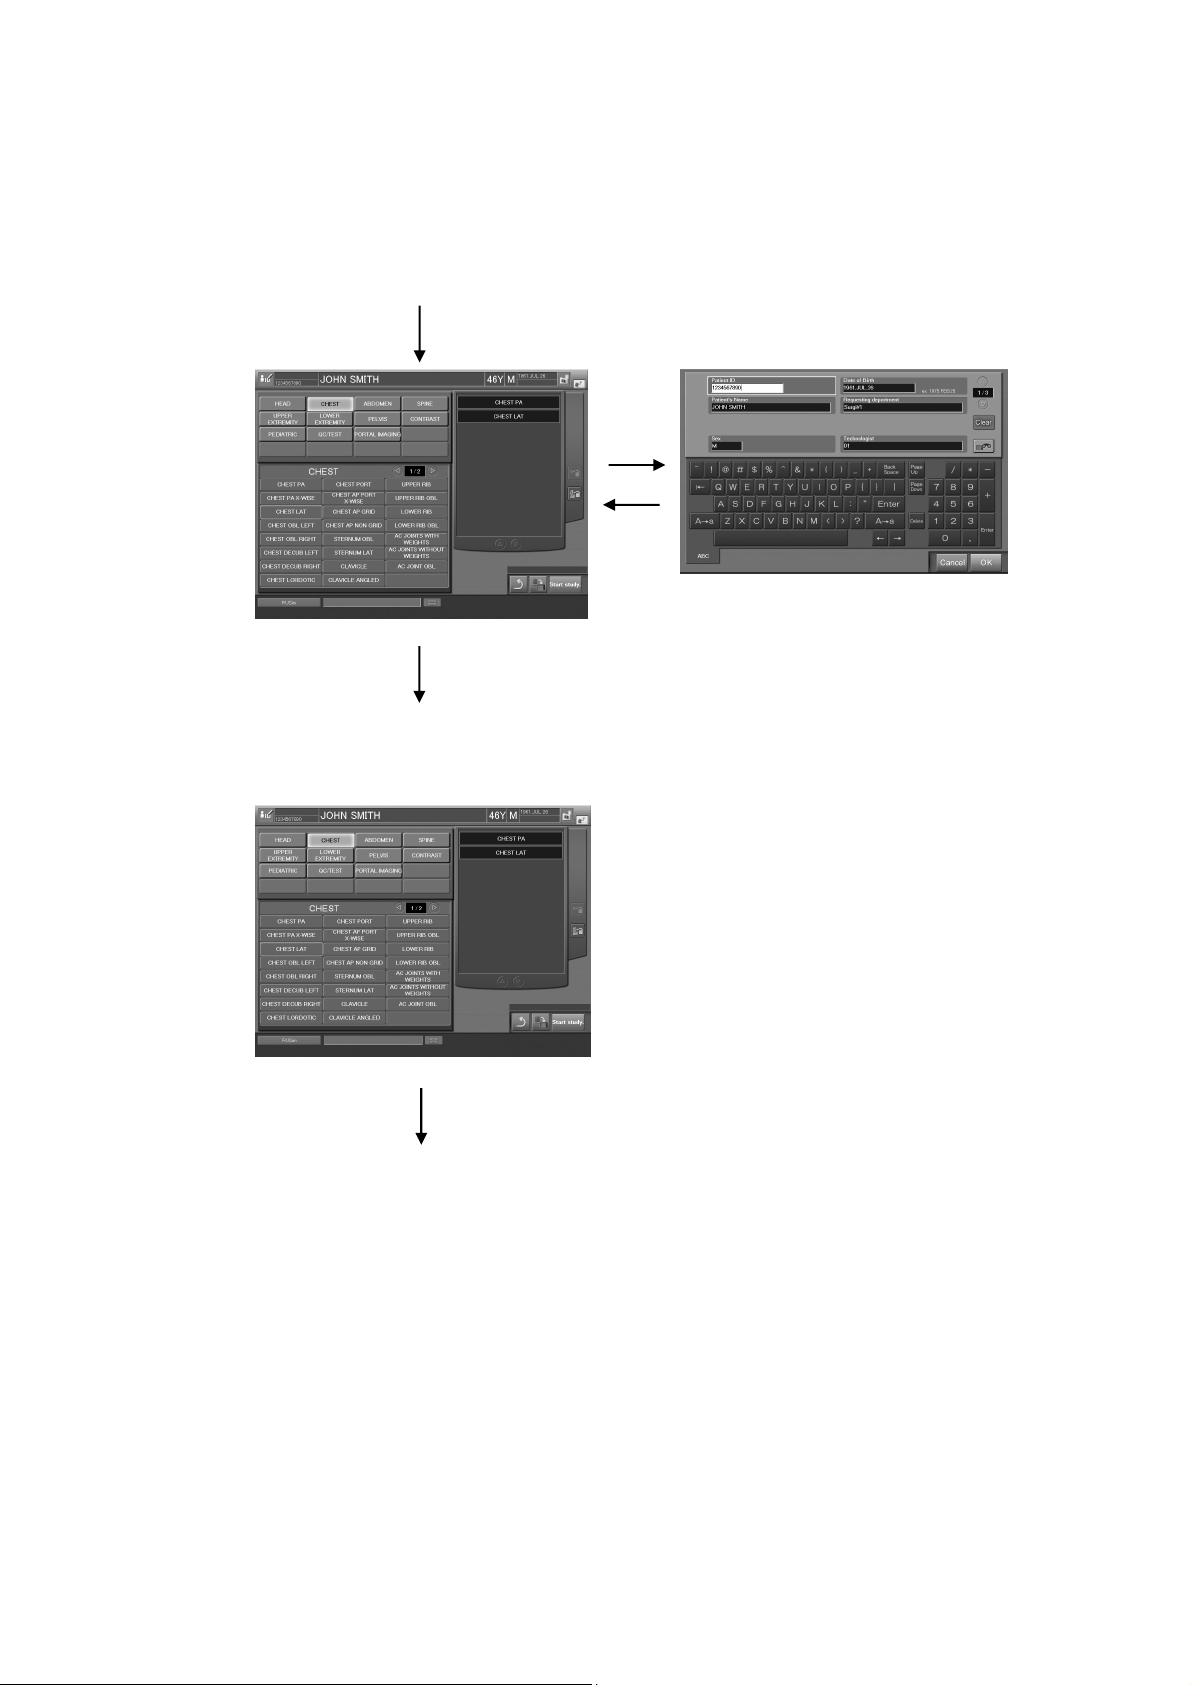
2.2.2 Confirming Study Details
Shown below is the transition outline of the basic screens for confirming study details.
(1) Modifying Patient Information ([3.2.1 Modifying Patient Information])
From 2.2.1 Receiving Studies
“Patient's Information Input Box”
“Exposure Menu Selection Screen”
CR Console Operation Manual
To (2) Modifying Exposure Menu
(2) Modifying Exposure Menu ([3.2.3 Modifying Exposure Menu])
“Exposure Menu Selection Screen”
To 2.2.4 Executing Studies
2009. 09 897N0519H 2 - 7

CR Console Operation Manual
2.2.3 Issuing Examination Orders
Shown below is the transition outline of the basic screens for issuing examination orders.
(1) Issuing Examination Orders ([3.3 Issuing Examination Orders])
“Examination Order Issuance Screen”
To 2.2.4 Executing Studies
2.2.4 Executing Studies
Shown below is the transition outline of the basic screens for “Executing Studies”.
Two display modes are available on the Study Execution Screen : One-image display mode and siximage display mode.
(1) Starting a Study ([3.4.1 Starting a Study])
“Study Execution Screen” (One-image display mode)
From 2.2.2 Confirming Study Details
Starting a study
“Exposure Menu Selection Screen”
Reserving a study
“Local WL list”
“Scroll View”
“Study Execution Screen” (Six-image display mode)
2 - 8 2009. 09 897N0519H

CR Console Operation Manual
(2) Preparation before Exposure (Study) ([3.2 Confirming Study Details])
Presented below is the transition outline of the basic screen for [
(Study)
].
“Exposure parameter selection box”
“Study Execution Screen”
To (3) Reading Images, (4) Performing Re-exposure/Additional Exposure
Preparation before Exposure
This box is displayed
when confirming/
changing exposure
parameters.
(3) Reading Images ([3.4 Executing Studies]), (4) Performing Re-exposure/Additional
Exposure ([3.6 Performing Re-exposure and Additional Exposure])
From (2) Preparation before Exposure (Study)
“Study Execution Screen”
To 2.2.5 (1) Editing Images
2009. 09 897N0519H 2 - 9

CR Console Operation Manual
2.2.5 From “Editing Images”, “Distribution” to “Suspending Studies” and
“Completing Studies”
Shown below is the transition outline of the basic screens for Editing Images, Distribution to
Suspending Studies and Completing Studies.
(1) Editing Images ([3.7 Editing Images])
From 2.2.4 Executing Studies
“Study Execution Screen” “Lists (QA/Delivered/All/Today)”
“Image Editing Screen (an image level)” “Image Editing Screen (a study level)”
To (2) Image Delivery
2 - 10 2009. 09 897N0519H

(2) Image Delivery ([3.8 Image Delivery])
CR Console Operation Manual
From (1) Editing Images
“Study Execution Screen”
(3) Suspending Studies ([3.9 Suspending Studies]) and
Completing Studies ([3.10 Completing Studies])
The study ended without completing
image editing (QA) will be stacked in
the QA list.
“Study Execution Screen”
To 2.2.1 Receiving Studies
To 2.2.3 Issuing Examination Orders
2009. 09 897N0519H 2 - 11

CR Console Operation Manual
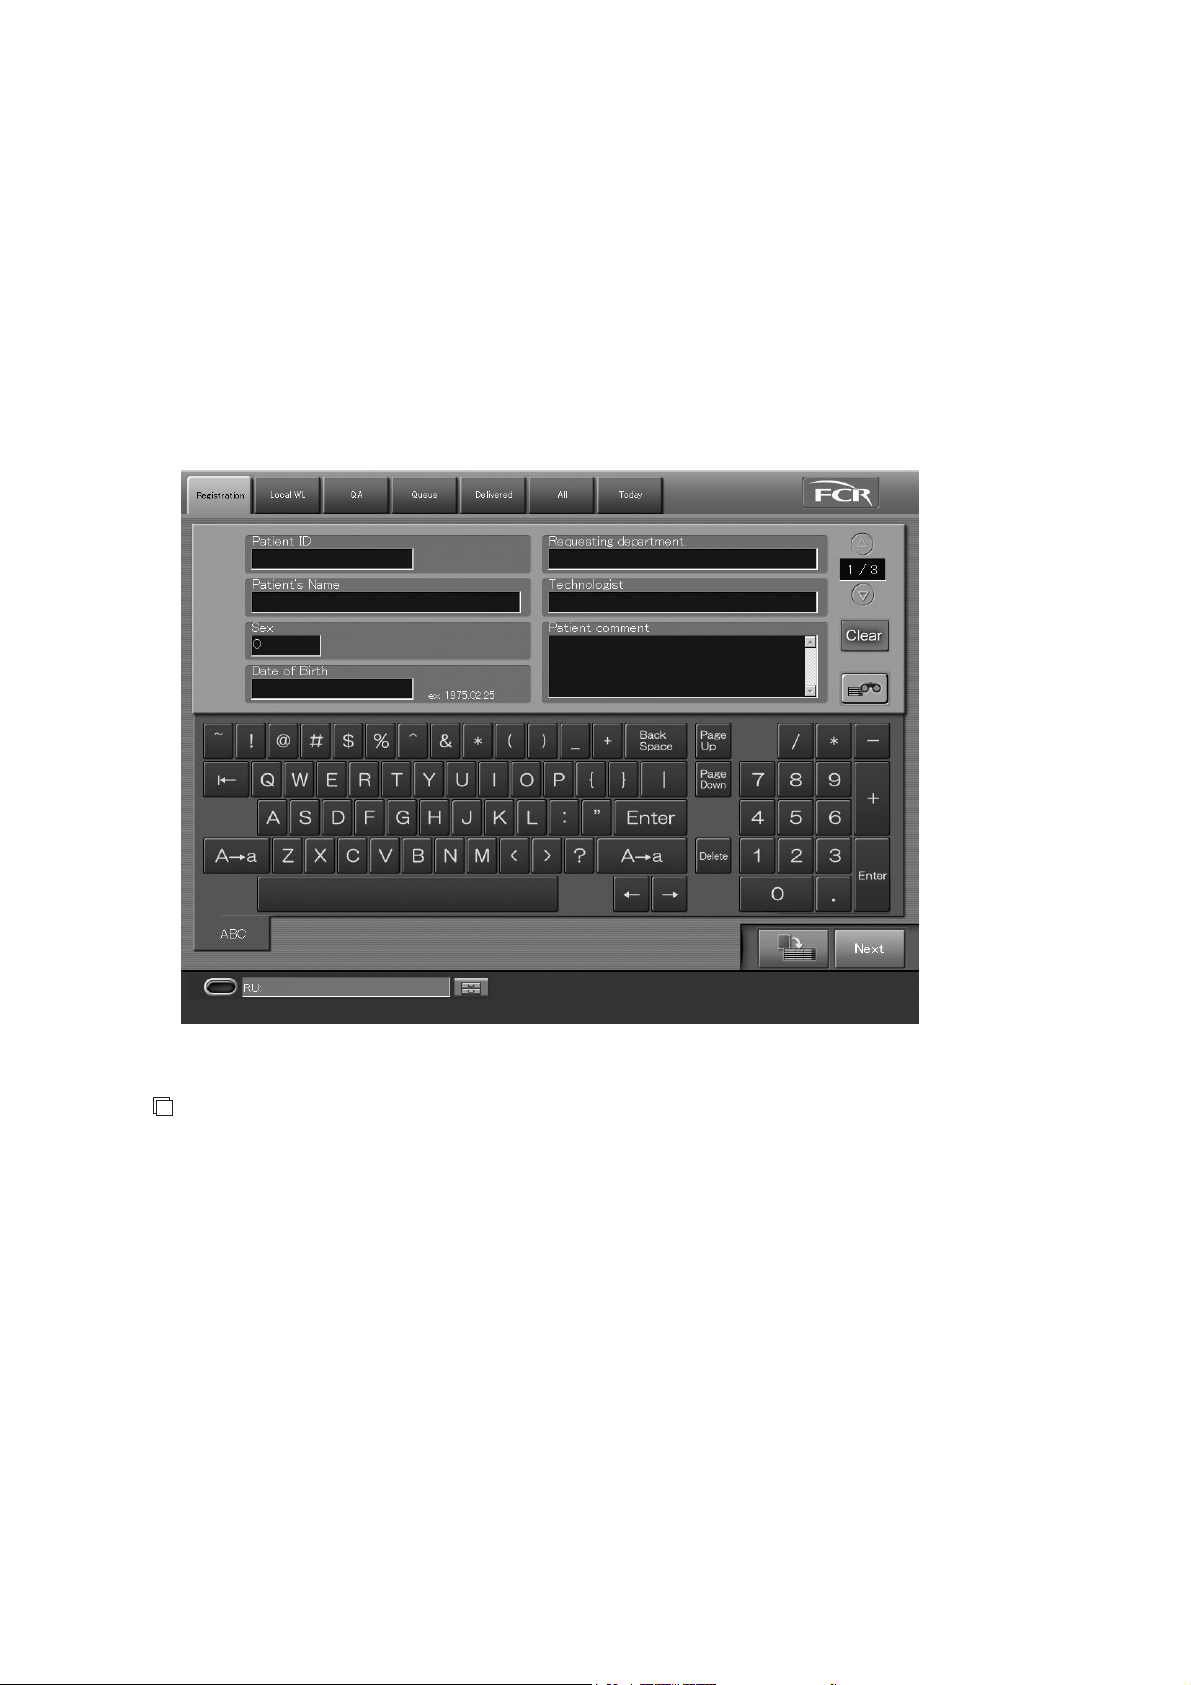
2.2.6 Patient Information Input Screen
A screen for reception of studies. Performs patient information input.
By selecting the list tabs at the top of the screen, various lists can be displayed. (For more
information about lists, see [
Explained herein is how to operate the list tab, screen keyboard and other input fields on the “Patient
Information Input Screen”.
Chapter 5. OPERATIONS - LIST
].)
(7) Output error icon
(1) List tab (3) Patient information input field
(6) FCR button
(2) Screen keyboard
(5) Image Reader status
(4) Scroll view display area (option)
(8) Display of the current time and date
(1) List tab
Selecting the list tab on the screen top will allow you to display various kinds of lists.
: Displays the “Local WL” list. Studies that have already registered patient information,
containing yet-to-be-read images, will be added to this list.
: Displays the “QA” list. Studies containing images already read, but yet-to-be-subjected to
image editing (QA), will be added to this list.
: Displays the “Queue” list. Studies containing images already read, but yet-to-be-output
(printout or delivery), will be added to this list.
: Displays the “Delivered” list. Studies that contain images already read and output (printout
or delivery) will be added to this list.
: Displays the “All” list. All studies saved in the CR Console database will be displayed in
this list.
: Displays the “Today” list. All studies registered today will be displayed in this list.
2 - 12 2009. 09 897N0519H

(2) Screen keyboard
Inputs characters in the patient information input field.
: Deletes one character to the left of the cursor.
: Deletes one character to the right of the cursor.
CR Console Operation Manual
Space Bar
/ : Moves the caret “
: Enter one blank space.
” to make space for one character to the left/right.
|
: Alternately switches upper- and lower-case letters of the alphabet.
: Determines the input data, and moves the caret “
(3) Patient information input field
Inputs patient information.
Accession No.
Reception No.
Patient ID
Patient’s Name
Sex
Date of Birth
: Input the study number. (A maximum number of digits vary
: Input patient’s reception number. (A maximum number of digits
: Input patient’s ID number of the single byte. (A maximum
: Input patient’s name (a maximum of 64 characters).
: Input patient’s sex (M (0): male, F (1): female, O (2): other).
: Input patient’s date of birth. The input format for the date is
Requesting department code :
Requesting department name :
Technologist
Patient comment
Physical disorder information
Infection information
: Input a name of technologist.
: Input comments on patient (a maximum of 1024 characters).
: Input information on physical disability (a maximum of 64
: Input information on epidemic disease (a maximum of 64
Contraindication information :
Pregnancy
Height (cm)
Weight (kg)
Phone number
Outpatient/Inpatient
Blood type (ABO)
Blood type (Rh)
Comments on study
: Input information on pregnancy (0: Not pregnant, 1: Possible to
: Input height (cm).
: Input weight (kg).
: Input phone number (a maximum of 16 characters).
: Input whether outpatient or inpatient (0: Outpatient, 1: Inpatient).
: Input blood type by ABO (0: A, 1: B, 2: AB, 3: O, 4: Unknown).
: Input blood type by Rh (0: Rh+, 1: Rh-, 2: Unknown).
: Input comments on study (a maximum of 10240 characters).
” to the next box.
|
depending on the setting performed at installation.)
vary depending on the setting performed at installation.)
number of digits vary depending on the setting performed at
installation.)
You can use the User Utility to specify which of the selections for
sex is to be determined as the default.
shown in the example below the input field.
Input requesting department code (2 characters).*
Input requesting department name (a maximum of 64 characters)*.
characters).
characters).
Input information on contraindication (a maximum of 64
characters).
be pregnant, 2: Pregnant, 3: Unknown).
2009. 09 897N0519H 2 - 13
CR Console Operation Manual
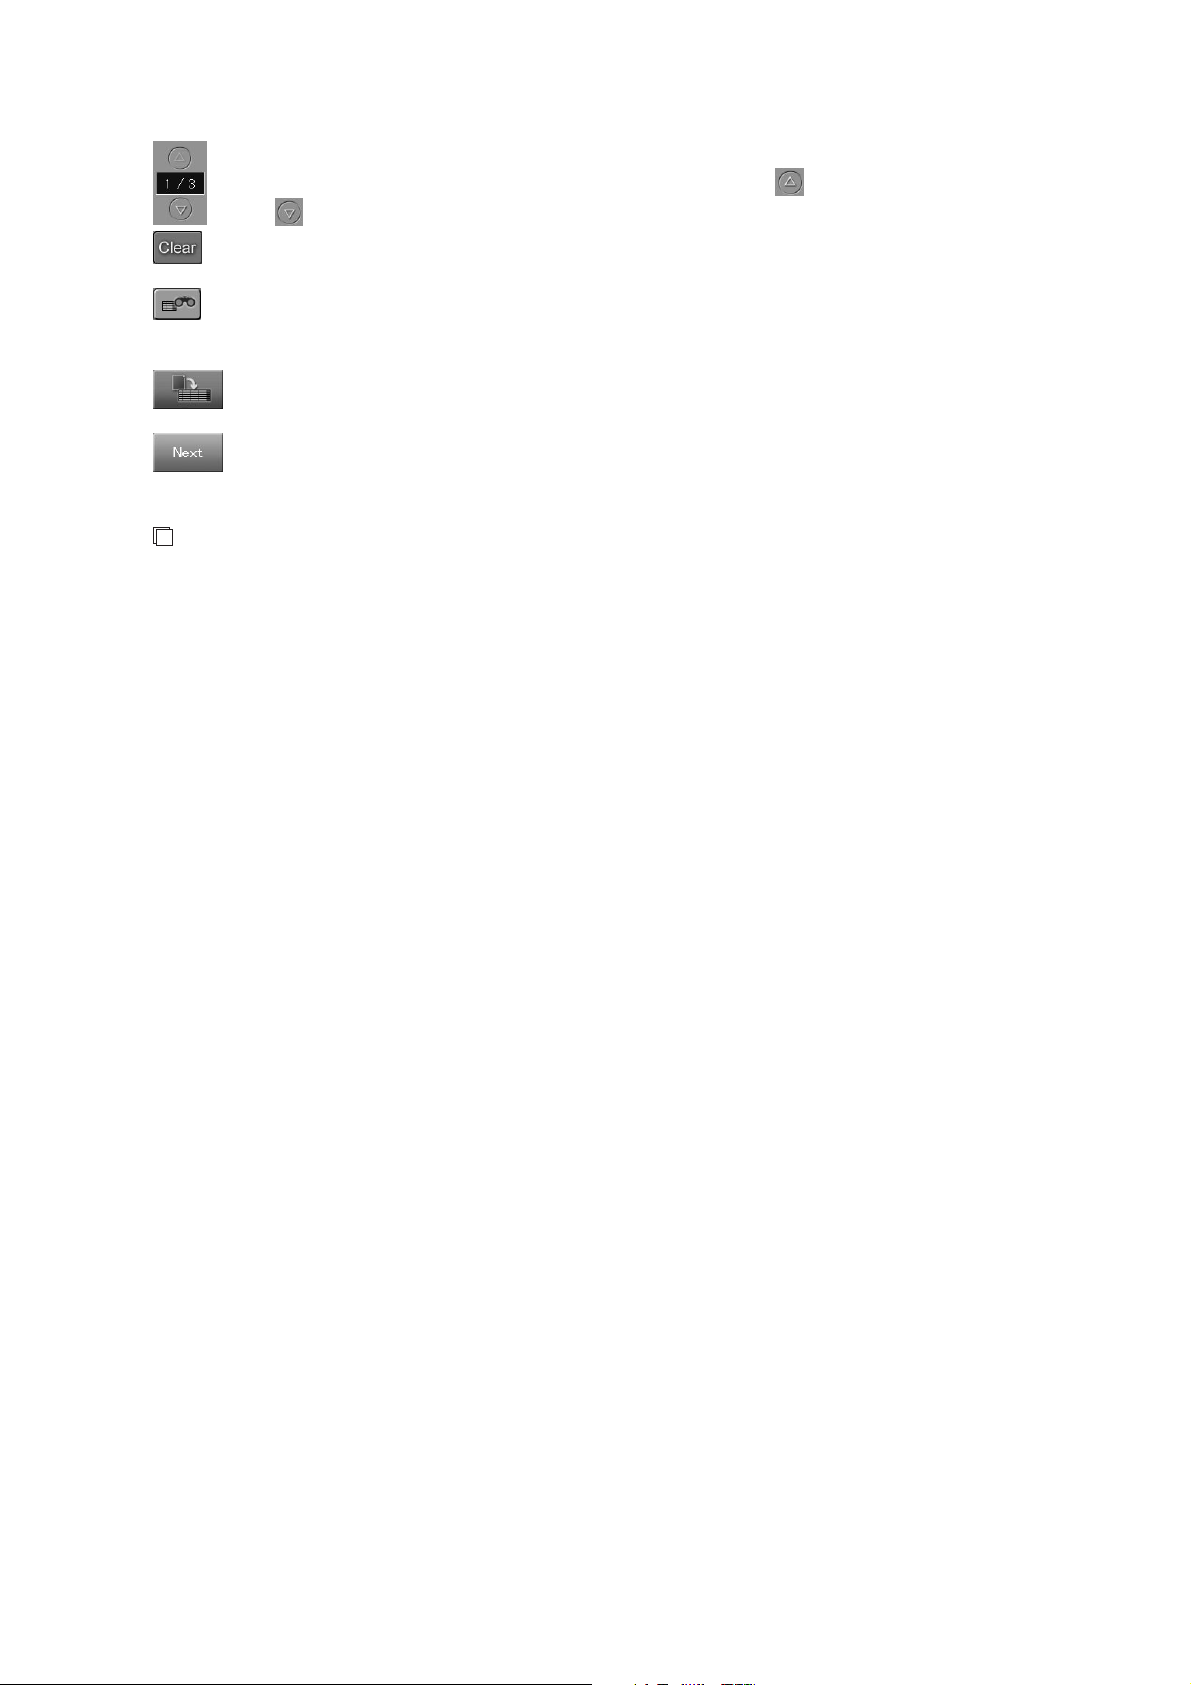
: Indicates page number of the patient information input field. turns one page backward,
: Clears patient information (except “Technologist”) input in the “Patient Information Input
: Uses keywords to search for necessary patient information from the patient information
: Reserves a study based on the information input in the “Patient Information Input Screen”.
: Terminates patient information input, and then displays the “Exposure Menu Selection
NOTE(*)
Whether an input “Requesting department code” and an input “Requesting department name” are
linked with each other or not will depend on the settings performed at installation.
and
turns one page forward.
Screen”, and then returns to the top page of the patient information input field.
database registered to the CR Console main unit so that it is displayed on the “Patient
Information Input Screen”. (This is denominated the patient information database function.)
A study thus reserved is displayed in the “Local WL” list.
Screen”.
2 - 14 2009. 09 897N0519H
CR Console Operation Manual
(4) Scroll view display area (option)
When the scroll view option is activated, the scroll view is displayed at the lower right corner of the
screen. The scroll view is displayed on the “Patient Information Input Screen”, “Exposure Menu
Selection Screen” and “Study Execution Screen”.
In the scroll view, you can check image reading status of a study whose image reading is processed
in the background. From among studies stacked in the “Local WL” list, the scroll view displays
status of studies that fall under the following conditions. For details of the scroll view, see [
Scroll View Display Area (option)
].
(5) Image Reader status
This displays operation status of the Image Reader connected to the CR Console and maintenance
icons. Displayed Image Reader status will differ depending on the connected Image Reader. For
details of Image Reader status, see [
2.3 Image Reader Status
].
2.4
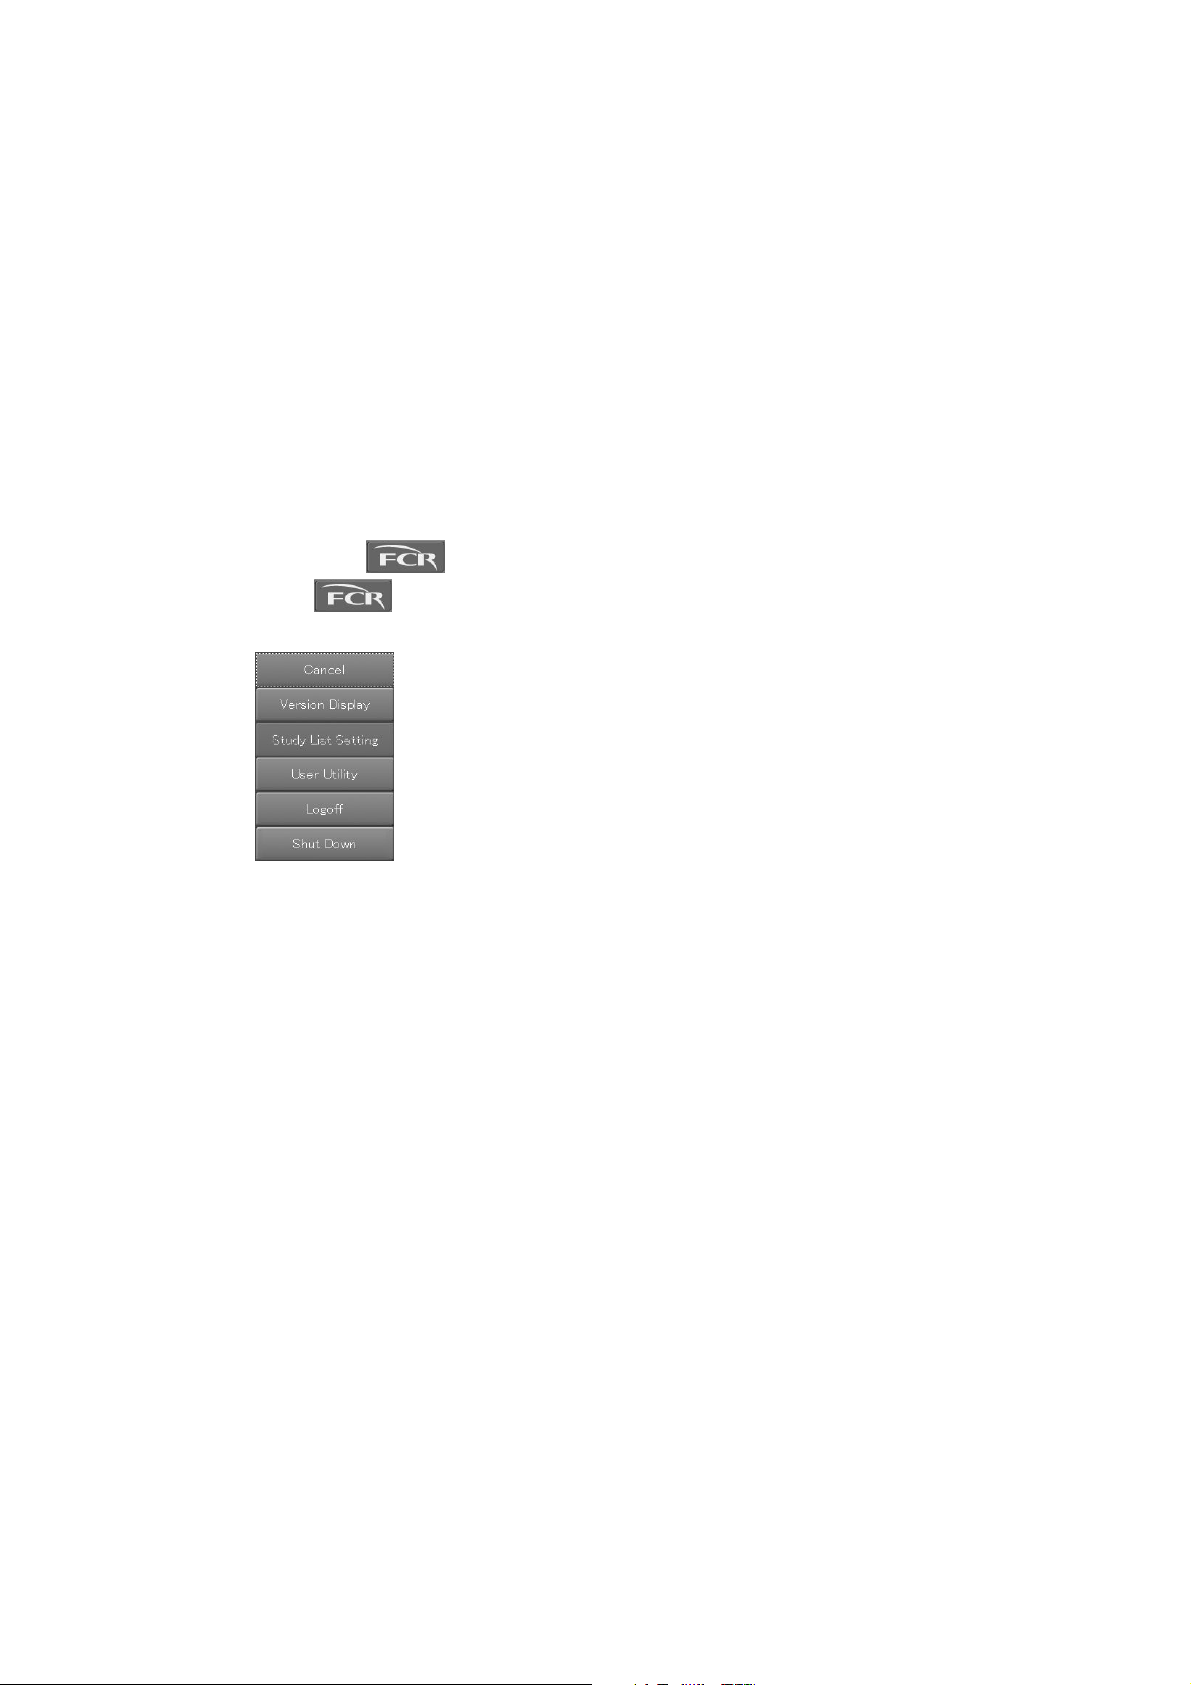
(6) FCR button (
Selecting
)
will display a menu that is associated with the CR Console system. The displayed
menu will differ depending on the settings performed at installation.
Displayed menus
Major menu items displayed are explained below.
Cancel
Cancels the menu display.
Software version display
Displays the “Version information confirmation box”. For details, see [
2.6 Version Display
].
2009. 09 897N0519H 2 - 15
CR Console Operation Manual
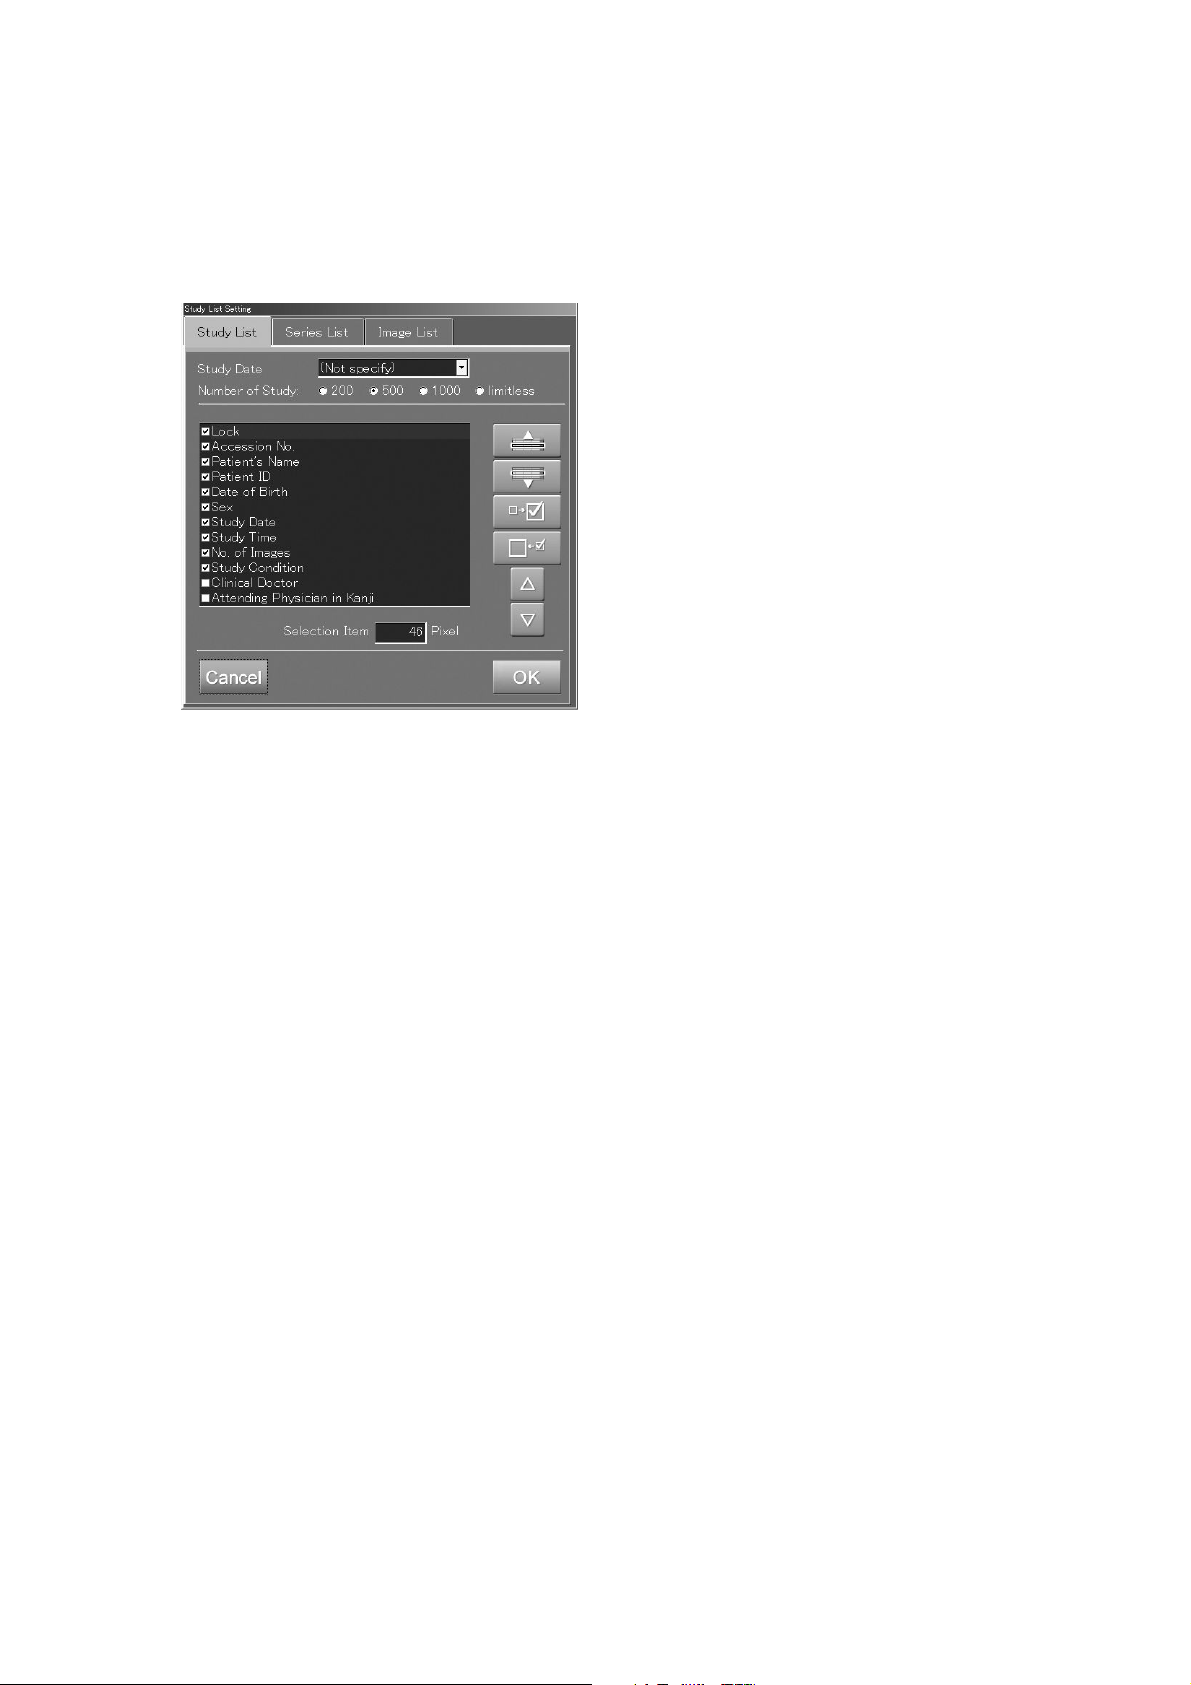
Study list setting
With this menu setting, you can display a dialog box with which information items in individuals
lists are to be shown or hidden and the order of displaying those items is changed. This menu setting
can be selected when each of the lists is displayed. For details of this study list setting, see [
Setting Study List
5.2 (16)
].
“Study list setting dialog box”
User Utility
Before starting User Utility mode, the CR Console should be shut down.
For details of User Utility mode, see [
UTILITY OPERATIONS
].
CR Console OPERATION MANUAL - THE USER
Logoff
This is to log off the user who is logged in from the CR Console.
For details of logoff, see [
2.1.1 (2) Logoff
].
System shutdown
This is to end the system operation and shut off the power to the CR Console.
For details of system shutdown, see [
2.1.2 Shutting Down the CR Console
].
2 - 16 2009. 09 897N0519H
CR Console Operation Manual
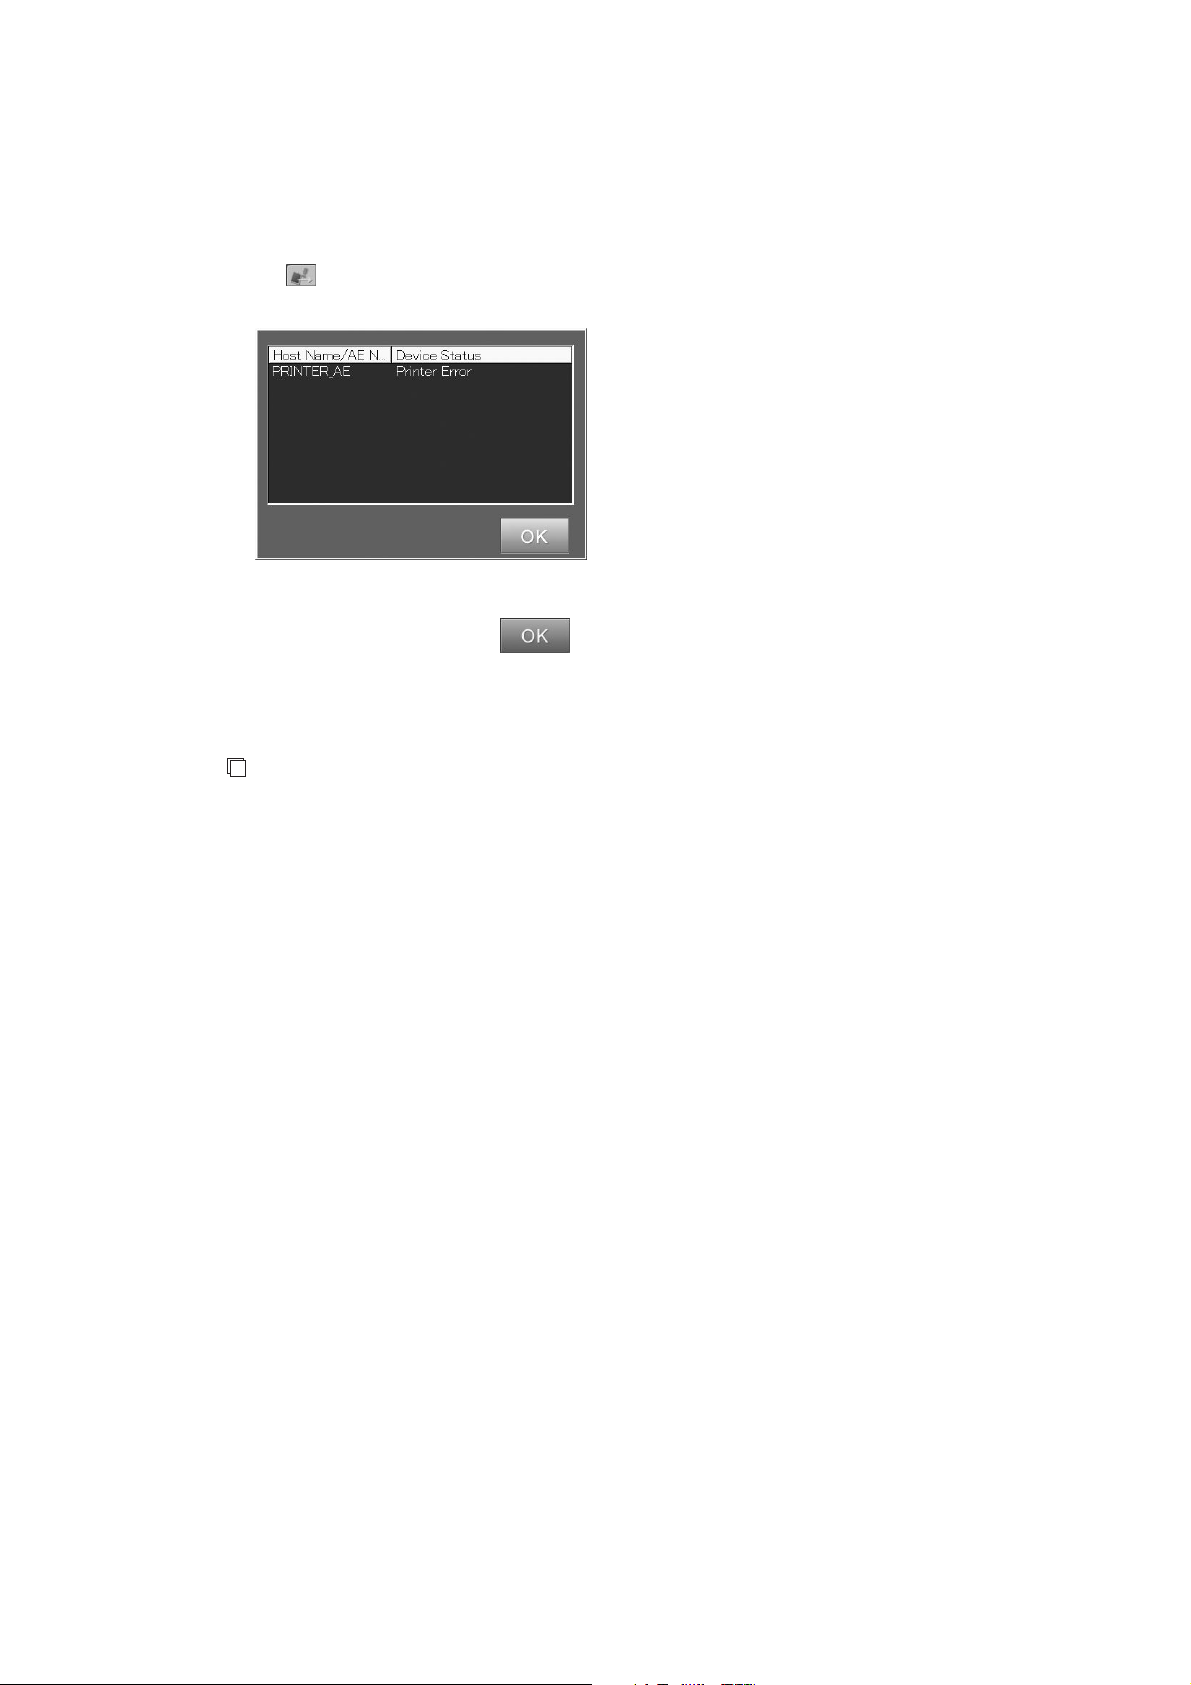
(7) If an Error Occurs on Destination Device
This icon appears at the upper right corner of the screen when an error occurs on a device targeted by
the CR Console for image output or on the communication with other devices connected to the CR
Console.
Select
.
The “Error display box” is displayed.
“Error display box”
Check the device status, select , and then take an appropriate action.
(8) Display of the current time and date
The current time and date are displayed. Confirm that they are correct.
NOTE
If the time and date are not correct, use the User Utility to change them.
For details on the User Utility, see [
OPERATION MANUAL - THE USER UTILITY OPERATIONS
Chapter 4 PROPERTY SETTING/CR Console
].
It is possible to change the position of the time and date display. To do this, select and drag the
display in the selected format.
To change the display format or to turn off the time and date display, please contact our authorized
distributor.
2009. 09 897N0519H 2 - 17
CR Console Operation Manual
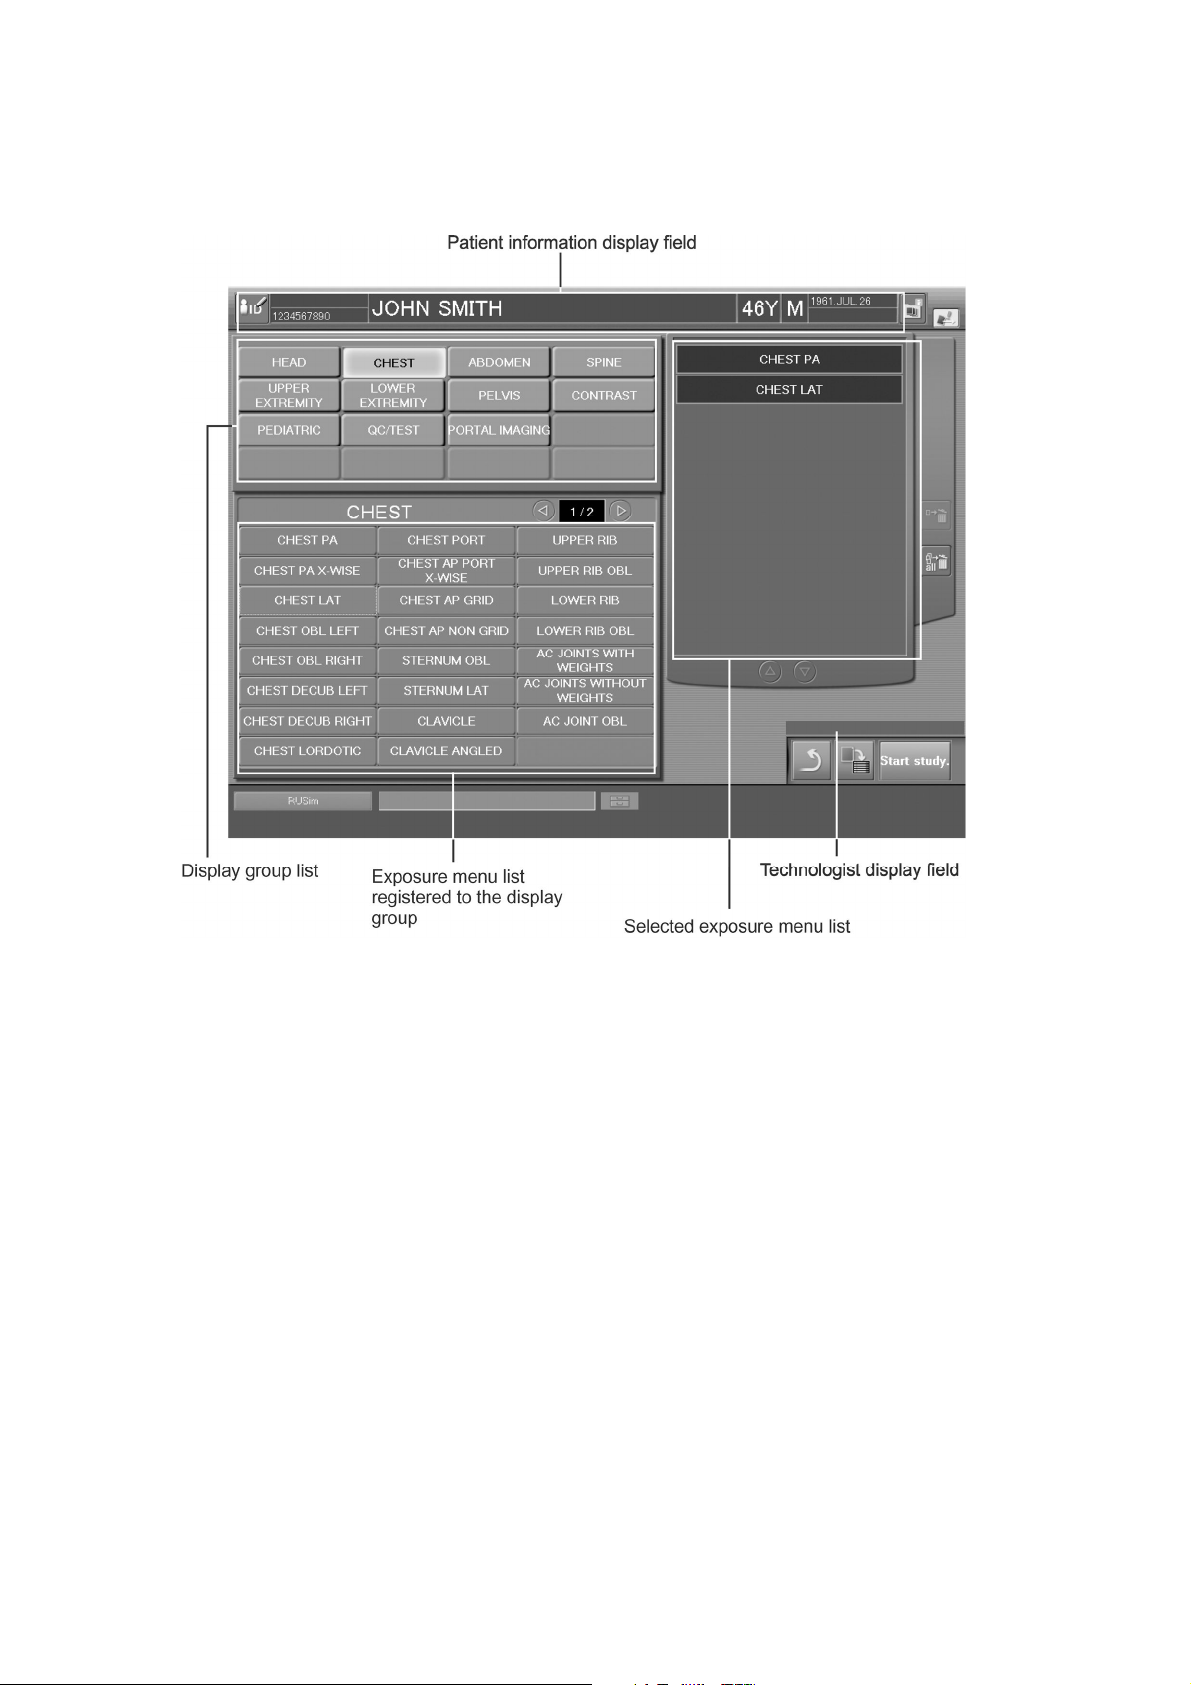
2.2.7 Exposure Menu Selection Screen
This is a screen for receiving studies. Performs operations of selection of exposure menus.
Patient information display field
Technologist display field
Display group list
Exposure menu list registered
to the display group
Selected exposure menu list
: Displays patient information.
: Displays the name of logged-in technologist.
Whether a technologist (user) name is displayed or not in the
“Technologist display field” depends on the setting performed at
installation.
: Selects a display group.
Exposure menus registered to the display group selected here
will be shown in the “Exposure menu list registered to the
display group”. Exposure menus registered to the “Display
group list” can be edited as necessary using the User Utility. For
more information, see the [
MANUAL - THE USER UTILITY OPERATIONS
CR Console OPERATION
].
: Displays exposure menu of the selected exposure region.
Select exposure menu(s).
: Exposure menus selected in the “Exposure menu list registered
to the display group” are displayed in this list. Moving up and
down the “Selected exposure menu list” with any exposure
menus selected accordingly will allow you to change order of
selected exposure menus.
2 - 18 2009. 09 897N0519H
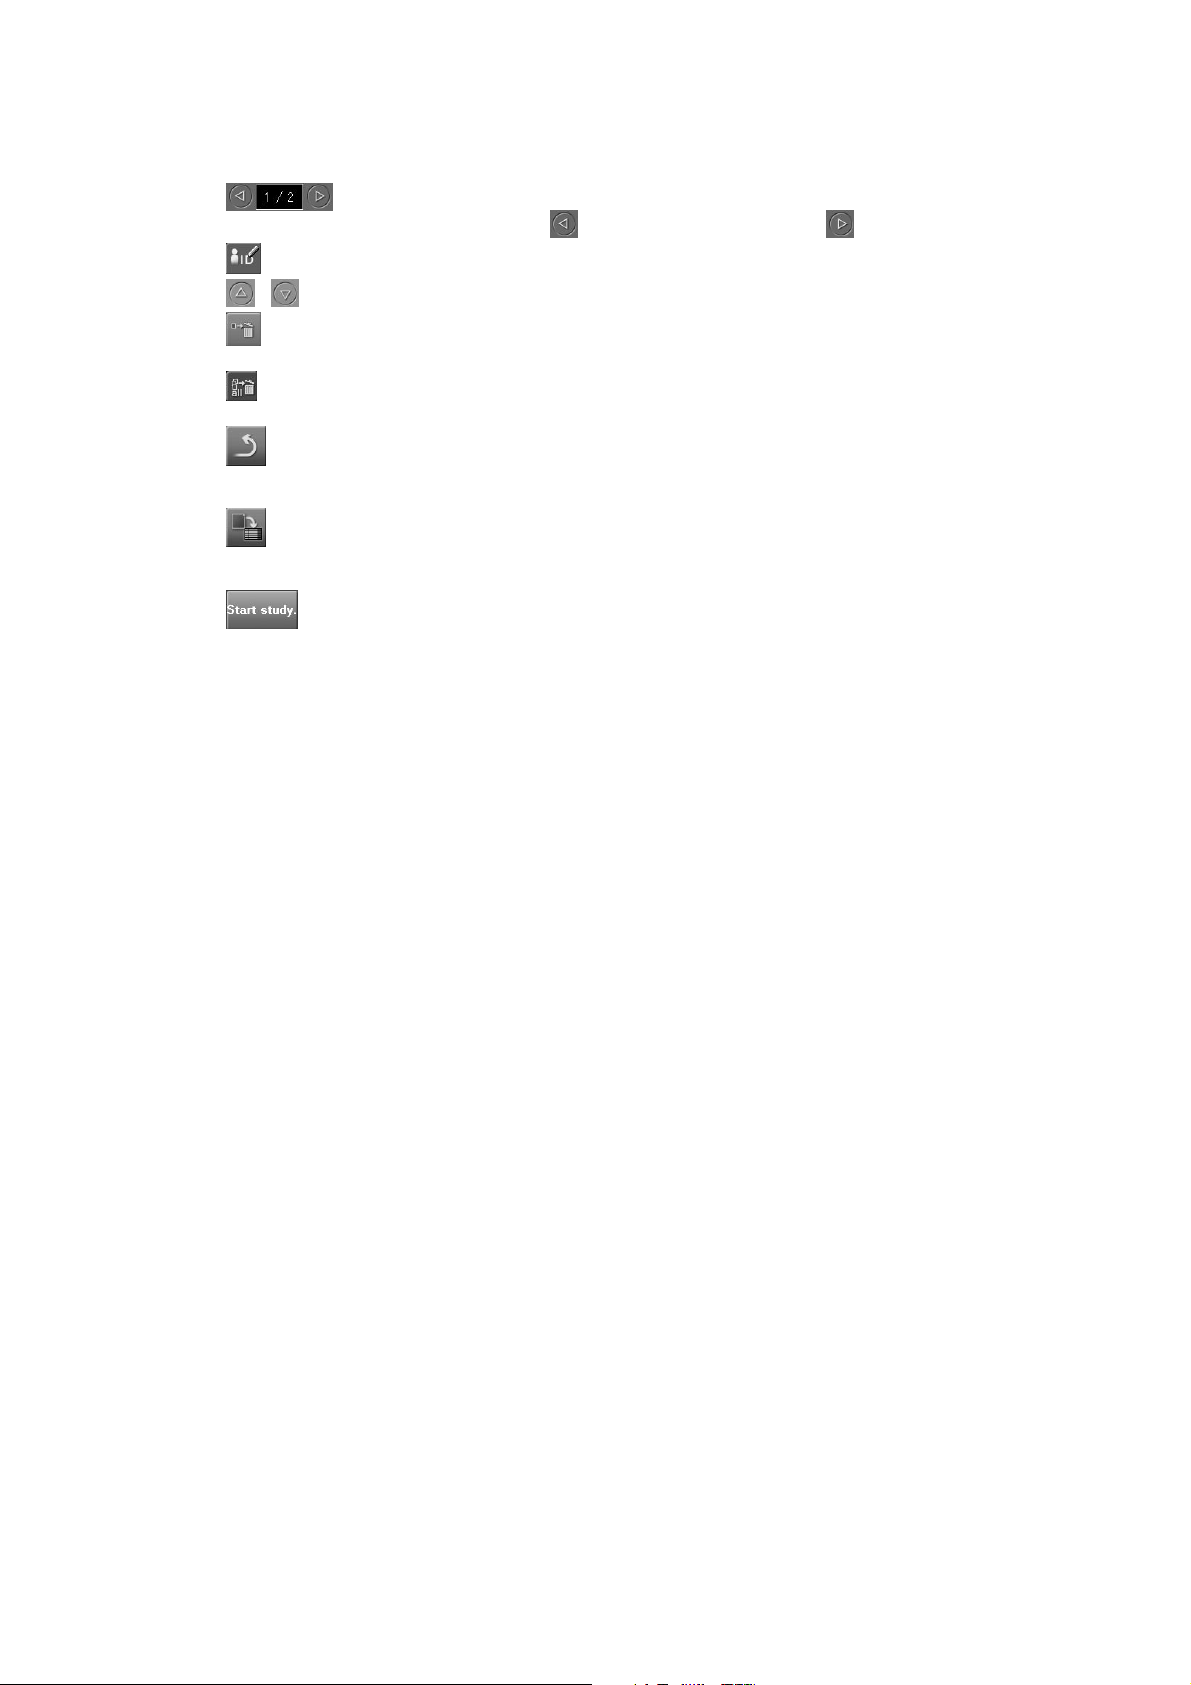
: Displays the page number of the exposure menu list by region.
turns to previous page, and turns to next page.
: Modifies patient information.
/ : Scrolls the selected exposure menu list.
CR Console Operation Manual
:
Deletes an exposure menu selected in the “Exposure menu list
registered to the display group”.
: Deletes all exposure menus included in the “Exposure menu list
registered to the display group”.
: Cancels setup data on the Patient Information Input Screen and
the Exposure Menu Selection Screen, and terminates the current
study. Returns to the Patient Information Input Screen.
: Reserves a study. The “Patient Information Input Screen”
accepts the next study continuously. A study thus reserved can
be selected from the “Local WL” list to restart.
: Starts executing a study. When a study is started, the “Study
Execution Screen” displays. Prior to starting a study, make sure
that the selected exposure menu is correct.
2009. 09 897N0519H 2 - 19

CR Console Operation Manual
2.2.8 Examination Order Issuance Screen
This is a screen for automatically issuing a patient ID with the examination order issuance function.
This function is useful for examining many people at a time such as group examination.
When using this function, the following screen is displayed instead of the “Patient Information Input
Screen”.
Presented below are samples and explanations of the screen.
Exposure menu list Examination order setting field
Facility Identification Code : Displays a unique identification code to a facility.
Auto-issuance : To issue patient IDs automatically, select
Technologist : Displays the name of the selected technologist.
Patient ID : Select or to set a patient ID.
Patient ID that will be issued : Displays the patient ID to be issued automatically.
Study comment : Input comments on study (a maximum of 10240 characters).
Anatomical Region : Displays the exposure menus selected on the “Performance
Setting Screen”.
. If not, select .
: Deletes the history of all patient IDs issued under the code in the
“Facility Identification Code” field.
: Displays the “Performance Setting Screen”. For details, see [
Issuing Examination Orders].
3.3
: Starts executing a study. When a study is started, the “Study
Execution Screen” is displayed. Prior to starting a study, make
sure that the selected exposure menu is correct.
2 - 20 2009. 09 897N0519H

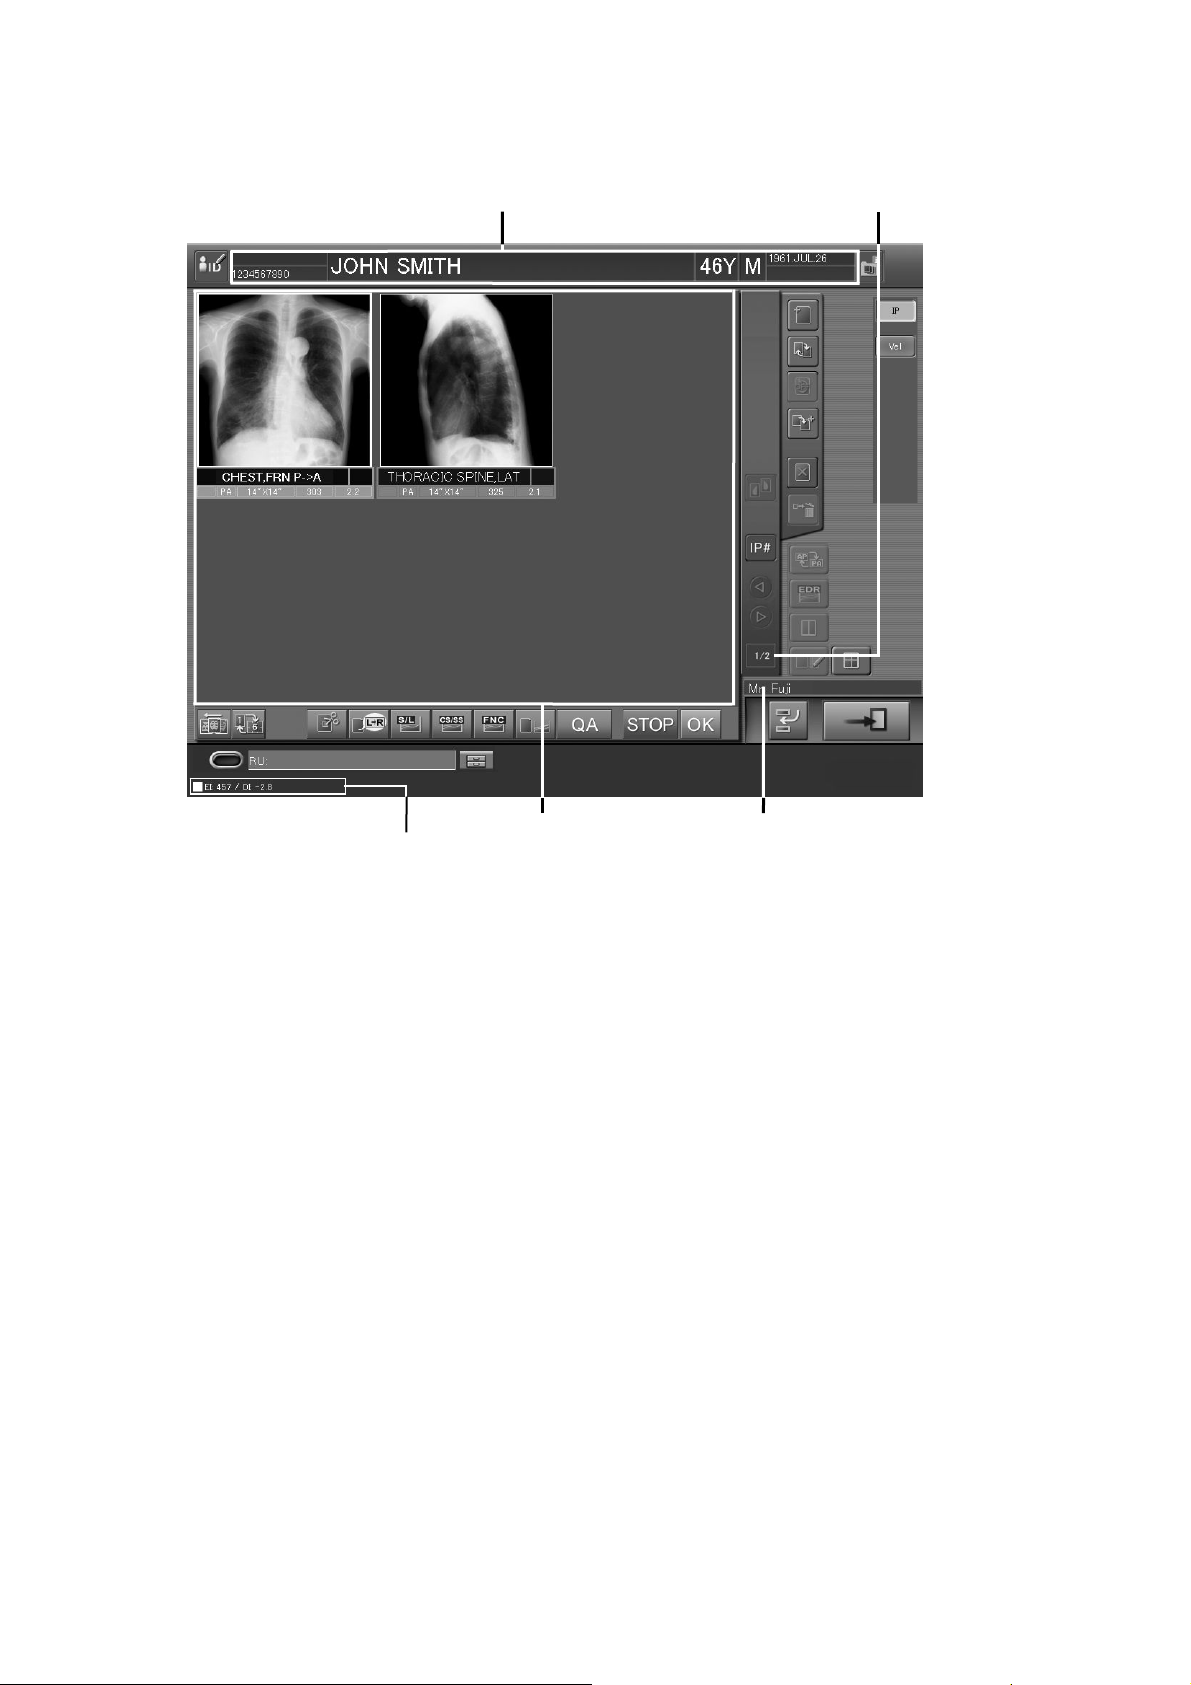
2.2.9 Study Screen
This is a screen for executing a study. On this screen, you can read images and have various kinds of
image processing be reflected on those images.
The “Study Execution Screen” display offers one-image display mode and six-image display mode.
A maximum of six images can be displayed in six-image display mode at the same time. When
starting a study, you can use the User Utility to select a desired mode for image display. Shown
herein are samples and explanations of image display in individual modes.
CR Console Operation Manual
Patient information display field Exposure menu list
One-image display mode
EI/DI display field
Image display field
Selected exposure menu number display field
Technologist display field
NOTE
The “Study Execution Screen” in this subsection is that of software version V8.3 or later.
This Operation Manual may contain the “Study Execution Screen” of version V8.2 or earlier,
which is partially different from the latest version.
2011. 06 897N0519M 2 - 21
CR Console Operation Manual
y
Patient information display field
Selected exposure menu
number displa
field
Six-image display mode
EI/DI display field
Image display field Technologist display field
Patient information display field
Selected exposure menu number
display field
Technologist display field
Image display field
: Displays patient information.
: Displays the number of the exposure menu currently being
selected and the total number of all exposure menus.
: Displays the name of logged-in technologist.
Whether a technologist (user) name is displayed or not in the
“Technologist display field” depends on the setting
performed at installation.
: When one-image display mode is selected, an image read
from an IP is displayed here. When six-image display mode
is selected, images are displayed in the order below: Starting
from the top left → top center → top right → bottom left →
bottom center → bottom right. Connected Image Reader and
registered IP number will be displayed in this field before
image reading session.
2 - 22 2010. 03 897N0519J

CR Console Operation Manual
EI/DI display field
Exposure menu list
(one-image display)
: When an image is displayed (or is selected in six-image
display mode), the EI and DI (defined in IEC 62494-1: 2008)
are displayed.
The EI and DI can be displayed only for normal images
(except mammography images). They do not appear for
energy subtraction images, long-view images, etc. When an
image is replaced with other one, the values are updated
accordingly.
The EI/DI display field can be repositioned by moving the □
mark.
Whether the EI/DI display field is displayed or not depends
on the setting made at the time of installation.
NOTES
In case that a cassette-type Image Reader is used, the EI
•
and DI values are displayed properly only when the type
of the IP is ST-VN, ST-VI, or ST-BD.
When using the EI and DI values for image quality
•
management, calibrations of Image Readers should be
carried out periodically.
The EI and DI may vary if a wrong exposure menu was
•
selected.
: This list shows exposure menus selected on the
“Exposure Menu Selection Screen”. Moving up and down
the “Exposure menu list” with any exposure menus selected
accordingly will allow you to change order of selected
exposure menus.
/
: Displays a menu for which the patient information is modified.
: Adds exposure menus and displays the “Exposure Menu Addition box”.
: Changes exposure menus and displays the “Exposure Menu Change box”.
: Performs auto-repeat exposure. Exposures can be performed repeatedly using the
exposure menu same as the selected one.
: Handles a read image as a rejected one.
: Adds the same exposure menu as the selected one.
: Deletes exposure menus.
: Scrolls the exposure menu list in one-image display mode and the image display field
in six-image display mode.
: Before exposure (image reading session), checks and changes, as necessary, exposure
parameters used for the exposure menu. The exposure parameter selection box is
displayed.
: Changes film format. The format change is possible either before or after image
reading.
: Displays images in monitor mode.
: Switches display mode alternately to six-image display mode.
NOTE
In six-image display mode, only up to 18 exposure menus can be displayed.
: Edits image information.
2010. 10 897N0519K 2 - 23

CR Console Operation Manual
: Temporarily suspends the auto-distribution function of images.
This icon is displayed only when the auto-distribution function by the User Utility is
determined to be “Automatically distribute images to all attributes whenever an image
is read.” or “Distributes only print attribute automatically at each reading time.”. In
other cases, it is not displayed.
: Delivers images individually.
This icon is displayed only when the auto-distribution function by the User Utility is
determined to be “Distributes all attributes individually.” or “Distributes Print
attribute only individually.”. In other cases, it is not displayed.
: Disables the auto-distribution function of images when a certain period of time has
passed after an image is read.
This icon is displayed only when “After image reading, Print attribute is output
automatically when a time passes. On the "Delay Time" setting unit, specify a time
for output of Print attribute.” is specified. In other cases, it is not displayed.
: Distributes the image immediately after image reading session, without awaiting a
certain period of time has passed.
This icon is displayed only when “After image reading, Print attribute is output
automatically when a time passes. On the "Delay Time" setting unit, specify a time
for output of Print attribute.” is specified. In other cases, it is not displayed.
: Specifies priority output.
: Completes or suspends a study.
2 - 24 2010. 10 897N0519K

2.2.10 Image Edit Screen
This is a screen for editing image information by an image level and also by a study level. For image
information editing by an image level, processing such as image information editing and film output
will be performed on images read on the “Study Execution Screen”.
For image information editing by a study level, processing such as image information editing and
image output will be performed on images of a study for which the exposure has already been
completed.
Image edit function authentication button
Image display field
CR Console Operation Manual
Information folder
EI/DI display field QA image controller buttons Technologist display field
Image edit function
authentication button
: Authenticates the operational authority of functions that change the
FCR image processing parameters. Alternately selects the display or
non-display of the FCR image processing parameter-changing buttons.
Whether a function authentication button is displayed or not depends
on the setting made at the time of installation.
Image display field
Information folder
Technologist display field
: Displays the image to be edited.
: Edits information in each folder.
: Displays a name of logged-in technologist.
Whether a technologist (user) name is displayed or not in the
“Technologist display field” depends on the setting performed at
installation.
QA image controller button
: Operates various utility functions (Magnifying display image/
Alternately switching image processing type /Reprinting display
image/Setting failed image/Locking study/Saving image/Outputting
DICOM files).
2010. 03 897N0519J 2 - 25

CR Console Operation Manual
EI/DI display field
*
*
: The EI and DI (defined in IEC 62494-1:2008) of the displayed image
are displayed.
The EI and DI can be displayed only for normal images (except
mammography images). They do not appear for energy subtraction
images, long-view images, etc. When an image is replaced with other
one, the values are updated accordingly.
The EI/DI display field can be repositioned by moving the □ mark.
Whether the EI/DI display field is displayed or not depends on the
setting made at the time of installation.
NOTES
In case that a cassette-type Image Reader is used, the EI and DI
•
values are displayed properly only when the type of the IP is STVN, ST-VI, or ST-BD.
When using the EI and DI values for image quality management,
•
calibrations of Image Readers should be carried out periodically.
The EI and DI may vary if a wrong exposure menu was selected.
•
: Saves edited image information.
: Terminates image information editing and returns to the previous
screen.
* The displayed button and its operation differ depending on the settings performed at installation.
For details, see [
4.6 Completing Image Edit
].
NOTE
• Displaying either
installation. When
or / varies depending on the setting performed at
/ is displayed, select and then to reflect the
setting.
Display property settings of QA buttons in a palette or QA image controller buttons can be set in
“User Utility”.
Refer to [
MANUAL - THE USER UTILITY OPERATIONS
Chapter 10 CUSTOMIZING THE SCREEN DISPLAY / CR Console OPERATION
].
2 - 26 2010. 10 897N0519K

2.3 Image Reader Status
This function allows you to verify status of the connected Image Reader by checking it in the field at
the bottom of the screen. Image Reader status is displayed differently depending on the connected
Image Reader. Presented below are some sample displays of Image Reader status and related
explanations.
<FCR Cassette type >
CR Console Operation Manual
<FCR 5000 series Built-in type>
<FCR VELOCITY series Built-in type>
2010. 03 897N0519J 2 - 27

CR Console Operation Manual
Selectors
n
When multiple Image Readers are connected, use these selectors to switch the status display
alternately. (In the case of six-image display mode, selectors are displayed at the upper right of the
screen.)
<Example : FCR Cassette type selectors>
<Example : FCR 5000 series Built-in type selectors>
<Example : FCR VELOCITY series Built-in type selectors>
2 - 28 2010. 03 897N0519J

CR Console Operation Manual
Operation status
o
Shows status of operation of the Image Reader.
Maintenance icon
p
Select this icon to display menus and select the “Scanner Cleaning” menu when the scanner of the
Image Reader needs to be cleaned (e.g., when a noise appears on read images).
After selection of the menu, refer to the operation manual of the Image Reader about cleaning
operations.
<Example : FCR Cassette type >
Shot enabled/disabled
q
Indicates whether the FCR VELOCITY series Built-in type is enabled or disabled to take shots. Shots
are enabled when in on status and disabled when in off status.
IP erasure
r
Select this icon if you wish to erase images without reading IP images, for example due to an
exposure error.
Grid used or not
s
Shows whether the grid is used or not.
Erasure mode
t
Whether it is possible or not to select erasure mode depends on the setting performed at installation.
When the FCR VELOCITY or FUJIFILM Unity SpeedSuite is selected by the selector
manipulations:
[Auto sensitivity change]
[High-sensitivity exposure]
: Changes the system operation automatically to the erasure mode set up
for each exposure menu.
: The system operation is in the normal erasure mode (High-sensitivity
<low-dose> exposure mode). If this button is selected with the [Auto
sensitivity change] mode activated appropriately, this [High-sensitivity
exposure] mode is enabled regardless of erasure mode set up for the
exposure mode.
When FCR Velocity Ufp is selected by the selector manipulation:
[Auto sensitivity change]
[High-sensitivity exposure]
2010. 03 897N0519J 2 - 29
: The system operation is in the High-speed erasure mode (normal
exposure mode).
: The system operation is in the normal erasure mode (High sensitivity
<low-dose> exposure mode).

CR Console Operation Manual
IP Evacuation Button
u
Whether it is possible or not to use the IP evacuation button depends on the setting performed at
installation. When the CR Console is connected to an FCR 5000 series built-in type Image Reader, if
this button is pressed for an exposure with the cassette placed in front of the exposure unit, the IP that
is within the Image Reader will be evacuated automatically.
When manipulating selector change, be sure to select [IP] same as with any other cassette-type Image
Readers.
NOTE
For an exposure using the cassette on an FCR 5000 series built-in type Image Reader:
When performing an exposure with the cassette placed in front of the exposure unit, be sure to
evacuate the IP appropriately. For an exposure performed without evacuating the IP, make sure to
subject it to erasure processing before performing an exposure the next time on the built-in type
Image Reader.
<Example of displaying IP evacuation button display>
2 - 30 2010. 03 897N0519J

2.4 Scroll View Display Area (option)
When the scroll view option is activated, the scroll view is displayed at the right-side bottom of the
screen. The scroll view is displayed in the “Patient Information Input Screen”, “Exposure Menu
Selection Screen”, “Study Execution Screen” and in the individual lists.
In the scroll view displayed at the right-side bottom of the screen, you can confirm image reading
status of a study that processes image reading in the background.
Of the studies stacked in the “Local WL” list, studies to be displayed in the scroll view are:
• Those for which image reading processing is not completed yet after the IP registration of all
exposure menus.
Exposure menus for which no IPs are registered will not be displayed in the scroll view, even when
there are exposure menus whose image reading session has not been completed yet.
When multiple studies that meet such conditions are stacked in the “Local WL” list, the latest out of
those studies will be displayed in the scroll view.
The scroll view function is available in common to the “Patient Information Input Screen”,
“Exposure Menu Selection Screen”, “Study Execution Screen” and the individual list tabs.
For how to resume a study from the scroll view, see [
View (option)
].
3.4.1 (5) Starting Studies from the Scroll
CR Console Operation Manual
NOTES
Setting for auto-distribution function when the scroll view option is activated
• With the scroll view option activated accordingly, “After image reading, Print attribute is output
automatically when a time passes. On the “Delay Time” setting unit, specify a time for output of
Print attribute.” is selected in the “Auto-distribution Setting” of the User Utility. When it is
selected, specify a time when the auto-distribution function is enabled. No other settings are
allowed in this section. For how to resume a study from the scroll view, see [
Chapter 4
PROPERTY SETTING / CR Console OPERATION MANUAL - THE USER UTILITY
OPERATIONS
].
Other precautions
• If the examination order issuance function is enabled, the scroll view option is disabled.
2010. 03 897N0519J 2 - 31
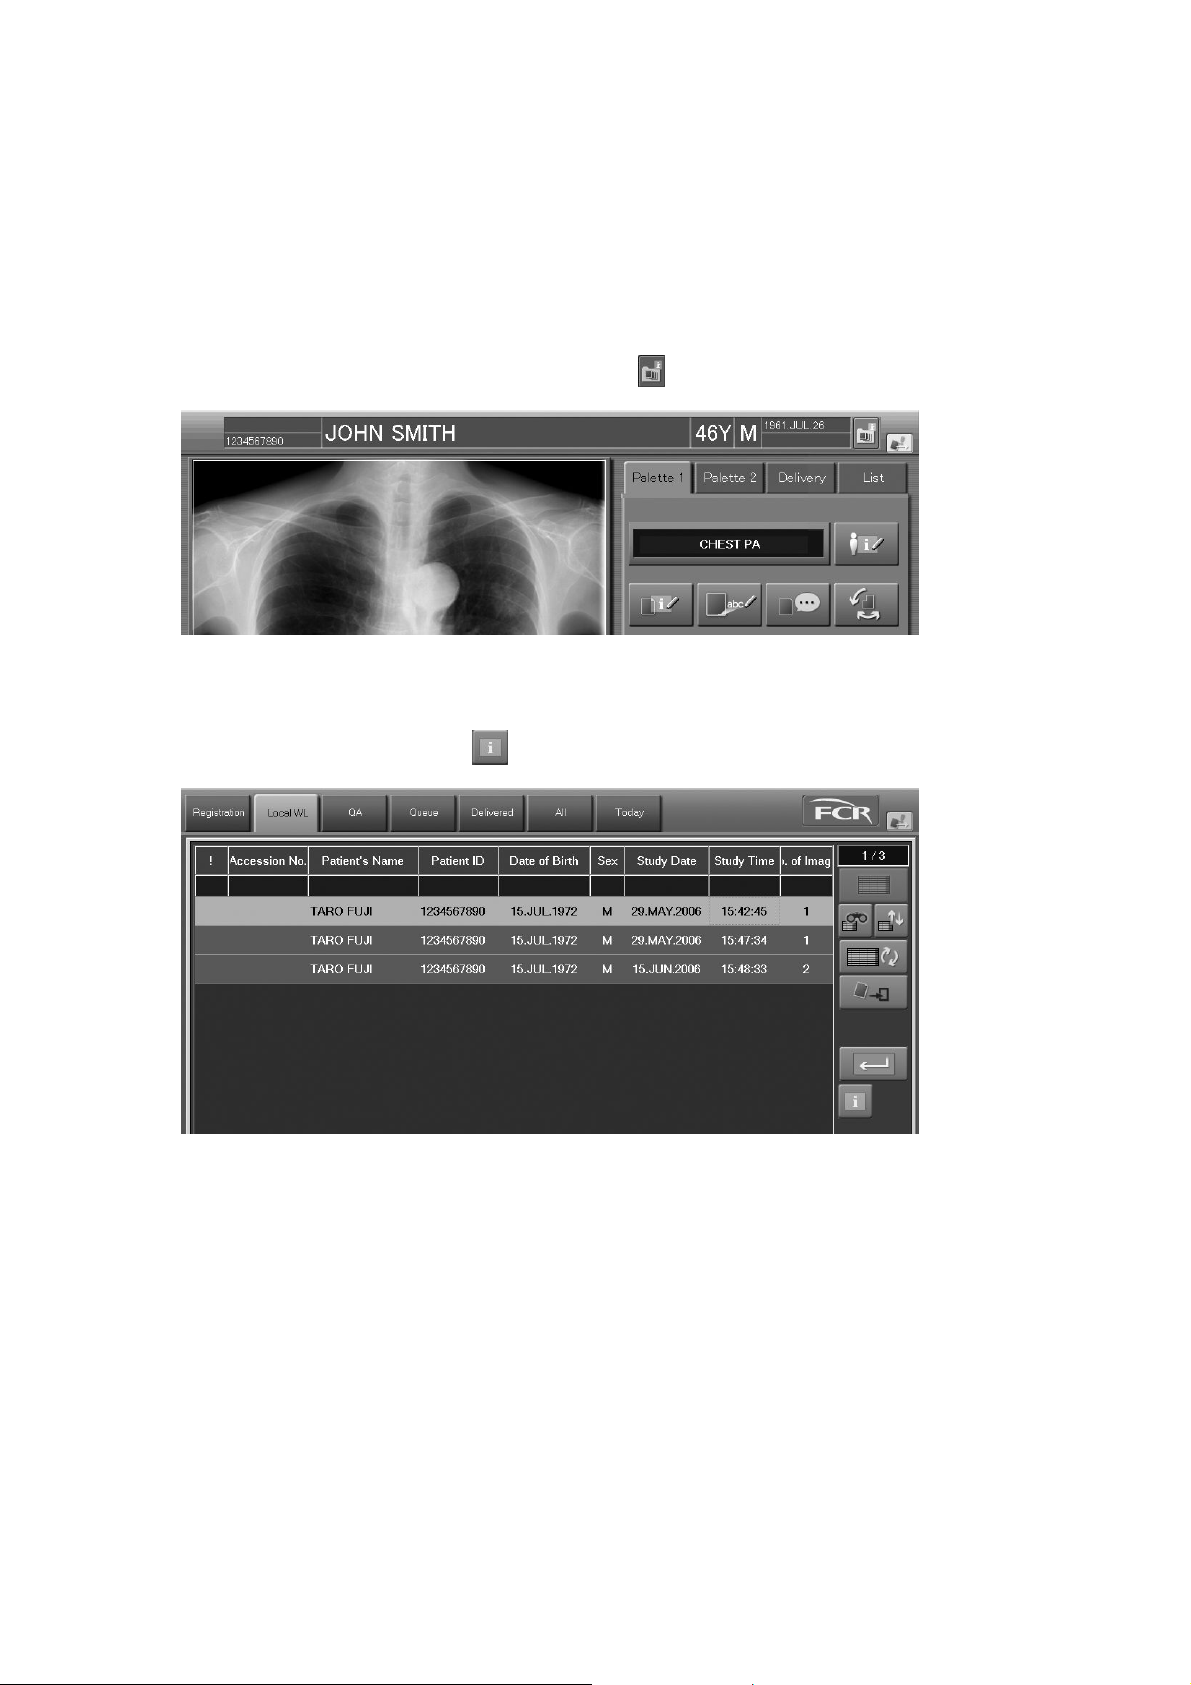
CR Console Operation Manual
2.5 Study Information List
You can view detailed study information in the “Study information box” that was opened.
The “Study information box” is available in common to the “Exposure Menu Selection Screen”,
“Study Execution Screen”, “Image Edit Screen” and the individual lists excepting the “Queue” list.
(1) Display from the “Exposure Menu Selection Screen”, “Study Execution Screen” and
“Image Edit Screen”
Display a study targeted for processing and then select
.
(2) Display from individual lists other than the “Queue” list
Select a target study and then select
.
2 - 32 2010. 03 897N0519J
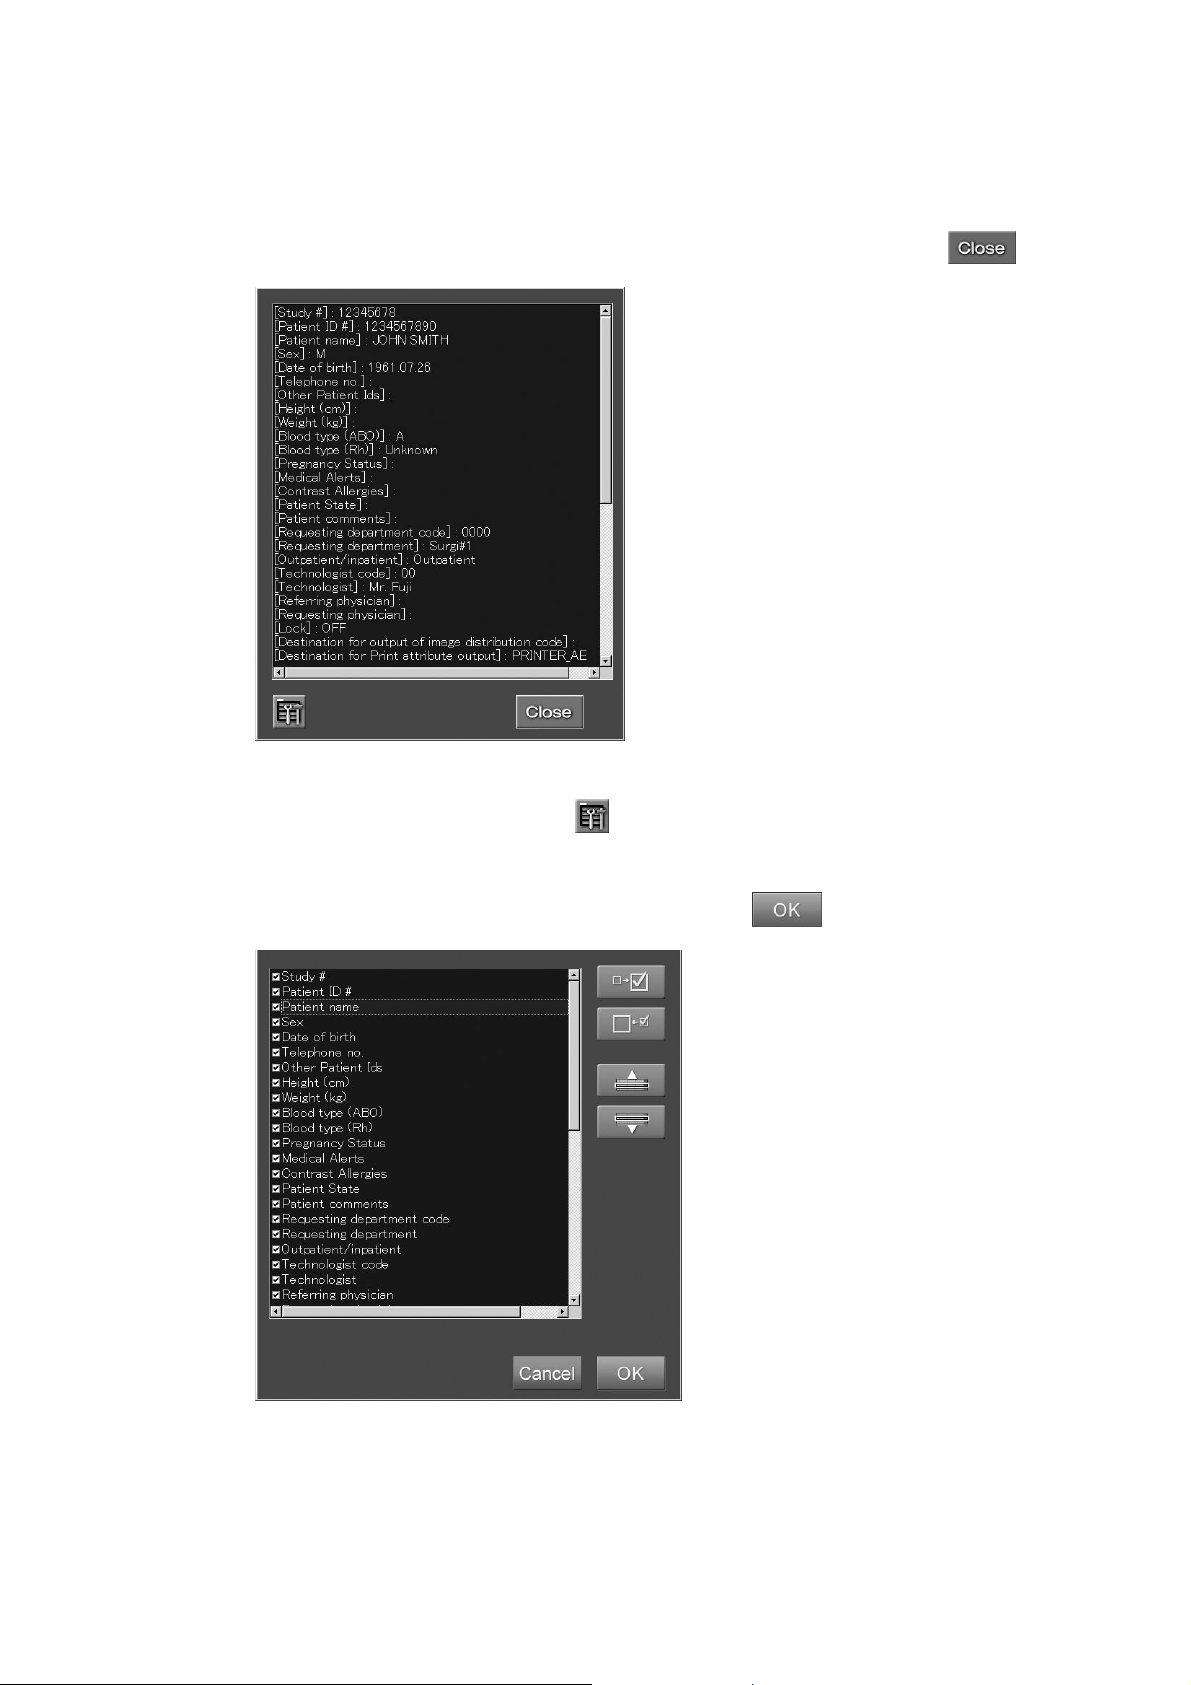
CR Console Operation Manual
The “Study information box” opens.
You can customize information items as needed. When customizing study information, you can
specify whether or not to display specific information items or change order of the item display.
After you have viewed study information or customized information items, select
.
“Study information box”
To customize information items, select .
The “Customization box” is displayed.
Perform the following operations as needed and then select
.
“Customization box”
2010. 03 897N0519J 2 - 33

CR Console Operation Manual
Display/Non-display :
Sets display/non-display of information items. After selecting a target item from the list, select
(Display)/ (Non-display). Checked items will be displayed, and unchecked items
will not be displayed.
You can also check or uncheck a study information item by directly selecting checkbox of the target
item. Specify whether or not to display a study information item and then select
Display order change :
Changes display order of information items. After selecting a target item from the list, select
(moves upward)/
:
.
(moves downward).
Cancels operation.
2 - 34 2010. 03 897N0519J
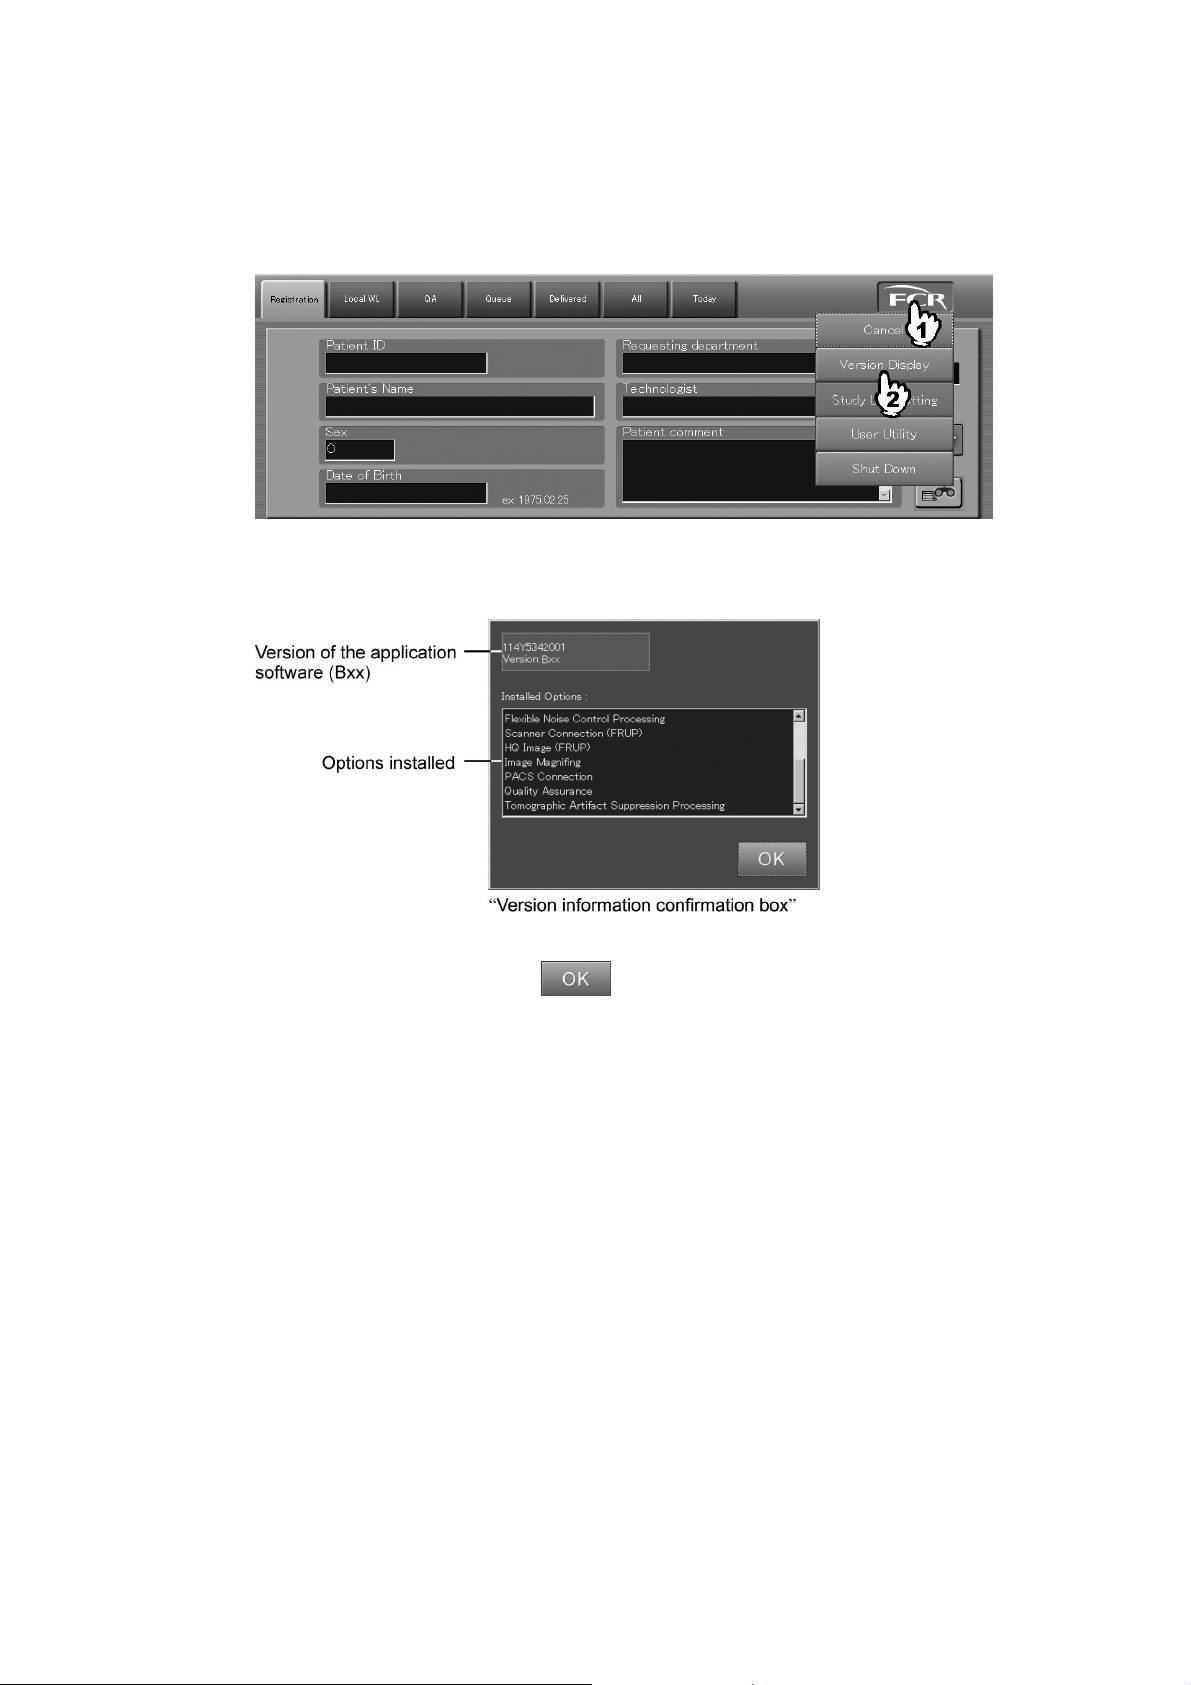
2.6 Version Display
The “Version information confirmation box” opens. In this box, you can confirm version of the
CR Console application software and installed optional software items.
A confirmation box is displayed.
CR Console Operation Manual
Check the contents, and then select
.
2010. 03 897N0519J 2 - 35

CR Console Operation Manual
2 - 36 2010. 03 897N0519J

CR Console Operation Manual
FUJI COMPUTED RADIOGRAPHY
Chapter
3
OPERATIONS
STUDY
2006. 10 897N0519C 3 - 1
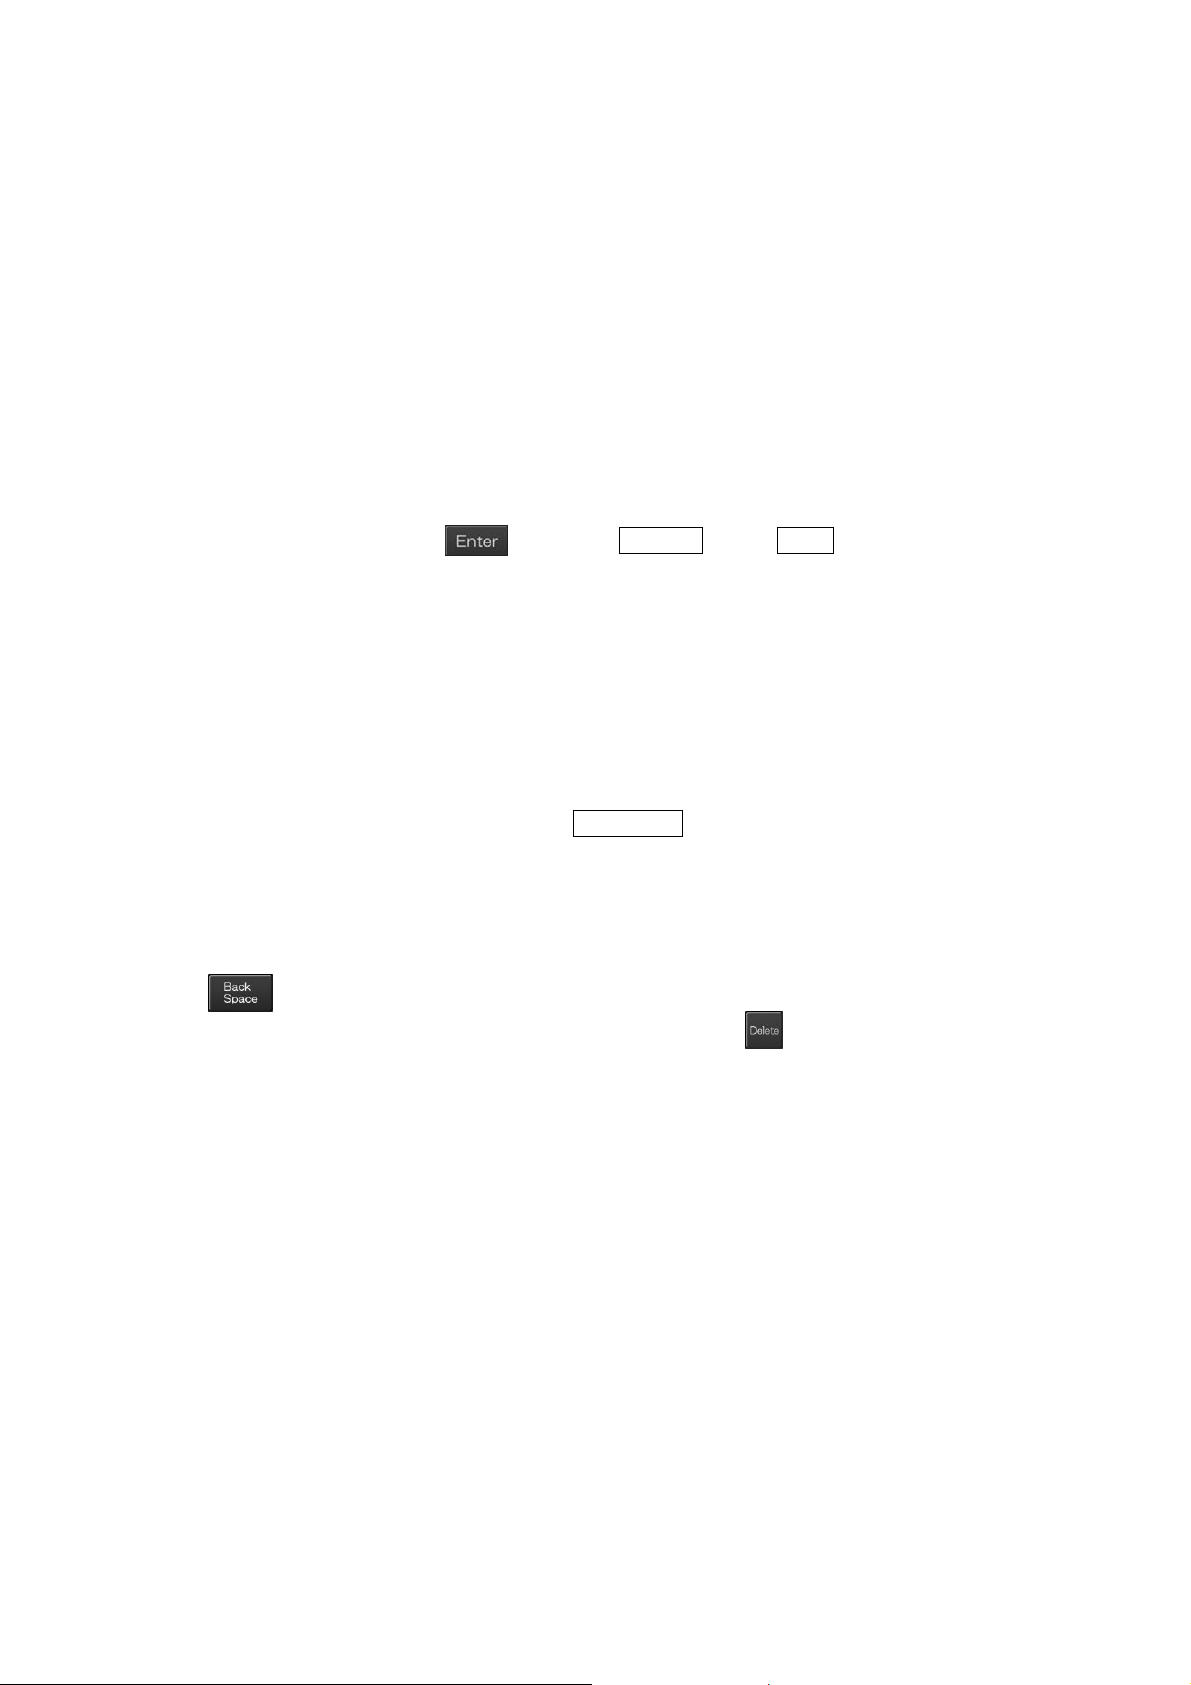
CR Console Operation Manual
3.1 Receiving Studies
3.1.1 Inputting Patient Information
Inputs patient information as follows.
All of the patient information items need not be input necessarily. Input in any one of the items in
order to proceed to the next operation.
The patient information (either Patient ID or Patient Name is necessarily input.), once received, is
automatically registered to the database. The previously registered patient information can be called
up from the database and displayed on the “Patient Information Input Screen” as desired.
(1) Inputting Patient Information in the “Patient Information Input Screen”
Input data to each item of patient information in the patient information input field.
After inputting characters, select
The caret “ | ” for character input will move to the next input box.
As patient information can also be input on the Exposure Menu Selection Screen or Study Execution
Screen later, you can proceed the operation without inputting any patient information at this step.
or press the ENTER key (or TAB key) on the keyboard.
To correct wrong input
Described below is how to correct characters input in the entry fields on the “Patient Information
Input Screen”.
When a keyboard is used :
As generally practiced in PC operation, use the BackSpace key to erase the input character
immediately before the caret and modify it. Or move the caret “ | ” using the arrow key to the
character you want to correct.
When a screen keyboard is used :
Use the arrow keys to move the caret “ | ” immediately after the character you want to correct, and
select
to immediately before the character you want to correct, and select
. The character immediately before the caret “ | ” will be erased. Or move the caret “ | ”
. The character immediately
after the caret “ | ” will be erased. Make then necessary corrections accordingly.
3 - 2 2006. 10 897N0519C
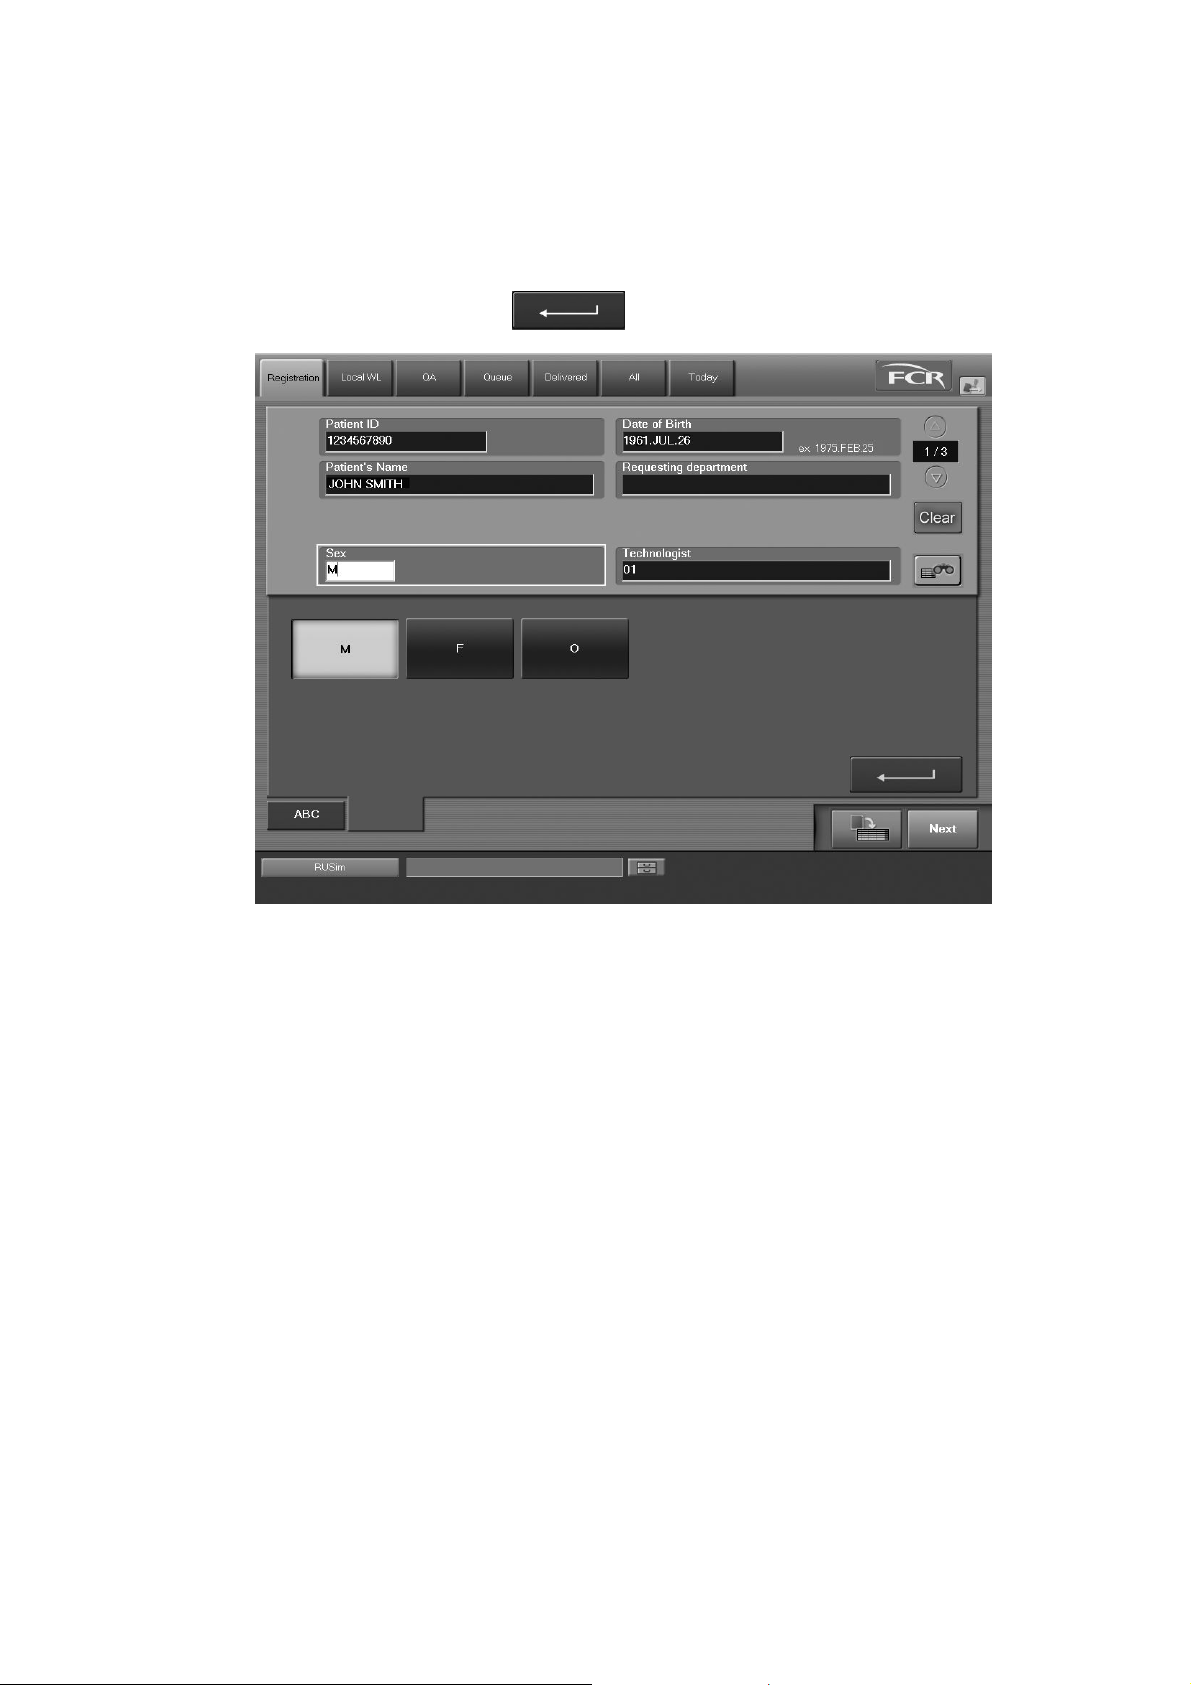
CR Console Operation Manual
Operation of the input items for which selection buttons are displayed
When the caret “ | ” for character input moves to boxes such as Sex, Requesting department,
Technologist, Pregnancy, Outpatient/Inpatient, and Blood type, a tab for data setting is displayed at
the lower left of the screen keyboard. For example, when the caret “ | ” is at the Sex input box, the
“Sex” tab is displayed as shown below.
Indicate any of them, and select
. Then, the “Sex” tab is closed to complete the input.
As for items other than Technologist (Sex, Requesting department, Pregnancy, Outpatient/
Inpatient, Blood type), you can input arbitrary characters.
For example, when inputting Sex, select the “ABC” tab to input “M” from the screen keyboard or a
value that is for the sex ([0] (zero) or [M] for Male) at the press of the equivalent key on the
keyboard. For more information about a value to be input, see [
Screen
].
2.2.6 Patient Information Input
2009. 09 897N0519H 3 - 3

CR Console Operation Manual
If the “Checkout by technologist box” opens when changing the technologist displayed in the
“Technologist input box”
When the user authentication has been specified according to the setting performed at installation, the
logged-in technologist is entered as the default in the Technologist input box.
When another technologist (user) is selected, the “Checkout by technologist” dialog like that shown
below appears.
Input the “User name” and “Password” after another technologist has been selected and the logged-in
technologist (user) will then be changed alternately.
“Checkout by technologist dialog box”
: Cancels operation.
(2) Ending Input of Patient Information to Display the “Exposure Menu Selection Screen”
After completing input of patient information, select
. The patient information input is then
finished to proceed to the exposure menu selection step.
When
is selected, a received study can be reserved as an unexecuted study. The reserved
study is stacked to the “Local WL” list.
NOTE
Whether input of Requesting department code/Requesting department name is correlated with
each other on not varies depending on the setting performed at installation.
3 - 4 2006. 10 897N0519C

3.1.2 Patient Information Database function
Inputs or deletes the patient information already registered to the database by executing keyword
retrieval/list retrieval. (The patient information database can be shared with other CR Consoles via
the dedicated server or standalone for this CR Console, depending on user’s own environments.)
(1) Input by keyword retrieval
Retrieves (inputs) patient information from the database using a one of the following items as a
keyword. Items to be used as keyword are those having the caret “ | ” for character input. When
inputting multiple items, only items with the caret “ | ” can be available as keyword.
<Items to be served as keyword>
• Patient ID
• Patient name
• Date of Birth
• Phone number
Input one of the items and select
be executed. If a Patient ID# is input as a keyword, retrieval is possible by pressing the Enter key.
. Retrieval of patient information that is for the input item will
CR Console Operation Manual
To retrieve patient information by inputting part of a keyword
If the input string in each item does not agree with the registered string completely, the retrieval
processing is valid. Thus, by using this feature, a fuzzy retrieval can be executed.
(A fuzzy retrieval processing is not valid for Date of Birth.)
In case of using Patient ID for a fuzzy retrieval, inputting “ * (for characters of any length)” or “ %
(for a single character)” is required as a wildcard.
Examples > Input “123*” at the Patient ID box to retrieve all patients whose first three places of
Patient ID are “123”.
> Input “JOHN” at the Patient’s Name field to retrieve all patients named “JOHN”.
(Sample of a fuzzy search performed by inputting “JOHN” in the Patient Name field)
When the hit patient information result is only one, it will be displayed automatically after the
completion of retrieval processing.
2006. 10 897N0519C 3 - 5
2008. 09 897N0519F

CR Console Operation Manual
When a multiple number of patient information are found for the corresponding item, the patient
information selection box will be displayed after the completion of retrieval processing.
Select desired patient information and select
. The patient information will be input.
“Patient information selection box”
: Deletes patient information.
/ : Scrolls patient information.
: Cancels operation.
3 - 6 2006. 10 897N0519C

CR Console Operation Manual
(2) Input by list retrieval
Displays a list of patient information registered in the database and then retrieves (inputs) patient
information in the list.
Select
without any input item in the patient information input field. (If the caret “ | ” for input
characters is in a place other than “Patient ID/Patient Name/Date of Birth/Phone Number”, is
grayed out and cannot be selected.)
The patient information selection box will be displayed.
Select the group folder tab to display desired patient information, select the patient information, and
then select
. The patient information will be input.
“Patient information selection box”
: Deletes patient information.
/ : Scrolls patient information.
: Cancels operation.
2006. 10 897N0519C 3 - 7

CR Console Operation Manual
(3) Deletion
Deletes unnecessary patient information from the database.
It is possible for you to delete unnecessary patient information from the list of patient information
items registered to the database and displayed in the “Patient Information Selection box”.
Select
with no data input in the patient information input field of the “Patient Information Input
Screen” or by inputting keywords for fuzzy retrieval. The “Patient Information Selection box” will
then be displayed.
Display the patient information to be deleted in the patient information selection box by performing
operations of “Input by keyword retrieval” or “Input by list retrieval”, select the patient information,
and then select
. The patient information will be deleted accordingly.
“Patient information selection box”
3 - 8 2006. 10 897N0519C

3.1.3 Selecting Exposure Menu
Selects an exposure menu as follows. A maximum of 48 menus can be selected.
When the patient information input is completed, the exposure menu selection box is displayed.
Select a menu item in the menu group to display the desired exposure menu, and then select an
exposure menu (more than one menu can be selected). The selected exposure menu(s) is displayed in
the selected exposure menu list on the right side of the screen.
: Displays page number of the exposure menu selection button.
turns one page backward, and turns one page forward.
Change order
Scroll
NOTE
When using a long-view exposure menu, make sure that the total number of exposure menus is
less than 48, including two exposure menus added after registering IPs.
: To change order of selected exposure menus, move a desired menu up or down on
the exposure menu list.
: Select
/ to scroll the selected exposure menu list.
CR Console Operation Manual
Confirm that the exposure menu selection is correct, and then select
This finishes selection of exposure menu, and proceeds to the next step.
.
“Exposure Menu Selection Screen”
: Cancels the settings on the Patient Information Input Screen and the Exposure Menu Selection
Screen. Then, ends the current study to return to the Patient Information Input Screen.
: Reserves a received study as an unexecuted study. Displays the Patient Information Input
Screen to receive the next study. The reserved study is stacked to the “Local WL” list. For how
to perform an already-reserved study from the “Local WL” list, see [
Studies from the “Local WL” List
2011. 06 897N0519M 3 - 9
].
3.4.1 (2) Starting

CR Console Operation Manual
3.2 Confirming Study Details
If patient information of a certain study is corrected when multiple studies are being started at the
same time, such a correction is reflected accordingly on patient information of other selected studies.
3.2.1 Modifying Patient Information
Modifies the patient information for the current study. Modification of the patient information is a
function used in common to the Exposure Menu Selection Screen and Study Execution Screen.
(When the user authentication has been specified according to the setting performed at installation,
the user is allowed to limit the use of this function. For details, refer to [
SETTING / CR Console OPERATION MANUAL - THE USER UTILITY OPERATIONS
Select
automatically. Select then
Exposure Menu Selection Screen :
. Exposure menus will be displayed if settings are determined to issue a patient ID
Chapter 3 TABLE
].)
.
The patient information input box is displayed.
Modify the patient information as necessary, and then select
.
“Patient information input box”
3 - 10 2008. 03 897N0519E
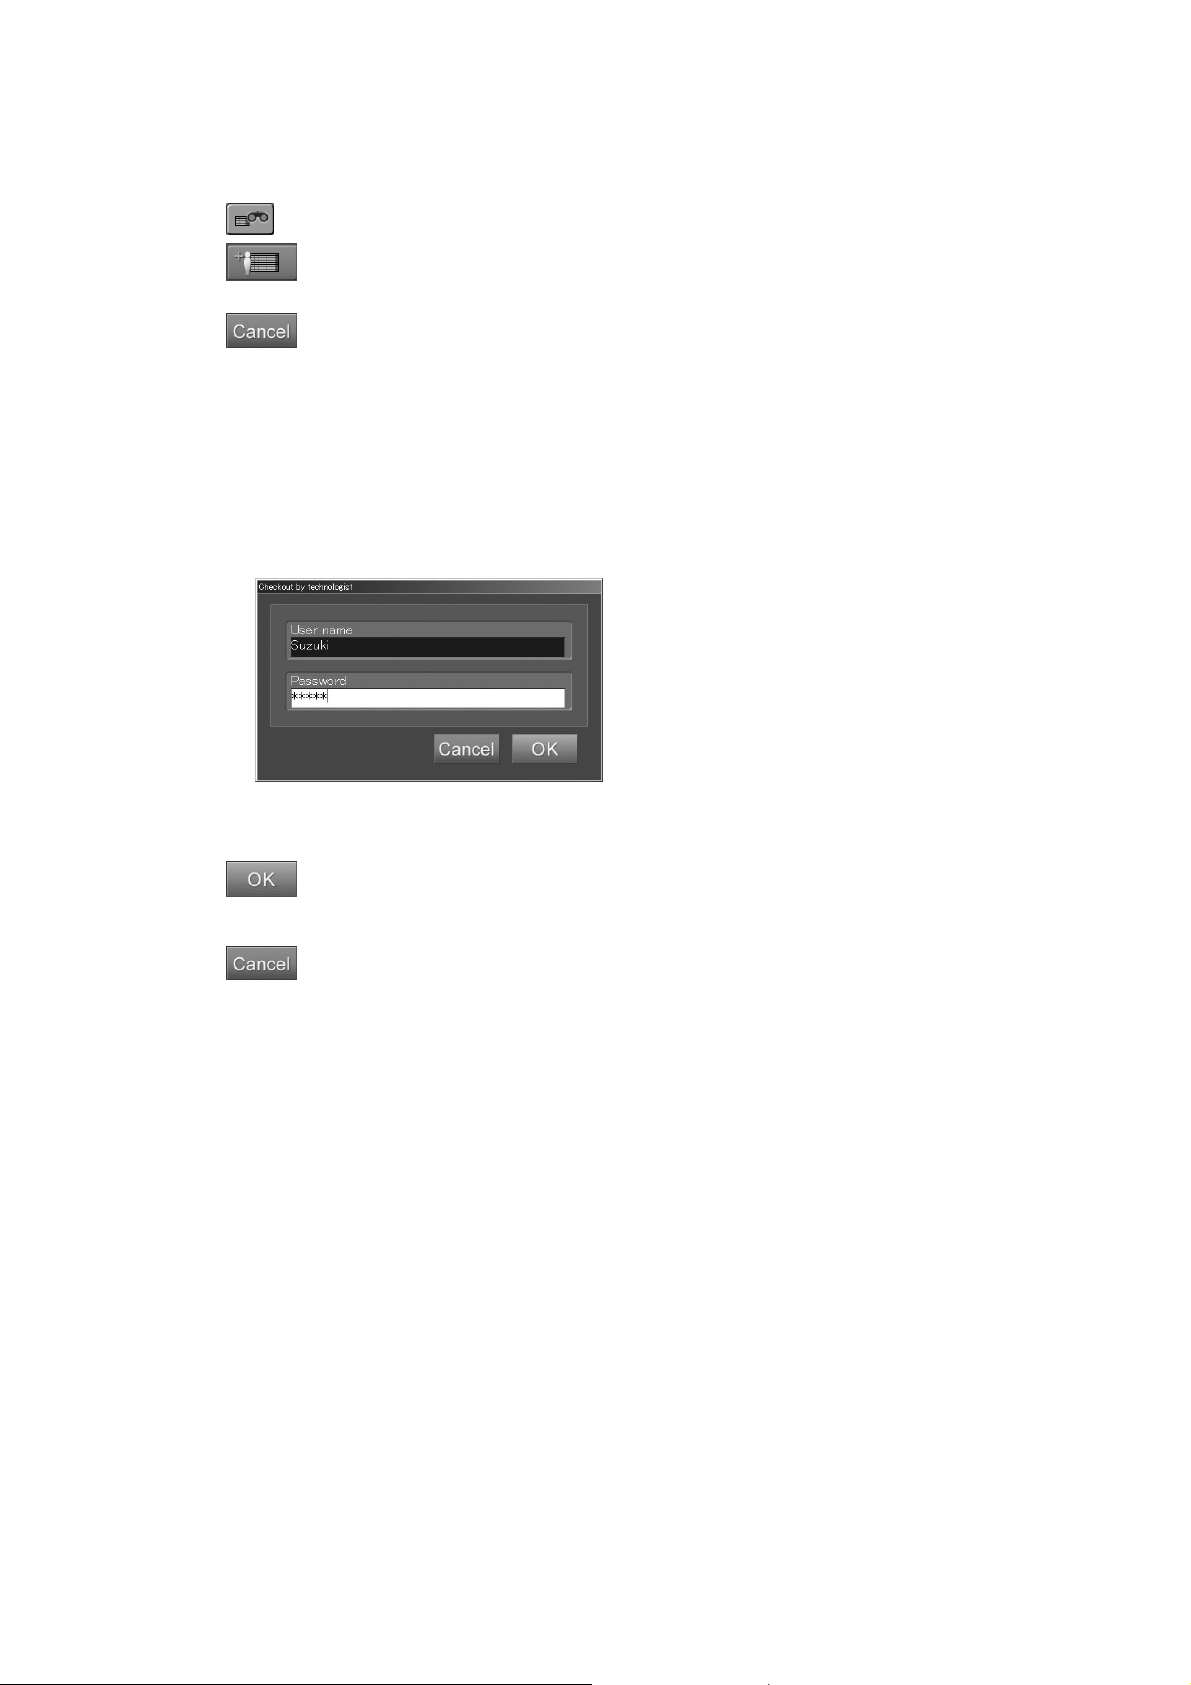
CR Console Operation Manual
For more information about the patient information to be input in the “Patient information input box”,
see [
2.2.6 Patient Information Input Screen
].
: Inputs patient information using the Patient Information Database function.
: Terminates the current study and proceeds to the patient information input of the next
study. Do not select this key when modifying the patient information. Note that this icon is
displayed only when patient information is to be modified on the Study Screen.
: Cancels operation.
If the “Checkout by technologist box” opens when changing the technologist displayed in the
“Technologist input box”
When the user authentication has been specified to be used according to the settings at installation, an
attempt to change the technologist (user) in the “Technologist” field will display the “Checkout by
technologist box”. This box displays user name with which the user logged in the program and the
password.
“Checkout by technologist dialog box”
Input the “User name” and “Password” after another technologist has been selected and select
. The technologist (user) for an exposure menu whose images have not yet been read will
then be changed to the logged-in technologist (user) alternately.
: Cancels operation.
Precautions to observe when changing the technologist information
When changing information included in the “Technologist” field, technologist information printed at
film output will differ as shown below, whether or not images have been read to an exposure menu
that is halfway through the study. (Note that the “Study Execution Screen” displays the changed
technologist name.)
Exposure menu for which the technologist was changed from “A” to “B” before image reading:
Technologist “B” will be printed on film because the result of technologist change processing was
reflected appropriately.
Exposure menu for which the technologist was changed from “A” to “B” after image reading:
Technologist “A” will be printed on film because the result of technologist change processing was
not reflected appropriately.
Precautions to observe when changing the order information of RIS
It is not allowed on the CR Console to change the patient information included in the order
information of RIS (connection by DICOM MWM service). The information on the CR Console and
RIS may not match, causing misidentification of the patient. To make changes, modify the patient
information on RIS, and then transmit the order information to the CR Console.
2008. 09 897N0519F 3 - 11

CR Console Operation Manual
3.2.2 Resetting the patient ID issuance
This function automatically issues a patient ID when a new study is initiated.
User Utility is responsible for performing this function.
For details, see [
THE USER UTILITY OPERATIONS
When issuing a patient ID automatically with the examination order issuance function, see [3.3
Issuing Examination Orders].
How to issue a patient ID complies with what is determined by the setting performed at installation.
When the patient ID issuance format includes “User-specified character string” or “Automatic
increment”, necessary values can be set up as follows. The values thus set up will remain effective
for a patient ID to be issued the next.
Chapter 4 PROPERTY SETTING / CR Console OPERATION MANUAL -
]
.
Select
to display the exposure menus and then select .
The patient ID edit box appears.
Edit values as necessary and select
.
“Edit box”
: Cancels operation.
3 - 12 2009. 09 897N0519H

3.2.3 Modifying Exposure Menu
Adds, changes, or deletes an exposure menu as follows.
(1) Adding Exposure Menus
To add exposure menus on the “Exposure Menu Selection Screen”, use this function with no
exposure menus selected in the “Selected exposure menu list”. For how to operate processing for
selection of exposure menus, see [
3.1.3 Selecting Exposure Menu
CR Console Operation Manual
].
NOTE
Make sure that no exposure menus have been selected in the “Selected exposure menu list”, and
then add exposure menus. An attempt to operate selection of exposure menus, with exposure
menus selected in the “Selected exposure menu list”, will result in adding those already-selected
exposure menus to menus to be newly added in the list.
(2) Changing Exposure Menus
To change an exposure menu on the “Exposure Menu Selection Screen”, select an exposure menu
you want to change from the “Selected exposure menu list” and then perform manipulation necessary
to actually changing the selected exposure menu. For how to select an exposure menu, see [
Selecting Exposure Menu
].
3.1.3
2008. 03 897N0519E 3 - 13
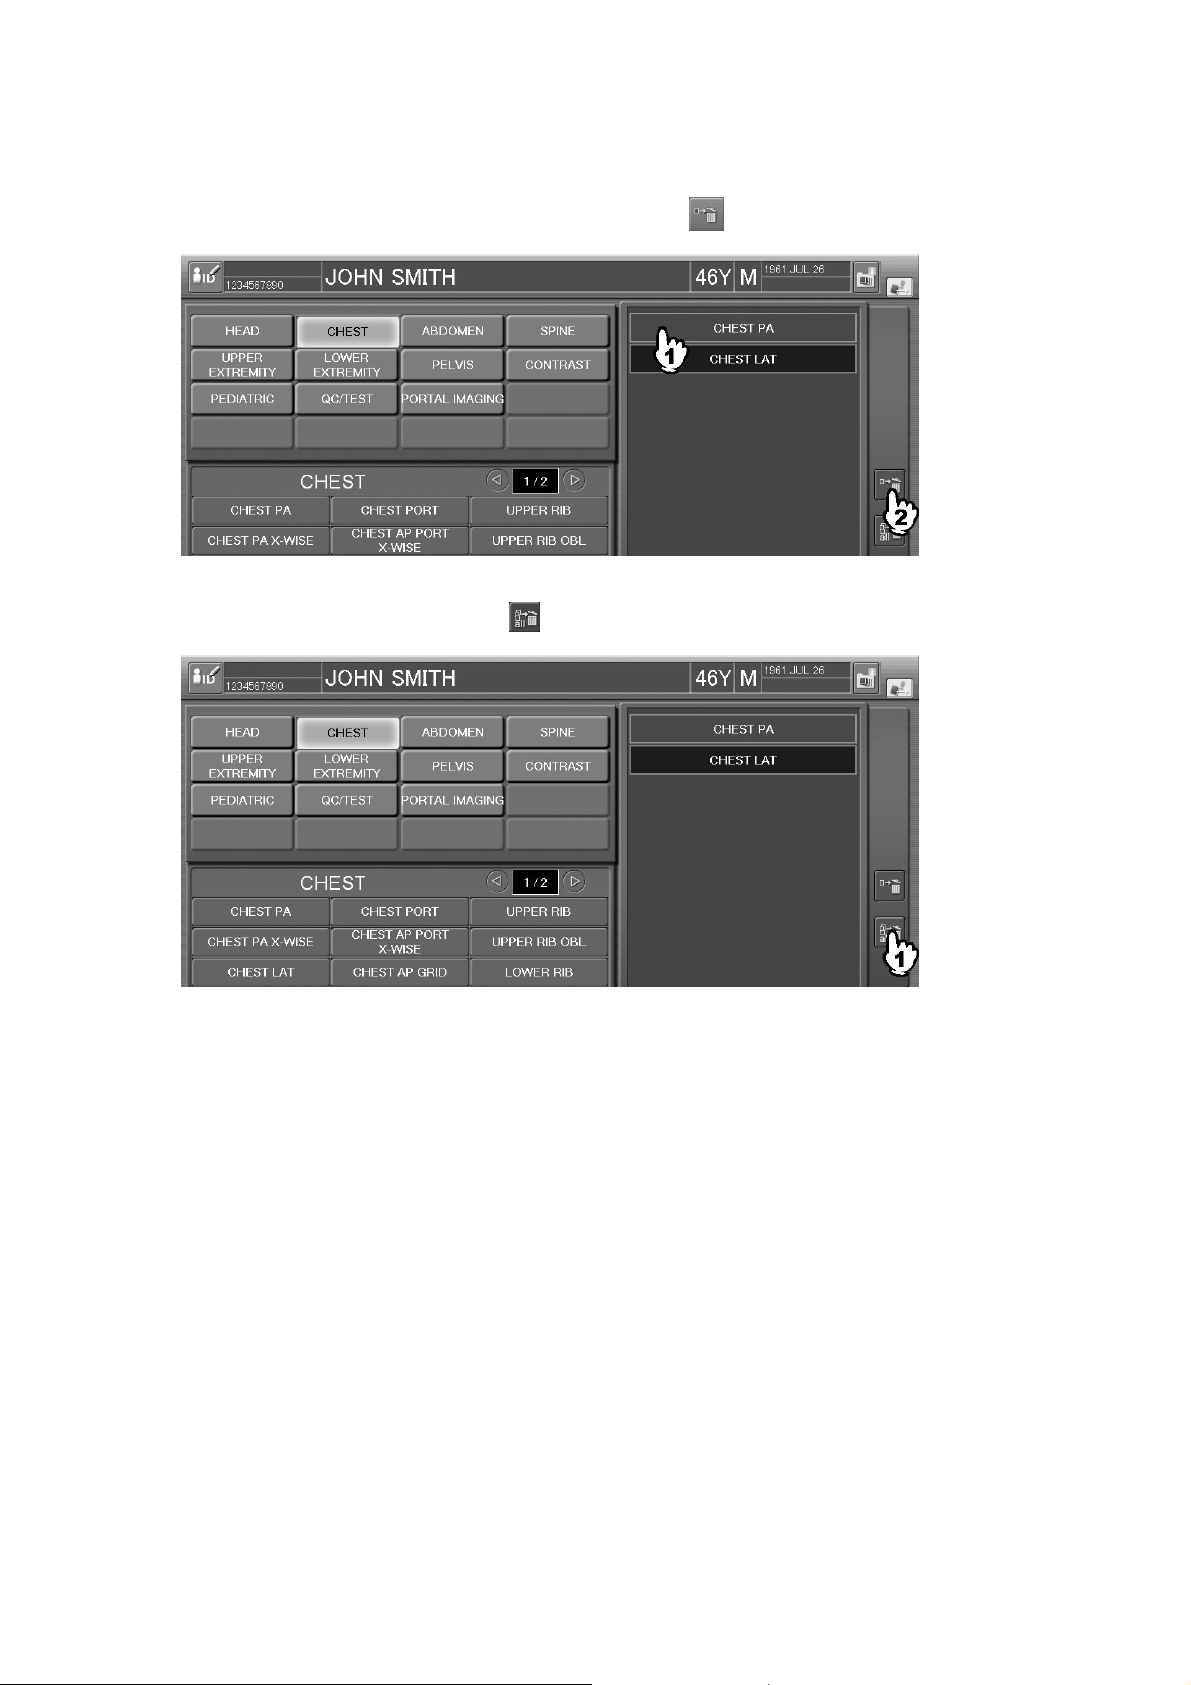
CR Console Operation Manual
(3) Deleting Exposure Menus
Deletes exposure menus as follows.
To delete a specific exposure menu, select it, and then select
.
To delete all the exposure menus, select
.
3 - 14 2008. 03 897N0519E
3.3 Issuing Examination Orders
The patient information and exposure menus of examination order can be set on the “Examination
Order Issuance Screen”.
To use the examination order issuance function, setting is required in the User Utility.
For details, see [
THE USER UTILITY OPERATIONS].
Also, how to issue a patient ID complies with what is determined by the setting performed at
installation.
A patient ID is issued automatically for each facility identification code using the examination order
issuance function, when a study is started. After a study is executed, a patient ID number with one
added to the number issued last is displayed on the “Examination Order Issuance Screen”. The
number can be changed to an arbitrary number.
When a patient ID is issued, duplication check is performed to prevent the existing patient ID from
being issued.
Chapter 4 PROPERTY SETTING / CR Console OPERATION MANUAL -
CR Console Operation Manual
NOTES
The following is not available when the examination order issuance function is enabled.
• DICOM Modality Worklist Management Software (Specifications for Patient Information)
• Serial Ordering Software
• CR Console Receipt Computer Connection Software (receipt computer manufactured by other
company)
• Patient’s Information Online Software
• Scroll view (option)
• Patient search and registration with the barcode reader (option)
• Patient search and registration with the card reader (option)
Explained herein are the differences in how to issue a number, which depends on the setting after
study completion in the User Utility
“Setup for starting the next study using the study end button.” is set to “Not to start the study.”
When is selected on the “Study Screen” after completing a study, the “Examination Order
Issuance Screen” is displayed with the next patient ID to be issued. Check the ID, and select
to start the next study. If the patient ID to be issued is already used, a confirmation box appears at this
time, asking whether to use the same patient ID number or to set another one.
2009. 09 897N0519H 3 - 15
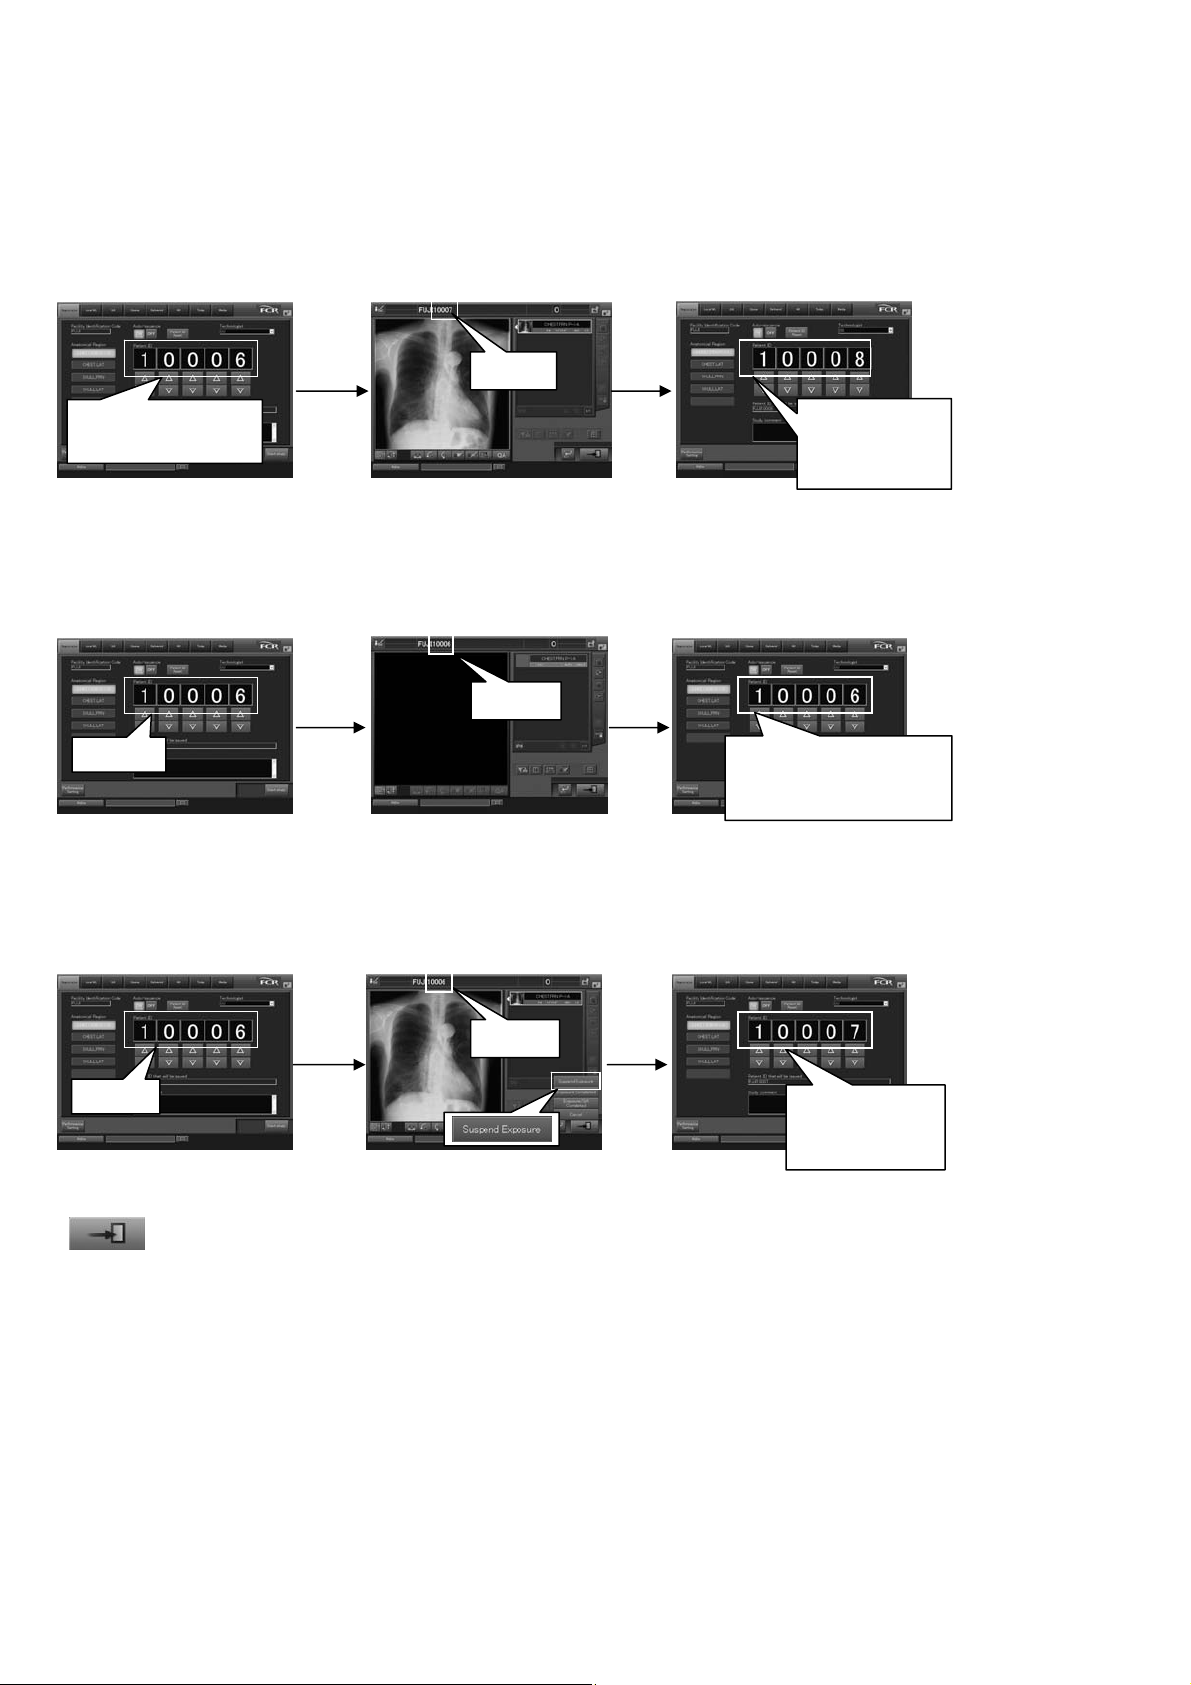
CR Console Operation Manual
g
Examples of patient IDs to be issued are as follows.
Example 1: When the patient ID is changed from “10006” to “10007”
Starting a study after
changing a patient ID
Finishing the study after
making an exposure
10007
Returning to the “Examination
Order Issuance Screen”
“10006” is changed
to “10007”.
Example 2: When a study is finished without making an exposure (without changing the patient ID “10006”)
Starting a study without
changing a patient ID
10006
Example 3: When a study is suspended after making an exposure (without changing the patient ID “10006”)
Starting a study without
changing a patient ID
Finishing the study without
making an exposure
10006
Suspending the study after
making an exposure
Returning to the “Examination
Order Issuance Screen”
The ID to be issued
next remains
unchan
Returning to the “Examination
Order Issuance Screen”
“10008” to be
issued next is
displayed.
ed (“10006”).
10006
10006
“Setup for starting the next study using the study end button.” is set to “Start the study.”
“10007” to be
issued next is
displayed.
When
is selected on the “Study Screen” after a study is completed, the patient ID is updated, and the next
study is started subsequently. At this time, the patient ID is checked for duplication with
the IDs already issued. If it is duplicated, the next available patient ID is assigned automatically.
Examples of patient IDs to be issued are as follows.
3 - 16 2011. 06 897N0519M
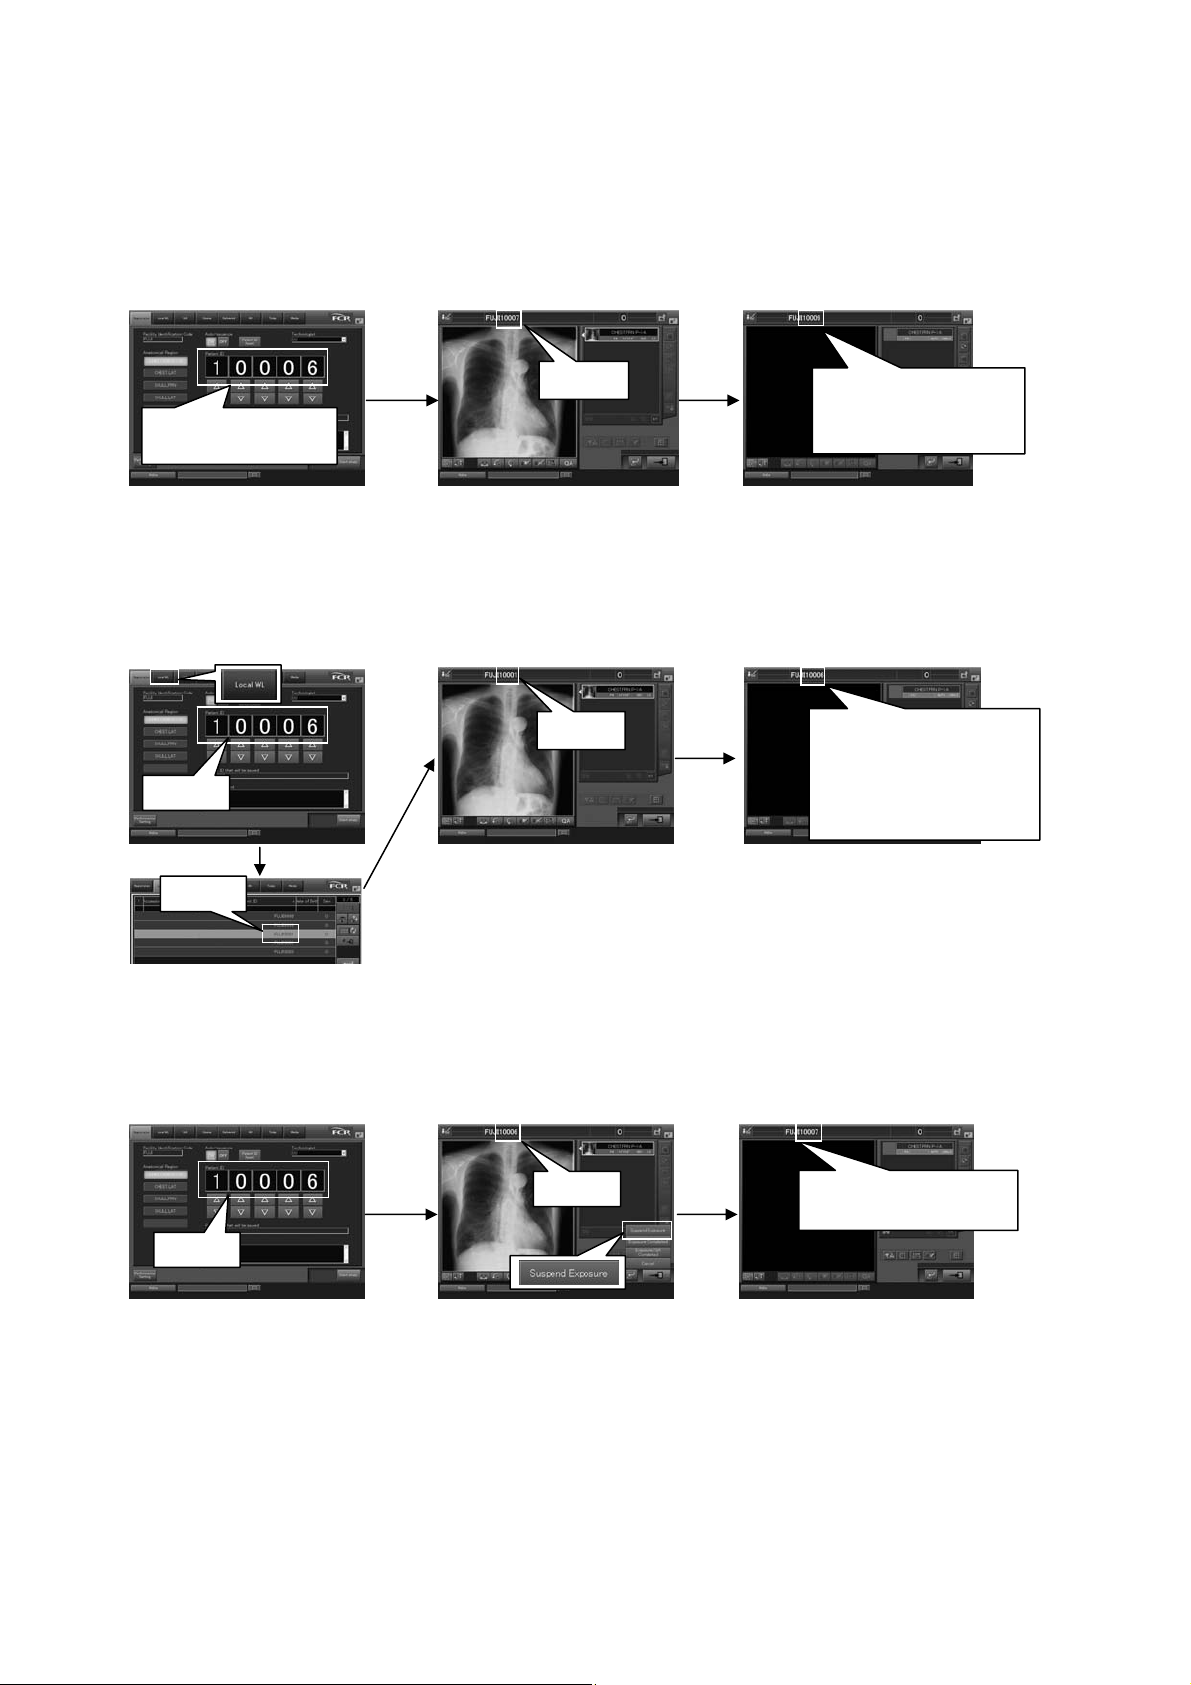
CR Console Operation Manual
play
Examples of patient IDs to be issued are as follows.
Example 1: When the patient ID is changed from “10006” to “10007”, and the subsequent ID “10008” is already
issued for other patient
Starting a study after
changing a patient ID
Finishing the study after
making an exposure
Starting the next study
10007
“10006” is changed
to “10007”.
“10009” is displayed
since “10008” is
already issued.
Example 2: When a suspended study (example: patient ID “10001”) is resumed
Selecting the “Local WL”
list and resuming the study
with the patient ID “10001”
Finishing the study after
making an exposure
Starting the next study
10001
A study is started with
the ID “10006” that
was displayed on the
10006
“Examination Order
Issuance Screen”.
10001
Example 3: When a study is suspended after making an exposure (without changing the patient ID “10006”)
Starting a study without
changing a patient ID
Suspending the study after
making an exposure
Starting the next study
10006
“10007” to be issued
next is dis
ed.
10006
2011. 06 897N0519M 3 - 17
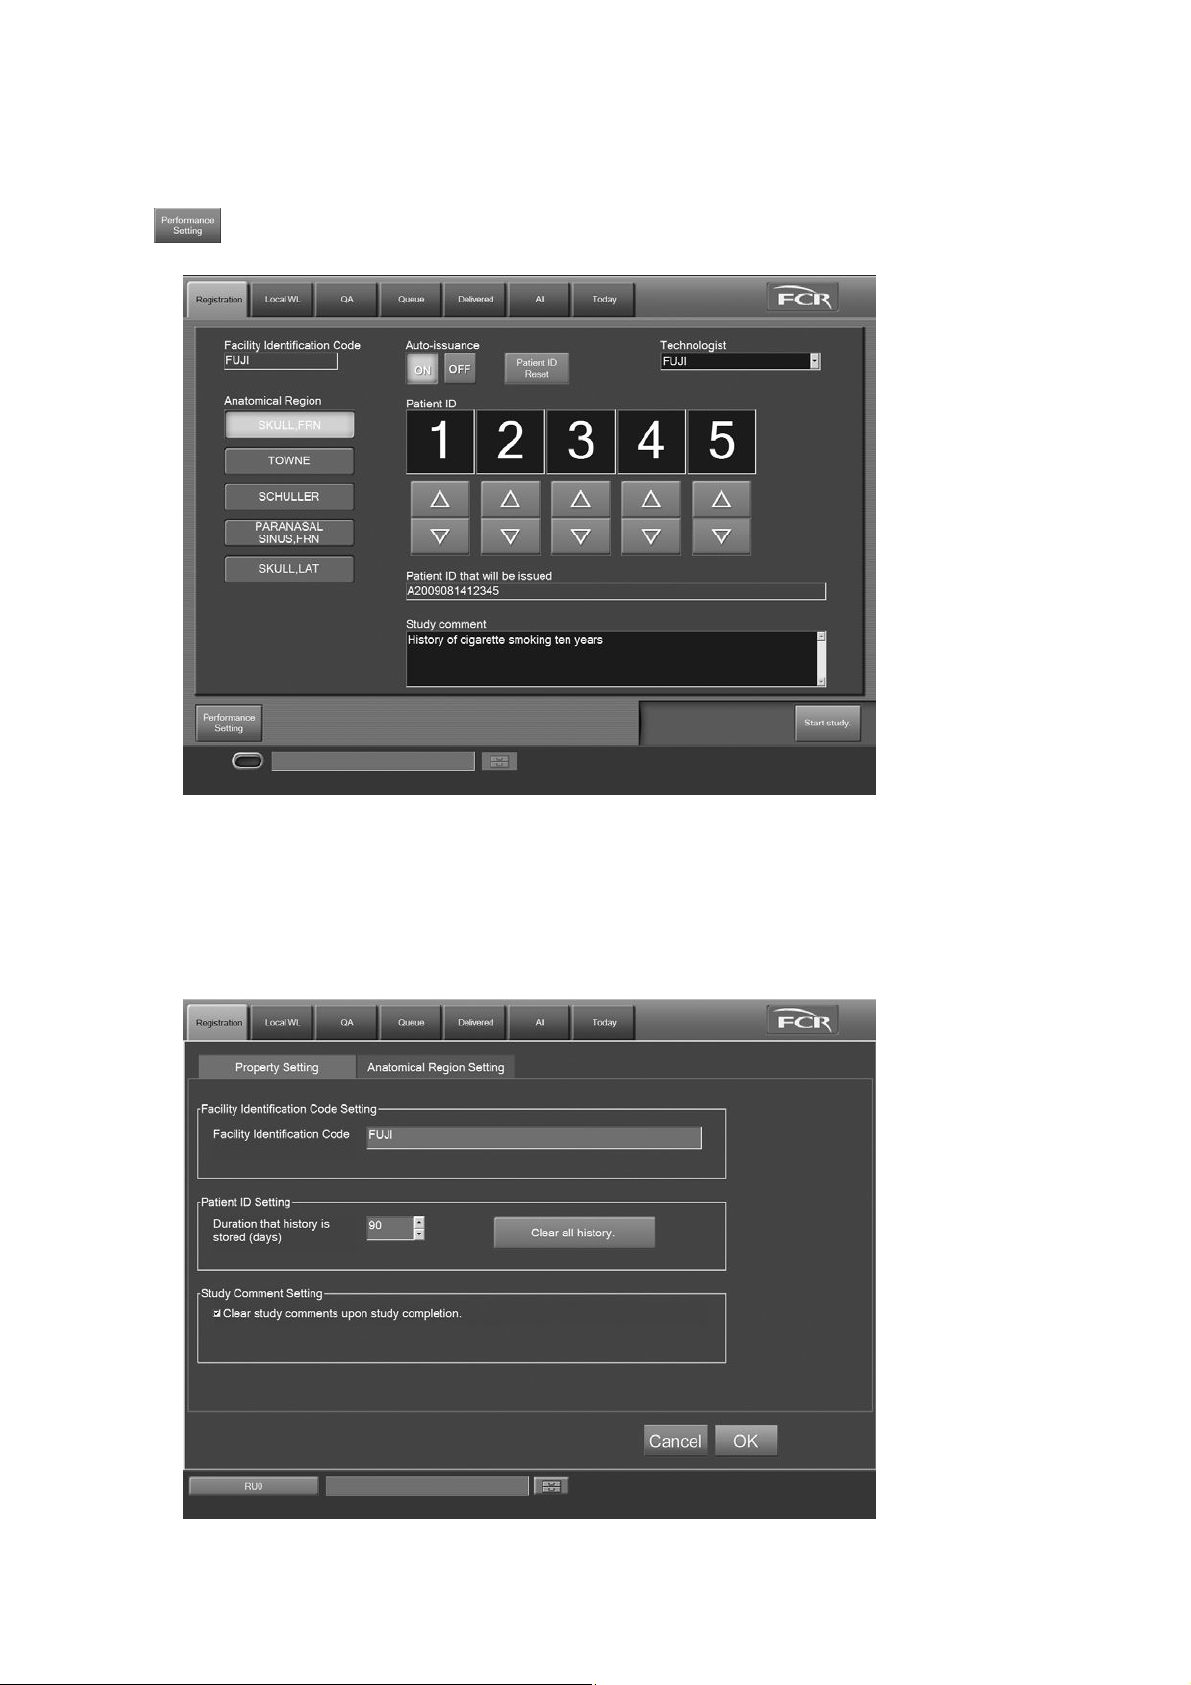
CR Console Operation Manual
3.3.1 Performance Setting
Make settings such as the facility identification code and the exposure menus to be used. Select
Explained herein are the performance setting items.
on the “Examination Order Issuance Screen”.
(1) Property Setting
Select the “Property Setting” tab.
“Property Setting Screen”
3 - 18 2011. 06 897N0519M
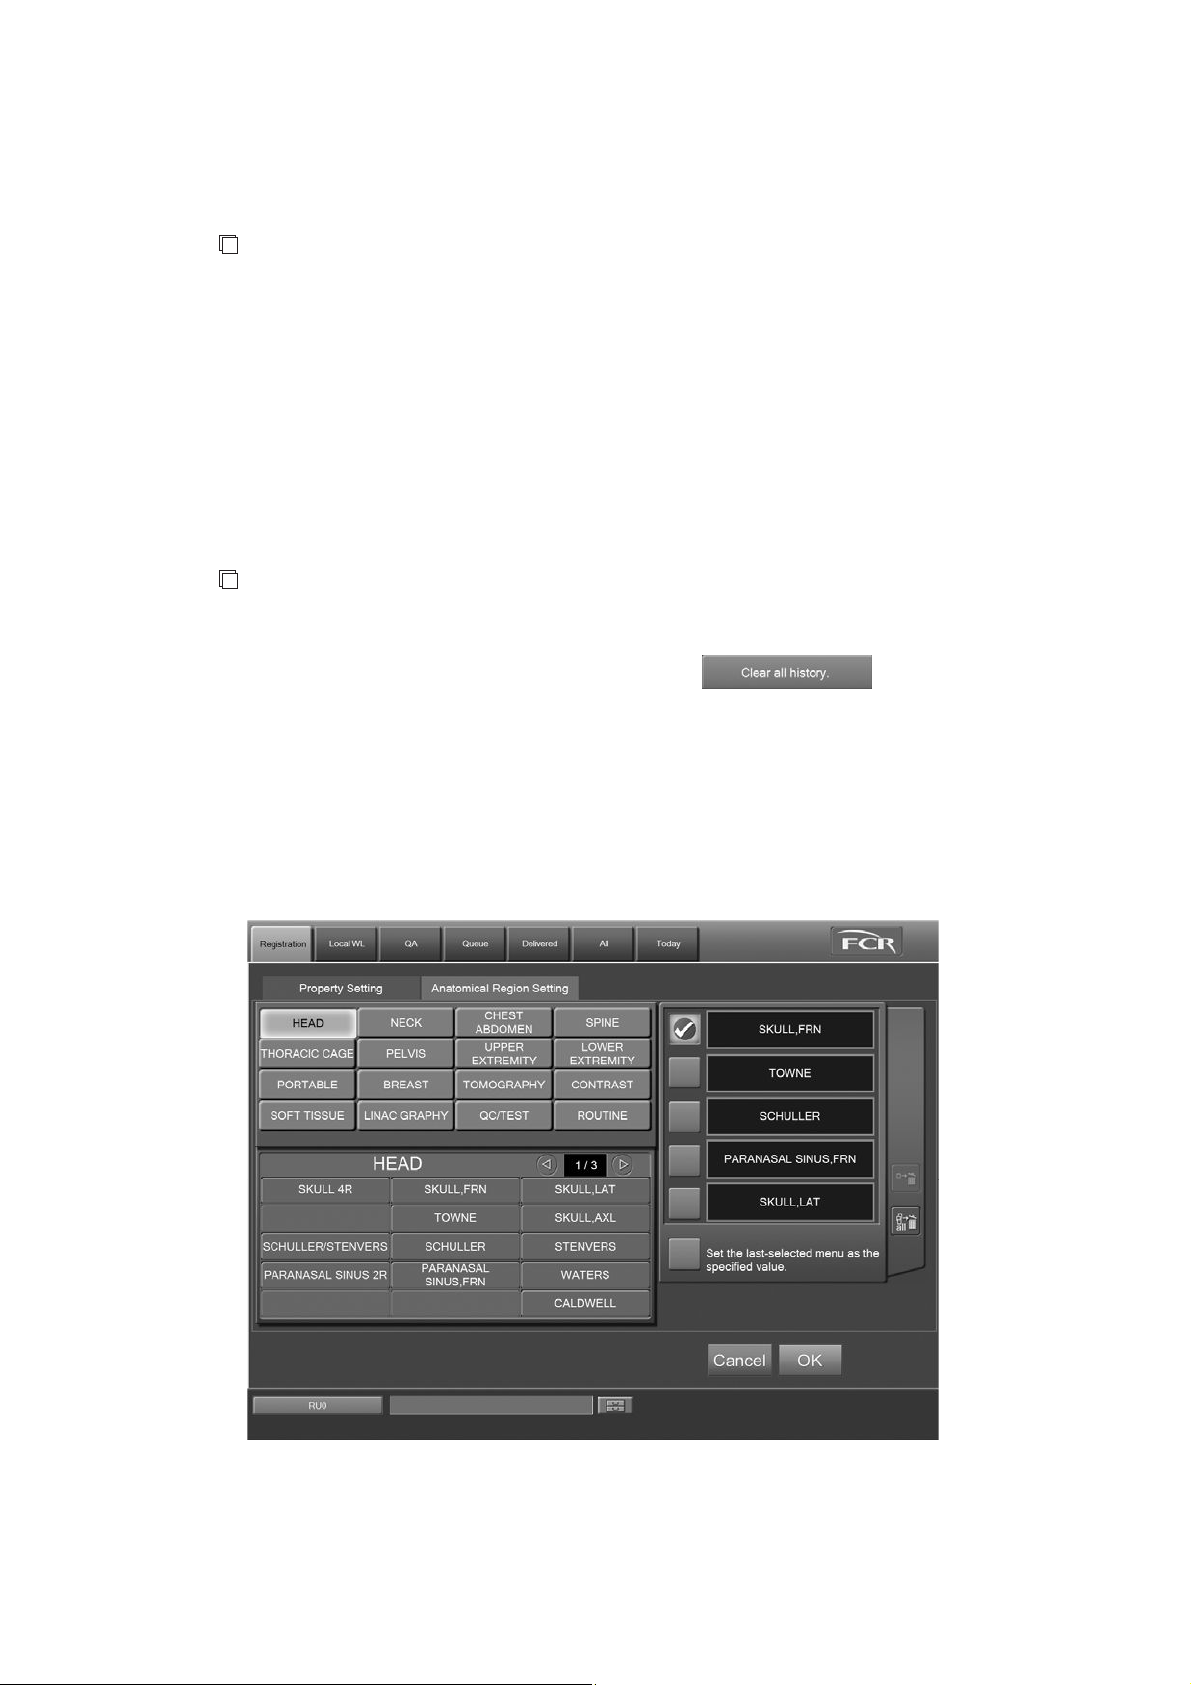
CR Console Operation Manual
Setting a facility identification code
Input a facility identification code (a maximum of 64 characters).
NOTE
Facility identification code cannot be set up to 64 characters, depending on the setting made at
the time of installation.
If you change a facility identification code to the existing one, a patient ID number with one added
to the number issued last is displayed on the “Examination Order Issuance Screen”, when the display
returns to the “Examination Order Issuance Screen”.
Setting the patient ID history
Enter the number of days to store the history of patent IDs issued automatically.
This can be set in the range of 1 to 365.
NOTE
When this period has elapsed, the patient IDs are deleted on startup of the CR Console.
To clear the history of all the patient IDs issued, select
Setting the comments
.
To clear comments on compl etion of the study, select the “Clear study comments upon study
completion.” checkbox.
(2) Setting the Anatomical Region
Select the “Anatomical Region Setting” tab.
“Anatomical Region Setting Screen”
You can set the exposure menus for examination order in advance. Note that only up to five exposure
menus can be set. For selecting and modifying the exposure menus, see [
] and [
Menu
2011. 06 897N0519M 3 - 19
3.2.3 Modifying Exposure Menu].
3.1.3 Selecting Exposure

CR Console Operation Manual
To set an exposure menu as the specified value
To set the selected exposure menu as the specified value, select
on the left of each exposure menu
in the “Selected exposure menu list”.
When on the left of “Set the last-selected menu as the specified value.” is selected, the exposure
menu selected in the last study is set as the specified value.
of the item set as the specified value changes to
.
NOTES
• Fewer exposure menus are displayed in the “Exposure menu list registered to the display group”
than in the usual “Exposure Menu Selection Screen”. Therefore, the exposure menus differ
depending on the displayed page.
• Different from the usual “Exposure Menu Selection Screen”, the exposure menu selected in the
“Exposure menu list registered to the display group” is displayed in the “Selected exposure menu
list” without change.
Make necessary settings, and then select . The settings are reflected to the “Examination
Order Issuance Screen”.
: Cancels operation.
3 - 20 2011. 06 897N0519M

3.3.2 Setting for Issuing the Examination Order
After completing the performance setting, set the examination order on the “Examination Order
Issuance Screen”.
Setting a patient ID number
Select
or to set the patient ID number to be newly issued.
The “Patient ID that will be issued” field displays the patient ID including the value that is set
according to the issuance format.
CR Console Operation Manual
“
Examination Order Issuance Screen
”
If a patient ID number is set to “0”, the study can be started for making a test exposure. In this case,
as the number is not stored in the history, a patient ID number with one added to the number issued
before the text exposure is displayed after completing the exposure.
NOTE
Selecting
resets the set patient ID and displays the initial value.
Note that this deletes the history of all the patient IDs issued under the code in “Facility
Identification Code” field.
Setting comments on study, technologist and anatomical regions
Set the comments on study, technologist and anatomical regions as required. For details, see [
Patient Information Input Screen].
2.2.6
2011. 06 897N0519M 3 - 21

CR Console Operation Manual
3.4 Executing Studies
Starts already-received studies and reads images on the “Study Execution Screen”. Described herein
are operations for the execution of studies.
3.4.1 Starting a Study
Displays the Study Execution Screen and starts a study. Perform appropriate operation depending on
the screen currently displayed.
NOTE
Do not interrupt an operation and leave the Study Screen on for a long time.
Depending on the setting made at the time of installation, the date and time displayed on the
Study Screen is taken as the starting date of the study. Therefore, a long interruption may result in
an inconsistency between displayed date and time and the actual date and time of the study.
If you have interrupted an operation for a long time, cancel the received study and start again
from the input of study information.
(1) Starting Studies from the Exposure Menu Selection Screen
Start a study that underwent necessary processing in “Receiving Studies” and “Confirming Study
Details” on the Patient Information Input Screen and Exposure Menu Selection Screen.
Select
.
The Study Execution Screen is displayed. There are two kinds of display mode: one-image display
mode and six-image display mode, which can be changed to each other alternately at the press of the
button. The mode can be switched alternately. It is possible to specify in the User Utility which
mode is displayed at first after the startup. Refer to [
OPERATION MANUAL - THE USER UTILITY OPERATIONS
Chapter 3 TABLE SETTING / CR Console
].
From the next study the mode set lastly will be displayed.
3 - 22 2011. 06 897N0519M

One-image display mode :
CR Console Operation Manual
Six-image display mode :
2011. 06 897N0519M 3 - 23

CR Console Operation Manual
(2) Starting Studies from the “Local WL” List
Executes studies stacked in the “Local WL” list. Select a study, and then select
.
In the event that the selected study has already been opened on another CR Console, it cannot be
opened. (See [
Chapter 5. OPERATIONS - LIST
].)
The Study Execution Screen is displayed. For more information about the Study Execution Screen,
see [
2.2.9 Study Screen
].
When starting multiple studies at the same time (option)
At the option where multiple studies can be started at the same time, it is possible for you to start
multiple studies from the “Local WL” at the same time for the same patient.
To start multiple studies for the same patient at the same time, the following input items of the
patient information should be consistent with each other. Note that inconsistency will result even if
these information items have been input differently for each study or no such items have been input.
• Patient ID
• Patient name
• Sex
• Date of birth
Note also that either of the following patient information items should have been input indispensably.
• Patient ID
• Patient name
3 - 24 2011. 06 897N0519M

CR Console Operation Manual
Select studies for the same patient from among the studies stacked to the “Local WL” list, and then
select
. A maximum of 20 studies can be selected at a time.
If patient information of the selected studies includes inconsistent data for the information items
listed below, a message appears saying that “Selected studies are not related with the same patient”.
• Patient ID
• Patient name
• Sex
• Date of birth
2011. 06 897N0519M 3 - 25
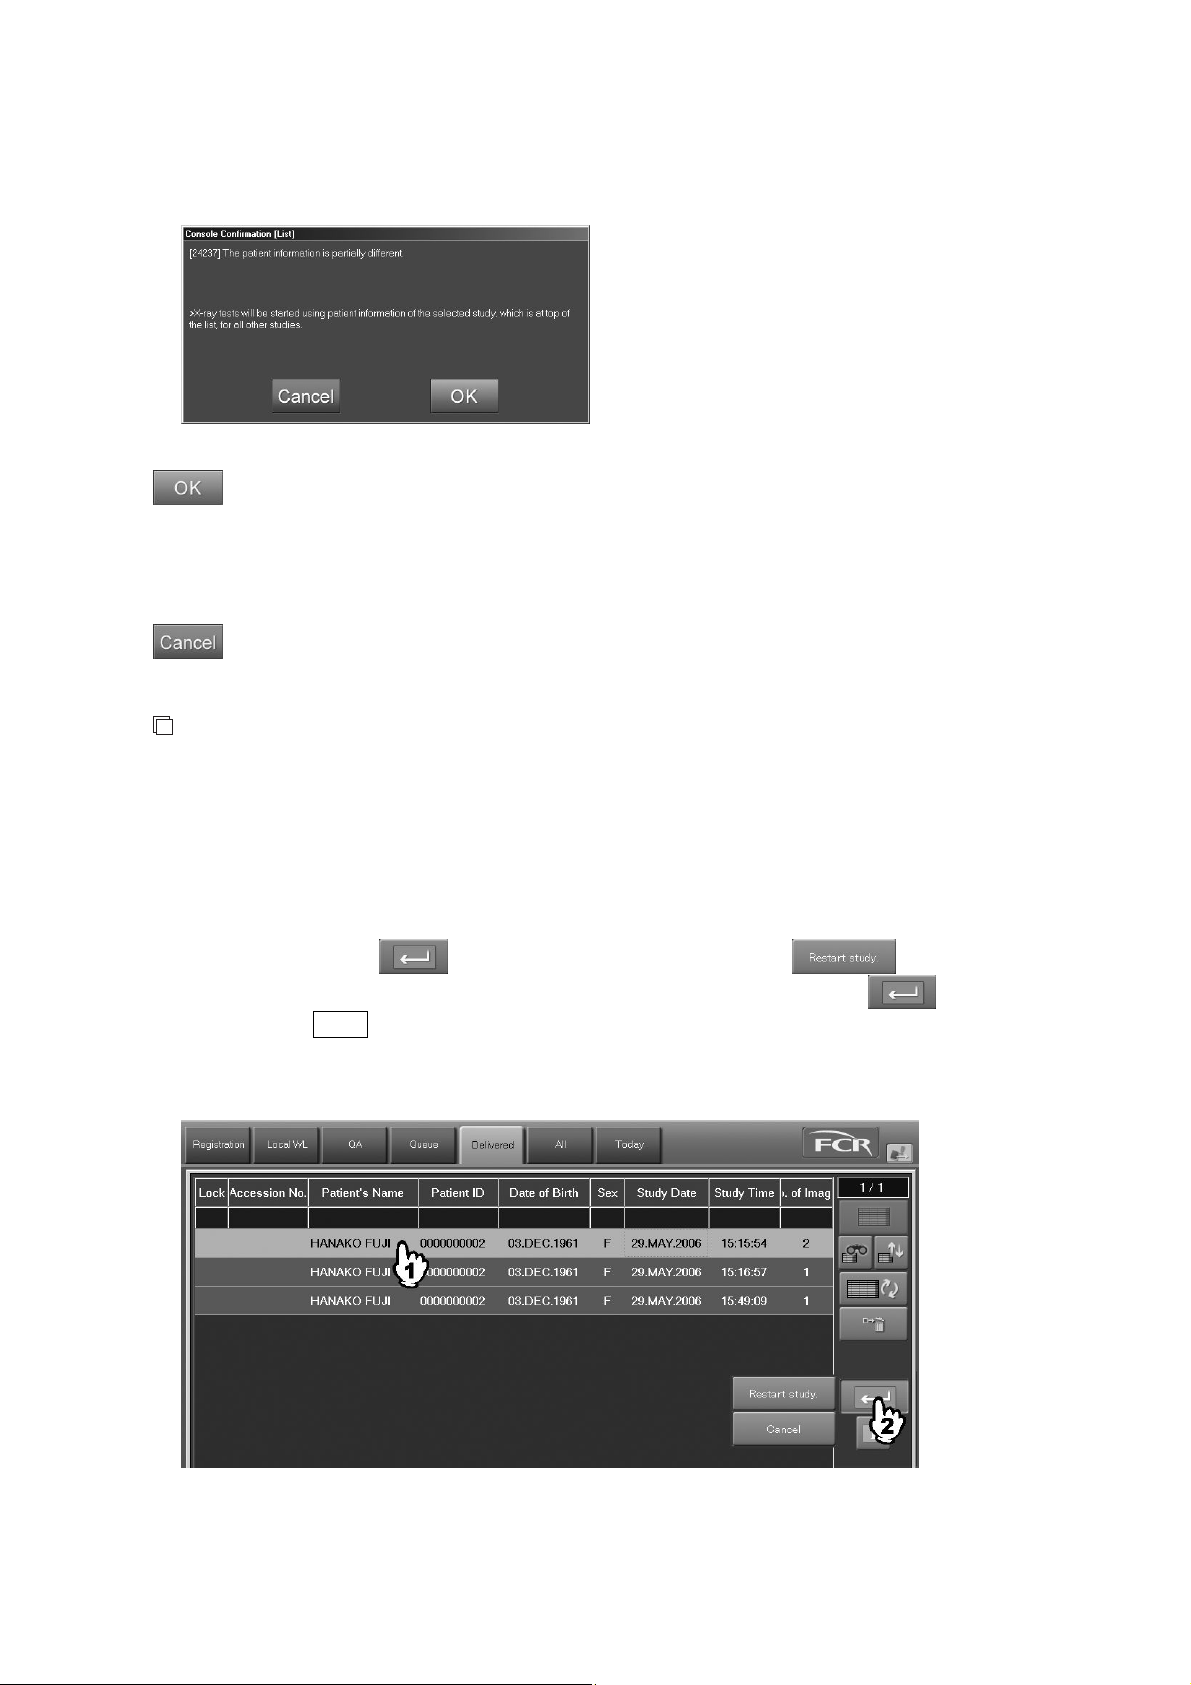
CR Console Operation Manual
If patient information of the selected studies includes inconsistent data for the information items
listed above, a message appears saying that “The patient information is partially different.”
: Displays studies selected in the “Local WL” list onto the Study Execution Screen.
: Cancels processing to start multiple studies at the same time, returning then to the “Local
At this time, patient information of the study shown at the head of the list of selected
studies will be reflected on all of the selected patient information. For this reason, there are
cases where some of the patient information items are overwritten by the patient
information items of the study that is at the head of the list.
WL” list.
NOTES
• Multiple studies cannot be started at the same time, if those studies include studies where only
patient information for which no exposure menus exist have been reserved.
• It is not allowed to start studies registered at the CR Console and those transmitted via RIS
(connection by DICOM MWM service) all together at the same time.
(3) Starting Studies from the “Delivered” List (additional exposures)
Performs additional exposures for the study stacked in the “Delivered” list. Select a study, and then
wait a few seconds while
It is also possible to resume study by selecting a study first and then by selecting
is selected to display the menu. Select .
while
holding down the Shift key. When doing so, the study to which the exposure or image editing (QA)
is currently being performed at a different CR Console cannot be selected. (Refer to [
OPERATIONS - LIST
].)
Chapter 5.
The “Study Screen” is displayed.
For more information about the “Study Screen”, see [
3 - 26 2011. 06 897N0519M
2.2.9 Study Screen
].

(4) Starting Studies from the “Examination Order Issuance Screen”
Start a study for which a patient ID is set on the “Examination Order Issuance Screen”.
Select
.
CR Console Operation Manual
The “Study Screen” is displayed. For more information about the ”Study Screen”, see [
Screen
].
2.2.9 Study
NOTES
• When the patient ID histories exceed 200 thousands, they will be deleted from the oldest on the
next startup of the CR Console.
• When the examination order issuance function is enabled, it is recommended that “The method at
the time pushed Study Finish button (The unregistered menu exists.)” is set to “The unregistration
menu is deleted, and study is finished.” in the Property Setting of User Utility.
• When the examination order issuance function is enabled, patient IDs can neither be searched nor
registered using the card reader or the barcode reader.
• If the hard disk of the unit is replaced due to faults, the history of the patient IDs automatically
issued will be lost. (This is equivalent to selecting
.) Make sure that no patient
IDs are duplicated when issuing a patient ID after the hard disk is replaced.
• The examination order issuance function can only be used at the following resolutions:
• 1024 × 768
• 1280 × 1024
• If the patient ID to be issued is already used, the following confirmation box is displayed when
is selected.
To use a duplicated patient ID without change, select .
To set another patient ID number, select , and set a number on the “Examination Order Issuance
Screen”.
2011. 06 897N0519M 3 - 27
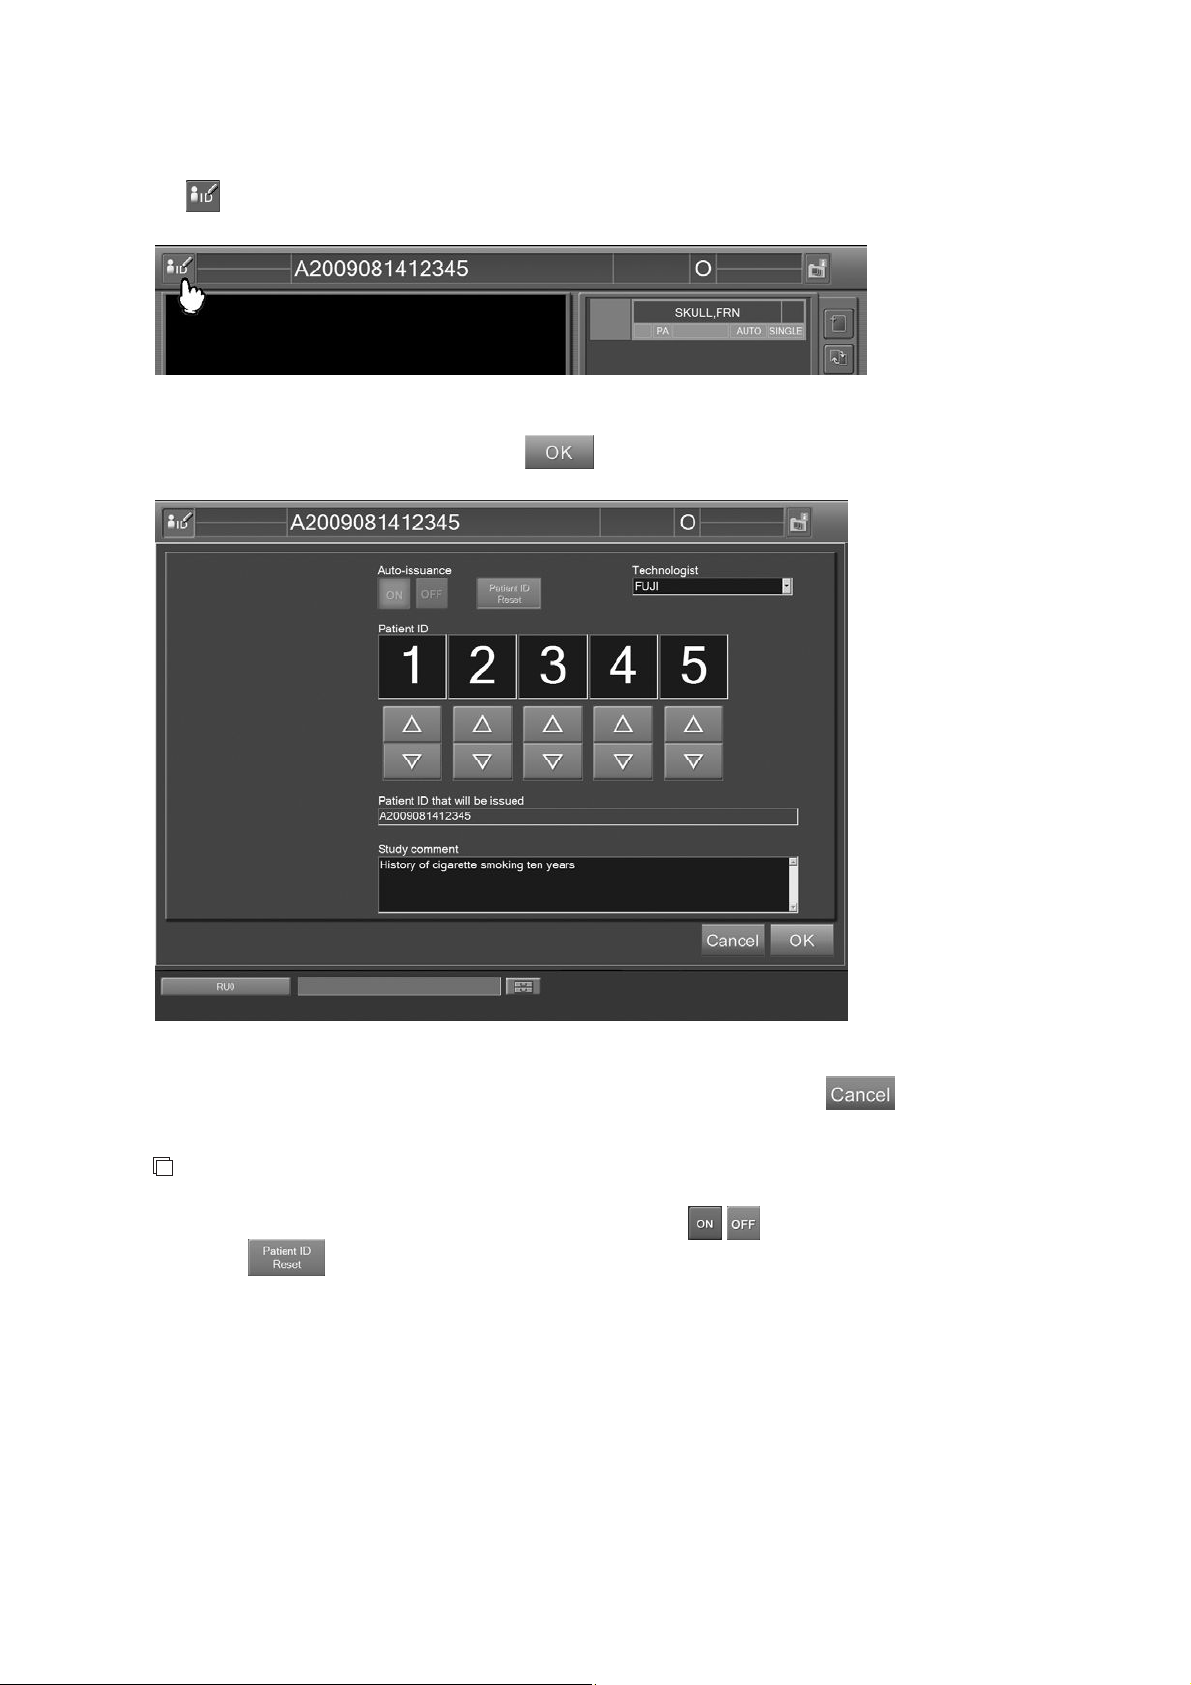
CR Console Operation Manual
Changing the contents of examination order
Select
on the “Study Screen”.
The “Examination Order Change Screen” is displayed.
After changing the setting as required, select
.
“Examination Order Change Screen”
To cancel the setting and close the “Examination Order Change Screen”, sel ect .
NOTE
Different from the “Examination Order Issuance Screen”,
well as
cannot be selected.
/ for automatic ID issuance as
3 - 28 2011. 06 897N0519M
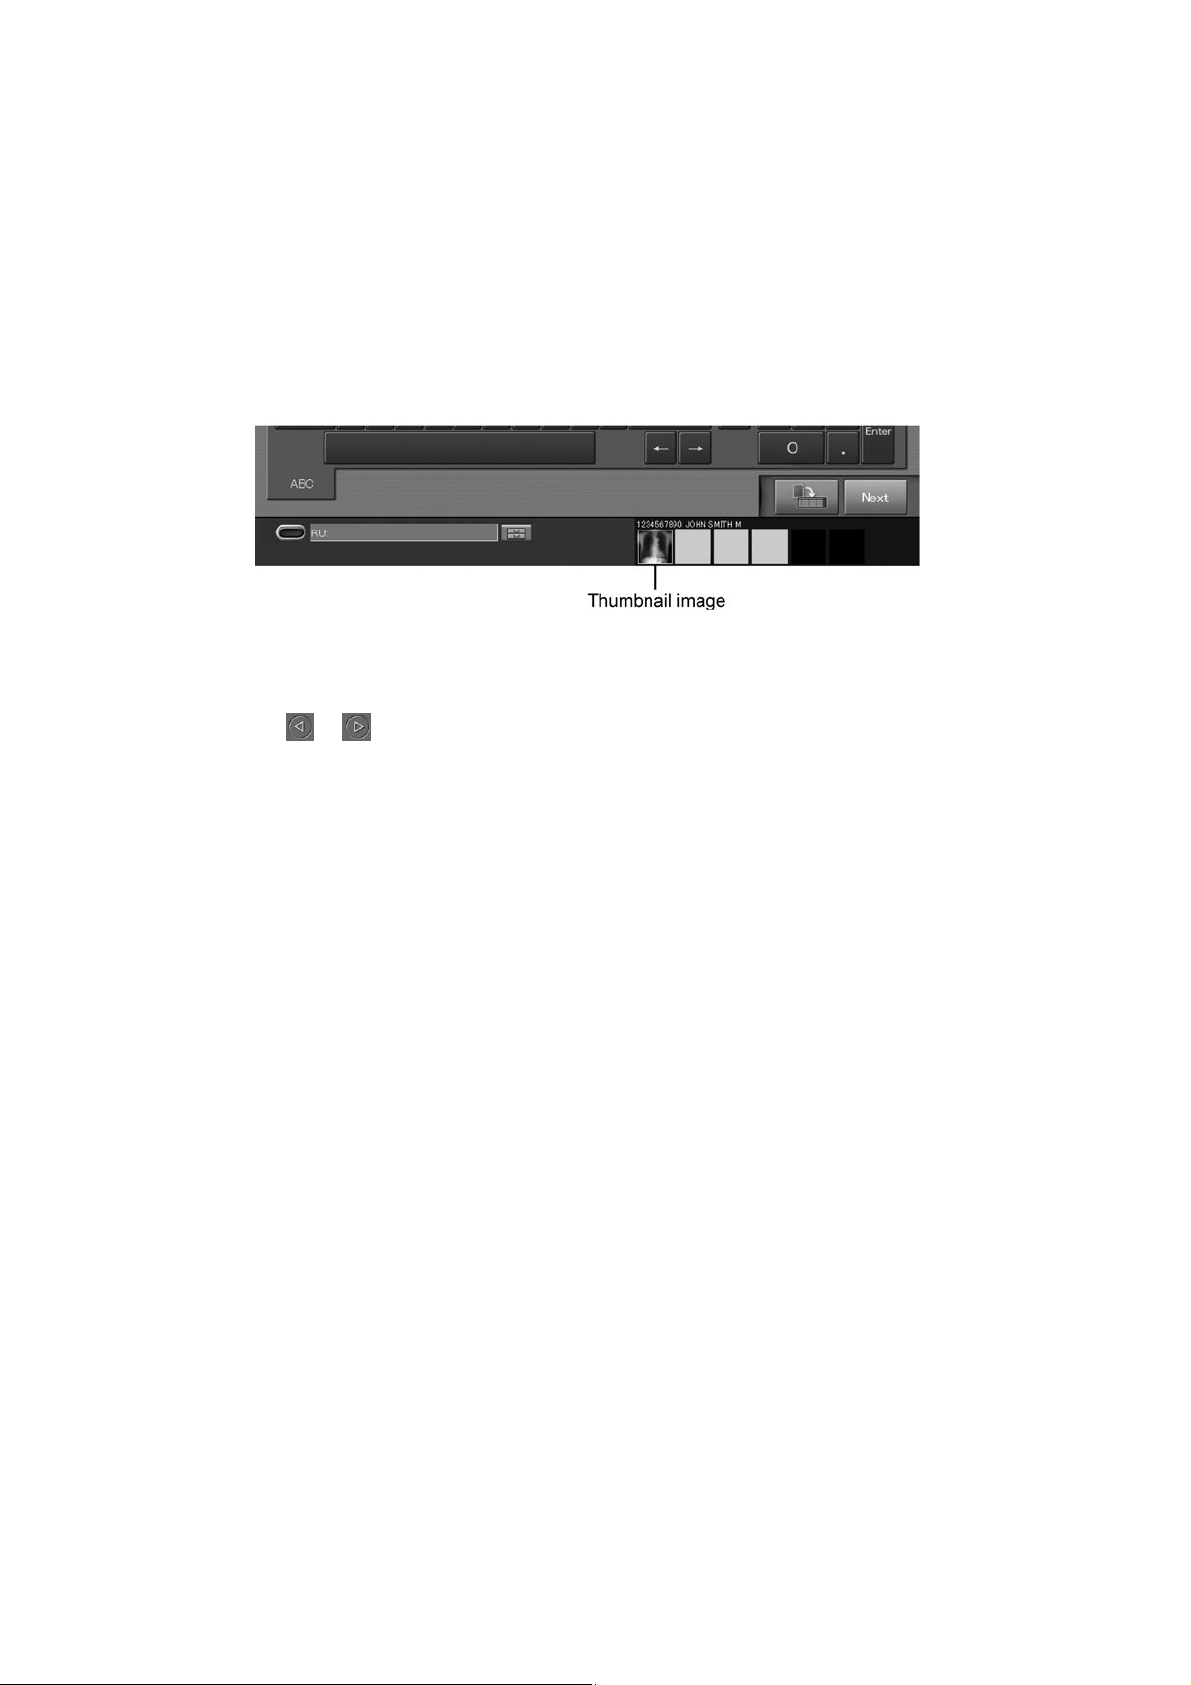
CR Console Operation Manual
(5) Starting Studies from the Scroll View (option)
When the study is ended before completing an image reading after the IP registration of all exposure
menus in study execution is completed, the image reading status is displayed in the scroll view at the
bottom of the Patient Information Input Screen/Exposure Menu Selection Screen/Study Execution
Screen/individual lists.
Studies displayed in the scroll view can be resumed.
For more information about the scroll view option, see [
2.4 Scroll View Display Area (option)
Select a thumbnail image.
].
When It is not Possible to Fully Display Thumbnail Images in the Scroll View
Select
or to scroll thumbnail images as desired. A maximum of 18 thumbnail images from the
beginning can be displayed.
To resume a study, display thumbnail images included in the scroll view on the “Study Execution
Screen”.
Different “Confirmation boxes” will be displayed depending on the screen displayed when thumbnail
images were selected.
2011. 06 897N0519M 3 - 29
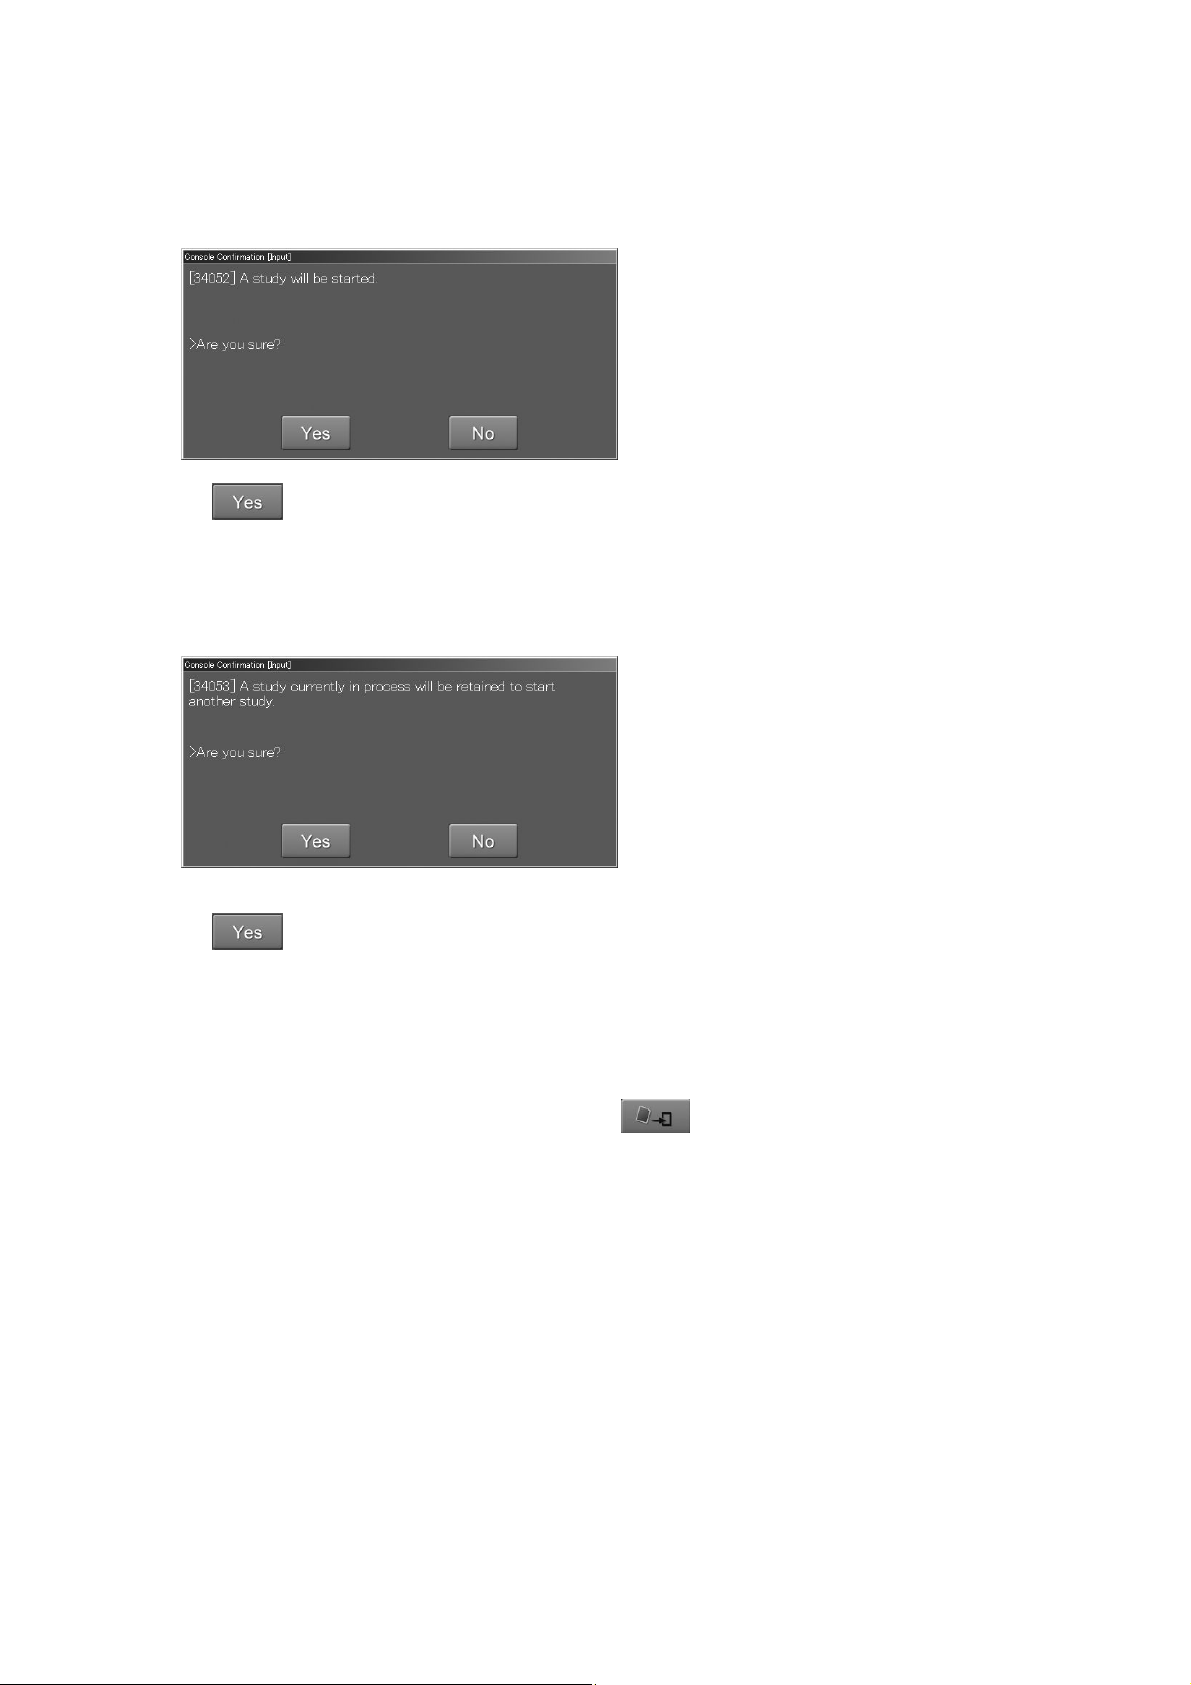
CR Console Operation Manual
Patient Information Input Screen/Exposure Menu Selection Screen/Study Execution
Screen/individual lists :
Select
.
A study selected in the scroll view is resumed. (When the resumed study is finished, the display
returns to the previous screen.)
Study Execution Screen :
Select
.
The ongoing study is suspended and a study selected in the scroll view is resumed.
(When the resumed study is ended, the screen returns to the suspended study.)
The User Utility allows you to perform settings for whether to end or suspend a study for which the
image reading was completed in the background. The User Utility also allows you to determine how
to end a study after it has been finished (by selecting
For how to perform settings in the User Utility, see the [
Console OPERATION MANUAL - THE USER UTILITY OPERATIONS
) in the “Local WL” list.
Chapter 4 PROPERTY SETTING / CR
].
The Study Execution Screen displays. For more information about this screen, see [
Screen
].
2.2.9 Study
3 - 30 2011. 06 897N0519M

CR Console Operation Manual
(6) Settings to Get the Next Study Started
The next study can be started without returning to the “Patient Information Input Screen”. At the start
of the next study, patient information items other than in the “Technologist” field will be cleared off.
(However, what is set by the User Utility is displayed for the sex.) To return to the “Patient
Information Input Screen” or individual lists, wait for a few seconds while holding down this icon
([Suspend Exposure]) to display the menu and then select one of [Suspend Exposure], [Exposure
Completed] and [Exposure/QA Completed].
(For how to perform settings necessary to start the next study, see [
Chapter 4 PROPERTY
SETTING / CR Console OPERATION MANUAL - THE USER UTILITY OPERATIONS
].)
2011. 06 897N0519M 3 - 31

CR Console Operation Manual
3.4.2 Preparation before Exposure (Image Reading): Confirmation and Modification of
Exposure Parameters
Makes various settings for the exposure menus of the study before performing exposures. Perform
the operation if necessary.
Confirms or changes exposure parameters. This processing cannot be performed to the exposure
menus to which the IP registration and/or the image reading have been performed. For an already-
registered IP, setting image flipping (
been read yet.
An appropriate condition for each parameter is already set by an exposure menu, perform these
operations accordingly.
Select an exposure menu that has not been subjected to image reading, and then select the exposure
parameter shortcut button for a parameter you want to modify to displaying setup boxes or select
to displaying the “Exposure Parameter Selection Box”. Note that the configuration where the
exposure parameter shortcut button is displayed differs depending on the settings made at the time of
installation and the settings made with the User Utility. Refer to [
SCREEN DISPLAY / CR Console OPERATION MANUAL - THE USER UTILITY
OPERATIONS
].
) is possible for the exposure menu, if the image has not
Chapter 10 CUSTOMIZING THE
One-image display mode:
3 - 32 2011. 06 897N0519M
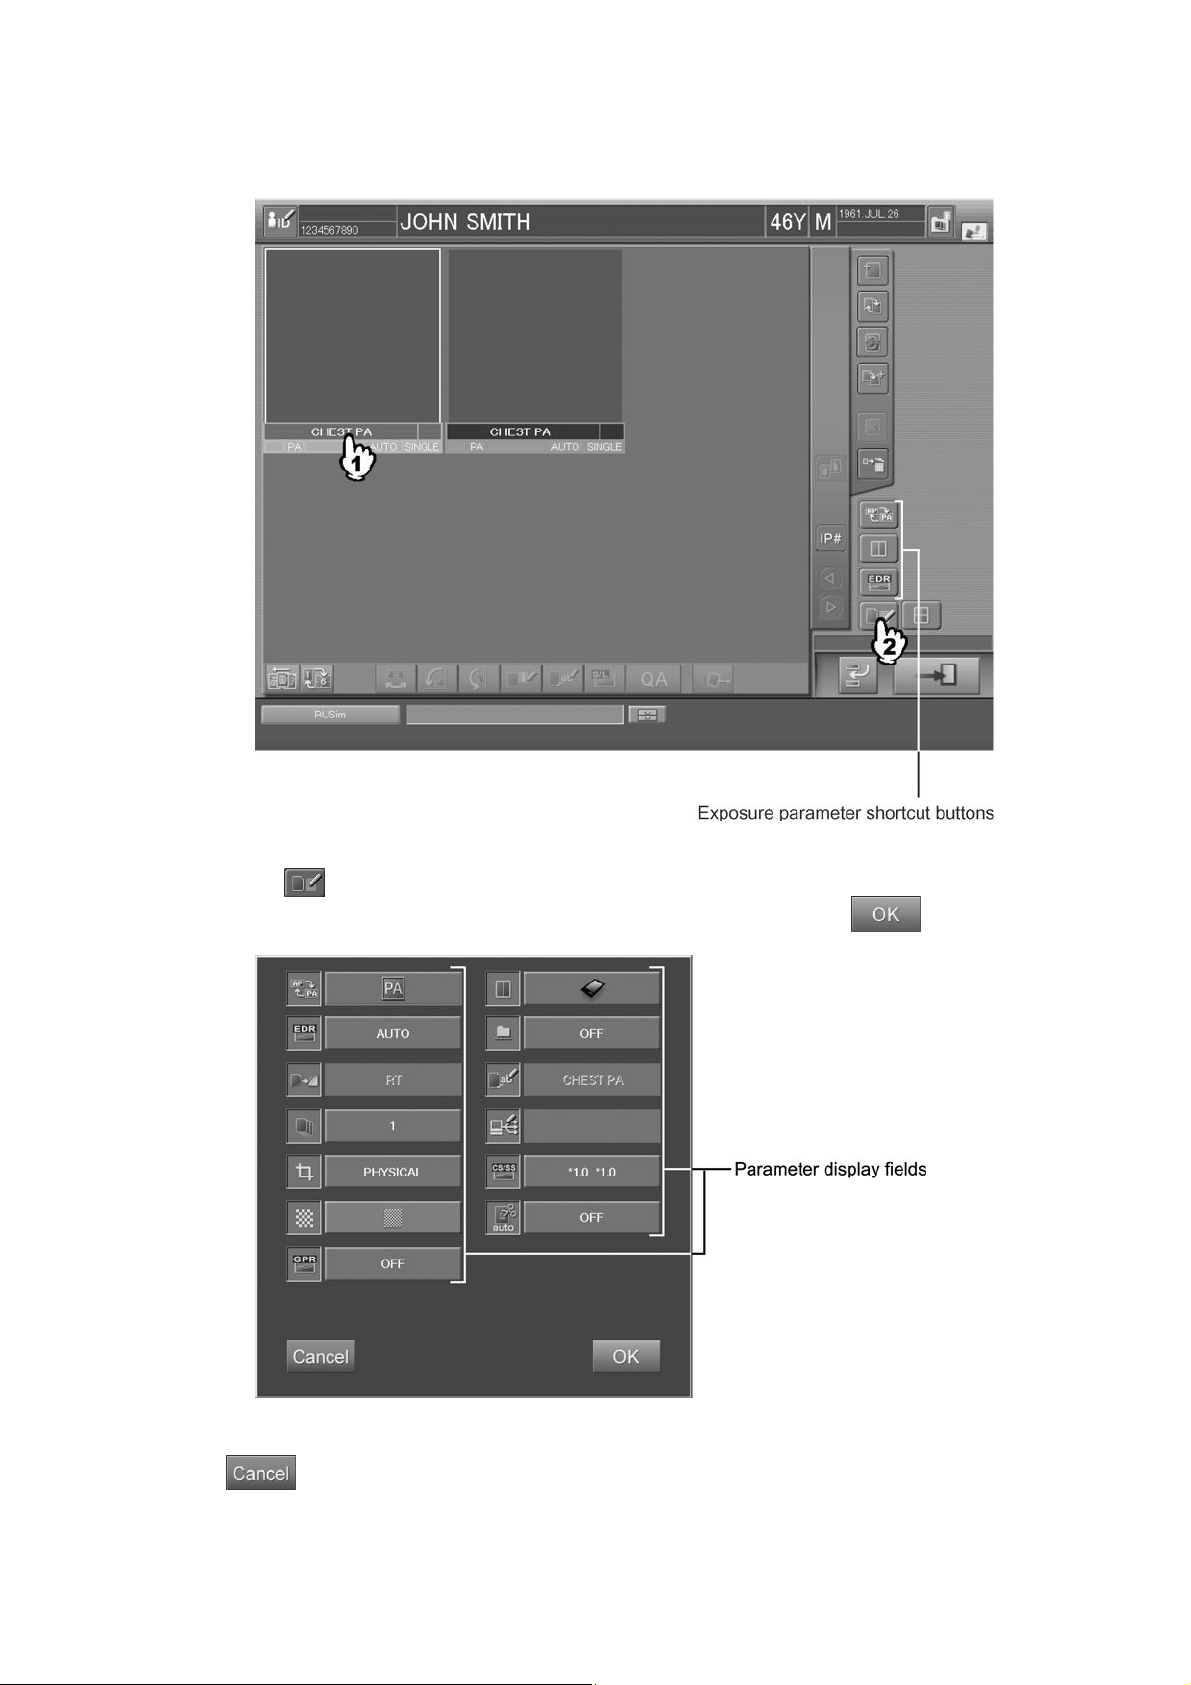
Six-image display mode :
CR Console Operation Manual
When
is selected, the exposure parameter selection box is displayed.
Perform the setting, which is to be explained hereafter, and then select
“Exposure parameter selection box”
.
: Cancels operation.
2011. 06 897N0519M 3 - 33
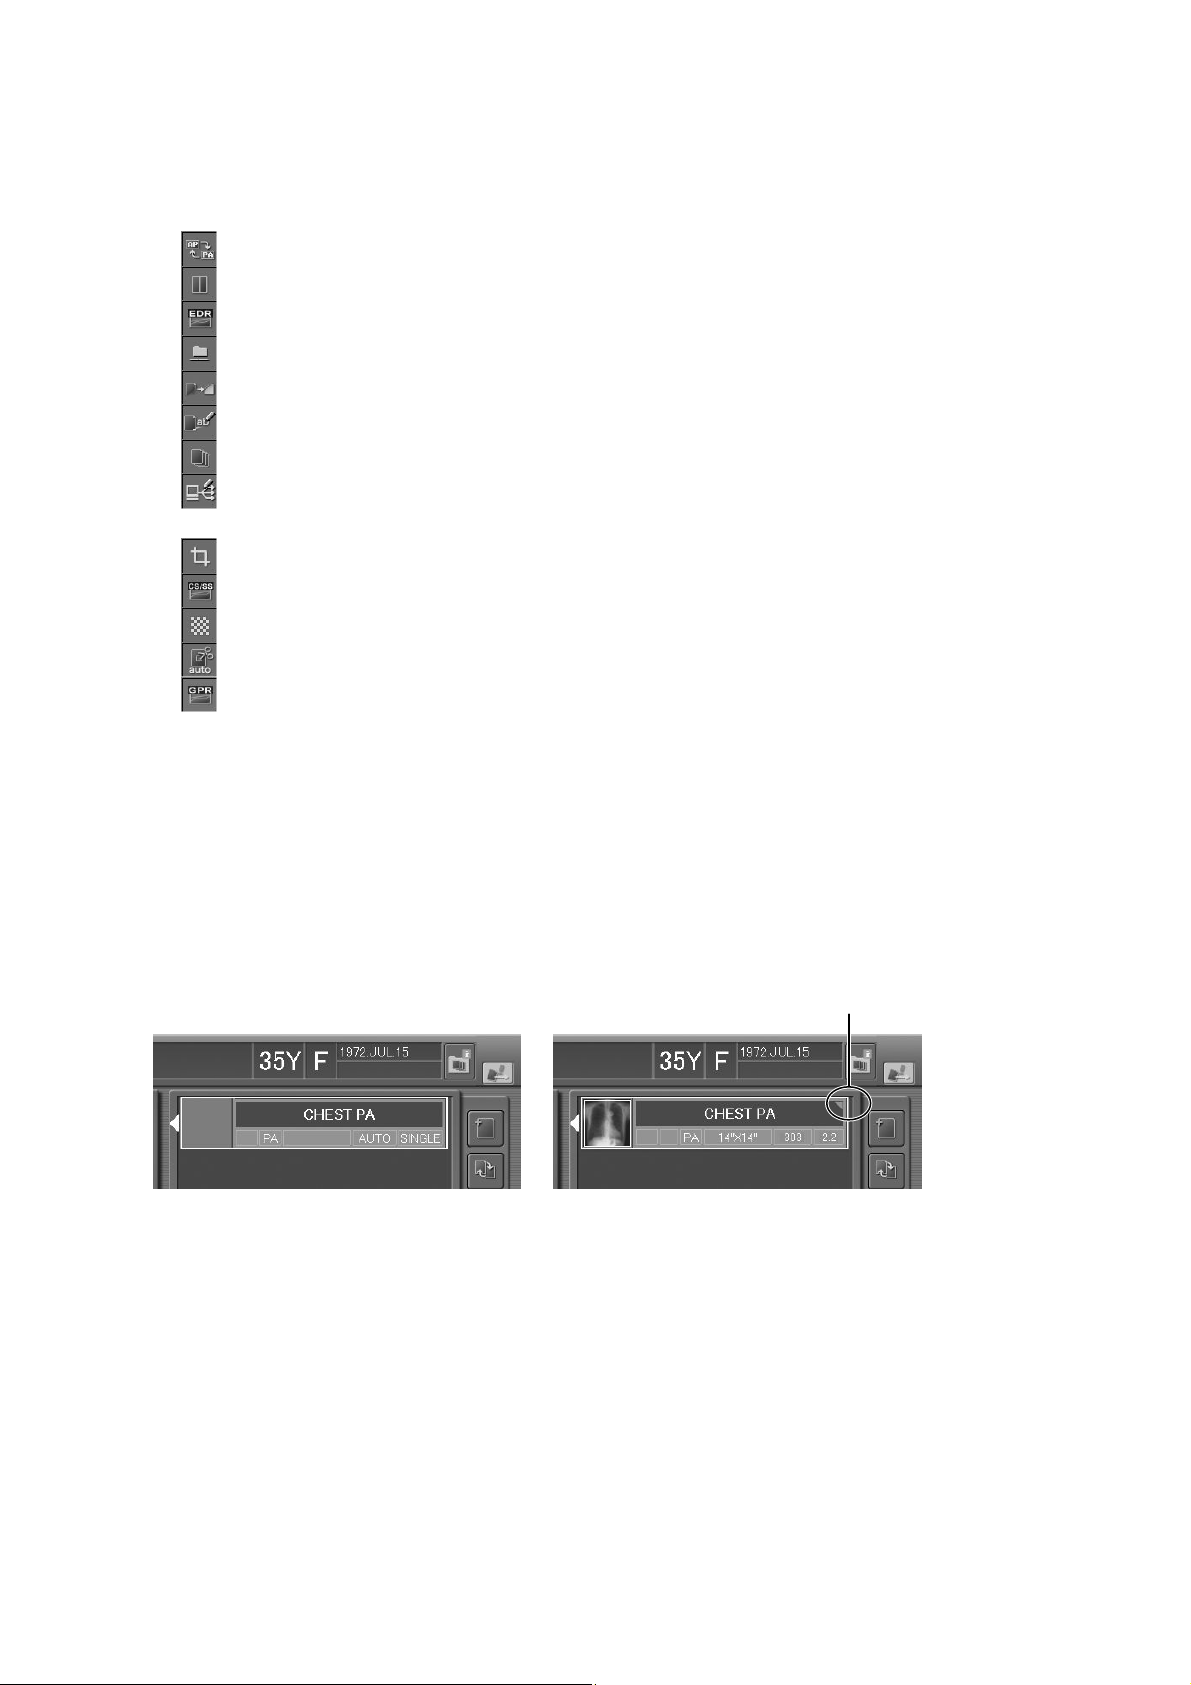
CR Console Operation Manual
If you select the parameter display field next to an icon shown in the exposure parameter selection
box, the setting box for that parameter opens. Icons shown in the exposure parameter selection box
differ depending on the setting performed at installation.
: Sets image flip.
: Sets a film output format.
: Sets EDR (Exposure Data Recognizer) mode.
: Sets image filing mode to a filing device, such as ODF and other.
: Sets special functions.
: Sets film marks (characters to be displayed on film).
: Sets the number of films to be output.
: Sets an image distribution code.
: Sets the IP reading size.
: Sets image CS (Contrast Shift) and SS (Sensitivity Shift).
: Sets image density.
(a code number that specifies a destination for image distribution).
: Sets image trimming processing.
: Sets GPR (Grid Pattern Removal Processing) when the “GPR option” has been activated.
When one of the exposure parameter shortcut buttons is selected, the setting box that is for the
selected parameter will be displayed. Perform appropriate operations referring to the following
explanation.
Receipt of the X-ray exposure parameters (option)
When the CR Console receives such parameters from the X-ray control unit, a marking will be
indicated at the upper right corner of the exposure menu, as shown below.
Marking indicating reception of
the X-ray exposure parameters
Before receiving X-ray exposure
parameters
After X-ray exposure parameters
have been received
3 - 34 2011. 06 897N0519M
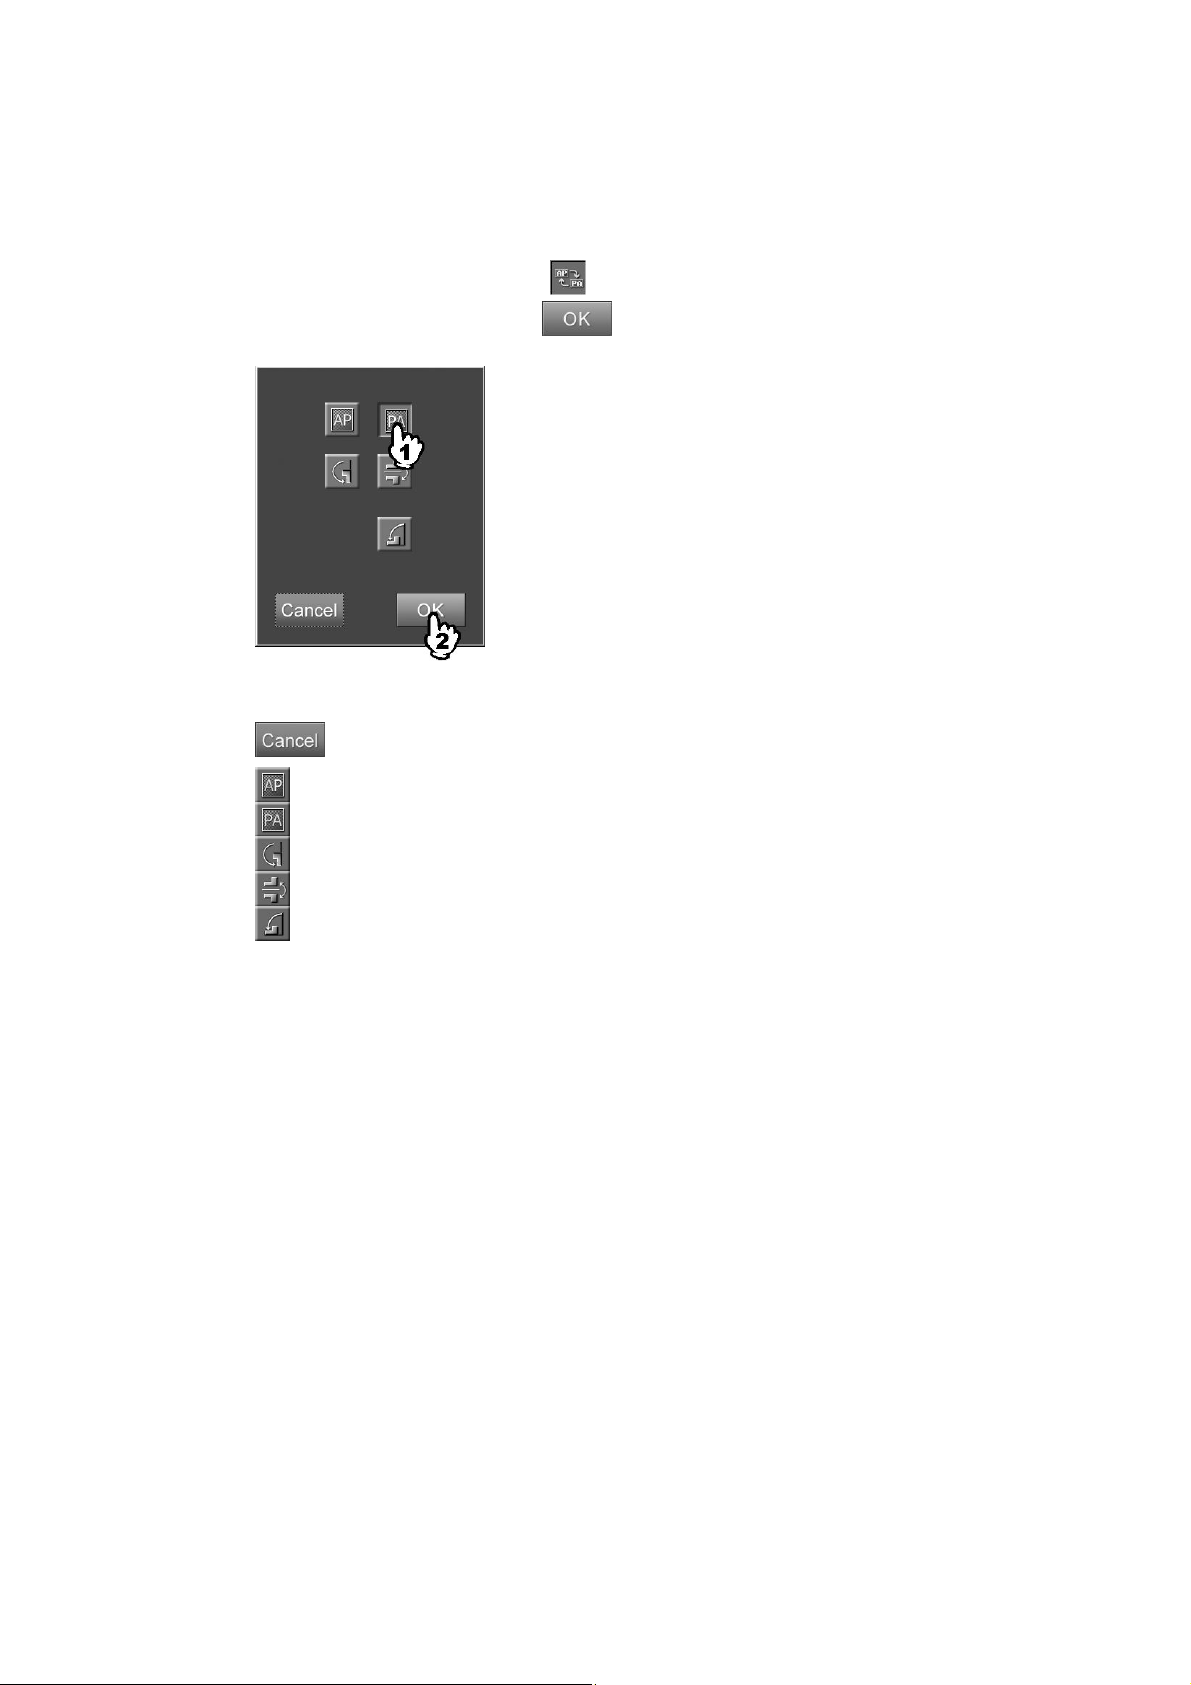
CR Console Operation Manual
(1) Setting image flip
Sets image flip display. This processing can be performed to the exposure menus to which the IP
registration has been done but image reading not yet performed.
Select the parameter display field of
Select one of these icons and select
“Image flipping setting box”
: Cancels operation.
: Normal image.
: Flips the image horizontally.
: Rotates the image 180 degrees.
to display the setting box.
.
: Flips the image vertically.
: Rotates the image 90 degrees to left.
When the image is set to be flipped (horizontally or vertically), the flip marker is displayed
automatically on the read image. To make use of this function, it is required that necessary settings
have been made by a designated service supplier.
For change of the settings (type, color and default display position of the flip marker), consult our
official dealer or local representative.
In case the setting of the image flip display is changed, the setting change will be cleared and the
initial setting restored, if the exposure menus are changed or the images are switched after image
reading.
2011. 06 897N0519M 3 - 35

CR Console Operation Manual
(2) Film output format
Sets the format of the film to be output.
Select the parameter display field of
Select one of the icons.
“Film output format setting box”
to display the setting box.
:Cancels operation.
: One-image format.
: Two-image format.
(3) EDR mode
Sets the EDR (Exposure Data Recognizer) mode.
Select the parameter display field of
to display the setting box.
Select one of the icons to make necessary settings, and then select
.
“EDR setting box”
:Cancels operation.
3 - 36 2011. 06 897N0519M
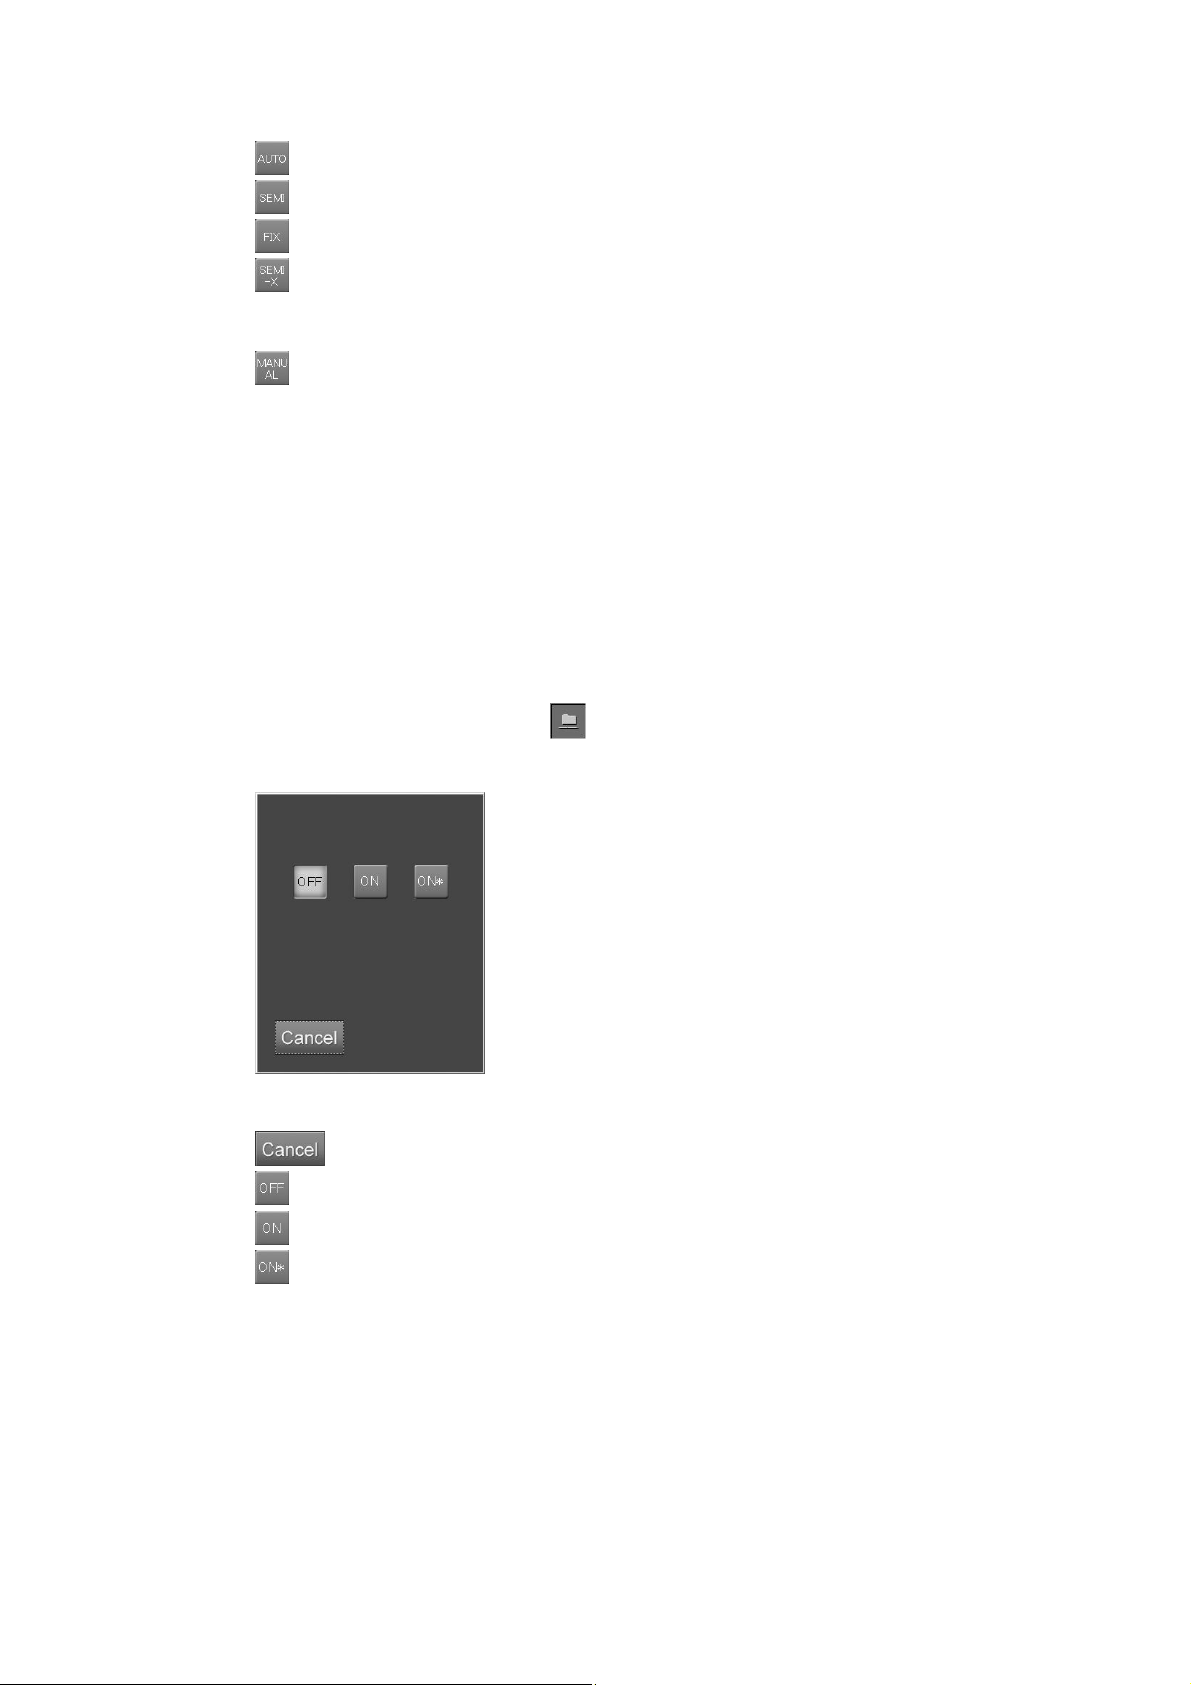
CR Console Operation Manual
: AUTO mode.
: SEMI AUTO mode.
: FIX mode. When this mode is selected, input S value (4 to 20047) in the item “FIX”.
: SEMI-X mode. When this mode is selected, select photometric position in the item
“SEMI-X”, and input a Dave value (0.30 to 2.64) of average density for a photometric
region.
: Manual EDR mode. When performing the manual EDR processing at the Image Reader,
make it effective by selecting it in combination with other mode. Each time selecting it,
valid/invalid is switched alternately.
If this mode is effective, the combined mode (AUTO/SEMI AUTO/FIX) with it
indicates the EDR mode performed for the image the first time it is displayed at the
Image Reader. (When combining this mode with the SEMI-X mode, the same
processing as the SEMI AUTO mode will be performed.) For example, when it is
combined with the AUTO mode, the manual EDR processing can be performed for the
images to which the AUTO mode processing has been performed first.
(4) Filing mode
Sets image filing mode to a filing unit (ODF, etc.).
Select the parameter display field of
Select one of the icons.
“Filing mode setting box”
: Cancels operation.
: Does not record the image in the filing unit.
: Records the image in the filing unit.
to display the setting box.
: Converts the image from high resolution (with the pixel density as is) to standard
resolution (smaller pixel density) and records the converted image in the filing unit.
2011. 06 897N0519M 3 - 37

CR Console Operation Manual
(5) Function
Sets the function (a special processing).
Select the parameter display filed of to display the setting box.
Select one of the icons.
“Function setting box”
: Cancels operation.
: Routine processing (normal exposure).
: Temporal subtraction processing.
: Energy subtraction processing.
: Whole spine processing.
Usually it is set to the exposure menus for the Image-composition Processing (optional).
If it is set when the user’s unit does not have the image-composing function, the image
processing defined to this function is only applied to the exposure menus.
3 - 38 2011. 06 897N0519M

CR Console Operation Manual
(6) Film mark
Sets a film mark (characters displayed on the film).
Select the parameter display field of
to display the setting box.
Select a film mark.
Any character can be input in the input field below the box. Enter characters, and then press the Enter key.
: Cancels operation.
: Clears all text entered in “Field for character input”.
/ : Turns page.
2011. 06 897N0519M 3 - 39

CR Console Operation Manual
(7) Number of film output
Sets the number of films to be output.
Select the parameter display field of
to display the setting box.
Select
or to set the number of output, and then select .
“Film output count setting box”
: Cancels operation.
With the User Utility, you can set up the number of films to be displayed as the initial value. If filing
mode is set to “OFF”, do not set this parameter to “0”.
(8) Distribution code
Sets the distribution code (a code number which specifies the destination of transfer) of the image.
Select the parameter display field of
to display the setting box.
Select a distribution code, and then press
“Distribution code setting box”
: Cancels operation.
.
3 - 40 2011. 06 897N0519M

(9) Reading size
Sets the reading size of IP.
Select the parameter display filed of
Select one of the icons.
<Cassette type> <FCR 5000 series>
<FCR VELOCITY series Built-in type>
CR Console Operation Manual
to display the setting box.
“Reading size setting box”
* The reading size setting box that opens differs depending on the Image Reader size.
: Cancels operation.
: Reads in the same size as the IP.
Others
: Reads in the displayed size shown on the icon.
For the bed-type Image Reader, only the center reference (C) icon can be selected as the
reference position for IP reading.
2011. 06 897N0519M 3 - 41
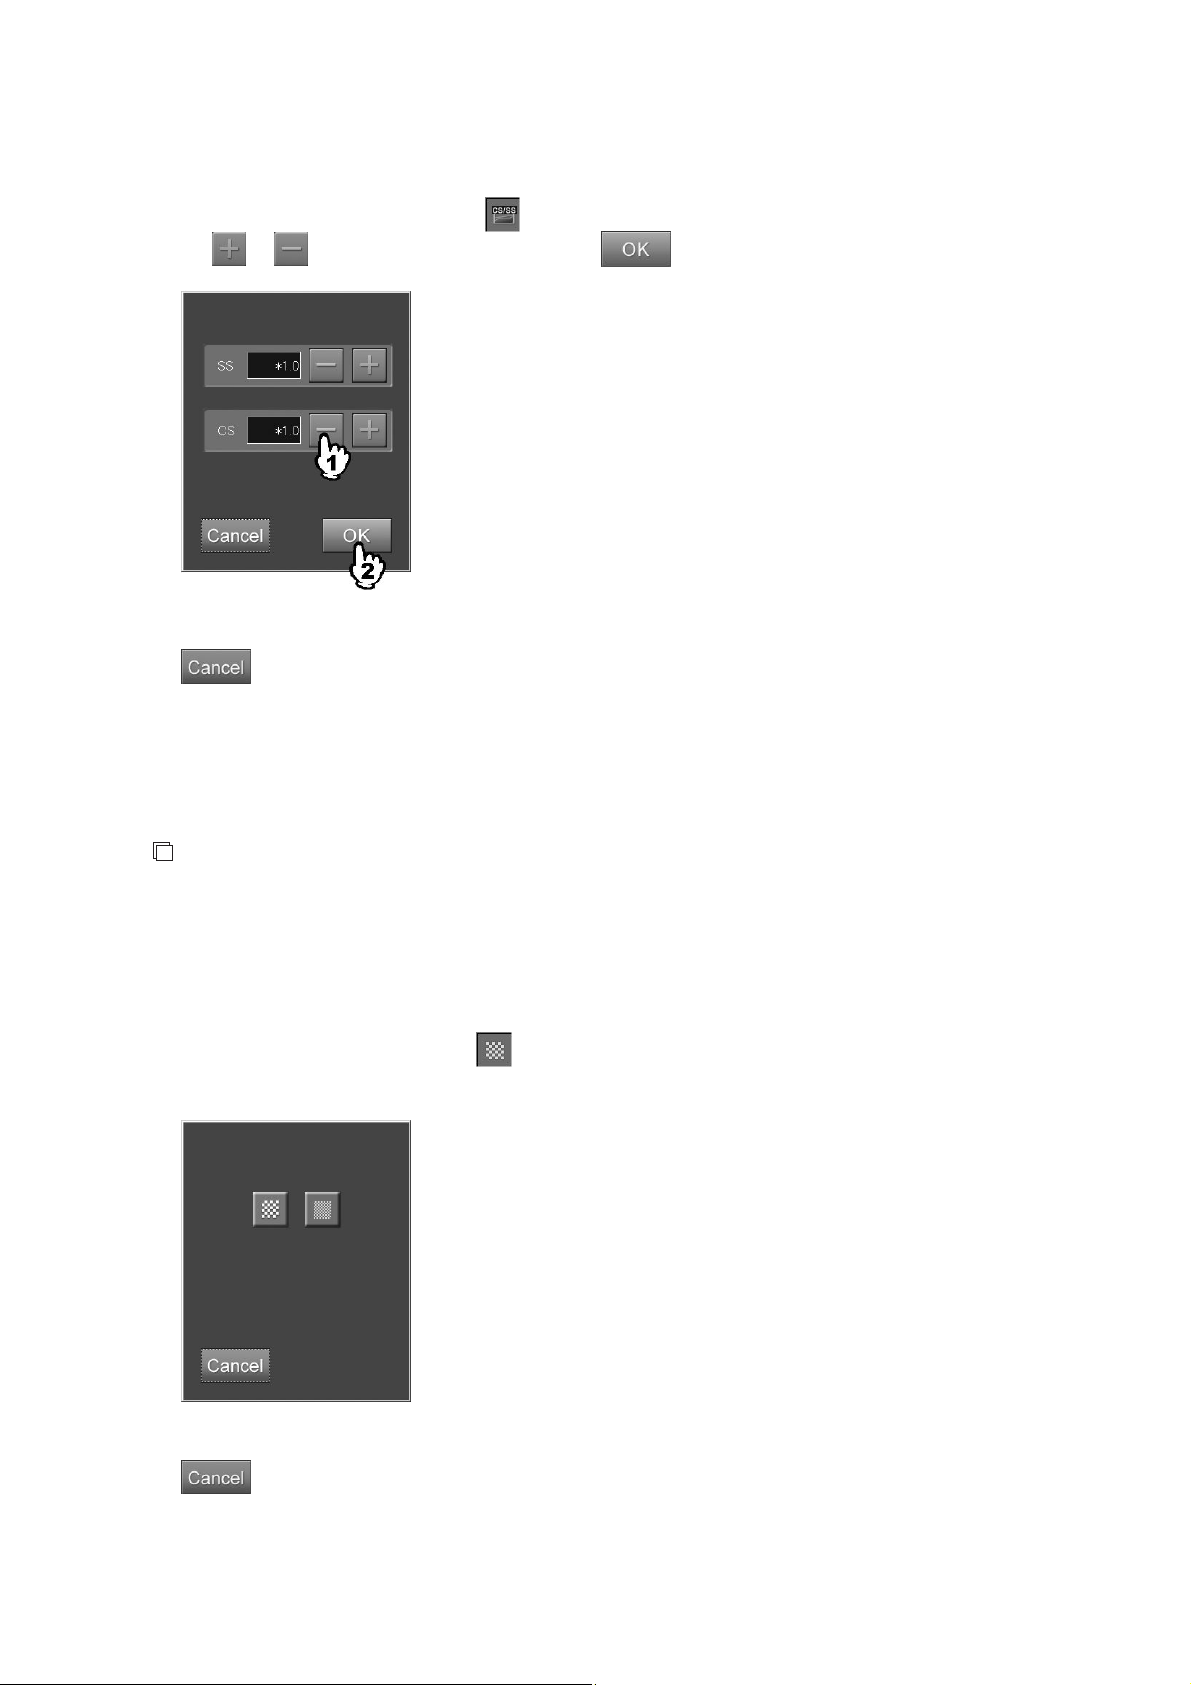
CR Console Operation Manual
(10) SS/CS
Sets SS (Sensitivity Shift) and CS (Contrast Shift) to the image.
Select the parameter displays field of
to display the setting box.
Select
“SS/CS setting box”
SS
or to select a value, and then select .
: Cancels operation.
: A coefficient given to parameters related to reading sensitivity. Changes the density of
the image. Can be set in the range of /(÷)2.0 to *(×)2.0.
CS
: A coefficient given to parameters related to tonal curve. Changes the contrast of the
image. Can be set in the range of *(×)0.5 to *2.0.
NOTE
Depending on the setting made at the time of installation, it may not be possible to change or
reference the SS (Sensitivity Shift) and CS (Contrast Shift) of the image.
(11) Pixel density
Sets pixel density for the image.
Select the parameter display field of
Select one of the icons.
“Pixel density setting box”
to display the setting box.
: Cancels operation.
3 - 42 2011. 06 897N0519M
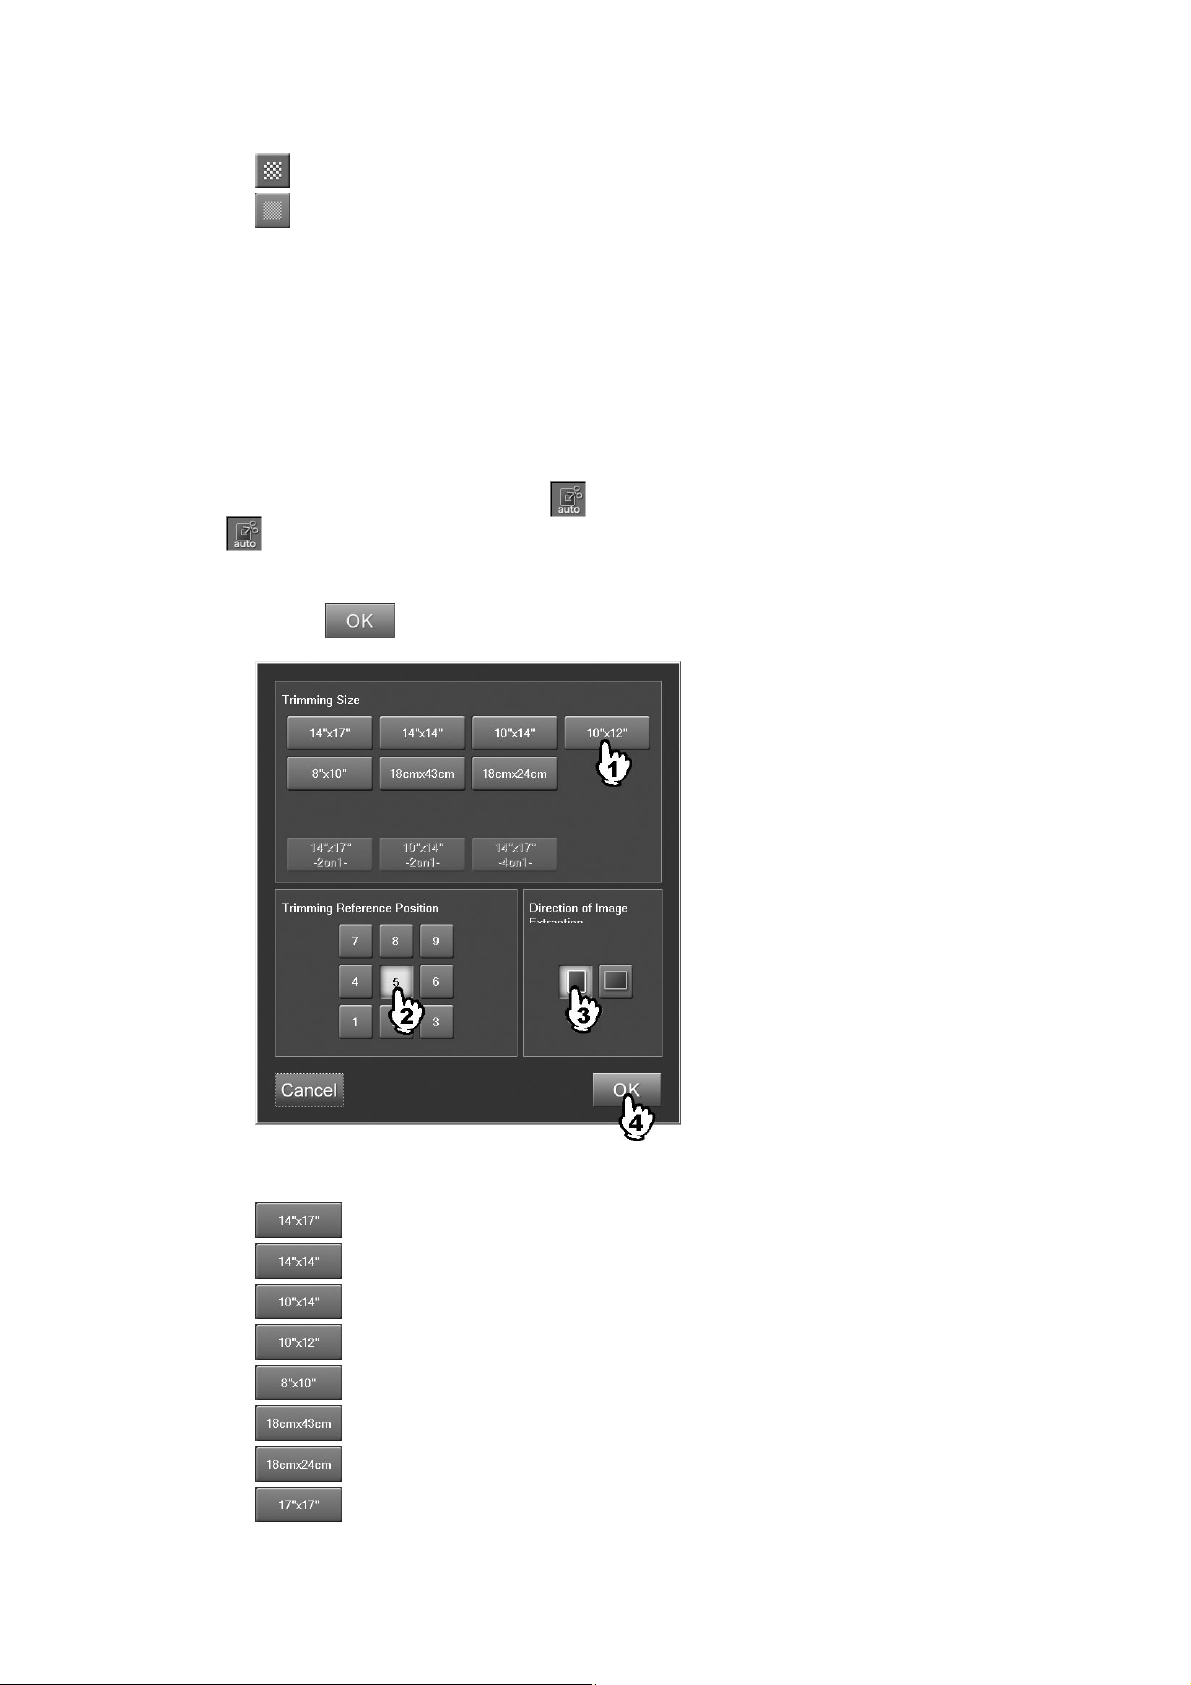
CR Console Operation Manual
: Standard density.
: High density.
The 14" x 14" or 14" x 17" sized images to which the standard density is set will be reduce-sized
images (67%) when they are output to film with one-image format at destination units.
(12) Trimming
Sets trimming processing. When the user authentication has been specified according to the setting
performed at installation, the user is allowed to limit the use of this function. For more information,
refer to [
UTILITY OPERATIONS
Select the parameter display field of
Chapter 3 TABLE SETTING / CR Console OPERATION MANUAL - THE USER
].
to display the setting box. (The parameter display box of
can be selected only when the trimming option has been activated.)
Select an extraction size, reference position for extraction, and direction for image extraction, and
then select
.
“Trimming setting box”
: Trims a read image to the 14”x17” size.
: Trims a read image to the 14”x14” size.
: Trims a read image to the 10”x14” size.
: Trims a read image to the 10”x12” size.
: Trims a read image to the 8”x10” size.
: Trims a read image to the 18x43cm size.
: Trims a read image to the 18x24cm size.
: Trims a read image to the 17”x17” size.
2011. 06 897N0519M 3 - 43

CR Console Operation Manual
The setting of image trimming for an already read image can be inactivated on the QA screen.
Even if the size of a read image does not fit to the image size before image extraction specified for
the “Extraction size” item, it is possible for you to change the trimming frame position to locate the
ROI at the center. (See [
However, the range of image trimming cannot be set for a size that exceeds the size of the read image.
Image display size and trimming size
When setting for trimming processing has been performed, a read image and its thumbnail image will
be the image before extraction combined with a trimming frame. If the image undergoes
magnification/reduction processing, its trimming frame will also be magnified/reduced accordingly.
The size displayed in the exposure menu field will be the size for the area specified with the
trimming frame. Moreover, if an image edited on the QA screen is saved, it will be saved in the size
by which the area specified by the trimming frame was extracted. However, the range of image
trimming cannot be set for a size that exceeds the size of the read image.
: Trims a read image to the 8”x14” size, the half of 14”x17”, if the 2on1 film format is
selected for the read image.
: Trims a read image to the 7”x10” size, the half of 10”x14”, if the 2on1 film format is
selected for the read image.
: Trims a read image to the 7”x8” size, the one fourth of 14”x17”, if the 4on1 film
format is selected for the read image.
Chapter 4 OPERATIONS - IMAGE EDIT
].)
NOTES
• Trimming processing is not available in the cases a) to c) below, even if the size of a read image is
the same as that of the image before it has been subjected to trimming processing as specified in
“Trimming Size:” above.
a) Images read from the FCR 5000 series at standard density
b) Composed images or source images for composition
c) Energy subtraction images
d) Some of the images read in FR mode
• With regard to an image that has been subjected to trimming processing to 10"x14" or 14"x10"
size, do not change image magnification ratio or image rotation direction on the image display
unit side. Because the trimming frame position information varies as the image magnification
ratio or image rotation direction changes, 10"x14" or 14"x10" sized images cannot be output
correctly even if they are reprinted via the CR Console.
• Modifying an exposure menu or replacing an image after image reading processing will retain the
trimming setting determined before such a change, resulting thus in disabling re-trimming
processing at initial menu setting after such a change.
• Note that the determined trimming setting will not be reflected on images extracted to 10”x12”,
8”x10”, 14”x17” 2on1, 10”x14” 2on1 or 14”x17” 4on1, if they are transferred to a filing device or
a soft copy device at standard density.
• When an image trimmed to 10"x14" or 14"x10" size is delivered (except for film output), it is
output in 14"x17" or 14"x14", depending on the image size before trimming processing. (The area
outside the trimming frame is painted in black.)
3 - 44 2011. 06 897N0519M
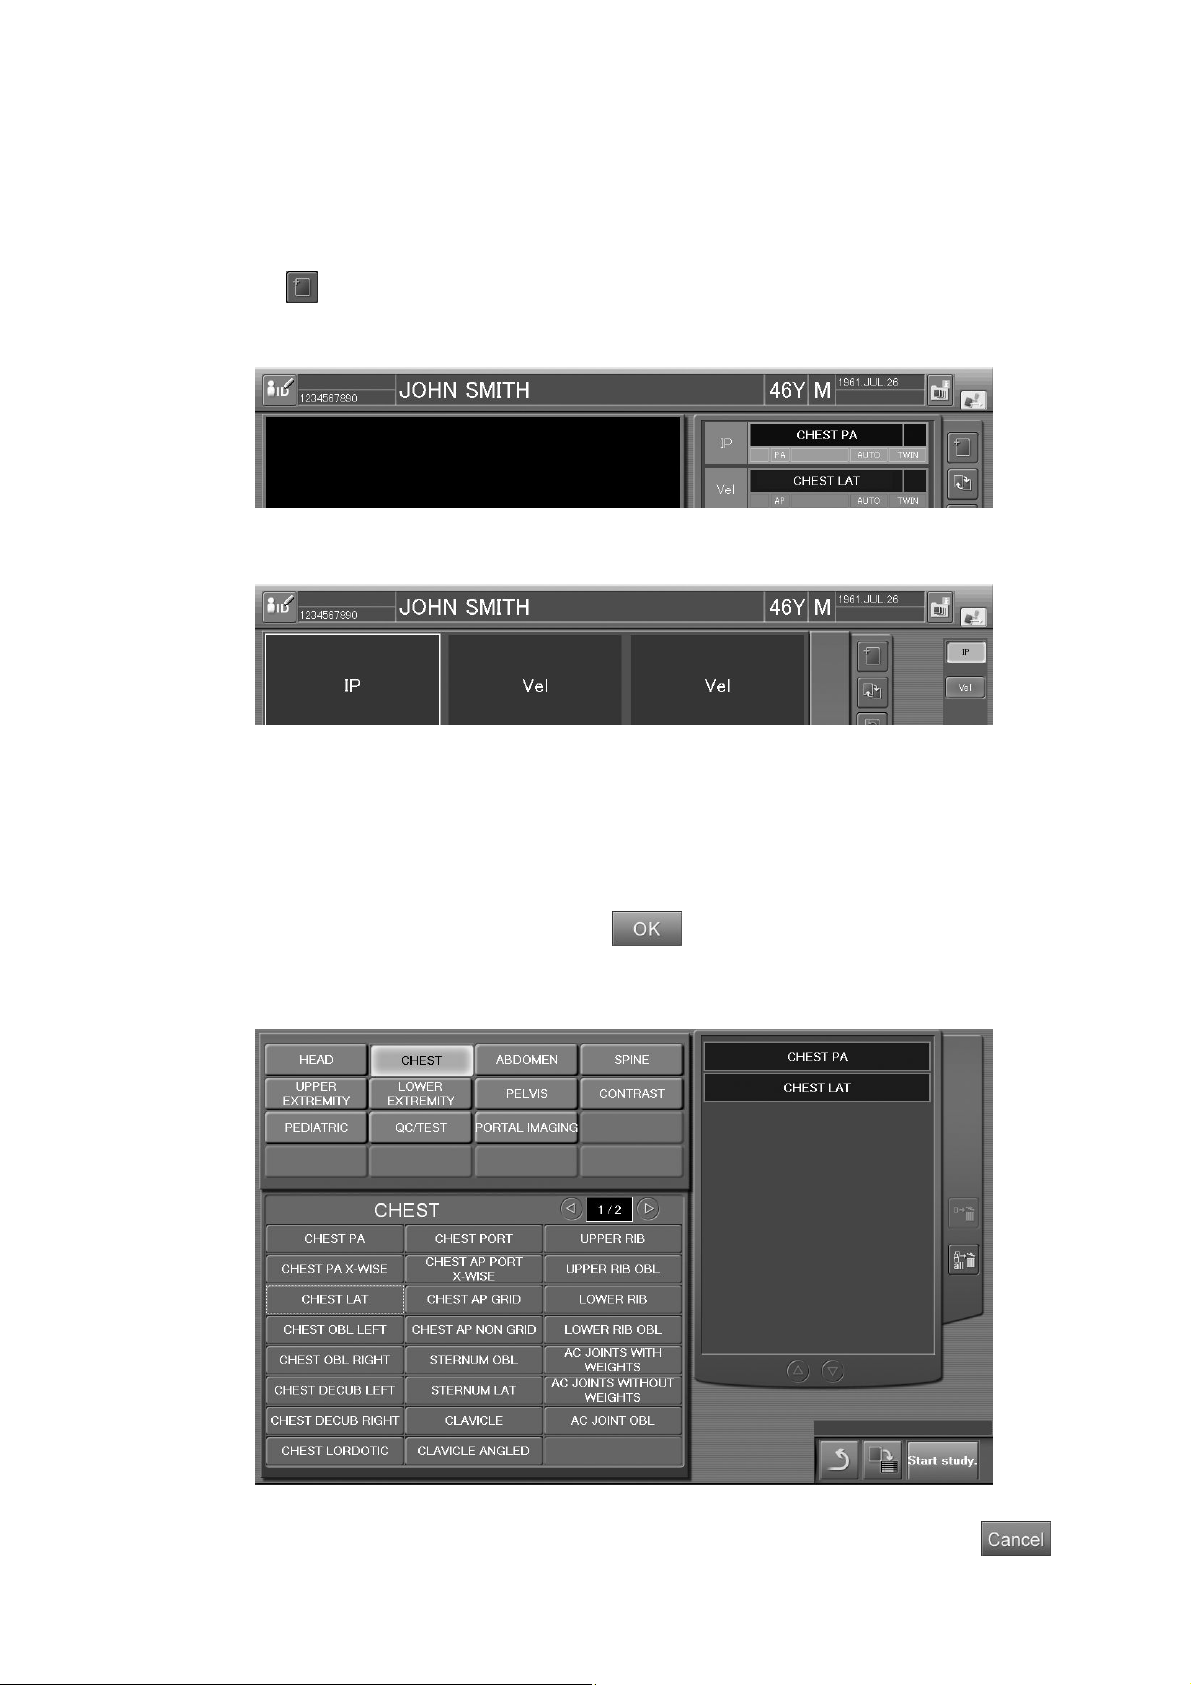
CR Console Operation Manual
3.4.3 Preparation before Exposure (Image Reading): Adding Exposure Menus
Adds exposure menus as follows.
Perform operation appropriately depending on the selected display mode of the Study Execution
Screen.
Select
Sample of one-image display mode :
Sample of six-image display mode :
.
The exposure menu addition box is displayed.
Select a menu item in the menu group to display the desired exposure menu, and then select an
exposure menu (more than one menu can be selected). The selected exposure menu(s) is listed in the
selected exposure menu list on the right side of the screen. (Only the added menu(s) is displayed in
the selected exposure menu list on the right side of the screen.)
After selecting an exposure menu(s), select
For how to select a menu in the exposure menu selection box, see [
].
Menu
.
3.1.3 Selecting Exposure
To cancel addition of exposure menus to return to the Study Execution Screen, select
2011. 06 897N0519M 3 - 45
.

CR Console Operation Manual
When adding study exposure menus at startup of multiple studies at the same time:
Study menus can be added also at startup of multiple studies at the same time.
To add a study menu at startup of multiple studies at the same time, select on the study screen an
exposure menu to be added to one study, and then select
The exposure menu selected in the exposure menu addition box will be added to the study selected
on the study screen.
Addition of exposure menus due to mis-exposure images or Auto Repeat processing can be
performed in the same manner.
.
The accession number and the
patient ID are the same with each
other.
A new menu is added to the
selected SKULL, FRN menu.
3 - 46 2011. 06 897N0519M
 Loading...