

6. Oplossing van problemen
Controleer vóórdat u de apparaten opnieuw
door een nieuwe van
Controleer zorgvuldig de aansluiting van de
Probleem Mogelijke oorzaak Oplossing
Geen woorden op de
voorkant LCD-Display.
Het alarm klinkt
voortdurend, ook al werkt
het elektriciteitsnet
normaal.
Bij een stroomuitval werkt
de UPS slechts korte tijd.
Het lichtnet is normaal,
maar het apparaat is op
batterij modus.
Lege accu. Laat de UPS ten minste 6 uur opladen.
Defecte accu. Vervang de accu door een nieuwe van
hetzelfde type.
De UPS is niet ingeschakeld. Druk kort op de schakelaar van de UPS,
zodat de in gebruik genomen wordt.
De UPS is overbelast. Ontkoppel een gedeelte van de belasting.
aansluit, of de belasting beantwoordt aan
de capaciteit van de UPS die in de
specificaties is vermeld.
De UPS is overbelast. Ontkoppel een gedeelte van de belasting.
De accuspanning is te laag. Laat de UPS ten minste 6 uur opladen.
Defecte accu. Het kan om een
gebrek gaan dat veroorzaakt
wordt door een te hoge
omgevingstemperatuur of door
slijtage van de accu.
De voedingskabel zit los.
Vervang de accu
hetzelfde type.
voedingskabel.
7 Specificaties
Model EP 1500 EP 2000
CAPACITEIT 1500 VA / 900 W 2000 VA / 1200 W
INGANG
Spanning 110/120 VAC of 220/230/240 VAC
Tolerantie 81–145 VAC / 162–290 VAC
UITGANG
Spanningsregeling +/–10 %
Schakeltijd: Gewoonlijk 2-6 ms, 10 ms max.
Golfvorm Gesimuleerde sinusgolf
ACCU
Type en aantal 12 V/9 Ah – 2 st.
Oplaadtijd 4-6 uur voor opladen tot 90% van de capaciteit
AFMETINGEN EN GEWICHT
Afmetingen (l x b x h) 397 x 146 x 205 mm
Gewicht (kg) 11,1 11,5
OMGEVING
Vochtigheid 0-90% rel. vochtigheid bij 0-40° C (niet-condenserend)
Geluidsproductie Minder dan 40 dB
MANAGEMENT
USB/RS-232 Ondersteunt Windows® 98/2000/2003/XP/Vista/2008, Windows® 7,
Linux, en MAC
Line Interactive UPS
1. Package Contents
You should have received the following items inside of package:
- UPS Unit
- Quick Guide
- Communication cable (only for the model with USB/RS-232 port)
- Power cable (only for the IEC-type input model)
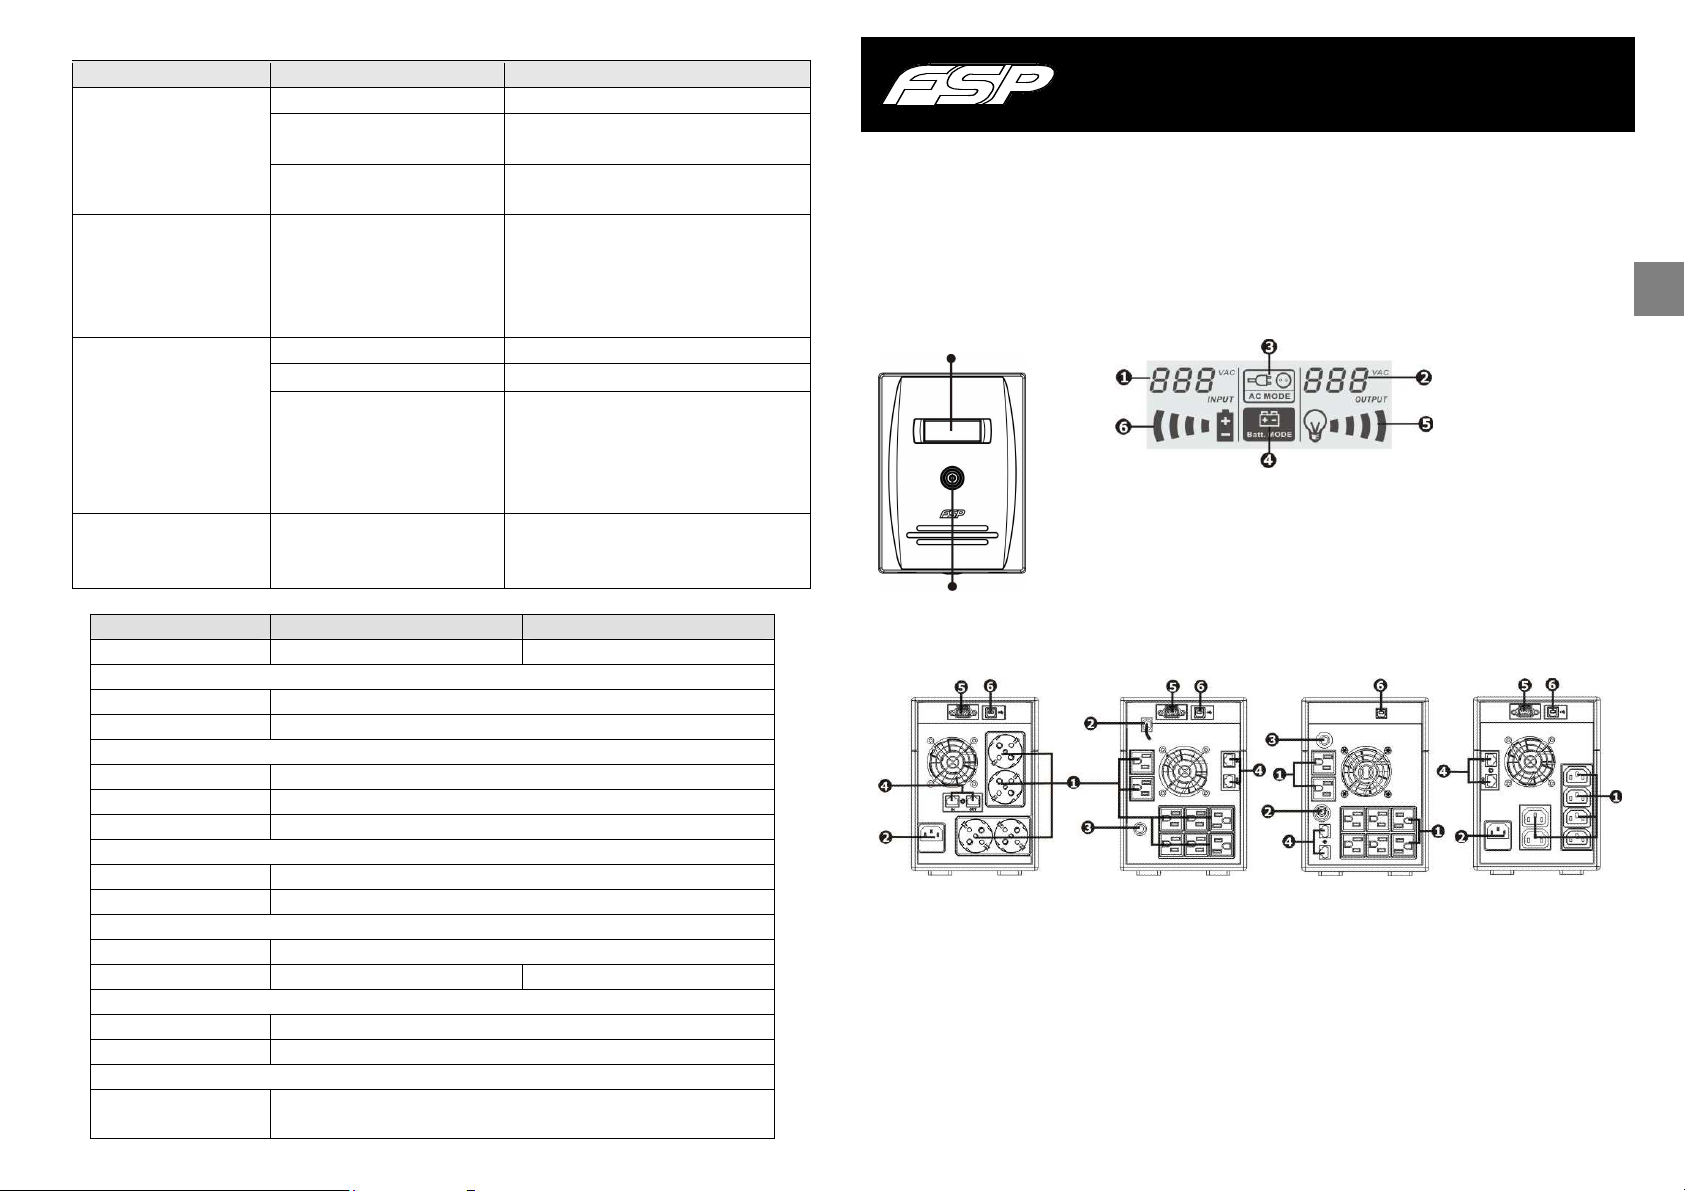
2. Product Overview
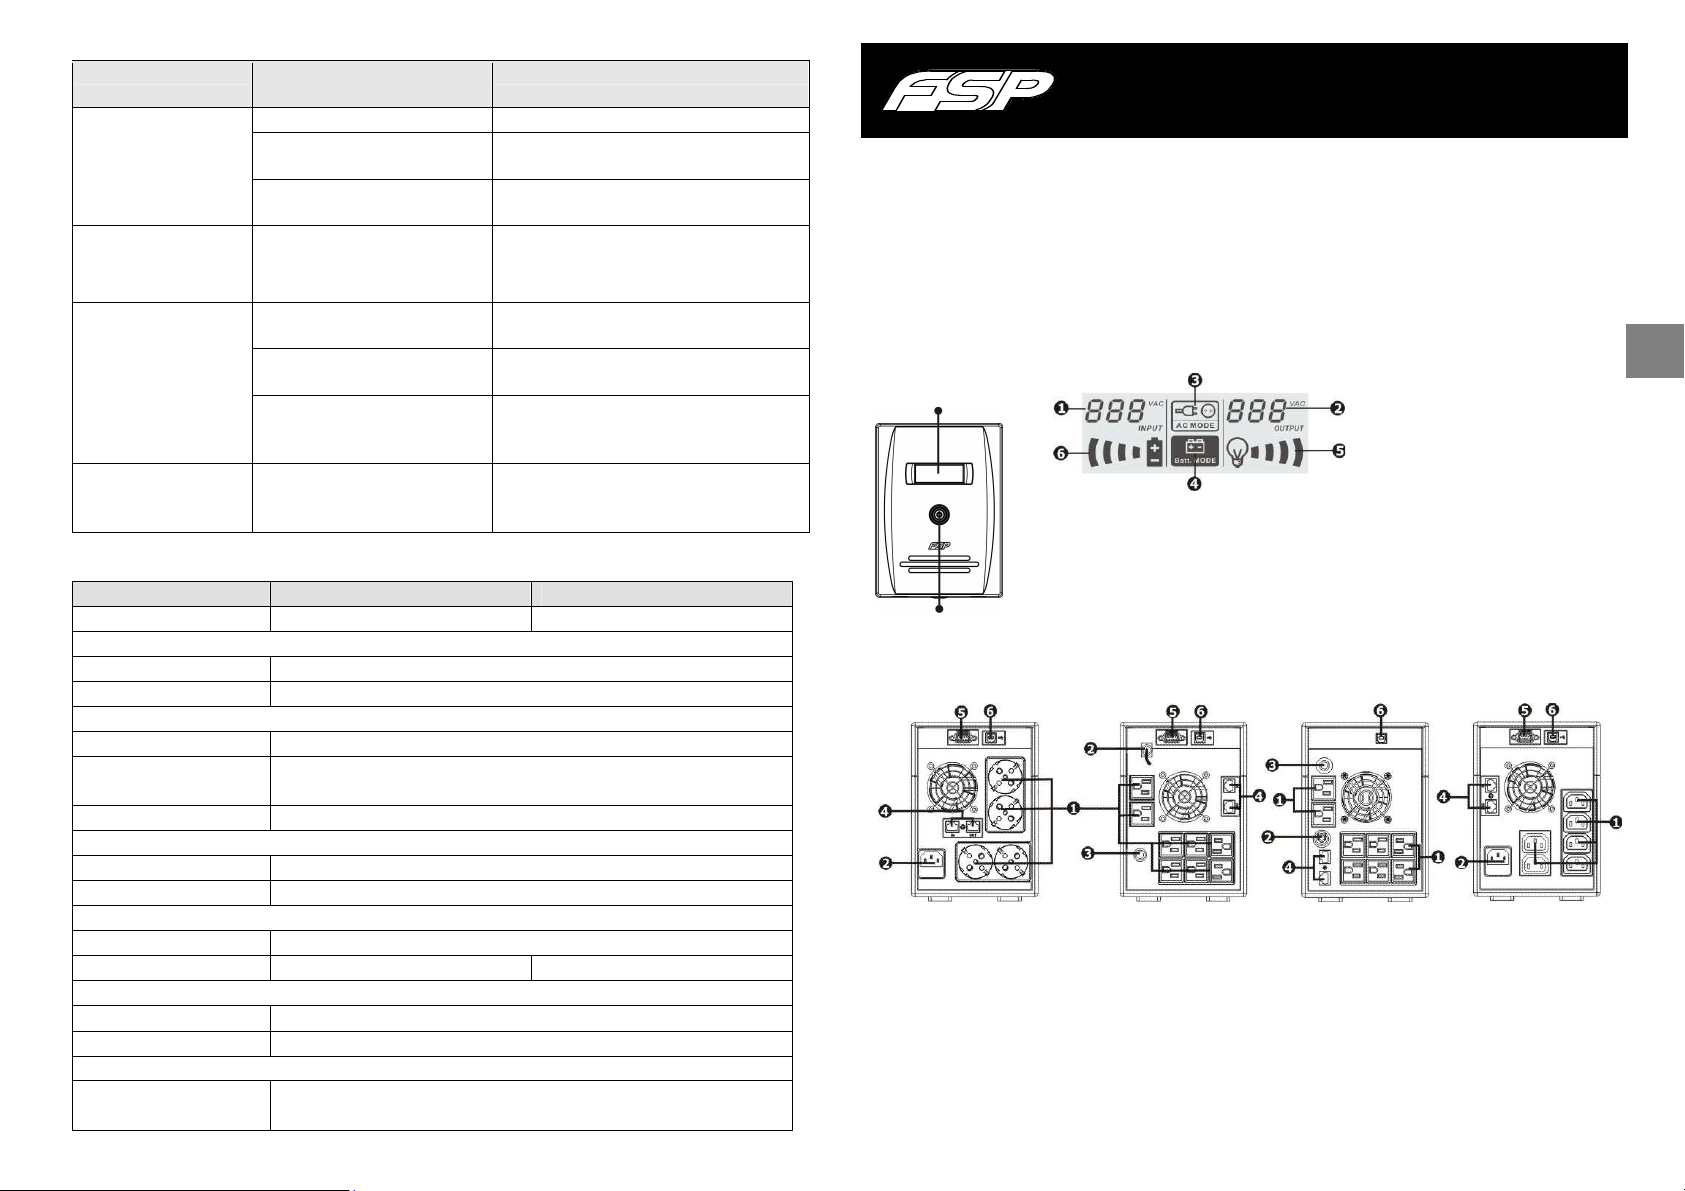
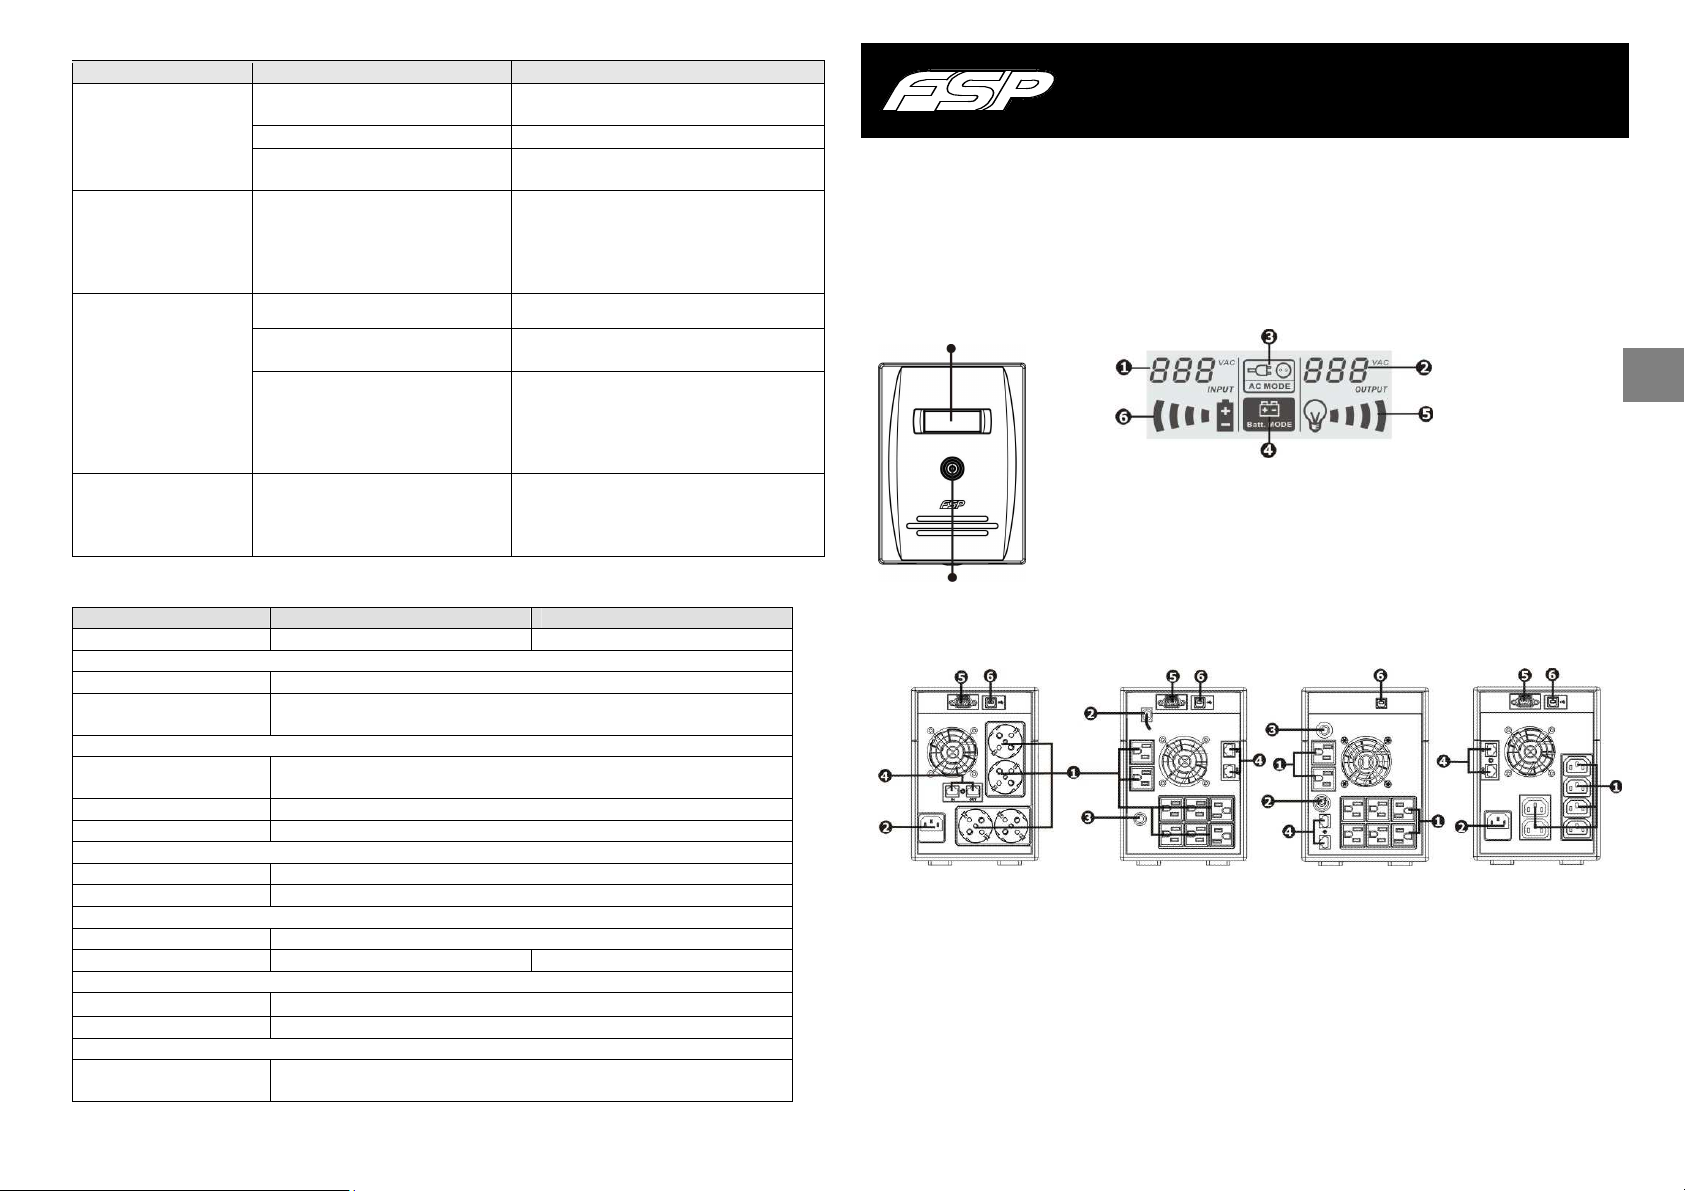
Front View: LCD panel:
LCD panel
Input voltage
Output voltage indicates overload
AC mode indicator
Power Switch
Back View:
Schuko Type NEMA Type I NEMA Type II IEC Type
Output receptacles
AC input
Circuit breaker
Battery mode indicator Indicates low battery
Modem/Phone/Network surge protection
RS-232 com. port
USB com. port
Load level indicator, flashing
Battery capacity indicator, flashing
Quick Guide V. 1.1
EN
78 1

6 hours
3. Installation and Initial Startup
Before installation, please inspect the unit and contents that nothing is
damaged or missing.
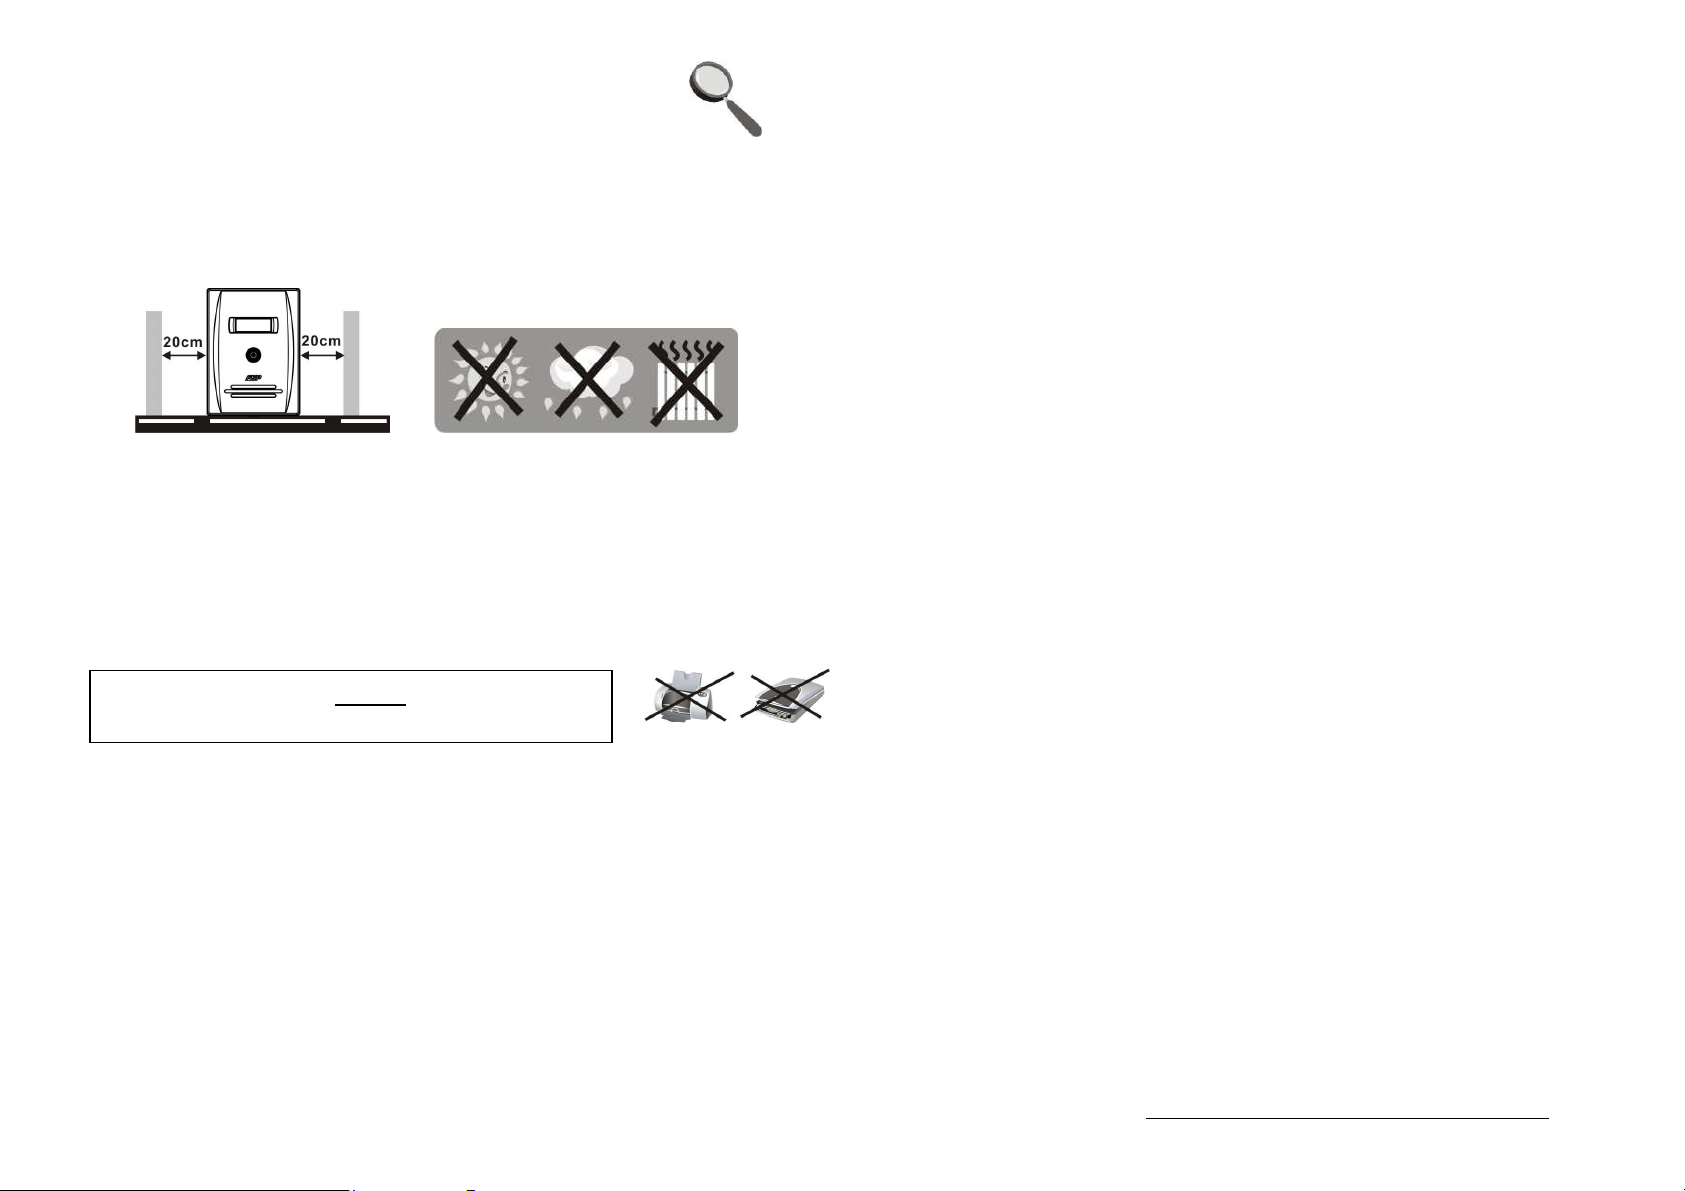
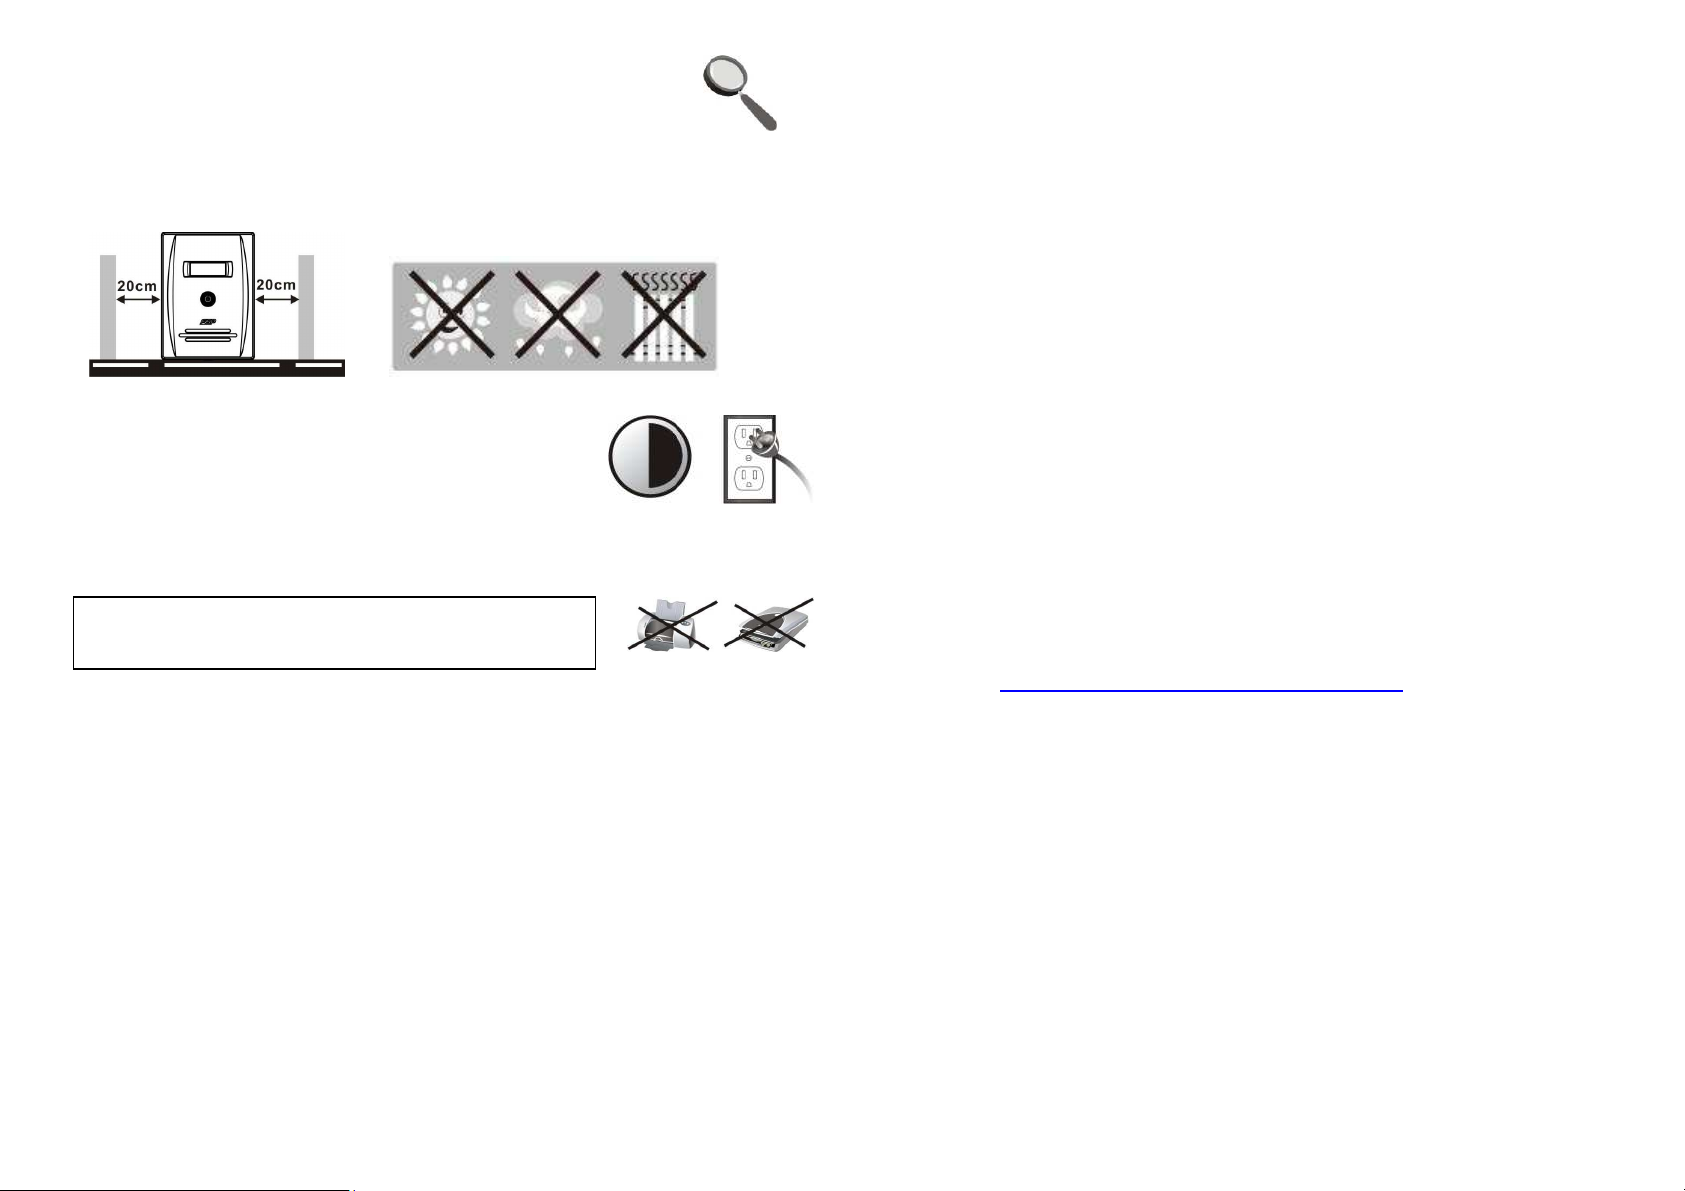
Placement & Storage Conditions
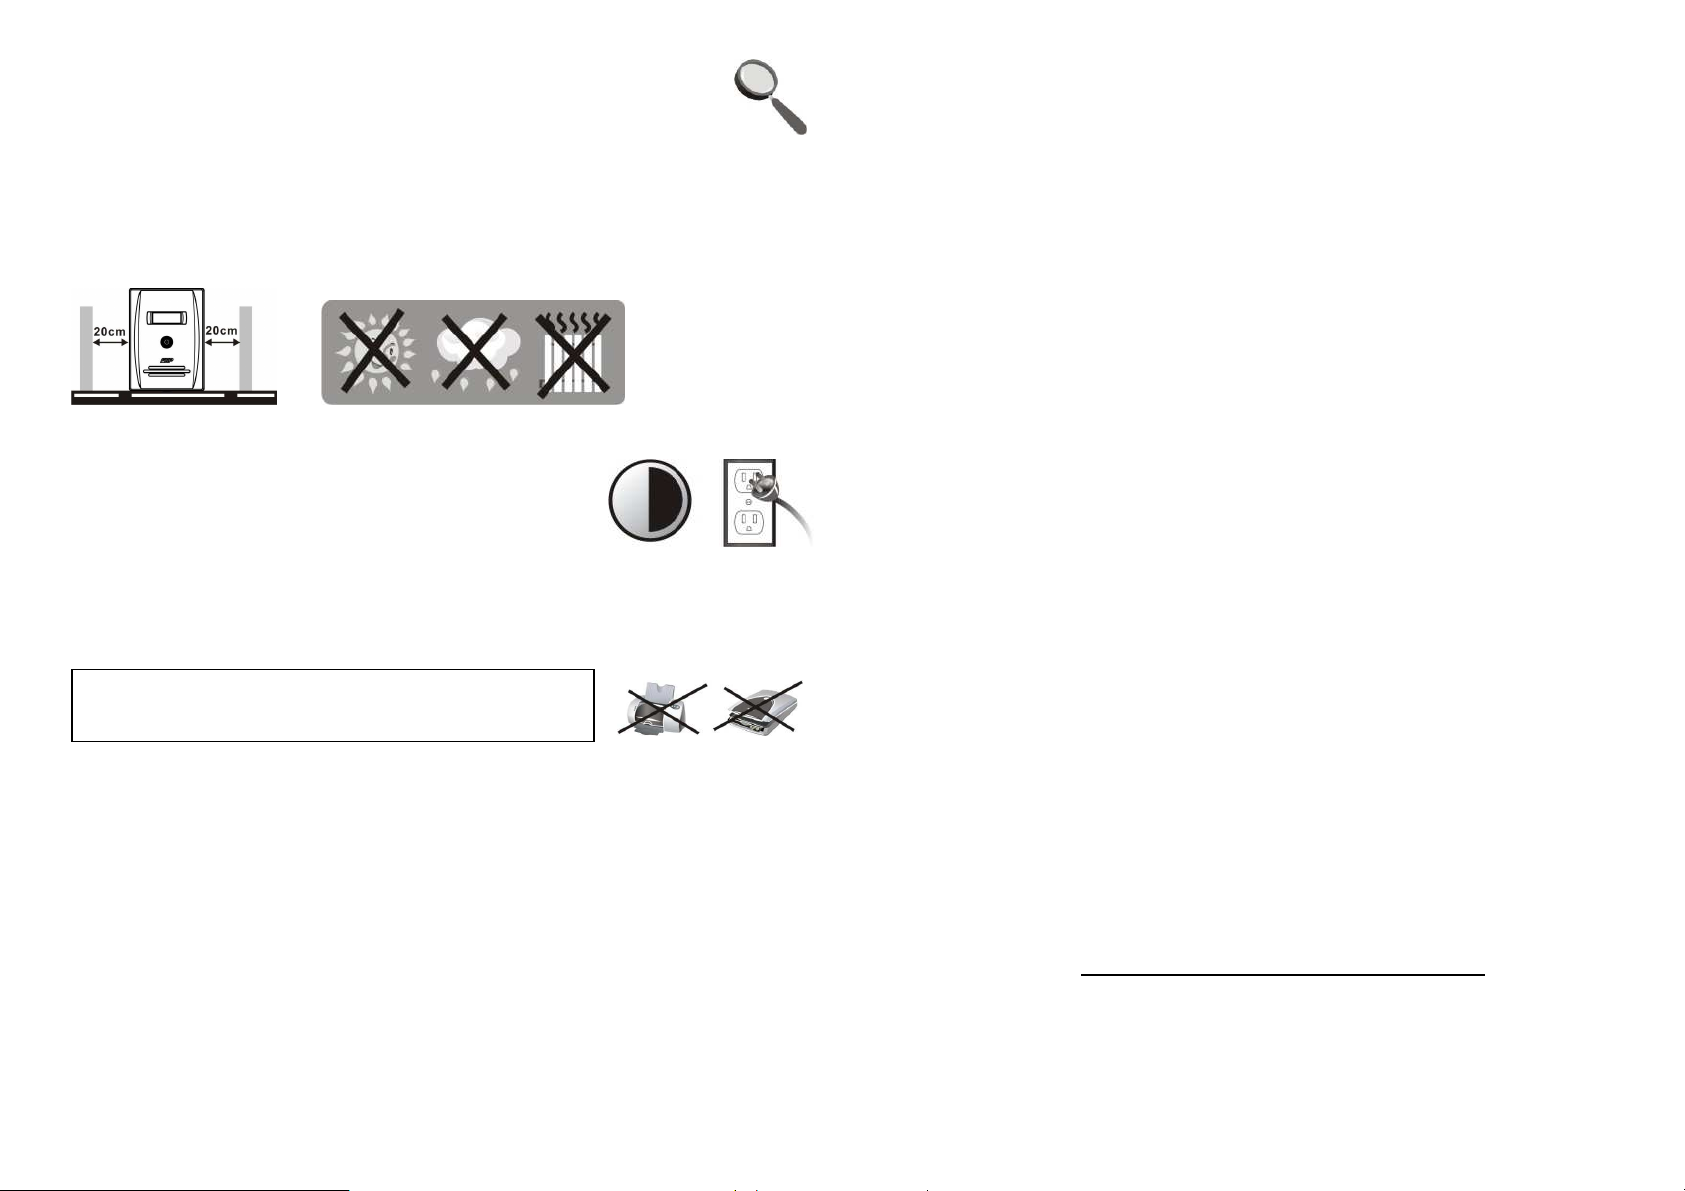
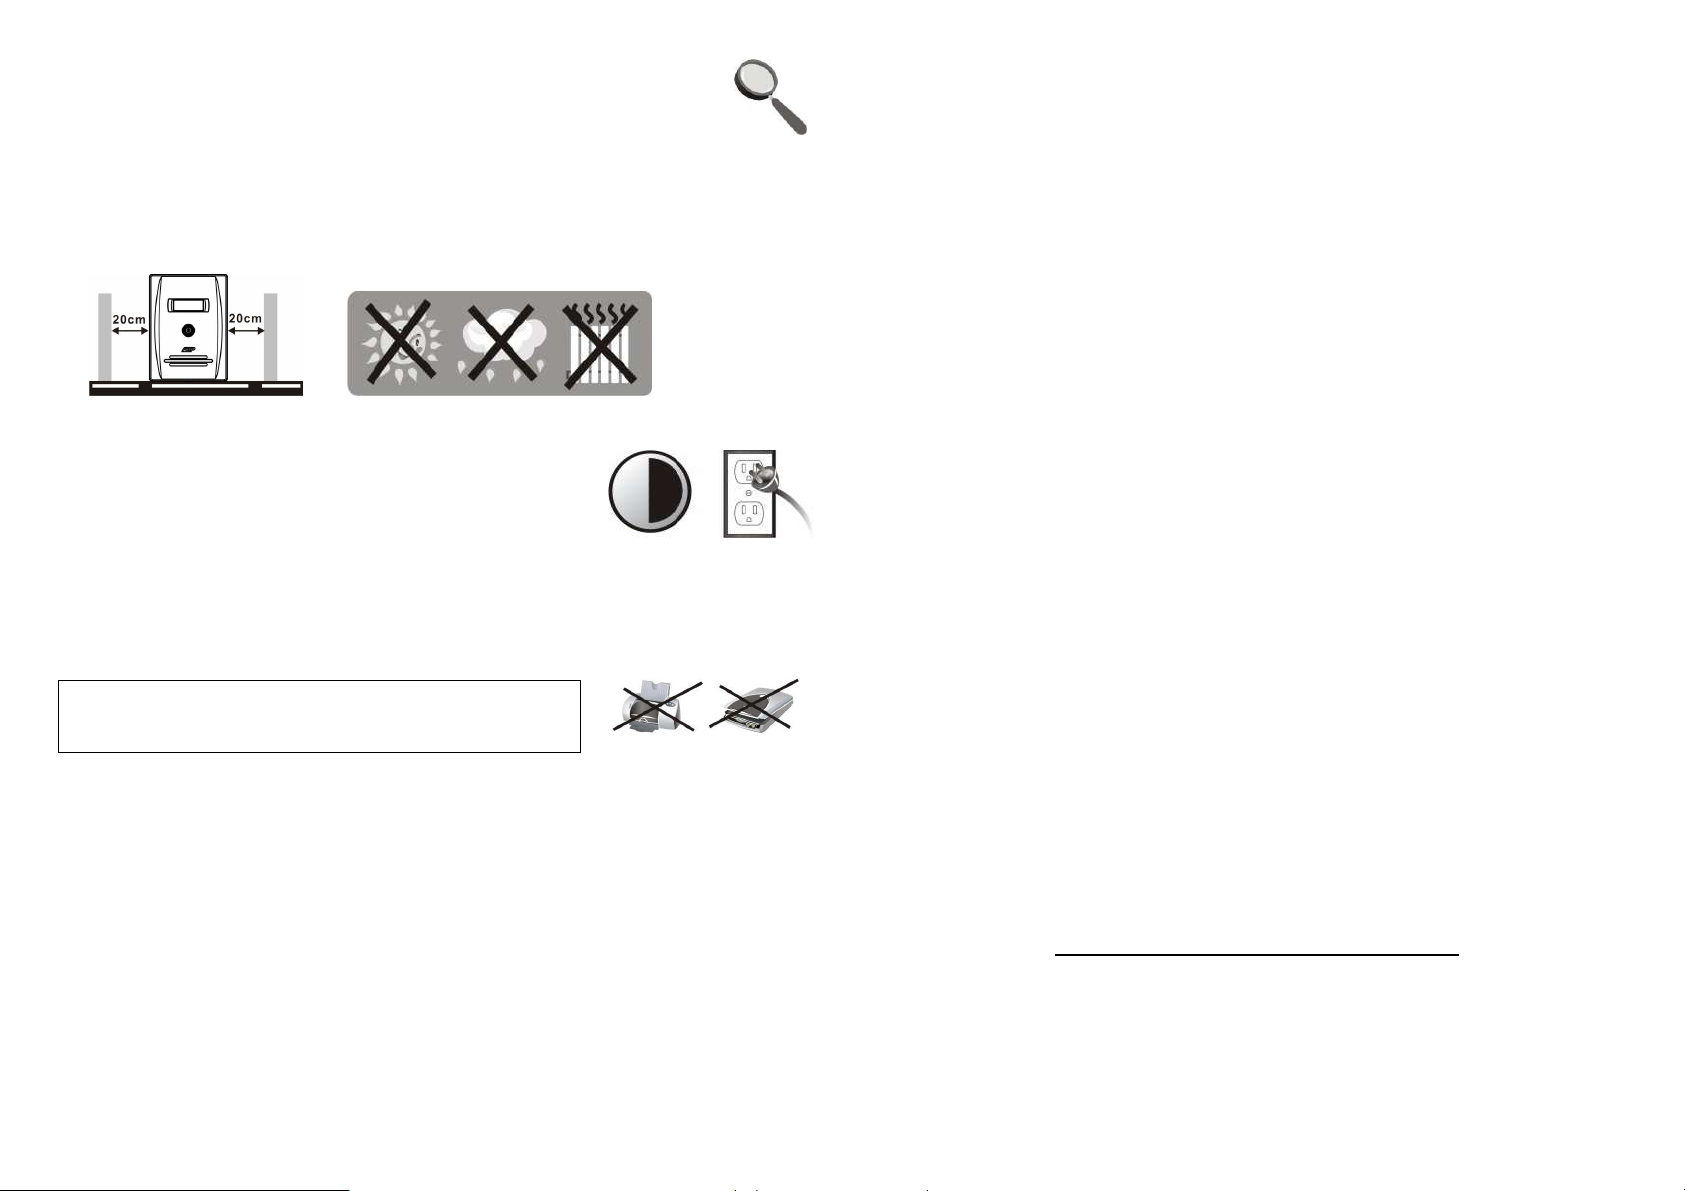
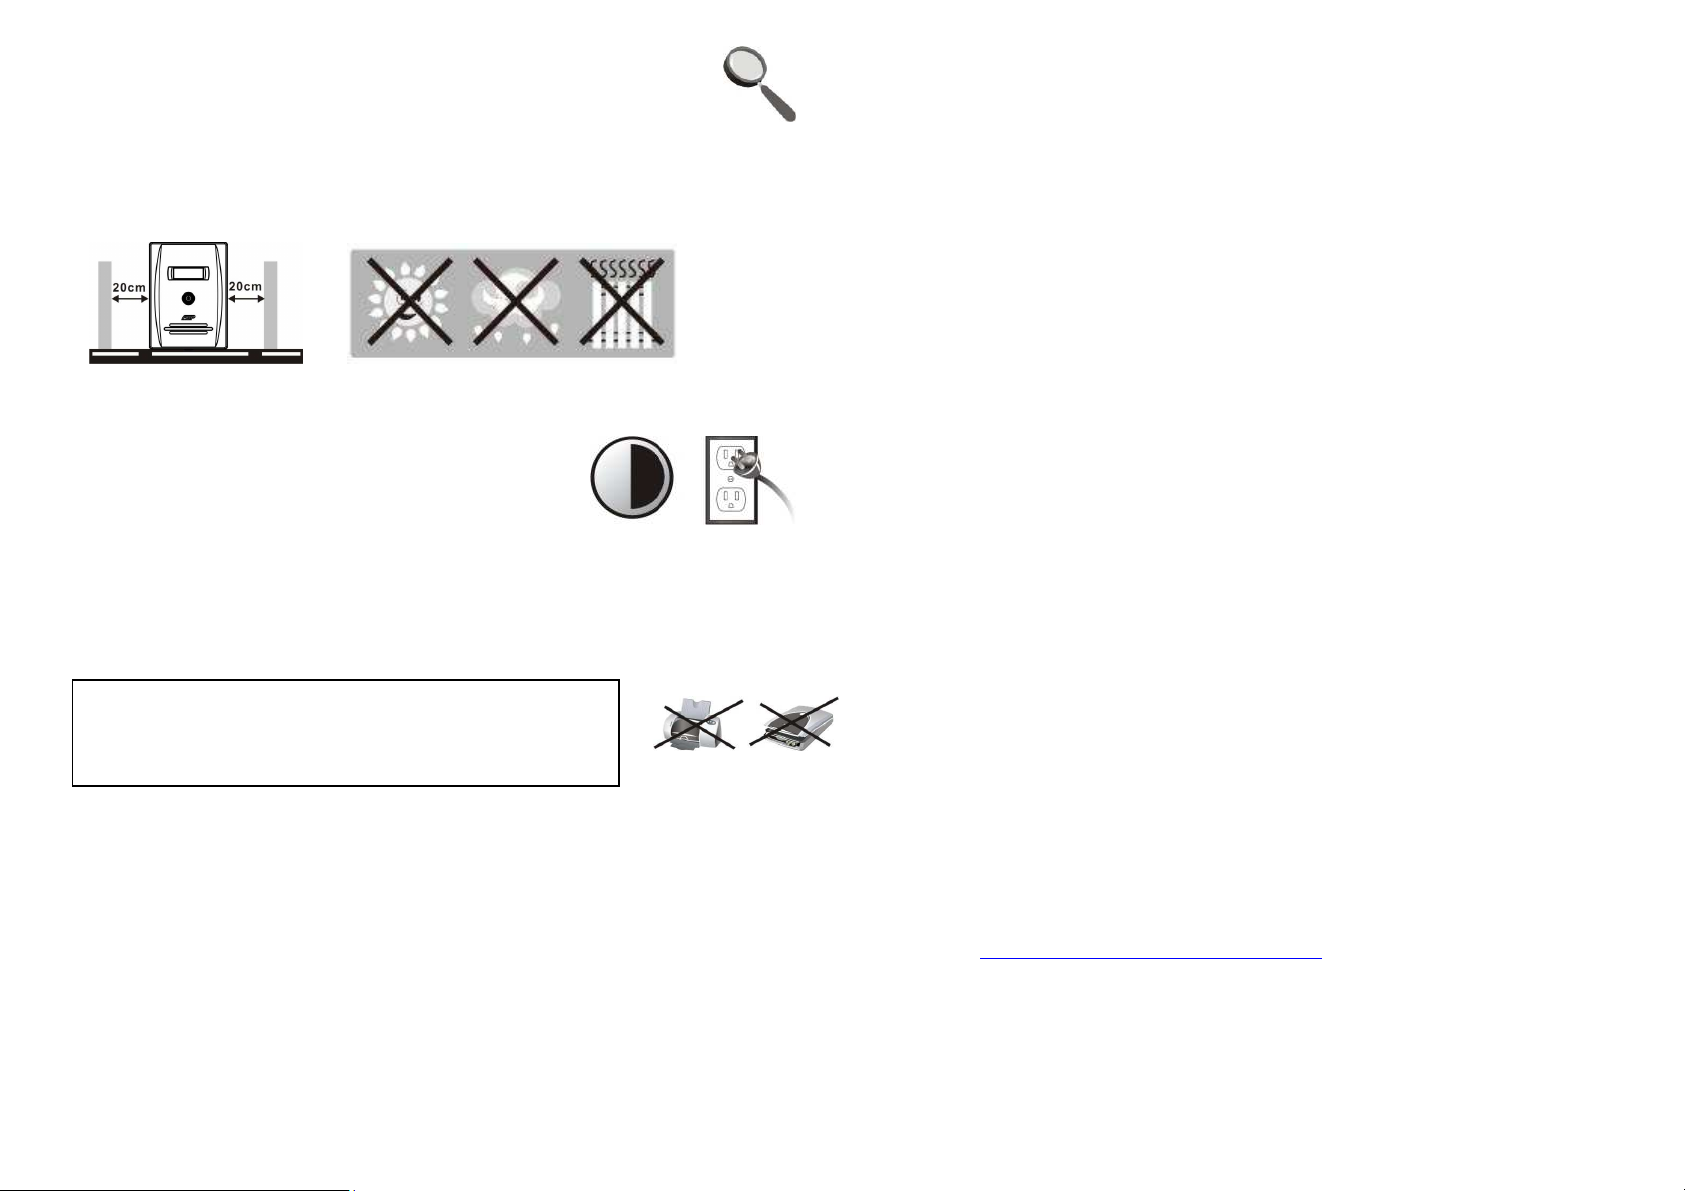
Install the UPS in a protected area that is free of excessive dust and has adequate air flow. Please
place the UPS away from other units at least 20 cm to avoid interference. Do NOT operate the UPS
where the temperature and humidity is above the recommended limit (Please check the specs)
Connect to Mains and Charging
Plug in the AC input cord to the wall outlet and charge the UPS for
at least 6 hours before using. The unit charges its battery while
connected to the mains.
Connect Devices
Plug in the devices to the output connections on the rear panel of the UPS. Turn the power on by
pressing the switch, the devices are now protected by the UPS.
Connect Modem/Phone/Network for Surge Protection
(Only for the model with RJ-45)
Plug the modem/phone line into the surge-protected “IN”
connection on the rear of the UPS unit, the other end should be plugged into the “OUT”
connection on the computer for the phone.
Connect Communication Cable (Only for the model with USB/RS-232 port)
To enable remote UPS shutdown/start-up and status monitoring, connect the communication
cable from the USB/RS-232 port and the other to the communication port of your PC. With the
monitoring software installed, you can schedule UPS shutdown/start-up and monitor the UPS
status.
Turn On/Off the Unit
Press the switch to turn on the UPS. To turn off, press and hold the switch for 5 seconds.
4. Important Safety Warning (PLEASE READ THE INSTRUCTIONS)
CAUTION!
•••• To prevent the risk of fire or electric shock, use only indoors in a temperature and humidity
controlled area free of conductive contaminants. (See the specifications for)
•••• To reduce risk of overheating, do not cover the UPS' cooling vents and avoid exposing the unit
to direct sunlight or installing the unit near appliances such as heaters or fires.
•••• Do not attach non-computer items, such as medical equipment, life-support equipment,
microwave ovens, or vacuum cleaners to UPS.
•••• Do not plug the UPS input into its own output.
•••• Do not place beverages or any other items containing liquid on or near the unit.
•••• In the event of an emergency, press the OFF button and disconnect the power cord from the
AC power supply to properly disable the UPS.
•••• Do not attach a power strip or surge suppressor to the UPS.
•••• If the UPS has a metal chassis, for safety purpose, grounding is a must during installation in
order to reduce leakage current below 3.5mA.
•••• Repair or service work should be performed or supervised by trained personnel only.
•••• When replacing the batteries, use the same number and type.
•••• Internal battery voltage is 12VDC. Sealed, lead-acid, 6-cell battery.
•••• Do not dispose of batteries in a fire as they may explode.
•••• Do not open or damage the battery or batteries. Released electrolyte is harmful to the skin
and eyes.
•••• Unplug the UPS prior to cleaning and do not use liquid or spray detergent.
•••• A battery can present a risk of electric shock and high short circuit current. The following
precautions should be observed before replacing batteries:
1) Remove watches, rings, or other metal objects.
2) Use tools with insulated handles.
3) Wear rubber gloves and boots.
4) Do not lay tools or metal parts on top of batteries.
5) Disconnect charging source prior to connecting or disconnecting batter terminals.
Attention: Hazard through electric shock. Risk when disconnecting the unit from the mains, the
battery may still contain voltage. The battery should be correctly disconnected at the plus and
minus pole of the connectors on the battery when maintenance work inside the UPS is carried out.
5. Software Download & Installation (Only for the model with
communication port)
Please follow steps below to install software:
1. Please visit http://www.power-software-download.com
2. Click ViewPower software icon and choose your required language to download.
3. Follow the on-screen instructions to install the software.
4. When your computer restarts, the monitoring software will appear as an orange “plug” icon at
the bottom right of your screen (system tray) where the clock is.
5. User name and password in software management:
User name: administrator
Password: administrator
2 3
6. Trouble Shooting
on the front
that the load matches the UPS
h the same
Problem Possible Cause Solution
No words
LCD panel display.
Alarm continuously
sounds although
mains supply is
normal.
When power fails,
back-up time is
shorten.
The mains is normal
but the unit is on
battery mode.
7 Specifications
Model EP 1500 EP 2000
CAPACITY 1500 VA / 900 W 2000 VA / 1200 W
INPUT
Voltage 110/120 VAC or 220/230/240 VAC
Voltage Range 81-145 VAC / 162-290 VAC
OUTPUT
Voltage Regulation +/-10%
Transfer Time Typical 2-6 ms, 10 ms max.
Waveform Simulated Sine Wave
BATTERY
Type & Number 12 V/9 AH x 2
Charging Time 4-6 hours recover to 90% capacity
PHYSICAL
Dimension (DxWxH) 397 x 146 x 205 mm
Net Weight (kgs) 11.1 11.5
Environment
Humidity 0-90 % RH @ 0-40° C (non-condensing)
Noise Level Less than 40 dB
MANAGEMENT
USB/RS-232 Supports Windows® 98/2000/2003/XP/Vista/2008, Windows®
Low battery. Charge the UPS at least 6 hours.
Battery fault. Replace the battery with the same
type of battery.
The UPS is not turned on. Press the power switch again to turn
on the UPS.
The UPS is overloaded. Remove some devices. Before
reconnecting equipment, please
check
capacity specified in the specs.
The UPS is overloaded. Remove some critical load.
Battery voltage is too low. Charge the UPS at least 6 hours.
Battery defect. Operating
temperature could be too
high, or battery is not
correctly used.
Power cord is loose. Check and reconnect the power cord.
Replace the battery wit
type of battery.
7, Linux, and MAC
4 5
Line Interactive UPS
1. Lieferumfang
Im Lieferumfang sollten Sie folgendes finden:
- USV Einheit
- Kurzanleitung
- Kommunikationskabel (nur für Modelle mit USB/RS-232 Schnittstelle)
- Netzkabel (nur für Modelle mit IEC-Eingang)
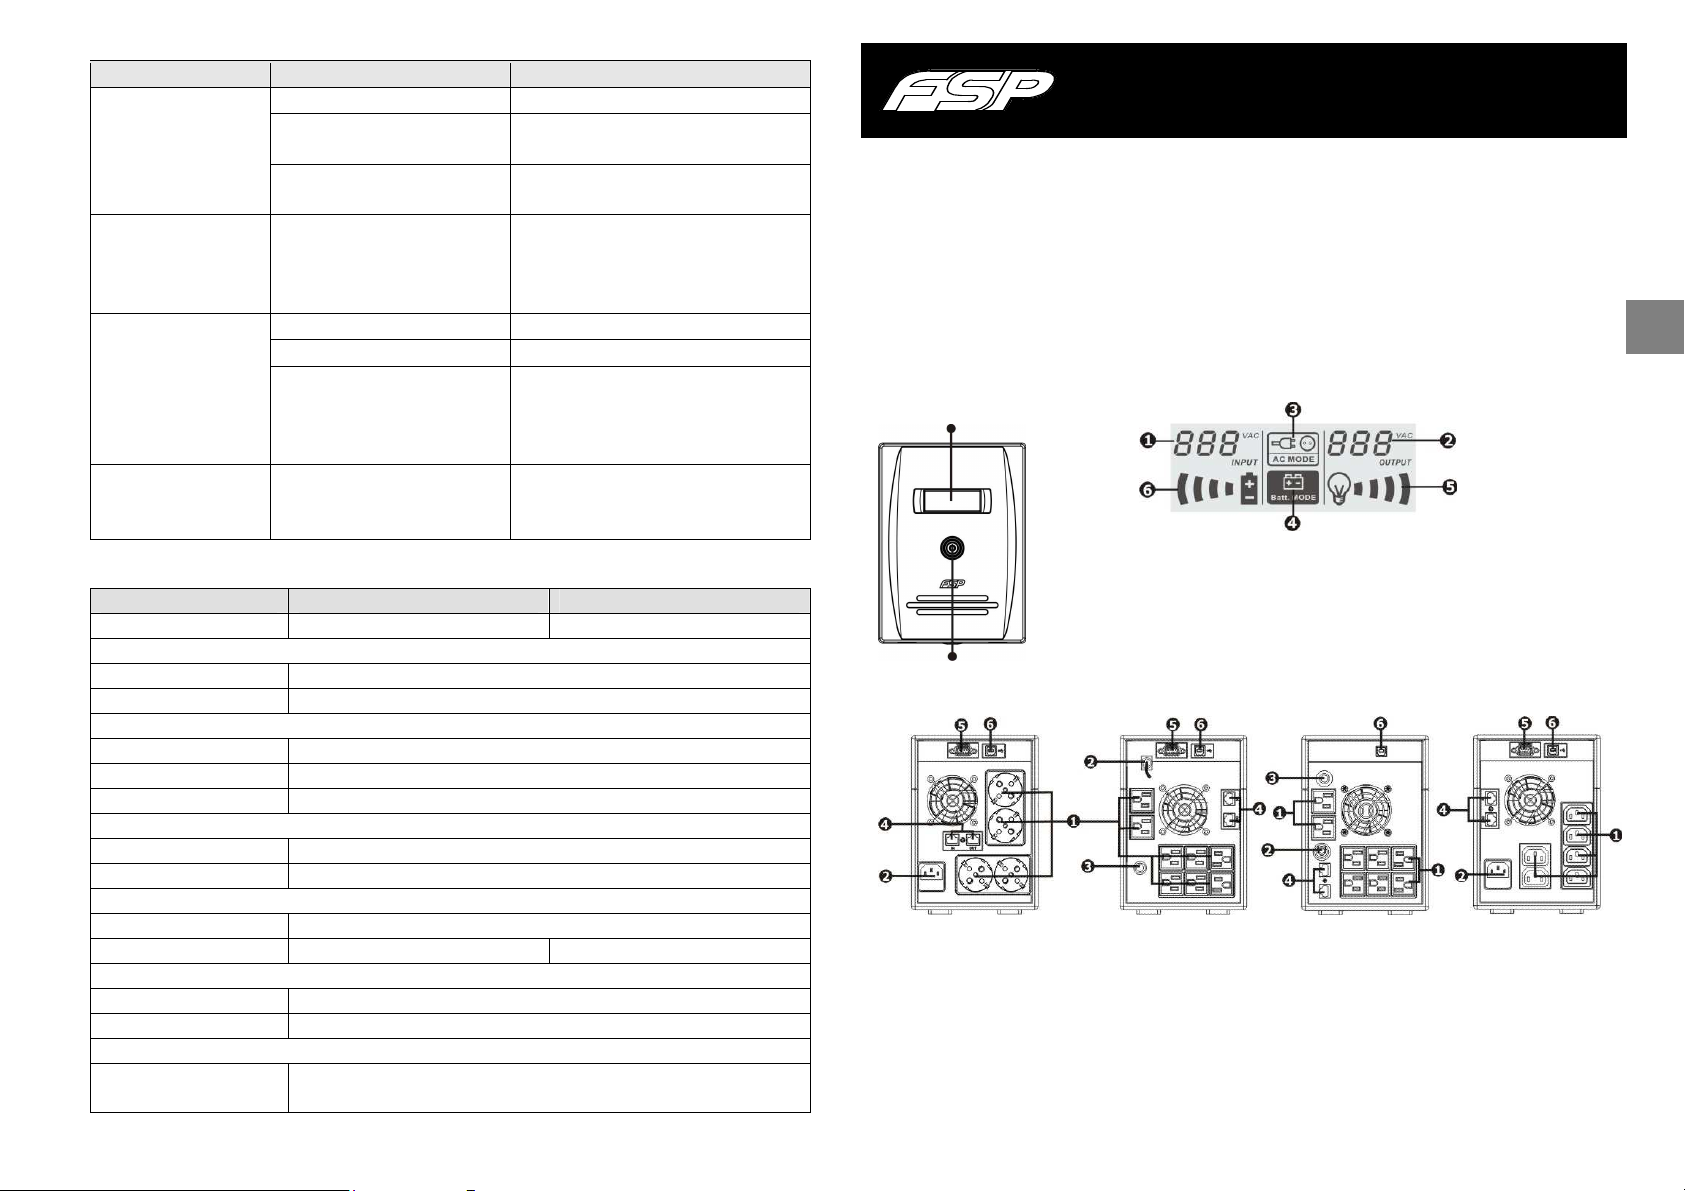
2. Produktübersicht
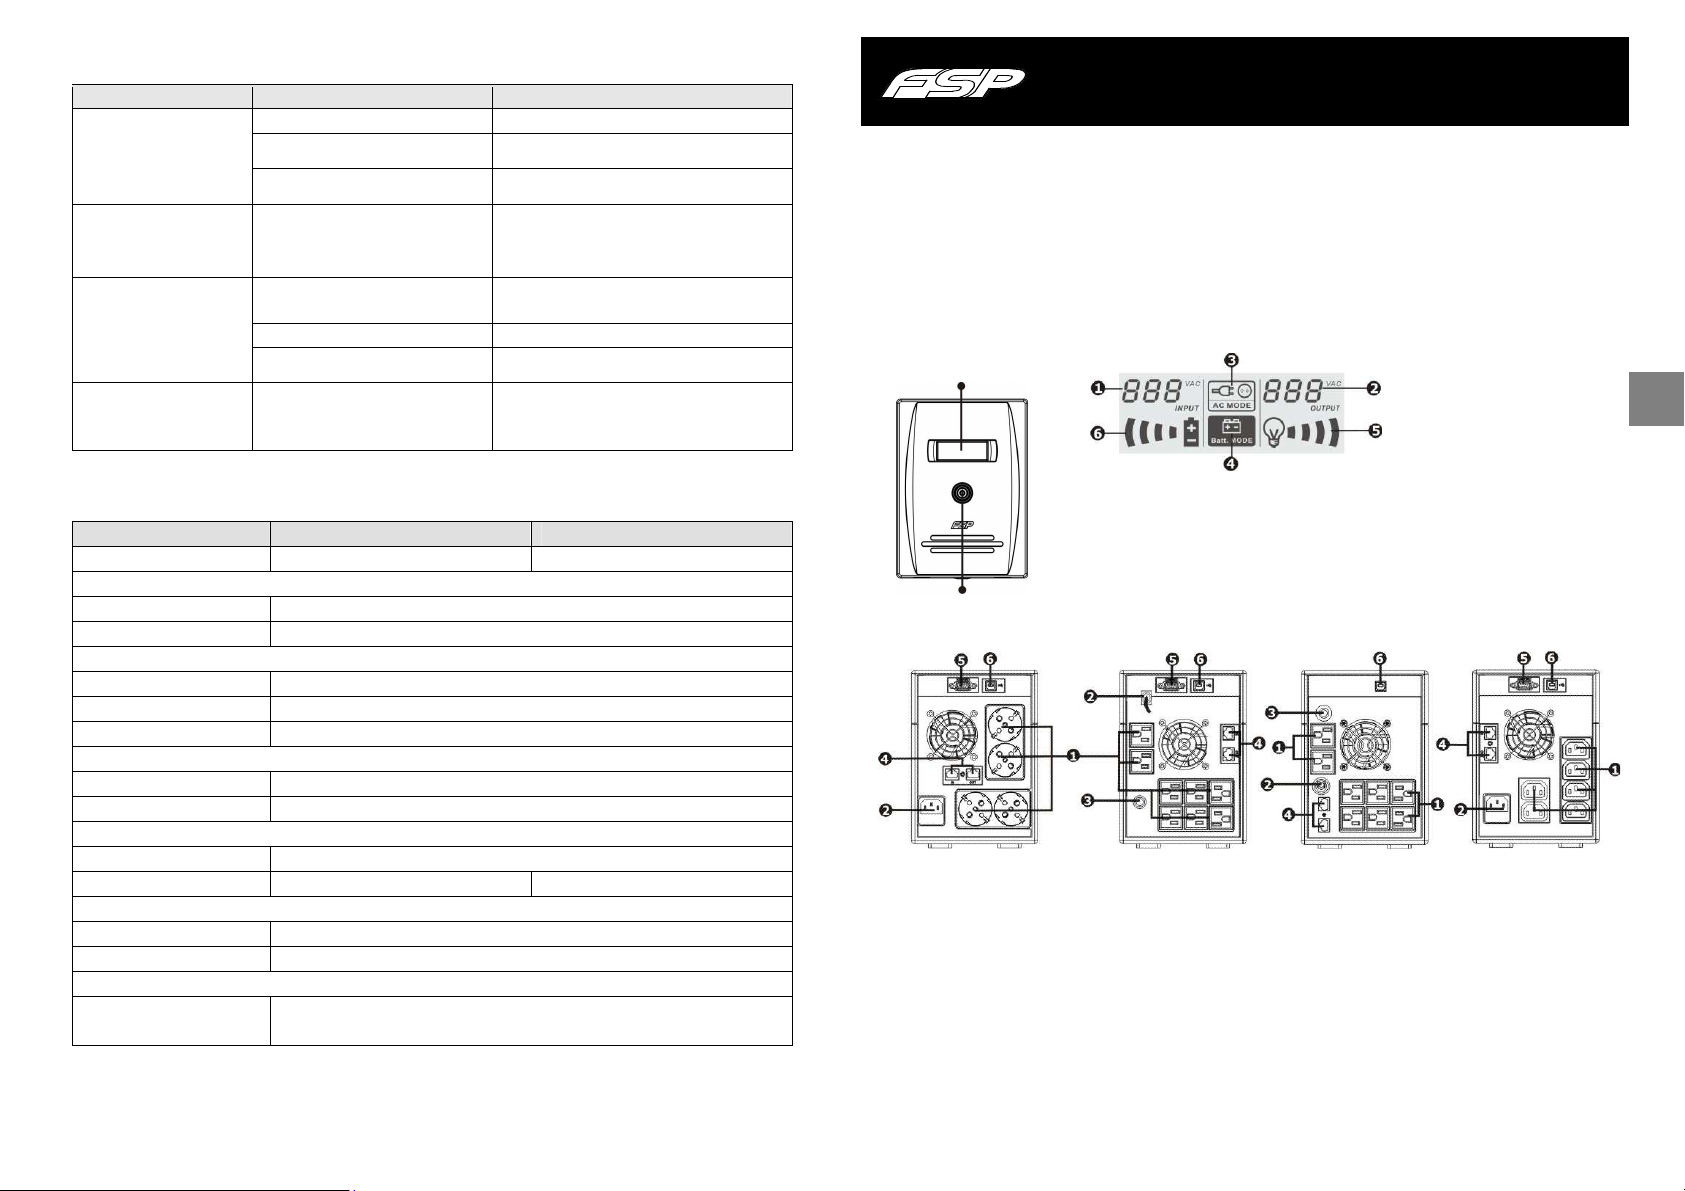
Vorderansicht: LCD panel:
LCD panel
Eingangsspannung
Ausgangsspannung
AC Modus Anzeige
Ein/Aus Schalter
Rückansicht:
Schuko Typ NEMA Typ I NEMA Typ II IEC Typ
Ausgänge
AC Eingang
Schutzschalter
Batterie Modus Anzeige zeigt niedrigen Batteriestatus an
Modem / Telefon / Netzwerk Überspannungsschutz
RS-232 com. Schnittstelle
USB com. Schnittstelle
Lade Status Anzeige, Blinken
zeigt Überladung an
Batteriekapazitätsanzeige, Blinken
Kurzanleitung V. 1.1
DE
HINWEIS: Vor der Installation sollten Sie den kompletten
Lieferumfang auf mögliche Schäden überprüfen.
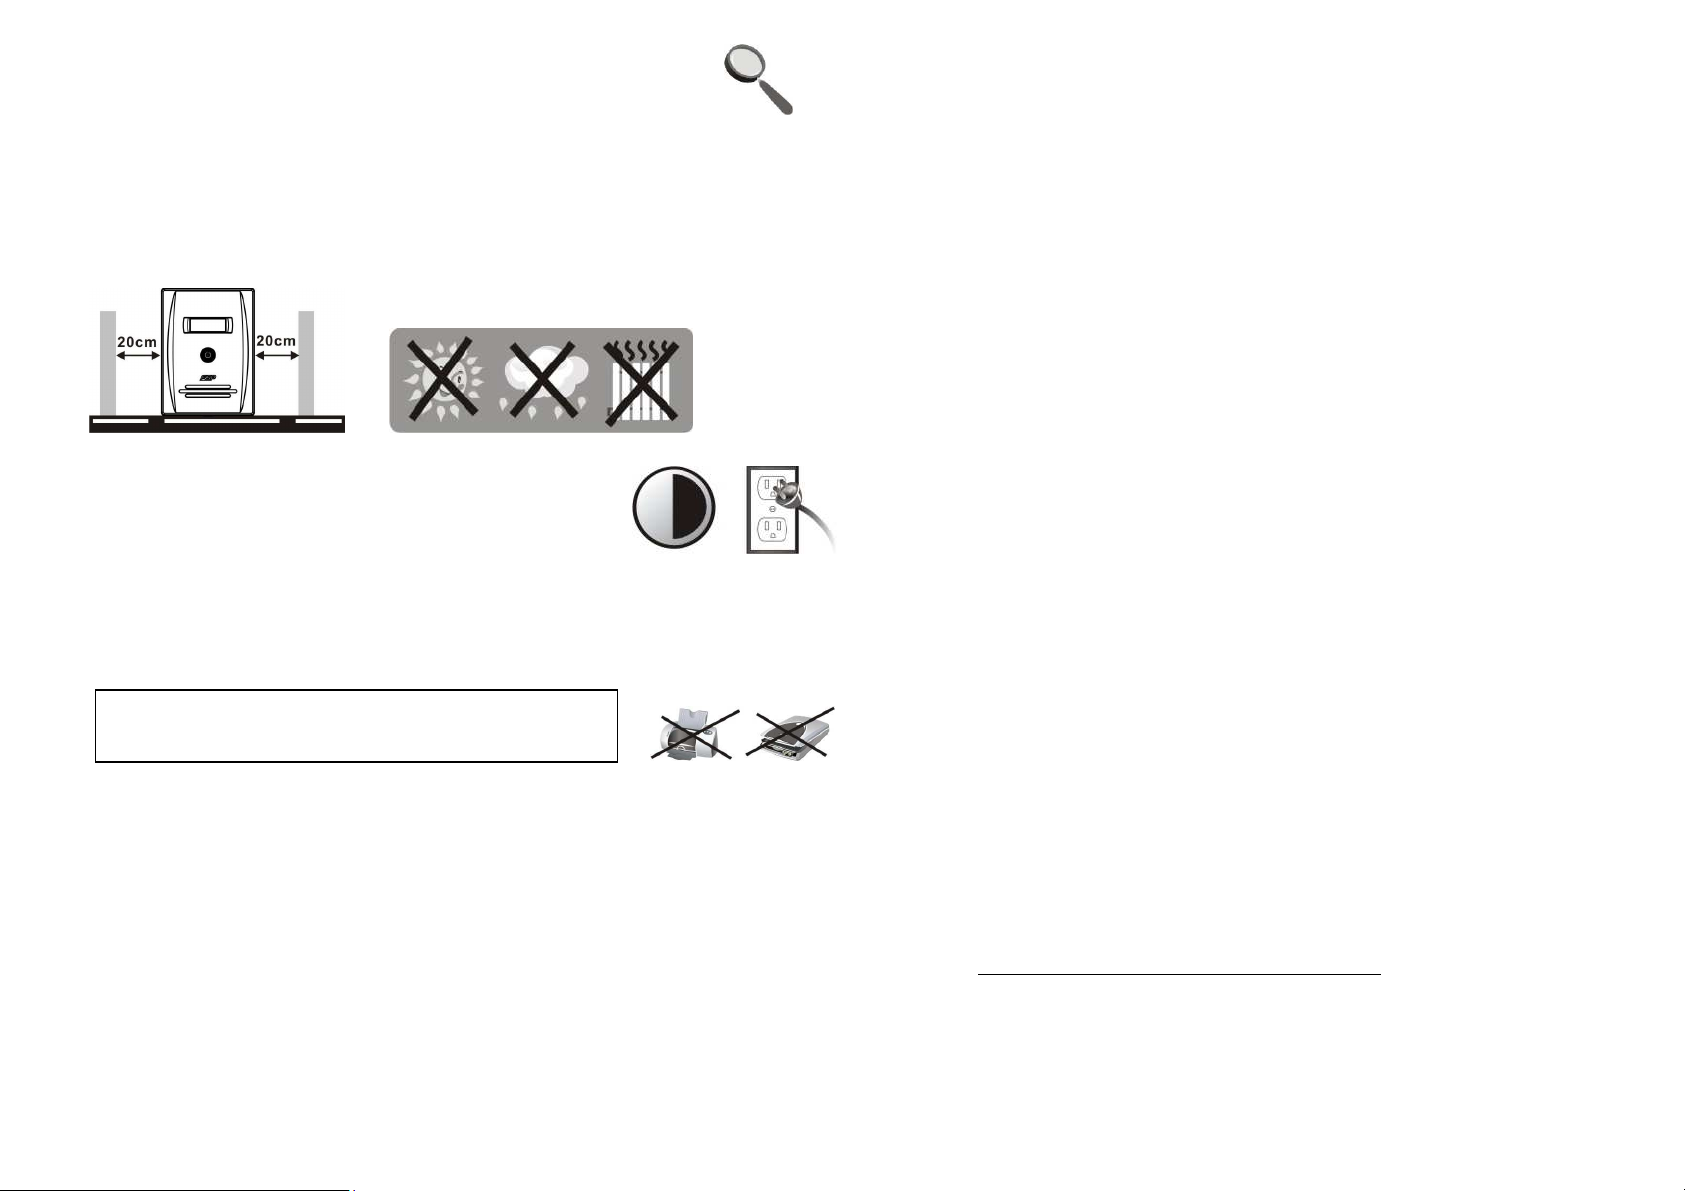
Aufstellung und Lagerungs-Bedingungen
Installieren Sie die USV in einer geschützten Umgebung, möglichst
staubfrei und mit ausreichender Luftzirkulation. Bitte halten Sie einen Mindestabstand von 20cm
ein, um Interferenzen mit anderen Geräten zu vermeiden. Betreiben Sie das Gerät nicht in einer
Umgebung, in der die Werte für Temperatur und Luftfeuchtigkeit die Spezifikationen
überschreiten. (Bitte überprüfen Sie vorab die Spezifikationen.)
Anschluß und Aufladen des Gerätes
Schließen Sie die USV mit dem Netzkabel an das Stromnetz an. Um ein optimales Ergebnis zu
erlangen, sollte die Batterie vor dem Erstgebrauch mindestens sechs Stunden aufgeladen
werden. Das Gerät lädt die Batterie, wenn sie angeschlossen ist.
Anschluß der Verbraucher
Schließen Sie die Verbraucher an die Ausgänge auf der Rückseite der USV an. Schalten Sie
einfach die USV ein, und schon sind die Geräte geschützt.
ACHTUNG: Schliessen Sie niemals einen Laserdrucker oder
einen Scanner an die USV an.
Anschluß von Modem/Telefon/Netzwerk für Überspannungsschutz (Nur für
Modelle mit RJ-45 Anschluß)
Schließen Sie ein Modem-/Telefonkabel am “IN” Anschluss an der Rückseite des Gerätes an.
Am „Out“ Anschluss schließen Sie dann das Modem/Telefon an.
Anschluss des Kommunikationskabels (nur für Modelle mit USB/RS-232)
Um ein automatisches Abschalten/Hochfahren sowie eine Statusüberwachung zu gewähren,
schließen Sie das Kommunikationskabel der USB/RS-232 Schnittstelle der USV an. Das andere
Ende wird an Ihrem PC angeschlossen. Mit der Überwachungssoftware können Sie ein
Abschalten/Hochfahren zeitlich planen und jederzeit den Status der USV überprüfen.
Ein/Ausschalten des Gerätes
Schalten Sie die USV durch Drücken des Ein/Aus Schalters ein. Durch erneutes Drücken des
Ein/Aus Schalters schalten Sie das Gerät wieder aus.
4. Wichtige Sicherheitshinweise (Bitte diese Anweisungen aufheben)
ACHTUNG!
•••• Um Feuergefahr und das Risiko eines elektrischen Schlages zu vermeiden, betreiben Sie das
Gerät bitte nur in einem Temperatur- und luftfeuchtigkeitskontrollierten Raum ohne leitende
Schmutzstoffe (Siehe Spezifikationen).
•••• Um eine Überhitzung der USV zu verhindern, sollten die Lüftungsöffnungen nicht abgedeckt
und das Gerät nicht in direktem Sonnenlicht oder in der Nähe von Heizkörpern aufgestellt
werden
•••• Bitte schliessen Sie keine “Nicht-PC” Geräte an die USV an wie z.B. medizinische Geräte,
Lebenserhaltungsgeräte, Mikrowellen oder Staubsauger.
•••• Schließen Sie die USV nicht am eigenen Ausgang an.
•••• Achten Sie darauf, dass keine Flüssigkeiten in der Nähe der USV gelagert werden oder in das
Gerät gelangen können.
•••• Im Notfall drücken Sie den AUS Knopf und ziehen Sie das Netzkabel aus der Steckdose, um
das Gerät ordnungsgemäß auszuschalten.
•••• Schließen Sie keine Mehrfachsteckdose oder einen Überspannungsschutz an der USV an.
•••• Sollte die USV in einem Metallgehäuse eingebaut werden, muss dieses aus
Sicherheitsgründen während des Betriebs geerdet sein, um den Leckstrom unter 3,5 mA zu
halten.
•••• Die Instandhaltung der Batterien darf nur von Fachpersonal durchgeführten werden.
Unbefugtes Personal darf sich nicht in der Nähe der Batterien aufhalten.
•••• Beim Tausch der Batterien gleiche Anzahl und Typen verwenden.
•••• Die interne Batteriespannung beträgt 12VDC. Es handelt sich um versiegelte Blei-Säure
Batterien mit 6 Zellen.
•••• Die Batterien nicht ins Feuer werfen. Die Batterie könnte explodieren. Die Batterie sollte auch
nicht gewaltsam geöffnet werden. Batteriesäure ist gesundheitsschädlich für Haut und Augen,
da ätzend.
•••• Vor einer Reinigung muss die USV vom Netz getrennt werden. Es dürfen keine Flüssigkeiten
oder Sprays benutzt werden.
•••• Bei einer Batterie besteht immer das Risiko eines elektrischen Schlages und eines hohen
Kurzschlussstroms (Brandgefahr). Folgende Vorkehrungen sollten Sie treffen bevor Sie eine
Batterie austauschen:
1) Entfernen Sie Uhren, Ringe oder andere metallene Gegenstände.
2) Benutzen Sie Werkzeuge mit isolierten Griffen.
3) Tragen Sie Gummihandschuhe und Stiefel.
4) Legen Sie keine Werkzeuge oder metallische Gegenstände auf die Oberseite der
Batterien.
5) Trennen Sie die USV vom Netz, bevor die Batterie angeschlossen oder entfernt wird.
VORSICHT: Gefahr durch elektrischen Schock. Auch nach Trennen des Gerätes vom Netz kann
noch gefährliche Spannung durch die Batterie auftreten. Bei Service- oder Wartungsarbeiten
innerhalb der USV sollten deshalb die Schnellverschlüsse an Plus- und Minuspol der Batterie
ebenfalls getrennt werden.
5. Software Download & Installation
Befolgen Sie bitte folgende Schritte um die Software herunterzuladen.
1. Gehen Sie auf folgende Website: http://www.power-software-download.com
(Nur für Modelle mit Kommunikations Port).
6 7

2. Klicken Sie das ViewPower Software Icon und wählen Sie das notwendige Betriebssystem,
Beim Stromausfall, ist die
ens für 6 Stunden
hohe Temperatur, oder falsche
Ersetzen Sie die Batterie mit einer Batterie
um die Software herunterzuladen.
3. Folgen Sie den Bildschirmanweisungen für die Installation der Software
4. Nach dem Neustart Ihres PCs wird die Software im System Tray in der Nähe der Uhr als
orangefarbiges Steckericon erscheinen.
5. Benutzername und Passwort in Software Management:
Benutzername: administrator; Passwort: administrator
6. Problembehandlung
Problem Mögliche Ursache Lösungsansatz
LED Display auf der
Frontseite funktioniert
nicht.
Der Alarm ertönt
dauerhaft obwohl der
Netzanschluss keine
Probleme aufweist.
Back-Up Zeit zu kurz.
Die Stromversorgung ist
in Ordnung aber das
Gerät schaltet immer in
den Batteriemodus.
Leere Batterie Laden Sie die USV mindestens 6 Stunden auf.
Defekte Batterie Ersetzen Sie die Batterie mit einer Batterie
Die USV ist nicht eingeschaltet Drücken Sie den Ein/Aus Schalter nochmals,
Die USV ist überlastet. Entfernen Sie zuerst einige Verbraucher.
Die USV ist überlastet. Entfernen Sie nicht notwendige Verbraucher.
Die Batteriespannung ist zu
niedrig.
Batterie defekt - evtl. durch
Nutzung der Batterie.
Das Netzkabel ist locker. Schließen Sie das Netzkabel wieder
gleichen Typs.
um die USV einzuschalten.
Bevor Sie sie wieder anschließen, stellen Sie
sicher, dass die Belastung nicht über der
Maximalleistung der USV liegt.
Laden Sie die USV mindest
auf.
gleichen Typs.
ordnungsgemäß an.
7 Spezifikationen
Modell EP 1500 EP 2000
KAPAZITÄT 1500 VA / 900 W 2000 VA / 1200 W
EINGANG
Spannung 110/120 VAC or 220/230/240 VAC
Spannungsbereich 81-145 VAC / 162-290 VAC
AUSGANG
Spannungsregulierung +/-10%
Übertragungszeit Typisch 2-6ms, 10 ms max.
Schwingungsverlauf Simulierte Sinus Welle
BATTERIE
Typ und Anzahl 12 V/9 AH x 2
Ladezeit 4-6 Stunden für 90% Kapazität
ÄUSSERE MASSE
Dimensionen (BxHxT) 397 x 146 x 205 mm
Nettogewicht (kg) 11.1 11.5
UMGEBUNG
Luftfeuchtigkeit
Geräuschpegel Weniger als 40 dB
MANAGEMENT
USB/RS-232 Unterstützt Windows® 98/2000/2003/XP/Vista/2008, Windows® 7,
0-90 % RF @ 0-40° C (nicht kondensierend)
Linux, and MAC
Entsorgung der Altbatterien oder der USV
Bitte erkundigen Sie sich vor Ort bei einer Recycling-Stelle oder einer Sondermüllanlage, wie die
Altbatterie oder die USV ordnungsgemäß entsorgt werden kann/muss.
ACHTUNG !!!
Bitte werfen Sie die Batterien unter keinen Umständen ins Feuer. Die Batterien können
explodieren. Batterien müssen ordnungsgemäß entsorgt werden. Bitte informieren Sie sich
persönlich über die Entsorgungsvorschriften vor Ort. Bitte öffnen oder beschädigen Sie die
Batterien nicht. Batteriesäure kann Augen und Haut angreifen, sowie Vergiftungen bewirken.
ACHTUNG !!!
Die Batterie oder die USV darf nicht in den Hausmüll gegeben werden. Die USV enthält
geschlossene Bleibatterien und muss ordnungsgemäß entsorgt werden. Bitte wenden Sie sich
vor Ort an die für Sie zuständige Recycling-/Aufbereitungsstelle oder Sondermüllanlage um
mehr Informationen zu erhalten.
ACHTUNG !!!
Die UPS enthält Sondermüll oder recyclebare Güter. Diese dürfen laut EAR (Elektro- und
Elektronikaltgerätegesetz) nicht im Hausmüll entsorgt werden. Bitte kontaktieren Sie die für Sie
zuständige Annahmestelle für Sondermüll oder recyclebare Güter.
8 9
Line Interactive UPS
1. Contenu du paquet
Vous devriez avoir reçu les éléments suivants dans le paquet:
- Unité UPS
- Guide d’Usage Rapide
- Câble de communication (seulement pour le modèle avec Port RS-232)
- Câble d’alimentation (seulement pour le modèle IEC-type)
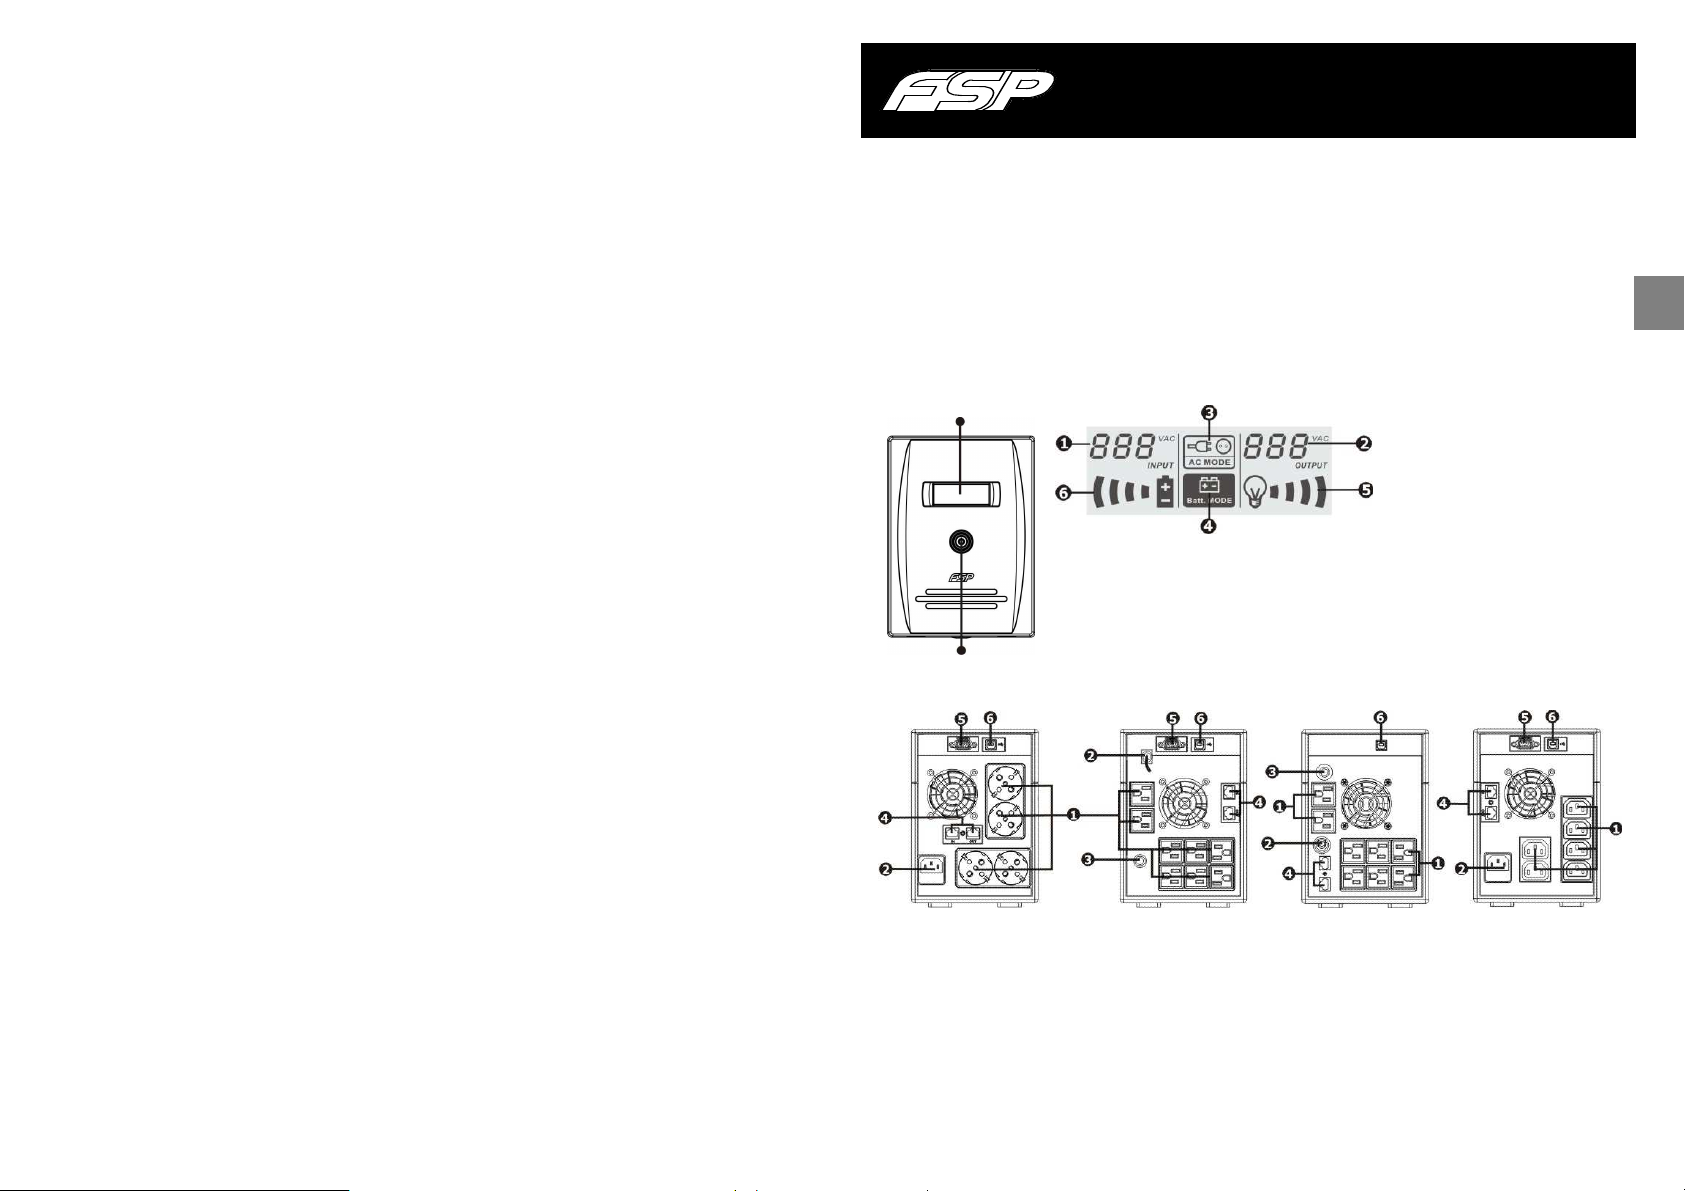
2. Description du Produit
Vue Frontale: Panneau LCD:
Panneau LCD
Guide Rapide V. 1.1
FR
Tension d’entrée
Bouton d’allumage
Vue Arrière:
Tension de sortie clignotement indique un surcharge
Indicateur de mode AC
Indicateur de mode batterie clignotement indique une batterie faible
Indicateur de niveau de charge, un
Indicateur de capacité batterie, le
10 11
Type Schuko Type Nema I Type Nema II Type IEC
Connecteurs de sortie
Entrée AC
Interrupteur circuit
Protection de Modem/Téléphone/Réseau
Port com. RS-232
Port com. USB
3. Installation et Mise en Marche
NOTE: Avant de l’installation, veuillez examiner l’unité. Assurez-vous que rien
dans le paquet n’est endommagé.
Conditions d’Installation et Stockage
Installer l’unité UPS dans un endroit protégé, libre de poussière et suffisamment ventilé. Veuillez
situer l’UPS au moins à 20 cm d’outres unités pour éviter les interférences. NE PAS UTILISER l’UPS
là où la température et l’humidité surpassent les limites spécifiques. (Vous trouverez les limites
dans les spécifications.)
Connexion à la Prise Secteur et Recharge
Relier l’entrée AC à une prise secteur. Il est conseillé de charger
la batterie au moins 6 heures avant de l’utiliser. L’UPS charge la
batterie lorsqu’elle est branchée a la prise secteur.
Connecter les charges/dispositifs
Reliez les charges avec les connecteurs de sortie du panneau arrière de l’UPS. Démarrez l’unité
UPS et tous les dispositifs connectés seront protégés.
PRÉCAUTION: JAMAIS connecter une imprimante laser ou
scanner à l’unité UPS. L’unité UPS peut être endommagée.
Connexion d’un Modem/Téléphone/Réseau Ethernet pour le protéger contre sauts de
courant (Seulement pour modèles avec connecteur RJ45)
Reliez une seule ligne de modem/téléphone avec l’entrée protégée “IN” en panel arrière de l’unité
UPS. Connectez l’ordinateur avec un autre câble réseau à la sortie “OUT ”
Connexion du Câble de Communication (Modèle avec port USB/RS-232)
Pour gérer le démarrage de l’UPS et contrôler son état, reliez un bout du câble de communication
au port RS-232 et l’autre a votre ordinateur. Une fois le logiciel de gestion installé, vous pouvez
programmer les mises en marche et arrêts de l’UPS à travers votre ordinateur, et contrôler son
état.
Allumer/Éteindre l’unité UPS
Allumez l’unité UPS en appuyant sur le bouton de démarrage. Pour l’éteindre, appuyez de nouveau
sur ce même bouton.
6 hours
4. Précautions Importantes de Sécurité (CONSERVEZ CES INSTRUCTIONS)
PRÉCAUTION!
•••• Pour éviter le risque de feu ou choc électrique, installez l’UPS en un endroit intérieur avec
température et humidité contrôlés, libre de polluants conducteurs. (Vous trouverez la portée
de température et humidité dans les spécifications.)
•••• Pour réduire le risque de sûrchauffage de l’UPS, ne couvrez pas les fentes d’aération et évitez
exposer l’UPS directement au soleil ou l’installer près de sources de chaleur.
•••• Ne pas brancher l’UPS á dispositifs qui n’ont pas de relation avec l’ordinateur, comme
équipement médicaux ou de soutien de la vie, fours microondes, ou aspirateurs.
•••• Ne pas connecter l’entrée de l’UPS avec sa propre sortie.
•••• Ne permettez pas que liquides ou objets étranges rentrent à l’UPS. Ne pas placer boissons ou
bouteilles avec liquides sur ou près de l’UPS.
•••• En cas d’émergence, appuyez le bouton OFF et débranchez le câble de la prise secteur pour
vous assurer que l’UPS est correctement déconnectée.
•••• Ne reliez pas un bloc multiprise ou protecteur contre sauts de courant a l’UPS.
•••• Si l’unité UPS a un châssis métallique, il est obligatoire par sécurité de la brancher à une prise
terre pour réduire des fuites de courant de moins de 3.5mA.
•••• L’entretien des batteries doit être réalise ou supervisé par personnel spécialisé qui connait les
précautions nécessaires. Le personnel pas autorisé ne doit pas travailler avec les batteries.
•••• Si vous remplacez les batteries, utilisez le même nombre et genre de batterie.
•••• La batterie a 6 cellules au plomb, est scellé, avec voltage de 12V DC.
•••• Ne jetez pas les batteries au feu. La batterie peut exploser. Ne pas ouvrir ou manipuler les
batteries. L’électrolyte est dangereux pour la peux et les yeux.
•••• Débrancher l’UPS avant de la nettoyer et ne pas utiliser liquides ou sprays détergentes.
•••• La batterie peut poser risque de choc électrique et courant de court-circuit. Les précautions
suivantes doivent être prises en charge avant de remplacer les batteries:
1) Retirez montres, anneaux et autres objets métalliques.
2) Utilisez des outils avec poignés isolées.
3) Utilisez des gants et bottes en caoutchouc.
4) Ne pas laisser outils ou pièces métalliques sur les batteries.
5) Débrancher la source de courant avant de (dé)connecter le terminal de la batterie.
Attention Danger de choc électrique. Même une fois débranché de la prise secteur, l’unité peut
produire haut voltage à travers la batterie. Pourtant, s’il est nécessaire de travailler à l’intérieur de
l’UPS, c’est obligatoire de débrancher les bornes positif et négatif de la batterie.
5. Téléchargement de Software & Installation (Seulement pour le modèle
avec port de communication)
Suivez les indications suivantes pour télécharger et installer le logiciel de gestion:
1. Dirigez-vous au site-web http://www.power-software-download.com
2. Cliquez sur l’icône de ViewPower et choisissez votre système d’exploitation pour télécharger le
logiciel.
3. Suivez les indications sur l’écran pour l’installation.
4. Une fois que votre ordinateur soit rallumé, vous trouverez l’icône orange du logiciel de gestion
en bas à droite, près de l’horloge.
5. Données d’accès au logiciel de gestion:
Nom d’utilisateur: administrator; Mot de passe: administrator
12 13

6. Solution de Problèmes
de la prise secteur est
u
Problème Cause Possible Solution
Le LCD du panel
frontal ne s’allume
pas.
L’Alarme sonne sans
cesse mais le courant
normal.
Quand le courant
arrête, le temps de
back-up est très court.
Prise secteur normal,
UPS en mode Batterie.
Faible charge de la batterie. Chargez l’UPS 6 heures au minimum.
Défaut batterie. Remplacez la batterie avec une du
même type.
L’unité UPS n’est pas allumée. Pulse le bouton d’allumage pour
redémarrer l’UPS.
L’UPS est surchargée. Déconnectez quelques charges.
Avant de reconnecter los dispositifs,
assurez-vous que la charge est
compatible avec celle indiquée dans
les spécifications de l’UPS.
L’UPS est surchargée. Déconnectez les charges principales.
Faible Voltage de la batterie. Chargez l’UPS 6 heures au minimum.
Batterie défectueuse,
probablement à cause de
haute température ou un
usage incorrect.
Le câble d’alimentation n’est
pas connecté.
Remplacez la batterie avec une d
même type.
Reliez le câble d’alimentation
correctement.
7 Spécifications
Modèle EP 1500 EP 2000
CAPACITÉ 1500 VA / 900 W 2000 VA / 1200 W
ENTRÉE
Voltage 110/120 VAC or 220/230/240 VAC
Portée de Voltage 81-145 VAC / 162-290 VAC
SORTIE
Régulation de Voltage +/-10%
Temps de réaction Normal 2-6 ms, maximum 10 ms.
Forme d’Onde Onde Sinusoïdale Simulée
BATTERIE
Type et Quantité 12 V/9 AH x 2
Temps de charge 4-6 heures pour récupérer 90% de la capacité
DIMENSIONES
Mesures (PxLxH) 397 x 146 x 205 mm
Poids Net (kg) 11.1 11.5
ENVIRONEMENT
Humidité
Niveau de Bruit Moins de 40 dB
GESTION
USB/RS-232 Support Windows® 98/2000/2003/XP/Vista/2008, Windows®
0-90 % RH @ 0-40° C (sans condensation)
7, Linux, and MAC
Line Interactive UPS
Guía rápida V. 1.1
1. Contenido del paquete
Debería haber recibido los siguientes elementos en el paquete:
- Unidad UPS
- Guía Rápida de Uso
- Cable de comunicación (sólo para el modelo con Puerto RS-232)
- Cable de alimentación (sólo para el modelo IEC-type)
2. Descripción del producto
Vista Frontal: Panel LCD:
Panel LCD
Voltaje de entrada
Voltaje de salida
Indicador de modo AC
Botón de encendido
Vista Trasera:
Tipo Schuko Tipo NEMA I Tipo NEMA II Tipo IEC
Conectores de salida Protector picos Modem/Teléfono/Red Ethernet
Entrada AC
Interruptor circuito
Indicador de modo de
batería
Puerto com. RS-232
Puerto com. USB
Indicador de carga, intermitente
indica sobrecarga
Indicador de nivel de batería,
internitente indica batería baja
ES
14 15
3. Instalación y Configuración Inicial
NOTA: Antes de la instalación, por favor inspeccione la unidad. Asegúrese de
que nada en el interior del paquete esta dañado.
Condiciones de Emplazamiento y Almacenamiento
Instale la unidad UPS en un área protegida libre de polvo y con suficiente ventilación. Por favor
sitúe la UPS al menos a 20 cm de otras unidades para evitar interferencias. NO UTIILICE la UPS
donde la temperatura y humedad superen los límites específicos. (Por favor, compruebe los límites
en las especificaciones.)
Conexión a red y Recarga
Enchufe el cable de entrada a la toma de la pared. Para un
mejor resultado se debe cargar la batería al menos 6 horas
antes del uso. La UPS recarga la batería mientras esté
enchufada.
Conecte las cargas/dispositivos
Enchufe las cargas en los conectores de salida del panel posterior de la UPS. Simplemente
arranque la unidad UPS y todos los dispositivos conectados a ella quedarán protegidos.
PRECAUCIÓN: NUNCA conectar una impresora láser o
scanner a la unidad UPS. Esto puede dañar la UPS.
Conexión de Modem/Teléfono/Red Ethernet para protección frente a picos de tensión
(Sólo para el modelo con conector RJ45)
Conecte una sola línea de modem/teléfono en la entrada protegida “IN” en el panel posterior de la
unidad UPS. Conecte el ordenador con otro cable de red a la salida “OUT”.
Conexión del Cable de Comunicación (Sólo para el modelo con puerto RS-232)
Para la supervisión del arranque/parada de la UPS y controlar su estado, conecte un extremo del
cable de comunicación al puerto RS-232 y el otro a su ordenador. Con el software de supervisión
instalado, se pueden programar paradas y arranques de la UPS a través del PC, así como controlar
su estado.
Encendido y Apagado de la Unidad
Arranque la unidad UPS pulsando el botón de encendido. Para apagarla, pulse de nuevo este
mismo botón.
6 hours
4. Precauciones Importantes de Seguridad
¡CUIDADO!
• Para prevenir el riesgo de fuego o choque eléctrico, instale la UPS en un área interior de
temperatura y humedad controladas, libre de contaminantes conductores. (Vea las
especificaciones para los rangos de temperatura y humedad aceptables.)
• Para reducir el riesgo de sobrecalentamiento de la UPS, no cubra las rejillas de ventilación y
evite exponer la unidad directamente al sol o instalarla cerca de fuentes de calor.
• No conecte a la UPS dispositivos que no estén relacionados con un ordenador, como
equipamiento médico o de apoyo a la vida, hornos microondas, o aspiradores.
• No conecte la entrada de la UPS en su propia salida.
• No permita que líquidos u objetos extraños entren a la UPS. No sitúe bebidas o envases con
líquidos encima o cerca de la unidad.
• En caso de emergencia, pulse el botón OFF y desenchufe el cable de alimentación para
asegurarse de que la UPS esta debidamente desconectada.
• No conecte un alargador ni un protector frente a picos de tensión a la UPS.
• Si la unidad UPS tiene un chasis metálico, por motivos de seguridad es obligatorio conectarla
a una toma de tierra para reducir fugas de corrientes de menos de 3.5mA.
• El mantenimiento de las baterías debe ser realizado o supervisado por personal especializado
que conozca las precauciones requeridas. Mantenga al personal no autorizado lejos de las
baterías.
• Si reemplaza las baterías, use el mismo número y tipo de baterías.
• La batería es de 6 celdas de plomo, sellada, con voltaje de 12V DC.
• No tire las baterías al fuego, la batería podría explotar. No abra o manipule las baterías. El
electrolito liberado es dañino para la piel y los ojos.
• Desconecte la UPS antes de limpiarla y no use líquidos ni sprays detergentes.
• La batería puede presentar un riesgo de choque eléctrico y corriente de corto circuito. Las
siguientes precauciones deben observarse antes de sustituir las baterías:
1) Retire relojes, anillos u otros objetos metálicos.
2) Use herramientas con empuñadora con aislamiento.
3) Use guantes y botas de goma.
4) No deje herramientas o partes metálicas sobre las baterías.
5) Desenchufe la fuente de alimentación antes de conectar o desconectar el terminal de
las baterías.
Atención Peligro de choque eléctrico. Incluso desenchufada de la red, la unidad puede producir
alto voltaje a través de la batería. Por lo tanto, si es necesario trabajar en el interior de la UPS, es
obligatorio desconectar los bornes positivo y negativo de la batería.
(CONSERVE ESTAS INSTRUCCIONES)
5. Descarga de Software & Instalación (Sólo para el modelo con puerto de
comunicaciones)
Por favor siga las indicaciones para descargar e instalar el software de supervisión:
1. Vaya a la página web http://www.power-software-download.com
2. Haga click en el icono de ViewPower y elija su sistema operativo para descargar el software.
3. Siga las instrucciones de la pantalla para su instalación.
4. Tras reiniciar el ordenador, el software de supervisión aparecerá como un icono naranja en la
bandeja del sistema, cerca del reloj.
5. Datos de acceso al software de gestión:
Nombre de usuario: administrator
Password: administrator
16 17

6. Solución de Problemas
no está
continuamente pero el
suministro eléctrico es
suministro eléctrico, el
ía con una del
el cable de alimentación
Кнопка включения/выключения
Problema Posible Causa Solución
La pantalla LCD no
funciona
La Alarma suena
normal.
Cuando falla el
tiempo de back-up es
corto.
Suministro es normal
pero la UPS funciona
en modo batería.
7. Especificaciones
Modelo EP 1500 EP 2000
CAPACIDAD 1500 VA / 900 W 2000 VA / 1200 W
ENTRADA
Voltaje 110/120 VAC ó 220/230/240 VAC
Rango de Voltaje 81-145 VAC / 162-290 VAC
SALIDA
Regulación de Voltaje +/-10%
Tiempo de reacción Típico 2-6 ms, máximo 10 ms.
Forma de Onda Onda Sinusoidal Simulada
BATERÍA
Tipo y Cantidad 12 V/9 AH x 2
Tiempo de Carga 4-6 horas para recuperar el 90% de capacidad
DIMENSIONES
Medidas (PxAnxAl) 397 x 146 x 205 mm
Peso Neto (kg) 11.1 11.5
AMBIENTE
Humedad
Nivel de Ruido Menos de 40 dB
SUPERVISIÓN
USB/RS-232 Soporte Windows® 98/2000/2003/XP/Vista/2008, Windows®
Carga de batería baja. Cargue la UPS al menos 6 horas.
Fallo de la batería. Reemplace la batería con una del
mismo tipo.
La unidad UPS
encendida.
La UPS está sobrecargada. Desconecte primero algunas cargas.
La UPS está sobrecargada. Desconecte las cargas principales.
El voltaje de la batería bajo. Cargue la UPS al menos 6 horas.
Batería defectuosa. Puede
deberse a temperatura
elevada o uso indebido.
El cable de alimentación está
suelto.
0-90 % RH @ 0-40° C (sin condensación)
Pulse el botón de encendido para
encender de nuevo la UPS.
Antes de reconectar los dispositivos,
asegúrese por favor de que la carga
coincide con la indicada en las
especificaciones de la UPS.
Reemplace la bater
mismo tipo.
Reconecte
correctamente.
7, Linux, and MAC
18 19
Line Interactive UPS
1. Содержание упаковки
Вы получите следующие компоненты в упаковке
- Блок бесперебойного питании (сокращенно ИБП)
- Инструкцию
- (Интерфейсный кабель (только для модели с USB/RS-232 портом))
- Кабель питания только IEC-type для моделей
2. Внешний вид
Вид спереди:
ЖК панель
ЖК панель
:
Входное напряжение
Выходное напряжение
Индикатор работы от сети
Индикатор работы от батареи
Вид сзади:
Schuko Type NEMA Type I NEMA Type II IEC Type
Выходные разъемы
AC вход
Предохранитель
батареи
Модем / телефон и сети Защита всплесков напряжения
RS-232 com. Port
USB com. port
Индикатор нагрузки
(мигает когда нагрузка
превышает допустимую)
Индикатор заряда
батерията (
батарея разряжена)
Quick Guide V. 1.1
RU
мигает когда

3. Инструкция по использованию
ВНИМАНИЕ: Перед использованием осмотрите ИБП, проверьте
отсутствие повреждений корпуса.
Условия эксплуатации
Установите ИБП в защищенном от пыли месте с хорошим воздухообменом. НЕ используйте
ИБП при температуре и влажности отклоняющихся от рекомендуемых (Пожалуйста
внимательно ознакомьтесь с инструкцией)
Подключение и зарядка
Подключите ИБП к розетке. Для лучшего результата
зарядите аккумулятор не менее 6 часов перед началом
использования. Аккумулятор ИБП заряжается при
подключенных устройствах.
Подключение устройств
Подключите устройства к выходным разъемам на задней панели ИБП. Включите ИБП, затем
устройства подключенные к ИБП будут защищены.
ВНИМАНИЕ: НЕ ПОДКЛЮЧАЙТЕ лазерные принтеры и
сканеры к ИБП. Они могут повредить устройство
Подключение Modem/Phone/Network (Только для моделей с RJ-45)
Подключите линию modem/phone к разъему “IN” на задней панели ИБП. Подключите
компьютер к разъему “OUT” с помощью другого телефонного кабеля
(Подключение коммуникационного кобеля (Только для моделей с USB/RS-232
port)
Для самостоятельного включения / выключения ИБП и просмотра состояния, подключите
кобель USB/RS-232 к компьютеру, вы можете контролировать включение / выключение и
статус ИБП с компьютера.
Включение / выключение устройства
Для включения ИБП нажмите на выключатель питания. Для выключение UPS нажмите еще
раз на выключатель питания.
6 часов
4. Инструкция по безопасности (СОХРАНИТЕ ЭТУ ИНСТРУКЦИЮ)
ВНИМАНИЕ!
• Чтобы предотвратить риск возгорания или электрошока, установите ИБП в зоне с
контролируемой температурой и влажностью. (См. спецификации по приемлемой
температуры и влажности.)
• Чтобы уменьшить риск перегрева ИБП, не закрывайте отверстия для охлаждения ИБП и
не подвергайте ИБП воздействию прямых солнечных лучей, не устанавливайте ИБП
вблизи приборов излучающих тепло, такие как обогреватели или печи.
• Не подключайте не компьютерное оборудование, такие как медицинское оборудование,
жизненно-вспомогательное оборудование, микроволновые печи, пылесосы к ИБП.
• Не подключайте вход и выход ИБП.
• Не допускайте попадание жидкостей или посторонних предметов в ИБП.
• В случае возникновения чрезвычайной ситуации, нажмите кнопку OFF и отсоедините
кабель питания от сети переменного тока питания, чтобы правильного отглючения
ИБП.
• Не подключайте сетевые развитвители и устройства подавления помех к выходу ИБП.
• Если ИБП с металлическим корпусом, в целях безопасности, ИБП в целях снижения тока
утечки ниже 3.5mA, заземление является обязательным при установке ИБП.
• Обслуживание батарей должно выполняться только или под наблюдением персонала,
знающих аккумуляторные батарей и необходимые меры предосторожности. Не
допускайте вмешательство несанкционированного персонала.
• При замене аккумулятора, используйте один и тот же номер и тип.
• Напряжение аккумулятора 12VDC. Герметичная, свинцово-кислотная аккумуляторная
батарея.
• Не уничтожайте аккумуляторы в огнём, так как аккумулятор может взорваться. Не
открывайте и не разрушайте корпус аккумулятора. Электролит вреден для кожи и глаз.
• Отсоедините ИБП перед уборкой и не используйте жидкие или распыляемые моющего
средства.
• Батарея может стать причиной электрошока и высокий ток при коротком замыкании.
Соблюдайте следующие предосторожности при замене аккумулятора.
• 1) Снимите часы, кольца и другие металлические предметы.
• 2) Используйте инструменты с изотермическими ручками.
• 3) Оденьте резиновые перчатки и сапоги.
• 4) Не кладите на аккумулятор металлические предметы.
• 5) Отсоедините ИБП от электросети до перед заменой аккумулятора.
ОСТОРОЖНО! Опасными из-за поражения электрическим током, Кроме того, при
отключении этого блока от сети, опасные напряжения все же могут быть доступны из-за
аккумуляторной батареи. Аккумулятор питания должен быть отключен, отключайте
разъемы плюс и минус от аккумулятора при разборке ИБП.
5. Загрузка и установка программы (Только для модели с портом)
Выполните следующие действия, чтобы загрузить и установить программное
обеспечение мониторинга:
1. Зайдите на сайт http://www.power-software-download.com
2. Нажмите значок ViewPower программного обеспечения, а затем выбрать необходимые
ОС для загрузки программного обеспечения.
3. Следуйте инструкциям на экране для установки программного обеспечения.
4. После перезагрузки компьютера, программа оранжевый значок программы
мониторинга появиться в системном окне, рядом с часами.
5. Логин и пароль программного обеспечения: Логин: administrator; Пароль: administrator
20 21

6. Решение проблем
Аккумулятор на полностью
Vypínač
См. таблицу ниже для решения мелких проблем.
Проблема Возможная причина Решение
На передней панели
ничего не написано.
Сигнал постоянно
звучит, когда сети
является нормальным.
При отключенном
электричестве,
резервные время
сократилось
При нормальном
напряжении в сети,
ИБП работает от
батареи
Разряжена аккумулятор Заряжайте ИБП по крайней мере 6 часов.
Аккумулятор испорчен Замените аккумулятор
ИБП отключен Нажмите выключатель снова и включите
ИБП перегружен Отключите часть устройств от ИБП, перед
ИБП перегружен Отключите часть устройств
заряжен
Батарея дефектом. Это
может быть связано с
высокой температурой
эксплуатации окружающей
среды, или неправильной
эксплуатации к батарее.
Шнур питания является
плохо подключен
ИБП.
повторным включением убедитесь что
нагрузка не превышает заявленные в
характеристики ИПБ
Зарядите ИПБ минимум 6 часов
Замените аккумулятор
Подключите шнур питания должным
образом.
7.... Спецификация
Модель EP 1500 EP 2000
ЕМКОСТЬ 1500 VA / 900W 2000 VA / 1200 W
ВХОД
Напряжение 110/120 VAC или 220/230/240 VAC
Диапазон напряжений 81-145 VAC / 162-290 VAC
ВЫХОД
Регулирование
напряжения
Время перехода стандартное 2-6 мс, 10 мс макс.
Форма волны Моделированая синусоидальная волна
БАТАРЕЯ
Тип и количество 12 V/9 AH x 2
Время зарядки 4-6 часов восстанавливает 90% емкости
Габариты
Размер (DxWxH) 397 x 146 x 205 мм
Вес (кг) 11.1 11.5
Окружающая среда
Влажность
Уровень шума Менее 40 дБ
Управление
USB/RS-232 Поддерживает Windows® 98/2000/2003/XP/Vista/2008, Windows®
0-90 % RH @ 0-40° C (без конденсата)
+/-10%
7, Linux, and MAC
Line Interactive UPS
Návod k obsluze, v. 1.1
1. Obsah balení
Balení obsahuje následující položky:
- Jednotku UPS
- Návod
- Komunikační kabel (pouze v případě modelu s portem RS-232)
- Přívodní síťový kabel (pouze v případě modelu se zásuvkami IEC)
2. Přehled
Pohled zepředu: LCD panel:
LCD panel
Vstupní napětí Indikátor zatížení, blikání
Výstupní napětí signalizuje přetížení
Indikátor provozu ze sítě Indikátor kapacity baterie,
Pohled zezadu:
Typ Schuko Type NEMA I Typ NEMA II Typ IEC
Výstupní zásuvky
Vstup přívodního kabelu telefonu nebo počítačové sítě (konektory RJ-45)
Resetovací tlačítko
Indikátor provozu z baterie blikání signalizuje téměř vybitou
baterii
Zásuvka pro přepěťovou ochranu modemu/
Port RS-232
Port USB
CZ
22 23

6 hodin
3. Instalace a úvodní nastavení
Pozn.: Před instalací zařízení zkontrolujte, že nebylo při převozu poškozeno.
Umístění a skladování
UPS umístěte na takové místo, které není prašné a vyznačuje se dostatečným přívodem vzduchu.
Pokud se bude UPS nacházet v blízkosti dalších elektrických zařízení, ponechte mezi nimi
vzdálenost minimálně 20 cm, abyste předešli případnému rušení. UPS neprovozujte v prostředí,
které překračuje limity teploty a vlhkosti (přesná omezení najdete v části Specifikace).
Připojení do elektrické sítě a nabíjení
Zapojte přívodní kabel do zásuvky. Pro dosažení plné funkčnosti
doporučujeme baterii nabíjet minimálně 4 hodiny před
připojením dalších zařízení. UPS začne nabíjet baterii
automaticky ihned po připojení do elektrické zásuvky.
Připojení chráněných zařízení
Zařízení, která chcete chránit před výpadkem elektrické energie, zapojte do zásuvek na zadní
straně UPS. Pak UPS zapněte pomocí vypínače na přední straně a poté zapněte zařízení, která jsou
do UPS připojena. Zařízení budou od toho okamžiku chráněna před výpadkem elektřiny.
UPOZORNĚNÍ: Do výstupních zásuvek UPS nikdy nepřipojujte
laserovou tiskárnu nebo skener. Tato zařízení by mohla UPS
vážně poškodit.
Připojení modemu/telefonu/počítačové sítě na přepěťovou ochranu (pouze pro
model s konektory RJ-45)
Do zásuvky označené IN nacházející se na zadní straně UPS zapojte kabel jdoucí z telefonní
zásuvky. Do výstupní zásuvky OUT pak zapojte další kabel směřující do počítačového modemu
nebo telefonu.
Připojení komunikačního kabelu (pouze pro model s portem RS-232)
Pokud chcete používat funkci automatického vypnutí/zapnutí UPS a monitorování jejího stavu,
připojte do portu RS-232 komunikační kabel, jehož druhý konec zapojte do počítače. Díky
monitorovacímu programu, který si musíte nainstalovat, můžete z připojeného počítače plánovat
vypnutí a zapnutí UPS a také monitorovat její stav.
Zapnutí a vypnutí UPS
UPS zapnete stiskem hlavního vypínacího tlačítka na čelní straně. USP vypnete opětovným
stlačením tohoto tlačítka.
4. Důležitá bezpečností upozornění (PROSÍM TYTO POKYNY SI USCHOVEJTE)
UPOZORNĚNÍ:
• Abyste zabránili riziku vzniku počáru nebo elektrického zkratu, používejte UPS ve vnitřním
prostředí, kde je možné regulovat teplotu a vlhkost a které nebosahuje vodivé příměsi
(podrobnosti o vhodné teplotě a vlhkosti najdete v části Specifikace tohoto manuálu).
• Abyste zabránili přehřátí UPS, nezakrývejte ventilační otvory UPS a UPS nevystavuje přímému
slunečnímu záření nebo ji neumisťujte poblíž zařízení generujících teplo, jako jsou teplomety,
kamna či krby.
• Do UPS nikdy nezapojujte nepočítačová zařízení, jako jsou zdravotnické přístroje, zvl. zařízení
k udržování lidského života, dále pak mikrovlnné trouby, vysavače apod.
• Nikdy nezapojujte přívodní kabel UPS do některé z jejích vlastních výstupních zásuvek.
• Zabraňte tomu, aby se do UPS dostaly kapaliny nebo jiné cizí látky. Nikdy nestavte nápoje
nebo jiné kapaliny na UPS nebo do její blízkosti.
• V případě nebezpečí stiskněte vypínací tlačítko a odpojte síťovou šňůru od přívodu elektrické
energie, čímž bude UPS řádně zabezpečena.
• K UPS nikdy nepřipojujte prodloužovací kabel nebo kabel s přepěťovou ochranou.
• Při otevření UPS hrozí nebezpečí úrazu elektrickým proudem. I po odpojení UPS od elektrické
energie může být na baterii umístěné uvnitř UPS stále přítomno nebezpečné napětí. Proto je v
případě údržby nebo sevisních prací uvnitř UPS nutno baterii odpojit, a to sejmutím konektorů
z kladného a záporného pólu baterie.
• Jakoukoli práci s baterií umístěnou v UPS může vykonávat jen příslušně pověřená osoba.
Neautorizované osoby nesmějí přijít do kontaktu s baterií.
• Pokud je třeba baterii vyměnit, nahraďte ji výhradně stejným typem.
• Vnitřní napětí baterie je 12 V stejnosměrně. Jedná se o zapouzdřenou šestičlánkovou baterii.
• Baterii nikdy nevhazujte do ohně, neboť může explodovat. Baterii neotevírejte ani nijak
nepoškozujte. Uvolněný elektrolyt může vážně poškodit pokožku a oči.
• Pokud chcete UPS zvenku očistit, nejprve ji odpojte od přívodu elekrické energie. Při čistění
nepoužívejte kapalné čisticí prostředky nebo spreje.
• Baterie může při neodborné manipulaci nebo při při zkratu zapříčinit úraz elektrickým
proudem. V případě výměny baterie dbejte následujících pokynů:
1) odložte náramkové hodinky, prsteny a další kovové předměty;
2) používejte nástroje s izolovanou rukovětí;
3) pracujte v gumových rukavicích a obujte si gumové boty;
4) nikdy nepokládejte nářadí nebo jakékoli kovové prvky na horní část baterie;
5) před připojováním nebo odpojováním baterie vytáhněte přívodní kabel ze zásuvky.
5. Download softwaru a jeho instalace (jen pro model s komunikačním
portem)
Při stahování a instalaci monitorovacího softwaru se držte tohoto postupu:
1. Jděte na stránku http://www.power-software-download.com
2. Klikněte na ikonu software ViewPower a vyberte operační systém, pro který chcete software
používat.
3. Postupujte podle instrukcí na obrazovce, které vás provedou instalací softwaru.
4. Po dokončení instalace je třeba počítač restartovat. Komunikačí software se pak objeví jako
oranžová ikona v pravé části systémové lišty (u hodin).
5. Uživatelské jméno a heslo pro ovládací software:
Uživatelské jméno: administrator ; Heslo: administrator
24 25

6. Odstraňování problémů
Vadná baterie. Může se jednat o
Nap
ětí v síti je normální,
Pečlivě zkontrolujte zapojení síťového
Wskaźnik trybu
baterii
niski poziom naładowania baterii miga
Problém Možná příčina Řešení
Kontrolka LCD na čelní
straně UPS nesvítí.
Alarm stále píská, i když
je elektrická síť plně
funkční.
Při výpadku elektrické
energie UPS pracuje jen
krátkou dobu.
ale UPS pracuje na
baterii.
Vybitá baterie. Nechte UPS nabíjet minimálně po dobu 6 h.
Vadná baterie.
UPS není zapnuta. Krátce stiskněte vypínač UPS, čímž ji
UPS je přetížena. Odpojte část zátěže. Před opětovým
UPS je přetížena. Odpojte část zátěže.
Napětí baterie je nízké. Nechte UPS nabíjet minimálně po dobu 6 h.
závadu způsobenou příliš
vysokou okolní teplotou nebo
opotřebováním baterie.
Síťový kabel je uvolněn.
Vyměňte baterii za novou stejného typu.
uvedete do provozu.
zapojením zařízení si ověřte, že zátěž
odpovídá kapacitě UPS uvedené ve
specifikaci.
Vyměňte baterii za novou stejného typu.
kabelu.
7 Specifikace
Model EP 1500 EP 2000
KAPACITA 1500 VA / 900 W 2000 VA / 1200 W
VSTUP
Napětí 110/120 VAC nebo 220/230/240 VAC
Tolerance 81–145 VAC / 162–290 VAC
VÝSTUP
Regulace napětí +/–10 %
Čas přepnutí Běžně 2–6 ms, 10 ms max.
Forma vlny Simulovaná sinusová vlna
BATERIE
Typ a počet 12 V/9 Ah – 2 ks
Doba nabíjení 4–6 hodin pro nabití na 90 % kapacity
ROZMĚRY A HMOTNOST
Rozměry (d x š x v) 397 x 146 x 205 mm
Váha (kg) 11,1 11,5
PROSTŘEDÍ
Vlhkost 0–90 % rel. vlhkosti při 0–40° C (nekondenzující)
Hlučnost Nižší než 40 dB
MANAGEMENT
USB/RS-232 Podporuje Windows® 98/2000/2003/XP/Vista/2008,
Windows® 7, Linux, and MAC
26 27
Line Interactive UPS
1. Zawartość opakowania
- Jednostkę UPS
- Instrukcję obsługi
- Przewód komunikacyjny (wyłącznie dla modeli z portem RS-232)
- Przewód zasilający (wyłącznie dla modeli typu IEC)
2. Charakterystyka produktu
Widok z frontu: Panel LCD:
Panel LCD
Napięcie wejściowe
Napięcie wyjściowe
Wskaźnik trybu AC
Włącznik zasilania
Powrót Zobacz
Schuko Type NEMA Type I NEMA Type II IEC Type
Wtyki zasilające
Wejście zasilania
Bezpiecznik
:
miganie wskazuje na przeci
Filtr dla modemu/telefonu/sieci
Port RS-232
Port USB
Wskaźnik poziomu obciążenia,
Wskaźnik pojemności baterii, wskazuje
Návod k obsluze, v. 1.1
ążenie
PL

6 godzin
3. Instalacja oraz pierwsze uruchomienie
Ważne: Upewnij się przed instalacją, że urządzenie w środku kartonu nie zostało
uszkodzone.
Instalacja i użytkowanie
Zainstaluj UPS w bezpiecznym miejscu, wolnym od nadmiaru kurzu oraz z dobrym przepływem
powietrza. UPS powinien być oddalony co najmniej 20 cm od innych urządzeń aby uniknąć
zakłóceń. Nie używaj UPS w warunkach, w których temperatura i wilgotność przekraczają
dopuszczalne normy, zawarte w specyfikacji na stronie 4.
Podłączenie i ładowanie
Podłącz wtyczkę do gniazdka w ścianie, a drugą końcówkę
przewodu do UPS. Najlepszy rezultat uzyskasz ładując UPS
przez co najmniej 6 godzin przed pierwszym uruchomieniem.
UPS ładuje się przez samo podłączenie do prądu.
Podłączanie urządzeń
Podłącz wtyczki zasilania urządzeń które chcesz podłączyć do UPS, do tylnego panelu.
Włączenie zasilania przyciskiem aktywuje UPS i powoduje włączenie ochrony dla podłączonych
urządzeń.
UWAGA: Nigdy nie podłączaj do UPS laserowych drukarek
lub skanerów. Może to uszkodzić UPS lub urządzenie.
Podłączenie i ochrona modemu/telefonu/sieci (Dla modeli z wtyczkami RJ-45)
Podłącz jedną linię modemową/telefoniczną do chronionego wejścia(IN) na tylnym panelu UPS.
Połącz wyjście (OUT) z komputerem kolejnym kablem telefonicznym.
Podłączenie przewodem komunikacyjnym (Dla modeli z portem RS-232/USB)
Aby umożliwić wyłączanie/włączanie oraz monitorowanie statusu z komputera, podłącz kabel
komunikacyjny z jednej strony do portu RS-232/USB w UPS, a drugi koniec do portu
komunikacyjnego w komputerze PC. Po zainstalowaniu oprogramowania monitorującego,
możesz zaplanować wyłączanie/włączanie oraz monitorować status przy użyciu swojego
komputera PC.
Włączanie i wyłączanie
Włączanie i wyłączanie UPS, odbywa się przez użycie przycisku POWER. Włącza on nie
działający UPS i zamyka UPS w momencie gdy chcemy go wyłączyć podczas pracy.
4. Informacje dotyczące bezpieczeństwa (ZACHOWAJ TE INFORMACJE)
UWAGA!
• Aby uniknąć ryzyka porażenia prądem lub ogniem, instaluj urządzenie w temperaturze i
wilgotności pokojowej, w otoczeniu wolnym od przewodzących zanieczyszczeń. (Zobacz w
specyfikacji akceptowalną temperaturę i wilgotność.)
• Aby uniknąć ryzyka przegrzania się UPS, nie przykrywaj otworów wentylacyjnych oraz unikaj
wystawiania jednostki na bezpośrednie światło słoneczne, nie instaluj blisko urządzeń
emitujących ciepło, takich jak kuchenki czy piece.
• Nie podłączaj do UPS urządzeń nie związanych z komputerami, takich jak urządzenia
medyczne, kuchenki mikrofalowe, odkurzacze itd.
• Nie podłączaj wtyczki zasilania UPS, do jego własnych gniazdek wyjściowych.
• Zwróć uwagę, aby płyny lub przedmioty nie przeniknęły do środka UPS. Nie stawiaj napojów i
naczyń zawierających płyny blisko jednostki.
• W przypadku awarii, wyłącz UPS i odłącz przewód zasilający z gniazdka.
• Nie podłączaj przedłużaczy sieciowych oraz listw zasilających do UPS.
• Jeśli UPS ma metalową obudowę, uziemienie jest konieczne dla celów bezpieczeństwa
• Istnieje prawdopodobieństwo porażenia elektrycznego, także po odłączeniu jednostki z
zasilania. Niebezpieczne napięcie może być wywołane także z baterii. W przypadku naprawy
lub wymiany baterii, zasilanie bateryjne powinno być odłączone w biegunach plus i minus
poprzez wyjęcie baterii.
• Serwisowanie i wymiana baterii, powinno być przeprowadzane/nadzorowane przez personel
przeszkolony o potencjalnych zagrożeniach, posiadający wiedzę na temat wymiany i
serwisowania baterii. Nie pozwalaj nie przeszkolonemu personelowi dotykać się do baterii.
• Przy wymianie baterii, korzystaj z baterii takiego samego typu.
• Woltaż wewnętrznej baterii to 12V prądu stałego. Do produkcji użyto zamkniętej,
6-ogniwowej baterii ołowiowo-kwasowej.
• Nie wyrzucaj baterii do ognia! Baterie mogą eksplodować! Nie otwieraj i nie niszcz baterii
mechanicznie. Zawarty w baterii elektrolit jest groźny dla skóry i oczu!
• Do czyszczenia, odłącz UPS z prądu i nie używaj detergentów w płynie i aerozolu.
• Występuje ryzyko porażenia prądem oraz krótkiego spięcia przy wymianie baterii.
• Następujące środki ostrożności powinny być przedsięwzięte przed wymienianiem baterii:
1) Zdejmij zegarek, obrączkę, kolczyki i wszelkie inne metalowe obiekty ze swojego ciała.
2) Używaj narzędzi z zaizolowanymi uchwytami.
3) Załóż gumowe rękawiczki oraz obuwie z gumową podeszwą.
4) Nie kładź narzędzi lub innych metalowych przedmiotów na bateriach.
5) Rozłącz źródło prądu przy instalowaniu lub deinstalowaniu baterii.
5. Pobieranie i instalacja oprogramowania
Podążaj za podanymi punktami aby pobrać i zainstalować oprogramowanie
monitorujące:
1. Udaj się na stronę http://www.power-software-download.com
2. Kliknij ikonkę programu ViewPower , następnie wybierz odpowiadający Ci system operacyjny i
wybierz “download”.
3. Podążaj za instrukcjami wyświetlanymi na ekranie komputera.
4. Po restarcie komputera, twoje oprogramowanie monitorujące pojawi się jako pomarańczowa
ikonka zlokalizowana na pasku zadań w pobliżu zegara.
5. Nazwa użytkownika i hasło w oprogramowanie do zarządzania
Nazwa użytkownika: administrator; Hasło: administrator
(Dla modeli z portem komunikacyjnym)
28 29
6. Rozwiązywanie problemów
nim
Usuń urządzenia o najwyższym poborze
Naładuj UPS przez co najmniej 6
Wymień baterię na drugą takiego
захранване
Prawdopodobna
Problem
Brak wyświetlania
diod LCD na przed
panelu.
Ciągły alarm. UPS jest przeciążony. Upewnij się, że możliwości UPS
Skrócony czas
podtrzymania
bateryjnego, gdy
wystąpi awaria prądu.
Sieci jest normalne,
ale urządzenie jest w
trybie ładowania.
Słabo naładowana bateria. Naładuj UPS przez co najmniej 6h.
Uszkodzenie baterii. Wymień baterię na drugą takiego
UPS nie jest włączony. Wciśnij ponownie przycisk “Power” aby
UPS jest przeciążony.
Naładowanie baterii zbyt
Defekt baterii. Zbyt wysoka
temperatura,niewłaściwe
obchodzenie z baterią.
Przewód zasilania jest luźny Przymocuj przewód zasilający
przyczyna Rozwiązanie problemu
samego typu.
włączyć UPS.
zgadzają się z obciążeniem które
próbujesz do niego podłączyć.
mocy baterii.
słabe.
godzin.
samego typu.
7. Specyfikacja
Model EP 1500 EP 2000
Pojemność 1500 VA / 900 W 2000 VA / 1200 W
Napięcie wejścia
Woltaż 110/120 VAC lub 220/230/240 VAC
Zakres napięcia 81-145 VAC / 162-290 VAC
Napięcie wyjściowe
Regulacja woltażu +/-10%
Czas przełączenia na
baterię
Sygnał Symulowana fala sinusoidalna
Bateria
Typ i numer 12 V/9 AH x 2
Czas ładowania 4-6 godzin do naładowania 90% pojemności
Wymiary i waga
Wymiary (DxSxW) 397 x 146 x 205 mm
Waga netto (kg) 11.1 11.5
Warunki otoczenia
Wilgotność
Głośność Mniej niż 40 dB
Zarządzanie
USB/RS-232 Wsparcie dla Windows® 98/2000/2003/XP/Vista/2008,
2-6 ms, 10 ms max.
0-90 % RH @ 0-40° C
Windows® 7, Linux, and MAC
Line Interactive UPS
Quick Guide V. 1.1
1. Съдържание на опаковката
- Блок за непрекъсваемо захранване (UPS-устройство)
- Инструкции за експлоатация
- Интерфейсен кабел (само за модели с USB/RS-232 порт)
- Захранващ кабел (само IEC-тип за моделите)
2. Общ преглед на продукта
изглед отпред:
LCD панел
Прекъсвач за
LCD панел:
батерията
Входящо напрежение
Изходящо напрежение показва претоварване
AC режим индикатор
Индикатор за статуса на Показва изтощена батерия
Индикатор Заредете ниво, мига
Капацитет на батериите индикатор, мига
Обратно Преглед
Тип шуко NEMA тип I NEMA тип II IEC тип
Изходящи портове Модем / телефон и мрежа за защита от
AC вход колебания на напрежението
Прекъсвач
:
RS-232 com. порт
USB com. Порт
BG
6 часа
3. Инструкция за експлоатация
ВНИМАНИЕ: Преди употреба, прегледайте инструкциите за безопасност и
проверете за липсата на външни повреди по корпуса.
Условия за експлоатация
Поставете UPS-устройството в проветриво и защитено от прах помещение. НЕ използвайте
UPS-устройството при температура и влажност, отклоняващи се от препоръчителните (Моля,
запознайте се внимателно с инструкцията.)
Включване и зареждане
Включете UPS-устройството към електрическата мрежа.
За постигане на оптимален резултат заредете
акумулатора за период от минимум 6 часа преди
използване. Акумулаторът на UPS-устройството се
зарежда при включени към него устройства.
Включване на устройствата
Включете устройствата към входните портове върху задния панел на UPS-устройството.
Включете UPS-устройството. От този момент включените към UPS-устройството са
защитени.
ВНИМАНИЕ: НЕ ВКЛЮЧВАЙТЕ лазерни принтери и скенери
към UPS-устройството. Същите могат да повредят
устройството.
Включване на модем/телефон/мрежа (Само на модели с RJ-45)
Свържете линията модем/телефон към към IN-порта на задния панел на UPS-устройството.
Включете компютъра към OUT-порта посредством другия телефонен кабел.
(Свързване на комуникационен кабел (Само за модели с USB/RS-232 порт)
За самостоятелно включване / включване на UPS-устройството и преглед на състоянието,
включвайки кабел USB/RS-232 към компютъра, можете да контролирате включването /
изключването и статуса на UPS-устройството посредством компютъра.
Включване / изключване на устройството
За включване на UPS-устройството натиснете прекъсвача за захранването. За изключване
натиснете прекъсвача повторно.
4. Инструкции за безопасност (ЗАПАЗЕТЕ ТЕЗИ ИНСТРУКЦИИ)
ВНИМАНИЕ!
• С цел да предотвратите риск от запалване или токов удар, поставете UPS-устройството в
помещение с контролирани температура и влажност. (Вижте спецификациите за
приемливата температура и влажност.)
• С цел да бъде намален рискът от прегряване на UPS-устройството, не закривайте неговите
въздухоотводи и не го подлагайте на въздействието на пряка слънчева светлина, не го
поставяйте в близост до отоплителни уреди и печки.
• Не включвайте към UPS-устройството оборудване, различно от компютърно – например
медицинско/ животоспасяващо оборудване, микровълнови печки, прахосмукачки и др.
• Не свързвайте входния и изходен порт на UPS-устройството.
• Не допускайте попадане на течности или странични предмети в UPS-устройството.
• При възникване на извънредна ситуация натиснете бутон OFF и изключете захранващия
кабел от мрежата, за да изключите правилно UPS-устройството.
• Не включвайте разклонители и устройства за предпазване от високо напрежение към изхода
на UPS.
• В случай, че UPS-устройството е с метален корпус, с оглед на безопасността,
UPS-устройството с цел намаляване на енергопотреблението под 3.5mA, заземяването е
задължително при инсталиране на UPS.
• Опасност от токов удар. Заради акумулаторната батерия, дори и при изключване на този
блок от мрежата , може да има опасно напрежение. Акумулаторът за захранване трябва да
бъде изключен. Изключвайте положителния и отрицателния полюс на батерията при
евентуално разглобяване на UPS-устройството.
• Поддръжката и сервизирането на батерията следва да се извършва единствено от
квалифициран персонал.
• При смяна на батерията, използвайте същия модел и тип.
• Напрежение на батерията 12VDC. Херметизирана, оловно-киселинна акумулаторна
6-клетъчна батерия.
• Не унищожавайте батерията чрез изгаряне! Съществува опасност от взрив. Не отваряйте и
не разрушавайте корпуса на батерията. Електролитът е вреден за кожата и очите.
• Изключете UPS-устройството и отстранете кабелите преди почистване и не използвайте
течни и прахообразни миещи средства.
• Батерията може да причини токов удар и късо съединение. Спазвайте следните мерки за
безопасност при смяна на батерията.
1) Свалете часовника си и други метални предмети (бижута например).
2) Използвайте инструменти с електроизолирани дръжки.
3) Сложете гумени ръкавици и ботуши.
4) Не слагайте метални предмети върху батерията.
5) Преди смяна на батерията, отстранете кабелите, свързващи UPS-устройството с
електрическата мрежа.
5. Изтегляне и инсталиране на (Само за модели с комуникационен порт)
Следвайте описаните по-долу стъпки, за да изтеглите и инсталирате софтуер
за мониторинг:
1. Посетете http://www.power-software-download.com
2. Натиснете иконата на ViewPower софтуера, след което изберете необходимата ОС за
изтегляне на софтуера.
3. Следвайте инструкциите от екрана за инсталиране на софтуера.
4. След като рестартирате компютъра, оранжевата икона на софтуера за мониторинг се
появава до часовника в системния прозорец.
5.
Потребителско име и парола в софтуера за управление на:
Потребителско име: administrator
Парола: administrator
6. Решение на проблем
натоварването не превишава посоченото
Акумулаторът не е напълно
инимум
Батерията е дефектна. Това може
ежово
Захранващият кабел не е свързан
М
одел
EP 1500
EP 2000
КАПАЦИТЕТ
15
00VA / 9
00W 2000VA / 1200W
ВХОД
Напрежение
110/120 VAC
или 220/230/240 VAC
Диапазон
на
ИЗХОД
Регулир
ане на
Време за переход
стандартно
2-
6 ms, 10 ms
максимум
Форма
на вълната Моделир
ана
синусоидална в
ъ
лна
БАТЕРИЯ
Тип и количество
12 V/
9 AH x
2
В
рем
е за зар
еждане
4-6
часа възстановява
90%
от капацитета
Габарити
Размер
и (ДxШxВ) 397 x 146 x 205 мм
Тегло
(кг) 11.1 11.5
Заобикаляща среда
В
лажност
0-
90 %
RH @ 0-40° C (без конденз
)
Ниво на
шума
По-
малко от
40 дБ
Управление
USB/RS
-
232 Подд
ържа
Windows® 98/2000/2003/XP/Vista/2008, Windows® 7,
Проблем Възможна причина Решение
Светодиодният
индикатор на предния
панел не работи
Постоянен звуков
сигнал, когато
електрическата мрежа
функционира
нормално.
При изключено
електричество,
времето за автономна
работа е съкатено.
При нормално мр
напрежение
UPS-устройството
работи чрез батерията.
Изтощена батерия Зареждайте батерията минимум 6
Батерията е развалена. Сменете батерията.
UPS-устройството е изключено. Натиснете прекъсвача повторни и
UPS-устройството е претоварено. Изключете част от устройствата,
UPS-устройството е претоварено. Изключете част от устройствата.
зареден.
да бъде свързано с високата
температура на заобикалящата
среда или с неправилна
експлоатация на батерията.
правилно.
часа.
включете UPS-устройството.
свързани към UPS. Преди да включите
UPS-устройството отново се уверете, че
в характеристиките му.
Зареждайте UPS-устройството м
6 часa.
Сменете батерията
Включете захранващия кабел според
инструкциите.
7.... Спецификация
Line Interactive UPS
1. ΠΕΡΙΕΧΟΜΕΝΑ ΣΥΣΚΕΥΑΣΙΑΣ
- Μονάδα UPS
- Οδηγίες χρήσης
- Καλώδιο επικοινωνίας
- Καλώδιο ρεύµατος
2. ΠΕΡΙΓΡΑΦΗ ΠΡΟΪΟΝΤΟΣ
Πρόσοψη: LCD οθόνη:
LCD οθόνη
Τάση εισόδου
Τάση εξόδου (flash: Υπερφόρτωση)
Ένδειξη ρεύµατος
∆ιακόπτης Ο/Ι
Πίσω όψη:
Κατάσταση Μπαταρίας
Quick Guide V. 1.1
Επίπεδο φορτίου
Επίπεδο Μπαταρίας
(flash: Χαµηλή µπαταρία)
GK
напрежението
напрежението
81-145 VAC / 162-290 VAC
+/-10%
Schuko Type NEMA Type I NEMA Type II IEC Type
Έξοδοι Προστασία Μodem/Τηλεφώνου/∆ικτύου
Είσοδος ΑC RS-232 θύρα
Circuit breaker
Linux, and MAC
34 35
USB θύρα
3. ΕΓΚΑΤΑΣΤΑΣΗ ΚΑΙ ΕΝΑΡΞΗ ΛΕΙΤΟΥΡΓΙΑΣ
Αρχικά ελέγξατε την συσκευή για πιθανή ύπαρξη χτυπήµατος ή
καταστροφής
Τοποθέτησε το UPS σε µια θέση µε αρκετό αερισµό και µακριά από έκθεση σε σκόνη.
Επίσης σε απόσταση 20cm από άλλες ηλεκτρικές συσκευές και εντός των
προκαθορισµένων ορίων θερµοκρασίας και υγρασίας
Σύνδεση στο ρεύµα
Συνδέστε το UPS στο ρεύµα 220V50Hz,
και αφήστε για 6 ώρες να φορτισθεί η µπαταρία.
Σύνδεση φορτίων
Αφού φορτίσουν οι µπαταρίες συνδέστε τις συσκευές σας
6 hours
στο πίσω µέρος και µετά πιέστε τον διακόπτη Ο/Ι σε θέση
λειτουργίας
Προσοχή: ΠΟΤΕ µην συνδέετε έναν εκτυπωτή LASER ή
SCANNER στο UPS σας
Εάν το UPS σας διαθέτει θύρα RJ45 συνδέστε τα MODEM, τηλέφωνα κτλ για προστασία από
υπερτάσεις.
Σύνδεση του καλωδίου επικοινωνίας USB ή RS-232
Συνδέοντας την θύρα USB ή RS – 232 του UPS µε το PC σας και χρησιµοποιώντας το κατάλληλο
software, ρυθµίστε τον χρόνο shutdown/start-up του PC .
Ενεργοποίηση – απενεργοποίηση UPS
Πατώντας διαδοχικά τον διακόπτη Ο/Ι µπορείτε να ενεργοποιήσετε ή να απενεργοποιήσετε το UPS
σας.
4. ΣΗΜΑΝΤΙΚΕΣ ΠΡΟΕΙ∆ΟΠΟΙΗΣΕΙΣ ΑΣΦΑΛΕΙΑΣ
• Για προστασία από ηλεκτροπληξία βεβαιωθείτε ότι οι συνθήκες λειτουργίας του UPS είναι
εντός των ορίων που καθορίζονται στον πίνακα τεχνικών χαρακτηριστικών.
• Για προστασία από υπερθέρµανση µην τοποθετείτε οτιδήποτε πάνω στο UPS. Μην το
εκθέτετε στον ήλιο και µην το τοποθετείτε δίπλα σε πηγές θερµότητας.
• Μην συνδέετε στο UPS ιατρικά µηχανήµατα, φούρνους µικροκυµάτων ή άλλες συσκευές
άσχετες µε τους Η/Υ.
• Μην συνδέετε την είσοδο AC στην έξοδο.
• Μην επιτρέψετε την επαφή του ups µε υγρά οποιασδήποτε σύνθεσης.
• Σε περίπτωση κινδύνου πατήστε τον διακόπτη Ο/Ι απενεργοποιήστε και στην συνέχεια
αποσυνδέστε το καλώδιο. Μην αγγίζετε τα µεταλλικά µέρη του UPS και καλέστε βοήθεια
ηλεκτρολόγου.
• Μην συνδέετε πολύµπριζο πάνω στο UPS µε σκοπό να αυξήσετε το πλήθος των συσκευών
που θέλετε να συνδέσετε.
• Μην αντικαθιστάτε τις µπαταρίες του UPS αλλά αναθέστε το σε έναν εξειδικευµένο τεχνικό.
• Μην χρησιµοποιείτε υγρά καθαρισµού πάνω στο UPS σας, κίνδυνος ηλεκτροπληξίας.
5. ΕΠΙΚΟΙΝΩΝΙΑ ΜΕ ΤΟ PC
Ακολουθείστε τις οδηγίες για εγκατάσταση του S/W επικοινωνίας
1. Πηγαίνετε στο http://www.power-software-download.com
2. Κάντε Click στο ViewPower και επιλέξτε βάσει του λειτουργικού συστήµατος που έχετε στο PC
σας..
3. Ακολουθήστε τις οδηγίες για την εγκατάσταση του προγράµµατος επικοινωνίας
4. Όταν επανεκκινήσετε το PC σας το πρόγραµµα επικοινωνίας θα εµφανιστεί µε ένα πορτοκαλί
εικονίδιο στο system tray, κοντά στο ρολόι.
5. Ονοµα Χρηστη / και κωδικός για τη χρήση του λογισµικού.
Ονοµα Χρήστη : administrator
κωδικός : administrator
:
36 37
6. ΚΩ∆ΙΚΟΠΟΙΗΣΗ ΠΡΟΒΛΗΜΑΤΩΝ
χρόνος επάρκειας είναι
βρίσκεται
Πρόβληµα Πιθανή Αιτία Λύση
Καµία ένδειξη στην
οθόνη
Ο βοµβητής ηχεί
συνεχώς ενώ το UPS
έχει είσοδο AC ρεύµα.
Σε περίπτωση
διακοπής ρεύµατος ο
µικρός.
Το ρεύµα είναι οκ
αλλά το UPS
σε Battery mode.
Χαµηλή Μπαταρία Φορτίστε το UPS για 6 ώρες.
Χαλασµένη µπαταρία
∆ιακόπτης Ο/Ι στο Ο.
Το UPS έχει υπερφορτωθεί Αποσυνδέστε κάποια
Το UPS έχει υπερφορτωθεί. Αποσυνδέστε κάποια
Χαµηλή Μπαταρία Φορτίστε το UPS για 6 ώρες.
Χαλασµένη µπαταρία. Αντικαταστήστε τις µπαταρίες.
Το καλώδιο σύνδεσης στα
(220V 50Hz) όχι σωστά
τοποθετηµένο
Αντικαταστήστε τις µπαταρίες.
Πατήστε τον ∆ιακόπτη Ο/Ι στο Ι
φορτία(συσκευές)
φορτία(συσκευές)
Ελέγξατε το καλώδιο της εισόδου
7 Χαρακτηριστικά
ΤΥΠΟΣ EP 1500 EP 2000
ΙΣΧΥΣ 1500 VA / 900 W 2000 VA / 1200 W
ΕΙΣΟ∆ΟΣ
Τάση 110/120 VAC or 220/230/240 VAC
Εύρος τάσης 81-145 VAC / 162-290 VAC
ΕΞΟ∆ΟΣ
∆ιόρθωση τάσης +/-10%
Χρόνος µεταγωγής Συνήθως 2-6 ms, 10 ms µέγιστο.
Κυµατοµορφή Προσοµοιωµένο ηµίτονο
ΜΠΑΤΑΡΙΑ
Τύπος / πλήθος 12 V/9 AH x 2
Φόρτιση 4-6 ώρες για επανάκτηση κατά 90%
∆ΙΑΣΤΑΣΕΙΣ
∆ιαστάσεις (DxWxH) 397 x 146 x 205 mm
Βάρος (kgs) 11.1 11.5
ΠΕΡΙΒΑΛΛΟΝ ΛΕΙΤΟΥΡΓΙΑ
Υγρασία 0-90 % RH @ 0-40° C (χωρίς συµπύκνωση)
Θόρυβος Λιγότερος από 40 dB
ΕΠΙΚΟΙΝΩΝΙΑ
USB/RS-232 Windows® 98/2000/2003/XP/Vista/2008, Windows® 7, Linux,
Unix, and MAC
UPS interactiva da gama
1. Conteúdo da embalagem
- Unidade UPS
- Guia de consulta rápida
- Cabo de comunicação (apenas para modelos com porta USB/RS-232)
- Cabo de alimentação (apenas para o modelo de entrada tipo IEC)
2. Descrição geral do produto
Vista frontal:
Painel LCD
Power switch
Vista traseira:
Tipo Schuko NEMA Tipo I NEMA Tipo II Tipo IEC Tipo
Receptáculos de saída
Entrada CA
Disjuntor
modem/telefone/rede
Painel LCD:
Tensão de entrada Indicador do nível de carga,
intermitente Indica sobrecarga
Tensão de saída
Indicador do modo AC intermitente indica bateria fraca
Indicador do modo de bateria
Protecção contra sobrecargas em
Porta com. RS-232
Porta com. USB
Guia de consulta rápida V. 1.1
Indicador de capacidade da bateria,
PT
38 39
3. Instalação e arranque inicial
Antes da instalação, inspeccione a unidade e o conteúdo para verificar que
não existem danos nem componentes em falta.
Condições de instalação e armazenamento
Instale a UPS num local protegido sem excesso de poeira e com ventilação adequada. Coloque
a UPS afastada de outras unidades e a uma distância de pelo menos 20 cm para evitar
interferências. Não utilize a UPS se a temperatura e a humidade registarem valores superiores
ao limite recomendado (consulte as especificações)
Ligação à corrente eléctrica e dispositivo de carga
Ligue o cabo de entrada CA à tomada de parede e carregue a
UPS durante pelo menos 6 horas antes de a utilizar. A unidade
carrega a bateria quando é ligada à corrente eléctrica.
6 horas
Ligação de dispositivos
Ligue os dispositivos às ligações de saída no painel traseiro da UPS. Prima o interruptor para
ligar o aparelho. Os dispositivos estão agora protegidos pela UPS.
ATENÇÃO: NUNCA ligue uma impressora laser ou um
scanner à UPS, isso pode danificar a unidade.
Ligar modem/telefone/rede protecção contra sobrecargas
(apenas para o modelo com RJ-45)
Ligue o modem/linha telefónica à ligação “IN” (Entrada) da protecção contra sobrecargas na
parte de trás da unidade UPS. A outra extremidade deve ser ligada à ligação no computador
“OUT” (Saída) para o telefone.
Ligar cabo de comunicação (apenas para modelos com porta USB/RS-232)
Para activar o encerramento/ligação da UPS e a monitorização de estado, ligue o cabo de
comunicação USB/RS-232 e o outro à porta de comunicação do PC. Depois de instalar o
software de monitorização, pode agendar o encerramento/ligação da UPS e monitorizar o
estado da UPS.
Ligar/Desligar a unidade
Prima o interruptor para ligar a UPS. Para a desligar, prima e mantenha premido o interruptor
durante 5 segundos.
4. Aviso de segurança importante (LEIA AS INSTRUÇÕES)
ATENÇÃO!
•••• Para evitar o risco de incêndio ou choque eléctrico, utilize o aparelho apenas dentro de casa num local
com temperatura e humidade controladas e sem substâncias contaminadoras. (Consulte as respectivas
especificações)
•••• Para reduzir o risco de sobreaquecimento, não obstrua as aberturas de ventilação da UPS e evite expor a
unidade a luz solar directa nem instale a unidade junto de aparelhos, tais como aquecedores ou lareiras.
•••• Não ligue aparelhos que não estejam relacionados com o computador, tais como equipamento médico,
respiradores artificiais, fornos de microondas ou aspiradores à UPS.
•••• Não ligue a entrada da UPS à própria saída.
•••• Não coloque bebidas ou outros objectos que contenham líquidos sobre ou junto da unidade.
•••• Em caso de emergência, prima o botão OFF (Desligar) e retire o cabo de alimentação da fonte de
alimentação CA para desligar correctamente a UPS.
•••• Não ligue um extensão eléctrica ou um supressor de picos à UPS.
•••• Por motivos de segurança, se a UPS tiver um chassis metálico, deve ligá-la à terra durante a instalação de
modo a reduzir a corrente de fuga abaixo de 3,5 mA.
•••• Os trabalhos de reparação ou assistência devem ser realizados ou supervisionados apenas por pessoal
devidamente formado.
•••• Quando substituir as baterias, utilize o mesmo número e tipo.
•••• A tensão interna da bateria é de 12 V CC. Bateria de 6 células, selada, de aço e chumbo.
•••• Não deite as baterias numa fogueira, uma vez que podem explodir.
•••• Não abra nem danifique a bateria ou as baterias. O electrólito derramado é nocivo para a pele e os olhos.
•••• Desligue a UPS antes de efectuar a limpeza e não utilize detergentes líquidos ou pulverizantes.
•••• Uma bateria pode representar um risco de choque eléctrico e corrente de curto-circuito elevada. Antes de
substituir as baterias, deve ter em conta as seguintes precauções:
1) Retire quaisquer relógios, anéis ou outros objectos metálicos.
2) Utilize ferramentas com pegas isolantes.
3) Use luvas e botas de borracha.
4) Não coloque ferramentas ou peças metálicas em cima das baterias.
5) Desligue a fonte de carga antes de ligar ou desligar os terminais da bateria.
Atenção: Perigo devido a choque eléctrico. Risco ao desligar a unidade da corrente eléctrica, uma
vez que a bateria pode ainda ter tensão. A bateria deve ser desligada correctamente nos pólos +
e - dos respectivos conectores quando realizar trabalhos de manutenção no interior da UPS.
5. Transferência e instalação de software (apenas para o modelo com porta de
comunicação)
Siga os passos indicados abaixo para instalar o software:
1. Visite o site http://www.power-software-download.com
2. Clique no ícone do software ViewPower e seleccione o seu idioma para fazer a transferência.
3. Siga as instruções no ecrã para instalar o software.
4. Quando o computador reiniciar, o software de monitorização é apresentado como um ícone
“ligação” laranja no canto inferior do ecrã (no tabuleiro do sistema) onde se encontra o relógio.
5. Nome de utilizador e palavra-passe para a gestão do software:
Nome de utilizador: administrador
Palavra-passe: administrador
40 41
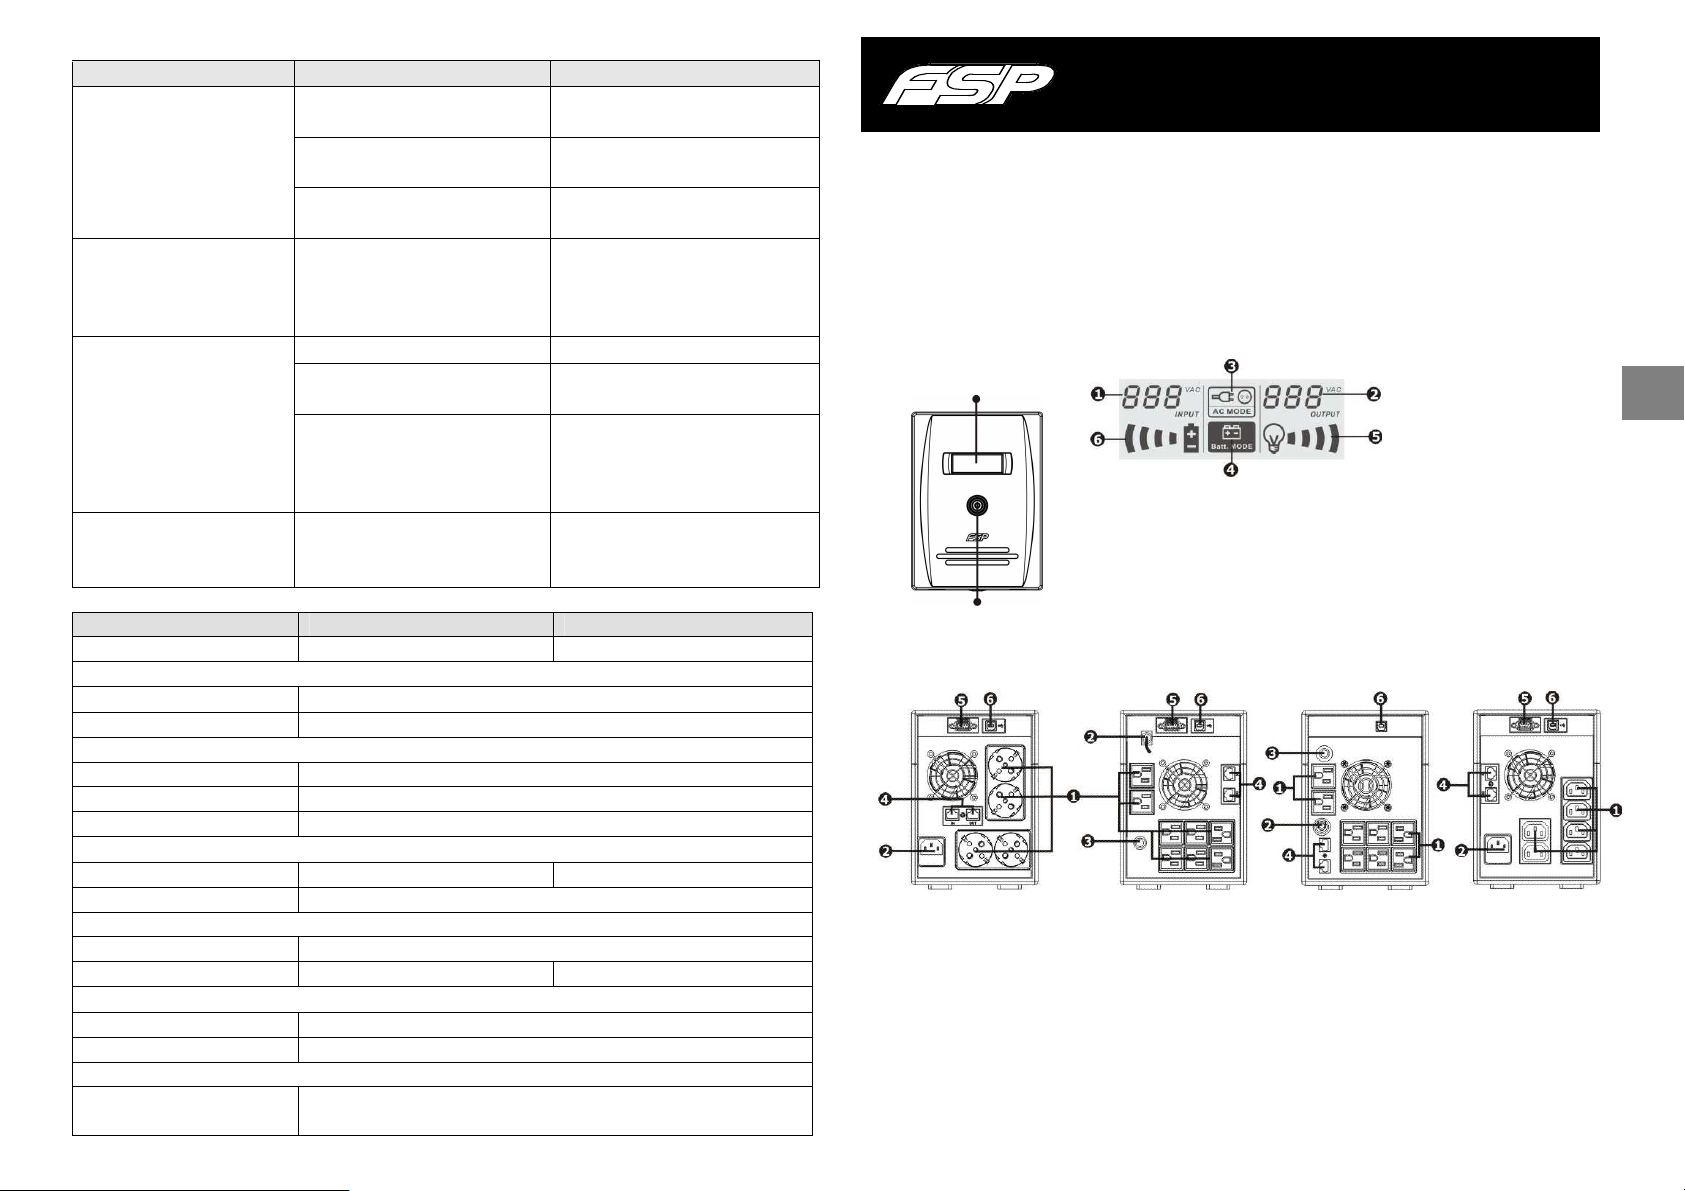
6. Resolução de problemas
nos 6
Remova alguns dispositivos. Antes de
voltar a ligar o equipamento, verifique
Carregue a UPS durante pelo menos 6
a bateria por um modelo
Verifique e volte a ligar o cabo de
Întrerupător curent
Problema Causa possível Solução
Não aparece texto no visor do
painel frontal.
O alarme soa continuamente
embora
a alimentação eléctrica seja
normal.
Quando ocorre uma falha de
energia, o tempo de reserva é
menor.
A corrente eléctrica é normal
mas a unidade está no
modo de bateria.
7 Especificações
Modelo EP 1500 EP 2000
CAPACIDADE 1500 VA / 900 W 2000 VA / 1200 W
ENTRADA
Tensão 110/120 V CA ou 220/230/240 V CA
Gama de tensões 81-145 V CA / 162-290 V CA
SAÍDA
Regulação de tensão +/-10%
Tempo de transferência Típica, 2-6 ms, máx. 10 ms
Forma de onda Onda sinusoidal simulada
BATERIA
Tipo e número 12 V/ 9 AH x 2 12 V/ 9 AH x 2
Tempo de carga 4 a 6 horas de recuperação para 90% da capacidade
FÍSICA
Dimensão (PxLxC) 397 x 146 x 205 mm
Peso líquido (kgs) 11,1 11,5
Ambiente
Humidade 0-90 % HR a 0-40 °C (sem condensação)
Nível de ruído Menos de 40 dB
GESTÃO
USB/RS-232 Compatível com Windows® 98/2000/2003/XP/Vista/2008/7, Linux,
Bateria fraca. Carregue a UPS durante pelo me
horas.
Bateria defeituosa. Substitua a bateria por um modelo
que seja idêntico.
A UPS não está ligada. Prima novamente o interruptor de
corrente para ligar a UPS.
A UPS está sobrecarregada.
se a carga corresponde à capacidade
da UPS indicada nas especificações.
A UPS está sobrecarregada. Remova alguma carga crítica.
A tensão da bateria é demasiado
fraca.
Bateria defeituosa. A temperatura
de funcionamento pode ser
demasiado alta ou a bateria não
está a ser utilizada correctamente.
O cabo de alimentação está solto.
horas.
Substitua
que seja idêntico.
alimentação.
Unix e MAC
UPS în linie interactivă
Ghid rapid de utilizare V. 1.1
1. Conţinutul pachetului
- Unitate UPS
- Ghid rapid de utilizare
- Cablu de comunicare (numai pentru modelul cu port USB/RS-232)
- Cablu de alimentare (numai pentru modelul de tip IEC)
2. Prezentarea generală a produsului
Vedere din faţă:
Panou LCD
Vedere din spate:
Tip Schuko Tip I NEMA Tip II NEMA Tip IEC
Prize de ieşire
Intrare AC
Întrerupător circuit
Panou LCD:
Tensiune intrare Indicator nivel încărcare, lumina
Tensiune ieşire pâlpâitoare indică supraîncărcare
Indicator mod AC Indicator capacitate acumulator,
Indicator mod lumina pâlpâitoare indică
acumulator acumulator aproape descărcat
Protecţie supratensiune modem/telefon/reţea
port de comunicare RS-232
port de comunicare USB
RO
42 43
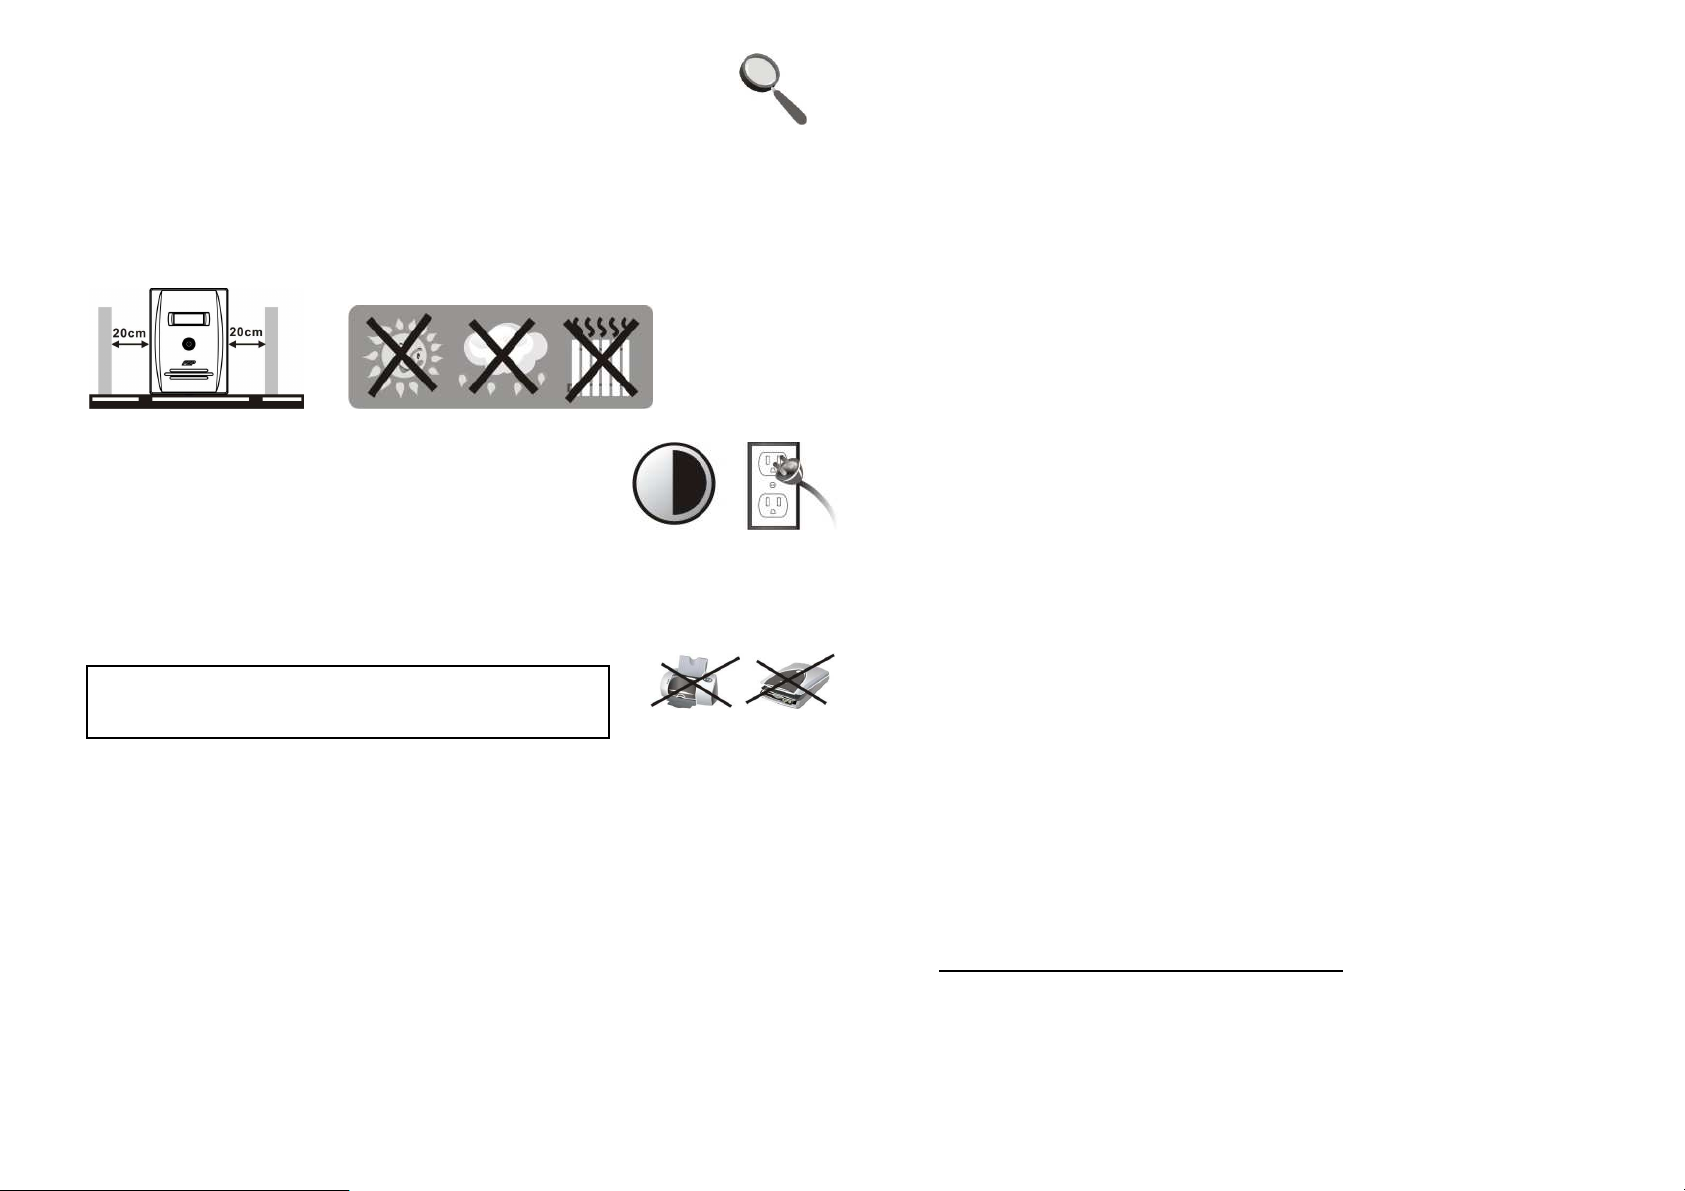
3. Instalare şi prima pornire
Înainte de instalare, verificaţi unitatea şi conţinutul pachetului ca nimic să nu
fie deteriorat sau să lipsească.
Condiţii de amplasare şi păstrare
Instalaţi unitatea UPS într-o zonă protejată, fără praf şi care este ventilată adecvat. Aşezaţi
unitatea UPS la o distanţă de cel puţin 20 de cm faţă de alte unităţi pentru a evita interferenţa.
NU puneţi unitatea UPS în funcţiune dacă temperatura şi umiditatea depăşesc limitele
recomandate (consultaţi specificaţiile).
Conectare la sursa de alimentare şi încărcare
Băgaţi cablul de intrare AC în priza de perete şi încărcaţi unitatea
UPS timp de cel puţin 6 ore înainte de utilizare. Unitatea îşi
încarcă acumulatorii în timp ce este conectată la sursa de
alimentare.
Conectarea dispozitivelor
Conectaţi dispozitivele la conexiunile de ieşire de pe panoul posterior al unităţii UPS. Porniţi
alimentarea cu curent apăsând întrerupătorul; dispozitivele sunt acum protejate de unitatea
UPS.
ATENŢIE: Nu conectaţi NICIODATĂ o imprimantă laser sau
scanner la unitatea UPS, acestea pot deteriora unitatea.
Conectaţi protecţia de supratensiune pentru modem/telefon/reţea (disponibilă
numai la modelul cu RJ-45)
Introduceţi cablul modemului/linia telefonică în conexiunea „IN” protejată împotriva
supratensiunii de pe panoul posterior al unităţii UPS, celălalt capăt trebuie introdus în conexiunea
„OUT” a calculatorului pentru telefon.
Conectarea cablului de comunicare (numai pentru modelul cu port USB/RS-232)
Pentru a activa oprirea/pornirea unităţii UPS şi monitorizarea stării de la distanţă, conectaţi cablul
de comunicare la portul USB/RS-232 şi celălalt capăt la portul de comunicare al calculatorului dvs.
Cu software-ul de monitorizare instalat, puteţi programa oprirea/pornirea unităţii UPS şi
monitoriza starea sa.
Pornirea/oprirea unităţii
Apăsaţi întrerupătorul pentru a porni unitatea UPS. Pentru a o opri, menţineţi întrerupătorul
apăsat timp de 5 secunde.
6 ore
4. Avertisment important privind siguranţa (VĂ RUGĂM CITIŢI
INSTRUCŢIUNILE)
ATENŢIE!
•••• Pentru a preveni riscul de incendiu sau electrocutare, folosiţi unitatea numai în încăperi închise cu o
•••• Pentru a reduce riscul de supraîncălzire, nu acoperiţi orificiile de ventilaţie ale unităţii UPS şi evitaţi
•••• Nu conectaţi articole care nu sunt calculatoare, precum echipament medical, echipament de suport vital,
•••• Nu conectaţi cablul de intrare UPS la propria sa conexiune de ieşire.
•••• Nu aşezaţi băuturi sau alte articole ce conţin lichide pe sau lângă unitate.
•••• În cazul unei urgenţe, apăsaţi butonul OFF (Oprit) şi deconectaţi cablul de alimentare de la sursa de
•••• Nu conectaţi prelungitoare sau prize cu protecţie la supratensiuni la unitatea UPS.
•••• Dacă unitatea UPS are o carcasă din metal, din motive de siguranţă, pământarea este obligatorie în timpul
•••• Operaţiile de reparaţie sau de service trebuie efectuate sau supravegheate numai de personal calificat.
•••• Atunci când înlocuiţi acumulatorii, folosiţi acelaşi număr şi tip.
•••• Tensiunea internă a acumulatorului este de 12 VDC. Acumulator etanş cu gel de plumb, cu 6 celule.
•••• Nu aruncaţi acumulatorii în foc fiindcă pot exploda.
•••• Nu deschideţi sau deterioraţi acumulatorii. Electrolitul eliberat este dăunător pielii şi ochilor.
•••• Scoateţi unitatea UPS din priză înainte de curăţare şi nu folosiţi detergenţi lichizi sau sub formă de spray.
•••• Un acumulator poate prezenta un risc de electrocutare şi scurtcircuitare. Următoarele precauţii trebuie
Atenţie: Pericol de electrocutare. Risc la deconectarea unităţii de la sursa de alimentare, acumulatorul poate
conţine încă tensiune. Acumulatorul trebuie deconectat corect la polul plus şi minus al conectorilor de pe
acumulator atunci când se efectuează operaţii de întreţinere pe unitatea UPS.
temperatură şi umiditate controlate, fără substanţe contaminante conductoare. (Consultaţi specificaţiile).
expunerea unităţii la lumina directă a soarelui sau instalarea sa în apropierea unor aparate precum
radiatoare sau sobe.
cuptoare cu microunde sau aspiratoare la unitatea UPS.
alimentare AC pentru a dezactiva unitatea UPS în mod corespunzător.
instalării pentru a reduce scăderea curentului sub 3,5 mA.
respectate înainte de înlocuirea acumulatorilor:
1) Îndepărtaţi ceasurile, inelele şi celelalte obiecte din metal de pe dvs.
2) Folosiţi scule cu mânere izolate.
3) Purtaţi mănuşi şi cizme de cauciuc.
4) Nu aşezaţi scule sau părţi metalice pe acumulatori.
5) Deconectaţi sursa de încărcare înainte de conectarea sau deconectarea terminalelor
acumulatorilor.
5. Descărcarea şi instalarea software-ului (Numai pentru modelul cu port de
comunicare)
Vă rugăm urmaţi paşii de mai jos pentru instalarea software-ului:
1. Vizitaţi http://www.power-software-download.com
2. Faceţi clic pe pictograma ViewPower şi alegeţi limba dorită de dvs. pentru descărcare.
3 Urmaţi instrucţiunile de pe ecran pentru a instala software-ul.
4. Atunci când calculatorul dvs. se reporneşte, software-ul de monitorizare va apărea ca o
pictogramă reprezentând o „priză” portocalie în colţul dreapta jos al ecranului (bara de procese
(system tray)), unde se află şi ceasul.
5. Nume utilizator şi parolă pentru administrarea software-ului:
Nume utilizator: administrator ; Parolă: administrator
44 45
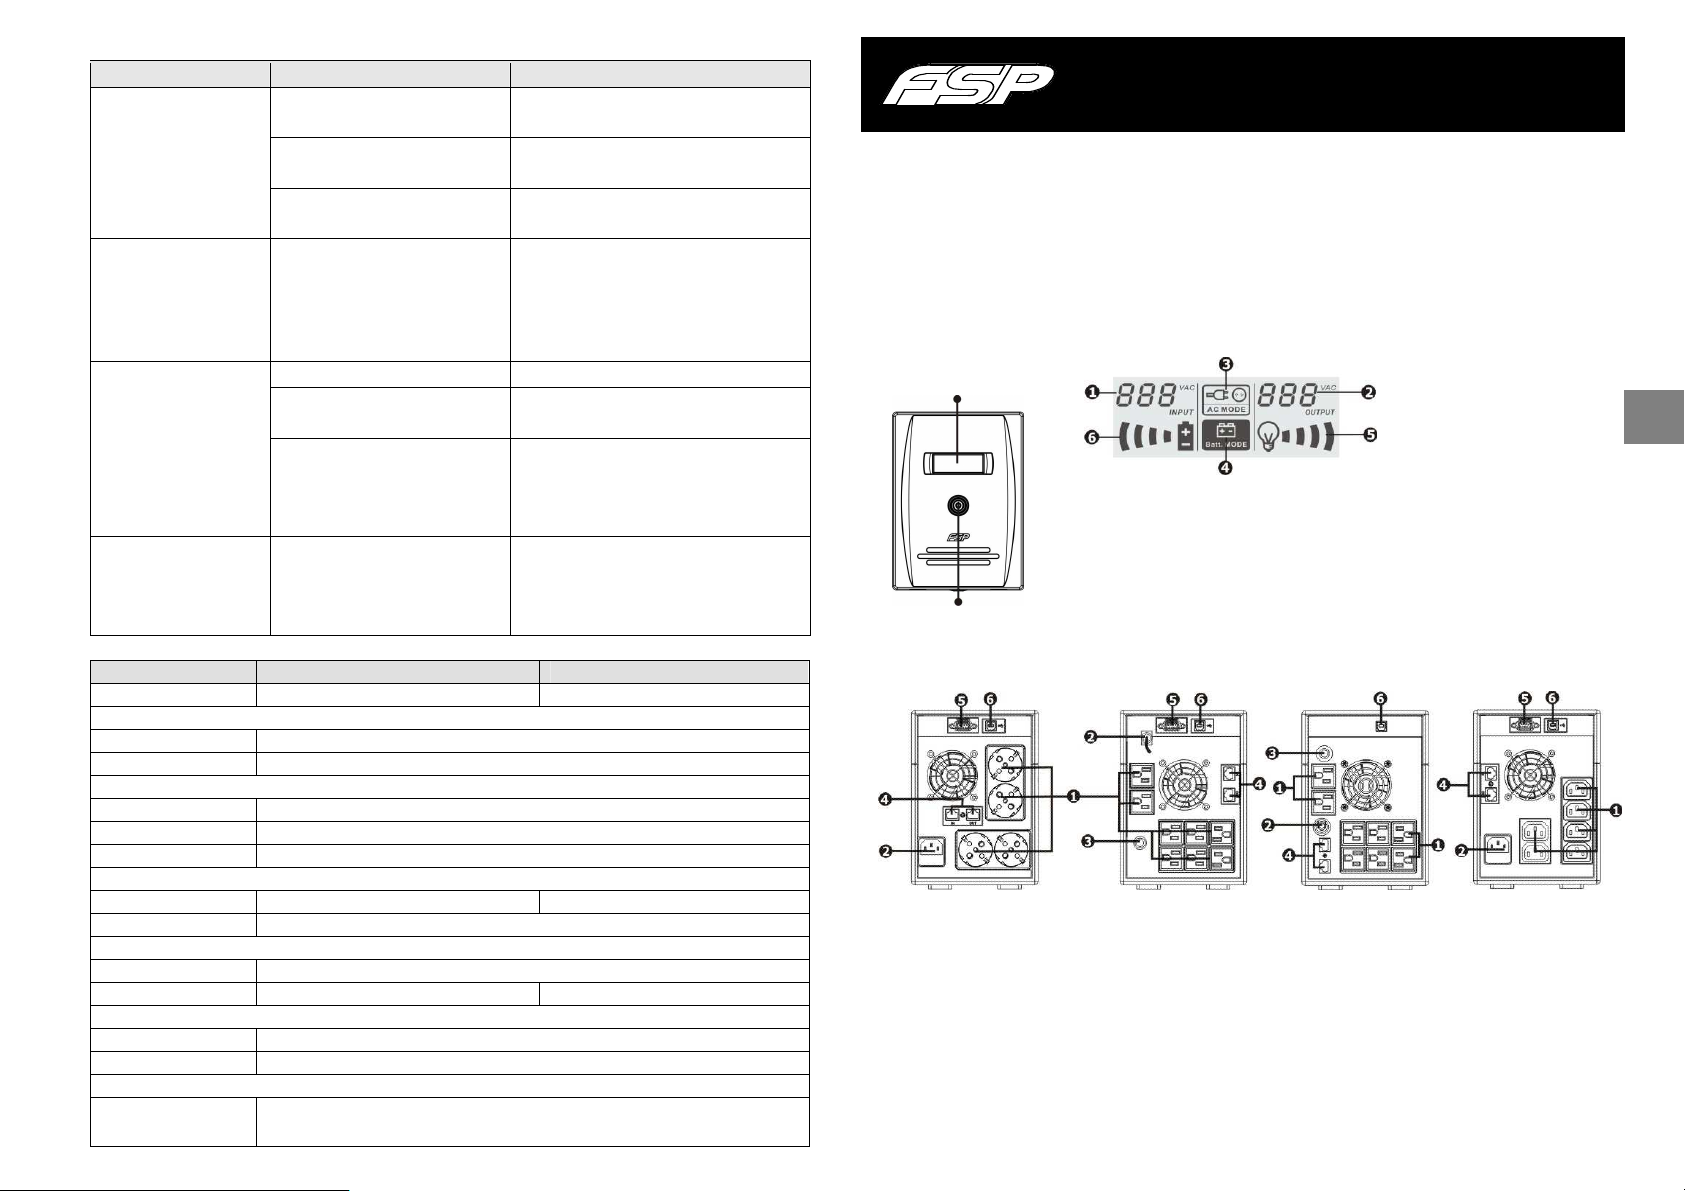
6 Identificarea problemelor
Încărcaţi unitatea UPS timp de cel puţin 6
Îndepărtaţi câteva dispozitive. Înainte de a
UPS timp de cel puţin 6
Înlocuiţi acumulatorul cu acelaşi tip de
Verificaţi şi reconectaţi cablul de
Problemă Cauză posibilă Soluţie
Nu apar cuvinte pe
afişajul de pe panoul
anterior.
Alarma sună continuu
deşi alimentarea cu
curent este normală,
Când se întrerupe
curentul, timpul de
recuperare este scurt.
Alimentarea cu curent
este normală dar
unitatea se află în mod
acumulator.
Acumulator aproape descărcat.
Defect acumulator. Înlocuiţi acumulatorul cu acelaşi tip de
Unitatea UPS nu este pornită. Apăsaţi întrerupătorul din nou pentru a
Unitatea UPS este supraîncărcată.
Unitatea UPS este supraîncărcată. Îndepărtaţi unele sarcini critice.
Tensiunea acumulatorului este
prea scăzută.
Defect acumulator. Temperatura
de funcţionare ar putea fi prea
mare, sau acumulatorul nu este
folosit în mod corect.
Cablul de alimentare este
deconectat.
7 Specificaţii
Model
CAPACITATE 1500 VA / 900 W 2000 VA / 1200 W
INTRARE
Tensiune 110/120 VAC sau 220/230/240 VAC
Interval tensiune 81-145 VAC / 162-290 VAC
IEŞIRE
Reglare tensiune +/-10%
Timp de transfer Tipic 2-6 ms, 10 ms max.
Formă undă Undă sinusoidală simulată
ACUMULATOR
Tip & număr 12 V/ 9 AH x 2 12 V/ 9 AH x 2
Timp de încărcare în 4-6 ore ajunge la 90% din capacitate
CARACTERISTICI FIZICE
Dimensiune (Lxlxh) 397 x 146 x 205 mm
Greutate netă (kg) 11.1 11.5
Mediu
Umiditate 0-90 % RH @ 0-40° C (non-condensare)
Nivel zgomot Mai mic de 40 dB
MANAGEMENT
USB/RS-232 Compatibil cu Windows® 98/2000/2003/XP/Vista/2008/7, Linux, Unix, şi
ore.
acumulator.
porni unitatea UPS.
conecta echipamentele, verificaţi că
sarcina de încărcare se potriveşte cu
capacitatea unităţii UPS indicată în
specificaţii.
Încărcaţi unitatea
ore.
acumulator.
alimentare.
EP 1500 EP 2000
MAC
46 47
Line Interactive UPS
Használati utasítás, 1.1. verzió
1. A csomagolás tartalma:
- UPS készülék
- Használati utasítás
- Kommunikációs kábel (csak az RS-232 porttal rendelkező típusnál)
- Hálózati kábel (csak az IEC konnektorokkal rendelkező típusnál)
2. Áttekintés
Elölnézet:
LCD-kijelző
Kapcsoló
Hátulnézet:
Schuko típus NEMA I típus NEMA II típus IEC típus
Kimeneti konnektorok
Hálózati csatlakozás
Újraindítás nyomógomb
LCD-kijelző:
Bemeneti feszültség
túlterhelést jelez
Kimeneti feszültség
Hálózatról üzemelés jele
Akkumulátorról üzemelés jele
aljzat (RJ-11/RJ-45 konnektorok)
RS-232 port
USB port
Terhelés kijelző, a villogás
Akkumulátor töltöttség kijelzése,
a villogás szinte teljesen lemerült
akkumulátort jelez
Túlfeszültséggel szemben védett
modem/telefon vagy számítógépes hálózat
HU
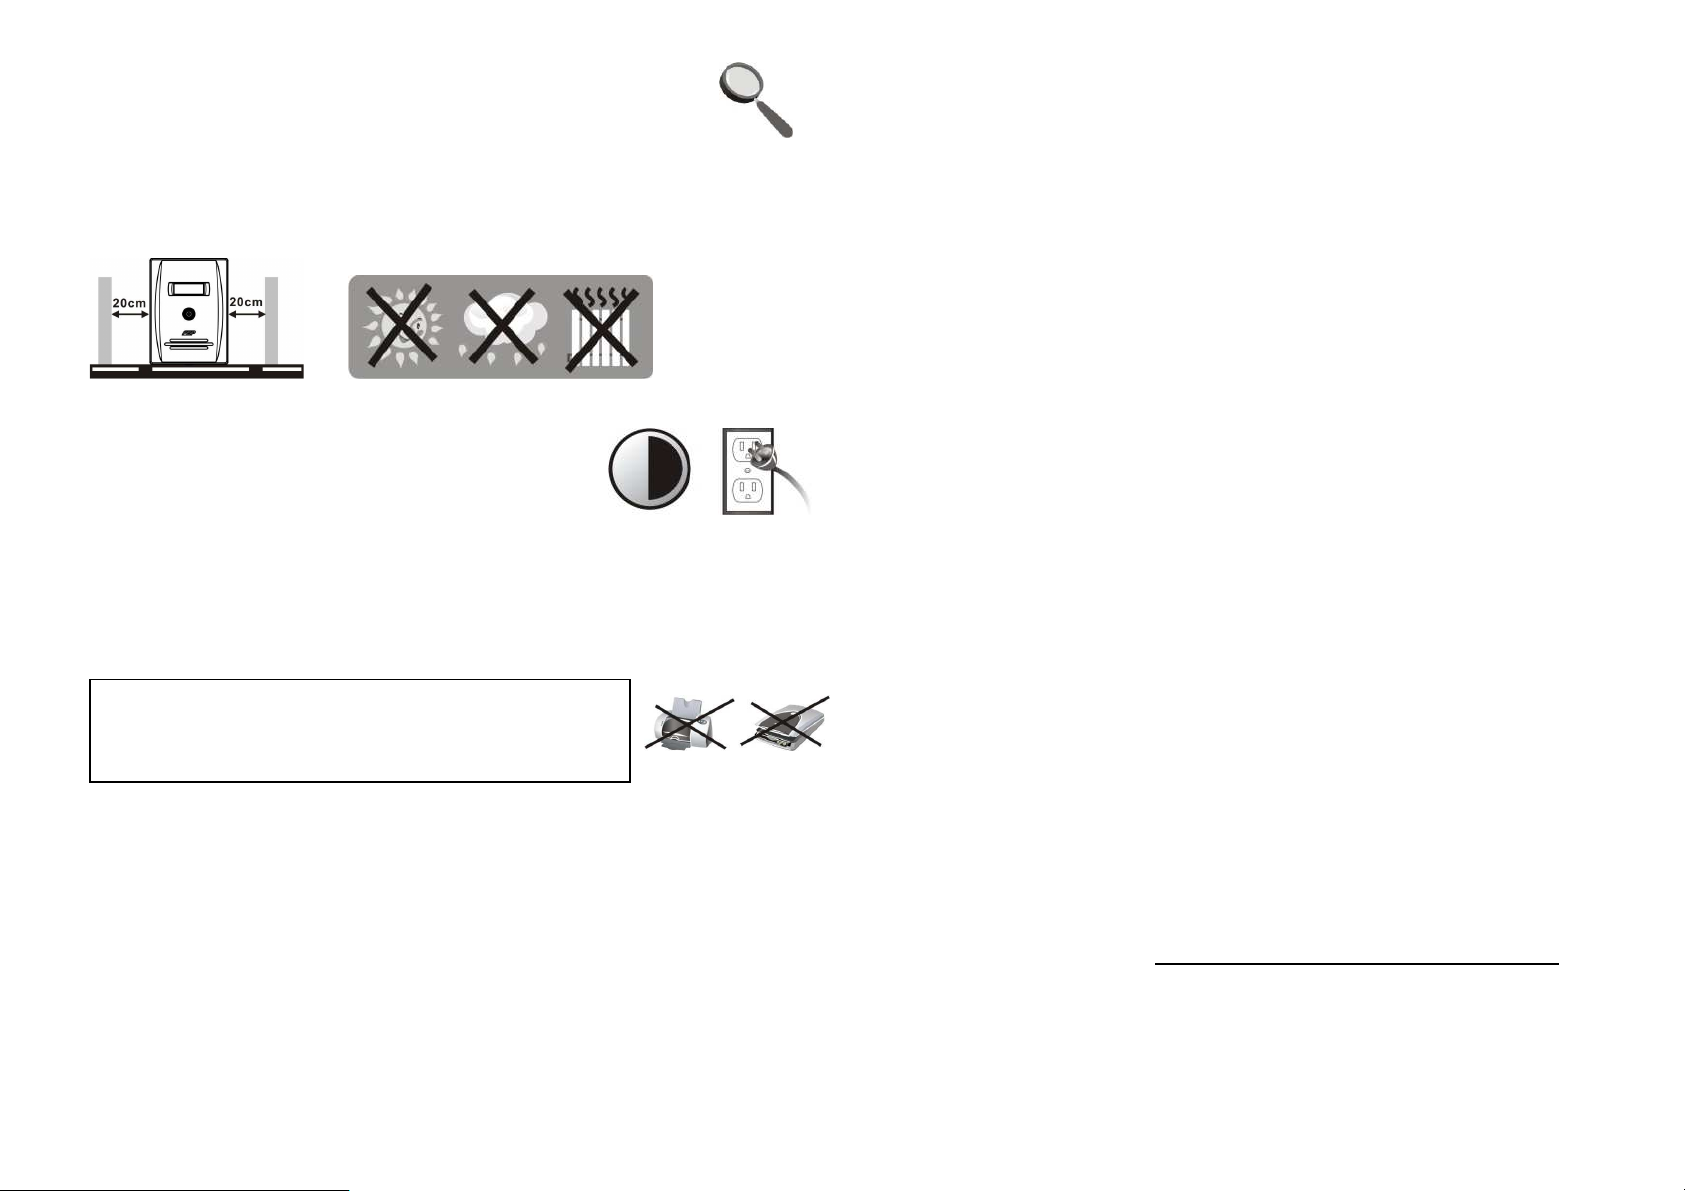
6 óra
3. Telepítés és alapbeállítások
Megj.: A használatba vétel előtt ellenőrizze le, hogy a készülék nem sérült-e
meg a szállítás folyamán.
Elhelyezés és tárolás
Az UPS készüléket pormentes és jól szellőztethető helyre állítsa fel. Amennyiben az UPS
készüléket más elektromos készülékek közelébe teszi, akkor a kölcsönös zavarások elkerülése
érdekében a készülékek között legalább 20 cm szabad helyet kell hagyni. Az UPS készüléket ne
használja túlságosan meleg és párás környezetben (a határértékeket a Műszaki adatok
tartalmazzák).
Csatlakozás a hálózathoz és töltés
Dugja a csatlakozódugót a konnektorba. A készülék megfelelő
működéséhez az akkumulátort legalább 4 óra hosszat tölteni
kell. A védeni kívánt készülékeket csak ezután csatlakoztassa.
Az UPS a hálózathoz csatlakoztatás után azonnal megkezdi az
akkumulátor töltését.
A védeni kívánt készülékek csatlakoztatása
Az áramkimaradással szemben védeni kívánt készülékeket csatlakoztassa az UPS hátlapján
található konnektorokhoz. Kapcsolja be az UPS előlapján található kapcsolót, majd kapcsolja be
az UPS-hez csatlakoztatott készülékeket. A csatlakoztatott készülékeket az UPS védi az
áramkimaradásokkal szemben.
FIGYELMEZTETÉS: Az UPS kimeneti aljzataihoz
lézernyomtatót, vagy szkennert csatlakoztatni tilos. Ezeket a
készülékeket az UPS tönkreteheti.
Modem/telefon/számítógépes hálózat csatlakoztatása a túlfeszültséggel szemben
védett aljzathoz (csak az RJ-11/RJ-45 konnektorokat tartalmazó típusnál)
Az UPS készülék hátlapján található IN jelű aljzatba dugja be a telefon fali konnektorból érkező
vezetéket. Az OUT jelű kimeneti aljzatba dugja be a modem vagy a telefonkészülék vezetékét.
A kommunikációs kábel csatlakoztatása (csak az RS-232 porttal rendelkező
típusnál)
Amennyiben szeretné kihasználni az UPS készülék automatikus ki- és bekapcsolási, valamint az
állapotfelügyeleti funkcióit, akkor a készülék és a számítógép RS-232 portjához csatlakoztassa a
soros kábelt. A csatlakoztatott számítógépre telepítendő felügyeleti program segítségével előre
beállíthatja az UPS ki- és bekapcsolását, valamint figyelemmel kísérheti az UPS állapotát.
Az UPS be- és kikapcsolása
Az UPS készülék bekapcsolásához nyomja meg az előlapon található kapcsológombot. Az UPS
készülék kikapcsolásához nyomja meg ismételten ezt a kapcsológombot.
4. Fontos biztonsági figyelmeztetések (A HASZNÁLATI UTASÍTÁS ŐRIZZE
MEG)
FIGYELMEZTETÉS:
• A tüzek, áramütések és zárlatok megelőzése érdekében az UPS készüléket csak olyan helyen használja,
ahol a hőmérséklet és a levegő páratartalma nem haladja meg a Műszaki adatok között szereplő
határértékeket, és a levegő nem tartalmaz elektromosságot vezető elegyet.
• A túlmelegedés megakadályozása érdekében az UPS készülék szellőzőnyílásait ne takarja le, és az UPS-t
ne tegye ki közvetlen napsütésnek, illetve a készüléket ne állítsa fel hősugárzó tárgyak (fűtőtest, kályha,
kandalló stb.) közelébe.
• Az UPS-hez nem számítógépes készülékeket, pl. egészségügyi eszközöket (különösen életfunkciókat
fenntartó berendezéseket), továbbá mikrohullámú sütőt, porszívót stb. csatlakoztatni tilos.
• Az UPS hálózati vezetékét a készülék saját kimeneti konnektorához csatlakoztatni tilos.
• Az UPS készülékbe idegen anyagok és folyadékok nem kerülhetnek. Italokat, illetve más folyadékokat az
UPS-re, vagy annak közelébe helyezni tilos.
• Veszély esetén, az UPS védelme érdekében, a készülék kapcsológombját nyomja meg, és a hálózati
csatlakozódugót húzza ki a hálózati konnektorból.
• Az UPS-hez hosszabbító vezetéket, vagy túlfeszültség ellen védett hosszabbítót csatlakoztatni tilos.
• Az UPS védőburkolatának a levétele esetén áramütés érheti. Az UPS hálózati csatlakozódugójának a
kihúzása után is veszélyes feszültség van a készülékben. A karbantartási és javítási munkák megkezdése
előtt az UPS akkumulátorának a plusz és mínusz pólusáról is le kell húzni a vezetékeket.
• Amennyiben az UPS készülékből az akkumulátort nem távolították el, akkor azon javítási munkát csak
villanyszerelő szakember végezhet. Hozzá nem értő személy nem kerülhet kapcsolatba az UPS
akkumulátorával.
• Az akkumulátort csak az eredetivel azonos típusú akkumulátorral szabad helyettesíteni.
• A készülékben található akkumulátor 12 V-os. Az akkumulátor tokozott, és hat cellát tartalmaz.
• Az akkumulátort robbanásveszély miatt tűzbe dobni tilos! Az akkumulátort felnyitni vagy felszúrni tilos. Az
akkumulátorból esetleg kifolyó elektrolit marási sérüléseket okoz a bőrön és a szemen.
• Amennyiben szeretné az UPS készüléket kívülről megtisztítani, akkor a csatlakozódugót előbb húzza ki a
hálózati konnektorból. A tisztításához folyékony tisztítószereket, vagy tisztító sprayt használni tilos.
• Az akkumulátor szakszerűtlen kezelése áramütést, a pólusok rövidrezárása tüzet okozhat. Az
akkumulátorcsere során tartsa be a következő utasításokat:
1) vegye le a karóráját és gyűrűjét, valamint az egyéb fém tárgyakat a testéről;
2) csak szigetelt fogantyúval rendelkező szerszámokat használjon;
3) viseljen gumikesztyűt, és az akkumulátor pólusokat ne érintse meg;
4) fém szerszámokat (vagy más fém tárgyakat) ne tegyen rá az akkumulátor pólusaira;
5) az akkumulátor lekötése vagy csatlakoztatása előtt a csatlakozódugót húzza ki a hálózati
konnektorból.
5. Szoftver letöltése és telepítése (csak a kommunikációs porttal rendelkező
készüléknél)
A felügyeleti szoftvert a következők szerint töltse le és telepítse a számítógépre:
1. Látogassa meg a következő oldalt:http://www.power-software-download.com
2. Kattintson a ViewPower szoftver ikonjára, válassza ki a számítógépe operációs rendszerét, majd
töltse le a programot.
3. Indítsa el a telepítőt, és kövesse a képernyőn megjelenő telepítési utasításokat.
4. A telepítés befejezése után indítsa újra a számítógépet. A kommunikációs szoftvert a tálca jobb
oldalán, a futó programok között egy narancssárga ikon jelzi.
5. Felhasználónév és jelszó a szoftveres vezérlésben:
Felhasználónév: administrator; Jelszó: administrator
48 49

6. Problémamegoldás
Az UPS bekapcsolásához nyomja meg a
sípol, annak ellenére, hogy
ismételt csatlakoztatása előtt ellenőrizze
e meg a
Műszaki adatok között szereplő értéket.
t töltse legalább 6 órán
Tegyen a készülékbe azonos típusú
Ellenőrizze le a hálózati vezeték
Probléma Lehetséges ok Megoldás
Az UPS előlapján a LCD
nem világít.
A vészjelzés folyamatosan
a hálózat rendben van.
Áramkimaradás esetén az
UPS csak rövid ideig
működik.
A hálózati normális, de a
készülék akkumulátoros
üzemmódban.
7. Műszaki adatok
Típus EP 1500 EP 2000
KAPACITÁS 1500 VA / 900 W 2000 VA / 1200 W
BEMENET
Feszültség 110/120 V AC vagy 220/230/240 V AC
Tűréshatárok 81–145 V AC / 162–290 V AC
KIMENET
Feszültségszabályozás: +/–10 %
Átkapcsolási idő Általában 2–6 ms, legfeljebb 10 ms
Hullámalak Szimulált szinuszgörbe
AKKUMULÁTOR
Típus és mennyiség 12 V/9 Ah – 2 db
Töltési idő 4-6 óra, a kapacitás 90 %-nak az eléréséig
MÉRETEK ÉS SÚLY
Méretek (h × sz × m) 397 x 146 x 205 mm
Súly (kg) 11,1 11.5
KÖRNYEZET
Páratartalom 0–90 % relatív páratartalom, 0–40° C-on (nem kondenzálódó)
Zajszint 40 dB-nél kisebb
FELÜGYELET
USB/RS-232 Támogatja a Windows® 98/2000/2003/XP/Vista/2008/7, Linux, Unix,
Lemerült az akkumulátor. Az UPS-t töltse legalább 6 órán
keresztül.
Az akkumulátor meghibásodott. Tegyen a készülékbe azonos típusú
akkumulátort.
Az UPS nincs bekapcsolva.
kapcsológombot.
Az UPS túl van terhelve. Csökkentse a terhelést. A berendezés
le, hogy a terhelés nem haladja-
Az UPS túl van terhelve. Csökkentse a terhelést.
Az akkumulátor feszültsége
alacsony.
Az akkumulátor meghibásodott. A
hibát a túl magas környezeti
hőmérséklet, vagy az akkumulátor
élettartamának a lejárása okozta.
A hálózati kábel nincs megfelelően
csatlakoztatva.
és MAC operációs rendszereket
Az UPSkeresztül.
akkumulátort.
bedugását.
50 51
Line Interactive UPS
Návod k obsluze, v. 1.1
1. Sadržaj pakovanja
- Jedinica UPS
- Uputstvo
- Komunikacioni kabel (samo u slučaju modela sa portom RS-232)
- Dovodni mrežni kabel (samo u slučaju modela sa utičnicama IEC)
2. Pregled
Pogled s prednje strane
LCD ploča
Prekidač
Pogled sa zadnje strane:
Tip Schuko Tipe NEMA I Tip NEMA II Tip IEC
Izlazne utičnice Utičnica za prenaponsku zaštitu
Ulaz dovodnog kabla modema/telefona ili računarske mreže
(konektori RJ-11/RJ-45)
Dugme za resetiranje
LCD Ploča:
Ulazni napon
Izlazni napon signalizira preopterećenje
Indikator rada iz mreže
Indikator rada iz baterije svjetlucanje signalizira da je baterija
Port RS-232
Port USB
Indikator opterećenja, svjetlucanje
Indikator kapaciteta baterije,
skoro prazna
BS

3. Instalacija i početno podešavanje
Napomena: Prije instalacije aparata prekontrolirajte, da li se tokom transporta
nije oštetio.
Smještanje i skladišćenje
UPS smjestite na mjesto koje nije prašnjavo, te dovoljno ulazi zrak. Kada se UPS nalazi u blizini
drugih električkih aparata, ostavite među njima razmak minimalno 20 cm, tako da izbjegnete
moguće smetnje. UPS ne puštati u rad u sredini koja prekoračuje limite temperature i vlažnosti
(tačna ograničenja možete naći u dijelu Specifikacije).
Priključenje na električku mrežu i punjenje
Dovodni kabao uključite u utičnicu. Radi postizanja potpune
funkcije preporučujemo bateriju puniti minimalno 4 sata prije
priključenja drugih aparata. UPS će baterije početi puniti
automatski, odmah nakon uključenja u električku utičnicu.
Priključenje zaštićenih aparata
Aparate koje želite zaštititi od pada električke energije uključite u utičnice sa zadnje strane UPS.
Dalje UPS uključite pomoću prekidača sa prednje strane i iza toga uključite aparate, koji su na
UPS priključeni. Aparati će od tog momenta biti zaštićeni u slučaju pada električke struje.
UPOZORENJE: U izlazne utičnice UPS nikada ne uključujte
laserski štampač ili skener. Ovi aparati bi UPS mogli važno
oštetiti.
Priključenje modema/telefona/računarne mreže na prenaponsku zaštitu (jedino za
model sa konektorima RJ-11/RJ-45)
U utičnicu označenu sa IN, koja se nalazi sa zadnje strane UPS, uključite kabao koji vodi iz
telefonske utičnice. U izlaznu utičnicu OUT sada uključite drugi kabao u pravcu na računarni
modem ili telefon.
Priključenje komunikacionog kabla (samo za model sa portom RS-232)
Kada želite koristiti funkciju automatskog isključenja/uključenja UPS i monitoriranja stanja
aparata, uključite u port RS-232 komunikacijski kabel, njegov drugi kraj uključite u računar.
Zahvaljujući programu monitoriranja, koji morate instalirati, od priključenog računara možete
planirati isključenje i uključenje UPS, te takođe monitorirati njegovo stanje.
Uključenje i isključenje UPS
UPS uključite pritiskom na glavno dugme za isključenje na prednjoj strani. USP isključite
ponovljenim pritiskom na isto dugme.
6 sati
4. Važna sigurnosna upozorenja (MOLIM SAČUVAJTE OVA UPUTSTVA)
UPOZORENJE:
• Radi sprječavanja rizika izbijanja požara ili električkog kratkog spoja, koristite UPS u
unutrašnjoj sredini, gdje se temperatura i vlažnost mogu regulirati, te koja ne sadrži
provodive smjese (detaljnije o povoljnoj temperaturi i vlazi možete naći u dijelu Specifikacija
ovog priručnika).
• Kako biste spriječili pregrijavanje UPS, ne prekrivajte ventilacijske otvore UPS i UPS ne izlažite
direktnom sunčevom zračenju, te ga ne postavljajte u blizini aparata, koji regeneriraju toplotu,
kao što su štednjak ili kamna.
• Na UPS nikada ne priključujte neračunarske aparate, kao što su zdravstveni instrumenti, prije
svega aparati za održavanje ljudskog života, isto tako mikrovalne pećnice, usisavači i sl.
• Nikada ne priključujte dovodni kabel UPS na neku od vlastitih izlaznih utičnica.
• Spriječite da u UPS uđu tečnosti ili druge strane materije. Nikada ne stavljajte piće ili druge
tečnosti na UPS ili u njegovoj blizini.
• U slučaju opasnosti pritisnite dugme za isključenje, te izvucite kabao iz dovoda električke
energije, tako će UPS biti dobro obezbijeđen.
• Na UPS nikada ne priključujte produžni kabao ili kabao sa prenaponskom zaštitom.
• Prilikom otvaranja UPS prijeti opasnost od udesa električkom strujom. I nakon isključenja UPS
od električke energije, na bateriji unutar UPS se stalno može nalaziti opasan napon. Zato je u
slučaju održavanja ili servisnih poslova unutar UPS baterije neophodno isključiti, tako da se
skine konektor sa pozitivnog i negativnog pola baterije.
• Bilo koji poslovi sa baterijom umetnutom u UPS može obavljati samo odgovorno povjerena
osoba. Neautorizirane osobe ne smiju doći u kontakt s baterijom.
• Kada je bateriju potrebno promijeniti, mijenjajte ju isključivo za isti tip.
• Unutarnji napon baterija je 12 V istosmjerni. Radi se o začaurenoj bateriji sa šest članaka.
• Bateriju nikada ne bacati u vatru, jer može eksplodirati. Bateriju ne otvarajte niti na drugi
način ne uništavajte. Oslobođeni elektrolit može važno oštetiti kožu i oči.
• Ako želite UPS očistiti sa vanjske strane, najprije ga isključite od dovoda električke energije.
Prilikom čišćenja ne koristite tečna sredstva za čišćenje ili sprejeve.
• Baterija može u slučaju neprofesionalne manipulacije ili prilikom kratkog spoja prouzrokovati
udes električkom strujom. U slučaju izmjene baterija pazite na slijedeća uputstva:
1) skinite ručni sat, prstenje i druge metalne predmete;
2) koristite alat sa izoliranom ručkom;
3) radite u gumenim rukavicama i nosite gumenu obuću;
4) nikada ne stavljajte alat ili bilo koje druge metalne predmete na gornji dio baterija;
5) prije priključenja ili isključenja baterija, izvucite dovodni kabel iz utičnice.
5. Download softwara i njegova instalacija (samo za model sa
komunikacijskim portom)
Prilikom skidanja i instalacije softwara monitorisanja radite po sledećem postupku:
1. Idite na stranicu http://www.power-software-download.com
2. Kliknite na ikonu software ViewPower i odaberite operacijski sistem za koji želite software
koristiti.
3. Radnju obavljajte prema instrukcijama na ekranu, one će vas voditi instalacijom softwara.
4. Nakon završetka instalacije računar se mora restartati. Komunikacijski software će se pojaviti u
obliku narančaste ikone u desnom dijelu sistema polica (kod sata).
5. Palavra-passe: administrador Korisničko ime i lozinka za korišćenje softvera:
Korisničko ime: administrator ; Lozinka: administrator
52 53

6. Otklanjanje problema
Stavite puniti UPS minimalno u trajanju od 6
Stavite puniti UPS minimalno u trajanju od 6
ežnog
Problem Mogući uzrok Rešenje
Kontrolna lampa LCD na
prednjoj strani UPS ne
svijetli.
Alarm stalno zviždi, i
kada električka mreža
sasvim funkcionira.
Prilikom pada električke
energije, UPS radi samo
kraće vrijeme.
Električka mreža sasvim
funkcionira, ali bateriju
žmiga.
Prazna baterija.
sati.
Pokvarena baterija. Zamijenite bateriju za novu istog tipa.
UPS nije uključen. Kratko pritisnite prekidač UPS, time će se
pusti u rad.
UPS je preopterećen. Isključite dio opterećenja. Prije ponovnog
priključenja aparata, provjerite, da li
opterećenje odgovara kapacitetu UPS
navedenom u specifikaciji.
UPS je preopterećen. Isključite dio opterećenja.
Napon baterije je niski.
sati.
Loša baterija. Može se raditi o
kvaru, koji je prouzrokovan
previše visokom temperaturom
ili zbog istrošenosti baterije.
Mrežni kabel je slobodan. Pažljivo prekontrolirajte priključak mr
Zamijenite bateriju za novu istog tipa.
kabla.
7 Specifikacije
Model EP 1500 EP 2000
KAPACITET 1500 VA / 800 W 2000 VA / 1200 W
ULAZ
Napon 110/120 VAC ili 220/230/240 VAC
Tolerancija 81–145 VAC / 162–290 VAC
IZLAZ
Regulacija napona +/–10 %
Vrijeme transfera Standardno 2–6 ms, 10 ms max.
Oblik vala Simulirani sinusni val
BATERIJA
Tip i broj 12 V/9 Ah – 2 kom
Vrijeme punjenja 4–6 sati za punjenje na 90 % kapaciteta
DIMENZIJE I TEŽINA
Dimenzije (d x š x v) 397 x 146 x 205 mm
Težina (kg) 11,1 11,5
SREDINA
Vlažnost 0–90 % rel. vlage pri 0–40° C (nekondenzirajuće)
Buka Manja od 40 dB
MENADŽMENT
USB/RS-232 Podržava Windows® 98/2000/2003/XP/Vista/2008/7, Linux, Unix, and
MAC
Line Interactive UPS
Návod k obsluze, v. 1.1
1. Sadržaj paketa
- Jedinica UPS
- Upute
- Komunikacijski kabel (jedino u slučaju modela s portom RS-232)
- Dovodni mrežni kabel (jedino u slučaju modela s utičnicama IEC)
2. Pregled
Pogled sprijeda
LCD ploča
Prekidač
Pogled straga:
Tip Schuko Tipe NEMA I Tip NEMA II Tip IEC
Izlazne utičnice
Ulaz dovodnog kabla modema/telefona ili računalne mreže (konektori
Tipka za resetiranje
LCD Ploča:
Ulazni napon Indikator opterećenja, treperenje
Izlazni napon signalizira preopterećenje
Indikator rada iz mreže Indikator kapaciteta baterije,
Indikator rada iz baterije žmiganje signalizira skoro praznu bateriju
Utičnica za prenaponsku zaštitu
RJ-11/RJ-45)
Port RS-232
Port USB
HR
54 55

3. Instalacija i početno namještenje
Napomena: Prije instalacije uređaja prekontrolirajte, da li tijekom prijevoza
nije došlo do oštećenja.
Postavljanje i skladištenje
UPS postavite na takvo mjesto, koje nije prašnjavo te se označuje dovoljnim dovodom zraka.
Ukoliko će se UPS nalaziti u blizini drugih električnih uređaja, ostavite između njih udaljenost
minimalno 20 cm, kako biste izbjegli moguće smetnje. UPS ne puštati u rad u sredini koje
premašuju limite temperature i vlažnosti (točna ograničenja možete naći u dijelu Specifikacije).
Priključenje na električnu mrežu i punjenje
Dovodni kabel uključite u utičnicu. Radi postizanja pune
funkcije preporučamo bateriju puniti minimalno 4 sata prije
priključenja drugih uređaja. UPS započne puniti bateriju
automatski odmah nakon uključenja u električnu utičnicu.
Priključenje zaštićenih uređaja
Uređaje koje želite štiti od pada električne energije uključite u utičnice sa stražnje strane UPS.
Sada UPS uključite pomoću prekidača na prednjoj strani te nakon toga uključite uređaje, koji su
na UPS priključeni. Uređaji će od tog trenutka biti zaštićeni od pada električne struje.
OPASKA: U izlazne utičnice UPS nikada ne uključujte laserski
pisač ili skener. Ovi uređaji bi UPS mogli ozbiljno oštetiti.
Priključenje modema/telefona/računalne mreže na prenaponsku zaštitu (jedino za
model s konektorima RJ-11/RJ-45)
U utičnicu označenu s IN, koja se nalazi sa stražnje strane UPS, priključite kabel koji vodi iz
telefonske utičnice. U izlaznu utičnicu OUT sada priključite drugi kabel u smjeru na računalni
modem ili telefon.
Priključenje komunikacijskog kabla (jedino za model s portom RS-232)
Ukoliko želite koristiti funkciju automatskog isključenja/uključenja UPS i monitoriranja stanja
istog, priključite u port RS-232 komunikacijski kabel, njegov drugi kraj uključite u računalo.
Zahvaljujući programu monitoriranja, koji morate instalirati, od priključenog računala možete
planirati isključenje i uključenje UPS te također monitorirati stanje istog.
Uključenje i isključenje UPS
UPS uključite pritiskom na glavnu isključnu tipku na prednjoj strani. USP isključite ponovnim
pritiskom na istu tipku.
6 sati
4. Važne sigurnosne opaske (MOLIM OVE UPUTE SAČUVAJTE)
UPOZORENJE:
• Kako biste spriječili rizik nastanka požara ili električnog kratkog spoja, koristite UPS u
unutarnjoj sredini, gdje se temperatura i vlažnost mogu regulirati, te koja ne sadrži vodljive
primjese (detaljnije o prikladnoj temperaturi i vlazi možete naći u dijelu Specifikacija ovog
priručnika).
• Kako biste spriječili pregrijavanje UPS, ne prekrivajte ventilacijske otvore UPS, te UPS ne
izlažite izravnom sunčevom zračenju, ne postavljajte ga neposredno pored uređaja koji
regeneriraju toplinu, kao što su štednjaci ili kamna.
• Na UPS nikada ne priključujte neračunalne uređaje, kao što su zdravstveni instrumenti, poseb.
uređaji za održavanje ljudskog života, dalje mikrovalne pećnice, usisavači i sl.
• Nikada ne priključujte dovodni kabao UPS na neku od njihovih vlastitih izlaznih utičnica.
• Spriječite da u UPS uđu tekućine ili druge strane tvari. Nikada ne stavljajte pića ili druge
tekućine na UPS ili u neposrednu blizinu.
• U slučaju opasnosti pritisnite tipku za isključenje, te izvucite kabel od dovoda električne
energije, ovime će UPS biti redovno osiguran.
• Na UPS nikada ne priključujte produžni kabel ili kabel s prenaponskom zaštitom.
• Pri otvaranju UPS prijeti opasnost od povreda električnom strujom. I nakon isključenja UPS od
električne energije unutar UPS može biti na bateriji stalno prisutan opasan napon. Stoga je u
slučaju održavanja ili servisnih radova unutar UPS neophodno bateriji isključiti, i to skidanjem
konektora sa pozitivnog i negativnog pola baterije.
• Bilo koji rad s baterijom postavljenom u UPS može obavljati jedino nadležno povjerena osoba.
Neautorizirane osobe ne smiju biti u kontaktu s baterijom.
• Ukoliko je bateriju potrebno zamijeniti, zamijenite ju isključivo za isti tip.
• Unutrašnji napon baterija je 12V istosmjerni. Radi se o začahurenoj bateriji s šest članaka.
• Bateriju nikada ne bacati u vatru, jer može eksplodirati. Bateriju ne otvarajte ni drukčije ne
poništavajte. Oslobođeni elektrolit može ozbiljno oštetiti kožu i oči.
• Ukoliko želite UPS s vanjske strane očistiti, najprije ga isključite od dovoda električne energije.
Pri čišćenju ne koristite tekuća sredstva za čišćenje ili sprejeve.
• Baterija može u slučaju nestručnog manipuliranja ili pri kratkom spoju prouzročiti nesretan
slučaj električnom strujom. U slučaju zamjene baterija vodite računa o narednim uputama:
1) odložite ručni sat, prstenje i druge metalne stvarčice;
2) koristite alate s izoliranim rukohvatom;
3) radite u gumenim rukavicama i obujte gumenu obuću;
4) nikada ne stavljajte alat ili bilo kakve druge metalne elemente na gornji dio baterija;
5) prije priključenja ili isključenja baterija izvucite dovodni kabel iz utičnice.
5. Download softwara i njegova instalacija (jedino za model s
komunikacijskim portom)
Pri skidanju i instalaciji softwara monitoriranja radite prema slijedećem postupku:
1. Idite na stranicu http://www.power-software-download.com
2. Kliknite na ikonu software ViewPower te odaberite operacijski sustav za koji želite software
koristiti.
3. Postupajte prema uputama na ekranu, iste će vas provesti instalacijom softwara.
4. Nakon završetka instalacije potrebno je računalo restartati. Komunikacijski software će se
pokazati kao narančasta ikona u desnom dijelu sustava polica (kod sata).
5. Korisničko ime i lozinka za rad sa softverom:
Korisničko ime: administrator; Lozinka: administrator
56 57

6. Odstranjivanje problema
na prednjoj strani UPS ne
tko pritisnite prekidač UPS, time se pusti
Stavite puniti UPS minimalno u trajanju 6
Pažljivo prekontrolirajte priključak mrežnog
напојување
ЛЦД панел:
Problem Mogući uzrok Rješenje
Kontrolna žaruljica LCD
svijetli.
Alarm stalno zviždi, i
ukoliko električna mreža
sasvim funkcionira.
Pri padu električne
energije UPS radi samo
kratko vrijeme.
Električna mreža sasvim
funkcionira, ali jedinica je
na baterije način.
Prazna baterija. Stavite puniti UPS minimalno u trajanju 6
sati.
Loša baterija. Promijenite bateriju za novu istog tipa.
UPS nije uključen. Kra
u rad.
UPS je preopterećen. Isključite dio opterećenja. Prije ponovnog
priključenja uređaja provjerite, da li
opterećenje odgovara kapacitetu UPS
navedenom u specifikaciji.
UPS je preopterećen. Isključite dio opterećenja.
Napon baterije je niski.
sati.
Loša baterija. Može ići o kvar
prouzročen previše visokom
temperaturom ili zbog
utrošenosti baterije.
Mrežni kabao je slobodan.
Promijenite bateriju za novu istog tipa.
kabla.
7 Specifikacije
Model EP 1500 EP 2000
KAPACITET 1500 VA / 900 W 2000 VA / 1200 W
ULAZ
Napon 110/120 VAC ili 220/230/240 VAC
Tolerancija 81–145 VAC / 162–290 VAC
IZLAZ
Regulacija napona +/–10 %
Vrijeme transfera Standardno 2–6 ms, 10 ms max.
Oblik vala Simulirani sinusni val
BATERIJA
Tip i broj 12 V/9 Ah – 2 kom
Vrijeme punjenja 4–6 sati za punjenje na 90 % kapaciteta
DIMENZIJE I TEŽINA
Dimenzije (d x š x v) 397 x 146 x 205 mm
Težina (kg) 11,1 11,5
SREDINA
Vlažnost 0–90 % rel. vlage pri 0–40° C (nekondenzirajuće)
Buka Manja od 40 dB
MENADŽMENT
USB/RS-232 Podržava Windows® 98/2000/2003/XP/Vista/2008/7, Linux, Unix, and
MAC
Line Interactive UPS
Кратко упатство К. 1.1
1. Содржина на пакетот
- уред за непрекинато напојување
- кратко упатство
- комуникациски кабел (само кај моделот со порта USB/RS-232)
- кабел за струја (само кај моделот со влеѕ од типот IEC)
2. Преглед на производот
Предна страна:
ЛЦД панел
Прекинувач за
Влезен напон
Излезен напон укажува на преоптоварување
Индикатор за АС
режим батеријата, трепка
Индикатор за режимот
на батеријата, укажува на слаба батерија
Индикатор за нивото на полнење, трепка
Индикатор за моќноста на
Задна страна:
Вид шуко НЕМА тип I НЕМА тип II IEC тип
Излезни приклучоци
AC влез
Склопка
Пренапонска заштита за
модем/телефон/мрежа
Порта RS-232 com.
Порта USB com.
MK
58 59

6 часа
3. Монтажа и прво пуштање во работа
60 61
Пред монтажата, проверете ги уредот и останатата содржина, да не се
оштетени или да не недостига нешто.
Услови за поставување и чување
Монтирајте го уредот за непрекинато напојување (UPS) на заштитено место, без прашина
и со соодветно проветрување. Поставете го уредот за непрекинато напојување (UPS)
најмалку 20 cm подалеку од другите уреди за да избегнете пречки. НЕ пуштајте го уредот
за непрекинато напојување (UPS) да работи кога температурата и влажноста се над
препорачаните (погледнете во спецификациите)
Приклучување на струја и полнење
Вметнете го штекерот од кабелот во приклучницата за струја
и полнете го уредот најмалку 6 часа пред да го користите.
Уредот си ја полни батеријата додека е приклучен на струја.
Приклучување други уреди
Приклучете ги уредите на излезните приклучоци, на задната
страна од уредот за непрекинато напојување (UPS). Притиснете
го прекинувачот за да го вклучите напојувањето и сега уредот
за непрекинато напојување (UPS) ги штити приклучените
уреди.
ВНИМАНИЕ: НИКОГАШ не приклучувајте ласерски печатач или скенер на уредот
за непрекинато напојување (UPS), бидејќи тие можат да го оштетат.
Приклучување на пренапонска заштита за модем/телефон/мрежа (само кај
моделот со RJ-45)
Вметнете го едниот крај од кабелот за модем/телефон во приклучокот „IN“, на задната
страна од уредот за непрекинато напојување (UPS), а другиот крај вметнете го во
приклучокот „OUT“, на компјутерот за телефонот.
Приклучување на комуникацискиот кабел (само кај моделот со порта
USB/RS-232)
За да го овозможите далечинското надгледување на гасењето/палењето и статусот на
уредот за непрекинато напојување (UPS), приклучете го едниот крај од комуникацискиот
кабел во портата USB/RS-232, а другиот крај во комуникациската порта на Вашиот
компјутер. Откако ќе го инсталирате софтверот за надгледување, можете да го
програмирате гасењето/палењето и да го надгледувате статусот на уредот за
непрекинато напојување (UPS).
Вклучување/исклучување на уредот
Притиснете го прекинувачот за да го вклучите уредот за непрекинато напојување (UPS).
За да го исклучите, притиснете и држете го прекинувачот 5 секунди.
4. Важни предупредувања за безбедноста (ПРОЧИТАЈТЕ ГИ УПАТСТВАТА)
ВНИМАНИЕ!
•••• За да ја спречите опасноста од струен удар, користете го само внатре и на место со контролирана
температура и влажност, без спроводливи загадувачи. (Погледнете ги спецификациите)
•••• За да ја намалите опасноста од прегревање, не покривајте ги отворите за проветрување на уредот
за непрекинато напојување (UPS) и избегнувајте да го изложувате на директна сончева светлина
или да го монтирате во близина на греалки или огништа.
•••• Немојте на уредот за непрекинато напојување (UPS) да приклучувате други уреди кои не се
компјутерски, како на пример медицинска опрема, опрема за одржување во живот, микробранови
печки или правосмукални.
•••• Не приклучувајте го влезот од уредот за непрекинато напојување (UPS) во сопствениот влез.
•••• Не оставајте пијалаци или други предмети кои содржат течности на или во близина на уредот.
•••• Во случај на нужда, притиснете го копчето OFF и извлечете го кабелот од приклучокот за струја за
да можете да прописно да го онеспособите уредот за непрекинато напојување (UPS).
•••• Немојте уредот за непрекинато напојување (UPS) да приклучувате на кабли со повеќе приклучоци
или уред за потиснување пренапони.
•••• Ако уредот за непрекинато напојување (UPS) има метално куќиште, во текот на монтажата
задолжително е заземјување за да се намали пропусната струја под 3,5mA.
•••• Поправките или сервисирањето треба да ги изведува или да ги надгледува само обучен персонал.
•••• Кога ги менувате батериите, користете нови од истиот број и тип.
•••• Внатрешниот напон на батеријата е 12VDC. Запечатена, оловна батерија, со 6 ќелии.
•••• Не фрлајте ги батериите во оган, бидејќи можат да експлодираат.
•••• Не отворајте ги и не оштетувајте ги батериите. Електролитот што се ослободува е штетен за
кожата и за очите.
•••• Извлечете го штекерот од уредот за непрекинато напојување (UPS) пред да го чистите и не
користете течен детергент или детергент во спреј.
•••• Батеријата може да претставува опасност од струен удар и висока струја на куса врска. Пред да ги
ставате батериите земете ги предвид следните мерки на предострожност:
1) извадете ги часовниците, прстените или другите метални предмети.
2) употребете алатки со изолирани рачки.
3) носете гумени ракавици и чизми.
4) не оставајте ги алатот или металните делови врз батериите.
5) откачете го изворот на напојување пред да ги приклучувате или откачувате клемите од
батеријата.
Внимание: Опасност од струен удар. Опасност при откачување на уредот од струја, батеријата може
да има преостанат напон. Кога се изведуваат работи на одржување во внатрешноста на уредот за
непрекинато напојување (UPS), батеријата треба правилно да се откачи на позитивните и на
негативните полови на конекторите.
5. Преземање и инсталација на софвер (само кај моделот со
комуникациска порта)
Изведете ги следните чекори за да го инсталирате софтверот:
1. појдете на http://www.power-software-download.com
2. кликнете на иконата за софтверот ViewPower и одберете го саканиот јазик за преземање.
3. следете ги упатствата на екранот за да го инсталирате софтверот:
4. откако ќе го рестартирате компјутерот, софтверот за надгледување ќе се појави како портокалова
икона на „штекер“, долу десно на екранот (системската лента), кај часовникот.
5. Nome de utilizador: administradorКорисничко име и лозинка за управување со софтверот:
Корисничко име: administrator
Лозинка: administrator

6. Откривање и отстранување пречки
Уредот за непрекинато
напојувањето со струја е
Отстранете некои уреди. Пред повторното
Отстранете некое критично
нот на батеријата е премногу
Полнете го уредот за непрекинато
Заменете ја батеријата со нова од истиот
Напојувањето со струја е
Проверете го и одново приклучете го
Проблем Можна причина Решение
На предниот екран нема
текст.
Се огласува непрекинат
аларм и покрај тоа што
нормално.
Кога ќе снема струја,
времето на резервно
напојување се скратува.
нормално но уредот е
вклучен во режим на
батерија.
Слаба батерија. Полнете го уредот за непрекинато
Дефект на батеријата. Заменете ја батеријата со нова од истиот
напојување (UPS) не е вклучен.
Уредот за непрекинато
напојување (UPS) е
преоптоварен.
Уредот за непрекинато
напојување (UPS) е
преоптоварен.
Напо
низок.
Дефект на батеријата. Можеби
работната температура е
премногу висока или батеријата
не се користи правилно.
Кабелот за струја е лабав.
напојување (UPS) најмалку 6 часа.
тип.
Повторно притиснете го прекинувачот за
да го вклучите уредот за непрекинато
напојување (UPS).
приклучување на опремата, проверете
дали оптоварувањето одговара на
моќноста на уредот за непрекинато
напојување (UPS), наведен во
спецификациите.
оптоварување.
напојување (UPS) најмалку 6 часа.
тип.
кабелот за струја.
7 Спецификации
Модел EP 1500 EP 2000
МОЌНОСТ 1500 VA / 900 W 2000 VA / 1200 W
ВЛЕЗ
Напон 110/120 VAC или 220/230/240 VAC
Напонски опсег 81-145 VAC / 162-290 VAC
ИЗЛЕЗ
Регулација на напон +/-10%
Време на префрлување Вообичаено 2-6 ms, 10 ms макс.
Облик на сигналот Симулиран синусен бран
БАТЕРИЈА
Тип и број 12 V/ 9 AH x 2
Време на полнење 4-6 часа за враќање на 90% од моќноста
ФИЗИЧКИ ИЗГЛЕД
Димензии (ДхШхВ) 397 x 146 x 205 mm
Нето тежина (kg) 11.1 11.5
Средина
Влажност
Ниво на бучава под 40 dB
УПРАВУВАЊЕ
USB/RS-232
Поддржува Windows® 98/2000/2003/XP/Vista/2008/7, Linux, Unix, и MAC
0-90 % RH @ 0-40° C (некондензирачка)
Line Interactive UPS
Návod k obsluhe, v. 1.1
1. Obsah balenia
- Jednotka UPS
- Návod
- Komunikačný kábel (iba v prípade modelu s portom RS-232)
- Prívodný sieťový kábel (iba v prípade modelu so zásuvkami IEC)
2. Prehľad
Pohľad spredu:
LCD panel
Vypínač
Pohľad zozadu:
Typ Schuko Typ NEMA I Typ NEMA II Typ IEC
Výstupné zásuvky Zásuvka pre prepäťovú ochranu
Vstup prívodného kábla modemu/telefónu alebo počítačovej siete
Tlačidlo reset (konektory RJ-11/RJ-45)
LCD Panel:
Vstupné napätie
Výstupné napätie signalizuje preťaženie
Indikátor prevádzky zo siete Indikátor kapacity batérie,
Indikátor prevádzky z batérie blikanie signalizuje takmer vybitú
RS-232 port
USB port
Indikátor zaťaženia, blikanie
batériu
SK
62 63
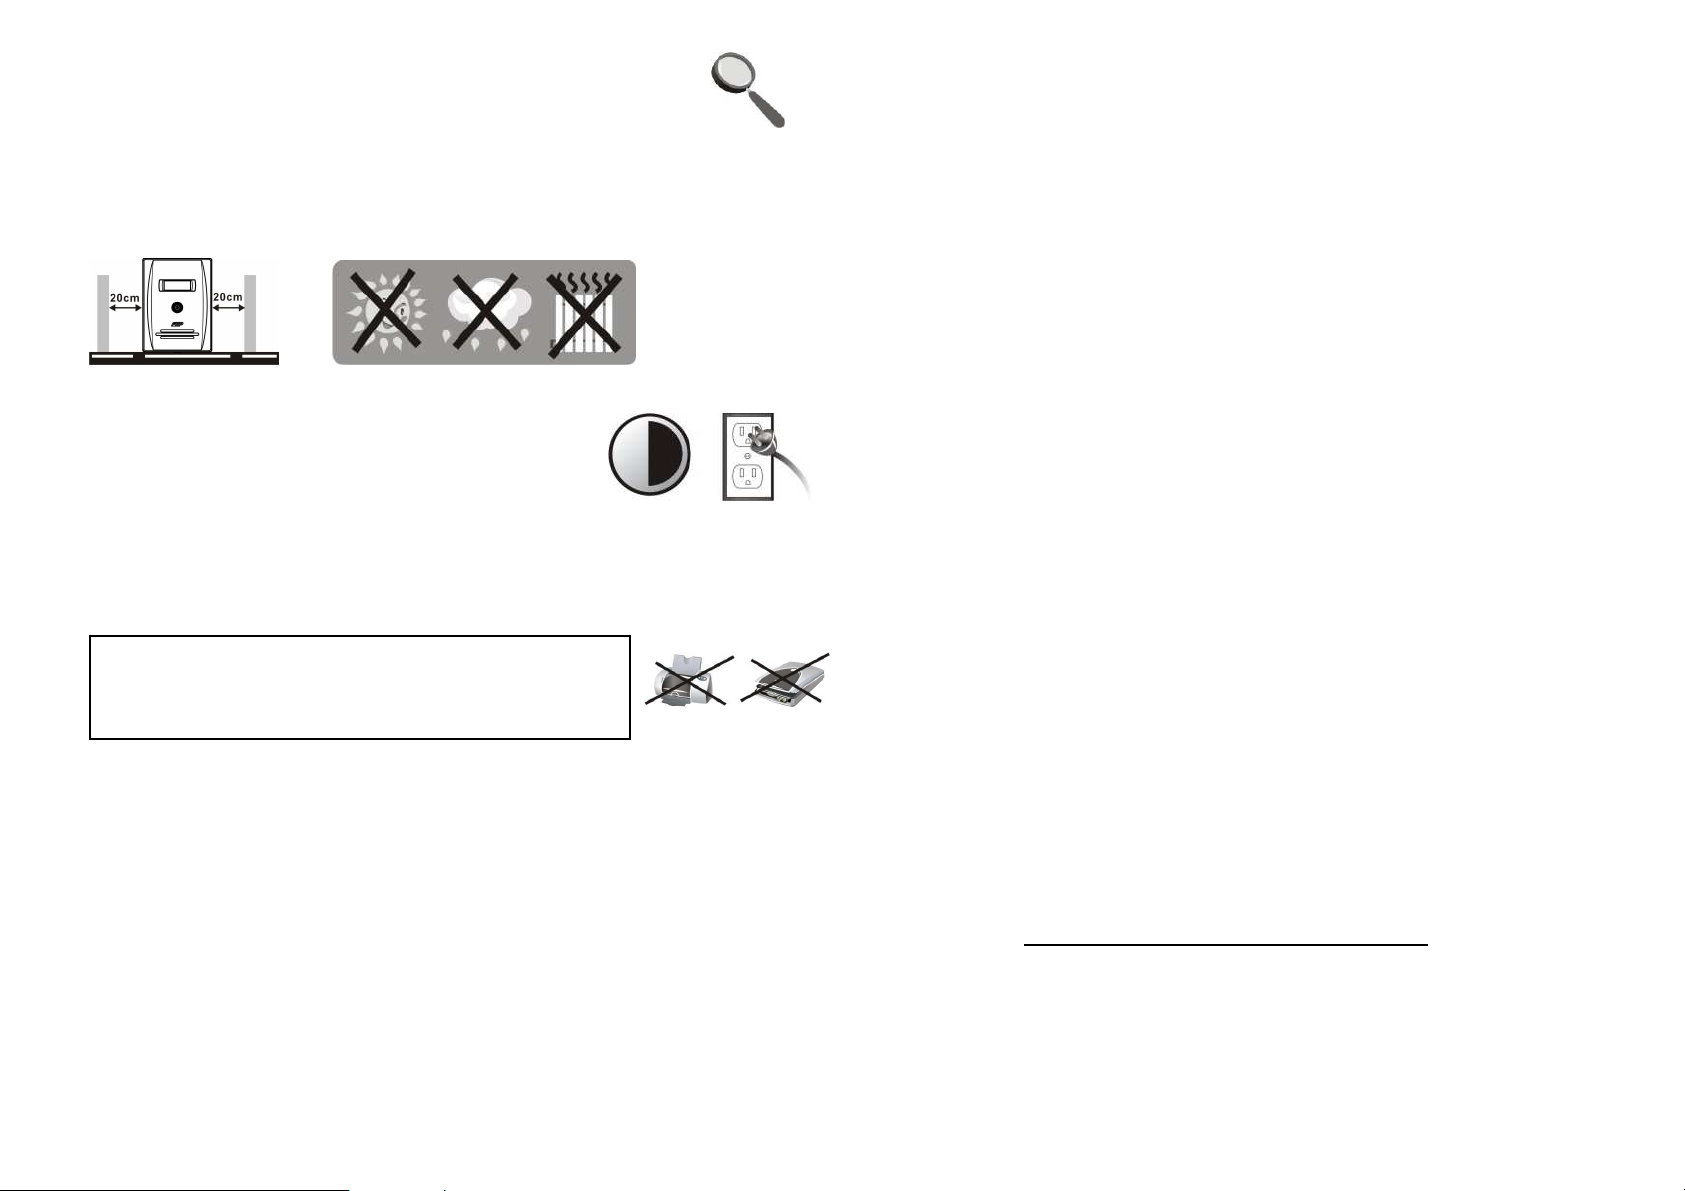
6 hodín
3. Inštalácia a úvodné nastavenia
Pozn.: Pred inštaláciou zariadenia skontrolujte, či nebolo počas prepravy
poškodené.
Umiestnenie a skladovanie
UPS umiestnite na také miesto, ktoré nie je prašné a má dostatočný prívod vzduchu. Pokiaľ sa
bude UPS nachádzať v blízkosti ďalších elektrických zariadení, ponechajte medzi nimi
vzdialenosť minimálne 20 cm, aby ste predišli prípadnému rušeniu. UPS neprevádzkujte
v prostredí, ktoré prekračuje limity teploty a vlhkosti (presné obmedzenia nájdete v časti
Špecifikácie).
Pripojenie do elektrickej siete a nabíjanie
Zapojte prívodný kábel do zásuvky. Pre dosiahnutie plnej
funkčnosti odporúčame nabíjať batériu minimálne 6 hodín
pred pripojením ďalších zariadení. UPS začne nabíjať batériu
automaticky ihneď po pripojení do elektrickej zásuvky.
Pripojenie chránených zariadení
Zariadenia, ktoré chcete chrániť pred výpadkom elektrickej energie, zapojte do zásuviek na
zadnej strane UPS. Potom UPS zapnite pomocou vypínača na prednej strane a potom zapnite
zariadenia, ktoré sú na UPS pripojené. Zariadenia budú od tohto okamihu chránené pred
výpadkom elektrického prúdu.
UPOZORNENIE: Do výstupných zásuviek UPS nikdy
nepripájajte laserovú tlačiareň alebo skener. Tieto zariadenia by
mohli UPS vážne poškodiť.
Pripojenie modemu/telefónu/počítačovej siete na prepäťovú ochranu (iba pre
model s konektormi RJ-11/RJ-45)
Do zásuvky označenej IN nachádzajúcej sa na zadnej strane UPS zapojte kábel idúci
z telefónnej zásuvky. Do výstupnej zásuvky OUT potom zapojte ďalší kábel smerujúci do
počítačového modemu alebo telefónu.
Pripojenie komunikačného kábla (iba pre model s portom RS-232)
Pokiaľ chcete používať funkciu automatického vypnutia/zapnutia UPS a monitorovania jej stavu,
pripojte do portu RS-232 komunikačný kábel, ktorého druhý koniec zapojíte do počítača. Vďaka
monitorovaciemu programu, ktorý si musíte nainštalovať, môžete z pripojeného počítača
plánovať vypnutie a zapnutie UPS a tiež monitorovať jej stav.
Zapnutie a vypnutie UPS
UPS zapnite stlačením hlavného vypínacieho tlačidla na prednej strane. UPS vypnite opätovným
stlačením tohto tlačidla.
4. Dôležité bezpečnostné upozornenia (TIETO POKYNY SI PROSÍM
USCHOVAJTE)
UPOZORNENIE:
• Aby ste zabránili riziku vzniku požiaru alebo elektrického skratu, používajte UPS vo vnútornom
prostredí, kde je možné regulovať teplotu a vlhkosť a ktoré neobsahuje vodivé prímesi
(podrobnosti o vhodnej teplote a vlhkosti nájdete v časti Špecifikácie tejto príručky).
• Aby ste zabránili prehriatiu UPS, nezakrývajte ventilačné otvory UPS a nevystavujte UPS
priamemu slnečnému žiareniu ani ju neumiestňujte do blízkosti zariadení generujúcich teplo,
ako sú teplomety, pece alebo krby.
• Do UPS nikdy nezapájajte nepočítačové zariadenia, ako sú zdravotnícke prístroje, najmä
zariadenia na udržiavanie ľudského života, ďalej potom mikrovlnné rúry, vysávače a pod.
• Nikdy nezapájajte prívodný kábel UPS do niektorej z jej vlastných výstupných zásuviek.
• Zabráňte tomu, aby sa do UPS dostali kvapaliny alebo iné cudzie látky. Nikdy neumiestňujte
na UPS alebo do jej blízkosti nápoje alebo iné kvapaliny.
• V prípade nebezpečenstva stlačte vypínacie tlačidlo a odpojte sieťový kábel od prívodu
elektrickej energie, čím bude UPS riadne zabezpečená.
• K UPS nikdy nepripájajte predlžovací kábel alebo kábel s prepäťovou ochranou.
• Pri otvorení UPS hrozí nebezpečenstvo úrazu elektrickým prúdom. Aj po odpojení UPS od
elektrickej energie môže byť na batérii umiestnenej vnútri UPS stále prítomné nebezpečné
napätie. Preto je nutné v prípade údržby alebo servisných prác vnútri UPS batériu odpojiť,
a to odstránením konektorov z kladného a záporného pólu batérie.
• Akúkoľvek prácu s batériou umiestnenou v UPS môže vykonávať len príslušne poverená
osoba. Neautorizované osoby nesmú prísť do kontaktu s batériou.
• Pokiaľ treba batériu vymeniť, nahraďte ju výhradne rovnakým typom.
• Vnútorné napätie batérie je 12 V jednosmerne. Ide o zapuzdrenú šesťčlánkovú batériu.
• Batériu nikdy neodhadzujte do ohňa, pretože môže explodovať. Batériu neotvárajte ani nijak
nepoškodzujte. Uvoľnený elektrolyt môže vážne poškodiť pokožku a oči.
• Pokiaľ chcete UPS zvonka očistiť, najskôr ju odpojte od prívodu elektrickej energie. Pri čistení
nepoužívajte kvapalné čistiace prostriedky ani spreje.
• Batéria môže pri neodbornej manipulácii alebo pri skrate zapríčiniť úraz elektrickým prúdom.
V prípade výmeny batérie dodržujte nasledujúce pokyny:
1) odložte náramkové hodinky, prstene a ďalšie kovové predmety,
2) používajte nástroje s izolovanou rukoväťou,
3) pracujte v gumených rukaviciach a obujte si gumenú obuv,
4) nikdy neukladajte náradie alebo akékoľvek kovové prvky na hornú časť batérie,
5) pred pripojovaním alebo odpojovaním batérie vytiahnite prívodný kábel zo zásuvky.
5. Download softvéru a jeho inštalácia (len pre model s komunikačným
portom)
Pri sťahovaní a inštalácii monitorovacieho softvéru postupujte takto:
1. Navštívte stránku http://www.power-software-download.com.
2. Kliknite na ikonu softvéru ViewPower a vyberte si operačný systém, pre ktorý chcete softvér
používať.
3. Postupujte podľa pokynov na obrazovke, ktoré vás prevedú inštaláciou softvéru.
4. Po dokončení inštalácie je potrebné počítač reštartovať. Komunikačný softvér sa potom objaví
ako oranžová ikona v pravej časti systémovej lišty (pri hodinách).
5. Meno používateľa a heslo v softvéri:
Meno používateľa: administrator ; Heslo: administrator
64 65
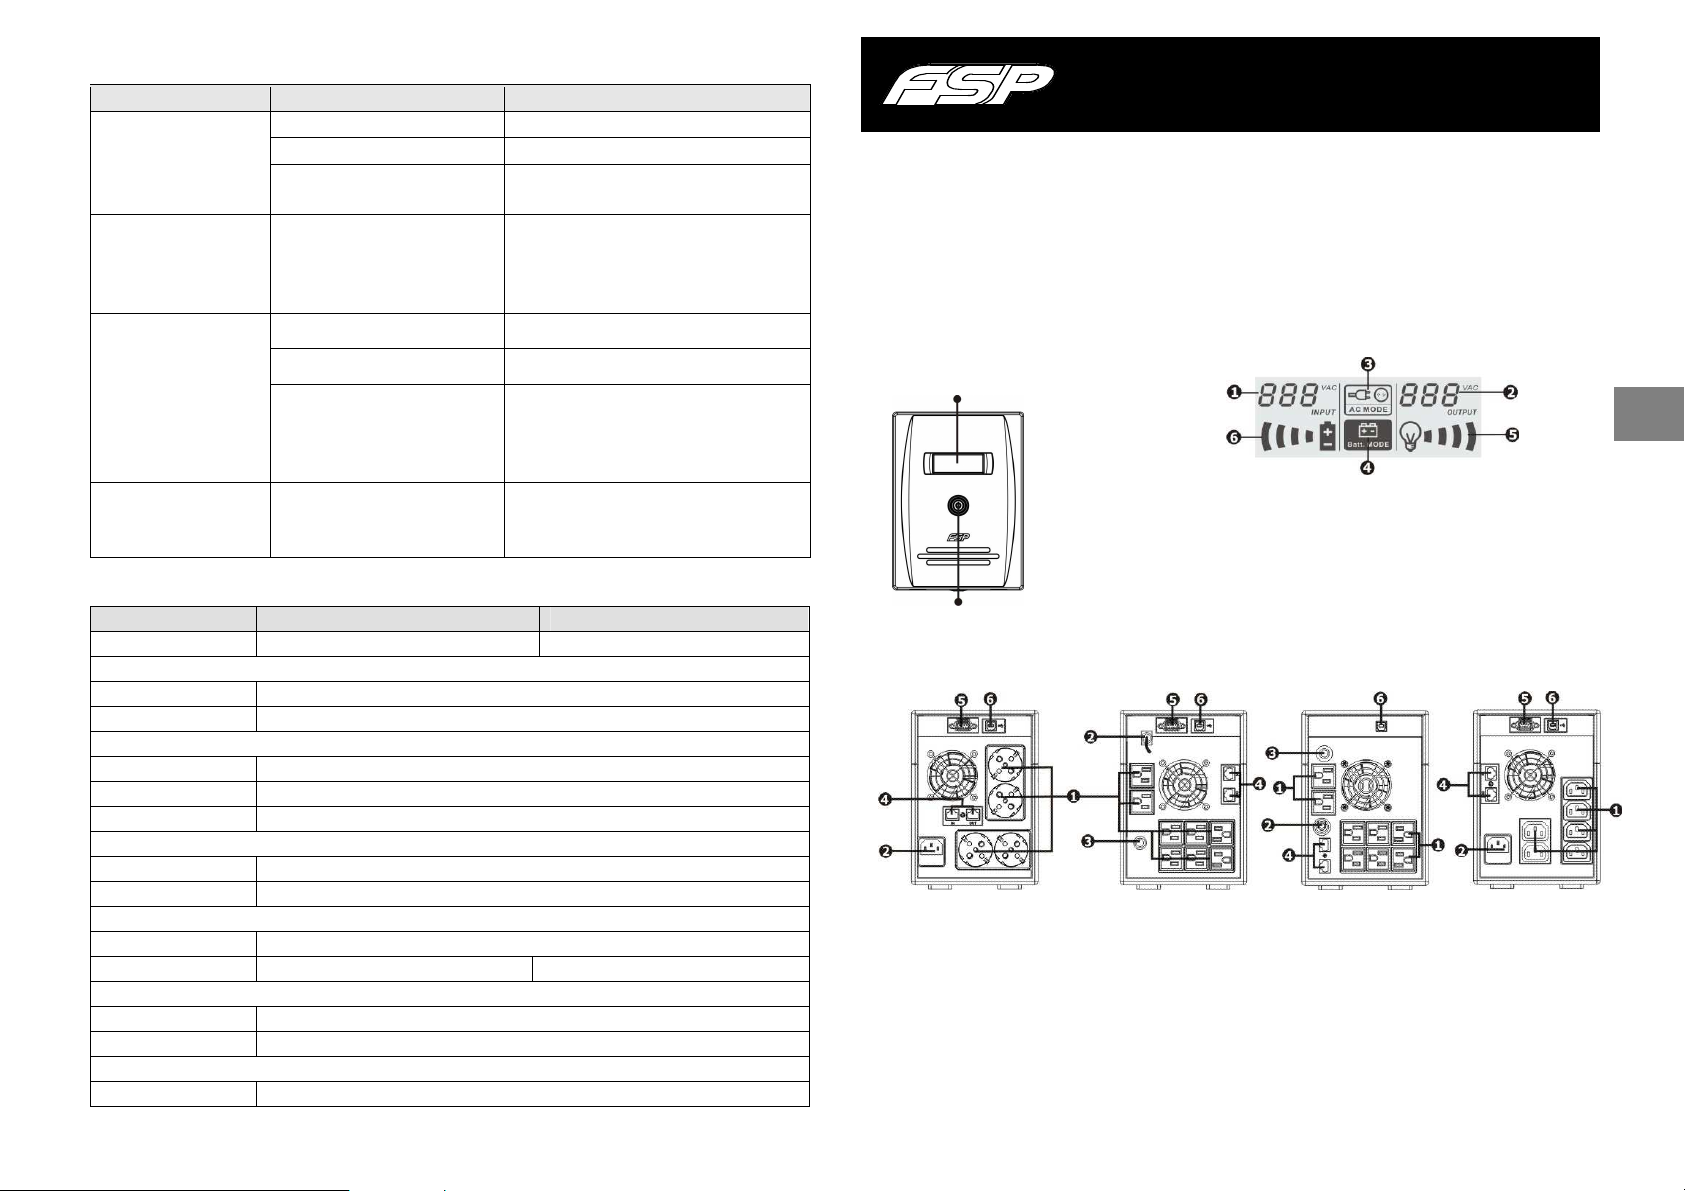
6. Odstraňovanie problémov
Krátko stlačte vypínač UPS, čím ju uvediete
ska, hoci je
Starostlivo skontrolujte zapojenie
Problém Možná príčina Riešenie
Kontrolka LCD na
prednej strane UPS
nesvieti.
Alarm stále pí
elektrická sieť plne
funkčná.
Pri výpadku elektrickej
energie UPS pracuje len
krátky čas.
Elektrická sieť je plne
funkčná, ale jednotka je
na batérií.
Vybitá batéria. Nechajte UPS nabíjať minimálne 6 hodín.
Chybná batéria. Vymeňte batériu za novú rovnakého typu.
UPS nie je zapnutá.
do prevádzky.
UPS je preťažená. Odpojte časť záťaže. Pred opätovným
zapojením zariadenia si overte, že záťaž
zodpovedá kapacite UPS uvedenej
v špecifikácii.
UPS je preťažená. Odpojte časť záťaže.
Napätie batérie je nízke. Nechajte UPS nabíjať minimálne 6 hodín.
Chybná batéria. Môže ísť
o chybu spôsobenú príliš
vysokou okolitou teplotou alebo
opotrebovaním batérie.
Sieťový kábel je uvoľnený.
Vymeňte batériu za novú rovnakého typu.
sieťového kábla.
7 Špecifikácie
Model EP 1500 EP 2000
KAPACITA 1500 VA/900 W 2000 VA / 1200 W
VSTUP
Napätie 110/120 VAC alebo 220/230/240 VAC
Tolerancia 81–145 VAC/162–290 VAC
VÝSTUP
Regulácia napätia +/–10 %
Čas prepnutia Bežne 2–6 ms, 10 ms max.
Forma vlny Simulovaná sínusová vlna
BATÉRIE
Typ a počet 12 V/9 Ah – 2 ks
Doba nabíjania 4–6 hodín pre nabitie na 90 % kapacity
ROZMERY A HMOTNOSŤ
Rozmery (d x š x v)
Hmotnosť (kg) 11,1 11,5
PROSTREDIE
Vlhkosť 0–90 % rel. vlhkosti pri 0–40 °C (nekondenzujúca)
Hlučnosť Nižšia než 40 dB
MANAŽMENT
USB/RS-232 Podporuje Windows® 98/2000/2003/XP/Vista/2008/7, Linux, Unix, a MAC
397 x 146 x 205 mm
Line Interactive UPS
Návod k obsluze, v. 1.1
1. Sadržaj pakovanja
- Jedinica UPS
- Uputstvo
- Komunikacioni kabel (samo u slučaju modela sa portom RS-232)
- Dovodni mrežni kabel (samo u slučaju modela sa utičnicama IEC)
2. Pregled
Pogled s prednje strane
LCD ploča
Prekidač
Pogled sa zadnje strane:
Tip Schuko Tipe NEMA I Tip NEMA II Tip IEC
Izlazne utičnice Utičnica za prenaponsku zaštitu
Ulaz dovodnog kabla modema/telefona ili računarske mreže
(konektori RJ-11/RJ-45)
Dugme za resetiranje
LCD Ploča:
Ulazni napon
Izlazni napon signalizira preopterećenje
Indikator rada iz mreže
Indikator rada iz baterije svjetlucanje signalizira da je baterija
Port RS-232
Port USB
Indikator opterećenja, svjetlucanje
Indikator kapaciteta baterije,
skoro prazna
SR
66 67
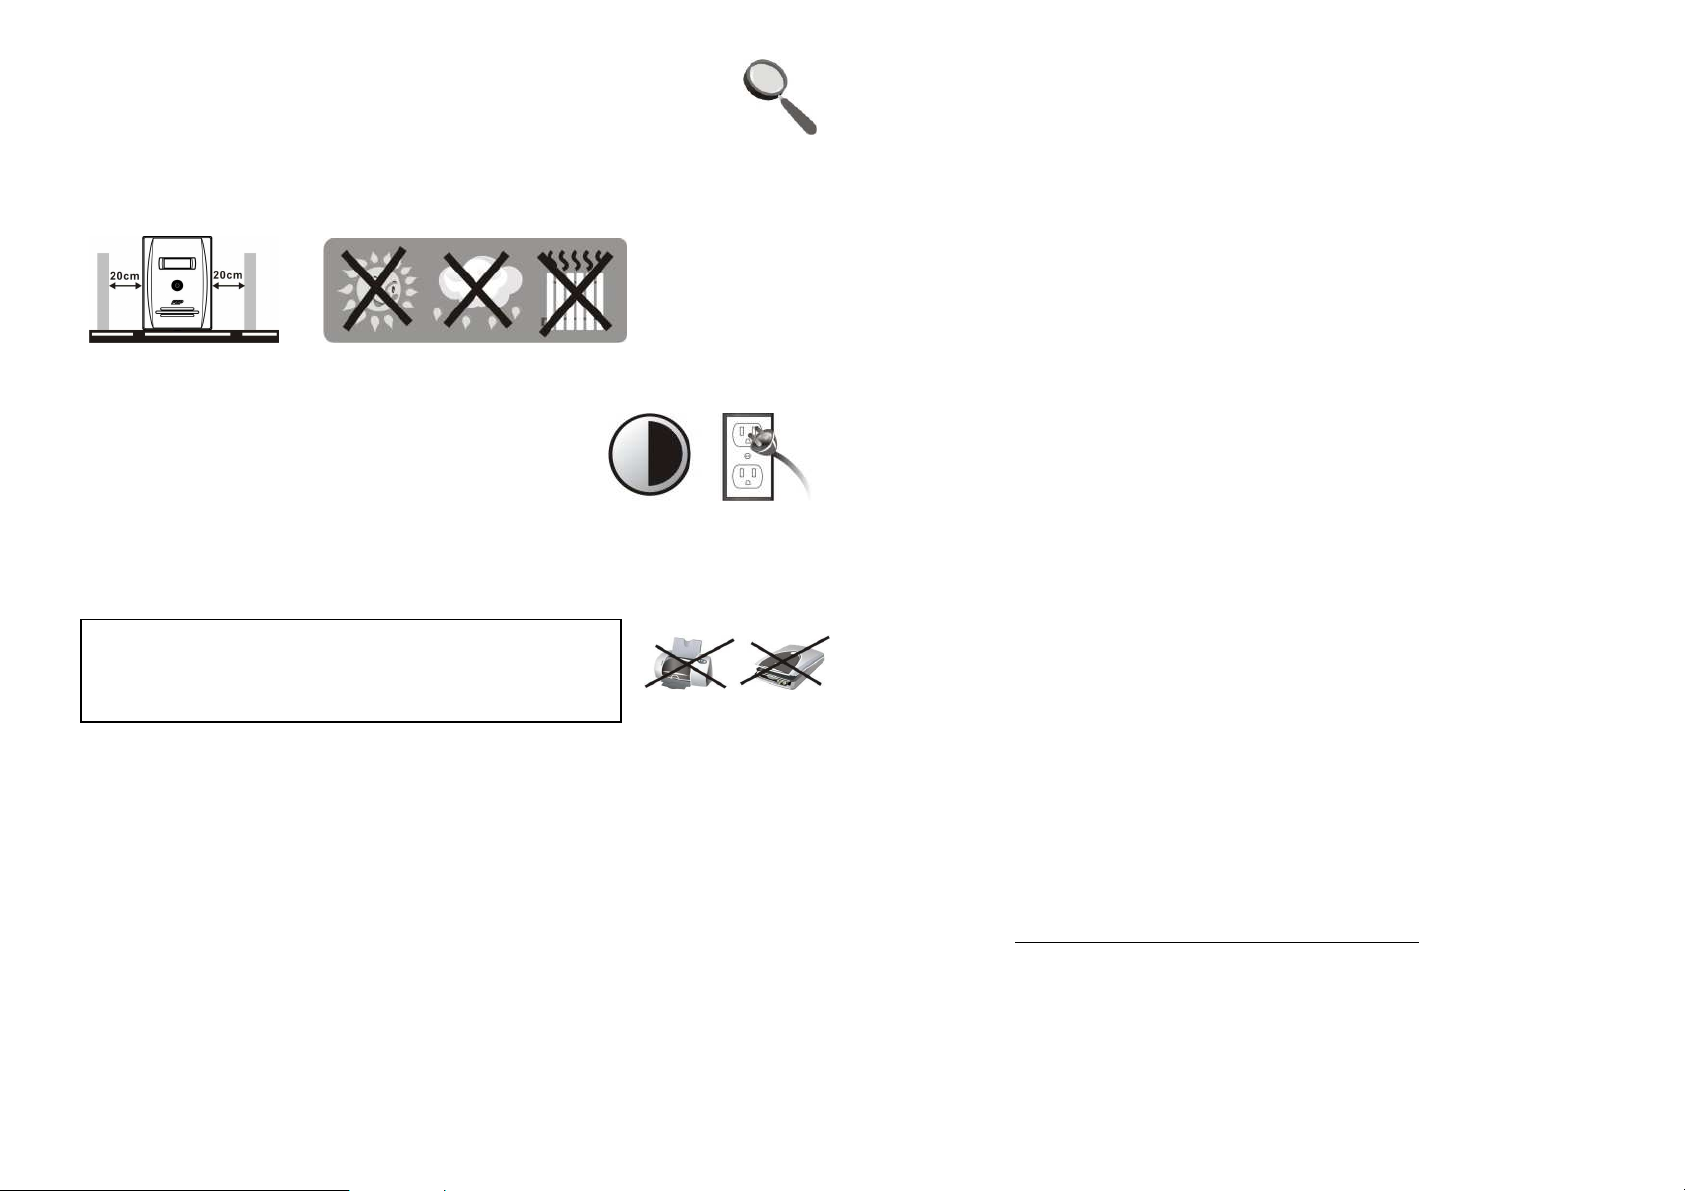
6 sati
3. Instalacija i početno podešavanje
Beleška: Pre instalacije aparata prekontrolirajte, da li u toku transporta nije
došlo do njegovog oštećenja.
Smeštanje i skladišćenje
UPS smestite na takvo mesto, koje nije prašnjavo, te je dovoljno dovoda vazduha. Kada se UPS
nalazi u blizini drugih električkih aparata, ostavite među njima razmak minimalno 20 cm, tako da
izbegnete moguće smetnje. UPS ne puštati u rad u sredini koja prelazi limite temperature i
vlažnosti (tačna ograničenja možete naći u delu Specifikacije).
Priključenje na električku mrežu i punjenje
Dovodni kabao uključite u utičnicu. Za postizanje potpune
funkcije preporučujemo bateriju puniti minimalno 4 sata pre
priključenja drugih aparata. UPS krene sa punjenjem baterije
automatski, odmah nakon uključenja u električku utičnicu.
Priključenje zaštićenih aparata
Aparate koje želite zaštititi od pada električke energije uključite u utičnice sa zadnje strane UPS.
Dalje UPS uključite pomoću prekidača na prednjoj strani i, iza toga uključite aparate, koji su na
UPS priključeni. Aparati će od tog momenta biti zaštićeni u slučaju pada električke struje.
UPOZORENJE: U izlazne utičnice UPS nikada ne uključujte
laserski štampač ili skener. Ovi aparati bi UPS mogli važno
oštetiti.
Priključenje modema/telefona/računarne mreže na prenaponsku zaštitu (samo za
model sa konektorima RJ-11/RJ-45)
U utičnicu označenu sa IN, koja se nalazi sa zadnje strane UPS, uključite kabao koji vodi iz
telefonske utičnice. U izlaznu utičnicu OUT dalje uključite drugi kabao u pravcu na računarni
modem ili telefon.
Priključenje komunikacionog kabla (samo za model sa portom RS-232)
Kada želite koristiti funkciju automatičkog isključenja/uključenja UPS i monitoriranja stanja
aparata, uključite u port RS-232 komunikacioni kabao, njegov drugi kraj uključite u računar.
Zahvaljujući programu monitoriranja, koji morate instalirati, od priključenog računara možete
planirati isključenje i uključenje UPS, te takođe monitorirati njegovo stanje.
Uključenje i isključenje UPS
UPS uključite pritiskom na glavno dugme za isključenje na prednjoj strani. USP isključite
ponovljenim pritiskom na isto dugme.
68 69
4. Važna sigurnosna upozorenja (MOLIM SAČUVAJTE OVA UPUTSTVA)
UPOZORENJE:
• Radi sprječavanja rizika izbijanja požara ili električkog kratkog spoja, koristite UPS u
unutrašnjoj sredini, gdje se temperatura i vlažnost mogu regulirati, te koja ne sadrži
provodive smjese (detaljnije o povoljnoj temperaturi i vlazi možete naći u dijelu Specifikacija
ovog priručnika).
• Kako biste spriječili pregrijavanje UPS, ne prekrivajte ventilacijske otvore UPS i UPS ne izlažite
direktnom sunčevom zračenju, te ga ne postavljajte u blizini aparata, koji regeneriraju toplotu,
kao što su štednjak ili kamna.
• Na UPS nikada ne priključujte neračunarske aparate, kao što su zdravstveni instrumenti, prije
svega aparati za održavanje ljudskog života, isto tako mikrovalne pećnice, usisavači i sl.
• Nikada ne priključujte dovodni kabel UPS na neku od vlastitih izlaznih utičnica.
• Spriječite da u UPS uđu tečnosti ili druge strane materije. Nikada ne stavljajte piće ili druge
tečnosti na UPS ili u njegovoj blizini.
• U slučaju opasnosti pritisnite dugme za isključenje, te izvucite kabao iz dovoda električke
energije, tako će UPS biti dobro obezbijeđen.
• Na UPS nikada ne priključujte produžni kabao ili kabao sa prenaponskom zaštitom.
• Prilikom otvaranja UPS prijeti opasnost od udesa električkom strujom. I nakon isključenja UPS
od električke energije, na bateriji unutar UPS se stalno može nalaziti opasan napon. Zato je u
slučaju održavanja ili servisnih poslova unutar UPS baterije neophodno isključiti, tako da se
skine konektor sa pozitivnog i negativnog pola baterije.
• Bilo koji poslovi sa baterijom umetnutom u UPS može obavljati samo odgovorno povjerena
osoba. Neautorizirane osobe ne smiju doći u kontakt s baterijom.
• Kada je bateriju potrebno promijeniti, mijenjajte ju isključivo za isti tip.
• Unutarnji napon baterija je 12 V istosmjerni. Radi se o začaurenoj bateriji sa šest članaka.
• Bateriju nikada ne bacati u vatru, jer može eksplodirati. Bateriju ne otvarajte niti na drugi
način ne uništavajte. Oslobođeni elektrolit može važno oštetiti kožu i oči.
• Ako želite UPS očistiti sa vanjske strane, najprije ga isključite od dovoda električke energije.
Prilikom čišćenja ne koristite tečna sredstva za čišćenje ili sprejeve.
• Baterija može u slučaju neprofesionalne manipulacije ili prilikom kratkog spoja prouzrokovati
udes električkom strujom. U slučaju izmjene baterija pazite na slijedeća uputstva:
1) skinite ručni sat, prstenje i druge metalne predmete;
2) koristite alat sa izoliranom ručkom;
3) radite u gumenim rukavicama i nosite gumenu obuću;
4) nikada ne stavljajte alat ili bilo koje druge metalne predmete na gornji dio baterija;
5) prije priključenja ili isključenja baterija, izvucite dovodni kabel iz utičnice.
5. Download softwara i njegova instalacija (samo za model sa
komunikacijskim portom)
Prilikom skidanja i instalacije softwara monitorisanja radite po sledećem postupku:
1. Idite na stranicu http://www.power-software-download.com
2. Kliknite na ikonu software ViewPower i odaberite operacijski sistem za koji želite software
koristiti.
3. Radnju obavljajte prema instrukcijama na ekranu, one će vas voditi instalacijom softwara.
4. Nakon završetka instalacije računar se mora restartati. Komunikacijski software će se pojaviti u
obliku narančaste ikone u desnom dijelu sistema polica (kod sata).
5. Korisničko ime i lozinka za upravljanje softverom:
Korisničko ime: administrator
Lozinka: administrator
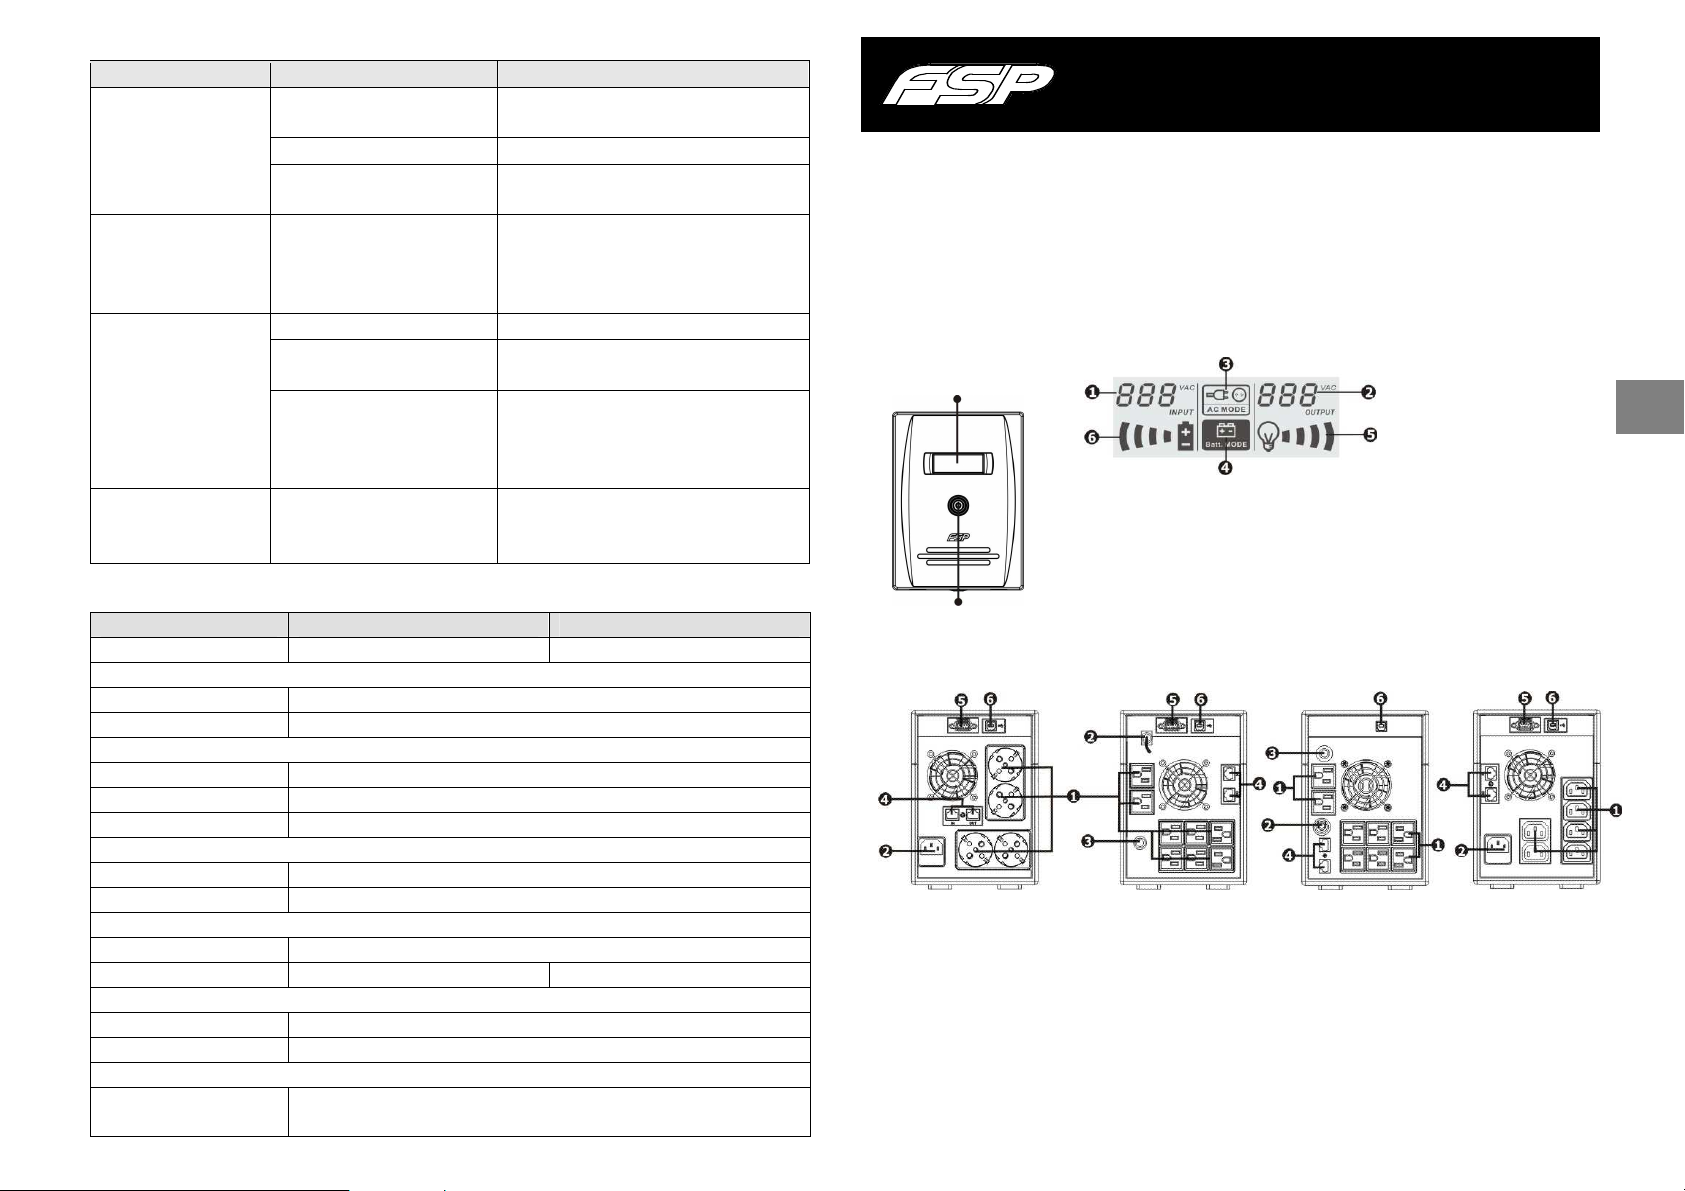
6. Otklanjanje problema
Stavite puniti UPS minimalno u trajanju od 6
Stavite puniti UPS minimalno u trajanju od 6
Pažljivo prekontrolirajte priključak mrežnog
Problem Mogući uzrok Rešenje
Kontrolna lampa LCD na
prednjoj strani UPS ne
svijetli.
Alarm stalno zviždi, i
kada električka mreža
sasvim funkcionira.
Prilikom pada električke
energije, UPS radi samo
kraće vrijeme.
Električka mreža sasvim
funkcionira, ali bateriju
žmiga.
Prazna baterija.
sati.
Pokvarena baterija. Zamijenite bateriju za novu istog tipa.
UPS nije uključen. Kratko pritisnite prekidač UPS, time će se
pusti u rad.
UPS je preopterećen. Isključite dio opterećenja. Prije ponovnog
priključenja aparata, provjerite, da li
opterećenje odgovara kapacitetu UPS
navedenom u specifikaciji.
UPS je preopterećen. Isključite dio opterećenja.
Napon baterije je niski.
sati.
Loša baterija. Može se raditi o
kvaru, koji je prouzrokovan
previše visokom temperaturom
ili zbog istrošenosti baterije.
Mrežni kabel je slobodan.
Zamijenite bateriju za novu istog tipa.
kabla.
7 Specifikacije
Model EP 1500 EP 2000
KAPACITET 1500 VA / 800 W 2000 VA / 1200 W
ULAZ
Napon 110/120 VAC ili 220/230/240 VAC
Tolerancija 81–145 VAC / 162–290 VAC
IZLAZ
Regulacija napona +/–10 %
Vrijeme transfera Standardno 2–6 ms, 10 ms max.
Oblik vala Simulirani sinusni val
BATERIJA
Tip i broj 12 V/9 Ah – 2 kom
Vrijeme punjenja 4–6 sati za punjenje na 90 % kapaciteta
DIMENZIJE I TEŽINA
Dimenzije (d x š x v) 397 x 146 x 205 mm
Težina (kg) 11,1 11,5
SREDINA
Vlažnost 0–90 % rel. vlage pri 0–40° C (nekondenzirajuće)
Buka Manja od 40 dB
MENADŽMENT
USB/RS-232 Podržava Windows® 98/2000/2003/XP/Vista/2008/7, Linux, Unix, and
MAC
Line Interactive UPS
Navodilo za uporabo 1.1
1. Vsebina dobave
- Enota UPS
- Navodila
- Komunikacijski kabel (samo v primeru modela s portom RS-232)
- Dovodni omrežni kabel (samo v primeru modela z vtičnicami IEC)
2. Pregled
Pogled od spredaj:
LCD panel
Stikalo
Pogled od zadaj:
Tip Schuko Tip NEMA I Tip NEMA II Tip IEC
Izstopne vtičnice
Vstop dovodnega kabla
Tipka reset
LCD Panel:
Vstopna napetost
Izstopna napetost signalizira preobremenitev
Indikator omrežnega napajanja Indikator zmogljivosti baterije -
Indikator napajanja iz baterije utripanje signalizira skoraj
Vtičnica za prenapetostno zaščito modema/telefona ali
računalniškega omrežja (konektorji RJ-11/RJ-45)
Port RS-232
Port USB
Indikator obremenitve - utripanje
Prazno baterijo
SL
70 71
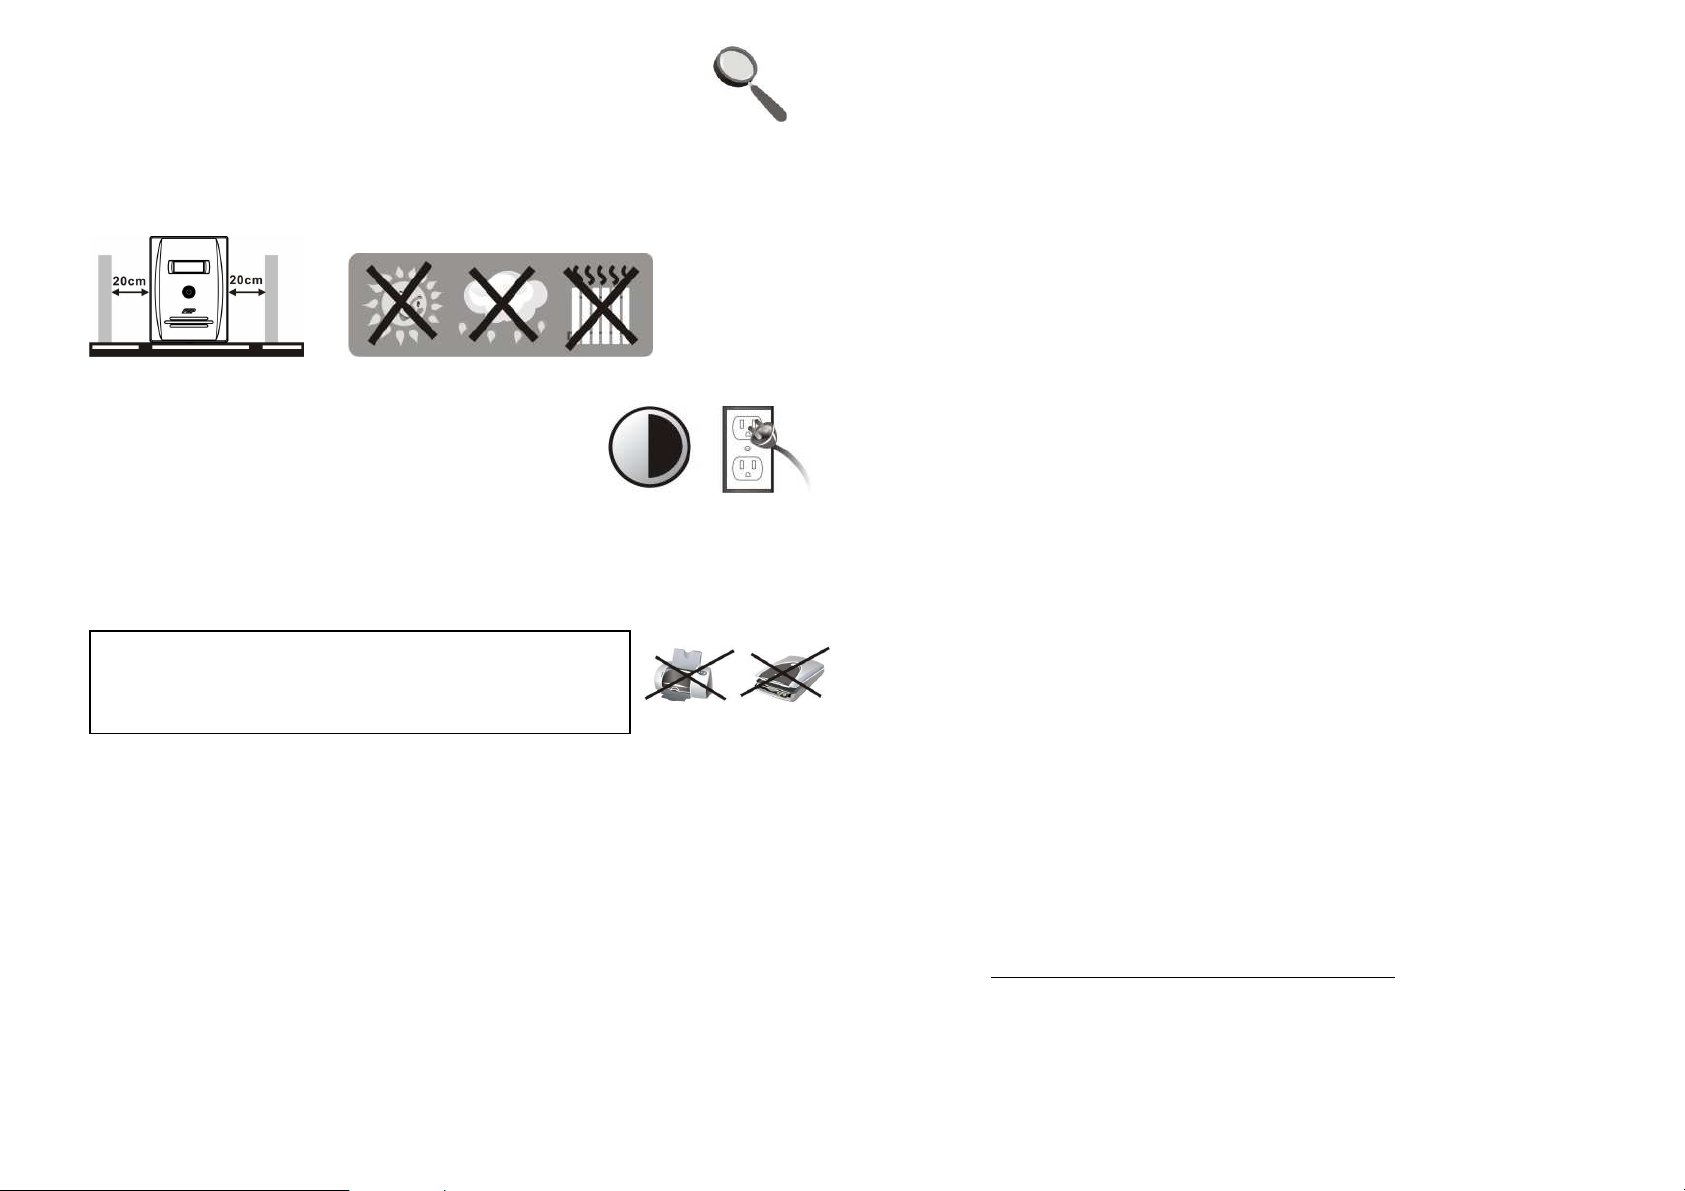
3. Instalacija in uvodna nastavitev
Opomba: Pred instalacijo preverite napravo, ali ni morda bila med
prevozom poškodovana.
Namestitev in skladiščenje
UPS namestite na takšno mesto, ki ni prašno in se odlikuje z zadostnim dovodom zraka.
V kolikor bi se UPS nahajal v bližini drugih električnih naprav, poskrbite, da bo razdaja med njimi
znašala vsaj 20 cm, da bi s tem preprečili morebitne motnje. UPS ne uporabljajte v okolju, ki
presega limite temperature in vlažnosti (natančne omejitve boste našli v delu Specifikacija).
Priključitev na električno omrežje in polnjenje
Dovodni kabel priključite v vtičnico. Za doseganje polne
zmogljivosti priporočamo polnjenje vsaj 4 ure prej, preden bi
priključili ostale naprava. UPS začne polniti baterijo
avtomatsko takoj po priključitvi v električno vtičnico
Priključevanje varovanih naprav
Naprave, ki jih želite varovati zoper izpad električne energije, priključite v vtičnice na zadnji
strani UPS. Nato UPS vklopite s pomočjo stikala na sprednji strani, nakar vklopite tiste naprave,
ki so priključene na UPS. Od tega trenutka bodo naprave zaščitene zoper izpad električne
energije.
OPOZORILO: V izstopne vtičnice UPS nikoli ne priključujte
laserskega tiskalnika oziroma optičnega bralnika. Takšne
naprave bi lahko resno poškodovale UPS.
Priključitev modema/telefona/računalniškega omrežja na prenapetostno zaščito
(samo pri modelu s konektorji RJ-11/RJ-45)
V vtičnico, ki nosi oznako IN, in ki se nahaja na zadnji strani UPS, priključite kabel, ki pelje
iz telefonske vtičnice. V izstopno vtičnico OUT nato priključite drugi kabel, ki pelje v računalniški
modem oziroma telefon.
Priključitev komunikacijskega kabla (samo pri modelu s portom RS-232)
V kolikor nameravate uporabljati funkcijo avtomatskega izklopa/vklopa UPS in monitoringa
njenega stanja, potem v port RS-232 priključite komunikacijski kabel, katerega nasprotni konec
priključite v računalnik. Z uporabo programa za monitoring, ki ga morate sami instalirati, lahko iz
priključenega računalnika planirate izklop in vklop UPS in hkrati tudi izvajate monitoring
njegovega stanja.
Vklop in izklop UPS
UPS vklopite s stiskom glavne stikalne tipke na čelni strani. USP izklopite s ponovnimsitiskom
iste tipke.
6 ur
4. Pomembna varnostna opozorila (PROSIMO, DA TE NAPOTKE SHRANITE)
OPOZORILO:
• Da bi preprečili tveganje nastanka požara oziroma električnega kratkega stika, uporabljajte
UPS v notranjem okolju, kjer je možno regulirati temperaturo in vlažnost ter v katerem ni
vodljivih primesi (podrobnosti o primerni temperaturi in vlažnosti boste našli v tem manualu
-v delu Specifikacija).
• Da bi preprečili pregrevanje UPS, ne pokrivajte prezračevalnih odprtin UPS in UPS naj tudi ne
bo izpostavljen direktnemu sončnemu sevanju oziroma ne bo nameščen v bližini naprav,
proizvajajočih toploto, kot so grelci, peči oziroma kamini.
• V UPS nikoli ne priključujte naprav, ki ne spadajo med računalniško opremo, kot so
medicinske naprave - predvsem tiste, ki skrbijo za vzdrževanje človekovega življenja, dalje pa
mikrovalovne pečice, sesalnike in pod.
• Dovodnega kabla UPS nikoli ne priključujte v katero njegovih lastnih izstopnih vtičnic.
• Preprečite, da bi se v UPS znašle tekočine oziroma druge tuje snovi. Nikoli ne postavljajte
pijač ali drugih tekočin na UPS oziroma v njegovo bližino.
• V primeru nevarnosti pritisnite stikalno tipko in omrežni kabel izključite iz dovoda električne
energije, s čemer boste UPS pravilno zavarovali.
• V UPS nikoli ne priključujte podaljševalnega kabla oziroma kabla s prenapetostno zaščito.
• Po odprtju UPS grozi nevarnost poškodbe z električnim tokom. Tudi potem, ko je UPS že
odklopljen od električnega napajanja, je na bateriji, nameščeni znotraj UPS, še vedno lahko
prisotna nevarna napetost. Zato je v primeru vzdrževalnih oziroma servisnih del znotraj UPS
potrebno odklopiti baterijo tako, da konektorje snamete iz obeh polov baterije.
• Kakršnokoli delo z baterijo nameščeno v UPS lahko izvaja samo pooblaščena oseba.
Nepooblaščene osebe ne smejo z baterijo priti v stik.
• V kolikor je potrebno baterijo zamenjati, jo nadomestite izključno z enakim tipom.
• Notranja napetost baterije znaša 12 V enosmerno. Gre za zaprto baterijo s šestimi celicami.
• Baterije nikoli ne odvrzite v ogenj - lahko pride do eksplozije. Baterije ne odpirajte, niti na
noben način ne poškodujte. Razliti elektrolit lahko resno poškoduje kožo oziroma oči.
• V kolikor želite UPS očistiti od zunaj, ga najprej odklopite od dovoda električne energije. Za
čiščenje ne uporabljajte tekočih čistilnih sredstev niti razpršilcev.
• Pri nestrokovnem ravnanju oziroma pri kratkem stiku baterija lahko povzroči poškodbo z
električnim tokom. V primeru menjave baterije upoštevajte naslednje napotke:
1) snemite ročno uro, prstane in ostale kovinske predmete;
2) uporabljajte orodje z izoliranimi ročaji;
3) delo opravljajte v gumijastih rokavicah in obuti v gumijaste čevlje;
4) orodja ali kakršnihkoli drugih kovinskih elementov nikoli ne odlagajte na zgornjo površino
baterije;
5) pred priključevanjem ali izključevanjem baterije dovodni kabel potegnite iz vtičnice.
5. Download software in njegova instalacija (samo pri modelu s
komunikacijskim portom)
Pri nalaganju in namestitvi programske opreme za monitoring upoštevajte naslednji
postopek:
1. Poiščite stran http://www.power-software-download.com
2. Kliknite na ikono software ViewPower in izberite operacijski sistem, v katerem želite uporabljati
programsko opremo.
3. Postopajte po navodilih na zaslonu, ki vas bodo vodili skozi namestitev programske opreme.
4. Po končani instalacije je potreben ponoven zagon računalnika. Nato se bo komunikacijski
program pojavil kot oranžna ikona v desnem delu sistemske vrstice (v bližini ure).
5. Uporabniško ime in geslo za upravljanje programske opreme:
Uporabniško ime: administrator ; Geslo: administrator
72 73
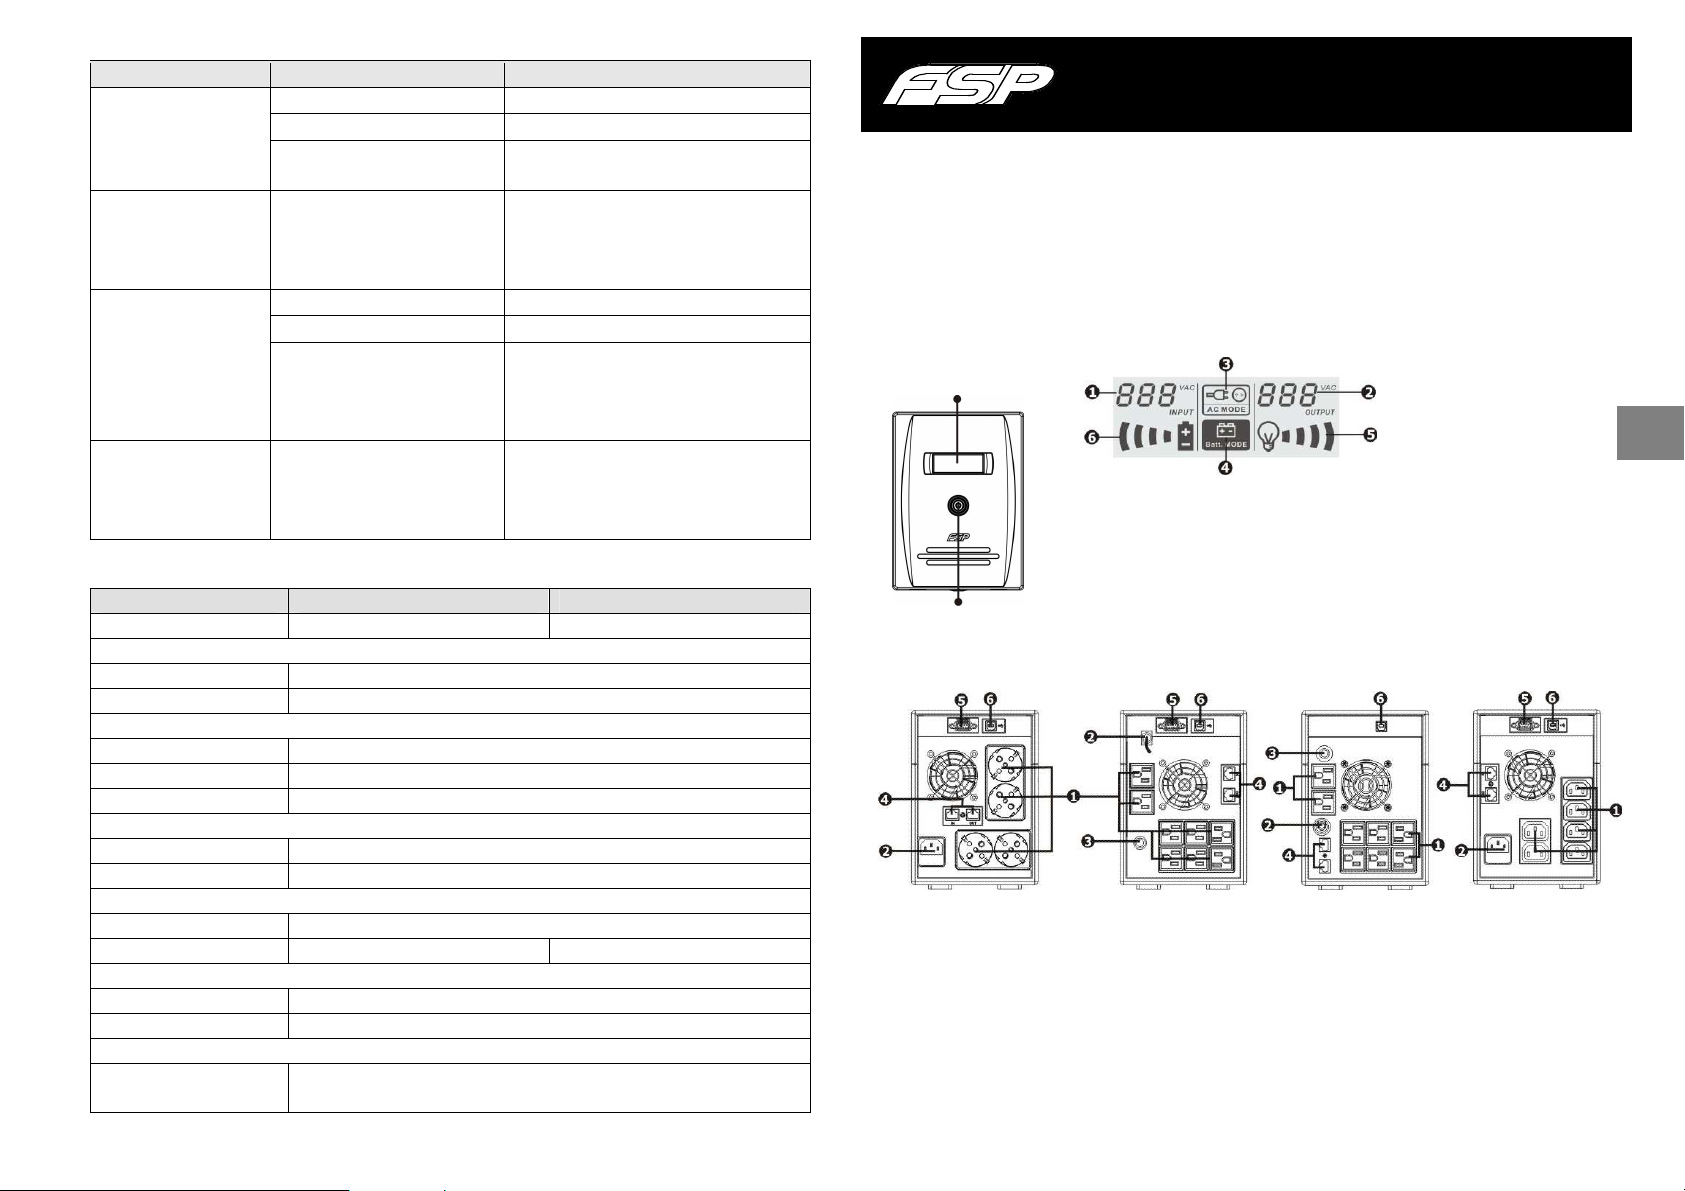
6. Odstranjevanje problemov
električno omrežje deluje
Izključite en del porabnikov. Pred ponovnim
Poškodovana baterija. Lahko gre
Električno omrežje deluje
Skrbno preverite priključek omrežnega
Problem Možen vzrok Rešitev
Ne sveti kontrolna LCD
na čelni strani UPS.
Alarm neprenehoma
piska tudi takrat, ko
s polno zmogljivostjo.
Pri izpadu električne
energije UPS deluje le
kratek čas.
s polno zmogljivostjo,
vendar enota baterije
način.
Prazna baterija. Poskrbite, da se UPS polni najmanj 6 ur.
Poškodovana baterija. Zamenjajte z novo baterijo enakega tipa.
UPS ni vklopljen. Kratko pritisnite stikalo UPS, s čemer ga
boste vklopili.
UPS je preobremenjen.
priključevanjem porabnikov preverite, ali
obremenitev odgovarja zmogljivosti UPS,
navedene v specifikaciji.
UPS je preobremenjen. Izključite en del uporabnikov.
Napetost baterije je prenizka. Poskrbite, da se UPS polni vsaj 6 ur.
Zamenjajte z novo baterijo enakega tipa.
za napako, povzročeno s
previsoko toploto okolja, ali pa
z obrabo baterije.
Omrežni kabel ni priključen.
kabla.
7 Specifikacija
Model EP 1500 EP 2000
ZMOGLJIVOST 1500 VA / 900 W 2000 VA / 1200 W
VSTOP
Napetost 110/120 VAC oziroma 220/230/240 VAC
Toleranca 81–145 VAC / 162–290 VAC
IZSTOP
Regulacija napetosti +/–10 %
Čas preklopa Običajno 2–6 ms, največ 10 ms.
Oblika valovanja Simulirano sinusno valovanje
BATERIJA
Tip in število 12 V/9 Ah – 2 kom.
Čas polnjenja 4–6 ur za polnjenje na 90 % zmogljivosti
DIMENZIJE IN MASA
Dimenzije (d x š x v) 397 x 146 x 205 mm
Masa (kg) 11,1 11,5
OKOLJE
Vlažnost 0–90 % rel. vlažnosti pri 0–40° C (ki ne kondenzira)
Hrup Nižji kot 40 dB
MANAGEMENT
USB/RS-232 Podpira Windows® 98/2000/2003/XP/Vista/2008, Windows® 7, Linux,
in MAC
Line Interactive UPS
Bedieningshandleiding v. 1. 1
1. Inhoud van de verpakking
- UPS-eenheid
- Handleiding
- Communicatiekabel (alleen bij het model met de RS-232-poort)
- Netvoedingskabel (slechts bij het model met de IEC-contacten)
2. Overzicht
Vooraanzicht:
LCD-scherm
Schakelaar
Achteraanzicht:
Type Schuko Type NEMA I Type NEMA II Type IEC
Uitgaande contactdozen
Aansluiting voedingskabel van modem/telefoon of computernetwerk
(connectors RJ-11/RJ-45)
Resetknop
LCD-scherm:
Ingangsspanning
Uitgangsspanning
Indicator netvoeding
Indicator accuvoeding
Contact voor overspannings-bescherming
Poort RS-232
Poort USB
Indicator belasting, knipperen
signaleert overbelasting
Indicator accucapaciteit,
knipperen signaleert bijna lege accu
NL
74 75
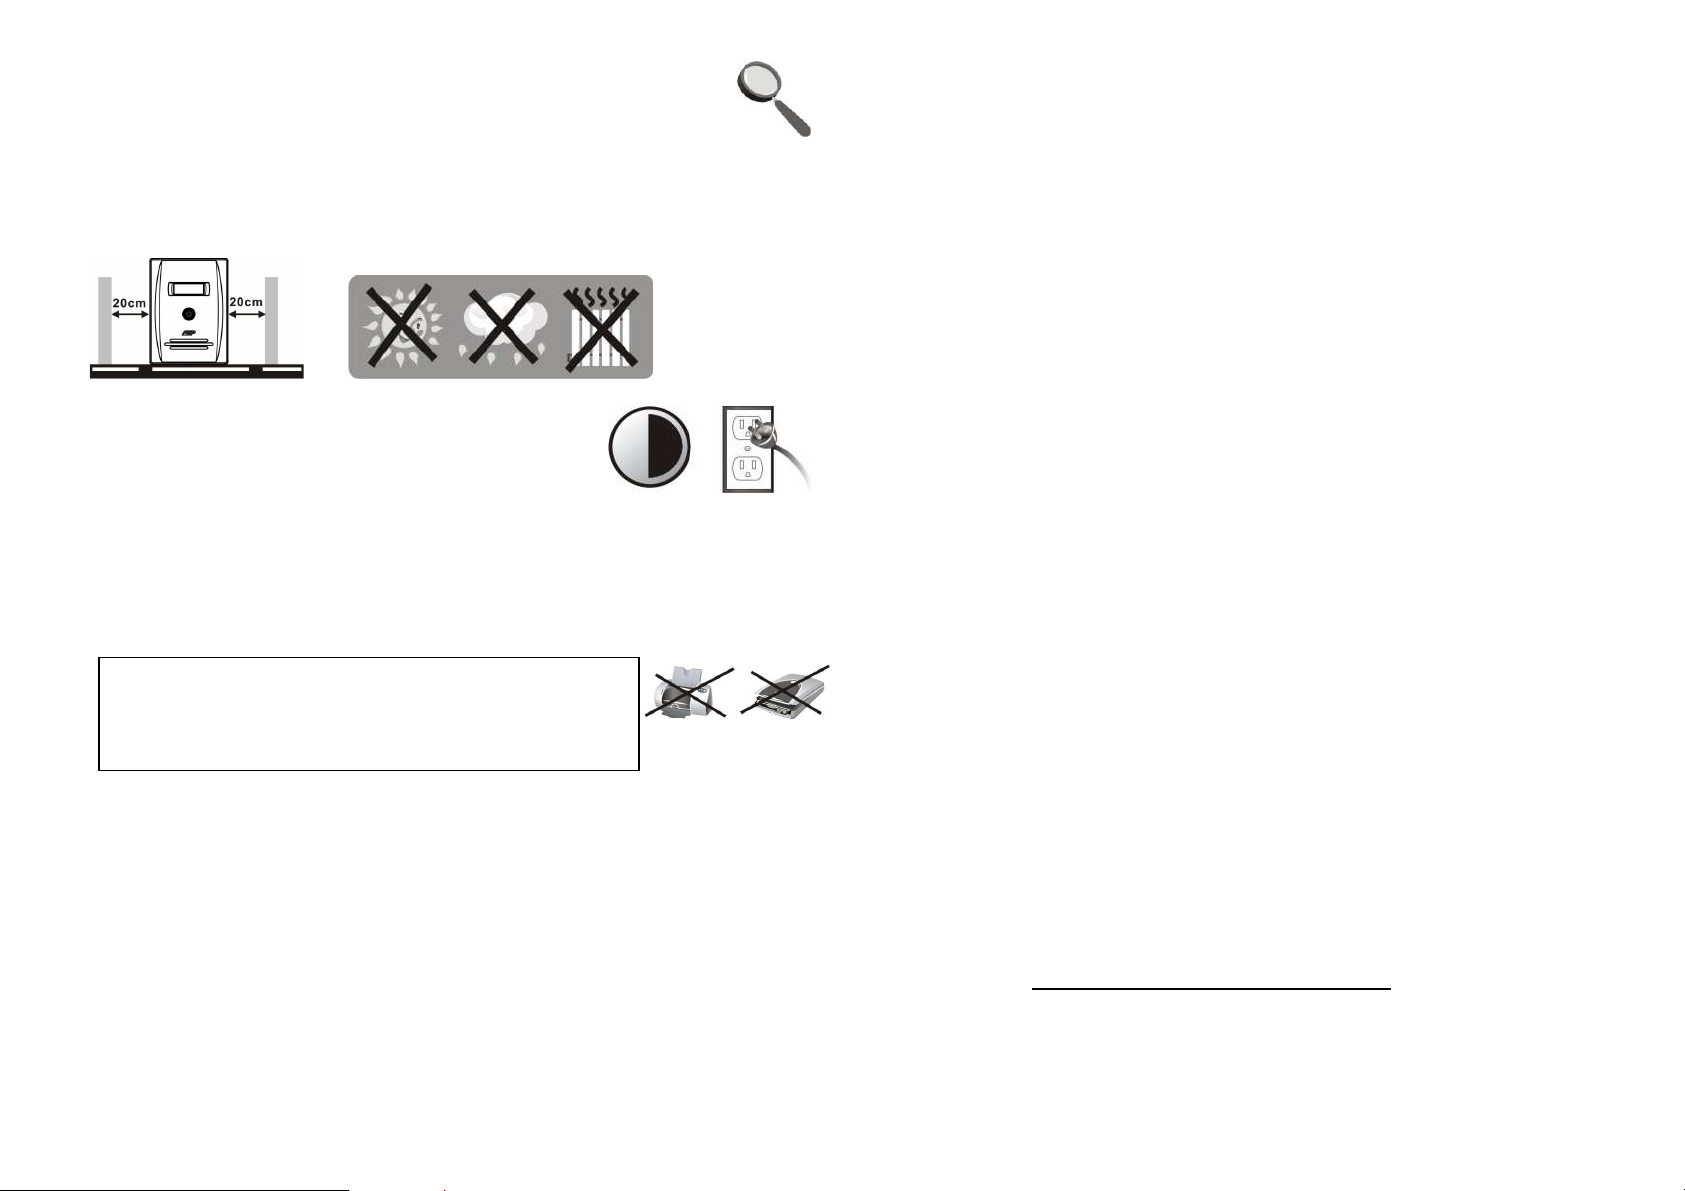
3. Installatie en basisinstellingen
Controleer vóór installatie van het apparaat, of het tijdens het transport niet
beschadigd is.
Plaatsing en opslag
Plaats de UPS op een plaats die niet stoffig is en voorzien is van een voldoende ventilatie. Als de
UPS geïnstalleerd wordt in de nabijheid van andere elektrische apparaten, zorg dan voor een
onderlinge afstand van ten minste 20 cm, om een eventuele storing te vermijden. Gebruik de
UPS niet in een omgeving, waar de temperatuur- en vochtigheidslimieten worden overschreden
(de precieze beperkingen kunt u in het gedeelte Specificaties vinden).
Aansluiting op het elektriciteitsnet en opladen
Sluit de voedingskabel aan op het contact. Om gebruik te
kunnen maken van de volledige functionaliteit bevelen we aan
om de accu ten minste 4 uur vóór aansluiting van andere
apparaten op te laden. De UPS begint automatisch
onmiddellijk na aansluiting op het elektriciteitsnet op te laden.
Aansluiting van beschermde apparaten.
Sluit het apparaat dat u tegen stroomuitvallen wilt beschermen, aan op de contactdoos aan de
achterzijde van de UPS. Schakel de UPS vervolgens in met de schakelaar aan de voorzijde en
schakel daarna de apparaten aan, die op de UPS zijn aangesloten. Vanaf dat ogenblik zullen de
apparaten beschermd zijn tegen een uitval van de elektriciteit.
WAARSCHUWING: Koppel nooit een laserprinter of een
scanner aan op de uitgangscontacten van de UPS. Deze
apparaten kunnen de UPS ernstig beschadigen.
Aansluiting van modem/telefoon/computernetwerk op de
overspannings-bescherming (alleen bij het model met de connectors RJ-11/RJ-45)
Koppel de kabel die uit het telefooncontact komt aan op het contact dat met IN aangeduid is en
dat zich aan de achterzijde van de UPS bevindt. Koppel vervolgens een andere kabel die naar de
computermodem of de telefoon voert, aan op het uitgangscontact OUT.
Aansluiting van de communicatiekabel (slechts voor het model met een
RS-232-poort)
Als u gebruik wilt maken van de functie voor automatisch uitschakelen/inschakelen van de UPS
en van controle van de toestand ervan, sluit dan de communicatiekabel op de RS-232-poort aan
en het andere einde daarvan op de computer. Dankzij het controleprogramma dat u dient te
installeren, kunt u via de aangesloten computer het in- en uitschakelen van de UPS regelen en
ook de toestand ervan controleren.
UPS inschakelen en uitschakelen
U schakelt de UPS in door drukken op de hoofddrukknop aan de voorzijde.U schakelt de UPS uit
door opnieuw op deze knop te drukken.
6 uur
4. Belangrijke veiligheidsopmerkignen (DEZE AANWIJZING ALSTUBLIEFT
BEWAREN)
WAARSCHUWING:
• Om het risico op brand of kortsluiting te beperken, dient u de UPS in ruimtes te gebruiken, waar de
temperatuur en de vochtigheid geregeld kan worden die vrij is van geleidende contaminaties (Specificaties
m.b.t. de geschikte temperatuur en de vochtigheid kunt u vinden in het gedeelte Specificaties van deze
handleiding).
• Bedek de ventilatieopeningen van de UPS niet om oververhitting van de UPS te voorkomen en stel de UPS
niet bloot aan rechtstreeks zonlicht. Plaats de UPS niet bij apparaten die warmte genereren, zoals
straalkachels, kachels en haarden.
• Sluit nooit apparaten aan op de UPS, die niets met computers te maken hebben, zoals geneeskundige
apparatuur, en vooral geen levensreddende apparatuur, magnetrons, stofzuigers e.d.
• Sluit de voedingskabel van de UPS nooit aan op een van de speciale uitgaande contacten.
• Voorkom dat er vloeistoffen of andere vreemde stoffen in de UPS terechtkomen. Plaats nooit dranken of
andere vloeistoffen op de UPS of in de nabijheid daarvan.
• Druk in het geval van gevaar op de schakeldrukknop en ontkoppel de voedingskabel van het
elektriciteitsnet, zodat de UPS naar behoren beveiligd is.
• Sluit nooit een verlengingskabel of een kabel met overspanningsbeveiliging op de UPS aan.
• Bij openen van de UPS dreigt het risico op een ongeval met elektrische stroom. Ook nadat de UPS van de
elektrische stroom ontkoppeld is, kan er op de accu in de UPS een gevaarlijke spanning staan. Daarom
dient bij onderhoud of reparatie aan de binnenzijde van de UPS de accu ontkoppeld te worden, en dat door
afnemen van de connectors van de positieve en negatieve pool van de accu.
• Alle werkzaamheden met de accu die zich in de UPS bevindt, kunnen slechts verricht worden door een
betreffende belaste persoon. Ongeautoriseerde personen mogen niet in contact met de accu komen.
• Als de accu vervangen moet worden, vervang hem dan altijd door hetzelfde type.
• De interne spanning van de accu is 12 V gelijkstroom. Het gaat om een verzegelde accu met zes cellen.
• Werp de accu nooit in het vuur, want hij kan exploderen. Open de accu niet en beschadig hem niet. De
vrijgekomen elektrolyt kan op ernstige wijze letsel toebrengen aan de huid en de ogen.
• Als u de UPS aan de buitenkant wilt reinigen, koppel dan eerst de elektrische energie af. Gebruik bij
reiniging nooit vloeibare reinigingsmiddelen of sprays.
• Een accu kan bij onvakkundige behandeling of bij kortsluiting een ongeval met elektrische stroom
veroorzaken. Houdt u zich bij de vervanging van de accu aan de volgende aanwijzingen:
1) doe polshorloges, ringen en andere metalen voorwerpen af;
2) gebruik instrumenten met een geïsoleerd handvat;
3) werk met rubberhandschoenen en trek rubberschoenen aan;
4) leg nooit gereedschap of welke metalen elementen dan ook op de bovenzijde van de accu;
5) trek vóór aansluiting of ontkoppeling van de accu de toevoerkabel uit het contact,
5. Downloaden van software en installatie daarvan (alleen voor het model
met de communicatiepoort)
Pas bij het downloaden en de installatie van de controlesoftware de volgende
werkwijze toe:
1. Bezoek de website http://www.power-software-download.com
2. Klik op het icoon software ViewPower en kies het besturingssysteem, waarin u de software wilt gebruiken.
3. Ga te werk volgens de instructies op het scherm, die u begeleiden bij de installatie van de software.
4. Na voltooiing van de installatie moet de computer opnieuw worden opgestart. De communicatiesoftware
verschijnt dan als een oranje icoon in het rechtergedeelte van de systeembalk (bij de tijdsaanduiding).
5. Gebruikersnaam en paswoord in software management:
Gebruikersnaam: administrator ; Paswoord: administrator
76 77
 Loading...