

Page 1

LED
Alarm
UPS Status
●
Off
The mains is normal and UPS
is operated normally.
★
Sounding every 10 seconds
Power failure occurs and UPS
is on battery mode.
★
Sounding every second
Low battery
○
Off
UPS is off.
●
Continuously sounding
UPS fault
Line-interactive UPS
ECO 400VA~800VA
FSP Manual Guide
Installation & Operation
1. Inspection
The following items are inside the box:
●UPS unit & User manual
• Remove the UPS from its package and inspect it for damage that
may have occurred during shipping. If any damage is discovered,
re-pack the unit and return it to the place of purchase.
2. Connect to Utility Power
• Connect AC power cord to utility power. Then, the UPS will start
to charge inside battery. For best result, charge the battery for 6
hours prior to initial use.
3. Connect Modem/Phone Line/Network(only for
the model with RJ 11/45 port)
• This UPS protects a single line (1 in/1 out) phone, modem, or fax
machine from surges when connected through the UPS. Plug in
conning Internet line into the “IN” socket. Use one more Internet
line cable in the “OUT” socket and plug one other end to the
modem input socket.
4. Plug in Equipment
• Plug your equipment to Battery Backup Outlets on the rear panel
of the UPS.
NOTE: Make sure that the UPS is powered on to protect all
important devices from data loss during power failure.
CAUTION: NEVER connect a laser printer or scanner to the
battery backup outlets of UPS. The equipment may draw
significantly power to overload the UPS.
5. Connect Com. Port and Install Software(only
for the model with USB com. port)
• Connect one end of the USB cable to PC and the other to the
USB port at the rear of the UPS.
Product Overview
Operation & Function
Operation:
1. Turn On the UPS
To turn on the UPS unit, press the power switch lightly. Then, the
LED will light up.
2. Turn Off the UPS
To turn off the UPS unit, press the power switch again. Then, the
LED will go off.
3. Cold Start Function
When the UPS is off and there is no power utility, it's still possible to
cold start the UPS unit to power the loads.
LED Indicator:
●LED on ○ LED Off ★ LED flashing
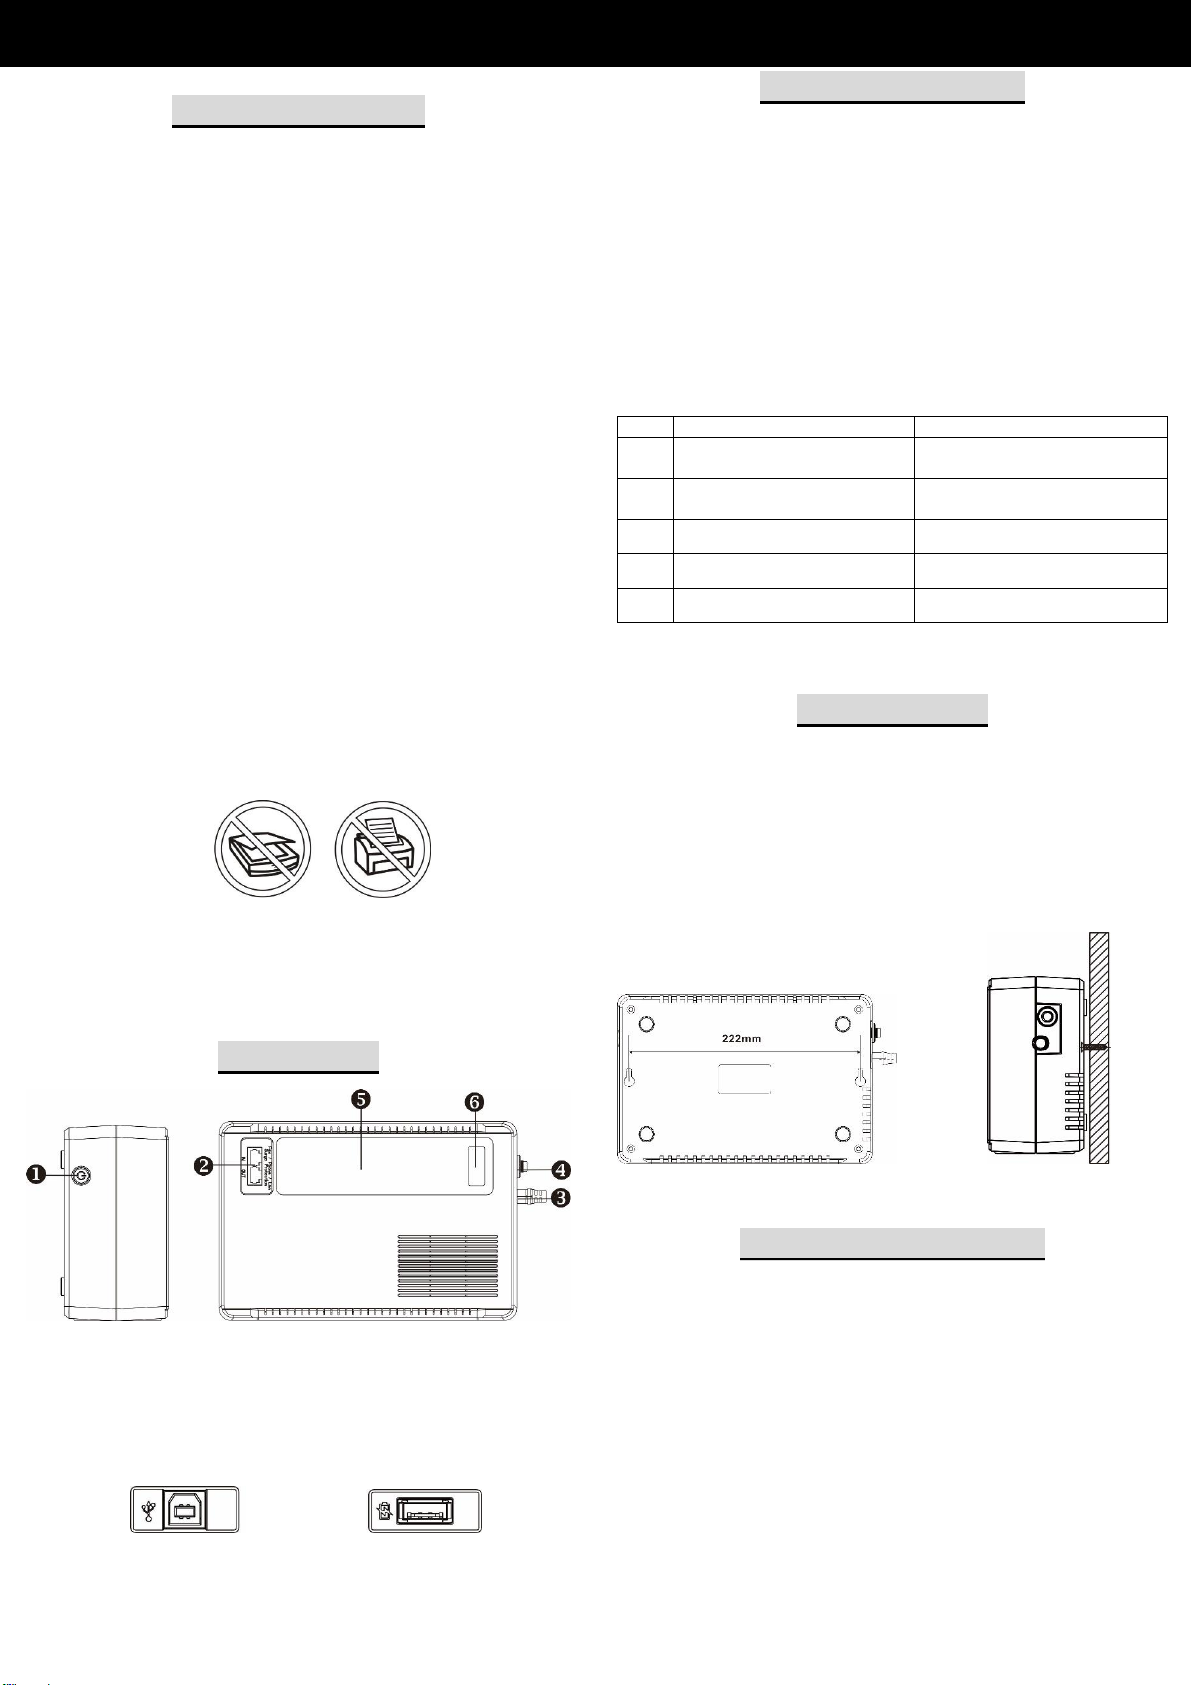
MOUNTING UPS
The unit can be mounted to a wall surface.
1. Use a ruler to draw a straight line in 222 mm
horizontally on the wall. (see chart 1)
2. Use a sharp nail to puncture the center of the two
ends to mark the wall.
3. Mount the unit by positioning the key-hole slots
over the mounting nails. (see chart 2)
1: Power switch with status indicator
2: Modem/Phone line/Network surge protection
3: AC input
4: Circuit breaker
5: Battery backup outlets (Schuko*3~4, Universal*3, UK*3, NEMA*4~5)
6: Options* USB com. port / USB charger
*This option is not available for the selection of 4 x schuko
Chart 1 Chart 2
Placement & Storage
Placement:
Install the UPS in a protected area that is free of excessive dust
and has adequate air flow. Place the UPS away from other units at least
20 cm to avoid interference. For best performance, keep the indoor
temperature between 0° C and 40° C.
Storage:
All connected equipment should be turned off, then disconnect from
the UPS to avoid battery drain. Unplug the UPS from the wall outlet.
Then turn off the UPS for storage. Store the UPS unit covered and
upright in environments where the ambient temperature is -20° C to 50°
C with its battery fully charged.
Page 2
Problem
Possible Cause
Solutions
LED not lit.
The UPS is not
on.
Press the power switch again to
turn on the UPS.
Battery voltage
is too low.
Charge the battery at least 6
hours.
Battery fault.
Replace the battery.
The UPS
always on
battery mode.
Power cord
loose.
Re-plug the power cord.
The UPS
continuously
beeps.
Please check
the fault code
for the details.
Please check the fault code for
the details.
Backup time
too short.
Battery voltage
is too low.
Charge the battery at least 6
hours.
Overload.
Remove some unnecessary
loads. Before reconnecting
equipment, please verify that the
load matches the UPS capability
specified in the specs.
Battery defect.
Replace the battery.
Model
400
600
800
Capacity
400VA/
240W
600VA/
360W
800VA/
480W
Input voltage
220/230/240 Vac
Input Voltage
Range
162-290 Vac
Output Voltage
Regulation
± 10%(bat mode)
Transfer Time
Typical 2-6 ms
Waveform
Simulated Sinewave
Battery Type
12V/4.5Ah
12V/5Ah
12V/5Ah
Battery Number
1 1 1
Charging Time
4 hours recover to 90% capacity
Dimension(mm)
245 x 163 x 90
Net Weight (kgs)
3.5
4.0
4.5
Humidity
0-90% RH @ 0-40°C non-condensing)
Noise Level
Less than 40dB
FSP Manual Guide
Line-interactive UPS
ECO 400VA~800VA
Safety caution
This manual contains important instructions that
should be followed during installation and
maintenance of the UPS and batteries.
• This UPS utilizes voltage that may be hazardous. Do not attempt
to disassemble the unit. The unit contains no user replaceable
parts. Only factory service personnel may perform repairs.
• This pluggable type A equipment with battery already installed by
the supplier is operator installable and may be operated by
laymen.
• The mains socket outlet that supplies the UPS shall be installed
near the UPS and shall be easily accessible.
• During the installation of this equipment it should be assured that
the sum of the leakage currents of the UPS and the connected
loads does not exceed 3.5mA.
• Connection to any other type of receptacle other than a two-pole,
three-wire grounded receptacle may result in shock hazard as
well as violate local electrical codes.
• In the event of an emergency, press the "OFF" button and
disconnect the power cord from the AC power supply to properly
disable the UPS.
• Do not allow any liquids or any foreign object to enter the UPS.
• Do not place beverages or any other liquid-containing vessels on
or near the unit.
• This unit intended for installation in a controlled environment
(temperature controlled, indoor area free of conductive
contaminants). Avoid installing the UPS in locations where there
is standing or running water, or excessive humidity.
• Do not plug the UPS input into its own output.
• Do not attach a power strip or surge suppressor to the UPS.
• Do not attach non-computer-related items, such as medical
equipment, life-support equipment, microwave ovens, or vacuum
cleaners to UPS.
• Do not dispose of batteries in a fire as they may explode.
• A battery can present a risk of electrical shock and high short
circuit current. The following precautions should be observed
when working on batteries:
1) Remove watches, rings, or other metal objects from the hands.
2) Use tools with insulated handles.
3) Wear rubber gloves and boots.
4) Do not lay tools or metal parts on top of batteries.
5) Disconnect charging source prior to connecting or
disconnecting batteries terminal.
6) Remove battery grounds during installation and maintenance to
reduce likelihood of shock.
• Internal battery voltage is 12VDC.Sealed, lead-acid, 6-cell battery.
• Servicing of batteries should be performed or supervised by
personnel knowledgeable of batteries and the required
precautions. Keep unauthorized personnel away from batteries.
• When replacing batteries, replace with the same number and type
of sealed lead-acid battery.
• Do not open or mutilate the battery or batteries. Release
electrolyte is harmful to the skin and eyes. It may be toxic.
• Attention, hazardous through electric shock. Also with dis-
connection of this unit from the mains, hazardous voltage still may
be accessible through supply from battery. The battery supply
should be therefore disconnected in the plus and minus pole at
the connectors of the battery when maintenance or service work
inside the UPS is necessary.
• To reduce the risk of overheating the UPS, do not cover the UPS'
cooling vents and avoid exposing the unit to direct sunlight or
installing the unit near heat emitting appliances such as space
heater or furnaces.
• Unplug the UPS prior to cleaning and do not use liquid or spray
detergent.
Troubleshooting
If any abnormal situations occur that are not listed above, please
call for service immediately.
Specification
400VA/600VA/800VA
*Specifications are subject to change without notice.
Placement & Storage
Placement:
Install the UPS in a protected area that is free of excessive dust
and has adequate air flow. Place the UPS away from other units at least
20 cm to avoid interference. For best performance, keep the indoor
temperature between 0°C and 40°C.
Storage:
All connected equipment should be turned off, then disconnect from
the UPS to avoid battery drain. Unplug the UPS from the wall outlet.
Then turn off the UPS for storage. Store the UPS unit covered and
upright in environments where the ambient temperature is -20°C to 50°C
with its battery fully charged.
Page 3
LED
Poplach
Stav UPS
●
Vypnuto
Síť je normální a UPS je
provozována normálně.
★
Zní každých 10 sekund
Došlo k výpadku napájení a
UPS je v režimu baterie.
★
Zní každou sekundu
Slabá baterie
○
Vypnuto
UPS je vypnutý.
●
Neustále znít
Chyba UPS
Pohotovostní UPS
ECO 400VA~800VA
FSP Manual Guide
Instalace a provoz
1. Kontrola
Uvnitř balení jsou následující položky:
●Jednotka UPS & Návod k použití
• Vyjměte jednotku UPS z obalu a zkontrolujte, zda během
doručování nedošlo k poškození. Zjistíte -li poškození, jednotku
znovu zabalte a vraťte v místě zakoupení.
2. Připojení k elektrické zásuvce
• Připojte síťový napájecí kabel k elektrické zásuvce. Poté začne
jednotka UPS nabíjet vnitřní akumulátor. Pro dosažení
optimálního výsledku nechte akumulátor před prvním použitím
nabíjet 6 hodin.
3. Připojte modem / telefonní linku / síť (pouze u
modelu s portem RJ 11/45)
• Tato jednotka UPS chrání telefon, modem nebo faxový přístroj s
jednou linkou (1 vstup / 1 výstup) před přepětím při připojení přes
UPS. Připojte internetovou linku do zásuvky „IN“. Do zásuvky
„OUT“ použijte ještě jeden kabel pro připojení k síti Internet a
druhý konec zapojte do vstupní zásuvky modemu.
4. Připojení vybavení
• Připojte zařízení k zásuvkám pro zálohování baterií na zadním
panelu UPS.
POZNÁ MKA: Ujistěte se, že je UPS zapnutá, aby byla chráněna
všechna důležitá zařízení před ztrátou dat při výpadku napájení.
UPOZORNĚNÍ: V ŽÁDNÉM PŘÍPADĚ nepřipojujte laserovou
tiskárnu nebo skener k zásuvkám záložního napájení z
akumulátoru jednotky UPS. Toto vybavení může odebírat značný
výkon a přetížit jednotku UPS.
5. Připojte Com. Port a Install Software (pouze
pro model s USB portem)
• Připojte jeden konec USB kabelu k PC a druhý do USB portu na
zadní straně UPS.
Zadní panel
Provozní zobrazení
Provozní:
1. Zapněte UPS
Jednotku UPS zapnete lehkým stisknutím vypínače. Poté se
rozsvítí LED.
2. Vypněte UPS
Chcete-li jednotku UPS vypnout, znovu stiskněte vypínač. Potom
LED dioda zhasne.
3. Funkce studeného startu
Když je UPS vypnutý a není k dispozici žádný napájecí zdroj, je
stále možné studený start jednotky UPS pro napájení zátěží.
Kontrolka LED:
●LED on ○ LED Off ★ LED bliká
MONTÁŽ UPS
Jednotku lze namontovat na povrch stěny.
1. Pomocí pravítka nakreslete rovnou čáru ve 222
mm vodorovně na stěnu. (viz graf 1)
2. Použijte ostrý hřebík k propíchnutí středu obou
konců, abyste označili stěnu.
3. Namontujte jednotku tak, že umístíte drážky na
klíč na montážní hřebíky. (viz graf 2)
1: Vypínač napájení se stavovým indikátorem
2: Modem / Telefonní linka / Přepěťová ochrana sítě
3: Vstup AC
4: Jistič
5: Zásuvky pro zálohování baterie (Schuko*3~4, Universal*3, UK*3,
NEMA*4~5)
6: Možnosti * USB com. port / USB
charger
* Tato volba není k dispozici pro výběr 4 x schuko
Chart 1 Chart 2
Umístění a skladování
Umístěn:
UPS instalujte do chráněného prostoru bez nadměrného prachu a
dostatečného proudění vzduchu. Umístěte UPS mimo dosah dalších 20
cm, aby nedošlo k rušení. Pro dosažení nejlepšího výkonu udržujte
vnitřní teplotu mezi 0 ° C a 40 ° C.
Úložný prostor:
Všechna připojená zařízení by měla být vypnuta, poté odpojte od UPS,
aby nedošlo k vybití baterie. Odpojte napájecí kabel ze zásuvky. Poté
UPS vypněte pro uložení. Udržujte jednotku UPS zakrytou a vzpřímenou
v prostředích, kde je okolní teplota -20 ° C až 50 ° C s plně nabitou
baterií.
Page 4

Problém
Možná příčina
Řešení
Na panelu se
nic
nezobrazuje.
Jednotka UPS
není zapnutá.
Zapněte jednotku UPS dalším
stisknutím vypínače.
Příliš nízké
napětí
akumulátoru.
Nechte akumulátor nabíjet
alespoň 6 hodin.
Závada
akumulátoru.
Vyměňte akumulátor.
Jednotka UPS
je neustále v
režimu
napájení z
akumulátoru.
Uvolněný
napájecí kabel.
Znovu připojte napájecí kabel.
Zní
nepřerušovaný
zvukový alarm
jednotky UPS.
Zjistěte
podrobnosti
podle kódu
závady.
Zjistěte podrobnosti podle kódu
závady.
Příliš krátká
doba zálohy.
Příliš nízké
napětí
akumulátoru.
Nechte akumulátor nabíjet
alespoň 6 hodin.
Přetížení.
Odpojte nepotřebné zátěže. Před
znovupřipojením vybavení
ověřte, zda zátěž odpovídá
možnostem jednotky UPS
uvedeným v technických údajích.
Poškození
akumulátoru.
Vyměňte akumulátor.
MODEL
400
600
800
KAPACITA
400VA/
240W
600VA/
360W
800VA/
480W
Vstupní napětí
220/230/240 Vstř.
Rozsah vstupního
napětí
140-290 Vstř.
Regulace
výstupního napětí
± 10%(režim akumulátoru)
Čas přenosu
Typicky 2 - 6 ms
Křivka
Simulovaná sinusová vlna
Typ akumulátoru
12V/4.5Ah
12V/5Ah
12V/5Ah
Počet akumulátorů
1 1 1
Doba nabíjení
4 hodin pro obnovu na 90% kapacitu
Rozměry (mm)
245 x 163 x 90
Čistá hmotnost(kg)
3.5
4.0
4.5
Vlhkost
0-90%RH při 0 - 40°C bez kondenzace)
Hlučnost
Méně než 40 dB
FSP Manual Guide
Pohotovostní UPS
ECO 400VA~800VA
Bezpečnostní opatrnost
Tato příručka obsahuje důležité pokyny, které je třeba
dodržovat při instalaci a údržbě UPS a baterií.
• Tato jednotka UPS pracuje s napětím, které může být
nebezpečné. Nepokoušejte se tuto jednotku rozebírat. Tato
jednotka neobsahuje žádné součásti, které by si mohl uživatel
vyměnit vlastními silami. Opravy smí provádět pouze tovární
servisní pracovníci.
• Toto připojitelné vybavení typu A s nainstalovaným akumulátorem
od dodavatele si může nainstalovat operátor a může jej používat
laik.
• Zásuvka hlavního napájení, která napájí tuto jednotku UPS, musí
být nainstalována v blízkosti jednotky UPS a musí být snadno
přístupná.
• Během instalace tohoto vybavení je třeba zajistit, aby součet
únikových proudů jednotky UPS a součet připojených zátěží
nepřekročil 3,5 mA.
• Připojení k jinému typu zásuvky, než ke dvoupólové, třívodičové,
uzemněné zásuvce může způsobit úraz elektrickým proudem a
také porušovat místní elektroinstalační vyhlášky.
• V případě nouze stiskněte tlačítko „OFF“ a odpojte napájecí kabel
od zdroje střídavého napájení, aby byla jednotka UPS řádně
deaktivována.
• Zabraňte vniknutí tekutin nebo jiných cizích látek do jednotky
UPS.
• Na jednotku ani do její blízkosti neumísťujte nápoje ani jiné
nádoby obsahující tekutiny.
• Tato jednotka je určena pro instalaci v řízeném prostředí (řízená
teplota, vnitřní prostor bez přítomnosti vodivého znečištění).
Jednotku UPS neinstalujte na místa se stojící nebo proudící
vodou nebo s nadměrnou vlhkostí.
• Nepřipojujte vstup jednotky UPS k jejímu vlastnímu výstupu.
• K jednotce UPS nepřipojujte napájecí lištu ani př epěťovou
ochranu.
• K jednotce UPS nepřipojujte nepočítačové spotřebiče, například
zdravotnické vybavení, vybavení pro podporu životních funkcí,
mikrovlnné trouby nebo vysavače.
• Akumulátory nepalte, protože mohou vybuchnout.
• Akumulátor může představovat nebezpečí úrazu elektrickým
proudem a vysokého zkratového proudu. Při práci na
akumulátorech je nutno dodržovat následující zásady:
1) Sejměte z rukou hodinky, prsteny nebo jiné kovové předměty.
2) Používejte nářadí, které má izolované rukojeti.
3) Noste gumové rukavice a vysoké boty.
4) Nepokládejte nářadí nebo kovové díly na horní stranu
akumulátorů.
5) Před připojením nebo odpojením pólu akumulátoru odpojte
zdroj nabíjení.
6) Při instalaci a údržbě odstraňte baterie, aby se snížila
pravděpodobnost úrazu elektrickým proudem.
• Napětí vnitřního akumulátoru je 12 V. Uzavřený, olověný,
6článkový akumulátor.
• Servisování akumulátorů smí provádět nebo dohlížet osoby, které
jsou obeznámeny s akumulátory a požadovanými zásadami.
Udržujte neautorizované osoby mimo dosah akumulátorů.
• Při výměně uzavřeného olověného akumulátoru použijte stejný
počet a typ.
• Akumulátor nebo akumulátory neotevírejte ani nepoškozujte.
Uvolněný elektrolyt poškozuje kůži a oči. Může být jedovatý.
• Před čištěním jednotku UPS odpojte a nepoužívejte žádné tekuté
čistidlo ani čistidlo ve spreji.
• Upozornění – nebezpečí úrazu elektrickým proudem. I po
odpojení této jednotky od hlavního napájení může být
nebezpečné napětí stále přístupné z akumulátoru. Z tohoto
důvodu je nutné při provádění údržby n ebo servisu uvnitř jednotky
UPS odpojit napájení akumulátoru na kladném a záporném pólu
na konektorech akumulátoru.
• Aby se omezilo riziko přehřívání jednotky UPS, nezakrývejte
chladicí otvory UPS a nevystavujte jednotku přímému slunečnímu
záření ani jednotku neinstalujte v blízkosti spotřebičů vydávajících
teplo, například k topidlům nebo pecím.
Troubleshooting
Pokud se vyskytnou abnormální situace, které nejsou uvedeny
výše, okamžitě kontaktujte servis.
Specification
400VA/600VA/800VA
*Změna technických údajů bez předchozí upozornění vyhrazena.
Page 5

LED
Alarm
USV Status
●
aus
Das Stromnetz ist normal und
die USV wird normal
betrieben.
★
Ertönt alle 10 Sekunden
Ein Stromausfall tritt auf und
die USV befindet sich im
Batteriemodus.
★
Hört sich jede Sekunde an
Niedriger Batteriestatus
○
aus
UPS ist ausgeschaltet.
●
Kontinuierlich klingend
USV-Fehler
Line-interaktive USV
ECO 400VA~800VA
FSP Manual Guide
Installation und Betrieb
1. Inspektion
Die folgenden Artikel sind im Lieferumfang enthalten:
●USV-Gerät & Bedienungsanleitung
• Nehmen Sie die USV aus ihrer Verpackung und prüfen Sie sie auf
mögliche Versandschäden. Falls Sie Schäden bemerken, sollten
Sie das Gerät wieder verpacken und an den.
2. An Netzstrom anschließen
• Verbinden Sie das Netzteil mit dem Netzstrom. Anschließend
beginnt die USV mit der Aufladung des internen Akkus. Für
optimale Ergebnisse laden Sie den Akku vor der ersten
Inbetriebnahme 6 Stunden lang auf.
3. Modem / Telefonleitung / Netzwerk
anschließen (nur für das Modell mit RJ 11/45Anschluss)
• Diese USV schützt ein Telefon, Modem oder Faxgerät mit einer
Leitung (1 Eingang / 1 Ausgang) vor Ü berspannungen, wenn es
über die USV angeschlossen wird. Verbinden Sie die
Internetleitung mit der IN-Buchse. Verwenden Sie ein weiteres
Internetkabel in der Buchse „OUT“ und stecken Sie ein anderes
Ende in die Modem-Eingangsbuchse.
4. Gerät anschließen
• Schließen Sie Ihre Geräte an die Batterie-Backup-Auslässe an
der Rückseite der USV an.
HINWEIS: Stellen Sie sicher, dass die USV eingeschaltet ist, um
alle wichtigen Geräte während eines Stromausfalls vor
Datenverlust zu schützen.
Achtung: Niemals einen Laserdrucker oder Scanner an die
Akkusicherungsanschlüsse der USV anschließen. Das Gerät
könnte zu viel Strom ziehen und die USV überlasten.
5. Verbinden Sie Com. Port and Install Software
(nur für das Modell mit USB-Com-Port)
• Verbinden Sie ein Ende des USB-Kabels mit dem PC und das
andere Ende mit dem USB-Anschluss an der Rückseite der USV.
Rückwand
Bedienung & Funktion
1. Schalten Sie die USV ein
Drücken Sie den Netzschalter leicht, um die USV-Einheit
einzuschalten. Dann leuchtet die LED auf.
2. Schalten Sie die USV aus
Drücken Sie den Netzschalter erneut, um die USV-Einheit
auszuschalten. Dann erlischt die LED.
3. Kaltstartfunktion
Wenn die USV ausgeschaltet ist und vorhanden ist, kann die USVEinheit dennoch kalt gestartet werden, um die Lasten mit Strom zu
versorgen.
LED Anzeige:
●LED on ○ LED aus ★ LED blinkt
USV-MONTAGE
Das Gerät kann an einer Wand montiert werden.
1. Zeichnen Sie mit einem Lineal eine gerade Linie
in 222 mm horizontal an der Wand. (see Grafik 1)
2. Stechen Sie mit einem scharfen Nagel in die Mitte
der beiden Enden, um die Wand zu markieren.
3. Montieren Sie das Gerät, indem Sie die
Schlüssellochschlitze über den
Befestigungsnägeln positionieren. (see Grafik 2)
1: Netzschalter mit Statusanzeige
2: Ü berspannungsschutz für Modem / Telefonleitung / Netzwerk
3: Wechselstromeingang
4: Leistungsschalter
5: Batterie-Backup-Steckdosen (Schuko*3~4, Universal*3, UK*3,
NEMA*4~5)
6: Optionen* USB com. port / USB charger
*Diese Option ist für die Auswahl von 4 x Schuko nicht verfügbar
Grafik 1 Grafik 2
Platzierung & Lagerung
Platzierung:
Installieren Sie die USV in einem geschützten Bereich, der frei von
übermäßigem Staub und mit ausreichendem Luftstrom ist. Stellen Sie
die USV mindestens 20 cm von anderen Geräten entfernt auf, um
Interferenzen zu vermeiden. Halten Sie für eine optimale Leistung die
Innentemperatur zwischen 0 ° C und 40 ° C.
Lager:
Alle angeschlossenen Geräte sollten ausgeschaltet und dann von
der USV getrennt werden, um eine Batterieentladung zu vermeiden.
Trennen Sie die USV von der Steckdose. Schalten Sie dann die USV zur
Lagerung aus. Lagern Sie die USV-Einheit abgedeckt und aufrecht in
Umgebungen mit einer Umgebungstemperatur von -20 ° C bis 50 ° C, in
denen der Akku voll aufgeladen ist.
Page 6

Problem
Mögliche
Ursache
Lösungen
Es wird nichts
am Bildschirm
angezeigt.
Die USV ist
nicht
eingeschaltet.
Drücken Sie zum Einschalten
der USV erneut den Ein/Ausschalter.
Akkuspannung
ist zu gering.
Laden Sie den Akku mindestens
6 Stunden lang auf.
Akkufehler.
Ersetzen Sie den Akku.
Die USV ist
immer im
Akkumodus.
Netzkabel ist
locke
Schließen Sie das Netzkabel
erneut an.
Die USV gibt
kontinuierlich
Signaltöne
aus.
Prüfen Sie den
Fehlercode.
Prüfen Sie den Fehlercode.
Sicherungszeit
ist zu kurz.
Akkuspannung
ist zu gering.
Laden Sie den Akku mindestens
6 Stunden lang auf.
Ü berlastung.
Entfernen Sie einige nicht
benötigte Lasten. Bitte stellen
Sie vor Wiederanschließen der
Geräte sicher, dass die Last mit
der in den technischen Daten
angegebenen USV-Leistung
übereinstimmt.
Modell
400
600
800
Kapazität
400VA/
240W
600VA/
360W
800VA/
480W
Eingangsspannung
220/230/240 V Wechselspannung
Eingangsspannungsbereich
162-290 V Wechselspannung
Ausgangsspannungsregulierung
± 10%(Akkumodus)
Ü bertragungszeit
Typical 2-6 ms, typisch
Wellenform
Simulierte Sinuswelle
Akkutyp
12V/4.5Ah
12V/5Ah
12V/5Ah
Anzahl Akkus
1 1 1
Ladezeit
4 Stunden zur Wiederherstellung
von bis zu 90 % Kapazität
Abmessungen (mm)
245 x 163 x 90
Nettogewicht (kg)
3.5
3.5
3.5
Feuchtigkeit
0 bis 90 % relative Luftfeuchte bei
0 bis 40 °C, nicht kondensierend
Geräuschemission
Weniger als 40 dB
FSP Manual Guide
Line-interaktive USV
ECO 400VA~800VA
Sicherheitshinweis
Dieses Handbuch enthält wichtige Anweisungen, die
bei der Installation und Wartung der USV und der
Batterien zu beachten sind.
• Die USV nutzt Spannung, die gefährlich sein kann. Versuchen Sie
nicht, das Gerät zu demontieren. Das Gerät enthält keine vom
Nutzer austauschbaren Teile. Reparaturen dürfen ausschließlich
von Kundendienstpersonal durchgeführt werden.
• Dieses steckbare Gerät vom Typ A mit bereits vom Hersteller
installiertem Akku kann vom Bediener installiert und von einem
Laien betrieben werden.
• Die Steckdose, die die USV mit Strom versorgt, sollte in der Nähe
der USV installiert und leicht zugänglich sein.
• Während der Installation dieses Gerätes muss sichergestellt sein,
dass die Summe der Leckströme der USV und angeschlossenen
Lasten 3,5 mA nicht überschreitet.
• Wenn das Gerät mit einer anderen als einer zweipolige,
dreiadrigen geerdeten Steckdose verbunden wird, besteht
Stromschlaggefahr. Außerdem könnte dies gegen örtliche
Vorschriften verstoß en.
• Drücken Sie bei einem Notfall die Aus-Taste und ziehen Sie den
Netzstecker aus der Steckdose, um die USV richtig zu
deaktivieren.
• Achten Sie darauf, dass weder Flüssigkeiten noch Fremdkörper in
die USV gelangen.
• Stellen Sie Getränke oder andere Behälter mit Flüssigkeiten nicht
auf oder in die Nähe des Gerätes.
• Dieses Gerät ist für die Installation in einer kontrollierten
Umgebung vorgesehen (temperaturreguliert, Innenbereich, frei
von leitfähigen Verunreinigungen). Installieren Sie die USV nicht
an Orten, an denen Wasser steht oder fließ t oder übermäßige
Feuchtigkeit herrscht.
• Schließen Sie den Eingang der USV nicht an einen ihrer
Ausgänge.
• Schließen Sie weder Mehrfachsteckdosen noch
Ü berspannungsschutzvorrichtungen an die USV ab.
• Schließen Sie keine Nicht-Computer-Geräte, wie Medizingeräte,
lebenserhaltende Maschinen, Mikrowellenöfen oder Staubsauger,
an die USV an.
• Entsorgen Sie Akkus nicht in einem Feuer, da sie explodieren
könnten.
• Ein Akku kann Stromschlaggefahr und hohen Kurzschlussstrom
bedeuten. Daher sollten bei Arbeiten an Akkus folgende
Sicherheitshinweise beachtet werden:
1)Entfernen Sie Uhren, Ringe, und andere metallische
Gegenstände von Ihren Händen.
2)Verwenden Sie Werkzeuge mit isolierten Griffen.
3)Tragen Sie Gummihandschuhe und -stiefel.
4)Legen Sie keine Werkzeuge oder Metallteile auf den Akkus ab.
5)Trennen Sie die Ladequelle, bevor Sie die Akkuklemmen
anschließen oder trennen.
6) Entfernen Sie die Batteriemasse während der Installation und
Wartung, um die Wahrscheinlichkeit eines Stromschlags zu
verringern.
• Die interne Akkuspannung beträgt 12 V Gleichspannung.
Versiegelter Bleiakku mit 6 Zellen.
• Die Wartung von Akkus sollte von einer Person, die mit Akkus und
den erforderlichen Vorsichtsmaß nahmen vertraut ist, durchgeführt
oder beaufsichtigt werden. Halten Sie nicht autorisierte Personen
immer von Akkus fern.
• Ersetzen Sie Akkus immer mit der gleichen Anzahl und dem
gleichen Typ an versiegeltem Bleiakku.
• Ö ffnen und beschädigen Sie Akkus nicht. Auslaufendes Elektrolyt
schadet Haut und Augen. Es könnte giftig sein.
• Achtung, Gefahren durch Stromschläge. Auch wenn dieses Gerät
vom Netzstrom getrennt ist, kann über die Versorgung vom Akku
immer noch gefährliche Spannung zugänglich sein. Die
Akkuversorgung sollte daher am Plus- und Minuspol der
Akkuanschlüsse getrennt werden, wenn Wartungs- oder
Servicearbeiten in der USV erforderlich sind.
• Reduzieren Sie die Gefahr einer Ü berhitzung der USV, indem Sie
die Belüftungsöffnungen der USV nicht abdecken und das Gerät
keinem direkten Sonnenlicht aussetzen. Installieren Sie das Gerät
außerdem nicht in der Nähe von Wärme abstrahlenden Geräten,
wie Heizungen oder Ö fen.
• Ziehen Sie vor der Reinigung den Netzstecker der USV,
verwenden Sie weder Flüssig- noch Sprühreiniger.
Fehlerbehebung
Wenn ungewöhnliche Situationen auftreten, die oben nicht aufgeführt
sind, rufen Sie bitte sofort den Kundendienst an.
Specification
400VA/600VA/800VA
*Specifications are subject to change without notice.
Page 7

LED
Alarme
Statut UPS
●
De
Le secteur est normal et
l'onduleur fonctionne
normalement.
★
Sonnant toutes les 10
secondes
Une panne de courant se
produit et l'onduleur est en
mode batterie.
★
Sonnant chaque seconde
Batterie faible
○
De
UPS est éteint.
●
Sonnant continuellement
Défaut de l'onduleur
Onduleur de secours
ECO 400VA~800VA
FSP Manuel d’utilisation
Installation et fonctionnement
1. Inspection
Les éléments suivants sont à l'intérieur de l'emballage :
●Onduleur & Manuel de l’utilisateur
• Retirez l'onduleur de son emballage et vérifiez la présence de
dommages ayant pu se produire pendant le transport. Si vous
constatez des dommages, remballez l'appareil et retournez-le au
lieu d'achat.
2. Raccordement à l'alimentation secteur
• Raccordez le cordon d'alimentation CA à l'alimentation secteur.
L'onduleur commence alors à charger la batterie interne. Pour les
meilleurs résultats possibles, chargez la batterie pendant 6
heures avant la première utilisation.
3. Connectez modem / réseau (uniquement pour
le modèle avec port RJ 11/45)
• Cet onduleur protège un téléphone, un modem ou un télécopieur
à une seule ligne (1 entrée / 1 sortie) des surtensions lorsqu'il est
connecté à l'onduleur. Branchez la ligne Internet de connexion
dans la prise «IN». Utilisez un autre câble de ligne Internet dans
la prise «OUT» et branchez l’autre extrémité à la prise d’entrée du
modem.
4. Branchement des équipements
• Branchez votre équipement aux prises de batterie de secours
situées sur le panneau arrière de l'onduleur.
REMARQUE: assurez-vous que l'onduleur est sous tension pour
protéger tous les périphériques importants contre la perte de
données en cas de panne de courant.
ATTENTION: NE branchez JAMAIS une imprimante laser ou un
scanner aux prises de secours sur batterie de l'onduleur.
L'équipement peut consommer une puissance considérable
entraînant la surcharge de l'onduleur.
5. Connectez Com. Logiciel de port et
d'installation (uniquement pour le modèle
avec port com. USB)
• Connectez une extrémité du câble USB au PC et l’autre au port
USB situé à l’arrière de l’onduleur.
Aperçu
Opération et Fonction
Opération:
1. Allumez l'onduleur
Appuyez légèrement sur l’interrupteur d’alimentation. Ensuite, la
LED s'allume.
2. Eteignez l'onduleur
Appuyez à nouveau sur l'interrupteur d'alimentation. Ensuite, le
voyant s'éteindra.
3. Fonction de démarrage à froid
Lorsque l'onduleur est éteint et qu'il n'y a pas de service public, il
est toujours possible de démarrer à froid l'onduleur pour alimenter les
charges.
LED Indicator:
●LED on ○ LED Off ★ LED clignotant
MONTAGE UPS
L'unité peut être installée sur une surface murale.
1. Utilisez une règle pour tracer une ligne droite
horizontale au mur de 222 mm. (Chart 1)
2. Utilisez un clou pointu pour percer le centre des
deux extrémités afin de marquer le mur.
3. Montez l'appareil en plaçant les fentes pour trous
de serrure sur les clous de montage. (Chart 2)
1: Interrupteur d'alimentation avec indicateur d'état
2: protection contre les surtensions modem / ligne téléphonique / réseau
3: entrée CA
4: disjoncteur
5: prises de secours pour batteries (Schuko * 3 ~ 4, universelles * 3, UK
* 3, NEMA * 4 ~ 5)
6: Options* USB com. port / USB charger
*Cette option n'est pas disponible pour la sélection de 4 x schuko
Chart 1 Chart 2
Placement et stockage
Placement:
Installez l'onduleur dans une zone protégée, exempte de poussière
et où l'air circule correctement. Éloignez l’onduleur d’au moins 20 cm
des autres unités pour éviter les interférences. Pour de meilleures
performances, maintenez la température intérieure entre 0 ° C et 40 ° C.
Espace de rangement en cas de non-utilisation :
Tous les équipements connectés doivent être éteints, puis
déconnectés de l'onduleur pour éviter de décharger la batterie.
Débranchez l’onduleur de la prise murale. Ensuite, éteignez l'onduleur
pour le stockage. Rangez l’onduleur couvert et droit dans des
environnements où la température ambiante est comprise entre -20 ° C
et 50 ° C avec la batterie complètement chargée.
Page 8

Problème
Cause possible
Solutions
Rien ne
s'affiche à
l'écran.
L'onduleur n'est pas
allumé.
Appuyez à nouveau sur
l'interrupteur d'alimentation
pour allumer l'onduleur.
La tension de la
batterie est trop basse.
Chargez la batterie au
moins 6 heures.
Panne de la batterie.
Remplacez la batterie.
L'onduleur est
toujours en
mode batterie.
Cordon d'alimentation
mal branché.
Rebranchez le cordon
d'alimentation
L'onduleur
émet des bips
en continu.
Veuillez consulter le
code de panne pour
plus de détails.
Veuillez consulter le code
de panne pour plus de
détails.
Temps de
sauvegarde
trop court.
La tension de la
batterie est trop basse.
Chargez la batterie au
moins 6 heures.
Surcharge.
Retirez des charges non
nécessaires. Avant de
rebranchez l'équipement,
veuillez vérifier que la
charge correspond à la
capacité de l'onduleur
indiquée dans les
spécifications.
Défaut de la batterie.
Remplacez la batterie.
MODÈ LE
400
600
800
CAPACITÉ
400VA/
240W
600VA/
360W
800VA/
480W
Tension d'entrée
220/230/240 V CA
Plage de tension
d'entrée
140-290 V CA
Régulation de la
tension de sortie
± 10%(Mode bat.)
Temps de transfert
Typique 2-6 ms
Forme d'onde
Onde sinusoïdale simulée
Type de batterie
12V/4.5Ah
12V/5Ah
12V/5Ah
Nombre de
batteries
1 1 1
Temps de chargement
4 heures pour récupérer 90 % de la capacité
Dimensions (mm)
245 x 163 x 90
Poids net (kg)
3.5
4.0
4.5
Humidité
0-90% HR @ 0-40°C sans condensation)
Niveau de bruit
Moins de 40 dB
FSP Manual d’utilisation
Onduleur de secours
ECO 400VA~800VA
Avertissement de sécurité
Ce manuel contient des instructions importantes à
suivre lors de l'installation et de la maintenance de
l'onduleur et des batteries.
• Cet onduleur utilise une tension qui peut être dangereuse.
N'essayez pas de démonter l'appareil. L'appareil ne contient
aucune pièce pouvant être remplacée par l'utilisateur. Seul le
personnel de service d'usine peut effectuer des réparations.
• Cet équipement enfichable de type A avec batterie déjà installée
par le fournisseur peut être installé par un opérateur et utilisé par
des personnes non initiées.
• La prise secteur qui alimente l'onduleur doit être installée à
proximité de l'onduleur et doit être facilement accessible.
• Pendant l'installation de cet équipement, vous devez vous assurer
que la somme des courants de fuite de l'onduleur et des charges
connectées ne dépasse pas 3,5 mA.
• Un branchement à un autre type de prise qu'une prise de terre à
deux pôles et trois fils peut entraîner un risque de décharge
électrique et enfreindre les réglementations électriques locales.
• En cas d'urgence, appuyez sur le bouton "ARRÊ T" et débranchez
le cordon électrique de l'alimentation CA pour désactiver
correctement l'onduleur.
• Ne laissez pas des liquides ou un objet étranger pénétrer dans
l'onduleur.
• Ne placez pas de boissons ou d'autres récipients contenant un
liquide sur ou à proximité de l'appareil.
• Cet appareil est conçu pour une installation dans un
environnement contrôlé (température contrôlée, espace intérieur
exempt de polluants conducteurs). Évitez d'installer l'onduleur
dans des endroits contenant de l'eau stagnante ou courante ou
une humidité excessive.
• Ne branchez pas l'entrée de l'onduleur à sa propre sortie.
• Ne raccordez pas un bloc multiprise ou un parasurtenseur à
l'onduleur.
• Ne raccordez pas d'appareils non informatiques, tels que des
équipements médicaux, des équipements d'assistance
respiratoire, des fours micro-ondes ou des aspirateurs à
l'onduleur.
• Ne jetez pas les batteries dans un feu car elles peuvent exploser.
• Une batterie peut présenter un risque de décharge électrique et
de courant de court-circuit élevé. Les précautions suivantes
doivent être prises en intervenant sur les batteries :
1)Enlevez les montres, bagues ou autres objets métalliques de
vos mains.
2)Utilisez des outils dotés de manches isolés.
3)Portez des gants et des bottes en caoutchouc.
4)Ne posez pas d'outils ou de pièces métalliques sur les
batteries.
5)Débranchez la source de chargement avant de brancher ou de
débrancher les bornes des batteries.
6) É liminez la masse de la batterie lors de l'installation et de la
maintenance pour réduire les risques d'électrocution.
• La tension de la batterie interne est 12 V CC. Batterie plomb-
acide 6 cellules scellée.
• Débranchez l'onduleur avant de le nettoyer et n'utilisez pas de
détergent liquide ou en vaporisateur.
• L'entretien des batteries doit être effectué ou supervisé par du
personnel connaissant les batteries et les précautions requises.
Maintenez le personnel non autorisé à l'écart des batteries.
• Lors du remplacement des batteries, remplacez-les par le même
nombre et le même type de batteries plomb-acide scellées.
• N'ouvrez pas et n'abîmez pas la ou les batteries. L'électrolyte
libéré est nocif pour la peau et les yeux. Cela peut être toxique.
• Attention, dangereux par décharge électrique. De plus, lorsque
cet appareil est débranché du secteur, une tension dangereuse
peut toujours être présente via l'alimentation provenant de la
batterie. L'alimentation de la batterie doit donc être débranchée
aux pôles + et - aux connecteurs de la batterie lorsque des
travaux de maintenance ou d'entretien à l'intérieur de l'onduleur
sont nécessaires.
• Pour réduire le risque de surchauffe de l'onduleur, ne couvrez pas
les orifices de refroidissement de l'onduleur et évitez d'exposer
l'appareil à la lumière directe du soleil ou d'installer l'appareil à
proximité d'appareils dégageant de la chaleur tels qu'un radiateur
ou un fourneau.
Dépannage
En cas de situations anormales non répertoriées ci-dessus,
contactez immédiatement le service technique.
Specification
400/VA600VA/800VA
*Les spécifications peuvent être modifiées sans préavis.
 Loading...