

Page 1
ELECTRONIC OVEN CONTROL GUIDE
NOTE: The basic timer is externally arranged in different configuration in various appliance models. This does not change
the way it operates.
NOTE: Some models have a touch pad control. To activate it, you just have to touch the pad with a finger. Take care to
have a good contact between the finger and the touch pad. Long nails can make the activation difficult. It is a good idea to
clean the control panel after each use or as soon as possible after a spill, boil over or spatter because some ionic or salty
ingredients as ketchup, tomatoes sauce, etc.., can operate the control. Before cleaning the control panel it is
recommended to turn on the control lockout feature.
Control Pad Functions
READTHE INSTRUCTIONS CAREFULLY BEFORE USING THE OVEN. For satisfactory use of youroven, become familiar
with the various functions of the oven as described below.
I Note: The time of day must first be set in order to the oven. I
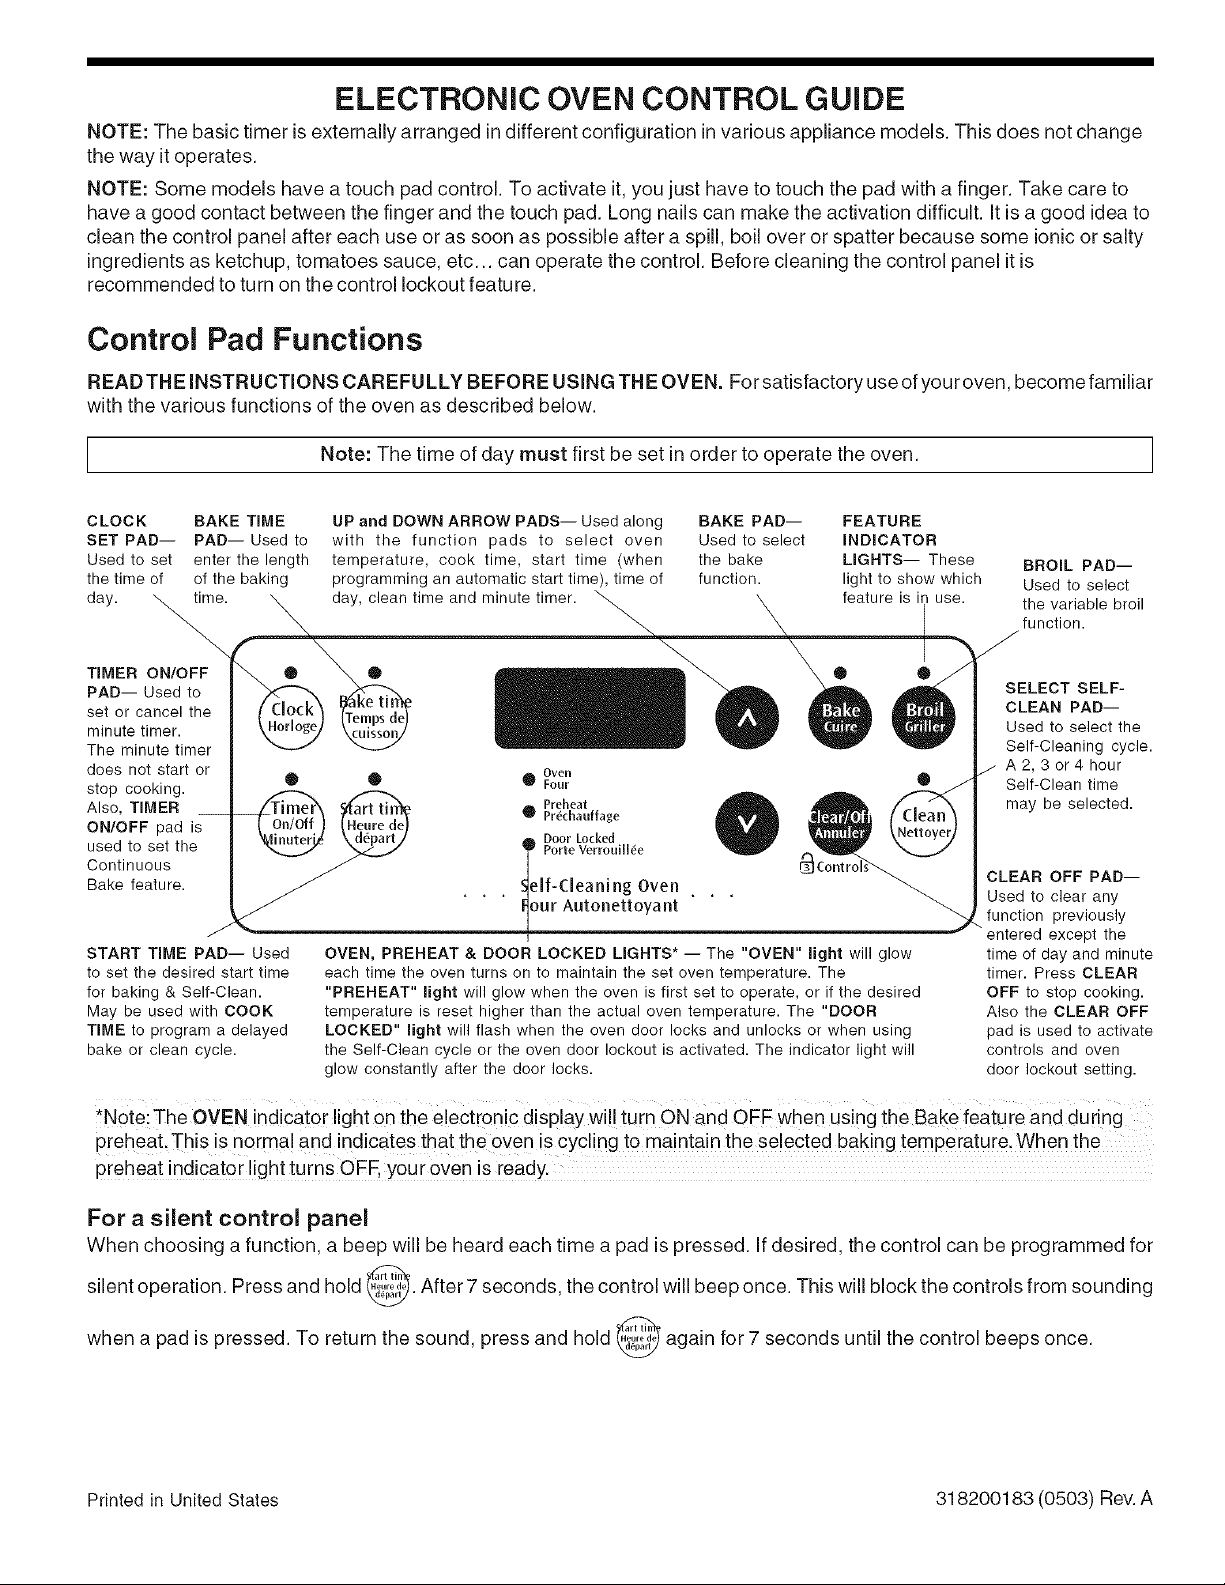
CLOCK SAKE TIME UP and DOWN ARROW PADS-- Used along BAKE PAD-- FEATURE
SET PAD-- PAD--Used to with the function pads to select oven Used to select INDICATOR
Used to set enter the length temperature, cook time, start time (when the bake LIGHTS-- These BROIL PAD--
the time of of the baking programming an automatic start time), time of function, light to show which Used to select
day. time. day, clean time and minute timer, feature is in use. the variable broil
TIMER ON/OFF
PAD-- Used to
set or cancel the
minute timer.
The minute timer
does not start or
stop cooking.
Also, TIMER
ON/OFF pad is
used to set the
Continuous
Bake feature.
START TIME PAD-- Used
to set the desired start time
for baking & Self-Clean.
May be used with COOK
TIME to program a delayed
bake or clean cycle.
® ® ® ®
Oven
0 Four
Preheat
Pr_chauffage
Door Locked
PorteVerrouill_e
eif-(:leaning Oven
our Autonettoyant
OVEN, PREHEAT & DOOR LOCKED LIGHTS* -- The "OVEN" light will glow
each time the oven turns on to maintain the set oven temperature. The
"PREHEAT" light will glow when the oven is first set to operate, or if the desired
temperature is reset higher than the actual oven temperature. The "DOOR
LOCKED" light will flash when the oven door locks and unlocks or when using
the Self-Clean cycle or the oven door lockout is activated. The indicator light will
glow constantly after the door locks.
operate
function.
SELECT SELF-
CLEAN PAD--
Used to select the
Self-Cleaning cycle.
A2,3or4hour
Self-Clean time
may be selected.
CLEAR OFF PAD--
Used to clear any
function previously
entered except the
time of day and minute
timer. Press CLEAR
OFF to stop cooking.
Also the CLEAR OFF
pad is used to activate
controls and oven
door lockout setting.
I
*Note:The OVEN indicator light on the electrenic display wi!! turn ON and OFF when using the Bake feature and during
preheat This is norma! and indicates that the oven is cycling t0 maintain the selected baking temperature, When the
preheat indicator light turns OFF, your oven is ready.
For a silent control panel
When choosing a function, a beep will be heard each time a pad is pressed, ifdesired, the control can be programmed for
silent operation. Press and hold _i_. After 7 seconds, the control will beep once. This will block the controls from
when a pad is pressed. To return the sound, press and hold I_ again for 7 seconds until the control
v
beeps
Printed in United States 318200183 (0503) Rev. A
sounding
once.
Page 2
Setting Oven Controls
Note: The time of day must first be set in order to operate the 0venl
To Set the Clock
When the range is first plugged in,or when the power supply to the range has been interrupted, the display will flash "t 2:00".
t. Press _ once (do not hold pad down).
2. Within 5 seconds, press and hold the 4 tuntil the correct time of day appears inthe display.
Note: The clock cannot be changed during any timed bake or Self-Clean cycle.
To Set the MinuteTimer:
1. Press _.
2. Press the O to increase the time inone minute increments. Press and hold the to increase the time in 10 minute
increments. The timer can be set for any amount of time from 1 minute to 11 hours and 59 minutes.
Note: If the O pad is pressed first, the timer will advance to 11 hours and 59 minutes.
3. The display shows the timer countdown in minutes until 1minute remains. Then the display will countdown in seconds.
4. When the set time has run out, the timer will beep 3 times. It will then continue to beep 3 times every 60 seconds until
is pressed.
Note: The indicator light located above the _ pad will glow while the minute timer is active.
Note: The minute timer does not start or stop cooking. It serves as an extra timer in the kitchen that will beep when the set
time has run out. The minute timer can be used alone or during any of the other oven functions. When the minute timer is in
use with any other function, the minute timer will be shown in the display. To view other functions, press the pad for that
function.
To Change the Minute Timer while it is in use:
While the timer is active and shows in the display, press and hold the or O to increase or decrease the time.
To Cancel the Minute Timer before the set time has run out: Press _.
NOte: To turn the time Of day display OFFer ONin the display piess _ and hold f0r i 5 seconds (the C0nti0! will beep
once) and then release, This feature does not remove the set time of day from the memory of the contro!. When the display
is turned OFF the time 0f day will reappear for a few secondS a_Y time the@ pad is touched.
Temperature conversion
The electronic oven control is setto operate in°F (Fahrenheit) when shipped from the factory. The oven can be programmed
for any temperature from 170°F to 550°F (77°C to 287°C).
To change the temperature to °C (Celsius) or from °C to °F (control should not be in a Bake or Clean mode):
t. Press, _." " appears inthe display.
Press and hold the A until "Hi" appears inthe2.
3. Press and hold , until °F or °C appears in the display.
A
4. Press the orU to change °F to °C or °C to
5. Press any control pad to return to normal operating mode.
display.
°F.
Page 3
Setting Oven Controls (cont'd)
To Set or Change the Temperature for Baking
The oven can be programmed to bake at any temperature from 170°F to 550°F (77°C to 287°C).
To Set the Controls for Baking:
1. Press ..... appears in the display.
2.
Within 5seconds, press the ).The display will show "350°F (177°C)." By pressing and holding the
the temperature can then be adjusted in 5°F increments (1°C).
3.
As
soon as the1 } pad is released, the oven will begin heating to the selected temperature. When the displayed
temperature reaches the desired baking temperature, the preheat indicator light will turn OFF and the control will beep 3
times.
4. To cancel baking, press,
To Change the Oven Temperature after Baking has Started:
1. Press _ and make sure the bake temperature is
2. Press the
) pad to increase or decrease the set temperature.
displayed.
To Set Control for Continuous Bake or 12 Hour Energy Saving
The oven control has a built-in 12 Hour Energy Saving feature that will shut off the oven if the control is left on for more than
11 hours and 59 minutes. The oven can be programmed to override this feature for continuous baking.
To set control for continuous baking:
1. Press and hold _ii!i_ down for 5 seconds until tone is heard, "---- hr" will appear in display for continuous
cooking.
The current time of day will return to the display.
2. TocanceltheContinuous Bakefunction, press_!!_!_and hold for5secondsuntiltoneisheard. "12hr" will appear in display
indicating that the control has returned to the 12 Hour Energy Saving feature.
To Set Control for Controls lockout
The control can be programmed to lock the oven control pads and the oven door.
To set the Lockout feature:
1. Press _ and hold for 3 seconds. "Loc" will appear indisplay, the "Door Locked" indicator light will flash and the motor
driven door lock will begin to close automatically. DO NOT open oven door while the indicatorlight isflashing. Allow about
15 seconds for the oven door to lock. Once the oven door is locked, the current time of day will appear in the display.
2. Tocancelthe L_ck_utfeature_press0andh_ldf_r3sec_nds.Thec_ntr__willunl_ckthe_vend__randresumen_rma_
operation.
Note: If anYeontroi pad is pressed while in the over= LoCkout mode, "Loc!, will appear inthe displayu ntilthe control
pad is released.
Page 4
Setting Oven Controls (cont'd)
To Set the Timed Bake and Delay Start Features
The _,,,_,',_BAKE TiME and _i;_ START TiME pads operate the features that will turn the oven ON and OFF at the times
you select inadvance. The oven can be programmed to start immediately and shut off automatically (Timed Bake) orto begin
baking at a later time with a delayed start time (Delay Start).
Note: During Timed Bake the preheat indicator light will nOtfunctionl
To Program the Oven to Begin Baking Immediately and To Shut Off Automatically (Timed Bake):
1. Be sure that the clock shows the correct time of day.
2. Place the food in the oven.
3.
Press ..... appears in the display.
4.
Within 5 the_
seconds, press the, or O' The display will show "350°F (177°C). '' By holding
temperature can then be adjusted in 5°F increments (1°C ).
_,i,% "o:oo"
5.
6.
7.
[Temps de
Press _!_. will flash in the display (HR:MIN).
Press the until the desired baking time appears in the display.
The oven will turn ON and begin heating.
To Program Oven for a Delayed Start Time and to Shut-Off Automatically (Delayed Start Bake):
1. Be sure that the clock shows the correct time of day.
2. Place the food in the oven.
or the
3. Press ..... appears in the display.
4. Within 5 seconds, press the, or 0' The display will show "350°F (177°C). '' By holding the_ or
the
temperature can then be adjusted in 5°F increments (1°C).
5. Press ,o,,,,,,,_. will flash in the display (HR:MIN).
keti, "0:00"
6. Press the or until the desired baking time appears.
7.
Press _. The earliest possible start time will appear in the
display.
8. Press the until the desired start time appears in the display.
9. Once the controls are set, the control calculates the time when baking will stop in order to start at the time you have set.
10. The oven will turn ON at the delayed start time and begin heating.
When the Set Bake Time Runs Out:
1. "END" will appear in the display window and the oven will shut-off automatically.
2. The control will beep 3 times every 60 seconds until is pressed.
To Change the Oven Temperature or Bake Time after Baking has Started:
1. Press the function pad you want to change.
2. Press the
,to adjust the setting.
Use caution with the Timed Bake and Delayed Start features. Foods that can easily spoil such as milk, eggs,
fish, meat or poultry, should be chilled in the refrigerator first. Even when chilled, they should not stand in the oven for more
than 1 hour before cooking begins, and should be removed promptly when cooking is completed.
Page 5
Setting Oven Controls (cont'd)
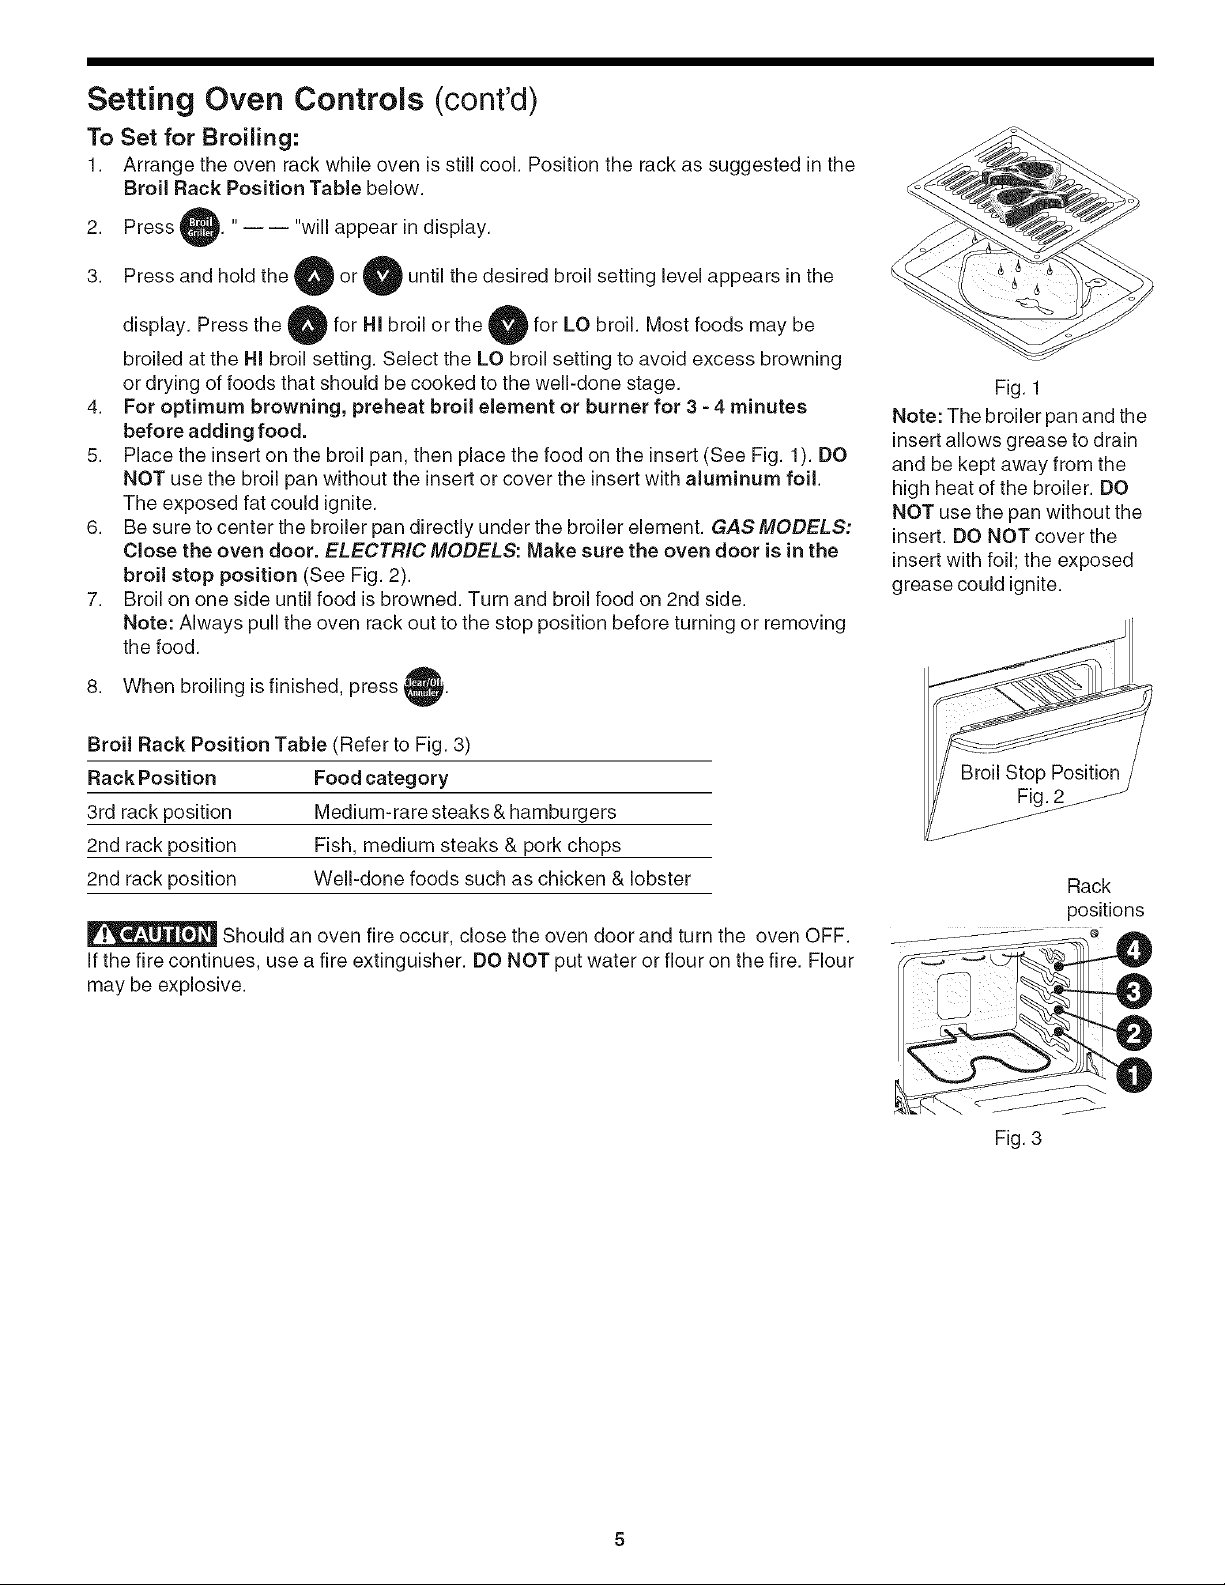
To Set for Broiling:
1. Arrange the oven rack while oven isstill cool. Position the rack as suggested in the
Broil Rack Position Table below.
2. Press "---- "will appear in display.
3. Press and holdthe_
display.
Press the for HI broil or the U for LO broil. Most foods may be
puntil the desired broil setting level appears in the
A
broiled at the Hi broil setting. Select the LO broil setting to avoid excess browning
or drying of foods that should be cooked to the well-done stage.
4.
For optimum browning, preheat broil element or burner for 3 - 4 minutes
before adding food.
5.
Place the insert on the broil pan, then place the food on the insert (See Fig. 1). DO
NOT use the broil pan without the insert or cover the insert with aluminum foil.
The exposed fat could ignite.
6.
Be sure to center the broiler pan directly under the broiler element. GAS MODELS:
Close the oven door. ELECTRIC MODELS: Make sure the oven door is in the
broil stop position (See Fig. 2).
7.
Broil on one side until food is browned. Turn and broil food on 2nd side.
Note: Always pull the oven rack out to the stop position before turning or removing
the food.
8. When broiling is finished, press i
Broil Rack Position Table (Refer to Fig. 3)
Rack Position Food category
3rd rack position Medium-rare steaks & hamburgers
2nd rack position Fish, medium steaks & pork chops
2nd rack position Well-done foods such as chicken & lobster
Should an oven fire occur, close the oven door and turn the oven OFF.
If the fire continues, use a fire extinguisher. DO NOT put water or flour on the fire. Flour
may be explosive.
Fig. 1
Note: The broiler pan and the
insert allows grease to drain
and be kept away from the
high heat of the broiler. DO
NOT use the pan without the
insert. DO NOT cover the
insert with foil; the exposed
grease could ignite.
Rack
positions
Fig. 3
Page 6

Self=Cleaning
Self-Clean Time Length
For satisfactory results, use a 2 hour Self-Cban cycle for light soils and a 3hour cycle for average ora 4 hourcycb for heavy
soils. NOTE: The kitchen area should be well ventilated using an open window, ventilation fan or exhaust hood during the
Self-Cban cycle. This will help eliminate the normal odors associated with the Self-Cban cycle.
To Set the Controls for a Self-Clean Cycle or a Delayed Start Self=Clean Cycle:
(Note: if you do not want to start a Delayed Self-Cban Cycle, skips steps 2 & 3.)
1. Be sure the clock shows the correct time of day.
2.
Press _. The " : " in the time of day will flash.
3. Press and hold the ) pad to scroll to the time to start the delayed Self-Cban cycle. Release the pad when the desired
time is displayed.
4.
Press _. " "appears in the
5. Press the or 0 once. "3:00" appears in the display for a 3 hour cycle. To change to a 2 hour
"2:00" appears in the display or to select a 4 hour cycle press "4:00" appears inthe display.
As soon as the controls are set, the motor driven lock will begin to close automatically and the "DOOR LOCK" indicator
light will flash. DO NOT open the oven door while the light is flashing (ittakes about 15 seconds for the oven door to lock).
6. "CLn" will appear inthe display during the Self-Clean cycle and the "DOOR LOCK" light will glow until the Self-Cleaning
cycle iscomplete or cancelled and the oven temperature has cooled.
When the Self=Clean Cycle is Completed:
1. The time of day or "End" will appear inthe display window and the "Clean" and "DOOR LOCK" light will continue to glow.
2. Oncetheovenhascooleddownforaboutl HOURandthe"DOORLOCK"lighthasgoneout, theovendoorcanbeopened.
3. if "End" isin the display and the Select Clean indicator light remains ON, press i The time of day will appear inthe
display.
NOTE: When the oven iscool, wipe away any residue or powdered ash with a damp cloth or paper towel.
display.
cycle
press
Stopping or Interrupting a Self-Cleaning Cycle
if it becomes necessary to stop or interrupt a Self-Cleaning cycle:
1. Press, }.
2. Once the oven has cooled down for about 1 HOUR and the "DOOR LOCK" light has gone out, the oven door can be
opened.
3. Restart the Self-Clean cycle once all conditions have been corrected.
_To avoid possible burns use care when opening the oven door after the Self-Cleaning cycle. Stand tothe side
of the oven when opening the door to allow hot air or steam to escape.
DO NOT force the oven door open. This can damage the automatic door locking system. Usecaution and avoid
possible burns when opening the door after the Self-Cleaning cycle has completed. The oven may still be VERY HOT.
Page 7
Adjusting the Oven Temperature
Your oven control has been precisely set at the factory. This setting may differ from your previous oven however, so your
recipe times may not give you the results you expect. If you think that the oven is cooking too hot or too cool for your recipe
times, you can adjust the control so that the oven cooks hotter or cooler than the temperature displayed.
To Adjust Oven Temperature:
1. Press
2.
Set the temperature to 550°F (287°C) by pressing and holding the
3.
Within 2 seconds, press and hold 4 until the 2 digit display appears. Release The display now indicates the
amount of degrees offset between the original factory temperature setting and the cutrent temperature setting. If the oven
control has the original factory calibration, the display will read "0."
4.
The
temperature can now be adjusted up or down 35°F or 19°C, in 5°F or 1°C steps by pressing and holding the a or
Adjust until the desired amount of offset appears in the display. When lowering the oven temperature, a minus sign
(-) will appear before the number to indicate that the oven will be cooler by the displayed amount of degrees.
When you have made the desired adjustment, press to go back to the time of day display.
Note: Oven temperature adjustments made will not change the Self-Cleaning feature temperature.
Page 8

Notes
Page 9

GUIDE DE LA COMMANDE I LECTRONIQUE DU FOUR
NOTE: L'apparence ext6rieure de la minuterie peut avoir une configuration differente pour divers modeles d'appareils,
Ceci ne change pas son fonctionnement,
NOTE: Certains mod&qes ont un panneau de contr61e & touche, Pour I'activer, vous n'avez qu'& appuyer sur une touche
avec un doigt, Assurez=vous d'avoir un bon contact entre le doigt et la touche, Les longs ongles peuvent rendre
I'activation difficile, C'est une bonne idee de nettoyer le panneau de commande aprSs chaque utilisation ou aussit6t que
possible apr6s des eclaboussures, Avant de nettoyer le panneau de commande il est recommande d'activer la fonction
verrouillage de la commande du four,
Fonctions des touches de la commande du four
LISEZ SOIGNEUSEMENT LES INSTRUCTIONS AVANT D'UTILISER LE FOUR. Pour bien utiliser votre four, habituez-
vous aux differentes fonctions du four decrites ci-dessous.
I Note: L'horloge doit d'abord 8tre mise b.I'heure afin de faire fonctionner le four. I
HORLOGE--
Sert & r_gler
I'heure.
MINUTERIE ON/
OFF-- Sert a mettre
en marche ou &
annuler la minuterie.
La minuterie ne fait
pas d6marrer ni
arr_ter la cuisson.
Aussi, la touche
MINUTERIE ON/
OFFsert & r6gler la
fonction cuisson
continue.
TEMPS DE
CUISSON-- Sert &
entrer la dur_e du
temps de cuisson.
®
®
Fl_ches ascendante et descendante-
S_lectionne la temperature du four, le temps de
cuisson, d_part differ6 (Iors de la programmation
d'un arr_t automatique), I'heure, la dur_e du
nettoyage et la minuterie.
Oven
O Four
Preheat
Pr6chauffage
Door Locked
Porte Verrouill6e
. . 4f-Cleaning Oven
our Autonettoyant
CUIRE- S_lectionne
la temperature du
mode de cuisson
normale.
®
TISMOINS LUMINEUX
DE FONCTION- Indique
quel mode est en
fonction.
GRILLER-
cuisson au gril.
NETTOYER- Sert
& selectionner le
®
cycle
Vous pouvez
s61ectionner un
autonettoyage
d'une dur6e de 2,
3 ou 4 heures.
la
HEURE DE DtSPART- Utilis6
pour r_gler le temps d_sir6 de
d_but de cuisson ou de d_but de
nettoyage. Peut _tre utilis_ avec
TEMPS DE CUISSON pour
programmer une cuisson
diff_r6e ou un nettoyage diff_re.
TI_MOINS LUMINEUX FOUR, PRECHAUFFAGE ET PORTE
VERROUILLI_E - Le voyant lumineux "Four" s'allume chaque fois que le
four est en fonction. Le voyant lumineux "Pr6chauffage" s'allume
aussit6t que le four est programm6 ou Iorsque la temperature est
reprogramm_e & la hausse et s'_teint Iorsque la temperature programme
est atteinte. Le voyant lumineux "Porte Verrouill_e" clignote jusqu'& ce
que la porte du four se verrouille Iors d'un cycle autonettoyant et reste
continue]lement allume une fois que ]a porte du four est verrouill_e.
ANNULER- Annule toutes les
fonctions pr_-s_lectionn_es sauf
I'heure et la minuterie. Appuyez
sur cette touche pour mettre fin &
la cuisson. Cette touche est aussi
utilisee pour activer la
caract_ristique verrouillage de la
commande et de la porte du four.
*Note: Le t6moin lumineUx FOUR sur la commande electronique S'ALLUME et s'#TEINT iorsque v0us utilisez la
caracteristique de cuisson et durant le prechauffage, Ceci est un fonctionnement normal qui indique que le four chauffe
de fa9on intermittente pour maintenir la temperature de cuisson choisiel Lorsque le temoin de prechauffage est #TEINT;
le four est pr_t,
Pour un tableau de commande silencieux:
Unsignal sonore se fera entendre chaque fois que vous appuyez sur une touche. Vous pouvez, si vous le desirez, programmer
les commandes
7 secondes, le tableau de commande 6met un signal sonore. Le tableau de commande n'6met plus de son Iorsque vous
appuyez sur une touche. Pour obtenir le son, appuyez de nouveau sur la touche ,_ et maintenez-la enfoncee pendant 7
secondes jusqu'& ce que le tableau de commande emette un signal sonore.
pour qu'elles fonctionnent sans 6mettre un signal sonore. Appuyez et gardez enfonc6 la touche ._. Apres
Irnprirne aux Etats-Unis 318200183 (0503) Rev. A
Page 10

R glage de la commande du four
Note: Aucune commande ne fonctionne si I'horloge n'est pas r_glee &I'heure.
R_glage de I'horloge
Lorsque I'appareilest branche pourlapremiere fois, ou chaque foisque sonalimentation a 6t6interrompue,"12:00" clignote A1'6cran.
1.
Appuyez sur @ une lois (ne maintenez pas la touche enfonc6e).
2. Dans les 5 secondes qui suivent, appuyez sur la touche ou @ et maintenez-la enfonc6e jusqu'& ce que
juste paraisse & I'ecran.
Note: L'horloge ne peut pas 8tre regl6e pendant un cycle de cuisson minut6e ou un cycle autonettoyant.
I'heure
R_glage de la minuterie
1. Appuyez sur _.
2. Appuyez sur@ pouraugmenter letemps par intervalle de 1 minute. Appuyez sur latouche @ et retenez-la pour faire
avancerle temps parintervalle de 10 minutes. La minuterie peut 8tre r6gl6e pour n'importe quel laps de temps, de 1 minute
& 11 heures et 59 minutes.
Note: Si vous appuyez d'abord sur la minuterie indiquera 11 heures et 59 minutes.
3. L'6cran indique le compte & rebours en minutes jusqu'& ce qu'il ne reste qu'une minute. Ensuite, le compte & rebours
s'affiche en secondes.
4. Lorsque la dur6e programmee s'est 6coul6e, la minuterie 6met 3 bips. Elle continue & emettre 3 bips toutes les 60
secondes
Note: Let6moin lumineux situe au-dessus de la touche _!_ s'allume pendant que la minuterie fonctionne.
Note: La minuterie ne far pas demarrer ni arr_ter lacuisson. Elle sert de minuterie additionnelle dans la cuisine et _met un
signal sonore Iorsque la dur6e programm6e s'est 6coul6e. Laminuterie peut _tre utilis6e ind6pendamment ou pendant toute
autre fonction du four. Lorsque la minuterie est utilis_e en mSme temps que tout autre fonction, le d_compte de la minuterie
apparaft & 1'6cran. Pour afficher les autres fonctions, appuyez sur la touche de fonction correspondante.
jusqu'& ce que vous appuyiez sur _',!_.
V
Pour changer la dur_e de la minuterie pendant qu'elle fonctionne: Lorsque la minuterie est active et que la dur6e est
affichee, appuyez sur la touche _ et maintenez-la enfonc6e pour augmenter ou diminuer la dur6e programm6e.
Pour arr_ter la minuterJe avant que le temps r_gl_ soit _coule: Appuyez sur @.
Note: Pour ETBNDRE ou ALLUMER I
15secondes (lecommande du four _met un bip), puis rel&chez latouche. Cette fonction n'efface pas I'heure de la memoire
de la commande du four. Lorsque I'affichage est CTEINT. I'heure r_apparaft pendant quelques secondes chaque lois que
afflchagedel heure, appuyez surlatouche _o,,o_etmalntenez-la enfoncee pendant
G#
vous appuyez sur _1.
Conversion de la temperature
La commande electronique du four est r6gl_e pour fonctionner en °F (Fahrenheit) Iorsqu'elle quitte I'usine. Lefour peut _tre
programm6 pour toute temp@ature entre 170 °F et 550 °F (77 °C et 287 °C).
Pourchanger latemperature en °C(Celsius) ou de °Ca °F (lacommande ne doit pas 6tre en mode de cuisson oude nettoyage):
1. Appuyez sur_ }. " "apparaft & 1'6cran.
2. Appuyez sur la touche et maintenez-la enfonc6e jusqu'& ce que "HI" apparaisse A 1'6cran.
3. Appuyez sur la touche et maintenez-la enfoncee jusqu'A ce que °F ou °C apparaisse AI'ecran.
4. Appuyez sur, tpour passer de °F & °C ou de °C b.°F.
5. Appuyez sur n'importe quelle touche pour retourner au mode de fonctionnement normal.
Page 11

R glage de ia commando du four (suite)
Pour r6gler ou changer la temperature pour la cuisson au four
Le four peut 8tre programm6 pour cuire b.n'importe quelle temp@ature entre 170°F et 550°F (77°C et 288°C).
Pour r_gler la commando du four pour la cuisson au four:
1. Appuyez sur o,,apparaft A I'ecran.
2. Dans los 5secondes qui suivent, appuyez sur! L'ecran indique "350 °F (177 °C)". En appuyant surla touche
ou et la maintenant la alors _tre intervalles de 5 °F
3. D_s que vous rel&chez la touche le four se met b.chauffer jusqu'b, la temp@ature selectionn6e. Lorsque
le four atteint la temp@ature affichee, le temoin lumineux de pr6chauffage s'C:TEINT et la commande du four emet 3 bips.
4. Pour annuler la fonction de cuisson, appuyez sur
Pour changer la temperature du four une lois la cuisson commenc_e:
1. & I'ecran.
Appuyez sur @ et assurez-vous que la temp@ature selectionn6e apparaft
Appuyez sur a ou pour augmenter ou diminuer la temp@ature2. s_lectionn6e.
en
enfonc_e, temp@ature peut ajust6e par (1°C),
R_glage du four pour la cuisson continue ou le mode _conomie d'_nergie 12 heures
Lacommandedu fourcomporte unecaract@istiqued'economied'energie 12 heuresquiarr_tele four s'il estlaiss6 en marche pour
plus de 11 heures et 59 minutes. Le four pout 8tre programme pour supprimer cette fonction et passer en cuisson continue.
Pour r_gler la commande la commande du four en cuisson continue:
1. Appuyez sur la touche _!_ et maintenez-la enfoncee pendant 5 secondes jusqu'& ce que le signal sonore se fasse
entendre, "---- hr" apparaft & I'ecran pour indiquer la cuisson continue. L'heure apparaft & I'ecran.
2. Pour annuler la fonction de cuJsson continue, appuyez sur la touche @ et maintenez-la enfonc6e pendant 5 secondes
jusqu'& ce que lesignal sonore se fasse entend re. "12hr" appara_t &I'ecran pour indiquer que la commande est revenue
& lacaract@istique d'economie d'6nergie 12 heures.
V
R_glage de la fonction de verrouiliage de la commande et de la porte du four
La commande peut _tre programm6e pour verrouiller les touches de la commande et la porte du four.
Pour r_gler la fonction de verrouJllage:
1. Appuyez sur latouche _ et maintenez-la enfonc6e pendant 3 secondes. "Loc" apparaft & I'ecran, let6moin lumineux
"Porte Verrouillee" clignote et le moteur verrou se met en marche afin de verrouJller automatiquement la porte du four.
N'ouvrez PAS ouvrir la porte du four Iorsque le t_moin lumineux clignote. La porte du four prend environ 15 secondes
& se verrouiller. Une fois que la porte du four est verrouill6e, I'heure apparaft & I'ecran.
2. Pour annuler la fonction de verrouillage, appuyez sur la touche tet maintenez-la enfonc_e pendant trois secondes.
La commande d_verrouille la porte du four et reprend lefonctionnement normal.
NOte: Si vous appuyez sur une touche durant le mode de VerrouJllage du four, !'L0c,' parait _ J,afficheur jusqu!_
ce que la touche SOit rel_ch_e,
Page 12

R glage de la commande du four(suite)
R_glages des fonctions cuisson minut_e et cuisson diff_r_e (cuisson minut_e diff_r_e)
Les touches _ TEMPS DE CUISSON et _ DEPART DIFFERF: commandent les fonctJons qui ALLUMENT
V
€:TEJGNENT le four aux moments que vous avez choisis a I'avance. Le four peut 8tre programm6 pour s'allumer
immediatement et s'_teindre automatiquement (cuisson minut6e) ou pour s'aliumer plus tard pour une cuisson diff@ee et
s'eteindre automatiquement (cuisson mJnut_e diff@_e).
Note: Durant la Cuiss0n miniutee le temoin lumineuxde pr6chauffage ne fonctionne pas.
Pour r_gler le four pour qu'Jl commence la cuJsson Jmm_dJatement et qu'Jl s'_teJgne automatiquement (cuisson
minut_e):
1. Assurez-vous que I'horloge est b. I'heure.
2. Placez la nourriture dans le four.
3. Appuyez sur ° "apparaft b.1'6cran.
4. Dans les 5 secondes qui suivent, appuyez sur, ou L'ecran indique "350 °F (177 °C)". En appuyant sur la
touche, et en la maintenant enfoncee, la temp@ature peut _tre ajust6e par intervalles de 5 °F (1 °C).
5.
Appuyez sur @. "0:00" clignote & I'ecran (HR:MIN).
6.
Appuyez sur ou @ jusqu'a ce que le temps de cuisson d6sir6 apparaisse
7.
Le four s'ALLUME et commence b.chauffer.
& I'ecran.
Pour r_gler le four pour qu'il d_marre plus tard et qu'il s'arr_te automatiquement (cuisson diff_r_e):
1. Assurez-vous que I'horloge est b. I'heure.
2. PJacez la nourriture dans le four.
et
3. Appuyez sur o ,,apparaft & I'ecran.
4. Dans les 5secondes qui suivent, appuyez surt L'ecran indique "350 °F (177 °C)". En appuyant su rla touche
et en la maintenant enfoncee, la temp@ature peut 8tre ajust6e par intervalles de 5 °F (1 °C).
5. Appuyez sur _i_' "0:00" clignote a 1'6cran (HR:MIN).
6. Appuyez sur jjusqu'b, ce que le temps de cuisson desir6 apparaisse & 1'6cran.
7. Appuyez sur @. L'heure de d6part la plus rapproch6e apparaft
&1'6cran.
8. Appuyez sur Jjusqu'a ce que le temps de cuisson desir6 apparaisse b.I'ecran.
9. Une fois que les commandes sont regl6es, la commande du four calcule b.quel moment la cuisson va s'arrSter afin de
pouvoir commencer a I'heure que vous avez choisie.
10. Le four s'ALLU ME b.I'heure de depart diff@e et commence b.chauffer.
Lorsque la dur_e de cuisson programm_e s'est _coul_e:
1. "END" appara_t & I'ecran et le four s'6teint automatiquement.
2. La commande du four continue b. emettre 3 bips toutes les 60 secondes jusqu'_, ce que vous appuyiez sur
Pour changer la temperature du four ou la dur_e pendant la cuisson:
1. Appuyez sur la touche de la fonction que vous voulez modifier.
2. Appuyez sur )pour ajuster le r6glage.
Soyez prudent Iorsque vous r_glez une cuJsson diff@_e. Cette fonction est utJlis_e pour faire cuire de la
viande salaisonn_e ou congel_e et la plupart des fruits et I_gumes. Lesaliments facilement p@issables comme le lait, les oeufs,
le poisson, la viande ou la volaille doivent d'abord 8tre refrig@es. MSme Iorsqu'ils sont refroidis, ilsne doivent pas rester dans
le four plus d'une heure avant le debut de la cuisson et doivent 8tre rapidement enlev_s Iorsque la cuisson est termin_e.
4
Page 13

R glage de ia commane du four (suite)
R_glage du gril:
1. Disposez les grilles du four Iorsque la temp@ature du four est encore basse.
Placez la grille selon les suggestions du tableau de position de la grille pour le
gril ci-dessous.
2,
Appuyez sur -- --" apparaTt b.I'ecran.
3.
Appuyez sur la touche U ou et maintenez-la enfonc6e jusqu'A ce que
A
le
reglage du gril d6sir6 paraisse A I'afficheur. Appuyez sur @ pour le reglage
du gril HI ou sur O pour le r6glage bas LO. La plupart des aliments peuvent 8tre
passes sous le gril au reglage 61ev6 HI. Choisissez le r6glage de gril bas LO pour
eviter de trop brunir ou d'ass_cher les aliments qui doivent 8tre bien cuits.
4,
Pour bien faire brunir, pr_chauffez I'_l_ment du gril pendant 3 a 4 minutes
avant de mettre la nourriture.
5.
Placez la grille dans la lechefrite, puis placez la nourriture sur la grille (fig. 1).
N'utilisez PAS la lechefrite sans sa grille et ne recouvrez pas la grille de papier
d'aluminium. La graisse aJnsi expos6e pourrait prendre feu.
6,
Placez la lechefrite sur la grille au centre du four, directement en dessous de
I'el6ment gril. MODELES.4 GAS: Assurez-vous que la porte du four est ferrule.
MODELES ELECTRIQUE: Assurez-vous que la porte du four est ouverte a la
position d'arr_t pour le grillage (fig. 2).
7,
Grillez le 1er c6te jusqu'b, ce que I'aliment ait bruni. Tournez I'aliment et grillez le
second c6t6. Note: Tirez toujours la grille du four jusqu'& la position d'arr_t avant
de tourner ou de retirer la nourriture du four.
8. Lorsque le grillage est termin6, appuyez sur la touche
Tableau de position de la grille pour le gril (reportez-vous b.la fig. 3)
Position de la grille Cat_goried'aliment
3ieme position Hamburgers et steaks & demi saignant
2iSme position Poisson, steaks b. point et c6telettes de porc
2iSme position Aliments bien cuits comme le poulet et le homard
61ev6
Fig. 1
Note: La Lechefritte permet
de drainer la graisse qui
s'6goutte et ainsi la garde
61oign6e de la haute chaleur
du gril. NE PAS utiliser la
lechefrite sans son couvercle
quJI'accompagne. NE PAS
recouvrir le couvercle de
papier aluminJum. Le gras en
surface pourrait s'enflammer.
grillage- Modeles
61ectriques seulement
Fig. 2
_F_'__i Si un feu se produit b.I'int@ieur du four, fermez la porte du four et
eteignez le four. Si le feu ne s'6teint pas, lancez sur le feu du bicarbonate de soude ou
utilisez un extincteur. NE PAS mettre d'eau ou de farine sur le feu. La farine risque
d'exploser et I'eau peut permettre a un feu de graisse de s'etendre et de causer des
blessures personnelles.
Position
de la grille
Page 14

Auto nettoyage
Dur_e du cycle autonettoyant
Pour de meilleurs resultats, utilisez le cycle d'autonettoyage de 2 heures pour lasalet_ I_g_re et le cycle de 3 heures pour
la salet_ moyenne ou un cycle de 4 heures pour la salet_ importante. NOTE: Vous devez bien a@er la cuisine en ouvrant
une fen_tre ou en utJlisant un ventilateur ou une hotte durant le cycle autonettoyant. L'a@ation aide A 61iminer les odeurs
normales qui se d6gagent Iors du cycle autonettoyant.
D_marrage d'un cycle autonettoyant ou d'un cycle autonettoyant diff_r_
(Note: Si vous ne d6sirez pas commencer un cycle autonettoyant diff@& sautez les 6tapes 2 et 3.)
1. Assurez-vous que I'horloge est b.I'heure.
2. Appuyez sur _. Les " : "de I'heure clignotent.
3.
Appuyez sur la touche _et maintenez-la enfoncee pour choisir I'heure de d@art du cycle autonettoyant diff@&
Rel&chez la touche Iorsque I'heure voulue appara;t.
4.
Appuyez sur _I[2_. " " appara;t a I'ecran.
5. Appuyez sur une fois. "3:00" appara;t b.1'6cran, pour lecycle de 3 heures. Pour choisir le cycle de 2 heures,
appuyez sur "2:00" appara_t & I'ecran. Pour s61ectionner lecycle de 4 heures, appuyez sur "4:00" appara_t
1'6cran.
D_s que les commandes sont r6gl6es, le moteur verrou de la porte commence b,se fermer automatiquement et letemoin
lumineux "DOOR LOCK" clJgnote. N'ouvrez PAS la porte pendant que let6moin clignote (il faut environ 15 secondes
la porte du four pour se verrouiller).
6.
"CLn" appara;t a I'ecran durant le cycle autonettoyant et le t6moin "DOOR LOCK" reste allum6 jusqu'b, ce que le cycle
autonettoyant soit termine ou annule et que le four ait refroidi.
,&la fin du cycle d'autonettoyage:
1. L'heure ou "End" (fin) apparaft A I'ecran et les temoins "Clean" et "DOOR LOCK" restent allum6s.
2. Une fois que le four a refroidi apr_s environ 1 HEURE et que letemoin "DOOR LOCK" s'est 6teint, vous pouvez ouvrir
la porte du four.
3. Si vous voyez"End" b.l'6cran etque let6moin "Select Clean" est toujours ALLUMI-, appuyez sur_ L'heure apparaftra
b.I'ecran.
NOTE: Lorsque le four est froid, essuyez tousles residus ou les cendres b.I'aide d'un linge humide ou d'un papier essuie-tout.
Arr6t ou interruption d'un cycle autonettoyant
Si vous devez arrSter ou interrompre un cycle autonettoyant:
1. Appuyez sur,
2. Une lois que le four a refroidi apres environ 1 HEU RE et que le t6moin "DOOR LOCK" s'est eteint, vous pouvez
ouvrir la porte du four.
3. Red6marrez le cycle autonettoyant Iorsque les conditions sont propices.
Soyez prudent en ouvrant la porte du four apr_s un cycle d'auto nettoyage. Tenez-vous sur le c6te de
I'appareil pour ouvrir la porte afin de laisser Fairchaud ou la chaleur s'6chapper.
Ne forcez pas la porte du four pour I'ouvrir. Ceci risque d'endommager le syst_me de verrouillage
automatique. Soyez prudent enouvrant la porte du four b.la fin d'un cycle autonettoyant; le four risque d'6tre encore tr_s
chaud.
Page 15

Ajustement de ia temperature du four
Lacommande 61ectronique de votre foura et6 regl6e de fagon pr6cise &I'usine. Ce r6glage peut diff@er de celui devotre ancien
four. Les dur6es indiqu6es dans vos recettes peuvent donc ne pas vous donner les mSmes r6sultats. Si vous croyez que le
four chauffe trop ou ne chauffe pas assez pour les dur6es indiqu6es dans vos recettes, vous pouvez ajusterle r6gulateur pour
que le four chauffe plus ou moins que la temp@ature indiqu6e.
Ajuster la temperature du four:
1. Appuyez sur
2. Ajustez la temp@ature b.550 °F (287 °C) en appuyant et maintenant enfonc6e la touche
3. Dans les 2 secondes qui suivent, appuyez sur la touche _ et maintenez-la enfonc6e jusqu'b, ce que 1'6cran affiche
2 chiffres. Rel&chez la touche, }. L'ecran indique maintenant 1'6cart en nombre de degr6s entre le r6glage d'usine
original et le reglage actuel. Si le r6gulateur du four poss_de la calibration d'usine origJnale, I'afficheur indique "0".
4,
La temp@ature peut maintenant 8tre ajustee de 35 °F (19 °C), b.intervalles de 5 °F (3 °C) en appuyant sur la touche
ou
O et en la maintenant enfoncee. Appuyez jusqu'a ce que I'ecart d6sir6 apparaisse b.I'ecran. Si vous baissez la
temp@ature du four, un signe negatif (-) apparaft devant le nombre pour indiquer que le four se refroidira du nombre de
deg r6s affich6s.
Lorsque vous avez effectu6 I'ajustement d6sir6, appuyez suri } pour retourner & I'affichage de I'heure.
Note: Les ajustements n'affectent pas la temp@ature du cycle autonettoyant.
 Loading...