

Page 1

VPRG4
Installation Instructions
Return Air Grille/Access Panel
For Vert-I-Pak A Series Units only
.
Please read these instructions completely before attempting installation.
NOTE: These instructions apply to Vert-I-Pak Series units only. Refer to Chassis Installation/Operation Manual
for additional information
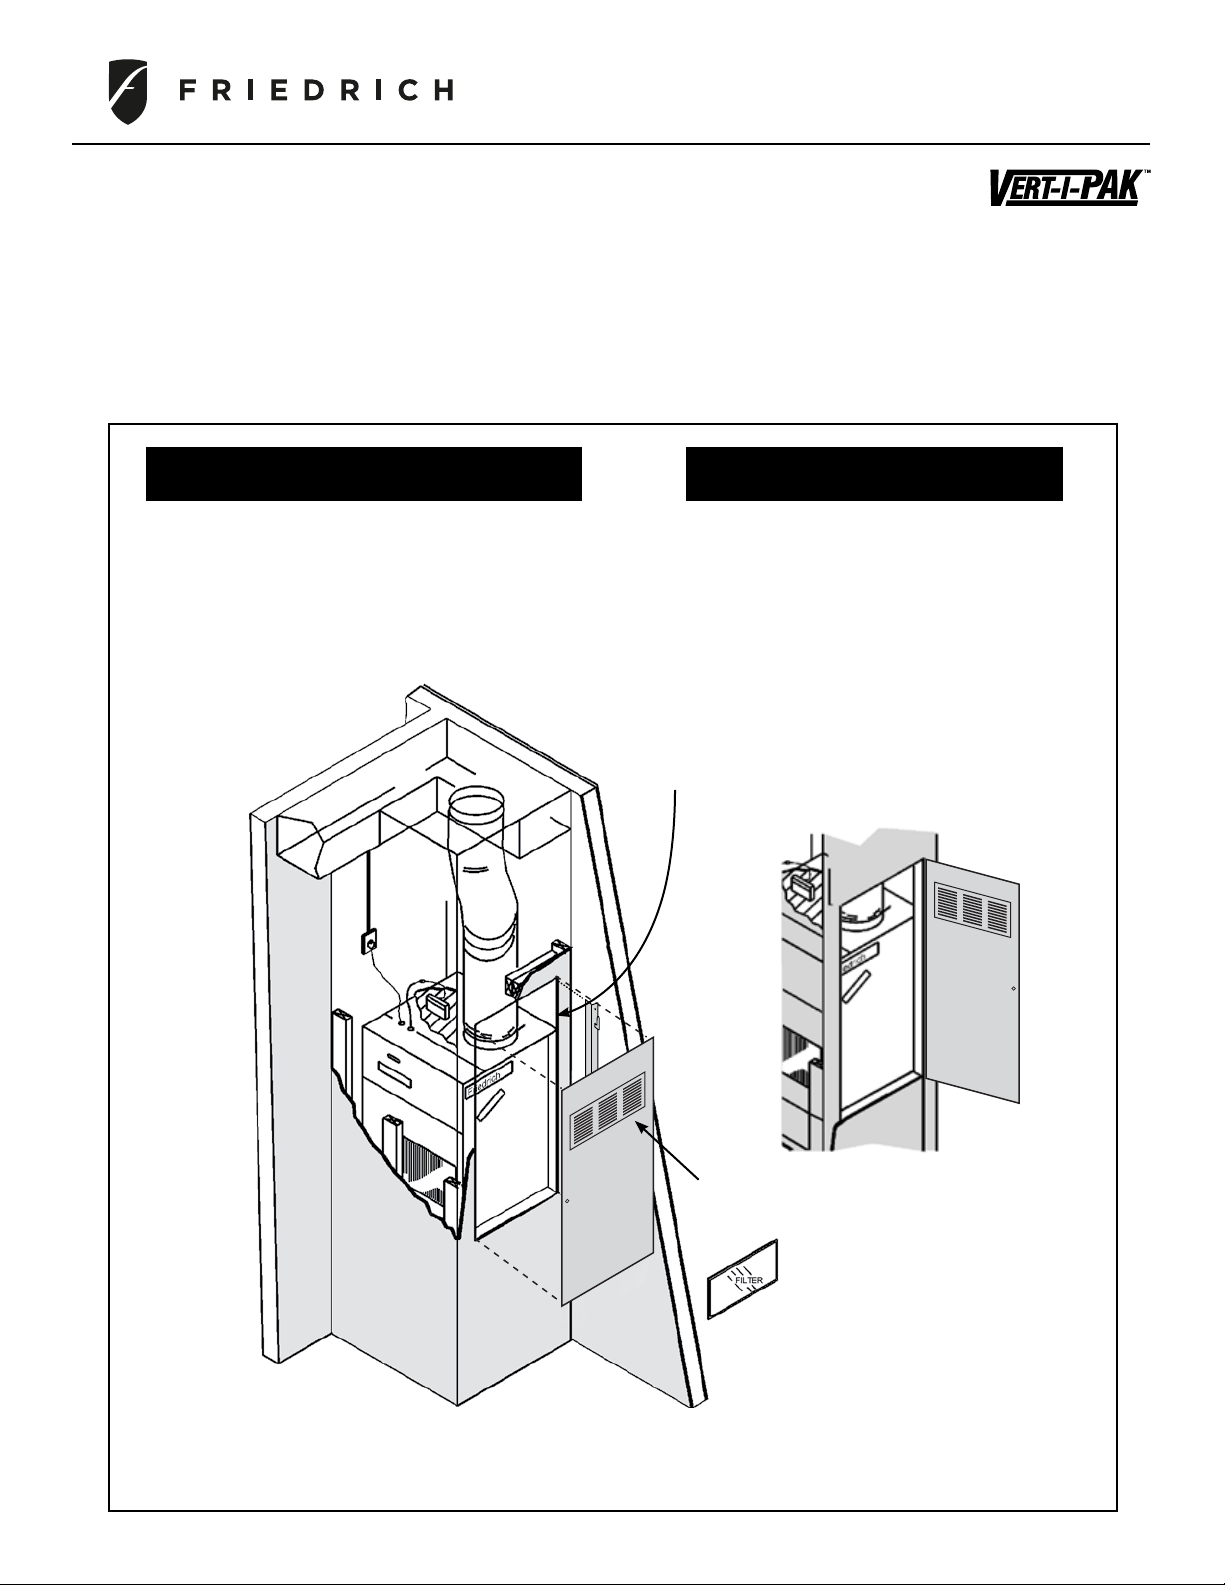
Parts Included in this Kit
VPRG4 Return Air Grille / Access Panel
(58" Tall x 29" Wide)
2x Mounting Bracket (left and right)
Mounting Screws
Parts not Included in this Kit
25" x 20" Filter
5/32" Allen wrench for latch
mechanism operation
Frame and sheetrock the access hole to 27" wide
and 55
be at the same level as the floor or subbase. The
chassis must fit thru this opening. The chassis is
23
specifications for actual dimensions).
3
/4" tall. The bottom of the opening should
1
/8" wide and 321/4" or 47" tall (consult chassis
Side Bracket
920-134-04 (2-10)
Filter mounts on
inside of door.
25" x 20" Nom. Filter
(field supplied)
VPRG4
Return Air Grille /
Access Panel
Page 2
VPRG4
Installation Instructions
Return Air Grille/Access Panel
For Vert-I-Pak A Series Units only
.
Please read these instructions completely before attempting installation.
NOTE: These instructions apply to Vert-I-Pak Series units only. Refer to Chassis Installation/Operation Manual
for additional information
Parts Included in this Kit
VPRG4 Return Air Grille / Access Panel
(58" Tall x 29" Wide)
2x Mounting Bracket (left and right)
Mounting Screws
Parts not Included in this Kit
25" x 20" Filter
5/32" Allen wrench for latch
mechanism operation
Frame and sheetrock the access hole to 27" wide
and 55
be at the same level as the floor or subbase. The
chassis must fit thru this opening. The chassis is
23
specifications for actual dimensions).
3
/4" tall. The bottom of the opening should
1
/8" wide and 321/4" or 47" tall (consult chassis
Side Bracket
920-134-04 (2-10)
Filter mounts on
inside of door.
25" x 20" Nom. Filter
(field supplied)
VPRG4
Return Air Grille /
Access Panel
Page 3

Step 1
Determine the orientation of the door.
The VPRG4 Kit comes with two mounting hinges.
One mounts to the left side of the opening and
locates the return air openings at the lower portion
of the door (View A).
The other mounts the hinge to the right side of the
opening and locates the return air openings at the
upper portion of the door (View B).
This provides an option for the direction that the
door will open. More importantly it can aid in sound
attenuation by locating the return air openings away
from the evaporator opening on the unit.
NOTE: For maximum sound attentuation it is
recommended that the left hand bracket (View A)
be used for VEA/VHA24 models and the right hand
bracket (View B) be used for VEA/VHA09, 12 and
18 models.
Follow STEPS 2A through 6A (next page) for left
side mounting (View A)
Follow STEPS 2B through 6B (next page) for right
side mounting (View B).
View A
Left hinge
View B
Right hinge
Page 4

Step 2A
Mount the Side Bracket
to the left side of the wall
opening. The Side Bracket
must be plumb (vertical).
Secure with four
#
8 x 11/4" pan-head screws.
NOTE: Hinge tabs must
point upward.
Step 3A
Install door onto the
Side Bracket. Be
sure that the access
door has engaged
the three tabs, and
the door is against
the side mounting
bracket.
Mounting the Side Bracket
Step 4A
Close the door. Draw a temporary horizontal reference line on
the wall adjacent to the center of the latch mounting hole.
Latch
mounting
hole in door
Draw
Reference
Line on wall
Step 6A
Slide the bracket upward and
tighten the mounting screws.
Mount the Door on the Side Bracket
Step 5A
Attach the latch
bracket to the opening,
aligning the bottom of
the bracket with the
reference line. Use two
#
18 x 11/4 screws.
Do not tighten.
Latch Bracket Installation
Latch mechanism
NOTE: The latch
mechanism should already
be factory mounted. This
assembly is shown for
reference. The latch arm
is adjustable to provide
a secure, rattle-free
installation. Install the lter.
Access Panel
Latch Arm
Reference
Line
Installing Latch Bracket
Latch Mechanism
Orientation
markings
Side View
Front View
Mounting Latch
Page 5

Step 2B
Mount the Side Bracket to
the right side of the wall
opening. The Side Bracket
must be plumb (vertical).
Secure with four
#
8 x 11/4" pan-head screws.
NOTE: Hinge tabs must
point upward.
Step 3B
Install door onto the
Side Bracket. Be
sure that the access
door has engaged
the three tabs, and
the door is against
the side mounting
bracket.
Mounting the Side Bracket
Step 4B
Close the door. Draw a temporary horizontal reference line on
the wall adjacent to the center of the latch mounting hole.
Draw
Reference
Line on wall
Latch
mounting
hole in door
Step 6B
Slide the bracket downward and
tighten the mounting screws.
Mount the Door on the Side Bracket
Step 5B
Attach the latch
bracket to the opening,
aligning the bottom of
the bracket with the
reference line. Use two
#
18 x 11/4 screws.
Do not tighten.
Reference
Line
Latch Bracket Installation
Latch mechanism
NOTE: The latch
mechanism should already
be factory mounted. This
assembly is shown for
reference. The latch arm
is adjustable to provide
a secure, rattle-free
installation. Install the lter.
Access Panel
Latch Arm
Installing Latch Bracket
Latch Mechanism
Orientation
markings
Side View
Front View
Mounting Latch
 Loading...