

Freefly MoVI M10 User Manual
USER GUIDE

P2
Freefly represents the intersection of art and technology. Our team consists of industry leading
specialists all focused on one task—inventing solutions to allow unrestricted camera movement.
Freefly initially created the CineStar line of multi-rotor camera platforms, which allowed smooth,
stable and dynamic low-altitude aerial imagery. After years of research and development in
camera stability, Freefly has created the MōVI stabilized camera gimbal. Our goal with the MōVI
is to empower a new era of stabilized cinematography on a variety of platforms, from handheld
to helicopters and everything in between.

P3
IN•ER•TIA
><
The Freefly MōVI is a digital 3 axis stabilization system that relies on both active
motor driven components and passive inertial stabilization. Passive stabilization
relies on the principles of inertia (tendency of an object to resist change in its
motion) and requires that the camera is well-balanced in the Pan, Tilt, and Roll Axes.
Active stabilization refers to the techniques of using sensors to measure the
camera’s Pan, Tilt, and Roll movements and counteract those movements
using motors attached to the 3 axes. These 2 types of stabilization
work in concert to achieve the smooth and stable shots for
which the MōVI is well known.
This manual will teach you how to setup,
balance, and tune your MōVI M10. For
new users, the process of balancing
and tuning a MōVI might seem
overwhelming at first, so allow
some time to master the
procedures described in
this manual.
P4
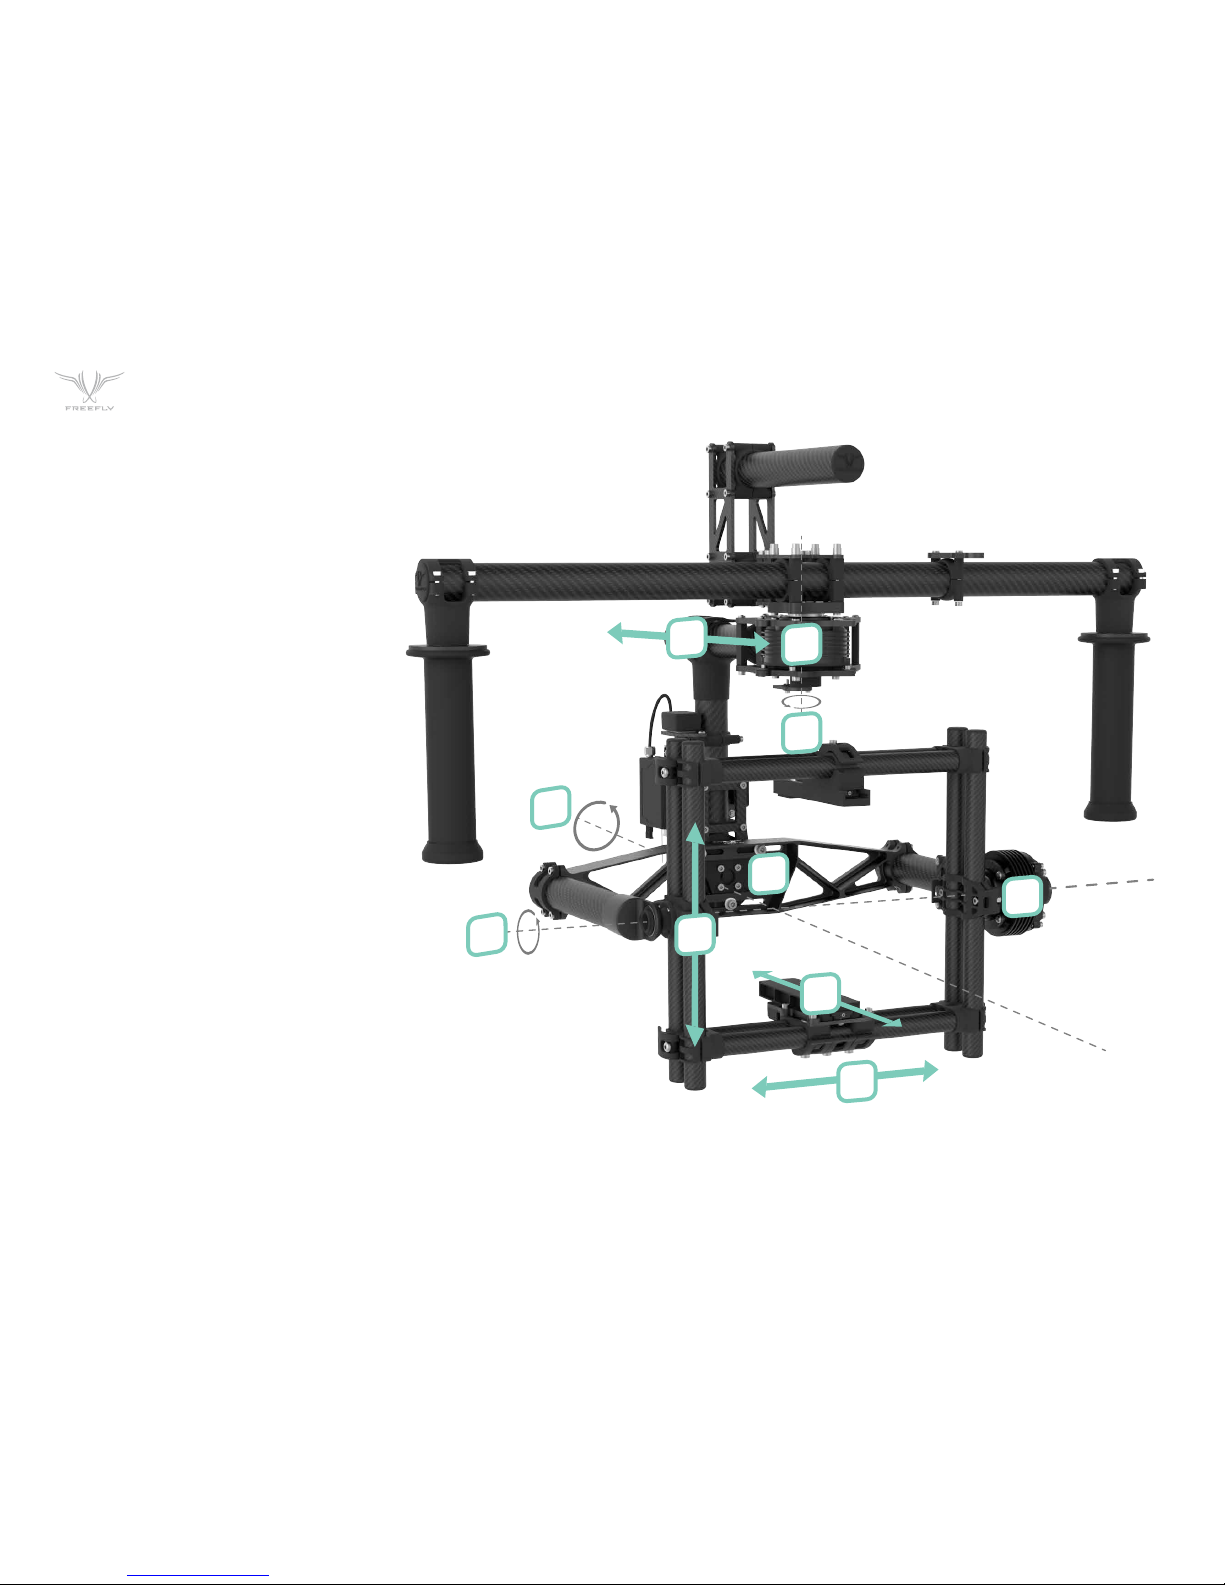
1. Pan Motor
2. Pan Axis
3. Roll Motor
4. Roll Axis
5. Tilt Motor
6. Tilt Axis
7. Tilt Front to Back Adjustment
8. Roll Adjustment Point
9. Tilt Vertical Adjustment
10. Pan Adjustment
MōVI
COMPONENTS:
1
10
2
5
6
4
7
8
9
3

P5
CONTENTS
01 GETTING STARTED
Batteries and Battery Charger:
Charging the Battery
Installing the Battery
Mounting the Camera
02 BALANCING THE MŌVI
Step 1: Tilt Front to Back Balance
Step 2: Tilt Vertical Balance
Step 3: Roll Balance
Step 4: Pan Balance
03 CONVERTING M10 TO MR
Attaching Landing Gear Legs & Octo Suspension Plate
04 APP/TUNING
Bluetooth Pairing/Freefly Configurator Connection
Initial Tuning
Majestic Tuning
Pan Majestic Tuning
Tilt Majestic Tuning
GUI Parameter Definitions
05 REMOTE CONTROL
Remote Control Features
Mode Switch (Dual Operator, Majestic, Kill)
06 TROUBLESHOOTING
Symptoms, Possible Causes and Solutions

P6
NOTICE
All instructions, warranties and other documents are subject to change at
the sole discretion of Freefly Systems Inc. (“Freefly”). For up-to-date product
literature, visit
www.freeflysystems.com.
DISCLAIMER
This is a sophisticated cinema product. It must be operated with caution and
common sense and requires some basic mechanical ability. Failure to operate
this product in a safe and responsible manner could result in injury or damage
to the product or other property. This User Guide contains instructions for
safety and operation. It is essential to read the entire User Guide and follow
all instructions and warnings in the manual, prior to setup or use, in order to
operate the MōVI correctly and avoid damage or injury.
Freefly has made every effort to provide clear and accurate information in this
User Guide, which is provided solely for the user’s knowledge. While thought to
be accurate, the information in this document is provided strictly “as is” and
Freefly will not be held responsible for issues arising from typographical errors
or user’s interpretation of the language used in this User Guide that is different
from that intended by Freefly.
Freefly reserves the right to revise this User Guide and make changes from time
to time without obligation to notify any person of such revisions or changes.
In no event shall Freefly, its employees or authorized agents be liable for any
damages or losses, direct or indirect, arising from the use of any technical or
operational information contained in this document.
BOX CONTENTS
Qty 1 - MōVI M10 Handheld Stabilizer
Qty 1 - MōVI Top Handle
Qty 1 - Stand
Qty 2 - Freefly 14.8V 2.6Ah MōVI Batteries
Qty 1 - Freefly LiPo Charger with AC cord and Charge Lead Adapter
Qty 1 - M2.5 Hex Driver
Qty 1 - M3 Hex Driver
OPTIONAL ACCESSORIES
QTY 1 - DX7S TRANSMITTER*
*Included with DX7s Transmitter:
Qty 1 - 2000MAh NiMh Transmitter Battery Pack
Qty 1 - SD Card
Qty 1 - 12V DC Power Supply
Qty 1 - DX7s Neck Strap
Qty 1 - DX7s User Manual

01-P7
GETTING STARTED
01

01-P8
BATTERIES AND BATTERY CHARGER
WARNING: You must read these safety instructions and warnings carefully
before charging or using your batteries. Failure to exercise caution while
using Lithium Polymer (LiPo) batteries and comply with the following
warnings could result in battery malfunction, electrical issues, excessive
heat, fire, or injury and property damage.
GENERAL GUIDELINES AND WARNINGS
You must read these safety instructions and warnings carefully before
charging or using your battery.
• Stop using or charging the battery immediately if the battery becomes or
appears damaged, starts to balloon or swell, leaks, becomes deformed or
gives off an odor, exceeds a temperature of 160ºF (71ºC), or if anything else
abnormal occurs. Disconnect the battery and observe in a safe area outside
of any building or vehicle for at least 45 minutes, as a damaged battery can
experience a delayed chemical reaction that could possibly result in fire.
• Never disassemble, modify, puncture, shock, drop, crash and/or short circuit
the battery. Leakage, smoke emission, ignition, explosion or fire can occur,
which may result in personal injury or property damage.
• DO NOT leave the battery and charger unattended during use.
• Never drop charger or batteries.
• Never attempt to charge “dead” or damaged batteries.
• Never charge a battery if the cable has been pinched or shortened.
• Never allow minors to charge or use battery packs without adult supervision.
• Never allow batteries to come in contact with moisture at any time.
• Never charge or store batteries in extremely hot or cold places (recommended
between 50º-80ºF/10º-26ºC), leave in a hot environment (inside an automobile
in hot weather), or leave in direct sunlight.
• Never place or carry batteries in your pockets or clothing.
• Always use Freefly-approved LiPo batteries.
• Always inspect the battery before charging.
• Always connect the positive red lead (+) and negative black lead (-) terminals
of the battery to the charger terminals correctly.
• Always disconnect the battery after charging, and let the charger cool
between charges.
• If a battery will not be used for more than one week, it is recommended that
the battery is stored with a voltage of approximately 3.8V per cell. Do not
store the battery fully charged. Store the battery at room temperature in a
cool or shaded area (ideally between 50º-80ºF/10º-26ºC).
• Batteries should be stored in a vented, fire-resistant container. No more than
two batteries should be placed in a container to avoid chain reactions. Storage
temperatures should not fall below 32ºF/0ºC or above 130ºF/54ºC. Damaged
batteries are extremely sensitive to temperature fluctuation and care should
be taken in their immediate disposal. High temperatures may cause fire, even
with undamaged batteries.
NOTICE: All instructions and warnings must be followed exactly. Mishandling
of LiPo batteries can result in fire. By handling, charging or using the
included LiPo batteries, you assume all risks associated with LiPo batteries.
If you are not prepared to accept complete liability for the purchase and/
or use of the batteries, you are advised to return them in new and unused
condition to the place of purchase immediately.
IMPORTANT NOTE: If you are using the battery to power or charge an
accessory used with the MōVI, it is your responsibility to constantly monitor
the battery’s voltage through the use of a voltage checker. If the accessory
drains the battery below 3.0V per cell, it will damage the battery and render
the battery unusable. Never attempt to charge a battery that has individual
cell voltages below 3.0V.
GETTING STARTED

01-P9
CHARGING PROCESS WARNINGS AND SAFETY PRECAUTIONS
• Never charge or use a LiPo battery that shows any damage or
disfigurement of any kind, as this may be a sign of internal damage.
Any damage to the protective cover, wiring or plugs is also reason to
discontinue use.
• Never leave the lead wires dangling from a battery.
• Never charge a battery unattended.
• Never connect more than one battery pack to the charger at a time.
• Never charge near moisture, extreme temperatures, flammable or
combustible materials.
• Never charge the battery while installed on the MōVI or other equipment or
while inside a vehicle.
• Never attempt to charge a battery that is damaged or has individual cell
voltages below 3.0V.
• Always inspect batteries before charging.
• Always use a specific LiPo charger only. Do not use a Nickel-cadmium
(NiCd) or Nickel-metal hydride (NiMh) charger, even though these chargers
may appear similar to a LiPo charger. Failure to do so may cause a fire,
which may result in personal injury and/or property damage.
• Always let the battery cool down to ambient temperature before charging.
• Always monitor the temperature of the battery while charging. If the
battery becomes hot to the touch or begins to swell, discontinue charging
immediately. Disconnect the battery from the charger and observe it from
a safe place for at least 45 minutes.
• Always ensure that the proper cell count or voltage is selected on your
charger for this battery. Failure to properly set the cell count or voltage
could result in fire or explosion of the battery.
• For optimal performance and extended life, do not allow your battery
voltage to drop below 3.4V. It is recommended that you use a voltage
checker to actively monitor battery voltage.
BATTERY DISPOSAL:
NOTICE: LiPo batteries require special handling for safe disposal. The
following steps must be taken to avoid damage or injury to yourself,
your property or anyone who comes in contact with the battery.
If the battery is undamaged but no longer useful:
1. Discharge the battery to a maximum of 1.0V per cell using a safe discharge
method.
2. Leave the battery uncharged and retest the battery after 24 hours. If the
battery is over 1.0V per cell, repeat the procedure until the battery is 1.0V
per cell or less.
3. Place electrical tape over each wire lead and tape the wire leads to
opposite sides of the battery.
4. Place battery in a sealed plastic bag and place plastic bag in a vented, firesafe container.
5. Use a fire-safe container to deliver battery to a recycling center authorized
for LiPo batteries. Please note that not all battery recycling services
include LiPo batteries. If no LiPo recycling facility is available in your area,
contact your state or local HAZMAT agency for instructions.
If the battery is damaged:
1. If the battery or wiring is damaged, please contact your state or local
HAZMAT facility for instructions. Batteries must be rendered safe before
being transported or recycled.
2. DO NOT transport or ship batteries which have more than 1.0V per cell
charged OR that show signs of damage without following the instructions
given by the HAZMAT agency.
GETTING STARTED
01-P10
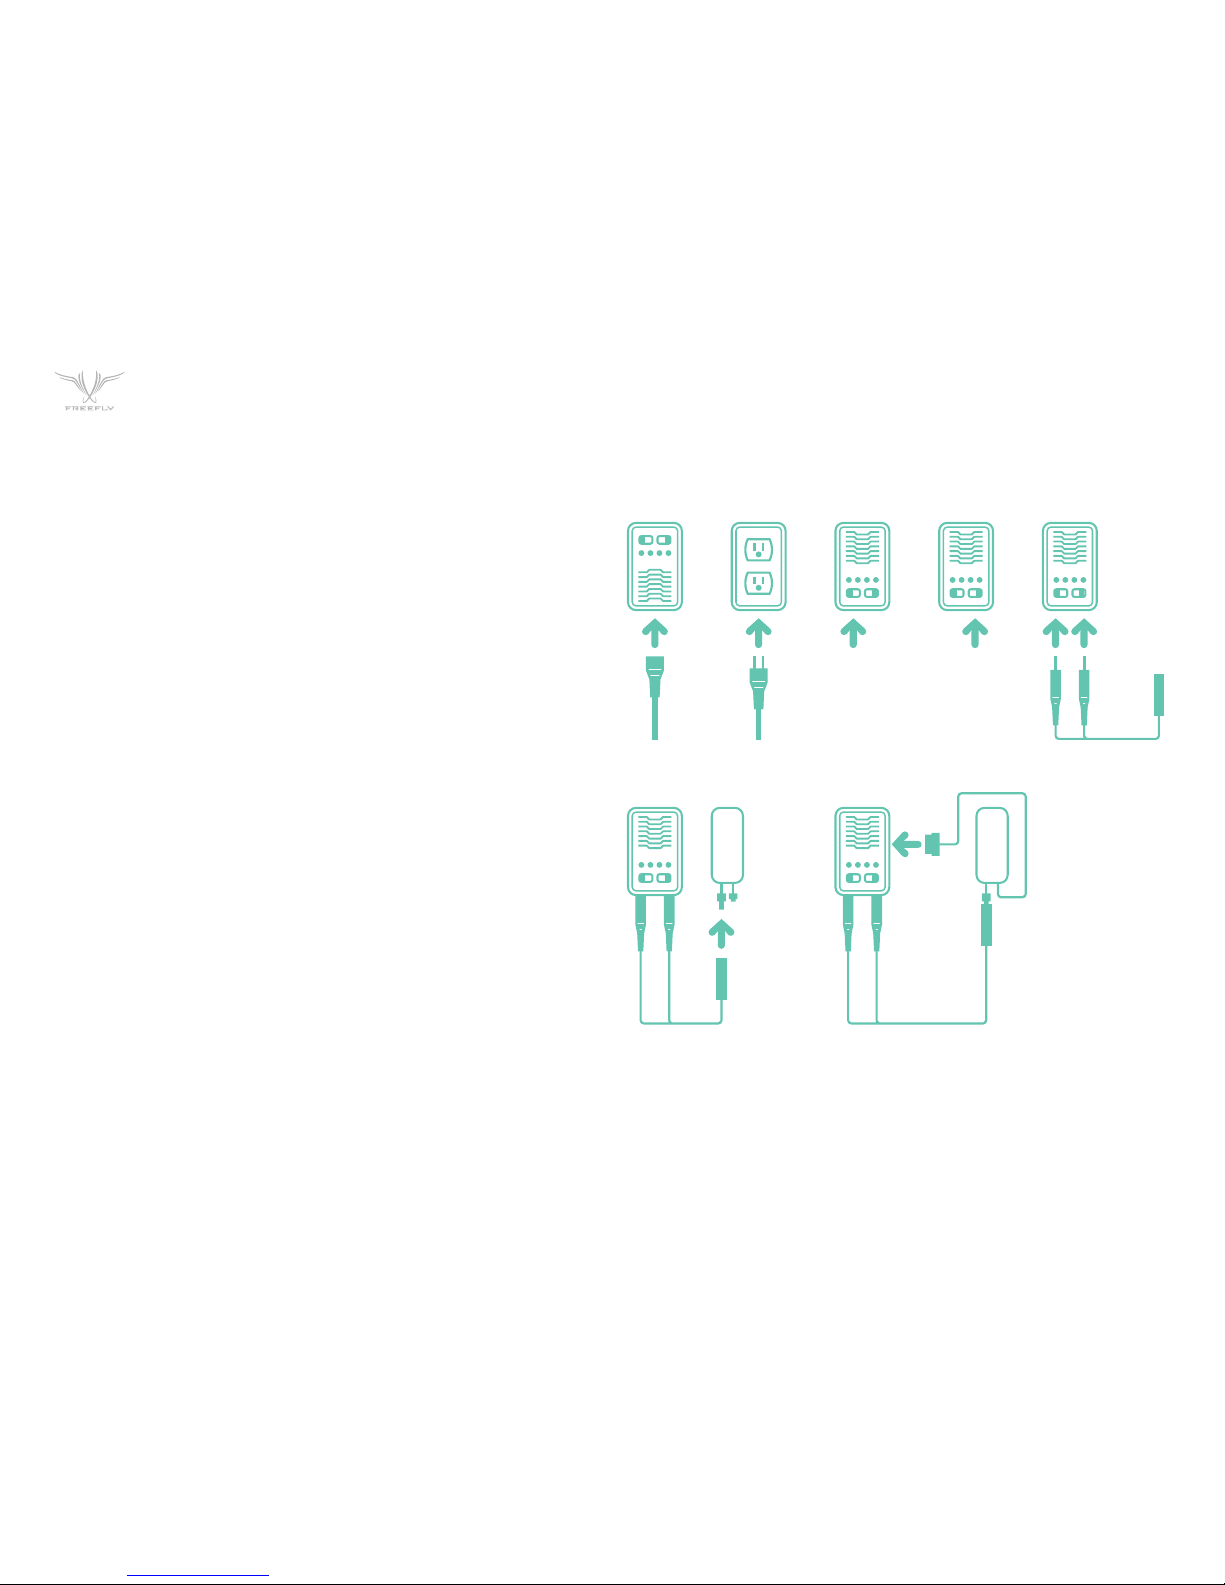
CHARGING THE BATTERY
1. Insert the AC power cord into the charger.
2. Insert the AC power cord into the wall socket. All LEDs will light for 1
second and the charge status LED will flash green, which indicates the
charger is ready to charge.
3. Select “LiPo” on the battery type switch.
4. Select the “3A” charging current on the charge current switch when
charging the included batteries.
5. Connect battery main charge lead to the charge lead input in the front of
the charger. Make sure the red plug is plugged into the red charge socket
and the black plug is plugged into the black charge socket.
6. Connect the Freefly 4s 2.6Ah battery to the charge lead. Always connect
the positive red lead (+) and negative black lead (-) terminals to the
corresponding colored terminals on the charger.
7. Connect the battery balance lead to the “4S” balance socket on the side
of the charger. The charger will automatically start charging.
8. The charge status LED and the cell status LED will glow constant red.
The cell 1-4 LED’s will glow continuously indicating a 4 cell battery pack.
9. When the battery is fully charged, the “charge status” LED will glow
constant green.
10. Unplug the battery from the balance port and charge lead. The battery
is ready for use in your MōVI M10.
GETTING STARTED
‘LiPo’
+
-
+
-
BATT.
‘4S’
BATT.
1. 2. 3. 4. 5.
6. 7-9.
'3A'
01-P11
INSTALLING BATTERY
IN THE MōVI
The MōVI batteries are custom designed to fit
snugly in the MōVI battery compartments. The
batteries are retained using a lightweight o-ring
and carbon latch mechanism. Be careful when
installing/removing the batteries to avoid
damaging the battery lead and balance lead.
Battery Specification
Battery Type: Lithium Polymer
Capacity: 2.6Ah
Voltage: 14.8v
Max Continuous Discharge: 3C (7.8A)
Max Burst Discharge: 5C (13A)
Max Charge Voltage: 4.2V per cell
Minimum Discharge Voltage: 3.0V per cell
Dimensions: [100mm (L) x 25mm (W)
x 30mm (H)]
Weight: 200g
Charger Specification
AC Input Voltage: 100-240V, 50-60HZ
Output Power: 20W
Charging Current (Selected by Switch):
1A, 2A, 3A
Current Drain for Balancing: 200mA
4 LEDs for Balancing Indicator
1 LED for Charging Status
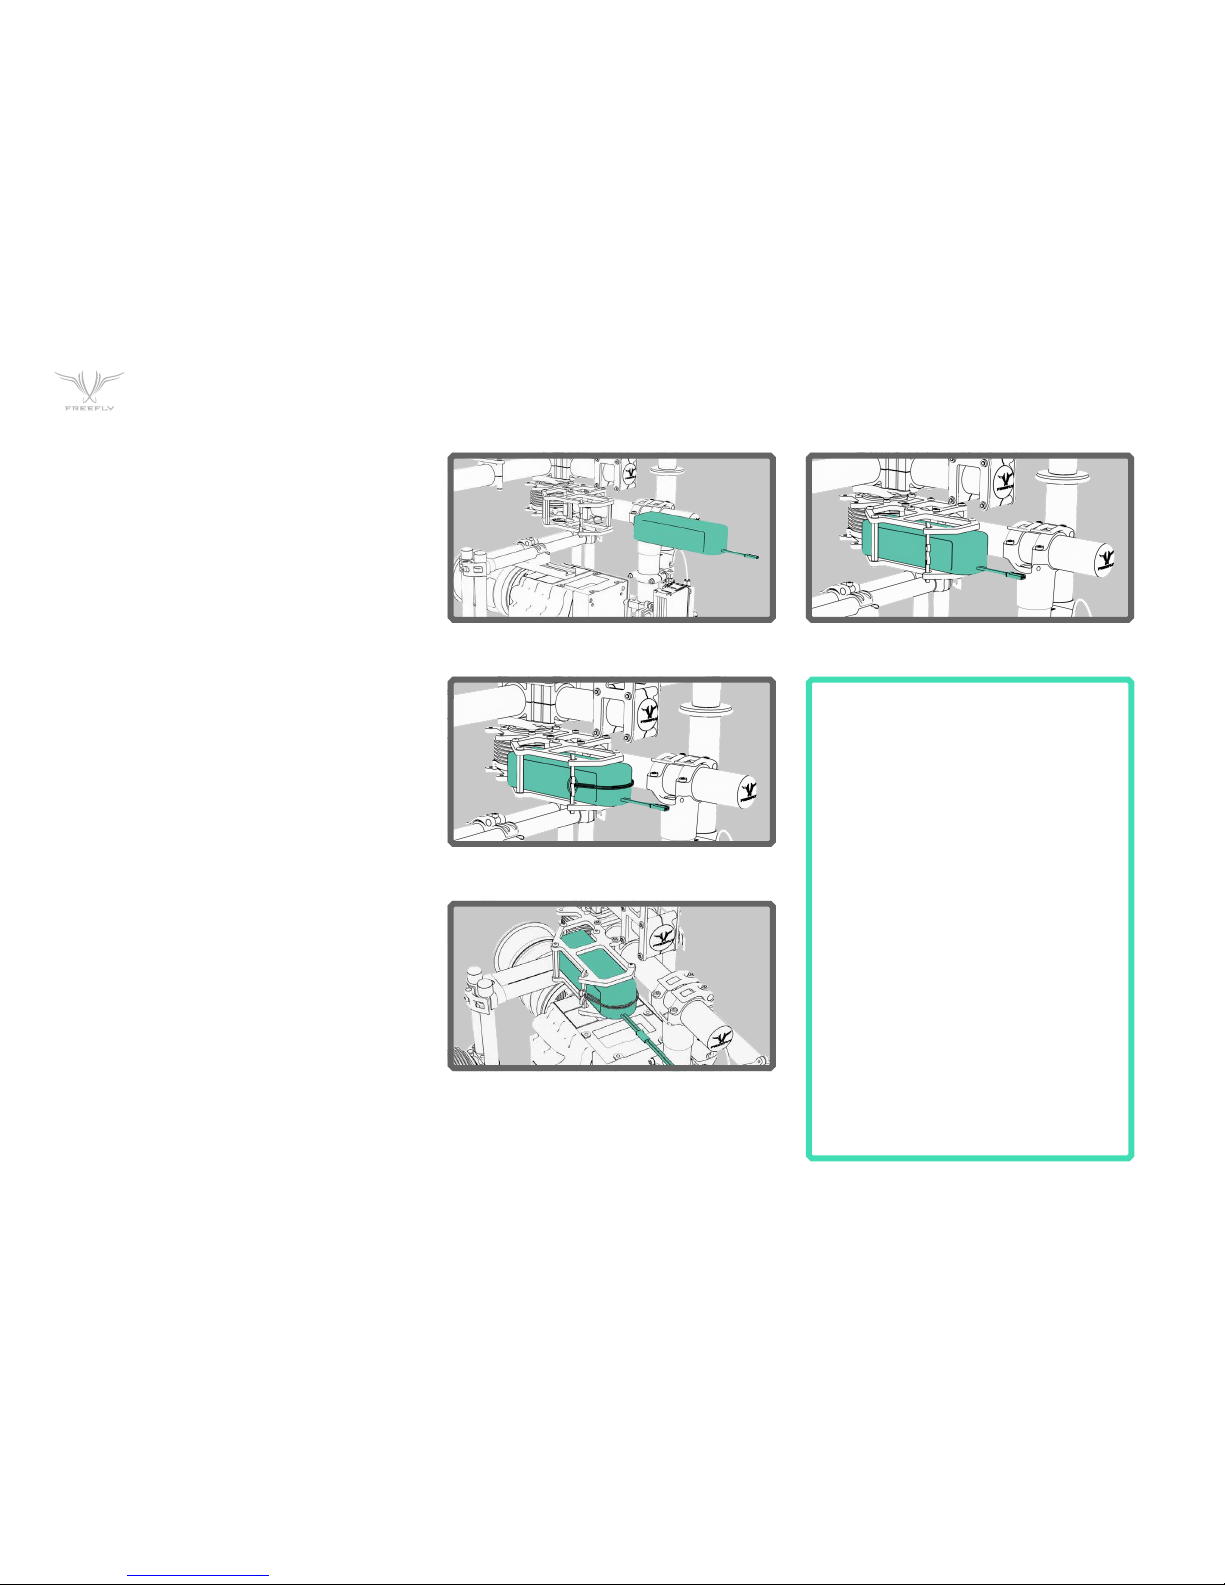
1. Insert battery into battery compartment observing proper orientation.
2. Engage battery latching mechanism.
GETTING STARTED
3. Ensure the MōVI power switch is set to “off” and
plug the battery into the power input connector
on the MōVI. Note: The battery and input
connector are keyed. Do not force the battery
and input connector together.
01-P12
MOUNTING THE
CAMERA
The MōVI uses a custom lightweight adjustable
camera plate to allow you to easily balance, install,
and remove your camera package. It is important
that you fully build your camera package prior to
installing it on the M10. Adding accessories after
balancing the M10 would necessitate re-balancing,
so it is best to install all accessories (follow focus
motors, receivers, batteries, etc.) prior to mounting
the camera to the MōVI.
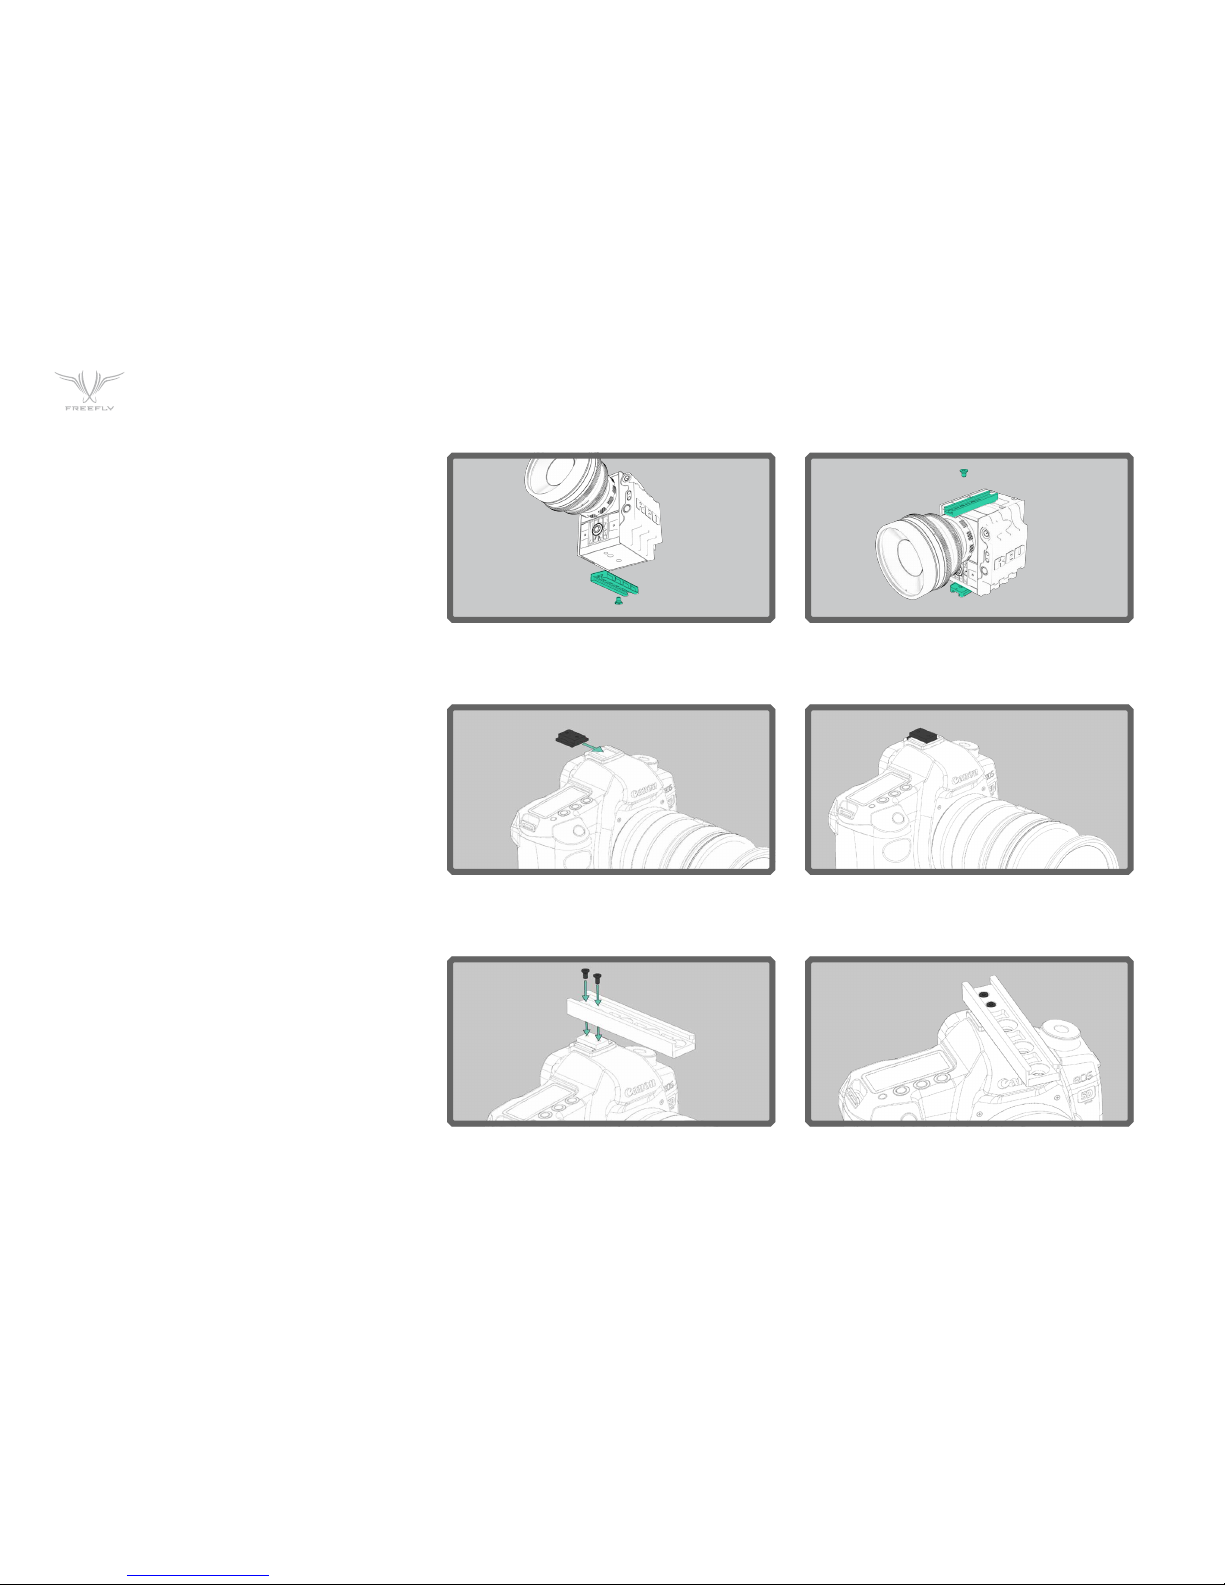
1. Attach the bottom camera rail to your camera using the provided ¼ - 20 screw. Please note that there
are multiple attachment holes in the camera rail to choose from to cater to different camera setups.
GETTING STARTED
2. Install the hot shoe adapter into the hot shoe of your camera. Note – For some cameras, you won’t use
the hot shoe adapter–top rail will attach similar to bottom rail in these cases.
3. Attach the top camera rail to the hot shoe adapter using the provided M3x6 flat head screws.
 Loading...