

Page 1
MANUAL
DVB-T USB STICK
DIGITAL TERRESTRIAL TV & RADIO RECIEVER / USB 2.0
WIN
Rev. 602
Page 2

Freecom DVB-T USB Stick
Warning !
All rights reserved. The products named in this manual are only used for identification
purposes and may be trademarks or registered trademarks of the respective companies.
This device was designed for home or office use.
This device is equipment complying with EN55022 class B.
Freecom Technologies is not liable for any damages that may occur from the use of a
Freecom system. All rights reserved. We reserve the right to upgrade our products is
keeping with technological advances.
GB
Dear customer,
The Freecom DVB-T Stick is fully compatible with DVB-T protocol for your desktop PC or
laptop use. Its tiny size design with high speed USB2.0 interface let you enjoy digital TV
programs anywhere!
It is also a Digital Video Recorder that you may record your favorite TV programs on your
hard disk either real time or scheduling. Quick setup makes it easy to use. It provides you
an immediate personal access with lots useful functions such as Channel Auto Scan,
Teletext, Electronic Program Guide, Favorite List etc. Yet, there is no need for an extra
power supply.
Freecom Technologies • Germany
www.freecom.com
© 2006 Freecom Technologies
2
Page 3

Table of Contents
Users manual
General Information ........................................................................................................... page 4
Warnings and Safety Instructions ................................................................................. page 5
How to Install
Installation Steps .................................................................................................................. page 6
Chapter 1:
Connect Freecom DVB-T Stick ........................................................................................page 7
Chapter 2:
Install Driver and Application ......................................................................................... page 8
Install Driver ...................................................................................................................page 8
Install Application ....................................................................................................... page 12
Chapter 3:
GB
DTV Software / System Introduction ........................................................................... page 17
Chapter 5:
DTV Software Introduction ..............................................................................................page 25
Chapter 6:
Trouble Shooting / Frequently Asked Questions (FAQ) ....................................... page 31
3
Page 4

Freecom DVB-T USB Stick
GB
Package Contents
• Freecom DVB-T Stick
• IR Remote Control
• Quick Installation Guide
• Terrestrial Antenna
• MCX-IEC Connector
• Manual & Application CD
System Requirements
The following hard- and software requirements must be fulfilled to ensure trouble-free
operation.
Hardware Requirements
• IBM or IBM compatible computer
• CPU: 1 GHz or above
• Memory: 128MB or more
• Sound card
Software Requirements
• OS: Windows 2000 (SP4) / XP (SP1) or higher
• Microsoft DirectX 9.0 or above
• Microsoft Media Player 7.0 or above
Important Notice: “All channels are subject to coverage and may
be changed from time to time. Reception may depend on the
type and condition of your existing aerial. Aerial upgrade may
be required. Please confirm coverage in your area.” We strongly
recommend that you install an outdoors antenna when you use
the DTV receiver indoors.
4
Page 5
General Information
Warnings and Safety Instructions
Please read and follow the below mentioned instructions. They should be observed in
order to prevent injury to the user, damage to the device and damage to property, as well
as to ensure safe use of the product. Not following these instructions may cause the unit
to malfunction.
Note:
1. Terrestrial digital wireless broadcast signal may be affected
by topography, objects and weather. This would cause a poor
signal quality. Therefore, we strongly suggest you to use a
rooftop antenna when received indoors.
2. This product is moveable but not be suitable of using in a high
speed moving environment. Please check other associated products for these requirements.
3. When you use the function of pre-recording, real time recording, or time shifting, please make sure you have enough hard
disk space to save huge recording data.
4. In order to operate properly, please follow the user manual
and suggestive setup. Improper operations may cause the system unstable or crash. Before you remove hard disk devices,
please check other related application has been closed.
GB
We reserves the right to add or delete the application and its
functions; all new release drivers and application will be mentioned in our website. We are not responsible for fürther notice.
5
Page 6

Freecom DVB-T USB Stick
GB
How to Install
Installation Steps
• Connect the Freecom DVB-T Stick to your computer.
• Install Driver
• Install DTV application
• Install DirectX 9.0 and reboot your system. (If DirectX 9.0 is already installed, you may
skip to next step)
• Restart Computer
6
Page 7
Connect Freecom DVB-T Stick
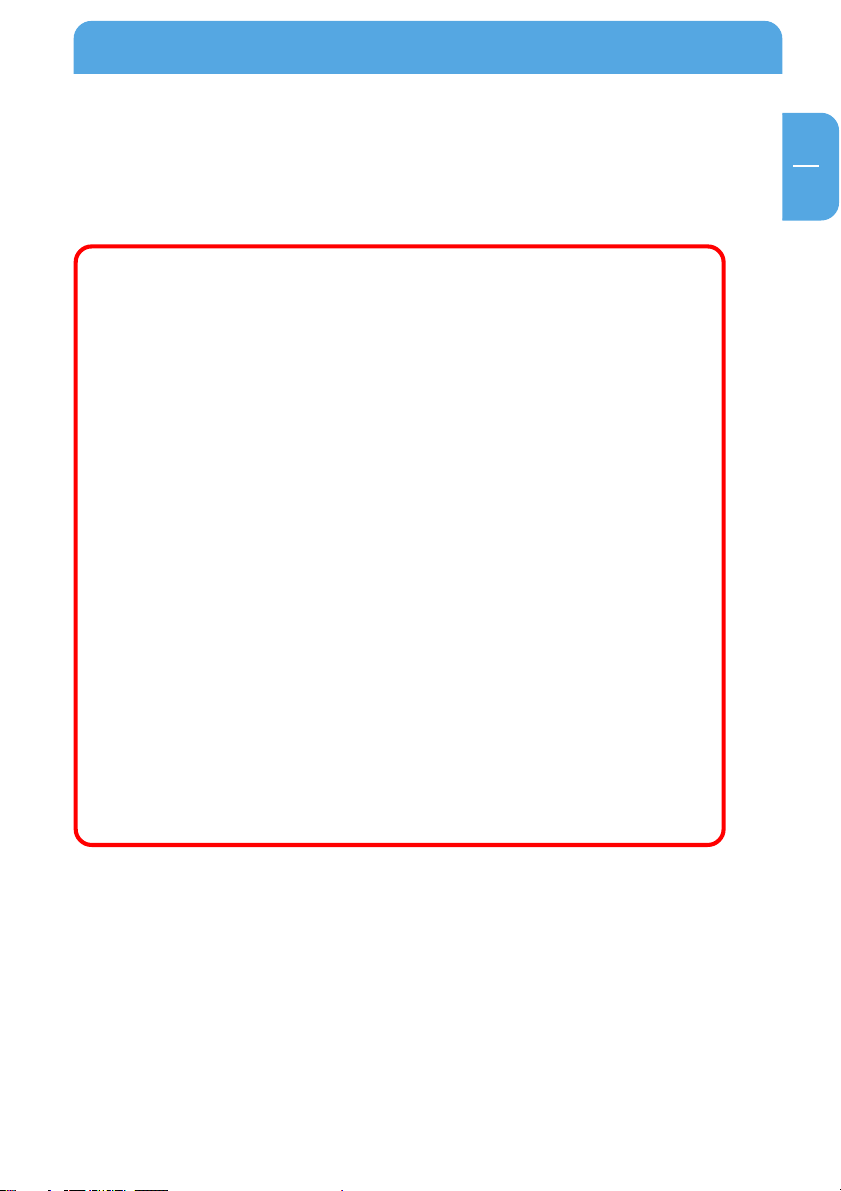
Chapter 1: Connect Freecom DVB-T Stick
Receiver to your computer
1. Connecting IEC connector to antenna.
2.Connecting antenna to DVB-T Stick Receiver
GB
1
3.Connecting DVB-T Stick Receiver to USB interface on your computer.
7
Page 8
Freecom DVB-T USB Stick
GB
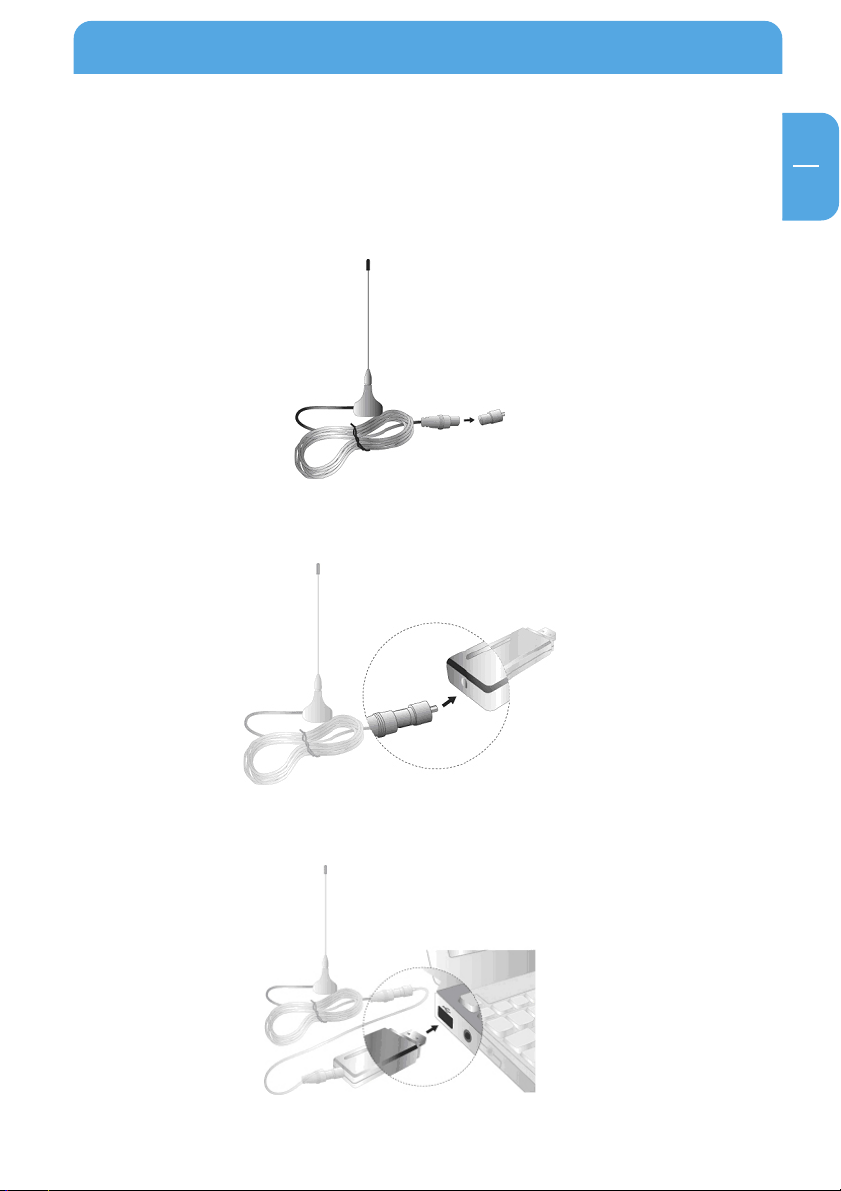
2
4. (Option:) You may need longer USB cable for the connection between PenType
Receiver and USB interface on your computer.
Note: When connecting the Freecom DVB-T USB Stick to a notebook, make sure the energy saving function is deactivated. The
energy saving function reduces CPU performance and might
influence the operation of the DVB-T USB stick.
Note: The antenna and the DVB-T USB receiver must be placed in
an appropriate position for best reception each time the DTV is
used.
Chapter 2: Install Driver and Application
2.1 Install Driver
Please connect the Freecom DVB-T Stick to your computer to start the driver installation.
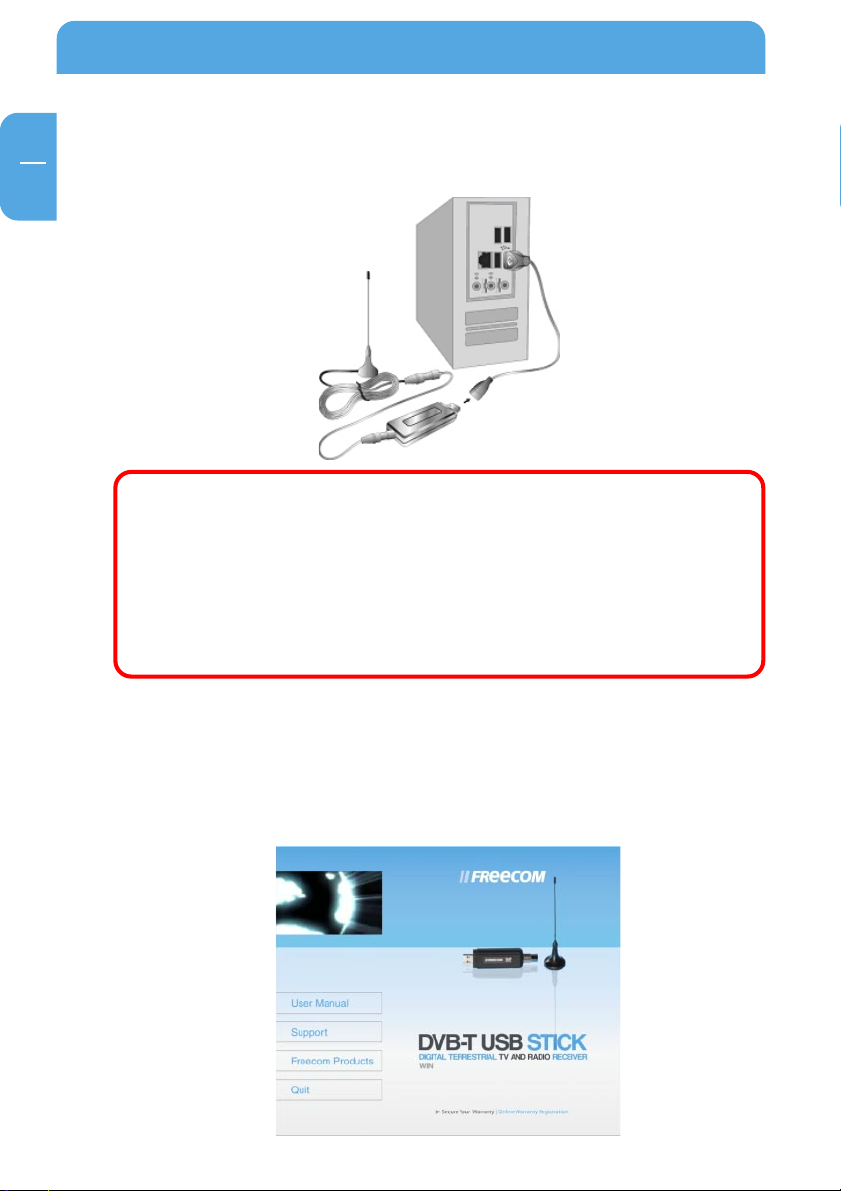
1. Insert the included CD in your CD-ROM drive.
8
Page 9
Install Driver and Application
2. Computer will detect the new hardware and Found New Hardware Wizard window
will be popped up. Please select “Install from a list or specific location (Ad-
vanced)”.
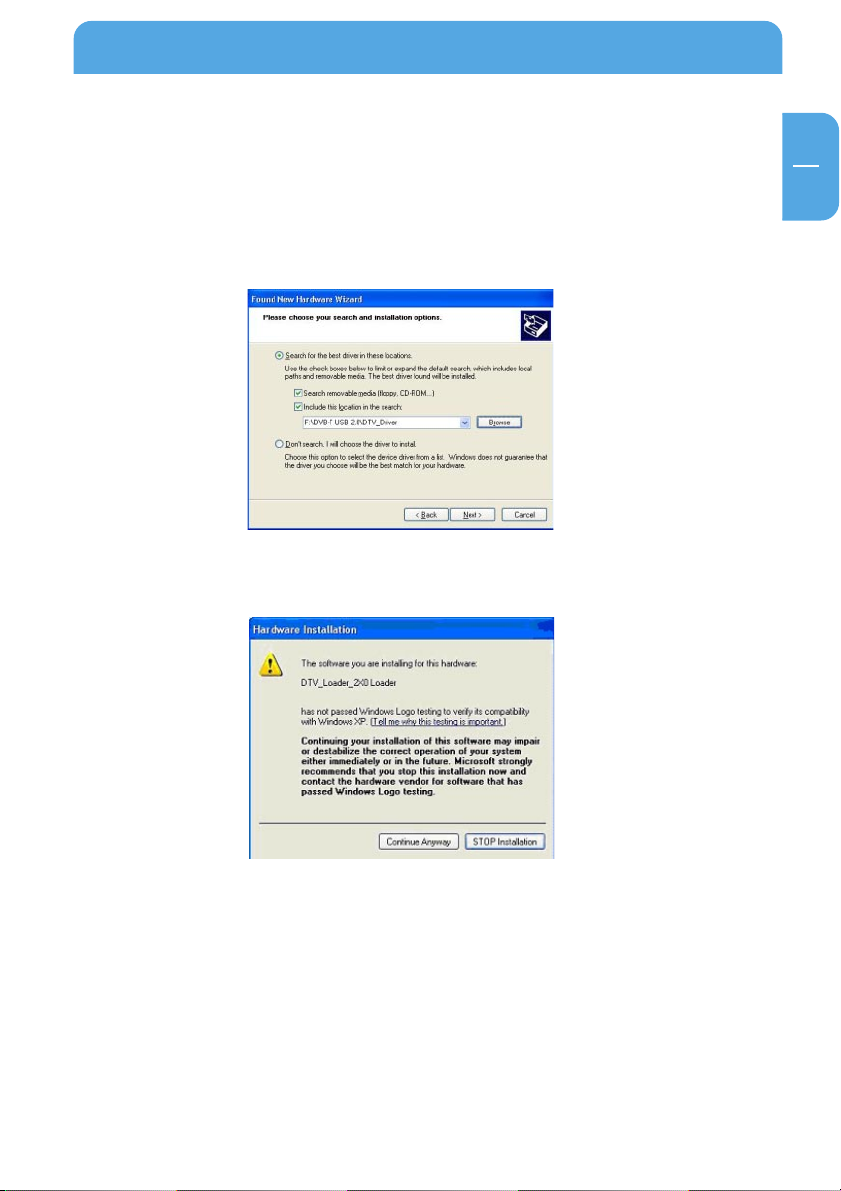
3. Please select “Search for the best driver in these locations”. You may click “Browse”
to find the driver location on CD-ROM directory. Choose “\DVB-T USB
2.0\DTV_Driver”.
4. Click “Continue Anyway” to continue
GB
2
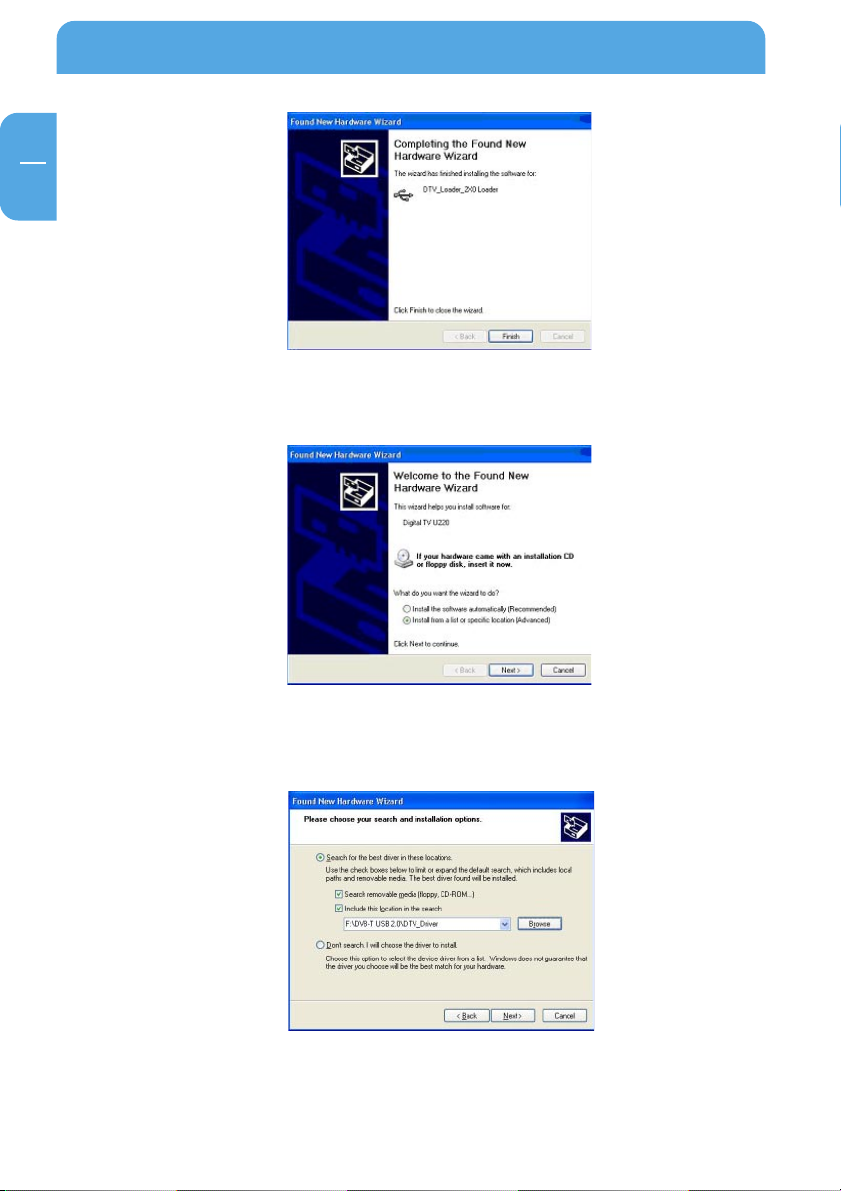
5. Click “Finish” to continue.
9
Page 10
GB
2
Freecom DVB-T USB Stick
6. Please select “Install from a list or specific location (Advanced)” then click “Next”
to continue.
7. Please select “Search for the best driver in these locations”. You may click “Browse”
to find the driver location on CD-ROM directory. Choose ““\DVB-T USB
2.0\DTV_Driver””.
8. Please click “Continue Anyway” to continue.
10
Page 11
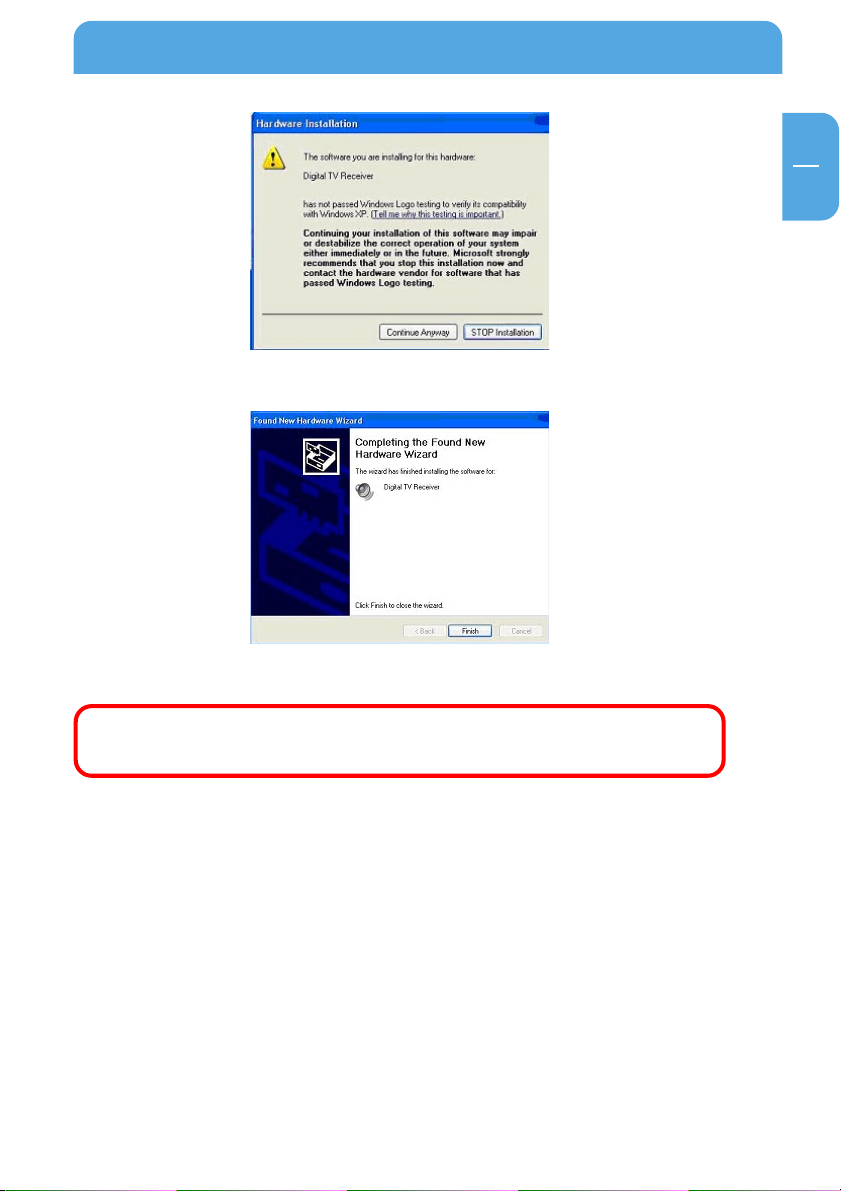
9. Click “Finish” to exit.
Install Driver and Application
GB
2
10. Installation of the application software will now start automatically.
Remark: Run the setup from the “DVB-T USB 2.0” folder on the
included CD if the installation does not start automatically.
11
Page 12

Freecom DVB-T USB Stick
GB
2
2.2 Install Application
1. Click “Next” to continue.
2. Please read the license agreement carefully then select “I agree to the terms of this
license agreement”. Click “Next” to continue.
3. Fill in user’s information in the column. Click “Next” to continue.
12
Page 13

Install Driver and Application
4. Enter product’s serial number and click “Next” to continue.
5. Select a language edition. Choose English and click “Next” to continue.
GB
2
6. This window is the original setting path and folder name. You may change it
according to personal reference. Click “Next” to continue.
13
Page 14

Freecom DVB-T USB Stick
GB
2
7. This window is the original shortcut icon and pre-setting shortcut folder. You may
change the folder name or appoint to an existing folder. Click “Next” to continue.
8. Please make sure the path and folder name is correct. Click “Next” to continue.
9. The following window indicates that the installation of DTV application is proceeding.
14
Page 15

Install Driver and Application
10. Please check “Yes, restart my computer now.” Click “Finish” to continue.
11. Click “Finish” and computer will be restarted automatically. The AC 3 installation
starts. Follow the instructions on the screen. Follow the instructions on the screen,the
application installation is done successfully.
Note: You MUST restart your computer to complete application
installation.
12. You may double check if the product drivers are installed properly. Please press Start
then right click My Computer. Click “Properties”.
GB
2
15
Page 16

Freecom DVB-T USB Stick
GB
2
13. Click “Device Manager” from Hardware tab. Find “Sound, video and game controllers” category and you may see “Digital TV Receiver” on the list. If you do not see
it. Please go back and install the drivers again.
14. If one of the drivers wasn’t installed correctly, the device will be shown with a yellow
exclamation mark in the device manager. To reinstall the driver, right-click on the
device and select “Update driver”. Install the driver again as described in chapter 2.1.
Later installation of the DVB-T application
If you uninstalled the software or cancelled the software installation, you can run the
software installation again any time by running the “Setup.exe” from the “DVB-T USB 2.0”
folder on the CD.
16
Page 17

DTV Software / System Introduction
Chapter 3: DTV Software / System Introduction
DVB-T player Software is very powerful. You can easily enjoy the high quality digital
sound and visual effect. Not only it provides the TV program, you can also use it to do the
instant digital video recording (DVR) and Scheduling Recording. With the help of the
operation of Time Shift, you won’t miss any best moment.
After you finish the installation of the software, you will find an icon “DVB-TPlayer”. Just
move the cursor and double click it to run the program.
After you run the DTV software, you can use the control panel as following.
3.1 Setup of the Digital Broadcasting program
GB
3
Due to different country or region, digital TV program has its own choice of operating
frequency channel, frequency width, transmitting parameter and frequency. The following instructions will show you environment setup.
17
Page 18

Freecom DVB-T USB Stick
GB
3
Scan Frequency:
1. Click the operating panel then choose Scan Channel tab.
2.Choose RF Frequency. You may select one of the following.
1. Country/ Area: You may choose the location where you
are.
2. All: If you can not find your location list in Country/ Area
list, you may select this option.
3. Range: You may define your own frequency range. Choose
VHF or UHF then enter its frequency range.
4. Single: If you know exact frequency of a digital program, you
may enter its frequency here.
3. Click "Start" to scan frequency based on the option of RF Frequency you select.
4. You may save all scanned channels by Click "Save as".
5. Click "OK" to exit the operating panel.
Note: Channel list will be saved as TBL file.
18
Page 19

DTV Software / System Introduction
Channel/ Frequency Sorting
You may use channel/ frequency sorting option after scan.
1. Click on “Program” and it will be shown by channel sorting.
2. Click on “Freq” and it will be shown by frequency sorting.
In addition, you may prioritize the channel list. Simply click on a channel and drag it to
where you want (move up or down).
GB
3
19
Page 20

Freecom DVB-T USB Stick
GB
3
3.2 Recording Setting
There are two ways of recording: one is real time recording and another is scheduling
recording.
1. Real time recording: when you record the program under the real time mode, the
recorded file will be saved to the default destination folder at C:\Program
Files\DTV\DVB-T USB 2.0\Capture\Video.mpg. If you want to save the program file to
a different destination, you may set up the path based on your preference.
After the above setting finished, you can click the "
watch digital programs. If you start recording, the clock on the left of the control
panel will turn red. If you wish stop the recording, please press the button “ ”.
” on the control panel when you
20
Page 21

DTV Software / System Introduction
2. Scheduling Recording: Please choose Setup. Select Record tab and check Enable
Preset. Double click on Channel column in Preset Record section.
When Record Input Window pops up, please follow the instructions below.
1. Choose a channel
2. Set recording start time and end time
3. You may have date setting options which are once, everyday and one specific day.
4. Mute speakers when recording is available when checked.
Click "OK" to continue.
GB
3
21
Page 22

Freecom DVB-T USB Stick
GB
3
5. When recording is finished, the menu will show “ok” as below.
Note: At the same period of time, you can’t record two programs
from different frequencies. Please be aware of the capacity of
the recording device. Long hours recording might exceed the
hard disk capacity.
22
Page 23

DTV Software / System Introduction
3.3 Display setup
On the display setup window, you can adjust the brightness, contrasting, and fullness
based on your own preference. Drag the mouse cursor to do the adjustments. If you want
to go back to the original setting, click "Reset".
3.4 Capture setup
GB
3
You may capture image and save it. When TV program displays, you may click button.
The image is captured and saved. You may click
to find and get your image file.
23
Page 24

Freecom DVB-T USB Stick
GB
3
3.5 Time shift Setup
If you need to leave in the middle of a program, you may start recording function by
clicking the Time-Shift button on real time. When you return, just move the scroll bar
which indicates recording status on the panel to playback the program you pre-record.
The system will continually record the program when you play until the time limit you
set. You may use Rewind, Fast-Forward or Pause function when pre-record program is
playing and press Play button to return.
24
Note: The pre-record program is temporarily saved in your hard
drive and it will be automatically removed when time is up. The
default setting is 10 minutes and you may change Time-Shift
time limit.
Page 25

DTV Software Introduction
Chapter 4: DTV Software Introduction
4.1 Control Panel
Icon Functions
Icon Function Icon Function
play
Full screen
Rewind, fast-forward
On-Line Help
Stop
Multi-channel Preview
Pause
Channel up and down
Channel recall
My favorite
Time shift
Video Recording
Photo capture
Mute
GB
4
Open saving file
System property setup
Electronic program guide
Teletext
Volume up
Volume down
Receive DVB-T
broadcasting
25
Page 26

Freecom DVB-T USB Stick
GB
4
4.2 Right Click Menu and Keyboard Shortcuts
Click the right button of the mouse when DTV application software is in playback. You
will see the function and keyboard shortcuts menu as following:
Function display Fast-link Function description
Playback Enter Playback program
Pause Space Pause the playing
Stop S Stop playing
Record R Record the on-going program
Mute M Shut down sound
Fast-forward F Fast –forward the on-going program
Rewind B Rewind the on-going program
Next Channel N Switch to next program
Previous channel P Switch to previous program
Channel recall L Switch to previous watching channel
My favorite Ctrl+M Open the favorite menu
Multi-channel browse Ctrl+W Provide multi-channel browse
(non-Syncronized)
Choice of language Ctrl+L Provide language switch
26
Time shift T Start or pause time shift function
Capture G Capture single picture as photo
Setup E Start setup function
Display control panel O Display control panel or not
Display ratio Select display ratio either 4:3 or 16:9
Image size Choice of image size 60%,100% ,150%
Full screen W Switch full screen or window
Increase volume + Increase volume
Decrease volume _ Decrease volume
Close to bar Ctrl+Z Close control panel to bar
About Ctrl+A Display DTV version information
Help H On-line help
Close Ctrl+X Close DTV playing software
Page 27

DTV Software Introduction
4.3 Functions
Channel Title Display
The current channel name will be displayed on the control panel in the language
assigned by the channel provider.
Video Recording
You can record video by clicking on
“Recording Setup” screen.
Multi-Channel Preview
Click on
To watch the program you want, select it and click “Play”.
Note: You can only preview FTA channels from the same transponder.
Capture
Click on
on the control panel to preview multi-channel at the same time.
to capture a still frame of the program you are currently watching.
. You can also schedule recordings in the
GB
4
Teletext
The application “Teletext” is a simple teletext browser. To start this function, click on
on the control panel. It only works when Freecom DVB-T Stick is running.
Electronic Program Guide(EPG)
Click on
content provider. Here you can get more information about the broadcasting programs.
on the control panel to see the electronic program guide provided by the
27
Page 28

Freecom DVB-T USB Stick
GB
4
4.4 More Functions
Mute display : When you click “Mute” button, will light up on the control panel.
Signal display : In the setting menu “ General” , choose (refresh RF information). Move
the cursor to
power consuming. We do not suggest using it if the battery is not enough in the system.
Warning ! This selection will affect some quality and function.
Don’t use it under normal circumstance. We suggest that you
turn off this function after executing the “Refresh RF information”
Recording display: When you start real-time or scheduling recording, the
control panel will turn red.
Program channel display :
on the control panel will indicates the channel of on-going playing or recording
program.
Source of display : When digital broadcasting program is playing , the control panel will
indicate its source as following
image, the control panel will indicate the file name or status as following .
, then you can see the signal receiving in motion. But it’s very
on the
. If it’s playing the recorded or selected
Volume display : When you adjust the volume, the volume icon
accordingly .
Electronic Program Menu : You may enter the program menu by choosing
on the control panel. You will receive the information of channel programs such as
programs schedule and introductions of the programs. (This function is provided by the
channel provider). You may double click on a “channel schedule” and scheduling
recording setup window will pop out.
28
will change
Page 29

DTV Software Introduction
Teletext : It is an application of words and numbers broadcasting. You may receive
program information from channel provider. Select
to start this function.
GB
4
P+/ P- Go to next/ previous page.
F+/ F- Go to next/ previous 10 pages.
M+/ M- Go to next/ previous 100 pages.
H Back to default setting
S Show subtitle
General setting function :
a. Full screen function– when the function is selected, the play window will be enlarged
to the full screen.
b. OSD function-display the selected command or function on the lower right corner
of the screen for several seconds.
c. Splash item- If this feature is selected, the screen will show a static picture when radio
channel is playing.
29
Page 30

Freecom DVB-T USB Stick
GB
4
4.5 Introduction of remote control function
Application Program
On and Off.
Mute Mode
Full Screen
Volume Control
Channel Control
Number Input
Channel Return
When using the remote control, always aim directly to the top side (logo side) of the DVBTstick. The maximum distance should not exceed 3 metres.
○○○○
30
Page 31

Trouble Shooting
Chapter 5: Trouble Shooting
This Chapter will help you to resolve the problems which you may encounter during the
installation and operation.
1. Freecom DVB-T Stick does not work properly
Driver installation might not complete. Click “Device Manager” from Hardware
tab. Find “Sound, video and game controllers” category and you may see “Digital
TV Receiver” on the list. If you do not see it. Please go back and install the drivers
again.
2. Windows cannot find Freecom DVB-T Stick
a. Check if Freecom DVB-T Stick is connected to your PC.
b. Before you launch Freecom DVB-T Stick, please wait for at least 3 seconds when
device is just plugged into the USB interface.
c. Try to restart operation system.
d. Run “Add/Remove Hardware Device” from Windows “control Panel” to install the
correct drivers.
e. Unplug the Freecom DVB-T Stick, then plug it again. Please note that the interval
between plug and unplug should be at least 3 seconds.
f. Plug Freecom DVB-T Stick into another USB port of the PC.
3. Windows cannot find the driver of DTV USB Receiver
a. Make sure the original CD-ROM is in the CD-ROM drive during the installation.
b. Please indicate the correct directory where the drivers located for Windows if
install the drivers by manual.
GB
5
4. Set up Digital TV Receiver software
a. Please run “Setup.exe” on the CD-ROM disc.
b. Follow the instruction of setup wizard for software installation.
5. Can not see any program channel when auto scan.
a. Check the cable connection between Freecom DVB-T Stick and the antenna.
b. Exit the application. Unplug the Freecom DVB-T Stick, then plug it again. Note
that the interval between plug and unplug should be at least 3 seconds. Launch
Freecom DVB-T Stick and test again.
31
Page 32

Freecom DVB-T USB Stick
GB
5
6. When error dialog box pops up or black screen appears
a. Might be resulted from poor signal quality, Freecom DVB-T Stick doesn’t receive
enough data of program or does receive wrong data. Please check the connection
between Freecom DVB-T Stick and the antenna.
b. Please check the driver of VGA card or on board VGA chip.
c. Please make sure your operation system is Microsoft Windows 2000(SP4)/ XP(SP1)
or higher.
d. Please install Microsoft DirectX9.0 and Media Player 7.0 or higher version.
7. Video is playing but Audio is failed
Please check the sound card or the volume setting.
8. Failed to play program
a. Make sure you have installed Sound Card Driver and the Sound Card is working.
b. Please note that no matter if you want to listen to the audio or not, the sound card
and its driver must be installed. Please check the signal quality and strength.
9. When playing program, audio is ok, but screen is blank. Why?
Please make sure your VGA driver and Microsoft DirectX9.0 were installed correctly.
10. DTV Mpeg2 video playback on Notebook PCs is not smooth
MPEG2 video playback consumes lots of CPU power. To get better performance,
please make sure “Power-saving” mode of the Notebook PC is disabled and the CPU
should run at its maximum frequency.
11. The Remote controller does not work. DTV USB Receiver does not
react to the key presses.
DVB-T PenType Receiver window must be the “focus” window to receive the remote
controller input. You might click on the caption of DVB-T PenType Receiver window,
then try again.
32
Page 33

Trouble Shooting
Following information is only for EU-member states:
The use of the symbol indicates that this product may not be treated as
household waste. By ensuring this product is disposed of correctly, you will
help prevent potential negative consequences for the environment and
human health, which could otherwise be caused by inappropriate waste
handling of this product. For more detailed information about recycling of
this product, please contact your local city office, your household waste
disposal service or the shop where you purchased the product.
GB
5
33
Page 34

WARRANTY (valid in Europe/Turkey only):
We thank you for purchasing this Freecom product and hope you will enjoy using it.
In order to avoid unnecessary inconvenience on your part, we suggest reading the quick install guide,
instruction manual and any additional electronic and or printed manuals. When problems occur we
have a database with Frequently Asked Questions (FAQ) on our Freecom website (www.freecom.com),
please check this site before you contact the helpdesk.
Your Guarantee
All Freecom products come with unlimited technical phone and web support. By this Guarantee, Freecom
warrants their products to be free from defects in material and workmanship for a period listed below
from the date of its original purchase. If during this period of guarantee the product proves defective
due to improper materials or workmanship, Freecom will, without charge for labour or parts, at its
sole discretion, repair or replace the product or its defective parts upon the terms and conditions set
out below.
Conditions
This guarantee will be granted only when the original invoice or sales receipt (indicating the date of
purchase, product and serial number) is presented together with the defective product and a Freecom
RMA number received from the Freecom Website or given by a Freecom Service Center. Freecom
reserves the right to refuse the free-of-charge guarantee services when the date of purchase of the
product cannot be proven. This guarantee will not apply if the RMA number is missing, the serial
number on the product has been altered, removed or made illegible.
This guarantee covers only the hardware components packaged with the product. This guarantee
covers none of the following: (a) any consumable supplied with the product, such as media or batteries; (b) damage to or loss of any software programs, data or removable storage media; (c) any damage
resulting from adaptations, changes or adjustments, which may have been made to the product,
without the prior written consent of Freecom; (d) attempted repair by any party other than authorized by Freecom and (e) accidents, lightning, water, fire or any other such cause beyond the reasonable control of Freecom.
With respect to all services provided, Freecom is not responsible for any damage to or loss of any
programs, data or other information stored on any media or any part of any product serviced. Freecom
is not liable for the consequence of business loss in case of system failure. Be sure to exclude all parts
not covered by this guarantee prior to returning the product to Freecom. Freecom is not liable for any
loss or damage to these items. If during the repair of the product the contents of the hard drive are
altered, deleted or in any way modified, Freecom is not liable whatsoever.
Repair parts and replacement products will be provided on an exchange basis and will be either new,
equivalent to new or reconditioned. All replaced parts and products become the property of Freecom
The period of guarantee for any product or part repaired or replaced in warranty shall be the balance
of the original guarantee. Repairs or replacements on product or parts out of warranty carry
months guarantee.
6 (six)6 (six)
6 (six)
6 (six)6 (six)
All Freecom products come with unlimited free technical phone and web support.
Freecom Product Warranty period
Classic & Internal Series 1 year (Two years in Europe)
FS & FX Series 1 year (Two years in Europe)
FHD Series 1 year (Two years in Europe)
FSG-xxx 1 year (Two years in Europe)
MediaPlayer-xxx 1 year (Two years in Europe)
DVB-T / USB Stick 1 year (Two years in Europe)
USB Floppy Disk Drive 1 year (Two years in Europe)
USBCard (Pro) 1 year (Two years in Europe)
USB 2.0 CardReader 1 year (Two years in Europe)
DAT & LTO Drives (retail) 3 years
DAT-S Kits 2 years
(GB)
 Loading...