

Page 1
(((Sp e a k i n g )))
User’s Guide
www.franklin.com
License Agreement
READ THIS LICENSE AGREEMENT BEFORE USING THE
ELECTRONIC REFERENCE. YOUR USE OF THE ELECTRONIC
REFERENCE DEEMS THAT YOU ACCEPT THE TERMS OF THIS
LICENSE. IF YOU DO NOT AGREE WITH THESE TERMS, YOU
MAY RETURN THIS PACKAGE WITH PURCHASE RECEIPT
TO THE DEALER FROM WHICH YOU PURCHASED THE
ELECTRONIC REFERENCE AND YOUR PURCHASE PRICE
WILL BE REFUNDED. ELECTRONIC REFERENCE means
the software product and documentation found in
this package and FRANKLIN means Franklin Electronic
Publishers, Inc.
Limited Use License
All rights in the ELECTRONIC REFERENCE remain the
property of FRANKLIN. Through your purchase, FRANKLIN
grants you a personal and nonexclusive license to use this
ELECTRONIC REFERENCE. You may not make any copies of
the ELECTRONIC REFERENCE or of the data stored therein at
the time of purchase, whether in electronic or print format.
Such copying would be in violation of applicable copyright
laws. Further, you may not modify, adapt, disassemble,
decompile, translate, create derivative works of, or in any
way reverse engineer the ELECTRONIC REFERENCE. You may
not export or reexport, directly or indirectly, the ELECTRONIC
REFERENCE without compliance with appropriate
governmental regulations. The ELECTRONIC REFERENCE
contains Franklin’s condential and proprietary information
which you agree to take adequate steps to protect from
unauthorized disclosure or use. This license is eective until
terminated by Franklin. This license terminates immediately
without notice from FRANKLIN if you fail to comply with any
provision of this license.
Please read the following safety warnings
and precautions before using your device.
Note: If this device is to be used by young
children, this User’s Guide should be read to
them by an adult and their use of the device
should be monitored. Failure to do so may
cause injury.
SCD-2100
Introduction
Congratulations on your purchase of the SCD2100, Speaking Merriam-Webster’s Collegiate®
Dictionary, 11th Edition. The SCD-2100 is
a terric resource for dening thousands
of words. Your dictionary also provides
pronunciations of headwords.
You can search for inected forms of words,
correct misspellings, and nd synonyms. Or
use your device to read about punctuation
and style, review geographic and biographic
information or nd translations of common
words. Study rules of grammar and build
your vocabulary using a personal word list,
an SAT®* word list and many fun vocabulary
building exercises and games.
*SAT is a registered trademark of the College Entrance
Examination Board, which was not involved in the
production of, and does not endorse, this product.
Battery Precautions
Your device is powered by two AAA batteries.
• Non-rechargeablebatteriesarenottobere-
charged. Never recharge batteries that come
with the device.
• Rechargeablebatteriesaretoberemoved
from the device before being charged.
• Rechargeablebatteriesareonlytobe
charged under adult supervision.
• Donotmixoldandnewbatteries.
• Onlybatteriesofthesameorequivalenttype
as recommended are to be used.
• Thesupplyterminalsarenottobeshort-
circuited.
• Donotexposebatteriestodirectheatortry
to take batteries apart. Follow the battery
manufacturer’s instructions for battery use.
• Alwaysremoveaweakordeadbatteryfrom
the device.
• Toavoiddamagecausedbyleakageofthe
battery uid, replace the battery or batteries
once every two years regardless of how much
the device has been used during that time.
• Shouldabatteryleak,thedevicemay
become damaged. Clean the battery
compartment immediately, avoiding contact
with your skin.
• Keepbatteriesoutofreachofsmall
children. If swallowed, consult a physician
immediately.
Product Care
Your device is designed to be light, compact
and durable. However, it is an electronic
device and must be treated carefully. Putting
unnecessary pressure on it or striking the
device against other objects can cause
damage.
In order to avoid damage to your device,
please:
• Keepthelidclosedwhenyouarenotusing
it. This will protect the screen from being
broken, scratched or marred in any way.
• Donotdrop,crush,bend,orapplyexcessive
force to the device.
• Donotexposeyourdevicetomoisture,
extreme or prolonged heat, cold, humidity,
or other adverse conditions. Avoid storing
it in damp, humid or wet places. It is not
waterproof.
• Cleanthedevicebysprayingamildglass
cleaner onto a cloth and wipe its surface. Do
not spray liquids directly on your device.
• Shouldthedevice’sdisplayglassbreak,
properly dispose of the product avoiding
contact with your skin, then wash your hands
immediately.
• Pleasekeepscreenprotectorsandplastic
bags away from babies and children to avoid
danger of suocation.
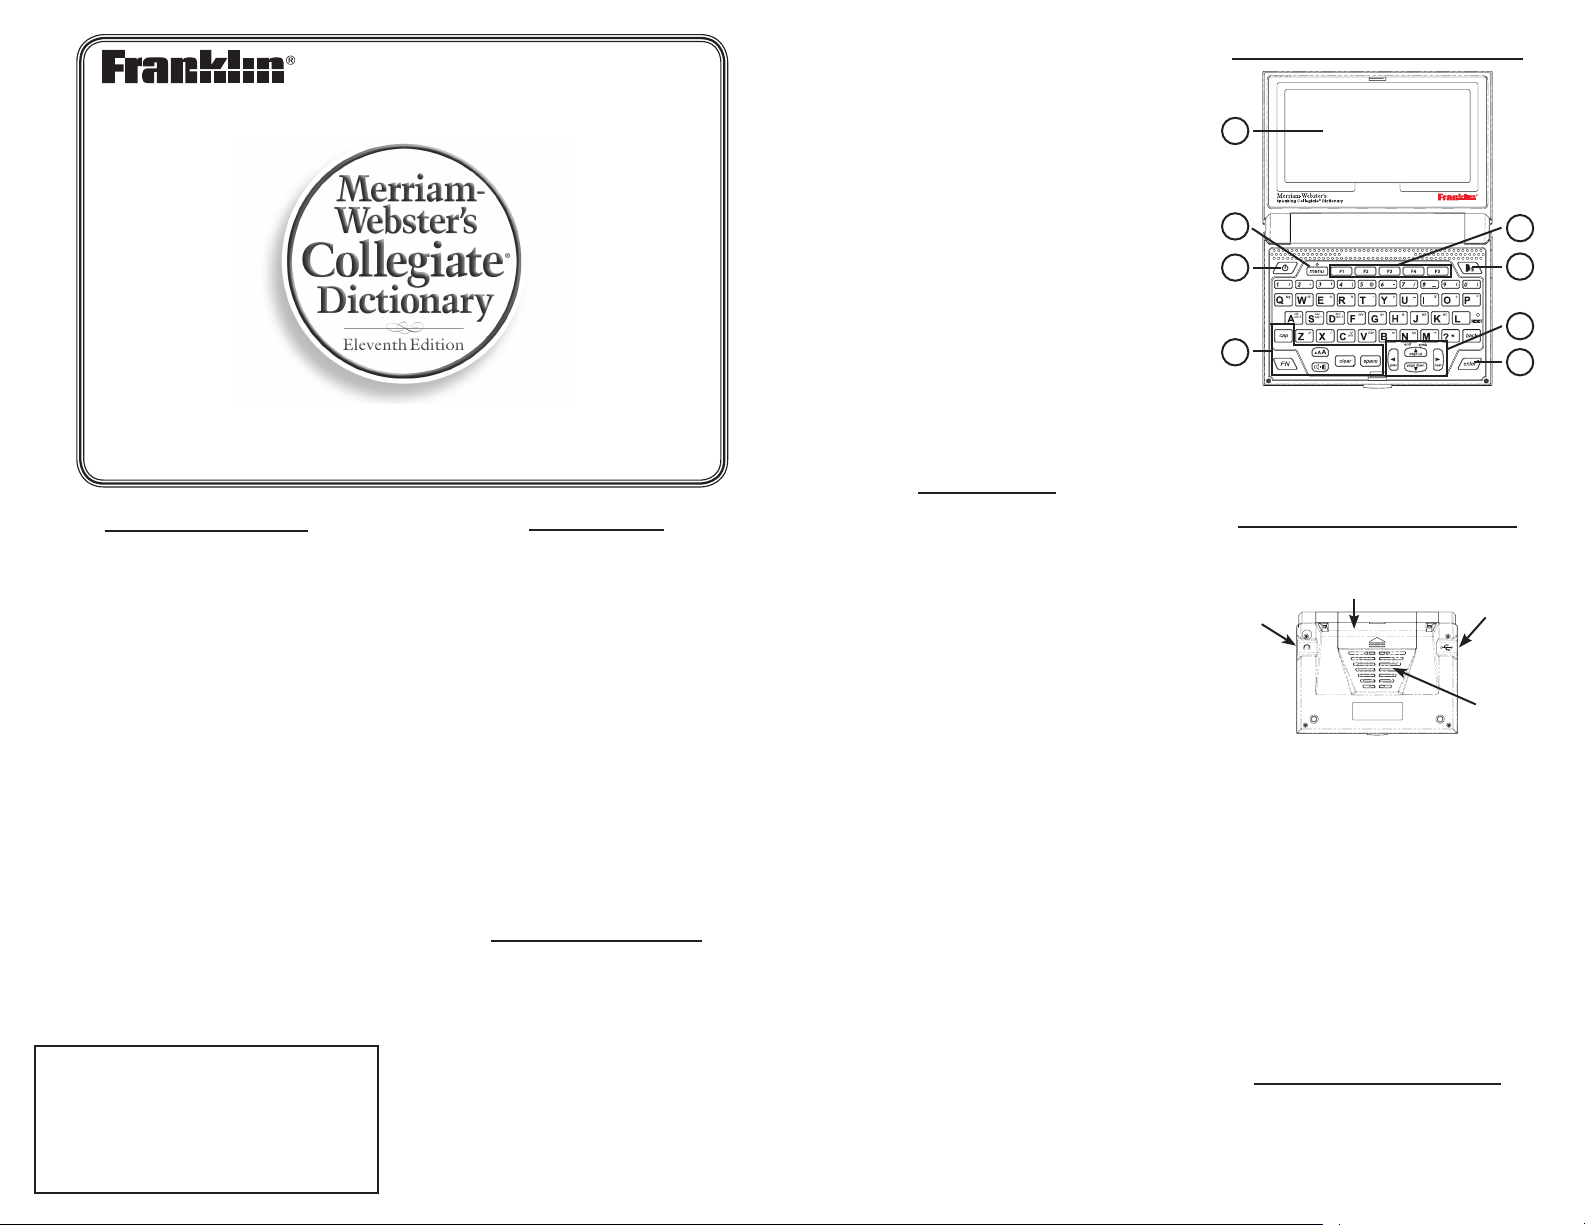
Understanding Your Device
1
2
4
7
3
5
6
8
1) Screen 2) Menu/Help Key
3) Soft Keys 4) Power Key
5) Say Key 6) Navigation Keys
7) Function Keys 8) Enter Key
Using the Special Features
Your unit is equipped with several special
features:
Battery Compartment
Headphone
Jack
USB Port
Speaker
Headphone Jack: The headphone jack is
designed for 3.5 mm, 35 ohm impedance
stereo headphones. Caution: Monophonic
headphones will not work with this unit.
USB Port: Located on the top of the device,
the USB Port is designed for a mini-USB 1.1
compatible connection. Plug the mini-USB
jack of the included cable into this port and
the standard-size USB jack into your PC to
connect your device to your PC.
Battery Compartment: The battery
compartment is located on the back of the
unit. It holds two AAA batteries.
Speaker: The speaker is located on the back
of the unit, below the battery compartment.
Replacing the Batteries
Your product is powered by two AAA batteries.
Follow these easy instructions to install or
replace them. Please have the new batteries
at hand before you remove the old ones.
Page 2

1. Turn your product o and turn it over.
AAA
AAA
2. Open the battery cover on the back of
your unit by pushing in the direction of
the arrow.
3. Remove the old batteries.
4. Install the batteries following the +/markings in the battery compartment.
Important: Be sure that the batteries are
installed correctly. Wrong polarity may
damage the unit.
5. Replace the battery cover.
Warning: If the batteries wear-out completely
or if you take more than a few seconds while
changing the batteries, any information that
was entered in the built-in books may be
erased. You should always keep written copies
of your important information.
Resetting Your Product
If the keyboard fails to respond, or if the
screen performs erratically, perform a system
reset by following the steps below.
1. Hold CLEAR and press .
If nothing happens, try Step 2.
2. Use a paper clip to gently press the reset
button on your unit.
The reset button is recessed in a pin-sized
hole on the back of your device.
Warning! Pressing the reset button with
more than light pressure may permanently
disable your product. In addition, resetting
the product erases settings and information
entered in its built-in books.
Key Guide
Soft Keys
Soft Key functions are represented by the
labels displayed along the bottom of the
screen. To perform a Soft Key function,
press the - key at the top of the
keyboard that corresponds to the label on the
screen that you want to select. These labels
change to reect the dierent functions
available in the various books and exercises in
this device.
For example, in the main menu, the following
Soft Keys are available:
BOOKS Displays the Books menu.
LEARN Displays the Learn menu.
EXER Displays the Exercises menu.
GAMES Displays the Games menu.
TOOLS Displays the Tools menu.
Please refer to the specic topics in this User’s
Guide to learn the function of any available
Soft Keys.
Function Keys
Turns the product on or o.
Goes to the main menu. With FN,
displays a help message.
Speaks a word.
Shifts to type capital letters.
Shifts to allow prev, next, page up,
page down, and in combination
with the number keys, types special
characters.
Clears or cancels the current
operation and reverts to the last
menu, prompt or screen. Goes to
the word entry screen in any book
that has one. Clears the calculator.
Backs up, erases a letter, or turns o
the highlight at an entry.
Enters a word, selects an item, or
begins a highlight in an entry.
At a word entry screen, types a ? to
stand for a letter in a word.
While in text, cycles through
the available font sizes (small,
medium, large).
Displays the volume bar. Press
or to adjust it.
At entry screens, types a space.
Combination Keys*
+ Pages up or down.
or
+ At a dictionary entry, displays the
or
previous or next entry.
+ At a menu, goes to the rst or last
or
menu item. At an entry, goes to the
start or end of the entry.
+ Types the special character
0-9
shown on the number key.
+ Displays a menu of special
characters, including: ! @ # $ % ^
& * ( ) – / \ ; : ‘ “ , . ? _ = ¡ ¿ [ and ].
+ Displays a help message.
+ At a word entry screen, types an
asterisk to stand for a series of
letters in a word.
*Hold the rst key while pressing the second.
Direction Keys
Moves up ( ), down ( ), left ( ),
or right ( ).
In menus and dictionary entries,
pages down.
For Your Information
Follow the Arrows ✓
The ashing arrows on the right of the screen
show which arrow keys you can press to
move around menus or view more text.
Help is Always at Hand ✓
You can view a help message at any screen by
pressing FN and then pressing MENU. Press
or to read. To exit help, press BACK.
Using the Main Menu
Use the main menu to quickly take you to
dierent books and exercises in your device.
The main menu contains ve tabs: Books,
Learn, Exercises, Games and Tools. Use and
to move to another tab. Use and to
highlight the option you want and press
ENTER to select it. You can also go directly to
a tab by pressing the tab’s respective Soft Key.
Understanding the Menus
The Books tab enables you to look up
denitions, thesaurus entries, information
about English usage, punctuation, style, signs,
symbols and tables, notable quotations, and
translations of common words.
The Learn tab enables you to access My
Vocabulary List, a personal dictionary, and
read grammar lessons. You can also access the
SAT® Word List.
The Exercises tab allows you to access
Speaking Spelling Bee and Flashcards. You can
try both exercises using English words saved
to My Vocabulary List and those found in the
SAT® Word List.
The Games tab allows you to access the
twelve games included in your device: Word
Train, Hangman, Anagrams, Word Builder,
Jumble, 1 and 2 player Link Four, Letris, Letter
Poker, Word Blaster, Word Dozer and Word
Deduction. You can also adjust the game
settings.
The Tools tab allows you to access a
demonstration and tutorial of how this device
works. You can also adjust the device settings.
Use this menu to access a phone book,
schedule, memo book, class schedule, timer,
stopwatch, clock, calculator, metric converter
and currency converter.
Viewing a Demonstration
or Tutorial
1. Press MENU.
2. Press TOOLS.
You can also press or until you reach the
Setup menu.
3. Press to highlight either Tutorial or View
Demo and press ENTER.
To stop the demonstration or exit from the
Tutorial and return to the Tools menu, press
CLEAR.
Changing the Settings
When using this device, you can activate
the Learn a Word feature, adjust the screen
contrast, the shuto time, and the type size.
You can also set up the time, date and cities
displayed in the clock.
1. Press MENU.
2. Press TOOLS.
You can also press or until you reach the
Tools menu.
3. Settings will be highlighted. Press ENTER
to select it.
4. Press or to move to Shuto,
Contrast, Type Size, Learn a Word or Time
Setup.
Shuto determines how long your product
stays on if no key is pressed.
Page 3

Contrast determines how dark or light the
screen is.
Type Size determines how large or small the
text is in the device.
Learn a Word determines whether or not
you see a word every time you turn on your
device.
Time Setup establishes the time, date and city
settings for the clock.
Note: To reset your device to its default
settings, press FN and then press CLEAR. The
Organizer password is not erased.
5. Press or to change the setting.
Your changes are automatically saved.
Note: At Time Setup, pressing opens a
secondary menu of options. Please see
“Setting the Time and Date” for more
information.
6. Press ENTER when done.
Press CLEAR or CLOSE to return to the Tools
menu.
Learn a New Word ✓
Your dictionary comes with a Learn a Word
feature to help you increase your vocabulary.
Each time you turn your dictionary on, you
can see a random headword.
Setting the Time and Date ✓
When is at Time Setup, press to open a
sub-menu of options for setting up the clock.
1. Press MENU.
2. Press TOOLS.
3. Settings is highlighted. Press ENTER to
select it.
4. Press to move to Time Setup and
then press ENTER.
5. Press or to move to Date, Time,
Home City, World City, Home City DST,
World City DST, or Time Format.
Date sets the date for your home city.
Time sets the time for your home city.
Home City allows you to select the major
city or region closest to your home.
World City allows you to select a world city
or region that you want to monitor.
Home City DST sets daylight saving time
(DST) for your home city on or o.
World City DST sets daylight saving time
(DST) for your world city on or o.
Time Format determines whether you use
a 12- or 24-hour clock.
6. Press or to open a pop-up box.
For Date and Time, press or to move
between the elds. Press or to change
them.
For Home City and World City, press or
to highlight a city. You can also type a
letter to go directly to that part of the list.
For Home City DST, World City DST and
Time Format, pressing or changes and
saves the setting.
7. Press ENTER to save the setting.
Press BACK to exit without saving.
8. Press CLOSE when done.
Finding Dictionary Entries
Use the Merriam-Webster’s Collegiate®
Dictionary, 11th Edition to look up denitions.
1. Press MENU.
2. Press BOOKS.
3. M-W’s 11th Collegiate Dictionary is
highlighted. Press ENTER to select it.
4. Begin typing a word (e.g., intuition).
As you type letters, the rst word in the book
that matches the letters you type moves to
the top of the word list. You may not have
to type the entire word in order to nd the
one you want. In this example, note that
“intuition” appears on the screen after you
type “intu”.
5. When the word you want is on the screen,
press until the word is highlighted.
Or you can continue typing letters until the
word is complete and the matching word is
automatically highlighted.
To erase a letter, press BACK. To type a
capital, press CAP and then press a letter key.
Press... To...
hear the highlighted word
pronounced
THES look up the highlighted word’s
thesaurus entry
LIST add the highlighted word to My
Vocabulary List
TRANS look up translations of the
highlighted word
6. Once the word you want is highlighted,
press ENTER to look it up.
Press or SPACE to scroll.
Press to hear a headword pronounced.
7. Press FN and then press or to view the
next or previous entry.
8. Press CLEAR when done.
Press MENU to go to the main menu.
Understanding Denitions ✓
Entries may consist of headwords, parts
of speech, and denitions. Other forms of
the word may follow the headword. After
the denition, you may see a list of usage
examples.
Misspelling Words ✓
If you enter a misspelled word, a list of
corrections appears. Highlight the word you
want and then press ENTER to see its entry.
Viewing Multiple Entries ✓
If a search nds more than one matching entry
you can easily move back and forth between
the matches. Press FN and then press or
to go to the previous or next matching entry.
Understanding Confusables ✓
Confusables are homonyms, homophones
and spelling variants that are easy to confuse,
e.g. board, bored. If the word you looked up is
a confusable, the CONF Soft Key is displayed.
Press CONF to view the confusables.
Hearing Words
This dictionary can pronounce the words that
appear on almost any screen – in denitions,
spell correction lists, My Vocabulary List, and
games. When you want to hear how a word is
pronounced, just highlight it and press .
To adjust the volume, rst press . Then
press or to adjust it higher or lower.
You can also plug headphones into the
headphone jack which is located on the right
side of the device when looking at the screen.
Try this example.
1. Press MENU.
2. Press BOOKS.
3. M-W’s 11th Collegiate Dictionary is
highlighted. Press ENTER to select it.
4. Type a word (e.g., ptarmigan).
5. Press to hear it pronounced.
6. Press ENTER to see its denition.
7. Press to hear the headword
pronounced.
8. Press ENTER to start the highlight.
9. Use the arrow keys to move the highlight
to a word you want to hear.
10. Press to hear the highlighted word
pronounced.
11. Press CLEAR when done.
Using the Thesaurus
Use the Franklin Thesaurus to nd synonyms,
antonyms and other information about a
word.
1. Press MENU.
2. Press BOOKS.
3. Use or to highlight Franklin Thesaurus,
then press ENTER.
4. Begin typing a word (e.g., complete).
As you type letters, the rst word in the book
that matches the letters you type moves to
the top of the word list. You may not have
to type the entire word in order to nd the
one you want. In this example, note that
“complete” appears on the screen after you
type “complet”.
5. When the word you want is on the screen,
press until the word is highlighted.
Or you can continue typing letters until the
word is complete and the matching word is
automatically highlighted.
To erase a letter, press BACK. To type a
capital, press CAP and then press a letter key.
Press to hear the word you typed
pronounced.
6. Press ENTER to view the thesaurus entry.
Press or SPACE to scroll.
Press to hear a headword pronounced.
7. Hold FN and press or to view the next
or previous entry.
8. Press CLEAR when done.
Press MENU to go to the main menu.
Understanding Thesaurus Entries ✓
A thesaurus entry consists of a group of
synonyms, antonyms and classmates.
Synonyms are words that have similar
meanings, e.g. happy/joyous. Antonyms are
words that have the opposite meaning of the
word being dened, e.g. happy/ miserable.
Classmates are words that are related in
some way to the word being dened, e.g.
triangle/triangle; castanets; cymbal; drum;
glockenspiel;....
Highlighting Words
Another way to look up words is by
highlighting them in entries or word lists.
You can then nd their denitions, thesaurus
entries, or add them to My Vocabulary List.
1. At any text, press ENTER to start the
highlight.
To turn the highlight o, press BACK.
2. Use the arrow keys to move the highlight
to the word you want.
Press... To...
ENTER or DICT dene the word
hear the word pronounced
THES view the word’s thesaurus
entry
LIST add the word to My
Vocabulary List
TRANS look up translations of the
word
Page 4

Note: Not all Soft Key functions are available
in all locations.
3. Press CLEAR when done.
Press MENU to go to the main menu.
Finding Letters in Words
If you are uncertain about how to spell a
word, type a question mark (?) in place of each
unknown letter. To nd prexes, suxes, and
other parts of words, type an asterisk (✽) in a
word. Each asterisk stands for a series of letters.
Note: If you type an asterisk at the beginning
of a word, it may take a little while to nd the
matching words.
1. Go to any word entry screen.
You can access a word entry screen by
selecting M-W’s 11th Collegiate Dictionary,
Franklin Thesaurus, or 5 Language Translator
from the Books menu.
2. Type a word with ?’s and ✽’s.
To type an asterisk, hold down CAP and press
.
3. Press ENTER.
4. Press to move the highlight to the word
you want and press ENTER to view its
entry.
5. Press CLEAR when done.
Press MENU to go to the main menu.
Reading About English Usage
This device contains a book to help you
review and learn common rules of English
usage.
1. Press MENU.
2. Press BOOKS.
3. Use or to highlight M-W’s Concise
English Usage, then press ENTER.
4. Use or to highlight the topic you want
and press ENTER.
Use or to highlight a sub-topic, if needed,
and press ENTER.
5. Press SPACE or to scroll.
6. Press CLEAR when done.
Press MENU to go to the main menu.
Reading About
Punctuation and Style
This device contains a book to help
you review and learn common rules of
punctuation and style.
1. Press MENU.
2. Press BOOKS.
3. Use or to highlight M-W’s Guide to
Punctuation & Style, then press ENTER.
4. Use or to highlight the topic you want
and press ENTER.
Use or to highlight a sub-topic, if needed,
and press ENTER.
5. Press SPACE or to scroll.
6. Press CLEAR when done.
Press MENU to go to the main menu.
Using Signs, Symbols
and Tables
This dictionary contains over 20 tables of
useful information about science, geography,
and other elds of knowledge.
To view a table, do the following:
1. Press MENU.
2. Press BOOKS.
3. Use or to highlight M-W’s Signs,
Symbols and Tables, then press ENTER.
4. Press or to highlight the topic you
want.
You can also type a letter to go to the rst
topic beginning with that letter. For example,
type st to highlight Stamps and stamp
collecting.
5. Press ENTER to view its entry.
Press or if necessary, to highlight the subtopic you want and then press ENTER. Press
BACK to return to the list.
Press SPACE or to scroll.
6. Press CLEAR when done.
Press MENU to go to the main menu.
Finding Quotations
This dictionary contains a book of notable
quotations, that you can nd by author,
subject or work.
1. Press MENU.
2. Press BOOKS.
3. Use or to highlight M-W’s Dictionary of
Quotations, then press ENTER.
4. Press or to highlight the search option
you want.
Search by Author displays a list of authors,
arranged alphabetically.
Search by Subject displays a list of subject,
arranged alphabetically.
Search by Work displays a list of published
works, arranged alphabetically.
5. Press ENTER.
6. Press or to highlight the author,
subject or work you want.
Press SPACE to scroll one page at a time. You
can also type a letter to go to the rst item
beginning with that letter. For example, in
the authors list, type cs to highlight C.S. Lewis.
7. Press ENTER.
Note: If multiple quotes exist for an author,
subject or work, press or to highlight the
quote you want and then press ENTER.
Press SPACE or to scroll.
8. Press CLEAR when done.
Press MENU to go to the main menu.
Using the
5-Language Translator
Use the 5-language translator to translate
words to and from English, Spanish, French,
German, and Italian.
1. Press MENU.
2. Press BOOKS.
3. Use or to highlight 5 Language
Translator, then press ENTER.
The input language is English by default.
Press a language’s respective Soft Key to
change the input language.
4. Begin typing a word (e.g., place).
As you type letters, the rst word in the book
that matches the letters you type moves to
the top of the word list. You may not have to
type the entire word in order to nd the one
you want. In this example, note that “place”
appears on the screen after you type “pl”.
5. When the word you want is on the screen,
press until the word is highlighted.
Or you can continue typing letters until the
word is complete and the matching word is
automatically highlighted.
To erase a letter, press BACK. To type a
capital, press CAP and then press a letter key.
5. Press ENTER to view the translations.
Press SPACE or to scroll.
6. Press CLEAR when done.
Press MENU to go to the main menu.
Using My Vocabulary List
You can save up to 100 words in My
Vocabulary List for personal study or review.
My Vocabulary List is saved between sessions
unless your product is reset.
Adding Words from the Learn
Menu
1. Press MENU.
2. Press LEARN.
3. My Vocabulary List will be highlighted.
Press ENTER to select it.
4. Press ADD.
5. Type a word and then press ENTER.
Note: If the word you typed is not found in
any dictionary on the device you see a list
of possible corrections.
6. Press CLOSE when done.
Adding Words from the
Dictionary
You can add words to My Vocabulary List from
any dictionary or thesaurus in your device.
1. Press MENU.
You see the Books menu.
2. Use or to select a dictionary or
thesaurus and then press ENTER.
3. Type the word you want to look up
and add to your word list (for example,
poignant).
4. Press LIST.
Add “poignant” to word list?, Go to My
Vocabulary List, and Cancel appear in a
menu. Press or to highlight the option
you want and press ENTER. A message will
conrm if your entry was added.
You can also press ENTER to view the
dictionary or thesaurus entry and then
press LIST to see your options.
5. Press CLEAR when done.
Viewing My Vocabulary List
1. Press MENU.
2. Press LEARN.
3. My Vocabulary List will be highlighted.
Press ENTER to select it.
The number of entries appears at the top
right of the screen.
4. Press or to highlight an entry.
You can also type the rst few letters of a
word to go directly to that part of the list.
5. Press ENTER to view its denition.
6. Press CLOSE when done.
Deleting Words
1. Press MENU.
2. Press LEARN.
3. My Vocabulary List will be highlighted.
Press ENTER to select it.
The number of entries appears at the top
right of the screen.
4. Press or to highlight an entry.
You can also type the rst few letters of a
word to go directly to that part of the list.
5. Press DELETE to remove the highlighted
entry.
You are asked to conrm the deletion. Yes
is highlighted. Press ENTER to delete the
word. Press to highlight No and then
press ENTER to cancel the deletion.
6. To delete all words, press DEL ALL.
Page 5

You are asked to conrm the deletion. No
is highlighted. Press ENTER to cancel the
deletion. Press to highlight Yes and then
press ENTER to erase the list. Note: Only
the current list is erased.
7. Press CLEAR when done.
Reading the Grammar Guide
Your device includes an outline of English
grammar topics such as parts of speech,
phrases, clauses, the correct usage of
punctuation, and so on.
1. Press MENU.
2. Press LEARN.
3. Press or to highlight Grammar Guide
and then press ENTER.
Each major section is composed of topics and
sub-topics.
4. Press or to highlight the topic you
want to study and then press ENTER.
5. If necessary, highlight the sub-topic you
want and press ENTER.
6. Press SPACE or to read.
If a topic contains a quiz to help you review
the rules described in that topic, the QUIZ
Soft Key will be displayed. Press QUIZ to
begin the quiz. Follow the instructions on the
screen to complete the quiz. To exit the quiz,
press CLOSE.
7. Press FN and then press or to view the
next or previous topic.
8. Press BACK to return to the list of topics.
9. Press CLEAR or MENU when done.
Using the SAT® Word List
The SAT® Word List is available to you to review
and learn English words like those you might
nd on the Scholastic Aptitude Test.
1. Press MENU.
2. Press LEARN.
3. Press or to highlight SAT® Word List,
then press ENTER.
Press or to scroll through the SAT® Word
List. You can also type a letter to go to the
rst word beginning with that letter. For
example, type gre to see gregarious.
Press ENTER at any word to view its denition.
Press BACK to return to the list.
Using Exercises
Using Exercises, you can test your spelling and
improve your vocabulary.
Speaking Spelling Bee
1. Press MENU.
2. Press EXER.
You can choose My Speaking Spelling Bee
which uses words from My Vocabulary List or
SAT® Speaking Spelling Bee which uses words
from the SAT® Word List.
3. Press or to highlight the one you want,
then press ENTER.
A word will be pronounced for you to spell.
To hear the word again, press .
4. Type in the word you just heard and press
ENTER to see if you spelled it right.
Press HINT to ash the word on the screen.
Press QUIT to reveal the word.
5. Press DEFINITION to see the denition of
the word.
Press BACK to return to Speaking Spelling Bee.
6. Press NEW for a new word.
7. Press END when done.
Flashcards
1. Press MENU.
2. Press EXER.
You can choose My Flashcards which uses
words from My Vocabulary List or SAT®
Flashcards which uses words from the SAT®
Word List.
3. Press or to highlight the one you want,
then press ENTER.
A word will appear on the screen for you to
study or dene. If needed, press DEFINITION
to see the denition. Press BACK to return to
Flashcards.
4. Press NEW for a new word.
5. Press END when done.
Playing The Games
You have twelve fun games to choose from.
Changing Game Settings
Before you play, you can choose the source of
the words or the skill level.
1. Press MENU.
2. Press GAMES.
3. Game Settings is highlighted. Press ENTER
to select it.
4. Use or to move to Game Words or
Skill Level.
Game Words chooses the source of the words:
M-W’s 11th Collegiate Dictionary, SAT® Word
List, or My Vocabulary List.
Skill Level determines how easy or dicult a
game is.
5. Use to open the drop-down menu.
6. Press or to highlight the option you
want and then press ENTER.
7. Press BACK to return to the Games menu.
Selecting a Game
In the Games menu, use or to move the
highlight to the game of your choice and
press ENTER.
Getting Help in the Games
During any game you can read instructions by
pressing HELP.
You can get a hint by pressing HINT or reveal
the game word by pressing QUIT. Note: If you
reveal the game word, you lose the round.
Using Phonebook,
Schedule and Memo
Adding Entries
1. Press MENU and then press TOOLS.
2. Press or to select Phone Book, Schedule
or Memo and then press ENTER.
3. Press NEW.
4. Enter the appropriate information in the
available elds.
Press or ENTER to advance to the next
eld.
To erase a letter, press BACK.
To type a capital, hold CAP and press a letter
key.
To type a number, press a number key.
To enter a special character (if permitted),
press FN and then press a number key. You
can also press FN and then press to
view a menu of special characters. Use
the direction keys to select one and press
ENTER.
In schedule or memo records, press
when required to open a pop-up menu. In
schedule records, this includes selecting
the type of event, the time of the event
and whether or not to set an alarm. In
memos, this includes selecting a date.
Use the navigation buttons to select your
settings and then press ENTER.
5. When done, press SAVE to add the entry.
Press CLOSE to exit without saving the
entry. You are asked to conrm the exit. Yes
is highlighted. Press ENTER to exit without
saving. Press to highlight No and then
press ENTER to cancel the exit.
Viewing Entries
1. Press MENU and then press TOOLS.
2. Press or to select Phonebook, Schedule
or Memo and then press ENTER.
3. Press or to select an entry.
4. Press ENTER to view the selected entry.
5. Press or to scroll through the available
elds.
If a eld contains too much information than
can t on the screen, it will display in a popup box while that eld is highlighted.
Press EDIT or DELETE to edit or delete the
current entry.
Press CLOSE to exit.
Editing Entries
1. Press MENU and then press TOOLS.
2. Press or to select Phonebook, Schedule
or Memo and then press ENTER.
3. Press or to select an entry.
4. Press EDIT to edit the selected entry.
5. Make your changes just as you would
when adding an entry.
Press or ENTER to advance to the next
eld.
Press or to move the cursor. To erase a
letter, press BACK.
6. Press SAVE when done.
Press CLOSE to exit without saving any
changes.
Deleting Entries
1. Press MENU and then press TOOLS.
2. Press or to select Phonebook, Schedule
or Memo and then press ENTER.
3. Press or to select an entry.
4. Press DELETE to remove the selected
entry.
You are asked to conrm the deletion. No
is highlighted. Press ENTER to cancel the
deletion. Press to highlight Yes and then
press ENTER to delete the word.
5. To delete all entries, press DEL ALL.
You are asked to conrm the deletion. No
is highlighted. Press ENTER to cancel the
deletion. Press to highlight Yes and then
press ENTER to erase the list.
Using a Password
You can use a password to prevent
unauthorized access to the phonebook,
schedule, memos and class schedule.
Warning! Always write the password in
a safe, separate location. To protect your
information, please make regular copies of
your data on your PC. For more information
on backing up and restoring your data, please
see “Copying Files to Your Device”.
1. Press MENU and then press TOOLS.
Page 6

2. Press or to select Phonebook, Schedule,
Memo or Class Schedule and then press
ENTER.
3. Press PASSWD.
4. At the prompt, type a password of up to
eight characters and press ENTER.
For security, each character will appear as *.
5. Re-enter the same password and press
CONFIRM or ENTER.
If the passwords do not match, you must start
over. The password you set will be requested
whenever the Phonebook (or other protected
feature) is selected.
6. To change the password, repeat Steps 1-5.
To disable the password, press ENTER at
both password prompts.
Class Schedule
Adding Classes
1. Press MENU and then press TOOLS.
2. Press or to select Class Schedule and
then press ENTER.
3. Press FN and then press or to set the
tab to the desired day of the week. Then
press or to select one of the 12 preset
blocks of time in AM, PM, or Night.
4. Press EDIT to add a class.
5. Type a class name and press ENTER.
Press DETAILS to add a teacher, address,
and memo.
Press or ENTER to advance to the next
eld.
To erase a letter, press BACK.
To type a capital, press CAP and then press a
letter key.
To type a number, press a number key.
To enter a special character (if permitted),
press FN and then press a number key. You
can also press FN and then press to
view a menu of special characters. Use the
direction keys to highlight one and then
press ENTER.
Press SAVE when you are nished adding
details.
6. Continue adding classes until your class
schedule is complete, then press SAVE.
Press DEL ALL to delete all classes. You
are asked to conrm the deletion. Cancel
is highlighted. Press ENTER to cancel the
deletion. Press to highlight OK and then
press ENTER to erase the schedule.
Press PASSWD to assign a password to your
Class Schedule. Please see “Using a Password”
in “Using Phonebook, Schedule and Memo”.
Viewing Your Schedule
1. Hold FN and then press or to change
days.
2. Press or to scroll through the schedule.
3. Press ENTER or DETAILS to view any details
of the highlighted class, then press BACK
to return to the schedule.
Timer
1. Press MENU and then press TOOLS.
2. Press or to select Timer and then press
ENTER.
3. Press SETUP.
4. Press to open a calendar.
A calendar is displayed.
5. Use the direction keys to select a target
date (day, month, and year) and then press
ENTER.
6. Press to go to the event eld.
7. Type an event title.
8. Press START when nished.
The Timer screen will then display how long it
will be until the day of the event.
9. Press CLOSE when done.
Press RESET to clear the scheduled event.
Stopwatch
1. Press MENU and then press TOOLS.
2. Press or to select Stopwatch and then
press ENTER.
3. When ready, press START to begin timing.
The stopwatch begins counting time in
hundredths of a second (HH:MM:SS.ss).
4. Press PAUSE to allow for adjustments.
For example, a time-out, caution ag, or
other non-event pause. Press CONTINUE
when ready to resume where the
stopwatch left o.
5. Press LAP as the participant reaches the
end of each lap or portion of the event.
Up to six (6) split times are recorded.
6. Press PAUSE to view the nal time.
7. Press RESET to start over again.
Using the Clock
The clock displays both home time and world
time in your selected format. You can use
the clock to check the time in dierent cities
around the world.
1. Press MENU and then press TOOLS.
2. Press or to select Clock and then press
ENTER.
The current time and date is displayed for the
selected home and world cities.
3. Press CLOSE when done.
Setting the Date and Time ✓
1. While viewing the clock, press SETUP.
2. Adjust the date and time for your home
city.
Press or to change the current setting.
Press or to move between the elds.
While setting the clock, press 24 HR (or 12
HR) to toggle between a 12- and 24-hour
clock.
3. Press SAVE when done.
Press CLOSE to exit without saving any
changes.
Changing Cities ✓
1. Press CITY.
The home city is highlighted.
2. Press ENTER to change the home city.
Or you can press and then press ENTER
to change the world city.
A menu of cities is displayed.
3. Press or to highlight the city you
want.
You can also type the rst few letters of a
city name to go directly to that part of the
list.
Press BACK to exit without selecting a new
city.
4. Press ENTER to select the highlighted
city.
The new city will be displayed, along with
the appropriate time for that new city.
While selecting a city, press DST ON (or
DST OFF) to toggle daylight saving time
(DST) on or o.
5. Press SAVE when done.
Press CLOSE to exit without saving any
changes.
Using the Calculator
Your device also includes a scientic
calculator that allows you to perform
advanced calculations.
1. Press MENU and then press TOOLS.
2. Press or to select Calculator and then
press ENTER.
3. Perform your calculation.
Press CLEAR or AC to clear all calculations.
Press CE to clear only the current number.
Press ENTER to complete the calculation.
Press... To...
T(.) type a decimal point
M(+/-) change the number from positive to
negative or vice versa
Y(+) add numbers
U(-) subtract numbers
I(x) multiply numbers
O(÷) divide numbers
Advanced Calculations ✓
Press... To...
N(1/x) calculate a reciprocal
X(√x) calculate a square root
Z(x2) square a number.
C(xy) calculate x raised to the yth
power. For example, press 3, C,
2, then ENTER to calculate 3
raised to the power of 2.
F(i n v ) + C(y√x) calculate the yth root of x. For
example, press 4, F, C, 8, 1
then ENTER to calculate the
4th root of 81.
R(%) calculate percentages. For
example, press 2, 5, I(x), 2, 0,
R, then ENTER to calculate the
value of 20% of 25.
A(sin) calculate the SIN of an angle.
For example, press A, 3, 0, CAP,
0, then ENTER to calculate the
SIN of a 30 degree angle.
F(i n v ) + A(sin) calculate an inverse SIN
S(cos) calculate the COS of an angle.
For example, press S, 6, 0, CAP,
0, then ENTER to calculate the
COS of a 60 degree angle.
F(i n v ) + S(cos) calculate an inverse COS
D(tan) calculate the TAN of an
angle. For example, press
D, 4, 5, CAP, 0, then ENTER
to calculate the TAN of a 45
degree angle.
F(i n v ) + D(tan) calculate an inverse TAN
Q(log) calculate logarithms
W(10x) calculate 10 to the xth power
E(ln) calculate natural logarithms
P(π) inputs the numerical value of π
into an equation
B(n!) calculate the factorial of n
V(e x p ) calculate the constant e raised
to the specied power. e is the
base of the natural logarithm.
Using the Calculator Memory
Try the following equation to practice using
the calculator memory:
(32 x 12) - (8 x 8) = 320
Page 7

1. Press CLEAR or AC to clear the calculator, if
necessary.
2. Press K(m c ) to clear the calculator memory,
if necessary.
3. Type 32, press I(x), type 12 and then press
ENTER.
4. Press G(m+) to add the result to memory.
m indicates a number is stored in memory.
5. Press CLEAR or AC.
6. Type 8, press I(x), type 8 and then press
ENTER.
7. Press H(m-) to subtract the result from the
number stored in memory.
8. Press CLEAR or AC.
9. Press J(m r ) to retrieve the number from
memory.
Using the Metric Converter
1. Press MENU and then press TOOLS.
2. Press to select Metric Converter and then
press ENTER.
3. Press or to select a conversion
category.
4. Press or to select a unit of measure.
5. Type a number.
As you type, the other units display their
converted values. To type a decimal, press
T(.). Use BACK to delete a number.
6. Press CLEAR or NEW to reset all values and
perform another conversion.
Using the Currency Converter
1. Press MENU and then press TOOLS.
2. Press to select Currency Converter and
then press ENTER.
3. Press or to select a currency.
4. Type the amount you have in the
highlighted currency.
The amount you type is automatically
converted to the listed currencies according
to the saved exchange rates.
5. Press NEW or CLEAR to clear a conversion.
Adjusting Exchange Rates ✓
1. Press SETUP.
2. Press or to select an exchange rate
you want to change.
Each exchange rate is based upon the
equivalent to 1 US Dollar.
3. Press CLEAR to clear the selected rate.
4. Enter a new exchange rate.
5. Adjust as many rates as you want.
6. Press SAVE.
Press CLOSE to exit without saving your
changes.
Press DEFAULT to reset all exchange rates
to their default values.
Using Personal Dictionaries
Use the Personal Dictionary feature to view
any .csv formatted personal dictionaries that
you have imported to your device from a
PC. For more information about importing
dictionaries to your device, please see
“Copying Files to Your Device”.
1. Press MENU.
2. Press LEARN.
2. Press to select Personal Dictionary and
then press ENTER.
Any .csv les you have imported to your
device appear in a list.
3. Press or to select the dictionary you
want to view and then press ENTER.
You see the list of entries contained in the
selected dictionary.
4. Press or to select the entry you want to
view.
You can also type letters to go directly to that
part of the list.
5. Press ENTER to view the selected entry.
6. Press CLOSE or CLEAR when done.
Connecting Your Device
Your device has a built-in USB port and comes
with a cable to connect it to your desktop
or laptop PC. When looking at the keyboard,
the USB port is on the left side of your device,
next to the power key: .
1. Turn on your device.
2. Connect the wide end of the included
USB cable to a USB port on your PC and
the smaller end to the USB port on your
device.
You see a “Franklin connects” icon on the
screen of your device when it is properly
connected to your PC. The keyboard on your
device is now disabled.
The rst time you plug your device into
your PC, software drivers must install. This
happens automatically. When the drivers are
installed your PC will let you know that your
device is ready to use. A window may also be
opened displaying the available folders on
your device. If you need to nd it, look for a
drive labeled “Removable Disk”.
Copying Files to Your Device
Your device is not limited to the books
it comes with. You can transfer personal
dictionaries. You can also save copies of your
data to another location on your PC to backup
important information.
Try copying a personal dictionary to your
device.
1. Make sure your device is connected to
your PC.
See “Connecting Your Device” for more
information.
2. On your PC, use Windows Explorer to nd
the drive labelled “Removable Disk” and
double-click it to open it.
3. Double-click “PersonalDict” to open that
folder.
4. Navigate on your PC to where you store
.csv les.
Or you can create a custom dictionary using
a spreadsheet or database application. Note:
Custom dictionaries should be created with
the following structure:
word-1 denition for word-1
word-2 denition for word-2
... ...
Important: When you save the le, please be
sure to select “CSV (comma delimited) (*.csv)”
format.
The le name you give the le is exactly how
it will display on your device.
5. Right-click the .csv le you want to copy to
your device and then click “Copy” from the
pop-up menu.
6. Right-click in the “PersonalDict” window
and then click “Paste” from the pop-up
menu.
7. Repeat steps 4 through 6 to copy
additional les to your device.
8. Close the open folders.
9. Unplug the USB cable from your PC and
the device.
10. Press MENU and then press LEARN.
11. Press to highlight Personal Dictionary
and then press ENTER.
About Your Device Folders ✓
When you access your device on your PC, an
assortment of folders are available to you
depending on which features you have used.
Remember, “PersonalDict” is always the
location to save any .csv formatted personal
dictionaries so they appear on your device.
Any other available folders will contain the
saved material from My Vocabulary List, the
Phone book and other features.
Backing Up Your Data ✓
Because you have access to the folders in
which any information you enter is saved,
you can backup this important information
on your PC. While your device is connected to
your PC, right-click any or all of those folders
and then click “Copy”. Find a location on your
PC where you want to save this information,
right-click in that window and then click
“Paste” to save the information.
Restoring Your Data ✓
If you accidentally erase information or it is
lost while replacing the batteries, you can
restore any important information you have
previously saved to your PC. Connect your
device to your PC. Next, nd the location on
your PC where you saved a backup copy of
your information. Right-click on those les
or folders and click “Copy”. Click the window
containing your device’s folders, right-click
and then click “Paste” from the pop-up menu.
You can then re-access your previously saved
information.
Specications
Model SCD-2100N: Speaking Merriam-
Webster’s Collegiate® Dictionary, 11th Edition
•Batteries: two AAA
•Size: 4 x 3 x 0.76 in
•Weight: 4.2 oz
© 2003-2009 Franklin Electronic Publishers,
Inc., Burlington, N.J. 08016-4907 U.S.A. All
rights reserved.
© 2003-2008 Merriam-Webster, Incorporated.
All rights reserved.
© 2009 Acapela Group S.A. All rights reserved.
U.S. Patents: 5,007,019; 5,203,705; 5,396,606;
5,497,474
ISBN 978-1-59074-496-3
Recycling and Disposal
Device Disposal ✓
This device should be disposed through your
local electronic product recycling system –
do not throw into the trash bin.
Page 8

Packaging Disposal ✓
Please save this User’s Guide and all packing
materials, as they contain important
information. In case of disposal, please refer to
your local recycling system.
Battery Disposal ✓
Do not dispose of batteries with normal
household waste. Please obey your local
regulations when disposing of used batteries.
This unit may change operating modes,
lose information stored in memory, or fail
to respond due to electrostatic discharge or
electrical fast transients. Normal operation of
this unit may be re-established by pressing the
reset key, by pressing , or by removing
and replacing the batteries.
FCC Notice
This device complies with Part 15 of the FCC Rules.
Operation is subject to the following two conditions:
(1) This device may not cause harmful interference, and
(2) This device must accept any interference received,
including interference that may cause undesired operation.
Warning: Changes or modications to this unit not
expressly approved by the party responsible for
compliance could void the user’s authority to operate the
equipment.
NOTE: This equipment has been tested and found to
comply with the limits for a Class B digital device, pursuant
to Part 15 of the FCC Rules. These limits are designed to
provide reasonable protection against harmful interference
in a residential installation. This equipment generates, uses
and can radiate radio frequency energy and, if not installed
and used in accordance with the instructions, may cause
harmful interference to radio communications. However,
there is no guarantee that interference will not occur in
a particular installation. If this equipment does cause
harmful interference to radio or television reception, which
can be determined by turning the equipment o and on,
the user is encouraged to try to correct the interference by
one or more of the following measures:
–Reorient or relocate the receiving antenna.
–Increase the separation between the equipment and
receiver.
–Connect the equipment into an outlet on a circuit
dierent from that to which the receiver is connected.
–Consult the dealer or an experienced radio/TV technician
for help.
NOTE: This unit was tested with shielded cables on the
peripheral devices. Shielded cables must be used with the
unit to insure compliance.
NOTE: The manufacturer is not responsible for any radio or
TV interference caused by unauthorized modications to
this equipment. Such modications could void the user’s
authority to operate the equipment.
Disclaimer of Warranties
Except as specically provided herein, Franklin makes no
warranty of any kind, express or implied, with respect to
this product.
Limited Warranty (U.S. only)
LIMITED WARRANTY, DISCLAIMER OF WARRANTIES,
AND LIMITED REMEDY
FRANKLIN WARRANTS TO THE ORIGINAL PURCHASER THAT
THIS PRODUCT WILL BE FREE FROM DEFECTS IN MATERIALS
AND WORKMANSHIP FOR A PERIOD OF ONE (1) YEAR FROM
THE ORIGINAL DATE OF PURCHASE AS EVIDENCED BY A
COPY OF THE SALES RECEIPT. THIS LIMITED WARRANTY
DOES NOT COVER DAMAGE DUE TO ACTS OF GOD,
ACCIDENT, MISUSE, ABUSE, NEGLIGENCE, MODIFICATION,
UNSUITABLE ENVIRONMENT, OR IMPROPER MAINTENANCE.
THE SOLE OBLIGATION AND LIABILITY OF FRANKLIN, AND
THE EXCLUSIVE REMEDY UNDER THIS LIMITED WARRANTY,
IS REPAIR OR REPLACEMENT AT THE SOLE OPTION OF
FRANKLIN AND THIS REMEDY APPLIES ONLY IN THE CASE
IN WHICH FRANKLIN DETERMINES THAT THE PRODUCT
WAS DEFECTIVE AND THAT THE DEFECT AROSE WITHIN THE
DURATION OF THE LIMITED WARRANTY. THIS REMEDY IS
THE EXCLUSIVE REMEDY FOR BREACH OF THIS WARRANTY.
THIS WARRANTY GIVES YOU CERTAIN RIGHTS; YOU
MAY ALSO HAVE OTHER RIGHTS THAT MAY VARY FROM
JURISDICTION TO JURISDICTION.
EXCEPT FOR THE LIMITED WARRANTY EXPRESSLY RECITED
ABOVE, THIS FRANKLIN PRODUCT IS PROVIDED ON AN “AS
IS” BASIS, WITHOUT ANY OTHER WARRANTIES, EXPRESS OR
IMPLIED, INCLUDING, BUT NOT LIMITED TO, WARRANTIES
OF MERCHANTABLE QUALITY, MERCHANTABILITY, OR
FITNESS FOR A PARTICULAR PURPOSE, OR THOSE ARISING
BY LAW, STATUTE, USAGE OF TRADE, OR COURSE OF
DEALING. THIS WARRANTY APPLIES ONLY TO PRODUCTS
MANUFACTURED BY OR FOR FRANKLIN AND SPECIFICALLY
DOES NOT INCLUDE BATTERIES, CORROSION OF BATTERY
CONTACTS OR ANY OTHER DAMAGE CAUSED BY
BATTERIES. FRANKLIN SHALL NOT HAVE ANY LIABILITY TO
THE PURCHASER OR ANY OTHER PERSON OR ENTITY FOR
ANY INDIRECT, INCIDENTAL, SPECIAL, OR CONSEQUENTIAL
DAMAGES WHATSOEVER, INCLUDING, BUT NOT LIMITED
TO, LOSS OF REVENUE OR PROFIT, LOST OR CORRUPTED
DATA, OR OTHER COMMERCIAL OR ECONOMIC LOSS, EVEN
IF FRANKLIN HAS BEEN ADVISED OF THE POSSIBILITY OF
SUCH DAMAGES, OR EVEN IF OTHERWISE FORESEEABLE.
FRANKLIN IS NOT RESPONSIBLE FOR CLAIMS BY A THIRD
PARTY. FRANKLIN’S MAXIMUM AGGREGATE LIABILITY
SHALL NOT EXCEED THE AMOUNT PAID FOR THE PRODUCT
AS EVIDENCED BY THE SALES RECEIPT. SOME STATES/
JURISDICTIONS DO NOT ALLOW THE EXCLUSION OR
LIMITATION OF LIABILITY FOR CONSEQUENTIAL OR
INCIDENTAL DAMAGES, SO THE ABOVE LIMITATION MAY
NOT APPLY TO YOU. IF THE LAWS OF THE RELEVANT
JURISDICTION DO NOT PERMIT FULL WAIVER OF
IMPLIED WARRANTIES, THEN THE DURATION OF IMPLIED
WARRANTIES AND CONDITIONS ARE LIMITED TO THE
DURATION OF THE EXPRESS WARRANTY GRANTED HEREIN.
Warranty Service: If you think your product is defective,
call Franklin’s Customer Service Desk, 1-800-266-5626,
to request a return merchandise authorization (“RMA”)
number, before returning the product (transportation
charges prepaid) to:
Franklin Electronic Publishers, Inc.
Attn: Service Department
One Franklin Plaza
Burlington, NJ 08016-4907
If you return a Franklin product, please include your name,
address, telephone number, a brief description of the
defect and a copy of your sales receipt as proof of your
original date of purchase. You must also write the RMA
prominently on the package if you return the product;
otherwise there may be a lengthy delay in the processing
of your return. Franklin strongly recommends using a
trackable form of deliver to Franklin for your return.
Limited Warranty
(EU and Switzerland)
Notwithstanding the disclaimer of warranties above, this
product, excluding batteries and liquid crystal display
(LCD), is guaranteed by Franklin to be free of defects in
materials or workmanship for a period of two years from
the date of purchase. It will be repaired or replaced with an
equivalent product (at Franklin’s option) free of charge for
any defect in workmanship or materials during that time.
This warranty explicitly excludes defects due to misuse,
accidental damage, or wear and tear. This warranty does
not aect the consumer’s statutory rights.
Limited Warranty (outside
U.S., EU and Switzerland)
Notwithstanding the disclaimer of warranties above, this
product, excluding batteries and liquid crystal display
(LCD), is guaranteed by Franklin to be free of defects in
materials or workmanship for a period of one year from
the date of purchase. It will be repaired or replaced with an
equivalent product (at Franklin’s option) free of charge for
any defect in workmanship or materials during that time.
Products purchased outside the United States, the
European Union and Switzerland that are returned under
warranty should be returned to the original vendor with
proof of purchase and description of fault. Charges will
be made for all repairs unless valid proof of purchase is
provided.
This warranty explicitly excludes defects due to misuse,
accidental damage, or wear and tear. This warranty does
not aect the consumer’s statutory rights.
SSE-28005-00
Rev. A
 Loading...