

Page 1
Page 2

License Agreement
READ THIS LICENSE AGREEMENT BEFORE USING THE
ELECTRONIC REFERENCE. YOUR USE OF THE
ELECTRONIC REFERENCE DEEMS THAT YOU ACCEPT
THE TERMS OF THIS LICENSE. IF YOU DO NOTAGREE
WITH THESE TERMS, YOU MAY RETURN THIS
PACKAGE WITH PURCHASE RECEIPTTO THE DEALER
FROM WHICH YOU PURCHASED THE ELECTRONIC
REFERENCE AND YOUR PURCHASE PRICE WILLBE
REFUNDED. ELECTRONIC REFERENCE means the
software product and documentation found in this package
and FRANKLIN means Franklin Electronic Publishers, Inc.
Limited Use License
All rights in the ELECTRONIC REFERENCE remain the
property of FRANKLIN. Through your purchase, FRANKLIN
grants you a personal and nonexclusive license to use this
ELECTRONIC REFERENCE. You may not make any copies
of the ELECTRONIC REFERENCE or of the data stored
therein, whether in electronic or print format. Such copying
would be in violation of applicable copyright laws. Further,
you may not modify, adapt, disassemble, decompile,
translate, create derivative works of, or in any way reverse
engineer the ELECTRONIC REFERENCE. You may not
export or reexport, directly or indirectly, the ELECTRONIC
REFERENCE without compliance with appropriate
governmental regulations. The ELECTRONIC REFERENCE
contains Franklin’s confidential and proprietary information
which you agree to take adequate steps to protect from
unauthorized disclosure or use. This license is effective until
terminated. This license terminates immediately without
notice from FRANKLIN if you fail to comply with any
provision of this license.
1
Page 3

Table of Contents
1. Introducing the . . . . . . . . . . . . . . . . . . . . . . . . . . .4
Pocket Prep™ for the NEW SAT . . . . . . . . . . . . .4
2. Getting Started . . . . . . . . . . . . . . . . . . . . . . . . . . .6
Installing or Replacing Batteries . . . . . . . . . . . . .6
Resetting Your Device . . . . . . . . . . . . . . . . . . . . .9
Using the Special Features . . . . . . . . . . . . . . . .11
Key Guide . . . . . . . . . . . . . . . . . . . . . . . . . . . .12
Using the Menus . . . . . . . . . . . . . . . . . . . . . . . .14
Changing the Settings . . . . . . . . . . . . . . . . . . . .15
3. Reviewing Preparation Materials . . . . . . . . . . . . .20
Highlighting Words . . . . . . . . . . . . . . . . . . . . . .22
Using Bookmarks . . . . . . . . . . . . . . . . . . . . . . .23
4. Taking the Practice Tests . . . . . . . . . . . . . . . . . . .25
Take a Practice Test . . . . . . . . . . . . . . . . . . . . .26
Reading Instructions and Passages . . . . . . . . .28
Answering the Essay Question . . . . . . . . . . . . .29
Answering Other Questions . . . . . . . . . . . . . . .31
Reading Test Reports . . . . . . . . . . . . . . . . . . . .34
2
Page 4

5. Using Reference Materials . . . . . . . . . . . . . . . . .37
Using the Dictionary . . . . . . . . . . . . . . . . . . . . .37
Using the Thesaurus . . . . . . . . . . . . . . . . . . . . .41
Using the Grammar Guide . . . . . . . . . . . . . . . .42
Using the User Word List . . . . . . . . . . . . . . . . .44
Using the Calculator . . . . . . . . . . . . . . . . . . . . .48
Playing Games . . . . . . . . . . . . . . . . . . . . . . . . .51
Copyrights, Trademarks, and Patents . . . . . . . . . . .57
FCC Notice . . . . . . . . . . . . . . . . . . . . . . . . . . . . . . .58
Limited Warranty (U.S. only) . . . . . . . . . . . . . . . . . .59
Limited Warranty (EU and Switzerland) . . . . . . . . . .61
Limited Warranty
(outside U.S., EU and Switzerland) . . . . . . . . . . . . .61
3
Page 5

1. Introducing the
Pocket Prep™ for the NEW SAT
Welcome to the 2005 edition of the Pocket Prep™ for the
NEW SAT*. The SAT-2400 is a powerful, electronic
reference that lets you study the areas covered in the exam,
take practice tests, evaluate your performance and improve
skills - all in an effort to get the best SAT score you can.
With the Pocket Prep™ for the NEW SAT, you can:
• read preparation materials including strategies for taking
the new SAT, information about the design of the exam,
and tutorials focused on verbal, math, and vocabulary
skills;
• bookmark sections or words to review later;
• practice with three full exams that can be timed and
scored;
• time your practice tests by counting up or down with the
clock;
• use the calculator to help solve math problems.
• review answers and explanations;
• diagnose and compare your performance with reports
that you can format;
• find over 100,000 words with comprehensive definitions,
most of which contain parts of speech and usage
examples;
* SAT is a registered trademark of The College Entrance Examination Board,
which was not involved in the production of, and does not endorse, this product.
4
Page 6
• see a word’s synonyms, antonyms, and other related
words using the built-in thesaurus;
• use the Grammar Guide, a comprehensive outline of
English grammar;
• create your own list of study words in the user word list;
• improve your spelling and vocabulary by playing fun and
educational games - Letris, Word Dozer; Flash Cards,
SAT Drills and Grammar Guide Quizzes.
To learn more, read this User ’s Guide.
✓ About Screen Illustrations
Some screen illustrations in this User’s Guide may differ
slightly from what you see on screen. This does not mean
that your unit is malfunctioning.
✓ Help is Always at Hand
You can view a help message at any screen by pressing
. Use the navigation button to scroll through the text.
To exit help, press .
During practice tests, press to access reference
information for the current question, if available. To exit
reference information, press . Press to access a
help menu. Press A to view instructions for the current
question or press B to view a help message. In each
case, use the navigation button to scroll through the text.
To exit instructions or help, press .
5
Page 7

2. Getting Started
Before you begin using the Pocket Prep™ for the NEW
SAT, you must:
• install the batteries,
• perform a system reset, and
• turn on the unit.
As you use the Pocket Prep™ for the NEW SAT, you may
want to change settings, such as the font size and contrast.
It is highly recommended that you set the clock before
starting a practice test. If you do not set the clock, the time
stamp for the practice test will be inaccurate.
Installing or Replacing Batteries
Your unit comes with and is powered by four (4) AAA
batteries. Install the batteries provided in the packaging to
start using the unit. Replace the batteries as soon as the
low battery warning is displayed.
Follow these instructions to install or replace the batteries.
1. Press to turn your unit off and turn it over.
2. Lift the battery cover on the back of your unit by
pushing up on the catch.
6
Page 8
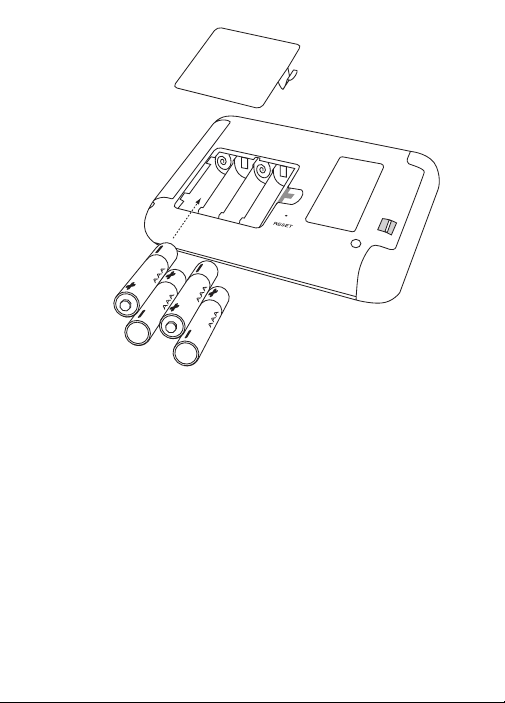
3. Remove the old batteries, if necessary.
4. Install the batteries following the +/- markings in
the battery compartment.
5. Replace the battery cover.
Warning: If the batteries wear-out completely any user-
entered information may be erased. You should always
keep written copies of your important information.
Battery disposal: Do not dispose of batteries with
normal household waste. Please obey your local
regulations when disposing of used batteries.
7
Page 9

Battery Precautions
• Non-rechargeable batteries are not to be recharged. Never recharge batteries that come with
the unit.
• Rechargeable batteries are to be removed from the
unit before being charged.
• Rechargeable batteries are only to be charged
under adult supervision.
• Only batteries of the same or equivalent type as
recommended are to be used.
• The supply terminals are not to be short-circuited;
• Do not expose batteries to direct heat or try to take
batteries apart. Follow the battery manufacturer’s
instructions for battery use.
• Always remove a weak or dead battery from the
unit.
• To avoid damage caused by leakage of the battery
fluid, replace the battery or batteries once every two
years regardless of how much the unit has been
used during that time.
• Should a battery leak, the unit may become
damaged. Clean the battery compartment
immediately, avoiding contact with your skin.
• Keep batteries out of reach of small children. If
swallowed, consult a physician immediately.
8
Page 10
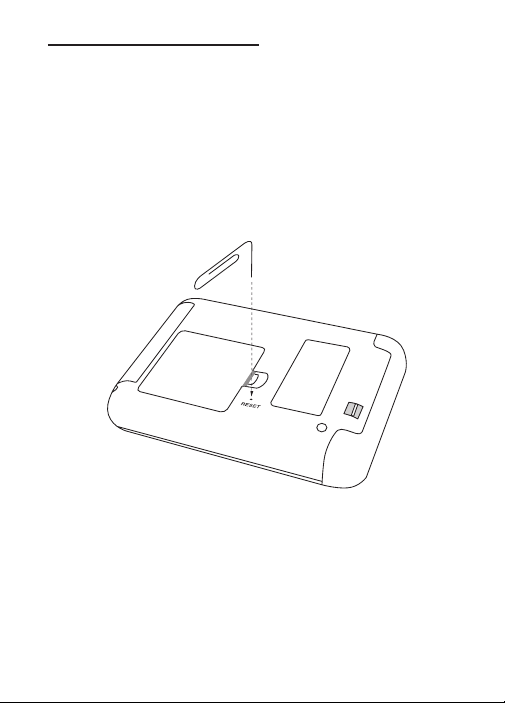
Resetting Your Device
If the keyboard fails to respond or if the screen performs
erratically, perform a system reset by following these steps.
1. Use a the blunt end of a paper clip to gently
press the reset button on your unit.
The reset button is recessed in a pin-sized hole on
the back of the unit.
Warning! Pressing the reset button with more than
light pressure may permanently disable your unit.
The message, “Initializing...Keep data found in
memory?” is displayed.
Note: This message refers to user-entered
information not the text of the books. User-entered
information includes practice test scores,
bookmarks, the user word list, and any settings you
may have changed.
9
Page 11

2. Press (the left arrow key), if necessary, to
highlight Yes and press (ENTER).
Select No to clear all user-entered information.
If you select No, the message “Erase data. Are you
sure?” is displayed. Select Yes to erase all userentered information. Select No to preserve the data.
✓ Resuming Where You Left Off
When you turn off the Pocket Prep™ for the NEW SAT
and turn it on again, the Princeton Review logo flashes
and the last screen you viewed is displayed.
10
Page 12
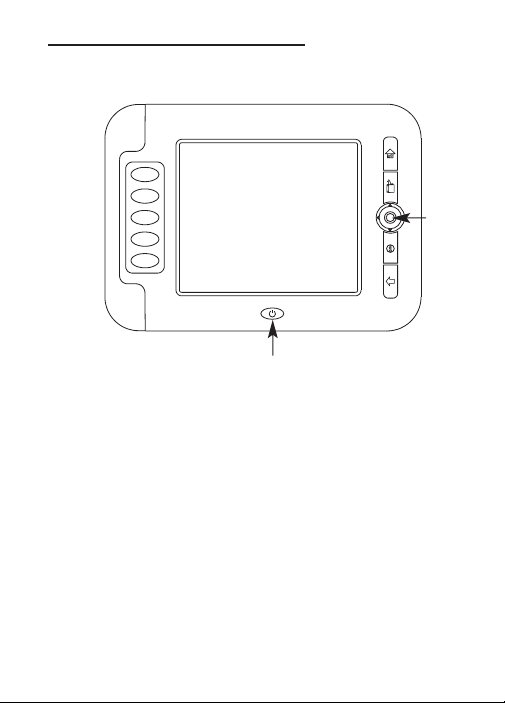
Using the Special Features
The Pocket Prep™ for the NEW SAT is equipped with
several special features.
AA
{
B
C
D
EE
On/Off
5-Way
Navigation
Button
Answer/
Menu
Keys
On/Off: Turns the unit on and off.
Answer/Menu Keys: Each of these keys corresponds to a
menu, an answer in a practice test, or a function in the
reference material. For details, please see the “Key Guide”
on page 12.
5-Way Navigation Button: This button moves the highlight
or page in the indicated direction – up, down, left or right.
Press the center of the button to begin a highlight, select an
item, or enter a word.
Battery Compartment: The battery compartment is located
on the back of the unit. It holds four (4) AAAbatteries.
11
Page 13

Key Guide
Answer Keys
A - E In a practice test, selects the respective multiple
A In the Home menu, goes to the SAT Prep menu.
B In the Home menu, goes to the Practice Tests
C In the Home menu, goes to the Reference
D In the Home menu, goes to the Settings menu.
E In the calculator, computes the result of a
choice answer.
Menu Keys
In the calculator, divides numbers. In the
dictionary or thesaurus, adds a word to the user
list. In SATDrills, displays answers.
menu. At the calculator, multiplies numbers. In
the thesaurus, goes to the dictionary. In the
dictionary, goes to the thesaurus.
menu. At the calculator, subtracts one number
from another. In SAT Drills, goes to the
calculator.
In the calculator, adds numbers. In the user
word list (word detail screen), deletes the
current word.
calculation. In the user word list (word detail
screen), erases the entire list.
12
Page 14
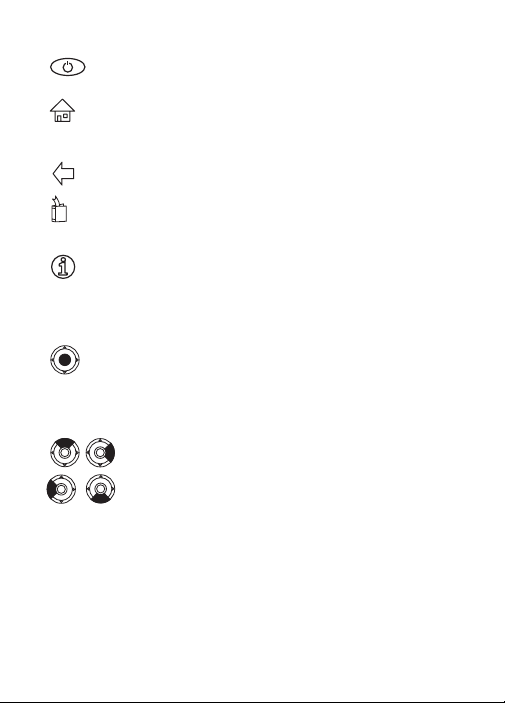
Function Keys
Turns the unit on and off.
Goes to the Home menu. Accesses reference
material for test questions.
Backs to the previous state or erases a letter.
Adds a bookmark at the current location or
question; goes to the Bookmarks menu.
Displays a help message or instructions for a
test question.
Direction Keys
When the the center of the button is pressed,
begins a highlight, selects an item, or enters a
word in an entry. This key is referred to as
ENTER throughout this guide.
Moves the highlight or page in the indicated
direction - up, down, left or right. The left and
right arrows go to the previous or next word,
item or entry. These keys are referred to as the
arrow keys throughout this guide.
13
Page 15
Using the Menus
When you turn on the unit for the first time, the Home menu
is displayed. The Home menu is the default state for the
unit. It contains four (4) icons that represent the following
menus: SAT Prep, SAT Practice Test, Reference, and
Settings.
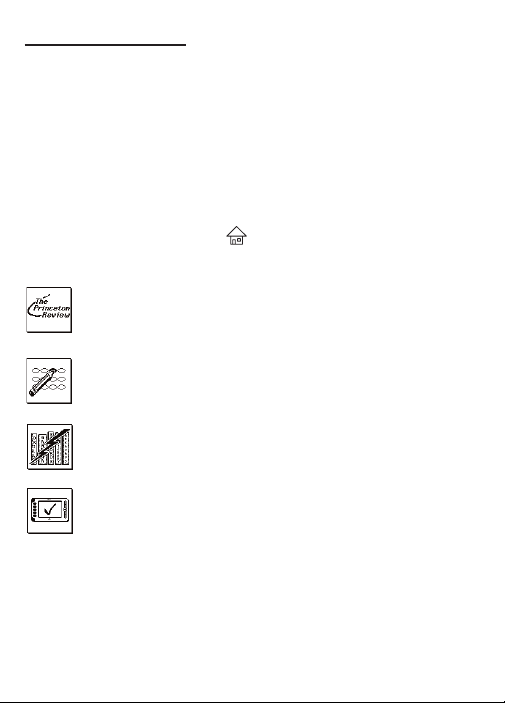
Start from Home
Use the Home menu to quickly access study materials,
practice tests, and settings.
To access this menu, press . The following icons are
displayed.
Goes to the SAT Prep menu.
Goes to the SAT Practice Tests menu.
Goes to the Reference menu.
Goes to the Settings menu.
✓ Follow the Arrows
The flashing arrows to the top, right of the screen show
which arrow keys you can press to move around menus
or view more text.
14
Page 16
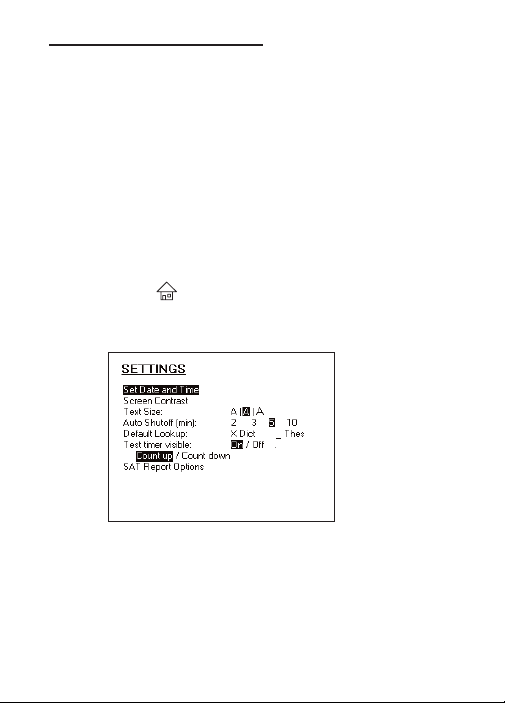
Changing the Settings
When using the Pocket Prep™ for the NEW SAT, you can
adjust the text size, the screen contrast, the timer, and the
shutoff time. You can also set the date and time, select
which reference material you want to look up words, and
pick your test report options.
Set the Date and Time
Set Date and Time enables you to set the date and time.
The date and time are used to time stamp and accurately
record your practice tests.
To set the time and date, follow these steps.
1. Press .
2. Use the arrow keys to highlight Settings and
press ENTER.
The Settings menu is displayed.
3. Press ENTER to select Set Date and Time.
15
Page 17
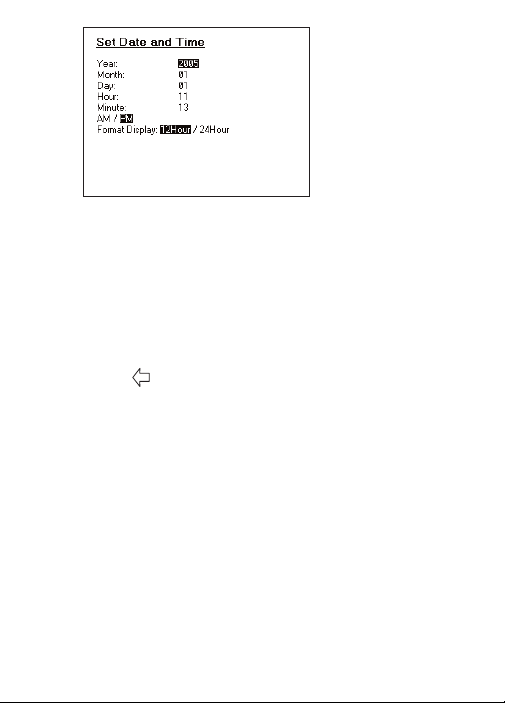
The Set Date and Time screen is displayed.
4. Press the left and right arrow keys to adjust the
year.
5. Press the down arrow key to move to the next
field.
6. Continue using the arrow keys to adjust the
settings and move between the fields.
7. Press to return to the Settings menu.
Set the Screen Contrast
Screen Contrast enables you to set how light or dark the
screen is displayed. To set the screen contrast, follow these
steps.
1. From the Settings menu, press the down arrow
to highlight Screen Contrast.
2. Press ENTER to select it.
16
Page 18
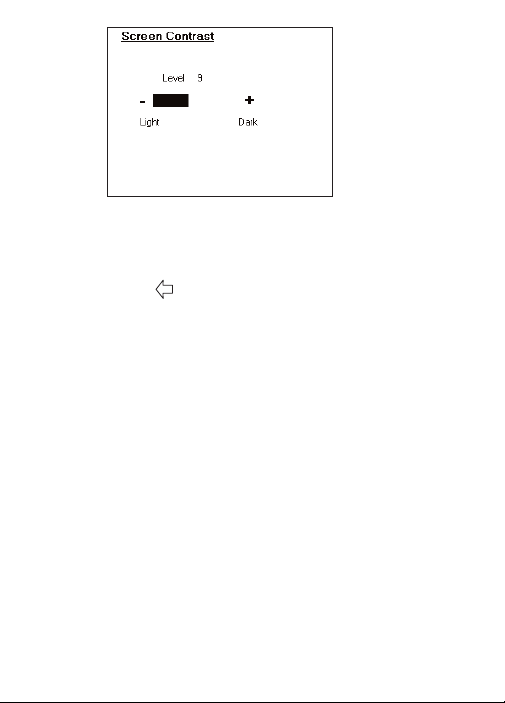
The Screen Contrast screen is displayed.
3. Press the left and right arrow keys to decrease
and increase the screen contrast.
4. Press to return to the Settings menu.
Set the SAT Report Options
SAT Report Options enable you to change the settings for
displaying practice test scores and percentages. To set the
SAT Report Options, follow these steps.
1. From the Settings menu, press the down arrow
repeatedly to highlight SAT Report Options.
2. Press ENTER to select it.
17
Page 19
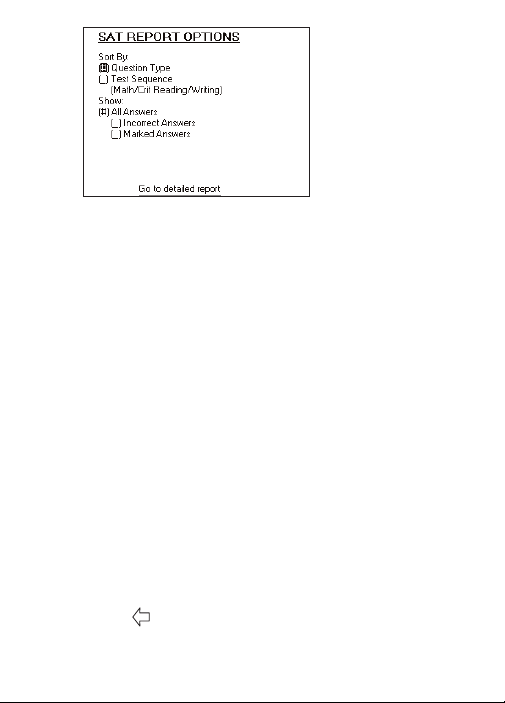
The SAT Report Options screen is displayed.
3. Press the up and down arrow keys to move to
different fields.
4. Press ENTER to select the field.
You can sort the report by Question Type or by Test
Sequence.
Question Type sorts by the kind of question, such as
“Error Identification” and “Sentence Completion”.
Test Sequence sorts the report by the test section.
You can select what answers you want to include in
your report.
All Answers displays all questions.
Incorrect Answers displays all incorrectly answered
questions.
Marked Answers displays all those questions you
marked to review while you were taking the test.
Note: Highlight Go to detailed report and press
ENTER to view any saved reports.
5. Press to return to the Settings menu.
18
Page 20

Change Other Settings
To change the text size, auto shutoff, default lookup, and
timer settings, follow these steps.
1. From the Settings menu, press the down arrow
repeatedly to move to the setting you want.
The highlight flashes on the current setting.
2. Press the right and left arrow keys to change the
setting.
Text Size enables you to set the size of the font
displayed on screen. The font size can be small,
medium or large. By default, the setting is medium.
The Auto Shutoff time is how long your unit stays on
if you forget to turn it off. Choose to automatically
shut off the unit in 2, 3, 5 or 10 minutes. Note: The
unit does not automatically turn off during a timed
practice test. Shutoff is disabled when the timer is
operating. Shutoff resumes when the time has
expired or the timer is turned off.
The Default Lookup is the reference book that is
opened when you want to look up a highlighted
word in text. Mark Dict to look up highlighted words
in the dictionary or Thes to look up highlighted
words in the thesaurus.
Test timer visible enables you to display or hide the
timer.
Count up or Count down enables you to set the way
the timer counts.
3. Press to return to the Home screen.
19
Page 21

3. Reviewing Preparation Materials
The SAT Prep menu contains information that helps you
prepare for the exam. Before taking a practice test, read
about how the exam is organized and learn strategies for
taking the test.
To access the SAT Prep menu and review the text, follow
these steps.
1. Press , use the arrow keys to highlight SAT
Prep and then press ENTER.
The foreword and sections are listed.
2. Use the down arrow to highlight the chapter or
section you want and press ENTER.
20
Page 22

The text of the section is displayed.
Note: In some parts of the book, you many need to
select a submenu or another section before reading
the text.
3. Press the up or down arrow keys to scroll line
by line.
At some places in the text, instructions appear on
the screen. For example, the message “ Next”
may appear at the bottom of the screen. Press the
right arrow to go to the next section.
From text, you can highlight words, search for
definitions and thesaurus entries, add bookmarks,
and add words to a user word list. For details,
please read “Highlighting Words” on page 22 and
“Using Bookmarks” on page 23.
4. Press the left or right arrows to scroll up or
down one screen at a time.
Press to return to the previous location.
5. Press when done.
21
Page 23

Highlighting Words
While reading the prep materials, you may want to look up
words in dictionary entries, find thesaurus entries or add
words to the user word list. To do these things, you first
have to highlight the words. To highlight words, follow these
steps.
1. From any location in text, press ENTER to start
the highlight.
To turn the highlight off, press .
2. Use the arrow keys to move the highlight to the
word you want.
To look up a word, press ENTER.
From reference materials (the dictionary, thesaurus,
grammar guide, and so forth), press A to add the
highlighted word to the user word list.
3. Press to return to your previous location.
4. Press when done.
For more information about finding definitions, see
“Using the Dictionary” on page 37.
22
Page 24

Using Bookmarks
You can add a bookmark at any location in the SATPrep
text and Grammar Guide, delete bookmarks, or delete the
entire list of bookmarks.
Note: Bookmarks are saved when you turn the unit on and
off. To preserve bookmarks after resetting the unit, you must
select Yes when prompted to save data in memory.
To add a bookmark, follow these steps.
1. From any location in text, press .
The Bookmark menu is displayed.
Note: If you press from a practice test question,
the question is marked with a check so that you can
review it later.
If you press from a menu, you can only view the
list of bookmarks or cancel.
2. Press ENTER to add the bookmark.
The message “Bookmark added” flashes on the
screen. A small
margin of the text that is bookmarked.
The text that you were viewing before you added to
bookmark is displayed.
M is displayed in the top, right
23
Page 25

To view or delete a bookmark, follow these steps.
1. From any location, press .
2. Press the down arrow to highlight See bookmark
list, if necessary, and then press ENTER.
The Bookmarks List is displayed.
3. Press ENTER to highlight the first bookmark.
4. Press the down arrow to highlight the bookmark
you want and then press ENTER.
The Bookmark Detail screen is displayed. This
screen shows the outline location of the bookmark.
From this screen, you can go to the text location of
the bookmark, delete the bookmark, or erase all
bookmarks.
5. Press ENTER again to select Go to this
bookmark.
To delete a single bookmark or erase the entire list
of bookmarks, press the down arrow to highlight
Delete this Bookmark or Erase All Bookmarks and
then press ENTER.
You must confirm the deletion. Press ENTER to
delete the bookmark or list of bookmarks. Press
to cancel the deletion.
24
Page 26

4. Taking the Practice Tests
The SAT Practice Test menu contains the list of available
practice tests. After reviewing the preparation materials, you
are ready to take a practice test. But before you begin, you
should know what to expect. Taking a practice exam on the
unit is different from taking a practice exam on paper.
This chapter describes how to do the following:
• access practice tests;
• read instructions and passages for a test section;
• answer the different types of questions: essay,
critical reading, writing, and math; and
• check your test scores.
It is strongly recommended that you read this entire chapter
before you begin a practice test.
25
Page 27

Take a Practice Test
To access the SAT Practice Test menu and take a test,
follow these steps.
1. Press .
2. Use the arrow keys to highlight SAT Practice
Test and then press ENTER.
The SAT Practice Tests menu is displayed.
3. Press the down arrow to highlight the practice
test you want and then press ENTER.
The Practice Test screen is displayed.
Note: Once you begin a practice test, you can
suspend or abort the test at any time. Turn off the
unit to suspend the test or press to abort the test
and discard your results so far.
To return to the SAT Practice Test menu without
starting the test, use the navigation button to
highlight BACK and then press ENTER.
26
Page 28

4. Press ENTER again to begin the test.
If you finish a section of the test before time has
expired, you can go back and review your answers
for the section, save your answers and continue to
the next section, or end the practice test and discard
your score.
If you do not finish a section of the practice test
before time has expired, you can continue with the
exam or end the practice test and discard your
score.
At the end of a test, you can save your answers and
proceed to the test reports or exit the test.
Press the down arrow to highlight the item you want,
then press ENTER.
When you begin a test, information about the first
section is displayed. This information includes the
number of questions and the time limit.
5. Press ENTER to begin the section.
27
Page 29

Reading Instructions and Passages
When you begin a section of a practice test, the directions
are displayed, and the timer begins to run.
1. Read the directions carefully.
2. Press the arrow keys to scroll through the
directions.
3. After you have read the directions, press ENTER
to go to the first question.
Note: For the essay question, all of your work is to
be done on the included paper. The unit is to be
used only as a timer for the essay question.
Note: For the math sections, the Reference
Information also is displayed. Press the arrow keys
to scroll through this information and then press the
right arrow to go to the first question.
4. Read the question thoroughly.
f you need to read the instructions again, press .
A help menu is displayed. Press A to read the
instructions or press B to read a help message.
Press again to return to the question.
Note: If the question refers to a passage or
Reference Information, press to display the
information. Press the arrow keys to scroll through
this information and then press again to return
to the question.
If you need to use the calculator, press ENTER.
Press to return to the question.
5. Answer the question.
For details about how to answer questions, read
“Answering Other Questions” on page 31.
28
Page 30

Answering the Essay Question
Just like the SATexam, the practice test begins with an essay
question. You have 25 minutes to complete the essay question.
Use paper that comes in the packaging to write your
answer. Write with a pencil, not a pen. And write on every
line of the paper. Your essay must not exceed the length of
both sides of the paper.
Stop writing after 25 minutes, but do not go on to another
section until you have completed the essay. If you go to the
next section before 25 minutes has elapsed, the remaining
time for the essay is lost.
To begin the essay question, follow these steps.
1. Press ENTER when you are ready to begin.
The timer begins counting as soon as you start the
section.
2. Read the directions carefully.
Use the arrow keys to scroll through the directions.
3. After you have read the directions, press the
right arrow to go to the essay question.
4. Read the question thoroughly and write your
answer on the lined paper provided with the unit.
Note: If you press the right arrow before 25 minutes
has elapsed, the end section screen is displayed. You
can choose to review the question, continue on to the
Essay Score screen, or stop the test and discard the
results so far. Use the down arrow to highlight the
choice you want and then press ENTER.
After 25 minutes have passed, the message “ESSAY
TIME EXPIRED” is displayed on the screen.
29
Page 31

5. Press ENTER to go to the Essay Score screen.
The Essay Score screen is displayed.
The score entered here is the preliminary score for
the essay you just wrote. By default, the score is
zero (0). The essay is scored from two (worst) to 12,
best. You can change the score now or at any time
when viewing the report for the practice test.
6. Press the left and right arrow keys to change the
score.
7. Press the down arrow to highlight ACCEPT
SCORE and press ENTER to record the score.
If you do not want to accept the score, you can stop
the test and discard the score. Use the up or down
arrow keys to highlight STOP TEST AND DISCARD
SCORE and press ENTER.
If you discard the score, you must confirm the
deletion. Select CONFIRM to discard the score.
Select BACK to return to the Essay Score screen.
After you accept, or adjust the score, the unit
displays the next section of the practice test.
30
Page 32

Answering Other Questions
To answer questions for the critical reading, writing, and
math sections, follow these steps.
1. Press ENTER when you are ready to begin.
The timer begins counting as soon as you start the
section.
2. Read the directions carefully.
Press the arrow keys to scroll through the directions.
Note: For the math sections, the Reference
Information is displayed. Press the down arrow to
scroll through this information and then press the
right arrow to go to the first question.
3. After you have read the directions, press the
ENTER to go to the first question.
Note: If the question refers to a passage or
Reference Information, the passage or Reference
Information is displayed. Press the arrow keys to
scroll through this information and then press the
right arrow to continue on to the question.
4. Read the question thoroughly and read the
possible answers.
5. Press an answer button (A - E) to register the
answer you want.
f you need to read the instructions again, press .
A help menu is displayed. Press A to read the
instructions or press B to read a help message.
Press again to return to the question.
31
Page 33

Note: If the question refers to a passage or
Reference Information, press to display the
information. Press the arrow keys to scroll through
this information and then press again to return
to the question.
If you need to use the calculator, press ENTER.
Press to return to the question.
6. Press the right arrow to go to the next question.
To skip a question, press the right arrow before
pressing an answer button (A - E). To go back to a
question, press the left arrow. To change an answer,
simply press the answer button (A - E) for the
answer you want.
If you are at the last question in a section, the end
section screen is displayed. You can choose to
review the questions for that section, accept your
answers and go on to the next section, or stop the
test and discard the results so far.
If you have run out of time, you can accept your
answers and go on to the next section or stop the
test and discard the results.
7. Press the down arrow to highlight the choice
you want and then press ENTER.
If you discard the score, you must confirm the
deletion. Select CONFIRM to discard the score.
Select BACK to return to the end section screen.
32
Page 34

✓ Answering Grid-In Questions
Math Grid-In questions require a special method to enter
answers. Follow these steps:
1. After reading the question, press A to display
the answer grid.
Press at any time to return to the question.
If you need to use the calculator from the answer
grid, press C. Use the calculator as needed, and
then press to return to the answer grid.
If you need to read the instructions again, press .
A help menu is displayed. Press A to read the
instructions or press B to read a help message.
Press again to return to the question.
Note: If the question refers to Reference
Information, press to display the information.
Press again to return to the question.
2. Press the down arrow to highlight the symbol or
number you want to enter into the position in the
grid and then press ENTER.
3. Press the right arrow to move to the next
column in the grid.
4. Repeat Steps 2 and 3 until the answer you want
is filled into the grid.
Enter only one character in a column. You can leave
the first or last column blank. Press E to erase the
answer.
5. Press A to accept the answer.
The question is displayed.
6. Press the right arrow to go to the next question.
33
Page 35

Reading Test Reports
You can review the results of each practice test you have
taken to see what areas require more preparation and study.
Note: If you have taken a practice test more than four (4)
times, the four most recent results for that test are saved.
To review the report for a test you have taken, follow these
steps.
1. Press .
2. Use the arrow keys to highlight SAT Practice
Test and then press ENTER.
The SAT Practice Tests menu is displayed.
Note: You also can access test reports at the end of
a practice test or from the SAT Report Options
screen (in the Settings menu).
3. Press the down arrow repeatedly to highlight
Test Reports and then press ENTER.
The Test Reports menu is displayed.
4. Press the navigation button to highlight the test
you want and then press ENTER.
34
Page 36

The test results for your practice test are displayed.
The report includes the test date and scores for the
Essay, Critical Reading, Math, and Writing sections.
It also includes the total score and the total time it
took to finish the practice test.
5. Press the down arrow to highlight Go to detailed
report and press ENTER.
This more detailed breakdown of your test report is
sorted, depending on the Test Report options, one
of two ways: by the types of question or by the test
sequence. The percentage of correct, incorrect and
unanswered questions are displayed in a table.
35
Page 37

6. Press ENTER to highlight a question type or
section.
7. Press the arrow keys to move the highlight to
the different question types.
Note: If the detailed report is sorted by question
type, you can also move the highlight to Go! under
the “Go to Study Sect” column. Press ENTER when
Go! is highlighted to go to the SAT Preparation
chapter for the question type. Then press to
return to the report.
8. Press ENTER to see your results for each
question.
The results table shows the section, question
number, correct answer, your answer, and the time
spent. Bolded answers are incorrect. Hyphens
indicate the question was left unanswered. Press
the down arrow to scroll through the results table.
9. Press ENTER to start the highlight.
10. Press the down arrow to move the highlight to
the question you want to review.
11. Press ENTER to go to the question, answer, and
explanation.
Use the arrow keys to scroll through the
explanation. Press the left or right arrows to go to
the previous or next question in the report you were
viewing. Press to return to the report.
12. Press when done.
36
Page 38

5. Using Reference Materials
The Pocket Prep™ for the NEW SAT includes the following
reference materials: Merriam-Webster®dictionary, a
thesaurus, a grammar guide, a calculator, games, your user
word list, and a SATword list.
Using the Dictionary
To find a dictionary entry, follow these steps.
1. Press .
2. Press the down arrow to highlight Reference and
press ENTER.
3. Press ENTER again to select Merriam-Webster’s
Dictionary.
The letter a is displayed. The blinking line marks the
location of the cursor.
Press the up and down arrows to scroll through the
alphabet and available symbols.
4. Press the right arrow to move the cursor and
enter the second letter.
The word aardvark is displayed.
Please note that when the dictionary finds a word
that matches the letters you have entered, it
automatically completes the word. If the word you
want is displayed, press ENTER to look it up. If not,
use the arrow keys to change and add letters until
the word you want is displayed.
Press the left arrow to delete the letter at the cursor.
37
Page 39

5. Press the up arrow until you see the word await.
6. Press the right arrow to enter the next letter.
The word await is displayed with the cursor at the
second letter "a" and the letters "it" are highlighted.
7. Press the right arrow again to enter the next
letter.
The word await is displayed with the cursor at letter
"i", and the "t" is highlighted.
8. Press the down arrow until the word award is
displayed.
9. Press the right arrow to enter the next letter.
10. Press the down arrow until the word aware is
displayed.
11. Press ENTER to look it up.
The dictionary entry is displayed.
If there is more than one definition, the message
Entry 1 of # is displayed, where # stands for the
number of available definitions.
If necessary, press the down arrow to read the
definition.
Press the right arrow to scroll down a screen at a
time and go to the next entry, where available.
12. Press when done.
38
Page 40

✓ Understanding Definitions
Dictionary entries consist of headwords, parts of speech,
and definitions. Other forms of the word may follow the
headword. After the translation or definition, you may see
a list of usage examples.
✓ Choosing Multiple Forms
Some words in this dictionary have more than one form
(e.g. resume, resumé, résumé). When the word you are
looking up has multiple forms, the different forms appear
in a list.Try this example.
1. Type resume at the dictionary Enter your word
screen and press ENTER.
The message “Multiple forms” flashes on the screen,
and the Multiple forms list is displayed.
2. Highlight the form you want and press ENTER to
see its dictionary entry.
To go back to the Multiple Forms list, press .
✓ Correcting Misspellings
The dictionary has a spell corrector that helps you if you
misspell a word. If you enter a misspelled word, a list of
corrections is displayed. Try this example.
1. Type nolij at the dictionary Enter your word
screen and press ENTER.
The message “Corrections” flashes on the screen,
and the Correction List is displayed.
2. Highlight the word you want and then press
ENTER to see its dictionary entry.
To go back to the Correction List, press .
39
Page 41

Finding Letters in Words
If you are uncertain about how to spell a word, type a
question mark (?) in place of each unknown letter. To find
prefixes, suffixes, and other parts of words, type an asterisk
(✽) in a word. Each asterisk stands for a series of letters.
Note: If you type an asterisk at the beginning of a word, it
may take a little while to find the matching words.
1. At the dictionary Enter your word screen, type a
word with ?s and ✽s (for example, se?rc
press ENTER.
The message “MatchMaker List” flashes on the
screen, and the list of possible matches is
displayed.
2. Use the arrow keys to highlight the word you
want and press ENTER to view its definition.
3. Press when done.
✽
) and
40
Page 42

Using the Thesaurus
Thesaurus entries consist of synonyms, antonyms,
Classmates™ and words to compare. Many words have
more than one thesaurus entry. To find a thesaurus entry,
follow these steps.
1. Press , use the arrow keys to highlight
Reference, and then press ENTER.
2. Press the down arrow to highlight Thesaurus
and press ENTER.
3. Enter a word (for example, splendid).
For detailed instructions about entering words, see
“Using the Dictionary” on page 37.
4. Press ENTER to view the thesaurus entry.
5. Press the down arrow to read the entry.
Press the left or right arrows to view the next or
previous thesaurus entry.
6. Press when done.
✓ Understanding Thesaurus Entries
A thesaurus entry consists of a group of synonyms,
antonyms and classmates. Synonyms are words that have
similar meanings, for example, happy/joyous. Antonyms
are words that have the opposite meaning of the word
being defined, for example, happy/unhappy. Classmates
are words that are related in some way to the word being
defined, for example octagon/polygon, triangle, rectangle,
pentagon....
41
Page 43

Using the Grammar Guide
The Grammar Guide contains an outline of English grammar
topics such as parts of speech, phrases, clauses, the
correct usage of punctuation, and so on. To view any
grammar topic, follow these steps:
1. Press , use the arrow keys to highlight
Reference, and then press ENTER.
2. Press the down arrow to highlight Grammar
Guide and press ENTER.
The Grammar Guide is displayed.
Each major section is composed of topics and sub-
topics.
3. Press the down arrow to highlight to the topic
you want and press ENTER to select it.
4. If necessary, highlight the sub-topic you want
and press ENTER.
To take a grammar quiz, highlight a menu item with
the word QUIZ in the name, press ENTER, read the
directions, and press ENTER again to start the quiz.
42
Page 44

To exit the grammar quiz, press . For more
information about grammar quizzes, please see
“Grammar Guide Quizzes” on page 56.
5. Use the arrow keys to scroll through the text.
Press ENTER to start a highlight and to remove
the highlight.
6. Press to return to the list of topics.
Press to go to the Home menu.
43
Page 45

Using the User Word List
You can save up to 100 words total in the user word list for
personal study or review. The list is saved between
sessions. The list is removed if you choose to erase all data
stored in memory during a reset.
Adding Words
You can add words to the user word list directly from the
Enter your word screen and from a dictionary or thesaurus
entry. To add a word to the user word list, follow these steps.
1. Press , use the arrow keys to highlight
Reference, and press ENTER.
2. Press ENTER again to select Merriam-Webster’s
Dictionary.
The dictionary Enter your word screen is displayed.
3. Type the word you want to add to the user word
list (for example, preposterous).
4. Press A.
The Add To User List screen is displayed.
Note: You can add a word from a dictionary or
thesaurus entry, too. Simply go to the entry and
press A.
5. Press ENTER to add the word to the list.
The message “Word added” flashes on the screen,
and the unit returns to the previous screen.
Press the down arrow and press ENTER to return to
the Enter your word screen without adding the word
to the user word list.
44
Page 46

Note: If you try to add a word that is already on the
user word list, the message “Already in list” flashes
on the screen.
6. Press to return to the Home menu.
✓ Adding Highlighted Words
You can also add words to the user list from definitions
and correction lists. First highlight a word and then press
A. Press ENTER to add the word to the user word list.
Viewing and Editing the User Word List
To view and edit the user word list, follow these steps.
1. Press , use the arrow keys to highlight
Reference, and press ENTER.
2. Press the down arrow to highlight View User
Word List and press ENTER.
The user word list is displayed.
If you have not added words to the user list, the
message, “The list is empty” flashes on the screen.
3. Press the down arrow to highlight a word on the
list.
4. Press ENTER to go to the User Word Detail
screen.
From this screen, you can look up the word in the
dictionary or thesaurus, delete the word from the
user word list or erase all words on the user word
list.
5. Press the down arrow to highlight the option
you want and press ENTER.
45
Page 47

Note: To remove a word or erase the all words on
the list, you must confirm the deletion by selecting
Delete word or Erase all words. You can cancel the
deletion and return to the User Word Detail screen.
6. Press to return to the user list.
Press to go to the Home menu.
✓ Adding Words Not in the Dictionary
When you add a word not in the dictionary, you are given
three options: Add Anyway, Correction List and Cancel
and return to previous screen. Highlight the option you
want and press ENTER.
Caution: Adding words that are not in the dictionary uses
considerably more memory than adding words that are. If
you add only words that are not in this dictionary, the user
list may contain as few as 10 words.
46
Page 48

✓ SAT Word List
To view the SAT Word List, follow these steps.
1. Press , use the arrow keys to highlight
Reference, and press ENTER.
2. Press the down arrow to highlight View SAT
Word List and press ENTER.
The SAT Word List is displayed.
3. Press the down arrow to highlight a word on the
list.
4. Press ENTER to look up the word in the
dictionary.
Press the down arrow and then ENTER to look up
the word in the Thesaurus.
Press twice to return to the list.
5. Press when done.
47
Page 49

Using the Calculator
A basic calculator is included in this product.
Note: While you take the practice tests, it is recommended
that you use the calculator that you plan to take with you to
the exam.
To make calculations with the calculator in the unit, follow
these examples.
1. Press , use the arrow keys to highlight
Reference and press ENTER.
2. Press the down arrow to highlight Calculator
and press ENTER.
3. Press the arrow keys to move the highlight to
the number or math operator you want and
press E.
For example, select a number.
You can type up to 10 digits.
If you type the wrong number, select CE to clear the
entry.
Select +, -, x, or ÷ to add, subtract, multiply, or
divide.
To... Press...
divide (÷) A
multiply (x) B
subtract (-) C
add (+) D
calculate a result (=) E
Select another number, and select = or press E.
48
Page 50

Note: An error mark “E” is displayed when the
calculation or memory content result overflows or
the dividend of a division calculation is zero (0).
Select CLR to clear the error
4. Select CLR to clear the current calculations.
To repeat the calculation, press E again.
To use negative numbers, try this example calculation:
(-25) ÷ (-4) = 6.25.
• Select the following keys in order.
2, 5, +/-, ÷, 4, +/-, =.
To use exponential numbers, try this example calculation:
3
1.05
= 1.157625
• Select the following keys in order.
1, ., 0, 5, x, =, =.
To use the root of a number, try this example calculation:
√5 = 2.2360679775
• Select the following keys in order.
5, sqrt.
To use a percentage, try this example calculation:
12% of 480 = 57.6.
• Select the following keys in order.
4, 8, 0, x, 1, 2, %.
49
Page 51

Using the Calculator Memory
1. In the Calculator, make a calculation or type a
number.
Example calculation: (52 x 8) - (12 x 3) = 380
2. Select the following keys in order.
5, 2, x, 8, =,
Note: An
number is stored in memory.
To use numbers in memory, try this example calculation:
380 ÷ 19 = 20.
1. Press the following keys in order.
MR, ÷, 1, 9, =.
2. Press
M+, 1, 2, x, 3, =, M-, MR.
M is displayed on the screen when a
MC to erase the content of the memory.
50
Page 52

Playing Games
You have five (5) fun and educational games from which to
choose: Flash Cards, Letris, Word Dozer, SAT Drills, and
Grammar Quizzes.
To select a game, follow these steps.
1. Press , use the arrow keys to highlight
Reference, and press ENTER.
2. Press the down arrow to highlight Games and
press ENTER again.
3. Use the arrow keys to highlight the game you
want and press ENTER.
During any game you can read instructions by
pressing . For details about playing the games,
read the following sections.
51
Page 53

✘ Flash Cards
In Flash Cards, words are displayed on the screen. Study
the word and look up the definition before going to the next
word. You can play Flash Cards by using random words
from the dictionary or by using words from the user word list.
1. From the Flash Cards menu, press ENTER to
begin the game using random words.
To use words from the user word list, press the
down arrow to highlight Begin User List Drill and
press ENTER.
A word is displayed on the screen for you to study or
define.
2. If needed, press ENTER to see the definition.
Press to return to Flash Cards.
3. Press the navigation button right and press
ENTER to see a new word.
4. Press when done.
52
Page 54

✘ Letris
In Letris, letters fall from the top of the display to the bottom.
1. Press the left and right arrows to move the
falling letter to make a word.
When you make a valid word (horizontally or
vertically), it disappears and your score increases
based on the length of the word.
2. Press the down arrow to make the letter fall
faster.
When the score reaches 50, a dinosaur appears on
the display. At 100, the dinosaur shoots fire from its
mouth, burns up all the letters and jumps off the
display. At 200, the dinosaur jumps down and
squishes all the letters. At each of these new levels,
the falling letter drops faster.
The game is over when there is no room for a new
letter to fall into the screen.
3. Press to return to the Games menu.
4. Press when done.
53
Page 55

✘ Word Dozer
In Word Dozer, letters randomly appear on the screen.
1. Use the arrow keys to move the word dozer so
that it pushes letters together into words.
When you make a valid word, it disappears and your
score increases based on the length of the word.
2. Press ENTER to pull a letter.
When the score reaches 50, 100, 200, 400 ..., the
Word Dozer clears the letters off of the screen and a
new level starts. Letters drop faster with each new
level.
The game is over when the screen is so crowded
with letters that you cannot make a word, a new
letter appears in the same space as the bulldozer, or
a letter falls on an existing letter.
3. Press to return to the Games menu.
4. Press when done.
54
Page 56

✘ SAT Drills
To do an SAT drill, follow these steps.
1. From the SAT Drills menu, press the down arrow
to highlight the drill you want and press ENTER.
2. Read the directions on the screen before you
begin.
3. Press the down arrow to scroll through the text,
if necessary.
4. Press the right arrow to go to the first drill.
Press C to go to the calculator, if needed.
5. Press A to display the answer to the question.
6. Press the right arrow to go to the next drill.
Press the left arrow to move to the previous drill
without displaying the answer.
Note: If you are at the first or last question, press to
return to the SAT Drills menu. If you entered through
the SATPrep text, the previous or next section of
the text is displayed.
55
Page 57

✘ Grammar Quizzes
To take a grammar quiz, follow these steps.
1. From the Grammar Quizzes menu, press the
down arrow to highlight the quiz you want and
press ENTER.
Note: You can also access grammar quizzes from
the Grammar Guide menu.
2. Read the directions on the screen before you
begin.
3. Press the down arrow to scroll through the text,
if necessary.
4. Press the right arrow to start the quiz.
5. Press the left and right arrows to highlight the
correct answer and press A to display the
answer.
6. Use the arrow keys to highlight “<Prev” or
“Next>” at the bottom of the screen and then
press ENTER.
Note: If you are at the first or last question, the
previous or next Grammar Guide quiz is displayed.
If you entered through the Grammar Guide, press
to return to the menu.
56
Page 58

Copyrights, Trademarks, and Patents
Model SAT-2400: Pocket Prep™ for the NEW SAT
• Batteries: four (4) AAA
• Size: 139.5 mm x 100 mm x 20 mm
© 2005 Franklin Electronic Publishers, Inc.,
Burlington, N.J. 08016-4907 U.S.A. All rights
reserved.
FCC Tested To Comply With FCC Standards.
FOR HOME OR OFFICE USE.
© 2004 Princeton Review Publishing, L.L.C. All rights
reserved.
This product published by arrangement with The
Princeton Review, an imprint of Random House, Inc.
Dictionary © 1997 Merriam-Webster, Incorporated. All
rights reserved.
SAT is a trademark of The College Board which was
not involved in the production of, and does not
endorse, this product.
U.S. Patents: 4,830,618; 4,891,775; 5,113,340;
5,203,705; 5,218,536
PATENT PENDING
ISBN 1-59074-311-3
This unit may change operating modes, lose information stored in
memory, or fail to respond due to Electrostatic Discharge or
Electrical fast transients. Normal operation of this unit may be reestablished by pressing the reset key, by pressing ON/OFF, or by
removing and replacing the batteries.
57
Page 59

FCC Notice
This unit complies with Part 15 of the FCC Rules. Operation is
subject to the following two conditions: (1) This unit may not
cause harmful interference, and (2) This unit must accept any
interference received, including interference that may cause
undesired operation.
Warning: Changes or modifications to this unit not expressly
approved by the party responsible for compliance could void the
user’s authority to operate the equipment.
NOTE: This equipment has been tested and found to comply
with the limits for a Class B digital unit, pursuant to Part 15 of
the FCC Rules. These limits are designed to provide reasonable
protection against harmful interference in a residential
installation. This equipment generates, uses and can radiate
radio frequency energy and, if not installed and used in
accordance with the instructions, may cause harmful
interference to radio communications. However, there is no
guarantee that interference will not occur in a particular
installation. If this equipment does cause harmful interference to
radio or television reception, which can be determined by turning
the equipment off and on, the user is encouraged to try to
correct the interference by one or more of the following
measures:
–Reorient or relocate the receiving antenna.
–Increase the separation between the equipment and receiver.
–Connect the equipment into an outlet on a circuit different from
that to which the receiver is connected.
–Consult the dealer or an experienced radio/TV technician for
help.
NOTE: This unit was tested with shielded cables on the
peripheral devices. Shielded cables must be used with the unit
to insure compliance.
NOTE: The manufacturer is not responsible for any radio or TV
interference caused by unauthorized modifications to this
equipment. Such modifications could void the user’s authority to
operate the equipment.
58
Page 60

Limited Warranty (U.S. only)
LIMITED WARRANTY, DISCLAIMER OF WARRANTIES AND
LIMITED REMEDY
(A) LIMITED WARRANTY. FRANKLIN WARRANTS TO THE ORIGINAL
END USER THATFOR A PERIOD OF ONE (1) YEAR FROM THE
ORIGINAL DATE OF PURCHASE AS EVIDENCED BY A COPY OF
YOUR RECEIPT, YOUR FRANKLIN PRODUCT SHALL BE FREE
FROM DEFECTS IN MATERIALS AND WORKMANSHIP. THIS
LIMITED WARRANTY DOES NOT INCLUDE DAMAGE DUE TO ACTS
OF GOD, ACCIDENT, MISUSE, ABUSE, NEGLIGENCE,
MODIFICATION, UNSUITABLE ENVIRONMENT OR IMPROPER
MAINTENANCE. THE SOLE OBLIGATION AND LIABILITY OF
FRANKLIN, AND YOUR EXCLUSIVE REMEDYUNDER THIS LIMITED
WARRANTY, WILL BE REPAIR OR REPLACEMENT WITH THE SAME
OR AN EQUIVALENT PRODUCT OF THE DEFECTIVE PORTION OF
THE PRODUCT, AT THE SOLE OPTION OF FRANKLIN IF IT
DETERMINES THATTHE PRODUCT WAS DEFECTIVE AND THE
DEFECTS AROSE WITHIN THE DURATION OF THE LIMITED
WARRANTY. THIS REMEDY IS YOUR EXCLUSIVE REMEDY FOR
BREACH OF THIS WARRANTY. THIS WARRANTY GIVES YOU
CERTAIN RIGHTS; YOU MAYALSO HAVE OTHER LEGISLATED
RIGHTS THATMAY VARYFROM JURISDICTION TO JURISDICTION.
(B) DISCLAIMER OF WARRANTIES AND LIMITATION OF
LIABILITY. EXCEPT FOR THE LIMITED WARRANTIES EXPRESSLY
RECITED ABOVE, THIS FRANKLIN IS PROVIDED ON AN “AS IS”
BASIS, WITHOUT ANY OTHER WARRANTIES OR CONDITIONS,
EXPRESS OR IMPLIED, INCLUDING, BUT NOT LIMITED TO,
WARRANTIES OF MERCHANTABLE QUALITY, MERCHANTABILITY
OR FITNESS FOR APARTICULAR PURPOSE, OR THOSE ARISING
BY LAW, STATUTE, USAGE OF TRADE, OR COURSE OF DEALING.
THIS WARRANTYAPPLIES ONLY TO PRODUCTS
MANUFACTURED BY FRANKLIN AND DOES NOTINCLUDE
BATTERIES, CORROSION OF BATTERY CONTACTS OR ANY
OTHER DAMAGE CAUSED BY BATTERIES. NEITHER FRANKLIN
NOR OUR DEALERS OR SUPPLIERS SHALL HAVE ANY LIABILITY
TO YOU OR ANYOTHER PERSON OR ENTITY FOR ANY
INDIRECT, INCIDENTAL, SPECIAL, OR CONSEQUENTIAL
DAMAGES WHATSOEVER, INCLUDING, BUTNOT LIMITED TO,
59
Page 61

LOSS OF REVENUE OR PROFIT, LOST OR DAMAGED DATA OR
OTHER COMMERCIAL OR ECONOMIC LOSS, EVEN IF WE HAVE
BEEN ADVISED OF THE POSSIBILITYOF SUCH DAMAGES, OR
THEY ARE OTHERWISE FORESEEABLE. WE ARE ALSO NOT
RESPONSIBLE FOR CLAIMS BY ATHIRD PARTY. OUR MAXIMUM
AGGREGATE LIABILITYTO YOU, AND THAT OF OUR DEALERS
AND SUPPLIERS, SHALL NOT EXCEED THE AMOUNT PAID BY
YOU FOR THE FRANKLIN PRODUCTAS EVIDENCED BY YOUR
PURCHASE RECEIPT. YOU ACKNOWLEDGE THAT THIS IS A
REASONABLE ALLOCATION OF RISK. SOME STATES/COUNTRIES
DO NOT ALLOW THE EXCLUSION OR LIMITATION OF LIABILITY
FOR CONSEQUENTIAL OR INCIDENTALDAMAGES, SO THE
ABOVE LIMITATION MAY NOT APPLYTO YOU. IF THE LAWS OF
THE RELEVANTJURISDICTION DO NOT PERMIT FULL WAIVER
OF IMPLIED WARRANTIES, THEN THE DURATION OF IMPLIED
WARRANTIES AND CONDITIONS ARE LIMITED TO THE
DURATION OF THE EXPRESS WARRANTY GRANTED HEREIN.
(C) WARRANTY SERVICE: UPON DISCOVERING A DEFECT, YOU
MUST CALL FRANKLIN’S CUSTOMER SERVICE DESK, 1-800266-5626, TO REQUESTA RETURN MERCHANDISE
AUTHORIZATION (“RMA”) NUMBER, BEFORE RETURNING THE
PRODUCT (TRANSPORTATION CHARGES PREPAID) TO:
FRANKLIN ELECTRONIC PUBLISHERS, INC.
ATTN: SERVICE DEPARTMENT
ONE FRANKLIN PLAZA
BURLINGTON, NJ 08016-4907
IF YOU RETURN AFRANKLIN PRODUCT, PLEASE INCLUDE A
NOTE WITH THE RMA, YOUR NAME, ADDRESS, TELEPHONE
NUMBER, ABRIEF DESCRIPTION OF THE DEFECT AND ACOPY
OF YOUR SALES RECEIPTAS PROOF OF YOUR ORIGINAL DATE
OF PURCHASE. YOU MUSTALSO WRITE THE RMA
PROMINENTLYON THE PACKAGE IF YOU RETURN THE
PRODUCT, OTHERWISE THERE MAY BE ALENGTHY DELAYIN
THE PROCESSING OF YOUR RETURN. WE STRONGLY
RECOMMEND USING ATRACKABLE FORM OF DELIVERY TO
FRANKLIN FOR YOUR RETURN.
60
Page 62

Limited Warranty
(EU and Switzerland)
This unit, excluding batteries and liquid crystal display (LCD), is
guaranteed by Franklin for a period of two years from the date of
purchase. It will be repaired or replaced with an equivalent unit (at
Franklin’s option) free of charge for any defect due to faulty
workmanship or materials.
Products purchased outside the European Union and Switzerland
that are returned under warranty should be returned to the original
vendor with proof of purchase and description of fault. Charges will
be made for all repairs unless valid proof of purchase is provided.
This warranty explicitly excludes defects due to misuse, accidental
damage, or wear and tear. This guarantee does not affect the
consumer’s statutory rights.
Limited Warranty
(outside U.S., EU and Switzerland)
This unit, excluding batteries and liquid crystal display (LCD), is
guaranteed by Franklin for a period of one year from the date of
purchase. It will be repaired or replaced with an equivalent unit (at
Franklin’s option) free of charge for any defect due to faulty
workmanship or materials.
Products purchased outside the United States, the European Union
and Switzerland that are returned under warranty should be returned
to the original vendor with proof of purchase and description of fault.
Charges will be made for all repairs unless valid proof of purchase is
provided.
This warranty explicitly excludes defects due to misuse, accidental
damage, or wear and tear. This guarantee does not affect the
consumer’s statutory rights.
ATP-28006-00
Rev. A
61
Page 63

 Loading...