

Page 1

Speaking Chinese-
English Dictionary
B-1100
USER’S GUIDE
Page 2

License Agreement
READ THIS LICENSE AGREEMENT BEFORE USING ANY BOOKMAN® PRODUCT.
YOUR USE OF THE BOOKMAN PRODUCT DEEMS THAT YOU ACCEPT THE
TERMS OF THIS LICENSE. IF YOU DO NOT AGREE WITH THESE TERMS, YOU
MAY RETURN THIS PACKAGE WITH PURCHASE RECEIPT TO THE DEALER
FROM WHICH YOU PURCHASED THE BOOKMAN PRODUCT AND YOUR
PURCHASE PRICE WILL BE REFUNDED. BOOKMAN PRODUCT means the
software product and documentation found in this package and FRANKLIN means
Franklin Electronic Publishers, Inc.
LIMITED USE LICENSE
All rights in the BOOKMAN PRODUCT remain the property of FRANKLIN. Through
your purchase, FRANKLIN grants you a personal and nonexclusive license to use
the BOOKMAN PRODUCT on a single FRANKLIN BOOKMAN at a time. You may
not make any copies of the BOOKMAN PRODUCT or of the data stored therein,
whether in electronic or print format. Such copying would be in violation of applicable
copyright laws. Further, you may not modify, adapt, disassemble, decompile,
translate, create derivative works of, or in any way reverse engineer the BOOKMAN
PRODUCT. You may not export or reexport, directly or indirectly, the BOOKMAN
PRODUCT without compliance with appropriate governmental regulations. The
BOOKMAN PRODUCT contains Franklin’s confidential and proprietary information
which you agree to take adequate steps to protect from unauthorized disclosure or
use. This license is effective until terminated. This license terminates immediately
without notice from FRANKLIN if you fail to comply with any provision of this license.
Page 3

Table of Contents
Introduction ....................................................................................... 2
Special Features .......................................................................... 2
Getting Started .................................................................................. 3
Installing Batteries....................................................................... 3
Resetting Your Product ............................................................... 3
Key Guide .......................................................................................... 4
Using the Main Menu ........................................................................ 6
Understanding the Menus........................................................... 6
Using the Dictionary ......................................................................... 7
Translating Words........................................................................ 7
Entering Chinese Words ............................................................. 7
Using Search ................................................................................ 8
Using Spell Correction ................................................................ 8
Using ? and * ................................................................................ 8
Highlighting Words...................................................................... 9
Viewing Conversational Phrases ............................................... 9
Building Vocabulary .................................................................. 10
Adding Words to the User List ................................................. 10
Removing Words from the User List........................................ 10
Using the Databank..........................................................................11
Adding Entries ............................................................................11
Removing Entries .......................................................................11
Entering Symbols .......................................................................11
Using the Calculator & Converter.................................................. 12
Converting Currency ................................................................. 12
Making Calculations .................................................................. 12
Setting The Clock....................................................................... 12
Using the Miscellaneous Menu...................................................... 13
Connecting Your Unit to a PC................................................... 13
Transferring Data to a PC.......................................................... 13
Receiving Data from a PC ......................................................... 13
Changing Settings ..................................................................... 14
Setting a Password.................................................................... 14
Copyrights, Trademarks, and Patents........................................... 15
Limited Warranty (U.S. only) .......................................................... 16
1
Page 4

Introduction
Welcome to the world of Franklin! This Franklin unit is a powerful, electronic
reference with a built-in book, plus two slots in the back for book cards. With the
Speaking Chinese-English Dictionary
• find over 264,000 translations, with comprehensive definitions;
• conjugate words quickly and easily;
• find similar words and homophones in a thesaurus;
• view conversational phrases in eight languages: Chinese, English, French,
German, Japanese, Italian, Spanish, and Dutch.
• use the Grammar Guide, a comprehensive outline of Chinese and English
grammar that includes fun quizzes and lessons;
• hear the pronunciation of headwords, definitions, and phrases in Chinese and
English;
• create your own list of study words in the User List and Exam List;
• play fun and educational games
• synchronize information from your personal computer using Data Link for
Windows, Chinese Windows (95 or 98), and DataGuard® (an optional
feature).
Your Franklin model also comes with a calculator, converter, databank, calendar,
clock, alarm, timer, and password protection. To learn more, read this User’s
Guide.
Special Features
Your unit is equipped with several special features that many, but not all,
BOOKMAN book cards use. To learn if you can use the special features with a
particular book card, read its User’s Guide.
Headphone Jack: The headphone jack is designed for 3.5 mm, 35 ohm
impedance stereo headphones.
Caution: Monophonic headphones will not work with this unit.
Volume Control: The dial controls the volume of the speaker or headphones.
AC Adaptor Jack: The AC adaptor is in the 3 volt range within a current range of
200 to 300 milliamperes.
This symbol indicates that the inner core of the plug of an AC adaptor is negative
and that the outer part of the plug is positive. If the symbol on your AC/DC
adaptor does not match the above symbol, confirm its compatibility at its place of
purchase.
Speaker: The speaker is located on the front of your unit, next to the display
screen. For best results, do not cover the speaker with your hand.
, you can:
–
+
2
Page 5

Getting Started
Before you start using your Franklin unit, you should know how to install batteries
and reset your product.
Installing Batteries
Your product is powered by two AAA batteries. Follow these easy instructions to
install or replace them.
1. Turn your product over.
2. Remove the battery cover on the back of your product by sliding the
door out.
3. Install the batteries according to the diagram in the battery compartment.
4. Replace the battery cover.
Warning: If the batteries wear-out completely, or if you take more than approxi-
mately a minute while changing the batteries, any information that was entered in
the built-in book or book card will be erased. You should always keep written
copies of your important information.
Resetting Your Product
If the keyboard fails to respond, the screen performs erratically, or the current
data becomes corrupted, perform a system reset by following the steps below.
1. Hold
If nothing happens, try Step 2.
2. Use a paper clip to gently press the reset button on your unit.
The reset button is recessed in a pin-sized hole on the front of the keyboard,
above
Warning! Pressing the reset button with more than light pressure may permanently disable your product. In addition, resetting the product erases settings and
information entered in its built-in book or an installed book card.
(CLEAR) and press
.
HELP
ON/OFF
.
Opening the Lid
To open the lid, push the notch at the front of the unit and lift up.
Getting Help
You can view a help message at any screen by pressing
or to scroll through the text. To exit help, press (CLEAR) or
HELP
. Press
SPACE
BACK
Following the Arrows
The flashing arrows on the right of the screen show which arrow keys you
can press to move around menus or view more text.
3
.
Page 6
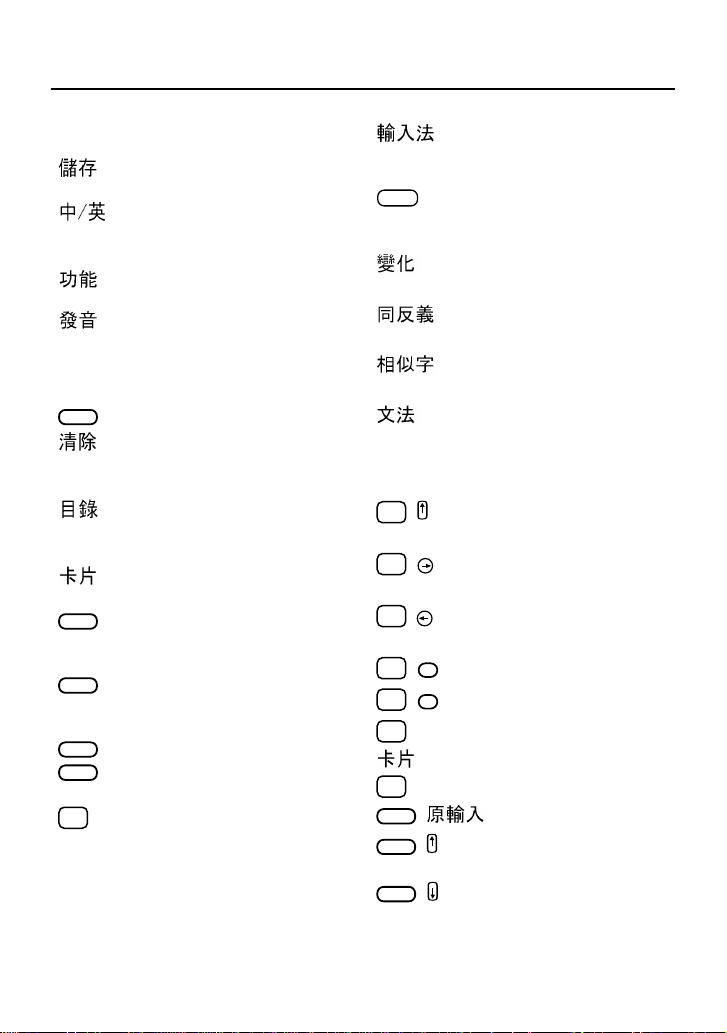
Key Guide
(SAVE)
(LANG)
(FUNC)
(SAY)
ON/OFF
(CLEAR)
(MENU)
(CARD)
BACK
ENTER
HELP
SHIFT
✩
Color Keys
Saves the entered data.
Toggles the entry language
between Chinese and
English.
Displays the functional
options for a state.
Pronounces the entry,
highlighted word or phrase.
Function Keys
Turns the product on or off.
In the dictionary, goes to the
Word Entry screen. Goes
back to the previous screen.
Highlights the next main
menu and wraps at the last
menu.
Exits the book you were
reading.
Backs up, erases a letter, or
turns off the highlight at an
entry.
Enters a word, selects an
item, begins a highlight in an
entry, or makes a calculation.
Displays a help message.
Shifts to type capital letters
and punctuation marks.
Shifts to allow special
functions, such as prev and
next.
Switches the phonetic
notations for the Chinese
input mode.
SMBL
From a Databank entry
screen, displays the available
symbols that can be entered.
Displays the inflection of the
entry word.
Displays synonyms and
antonyms of the entry word.
Displays confusables of the
entry word.
Displays grammar information
about the entry word.
Combination Keys*
+ Locks the keyboard to the
✩
shift position.
+ Sets the input to insert or
✩
overwrite characters.
+ Deletes the highlighted
✩
character.
+DN Shows the next entry.
✩
+UP Shows the previous entry.
✩
+ Copies a word between books.
✩
(CARD)
+ Displays the last word entered.
✩
( )
BACK
SHIFT
+ From a definition, scrolls to
the first line of text.
+ From a definition, scrolls to
SHIFT
the last line of text.
*
Hold the first key while pressing the second.
4
Page 7

Key Guide
Direction Keys
In text, scrolls up.
UP
In text, scrolls down.
DN
Moves the cursor or highlight in
the indicated direction.
SPACE
At menus and dictionary entries,
pages down. At the Word Entry
screen, types a space.
Icons and Indicators
LOW Indicates a low battery.
Indicates secure data; the
password is locked.
Indicates that an alarm is set.
Indicates a search in progress.
Calculator Keys
Q
(M+) Adds the number to the number
stored in the memory.
W
(M-) Subtracts the number from the
number stored in the memory.
E
(MR) Recalls the number stored in the
memory.
R
(MC) Clears the memory.
T
(+/-) Changes the number on the
screen to a negative or positive
number.
Y
(+) Calculates the sum of two
values.
U
(-) Subtracts one value from
another.
I
(x) Multiplies two values.
O
(/) Divides one value by
another.
P
(%) Calculates a percentage.
2
Z
(x
) Squares a number.
y
X
(x
) Calculates an exponential
function.
C
(1/x) Calculates the reciprocal of
a value.
V
(√) Calculates the root of a
value.
B
(x!) Calculates the factorial of a
value.
N
(DRG) Calculates the degree.
M
(EXP) Calculates the exponential.
-
(C/CE) Clears the entry or result.
A
(sin) Calculates sine.
-1
S
(sin
) Calculates the inverse sine.
D
(cos) Calculates cosine.
-1
F
(cos
) Calculates the inverse
cosine.
G
(tan) Calculates tangent.
-1
H
(tan
) Calculates the inverse
tangent.
J
(log) Calculates the logarithmic
function.
K
(ln) Calculates the natural
logarithmic function.
L
(π) Inserts the value for pi.
5
Page 8

Using the Main Menu
The main menu appears as five tabs at the top of the screen - Dictionary,
Databank, Clock & Calendar, Calculator & Converter, and Miscellaneous.
The current menu is highlighted, and a numbered list of current menu items
appears below. Use
Understanding the Menus
The Dictionary lets you translate words from English to Chinese and
from Chinese to English. You can view and hear conversational
phrases, access the User List and Exam List, or display nouns to
improve your vocabulary.
The Databank lets you keep track of your contacts and schedule, using
the following functions: Phone Book (TeleCard), Memo, Schedule, To
Do List, Solar Anniversaries, and Lunar Anniversaries. The phone book
also allows you to categorize your contacts into separate lists.
(MENU) to highlight the tab you want.
The Clock & Calendar lets you keep track of different times and dates
by using a monthly calendar, local and world time, solar-lunar conversion, alarms, and a timer.
The Calculator & Converter lets you use a standard and scientific
calculator, set the calculator between base 2 and base 10, and display
units of measurement and conversion standards. You can also convert
values and store financial information, such as the terms of a loan.
The Miscellaneous menu lets you exchange information and synchronize data with another Chinese-English Dictionary or with a PC running
Chinese Windows. You can also read reference information, change
the unit settings, set a password, and play games.
6
Page 9

Using the Dictionary
Use the Dictionary to translate words between Chinese and English, find
definitions, and view concersational phrases in eight languages, and store words
in the User List.
Translating Words
To translate a word or phrase from English to Chinese, follow these steps.
1. Select the
2. Press
3. Enter an English word (for example,
As you type, the dictionary moves to the matching letter combination in the
word list.
4. Press
The translation of the word appears.
To return to the word list, press
previous screens, press
To translate a word or phrase from Chinese to English, follow these steps.
1. Select the
2. Press
3. Enter a Chinese word (see “Entering Chinese Words” below).
4. Press
The Chinese characters and the English translation appear.
Entering Chinese Words
You can enter Chinese characters in five input modes: Taiwanese, Pinyin,
Cantonese, Cangjie, or by the number of strokes. The default input mode is
Taiwanese. To change the input mode, press
• The Taiwanese input mode (
the keyboard (green key characters). These keys are automatically shifted
when in Taiwanese input mode. When you type the first few strokes of a word,
a list of possible completions appears at the bottom of the screen. Press the
number under the word you want to select it. The word appears on the entry
line. To type the character
• The Pinyin input mode (
display a list of Chinese characters. To type the character
[3], and [1].
Dictionary
1
to select
ENTER
to select it.
Dictionary
2
to select
ENTER
to translate the word.
tab on the main menu.
Eng-Chi
tab on the main menu.
Chi-Eng
.
cat)
.
(CLEAR). To continue to back through
(CLEAR) repeatedly.
.
.
) uses the phonetic notations that appear on
, press [J], [3], and [1].
) uses the Pinyin alphabet plus intonation to
, press [W], [U],
7
Page 10

Using the Dictionary
• The Cantonese input mode ( ) uses the Pinyin alphabet with Cantonese
pronunciation. To type the character
• The Cangjie input mode (
) uses the dark blue set of characters that appear
above each letter key. To type the character
• The number of strokes input mode (
number of strokes in the character you want. A list of characters containing
four strokes appears at the bottom of the screen. Use
through this list. To type the character , press [4],
Using Search
Search matches the sequence of letters as you type them. A list of the matching
words appears on the screen. You can continue typing or scroll through the list
using the arrow keys.
Note: This feature is available in English only.
Using Spell Correction
Spell Correction provides a list of possible correctly spelled words. To use spell
correction, follow these steps.
1. Enter a misspelled word. For example, type
The message
2. Press
ENTER
No matches
to select
appears, followed by a dialog box.
Spelling check
The unit lists possible spell corrections.
Close Word
menu.
takes you directly to the translation of the closest word on the
User list
searches for the word in your User List.
3. Use the arrow keys to highlight the word you want.
4. Press
(CLEAR) to return to the previous screen.
Note: This feature is available in English only.
, press [N], [G],
, press [M], [D], [M], and
SPACE
, and [1].
SPACE
) uses a numerical value to indicate the
and to scroll
, , and [3].
ENTER
recipt
and press
ENTER
.
.
.
Using ? and *
If you are uncertain about how to spell a word, use a question mark (?) or an
asterisk (*). To use the question mark, follow these steps.
1. Type a question mark (?) in place of each unknown letter. For example,
type
w?y
and press
The unit displays all words that match the pattern:
ENTER
.
way, why, wry
, and so forth.
2. Use the arrow keys to highlight the word you want.
3. Press
(CLEAR) to return to the previous screen.
8
Page 11

Using the Dictionary
To find prefixes, suffixes, and other parts of words, type an asterisk (*) in a word.
Each asterisk represents zero, one or more characters. Follow these steps.
1. Type an asterisk (*) in place of an unknown character or series of
characters. For example, type
The unit displays all words that begin with
walkaway, walkway.
Note: Do not type an asterisk at the beginning of a word. It delays the search
considerably.
2. Use the arrow keys to highlight the word you want.
3. Press
(CLEAR) to return to the previous screen.
Note: This feature is available in English only.
Highlighting Words
Another way to look up words is by highlighting them in dictionary entries or word
lists. You can then find translations, hear the word, or add the word to the User
List.
1. At any text, press
ENTER
to start the highlight.
To turn the highlight off, press
2. Use the arrow keys to move the highlight to the word you want.
SHIFT
Hold
and press an arrow key to highlight more than one word.
To . . . Press . . .
translate the word
hear the word (SAY)
add the word to the User List (SAVE)
3. Press
CLEAR
when done.
w*y
CLEAR
.
and press
w
and end in y: wacky, waggery,
ENTER
ENTER
.
Viewing Conversational Phrases
This unit contains conversational phrases in eight languages. To use conversational phrases, follow these steps.
1. From the Dictionary menu, press 3 to select
Phrases
.
A list of 14 categories appears. Use the arrow keys to scroll through the list.
2. Press the number of the category you want. For example, press 5 to
select
Shopping
.
The phrase and translation appear. The boxed letter in the upper left corner of
the screen indicates the current source language. To change the source
language, type the letter that corresponds to the language.
Language: English French German Italian Japanese Spanish Dutch
Letter: E F G I J S H
Note: You can save English phrases to the exam list by pressing
hear an English or Chinese phrase pronounced by pressing
(SAVE) or
(SA Y).
9
Page 12

Using the Dictionary
Building Vocabulary
The Dictionary includes vocabulary words, divided into the following 15 categories: Food, Clothing, Home, Transportation, School, Recreation, People, Animals,
Plants, Minerals, Politics, Finance, Military, Astronomy, and Other. Each category
contains a list of words and definitions.
1. From the Dictionary menu, press
Or use the arrow keys to highlight
2. Use the arrow keys to highlight the category you want and press
3. Use the arrow keys to highlight the noun you want and press
You can save English words to the exam list by pressing
Adding Words to the User List
You can save English and Chinese words for personal study or review in two
separate User Lists. To add words to the User List, follow these steps.
1. From the Dictionary tab, press
Or use the arrow keys to highlight
2. Press the number of the list you want. For example, press
If the list is empty, a dialog box appears. Press
If the list contains entries, the words appear in alphabetical order. Press
(FUNC) and
ENTER
to add another word.
3. Type the word or phrase you want and press
4. Type the definition for the word .
You can change the language by pressing
pressing
5. Press
SMBL
. See “Entering Symbols” on page 11.
(SAVE).
The unit saves the entry and returns to the User List.
6. Press
when done.
CLEAR
4
for
Noun
5
for
UserList
User List
Noun
.
and press
.
and press
Y
to add new data.
ENTER
.
.
ENTER
.
ENTER
(SAVE).
.
ENTER
1
for
ENTER
E-CList
.
.
(LANG) or enter a symbol by
Removing Words from the User List
1. From the User List, use the arrow keys to highlight the word you want to delete.
2. Press
(FUNC).
A list of commands appears. You also can edit, copy, or find words on the list.
3. Press
4. Press
3
for
Del
.
Or use the arrow keys to highlight
data? Y/N
appears.
Y
to delete the word from the User List.
Del
and press
ENTER
. The message
Delete
The unit returns to the User List.
10
Page 13

Using the Databank
Adding Entries
You can add English and Chinese contact and scheduling information and notes
to the databank. To add an entry, follow these steps.
1. From the Databank menu, highlight the item you want and press
For example, highlight
If no entries are saved, the message
To Do
and press
New data? Y/N
ENTER
.
appears. Press Y to enter
new data.
If entries already exist, press
(FUNC) and 1 for
New
.
2. Enter the information as you are prompted.
You can change the entry language between Chinese and English by pressing
3. Press
(LANG). After the last prompt, the message
(SAVE) to store the entry in memory.
no more column
The unit returns to the databank.
Removing Entries
You can edit, delete, copy, and find databank entries from the TeleCard, Memo,
Schedule, or To Do list. To remove an entry, follow these steps.
1. Use the arrow keys to highlight the databank category you want and
press
ENTER
.
The current list of entries appears in alphabetical order.
2. Use the arrow keys to point the cursor at the entry you want to remove
and press
3. Press
.
ENTER
(FUNC) .
A list of options appears.
4. Press 3 for
ENTER
The message
5. Press
Del
or use the arrow keys to highlight the option and press
.
Delete data? Y/N
Y
to delete the data entry.
appears.
The unit returns to the list of entries for the databank category.
.
ENTER
appears.
Entering Symbols
To enter a symbol in the databank entry screen, follow these steps.
1. Press
SMBL
.
A list of available symbols appears at the bottom of the screen.
2. Use
and to scroll through the list of symbols.
3. Press the number under the symbol that you want.
You can press
to select the first symbol in the list.
ENTER
Note: This feature is available in English only.
11
Page 14

Using the Calculator & Converter
Converting Currency
The unit calculates currency values based on exchange rates that you enter.
Rates from Taiwanese to Chinese, Japanese, American, and Hong Kong
currencies appear as default conversions. To convert currency, follow these
steps.
1. From the Calculator menu, press
Or use the arrow keys to highlight
You can add, edit, or delete a rate of exchange by pressing
selecting the option you want. To add or edit a currency rate, you must enter a
name for the source currency, the rate of exchange, and a name for the target
currency. Then press
(SAVE) to store the changes. To remove a rate of
exchange, simply confirm the deletion by pressing Y.
2. Use the arrow keys to point the cursor at the exchange you want and
ENTER
press
. For example, press and press
from Taiwanese to Japanese currency.
The rate of exchange appears on the screen. You can alter the exchange rate
by entering a different value.
3. Confirm the correct exchange rate and press
Use
and to toggle between the source and target currency rates.
4. Type the value of the source currency and press
The value of the converted currency appears in the last field on the screen.
5. Press
(CLEAR) to return to the list of currency rates.
Making Calculations
When you use the calculator, the keyboard shifts automatically . You can use any
value or function of the calculator keys as shown in the “Key Guide” on page 5.
➤
Setting The Clock
1. From the Clock/Calendar menu, press 2 for
When you reset your product, the time setting automatically appears. Type the
correct date and time and press
2. Press
The clock options (
(FUNC) to set the clock options.
City, Hour, DST, Time
3. Press the number of the option you want. For example, press
City displays the list of possible cities. The default city is Taipei. Hour toggles
between a 12-hour and 24-hour clock.
4. Type or select the value you want and press
5. Press
(CLEAR) to return to the Clock/Calendar menu.
5
to select
Currency
ENTER
.
and press
local
, and
Alar(m)
Currency
ENTER
.
.
ENTER
to select an exchange
ENTER
.
ENTER
.
.
) appear.
.
ENTER
(FUNC) and
4
for
Time
.
12
Page 15

Using the Miscellaneous Menu
You can synchronize data, read reference information, change settings, and play
games using the Miscellaneous menu.
Connecting Your Unit to a PC
Data communication requires a PC running Chinese Windows (95 or 98) and
Data Link for Windows. DataGuard® is optional. You also need the appropriate
serial cable. To connect your unit to a PC, follow these steps.
1. Turn the unit and the PC off.
2. Plug the 3-pin end of the serial cable into the Data Link port on the unit.
3. Plug the 9-pin end of the serial cable into the communciation port
(COM1 or COM2) on the PC.
Make sure the cable is securely attached. If the port is not compatible with the
cable, you will need an adapter.
4. Turn the unit and the PC on.
5. Start the Data Link application on your PC.
Transferring Data to a PC
1. From the Miscellaneous menu on your unit, highlight
ENTER
press
2. Highlight
.
All
and press
ENTER
to send all data records stored in the
databank.
The unit displays all sections of the databank.
ENTER
3. Press
to begin transferring data.
When the data transfer is complete, the message
on the screen. You can view the data in the Data Link application on your PC.
Note: You can also transfer an item or a record of data. When transferring an
item, you must choose the Databank item you want. For example, you can
transfer the contents of the Memo only. When transferring a record, you must
choose the Databank item and the record you want. For example, you can
transfer a single record from the To Do list.
DataComm
Transfer Finished
and
appears
Receiving Data from a PC
• From the Data Communication screen, highlight
The message
Waiting for Reception
appears. The amount of time it takes to
Receive
and press
receive data depends on the number of records being transferred. When
transfer is complete, the message
transfer finished
appears on the screen.
13
ENTER
.
Page 16

Using the Miscellaneous Menu
Changing Settings
You can change the screen display, memory, key tone, shutoff , startup screen,
and speech of the unit. The shutoff time is how long your product stays on if you
forget to turn it off. To change the display for the unit, follow these steps.
1. From the Miscellaneous menu, press
Or use the arrow keys to highlight
2. Use the arrow keys to highlight the option you want and press
example, highlight
Display
and press
Setup
3
for
Setup
and press
.
ENTER
.
ENTER
.
. For
ENTER
The display settings appear. You can change the contrast, language, or
Chinese font (simplified or traditional).
3. Use the arrow keys to highlight the option you want and press
example, press
to highlight
Language
and press
ENTER
.
ENTER
. For
The language settings appear.
4. Use the arrow keys to highlight the option you want and press
example, highlight
English
and press
ENTER
.
ENTER
. For
Your changes are automatically saved. For example, the message language
for the entire unit immediately changes.
The unit returns to the display settings.
5. Press
(CLEAR) when done.
Setting a Password
You can set a password to protect the information in the databank.
1. From the Miscellaneous menu, press
Or use the arrow keys to highlight
1
for
Lock
2. Press
.
Or use the arrow keys to highlight
3. Type a password and press
ENTER
4
for
Password
Lock
and press
.
Password
and press
ENTER
.
.
ENTER
.
Your password must be no more than eight English letters or numbers. As you
type the password, an asterisk (*) appears in place of each character. When
you press
4. Type the password again and press
If the password was set successfully, the message
, the unit prompts you to confirm the password.
ENTER
ENTER
.
Lock completed!
appears.
The unit returns to the previous screen. After you set a password, any
information you enter is protected. You can browse the databank only by
entering the correct password.
If the password was not set, the message
Wrong password!
appears. Try to
enter the correct password or press (CLEAR) to back out of the password
screen and start again.
5. Press (CLEAR) when done.
14
Page 17

Copyrights, T rademarks, and Patents
Model B-1100:
• Batteries: two AAA
• Size: 14.8 x 8.3 x 2.2 cm
• Weight: 8 oz.
© 2000 Franklin Electronic Publishers, Inc., Burlington, N.J. 08016-4907 USA.
© 2000 Kinpo Electronics, Inc.
© 1998 Voxware, Inc. L&H Quality Speech
All rights reserved.
FOR HOME OR OFFICE USE.
U.S. Patents: 4,406,626; 4,490,811; 4,830,618; 4,891,775; 4,982,181; 5,113,340;
5,203,705 5,218,536; 5,295,070; 5,321,609; 5,153,831; 5,249,965; 5,396,606;
5,627,726
German Patent: M940744.5;
Euro. Pat. 0 136 379
PATENTS PENDING.
ISBN 1-56712-594-8
UPC: 0-84793-99213-1
[CE SYMBOL]
[AUSTRALIAN CHECKMARK]
[GREEN MARK]
Limited Warranty (outside U.S.)
This product, excluding batteries, is guaranteed by Franklin for a period of one
year from the date of purchase. It will be repaired or replaced with an equivalent
product (at Franklin’s option) free of charge for any defect due to faulty workmanship or materials.
Products purchased outside the United States that are returned under warranty
should be returned to the original vendor with proof of purchase and description
of fault. Charges will be made for all repairs unless valid proof of purchase is
provided.
This warranty explicitly excludes defects due to misuse, accidental damage, or
wear and tear. This guarantee does not affect the consumer’s statutory rights.
Speaking Chinese-English Dictionary
15
Page 18

Limited Warranty (U.S. only)
LIMITED WARRANTY, DISCLAIMER OF WARRANTIES AND LIMITED REMEDY
(A) LIMITED WARRANTY. FRANKLIN WARRANTS TO THE ORIGINAL END USER THAT FOR A
PERIOD OF ONE (1) YEAR FROM THE ORIGINAL DATE OF PURCHASE AS EVIDENCED BY A
COPY OF YOUR RECEIPT, YOUR FRANKLIN PRODUCT SHALL BE FREE FROM DEFECTS IN
MATERIALS AND WORKMANSHIP. THIS LIMITED WARRANTY DOES NOT INCLUDE DAMAGE
DUE TO ACTS OF GOD, ACCIDENT, MISUSE, ABUSE, NEGLIGENCE, MODIFICATION,
UNSUITABLE ENVIRONMENT OR IMPROPER MAINTENANCE. THE SOLE OBLIGATION AND
LIABILITY OF FRANKLIN, AND YOUR EXCLUSIVE REMEDY UNDER THIS LIMITED WARRANTY, WILL BE REPAIR OR REPLACEMENT WITH THE SAME OR AN EQUIVALENT
PRODUCT OF THE DEFECTIVE PORTION OF THE PRODUCT, AT THE SOLE OPTION OF
FRANKLIN IF IT DETERMINES THAT THE PRODUCT WAS DEFECTIVE AND THE DEFECTS
AROSE WITHIN THE DURATION OF THE LIMITED WARRANTY. THIS REMEDY IS YOUR
EXCLUSIVE REMEDY FOR BREACH OF THIS WARRANTY. THIS WARRANTY GIVES YOU
CERTAIN RIGHTS; YOU MAY ALSO HAVE OTHER LEGISLATED RIGHTS THAT MAY VARY
FROM JURISDICTION TO JURISDICTION.
(B) DISCLAIMER OF WARRANTIES AND LIMITATION OF LIABILITY. EXCEPT FOR THE
LIMITED WARRANTIES EXPRESSLY RECITED ABOVE, THIS FRANKLIN IS PROVIDED ON
AN “AS IS” BASIS, WITHOUT ANY OTHER WARRANTIES OR CONDITIONS, EXPRESS OR
IMPLIED, INCLUDING, BUT NOT LIMITED TO, WARRANTIES OF MERCHANTABLE QUALITY,
MERCHANTABILITY OR FITNESS FOR A PARTICULAR PURPOSE, OR THOSE ARISING BY
LAW, STATUTE, USAGE OF TRADE, OR COURSE OF DEALING. THIS WARRANTY APPLIES
ONLY TO PRODUCTS MANUFACTURED BY FRANKLIN AND DOES NOT INCLUDE BATTERIES, CORROSION OF BATTERY CONTACTS OR ANY OTHER DAMAGE CAUSED BY
BATTERIES. NEITHER FRANKLIN NOR OUR DEALERS OR SUPPLIERS SHALL HAVE ANY
LIABILITY TO YOU OR ANY OTHER PERSON OR ENTITY FOR ANY INDIRECT, INCIDENTAL,
SPECIAL, OR CONSEQUENTIAL DAMAGES WHATSOEVER, INCLUDING, BUT NOT LIMITED
TO, LOSS OF REVENUE OR PROFIT, LOST OR DAMAGED DATA OR OTHER COMMERCIAL
OR ECONOMIC LOSS, EVEN IF WE HAVE BEEN ADVISED OF THE POSSIBILITY OF SUCH
DAMAGES, OR THEY ARE OTHERWISE FORESEEABLE. WE ARE ALSO NOT RESPONSIBLE
FOR CLAIMS BY A THIRD PARTY. OUR MAXIMUM AGGREGATE LIABILITY TO YOU, AND
THAT OF OUR DEALERS AND SUPPLIERS, SHALL NOT EXCEED THE AMOUNT PAID BY
YOU FOR THE FRANKLIN PRODUCT AS EVIDENCED BY YOUR PURCHASE RECEIPT. YOU
ACKNOWLEDGE THAT THIS IS A REASONABLE ALLOCATION OF RISK. SOME STATES/
COUNTRIES DO NOT ALLOW THE EXCLUSION OR LIMITATION OF LIABILITY FOR CONSEQUENTIAL OR INCIDENTAL DAMAGES, SO THE ABOVE LIMITATION MAY NOT APPLY TO
YOU. IF THE LAWS OF THE RELEVANT JURISDICTION DO NOT PERMIT FULL WAIVER OF
IMPLIED WARRANTIES, THEN THE DURATION OF IMPLIED WARRANTIES AND CONDITIONS
ARE LIMITED TO THE DURATION OF THE EXPRESS WARRANTY GRANTED HEREIN.
(C) WARRANTY SERVICE: UPON DISCOVERING A DEFECT, YOU MUST CALL FRANKLIN’S
CUSTOMER SERVICE DESK, 1-800-266-5626, TO REQUEST A RETURN MERCHANDISE
AUTHORIZATION (“RMA”) NUMBER, BEFORE RETURNING THE PRODUCT (TRANSPORTATION CHARGES PREPAID) TO:
FRANKLIN ELECTRONIC PUBLISHERS, INC.
ATTN: SERVICE DEPARTMENT
ONE FRANKLIN PLAZA
BURLINGTON, NJ 08016-4907
IF YOU RETURN A FRANKLIN PRODUCT, PLEASE INCLUDE A NOTE WITH THE RMA, YOUR
NAME, ADDRESS, TELEPHONE NUMBER, A BRIEF DESCRIPTION OF THE DEFECT AND A
COPY OF YOUR SALES RECEIPT AS PROOF OF YOUR ORIGINAL DATE OF PURCHASE.
YOU MUST ALSO WRITE THE RMA PROMINENTLY ON THE PACKAGE IF YOU RETURN THE
PRODUCT, OTHERWISE THERE MAY BE A LENGTHY DELAY IN THE PROCESSING OF YOUR
RETURN. WE STRONGLY RECOMMEND USING A TRACKABLE FORM OF DELIVERY TO
FRANKLIN FOR YOUR RETURN.
16
Page 19

FCC Notice
NOTE: This equipment has been tested and found to comply with the limits for a
Class B digital device, pursuant to Part 15 of the FCC Rules. These limits are
designed to provide reasonable protection against harmful interference in a residential installation. This equipment generates, uses and can radiate radio frequency
energy and, if not installed and used in accordance with the instructions, may cause
harmful interference to radio communications. However, there is no guarantee that
interference will not occur in a particular installation. If this equipment does cause
harmful interference to radio or television reception, which can be determined by
turning the equipment off and on, the user is encouraged to try to correct the
interference by one or more of the following measures:
– Reorient or relocate the receiving antenna.
– Increase the separation between the equipment and receiver.
– Connect the equipment into an outlet on a circuit different from that to which the
receiver is connected.
– Consult the dealer or an experienced radio/TV technician for help.
NOTE: This unit was tested with shielded cables on the peripheral devices. Shielded
cables must be used with the unit to insure compliance.
NOTE: The manufacturer is not responsible for any radio or TV interference caused
by unauthorized modifications to this equipment. Such modifications could void the
user’s authority to operate the equipment.
KCD-28000-00
P/N 7201933
Rev . A
Page 20

Electronic Publishers
www.franklin.com
 Loading...