

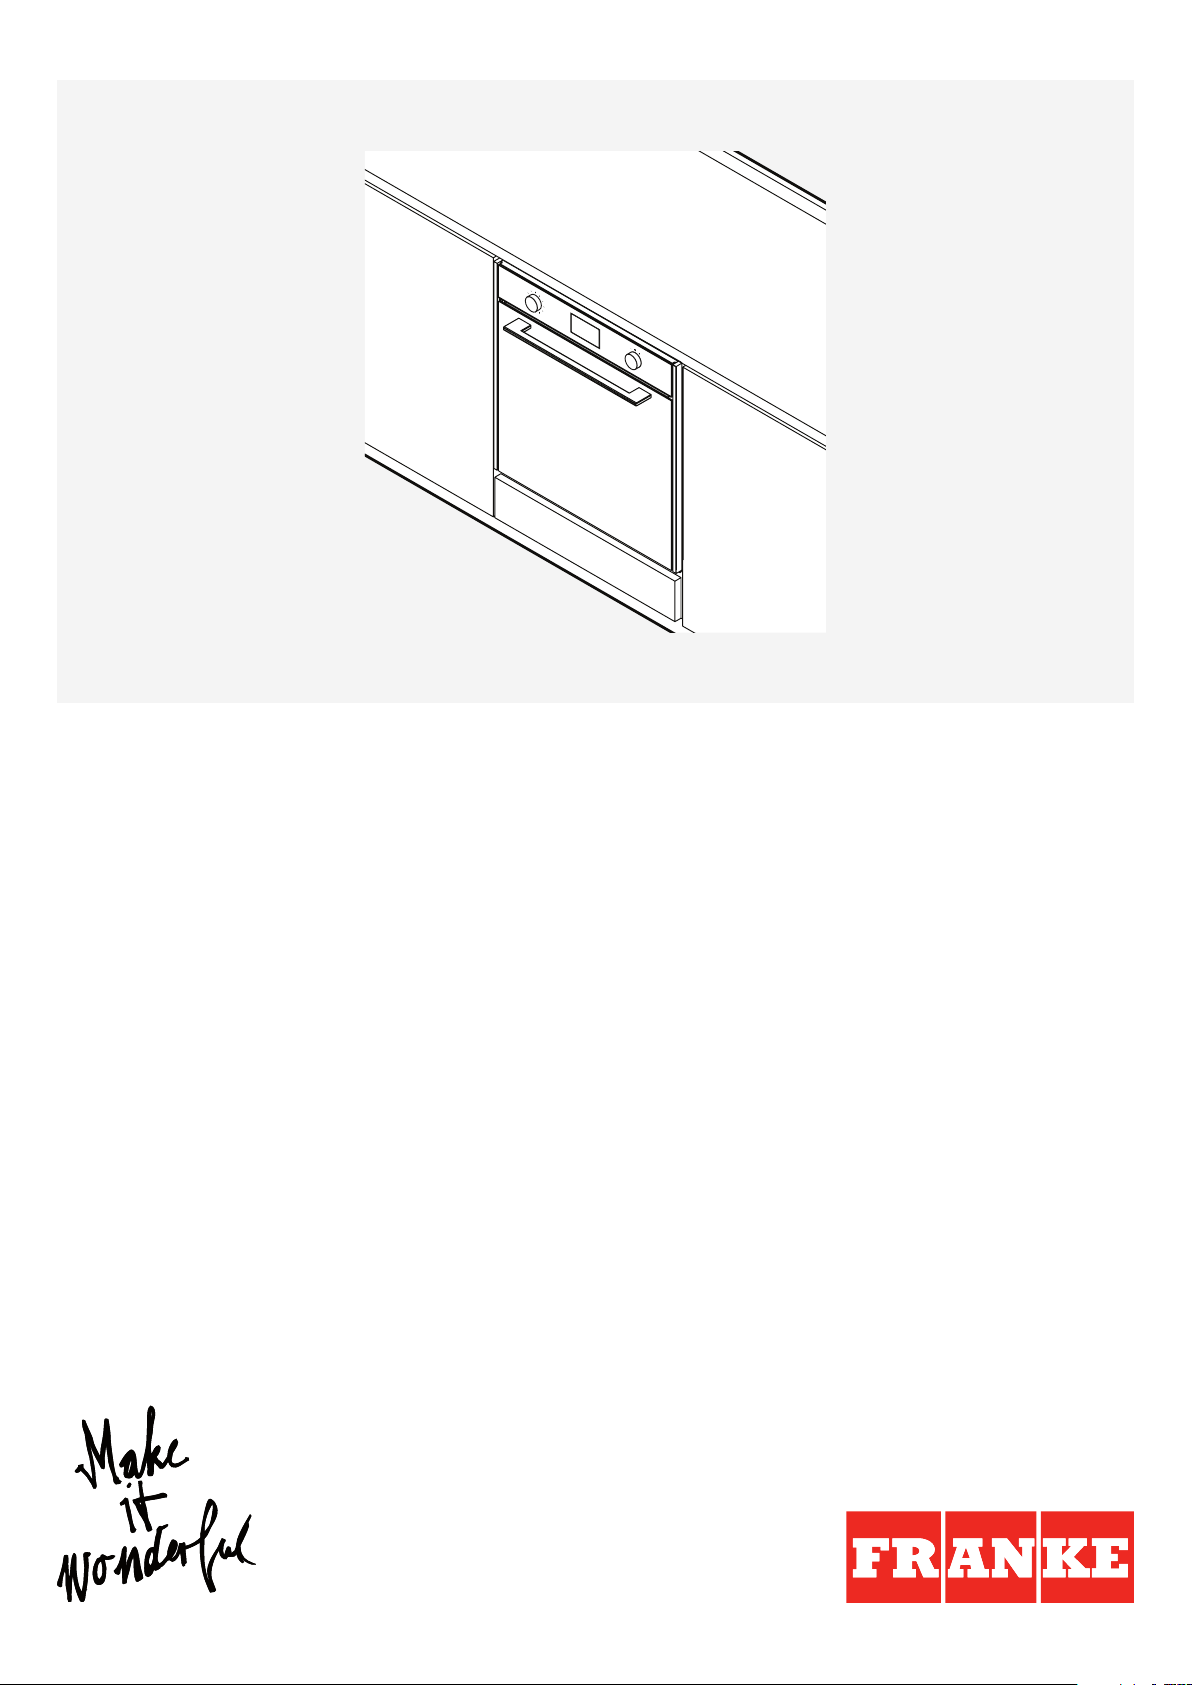
FMY 98 P XS FMY 98 P BK
EN User manual Pyrolytic Oven

LANGUAGES
EN USER MANUAL ................................................................................................................................................................................ 3

EN
TABLE OF CONTENTS
OVERVIEW .................................................................................................................................................................................. 4
CONTROL PANEL ...................................................................................................................................................................... 4
ACCESSORIES ............................................................................................................................................................................ 5
FUNCTIONS ...............................................................................................................................................................................6
FIRST TIME USE ......................................................................................................................................................................... 7
DA ILY U SE ................................................................................................................................................................................... 8
USEFUL TIPS ............................................................................................................................................................................ 10
COOKIN G TABLE ..................................................................................................................................................................... 11
CLEANING AND MAINTENANCE ........................................................................................................................................ 13
TROUBLESHOOTING ............................................................................................................................................................. 15
SUPPORT .................................................................................................................................................................................. 15
3
USER GUIDE
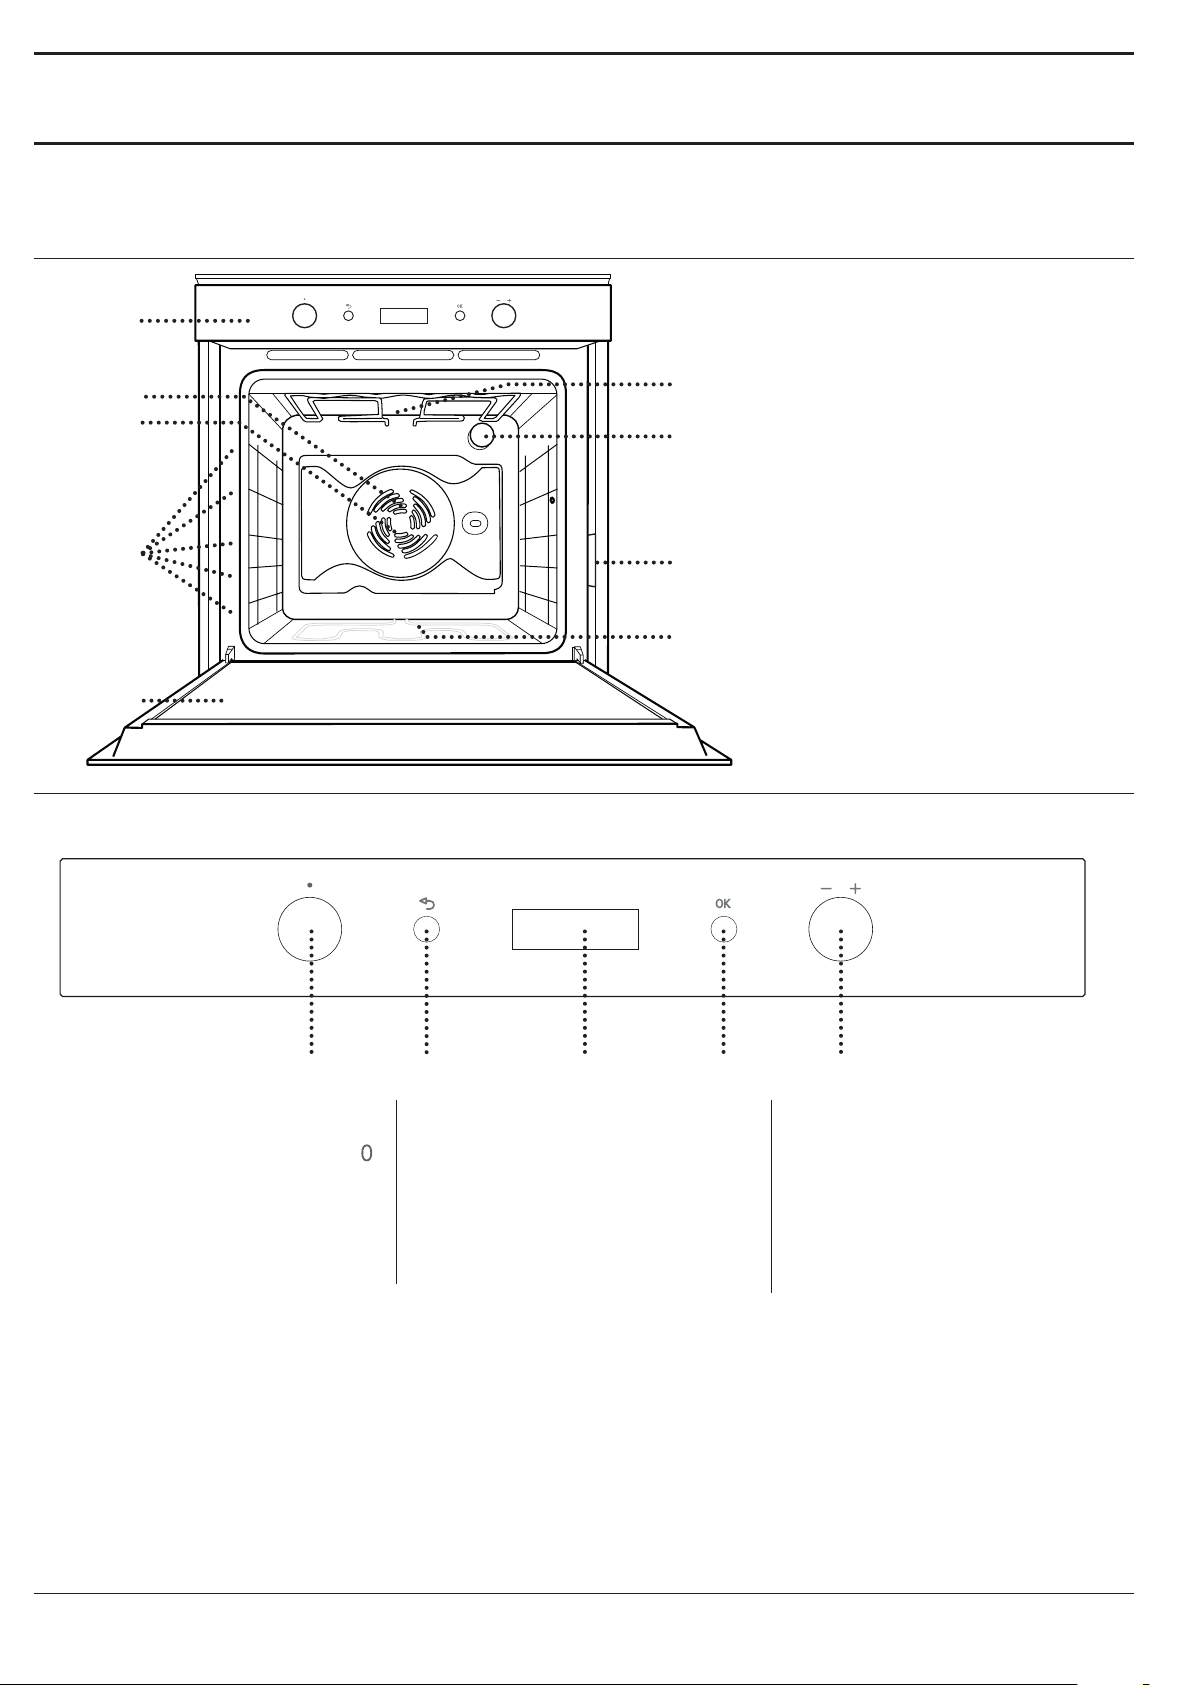
OVERVIEW
1
2
3
4
5
4
3
2
1
1. Control panel
2. Fan
3. Circular heating element
(not-visible)
6
4. Shelf guides
(the level is indicated on the front
5
7
of the oven)
5. Door
4
6. Upper heating element/grill
7. Lamp
3
2
1
8
9
8. Identification plate
(do not remove)
9. Bottom heating element
(not-visible)
5
CONTROL PANEL
1 5
1. SELECTION KNOB
For switching the oven on by
selecting a function. Turn to the
position to switch the oven off.
2. BACK
For returning to the previous
settings menu.
2
3 4
3. DISPL AY
4. CONFIRMATION BUTTON
For confirming a selected function
or a set value.
5. ADJUST KNOB
For scrolling through the menus
and applying or changing settings.
Please note: All knobs are push-activated knobs. Push down on the center of the knob to release it from its seating.
4
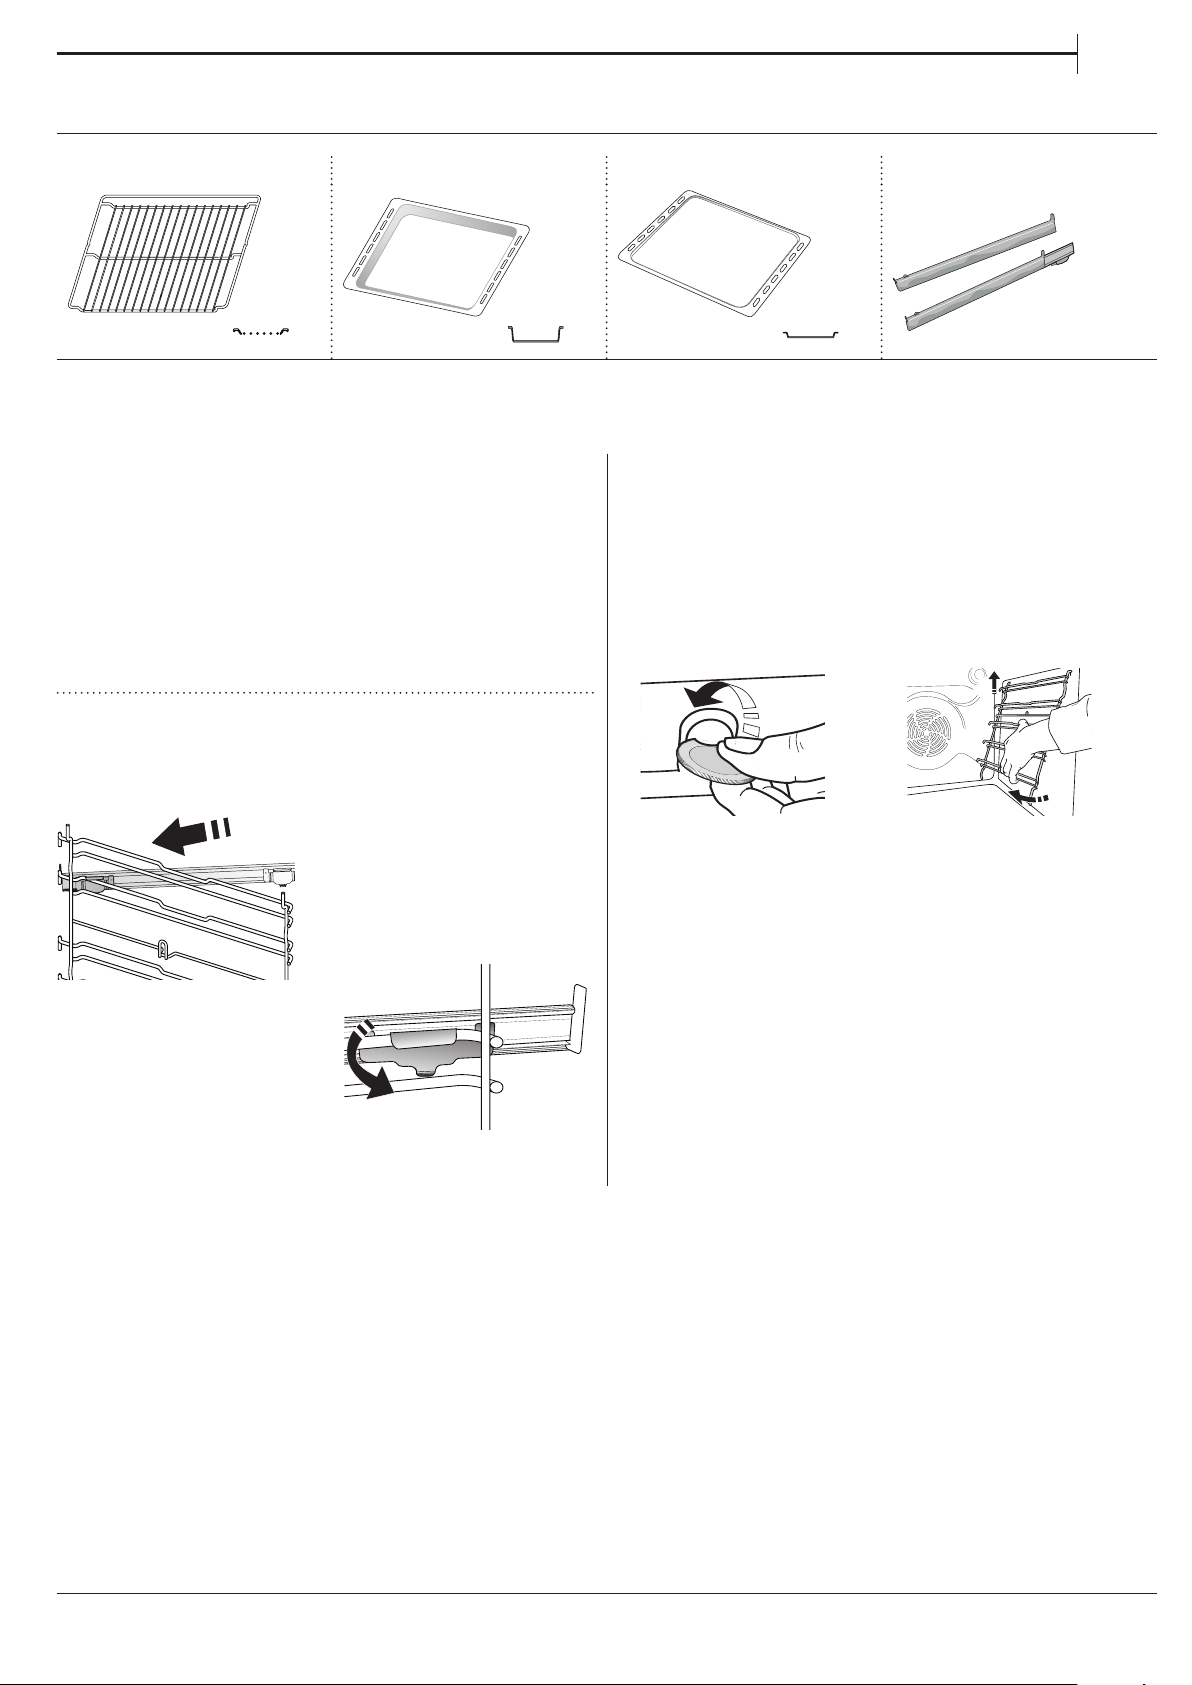
ACCESSORIES
2
WIRE SHELF DRIP TRAY BAKING TRAY SLIDING RUNNERS
The number of accessories may vary depending on which model is purchased.
Other accessories can be purchased separately from the After-sales Service.
EN
INSERTING THE WIRE SHELF AND OTHER
ACCESSORIES
Insert the wire shelf horizontally by sliding it across
the shelf guides, making sure that the side with the
raised edge is facing upwards.
Other accessories, such as the drip tray and the
baking tray, are inserted horizontally in the same way
as the wire shelf.
FITTING THE SLIDING RUNNERS
Remove the shelf guides from the oven and remove
the protective plastic from the sliding runners.
Fasten the upper clip of the
runner to the shelf guide
and slide it along as far as it
will go. Lower the other clip
into position.
To secure the guide, press
the lower portion of the
clip firmly against the shelf
guide. Make sure that the
runners can move freely.
Repeat these steps on the
other shelf guide on the same level.
Please note: The sliding runners can be tted on any level.
REMOVING AND REFITTING THE SHELF GUIDES
• To remove the shelf guides, lift them up and pull the
lower parts out of their lodgings: The shelf guides can
now be removed.
• To refit the shelf guides, first fit them back into their
upper seating. Keeping them held up, slide them into
the cooking compartment, then lower them into
position in the lower seating.
1
5

FUNCTIONS
OFF
For switching off the oven.
CONVENTIONAL*
For cooking meat or baking cakes with liquid
centre on a single shelf.
CONVECTION BAKE
For cooking meat or baking cakes with liquid
centre on a single shelf.
FORCED AIR
For cooking different foods that require
the same cooking temperature on several shelves
(maximum three) at the same time. This function
can be used to cook different foods without odours
being transferred from one food to another.
GRILL
For grilling steaks, kebabs and sausages,
cooking vegetables au gratin or toasting bread.
When grilling meat, we recommend using a drip tray
to collect the cooking juices: Position the pan on any
of the levels below the wire shelf and add 500 ml of
drinking water.
TURBO GRILL
For roasting large joints of meat (legs, roast
beef, chicken). We recommend using a drip tray to
collect the cooking juices: Position the pan on any
of the levels below the wire shelf and add 500 ml of
drinking water. The turnspit (if provided) can be used
with this function.
MAXI COOKING
For cooking large joints of meat (above 2.5
kg). Use the 1st or 2nd shelves, depending on the
size of the joint. The oven does not have to be
preheated. We suggest turning the meat during
cooking to obtain uniform browning on both sides.
It is advisable to baste the meat every now and again
so that it does not become too dry.
FAST PREHEATING
For preheating the oven quickly.
PYROLYTIC CLEANING
For eliminating cooking residues with an extrahigh temperature cycle. Two self-cleaning cycles are
available: a complete cycle and a quick cycle (ECO).
It is advisable to use the complete cycle only in case
of a very dirty oven, and the shorter cycle if the
function is used at regular intervals.
SETTINGS
For changing the oven settings (time,
language, audible signal volume, brightness, ECO
mode, unit of measurement, power).
Please note: When Eco mode is active, the brightness of the
display will be reduced and the light switches o to save
energy. They are reactivated temporarily whenever any of
the buttons are pressed.
COOKASSIST
MEAT
the best temperature and cooking method for meat.
This function intermittently activates the fan at
low speed to prevent the food from drying out too
much.
POULT
the best temperature and cooking method for
poultry. This function intermittently activates the fan
at low speed to prevent the food from drying out
too much.
CASSE
the best temperature and cooking method for pasta
dishes.
BREAD
the best temperature and cooking method for all
types of bread.
MEAT
This function automatically selects
POULTRY
This function automatically selects
CASSEROLE
This function automatically selects
BREAD
This function automatically selects
ECO FORCED AIR*
For cooking stuffed roasting joints and fillets
of meat on a single shelf. Food is prevented from
drying out excessively by gentle, intermittent air
circulation. When this function is in use, the ECO
light will remain switched off throughout cooking
but can be switched back on temporarily by pressing
.
To use the ECO cycle and therefore optimise power
consumption, the oven door should not be opened
until the food is completely cooked.
6
PIZZA
the best temperature and cooking method for all
types of pizza.
PASTR
the best temperature and cooking method for all
kinds of cakes (leavened cakes, filled cakes, tarts,
etc.).
* Function used as reference for the energy eciency
declaration in accordance with Regulation (EU) No. 65/2014
PIZZA
This function automatically selects
PASTRY CAKES
This function automatically selects

EN
RISIN
savoury dough. To maintain the quality of proving,
do not activate the function if the oven is still hot
following a cooking cycle.
WARM
crisp.
RISING
For optimal proving of sweet or
KEEP WARM
For keeping just-cooked food hot and
FIRST TIME USE
1. PLEASE SELECT LANGUAGE
You will need to set the language and the time
when you switch on the appliance for the first time:
“ENGLISH” will scroll along the display.
ENGLI
Turn the adjustment knob to scroll through the list of
available languages and select the one you require.
Press
Please note: The language can subsequently be changed
from the “Settings” menu.
2. SET THE TIME
After selecting the language, you will need to set the
current time: The two digits for the hour will flash on
the display.
to confirm your selection.
SLOW
while keeping them tender and succulent. We
recommend searing roasting joints in a pan first
to brown the meat and help seal in its natural
juices. Cooking times range from two hours for
fish weighing 300 g to four or five hours for fish
weighing 3 kg, and from four hours for joints of meat
weighing 1 kg to six or seven hours for joints of meat
weighing 3 kg. For meat, times range from 4 hours
for 1 kg joints to 6-7 hours for 3 kg joints.
SLOW COOKING
For cooking meat and fish gently
3. SET THE POWER CONSUMPTION
The oven is programmed to consume a level of
electrical power that is compatible with a domestic
network that has a rating of more than 3 kW: If your
household uses a lower power, you will need to
decrease this value.
Turn the selection knob until “SETTINGS” is shown on
the display, then press
Turn the adjustment knob to select the “POWER” menu
item and press
to confirm.
to confirm.
POWER
Turn the adjustment knob to select “Low” and press
to confirm.
LOW
Turn the adjustment knob to set the correct hour and
press
the display.
Turn the adjustment knob to set the minutes and press
Please note: You may need to set the time again following
lengthy power outages.
: The two digits for the minutes will flash on
to confirm.
4. HEAT THE OVEN
A new oven may release odours that have been left
behind during manufacturing: This is completely
normal.
Before starting to cook food, we therefore
recommend heating the oven with it empty in order
to remove any possible odours.
Remove any protective cardboard or transparent film
from the oven and remove any accessories from inside
it.
Heat the oven to 200 °C for around one hour, ideally
using a function with air circulation (e.g. “Forced Air”
or “Convection Bake”).
Follow the instructions for setting the function
correctly.
Please note: It is advisable to air the room after using the
appliance for the rst time.
7
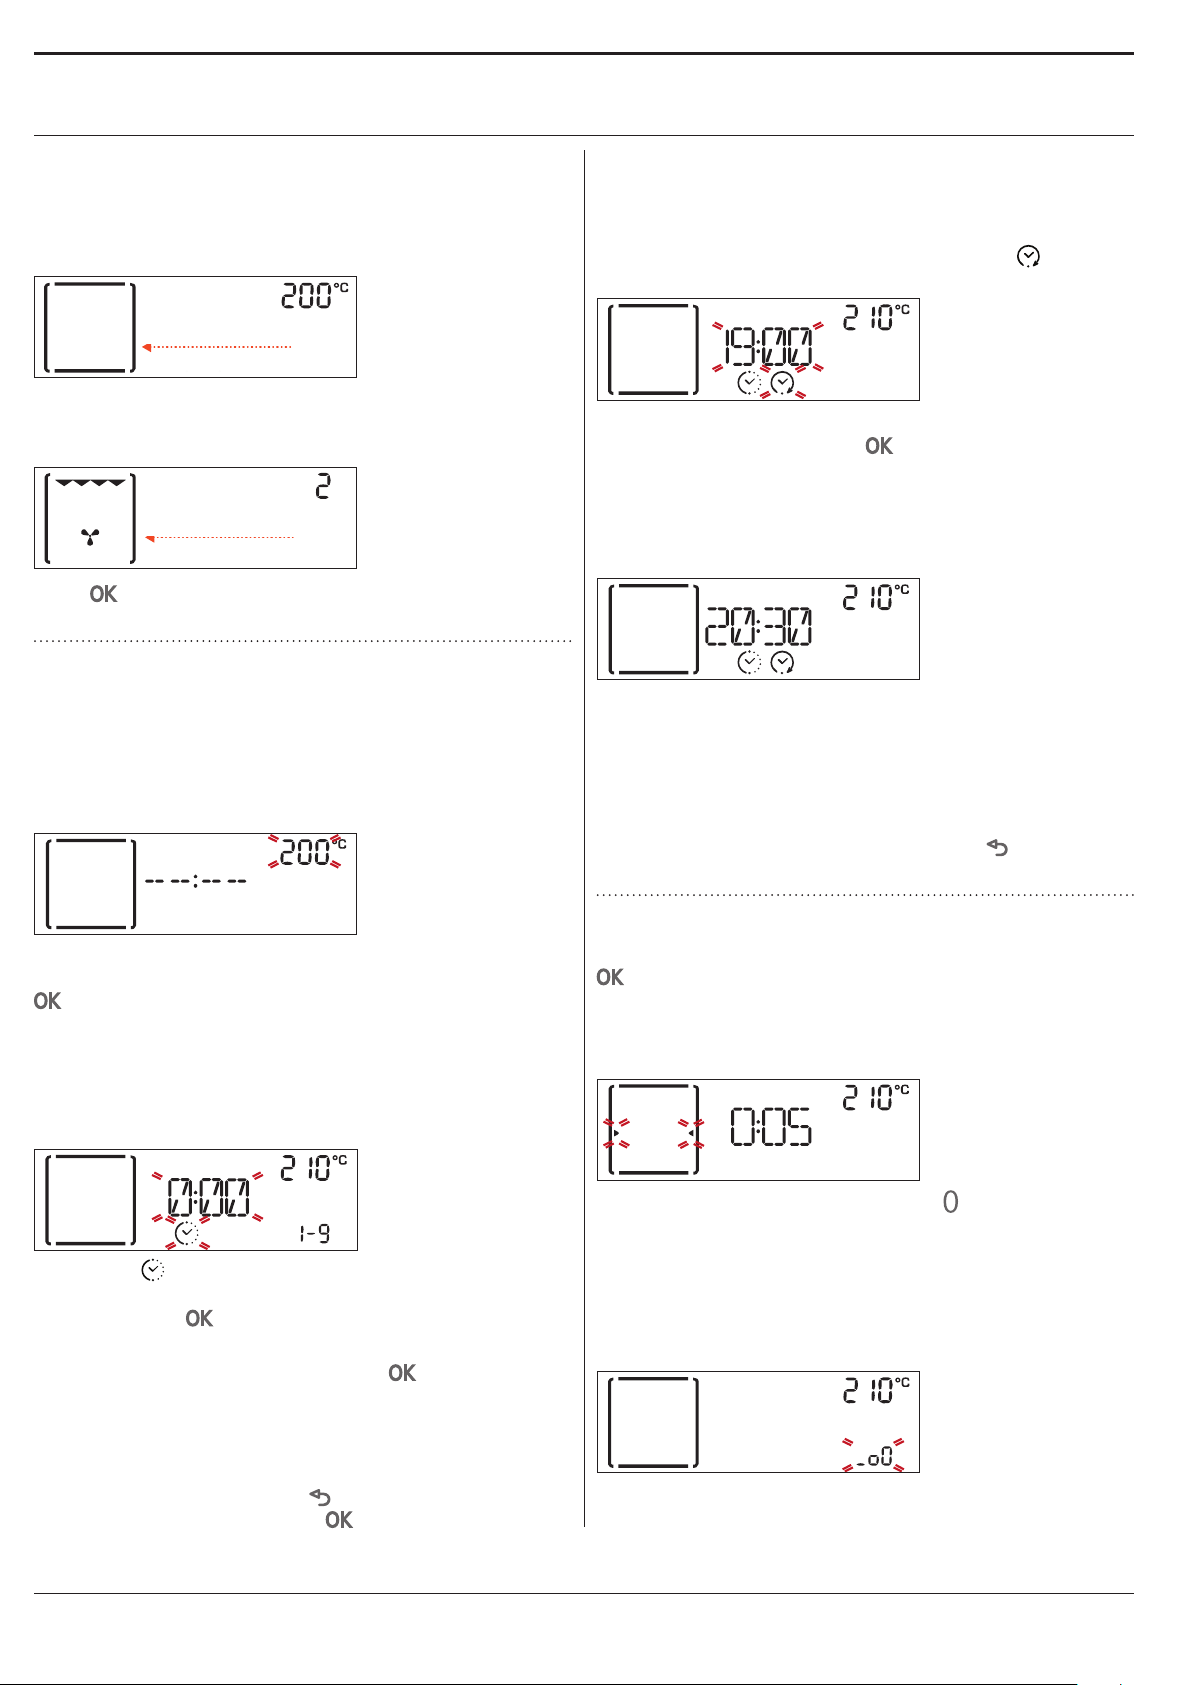
DAILY USE
1. SELECT A FUNCTION
Turn the selection knob to switch on the oven and
show the function you require on the display: The
display will show the icon for the function and its
basic settings.
CONVE
To select an item from the menu (the display will
show the first available item), turn the adjustment
knob until the item you require is shown.
TURBO
Press to confirm selection: the display will show
the basic settings.
2. SET THE FUNCTION
After having selected the function you require, you
can change its settings.
The display will show the settings that can be
changed in sequence.
TEMPERATURE/GRILL LEVEL
SETTING THE END COOKING TIME DELAYED START
In many functions, once you have set a cooking time
you can delay starting the function by programming
its end time.
The display shows the end time while the
flashes.
Turn the adjustment knob to set the time you want
cooking to end, then press
the function.
Place the food in the oven and close the door: The
function will start automatically after the period of
time that has been calculated in order for cooking to
finish at the time you have set.
Notes: Programming a delayed cooking start time will
disable the oven preheating phase: The oven will reach the
temperature your require gradually, meaning that cooking
times will be slightly longer than those listed in the cooking
table.
During the waiting time, you can use the adjustment knob to
amend the programmed end time or press
the settings.
to confirm and start
icon
to change
When the value flashes on the display.
turn the adjustment knob to change it, then press
to confirm and continue to alter the settings that
follow (if possible).
Please note: Once the function has been activated, the
temperature can be changed using the adjustment knob.
DURATION
When the icon flashes on the display, use the
adjustment knob to set the cooking time you require
and then press
You do not have TO set the cooking time if you want
to manage cooking manually: Press
start the function.
In this case, you cannot set the end cooking time by
programming a delayed start.
Please note: You can adjust the cooking time that has been
set during cooking by pressing : use the adjustment
knob to amend it and then press to conrm.
to confirm.
to confirm and
3. ACTIVATE THE FUNCTION
Once you have applied the settings you require, press
to confirm the time that cooking will end and
activate the function.
Please note: Once cooking has started, the display will
recommend the most suitable level for each function.
You can turn the selection knob to to pause the
function that has been activated at any time.
4. PRE HEATING
Some functions have an oven preheating phase: Once
the function has started, the display indicates that the
preheating phase has been activated.
PRE
Once this phase has finished, an audible signal will
sound and the display will indicate that the oven has
reached the set temperature:
8

At this point, open the door, place the food in the
oven, close the door and start cooking.
Please note: Placing the food in the oven before preheating
has nished may have an adverse eect on the nal cooking
result. Opening the door during the preheating phase will
stop pause it.
The cooking time does not include a preheating phase.
You can always change the temperature you want the oven
to reach using the adjustment knob.
5. END OF COOKING
An audible signal will sound and the display will
indicate that cooking is complete.
END
Press to continue cooking in manual mode
(without a programmed cooking time) or turn the
adjustment knob to extend the cooking time by
setting a new duration.
In both cases, the temperature or the grill level
settings will be retained.
BROWNING
Some functions of the oven enable you to brown
the surface of the food by activating the grill once
cooking is complete.
EN
indicate once the timer has finished counting down
the selected time.
Please note: The timer does not activate any of the cooking
cycles.
Use the adjustment knob to change the time set on the
timer; press to switch the timer o at any time.
Once the timer has been activated, you can also select
and activate a function.
Turn the selection knob to switch on the oven and
then select the function your require.
Once the function has started, the timer will continue
to count down independently without interfering
with the function itself.
CONVE
To switch off the timer, turn the selection knob to
to stop the function that is currently active and then
press
. KEY LOCK
To lock the keypad, press and hold and at the
same time for at least five seconds.
.
PRESS
When the display shows the relevant message, if
required press
cycle.
You can stop the function at any time by turning the
selection knob to 0 to switch the oven o.
. TIMER
When the oven is switched off, the display can be
used as a timer. To activate this function, make sure
that the oven is switched off and turn the adjustment
knob: The
Turn the adjustment knob to set the length of time you
require and then press
An audible signal will sound and the display will
to start a five-minute browning
icon will flash on the display.
again to activate the timer.
Do this again to unlock the keypad.
Please note: This function can also be activated during
cooking. For safety reasons, the oven can be switched o at
any time by turning the selection knob to .
. AUTOMATIC CLEANING – PYRO
Before activating this function, make sure that you
have removed all the accessories from the oven,
including the shelf guides.
Turn the selection knob to select the automatic
cleaning function.
Note: Remove excessive residuals inside the cavity and clean
the inner door glass before using the pyrolytic function.
There are two self-cleaning cycles available: a
complete cycle and a quick cycle (ECO).
Turn the adjustment knob to select the desired cycle
and press
to confirm.
9

The oven begins the self-cleaning cycle, and the door
locks automatically: a warning message appears on
the display, along with a countdown indicating the
status of the cycle in progress.
Once the cycle has been completed, the door remains
locked until the temperature inside the oven has
returned to a safe level.
COOL
The display will then show the current time.
Please note: like with other manual, it is also possible to set
the end time for the automatic cleaning cycle.
USEFUL TIPS
HOW TO READ THE COOKING TABLE
The table lists the best function, accessories and
level to use to cook various different types of food.
Cooking times start from the moment food is placed
in the oven, excluding preheating (where required).
Cooking temperatures and times are approximate
and depend on the amount of food and the type
of accessory used. Use the lowest recommended
settings to begin with and, if the food is not cooked
enough, then switch to higher settings. Use the
accessories supplied and preferably dark-coloured
metal cake tins and baking plates. You can also use
Pyrex or stoneware pans and accessories, but bear in
mind that cooking times will be slightly longer.
COOKING DIFFERENT FOODS AT THE SAME TIME
Using the “Forced Air” function, you can cook
different foods which require the same cooking
temperature at the same time (for example: fish and
vegetables), using different shelves. Remove the food
which requires a shorter cooking time and leave the
food which requires a longer cooking time in the
oven.
10

COOKING TABLE
EN
RECIPE FUNCTION PREHEAT.
Leavened cakes
Filled cake
(cheese cake, strudel, fruit pie)
Biscuits/tartlets
Choux buns
PASTR
PASTR
PASTR
TEMPERATURE
(°C)
COOK TIME
(Min.)
- 160-180 30-90
Yes 160-180 30-90
- 160 –200 30 - 85
Yes 160 –200 35-90
- 170 – 180 15 - 45
Yes 160 -170 20-45
Yes 160 -170 20-45 ***
Yes 180 -200 30-40
Yes 180 -190 35-45
Yes 180 -190 35-45 ***
Yes 90 110 -150
LEVEL
AND ACCESSORIES
2/3
4
1
3
4
1
3
4
1
5
3
3
4
1
5
3
3
1
1
Meringues
Yes 90 130 - 150
Yes 90 140-160 ***
PIZZA
Pizza (Thin, thick, focaccia)
- 220 - 250 20-40
Yes 220 - 240 20-40
Yes 220 - 240 25-50 ***
Bread loaf 1 kg
Rolls
BREAD
BREAD
- 180 - 220 50 - 70
- 180 - 220 30 - 50
Bread Yes 180 -200 30 - 60
PIZZA
Yes 250 10 - 15
Frozen pizza
Yes 250 10 - 20
Yes 180 -190 40-55
Salty cakes
(vegetable pie, quiche)
Yes 180 -190 45 - 60
Yes 180 -190 45-70 ***
4
5
2
4
5
2
2
4
3
4
2 / 3
4
5
1
3 1
1
3
1
1
1
3 1
1
Vols-au-vents/pu pastry crackers
Lasagne/soué
Baked pasta/cannelloni
CASSE
CASSE
Yes 190 -200 20-30
Yes 180 -190 20-40
Yes 180 -190 20-40 ***
- 190 -200 40 - 65
- 190 -200 25 - 45
3
4
5
1
3 1
3
3
11

RECIPE FUNCTION PREHEAT.
Lamb/veal/beef/pork 1 kg
MEAT
TEMPERATURE
(°C)
COOK TIME
(Min.)
- 190 -200 60 - 90
LEVEL
AND ACCESSORIES
3
Chicken/rabbit/duck 1 kg
Turkey/goose 3 kg
Baked sh/en papillote
(llet, whole)
Stued vegetables
(tomatoes, courgettes, eggplants)
POULT
POULT
- 200 -230 50 - 80
- 190 -200 90 - 150
Yes 180 -200 40-60
Yes 180 -200 50-60
Toasted bread - 3 (High) 3-6
Fish llets/slices - 2 (Medium) 20-30 *
Sausages/kebabs/spare ribs/
hamburgers
2 - 3 (Medium -
High)
15 - 30 *
Roast chicken 1-1.3 kg - 2 (Medium) 55-70 **
Roast beef rare 1 kg - 2 (Medium) 35-50 **
Leg of lamb/knuckle - 2 (Medium) 60-90 **
Roast potatoes - 2 (Medium) 35-55 **
Vegetable gratin - 3 (High) 10-25
Lasagne and meat Yes 200 50-100 ***
3
2
3
2
5
4
5
2
3
4
1
3
3
3
3
4
1
Meat and potatoes Yes 200 45-100 ***
Fish and vegetables Yes 180 30-50 ***
Complete meal: Fruit tart (level 5)/
lasagne
(level 3)/meat ( level 1)
Yes 190 40-120 ***
Stued roasting joints - 200 80-120 ***
Cuts of meat
(rabbit, chicken, lamb)
- 200 50-100 ***
4
4
5
3
3
1
1
3 1
* Turn food halfway through cooking.
** Turn food two thirds of the way through cooking (if necessary).
*** Estimated length of time: dishes can be removed from the oven at dierent times depending on personal preference.
MANUAL
FUNCTIONS
COOKASSIST
Conventional Grill Turbo Grill Forced Air Convection Bake Eco Forced Air
MEAT
Meat Poultry Casserole Bread Pizza Pastry
POULT
CASSE
BREAD
PIZZA
PASTR
ACCESSORIES
12
Wire shelf
Baking tray or cake tin
on the wire shelf
Drip tray / Dessert
tray / Baking tray on
wire shelf
Drip tray
Drip tray with 500 ml
of water
Baking tray

CLEANING AND MAINTENANCE
EN
Make sure that the oven has
cooled down before carrying out
any maintenance or cleaning.
Do not use steam cleaners.
Do not use wire wool, abrasive
scourers or abrasive/corrosive
cleaning agents, as these could
damage the surfaces of the
appliance.
EXTERIOR SURFACES
• Clean the surfaces with a damp microfibre cloth.
If they are very dirty, add a few drops of pH-neutral
detergent. Finish off with a dry cloth.
• Do not use corrosive or abrasive detergents. If any of
these products inadvertently comes into contact with
the surfaces of the appliance, clean immediately with
a damp microfibre cloth.
INTERIOR SURFACES
• After every use, leave the oven to cool and then
clean it, preferably while it is still warm, to remove
any deposits or stains caused by food residues. To
dry any condensation that has formed as a result of
cooking foods with a high water content, leave the
oven to cool completely and then wipe it with a cloth
or sponge.
Wear protective gloves.
The oven must be disconnected
from the mains before carrying
out any kind of maintenance
work.
• Clean the glass in the door with a suitable liquid
detergent.
• The oven door can be removed to facilitate cleaning .
ACCESSORIES
Soak the accessories in a washing-up liquid solution
after use, handling them with oven gloves if they
are still hot. Food residues can be removed using a
washing-up brush or a sponge.
CLEANING THE COOKING COMPARTMENT WITH THE PYRO CYCLE
Do not touch the oven during the Pyro cycle.
Keep children and animals away from the oven
This function enables you to eliminate cooking
spatters using a high temperature food residues turn
into deposits that can be easily wiped away with a
damp sponge once the oven has cooled down.
If the oven is installed below a hob, make sure that
all the burners or electric hotplates are switched off
while running the self-cleaning cycle.
Remove all accessories from the oven before
running the Pyro function (including the shelf
guides).
For optimum cleaning results, remove excessive
residuals inside the cavity and clean the inner door
glass before using the pyrolytic function.
during and after (until the room has nished airing)
running the Pyro cycle.
Then oven has two different pyrolytic cleaning
functions: the complete cycle provides for a thorough
cleaning if the oven is extremely dirty, while the quick
cycle (ECO) is shorter and consumes less energy, thus
making it suitable for use at regular intervals.
Only run the Pyro function if the appliance contains
heavy soiling or gives off bad odours during cooking.
Please note: The oven door cannot be opened while
pyrolytic cleaning is in progress. It will remain locked until the
temperature has returned to an acceptable level.
Ventilate the room during and after the pyrolytic
cleaning cycle (until the room has been completely
aerated).
13

b
a
a
b
~15°
b
a
REPLACING THE LAMP
1. Disconnect the oven from the power supply.
2.. Remove the cover from the light, replace the bulb
and put the cover back on the light.
3. Reconnect the oven to the power supply.
REMOVING AND REFITTING THE DOOR
1. To remove the door, open it fully and lower the
catches until they are in the unlock position.
Please note: Only use 25-40W/230V type E-14, T300°C
incandescent lamps, or 20-40W/230 V type G9, T300°C
halogen lamps. The bulb used in the product is specically
designed for domestic appliances and is not suitable for
general room lighting within the home (EC Regulation
244/2009). Light bulbs are available from our After-sales
Service.
If using halogen bulbs, do not handle them with your bare
hands as your ngerprints could cause damage. Do not use
the oven until the light cover has been retted.
4. Lower the door and then open it fully.
Lower the catches into their original position: Make
sure that you lower them down completely.
2. Close the door as much as you can.
Take a firm hold of the door with both hands – do not
hold it by the handle.
Simply remove the door by continuing to close it
while pulling it upwards at the same time until it is
released from its seating. Put the door to one side,
resting it on a soft surface.
3. Refit the door by moving it towards the oven,
aligning the hooks of the hinges with their seating
and securing the upper part onto its seating.
Apply gentle pressure to check that the catches are in
the correct position.
“CLICK”
5. Try closing the door and check to make sure that it
lines up with the control panel. If it does not, repeat
the steps above: The door could become damaged if
it does not work properly.
14

TROUBLESHOOTING
Problem Possible cause Solution
EN
The oven is not working.
The door will not open.
The display shows the letter “F”
followed by a number.
Power cut.
Disconnection from the
mains.
Check for the presence of mains electrical power
and whether the oven is connected to the
electricity supply.
Turn off the oven and restart it to see if the fault
persists.
Cleaning cycle in progress.
Fault with the door lock.
Wait for the function cycle to end and the oven
to cool down.
Turn off the oven and restart it to see if the fault
persists.
Software problem. Contact you nearest Client After-sales Service
Centre and state the number following the letter
“F”.
SUPPORT
In the event of any operation problems, contact a Franke
Technical Service Centre.
Never use the services of unauthorized technicians.
Specify:
- the type of fault
- the appliance model (art./Code)
- the serial number (S.N.) on the rating plate, located
on the right hand edge of the oven cavity (visible
when the oven door is open).
001
When contacting our
Service Centre, please
state the codes provided
on your product's
identification plate.
XXXXXXXXXX
XXXXXXXXXX
XXXXXXXXXX
XXXXXXXXXX
XXXXXXXXXXXXXXXXXXXX
Model: xxxXXXXxx
XXXXXX
XXXXXX XXXXXX XXXXX XXXXXXX
15

www.franke.com
400011431605
EN DE FR IT ES PT PL
 Loading...