

Page 1
IT
GB
FR
DE
TR
Istruzioni per l’uso e l’installazione
Cappa
Instructions for use and installation
Cooker Hood
Mode d’emploi et installation
Hotte de Cuisine
Bedienungsanleitung und Einrichtung
Dunstabzugshaube
Kullanõm ve montaj talimatlarõ
Davlumbaz
FDS 654
FDS 954
Page 2

Instructions Manual
INDEX
RECOMMENDATIONS AND SUGGESTIONS ................................................................................................................... 14
CHARACTERISTICS ...........................................................................................................................................................15
INSTALLATION.................................................................................................................................................................... 16
USE ......................................................................................................................................................................................19
MAINTENANCE ...................................................................................................................................................................20
EN
3
3
Page 3
RECOMMENDATIONS AND SUGGESTIONS
INSTALLATION
• The manufacturer will not be held liable for any damages resulting
from incorrect or improper installation.
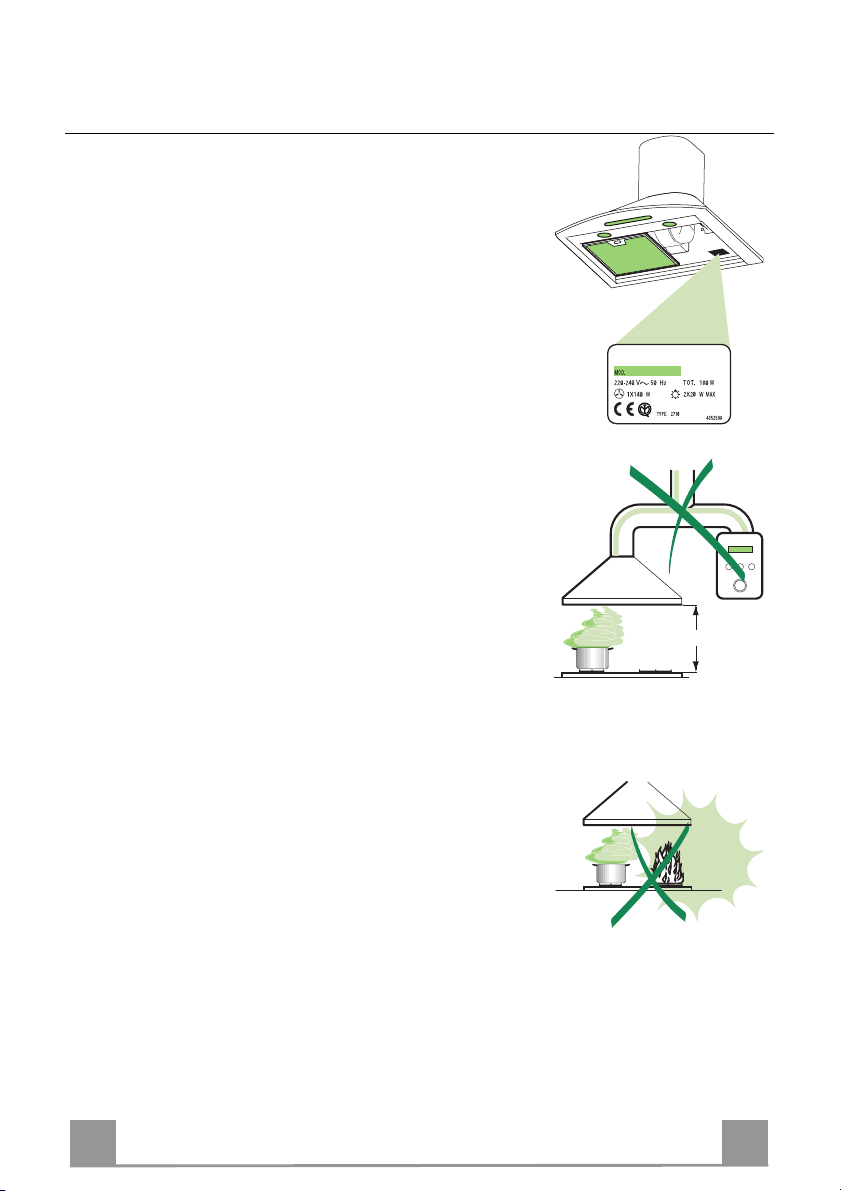
• The minimum safety distance between the cooker top and the extractor hood is 650 mm.
• Check that the mains voltage corresponds to that indicated on the
rating plate fixed to the inside of the hood.
• For Class I appliances, check that the domestic power supply guarantees adequate earthing.
Connect the extractor to the exhaust flue through a pipe of minimum
diameter 120 mm. The route of the flue must be as short as possible.
• Do not connect the extractor hood to exhaust ducts carrying combustion fumes (boilers, fireplaces, etc.).
• If the extractor is used in conjunction with non-electrical appliances
(e.g. gas burning appliances), a sufficient degree of aeration must be
guaranteed in the room in order to prevent the backflow of exhaust
gas. The kitchen must have an opening communicating directly with
the open air in order to guarantee the entry of clean air.
USE
• The extractor hood has been designed exclusively for domestic use to
eliminate kitchen smells.
• Never use the hood for purposes other than for which it has ben designed.
• Never leave high naked flames under the hood when it is in operation.
• Adjust the flame intensity to direct it onto the bottom of the pan only,
making sure that it does not engulf the sides.
• Deep fat fryers must be continuously monitored during use: overheated oil can burst into flames.
• The hood should not be used by children or persons not instructed in
its correct use.
MAINTENANCE
• Switch off or unplug the appliance from the mains supply before carrying out any maintenance work.
• Clean and/or replace the Filters after the specified time period.
• Clean the hood using a damp cloth and a neutral liquid detergent.
650 mm min.
EN
1
14
Page 4
CHARACTERISTICS
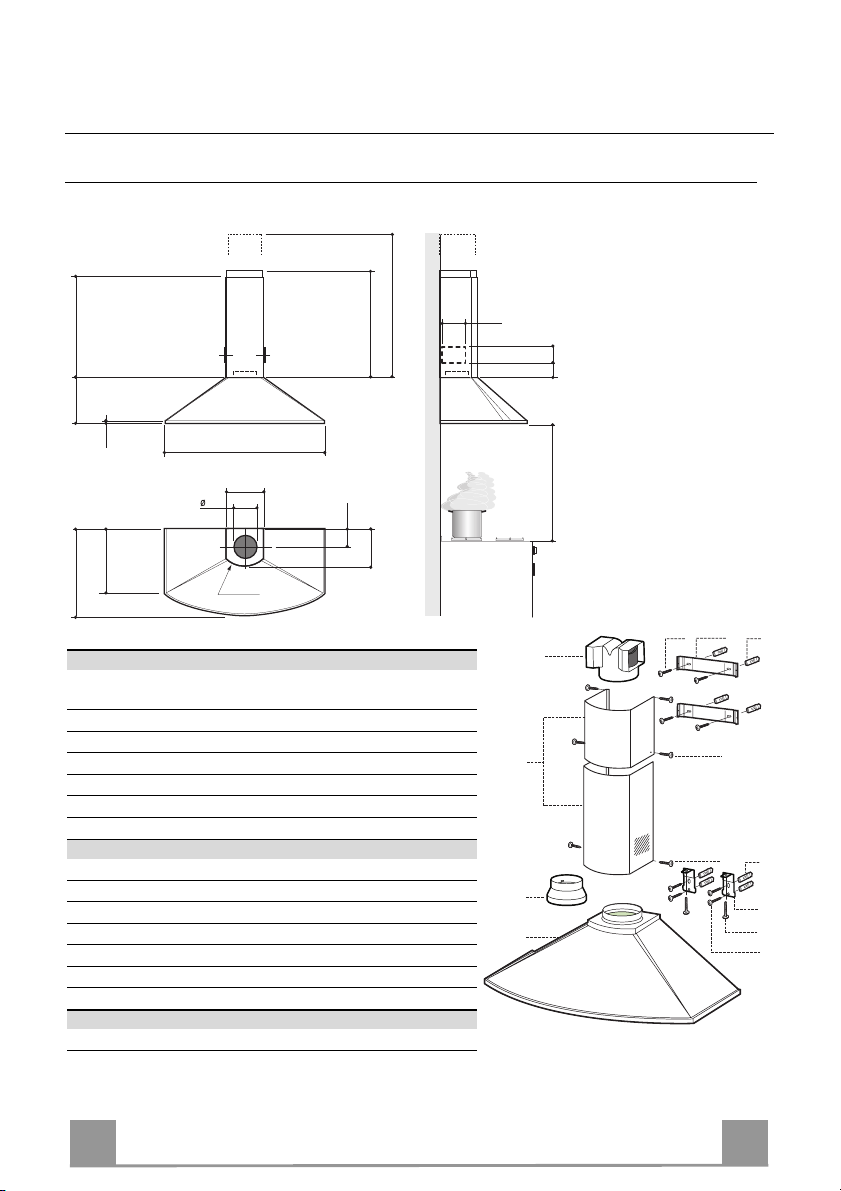
Dimensions
max. 745
min. 560
240
469 - 499
20
360
598 - 898
210
150
r. 191
min. 560
100
228
Components
Ref.Q.ty Product Components
1 1 Hood Body, complete with: Controls, Light, Blower,
Filters
2 1 Telescopic Chimney comprising:
2.1 1 Upper Section
2.2 1 Lower Section
9 1 Reducer Flange ø 150-120 mm
15 1 Air Outlet Connection
Ref.Q.ty Installation Components
7.1 2 Hood Body Fixing Brackets
7.2.1 2 Upper Chimney Section Fixing Brackets
11 8 Wall Plugs
12a 8 Screws 4.2 x 44,4
12c 6 Screws 2.9 x 9.5
12d 2 Screws M4 x 25
Q.ty Documentation
1 Instruction Manual
EN
132
90
81
650 min.
12a 11
15
2.1
2
2.2
9
1
7.2.1
12e
12e
c
11
c
7.1
12d
12a
1
15
Page 5
INSTALLATION
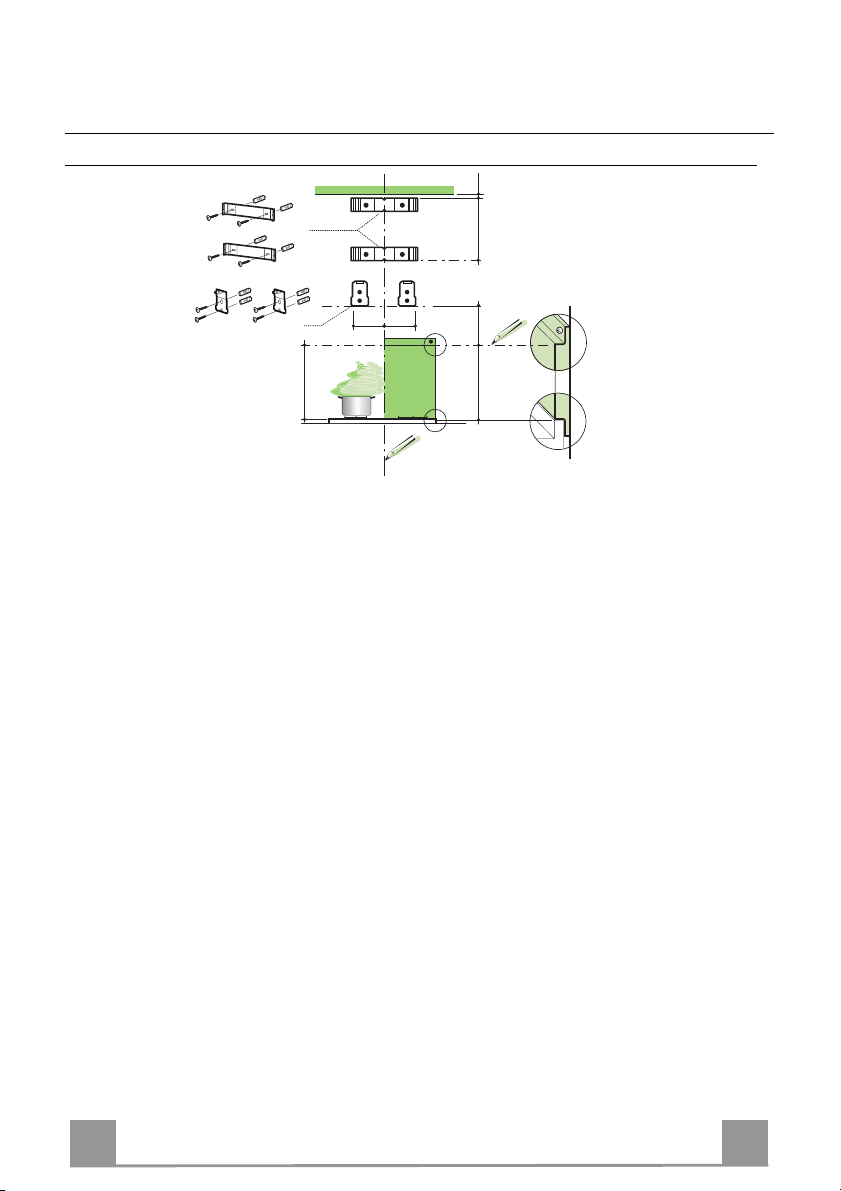
Wall marking:
• Draw a vertical line on the supporting wall up to the ceiling, or as high as practical, at the
centre of the area in which the hood will be installed.
• Draw a horizontal line at 650 mm above the hob for installation without the back panel, or at
height H (height of the visible part of the panel) for installation with the back panel.
• Place bracket 7.2.1 on the wall as shown about 1-2 mm from the ceiling or upper limit,
aligning the centre (notch) with the vertical reference line.
• Mark the wall at the centres of the holes in the bracket.
• Place bracket 7.2.1 on the wall as shown at X mm below the first bracket (X = height of the
upper chimney section supplied), aligning the centre (notch) with the vertical line.
• Mark the wall at the centres of the holes in the bracket.
• Place bracket 7.1 as shown 110 mm from the vertical reference line and 180 mm above the
horizontal reference line.
• Mark the centres of the holes in the bracket.
• Repeat this operation on the other side.
The Rear Panel must be fitted before fixing the hood body and, if it is to be fixed at both top
and bottom, must be fitted at the correct height prior to installing the bases. As this operation is
rather complex, it should be carried out either by the kitchen installer or a qualified person
who knows the final dimensions of the units.
For fixing at the top only, proceed as follows:
• Rest the back panel on the base, inserting the lower plate between the upper surface and the
wall, centring it on the vertical reference line.
• Mark the centres of the two holes in the upper plate.
• Drill ø 8 mm holes at all the centre points marked.
• Insert the wall plugs 11 in the holes.
• Fix the brackets using the 12a screws supplied.
• Fix the back panel (where present) using the 12a screws supplied.
Wall drilling and bracket fixing
7.2.1
11 0
7.1
650 min.
REAR PANEL (OPTIONAL)
11 0
1÷2
X
H 180
EN
1
16
Page 6
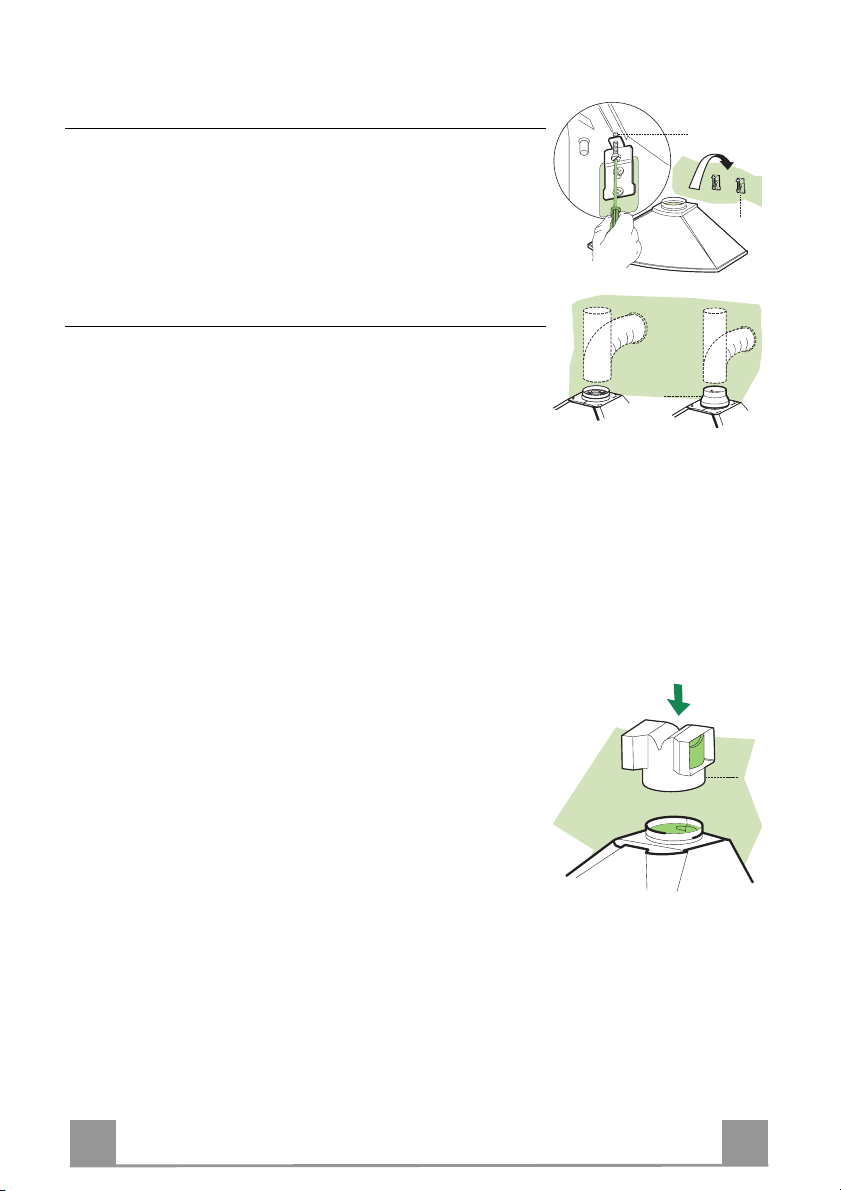
Mounting the hood body
• Screw the two screws 12d supplied onto the brackets 7.1.
• Hook the hood body onto the bracket 7.1, centring it around
the vertical line.
• Use the adjusting screws 12d underneath the hood to level the
hood body.
Connections
DUCTED VERSION AIR EXHAUST SYSTEM
When installing the ducted version, connect the hood to the
chimney using either a flexible or rigid pipe ø 150 or 120 mm,
the choice of which is left to the installer.
• To install a ø 120 mm air exhaust connection, insert the reducer flange 9 on the hood body outlet.
• Fix the pipe in position using sufficient pipe clamps (not supplied).
• Remove any activated charcoal filters.
12.d
7.1
ø 120ø 150
9
RECIRCULATION VERSION AIR OUTLET
• Push fit the air outlet fitting 15 onto the air outlet of the hood
body.
• Ensure that the activated charcoal filters have been inserted.
EN
15
17
1
Page 7
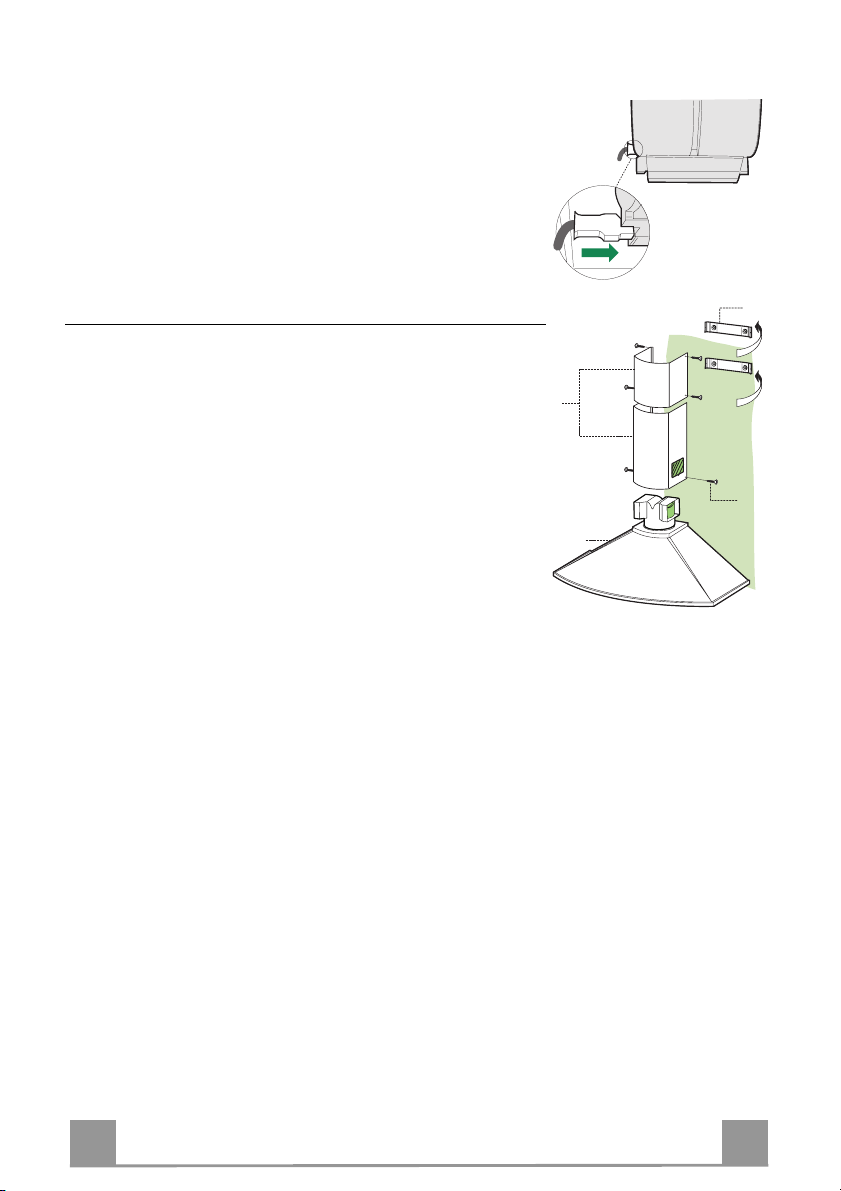
ELECTRICAL CONNECTION
• Connect the hood to the mains through a two-pole switch having a contact gap of at least 3 mm.
• Remove the grease filters (see paragraph Maintenance) being
sure that the connector of the feeding cable is correctly inserted
in the socket placed on the side of the fan.
Flue assembly
Upper exhaust flue
• Slightly widen the two sides of the upper flue and hook them
behind the brackets 7.2.1, making sure that they are well
seated.
• Secure the sides to the brackets using the 4 screws 12c (2,9 x
2.1
2
2.2
7.2.1
9,5) supplied.
Lower exhaust flue
• Slightly widen the two sides of the flue and hook them between the upper flue and the wall, making sure that they are
1
12c
well seated.
• Fix the lower part laterally to the hood body using the 2 screws
12c (2,9 x 9,5) supplied.
EN
1
18
Page 8
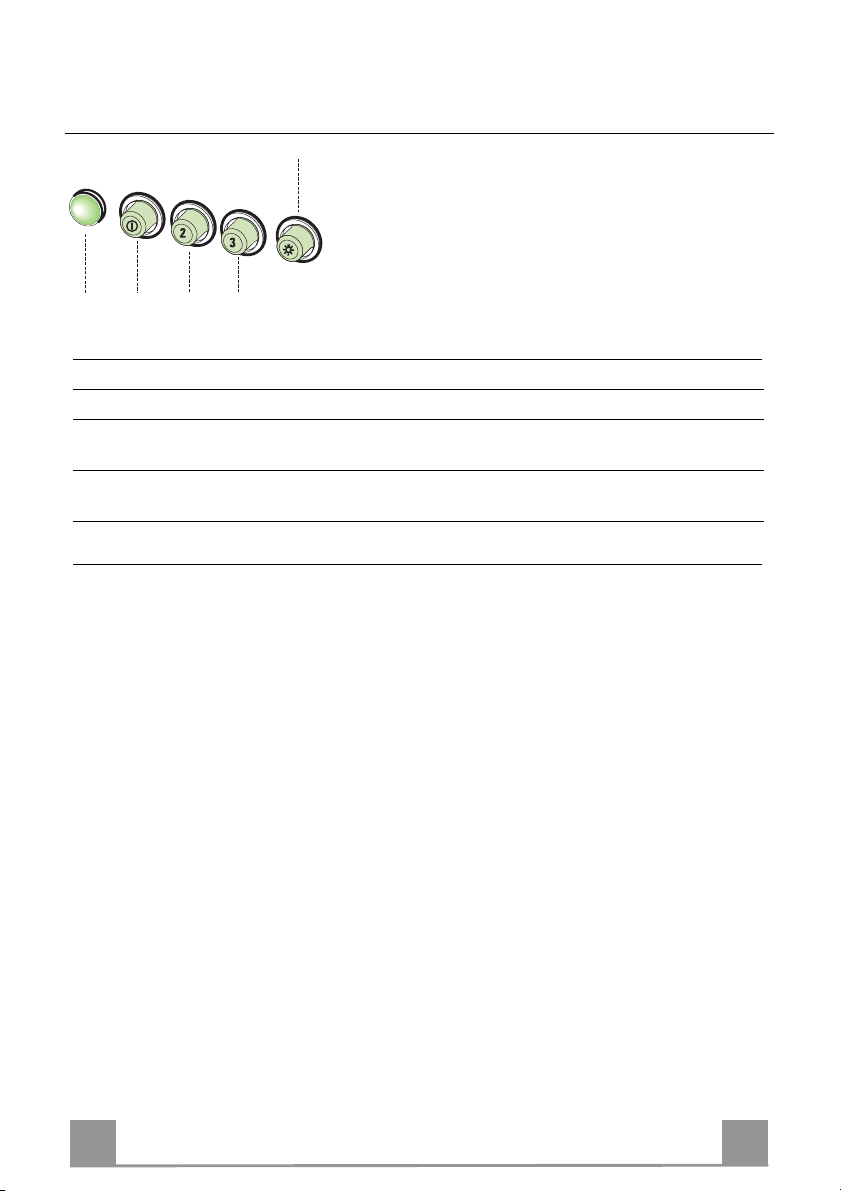
USE
L
S
V1 V2 V3
L Light Switches the lighting system on and off.
S Led Motor running led.
V1 Motor Switches the extractor motor on and off at low speed. Used to provide a
contin-uos and silent air change in the presence of light cooking vapours.
V2 Speed Medium speed, suitable for most operating conditions given the optimum
treated air flox/noise level ratio.
V3 Intensive Maximum speed, used for eliminating the highest cooking vapour emission,
including long periods.
EN
1
19
Page 9
MAINTENANCE
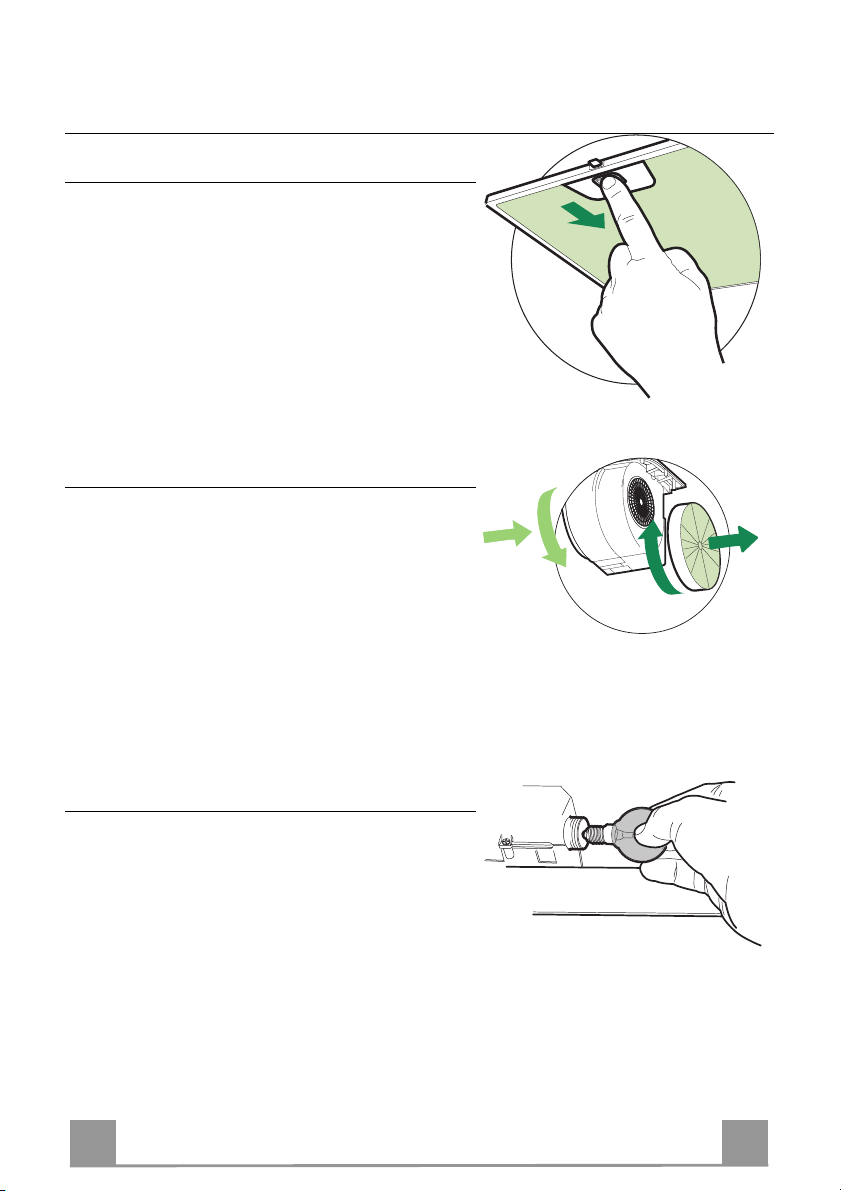
CLEANING METAL SELF- SUPPORTING GREASE FILTERS
• The filters must be cleaned every 2 months of operation, or more frequently for particularly heavy
usage, and can be washed in a dishwasher.
• Remove the filters one at a time by pushing them
towards the back of the group and pulling down at
the same time.
• Wash the filters, taking care not to bend them. Allow them to dry before refitting.
• When refitting the filters, make sure that the handle is visible on the outside.
Activated charcoal filter (Recirculation version)
These filters are not washable and cannot be regenerated, and must be replaced approximately every 4
months of operation, or more frequently with heavy
usage.
REPLACING THE ACTIVATED CHARCOAL FILTER
• Remove the metal grease filters
• Remove the saturated activated charcoal filter as
shown (A).
• Fit the new filters (B).
• Replace the metal grease filters.
Grease filters
B
A
Lighting
LIGHT REPLACEMENT
40 W incandescent light.
• Remove the metal grease filters.
• Unscrew the bulbs and replace them with new ones
having the same characteristics.
• Replace the metal grease filters.
EN
2
20
Page 10
Dir. 89/336/CEE
73/23/CEE
93/68/CEE
Il simbolo sul prodotto o sulla confezione indica che il prodotto non deve essere considerato come un normale rifiuto domestico,
ma deve essere portato nel punto di raccolta appropriato per il riciclaggio di apparecchiature elettriche ed elettroniche. Provvedendo a
smaltire questo prodotto in modo appropriato, si contribuisce a evitare potenziali conseguenze negative per l’ambiente e per la salute,
che potrebbero derivare da uno smaltimento inadeguato del prodotto. Per informazioni più dettagliate sul riciclaggio di questo prodotto,
contattare l’ufficio comunale, il servizio locale di smaltimento rifiuti o il negozio in cui è stato acquistato il prodotto.
The symbol on the product or on its packaging indicates that this product may not be treated as household waste. Instead it shall
be handed over to the applicable collection point for the recycling of electrical and electronic equipment. By ensuring this product is
disposed of correctly, you will help prevent potential negative consequences for the environment and human health, which could otherwise be caused by inappropriate waste handling of this product. For more detailed information about recycling of this product, please
contact your local city office, your household waste disposal service or the shop where you purchased the product.
Le symbole sur le produit ou son emballage indique que ce produit ne peut être traité comme déchet ménager. Il doit plutôt être
remis au point de ramassage concerné, se chargeant du recyclage du matériel électrique et électronique. En vous assurant que ce
produit est éliminé correctement, vous favorisez la prévention des conséquences négatives pour l’environnement et la santé humaine
qui, sinon, seraient le résultat d’un traitement inapproprié des déchets de ce produit. Pour obtenir plus de détails sur le recyclage de ce
produit, veuillez prendre contact avec le bureau municipal de votre région, votre service d’élimination des déchets ménagers ou le
magasin où vous avez acheté le produit.
Das Symbol auf dem Produkt oder seiner Verpackung weist darauf hin, dass dieses Produkt nicht als normaler Haushaltsabfall
zu behandeln ist, sondern an einem Sammelpunkt für das Recycling von elektrischen und elektronischen Geräten abgegeben werden
muss. Durch Ihren Beitrag zum korrekten Entsorgen dieses Produkts schützen Sie die Umwelt und die Gesundheit Ihrer Mitmenschen.
Umwelt und Gesundheit werden durch falsches Entsorgen gefährdet. Weitere Informationen über das Recycling dieses Produkts
erhalten Sie von Ihrem Rathaus, Ihrer Müllabfuhr oder dem Geschäft, in dem Sie das Produkt gekauft haben.
Ürün veya paketi üzerindeki sembolü, bu ürünün normal bir evsel atõk olarak görülmemesi ve bu tip elektrikli veya elektronik
cihazlarõn atõldõğõ dönüşümlü toplama noktalarõna terkedilmesi gerektiğine işaret eder. Bu ürünü gerektiği gibi elimine etme kurallarõna
uyarsanõz çevre ve insan sağlõğõ üzerindeki olumsuz etkilerini bertaraf etmeye katkõ sağlamõş olursunuz. Bu ürünün geri dönüşüm
koşullarõ hakkõnda daha ayrõntõlõ bilgi için hudutlarõ içinde bulunduğunuz belediyenin ilgili diaresine, atõk yoketme servisine veya ürünün
satõcõsõna danõşõnõz.
Franke S.p.a.
Via Pignolini,2
37019 Peschiera del Garda (VR)
www.franke.it
436002868_ver1
 Loading...