

Page 1
)&%16'
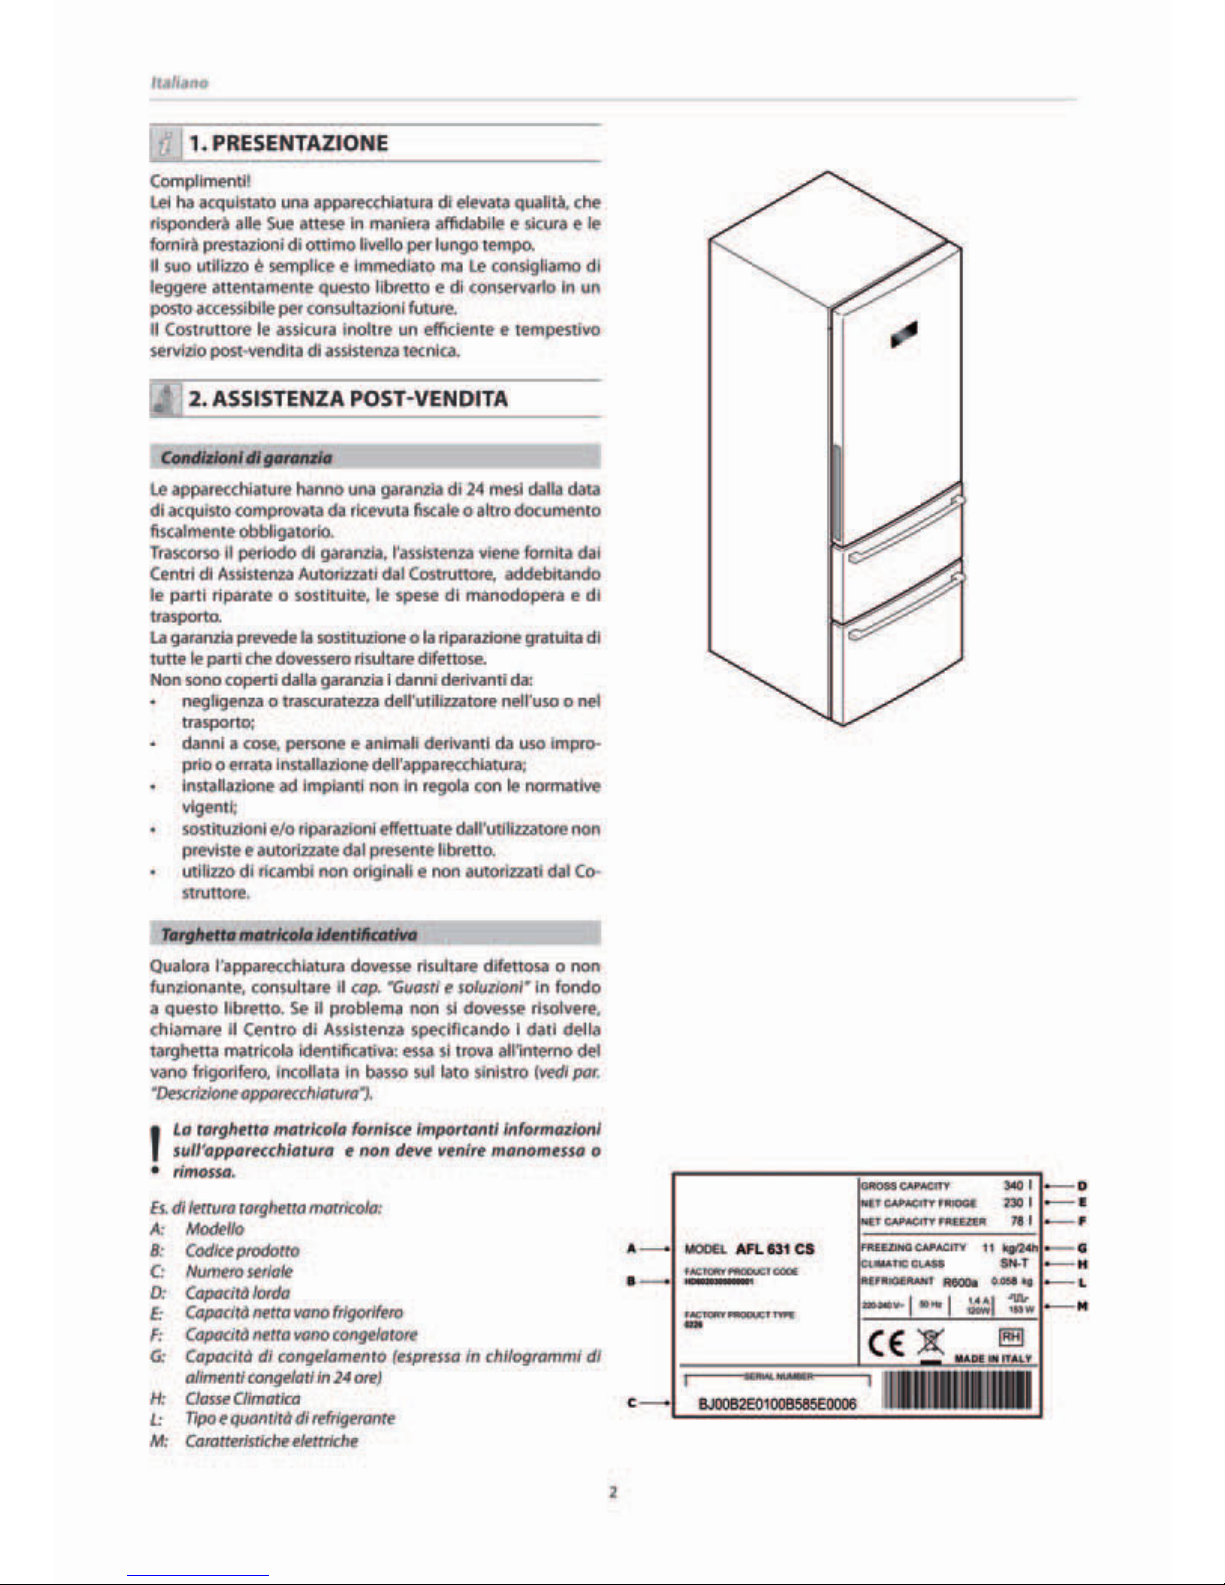
Page 2

Page 3

1
Italiano
INDICE
1. PRESENTAZIONE........................................................................................2
Assistance
HAIER
HAIER
2. ASSISTENZA POSTVENDITA.....................................................................2
Condizioni di garanzia...............................................................................2
Targhetta matricola identicativa ............................................................ 2
3. CARATTERISTICHE APPARECCHIATURA .................................................. 3
Tabella 1 - Dati tecnici ................................................................................3
Condizioni di funzionamento .................................................................... 4
Descrizione apparecchiatura..................................................................... 4
4. SICUREZZA................................................................................................. 5
Precauzioni di sicurezza............................................................................. 5
Scheda sicurezza gas R600a ......................................................................7
Smaltimento e dismissione........................................................................ 7
5. INSTALLAZIONE.........................................................................................8
Trasporto e disimballo ...............................................................................8
Posizionamento .........................................................................................8
Montaggio maniglie...................................................................................8
Pulizia prima dell’uso................................................................................. 9
Collegamento elettrico .............................................................................. 9
6. USO...........................................................................................................10
Descrizione funzioni frigorifero e congelatore -
MODELLO AFL..................... 10
Descrizione funzioni frigorifero e congelatore -
MODELLO AFD.................12
Consigli per la conservazione dei cibi: frigorifero/congelatore ............. 13
INOX
I
N
O
X
7. MANUTENZIONE ORDINARIA.................................................................17
Pulizia dell’apparecchiatura....................................................................17
8. MANUTENZIONE STRAORDINARIA ........................................................18
Reversibilità porta....................................................................................18
9. GUASTI E SOLUZIONI................................................................................20
Page 4
Page 5

3
Italiano
3. CARATTERISTICHE APPARECCHIATURA
Tabella 1 - Dati tecnici
Modello
AFL AFD
1 Caratterististiche di base
Classe energetica A+ A+
Classe climatica SN /T SN /T
Voltaggio/frequenza V/Hz 220-240 ~/ 50 220-240 ~/ 50
Tipo di refrigerante (R134a / R600a) R600a R600a
Tempo di mantenimento temperatura in caso di blackout h 16 16
2 Caratteristiche fondamentali
Numero di compressori n° 1 1
Sbrinamento frigo/congelatore
(M = Manuale / A = Automatico) A / A A / A
Sistema di controllo (E = Elettronico / M = Meccanico) E E
NO FROST (Refrigeratore/Congelatore) si/si si/si
Ventilato (Solo refrigeratore) si si
3 Temperature e capacità di refrigerazione
Intervallo impostazione temperatura frigo °C 2 ÷ 8 2 ÷ 8
Temperatura cassetto carne °C -2 ÷ 3 -2 ÷ 3
Temperatura cassetto verdura °C 0 ÷10 0 ÷10
Intervallo impostazione temperatura congelatore °C -16 ÷ -24 -16 ÷ -24
Volume netto frigorifero l 230 230
Volume netto congelatore l 78 78
Portata massima cassetto congelatore kg 30 30
4 Pannello di controllo
Comandi e indicazione temperatura interni esterni
Tipo display LED LED
Super rareddamento (Refrigeratore) si si
Super congelamento (Congelatore) si si
Allarme di sovratemperatura si si
Termostato regolabile si si
Lampade spia
giallo/verdi giallo/verdi
5 Dimensioni dell’apparecchiatura
Dimensioni (altezza x larghezza x profondità) cm 186,5 x 59,5 x 64 186,5 x 59,5 x 64
Profondità con porta aperta cm 120 120
6 Accessori
Ice maker (M = Manuale / A = Automatico) M M
Luce interna si si
Lunghezza cavo alimentazione cm 200 200
Tipo di spina Schuko Schuko
7 Dimensioni, imballo e peso
Dimensione imballo (altezza x larghezza x profondità) cm 193,3 x 64 x 73 193,3 x 64 x 73
Peso netto kg 91 91
Page 6

4
Italiano
Condizioni di funzionamento
Il corretto funzionamento dell’apparecchiatura e le temperature
di rareddamento e conservazione dichiarate nella “
Tabella 1
- Dati tecnici” sono garantite solo alle seguenti condizioni di
funzionamento:
• temperatura della stanza in cui si trova l’apparecchiatura
conforme alla classe climatica indicata nella targhetta
matricola.
Tabella 2 - Classe climatica
Classe climatica: Temperature ambiente:
SN da +10°C a +32°C
N da +16°C a +32°C
ST da +16°C a +38°C
T da +16°C a +43°C
• umidità relativa massima ambiente: 90%;
• posizionamento dell’apparecchiatura lontano da fonti di
calore (es. forni, caloriferi, raggi diretti del sole, ecc..);
• posizionamento dell’apparecchiatura al riparo da agenti
atmosferici;
• manutenzione ordinaria periodica eettuata seguendo le
indicazioni riportate nel presente manuale;
• aperture di ventilazione nell’involucro dell’apparecchio
libere da ostruzioni;
• corretta installazione (es. livellamento, portata impianto
adeguata ai dati della targhetta matricola).
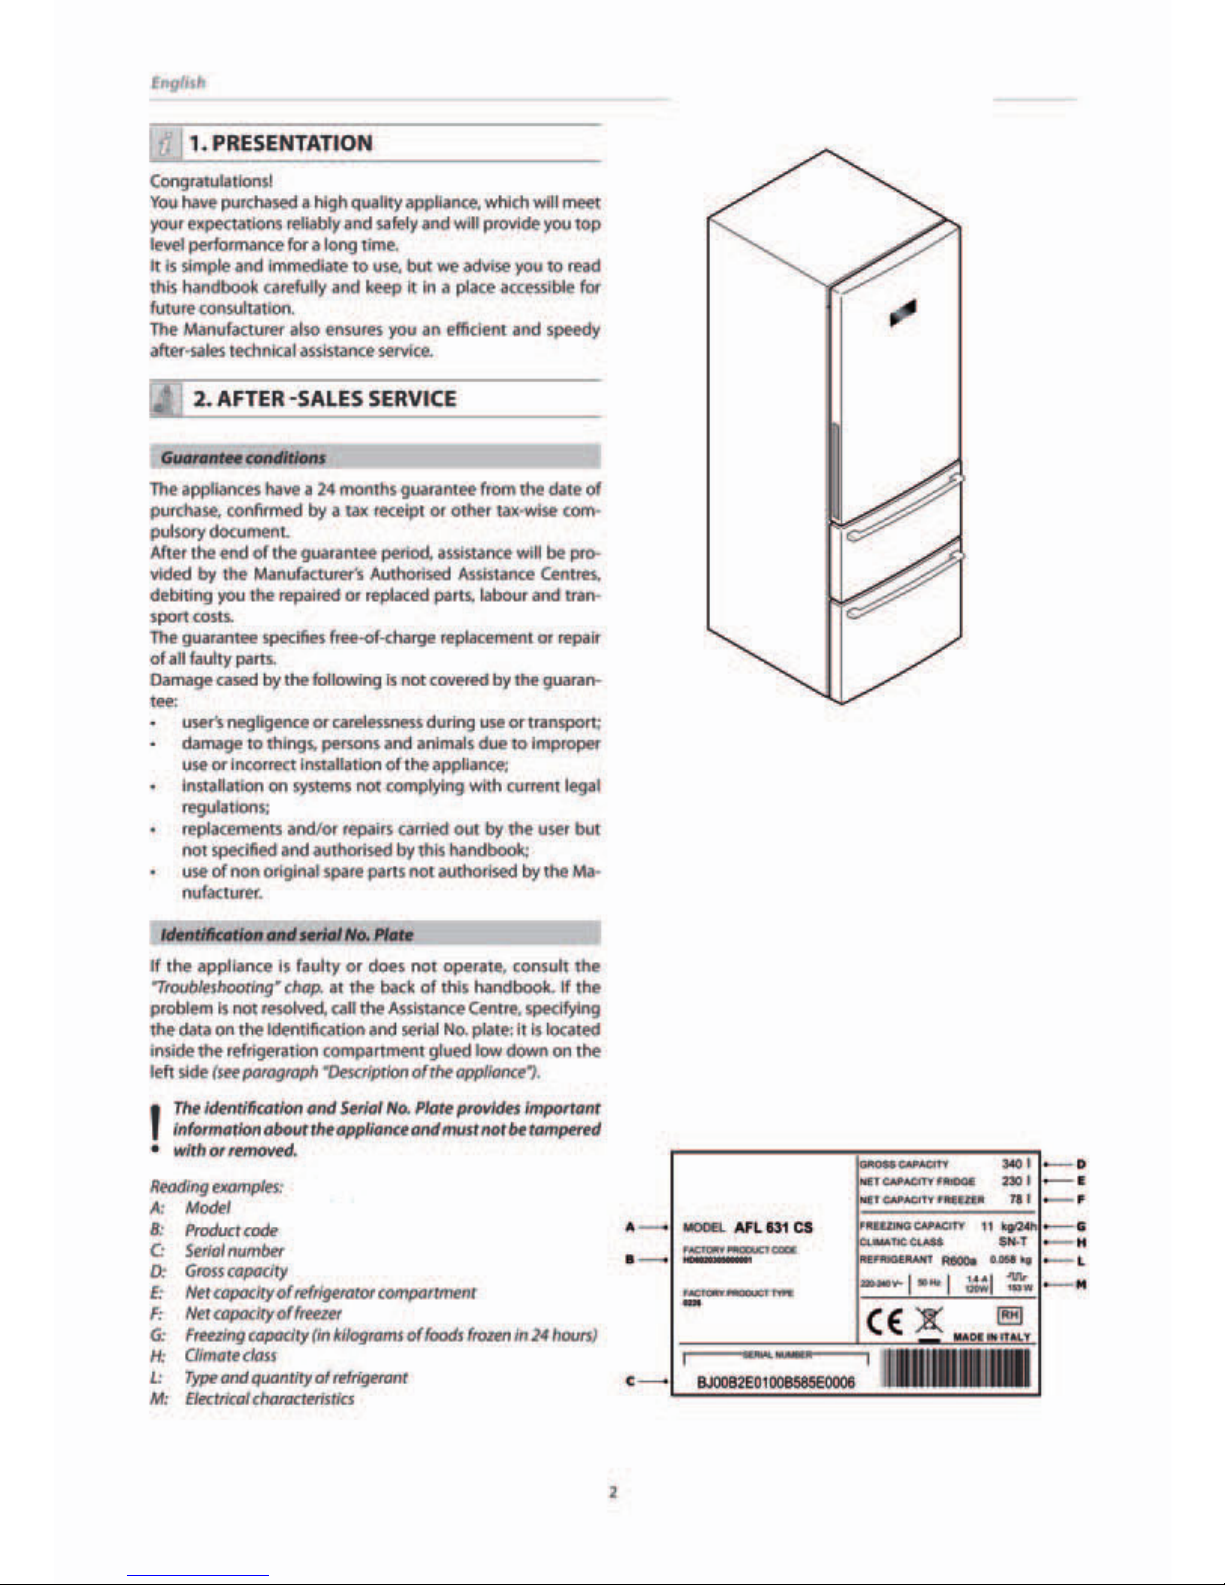
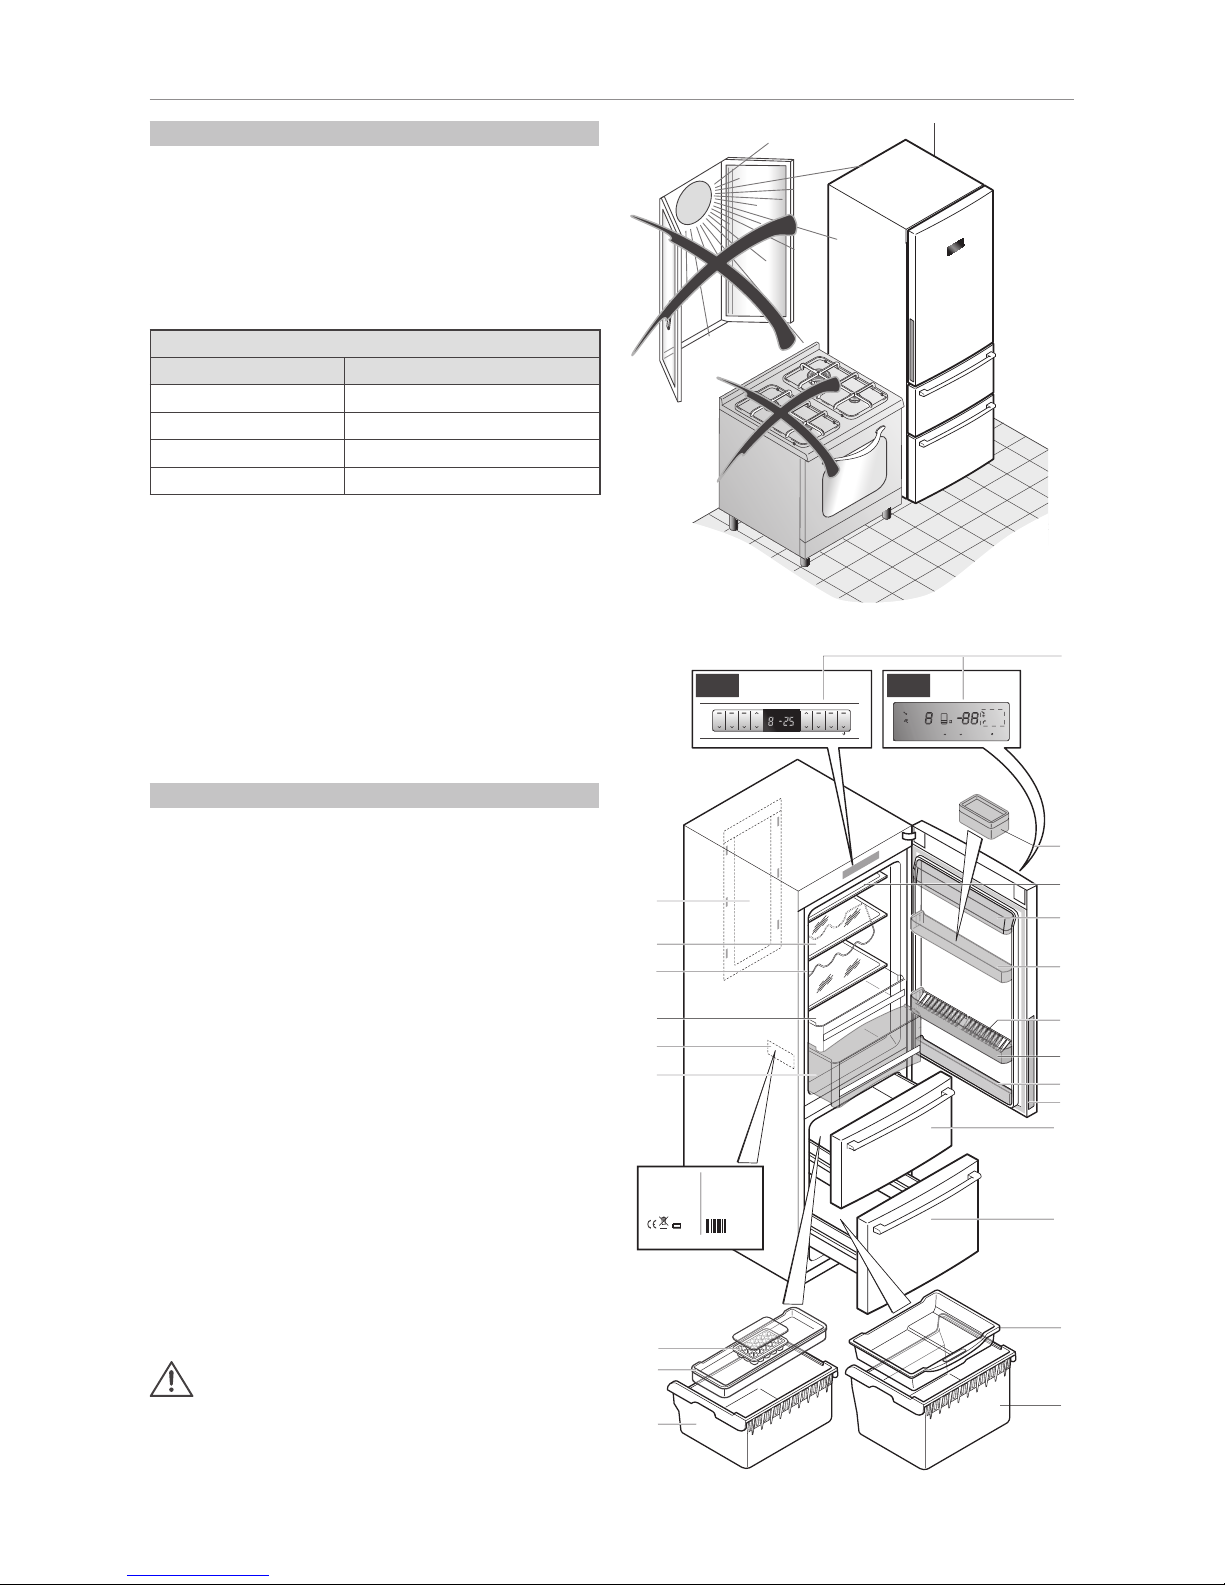
Descrizione apparecchiatura
Di seguito forniamo una dettagliata descrizione
dell’apparecchiatura da Lei acquistata.
Legenda:
A: Pannello comandi frigorifero
B: Luce interna
C: Ripiano in vetro
D: Portabottiglie
E: Cassetto “Fresh Control 0°C”
F: Targhetta matricola
G: Cassetto conservazione frutta/verdura
H: Vaschetta ghiaccio
I: Vassoio cassetto freezer
L: Cassetto interno freezer
M: Portaburro
N: Ripiano in vetro (2 componenti)
O: Balconcino chiuso
P: Balconcino
Q: Ferma-bottiglie (due componenti)
R: Balconcino porta - bottiglie
S: Balconcino piccolo
T: Maniglia porta
U1: Cassetto superiore freezer
U2: Cassetto inferiore freezer
V: Vassoio interno freezer
Z: Cassetto interno freezer
NOTA:
Gli accessori illustrati in gura sono presenti in diversi
modelli. Ci possono essere delle lievi dierenze tra questi e
quelli presenti nel proprio frigorifero.
I
L
H
U1
U2
V
Z
T
D
C
E
B
P
S
MODELLO
PNC
FLUIDO REFRIG FRIGORIFERO
CAPACITA' LORDA TOTALE
CAPACITA' NETTA FRIGO
CAPACITA' NETTA CONGELATORE
CAPACITA' DI CONG.
CLASSE
MODEL
REFRIGERANT REFRIGERATOR
GROSS CAPACITY
REFRIGERATOR NET CAPACITY
FREEZER NET CAPACITY
FREEZING CAPACITY
CLASS
R600a
SER. NO.
0,052
Kg
xxx
xxx
xx
SN-T
PRODOTTO IN ITALIA
MADE IN ITALY
220-240 50V HZ W
0001
RH
N
O
G
F
Q
AFL
Stand-by Holiday SuperCool
SuperFreeze
Alarm
°C
AFD
Stand-by
Super Cool
Super Free
Ice Maker
Clean Pipe
Input water time
Holiday
Alarm
Set OK
A
M
R
Page 7

5
Italiano
4. SICUREZZA
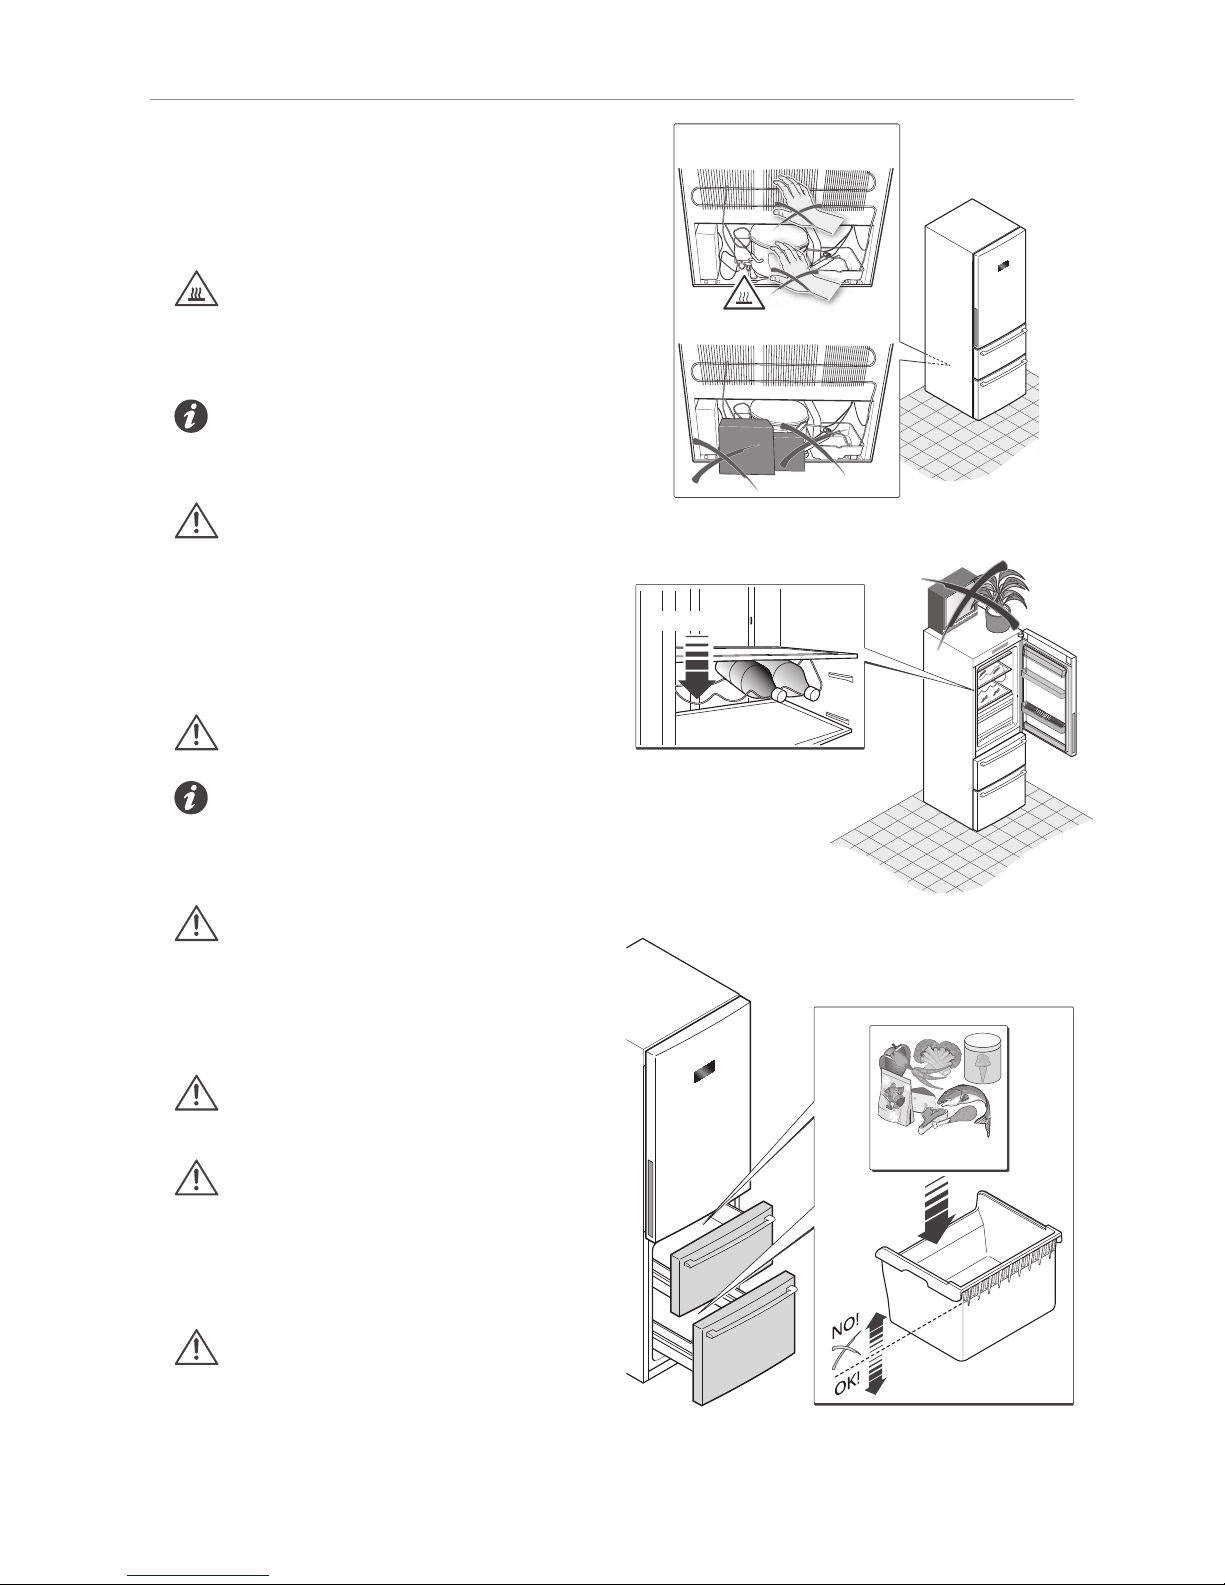
Precauzioni di sicurezza
Simbologia:
Consigli di carattere generale per ottimizzare il funzionamento dell’apparecchiatura
Pericolo generico
Superci calde
• È molto importante che il presente libretto d’istruzione
sia conservato assieme all’apparecchiatura per qualsiasi
futura consultazione. Nel caso di vendita o cessione ad
altra persona, assicurarsi che il libretto sia fornito assieme
all’apparecchiatura, permettendo così al nuovo utente di
conoscerne il funzionamento e le relative avvertenze.
• Queste avvertenze sono state redatte per la Vostra sicurezza:
Vi preghiamo dunque di leggerle attentamente prima di
installare ed utilizzare l’apparecchiatura.
• Se l’apparecchiatura, durante il trasporto, viene sistemata
in posizione orizzontale è possibile che l’olio contenuto nel
compressore deuisca nel circuito refrigerante. Si consiglia
pertanto di lasciare l’apparecchiatura in posizione verticale
per almeno 2 ore prima della messa in funzione, per dar
modo all’olio di deuire nel compressore.
• Dopo aver disimballato l’apparecchiatura, controllatela
attentamente ed installatela seguendo le indicazioni del
capitolo relativo: se si rileva qualche anomalia, spegnere
l’apparecchiatura e seguire la procedura indicata nel cap.
“Assistenza post-vendita”.
• Prima di qualsiasi operazione di manutenzione ordinaria e
straordinaria staccare l’alimentazione dell’apparecchiatura;
tale operazione va eseguita evitando assolutamente di tirare
la spina per il cavo. Controllare inoltre che il cavo non sia
danneggiato; in tal caso contattare un Centro di Assistenza.
Se l’apparecchiatura è stata spostata, una volta riposizionata
controllare che il cavo di alimentazione non resti schiacciato
o di intralcio.
•
ATTENZIONE: gli apparecchi sono dotati di gas
refrigerante ISOBUTANO (R600a). Il trasporto e gli
eventuali spostamenti dell’apparecchiatura devono
avvenire prestando la massima attenzione, affinché
l’apparecchiatura stessa non subisca colpi o scuotimenti
eccessivi. La mancata osservanza della norma appena
indicata potrebbe rendere l’apparecchio non funzionante;
il danneggiamento del circuito di refrigerazione con
possibile fuoriuscita di gas refrigerante, potrebbe produrre
rischi d’esplosioni causate da scintille o amme esterne. Non
mettete in funzione per nessun motivo il Vostro apparecchio
se esso appare danneggiato. In caso di danni, contattare il
Servizio Assistenza, aerare il locale in cui si trova l’apparecchio
ed evitare amme o interventi sull’apparecchio.
2h
OK !
NO !
SODIUM
BICARB
ONA
TE
A
C
E
T
O
Page 8
6
Italiano
• Prima di collegare l’apparecchiatura alla rete elettrica
accertarsi che la portata dell’impianto sia adeguata ai dati
di targa presenti sulla targhetta matricola. Ogni eventuale
modica che si rendesse necessaria all’impianto elettrico
domestico, per poter installare l’apparecchiatura, dovrà
essere eseguito da personale qualicato.
•
Se l’apparecchiatura viene spostata dalla sua
posizione abituale,tenerepresente che, anchedopo
aver staccato l’alimentazione, per qualche tempo i
componenti che sono posti sul retro dell’apparecchiatura,
possono essere molto caldi.
•
L’apparecchiaturanon è progettata per essere inseri-
ta in una struttura da incasso. Un’aerazione insuciente comporterà sicuramente un cattivo funzionamento
e danni all’apparecchiatura.
•
ATTENZIONE: durante ilnormale funzionamentoela
manutenzione ordinaria, evitare assolutamente di:
- usare apparecchi elettrici all’interno degli scomparti per
la conservazione dei cibi congelati dell’apparecchio;
- usare dispositivi meccanici o altri mezzi per accelerare il
processo di sbrinamento diversi da quelli raccomandati
dal Costruttore;
- appoggiare oggetti fragili, pesanti o instabili sopra
l’apparecchiatura.
•
ATTENZIONE: Il carico massimo del portabottiglie è
di kg 10.
• Latemperatura all’interno del frigoriferoe delconge-
latore potrebbe subirepiccoli sbalzi; questeapparecchiature non sono quindi adatte alla conservazione di
prodotti (es. medicinali) per i quali deve essere garantita
una temperatura stabile.
•
ATTENZIONE: quest’apparecchiatura è stata
progettata per essere utilizzata da persone adulte,
ed è destinata unicamente ad uso domestico per la
conservazione e/o congelazione degli alimenti. Fare
attenzione, quindi, che i bambini non si avvicinino con
l’intento di giocarvi, che non si siedano sui cassetti e che
evitino di appendersi alle porte dell’apparecchio.
•
ATTENZIONE: Non introdurre nell’apparecchiatura
sostanze a rischio di esplosioni, contaminanti o
volatili.
•
ATTENZIONE: Nonmettere mainelloscompartimento
a bassa temperatura (congelatore) bibite gassate o
bottiglie d’acqua:potrebberoesplodere. Inoltre siconsiglia
vivamente di non introdurre mai liquidi o alimenti caldi
all’internodell’apparecchiaturae dinonriempire noall’orlo
i recipienti. Per tutti gli altri consigli di conservazione
consultare il cap. “Uso”.
•
ATTENZIONE: La portata massima di ogni cassetto
freezer è pari a kg 30.
Si raccomanda di:
- non superare questo limite di carico;
- non superare il livello denito della linea di carico, indicato
in gura.
Max 10kg!
NO !
NO !
Max 30kg!Max 30kg!
Page 9
7
Italiano
Scheda sicurezza gas R600a
Misure in caso di fuoriuscita accidentale
Lasciar evaporare il materiale a condizione che vi sia una
ventilazione adeguata.
Comportamento del gas
Il gas è altamente inammabile; evitare nel modo più assoluto
quindi il contatto con amme libere e superci calde.
Il gas R600a è più pesante dell’aria, e quindi è possibile la
formazione di concentrazioni elevate vicino al suolo dove la
ventilazione generale è scarsa.
Primo soccorso
Inalazione
Allontanare il soggetto esposto dalla zona inquinata e portarlo
in un luogo caldo e ben ventilato.
Esposizioni prolungate possono causare principio di asssia
e possibile perdita di conoscenza. Praticare la respirazione
articiale se necessario, e nei casi più gravi somministrare
ossigeno sotto stretto controllo medico.
Contatto con la pelle
E’ improbabile che il contatto occasionale con la pelle, risulti
pericoloso, per assorbimento cutaneo. Nel caso ciò avvenga:
lavare abbondantemente la zona interessata.
Gli schizzi di liquido ed il liquido nebulizzato possono produrre
ustioni da gelo: irrorare abbondantemente con acqua la parte
interessata e ricorrere al medico per il trattamento di eventuali
ustioni.
Contatto con gli occhi
Irrigare abbondantemente con acqua a palpebre ben aperte e
ricorrere al più presto alle cure di un medico specialista.
Si consiglia comunque di consultare il proprio medico
in seguito al contatto o all’inalazione del gas R600a.
Smaltimento e dismissione
Ai sensi dell’art. 13 del Decreto Legislativo
25 luglio 2005, n. 151 “Attuazione delle
Direttive 2002/95/CE, 2002/96/CE e
2003/108/CE, relative alla riduzione dell’uso
di sostanze pericolose nelle apparecchiature
elettriche ed elettroniche, nonché allo
smaltimento dei riuti”.
Il simbolo del cassonetto barrato riportato sull’apparecchiatura
o sulla sua confezione indica che il prodotto alla ne della propria
vita utile deve essere raccolto separatamente dagli altri riuti.
L’utente dovrà, pertanto, conferire l’apparecchiatura giunta a
ne vita agli idonei centri di raccolta dierenziata dei riuti
elettronici ed elettrotecnici, oppure riconsegnarla al rivenditore
al momento dell’acquisto di una nuova apparecchiatura di tipo
equivalente, in ragione di uno a uno.
Prestate attenzione affinché il vecchio apparecchio sia
trasportato al punto di raccolta per il suo smaltimento senza
che il circuito di rareddamento venga danneggiato. Sarete
così sicuri di prevenire uscite incontrollate del refrigerante.
I dati relativi al refrigerante sono riportati sulla targa
dell’apparecchio.
Il cicloisopentano, sostanza non nociva all’ozono, è usato come
espandente per la schiuma isolante.
L’adeguata raccolta differenziata per l’avvio successivo
dell’apparecchiatura dismessa al riciclaggio, al trattamento e
allo smaltimento ambientalmente compatibile contribuisce
ad evitare possibili eetti negativi sull’ambiente e sulla salute e
favorisce il reimpiego e/o riciclo dei materiali di cui è composta
l’apparecchiatura.
Lo smaltimento abusivo del prodotto da parte dell’utente
comporta l’applicazione delle sanzioni di cui alla corrente
normativa di legge.
Per informazioni più dettagliate inerenti i sistemi di raccolta
disponibili, rivolgersi al servizio locale di smaltimento riuti.
Vi ringraziamo per il Vostro contributo alla tutela
dell’ambiente.
Si raccomanda di tagliare il cavo di alimentazione prima
di portare l’apparecchiatura ai centri di raccolta.
Rendere inutilizzabile la chiusura della porta (asportando
le guarnizioni): o meglio ancora smontare la porta al ne
di evitare che, per esempio, un bambino rischi di
rimanere chiuso all’interno giocando.
Page 10
8
Italiano
5. INSTALLAZIONE
Trasporto e disimballo
Se l’apparecchiatura, durante il trasporto, viene sistemata
in posizione orizzontale è possibile che l’olio contenuto nel
compressore deuisca nel circuito refrigerante. Si consiglia
pertanto di lasciare l’apparecchiatura in posizione verticale
per almeno 2 ore prima della messa in funzione, per dar modo
all’olio di deuire nel compressore.
Rimuovere l’imballo esterno, togliere la pellicola protettiva, ove
presente, dalle superfici dell’apparecchiatura, pulire l’esterno
dell’apparecchiatura con prodotti specifici evitando l’uso di
raschietti o panni abrasivi che potrebbero irrimediabilmente
danneggiare le superfici.
Togliere con attenzione tutti i fogli ed i nastri adesivi
dall’apparecchiatura e dalla porta, le eventuali parti di
polistirolo.
Prelevare dall’interno dell’apparecchio i documenti e gli
accessori esistenti.
Il materiale di imballo è riciclabile ed è contrassegnato
dal simbolo del riciclaggio.
Per lo smaltimento seguire le normative locali. Il
materiale di imballaggio (sacchetti plastica, parti in
polistirolo, ecc…) deve essere tenuto fuori dalla portata
dei bambini in quanto potenzialmente fonte di
pericolo.
Controllate attentamente l’apparecchiatura: se si rileva qualche
anomalia, non installatela e seguire la procedura indicata nel
cap. “Assistenza post-vendita”.
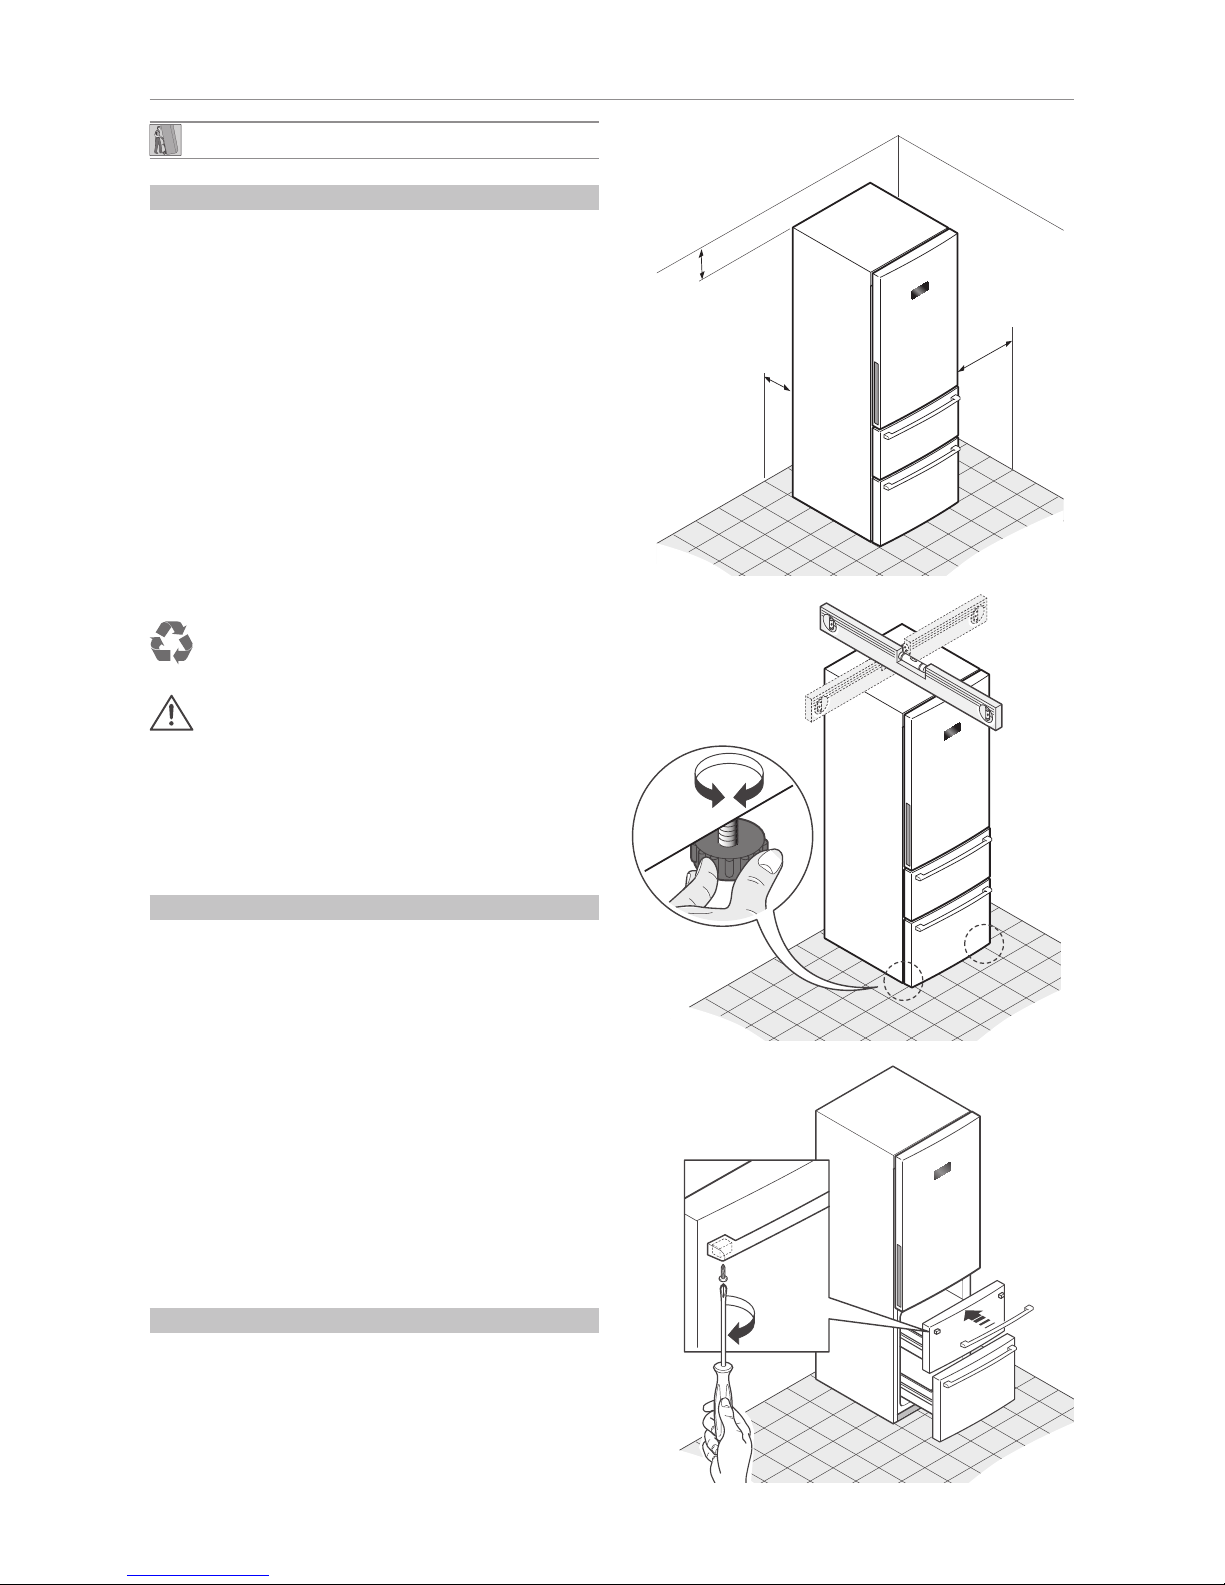
Posizionamento
Il luogo scelto per il posizionamento deve soddisfare le
indicazioni fornite nel par. “Condizioni di funzionamento”,
deve avere un fondo stabile e di portata adeguata al peso
dell’apparecchiatura.
Inoltre si deve tener conto delle distanze da rispettare per
il corretto funzionamento dell’apparecchiatura e per i suoi
ingombri:
1) parte superiore (almeno 20 cm)
2) parte posteriore (almeno 10 cm)
3) parete sul lato apertura porta (almeno 30 cm).
Livellare l’apparecchiatura mediante i piedini: mantenendo
l’apparecchiatura leggermente sollevata dal pavimento si
facilita una buona circolazione d’aria sul condensatore.
In queste condizioni si avrà un funzionamento ottimale del
circuito refrigerante.
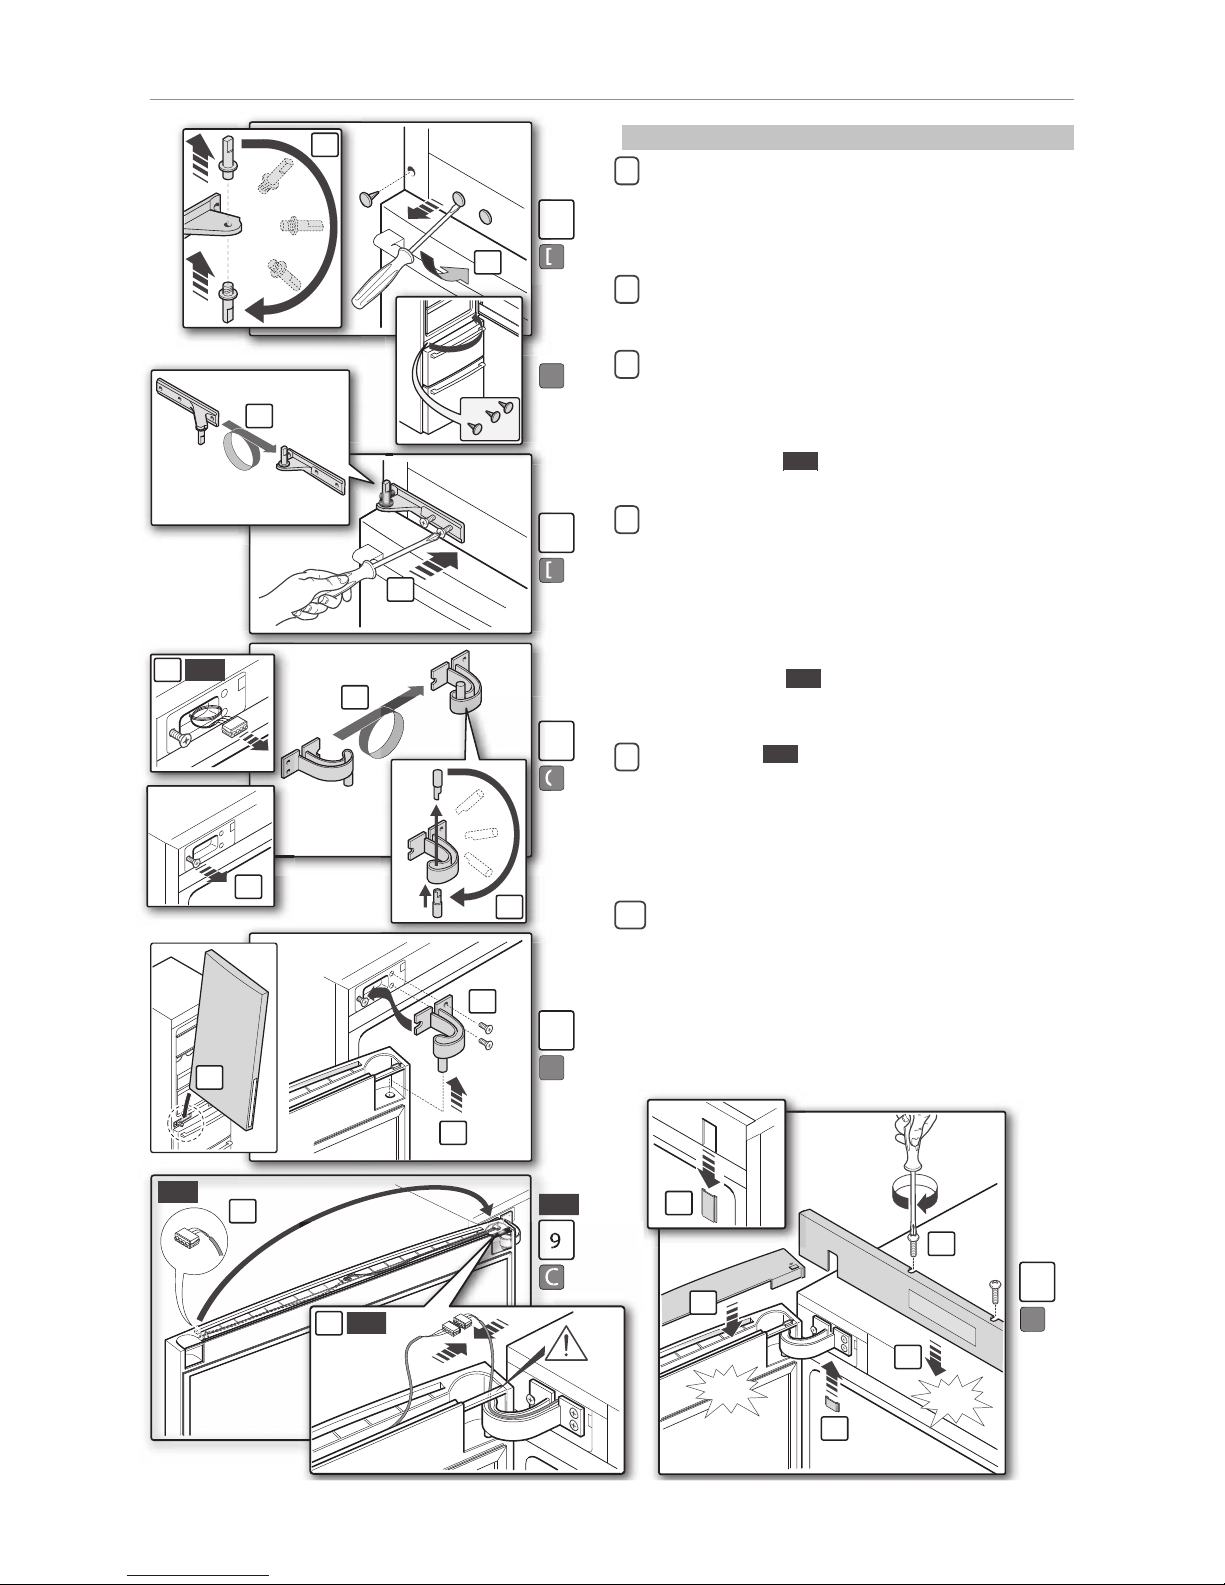
Montaggio maniglie
Le maniglie dei cassetti freezer sono fornite smontate: per il
loro montaggio fare riferimento alla figura a lato.
10 cm
20 cm
30 cm
Page 11
9
Italiano
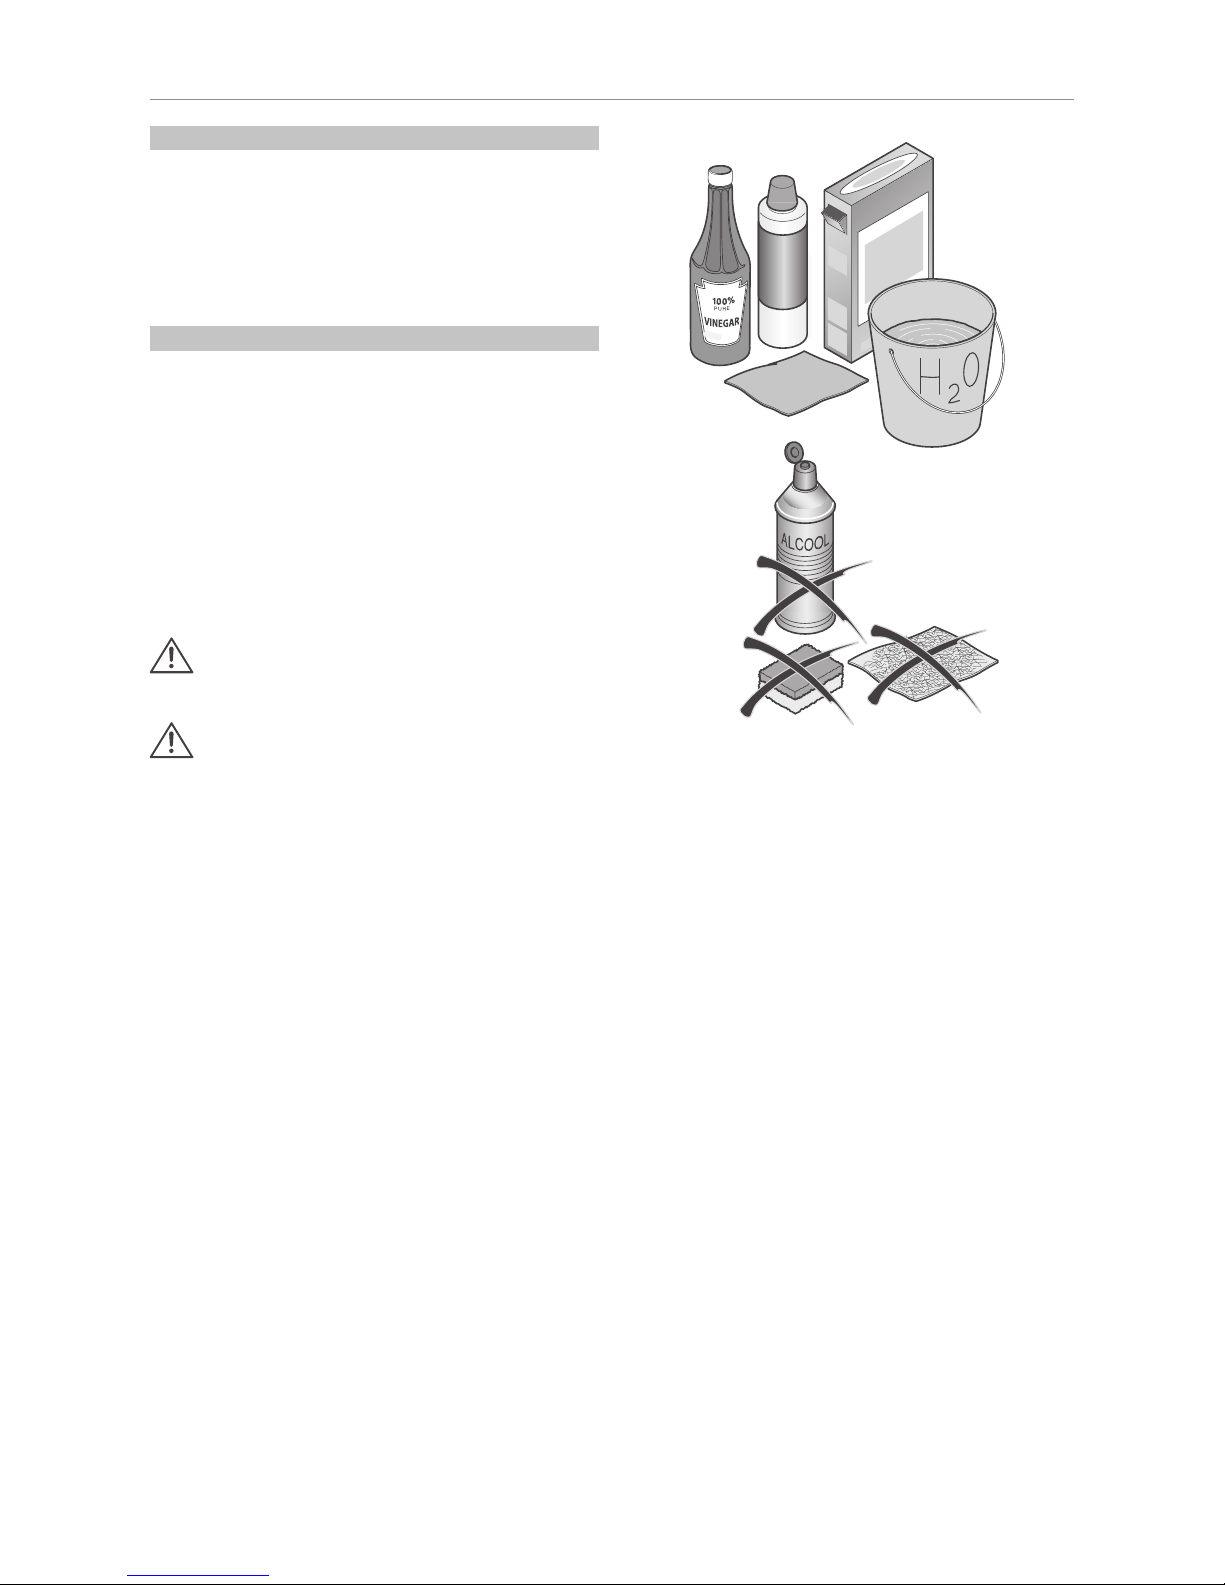
Pulizia prima dell’uso
Accertarsi di aver tolto dall’interno dell’apparecchiatura tutti
i nastri adesivi che tengono fermi gli accessori, pulire tutte
le parti interne con acqua tiepida e sapone neutro, aceto o
bicarbonato di sodio, allo scopo di togliere il caratteristico odore
di nuovo, asciugare poi accuratamente.
Non usare detersivi e/o polveri abrasive, a base di soda, o
solventi che potrebbero danneggiare le finiture.
Collegamento elettrico
Assicurarsi, prima di inserire la spina nella presa di corrente,
che:
• le proprie mani non siano bagnate o umide;
• la tensione e la frequenza riportate nella targa matricola
corrispondano a quelle dell’impianto domestico (è ammessa
un’oscillazione da -6% a +6% sulla tensione nominale; per
il funzionamento a tensioni diverse si dovrà ricorrere ad un
autotrasformatore di adeguata potenza);
• Il cavo e la spina non siano danneggiati o schiacciati da
oggetti pesanti;
• il cavo di alimentazione non sia eccessivamente tirato: non
sono ammesse prolunghe per raggiungere la presa.
ATTENZIONE: l’apparecchio non va allacciato a
raddrizzatori (ad esempio ad impianti solari) e non deve
essere collegato tramite prolunga.
ATTENZIONE: è indispensabile collegare l’apparecchio
ad un’efficiente presa di terra.
A tale scopo, se la presa di corrente dell’impianto domestico non
fosse collegata a terra, allacciare l’apparecchio ad un efficiente
impianto di terra a parte, conformemente alle norme vigenti,
consultando un tecnico specializzato.
Il Costruttore declina ogni responsabilità nel caso in cui questa
norma antinfortunistica non fosse rispettata.
Quest’apparecchiatura è conforme alle seguenti direttive
comunitarie:
B.T. 73/23/CEE
93/68/CEE
SODIUM
BICARBONATE
Page 12

10
Italiano
6. USO
Descrizione funzioni frigorifero e congelatore - MODELLO AFL
Alimentazione iniziale della corrente
Quando il frigorifero è alimentato, l’indicatore (A10) s’illumina.
Le temperature dei vani si visualizzano sul display come “-” a
causa dell’alta temperatura presente nell’interno. Verrà emesso
un segnale acustico d’allarme. Premere il tasto (A9) e il segnale
acustico cesserà, mentre l’indicatore (A9) rimane acceso. Dopo
che la temperatura si è abbassata ad un determinato livello,
le temperature del frigorifero e del congelatore visualizzate
sul display indicheranno rispettivamente “5” e “-18” come da
impostazioni predefinite dalla fabbrica.
Impostazione della temperatura nel vano frigorifero
Premere il tasto (A4) o (A5) per impostare la temperatura
del frigorifero: l’indicatore corrispondente lampeggerà
consentendo di impostare la temperatura da 2°C a 8°C.
L’impostazione verrà confermata automaticamente 5 secondi
dopo la conclusione dell’operazione oppure premendo un
qualsiasi altro tasto.
Impostazione della temperatura nel vano congelatore
Premere il tasto (A6) o (A7) per impostare la temperatura
del congelatore: l’indicatore corrispondente lampeggerà
consentendo di impostare la temperatura da -16°C a -24°C.
L’impostazione verrà confermata automaticamente 5 secondi
dopo la conclusione dell’operazione oppure premendo un
qualsiasi altro tasto.
Super ra reddamento (Super Cool)
Per attivare questa funzione premere il tasto (A3) di Super
raffreddamento (Super Cool); così facendo si illuminerà
anche l’indicatore corrispondente. Questa funzione verrà
automaticamente disattivata quando la temperatura scenderà
al livello minimo. È possibile disattivare questa funzione
premendo nuovamente il tasto (A3).
In questa modalità non è possibile impostare la temperatura
nel vano frigorifero e la funzione Holiday.
Super congelamento (Super freeze)
Per attivare questa funzione premere il tasto (A8) di
Supercongelamento (Super freeze); così facendo si illuminerà
anche l’indicatore corrispondente. Questa funzione si disattiva
automaticamente dopo 24 ore. È possibile disattivare questa
funzione premendo nuovamente il tasto (A8).
In questa modalità non è possibile impostare la temperatura
nel vano congelatore.
Funzione Holiday
Per attivare questa funzione premere il tasto (A2).
In modalità Holiday, il frigorifero lavorerà ad una temperatura
superiore a +10 °C (si consiglia di rimuovere gli alimenti
deperibili dal vano frigo e chiudere la porta dello stesso
dopo aver attivato questa funzione). La temperatura del vano
frigorifero verrà indicata con “-”. Premere di nuovo il tasto
(A2), l’indicatore corrispondente si spegnerà e il frigorifero
commuterà nello stato a controllo normale.
In questa modalità è possibile impostare la funzione
Super congelamento (Super Freeze) e la funzione Super
ra reddamento (Super Cool). In quest’ultimo caso la funzione
Holiday viene disattivata automaticamente.
Controllo del display
Lo schermo del display si spegnerà automaticamente 1
min. dopo il termine dell’operazione. Può essere riacceso
con l’apertura della porta o la pressione di qualunque tasto
(l’allarme non accende lo schermo).
Stand-by Holiday SuperCool
SuperFreeze
A1
Alarm
A2 A3 A4
A5
TF TC A8 A9 A10A6
A7
°C
Legenda:
A1: Stand-by
A2: Pulsante funzione Holiday
A3: Pulsante Super ra reddamento (Super Cool)
A4: Pulsante aumento temperatura frigo
A5: Pulsante diminuzione temperatura frigo
A6: Pulsante aumento temperatura congelatore
A7: Pulsante diminuzione temperatura congelatore
A8: Pulsante Super congelamento (Super Freeze)
A9: Pulsante eliminazione suono di allarme
A10: Pulsante alimentazione
TF: Temperatura frigorifero
TC: Temperatura congelatore
Page 13

11
Italiano
Allarme di porta aperta
Quando la porta del frigorifero rimane aperta per più di 3 min.,
verrà emesso un segnale acustico: 3 bip ogni 30 secondi. Il
segnale acustico può essere disattivato chiudendo la porta, o
premendo un tasto qualsiasi.
Se la porta rimane aperta verrà ripristinata la luminosità del
display e sarà visualizzato l’indicatore di allarme (A9).
Allarme di temperatura eccessiva
Quando la temperatura nel vano congelatore sale oltre ad un
determinato livello, l’indicatore luminoso del pulsante (A9)
lampeggia e verrà emesso un segnale acustico (1 bip al secondo).
Il segnale acustico cesserà quando la temperatura nel vano
congelatore raggiungerà il livello denito, o premendo un tasto
qualsiasi: l’indicatore (A9) rimarrà acceso no al raggiungimento,
all’interno dei vani, della temperatura impostata.
Spegnimento del vano frigorifero
Tenendo premuto il tasto (A1) per 3 secondi gli indicatori (TF) e
(A1) si spegneranno e il vano frigorifero verrà spento, mentre il
vano congelatore lavora normalmente. Per riaccendere il vano
frigorifero tenere premuto di nuovo il tasto (A1) per 3 secondi:
l’indicatore corrispondente s’illuminerà, e l’icona che indica la
temperatura del vano frigorifero si ripristinerà.
Spegnimento dell’apparecchiatura
Tenendo premuto il tasto (A10) per 3 secondi, l’indicatore
corrispondente si spegnerà, lo schermo del display si spegnerà
e il frigorifero cesserà di lavorare continuando a restare
alimentato dalla rete elettrica.
Per riaccendere l’apparecchiatura tenere premuto di nuovo
il tasto (A10) per 3 secondi, l’indicatore corrispondente
s’illuminerà, lo schermo del display si accenderà e il frigorifero
riprenderà a lavorare normalmente.
Nota: se le funzioni Holiday o Super rareddamento, e la funzione
Super congelamento erano attive precedentemente allo
spegnimento dell’apparecchiatura, al momento dell’accensione
queste verranno ripristinate.
Indicazione dell’errore
Quando si visualizza “E” o “F” a causa di un malfunzionamento,
il frigorifero può ancora garantire la conservazione dei cibi.
Si prega di contattare quanto prima il Centro di Assistenza.
Page 14
12
Italiano
Descrizione funzioni frigorifero e congelatore - MODELLO AFD
Legenda:
A1: Stand-by
A2: Pulsante Set (Menù Funzioni)
A3: Pulsante aumento temperatura
A4: Pulsante diminuzione temperatura
A5: Pulsante OK - conferma valori impostati
A6: Interruttore ON/OFF
B: Indicatore luminoso Super Cool (Super ra reddamento)
C: Indicatore luminoso funzione Holiday
D: Temperatura frigo
E: Indicatore luminoso vano Frigorifero
F: Indicatore luminoso vano Congelatore
G: Indicatore luminoso d’ allarme
H: Temperatura freezer
I: Indicatore luminoso Super Freeze (super congelamento)
Stand-by
Super Cool
Super Freeze
Ice Maker
Clean Pipe
Input water time
Holiday
Alarm
Set OK
A1
B
D F E G H IC
A2 A3 A4 A5 A6
Alimentazione iniziale della corrente
Quando il frigorifero è alimentato per la prima volta l’indicatore
(G) si illumina. Le temperature dei vani frigo e freezer si
visualizzano nel display rispettivamente con i simboli “-“ e “- -“
a causa dell’alta temperatura presente all’interno.
A seguire verrà emesso un segnale acustico dall’allarme.
Premere il pulsante (A5) e il segnale acustico cesserà mentre la
luce (G) rimarrà accesa no al raggiungimento delle temperature
prede nite dalla fabbrica.
Il display ridurrà la sua luminosità dopo un minuto dal termine
dell’ultima operazione.
Impostazione della temperatura nel vano frigorifero
Premere ripetutamente il pulsante (A2) nchè gli indicatori
(D) ed (E) cominciano a lampeggiare contemporaneamente;
premere i tasti (A3) e (A4) per impostare la temperatura da un
valore minimo di 2°C no ad un massimo di 8°C.
Premere il pulsante (A5) per confermare la temperatura impostata:
gli indicatori (D) ed (E) smetteranno di lampeggiare.
Impostazione della temperatura nel vano congelatore
Premere ripetutamente il pulsante (A2) nchè gli indicatori
(H) ed (F) cominciano a lampeggiare contemporaneamente;
premere i tasti (A3) e (A4) per regolare la temperatura da un
valore minimo di -24°C no ad un massimo di -16°C.
Premere il pulsante (A5) per confermare la temperatura impostata:
gli indicatori (H) ed (F) smetteranno di lampeggiare.
Super ra reddamento (Super Cool)
Premere ripetutamente il pulsante (A2) finchè l’indicatore
(B) comincia a lampeggiare; premere il pulsante (A5) per
confermare l’attivazione della funzione “Super Cool”.
L’indicatore (B) terminerà di lampeggiare e rimarrà acceso.
Questa funzione verrà automaticamente disattivata quando la
temperatura scenderà al livello minimo. E’ possibile disattivare
la funzione ripetendo la procedura di attivazione.
In questa modalità non è possibile impostare la temperatura
nel vano frigorifero e la funzione Holiday.
Super congelamento (Super Freeze)
Premere ripetutamente il pulsante (A2) finchè l’indicatore
(I) comincia a lampeggiare; premere il pulsante (A5) per
confermare l’attivazione della funzione “ Super Freeze”.
L’indicatore (I) terminerà di lampeggiare e rimarrà acceso.
Questa funzione verrà automaticamente disattivata dopo
24h. E’ possibile disattivare la funzione ripetendo la sequenza
di attivazione.
In questa modalità non è possibile impostare la temperatura
nel vano congelatore.
Funzione Holiday
Premere ripetutamente il pulsante (A2) finchè l’indicatore
(C) comincia a lampeggiare; premere il pulsante (A5) per
confermare l’attivazione della funzione Holiday.
L’indicatore (C) terminerà di lampeggiare e rimarrà acceso.
In modalità Holiday, il frigorifero lavorerà ad una temperatura
superiore a +10 °C (si consiglia di rimuovere gli alimenti
deperibili dal vano frigo e chiudere la porta dello stesso
dopo aver attivato questa funzione). La temperatura del vano
frigorifero verrà indicata con “-” Per disattivare la funzione
ripetere la procedura di attivazione.
In questa modalità è possibile impostare la funzione Super
congelamento (Super Freeze) e la funzione Super ra reddamento
(Super Cool). In quest’ultimo caso la funzione Holiday viene
disattivata automaticamente.
Controllo Display
Lo schermo del display ridurrà automaticamente la luminosità
un minuto dopo il termine dell’ultima operazione. La luminosità
verrà ripristinata aprendo la porta o premendo un tasto
qualsiasi. In caso di allarme verrà attivato solamente il segnale
acustico, non verrà modi cata la luminosità del display.
Allarme di porta aperta
Quando la porta del frigo rimane aperta per più di tre minuti,
l’indicatore (G) lampeggia e verrà emesso un segnale acustico
di 3 bip ogni 30sec. Richiudendo la porta l’allarme cesserà e
l’indicatore (G) si spegnerà. Per escludere il solo segnale acustico
è possibile premere il pulsante (A5).
Page 15

13
Italiano
Allarme di temperatura eccessiva
Quando la temperatura nel vano congelatore sale oltre ad
un determinato livello, l’indicatore (G) si illumina e verrà
emesso un segnale acustico (1 bip al secondo). Il segnale
acustico cesserà quando la temperatura nel vano congelatore
raggiungerà il livello de nito: l’indicatore (G) rimarrà acceso
no al raggiungimento, all’interno dei vani, della temperatura
impostata. E’ possibile escludere il solo segnale acustico
premendo il pulsante (A5).
Spegnimento del vano frigorifero
Premere e tenere premuto il pulsante (A1) per 3 secondi; il
vano frigorifero verrà spento, mentre il vano congelatore
lavora normalmente. Sul display l’indicatore (D) si spegnerà e
l’indicatore (E) si oscurerà. Per riaccendere il vano frigorifero
tenere premuto per 3sec il pulsante (A1); sul display riappare
l’indicatore (D) e l’indicatore (E) ritorna alla luminosità normale.
NOTA: se le funzioni Holiday o super ra reddamento erano
Consigli per la conservazione dei cibi: FRIGORIFERO
Descrizione delle funzioni
Super raffreddamento: si suggerisce di utilizzare questa
funzione quando si ripongono nel comparto frigo gli alimenti
freschi acquistati dopo aver fatto la spesa.
Questa modalità favorisce un ra reddamento più rapido degli
alimenti stessi.
Funzione Holiday: questa funzione è indicata quando
si desidera, per brevi periodi di tempo (ad esempio una
vacanza), non spegnere il frigorifero ma farlo funzionare con
consumi ridotti. Con questa modalità il vano freezer funziona
regolarmente e il vano frigo funziona a temperatura superiore
a +10°C: data la temperatura togliere dal frigorifero tutti gli
alimenti deperibili che necessitano di temperature inferiori per
la loro conservazione ottimale e tenere la porta del frigorifero
chiusa.
Consigli per la refrigerazione dei cibi
Per mezzo della circolazione dell’aria nel vano di raffreddamento
si vengono a creare ambienti con temperature diverse,
particolarmente adatti per la conservazione dei vari alimenti;
è importante quindi disporre gli alimenti in modo che l’aria
possa circolare liberamente attorno ad essi.
Le zone più fredde (adatte ad esempio alla conservazione di
salumi e carni) si trovano appena sopra il cassetto per le verdure,
quindi nella parte inferiore del frigorifero e in prossimità della
parete posteriore; le zone invece meno fredde si trovano nella
parte superiore, verso l’esterno e nelle porte (ideali per la
conservazione di burro e formaggi spalmabili).
La ventilazione all’interno del cassetto per le verdure è assicurata
da una serie di feritoie che, a discrezione dell’utilizzatore,
possono venire chiuse.
Per utilizzare nel modo migliore lo scomparto frigorifero è
necessario:
• non introdurre vivande calde o liquidi caldi in
evaporazione;
• riporre sempre in contenitori chiusi, o nelle apposite
confezioni, i liquidi e tutti quegli alimenti che emanano o
che possono assorbire facilmente odori e sapori;
• non mettere olio alimentare nei contenitori essibili nella
porta del frigorifero: potrebbero formarsi delle crepe nella
plastica;
• non ostruire mai i fori e le griglie di ventilazione sulla parete
di fondo del vano frigo e congelatore;
• non depositare nell’apparecchio materiali esplosivi o
bombolette spray con propellenti infiammabili quali
butano, propano, pentano, etc… e riporre alcool ad alta
gradazione solo in piedi ed in contenitori ben chiusi. I gas o
i liquidi che fuoriescono accidentalmente dalle bombolette
sono riconoscibili leggendo le indicazioni sul loro contenuto
e sono a volte contraddistinte da una amma.
Ripiano vetro in due pezzi
Con una semplice operazione mostrata nella figura sottostante
è possibile posizionare il ripiano in vetro anteriore (D2) sotto a
quello posteriore (D1). In questo modo si crea dello spazio utile
per la refrigerazione di bottiglie in posizione verticale (oppure
altri contenitori molto alti).
D2
D1
attive precedentemente allo spegnimento del vano frigorifero,
al momento della riaccensione queste verrano ripristinate.
Spegnimento dell’apparecchiatura
Tenere premuto il pulsante (A6) per 3sec; il display si spegnerà
e il frigorifero cesserà di lavorare continuando a restare
alimentato dalla rete elettrica. Per riaccendere il frigorifero
ripremere il tasto (A6) e tenerlo premuto per 3 secondi.
Nota: se le funzioni Holiday o Super ra reddamento, e la funzione
Super congelamento erano attive precedentemente allo
spegnimento dell’apparecchiatura, al momento dell’accensione
queste verranno ripristinate.
Segnali d’errore
Quando si visualizza “E” o “F” a causa di un malfunzionamento,
il frigorifero può ancora garantire la conservazione dei cibi.
Si prega di contattare quanto prima il Centro di Assistenza.
Page 16
14
Italiano
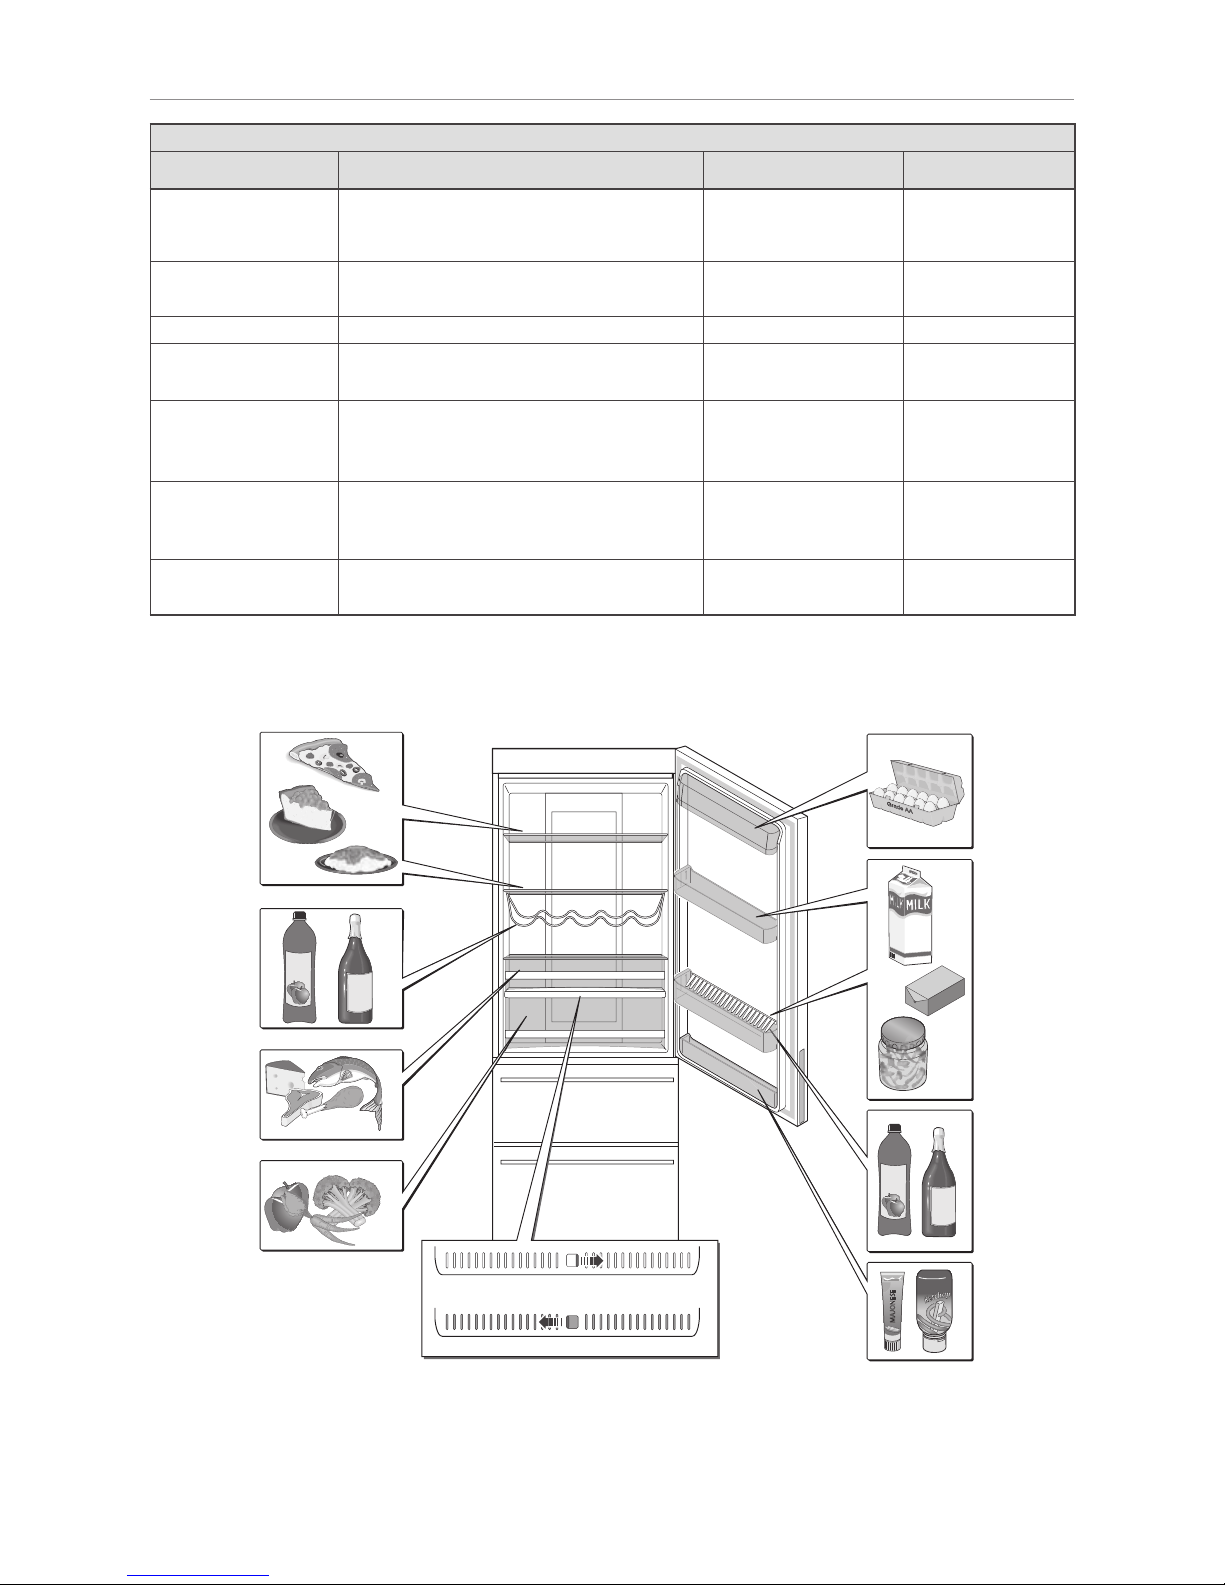
Tabella 3 - Conservazione dei cibi nel frigorifero
Alimento Recipienti per la conservazione Zona di conservazione Durata
Carne e pesce
(di qualsiasi tipo)
Formaggi a pasta dura
Pellicola protettiva, fogli di alluminio, recipienti
chiusi di vetro, plastica per alimenti o acciaio.
Cassetto
“Fresh Control 0°C”
1-2 giorni
Cibi cotti, piatti freddi,
dolciumi
Recipienti chiusi di vetro, plastica per alimenti
o acciaio.
Qualsiasi ripiano 1-2 giorni
Frutta e verdura Confezione di vendita o sfuse. Cassetti frutta/verdura 3-4 giorni
Banane, patate,
cipolla ed aglio
Non conservare in frigorifero. -
Acqua, vino, birra, latte,
succhi di frutta, bevande
gassate
Contenitori di vetro o plastica per alimenti. Balconcini sulla porta Fare rif. alla data di
scadenza.
Sottaceto/sottolio,
salse, burro, formaggi
spalmabili, uova
Confezione originale. Balconcini sulla porta Fare rif. alla data di
scadenza.
Yogurt Confezione originale. Qualsiasi ripiano
Fare rif. alla data di
scadenza.
CLOSE/CHIUSO
OPEN/APERTO
A
p
p
l
e
J
u
i
c
e
MAJONESE
BUTTER
A
p
p
l
e
J
u
i
c
e
Page 17
15
Italiano
Consigli per la conservazione dei cibi: CONGELATORE
Descrizione delle funzioni
Super congelamento: La funzione di congelamento rapido
è studiata per preservare al meglio il valore nutrizionale
degli alimenti riposti nel vano congelatore, garantendo un
congelamento completo in un tempo più breve.
Consigli per il congelamento dei cibi
Lo scomparto congelatore è indicato per la conservazione di
alimenti già surgelati, per la congelazione di quantità ridotte
di alimenti e per la preparazione di cubetti di ghiaccio e di
gelato.
ATTENZIONE: per congelare e per conservare gli alimenti
a lungo è necessaria una temperatura di -18°C. Questa
temperatura blocca notevolmente l’azione dei microrganismi.
Non appena la temperatura supera i -10°C, il processo di
decomposizione attivato dai microrganismi ricomincia
rendendo gli alimenti meno durevoli. Per tale motivo, una volta
scongelati, gli alimenti possono essere ricongelati solo dopo
previa cottura in modo da eliminare la maggior parte dei
microrganismi.
Alcuni consigli:
• per conservare i cibi surgelati è necessario assicurarsi che
essi siano stati ben conservati dal rivenditore;
• si consiglia di limitare le aperture dello scomparto
contenente gli alimenti surgelati o congelati e di tenerlo
aperto il minor tempo possibile;
• si consiglia di congelare solamente alimenti freschi e
di ottima qualità, dopo averli accuratamente lavati ed
asciugati;
• porre nel cassetto inferiore gli alimenti da congelare, questo
è il punto più freddo dello scomparto freezer;
• la temperatura di conservazione deve essere perennemente
inferiore o uguale a -18°C;
• sulla targhetta matricola viene riportata la massima quantità
di alimenti freschi che possono essere congelati in 24 h
(“freezing capacity”). Una maggiore quantità rende la
qualità del congelamento scadente, e riduce notevolmente
la qualità degli alimenti già surgelati;
• si raccomanda di attivare la funzione SuperFreeze (Super
congelamento) 24 ore prima di eettuare il congelamento
quando si hanno quantità di alimenti superiori a 8 Kg;
• congelare gli alimenti in piccole porzioni, avvolte
accuratamente con del protettivo adatto (fogli di alluminio
o appositi sacchetti freezer) ben aderenti e chiusi, segnando
la data di confezionamento e di scadenza;
• gelati e ghiaccioli dovrebbero essere consumati solo alcuni
minuti dopo essere stati tolti dal congelatore per evitare
lacerazioni cutanee alle labbra ed alla lingua. Per la stessa
ragione si consiglia di evitare di toccare le pareti interne del
congelatore con le mani bagnate;
• i pacchetti devono essere asciutti per evitare che si congelino
insieme o che si attacchino;
• il confezionamento deve assicurare che l’aria e l’umidità non
fuoriescano per prevenire l’essiccazione degli alimenti e la
perdita delle vitamine in essi contenute;
• i sacchetti e/o i fogli devono essere morbidi per aderire bene
al contenuto;
• disporre gli alimenti da congelare in modo che non
vengano a contatto con i cibi già surgelati, per evitare lo
scongelamento;
• per congelare piccole quantità di alimenti freschi (1-2
kg) non è necessario intervenire nella regolazione della
manopola del termostato. Per congelare quantità superiori,
attivare la funzione “Super Freeze” (par. “Descrizione funzioni
frigorifero e congelatore)”.
ATTENZIONE: nello scomparto congelatore o nelle
cellette a bassa temperatura non vanno conservate
bibite imbottigliate, specie se gassate; se le bevande gelano
il contenuto si dilata e le bottiglie possono scoppiare.
ATTENZIONE: un innalzamento di temperatura dei
surgelati ne riduce il tempo di conservazione.
• Se per cause accidentali, come mancanza di corrente
nell’impianto domestico, gli alimenti nello scomparto
congelatore si fossero anche non completamente
scongelati, sarà necessario consumarli in tempi molto brevi;
si possono anche ricongelare previa cottura.
• Con interruzioni brevi (fino a 6-8 ore) gli alimenti non
saranno soggetti ad alterazioni.
Creazione del ghiaccio in cubetti
L’apparecchio viene dotato di una o più vaschette per la
produzione di ghiaccio in cubetti; riempirle per tre quarti con
acqua potabile e riporle nello scomparto preposto. Non usare
oggetti metallici e specialmente appuntiti per staccare le
vaschette. Per staccare facilmente i cubetti di ghiaccio dalla
vaschetta, versare un po’ di acqua corrente sulla vaschetta
stessa.
Consigli per lo scongelamento dei cibi
Per poter cuocere ottimamente gli alimenti congelati è
consigliato lo scongelamento in frigo oppure a temperatura
ambiente, accorciando in quest’ultimo caso il tempo di
scongelamento.
Avendo necessità di cuocere rapidamente gli alimenti, se
di piccole dimensioni, si possono cuocere direttamente
allungando i tempi di cottura.
Se di dimensioni normali prima della cottura possono essere
scongelati in forno a microonde.
Una volta scongelati, gli alimenti si deteriorano in breve
tempo, dovrebbero quindi essere consumati entro le 12-24 ore
successive e possono venir ricongelati solo una volta cucinati
(bolliti o cotti).
Page 18
16
Italiano
Tabella 4 - Congelamento dei cibi nel congelatore
Alimento Recipienti per la conservazione
Zona di
conservazione
Durata
Conservazione degli
alimenti surgelati,
ghiaccio in cubetti, gelati
Confezione originale ben chiusa. parte superiore
vano congelatore
Fare rif. alla data di
scadenza.
Congelamento alimenti:
carne e pesce
Confezione originale ben chiusa.
Recipienti per alimenti resistenti alle basse
temperature chiusi ermeticamente.
Massima quantità per recipiente: 2,5 Kg
preferibilmente nella
parte inferiore
vano congelatore
Bovino: 12 mesi
Suino: 12 mesi
Suino macinato: 6 mesi
Coniglio: 6 mesi
Vitello: 9 mesi
Agnello: 9 mesi
Pollame: 6 mesi
Pesce: 6 mesi
Congelamento alimenti:
primi, frutta, verdura,
dolci
Recipienti per alimenti resistenti alle basse
temperature chiusi ermeticamente.
Massima quantità per recipiente: 1Kg
parte superiore
vano congelatore
6-12 mesi
Page 19
17
Italiano
INOX
I
N
O
X
7. MANUTENZIONE ORDINARIA
Pulizia dell’apparecchiatura
Staccare l’alimentazione elettrica prima dell’intervento.
Pulizia interna
Pulire tutte le parti interne con acqua tiepida
e sapone neutro, aceto o bicarbonato di sodio,
asciugare poi accuratamente. In alternativa utilizzare
detersivi specifici per il frigorifero in vendita in
qualsiasi supermercato. Non usare detersivi e/o
polveri abrasive, a base di soda, o solventi che
potrebbero danneggiare le finiture. Per facilitare
la pulizia è possibile rimuovere gli accessori interni
(consultare il par. “Smontaggio componenti”).
Pulizia esterna
Pulire tutte le parti esterne con detersivi specifici,
non usare detersivi e/o polveri abrasive, a base di soda, solventi
che potrebbero danneggiare le finiture o getti d’acqua.
Smontaggio componenti
Per agevolare le operazioni di pulizia è possibile smontare tutti
i componenti interni dell’apparecchiatura.
Seguire le indicazioni della figura relativa.
A: Cassetti freezer, cassetto frutta/verdura e cassetto “Fresh
Control 0°C”: questi cassetti scorrono su guide particolari
dotate di fermi, essi impediscono che, aprendo i cassetti,
questi fuoriescano totalmente rischiando di cadere a terra.
Se si desidera asportarli dall’apparecchiatura per le
operazioni di pulizia, estrarli per 3/4 della loro profondità,
sollevarli leggermente verso l’alto e continuare l’estrazione
continuando a tenerli inclinati verso l’alto.
B: Balconcini porta: sono semplicemente inlati sulle guide
integrate alla porta, per estrarli sollevarli verso l’alto
spingendoli in modo deciso dal basso.
C: Cassetti freezer: non è possibile asportarli completamente
dall’apparecchiatura per motivi di sicurezza; una volta aperti
no alla massima estrazione consentita å è possibile estrarre
i cassetti interni semplicemente sollevandoli verso l’alto ç.
D: Ripiano in vetro in due pezzi: il ripiano anteriore (D2) è
agganciato a quello posteriore per impedirne la fuoriuscita
accidentale (vedi part.ç); per estrarlo, sollevare leggermente
il ripiano posteriore (D1) e slare il ripiano anteriore (D2).
Il ripiano posteriore (D1) è bloccato alla sua estremità da due
perni che ne impediscono la fuoriuscita accidentale (vedi
part.é), per estrarlo sollevarlo verso l’alto e tirarlo a sè no
a slarlo. Quando si riposizionano i due ripiani (D1 e D2)
accertarsi di agganciarli nuovamente l’uno all’altro.
E: Ripiano in vetro con portabottiglie: il ripiano scorre su guide
e ha due perni che ne impediscono la fuoriuscita accidentale
(vedi part.å); se si desidera asportarlo dall’apparecchiatura
per le operazioni di pulizia, sollevarlo leggermente verso l’alto
ed estrarlo continuando a tenerlo inclinato verso l’alto.
F: Ripiano in vetro: il ripiano scorre su guide, se si desidera
asportarlo dall’apparecchiatura per le operazioni di
pulizia, asportare il cassetto “Fresh Control 0°C”, sollevare
leggermente il ripiano verso l’alto ed estrarlo continuando a
tenerlo inclinato verso l’alto.
B
A
D1
D2
E
F
2
D2
3
D1
D3
1
D1
C
C
Page 20
18
Italiano
1
A
1C
1D
1B
2
2A
CLICK!
C
1C
3A
3
A
3B
4A
4
B
3C
2B
A
C
B
D
1A
3D
AFD
AFD
AFD
Stand-by
Super Cool
Super Free
Ice Maker
Clean Pipe
Input water time
Holiday
Alarm
Set OK
AFL
Stand-by Holiday SuperCool
SuperFreeze
Alarm
°C
8. MANUTENZIONE STRAORDINARIA
Staccare l’alimentazione elettrica e
svuotare l’apparecchiatura prima
dell’intervento.
1 A) Aprire la porta del frigorifero;
B) con un cacciavite a taglio agire sulle due clip per
rimuovere la testatina dal lato superiore della porta e
sfilarla verso l’alto;
C) aiutandosi con un cacciavite a taglio sfilare verso il basso
le clip dal lato destro e sinistro situate sotto la cerniera
superiore avendo cura di non danneggiarle;
D) solo per modd.
AFD
: staccare con delicatezza i due
blocchetti di aggancio (i due cavetti collegano il display
situato sulla porta all’apparecchiatura).
2 A) Svitare le due viti, poste nella parte superiore, che
trattengono il pannello frontale;
B) per rimuoverlo far leva in più punti con un cacciavite a
taglio prestando attenzione a non danneggiarlo.
3 A) Tenendo ben salda la porta del frigorifero, svitare le due
viti che trattengono la cerniera superiore sulla sinistra e
allentare la terza vite posta sulla destra.
B) Togliere la cerniera superiore, prima ruotandola in senso
antiorario e poi sflilandola verso l’alto.
C) A questo punto togliere la porta del frigorifero sfilandola
verso l’alto e riporla con cura facendo attenzione a non
danneggiarla;
D) solo per modd.
AFD
: avvolgere il cavetto ed inserirlo
all’interno del vano che si trovava dietro la cerniera,
prestare attenzione che non sporga per non intralciare
il successivo riposizionamento del pannello frontale.
4 A) Svitare le tre viti che trattengono la cerniera centrale per
rimuoverla.
Reversibilità porta: smontaggio porte dal lato destro
Page 21
19
Italiano
8B
8C
5
D
B
6
D
7
C
5A
8
C
9
C
10
C
8A
5B
7A
7B
7C
10A
CLICK!
10D
10C
10B
CLICK!
1C
10D
6B
6A
7D
7C
AFD
9A
AFD
AFD
AFD
9B
Reversibilità porta: montaggio porte sul lato sinistro
5 A) Prendere la cerniera centrale, aiutandosi con una pinza svitare
il perno, capovolgerlo di 180° e riavvitarlo sulla cerniera.
B) Aiutandosi con un cacciavite a taglio, sfilare i tre copri-fori
della traversa centrale dal lato sinistro e rimontarli sul lato
destro.
6 A) Prendere la cerniera centrale e ruotarla di 180°;
B) fissarla con le apposite viti su lato sinistro della traversa
centrale.
7 A) Allentare leggermente la vite (già presente) al lato
superiore sinistro dell’apparecchiatura.
B) Prendere la cerniera superiore, capovolgerla sottosopra;
C) togliere dalla cerniera il perno (ora si trova verso l’alto)
ed infilarlo nella sua parte inferiore;
D) solo per modd.
AFD
: estrarre dal vano il cavetto display
e, provvisoriamente, lasciarlo pendere dall’apparecchiatura.
8 A) Prendere la porta del frigorifero, infilarla nel perno
della cerniera centrale,
B) infilare la cerniera superiore sulla porta ed avvicinare la
stessa nell’apposita sede dell’apparecchiatura.
C) Infilare l’ asola della cerniera sulla vite presente sul lato
sinistro (allentata in fase 7A);
bloccare la cerniera all’apparecchiatura, avvitando su di
essa due viti.
Solo per modd.
AFD
: infilare il cavetto display (estratto
in fase 7D) all’interno della feritoia superiore della
cerniera (vedi disegno 9B).
9 solo per modd.
AFD
:
A) spostare il cavetto display che si trova nella fessura sopra
la porta frigo dal lato sinistro al lato destro mantenendolo
sempre all’interno della fessura predisposta;
B) far passare il cavetto che si trova all’interno della feritoia
della cerniera sotto il traversino della porta e unire i due
cavetti display.
10 A) Applicare a scatto la testatina (rimossa in precedenza)
sul lato superiore della porta del frigorifero.
B) Applicare a scatto il pannello frontale facendo pressione
in più punti;
C) fissarlo con due viti;
D) applicare le clip sul lato destro e sinistro (rimosse in
precedenza).
Page 22
20
Italiano
9. GUASTI E SOLUZIONI
1. ALIMENTAZIONE
PROBLEMA VERIFICHE SOLUZIONI
L’APPARECCHIATURA NON
FUNZIONA
CONTROLLARE L’IMPIANTO ELETTRICO;
VERIFICARE A VISTA CHE LA SPINA DEL CAVO DI ALIMENTAZIONE SIA BEN INSERITA NELLA PRESA DI CORRENTE;
VERIFICARE A VISTA CHE IL CAVO DI ALIMENTAZIONE E LA
SPINA NON ABBIANO SUBITO DANNI.
CONTATTARE UN ELETTRICISTA;
RICOLLEGARE LA SPINA ALLA PRESA DI CORRENTE:
CHIAMARE L’ASSISTENZA TECNICA.
2. LUCE
PROBLEMA VERIFICHE SOLUZIONI
LUCE INTERNA SPENTA ALLA
APERTURA DELLA PORTA
VEDI PUNTO 1;
LUCE INTERNA SPENTA ALL’ APERTURA DELLA PORTA.
SCHEDA A LED GUASTA: CHIAMARE L’ASSISTENZA TECNICA.
NB: L’INTERVENTO DI SOSTITUZIONE DEVE ESSERE ESEGUITO
DAL SERVIZIO ASSISTENZA AUTORIZZATO.
3. TEMPERATURE TROPPO ALTE
PROBLEMA VERIFICHE SOLUZIONI
INSUFFICIENTE CAPACITA’ DI
RAFFREDDAMENTO REFRIGERATORE
CONTROLLARE CHE IL CIBO NON SIA POSIZIONATO TROPPO A RIDOSSO DELLA PARETE REFRIGERATORECONTRO LE
BOCCHETTE DI VENTILAZIONE;
LA CORRETTA CHIUSURA DELLE PORTE E L’ADESIONE DELLE
GUARNIZIONI;
VALORE DELLA TEMPERATURA IMPOSTATA NON CORRETTO;
CONTROLLARE CHE L’APPARECCHIO NON SIA INSTALLATO
VICINO AD UNA FONTE DI CALORE.
RIPOSIZIONARE ADEGUATAMENTE IL CARICO.
CHIUDERE LE PORTE CORRETTAMENTE E PULIRE LE GUARNIZIONI;
IMPOSTARE LE TEMPERATURE (FRIGO/FREEZER) IN BASE
ALLE INDICAZIONI CONTENUTE NEL PRESENTE MANUALE;
RIPOSIZIONARE L’APPARECCHIO.
4. RUMORI E VIBRAZIONI
PROBLEMA VERIFICHE SOLUZIONI
VIBRAZIONE DELL’ APPARECCHIATURA
RUMORE DAL COMPRESSORE
CONTROLLARE CHE LAPPARECCHIO SIA STABILE ED I PIEDINI
BEN REGOLATI;
VERIFICARE CHE LA PARTE POSTERIORE DELL’APPARECCHIATURA NON SIA TROPPO VICINA ALLA PARETE;
RUMORE INTERNO AL COMPRESSORE.
REGOLARE CON L’APPOSITO ATTREZZO L’ALTEZZA DEI
PIEDINI;
SPOSTARE L’APPARECCHIO;
CHIAMARE L’ASSISTENZA TECNICA.
5. ODORI
PROBLEMA VERIFICHE SOLUZIONI
EMANAZIONE DI CATTIVI
ODORI
VERIFICARE LA CORRETTA CONSERVAZIONE DEI CIBI;
VERIFICARE LA FUORIUSCITA DI LIQUIDI ALL’INTERNO DELL’APPARECCHIATURA;
VERIFICARE LA PRESENZA DI CATTIVO ODORE SULLE
GUARNIZIONI;
APPARECCHIATURA RIMASTA TROPPO A LUNGO FERMA CON
LE PORTE CHIUSE.
COPRIRE I CIBI E/O UTILIZZARE GLI APPOSITI INVOLUCRI DI
PLASTICA PER LA CONSERVAZIONE;
PULIRE LE CELLE ED I RIPIANI IN VETRO CON APPOSITO
DETERGENTE PER FRIGORIFERI;
PULIRE LE GUARNIZIONI CON ACQUA E ACETO;
VALUTARE LA CAUSA DEL FERMO DELL’APPARECCHIATURA.
Page 23

1
English
INDEX
1. PRESENTATION..........................................................................................2
Assistance
HAIER
HAIER
2. AFTERSALE SERVICE ................................................................................ 2
Guarantee conditions ................................................................................ 2
Identication and serial No. Plate .............................................................2
3. SPECIFICATIONS OF THE APPLIANCE ......................................................3
Table 1 - Technical data ..............................................................................3
Operative conditions..................................................................................4
Description of the appliance .....................................................................4
4. SAFETY........................................................................................................5
Safety precautions .....................................................................................5
Safety data sheet for R600 a gas ............................................................... 7
Disposal and interruption.......................................................................... 7
5. INSTALLATION ........................................................................................... 8
Transport and unpacking ..........................................................................8
Positioning .................................................................................................8
Installation of handles ...............................................................................8
Cleaning before use ................................................................................... 9
Electrical connection .................................................................................9
6. USE ........................................................................................................... 10
Description of the functions of the refrigerator and freezer
- AFL MODEL............ 10
Description of the functions of the refrigerator and freezer
- AFD MODEL........... 12
Advice on the preservation of foods: refrigerator/freezer...................... 13
INOX
I
N
O
X
7. ROUTINE MAINTENANCE ........................................................................17
Cleaning the appliance ............................................................................17
8. EXTRAORDINARY MAINTENANCE..........................................................18
Door reversibility ..................................................................................... 18
9. TROUBLESHOOTING.................................................................................20
Page 24
Page 25
3
English
3. SPECIFICATIONS OF THE APPLIANCE
Table 1 – Technical data
Model
AFL AFD
1 Basic specications
Energy class A+ A+
Climatic class SN /T SN /T
Volts/frequency V/Hz 220-240 ~/ 50 220-240 ~/ 50
Type of refrigerant (R134a / R600a) R600a R600a
Temperature maintenance time in case of blackout h 16 16
2 Essential specications
Number of compressors n° 1 1
Defrosting of refrigerator/freezer
(M = Manual / A = Automatic) A / A A / A
Control system (E = Elettronic / M = Mechanical) E E
NO FROST (Refrigerator/Freezer) yes/yes yes/yes
Ventilated (Refrigerator only) yes yes
3 Temperature and refrigeration capacity
Refrigerator temperature setting interval °C 2 ÷ 8 2 ÷ 8
Meat box temperature °C -2 ÷ 3 -2 ÷ 3
Vegetables box temperature °C 0 ÷10 0 ÷10
Freezer temperature setting interval °C -16 ÷ -24 -16 ÷ -24
Refrigerator net volume l 230 230
Freezer net volume l 78 78
Maximum capacity of freezer drawer kg 30 30
4 Control panel
Commands and temperature indications internal external
Type of display LED LED
Super cooling (Refrigerator) yes yes
Super freezing (Freezer) yes yes
Over-temperature alarm yes yes
Adjustable thermostat yes yes
Indicator lights
yellow/green yellow/green
5 Dimensions of appliance
Dimensions (height x width x depth) cm 186,5 x 59,5 x 64 186,5 x 59,5 x 64
Depth with door open cm 120 120
6 Accessories
Ice maker (M = Manual / A = Automatic) M M
Internal light yes yes
Power cable length cm 200 200
Type of plug Schuko Schuko
7 Dimensions, packing and weight
Packing dimensions (height x width x depth) cm 193,3 x 64 x 73 193,3 x 64 x 73
Net weight kg 91 91
Page 26
4
English
Operating conditions
Correct operation of the appliance and the cooling and
preservation temperatures specified in “Table1 – Technical
specications” are guaranteed only at the following operating
conditions:
• temperature of the room where the appliance is housed
conforming to the climatic class indicated on the Serial
No. Plate.
Table 2 - Climatic class
Climatic class: Ambient temperature:
SN From +10°C to +32°C
N From +16°C to +32°C
ST From +16°C to +38°C
T From +16°C to +43°C
• maximum relative ambient humidity: 90%;
• the appliance must be located well away from heat sources (e.g. ovens, central heating plants, direct sun rays,
etc..);
• the appliance must be located protected against the atmospheric agents;
• routine periodic maintenance carried out by following
the indications contained in this manual;
• ventilation openings in the housing of the appliance free
of any obstructions;
• correct installation (e.g. levelling, capacity of the system
conforming to the data on the serial No. Plate).
Description of the appliance
Detailed description of the appliance you have purchased.
Key:
A: Refrigerator control panel
B: Internal light
C: Glass shelf
D: Bottles holder
E: “ Fresh Control 0°C” drawer
F: Serial No. Plate
G: Fruit/vegetables preservation drawer
H: Ice tray
I: Freezer drawer tray
L: Freezer internal drawer
M: Butter carrier
N: Glass top (2 components)
O: Closed balcony
P: Balcony
Q: Bottle stop (2 components)
R: Bottles holder balcony
S: Small balcony
T: Door handle
U1: Freezer top drawer
U2: Freezer bottom drawer
V: Freezer internal tray
Z: Freezer internal drawer
NOTE:
The accessories illustrated in the gure are present in
various models. there may be small dierences between these
and those present on your refrigerator.
I
L
H
U1
U2
V
Z
T
D
C
E
B
P
S
MODELLO
PNC
FLUIDO REFRIG FRIGORIFERO
CAPACITA' LORDA TOTALE
CAPACITA' NETTA FRIGO
CAPACITA' NETTA CONGELATORE
CAPACITA' DI CONG.
CLASSE
MODEL
REFRIGERANT REFRIGERATOR
GROSS CAPACITY
REFRIGERATOR NET CAPACITY
FREEZER NET CAPACITY
FREEZING CAPACITY
CLASS
R600a
SER. NO.
0,052
Kg
xxx
xxx
xx
SN-T
PRODOTTO IN ITALIA
MADE IN ITALY
220-240 50V HZ W
0001
RH
N
O
G
F
Q
AFL
Stand-by Holiday SuperCool
SuperFreeze
Alarm
°C
AFD
Stand-by
Super Cool
Super Free
Ice Maker
Clean Pipe
Input water time
Holiday
Alarm
Set OK
A
M
R
Page 27

5
English
4. SAFETY
Safety precautions
Symbols:
General advice to optimise operation of the appliance
General danger
Hot surfaces
• This handbook must be stored together with the appliance
for any future consultation. In the event of sale or transfer to
another person, make sure that the handbook is provided
together with the appliance, thus enabling the new user to
know its operation and the relevant warnings.
• These warnings have been drafted for your safety: therefore,
please read them carefully before installing and using the
appliance.
• If the appliance is in a horizontal position during transport.
The oil in the compressor may flow out into the refrigerating
circuit. We therefore advise you to leave the appliance in a
vertical position for 2 hours before start-up, to enable oil to
flow into the compressor.
• After unpacking the appliance, check it carefully and install
it following the instructions in the relevant chapter: if you
notice any faults, turn OFF the appliance and follow the
procedure indicated in chap. “After-sales assistance”.
• Before you attempt any routine or extraordinary maintenance
operation, disconnect electrical power to the appliance
– when you do this, do not on any account pull the plug by
its cable. Also check if the cable is damaged. If it is, contact
a Service Centre. If the appliance has been moved, when repositioned, make sure that the power cable is not crushed
or is not obstructing.
•
IMPORTANT: the appliances are provided with
refrigerant gas, ISOBUTHANE (R600a). The appliance
must be transported and moved, taking maximum care to
ensure that it is not excessively struck or shaken. Failure to
observe the above rule, could put the appliance out of
service. Damage to the refrigerating circuit, with possible
outow of refrigerating gas, could create risks of explosion
caused by external sparks or ames. Do not, on any account,
run your appliance if it appears to be damaged. In case of
damage, contact the Service Centre, ventilate the room
where the appliance is located, and avoid ames or jobs on
the appliance.
• Before you connect the appliance to the electrical mains,
make sure that the capacity of the system is adequate
with respect to the data on the serial number plate. Any
modification which may be necessary to the domestic
electrical system, in order to install the appliance, must be
carried out by qualied personnel.
2h
OK !
NO !
SODIUM
BICARB
ONA
TE
A
C
E
T
O
Page 28

6
English
• If theappliance ismovedfrom its usualposition, take
into account that even after you have unplugged,
the components on the rear of the appliance may remain
very hot for some time.
•
The appliance is not built for insertion in an embedding structure. Insucient ventilation will certainly
lead to poor operation and will damage the appliance.
•
IMPORTANT: during normal operation and routine
maintenance, do not on any account:
- use electric appliances inside the compartments for
preserving food frozen by the appliance;
- use mechanical or other devices to accelerate the
defrosting process, other than those recommended by
the Manufacturer;
- lay fragile, heavy or unstable objects on the appliance.
• IMPORTANT: Bottles holder maximum load: 10Kg.
•
Temperature insidethe refrigeratorandfreezer could
rise or fall slightly; these appliances are therefore
unsuitable for preserving products (e.g. medicines) for
which a stable temperature must be guaranteed.
•
IMPORTANT: this appliance was designed solely for
domestic use, for preserving and/or freezing foods.
Therefore, make sure that children do not approach the
refrigerator with the intention of playing there, do not sit
on the drawers and do not hang on the doors its
appliance.
•
IMPORTANT:Do notput substanceswithanexplosion
risk, contaminants or volatile substances in the
appliance.
•
IMPORTANT: Never put carbonated beverages or
bottles of waterin thelow temperature compartment
(freezer) – they may explode. Furthermore, we strongly
advise you not to put hot liquids or foods inside the
appliance and notto llreceptacles up to their brim.For all
other preservation advice, consult chap. “Use”.
•
IMPORTANT: The maximum capacity of every freezer
drawer is 30 Kg.
- do not exceed this capacity limit;
- do not exceed the defined level of the capacity line,
indicated in the gure.
NO !
NO !
Max 30kg!Max 30kg!
Max 10kg!
Page 29
7
English
Safety data sheet for R600a gas
Measures in the event of accidental leakage
Allow the material to evaporate providing that adequate
ventilation is provided.
Behaviour of gas
The gas is highly inammable; therefore, absolutely avoid
contact with naked ames and hot surfaces. Gas R600a is
heavier than air, and therefore, high concentrations could form
close to the oor where general ventilation is poor.
First aid
Inhalation
Take the exposed person from the polluted area and carry him
to a warm, well ventilated place.
Long exposure can cause the onset of asphyxia and possible
loss of consciousness. If necessary, practice articial respiration,
and, in the most serious cases, administer oxygen, under close
medical supervision.
Skin contact
It is unlikely that occasional contact with the skin is dangerous
by cutaneous absorption. If this happens: thoroughly wash the
aected zone.
Liquid splashes and atomised liquid can cause freezing burns:
Wash the aected part with plenty of water and call in a doctor
to treat any burns.
Eye contact
Wash with plenty of water, with eye lids well open, and call in
a specialised doctor as soon as possible.
In any event, we advise you to consult your own doctor
following contact with or inhalation of R600a gas.
Disposal and interruption
Under the provisions of art.13 of Law Decree
of 25 July 2005, No.151 “Implementation of
Directives 2002/95 CE, 2002/96/CE and
2003/108/CE, concerning the reduction in
the use of dangerous substances in electric
and electronic appliances, and the disposal
of waste”:
The symbol of the crossed rubbish bin axed to the appliance
or to its package indicates that, at the end of its useful life, the
product must collected separately from other waste. Therefore,
the user shall transfer the appliance, when it has reached
the end of its life, to centres for dierentiated collection of
electronic and electro-technical waste, or redelivery it to the
seller when the user buys a new appliance of equivalent type,
one for one.
Make sure that the old appliance is transported to the collection
point for its disposal without any damage to the cooling circuit.
You will therefore be sure of preventing uncontrolled outow
of refrigerant. The refrigerant data are shown on the appliance’s
data plate.
The cycloisopenthane, a substance not harmful to ozone, is
used as an expander for the insulating foam.
Adequate dierentiated collection, prior to sending the outof-service appliance for environmentally compatible recycling,
treatment and disposal, contributes to avoiding possible
negative eects on the environment and health, and favours
the use and/or recycling of the materials the appliance is
composed of.
Abusive disposal of the product by the user, entails the
application of the sanctions under current legal regulations.
For more detailed information about the available collection
systems, contact your local waste disposal service. We thank you
for your contribution to the protection of the environment.
We advise you to cut the power cable before taking the
appliance to the collection centres.
Make the closing of the door unt for use (by removing
the seals), or better still, remove the door in order, for
example, to prevent a child risking to stay shut inside
while playing.
Page 30

8
English
5. INSTALLATION
Transport and unpacking
If the appliance is in a horizontal position during transport. The
oil in the compressor may ow out into the refrigerating circuit.
We therefore advise you to leave the appliance in a vertical
position for 2 hours before start-up, to enable oil to ow into
the compressor.
Remove the external packing, remove the protective lm,
where present, from the surfaces of the appliance, clean the
outside of the appliance with specic products. Do not use
scrapers or abrasive fabrics which could damage the surfaces
beyond repair.
Carefully remove all sheets and adhesive tape from the
appliance and door and any parts in polystyrene.
Take out the documents and existing accessories from inside
the appliance.
The packing material is recyclable and is marked with
the recycling symbol.
For disposal, follow the local regulations. Packing
material (plastic bags, parts in polystyrene, etc...) must
kept out of reach of children as it is a potential source
of danger.
Control the appliance carefully: if you notice any faults, do not
install the appliance and follow the procedure indicated in chap.
“After-sales assistance”.
Positioning
The place chosen for positioning must satisfy the indications
supplied in parag. “Operating conditions”, and must have a
stable oor of sucient capacity for the appliance’s weight.
Furthermore, you must take into account the distances to be
respected for correct operation of the appliance and for its
dimensions:
1) top part (at least 20 cm)
2) back part (at least 10 cm)
3) wall on door opening side (at least 30 cm).
Level the appliance with its feet: keep the appliance slightly
above the floor to encourage good air circulation on the
condenser. In these conditions, you will obtain excellent
operation of the refrigerant circuit.
Installation of handles
The handles of the freezer drawers are supplied disassembled:
to assemble them, refer to the figure at the side.
10 cm
20 cm
30 cm
Page 31

9
English
Cleaning before use
Make sure that you have removed, from the appliance, all the
adhesive strips which restrain the accessories, clean all internal
parts with lukewarm water and neutral soap, vinegar or sodium
bicarbonate, in order to remove the characteristic odour of new
parts, then dry carefully.
Do not use detergents and/or abrasives containing soda, or
solvents which could damage the nishes.
Electrical connection
Before you insert the plug in the power socket, make sure
that:
• you hands are not wet or humid;
• voltage and frequency on the serial number plate match
those of the domestic power supply (a swing of -6% to +6%
is permitted for nominal voltage; for operation at dierent
voltages, use a transformer of adequate power);
• the cable and plug are not damaged or crushed by heavy
objects;
• the power cable is not too tight: extensions to reach the
socket are not permitted.
IMPORTANT: do not connect the appliance to rectiers
(e.g. sun plants) or by an extension lead.
IMPORTANT: the appliance must be connected to an
ecient earth plate.
To this end, if the power socket of the domestic system is
not connected to earth, connect the appliance to a separate
efficient earth system, in compliance with current legal
regulations, consulting a specialised technician.
The Manufacturer declines all and any responsibility if this
accident prevention regulation is not respected.
This appliance conforms to the following EU directives:
B.T. 73/23/EEC
93/68/EEC
SODIUM
BICARBONATE
Page 32

10
English
6. USE
Description of the functions of the refrigerator and freezer – MODEL AFL
Initial power supply
When the refrigerator is powered up, indicator (A10) lights up.
The temperature of the compartments is shown on the display
as “-”due to the high temperatures inside. An alarm buzzer is
sounded. Press key (A9) and the buzzer stop, whereas indicator
(A9) stays lighted. the display shows. When the temperature has
dropped to a given level, the temperatures of the refrigerator
and freezer on the display respectfully indicate “5” and “-18”
according to the settings prede ned in the factory.
Setting temperature in the refrigerator compartment
Press key (A4) or (A5) to set the refrigerator temperature:
the relevant indicator light ashes, enabling you to set the
temperature from 2°C to 8°C. The setting will be con rmed
automatically 5 seconds after the operation has ended, or by
pressing any key.
Setting the temperature of the Cooler compartment
Press key (A6) or (A7) to set the cooler temperature: the relevant
indicator light ashes, enabling you to set the temperature from
-16°C to -24°C. The setting will be con rmed automatically 5
seconds after the operation has ended, or by pressing any
key.
Super Cool
To activate this function, press Super Cool key (A3): In this
way the relevant indicator light also lights up. This function
will be automatically disabled when the temperature drops
to minimum level. This function can be disabled by pressing
key (A3) again.
In this mode, the temperature in the refrigerator compartment
and the Holiday function cannot be set.
Super freeze
To activate this function, press Super Freeze key (A8): In this
way the relevant indicator light also lights up. This function will
be automatically disabled after 24 hours. This function can be
disabled by pressing key (A8) again.
In this mode, the temperature in the Cooler compartment
cannot be set.
Holiday Function
To activate this function, press key (A2). In the Holiday mode,
the refrigerator works at a temperature of over +10°C (after
you have activated this function, we advise you to remove
perishable foods from the refrigerator compartment and close
its door).The temperature of the refrigerator compartment is
indicated by “-“. Press key (A2) again – the relevant indicator
goes OFF and the refrigerator will change over to normal
control status.
In this mode you can set both the Super Freeze function and
the Super Cool function. In the latter case, the Holiday function
is automatically disabled.
Control of display
The display screen goes OFF automatically 1 min. after the end
of the operation. It can be enabled again by opening the door
or pressing any key (an alarm does not turn ON the screen).
Open door alarm
When the refrigerator door stays open for more than 3 min., a
buzzer is sounded: 3 beeps every 30 seconds. The buzzer can
be disabled by closing the door, or pressing any key. If the door
stays open the display is re-lighted and the alarm indicator
(A9) is shown.
Stand-by Holiday SuperCool
SuperFreeze
A1
Alarm
A2 A3 A4
A5
TF TC A8 A9 A10A6
A7
°C
Key:
A1: Stand-by
A2: Holiday function push button
A3: Super Cool push button
A4: Refrigerator temperature increase push button
A5: Refrigerator temperature reduction push button
A6: Freezer temperature increase push button
A7: Freezer temperature reduction push button
A8: Super Freeze push button
A9: Alarm silencing push button
A10: Power ON push button
TF: Refrigerator temperature
TC: Freezer temperature
Page 33

11
English
Excessive temperature alarm
When the temperature in the freezer compartment rises over
a given level, the indicator light of push button (A9) ashes
and a buzzer is sounded: 1 beep per second. The buzzer stops
when the temperature in the freezer compartment reaches
the dened level, or by pressing any key. The indicator (A9)
stays lighted until the set temperature is reached inside the
compartments.
Turning OFF the refrigerator compartment
If you press key (A1) for 3 seconds, indicators (TF) and (A1) go
OFF, the refrigerator compartment will be disabled, whereas
the freezer compartment operates normally. To re-enable the
refrigerator compartment, press key (A1) again for 3 seconds:
the relevant indicator lights up, and the icon indicating the
temperature of the refrigerator compartment will be reset.
Turning OFF the appliance
If you press key (A10) for 3 seconds, the relevant indicator goes
OFF, the display screen also goes OFF, and the refrigerator stops
operating but will continue to be powered by the electrical
system. To re-enable the appliance, press key (A10) once again
for 3 seconds. The relevant indicator lights up, the display screen
lights up and the refrigerator resumes operating normally.
Note: if the Holiday or Super Cool functions, and the Super
Freeze function were active before the appliance was turned
OFF, they are re-activated at power-up.
Error indication
When “E” or “F” is displayed due to a malfunction, the refrigerator
can still guarantee preservation of foods.
Please contact the Service Centre as soon as possible.
Page 34

12
English
Description of the functions of refrigerator and freezer – MODEL AFD
Key:
A1: Stand-by
A2: Set push button (Functions Menu)
A3: Temperature increase push button
A4: Temperature reduction push button
A5: OK push button - con rms set values
A6: ON/OFF switch
B: Super Cool indicator light
C: Holiday function indicator light
D: Refrigerator temperature
E: Refrigerator compartment indicator light
F: Cooler indicator light
G: Alarm indicator light
H: Freezer temperature
I: Super Freeze indicator light
Stand-by
Super Cool
Super Freeze
Ice Maker
Clean Pipe
Input water time
Holiday
Alarm
Set OK
A1
B
D F E G H IC
A2 A3 A4 A5 A6
Initial power supply
When the refrigerator is powered for the rst time, indicator
(G) lights up. The temperature of the refrigerator and freezer
compartments is respectively shown as “-“and “- -“on the display,
due to the high temperature inside. An alarm buzzer is then
generated. If you press key (A5) the buzzer stops, whereas the
indicator (G) stays lighted until the temperatures prede ned in
the factory are reached. The display reduces its brightness one
minute before the end of the last operation.
Setting the temperature in the Refrigerator compartment
Press key (A2) repeatedly until indicators (D) and (E) begin to
ash simultaneously; press keys (A3) and (A4)
to set the temperature from a minimum value of 2°C up to a
maximum of 8°C.
Press push button (A5) to confirm the set temperature:
indicators (D) And (E) will stop ashing.
Setting the temperature in the Cooler compartment
Press key (A2) repeatedly until indicators (H) and (F) begin to
ash simultaneously; press keys (A3) and (A4)
to set the temperature from a minimum value of -24°C up to a
maximum of -16°C.
Press push button (A5) to confirm the set temperature:
indicators (H) and (F) will stop ashing
Super Cool
Press key (A2) repeatedly until indicator (B) begins to ash;
press push button (A5) to con rm activation of the Super Cool
function.
Indicator (B) will stop ashing and will remain lighted. This
function will be automatically disabled when temperature
drops below minimum level. This function can be disabled by
repeating the activation procedure
In this mode, the temperature in the refrigerator compartment
and the Holiday function cannot be set.
Super Freeze
Press push button (A2) repeatedly until indicator (I) begins to
ash; press push button (A5) to con rm activation of the SuperFreeze function.
Indicator (I) will stop ashing and will remain lighted. This
function will be automatically disabled after 24 hours.
This function can be disabled by repeating the activation
sequence.
In this mode, the temperature in the cooler compartment
cannot be set.
Holiday function
Repeatedly press push button (A2) until indicator (I) begins to
ash; press push button (A5) to con rm activation of the Holiday
function. Indicator (C) stops ashing and remains lighted. In
Holiday mode the refrigerator operates at a temperature of
over +10°C (we advise you to remove perishable foods from the
refrigerator compartment and close its door after activating this
function). The temperature of the refrigerator compartment is
indicated with “-”. To disable the function, repeat the activation
procedure.
In this mode you can set both the Super Freeze function and
the Super Cool function. In the latter case, the Holiday function
is automatically disabled.
Display Control
The display screen automatically reduces brightness one
minute after the end of the operation. Brightness is resumed by
opening the door or pressing any key. In the case of an alarm,
only the buzzer is activated, and the brightness of the display
is not modi ed.
Open door alarm
When the refrigerator door stays open for more than 3 min.,
indicator (G) ashes and a buzzer is sounded: 3 beeps every 30
seconds. If the door is closed, the alarm stops and indicator (G)
goes OFF. To exclude the buzzer only, press push button (A5).
Page 35

13
English
Excessive temperature alarm
When the temperature in the freezer compartment rises over
a given level, indicator (G) lights up and a buzzer is sounded (1
beep per second). The buzzer stops when the temperature in
the freezer compartment reaches the de ned level. Indicator
(G) stays lighted until the set temperature is reached inside the
compartments. To exclude the buzzer only, press push button
(A5).
Disabling the refrigerator compartment
If you press key (A1) and hold it down for 3 seconds: the
refrigerator compartment will be disabled, whereas the freezer
compartment will operate normally. On the display, indicator
(D) will go OFF and indicator (E) will darken. To re-enable
the refrigerator compartment, press key (A1) for 3 seconds:
indicator (D) will reappear and indicator (E) returns to normal
brightness.
Advice on the preservation of foods: REFRIGERATOR
Description of functions
Super Freeze: we advise you to use this function when you
put the fresh foods you have bought during shopping, in the
refrigerator compartment.
This method favours faster cooling of foods.
Holiday function: this function is recommended when, for
short periods (e.g. a holiday), you do not wish to disable the
refrigerator but make it work at reduced consumption. With
this mode, the freezer compartment operates normally and
the refrigerator compartment operates at temperatures of over
+10°C. In view of the temperature, remove from the refrigerator
all perishable foods which require lower temperatures for
excellent preservation, and keep the refrigerator door closed.
Advice on cooling foods
Ambients with different temperatures can be created by
circulating air in the cooling compartment. These ambients are
particularly suitable for preserving various foods. It is therefore
important to position the foods to allow air to freely circulate
around them.
The coldest zones (e.g. suitable for preserving dressed and other
meats are just above the vegetables drawer. Instead the less
cool zones are situated at the top, toward the outside and in the
doors (ideal for preserving butter and cheeses to spread).
Ventilation inside the vegetables drawer is provided by a series
of slits which can be closed at the user’s discretion.
Advice on how to best use the refrigerator compartment:
• do not put in hot foods or evaporating hot liquids;
• always replace in closed containers, or in appropriate
packages, liquids and all foods which issue or which can
easily absorb odours and avours;
• do not put food oil in exible containers in the refrigerator
door: cracks could form in the plastic;
• never obstruct the ventilation holes or grids on the bottom
wall of the refrigerator and freezer compartment;
• do not put in the appliance explosive materials or spray
cylinders containing inflammable propellants such as
butane, propane pentane, etc...and put back high proof
alcohol only in upright position and in properly shut
containers. Gasses or liquids that accidentally issue from
cylinders can be recognised by reading the indications
of their content, and are sometimes marked with a ame
symbol.
Glass top in two pieces
By a simple operation, shown in the gure below, the front glass
top (D2) can be positioned under the rear one (D1).
In this way you can create space for cooling bottles (or other
very high containers) in a vertical position.
D2
D1
NOTE: if the Holiday or Super Cool functions were active before
the appliance was turned OFF, they are re-activated at the new
power-up.
Disabling the appliance
If you push button (A6) for 3 seconds, the display screen goes
OFF, and the refrigerator stops operating but will continue to be
powered by the electrical system. To re-enable the appliance,
press key (A6) once again and hold it down for 3 seconds
Note: if the Holiday or Super Cool functions, and the Super
Freeze function were active before the appliance was turned
OFF, they are re-activated at power-up.
Error indication
When “E” or “F” is displayed due to a malfunction, the refrigerator
can still guarantee preservation of foods.
Please contact the Service Centre as soon as possible.
Page 36

14
English
CLOSE/CHIUSO
OPEN/APERTO
A
p
p
l
e
J
u
i
c
e
MAJONESE
BUTTER
A
p
p
l
e
J
u
i
c
e
Table 3 - Preserving foods in the refrigerator
Food Preservation containers Preservation zone Duration
Meat and fish (of any
type)
Hard cheeses
Protective lm, aluminium sheets, closed glass
containers, plastic for foods or steel
Drawer
“Fresh Control °0C”
1-2 days
Cooked foods, cold
dishes, sweets
Closed containers in glass, plastic for foods or
steel
Any drawer 1-2 days
Fruit and vegetables Sale package or bulk Fruit/vegetable drawers 3-4 days
Bananas, potatoes,
onions and garlic
Do not preserve in the refrigerator - -
Water, wine, beer,
milk, fruit juices, zzy
beverages
Food containers in glass or plastic Balconies on the door Ref er t o the best
before date
Pickled or in oil
foods, sauces, butter,
spreadable cheeses, eggs
Original package Balconies on the door R efer to the best
before date
Yoghurt
Original package Any drawer
Refer to the best
before date
Page 37

15
English
Advice on preserving foods: FREEZER
Description of functions
Freezing: The rapid freezing function is designed to best
preserve the nutritional value of foods placed in the freezer
compartment , guaranteeing complete and quicker freezing.
Advice on freezing foods
The freezer compartment is recommended for preserving
already frozen foods, for freezing small quantities of foods, and
for preparing ice cubes and ice cream.
IMPORTANT: a temperature of -18°C is necessary for
freezing and preserving foods for a long time. This
temperature considerably stops the action of microorganisms.
As soon as the temperature exceeds -10°C, the decomposition
process activated by the microorganisms is resumed, shortening
the life of foods. For this reason, when foods have been
defrosted, they can be re-frozen only after cooking in order to
eliminate most of the microorganisms.
Some advice:
• to preserve frozen foods, make sure that they are well
preserved by the seller;
• we advise you to limit opening the compartment containing
deep frozen and frozen foods and keep it open for as little
time as possible;
• we advise you to freeze only fresh, high quality foods, after
washing and drying them carefully;
• place the foods to be frozen in the lower drawer – this is the
coldest point of the freezer compartment;
• preservation temperature must always be lower than or
equal to -18°;
• the serial number plate indicates the maximum quantity of
fresh foods which can be frozen in 24 h (“freezing capacity”).
A larger quantity worsens freezing quality, and considerably
reduces the quality of already frozen foods;
• we advise you to activate the Super- Freeze function 24
hours before freezing, when food quantities exceed 8 Kg;
• freeze foods in small portions, carefully wrapped in suitable
protective material (aluminium sheets or specic freezer
packets), adhering well and closed, marking the packing
and best before dates;
• ice cream and ice lollies should be eaten only a few minutes
after they have been removed from the freezer, to avoid
cutaneous lacerations to lips and tongue. For the same
reason, do not touch internal parts of the freezer with wet
hands;
• packets must be dry to prevent them freezing together or
attaching to each other;
• the packaging must ensure that air and humidity do not
come out, to prevent drying of foods and loss of the vitamins
they contain;
• the bags and/or sheets must be soft to adhere well to the
contents;
• arrange the foods to be frozen so that they do not come into
contact with already frozen foods, to avoid defrosting;
• to defrost small quantities of fresh foods (1-2 Kg), there
is no need to adjust the thermostat knob. To defrost
larger quantities, enable the “Super-Freeze” function
(parag.”description of refrigerator and freezer functions)”.
IMPORTANT: do not preserve bottled drinks, especially
if fizzy, in the freezer compartment or in the low
temperature cells; if the beverages freeze, the contents
expand and the bottles can burst.
IMPORTANT: increasing the temperature of frozen foods,
reduces their preservation time.
• If, for accidental reasons, i.e. a power cut in the domestic
system, the foods in the freezer compartment have
defrosted (eve if only partially), they must be consumed very
quickly; they can also be re-frozen after being cooked.
• With brief interruptions (up to 6-8 hours), the foods will not
alter.
Making ice cubes
The appliance is supplied with one or more trays for the
production of ice cubes; ll up to ¾ with drinking water and
put them back in the appropriate compartment. Do not use
metallic and specially sharpened objects to detach the trays.
To easily detach ice cubes from the tray, pour some running
water on the tray.
Advice on defrosting foods
To cook frozen foods excellently, we advise you to defrost
them in the refrigerator or at room temperature, shortening
defrosting time in the latter case.
If you want to cook the foods quickly, providing they are small
they can be cooked directly, lengthening cooking times.
If they are of normal dimensions, they can be defrosted in a
microwave oven.
When foods are defrosted, they deteriorate quickly. Therefore,
they should be consumed by the next 12-24 hours and can be
refrozen only after they are cooked (boiled or roasted).
Page 38

16
English
Table 4 - Preserving foods in the freezer
Food Preservation containers Preservation zone Duration
Preservation of frozen
foods, ice cubes, ice
creams
Original package, well closed
top of freezer
compartment
Refer to best before date
Freezing foods: meat
and sh
Original package, well closed.
Food containers resisting to cold temperatures,
hermetically closed.
Maximum quantity per container: 2.5 Kg
preferably at the
bottom of the freezer
compartment
Beef: 12 months
Pork: 12 months
Minced pork: 6 months
Rabbit: 6 months
Veal: 9 months
Mutton: 9 months
Poultry: 6 months
Fish: 6 months
Freezing foods:1st
courses/ pasta dishes,
fruit, vegetables, sweets
Food containers resisting to cold temperatures,
hermetically closed.
Maximum quantity per container: 1 Kg
top part
freezer compartment
6-12 months
Page 39

17
English
INOX
I
N
O
X
7. ROUTINE MAINTENANCE
Cleaning the appliance
Disconnect the electrical power supply before starting
the job.
Internal cleaning
Clean all internal parts with tepid water and neutral
soap, vinegar or sodium bicarbonate, then dry
accurately. Alternatively use detergents made
specifically for the refrigerator, on sale in any
supermarket. Do not use abrasive detergents and/or
powders, soda based detergents, or solvents which
could damage the nish. To facilitate cleaning, the
internal accessories can be removed (consult parag.
“Dismantling components”).
External cleaning
Clean all external parts with specic detergents. Do not use
abrasive detergents and/or powders, soda based detergents,
or solvents which could damage the nish.
Dismantling components
To facilitate cleaning operations, all the internal components
of the appliance can be dismantled. Follow the instructions in
the relevant gure.
A: Freezer drawers, fruit/vegetable drawer and “Fresh Control
0°C drawer”: these drawers slide on special guides with stops,
which prevent the drawers coming out entirely when opened,
and risk falling on the oor. If you wish to take them out of the
appliance for the cleaning operations, extract them to up to
¾ of their depth, lift them up slightly and continue extracting,
keeping them inclined upwards.
B: Door balconies: they are simply tted on the guides integrated
on the door. To remove them, lift them upward, rmly pushing
them up.
C: Freezer drawers: they cannot be fully removed from the
appliance for reasons of safety; when they have been opened
up to the maximum permitted extraction å the internal
drawers can be extracted by simply lifting them up ç.
D: Glass top in two pieces: the front top (D2) is connected to
the rear top to prevent the latter coming out accidentally
(see detail.ç); to remove it, slightly lift the rear top (D1) and
withdraw the front top (D2).
The rear top (D1) is restrained at its ends by two pins which
prevent it coming out accidentally (see detail é). To extract
it, lift it upward and pull it toward yourself until you withdraw
it. When you re-position the two tops (D1 and D2) make sure
you connect them once again to each other.
E: Top in glass with bottle holder: the top slides on guides,
and has two pins preventing the guides from coming out
accidentally(see detail å); if you wish to remove it from the
appliance for the cleaning operations ,lift it up slightly and
extract it, keeping it inclined upwards.
F: Glass top: the top slides on guides. If you wish to remove it
from the appliance for cleaning operations, take away the
“Fresh Control 0°C” drawer, slightly lift up the top and extract
it, continuing to hold it inclined upwards.
B
A
D1
D2
E
F
2
D2
3
D1
D3
1
D1
C
C
Page 40

18
English
1
A
1C
1D
1B
2
2A
CLICK!
C
1C
3A
3
A
3B
4A
4
B
3C
2B
A
C
B
D
1A
3D
AFD
AFD
AFD
Stand-by
Super Cool
Super Free
Ice Maker
Clean Pipe
Input water time
Holiday
Alarm
Set OK
AFL
Stand-by Holiday SuperCool
SuperFreeze
Alarm
°C
8. EXTRAORDINARY MAINTENANCE
Disconnect power and empty the
appliance before you start the
operation.
1 A) Open the refrigerator door;
B) using a normal screwdriver, work on the two clips to
remove the head from the top end of the door and
withdraw it upward;
C) using a normal screwdriver, withdraw downward the
clips from the right and left side – the clips are under the
upper hinge, take care not to damage them.
D) only for
AFD
model: remove the two docking blocks
delicately (the two cables connect the display on the
door to the equipment)
2 A) Unscrew the two screws which secure the front panel,
located at the top;
B) To remove it, obtain leverage in several points with
a normal screwdriver, taking care not to damage the
panel.
3 A) While firmly holding the refrigerator door, unscrew the
two screws which restrain the upper hinge on the left
and loosen the third screw located on the right.
B) Remove the upper hinge, first turning it anti-clockwise
and then withdrawing it upwards.
C) Next, remove the door from the refrigerator, withdrawing
it upward and re-position it carefully, paying attention
not to damage it.
D) only for model
AFD
: wind the cable and insert it in the
compartment behind the hinge, making sure it does not
project and obstruct the subsequent re-positioning of
the front panel.
4 A) Unfasten the three screws which restrain the central
hinge so that you can remove it.;
Door reversibility: dismantling door from the right
Page 41

19
English
8B
8C
5
D
B
6
D
7
C
5A
8
C
9
C
10
C
8A
5B
7A
7B
7C
10A
CLICK!
10D
10C
10B
CLICK!
1C
10D
6B
6A
7D
7C
AFD
9A
AFD
AFD
AFD
9B
Door reversibility: mounting door from the left
5 A) Take the central hinge, and with the aid of pliers, unscrew
the pin, turn it upside down and re-fasten it on the
hinge.
B) With the help of a normal screwdriver, withdraw the three
hole-covers of the central cross piece from the left, and
re-install them on the right.
6 A) Take the central hinge and turn it through 180°C;
B) fasten it with the screws on the left of the central cross-
piece.
7 A) Slightly loosen the screw (already fitted) on the top left
side of the appliance.
B) Take the top hinge and turn it upside down;
C) remove the pin (now high up) from the hinge and fit it in
its lower part;
D) for
AFD
model only: extract the display cable from the
compartment and provisionally let it hang from the
appliance.
8 A) Take the refrigerator door, and insert it on the pin of the
central hinge,
B) Fit the upper hinge on the door and take it toward its
location on the appliance
C) Insert the hinge slot on the screw at the left (loosened in
step 7A);
secure the appliance’s hinge, fastening two screws on
it.
For
AFD
model only: insert the display cable (removed
in step 7D) inside the top slot of the hinge (see drawing
9B):
9 For
AFD
model only:
A) transfer the display cable, located in the slit above the
refrigerator door, from left to right, always keeping it
inside the slit;
B) route the cable inside the hinge slit under the door cross-
beam and unite the two display cables.
10 A) Click-fit the head (previously removed) on the top side
of the refrigerator door.
B) Click-fit the front panel, applying pressure on several
points;
C) secure it with two screws;
D) fit the clips on the right and left sides (previously
removed).
Page 42

20
English
1. POWER SUPPLY
PROBLEM CHECKS SOLUTIONS
APPLIANCE NOT OPERATING CHECK THE ELECTRICAL SYSTEM
VISUALLY CHECK IF THE PLUG OF THE POWER CABLE IS
CORRECTLY INSERTED IN THE POWER SOCKET;
VISUALLY CHECK IF THE POWER CABLE AND PLUG HAVE
BEEN DAMAGED.
CONTACT AN ELECTRICIAN;
RECONNECT THE PLUG TO THE POWER SOCKET;
CALL THE TECHNICAL SERVICE
2. LIGHTING
PROBLEM CHECKS SOLUTIONS
INTERNAL LIGHT OFF WHEN
DOOOR OPENED
SEE POINT 1;
INTERNAL LIGHT OFF WHEN DOOOR OPENED FAULT Y LED BOARD: CALL THE TECHNICAL SERVICE.
NB: THE REPLACEMENT OPERATION MUST BE CARRIED OUT
BY THE AUTHORISED ASSISTANCE SERVICE
3. TEMPERATURES TOO HIGH
PROBLEM CHECKS SOLUTIONS
INSUFFICIENT REFRIGERATOR
COOLING CAPACITY
MAKE SURE THAT FOOD IS NOT PLACED TOO NEAR THE
REFRIGERATOR WALLS AGAINST THE VENTILATION OPENINGS;
CORRECT CLOSURE OF THE DOORS AND ADHESION OF
SEALS;
VALUE OF SET TEMPERATURE INCORRECT
MAKE SURE THAT THE APPLIANCE IS NOT INSTALLED NEAR
A HEAT SOURCE.
RE-POSITION THE LOAD ADEQUATELY.
CLOSE THE DOORS CORRECTLY AND CLEAN THE SEALS;
SET THE TEMPERATURES (REFRIGERATOR/FREEZER) ACCORDING TO THE INSTRUCTIONS IN THIS MANUAL;
RE-POSITION THE APPLIANCE
4. NOISES AND VIBRATIONS
PROBLEM CHECKS SOLUTIONS
APPLIANCE VIBRATING
COMPRESSOR NOISE
MAKE SURE THAT THE APPLIANCE IS STABLE, WITH THE FEET
CORRECTLY ADJUSTED;
MAKE SURE THAT THE REAR OF THE APPLIANCE IS NOT TOO
CLOSE TO THE WALL;
NOISE INSIDE THE COMPRESSOR
ADJUST THE HEIGHT OF THE FEET WITH AN APPROPRIATE
TOOL
MOVE THE APPLIANCE;
CALL THE TECHNICAL SERVICE
5. SMELLS
PROBLEM CHECKS SOLUTIONS
BAD SMELLS ISSUING CHECK CORRECT PRESERVATION OF FOODS;
CHECK IF THERE IS ANY LEAKAGE OF LIQUIDS INSIDE THE
APPLIANCE;
CHECK IF THERE ARE ANY BAD SMELLS ON THE SEALS;
APPLIANCE OUT OF SERVICE FOR TOO LONG, WITH THE
DOORS CLOSED.
COVER THE FOODS AND/OR USE PLASTIC CONTAINERS FOR
PRESERVATION;
CLEAN THE CELLS AND GLASS TOPS WITH A SPECIFIC REFRIGERATOR DETERGENT;
CLEAN THE SEALS WITH WATER AND VINEGAR;
ASSESS THE CAUSE OF THE APPLIANCE ‘S STOPPING .
9. TROUBLESHOOTING
Page 43

1
Français
INDICE
1. PRESENTATION..........................................................................................2
Assistance
HAIER
HAIER
2. SERVICE APRESVENTE............................................................................. 2
Conditions de garantie.............................................................................. 2
Plaquette matricule d’identication ......................................................... 2
3. CARACTERISTIQUES APPAREIL................................................................. 3
Tableau 1 - Données techniques ................................................................3
Conditions de fonctionnement ................................................................. 4
Description de l’ appareil...........................................................................4
4. SECURITE.................................................................................................... 5
Précautions de sécurité.............................................................................. 5
Fiche sécurité gaz R600a........................................................................... 7
Elimination et mise au rebus...................................................................... 7
5. INSTALLATION ........................................................................................... 8
Transport et déballage...............................................................................8
Positionnement..........................................................................................8
Montage poignées ..................................................................................... 8
Nettoyage avant utilisation....................................................................... 9
Raccordement électrique........................................................................... 9
6. UTILISATION ............................................................................................ 10
Description des fonctions du frigidaire et du congélateur
- MODELE AFL...... 10
Description des fonctions du frigidaire et du congélateur
- MODELE AFD ....12
Conseils pour la conservation des aliments: frigidaire/congélateur ..... 13
INOX
I
N
O
X
7. ENTRETIEN ORDINAIRE...........................................................................17
Nettoyage de l’appareil............................................................................17
8. ENTRETIEN EXTRAORDINAIRE................................................................18
Réversibilité porte....................................................................................18
9. PANNES ET SOLUTIONS............................................................................20
Page 44

Page 45

3
Français
3. CARACTERISTIQUES APPAREIL
Tableau 1 - Données techniques
Modello
AFL AFD
1 Caractéristiques de base
Classe énergétique A+ A+
Classe climatique SN /T SN /T
Voltage/fréquence V/Hz 220-240 ~/ 50 220-240 ~/ 50
Type de réfrigérant (R134a / R600a) R600a R600a
Temps de maintien température en cas de blackout h 16 16
2 Caractéristiques fondamentales
Nombre de compresseur n° 1 1
Dégivrage frigidaire/congélateur
(M = Manuel / A = Automatique) A / A A / A
Système de contrôle
(E = Electronique / M = Mécanique)
EE
NO FROST (Réfrigérant/Congélateur) oui/oui oui/oui
Ventilé (Uniquement réfrigérateur) oui oui
3 Températures et capacité de réfrigération
Intervalle réglage température frigidaire °C 2 ÷ 8 2 ÷ 8
Température tiroir viande °C -2 ÷ 3 -2 ÷ 3
Température tiroir légumes °C 0 ÷10 0 ÷10
Intervalle réglage température congélateur °C -16 ÷ -24 -16 ÷ -24
Volume net frigidaire l 230 230
Volume net congélateur l 78 78
Charge maximale tiroir congélateur kg 30 30
4 Panneau de contrôle
Commandes et indication température intérieure internes externes
Type display LED LED
Super refroidissement (Réfrigérateur) oui oui
Super congélation (Congélateur) oui oui
Alarme de sur température oui oui
Thermostat réglable oui oui
Lampes témoin
jaune/verte jaune/verte
5 Dimensions de l’appareil
Dimensions (hauteur x largeur x profondeur) cm 186,5 x 59,5 x 64 186,5 x 59,5 x 64
Profondeur avec porte ouverte cm 120 120
6 Accessoires
Ice maker (M = Manuel / A = Automatique) M M
Eclairage interne oui oui
Longueur câble alimentation cm 200 200
Type de che Schuko Schuko
7 Dimensions, emballage et poids
Dimension emballage (hauteur x largeur x profondeur) cm 193,3 x 64 x 73 193,3 x 64 x 73
Poids net kg 91 91
Page 46

4
Français
Conditions de fonctionnement
Le fonctionnement correct de l’appareil et les températures de
refroidissement et de conservation déclarées dans le “Tableau
1- Données techniques” sont garanties uniquement pour les
conditions de fonctionnement suivantes:
• température de la pièce dans laquelle se trouve l’appareil
conforme à la classe climatique indiquée sur la plaquette
matricule.
Tableau 2 - Classe climatique
Classe climatique: Températureambiante:
SN de +10°C à +32°C
N de +16°C à +32°C
ST de +16°C à +38°C
T de +16°C à +43°C
• humidité relative maximale de l’environnement: 90%;
• positionnement de l’appareil loin des sources de chaleur
(ex. fours, radiateurs, rayons solaires directs, etc );
• positionnement de l’appareil à l’abri des agents
atmosphériques;
• entretien ordinaire périodique effectué suivant les
indications reportées dans ce manuel;
• ouvertures de ventilation dans l’enveloppe de l’appareil
libres d’obstructions;
• installation correcte (ex. niveaux, charge de l’installation
adaptée aux données de la plaquette matricule).
Description de l’appareil
Ci-après se trouve une description détaillée de l’appareil que
vous avez acheté.
Légende:
A: Panneau commandes frigidaire
B: Eclairage interne
C: Plan en verre
D: Porte-bouteilles
E: Tiroir “Fresh Control 0°C”
F: Plaquette matricule
G: Tiroir conservation fruits/légumes
H: Plaquette glaçons
I: Plateau tiroir freezer
L: Tiroir interne freezer
M: Porte-beurre
N: Plan en verre (2 pièces)
O: Compartiment fermé
P: Compartiment
Q: Bloque-bouteilles (2 pièces)
R: Compartiment porte-bouteilles
S: Petit compartiment
T: Poignée porte
U1: Tiroir supérieur freezer
U2: Tiroir inférieur freezer
V: Plateau interne freezer
Z: Tiroir interne freezer
NOTE:
Les accessoires illustrés sur la gure sont présents sur
diérents modèles. Il peut y avoir de légères diérences entre
ces derniers et ceux présents sur votre frigidaire.
I
L
H
U1
U2
V
Z
T
D
C
E
B
P
S
MODELLO
PNC
FLUIDO REFRIG FRIGORIFERO
CAPACITA' LORDA TOTALE
CAPACITA' NETTA FRIGO
CAPACITA' NETTA CONGELATORE
CAPACITA' DI CONG.
CLASSE
MODEL
REFRIGERANT REFRIGERATOR
GROSS CAPACITY
REFRIGERATOR NET CAPACITY
FREEZER NET CAPACITY
FREEZING CAPACITY
CLASS
R600a
SER. NO.
0,052
Kg
xxx
xxx
xx
SN-T
PRODOTTO IN ITALIA
MADE IN ITALY
220-240 50V HZ W
0001
RH
N
O
G
F
Q
AFL
Stand-by Holiday SuperCool
SuperFreeze
Alarm
°C
AFD
Stand-by
Super Cool
Super Free
Ice Maker
Clean Pipe
Input water time
Holiday
Alarm
Set OK
A
M
R
Page 47

5
Français
4. SECURITE
Précautions de sécurité
Symboles:
Conseils de caractère général pour optimaliser le fonctionnement de l’appareil
Danger générique
Surfaces chaudes
• Il est très important que ce livret soit conservé avec
l’appareil pour toute éventuelle future consultation. En
cas de vente ou de cession à une autre personne, s’assurer
que le livret soit fourni avec l’appareil, permettant ainsi au
nouvel utilisateur d’en connaître le fonctionnement et les
avertissements relatifs.
• Ces avertissements ont été rédigés pour votre sécurité : nous
vous prions donc de les lire attentivement avant d’installer
et d’utiliser l’appareil.
• Si l’appareil, durant le transport, est placé en position
horizontale, il est possible que l’huile contenue dans le
compresseur sorte du circuit de réfrigération. Il est donc
conseillé de laisser l’appareil en position verticale pendant
au moins 2 heures avant la mise en fonction, pour laisser
l’huile s’écouler dans le compresseur.
• Après avoir déballé l’appareil, le contrôler attentivement
et l’installer suivant les indications du chapitre relatif : si
l’on détecte une anomalie, éteindre l’appareil et suivre la
procédure indiquée dans le chapitre “Service après-vente”.
• Avant toute opération d’entretien ordinaire et extraordinaire,
débrancher l’alimentation de l’appareil ; cette opération doit
être eectuée en évitant absolument de tirer la che du
câble. Contrôler de plus que le câble ne soit pas abîmé ;
dans ce cas, contacter un Centre d’Assistance. Si l’appareil
a été déplacé, une fois replacé, contrôler que le câble
d’alimentation ne soit pas écrasé ou emmêlé.
•
ATTENTION: les appareils sont dotés de gaz
réfrigérant ISOBUTANE (R600a). Le transport et les
éventuels déplacements de l’appareil devront se faire avec
une attention maximale, an que l’appareil ne subisse pas
de coups ou de secousses excessives. La non observation
de la norme indiquée ci avant pourrait rendre l’appareil non
fonctionnel ; la détérioration du circuit de réfrigération avec
une possible sortie de gaz réfrigérant pourrait produire des
risques d’explosion causés par des étincelles ou des ammes
externes. Ne pas mettre votre appareil en fonction sous
aucun prétexte s’il vous semble endommagé. En cas de
dégâts, contacter le Service Assistance, aérer la pièce où se
trouve l’appareil et éviter les ammes ou les interventions
sur l’appareil.
2h
OK !
NO !
SODIUM
BICARB
ONA
TE
A
C
E
T
O
Page 48

6
Français
• Avant de raccorder l’appareilau circuit électrique, s’assurer
que la charge de l’installation soit adaptée aux données
de la plaque présente sur la plaquette matricule. Toute
modication éventuellequi devraitêtrefaite àl’installation
électrique pour pouvoir installer l’appareil devra être
eectuée par du personnel qualié.
•
Si l’on déplace l’appareil de sa position habituelle, il
faut tenir compte que même après avoir coupé le
courant, les composants placés à l’arrière de l’appareil
peuvent être très chauds.
•
L’appareil n’est pas conçu pour être inséré dans une
structure à encastrement. Une aération insusante
entraînera sûrement un mauvais fonctionnement et des
dégâts à l’appareil.
•
ATTENTION: durant le fonctionnement normal et
l’entretien ordinaire, éviter absolument de:
- utiliser des appareils électriques à l’intérieur des
compartiments pour la conservation des aliments
congelés de l’appareil;
- utiliser des dispositifs mécaniques ou d’autres moyens
pour accélérer le processus de dégivrage diérents de
ceux recommandés par le Constructeur;
- mettre des objets fragiles, lourds ou instables sur
l’appareil.
•
ATTENTION: La chargemaximaledu Porte-bouteilles
est de 10 Kg.
• La températureà l’intérieur dufrigidaireou du congé-
lateur pourrait subir de petites variations ; ces appareils nesontdonc pasadaptés àlaconservation deproduits
(ex. médicaments) pour lesquels doit être garantie une
température absolue.
•
ATTENTION: cet appareil aété conçu pourêtre utilisé
par despersonnesadultes etestdestiné uniquement
à l’usage domestique pour la conservation et/ou la
congélation des aliments. Faire attention, donc, que les
enfants ne s’en approchent pas avec l’intenter d’y jouer,
qu’ils s’assoient sur les tiroirs et éviter qu’ils ne se pendent
aux portes de l’appareil.
•
ATTENTION: Ne pas introduire dans l’appareil de
substances à risque d’explosion, contaminantes ou
volatiles.
•
ATTENTION: Ne jamaismettredans lecompartiment
basse température (congélateur) des boissons
gazeuses oudes bouteilles d’eau : elles pourraientexploser.
De plus,il est vivementconseilléde nepas mettre d’aliments
liquides ouchauds dansl’appareilet dene pasremplir àras
les récipients.Pourtous les autresconseils deconservation,
consulter le chapitre “Utilisation”.
•
ATTENTION: La charge maximale de chaque tiroir
freezer est de 30 kg.
Il est conseillé de:
- ne pas dépasser cette limite de charge.
- ne pas dépasser le niveau déni de la ligne de charge,
indiqué sur la gure.
NO !
NO !
Max 30kg!Max 30kg!
Max 10kg!
Page 49

7
Français
Fiche sécurité gaz R600a
Mesure en cas de perte accidentelle
Laisser évaporer le matériel à condition qu’il y ait une ventilation
adaptée.
Comportement du gaz
Le gaz est hautement inammable; éviter donc absolument
le contact avec des ammes libres et des surfaces chaudes.
Le gaz R600a est plus lourd que l’air et donc la formation
de concentrations élevées au niveau du sol où la ventilation
générale est faible est possible.
Premiers secours
Inhalation
Eloigner le sujet exposé de la zone polluée et le porter dans un
endroit chaud et bien aéré.
Des expositions prolongées peuvent causer un début d’asphyxie
et des pertes de connaissance. Pratiquer la respiration articielle
si nécessaire et dans les cas les plus graves, administrer de
l’oxygène sous surveillance médicale.
Contact avec la peau
Il est improbable que le contact avec la peau résulte dangereux
par absorption cutanée. Dans le cas où cela se produirait : laver
abondamment la zone concernée.
Les éclaboussures de liquide et le liquide nébulisé peuvent
produire des brûlures par gel : rincer abondamment à l’eau la
partie intéressée et appeler un médecin pour le traitement des
éventuelles brûlures.
Contact avec les yeux
Rincer abondamment à l’eau avec les paupières bien ouvertes
et recourir le plus vite possible aux soins d’un médecin
spécialisé.
Il est de toute façon conseillé de contacter son médecin
traitant suite au contact ou à l’inhalation de gaz
R600a.
Elimination et mise au rebus
Selon l’art. 13 du Décret Législatif du 25 juillet
2005, n° 151 “Mise en œuvre des Directives
2002/95/CE, 2002/96/CE et 2003/108/CE,
relatives à la réduction de l’utilisation de
substances dangereuses dans les appareils
électriques, ainsi qu’à l’élimination des
déchets ”.
Le symbole du container barré reporté sur l’appareil ou sur son
emballage indique que le produit à la n de sa propre vie utile
doit être récolté séparément des autres déchets. L’utilisateur
devra, donc, remettre l’appareil en fin de vie aux centres
adaptés de récolte diérenciée des déchets électriques et
électrotechniques, ou bien le remettre au vendeur au moment
de l’achat d’un nouvel appareil de type équivalent, à raison de
un à un.
Faire attention à ce que le vieil appareil soit transporté au
point de récolte pour son élimination sans que le circuit de
refroidissement ne soit abîmé. Vous serez ainsi sur de prévenir
les pertes incontrôlées de réfrigérant.
Les données relatives au réfrigérant se trouvent sur la plaque
de l’appareil.
Le cycloisopentane, substance non nocive pour l’ozone, est
utilisé comme détendeur pour la mousse isolante.
Une bonne récolte différenciée pour l’envoi successif de
l’appareil au recyclage, au traitement et à l’élimination
compatible avec l’environnement, contribue à éviter de
possibles eets néfastes sur l’environnement et sur la santé et
favorise la réutilisation et/ou le recyclage des matières dont il
est composé.
L’élimination abusive du produit de la part de l’utilisateur
comporte l’application des sanctions reprises dans cette
normative.
Pour des informations plus détaillées inhérentes aux systèmes
de récolte disponibles, contacter le service local d’élimination
des déchets.
Nous vous remercions pour votre contribution au respect de
l’environnement.
Il est conseillé de couper le câble d’alimentation avant
de porter l’appareil au centre de récolte.
Rendre inutilisable la fermeture de la porte (en enlevant
les joints) : ou mieux encore démonter la porte an
d’éviter que, par exemple, un enfant ne risque de rester
coincé dedans en jouant.
Page 50

8
Français
5. INSTALLATION
Transport et déballage
Si l’appareil, durant le transport, est placé en position
horizontale, il est possible que l’huile contenue dans le
compresseur ne sorte du circuit de réfrigération. Il est donc
conseillé de laisser l’appareil en position verticale pendant au
moins 2 heures avant la mise en fonction, pour laisser l’huile
s’écouler dans le compresseur.
Enlever l’emballage externe, enlever la pellicule de protection,
si présente, des surfaces de l’appareil, nettoyer l’extérieur de
l’appareil avec des produits spéciques en évitant l’usage de
rasoirs ou de chions abrasifs qui pourraient irrémédiablement
abîmer les surfaces.
Enlever avec attention toutes les feuilles et les rubans
adhésifs de l’appareil et de la porte, les éventuelles parties de
polystyrène.
Enlever de l’intérieur de l’appareil les documents et les
accessoires existants.
Le matériel d’emballage est recyclable et est contresigné
du symbole recyclage.
Pour l’élimination, suivre les réglementations locales.
Les matériaux d’emballage (sachets en plastique, pièces
en polystyrène, etc.) doivent être maintenus hors de la
portée des enfants car ce sont des sources de danger
potentielles.
Contrôler attentivement l’appareil : si l’on détecte une anomalie,
ne pas l’installer et suivre la procédure indiquée dans le chapitre
“Service après-vente”.
Positionnement
L’endroit choisi pour le positionnement doit satisfaire les
indications fournies dans le paragraphe “Conditions de
fonctionnement ”, doit avoir un fond stable et une portée
adaptée au poids de l’appareil.
De plus, il faut tenir compte des distances à respecter
pour le fonctionnement correct de l’appareil et pour son
encombrement:
1) partie supérieure (au moins 20 cm)
2) partie postérieure (au moins 10 cm)
3) paroi sur le côté ouverture porte (au moins 30 cm).
Mettre l’appareil à niveau en utilisant les pieds : en maintenant
l’appareil légèrement soulevé du sol, on facilite une bonne
circulation d’air sur le condensateur. Dans ces conditions, on
aura un fonctionnement optimal du circuit de réfrigération.
Montage poignées
Les poignées des tiroirs freezer sont fournies démontées: pour
leur montage, faire référence à la figure à côté.
10 cm
20 cm
30 cm
Page 51

9
Français
Nettoyage avant utilisation
S’assurer d’avoir enlevé de l’intérieur de l’appareil tous les
rubans adhésifs qui maintenaient les accessoires, nettoyer
toutes les parties internes avec de l’eau tiède et du savon
neutre, du vinaigre ou du bicarbonate de soude, dans le
but d’enlever l’odeur de neuf caractéristique, sécher ensuite
soigneusement.
Ne pas utiliser de détergents et/ou poudres abrasives, à base de
soude, ou des solvants qui pourraient abîmer les nitions.
Raccordement électrique
S’assurer, avant de mettre la che dans la prise de courant,
que:
• vos mains ne soient pas mouillées ou humides;
• la tension et la fréquence reportée sur la plaque matricule
correspondent à celle de l’installation électrique (une
variation de -6% a +6% sur la tension nominale est permise;
pour le fonctionnement à des tensions diérentes, il faudra
recourir à un transformateur de puissance adaptée);
• le câble et la che ne doivent pas être abîmés ou écrasés
par des objets lourds;
• le câble d’alimentation ne soit pas être trop tendu: les
rallonges pour atteindre la prise ne sont pas permises.
ATTENTION: l’appareil ne doit pas être branché à des
redresseurs (par exemple à des panneaux solaires) et ne
doit pas être relié par rallonge.
ATTENTION: il faut relier l’appareil à une prise de terre
ecace.
Pour cela, si la prise de l’installation électrique domestique
n’était pas reliée à la terre, brancher l’appareil à un système
de mise à la terre séparé ecace, selon les lois en vigueur, en
consultant un technicien spécialisé.
Le Constructeur décline toute responsabilité au cas où cette
norme ne serait pas respectée.
Cet appareil est conforme aux directives communautaires
suivantes :
B.T. 73/23/CEE
93/68/CEE
SODIUM
BICARBONATE
Page 52

10
Français
6. UTILISATION
Description des fonctions frigidaire et congélateur - MODELE AFL
Alimentation initiale par le courant
Quand le frigidaire est alimenté, l’indicateur (A10) s’illumine. Les
températures des compartiments sont a chées sur le display
comme “-” à cause de la température élevée à l’intérieur. Un
signal sonore d’alarme sera émis. Appuyer sur la touche (A9)
et le signal sonore cessera, tandis que l’indicateur (A9) reste
allumé. Après que la température se soit abaissée à un niveau
déterminé, les températures du frigidaire et du congélateur
a chées sur le display indiqueront respectivement “5” et “- 18”
telles que programmées par l’usine.
Réglage de la température du compartiment frigidaire
Appuyer sur la touche (A4) ou (A5) pour régler la température
du frigidaire, l’indicateur correspondant clignotera permettant
de régler la température de 2°C à 8°C. Le réglage sera con rmé
automatiquement 5 secondes après la conclusion de l’opération
ou bien en appuyant sur une touche au choix.
Réglage de la température du compartiment congélateur
Appuyer sur la touche (A6) ou (A7) pour régler la température du
congélateur: l’indicateur correspondant clignotera permettant
de régler la température de - 16°C à - 24°C. Le réglage sera
con rmé automatiquement 5 secondes après la conclusion de
l’opération ou bien en appuyant sur une touche au choix.
Super refroidissement (Super Cool)
Pour activer cette fonction, appuyer sur le bouton de Super
refroidissement (A3) (Super Cool); en faisant cela, l’indicateur
correspondant s’illuminera également. Cette fonction sera
automatiquement désactivée lorsque la température descendra
au niveau minimum. Il est possible de désactiver cette fonction
en appuyant à nouveau sur la touche (A3).
Dans ce mode, il n’est pas possible de régler la température du
compartiment frigidaire et la fonction Holiday.
Super congélation (Super freeze)
Pour activer cette fonction, appuyer sur le bouton de Super
congélation (A8) (Super Freeze); en faisant cela, l’indicateur
correspondant s’illuminera également. Cette fonction sera
automatiquement désactivée après 24 heures. Il est possible
de désactiver cette fonction en appuyant à nouveau sur la
touche (A8).
Dans ce mode, il n’est pas possible de régler la température du
compartiment congélateur.
Fonction Holiday
Pour activer cette fonction, appuyer sur la touche (A2).
En mode Holiday, le frigidaire travaillera à une température
supérieure à + 10 °C (il est conseillé d’enlever les aliments
périssables du compartiment frigidaire et de fermer la porte
de ce dernier après avoir activé cette fonction). La température
du compartiment frigidaire sera indiquée par “-”. Appuyer de
nouveau sur la touche (A2), l’indicateur correspondant s’éteindra
et le frigidaire passera en mode de contrôle normal.
Dans ce mode, il est possible de régler la fonction Super
congélation (Super Freeze) et la fonction Super refroidissement
(Super Cool). Dans ce dernier cas, la fonction Holiday est
automatiquement désactivée.
Contrôle du display
L’écran du display s’éteindra automatiquement 1 minute après
le terme de l’opération. Il peut être rallumé avec l’ouverture de
la porte ou la pression d’une touche au choix (l’alarme n’allume
pas l’écran).
Alarme de porte ouverte
Quand la porte du frigidaire reste ouverte pendant plus de
3 minutes, un signal sonore sera émis: 3 bip toutes les 30
secondes. Le signal sonore peut être désactivé en fermant la
Stand-by Holiday SuperCool
SuperFreeze
A1
Alarm
A2 A3 A4
A5
TF TC A8 A9 A10A6
A7
°C
Légende:
A1 : Stand-by
A2: Touche fonction Holiday
A3: Touche Super refroidissement (Super Cool)
A4: Touche augmentation température frigidaire
A5: Touche diminution température frigidaire
A6: Touche augmentation température congélateur
A7: Touche diminution température congélateur
A8: Touche Super congélation (Super Freeze)
A9: Touche élimination son alarme
A10: Touche alimentation
TF: Température frigidaire
TC: Température congélateur
Page 53

11
Français
porte, ou en appuyant sur une touche au choix.
Si la porte reste ouverte, le display redeviendra lumineux et
l’indicateur d’alarme (A9) s’achera.
Alarme de température excessive
Quand la température du compartiment congélateur dépasse
un niveau déterminé, l’indicateur lumineux de la touche (A9)
clignotera et un signal sonore sera émis (1 bip par seconde).
Le signal sonore cessera lorsque la température du compartiment
congélateur atteindra le niveau déni, ou en appuyant sur une
touche au choix : l’indicateur (A9) restera allumé jusqu’à obtenir
la température programmée à l’intérieur des compartiments.
Coupure du compartiment frigidaire
En maintenant la touche (A1) enfoncée pendant 3 secondes,
les indicateurs (TF) et (A1) s’éteindront et le compartiment
frigidaire sera éteint, tandis que le compartiment congélateur
fonctionnera normalement. Pour allumer à nouveau le
compartiment frigidaire, maintenir appuyé à nouveau la touche
(A1) pendant 3 secondes : l’indicateur correspondant s’allumera
et l’icône qui indique la température du compartiment frigidaire
réapparaîtra.
Coupure de l’appareil
En maintenant appuyée la touche (A10) pendant 3 secondes,
l’indicateur correspondant s’éteindra, l’écran du display
s’éteindra et le frigidaire arrêtera de travailler en continuant à
être alimenté par le courant.
Pour rallumer l’appareil, maintenir appuyée à nouveau la
touche (A10) pendant 3 secondes, l’indicateur correspondant
s’allumera, l’écran du display s’allumera et le frigidaire
fonctionnera à nouveau normalement.
Note: si les fonctions Holiday ou Super refroidissement, et la
fonction Super congélation étaient actives avant la coupure
de l’appareil, elles seront ractivées au moment de l’allumage
de l’appareil.
Indication d’erreur
Quand “E” ou “F” s’ache à cause d’un mauvais fonctionnement,
le frigidaire peut encore garantir la conservation des
aliments.
Il faut contacter au plus vite le Centre d’Assistance.
Page 54

12
Français
Description des fonctions frigidaire et congélateur - MODELE AFD
Légende:
A1: Stand-by
A2: Touche Set (Menu Fonctions)
A3: Touche augmentation température
A4: Touche diminution température
A5: Touche OK - con rmation valeurs programmées
A6: Interrupteur ON/OFF
B: Indicateur lumineux Super Cool (Super refroidissement)
C: Indicateur lumineux fonction Holiday
D: Température frigo
E: Indicateur lumineux compartiment Frigidaire
F: Indicateur lumineux compartiment Congélateur
G: Indicateur lumineux d’alarme
H: Température freezer
I: Indicateur lumineux Super Freeze (super congélation)
Stand-by
Super Cool
Super Freeze
Ice Maker
Clean Pipe
Input water time
Holiday
Alarm
Set OK
A1
B
D F E G H IC
A2 A3 A4 A5 A6
Alimentation initiale par le courant
Quand le frigidaire est alimenté pour la première fois, l’indicateur
(G) s’allume. Les températures des compartiments frigidaire et
congélateur s’affichent sur le display respectivement avec
les symboles “-“ et “- -“ à cause de la température présente à
l’intérieur. Ensuite, un signal sonore d’alarme est émis.
Appuyer sur la touche (A5) et le signal sonore cessera tandis
que la lumière (G) restera allumée jusqu’à l’obtention des
températures prédé nies à l’usine.
Le display réduira sa luminosité après une minute du terme de
la dernière opération.
Réglage de la température du compartiment frigidaire
Appuyer plusieurs fois sur la touche (A2) jusqu’à ce que les
indicateurs (D) et (E) commencent à clignoter ensemble;
appuyer sur les touches (A3) et (A4) pour régler la température
d’une valeur minimale de 2°C jusqu’à un maximum de 8°C.
Appuyer sur la touche (A5) pour con rmer la température
réglée: les indicateurs (D) et (E) arrêteront de clignoter.
Réglage de la température du compartiment congélateur
Appuyer plusieurs fois sur la touche (A2) jusqu’à ce que les
indicateurs (H) et (F) commencent à clignoter ensemble;
appuyer sur les touches (A3) et (A4) pour régler la température
d’une valeur minimale de -24°C jusqu’à un maximum de -16°C.
Appuyer sur la touche (A5) pour con rmer la température
réglée: les indicateurs (H) et (F) arrêteront de clignoter.
Super refroidissement (Super Cool)
Appuyer plusieurs fois sur la touche (A2) jusqu’à ce que
l’indicateur (B) commence à clignoter; appuyer sur la touche
(A5) pour con rmer l’activation de la fonction “Super Cool”.
L’indicateur (B) arrêtera de clignoter et restera allumé. Cette
fonction sera directement désactivée quand la température
descendra au niveau minimum. Il est possible de désactiver la
fonction en répétant la procédure d’activation.
Dans ce mode, il n’est pas possible de régler la température du
compartiment frigidaire et la fonction Holiday.
Super congélation (Super Freeze)
Appuyer plusieurs fois sur la touche (A2) jusqu’à ce que
l’indicateur (I) commence à clignoter; appuyer sur la touche (A5)
pour con rmer l’activation de la fonction “Super Freeze”.
L’indicateur (I) arrêtera de clignoter et restera allumé. Cette
fonction sera directement désactivée après 24 heures. Il est
possible de désactiver la fonction en répétant la séquence
d’activation.Dans ce mode, il n’est pas possible de régler la
température du compartiment congélateur.
Fonction Holiday
Appuyer plusieurs fois sur la touche (A2) jusqu’à ce que
l’indicateur (C) commence à clignoter; appuyer sur la touche
(A5) pour con rmer l’activation de la fonction “Holiday”.
L’indicateur (C) arrêtera de clignoter et restera allumé.
En mode Holiday, le frigidaire travaillera à une température
supérieure à + 10 °C (il est conseillé d’enlever les aliments
périssables du compartiment frigidaire et de fermer la porte de
ce dernier après avoir activé cette fonction). La température du
compartiment frigidaire sera indiquée par “-”. Pour désactiver
la fonction, répéter la procédure d’activation.
Dans ce mode, il est possible de régler la fonction Super
congélation (Super Freeze) et la fonction Super refroidissement
(Super Cool). Dans ce dernier cas, la fonction Holiday est
automatiquement désactivée.
Contrôle Display
L’écran du display réduira automatiquement la luminosité 1
minute après le terme de la dernière opération. La luminosité se
rétablira avec l’ouverture de la porte ou la pression d’une touche
au choix. En cas d’alarme, seul le signal sonore sera activé, la
luminosité du display ne sera pas modi ée.
Alarme de porte ouverte
Quand la porte du frigidaire reste ouverte pendant plus de 3
minutes, l’indicateur (G) clignote et un signal sonore sera émis:
3 bip toutes les 30 secondes. En refermant la porte, l’alarme
cessera et l’indicateur (G) s’éteindra. Pour exclure le seul signal
sonore, il faut appuyer sur la touche (A5).
Page 55

13
Français
Alarme de température excessive
Quand la température du compartiment congélateur dépasse
un niveau déterminé, l’indicateur (G) s’allume et un signal
sonore sera émis (1 bip par seconde).
Le signal sonore cessera lorsque la température du compartiment
congélateur atteindra le niveau dé ni: l’indicateur (G) restera
allumé jusqu’à obtenir la température programmée à l’intérieur
des compartiments.
Il est possible de couper le signal sonore en appuyant sur la
touche (A5).
Coupure du compartiment frigidaire
En maintenant la touche (A1) enfoncée pendant 3 secondes, le
compartiment frigidaire s’éteindra, tandis que le compartiment
congélateur fonctionnera normalement. Sur le display,
l’indicateur (D) s’éteindra et l’indicateur (E) s’obscurcira. Pour
allumer à nouveau le compartiment frigidaire, maintenir
appuyée à nouveau la touche (A1) pendant 3 secondes :
l’indicateur (D) réapparaît sur le display et l’indicateur (E)
reprend une luminosité normale.
NOTE: si les fonctions Holiday ou super refroidissement étaient
activées lors de la coupure du compartiment frigidaire, elles
seront rétablies lors de l’allumage.
Coupure de l’appareil
En maintenant appuyée la touche (A6) pendant 3 secondes,
le display s’éteindra et le frigidaire arrêtera de travailler en
continuant à être alimenté par le courant.
Pour rallumer le frigidaire, maintenir appuyée à nouveau la
touche (A6) pendant 3 secondes.
Note: si les fonctions Holiday ou super refroidissement et super
congélation étaient activées lors de la coupure du compartiment
frigidaire, elles seront rétablies lors de l’allumage.
Signaux d’erreurs
Quand “E” ou “F” s’a che à cause d’un mauvais fonctionnement,
le frigidaire peut encore garantir la conservation des aliments.
Il faut contacter au plus vite le Centre d’Assistance.
Conseils pour la conservation des aliments : FRIGIDAIRE
Description des fonctions
Super refroidissement:
il est conseillé d’utiliser cette fonction
lorsque l’on place dans le compartiment frigidaire des aliments
fraîchement achetés après avoir fait les courses. Ce mode
favorise un refroidissement plus rapide des aliments.
Fonction Holiday: cette fonction est indiquée quand on désire,
pour des périodes de temps courtes (par exemple les vacances),
ne pas éteindre le frigidaire mais le faire fonctionner avec un
minimum de consommation. Avec ce mode, le compartiment
freezer fonctionne régulièrement et le compartiment frigidaire
fonctionne à température supérieure à + 10°C: vu la température,
enlever tous les aliments périssables du frigidaire qui ont besoin
de températures inférieures pour leur conservation optimale
et laisser la porte du frigidaire fermée.
Conseils pour la réfrigération des aliments
Au moyen de la circulation d’air dans le compartiment de
refroidissement, on crée des zones avec des températures
di érentes, particulièrement adaptées pour la conservation
des di érents aliments ; il est donc important de disposer
les aliments de façon à ce que l’air puisse circuler facilement
autour de ceux-ci.
Les zones plus froides (adaptées par exemple à la conservation
des charcuteries et viandes), se trouvent à peine au dessus
du tiroir pour les légumes, donc dans la partie inférieure du
frigidaire et à proximité de la paroi postérieure ; les zones moins
froides se trouvent dans la partie supérieure, vers l’extérieur et
dans les portes (idéales pour la conservation du beurre et des
fromages à tartiner).
La ventilation à l’intérieur du tiroir pour les légumes est assurée
par une série de fentes qui, au gré de l’utilisateur, peuvent être
fermées.
Pour utiliser au mieux le compartiment frigidaire, il faut :
• ne pas introduire d’aliments chauds ou de liquide chauds
en évaporation;
• toujours placer dans des récipients fermés, ou dans des
boîtes prévues, les liquides et tous les aliments qui émanent
ou qui peuvent absorber facilement des odeurs et des
saveurs;
• ne pas mettre d’huile alimentaire dans les récipients exibles
de la porte du frigidaire : il pourrait se former des fentes dans
le plastique;
• ne jamais obturer les fentes et les grilles de ventilation sur
les parois du fond du frigidaire et du congélateur;
• tel que le butane, le propane, le pentane, etc… et placer
les alcools forts uniquement debout et dans des récipients
bien fermés. Les gaz ou les liquides qui peuvent sortir
accidentellement des bonbonnes sont reconnaissables en
lisant les indications sur leur contenu et sont parfois indiqués
par une amme.
Plan en verre en deux pièces
En suivant la simple opération montrée dans la figure cidessous, il est possible de placer le plan en verre antérieur (D2)
sous celui postérieur (D1). De cette façon, on crée un espace
utile pour la réfrigération de bouteilles en position verticale (ou
bien d’autres récipients très hauts).
D2
D1
Page 56

14
Français
Tableau3–Conservation des aliments dans le frigidaire
Aliment Récipients pour la conservation Zone de conservation Durée
Viande et poisson (de
tout type)
Fromages à pâte dure
Feuille fraîcheur, feuille d’aluminium, récipients
fermés en verre, en plastique pour aliments ou
en acier.
Tiroir “Fresh Control 0°C” 1-2 jours
Aliments cuits, plats
froids, pâtisseries
Récipients fermés en verre, en plastique pour
aliments ou en acier.
N’importe quel plan 1-2 jours
Fruits et légumes Emballage de vente ou en vrac. Tiroirs fruits/légumes 3-4 jours
Bananes, patates,
oignon et ail
Ne pas conserver au frigidaire. -
Eau, vin, bière, lait,
jus de fruits, boissons
gazeuses
Récipients en verre ou plastique pour aliments. Dans la porte Faire référence à la
date de péremption
Sous vinaigre/sous huile,
sauces, beurre, fromages
tartinables, œufs
Emballage original. Dans la porte Faire référence à la
date de péremption
Yaourt
Emballage original. N’importe quel plan Faire référence à la
date de péremption
CLOSE/CHIUSO
OPEN/APERTO
A
p
p
l
e
J
u
i
c
e
MAJONESE
BUTTER
A
p
p
l
e
J
u
i
c
e
Page 57

15
Français
Conseils pour la conservation des aliments : CONGELATEUR
Description des fonctions
Super congélation
: La fonction de congélation rapide a été
étudiée pour préserver au mieux la valeur nutritionnelle
des aliments placés dans le compartiment congélateur, en
garantissant une congélation complète en un temps plus
court.
Conseils pour la congélation des aliments
Le compartiment congélateur est indiqué pour la conservation
des aliments déjà surgelés, pour la congélation de petites
quantités d’aliments et pour la préparation des glaçons et de
la glace.
ATTENTION: pour congeler et conserver les aliments plus
longtemps, une température de - 18°C est indispensable.
Cette température bloque de façon importante l’action des
microorganismes. Dès que la température dépasse les - 10°C,
le processus de décomposition actif des microorganismes
recommence rendant les aliments plus périssables. Pour cette
raison, une fois décongelés, les aliments ne peuvent être
recongelés qu’uniquement après cuisson de façon à éliminer
la plus grande partie des microorganismes.
Quelques conseils:
• pour conserver les aliments surgelés, il faut s’assurer qu’ils
aient été bien conservés par le revendeur;
• il est conseillé de limiter les ouvertures du compartiment
congélation et de le tenir ouvert le moins longtemps
possible;
• il est conseillé de congeler uniquement des aliments frais
et de qualité optimale, après les avoir lavés et séchés
soigneusement;
• placer dans le tiroir inférieur les aliments à congeler, c’est le
point le plus froid du compartiment freezer;
• la température de conservation doit être continuellement
inférieure ou égale à - 18°C;
• sur la plaquette matricule est reportée la quantité maximale
d’aliments frais qui peuvent être congelés en 24 h (“freezing
capacity”). Une plus grande quantité résulte en une qualité
de congélation moins bonne et réduit de façon importante
la qualité des aliments déjà surgelés;
• il est conseillé d’activer la fonction Super Freeze (Super
congélation) 24 heures avant d’eectuer la congélation
quand il y a une quantité d’aliments supérieure à 8 Kg;
• congeler les aliments en petites portions, soigneusement
emballés dans des protections adaptées (feuilles d’aluminium
ou sachets freezer) bien adhérentes et fermées, en indiquant
la date d’emballage et la péremption;
• les glaces et les glaçons devraient être consommés
seulement quelques minutes après avoir été prélevés du
congélateur pour éviter des lacérations cutanées aux lèvres
et à la langue. Pour la même raison, il est conseillé d’éviter
de toucher les parois internes du congélateur avec les mains
mouillées;
• les paquets doivent être séchés pour éviter qu’ils ne se
congèlent ensemble ou qu’ils ne s’attachent;
• l’emballage doit assurer que l’air et l’humidité ne sortent
pas pour prévenir la dessiccation des aliments et la perte
des vitamines qui y sont contenues;
• les sachets et/ou les feuilles doivent être souples pour bien
adhérer au contenu;
• placer les aliments à congeler de façon à ce qu’ils ne
viennent pas en contact avec les aliments déjà surgelés,
pour éviter la décongélation;
• pour congeler de petites quantités d’aliments frais (1-2 kg),
il n’est pas nécessaire de modier le réglage de la poignée
du thermostat. Pour congeler de plus grandes quantités,
activer la fonction “Super Freeze” (paragraphe “Description
fonctions frigidaire et congélateur)”.
ATTENTION: dans le compartiment congélateur ou dans
les cellules à basse température, il ne faut pas conserver
les boissons embouteillées, spécialement si elles sont
gazeuses ; si les boissons gèlent, le contenu se dilate et les
bouteilles peuvent exploser.
ATTENTION: une augmentation de la température des
surgelés en réduit la durée de conservation.
• Si pour une raison accidentelle, comme une coupure de
courant, les aliments du compartiment congélation se sont
décongelés en partie, il faudra les consommer rapidement ;
ils pourront être recongeler après cuisson.
• Avec des interruptions brèves (jusqu’à 6-8 heures) les
aliments ne seront pas sujets à altération.
Création de glaçons
L’appareil est fourni avec une ou plusieurs plaquettes pour la
production de glaçons ; les remplir au trois quart avec de l’eau
potable et les replacer dans le compartiment prévu. Ne pas
utiliser d’objets métalliques et particulièrement pointus pour
défaire les récipients. Pour détacher facilement les cubes de
glace, verser un peu d’eau courante sur le récipient.
Conseils pour la décongélation de aliments
Pour pouvoir cuire de façon optimale les aliments congelés, il
est conseillé de les décongeler au frigo ou bien à température
ambiante, diminuant dans ce cas le temps de décongélation.
En cas de nécessité de cuire rapidement les aliments, s’ils sont de
petites dimensions, on peut les cuire directement en allongeant
les temps de cuisson.
S’ils sont de dimension normale, ils peuvent être décongelés
dans le four à micro-ondes avant la cuisson.
Une fois décongelés, les aliments se détériorent rapidement, ils
devraient donc être consommés endéans les 12-24 heures et
peuvent être recongelés uniquement une fois cuisinés (bouillis
ou cuits).
Page 58

16
Français
Tableau4–Congélation des aliments dans le congélateur
Aliment Récipients pour la conservation Zone de conservation Durée
Conservation des aliments
surgelés, glaçons, glaces
Emballage original bien fermé. Pa rtie supérieure
compartiment
congélateur
Faire référence à la date
de péremption.
Congélation aliments :
Viande et poison
Emballage original bien fermé.
Récipients pour aliments résistants aux basses
températures fermés hermétiquement.
Quantité maximale par récipient: 2,5 Kg
Préférentiellement
dans la partie basse
du compartiment
congélateur
Boeuf: 12 mois
Porc: 12 mois
Haché de porc: 6 mois
Lapin: 6 mois
Veau: 9 mois
Agneau: 9 mois
Volaille: 6 mois
Poisson: 6 mois
Congélation aliments:
entrées, fruits, légumes,
desserts
Récipients pour aliments résistants aux basses
températures fermés hermétiquement.
Quantité maximale par récipient: 1 Kg
Partie supérieure
compartiment
congélateur
6-12 mois
Page 59

17
Français
INOX
I
N
O
X
7. ENTRETIEN ORDINAIRE
Nettoyage de l’appareil
Débrancher l’alimentation électrique avant toute opération.
Nettoyage interne
Nettoyer toutes les parties internes à l’eau tiède
et au savon neutre, au vinaigre ou au bicarbonate
de soude, sécher ensuite soigneusement. En
alternative, utiliser des détergents spéciques pour
le frigidaire en vente dans les supermarchés.
Ne pas utiliser de détergents et/ou poudres
abrasives, à base de soude, ou des solvants car
ils pourraient abîmer les nitions. Pour faciliter le
nettoyage, il est possible d’enlever les accessoires
internes
(consulter le paragraphe “Démontage
composants”).
Nettoyage externe
Nettoyer toutes les parties externes avec des détergents
spécifiques, ne pas utiliser de détergents et/ou poudres
abrasives, à base de soude, des solvants qui pourraient abîmer
les nitions ou des jets d’eau.
Démontage des composants
Pour faciliter les opérations de nettoyage, il est possible de
démonter tous les composants internes de l’appareil. Suivre
les indications de la gure relative.
A:
Tiroir freezer, tiroir fruits/légumes “Fresh Control 0°C”: ces
tiroirs coulissent sur des guides particuliers dotés d’arrêts qui
empêchent que, en ouvrant les tiroirs, ils ne sortent totalement
et ne risquent de tomber par terre. Si l’on souhaite les enlever
de l’appareil pour les opérations de nettoyage, les extraire
jusqu’au 3/4, les soulever légèrement vers le haut et continuer
l’extraction en les maintenant inclinés vers le haut.
B: Compar timents dans le porte: ils sont simplement enlés sur
des guides intégrés à la porte, pour les extraire, les soulever
vers le haut en poussant de façon ferme par le bas.
C:
Tiroirs freezer: il n’est pas possible de les enlever complètement
de l’appareil pour des raisons de sécurité; une fois ouverts jusqu’à
l’extraction maximale consentie å, il est possible d’extraire les
tiroirs internes en les soulevant simplement vers le haut ç.
D: Plan en verre en deux parties: le plan antérieur (D2) est
accroché à celui postérieur pour en empêcher la sortie
accidentelle (voir part.ç); pour l’extraire, soulever légèrement
le plan postérieur (D1) et faire glisser le plan antérieur (D2Le
plan postérieur (D1) est bloqué à son extrémité par deux
crochets qui en empêchent la sortie accidentelle (voir part.é),
pour l’extraire, soulever vers le haut et le tirer vers soi jusqu’à
l’enlever. Quand on replace les deux plans (D1 et D2), s’assurer
de les accrocher à nouveau l’un à l’autre.
E: Plan en verre avec porte-bouteilles: le plan glisse sur des guides
et a deux crochets qui en empêchent la sortie accidentelle
(voir part.å); si l’on souhaite l’enlever de l’appareil pour les
opérations de nettoyage, le soulever légèrement vers le haut
et l’extraire en continuant à le tenir incliné vers le haut.
F:
Plan en verre: le plan coulisse sur des guides, si l’on désire
l’enlever de l’appareil pour les opérations de nettoyage, enlever
le tiroir “Fresh Control 0°C”, soulever légèrement le plan vers le
haut et l’extraire en continuant à le tenir incliné vers le haut.
B
A
D1
D2
E
F
2
D2
3
D1
D3
1
D1
C
C
Page 60

18
Français
1
A
1C
1D
1B
2
2A
CLICK!
C
1C
3A
3
A
3B
4A
4
B
3C
2B
A
C
B
D
1A
3D
AFD
AFD
AFD
Stand-by
Super Cool
Super Free
Ice Maker
Clean Pipe
Input water time
Holiday
Alarm
Set OK
AFL
Stand-by Holiday SuperCool
SuperFreeze
Alarm
°C
8. ENTRETIEN EXTRAORDINAIRE
Débrancher l’alimentation
électrique et vider l’appareil avant
toute opération d’entretien.
1 A) Ouvrir la porte du frigidaire;
B) avec un tournevis, agir sur les deux clips pour enlever la
tête du côté supérieur de la porte et la faire glisser vers
le haut;
C) en s’aidant d’un tournevis, faire glisser vers le bas le clip
du côté droit et gauche situé sous la charnière supérieure
en ayant soin de ne pas l’abîmer;
D) uniquement pour mod.
AFD
: Détacher doucement
les deux blocs crochet (les deux fils sont reliés au display
situés sur la porte de l’appareil).
2 A) Dévisser les deux vis, placées sur la partie supérieure, qui
maintiennent le panneau frontal;
B) pour enlever, faire levier en plusieurs points avec un
tournevis en faisant attention à ne pas l’abîmer.
3 A) En tenant fermement la porte du frigidaire, dévisser les
deux vis qui maintiennent la charnière supérieure sur la
gauche et dévisser un peu la troisième vis placée sur la
droite.
B) Enlever la charnière supérieure, en la faisant d’abord
tourner dans le sens inverse des aiguilles d’une montre
et ensuite, en la faisant glisser vers le haut.
C) A ce stade, enlever la porte du frigidaire en la faisant
glisser vers le haut et la déposer en ayant soin de ne pas
l’abîmer;
D) uniquement pour mod.
AFD
: enrouler le fil et l’insérer
à l’intérieur du compartiment qui se trouve derrière la
charnière, faire attention qu’il ne dépasse pas pour ne pas
empêcher le placement successif du panneau frontal.
4 A) Dévisser les trois vis qui maintiennent la charnière
centrale pour l’enlever.
Réversibilité porte: démontage porte du côté droit
Page 61

19
Français
8B
8C
5
D
B
6
D
7
C
5A
8
C
9
C
10
C
8A
5B
7A
7B
7C
10A
CLICK!
10D
10C
10B
CLICK!
1C
10D
6B
6A
7D
7C
AFD
9A
AFD
AFD
AFD
9B
Réversibilité porte: montage porte du côté gauche
5 A) Prendre la charnière centrale, en s’aidant avec une pince
dévisser le crochet en le tournant de 180° et le revisser
sur la charnière.
B) En s’aidant d’un tournevis, enlever les trois couvre-trous
de la traverse centrale du côté gauche et les remonter
sur le côté droit.
6 A) Prendre la charnière centrale, la tourner de 180°;
B) la fixer à l’aide des vis prévues sur le côté gauche de la
traverse centrale.
7 A) Dévisser légèrement la vis (déjà présente) du côté
supérieur gauche de l’appareil.
B) Prendre la charnière supérieure, la retourner tête en
bas;
C) enlever le crochet de la charnière (maintenant il se trouve
vers le haut) et l’enfiler dans la partie inférieure;
D) uniquement pour mod.
AFD
: enlever le fil display du
compartiment et, provisoirement, le laisser pendre de
l’appareil.
8 A) Prendre la porte du frigidaire, l’enfiler sur le crochet de
la charnière centrale,
B) enfiler la charnière supérieure sur la porte et la rapprocher
de l’appareil.
C) Enfiler la fente de la charnière sur la vis présente sur le
côté gauche (légèrement dévissée en phase 7A); bloquer
la charnière de l’appareil, en y vissant les deux vis.
D) Uniquement pour mod.
AFD
: enfiler le fil display (extrait
en phase 7D) à l’intérieur de la fente supérieure de la
charnière (voir dessin 9B).
9 uniquement pour mod.
AFD
:
A) déplacer le fil display qui se trouve dans la fente de
la porte du côté gauche au côté droit en le maintenant
toujours à l’intérieur de la fente prévue;
B) faire passer le fil qui se trouve à l’intérieur de la fente
de la charnière sous le traversin de la porte et unir les
deux fils display.
10 A) Appliquer la tête (enlevée précédemment) sur le côté
supérieur de la porte du frigidaire jusqu’au déclic ;
B) appliquer le panneau frontal en faisant pression sur
plusieurs points jusqu’au déclic;
C) le fixer avec deux vis;
D) appliquer le clip sur le côté droit et gauche (enlevé
précédemment).
Page 62

20
Français
1. ALIMENTATION
PROBLEME VERIFICATIONS SOLUTIONS
L’APPAREIL NE FONCTIONNE
PAS
CONTROLER L’INSTALLATION ELECTRIQUE;
VERIFIER A VUE QUE LA FICHE DU CABLE D’ALIMENTATION
SOIT BIEN INSEREE DANS LA PRISE DE COURANT;
VERIFIER A VUE QUE LE CABLE D’ALIMENTATION ET LA FICHE
N’AIENT PAS SUBI DE DOMMAGES.
CONTACTER UN ELECTRICIEN;
REBRANCHER LA FICHE A LA PRISE DE COURANT ;
APPELER L’ASSISTANCE TECHNIQUE.
2. LUMIERE
PROBLEME VERIFICATIONS SOLUTIONS
ECLAIRAGE INTERNE ETEINT A
L’OUVERTURE DE LA PORTE
VOIR POINT 1;
ECLAIRAGE INTERNE ETEINT A L’OUVERTURE DE LA PORTE
FICHE LED ENDOMMAGEE: APPELER L’ASSISTANCE TECHNIQUE.
NB: L’INTERVENTION DOIT ETRE EFFECTUEE PAR LE SERVICE
D’ASSISTANCE AUTORISE.
3. TEMPERATURES TROP ELEVEES
PROBLEME VERIFICATIONS SOLUTIONS
CAPACITE DE REFROIDISSEMENT REFRIGERATEUR INSUFFISANTE
CONTROLER QUE LES ALIMENTS NE SOIENT PAS PLACES
TROP HAUT CONTRE LA PAROI DU REFRIGERATEUR, CONTRE
LES BOUCHES DE VENTILATION;
LA FERMETURE CORRECTE DES PORTES ET L’ADHESION
DES JOINTS;
VALEUR DE LA TEMPERATURE REGLEE NON CORRECTE;
CONTROLER QUE L’APPAREIL NE SOIT INSTALLE PRES D’UNE
SOURCE DE CHALEUR.
REPLACER LA NOURRITURE DE FACON ADEQUATE.
FERMER LES PORTES CORRECTEMENT ET NETTOYER LES
JOINTS;
REGLER LES TEMPERATURES (FRIGO/FREEZER) SUR BASE DES
INDICATIONS CONTENUES DANS CE MANUEL;
DEPLACER L’APPAREIL.
4. BRUITS ET VIBRATIONS
PROBLEME VERIFICATIONS SOLUTIONS
VIBRATION DE L’APPAREIL
BRUIT DU COMPRESSEUR
CONTROLER QUE L’APPAREIL SOIT STABLE ET LES PIEDS
BIEN REGLES;
VERIFIER QUE LA PARTIE POSTERIEURE DE L’APPAREIL NE
SOIT TROP PROCHE DE LA PAROI;
BRUIT INTERNE DU COMPRESSEUR.
REGLER LA HAUTEUR DES PIEDS AVEC L’OUTIL PREVU;
DEPLACER L’APPAREIL;
APPELER L’ASSISTANCE TECHNIQUE
5. ODEURS
PROBLEME VERIFICATIONS SOLUTIONS
EMANATION DE MAUVAISES
ODEURS
VERIFIER LA CORRECTE CONSERVATION DES ALIMENTS;
VERIFIER LA SORTIE DE LIQUIDE A L’INTERIEUR DE L’APPAREIL;
VERIFIER LA PRESENCE DE MAUVAISES ODEURS SUR LES
JOINTS;
APPAREIL RESTE TROP LONGTEMPS A L’ARRET AVEC LES
PORTES FERMEES.
COUVRIR LES ALIMENTS ET/OU UTILISER DES RECIPIENTS EN
PLASTIQUE POUR LA CONSERVATION;
NETTOYER LES CELLULES ET LES PLANS EN VERRE AVEC UN
DETERGENT POUR FRIGIDAIRE;
NETTOYER LES JOINTS AVEC EAU ET VINAIGRE;
DETERMINER LA CAUSE D’ARRET DE L’APPAREIL.
9. PANNES ET SOLUTIONS
Page 63

Page 64

Page 65

3
Deutsch
3. GERÄTEMERKMALE
Tabelle 1 – Technische Angaben
Modello
AFL AFD
1 Grundmerkmale
Energieezienzklasse A+ A+
Klimaklasse SN /T SN /T
Spannung/Frequenz V/Hz 220-240 ~/ 50 220-240 ~/ 50
Kühlmittelart (R134a / R600a) R600a R600a
Lagerzeit bei Stromausfall h 16 16
2 Grundsätzliche Merkmale
Anzahl der Verdichter n° 1 1
Abtauverfahren Kühlteil/Gefrierfach
(M = von Hand / A = automatisch) A / A A / A
Kontrollsystem
(E = elektronisch/M=mechanisch)
EE
NO FROST (Kühlteil/Gefrierfach) ja/ja ja/ja
Ventiliert (nur Kühlteil) ja ja
3 Temperaturen und Kühlvermögen
Intervall Temperatureingabe Kühlteil °C 2÷8 2÷8
Temperatur Fleischbehälter °C -2 ÷ 3 -2 ÷ 3
Temperatur Gemüseschubfächer °C 0 ÷10 0 ÷10
Intervall Temperatureingabe Gefrierfach °C -16 ÷ -24 -16 ÷ -24
Nutzinhalt Kühlteil l 230 230
Nutzinhalt Gefrierfach l 78 78
Tragleistung Gefrierteil kg 30 30
4 Bedienblende
Bedientasten und Temperaturanzeige innen außen
Displayart LED LED
Schnell-Kühlung (Kühlteil) ja ja
Schnellfrostung (Gefrierteil) ja ja
Überhitzungsalarm ja ja
Einstellbarer Thermostat ja ja
Kontrollanzeigen
grün-gelb grün-gelb
5 Gerätgrößen
Abmessungen (Höhe x Breite x Tiefe) cm 186,5 x 59,5 x 64 186,5 x 59,5 x 64
Tiefe bei oener Tür cm 120 120
6 Zubehörteile
Ice maker (M = von Hand / A = automatisch) MM
Innenbeleuchtung ja ja
Länge Versorgungskabel cm 200 200
Stecker Schuko Schuko
7 Abmessungen, Verpackung und Gewicht
Verpackungsabmessungen (Höhe x Breite xTiefe) cm 193,3 x 64 x 73 193,3 x 64 x 73
Nettogewicht kg 91 91
Page 66

4
Deutsch
Betriebsvoraussetzungen
Der korrekte Betrieb des Gerätes und die Angaben zu Kühl- und
Konservierungstemperaturen inTabelle 1 - „Technische Angaben“ sind
nur unter folgenden Betriebsvoraussetzungen gewährleistet:
•
Die Temperatur des Raumes, in dem sich das Gerät bendet,muss
der auf dem Typenschild angegebenen Klimaklasse entsprechen.
Tabelle 2 - Klimaklasse:
Klimaklasse: Lufttemperaturen:
SN von +10°C bis +32°C
N von +16°C bis +32°C
ST von +16°C bis +38°C
T von +16°C bis +43°C
• Max. relative Raumfeuchtigkeit: 90%;
• Gerät nicht in der Nähe von Wärmequellen aufstellen (z.B.
Backofen, Heizkörper, direktes Sonnenlicht usw).
• Gerät vor Witterungseinüssen geschützt aufstellen.
• Regelmäßige Durchführung der normalen Wartung unter
Befolgung der Anweisungen in dieser Gebrauchsanleitung.
• Lüftungsönungen am Gehäuse und am Gerät nicht verschließen oder zustellen.
• Korrekte Installation (z.B. Nivellierung, Leistungsfähigkeit
der elektrischen Anlage entsprechend der Angaben auf
dem Typenschild).
Beschreibung des Geräts
Es folgt eine detaillierte Beschreibung des von Ihnen
erworbenen Gerätes.
Legende:
A: Bedienblende Kühlschrank
B: Innenbeleuchtung
C: Ablageäche aus Glas
D: Flaschenablage
E: Schubfach „Fresh Control 0 °C“
F: Typenschild
G: Obst-/Gemüseschubfach
H: Schale für Gefrierschubfach
I: Gefrierschubfach
L: Inneres Schubfach Gefrierteil
M: Butterschale
N: Ablageäche aus Glas (zweiteilig)
O: Türfach mit Klappe
P: Türabstellregal
Q: Flaschenhalter (zweiteilig)
R: Flaschenabstellregal
S: Kleines Türfach
T: Türgri
U1:Oberes Schubfach Gefrierteil
U2:Unteres Schubfach Gefrierteil
V: Innere Schale Gefrierteil
Z: Inneres Schubfach Gefrierteil
HINWEIS:
Die in dieser Abbildung gezeigten Zubehörteile sind
bei mehreren Modellen vorhanden. Es können daher leichte
Abweichungen zwischen diesen und den Zubehörteilen Ihres
Kühlschranks bestehen.
I
L
H
U1
U2
V
Z
T
D
C
E
B
P
S
MODELLO
PNC
FLUIDO REFRIG FRIGORIFERO
CAPACITA' LORDA TOTALE
CAPACITA' NETTA FRIGO
CAPACITA' NETTA CONGELATORE
CAPACITA' DI CONG.
CLASSE
MODEL
REFRIGERANT REFRIGERATOR
GROSS CAPACITY
REFRIGERATOR NET CAPACITY
FREEZER NET CAPACITY
FREEZING CAPACITY
CLASS
R600a
SER. NO.
0,052
Kg
xxx
xxx
xx
SN-T
PRODOTTO IN ITALIA
MADE IN ITALY
220-240 50V HZ W
0001
RH
N
O
G
F
Q
AFL
Stand-by Holiday SuperCool
SuperFreeze
Alarm
°C
AFD
Stand-by
Super Cool
Super Free
Ice Maker
Clean Pipe
Input water time
Holiday
Alarm
Set OK
A
M
R
Page 67

5
Deutsch
4. SICHERHEIT
Sicherheitsmaßnahmen
Symbole:
Allgemeine Empfehlungen zur Betriebsoptimierung des
Gerätes
Allgemeine Gefahr
Heiße Oberächen
• Es ist sehr wichtig, dass die vorliegendeGebrauchsanleitung
für weiteres Nachschlagen zusammen mit dem Gerät
aufbewahrt wird. Bei Weiterverkauf oder Weitergabe an
andere Personen sicherstellen,dassdie Gebrauchsanleitung
zusammen mit dem Gerät übergeben wird, damit der
neue Benutzer von der Bedienung des Gerätes und den
entsprechenden Hinweisen Kenntnis nehmen kann.
• Diese Hinweise wurde für Ihre Sicherheit erstellt: Bitte lesen
Sie sie daher aufmerksam durch, bevor Sie zur Installation
und Inbetriebnahme des Gerätes übergehen.
• Wird das Gerät in horizontaler Lage transportiert, kann das
im Verdichter enthaltene Ölin den Kühlkreislauf ießen.Es
wird daher empfohlen, das Gerät mindestens 2 Stunden lang
vertikal stehen zu lassen, bevor es in Betrieb genommen
wird, damit das Öl in den Verdichter zurückießen kann.
• Das Gerät nach dem Auspacken sorgfältig kontrollieren
und gemäß den Angaben im entsprechenden Kapitel
installieren: Wird eine Störung festgestellt, muss das
Gerät ausgeschaltet und gemäß Kap. „After Sales Service“
vorgegangen werden.
• Vor der Durchführung normaler oder außergewöhnlicher
Wartungsarbeiten die Stromversorgung zum Gerät
unterbrechen. Dies darf keinesfalls durch Ziehen am
Kabel erfolgen. Vergewissern Sie sich außerdem, dass
das Kabel unversehrt ist. Wenden Sie sich andernfalls an
das Kundendienstzentrum. Wurde das Gerät umgestellt,
muss beim Zurückstellen sichergestellt werden, dass
das Versorgungskabel nicht im Weg ist oder gequetscht
wurde.
•
ACHTUNG: Die Geräte sind mit dem Kühlgas
ISOBUTAN(R600a)gefüllt. BeimTransport und beim
eventuellen Verrücken des Gerätes muss höchste Vorsicht
walten, damit das Gerät keine starken Stöße oder Schläge
erfährt. Ein Nichtbeachten dieser Regel kann zu einem
Funktionsverlust des Gerätes führen. Eine Beschädigung
des Kühlkreislaufs und nachfolgender möglicher
Gasentweichung kann zu Explosionsgefahr durch Funken
oder Flammen von außen führen. Nehmen Sie das Gerät
unter keinenUmständenin Betrieb, wenn diesesbeschädigt
ist. Wenden Sie sich bei Schäden an den Kundendienst,
lüften Sieden Raum, in dem sichdas Gerätbendet, halten
SieFlammendavonfern, undführen Siekeine eigenständigen
2h
OK !
NO !
SODIUM
BICARB
ONA
TE
A
C
E
T
O
Page 68

6
Deutsch
Eingrie durch.
• Vergewissern Sie sich vor dem Anschließen des Gerätes an
das elektrische Stromnetz, dass die Leistung der Anlage
den Angaben auf dem Typenschild entspricht. Sollten zur
Installierung des Gerätes Änderungen an der häuslichen
elektrischen Anlage notwendig sein, müssen diese von
Fachkräften vorgenommen werden
•
Wird das Gerät verrückt, muss beachtet werden, dass
die Bauteile auf der Geräterückseite auch nach
Unterbrechen der Stromzufuhr noch einige Zeit heiß
bleiben.
•
Das Gerät eignet sich nicht für den Einbau. Eine unzureichende Belüftung führt mit Sicherheit zu Funk-
tionsstörungen oder Schäden am Gerät.
•
ACHTUNG: Während des normalen Betriebs und bei
der normalen Wartung unter keinen Umständen:
- Elektrogeräte innerhalb der Aufbewahrungsfächer für
Gefriergut verwenden;
- mechanische Vorrichtungen oder sonstige Mittel zur
Beschleunigung des Abtauvorgangs verwenden, die nicht
vom Hersteller angegeben wurden;
- zerbrechliche, schwere oder instabile Gegenstände auf
dem Gerät abstellen.
•
ACHTUNG: Die maximale Tragleistung des
Flaschenhalters beträgt 10 kg.
•
Die Innentemperatur des Kühl- und des Gefrierteils
kann leichten Schwankungen unterliegen. Diese
Geräte eignen sich daher nicht zum Aufbewahren von
Produkten (z.B. Medikamente), die einer stabilen Temperatur bedürfen.
•
ACHTUNG: Dieses Gerät darf nur von Erwachsenen
bedient und nur im häuslichen Bereich und zum
Aufbewahren und/oder Einfrieren von Lebensmitteln
verwendet werden. Achten Sie daher darauf, dass Kinder
nicht in der Nähe des Gerätes bzw. darin spielen, sich nicht
auf die Schubfächer setzen und sich nicht an dessen Tür
hängen.
•
ACHTUNG: Keine explosionsgefährlichen,
verunreinigenden oder sich verüchtigende Stoe
in das Gerät einführen.
•
ACHTUNG: Niemals kohlensäurehaltige Getränke
oder Wasseraschen in das Gefrierfach legen: Diese
können zerbersten. Es wird außerdem dringendst
empfohlen, keine heißen Flüssigkeiten oder Speisen in das
Gerät zu geben und die Behälter nicht bis zum Rand zu
füllen. Weitere Aufbewahrungsempfehlungen nden Sie im
Kap. „Verwendung“.
•
ACHTUNG: Die maximale Tragleistung jedes
Schubfachs im Gefrierteil beträgt 30 kg.
Es wird empfohlen,
- diese Lastgrenze nicht zu überschreiten;
- das in der Abbildung durch die Lastlinie angezeigte Niveau
nicht zu überschreiten.
NO !
NO !
Max 30kg!Max 30kg!
Max 10kg!
Page 69

7
Deutsch
Sicherheitsdatenblatt Kühlgas R600a
Maßnahmen bei unbeabsichtigter Freisetzung
Den Sto verdampfen lassen – vorausgesetzt es besteht eine
geeignete Belüftung.
Verhalten des Gases
Das Gasist leicht entzündbar.DenKontakt mitoenen Flammen
und heißen Oberächen daher unbedingt vermeiden.
Das Gas R600a ist schwerer als Luft, es kann sich daher in
Bodennähe verstärkt ansammeln,wo dieBelüftung allgemein
schwach ist.
Erste-Hilfe-Maßnahmen
Bei Einatmen
Das Opferistaus demverunreinigtenBereichund andie frische
Luft zu bringen. Warm und ruhig halten.
Längeres Ausgesetztsein kann zu Erstickungsbeginn und
zu Bewusstseinsverlust führen. Künstlich beatmen und
in schweren Fällen unter strenger medizinischer Aufsicht
Sauersto zuführen.
Bei Hautkontakt
Es ist unwahrscheinlich, dassbei unbeabsichtigtemHautkontakt
eine Gefahrdurch Aufnahmedes Gasesvon derHaut entsteht.
Geschieht dies dennoch: Die betroene Stelle mit reichlich
Wasser abwaschen.
Flüssigkeitsspritzer und die zerstäubte Flüssigkeit können
zu Erfrierungen führen: Die betroffene Stelle mit reichlich
Wasserabwaschen undeinen Arztzur Behandlung eventueller
Erfrierungen aufsuchen.
Bei Augenkontakt
Mit reichlichWasserbei geönetemLidspalt ausspülenund so
bald wie möglich einen Augenarzt aufsuchen.
Es wird empfohlen,beiKontakt oderEinatmen des Gases
R600a in jedem Fall den Hausarzt aufzusuchen.
Entsorgung und Außerbetriebsetzung
Im Sinne des Artikels 13 des Gesetztesdekrets
Nr. 151 vom 25. Juli 2005 „Umsetzung der
Richtlinien 2002/95/EG, 2002/96/EG und
2003/108/EG zur Beschränkung der
Verwendung bestimmter gefährlicher Stoe
in Elektro- und Elektronikgeräten sowie der
Entsorgung von Altgeräten“.
Das Symbolderdurchkreuzten Mülltonneaufdem Gerätselbst
oder aufderVerpackungweist daraufhin,dass dasProduktam
Ende seiner Nutzungsdauer von anderen Abfällen getrennt
entsorgt werden muss. DerBenutzermuss dasGerätdaher nach
Ablauf dessen Funktionsdauer einer Abfallsammelstelle für
elektronischen und elektrotechnischen Sondermüll zuführen
oder es beim Kauf eines gleichwertigen Neugerätes dem
Händler im Verhältnis eins zu eins überlassen.
AchtenSiedarauf,dassderKühlkreislauf während desTransports
zur Müllsammelstelle nicht beschädigt wird. Auf diese Weise
kann sichergegangenwerden,dass keinunkontrollierterAblass
von Kühlmittelerfolgt. Alle Angaben zum Kühlmittel benden
sich auf dem Typenschild am Gerät.
Cycloisopentan schadet der Ozonschicht nicht und wird als
Expansionsmittel für den Isolierschaum verwendet.
Die Zuführung des außer Betrieb gesetzten Gerätes zur
entsprechenden Sammelstelle und folglich zum Recycling
für eine umweltfreundliche Behandlung und Entsorgung
verhindert möglicheGefahren fürdiemenschliche Gesundheit
und fürdie Umwelt undträgt zurWiederverwertungund/oder
zum Recycling der Altmaterialen des Gerätes bei.
Die ungesetzliche Entsorgung des Produkts wird mit den
Sanktionen der geltenden gesetzlichen Bestimmungen
geahndet.
Weitere detaillierte Informationen zu den
Entsorgungsmöglichkeiten erhalten Sie bei der örtlichen
Müllabfuhr.
Wir danken Ihnen für Ihren Beitrag zum Schutz unserer
Umwelt.
Es wird empfohlen, das Versorgungskabel vor der
Zuführung des Gerätes zur Sammelstelle abzutrennen.
Machen Sie den Schließmechanismus der Tür
unbrauchbar (indemSie die Dichtung entfernen), oder
bauen Sie die Tür besser ganz aus, damit Kinder beim
Spielen nicht im Gerät eingeschlossen bleiben
können.
Page 70

8
Deutsch
5. INSTALLATION
Transport und Entfernen der Verpackung
Wird das Gerät in horizontalerLage transportiert, kann das im
Verdichter enthaltene Öl in den Kühlkreislauf ießen. Es wird
daher empfohlen, das Gerät mindestens 2 Stunden lang vertikal
stehen zu lassen, bevor es in Betrieb genommen wird, damit
das Öl in den Verdichter zurückießen kann.
Entfernen Sie die äußere Verpackung und, wo vorhanden, die
Schutzfolie von denOberächen desGerätes. ReinigenSie dann
die Gerätaußenseiten mit speziellen Produkten. Verwenden
Sie dazu keine Schaber oder kratzende Tücher, da diese die
Oberächen beschädigen würden.
Entfernen Sievorsichtigalle PlastikfolienundKlebebänder aus
dem Kühlschrank und aus der Tür sowie alle Styroporteile aus
dem Verdichterfach.
Entnehmen Siedem Geräteinnenraumdie Unterlagen unddie
vorhandenen Zubehörteile.
DasVerpackungsmaterialistrecyclingfähig und mit dem
Recyclingsymbol versehen.
EntsorgenSieesentsprechendder örtlichen gesetzlichen
Bestimmungen.DasVerpackungsmaterial(Plastikbeutel,
Styroporteile usw.) muss von Kindern ferngehalten
werden, da es eine mögliche Gefahrenquelle darstellt.
Kontrollieren Sie das Gerät aufmerksam: Sollten Sie
Unregelmäßigkeiten entdecken, installieren Sie es nicht, und
befolgen Sie die in Kap. „After Sales Service“ beschriebene
Vorgehensweise.
Aufstellen des Gerätes
Die zum Aufstellen des Gerätes gewählte Stelle muss
den in Abschnitt „Betriebsvoraussetzungen“ genannten
Voraussetzungen entsprechen: Sie muss einen stabilen
Untergrund aufweisen, und ihre Tragfähigkeit muss dem
Gewicht des Gerätes entsprechen.
Zudem sind die einzuhaltenden Abstände für den korrekten
Betrieb des Gerätes sowie für seine Abmessungen zu
beachten:
1) nach oben: mindestens 20 cm
2) nach hinten: mindestens 10 cm
3) zur Wand, in deren Richtung sich die Tür önet: mindestens 30 cm
Nivellieren SiedasGerät mithilfe derEinstellfüßchen:Eine leicht
erhöhte Position desGeräts erleichtertdie Luftzirkulierung auf
dem Kondensator.
Auf diese Weise wird ein optimaler Betrieb des Kühlkreises
erreicht.
Einbau der Grie
Die Grie derGefrierschubfächer werden ausgebaut geliefert:
Bringen Sie diese nach den Angaben in der nebenstehenden
Abbildung an.
10 cm
20 cm
30 cm
Page 71

9
Deutsch
Reinigung vor der Inbetriebnahme
Vor der Inbetriebnahme müssen alle Klebebänder, die die
Zubehörteile im Geräteinneren befestigt haben, entfernt
werden. AlleInnenteilemit lauwarmemWasserundneutralem
Reinigungsmittel Seife, Essigoder Natriumbikarbonatreinigen
und sorgfältig trocken wischen, damit der „Fabrikgeruch“
entfernt wird. Reinigungsmittel, Scheuermittel, Mittel auf der
Basis vonkohlensauremNatron undLösungsmittelkönnen die
Oberächen beschädigen und dürfen daher nicht verwendet
werden.
Elektrischer Anschluss
Vergewissern Sie sich vor dem Einstecken des Steckers, dass:
• Ihre Hände nicht nass oder feucht sind;
• die Netzspannung unddie Netzfrequenz mit den Daten der
häuslichen Anlageübereinstimmen(eine Schwankungvon
-6% bis +6% auf die Nennspannung isterlaubt. Für andere
Spannungen ist ein entsprechender Spartransformator
erforderlich);
• das Kabel und der Stecker nicht beschädigt sind oder von
schweren Gegenständen gequetscht wurden;
• das Versorgungskabel nicht zu stark gespannt ist: Es
dürfen keineVerlängerungskabel zurSteckdose eingesetzt
werden.
ACHTUNG: Das Gerät darf nicht an Gleichrichter (z. B.
Solaranlagen) und nicht über ein Verlängerungskabel
angeschlossen werden.
ACHTUNG: Das Gerät muss unbedingt entsprechend
geerdet werden.
Sollte die Steckdose der häuslichen Anlage, an die es
angeschlossen wird, nicht geerdet sein, muss das Gerät
von einem Fachmann an eine separate, funktionstüchtige
Erdungsanlage angeschlossen werden, die den geltenden
gesetzlichen Auagen entspricht. Der Hersteller haftet nicht
für Schäden, die auf die Nichtbeachtung dieser Hinweise
zurückzuführen sind.
Dieses Gerät entspricht den folgenden europäischen
Richtlinien:
Niederspannungs-Richtlinie 73/23/EWG
93/68/ EWG
SODIUM
BICARBONATE
Page 72

10
Deutsch
6. BEDIENUNG
Beschreibung der Funktionen des Kühl- und des Gefrierteils - MODELL AFL
Erste Stromanlegung
Beim ersten Einschalten des Kühlschranks leuchtet die
Versorgungsanzeige (A10) auf. Die Temperaturwerte der
Fächer werden aufgrund der vorhandenen hohen Temperatur
als „-“ angezeigt. Es erfolgt ein akustisches Alarmsignal. Durch
Druck der Taste (A9) wird das akustische Signal unterbrochen,
während die Anzeige (A9) an bleibt. Sobald die Temperatur
einen bestimmten unteren Wert erreicht hat, zeigt das Display
für die Kühlteil- und für die Gefrierteiltemperatur jeweils
„5“ bzw. “ – 18 „ an, was den werkseitig eingestellten Werten
entspricht.
Temperatureinstellung im Kühlteil
Die Taste (A4) oder (A5) drücken, um die Kühlschranktemperatur
einzustellen: Die entsprechende Anzeige beginnt zu blinken,
und es kann eine Temperatur zwischen 2 und 8 °C eingestellt
werden. Die Einstellung wird 5 Sekunden nach Abschluss des
Vorgangs oder durch Druck einer beliebigen Taste automatisch
bestätigt.
Temperatureinstellung im Gefrierteil
Die Taste (A6) oder (A7) drücken, um die Gefrierteiltemperatur
einzustellen: Die entsprechende Anzeige beginnt zu blinken,
und es kann eine Temperatur zwischen - 16 und – 24 °C
eingestellt werden. Die Einstellung wird 5 Sekunden nach
Abschluss des Vorgangs oder durch Druck einer beliebigen
Taste automatisch bestätigt.
Schnellkühlfunktion (Super Cool)
Zur Aktivierung dieser Funktion die Taste Schnellkühlung (A3)
(Super Cool) drücken. Dadurch leuchtet auch die entsprechende
Anzeige auf. Diese Funktion wird automatisch deaktiviert, wenn
die Temperatur die Untergrenze erreicht. Die Funktion kann
durch erneuten Druck der Taste (A3) unterbrochen werden.
In dieser Betriebsweise können die Temperatur des Kühlteils
und die Holiday-Funktion nicht eingestellt werden.
Schnellgefrierfunktion (Super Freeze)
Zur Aktivierung dieser Funktion die Taste Schnellfrostung
(A8) (Super Freeze) drücken. Dadurch leuchtet auch die
entsprechende Anzeige auf. Diese Funktion wird nach 24
Stunden automatisch deaktiviert. Die Funktion kann durch
erneuten Druck der Taste (A8) unterbrochen werden.
In dieser Betriebsweise kann die Temperatur des Gefrierteils
nicht eingestellt werden.
Holiday-Funktion
Zur Aktivierung dieser Funktion die Taste (A2) drücken.
Zur Aktivierung dieser Funktion die Taste (A2) drücken. Im
Holiday-Modus läuft der Kühlschrank bei einer Temperatur
über + 10 °C (es wird empfohlen, verderbliche Speisen aus
dem Kühlteil zu nehmen und nach Aktivieren dieser Funktion
die Kühlschranktür zu schließen). Die Temperatur des Kühlteils
wird durch „-“ angezeigt. Die Taste (A2) erneut drücken: Die
entsprechende Anzeige erlischt, und der Kühlschrank schaltet
auf die normale Steuerung zurück.
In dieser Betriebsweise können die Schnellgefrierfunktion
(Super Freeze) und die Schnellkühlfunktion (Super Cool)
eingestellt werden. Im letzten Fall wird die Holiday-Funktion
automatisch abgeschaltet.
Display-Kontrolle
Der Displaybildschirm geht 1 Min. nach Beendigung der
Eingabe automatisch aus. Er kann durch Ö nen der Tür oder
durch Druck einer beliebigen Taste wieder eingeschaltet
werden (ein Alarm schaltet den Bildschirm nicht ein).
Stand-by Holiday SuperCool
SuperFreeze
A1
Alarm
A2 A3 A4
A5
TF TC A8 A9 A10A6
A7
°C
Legende:
A1: Standby
A2: Taste Holiday-Funktion
A3: Taste Schnellkühlung (Super Cool)
A4: Taste Kühlteiltemperatur steigern
A5: Taste Kühlteiltemperatur senken
A6: Taste Gefrierteiltemperatur steigern
A7: Taste Gefrierteiltemperatur senken
A8: Taste Schnellfrostung (Super Freeze)
A9: Taste Alarmton ausschalten
A10: Taste Stromversorgung
TF: Kühlteiltemperatur
TC: Gefrierteiltemperatur
Page 73

11
Deutsch
Alarm Tür oen
Bleibt die Kühlschranktür länger als 3 Min. oen, erfolgt ein
akustisches Signal: 3 Biep alle 30 Sekunden. Das akustische
Signal wirddurchSchließen derTür oderdurchden Druckeiner
beliebigen Taste unterbrochen.
Bleibt die Tür oen, geht die Displaybeleuchtung wieder an,
und die Alarmanzeigeleuchte (A9) wird angezeigt.
Übertemperaturalarm
Steigt die Temperatur im Gefrierteil über einen bestimmten
Grenzwert, beginnt die Anzeigeleuchte der Taste (A9) zu
blinken, und es erfolgt ein akustisches Signal (1 Biep pro
Sekunde). Das akustische Signalwird unterbrochen, wenn der
Gefrierteil den eingestellten Temperaturwert erreicht, oder
wenn eine beliebige Taste gedrückt wird: Die Anzeige (A9)
bleibt an,bisdie eingestellteTemperaturim Gefrierfachinneren
erreicht ist
.
Abschalten des Kühlteils
Die Taste (A1) 3 Sekunden lang gedrückt halten. Die Anzeigen
(TF) und (A1) gehen aus, und der Kühlteil wird abgeschaltet,
während der Gefrierteil normal weiterläuft. Zum erneuten
Anschalten des Kühlteils die Taste (A1) wiederum 3 Sekunden
lang gedrückthalten: DieentsprechendeAnzeige leuchtetauf,
unddieIkonezeigtdieWiederherstellung derKühlteiltemperatur
an.
Abschalten des Gerätes
Die Taste (A10) 3 Sekunden lang gedrückt halten. Die
entsprechende Anzeigeund derDisplaybildschirm gehen aus,
und der Kühlschrank wird abgeschaltet, bleibt jedoch vom
Stromnetz versorgt.
Zum erneuten Anschalten des Kühlteils die Taste (A10)
wiederum 3 Sekunden lang gedrückt halten: Die entsprechende
Anzeige leuchtet auf, der Displaybildschirm schaltet ein und
der Kühlschrank läuft normal weiter.
Hinweis: Waren vor dem Abschalten des Gerätes die
FunktionenHoliday oderSchnellkühlung undSchnellfrostung
aktiviert, werden diese bei Wiederanschalten des Gerätes
wieder hergestellt.
Fehleranzeige
Wird aufgrund eines Störbetriebs E oder F angezeigt, ist die
Kühlung der Speisen weiterhin garantiert.
Es wird jedoch gebeten, sich so bald wie möglich an das
Kundendienstzentrum zu wenden.
Page 74

12
Deutsch
Beschreibung der Funktionen des Kühl- und des Gefrierteils - MODELL AFD
Legende:
A1: Standby
A2: Taste Set (Funktionsmenü)
A3: Taste Temperatur steigern
A4: Taste Temperatur senken
A5: Taste OK – Bestätigung der eingegebenen Werte
A6: Schalter ON/OFF
B: Leuchtanzeige Super Cool (Schnellkühlung)
C: Leuchtanzeige Holiday-Funktion
D: Kühlteil-Temperatur
E: Leuchtanzeige Kühlteil
F: Leuchtanzeige Gefrierteil
G: Leuchtanzeige Alarm
H: Gefrierteil-Temperatur
I: Leuchtanzeige Super Freeze (Schnellfrostung)
Stand-by
Super Cool
Super Freeze
Ice Maker
Clean Pipe
Input water time
Holiday
Alarm
Set OK
A1
B
D F E G H IC
A2 A3 A4 A5 A6
Erste Stromanlegung
Beim ersten Einschalten des Kühlschranks leuchtet die
Versorgungsanzeige (G) auf. Die Temperaturwerte des Kühlund des Gefrierteils werden aufgrund der vorhandenen hohen
Temperatur jeweils mit den Symbolen „-“ und „-“ auf dem Display
angezeigt.
Es folgt ein akustisches Alarmsignal.
Durch Druck der Taste (A5) wird das akustische Signal unterbrochen,
während die Leuchte (G) an bleibt, bis der werkseitig eingegebene
Temperaturwert erreicht wird.
Die Beleuchtung des Displays wird eine Minute nach der letzten
Eingabe langsam weniger.
Temperatureinstellung im Kühlteil
Die Taste (A2) wiederholt drücken, bis die Anzeigen (D) und (E)
gleichzeitig zu blinken beginnen. Die Tasten (A3) und (A4) drücken,
um einen Temperaturwert von 2 bis maximal 8 °C einzugeben.
Die Taste (A5) drücken, um die eingestellte Temperatur zu
bestätigen: Die Anzeigen (D) und (E) hören auf zu blinken.
Temperatureinstellung im Gefrierteil
Die Taste (A2) wiederholt drücken, bis die Anzeigen (H) und
(F) gleichzeitig zu blinken beginnen. Die Tasten (A3) und (A4)
drücken, um einen Temperaturwert von - 24 bis maximal - 16 °C
einzugeben.
Die Taste (A5) drücken, um die eingestellte Temperatur zu
bestätigen: Die Anzeigen (H) und (F) hören auf zu blinken
Schnellkühlfunktion (Super Cool)
Die Taste (A2) wiederholt drücken, bis die Anzeige (B) zu blinken
beginnt. Die Taste (A5) drücken, um die Aktivierung der Funktion
„Super Cool“ zu bestätigen.
Die Anzeige (B) hört auf zu blinken und bleibt an. Diese Funktion
wird automatisch ausgeschaltet, wenn die Temperatur den
Mindestwert erreicht. Die Funktion kann auch durch Wiederholen
des Aktivierungsvorgangs abgeschaltet werden.
In dieser Betriebsweise können die Temperatur im Kühlteil und die
Holiday-Funktion nicht eingestellt werden.
Schnellgefrierfunktion (Super Freeze)
Die Taste (A2) wiederholt drücken, bis die Anzeige (I) zu blinken
beginnt. Die Taste (A5) drücken, um die Aktivierung der Funktion
„Super Freeze“ zu bestätigen.
Die Anzeige (I) hört auf zu blinken und bleibt an. Diese Funktion
wird nach 24 h automatisch ausgeschaltet. Die Funktion kann
auch durch Wiederholen des Aktivierungsvorgangs abgeschaltet
werden.
In dieser Betriebsweise kann die Temperatur im Gefrierteil nicht
eingestellt werden.
Holiday-Funktion
Die Taste (A2) wiederholt drücken, bis die Anzeige (C) zu blinken
beginnt. Die Taste (A5) drücken, um die Aktivierung der HolidayFunktion zu bestätigen
Die Anzeige (C) hört auf zu blinken und bleibt an.
Im Holiday-Modus läuft der Kühlschrank bei einer Temperatur über
+ 10 °C (es wird empfohlen, verderbliche Speisen aus dem Kühlteil
zu nehmen und nach Aktivieren dieser Funktion die Kühlschranktür
zu schließen). Die Temperatur des Kühlteils wird durch „-“ angezeigt.
Die Funktion kann durch Wiederholen des Aktivierungsvorgangs
abgeschaltet werden.
In dieser Betriebsweise können die Schnellgefrierfunktion (Super
Freeze) und die Schnellkühlfunktion (Super Cool) eingestellt
werden. Im letzten Fall wird die Holiday-Funktion automatisch
abgeschaltet.
Display-Kontrolle
Der Displaybildschirm geht 1 Min. nach Beendigung der Eingabe
automatisch langsam aus. Er kann durch Ö nen der Tür oder durch
Druck einer beliebigen Taste wieder eingeschaltet werden. Liegt ein
Alarm vor, erfolgt nur ein akustisches Signal. Die Beleuchtung des
Displays verändert sich nicht.
Alarm Tür o en
Bleibt die Kühlschranktür länger als 3 Min. o en, beginnt die
Leuchtanzeige (G) zu blinken, und es erfolgt ein akustisches
Signal: 3 Biep alle 30 Sekunden. Das akustische Signal wird durch
Schließen der Tür unterbrochen. Die Anzeige (G) geht aus. Soll nur
Page 75

13
Deutsch
das akustische Signal ausgeschaltet werden, kann die Taste (A5)
gedrückt werden.
Übertemperaturalarm
Steigt die Temperatur im Gefrierteil über einen bestimmten
Grenzwert, beginnt die Anzeige (G) zu leuchten, und es erfolgt
ein akustisches Signal (1 Biep pro Sekunde). Das akustische
Signal wird unterbrochen, wenn der Gefrierteil den eingestellten
Temperaturwert erreicht: Die Anzeige (G) bleibt an, bis die
eingestellte Temperatur im Gefrierfachinneren erreicht ist. Soll nur
das akustische Signal ausgeschaltet werden, kann die Taste (A5)
gedrückt werden.
Abschalten des Kühlteils
Die Taste (A1) 3 Sekunden lang gedrückt halten. Der Kühlteil wird
abgeschaltet, während der Gefrierteil normal weiterläuft. Auf dem
Display geht die Anzeige (D) aus, und die Anzeige (E) wird dunkel.
Zum erneuten Anschalten des Kühlteils die Taste (A1) wiederum 3
Sekunden lang gedrückt halten: Auf dem Display erscheint erneut
Empfehlungen zum Aufbewahren von Lebensmitteln: KÜHLTEIL
Beschreibung der Funktionen
Schnellkühlung: Es wird empfohlen, diese Funktion für eine
schnellere Kühlung der frisch eingekauften Lebensmittel im
Kühlteil zu verwenden.
Holiday-Funktion: Diese Funktion sollte verwendet werden,
wenn der Kühlschrank über kurze Zeiträume (z.B. während des
Urlaubs) auf Spar amme laufen, aber nicht abgeschaltet werden
soll. Bei dieser Funktion läuft der Gefrierteil normal weiter, und
die Temperatur im Kühlteil liegt über + 10 °C: Aufgrund der
erhöhten Temperatur, wird empfohlen, verderbliche Speisen,
für deren optimale Aufbewahrung niedrigere Temperaturen
benötigt werden, aus dem Kühlteil zu nehmen und die
Kühlschranktür geschlossen zu halten.
Empfehlungen zum Kühlen der Speisen
Durch die Luftzirkulation im Kühlteil entstehen Bereiche mit
unterschiedlichen Temperaturen, die für unterschiedliches
Kühlgut angezeigt sind; daher müssen die Lebensmittel so
eingelagert werden, dass die Luft ungehindert zirkulieren
kann.
Die kälteren Zonen (zum Beispiel für die Aufbewahrung von
Fleisch- und Wurstwaren) befinden sich unmittelbar über
der Gemüseschubfach, d.h. im hinteren unteren Bereich des
Kühlschrankes. Die wärmeren Zonen hingegen be nden sich
im oberen Abschnitt an den Seitenwänden und in den Ablagen
an der Türinnenseite (ideal für die Aufbewahrung von Butter
und Streichkäse).
Die Luftzirkulierung im Gemüseschubfach wird durch eine
Serie von Lüftungsschlitzen garantiert, die nach Belieben
geschlossen werden können.
Für eine optimale Nutzung des Kühlabteils sollten Sie die
folgenden Regeln und Tipps beachten:
• Keine warmen Getränke oder verdampfenden Flüssigkeiten
einlagern.
• Flüssigkeiten und Lebensmittel, die Gerüche verbreiten oder
annehmen, immer in geschlossenen Behältern oder in der
Verpackung aufbewahren.
• Kein Speiseöl in exiblen Behältern in der Kühlschranktür
aufbewahren, da sich Risse im Kunststo bilden könnten.
• Keinesfalls die Lüftungsöffnungen und -gitter in der
Rückwand des Kühl- und des Gefrierteils verdecken.
• Keine explosiven Materialien oder Spraydosen mit
ent ammbaren Treibmitteln wie Butan, Propan, Pentan
usw. in den Kühlschrank geben, und hochprozentigen
Alkohol nur in gut verschlossenen Behältern aufrecht
einlagern. Gase oder Flüssigkeiten, die versehentlich aus
den Spraydosen austreten können, identi zieren Sie an
Hand der Angaben auf der Dose, die manchmal auch durch
ein Flammensymbol gekennzeichnet sind.
Zweiteilige Ablage äche aus Glas
Durch einen einfachen Handgri , den die Abbildung unten
zeigt, kann die vordere Ablage äche aus Glas (D2) unter der
hinteren (D1) befestigt werden.
Auf diese Weise wird Nutz äche zur Kühlung von stehenden
Flaschen (oder anderen, sehr hohen Behältern) gewonnen.
D2
D1
die Anzeige (D), und die Anzeige (E) leuchtet wieder normal.
Hinweis: Waren vor dem Abschalten des Gerätes die Funktionen
Holiday oder Schnellkühlung aktiviert, werden diese bei
Wiederanschalten des Gerätes wieder hergestellt.
Abschalten des Gerätes
Die Taste (A6) 3 Sekunden lang gedrückt halten. Der Displaybildschirm
geht aus, und der Kühlschrank wird abgeschaltet, bleibt jedoch vom
Stromnetz versorgt.
Zum erneuten Anschalten des Kühlteils die Taste (A6) wiederum 3
Sekunden lang gedrückt halten.
Hinweis: Waren vor dem Abschalten des Gerätes die Funktionen
Holiday oder Schnellkühlung und Schnellfrostung aktiviert, werden
diese bei Wiederanschalten des Gerätes wieder hergestellt.
Fehleranzeige
Wird aufgrund eines Störbetriebs E oder F angezeigt, ist die
Kühlung der Speisen weiterhin garantiert.
Es wird jedoch gebeten, sich so bald wie möglich an das
Kundendienstzentrum zu wenden.
Page 76

14
Deutsch
Tabelle 3 - Aufbewahren von Lebensmitteln im Kühlteil
Lebensmittel Aufbewahrungsbehälter Aufbewahrungszone Haltbarkeit
Fleisch und Fisch
(jeder Art)
Hartkäse
Frischhaltefolie, Aluminium, geschlossene
Behälter aus Glas, Plastik oder Stahl zum
Aufbewahren von Lebensmitteln.
Schubfach
„Fresh Control 0 °C“
1 – 2 Tage
Gekochte Speisen,kalte
Gerichte, Süßspeisen
Geschlossene BehälterausGlas, PlastikoderStahl
zum Aufbewahren von Lebensmitteln.
Jede beliebige Ablage 1 – 2 Tage
Obst und Gemüse Originalverpackung oder lose. Obst-/emüseschubfächer 3 - 4 Tage
Bananen, Kartoeln,
Zwiebeln und Knoblauch
Nicht im Kühlschrank lagern. -
Mineralwasser, Wein,
Bier, Milch, Fruchtsäfte,
Getränke mit Kohlensäure
Behälter aus Glas oder Plastik zum
Aufbewahren von Lebensmitteln.
Abstellregale an der Tür Siehe
Haltbarkeitsdatum
In Essig / Öl eingelegte
Speisen, Saucen, Butter,
Streichkäse, Eier
Originalverpackung. Siehe Haltbarkeitsdatum Siehe
Haltbarkeitsdatum
Joghurt Originalverpackung.
Jede beliebige Ablage
Siehe
Haltbarkeitsdatum
CLOSE/CHIUSO
OPEN/APERTO
A
p
p
l
e
J
u
i
c
e
MAJONESE
BUTTER
A
p
p
l
e
J
u
i
c
e
Page 77

15
Deutsch
Empfehlungen zum Aufbewahren von Lebensmitteln: GEFRIERTEIL
Beschreibung der Funktionen
Schnellfrostung: Die Funktion der Schnellfrostung wurde
entwickelt, um den Nährwert der im Gefrierteil aufbewahrten
Lebensmittel so gut wie möglich zu erhalten, indem ein
komplettes Einfrieren in noch kürzerer Zeit gewährleistet
wird.
Empfehlungen zum Einfrieren von Speisen
Das Gefrierabteileignetsich fürdie Aufbewahrungvonbereits
tiefgekühlten Lebensmitteln, zum Einfrieren von geringen
Mengen frischer Lebensmittel und für die Zubereitung von
Eiswürfeln und Speiseeis.
ACHTUNG: Zum Einfrieren und langen Aufbewahren
von Lebensmitteln ist eine Temperatur von -18 °C
erforderlich. Bei dieserTemperaturwerden dieMikroorganismen
inaktiviert. Sobald die Temperatur auf Werte über -10 °C
ansteigt, setzt der von den Mikroorganismen aktivierte
Zersetzungsvorgang wieder ein, und die Lebensmittel
verderben relativ rasch. Deshalb dürfen bereits aufgetaute
Lebensmittel nur nach vorherigem Garen wieder eingefroren
werden. Dies tötet die meisten Mikroorganismen ab.
Einige Ratschläge:
• VergewissernSie sich vor dem Einlagern von tiefgefrorenen
Lebensmitteln, dass diese beim Händler auch richtig
aufbewahrt worden sind.
• Önen Sie das Gefrierabteil nur, wenn unbedingt nötig,und
nur so lange wie unbedingt erforderlich.
• Es wird empfohlen, ausschließlich frische und qualitativ
hochwertige Lebensmittel einzufrieren,die zuvor sorgfältig
gewaschen und abgetrocknet worden sind.
• Geben Sie Lebensmittel,dieeingefrorenwerdensollen,indas
untere Schubfach, dem kältesten Fach des Gefrierteils.
• Die Lagertemperatur muss konstant unter bzw. Bei – 18 °C
liegen.
• Auf dem Typenschild bendet sich die Angabe dazu, bis zu
welcher Menge frische Lebensmittel innerhalb 24 Stunden
eingefroren werden können („Freezing Capacity“). Eine
größereMengewürdedieFrostungsqualitätbeeinträchtigen
und die Qualität der eigefrorenen Lebensmittel erheblich
herabsetzen.
• Es wird empfohlen, die Funktion Schnellfrostung (Super
Freeze) 24 Stunden vor dem Einfrieren der Lebensmittel
einzuschalten, wenn diese ein Gewicht von über 8 kg
aufweisen.
• Freieren Sie die Lebensmittel in kleinen Portionen
und entsprechend verpackt (in Aluminiumfolie oder
Gefrierbeutel)ein.DieVerpackungen solltengutverschlossen
und mit dem Verpackungs- und dem Haltbarkeitsdatum
versehen sein.
• Milchspeiseeis und Wassereis sollten erst einige Minuten
bei Raumtemperaturruhen, bevorsie verzehrt werden,um
Hautverletzungen anLippen undZungezu vermeiden.Aus
demselben Grund wird davon abgeraten, die Innenwände
des Gefrierteils mit nassen Händen zu berühren.
• Die Gefrierpakete müssen trocken sein, damit sie nicht
zusammenfrieren oder aneinander festfrieren.
• Die Verpackung muss so erfolgen, dass keine Luft oder
Feuchtigkeit entweichen kann, um die Lebensmittel vor
dem Austrocknen und vor Vitaminverlust zu bewahren;
• Die Gefrierbeutel und/oder die Gefrierfolie dürfen nicht
starr sein und müssen sich gut um den Inhalt legen;
• Die einzufrierenden Lebensmittel so legen,dass sie nicht mit
bereits gefrosteten Speisen in Berührung kommen, damit
diese nicht antauen;
• Zum Einfrieren kleinererMengen an frischen Lebensmitteln
(1-2 kg) muss der Thermostat nicht nachgestellt werden.
Zum Einfrieren größerer Mengen die Funktion „Super
Freeze“ einschalten (Abschnitt ÑBeschreibung der Funktionen
des Kühl- und des Gefrierteilsì).
ACHTUNG: Im Gefrierteil und in den
Niedrigtemperaturfächern dürfen keine Getränke in
Flaschen und besonders keine kohlensäurehaltigen
Getränke aufbewahrt werden. Wenn diese Getränke
gefrieren, breitet sich der Inhalt aus, und die Flaschen
können zerbersten.
ACHTUNG:Ein Ansteigender Temperatur desGefrierguts
reduziert deren Haltbarkeit.
• Sollten die im Gefrierteil aufbewahrten eingefrorenen
Lebensmittel aus zufälligen Gründen, wie ein Stromausfall
in der häuslichen Elektronanlage auch nur angetaut sein,
müssen sie innerhalb kürzester Zeit verbraucht werden.
Nach vorherigem Garenkönnensie auchwiedereingefroren
werden.
• Bei kurzen Unterbrechungen (bis zu 6-8 Stunden) erfahren
die Lebensmittel keine Beeinträchtigung.
Bereitung von Eiswürfeln
Das Gerät ist mit einer oder auch mehreren Schalen für
die Bereitung von Eiswürfeln ausgestattet; diese Schalen
einfach zu drei Viertel mit Trinkwasser füllen und in das
für die Eiswürfelbereitung bestimmte Fach stellen. Zum
Herausnehmen von festgefrorenen Eiswürfelschalen keine
metallenen undkeine scharfkantigen Gegenständeverwenden.
Zum Herauslösender Eiswürfel aus der Formeinfachein wenig
Wasser darüber rinnen lassen.
Empfehlungen zum Auftauen der Speisen
Um tiefgefrorene Lebensmittel gut verkochen zu können,
sollten sie vorher im Kühlschrank oder, wenn weniger Zeit zur
Verfügung steht, bei Zimmertemperatur aufgetaut werden.
Wenn Sie nur wenig Zeit zur Verfügung haben, können
kleine tiefgekühlte Waren auch direkt gekocht werden;
allerdings müssen sie dann länger gegart werden als sonst.
Durchschnittlich große Stückemüssen vor demGaren in einem
Mikrowellenherd aufgetaut werden. Nach dem Auftauen sind
die Lebensmittel nur kurze Zeit haltbar und sollten daher
binnen 12 bis 24 Stunden verzehrt werden und können nur
in gekochter Form (gegart oder gebraten) erneut tiefgefroren
werden.
Page 78

16
Deutsch
Tabelle 4 - Einfrieren von Speisen im Gefrierteil
Lebensmittel Aufbewahrungsbehälter Aufbewahrungszone Haltbarkeit
Lagerung von tiefgefrorenen
Lebensmitteln, Eiswürfeln,
Speiseeis
Gut verschlossene Originalverpackung Oberes Gefrierfach Siehe Haltbarkeitsdatum
Einfrieren von Fleisch
und Fisch
Gut verschlossene Originalverpackung,
für Niedrigtemperaturen geeignete, hermetisch
verschlossene Behälter für Lebensmittel
Maximaler Inhalt: 2,5 kg
Unteres Gefrierfach
Rind: 12 Monate
Schwein: 12 Monate
Schweinehackeisch: 6
Monate
Kaninchen: 6 Monate
Kalb: 9 Monate
Lamm: 9 Monate
Geügel: 6 Monate
Fisch: 6 Monate
Einfrieren von Nudelund Reisgerichten, Obst,
Gemüse und Süßspeisen
Für Niedrigtemperaturen geeignete, hermetisch
verschlossene Behälter für Lebensmittel
Maximaler Inhalt: 1 kg
Oberes Gefrierfach
6-1
2 Mona
te
Page 79

17
Deutsch
INOX
I
N
O
X
7. NORMALE WARTUNG
Reinigung des Gerätes
Vor der Reinigung die elektrische Stromversorgung
unterbrechen.
Reinigung innen
Alle Geräteinnenseitenmit lauwarmemWasser und einem
neutralen Reinigungsmittel,Essigoder Natronabwaschen,
dann gut abtrocknen. Alternativ können spezielle
Kühlschrankreiniger verwendet werden, die es in jedem
Supermarkt zu kaufen gibt. Keine Schermittel und/oder
–pulver mit Soda oder Lösungsmittel verwenden. Diese
können die Oberächen angreifen. Für eine einfachere
Reinigung können die inneren Zubehörteile ausgebaut
werden (siehe Abschnitt „Ausbau der Zubehörteile“).
Reinigung außen
Alle Außenseiten des Gerätes mit speziellen Reinigern säubern. Keine
Schermittel und/oder –pulver mit Soda, Lösungsmittel oder einen
Wasservollstrahl verwenden. Diese können die Oberächen angreifen.
Ausbau der Zubehörteile
Für eine einfachere Reinigung können die inneren Zubehörteile des
Gerätes ausgebaut werden.
Befolgen Sie dazu die Anweisungen in der entsprechenden
Abbildung.
A: Gefrierschubfächer, Obst-/Gemüseschubfächer und “Fresh Control 0
°C”-Schubfach: Diese Schubfächer laufen auf besonderen Führungen
mit Sperren, die verhindern, dass die Schubfächer beim Herausziehen
ganz herausfallen. Zum Entfernen der Schubfächer aus dem Gerät
für Reinigungszwecke müssen diese zu ¾ herausgezogen, leicht
angehoben und so geneigt weiter herausgezogen werden.
B: Abstellregale Tür: Diese stecken einfach auf in die Tür eingelassenen
Führungen. Zum Herausnehmen müssen sie mit einem kräftigen Druck
von unten nach oben herausgezogen werden.
C: Gefrierschubfächer: Aus Sicherheitsgründen können diese nicht ganz
aus dem Gerät herausgenommen werden. So weit herausziehen wie
möglich
å
. Die inneren Schubfächer können einfach angehoben und
herausgenommen werden
ç
.
D: Zweiteilige Glasablagefläche: Die vordere Ablage (D2) ist an der
hinteren befestigt, damit sie nicht unbeabsichtigt herausgezogen
werden (siehe Detail
ç
). Zum Herausnehmen die hintere Ablage (D1)
leicht anheben, und die vordere Ablage (D2) herausziehen.
Die hintere Ablage (D1) wird an einem Ende von zwei Zapfen gehalten,
damit sie nicht unbeabsichtigt herausgezogen wird (siehe Detail
é
). Zum Herausnehmen anheben und zu sich herziehen. Beim
Wiedereinbau der beiden Ablagen (D1 und D2) sicherstellen, dass sie
miteinander verhakt wurden.
E: Glasablageäche mit Flaschenhalter: Die Ablage liegt auf Führungen
und ist mit zwei Zapfen ausgestattet, damit sie nicht unbeabsichtigt
herausgezogen wird (siehe Detail
å
). Zum Herausnehmen aus dem
Gerät für Reinigungszwecke muss die Ablage leicht angehoben und
so geneigt herausgezogen werden.
F: Glasablagefläche: D
ie Ablage liegt auf Führungen, zum
Herausnehmen aus dem Gerät für Reinigungszwecke muss das
Schubfach „Fresh Control 0 °Cì herausgenommen, die Ablage leicht
angehoben und so geneigt herausgezogen werden.
B
A
D1
D2
E
F
2
D2
3
D1
D3
1
D1
C
C
Page 80

18
Deutsch
Wechseln des Türanschlags: Ausbau der Türen von rechts
1
A
1C
1D
1B
2
2A
CLICK!
C
1C
3A
3
A
3B
4A
4
B
3C
2B
A
C
B
D
1A
3D
AFD
AFD
AFD
Stand-by
Super Cool
Super Free
Ice Maker
Clean Pipe
Input water time
Holiday
Alarm
Set OK
AFL
Stand-by Holiday SuperCool
SuperFreeze
Alarm
°C
8. AUSSERORDENTLICHE WARTUNG
Vor dem Eingriff die elektrische
Stromversorgung unterbrechen,
und das Gerät leeren.
1 A) Die Kühlschranktür önen.
B)
Mit einem Schlitzschraubendreher die beiden Clipscharniere
herausschrauben, um den oberen Abschluss der Tür zu
entfernen und diesen nach oben herauszuheben.
C) Mit einem Schlitzschraubendreher die beiden
Clipscharniere rechts und links unter dem oberen
Scharnier herausdrücken, ohne diese zu beschädigen.
D) Nur für Modelle
AFD
: Vorsichtig die beiden
Kupplungsendmaße auskuppeln (die beiden Drähte
schließen das Display an der Tür an das Gerät an).
2 A) Die beiden oberen Schrauben, die das Frontpaneel
befestigen, herausschrauben.
B)
Das Paneel vorsichtig an mehreren Stellen mit einem
Schlitzschraubendreher heraushebeln, ohne diese zu beschädigen.
3 A) Die Kühlschranktür gut festhalten, die beiden Schrauben
herausdrehen, die das obere Scharnier links befestigen, und
die dritte Schraube auf der rechten Seite lockern.
B) Das obere Scharnier zuerst nach links drehen und dann nach
oben herausziehen.
C) Jetzt kann die Kühlschranktür nach oben herausgezogen
und vorsichtig abgestellt werden, damit sie nicht beschädigt
wird.
D) Nur für Modelle
AFD
: Den Draht aufwickeln und in das Fach
hinter dem Scharnier einführen. Darauf achten, dass er nicht
heraushängt, umdenWiedereinbaudes Frontpaneels nichtzu
behindern.
4 A) Die drei Schrauben herausdrehen, die das mittlereScharnier
befestigen, und dieses entfernen.
Page 81

19
Deutsch
8B
8C
5
D
B
6
D
7
C
5A
8
C
9
C
1
0
C
8A
5B
7A
7B
7C
10A
CLICK!
10D
10C
10B
CLICK!
1C
10D
6B
6A
7D
7C
AFD
9A
AFD
AFD
AFD
9B
Wechseln des Türanschlags: Aufbau der Türen von links
5 A) Das mittlere Scharnier zur Hand nehmen, mit einer Zange
den Bolzen herausdrehen, um 180 Grad drehen und wieder
in das Scharnier einschrauben.
B) Mit einem Schlitzschraubendreher die drei Kappen der
Bohrungen am mittleren Querträger von der linken
Seite entfernen und rechts anbringen.
6 A) Das mittlere Scharnier um 180 Grad drehen
B) und mit den entsprechenden Schrauben an der linken Seite
des Querträgers befestigen.
7 A) Die (bereits vorhandene)Schraube links obenam Gerät etwas
lockern.
B) Das obere Scharnier nehmen und umkehren.
C) Den Bolzen aus dem Scharnier nehmen (der jetzt nach oben
zeigt) und von unten einführen.
D) Nur für Modelle
AFD
: DenDisplaydrahtaus dem Fach nehmen
und provisorisch aus dem Gerät heraushängen lassen.
8 A) Die Kühlschranktür nehmen und auf den Bolzen des
mittleren Scharniers führen.
B) Das obere Scharnier in die Tür führen, und die Tür in die
entsprechende Position am Gerät führen.
C) Die Bohrung des Scharniers auf die Schraube auf der linken
Seite führen (die in Schritt 7 A gelockert worden war);
das Scharnier am Gerät befestigen, indem zwei Schrauben
eingedreht werden.
Nur für Modelle
AFD
: Den Displaydraht (der in Schritt 7 D
herausgezogen worden war) in den oberen Schlitz des
Scharniers einführen (siehe Zeichnung 9B).
9 Nur für Modelle
AFD
:
A) Den Displaydrahtim Schlitz überder Kühlschranktürvon links
nach rechts schieben und dabei im Schlitz lassen.
B) Den Displaydraht im Schlitz des Scharniers unter dem
Querträger derTürdurchführen,und diebeiden Displaydrähte
verbinden.
10 A) Den oberen Abschlussteil (der zuvor entfernt worden war)
wieder oben an der Kühlschranktür einführen und einrasten
lassen.
B) Das Frontpaneel durch Druck an mehreren Stellen einrasten
lassen.
C) Mit zwei Schrauben befestigen.
D) Die (zuvor ausgebauten) Scharnierclips links und rechts
anbringen.
Page 82

20
Deutsch
9. STÖRUNGEN UND ABHILFEN
1. STROMVERSORGUNG
STÖRUNG KONTROLLE ABHILFE
DAS GERÄT FUNKTIONIERT
NICHT.
DIE ELEKTROANLAGE ÜBERPRÜFEN.
NACHSEHEN, OB DER STECKERDESVERSORGUNGSKABELS
KORREKT IN DER STECKDOSE STECKT.
NACHSEHEN, OBDER STECKER UNDDASVERSORGUNGSKABEL BESCHÄDIGT SIND.
EINEN ELEKTRIKER HINZUZIEHEN.
DEN STECKER RICHTIG IN DIE STECKDOSE STECKEN.
DEN KUNDENDIENST ANRUFEN.
2. BELEUCHTUNG
STÖRUNG KONTROLLE ABHILFE
BEI ÖFFNEN DER TÜR BLEIBT DIE INNENBELEUCHTUNG
AUS.
SIEHE PUNKT 1.
BEI ÖFFNEN DER TÜR BLEIBT DIE INNENBELEUCHTUNG
AUS.
LED-PLATINE DEFEKT: DEN KUNDENDIENST ANRUFEN
HINWEIS: DERAUSTAUSCH MUSS DURCHDEN AUTORISIERTEN KUNDENDIENST ERFOLGEN.
3. ZU HOHE TEMPERATUR
STÖRUNG KONTROLLE ABHILFE
LED-PLATINE DEFEKT: DEN
KUNDENDIENST ANRUFEN
HINWEIS: DER AUSTAUSCH
MUSS DURCH DEN AUTORISIERTEN KUNDENDIENST
ERFOLGEN.
ÜBERPRÜFEN,
OB DIE SPEISEN SICH ZU NAHE AN DER RÜCKWAND DES
KÜHLTEILS UND AN DEN LÜFTUNGSDÜSEN BEFINDEN;
OB DIE TÜREN KORREKT GESCHLOSSEN SIND UND DIE
DICHTUNGEN GUT ABSCHLIESSEN;
OB DER EINGESTELLTETEMPERATURWERT KORREKT IST;
OB DAS GERÄT IN DER NÄHE EINERWÄRMEQUELLE INSTALLIERT WURDE.
DEN INHALT DES KÜHLTEILS NEU EINRÄUMEN UND ENTSPRECHEND ANORDNEN.
DIE TÜREN KORREKT SCHLIESSEN UND DIE DICHTUNGEN
SÄUBERN.
DIETEMPERATURWERTE (KÜHLTEIL/GEFRIERTEIL) ENTSPRECHEND DER ANGABEN IN DIESER ANLEITUNG EINSTELLEN.
DAS GERÄT NEU POSITIONIEREN.
4. GERÄUSCHENTWICKLUNG UND VIBRATIONEN
STÖRUNG KONTROLLE ABHILFE
DAS GERÄT VIBRIERT.
GERÄUSCHENTWICKLUNG
DURCH DEN VERDICHTER
ÜBERPRÜFEN,
OB DAS GERÄT STABIL STEHT UND OB DIE FÜSSCHEN RICHTIG EINGESTELLT SIND.
ÜBERPRÜFEN, OB DIE RÜCKSEITE DES GERÄTES ZU NAHE
AN DER WAND STEHT.
ENTSTEHEN GERÄUSCHE IM VERDICHTER SELBST?
DIE HÖHE DER FÜSSCHEN MIT DEM ENTSPRECHENDEN
WERKZEUG EINSTELLEN.
DAS GERÄTVON DER WAND WEGRÜCKEN.
DEN KUNDENDIENST ANRUFEN.
5. GERÜCHE
STÖRUNG KONTROLLE ABHILFE
ENTSTEHUNG SCHLECHTER
GERÜCHE
ÜBERPRÜFEN, OB DIE SPEISEN KORREKT GELAGERT WERDEN.
ÜBERPRÜFEN, OB IM GERÄT FLÜSSIGKEITEN AUSLAUFEN.
ÜBERPRÜFEN, OB DIE DICHTUNGEN SCHLECHT RIECHEN.
STANDDAS GERÄT ZULANGE MIT GESCHLOSSENENTÜREN
STILL?
SPEISEN ABDECKEN UND/ODER IN DEN ENTSPRECHENDEN
AUFBEWAHRUNGSBEHÄLTERN LAGERN.
FÄCHERUND GLASABLAGEFLÄCHEN MITSPEZIELLEN KÜHLSCHRANK-REINIGERN ABWASCHEN.
DIE DICHTUNGEN MIT WASSER UND ESSIG ABWASCHEN.
ÜBERPRÜFEN, WARUM DAS GERÄT STILL STAND.
Page 83

1
Español
ÍNDICE
1. PRESENTACIÓN.......................................................................................... 2
Assistance
HAIER
HAIER
2. ASISTENCIA POST VENTA..........................................................................2
Condiciones de garantía............................................................................ 2
Placa matrícula de identicación ..............................................................2
3 CARACTERÍSTICAS DEL APARATO ............................................................3
Tabla 1 – Datos tecnico .............................................................................. 3
Condiciones de funcionamiento................................................................4
Descripción del aparato............................................................................. 4
4. SEGURIDAD................................................................................................ 5
Precauciones de seguridad ........................................................................5
Ficha de seguridad gas R600a ...................................................................7
Recolección y eliminación.......................................................................... 7
5. INSTALACIÓN.............................................................................................8
Transporte y desembalaje ......................................................................... 8
Colocación..................................................................................................8
Montaje asas ..............................................................................................8
Limpieza antes del uso ...............................................................................9
Conexión eléctrica...................................................................................... 9
6. USO........................................................................................................... 10
Descripción de las funciones del frigoríco y del congelador - MODELO AFL.... 10
Descripción de las funciones del frigoríco y del congelador - MODELO AFD ...12
Consejos para la conservación de los alimentos: frigoríco/congelador
..........13
INOX
I
N
O
X
7. MANTENIMIENTO ORDINARIO...............................................................17
Limpieza del aparato ...............................................................................17
8. MANTENIMIENTO EXTRAORDINARIO.................................................... 18
Reversibilidad puerta............................................................................... 18
9. AVERÍAS Y SOLUCIONES..........................................................................20
Page 84

Page 85

3
Español
3. CARACTERÍSTICAS DEL APARATO
Tabla 1 – Datos técnicos
Modelo
AFL AFD
1 Características base
Clase energética A+ A+
Clase climática SN /T SN /T
Voltaje/frecuencia V/Hz 220-240 ~/ 50 220-240 ~/ 50
Tipo refrigerante (R134a / R600a) R600a R600a
Tiempo mantenimiento temperatura en caso de blackout h 16 16
2 Características fundamentales
Número de compresores n° 1 1
Deshielo frigo/congelador (M= Manual / A= Automático) A / A A / A
Sistema de control (E= Electrónico / M= Mecánico) E E
NO FROST (Refrigerador/Congelador) sí/sí sí/sí
Ventilado (Sólo refrigerador) sí sí
3 Temperatura y capacidad de refrigeración
Intervalo regulación temperatura frigoríco °C 2 ÷ 8 2 ÷ 8
Temperatura compartimiento carne °C -2 ÷ 3 -2 ÷ 3
Temperatura compartimiento verdura °C 0 ÷10 0 ÷10
Intervalo regulación temperatura congelador °C -16 ÷ -24 -16 ÷ -24
Volumen neto frigoríco l 230 230
Volumen neto congelador l 78 78
Capacidad máxima de cada cajòn del congelador kg 30 30
4 Panel de mandos
Mandos e indicación temperatura internos internos
Tipo display LED LED
Súper enfriamiento (Refrigerador) sí sí
Súper congelación (Congelador) sí sí
Alarma exceso de temperatura temperatura sí sí
Termostato regulable sí sí
Indicadores luminosos
Amarillos / verdes Amarillos / verdes
5 Dimensiones del aparato
Dimensiones (altura x anchura x profundidad) cm 186,5 x 59,5 x 64 186,5 x 59,5 x 64
Profundidad con la puerta abierta cm 120 120
6 Accesorios
Ice maker (M= Manual / A=Automático) M M
Luz interior sí sí
Longitud cable alimentación cm 200 200
Tipo enchufe Schuko Schuko
7 Dimensiones, embalaje y peso
Dimensiones embalaje (altura x anchura x profundidad) cm 193,3 x 64 x 73 193,3 x 64 x 73
Peso neto kg 91 91
Page 86

4
Español
Condiciones de funcionamiento
El correcto funcionamiento del aparato y las temperaturas de
enfriamiento y conservación que se citan en la “Tabla 1 – Datos
técnicos” están garantizados sólo si se respetan las siguientes
condiciones de funcionamiento:
• la temperatura del lugar en el que se encuentra el aparato
tiene que responder a la clase climática indicada en la placa
de la matrícula.
Tala 2 - Clase climática
Clase climática Temperatura ambiente:
SN de +10°C a +32°C
N de +16°C a +32°C
ST de +16°C a +38°C
T de +16°C a +43°C
• máxima humedad relativa ambiental: 90%;
• colocación del aparato lejos de fuentes de calor (por
ejemplo hornos, radiadores, rayos directos del sol, etc.);
• colocación del aparato en lugar protegido de los agentes
atmosféricos;
• mantenimiento ordinario periódico efectuado siguiendo
las indicaciones contenidas en el presente manual;
• aperturas de ventilación en el involucro del aparato libres
de obstrucciones;
•
correcta instalación (por ejemplo, nivelación, capacidad de la
instalación adecuada a los datos de la placa matrícula, etc.).
Descripción del aparato
Seguidamente proporcionamos una descripción detallada del
aparato que Ud. Ha comprado.
Lista:
A: Panel de mandos frigoríco
B: Luz interna
C: Bandeja de vidrio
D: Portabotellas
E: Cajón “Fresh Control 0°C”
F: Placa matricula
G: Cajón conservación fruta/verdura
H: Bandeja para cubitos de hielo
I: Bandeja cajón congelador
L: Cajón interior congelador
M: Mantequera
N: Bandeja de vidrio (dos elementos)
O: Bandeja colgante cerrada
P: Bandeja colgante
Q: Botellero (dos elementos)
R: Bandeja portabotellas
S: Bandeja colgante pequeña
T: Asa puerta
U1: Cajón superior congelador
U2: Cajón inferior congelador
V: Bandeja interna congelador
Z: Cajón interno congelador
NOTA:
Los accesorios que se ilustran en el dibujo están en
varios modelos. Pueden existir pequeñas diferencias entre éstos
y los de nuestro frigoríco.
I
L
H
U1
U2
V
Z
T
D
C
E
B
P
S
MODELLO
PNC
FLUIDO REFRIG FRIGORIFERO
CAPACITA' LORDA TOTALE
CAPACITA' NETTA FRIGO
CAPACITA' NETTA CONGELATORE
CAPACITA' DI CONG.
CLASSE
MODEL
REFRIGERANT REFRIGERATOR
GROSS CAPACITY
REFRIGERATOR NET CAPACITY
FREEZER NET CAPACITY
FREEZING CAPACITY
CLASS
R600a
SER. NO.
0,052
Kg
xxx
xxx
xx
SN-T
PRODOTTO IN ITALIA
MADE IN ITALY
220-240 50V HZ W
0001
RH
N
O
G
F
Q
AFL
Stand-by Holiday SuperCool
SuperFreeze
Alarm
°C
AFD
Stand-by
Super Cool
Super Free
Ice Maker
Clean Pipe
Input water time
Holiday
Alarm
Set OK
A
M
R
Page 87

5
Español
4. SEGURIDAD
Precauciones de seguridad
Simbología:
Consejos de tipo general para mejorar el funcionamiento
del aparato
Peligro genérico
Supercies calientes
• Es muy importante que el presente manual de instrucciones
se guarde con el aparato para consultarlo cuando sea
necesario. En el caso de venta o cesión a otra persona,
asegurarse de que el manual acompañe al aparato para
permitir al nuevo usuario el perfecto conocimiento de su
funcionamiento y las relativas advertencias.
• Estas advertencias han sido redactadas para su seguridad:
les rogamos que las lea atentamente antes de instalar y
utilizar el aparato.
• Si el aparato, durante el transporte, se coloca en posición
horizontal es posible que el aceite que contiene el
compresor fluya en el circuito de refrigeración. Se aconseja
dejar el aparato en posición vertical durante dos horas como
mínimo antes de ponerlo en funcionamiento, para que el
aceite vuelva al compresor.
• Tras haber desembalado el aparato, hay que revisarlo
atentamente e instalarlo siguiendo las indicaciones del
relativo capítulo: si se nota alguna anomalía, apagar el
aparato y efectuar el procedimiento que se indica en el cap.
“Asistencia post venta”.
• Antes de realizar cualquier operación de mantenimiento
ordinario o extraordinario, quitar la alimentación al aparato;
esta operación se efectúa sin tirar del cable del enchufe.
Comprobar que el cable no esté dañado; si así fuese ponerse
en contacto con un Centro de Asistencia. Si el aparato ha
sido desplazado, una vez vuelto a colocar, comprobar que
el cable de alimentación no se haya chafado o moleste.
•
ATENCIÓN: los aparatos están dotados de gas
refrigerante ISOBUTANO (R600a). El transporte y los
eventuales desplazamientos del aparato tienen que
efectuarse con el máximo cuidado, para no golpearlo o
sacudirlo excesivamente. La inobservancia de esta norma
podría comprometer el funcionamiento del aparato; si el
circuito de enfriamiento se daña podría escaparse el gas
refrigerante, produciendo explosiones a causa de chispas
o llamas exteriores. No poner en funcionamiento por ningún
motivo el aparato si ha sido dañado. En este caso hay que
ponerse en contacto con el Servicio de Asistencia, ventilar
el lugar en el que se encuentra el aparato y no acercarle
llamas o manipularlo.
2h
OK !
NO !
SODIUM
BICARB
ONA
TE
A
C
E
T
O
Page 88

6
Español
• Antes de conectar el aparato a la red eléctrica, comprobar
que la red corresponda a los datos presentes en la placa de
la matrícula. Cualquier modicación que eventualmente
hubiera que realizar en la red eléctrica doméstica para
instalar el aparato, tendrá que ser efectuada por personal
adecuado.
•
Si el aparato se desplaza de su posición habitual, hay
que tener en cuenta que incluso después de haber
desconectado la alimentación y durante un tiempo, los
elementos situados en la parte posterior del aparato pueden
estar muy calientes.
• El aparato no ha sido concebido para ser empotrado.
Una ventilación insuciente comportará un malfun-
cionamiento y daños al aparato mismo.
•
¡ATENCIÓN!: durante el funcionamiento normal y el
mantenimiento ordinario, evitar absolutamente:
- usar aparatos eléctricos dentro de los compartimientos
para conservar los alimentos congelados;
- usar dispositivos mecánicos u otros medios para acelerar
el proceso de descongelación que sean diferentes de los
que el Fabricante aconseja;
- apoyar objetos frágiles, pesados o inestables encima
del aparato;
•
¡ATENCIÓN!: La carga máxima del portabotellas es
10 Kg.
•
La temperatura en el interior del frigoríco y del con-
gelador podría sufrir alteraciones; por lo tanto estos
aparatos no son adecuados para conservar productos (por
ejemplo medicinas) que necesiten una temperatura estable.
•
¡ATENCIÓN!: este aparato ha sido concebido para ser
utilizado por los adultos y está destinado a un uso
exclusivamente doméstico para conservar y/o congelar
alimentos. Evitar que los niños se acerquen con la intención
de jugar que se sienten en los cajones y que se cuelguen a
las puertas del aparato.
•
¡ATENCIÓN!: No introducir en el aparato sustancias
explosivas, contaminantes o volátiles.
•
¡ATENCIÓN!: No poner nunca en el compartimiento
de baja temperatura (congelador) bebidas gaseosas
o botellas de agua: podrían explotar. Además se aconseja
no introducir líquidos o alimentos calientes en el interior
del aparato y no llenar hasta el borde los recipientes. Para
todos los demás consejos de conservación consultar el cap:
“Uso”.
•
¡ATENCIÓN!: La capacidad máxima de cada cajón del
congelador es de 30 Kg.
Se aconseja:
- no superar este límite de carga.
- no superar el nivel establecido en la línea de carga,
indicado en el dibujo.
NO !
NO !
Max 30kg!Max 30kg!
Max 10kg!
Page 89

7
Español
Ficha de seguridad gas R600a
Medidas en caso de escape accidental
Dejar evaporar el material siempre y cuando haya una
ventilación adecuada.
Comportamiento del gas
El gas es altamente inamable; evitar absolutamente el contacto
con llamas libres y con supercies calientes.
El gas R600a es más pesado que el aire y por lo tanto es posible
la formación de concentraciones elevadas cerca del suelo,
donde la ventilación general es escasa.
Primeros auxilios
Inhalación
Alejar a la persona expuesta a inhalación de la zona contaminada
y llevarla a un lugar caliente y bien ventilado.
Las exposiciones prolongadas pueden causar un principio
de asxia y es posible incluso perder el conocimiento. Si es
necesario practicar la respiración articial y en los casos más
graves suministrar oxígeno bajo vigilancia médica.
Contacto con la piel
Es poco probable que el contacto ocasional con la piel resulte
peligroso por absorbencia cutánea. Si esto sucede, lavar
abundantemente la zona interesada.
Las salpicaduras de líquido y el líquido nebulizado pueden
producir quemaduras por hielo: mojar abundantemente
con agua la parte interesada y acudir a un médico para el
tratamiento de la quemadura.
Contacto con los ojos
Enjuagar abundantemente con agua manteniendo los párpados
bien abiertos y recurrir lo antes posible a un especialista.
En cualquier caso se aconseja consultar al propio médico
tras el contacto o la inhalación con el gas R600a.
Recolección y eliminación
En virtud del Art.:13 del Decreto Legislativo
n°151 del 25 julio 2005 “Actuación de las
Directivas 2002 / 95 / CE, 2002 / 96 / CE y 2003
/ 108 /CE, relativas a la reducción del uso de
sustancias peligrosas en los aparatos
eléctricos y electrónicos, así como a la
eliminación de residuos”
El símbolo del cubo con una cruz encima que lleva el aparato
o su embalaje signica que el producto, al nal de su vida útil,
tiene que ser recogido separadamente del resto de los demás
residuos. El usuario deberá entregar el aparato inservible a
los centros de recogida selectiva de residuos electrónicos y
electrotécnicos, o bien entregarlo al revendedor en el momento
de la compra de un nuevo aparato de tipo equivalente, en razón
de uno por otro.
Es necesario que el viejo aparato se transporte al punto de
recogida para su eliminación sin que el circuito de enfriamiento
sufra daños, para evitar escapes incontrolados del refrigerante.
Los datos relativos al refrigerante están señalados en la placa
del aparato.
El cicloisopentano no es una sustancia nociva para el ozono y
se usa como expandente para la espuma aislante.
Una adecuada recogida selectiva para un sucesivo reciclaje
del aparato inservible, a un tratamiento y a una eliminación
compatibles con el medio ambiente, contribuye a evitar
efectos negativos en el medio ambiente y la salud y favorece
la reutilización y/o el reciclaje de los materiales de los que el
aparato está compuesto.
La eliminación abusiva del producto por parte del usuario
comporta la aplicación de las sanciones previstas por las leyes
vigentes.
Para informaciones más detalladas acerca de los sistemas de
recogida disponibles, dirigirse al servicio local de eliminación
de residuos.
Les damos las gracias por su contribución en la protección
medioambiental.
Se aconseja cortar el cable de alimentación antes de
llevar el aparato a un centro de recogida.
Desmontar el cierre de la puerta (quitando las
guarniciones): o mejor aún desmontar la puerta para
evitar que, por ejemplo, un niño se quede atrapado
dentro mientras juega.
Page 90

8
Español
5. INSTALACIÓN
Transporte y desembalaje
Si el aparato, durante el transporte, se coloca en posición
horizontal, es posible que el aceite que contiene el compresor
uya en el circuito refrigerante. Se aconseja por lo tanto poner el
aparato en posición vertical y dejar pasar 2 horas como mínimo
antes de ponerlo en funcionamiento, para dar la posibilidad al
aceite de volver a uir en el compresor.
Quitar el embalaje exterior, quitar la película protectora de
las superficies del aparato, limpiar el exterior del aparato
con productos especícos, evitando el uso de rascadores o
paños abrasivos que pueden dañar irremediablemente las
supercies.
Quitar cuidadosamente papeles y cinta adhesiva del aparato y
de la puerta y eventuales trozos de poliestirol.
Quitar los documentos y los accesorios colocados en el interior
del aparato.
El material utilizado para el embalaje es reciclable y lleva
el símbolo del reciclaje.
Para la eliminación respetar las leyes locales. El material
de embalaje (bolsas de plástico, trozos de poliestirol,
etc.) tiene que mantenerse fuera del alcance de los niños
ya que es peligroso.
Compruebe atentamente el aparato: si nota alguna anomalía no
lo instale y siga el procedimiento descrito en el par. “Asistencia
post venta”.
Colocación
El lugar elegido para la colocación tiene que satisfacer
las indicaciones suministradas en el par. “Condiciones de
funcionamiento”, tiene que tener una base estable y con una
resistencia adecuada al peso del aparato.
Además hay que tener en cuenta las distancias que hay que
respetar para un correcto funcionamiento del aparato y para
sus dimensiones:
1) parte superior (al menos 20 cm)
2) parte posterior (al menos 10 cm)
3) pared del lado apertura puerta (al menos 30 cm).
Nivelar el aparato mediante los pies: manteniendo el aparato un
poco elevado del suelo se facilita una buena circulación de aire
en el condensador. En estas condiciones se obtiene un perfecto
funcionamiento del circuito de refrigeración.
Montaje asas
Las asas de los cajones del congelador se suministran
desmontadas: para montarlas tomar como referencia el dibujo
de al lado.
10 cm
20 cm
30 cm
Page 91

9
Español
Limpieza antes del uso
Comprobar que se hayan quitado del interior del aparato todas
las cintas adhesivas que sujetan los accesorios, lavar todas
las partes internas con agua tibia y jabón neutro, vinagre o
bicarbonato de sodio, para quitar el olor a nuevo característico
y luego secar cuidadosamente.
No usar detergentes y/o polvos abrasivos a base de soda o
disolventes que podrían dañar los acabados.
Conexión eléctrica
Antes de introducir el enchufe en la toma de corriente tener
cuidado:
• que las manos nos estén mojadas o húmedas;
• que la tensión y la frecuencia citadas en la placa de la
matrícula correspondan a las de la instalación de la casa (se
admite una oscilación de -6% a +6% en la tensión nominal;
para el funcionamiento con tensiones diferentes habrá que
recurrir a un autotransformador de potencia adecuada);
• que el cable y el enchufe no estén dañados o chafados por
objetos pesados;
• que el cable de alimentación no esté excesivamente en
tensión; no se pueden utilizar prolongaciones para alcanzar
la toma.
¡ATENCIÓN!: el aparato no tiene que conectarse a
rectificadores (por ejemplo instalaciones solares) y no
tienen que utilizarse prolongaciones para conectarlo.
¡ATENCIÓN!: es indispensable conectar el aparato a una
toma di tierra eficaz.
A este fin, si la toma de corriente de la instalación doméstica
no tuviese conexión a tierra, conectar el aparato a una toma de
tierra eficaz a parte, de conformidad con las normas vigentes,
consultando a un técnico especializado.
El Fabricante declina toda responsabilidad en el caso de
que esta norma para la prevención de accidentes no fuese
respetada.
Este aparato está conforme a las siguientes directivas
comunitarias:
B.T. 73/23/CEE
93/68/CEE
SODIUM
BICARBONATE
Page 92

10
Español
6. USO
Descripción de las funciones del frigorí co y del congelador - MODELO AFL
Alimentación inicial de la corriente
Cuando el frigorí co está alimentado, el indicador (A10) se
ilumina. Las temperaturas de los compartimientos se visualizan
en el display como “-“ a causa de la elevada temperatura del
interior. Se emite una señal acústica de alarma. Pulsar la tecla
(A9) y la señal acústica cesará, mientras que el indicador
(A9) permanecerá encendido. Cuando la temperatura baja a
un nivel determinado, las temperaturas del frigorí co y del
congelador que se visualizan en el display indican “5” y “-18”
respectivamente, como predeterminado de fábrica.
Regulación de la temperatura en el compartimiento del
frigorí co
Pulsar el botón (A4) o (A5) para regular la temperatura del
frigorí co: el indicador correspondiente parpadea permitiendo
regular la temperatura de 2°C a 8°C. La regulación se con rma
automáticamente 5 segundos después de la conclusión de la
operación o bien pulsando cualquier otro botón.
Regulación de la temperatura en el compartimiento
congelador
Pulsar el botón (A6) o (A7) para regular la temperatura
del congelador: el indicador correspondiente parpadea
permitiendo regular la temperatura de -16°C a -24°C. La
regulación se con rma automáticamente 5 segundos después
de la conclusión de la operación o bien pulsando cualquier
otro botón.
Súper enfriamiento (Super Cool)
Para activar esta función pulsar el botón (A3) de Súper
enfriamiento (Super Cool); de este modo se ilumina el indicador
correspondiente. Esta función se desactiva automáticamente
cuando la temperatura desciende por debajo del nivel mínimo.
Es posible desactivar esta función pulsando de nuevo el botón
(A3). Con esta modalidad no es posible ajustar la temperatura
en el compartimiento frigorí co y la función Holiday.
Súper congelación (Super freeze)
Para activar esta función pulsar el botón (A8) de
Supercongelación (Super freeze); de este modo se ilumina
el indicador correspondiente. Esta función se desactiva
automáticamente tras 24 horas. Es posible desactivar esta
función pulsando de nuevo el botón (A8).
Con esta modalidad no es posible ajustar la temperatura en el
compartimiento congelador.
Función Holiday
Para activar esta función pulsar el botón (A2).
En modo Holiday el frigorí co funciona a una temperatura
superior a + 10°C (se aconseja quitar los alimentos que
se pueden estropear del frigorífico y cerrar la puerta del
mismo tras haber activado esta función). La temperatura
del compartimiento del frigorí co se indica con “-“. Pulsar de
nuevo la tecla (A2), el indicador correspondiente se apaga y el
frigorí co conmuta al estado de control normal.
En esta modalidad se puede programar la función Súper
congelación (Super Freeze) y la función Súper enfriamiento
(Super Cool). En este último caso la función Holiday se desactiva
automáticamente.
Control display
La pantalla del display se apaga automáticamente 1 minuto
después de que nalice la operación. Puede encenderse de
nuevo con la apertura de la puerta o pulsando cualquier botón
(la alarma no enciende la pantalla).
Stand-by Holiday SuperCool
SuperFreeze
A1
Alarm
A2 A3 A4
A5
TF TC A8 A9 A10A6
A7
°C
Lista:
A1: Stand-by
A2: Botón función Holiday
A3: Botón Súper enfriamiento (Super Cool)
A4: Botón aumento temperatura frigorí co
A5: Botón disminución temperatura frigorí co
A6: Botón aumento temperatura congelador
A7: Botón disminución temperatura congelador
A8: Botón Súper congelación (Super Freeze)
A9: Botón eliminación alarma acústica
A10: Botón alimentación
TF: Temperatura frigorí co
TC: Temperatura congelador
Page 93

11
Español
Alarma puerta abierta
Cuando la puerta del frigoríco permanece abierta durante
más de 3 minutos, se emite una señal acústica: 3 bip cada 30
segundos. La señal acústica puede ser desactivada cerrando la
puerta o pulsando cualquier botón.
Si la puerta permanece abierta se recupera la luminosidad en
el display y se visualiza el indicador de alarma (A9).
Alarma temperatura excesiva
Cuando la temperatura en el compartimiento del congelador
sube más allá de un nivel determinado, el indicador luminoso
del botón (A9) parpadea y se emite una señal acústica (1 bip
al segundo). La señal acústica cesa cuando la temperatura en
el compartimiento del congelador alcanza el nivel predenido
o se pulsa una tecla cualquiera: el indicador (A9) permanece
encendido hasta que en el interior de los compartimientos se
alcanza la temperatura deseada.
Apagar el compartimiento del frigoríco
Pulsando el botón (A1) durante 3 segundos los indicadores
(TF) y (A1) se apagan y el compartimiento frigorífico se
desactiva mientras que el congelador continua funcionando
normalmente. Para encender el compartimiento del frigoríco
hay que pulsar de nuevo el botón (A1) durante 3 segundos: el
indicador correspondiente se ilumina y el icono que indica la
temperatura del compartimiento frigoríco se recupera.
Apagar el aparato
Manteniendo pulsado el botón (A10) durante 3 segundos, el
indicador correspondiente se apaga, así como la pantalla del
display y el frigoríco que continuará siendo alimentado por
la red eléctrica.
Para encender de nuevo el aparato pulsar otra vez el botón
(A10) durante 3 segundos, el indicador correspondiente se
ilumina, se enciende la pantalla del display y el frigoríco
vuelve a funcionar normalmente.
Nota: si las funciones Holiday o Súper enfriamiento y la función
Súper congelación estaban activadas con precedencia al
momento del apagado, se recuperarán al encendido.
Señalización de un error
Cuando se visualiza “E” o “F” a causa de un malfuncionamiento, el
frigoríco garantiza la conservación de los alimentos. Rogamos
contacten lo antes posible el Centro de Asistencia.
Page 94

12
Español
Descripción de las funciones frigorí co y congelador - MODELO AFD
Lista:
A1: Stand-by
A2: Botón Set (Menú Funciones)
A3: Botón aumento temperatura
A4: Botón disminución temperatura
A5: Botón OK - con rma los valores programados
A6: Interruptor ON/OFF
B: Indicador luminoso Super Cool (Súper enfriamiento)
C: Indicador luminoso función Holiday
D: Temperatura frigorí co
E: Indicador luminoso Frigorí co
F: Indicador luminoso Congelador
G: Indicador luminoso de alarma
H: Temperatura congelador
I: Indicador luminoso Super Freeze (súper congelación)
Stand-by
Super Cool
Super Freeze
Ice Maker
Clean Pipe
Input water time
Holiday
Alarm
Set OK
A1
B
D F E G H IC
A2 A3 A4 A5 A6
Alimentación inicial de la corriente
Cuando el frigorífico está alimentado por primera vez, el
indicador (G) si ilumina. Las temperaturas de los compartimientos
frigorí co y congelador se visualizan en el display con los
símbolos “-“ y “- -“ respectivamente a causa de la elevada
temperatura en el interior. Seguidamente se emite una señal
acústica de alarma.
Pulsar la tecla (A5) y la señal acústica cesará, mientras que
el indicador (G) permanecerá encendido hasta alcanzar las
temperaturas predeterminadas de fábrica.
El display reducirá su luminosidad pasado un minuto desde la
última operación.
Regulación de la temperatura en el compartimiento del frigorí co
Pulsar repetidamente el botón (A2) hasta que los indicadores
(D) y (E) empiecen a parpadear contemporáneamente; pulsar
los botones (A3) y (A4) para programar la temperatura de un
valor mínimo de 2°C hasta un máximo de 8°C.
Pulsar el botón (A5) para con rmar la temperatura programada:
los indicadores (D) y (E) cesan de parpadear.
Regulación de la temperatura en el compartimiento congelador
Pulsar repetidamente el botón (A2) hasta que los indicadores
(D) y (E) empiecen a parpadear contemporáneamente; pulsar
los botones (A3) y (A4) para programar la temperatura de un
valor mínimo de -24°C hasta un máximo de -16°C.
Pulsar el botón (A5) para con rmar la temperatura programada:
los indicadores (H) y (F) cesan de parpadear.
Súper enfriamiento (Super Cool)
Pulsar repetidamente el botón (A2) hasta que el indicador (B)
empiece a parpadear; pulsar el botón (A5) para con rmar la
activación de la función “Super Cool”.
El indicador (B) cesa de parpadear y permanece encendido.
Esta función se desactiva automáticamente cuando la
temperatura desciende al nivel mínimo. Es posible desactivar
la función repitiendo el procedimiento de activación.
En esta modalidad no es posible programar la temperatura en
el compartimiento del frigorí co, tampoco la función Holiday.
Súper congelación (Super freeze)
Pulsar repetidamente el botón (A2) hasta que el indicador (I)
empieza a parpadear; pulsar el botón (A5) para con rmar la
activación de la función “ Super Freeze”. El indicador (I) cesa de
parpadear y permanece encendido. Esta función se desactiva
automáticamente tras 24 horas. Es posible desactivar la
función repitiendo el procedimiento de activación.
En esta modalidad no es posible programar la temperatura en
el compartimiento del congelador.
Función Holiday
Pulsar repetidamente el botón (A2) hasta que el indicador (C)
empieza a parpadear; pulsar el botón (A5) para con rmar la
activación de la función Holiday.
El indicador (C) cesa de parpadear y permanece encendido.
En modalidad Holiday, el frigorí co funciona a una temperatura
superior a +10 °C (se aconseja quitar los alimentos que
se pueden estropear del frigorí co y cerrar la puerta del
mismo tras haber activado esta función). La temperatura del
compartimiento del frigorí co se indica con “-“. Para desactivar
la función repetir el procedimiento de activación.
En esta modalidad es posible programar la función Súper
congelación (Super Freeze) y la función Súper enfriamiento
(Super Cool). En este último caso la función Holiday se
desactiva automáticamente.
Control Display
La pantalla del display se apaga automáticamente 1 minuto
después de que nalice la operación. Puede encenderse de
nuevo con la apertura de la puerta o pulsando cualquier botón.
En caso de alarma se activa solamente la señal acústica y no se
modi ca la luminosidad del display.
Alarma puerta abierta
Cuando la puerta del frigorí co permanece abierta durante más
de 3 minutos, el indicador luminoso (G) parpadea y emite una
señal acústica: 3 bip cada 30 segundos. Si se cierra la puerta la
alarma cesa y el indicador (G) se apaga. Si se desea quitar solo
la señal acústica, pulsar el botón (A5).
Page 95

13
Español
Alarma temperatura excesiva
Cuando la temperatura en el compartimiento del congelador
sube más allá de un nivel determinado, el indicador (G) se
ilumina y emite una señal acústica (1 bip al segundo). La señal
acústica cesa cuando la temperatura en el compartimiento
del congelador alcanza el nivel predeterminado: el indicador
(G) permanece encendido hasta que en el interior de los
compartimientos se alcanza la temperatura deseada. Se puede
excluir solo la señal acústica pulsando el botón (A5).
Apagar el compartimiento del frigorí co
Mantener pulsado durante 3 segundos el botón (A1); el
compartimiento frigorí co se desactiva mientras que el
congelador continua funcionando normalmente. En el display
el indicador (D) se apaga y el indicador (E) se oscurece. Para
volver a encender el compartimiento del frigorí co hay que
pulsar de nuevo el botón (A1) durante 3 segundos; en el
display aparece de nuevo el indicador (D) y el indicador (E)
vuelve a la luminosidad normal.
C
onsejos para la conservación de los alimentos: FRIGORÍFICO
Descripción de las funciones
Súper enfriamiento: aconsejamos utilizar esta función cuando
se conservan en el compartimiento del frigorí co alimentos
frescos comprados recientemente.
Esta modalidad favorece un enfriamiento más rápido de los
alimentos.
Función Holiday: esta función esta indicada cuando se desea,
durante un periodo breve (por ejemplo unas vacaciones) dejar
el frigorí co encendido pero funcionando con un consumo
reducido. Con esta modalidad el congelador funciona
normalmente y el frigorí co a una temperatura superior a
+10°C. Hay que quitar del frigorí co todos los alimentos que
necesitan temperaturas inferiores para su conservación y
mantener cerrada la puerta.
Consejos para la refrigeración de los alimentos
A causa de la circulación del aire en el compartimiento de
enfriamiento se crean ambientes con temperaturas diferentes,
cada una de ellas adecuada para la conservación de los varios
tipos de alimentos; es importante guardar los alimentos de
manera que se permita al aire circular libremente alrededor
de ellos.
La zona más fría (adecuada para los embutidos y la carne) es la
que está encima del cajón para las verduras, en la parte inferior
del frigorífico y cerca de la pared posterior; la zona menos fría
se encuentra parte superior y hacia el exterior y en las puertas
(ideales para guardar la mantequilla y los quesos blandos).
La ventilación en el interior del cajón de la verdura está
garantizada a través de una rejilla que el usuario puede cerrar
si lo desea.
Para utilizar en el mejor modo el compartimiento del frigorífico
hay que respetar las siguientes normas:
• no introducir alimentos o líquidos calientes que estén
evaporando;
• guardar siempre en recipientes cerrados o en sus cajas,
los líquidos y todos los alimentos que emanan o pueden
absorber fácilmente olores y sabores;
• no poner nunca aceite para alimentos en los contenedores
flexibles en la puerta del frigorífico: el plástico podría
agrietarse;
• no obstruir los agujeros o las rejillas de ventilación de la
pared del fondo del frigorí co y del congelador;
• no guardar dentro material explosivo o bombonas de
spray con propelentes in amables como butano, propano,
pentano, etc. El alcohol de elevada graduación puede
colocarse solo de pie y en recipientes bien cerrados. El gas o
líquido que resulta peligroso si se derrama accidentalmente
de una bombona se puede reconocer porque en las
indicaciones acerca del contenido llevan una llama
dibujada.
Bandeja de vidrio de dos piezas
Con una simple operación tal y como se muestra en el dibujo
de abajo, es posible colocar la bandeja de vidrio anterior (D2)
debajo de la posterior (D1).
De este modo se crea un espacio útil para la refrigeración de
botellas en posición vertical ( o bien de otros recipientes muy
altos).
D2
D1
NOTA: si las funciones Holiday o súper enfriamiento estaban
activadas antes de apagar el compartimiento frigorí co, en el
momento en que éste se vuelva a encender se recuperarán.
Apagar el aparato
Manteniendo pulsado el botón (A6) durante 3 segundos, el
display y el frigorí co se apagan aunque éste último continuará
siendo alimentado por la red eléctrica. Para encender de nuevo
el aparato pulsar otra vez el botón (A6) durante 3 segundos:
NOTA: si las funciones Holiday o Súper enfriamiento y la
función Súper congelación estaban activadas antes de apagar
el compartimiento frigorí co, en el momento en que éste se
vuelva a encender se recuperarán.
Señalización de un error
Cuando se visualiza “E” o “F” a causa de un malfuncionamiento,
el frigorí co garantiza la conservación de los alimentos.
Rogamos contacten lo antes posible el Centro de Asistencia.
Page 96

14
Español
Tabla 3-Conservación de alimentos en el frigoríco
Alimento
Recipientes para conservación Zona de conservación
Duración
Carne y pescado (de
cualquier tipo) Quesos
de pasta dura
Película protectiva, hojas de aluminio,
recipientes cerrados de vidrio, plástico para
alimentos o acero.
Cajón
“Fresh Control 0°C”
1-2 días
Alimentos cocidos,
platos fríos, pasteles
Recipientes cerrados de vidrio, plástico para
alimentos o acero.
Cualquier altura 1-2 días
Fruta y verdura En las bandejas en las que se vende o suelta. Cajón fruta/verdura 3-4 días
Plátanos, patatas, ajo y
cebolla.
No guardar en el frigoríco. -
Agua, vino, cerveza,
leche, zumos de fruta,
bebidas con gas
Recipientes de vidrio o plástico para alimentos. Bandejas de la puerta Mirar la fecha de
caducidad
Alimentos en vinagre/
aceite, salsas, mantequilla,
quesos blandos, huevos
En su recipiente original. Bandejas de la puerta M irar la fecha de
caducidad
Yogurt
En su recipiente original. Cualquier altura
Mirar la fecha de
caducidad
CLOSE/CHIUSO
OPEN/APERTO
A
p
p
l
e
J
u
i
c
e
MAJONESE
BUTTER
A
p
p
l
e
J
u
i
c
e
Page 97

15
Español
Consejos para la conservación de los alimentos: CONGELADOR
Descripción de las funciones
Súper-congelación: La función de congelación rápida ha sido
estudiada para conservar del mejor modo el valor nutritivo de
los alimentos que se conservan en el congelador, garantizando
una completa congelación en breve tiempo.
Consejos para congelar los alimentos
El compartimiento del congelador es el más indicado para
conservar alimentos ya congelados, para congelar cantidades
reducidas de alimentos y para preparar cubitos de hielo y
helado.
ATENCIÓN: para congelar y conservar los alimentos
durante largo tiempo es necesaria una temperatura de
-18°C. Esta temperatura bloquea la acción de los microorganismos.
Apenas la temperatura supera los -10°C, el proceso de
descomposición llevado a cabo por los microorganismos se
vuelve a poner en funcionamiento, haciendo que los alimentos
se deterioren más rápidamente. Por este motivo, una vez que
se han descongelado, los alimentos pueden ser vueltos a
congelar sólo con cocción previa, de modo que se eliminen la
mayor parte de los microorganismos.
Algunos consejos:
• para conservar alimentos congelados es necesario estar
seguros de que el revendedor los haya conservado en buen
estado;
• se aconseja evitar de abrir continuamente el compartimiento
que contiene los alimentos ultracongelados o congelados
y tenerlo abierto durante el menor tiempo posible;
• se aconseja congelar solamente alimentos frescos y
de óptima calidad, tras haberlos lavado y secado con
cuidado;
• poner en el cajón inferior los alimentos que hay que
congelar, éste es el punto más frío del congelador;
• la temperatura de conservación tiene que ser siempre
inferior o igual a -18°C;
• en la placa matrícula se cita la cantidad máxima de alimentos
frescos que pueden congelarse en 24 horas (“freezing
capacity”). Si se congela una cantidad superior, la calidad
de congelación disminuye y se reduce además la calidad
de los alimentos que ya han sido congelados;
• se aconseja activar la función SuperFreeze (Súper
congelación) 24 horas antes de efectuar la congelación
cuando se prevé congelar una cantidad de alimentos
superior a 8 Kg;
• congelar los alimentos en porciones pequeñas, envueltas
con cuidado con material de protección adecuado ( hojas
de aluminio o bolsas para congelar) bien cerrado y apretado
y poniendo una etiqueta con la fecha en que han sido
congelados y con la fecha de caducidad;
• los helados y los polos deberían consumirse algunos
minutos después de haberse sacado del congelador, para
evitar que se peguen a los labios y a la lengua. Por este
motivo se aconseja evitar tocar las paredes del congelador
con las manos mojadas;
• los paquetes tienen que estar secos para evitar que se
congelen juntos o que se peguen entre ellos;
• el empaquetado tiene que efectuarse de modo que el aire
y la humedad no se escapen, para evitar que los alimentos
se sequen y que se pierdan las vitaminas que contienen;
• las bolsas y/o las hojas de aluminio tienen que ser blandos
para adherirse bien al contenido;
• colocar los alimentos que hay que congelar de manera que
no se toquen con los alimentos ya congelados, para evitar
que éstos se descongelen;
• para congelar pequeñas cantidades de alimentos frescos
(1-2 Kg) no es necesario regular el mando del termostato.
Para congelar cantidades superiores, poner en marcha la
función “Súper Freeze” (par. “Descripción funciones frigoríco
y congelador”).
ATENCIÓN: en el compartimiento congelador o en los
compartimientos de baja temperatura no hay que
colocar bebidas en botella, especialmente con gas; si las
bebidas se hielan el contenido se dilata y las botellas se
revientan.
ATENCIÓN: si los alimentos congelados sufren un aumento
de temperatura disminuye el tiempo de conservación.
• Si, por causas accidentales, como la falta de corriente en
la instalación doméstica, los alimentos del congelador se
descongelan, incluso parcialmente, hay que consumirlos
lo más rápidamente posible; se pueden volver a congelar
previa cocción.
• Con interrupciones breves (hasta 6-8 horas) los alimentos
permanecen inalterados.
Creación de los cubitos de hielo
Con el aparato se suministran una o varias bandejas para hacer
cubitos de hielo; llenar las tres cuartas partes con agua potable
y ponerlas en el compartimiento del hielo. No usar objetos
metálicos puntiagudos para sacar los cubitos de las bandejas
Para sacar fácilmente los cubitos de las bandejas, mojarlas bajo
el agua corriente.
Consejos para descongelar los alimentos
Para cocinar los alimentos congelados se aconseja descongelarlos
en el frigorífico o bien a temperatura ambiente, reduciéndose
en este caso el tiempo necesario para la descongelación.
Los alimentos de pequeñas dimensiones pueden cocinarse
directamente sin descongelar, si es necesario, alargando la
duración de la cocción.
Si son de dimensiones medias pueden descongelarse antes de
la cocción en el horno microondas.
Una vez descongelados, los alimentos se deterioran en un
Page 98

16
Español
tiempo breve y deberían consumirse en las 12-24 horas
sucesivas. Se pueden volver a congelar sólo si se cocinan de
nuevo (hervidos o cocidos).
Tabla 4 – Congelación de los alimentos en el congelador
Alimento Recipiente para la conservación Zona de conservación Duración
Conservación de los
alimentos congelados,
cubitos de hielo, helados
Caja original bien cerrada parte superior del
congelador
Ver la fecha de
caducidad
Congelación de
alimentos: carne y
pescado
Paquetes originales bien cerrados.
Recipientes para alimentos resistentes a las
bajas temperaturas y cerrados herméticamente.
Cantidad máxima por recipiente: 2,5 Kg
preferiblemente en
la parte inferior del
congelador
Bovino: 12 meses
Cerdo: 12 meses
Cerdo picado: 6 meses
Conejo: 6 meses
Ternera: 9 meses
Cordero: 9 meses
Aves: 6 meses
Pescado: 6 meses
Congelación de
alimentos: primeros
platos, fruta, verdura,
pasteles
Recipientes para alimentos resistentes a las
bajas temperaturas y herméticamente cerrados.
Cantidad máxima por recipiente: 1 Kg
parte superior del
congelador
6-12 meses
Page 99

17
Español
INOX
I
N
O
X
7. MANTENIMIENTO ORDINARIO
Limpieza del aparato
Desconectar la alimentación eléctrica antes de la
operación.
Limpieza interna
Lavar el interior con agua tibia y jabón neutro,
vinagre o bicarbonato de sodio y secar con cuidado.
Como alternativa se pueden utilizar detergentes
especícos para el frigoríco, en venta en cualquier
supermercado. No usar detergentes y/o polvos
abrasivos, a base de soda o disolventes que pueden
estropear los acabados. Para facilitar la limpieza es
posible quitar los accesorios que se encuentran dentro
(consultar par. “Desmontaje de los elementos”).
Limpieza externa
Lavar con detergentes especícos, no usar detergentes y/o polvos
abrasivos, a base de soda, disolventes que pueden estropear los
acabados o chorros de agua.
Desmontaje de los elementos
Para facilitar las operaciones de limpieza, es posible desmontar
todos los elementos que componen el interior del aparato. Seguir
las instrucciones que se indican en el relativo dibujo.
A: Cajones congelador, cajón fruta/verdura y cajón “Fresh Control
0°C”: estos cajones están montados sobre guías deslizantes
especiales con topes que impiden que los cajones se caigan
al suelo cuando se abren. Si se desea quitarlos para efectuar
la limpieza hay que extraerlos ¾ partes de su profundidad,
levantarlos un poco hacia arriba y continuar la extracción
manteniéndolos ligeramente inclinados hacia arriba.
B: Bandejas de las puertas: están colocados sobre las guías
integradas con las puertas, para sacarlas levantarlas hacia
arriba empujándolas con decisión desde abajo.
C: Cajones del congelador: no es posible quitarlos completamente
por motivos de seguridad; una vez que han sido abiertos hasta
su máxima extracción permitida å es posible extraer los cajones
internos levantándolos simplemente hacia arriba ç.
D: Bandeja de vidrio de dos piezas: la bandeja anterior (D2) está
unida a la posterior para impedir su salida accidental (ver part.
ç
); para extraerla levantar ligeramente la bandeja posterior
(D1) y sacar la anterior (D2).
La bandeja posterior (D1) está bloqueada en su extremidad por
dos pernos que impiden su salida accidental (ver part.
é
),para
extraerla levantar hacia arriba y tirar hasta sacarla. Cuando
se vuelven a colocar las dos bandejas(D1 y D2) hay que estar
seguros de unirlas de nuevo la una a la otra.
E: Bandeja de vidrio con portabotellas: la bandeja está montada
sobre guías deslizantes y tiene dos pernos que impiden la salida
accidental (ver part.
å
); si se desea quitarla para efectuar
la limpieza, levantarla ligeramente hacia arriba y extraerla
manteniéndola ligeramente inclinada hacia arriba.
F: Bandeja de vidrio: la bandeja se desliza sobre guías, si se desea
sacarla para efectuar la limpieza quitar el cajón “Fresh Control
0°C”, levantar ligeramente la bandeja hacia arriba y extraerla
manteniéndola inclinado hacia arriba.
B
A
D1
D2
E
F
2
D2
3
D1
D3
1
D1
C
C
Page 100

18
Español
1
A
1C
1D
1B
2
2A
CLICK!
C
1C
3A
3
A
3B
4A
4
B
3C
2B
A
C
B
D
1A
3D
AFD
AFD
AFD
Stand-by
Super Cool
Super Free
Ice Maker
Clean Pipe
Input water time
Holiday
Alarm
Set OK
AFL
Stand-by Holiday SuperCool
SuperFreeze
Alarm
°C
8. MANTENIMIENTO EXTRAORDINARIO
Reversibilidad puerta: desmontaje puertas del lado derecho
Desconectar la alimentación
eléctrica y vaciar el aparato antes
de la operación.
1 A) Abrir la puerta del frigoríco;
B) con un destornillador plano levantar los dos clip para quitar el
cabezal del lado superior de la puerta y sacarla hacia arriba;
C) con la ayuda de un destornillador plano tirar hacia abajo
los clip del lado derecho e izquierdo colocados bajo la
bisagra superior, teniendo cuidado en no estropearlos.
D) solo para los modelos
AFD
: soltar con cuidado los dos
enganches (los dos cables que conectan el display
colocado en la puerta del aparato)
2 A) Desenroscar los dos tornillos colocados en la parte
superior que sujetan el panel frontal;
B) para quitarlo hacer palanca en varios puntos con
un destornillador plano, poniendo cuidado en no
estropearlo.
3 A) Sujetando la puerta del frigoríco, desenroscar los dos
tornillos que sujetan la bisagra superior de la izquierda
y aojar el tercer tornillo colocado a la derecha.
B) Quitar la bisagra superior, girándola primero en sentido
antihorario y luego extrayéndola hacia arriba.
C) Quitar la puerta sacándola hacia arriba y apoyarla con
cuidado para no estropearla.
D)
solo para los modelos
AFD
: enrollar el cable y volverlo a
colocar en el interior de la cavidad en la que se encuentra
la cremallera, poner atención en que no salga para que
el panel frontal pueda volver a colocarse sin obstáculos.
4 A) Desenroscar los tres tornillos que sujetan la bisagra
central para quitarla.
 Loading...