

Page 1
D
G
U
V
T
e
s
t
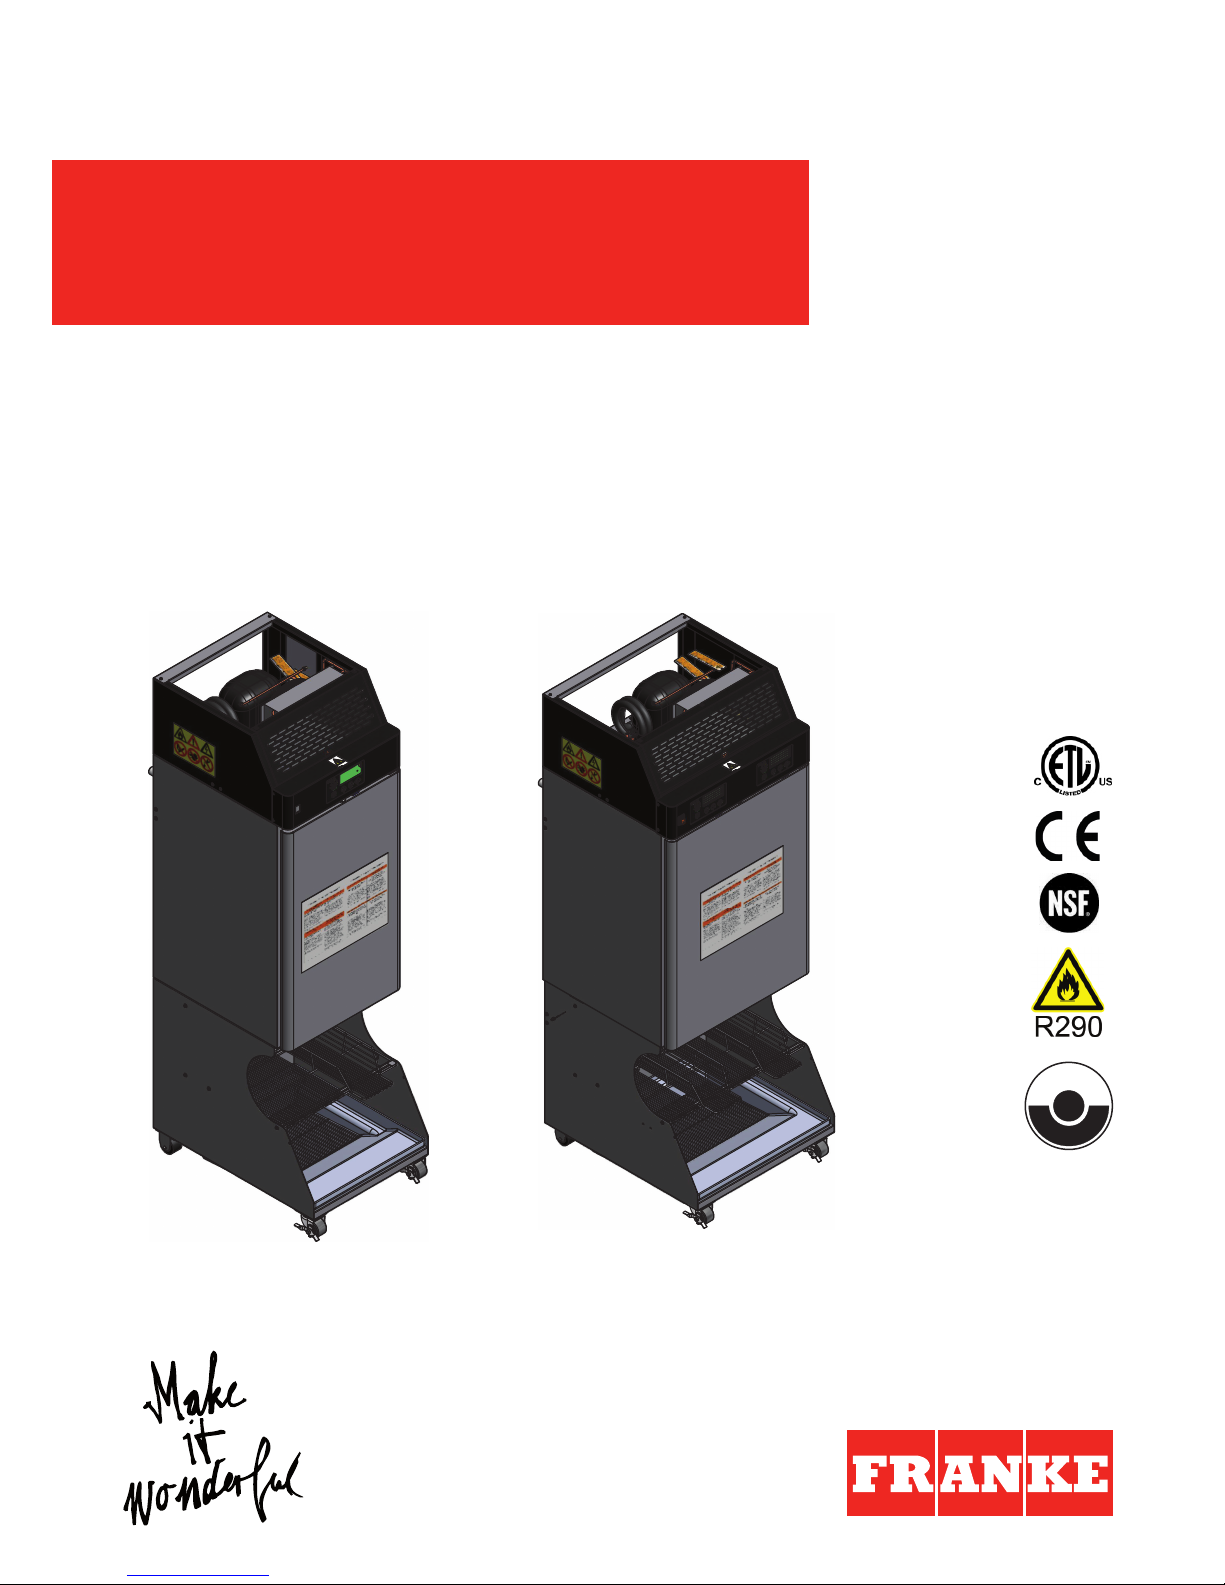
F3D3–Dual Lane
F3D3P–Dual Lane
F3D3S–Single Lane
F3D3SP–Single Lane
USER MANUAL
Original instructions
en
Single Lane/Dual Lane (with R404A or propane (R290) refrigerant)
FROZEN FRY DISPENSER F3D3S/F3D3/
F3D3SP/F3D3P
Page 2

Franke Foodservice Systems
29.0 7. 2 0 15
2004/108/EC (EMC Directive)
2006/42/EC (Machinery Directive)
EMC: EN 55014-1:2007, EN 55014-2:2007
MD: EN 60204-1:2006, EN ISO 12100:2010
2
07/2 0 15
Franke Foodservice Systems GmbH
Jurastrasse 3
797 13 Bad Säckingen
Germany
Phone: +49 7761 5533 0
www.franke.de
19004639
R404a R290 (Propan)
Single Lane Dual Lane Single Lane Dual Lane
718.390.599 718.387.897 718.390.030 718.387.300
718.390.792 7 18.390.740
718.390.03 1 718.390.586 718.390.032 7 18.390.587
718.390.793 7 18.390.741
718.390.062 718.390.839 7 18.392.147 718.390.796
This document reflects the technical status at the time of the revision.
We reserve the right to make technical changes.
Franke Foodservice Systems GmbH declares under
its sole responsibility that this/these appliance(s)
set forth in this declaration conform(s) to the regulations of these directives:
The conformity was tested using the harmonized EN
standards:
Declaration of Conformity
User manual Item no.:
Revision date:
Frozen fry dispenser F3D3S/F3D3/ F3D3SP/F3D3P
en
Item no.:
Page 3

3
07/2 0 15 Frozen fry dispenser F3D3S/F3D3/ F3D3SP/F3D3P
en
CONTENT
1 Safety ..................................................................................................................................4
1.1 Symbols from the user manual ...................................................................................4
1.2 Warning and prohibitory signs ................................................................................... 5
1.3 Proper use ................................................................................................................ 5
1.4 Safety instructions .................................................................................................... 6
2 Installation ..........................................................................................................................9
2.1 Technical data ........................................................................................................... 9
2.2 Removing the packaging box ..................................................................................... 11
2.3 Removing the pallet .................................................................................................. 12
2.4 Setting up the appliance ........................................................................................... 12
2.5 Changing the door hinge ........................................................................................... 13
2.6 Electrical connection ................................................................................................ 13
2.7 Final steps ................................................................................................................ 13
3 Appliance description ....................................................................................................... 15
3.1 Before starting up for the first time ........................................................................... 18
3.2 Daily procedure for starting up/switching on ............................................................ 19
3.3 Filling with fries ........................................................................................................ 21
3.4 Dispensing fries .......................................................................................................22
3.5 Daily procedure for decommissioning/switching off .................................................23
4 Cleaning ............................................................................................................................24
4.1 Defrosting ................................................................................................................24
4.2 Daily cleaning procedure ..........................................................................................25
5 Preventive maintenance ...................................................................................................26
5.1 Cleaning the filter .....................................................................................................26
5.2 Cleaning the condenser ribs .....................................................................................26
5.3 Customer service (electric components) .................................................................. 27
5.4 Customer service (cooling system)* .........................................................................28
6 Malfunctions/Troubleshooting ........................................................................................29
6.1 Error messages ........................................................................................................29
6.2 Malfunctions ............................................................................................................29
7 Decommissioning (storage/disposal) ..............................................................................32
7.1 S t orage ....................................................................................................................32
7.2 Disposal ...................................................................................................................32
* only F3D3SP/F3D3P
Page 4
4
07/2 0 15
!
!
i
Frozen fry dispenser F3D3S/F3D3/ F3D3SP/F3D3P
en
IMPORTANT!
Before initial use, the instructions on operating safety, use and maintenance must be read carefully and understood. Keep the user manual in the vicinity of the appliance for later reference.
SAFETY
. SYMBOLS FROM THE USER MANUAL
Additional information, tips and recommendations
can be found here.
Important information can be found here.
NOTICE indicates a situation which, if not avoided,
may result in damage to the appliance.
CAUTION indicates a potentially hazardous situation
which, if not avoided, may result in minor or moderate injury.
WARNING indicates a potentially hazardous situation which, if not avoided, may result in injury.
DANGER indicates a potentially hazardous situation
which, if not avoided, may result in fatal or serious
injury.
DANGER
WARNING
CAUTION
NOTICE
Page 5

5
07/2 0 15
!
Frozen fry dispenser F3D3S/F3D3/ F3D3SP/F3D3P
en
IMPORTANT!
- The appliance must only be operated by trained personnel. Each operator of the appliance
must have read and understood the user manual.
- Children and people with restricted physical, sensory or cognitive abilities must never be left
alone with the appliance and must always be supervised.
- Adhere to the maintenance and cleaning intervals. Regular maintenance and cleaning preserves the operating safety and performance of the appliance.
- Give the user manual to the next owner if the appliance is sold or passed on to a new owner.
- The appliance is not suitable for storing frozen products (french fries) for extended periods; it
is only intended as an intermediate storage location between the freezer room and the deep
fr y er.
Warning of dangerous
electric voltage
Warning of flammable
materials
Maintenance and repair
work by unauthorized
persons is prohibited.
Access is prohibited to
unauthorized persons
Fire, open flames and
smoking is prohibited
General warning
. WARNING AND PROHIBITORY SIGNS
. PROPER USE
This is technical equipment that is only intended for use in the food service industry.
The appliance may only be used for its intended purpose, i.e. for the intermediate storage and
filling of frozen products (french fries). Any other use is considered inappropriate.
Page 6
6
07/2 0 15 Frozen fry dispenser F3D3S/F3D3/ F3D3SP/F3D3P
en
- It may only be used for its intended purpose.
- The appliance is not suitable to be set up and used outdoors. It is intended for use in kitchens
where it is protected against the weather, excessively high temperatures and humidity, and a
corrosive atmosphere.
DANGER
Risk of fatal injury from electric shock!
- If the appliance is damaged or malfunctioning, disconnect it from the power supply before performing repair, maintenance or cleaning work.
- Adhere to the safety instructions on the appliance itself (see figure), such as on the power
supply filter housing.
- Do not connect the appliance to the power supply if the connection cable is damaged. Have
the damaged cable replaced with an equivalent cable by a qualified electrician. Do not put the
appliance back into service beforehand.
- Never repair the appliance yourself.
- Have the necessary repairs carried out by a qualified specialist with original spare parts.
Moisture on the electrical components can lead to a short circuit and to serious or even
fatal injury on contact.
- Never clean the appliance with a direct water jet, a sponge or a high-pressure water jet.
- Never connect the appliance to the power supply while the appliance is wet.
- Disconnect the appliance from the power supply immediately if the appliance becomes wet
during operation.
. SAFETY INSTRUCTIONS
WARNING
Danger of fire!
The cooling circuit is filled with R290 (propane)*. Propane is highly flammable. The cooling
coils are contained in the side walls. If the cooling coils are damaged, highly flammable
propane will escape.
An analysis or repair of the cooling system is only allowed under certain conditions!
- Never repair the cooling system yourself!
- If you experience problems, contact the technical customer service. The appliance may only
be repaired by a refrigeration technician under certain conditions!
- Read the chapter “Maintenance/repair”!
* only F3D3SP/F3D3P
Page 7

7
07/2 0 15 Frozen fry dispenser F3D3S/F3D3/ F3D3SP/F3D3P
en
CAUTION
Risk of injury when unpacking!
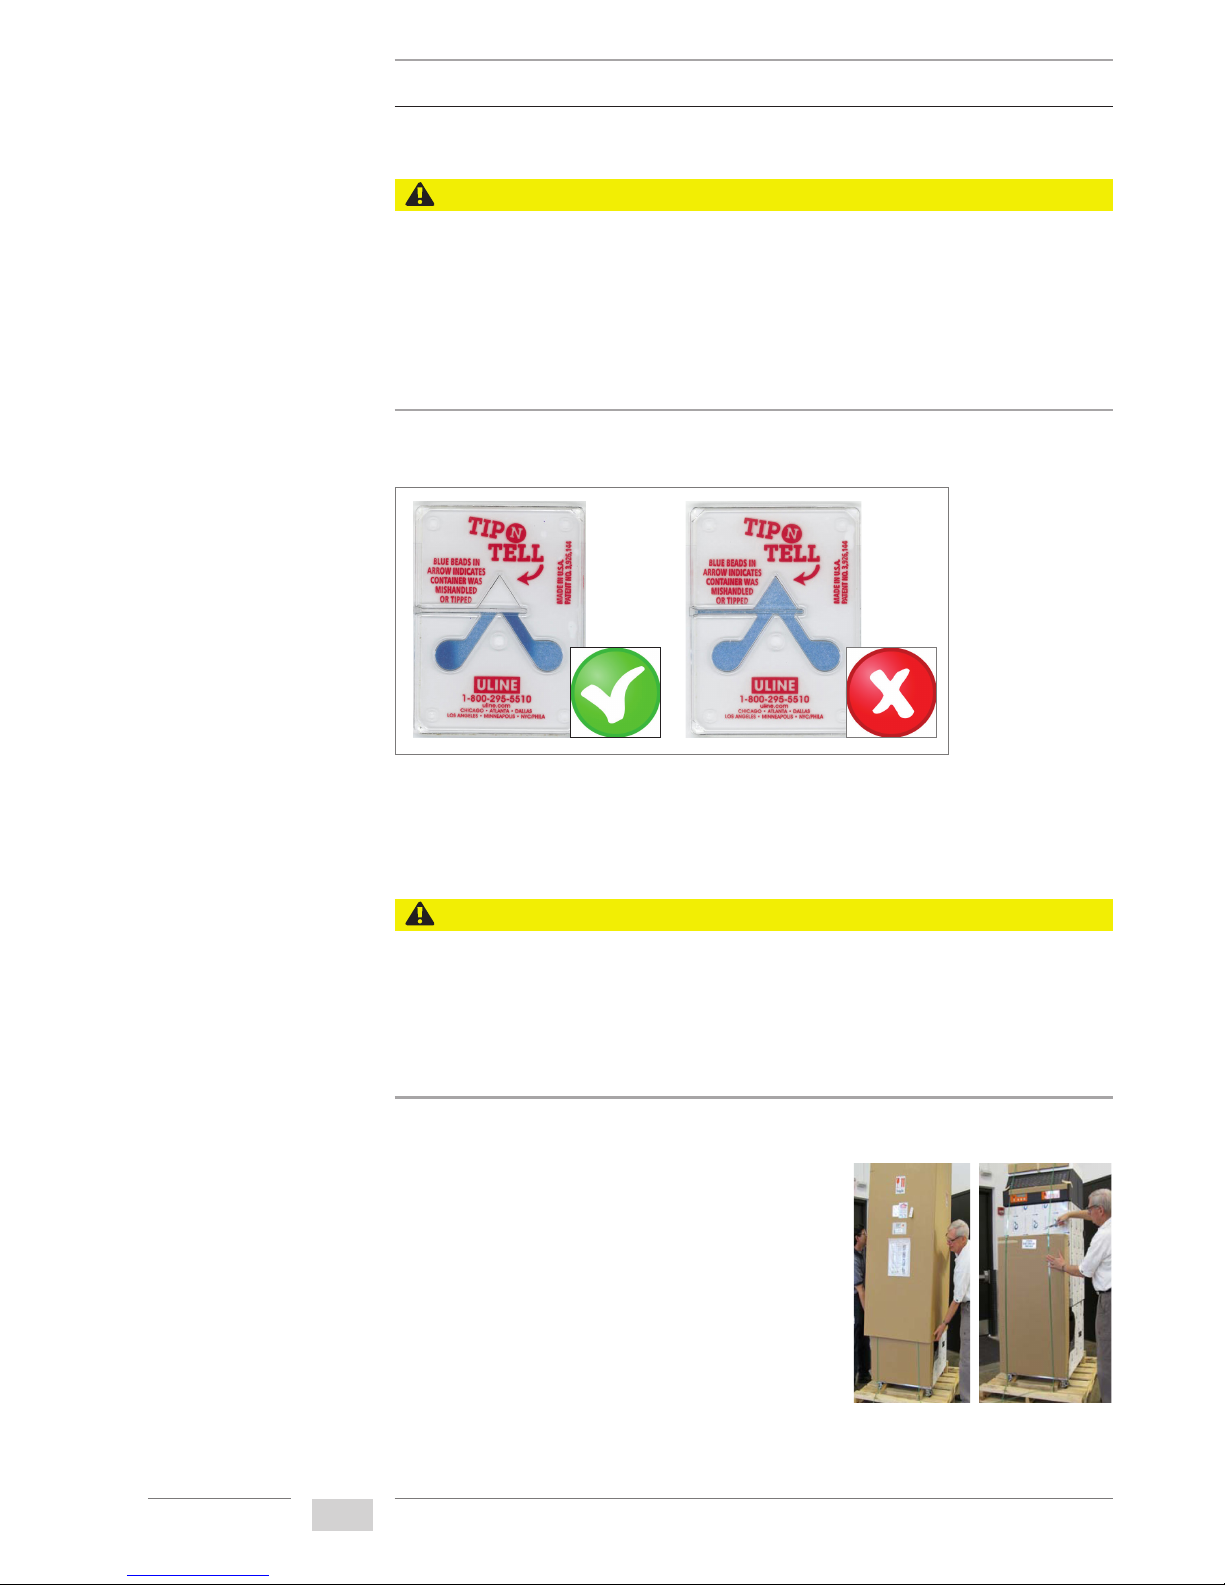
A tilt indicator is mounted on the shipping box. It must show the correct display (see Fig.
01).
- Only unpack the appliance if the tilt indicator shows the correct display.
- Do not unpack the appliance if the tilt indicator display is incorrect. Contact technical customer service.
The straps on the shipping box are under tension. The wood of the pallet can splinter.
- Keep an adequate distance when cutting the straps.
- Wear gloves and goggles when unpacking.
The appliance is very heavy, top heavy and can easily tip. Therefore, the pallet is designed
so the appliance can only be pushed forward off the pallet with the aid of 2 metal ramps.
- Do not unpack the appliance alone. The appliance should be unpacked by two or three people.
- Do not try to push the appliance off the pallet sideways or toward the rear.
CAUTION
Risk of injury!
The condenser ribs are sharp and can cause cutting injuries.
- Do not touch the condenser ribs while cleaning.
- Wear suitable gloves while cleaning.
The cooling lines can become very hot and cause burns.
- Do not touch the cooling lines while cleaning.
- Wear suitable gloves while cleaning.
CAUTION
Danger of molds, microbes and viruses!
If the appliance is inadequately cleaned, food residues will deposit on interior surfaces
(especially in the hoppers) and on the wire racks.
- Adhere to the cleaning intervals.
- Read the “Cleaning” chapter.
Page 8

8
07/2 0 15 Frozen fry dispenser F3D3S/F3D3/ F3D3SP/F3D3P
en
NOTICE
Appliance damage!
Rinsing with water that is too hot can deform the hopper(s).
- Clean the hopper(s) with lukewarm water only.
Components that are frozen together may damage the appliance.
- Never place wet components into the freezer.
- Carefully dry the components after cleaning.
Heavy objects may damage the basket wire racks and the drip pans.
- Only place frying baskets on the basket wire racks and drip pans when the baskets are empty.
NOTICE
Rust on stainless steel surfaces!
Abrasive cleaning agents and sharp objects cause iron residue that can rust.
- Do not use abrasive cleaning agents, steel wool, brushes, scrapers or other sharp objects for
cleaning.
- Use cleaning fleece made of artificial fibers to remove stubborn dirt.
Page 9
9
07/2 0 15
X
Y1
Y3
Y2
Y4
Z4
Z3
Z1
Z2
Y1
Y3
Y2
Y4
X
Z1
Z2 Z3 Z4
Single Lane Dual Lane
* F3D3SP/F3D3P
** F3D3S/F3D3
Frozen fry dispenser F3D3S/F3D3/ F3D3SP/F3D3P
en
Model Single Lane Dual Lane
Noise emission
< 70dB (A) < 70dB (A)
Dimensions (mm)
Width X 558.5 714.3
Depth Y1* 689. 3 689. 3
Depth Y2* 814.1 814.1
Depth Y3** 655.8 655.8
Depth Y4** 781.1 78 1.1
Height Z1 1983.0 1983.0
Height Z2 723.0 723.0
Height Z3 940.0 940.0
Height Z4 320.1 320.1
Weight (kg)
Net -.- -.-
Shipping weight -.- -.-
Electrical connection (F3D3P/F3D3SP)
Voltage 230 V 230 V
Phases 1 Ph/L/N/PE 1 Ph/L/N/PE
Power 0.6 kW 0.6 kW
Frequency 50 Hz 50 Hz
Amperes 3.7 A 3.7 A
The appliance must be installed by qualified specialists according to the manufacturer's instructions and building, food and electrical regulations.
Locally applicable accident prevention regulations must be followed. If accident prevention regulations are not observed, the manufacturer is released from any liability.
INSTALLATION
. TECHNICAL DATA
Page 10

10
07/2 0 15
1
718.390.599, 718.387.897,
718.390.030, 718.387.300,
718.390.792, 718.390.740
2
718.390.031, 7 18.390.586,
718.390.032, 718.390.587,
718.390.793, 7 18.390.741
3
718.390.062, 7 18.390.839,
718.392.147, 718.390.796
Frozen fry dispenser F3D3S/F3D3/ F3D3SP/F3D3P
en
* The dosing quantity calibration can be changed (instructions on calibrating the dosing quantity can be found in
the Service Manual).
Model Single Lane Dual Lane
Electrical connection (F3D3/F3D3S)
Voltage 230 V 120 V 230 V 120 V
Phases 1 Ph/L/N/PE 1 Ph/L/N/PE
Power 1.3 kW 1.3 kW 1.3 kW 1.3 kW
Frequency
50 & 60
Hz
60 Hz
50 & 60
Hz
60 Hz
Amperes 5.5 A 11.0 A 5.5 A 11.0 A
Operating conditions and installation requirements
Max. ambient temperature 33 °C 33 °C
Max. humidity 60 % 60 %
Minimum rear clearance 30mm 30mm
Minimum top clearance 100 mm 100 mm
Minimum side clearance None None
Energy consumption (24 h) (F3D3P/F3D3SP)
4.05 kWh 5.1 kW h
Energy consumption (24 h) (F3D3/F3D3S)
6.2 kWh 7.5 kWh
Cooling system
Closed system, cold wall construction
Refrigerant (F3D3P/F3D3SP)
R290 R290
Refrigerant (F3D3/F3D3S)
R404A R404A
Climate class
N N
Operating temperature
–18 °C to –23 °C –18 °C to –23 °C
French fry capacity
Up to 18kg Up to 26kg
Dispensing rate
Up to 350 baskets
per hour
Up to 700 baskets
per hour
Dispensing accuracy
Plus/minus 10% of the calibration weight
for the large dosing quantity
Load size
1
[Small] 0.75 lb. (340 g) 0.75 lb. (340 g)
[Medium] 1.0 lb. (454 g) 1.0 lb. (454 g)
[Large] 1.5 lb. (680 g) 1.5 lb. (680 g)
Load size
2
[Small] 417 g 417 g
[Medium] 500 g 500 g
[Large] 625 g 625 g
Load size
3
[Small] 280 g 280 g
[Medium] 625 g 625 g
[Large] 833 g 833 g
Page 11
11
07/2 0 15 Frozen fry dispenser F3D3S/F3D3/ F3D3SP/F3D3P
en
Fig. 03: Removing
the accessories box.
Fig. 02: Lifting
off the packaging
box.
CAUTION
Risk of injury!
The straps on the shipping box are under tension. The wood of the pallet can splinter.
- Keep an adequate distance when cutting the straps.
- Wear gloves and goggles when unpacking.
- Cut the plastic straps with scissors.
- Lift off the packaging box (with 2 people, see Fig.
02).
- Cut the plastic straps of the accessories box with
scissors (see Fig. 03).
The accessories box contains removable components. Do not discard.
Procedure:
The tilt indicator must show the correct display (see Fig. 01).
Fig. 01: Tilt indicator:
Correct: The appliance can be
unpacked.
Incorrect: The appliance must not be
unpacked; contact
technical customer
service.
CAUTION
Risk of injury!
A tilt indicator is mounted on the shipping box. The tilt indicator must show the correct
display (see Fig. 01).
- Only unpack the appliance if the tilt indicator shows the correct display.
- Do not unpack the appliance if the tilt indicator display is incorrect. Contact technical customer service.
. REMOVING THE PACKAGING BOX
Page 12

12
07/2 0 15 Frozen fry dispenser F3D3S/F3D3/ F3D3SP/F3D3P
en
Fig. 04: Pushing the appliance off the pallet.
Configuration 2
Configuration 1
Frozen fry dispenser Deep fryers Bagging station
Bagging station Deep fryers Frozen fry dispenser
. REMOVING THE PALLET
- Get two people to grasp the appliance at both sides.
- Carefully push the appliance forward. Hold the pallet
in place. If necessary, carefully shift the appliance
back and forth (see Fig. 04).
Pushing the appliance forward causes 2 metal
ramps to be extended which can be used to
push the appliance off the pallet without requiring a fork lift.
- Push the appliance down along the metal ramps until
the front castors touch the ground.
- Carefully push the appliance off the metal ramps
until all 4 castors are on the floor.
CAUTION
Risk of injury!
The appliance is very heavy, top heavy and can easily tip. Therefore, the pallet is designed
so the appliance can only be pushed forward off the pallet with the aid of 2 metal ramps.
- Do not unpack the appliance alone. The appliance should be unpacked by two or three people.
- Do not try to push the appliance off the pallet sideways or toward the rear.
. SETTING UP THE APPLIANCE
The appliance must be set up horizontally. The ventilation openings in the housing must be kept
clear. Note the minimum clearances (see "Technical data").
The setup location must be suitable for cleaning the appliance and for rolling it forward for rear
access (for maintenance).
The appliance is set up next to the frying station. The following configurations are possible:
Page 13

13
07/2 0 15 Frozen fry dispenser F3D3S/F3D3/ F3D3SP/F3D3P
en
IMPORTANT!
The appliance must be integrated in a potential equalization system. The corresponding clamp
is marked with a label. This connection must comply with regulations and must be tested for
effectiveness.
. CHANGING THE DOOR HINGE
The freezer should open on the side from which the fries are easier to fill.
The appliance is delivered with a right-hinged door by default. Depending on the situation, the
hinges may need to be changed. Instructions on changing the hinges can be found in the Service
Manual.
. ELECTRICAL CONNECTION
Locally applicable electrical installation and safety regulations must be obser ved.
The connection to the electrical supply grid must conform to the relevant standards.
Before establishing the power connection, check that the voltage and frequency given on the
rating plate match the values of the electrical supply grid.
- Move the appliance into position and lock the brakes of the two front castors.
- F3D3P/F3D3SP: Insert the connector into a 230V (50Hz) power socket. The power cable
provided is 3m long.
- F3D3/F3D3S: Insert the connector into a 230V (50 & 60Hz) or 120 V (60 Hz) power socket.
The power cable provided is 3m long.
. FINAL STEPS
Pulling off the protective films
- Carefully pull the protective film off the stainless steel surfaces.
- Remove any glue residues with a suitable solvent.
Page 14

14
07/2 0 15
i
Frozen fry dispenser F3D3S/F3D3/ F3D3SP/F3D3P
en
Cleaning the stainless steel surfaces
NOTICE
Rust on stainless steel surfaces!
Abrasive cleaning agents and sharp objects cause iron residue that can rust.
- Do not use abrasive cleaning agents, steel wool, brushes, scrapers or other sharp objects for
cleaning.
- Use cleaning fleece made of artificial fibers to remove stubborn dirt.
- Clean the stainless steel surfaces with a moist cloth (lukewarm water and neutral soap).
- Wipe clean with clear water.
- Wipe dry thoroughly.
Removing limescale deposits and lime stains
If cleaning with a neutral soap is not sufficient, limescale deposits can be removed with a 25%
solution of vinegar. Give the vinegar solution time to act, rinse with clear water and wipe dry.
Page 15

15
07/2 0 15 Frozen fry dispenser F3D3S/F3D3/ F3D3SP/F3D3P
en
APPLIANCE DESCRIPTION
The F3D3 is used to easily portion frozen fries without a loss in quality. The semi-automatic
equipment ensures that filled frying baskets are made available according to need. The F3D3
Dual Lane is particularly flexible due to the two separately operable dispenser lanes.
R404A or the environmentally friendly R290 is used as the refrigerant. R290 has no damaging influence on the ozone layer (ODP), a negligible greenhouse effect (GWP) and is available
worldwide. Because of its efficient energy properties, R290 is highly suitable as a coolant for
this application. Special precautions must be taken into consideration due to the coolant's high
flammability.
The F3D3 is available in 4 different models:
- F3D3S Single Lane: with one dispenser lane, using R404A refrigerant
- F3D3SP Single Lane: with one dispenser lane, using propane refrigerant
- F3D3 Dual Lane: with two dispenser lanes, using R404A refrigerant
- F3D3P Dual Lane: with two dispenser lanes, using propane refrigerant
Accessories (optional), only for the dual lane models
- Side basket wire rack
- Collecting pan for the side basket wire rack
Scope of delivery (components)
Non-removable components (permanently installed in the freezer):
- Bucket with filler doors
Removable components (in appliance):
- Hopper (Single Lane: 1 unit, Dual Lane: 2 units)
- Deflector (Single Lane: 1 unit, Dual Lane: 2 units)
- Freezer bottom (1 unit)
- Wire rack (1 unit)
Removable components (in accessories box):
- Upper basket wire rack with basket guides (1 unit)
- Lower basket wire rack (1 unit)
- Lower drip pan (1 unit)
- Crumb tray (1 unit) (option)
Page 16

16
07/2 0 15
F3D3S und F3D3SP–Single Lane
Frozen fry dispenser F3D3S/F3D3/ F3D3SP/F3D3P
en
Warning and prohibitory signs
Storage area for
unused baskets
Castors without brake
Castors with brake
Lower drip pan (plastic)
Lower basket wire rack
Upper basket wire rack with basket guide
Freezer bottom
Handles for manually turning the drum
Deflector (rubber)
Hopper with
drum
Control panel of the
dispenser lane
Access plates to condenser
F3D3SP Type label
Compressor cabinet
Power switch
F3D3S type label behind
the air filter
Crumb Tray (option)
Page 17

17
07/2 0 15
F3D3 und F3D3P–Dual Lane
Frozen fry dispenser F3D3S/F3D3/ F3D3SP/F3D3P
en
Warning and prohibitory signs
Storage area for
unused baskets
Castors without brake
Castors with brake
Lower drip pan (plastic)
Lower basket wire rack
Upper basket wire rack with basket guides
Freezer bottom
Handles for manually
turning the drum
Deflector (rubber)
Hopper with
drum
Control panels of the
dispenser lanes
Access plates to condenser
F3D3P Type label
Compressor cabinet
Power switch
F3D3S type label behind
the air filter
Crumb Tray (option)
Wire rack
Page 18

18
07/2 0 15 Frozen fry dispenser F3D3S/F3D3/ F3D3SP/F3D3P
en
ACTION–1 button: Performs the actions that are displayed on the screen
– Inc (= increase)
ATTENTION symbol (with 3 LEDs at the corners):
Indicates the status of the dispenser lane:
- Lamps are off: The appliance is ready to operate.
- Lamps light up: Indicates a low filling level. The appliance continues to dispense fries.
- Lamps flash: Indicates an error. The screen displays an error message.
BASKET symbol (with 7 green
LEDs):
When the BASKET symbol
lights up, the dispenser lane is
ready to dispense the product
into the frying basket.
ACTION–3 button: Performs the actions that are displayed on the screen – OK (= confirm), Reset, 2 LEDs
flash!
ACTION–2 button: Performs the actions displayed on the screen – Dec
(= decrease).
LCD screen:
- Displays the current operating
temperature of the freezer.
- Displays error messages and possible causes.
- Displays the appliance setup and
diagnosis programs with possible
measures or decision options.
ON/OFF button: For switching on the
dispenser lane. Press for 4 seconds until
both LEDs light up.
Control panel for the dispenser lane
There is one control panel for each dispenser lane. The dispenser lanes can be operated separately. If necessary, one of the dispenser lanes can be switched off (F3D3P–Dual Lane).
. BEFORE STARTING UP FOR THE FIRST TIME
Before starting up for the first time, all components of the appliance must be cleaned.
Cleaning removable components
The removable components are located, firstly, in the appliance itself and, secondly, in the accessories box (see scope of delivery).
Page 19

19
07/2 0 15
i
Frozen fry dispenser F3D3S/F3D3/ F3D3SP/F3D3P
en
. DAILY PROCEDURE FOR STARTING UP/SWITCHING
ON
Assembling the appliance
NOTICE
Appliance damage!
Components that are frozen together may damage the appliance.
- Never place wet components into the freezer.
NOTICE
Appliance damage!
Rinsing with water that is too hot can deform the hopper(s).
- Clean the hopper(s) with lukewarm water only.
Components that are frozen together may damage the appliance.
- Never place wet components into the freezer.
- Carefully dry the components after cleaning.
- Wash and disinfect all components in the rinsing sink one after the other.
- Set all components upright to air dry.
- Place the hopper upside down so the water can drain out of it.
Cleaning the interior and non-removable components
- Wipe off and disinfect the refrigerator and the bucket (see Fig. 05) with a cloth.
- In particular, wipe off and disinfect the front and back of the filler doors and the entire bucket.
- Carefully wipe all parts dry with a sterile fabric.
Tip:
The filler doors of the bucket are spring-loaded and can be opened by pushing on them carefully.
All parts of the bucket are more easily accessible for cleaning with the filler doors fully open.
Fig. 05: Bucket with filler doors
Page 20

20
07/2 0 15
i
Frozen fry dispenser F3D3S/F3D3/ F3D3SP/F3D3P
en
Roll the appliance into position and block the brakes of
the front castors.
OptionOption
Mount the side basket wire
rack (if present)
Position the collecting pan
under the basket wire rack.
Place the upper basket wire
rack onto the cross supports.
Tip:
If the hub is not fully engaged,
the hopper will not be in the
right position and the freezer
will not be able to close.
In this case, turn the drum
slightly at the handle until the
hub fully engages.
Insert the hopper. Ensure that
the hub is fully engaged in the
drum. Turn the drum at the
handle if necessary until the
hub engages.
Slide the deflector into the
hopper with the short side
first.
Insert the lower basket wire
rack.
Insert the lower drip pan.
Insert the freezer bottom
with the right orientation. The
slanted surface must face
down and toward the rear.
Press it down.
Insert the wire rack (in the
freezer above the hopper(s)).
Only for dual lane models
Insert the crumb tray.
Page 21

21
07/2 0 15
!
Frozen fry dispenser F3D3S/F3D3/ F3D3SP/F3D3P
en
Close the freezer.Repeat steps 2 and 3 until
the hopper(s) is/are full (see
"Technical data", french fry
capacity).
Carefully pour the fries into
the hopper from above, being
careful that the fries do not
break. Hold the bag in such a
way that most fries fall parallel to the drum.
Fully tear open the bag hold-
ing the frozen fries. Be careful
not to break or crush the
fries.
. FILLING WITH FRIES
IMPORTANT!
The products should not be filled until the required operating temperature is reached.
Fig. 06: Display with temperature
(actual value).
Switching on/letting cool to the operating temperature
- Close the freezer.
- Switch the cooling system on at the power switch. The indicator lamp in the switch lights up.
The cooling process begins. The current temperature is shown on the display as the
freezer cools (see Fig. 06). After approx. 3 hours, the appliance will have reached the
required operating temperature (–18 to –23°C). Depending on the ambient conditions
(room temperature and humidity), cooling may take longer.
NOTICE
Ice on the freezer walls
prevents the appliance
from reaching its operating
temperature.
- Do not leave the freezer
door open longer than is
necessary for filling.
- Defrost the appliance daily
(see the "Cleaning" chapter).
Remove the wire rack.
Check the hopper. Remove
any product remnants.
Page 22

22
07/2 0 15
i
Frozen fry dispenser F3D3S/F3D3/ F3D3SP/F3D3P
en
Option
Remove the filled basket and
immediately place it into the
de ep fryer.
The screen displays [Filling].
The filling process is displayed
on the screen by a growing,
horizontal bar.
Place an empty deep fryer
basket under the dispenser
and push it back against the
dispensing pressure switch.
The basket is filled.
The appliance is ready to dispense fries when the BASKET
symbol lights up. [Ready]
appears on the screen.
Change the load size if necessary. The load size is set to
[small] by default.
Press the ON/OFF button for
4 seconds until the button
LEDs light up. The dispenser
lane is switched on.
. DISPENSING FRIES
NOTICE
Loss in quality!
The product thaws quickly in the filled frying basket. The filled baskets should not be
stored on the storage areas of the frozen fry dispensers or on the deep fryer for long
periods.
- Only fill a basket if the deep fryer is ready to use.
Setting the load size
The current load size is
displayed at the bottom left
of the screen (e.g. small =
standard)
Press the ACTION–3 button.
The display changes to the
next load size (e.g. medium).
Press until the desired load
size is displayed on the
screen.
Page 23

23
07/2 0 15
i
Frozen fry dispenser F3D3S/F3D3/ F3D3SP/F3D3P
en
1. Press the ON/OFF button for 4 seconds until the button LEDs go out. The dispenser lane is
switched off.
2. Press the power switch to disconnect the appliance from the power supply. The indicator
lamp in the switch goes out.
3. Take the hopper out of the appliance.
4. Fill the remaining fries from the hopper into a suitable storage container and store them in
the freezer room.
Setting down the empty frying baskets
NOTICE
Appliance damage!
Heavy objects may damage the basket wire racks and the drip pans.
- Only place frying baskets on the basket wire racks and drip pans when the baskets are empty.
Empty frying baskets can be set down on the intended area in the appliance until they are
refilled:
Location Single Lane Dual Lane
Lower basket wire rack 3 baskets 4 baskets
Upper basket wire rack (+
dispensing stations)
2 (+1) baskets 2 (+2) baskets
Side basket wire rack (if
present)
Tip:
In restaurants with continuous opening hours, the freezer should be switched off for 2-3 hours
daily.
It is recommended to keep the filling quantity of the hopper relatively low before closing the
restaurant for the day so that only a small quantity of fries needs to be kept in the freezer room
overnight.
For a more convenient timing of the cleaning process, the F3D3/F3D3P–Dual Lane offers the
option of switching off only one of the two dispenser lanes before closing for the day. The components can then be taken out of the appliance and cleaned.
. DAILY PROCEDURE FOR DECOMMISSIONING/
SWITCHING OFF
The appliance must be emptied, defrosted and cleaned every day after closing.
Page 24

24
07/2 0 15 Frozen fry dispenser F3D3S/F3D3/ F3D3SP/F3D3P
en
NOTICE
Damage!
The freezer should only be defrosted passively.
- Switch off the appliance at the power switch and leave the door open.
- Never scratch the ice layers off the freezer walls to accelerate the defrosting process.
3. Let the appliance defrost with the door open.
4. Remove the collecting pan of the side basket wire rack (if present).
DANGER
Risk of fatal injury from electric shock!
- Before cleaning: Disconnect the appliance from the power supply.
Moisture on the electrical components can lead to a short circuit and to serious or even
fatal injury on contact.
- Never clean the appliance with a direct water jet, a sponge or a high-pressure water jet.
CLEANING
. DEFROSTING
The appliance must be disconnected from the power supply. No products must be located inside
the appliance.
1. Take all removable components except for the bottom drip pan out of the appliance. The drip
pan will catch the dripping melt water.
2. Remove the deflector from the hopper(s).
Page 25

25
07/2 0 15
i
Frozen fry dispenser F3D3S/F3D3/ F3D3SP/F3D3P
en
- Remove the lower drip pan, wash it in the rinsing sink and set it upright to dry.
- Wipe off and disinfect the entire basket wire rack area with the cross supports, side walls and
the rear wall using a cloth.
- Thoroughly dry the interior and the basket wire rack area with a sterile cloth.
- Close the freezer door.
Tip:
The filler doors of the bucket are spring-loaded and can be opened by pushing on them carefully.
All parts of the bucket are more easily accessible for cleaning with the filler doors fully open.
Fig. 07: Bucket with filler doors
. DAILY CLEANING PROCEDURE
NOTICE
Appliance damage!
Rinsing with water that is too hot can deform the hopper(s).
- Clean the hopper(s) with lukewarm water only.
Components that are frozen together may damage the appliance.
- Never place wet components into the freezer.
- Carefully dry the components after cleaning.
- Wash and disinfect all components taken out of the appliance in the rinsing sink one after the
othe r.
- Set all components upright to air dry.
- Place the hopper upside down so the water can drain out of it.
After the appliance is fully defrosted:
- Wipe off and disinfect the refrigerator and the bucket (see Fig. 07) with a cloth.
- In particular, wipe off and disinfect the front and back of the filler doors and the entire bucket.
Page 26

26
07/2 0 15
!
Frozen fry dispenser F3D3S/F3D3/ F3D3SP/F3D3P
en
IMPORTANT!
Clean condensers have a major influence on the service life of the compressor.
- Remove the access plate to the condenser.
- Remove the filter from the appliance.
- Clean the filter in the rinsing sink using a household dishwashing detergent.
- Rinse with clear water.
- Let dr y.
- Insert the filter.
- Close the access plate.
DANGER
Risk of fatal injury from electric shock!
- Before performing maintenance: Disconnect the appliance from the power supply.
- Have the necessary repairs carried out by a qualified specialist with original spare parts.
PREVENTIVE MAINTENANCE
Dishwashing detergent
Required tools/material
1 x monthly
Cleaning interval
. CLEANING THE FILTER
. CLEANING THE CONDENSER RIBS
Page 27

27
07/2 0 15 Frozen fry dispenser F3D3S/F3D3/ F3D3SP/F3D3P
en
- Remove the access plate to the condenser.
- Remove the filter from the appliance.
- Free the condenser ribs of dust and dirt using a brush with soft bristles or a vacuum cleaner.
- Insert the filter.
- Close the access plate.
CAUTION
Risk of injury!
The condenser ribs are sharp. Contact may result in cutting injuries.
- Do not touch the condenser ribs.
- Wear gloves if necessary.
Brush with soft bristles
Alternative:
Vacuum cleaner
Required tools/material
1 x monthly
Cleaning interval
. CUSTOMER SERVICE (ELECTRIC COMPONENTS)
- In case of malfunction, contact technical customer service.
- Please provide the item number and type. This information is located on the rating plate.
Page 28

28
07/2 0 15 Frozen fry dispenser F3D3S/F3D3/ F3D3SP/F3D3P
en
- Work on cooling systems must never be carried out in rooms at the restaurant.
- The appliance may be repaired in a suitable workshop. It is important to ensure that there is
sufficient ventilation!
- The appliance may only be kept outside in the open air for the duration of the work on the
cooling system.
- The work may only be carried out by a qualified (certified) specialist company. The relevant
local standards and laws for this qualification are valid.
Certain requirements apply to work (analysis/repair/maintenance) on cooling systems that must
be strictly observed. If these requirements are not fulfilled then this will result in the expiry of
the guarantee cover and the manufacturer accepts no liability.
WARNING
Danger of fire!
The cooling circuit is filled with R290 (propane). Propane is highly flammable.
Work (analysis/repair/maintenance) on the cooling system is only allowed under certain
conditions!
- Never repair the cooling system yourself!
- If you experience problems, contact the technical customer service. The appliance may only
be repaired by a refrigeration technician under certain conditions!
. CUSTOMER SERVICE (COOLING SYSTEM)*
* only F3D3SP/F3D3P
Page 29

29
07/2 0 15 Frozen fry dispenser F3D3S/F3D3/ F3D3SP/F3D3P
en
Problem Cause Remedy
1
The power
switch is
switched on but
the freezer is not
running.
The connector is not plugged into
the socket.
Connect the power connector (switch on the power switch).
The power socket is faulty.
Plug the connector into another socket. Have the faulty power
socket repaired by an electrician.
The fuse tripped. Check if the fuse tripped. Reset it if necessary.
Error message Problem Remedies
Filling level in hopper is
low (enough for filling 3
to 4 baskets)
Fill the hopper with fries.
ATTENTION: If the machine continues dispensing until the hopper
is almost empty, the filling process is interrupted and error message
Err04 is displayed.
Bucket error Call technical customer service.
1. The hopper is empty
2. There is a clump
of fries (bridge) in the
hopper
1. Fill with fries.
or
2. Check the hopper for clumped fries and release/remove the bridge if
necessary.
3. Press [Reset] (ACTION–3 button).
The filler doors are
blocked
1. Check the filler doors for blockage.
2. Press [Reset] (ACTION–3 button).
Load cell problem Call technical customer service.
MALFUNCTIONS/TROUBLESHOOTING
. ERROR MESSAGES
The error messages are displayed on the control panel screen.
. MALFUNCTIONS
Page 30

30
07/2 0 15 Frozen fry dispenser F3D3S/F3D3/ F3D3SP/F3D3P
en
Problem Cause Remedy
2
The freezer is
running but
cannot reach the
required operating temperature
(-18 °C).
Ice formation on the inside walls,
especially on the temperature
sensor.
Take all products and components out of the appliance and defrost the appliance (see the "Cleaning" chapter). Recommendation: To avoid ice formation, do not keep the freezer door open
longer than necessary. Defrost daily.
The filter is soiled. Clean the filter (see the "Preventive maintenance" chapter).
The condenser ribs are soiled.
Clean the condenser ribs (see the "Preventive maintenance"
chapter).
None of the measures taken
correct the problem (defrosting,
cleaning of the filter and condenser
ribs).
Call technical customer service.
3
The dispenser
lanes cannot be
switched on.
No line power.
Switch on the power switch. (Start up the appliance, see the
"Daily startup" chapter).
Plug in the connector (start up the appliance, see the "Daily
procedure for starting up" chapter).
The ON/OFF button was not
pressed long enough.
Press the ON/OFF button for 4 seconds until the button LEDs
light up.
4
The freezer door
does not close
properly.
The hopper(s) is/are not properly
engaged in the drum hub.
Press the hopper into the appliance, turning the drum at the
handle if necessary.
5
The drum does
not turn.
The hopper is empty. The screen
displays the error message Err04
and the Action–3 [Reset] button
flashes.
Fill the hopper with fries. Press [Reset]. The filling process
begins.
In the hopper, fries are baked
together to form a "bridge". The
screen displays the error message
Err04 and the ACTION–3 [Reset]
button flashes.
Shake the hopper and redistribute the fries to break up the
bridge. Proceed carefully so as not to break the fries. Press
[Reset]. The filling process begins.
6
The lifting module does not go
up or down.
The lift motor is faulty. Call technical customer service.
7
The basket
symbol does not
light up.
The dispenser lane is switched off.
Press the ON/OFF button for 4 seconds until the button LEDs
light up.
The required loading size was not
reached.
See no. 12
8
The ACTION–3
button [Reset]
flashes.
The filling process is aborted prematurely.
Press [Reset]. The filling process begins.
In the hopper, fries are baked
together to form a "bridge". The
screen displays error message
Err04 and the ACTION–3 [Reset]
button flashes.
Shake the hopper and redistribute the fries to break up the
bridge. Proceed carefully so as not to break the fries.
Page 31

31
07/2 0 15 Frozen fry dispenser F3D3S/F3D3/ F3D3SP/F3D3P
en
Problem Cause Remedy
9
The appliance
does not dispense the product and error
message Err04
is displayed.
The hopper is empty.
Fill the hopper with fries. Press [Reset]. The filling process
begins.
In the hopper, the fries are baked
together to form a "bridge" (very
hard).
Shake the hopper and redistribute the fries to break up the
bridge. Proceed carefully so as not to break the fries. If necessary, remove very hard clumps. Press [Reset]. The filling
process begins.
10
The appliance does not
dispense the
product and
error message
Err02 or Err07 is
displayed.
The bucket is missing. Insert the bucket.
The filler door motor is faulty. Call technical customer service.
11
The [Low product warning]
error message
appears.
The filling level in the hopper is low
(only 3–4 fillings).
Fill the hopper with fries. Attention: If the machine continues
dispensing until the hopper is empty, the filling process is
aborted and error message Err04 is displayed.
The frozen fries created a hollow
space around the sensor in the
hopper.
Shake the hopper and redistribute the fries to close the hollow
space. Proceed carefully so as not to break the fries.
12
The hopper is
empty but error
message Err04
is not displayed.
The "Low product" sensor is soiled. Clean the "Low product" sensor.
The "Low product" sensor is faulty. Call technical customer service.
13
The loading
weights are
permanently
incorrect (either
too light or too
heavy).
The deflector is missing from the
hopper.
Slide in the deflector.
The deflector is damaged (e.g.
cracked on the side).
Replace the deflector. (The deflector is a wear part and should
be replaced in good time).
The freezer bottom is not correctly
positioned.
Take out the freezer bottom and insert it correctly.
14
The filler doors
do not open to
dispense fries.
The basket symbol does not light
up.
Wait for the BASKET symbol to light up. The fries are now
dispensed.
The basket wire rack is not positioned correctly.
Take out the basket wire rack and insert it correctly.
The Err04 and [Low product warn-
ing] error messages appear.
Fill the hopper with fries.
The ACTION–3 button [Reset]
flashes.
See error 8.
15
The filler doors
do not close after the fries are
dispensed.
Fries are jammed in the filler
doors.
Remove all fries from the filler doors.
The return spring of the filler door
is broken.
Close the filler doors manually. If the filler doors open again by
themselves, call technical customer service.
The filler door sensor is faulty.
If the filler doors cannot be closed manually, call technical
customer service.
16
The load size
cannot be
changed on the
operator panel.
The filling process is not yet finished.
The filling process is finished when the BASKET symbol LEDs
light up and [Ready] appears on the screen. The load size can
now be changed.
Page 32

32
07/2 0 15 Frozen fry dispenser F3D3S/F3D3/ F3D3SP/F3D3P
en
Disassembly of the appliance must be per formed by qualified specialists according to the manufacturer's instructions.
- Follow the local safety regulations.
- Dispose of the appliance in accordance with local regulations.
- It is essential that you observe the laws and regulations for the disposal of environmentally
harmful substances. Obtain detailed information about their disposal – such substances
include refrigerants or plastics.
- Before disassembly, all food remnants must be removed and the appliance must be thoroughly
cleaned.
DANGER
Risk of fatal injury from electric shock!
- Ensure that the appliance is disconnected from the power supply.
DECOMMISSIONING (STORAGE/DISPOSAL)
. STORAGE
Storage conditions
The storage area must be dry and well ventilated.
Procedure
- Disconnect the appliance from the power supply.
- Remove all food and beverages from the appliance.
- Clean the interior and the accessories.
- Using a cloth, apply a thin protective film of Vaseline oil onto the metal surfaces.
- Leave the doors and drawers slightly open to guarantee good air circulation.
. DISPOSAL
Page 33

33
07/2 0 15
!
Frozen fry dispenser F3D3S/F3D3/ F3D3SP/F3D3P
en
IMPORTANT!
Releasing refrigerant into the atmosphere is strictly forbidden!
Special regulations apply when disposing of refrigerant:
Special regulations apply when disposing of used
electrical appliances:
The customer assumes responsibility for proper disposal of the delivered product after the end
of its service life at the customer's own expense, in accordance with legal regulations. The
customer releases Franke from the obligations under Section 10, Paragraph 2, of the German
Electrical and Electronic Equipment Act (ElektroG) and claims by third parties in this connection.
The entitlement by Franke to be released by the customer is not subject to any statute of limitations and ends after utilization with proper disposal by the customer. If the product is passed
on to a third party, the customer must ensure that the disposal requirement is fulfilled upon the
end of service life. In the event that the customer requests disposal by Franke, Franke GmbH will
prepare a quotation for the customer for the return and disposal of the waste appliance at the
time of disposal. The customer will be charged for transport and disposal costs.
The refrigerant used is either R404A or R290. The necessary specifications on handling the
coolant are given in the manufacturer's data sheet. If you would like more information about this
product, please contact the manufacturer:
R
Linde AG
Werksgruppe Technische Gase
Seitnerstrasse 70
82049 Höllriegelskreuth
Germany
Tel. +49 (0) 89/7446–0
Ra
Arkema Direction de la Communication
Financière
4-8, cours Michelet – La Défense 10
92091 Paris La Défense Cedex
France
Tel. +33 (0) 1 49 00 74 63
Fax +33 (0) 1 49 00 50 24
Page 34

G:\FCE_Engineering\100_user_manuals\GM\Frozen_ fry_dispenser_F3D\FrozenFr yDispenserF3D_allversions.indd
Russia
... and over 30 Market Managers
throughout Europe
Poland
United Kingdom
Germany
Headquarter/Sales Office/Logistics
Sales Office/Logistics Sales Office/Logistics
Sales Office Production/Sales Office/Logistics
Franke Foodservice Systems GmbH
Jurastrasse 3
797 13 Bad Säckingen
Germany
Phone: +49 7761 5533 0
www.franke.de
Franke Foodservice Systems GmbH
Speicherstr. 4
44809 Bochum
Germany
Phone: +49 234 3380 0
www.franke.de
Franke Neva LLC
Volgogradsky prospect 43, Building 3
109316 Moscow
Russia
Phone: +7 495 225 5658
www.franke.ru
Franke Foodservice Systems
Poland Sp. z o. o.
ul. Polnocna 11
81-029 Gdynia
Poland
Phone: +48 58 660 9100
www.franke.pl
Franke Foodservice Systems GmbH
Unit 2A Broom Business Park
Bridge Way
Chesterfield
S419QG
UK
Phone: +44 1246 264280
www.franke.co.uk
LocationsLocations
en
 Loading...