

Page 1
F3D Frozen French Fry Dispenser
Operating Manual
Page 2

Table of Contents
Diagram: Key Components Page 3
1
Installation Page 4
2
Temperature Setting Page 6
3
Store-Opening Procedure Page 7
4
Reading the Control Panel Page 8
5
Dispensing MacFries Page 9
6
Store-Closing Procedure Page 11
7
Preventative Maintenance Page 13
8
Basic Troubleshooting: Freezer Page 14
9
Basic Troubleshooting: Dispenser Page 15
10
Replacement Parts List Page 17
11
Specifications Page 20
F3D Operating Manual Page 2
Page 3
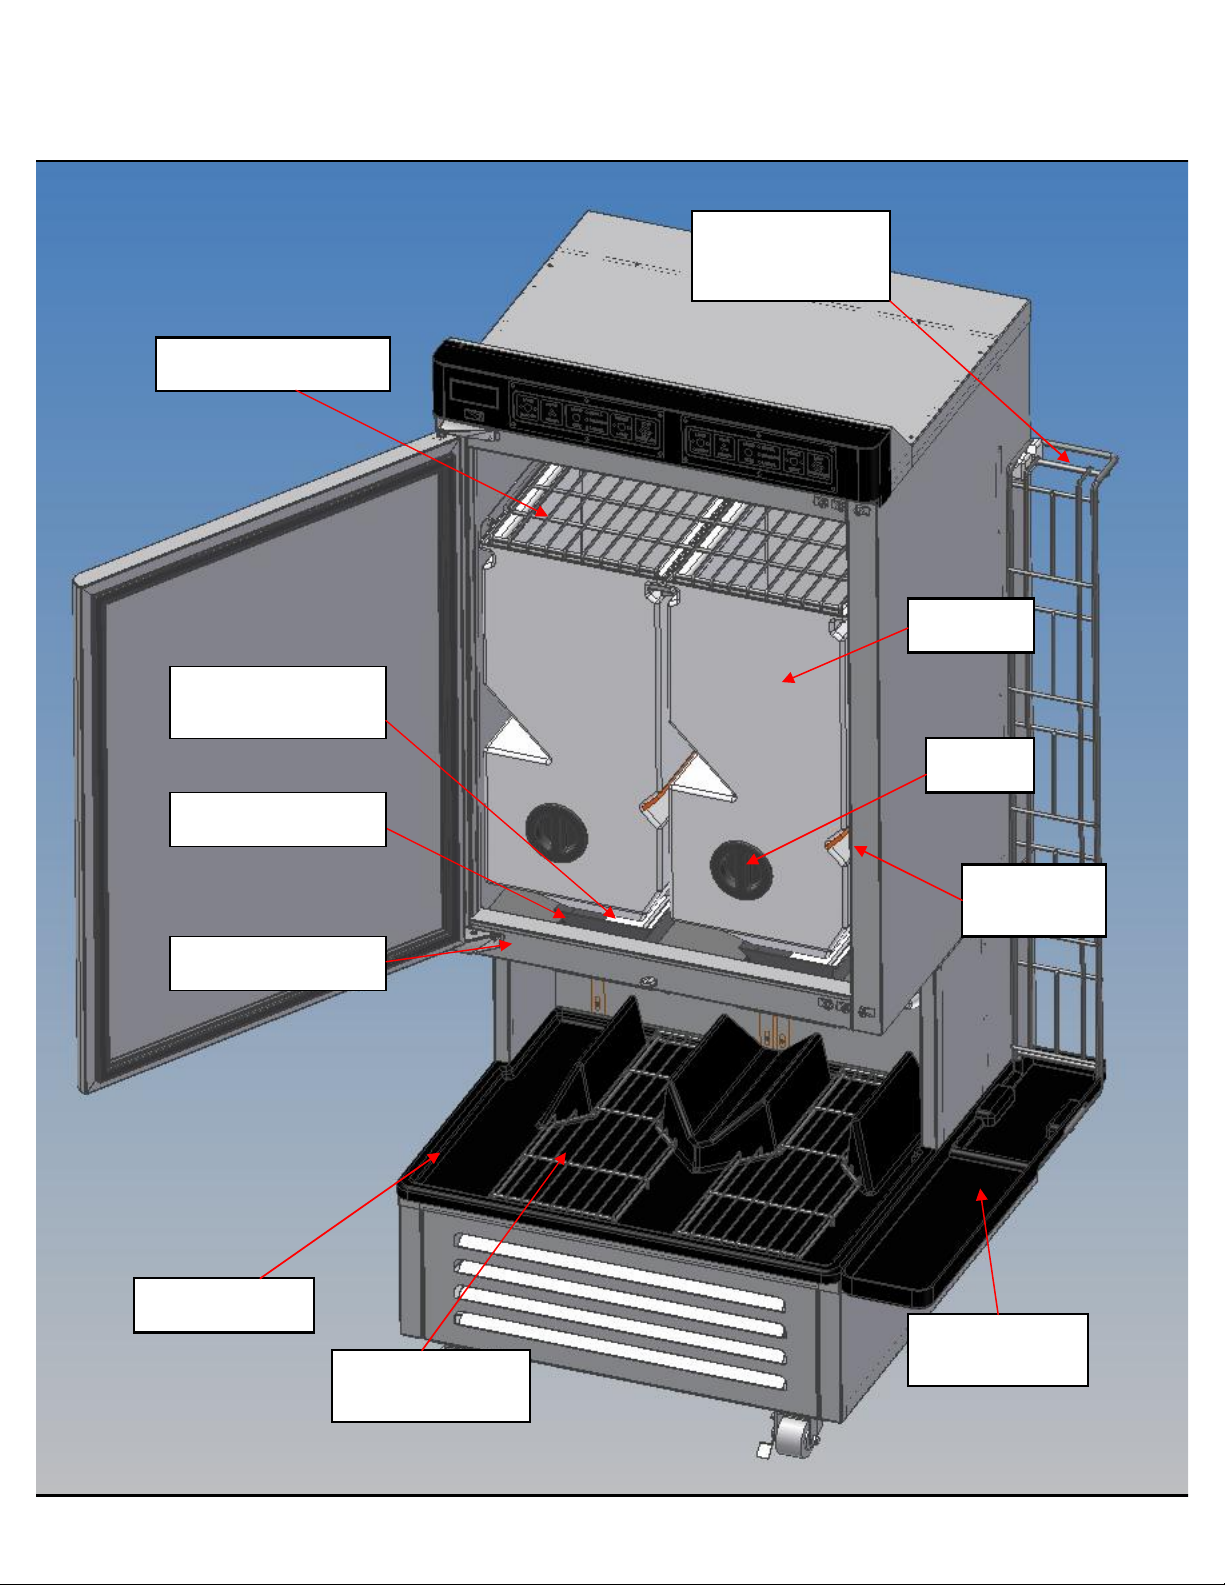
Hash Brown Rack
Franke F3D
Key
Components
Product Chute
Doors
Side Basket
Storage Rack
Hopper
Drum
Product Chutes
Dispense Area
Main Drip Tray
Wire Basket
Guide
Rubber
Deflector
Side Basket
Drip Tray
F3D Operating Manual Page 3
Page 4
1
Installation
(Model F3D 2.0 Dual Lane Model)
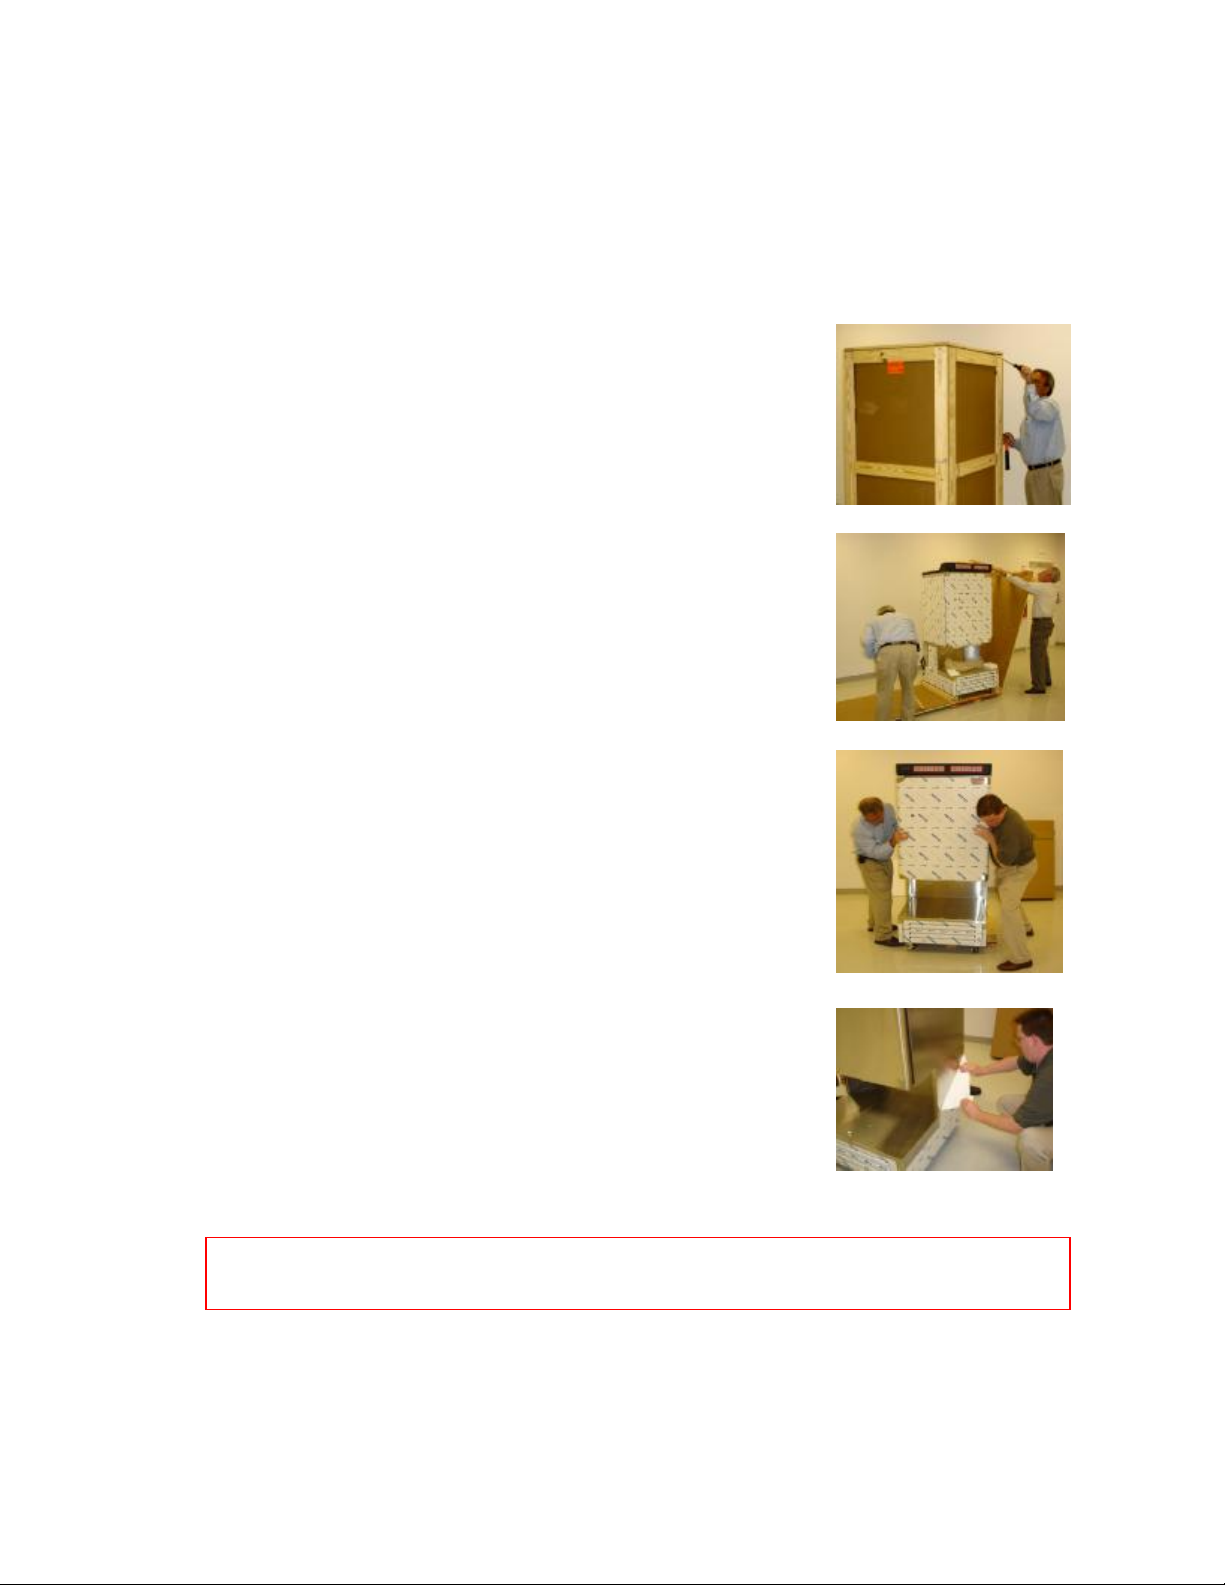
1 Uncrate the Unit
§ Using a large screwdriver and/or prybar,
loosen and remove the wooden crate top.
§ Loosen and remove the crate front panel. Be
careful not to scratch the dispenser s cabinet
with your tools.
§ Remove the carton of accessories and set
aside.
§ Loosen and remove the crate rear panel.
§ Pull the crate side panels apart. The wooden
cross-members stay attached to, and come
out with, the side panels.
2 Slide Unit Out
You ll need the help of one or two people to
finish uncrating.
§ With a person on each side of the unit, grasp
the dispenser at the sides.
§ Keeping the crate bottom stationary, slide the
unit toward the front. Use a gentle rocking
motion as needed.
§ When the front wheels are on the floor, keep
pushing the unit forward until all four wheels
are off the crate bottom.
Caution! The crate is built to allow the unit to slide out from the
front ONLY. Pushing toward the rear may cause the unit to tip over.
§ Peel protective white adhesive film from all stainless steel surfaces.
F3D Operating Manual Page 4
Page 5
3 Position the Unit
Usually, the F3D is positioned at the right-hand side of the fry station.
The fry station line-up is as follows:
Fry Bagging Station ß Fryers ß F3D Dispenser
The fry basket storage rack must be mounted onto the side of the
dispenser. It can be placed on either the left or right side, but should
be placed on the side closest to the fryers.
Roll the unit into place and connect it to a 110V power outlet. A sixfoot power cord with plug is provided.
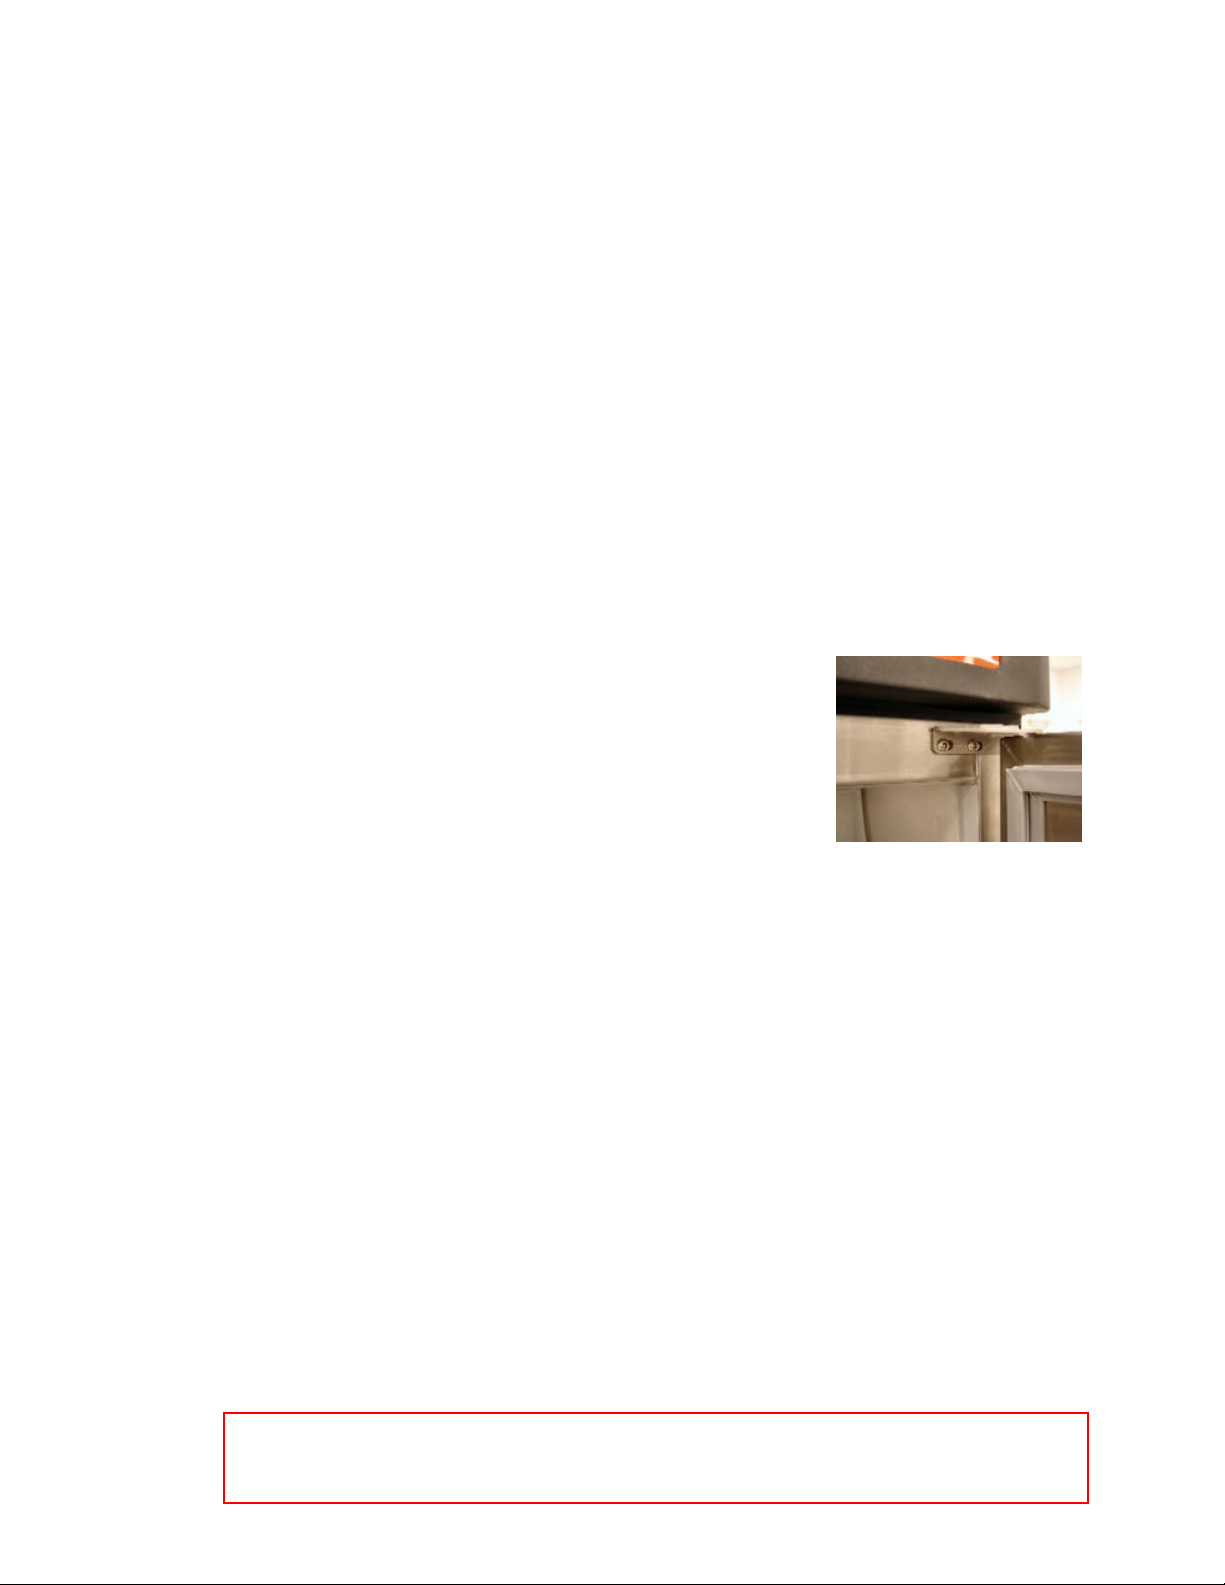
4 Check Door Hinges
Check the location of the freezer door hinges.
The hinges should be on the side of the dispenser
farthest from the fryers. If the dispenser is not
received this way, the hinges will need to be
removed and mounted on the correct side. (See
the Technical Manual for instructions.)
5 Unpack Removable Components
Open the accessories carton and unpack the following items (all
pictured in the diagram at the front of this booklet):
§ Hoppers
§ Product chutes (packed inside the hoppers)
§ Wire basket guides
§ Rubber deflectors
§ Freezer bottom
§ Main drip tray
§ Side basket storage rack
§ Side basket drip tray
6 Wash and Sanitize Removable Components
Place all loose components in the sink; wash and sanitize each item.
F3D Operating Manual Page 5
Page 6

Note! Use only warm water, not hot water, when cleaning the
hoppers. Excessively hot water can cause the hoppers to warp.
7 Drip-Dry Components
Place components so that they may drip-dry.
Leave the hoppers on a flat, clean surface to drip-dry!NOT the top of
the sharp wall between sink bowls.
Note! Do not replace WET parts in the freezer. The parts could
freeze together and cause damage to the machine.
8 Clean Non-Removable Components
§ Wipe down, sanitize and dry the freezer interior and the chute
doors. Tip: The chute door frames are hinged. You can gently
push them open to fully clean the chute doors and door frames.
§ Wipe down and sanitize the side basket hanger rack.
§ Wipe down and sanitize the surface beneath the drip tray.
§ Close the freezer door.
2
Temperature Setting
The F3D s internal, adjustable thermostat maintains the correct MacFries
storage temperature range (0° to "10° F.). This thermostat is properly
calibrated and tested at the factory prior to shipment from Franke.
A digital thermometer on the control panel displays the actual operating
temperature. If adjustment becomes necessary, you can access the
thermostat by removing the bottom front louvered panel.
F3D Operating Manual Page 6
Page 7
3
Start-Up Procedure
1 Dry All Parts
Using a clean, sanitized towel, wipe down the freezer s interior, chute
doors, and the dispense area to remove any remaining moisture.
Make sure all that all components that were removed for cleaning are
completely dry before installing them.
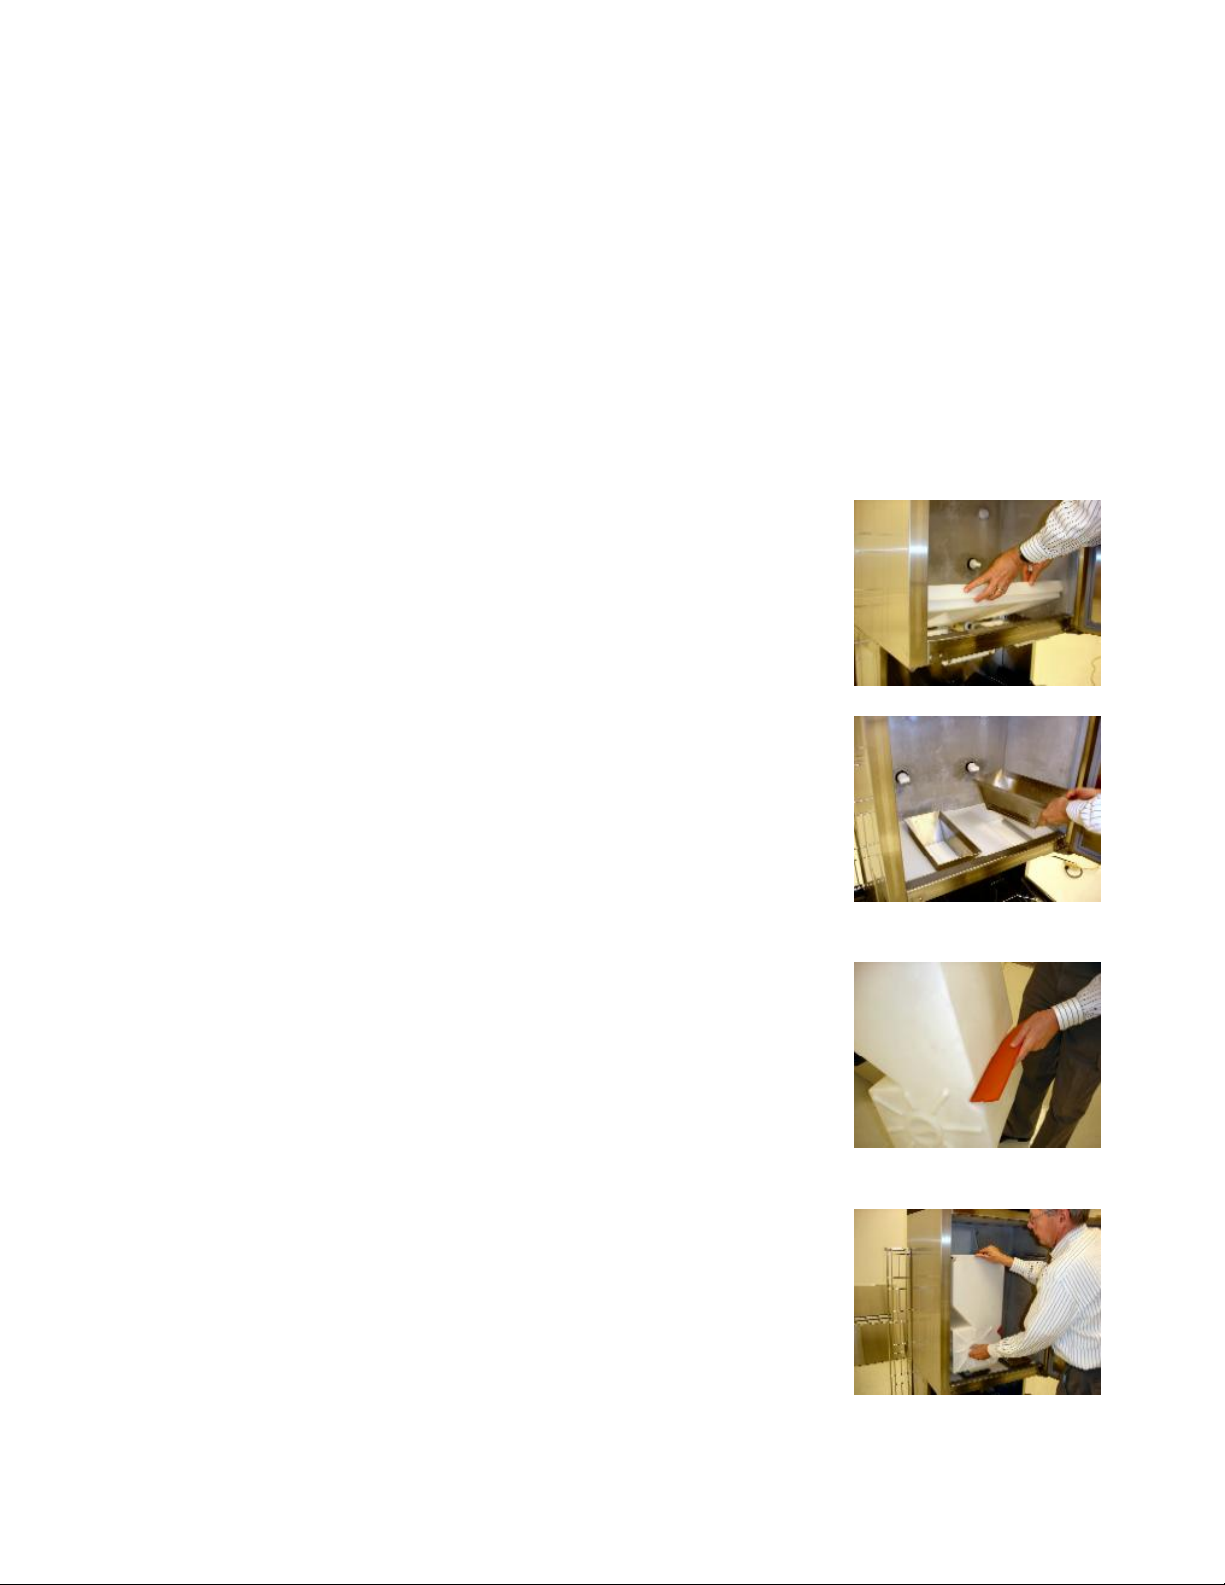
2 Assemble Unit
Install all removable components as follows:
§ Place the main drip tray and wire basket
guides into the dispense area.
§ Hang the side basket rack storage rack onto
supports on the cabinet s left side.
§ Place the side drip tray at the bottom of
basket storage rack.
§ Position and press the freezer bottom into
the cabinet, over chute door frames. Make
sure the corner slots are facing you.
§ Place the product chutes into the freezer
bottom, onto the chute door frames. Make
sure chutes seat properly into their frames.)
§ Push the rubber deflectors, small edge first,
into the slots cut in the side of the hopper.
§ Place the fry hoppers in the freezer, making
sure drive hub fully engages the drum.
(Tip: You may need to turn the drum slightly,
using the front turn handle, while pushing the
hopper in place to engage the hub.)
F3D Operating Manual Page 7
Page 8
Note! If not fully engaged, the hopper will not seat properly on the
center hanger, and the freezer door will not close.)
3 Bring Freezer Down to Temperature
Close the freezer door. Turn the main power switch on the control
panel to #ON.$ Run the freezer at least 1-1/2 hours (90 minutes)
before loading any french fries.
4
Reading the Control Panel
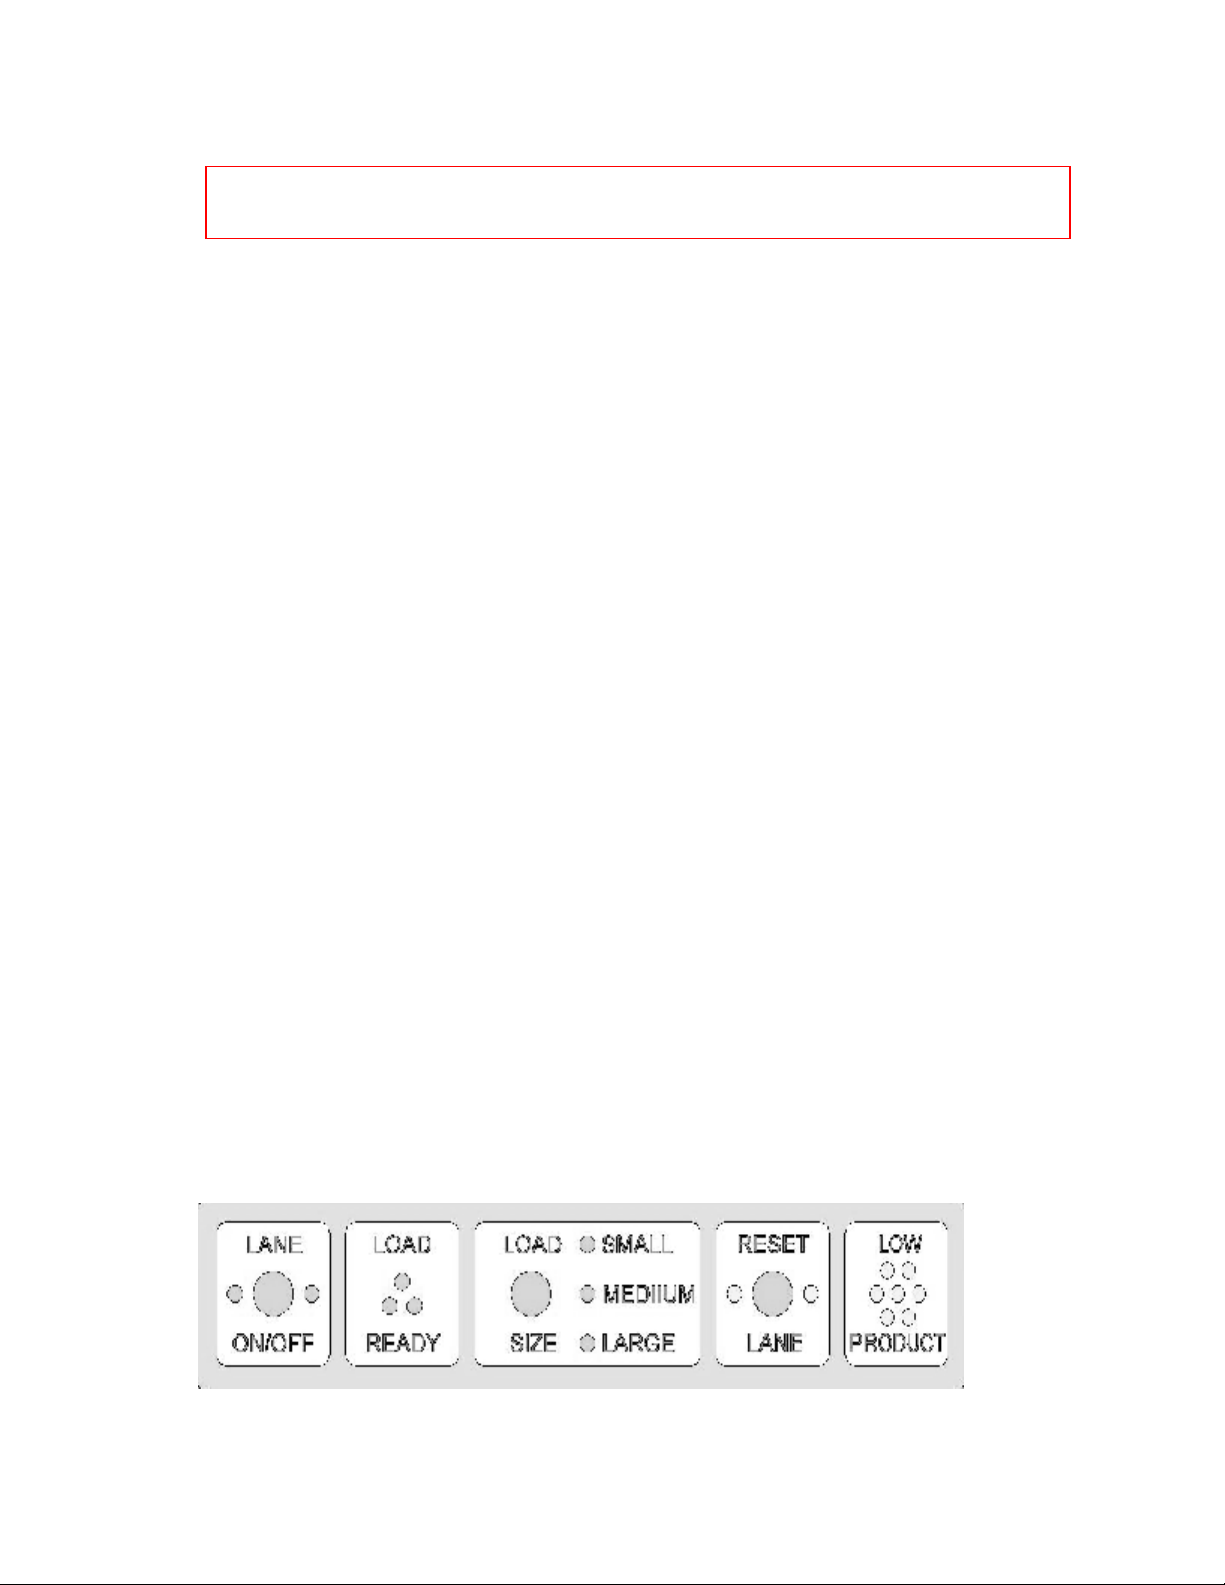
Each lane has a panel with these controls:
q Green LANE ON/OFF touch pad and light:
o The lane is operational when lit.
q Green LOAD READY light:
o The lane is ready to dispense when lit.
q Amber LOAD SIZE light:
o A single light identifies the load size selected.
o Tip: If you change load size, the setting takes effect after the
next dispense cycle.
q Red RESET LANE light:
o Flashes if the selected load size has not been met.
q Red LOW PRODUCT light:
o Flashes when approximately one bag of fries remains in the hopper for this
lane.
F3D Operating Manual Page 8
Page 9
5
Dispensing MacFries
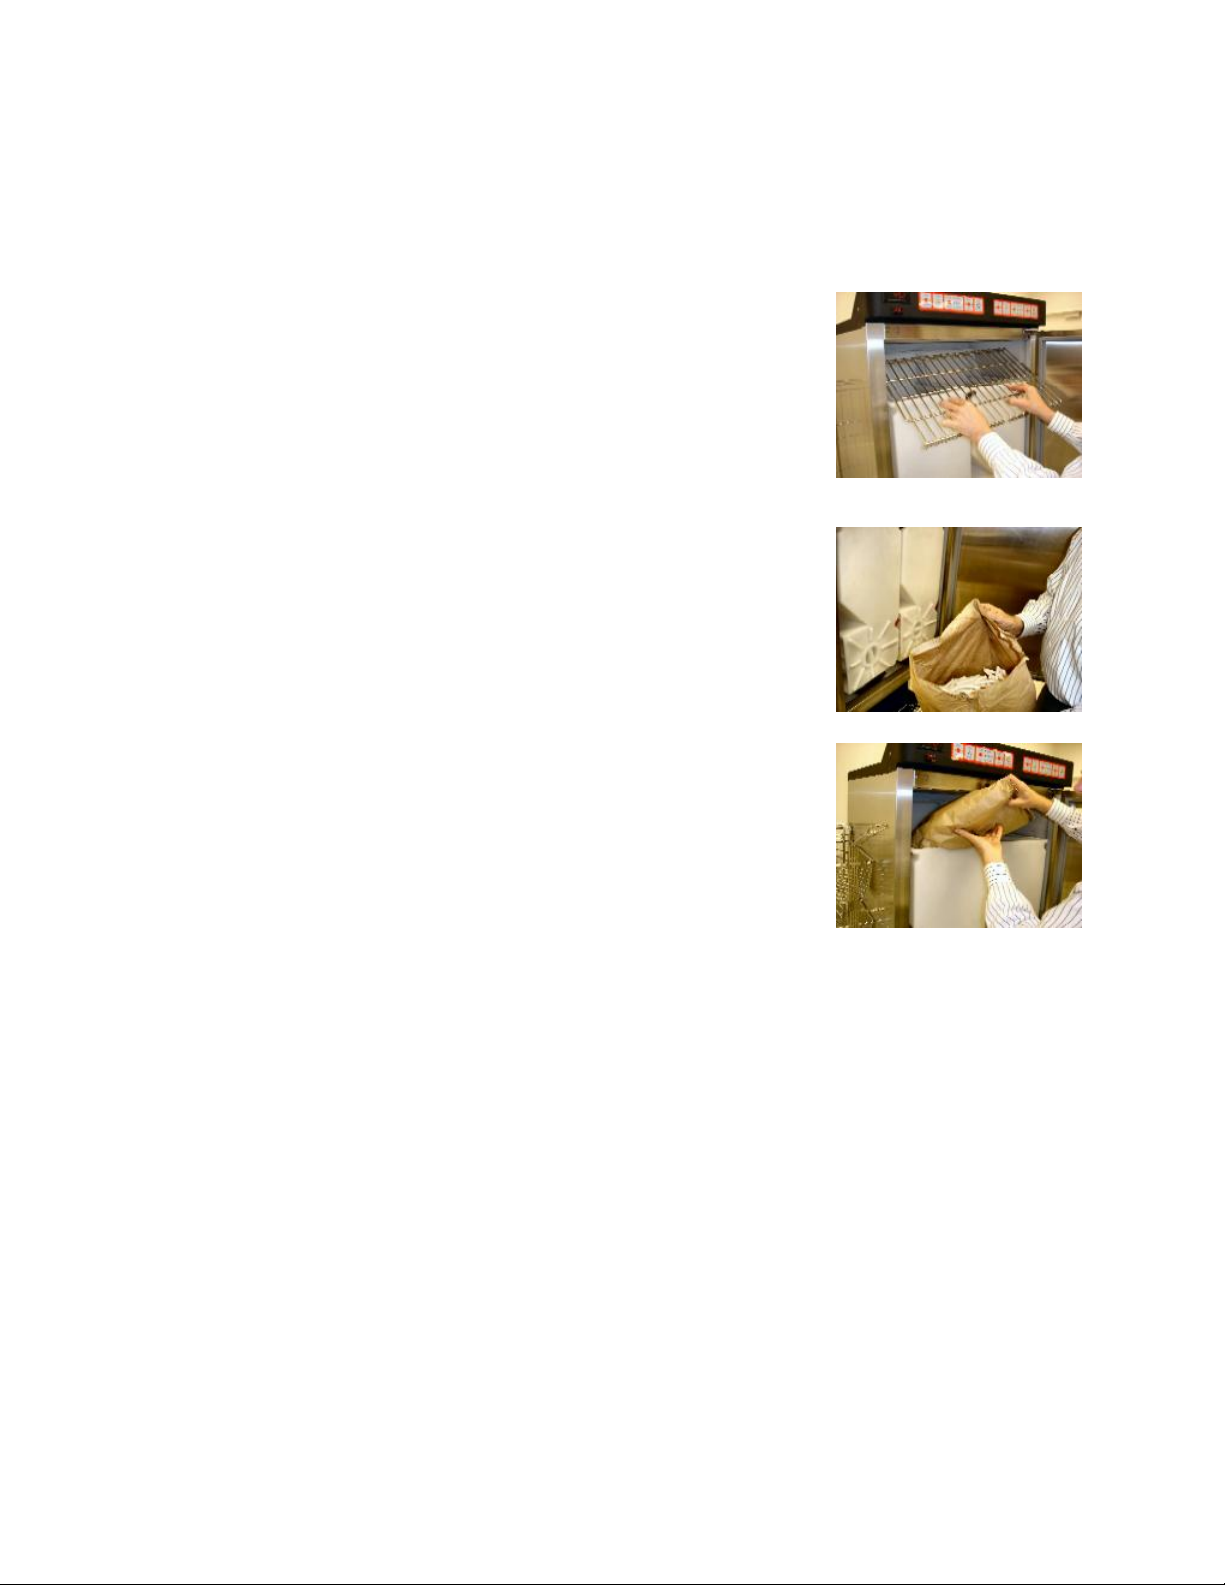
1 Remove Hash Brown Rack
Once the freezer has reached 0° F or lower, open
the freezer door and remove the optional hash
brown storage rack from the top of the hoppers.
(Tip: Use the rack to store bagged hash browns in
the freezer during breakfast hours.)
2 Check the Hoppers
Check that the hoppers are empty. Discard any
fries left in the hoppers.
3 Open MacFries bag
Tear open the MacFries case and gently remove
one of the 6-lb. (2.7 kilogram) inner bags from the
center of the case. Pull the bag s top seam apart
completely. Be careful not to crush the fries.
4 Fill Hoppers
Place the bag at the top of the hopper inside the freezer. Gently pour
the fries from the bag into the hopper. Repeat until full. Each hopper
can hold 5 to 6 bags of fries.
5 Power On Lanes
Press and momentarily hold the green #LANE ON/OFF$ button until the
lights illuminate. Turn on each lane.
6 Set Load Size (LARGE is the default)
Press the green #LOAD SIZE$ button repeatedly until the light
illuminates next to your load size selection.
F3D Operating Manual Page 9
Page 10
Tip: Load size changes can only be made when the green #LOAD
READY$ light is on.
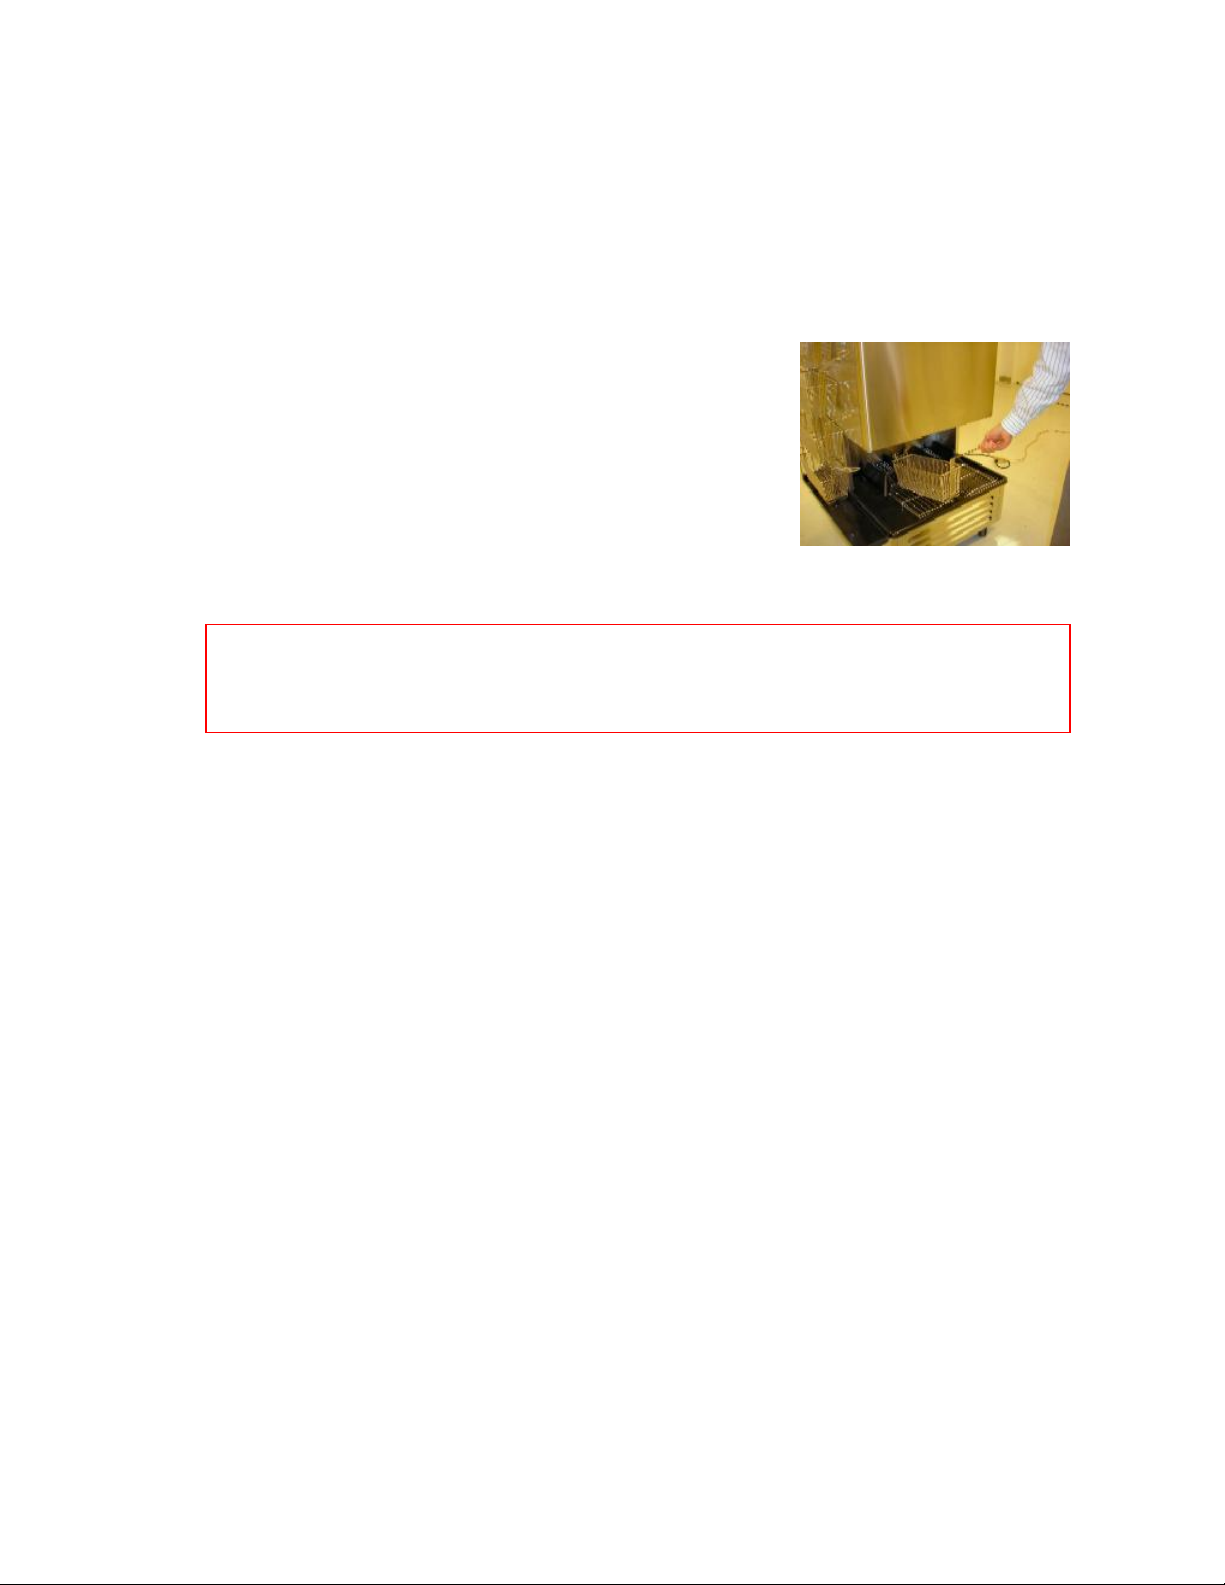
7 Dispense Fries
Insert a fry basket all the way into the basket guide, with the bottom
resting on the wire rack, and hold it steady.
When the system is ready, indicated by the
green #LOAD READY$ light, the machine will
rapidly dispense a load of fries.
8 Remove Basket
Pull the basket out of the guide and move it to the fryer.
(Note! Only dispense fries when you are ready to cook them.
Never store a full basket in the dispenser, on the basket rack, or
over a fryer. This will cause fries to rapidly thaw, affecting quality.
9 Store Empty Baskets
Store empty baskets, after they are removed from the fryer, on the side
basket storage rack until needed.
10 Watch for Flashing Lights
If Red #RESET LANE$ lights are flashing:
Press the green #RESET$ button. When the red light stops flashing,
the unit is ready to resume dispensing.
If Red #LOW PRODUCT$ lights are flashing:
Refill the hopper at any time. The dispenser remains operational
during refill.
Tip: If demand is low, a lane can be emptied and turned off. (Empty
remaining fries into a holding bin. Store the holding bin in the walk-in
freezer.)
F3D Operating Manual Page 10
Page 11
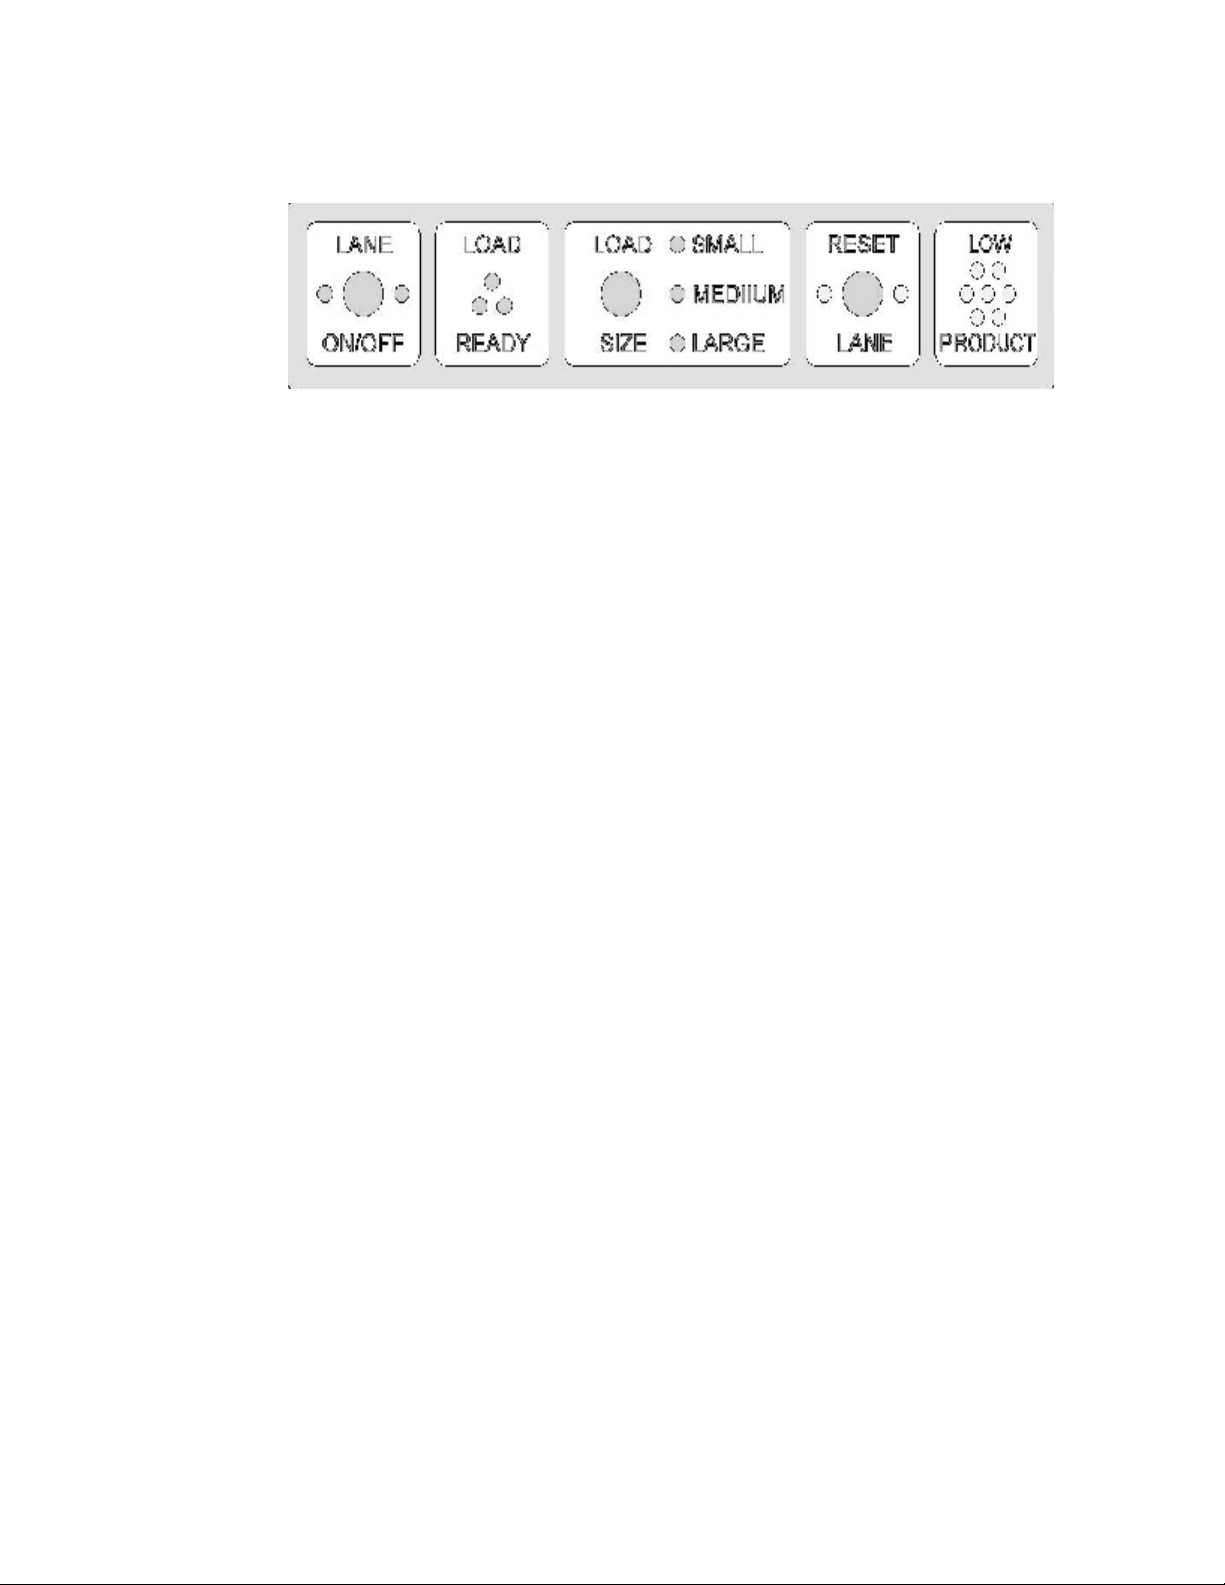
Operator Control Panel
6
Store-Closing Procedure
The F3D dispenser must be emptied, cleaned and defrosted every day.
Tip: You can get a head start on cleaning by turning off one lane at some
point after the dinner rush, but before closing. Disassemble and clean the
parts for this lane while still dispensing fries from the other lane.
1 Turn Lanes Off
Press and momentarily hold the #LANE ON/OFF$ button until the green
light goes off. Turn off each lane.
2 Turn Main Power Off
Turn off the main power by switching the ON/OFF toggle switch to the
OFF position.
3 Disassemble Unit
§ Remove the hoppers from the freezer.
§ Empty any remaining fries into a holding bin.
§ Store the holding bin in the walk-in freezer.
Tip: Keep an eye on the hopper levels toward the end of the day,
to minimize the amount of fries you will need to store overnight.
F3D Operating Manual Page 11
Page 12
§ Remove rubber deflectors from hoppers.
§ Remove product chutes from chute door frames.
§ Remove freezer bottom from cabinet.
§ Remove side basket drip tray.
§ Remove wire basket racks from main drip tray.
§ Leave main drip tray in place for now, to collect dripping water
while the freezer defrosts.
§ Leave freezer door ajar to allow frost to melt.
Note! Never defrost the freezer by scraping the inside walls,
regardless of how much ice is present. The only proper method
of defrosting is to turn the freezer off and allow frost to melt.
4 Wash and Sanitize Removable Components
Place all removed components in the sink; wash and sanitize.
Note! Use only warm water, not hot water, when cleaning the
hoppers. Excessively hot water can cause the hopper to warp.
5 Drip-Dry Components
Place components so that they will drip-dry overnight.
Leave the hoppers on a flat, clean surface to drip-dry!NOT the top of
the sharp wall between sink bowls.
Note! Do not put any WET parts back in the cold freezer.
The parts could freeze together and damage the machine.
6 Clean Non-Removable Components
Wait for frost to melt from the walls of the freezer. Then:
F3D Operating Manual Page 12
Page 13
§ Wipe down, sanitize and dry the freezer interior and the chute
doors.
Tip: The chute door frames are hinged. You can gently push them
open to fully clean the chute doors and door frames.
§ Wipe down and sanitize the side basket hanger rack.
§ Remove the main drip tray; wash and sanitize it in the sink.
§ Wipe down and sanitize the surface beneath the drip tray.
§ Close the freezer door.
Note: For stores that operate on a 24-hour schedule, the freezer
should be shut down for a minimum of 2-3 hours per day.
7
Preventative Maintenance
1 Clean the Condenser Coil
Periodically, remove the front louvered panel to access the condenser
coil. Use a soft-bristled cleaning brush to gently remove dust and
debris in and around the coil.
CAUTION!
Verify the freezer is disconnected from the power source before
attempting any preventive maintenance.
Care should be taken to avoid physical contact with the fins on the
condenser coil or any related refrigeration lines. The fins on a
condenser coil are very sharp, and certain refrigeration lines can be
very hot resulting in possible cuts and/or burns. Gloves are
recommended when accessing the internal components of any
refrigerated equipment.
F3D Operating Manual Page 13
Page 14

2 Wash the Condenser Coil Filter
Periodically, remove the front louvered panel to access the reusable
condenser filter.
This filter can be washed in the sink or in a dishwasher. Make sure all
dust and debris are removed from the filter and allow the filter to
completely dry before replacing in unit.
8
Basic Troubleshooting: Freezer
Problem 1:
The freezer is running but will not reach 0°F or below.
q Verify that the freezer has recently been defrosted. Follow Store-
Closing Procedure in Section 6 above. If defrosting is not performed
daily, the internal evaporator may develop an ice build-up, which will
prevent the freezer from reaching its set temperature.
q Verify that the condensing coil is free from debris by following the
procedure outlined in Section 7 above.
q If these steps don t resolve the problem, contact Franke Technical
Support at (800) 537-2653; press 5 for Technical Services.
Problem 2:
The freezer will not run when turned on.
q Verify that the unit is plugged in and that the main power switch is in
the #ON$ position.
q Confirm that the wall outlet is working by plugging the freezer into
another outlet.
q Verify that the circuit breaker has not been tripped. Reset if necessary.
q If these steps don t resolve the problem, contact Franke Technical
Support at (800) 537-2653; press 5 for Technical Services.
F3D Operating Manual Page 14
Page 15
9
position. Toggle switch
" button to turn on lane.
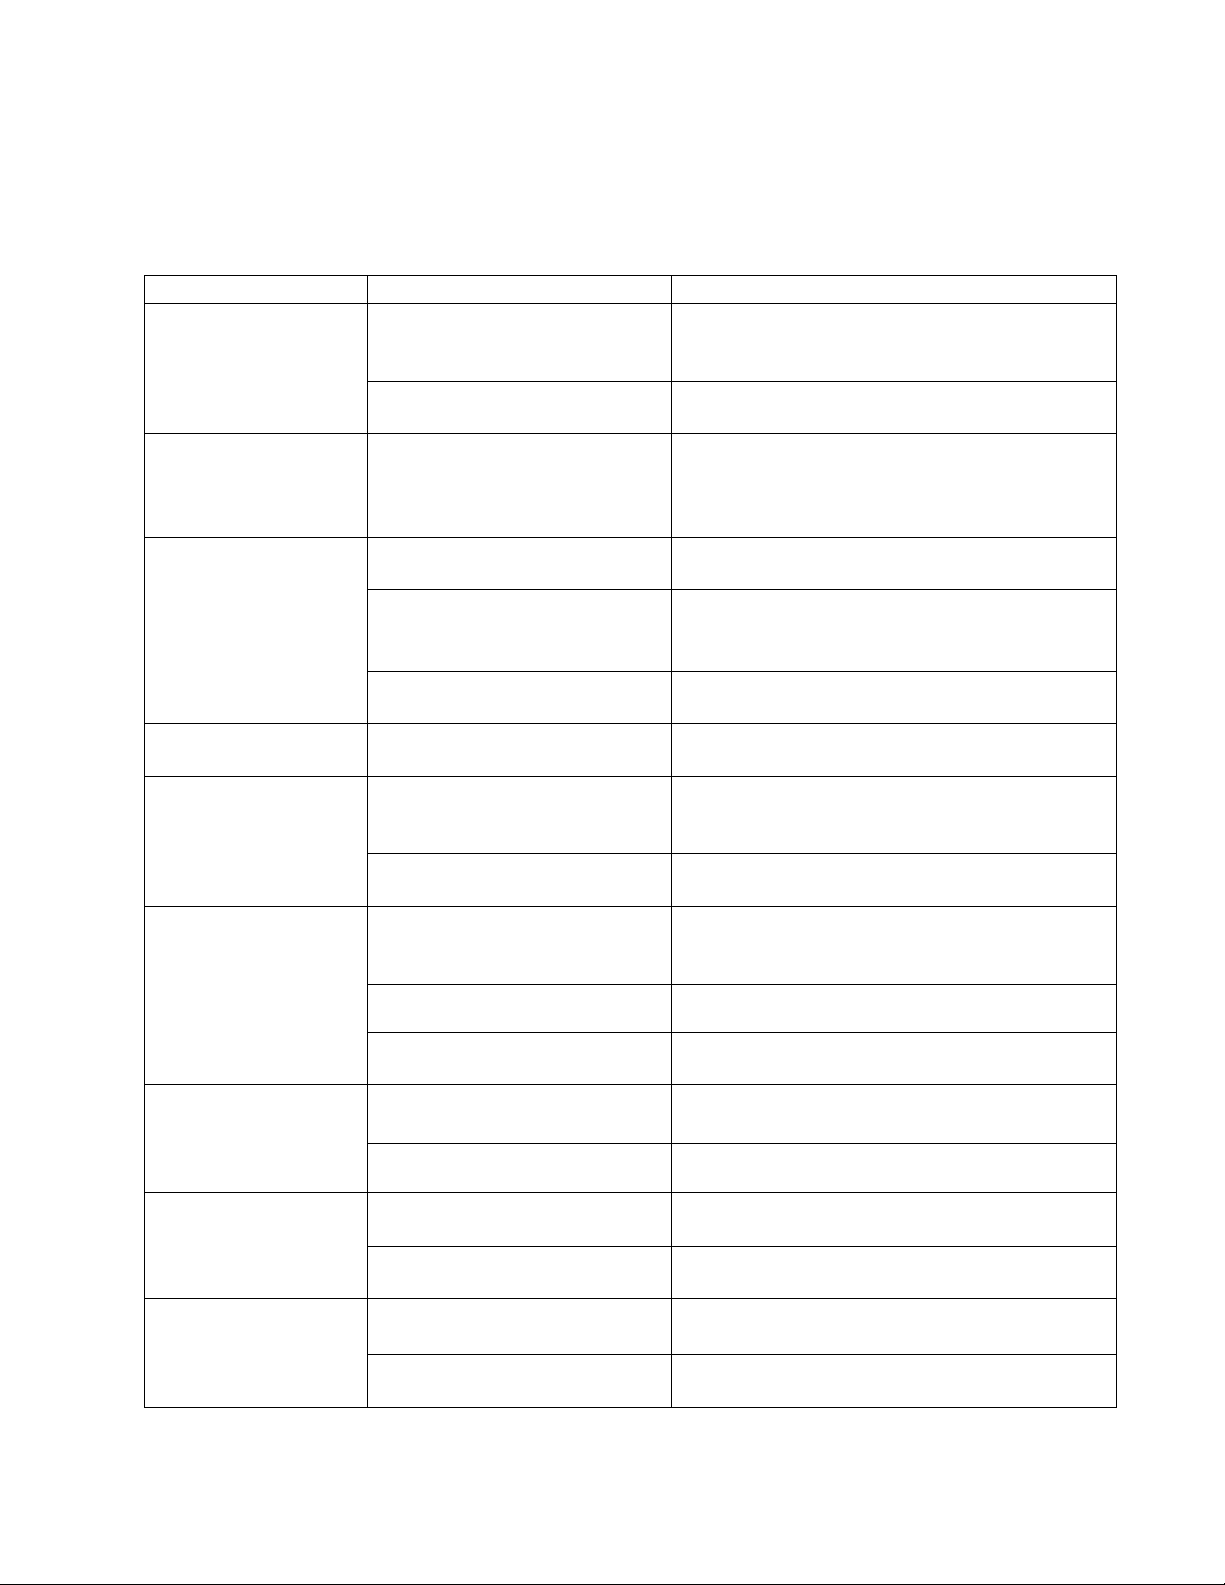
Basic Troubleshooting: Dispenser
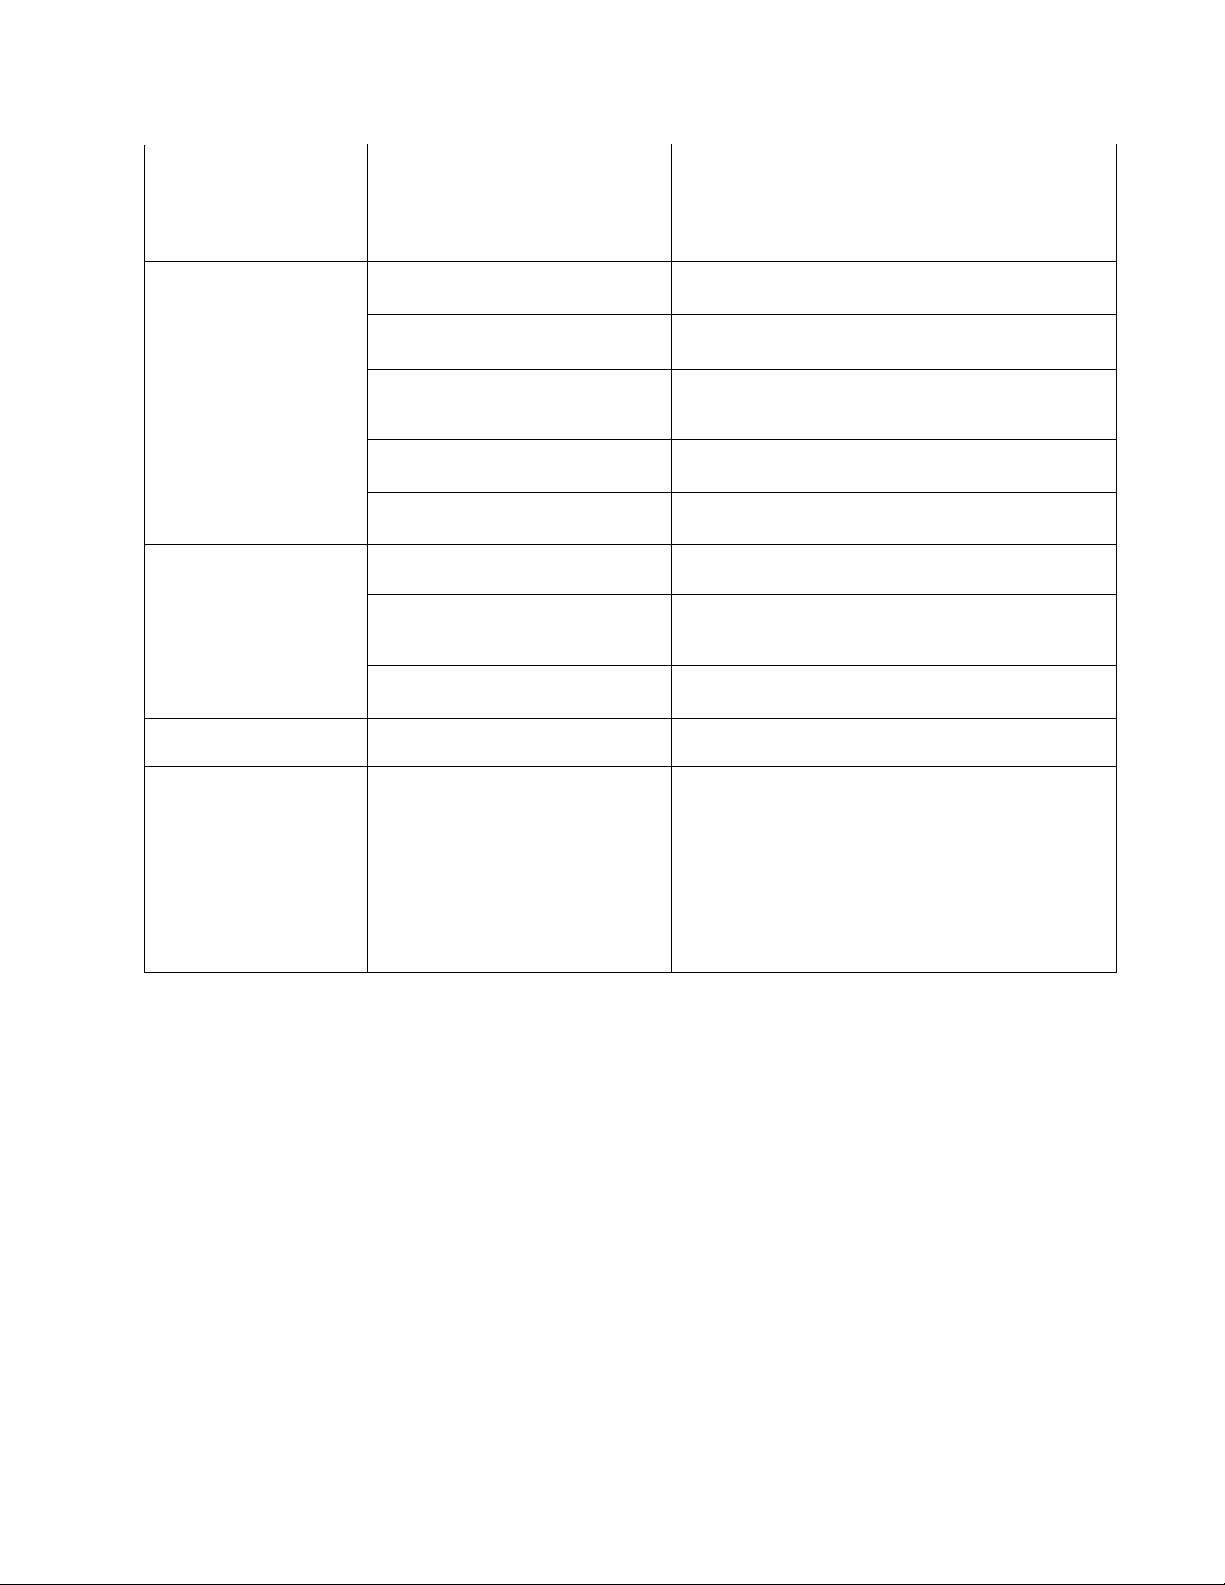
PROBLEM POSSIBLE CAUSE WHAT TO DO
Individual lanes will not
turn on.
Freezer door will not
close properly.
Main power is off. Flip power switch to “ON”
will illuminate. Allow 1-1/2 hours for cool-down
before adding product.
Machine is unplugged. Plug into 110 VAC outlet and turn on main power
switch.
One or both hoppers may not be
fully engaged in drive hub.
Push hoppers into freezer until center hanger tab
is in front of hopper. If hopper is not engaged
with drive hub, rotate the drum’s turn handle to
allow engagement.
Dispenser Drum is not
rotating.
Lift Assembly will not
raise or lower.
Green "LOAD READY"
light will not turn on.
Red "RESET LANE"
light is flashing.
Red "LOW PRODUCT"
light is flashing.
The load chute is full. The dispense drum will only rotate when the load
chute is empty.
The hopper is empty, "LOW
PRODUCT" and "RESET LANE'
lights are flashing.
Fries have formed a "bridge"
condition.
Motor failure. Call Service Tech.
Lane may be turned off. Press the "LANE ON/OFF
Desired load size has not been
achieved.
Fill cycle may have timed out
before proper weight was
achieved.
Frozen fries in the hopper have
formed a "bridge" over the drum.
Hopper is empty. Fill hopper with fries. Press the "RESET LANE"
Hopper is low or empty. Fill hopper with fries. Press the "RESET LANE"
Fill the hopper with fries and push the "RESET
LANE" button. Drum will start to rotate.
Shake hopper / re-distribute fries to break up the
bridge.
Fill cycle will begin.
See "Red RESET LANE is flashing."
Press the "RESET LANE" button to restart drum.
Fill cycle will begin.
Shake hopper / re-distribute fries to break up the
bridge.
button to restart drum. Fill cycle will begin.
button to restart drum. Fill cycle will begin.
Lane is empty but low
product light is not on.
Basket loads are
consistently light or
heavy.
F3D Operating Manual Page 15
Frozen fries in the hopper have
formed a void around the sensor.
Debris may be caught in the Low
Product sensor hole.
Hopper may have shifted forward
on hanger.
Orange silicone baffle is not
installed in hopper.
Product has fallen into bottom
area around chute.
Shake hopper / re-distribute fries to break up the
void.
Remove any debris trapped in and around low
product sensor.
Push hopper into freezer as far as it will go.
Remove product from hopper and install Baffle
into hopper slot.
Remove product from chute area to allow free
movement of chute.
Page 16
Load chute is not installed
e it side movement and the top
Green "LOAD READY" light is not
Drip pan and/or basket rack is not
press 5 for
basket sensor to reset. A second
properly.
Door will not open to
allow product dispense.
Door will not close after
product dispense.
Unable to change load
size using control panel.
The unit is double
dispensing into a basket.
on.
Basket is not against sensor at
back of dispensing area.
installed correctly.
Red "LOW PRODUCT" light is
flashing.
Red "RESET LANE" light is
flashing.
Product may be caught in door. Clear obstruction allowing doors to close.
Door return spring may have
broken.
Door sensor may have failed. If doors cannot be closed by hand, call Franke at
Fill process has not completed. When the green "LOAD READY" light is lit, load
The basket is staged in the
dispense position. A load of fries
is dispensed. The basket handle
is then bumped, causing the
Re-align chute so it drops into cutout in load
plate. When correctly installed, there is minimum
front to back or sid
of the chute is parallel to the surface of the
bottom.
Wait until ready light is on, product will dispense.
Slide the fry basket all the way in until it stops
against the back of the dispenser.
Install drip pan and basket rack so back edge of
fry basket aligns with sensor at back of dispense
areas.
Fill hopper with fries. Press the "RESET LANE"
button to restart drum. Fill cycle will begin.
See "Red RESET LANE is flashing."
If doors can be closed by hand but will not stay
closed, call Franke at (800) 537-2653;
Technical Services.
(800) 537-2653; press 5 for Technical Services.
size may be changed.
Do not stage the basket in the dispense area at
any time. Only dispense fries when ready to
place them in the fryer. Dispensing ahead of time
allows fries to thaw, affecting product quality.
load of fries will be dispensed.
F3D Operating Manual Page 16
Page 17
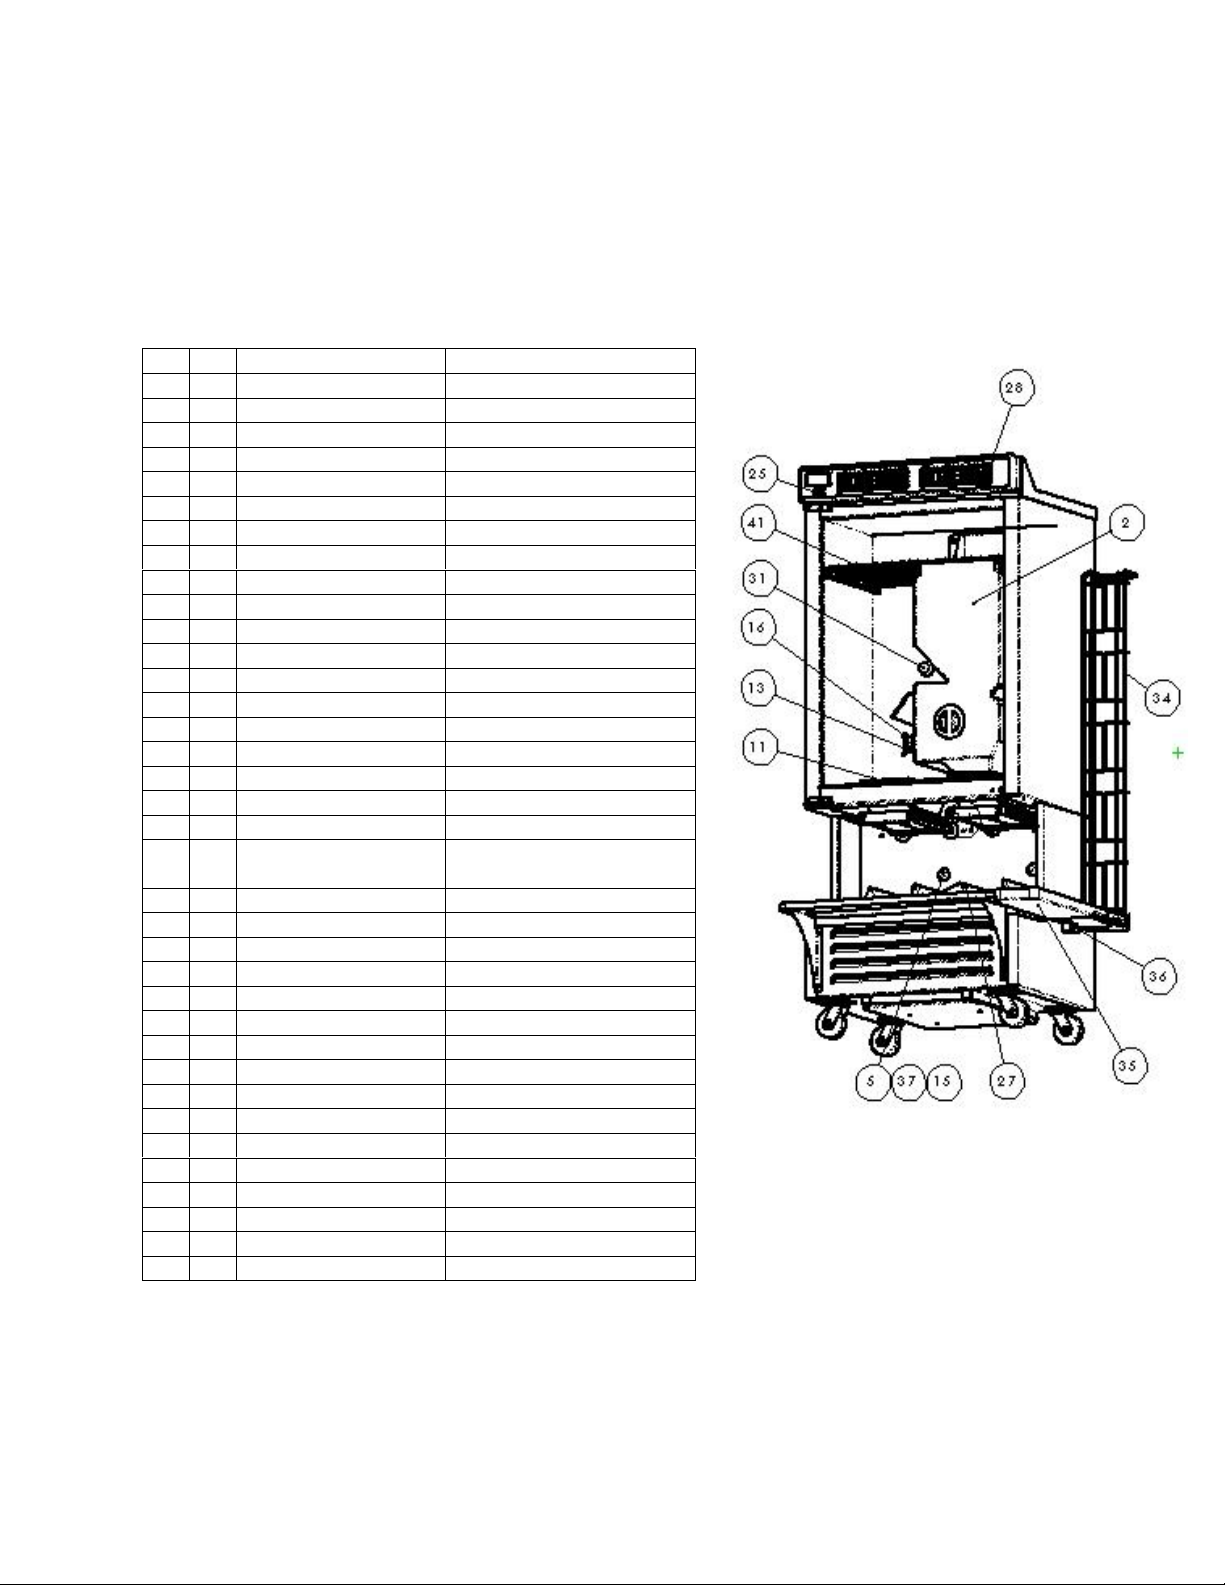
10
Replacement Parts
Freezer Assembly
ITEM QTY. PART NO. DESCRIPTION
1 1 ROBOFREEZE ENC. FREEZER
2 2 800716 ASY, HOPPER
3 2 800699 ASY, DRIVE ROTOR
5 2 150129 MOUNT SENSOR
6 1 800697 BOTTOM FREEZER
7 2 800760 ASY, DOOR LIFT
11 2 800633 CHUTE PRODUCT
13 2 9562K48 SEAL RUBBER 1 1/2 DIA SHAFT
15 2 98410A133 RING RETAIN 1" EXT SINK
16 8 92949A537 SCR BHC 1/4-20 X 1/2 STST
18 8 92141A029 WSHR FLAT 1/4 X 5/8
19 8 92146A029 WSHR SPLIT 1/4 STST
20 8 91841A029 NUT HEX 1/4-20 STST
21 1 800723 ASY. MOUNT PC BOARD
22 2 CONTROLLER BOARD CONTROLLER BOARD
23 12 92949A146 SCR BHC 6-32 X 3/8 STST
24 6 92949A265 SCR BHC 10-32 X 1/2 STST
25 1 SWITCH ROCKER SWITCH ROCKER
26 12 91755A21 WSHR FLAT #6 RETAINED
27 1 800749 PAN PRODUCT DRIP
28 2 800727 ASY CONTROL PANEL
29 2 9600K61 GROMMET 1 1/2 X 1/16
30 2 800741 ASY CABLE LOW PRODUCT
31 2 800730 SLEEVE PROX SENSOR
32 2 800736 WSHR SENSOR RETAINING
33 2 98410A139 RING RETAIN 1 1/2 EXT ZINK
34 1 800744 RACK SIDE BASKET
35 1 800747 PAN SIDE BASKET DRIP
36 2 800745 HANGER SIDE RACK
37 2 800743 ASY CABLE BASKET PRESENT
38 2 800738 ASY CABLE POWER
39 2 800739 ASY CABLE MOTOR
40 2 800750 MESH BASKET SUPORT
41 1 800751 WIRE RACK HOPPER TOP
42 1 TEMP DISPLAY DIGITAL_2 DIGITAL TEMP DISPLAY
43 1 800764 RAIL DIN 1 3/8 X 6 1/2 LONG
44 2 S8VS-06024 POWER SUPPLY 24 VDC
1.
F3D Operating Manual Page 17
Page 18
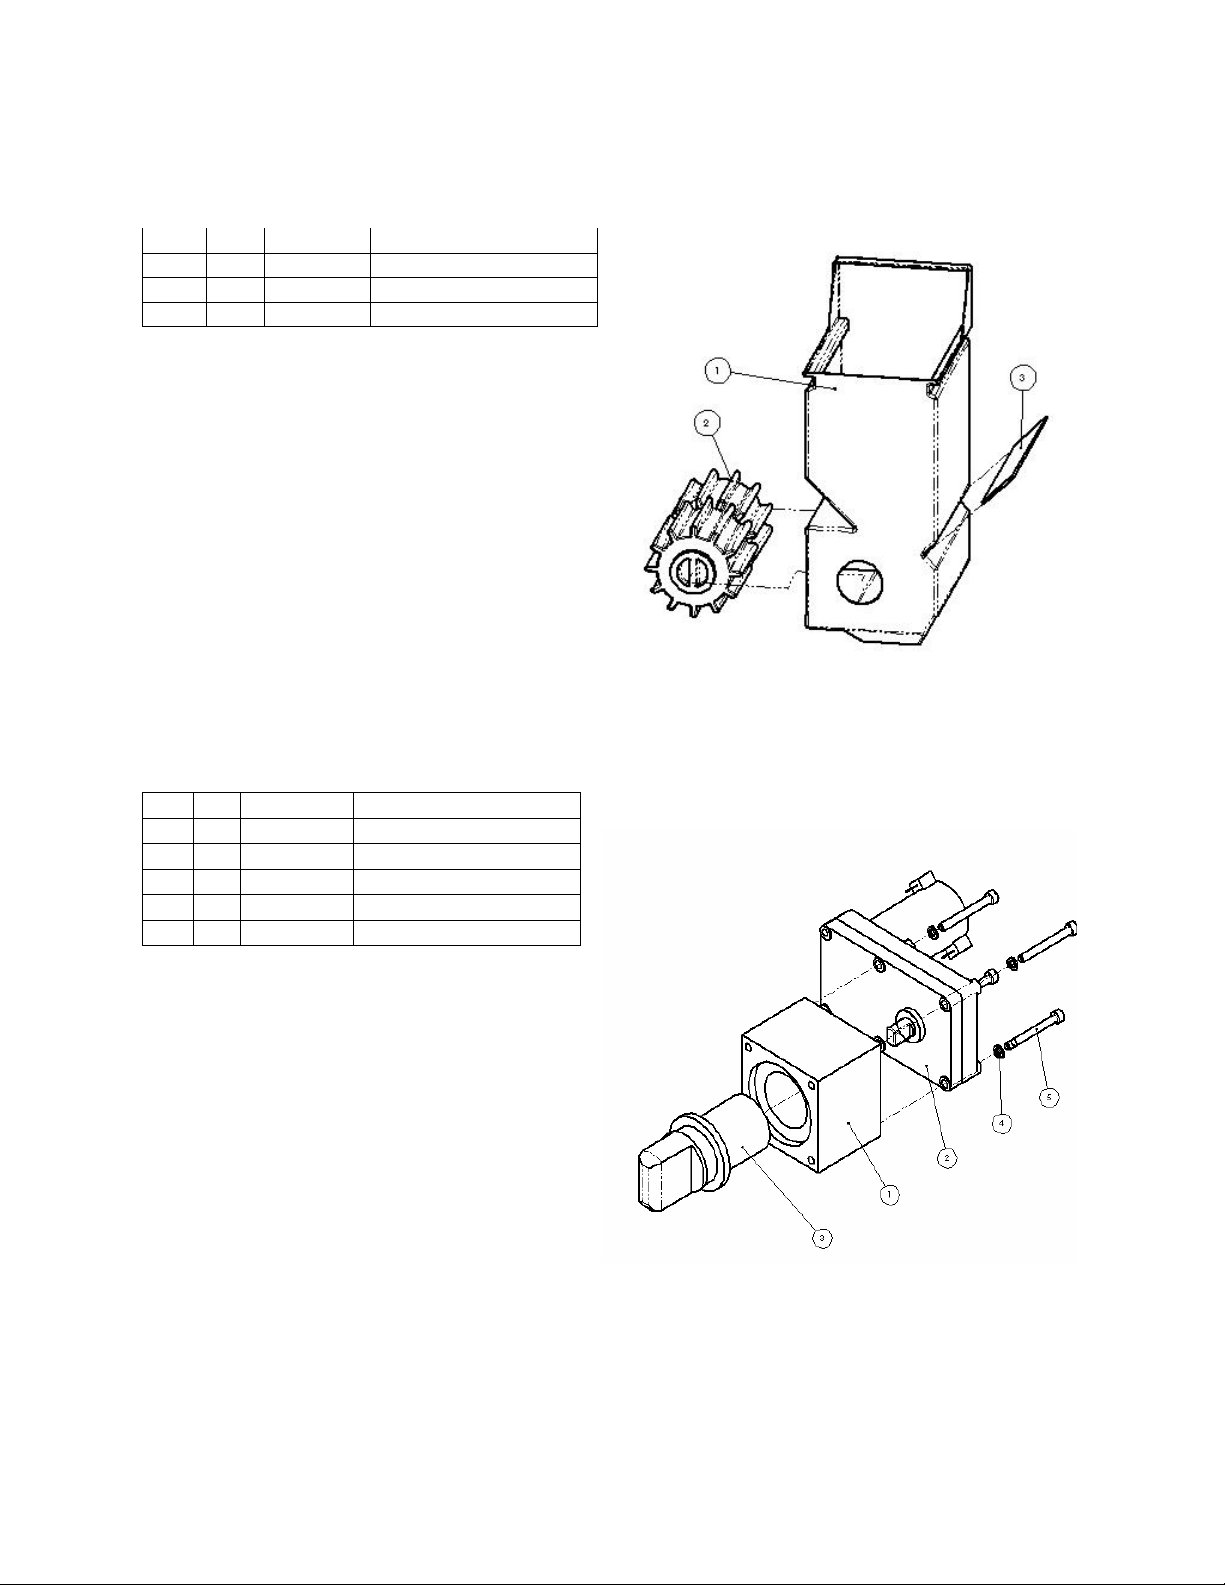
Hopper Assembly
ITEM
ITEM
QTY. PART NO. DESCRIPTION
1 1 800680 HOPPER OPEN TOP
2 1 800649 ROTOR ROBOFREEZE
3 1 800531 BAFFLE
Drum Motor Assembly
QTY. PART NO. DESCRIPTION
1 1 800619 BLOCK MOTOR ROTOR
2 1 26-67-100-GM MOTOR GEAR REDUCTION
3 1 800620 DRIVE SHAFT ROTOR
4 4 92146A011 WSHR SPLIT #10
5 4 92196A252 SCR SHC 10-24 X 1 3/4 STST
F3D Operating Manual Page 18
Page 19

Lift Assembly
ITEM QTY. PART NO. DESCRIPTION
1 1 800728 MOUNT DOOR MECH
2 1 800702 BRACKET OPTIC SENSOR
3 1 800742 ASY CABLE DOOR SENSE
4 1 800703 FLAG LIMIT
5 2 97245A555_3-12 PIN CLEVIS 3/16 X 1 1/2
6 2 800561 BLOCK DOOR ROTATION
7 1 94639A075 ROLLER CAM
8 1 800560 LINK DOOR ACTUATOR
9 1 800567 ARM CAM
10 2 26-67-100-GM MOTOR GEAR REDUCTION
11 2 97245A555_3-7 PIN CLEVIS 3/16 X 7/8
12 1 97245A555_4-16 PIN CLEVIS 1/4 X 2
13 1 97245A555_4-12 PIN CLEVIS 1/4 X 1 1/2
14 1 9654K326 SPRING EXTENSION 1/2 OD X 5
15 2 94639A137 SPACER 1/2 OD 1/4 ID 1/8 THK
16 6 98410A122 RING RETAIN 1/2 EXT ZINK
17 2 800673 MOUNT DOOR LIFT ASY
18 1 800759 SHAFT DOOR LEFT
19 1 800758 SHAFT DOOR RIGHT
20 4 92141A029 WSHR FLAT 1/4 X 5/8
21 6 92146A029 WSHR SPLIT 1/4 STST
22 4 92240A537 BOLT HEX 1/4-20 X 1/2 STST
23 2 91772A110 SCR PPH 4-40 X 1/2
24 2 96278A005 NUT/WASHER HEX 4-40 STST
25 2 92949A190 SCR BHC 8-32 X 1/4 STST
26 6 98401A439 PIN COTTER 3/32 X 1/2 STST
27 2 92196A276 SCR SHC 10-32 X 1 1/4 STST
28 8 92146A011 WSHR SPLIT #10
29 6 92196A277 SCR SHC 10-32 X 1 1/2 STST
30 1 SC00010 SLIDE BEARING ASSEMBLY
31 2 6126K34 BEARING SNAP IN 5/16 ID
32 1 92949A263 SCR SBH 10-32 X 3/8 STST
33 1 800729 SHAFT DOOR LIFT
34 1 800735 ASY LOAD CELL
35 2 92196A548 SCR SHC 1/4-20 X 1 3/4 STST
36 4 92196A544 SCR SHC 1/4-20 X 1 1/4 STST
37 4 SFR8ZZMC33QSRIL BRG 1/2 ID 1 1/8 OD FLNGD
38 1 92196A148 SCR SHC 6-32 X 1/2 STST
39 1 800762 DOOR RIGHT PRODUCT
40 1 800761 DOOR LEFT PRODUCT
41 2 800720 COVER DOOR HOLE
42 2 9562K43 SEAL RUBBER 1/2 DIA SHAFT
43 6 92949A247 SCR SBH 10-24 X 1 STST
44 1 800755 ASY, DOOR FRAME
F3D Operating Manual Page 19
Page 20
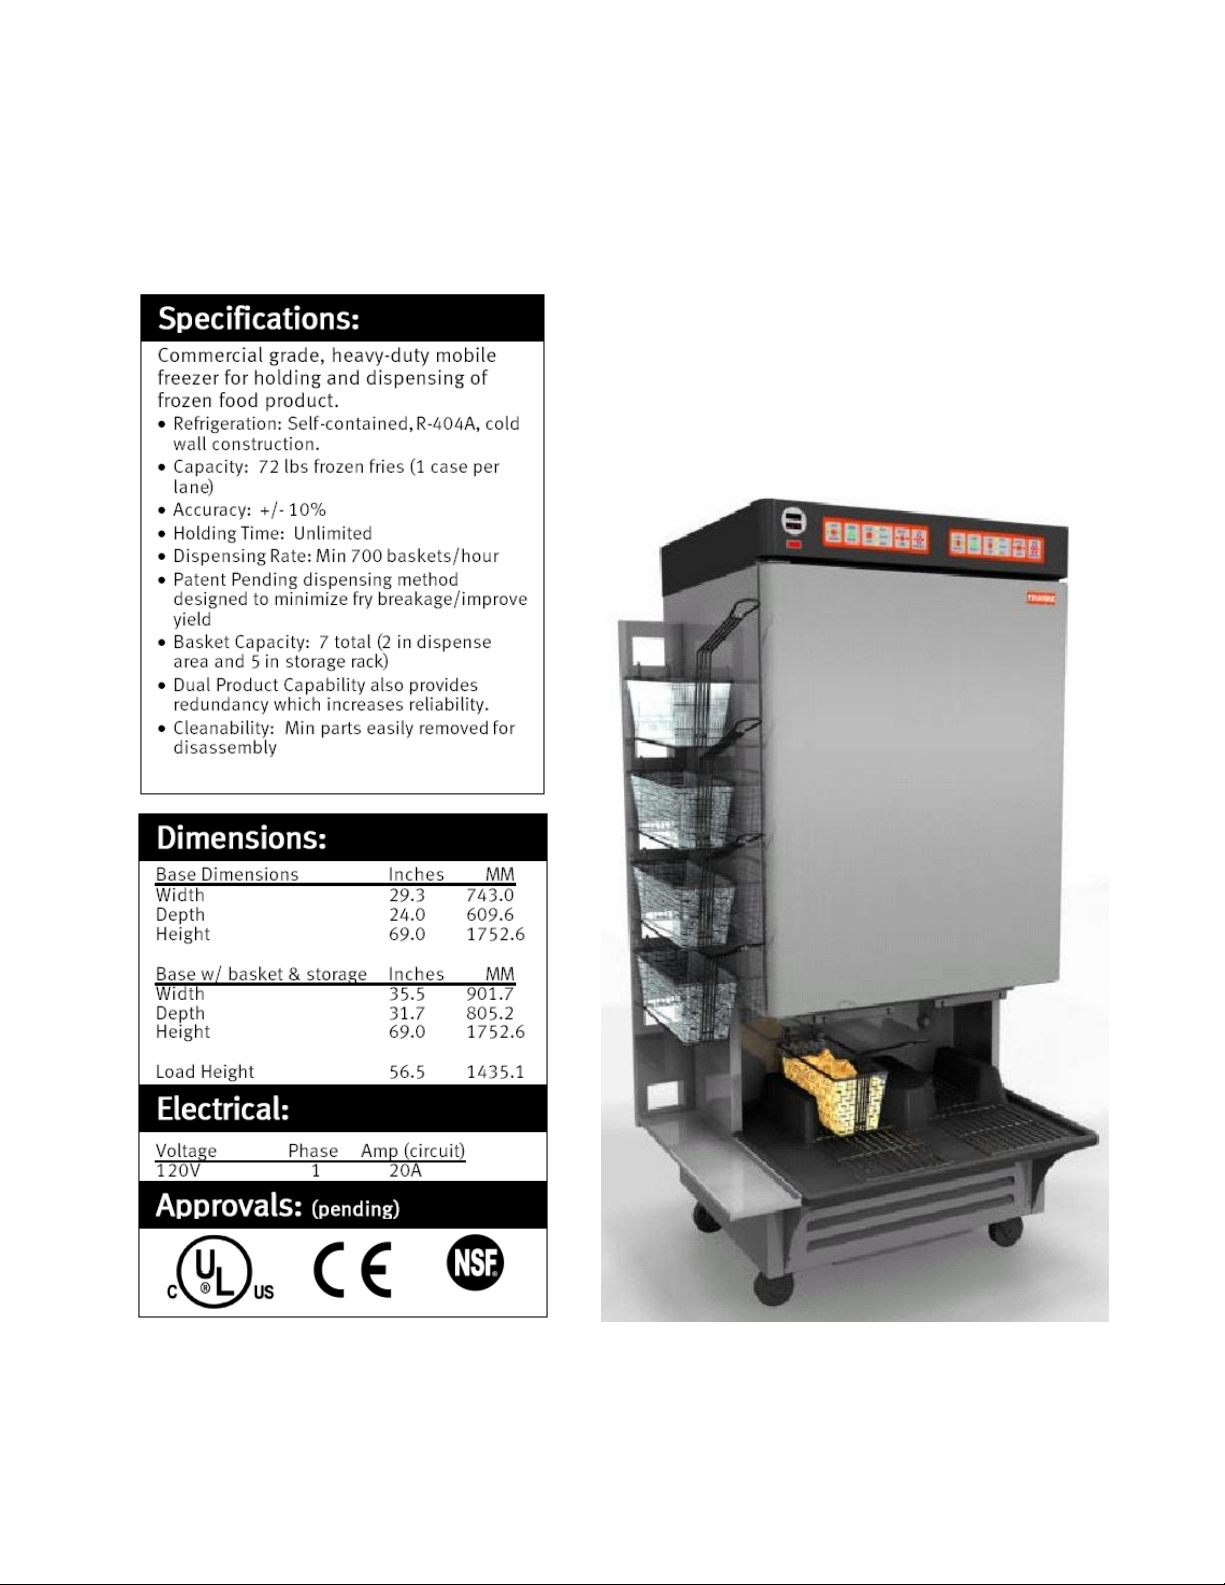
11
Specifications
F3D Operating Manual Page 20
Page 21

Questions? Comments? Problems?
§ For service questions, call Franke at (800) 537-2653; press 5 for
Technical Services.
§ For questions and comments about operating the F3D Dispenser,
call Franke Product Engineering at 615-287-8281, or at
615-287-8233.
Franke Foodservice Systems
305 Tech Park Drive
LaVergne, TN 37086
USA
800-537-2653
www.frankefs.com
This document contains proprietary information, is the property of Franke Inc. and may not be reproduced or distributed without the express written
permission of Franke Inc. Due to a continuous program of product development, Franke Inc. reserves the right to make changes in design and specifications
without prior notice.
F3D Operating Manual Page 21
 Loading...