

Page 1
Operating Manual Type E
Coffee machine Ecolino
Softwareversion as of: V 2.05
Revised No.: SL 20987
Date: 01.05.2002, Rev. C
Visum: BJC
Page 2

1T 310'177 Operating Manual Ecolino Erstellt: 01.05.2002 Rev.: C SL: 20'987 BJC
page 2
Valued customer
Congratulations on purchasing a Franke coffee machine. You have chosen a high-quality appliance
for the preparation of coffee, developed and manufactured in line with the latest state of the art.
Franke AG’s Coffee Machines Business Unit produces appliances according to the standards ISO
9001 and ISO 14001. The certification is constantly checked by external bodies.
Important:
Before you use your new appliance, please read the operating instructions carefully and keep them
for future reference. In particular, note the instructions for daily cleaning and care of your appliance.
If they are applied consistently, you will ensure trouble-free operation and always obtain high-quality
coffee from the appliance.
If you would like further information or if you encounter particular problems not treated in sufficient
detail in these operating instructions, please request the necessary information from your local
customer service or directly from Franke Coffeemachines LTD, Aarburg.
Franke Kaffeenaschinen AG
CH-4663 Aarburg
Tel.: 062 787 37 37
Fax: 062 787 30 10
www.km.franke.ch
Page 3

1T 310'177 Operating Manual Ecolino Erstellt: 01.05.2002 Rev.: C SL: 20'987 BJC
page 3
Contents
1. GENERAL .................................................................................................................................6
1. 1 Installation .................................................................................................................................6
1.1.1 Installationsplan.......................................................................................................................... 6
1.1.2 Water connection ....................................................................................................................... 7
1.1.3 Power connection ....................................................................................................................... 7
1.1.4 Dimensions ................................................................................................................................ 7
1.2 Ratingplate.................................................................................................................................8
1.3 Possible Products .....................................................................................................................8
1.4 Precautions................................................................................................................................8
1.5 Declaration of conformity...........................................................................................................9
2. DISPLAY MESSAGES ..........................................................................................................10
2.1 Fault- and information messages............................................................................................10
2.1.1 Messages during use with chip cards .................................................................................. 11
3 OPERATION ............................................................................................................................13
3.1 Daily Operation ........................................................................................................................13
3.1.1 Operational readiness of the coffee machine................................................................................. 13
3.1.2 Preparation of coffee products ..................................................................................................... 13
3.1.3 Preparation of coffee products (powder)........................................................................................ 14
3.1.4 Preparation of hot water.............................................................................................................. 14
3.1.5 Heating up beverages with steam manual / autosteam .................................................................. 14
3.2 Cappuccino / White coffee / Froth / Milk (Option CF2 / CF2..................................................15
3.2.1 Versions ................................................................................................................................... 15
3.2.2 Preparation of Cappuccino / White coffee ..................................................................................... 15
3.2.3 Preparation of milk froth or heated milk ........................................................................................ 15
3.3 Preparation of beverages using the Shift key ................................................................................... 16
3.3.1 Preparation of coffee products- and milky coffee products .............................................................. 16
3.3.2 Preparation of tea or heating of beverages with steam, milk and milk foam ...................................... 16
3.4 Rinse / Autorinse......................................................................................................................17
3.4.1 Rinse ........................................................................................................................................17
3.4.2 Autorinse .................................................................................................................................. 17
3.5. Daily cleaning.....................................................................................................................18
3.5.1 Automatic cleaning programme for coffee machine without Option CF 1 / CF 2 .....................18
3.5.2 Automatic cleaning programme for coffee machine with Cappuccinatore option CF 1 / CF 2 20
3.5.2a Manual claening of the Cappuccinatore (CF 1 / CF2) ................................................................... 20
3.5.2b Manual cleaning of the throttle valve (only CF2) ........................................................................... 21
3.5.2c Automatic cleaning programme for coffee machine with Cappuccinatore CF1 / CF2 ........................ 21
3.6 Switching off the coffee machine ............................................................................................25
3.7 Display elements .....................................................................................................................25
3.7.1 Heating (*)................................................................................................................................. 25
3.7.2 Water feed (>) ........................................................................................................................... 25
4 CHIP CARDS...........................................................................................................................26
4.1 Chip card functions..................................................................................................................26
4.2 Download Card........................................................................................................................26
4.2.1 Handling of the Dow ................................................................................................................... 26
4.2.1.1 Saving coffee machine data on Download Card .......................................................................... 26
4.2.1.2 Downloading the Download Card to the coffee machine............................................................... 26
4.3 Adjust Card ..............................................................................................................................26
4.3.1 Handling of the Adjust Card......................................................................................................... 26
4.3 Adjust Card ..............................................................................................................................27
4.3.1 Handling of the Adjust Card......................................................................................................... 27
4.3.1.1 Set amount ground.................................................................................................................. 27
4.3.1.2 Set amount of water ................................................................................................................ 28
4.3.1.2.1 Set amount of milk quantity for cappuccino............................................................................. 28
Page 4

1T 310'177 Operating Manual Ecolino Erstellt: 01.05.2002 Rev.: C SL: 20'987 BJC
page 4
4.3.1.3 Product counter ...................................................................................................................... 28
4.3.1.4 Clear counter readings ............................................................................................................. 29
4.3.1.5 Set time ................................................................................................................................. 29
4.3.1.6 Set date................................................................................................................................. 30
4.3.1.7 Switch on/off time ................................................................................................................... 30
4.3.1.8 Change PIN code from the Adjust Card ..................................................................................... 31
5. OPTIONS.................................................................................................................................32
5.1 Water container execution.......................................................................................................32
5.1.1 General Remarks....................................................................................................................... 32
5.1.2 Cleaning ................................................................................................................................... 32
5.1.3 Control...................................................................................................................................... 32
5.1.4 Preparation of beverages ............................................................................................................ 32
5.1.5 Accounting facilities ................................................................................................................... 32
5.2 External units ...........................................................................................................................33
5.2.1 Automatic chocolate machine ..................................................................................................... 33
5.2.2 General..................................................................................................................................... 33
5.2.3 Preparation of chocolate products ............................................................................................... 33
5.2.3 Possible accounting systems ..................................................................................................... 33
5.3 Option of second grinder .........................................................................................................33
5.3.1 Option of mixing ground coffee .................................................................................................... 33
5.3.2 Supervision of the beanhoppers .................................................................................................. 33
6. ACCOUNTINGSYSTEMS.....................................................................................................34
6.1 Cash System ...........................................................................................................................34
6.1.1 Chip Cards required ................................................................................................................... 34
6.1.2 Free Card.................................................................................................................................. 34
6.1.3 Cash Card / Cash Card Plus ....................................................................................................... 34
6.1.3.1 Preparation of beverages with the Cash/ Cash + Card or Free Card.............................................. 35
6.1.4 Messages ................................................................................................................................. 36
6.1.5 Management Card ..................................................................................................................... 36
6.1.5.1 Handling of the Management Card ............................................................................................ 37
6.1.5.2 Accounting mode YES/NO....................................................................................................... 37
6.1.5.3 Price switching ....................................................................................................................... 37
6.1.5.4 Change price .......................................................................................................................... 38
6.1.5.5 Change chocolate prices ......................................................................................................... 39
6.1.5.6 Cash Card sales ..................................................................................................................... 39
6.1.5.7 Free Card sales ...................................................................................................................... 39
6.1.5.8 Clear sales ............................................................................................................................. 40
6.1.5.9 Register Free Card .................................................................................................................. 40
6.1.5.10 Clear Free Card..................................................................................................................... 40
6.1.5.11 Change PIN-code .................................................................................................................. 41
6.1.6 Load Card ................................................................................................................................. 41
6.1.6.1 Handling of the Load Card ........................................................................................................ 41
6.1.6.2 Load Chip Cards ..................................................................................................................... 42
6.1.6.3 Clear Chip Cards ..................................................................................................................... 42
6.1.6.4 Chip Card Loads ..................................................................................................................... 43
6.1.6.5 Chip Card Information .............................................................................................................. 43
6.1.6.6 Enable Chip Cards .................................................................................................................. 44
6.1.6.7 Disable Chip Card ................................................................................................................... 44
6.1.6.8 Change PIN code .................................................................................................................... 45
6.2 Coin Validator...........................................................................................................................45
6.2.1 General remarks ........................................................................................................................ 45
6.2.2 Selection of product ................................................................................................................... 45
6.2.3. Types of Coin Calidators ............................................................................................................ 46
6.3 Payment Systems ...................................................................................................................46
6.3.1 General Remarks....................................................................................................................... 46
6.3.2 Selection of Product................................................................................................................... 46
6.3.3 Types of Payment Systems ........................................................................................................ 46
Page 5

1T 310'177 Operating Manual Ecolino Erstellt: 01.05.2002 Rev.: C SL: 20'987 BJC
page 5
6.4 Waiter Control System ............................................................................................................47
6.4.1 General Remarks....................................................................................................................... 47
6.4.2 Selection of product ................................................................................................................... 47
6.4.3 Types of Waiter Control Systems ................................................................................................ 47
7 ACCESSORIES ......................................................................................................................... 48
7.1 Cleaning tablets .......................................................................................................................48
7.2 Cleaning agent for milk froth unit CF 1 / CF "..........................................................................48
Page 6
1T 310'177 Operating Manual Ecolino Erstellt: 01.05.2002 Rev.: C SL: 20'987 BJC
page 6
1. GENERAL
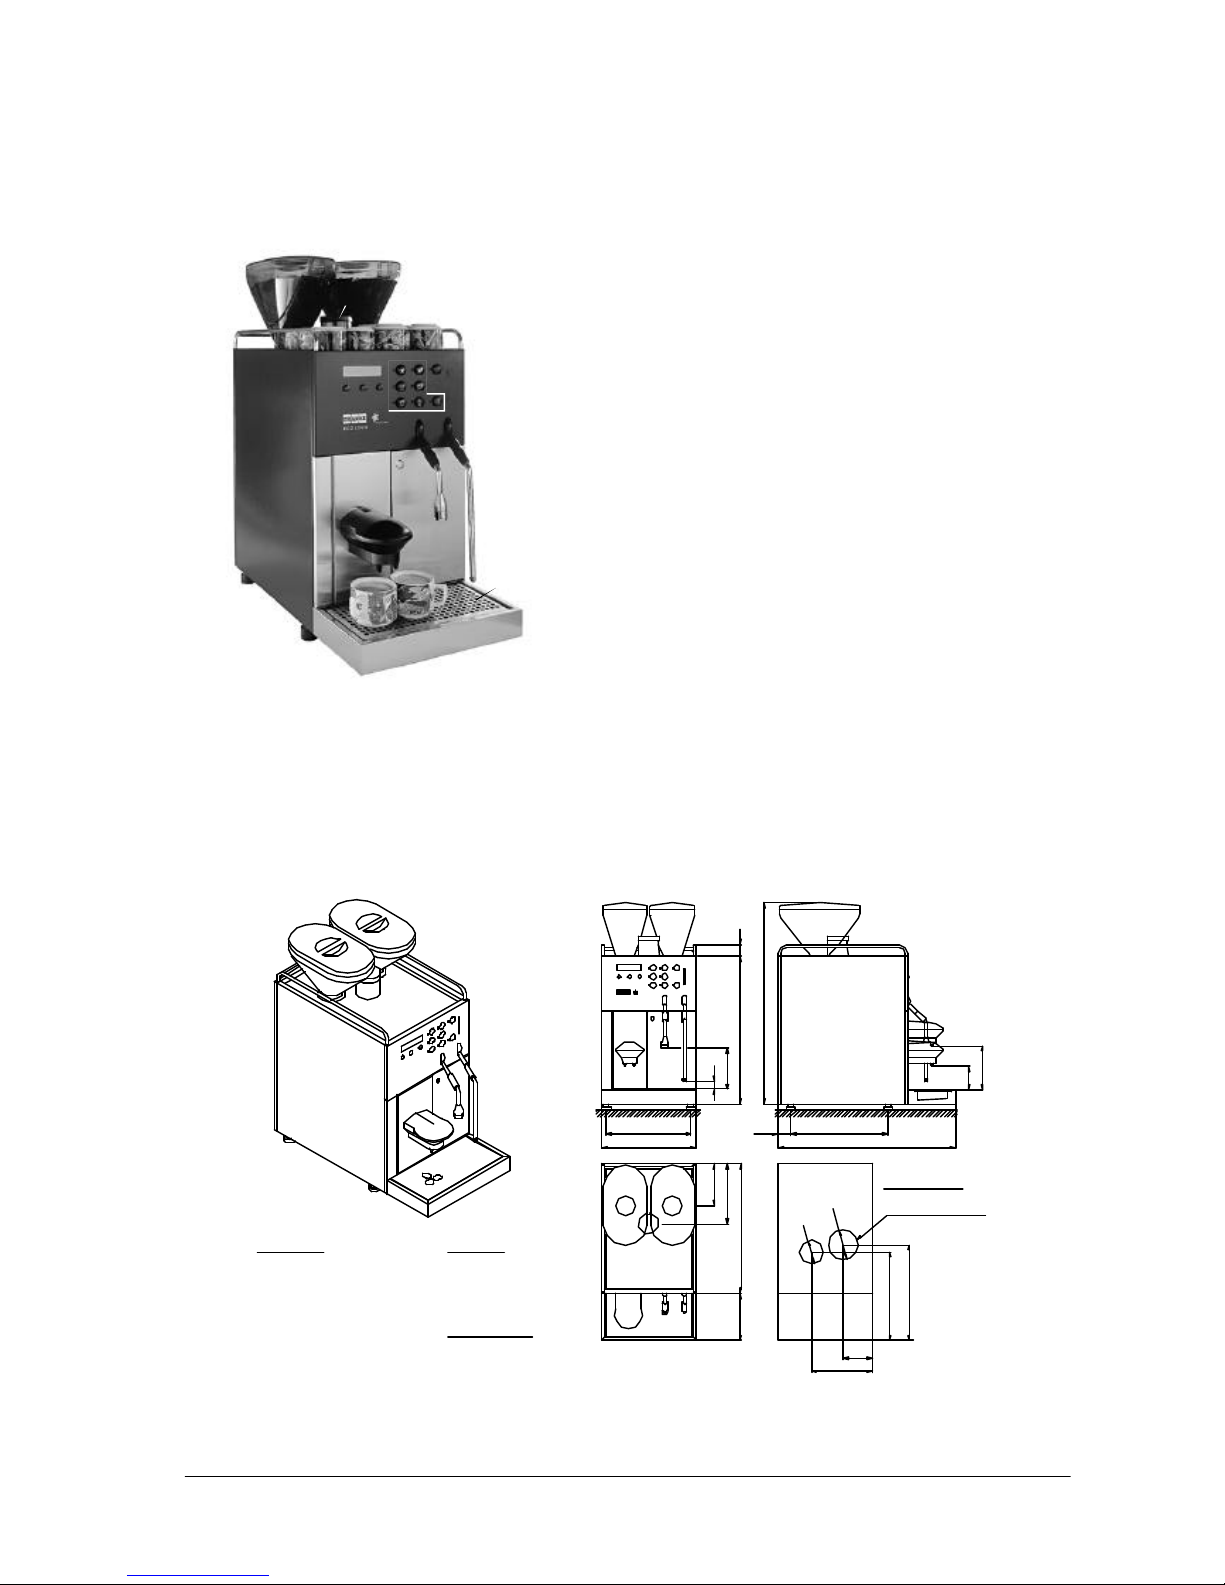
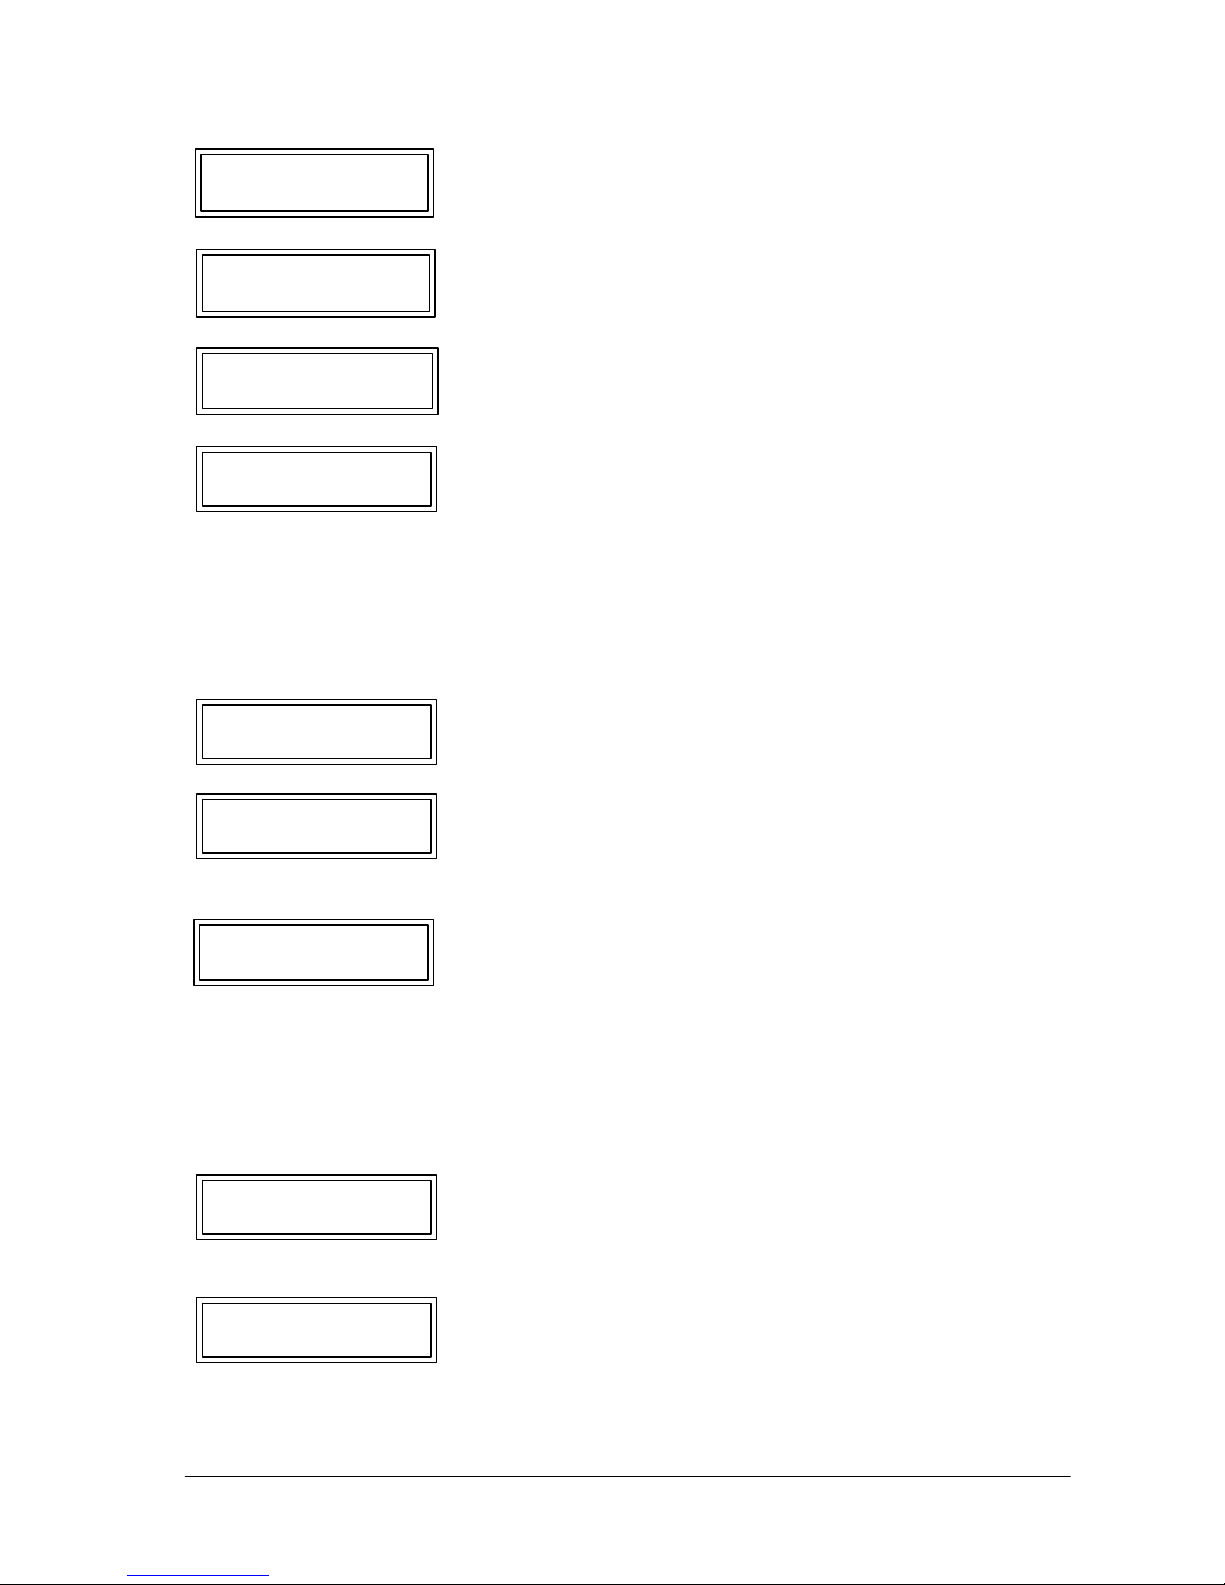
1.1.1 Installationplan
1. 1 Installation
205
440
25
140
143
43.5
???????
??????????
40
695
78
148
-Funnel Ø50 with SiphonRings G3/8", l = 1500 mm
with outlet
-Outlet tube not fixet
-Dia. of outlet line min.d = 1"
-Power P = 2200 W
Special voltage on request
50/60Hz
-230-240V~/10A
Power connection
Cable l = 2000 mm
As for the rest the local regulations are binding!
exterior screw thread
-Water pressure 80-600 kPa
-Cold water connection G3/8"
-PH ideal value 7
-Recommendet water hardness
7°German hardness,13° French hardn.
and filter
-Chlorine content max. 100mg/lt
-Stop valve with nonreturne valve
(0.8-6.0 bar)
Outlet tube Ø16 x 2000 mm
Water outletWater feeding
Flexibel metal tube with two coupling
Holes in counter
Option with chute for
coffee ground
300
315
210
96
160
320
286 330
600
Ø80
Ø120
500
1514
8
9
12
10
13
11
2
3
5 6
7
17
1
16
4
Legend
1 Control unit
2 E.S.M. key
3 Chip Card reader
4 Product keys
5 Clean and "-" key
6 Stop and "+" key
7 Shift key
8 Coffee outlet
9 Tea outlet
10 Steam outlet
11 Coffee grounds container door
12 Pushbutton
13 Drip grille
14 Bean container left
15 Bean container right (option left grinder)
16 Filling hopper
17 Display
Page 7

1T 310'177 Operating Manual Ecolino Erstellt: 01.05.2002 Rev.: C SL: 20'987 BJC
page 7
1.1.2 Water connection
- When a new coffee machine is installed, the pressure hose and the water pipe must be thoroughly
flushed.
- The coffee machine must be connected to a drinking water pipe with a tap. The premounted
pressure hose with a G3/8" screw connection on the pressure reducer is connected to the water
tap (adjust to 3 bar)
- The drain hose supplied is connected to the drip tray and to the trap. This is tightly fixed to the trap
and laid in a gradient.
- The water hardness must be 8-12 WH°. The chlorine content is max. 100 mg per litre. Otherwise,
the local provisions are binding.
- As option the Ecolino can also be operated without fixed water connection and siphon outlet. You
will find further information regarding the water tank operation under chapter 5.2.
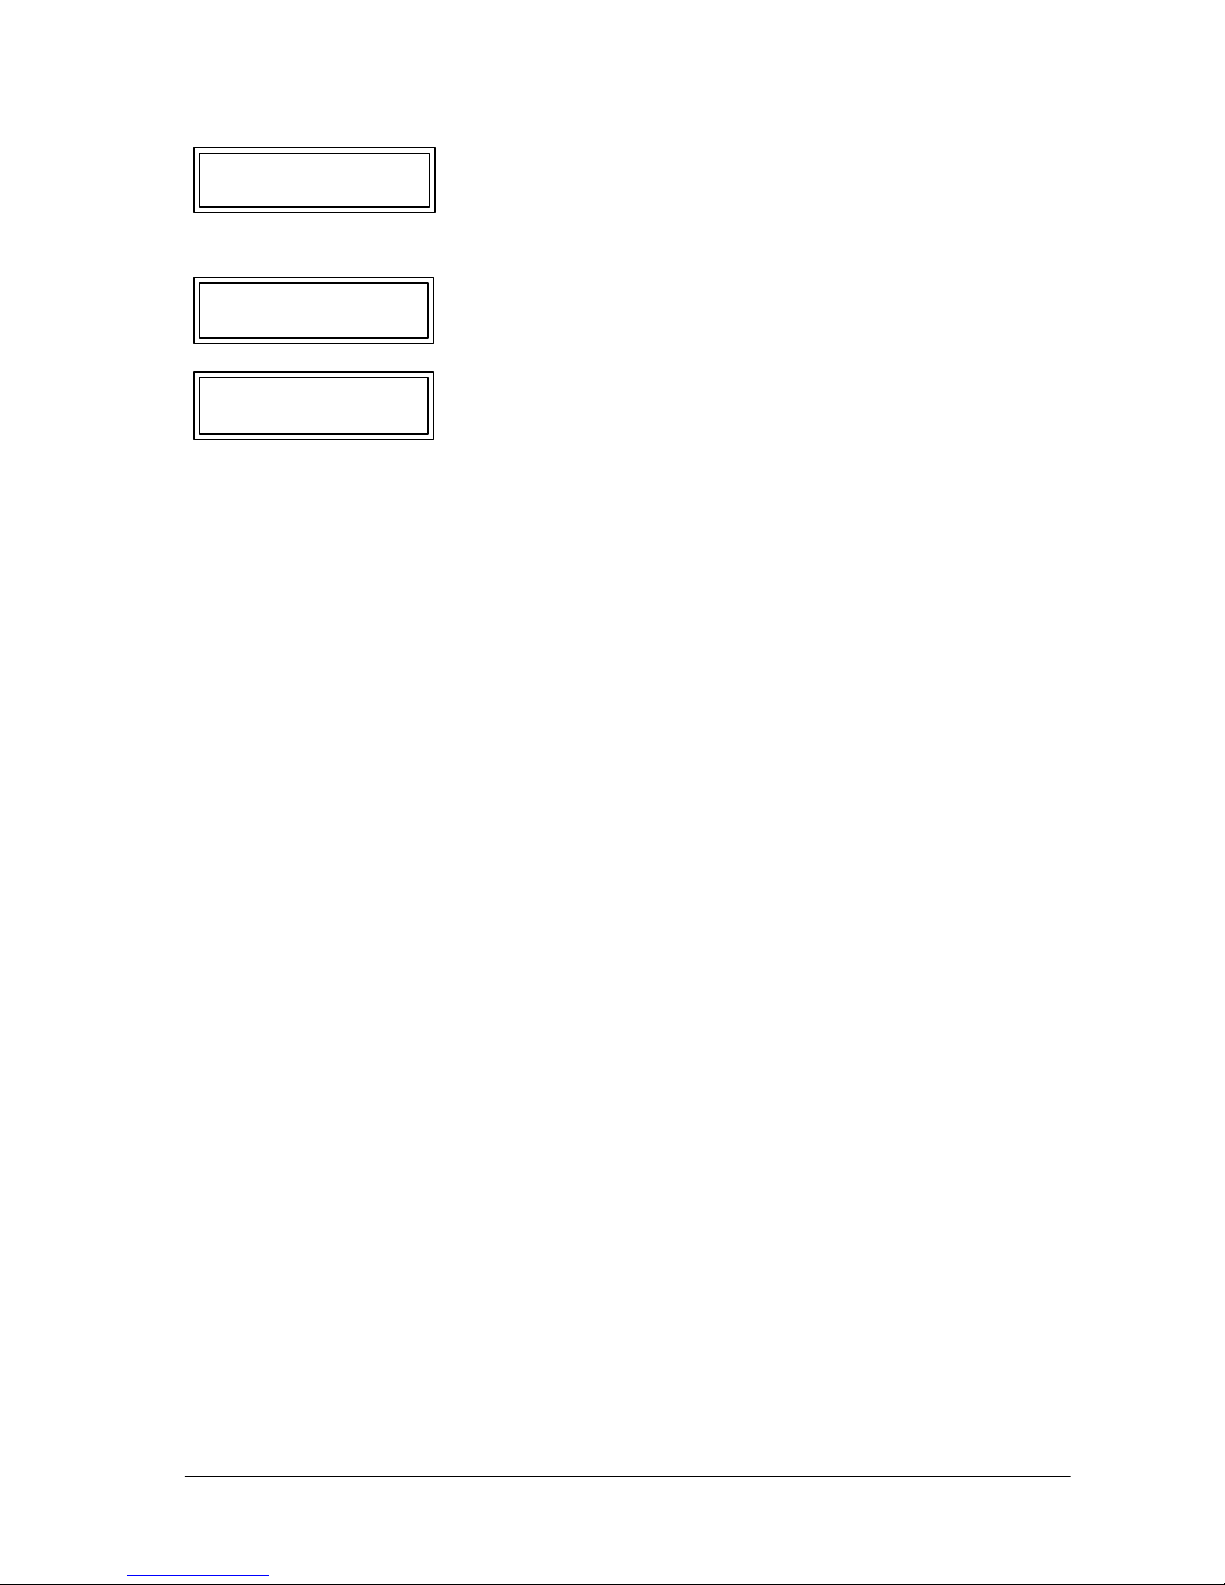
1.1.3 Power connection
Basic models Connected load Current
E 1M H 2,2kW /10 A 230-240 Vac (PNE)
E 1M HD (CF1/2) 2,2kW /10 A 230-240 Vac (PNE)
E 2M H 2,2kW /10 A 230-240Vac (PNE)
E 2M HD (CF1/2) 2,2kW /10 A 230- 240 Vac (PNE)
E 1M H 1,9kW / 10 A 208 Vac (PNE)
E 1M HD (CF1/2) 1,9kW / 10 A 208 Vac (PNE)
E 2M H 1,9kW / 10 A 208 Vac (PNE)
E 2M HD (CF1/2) 1,9kW / 10 A 208 Vac (PNE)
Otherwise, the local provisions are binding.
Legend:
1 Power connection (HO5VV-F
PW/80 C13 250V/10A)
2 Water connection (G3/8")
Proceed with care, plastic thread!
1.1.4 Dimensions
Height 695mm
Width 320mm
Depth 600mm
Outlet 78 / 148mm
Net weight 38kg (E 1M HD)
Page 8

1T 310'177 Operating Manual Ecolino Erstellt: 01.05.2002 Rev.: C SL: 20'987 BJC
page 8
1.2 Ratingplate
1.3 Possible Products
The following beverages can be prepared with the Ecolino coffee machine:
- Coffee - Cappuccino (option)
- Coffee with cream - Milk froth (option)
- Decaffeinated coffee - Heated milk (option)
- Espresso coffee - Steam (for heating beverages, e.g. milk)
- White coffee (option) - Hot water
1.4 Precautions
- The ambient temperature must not fall below 10°C and must not exceed 40°C.
- The coffee machine must not be cleaned by spraying it with a hose or high-pressure cleaner.
- Never place hands in the bean containers in the operating mode.
- Never place hands under the outlets while product is being dispensed.
- Do not pour any liquids onto the cup support surface.
- The noise emissions can exceed 7 dB (A) when beverages are heated by means of steam
function.
- FRANKE cannot assume any liability for damage caused by failure to observe these operating
instructions.
1 Ratingplate
Page 9
1T 310'177 Operating Manual Ecolino Erstellt: 01.05.2002 Rev.: C SL: 20'987 BJC
page 9
1.5 Declaration of conformity
Franke AG Aarburg
CH-4663 Aarburg
Schweiz
Tel. ++41 (0)62 787 31 31
Fax ++41 (0)62 791 67 61
Internet www.franke.ch
Ihr Partner für
Küche und Gastronomie
Bau und Industrie
EU/UE
KONFORMITÄTSERKLÄRUNG
DECLARATION OF CONFORMITY
DECLARATION DE CONFORMITE
Wir
We
Nous FRANKE AG
______________________________________________________________________________
(Name des Anbieters) (supplier’s name) (nom du fournisseur)
CH - 4663 Aarburg
_____________________________________________________________________________
(Anschrift) (address) (adresse)
erklären in alleiniger Verantwortung, dass das Produkt
declare under our sole responsibility that the product
déclarons sous notre seule responsabilité que le produit
Gewerblicher Kaffeezubereiter « ECOLINO «
Industrial Coffee Percolator
Cafetière industrielle
__________________________________________________________________________________________
E1MH, E1MHD, E2MH, E2MHD, E1MHDCF1, E1MHDCF2, E2MHDCF1, E2MHDCF2
________________________________________________________________________________
(Bezeichnung Typ oder Modell, Los-, Chargen- oder Seriennummer, möglichst Herkunft und Stückzahl)
(name, type or model, lt, batch or serial number, possibly sources and numbers of items)
(nom, type ou modèle, no de lot, d’échantillon ou de série, évent. sources et nombre d’éxemplaires)
auf das sich diese Erklärung bezieht, mit der/den folgenden Norm(en) oder normativen Dokumenten
übereinstimmt.
to which this declaration relates is in conformity with the following standard(s) or other normative document(s).
auquel se réfère cette déclaration est conforme à la (aux) norme(s) ou autre(s) document(s) normatif(s).
EN60335-2-15; EN60335-2-33; IEC335-1.1991; IEC335-2-75.1995
EN61000-3-2/-3; EN61000-4-4/-5/-11; EN55014; EN55141; IEC1000-4-2;
SVGW W/TPW 113, -126, EN 60335
________________________________________________________________________________
Titel und/oder Nummer sowie Ausgabedatum der Norm(en) oder der anderen normativen Dokumente)
(title and/or number and date of issus of the standard(s) or other normative document(s)
(titre et/ou no et date de publication de la (des) norme(s) ou autre(s) document(s) normatif(s)
Gemäss den Bestimmungen der Richtlinie(n); following the provisions of Directive(s); conformément aux
dispositions de(s) Directive(s)
(falls zutreffend) (if applicable) (le cas échéant) 73/23/EWG + 89/336/EWG + 93/68/EWG
_______________________________________________________________________
(Ort und Datum der Ausstellung) (Name und Unterschrift oder gleichwertige Kennzeichnung des Befugten)
(Place and date of issue) (name and signature or equivalent marking of authorized person)
(Lieu et date) (nom et signature du signataire autorisé)
Aarburg, 02. April 2001
Leitung KM
M. Gyger
Page 10
1T 310'177 Operating Manual Ecolino Erstellt: 01.05.2002 Rev.: C SL: 20'987 BJC
page 10
2. DISPLA Y MESSAGES
2.1 Fault- and information messages
locked selection This message appears when the coffee machine is switched on
heating and remains until the operating temperature is reached.
locked selection This message may appear when large quantities of hot water
heating are taken off at short intervals. The coffee machine is heating up
and products cannot be selected during this time.
locked selection The operating temperature was not reached within 12 min.
timeout heater Switch the coffee machine off and on again at the E.M.S. key. If
the message reappears, contact the Service Department.
ocked selection Current of coffee press has not been reached.
motor power
locked selection The brewing piston motor control is defective.
error motor drive (Contact Service)
locked selection The infusion piston motor has not reached a defined starting
motor timeout position within 10 sec. Switch off the coffee machine by means
of the E.M.S. key. Check whether the grounds container has
beencorrectly inserted or whether an object is present in the
infusion area. Rectify any of these problems and switch on the
coffee machine again. If the message reappears, contact the
Service Department.
locked selection The water level in the boiler was not reached within 3 min.
niveau timeout Switch off the coffee machine by means of the E.M.S. key.
Check the water supply for leaks and ascertain that it is opened.
Switch on the coffee machine again. If the message reappears,
contact the Service Department.
locked selection The coffee outlet is not mounted or not correctly mounted.
missing coffee outlet
open door The grounds container door is open. This message appears
empty drawer when you empty the grounds container. The grounds
container must be emptied before the door is closed
again.
select product Only 5 coffee products can be selected before product output
drawer full is blocked.
locked selection The coffee grounds container must be emptied.
empty drawer
Page 11
1T 310'177 Operating Manual Ecolino Erstellt: 01.05.2002 Rev.: C SL: 20'987 BJC
page 11
2.1.1 Messages during use with chip cards
product distribution If a chip card is inserted during product dispensing, this
locked selection message appears. You must remove the chip card and you
cannot reinsert it until product dispensing is complete.
wrong ID- number The installation number is not identical. This message appears
remove card if a Download Card of another machine is inserted. This card
does not function on this coffee machine. Ascertain whether
you are using the Download Card assigned to the coffee
machine.
locked selection This message only appears by versions "autosteam" if the
temp.probe-2 defect temperature probe is defective
select product The product output is still possible.
repl. watersoftener
select product (See Section 3.5 Daily cleaning)
clean The product output is still possible.
select product There is a fault in the water flow.
error flowmeter - Is coffee being dispensed normally at the coffee outlet?
YES: The Service Department must be contacted.
NO: Was an adjustment made with the Adjust Card?
YES: Insert Download Card and proceed according to
Section 4.2.1.2. If the message reappears, contact the Service
Department.
NO: Contact Service Department since there may be a
blockage in the infusion system.
locked selection Please check the water container.
watercont./reset "+"
locked selection The connection between CCI/CSI interface is broken. Contact
no communication the Service Department. To enable you to continue dispensing
products, switch the accounting system off using the
Management Card, according to Section 6.1.5.2.
blocking button A key is blocked. The jamming can be eliminated by pressing
locked selection the blocked key again.
Page 12
1T 310'177 Operating Manual Ecolino Erstellt: 01.05.2002 Rev.: C SL: 20'987 BJC
page 12
wrong card The installation number is not identical. The user’s Adjust Card
remove card is not assigned to this coffee machine. This card does not
function on this coffee machine. Ascertain whether you are
using the Adjust Card assigned to the coffee machine.
wrong pin-code The wrong Pin Code of the card was input. Remove the card
remove card from the card reader and try again. There is no limit to the
number of attempts.
* reading error The chip card was inserted the wrong way round or there is dirt
remove card on the chip. Clean the chip with a soft cloth (without the addition
of cleaning agent, etc.) and reinsert the card into the card reader.
If he message still appears, the chip card is defective. Contact
the Service Department.
Descriptions of the messages in connection with the internal cash accounting system appear in
Section 6.1.4.
Page 13
1T 310'177 Operating Manual Ecolino Erstellt: 01.05.2002 Rev.: C SL: 20'987 BJC
page 13
3 OPERATION
3.1 Daily Operation
3.1.1 Operational readiness of the coffee machine
1. Before switching on, the following points must be observed:
a) The water supply has been opened
b) The coffee machine must be connected to the power supply
c) The coffee bean containers have been filled
2. The display shows E.S.M.
E.S.M. =Energy Safing Mode 15:00 10.04.1997
3. When the E.S.M. key is pressed, all keys light up briefly and the illuminated display shows:
startup
15:00 10.04.1997
4. After the operating temperature has been reached, the
following message is displayed:
- The appropriate program automatically switches the machine ON at a certain time
- During the heat-up phase, a steam surge occurs every minute.
IT MUST NOT BE WORKED UNDERNEATH OF THE OUTLETS, DANGER OF SCALD!
- The coffee machine is now ready for operation.
3.1.2 Preparation of coffee products
1. Push outlet to desired height
2. Place cup under the outlet
3. Select desired product
4. The display shows select product
presele. 1 draw 1
- Depending on the programming, several products can be chosen. These can be reset or
cancelled with the Stop key.
- Tea or steam can be dispensed simultaneously.
locked selection
water feeding
locked selection
heating
- If the on/off function has been programmed with the
Adjust Card (customized) the Adjust Card must be
inserted. Now, the Ecolino will be switched on
automatically without pushing the E.S.M. button.
select product
15:00 10.04.1997
Page 14

1T 310'177 Operating Manual Ecolino Erstellt: 01.05.2002 Rev.: C SL: 20'987 BJC
page 14
3.1.3 Preparation of coffee products (powder)
1.Push outlet to desired height
2. Place cup under the outlet
select product
3. Press appropriate programmed product pre-ground coffee
4. Introduce the powder through the filling hopper
5. Press the selected product again select product
presele. 1 draw 1
- Manual coffee dispensing cannot be preselected.
- Tea or steam can be dispensed simultaneously.
3.1.4 Preparation of hot water
1. Place cup under the tea outlet
2. Press tea key
3. The display shows
- Caution: When tea is being dispensed, do not push the tea outlet upwards or place hands under
the outlet; there is a danger of scalding.
- If no specific outflow time has been programmed, steam dispensing can be terminated by
pressing the tea key again.
- Tea dispensing cannot be preselected.
3.1.5 Heating up beverages with steam manual / autosteam
1. Immerse the steam pipe as far as the bottom of the vessel containing the beverage to be heated
2. Press steam key
3. The display shows
4. Repeat points 2 + 3 until the desired temperature has been reached
By version "autosteam" the steam output stops automatically if the adjusted temperature is
reached.
5. Place vessel to one side
6. Wipe steam pipe with a damp cloth
7. Clean nozzle with a short "steam surge"
- Caution: When dispensing steam, do not push the steam pipe upwards or place hands under
the outlet; there is a danger of scalding.
- If no specific outflow time has been programmed, water dispensing can be terminated by
pressingthe steam key again.
- Steam dispensing cannot be preselected.
select product
15:00 10.04.1997
select product
15:00 10.04.1997
Page 15

1T 310'177 Operating Manual Ecolino Erstellt: 01.05.2002 Rev.: C SL: 20'987 BJC
page 15
3.2 Cappuccino / White coffee / Froth / Milk (Option CF2 / CF2
3.2.1 Versions
The products cappuccino, white coffee, milk froth or heated milk can be automatically triggered at
the press of a button by means of up to two additional milk froth units which can be integrated in the
coffee outlet.
Model CF1: Dispensing of frothy milk for cappuccino
Model CF2: Dispensing of milk and frothy milk
To ensure the required milk does not exceed about 4-5°C and the milk is fed to the milk froth unit,
the specially developed cooling unit is recommended.
3.2.2 Preparation of Cappuccino / White coffee
1. Push outlet to desired height
2. Place cup under the coffee outlet and milk froth unit
3. Select desired product
4. The display shows select product
presele.1 draw 1
- Depending on the programming, several products can be selected. These can be reset or
cancelled with the Stop key.
- Simultaneous dispensing of tea, steam, milk or froth is not possible
3.2.3 Preparation of milk froth or heated milk
1. Push outlet to desired height
2. Place cup under the coffee outlet and milk froth unit
3. Selected desired product
4. The display shows select product
15:00 10.04.1997
- If no specific outflow time is programmed, milk/froth dispensing can be terminated by pressing
the product key again.
- Milk/froth dispensing cannot be preselected.
Page 16

1T 310'177 Operating Manual Ecolino Erstellt: 01.05.2002 Rev.: C SL: 20'987 BJC
page 16
3.3 Preparation of beverages using the Shift key
All product keys can be programmed with double functions by means of the Shift key, i.e. two
different product definitions are possible per product key.
3.3.1 Preparation of coffee products- and milky coffee products
1. Push outlet to desired height
2. Place cup under the outlet
3. Press Shift key select product
4. Select desired product 10:00 14.04.97
5. The display shows select product
presele. 1 draw 1
- Depending on the programming, several products can be selected. (steps 3 & 4, however, have
to repeated) These can be reset or terminated using the Stop key.
- Tea or steam can be dispensed simultaneously.
3.3.2 Preparation of tea or heating of beverages with steam, milk and milk foam
1. Place cup under the desired outlet (tea/steam)
2. Press Shift key select product
10:00 14.04.97
3. Press product key
4. The display shows select product
10:00 14.04.97
- The product selected can be reset, respectively stopped by pushing the stop button (in case of
simultaneous choice of coffee, the shift button has to be pressed first and afterwards the
respective product button in order to break off the product chosen)
- The products programmed (tea, steam, milk and foamed milk) cannot be prechosen.
Page 17

1T 310'177 Operating Manual Ecolino Erstellt: 01.05.2002 Rev.: C SL: 20'987 BJC
page 17
3.4 Rinse / Autorinse
3.4.1 Rinse
If the Clean key is pressed for about 2 seconds, the infusion system and, where present, the milk
and frothy milk device are rinsed. This rinse sequence takes about 15 seconds. The rinse sequence
does not replace daily cleaning as described under Section 3.5.
3.4.2 Autorinse
If no coffee key is pressed for a certain time (programmable) after the last coffee product has been
dispensed, an automatic rinse cycle is carried out as described under Section 3.4.1 Rinse.
The autorinse must be enabled by the service engineer.
Page 18

1T 310'177 Operating Manual Ecolino Erstellt: 01.05.2002 Rev.: C SL: 20'987 BJC
page 18
3.5. Daily cleaning
- To grant the products’ quality a daily, thorough cleaning is essential
- Depending on the programming, daily cleaning can be carried out with or without cleaning tablet.
The user is instructed with regard to the additional steps to be followed when cleaning with
cleaning tablet.
- The Ecolino must remain switched on for cleaning.
3.5.1 Automatic cleaning programme for coffee machine (only for appliances
without
CF1/CF2 milk and frothy milk options)
1. Briefly press Clean key (Figure 1) clean
locked selection
2. Raise tea and steam outflow and press the marked
area of the door (Figure 2) (The door must be opened clean
within 7 seconds, otherwise the coffee machine open door
switches back to the operating mode).
3. Completely open the door (Figure 3).
Figure1 Figure2 Figure3
Page 19

1T 310'177 Operating Manual Ecolino Erstellt: 01.05.2002 Rev.: C SL: 20'987 BJC
page 19
4. Pull out brewing piston and brewing table using a damp cloth (Figure 4).
5. Remove the grounds container by raising the tea and steam tube and empty. Then thoroughly
wash out the grounds container and dry it with a cloth (Figure 5).
6. Remove remaining dirt using a cloth (Figure 6).
7. Insert grounds container by raising the tea and steam tube (Figure 7).
8. Close the door (Figure 8). clean
locked selection
9. After the door has been closed, the display shows the
following after approx. 2 seconds: clean
cleaning tablet
10. Drop in tablet through filling funnel (Figure 9
11. Press Clean key (Figure 10). clean
locked selection
12. The automatic cleaning is started and takes from about 1 min to 6 min, depending on the number
of programmed cleaning cycles.
13. When cleaning is complete, remove and clean drip grille. Remove remaining dirt from the drip
tray using a cloth. Then rinse the drip tray with water and dry with a cloth. Insert drip grille again.
If the Ecolino is switched off during cleaning, the cleaning programme automatically
starts when the Ecolino is switched on.
Figure 4 Figure 5 Figure 6 Figure 7
Figure 8 Figure 9 Figure 10
Page 20

1T 310'177 Operating Manual Ecolino Erstellt: 01.05.2002 Rev.: C SL: 20'987 BJC
page 20
3.5.2 Clleaning of the coffee machine
with
Cappuccinatore option CF1/CF2
The following sections describe the cleaning steps which will ensure satisfactory operation of the
whole system if followed. Read these instructions carefully and keep them in a suitable place.
- Use only satisfactory, cooled milk.
- Use the cleaning agents recommended by Franke.
- Carry out the cleaning at least once a day after closing.
- Replace worn seals in good time.
Before carrying out the automatical cleaning, the cappuccinatore has to be cleaned
manually.
3.5.2a Manual cleaning of the Cappuccinatore CF1/CF2
Figure 1 Figure 2 Figure 3 Figure 4 Figure 5
Figure 6
Figure 7 Figure 8 Figure 9 Figure 10
Figure 11
Figure 12 Figure 13
Figure 14
1. Open outflow door (Figure 1).
2. Pull out the air nozzle and clean with the relevant wire from the brush set (Figure 2 and 3).
3. Clean the connection with the brush (Figure 4).
4. Remove coffee outflow. Press the marked area at the top with your thumb and pull away the
outflow in a forward direction (Figure 5). Clean the outflow with warm water.
Page 21

1T 310'177 Operating Manual Ecolino Erstellt: 01.05.2002 Rev.: C SL: 20'987 BJC
page 21
5. Remove frother head and dismantle (Figures 6 and 8).
6. Clean all parts of the frother head using a mild cleaning agent in water at about 50°C.
IT IS ESSENTIAL TO USE BRUSHES FOR HOLES (Figures 9-12). Rinse all parts with
fresh water.
7. Assemble frother head.
8. Mount frother head (Figure 13).
9. Mount coffee outflow again (Figure 14).
3.5.2b Manual cleaning of the throttle valve (CF2 only)
The throttle valve must be cleaned daily. To do this, pull it off the milk tube. Clean the individual parts
using the brush set supplied and/or place the parts overnight in a little cleaning solution. Rinse the
parts thoroughly with fresh water and reassemble the valve. (Note the assembly direction of the valve
body with pressure spring.)
Now push it back onto the milk suction tube and ensure that the valve is completely in the milk.
Figure 1 Figure 2 Figure 3 Figure 4
1. Remove the milk container and place the remaining milk in a refrigerator until required for further
use (Figure 1).
2. Clean the milk container. Now introduce 3 caps of cleaning agent in the container (Figure 2).
3. Now fill the milk container with 1 litre of cold water (Figure 3).
4. Place the container in the refrigerator, place the milk tube in the container and close the door
(Figure 4).
3.5.2c Automatic cleaning programme for coffee machine with Cappuccinatore option
CF1 / CF2
Page 22

1T 310'177 Operating Manual Ecolino Erstellt: 01.05.2002 Rev.: C SL: 20'987 BJC
page 22
5. Briefly press the Clean key (Figure 5). clean
locked selection
6. Raise the tea and steam outflow and press the marked
area of the door (Figure 6) (The door must be opened
within 7 seconds, otherwise the coffee machine switches
back to the operating mode).
7. Completely open the door (Figure 7).
clean
open door
Figure 5 Figure 6 Figure 7
Figure 8 Figure 9 Figure 10 Figure 11
8. Pull out brewing piston and brewing table using a damp cloth (Figure 8).
9. Remove the grounds container by raising the tea and steam tube and empty. Then thoroughly
wash out the grounds container and dry with a cloth (Figure 9).
10. Remove remaining dirt using a cloth (Figure 10).
11. Insert the grounds container by raising the tea and steam tube (Figure 11).
Page 23

1T 310'177 Operating Manual Ecolino Erstellt: 01.05.2002 Rev.: C SL: 20'987 BJC
page 23
Figure12 Figure13 Figure14
12. Close the door (Figure 12). clean
locked selection
13. After the door has been closed, the display shows the
following after approx. 2 seconds: clean
cleaning tablet
14. Drop in tablet through filling funnel (Figure 13).
15. Press the Clean key (Figure 14). clean
locked selection
16. The automatic cleaning is started and takes from about 1 min to 6 min, depending on the
number of programmed cleaning cycles.
17. After the end of the 1st phase (points 1-16), the
following appears on the display: clean
please rinse
18. Now remove the milk container and wash it out (Figure 15).
19. Pour 1 litre of cold water into it (Figure 16).
20. Place the container back in the refrigerator, place the milk tube in the container and close the
door (Figure 17).
Figure15 Figure16 Figure17
Page 24

1T 310'177 Operating Manual Ecolino Erstellt: 01.05.2002 Rev.: C SL: 20'987 BJC
page 24
Figure18
21. Briefly press the Clean key (Figure 18)
(2nd phase is started). clean
locked selection
22. Once the cleaning is complete, remove and clean the drip grille. Remove remaining dirt from
the drip tray using a cloth. Then rinse the drip tray with water and dry with a cloth. Insert the
drip grille again.
- If the Ecolino is switched off during cleaning, the cleaning programme automatically starts
when the Ecolino is switched on.
-During cleaning of the milk, frothy milk and coffee components, do not place your hands
under the combined coffee outflow and the milk or frothy milk device => danger of
scalding!
Page 25

1T 310'177 Operating Manual Ecolino Erstellt: 01.05.2002 Rev.: C SL: 20'987 BJC
page 25
3.6 Switching off the coffee machine
1. The coffee machine is switched off by pressing the E.S.M. key for about 2 seconds. The
display illumination goes out and the display shows
E.S.M.
15:00 10.04.97
- With appropriate programming, the unit switches automatically to the E.S.M. mode after a
certain time.
- If the coffee machine is not used for a long period, it must be disconnected from the power
supply and the water supply must be closed.
- If the On/Off function is programmed with the Adjust Card (customer-specific), the Adjust
Card must be inserted and the E.M.S. key pressed for about 2 seconds.
3.7 Display elements
Two characters are additionally shown on the display.
3.7.1 Heating (*)
The boiler heater is switched on from time to time to ensure that the set water temperature is always
reached in the operating mode. This is represented by an asterisk on the display.
select product *
15:00 10.04.1997
3.7.2 Water feed (>)
With automatic water feed, the display shows a special character (>).
> select product
15:00 10.04.1997
Page 26

1T 310'177 Operating Manual Ecolino Erstellt: 01.05.2002 Rev.: C SL: 20'987 BJC
page 26
4 CHIP C ARDS
4.1 Chip card functions
4.2 Download Card
- The Download Card is used for saving machine configurations.
The configurations can be saved from the coffee machine to the card or from the card to the coffee
machine.
- This card should be kept in a safe place.
4.2.1 Handling of the Download Card
If the Download Card has not yet been assigned to the Ecopower (setting made at the factory), the
product
settings and basic settings are automatically backed up when the Download Card is inserted into
the chip card reader for the first time. On subsequent use of the Download Card, this automatic back
up no longer occurs.
4.2.1.1 Saving coffee machine data on Download Card
1. Insert the Download Card into the Chip Card reader DOWNLOAD
unit card
2. With the "+" or "-" key, select until the following DOWNLOAD
appears: unit card
3. Start saving with the Shift key ...SAVE...
select product
15:00 10.04.1997
4. Remove the Download Card from the Chip Card reader
4.2.1.2 Downloading the Download Card to the coffee machine
1. Insert the Download Card into the Chip Card reader DOWNLOAD
unit card
2. With the "+" or "--" key, select until the following DOWNLOAD
appears: card unit
3. Start saving with the Shift key ...LOAD...
Page 27

1T 310'177 Operating Manual Ecolino Erstellt: 01.05.2002 Rev.: C SL: 20'987 BJC
page 27
last backup
date 14.04.1997
4. Remove the Download Card from the Chip Card select product
reader 15:00 10.04.1997
4.3 Adjust Card
The most important settings can be changed or adapted using the Adjust Card:
- Set amount ground
- Set water flow
- Product counter total and per product
- Clear counter
- Set time
- Set data
- Set on/off times
- Change PIN code
4.3.1 Handling of the Adjust Card
If the Adjust Card has not yet been assigned to the Ecolino (setting made at the factory), the user
will be requested to enter the installation number when the Adjust Card is inserted into the chip card
reader for the first time. The installation number can be found on the rating plate under the
identification no. During the input, the Stop key is used for increasing the number and the Clean key
for reaching the next digit position. On subsequent use of the Adjust Card, there is no request for
this input.
1. After insertion of the Adjust Card, the PIN code is scanned depending on the program
pin-code 0000
‘-/+’ ‘shift" ?
2. Digits are entered using the "+" or "-" key. The next position is reached using the Shift key.
3. Once the PIN code has been correctly entered, the user enters the Adjust level.
4. If the PIN code was not correctly entered, the Adjust Card must be removed and reinserted. Input
of the PIN code can now be repeated starting from point 1.
4.3.1.1 Set amount ground
1. Insert Adjust Card
2. Press the "+" or "-" key until the parameter adjust millquantity
is obtained select product
3. Select the product to be changed adjust millquantity
(For shift products, the Shift key must be pressed ground +0%
and then the product key)
Page 28

1T 310'177 Operating Manual Ecolino Erstellt: 01.05.2002 Rev.: C SL: 20'987 BJC
page 28
4. Make the desired setting with "+" and "-" keys
(The max. Setting range is +/- 20 %)
5. Setting can be terminated by pressing the Shift key, after which the user returns to the Adjust level.
4.3.1.2 Set amount of water
1. Insert Adjust Card
2.Press the "+" or "-" key until the parameter adjust quantity
is obtained select product
3. Select the product to be changed adjust quantity
(For shift products, the Shift key must first be pressed water + 0%
and then the product key)
4. Make the desired setting with the "+" and "-" keys
(The max. setting range is +/- 30 %)
5. The setting can be terminated by pressing the Shift key, after which the user returns to the Adjust
level.
4.3.1.2.1 Set amount of milk quantity for cappuccino
1. Insert Adjust Card
2. Press the "+" or "-" key until the parameter adjust quantity
is obtained Select product
3. Select the product to be changed adjust quantity
(For shift products, the Shift key must first be pressed water +0%
and then the product key)
4. Make the desired setting with the "+" and "-" keys adjust milk quantity
(The max. setting range is +/- 30 %) milk quantity +0%
5.The setting can be terminated by pressing the Shift key, after which the user returns to the Adjust
level.
4.3.1.3 Product counter
1. Insert Adjust Card
2. Press the "+" or "-" key until the parameter count. product total
is obtained c: 10 t: 5
3. To take into account the number of individual count. product total
products, the desired product key must be pressed. numbers 2
(For shift products, the Shift key must first be pressed
and then the product key)
4. The interrogation can be terminated by pressing the "+" or "-" key, after which the user returns to
the Adjust level.
Page 29

1T 310'177 Operating Manual Ecolino Erstellt: 01.05.2002 Rev.: C SL: 20'987 BJC
page 29
4.3.1.4 Clear counter readings
1. Insert Adjust Card
2. Press the "+" or "-" key until the parameter delete counter
is obtained perform ‘shift’
3. Press the Shift key delete counter
The user is asked to confirm that the counter reading delete? ‘shift’
is to be cleared.
4. The counter readings are cleared by pressing the delete counter
Shift key again. ...done...
After the counter readings have been cleared, the user automatically returns to the Adjust level.
4.3.1.5 Set time
1. Insert Adjust Card
2. Press the "+" or "-" key until the parameter set time
is obtained perform ‘shift’
3. Press the Shift key set time
09:15:28
4. Make the desired hours setting with the "+" and "-" keys
5. Press the Shift key set time
09:15:28
6. Make the desired minutes setting with the "+" and "-" keys
7. Press the Shift key set time
09:15:28
Page 30

1T 310'177 Operating Manual Ecolino Erstellt: 01.05.2002 Rev.: C SL: 20'987 BJC
page 30
8. Make the desired seconds setting with the "+" and "-" keys
9. Setting can be terminated by pressing the Shift key, after which the user returns to the Adjust level.
4.3.1.6 Set date
1. Insert Adjust Card
2. Press the "+" or "-" key until the parameter set date
is obtained perform ‘shift’
3. Press the Shift key set date
14.04.1997
4. Make the desired day setting with the "+" and "-" keys
5. Press the Shift key set date
14.04.1997
6. Make the desired month setting with the "+" and "-" keys
7. Press the Shift key set date
14.04.1997
8. Make the desired year setting with the "+" and "-" keys
9. Setting can be terminated by pressing the Shift key, after which the user returns to the Adjust level.
4.3.1.7 Switch on/off time
1. Insert Adjust Card
2. Press the "+" or "-" key until the parameter timerfunction on/off
is obtained perform ‘shift’
on 00:00
3. Press the Shift key
4. Make the desired hours setting of the switch-on time with the "+" and "-" keys
Page 31

1T 310'177 Operating Manual Ecolino Erstellt: 01.05.2002 Rev.: C SL: 20'987 BJC
page 31
5. Press the Shift key on 00:00
6. Make the desired minutes setting of the switch-on time with the "+" and "-" keys
7. Press the Shift key on 00:00
off 00:00
8. Make the desired hours setting of the switch-on time with the "+" and "-" keys
9. Press the Shift key on 00:00
off 00:00
10. Make the desired minutes setting of the switch-off time with "+" and "-" keys
11. Setting can be terminated by pressing the Shift key, after which the user returns to the Adjust
level.
The Ecolino has an automatic on and off function. Two on functions can be selected:
- Mo - Fr
The Ecolino automatically switches on and off at the programmed times from Monday to Friday.
The Ecolino can still be switched on and off manually. On Saturdays and Sundays, the switch off
time is always taken into account.
- Everyday
The Ecolino automatically switches on and off at the programmed times from Monday to Sunday.
The Ecolino can still be switched on and off manually.
4.3.1.8 Change PIN code from the Adjust Card
1. Insert Adjust Card
2. Press the "+" key until the parameter change pin-code
is obtained perform ‘shift’
3. Press the Shift key pin-code 0000
‘-/+’ ‘shift??
4. Set the deisred number with the "+"/"-" key
5. Once the desired number has been set, press the Shift key to obtain the next item.
6. After the last item has been set, press the Shift key to return to the Adjust level.
Page 32

1T 310'177 Operating Manual Ecolino Erstellt: 01.05.2002 Rev.: C SL: 20'987 BJC
page 32
5. OPTIONS
5.1 Water container execution
5.1.1 General Remarks
The water container execution includes two different sizes of canisters:
Large container = Fresh water
Small container = Sewage water
5.1.2 Cleaning
The fresh water container has to be cleaned daily and refilled with fresh water. The sewage container
has to be emptied and cleaned daily. If the machine stands still for a longer period the containers have
to be emptied and cleaned.
5.1.3 Control
The fresh- and sewage water level are controlled by means of floating switches. If the fresh water
container is empty or the sewage canister filled the display indicates
Now, the containers have to be emptied, respectively refilled by means of dismantling their covers.
Please take care that both covers with the integrated floating switches have been mounted correctly.
Now, the indication on display can be reset with the "+"- button.
locked selection
watercont./reset "+"
5.1.4 Preparation of beverages
Beverages can be dispensed as described under Section
3.1 to 3.3.
5.1.5 Accounting facilities
All accounting systems listed under Section 6 can be
used in the water tank version.
Page 33

1T 310'177 Operating Manual Ecolino Erstellt: 01.05.2002 Rev.: C SL: 20'987 BJC
page 33
5.2 External units
5.2.1 Automatic chocolate machine
5.2.2 General
This section describes how you can dispense chocolate products using the accounting system
connected to the Ecolino.
All settings and instructions for the automatic chocolate machine are to be found in the operating
instructions „ECOLINO chocolate machine“.
The chocolate machine is electrically connected to the Ecolino. When the automatic on/off time of
the Ecolino (see Section 4.3.1.7) is programmed, the chocolate machine therefore also fulfils this
function.
The shift function of the tea and steam key is no longer available in this mode.
5.2.3 Preparation of chocolate products
1. Place the cup under the outlet
2. Identify payment system
3. Select desired product. The product is dispensed.
For more detailed information, see Section 6.1 Cash System, Section 6.3 Payment systems and
Section 6.4 Waiters’ accounting.
5.2.3 Possible accounting systems
Internal Cash System
Coin tester:
CF330
Payment systems:
U-Key prog 108 / Legic / Girovend 3200 / Coin changer CF580 EXE
Waiters’ accounting:
WMF Hogatron / Addimat / Habimat / Harteck / Walla / Trippen
5.3 Option of second grinder
The Ecolino can be equipped with two grinders.
This makes it possible to use two different types of coffee or espresso beans for coffee or espresso
preparations.
5.3.1 Option of mixing ground coffee
Ground beans are dispensed from both coffee grinders. First the left grinder and then the right
grinder are activated, depending on the percentage programmed. This cycle results in the mixture
of the two types of coffee beans. As far as the user is concerned, Ecolino is operated in the usual
way.
5.3.2 Supervision of the beanhoppers
If there are no more beans in the beanhoppers the message "no beans" will appear on the display
after you have selected a coffee product. By that, the proper quantity of coffee is guaranteed for each
selected product.
Page 34

1T 310'177 Operating Manual Ecolino Erstellt: 01.05.2002 Rev.: C SL: 20'987 BJC
page 34
6. ACCOUNTING SYSTEMS
6.1 Cash System
The Cash System is operated with the integrated card reader.
Operation of the Cash System is possible independently of any additional connected accounting
system.
To ensure that the user cards are operational, they must first be enabled and charged (Cash Card
charging only).
6.1.1 Chip Cards required
Cash Card A / B / C / D / E / F / G / H / I / J
Load Card
Management Card
Free Card
6.1.2 Free Card
The Free Card permits dispensing of beverages without a
charge. It can be used in all accounting systems.
The withdrawals made using the Free Card can be insepected
using the Management Card.
6.1.3 Cash Card / Cash Card Plus
The Cash Card is a credit card. For each withdrawal of a
product, the programmed price is debited from the Cash Card.
The remaining credit is shown on the display.
The various Cash Cards (A-J) enable the service engineer to
program individual price levels. The price levels for Cash Card
groups (A-H) are added to or subtracted from the product price
in %.
Z.B. Product price 1.00 Cash Card A (100%) 1.00
Product price 1.00 Cash Card B (150%) 1.50
Product price 1.00 Cash Card C (50%) 0.50
The Cash Card Plus has the same features as the Cash Card.
However, the Cash Card Plus is not a credit card.
On the Cash Card Plus the amount of each product is added up
whereas on the Chip Card the amount is deducted.
Page 35

1T 310'177 Operating Manual Ecolino Erstellt: 01.05.2002 Rev.: C SL: 20'987 BJC
page 35
6.1.3.1 Preparation of beverages with the Cash/ Cash + Card or Free Card
Initially, the Ecolino must be ready for operation and the accounting switched on by means of the
Management Card.
There are two possibilities for dispensing beverages. If the product is selected, it is subsequently
dispensed (normal function). In the Bankomat function, the chip card must first be removed after
product selection before product dispensing is started.
Standard function:
1. The display shows credit-modus
15:00 10.04.1997
2. Insert Card or Free Card into the card reader credit: 20.00
select product
3. Select desired product credit: 18.50
The product price is debited from or credited to the presele. 1 draw 1
Cash Card, the product is dispensed and the new credit
is displayed.
Bankomat function
Items 1 and 2 are the same as for normal operation.
3. Select desired product
The product price is debited from or credited to the Cash Card.
4. The display shows remove card
5. To start product dispensing, the chip card must be removed.
of the text "credit". select product
- Depending on the programming, several products can be selected.
- After the product has been dispensed, further products can be selected or the card can be
removed from the card reader.
If the Free Card is used, "free of charge" appears instead free of charge
Page 36

1T 310'177 Operating Manual Ecolino Erstellt: 01.05.2002 Rev.: C SL: 20'987 BJC
page 36
6.1.4 Messages
credit: 00.00 The product price is higher than the remaining credit on the Cash
too littel credit Card.The Cash Card must be charged. For charging the Cash Card,
see Section 6.1.6.
credit-mode This message appears only for about 3 seconds. A product key has
insert card been chosen but the Cash Card has not been inserted into the chip
card reader.
wrong ID- number The user cards Cash -, Cash + or Free Card do not have the same
remove card installation number as that stored in the Ecolino. These cards do not
function on this Ecolino. Ascertain whether you are using the correct
chip cards.
wrong card - The wrong chip card was inserted in response to a request. Remove
remove card this chip card and follow the instructions in the Ecolino display.
- The user cards Management or Load Card do not have the same
installation number as that stored in the Ecolino. These cards do not
function on this Ecolino. Ascertain whether you are using the correct
chip cards.
wrong pin-code The wrong Pin Code of the card was input. Remove the card from the
remove card card reader and try again. There is no limit to the number of attempts.
*reading error The chip card was inserted the wrong way round or there is dirt on the
remove card chip. Clean the chip with a soft cloth (without addition of cleaning
agent, etc.) and reinsert the card into the card reader. If the message
still appears, the chip card is defective. Contact the Service Depart
ment.
locked card The Cash Card has been disabled. Products cannot be dispensed.
remove card To enable the card again, proceed as described under Section 6.1.6.6.
6.1.5 Management Card
- Accounting mode YES/NO
- Price switching
- Change price / article number
- Cash Card sales
- Free Card sales
- Set date
- Clear sales
- Clear Free Card
- Change PIN code
- Register Free Card
Page 37

1T 310'177 Operating Manual Ecolino Erstellt: 01.05.2002 Rev.: C SL: 20'987 BJC
page 37
6.1.5.1 Handling of the Management Card
If the Management Card has not yet been assigned to the Ecolino (setting made at the factory), you
will be requested to input the installation number when you first insert the Management Card into the
chip card reader. The installation number appears on the rating plate under the identification no.
During input, the Stop key is used to increase the number and the Clean key to reach the next digit
position. This input is no longer requested on subsequent use of the Management Card.
1. After insertion of the Management Card, the PIN code is scanned depending on the security level
pin-code 0000
"-/+" "shift" à
2. Digits are entered with the "+" or "-" key. The next item is reached by pressing the Shift key.
3. Once the PIN code has been correctly entered, the user is taken into the Management level.
4. If the PIN code was incorrectly entered, the Management Card must be removed and reinserted.
Input of the PIN code can now be repeated from point 1.
6.1.5.2 Accounting mode YES/NO
The programmed accounting system can be enabled (YES) or disabled by means of this parameter.
In the event of errors in the accounting system, the setting can be programmed as NO, enabling
product selection to continue.
1. Insert Management Card into the card reader
2. Press the "+"/"-" key until the parameter is obtained account modus
YES/NO
3. Enable or disable the accounting system using the
Shift key
4. Setting can be terminated by pressing the "+" or "-" key, after which the user returns to the
Management level.
6.1.5.3 Price switching
Two different prices can be input per product. The two phases can be switched according to time
by means of the price switching (day/night prices).
1. Insert the Management Card into the card reader
2. Press the "+" or "-" key until the parameter is obtained shift price
perform "shift"
3. Press the Shift key price 1 00:00
4. Make the desired hours setting of the switching time
for price 1 using the "+" and "-" keys
5. Press the Shift key price 1 00:00
Page 38

1T 310'177 Operating Manual Ecolino Erstellt: 01.05.2002 Rev.: C SL: 20'987 BJC
page 38
.
6. Make the desired minutes setting of the switching time
for price1 using the "+" and "-" keys
7. Press the Shift key price 1 00:00
price 2 00:00
8. Make the desired hours setting of the switching time
for price 2 using the "+" and "-" keys
9. Press the Shift key price 1 00:00
price 2 00:00
10. Make the desired minutes setting of the switching time for price 2 using "+" and "-" keys.
11. Setting can be terminated by pressing the Shift key, after which the user returns to the
Management level.
6.1.5.4 Change price
1. Insert the Management Card into the card reader
2. Press the "+" or "-" key until the parameter is obtained change price
select product
3. Press product
price 1 0.00
(In the case of Shift product, the Shift key must first
be pressed and then the product key selected.
4. Set price 1 with the "+" and "-" keys price 1 1.00
5. Set price 2 with the "+" and "-" keys price 2 0.00
6. After the price setting, press the Shift key price 2 1.00
7. Accept the article number with the „+“ and „-“ key part number X
(Displayed only in the case of programmed waiter system)
Set the price level with the „+“ and „-“ key
(Displayed only in the case of programmed coin testing system)
8. After the above settings have been made, change price
press the Shift key select product
9. By pressing the „+“ or „-“ key, another parameter can now be selected.
Page 39

1T 310'177 Operating Manual Ecolino Erstellt: 01.05.2002 Rev.: C SL: 20'987 BJC
page 39
6.1.5.5 Change chocolate prices
This parameter appears only if the optional chocolate machine has been programmed.
1. Insert Management Card into the card reader
2. Press the „+“ and „-“ key until the parameter appears chocolate price
select product
3. Press chocolate product Price 1 0.00
(Points 4-6 as before)
7. Set the article number with the „+“ and „-“ keys part number X
(Displayed only in the case of programmed waiter system)
8. After the above-mentioned settings have been made, press the Shift key
9. By pressing the „+“ or „-“ key, another parameter can chocolate price
now be set. select product
(Adapt the existing Sections 6.1.5.5-6.1.5.10 in relation to newly inserted Section 6.1.5.5).
6.1.5.6 Cash Card sales
1. Insert the Management Card into the card reader
2. Press the "+" or "-" key until the parameter is obtained turn-over cash card
The total sales for the Cash Cards is displayed amount X.XX
3. Setting can be terminated by pressing the Shift key, after which the user returns to the
Management level.
6.1.5.7 Free Card sales
1. Insert the Management Card into the card reader
2. Press the "+" or "-" key until the parameter is obtained turn-over free card
The total sales for the Free Cards is displayed amount X.XX
3. Setting can be terminated by pressing the Shift key, after which the user returns to the
Management level.
Page 40

1T 310'177 Operating Manual Ecolino Erstellt: 01.05.2002 Rev.: C SL: 20'987 BJC
page 40
6.1.5.8 Clear sales
The Cash Card and Free Card sales can be cleared by means of this parameter.
1. Insert the Management Card into the card reader
2. Press the "+" or "-" key until the parameter is delete turn-over
obtained perform "shift"
3. Press the Shift key delete turn-over
You are asked to confirm that you want to clear the sales delete? "shift"
If this is not the case, switch back to the
Management level with the "+" or "-" key
4.Press the Shift key clear turn-over
The sales are cleared ...done...
clear turn-over
perform "shift"
5. The Management level is reached by pressing the "+" or "-" key.
6.1.5.9 Register Free Card
1. Insert the Management Card into the card reader
2. Press the "+" or "-" key until the parameter is obtained accounce free-card
perform "shift"
3. Press the Shift key remove card
The Management Card must be removed
insert card
free/management à
4. Insert the Free Card into the card reader card reported
5. Remove the Free Card remove card
6. If further Free Cards are registered, steps 4+5 must insert card
be repeated free/management à
7. Insert the Management Card into the card reader announce free-card
perform "shift"
6.1.5.10 Clear Free Card
1. Insert the Management Card into the card reader
2. Press the "+" or "-" key until the parameter is obtained delete free card
perform "shift"
Page 41

1T 310'177 Operating Manual Ecolino Erstellt: 01.05.2002 Rev.: C SL: 20'987 BJC
page 41
3. Press the Shift key delete card
You are asked to confirm that the Free Card table is delete? "shift"
to be cleared. If this is not the case, change to the
Management level with the "+" or "-" key
4. Press the Shift key delete free card
All registered Free Cards are cleared ...done...
delete free card
perform "shift"
6.1.5.11 Change PIN-code
1. Insert the Management Card into the card reader
2. Press the "+" or "-" key until the parameter is obtained change pin-code
perform "shift"
3. Press the Shift key pin-code 0000
"-/+" "shift" à
4. Digits are entered using the "+" or "-" key. The next item is obtained using the Shift key.
5. After the input, the new PIN code is saved to the change pin-code
Mangagement Card ... done....
6.1.6 Load Card
- Load Chip Cards
- Clear Chip Cards
- Chip Card loads
- Chip Card information
- Enable Chip Cards
- Disable Chip Cards
- Change PIN code
6.1.6.1 Handling of the Load Card
If the Load Card has not yet been assigned to the Ecopower (setting made at the factory), you will
be requested to input the installation number when you insert the Load Card into the chip card reader
for the first time. The installation number appears on the rating plate under the identification no.
During input, the Stop key is used to increase the number and the Clean key to reach the next digit
position. This input is no longer requested on subsequent use of the Load Card.
1. After insertion of the Load Card, the PIN code is scanned depending o the security level
pin-code 0000
"-/+" "shift" à
2. Digits are input with the "+" or "-" key. The next item is obtained using the Shift key.
3. Once the PIN code has been correctly entered, the Load level is reached.
4. If the Pin code is incorrectly entered, the Load Card must be removed and reinserted. Input of the
PIN code can now be repeated from point 1.
Page 42

1T 310'177 Operating Manual Ecolino Erstellt: 01.05.2002 Rev.: C SL: 20'987 BJC
page 42
6.1.6.2 Load Chip Cards
1. Insert the Load Card into the card reader
2. Press the "+" or "-" key until the parameter is obtained load chip cards
perform "shift"
3. Press the Shift key remove card
The Load Card must be removed
insert card
cash/load à
4. Insert the Cash Card into the card reader credit XX.XX
load sum 00.00
5. Using the "+" key, adjust the loaded amount by the credit XX.XX
loading factor programmed by the service engineer load sum 10.00
6. Press the Shift key to load this amount onto the credit XX.XX
Cash Card ...save...
credit 10.00
...done...
credit 10.00
load sum 00.00
7. Remove the Cash Card remove card
8. If further Cash Cards are to be loaded, steps 4 to 7 insert card
must be repeated. cash/load à
9. Insert the Load Card into the card reader load chip cards
perform "shift"
6.1.6.3 Clear Chip Cards
The credit on the Cash Card is cleared.
1. Insert the Load Card into the card reader
2. Press the "+" or "-" key until the parameter is obtained delete chip cards
perform "shift"
3. Press the Shift key remove card
The Load Card must be removed
insert card
cash/load à
Page 43

1T 310'177 Operating Manual Ecolino Erstellt: 01.05.2002 Rev.: C SL: 20'987 BJC
page 43
4. Insert the Cash Card into the card reader cash card
The user is asked to confirm that the Cash Card is to delete? "-"
be cleared. If this is not the case, remove the Cash Card
and insert the Load Card into the card reader.
5. Press the "-" key delete cash card
The credit on the Cash Card is cleared ...busy...
6. Remove the Cash Card remove card
7. If further Cash Cards are to be cleared, steps 4 to 6 insert card
must be repeated cash/load à
8. Insert the Load Card into the card reader delete chip cards
perform "shift"
6.1.6.4 Chip Card Loads
The total loaded amount is displayed and can be cleared.
1. Insert the Load Card into the card reader
2. Press the "+" or "-" key until the parameter is obtained chip cards loading
turn-over XX.XX
If it is intended to clear the total oaded amount, the following procedure must be adopted:
3. Press the Shift key delete chip cards
delete? "-"
4. Press the "-" key so that the total loaded amount is chip cards loading
cleared turn-over 00.00
5. By pressing the "+" or "-" key, the Management level
is reached.
6.1.6.5 Chip Card Information
If a Cash Card is lost, the owner can be found by means of the card number. This of course assumes
that all card data and users are registered.
1. Insert the Load Card into the card reader
2. Press the "+" or "-" key until the parameter is obtained info chip cards
perform "shift"
3. Press the Shift key remove card
delete? "-"
insert card
cash/load à
Page 44

1T 310'177 Operating Manual Ecolino Erstellt: 01.05.2002 Rev.: C SL: 20'987 BJC
page 44
4. Insert the Cash Card into the card reader cash-A X
The card number and Cash Card Group are displayed. card number XXXXXXX'
5. Remove the Cash Card insert card
cash/load à
6. If further Cash Cards are to be inspected, steps 4+6 insert card
must be repeated. cash/load à
7. Insert the Load Card into the card reader info chip cards
perform "shift"
6.1.6.6 Enable Chip Cards
1. Insert the Load Card into the card reader
2. Press the "+" or "-" key until the parameter is obtained release chip cards
perform "shift"
3. Press the Shift key remove card
The Load Card must be removed
insert card
cash/load à
4. Insert the Cash Card into the card reader cash card
YES
5. The Cash Card must be removed remove card
6. If furhter Cash Cards are to be enabled, steps 4+6 insert card
must be repeated cash/load à
7. Insert the Load Card into the card reader release chip cards
perform "shift"
6.1.6.7 Disable Chip Card
When the Cash Card is disabled, an existing credit is not deleted.
1. Insert the Load Card into the card reader lock chip cards
2. Press the "+" or "-" key unitl the parameter is obtained perform "shift"
3. Press the Shift key remove card
The Load Card must be removed
insert card
cash/load à
4. Insert the Cash Card into the card reader cash card
NO
Page 45

1T 310'177 Operating Manual Ecolino Erstellt: 01.05.2002 Rev.: C SL: 20'987 BJC
page 45
5. The Cash Card must be removed remove card
6. If furhter Cash Cards are to be disabled, steps 4+5 insert card
must be repeated. cash/load à
7. Insert the Load Card into the card reader lock chip cards
perform "shift"
6.1.6.8 Change PIN code
1. Insert Load Card
2. Press the "+" or "-" key until the parameter is obtained change pin-code
perform "shift"
3. Press the Shift key pin-code 0000
"-/+" "shift" à
4. Digits are input with the "+" or "-" key. The next item is obtained using the Shift key.
5. After the input, the new PIN code is saved to the change pin-code
Load Card ...done...
6.2 Coin Validator
6.2.1 General remarks
- Initial situation: The Ecopower is ready for operation.
- The cash system can run parallel to the coin validator.
- To grant function of coin validator the Ecopower must be switched on and the account system
has to be activated by the management card which is supplied along with the machine (see
chapter 6.1.5.2).
- Generally, two different prices can be adjusted with the coin validator.
- When switching off the Ecopower existing credits can get lost.
6.2.2 Selection of product
1. The display indicates credit-mode
12:00 1.1.97
2. Insert coin into coin validator price level 1
select product
3. Select product. The product will be supplied.
Page 46

1T 310'177 Operating Manual Ecolino Erstellt: 01.05.2002 Rev.: C SL: 20'987 BJC
page 46
6.2.3. Types of Coin Calidators
Mars Cash Flow 330
Please do not hesitate to contact our After Sales Service for any additional information you may
need.
6.3 Payment Systems
6.3.1 General Remarks
Payment systems are understood as systems which include a certain amount on a medium. When
selecting a product the respective price is deducted from the mdium.
- Initial situation: The Ecopower is ready for operation.
- The cash system can run parallel to the payment system.
- To grant function of payment system the Ecopwer must be switched on and the account system
has to be activated by the management card which is supplied along with the machine (see
chapter 6.1.5.2).
- When switching off the Ecopopwer existing credits can get lost.
6.3.2 Selection of Product
1. The display indicates credit-mode
12:00 1.1.97
2. Process Payment Systems identification credit-mode
12:00 1.1.97
3. Select product. The product will be "ausgegeben"
6.3.3 Types of Payment Systems
U-Key program 108 (medium: key, card)
Legic (medium: key, card)
Girovend 3200 (medium: card)
Coin dispenser Mars Cash Flow 560 EXE
Please do not hesitate to contact our After Sales Service for any additional information you may
need.
Page 47

1T 310'177 Operating Manual Ecolino Erstellt: 01.05.2002 Rev.: C SL: 20'987 BJC
page 47
6.4 Waiter Control System
6.4.1 General Remarks
- The waiter control system runs through a server unit. After identification of waiter the product will
bereleased by the Ecopower. The server system transmits following information to the cash
register:
Waiter's identification
Product number
All products will then be booked at the cash register to the particular waiter.
- Initial Situation: The Ecopower is ready for operation
- The cash system can be run parallel to the waiter control
- In order to operate the cash system the Ecopower has to be switched on and the control system
must be activated by the management card which is supplied along with the machine (see
chapter 6.1.5.2.)
6.4.2 Selection of product
1. The display indicates release waiter
12:00 1.1.97
2. Proceed waiter identification on system select product
12:00 1.1.97
3. Select product. The product will be supplied
6.4.3 Types of Waiter Control Systems
WMF / Hogatron
Addimat
Habimat
Harteck
Walla
Trippen
Please do not hesitate to contact our After Sales Service for any additional information you may
need.
Page 48

1T 310'177 Operating Manual Ecolino Erstellt: 01.05.2002 Rev.: C SL: 20'987 BJC
page 48
7 ACCESSORIES
7.1 Cleaning tablets
Article number BK 300'935
Scope of delivery 1 packing (100 tablets)
7.2 Cleaning agent for milk froth unit CF 1 / CF "
Recommended cleaning agents: Sterilisation agent 2% NATRIUMHYPOCHLORIT
Article number 1L 301'219
Scope of delivery 1l bottel (is enough for 15 liters detergent water)
THE TECHNICAL DATA AND THE EQUIPMENT MAY BE MODIFIED TO
MAKE IMPROVEMENTS THROUGH FRANKE AG.
 Loading...